

Page 1

WATER RESISTANT 1-CHANNEL MICRO DVR KIT
WITH CAMERA
(MPD-01A + SSB-F50A-M8)
Operation Manual
MPD-01A
● Built-in 2.5” TFT LCD Monitor
● 1-Channel Video & Audio
● Record to SD Card
● Download from SD Card or USB Port
● Event Trigger by Motion Pre Alarm 30 or 60 sec.
● Post Alarm 10, 20, 30, ... 120 sec.
● Recording Frame Rate: 5/10/15/20/25/30 + PS
● Rechargeable / Removable LZ-Polymer Battery
● 2 Hours of Recording Time / Battery
● 5V Camera Power Source
SSB-F50A-M8
● Sharp 1/3” CCD
● 500 TV Lines
● Built-in Microphone
● 0.5 Lux @ F2.0
● Camera comes with 4 types of lens:
3.6mm Default, 6.0mm, 8.0mm, 12.0mm
● IP66 Rating
● 5~12V DC
Page 2

Contents
Photo of Micro DVR and CCD Camera...................................................................2
Remote Control Description......................................................................................3
1. Functions ....................................................................................................................................5
1.1 Video Audio Input................................................................................................................. 5
1.2 Video Audio output............................................................................................................... 5
1.3 Menu UI .................................................................................................................................... 5
1.4 LED Light.................................................................................................................................. 5
1.5 LCD Display ............................................................................................................................. 5
1.6 Screen Display ........................................................................................................................ 6
2. Menu Functions .........................................................................................................................8
2.1 Main........................................................................................................................................... 8
2.1.1 Play Video ...................................................................................................................... 8
2.1.2 Play Picture.................................................................................................................. 10
2.1.3 CAMERA SETTING.................................................................................................... 10
2.1.4 Record Setting............................................................................................................. 11
2.1.4.1 Video/Audio ...........................................................................................................11
2.1.4.2 Snapshot................................................................................................................ 11
2.1.4.3 Video Loss............................................................................................................. 12
2.1.4.4 Motion Detect........................................................................................................ 12
2.1.4.5 Pre/Post Alarm...................................................................................................... 13
2.1.5 SYSTEM SETTING .................................................................................................... 13
2.1.5.1 DATE/TIME ........................................................................................................... 14
2.1.5.2 STORAGE .............................................................................................................14
2.1.5.2.1 DEVICE ...........................................................................................................14
2.1.5.2.2 STATUS .......................................................................................................... 14
2.1.5.2.3 WARN LOW ...................................................................................................14
2.1.5.2.4 FORMAT ......................................................................................................... 15
2.1.5.2.5 Default Setting................................................................................................ 15
3. PC Playback Software............................................................................................................ 15
4. Watch Dog................................................................................................................................ 15
5. Default Setting ......................................................................................................................... 15
Appendix a Explanation for Buttons on System ..................................................16
Appendix b Recommend the different Brand of SD card to be used in the DVR
.....................................................................................................................................18
1
Page 3

(
)
Photo of Micro DVR and CCD Camera
1/3’’ Color CCD
camera
Left Panel of Micro DVR
M8 waterproof
connector
2.5” LCD TFT
display
1. DI/Do connecter (Reserved)
2. 5V adapter.
3. USB Port: M
ini USB, A type, connects to PC
Right Panel of Micro DVR
4. SD Slot: SD Card
5. Battery
Insert SD card before turn the Power on
1Audio/Video In & Camera Power (M8 connector)
2 IR Receivers
3 LED Light. (Details please refer to 3.1)
4 Audio/Video Out (M8 connector)
2
Page 4

Remote Control Description
Record
Snapshot
This can turn on/off the LCD when system is power on,
Power On/Off (Note: Need to hold the button for 3 sec)
Stop/ESC. (Stop playing Video or Recording, ESC = Escape)
3
Page 5

Play (play the last Video File automatically)/Pause
Fast Forward. (Speed by X2、X4、X8、X16)
Rewind (Back Forward.) (Speed by X2、X4、X8、X16)
Forward the video frame by frame
Rewind the video frame by frame
Cursor Up (Multi Purpose)
Cursor Down (Multi Purpose)
Access to main menu or to confirm your setup.
Volume Up
Volume Down
PAL or NTSC Switch
4
Page 6

1. Functions
− 1.1 Video Audio Input
Support 1 Video Channel
Support 1 Audio Channel
− 1.2 Video Audio output
Selectable NTSC/PAL output
L/R line input and output or 1 Microphone input and output.
− 1.3 Menu UI
OSD menu presentation
Power on/off, Snapshot/ESC, Arrow Up/ FF, Arrow Down/ FB, Enter, operation
buttons
− 1.4 LED Light
Red LED
Recording: LED lights on permanently
Stop Recording: LED lights on for 2 seconds and off for 2 seconds.
Green LED
Out of storage space: LED lights on for 1 second and off for 1 second.
System malfunction: LED lights on for 1/2 second and off for 1/2 second
Normal: LED lights on permanently
Orange LED
Charging status: Orange LED lights on permanently; with Red LED lights on for
4 second and Green LED lights on 4 second.
− 1.5 LCD Display
2.5” TFT LCD
Programmable LCD off with 0, 30, 60, 120 seconds when there is no activity on the
menu or buttons. ‘0’ means to keep LCD “on” permanently.
When system is power on, press LCD_KEY on IR remote controller will allow users
to turn on/off the LCD
5
Page 7

− 1.6 Screen Display
d. Rec Status
b. Storage Status
a. Day and Time
MM/DD/YY ( 05/10/07)
HH:MM:SS ( 14:23:42)
b. Available SD storage (in %), i.e. SD:98%
C. Battery Capacity
c. Color icon shows the
Battery Capacity
a. Day and Time
SD cars has no space left for recoring
Battery is full when the icon is in green
full scale
2/3 yellow indicates the battery is only
half capacity left.
6
Page 8

p
1. Recording status
Red icon indicates it’s running out of
battery soon.
Blue icon indicates the battery is
recharging now.
Plug icon indicates the recorder is using an
adapter to recharging the battery and as a
ower supply as well.
Blank B indicates recorder is in preview state
REC B indicates recorder is in recording state
(There are 5 sub-categories under recording, includes “Video/Audio”
“snapshot”, “video loss”, “Motion Detect”, “PRE/POST Alarm ” (Please
refer to section 2.1.4~2.1.4.5 for more details)
PLAY B indicates recorder is in playback status
Motion Detection B indicates Motion Detection is enabled.
indicates Motion Detection is disabled.
Video Loss B indicates video Loss is enabled.
7
Page 9
2. Menu Functions
− 2.1 Main
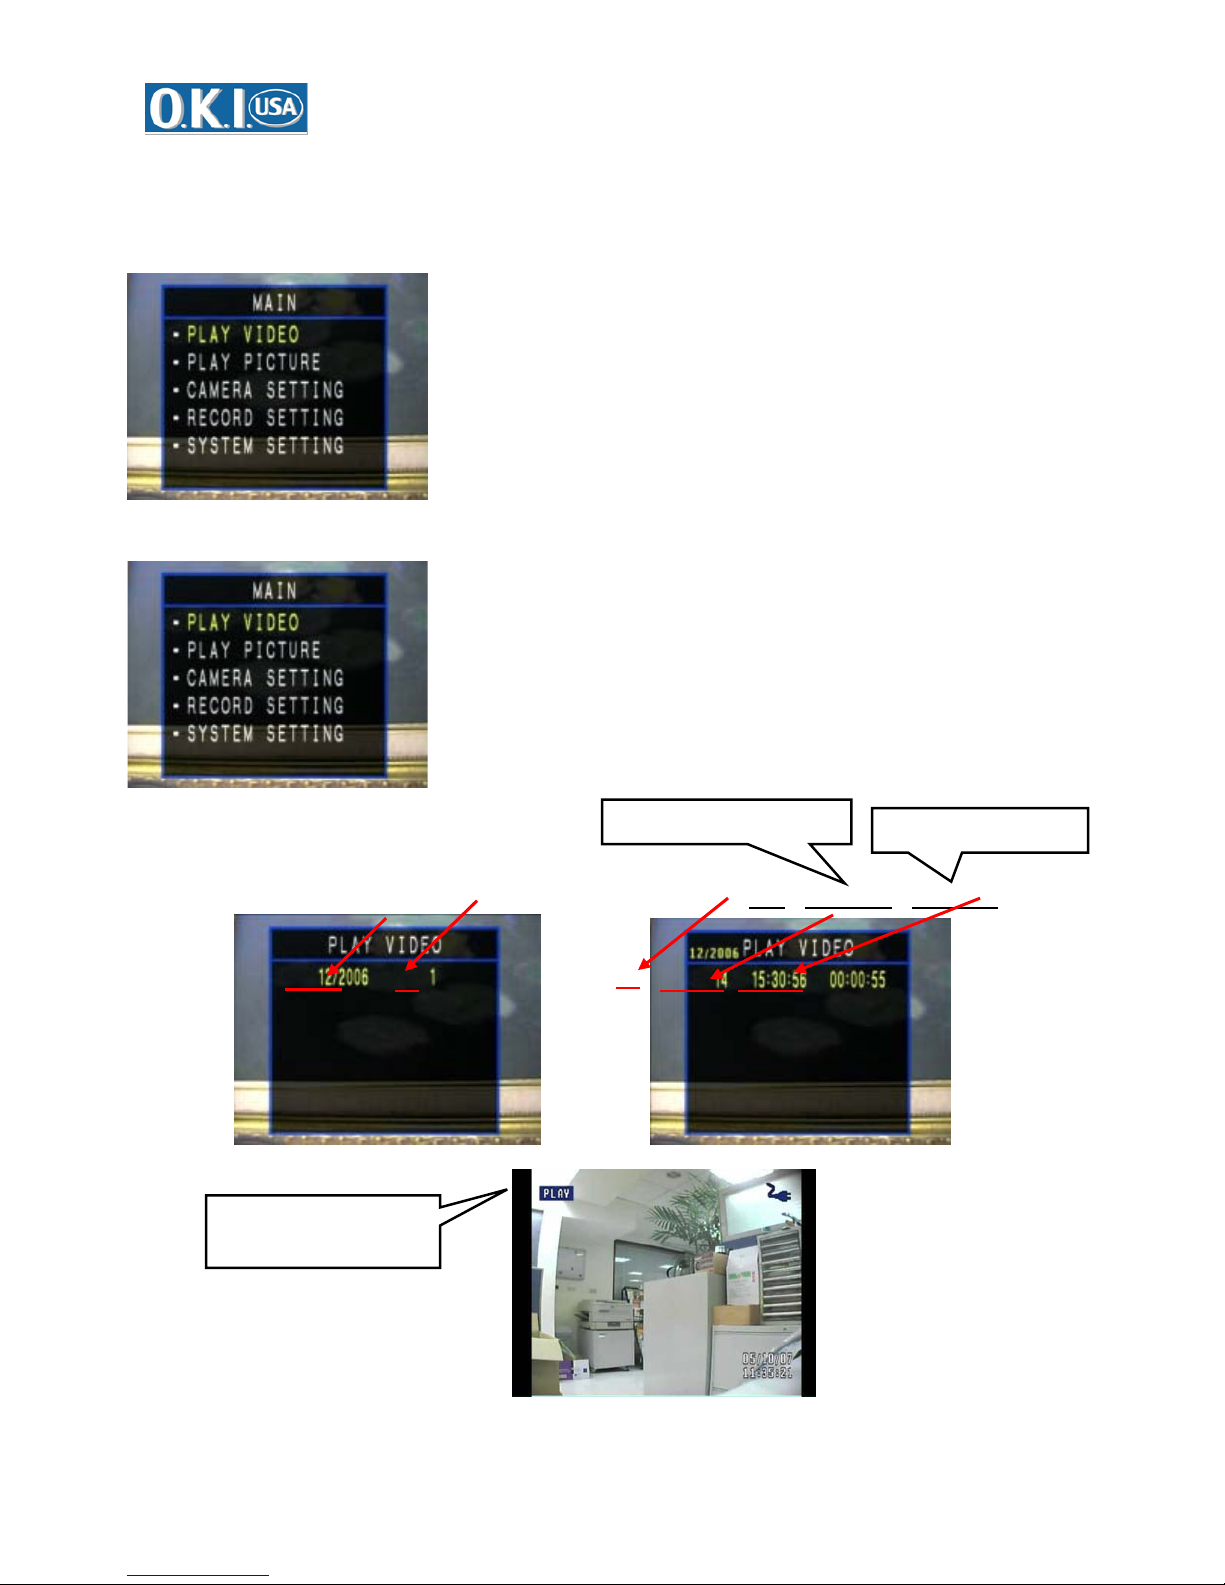
2.1.1 Play Video
Monthly List (MM/YYYY、 Total # of Records) Record List (
Video clip of Playback
Record starting time
Day、hh:mm:ss
Recording Duration
、hh:mm:ss)
8
Page 10

)
)
Playback
Video clip of PAUSE during
playback
Two ways to FF & FB the video:
1. Press STEP_F , STEP_B on the remote
controller
Video clip of FF (x2/x4/x8/x16
Video clip of FB (Remind) (x2/x4/x8/x16
2. Press button or on DVR.
9
Page 11

2.1.2 Play Picture
Date List (MM/DD/YYYY、 Total# of Pictures)
Picture Storage Path:
\JPEG\YYMMDD\
File Name:
A. the 1
B. the other pictures are names
st
picture is named in
hh/mm/ss.
in hh/mm/ss/xx
JPG
.JPG
Time and date when snapshot was taken
2.1.3 CAMERA SETTING
Video clip of Play Picture
Programmable to stamp date/ time
on the pictures
BRIGHTNESS:0~100
CONTRAST:0~100
COLOR:0~100
HUE:0~100
10
Page 12

2.1.4 Record Setting
FPS: 30/25/20/15/10/5
RESOLUTION: VGA or HVGA
AUDIO: ON/OFF
MOTION: ON/OFF LV:0~10
DATE PRINT:ON/OFF
2.1.4.1 Video/Audio
Recorded Video Clip
z Programmable Audio on/off for recording
z Video Storage Path:
\Year\Month\Day\Hour-Minute-Second
z Support continue recording after power loss
z Resolution selectable: HVGA (640 x 240) or VGA
(640 x 480)
z Recommend best Recording Frame rate is 30FPS at
NTSC and 25FPS at PAL
FPS: 30/25/20/15/10/5
RESOLUTION: VGA or HVGA
AUDIO: ON/OFF
2.1.4.2 Snapshot
Picture Storage Path: \JPEG\YYMMDD\
Programmable to stamp date/time on pictures
Date Print
ON: to stamp date/time on
pictures
OFF: not to stamp date/time
on pictures
11
Page 13

r
2.1.4.3 Video Loss
Video Loss recording
On: will display “VIDEO LOSS” while video signal input is lost
After the Video loss is enables for 5 seconds; DVR will automatically stop
recording. To retrieve recording, please connect Video input and press Rec
button.
ON: To enable Video
Loss.
OFF: To disable Video
Loss
Recording stop after Video loss
enabled 5 seconds late
2.1.4.4 Motion Detect
Motion Detection is on
ON: To enable Motion
detection.
OFF: To disable Motion
detection.
SENSITIVITY: 1-10 level
ALARM TIME: M.T. Alarm
recording duration from
10~60 SEC
The function is programmable in menu
M.T.’s recording duration & detect sensitivity are also programmable in the menu
12
Page 14

)
It will take 10 seconds delay to activate when M.T. is activated.
Press twice on the “Stop” button on DVR to enter the menu to disable M.T. or
press “stop’ key on the remote
2.1.4.5 Pre/Post Alarm
Pre alarm is on
ON: To enable Pre/Post alarm.
OFF: To disable Pre/Post Alarm
Pre-Alarm: recording duration 30
or 60 Sec before the alarm is
triggered.
Post-Alarm: recording duration
10-120 Sec after the alarm is
triggered.
Post Alarm is on
2.1.5 SYSTEM SETTING
Page1
Page2
13
TV: NTSC/PAL selectable
LCD SLEEP:00/30/60/90/120
LED:ON/OFF
BEEP:ON/OFF(beep sound on/off
when pressing the button)
LANGUAGE: ENGLISH
DATE/TIME: Three formats (refer
to 2.1.5.1
STORAGE: SD card
DEFAULT:
Page 15

2.1.5.1 DATE/TIME
3 Formats: MMDDYY/
Date/Time has 3 formats: YY/MM/DD, DD/MM/YY and MM/DD/YY
2.1.5.2 STORAGE
2.1.5.2.1 DEVICE
DDMMYY/
YYMMDD
2.1.5.2.2 STATUS
2.1.5.2.3 WARN LOW
DEVICE: SD CARD or onboard
Flash (option)
WARN LOW:15/10/5 % (warning
message when the storage is only
5 or 10 or 15%left)
Video clip of storage
warning message
during Recording
14
Page 16

2.1.5.2.4 FORMAT
2.1.5.2.5 Default Setting
3. PC Playback Software
E-Player
4. Watch Dog
Built-in hardware watchdog mechanism
5. Default Setting
Camera Setup (Brightness, Contrast, Color, Hue): 50
FPS: 30
Resolution: VGA
Audio: ON
Motion Detect: OFF
Motion Sensitivity: Level 5
Motion Alarm Time: 10
Pre/Post Function: OFF
Pre-Alarm Time: 30
Post-Alarm Time: 60
Video Loss: OFF
Date Print: ON
TV: NTSC
LCD Sleep: 30 sec
LED: ON
Beep: OFF
Language: English
Date Format: MM/DD/YY
Device: SD CARD
15
Page 17

r
Warn Low: 15%
Appendix a Explanation for Buttons on System
ON/OFF
Powe
Record
Snapshot
& ESC
POWER Button(Toggle): Power ON/OFF (must press 2 secon d s to active)
REC_Button :
Condition Action
In Preview Mode Start recording
In Play Mode Adjust volume up
Snapshot _Button :
Condition Action
In Preview Mode Take a snapshot
In Play Mode Adjust volume down
In Menu As an ESC button
UP_Button :
Condition Action
In Preview Mode Play the last recorded movie
In Play Mode Toggle as FF
In Menu Mode Cursor “Up” key
Up & FF
Enter main menu or Stop
Down & FB
16
Page 18

DOWN_Button :
Condition Action
In Play Mode Toggling as FB
In Menu Mode Cursor “Down” key
ENTER Button :
Condition Action
In Preview Mode Enter main menu
In Play Mode Stop playing back last movie
In Menu Mode Confirm your setup
Lock Button (Enable/Disable) : To activa te the button LOCK/UNLOCK function
In preview mode, press button which it
shows the blue key symbol on the screen.
Next, press
green key symbol on the screen.
Final, press
the Red key symbol on the screen.
Repeat the same steps to unlock button
button which it shows the
button which it shows
17
Note: The “REC” button still works if the
recorder is under Pre Alarm status. But no
buttons can work if Post alarm has activated
.
Page 19

Appendix b Recommend the different Brand of SD card
to be used in the DVR
1. Transcend 1GB 80x, 2G and 4G 150X
2. Kingston 2GB 120x
3. SanDisk 2GB Extreme III
18
 Loading...