

Page 1
WDEM-7680 680 TVL
WDEM-7610
610 TVL
Hyper Wide Dynamic Camera
Effio WDR
Quick Setup Guide
** Please refer to User Manual CD for detailed information **
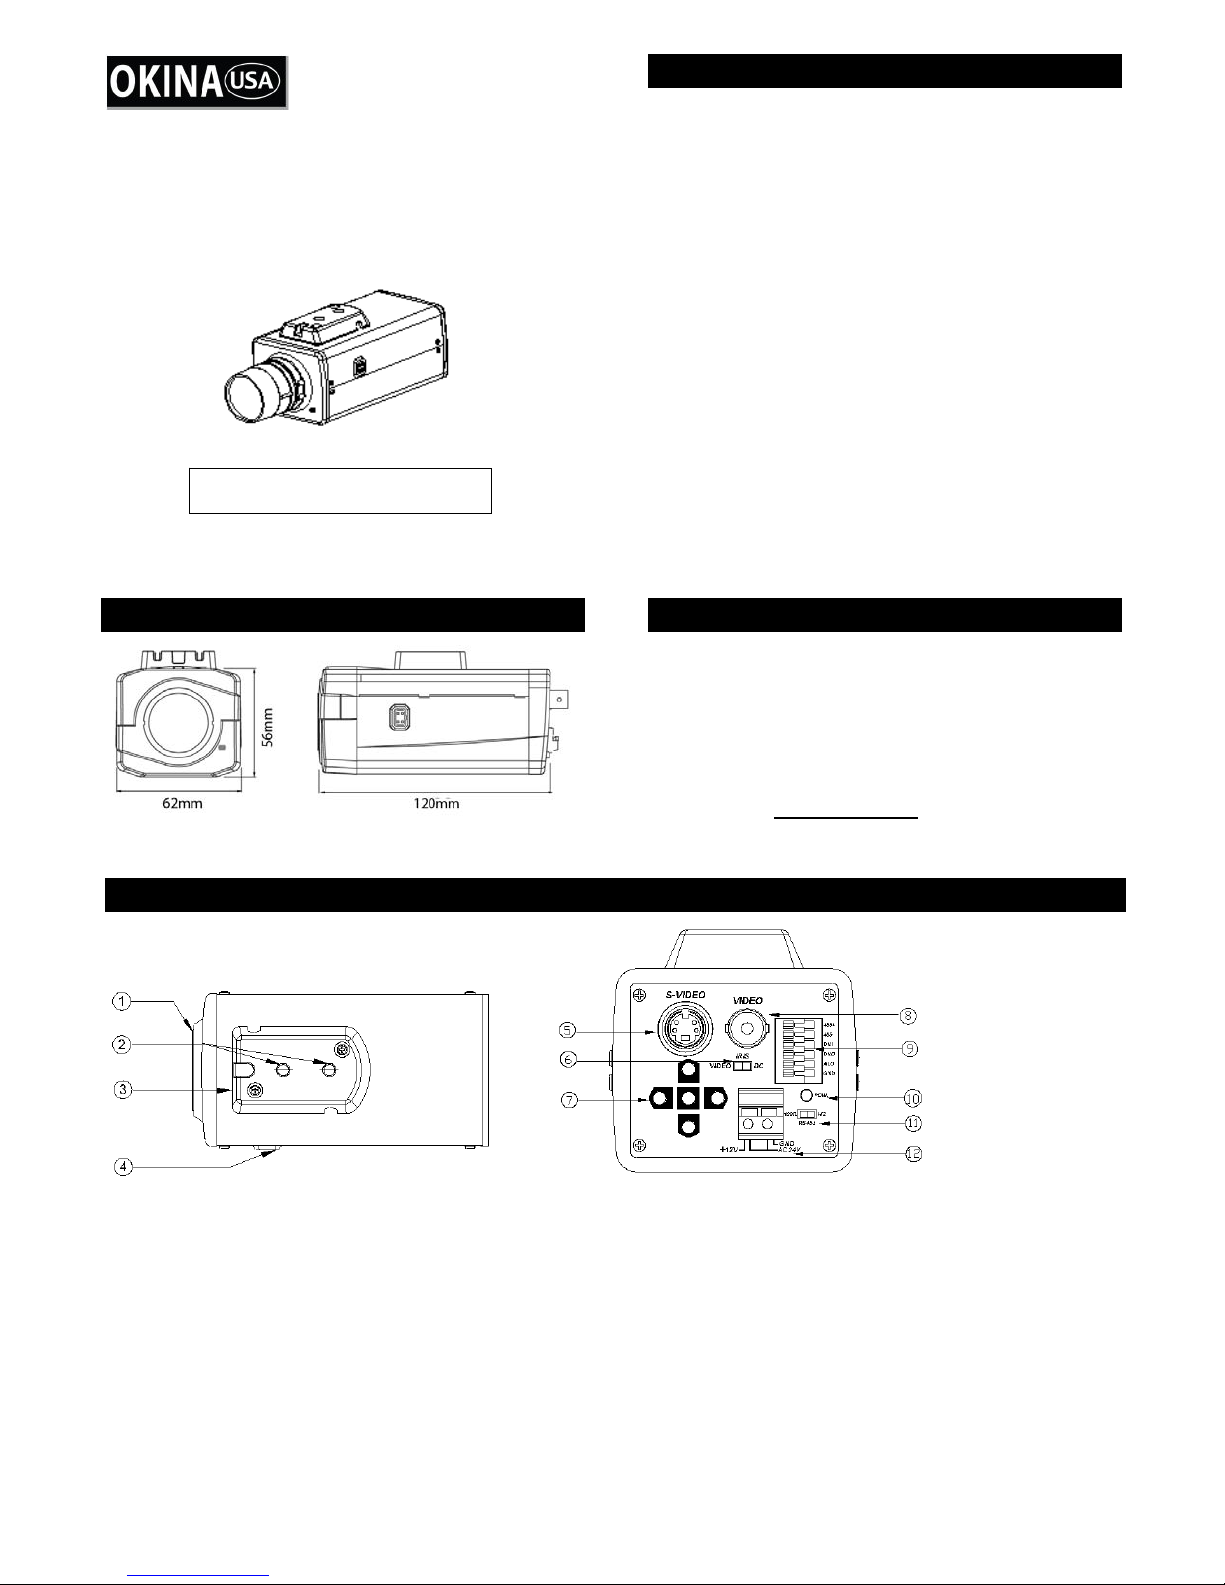
DIMENSIONS (Unit: mm)
DESCRIPTION OF CAMERA PARTS
FEATURES
WDE-7680
Color: 680 TVL, B/W: 700 TVL
Powerful 510x WDR (54dB)
WDE-7610
Color: 610 TVL, B/W: 630 TVL
Powerful 256x WDR (53dB)
1/3" Hyper Wide Dynamic Color Camera, Effio WDR DSP
Color: 0.03 Lux @ F1.0, B/W: 0.01 Lux @ F1.0,
Sense-up: 0.0001 Lux @ F1.0
Mechanical IR Cut Filter (ICR)
Multi-Language OSD Control / RS485 Control
Ideal for Backlight Environments
2D/3D Noise Reduction & Sense Up (512x) Functions
High Contrast Images; Face Detection of up to 4 faces
E-zoom Function (1~256x)
Advanced Motion Detection Function
Polygonal Mosaic Privacy Mask; Freeze / Timer Clock
12V DC / 24V AC, 3.0W
PACKAGE CONTENTS
One (1) WDEM-7680 or WDEM-7610 camera
One (1) DC Connector
One (1) CS Mount Ring
One (1) DC Plug
One (1) Allen Wrench
One (1) Warning Sign Sticker
One (1) Quick Setup Guide
One (1) CD with User Manual
* For any returns, please include all components listed above with
original packaging in Resalable Condition
be accepted if any components are missing/damaged or if any cable is
tampered with.
. Absolutely No Returns will
(1) Lens Mount
This mount is used to install a CS-mount lens. CS-adaptor ring is
required when using a C mount lens.
(2) Camera Mounting Screw Holes
Screw hold for mounting the camera.
(3) Mount Adapter
The adapter can be attached onto the top or bottom of the unit.
(4) Auto Iris Lens Connector (4-pin type)
The lens connector supplies the auto-iris lens (not supplied) with DC
control signal
(5) S-Video Output Terminal
Separate Y (brightness) and C (color) signal are outputs from this
terminal to obtain better video quality at a video monitor.
Copyright © 2010. All Rights Reserved.
www.okinausa.com 1 REV012011-V05
1. C signal: 0.3V (p-p), 75Ω, unbalance 3. C signal Ground
2. Y signal: 1.0V (p-p), 75 Ω, unbalance, 4. Y signal Ground
negative synchronizing
(6) Iris Mode Selection Switch
Select DC or VIDEO mode according to the lens.
(7) OSD Control Buttons
ENTER button
UP & DOWN buttons
LEFT & RIGHT buttons
(8) Video Connector
Video can be outputted via this BNC connector (75Ω).
(9) Communication Connectors
1. RS485+ 4. Day & Night Output
2. RS485- 5. Alarm Out
3. Day & Night External Input 6. Ground
(10) Power Input Indicator Light
When the camera is connected to a power source, the indicator light
will be on.
(11) RS485 Terminal Impedance Switch
Set the first and the last equipment terminal impedances as 120Ω
and set the rest parallel connection equipment in the middle as HiZ to
obtain the best transmitting status.
(12) Power Input Terminal
Connect the power input of 12V DC/24V AC (10.8~39V DC/24V AC).
Page 2
(
SPECIFICATION
PIC T-409 T-411
Model WDEM-7680 WDEM-7610
Image Sensor 1/3" Sony 760H Double-speed (Double-density) CCD
Number of Total Pixels
Resolution
Minimum Illumination Color: 0.03 Lux @ F1.0; B/W: 0.01 Lux @ F1.0; Sense-up: 0.0001 Lux @ F1.0
Wide Dynamic Range 510x Normal Camera (54dB) 256x Normal Camera (53dB)
Video Output 75Ω (BNC), S-Video (Y/C)
Signal to Noise Ratio More than 52dB (AGC off, Weight on)
Gamma Correction 0.45
Mechanical IR Cut Filter (ICR) Automatically Switches (Switching lux level can be adjusted)
Menu OSD Control or by RS485 Control
Title TITLE (LOCATION)
Synchronizing System INTERNAL / LINE LOCK
Digital Day&Night Mode COLOR / B&W / AUTO / EXT / SCHEDULE
Electronic Shutter
Automatic Gain Control AUTO / MANUAL / OFF
White Balance
Back Light Compensation WDR / BLC / OFF
Flickerless ON / OFF
Dynamic Noise Reduction 3D / 2D
Sense Up AUTO (Limit x2~x512) / OFF
Face Detection 4 Face Detection
Language ENGLISH / TRADITIONAL CHINESE / SIMPLIFIED CHINESE
E-Zoom x1~x256, Pan / Tilt Adjustable
Motion Detection ; Privacy
Timer Clock Year / Month / Date, Hour / Minute / Second
Camera Control Interface RS485 Interface OSD control by Pelco-D, Pelco-P
Automatic IRIS ; Connector VIDEO / DC ; D4 IRIS Jack
Lens Mount C / CS mount (with Adaptor)
Lens Not Included
Power Input ; Consumption 12V DC / 24V AC (10.8~39V DC / 24V AC) ; 3.0W
Operation ; Storage Temp. 14˚F~122˚F ; -4˚F~140˚F ; -10˚C~50˚C ; -20˚C~60˚C
Operation ; Storage Humidity Maximum: RH80% ; RH90%
Dimensions 2.36”(W) x 1.97”(H) x 4.68”(L) / 60mm(W) x 50mm(H) x 119mm(L)
Net Weight 0.77 lbs / 350g
* Specifications are subject to change without notice.
PAL version also available.
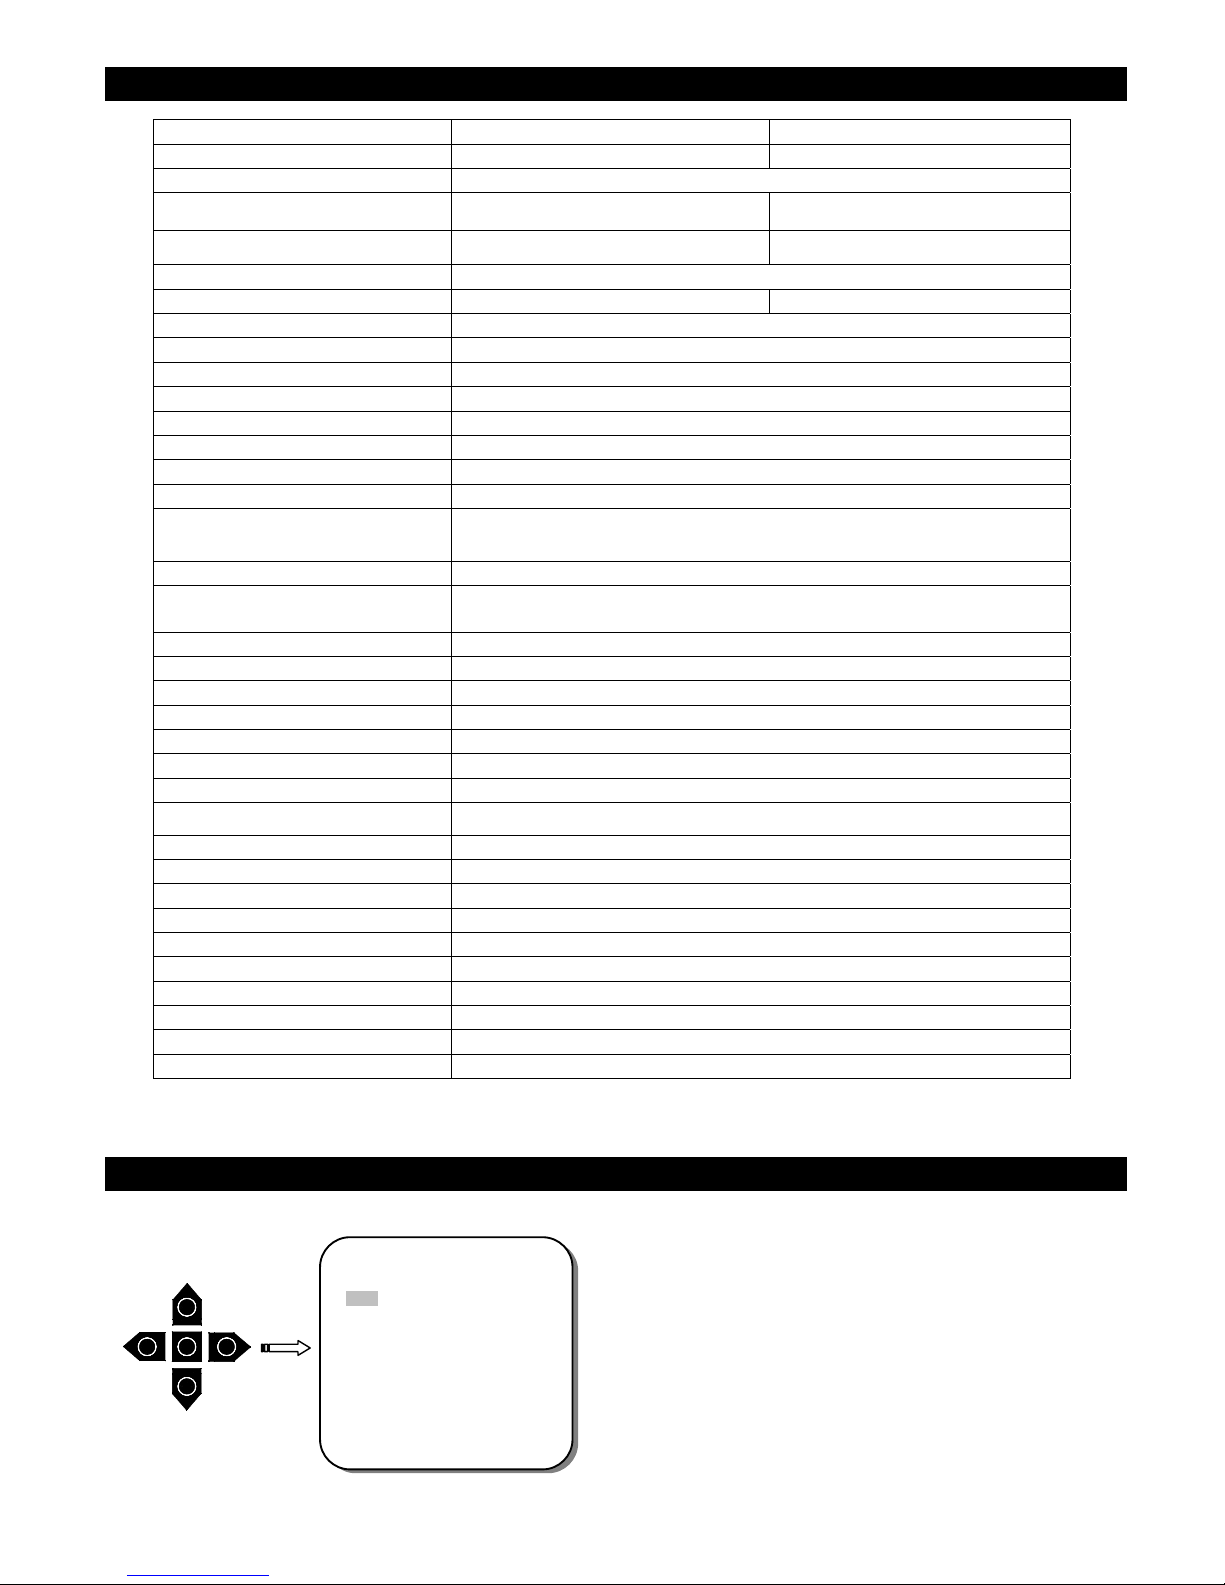
OSD OPERATION
Use OSD Control Buttons to operate OSD and adjust settings.
Copyright © 2010. All Rights Reserved.
www.okinausa.com 2 REV012011-V05
* * MAIN MENU **
LENS
AGC
WDR
WHITE BALANC E
2DNR & 3DNR
DAY / NIGHT
SHUTTER
IMAGE
EFFECT
SYSTEM
EXIT
NTSC: 1028(H) x 508(V)
PAL: 1024(H) x 596(V)
Color: 680TVL, B/W: 700TVL
Sony Effio WDR
AUTO(1/50(60)~1/100,000sec.) / SCHEDULE or DAY&NIGHT / MANUAL: 1/50(60), FL
1/120(100), 1/200, 1/250, 1/350, 1/500, 1/750, 1/1,000, 1/1,500, 1/2,000, 1/3,000, 1/4,000,
OUTDOOR(1800°K~10500°K) / INDOOR(4500°K~8500°K) / ANTI CR
1/10,000, 1/30,000, 1/60,000, 1/100,000 sec.
ATW / AWB / AWC (Push Lock) / MANUAL /
ON / OFF
ON / OFF (24x16 Zones, Alarm) ;
16 Zones Programmable, Polygonal Mosaic)
NTSC: 811(H) x 508(V)
PAL: 795(H) x 596(V)
Color: 610TVL, B/W: 630TVL
Sony Effio WDR
1. Start to operate the OSD menu
Press the ENTER button to bring up the OSD main menu to start
operating OSD menus.
2. Select items with the cursor buttons
SET<┘
AUTO
WDR<┘
ATW
SET<┘
COLOR
MANUAL<┘
SET<┘
SET<┘
SET<┘
y Use buttons c and d to move the cursor up and down.
y Use buttons e and f to switch the modes or to adjust the
parameters or the values of the settings.
3. Switch to the sub-menu
Items with “<┘” symbol in the end contains sub-menus. For further
settings of those items, select the desired item with the button c or d
and press the ENTER button to bring up the sub-menu and edit.
4. Return to the previous page
Select RETURN and press the ENTER button to return to the previous
page.
5. Exit the OSD menu
Select EXIT with the button c or d and press the ENTER button to exit
the OSD menu.
Page 3

BASIC SETTINGS
Adjust the item with buttons e and f, for the item with sub-menus, click enter to edit it.
** MAIN MENU **
LENS
AGC
WDR
WHITE BALANCE
2DNR & 3DNR
DAY / NIGHT
SHUTTER
IMAGE
EFFECT
SYSTEM
EXIT
SET<┘
AUTO
WDR<┘
ATW
SET<┘
COLOR
MANUAL<┘
SET<┘
SET<┘
SET<┘
y LENS: LENS <┘/ BRIGHTNESS / SPEED
y AGC: AUTO / OFF / MANUAL
y WDR: WDR / BLC / OFF
y WHITE BALANCE: ATW / AWB / AWC / MANUAL / OUTDOOR / INDOOR / ANTI CR
y 2DNR & 3DNR: ON <┘/ OFF
y DAY/NIGHT: COLOR / B&W / AUTO / EXTERNAL / SCHEDULE
y SHUTTER: MANUAL / AUTO / DAY/NIGHT
y IMAGE: HIGH RESOLUTION / SHAPRNESS / CHROMA / FREEZE / MIRROR /
POS/NEG
y EFFECT: MOTION DETECTION / FACE DETECTION / VPS / E-ZOOM / PRIVACY
MASK
y SYSTEM: CAMERA TITLE / DATE/TIME / COMM / SYNC / LANGUAGE / FIRMWARE /
RESTORE
y EXIT: Exit the OSD menu
CAUTION
1. Never point the camera toward the sun
Do not expose the lens directly to the sun or to strong light as this may damage the pick-up device.
2. Handle this camera with care
Avoid any shock or bumping of the camera. Improper handling could damage the camera.
3. Requires a proper operating environme n t
This camera is designed for indoor and outdoor use. The allowable temperature range for operation of this camera is between 14˚F~122˚F /
-10°C~50°C and the allowable humidity is 90%RH maximum.
4. Clean the front face to the pick-up device
It is recommended that the pick-up device surface be cleaned before lens installation or whenever the lens is changed. Cleaning should be done by
using a chamois, a very fine soft cloth, lens tissue, or cotton tipped applicator and ethanol to carefully remove any fingerprint or dust.
5. Check the power source voltage
The power source voltage should be within the specified range. (Camera must meet the specifications). Camera must be connected to a surge
protector at all times.
6. Objects and liquid entry
Never push objects of any kind into this camera as this may touch dangerous voltage points of short out parts that could result in a fire or electric
shock. Never spill any kind of liquid on the video product.
7. Servicing
Do not attempt to service this video product by yourself as opening or removing covers may expose you to dangerous voltage or other hazards.
Refer all service to qualified servicing personnel.
8. Damage requiring service
Unplug this video product from the wall outlet and refer service to qualified servicing personnel under the following conditions:
a. When the power supply cord or plug is damaged.
b. If liquid has been spilled, or objects have fallen into the video product.
c. If the video product has been exposed to rain or water.
d. If the video product has been dropped or the cabinet has been damaged.
e. When the video product exhibits a distinct change in performance.
WARRANTY
OKINA USA products are covered under warranty for one year from the date of purchase. The warranty will automatically be voided if any of the
following occurs:
1. Camera sticker is removed
If the camera sticker is removed, we will not be able to confirm any information regarding when and where the product was purchased. We have no
other way to verify the purchase record without the serial number on the camera sticker; therefore, it should not be removed.
2. Camera is modified in any way
If the camera is scratched, damaged, or modified in a manner not described in this manual, the warranty will be voided immediately. It is the
customer’s responsibility to keep the camera in good condition.
3. Video or power cable is cut
The video cable and the power cable should not be tampered with. Cutting or modifying of the cables will result in termination of the warranty.
Copyright © 2010. All Rights Reserved.
www.okinausa.com 3 REV012011-V05
 Loading...