

Page 1
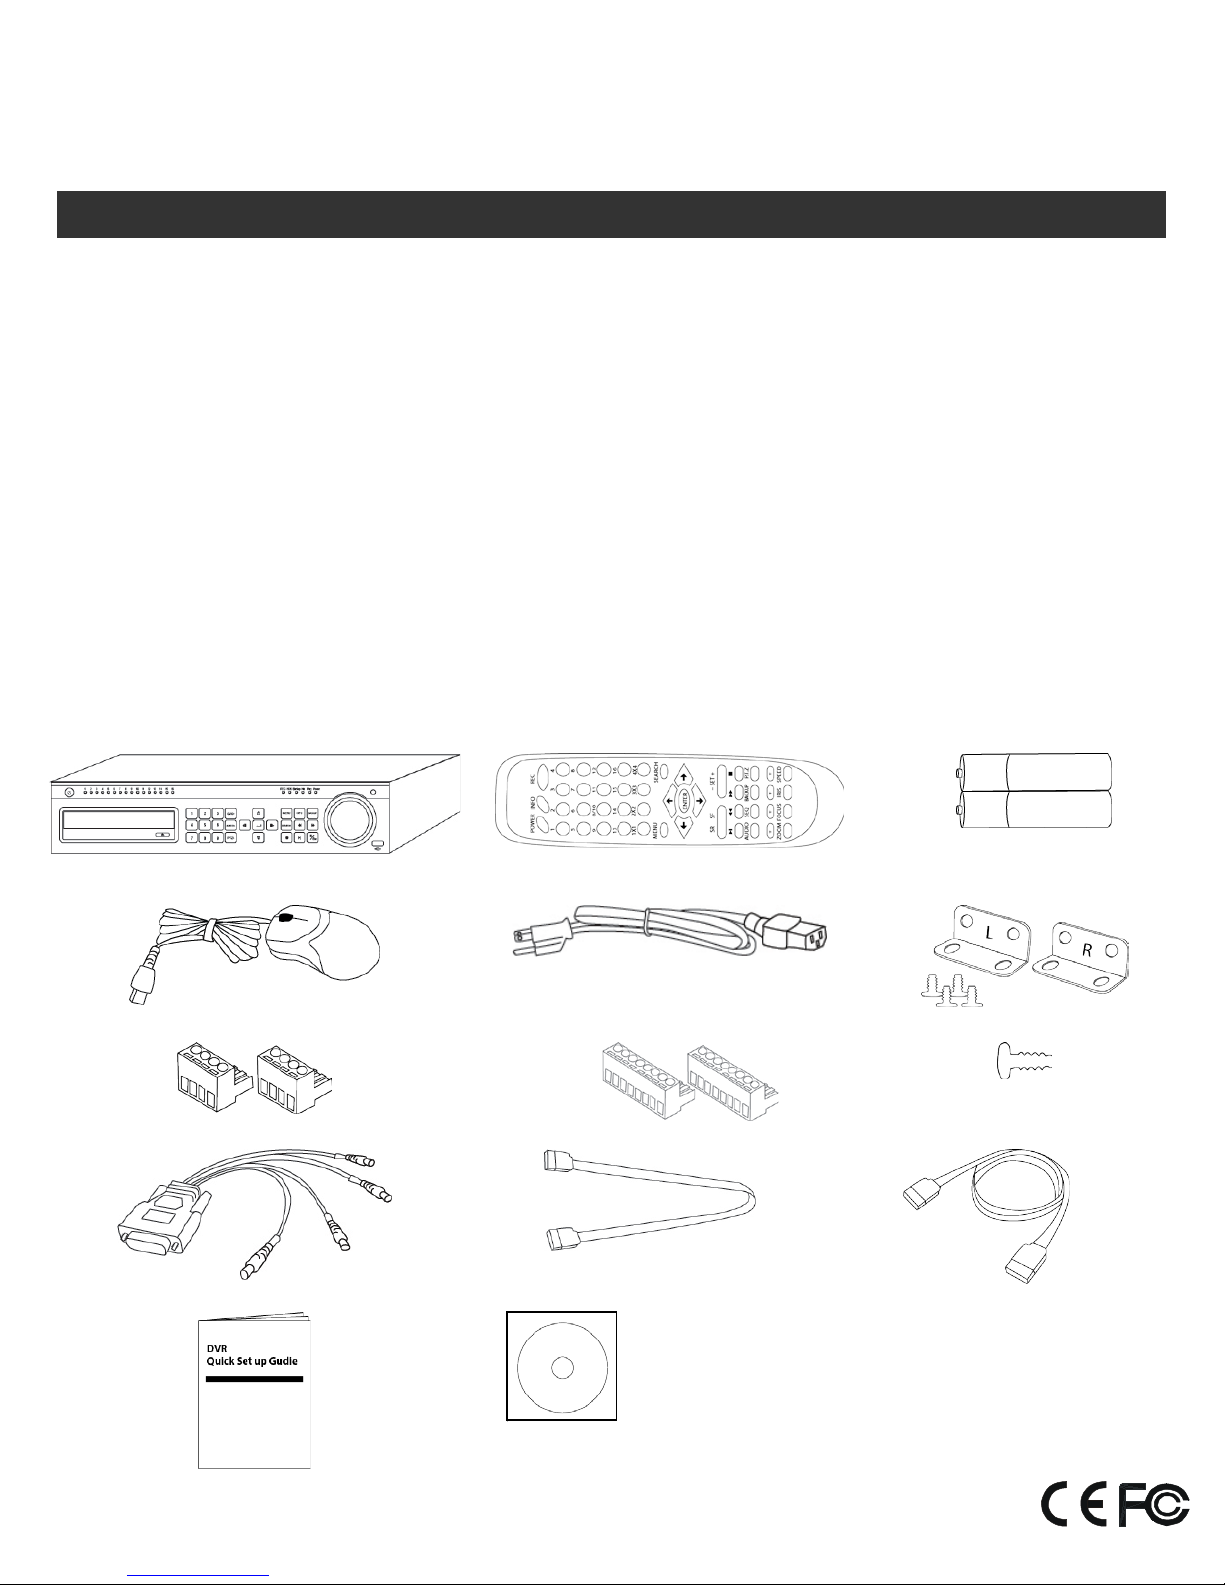
PACKAGE CONTENTS
A.
One (1)
HDRH-44-2U DVR
B.
One (1)
Remote Controller
C.
Two (2)
AAA Battery for Remote Controller
D.
One (1)
USB Mouse
E.
One (1)
Power Cord
F.
Two (2)
Rack Mount Ear w/ Screws
G.
Two (2)
4 Screw on Terminal Connector
H.
Two (2)
8 Screw on Terminal Connector
I.
Sixteen (16)
Hard Drive Screws
J.
One (1)
Loop out Cable DB 15 to 4 CVBS for Analog Channel
K.
Two (2)
eSATA Cable
L.
Six (6)
SATA Cable Inside DVR
M.
One (1)
Quick Set up Guide Book
N.
One (1)
User’s Manual & CMS Software CD
A.
B.
C.
D.
E.
F.
G.
H.
I.
J.
k.
L.
M.
N.
HDRH- 44- 2U
Hybrid H.264 DVR –
Quick Setup Guide
x 16
x 2
x 6
Please read this Quick Setup Guide before installation.
*Note: Any Return Must Include All Components.
x 2
x 2
x 2
x 2
4 CH. Full HD SDI + 4 CH. CVBS Analog
Inside the DVR
Missing Components will be charge.
We highly recommend installing a UPS Battery Backup
System to avoid power failure restore damage to
Hard Drive & motherboard.
MADE IN TAIWAN
R201302-V019
Page 2
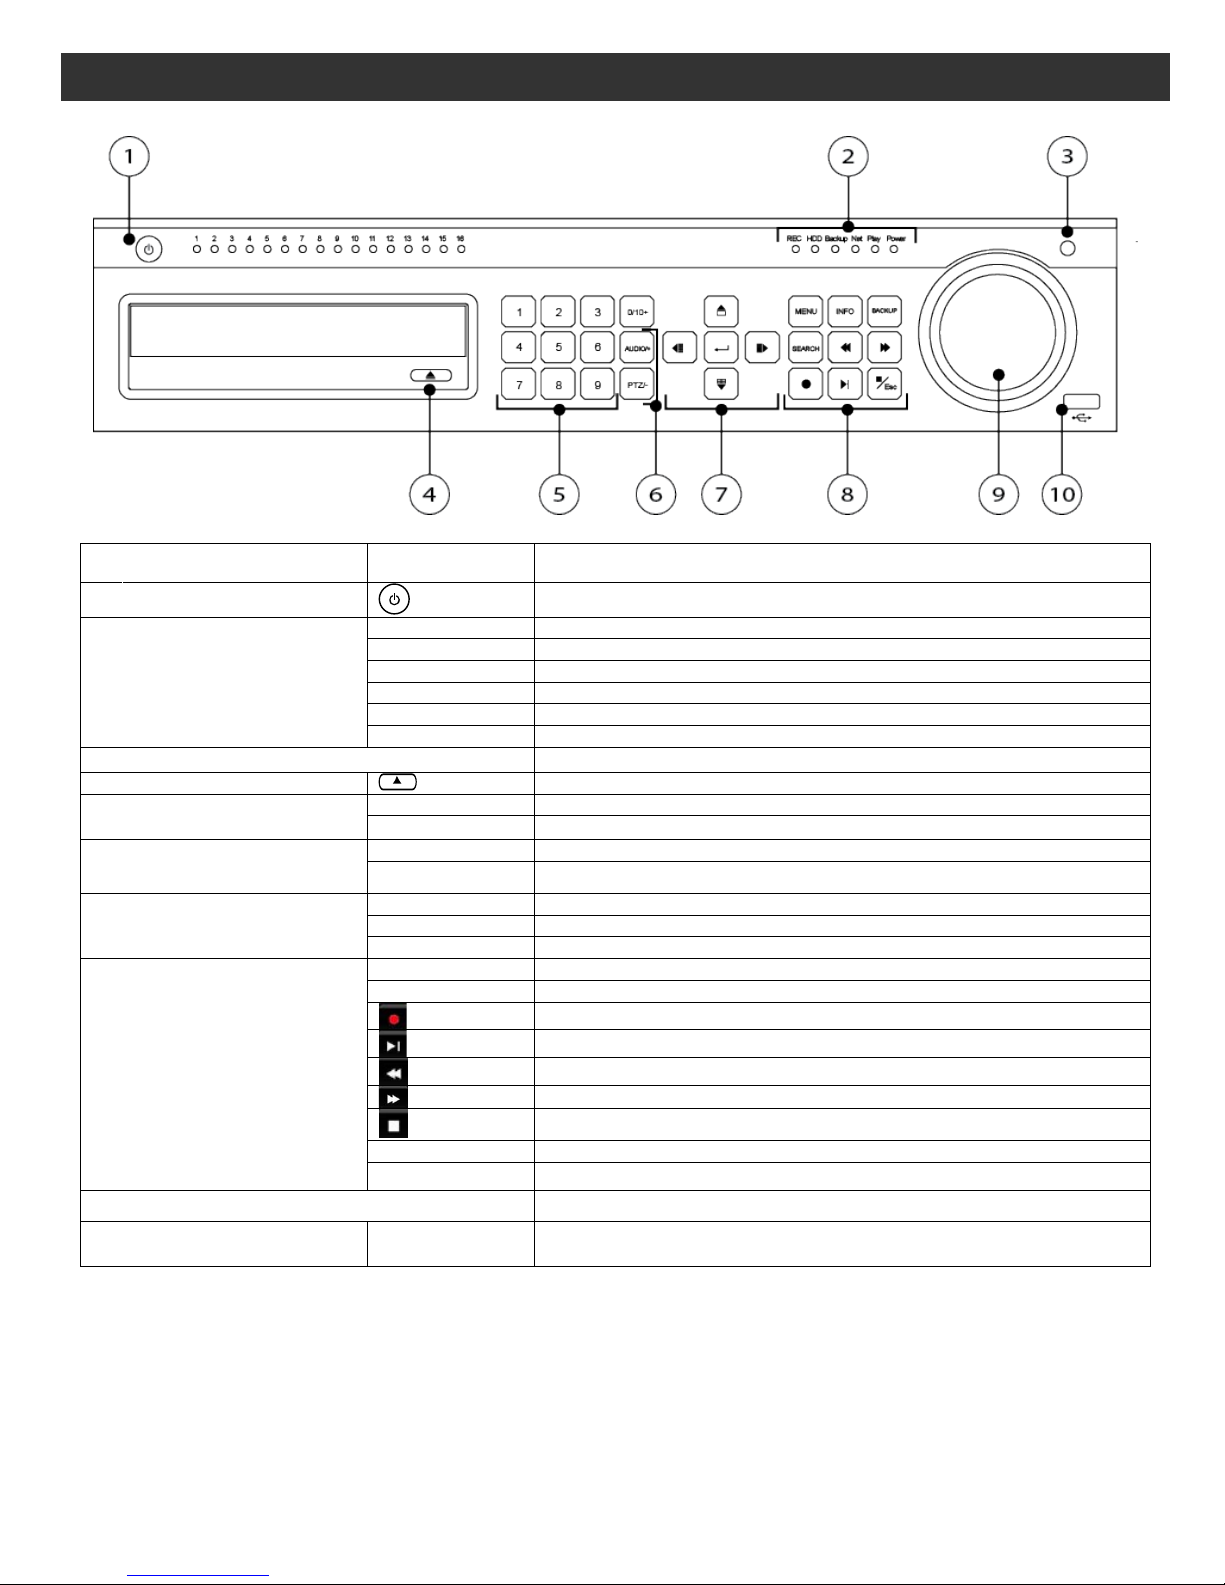
1. Front Panel
REC
When recording, the light is blue
HDD
When HDD is writing and reading , the light is blue
Backup
When backup files and data, the light is blue
Net
When access to network , the light is blue
Play
When playing video, the light is blue
Power
Power indicator, when connection , the light is blue
3
IR receiver
Remote receiver
4
Eject Button
Eject DVD
1-9
Input number 1-9 or choose camera
0/10+
Input number0, 10 and the above number together with other digital keys
Compound Button
P.T.Z./-
1. Enter PTZ mode in live 2. Decrease the value in setup
Direction button
Change direction to select items
Multi-screen
Change screen display mode like1/4/9/ 16 cha nnel
Enter button
Confirm selection
MENU
Enter menu in live
INFO
Check recording data
Record manually
Rewind
Fast forward
/Esc
BACKUP
Enter backup mode in live
SEARCH
Enter search mode
To connect external USB devices like USB flash, USB HDD for backup or
update firmware;
Panel Definition
Item # Label Name Function
Power Switch
1
Power on/off
HDRH-44-2U Quick Setup Guide
Work state indicator
2
5 Digital Button
6
7
Input button
Function button
8
9 Split / Direction K ey Switch split / Move selected item
10 USB USB port
AUDIO/+ 1. Control voice 2. Increase the value in setup
Play/Pause
Exit/ESC
2 R201304-V10
Page 3
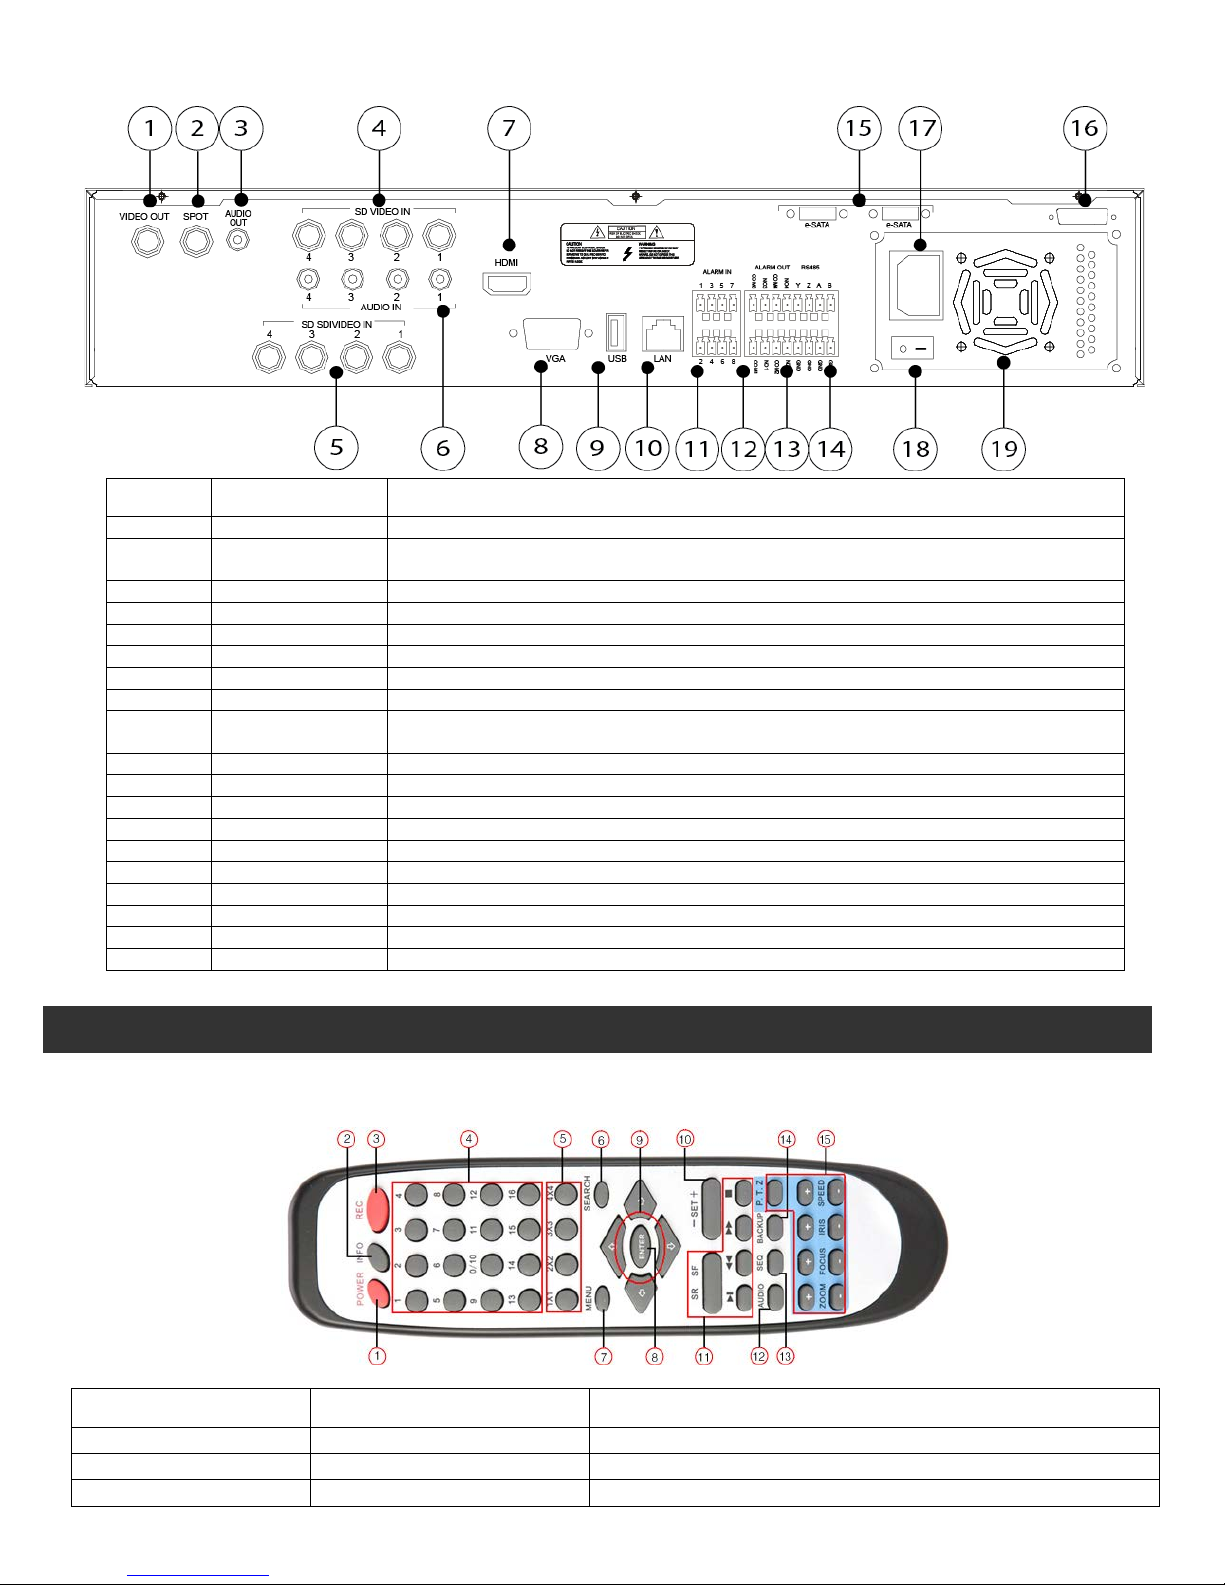
2. Back Panel
1
Power
System shut down
2
INFO
Enter information page
3
REC
Manual record
1
Video out
BNC Connect to monitor
BNC Connect to monitor as an AUX output to display channel by channel. Video would be
displayed without OSD.
3
Audio out
RCA Audio output, connect to Speaker
4
SD Video in
BNC CVBS video signal input, Recommend use Gold Center Plan
5
HD SDI Video in
BNC HD SDI video signal input
6
Audio in
RCA 4 CH Audio input
7
HDMI port
HDMI Connect to high-definition display device
8
VGA port
VGA output, connect to monitor
To connect external USB devices like USB flash, USB HDD or USB mouse. Recommend
using for USB mouse
10
LAN
Network port
11
ALARM IN
Screw in connect to external sensor1-8
12
ALARM OUT
Screw in 4ch relay output. Connect to external alarm.
13
P/Z
Screw in Connect to Speed Dome, Y is TX+, Z is TX-
14
K/B Controller
Screw in Connect to Keyboard Controller, A is TX+, B is TX-
15
E-SATA
Connect to External HDD for backup
16
LOOP OUT
DB 15 for outputting 1-4ch image independently to 4 BNC Pigtail
17
POWER INPUT
AC 110V-220V
18
POWER SWITCH
Switch on/off
19
FAN
For cooling the device
Control Option
Item # Label Name Function
2 Spot
HDRH-44-2U Quick Setup Guide
9 USB port
1. Remote Controller
◆ This remote control uses AAA battery, the definition as following:
1.
Item # Label Name Function
3 R201304-V10
Page 4
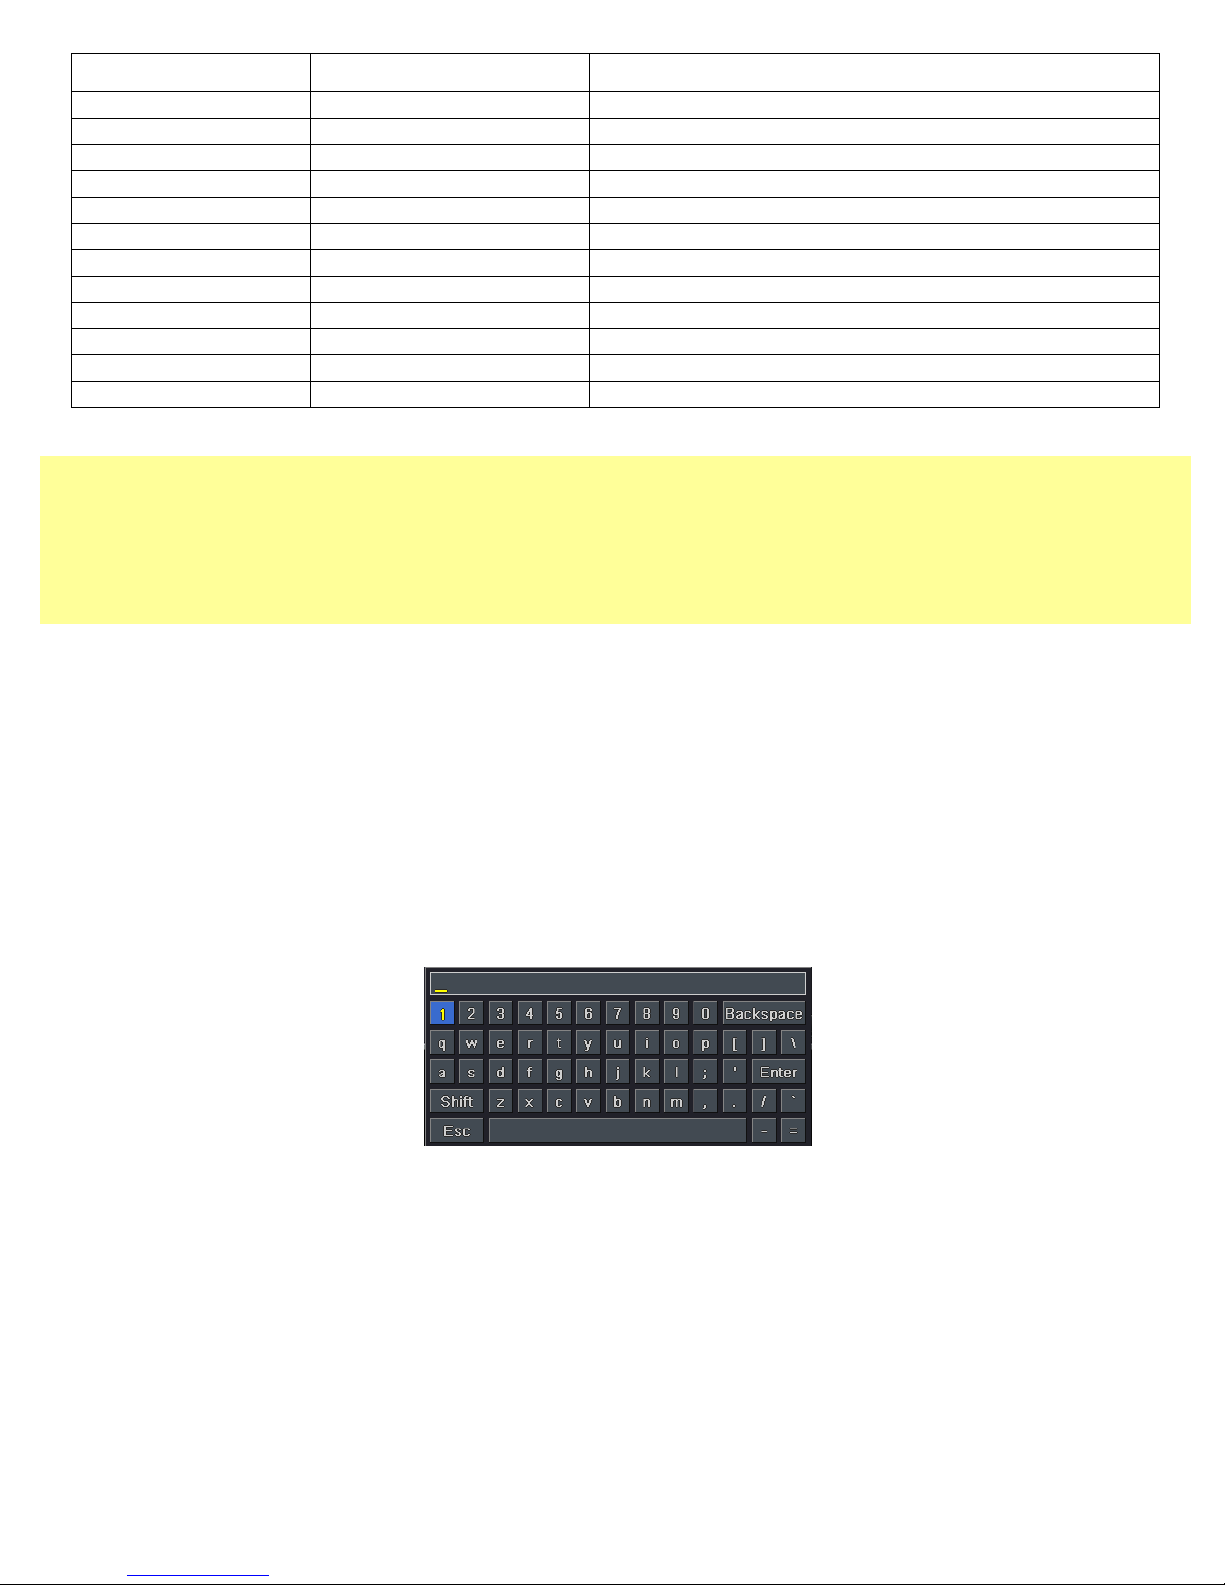
Item # Label Name Function
4
Digital Button
Enter digital or switch channel
5
Split Screen
Switch split screen
6
SEARCH
Enter search mode
7
MENU
Enter Mode
8
ENTER
Enter
9
Direction Button
Move item or PTZ direction
10
+/-
Add or reduce value
11
Playback Control
Playback control FF/REW/STOP/STEP
12
AUDIO
Live audio switch
13
SEQ
Sequence
14
BACKUP
Enter Backup mode
15
PTZ Control
Control PTZ Zoom/Focus/Iris/Speed
◆ Switch Remote Control ID
1. Take remote cont rol and point to DVR then continuously press “8”,”8”,”ID(0-65535)”,”Enter”.
2. Make change on DVR ID Setting,
Go to “SYSTEM MENU” > “DEVICE ID” to make change
*The ID must be the same on DVR.
*For example: If ID=1 ,
Please take remote control and point to DVR then press 8,8,1,Enter.
Then go to “SYSTEM MENU” > “DEVICE ID” change the ID=1
2.3 Mouse Control: REQUIRED
◆Connection: Recommend to connect the USB mouse to the back panel.
◆Mouse functions:
1)Under LIVE mode:
On every channel,you could double click the left button to switch FULL SCREEN and double click again to
switch back to original split mode.
On every channel,you could single click right button to popup MENU page.
2)Under MENU page:
Single click left button on any functional icon could enter the function page and Single click right button to
exit function page or jump back to previous page.
If you want to key in letter or digit, please move mouse to textbox then single click left button on textbox. The
OSD keyboard will pop up as following,
3)Under Backup mode:
Single click left button to select item, single click right button to jump back to previous page.
4)Under PTZ mode:
Single click left button to operate PTZ function, single click right button to jump back to previous page.
HDRH-44-2U Quick Setup Guide
4 R201304-V10
Page 5
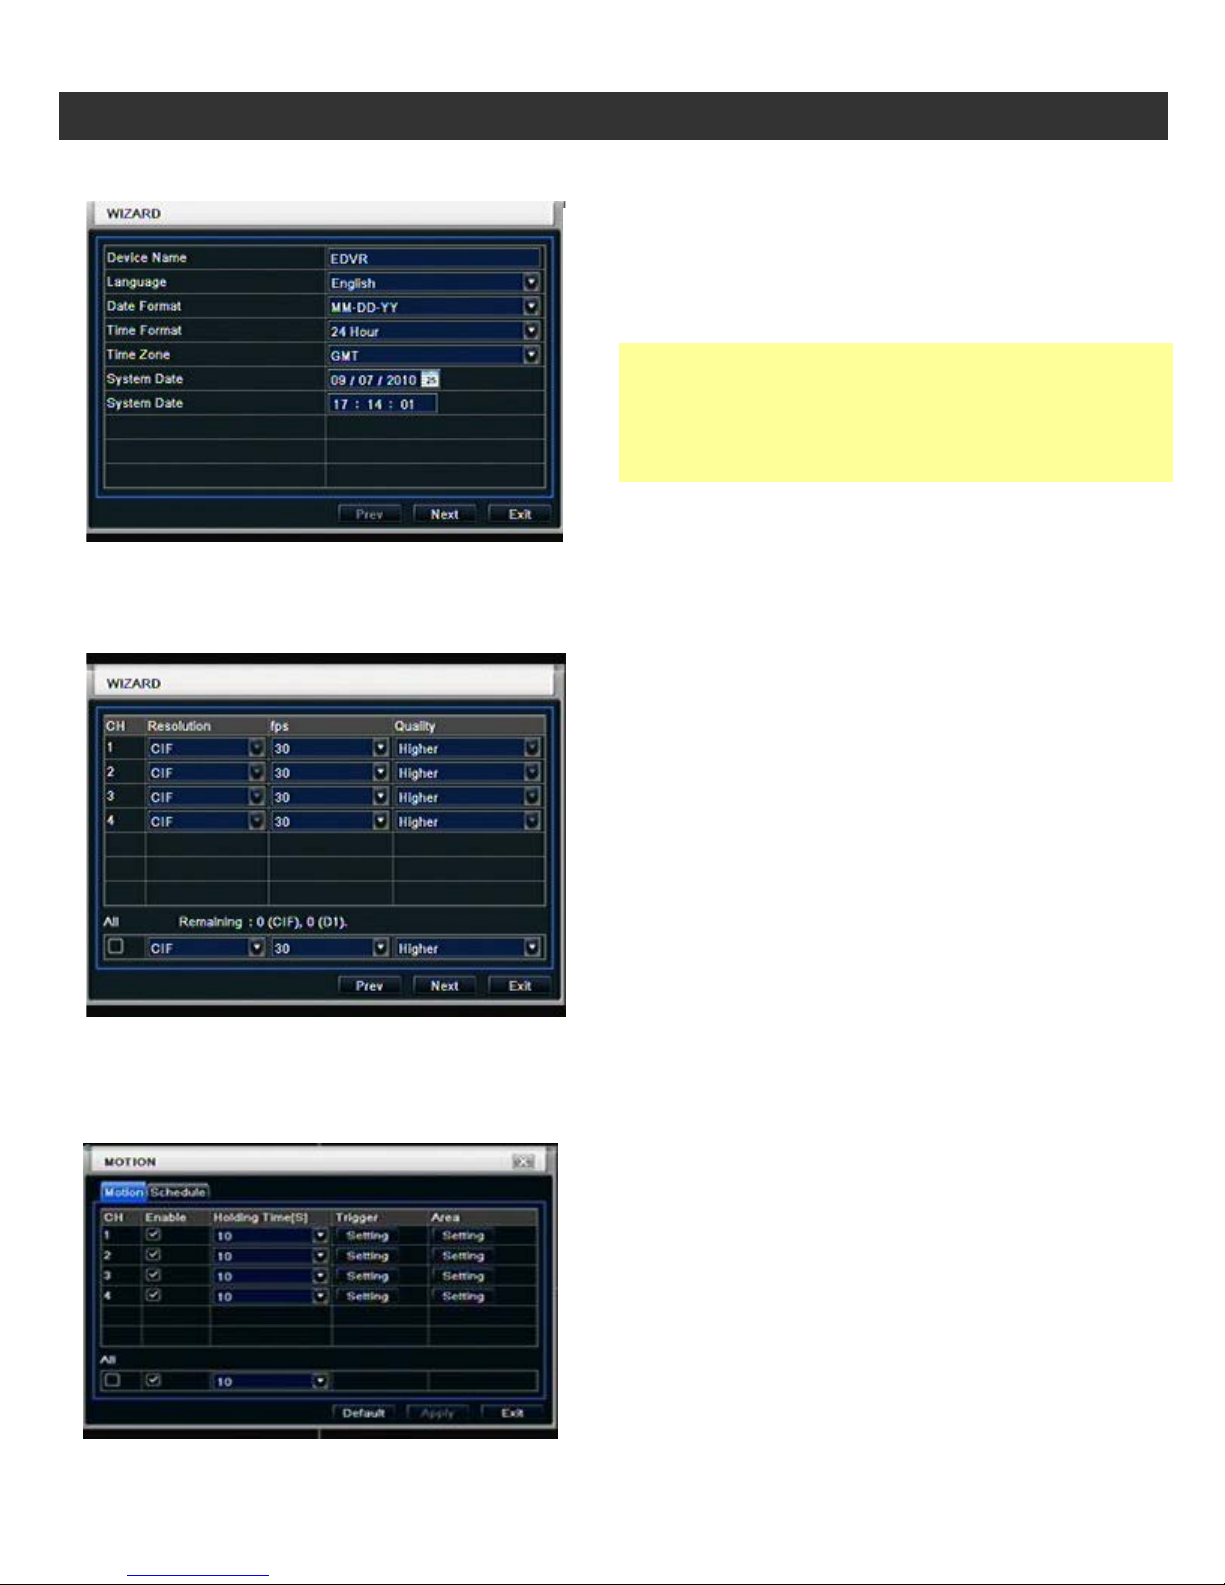
Wizard setup
Device Name: to set a name of DVR.
You can setup record frame rate and quality for each
1. Wizard for language and time setup
2. Wizard for Record setup
HDRH-44-2U Quick Setup Guide
Language: to set a proper language.
Date Format: to set a proper display format of time.
Time Format: to set 24 hour or 1 2 hour format to
display.
Time Zone: to set proper time zone (GMT-8: Los
Angeles) *Caution: Please make sure to set time
zone correctly.
To prevent getting different time stamps between
local and remote site.
System Date: to set current system date time.
Please click “next” to next wizard process.
1.1
Motion Detection Recording:
Motion Detection Recording: Enter Main Menu Setup Alarm Motion
Enable the Channels to turn on Motion Detect Record.
**Motion Schedule Default: is set to Full Time motion recording on all channels.
5 R201304-V10
channel and change record resolution.
Adjustable parameter as following,
Resolution: CIF, HD1 or D1
Frame rate: Number of channel.resolution@NTSC frame
rate(PAL frame rate)
4 CH
4CIF@30(25) 4HD1@30(25) 4D1@30(25)
Quality: Highest/ Higher/ Normal/ Low/ Lower/ Lowest
If you want to change all channel setup at once, please
click “All” then setup resolution, frame rate and quality at
right hand side.
Please click “next” to next wizard process.
Page 6
HDRH-44-2U Quick Setup Guide
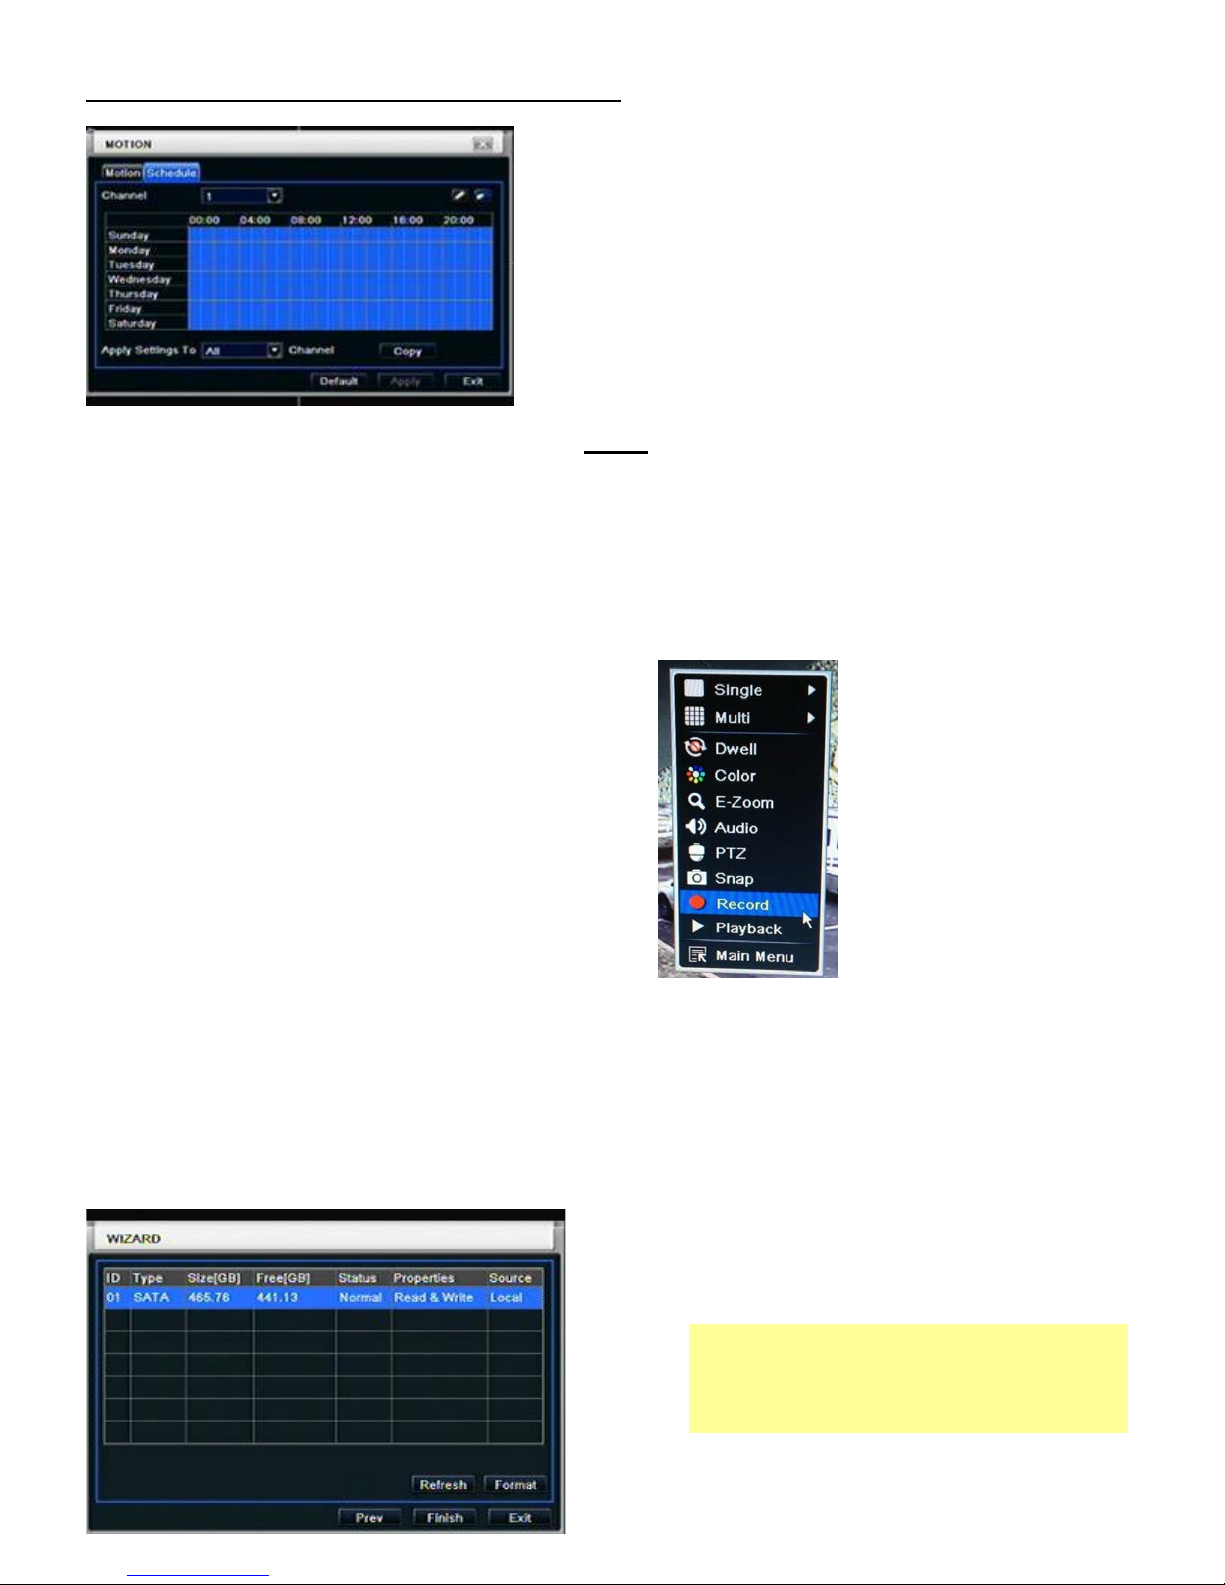
You can format HDD by using “Format”
If Schedule Motion Recording needs to be changed:
To modify motion recording schedule click on the pencil icon located on the upper right of the screen, then
click on desired days and times to schedule recording when motion trigger.
If same schedule apply to all channels. After highlighting desired squares apply settings to “All” Channel, click
“Copy”and click Apply to save setting. To Enable full time motion Recording,
highlight the entire Blue Grid.
1.2
Full Time Recording :
1. Pre s s “Record” Button on the front panel of the DVR. Green box will appear on screen to confirm that manual
recording is enabled. Press “Record” Button again to stop r ecording .
OR Right click on main screen and select “Record”.
Note: Definition of Holding Time (on motion detect setting) :
After motion record is activated and there is NO activity within 10 seconds this will be handled as one event.
Otherwise if there IS activity within that time frame it will continue recording.
Note: Change Daylight Savings on the first week of March and second week of November.
3. Wizard for HDD setup
6 R201304-V10
function.
After HDD format completed, it will show
“Normal” label on status.
*Please make sure to backup all HDD
data before you format the HDD.
All HDD data will be erased after HDD
formatted.
Please click “Finish” to get into login page.
Page 7
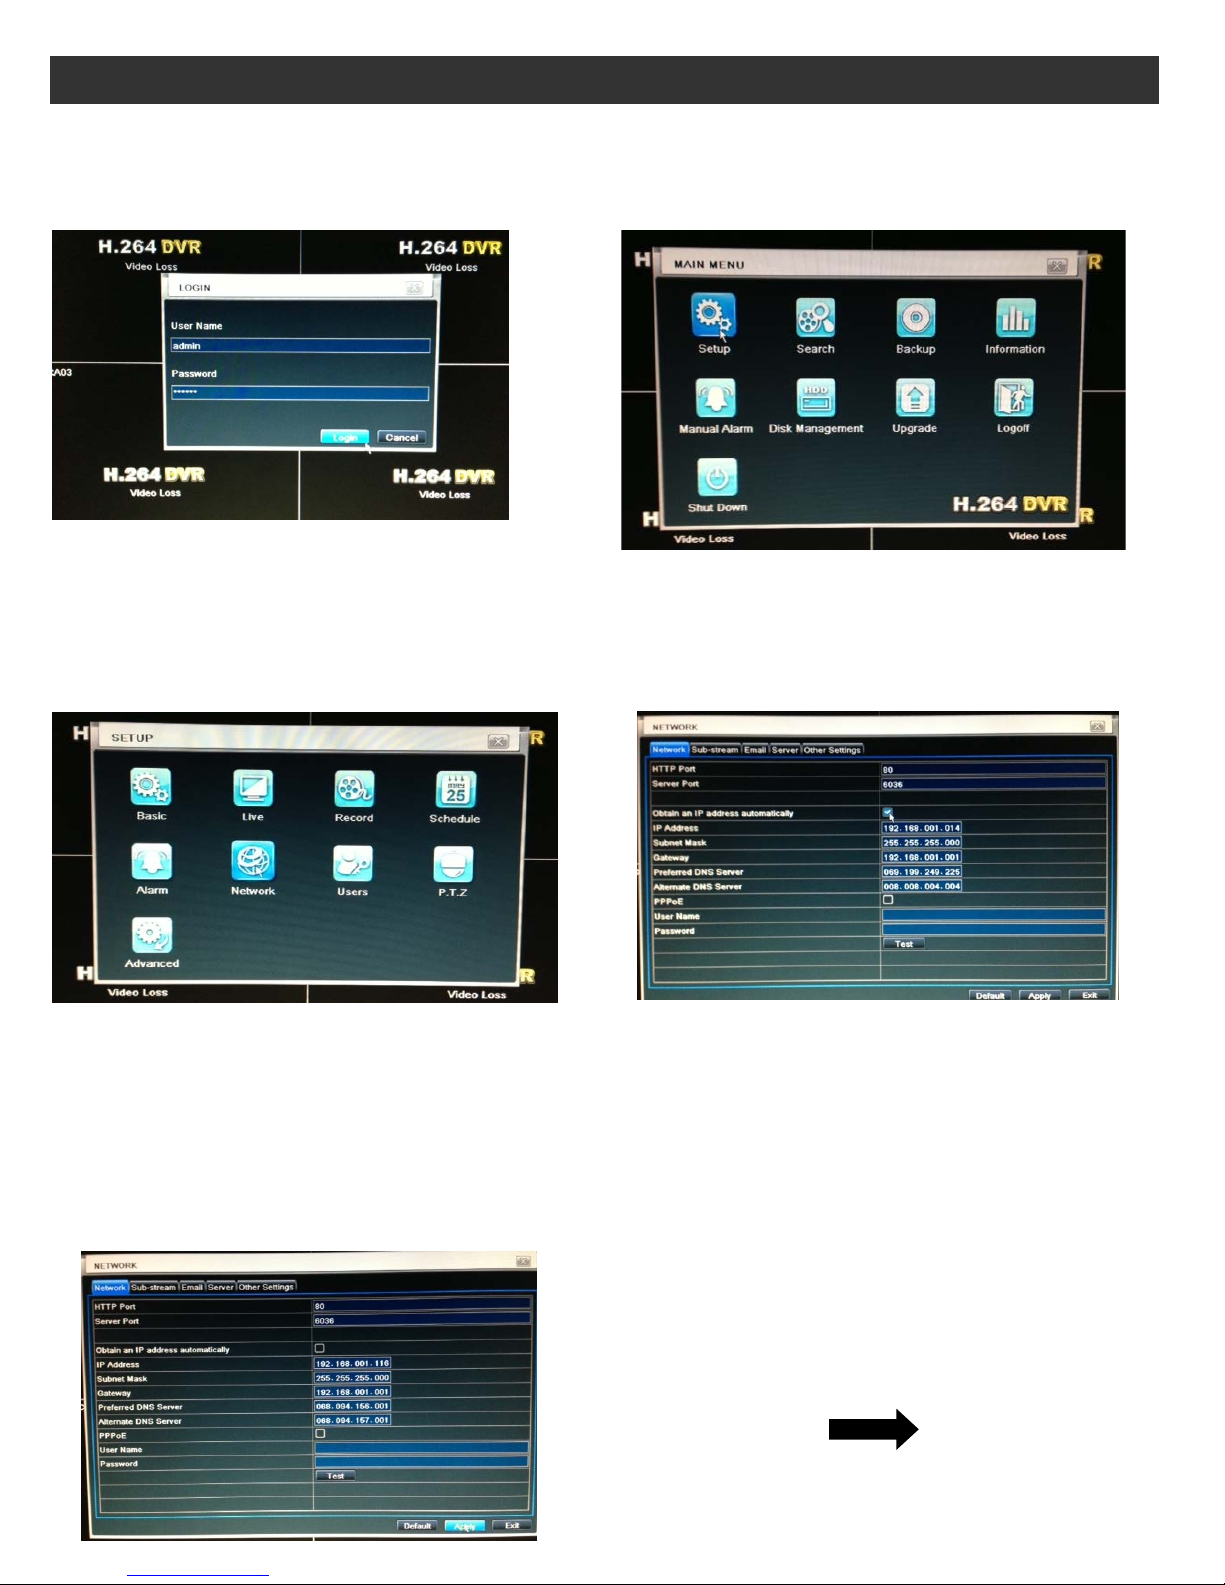
1. Enter Main Menu screen by pressing the MENU
2. Select Setup.
3. Select Network.
Select “Obtain an IP address automatically,”
Network Setup: Static IP Address & DDNS
Part 1. St atic IP A ddress
button on the front panel of the DVR.
Then enter password “123456” and click Login
HDRH-44-2U Quick Setup Guide
4.
turn on this feature.
Then Select Apply at the bottom of the screen
to restart the network.
This will generate a new IP Address.
(Make sure Ethernet Cable is plugged in)
5. After Apply, the IP Address, Netmask, Gateway, and DNS addresses should automatically be generated.
*For STA
TIP: Write down HTTP Port, Server Port, and IP Address on a piece of paper for reference. You will need
these numbers later in the installation.
TIP: If you do not know a DNS address and the DVR did not populating those fields by itself, try 8.8.8.8 and
8.8.4.4. These are Google's public DNS addresses, and in addition to working well.
6. Uncheck “Obtain an IP address automatically” to turn off this feature and make IP Address stay the same. Then
click Apply.
Continued For DDNS
Set up Part 2
7 R201304-V10
Page 8
HDRH-44-2U Quick Setup Guide
Step 1
Step 2
Step 3
Tip: When using other DDNS websites you may
Part 2. DDNS
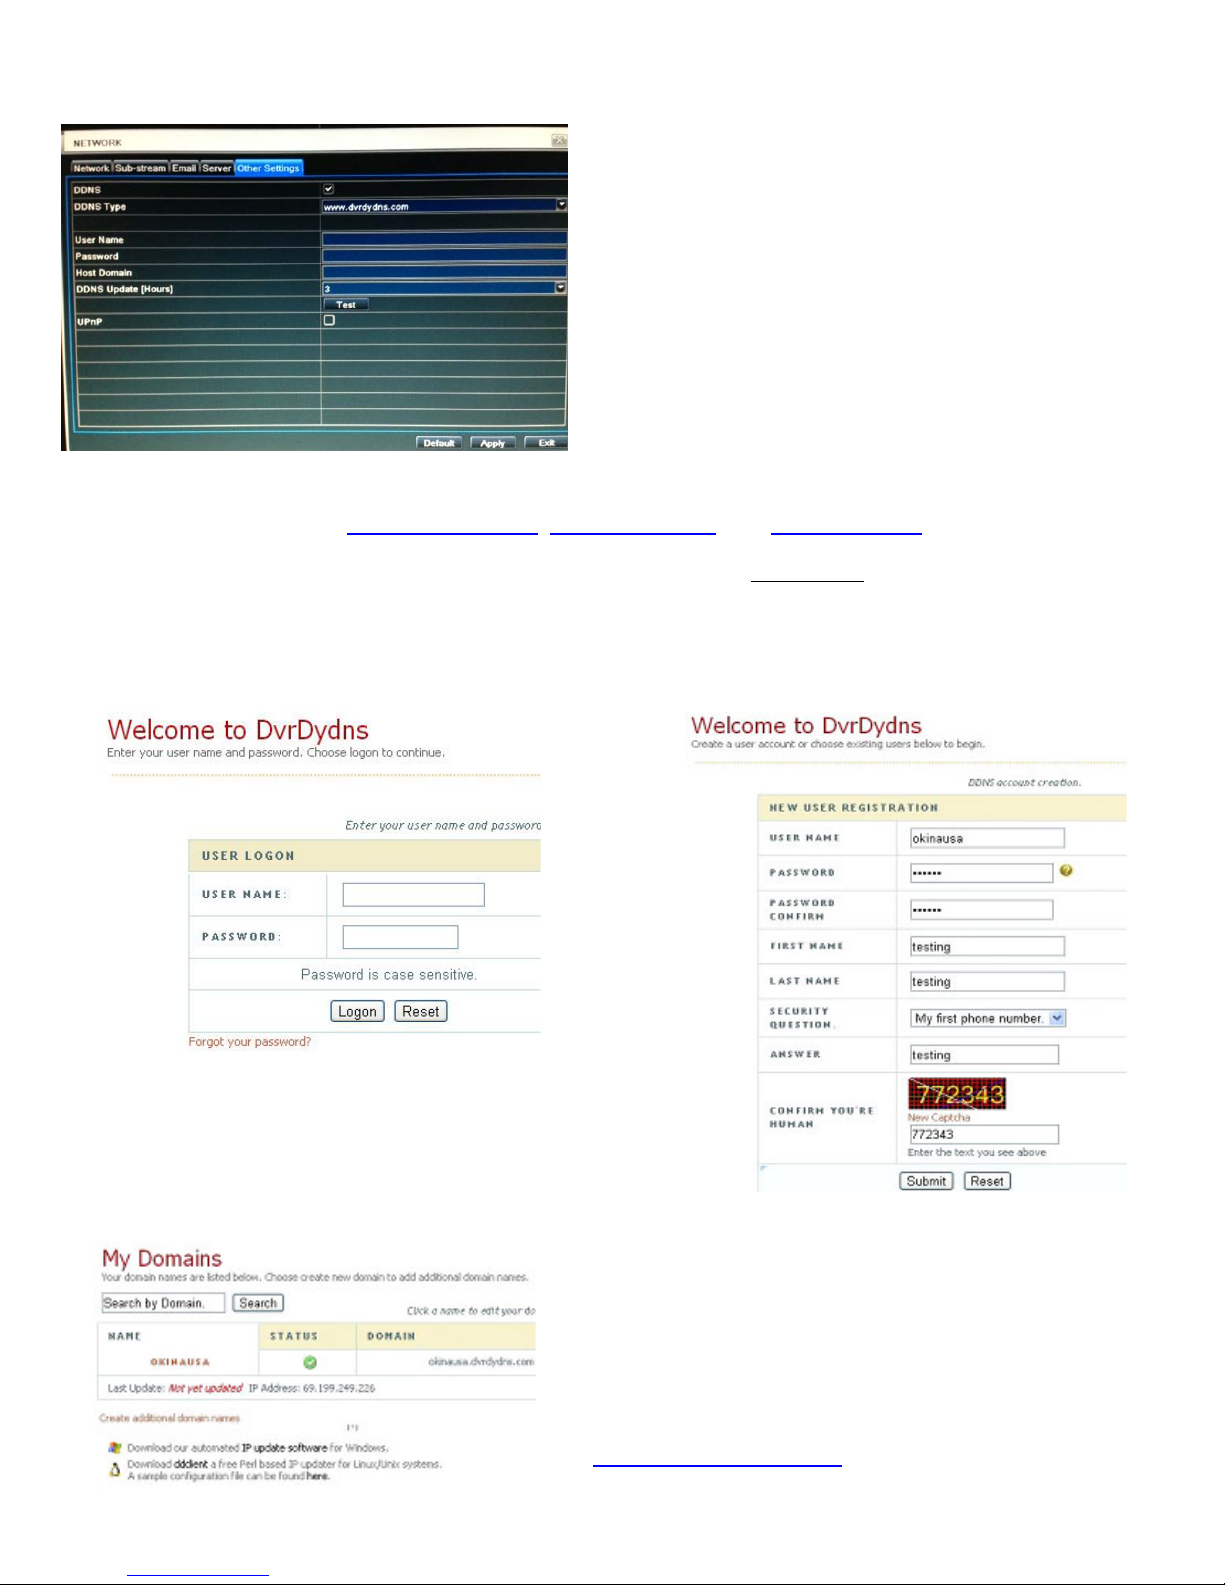
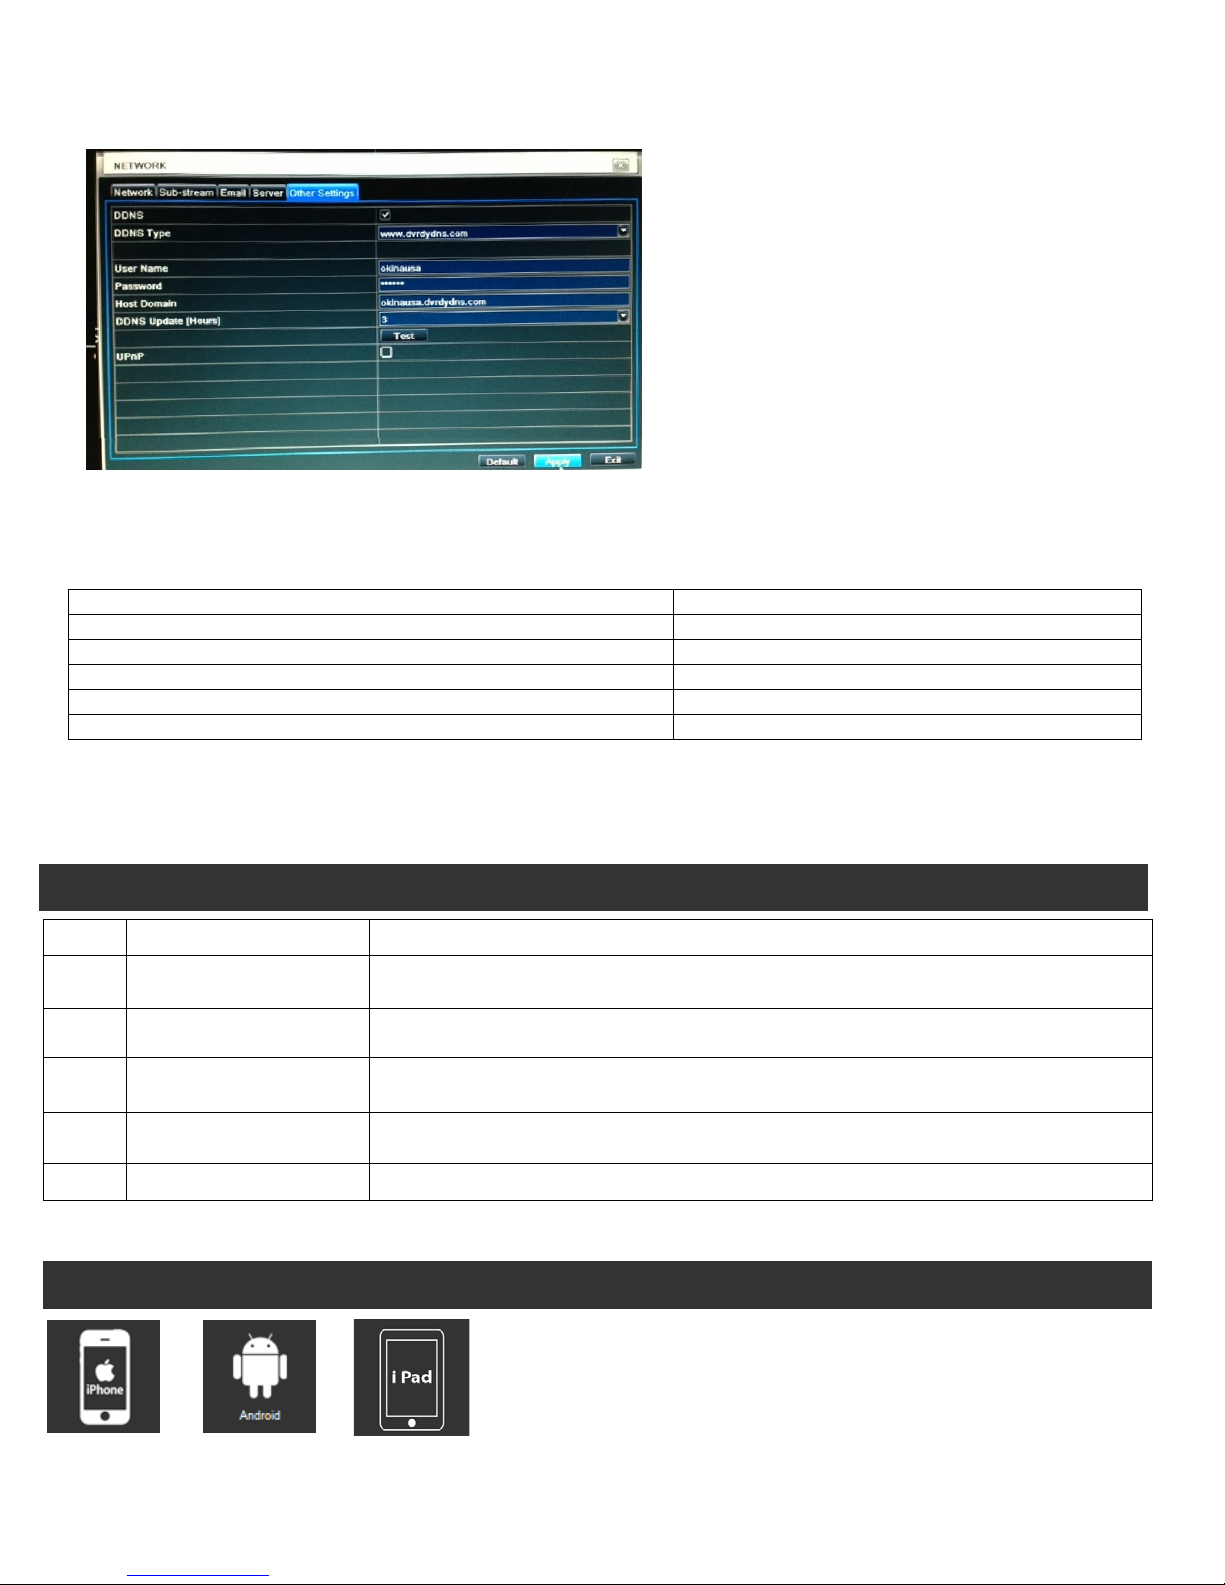
1. Continue Part 1: Select “Other Setting” from the Tab bar and turn on DDNS.
2. Select DDNS Type and pick one website from the given field to register your Host Domain Name.
TIP: We recommend using www.dvrdydns.com, www.dynddns.us, and www.no-ip.com because they are free.
3. Using your Internet Browser, go to that website you selected and REGISTER t o obtain User Name, Password,
and Host Domain information to setup DDNS for your DVR.
TIP: Write down Name, Password, and Host Domain information for reference to use later in installation.
8 R201304-V10
be required to enter your external IP Address to
register your Host Domain Name.
- To find your external IP Address use this website:
http://www.whatsmyip.net
Page 9
HDRH-44-2U Quick Setup Guide
HTTP Port: Port for IE connection. (Default is 80)
80
Server Port: Port for video and audio streaming. (Default is 6036)
6036
Incoming Port Range (advance)
80-80 (or alternative if port 80 is being used)
Forward Port (advance)
80, 6036
IP
Your DVR’s internal IP, typically 192.168.x.x
Protocol (advanced)
TCP & UDP
is available but is charged. Visit website for more information.
Log In or Create a FREE account to start monitoring this domain name.
information.
Mobile App: Super Live Pro
TIP: The DDNS URL will always be in the
DDNS Hosting Server
*Please check specification sheet on the User’s Manual.
4. Now enter User Nam e, Password, and Host Dom ain that you wrote down earlier and click Test - After Test passes, then
click Apply and Exit.
form of <hostname>.dvrdydns.com
If you are unable to access the DVR from the
internet using the DDNS URL, but the IP
works, please double check that you have the
DDNS URL correctly typ ed
5. Finally, you will need to set port forwarding on your internet-facing router/gateway to direct port 80 traffic to the DVR. Also
you will need to port forwarded your server port 6036 to stream video and audio as well. Locate the page in your router
settings to set port forwarding (may also be labeled “firewall”).
TIP: Some consumer router/gateway devices may present the firewall settings as a list of services to forward. In this case,
consult the manual for settings for creating a custom service and use the above values. For router/gateway devices provided by
your ISP, please contact your ISP technical support.
Item # DDNS Server Website
1 www.dvrdydns.com
2 www.no-ip.com
3 www.dyndns.us Recommended,Free
4 www.meibu.com
5 www.dyndns.com $15/year.
* Note: For further assistance regarding technical support and more details, please visit DDNS Server Website.
Notes
Recommended, Free
Log In or Create a FREE account to start monitoring this domain name.
Recommended, Free for entry lev el serv ice. Enhanced Domain membership for more features
It’s a Chinese website, Free for second- level dom ain names, but the website will verify your
**Quick Setup Guide & User’s Manual are subject the change without notice.
9 R201304-V10
Page 10
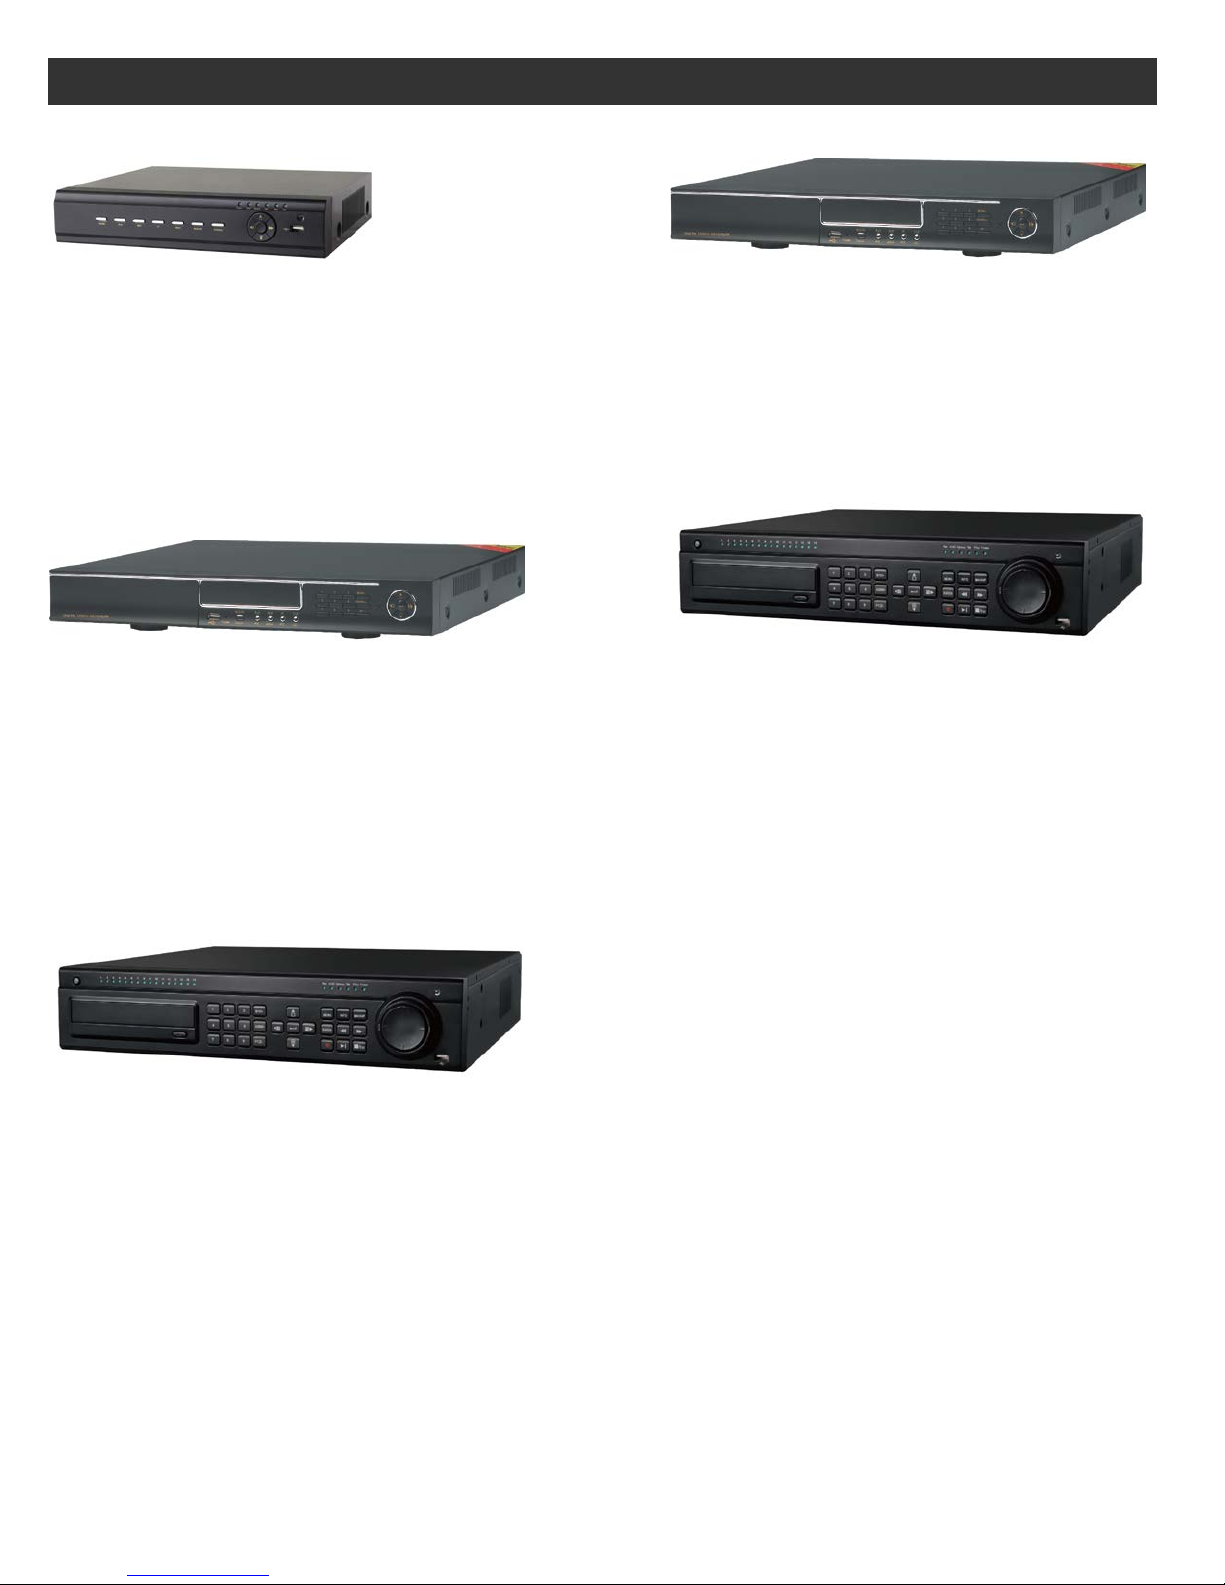
Additional DVR Option
Full D1 Realtime H.264 DVR – 4CH.
Full D1 Realtime H.264 DVR – 8 / 16 CH.
Hybrid H.264 DVR – 4CH. HD & 4 CH. Analog
HD SDI H.264 DVR – 4CH.
HDRS-04-1U
HD SDI H.264 DVR – 8 / 16 CH.
For more information please visit
DDR-04
DDR-08
DDR-16
HDRH-44-2U Quick Setup Guide
HDRS-08-2U
HDRS-16-2U
HDRH-44-2U
www.mydvrremote.com
10 R201304-V10
 Loading...