

Page 1
Page 2
Page 3
THE
PERSONAL
COLOR
PRINTER
Page 4
SPECIAL
NOTE
This
handbook
will
help
you
install
and
use
your
new
OKIDATA printer. It
contains
everything
you
need
to
know
to
print
with
your
OKIMATE's special features.
Every effort
has
been
made
to
insure
that
the
information
in
this
document
is
complete
, ac-
curate
and
up-to-date. OKIDATA
assumes
no
responsibility
for
the
results
of errors beyond
its
control. OKIDATA also
cannot
guarant
ee
that
changes
in
software and
equipment
made
by
other
manufacturers,
and
referred
to
in
this
handbook,
will
not
affect
the
applicability of
the
information
in
this
handbook.
Copyright
1985 by OKIDAT A. All rights re-
served,
including
the
right
to
reproduce
this
handbook
or
portions
thereof
in
any
form .
Revised
edition
July 1985.
Page 5
TABLE
OF
CONTENTS
Opening
Moves: Setting Up Your
Printer
...
1
The
Playing Pieces
....
.. ..
....
.......
......
....
. 2
Inserting
the
Control
Module.
.........
......
2
Connecting
the
Commodore.....
....
...... ... 4
Overview
of
the
OKIMA TE 10 ..
.......
......
5
Inserting
Computer
Paper.......
........
......
6
Inse
rting
Single She e
ts..
....
.........
.......
... 8
Loading Ribbon
..............
.......
......
.. ..
...
10
Printing a Test
Pattern
......
.......
... ..
....... 12
Beginning
the
Match
.. .
....
....
.. .. .. ..
....
....
13
Running
the
Disk
Demonstration..
. . . . . . . .. 14
The
Rules of
the
Gam
e.....
....
......
.. ...
....
14
Using
a Software Package ...
...........
.....
.. 14
A Player's Guide: More
About
Your
Printer ...........
......
.........
.. .. ..
......
15
Using
Paper Clip ..
.....
.....
........
............
17
Using
Word Pro 3 ..
........
....
..........
....
...
19
Using
Easy Script
....
.....
.. ..
........
........
... 20
Using
Color
Graphics
.....
...
......
.. .. ..
......
22
BASIC
Printing
in a Nutshell
....
......
...... 24
Printing
Listings .. ........ ..........
.......
...... 25
Creating
Special Effects
......
.......
........
.. . 26
Character
Size ....
......
........
..........
....
....
27
Character
Set .. .. .. ..... ..... .... .
....
....
....
... . 27
Reverse Field
....
........
......
............
......
. 28
Indenting/Tabs ......
......
.....
.......
...
........
28
Page
Formatting
........
......
..................
. 28
Continuous
Printing
.............
........
......
. 28
Fine
Positioning .......
......
.............
.. .. .. . 29
Black
and
White
Graphics
......
.........
......
29
Data
Statements
....
.......
...........
...
...
.. ... 31
Repeating Graphics ..
....
.......
...
.........
....
32
Color
Printing
....
.......
.. ... ....
....
............
32
Color Shading ..
....
......
................
.. .... .. 34
Command
Reference
Chart
....................
. 36
Dealing
With
Trouble: Cleaning
and
Maintaining
Your
Printer
........
.........
.. ... 37
Cleaning
Up
.....
....
..........
........
.......
....
38
Replacing
the
Printhead ...........
.. ...
.......
39
Check'Mate .......
.....
....
... .....
.....
.........
. 39
Repair
.......
....
......
....
.. ..
..........
.... .. .
....
46
Ordering
Parts
and
Supplies
......
............
47
Specifications ...
....
.... ....
....
.......
......
... ... 48
Limited
Warranty
....
....
............ ....
......
...
50
Page 6
Page 7
\J~
",
OIQ
& •
.----
..
_,.--
."
........
.-
·"·
ow
OPeni"9
Moves
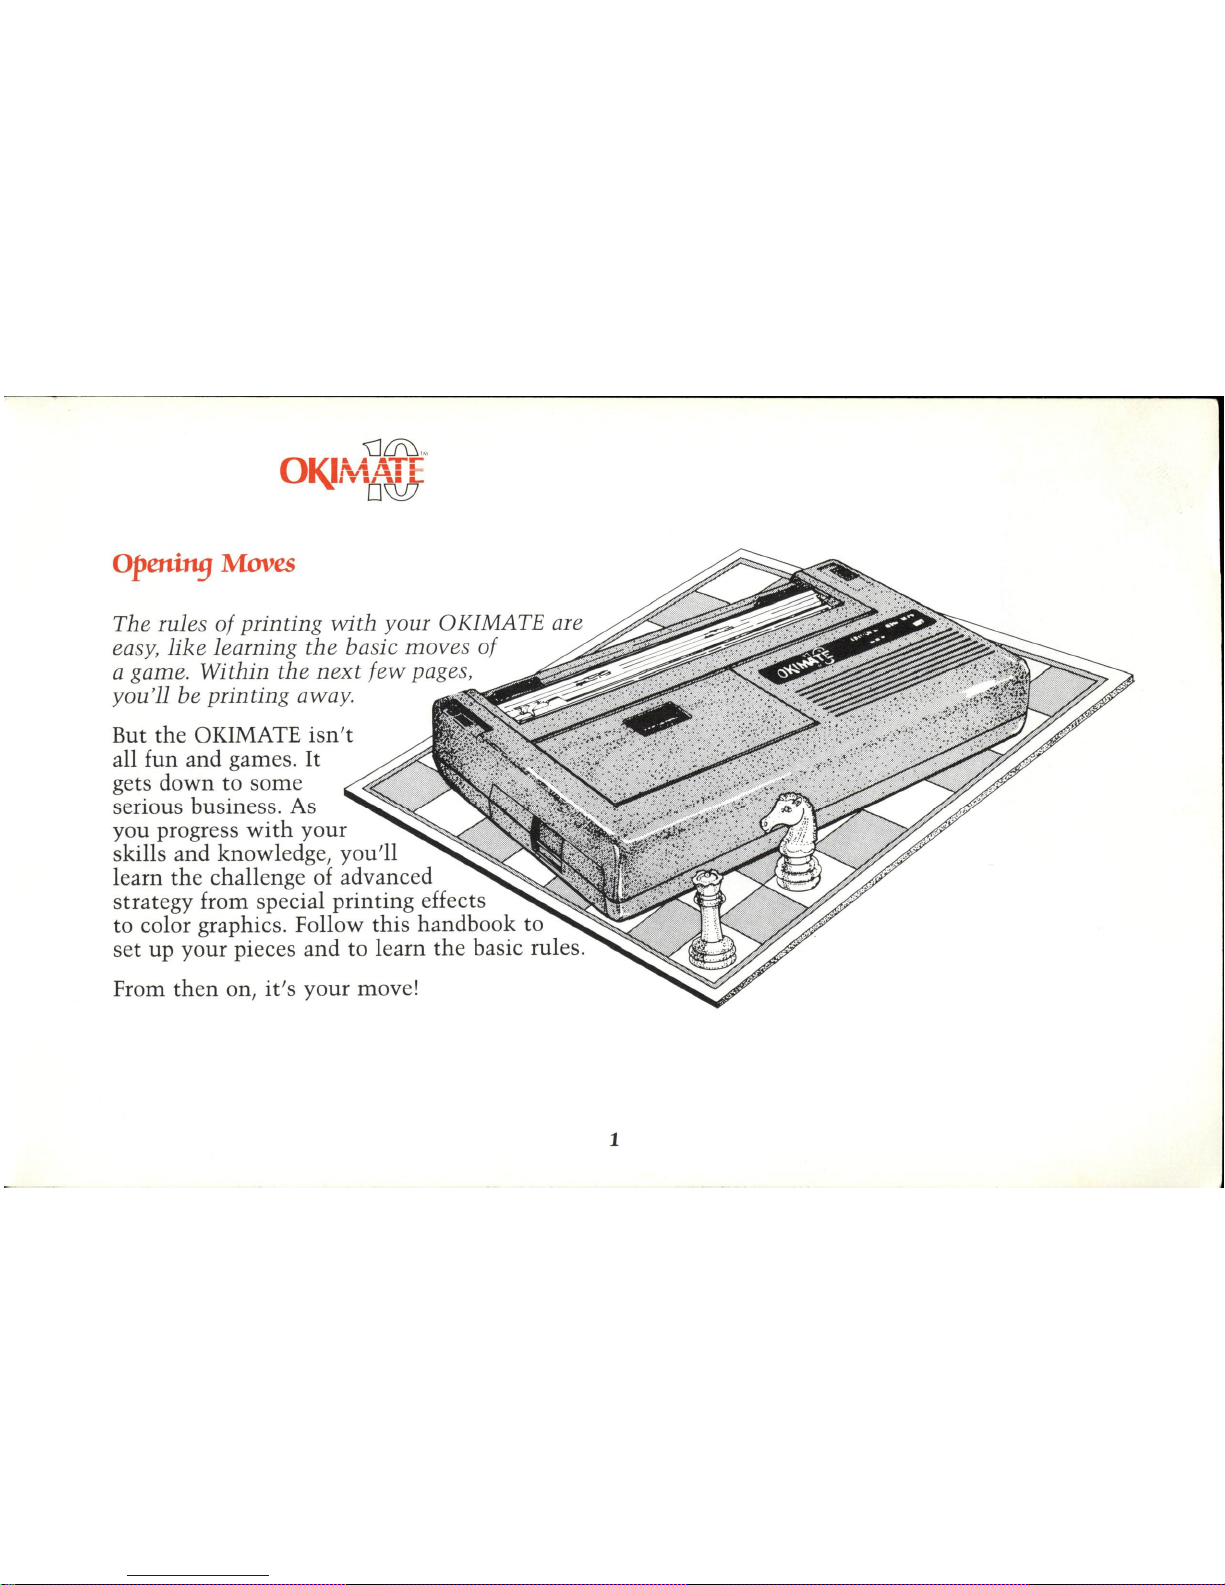
The rules
of
printing
with
your OKIMATE are
easy,
like
learning
the
basic
moves
of
a game. Within the
next
few
paoge:;.s~
'
~fiI
~~~
you'll be printing away.
~
But the OKIMATE
isn't
all fun and games.
It
gets down to some
serious business. As
you progress
with
your
skills and knowledge, you'll
learn the challenge of advanced
strategy from special printing effects
to color graphics. Follow this handbook to
set up your pieces and to learn
the
basic rules.
From
then
on,
it's
your move!
1
Page 8
The praying Pieces
Before
you
begin,
make
sure you have
the
fol-
lowing:
In
the
printer
box
...
The
OKIMATE 10 printer, of course
In
the
Plug
'N
Print Kit.. .
The
Printer
Handbook
Black ribbon (in
the
clear bag)
Color ribbon (in
the
color bag)
Computer
paper
Commodore
data cable
"Learn
to
Print"
demonstration
and
"Color
Print"
on
disk
Plug
'N
Print
Control
Module for
Commodore
Commodore
Control
Module locking cover
If
any
of
these
items
is
missing
or damaged,
return
the
complete
package, along
with
your
sales receipt,
to
the
place
of
purchase.
2
Don't plug your printer in just
yet-we'll
tell
you when you can.
Inserting
the
Contro(
ModUCe
l.
Slide
the
module
into
the
slot
until
it
is firmly
in
place.
2.
Carefully
push
the
module
board
with
your
thumb
until
you feel
it's
secure.
3.
Insert
the
module
locking cover as
shown
.
Follow
the
directions
on
the
next
few pages to
setup
and
run
the
"Learn to
Print"
demon-
stration
program. In
about
15
minutes
you
can be
printing
in
black
or
in
color.
At
this
point
you
only
need
the
paper and
the
equip-
ment
supplied
with
your
Commodore
Plug
'N
Print kit. (More detailed
information
on
oper-
ating your OKIMATE is provided
in
Chapter
2,
"A
Player's
Guide"
which
begins
on
page
15.)
Page 9
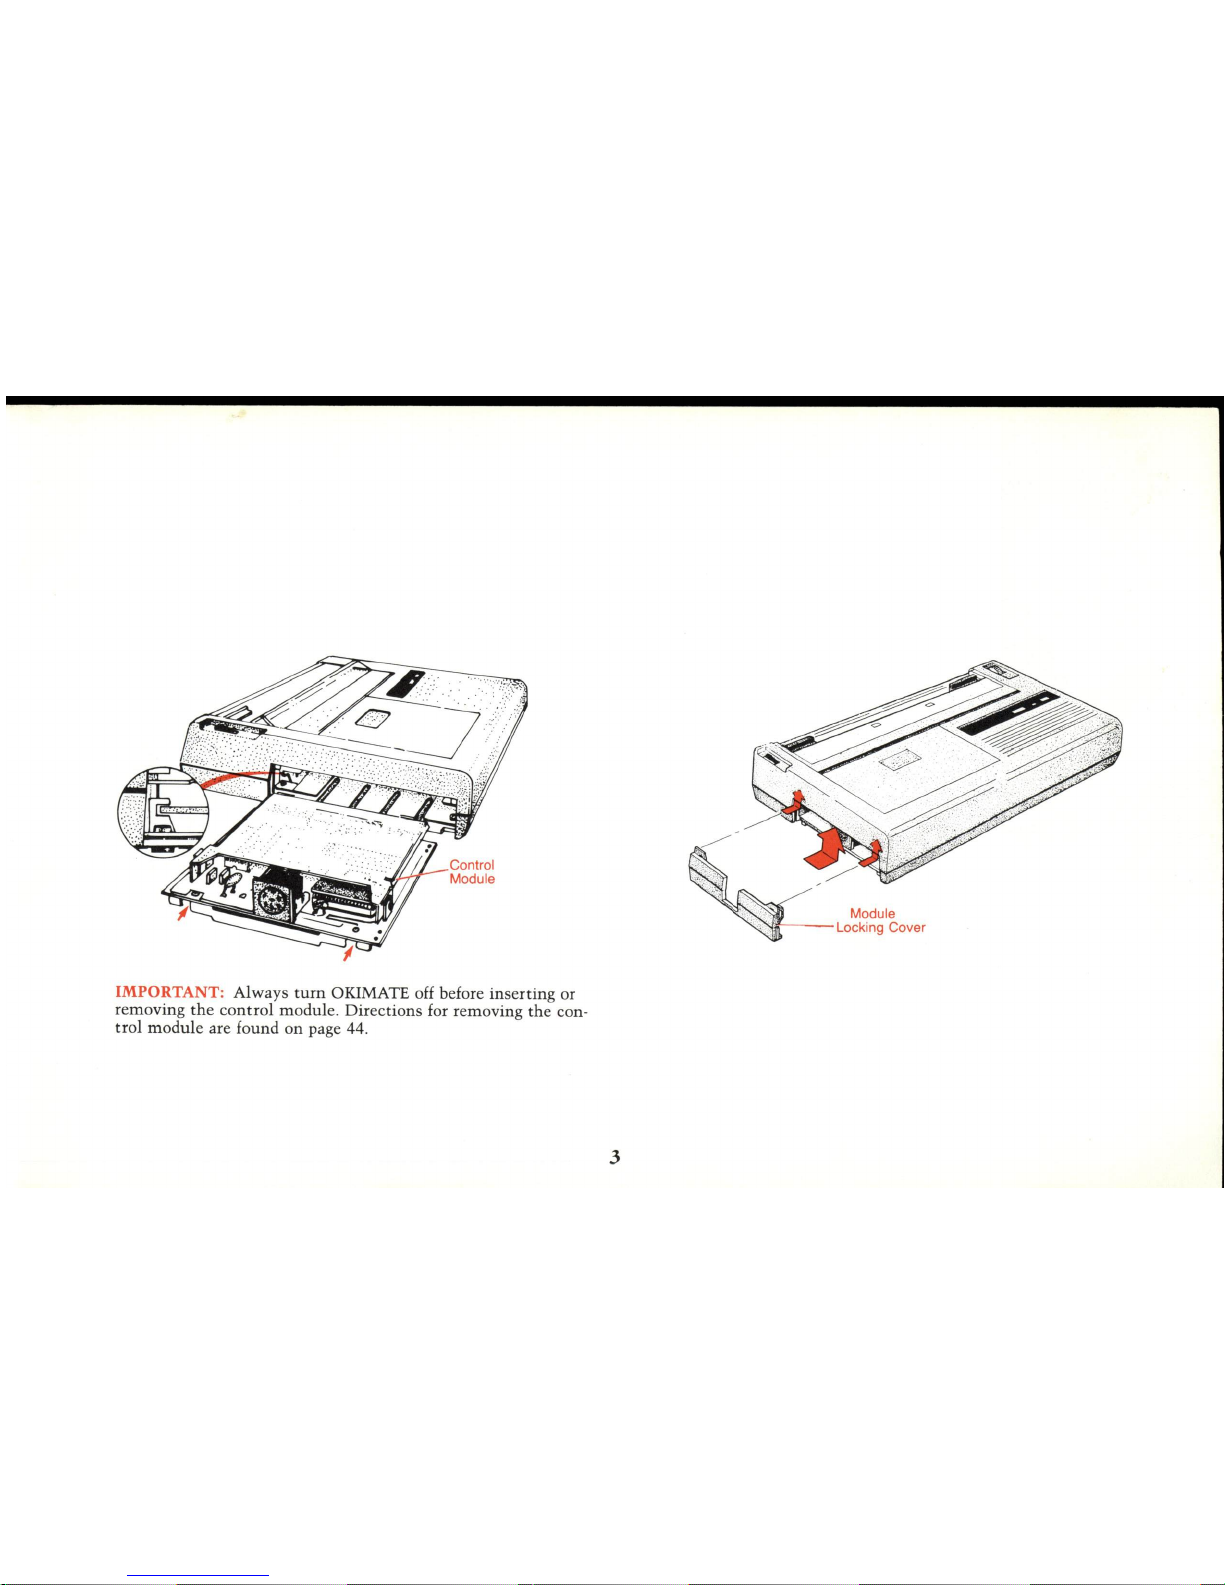
IMPORTANT: Always
turn
OKIMATE off before inserting or
removing
the
control
module. Directions for removing
the
con-
trol
module
are found on page 44.
3
Page 10
Connecting
tire
Commodore
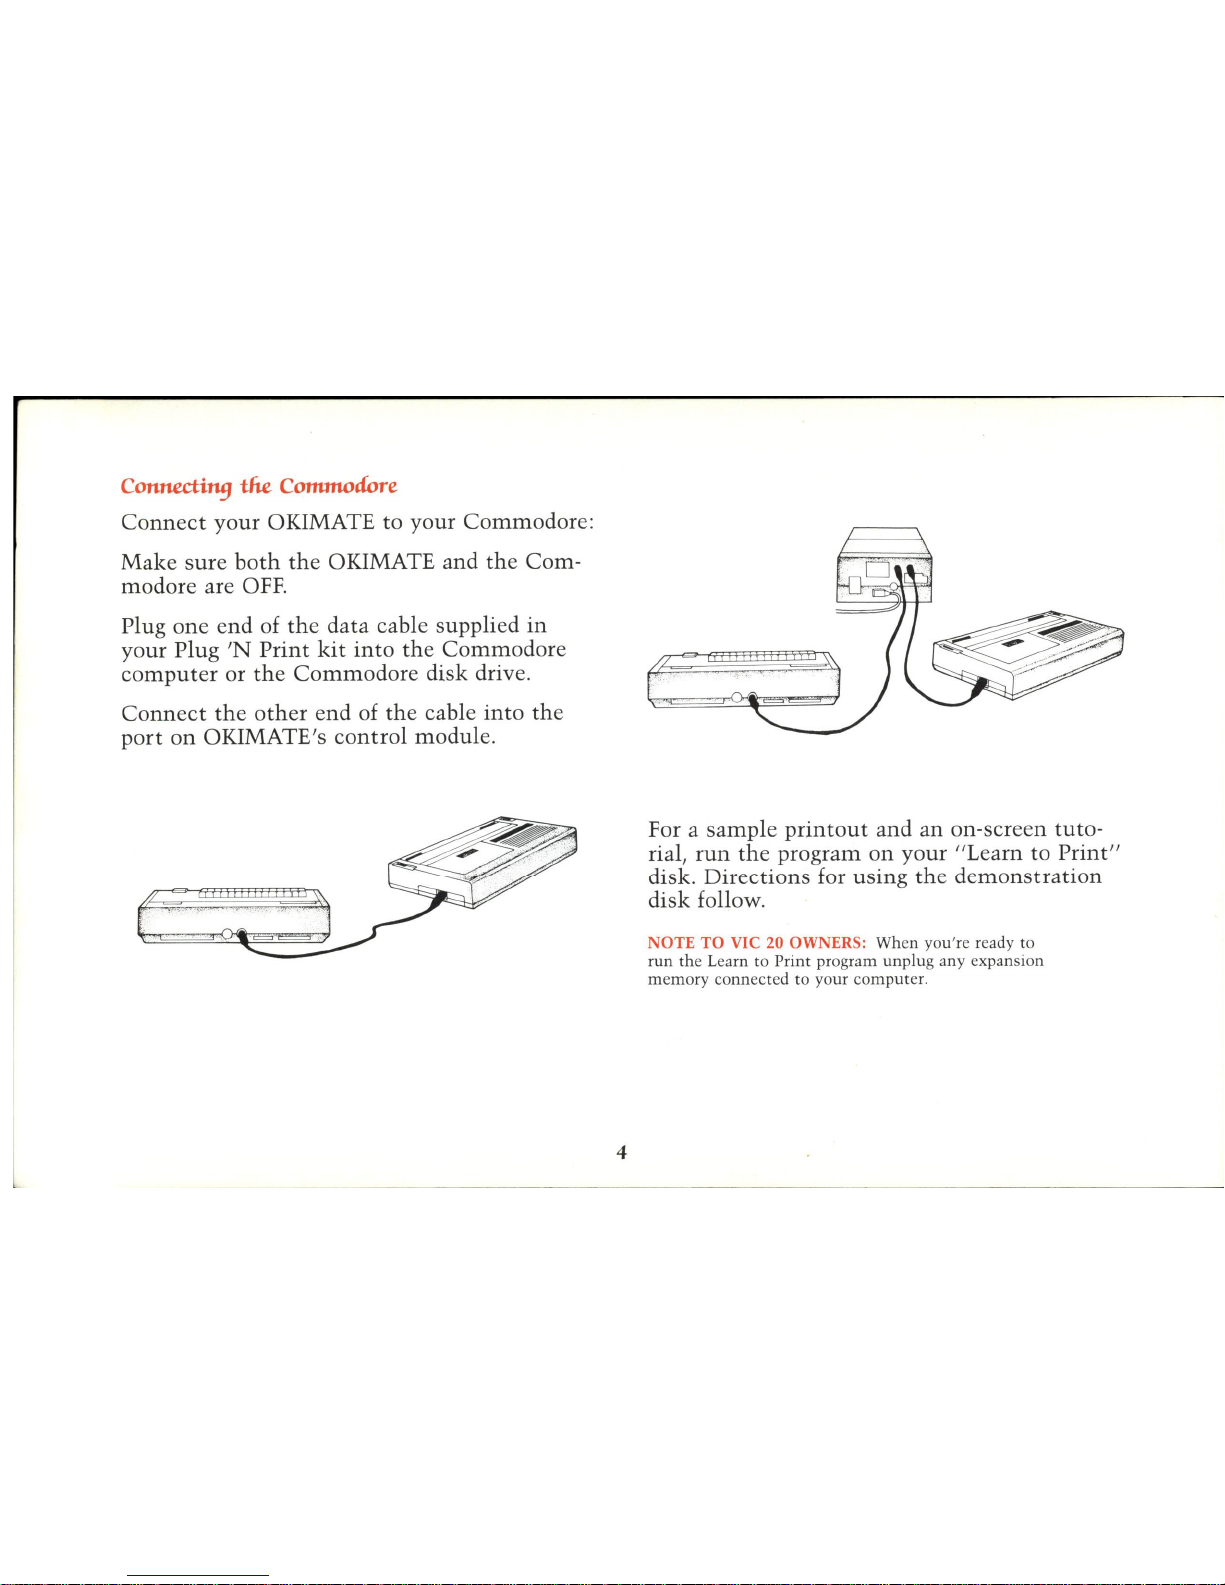
Connect
your
OKIMATE to your
Commodore
:
Make
sure
both
the
OKIMATE and
the
Com-
modore are
OFF.
Plug
one
end
of
the
data cable supplied
in
your
Plug
'N
Print
kit
into
the
Commodore
computer
or
the
Commodore
disk drive.
Connect
the
other
end
of
the
cable
into
the
port
on
OKIMATE's
control
module.
4
For a
sample
printout
and
an
on-screen tuto-
rial,
run
the
program
on
your
"Learn to
Print"
disk.
Directions
for
using
the
demonstration
disk follow.
NOTE
TO
VIC 20 OWNERS: When you 're ready
to
run the Learn
to
Print
program
unplu
g any expansion
memory co
nne
cted
to
yo
ur computer.
Page 11
Overview
of
tile
OKIMATE
10
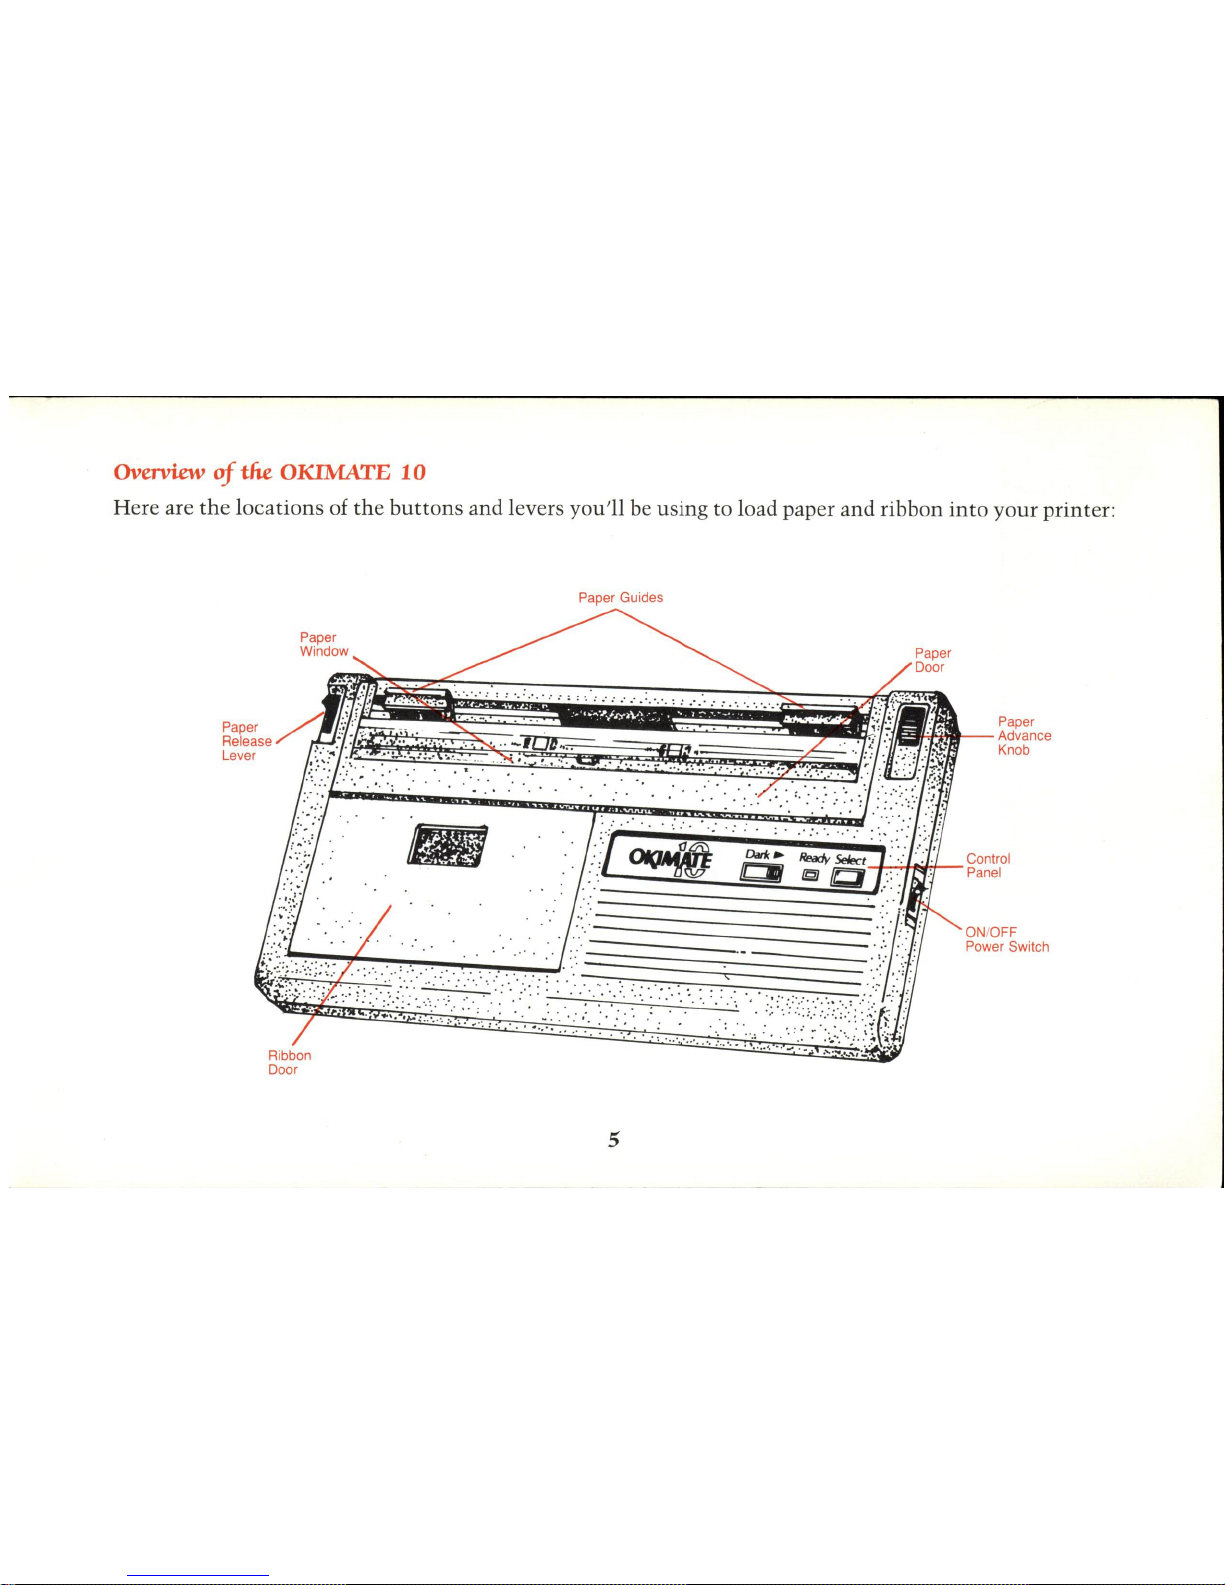
Here
are
the
locations
of
the
buttons
and
levers you'll be
using
to
load paper
and
ribbon
into
your
printer
:
Paper
Guides
:
~~~~
' : "
--3=
~
"
"~
":
:
'
§
"
,~~
, , '
~-:-"7-' ~
'
'-c-' ',
:..;..:
.:...:,,
' ',
-=-
' ,
..:...C
' "
0.
" :..:i' , "
' , '
'.:
"
5
ON
/OFF
Power
Switch
Page 12
To
get
the
best
printing
from
your
OKI-
MATE,
use
smooth
paper,
like
the
com-
puter
paper
that
came
with
your
Plug
'N
Print
kit.
Smooth
paper
made
especially
for
ribbon-transfer
printers
is
available
at
most
mass
retail
chain
stores, office sup-
ply
stores
and
computer
stores
. Look for
these
brands
:
•
Plain
Paper
for
Thermal
Transfer
Print-
ers
from
Hammermill
Paper
Company
•
Compucolor
Ribbon
Transfer
Paper
from
Schoeller
Paper
Company
•
Rediform
Paper
Company
boxes
marked
"Recommended
for
Thermal
Transfer
Printers"
•
Acetate
sheets
up
to
.005
inch
thick
for
transparencies
.
Paper
is
also
available
from
OKIDATA
Supplies. See page
47
for our toll -free
number
.
6
Insertif19 Computer Paper
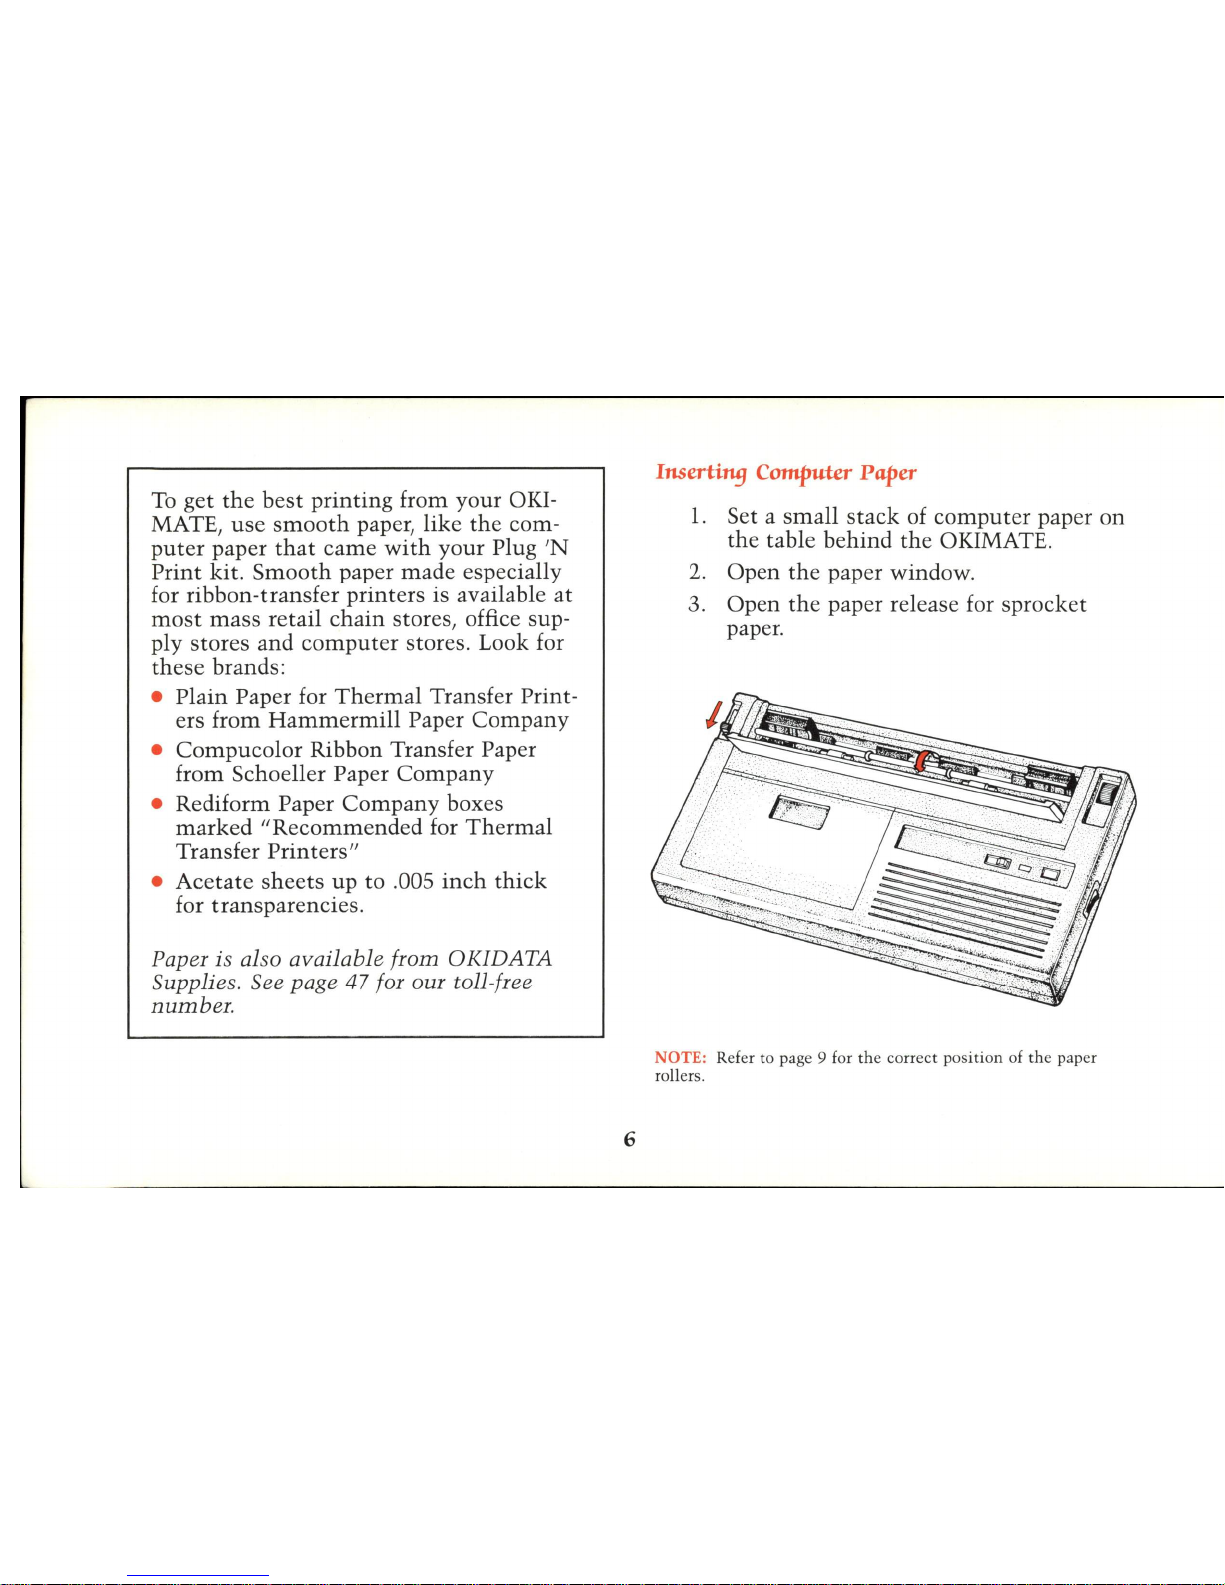
1.
Set a
small
stack
of
computer
paper
on
the
table
behind
the
OKIMATE.
2.
Open
the
paper
window.
3.
Open
the
paper
release
for
sprocket
paper.
NOTE: Refer
to
page 9 for the corr e
ct
position of the paper
rollers.
Page 13
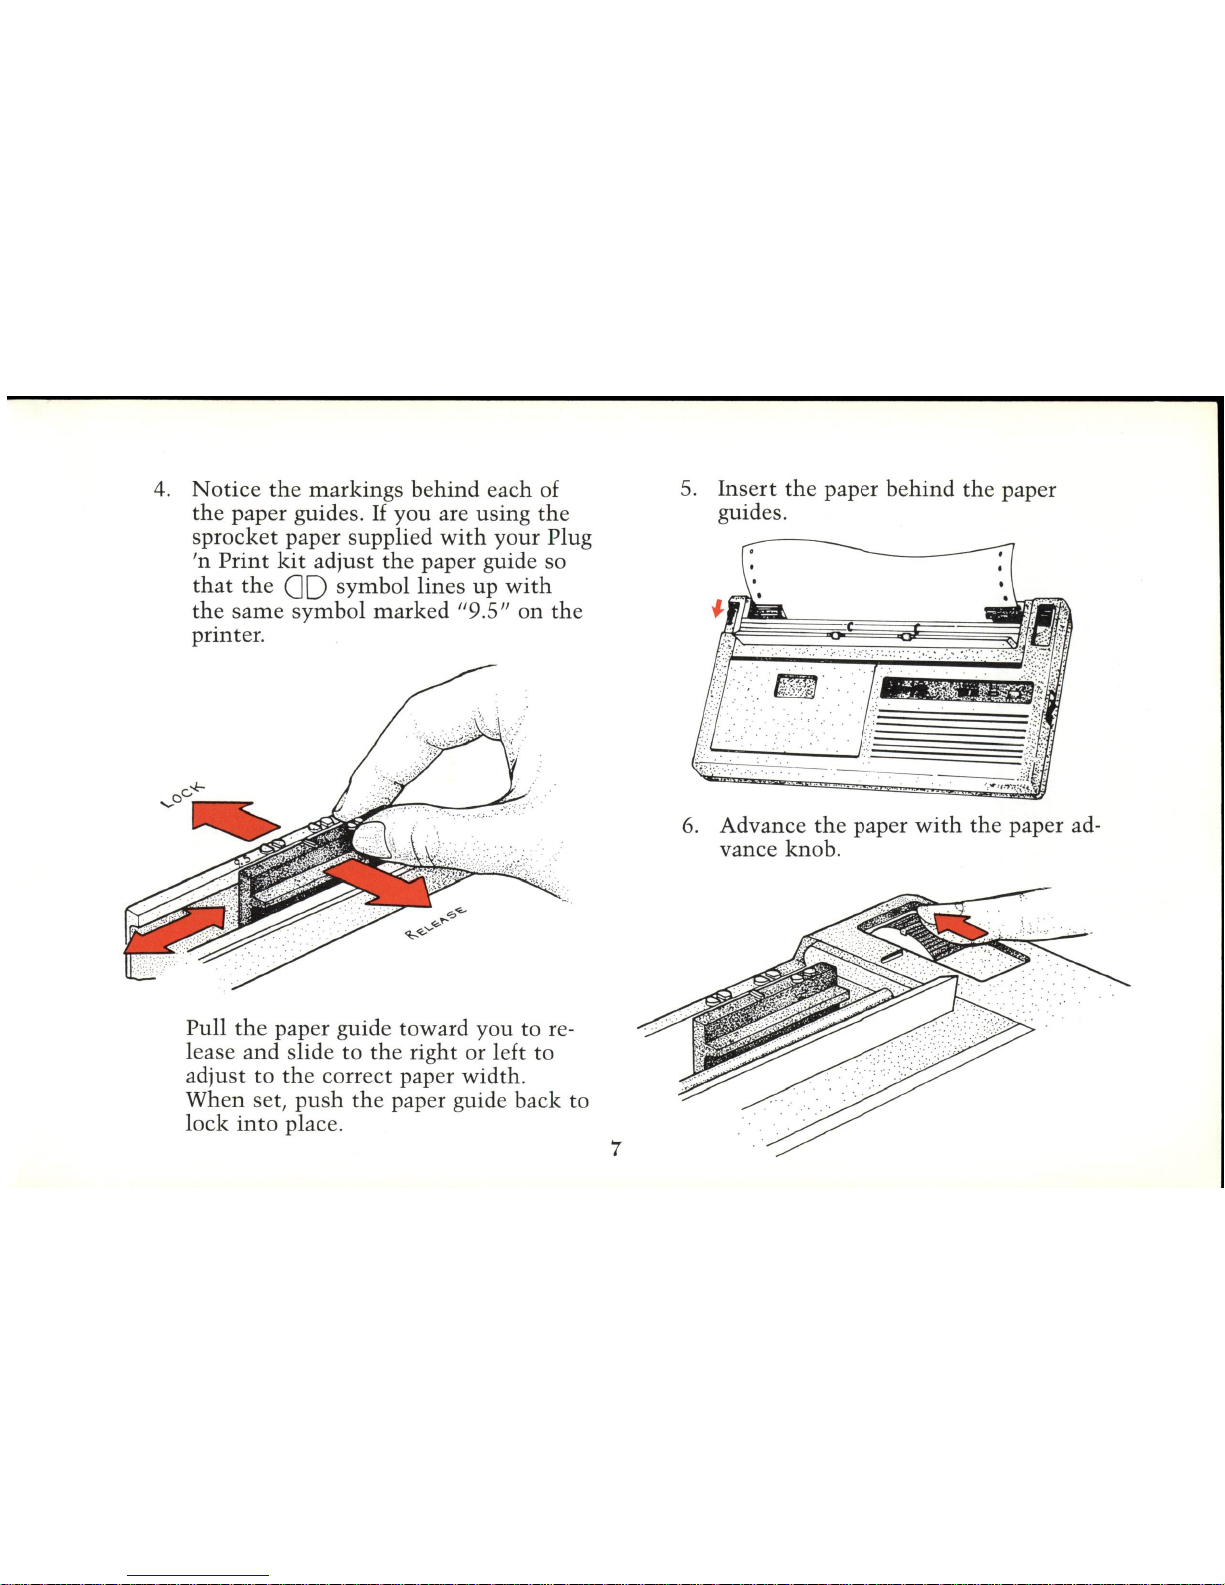
4.
Notice
the
markings
behind
each of
the
paper guides.
If
you
are
using
the
sprocket
paper supplied
with
your
Plug
'n
Print
kit
adjust
the
paper guide so
that
the
0 D
symbol
lines
up
with
the
same
symbol
marked
1/9.5/1
on
the
printer.
Pull
the
paper guide toward you to re-
lease
and
slide
to
the
right or left
to
adjust
to
the
correct paper width.
When
set,
push
the
paper guide
back
to
lock
into
place.
7
5.
Insert
the
paper
behind
the
paper
guides.
6.
Advance
the
paper
with
the
paper ad-
vance knob.
Page 14
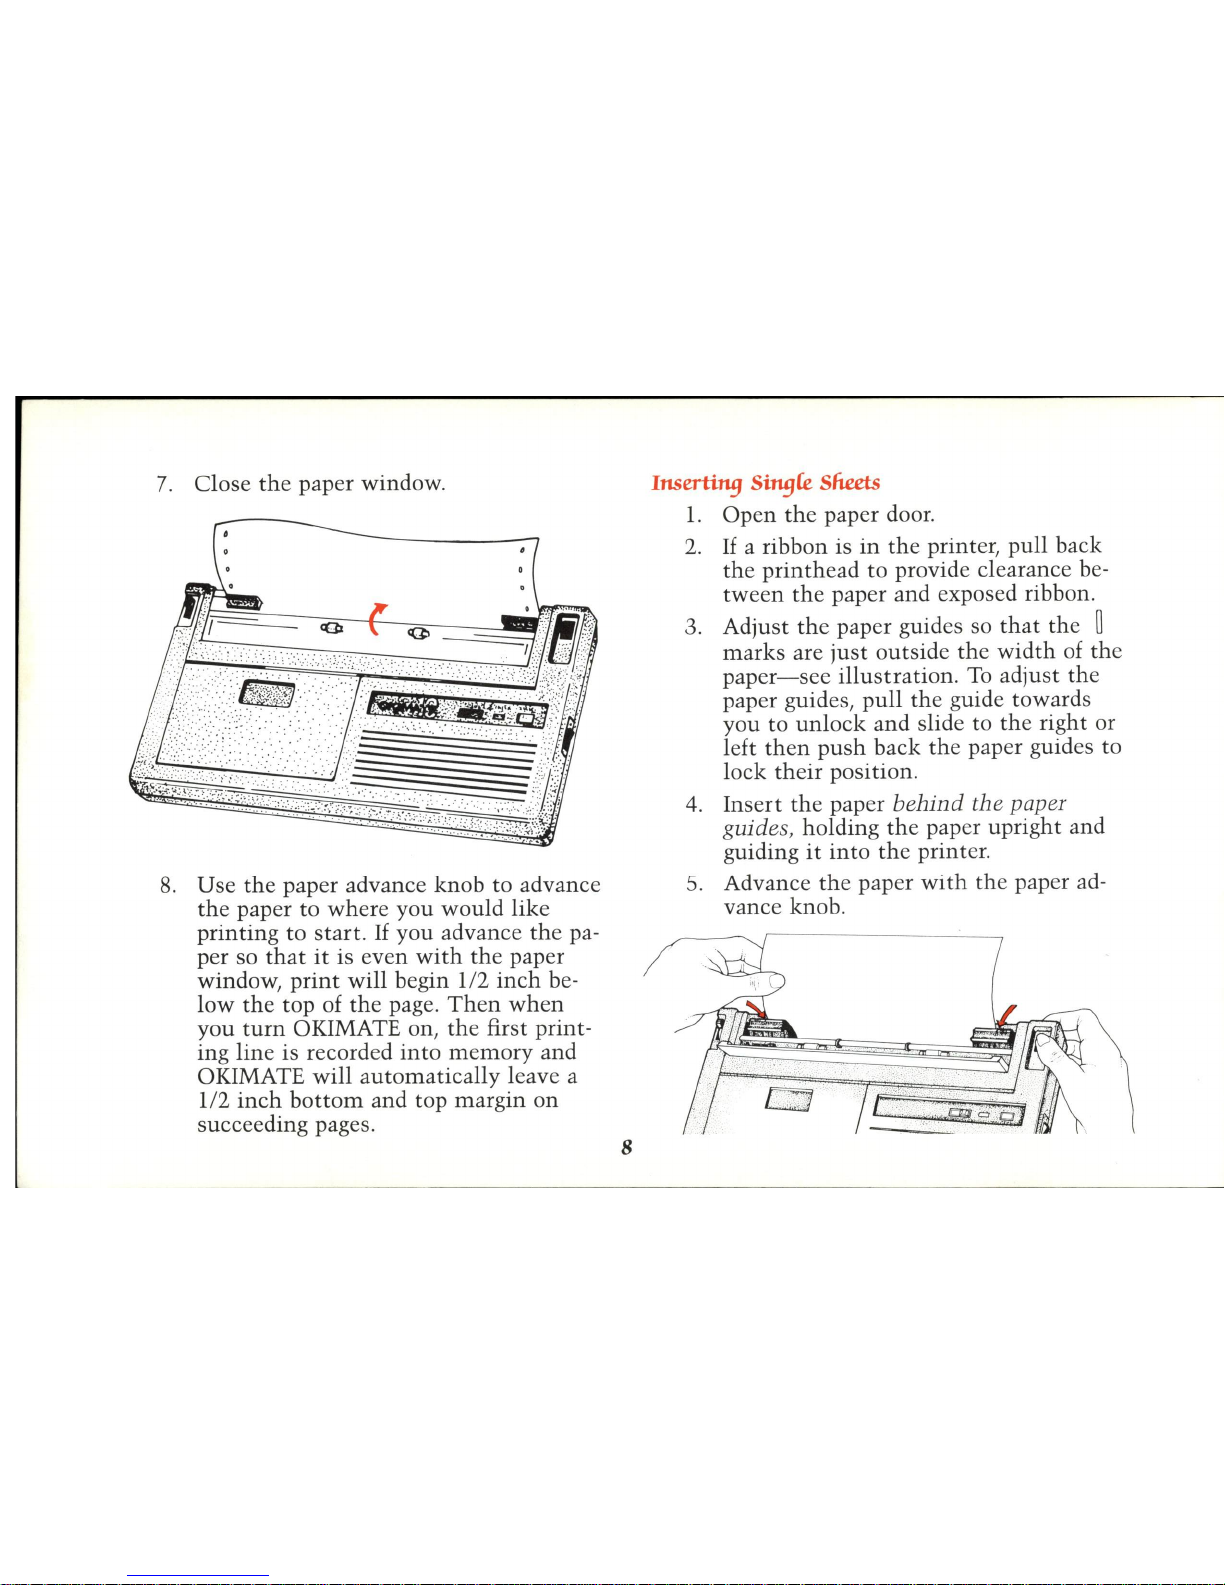
7.
Close
the
paper window.
8.
Use
the
paper advance knob to advance
the
paper to
where
you
would
like
printing
to
start.
If
you
advance
the
pa-
per so
that
it
is even
with
the
paper
window,
print
will
begin
112
inch
be-
low
the
top of
the
page.
Then
when
you
turn
OKIMATE on,
the
first print-
ing
line
is recorded
into
memory
and
OKIMATE
will
automatically
leave a
112
inch
bottom
and top margin
on
succeeding pages.
8
Insertill9
Si119Ce
shuts
l.
Open
the
paper door.
2.
If
a ribbon is
in
the
printer,
pull
back
the
printhead
to provide clearance be-
tween
the
paper
and
exposed ribbon.
3. Adjust
the
paper guides so
that
the
0
marks
are
just
outside
the
width
of
the
paper-see
illustration.
To
adjust
the
paper guides,
pull
the
guide towards
you
to
unlock
and
slide to
the
right or
left
then
push
back
the
paper guides to
lock
their
position.
4.
Insert
the
paper
behind
the paper
guides,
holding
the
paper upright and
guiding
it
into
the
printer.
5.
Advance
the
paper
with
the
paper ad-
vance knob.
Page 15
6.
Push
the
printhead
back
to
its
upright
position.
7.
Close
the
paper release and
the
paper
door.
8.
Use
the
paper advance
knob
to advance
the
paper
to
where
you
would
like
printing
to
begin.
9.
Continue
to
advance
the
paper so
that
it
is
even
with
the
paper window.
This
will
allow
printing
to
begin
112
inch
below
the
top
of
the
page-the
dis-
tance
between
the
top edge and
the
first
printed
line
on
a page.
10.
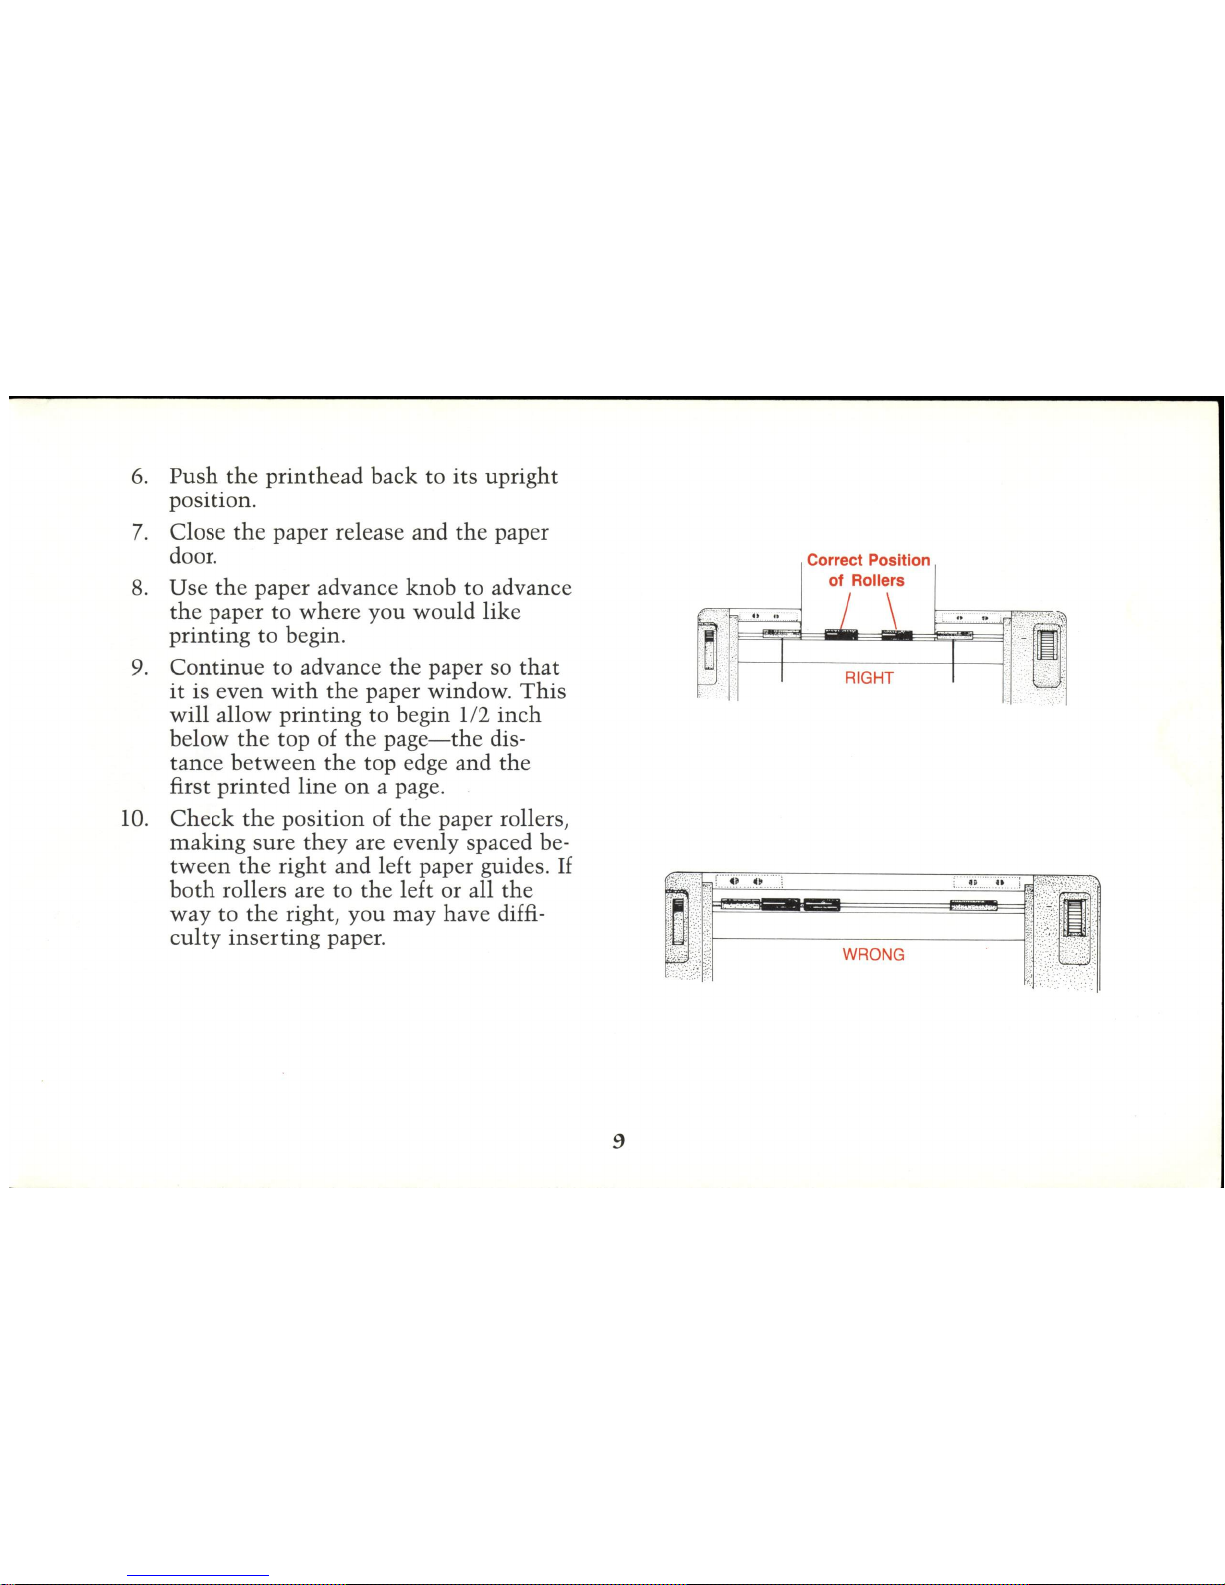
Check
the
position
of
the
paper rollers,
making
sure
they
are evenly spaced be-
tween
the
right
and
left paper guides.
If
both
rollers are
to
the
left or all
the
way
to
the
right,
you
may
have
diffi-
culty
inserting
paper.
9
Correct Position
of Rollers
J·
r--
--+-
1 -:
'G
-H;
-f-
I
---l
.
~"
m
%
~
;:j,;;
r:
~
;
....
;;~"
~~"
••..
~W~
RO
~
NG ~.
'~
i
......
i.'~i
I'l
l
;
~
.
. ,
..
,
.'.
',
..
Page 16
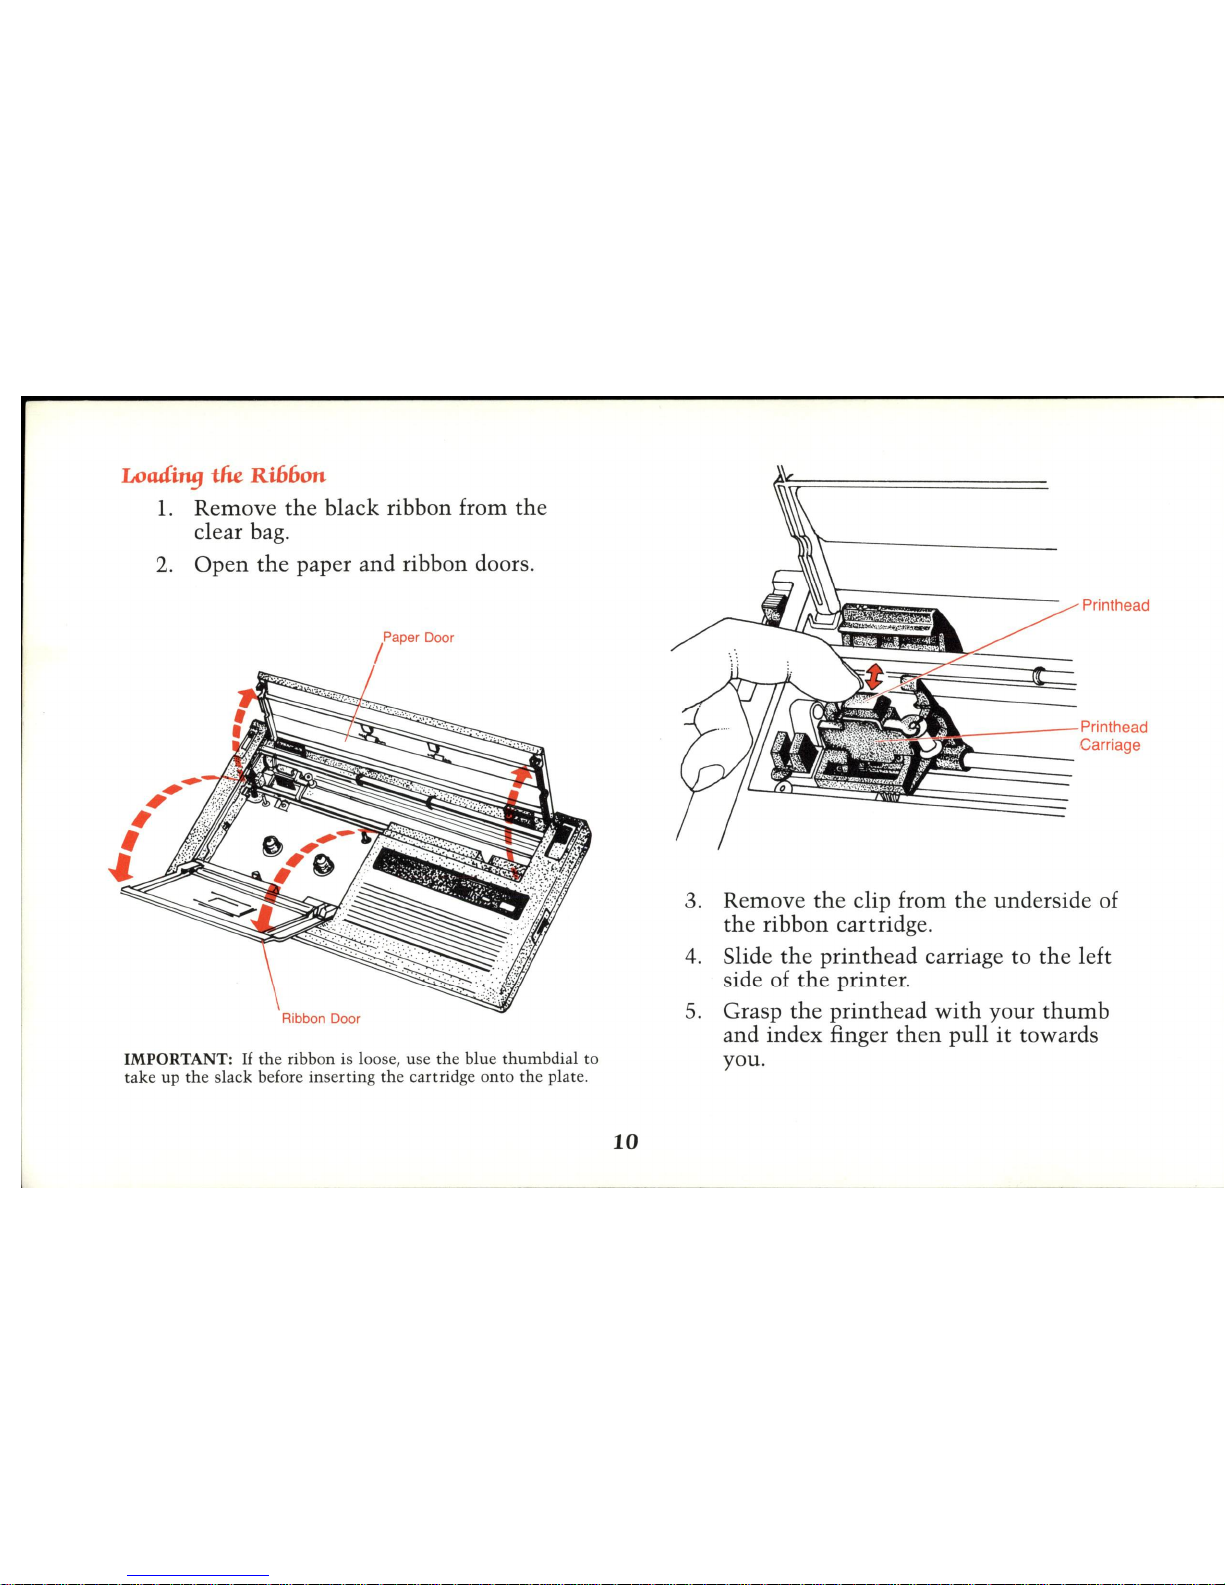
Loading
the Ri660n
1.
Remove
the
black
ribbon from
the
clear bag.
2.
Open
the
paper
and
ribbon doors.
IMPORTANT:
If
th
e ribbon is loose, use the blue
thumb
dial to
take up
th
e slack before inserting the cartrid
ge
onto the plat
e.
10
Printhead
_----Printhead
r---
__
Carriage
3.
Remove th
e clip from
the
underside of
the
ribbon
cartridge
.
4. Slide
the printhead
carriage to
the
left
side of
the
printer
.
5. Grasp
the printhead
with
your
thumb
and
index
finger
then
pull
it
towards
you
.
Page 17
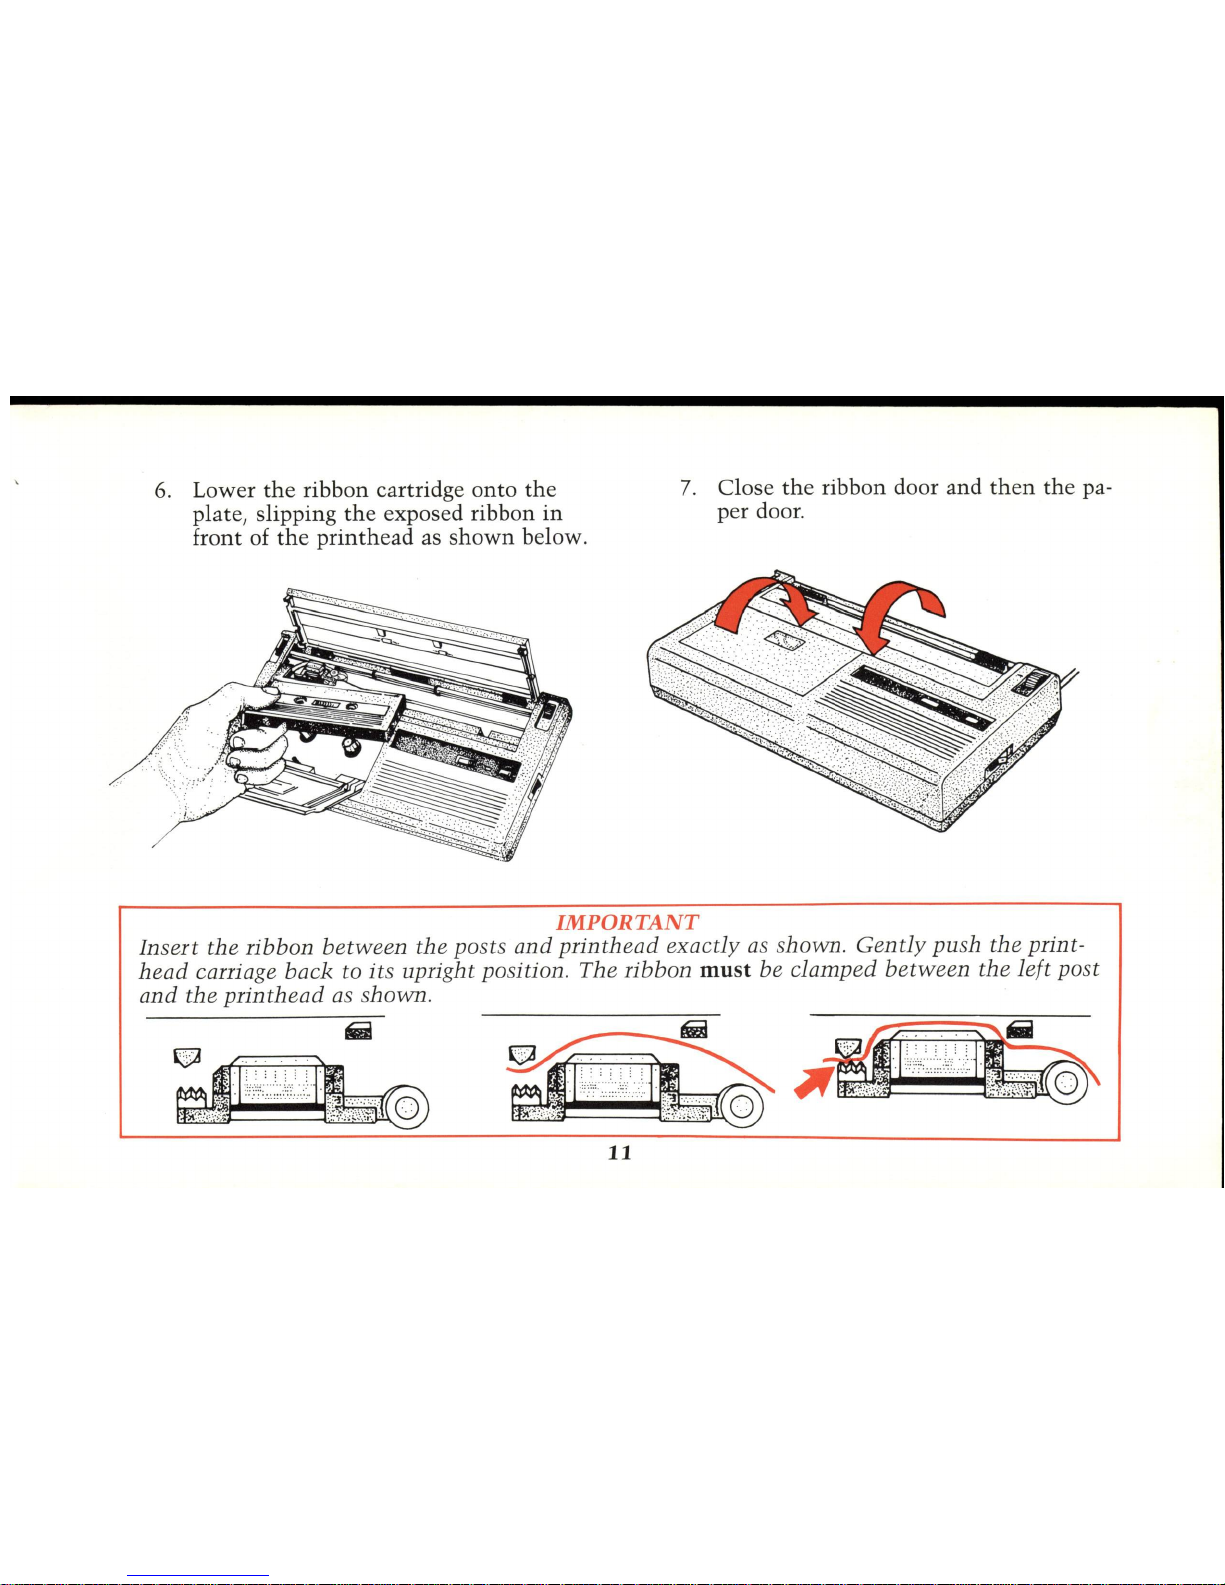
6.
Lower
the
ribbon cartridge
onto
the
plate, slipping
the
exposed ribbon
in
front of
the
printhead
as
shown
below.
7.
Close
the
ribbon door and
then
the
pa-
per door.
IMPORTANT
Insert the ribbon between the posts and printhead exactly
as
shown.
Gently
push the print-
head carriage back
to
its
upright position . The ribbon must be clamped between
the
left post
and
the
printhead
as
shown.
11
Page 18
Printil19 A
Test
Pattern.
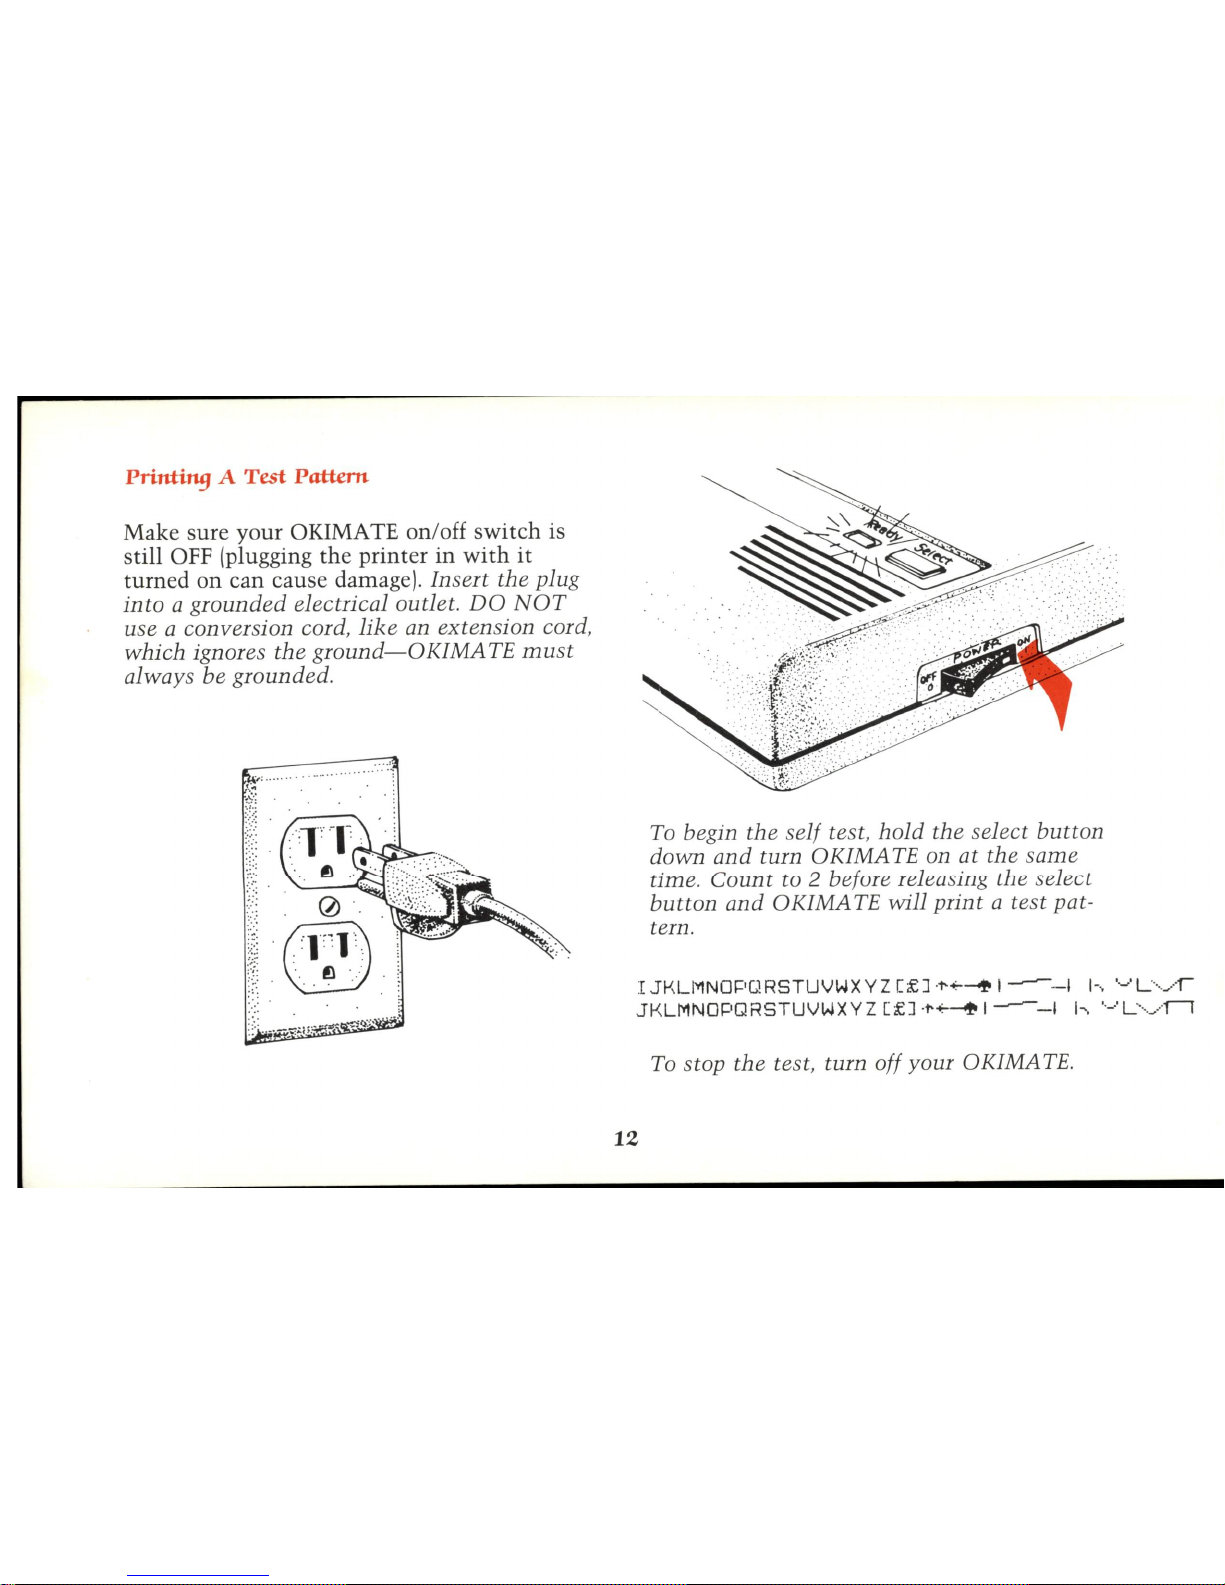
Make sure your OKIMATE on/off
switch
is
still OFF (plugging
the
printer
in
with
it
turned
on
can cause damage). Insert the plug
into
a grounded electrical outlet.
DO
NOT
use a conversion cord ,
like
an extension cord,
which ignores the
ground-OKIMATE
must
always be grounded .
. , : ...... .
f ••
~
_
......
. .
~y.:
To
begin the self test,
hold
the select
button
down
and
turn OKIMA
TE
on at the
same
time. Count
to
2 before releasing the select
button
and
OKIMATE will print a test pat-
tern.
I
JKLMNOPQRSTUVWXYZ
[£]
'
1-":--+
1--1
h
'~'L""J-r
JKLMNOPQRSTUVWXYZ
[£]
'f'
~
1--1
h ··
-.'L'··./II
To
stop the test, turn off your OKIMATE.
12
Page 19
Bf9innil19 the Match
Let's
tak
e a closer
look
at
the
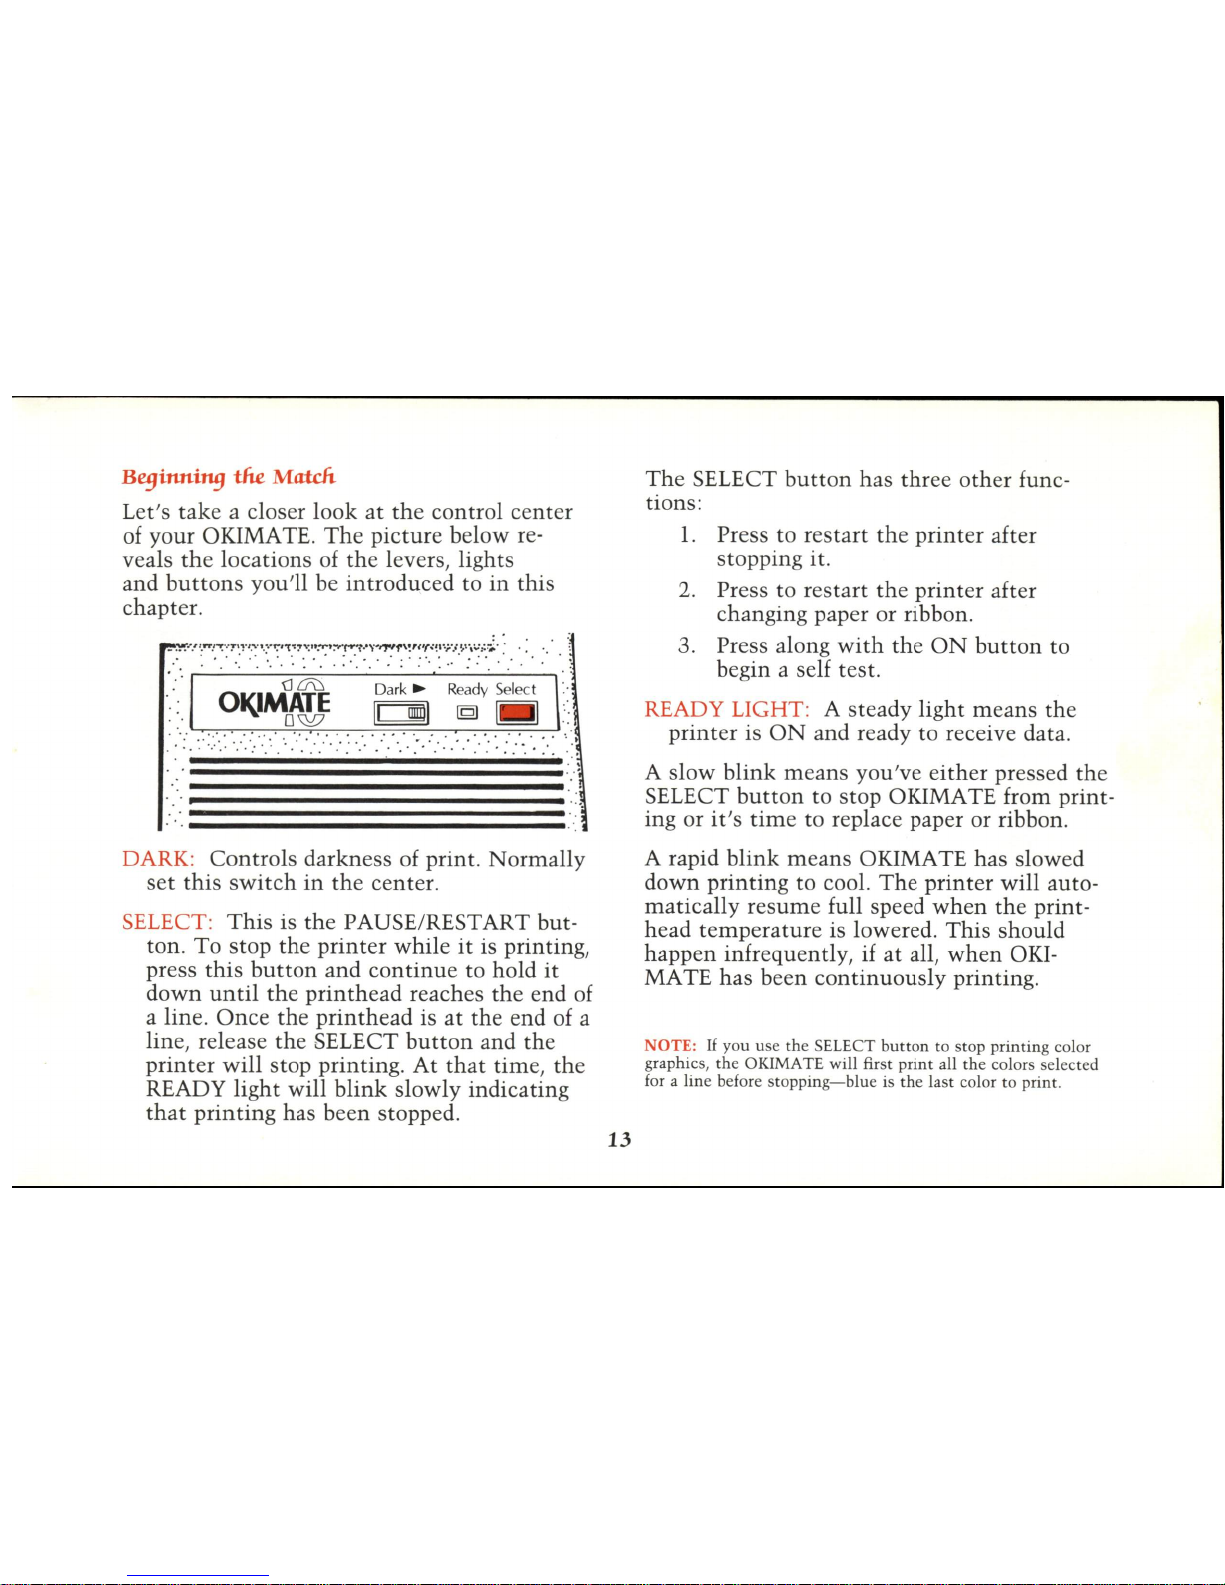
control center
of
your
OKIMA TE.
The
picture
below re-
veals
the
locations
of
the
levers, lights
and
buttons
you'll be
introduced
to
in
this
chapter.
DARK:
Controls
darkness of print.
Normally
set
this
switch
in
the
center.
SELECT:
This
is
the
PAUSE/RESTAR
T but-
ton.
To
stop
the
printer
while
it
is printing,
press
this
button
and
continue
to
hold
it
down
until
the
printhead
reaches
the
end of
a line.
Once
the
printhead
is
at
the
end of a
line
, release
the
SELECT
button
and the
printer
will
stop
printing. At
that
time, th
e
READY
light
will
blink
slowly indicating
that
printing
has been stopped .
13
The
SELECT
button
has
three
other
func-
tions:
1.
Press to
restart the
printer
after
stopping it.
2. Press
to restart
the
printer
after
changing paper or ribbon.
3. Press along
with
the
ON
button
to
begin a self test.
READY LIGHT: A steady
light
means the
print
er is
ON
and ready
to
receive data.
A
slow
blink means
you 've
either
pressed the
SELECT
button
to stop OKIMATE from print-
ing or
it's
time
to replace paper or ribbon.
A rapid
blink
means OKIMA TE has slowed
down
printing
to
cool.
The
printer
will
auto-
matically resume
full speed
when
the
print-
head
temperature
is lowered.
This
should
happen
infrequently, if
at
all,
when
OKI-
MATE
has
been
continuously
printing.
NOTE:
If
you use the S
ELE
CT
butt
on to stop
print
ing color
graphi cs,
th
e OKIMA TE will first
print
all the colors selected
f
or a lin
e before
sto
pping-blue is the last color to
print
.
Page 20
Running
the
Disk
Demonstration
There
are
two
programs
on
your
demonstra-
tion
disk-one
is a
combination
demonstra-
tion
of OKIMATE's capabilities and a
tutorial
;
the
other
one
is a color
print
program
that
al-
lows
you
to
print a picture
from a previously
created file. Both programs give
you a chance
to
see
what
OKIMATE can do right away.
The
Learn to
Print
program is
compatible
with
the
Commodore
64, VIC 20, SX-64, Plus/
4,
VIC
16
and
the
Commodore
128*.
Here's
how
you
use
them:
1.
Insert
the
Learn to
Print
disk
into
your
disk drive.
2.
Type:
LOAD
"LEARN",
8
3. Press
the
RETURN
key.
4.
When
you
see
the
READY prompt,
type:
RUN
5.
Press
the
RETURN
key.
After a
minute
or so to load,
the
program will
begin. First
you'll
have
the
opportunity
to see
black
and
white
and color
demonstrations-
the
disk
will
tell
you
when
to
put
the
color
ribbon in. You'll get a hard-copy
sample
of
everything
you
can
do
with
your OKIMA TE.
14
The Rules
of
the
Game
Chances
are
that
you
want
to
use
your OKI-
MATE
to
print
information
from a software
package,
whether it's a record of
your
budget
from a financial program or a
letter
to
Aunt
Mary
on
your
word
processor.
It's
easy to do
because
these
packages
almost
always have a
feature
that
controls
printing, so
that
all you
have
to
do is follow
the
instructions
provided
with
your
software. Keep
in
mind
that
from
the
computer's
point
of view, OKIMATE
works
the
same
way
as
the
Commodore
1525
printer
does, so if OKIMATE 10
isn't
listed,
follow
any
instructions
given
in
your
software
manual
for
the
1525 printer.
• must be in 64 e
mul
ation mod
e.
Using a Software
P~e
There
are so
many
software packages avail-
able for
Commodore
computers
that
we
sim-
ply
can't
provide you
with
specific details on
how
each
one
works
with
OKIMA TE .
However,
we
have
included
setup
procedures
for
three
popular
word processing
packages-
Easy Script, Paper Clip and Word Pro
3-that
may
prove valuable to you .
Page 21
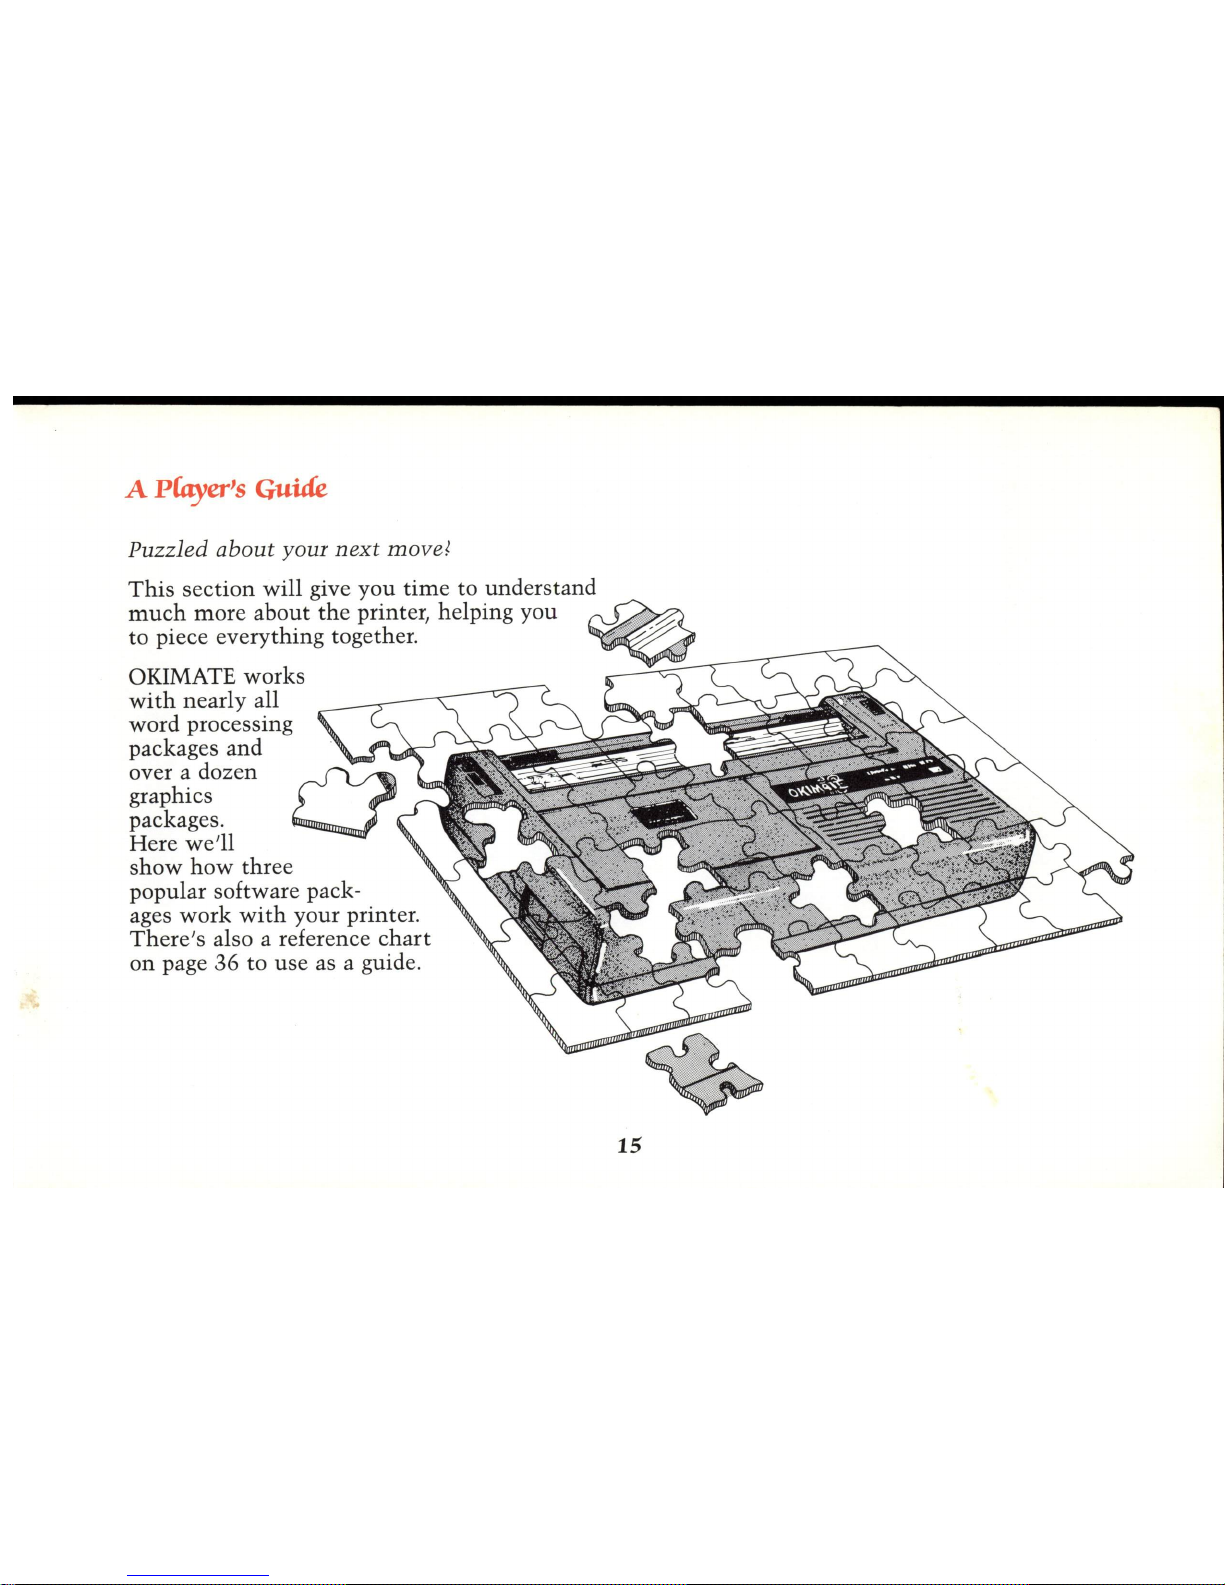
A
P~er's
Guide
Puzzled about your
next
move~
OKIMATE
works
with
nearly all
word
processing
packages
and
over a dozen
graphics
packages.
Here
we'll
show
how
three
popular software packages
work
with
your printer.
There's
also a reference
chart
on
page 36 to
use
as a guide .
15
Page 22
Most
computers
and
printers
use a standard
numerical
coding
system
called ASCII. Com-
modore
products, however, operate
with
a dif-
ferent
code,
usually
referred
to
as
Commodore
ASCII,
and
this
is
the
same
code
that
your
OKIMATE
with
the
Commodore
Plug
'N
Print
module
uses.
So
be
sure
to follow print-
ing
procedures for
Commodore
ASCII
if
your
software packages
use
different procedures for
each
coding
system.
Some
programs
ask
you
to
select
which
printer
you
have
from a
list
called a
"menu
."
If
the
menu
doesn't
include
OKIMATE 10,
use
Commodore
1525.
Your software
may
give provisions for using
OKIMATE's special features,
like
different
sizes
and
styles
of type,
although
the
flexibil-
ity
of
these
packages often varies. You'll need
to
know
the
special codes
that
control
the
features
you
want-check
the
handy
reference
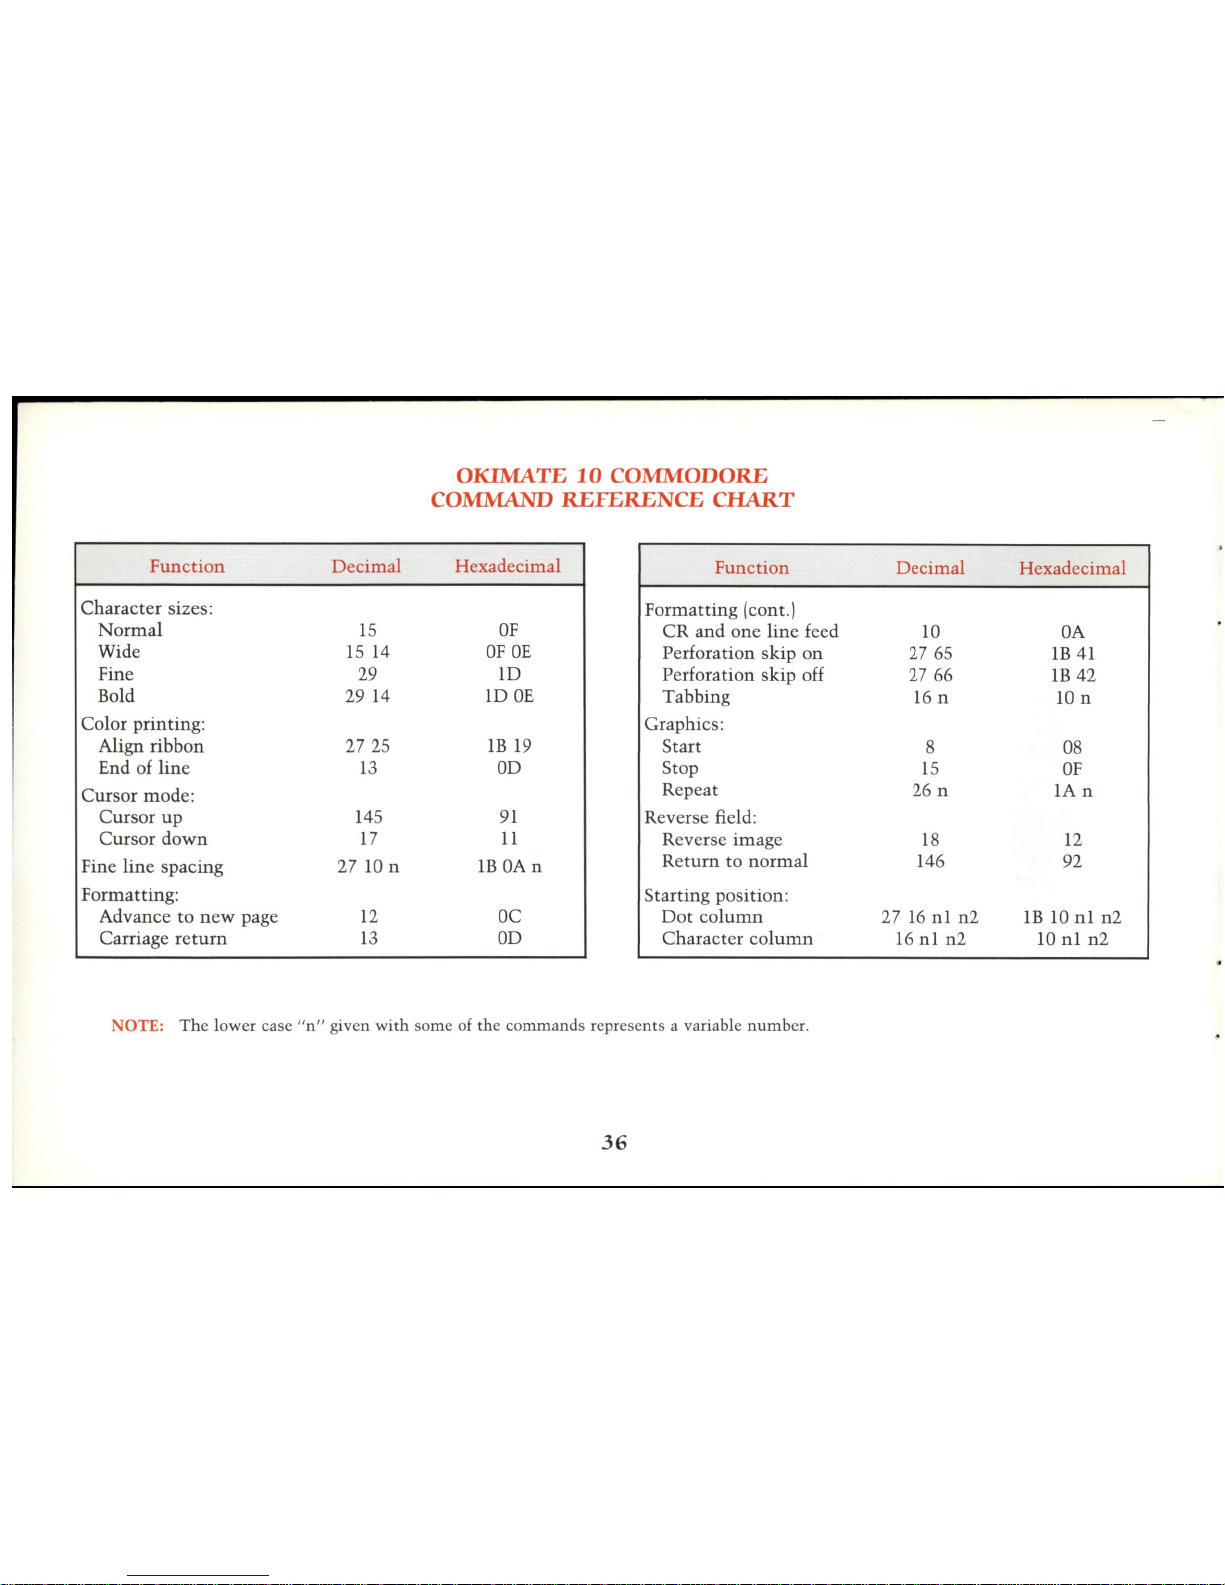
1G
chart
on
page
36-and
how
your
software
handles
those
codes-check
your
software in-
structions.
The
way
printer
control
codes are
handled
dif-
fers from package to package. Some
have
spe-
cial codes
that
go before OKIMATE's codes.
Others
have
ways
you
can
assign OKIMATE's
codes
to
characters
you're
not
likely
to use,
such
as
the
@ symbol, so
that
you
can change
printing
styles
with
a single
keystroke.
The
instructions
which
came
with
your software
packages
should
explain
how
it
deals
with
printers.
Remember
that
your
software package
may
not
let
OKIMATE do all
the
things
it's
capa-
ble
of-an
accounting
package, for example,
will
probably
let
you
pick a style
of type for
the
entire
document
but
will
not
allow you to
change features
within
the
document
.
Page 23
USING
PAPER
CLIP
Tfi£
Setup
1.
Insert
the
Paper Clip
battery
pack
into
the
Commodore
joystick
port
1.
2.
Turn
on
your
computer.
When
READY
appears, type :
RUN <CR
>
3.
Slide
the
Paper Clip
disk
into
drive A.
4.
When
READY appears, type: LOAD
"PRINTER SETUP-D",8 <CR>
NOTE: First
time
installation only.
5.
When
LOAD CHARACTER SET ap-
pears, type: Y <
CR
>
6.
When
FILENAME appears, type:
standard CBM < CR>
NOTE:
The
screen will fill
with
random characters
and will gradually clear .
7.
When
LOAD PREVIOUS
FILE
ap-
pears,type: Y <
CR
>
8.
When
FILENAME appears, type: 1525-
p-alf < CR>
9.
When
'@'?64 appears, hold
down
the
CONTROL
key
and type O.
NOTE: <CR>
means
press the RETURN key .
10.
11.
17
Use
the
CRSR
DOWN
key
to skip to
PRINTER INITIALIZE CHARACTERS
and
enter
the
following
command
to
turn
off
the
OKIMATE
10
automatic
skip over perforation:
Press
the
DEL
key
to erase
the
current
entry.
Type: 27 < CR >
Press
the
DEL key to erase
the
next
entry.
Type: 66 < CR>
Press < CR >
three
times.
When
SECONDARY ADDRESS ap-
pears, press < CR> once.
Use
the
CRSR
DOWN
key to skip to
PITCH
= 12 CHARACTERS PER
INCH
and
enter
the
following
command
to
print
bold:
Press
the
DEL key twice to erase 15.
Type: 29 < CR>
Press
the
DEL key to erase
O.
Type: 14 < CR >
Page 24
Press < CR>
three
times.
When
SECONDARY ADDRESS ap-
pears press <
CR
> once.
When
the
PITCH = 15
CHARACTERS
PER
INCH
appears, press
the
DEL key
twice
to erase 15.
Type: 29 < CR >
Press <
CR
> four times.
When
SECONDARY ADDRESS ap-
pears press < CR> once.
NOTE: The remainder of
the
commands are identical
to
th
e Commodore printer and do
not
need
to
be
changed.
12. Use
the
CRSR
DOWN
key to advance
to SECONDARY ADDRESS FOR
TEXT
and
press
the < CR
> once.
13. Remove
the
Paper Clip disk and
insert
a
formatted
data
disk.
14. Hold
down
the
CONTROL
key and
the
SHIFT
key
and
press
9.
15.
When
FILENAME appears, type : OKI-
MATE 10 < CR >
16.
When
DRIVE # appears, type: 0
18
Creati"9
a.
Document
NOTE: Make sure
the
data disk is still
in
the
disk drive.
1.
Load "P*", 8 <CR>
2.
Press
CONTROL
then
1.
3.
When
FILENAME appears, type: OKI-
MATE 10 < CR >
4.
Press
CONTROL
then
1.
NOTE:
If
creating a new file skip
to
step 6.
5.
When
FILENAME appears, type
the
name
of
the
document
you
want
to edit.
6.
When
you
are preparing your docu-
ment
and
wish
to change
printing
styles, press
the
British
pound
sign key
and
enter
the
change code. For exam-
ple,
if
you
wanted
to change
the
left
margin to 15,
you
would
press
the
Brit-
ish
pound
sign
key
then
type: Im15
Likewise, if
you
wanted
to
print
in
bold,
you
would
press
the
British
pound
sign key and
then
type: pt12
Printi"9
a.
Document
1.
Press
CONTROL
then
O.
2.
When
CONTINUOUS
OUTPUT
ap-
pears, type: N < CR >
Page 25
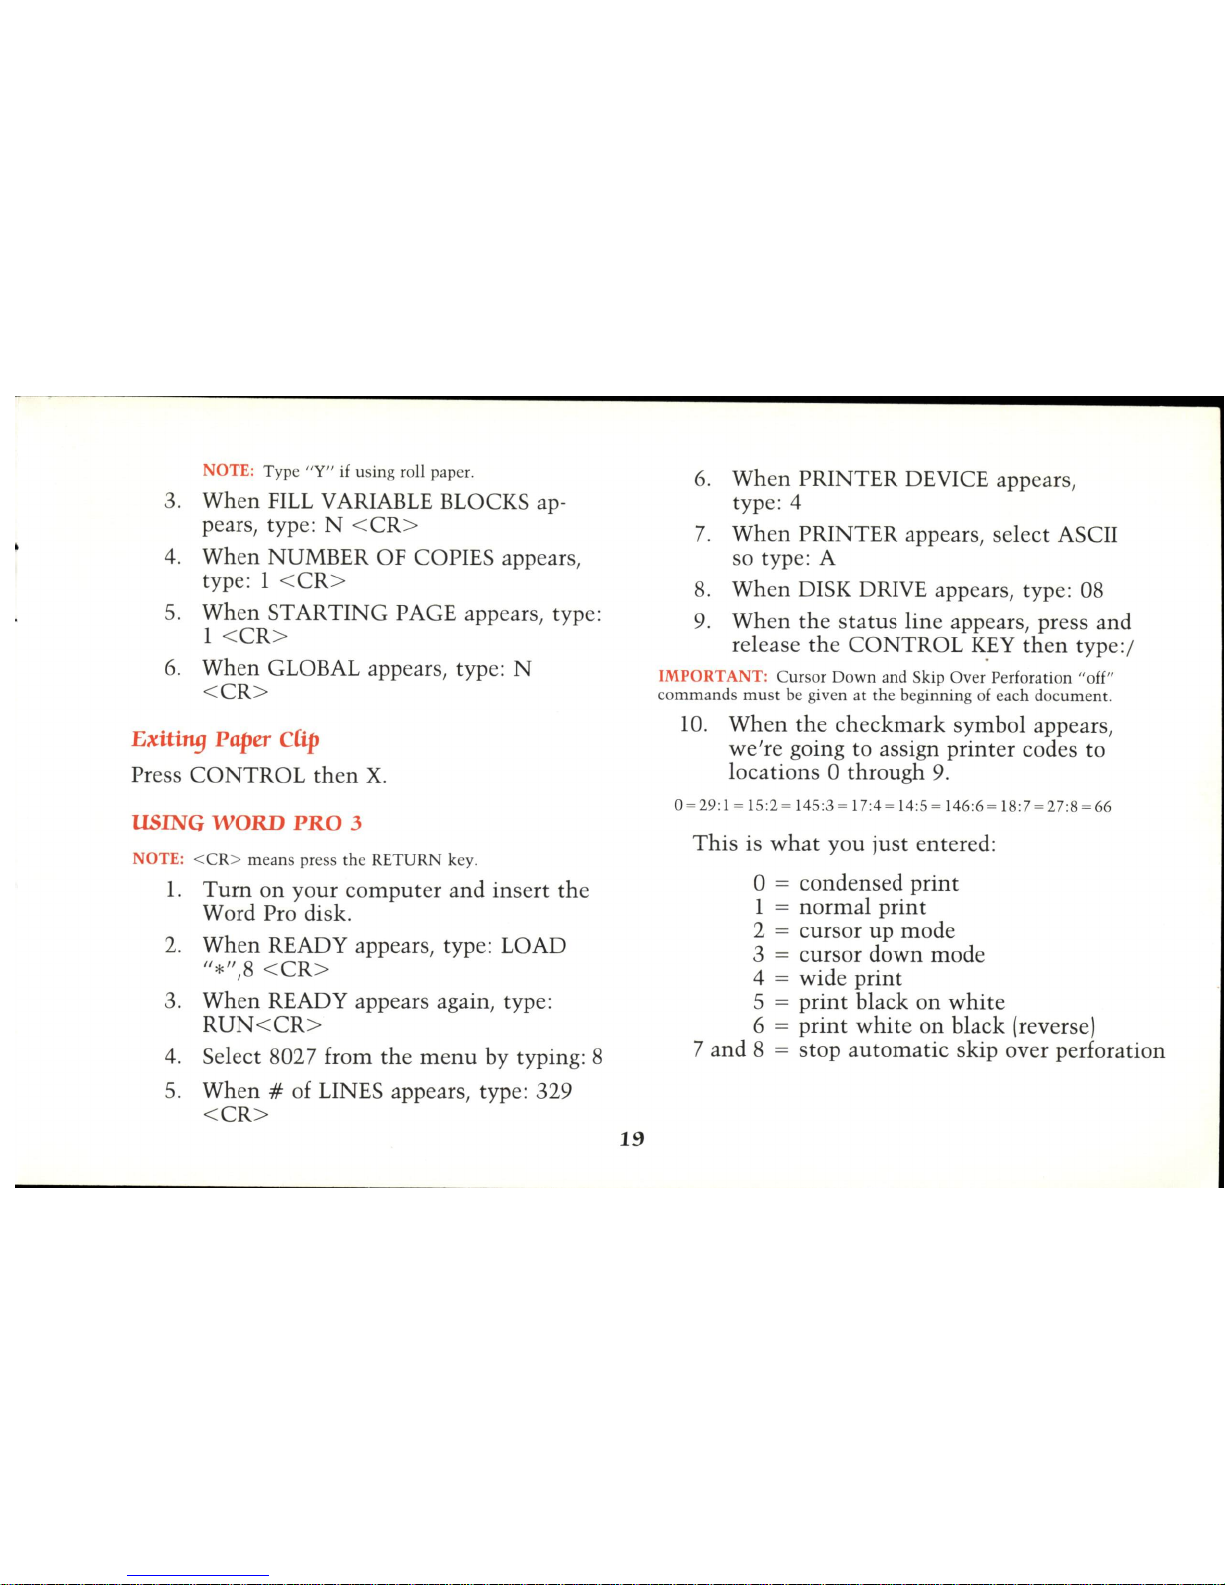
NOTE: Type "Y"
if
using roll paper.
3.
When
FILL
VARIABLE BLOCKS ap-
pears, type: N < CR >
4.
When
NUMBER OF COPIES appears,
type: 1 < CR >
5.
When
STARTING PAGE appears, typ e:
1 < CR >
6.
When
GLOBAL appears, type: N
<
CR
>
Exiti"9
Paper
CUp
Press
CONTROL
then
X.
USING
WORD
PRO
3
NOTE: < CR> means press the RETURN key.
1.
Turn
on
your
computer
and
insert the
Word Pro disk.
2.
When
READY appears, type: LOAD
//*//,8
<C
R>
3.
When
READY appears again, typ
e:
RUN
< CR >
4.
Select 8027 from
the
menu
by typing : 8
5.
When
# of LINES appears, type: 329
< CR >
19
6.
When
PRINTER DEVICE appears,
type : 4
7.
When
PRINTER appears, select ASCII
so type : A
8.
When
DISK DRIVE appears, type: 08
9.
Wh
en
the
status
line
appears, press and
release
the
CONTROL
KEY
then
typ
e:/
IMPORTANT: Cursor Down and Skip Over Perforation "off"
commands
must
be given at the beginning of each document.
10. When
the
checkmark
symbol appears,
we're
going to assign
printer
codes
to
locations 0 through
9.
0 = 29: 1 = 15:2 = 145:3 = 17:4 = 14:5 = 146:6 = 18:7 = 27:8 = 66
This
is
what
you
just
entered:
o = condensed
print
1 =
normal
prin t
2
= cursor up
mode
3 = cursor down
mode
4 =
wide
print
5 =
print
black
on
white
6 =
print
white
on
black (reverse)
7 and 8
= stop
automatic
skip over perforation
Page 26
Entering
Print
Features
in
a Document
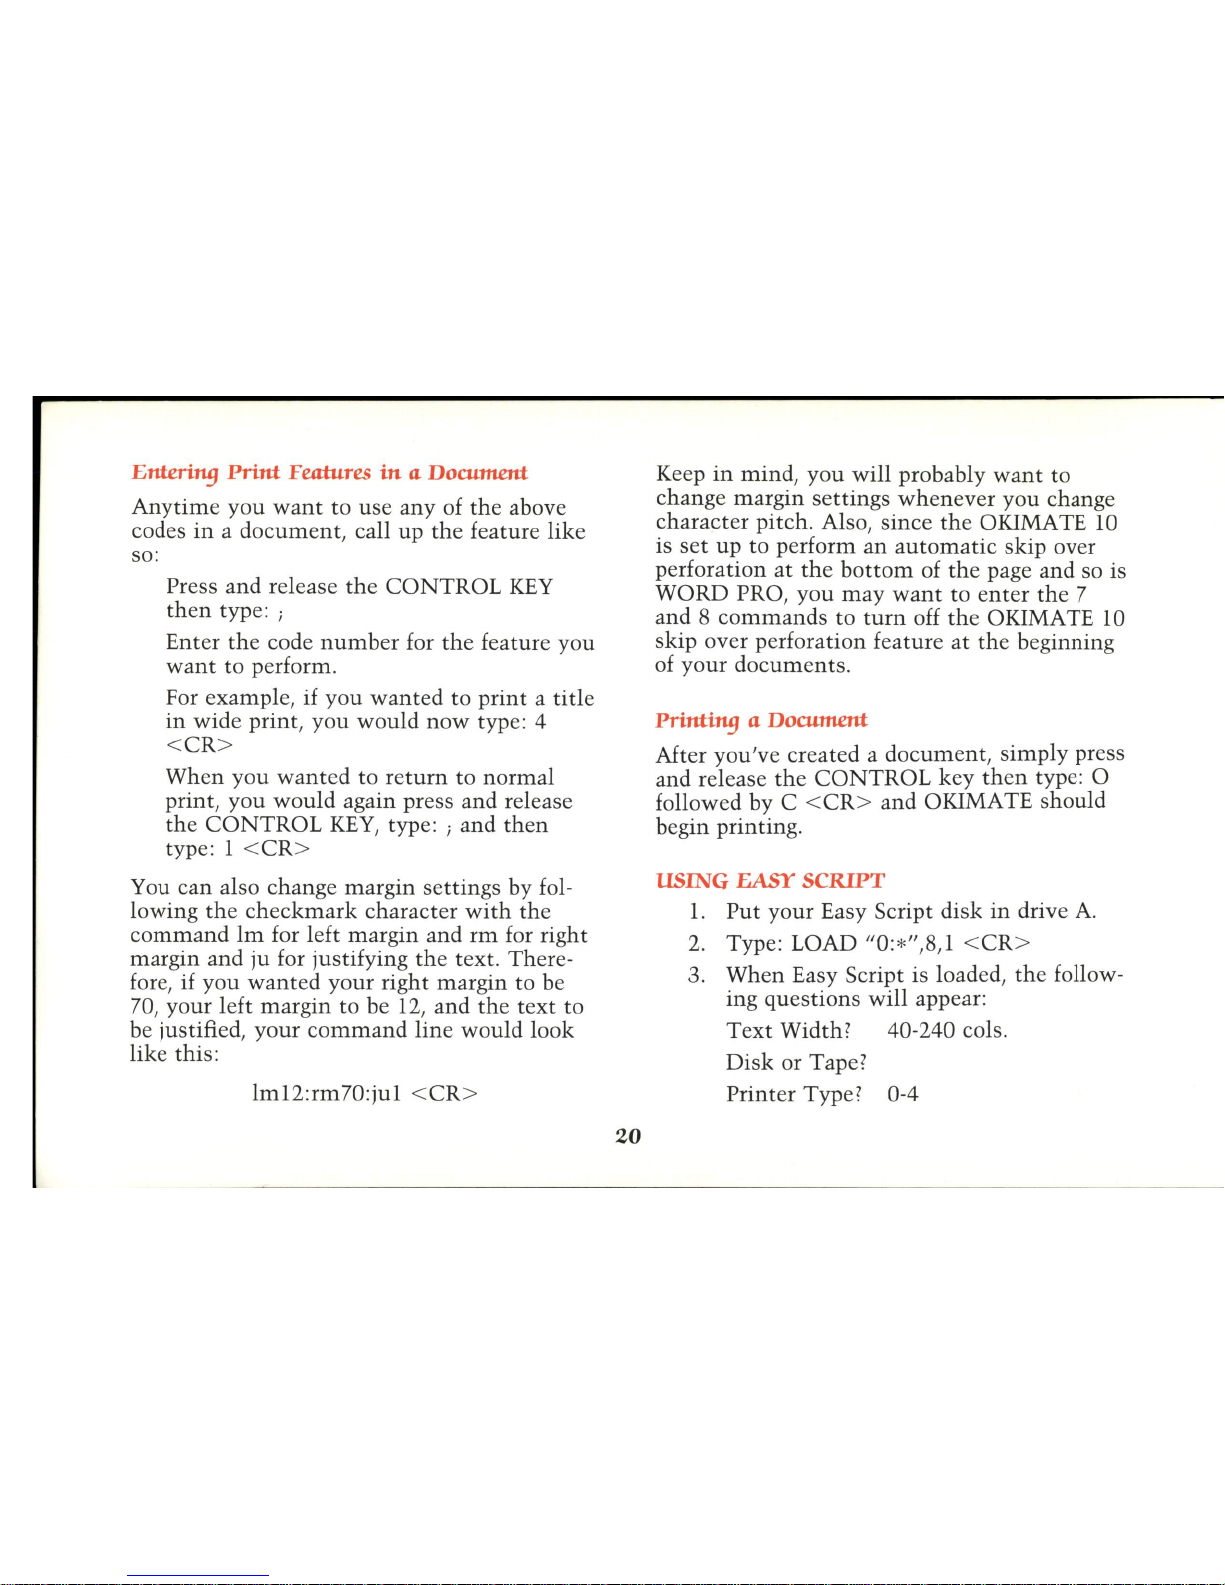
Anytime
you
want
to
use
any
of
the
above
codes
in a document,
call
up
the
feature
like
so:
Press
and
release
the
CONTROL
KEY
then
type: i
Enter
the
code
number
for
the
feature
you
want
to perform.
For example, if
you
wanted
to
print a title
in
wide print,
you
would
now
type: 4
< CR >
When
you
wanted
to
return
to
normal
print,
you
would
again press and release
the
CONTROL
KEY,
type: i and
then
type: 1 < CR >
You
can
also change
margin
settings by fol-
lowing
the
checkmark
character
with
the
command
1m
for left
margin
and
rm
for right
margin
and ju for justifying
the
text. There-
fore, if
you
wanted
your
right
margin
to be
70,
your
left
margin
to be
12,
and
the
text
to
be justified,
your
command
line
would
look
like
this
:
lm12:rm70:ju1 < CR >
20
Keep
in
mind, you
will
probably
want
to
change
margin
settings
whenever
you change
character
pitch. Also,
since
the
OKlMATE
10
is
set
up
to perform
an
automatic
skip over
perforation
at
the
bottom
of
the
page and so is
WORD
PRO, you
may
want
to
enter
the
7
and 8 commands
to
turn
off
the
OKIMATE 10
skip over perforation feature
at
the
beginning
of
your
documents.
Printing a Document
After you've created a
document,
simply
press
and release
the
CONTROL
key
then
type: 0
followed by C < CR>
and
OKlMATE
should
begin printing.
USING
EASY
SCRIPT
1.
Put
your
Easy Script disk
in
drive A.
2.
Type: LOAD "0:*
/1,8,1
< CR>
3.
When
Easy Script is loaded,
the
follow-
ing
questions
will
appear:
Text
Width? 40-240 cols.
Disk
or Tape?
Printer
Type? 0-4
Page 27
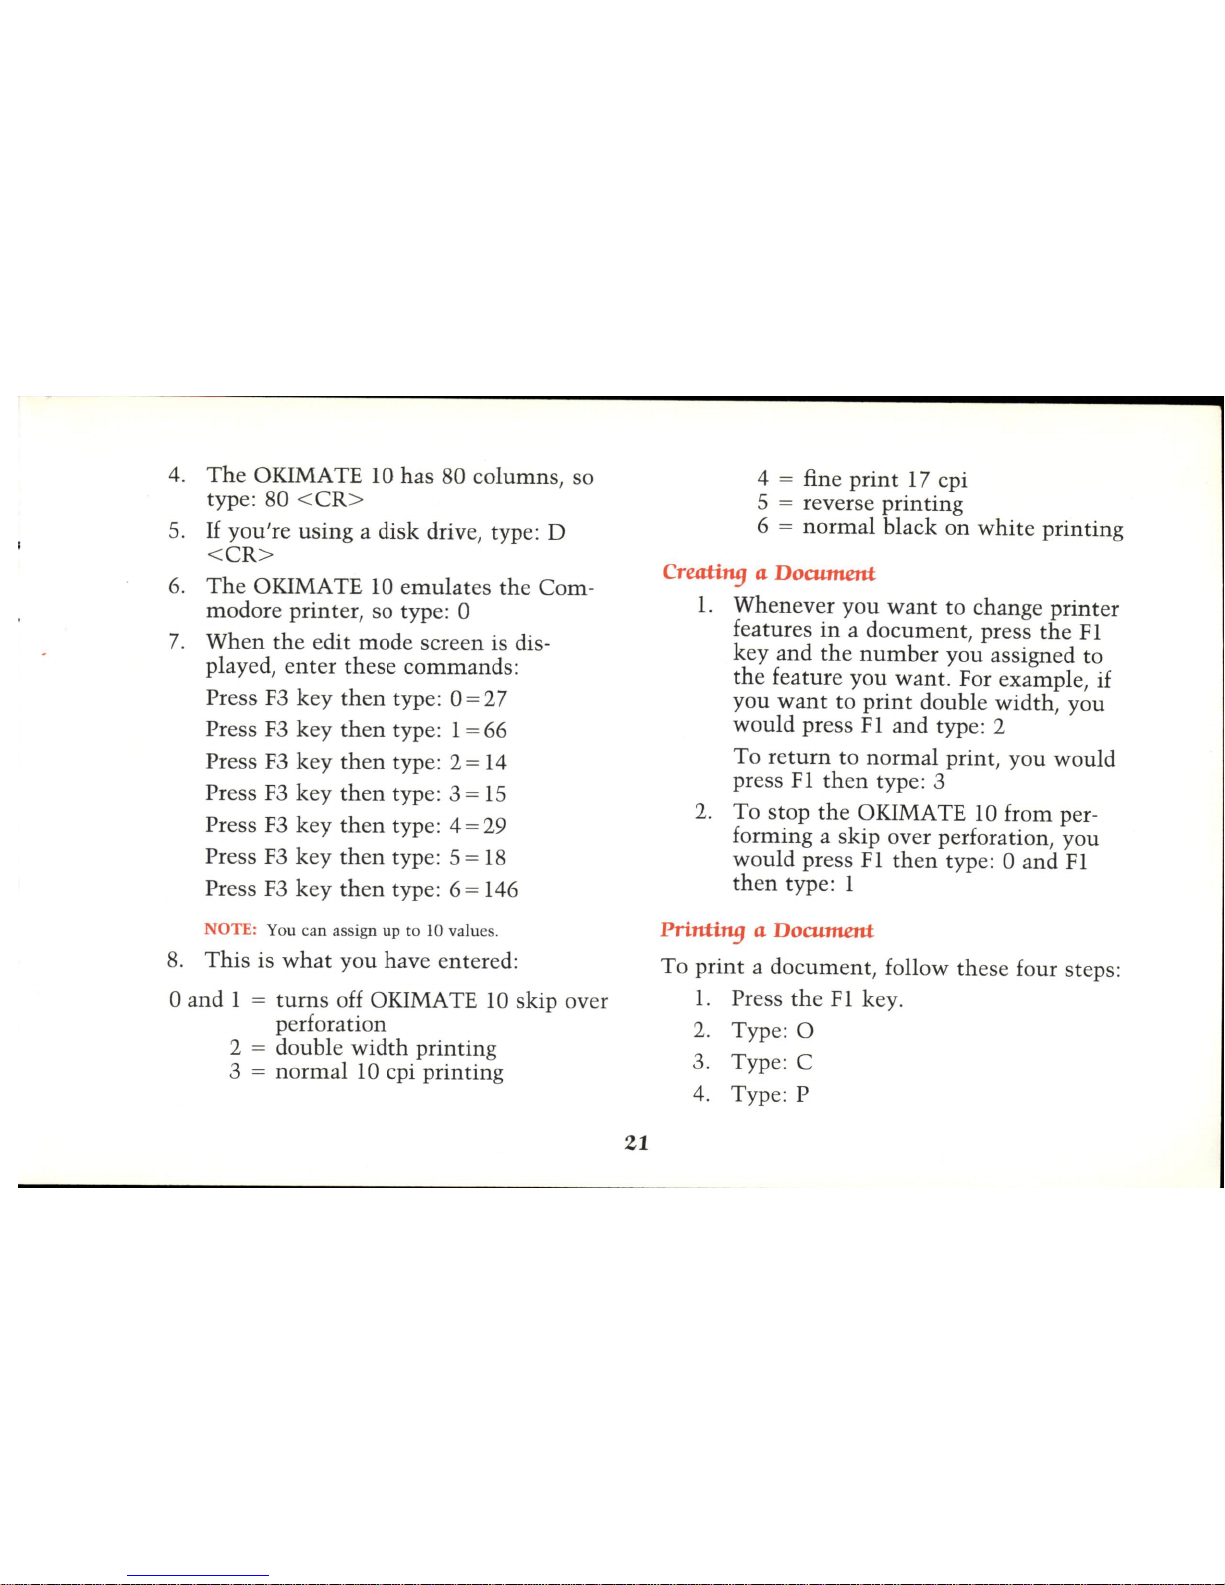
4.
The
OKIMA TE 10 has 80 columns, so
type: 80 <
CR
>
5.
If
you're
using
a disk drive, type: D
< CR >
6.
The
OKIMA
TE
10
emulates the
Com
-
modore
printer, so
type
: 0
7.
When
the
edit
mode
screen
is dis-
played,
enter
these
commands:
Press
F3
key
then
type: 0 = 27
Press
F3
key
then
type
: 1 = 66
Press
F3
key
then
type: 2 = 14
Press
F3
key
then
type: 3 =
15
Press
F3
key
then
type: 4 = 29
Press
F3
key
then
type: 5 =
18
Press
F3
key
then
type: 6 = 146
NOTE: You can assign up to 10 values.
8.
This
is
what
you have entered :
o and 1 =
turns
off OKIMA TE
10
skip over
perfora
tion
2 = double
width
printing
3 =
normal
10 cpi
printing
21
4 = fine
print
17 cpi
5
= reverse
printing
6 =
normal
black
on
white
printing
Creating a Document
1.
Whenever
you
want
to
change
printer
features
in a document,
press
the
F 1
key
and
the
number
you
assigned
to
the
feature
you
want.
For example, if
you
want
to
print
double
width
, you
would
press F 1
and
type : 2
To
return
to
normal
print,
you
would
press
Fl
then
type : 3
2.
To
stop
the
OKIMA TE 10 from performing a skip over perforation, you
would
press F 1 then type: 0
and
F 1
then
type: 1
Printing a Document
To
print a document,
follow
thes
e four steps:
1.
Press the
Fl
key.
2.
Typ
e:
0
3. Type: C
4. Type: P
Page 28
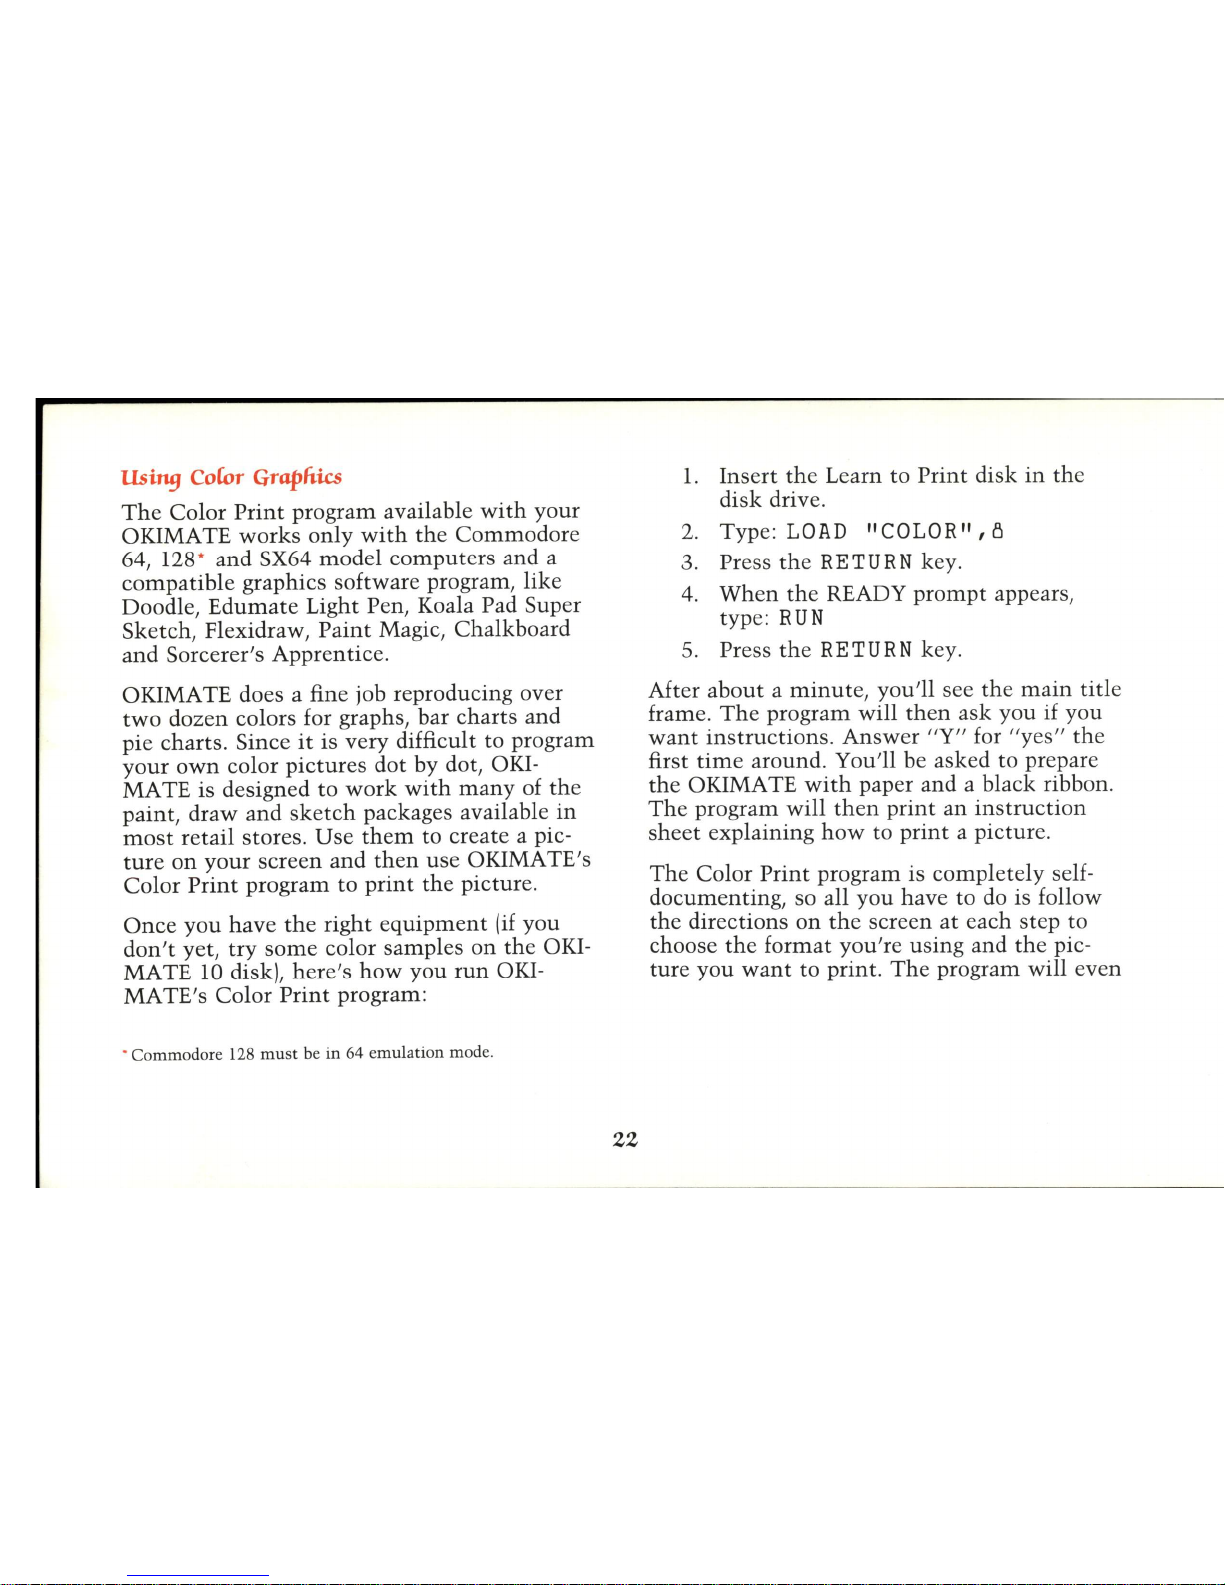
Usif19
CoCor
Graphics
The
Color
Print
program available
with
your
OKIMATE
works
only
with
the
Commodore
64, 128*
and
SX64
model
computers
and a
compatible
graphics software program,
like
Doodle,
Edumate
Light Pen, Koala Pad Super
Sketch, Flexidraw,
Paint
Magic, Chalkboard
and
Sorcerer's Apprentice.
OKIMA TE does a fine job reproducing over
two
dozen colors for graphs, bar charts and
pie
charts. Since
it
is very difficult
to
program
your
own
color
pictures
dot
by dot, OKI-
MATE is designed
to
work
with
many
of
the
paint, draw
and
sketch
packages available
in
most
retail
stores.
Use
them
to
create a pic-
ture
on
your
screen
and
then
use
OKIMATE's
Color
Print
program
to
print
the
picture.
Once
you
have
the
right
equipment
(if
you
don't
yet,
try
some
color samples
on
the
OKI-
MATE 10 disk),
here's
how
you
run
OKI-
MATE's
Color
Print
program:
• Co
mmodor
e 128
must
be
in
64 e
mulati
on
mod
e.
22
1.
Insert
the
Learn to
Print
disk
in the
disk drive .
2. Type:
LOAD
"COLOR",
()
3. Press
the
RETURN
key
.
4.
When
the
READY
prompt
appears,
type :
RUN
5. Press
the
RETURN
key
.
After
about a minute, you'll
see
the
main
titl
e
frame.
The
program
will
then
ask
you
if
you
want
instructions.
Answer
"Y"
for
"yes" the
first
time
around. You'll be asked to prepare
the
OKIMATE
with
paper and a black ribbon.
The
program
will
then
print
an
instruction
sheet
explaining
how
to
print
a picture.
The
Color
Print
program is
completely
selfdocumenting, so all you have to do is follow
the
directions
on
the
screen
at
each
step
to
choose
the
format
you're
using and
the
pic-
ture
you
want
to
print.
The
program
will
even
Page 29
tell you
if
OKIMATE
isn't
ready to
print
and
will give you a list of things to check.
If
you
want
to conserve your color ribbon, select just
one example from
the
color program to see
how
OKIMA TE prints colors.
Once you've made your selections and
the
printer is
ready-don't
forget to insert
the
color
ribbon-just
press
the
RETURN key and
watch
OKIMA TE
print
your picture
in
full
color. It will take a
while
because each line
must
print
three times,
but
the
results should
be
worth
the
wait.
23
Page 30
BASIC
PRINTING
IN
A NUTSHELL
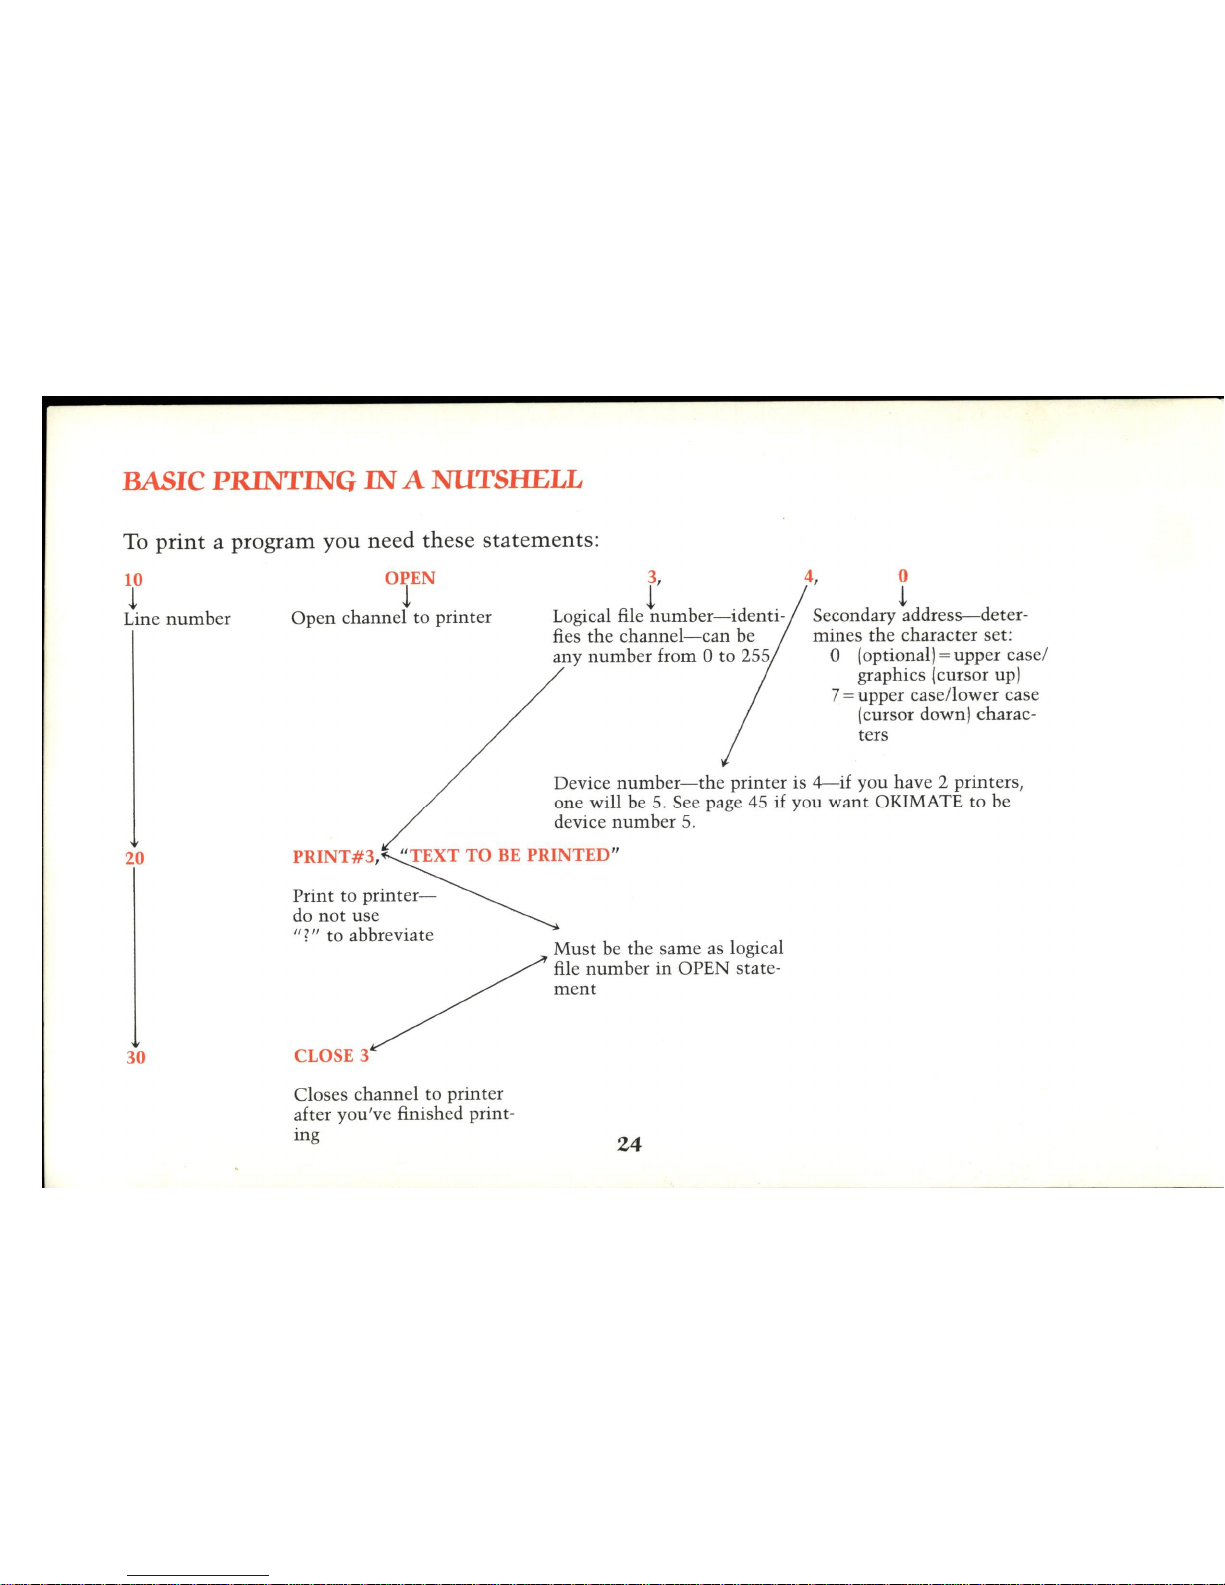
To
print a program
you
need
these
statements:
10
1
Line
number
20
30
0 j EN
Open
channel
to printer
3,
1
Logical file
number-identi-
fies
the
channel-can
be
any
number
from a to 255
4, 0
t
Secondary
address-deter-
mines
the
character set:
o (optional) = upper casel
graphics (cursor up)
7
= upper casellower case
(cursor down) characters
Device
number-the
printer
is
4-if
you have 2 printers,
one will be
5.
See page
45
if
you
want
OKIMATE to be
device
number
5.
PRINT#3'~"TEXT
TO
BE
PRINTED"
Print
to printer-
do
not
use
"?"
to abbreviate
CLOSE 3
Closes channel
to
printer
after you've finished printing
Must
be
the
same as logical
file
number
in
OPEN state-
ment
24
Page 31
Pri~
Listil19s
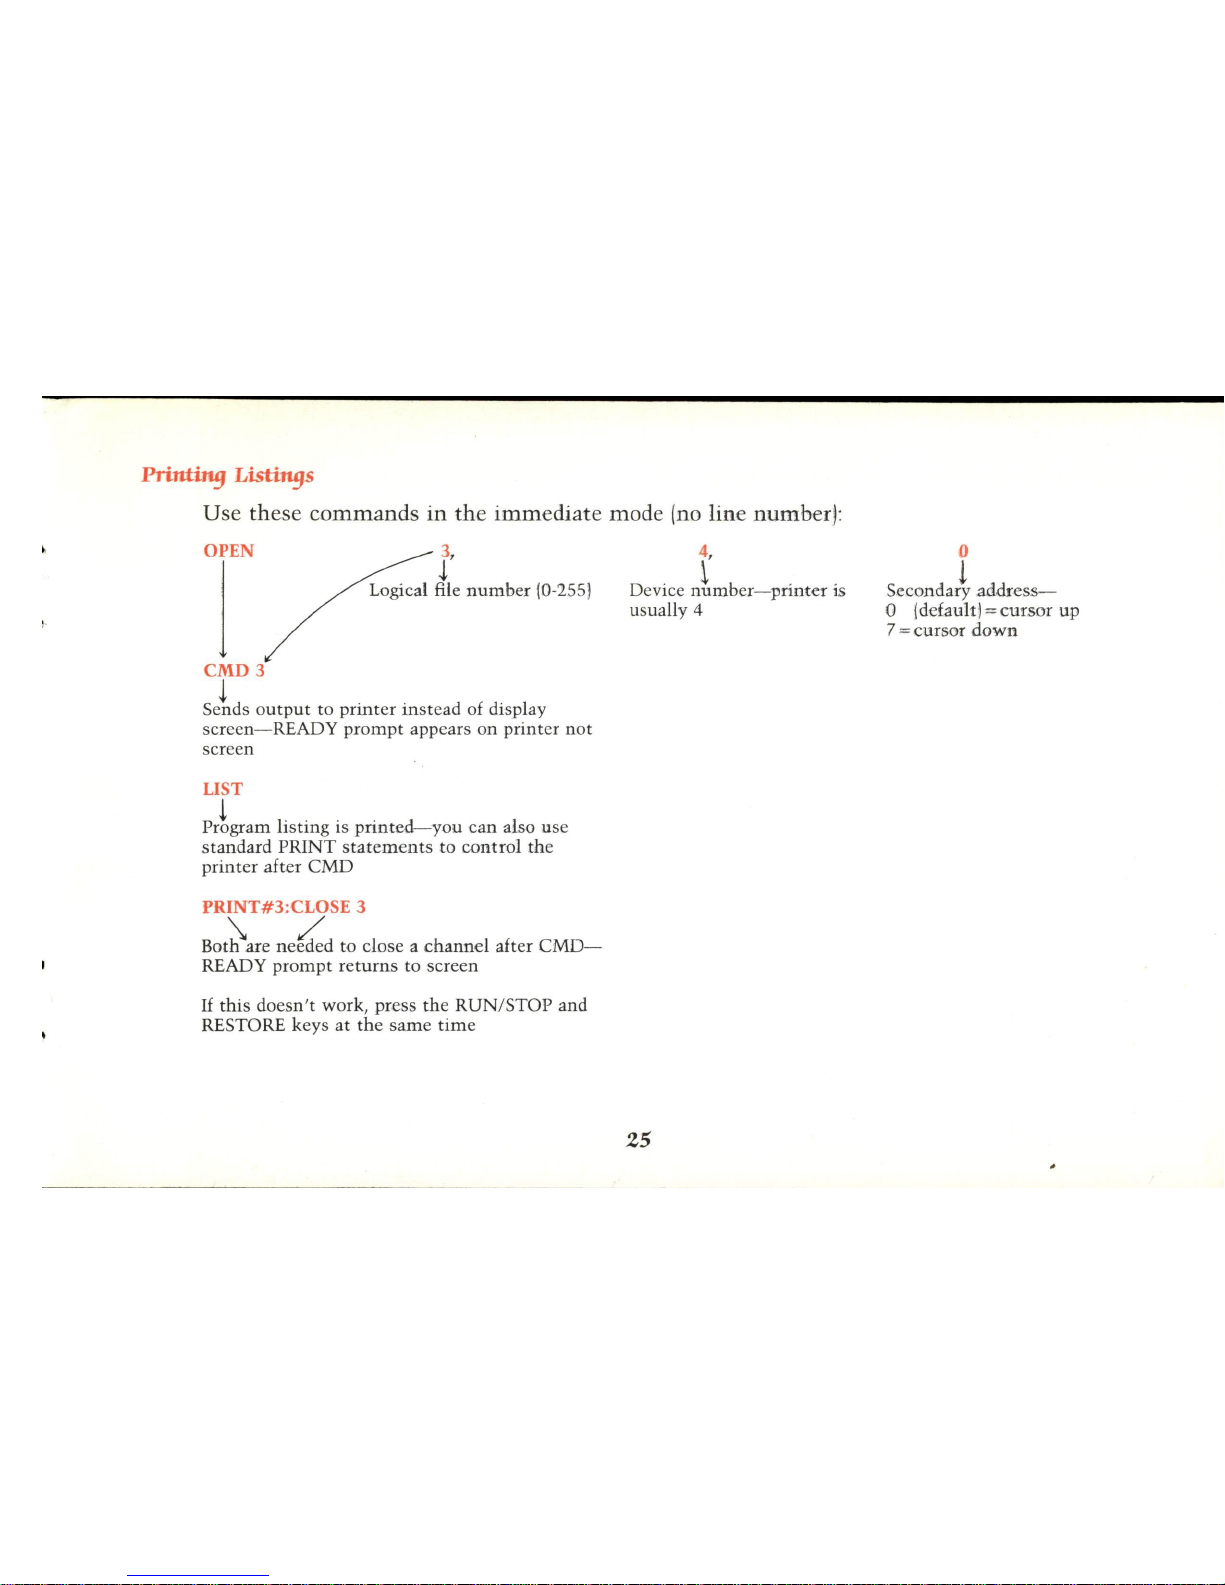
Use
these
commands
in
the
immediate
mode
(no
line
number):
OPEN
j
3,
J
Logical file
number
(0-255)
CMD3
~
Sends
output
to
printer
instead
of display
screen-READY
prompt
appears on printer
not
screen
LIST
t 1
'"
.
d-
,_
Program Istmg
IS
pnnte
you
can
a1.:)O
use
standard
PRINT
statements
to
control
the
printer
after
CMD
PRINT#3:CLOSE 3
\ /
Both
are
needed
to
close a
channel
after
CMD-
READY
prompt
returns
to screen
If
this
doesn't
work, press
the
RUN
/STOP and
RESTORE keys at
the
same
time
4,
D
·
~
b . .
eVlce
num
er-
pnnter
IS
usually 4
25
o
i
S.econdary
addr
·ess-
o
jddaultj = cursor
up
7 = cursor
down
Page 32
Creating Special Effects
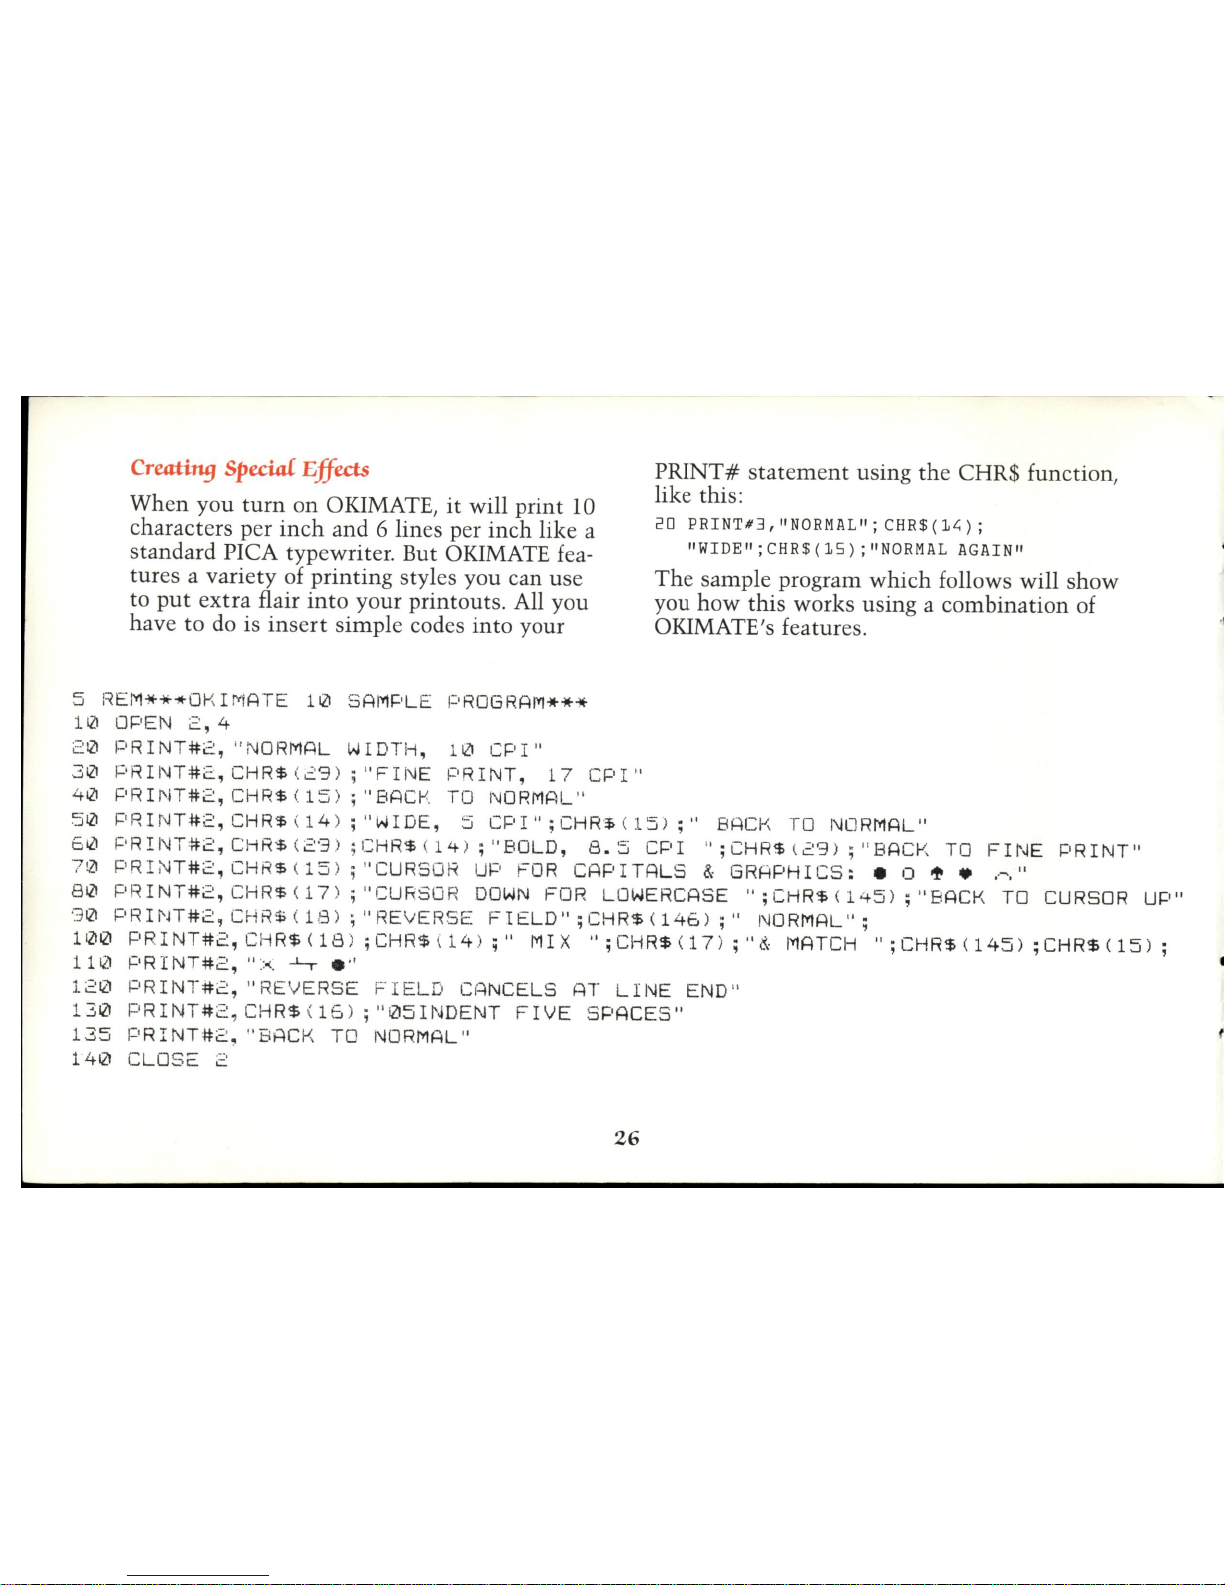
When you
turn
on
OKIMATE,
it
will print 10
characters per
inch
and 6 lines per
inch
like a
standard PICA typewriter. But OKIMATE features a variety of
printing
styles you can use
to
put
extra
flair
into
your
printouts
. All you
have to do is
insert
simple codes
into
your
5 RE
M***O
KIMATE
10 SAMPL
E PRO
GRAM***
10
OPEN
2,4
20
PRINT#2,
"N
ORMAL
WIDTH,
10
CPI"
30
PRII\lT
#2,
CHR$ (2'3
) ;
"FINE
PRI
NT,
17
CPI"
40
PRINT#2,
CHR$ (15) ;
"8ACI-
.(.
TO
NORMAL
"
PRINT#
statement
using
the
CHR$ function,
like this:
20 PRINT#3,
"NORMAL";
CHR$
(M)
;
"WIDE";CHR$(15);"NORMAL
AGAIN"
The
sample program
which
follows will show
you
how
this works using a combination of
OKIMATE's features.
50
PRIr'-lT#2,
CHR$ (14 ) j
"WIDE,
5
CPI";
CHR$ (15 )
;"
BACK
TO
NORMAL"
50
i='
RINT#2,
CHR$ (2'3) ;CHR
$
(1
4 ) ;
"B
OLD,
8.5
CPI "jCHR$
(2'3)
j " 8ACI-< TO
FINE
PRINT"
70
PRIN
T#2,
CHR$
(15) ; "CURSOR
UP FOR
CAPITALS
&
GRAPHICS:
• 0
'!-
...
~,"
80
PR I NT#2,
CHR$ ( 17
) ;
"CURSOR
DOWN
FOR
LOWERCASE
";
CHR$ ( H·5) j "BACK
TO CURSOR
UP"
'30 PRII'H#2,CHR$
(18) ; "RE
VERSE
FIELD"jCHR$(14E.);"
I
\lORMAL";
100
PRINT#2,CHR$(18
)
;CHR$i14 )
;"
MIX
"jCHR$(17)
j"&
MATCH
"jCHR$(145)
jCHR$(15)
j
110
PRINT#2,
"><.
~
. "
120
PRINT#2,
"RE'vERSE
FIE
LD
C(~NCELS
AT
LINE
END"
130 PRINT
#2,CHR$(15
) ;
"iZl5INDENT
FIVE SPACES"
135
PRINT#2,
"B
ACK
TO
NORMAL"
140
CLOSE
2
26
Page 33
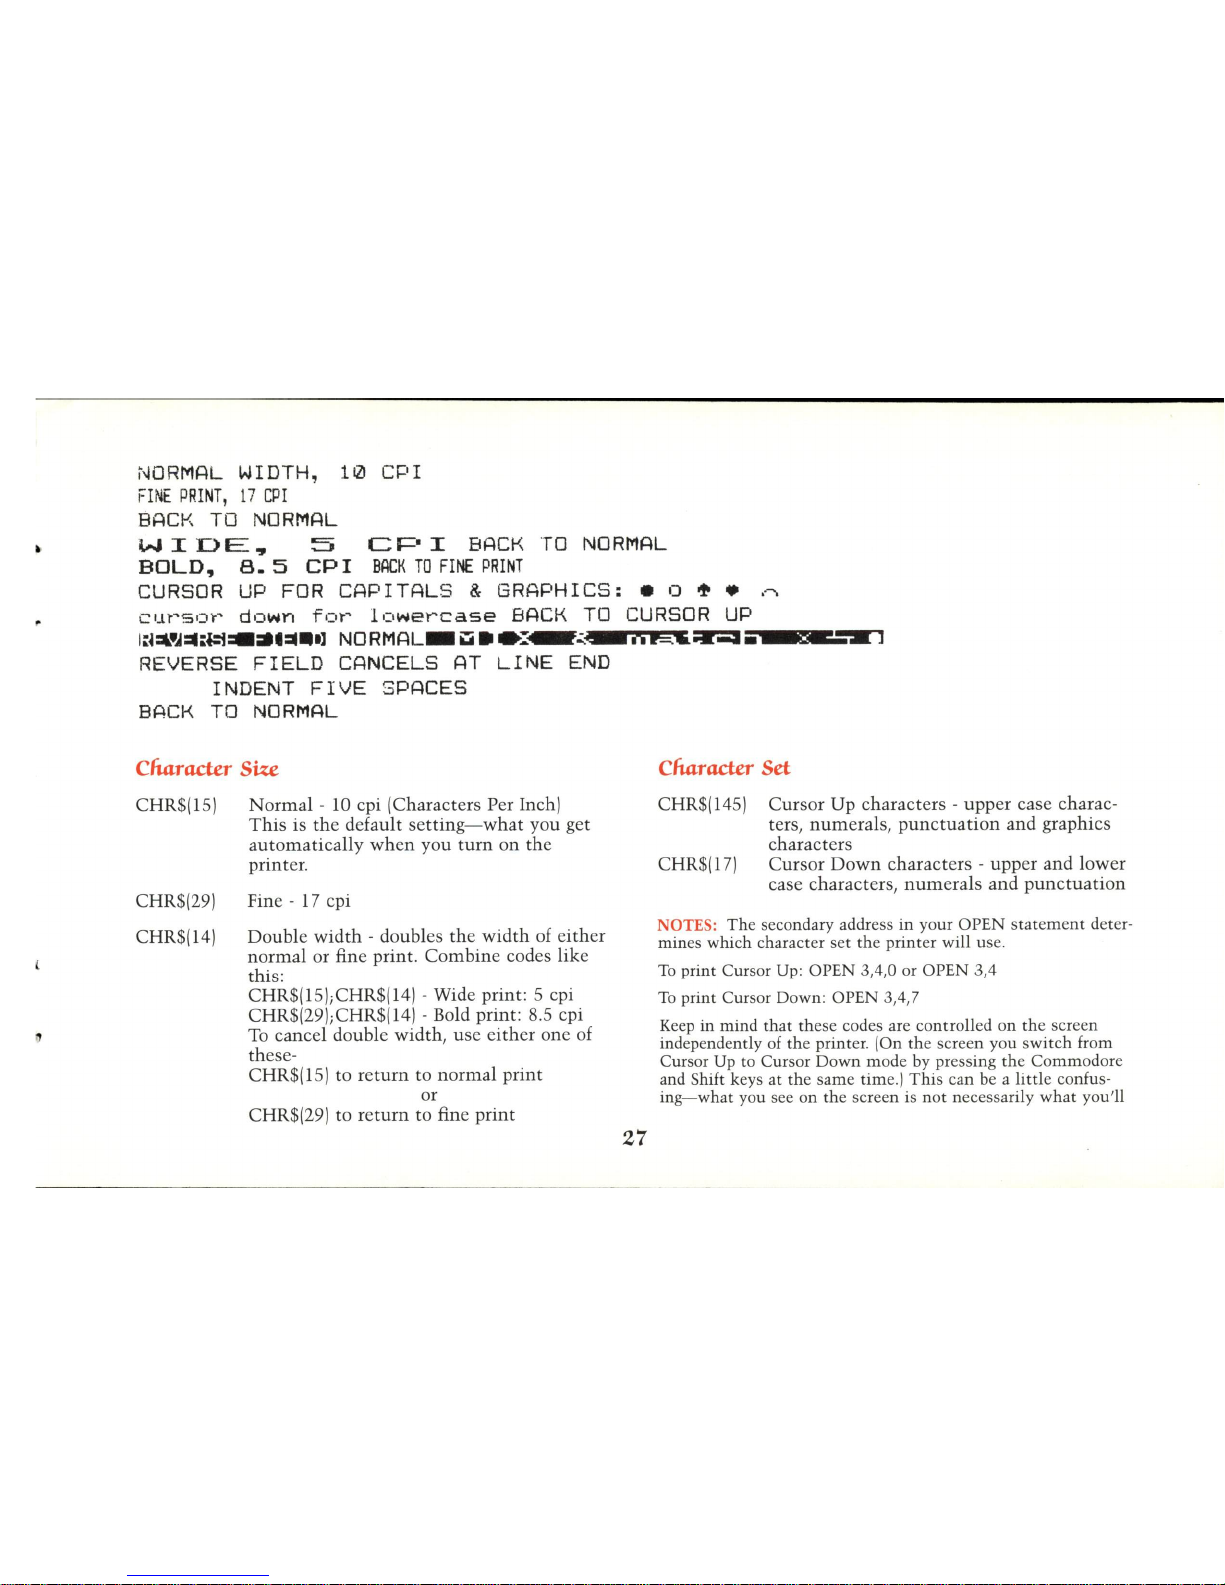
NORMAL
WIDTH,
10
CPI
FINE
PRINT,
17
CPI
BACK
TO
NORMAL
W I
DE.,
5
Ca="
I
BACK
TO
NORMAL
BOLD,
8.
5
CP
I
BACK
TO
FINE
PRINT
CURSOR
UP
FOR
CAPITALS & GRAPHICS: • 0
~.
~
cursor
down
for
lowercase
BACK
TO
CURSOR
UP
1.~=L'J:::II:i:i=-iil.:::II.']
NORMAL.
u
••
:.-=..-:.
1"1
F-..~
••
_.:IE
REVERSE FIELD
CANCELS
AT
LINE
END
INDENT
FIVE
SPACES
BACK
TO
NORMAL
character Size
CHR$(15)
CHR$(29)
CHR$(14)
Normal
- 10 cpi (Characters Per Inch)
This
is
the
default
setting-what
you get
automatically
when
you
tum
on the
printer.
Fine - 17 cpi
Double
width
- doubles
the
width
of
either
normal or fine print.
Combine
codes
lik
e
this:
CHR$(15);CHR$(14) - Wide print: 5 cpi
CHR$(29);CHR$(14) - Bold print: 8.5 cpi
To
cancel double width, use either one of
theseCHR$(15) to
return
to
normal
print
or
CHR$(29) to
return
to fine
print
27
character
Set
CHR$(145) Cursor Up characters -
upper
case charac-
ters,
numerals, punctuation
and graphics
characters
CHR$(17) Cursor
Down
characters -
upper
and lower
case characters,
numerals
and
punctuation
NOTES:
The
secondary address
in
your
OPEN
stat
ement
deter-
mines which character
set
the
printer
will use.
To
print Cursor Up: OPEN 3,4,0 or OPEN 3,4
To
print Cursor Down: OPEN 3,4,7
Keep in
mind
that
these codes are controlled on
the
screen
independently
of
the
printer. (On
the
screen you
switch
from
Cursor Up to Cursor
Down
mode
by pressing
the
Commodore
and Shift keys at
the
same time.)
This
can be a
little
confus-
ing-what
you see
on
the screen is
not
necessarily
what
you'll
Page 34
get from
the
printer.
If
you're programming
for
a Cursor Down
printout, we
recommend
that
you set the screen to reflect
the
Cursor
Down
display.
Reverse
Fidd
CHR$(18)
Reverse field - prints
white
characters
against a black background
CHR$(146) Reverse field off - returns to standard
black-on-white printing
NOTE:
This
feature is
automatically
cancelled at the end of the line.
Put
CHR$(l8)
at
the
beginning of each line you want
to
print
in reverse field.
Indenti"9/Tabs
CHR$(161;lnn"
Indent -starts
printing
at
column
num-
ber
"nn"
NOTES;
1.
This
command
can
be
used
at
the beginning of a line to in-
dent
or
in
the
middle of a
line
to tab.
2.
The
columns
are
as wide as a
character-I
110
inch
in
nor-
mal print,
1117
inch
in
fine print.
28
Ptlg
e
Fonnatti"9
CHR$(13)
CHR$(27);
CHR$(10h
CHR$(n);
NOTES:
Line Feed - advances
the
page by
one
line
Fine Line Feed - advances page by nl144
inch
1.
n can be any
number
between 0 and 255. When n is
0,
the
line feed is
2561144
inch
.
2.
This
code should go
at
the
end of a line and a semicolon
must
always follow it.
CHR$(12)
Form Feed (New Page) - advances
the
pa-
per to the first printing line of
the
next
page
Continuous
Printi"9
CHR$(27);"A"
Automatic
Skip
ON -when
the
printer
comes to
within
112
inch
of
the
bottom
of an
11
inch
page,
it
automatically
skips to the first
print
line
of
the
next
page
CHR$(27);"B"
Automatic
Skip OFF -
the
printer prints
continuously
without
skipping
NOTES :
The
printer
will perform an
automatic
skip unless
you add
the
automatic
skip off
command
to
your program.
This
feature
may
interfere
with
some word processing packages
that
perform
their
own
page formatting. For
more
information on
how
to
tum
off
automatic
skip when you're using a word pro·
cessor, see page 43.
Page 35
Fim
Positionill9
This feature lets you
start
printing
at
a
specific distance from
the
left margin. This
distance is measured
in
dot columns,
which
is 1/60" wide for normal print. (There are 480
dot columns on a line.)
NOTE:
If
you're
usin
g fin e print or bold print, the distance
from
th
e left margin will be measured
in columns that
are
1110
3"
wide. The procedure is the same,
but
keep
in
mind
that
th
ere are 824 dot
column
s on a line of fine print.
Suppose you
wanted
to
start
printing
at
the
180th column,
which
would be three inches
from the margin . Add this command:
PRINT#3,CHR$(27);CHR$(16);
Follow the
command
with
two codes
which
represent
the
number
of dot columns . Take
the
number
of dot columns (180
in
our exam-
ple) and divide
it
by 256.
The
quotient is
the
first code;
the
remainder is
the
second. First
divide 180 by 256, like this:
J
quotient
256)180
- 0 subtract
180 remainder
29
Now, take
the
quotient
and
the
remainder
and add
them
to your
print
statement,
fol-
lowed by your text:
PRINT#3,CHR$(27);CHR$(16);
CHR$
(0) ; CHR$
(150)
; "TEXT
...
"
BCack
and White Graphics
You can use OKIMATE
with
any graphics
program
that
can produce a
printout-just
by
following the directions for
the
Commodore
1525
in
your software manual. You can also
program graphics directly,
but
it
takes a
little
bit of paperwork.
The first step is to
map
out
your image on a
piece
of
graph paper. OKlMATE
prints
graph-
ics
in
columns of seven dots, so divide your
picture, like ours',
into
seven-row strips .
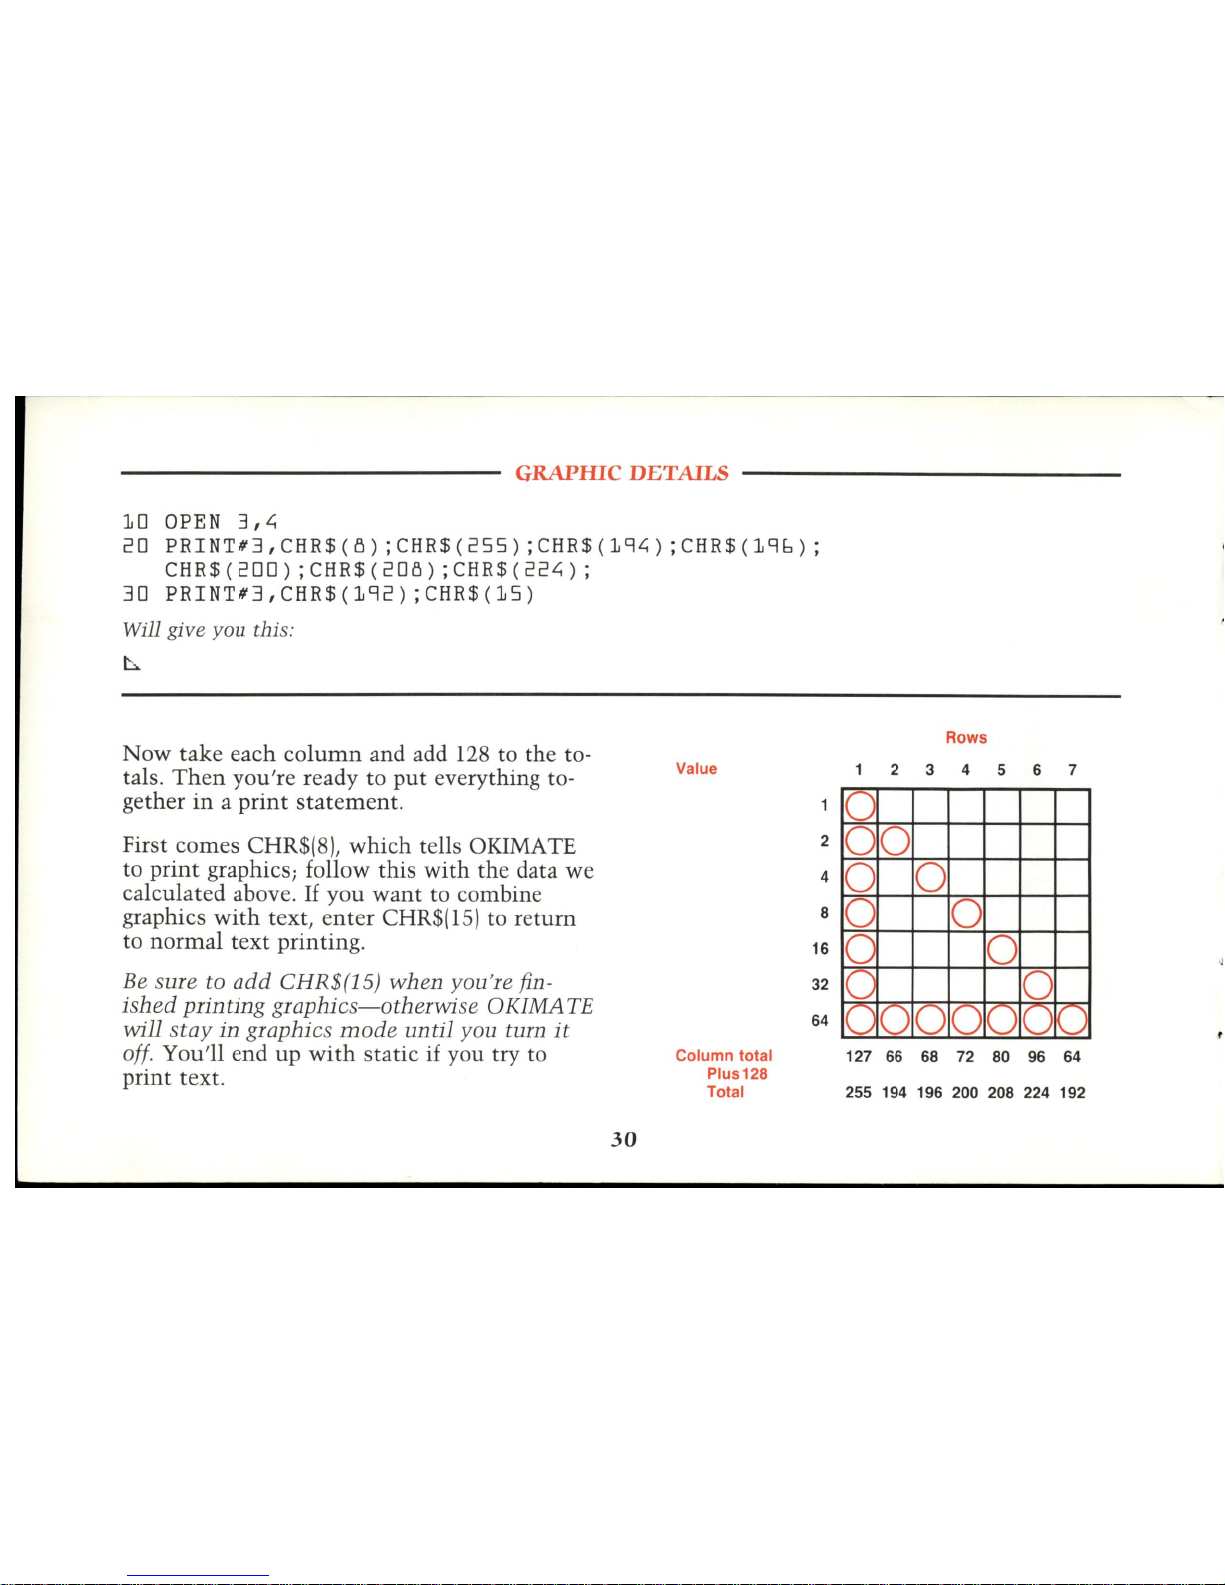
The numbers on
the
left
show
the
value of
each dot position
in
a column. Starting
at
the
left column add
the
values for each position
that contains a dot.
Then
add
the
next
col-
umn
to
the
right and so on
until
you have a
total value for each of
the
seven columns.
Page 36
- -
--
- - - -
---
--------
----
---
--
---
-
---
----
- - - -
GRAPHIC
DETAILS
-------------
10
OPEN
3,L;
20
PRINT#3,CHR$(5);CHR$(255);CHR$(19L;);CHR$(196);
CHR$
(200)
; CHR$
(205) ; CHR$
(22L;)
;
30
PRINT#3,CHR$(192)
;CHR$(15)
Will gi
ve you
thi
s:
~
Now
take
each
column
and add
128
to the to-
tals .
Then
you're
ready to
put
everything to-
gether
in a print
statement
.
First
comes
CHR$(8),
which
tells OKIMATE
to
print
graphics; follow this
with
the
data we
calculated above.
If
you
want
to combine
graphics
with
text, enter CHR$(IS) to re
turn
to
normal
text
printing
.
Be sure
to
add
CHR$ (15) when you're fin-
ished printing graphi
cs
-oth
erwise OKlMATE
wi
ll
stay
in
graphics
mod
e until you turn
it
off.
You 'll
end
up
with
static
if
you try to
print
text.
30
Value
2
4
8
16
32
64
Column total
Plus128
Total
Rows
2 3 4 5 6 7
0
0
0
0
0
0
0
0 0
10 0
I
C)
0 0 0
r,
I
C)
If'
\..../
I
\,../
127
66
68
72
80
96
64
255 194 196 200 208 224 192
Page 37
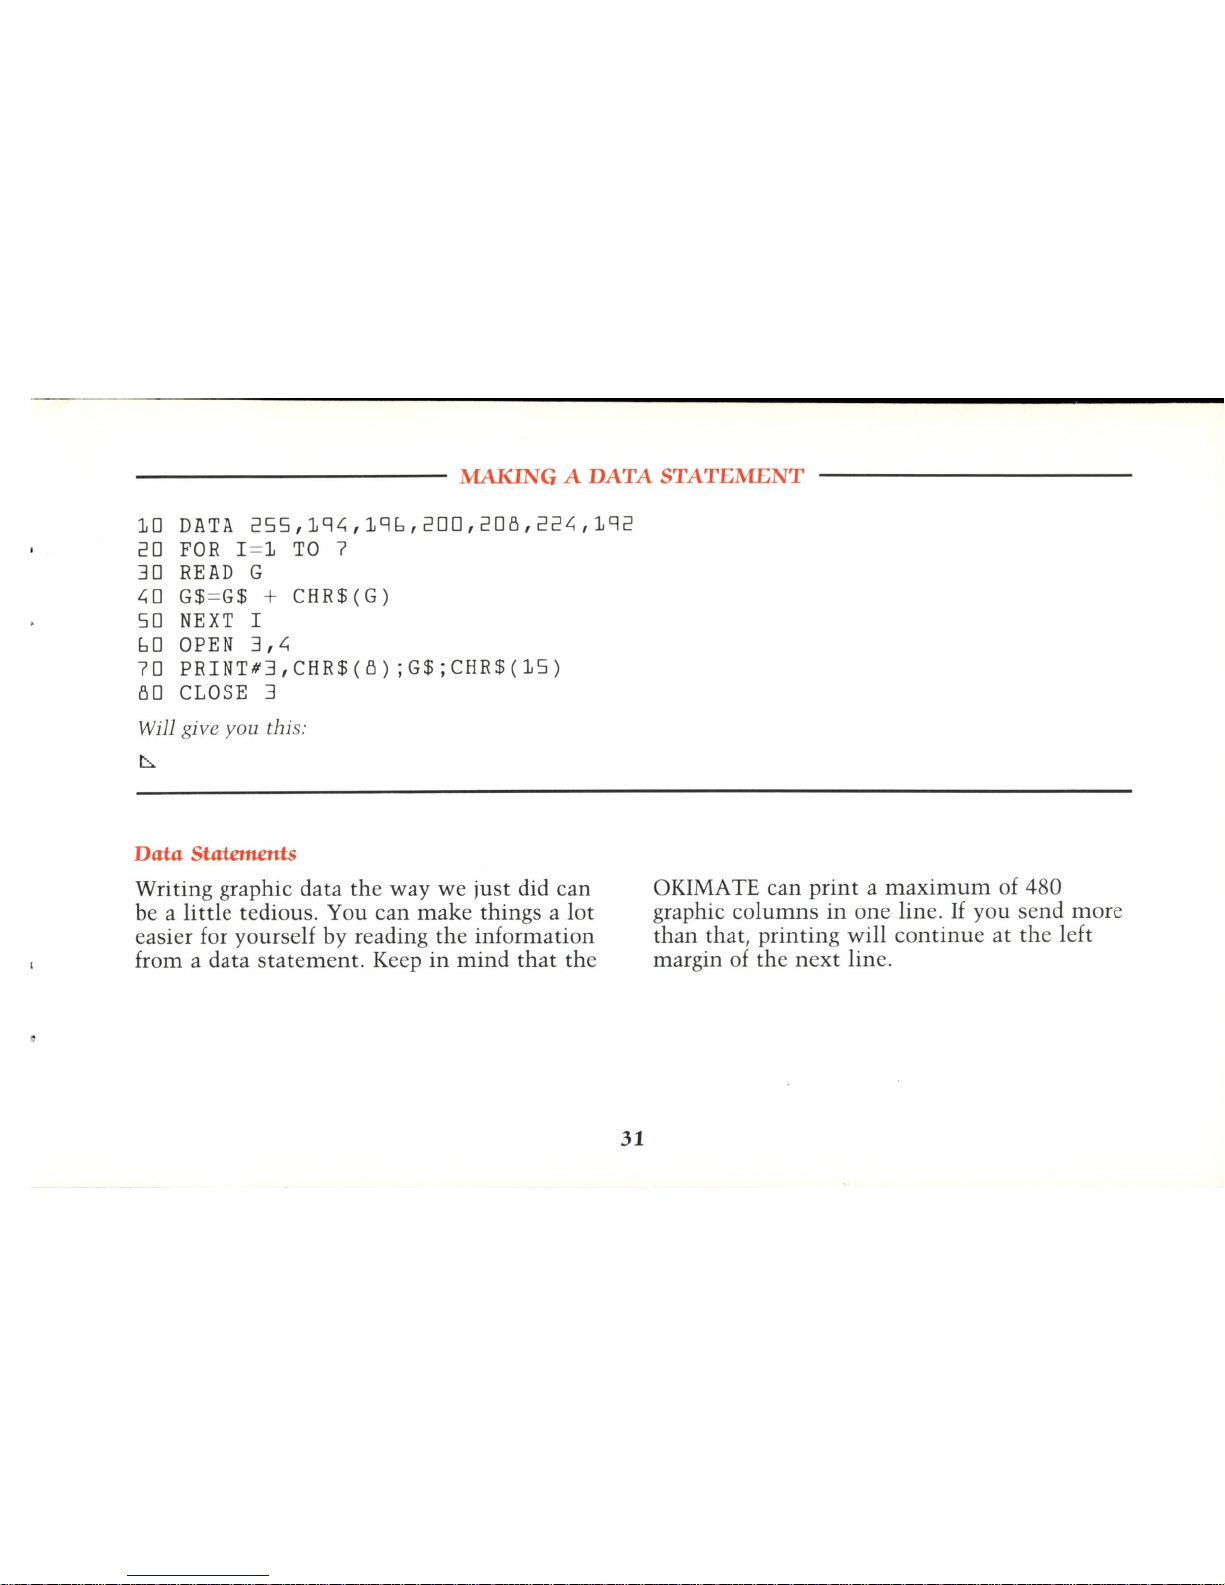
MAKING
A
DATA
STATEMENT
-----------
10
DATA
255,19~,196,200,205,22~,192
20
FOR
1=1
TO
7
3D
READ
G
~O
G$=G$
+ CHR$(G)
50
NEXT
I
60
OPEN
3,~
70
PR1NT#3,CHR$(5);G$;CHR$(15)
50
CLOSE
3
Will give you this:
b..
Data. Statements
Writing graphic
data
the
way
we
just
did can
be a
little
tedious. You can
make
things a
lot
easier for yourself by reading
the
information
from a
data
statement.
Keep
in
mind
that
the
31
OKIMATE can
print a maximum
of 480
graphic
columns
in
one
line.
If
you send
more
than
that,
printing
will
continue
at
the
left
margin of
the
next
line.
Page 38
------------------------
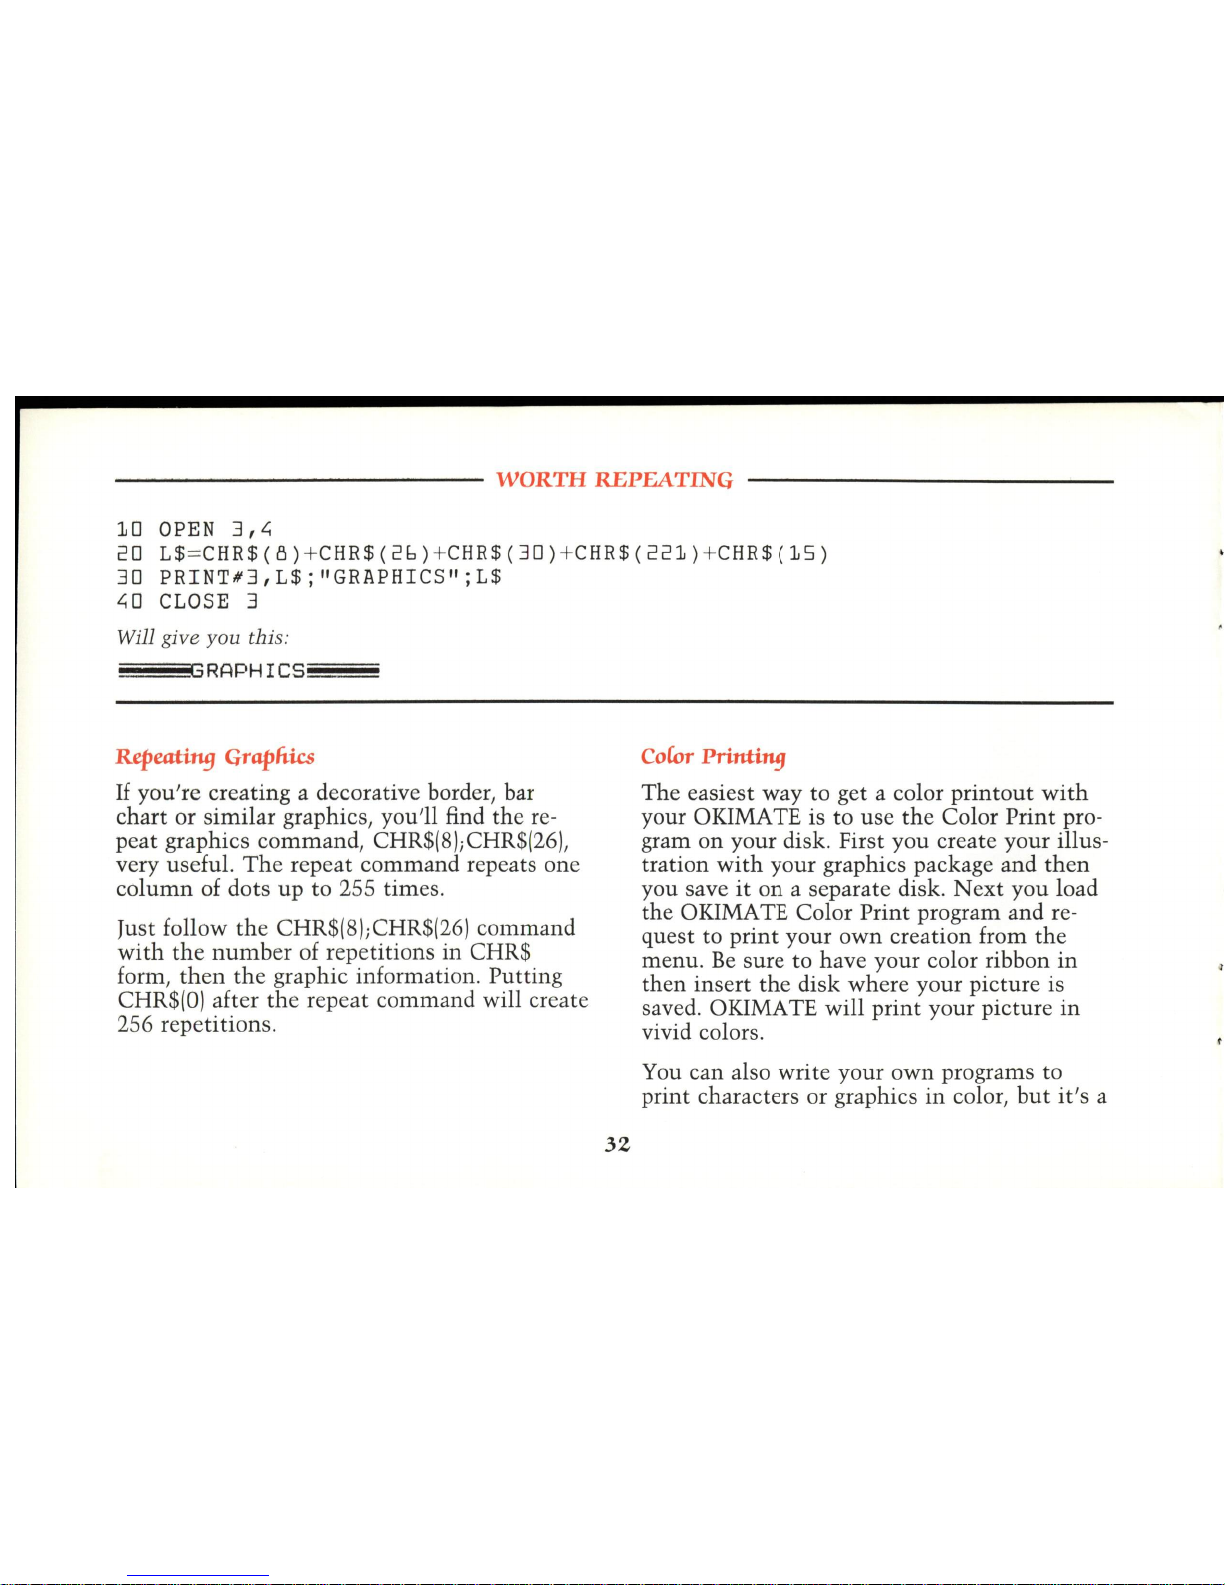
WORTH REPEATING
10
OPEN
3,L;
20
L$=
CHR$(8)+CHR$(26)+CHR$(30)+CHR$(221)+CHR$(15)
30
PRINT#3,L$;"GRAPHICS";L$
L;o
CLOSE
3
Will give
you
this:
~~~GRAPHICS~~
Repeating Graphics
If
you're
creating a decorative border, bar
chart or
similar
graphics, you'll find
the
re-
peat graphics
command,
CHR$(8liCHR$(26j,
very useful.
The
repeat
command
repeats one
column
of
dots up to 255 times.
Just follow
the
CHR$(8)jCHR$(26)
command
with
the
number
of repetitions in CHR$
form,
then
the
graphic information. Putting
CHR$(O)
after
the
repeat command will create
256
repetitions
.
32
Co
Cor
Printing
The
easiest way to get a color
printout
with
your OKIMA TE is to use
the
Color
Print
pro-
gram
on
your disk. First you create your illus-
tration
with
your graphics package and
then
you save
it
on
a separate disk.
Next
you load
the
OKIMA TE Color
Print
program and re-
quest to
print
your
own
creation from
the
menu. Be
sure to have your color ribbon
in
then
insert
the
disk where your picture is
saved.
OKIMA TE will
print
your
picture
in
vivid colors.
You can also
write
your
own
programs to
print
characters or graphics
in
color,
but
it's
a
Page 39
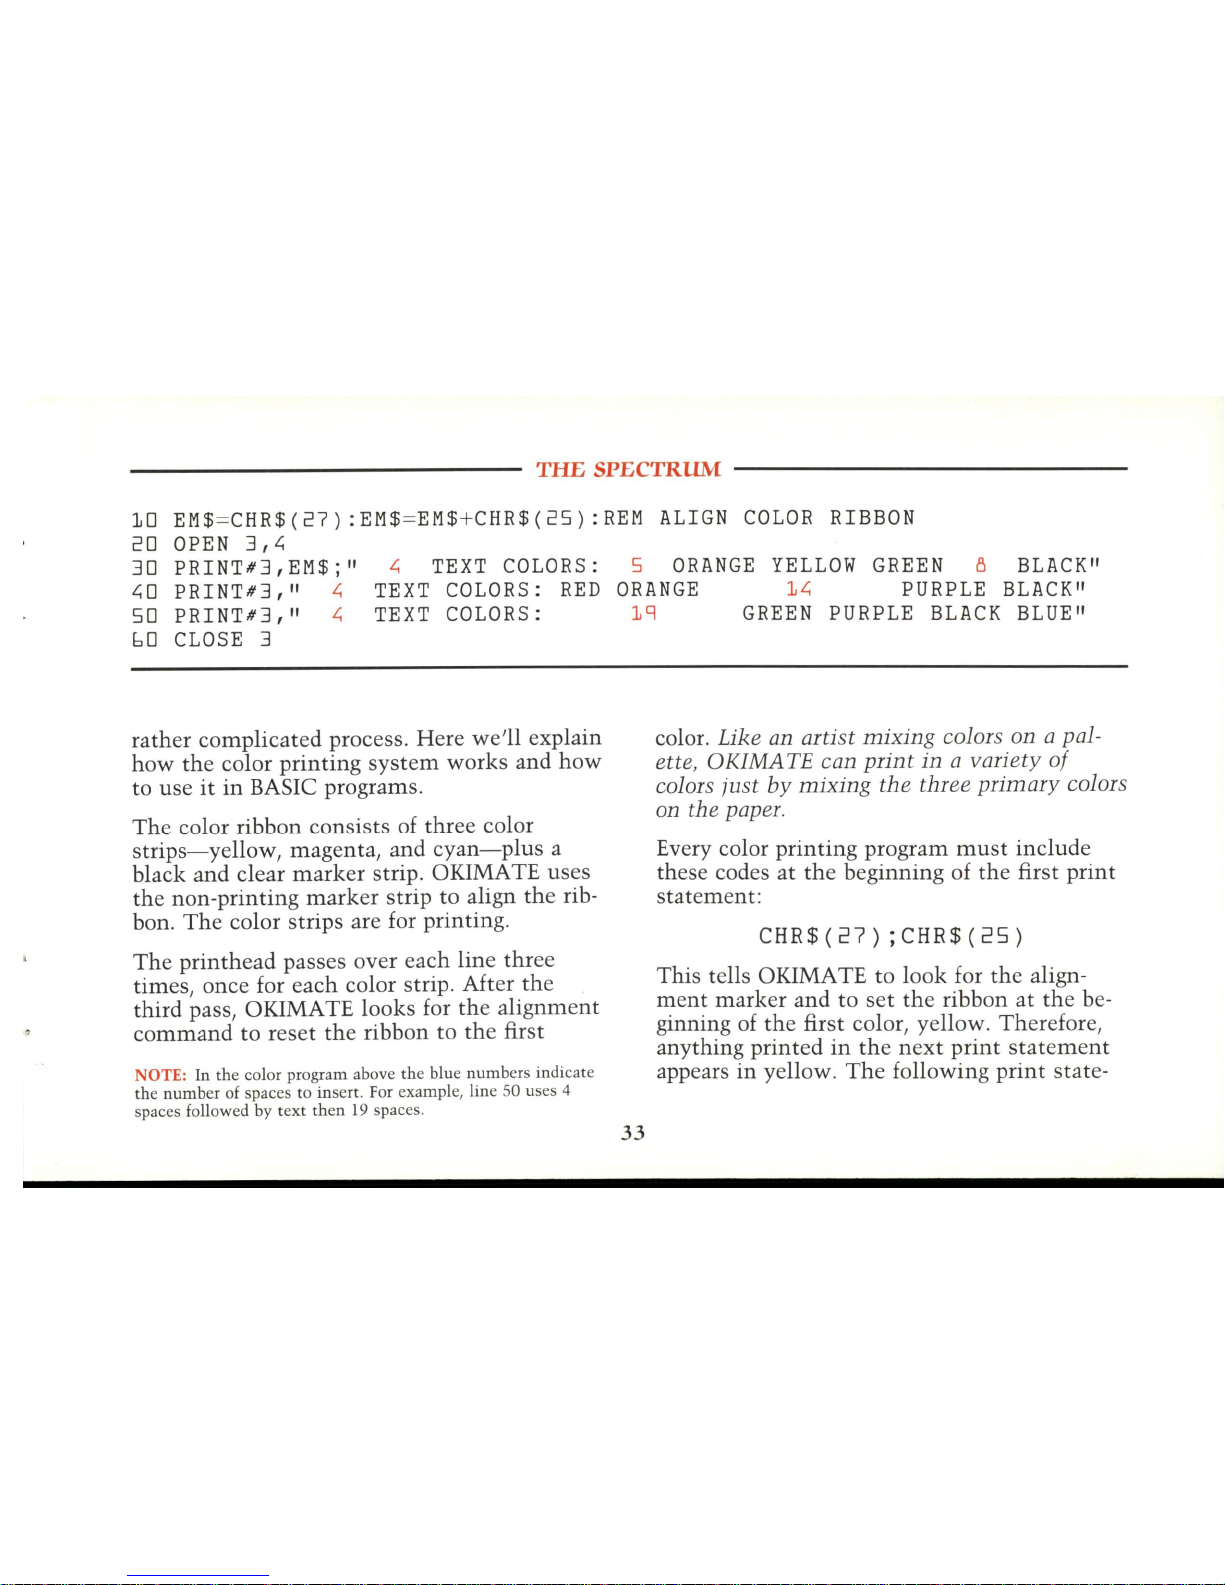
THE
SPECTRUM
-------------
10
EM$
=CHR$(27):EM$ =EM$+CHR$(25):REM
ALIGN
COLOR
RIBBON
20
OPEN
3,t;
3D
PRINT#3,EM$;"
t;0
PRINT#3,"
t;
50
PRINT#3,"
t;
60
CLOSE
3
t;
TEXT
COLORS:
5
ORANGE
YELLOW
GREEN
8
BLACK"
TEXT
COLORS:
RED
ORANGE
1t;
PURPLE
BLACK"
TEXT
COLORS:
19
GREEN
PURPLE
BLACK
BLUE"
rather complicated process. Here we'll explain
how
the
color printing
system
works and
how
to use
it
in
BASIC programs.
The
color ribbon consists
of
three color
strips-yellow,
magenta, and
cyan-plus
a
black and clear
marker
strip. OKIMA TE uses
the non-printing
marker
strip to align
the
rib-
bon.
The
color strips are for printing.
The
printhead passes over each line three
times, once for each color strip. After
the
third pass, OKIMA TE looks for
the
alignment
command
to reset
the
ribbon to the first
NOTE:
In
the color program above th e blue
numbers
indicate
the number of spaces
to
insert. For example, line
SO
uses 4
spaces followed
by
text then 19 spaces.
33
color. Like
an
artist
mixing
colors on a pal-
ette, OKIMATE can
print
in
a variety
of
colors just
by
mixing
the
three primary colors
on the paper.
Every color printing program
must
include
these codes
at
the
beginning of
the
first
print
statement:
CHR$(27)
;CHR$(25)
This tells OKIMATE to look for
the
align-
ment
marker and to
set
the
ribbon
at
the
be-
ginning
of
the
first color, yellow. Therefore,
anything printed
in
the
next
print
statement
appears
in
yellow.
The
following print state-
Page 40
ment
data appears
in
magenta and
the
third
appears
in
cyan
.
At
the
end
of
the
third
print
statement, add
CHR$(
13)
to
return
the
printhead to
the
left
and to advance
the
paper one line.
The
next
print
statement
must
again begin
with
the
alignment
command,
CHR$(27)iCHR$(25).
Don't forget to insert the color ribbon before
trying this print sample!
Co
Cor
Sfuufif19 (For
E~perts
Only)
The
program
you
just
did printed seven
colors,
but
OKIMATE
isn't
limited to
that. By
combining
dot
graphics and color printing,
you
can
create a variety of resolutions and
hues.
The
secret
to
reproducing
the
colors
in
our
program
on
page 35 is a checkered graphic
pattern
that
combines
color dots
with
white
spaces.
34
When you
print
this
pattern
in
color, you get
a light shade of
that
particular color, since
the
color you choose is mixed
with
white. For ex-
ample, a checkered red gives you a
pink
shade.
By
combining light colors
with
other
light colors, you can create dozens of colors.
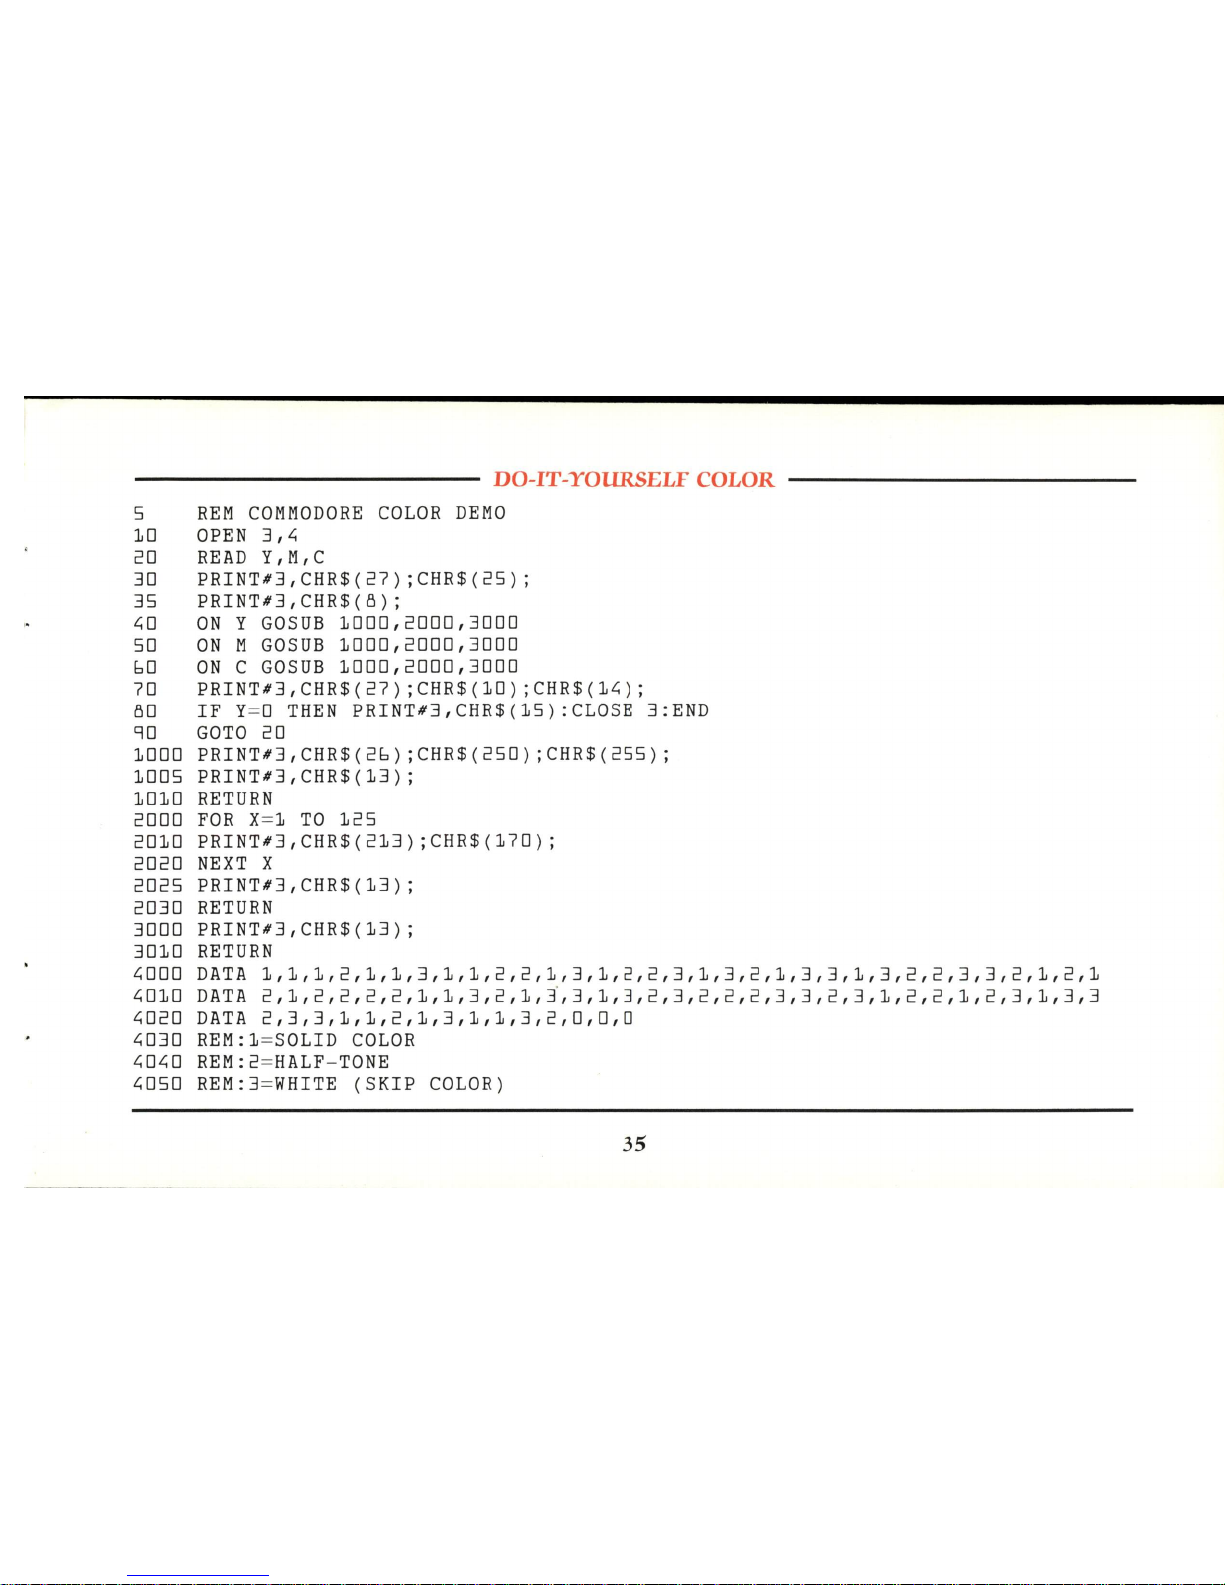
The
program
we've
provided will give you a
printout
of 26 colors.
It
uses three subroutines
to create solid blocks of color, checkered patterns and
white
spaces.
The
data
statements
in
lines 4000, 4010 and 4020
list
the
possible
combinations of yellow,
magenta
and cyan us-
ing
these
subroutines:
Page 41
5
10
cD
3D
35
L;O
50
60
70
50
90
1000
1005
1010
COOO
c010
cOcO
COC5
c030
3000
3010
L;OOO
L;010
L;OCO
L;030
L;OL;O
L;050
DO-IT-YOURSELF COLOR
------------
REM
COMMODORE
COLOR
DEMO
OPEN
3,L;
READ
Y,M,C
PRINT#3,CHR$(c7);CHR$(c5);
PRINT#3,CHR$(5);
ON Y GOSUB
1000,COOO,3000
ON M GOSUB
1000,COOO,3000
ON C GOSUB
1000,COOO,3000
PRINT#3,CHR$(c7)
;CHR$(10);CHR$(1L;);
IF
y=o
THEN
PRINT#3,CHR$(15):CLOSE
3:END
GOTO
cD
PRINT#3,CHR$(c6)
;CHR$(c50);CHR$(c55);
PRINT#3,CHR$(13)
;
RETURN
FOR
X=1
TO
1c5
PRINT#3,CHR$(c13);CHR$(170);
NEXT
X
PRINT#3,CHR$(13);
RETURN
PRINT#3,CHR$(13);
RETURN
DATA
1,1,1,c,1,1,3,1,1,c,c,1,3,1,c,c,3,1,3,c,1,3,3,1,3,c,c,3,3,c,1,c,1
DATA
c,1,c,c,c,c,1,1,3,c,1,j,3,1,3,c,3,c,c,c,3,3,c,3,1,c,c,1,c,3,1,3,3
DATA
c,3,3,1,1,c,1,3,1,1,3,c,O,O,O
REM:1=SOLID
COLOR
REM:c=
HALF-TONE
REM:3 =
WHITE
(SKIP
COLOR)
35
Page 42
OKIMATE
10
COMMODORE
COMMAND
REFERENCE
CHART
Function
Decimal
Hexadecimal
Function
Decimal
Hexadecimal
Character
sizes:
Formatting
(cont.)
Normal
15
OF
CR
and
one
line feed
10
OA
Wide
15
14
OF
OE
Perforation
skip
on
2765
1B
41
Fine 29
lD
Perforation
skip
off
2766
IB 42
Bold 29 14
lD
OE
Tabbing
16
n
IOn
Color
printing
: Graphics:
Align
ribbon
272
5
IB
19
Start
8
08
End of
line
13
OD
Stop
15
OF
Cursor
mode:
Repeat
26 n 1A n
Cursor
up
145
91
Reverse field:
Cursor
down
17
11
Reverse image
18
12
Fine
line
spacing 27 10 n
1B
OA
n
Re
turn
to
normal
146
92
Formatting:
Starting
position
:
Advance
to
new
page
12
OC
Dot
column
27
16
n1
n2
1B
10
n1
n2
Carriage
return
13
OD
Character
col
umn
16
nl
n2
10
n1
n2
NOTE: The lower case " n" given
with
some of the
command
s represents a variabl e
number.
36
Page 43
37
DroU"9
with
n-0u6Ce
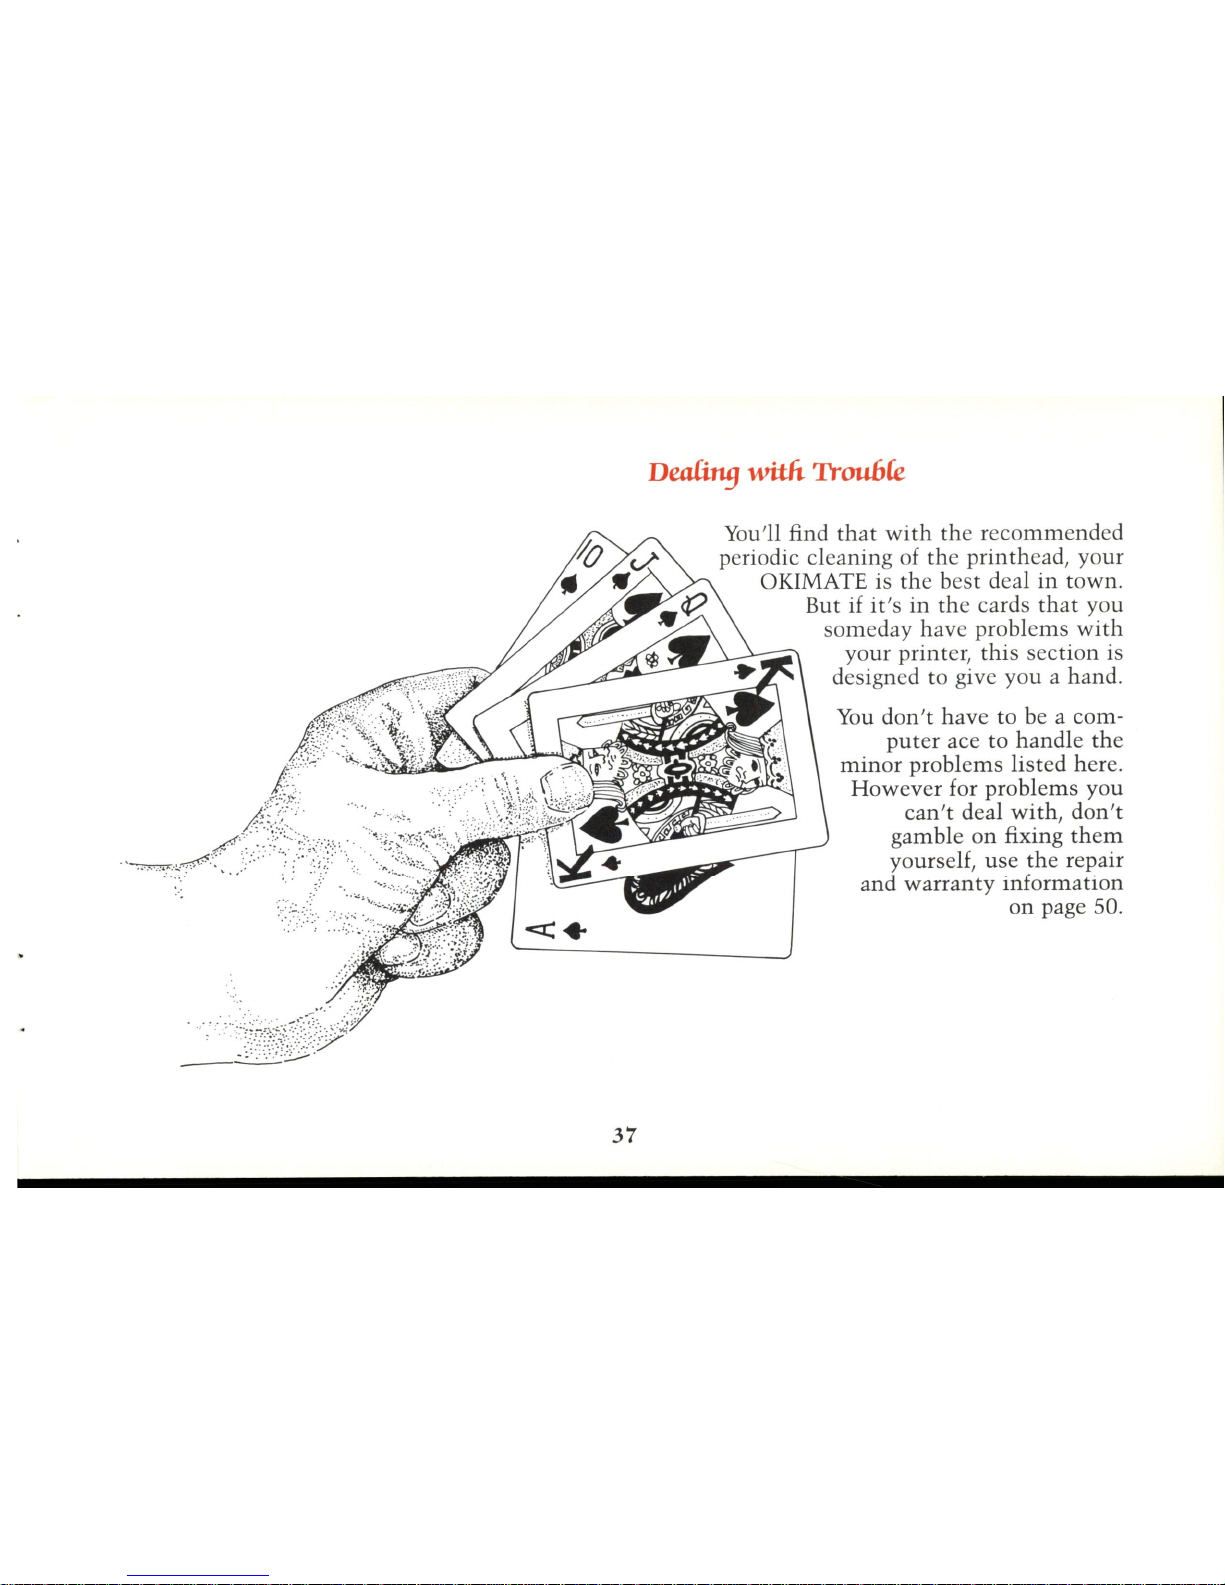
You'll find
that
with
the
recommended
periodic
cleaning
of
the
printhead,
your
OKIMATE is
the
best
deal
in
town.
But if
it's
in
the
cards
that
you
someday
have
problems
with
your
printer,
this
section
is
designed to give you a hand.
You
don't
have
to
be a com-
puter
ace
to
handle
the
minor
problems
listed
here.
However
for
problems
you
can't
deal
with,
don't
gamble
on
fixing
them
yourself,
use
the
repair
and
warranty
information
on
page 50.
Page 44
CCeani"9
up
Wipe
the
OKIMATE paper
window
with
a
clean, damp, lint-free
cloth whenever ribbon
ink
or
dust
begins
to
accumulate.
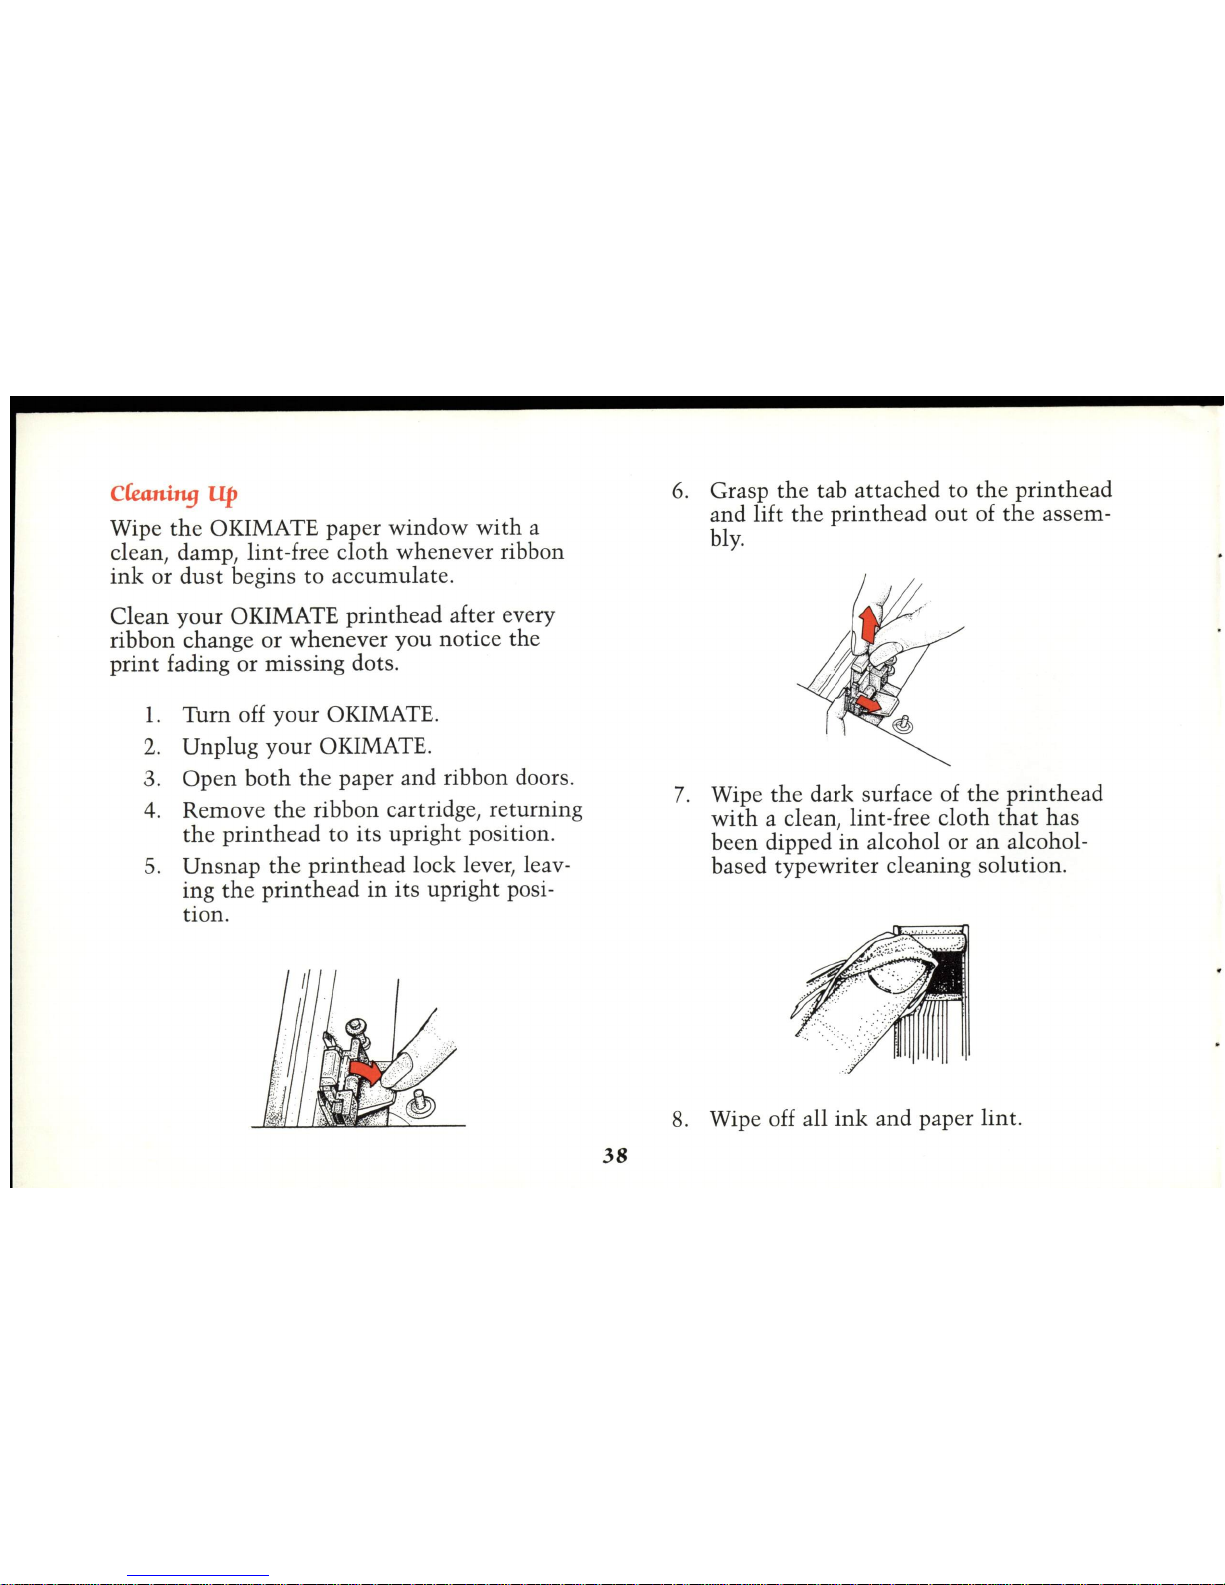
Clean
your
OKIMATE
printhead
after every
ribbon change
or
whenever
you
notice
the
print
fading
or
missing
dots.
l.
Tum
off
your
OKIMATE.
2.
Unplug
your
OKIMATE.
3.
Open
both
the
paper and ribbon doors.
4.
Remove
the
ribbon cartridge, returning
the
printhead
to
its
upright position.
5.
Unsnap the
printhead
lock lever, leav-
ing
the
printhead
in
its
upright posi-
tion.
38
6.
Grasp
the
tab
attached
to
the
printhead
and
lift
the
printhead
out
of
the
assem-
bly.
7. Wipe
the
dark surface of
the
printhead
with
a clean, lint-free
cloth
that
has
been dipped
in
alcohol or
an
alcohol-
based
typewriter
cleaning solution.
8.
Wipe off all
ink
and paper lint.
Page 45
9.
Replace
the
printhead-make
abso-
lutely
certain
that
the
black
thermal
surface faces towards
the
paper.
10. Close
the
printhead
lock
lever.
11.
Replace
the
ribbon cartridge.
12.
Close
the
paper and ribbon doors.
RepCacing
tile.
Printh.ead
If
you
notice
the
characters
or
graphics
printed
by your OKIMATE are
not
fully
formed,
with
one
or
more
dots
consistently
missing,
your
printhead
may
need replacing.
Clean
the
printhead
first, according
to
the
di-
rections
on
page 38
and
then
if
the
problem
still
persists, replace
the
printhead. (Ordering
information
is
on
page 47.)
To
replace
the
printhead,
remove
it
following
the
steps
described
in
"Cleaning
Up"
on
page
38 .
Insert a new
printhead
in
its
place-mak-
ing
absolutely
certain
that
the
dark
thermal
side of
the
printhead
faces
the
paper and
the
printhead
carriage is
in
its
upright
position.
39
CIUck'
Mate
Use
this
handy
troubleshooting
guide if
you
have any
problems
with
your
printer:
What
happens
if
. . .
·
..
the
printer
doesn't
work
and
the
READY
light
is
not
on~
Check
the
data
cable
and
the
Plug
'N
Print
control
module
connections.
Make
sure
both
your
printer
and
computer
are
switched
on.
·
..
the
READY
light
blinks
slowly~
Your
printer
is
out
of paper or ribbon. Replen-
ish
the
supply
and
press
the
SELECT
switch
when
ready
to
continue.
·
..
the
READY
light
blinks
rapidly
and
the
printer sl
ows
down~
The
printhead
has
overheated.
Do
not
shut
off
power-the
printer
will
automatically
resume
full speed
when
it
cools .
·
..
printing
becomes
faded or
blurred~
The
printhead
needs cleaning. Follow
the
steps
in
"Cleaning
Up"
on
page 38.
Page 46
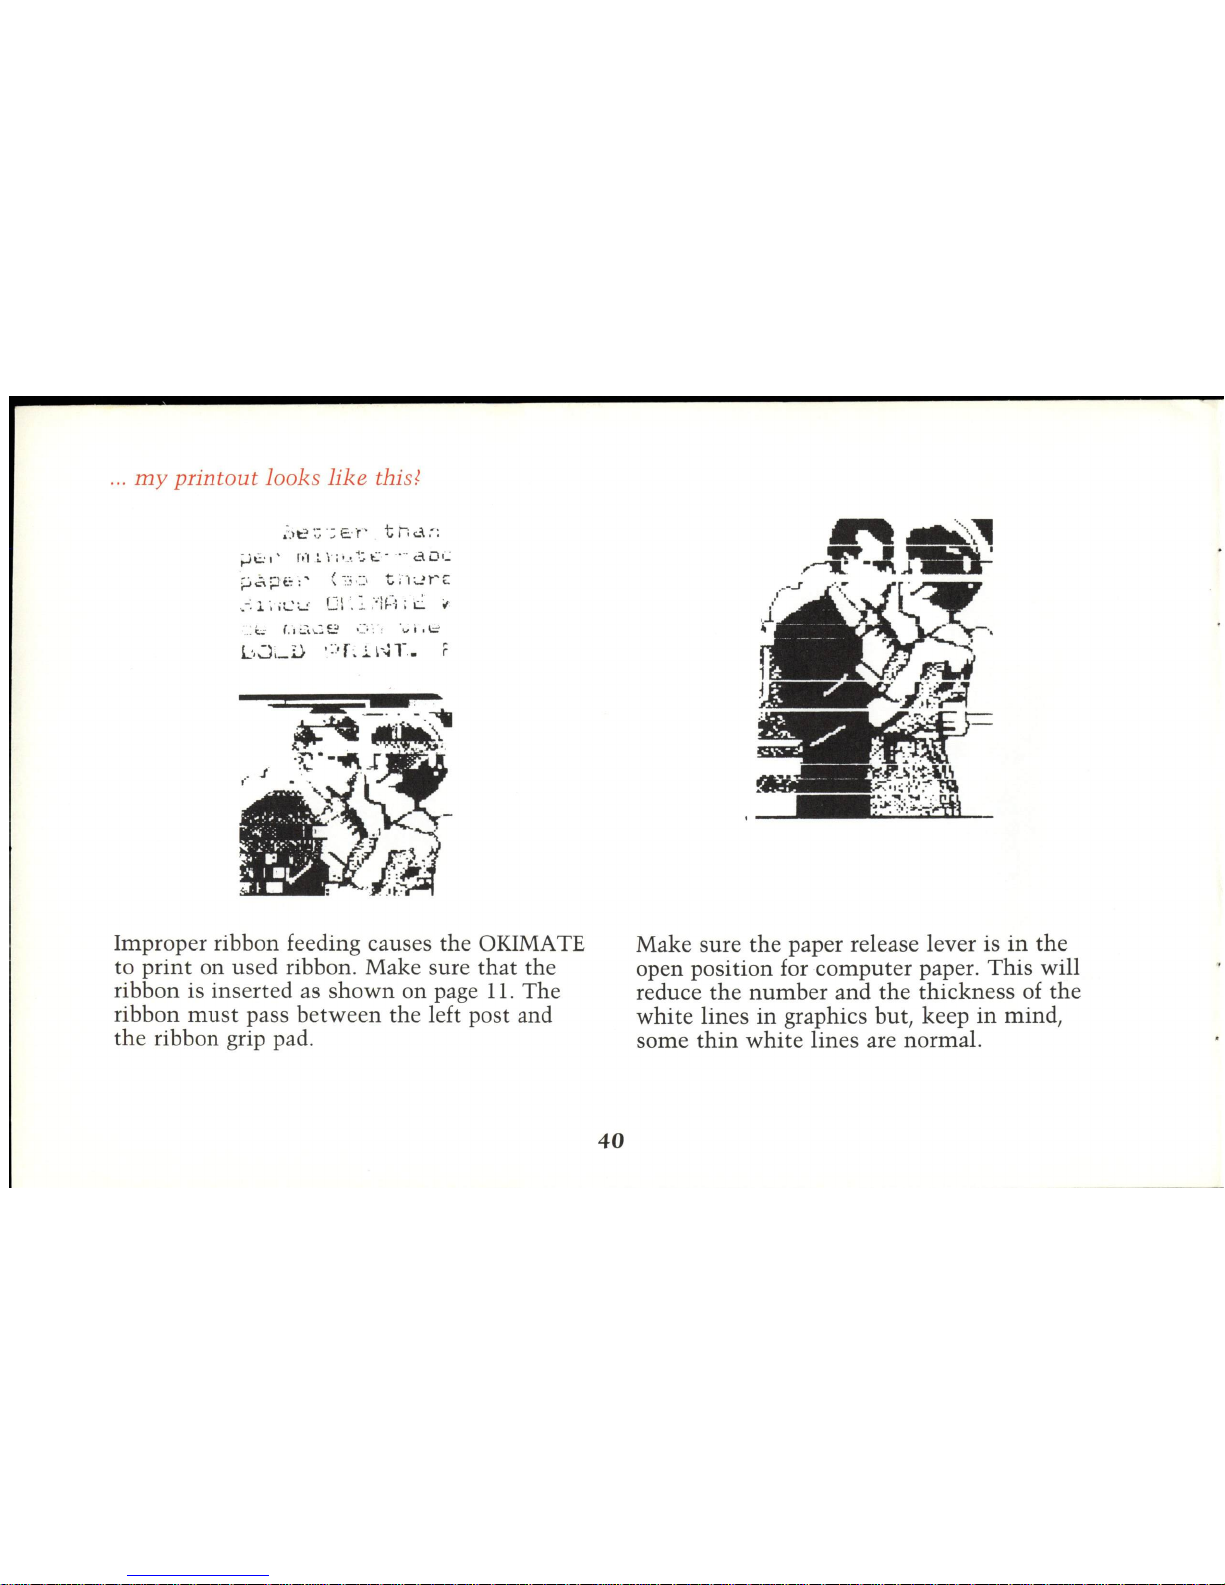
...
my
printout
looks
like
this!
pJ
c.:
I '
1",
"
~
\- i ',', t . t:: - .. "
<-='\
0
(.:
~~Pt.::;" (-
: :~,:) t;'i~t"E
...
-: 1
.~
iC~
'
rj l.:.
:;!~:.
-j
;
C.
.,
Improper ribbon feeding causes
the
OKIMA TE
to
print
on
used ribbon. Make sure
that
the
ribbon is inserted as
shown
on page
11.
The
ribbon
must
pass
between
the left post and
the
ribbon grip pad.
40
Make sure
the
paper release lever is
in
the
open position for computer paper.
This
will
reduce
the
number
and
the
thickness
of
the
white
lines
in
graphics but, keep
in
mind,
some
thin w hi
te lines are normal.
Page 47
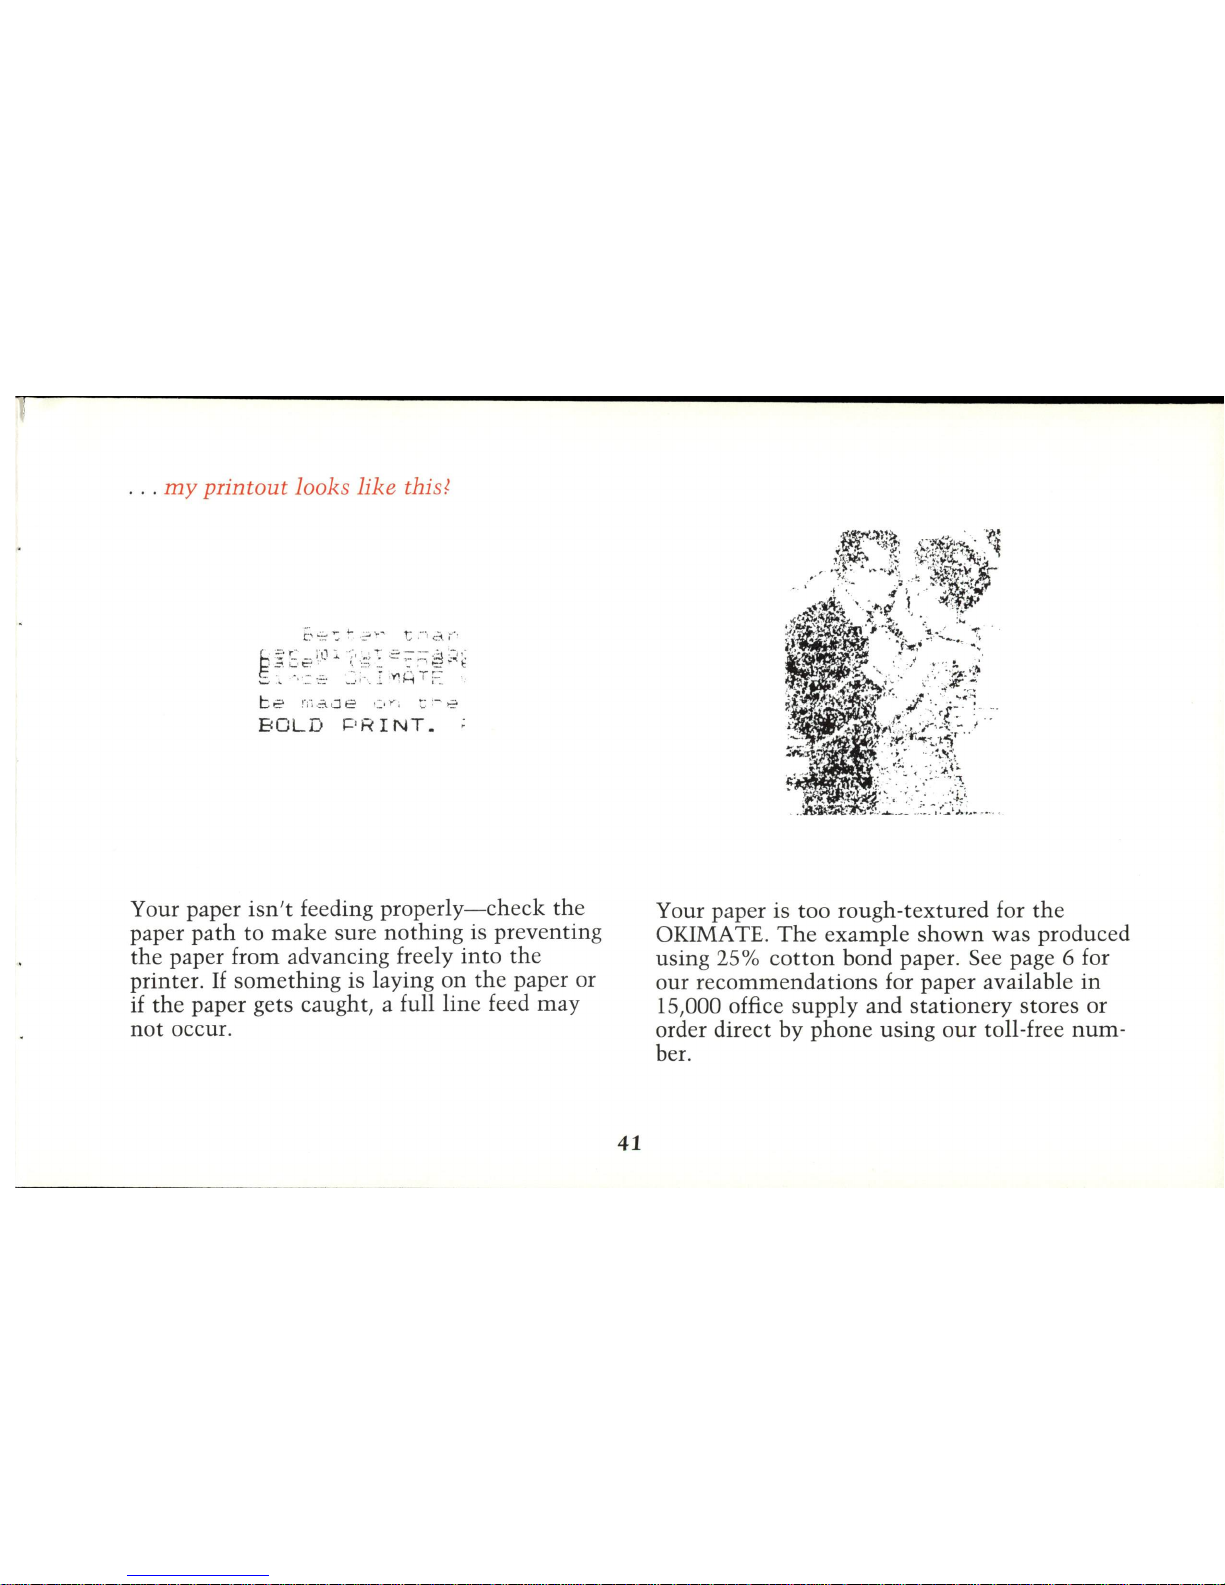
·
..
m y printout
looks lik
e thist
g
".
r- " 1 - ,,' ,
~
.:::.---:,,-,,'
___
_ ',.L J.. , I . "J .
'-;-.~
'
:::s
..
-.~
, .='. '-, t::' . '.
::;
_.
~
,'
'=-
{.
.,;:.
', -
,::,:::
.
_>,~
"'HTr.::
'
BOLD
PRINT.
Your paper
isn't
feeding
properly-check
the
paper
path
to
make
sure
nothing
is
preventing
the
paper from advancing freely
into
the
printer.
If
something
is laying
on the paper or
if
the
paper gets caught, a full
line
feed
may
not
occur.
41
Your paper is too
rough-textured
for
the
OKIMA TE.
The
example
shown
was
produced
using 25
%
cotton
bond
paper. See page 6 for
our
recommendations
for paper available
in
15,000 office
supply
and
stationery
stores or
order direct by
phone
using
our
toll-free
num-
ber.
Page 48
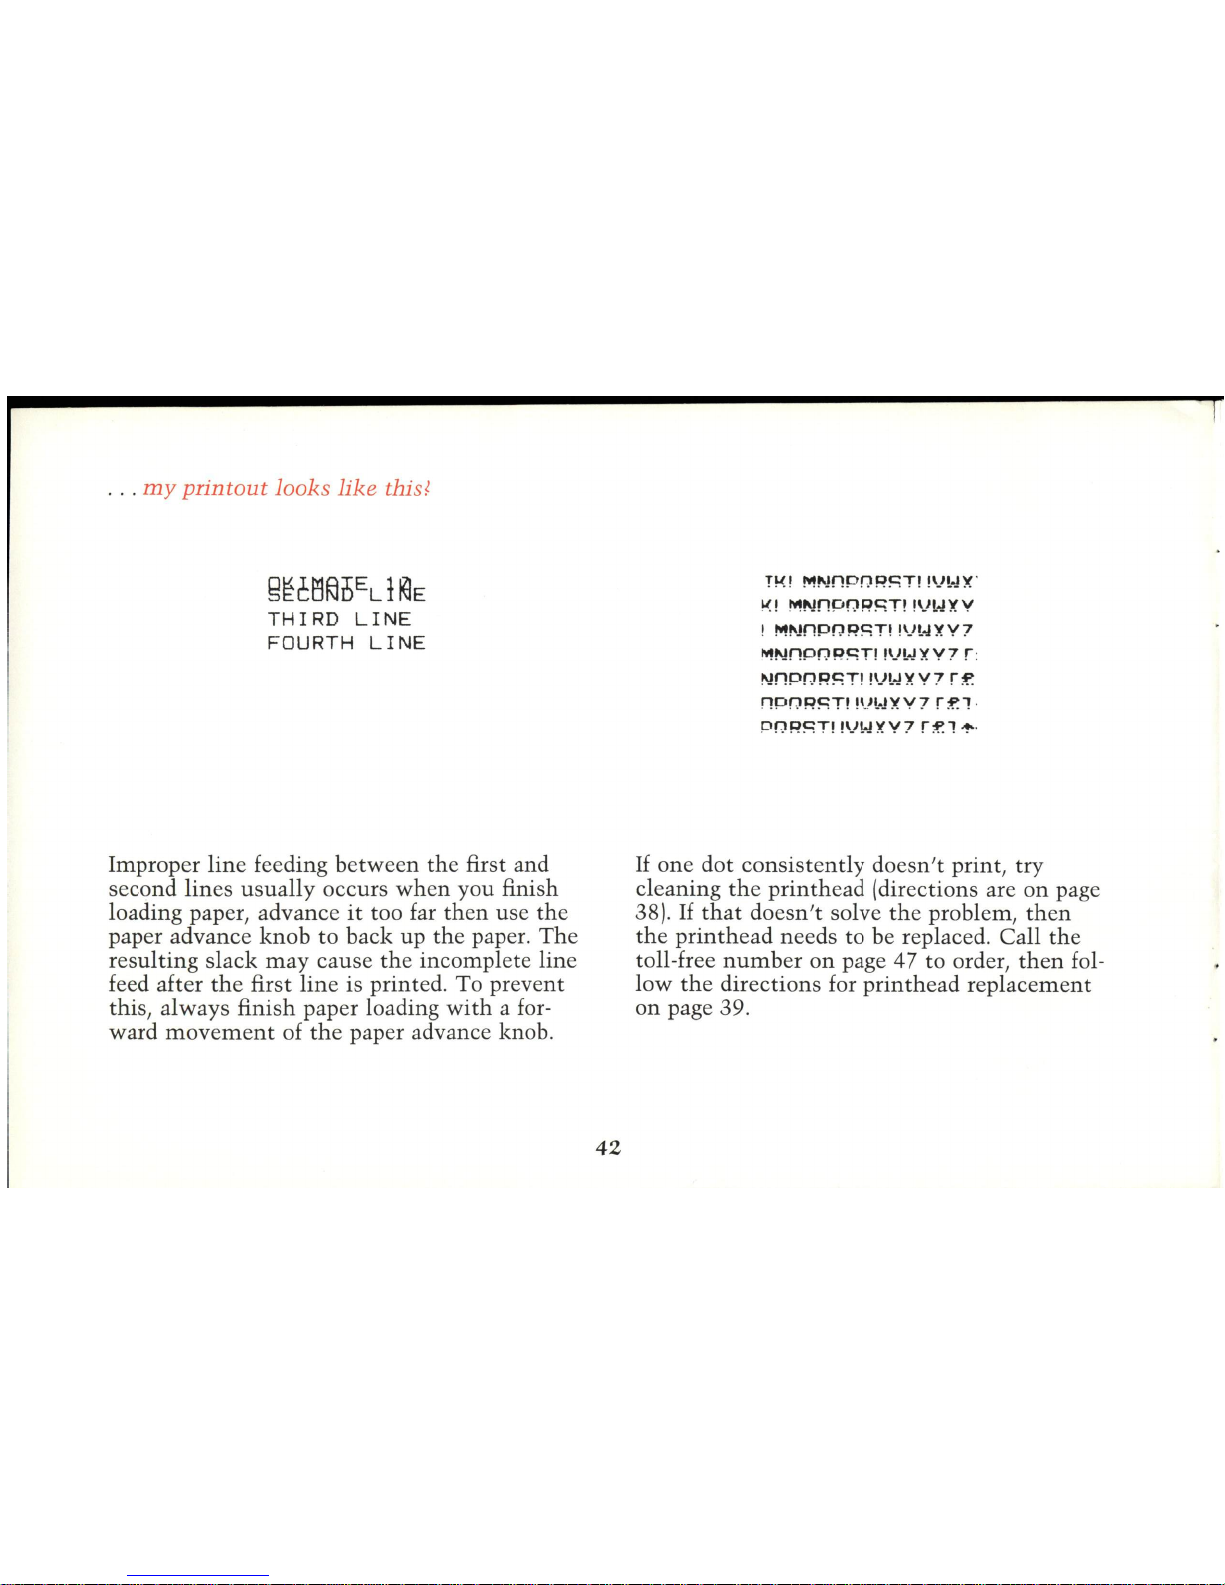
·
..
my
printout
looks
like
thist
~~C~fi;l~EL!~E
THIRD LINE
FOURTH
LINE
Improper
line
feeding
between
the
first and
second lines
usually
occurs
when
you finish
loading paper, advance
it
too far
then
use
the
paper advance
knob
to back up
the
paper.
The
resulting
slack
may
cause
the
incomplete line
feed after
the
first
line
is printed. To prevent
this, always finish paper loading
with a for-
ward
movement
of
the
paper advance knob.
42
no
M"Jf1pnpST!
!Vt
..
.!)C
K!
MNnpnpST!
!Vl..Jl(V
!
M"Jf1pnpST!
!Vt..Jl(V?
""'Nnpn
PST!
!Vt..J}(
V?
r .
NnpnpST!
!VWl(V?
r~
f1pnpST!
!vt
..
j}(V?
r~l
·
DnpST!
!vt-.!XV?
r~l""
·
If
one
dot
consistently
doesn't
print, try
cleaning
the
printhead
(directions are
on
page
38).
If
that
doesn't
solve
the
problem,
then
the
printhead
needs to be replaced. Call
the
toll-free
number
on
page 47 to order,
then
fol-
low
the
directions for
printhead
replacement
on
page 39.
Page 49
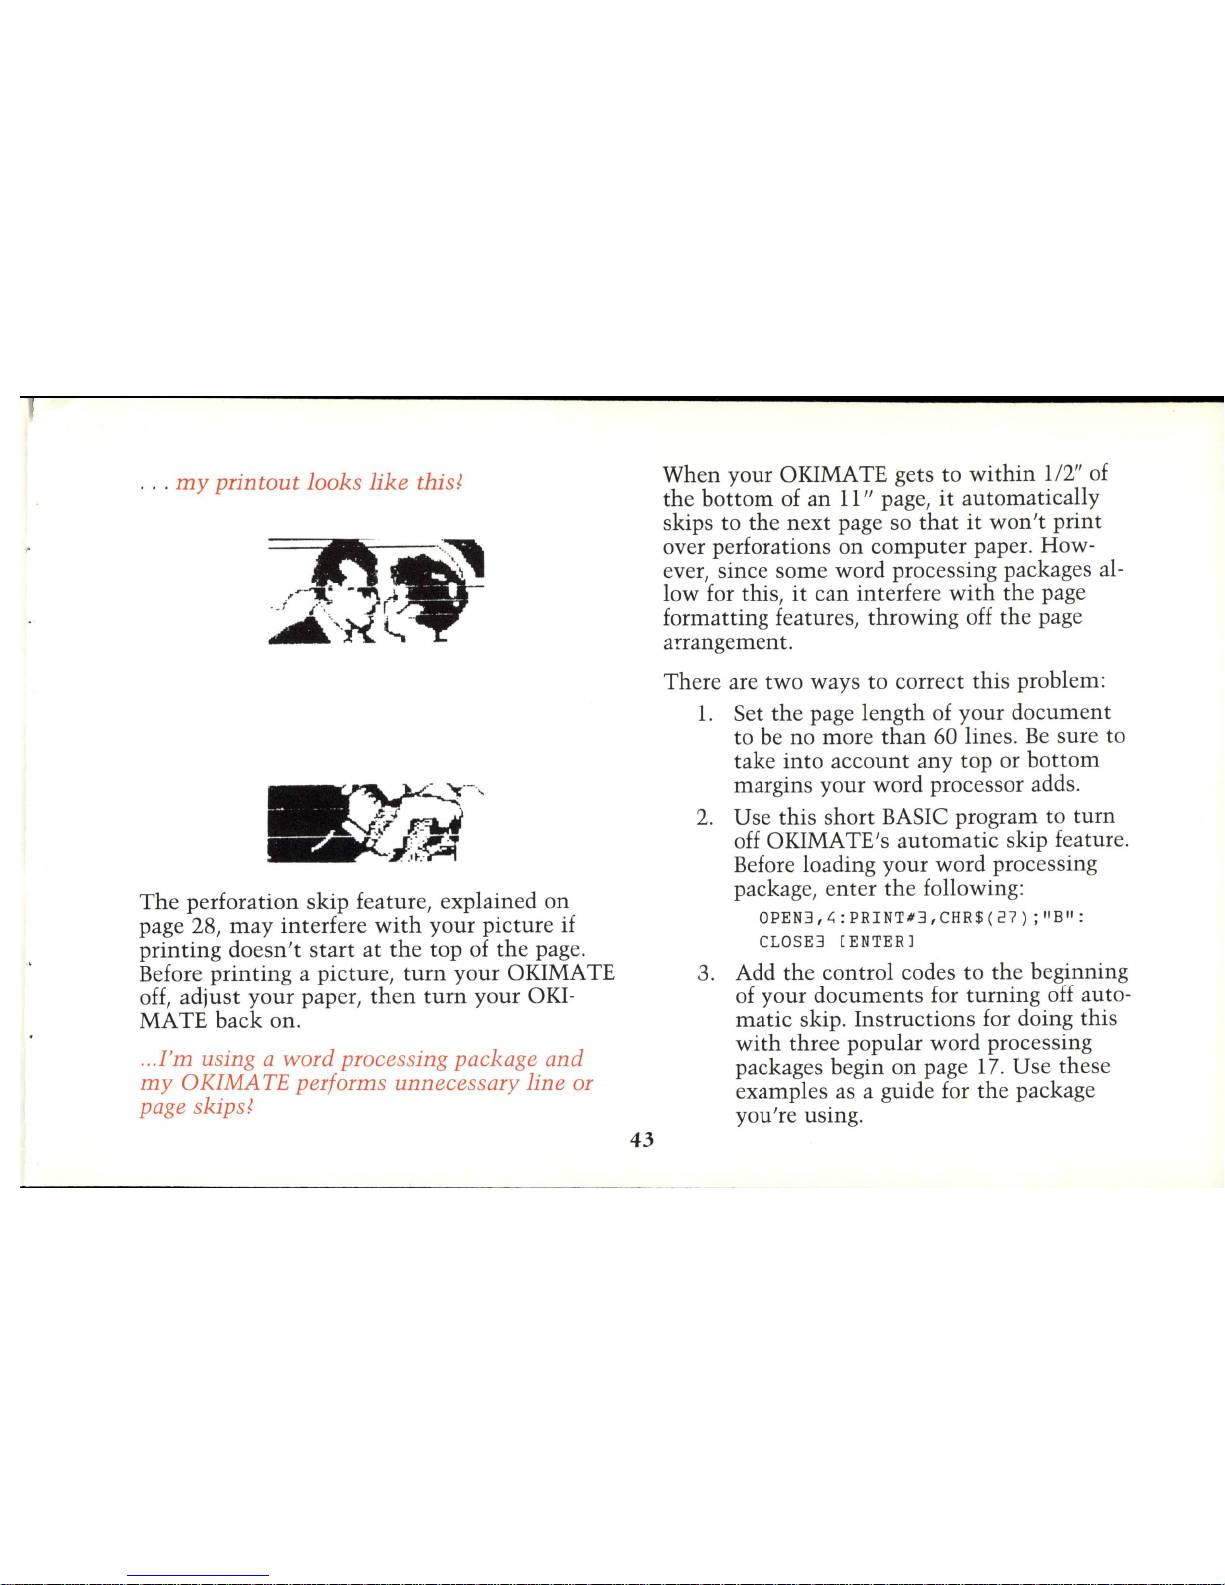
·
..
my
printout
looks
like
this!
The
perforation
skip
feature, explained
on
page 28,
may
interfere
with
your
picture
if
printing
doesn't
start
at
the
top of
the
page.
Before
printing
a picture,
turn
your
OKIMATE
off,
adjust
your
paper,
then
turn
your
OKI-
MATE
back
on.
...
I'm
using a word processing package and
my
OKIMATE performs unnecessary line
or
page skips!
43
When
your OKIMATE gets
to
within
112"
of
the
bottom
of
an
11" page,
it
automatically
skips to
the
next
page so
that
it
won't
print
over perforations
on
computer
paper. How-
ever, since
some
word processing packages al-
low for this,
it
can interfere
with
the
page
formatting features,
throwing
off
the
page
arrangement.
There are
two
ways to correct
this
problem:
1.
Set
the
page
length
of
your
document
to be no
more
than
60 lines.
Be
sure to
take
into
account
any top or
bottom
margins your word processor adds.
2.
Use
this
short
BASIC program to
turn
off OKIMATE's
automatic
skip feature.
Before loading your word processing
package,
enter
the
following:
OPEN3,L;:PRINT#3,CHR$(27);"B":
CLOSE3
[ENTER]
3. Add
the
control codes
to
the
beginning
of
your
documents
for
turning
off auto-
matic
skip.
Instructions
for doing this
with
three popular
word
processing
packages begin
on
page 17.
Use
these
examples as a guide for
the
package
you're
using.
Page 50
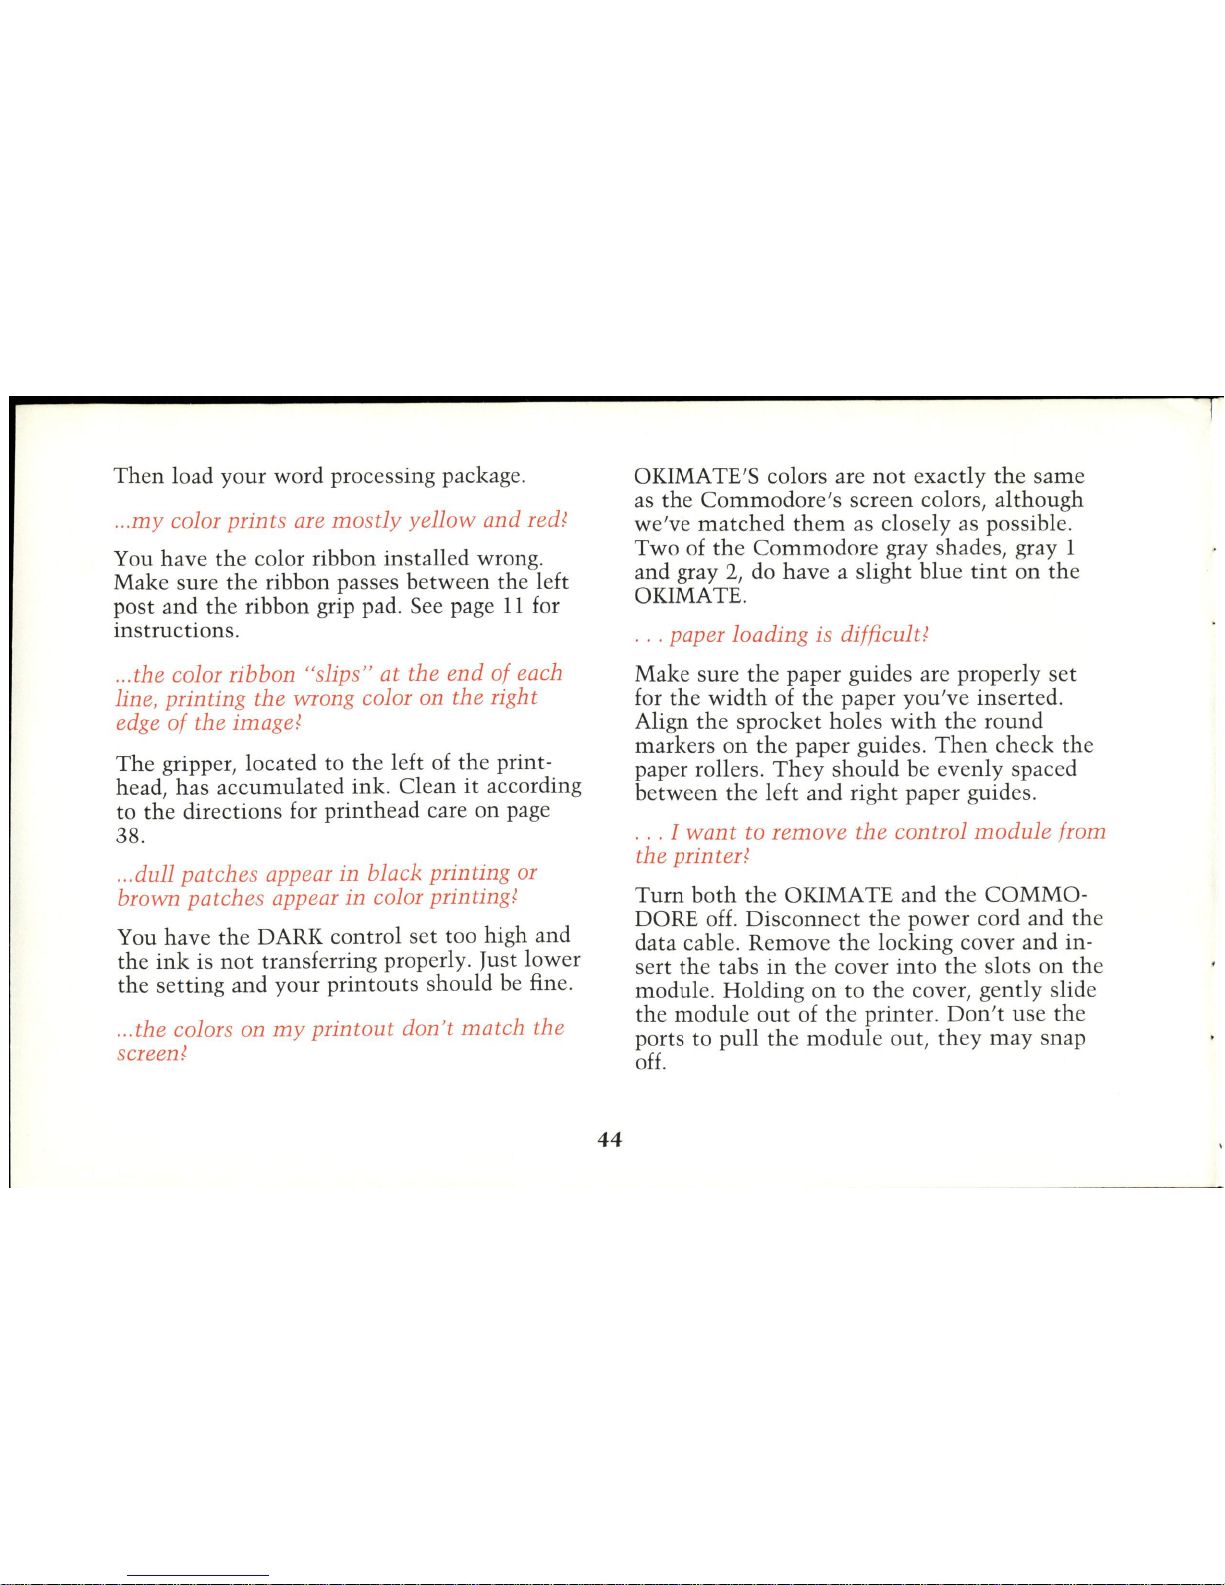
Then
load
your
word processing package.
... my
color prints are
mostly
yellow
and
red?
You
have
the
color ribbon
installed
wrong.
Make
sure
the
ribbon passes
between
the
left
post
and
the
ribbon grip pad. See page
11
for
instructions.
...
the color ribbon "slips" at the
end
of each
line, printing
the
wrong color on the right
edge
of
the image?
The
gripper, located to
the
left of
the
print-
head,
has
accumulated
ink. Clean
it
according
to
the
directions for
printhead
care on page
38.
...
dull patches appear in black printing
or
brown patches appear in color printing?
You
have
the
DARK control
set
too high
and
the
ink
is
not
transferring properly. Just
lower
the
setting
and
your
printouts
should
be fine.
... the colors on
my
printout don't
match
the
screen?
44
OKIMATE'S colors are
not
exactly
the
same
as
the
Commodore's
screen
colors,
although
we've
matched
them
as closely as possible.
Two
of
the
Commodore
gray shades, gray 1
and
gray
2,
do
have a slight
blue
tint
on
the
OKIMATE.
. . . paper loading
is
difficult?
Make
sure
the
paper guides are properly
set
for
the
width
of
the
paper
you've
inserted.
Align
the
sprocket
holes
with
the
round
markers
on
the
paper guides.
Then
check
the
paper rollers.
They
should
be
evenly
spaced
between
the
left
and
right
paper guides.
. . . I
want
to
remove
the
control
module
from
the printer?
Turn
both
the
OKIMA TE
and
the
COMMO-
DORE off.
Disconnect
the
power
cord
and
the
data cable.
Remove
the
locking
cover
and
in-
sert
the
tabs
in
the
cover
into
the
slots
on
the
module.
Holding
on
to
the
cover,
gently
slide
the
module
out
of
the
printer.
Don't
use
the
ports
to
pull
the
module
out,
they
may
snap
off.
Page 51
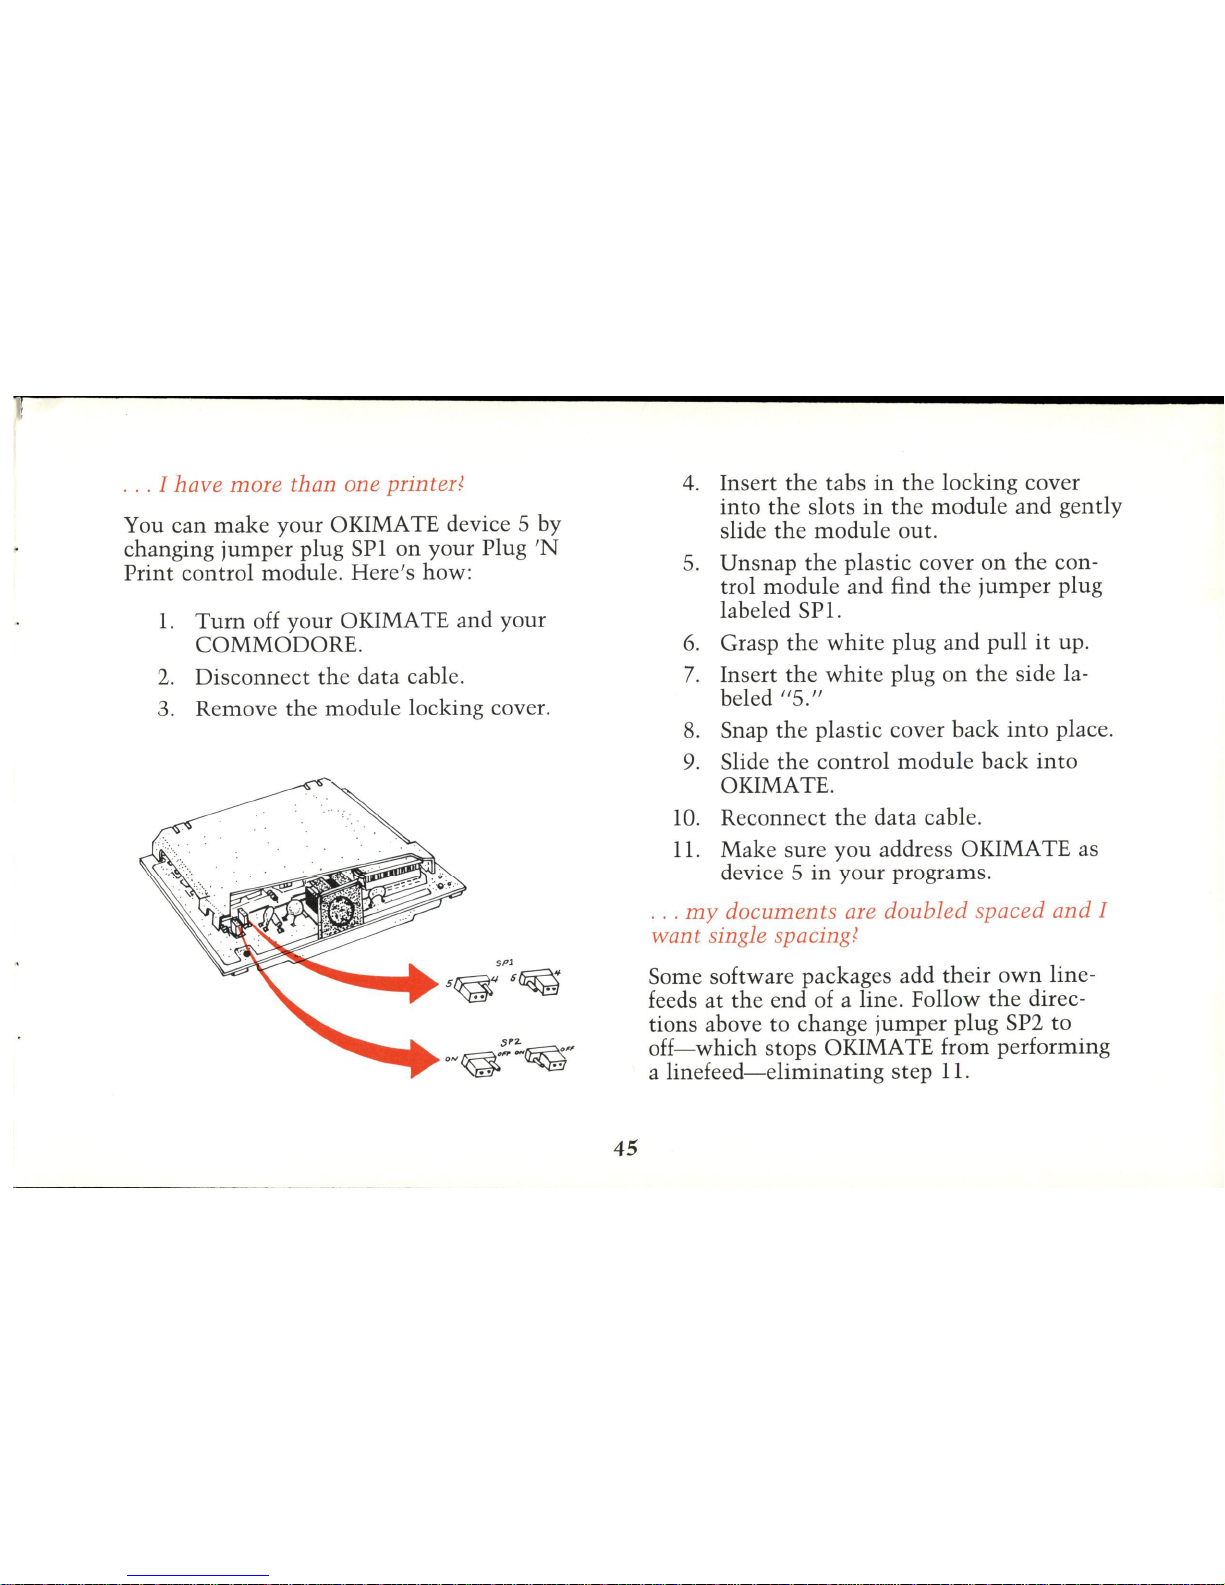
... I have
more
than one printer!
You
can
make
your OKIMA TE device 5 by
changing
jumper
plug SPI
on
your Plug
'N
Print
control
module.
Here's
how:
1.
Tum
off your OKIMA TE and your
COMMODORE
.
2.
Disconnect
the
data cable.
3. Remove
the
module
locking cover.
45
4.
Insert
the
tabs
in
the
locking cover
into
the
slots
in
the
module
and
gently
slide
the
module
out.
5.
Unsnap
the
plastic cover
on
the
con-
trol
module
and find
the
jumper
plug
labeled
SP
1.
6.
Grasp
the
white
plug and
pull
it
up.
7.
Insert
the
white
plug
on
the
side la-
beled 1/5."
8.
Snap
the
plastic cover
back
into
place.
9.
Slide
the
control
module
back
into
OKIMATE.
10.
Reconnect
the
data
cable.
11.
Make
sure
you
address OKIMATE as
device 5
in
your programs .
. . .
my
documents are doubled spaced
and
I
want single spacing!
Some software packages add
their
own
line-
feeds
at
the
end
of a line. Follow
the
direc-
tions above to change
jumper
plug SP2
to
off-which
stops OKIMA TE from performing
a
linefeed-eliminating
step 11.
Page 52
·
.. I have
questions or problems
not an-
swered here?
Whom
you
call depends
on
the
nature
of
your
problem.
If
you
are
missing
an
item
in
your
Plug
'N
Print
Kit,
take
the
entire
kit
back
to
the
place of purchase.
If
you
require
service
on
your OKIMATEIO
printer, call 1-800-0KIDATA (in
New
Jersey,
call 609-235-2600) and, if necessary, we'll refer
you
to
send
the
printer
to one of our
three
service centers.
If
you
are
instructed
to ship
your
printer, here's
what
you'll
need to do:
How
to
Pack
What
to
Ship
Use
the
original
carton
and styro-
foam
if possible.
Otherwise
pack
your
printer
in
a strong, corrugated cardboard box and surround
it
with
at
least
three
inches of
crumpled
newspaper.
Send
th
e printer,
the
operating
module
(plugged
into
the
side of
the
printer), and a
print
sample
identifying
your
problem-if
possi-
ble. Please
include a written
de-
46
How
to
Ship
Where
to
Ship
Service
Centers
Repair
Warranty
scription
of
your
problem, what
software
you're
using
and
your
phone
number.
DO
NOT
SEND
YOUR RIBBON CARTRIDGE,
DATA
CABLE, DISKS
OR
TAPES.
A DATED SALES RECEIPT
MUST
BE
INCLUDED FOR WAR-
RANTY
REPAIRS.
Prepaid
Send to
the
OKIDATA Service
Center
recommended
by
our
Cus-
tomer
Service Representative.
There's a listing
on
page 50.
All
warranty
repair service
must
be performed by
an
Authorized
OKIDATA Service Center. (Read
the
Limited
Warranty
information
on
page 50 for additional informa-
tion
.)
All repairs performed by
an
OKI-
DATA
Service
Center
are war-
ranted
for
30
days.
Page 53
If
you
have
questions
concerning operating
the
OKIMATE
that
are
not
addressed
in
this
handbook, call 1-800-0KIDA T A
between
8
a.m and 7
p.m
EST and a
Customer
Service
Representative
will
be happy to assist you.
onferiJl9
Parts and
Supp(w
Now
you
can order OKIMATE 10 supplies
and
spare parts by
phone
and charge
them
to
your
VISA or MasterCard.
The
following
items
are available :
• PAPER
• RIBBONS
• REPLACEMENT PRINTHEADS
• "LEARN
TO
PRINT"
DEMONSTRA-
TION
ON
CASSETTE TAPE FOR
COMMODORE
VIC 20
AND
64 ONLY.
To
order, call toll-free 1-800-524-0338 or if
calling from
New
Jersey dial 1-800-624-1076.
Operators are
on
duty
Monday
through
Friday
from 8:30 a.m.
until
9:00 p.m. EST.
47
Page 54
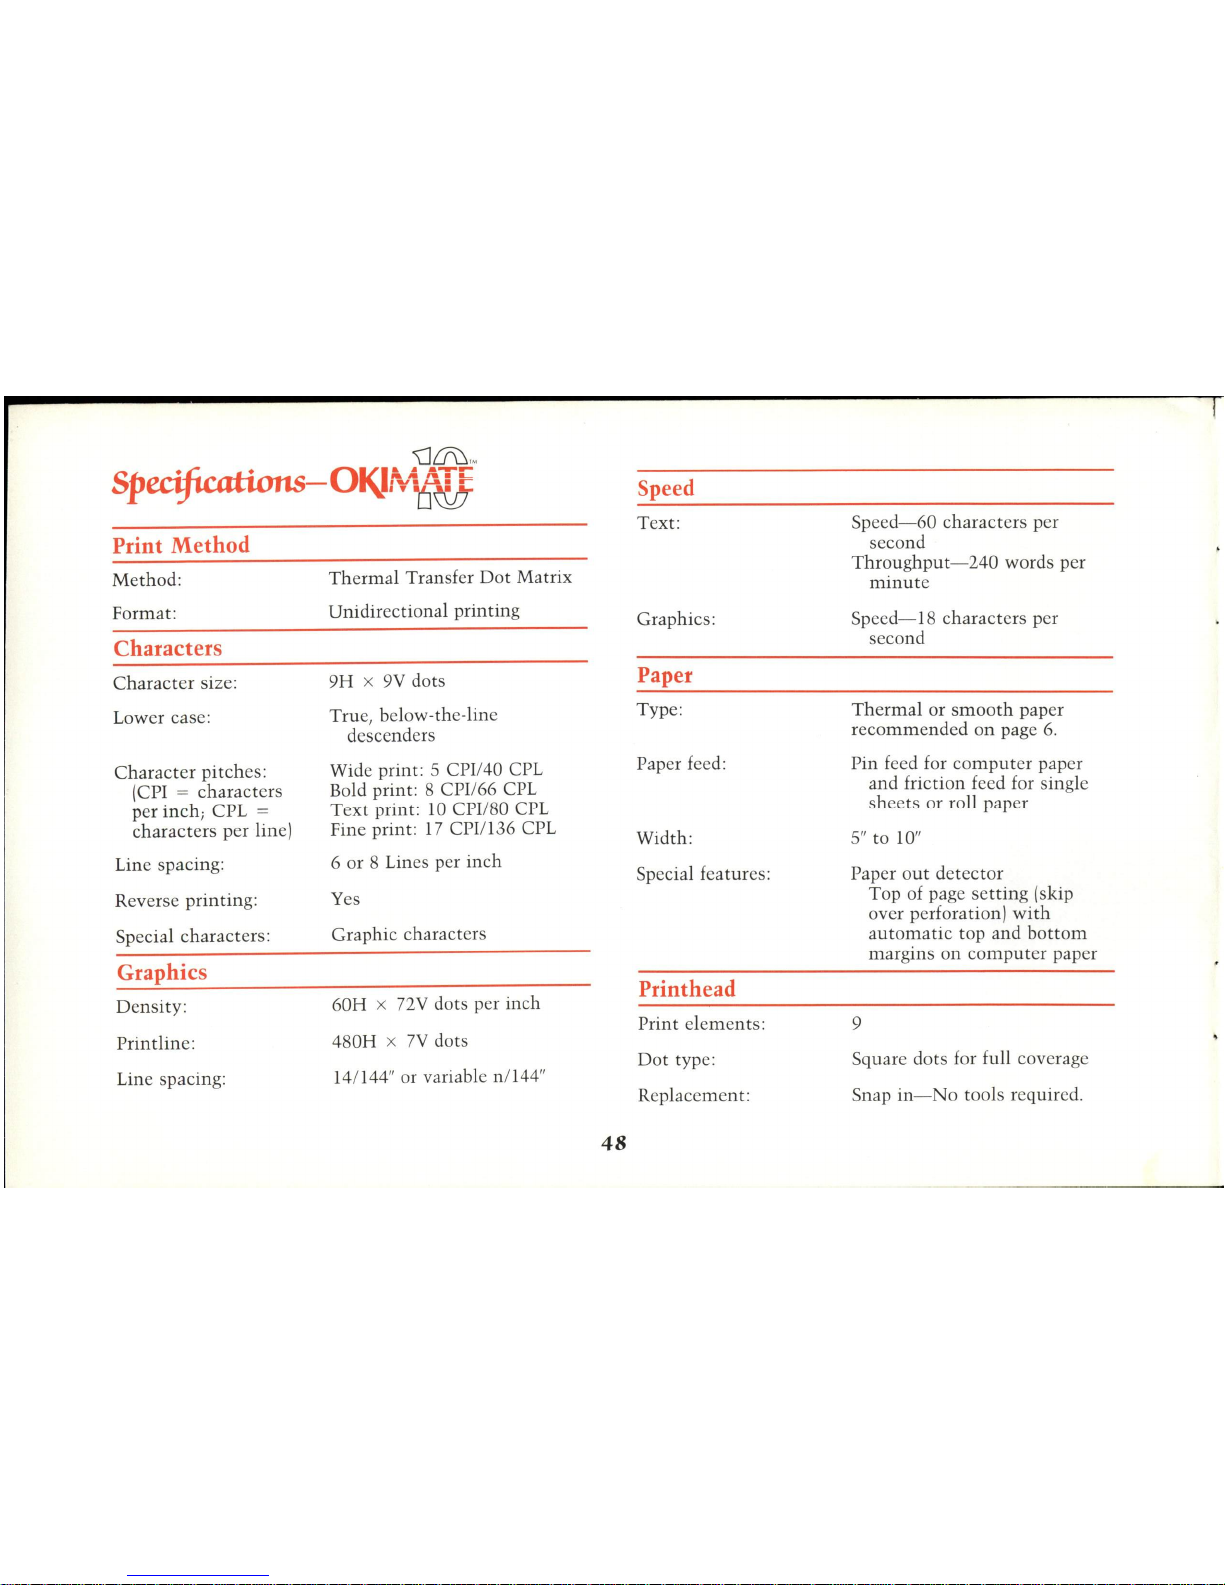
Print Method
Method:
Format:
Characters
Character
size:
Lower case:
Character
pitches:
(CPI
= characters
per inch; CPL
=
characters
per
line)
Line spacing:
Reverse printing:
Special characters:
Graphics
Density:
Printline:
Line spacing:
Thermal
Transfer
Dot
Matrix
Unidirectional printing
9H x
9V
dots
True, bclow-the-line
descenders
Wide print:
5 CPII40 CPL
Bold print: 8 CPII66 CPL
Text
print:
10
CPI180 CPL
Fine print:
17
CPII136 CPL
6 or 8 Lines per
inch
Yes
Graphic characters
60H x
72V
dots per inch
480H x
7V
dots
141144" or variable n1144"
48
Speed
Text
:
Graphics:
Paper
Type:
Paper feed:
Width:
Special features:
Printhead
Print
clements:
Dot
type:
Replacement:
Speed-60
characters per
second
Throughput-240
words per
minute
Speed-18
characters per
second
Thermal
or
smooth
paper
recommended
on
page
6.
Pin
feed for
computer
paper
and friction feed for single
sheets
or roll paper
5" to 10"
Paper
out
detector
9
Top of page
setting
(skip
over perforation)
with
automatic
top and
bottom
margins
on
computer
paper
Square dots for full coverage
Snap
in-No
tools required.
Page 55
Warranty
and
Repair Information
LIMITED
WARRANTY
Okidata, Division
of
OKI AMERICA, In
c.
I"Okidata") warrants
this OKIMATE Printer to be free from defect in material and
workmanship
and will remedy any
such
defect according to
the
terms of
the
Limited Warranty.
This
limited warranty does
not
extend to printer ribbon, a consumable item.
Okidata will repair lor at
its
option, replac
e)
at no charge any
defective componentls) of
the
OKIMATE Printer for ninety
190)
days from
the
date of purchase.
This
Limited Warranty extends
to
the
original purchaser only.
To
make
request or claim for service under this Limited
War-
ranty,
the
original purchaser
must
return the Okidata product,
sh
ipping prepaid, in the original shipping container or equiva-
l
ent
, to
Okidata
or an
Okidata
authorized service or repair cen-
ter and
assume
the risk
of
loss or damage in
transit
to Okidata.
Proof
of
purchase for the product showing the date
of
purchase,
dealer's
name
, Iserial number) and
item
purchased must accom-
pany any request for work to be performed under this Limited
Warranty.
---
This
Limited Warranty shall not apply
if
the product has been
damaged due to abuse,
misuse
, misapplication, accident, or as a
result of service or modification by any
other
than
an author-
ized Okidata repair center.
THERE
ARE
NO
EXPRESS WARRANTIES OTHER
THAN
THOSE
ON
THE
FACE
HEREOF
AND
DESCRIBED ABOVE.
NO
WARRANTIES WHETHER EXPRESS OR IMPLIED, IN-
CLUDING, BUT
NOT
LIMITED TO, ANY IMPLIED
WARRANTIES OF MERCHANTABILITY OR FITNESS FOR A
PARTICULAR PURPOSE SHA
LL
EXTEND BEYOND THE
WARRANTY PERIOD DESCRIBED ABOVE OF NINETY
DAYS.
Some states do
not
allow
limitations
on how long an
implied warranty lasts, so the above
limitation
may
not
apply
to you.
OKIDATA SHA
LL
NOT
BE
RESPONSIBLE OR
LIABLE
FOR
ANY SPECIAL, INCIDENTAL, OR CONSEQUENTIA L DAMAGES OR
LOSS
ARISING FROM THE
USE
OF THIS PROD-
UCT. Some states do not allow the exclusion or
limit
ation of
incidental or consequential damages, so
the
above exclusion
may
not
apply
to
you.
This
Limited Warranty applies to this product
when
sold in the
continental
Unit
ed
States. Additional information on ob
tainin
g
service under this Limited Warranty is available by contacting
Okidata
at
any of
the
repair centers listed below.
OKIDATA SERVICE CENTERS
WEST
834 Auburn
Court
Fremont, CA
94536
1415)
657-0600
MIDWEST
1155A
W.
Dundee
Road
Arlington Heights,
IL
60004
1312)
253-8055
EAST
III
Gaither Drive
Mt
. Laur el,
NT
08054
1609
) 235-2600
This
warranty for this product when purchased outside
of
the continental United States may vary.
Contact
your Okidata Dealer
for
warranty service information.
This
warranty gives you specific legal rights, and you may also have
other
rights which vary from state to state.
50
Page 56
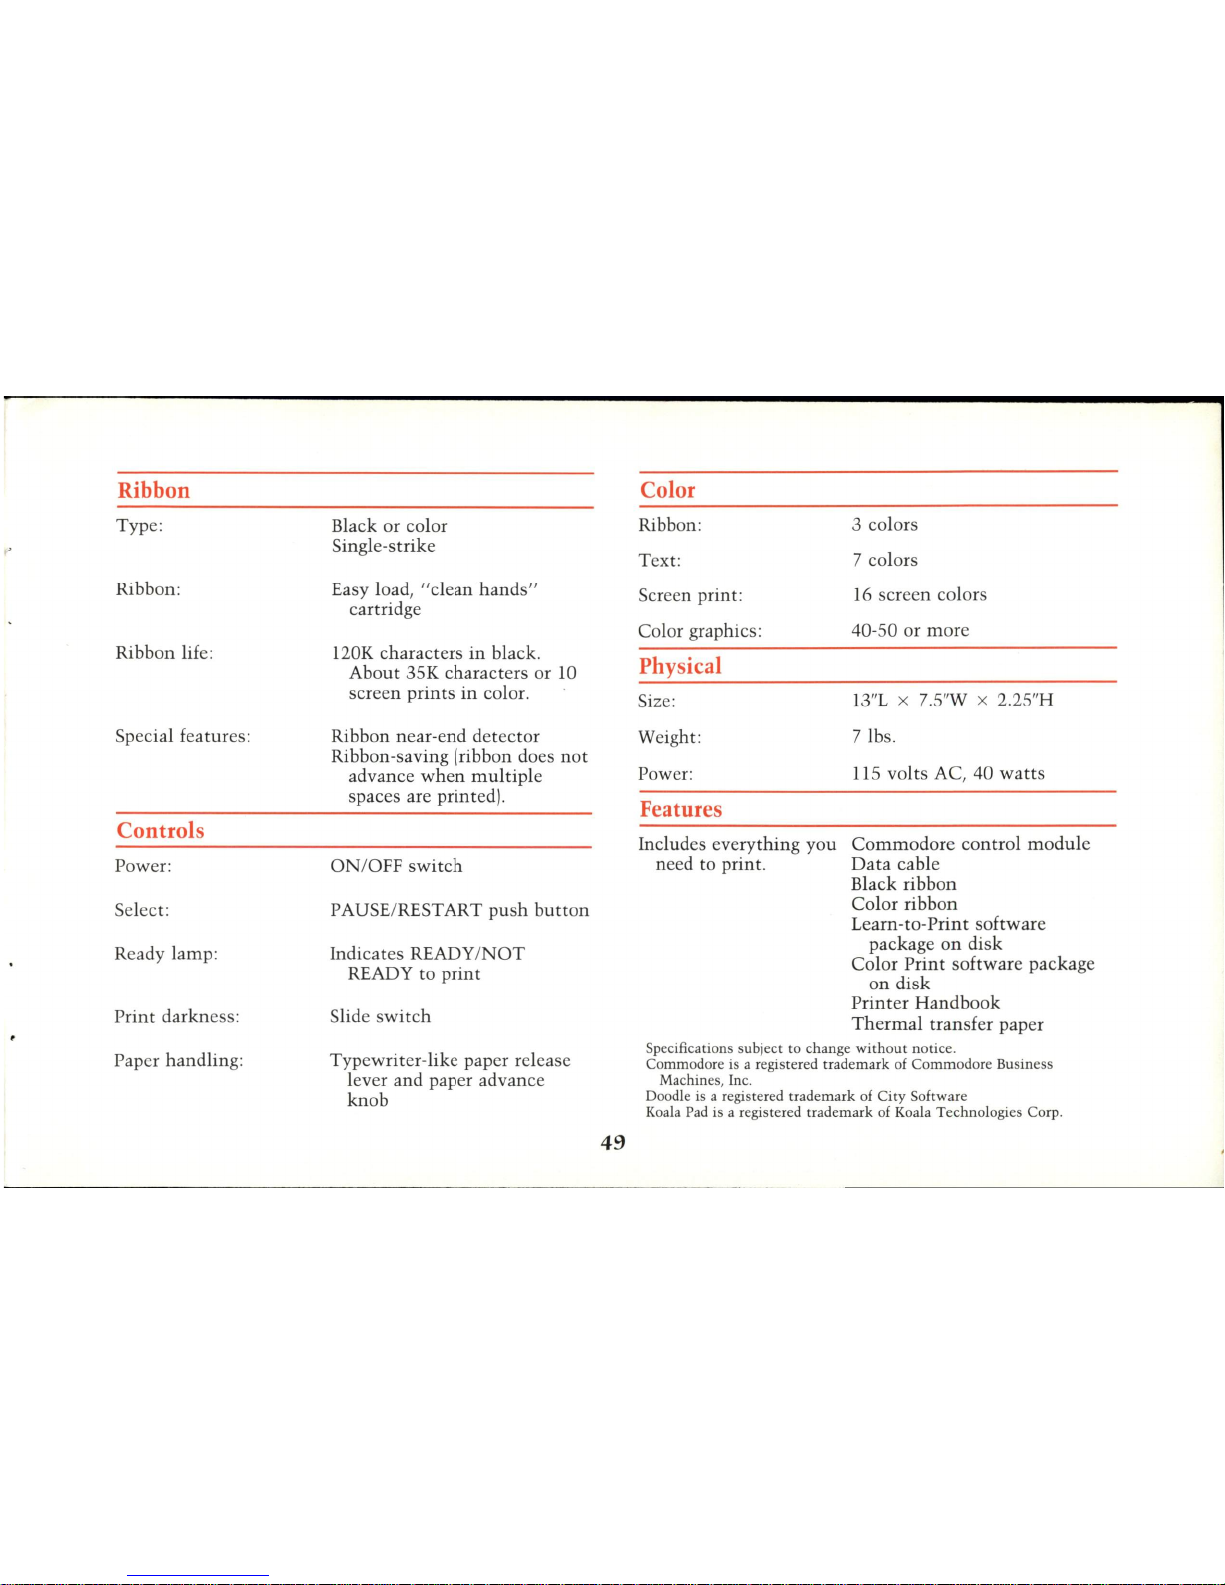
Ribbon
Typ
e:
Ribbon :
Ribbon life:
Special featur es:
Controls
Power:
Select:
Ready lamp:
Print
darkn
ess:
Paper
handlin
g:
Black or color
Single-strike
Easy load, "clean hands "
cartridge
120K characters
in
black.
About
35K characters or 10
screen prints
in
color.
Ribbon near-end detector
Ribbon-saving (ribbon does
not
advance
when
multiple
spaces are printed) .
ON
/OFF
switch
PAUSE/RESTART
push
button
Indicates READY/
NOT
READY to print
Slide
switch
Typewriter-like paper release
lever and paper advanc e
knob
49
Color
Ribbon:
Tex
t:
Screen print:
Color graphics:
Physical
Size:
Weig
ht
:
Power:
Features
Includes everything you
need
to
print
.
3 colors
7 colors
16 screen colors
40-50 or
mor
e
J3
"L x
7S
'W
x 2.2S"H
7lbs.
115 volts AC, 40
watts
Commodore
control
modul
e
Data
cable
Black ribbon
Color ribbon
Learn -
to-
Prin t software
package
on
disk
Color
Print
software package
on disk
Printer
Handbook
Thermal
transfer paper
Specifications subject
to
chan
ge
without
notice.
Commodore is a r
egiste
red tr ademark of
Commodo
re Business
Machines, Inc.
Doodle is a registered trademark of
City
Software
Koala Pad is a registered trademark of Koala T
echnologies
Cor
p.
Page 57
Federal Conununications Conunission
Radio
Fr~
In:tetference
Statement
WARNING :
This
equipment
complies
with
the
limits
for a
Class B
computing
device in accordance
with
the
specifications
in Subpart
J of
Part
15 of FCC Rules.
These
specifications are
designed to
minimiz
e radio frequency
int
erference in a residen-
tial installation;
how
ever,
ther
e is no guarantee
that
radio or
television interference will
not
occur in any
particular
installa-
tion.
If
this equipment
does cause interference to radio or tele-
vision reception,
which
can be de
termined
by
turning the
equipment
off and
on
when
the
radio or television is on,
the
user is encouraged to
try
to correct the
interf
erence
by
one
or
more of
the
following measures:
• Reorient
the
radio
or
television receiving
antenna.
• Relocate
the
print
er
with
respect to
the
receiv e
r.
• Mov e
the
print
er away from
the
receiver.
• Plug
the
printer
into
a different
outlet
so
that
the
printer and
the
receiver are
on
different branch circuits.
If
necessary, the user
should
consult
the
dealer or
an
experi-
enced radio/television tec
hnician
for additional suggestions.
Th
e user may find
the
following
booklet
prepared by
the Fed-
eral
Communications
Commission
helpful:
"How to Identify
and
Resolve Radio -TV
Int
erference Prob-
lems ".
This
booklet is available from
the
u.S.
Government
Printing
Office, Washington,
DC
20402 by ordering Stock No. 004 -
00000345-4.
Page 58
Page 59
Page 60
 Loading...