

Page 1
®
DOC·IT
FAST START
®
Ê
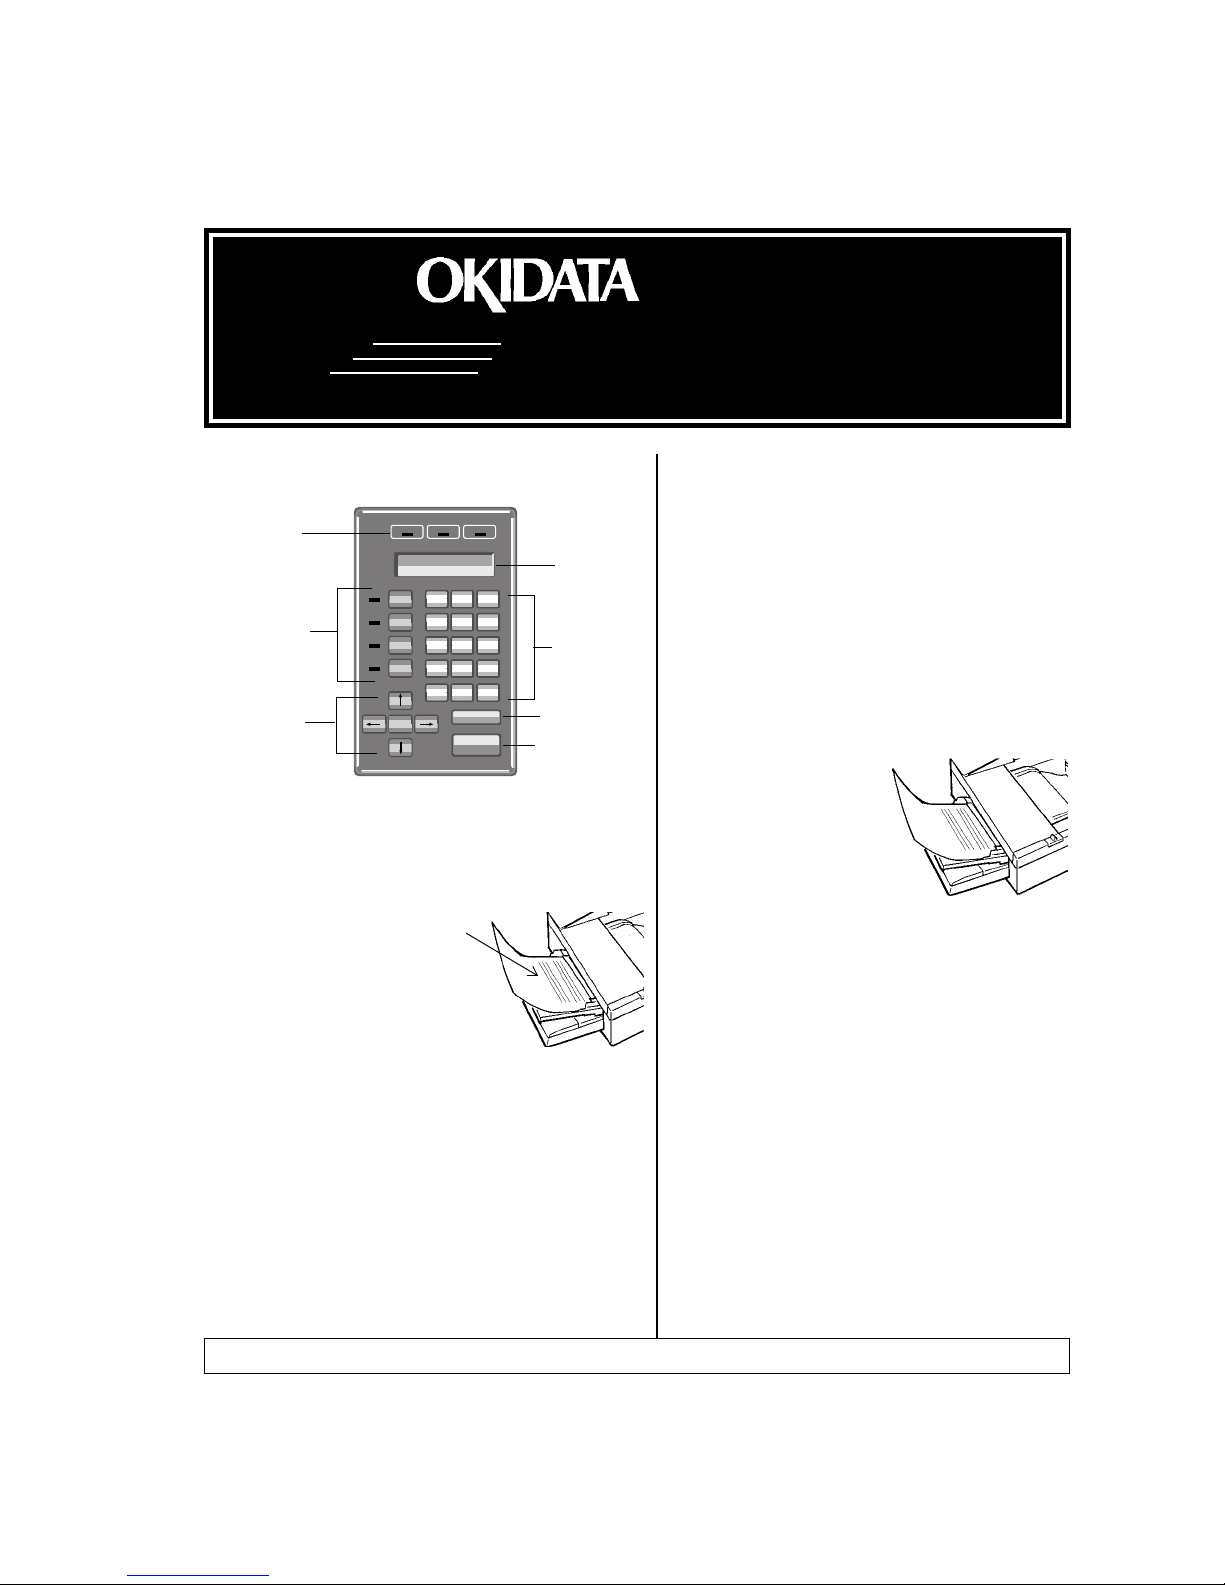
The Front Panel:
ABC DEF
1
JKL
GHI
45
TUV
PRS
78
QZ
*
Speed
Dial
Dial
Pause
FAX Rec'd
2
0
STOP
START
3
MNO
6
WXY
9
#
Redial
Display
Keypad
STOP
Key
START
Key
Status
Ready Error
LEDs
Function
LEDs
&
Keys
Printer
Scanner
Scanner
Copier
Copies
FAX
FAX
Menu
Control
ENTER
Keys
Walk Up Faxing
(See Chapter 10 in your User's Guide for more
information.)
1. Remove staples, clips, etc. and
load document(s) face up.
2. Press FAX key.
3. Enter fax number:
a. use keypad, OR
b. use PUBLIC Phone Book by
pressing
on display.
Note: PUBLIC Phone Book must be created
using DOC-IT Manager: see Chapter 6 of
your User's Guide.
5. To transmit now, press START key.
To send delayed fax, press ENTER key, then
use
digit(s) to be changed, then enter new value
using keypad. When done, press START key.
↓↓
↓ until fax # you wish to dial appears
↓↓
←←
← and
←←
→→
→ to move underline to time/date
→→
Making Copies
(See Chapter 8 in your User's Guide for
more information.)
Before making copies:
1. Remove staples, clips, etc., from document.
2. If light beside Copier key on panel is not
lit, press Copier key.
To Make Regular Copies
1. Load document(s)
face up.
2. Use keypad to
enter number of
copies.
3. Press START key.
To Make 2-up, 4-up or Merge
Copies
1. Load documents face up.
2. Press
3. Press
4. Press START key.
↓↓
↓ twice.
↓↓
→→
→ until copy mode you wish to
→→
use appears on display. Choose from
— 2-up copy
— 4-up portrait
— 4-up landscape
— Merge copy
— Normal
Before starting, see checklist on back page!
Page 2
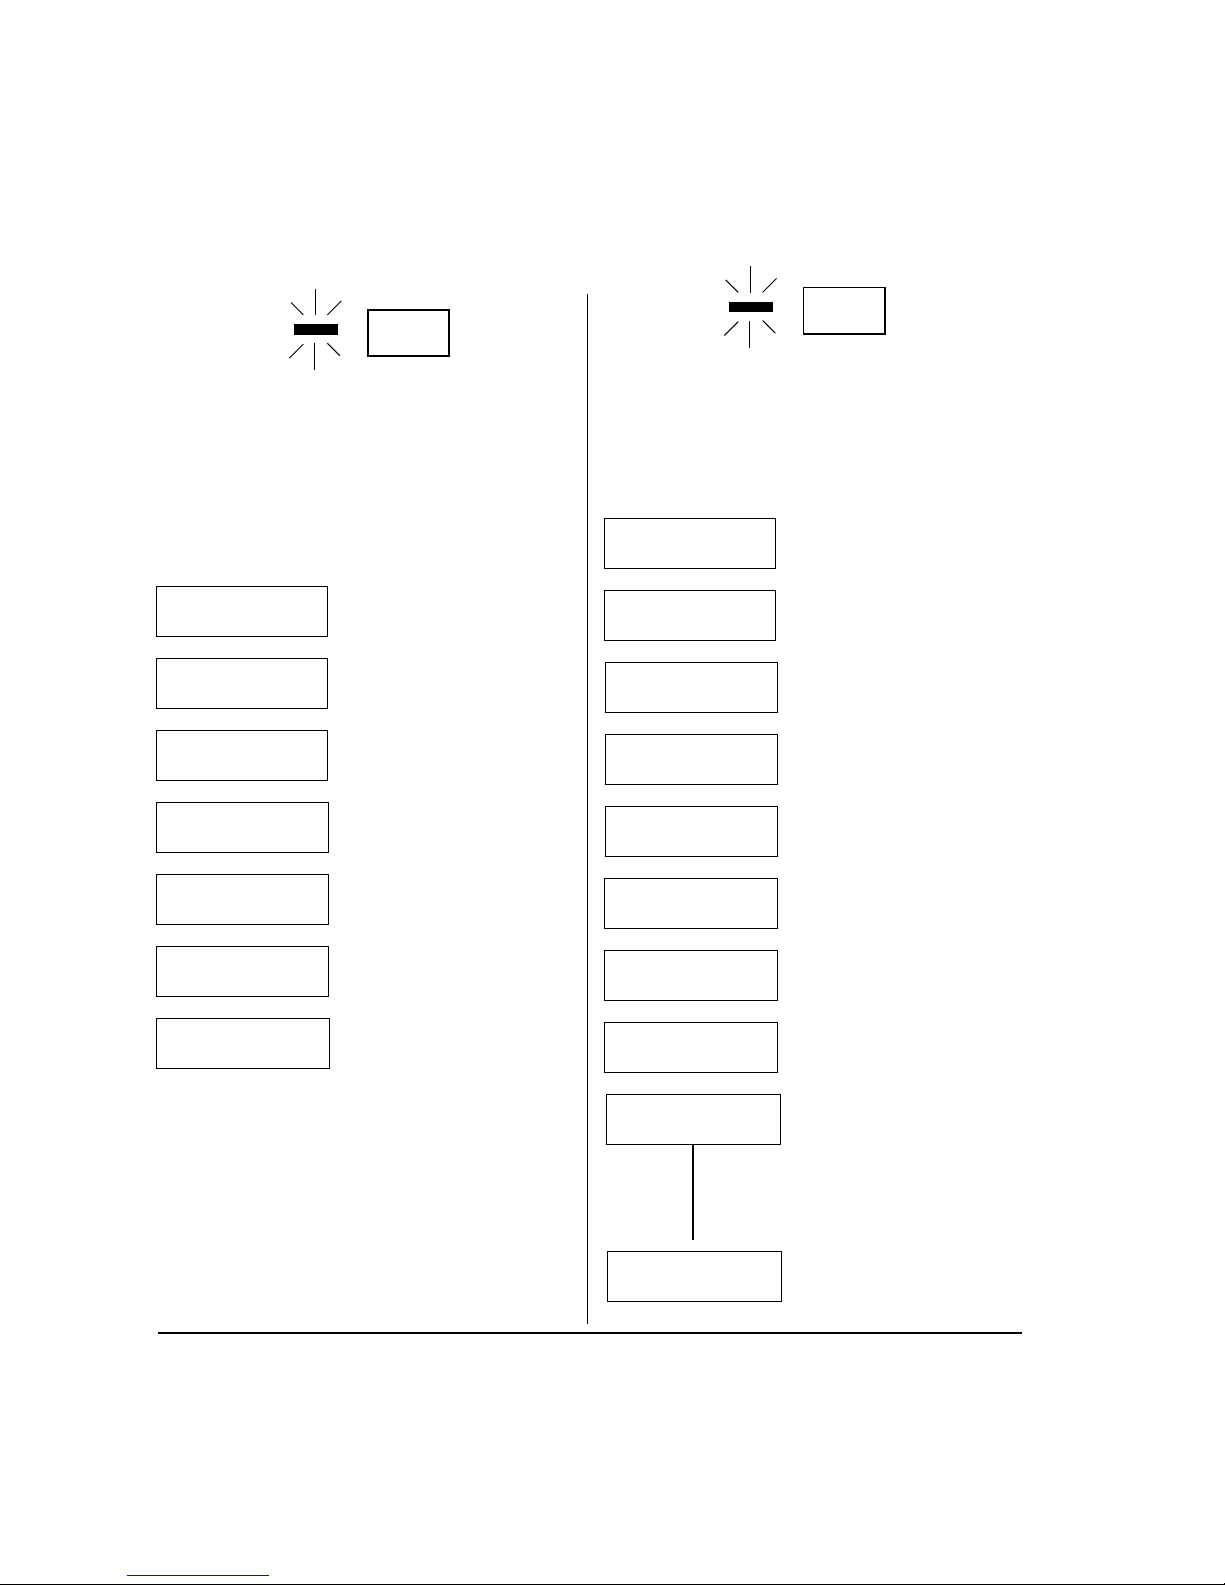
DOC·IT Front Panel
Menu
Printer
TrueImageTM 35 or TrueImage
13
Menu Item
(Default)
PS/On-Line
↓↓
↓
↓↓
PS/Off-Line
↓↓
↓
Tray Source:
Upper tray
Allow Job reset?
Yes
Start up page?
No
Wait timeout:
30 seconds
Restore default
No
↓↓
↓↓
↓
↓↓
↓↓
↓
↓↓
↓↓
↓
↓↓
↓↓
↓
↓↓
Other Choices
(Press
Lower tray (optional
lower tray installed)
No
Yes
60 seconds, Infinite
Yes
→→
→)
→→
Printer
PCL4.5 or PCL5 (HP IIP or
III Comp.)
Menu Item
(Default)
PCLxx/On-Line
↓↓
↓
Orientation
Portrait
Number of copies
1
Paper size
Letter
Manual Feed
On
Paper supply
Tray 1
Lines per page
60
Font number
0
Symbol set
Roman-8
Reset menu?
No
↓↓
↓↓
↓
↓↓
↓↓
↓
↓↓
↓↓
↓
↓↓
↓↓
↓
↓↓
↓↓
↓
↓↓
↓↓
↓
↓↓
↓↓
↓
↓↓
↓↓
↓
↓↓
Other Choices
(Press
Landscape
Select from 1 to 99
using ← and →
Legal, A4, Env: COM10, Env: Monarch
Off
Tray 2 (optional lower
tray installed)
0 to 128, using ← & →
1 to 6 for PCL 4.5
0 to 14 for PCL 5
EC94 L1; PC-8; PC-8
DN; PC-850; Legal;
ISO- 2, 4, 6, 10, 11,
14 to 17, 21, 25, 57, 60,
61, 69, 84, 85; German;
Spanish
Yes
→→
→)
→→
2
Page 3
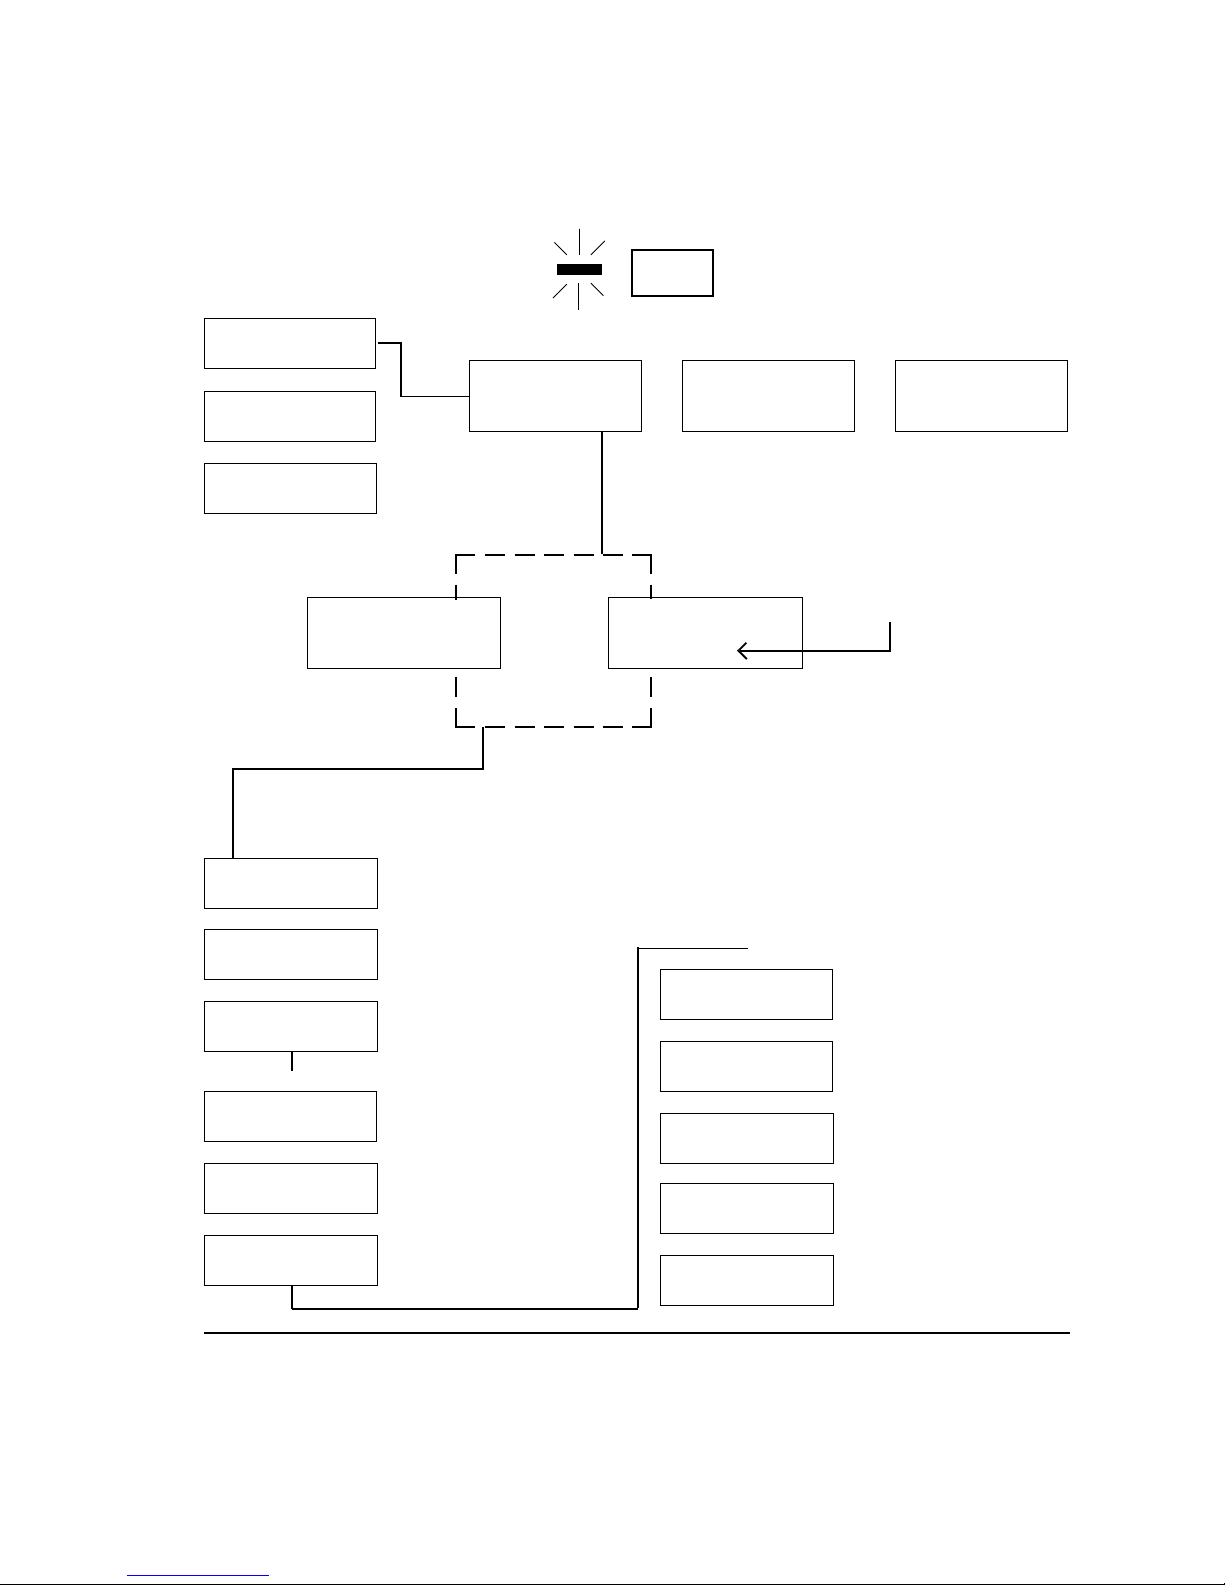
FAX Reports
9:20am 02/24/xx
↓↓
↓
↓↓
Print activity
now? ✓No Yes
↓↓
↓
↓↓
Print err report
✓No Yes
Smith, John
555-1000
Press ENTER to access
Parameters menu
Press
←←
←
←←
Send FAX
9:11am 01/11/xx
↓↓
Press
↓
↓↓
FAX
→→
→
→→
Manual FAX Rcv
←←
←
←←
9:11am 01/11/xx
Telephone Number
↓↓
Press
↓ to access
↓↓
Parameters menu
→→
→
→→
Print Rcvd FAX
←←
←
←←
9:11am 01/11/xx
(Enter phone #
using keypad,)
Menu Item
(Default)
Xmit time/date:
13:15 02/24/xx
↓↓
↓
↓↓
Type:
Text only
↓↓
↓
↓↓
Intensity:
0
↓↓
↓
Resolution:
Std (200x200)
Send FAX header
Yes
# of Redials
2
↓↓
↓↓
↓
↓↓
↓↓
↓
↓↓
Other Choices
(Press
Photo only, Text+Photo
+1 (dark), +2, +3, +4,
+5 (darkest), -5 (lightest), -4, -3, -2, -1 (light)
Fine (200 x 200), 300
dpi DOC-IT
No
Use keypad to enter #
from 0 to 99
→→
→)
→→
Menu Item
(Default)
↓↓
↓
↓↓
Time betw redial:
5 minutes
↓↓
↓
↓↓
Init data speed
9600 baud
↓↓
↓
↓↓
Save sent FAXes?
Yes
↓↓
↓
↓↓
Save config?
No
↓↓
↓
↓↓
Restore defaults?
No
Other Choices
(Press
10, 20, 30, or 0 minutes
4800 baud
No
Yes
Yes
→→
→)
→→
3
Page 4
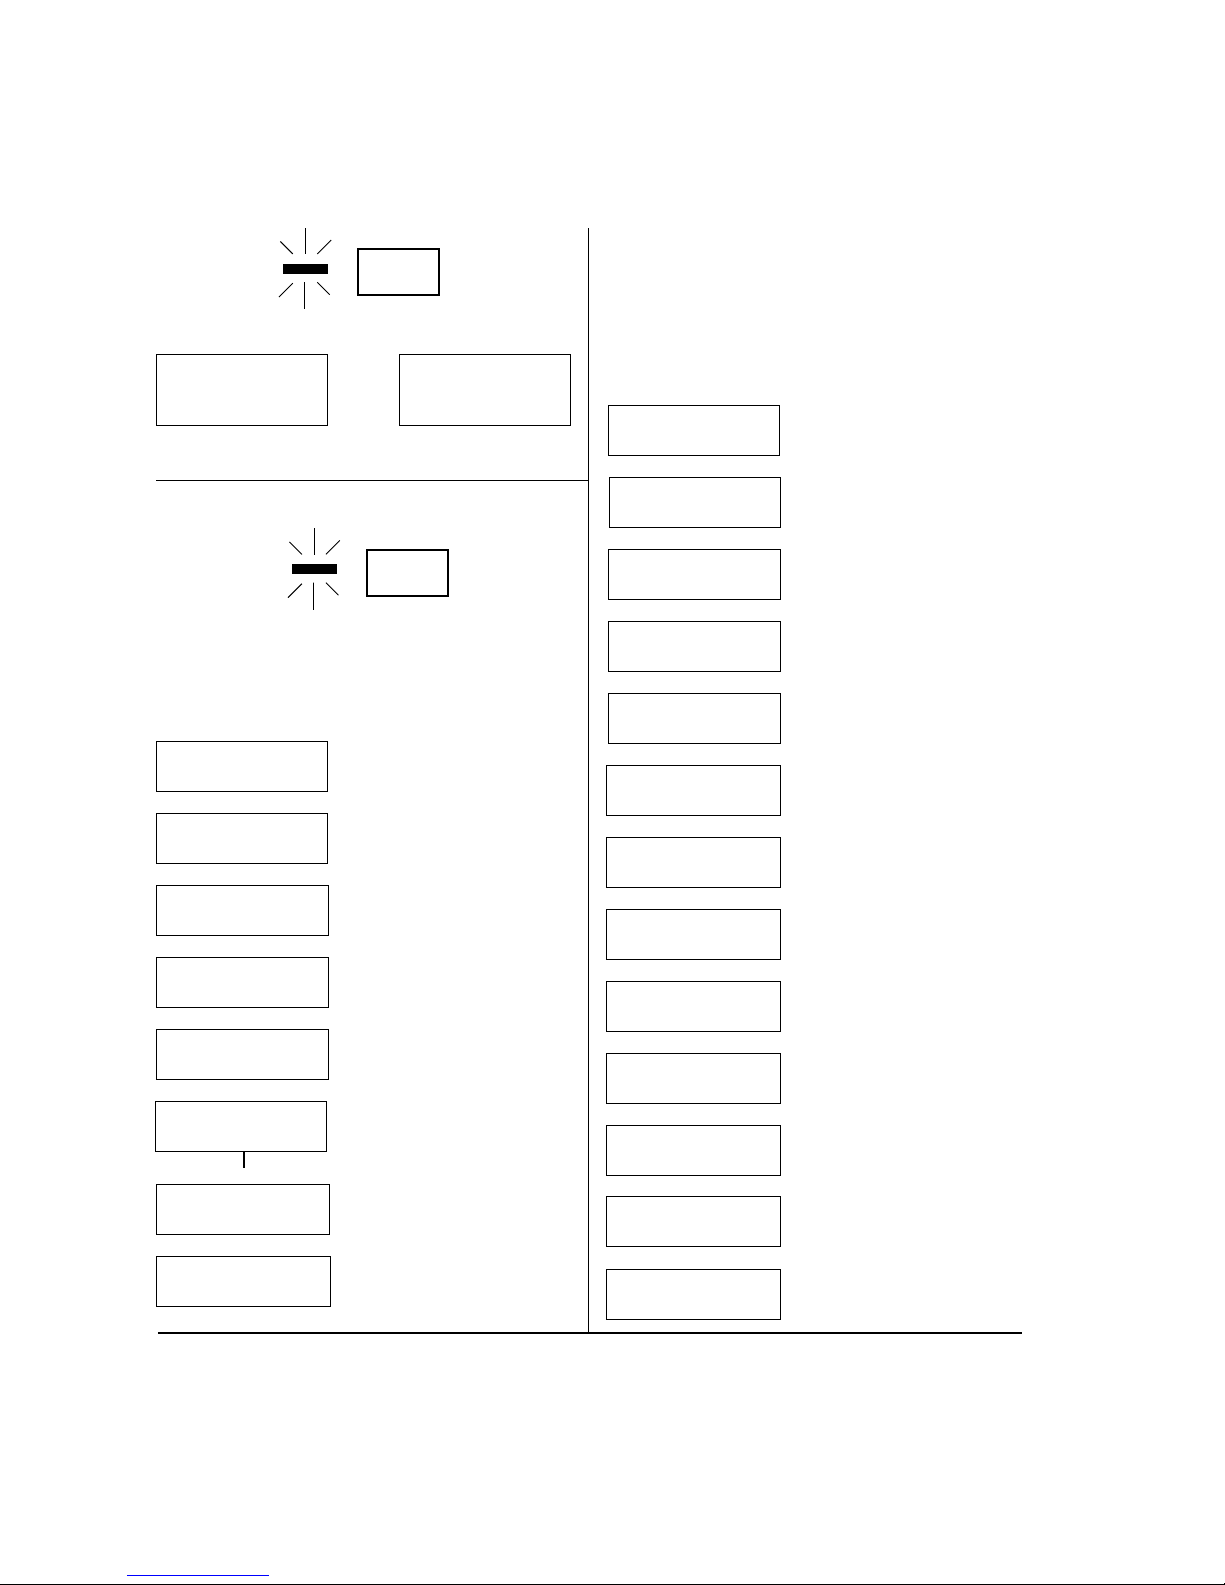
Scanner
ADF Off
(Default)
Copies 01
↓ for settings ↓
↓↓
↓
↓↓
Type of original
Text
↓↓
↓
↓↓
Copy method
Normal copy
↓↓
↓
↓↓
Original size
Letter
↓↓
↓
↓↓
Paper supply
Tray 1
↓↓
↓
↓↓
Intensity
0 (normal)
↓↓
↓
↓↓
Save config?
No
↓↓
↓
↓↓
Restore defaults
No
Scanner
→→
→
→→
←←
←
←←
Scanner
ADF On
Copier
Other Choices
(Press
Use keypad to enter #
of copies, 01 to 99
Text+Photo, Photo
2-up copy, 4-up portrait,
4-up landscape, Merge
copy
Legal-13, Legal-14, A4
Manual feed, Tray 2
(optional tray installed)
+1 (dark), +2, +3, +4,
+5 (darkest), -5 (lightest), -4, -3, -2, -1 (light)
Yes
Yes
→→
→)
→→
Administration Menu
To enter menu, press and hold Enter key for 5
seconds. To exit, press any function key. See
Chap. 9 in your User's Guide for details on
using DOC·IT Manager for Administration.
Menu Item
Administration
↓ for settings ↓
↓↓
↓
↓↓
Buzzer level
Medium
↓↓
↓
↓↓
Engine version:
xxx.xx/xxx.xx
↓↓
↓
↓↓
Keyclick length
Off
↓↓
↓
↓↓
Print darkness
0
↓↓
↓
↓↓
Print start pos.
3.1.mm
↓↓
↓
↓↓
Reset drum ctr?
No
↓↓
↓
↓↓
Scan start pos:
+0.0mm
↓↓
↓
↓↓
Software version
DDP 3.2
↓↓
↓
↓↓
Time to quiet
8 minutes
↓↓
↓
↓↓
Univ/Env Tray:
Letter
↓↓
↓
↓↓
Save config?
No
↓↓
↓
↓↓
Restore defaults
No
Other Choices (Press
→→
→)
→→
High, Low
You'll need this # if you
call for service.
Short, Medium, Long
+1, +2, -2, -1
0.6 to 8.1 in 0.5 mm
increments
Yes
-4.0 to +4.0 in 0.5 mm
increments
You'll need this # if you
call for service.
4 minutes, 1 minute,
disabled
A4, Env: Monarch,
Env: COM-10
Yes
Yes
4
Page 5
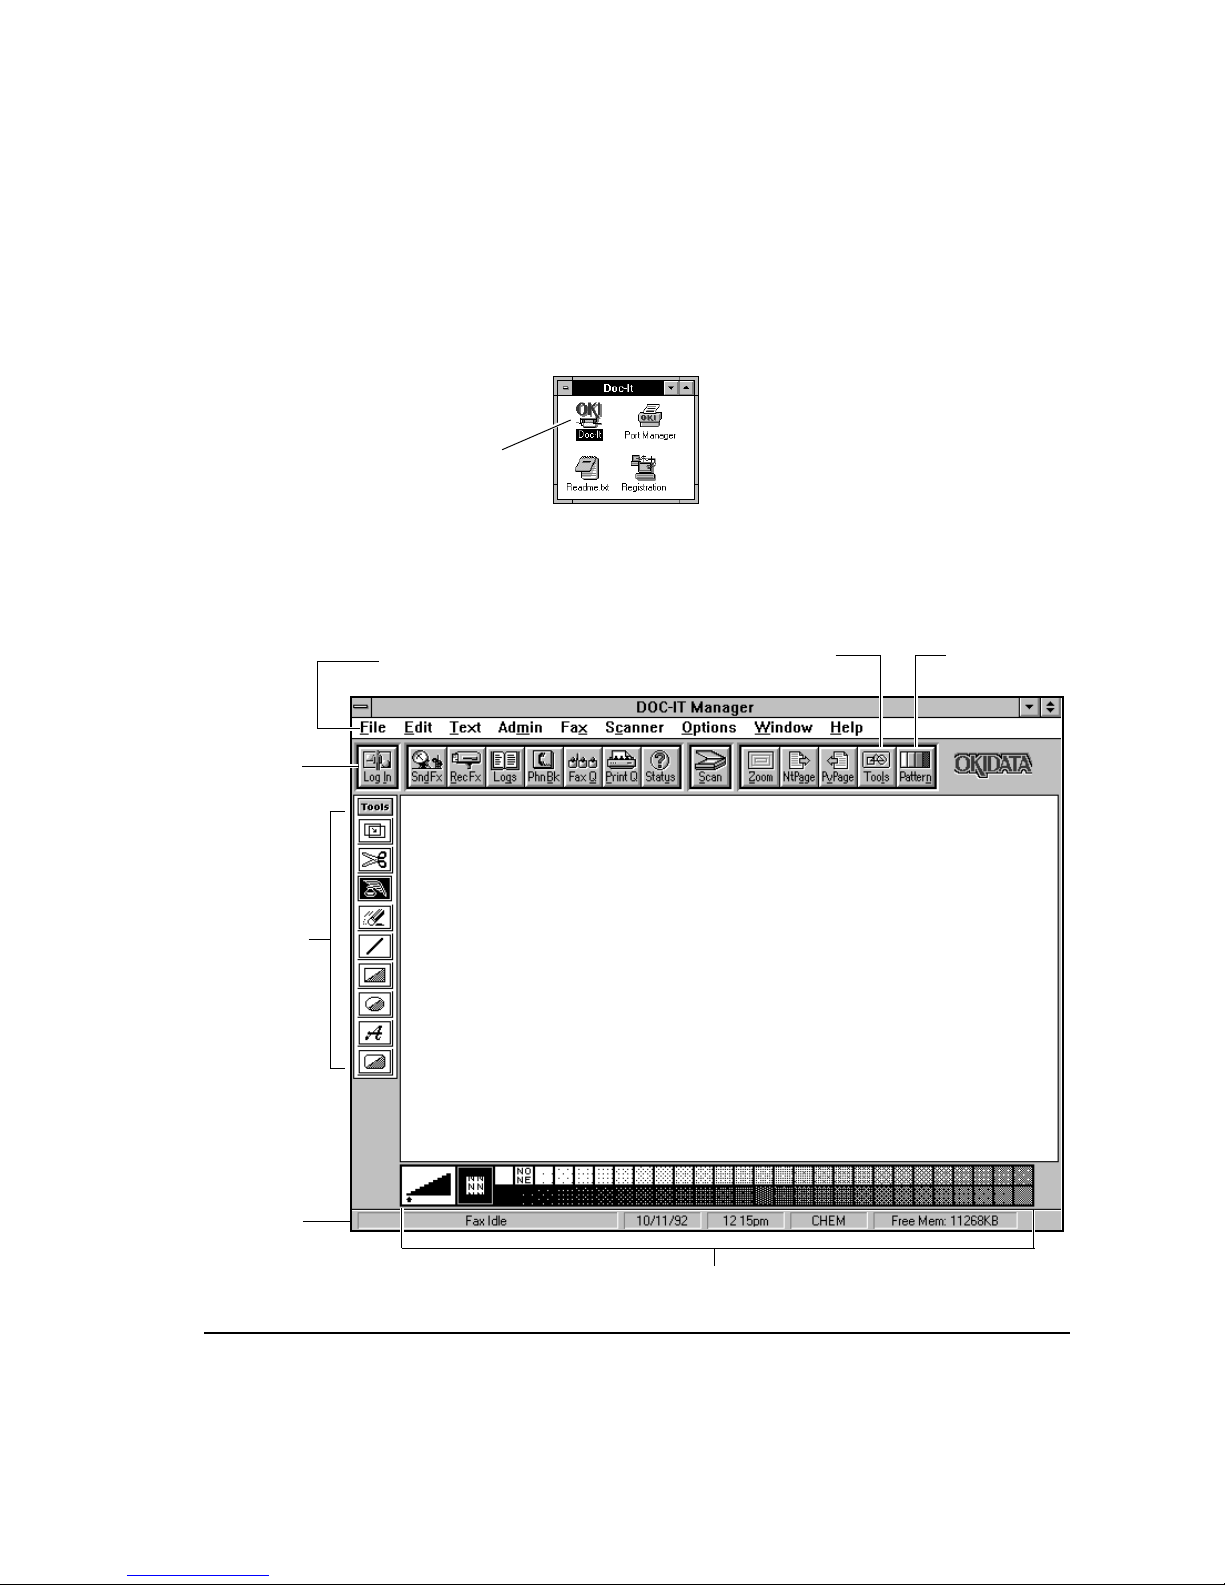
Using DOC·IT Manager Software
Starting DOC·IT Manager
To start DOC·IT Manager, double-click the Doc·It icon in the Doc·It program group:
DOC·IT
icon
The DOC·IT Manager Main Screen
Click Tools
to activate
Tool Bar
Button
Bar:
click
buttons
to
activate
common
DOC·IT
tasks
Toolbar,
activated
by
clicking
Tools in
Button
Bar.
Pull down menus:
click to access
common DOC·IT tasks
Click
Pattern
to
activate
Pattern
Palette
Status
Bar
Pattern Palette, activated by clicking Pattern button
in Button Bar.
5
Page 6
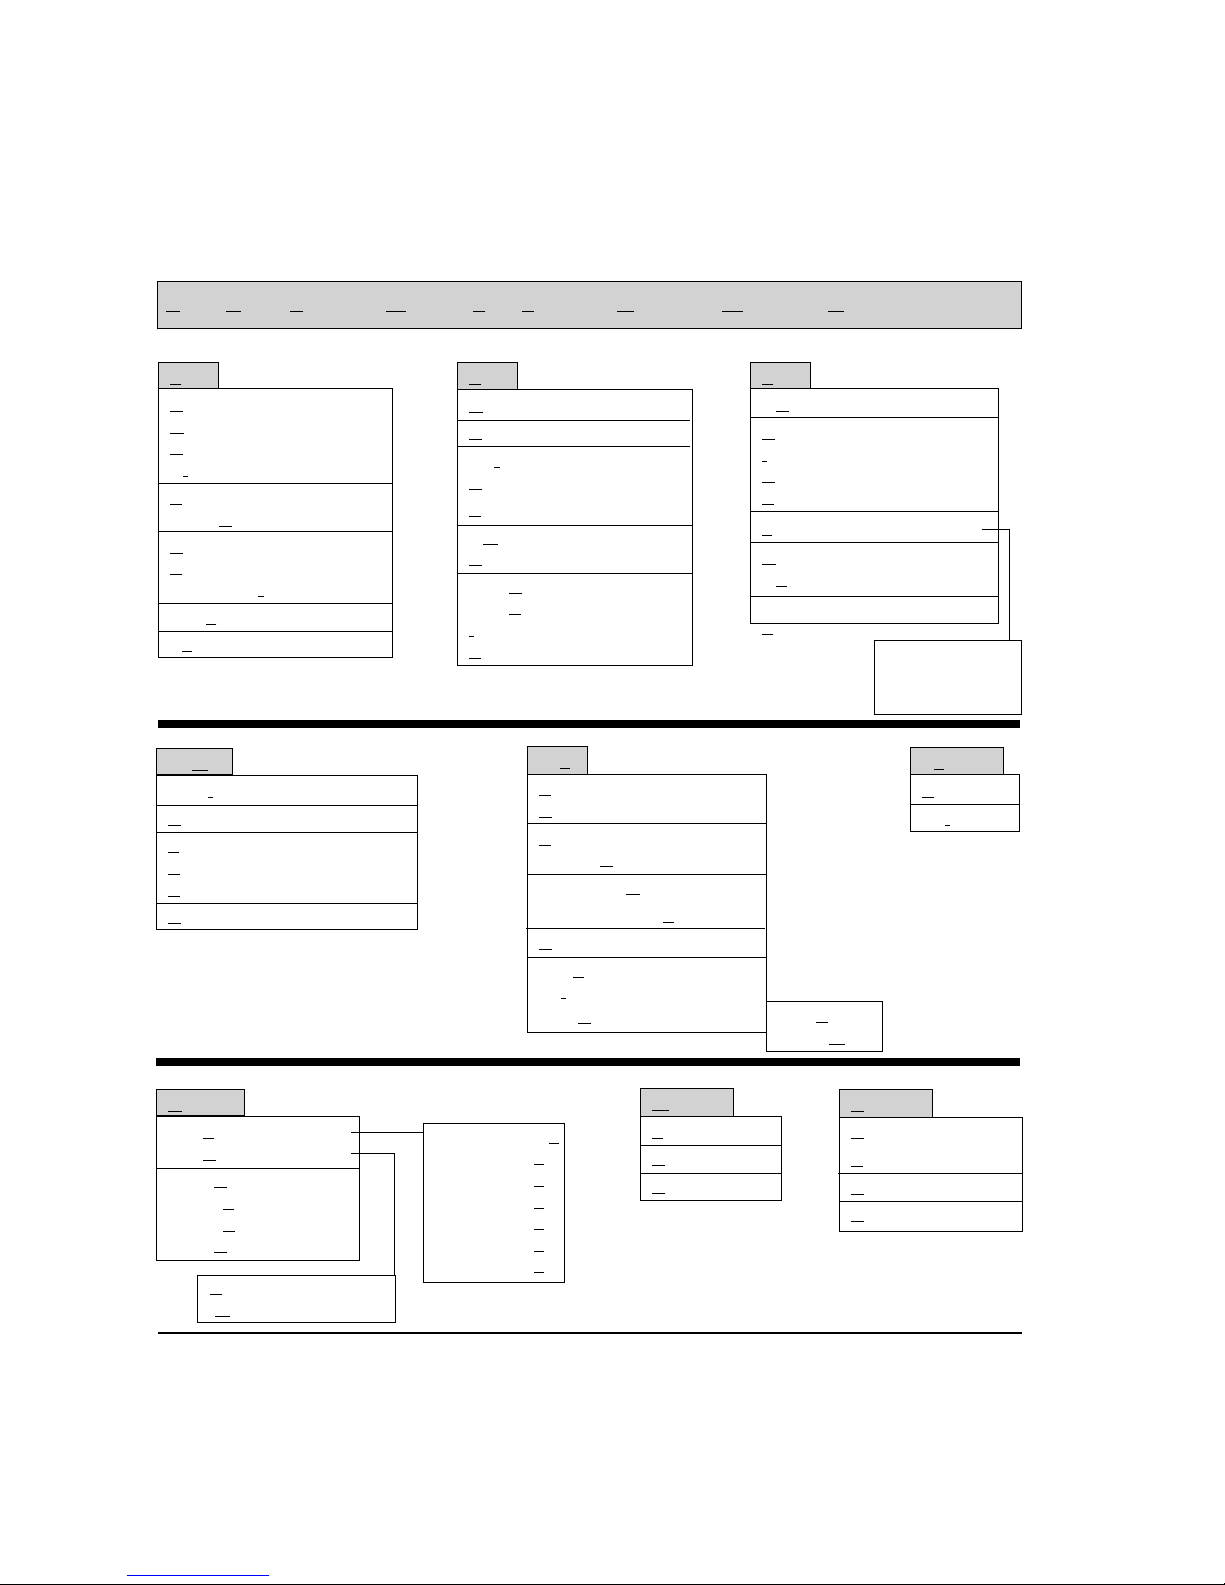
Pull-Down Menus
File Edit Text Admin FaxScanner O ptions Window Help
File
New... Ctrl+N
Open... Ctrl+O
Close
Close All
Save Ctrl+S
Save As...
Direct Print...
Print Ctrl+P
Printer Setup...
vert...
Con
Exit
Admin
Log In...
User ID Management...
Fax System Settings...
Voice Answer Settings...
Print System Settings...
Billing Code Management...
Edit
Goto Page...
Undo Alt+BkSp
t Shift+Del
Cu
Copy Ctrl+Ins
Paste Shift+Ins
✓✓
Move
✓
✓✓
Duplicate
Flip Horizontal
Flip Vertical
Invert
Erase
Fax
Send Fax...
Received Fax...
Polling Files...
Phone Book...
Outgoing Queue...
Send/Receive
Abort Current Fax
us...
Stat
Settings...
Edit Cover Page ©
Logs...
Text
✓✓
✓Normal
✓✓
Bold Ctrl+B
Italic Ctrl+I
Underline Ctrl+U
Strikeout
Justification ©
Opaque Background
✓✓
✓Transparent
✓✓
Background
Fonts...
Left Ctrl+L
Right Ctrl+R
Center Ctrl+C
Scanner
Scan...
ttings...
Se
Standard...
Custom...
Options
Zoom ©
Set
Set Document ©
Hide Button Bar
Show Tools
Show Pattern Palette
Hide Help/Status Bar
Single Document
✓✓
✓Multiple Documents
✓✓
6
Actual Size 1/1
Zoom out 1/2
Zoom out 1/3
Zoom out 1/4
Zoom out 1/5
Zoom out 1/6
Zoom out 1/8
Window
Tile
Cascade
Arrange Icons
Help
Contents
Search for Help On
How to Use Help
About DOC-IT...
Page 7
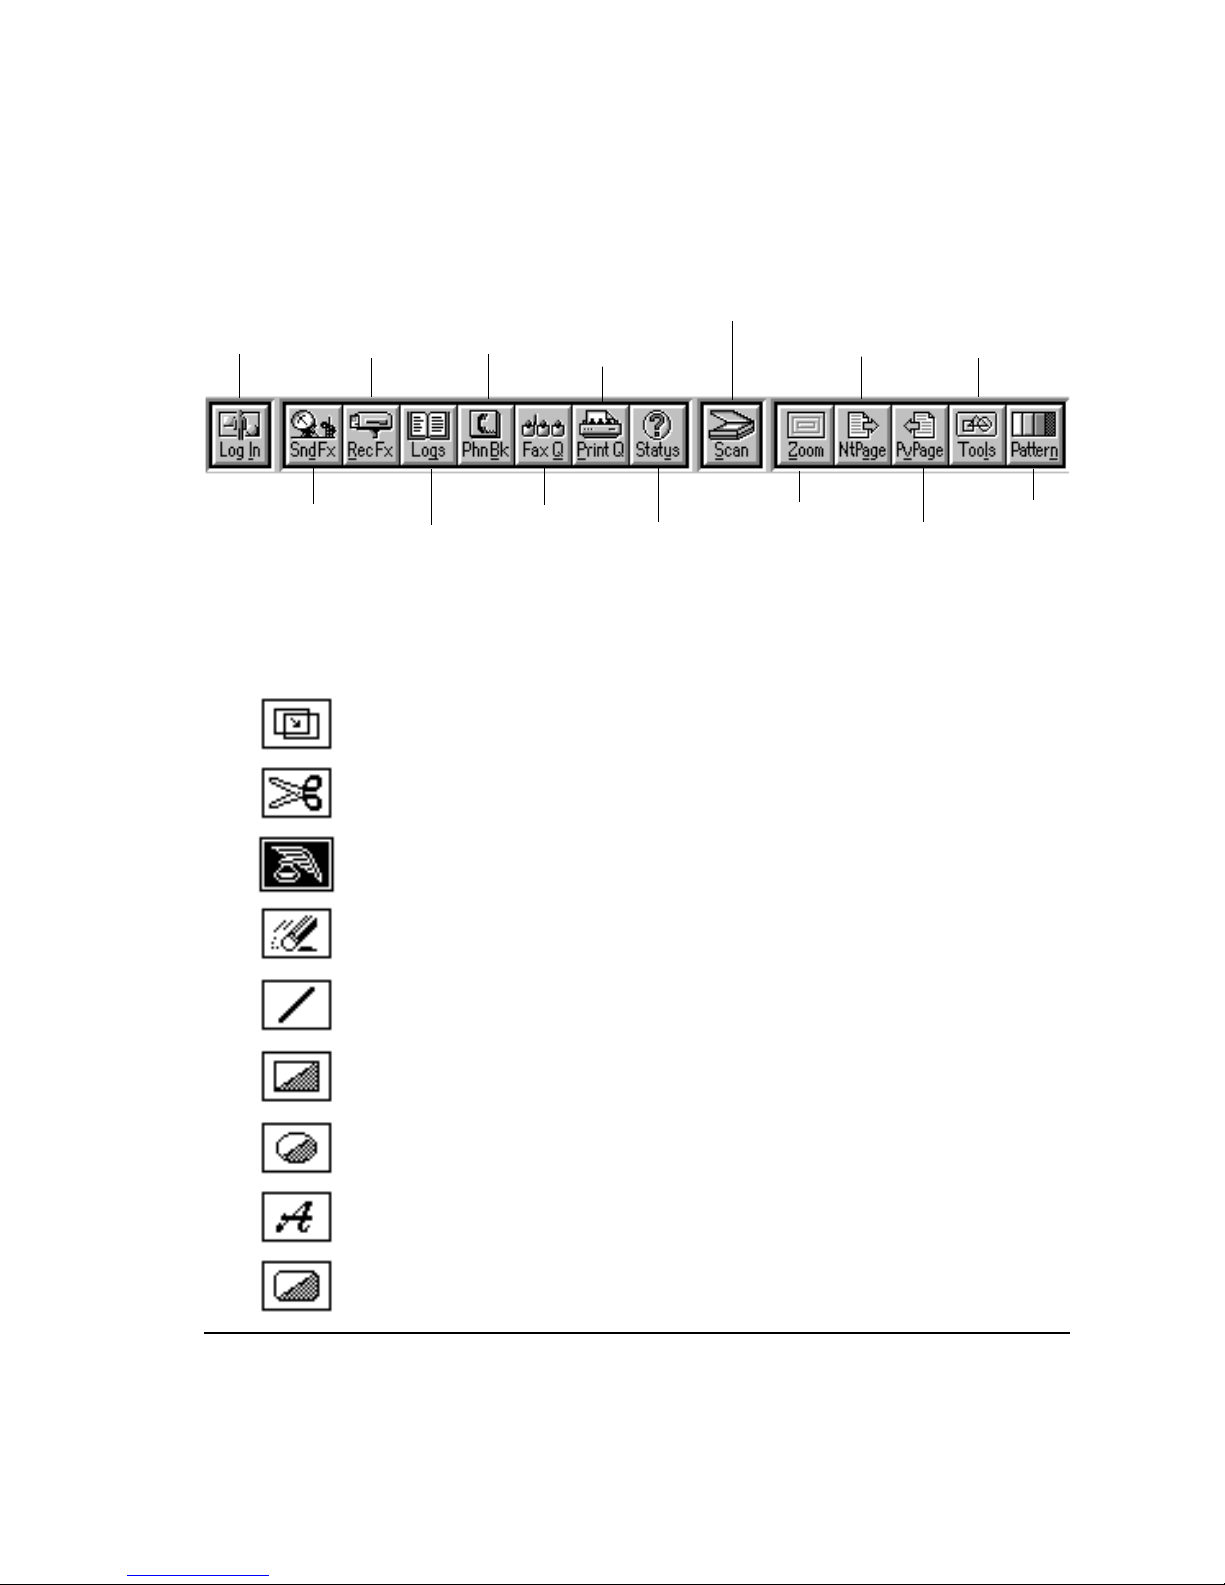
Button Bar
Log in
under
your
User ID
Check
received
faxes
Edit
or
browse
phone
book
Check
print
job
status
Scan
Go to
next
page in
document
Toggle
Tool
Bar
on &
off
screen
Send
fax
Toolbar
Toggle
Pattern
Palette
on &
off
screen
Check
log of
sent &
received
faxes
Check
fax
jobs
status
Check
fax
station
status
Change
magnification
of image
in active
window
Go to
previous
page
in
document
Selection Tool: Use to select rectangular area of image, then drag it,
copy/drag it, cut it or copy it to clipboard.
Scissors Tool: Use to select irregular shape area of image, then drag it,
copy/drag it, cut it or copy it to clipboard.
Pen Tool: Use to draw freehand. Set thickness of line using pattern palette.
Eraser Tool: Use to erase portions of image. Set thickness of eraser using
pattern palette.
Line Tool: Use to draw straight lines. Set thickness of line using pattern
palette.
Rectangle Tool: Use to draw filled or unfilled rectangles and squares.
Oval Tool: Use to draw filled or unfilled ovals and circles.
Text Tool: Use this tool to add text (black and white only).
Rounded-Corner Rectangle Tool: Use to draw filled or unfilled
rectangles and squares with rounded corners.
7
Page 8
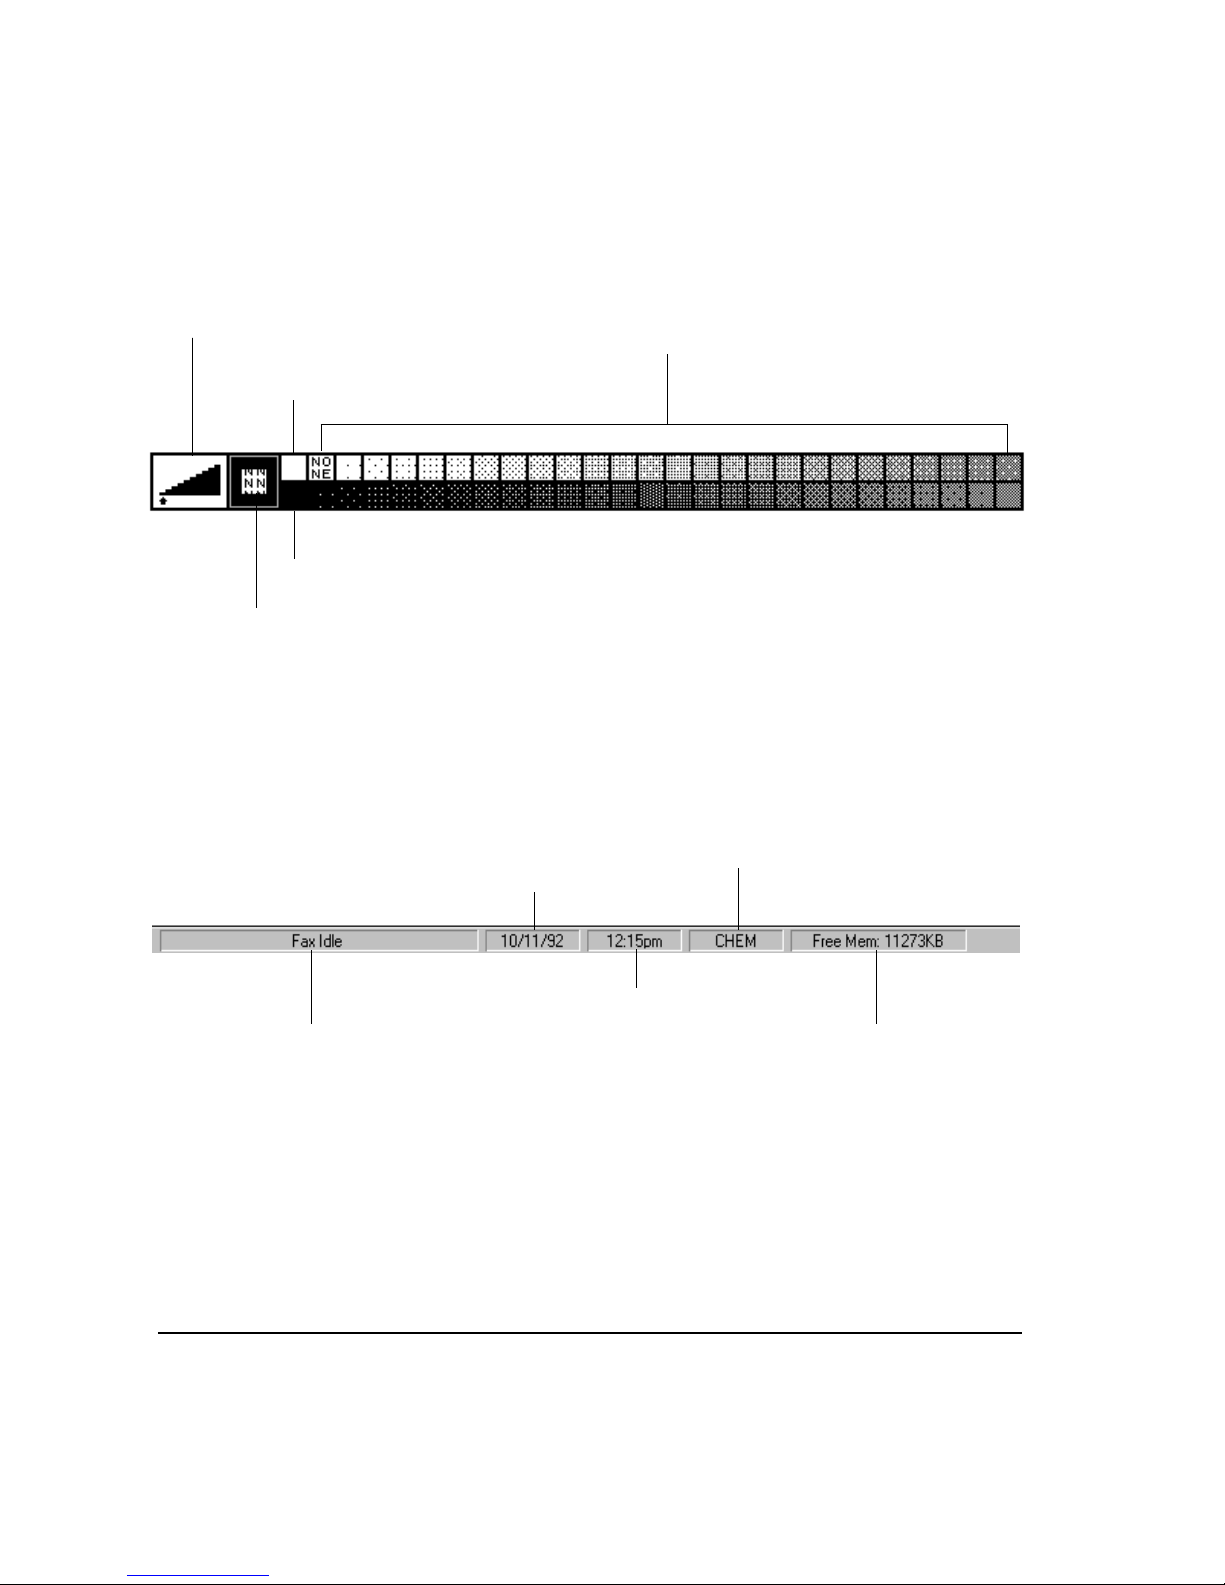
Pattern Palette
Sets width of pen
line or eraser
Select solid white
pattern
Select solid black
pattern
Shade selector
➠ Click outside to select
outline
➠ Click inside to select
interior pattern
Status Bar
Select shaded pattern
Current
date
Current
user
Status
of fax
8
Current
time
Amount of free
memory
Page 9

Basic DOC·IT Functions
Printing
See Chapter 5 in your User's Guide for additional information on printing.
Here is a summary of compatible printer
drivers which can be substituted for the
DOC·IT drivers.
DOC·IT Compatible Driver
TrueImage 35 Apple® LaserWriter®
II NTX, or
PostScript
driver
TrueImage 13 Apple LaserWriter II, or
ible driver
PCL5 HP® LaserJet® III, or
PCL4.5 HP LaserJet IIP, or
To print from Windows
application:
1. Click File, then select Print .
2. Make sure a DOC·IT driver is selected
(e.g., DOC-IT HP III Comp. on OKIPORT).
3. Click Setup if you wish to set paper source,
paper size, or orientation, then click OK.
4. Click OK. Your application will begin
processing the document to be printed.
Note: If you're using a DOC·IT driver
To print from DOS application:
Compatible
PostScript Compat-
HP Compatible driver
HP Compatible driver
on OkiPort, a dialog box will pop
up asking you to select Print
Only, Fax Only,
or Print And Fax.
1. Exit Windows and go to DOS prompt.
Make sure you're in the main DOC·IT
directory (default is c:\docit).
2. Type config, then press Enter key.
3. Select ``Display DOC·IT Settings''.
4. Record driver and port # for the LPT port
you're using.
Note: If you wish to change the LPT
assignments for your emulations,
select “Set Print Emulations”.
5. Press Esc key, then exit to DOS.
6. Enter your DOS application.
7. Refer to your software documentation for
instructions on how to engage a printer
driver and port, and select the appropriate
compatible driver shown in the table above
To eliminate “DOC-IT Print”
pop-up box when printing from
Windows application:
1. Exit Windows and go to DOS prompt.
Make sure you're in the main DOC·IT
directory (default is c:\docit).
2. Type config, then press Enter key.
3. Select ``Display DOC·IT Settings''.
4. Record driver and port # for the LPT port
you're using.
5. Press Esc key, then exit to DOS.
6. Engage Windows and double-click
Windows Control Panel icon.
7. Double-click Printers icon.
8. Select driver you recorded in step 4
above, and click Connect.
9. Select port recorded in step 4: click OK.
10. With new printer highlighted, click Set As
Default Printer
11. Click Close to exit dialog box, then close
Windows Control Panel.
Note: Alternately, select a compatible
driver from table above, then con-
.
9
Page 10

To print to LPT1:
To print to LPT1, you must redirect it to
DOC·IT LPT2 or LPT3, using either the
DOC·IT Configuration program or the
DCTLOAD program.
The DOC·IT Configuration Program
This will change your AUTOEXEC.BAT and
continue to redirect LPT1 even if you reboot.
1. If you're in Windows, exit. Then go to DOS
prompt, and make sure you're in the main
DOC·IT directory (default is c:\docit).
2. Type config, then press Enter key.
3. Select “Set Print Emulations”.
4. Select LPT1.
5. Select “Redirect to LPT2” or “Redirect to
LPT3”, as desired.
6. Select “Return to Main Menu”.
7. Save changes and exit to DOS.
The DCTLOAD Program
This allows you to redirect LPT1 from within
a DOS application using the hot-key combination [Left] Ctrl-[Left] Alt-D, until you reboot.
1. If you're in Windows, exit. Then go to DOS
prompt, and make sure you're in the main
DOC·IT directory (default is c:\docit).
2. Type dctload, then press Enter key.
3. Enter your DOS application.
4. Press [Left] Ctrl-[Left] Alt-D (hot key
combination).
5. Select “1” from the DOC-IT DOS UTILITY
screen.
6. Choose LPT2 or LPT3 from the Select LPT1
Re-Direction screen.
7. Press Enter key.
8. Press ESC key to exit back out to you DOS
application
To enable Print Screen:
To enable print screen, you must redirect
LPT1 to a DOC·IT port with an HP driver:
PCL4+ (HP LaserJet IIP) or PCL5 (HP LaserJet
III), using one of the programs described at
left. Then, to print screen:
1. Press Print Screen key on your keyboard.
2. Using DOC·IT front panel, press STOP,
then ENTER, then START.
Faxing
See Chapter 7 in your User's Guide for additional information on sending faxes.
To send Fax from a Windows
application:
1. Click File, then choose Print from menu.
2. Select a Windows DOC·IT driver on
OkiPort, then click OK.
3. From ``DOC·IT Print'' dialog box, select
Fax Only or Print And Fax, then click OK.
4. Enter information in ``DOC·IT Fax From
Application''. Then enter fax number:
a. Tab down to Recipient FAX Number box
and type in number manually. OR
b. Click Phone Book, then click OK to call
PUBLIC Phone Book onto screen.
Click a number to select it. OR
c. Click User: select your User ID, enter
your password, click OK. Click Phone
Book
, select “Use Private Phone Book”
and click OK to bring list of numbers
onto screen. Click a number to select it.
5. Optional: click Settings to select resolution,
data speed, etc., then click OK.
6. Click Send.
10
Page 11
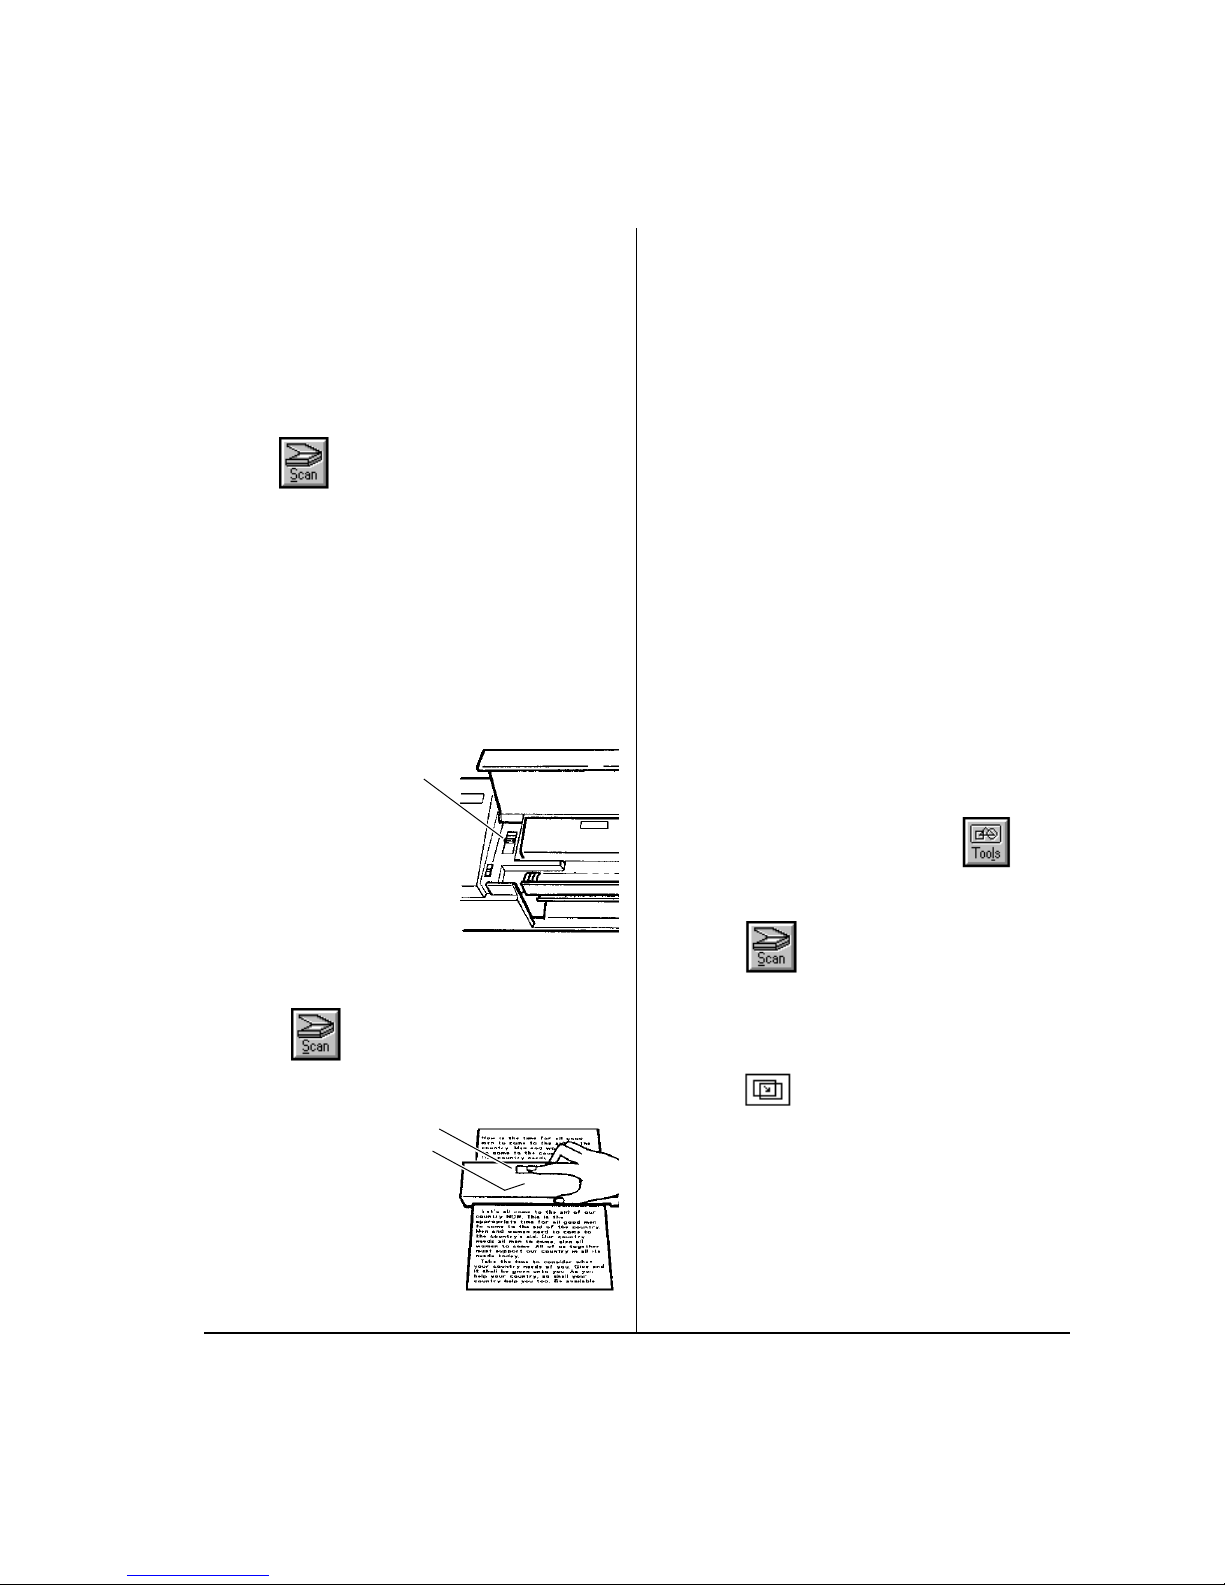
Scanning
See Chapters 3 and 4 in your User's Guide for
additional information on scanning.
Basic scan using Automatic
Document Feed
1. Engage DOC·IT Manager software.
2. Click .
9. Press scanner START button. When READY
light blinks, move scanner slowly down
document.
Note: If you go too fast, unit will beep!
10. When done, release START button and
wait for image to appear on screen.
Note: A similar hand-held method is used
for copying: see “Manual Copying”
in Chapter 8 of your User's Guide.
3. Optional: click Settings... to make changes
in Intensity, Resolution, etc., then click OK.
4. Select Single or Multiple pages to scan.
5. Load document(s) face up.
6. Click OK.
Basic scan using Hand-Held
Scanner
1. Engage DOC·IT
Manager software.
2. Place document on
flat area near DOC·IT.
3. Lift scanner cover and
slide release button
toward SCANNER
EJECT
label.
4. Remove scanner and
place it on document.
5. Click .
6. Click Settings...
7. Select Hand Held
under Scan Method:,
then make any needed
changes in other
settings and click OK.
8. Click OK: scanner
READY light will
glow.
To get your program to
recognize the DOC·IT ADF
Versus a Flatbed Scanner:
From DOC·IT front panel:
1. Press Scanner.
2. Press ← (ADF ON).
3. Press Enter.
To cut and paste from DOC·IT
to your Windows application:
1. Engage DOC·IT Manager software.
2. If Toolbar isn't engaged, click .
3. Load document face up.
4. Click .
5. Make any changes you want in “Scan
Using Document Feeder” dialog box, then
click OK and wait for document to scan.
6. Click (Selection Tool).
7. Move mouse pointer to top left side of
area you wish to cut and paste, then click
and drag pointer to bottom right side of
area to cut, and release mouse button.
8. Click Edit in menu, then select Cut (or
Copy to maintain scanned image as is).
9. Go to your Windows application.
10. Click Edit in menu, then select Paste.
11. In most applications, you can set the
11
Page 12

DOC·IT Setup and Configuration Checklist
Before you begin using your DOC·IT System, please take a few minutes to go through the
following checklist to set up and configure your system:
❑ Set up Fax System Settings
1. Click DOC·IT icon in Doc-It program group to engage DOC·IT Manager.
2. Click Admin in menu, then select Fax System Settings... .
3. Click OK (Note: Factory default is no password for Admin Login).
4. Click Set Station button and type in the information in the boxes. This will add
your identification to the top of outgoing faxes as required by the FCC.
5. Click OK.
6. Locate Rings Prior to Answer (½-way down), and click ▼ or ▲ to change setting to
desired value from 1 to 8 rings (suggest change to 1 ring for dedicated fax line).
7. Check screen for any other global settings you wish to change.
8. Click OK.
❑ Set up Print System Settings for Receiving Legal-Size Faxes
(a) If you have the optional legal tray installed in the optional second paper tray,
select Smart: DOC·IT will automatically switch to legal-size tray
(b) If you don't have optional legal-size tray, set Vertical Shrink to 140%: DOC·IT
will automatically shrink legal-size faxes to fit on 11" paper.
1. While in DOC·IT Manager, click Admin in menu and select Print System Settings.
2. Click OK.
3. (a) Click Smart in Fax Print To Tray box
(b) Or, Click ▲ spin button to set Vertical Shrink to 140%.
4. Click OK.
❑ Complete the Electronic Warranty Registration
To be informed of upgrades and enhancements for your DOC·IT system, complete
the Electronic Warranty Registration: double click Registration icon in Windows
DOC·IT group, then click “Register Your DOC-IT System” to start the process.
❑ Configure to Print from DOS
If you'll be printing to DOC·IT from DOS applications, see “To print from DOS
application” on page 9 of this booklet.
OKIDATA, 532 Fellowship Road, Mt. Laurel, NJ 08054 TEL: (609) 231-1375 FAX: 609-233-8630
OKIDATA and DOC·IT are registered trademarks of OKI Electric Industry Co., Ltd. OKIDATA marque déposée de OKI Electric Industry Co., Ltd.;
marca registrada OKI Electric Industry Co., Ltd. Apple and LaserWriter are registered trademarks of Apple Computer, Inc. HP and LaserJet are
registered trademarks of Hewlett-Packard Company. PostScript is a trademark of Adobe Systems Incorporated, which may be registered in certain
jurisdictions. TrueImage and Windows are trademarks of Microsoft Corporation.
© 1994 by OKIDATA
59265401
Page 13

®
DOC·IT
FAST START
®
Ê
 Loading...