

Page 1

User's Guide
1
Page 2

Table of Contents
INTRODUCTION............................................................................................................. 5
Getting Help................................................................................................................................. 6
Upgrading Unimessage Pro.......................................................................................................... 6
Unimessage Pro Components ...................................................................................................... 6
The Scheduler ......................................................................................................................................... 6
Device Drivers ........................................................................................................................................ 6
The User Interface................................................................................................................................... 7
INSTALLATION AND CONFIGURATION................................................................. 7
Installation and device configuration ...........................................................................................7
System Requirements.............................................................................................................................. 7
Installation .............................................................................................................................................. 8
Stand-alone or Network Server installation..........................................................................................................8
Network client installation ................................................................................................................................. 11
Removing Unimessage Pro................................................................................................................... 11
Loading Unimessage Pro for the first time ................................................................................ 12
Unimessage Pro Main Display.............................................................................................................. 14
Device Configuration............................................................................................................................ 15
Restarting a device, to activate changed settings................................................................................................ 16
Email Configuration (not included with Xlite version) ............................................................. 17
Associating email Servers with email Devices ..................................................................................... 17
Selecting an email Account to Send email Messages ........................................................................... 18
SENDING YOUR FIRST MESSAGE........................................................................... 18
RECEIVING MESSAGES............................................................................................. 20
Setting up your MFP.................................................................................................................. 20
ROUTING RULES ......................................................................................................... 22
System Routing Rules - Messages Received ............................................................................. 22
User Routing Rules - Messages Sent or Received ..................................................................... 22
SCANNING...................................................................................................................... 23
Scanning with your MFP or other Twain-Compatible Scanner................................................. 23
Any Windows Application, Including Unimessage Pro ....................................................................... 23
Into Unimessage Pro, from TWAIN Scanners...................................................................................... 24
AUTOMATIC MESSAGE TRANSMISSION USING EMBEDDED COMMANDS25
TIME-DELAYED TRANSMISSION ........................................................................... 26
2
Page 3

SENDING FILES, INCLUDING COLOR IMAGES, WITH YOUR FAX AND
EMAIL MESSAGES ...................................................................................................... 26
UNIPAD, THE UNIMESSAGE PRO MESSAGE EDITOR ...................................... 28
MAKING PERSONALIZED FAX COVER SHEETS................................................ 28
HOUSEKEEPING .......................................................................................................... 29
FOLDERS........................................................................................................................ 29
Finding Items Stored in Unimessage Pro Folders...................................................................... 30
UNIMESSAGE INSTALLATION DETAILS.............................................................. 31
Step-by-Step Installation Wizard ............................................................................................... 31
Start Up Wizard: User........................................................................................................................... 32
Start Up Wizard: Floppy Disk .............................................................................................................. 33
Start Up Wizard: User Accounts........................................................................................................... 34
Start Up Wizard: Add User................................................................................................................... 35
Start Up Wizard: Email Servers............................................................................................................ 37
Start Up Wizard: Front-End.................................................................................................................. 39
Device Wizard: Select Device .............................................................................................................. 40
Device Wizard: Detect Device Introduction......................................................................................... 41
Device Wizard: Select........................................................................................................................... 42
Start Up Wizard: Device....................................................................................................................... 43
Start Up Wizard: Email Device ............................................................................................................ 44
Device Wizard: Detected Devices ........................................................................................................ 45
Device Wizard: Use for Fax.................................................................................................................. 46
Device Wizard: Device Name............................................................................................................... 47
Device Wizard: Job Types.................................................................................................................... 48
Device Wizard: Dial Mode ................................................................................................................... 49
Device Wizard: Answering................................................................................................................... 51
Device Wizard: Use For Dial-Up Email ............................................................................................... 52
Device Wizard: Dial-Up Connections/Servers ..................................................................................... 53
Dial-up networking name................................................................................................................................... 53
User Name ............................................................................................................................................ 53
Password ............................................................................................................................................................ 53
Device Wizard: New Account .............................................................................................................. 54
User or system wide........................................................................................................................................... 54
Device Wizard: Mail Servers................................................................................................................ 55
Server ports........................................................................................................................................................ 56
Delivery..............................................................................................................................................................56
Limits of incoming messages............................................................................................................................. 57
Device wizard: check mail.................................................................................................................... 57
How to Define More Email Accounts................................................................................................... 59
Start Up Wizard: Scheduler .................................................................................................................. 60
Start Up Wizard: Shortcut..................................................................................................................... 61
3
Page 4

Congratulations..................................................................................................................................... 62
LEGAL INFORMATION .............................................................................................. 63
Conditions of Purchase .............................................................................................................. 63
Permitted Uses ........................................................................................................................... 63
Uses not Permitted ..................................................................................................................... 63
Governing Law........................................................................................................................... 64
Limited Warranty....................................................................................................................... 64
Copyright ................................................................................................................................... 64
Trademarks................................................................................................................................. 65
INDEX .............................................................................................................................. 66
4
Page 5

Introduction
Wordcraft International Limited has specially designed Unimessage Pro for use
with select OKIFAX fax machines and OKIOFFICE Multifunctional Printers
(MFPs). With Unimessage Pro you can send and receive fax messages quickly
and easily by linking your device to your PC.
Subject to the devices with which you are using Unimessage Pro and the
configuration of your specific copy of Unimessage Pro, other features of
Unimessage Pro include:
Viewing your incoming and outgoing messages on screen in the
Unimessage Pro Message Editor, UniPad.
Built in "New message" function for sending messages without having to
use your word processing application.
Scanning hard copy documents using the TWAIN scanner in your
OKIFAX.
Creating contacts in your Unimessage Pro Phonebooks for frequently
used fax numbers and email addresses.
Automated message transmission using Unimessage Pro Embedded
Commands.
Time-delayed transmission to take advantage of evening or weekend
telephone rates.
Creating folders to store your incoming and outgoing messages.
Creating your personalized fax cover sheets.
Sending color images by fax using Wordcraft's WBF transfer protocol or
ITU DTM.
Sending data files embedded in your fax documents using Wordcraft's
WBF transfer protocol or ITU DTM.
Viewing and editing monochrome fax and color graphics files in the
Unimessage Pro Viewer, UniPad.
Creating graphics files in the Unimessage Pro Viewer.
Storing properties of files in the Unimessage Pro folders to be used with
Unimessage Pro’s sophisticated search engine.
Routing of incoming messages using Unimessage Pro’s simple wizard
style Routing Rules.
Can be easily upgraded to support multiple users on suitable Windows
Local Area Networks [LAN].
This User Guide gives instructions on how to install Unimessage Pro, how
to send your first message, how to receive messages to your PC, and
basic information about some of the other functions listed above.
5
Page 6

Getting Help
Unimessage Pro has detailed help files that give much more information than is
in this guide. Select Contents and Index from the Help menu to view an onscreen manual.
Context-related Help by subject and topic is available at any time. You can
display it by clicking on the Help buttons or by pressing F1 on your keyboard.
Upgrading Unimessage Pro
Unimessage Pro can be upgraded for several reasons, including:
To add features, for example email functions are not included in all
Unimessage Pro configurations.
To support multiple users on a LAN.
To support more devices at the same time.
See your Oki dealer for upgrade information.
Unimessage Pro Components
Unimessage Pro has three components:
The Scheduler
This controls the list (queue) of jobs waiting to be done, makes sure jobs are
done by the right device at the right time and keeps a record (log) of everything
that happens. The Scheduler runs in the background so you can continue to use
the PC for other work while jobs are being carried out.
On a network, only one Scheduler is required. This can run on any workstation,
whether or not that workstation is connected to a device or is submitting fax or
email jobs, but it is usually more convenient to run it on the first workstation to
which you attach a device.
Device Drivers
These get their instructions from the Scheduler and each one knows how to send
or receive messages using a certain type of device - mail server, modem or MFP.
Device drivers also run in the background.
More than one driver (and more than one device) can be used on a single PC if
the volume of messages requires it. On a network Unimessage Pro supports
multiple devices (of different types if required) and multiple users, but the devices
themselves should not be connected to network file servers which are already
busy meeting the filing and printing needs of the network. Connecting devices to
file servers would also restrict the total number of devices on the network - with
Unimessage Pro you can connect up to 30 devices (subject to your software
license) - the more devices, the greater the throughput.
Depending on your configuration, the Unimessage Pro fax and email drivers may
appear minimized at the foot of your screen. If so, double click on them to display
the progress of a fax or email.
6
Page 7

The User Interface
This is the part of Unimessage Pro you use. One of its tasks is to enable you to
send messages directly from any Windows application by printing to the
Unimessage Pro printer. Unimessage Pro will convert this printed output into the
correct format: fax or email, depending on the requirements of the person(s) you
are sending it to.
It allows you to see the various job queues and lists that make up Unimessage
Pro and it allows you to create and view messages as well as selecting various
program options
On networks the user interface runs on each workstation that wants to send or
receive messages.
Installation and Configuration
Installation and device configuration
System Requirements
Before you install Unimessage Pro you should make sure that you have an IBMcompatible PC running Windows 95, 98, NT4 or above. The following minimum
specification is recommended:
Pentium 120MHz, 16 MB RAM when running Windows 95 or 98 First
Edition.
Microsoft Windows 95 OSR1 Service Pack 1 is recommended.
Pentium 120MHz, 32 MB RAM when running Windows NT4 or 98 Second
Edition.
When using Windows NT4 please ensure that Microsoft NT4 Service Pack
4 or later is installed.
Pentium 133MHz, 64 MB RAM when running Windows 2000 Professional
– 128 MB Ram recommended.
A 24-Bit color video card and driver is recommended.
Please note that though Unimessage Pro will operate on the above specification
PC this is a minimum. As with most Windows applications, Unimessage Pro will
run faster when used on a PC with a faster processor or with more RAM. If you
are using other applications on your PC at the same time as Unimessage Pro, a
faster processor and additional RAM are highly recommended.
7
Page 8

Installation
Stand-alone or Network Server installation
To install Unimessage Pro:
If using Windows NT4 or 2000, make sure you have Administrator access
rights – this is necessary because Unimessage Pro needs to:
Register the location of some of its components.
Install any Windows updates that are required to use Unimessage Pro.
Create any printers provided by Unimessage Pro.
Close all applications that are running to avoid any conflicts during
installation, especially Outlook or Exchange.
Make sure that the MFP or modem is connected correctly and is switched
on.
If your copy of Unimessage Pro includes support for the sending and
receiving of email messages via SMTP and POP3 servers and you want
to access the internet via a Windows Dial Up Network [DUN] connection,
make sure that you have installed a suitable modem driver under
Windows and created the Windows DUN connection before you install
Unimessage Pro.
Put the Unimessage Pro CD-ROM in your CD drive.
If the CD does not auto-run, Select StartRun
In the dialog box type:
D:\SETUP (where "D" is your CD drive).
Press Enter.
The Unimessage Pro Auto Installer Screen displays. To select an option on the
Unimessage Pro Auto Installer Screen either double click it or use cursor
up/down to select it then press Enter on your keyboard.
Please follow the on-screen prompts to:
Select a language.
View any on-line documentation that may be included.
Start the Unimessage Pro installation.
When using Unimessage Pro on a network with a separate file server, ensure
that you install Unimessage Pro onto the file server.
When using the peer-to-peer network functions provided by Windows 95, 98,
NT4 or 2000, install Unimessage Pro onto the main PC’s hard disk then share
the Unimessage Pro folder so that it is visible to all other Windows PCs where
you want to be able to use Unimessage Pro. You must grant full access to the
shared folder; read-only access is not sufficient.
Once all the files have been copied from the CD, you should restart
Windows before you use Unimessage Pro – doing so allows any required
updates to be applied.
Unimessage Pro will continue the installation on re-starting. Please follow
the instructions carefully.
Unimessage Pro requires you to enter your user details; you can enter any
8
Page 9

alphanumeric characters including spaces. Unimessage Pro will validate
any data entered, as the information is very important and will be
automatically used in fax or email details so that recipients can reply to
you correctly.
If you have received a Unimessage Pro Upgrade Disk with your CD you
should insert this when prompted to so that the new configuration can be
implemented.
If you are installing Unimessage Pro for use on a network you can create
users during the installation process. Each user is granted one of 3
privilege levels (Administrator, Supervisor or User) that determine what
the user is allowed to do.
If your copy of Unimessage Pro includes support for email devices (any
version other than Xlite) and you have either a permanent connection to
the Internet or a Windows DUN connection to the Internet, you can
configure Unimessage Pro to send and receive email messages:
Define any SMTP and POP3 email servers that you want to be available
with Unimessage Pro.
Configure Unimessage Pro to use either your permanent connection or an
existing Windows DUN connection to the Internet by selecting a device
that can support data connections, such as a modem on the port that you
have already defined a Windows DUN connection.
If you are using a Windows DUN connection you will need to enter User and
Password details into Unimessage Pro even if these have already been entered
when the connection was defined.
Select which SMTP and POP3 email servers can be accessed via the
Unimessage Pro email driver.
Define the first email account and select whether it should be System-wide
or User specific.
A System-wide email account is only visible to Unimessage Pro
Administrators and Supervisors and any email retrieved using
a System-wide email account is added to the Network Inbox. A
User specific email account is visible to the user associated
with it as well as all Administrators and Supervisors. Any email
retrieved using a User specific email account is added to the
user’s Received items folder.
If the device you select or detect can support the sending or receiving of
fax messages, and you want to use it to send or receive fax messages,
you will need to configure it.
When Unimessage Pro has collected sufficient information it will create a
shortcut to start Unimessage Pro, which it will then run.
9
Page 10
Before you can send email messages, you must have
defined an email driver and an email account. If you
configured Unimessage Pro for use with a fax machine
during installation, you must define a new device and
account for email messages.
Additional devices can be defined by selecting Device
from the File, New menu at the PC to which the device is
connected.
You will only be permitted to have the number of devices
allowed by your license active at any one time. You
may be able to upgrade your copy of Unimessage Pro
to allow more devices to be active at the same time if
your message traffic requires it. Refer your
Unimessage Pro Administrator to the section on
Upgrading Unimessage Pro if required.
Additional email accounts can be defined by selecting
Email account from the File, New menu.
If you have installed Unimessage Pro onto a local hard
disk [HD] and want to use it from other PCs on a peer-topeer network remember to share the Unimessage Pro
folder with full access rights to all other PCs that you
want to be able to use Unimessage Pro.
If you are using a Windows Dial Up Networking [DUN]
connection and are also connected to a LAN using the
IPX/SPX protocol, e.g. some versions of Novell Netware,
you will be disconnected from the LAN while the
Windows DUN connection is established. To avoid this
display the properties for the Windows DUN, click the
Server Types tab and de-select the Log on to network
and IPX/SPX Compatible options then click OK.
10
Page 11
Network client installation
On each of the Windows PCs where you want to use Unimessage Pro:
If using Windows NT4 or 2000, make sure you have Administrator access
rights – this is necessary because Unimessage Pro needs to:
Register the location of some of its components.
Install any Windows updates that are required to use Unimessage Pro.
Create any printers provided by Unimessage Pro.
If the drive where Unimessage Pro is installed is not already mapped on
the PC:
Use Network Neighborhood to browse to the folder where you have
installed Unimessage Pro.
Right click on the Unimessage Pro folder and select Map network
drive from the menu that is displayed.
Select the Client folder on the drive that is mapped to where
Unimessage Pro is installed, and run SETUP.EXE from this folder.
Confirm the drive where Unimessage Pro is installed, ; the default
suggested will usually be correct.
After registering the location of its components and installing any Windows
updates that are required, restart Windows
Unimessage Pro will continue the installation on re-starting. Please follow
the instructions carefully.
During the installation of Unimessage Pro network client on
each network workstation only create a device driver if the
modem or MFP is connected directly to the workstation at
which you are installing the client – you can use modems and
MFPs connected elsewhere on the network from within
Unimessage Pro.
Additional email accounts can be defined by selecting Email
account from the File, New menu.
Additional devices can be defined by selecting Device from the
File, New menu at the PC to which the device is connected.
You will only be permitted to have the number of devices
allowed by your license active at any one time. You may be
able to upgrade your copy of Unimessage Pro to allow more
devices to be active at the same time if your message traffic
requires it. Refer your Unimessage Pro Administrator to the
section on Upgrading Unimessage Pro if required.
If you are using a Windows Dial Up Networking [DUN]
connection and are also connected to a LAN using the
IPX/SPX protocol, e.g. some versions of Novell Netware, you
will be disconnected from the LAN while the Windows DUN
connection is established. To avoid this display the properties
for the Windows DUN, click the Server Types tab and de-
select the Log on to network and IPX/SPX Compatible
options then click OK.
Removing Unimessage Pro
11
Page 12
Unimessage Pro integrates into the Windows Add/Remove Programs function.
Select Start Control Panel Add/Remove Programs, then Unimessage Pro
and click the Add/remove button to start the removal process.
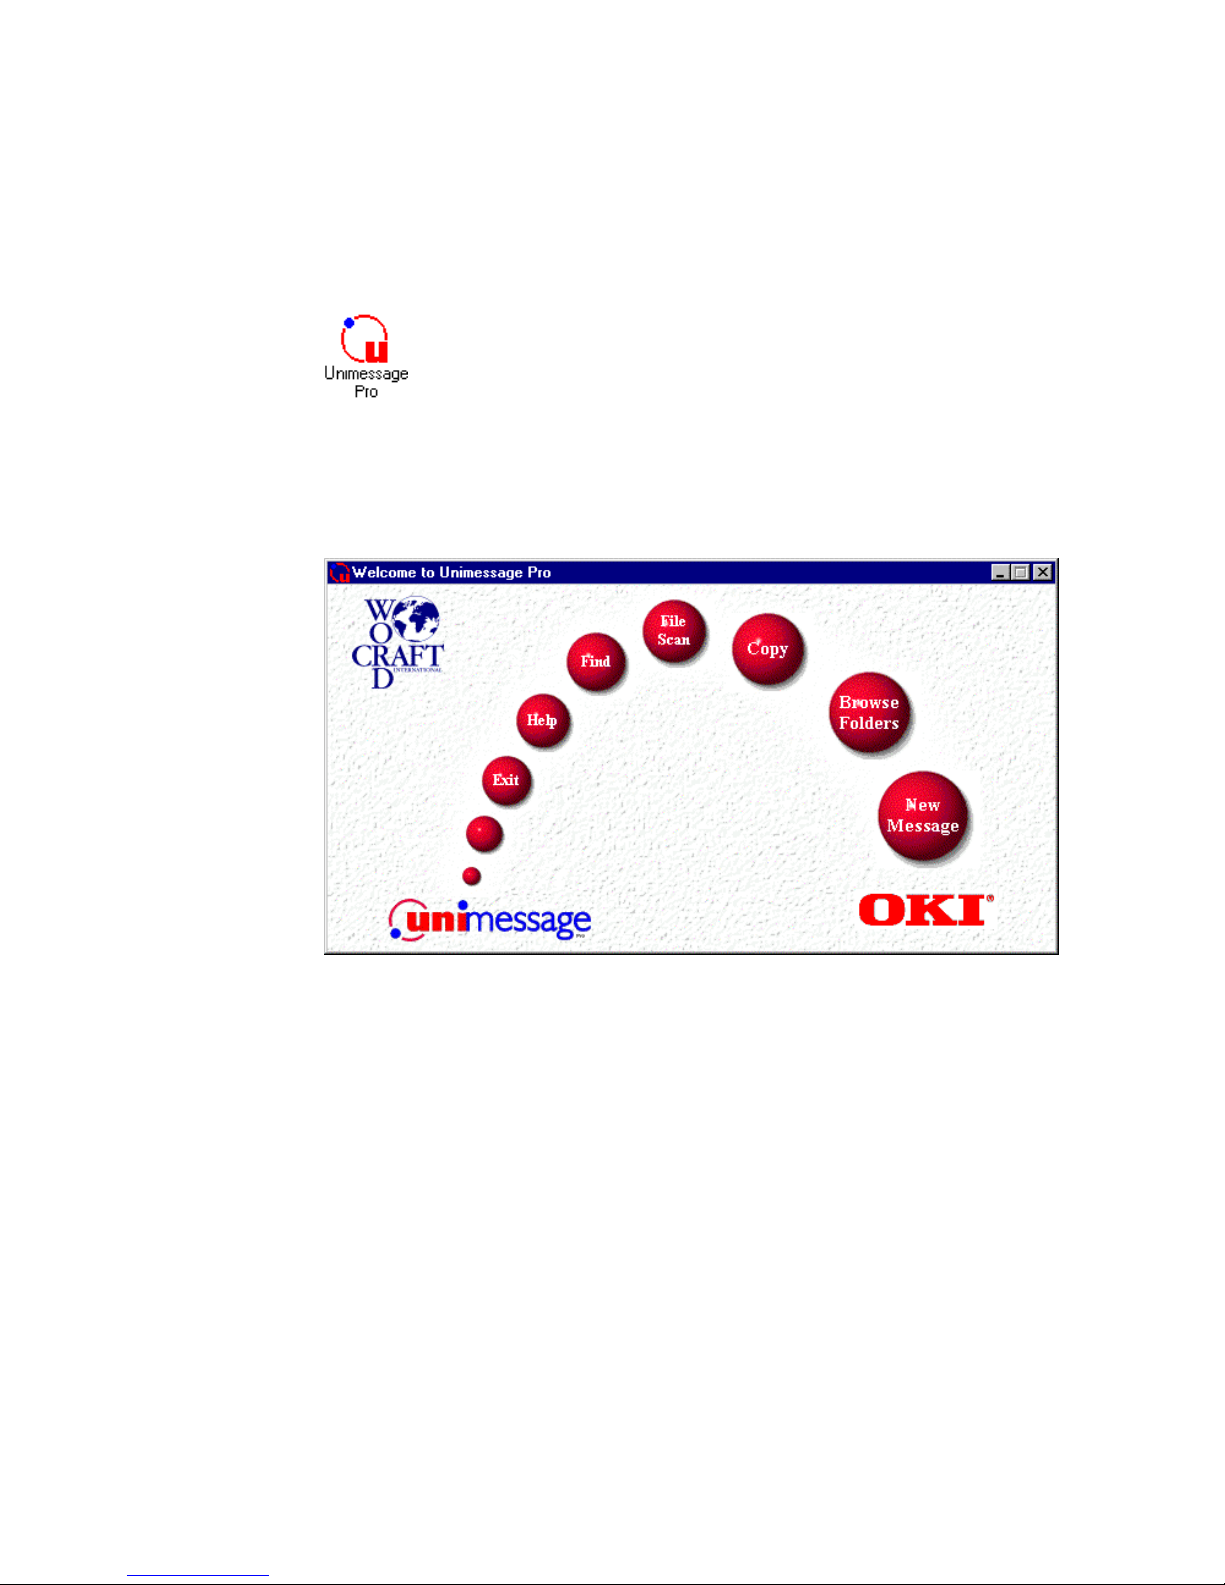
Loading Unimessage Pro for the first time
Select the Unimessage Pro shortcut from your Desktop Start menu or
Start Programs folder depending on where you chose to create it during
Unimessage Pro installation.
Unimessage Pro Welcome Menu
When you start Unimessage Pro it normally displays the main Welcome menu:
From this menu you can access the main Unimessage Pro system. You can
check on the progress of messages and examine the lists of received and
transmitted messages by clicking the Unimessage Pro logo. Click the Wordcraft
logos to visit the Wordcraft International Ltd. web site
(http://www.wordcraft.co.uk).
The round buttons provide quick access to some of the Unimessage Pro
functions and can include a combination of the following:
12
Page 13

New
Message
This takes you directly to the Unimessage
Pro message editor so that you can create
a message and send it.
Browse
Folders
This takes you to the list of folders within
Unimessage Pro so that you can check on
the progress of messages, examine the
lists of received, transmitted, filed
messages and print these lists or individual
messages.
Copy
(All versions except Xlite) This combines
the functions of TWAIN scanning and
printing and allows you to make multiple
hardcopies of a document in the automatic
document feeder of the TWAIN scanner.
File Scan This takes you to the Unimessage Pro
Scan setup dialog so that you can scan
documents or images into your PC.
Email
Scan
(All versions except Xlite) This scans a
document or image, then automatically
attaches it to an email message.
Find This takes you to the Unimessage Pro Find
dialog where you can search your Personal
Unimessage Pro folders for filed items.
Fax
options
Help
This allows you to set up the main fax
parameters of the software.
This takes you to the Unimessage Pro online Help.
Exit This closes Unimessage Pro.
13
Page 14
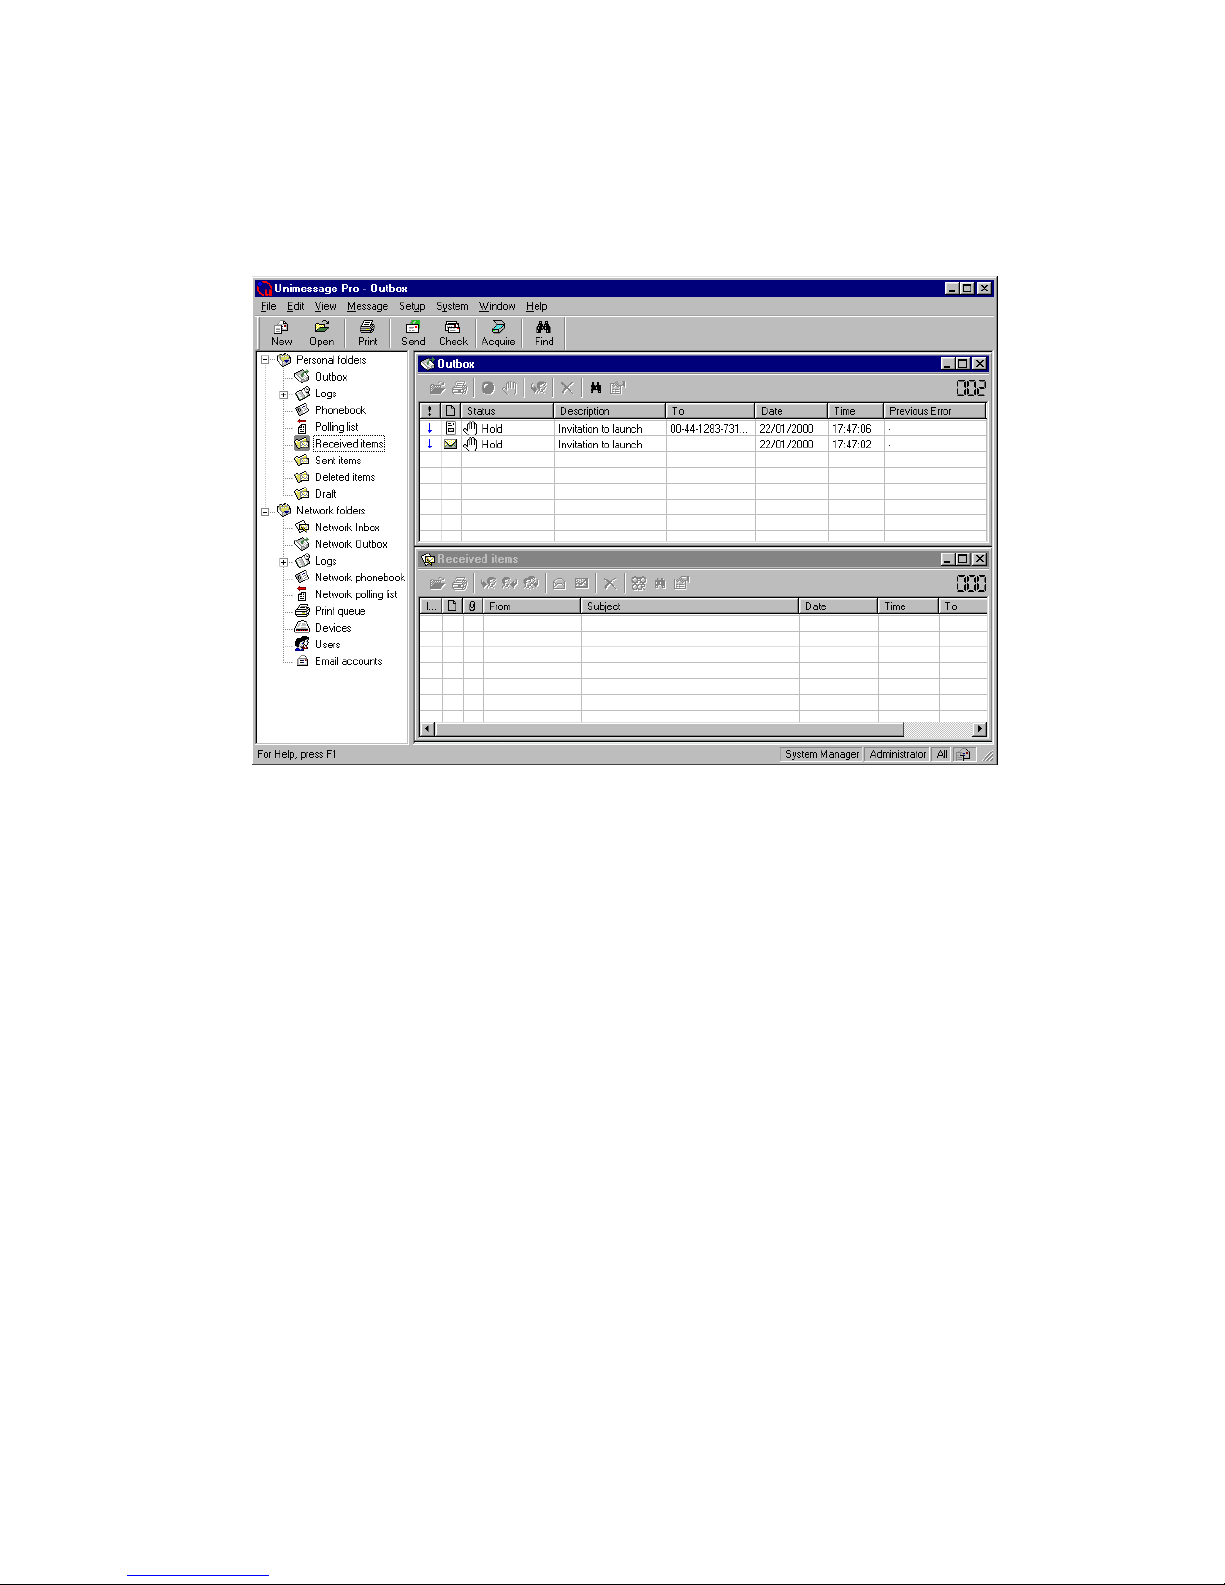
Unimessage Pro Main Display
When you click the Unimessage Pro logo on the Welcome menu the main
Unimessage Pro display appears:
At the top of the Main Unimessage Pro Display is the menu list: File, Edit, View,
Message, Setup, System, Window and Help.
Below the menu list is the main toolbar: New, Open, Print, Send, Check, Acquire,
and Find. You can disable the toolbar display from the View menu.
At the foot of the screen is a status bar that displays various messages
depending on what you are doing. You can disable the status bar from the View
menu.
The remainder of the screen is divided into two parts:
On the left is the list of available folders.
To open a folder in the right pane, click its name in the folder tree.
If a folder contains any unread items, Unimessage Pro displays the number
of unread items within each folder after each folder’s name in this section of
the screen.
If your copy of Unimessage Pro includes functions to allow its use on a
supported Windows based LAN you will see a Network folders branch in this
tree as well as the Personal folders branch. Folders within this branch,
including any you create yourself, are visible to all Unimessage Pro users on
the LAN – though their access to the folder may be restricted depending on
the user’s privilege level.
14
Page 15
For details of the maximum number of people that can use Unimessage Pro
at the same time on a LAN, select About Unimessage Pro from the Help
menu and consult the Network tab. You can increase the maximum number
of people that can use Unimessage Pro at the same time up to 500. Refer
your Unimessage Pro Administrator to the section on Upgrading Unimessage
Pro if required.
You can change the width of this area by placing your cursor on its right-hand
border (the cursor will change shape), holding down the left mouse button,
and dragging the border to a new position.
On the right is a display area for individual or multiple folders.
You can select folders to be displayed by clicking on them in the folder list. Once
folders are displayed they can be minimized or maximized like normal Windows
screens. You can use the Window menu to cascade the folders displayed, split
them horizontally or vertically, switch between open folders, or close them all.
Most folders also have their own toolbars that you can disable from the View
menu.
When you close the main Unimessage Pro display, the
Welcome menu reappears.
If you prefer to skip the Welcome menu, select Program from
the Setup menu, click on the Application tab and clear the
Show "welcome" screen option then click OK. The next time
you start Unimessage Pro, the Welcome menu will not appear.
You can switch between open folders in the main
Unimessage Pro display using Ctrl+TAB or Ctrl+F6.
You can close the current folder in the main Unimessage Pro
display using Ctrl+F4.
Device Configuration
During the installation process you configured Unimessage Pro for use with your
MFP. If you want to, you can reconfigure how Unimessage Pro works with your
MFP, for example to enable or disable reception of fax messages to the PC via
the Devices folder.
Open the Devices folder in the folder tree, then double-click on the appropriate
entry in the list of devices that appears in the right hand pane. Your device’s
settings display:
15
Page 16

Change the settings on the Device Properties dialog and then click OK to save
the new settings.
All changes made to controls on any tab of
the above dialog take effect from when
Unimessage Pro, or the device, is restarted.
The All settings button allows you to
review and change all of the detailed
settings that are available for the type of
device you are using. Only make changes if
you are sure improper settings can cause
unpredictable behavior.
Restarting a device, to activate changed settings
Changes made to a device’s properties only take effect from the next time you
start Unimessage Pro, or close and then restart the device after editing its
settings, as described below:
Select the device in the Devices list.
Click the Log off toolbar button:
Click the Start toolbar button:
16
Page 17

Email Configuration (not included with Xlite version)
You will see the Email accounts folder included in either your Personal Folders
(for stand-alone configurations) or Network folders (for LAN compatible
configurations) branch of the folder tree.
Email servers (POP3 and SMTP)
Unimessage Pro can retrieve email messages from mailboxes on POP3 email
servers and send email messages via SMTP email servers.
Unimessage Pro administrators maintain a list of POP3 and SMTP email servers
that can be accessed by Unimessage Pro on the Servers tab after selecting
Email from the Setup menu.
Associating email Servers with email Devices
Unimessage Pro email devices are responsible for sending and receiving email
messages. Before any users can send or receive email messages, at least one
Unimessage Pro email device must be active that can access the required POP3
and SMTP email servers.
When defining an email driver you can select what POP3 and SMTP servers it
can access. To review and change this information, when logged onto
Unimessage Pro as an Administrator:
Open the Devices folder.
Double-click on the appropriate email device.
Click on the Servers tab.
If this email device connects to the Internet via a Windows DUN
connection, ensure that the appropriate connection is selected.
Select all POP3 and SMTP servers that this email device can access,
clear all that it cannot.
Click OK.
Email accounts
There are two types of email accounts in Unimessage Pro:
System-wide
These accounts are only shown in the list of email accounts for Unimessage
Pro Supervisors and Administrators who can use them to send email
messages. However, any email retrieved using the POP3 email server
account defined in a System-wide email account is added to the Network
Inbox.
User specific
These accounts "belong" to one specific Unimessage Pro user. Any email
messages retrieved using a user specific email account are moved directly
into the appropriate user’s Received items folder, they do not pass through
the Network Inbox.
A Unimessage Pro user with User privileges sees only those email accounts
that "belong" to them, they can create more email accounts but can only use
POP3 and SMTP servers already defined by Unimessage Pro Administrators.
17
Page 18
Selecting an email Account to Send email Messages
Before any Unimessage Pro user can send any email messages via Unimessage
Pro at least one email account must be shown in the user’s view of the Email
accounts folder. One of the email accounts listed must be set as the default
(shown bold) by right clicking on it and selecting Use to send my email .
Once an email account has been set as default that user can submit email
messages. However, email messages will can only be sent when a Unimessage
Pro device capable of sending and receiving email messages via the appropriate
SMTP and POP3 email servers is available. If no such device is available, email
messages will remain in the Outbox unsent, and no email messages will can be
received.
Sending your first message
To check that your Unimessage Pro installation has been successful, it is a good
idea to send a quick test message. Alternatively, you can put a first test job on
hold and view it in the personal Outbox folder to check layout etc., then delete it.
Make sure that Unimessage Pro is loaded.
Load your word processor.
Enter any text you wish.
Select Print and choose the Unimessage Pro printer.
Use the Properties button to check fine resolution (200x200 dpi) is
selected.
Print the text.
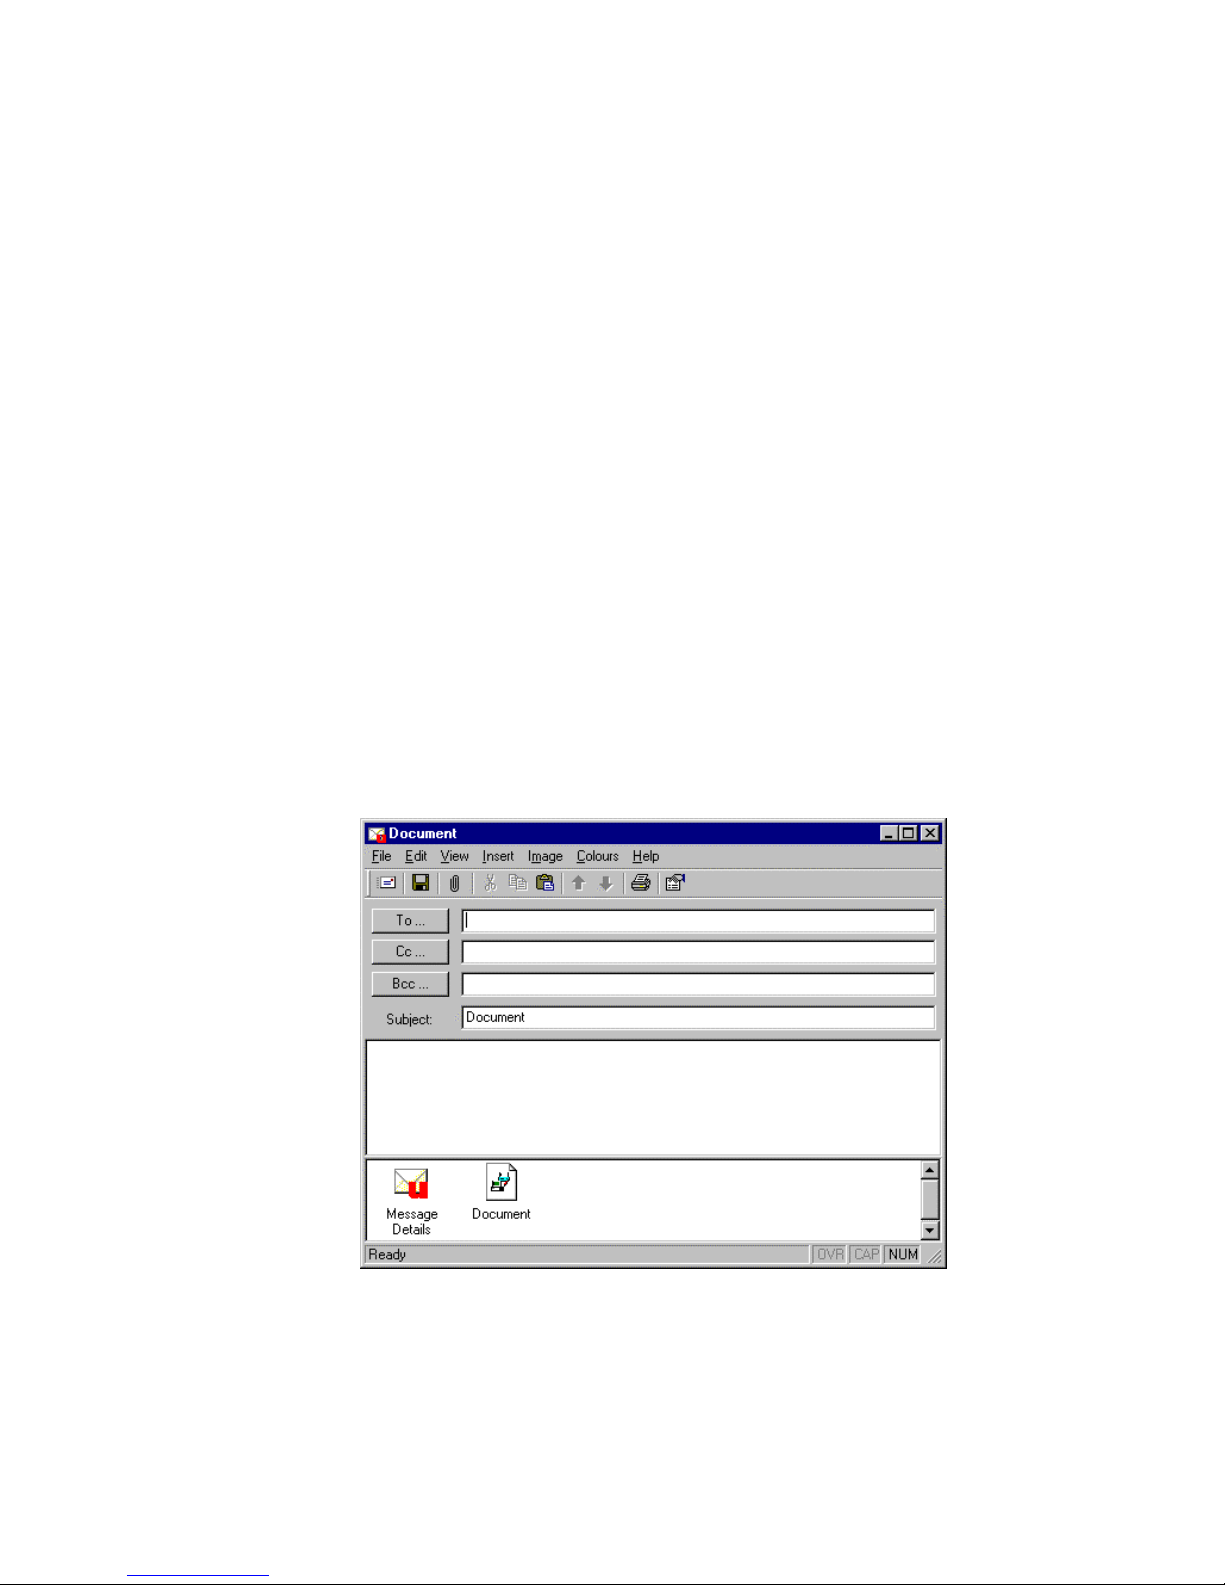
The Unimessage Pro message editor opens:
Enter the fax number or email address (depending on the device you have
installed) in the To: field.
If you enter an email address an image of the document printed will be sent
as an email attachment.
To prevent the message from being sent immediately, click the Properties
18
Page 19
button in the toolbar (or select Properties from the File menu).
Select Hold in the Status drop-down list on the General tab and click OK.
To send the message, click on the Send button in the toolbar (or select
Send from the File menu).
In Unimessage Pro you can see the job on hold in your personal Outbox.
Once the Job is in the Outbox there are several options available after
selecting the job, ; these include:
Clicking the Open toolbar button to view the message.
Clicking the Start toolbar button to allow the message to be sent.
The job’s status should change from Hold to Pending and then to In
progress as Unimessage Pro starts to send the message.
Clicking the Delete toolbar button to delete the message without
sending it.
The message will be added to the Deleted items folder from where you can
restore it later.
If you instruct Unimessage Pro to send your message, after it has been
sent Unimessage Pro:
Adds an entry to the Send log list within the Logs folder (showing
details of the success or failure of the attempt).
If sent successfully, moves the entry from the personal Outbox folder
and places a new entry in the Sent items folder unless you have
defined a Routing Rule that applies to sent messages.
To send a short message you can also do any of the following:
Click the New Message button on the Welcome to Unimessage
Pro menu.
Click the New button on the main Unimessage Pro toolbar.
Select New, Message from the File menu.
Press Ctrl+N.
If you regularly send messages from Windows applications by
printing to the Unimessage Pro printer you can use Unimessage
Pro’s unique system of embedded commands to automate the
process. For more information please see the sections on
Automating the transmission process and Embedded
commands in the Unimessage Pro Help system available, by
selecting Contents and Index from the Help menu.
You can type a recipient’s name and associated fax number or
email address into the To, Cc or Bcc fields using the "Name <Fax
Number>" or "Name <Email address>".
e.g. John Watkins <jwatkins@pcfax.com>
Jane Walker <00-44-1283-731402>
Use the semi-colon character ";" to separate recipients in the To,
19
Page 20

Cc and Bcc fields or embedded commands.
e.g. John Watkins <jwatkins@pcfax.com>;Jane Walker <00-44-
1283-731402>;Rory Patterson
Hold down SHIFT when deleting an item to delete the item
without storing it in the Deleted items folder. Take care though –
you will not be able to restore the item later.
When you try to send or receive a message Unimessage Pro will
record details of each attempt in the logs folder. See
Housekeeping section for more information.
Receiving Messages
Setting up your MFP
Your fax/MFP must be configured to forward received faxes to the PC; to do this
press the AUTO REC button repeatedly until the LCD display shows PC MODE.
Please consult the OKIFAX or OKIOFFICE User’s Guide for details.
Setting up Unimessage Pro
During the installation process you configured Unimessage Pro for use with your
MFP. You can reconfigure how Unimessage Pro works with your device, for
example to enable or disable reception of fax messages to the PC, via the
Devices folder.
Open the Devices folder in the folder tree, then double-click on the appropriate
entry in the list of devices that appears in the right hand pane. The Auto-answer
check box on the Device tab controls whether Unimessage Pro will answer
incoming calls to receive fax messages. Change the settings as required and
then click OK to save the new settings.
The settings take effect when Unimessage Pro next restarts, or after closing and
restarting the device.
Whether or not your MFP supports the print and forward to
PC function for received fax messages you can also define
a Routing Rule to have all or some received messages
printed automatically
How do I know when a message has been received?
On a stand-alone Unimessage Pro system, where the Network folders branch is
not present in the folder tree:
All your received messages are initially stored in the Received items
folder.
On a multi-user Unimessage Pro system, where the Network folders branch is
present in the folder tree:
20
Page 21

All received fax messages are initially stored in the Network inbox folder
that is visible only to Unimessage Pro Supervisors and Administrators.
Email messages retrieved from POP3 email servers are stored in the
Network Inbox for System Wide email accounts or into the appropriate
user’s Received items folder for email accounts personal to a specific
user.
For more information on email accounts refer to the on-line help and to the
section on Email Configuration within this guide.
If Unimessage Pro is running when a message is received, Unimessage Pro
advises you of the reception and asks if you want to view the received message,
view the contents of the folder in which it is stored, or deal with it later:
You can configure Unimessage Pro not to tell you when a message is received in
the dialog box displayed when you select Events from the Setup menu.
If you want Unimessage Pro to automatically move, copy, forward or perform
some other action on some or all messages stored in the Network Inbox, you can
define one or more System Routing Rules by selecting System Routing Rules
from the Setup menu. For messages stored in a user’s Received items folder,
each user can define personal User Routing Rules by selecting Routing Rules
from the Setup menu.
If you receive a message that has files attached to it, Unimessage Pro shows a
shortcut in the file bar along the bottom of the Unimessage Pro Viewer window
corresponding to each attached file when you view the message. The
Unimessage Pro Viewer can display the following types of image files attached to
received fax and email messages:
Bitmap files (.BMP)
JPEG files (.JPG)
PaintBrush files (.PCX)
TIFF files (.TIF)
Clicking on the shortcut shows the image file in the Unimessage Pro Viewer
Other format files can be displayed in the associated application, e.g. Microsoft
Word for .DOC files, by double- clicking the shortcut.
To save files received attached to messages separately, right click on the
shortcut for the attachment and select Save as from the menu then displayed.
21
Page 22

Take care if you edit a received message or attachments to
a received message – you are editing the original message
or attachment, as it is stored in Unimessage Pro. Consider
saving the attachments separately by right clicking on the
shortcut and selecting Save as or copying the received
message and editing the copy.
To view HTML format received email messages you must
have Microsoft Internet Explorer 4 or later installed.
When you try to send or receive a message, Unimessage
Pro records details of each attempt in the logs folder. See
Housekeeping section for more information.
Routing Rules
System Routing Rules - Messages Received
If a received message is a fax with a sub address allocated to a Unimessage Pro
user or an email received on a user specific email account:
The received message is delivered directly to the user.
If the received fax message doesn’t have a sub-address matching any
Unimessage Pro user, or is an email message received by the Unimessage Pro
system via a Unimessage Pro System-Wide email account:
The received message is added to the Network Inbox folder, and all
available Unimessage Pro Supervisors and Administrators are notified that
the message has arrived and requires attention.
To vary the action on receipt of a message into the Unimessage Pro Network
Inbox, Unimessage Pro provides System Routing Rules.
System Routing Rules are:
Created and maintained by Unimessage Pro Administrators by selecting
System Routing Rules from the Setup menu.
Processed by the Unimessage Pro scheduler in the order shown, from top
to bottom.
User Routing Rules - Messages Sent or Received
When a message is received it is normally stored in the Received items folder,
when a message has been sent it is usually stored in the Sent items folder.
You can change the action by which all or some messages are sent or received
by defining one or more Routing rules. Select Routing Rules from the Setup
menu to create, modify, remove, activate or deactivate Routing Rules.
User Routing Rules are:
22
Page 23

Created and maintained by any Unimessage Pro user.
Specific to the user. Each user can define their own routing rules, which
act completely independently of all other Unimessage Pro users' routing
rules.
Processed by the Unimessage Pro user in the order they are shown, from
top to bottom, when a message is forwarded to the user for any of the
following reasons:
Automatically because Unimessage Pro is operating in stand-alone
mode where the Network folders branch of the folder tree is not
present.
Automatically as a result of a matching System Routing Rule.
Automatically as a result of the sub-address sent with the fax message
matching a Unimessage Pro user’s sub-address.
Automatically because it was received via a user specific email
account.
Manually by a Unimessage Pro Supervisor or Administrator.
Some sample rules are supplied with Unimessage Pro. To activate them, go to
the Routing Rules dialog, select a suitable sample to base your own rule on, click
Copy, click Modify, enter the incomplete information and click Finish to store
the completed rule.
If OCR functions are included in your copy of Unimessage
Pro, you can define a User Routing Rule to automatically
OCR received fax messages.
You can also define an OCR auto-detection scheme by
selecting OCR from the Setup menu that you can apply as
part of the User Routing Rule, to detect information from
the received OCR data derived from the fax image - for
example the subject of the fax message. If you define other
routing rules below the OCR and Detect User Routing
Rules these subsequent rules can act on the detected
information.
Scanning
Scanning with your MFP or other Twain-Compatible Scanner
If your MFP is TWAIN compatible, it means that you can use your MFP to scan
hard copy documents into any TWAIN compatible application you are running
(e.g. PaintShop Pro, Corel Photo Paint, etc.).
Any Windows Application, Including Unimessage Pro
When using a TWAIN compatible Windows application, including Unimessage
Pro, page(s) can be scanned, by using the procedure below:
Select Select Source from the File menu.
Choose the appropriate TWAIN Scanner from the menu and click on OK.
Select Acquire Image from the File menu.
The scanner setting dialog will appear, choose settings and start the scan.
23
Page 24

Often there is a Help button that provides more information about the
settings available for your scanner.
If you acquire images at asymmetric resolutions such as 200
x 100 dpi and 200 x 400 dpi, you will be able to view them in
Unimessage Pro, but may experience problems with
displaying them in other Windows applications. If your image
appears distorted when scanning at these (or other
asymmetric) resolutions, scan again using square
resolutions instead, e.g. 200 x 200 dpi, 300 x 300 dpi, etc.
Asymmetric resolutions will also usually yield poor OCR
results.
Into Unimessage Pro, from TWAIN Scanners
Unimessage Pro also provides a function that allows you to build a multi-
page document from several separate TWAIN scans.
This is useful if you want to scan different pages with different settings, or
if you want to scan both sides of a document. It is used as described
below:
Select Multiple Scans from the File menu.
The Unimessage Pro Scan Multiple Pages dialog appears:
Click the Help button on this dialog for more details of how these
advanced scanning functions are used.
24
Page 25

If you intend to scan a document for fax transmission, select
fax resolutions such as 200 x 200 dpi or 200 x 100 dpi and
select Black and White instead of Color or Grey Scale.
If you want to scan a document for Optical Character
Recognition [OCR], best results are usually obtained with
square resolutions such as 200 x 200 dpi, 300 x 300 dpi and
400 x 400 dpi and Black and White, rather than Grey Scale
or Color. 200 x 200 dpi is usually adequate for all but the
smallest print.
24-bit color and high-resolution images can be very large;
over 40 megabytes for each file, and additional PC memory
may be required to manipulate the image. It is best to use
no higher than 200 x 200 dpi when using 24-bit color.
Automatic Message Transmission using Embedded Commands
You can send messages from your Windows application without directly entering
Unimessage Pro.
When you select the Unimessage Pro printer from your application, a new font
becomes available, the Commands font. If you use this font to enter commands,
Unimessage Pro finds these when you print to the Unimessage Pro printer,
follows the instructions and removes the commands from the document before
sending it. The commands must be entered in the Commands font, at 12 point
and enclosed by double square brackets.
For example:
[[TO=01234 567890]]
This command tells Unimessage Pro that the message is to be sent to the fax
number 01234 567890.
For more information, please see the sections on Automating the transmission
process and Embedded Commands in the Unimessage Pro Help system
available by selecting Contents and Index from the Help menu.
You can also include Phonebook Contact and Distribution
list names in the embedded commands.
If you are using Word 97 (or subsequent versions of Word)
you must ensure that the Use printer metrics to layout
document is selected in Word. This can be found in the
Compatibility tab reached from the Options item in the
Tools menu.
25
Page 26

Time-Delayed Transmission
When you send a message you have the option of delaying transmission.
From the Unimessage Pro message editor, click the Properties toolbar button or
select Properties from the File menu, and then select the Time Range tab.
Here you can specify or select a date and time before or after which the message
should not be sent. Alternatively, you can specify times that the message should
be sent between, e.g. 18:00 and 08:00 the following day for a cheaper call rate,
on any day.
You can also set, clear or change the time delay settings for
jobs in the Outbox by right clicking on the job, selecting
Properties from the menu displayed, and then reviewing the
settings on the Transmission tab
Sending files, including color images, with your fax and email
messages
Files can be attached to both fax and email messages using Unimessage Pro.
Unimessage Pro can attach image and other files to your fax message and send
it using either:
Wordcraft Binary File [WBF] attachment – supported by all MFPs and
modems.
International Telecommunications Union [ITU] Document Transfer Mode
[DTM] fax attachment – supported by only some MFPs and Class 1
compatible fax modems.
The image is encoded and embedded into your fax message, and decoded by
the recipient's viewer software.
26
Page 27

If you want to send fax messages with WBF attachments to
users of PC fax software other than Unimessage Pro users,
other recipients of your fax messages can download a demo
version of the Unimessage Pro Viewer from the following
Internet Website, which they can then use to decode the
WBF attachment:
Wordcraft International Ltd:
http://www.wordcraft.co.uk/download/home.htm,
and click the Unimessage Pro logo.
Files can be attached to email messages and sent in the following modes:
MIME
UUENCODE
BINHEX
When you define a Phonebook contact, you can specify in which format the
contact can accept attachments to fax and email messages on the Options tab.
Unimessage Pro then sends any files you attach to messages addressed to the
contact, in the appropriate format.
To attach a file to a message either:
Select File from the Insert menu, or click the Paperclip button in the
Unimessage Pro Message Editor toolbar, then browse to find the file you
want to send.
Drag the file you want to attach, from Windows Explorer or from a
Unimessage Pro file list into the Unimessage Pro message editor.
Use the embedded command:
[[ATTACH=…]]
Each attached file is represented by a shortcut that is shown at the bottom of the
Unimessage Pro message editor window.
When adding contacts to your Phonebook that you will send
messages to via fax, remember to tell Unimessage Pro
whether the contact can accept files attached to fax
messages using WBF, DTM or not at all via the Options tab
on the contact’s properties dialog.
If you send a fax message to a contact that cannot accept
WBF or DTM format attachments and you attach an image
file to the message, Unimessage Pro converts any attached
image files (.BMP, .PCX, .JPG and .TIF) into FAX image
format (e.g. Black and White) before sending them. This
means the receiver does not receive the original file, merely
a faxed image of the file.
Messages with other types of files attached cannot be sent
by fax to recipients that cannot accept WBF or DTM format
file attachments.
27
Page 28

UniPad, the Unimessage Pro Message Editor
The Unimessage Pro Message Editor operates in two modes – Text and
Graphical. Use text mode when you create a new message, or after you OCR a
scanned image or received fax message. Use graphical mode to view received
fax messages or image files.
Full information on all of the features of the Unimessage Pro Message Editor and
Viewer is available in the help file.
Making Personalized Fax Cover Sheets
Unimessage Pro comes with several cover sheets. During installation you can
choose a default cover sheet. To change this choice select Fax from the Setup
menu, then show the Cover sheet tab.
You may choose to make your own cover sheet for use when sending fax
messages. If so, you first need to design your base document in your usual
Windows application (Microsoft Word for example). When this is done, you
should print this document to the Unimessage Pro printer.
When the Unimessage Pro Message Editor appears, click on the FAX shortcut in
the file bar at the bottom of the UniPad window, and an image of the document
you have just printed will appear. If it is not already visible use the View,
Toolbar, Cover sheet tools to display the toolbar for creating and editing cover
sheets. There are several buttons on this toolbar:
In order, these are used to:
Select object(s). Hold SHIFT while clicking on objects to select several
objects.
Insert field: Merge field, Text field and Image field.
Draw a rectangle where the field should be added, then select the
properties for the field in the dialog displayed.
Align selected objects: Left, Right, Top and Bottom.
Align selected objects: Baseline
Select either a Merge field or Text field object, click this button, then click
on the base line (bottom) of some text on the page that the base line of
the field should be aligned with.
Equalize selected objects: Width, Height and Size.
Position selected objects: Center vertically on page and Center
Horizontally on page.
Select the appropriate Insert field tool, and draw rectangles on the page where
Unimessage Pro should insert some information, for example the name of the
person you are sending the fax message to, then select the appropriate settings
for the field and click OK.
To set fields to have similar location or size, select the field whose location or
size you want to match, then, while holding down the SHIFT key, click on all the
fields you want to change then click the appropriate Alignment and Equalize size
tools.
28
Page 29

Select Save as from the File menu, change the file type to Cover Sheet, select
the appropriate folder (e.g. C:\Program Files\Unimessage Pro\Public), enter a
suitable filename and click OK. When prompted, enter a suitable Description,
select the Save objects check box but do not select the Include objects on
page check box, then click OK. Your new cover sheet should then be available in
Unimessage Pro.
Housekeeping
When you try to send or receive a message Unimessage Pro records details of
each attempt in the logs folder. Periodically you should empty all or some of the
entries in these logs by opening the folder, select an entry, click the Clear log
button then complete the dialog and click OK.
You can configure Unimessage Pro to automatically clear some or all of the
entries in your message folders on starting by right clicking on the folder in the
folder tree and selecting Properties, Advanced.
Items in the Deleted items folder can be individually restored to their original
location using the right click menu.
Folders
Unimessage Pro uses folders to store messages that you have sent and
received, images that you have scanned, and details about files you have on
your computer. You can then search all or some of these folders to find
messages or files at a later date.
You can create your own folders, and each folder can contain sub-folders.
To create a new folder:
Right click, in the folder list shown on the left side of the main Unimessage
Pro display, on the folder within which you want to create a new folder, or
right click on Personal Folders.
Select New folder.
Type a name for the new folder and, if required, a brief comment
describing, for example, the folder’s intended use.
Click OK.
You can drag items into Unimessage Pro folders, either from Windows Explorer,
or from other Unimessage Pro folders.
29
Page 30

When you drag from a Windows Explorer folder to a
Unimessage Pro folder Unimessage Pro only stores a
reference to the file and document properties for the file
The file itself is not copied into the Unimessage Pro folder
and will be opened from its original location when you
open the reference to it within Unimessage Pro.
If you drag from a Unimessage Pro folder to another
Unimessage Pro folder Unimessage Pro normally copies the
file to the target Unimessage Pro folder. However if the
source references a file outside of the Unimessage Pro
folder structure (i.e. was dragged in from a Windows
Explorer folder) only the reference to the external file is
moved or copied.
If you open an image file (.BMP, .JPG, .TIF, .PCX, .FAX or
.FCS) in the Unimessage Pro Viewer and then select Save
in Unimessage Pro folder from the File menu, the image
file always stored in the Unimessage Pro folder.
To create a folder that is visible to all people using
Unimessage Pro on your LAN, right click on Network
folders instead of Personal folders.
Finding Items Stored in Unimessage Pro Folders
Once files are stored in Unimessage Pro folders, you can ask Unimessage Pro to
find items for you based on their properties.
To search for items stored in Unimessage Pro folders:
Start the search using:
The Find button on the main Unimessage Pro toolbar – this searches
the Personal Folders structure.
Or right click on a folder in the list of folders and select Find.
Or click the Find toolbar button in an open list.
Then:
Define a new search:
Select whether sub-folders should also be searched.
Select what properties you want to look for, by checking the boxes
corresponding to those properties in the Search Criteria list, and
complete the details to search for by clicking on the red underlined
words in the Match a message list.
Or select from the list of previous searches in the Search History.
Then click OK to start searching.
Unimessage Pro shows you the results of the search; you can right click
on entries in the Find Results dialog to perform functions on them.
30
Page 31

When you use either of the following methods to search for
items:
The Find button on the Welcome to Unimessage Pro menu,
to search Personal folders.
The Find button on the main toolbar, to search Personal
folders.
The Find menu displayed when you right click on Personal
folders or Network folders.
The contents of the following system folders will not be processed
and therefore we do not recommend that you file items in these
folders:
Outbox, Send log, Receive log, Phonebook, Polling list, Print
queue, Devices, Users, Email accounts.
If you want to search any system folders, open the folder and click
the Find button on the toolbar.
Unimessage Installation Details
Step-by-Step Installation Wizard
After the first stage of installation and re-booting your computer you will be
presented with Unimessage Pro Installation Wizard that guides you step-by-step
through the installation and configuration screen.
The screens are listed below for your convenience.
You can configure Unimessage Pro later, so don’t worry about clicking Next.
Please be sure to create a shortcut item at the end of the Wizard so that you can
easily start Unimessage Pro when you need to.
The actual screens may vary, depending on the version of Unimessage Pro and
the features of your OKIFAX fax machine or OKIOFFICE MFP.
Unimessage Pro is licensed for a limited number of devices and users (you can
purchase more devices or users, please see Upgrading Unimessage Pro).
However, this number refers to concurrent devices and users. If you cannot log
on a device or a user, log an existing one off and try again.
31
Page 32

Start Up Wizard: User
Enter the details of the user of this copy of Unimessage Pro.
These details will be used when preparing messages for transmission.
32
Page 33

Start Up Wizard: Floppy Disk
Unimessage Pro may be supplied with a floppy disk containing additional files.
When provided, these files are essential to the successful operation of
Unimessage Pro. These files will add features, users or devices.
The disk should be inserted into the computer’s floppy disk drive and the
appropriate driver selected or Unimessage Pro may not operate correctly.
If a floppy disk is provided with your copy of Unimessage Pro please keep it in a
safe and secure place together with the Unimessage Pro CD. You will need
either one if you subsequently have to reinstall the software or want to upgrade
Unimessage Pro.
33
Page 34

Start Up Wizard: User Accounts
The following users are already setup.
Select Yes to add a new one or No to continue, then click Next.
34
Page 35

Start Up Wizard: Add User
Add details of the new user.
Sub-address can be used to route incoming faxes to the user, if both the
sending and receiving the fax devices support this feature.
Privilege level controls which Unimessage Pro features the user can access.
Calls allowed controls which telephone calls the user is permitted to make.
Use Advanced to set maximum priorities for the user’s jobs.
Select the Can check for email option if the user should be allowed to tell the
scheduler to check for any new email whenever they want, otherwise
Unimessage Pro will check at regular intervals as defined for the email account.
35
Page 36

Network: User Advanced Screen
Maximum priority
This sets a limit on the priority that any user may assign to a transmission.
Maximum poll priority
This sets a limit on the priority that any user may assign to a fax poll.
36
Page 37

Start Up Wizard: Email Servers
Unimessage Pro can retrieve email messages from mailboxes on POP3 email
servers and send email messages via SMTP email servers.
If you are using Unimessage Pro with an MFC device only, click Next.
An MFC will not support email. To use email setup another device from the front-
end later.
If you wish to setup an email capable device, Unimessage Pro now needs to
know what email servers may be used.
If you do not wish to setup an email device now, or wish to use the servers listed,
choose No then click Next.
The listed email servers are already setup.
Select Yes to add a new one.
If no servers are specified you cannot setup email features until they have been
setup from the front-end on the Servers tab after selecting Email from the Setup
menu.
37
Page 38

Start Up Wizard: Add Server
Unimessage Pro can retrieve email messages from mailboxes on POP3 email
servers and send email messages via SMTP email servers.
Add the name of the email server you would like to access from Unimessage
Pro.
(e.g. mail.domain.com or 111.222.333.444)
Indicate what type of server it is.
Unimessage Pro administrators maintain a list of POP3 and SMTP email servers
that can be accessed by Unimessage Pro on the Servers tab after selecting
Email from the Setup menu.
38
Page 39

Start Up Wizard: Front-End
This is the part of Unimessage Pro that allows you to create, send and receive
messages.
If you want the front-end running on this PC, you should select the Unimessage
Pro user name and language to be used.
If the front-end is running, it will use one of your user licenses. You may wish to
install a device on a computer without installing the front-end to avoid using a
user license.
39
Page 40

Device Wizard: Select Device
Select No if you do not have a device connected directly to your computer.
The Yes, look for devices … option scans the ports of your computer looking for
devices that can be used by Unimessage Pro. Use this option if you are not sure
to which port your device is connected. Not all devices can be detected.
The Yes, select a device ... from the list of supported devices option displays
a list of devices that this version of Unimessage Pro can support.
If present Yes, select a device ... from the list of device(s) already
configured allows you to select a device that is already known to your copy of
Unimessage Pro. You probably have set it up before.
40
Page 41

Device Wizard: Detect Device Introduction
41
Page 42

Device Wizard: Select
This is a list of all devices that can be supported by this version of Unimessage
Pro.
Select the manufacturer then the model.
In case your device is not shown in the list, select General drivers and then the
appropriate Class 1 fax, Class 2 fax or fax/data modem option depending on your
device’s capabilities.
If your device is both Class 1 and Class 2 compatible select Class 1 as this
allows Unimessage Pro to use more advanced compression and Error Correction
functions.
42
Page 43

Start Up Wizard: Device
Choose a fax device from the list.
Any earlier devices will be updated if necessary.
43
Page 44

Start Up Wizard: Email Device
Choose an email device from the list.
44
Page 45

Device Wizard: Detected Devices
Unimessage Pro has checked the ports and may have found one or more
devices.
Click on the device you wish to setup.
45
Page 46

Device Wizard: Use for Fax
Select Yes if you want to send faxes with this device.
46
Page 47

Device Wizard: Device Name
All devices known to Unimessage Pro must have a unique name of up to 8
characters.
You can add a more detailed description if you wish.
To accept the standard, recommended settings select the Typical option.
To review all settings, and where appropriate change them, select the Custom
option.
47
Page 48

Device Wizard: Job Types
The contents change depending upon the device selected.
Select which type of jobs you would allow Unimessage Pro to carry out using this
device.
These are jobs that can be carried out using Unimessage Pro’s capability. Some
jobs (for example printing or scanning) may also be carried out using software
delivered with the device.
48
Page 49

Device Wizard: Dial Mode
Select tone or pulse dialing.
Tone is fast so should be the preferred method unless it is not supported by your
telephone system.
49
Page 50

Device Wizard: Preamble
If you have to dial "9" to get an outside line (or any other digits) you should enter
it here.
If you would like a delay anywhere in this dialing preamble you should enter an
ampersand (&) to give a pause of about one second.
If you are using Unimessage Pro at home and need to dial a code number to
charge the cost of your fax messages to a different account, you could enter the
code number here.
Remember that you can use the "/" character at the start of a fax number in
Unimessage Pro to tell Unimessage Pro to ignore any Preamble you might have
entered.
For example "9&" meaning "dial 9 for an outside line, pause for about 1 second,
then dial the rest of the number."
50
Page 51

Device Wizard: Answering
This screen can sometimes include options to print on receipt all faxes received
to PC.
If you want to receive faxes into your computer you must allow Unimessage Pro
to answer incoming calls.
Note:
It must be possible to dial in to your devices for it to answer calls. This may not
be the case on many company telephone exchanges where your modem may
not be connected directly to an outside line.
51
Page 52

Device Wizard: Use For Dial-Up Email
This device can be used for dial-up connection to the Internet but you may not
want to use it for email - for example, you may collect your email via a permanent
connection on your network.
Select Yes only if you really do want to do a dial-up email connection with this
device.
52
Page 53

Device Wizard: Dial-Up Connections/Servers
Unimessage Pro uses your Windows dial-up connections to connect to the
Internet.
Dial-up networking name
The name of the dial-up connection. If you have more than one dial-up
connection and you do not wish to use this one with your device just click Next.
User Name
Your dial-up user name. This is the same user name you entered in Windows
Dialup Networking or DUN (it is not always the same as the user name you need
to access your email (POP3) server).
Password
Your dial-up password. This is the same password you entered in Windows
Dialup Networking or DUN (it is not always the same as the password you need
to access your email (POP3) server).
Select the mail servers you wish to access via this dial-up connection.
53
Page 54

Device Wizard: New Account
Enter a friendly name for the email account.
Choose who can have access to this account.
User or system wide
If email received using this account should be routed directly to a specific user's
Received items folder, select the "User" option and the appropriate user from the
list presented.
Email received using a "System wide" account will be routed to the Network
Inbox which is visible only to Unimessage Pro Supervisors and Administrators
from where it can then either be routed manually or automatically using System
Routing Rules.
System wide email accounts are only visible to Unimessage Pro Supervisor and
Administrators. Unimessage Pro Users see and use only email accounts that are
specific to them.
54
Page 55

Device Wizard: Mail Servers
Select the servers to be used with this dial-up account.
Mail can usually be sent via any SMTP mail server but you may wish to select a
preferred one to be used by this device.
Any will allow the program to choose freely.
You will need to enter your POP3 account name and password in order to
receive email.
(This is not always the same as the details you entered in the dialup networking
screen earlier)
Click Advanced to allow more selections.
55
Page 56

Advanced mail settings
Server ports
SMTP Port: do not change this value unless you are confident that you know
what you are doing. The default value is 25.
POP3 Port: do not change this value unless you are confident that you know
what you are doing. The default value is 110.
Delivery
Leave a copy on the server: select this if you would like to leave a copy of your
incoming mail on the POP server. You might wish to do this if you are working
from home and you want to see your mail but you want to leave it on the server
so that you can retrieve it later using your office system.
Delete from server when the local copy deleted: if you are leaving the mail on the
server you can select this option to delete it when you delete the copy you have
downloaded.
Automatically remove from server: if you are leaving mail on the server you can
set a limit on the number of days it should be left before being deleted.
56
Page 57

Limits of incoming messages
Limit the size of message that can be downloaded: you can set limits on the size
of messages you are willing to accept if you are working from home using dial-up
and you do not want to download large messages (probably with attachments).
Unimessage Pro will download as far as the limit you set so you will have an idea
about what has arrived.
If only part of a message has been downloaded, because it exceeds the
maximum size set on this dialog, then you will see an icon partly colored red in
the attachment column for the email message. If you want to retrieve the entire
message, after reviewing the lines that were downloaded for the message, right
click on the message and select Download all of this message.
Device wizard: check mail
If you want to choose to check automatically for email, you will need to say how
long to wait before checking again.
You can also choose which days or times to check, or only to check while you
are logged on (network version only). If you don’t check this option, Unimessage
Pro will continue to collect your emails while you are not logged on, and will send
them to you next time you log on.
You might wish to check mail when connection costs are lower or when the
service provider is not busy.
57
Page 58

Check mail
You can select what times or which days you wish to check your email account.
Click the day buttons to select the day, the hour buttons to select the hour, the
top left button to select all.
58
Page 59

How to Define More Email Accounts
59
Page 60

Start Up Wizard: Scheduler
Unimessage Pro has three main components:
The user front-end - the part you will see when running Unimessage Pro
One or more device drivers - these are associated with particular devices,
Your Oki MFP, as well as other fax modems/fax machines, supported by
Unimessage Pro
The scheduler - this takes jobs created by the front-end and allocates
them to devices. When jobs are done it updates various logs and journals
so that the front-end can keep you informed.
The scheduler is in overall charge of the system and is required on a stand-alone
PC.
On a network the scheduler must be running on at least one PC, otherwise user
front-ends and device drivers will not be able to log on.
If you want to run the scheduler on this PC, indicate which language you would
like to use.
If in doubt choose the Yes option, which will detect the scheduler running on
another PC and automatically configure itself.
60
Page 61

Start Up Wizard: Shortcut
Unimessage Pro will create a shortcut to allow you to start the program with the
options you have selected.
You may give the shortcut a descriptive name and select where it should be
displayed:
on the desktop (your screen)
in the start menu (available immediately when you click the Windows Start
button)
or in a particular program group (select a program group from the pull-
down list)
If you don’t create a shortcut you will not be able to start the program with the
options you have selected unless you manually configure a shortcut from the
front end.
61
Page 62

Congratulations
62
Page 63

Legal Information
Wordcraft International Limited
Unimessage Pro Software License Agreement
Conditions of Purchase
Software is licensed subject to the limitations on permitted use. No refund will be
given after the purchaser has installed the software. This License shall continue
for as long as the Product is in use. Failure to comply with the terms and
conditions detailed below will result in termination of the license. All copies of the
software must be destroyed on termination of the license.
Permitted Uses
The original purchaser may use the software on a computer system owned or
used by the original purchaser for the purpose of any business or profession. The
original purchaser may store the software on a hard disk system for use only by
the permitted number of users and connected only to the permitted number of
communication devices as specified in the system configuration file contained
within the software product at the time of purchase, plus the number of users and
devices added by obtaining a valid licensed upgrade from Wordcraft International
Limited or an authorized agent of Wordcraft International Limited.
Uses not Permitted
1. Downloading of the software from a computer service or bulletin board or
use in a multi-site arrangement except in respect of users licensed by
Wordcraft International Limited to do so.
2. Use of the software in a computer service business, network, timesharing, interactive cable television or multiple CPU arrangement except
in respect of users licensed by Wordcraft International Limited to do so.
3. The use of a single user version on a second or subsequent computer or
network workstation. Details of multi-user packs are available from
authorized dealers or authorized distributors of Wordcraft International
Limited or direct from Wordcraft International Limited.
4. The use of a network version on a second or subsequent network.
5. The making of alterations and modifications to the software, merging all or
any part of the software with another program, reverse engineering,
decompiling, or disassembling of the software.
6. Obscuring any areas of the software responsible for company branding,
63
Page 64

image, help system, contacting Wordcraft International Ltd, identifying
Wordcraft International Ltd as the copyright and trademark owner, or any
such related areas. Exemptions to this clause will only be granted in
exceptional circumstances at the discretion of Wordcraft International Ltd
Applications must be made in writing to Wordcraft International Ltd.
7. The right to rent, assign, lease, transfer or grant sub-licenses or other
rights to others.
8. The making of copies of any documentation belonging to Wordcraft
International Limited.
9. The selling or transferring of software marked ‘Not for Resale’ or
‘Evaluation’ or ‘Demonstration’ or ‘Training’.
10. Any other uses not included in "Permitted Uses" above, which would
require a license to use the copyright in the software.
The license contained in this agreement will terminate automatically and without
notice from Wordcraft International Limited if any provision in this agreement is
not complied with.
Governing Law
This agreement shall be governed by the laws of the United Kingdom of Great
Britain and Northern Ireland.
Limited Warranty
Wordcraft International Limited make no representations or warranties, express
or implied, of any kind with respect to the contents of this package and
specifically disclaim any express or implied warranty of merchantability or fitness
for any particular purpose. Wordcraft International Limited’s liability shall be
limited to replacing any faulty product with alternative product or a cash refund up
to but not exceeding the value of the monies paid for the product when originally
purchased. In no event shall Wordcraft International Limited or their suppliers be
liable for any special, incidental, indirect or consequential damages whatsoever
(including, without limitation, damages for loss of revenue or profits, business
interruption, lost or damaged data, or any other loss arising out of the installation
of, use of or inability to use this software product). Wordcraft International Limited
shall not be responsible for any claims arising from the use of software marked
‘Not for Resale’ or ‘Evaluation’ or ‘Demonstration’ or ‘Training’.
Wordcraft International Limited shall not be responsible for any claims arising
from the use of software other than the use for which it was specifically sold.
Wordcraft International Limited shall not be responsible for any claims by a third
party.
No oral or written information or advice given to Wordcraft International Limited,
or given by Wordcraft International Limited , or an authorized representative shall
create a warranty or in any way increase the scope of this warranty.
Copyright
64
Page 65

Software and documentation produced by Wordcraft International Limited is
protected by International Copyright Conventions.
Trademarks
Wordcraft is a trademark of Wordcraft International Limited.
All other trademarks are acknowledged.
Following installation the package will be automatically registered.
This is a legally binding agreement with Wordcraft International Limited.
If you feel you cannot accept the conditions defined above please return the
complete software package unopened to your supplier.
© 2000 Wordcraft International Limited
65
Page 66

Index
About Unimessage Pro .................................................................................................................................12
Acquire .........................................................................................................................................................12
Add/remove button ......................................................................................................................................... 7
Administrators .............................................................................................................................. 7, 12, 20, 22
All ................................................................................................................................................................. 12
ATTACH ...................................................................................................................................................... 26
AUTO REC button .......................................................................................................................................20
Auto-answer.................................................................................................................................................. 20
Automatic Message Transmission using Embedded Commands..................................................................25
Automating ............................................................................................................................................. 18, 25
Bcc ................................................................................................................................................................ 18
BINHEX .......................................................................................................................................................26
BMP........................................................................................................................................................ 20, 26
Browse Folders ............................................................................................................................................. 12
Cc.................................................................................................................................................................. 18
Check ............................................................................................................................................................ 12
Class.............................................................................................................................................................. 26
Clear.............................................................................................................................................................. 29
Client............................................................................................................................................................... 7
Select........................................................................................................................................................... 7
Color images................................................................................................................................................. 26
Compatibility ................................................................................................................................................ 25
Configure Unimessage Pro ............................................................................................................................. 7
Connects
Internet...................................................................................................................................................... 12
Define ...........................................................................................................................................................26
Phonebook ................................................................................................................................................ 26
Routing Rule............................................................................................................................................. 20
Delete toolbar button .................................................................................................................................... 18
Detect User Routing Rules............................................................................................................................ 22
Device Configuration.................................................................................................................................... 12
Devices folder............................................................................................................................................... 20
Devices list.................................................................................................................................................... 12
Distribution list ............................................................................................................................................. 25
DOC.............................................................................................................................................................. 20
Document Transfer Mode............................................................................................................................. 26
DTM .............................................................................................................................................................26
DUN.......................................................................................................................................................... 7, 12
Edit................................................................................................................................................................ 12
Email................................................................................................................................................... 7, 12, 18
Email Configuration................................................................................................................................ 12, 20
Email messages............................................................................................................................................. 26
Email Scan .................................................................................................................................................... 12
Embedded Commands ............................................................................................................................ 18, 25
Events ...........................................................................................................................................................20
Fax Number .................................................................................................................................................. 18
Faxes............................................................................................................................................................. 20
PC .............................................................................................................................................................20
File list .......................................................................................................................................................... 26
Files............................................................................................................................................................... 26
66
Page 67

Sending .....................................................................................................................................................26
Find............................................................................................................................................................... 12
Forward......................................................................................................................................................... 20
PC .............................................................................................................................................................20
Grey Scale..................................................................................................................................................... 23
Hardcopies .................................................................................................................................................... 12
Help .............................................................................................................................................................. 12
Help button ...................................................................................................................................................23
Help menu..................................................................................................................................................... 25
High-resolution ............................................................................................................................................. 23
Hold .............................................................................................................................................................. 18
HTML........................................................................................................................................................... 20
Index ............................................................................................................................................................. 18
Insert menu ...................................................................................................................................................26
International Copyright Conventions............................................................................................................ 63
International Telecommunications Union..................................................................................................... 26
Internet.......................................................................................................................................................... 12
connects ....................................................................................................................................................12
IPX/SPX ......................................................................................................................................................... 7
ITU................................................................................................................................................................ 26
JPEG ............................................................................................................................................................. 20
JPG.......................................................................................................................................................... 20, 26
LAN .......................................................................................................................................................... 7, 12
LCD .............................................................................................................................................................. 20
License.......................................................................................................................................................... 63
Limited Warranty.......................................................................................................................................... 63
Log.......................................................................................................................................................... 12, 18
Map................................................................................................................................................................. 7
Message ............................................................................................................................................12, 18, 20
Receiving .................................................................................................................................................. 20
Message Editor .............................................................................................................................................28
Message Editor toolbar ................................................................................................................................. 26
Messages Received....................................................................................................................................... 22
Messages Sent............................................................................................................................................... 22
MFP .............................................................................................................................................. 7, 12, 20, 23
Microsoft Internet Explorer ..........................................................................................................................20
MIME ...........................................................................................................................................................26
Name............................................................................................................................................................. 18
Network ............................................................................................................................................12, 20, 22
Network Inbox.............................................................................................................................. 7, 12, 20, 22
New............................................................................................................................................................... 18
New menu....................................................................................................................................................... 7
New Message................................................................................................................................................ 12
OCR .................................................................................................................................................. 22, 23, 28
define ........................................................................................................................................................22
selecting .................................................................................................................................................... 22
Open toolbar button ...................................................................................................................................... 18
Optical Character Recognition...................................................................................................................... 23
Options.......................................................................................................................................................... 26
Options item.................................................................................................................................................. 25
Outbox ..............................................................................................................................................12, 18, 26
PaintBrush..................................................................................................................................................... 20
PaintShop Pro ...............................................................................................................................................23
Paperclip button ............................................................................................................................................ 26
PC .................................................................................................................................................................20
faxes.......................................................................................................................................................... 20
forward...................................................................................................................................................... 20
67
Page 68

PC MODE..................................................................................................................................................... 20
PCX ........................................................................................................................................................ 20, 26
Pending .........................................................................................................................................................18
Permitted Uses .............................................................................................................................................. 63
Personal Folders............................................................................................................................................ 12
Phonebook ....................................................................................................................................................26
define ........................................................................................................................................................26
Phonebook Contact....................................................................................................................................... 25
POP3................................................................................................................................................... 7, 12, 20
Print .................................................................................................................................................. 12, 18, 25
Unimessage Pro ........................................................................................................................................25
Program.........................................................................................................................................................12
Properties .......................................................................................................................................... 18, 26, 29
selecting .............................................................................................................................................. 26, 29
Properties toolbar button............................................................................................................................... 26
Received ........................................................................................................................................... 12, 20, 22
Removing........................................................................................................................................................ 7
Routing Rule..................................................................................................................................... 18, 20, 22
define ........................................................................................................................................................20
selecting .................................................................................................................................................... 20
Routing Rules dialog.....................................................................................................................................22
Save............................................................................................................................................................... 20
Scan............................................................................................................................................................... 12
Select............................................................................................................................................................. 25
Contents .................................................................................................................................................... 25
Unimessage Pro ........................................................................................................................................25
Select File .....................................................................................................................................................26
Send .............................................................................................................................................................. 18
Send button ................................................................................................................................................... 18
Sent ......................................................................................................................................................... 18, 22
Servers ..........................................................................................................................................................12
Setup .............................................................................................................................................................12
SMTP........................................................................................................................................................ 7, 12
Status............................................................................................................................................................. 18
Supervisors ......................................................................................................................................... 7, 12, 22
System........................................................................................................................................................... 12
System Requirements......................................................................................................................................7
System Routing Rules............................................................................................................................. 20, 22
System-Wide email accounts........................................................................................................................ 22
Text............................................................................................................................................................... 28
TIF .................................................................................................................................................... 20, 26, 29
TIFF .............................................................................................................................................................. 20
Time Range................................................................................................................................................... 26
Time-Delayed Transmission......................................................................................................................... 26
Tools menu ...................................................................................................................................................25
Top................................................................................................................................................................ 28
Transmission................................................................................................................................................. 26
TWAIN................................................................................................................................................... 12, 23
TWAIN Scanner ...........................................................................................................................................23
Type .............................................................................................................................................................. 28
Cover Sheet............................................................................................................................................... 28
Unimessage Pro ............................................................................................................................................ 25
print........................................................................................................................................................... 25
select ......................................................................................................................................................... 25
Unimessage Pro Help.................................................................................................................................... 25
UniPad ......................................................................................................................................................5, 28
UniPad window............................................................................................................................................. 28
68
Page 69

Upgrading .......................................................................................................................................................5
Upgrading Unimessage Pro ............................................................................................................................ 7
User............................................................................................................................................................... 12
User Accounts............................................................................................................................................... 31
User Advanced Screen.................................................................................................................................. 31
User Name .................................................................................................................................................... 31
User Routing Rules................................................................................................................................. 20, 22
define ........................................................................................................................................................22
UUENCODE ................................................................................................................................................ 26
View menu.................................................................................................................................................... 12
Viewer............................................................................................................................................... 26, 28, 29
WBF.............................................................................................................................................................. 26
Width
Height ....................................................................................................................................................... 28
Window menu............................................................................................................................................... 12
Windows....................................................................................................................................................... 18
Windows application ....................................................................................................................................25
Windows Explorer ........................................................................................................................................ 29
Windows Local Area Networks...................................................................................................................... 5
Wordcraft Binary File................................................................................................................................... 26
Xlite ..............................................................................................................................................................12
69
 Loading...