

Wide Format Printer
Teriostar LP-2060 Series
Multifunction Model
Chapter
1
Before Use
LP-2060-MF
Printer Model
LP-2060
User's Manual
U10000138300 December, 2017 Rev. 2
for Basic Printer Operation
Chapter
2
Basic Operations
Chapter
3
Menu Functions
Chapter
4
Print Job Box
Function
Chapter
5
Authentication
Function
Chapter
6
TroubleshootingAppendix
U10000138300 December, 2017 Rev. 2
Copyright© 2016 OKI Data Infotech Corporation.
All rights reserved.
The contents of this manual may be changed without prior notice.
This product supports TCP/IP (IPv4/IPv6).
This product displays fonts created by TypeBank Co., Ltd. and ARPHIC TECHNOLOGY.
This equipment has been tested and found to comply with the limits for a Class A digital device, pursuant
to Part 15 of the FCC Rules. These limits are designed to provide reasonable protection against harmful
interference when the equipment is operated in a commercial environment.
This equipment generates, uses, and can radiate radio frequency energy and, if not installed and used
in accordance with the instruction manual, may cause harmful interference to radio communications.
Operation of this equipment in a residential area is likely to cause harmful interference in which case the
user will be required to correct the interference at his own expense.
The CE mark, that shows that the products sold in the EU are conformed to the requirements of EC directive,
is statutorily obliged to be axed to the products.
In each directive, the scope of directive to be applied to equipment is explicitly dened. Our company’s
product LP-2060 series conforms the EMC directive, low voltage directive and RoHS Directive.
Inquiry of CE mark:
OKI Europe Ltd.
Wide Format Division
Siemensstrasse 9 , D-63263 Neu-Isenburg
Germany
Tel: +49 (0)6102 297 400
Fax: +49 (0)6102 297 50 400
OKI Data Infotech Corporation
8 Nakase 1-chome, Mihama-ku, Chiba-shi, Chiba 261-8507, Japan
Phone : +81 43 211 1363
Fax : +81 43 211 8709

Preface
Your Printer is a Teriostar LP-2060 Series wide format Printer (Referred
to as the Printer in this manual), and this manual describes the general
handling methods for the Printer, the Printer functions, and the operating
methods. They are written on the assumption that the Printer has already
been installed.
For details about the copy, scan, and submission functions in the
multifunction models, see the separate User's Manual for Multifunction
Printer Operation.
To handle the Printer safely and correctly, be sure to read the Safety
Precautions carefully before use. Keep this manual in a place where you
can easily read it when required.
The LP-2060 printer model may not be sold in some countries or regions.
LP-2060/LP-2060-MF User's Manual for Basic Printer Operation
3
Safety Precautions
In this manual, the following symbols are used to alert the user to information that
will prevent damage to the Printer, and ensure its safe and correct use.
These symbols are explained below. Make sure that you thoroughly understand
the information. Always follow the instructions marked by these symbols.
Symbol Examples
Warning
Caution
If this information is ignored and the Printer is
handled incorrectly, it may result in serious injury or
death.
If this information is ignored and the Printer is
handled incorrectly, it may result in injury or machine
damage.
This symbol indicates that caution is required (includes dangers and
U
warnings).
The example on the left indicates a safety Warning or
Precaution.
This symbol indicates a prohibited action.
The example on the left means Do not disassemble.
This symbol indicates required actions or instructions.
The example on the left means Disconnect the power plug from
the outlet.
4
LP-2060/LP-2060-MF User's Manual for Basic Printer Operation
Warning
Be very careful not to touch the fuser unit labeled HIGH TEMPERATURE inside
the Printer.
Burn injuries may result.
Do not disassemble or modify the Printer.
An accident or malfunction may result.
Do not heat a toner cartridge or a waste toner bottle containing waste toner, nor
place it into a ame.
It may burst or ignite, resulting in an accident or re.
Never use the Printer in a location exposed to abnormally high humidity
or moisture.
A re, electric shock, or malfunction may result.
Do not drop metal pieces such as staples, or spill water, or other liquids inside
the Printer or through gaps.
A re, electric shock, or malfunction may result.
Do not connect or disconnect the power cord or other parts with wet hands. An
electric shock may result.
In the following situations, turn o the power, and disconnect the power plug
from the outlet. If you continue using the Printer in an abnormal condition, an
accident or re may result.
When cleaning
When an abnormal odor, noise, or smoke is emitted
When foreign matter such as metal pieces or water get inside the Printer
or through gaps
When a problem that must be repaired by the service representative oc-
curs
Connect the power plug separately to a power socket with a rated voltage
of 120V and a rated current of 16A or more, or to a power socket with a rated
voltage of 230V and a rated current of 9A or more. To prevent a re or electric
shock, avoid the sharing of power with other equipment.
LP-2060/LP-2060-MF User's Manual for Basic Printer Operation
5
Be sure to remove the dust on the power plug and the socket. Do not use a
dusty plug as a current leak due to humidity on its surface may heat the plug
and result in re.
Make sure that the Printer is well grounded. Failure to ground the Printer may
result in electrical shock, re, and increased susceptibility to electromagnetic
interference.
Do not x, twist, bind, modify, stretch, or bend excessively the power cord. Do
not put heavy object on it. A damaged power cord may heat and result in re or
electrical shock.
If the power cord is cut or if the wires are exposed, ask a service representative
for replacement.
Using a damaged power cord may result in re or electrical shock.
Caution
Do not disassemble or modify the toner cartridge.
The toner on your skin will have a negative eect.
If ink stains your skin or clothing, wash with soap and water immediately.
To prevent a toner leakage, do not drop the toner cartridge nor expose it to
strong impacts.
If toner gets into your eyes, do not rub your eyes, and wash the toner out. Visit a
doctor immediately.
As the roll paper is heavy, handle it carefully to make sure that you do not drop
it.
Dropping the roll paper on your feet may result in injury.
When installing the roll paper, use the cutter to cut the end of the paper. At this
time, be careful not to injure yourself on the cutter.
Install the Printer close to a power outlet. Make sure the outlet is easy to reach in
case the power plug needs to be disconnected in an emergency.
6
LP-2060/LP-2060-MF User's Manual for Basic Printer Operation
When connecting and disconnecting the power cord, hold it by the plug or
connector.
To prevent a re, electric shock, or malfunction, avoid pulling the cord.
If you use a power strip, change it for a new one at least once a year.
Do not use an extension cable or an adapter plug.
Once a month, turn the power switch o and inspect the followings. Contact
your service representative if you detect any problem.
The plastic insulator at the base of the plug's pins does not suer from
heat deformation.
The plug's pins are not bent or covered by rust.
There is no dust between the plug's pins.
The power cord is not frayed and the energized wires are not exposed.
The plug is rmly plugged into the socket.
There is no dust on the plug or the socket.
Before moving the Printer from its current installation location to another
location, contact your service representative.
In addition to the items above, observe the warnings and precautions in each
section of the manual.
LP-2060/LP-2060-MF User's Manual for Basic Printer Operation
7
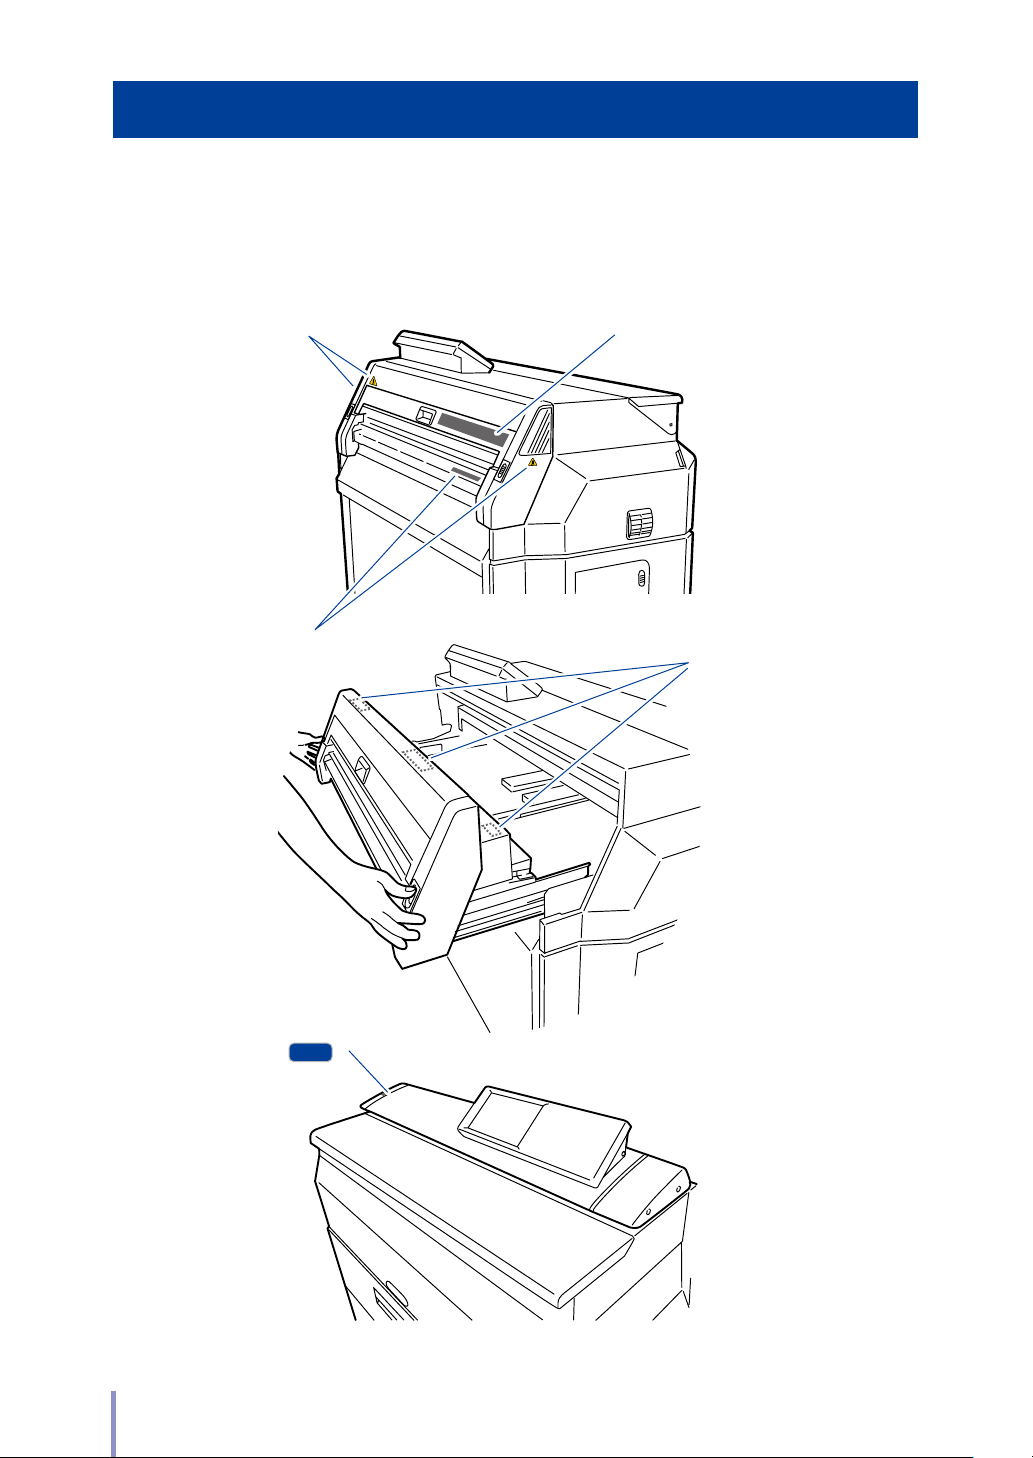
Warning Labels
MF
Warning labels are axed to the Printer in the locations shown in the gure below.
Make sure you understand the information on the warning labels before handling
the Printer.
(1) HIGH TEMPERATURE
caution label
(1) HIGH TEMPERATURE
caution label
(2) Instruction label to remove jams
(1) HIGH TEMPERATURE
caution label
(3) Caution label to prevent hands
from being stuck
8
LP-2060/LP-2060-MF User's Manual for Basic Printer Operation
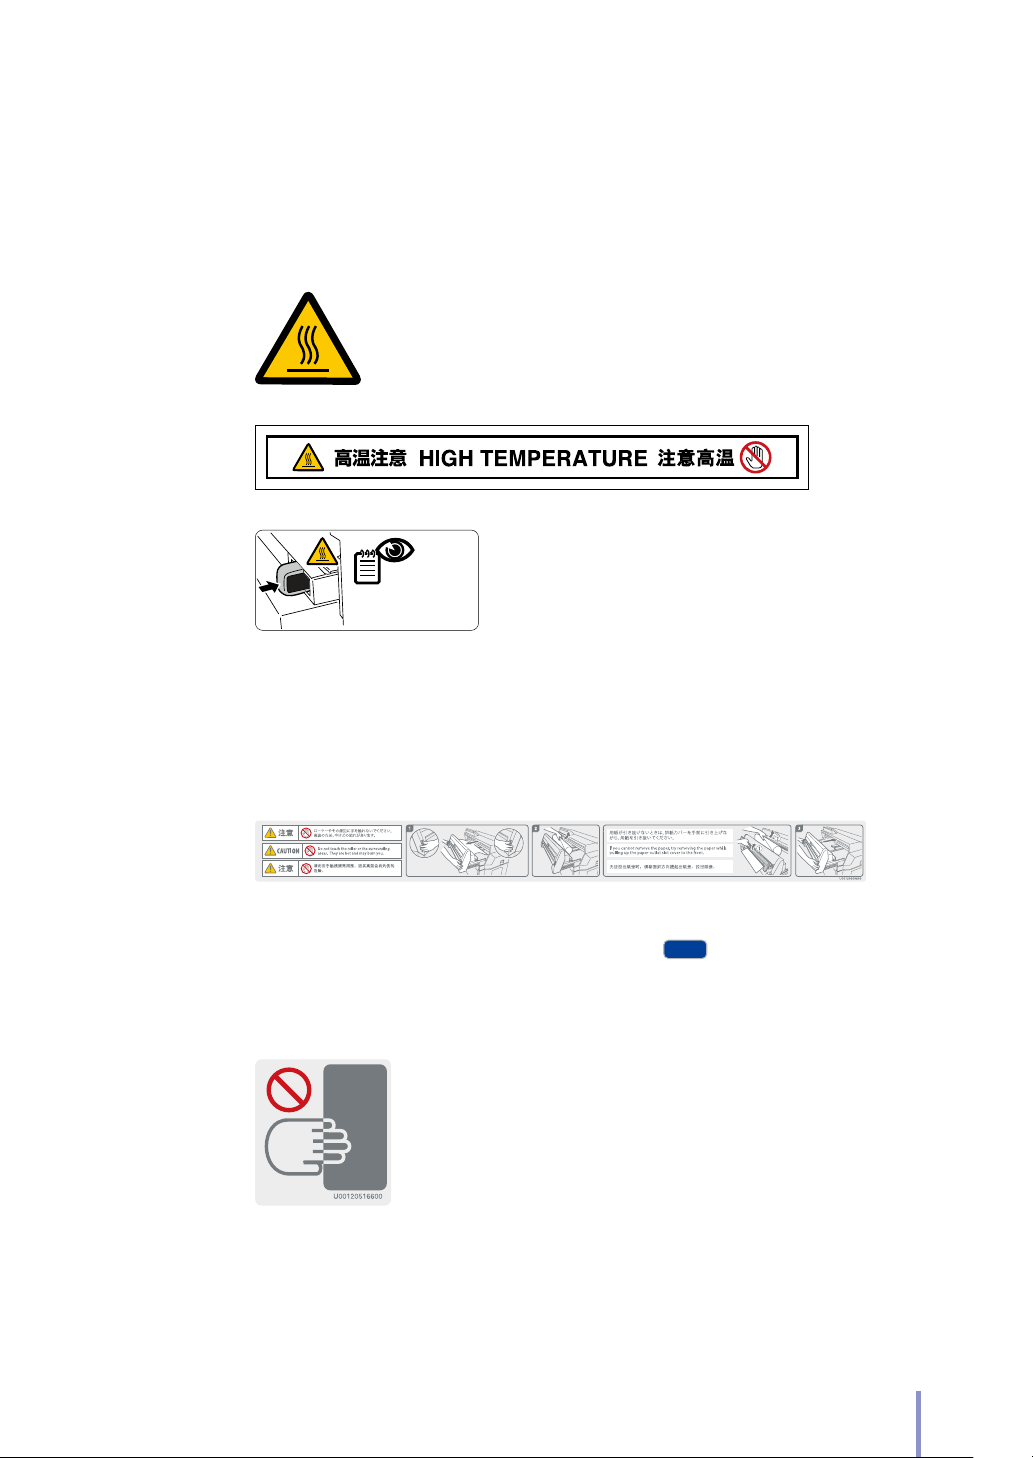
(1) HIGH TEMPERATURE caution label, affixed inside, seen when the fuser unit
MF
door is opened.
This label warns against touching heated parts.
The fuser unit becomes very hot. Be careful not to touch this area inside the
Printer, while the cover is opened, e.g., to remove a paper jam.
取扱説明書を参照
SEE MANUAL
䇋খ䯙Փ⫼䇈ᯢк
U00120740500
(2) Instruction label to remove jams
This label indicates the removal direction for jammed paper when a jam occurs
in the fuser unit.
Remove the paper by following the instruction on the label.
(3) Caution label to prevent hands from being stuck
This label raises your caution to prevent your hands from being stuck between
the Printer and the scanner.
On closing the scanner, do not place your hands near this label.
LP-2060/LP-2060-MF User's Manual for Basic Printer Operation
9

Reading the Manual
Manual Structure
This manual is comprised of 6 chapters and an appendix.
Chapter 1 describes information such as the printer features and part names. These
should be known before starting operations. First, read Chapter 1 to understand
the basic information about the Printer.
Chapter 2 describes the items that are required for operating the Printer, such as
turning the power on, and o, and setting the paper. Read this chapter to learn
about the basic methods for handling the Printer.
Chapter 3 describes the Printer's functions and their setup procedure.
Chapter 4 describes the Print Job Box function of the Printer. Read this chapter to
learn the basic settings of this function and how to use it.
Chapter 5 describes the authentication function for the Printer. Read this chapter
to manage the Printer and the users of the Printer.
Chapter 6 describes the action to solve a Printer problem. Take appropriate action
by following the instructions in this chapter.
The Appendix contains the Printer's basic specications, command lists, and menu
structure.
10
LP-2060/LP-2060-MF User's Manual for Basic Printer Operation

Notations
TIP
MF
Indicators
Warning
Describes information equivalent to a Warning in a safety precaution.
Caution
Describes information equivalent to a Caution in a safety precaution.
Note
Describes the information to be noted on handling the Printer.
The Tip indicator.
Indicates useful information, supplementary operation, or other information.
(& page) The Reference indicator.
The reference section or page is shown after this indicator.
Multifunction Model.
Indicates functions or part names that only applied to the
D-SCAN format
Note that the following related to D-SCAN is applied only for the customers in
Japan.
- All descriptions in the documents for LP-2060/LP-2060-MF.
- All messages appearing on the operation panel.
LP-2060/LP-2060-MF User's Manual for Basic Printer Operation
11
Supplied Items
MF
MF
MF
The Printer components and options are shown in the tables below.
If any parts are missing or damaged, contact the store of purchase or your nearest
service representative.
Printer Components Quantity Notes
Printer 1
Toner cartridge 3 For installation check
Waste toner bottle 1 Installed in the Printer
Quick Reference Guide 1
CD-ROM 1
Paper ange 4 set 2 per set
Process cartridge 1 With 2 ozone lters
Roll paper 1
Output tray 1
Original output guide
Toner door/document table
30 m each for A0, A1, and A3
For installation check
Not attached for the 120V system printers.
2
1
Original width guide
Power cord 2
2
To the 200V system printers, two types of
the power cords are attached.
To the 120V system printers, no power
cord is attached as it is already mounted
and fixed to the printers.
12
LP-2060/LP-2060-MF User's Manual for Basic Printer Operation
Consumables
MF
Product Name Part No. Quantity Notes
Toner Cartridge LP -761 2
Waste Toner Bottle LP-850 1
Process Cartridge LP-852 1
Charger Unit LP-860 1
Paper Flange LP-871 1 set 2 per set
Process Cartridge 60 LP-872 1 For tracing paper (60g/m
Options
Printer Components Part No. Quantity Notes
2
)
Carrier Sheet Set
STACKER STD LP-854 1 For stacking printouts with A2 or more
Catch Basket LP-863 1 For stacking printouts with A1 or more
Bucket (W) LP-859 1 For storing printouts.
Original Stacking tray LP-858 1
TerioStation PDF Print LP- 874 1
ActiveActive Directory
authenticationDirectory
Smart card authentication
kit
LP -819 1 For protecting original documents
For storing original documents output
from the scanner.
For high-speed PDF print operation using
TerioStation.
LP-868 1
To perform individual authentication using
Active Directory.
To perform individual authentication using
1
smart cards.
LP-2060/LP-2060-MF User's Manual for Basic Printer Operation
13
LP-819 Carrier Sheet Set
MF
LP-874 TerioStation PDF Print
LP-868 Active Directory authentication
LP-854 STACKER STD
LP-859 Bucket (W)
LP-863 Catch Basket
LP-858 Original Stacking tray
MF
14
Smart Card Authentication Kit
LP-2060/LP-2060-MF User's Manual for Basic Printer Operation

Preface
Table of Contents
TSafety Precautions ........................................................................................4
TWarning Labels .............................................................................................. 8
TReading the Manual ....................................................................................10
Manual Structure ...................................................................................................................... 10
Notations ........................................................................................................................................11
D-SCAN format ...........................................................................................................................11
TSupplied Items ............................................................................................. 12
TConsumables ................................................................................................13
TOptions .......................................................................................................... 13
Chapter
1
Before Use
TFeatures .........................................................................................................24
TOperation Requirements ...........................................................................26
Environment Requirements ............................................................................................... 26
Ensure Good Ventilation.......................................................................................................27
Installation/Maintenance Space ...................................................................................... 28
Supported paper ...................................................................................................................... 29
TPart Names and Functions.........................................................................32
Front Side ...................................................................................................................................... 32
Left Side and Rear Side .........................................................................................................33
Inside ................................................................................................................................................ 34
Operation Panel ........................................................................................................................35
TMode Screen ................................................................................................39
LP-2060/LP-2060-MF User's Manual for Basic Printer Operation
15

Chapter
2
Basic Operations
TTurning the Power On/O .........................................................................42
Powering On ............................................................................................................................... 43
Powering O ............................................................................................................................... 45
TReplacing the Roll Paper ........................................................................... 46
Replacement Precautions ................................................................................................... 47
Removing the Roll Paper .....................................................................................................48
Installing the Roll Paper ........................................................................................................ 49
TReplacing the Toner Cartridge..................................................................53
Handling Precautions .............................................................................................................54
Toner Replacement Procedure ........................................................................................55
TReplacing the Waste Toner Bottle ............................................................58
Replacement Precautions ................................................................................................... 59
Waste Toner Bottle Replacement Procedure...........................................................59
TReplacing the Charger Unit .......................................................................62
Charger Unit Replacement Procedure.........................................................................62
TReplacing the Process Cartridge ..............................................................66
Replacement Precautions ...................................................................................................66
Process Cartridge Replacement Procedure ..............................................................67
TJob Operation ..............................................................................................73
Printing Pause and Cancellation ...................................................................................... 74
Handling Print Jobs ................................................................................................................. 74
TWeb Functions .............................................................................................75
Functions ....................................................................................................................................... 75
TCleaning the Exterior ..................................................................................77
TUsing Paper from a New Size Standard ..................................................78
TUsing Paper from a User Dened Series .................................................80
TRestricting the Available Rolls ..................................................................82
16
LP-2060/LP-2060-MF User's Manual for Basic Printer Operation

Chapter
3
Menu Functions
TMenu Mode Screen .................................................................................... 84
Conrming Printer Restart ..................................................................................................86
TPaper Menu ..................................................................................................87
Rolls 1 to 4 Paper Types ........................................................................................................ 87
Rolls 1 to 4 Size Standards ...................................................................................................87
TPrinter Engine Menu ...................................................................................89
Power Save Time ...................................................................................................................... 89
Top Cut Timer for Roll n (n = 1 to 4) ..............................................................................89
Top Cut at Door Open ...........................................................................................................90
Print Density ................................................................................................................................ 91
Humidity for Tracing Paper.................................................................................................91
Power Saving in Standby ..................................................................................................... 91
Output Report to Tray ...........................................................................................................92
Print Reports with Other Paper ........................................................................................92
TSystem Menu ................................................................................................93
Communication Parameters .............................................................................................. 93
Available Size Standards .................................................................................................... 104
Paper Size Standards ............................................................................................................105
User Dened Size ...................................................................................................................106
Printer Settings ......................................................................................................................... 107
TPorts Settings Menu .................................................................................113
Common Settings .................................................................................................................. 113
Port 1 to 20 ................................................................................................................................. 114
TSetup Items in PDL Settings Menu ........................................................ 117
Available Data Formats ....................................................................................................... 117
Automatic Data Format Identication ....................................................................... 117
Setting Parameter Table in PDL Setting Menu .....................................................118
PDL Parameter Priority Mode.......................................................................................... 119
Paper Parameters....................................................................................................................120
Drawing Parameters .............................................................................................................126
Scale Parameters .....................................................................................................................12 9
Format Parameters (only with HP-GL and D-SCAN) .........................................136
Pen Parameters (only with HP-GL and D-SCAN) .................................................142
LP-2060/LP-2060-MF User's Manual for Basic Printer Operation
17

Raster Parameters .................................................................................................................. 14 6
MF
MF
MF
PDC (Print Data Converter) Parameters .....................................................................147
Stamp Parameters ..................................................................................................................150
TFunction Menu ...........................................................................................153
Print System Settings ...........................................................................................................153
Print Print Settings .................................................................................................................153
Print Copy Settings
Print Submission Settings
................................................................................................153
..................................................................................153
Print All Settings ......................................................................................................................154
Print for Fax Transmission ..................................................................................................154
Print Error Log ...........................................................................................................................154
Print Engine Information ....................................................................................................154
Print Scanner Information
.................................................................................154
Initialize Port Accounting Information .......................................................................154
Print Port Accounting Information...............................................................................155
Initialize for Std Use ...............................................................................................................155
All Output Trays to On .........................................................................................................155
All Output Trays to O .........................................................................................................155
PDL Setting Print (Port 1 to 20) ......................................................................................155
TOptions Settings Menu ............................................................................156
TSubmission Destination Setting Menu .................................................157
TAdjustment Menu .....................................................................................161
TSmart card settings Menu .......................................................................162
TImport/Export Menu ................................................................................163
Export Operation ....................................................................................................................167
Import Operation .................................................................................................................. 168
TDate and Time Settings Menu ................................................................169
TDelete HDD Data Menu ............................................................................ 170
18
LP-2060/LP-2060-MF User's Manual for Basic Printer Operation

Chapter
4
Print Job Box Function
TOverview of the Print Job Box Function ...............................................172
TPrint Job Box Settings Menu ...................................................................173
TPrint Job Box Operation ...........................................................................175
TUsing Smart Cards with the Print Job Box Function ...........................178
Preparation .................................................................................................................................178
Smart Card Registration Procedure .............................................................................178
Print Procedure Using a Smart Card ............................................................................182
LP-2060/LP-2060-MF User's Manual for Basic Printer Operation
19

Chapter
5
Authentication Function
TAuthentication Function Overview ...................................................... 186
TPrinter Administration ............................................................................ 189
User Administrators and Standard Users ..................................................................189
Registering a Supervisor ....................................................................................................192
Registering User Administrators ....................................................................................193
Enabling Printer Administration ....................................................................................195
Administrator Login .............................................................................................................. 197
TUser Authentication ................................................................................. 198
Operation Guide for User Authentication ...............................................................198
Printer Setting Procedure to Enable User Authentication Operation ... 201
Registering a User .................................................................................................................202
User Authentication Setting Procedure ................................................................... 205
Allow User Info Edit .............................................................................................................. 208
Overview of No Authentication Print Job Settings .......................................... 209
No Authentication Print Job Settings
(Disabling Authentication from Specied Computers) ..................................209
No Authentication Print Job Settings
(Disabling Authentication for Ports)............................................................................211
User Authentication Procedure (Login) and Logout ........................................213
One-time Password Authentication ...........................................................................218
AD-related Attributes Location ..................................................................................... 221
TSmart Card Registration Procedure ...................................................... 222
Preparation 1 ............................................................................................................................ 222
Preparation 2 ............................................................................................................................ 222
Registration of Smart Cards by Users with the Printer ....................................223
20
LP-2060/LP-2060-MF User's Manual for Basic Printer Operation

Chapter
6
Troubleshooting
TInitial Checks ............................................................................................. 226
TWhen the Error Screen Appears ............................................................ 227
Paper Jam ................................................................................................................................... 227
Door is Open ............................................................................................................................ 235
TError Log Reference ................................................................................. 236
Procedure to Check the Error Log ............................................................................... 236
Error Log List ............................................................................................................................. 236
TEthernet Troubleshooting ...................................................................... 247
TImage Quality Defects ............................................................................. 249
TUnusual Sound .......................................................................................... 250
TWhen you have set the wrong language ............................................. 251
LP-2060/LP-2060-MF User's Manual for Basic Printer Operation
21

Appendix
TBasic Specications .................................................................................. 254
Printer Specications ........................................................................................................... 254
TMenu Structure ......................................................................................... 256
Printer Engine Menu ............................................................................................................ 257
System Menu ........................................................................................................................... 258
Ports Setting Menu .............................................................................................................. 264
PDL Setting Menu ................................................................................................................. 265
Print Job Box Settings Menu .......................................................................................... 272
Smart card settings Menu ................................................................................................273
TCommand Lists ..........................................................................................274
List of HP-GL and HP-GL/2 Printer Engine Control Commands ................274
List of HP-GL and HP-GL/2 Printer Engine Printing Commands................275
List of HP RTL Printing Commands ............................................................................. 278
List of D-SCAN Format Commands ............................................................................ 280
TIFF Tags ...................................................................................................................................... 286
CALS Format Record ........................................................................................................... 287
Commands Supported by lpd ...................................................................................... 289
xpt (socket I/F) ......................................................................................................................... 289
22
LP-2060/LP-2060-MF User's Manual for Basic Printer Operation

Chapter
1
Before Use Basic Operations Menu Functions
Chapter
1
Before Use
Chapter 1 describes the information required for using the Printer. Be sure to
understand the basic information described in this chapter before moving to the
next chapters.
Chapter Contents
Features ....................................................................................................24
T
Operation Requirements ......................................................................26
T
Part Names and Functions ....................................................................32
T
Mode Screen ............................................................................................39
T
Chapter
2
Chapter
3
Chapter
4
Print Job B ox
Function
Chapter
5
Authentication
Function
LP-2060/LP-2060-MF User's Manual for Basic Printer Operation
23
Chapter
6
Troubleshooting Appendix
Printer ModelMultifunction Model
Chapter
1
Before Use Basic Operations Menu Functions
Chapter
2
Chapter
3
Chapter
4
Print Job B ox
Function
Features
This manual explains the operation for LP-2060-MF/LP-2060 Wide Format Printer,
that is:
- A monochrome raster printer with electro photographic technology, to receive
and Print the graphic data created on a workstation or personal computer
(referred to as “computer” in this manual).
- A multi function device, that combines the monochrome raster Printer with a
contact image scanner.
Chapter
5
Authentication
Function
Chapter
6
Troubleshooting Appendix
The Printer has the following features.
High-speed
printing at high
resolution
Multi port
interface
With a printing speed of 105 mm (4.13 inches)/sec, the
Printer outputs A0 size 5 pages in 1 minute. In addition,
highly accurate printing with 600 dpi resolution is
output.
The Printer is equipped with an Ethernet interface that
enables network connections.
With the Ethernet interface, 20 logical ports can be
used, enabling up to 20 computers to be connected at
the same time.
24
LP-2060/LP-2060-MF User's Manual for Basic Printer Operation
2-stage 4-roll
TIP
MF
feed mechanism,
compatible with
long pages
Features
T
The Printer is equipped with a 2-stage roll feed
mechanism in which 4 types of roll paper are supported:
- A0 (or 36 inches)
- A1 (or 24 inches)
- A2 (or 18 inches)
- A3 (or 12 inches)
By selecting the roll paper from A0 to A4 depending on
Chapter
1
Before Use Basic Operations Menu Functions
Chapter
2
the original documents, the Printer eliminates paper
waste and reduces running costs.
Also, the Printer outputs the long pages up to 15m
(590.55 inches). For the maximum printing areas for the
Printer, see the list below.
Paper type Roll Paper
Plain paper/
Recycled paper
Tracing paper
(75g (2.65oz)/
2
)
m
Tracing paper
(60g (2.11oz)/
2
) /
m
Matte lm
Used
A0 roll paper 841×15m (33.11×590.55 inches)
A1 roll paper 594×15m (23.39×590.55 inches)
A2 roll paper 420×1220mm (16.54×48.03 inches)
A3 roll paper 297×920mm (11.69×36.22 inches)
A0 roll paper 841×3600mm (33.11×141.73 inches)
A1 roll paper 594×3600mm (23.39×141.73 inches)
A2 roll paper 420×1220mm (16.54×48.03 inches)
A3 roll paper 297×920mm (11.69×36.22 inches)
A0 roll paper 841×1220mm (33.11×48.03 inches)
A1 roll paper 594×920mm (23.39×36.22 inches)
A2 roll paper 420×610mm (16.54×24.02 inches)
A3 roll paper 297 ×4 60mm (11. 69 ×18 .11 i nc he s)
Max. Printing Range
Chapter
3
Chapter
4
Print Job B ox
Function
Chapter
5
Authentication
Function
Chapter
6
Troubleshooting Appendix
A wide
variety of paper
supported
High resolution
scanner
unction
Printing areas do not include the 3 mm (0.12
inches) on front end, 2 mm (0.08 inches) on rear
end, and 2 mm (0.08 inches) on both sides.
Plain paper, recycled paper, tracing paper (60 g (2.65oz)/
2
and 75 g (2.11oz)/m2), and lm are available in roll paper
m
format. Select the paper type depending on your purpose.
An original is scanned and copied at 600 dpi resolution.
LP-2060/LP-2060-MF User's Manual for Basic Printer Operation
25

TIP
Chapter
1
Before Use Basic Operations Menu Functions
Operation Requirements
This section describes the operation requirements for the Printer.
Chapter
2
Chapter
3
Chapter
4
Print Job B ox
Function
Chapter
5
Authentication
Function
Environment Requirements
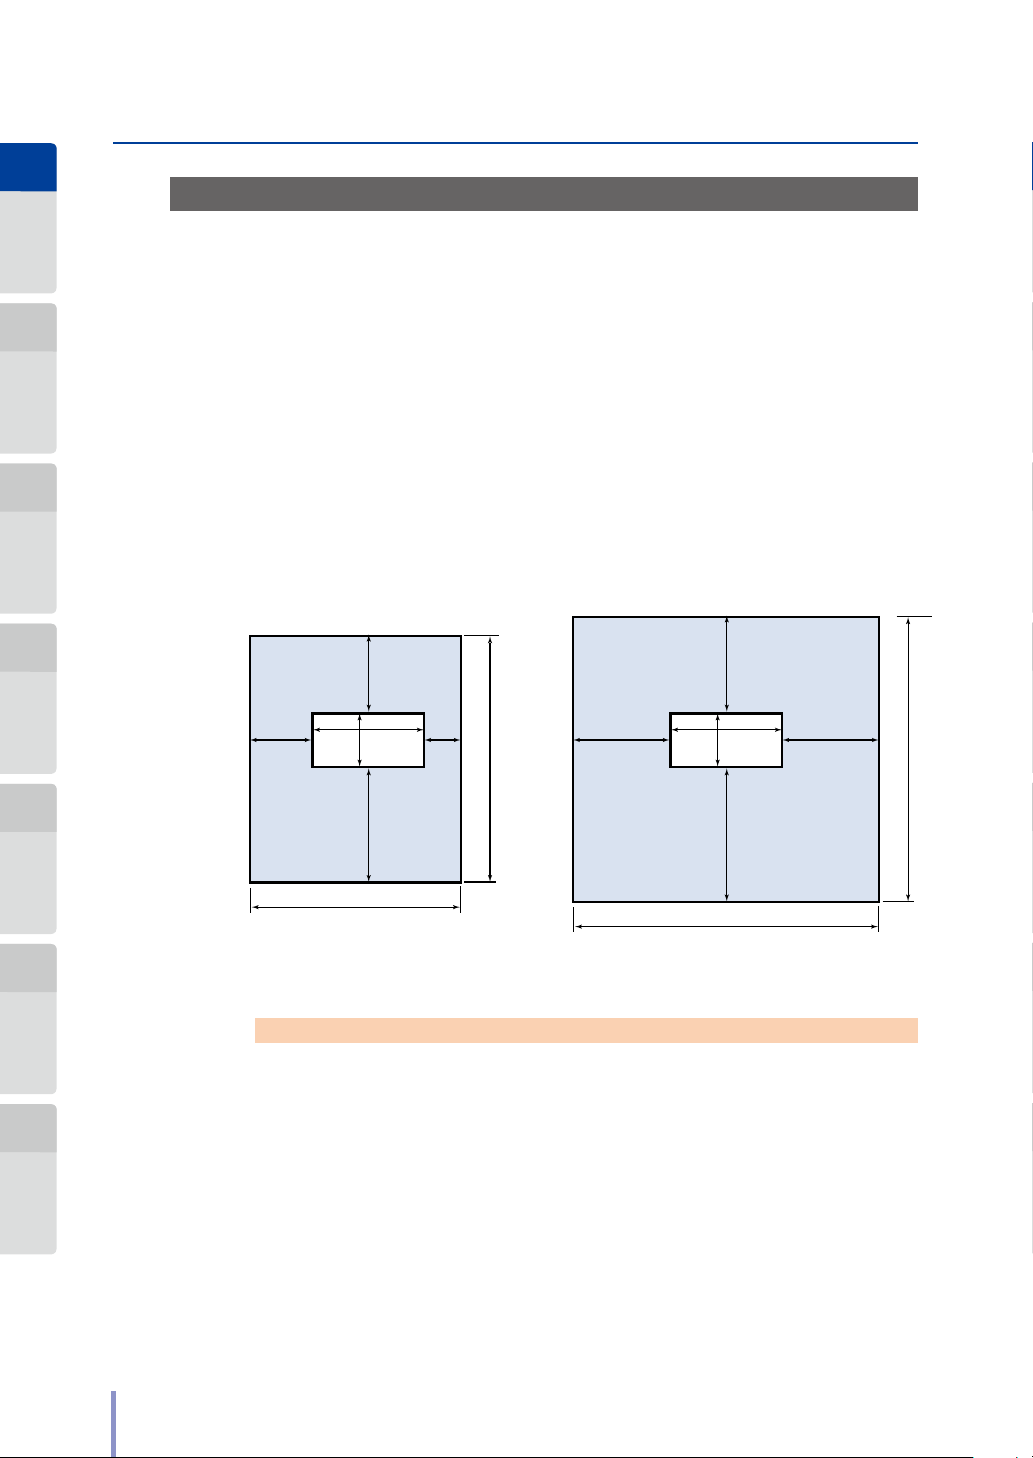
Operate the Printer within the temperature and humidity range shown in the gure below.
To obtain good image quality, operate the Printer within a temperature
range of 20 to 30˚C (68 to 86˚F) and a humidity range of 45 to 60% RH.
Operation Temperature and Humidity Range
(×103Pa)
Water vapor pressure
5
4
28˚C (82.4˚F), 80%RH
3
Operation Temperature
and Humidity Range
80%RH
(50%RH)
35˚C (95˚F), 48%RH
Chapter
6
Troubleshooting Appendix
26
2
1
15˚C (59˚F)
0
10 (50)
20 (68) 30 (86)
Temperature
Note
Even though the temperature and humidity is within the range shown above,
at low temperature the scan speed may decrease or data processing time
may increase. In such a case, to solve them you are recommended to increase
the room temperature to be within the range 20˚C to 30˚C (68 to 86˚F).
LP-2060/LP-2060-MF User's Manual for Basic Printer Operation
35˚C (95˚F)
20%RH
40 (104)
˚C (˚F)
Operation Requirements
T
Warning Regarding Low-temperature Environment
When the Printer is in a low-temperature environment, a low-temperature icon is
displayed on the screen.
When this icon is displayed, modify the ambient temperature so that it is within the
recommended temperature range of 20°C to 30°C.
Chapter
1
Before Use Basic Operations Menu Functions
Chapter
2
Chapter
3
Note
This may cause the scanning speed to become slower or the data processing
time to become longer.
Do not install in the following locations.
A location exposed to direct sunlight or a bright location, such as
next to a window
A location exposed to vibration
A location exposed to a large amount of dust
A location prone to sharp changes in temperature or humidity
A location near a heater
A location that may be exposed to water
A location exposed to wind, such as from a ventilator outlet
A location exposed to a signicant amount of ammonia gas, such as
from a diazo copying machine
A location with poor ventilation
Ensure Good Ventilation
Chapter
4
Print Job B ox
Function
Chapter
5
Authentication
Function
Chapter
6
Troubleshooting Appendix
If the Printer is used for a long time in a room with poor ventilation or to print a
large number of copies, gases such as ozone may emit an unpleasant odor, and
reduce the comfort of the oce environment. Also, chemical substances may be
emitted during printing operations. Ensure enough ventilation and air circulation
for safe use of the Printer.
LP-2060/LP-2060-MF User's Manual for Basic Printer Operation
27
Installation SpaceMaintenance Space
Chapter
1
Before Use Basic Operations Menu Functions
Chapter
2
Operation Requirements
T
Installation/Maintenance Space
Installation and maintenance space shown in the gure below is required for:
- Consumables replacement
- Printout handling
- Ventilation
- Repair operation including parts replacement
Chapter
3
Chapter
4
Print Job B ox
Function
Chapter
5
Authentication
Function
Chapter
6
Troubleshooting Appendix
Installation/Maintenance Space
900
600
(23.62)
(Printer front)
Note
Before relocating the Printer, contact your service representative.
(35.43)
1200 (47.24)
640
(25.20)
1200
(47.24)
2100 (82.68)
300
(11.81)
2740 (107.87)
1300
(51.18)
1000
(39.37)
640
(25.20)
1200 (47.24)
1000
(39.37)
(Printer front)
1600
(62.99)
3200 (125.98)
Unit: mm (inches)
2000 mm (78.74 inches) in height
3540 (139.37)
28
LP-2060/LP-2060-MF User's Manual for Basic Printer Operation
Operation Requirements
T
Supported paper
Use the OKI Data Infotech-specied roll paper listed below.
Note
If the installed paper is not OKI Data Infotech-specied, the image quality is
not guaranteed and the Printer malfunction may occur.
Store the paper carefully, following the instructions below.
Note
To protect the paper against dust, put it in a bag.
Store paper in a cool, dark, and dry place.
Roll Paper Specied by OKI Data Infotech
Part No. Paper Type Size
LP-733
LP-780 A1 width (594 mm (23.39 inches))
LP-788 A2 width (420 mm (16.54 inches))
LP-781 A3 width (297 mm (11.69 inches))
LP-735
LP-782 A1 width (594 mm (23.39 inches))
LP-740 A2 width (420 mm (16.54 inches))
LP-783 A3 width (297 mm (11.69 inches))
LP-796
LP-784 A1 width (594 mm (23.39 inches))
LP-741 A2 width (420 mm (16.54 inches))
LP-785 A3 width (297 mm (11.69 inches))
LP-744
LP-786 A1 width (594 mm (23.39 inches))
LP-743 A2 width (420 mm (16.54 inches))
LP-787 A3 width (297 mm (11.69 inches))
LP-610
LP-611 A1 width (594 mm (23.39 inches))
LP-612 A2 width (420 mm (16.54 inches))
LP-613 A3 width (297 mm (11.69 inches))
Plain paper
(67g (2.36oz)/m
Tracing paper
(75g (2.65oz)/m
Tracing paper
(60g (2.12oz)/m
Matte lm (#300)
Recycled paper
(68g (2.40oz)/m
2
)
2
)
2
)
2
)
In addition, roll paper with the following widths can be used with this Printer.
A0 width (841 mm (33.11 inches))
A0 width (841 mm (33.11 inches))
A0 width (841 mm (33.11 inches))
A0 width (841 mm (33.11 inches))
A0 width (841 mm (33.11 inches))
Chapter
1
Before Use Basic Operations Menu Functions
Chapter
2
Chapter
3
Chapter
4
Print Job B ox
Function
Chapter
5
Authentication
Function
Chapter
6
Troubleshooting Appendix
LP-2060/LP-2060-MF User's Manual for Basic Printer Operation
29
Chapter
1
Before Use Basic Operations Menu Functions
Chapter
2
Chapter
3
Chapter
4
Print Job B ox
Function
Operation Requirements
T
ARCH Series
Roll Width Standard Longer Side Shorter Side
36 inches
(914.4 mm)
24 inches
(609.6 mm)
18 inches
(4 57.2 mm)
12 i nch es
(304.8 mm)
E standard size
D standard size
D standard size
C standard size
C standard size
B standard size
B standard size
A standard size
1219. 2 mm
(48 inches)
914.4 mm
(36 inches)
914.4 mm
(36 inches)
609.6 mm
(24 inches)
609.6 mm
(24 inches)
45 7.2 m m
(18 inches)
45 7.2 m m
(18 inches)
304.8 mm
(12 inches)
914.4 mm
(36 inches)
609.6 mm
(24 inches)
609.6 mm
(24 inches)
45 7.2 m m
(18 inche s)
45 7.2 m m
(18 inche s)
304.8 mm
(12 in che s)
304.8 mm
(12 in che s)
228.6 mm
(9 inches)
Chapter
5
Authentication
Function
Chapter
6
Troubleshooting Appendix
ANSI Series
Roll Width Standard Longer Side Shorter Side
1117. 6 m m
(44 inches)
863.6 mm
(34 inches)
863.6 mm
(34 inches)
558.8 mm
(22 inches)
558.8 mm
(22 inches)
431.8 mm
(17 inches)
431.8 mm
(17 inches)
279.4 mm
(11 inches)
34 inches
(863.6 mm)
22 inches
(558.8 mm)
17 in ches
(431. 8 mm)
11 inches
(279.4 mm)
E standard size
D standard size
D standard size
C standard size
C standard size
B standard size
B standard size
A standard size
30×42 Series
863.6 mm
(34 inches)
558.8 mm
(22 inches)
558.8 mm
(22 inches)
431.8 mm
(17 inc hes)
431.8 mm
(17 inc hes)
279.4 mm
(11 in ch es)
279.4 mm
(11 in ch es)
215.9 mm
(8.5 inches)
30
LP-2060/LP-2060-MF User's Manual for Basic Printer Operation

Operation Requirements
T
Roll Width Standard Longer Side Shorter Side
30 inches
(762.0 mm)
15 i nch es
(762.0 mm)
30×42 size
Standard size
15×21 size
Standard size
1066. 8 mm
(42 inches)
533.4 mm
(21 inches)
MAP Series
Roll Width Standard Longer Side Shorter Side
1000.0 mm
(39.37 inches)
700.0 mm
(27.56 inches)
700.0 mm
(27.56 inches)
700.0 mm
(27.56 inches)
500.0 mm
(19.69 inches)
B1 standard size
B2 standard size
B2 standard size
762.0 mm
(30 inches)
381.0 mm
(15 in ches)
700.0 mm
(27.56 inches)
500.0 mm
(19.69 inches)
500.0 mm
(19.69 inches)
Chapter
1
Before Use Basic Operations Menu Functions
Chapter
2
Chapter
3
DIN Series
Roll Width Standard Longer Side Shorter Side
70 7. 0 mm
(27.83 inches)
500.0 mm
(19.69 inches)
B1 standard size
B2 standard size
B2 standard size
B3 standard size
1000.0 mm
(39.37 inches)
70 7. 0 mm
(27.83 inches)
70 7. 0 mm
(27.83 inches)
500.0 mm
(19.69 inches)
70 7. 0 mm
(27.83 inches)
500.0 mm
(19.69 inches)
500.0 mm
(19.69 inches)
353.0 mm
(13.90 inches)
User-dened Series
With user-defined series, standard-size printing is not available. All printing is
performed at actual length.
Chapter
4
Print Job B ox
Function
Chapter
5
Authentication
Function
Chapter
6
Troubleshooting Appendix
LP-2060/LP-2060-MF User's Manual for Basic Printer Operation
31

MF
MF
Chapter
1
Before Use Basic Operations Menu Functions
Part Names and Functions
This section describes the Printer's par t names, operation information, and
functions.
Chapter
2
Chapter
3
Chapter
4
Print Job B ox
Function
Chapter
5
Authentication
Function
Chapter
6
Troubleshooting Appendix
Front Side
Printer Model
(5)
Roll number
Roll 1Roll 2
2
U001XXXXXXXX
Roll 4Roll 3
1
U001XXXXXXXX
(1)
Multifunction Model
(6)
(1)
(5)
(2)
(3)
(4)
(1) Operation panel
Contains the following
- Lamps and a screen to indicate the Printer status
- Buttons to set functions. (& page 35)
(2) Front door
Open to clear a paper jam inside the Printer.
(& page 230)
(3) Drawer for rolls 1 and 2
Sets the roll paper. (& page 48)
(4) Drawer for rolls 3 and 4
Sets the roll paper. (& page 48)
(5) Toner door/document table
Open to replace the toner cartridge.
(& page 55)
(6) Scanner cover
Open to clear an original jam.
(& page 233)
32
4
U001XXXXXXXX
LP-2060/LP-2060-MF User's Manual for Basic Printer Operation
3
U001XXXXXXXX

Printer ModelMultifunction Model
(1)
(7)
(8)
(3)
(6)
(2)
(5)
(4)
MF
Left Side and Rear Side
Part Names and Functions
T
(1) Fuser Unit Drawer
Open to:
- Replace the process cartridge; or
- Clear a paper jam near the paper outlet
(& page 62, & page 228)
(2) Latch button
Press to open the fuser unit drawer.
(& page 62, & page 228)
(3) Paper outlet cover
Open to clear a paper jam in the cutter unit.
(& page 229)
(4) Filter cover
Remove to replace a lter. (& page 72)
(5) Waste toner door
Open when replacing a waste toner bottle.
(& page 60)
(6) Outlet slot
Outputs paper.
(7) Original output guide
Guides the scanned original to the proper
position.
(8) Output tray
Stores output paper sized A3 or smaller.
Chapter
1
Before Use Basic Operations Menu Functions
Chapter
2
Chapter
3
Chapter
4
Print Job B ox
Function
Chapter
5
Authentication
Function
Chapter
6
Troubleshooting Appendix
LP-2060/LP-2060-MF User's Manual for Basic Printer Operation
33

Chapter
1
Before Use Basic Operations Menu Functions
Part Names and Functions
T
Inside
Chapter
2
Chapter
3
Chapter
4
Print Job B ox
Function
Chapter
5
Authentication
Function
Chapter
6
Troubleshooting Appendix
(3)
(1)
(2)
(5)
(6)
(4)
(7)
(8)
(9)
(2)
(1) Paper ange
Installs the roll paper. (& page 49)
(2) Paper feed knob
Feeds the end of the roll paper into the paper
inlet. (& pa ge 51)
(3) Cutter
Cuts the paper. (& pa ge 51)
(4) Process cartridge drawer
Open to replace a process cartridge.
(& page 67)
(5) Heater switch
The switch for the heater. (& page 42)
(6) Main power switch
Turn on or o to supply the power to the Printer.
(& page 42)
(7) Ethernet interface connector
The interface connector for 1000BASE-T,
100BASE-TX, and 10BASE-T.
(8) USB port
Used to connect a smart card reader or a USB
drive.
(9) Power cord
Insert into a power outlet.
34
LP-2060/LP-2060-MF User's Manual for Basic Printer Operation

Part Names and Functions
T
Operation Panel
The layout for the keys, lamps, and touchpanel screen on the operation panel is
shown in the following gures.
Multifunction Model
Chapter
1
Before Use Basic Operations Menu Functions
Chapter
2
Printer Model
(& page 39)
(& page 39)
2
3
4
Chapter
3
1
5 7
6
Chapter
4
Print Job B ox
Function
3
2
1
5 6
4
Chapter
5
Authentication
Function
Chapter
6
Troubleshooting Appendix
LP-2060/LP-2060-MF User's Manual for Basic Printer Operation
35

MF
MF
MF
Chapter
1
Before Use Basic Operations Menu Functions
Chapter
2
Chapter
3
Chapter
4
Print Job B ox
Function
Chapter
5
Authentication
Function
Chapter
6
Troubleshooting Appendix
Part Names and Functions
T
1
Changes the mode.
COPY button
Changes to copy mode, and the green lamp next to the button
lights up. For more details, see the separate User's Manual for
Multifunction Printer Operation.
SUBMIT button
Changes to submission mode, and the green lamp next to
the button lights up. For more details, see the separate User's
Manual for Multifunction Printer Operation.
SCAN button
Changes to scan mode, and the green lamp next to the button
lights up. For more details, see the separate User's Manual for
Multifunction Printer Operation.
PRINT button
Changes to print mode, and the green lamp next to the button
lights up. Printing can be performed.
MENU button
Changes to menu mode to specify the Printer's settings.
2
Indicate the Printer modes' status.
Green: Mode lamps
Green (lights up): Indicates the mode displayed on the screen.
Green (ashes): Indicates the job processing in the mode
undisplayed on the screen.
Red: Error lamps
Red (lights up): Indicates that an error has occurred for the
corresponding mode.
36
REMOTE lamp
Green (lights up): Indicates data transmission with connected
computers or access from Web functions.
LP-2060/LP-2060-MF User's Manual for Basic Printer Operation

Part Names and Functions
MF
TIP
T
3
Resets the settings, stops a printing in progress, and changes to
power save mode.
RESET button
In copy mode or submission mode, press this button to reset the
settings and return to the initial mode.
STOP button
Press this button to stop printing in progress.
POWER SAVE button
While the Printer is idling, press this button to change to power
save mode. The lamp next to the button lights up. After changing
to power save mode, the screen display turns o. To cancel the
power save mode, press POWER SAVE again.
Chapter
1
Before Use Basic Operations Menu Functions
Chapter
2
Chapter
3
The Printer is set to enter power save mode
automatically if no operations are performed
for a prescribed time. This time can be
changed. For more details, see Chapter 3.
4
Turns the Printer power On or O.
5
Enters the number of copies or the setting values.
Numerical keypad
Uses to enter the values.
C button
Clears the setting values.
6
Changes, enters, or cancels the setting values.
+/- button
Uses to enter the values.
Enter button
Conrms the setting values.
Cancel button
Cancels the input operation or the last scanned document when
copies are stored.
Chapter
4
Print Job B ox
Function
Chapter
5
Authentication
Function
Chapter
6
Troubleshooting Appendix
LP-2060/LP-2060-MF User's Manual for Basic Printer Operation
37

MF
Chapter
1
Before Use Basic Operations Menu Functions
Chapter
2
Chapter
3
Chapter
4
Print Job B ox
Function
7
Starts scanning the original or stops scanning in progress.
STOP FEED button
Stops the scanning of the original.
START button
Starts the scanning of the original.
Chapter
5
Authentication
Function
Chapter
6
Troubleshooting Appendix
38
LP-2060/LP-2060-MF User's Manual for Basic Printer Operation

MF
MF
MF
Mode Screen
Chapter
1
Before Use Basic Operations Menu Functions
Print Mode Screen
Displays the size, type and the
current level of paper.
Copy Mode Screen
Performs copy operations.
For more details, see the
separate User's Manual for
Multifunction Printer Operation.
Submission Mode Screen
Submits image data scanned
with the Printer to a shared folder
of a computer connected to the
network, a printer connected to
the network, or the submission
box in the HDD of the Printer.
For more details, see the
separate User's Manual for
Multifunction Printer Operation.
Chapter
2
Chapter
3
Chapter
4
Print Job B ox
Function
Chapter
5
Authentication
Function
Menu Mode Screen
Shows the Printer's status and
settings.
For the structure of the Setup
menu, see the following page.
SCAN Mode Screen
For scanning an original from
a computer connected to the
network.
For more details, see the
separate User's Manual for
Multifunction Printer Operation.
LP-2060/LP-2060-MF User's Manual for Basic Printer Operation
39
Chapter
6
Troubleshooting Appendix

Chapter
1
Before Use Basic Operations Menu Functions
Chapter
2
Chapter
3
Chapter
4
Print Job B ox
Function
Chapter
5
Authentication
Function
Chapter
6
Troubleshooting Appendix
PDL Setting
Sets the printing
parameters and
similar items.
(& pag e 117 )
Printer Engine
Sets the operation
conditions for the
Printer engine.
(& page 89)
System
Sets the Printer's
general system
settings.
(& page 93)
Port Setting
Sets the
communication port.
(& pag e 113)
Power Save Time
Top Cut Timer
Top Cut at Door Open
Print Density
Humidity for Tracing Paper
Power Saving in Standby
Output Report to Tray
Print Reports with Other Paper
Communication Parameters
(& page 93)
Available Size Standards
(& page 104)
Paper Size Standards
(& page 105)
User Dened Size
(& page 106)
Printer Settings
(& page 107)
Common Settings
Port 1
(& pag e 114 )
Port 20
(& page 89)
(& page 89)
(& page 90)
(& pa ge 91)
(& pa ge 91)
(& pa ge 91)
(& page 92)
(& page 92)
Network Settings
Scanner
A Series
ARCH Series
ANSI Series
30×42 Series
A Series
ARCH Series
ANSI Series
30×42 Series
User Dened 1
User Dened 2
User Dened 3
User Dened 4
Common Settings
Multifunction Settings
Connection Timeout
Protocol selection
HP-GL
D-SCAN
TIFF
CALS
Map Series
DIN Series
User Dened
Map Series
DIN Series
User Dened
Character entry settings
Limit Printer's Functions
XPT Port
Printer Name
User Name
FTP password
Host character encoding
Port 1_HP-GL
Port 20_HP-GL
Port 1_D-SCAN
Port 20_D-SCAN
Port 1_TIFF
Port 20_TIFF
Port 1_CALS
Port 20_CALS
Paper Parameters
(& pa ge 120)
Drawing Parameters
(& pa ge 126)
Scale Parameters
(& pa ge 129)
Format Parameters
(& page 136)
Pen Parameters
(& page 142)
Raster Parameters
(& page 146)
PDC Parameters
(& page 147)
Stamp Parameters
(& page 150)
Paper Parameters
Drawing Parameters
Scale Parameters
Format Parameters
Pen Parameters
Raster Parameters
PDC Parameters
Stamp Parameters
Paper Parameters
Drawing Parameters
Scale Parameters
Raster Parameters
PDC Parameters
Stamp Parameters
Paper Parameters
Drawing Parameters
Scale Parameters
Raster Parameters
PDC Parameters
Stamp Parameters
Paper Supply Mode
Page Size
Print Copies
Size of Automatically Supplied Paper
Con. OtherPaper in ContinuousMode
Con. Other Paper in Optimal Mode
Parameter Mode
Oset Mode
Same Drawing Size with Top and Bottom Blank
Scale Settings
Scale in A
Scale in ARCH
Printer Drive
Language
Terminator PG1;
Terminator NR;
Pen Settings
Binary Image Scale
PDC Parameters
File save destination
File naming rules 1
Stamp position
Stamp direction
Distance from paper edges
Centering
Paper Type
Excess Size Tolerance
Con. Other Paper w/ Auto Rotation
A4 Direcw/ ActualSize&Continuous
X Oset
Y Oset
Scale in ANSI
Scale for A Series Roll Width
Scale for ARCH Series Roll Width
Terminator SP0
Terminator ESC.);
Terminator AF;
Terminator AH;
Pen 0 to 15
Screening
File naming rules 2
File naming rules 3
File naming rules 4
Characters Height
Stamped items 1
Stamped items 2
Writing Mode
Mirror
(& pa ge 120)
Parameter Mode
(& pa ge 129)
Drawing Identify by Paper Number
Pen 1 to 32
(& page 146)
(& page 147)
(& page 150)
(& pa ge 120)
Reverse
(& pa ge 129)
(& page 146)
(& page 147)
(& page 150)
(& pa ge 120)
(& pa ge 126)
(& pa ge 129)
(& page 146)
(& page 147)
(& page 150)
Output tray
Print from End
Print Direction
Reverse
Error Memo
Scale for ANSI Series Roll Width
Scale for User Dened Roll Width
Terminator FR;
Drawing Size Command
Drawing
Identify by Paper Number
Uniformity eects
Format of date and time created
File format
Number of destination folder for submission
Stamped items 3
Stamped date and time format
Stamped character string
(& pa ge 126)
(& page 136)
(& page 142)
(& pa ge 126)
40
LP-2060/LP-2060-MF User's Manual for Basic Printer Operation

Chapter
1
Before Use Basic Operations Menu Functions
Chapter
2
Basic Operations
Chapter 2 describes the basic operations for the Printer. These include turning the
power on and o, replacing the paper, and replacing the toner cartridge.
Chapter Contents
Turning the Power On/O .....................................................................42
T
Replacing the Roll Paper .......................................................................46
T
Replacing the Toner Cartridge .............................................................53
T
Replacing the Waste Toner Bottle .......................................................58
T
Replacing the Charger Unit ..................................................................62
T
Replacing the Process Cartridge .........................................................66
T
Job Operation .........................................................................................73
T
Web Functions.........................................................................................75
T
Cleaning the Exterior ............................................................................. 77
T
Using Paper from a New Size Standard ..............................................78
T
Using Paper from a User Dened Series ............................................80
T
Restricting the Available Rolls .............................................................82
T
Chapter
2
Chapter
3
Chapter
4
Print Job B ox
Function
Chapter
5
Authentication
Function
Chapter
6
Troubleshooting Appendix
LP-2060/LP-2060-MF User's Manual for Basic Printer Operation
41

Chapter
1
Before Use Basic Operations Menu Functions
Chapter
2
Chapter
3
Chapter
4
Print Job B ox
Function
Turning the Power On/O
The Printer has two power switches. The main power switch is on the bottom left
when viewed from behind the Printer, and the POWER button is on the operation
panel.
Normally, keep the main power switch on, and turn the Printer's power on or o by
pressing POWER on the operation panel.
Note
Do not turn o the main power switch while data is being processed. The
system may crash.
Operation panel
Heater switch
POWER button
Chapter
5
Authentication
Function
Chapter
6
Troubleshooting Appendix
Main power switch
4242
LP-2060/LP-2060-MF User's Manual for Basic Printer Operation

Powering On
1
Main power switch
Turning the Power On/O
T
Turn on the main power switch on the
bottom left when viewed from behind
the Printer.
Press the main power switch to the side (upper
side).
Chapter
1
Before Use Basic Operations Menu Functions
Chapter
2
Chapter
3
2
3
Heater switch
The rst time the power is turned on after purchasing the Printer, guidance is
displayed for initial settings such as the panel language.
Set the heater switch to On if the
humidity is high or the paper is
wrinkled.
Press the heater switch to the side (upper side).
After ensuring that the main power
switch is on, press POWER on the
Printer's operation panel.
Chapter
4
Print Job B ox
Function
Chapter
5
Authentication
Function
Chapter
6
Troubleshooting Appendix
LP-2060/LP-2060-MF User's Manual for Basic Printer Operation
43

Chapter
1
Before Use Basic Operations Menu Functions
Chapter
2
Turning the Power On/O
T
The rst time the power is turned
on after purchasing the Printer,
the following settings must be
congured.
- Panel language
- Printer initialization
- Date and time settings
- IP address, subnet mask , and
default gateway of the Printer
Chapter
3
Chapter
4
Print Job B ox
Function
Chapter
5
Authentication
Function
Chapter
6
Troubleshooting Appendix
If these items have already been set, the following display appears.
During warming up, Warming up… and the warming up counter are
displayed.
Warming up takes approximately 3 minutes.
If waiting print jobs remain when turning the power o, the following message
is displayed next time the power is turned on.
44
Select Yes to delete the waiting print jobs.
Select No to keep the waiting print jobs. In this case, the waiting print jobs are
printed when the Printer starts.
After about 10 seconds, No is automatically selected and the message
disappears.
LP-2060/LP-2060-MF User's Manual for Basic Printer Operation

Turning the Power On/O
T
Powering O
Before turning o the power, make sure that the Printer is ready to receive data
(standby screen is displayed).
Hold down POWER on the Printer's
1
panel for about 1 second.
Chapter
1
Before Use Basic Operations Menu Functions
Chapter
2
2
When Shutting Down is displayed,
release the button.
If a job exists, it is saved automatically.
Printing for the saved job is available
the next time the power is turned on.
After the shutdown process is completed, the power turns o.
Main power switch
If the Printer will not be used for a long
time, turn o the main power switch.
Press the main power switch to the side (lower
side).
Chapter
3
Chapter
4
Print Job B ox
Function
Chapter
5
Authentication
Function
Chapter
6
Troubleshooting Appendix
Note
Always turn o the power using the POWER button on the operation panel.
Directly turning o the main switch may damage the data stored inside the
Printer.
Do not turn o the power when the REMOTE lamp is ashing.
LP-2060/LP-2060-MF User's Manual for Basic Printer Operation
45

TIP
Chapter
1
Before Use Basic Operations Menu Functions
Replacing the Roll Paper
This section describes the removal and installation procedures at the roll paper
replacement.
Chapter
2
Chapter
3
Chapter
4
Print Job B ox
Function
Chapter
5
Authentication
Function
When the roll paper is running out, the roll paper icon on the screen changes as follows.
When the icon above is displayed, the Printer can output approximately 50 m
(1968.50 inches) of printout. So get ready to replace the paper roll with a new one.
When the roll paper is used up, an error lamp lights up, and the following is
displayed on the screen.
Chapter
6
Troubleshooting Appendix
4646
When the prompt message to supply paper appears, you can cancel the
one page of the job waiting for the paper. Apply this function when the
required paper is not available any more.
When the prompt message to supply paper appears, press Alternative
Printing to print with:
- a paper size bigger than the requested paper; or
- a paper type dierent from the requested paper.
LP-2060/LP-2060-MF User's Manual for Basic Printer Operation

However, Alternative Print is not eective when:
- On the print mode, Paper Supply Mode is set to Roll 1, Roll 2, Roll 3,
or Roll4; or
- On the copy mode, Roll Position setting is not Auto.
With rolls other than user dened series, the roll paper width is displayed
as follows. (Changing the unit of length does not change the display.)
A series A0 A1 A2 A3
ARCH series 36 in. 24 in. 18 in. 12 in.
ANSI series 34 in. 22 in. 17 in. 11 in.
30×42 series 30 in.
MAP series 707 mm (27.83 inches) 500 mm (19.69 inches)
DIN series 707 mm (27.83 inches) 500 mm (19.69 inches)
With the user dened series, the screen displays the values, specied at
the User Dened Size 1 to 4, in mm or in inches.
Example:
234.5 mm, when the unit of length is set to mm.
12.3 in., when the unit of length is set to inches.
Note
If the paper type and the paper series are specied on the supply paper
screen, press Paper to set the paper type and the paper series before
loading the new roll.
Replacement Precautions
Replacing the Roll Paper
T
Chapter
1
Before Use Basic Operations Menu Functions
Chapter
2
Chapter
3
Chapter
4
Print Job B ox
Function
Chapter
5
Authentication
Function
Caution
The roll paper is heavy. Be careful not to drop it and injure yourself.
The recommended roll paper size for installation on roll positions 2 and 4 is
A2 or less.
When installing a roll paper size of A1 or larger, get the help of another
person to carry the roll paper. Installing the paper by yourself may injure
your back.
Be careful not to hit the roll paper against the cutter unit or rest it on top of
the unit. The cutter unit may be damaged.
Be careful not to drop the roll paper onto the ange guide. The ange guide
may be damaged.
The ange guide will be damaged if you drop the roll paper when the paper
anges are installed.
LP-2060/LP-2060-MF User's Manual for Basic Printer Operation
47
Chapter
6
Troubleshooting Appendix

TIP
is also opened.
is not opened.
When opening the drawer for rolls
When opening the drawer for rolls
Chapter
1
Before Use Basic Operations Menu Functions
Chapter
2
Chapter
3
Replacing the Roll Paper
T
When installing the roll paper, cut the end of the paper with the cutter. At
this time, be careful not to injure yourself on the cutter.
Be careful not to trap your hand when opening and closing the roll paper
drawers. When a roll paper drawer is open, do not open the other roll paper
drawer. The risk of trapping your hand will increase.
Note
Use the OKI Data Infotech-specied roll paper. If your paper is not OKI Data
Infotech-specied, the image quality is not guaranteed.
Store paper in a cool, dark, and dry place
Note that the drawer for rolls 3 and 4 is also opened when you open the
drawer for rolls 1 and 2.
Chapter
4
Print Job B ox
Function
Chapter
5
Authentication
Function
Removing the Roll Paper
Chapter
6
Troubleshooting Appendix
1
1 and 2,
the drawer for rolls 3 and 4
Pull out the drawer for rolls 1 and 2, or
the drawer for rolls 3 and 4.
Hold the center handle with your ngers, and pull
it out towards yourself slowly.
(In the example in the gure, the drawer for rolls
1 and 2 is opened.)
3 and 4,
the drawer for rolls 1 and 2
Note
You are recommended to open the roll
paper drawers with both hands if you
cannot open them easily.
Do not open the drawer by holding the
cutter unit. This may cause a malfunction.
48
LP-2060/LP-2060-MF User's Manual for Basic Printer Operation

2
TIP
Paper ange
3
Knob
Note
To prevent the paper ange ends from being misaligned, do not turn the aper
ange knobs too much with excessive force.
Installing the Roll Paper
Replacing the Roll Paper
T
Rewind and remove the roll paper.
Turn the paper anges in the direction shown in
the gure. Rewind the roll paper until the end of
the paper appears.
Lift up the paper anges, and remove the roll
paper.
Release the paper anges, and remove
the roll paper.
Loosen the paper ange knobs by turning them
in the OPEN direction. Remove the paper anges
on both sides.
Chapter
1
Before Use Basic Operations Menu Functions
Chapter
2
Chapter
3
Chapter
4
Print Job B ox
Function
Chapter
5
Authentication
Function
1
There is no dierence between the left and right paper anges. The
anges can be installed on either side.
Set the paper anges onto the roll
paper.
Insert the end of a paper ange onto the roll
paper tube. Fasten the ange by turning the
knob in the CLOSE direction.
Knob
Note
If a paper ange knob is too loose, the roll paper will move from side to side.
There will be a negative eect on printing. Fasten the knobs tightly.
LP-2060/LP-2060-MF User's Manual for Basic Printer Operation
49
Chapter
6
Troubleshooting Appendix

OkNo
Chapter
1
Before Use Basic Operations Menu Functions
Chapter
2
Chapter
3
Chapter
4
Print Job B ox
Function
Replacing the Roll Paper
T
2
3
Move the ange guide.
Align the ange guide with the position
appropriate for the roll paper size.
Set the roll paper into the Printer.
Hold the roll paper so that the paper end appears
at the front bottom. Slowly insert the paper
ange while aligning it with the groove on the
ange guide.
Chapter
5
Authentication
Function
Chapter
6
Troubleshooting Appendix
Note
Be careful not to drop the roll paper.
Flange guide Paper ange
Caution
The recommended roll paper size for installation on roll positions 2 and 4
is A2 or less. When installing a roll paper size of A1 or larger, get the help of
another person to carry the roll paper. Installing the paper by yourself may
injure your back.
50
LP-2060/LP-2060-MF User's Manual for Basic Printer Operation

4
5
Paper feed roller
Replacing the Roll Paper
T
Insert the top of the roll paper under
the paper feed roller.
By manually rotating the paper ange, feed the
roll paper.
By rotating the paper feed knob, feed
the roll paper so that a the top of the
roll paper protrude from the printer by
approximately 60 cm.
60 cm
Chapter
1
Before Use Basic Operations Menu Functions
Chapter
2
Chapter
3
Chapter
4
Print Job B ox
Function
6
Paper feed knob
Move the cutter to cut the paper.
Dispose of the cut paper.
Cutter
Note
After cutting the paper, move the cutter to the arrowed position in the right or
left.
Caution
Be careful not to injure yourself on the cutter.
Chapter
5
Authentication
Function
Chapter
6
Troubleshooting Appendix
LP-2060/LP-2060-MF User's Manual for Basic Printer Operation
51

TIP
Chapter
1
Before Use Basic Operations Menu Functions
Chapter
2
Chapter
3
Chapter
4
Print Job B ox
Function
Replacing the Roll Paper
T
7
Approximately 90°Approximately 90°
8
Slightly rewind the roll paper.
Slightly rewind the roll paper by turning the
paper feed knob by approximately 90°.
Close the roll paper drawer.
Hold the handle and slowly push in the drawer
for rolls 1 and 2, or the drawer for rolls 3 and 4.
(It takes about 30 seconds for the paper feeding
to get ready.)
When the Printer contains the jobs to be
completed, the printing is started.
Chapter
5
Authentication
Function
Chapter
6
Troubleshooting Appendix
Note
After closing a roll paper drawer, do not open it again until the Warming
up… (Warming-up counter) message disappears.
Paper detection is performed immediately after closing the roll paper
drawer. As such, opening a roll paper drawer at this time may cause a paper
jam.
When you set a roll paper of a dierent type or series, press Paper on
the supply paper error screen. Set the type and the series of the new
paper roll on the paper setting popup screen which appears.
52
LP-2060/LP-2060-MF User's Manual for Basic Printer Operation

Replacing the Toner Cartridge
TIP
MF
When the toner level is low, the icon below is displayed on the screen.
After the icon above appeared, about 100 m (3937.01 inches) of printing is possible.
However, prepare a new toner cartridge in advance to replace the toner.
When the toner runs out, the screen below is displayed. Replace the toner following
the procedure described below.
Chapter
1
Before Use Basic Operations Menu Functions
Chapter
2
Chapter
3
Chapter
4
Print Job B ox
Function
When you open the toner door/document table
the Toner Replacement label. Refer to this when replacing the toner
cartridge.
, you will see
Note
Do not print pages with a high print coverage rate just before the toner runs
out, such as pages with a lot of solid printing or reverse printing (white on
black). The Printer may be damaged when the toner runs out.
To avoid this, replace the toner as soon as possible when the toner level runs
low.
The Supply Toner screen may not disappear if you replace only one toner
cartridge after the toner has run out.
Chapter
5
Authentication
Function
Chapter
6
Troubleshooting Appendix
LP-2060/LP-2060-MF User's Manual for Basic Printer Operation
5353

Chapter
1
Before Use Basic Operations Menu Functions
Replacing the Toner Cartridge
T
Handling Precautions
Chapter
2
Chapter
3
Chapter
4
Print Job B ox
Function
Chapter
5
Authentication
Function
Warning
Do not put a used toner cartridge into a ame. It may cause a re or
burns.
Put the used toner cartridge into the bag provided in the box of the
new toner cartridge. Dispose of it as nonburnable trash.
Caution
Do not drop the toner cartridge or expose it to strong impacts.
Toner may leak from the cartridge.
Do not force open the toner cartridge.
Do not touch the toner directly. If toner accidentally makes contact
with your skin or clothes, wash it o immediately with water.
Make sure that toner does not get into your eyes, and that you do
not breathe it in. If toner accidentally gets into your eyes, wash it
out with a large amount of water. Consult a doctor.
Store the toner cartridge in a place out of the reach of children. If
a child accidentally swallows some toner, wash the child's mouth
thoroughly with water. Then make the child drink a large amount of
water. Take the child to a doctor for an examination.
Chapter
6
Troubleshooting Appendix
54
Note
If you move the toner cartridge from a cold place to somewhere warm, leave
it in room temperature for at least 3 hours before using it.
After installing a new toner cartridge, try to use it all within 6 months. If a
long period of time elapses after installing a cartridge, the printing quality
will deteriorate.
Store toner cartridges in a cool and dark place.
Use genuine toner cartridges.
LP-2060/LP-2060-MF User's Manual for Basic Printer Operation

Toner Replacement Procedure
MF
Replacing the Toner Cartridge
T
Chapter
1
Before Use Basic Operations Menu Functions
1
Caution
The toner spills out when the green tape on the cartridge is
removed. To avoid the toner from spreading, remove the tape only
after installing the cartridge into the Printer and pulling it as far as it
goes to the left side.
Never rell an empty toner cartridge with toner. A malfunction may
result.
Note
Before replacing the toner cartridge, make sure that the power is on and
Supply Toner is displayed.
When the power is o, the toner amount is not detected. As such, even if the
toner cartridge is replaced correctly, the error is not canceled.
Wait until all printing jobs have nished before replacing the toner
cartridge. If replacement is performed during a printing operation, the
printing will stop, and the corresponding data may be lost.
Do not replace the toner cartridge twice consecutively.
With your both hands, open the toner
door (or document table
).
Chapter
2
Chapter
3
Chapter
4
Print Job B ox
Function
Chapter
5
Authentication
Function
Warning
Never rell an empty toner cartridge with toner. A malfunction may
result.
LP-2060/LP-2060-MF User's Manual for Basic Printer Operation
55
Chapter
6
Troubleshooting Appendix

Chapter
1
Before Use Basic Operations Menu Functions
Chapter
2
Chapter
3
Chapter
4
Print Job B ox
Function
Replacing the Toner Cartridge
T
2
3
Remove the empty toner cartridge.
Hook your ngers on the concave part of the
toner cartridge, pull the cartridge to the right
of the Printer as far as it goes, then lift up and
remove the cartridge.
Remove the new toner cartridge from
its box.
Chapter
5
Authentication
Function
Chapter
6
Troubleshooting Appendix
4
5
Shake the new toner cartridge to mix
the toner inside.
Shake up and down, and left to right, 10 times in
each direction.
x10
x10
Set the toner cartridge into the Printer.
Insert the toner cartridge by aligning the tabs on
the cartridge with the guide rails on the Printer.
56
LP-2060/LP-2060-MF User's Manual for Basic Printer Operation

6
MF
TIP
7
8
Replacing the Toner Cartridge
T
Push in the toner cartridge.
Push in the cartridge to the left of the Printer as
far as it goes.
Pull o the green tape.
Pull o the green tape to the right side while
holding the toner cartridge with your other hand.
Be careful not to drop any toner adhered to the
removed tape, and dispose of the tape according
to the local regulations.
Note
Be careful not to smear your hands, your clothes, or the Printer with toner
adhered to the tape.
With your both hands, Close the toner
door (or document table
Chapter
1
Before Use Basic Operations Menu Functions
Chapter
2
Chapter
3
Chapter
4
Print Job B ox
Function
Chapter
5
Authentication
Function
).
The toner mixing takes about 1 minute.
Dispose of the used toner cartridge according to the local regulations.
LP-2060/LP-2060-MF User's Manual for Basic Printer Operation
57
Chapter
6
Troubleshooting Appendix

TIP
Chapter
1
Before Use Basic Operations Menu Functions
Chapter
2
Chapter
3
Replacing the Waste Toner Bottle
When the waste toner bottle is nearly full with waste toner, the icon below is
displayed on the screen.
Chapter
4
Print Job B ox
Function
Chapter
5
Authentication
Function
Chapter
6
Troubleshooting Appendix
After the icon above appeared, about 200 m (7874.02 inches) of printing is possible.
However, prepare a new waste toner bottle in advance to replace the bottle.
When the waste toner bottle is full, the screen below is displayed. Replace the
waste toner bottle following the procedure described below.
An instruction label to replace waste toner bottle is axed to the side
of the waste toner bottle. Refer to this when replacing the waste toner
bottle.
5858
LP-2060/LP-2060-MF User's Manual for Basic Printer Operation

Replacement Precautions
Replacing the Waste Toner Bottle
T
Chapter
1
Before Use Basic Operations Menu Functions
Warning
Do not place a waste toner bottle into a ame. An accident or re
may result.
Caution
Do not drop or hit a waste toner bottle that contains waste toner.
The waste toner may spill.
Do not touch the waste toner directly. If toner accidentally makes
contact with your skin or clothes, wash it o immediately with
water.
Be careful not to breathe in the waste toner, and do not let it get
into your eyes. If waste toner accidentally gets into your eyes, wash
it out with a large amount of water. Consult a doctor.
Note
Dispose of the waste toner bottle according to the local regulations.
Wait until all printing jobs have nished before replacing the waste toner
bottle.
If a waste toner bottle is replaced during a printing operation, the printing
will stop and the corresponding data may be lost.
Do not reuse the waste toner bottle or the toner inside the waste toner
bottle.
Waste Toner Bottle Replacement Procedure
Chapter
2
Chapter
3
Chapter
4
Print Job B ox
Function
Chapter
5
Authentication
Function
Chapter
6
Troubleshooting Appendix
1
Remove the new waste toner bottle
from its box.
LP-2060/LP-2060-MF User's Manual for Basic Printer Operation
59

x10
Chapter
1
Before Use Basic Operations Menu Functions
Chapter
2
Chapter
3
Chapter
4
Print Job B ox
Function
Replacing the Waste Toner Bottle
T
2
3
Open the waste toner door.
The waste toner door is on the left side of the
Printer.
Lightly tap the duct to remove any
waste toner accumulating inside.
Chapter
5
Authentication
Function
Chapter
6
Troubleshooting Appendix
4
②
①
Remove the waste toner bottle from
the Printer.
(1) Lift up the waste toner bottle.
(2) Pull out the bottle towards you from the
bottom.
60
LP-2060/LP-2060-MF User's Manual for Basic Printer Operation

5
TIP
Replacing the Waste Toner Bottle
T
Remove the cap from the new waste
toner bottle and screw it on the waste
toner bottle that contains the waste
Chapter
1
Before Use Basic Operations Menu Functions
6
7
②
①
toner.
Note
Screw the cap securely. If not, when the
toner bottle is fallen down accidentally,
the cap may come away and the toner
may spill.
Install a new waste toner bottle.
(1) Insert the opening of the waste toner
bottle into the Printer's waste toner outlet.
Insert the bottle while lifting it up slightly.
(2) Lower the bottle to the oor of the Printer,
and stabilize it.
Close the waste toner door.
Chapter
2
Chapter
3
Chapter
4
Print Job B ox
Function
Chapter
5
Authentication
Function
Dispose of the waste toner bottle according to the local regulations.
LP-2060/LP-2060-MF User's Manual for Basic Printer Operation
61
Chapter
6
Troubleshooting Appendix

MF
Chapter
1
Before Use Basic Operations Menu Functions
Replacing the Charger Unit
The following explains the procedure for replacing the charger unit.
Charger Unit Replacement Procedure
Chapter
2
Chapter
3
Chapter
4
Print Job B ox
Function
Chapter
5
Authentication
Function
1
2
3
By pressing the POWER button on the
operation panel, turn the Printer o.
Put the document table in the vertical
position.
Press the latch button, and open the
fuser unit drawer.
Chapter
6
Troubleshooting Appendix
62
4
LP-2060/LP-2060-MF User's Manual for Basic Printer Operation
By rotating the right and left outer-
side knobs counterclockwise,
release the process cartridge
drawer's lock.

TIP
5
Replacing the Charger Unit
T
Note that the knobs are classied into two: inner-side ones and
outerside ones. At the step 3, rotate the outer-side knobs.
Inner-side knob
U00120305200
Outer-side knob
Pull out the process cartridge to your
side by holding its green-indicated
parts.
Chapter
1
Before Use Basic Operations Menu Functions
Chapter
2
Chapter
3
Chapter
4
Print Job B ox
Function
Chapter
5
Authentication
Function
Chapter
6
Troubleshooting Appendix
LP-2060/LP-2060-MF User's Manual for Basic Printer Operation
63

TIP
Chapter
1
Before Use Basic Operations Menu Functions
Chapter
2
Chapter
3
Chapter
4
Print Job B ox
Function
Replacing the Charger Unit
T
6
7
Pull the green handles to remove
the charger unit.
Dispose of the used charger unit according to the local regulations.
Remove a new charger unit from its
box.
Chapter
5
Authentication
Function
Chapter
6
Troubleshooting Appendix
8
Install the new charger unit by
aligning its | mark with the process
cartridge’s | mark.
The charger unit does not have right and left
sides.
64
LP-2060/LP-2060-MF User's Manual for Basic Printer Operation

TIP
9
Replacing the Charger Unit
T
The charger unit can be installed in either direction.
If lines or other defects appear on the printout, inverting the charger
unit right and left sides may solve the problem.
Close the process cartridge drawer.
Chapter
1
Before Use Basic Operations Menu Functions
Chapter
2
Chapter
3
10
11
12
By rotating the outer-side knobs, fix
the process cartridge.
Close the fuser unit drawer.
By pressing the POWER button on
the operation panel, turn on the
Chapter
4
Print Job B ox
Function
Chapter
5
Authentication
Function
Chapter
6
Troubleshooting Appendix
printer.
LP-2060/LP-2060-MF User's Manual for Basic Printer Operation
65

Chapter
1
Before Use Basic Operations Menu Functions
Replacing the Process Cartridge
The following explains the procedure for replacing the process cartridge.
Chapter
2
Chapter
3
Chapter
4
Print Job B ox
Function
Chapter
5
Authentication
Function
Chapter
6
Troubleshooting Appendix
Replacement Precautions
Warning
Do not place a process cartridge into a ame. An accident or re
may result.
Note
Keep the process cartridge stored in its cardboard box. Unpack the package
only just before using it.
When handling the process cartridge, hold the handles at each end rmly
with both hands.
Handle the process cartridge carefully to prevent the photoconductor drum
surface from being scratched or damaged.
Do not touch areas other than the handles of the process cartridge.
Be sure to mount the process cartridge cover to protect the photoconductor
drum and prevent its light deterioration.
Remove the cover only when you are
installing the process cartridge into the
Printer.
Black developing toner may be adhered
to the photoconductor drum of a new
process cartridge. However, this is for
maintaining the cartridge in a good
condition, so use the cartridge as is. The toner is cleaned automatically
after the cartridge is inserted into the Printer. So it does not aect the print
quality.
To prevent the waste toner from being spilled, be careful not to expose the
process cartridge to strong shaking, tilting, or impacts.
Handles
Photoconductor
drum
6666
LP-2060/LP-2060-MF User's Manual for Basic Printer Operation

Process Cartridge Replacement Procedure
TIP
By pressing the POWER button on the
1
2
3
operation panel, turn the Printer o.
Press the latch button, and open the
fuser unit drawer.
By rotating the right and left outer-side
knobs counterclockwise, release the
Replacing the Process Cartridge
T
Chapter
1
Before Use Basic Operations Menu Functions
Chapter
2
Chapter
3
Chapter
4
Print Job B ox
Function
process cartridge drawer's lock.
Note that the knobs are classied into two: inner-side ones and
outerside ones. At the step 4, rotate the outer-side knobs.
Inner-side knob
U00120305200
Outer-side knob
Chapter
5
Authentication
Function
Chapter
6
Troubleshooting Appendix
LP-2060/LP-2060-MF User's Manual for Basic Printer Operation
67

TIP
Chapter
1
Before Use Basic Operations Menu Functions
Chapter
2
Chapter
3
Replacing the Process Cartridge
T
4
Pull out the process cartridge toward
you by holding its green-indicated
parts.
Chapter
4
Print Job B ox
Function
Chapter
5
Authentication
Function
Chapter
6
Troubleshooting Appendix
5
Remove the process cartridge.
Hold the handles on the process cartridge when
pulling it out.
To the used process cartridge, attach the protective case removed from
a new process cartridge at the step 8. Then dispose of it according to
the local regulations.
68
LP-2060/LP-2060-MF User's Manual for Basic Printer Operation

6
7
Replacing the Process Cartridge
T
Remove a new process cartridge from
its box.
Remove a new process cartridge from its box
with the protective case still attached.
Check that two types of replacement lters are
included in the process cartridge box.
Large lter Small lter
Install the new process cartridge.
With the protective case still attached, install the
process cartridge in the Printer so that both of
green arrow labels on the protective case and
Printer are aligned.
Chapter
1
Before Use Basic Operations Menu Functions
Chapter
2
Chapter
3
Chapter
4
Print Job B ox
Function
8
Remove the protective case of the
process cartridge.
Chapter
5
Authentication
Function
Chapter
6
Troubleshooting Appendix
LP-2060/LP-2060-MF User's Manual for Basic Printer Operation
69

Chapter
1
Before Use Basic Operations Menu Functions
Chapter
2
Chapter
3
Chapter
4
Print Job B ox
Function
Replacing the Process Cartridge
T
9
10
11
Remove the drum protective sheet.
Rotate the knob at the center to remove it,
and then dispose of it.
Close the process cartridge drawer.
Chapter
5
Authentication
Function
Chapter
6
Troubleshooting Appendix
12
By rotating the outer-side knobs, x the
process cartridge.
70
LP-2060/LP-2060-MF User's Manual for Basic Printer Operation

13
(1)
(3)
(2)
Replacing the Process Cartridge
T
Replace the small lter installed at the
left part of the fuser unit drawer.
(1) Turn the knob and remove the cover.
(2) Replace the lter inside.
(3) Reinstall the cover.
(4) Replace the small lter on the other side
following the same procedure.
Chapter
1
Before Use Basic Operations Menu Functions
Chapter
2
Chapter
3
Chapter
4
Print Job B ox
Function
14
Close the fuser unit drawer.
Chapter
5
Authentication
Function
Chapter
6
Troubleshooting Appendix
LP-2060/LP-2060-MF User's Manual for Basic Printer Operation
71

TIP
TIP
Chapter
1
Before Use Basic Operations Menu Functions
Chapter
2
Chapter
3
Chapter
4
Print Job B ox
Function
Replacing the Process Cartridge
T
15
(1)
(2)
Replace the large lter.
Pull out the large lter toward you, and remove
it. Then install the large lter contained in the
process cartridge box.
(1) On the left side of the Printer, pull out the
lter cover towards you, and remove it.
(2) Replace the large lter inside.
(3) Reinstall the lter cover.
Install the lter cover in any
direction.
Chapter
5
Authentication
Function
Chapter
6
Troubleshooting Appendix
16
(3)
Dispose of the two removed lters according to the local regulations.
By pressing the POWER button on the
operation panel, turn the Printer on.
72
LP-2060/LP-2060-MF User's Manual for Basic Printer Operation

Job Operation
Job N
Job N
Job N-1
Job N-n
Job M
Job M-1
Job M-n
Job L
Job L-1
Job L-n
Job (Data) Received
Enable canceling
Deleted in Sequence
Printing
Enable canceling
Enable to be moved to
the front of waiting
Enable reprinting
(moved to the front of waiting)
Waiting JobsCompleted Jobs
Jobs Under Processing
TIP
The Printer identies each received data and scanned data as a job, which means
they are the equivalent of the les used for data transmission. On the Printer's job
operation, a job is equal to a le.
However, a drawing is not always equal to a job, as sometimes one job is comprised
of two drawings or more.
Through the operation panel or the Web functions (& pag e 75), the job
operation enables you to check a print job status, change a print job order, and
reprint a completed job.
Chapter
1
Before Use Basic Operations Menu Functions
Chapter
2
Chapter
3
Chapter
4
Print Job B ox
Function
To be able to display and manipulate completed jobs, Save/Delete
Complete Job in the system settings must be set to Save.
This parameter is set to Delete by default.
See & page 108 for more details.
LP-2060/LP-2060-MF User's Manual for Basic Printer Operation
7373
Chapter
5
Authentication
Function
Chapter
6
Troubleshooting Appendix

Chapter
1
Before Use Basic Operations Menu Functions
Job Operation
T
Printing Pause and Cancellation
Chapter
2
Chapter
3
Chapter
4
Print Job B ox
Function
Chapter
5
Authentication
Function
During continuous printing of multiple jobs, press MENU to temporary pause the
job printing. However, the printing may continue for up to 5 jobs after the menu
screen is displayed. Press either of PRINT, COPY, SUBMIT, or SCAN to exit the
menu mode and continue printing.
During printing, press STOP to cancel the page currently being printed.
Handling Print Jobs
Press Job on the print mode top screen to display the print job screen.
The following operations can be performed from the print job screen.
- Changing printing order and cancelling waiting jobs
- Cancelling processing jobs
- Deleting completed jobs
Chapter
6
Troubleshooting Appendix
74
LP-2060/LP-2060-MF User's Manual for Basic Printer Operation

Web Functions
MF
With a Web browser, the following Printer functions are remotely operated from a
host computer.
To operate these functions, the IP address of the Printer must be set in advance.
Also, Cookies and JavaScript must be enabled in the Web browser. For the setting
method, see Help in the host computer's browser (or operating system).
Functions
Chapter
1
Before Use Basic Operations Menu Functions
Chapter
2
(1) Printer status display function
Enables the Printer status to be checked on the host computer's screen.
With this function, the Printer's job progress and error status are checked remotely.
(2) Setup browsing and changing function
Enables settings on the Printer, such as the print parameters, to be browsed or
edited on the host computer's screen.
(3) Job control function
Enables detailed job information to be checked on the host computer's screen. Also
enables the nished print job to be reprinted.
(4) Remote maintenance function
Enables the job history and past error history to be checked if a problem occurs.
Also enables the system rmware to be updated.
(5) User registration function
Enables user registration when user authentication is used.
Chapter
3
Chapter
4
Print Job B ox
Function
Chapter
5
Authentication
Function
Chapter
6
Troubleshooting Appendix
(6) Submission destination preset function
Enables presetting of submission destinations for Submit to folder and printer
submission. When presetting using Web functions, submission destination names
can be registered in multiple languages. Preset submission destinations can be
used as PDC submission destinations as well.
(7) Image browsing, acquisition, and deletion in the submission box
Enables the browsing, acquisition, and deletion of image data stored in the
submission box of the Printer.
LP-2060/LP-2060-MF User's Manual for Basic Printer Operation
7575

Chapter
1
Before Use Basic Operations Menu Functions
Chapter
2
Chapter
3
Chapter
4
Print Job B ox
Function
Web Functions
T
(7) Image browsing, acquisition, and deletion in the PDC box
Enables the browsing, acquisition and deletion of image data stored in the PDC box
of the Printer.Starting the Web Functions
Perform the following Printer preparations.
1
(1) Start up the Printer by turning on the power.
(2) Check the IP address setting. (If the IP address has not been set, set it by
following the guidance displayed during startup.)
(3) Also perform any Ethernet parameter settings as required.
Open the Web browser.
2
(1) Install a Web browser on the host computer.
Microsoft Internet Explorer Ver. 6.0 or higher
(2) Open the Web browser.
(3) Enter "http://(IP address set on the Printer)/" in the address eld, and press
ENTER.
Chapter
5
Authentication
Function
Chapter
6
Troubleshooting Appendix
76
LP-2060/LP-2060-MF User's Manual for Basic Printer Operation

Cleaning the Exterior
If the Printer e xterior becomes dir ty, soak a soft cloth in water or a neutral
detergent diluted with water. Wring the cloth thoroughly, and then wipe the
Printer.
Warning
Never use volatile solvents such as thinner, benzene, or alcohol.
Chapter
1
Before Use Basic Operations Menu Functions
Chapter
2
Chapter
3
Chapter
4
Print Job B ox
Function
Chapter
5
Authentication
Function
Chapter
6
Troubleshooting Appendix
LP-2060/LP-2060-MF User's Manual for Basic Printer Operation
7777

Chapter
1
Before Use Basic Operations Menu Functions
Chapter
2
Using Paper from a New Size Standard
This Printer supports the paper of the following size standards.
A series
ARCH series
ANSI series
30×42 series
MAP series
DIN series
User Dened series
Chapter
3
Chapter
4
Print Job B ox
Function
Chapter
5
Authentication
Function
Chapter
6
Troubleshooting Appendix
The Printer's factory default setting is A series.
Check the size standard currently specified on your Printer in Available Size
Standards (& page 104). (The size standard set to On is activated.)
This section describes the procedure to add a new size standard. The following is
described taking ANSI series as an example, and the same procedure is applied
to the other size standards. For user dened series, see Using Paper from a User
Dened Series (& page 80).
(1) Set the available size standards
In Available Size Standards (& page 104), set ANSI series to On.
Note
It is not possible to set all the size standards to O.
When the Available Size Standards setting is changed, the Printer restarts.
(2) Set the paper size standards
The rolls available in the ANSI series are 34 inches, 22 inches, 17 inches, and 11
inches. Set the roll you will actually use to On in Paper Size Standards (& page
105). You are recommended to set all unrequired roll widths to O.
7878
Note
It is not possible to set all the paper size standards in the same size standard
to O
When the Paper Size Standards setting is changed, the Printer restarts.
LP-2060/LP-2060-MF User's Manual for Basic Printer Operation

(3) Set the roll
Set the ANSI series roll into the roll paper drawer. For the roll paper installation
method, see page 46.
Chapter
1
Before Use Basic Operations Menu Functions
(4) Set the paper menu
Set Size Standard to ANSI series for the roll paper drawer in which you set the
ANSI series roll (& page 87).
(5) Set up the PDL
In the PDL setup for the data transmission port, set Size of Automatically
Supplied Paper to ANSI series (& page 120).
(6) Unexpected operation
If the set series does not operate as expected, check the settings again from (1) to (5).
Chapter
2
Chapter
3
Chapter
4
Print Job B ox
Function
Chapter
5
Authentication
Function
LP-2060/LP-2060-MF User's Manual for Basic Printer Operation
79
Chapter
6
Troubleshooting Appendix

Chapter
1
Before Use Basic Operations Menu Functions
Chapter
2
Using Paper from a User Dened Series
The Printer supports the following user dened series rolls.
Standard-size printing cannot be performed with user dened series. All printing is
actual length printing.
279.4 mm (11 inches)to
914.4 mm (36 inches)
Default values:
User Dened 0 = 914 mm (35.98 inches)
User Dened 1 = 620 mm (24.41 inches)
User Dened 2 = 450 mm (17.72 inches)
User Dened 3 = 310 mm (12.20 inches)
Chapter
3
Chapter
4
Print Job B ox
Function
Chapter
5
Authentication
Function
Chapter
6
Troubleshooting Appendix
This section describes the procedure for operating with a user dened series.
(1) Set the available size standards
In Available Size Standards (& page 104), set User Dened to On.
Note
When this setting is changed, the Printer restarts.
(2) Set the user dened size
In the user dened series, four paper widths from user dened 1 to 4 are available.
In User Dened Size, set the width for each (& page 106).
Note
When this setting is changed, the Printer restarts.
(3) Set the paper size standards
Set the roll you intend to use to On in Paper Size Standards (& page 105). You
are recommended to set all unrequired rolls to O.
8080
Note
It is not possible to set all the user dened series rolls to O.
When this setting is changed, the Printer restarts.
LP-2060/LP-2060-MF User's Manual for Basic Printer Operation

(4) Set the roll
Set the user dened series roll into the roll paper drawer. For the roll paper setting
method, see page 46.
Chapter
1
Before Use Basic Operations Menu Functions
(5) Set the paper menu
Set Size Standard to User Dened for the roll paper drawer in which you set the
roll (& page 87).
(6) Set up the PDL
In the PDL setup for the data transmission port, set Size of Automatically
Supplied Paper to User Dened (& page 120).
Also, when performing user dened operations with the printer driver, set Printer
Drive to User Dened (& page 137).
(7) Unexpected operation
If the user dened series does not operate as expected, Again check the settings (1)
to (6).
Chapter
2
Chapter
3
Chapter
4
Print Job B ox
Function
Chapter
5
Authentication
Function
LP-2060/LP-2060-MF User's Manual for Basic Printer Operation
81
Chapter
6
Troubleshooting Appendix

Chapter
1
Before Use Basic Operations Menu Functions
Chapter
2
Chapter
3
Restricting the Available Rolls
To simplify the Printer operation, you are recommended to restrict the roll paper
sizes required for operation. The following explains the procedure when you intend
to operate only with the A0 and A1 rolls.
(1) Set the paper size standards
Set the roll that you intend to use to On in Paper Size Standards (& page 105).
Set the rolls that you will not use to O.
For example, if you want to operate only with the A0 and A1 rolls:
A0 Roll = On
A1 Roll = On
A2 Roll = O
A3 Roll = O
Set as above.
Chapter
4
Print Job B ox
Function
Chapter
5
Authentication
Function
Chapter
6
Troubleshooting Appendix
(2) No paper or paper runs out
If paper runs out while the Printer is printing, a message prompting paper setting
may be displayed on the operation panel. However, prompts are not displayed for
rolls set to O in Paper Size Standards.
(3) Optimal mode
When Paper Supply Mode is set to Optimal (& page 120), the Printer automatically
selects the roll to produce the least wasted paper among the rolls set to On in Paper
Size Standards. are available. When the roll that will produce the least wasted
paper is not set in the Printer, a message prompting paper setting is displayed on
the operation panel.
8282
LP-2060/LP-2060-MF User's Manual for Basic Printer Operation

Chapter
1
Before Use Basic Operations Menu Functions
Chapter
3
Menu Functions
This chapter explains the menu functions of the Printer.
Chapter Contents
Menu Mode Screen ................................................................................84
T
Paper Menu ..............................................................................................87
T
Printer Engine Menu ..............................................................................89
T
System Menu ...........................................................................................93
T
Ports Settings Menu .............................................................................113
T
Setup Items in PDL Settings Menu .................................................... 117
T
Function Menu ......................................................................................153
T
Options Settings Menu........................................................................156
T
Submission Destination Setting Menu ............................................157
T
Adjustment Menu ................................................................................. 161
T
Smart card settings Menu ...................................................................162
T
Import/Export Menu ............................................................................163
T
Date and Time Settings Menu ............................................................169
T
Delete HDD Data Menu ....................................................................... 170
T
Chapter
2
Chapter
3
Chapter
4
Print Job B ox
Function
Chapter
5
Authentication
Function
Chapter
6
Troubleshooting Appendix
LP-2060/LP-2060-MF User's Manual for Basic Printer Operation
83

Chapter
1
Before Use Basic Operations Menu Functions
Chapter
2
Menu Mode Screen
Press MENU to display the menu screen.
(1) (2) (3)
(4) (5) (6)
(7) (8) (9)
Chapter
3
Chapter
4
Print Job B ox
Function
Chapter
5
Authentication
Function
Chapter
6
Troubleshooting Appendix
(10)
(11) (12)
(13)
(1) Printer Information Menu
The Printer serial number, rmware
version, and other information are
displayed.
(2) Paper Menu
(& page 87)
(3) Printer Engine Menu
(& page 89)
(4) System Menu
(& page 93)
(14)
(8) Options Settings Menu
Optional products' license key is entered.
(&page 156)
(9) Adjustment Menu
(& pa ge 161)
(10) Upgrading Menu
Upgrades the Printer's rmware. For details,
contact your dealer or nearest service
representative.
(11) Administrator Settings Menu
(12) Administrator Login Menu
84
(5) Ports Settings Menu
(& page 113)
(6) PDL Settings Menu
(& page 117)
(7) Function Menu
(& page 153)
LP-2060/LP-2060-MF User's Manual for Basic Printer Operation
(13)
User Authenication Settings Menu
See Chapter 5 Authentication Function.
(& page 185)
(14) Help Menu
The following procedures are displayed on
the screen.
• Replace the Toner Cartridge
• Replace the Waste Toner Bottle
• Load Roll Paper
• Clear Paper Jams
• Clear Original Jams

(15)
(16)
(17)
Chapter
1
Before Use Basic Operations Menu Functions
Chapter
2
(18)
(19) (20)
(15) Submission Settings Menu
(& page 157)
(16) Print Job Box Settings Menu
See Chapter 4 Print Job Box Function
(& page 171)
(17) Smart card settings Menu
(& page 162)
This menu is displayed only when the
smart card option is enabled.
(18) Import/Export Menu
(& page 163)
(21)
(19) Date and Time Settings Menu
(& page 169)
(20) Enter Product Key Menu
This menu is used to enter the product
key.
User cannot enter product keys.
Please do not change this setting.
(21) Delete HDD Data Menu
(& page 170)
Chapter
3
Chapter
4
Print Job B ox
Function
Chapter
5
Authentication
Function
Chapter
6
Troubleshooting Appendix
LP-2060/LP-2060-MF User's Manual for Basic Printer Operation
85

Chapter
1
Before Use Basic Operations Menu Functions
Chapter
2
Chapter
3
Chapter
4
Print Job B ox
Function
Conrming Printer Restart
When setting changes require the printer to restart, the following printer restart
conrmation screen appears after the Standby button is pressed and the menu
top screen is exited.
To continue conguration, press No.
When conguration is complete, press Yes to restart printer.
Setting changes are not applied until the printer is restarted.
Chapter
5
Authentication
Function
Chapter
6
Troubleshooting Appendix
86
LP-2060/LP-2060-MF User's Manual for Basic Printer Operation

Paper Menu
In the Paper menu, set the roll paper type and size standard.
Note
The screen displays the paper size standards to be selected only when they
are activated in Available Size Standards in the system parameters.
Rolls 1 to 4 Paper Types
Sets the type of paper to use.
<Parameter by selecting options> n: Default value
n
Tracing Tracing paper
Paper Plain paper
Film Matte lm
Chapter
1
Before Use Basic Operations Menu Functions
Chapter
2
Chapter
3
Chapter
4
Print Job B ox
Function
Rolls 1 to 4 Size Standards
Roll paper with the following widths can be installed in the Printer.
On installing the roll paper in the roll feed unit, the paper size standard selected at
this setting must be specied for each roll paper drawer.
Auto
When two rolls of dierent size standards are installed in a roll feed unit and Auto is
selected, the Printer identies their roll widths automatically. If the Printer does not
identify the widths correctly, change the setting to the size standard you intend to
use.
When you intend to install the rolls of a specific size standard, you are
recommended to specify the size standard rather than Auto.
A series
A0 (841 mm (33.11 inches)), A1 (594.5 mm (33.11 inches)),
A2 (420.5 mm (16.56 inches)), A3 (297.3 mm (11.70 inches))
Chapter
5
Authentication
Function
Chapter
6
Troubleshooting Appendix
LP-2060/LP-2060-MF User's Manual for Basic Printer Operation
87

Chapter
1
Before Use Basic Operations Menu Functions
ARCH series
36 in. (914 mm), 24 in. (609.6 mm), 18 in. (457.2 mm),
12 in. (304.8 mm)
Chapter
2
Chapter
3
Chapter
4
Print Job B ox
Function
Chapter
5
Authentication
Function
ANSI series
34 in. (863.6 mm), 22 in. (558.8 mm), 17 in. (431.8 mm),
11 in. (279.4 mm)
30x42 series
30 in. (762.0 mm), 15 in. (381.0 mm)
MAP series
700 mm (27.56 inches), 500 mm (19.69 inches)
DIN series
707 mm (27.83 inches), 500 mm (19.69 inches)
User Dened series
<Parameter by selecting options> n: Default value
Auto ANSI series DIN series
A series 30x42 series User Dened series
n
ARCH series MAP series
Chapter
6
Troubleshooting Appendix
88
Note
As options, the Printer displays only the paper size standard set to On in
Available Size Standards in the System menu.
LP-2060/LP-2060-MF User's Manual for Basic Printer Operation

Printer Engine Menu
The Printer Engine menu species the operation conditions for the Printer engine.
Power Save Time
The parameter species the maximum idle time before entering the power save
mode.
<Parameter by selecting options> n: Default value
Chapter
1
Before Use Basic Operations Menu Functions
Chapter
2
15 minutes Enters power save mode if the Printer is not operated for
15 minutes.
30 minutes Enters power save mode if the Printer is not operated for
30 minutes.
60 minutes Enters power save mode if the Printer is not operated for
n
60 minutes.
90 minutes Enters power save mode if the Printer is not operated for
90 minutes.
235 minutes Enters power save mode if the Printer is not operated for
235 minutes.
zAfter printing is completed, the Printer enters power save mode automatically when
the data waiting status reaches the set time.
zThe power save mode is canceled automatically when the Printer receives the data.
zThe power save mode is canceled automatically when the Printer is accessed with a
browser or SNMP manager.
zTo cancel the power save mode, press POWER SAVE while the Printer is in the power
save mode.
Top Cut Timer for Roll n (n = 1 to 4)
Chapter
3
Chapter
4
Print Job B ox
Function
Chapter
5
Authentication
Function
Chapter
6
Troubleshooting Appendix
Sets the data waiting time after which the end of the roll paper is cut automatically.
This is performed when data is received for printing after the data waiting status
has continued for a while.
LP-2060/LP-2060-MF User's Manual for Basic Printer Operation
89

TIP
Chapter
1
Before Use Basic Operations Menu Functions
Chapter
2
Printer Engine Menu
T
<Parameter by selecting options> n: Default value
O Does not cut.
n
30 minutes Cuts the paper if the printer is not operated for 30
minutes.
1 hour Cuts the paper if the printer is not operated for 1 hour.
2 hours Cuts the paper if the printer is not operated for 2 hours.
4 hours Cuts the paper if the printer is not operated for 4 hours.
Chapter
3
Chapter
4
Print Job B ox
Function
Chapter
5
Authentication
Function
Chapter
6
Troubleshooting Appendix
1 minute Cuts the paper if the printer is not operated for 1 minute.
5 minutes Cuts the paper if the printer is not operated for 5 minutes.
10 minutes Cuts the paper if the printer is not operated for 10
minutes.
Top Cut at Door Open
With Top Cut at Door Open, the Printer can cut the top of the roll paper automatically
when printing the rst data job after the drawer for rolls 1 and 2 or the drawer for
rolls 3 and 4 is opened or closed. The cut width is 400 mm (15.75 inches).
With this function, the top of the roll paper is cut with the printer's
cutter. Set for a clean cut on the top of the paper of the output page.
<Parameter by selecting options> n: Default value
O Does not cut the paper.
n
90
On Cuts the paper.
LP-2060/LP-2060-MF User's Manual for Basic Printer Operation

Print Density
Adjusts the print density.
<Parameter by selecting options> n: Default value
Low
Slightly Low
Normal
n
Slightly High
High
Printer Engine Menu
T
Chapter
1
Before Use Basic Operations Menu Functions
Chapter
2
Chapter
3
Humidity for Tracing Paper
The parameter species the print mode for tracing paper.
<Parameter by selecting options> n: Default value
Normal Species the print mode for the tracing paper printed
n
under the normal environmental condition.
High Humidity Species the print mode for the tracing paper printed
under the high-humidity environmental condition.
Power Saving in Standby
This parameter species how energy is saved when the Printer is in standby.
When the parameter is set to Medium or High, power consumption can be
reduced even without entering the power save mode.
However, when printing, warm-up time may be longer and the Printer may not be
able to print immediately.
Chapter
4
Print Job B ox
Function
Chapter
5
Authentication
Function
Chapter
6
Troubleshooting Appendix
<Parameter by selecting options> n: Default value
O Power saving is low, but warm-up time is short.
n
Medium Power saving is fairly high, but warm-up time is fairly long.
High Power saving is high, but warm-up time is long.
LP-2060/LP-2060-MF User's Manual for Basic Printer Operation
91

Chapter
1
Before Use Basic Operations Menu Functions
Chapter
2
Chapter
3
Chapter
4
Print Job B ox
Function
Printer Engine Menu
T
Output Report to Tray
Print Reports with Other Paper
This parameter species where to output (A3 tray or outlet slot) the reports, such as
the Print System Settings.
<Parameter by selecting options> n: Default value
O Outputs to the outlet slot.
On Outputs to the Output Tray.
n
This parameter specifies whether or not to print with other large paper roll in
case reports, such as the Print System Settings, are output and no A3 paper roll is
installed to the printer.
<Parameter by selecting options> n: Default value
Chapter
5
Authentication
Function
Chapter
6
Troubleshooting Appendix
On Prints with other large paper roll.
n
O Print is not performed with a dierent paper and an error
specifying that there is no more paper is displayed.
Load an A3 paper roll to print the report.
92
LP-2060/LP-2060-MF User's Manual for Basic Printer Operation

System Menu
After settings are changed in this menu, the Printer restarts
exiting Menu Mode.
If there are waiting jobs, only browsing is available.
Communication Parameters
The Printer is equipped with an Ethernet interface that enables the following
functions.
(1) Receiving, analyzing, and printing PDL data
(2) Sending scanned data to external computers
(3) Controlling the Printer scan function from an external computer
In Communication Parameters, select the various communication settings for
functions (1) to (3) above.
The Printer can use the following connection protocols.
IPv4
IPv6
Both protocols can be used at the same time.
IPv4 is always enabled.
IPv6 can be enabled or disabled. It is disabled by default.
(&page 86)
on
Chapter
1
Before Use Basic Operations Menu Functions
Chapter
2
Chapter
3
Chapter
4
Print Job B ox
Function
Chapter
5
Authentication
Function
Network Settings
n
Common Settings
z
IP Address
y
Sets the IP address (Internet address) of the Printer.
This parameter is the same as the parameter that is set in the installation operation.
<Parameter by entering numbers>
0.0.0.0 to 255.255.255.255 De fault va lu e: 192.168.10 0.100
LP-2060/LP-2060-MF User's Manual for Basic Printer Operation
93
Chapter
6
Troubleshooting Appendix

Chapter
1
Before Use Basic Operations Menu Functions
System Menu
T
Subnet Mask
y
Sets the subnet mask of the printer's network.
<Parameter by entering numbers>
Chapter
2
Chapter
3
Chapter
4
Print Job B ox
Function
Chapter
5
Authentication
Function
0.0.0.0 to 255.255.255.255 Default value: 255.255.255.0
DNS Server 1 (IPv4/IPv6)
y
DNS Server 2 (IPv4/IPv6)
y
Sets the DNS server addresses (IPv4/IPv6). The DNS Server 1 is prioritized over the
DNS Server 2.
zThis setting is not required when, at the submission function, the destination is
specied with an IP address.
<Parameter by entering characters in IPv4/IPv6 format>
0 to 63 characters
Host Name
y
Sets the Printer’s host name.
<Parameter by entering characters>
0 to 15 characters
Windows Domain
y
Sets the Windows domain name of the Printer.
Chapter
6
Troubleshooting Appendix
94
<Parameter by entering characters>
0 to 15 characters
Connection Speed
y
Sets the communication speed.
<Parameter by selecting options> n: Default value
Auto Automatically recognizes 1000BASE-T, 100BASE-TX, or
n
10BASE-T.
1000 Sets to 1000BASE-T.
100 Sets to 100BASE-TX.
10 Sets to 10BASE-T.
LP-2060/LP-2060-MF User's Manual for Basic Printer Operation

System Menu
T
Connection Type
y
Sets the communication method.
<Parameter by selecting options> n: Default value
Auto
n
Full
Half
HTTP Port Address
y
Sets the HTTP port for the Web function.
<Parameter by entering numbers>
0 to 65535 Default value: 80
SNMP
y
Sets the SNMP operation. When the setting is On, SNMP is enabled. Note that the
SNMP community name can be set via the Web.
Chapter
1
Before Use Basic Operations Menu Functions
Chapter
2
Chapter
3
Chapter
4
Print Job B ox
Function
<Parameter by selecting options> n: Default value
O
On
n
SNMP Community
y
The SNMP community name can be set.
The default name is public.
Up to 63 characters can be used for this setting.
SNMP Version
y
Sets the version of the SNMP to use.
<Parameter by selecting options> n: Default value
Version 1
Version 2
n
Chapter
5
Authentication
Function
Chapter
6
Troubleshooting Appendix
LP-2060/LP-2060-MF User's Manual for Basic Printer Operation
95

Chapter
1
Before Use Basic Operations Menu Functions
Chapter
2
System Menu
T
IPv6 Connection
y
Sets whether to use IPv6 connection.
<Parameter by selecting options> n: Default value
O IPv6 is not used. Set this parameter to O when using
n
only IPv4 connection.
On IPv6 is used.
IPv6 Address Manual Setting
y
Chapter
3
Chapter
4
Print Job B ox
Function
Chapter
5
Authentication
Function
Chapter
6
Troubleshooting Appendix
Sets whether to set manually the IPv6 address on the Printer.
<Parameter by selecting options> n: Default value
O The IPv6 address is not set manually on the Printer. The
n
address is generally not set manually in environments
with automatic IPv6 address conguration.
On The IPv6 address is set manually on the Printer.
IPv6 Address
y
Sets the IPv6 address when IPv6 Address Manual Setting is On.
<Parameter by entering characters in IPv4/IPv6 format>
0 to 63 characters
Prex Length
y
Sets the prex length when IPv6 Address Manual Setting is On.
<Parameter by entering numbers>
0 to 128 Default value: 64
96
LP-2060/LP-2060-MF User's Manual for Basic Printer Operation

System Menu
T
DHCPv6
y
Set the options when the Printer is installed in an environment with automatic IPv6
address distribution from the DHCP server.
Chapter
1
Before Use Basic Operations Menu Functions
<Parameter by selecting options> n: Default value
RA The IPv6 address is obtained automatically using RA
n
(router advertisement). This is the parameter generally
used.
On The IPv6 address is forcibly obtained from the DHCP
server.
O The IPv6 address is not automatically obtained from the
DHCP server.
Routing Table
z
Sets the routing table for the Printer. This is used when connecting the Printer with
a host on a dierent network.
Gateway Address 01 to 10
y
Sets the IP address of the router.
<Parameter by entering numbers>
0.0.0.0 to 255.255.255.255 Default value:
0.0.0.0 (not set)
Chapter
2
Chapter
3
Chapter
4
Print Job B ox
Function
Chapter
5
Authentication
Function
Network Address 01 to 10
y
Sets the network address.
<Parameter by entering numbers>
0.0.0.0 to 255.255.255.255 Default value:
0.0.0.0 (not set)
zThe network address set to 0.0.0.0 species the default routing
LP-2060/LP-2060-MF User's Manual for Basic Printer Operation
97
Chapter
6
Troubleshooting Appendix

Chapter
1
Before Use Basic Operations Menu Functions
System Menu
T
Subnet Mask 01 to 10
y
Sets the subnet mask of the routing destination network.
<Parameter by entering numbers>
Chapter
2
Chapter
3
Chapter
4
Print Job B ox
Function
Chapter
5
Authentication
Function
0.0.0.0 to 255.255.255.255 Default value:
0.0.0.0 (not set)
zThis parameter is not applicable when default routing is set.
zThis parameter is applicable when the destination network is set in the network
addresses of the routing table.
IPv6 Network Address 01 to 02
y
Sets the IPv6 network address.
<Parameter by entering characters in IPv4/IPv6 format>
0 to 63 characters
Prex Length 01 to 02
y
Sets the prex length of the routing destination IPv6 network.
<Parameter by entering numbers>
0 to 128 Default value: 64
IPv6 Gateway Address 01 to 02
y
Sets the IP address of the IPv6 router.
Chapter
6
Troubleshooting Appendix
98
<Parameter by entering characters in IPv4/IPv6 format>
0 to 63 characters
SNMP TRAP
z
Settings regarding SNMP TRAP are performed with this parameter.
The TRAP function is enabled when using the print function.
TRAP 1 to 5
y
Agent Computer
y
Sets the IP address of the agent computer to return a trap.
This setting is not required when, at the submission function, the destination is
specied with an IP address.
LP-2060/LP-2060-MF User's Manual for Basic Printer Operation

System Menu
T
<Parameter by entering numbers>
0.0.0.0 to 255.255.255.255 Default value:
0.0.0.0
The default value indicates that no IP address is
registered, which is the same as the trap O.
Error
y
Species a trap to be sent at an error related to the engine. However, the error does
not include the technical call errors.
The destination to send the trap at an error is the trap agent computer set in the
previous item, TRAP ** Agent Computer.
However, note that this setting is disabled even if set to On when the TRAP Agent
Computer is not specied.
<Parameter by selecting options> n: Default value
On
n
O
Chapter
1
Before Use Basic Operations Menu Functions
Chapter
2
Chapter
3
Chapter
4
Print Job B ox
Function
Job
y
Species a trap when a printing job is completed. When this parameter is not set to
O, the trap condition is specied with TRAP**:IP address or TRAP**:IP operation.
<Parameter by selecting options> n: Default value
O
n
On by IP Address
On by Port
IP Address
y
Enabled when On by IP Address is selected in operation TRAP ** job. The setting
can be changed. If the IP address specied here matches the IP address of the job
transmission destination host, a trap is sent to the TRAP Agent Computer. Note that
when this setting is 0.0.0.0, a trap is sent for all the received jobs.
<Parameter by entering numbers>
0.0.0.0 to 255.255.255.255 Default value:
0.0.0.0
Chapter
5
Authentication
Function
Chapter
6
Troubleshooting Appendix
LP-2060/LP-2060-MF User's Manual for Basic Printer Operation
99

Chapter
1
Before Use Basic Operations Menu Functions
Chapter
2
Chapter
3
Chapter
4
Print Job B ox
Function
System Menu
T
Port
y
Enabled when On by Port is selected in operation TRAP ** job. The setting can also
be enabled. After printing is completed, a trap is sent to the TRAP Agent Computer
for all jobs sent to the Printer port that is specied here.
<Parameter by selecting options> n: Default value
All
n
Port ** **: Port 01 to Port 20
ActiveDirectory Settings (option)
z
DC Addresses 1 to 3
y
Specifies the DC (Domain Controller) address (IPv4/IPv6) when Active Directory
(option) is used.
<Parameter by entering characters>
Up to 255 characters
DC Access Login Name
y
Chapter
5
Authentication
Function
Chapter
6
Troubleshooting Appendix
Species the DC (Domain Controller) login name.
<Parameter by entering characters>
Up to 63 characters
zUsers with Active Directory access rights do not need to have domain administrator
privileges.
DC Access Password
y
Species the DC (Domain Controller) password.
<Parameter by entering characters>
Up to 63 characters
zUsers with Active Directory access rights do not need to have domain administrator
privileges.
Account Verication
y
Species whether or not the user logs in Active Directory.
In principle, this setting should not be changed.
<Parameter by selecting options> n: Default value
Logged In Logs in Active Directory.
n
100
Not Logged In Does not log in Active Directory.
LP-2060/LP-2060-MF User's Manual for Basic Printer Operation
 Loading...