

Page 1

MPS480mb
RT322
User’s Guide
59102101 my.okidata.com
Page 2

Copyright Information _____________
Copyright © 2010 by Oki Data. All Rights Reserved
Document Information
MPS480mb User’s Guide
P/N 59102101
Revision 1.0
October, 2010
Disclaimer
Every effort has been made to ensure that the information in this document is
complete, accurate, and up-to-date. The manufacturer assumes no responsibility for
the results of errors beyond its control. The manufacturer also cannot guarantee that
changes in software and equipment made by other manufacturers and referred to in
this guide will not affect the applicability of the information in it. Mention of software
products manufactured by other companies does not necessarily constitute
endorsement by the manufacturer .
While all reasonable efforts have been made to make this document as accurate and
helpful as possible, we make no warranty of any kind, expressed or implied, as to the
accuracy or completeness of the information contained herein.
The most up-to-date drivers and manuals are available from the web site: http://
www.okiprintingsolutions.com
Trademark Information
Oki is a trademark of Oki Electric Industry Company Ltd.
Apple, Macintosh and Mac OS are registered trademarks of Apple Computers Inc.
Hewlett-Packard, HP, and LaserJet are registered trademarks of Hewlett-Packard
Company.
Microsoft, MS-DOS and Windows are either registered trademarks or trademarks of
Microsoft Corporation in the United States and/or other countries.
Other product names and brand names are registered trademarks or trademarks of
their proprietors.
2•Preface
Page 3

Emergency first aid
Take care with toner powder:
If swallowed, give small amounts of cold water and seek medical
attention. DO NOT attempt to induce vomiting.
If inhaled, move the person to an open area for fresh air. Seek medical
attention.
If it gets into the eyes, flush with large amounts of water for at least 15
minutes keeping eyelids open. Seek medical attention.
Spillages should be treated with cold water and soap to help reduce risk
of staining skin or clothing.
3•Preface
Page 4

Contents _________________________
About this Guide . . . . . . . . . . . . . . . . . . . . . . 6
Notes, Cautions and Warnings . . . . . . . . . . . 7
Introduction . . . . . . . . . . . . . . . . . . . . . . . . . 8
Overview . . . . . . . . . . . . . . . . . . . . . . . . . . . 10
Front View . . . . . . . . . . . . . . . . . . . . . . . . . . 10
Rear View . . . . . . . . . . . . . . . . . . . . . . . . . . . 12
Control Panel . . . . . . . . . . . . . . . . . . . . . . . . 13
Character Switching . . . . . . . . . . . . . . . . . . . . 16
Changing the Display Language . . . . . . . . . . . . 17
Getting Started . . . . . . . . . . . . . . . . . . . . . . 18
Releasing the Scanner Lock . . . . . . . . . . . . . . . 18
Power Save Mode . . . . . . . . . . . . . . . . . . . . . . 18
Switching Off . . . . . . . . . . . . . . . . . . . . . . . . . 19
Installing Drivers and Utilities. . . . . . . . . . . . . . 20
Windows: Installing the Twain (Scanner)
Driver and Printer Drivers. . . . . . . . . . . . . . 20
Mac OS X: Installing the Printer Driver. . . . . . 23
Fax Driver: Windows Only . . . . . . . . . . . . . . 24
MFP Setup Tool: Windows Only . . . . . . . . . . . 24
Actkey Utility: Windows Only, USB Only . . . . 25
Paper Recommendations . . . . . . . . . . . . . . . . . 27
Tray 1 . . . . . . . . . . . . . . . . . . . . . . . . . . . . . . 28
Multi Purpose Tray . . . . . . . . . . . . . . . . . . . . . 28
Face Down Stacker . . . . . . . . . . . . . . . . . . . 30
Face Up Stacker . . . . . . . . . . . . . . . . . . . . . 30
Duplex Unit . . . . . . . . . . . . . . . . . . . . . . . . 30
Loading Paper . . . . . . . . . . . . . . . . . . . . . . . . 31
Cassette Trays . . . . . . . . . . . . . . . . . . . . . . 31
Loading Paper: Multi Purpose Tray . . . . . . . . . . 35
Configuring your machine . . . . . . . . . . . . . . 38
Minimum configuration requirements . . . . . . . . 38
To send faxes: . . . . . . . . . . . . . . . . . . . . . . 38
To send e-mails: . . . . . . . . . . . . . . . . . . . . . 38
To file document(s) via intranet . . . . . . . . . . 38
Pre-configuration information . . . . . . . . . . . . . . 38
General . . . . . . . . . . . . . . . . . . . . . . . . . . . 38
Fax set up . . . . . . . . . . . . . . . . . . . . . . . . . 39
Network set up . . . . . . . . . . . . . . . . . . . . . . 39
Internet communication features. . . . . . . . . . 41
Configuration . . . . . . . . . . . . . . . . . . . . . . . . . 43
. . . from the web page . . . . . . . . . . . . . . . . 44
. . . from the setup tool . . . . . . . . . . . . . . . . 45
. . . from the control panel . . . . . . . . . . . . . 46
The Printer Menu. . . . . . . . . . . . . . . . . . . . . 47
Setting the fax facility . . . . . . . . . . . . . . . . . . . 61
Initial set up . . . . . . . . . . . . . . . . . . . . . . . . 61
Advanced set up . . . . . . . . . . . . . . . . . . . . . 62
Managing the address book . . . . . . . . . . . . . . . 66
Adding an email address entry . . . . . . . . . . . 66
Deleting an email address entry . . . . . . . . . . 67
Modifying an email address entry . . . . . . . . . 67
Adding a group entry . . . . . . . . . . . . . . . . . . 68
Deleting a group address entry . . . . . . . . . . . 68
Modifying a group address entry . . . . . . . . . . 69
Access Control . . . . . . . . . . . . . . . . . . . . . . . 70
Enabling Access Control. . . . . . . . . . . . . . . . . . 70
Logging in . . . . . . . . . . . . . . . . . . . . . . . . . . . 70
Logging out . . . . . . . . . . . . . . . . . . . . . . . . . . 71
Operation time-out . . . . . . . . . . . . . . . . . . . . . 71
Operation . . . . . . . . . . . . . . . . . . . . . . . . . . . 72
Loading document(s) . . . . . . . . . . . . . . . . . . . 72
Placing document(s) in the ADF . . . . . . . . . . 72
Placing document(s) on the glass . . . . . . . . . 74
Copying . . . . . . . . . . . . . . . . . . . . . . . . . . . . 75
Basic operation . . . . . . . . . . . . . . . . . . . . . . 75
Advanced operation. . . . . . . . . . . . . . . . . . . 75
Scanning . . . . . . . . . . . . . . . . . . . . . . . . . . . . 77
Basic Operation. . . . . . . . . . . . . . . . . . . . . . 77
Scan To Email. . . . . . . . . . . . . . . . . . . . . . . 77
Scan to Network PC . . . . . . . . . . . . . . . . . . . 79
Scan to PC . . . . . . . . . . . . . . . . . . . . . . . . . 79
Faxing: Basic operation . . . . . . . . . . . . . . . . . . 82
Searching the phone book . . . . . . . . . . . . . . 82
Sending a Fax. . . . . . . . . . . . . . . . . . . . . . . 83
Faxing: Advanced operation. . . . . . . . . . . . . . . 84
Changing the Fax Quality (Mode) . . . . . . . . . 84
Adjusting Density . . . . . . . . . . . . . . . . . . . . 84
Document Size . . . . . . . . . . . . . . . . . . . . . . 84
Fax Receiving . . . . . . . . . . . . . . . . . . . . . . . 85
Faxing: Printing Reports . . . . . . . . . . . . . . . . . 87
Printing a fax activity report . . . . . . . . . . . . . 87
Printing transmission reports . . . . . . . . . . . . 88
Faxing: Sending a Fax from your PC . . . . . . . . . 89
Using the Phone Book . . . . . . . . . . . . . . . . . 91
Printer Settings in Windows . . . . . . . . . . . . 94
Printing preferences in Windows applications . . . 94
PCL emulation. . . . . . . . . . . . . . . . . . . . . . . 95
Setting from Windows control panel . . . . . . . 99
PS emulation . . . . . . . . . . . . . . . . . . . . . . . . 103
Settings from the Control Panel . . . . . . . . . 107
2-sided (duplex) printing . . . . . . . . . . . . . . . 108
To carry out Duplex Printing: . . . . . . . . . . . 108
4
Page 5

Printer settings in Mac OS X . . . . . . . . . . . 109
PCL emulation . . . . . . . . . . . . . . . . . . . . . . . 109
Setting printing options . . . . . . . . . . . . . . . 109
Saving driver settings . . . . . . . . . . . . . . . . 110
Changing the Default Printer and Paper Size . 111
Page setup options . . . . . . . . . . . . . . . . . . 111
Print Options. . . . . . . . . . . . . . . . . . . . . . . 112
Paper Handling . . . . . . . . . . . . . . . . . . . . . 115
Cover page . . . . . . . . . . . . . . . . . . . . . . . . 116
Duplex . . . . . . . . . . . . . . . . . . . . . . . . . . . 116
Effects . . . . . . . . . . . . . . . . . . . . . . . . . . . . 118
Printer setup options . . . . . . . . . . . . . . . . . . . 119
Printer options . . . . . . . . . . . . . . . . . . . . . 119
Print control . . . . . . . . . . . . . . . . . . . . . . . 120
Summary . . . . . . . . . . . . . . . . . . . . . . . . 121
PS emulation . . . . . . . . . . . . . . . . . . . . . . . . 121
Copies & pages . . . . . . . . . . . . . . . . . . . . . 121
Layout . . . . . . . . . . . . . . . . . . . . . . . . . . . 121
Scheduler . . . . . . . . . . . . . . . . . . . . . . . . . 122
Paper handling . . . . . . . . . . . . . . . . . . . . . 122
Cover page . . . . . . . . . . . . . . . . . . . . . . . . 122
Error Handling . . . . . . . . . . . . . . . . . . . . . 122
Paper Feed . . . . . . . . . . . . . . . . . . . . . . . . 123
Printer Features . . . . . . . . . . . . . . . . . . . . 123
Cancelling a print job . . . . . . . . . . . . . . . . . . 126
Overlays and Macros (Windows only). . . . 127
What are overlays and macros? . . . . . . . . . . . 127
Creating PostScript overlays. . . . . . . . . . . . . . 127
Creating the overlay image. . . . . . . . . . . . . 127
Create and download the project. . . . . . . . . 128
Test printing the overlay . . . . . . . . . . . . . . 128
Defining overlays . . . . . . . . . . . . . . . . . . . 129
Printing with PostScript overlays . . . . . . . . . 129
Creating PCL Overlays . . . . . . . . . . . . . . . . . . 130
Creating the overlay image. . . . . . . . . . . . . 130
Create and download macros . . . . . . . . . . . 131
Test printing the macro . . . . . . . . . . . . . . . 132
Defining overlays . . . . . . . . . . . . . . . . . . . 132
Printing with PCL overlays . . . . . . . . . . . . . 133
Maintenance . . . . . . . . . . . . . . . . . . . . . . . 134
Consumables . . . . . . . . . . . . . . . . . . . . . . . . 134
Replacing consumable items . . . . . . . . . . . . . 135
Toner cartridge replacement . . . . . . . . . . . . 135
Image drum replacement . . . . . . . . . . . . . . 140
Cleaning . . . . . . . . . . . . . . . . . . . . . . . . . . . 145
the unit casing . . . . . . . . . . . . . . . . . . . . . 145
the paper path in the ADF . . . . . . . . . . . . . 145
the underside of the ADF . . . . . . . . . . . . . . 146
the document glass . . . . . . . . . . . . . . . . . . 147
the LED head . . . . . . . . . . . . . . . . . . . . . . 148
Installing options . . . . . . . . . . . . . . . . . . . 150
Option order numbers . . . . . . . . . . . . . . . . . . 150
Installation procedure . . . . . . . . . . . . . . . . . . 150
Troubleshooting. . . . . . . . . . . . . . . . . . . . . 151
Clearing paper jams . . . . . . . . . . . . . . . . . . . 151
In the scanner ADF section... . . . . . . . . . . . 151
In the printer section... . . . . . . . . . . . . . . . 152
Dealing with unsatisfactory printing . . . . . . . . 161
Dealing with unsatisfactory copying . . . . . . . . 162
Fax problem checklist . . . . . . . . . . . . . . . . . . 163
Specifications. . . . . . . . . . . . . . . . . . . . . . . 165
General . . . . . . . . . . . . . . . . . . . . . . . . . . . 165
Appendix A - Moving and transporting . . . 173
Moving your MFP . . . . . . . . . . . . . . . . . . . . . 173
Transporting your MFP. . . . . . . . . . . . . . . . . . 173
5
Page 6

About this Guide__________________
Note
Images used in this manual may include optional features that your product
does not have installed.
This guide is part of a suite of printed and online documentation provided to help you
become familiar with your unit and to make the best use of its many features.
6 • About this Guide
Page 7
Notes, Cautions and Warnings _______
Note
A note provides additional information to supplement the main text.
Caution!
A caution provides additional information which, if ignored, may
result in equipment malfunction or damage.
Warning!
A warning provides additional information which, if ignored, may
result in a risk of personal injury.
For the protection of your unit, and in order to ensure that you benefit from its full
functionality, this model has been designed to operate only with genuine original
toner cartridges. Any other toner cartridge may not operate at all, even if it is
described as “compatible”, and if it does work, your product's performance and print
quality may be degraded.
Specifications are subject to change without notice.
7 • Notes, Cautions and Warnings
Page 8

Introduction_____________________
Congratulations on choosing this Multi Function Product (MFP). It is designed with
advanced features, to give you clear and crisp black and white pages at high speed
on a range of office print media.
With this MFP, you can instantly scan paper-based documents and deliver the
electronic image to various destinations including e-mail addresses, printers, ftp
servers, fax machines or someone else's computer on the network.
Your MFP includes these features:
• Digital copying
An intuitive control panel, makes digital copying fast and easy.
•Fast Copy Speed
Up to 22 copies per minute Letter (21 copies per minute A4 SEF) in black and
white for fast and efficient copying.
• Up to 600 x 600 dpi (dots per inch) copy resolution.
• Actkey utility (Windows only)
Enables the MFP to receive one key touch commands from a locally connected
computer (“pull scan”).
• Scan to E-mail
Connected to an Ethernet network and a SMTP server, this MFP allows you to
transmit document(s) over the internet via e-mail. With a touch of the e-mail
button and the selection of your recipients' e-mail addresses, the document(s) is/
are first scanned and converted into an image file, and then transmitted to
remote recipients within minutes.
• Scan to Network PC
Allows you to send scanned documents (PDF, TIFF and JPEG file formats) to a
server or a personal computer's file folder over an intranet with FTP (File Transfer
Protocol), CIFS (Common Internet File System) protocol. The scan to filing
feature removes the need for the mail server to handle large attachments.
• Network/PC Printing
When connected to a Network, the MFP is able to perform network or PC printing.
• Multiple Pages Sending
With the Auto Document Feeder (ADF), the MFP allows a stack of up to 50 page
document(s) to be continuously scanned.
•Faxing
An intuitive control panel, makes direct faxing fast and easy.
• Advanced Fax Transmission and Reception
Includes delayed transmissions and sending to multiple locations.
• Address Book/Profiles Managing
This provides a convenient way to manage all the e-mail addresses and profiles
(filing destinations).
8•Introduction
Page 9

• MFP Setup Tool Utility
Allows you to create up to 100 e-mail addresses and several filing destinations to
manage your document.
•Print Resolution
1200 x 1200dpi .
• Duplex Printing
Automatic two-sided (duplex) printing for economical use of paper and compact
printing of larger documents.
• High speed USB 2.0 interface
• Emulations
Standard PCL6, PCL5e and PostScript 3.
• Paper Handling
530 sheets (75 g/m
2
).
• Template Manager Utility for Windows
Enables the design and print of business cards, banners, labels with ease.
The following optional features are available:
• Additional memory, to allow printing of more complex pages.
• One additional paper tray for loading a further 530 sheets.
9•Introduction
Page 10
Overview _______________________
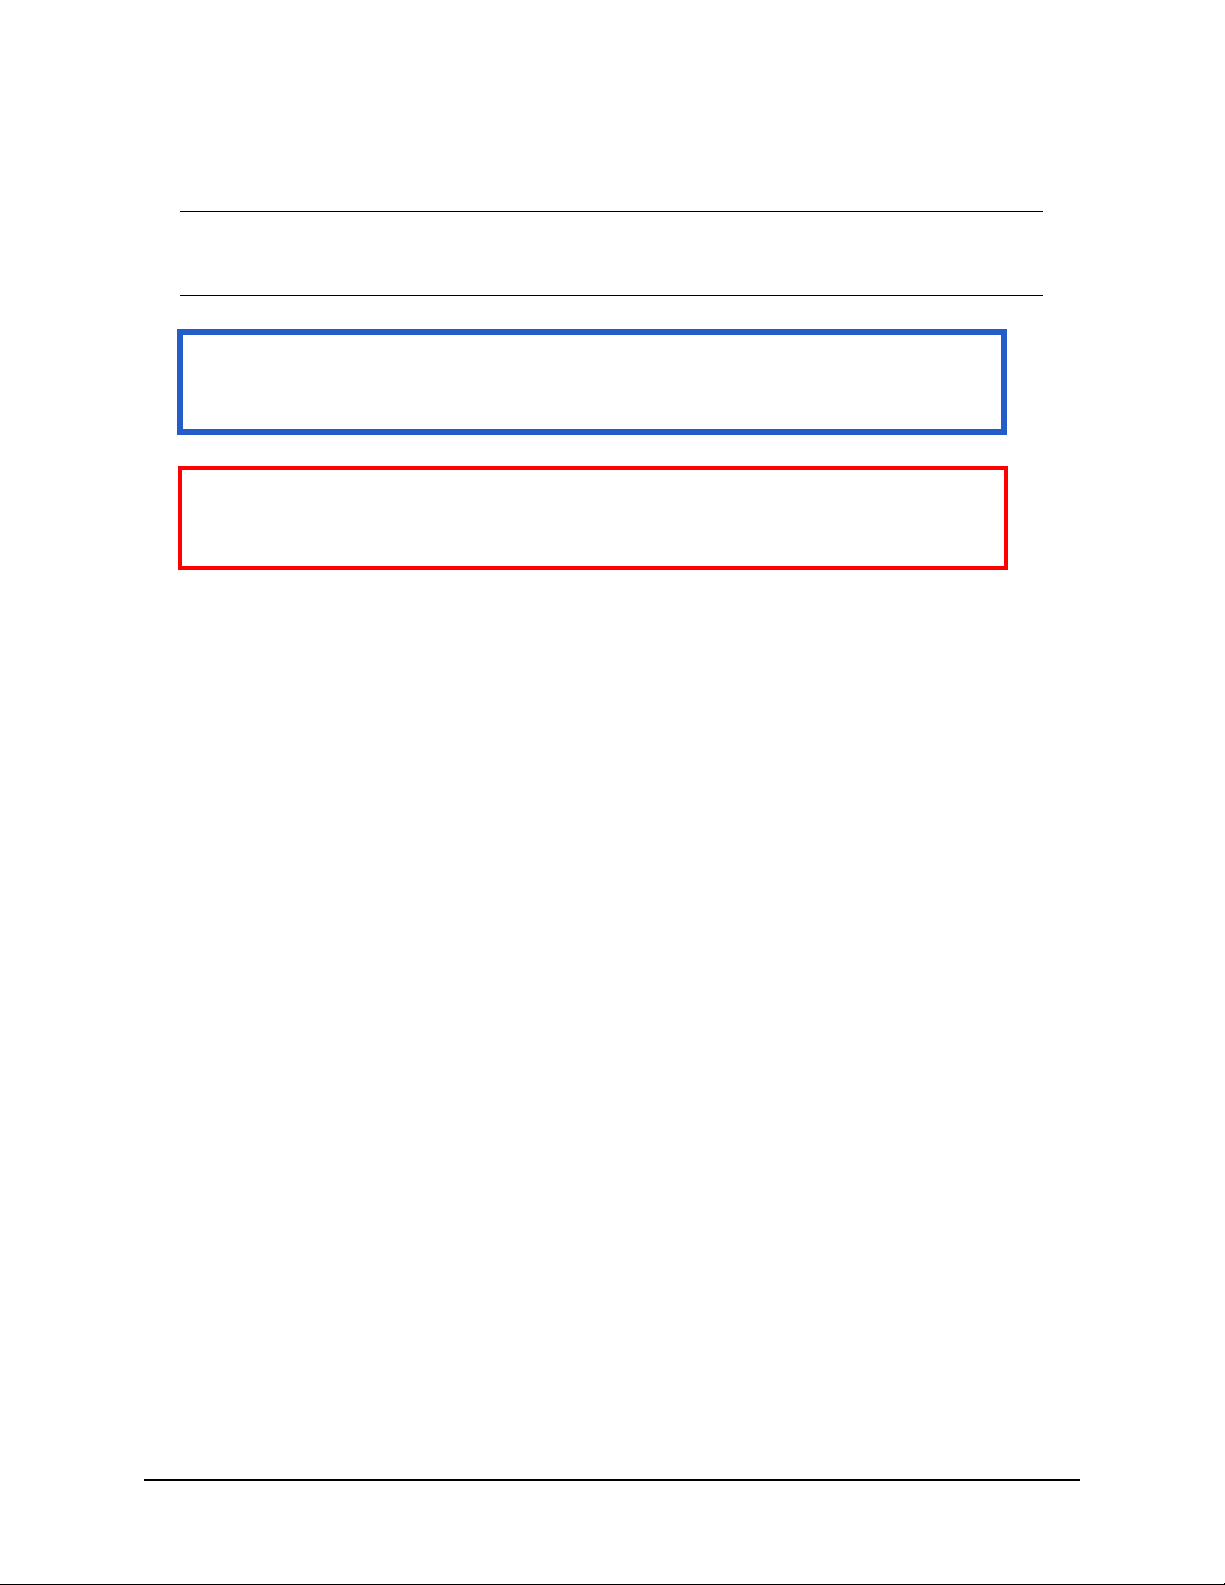
Front View
10
11
12
9
8
7
1. Output stacker, face down
Standard printed copy delivery point. Holds up to 150 sheets of 20-lb. US
Bond (75 g/m²) paper.
2. Top cover release button
Press to open.
3. Multi purpose tray release handle
Pull to open.
2
1
3
4
5
6
4. Multi purpose tray
Used for feeding heavier paper stocks, envelopes and other special media.
Holds up to 50 sheets of 20-lb. US Bond (75 g/m²) paper. Also has an
extendable paper support.
10 • Overview
Page 11
10
11
12
9
8
7
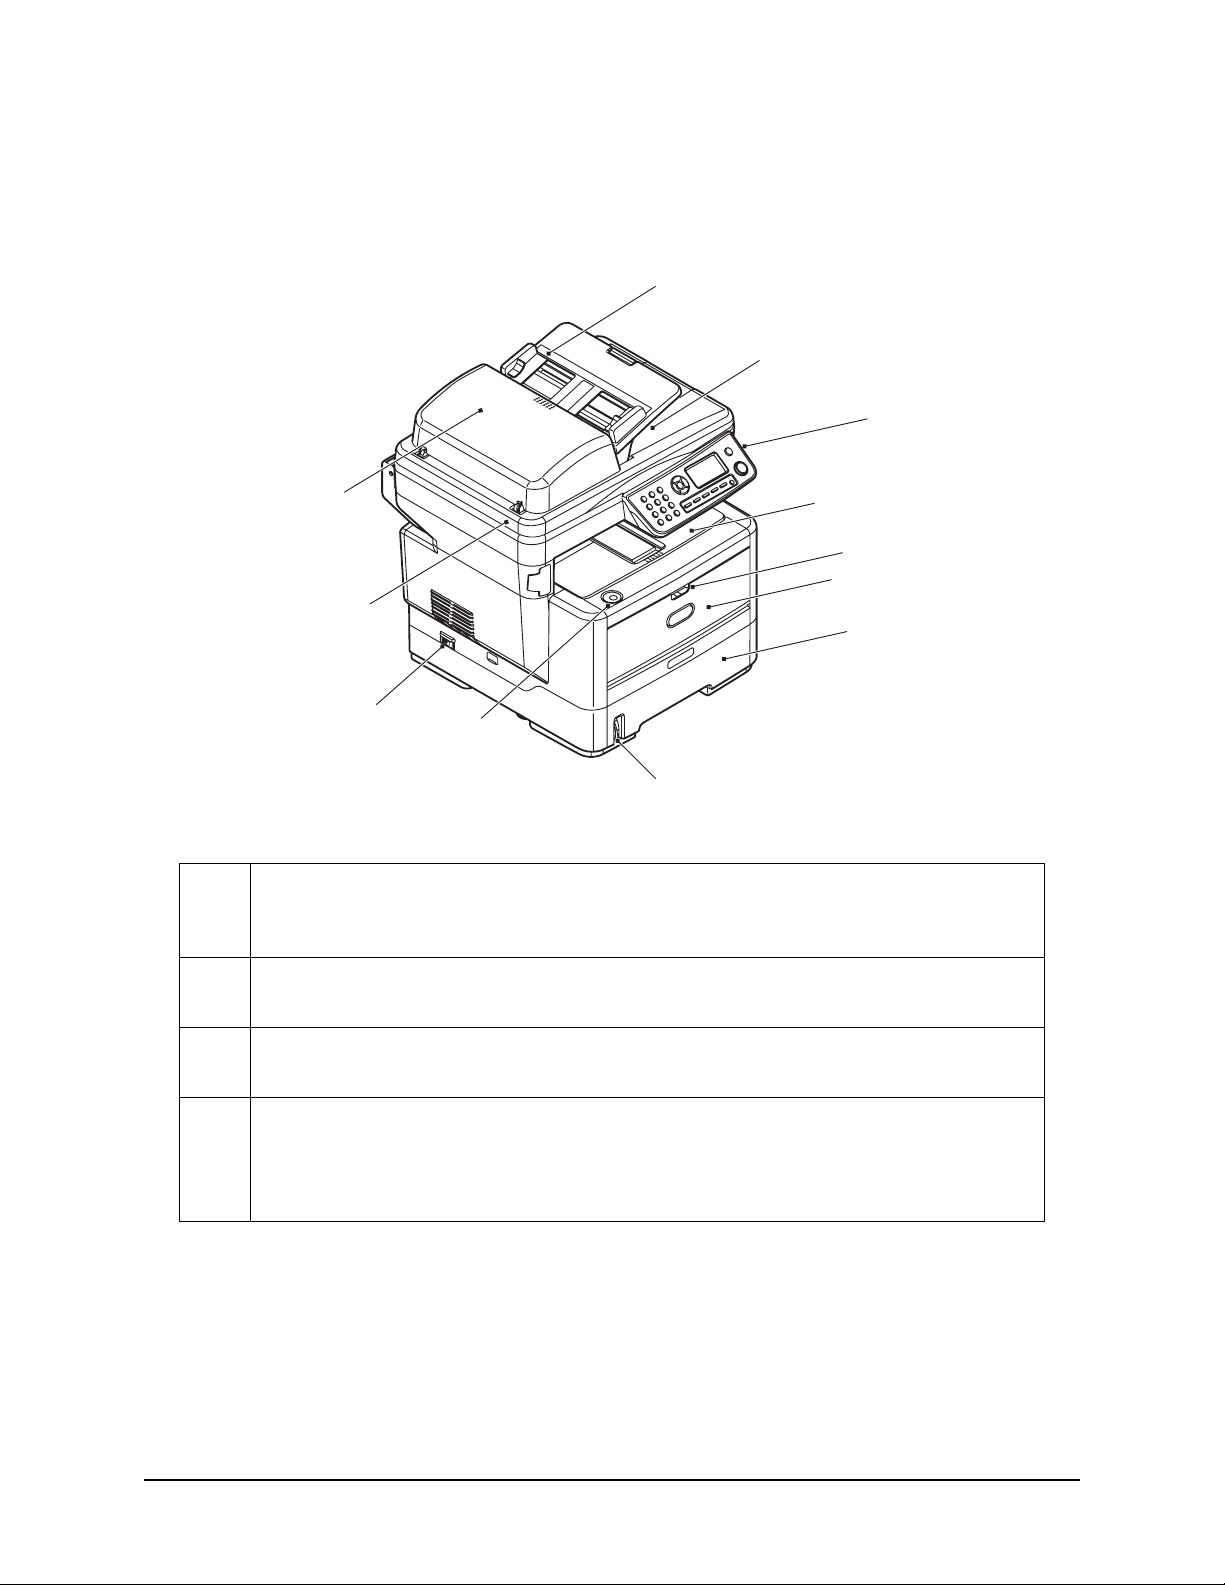
5. Paper tray
Holds up to 530 sheets of 20 lb. US Bond (75 g/m².)
6. Paper level lever
To visually indicate the paper level in the tray.
7. ON/OFF power switch
Refer to “Switching Off” on page 19 for details.
1
3
4
5
2
6
8. Scanner Bed
9. ADF ( Automatic Document Feed) unit
10. ADF (Automatic Document Feed) paper tray
Holds up to 50 sheets of letter/A4 size paper, 20 lb. US Bond (75 g/m²).
11. Document cover
12. Control panel
With LCD and operator buttons.
One touch key: refer to “Control Panel” on page 13.
11 • Overview
Page 12
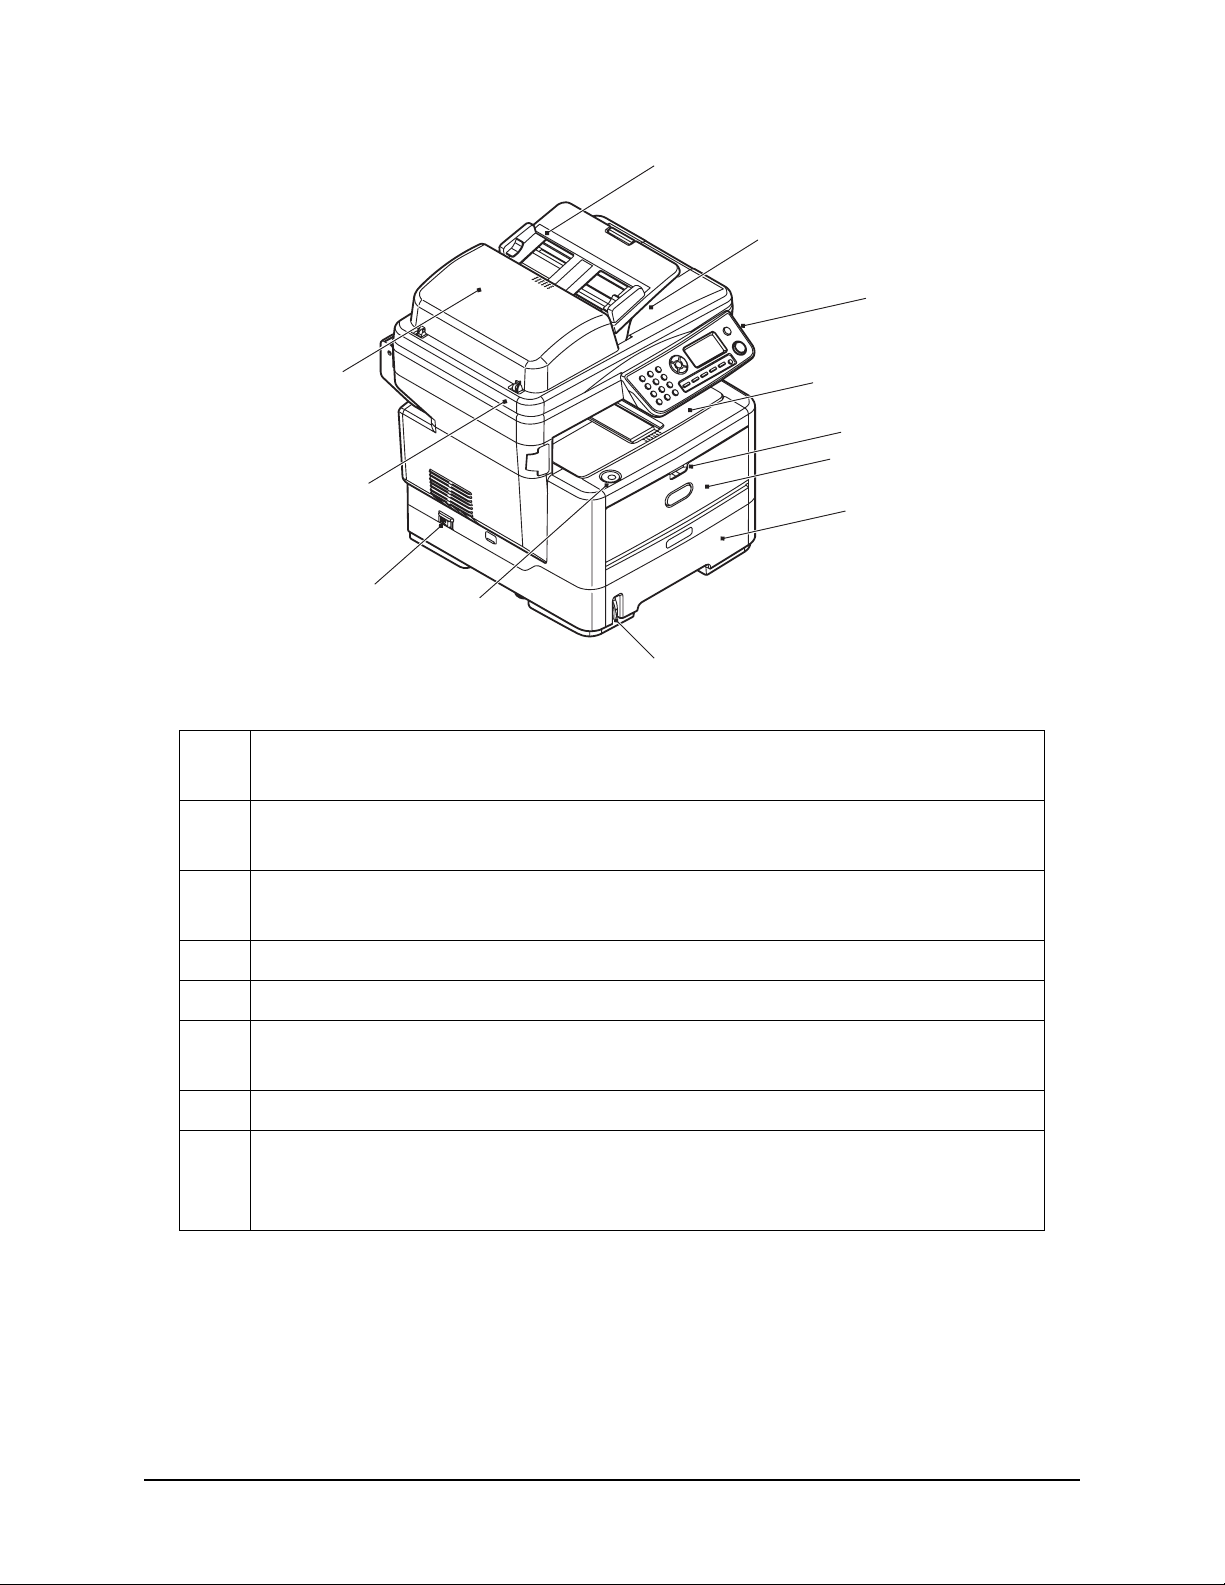
Rear View
13. Access panel
Allows access to install optional memory.
20
19
18
17
21
13
14
15
16
14. Duplex unit
Provides automatic two-sided printing.
15. Rear output cover (closed) (face up stacker)
This is mainly used for heavy print media. When used in conjunction with the
multi purpose feed tray, the paper path through the MFP is essentially
straight. This avoids bending the print media around curves in the paper
path.
16. AC power socket
17. Parallel connector
18. USB connector
19. Test switch
20. Network connection
21. Line connection
For connecting the machine to the telephone line.
Tel connection
For connecting a telephone handset (if required).
12 • Overview
Page 13
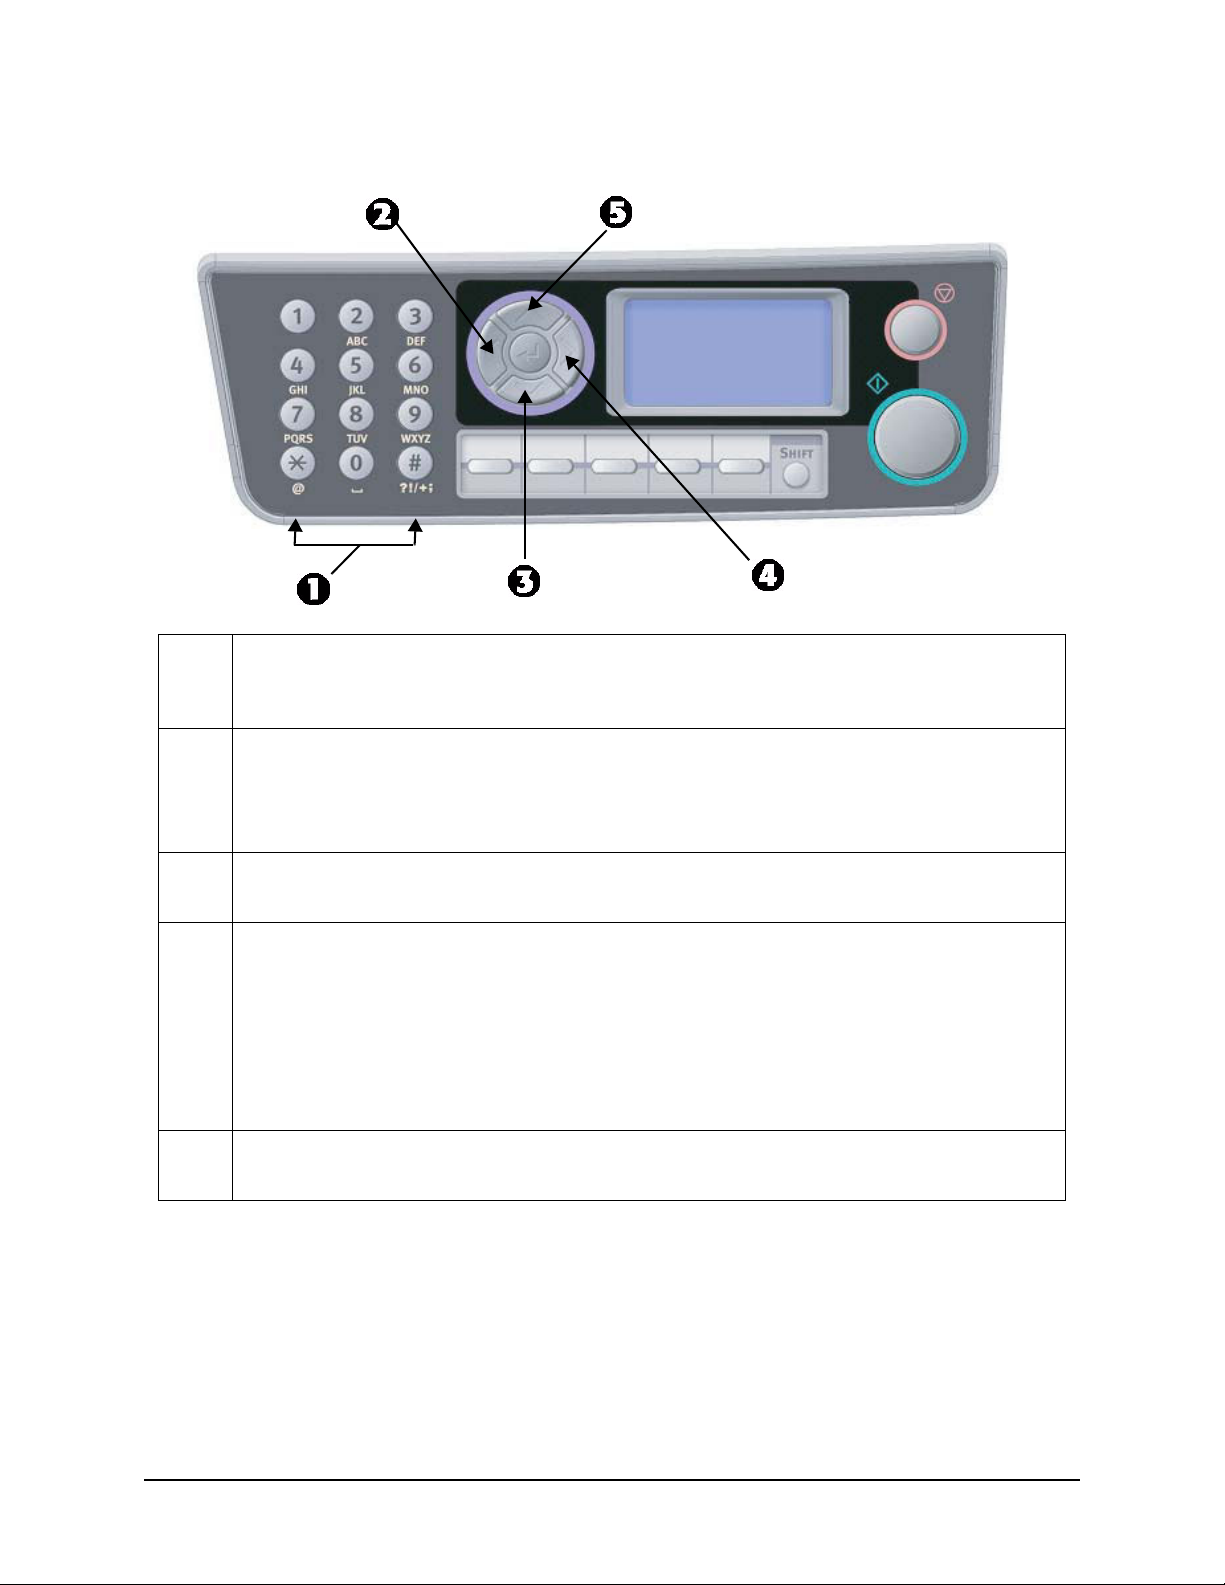
Control Panel
1. Key Pad
Used to enter numbers, upper-case/lower-case letters and symbols in the Entry
Line. Refer to “Character Switching” on page 16 for further details.
2. Left Key
When in Switching mode: Returns the display to the Function Selection screen or
Scan Sub Function Selection screen from the Stand-by screen.
When Setting up: Increments the value of the tree structure.
3. Down Key
When setting up or in switching mode: Moves the cursor down.
4. Right Key
When in Switching mode:
• Used to confirm the Mode selected.
• Used to start Push scan (if push scan is selected, the executing Push Scan
screen is displayed.)
When Setting up:
• Decrements the value of the tree structure.
5. Up Key
When setting up or in Switching mode: Moves the cursor up.
13 • Overview
Page 14
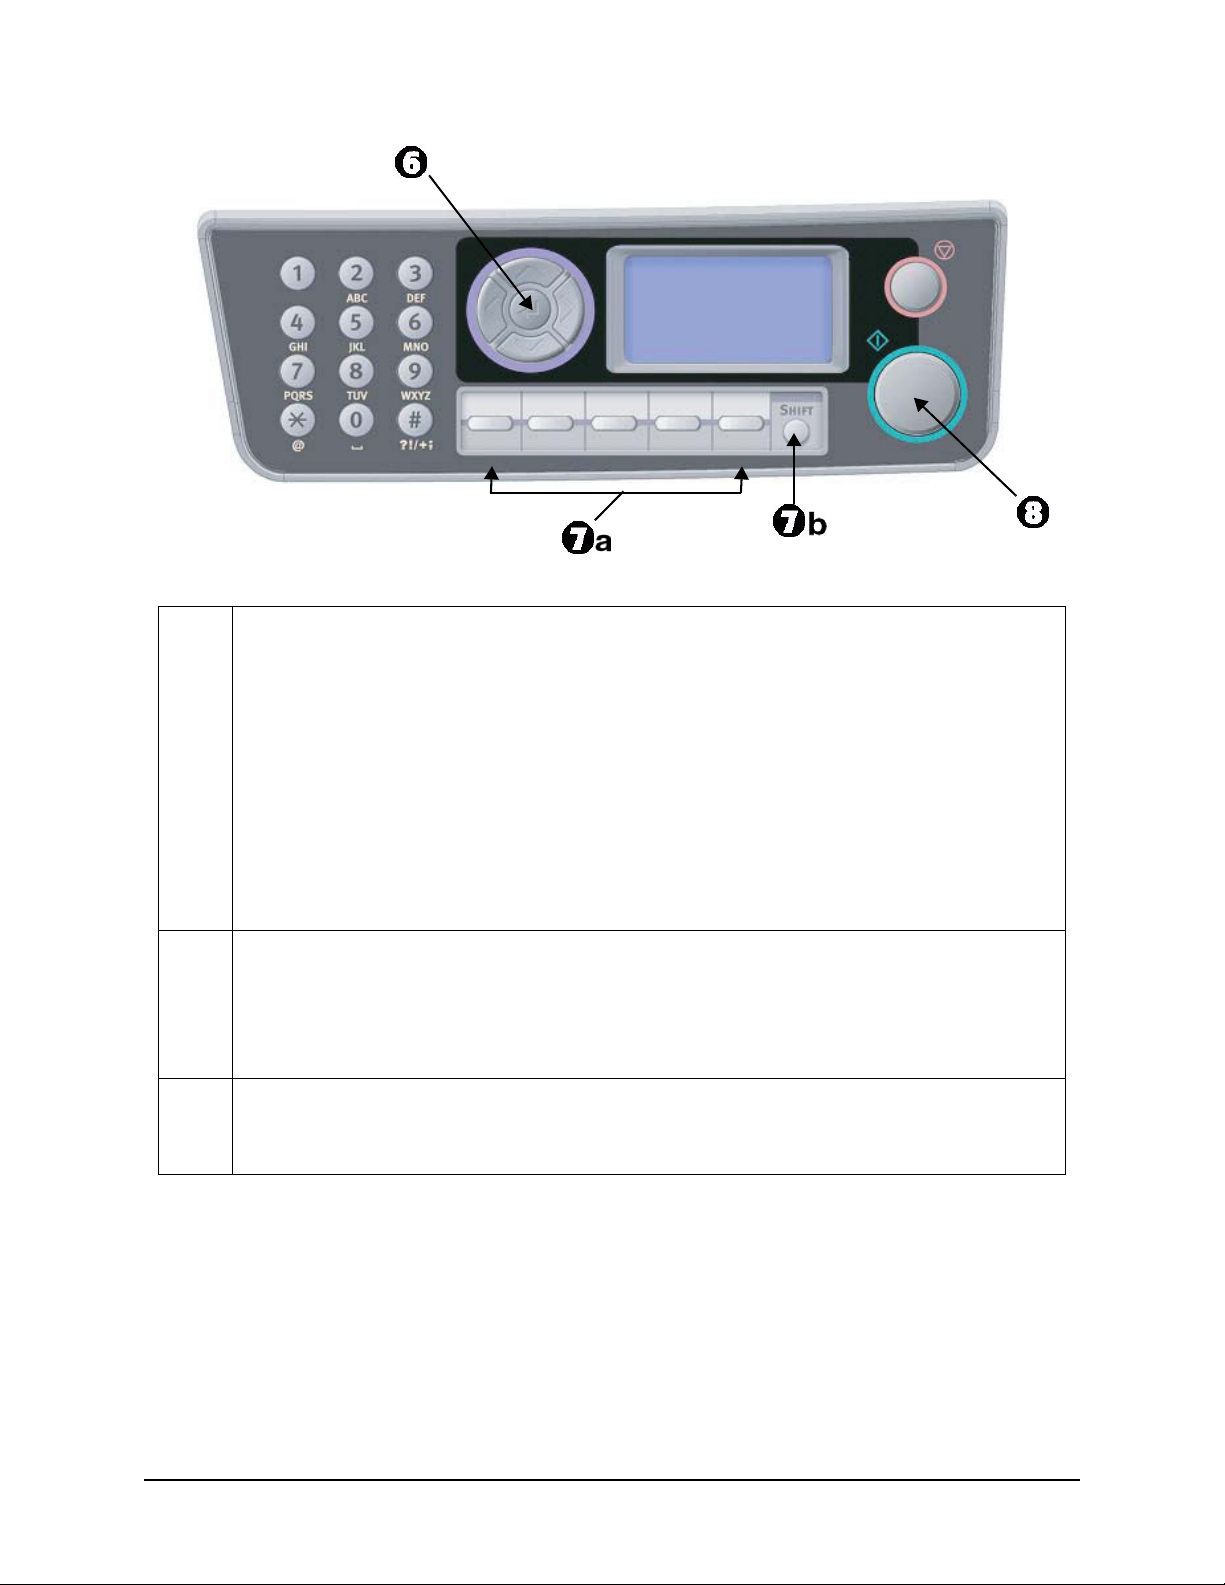
6. Enter Key
When in Switching mode:
• Used to confirm the Mode selected.
• Used to start Push Scan (If Push scan is selected, the Executing Push scan
screen is displayed.)
When Setting up:
• Increases/decreases the value of the tree structure.
When entering Pin ID:
• Used to confirm the PIN ID entered.
When in Error/Warning State
• Used to recover.
7. One Touch Key Panel
The One Touch keys (7a) are used to dial numbers from #00 to #09 that you
have programmed in as fax numbers.
The shift key (7b) switches between numbers from 00 to 04 and numbers from
05 to 09.
8. Start Button:
• Press to execute the function selected (Copy, Scan, etc.).
• Press to recover from Error/Warning states.
14 • Overview
Page 15

9. Stop Button:
• Stops the function being executed (Copy, Scan, etc._).
• Cancels a Print job.
10. Liquid Crystal Display (LCD): 128 x 64 dots.
(Continued)
15 • Overview
Page 16

Character Switching
Numbers, upper and lower case letters and symbols can be entered using the keypad.
Press the key multiple times to switch between characters.
The example below is based on English being the display language:
KEY
To scan through the choices for each key, you must press the key
rapidly: within 2 seconds of the previous press.
1 1 → 1
2 a → b
3 d
4 g
5 j
6 m
7 p
8 t
9 w
→ c → A → B → C → 2
→ e → f → D → E → F → 3
→ h → i → G → H → I → 4
→ k → l → J → K → L → 5
→ n → o → M → N → O → 6
→ q → r → s → P → Q → R → S → 7
→ u → v → T → U → V → 8
→ x → y → z → W → X → Y → Z → 9
0 SP (space)
* @
# .
→ * → a
→ _ → - → P → SP (space) → + → ! → “ →
→ % → & → ‘ → ( → ) → , → / → : →
$
→ 0 → SP (Space)
; → < → = → > → ? → [ → £ → ] → ^ → #
16 • Overview
Page 17

Changing the Display Language
The default language used by your MFP for display messages and for report printing
is English. If required, this can be changed using the Panel Language Setup utility.
•English
• Canadian French
• Latin American Spanish
• Brazilian Portuguese
Note
See the information enclosed on the CD-ROM included with your unit
(the Panel Language Setup Utility) for the procedure for changing the
language.
17 • Overview
Page 18
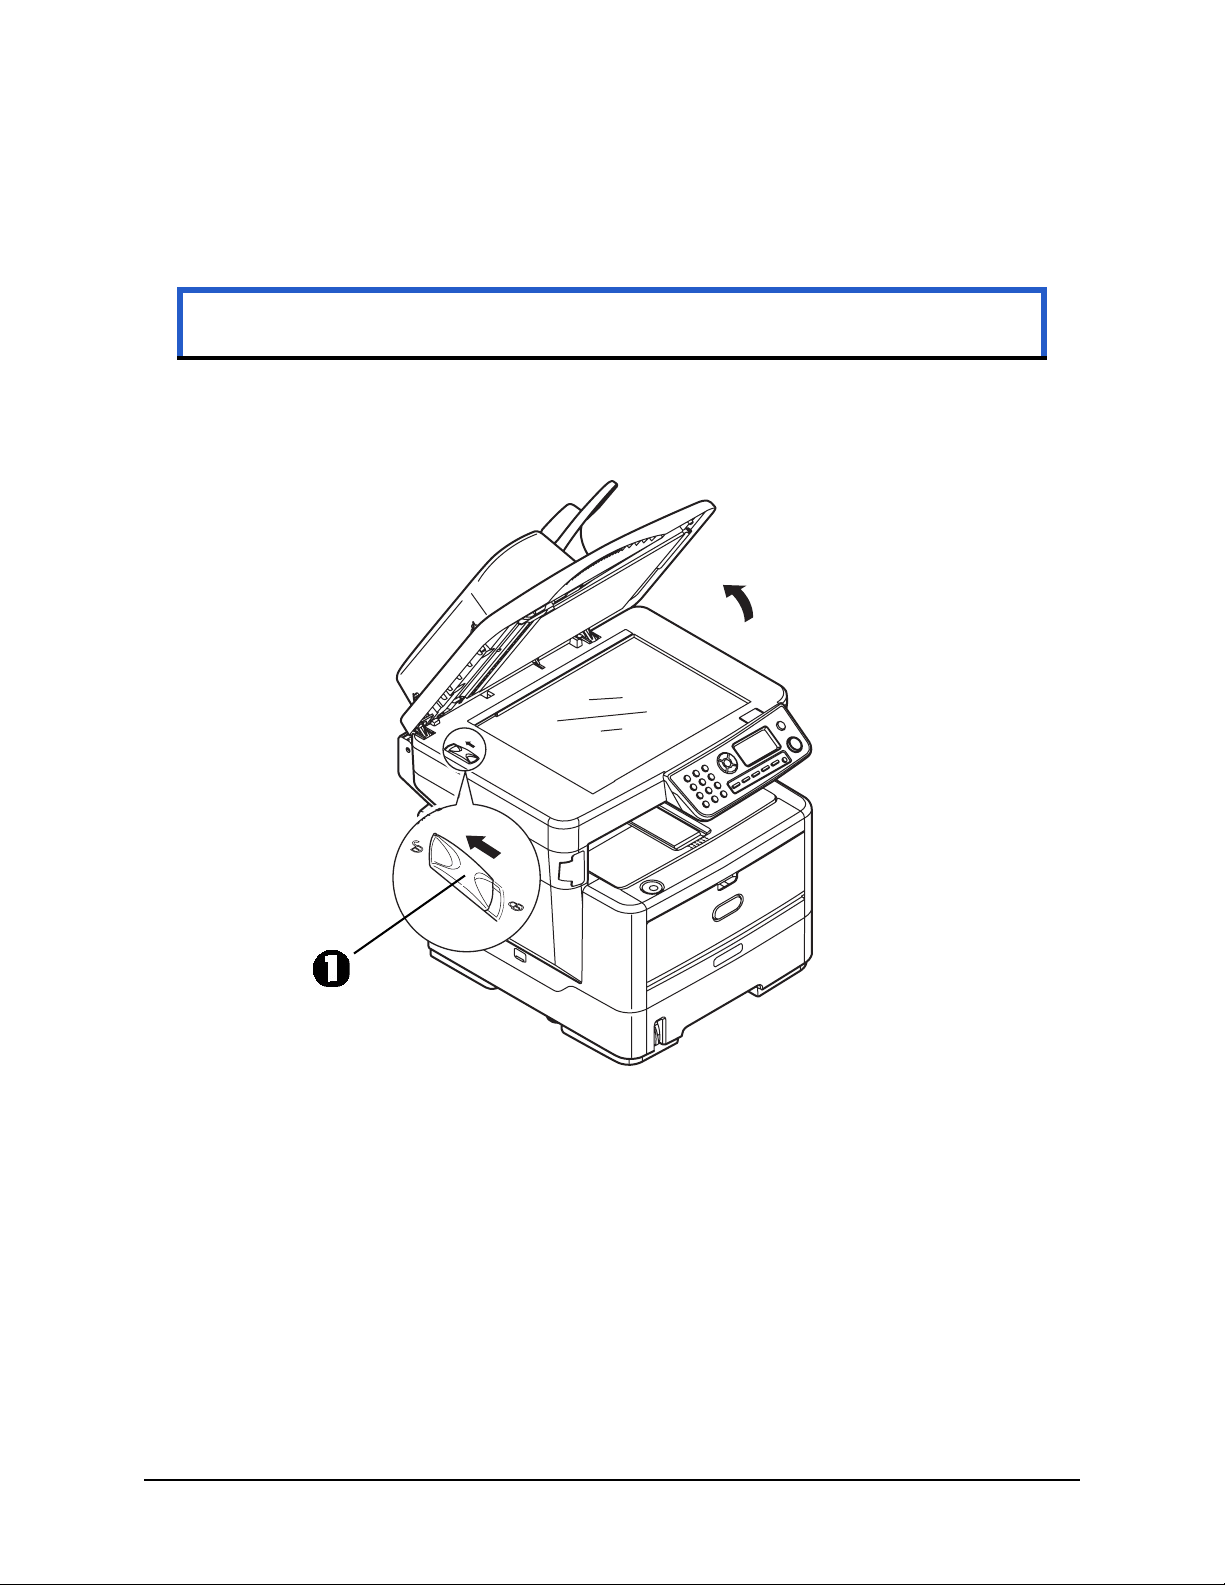
Getting Started___________________
Releasing the Scanner Lock
Caution!
Make sure the scanner is in the UNLOCKED position before operating.
1. Open the document cover.
2. Move the scan lock lever (1) to the UNLOCKED position.
Power Save Mode
If you do not use the MFP for a while, the machine will enter the power save mode to
control the power consumption of the device.
18 • Getting Started
Page 19

Switching Off
Caution!
Do not turn off the power switch suddenly as this may damage your MFP.
1. Press the down arrow button on the control panel to highlight Menu. Press Enter.
2. Press the down arrow button on the control panel to highlight System Shutdown.
Press Enter.
3. Press Enter to execute.
4. At the prompt, turn the power switch OFF.
19 • Getting Started
Page 20

Installing Drivers and Utilities
Your machine is supplied with the following drivers:
• TWAIN (scanner) driver: Windows only, USB only
• Printer driver: PCL5e (all models), PCL 6 (all models), PostScript3
• Fax driver: Windows only
Note
You must be logged on as an administrator or a member of the
Administrators group in order to complete this procedure. If your
computer is connected to a network, network policy settings may also
prevent you from completing this procedure.
The MFP is a “dual device” - Windows sees it as a scanner and a printer. Therefore,
you must install two different drivers; the TWAIN (scanner) driver and the printer
driver.
The installation instructions below refer to USB connection. For network connection
details refer to the Setup/Reference Guide.
If you are running Windows Server 2003 or Server 2008, you may need to follow
these steps to ensure WIA service starts when using the TWAIN driver and Actkey
Utility.
1. Click Start > Administrative Tools > Services.
2. Double-click Services.
3. Double-click Windows Image Acquisition (WIA).
4. From the Startup type menu, select Automatic.
5. Under Service status, click Start.
6. Click OK.
Windows: Installing the Twain (Scanner) Driver and
Printer Drivers
TWAIN Driver: Pull versus Push Scanning
Pull Scanning = initiating a scan from your computer via software.
Push Scanning: initiating a scan by pressing a button on the MFP’s front panel
The TWAIN driver is used for “Pull Scanning”l. The TWAIN driver only works via USB
connections. This means it's not possible to control the scanner over the network from
your computer.
Installing the Drivers
There are two ways of installing the drivers:
20 • Getting Started
Page 21
• Oki Driver Installer Program (recommended method)
• Plug and Play (USB only)
Oki Driver Installer Installation
Before powering up the printer
1. Run the Oki driver installer program from the CD-ROM supplied with your unit.
2. Plug in the printer and switch it on.
Windows completes the installation of the TWAIN and printer drivers automatically.
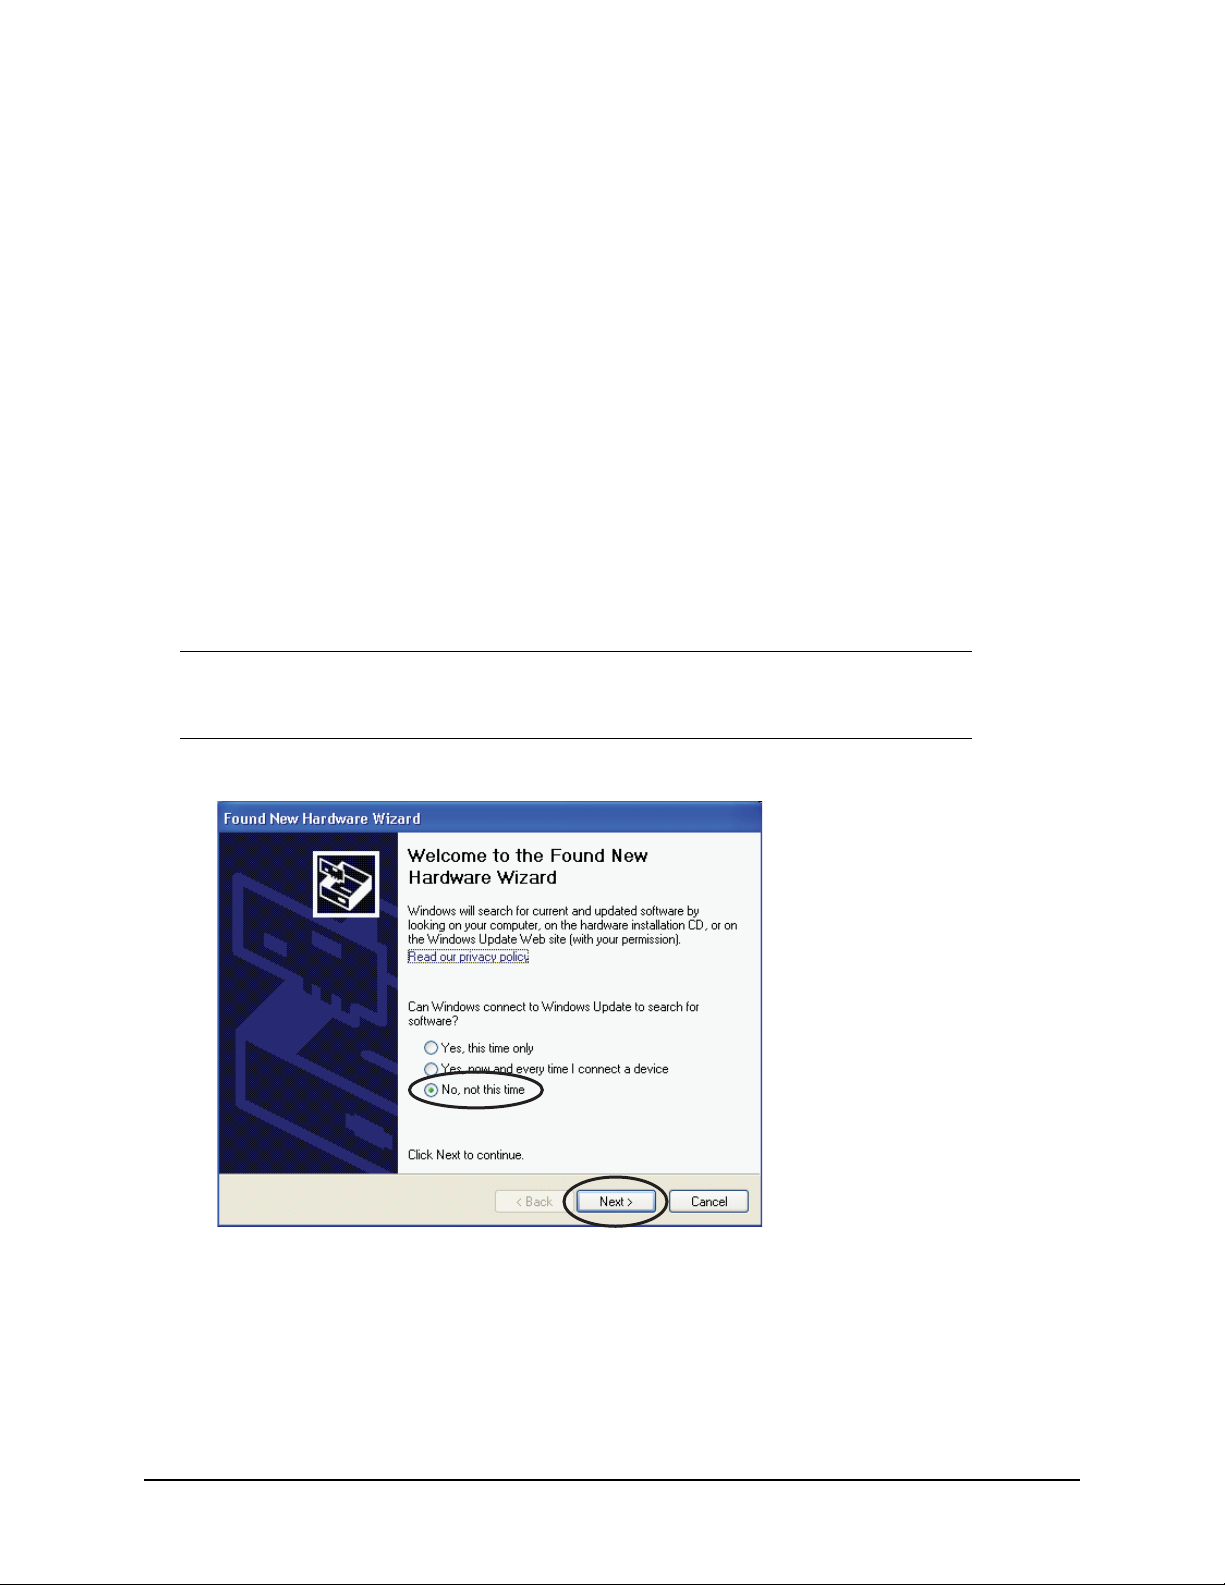
Plug and Play Installation
When the MFP is plugged into a PC using a USB cable, you'll be prompted to install
two different drivers; the TWAIN (scanner) driver first and then the printer driver.
1. Attach the printer to a USB port on your computer.
2. Switch on the Printer.
3. Insert the Drivers & Utilities CD supplied with you unit.
Note7
If the CD runs automatically, cancel the dialog box.
The ‘New Hardware Found' screen displays.
If you do not see the ‘New Hardware Found' screen, please check that the power
and USB cables are connected properly, and the printer is switched on.
21 • Getting Started
Page 22
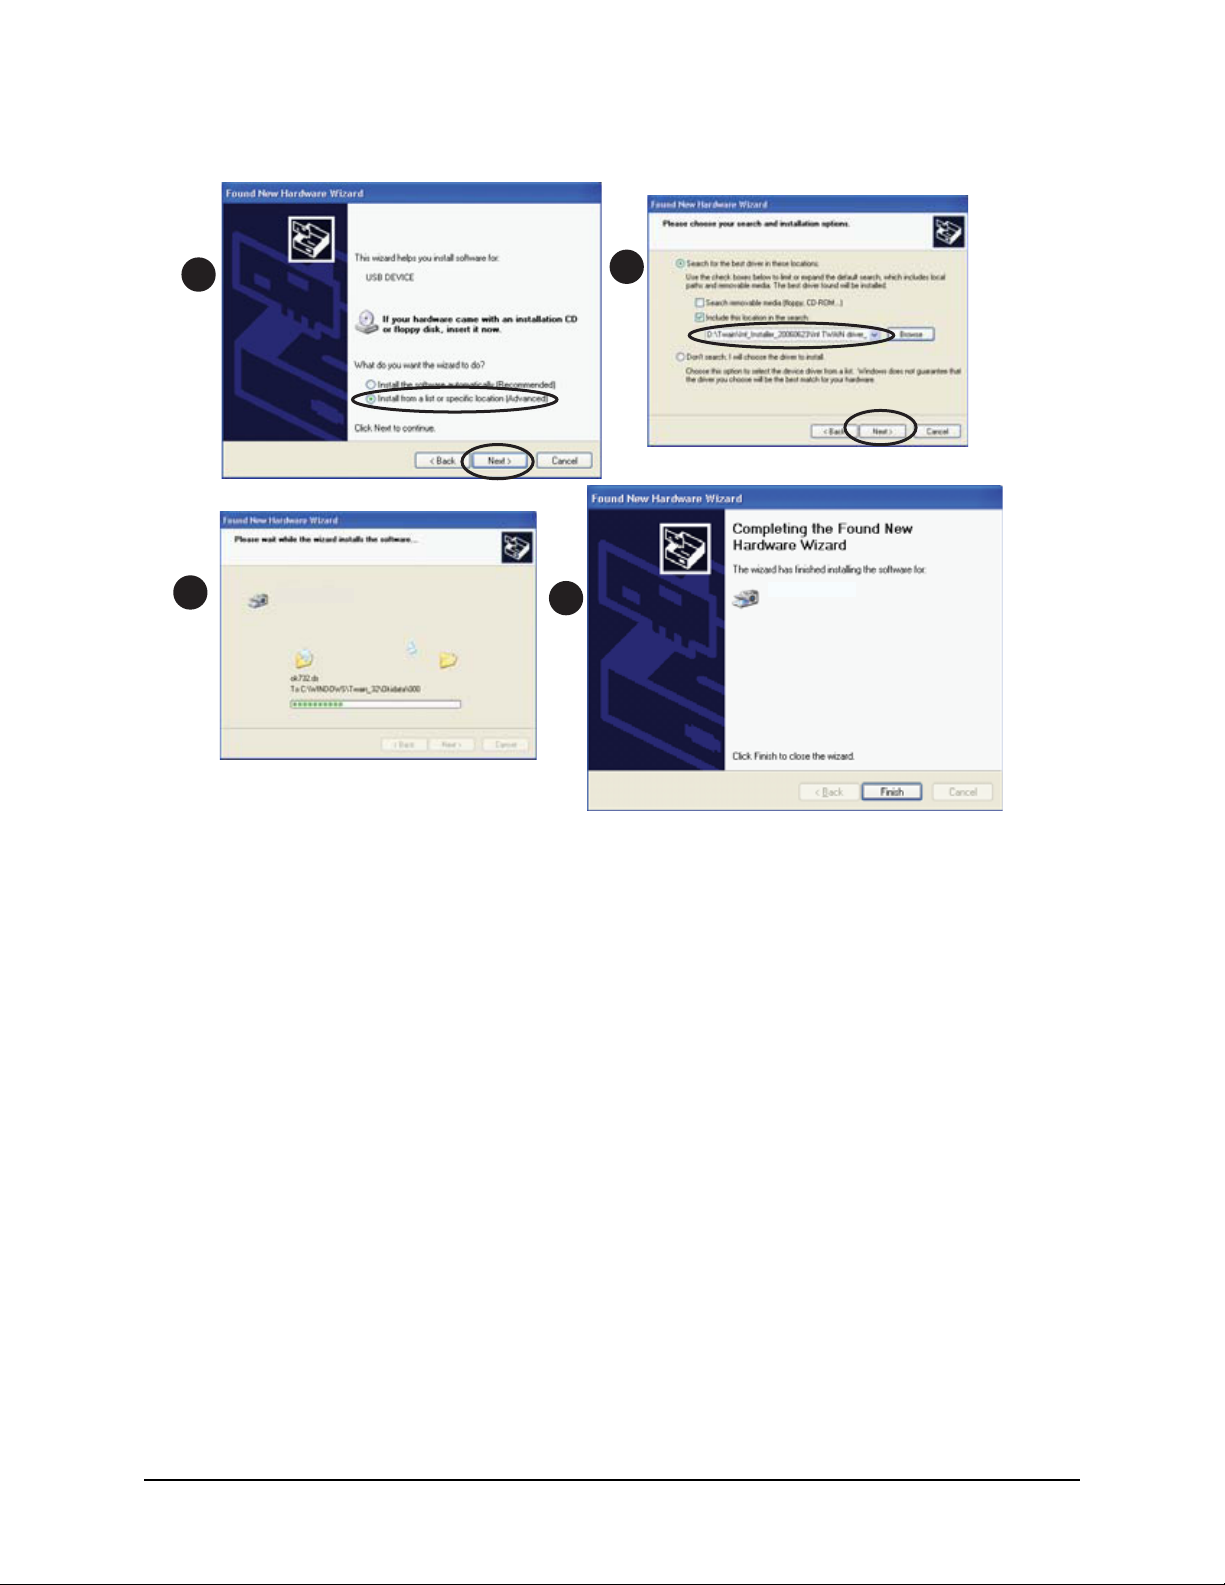
4. Install the TWAIN driver first
c
a
b
d
22 • Getting Started
Page 23
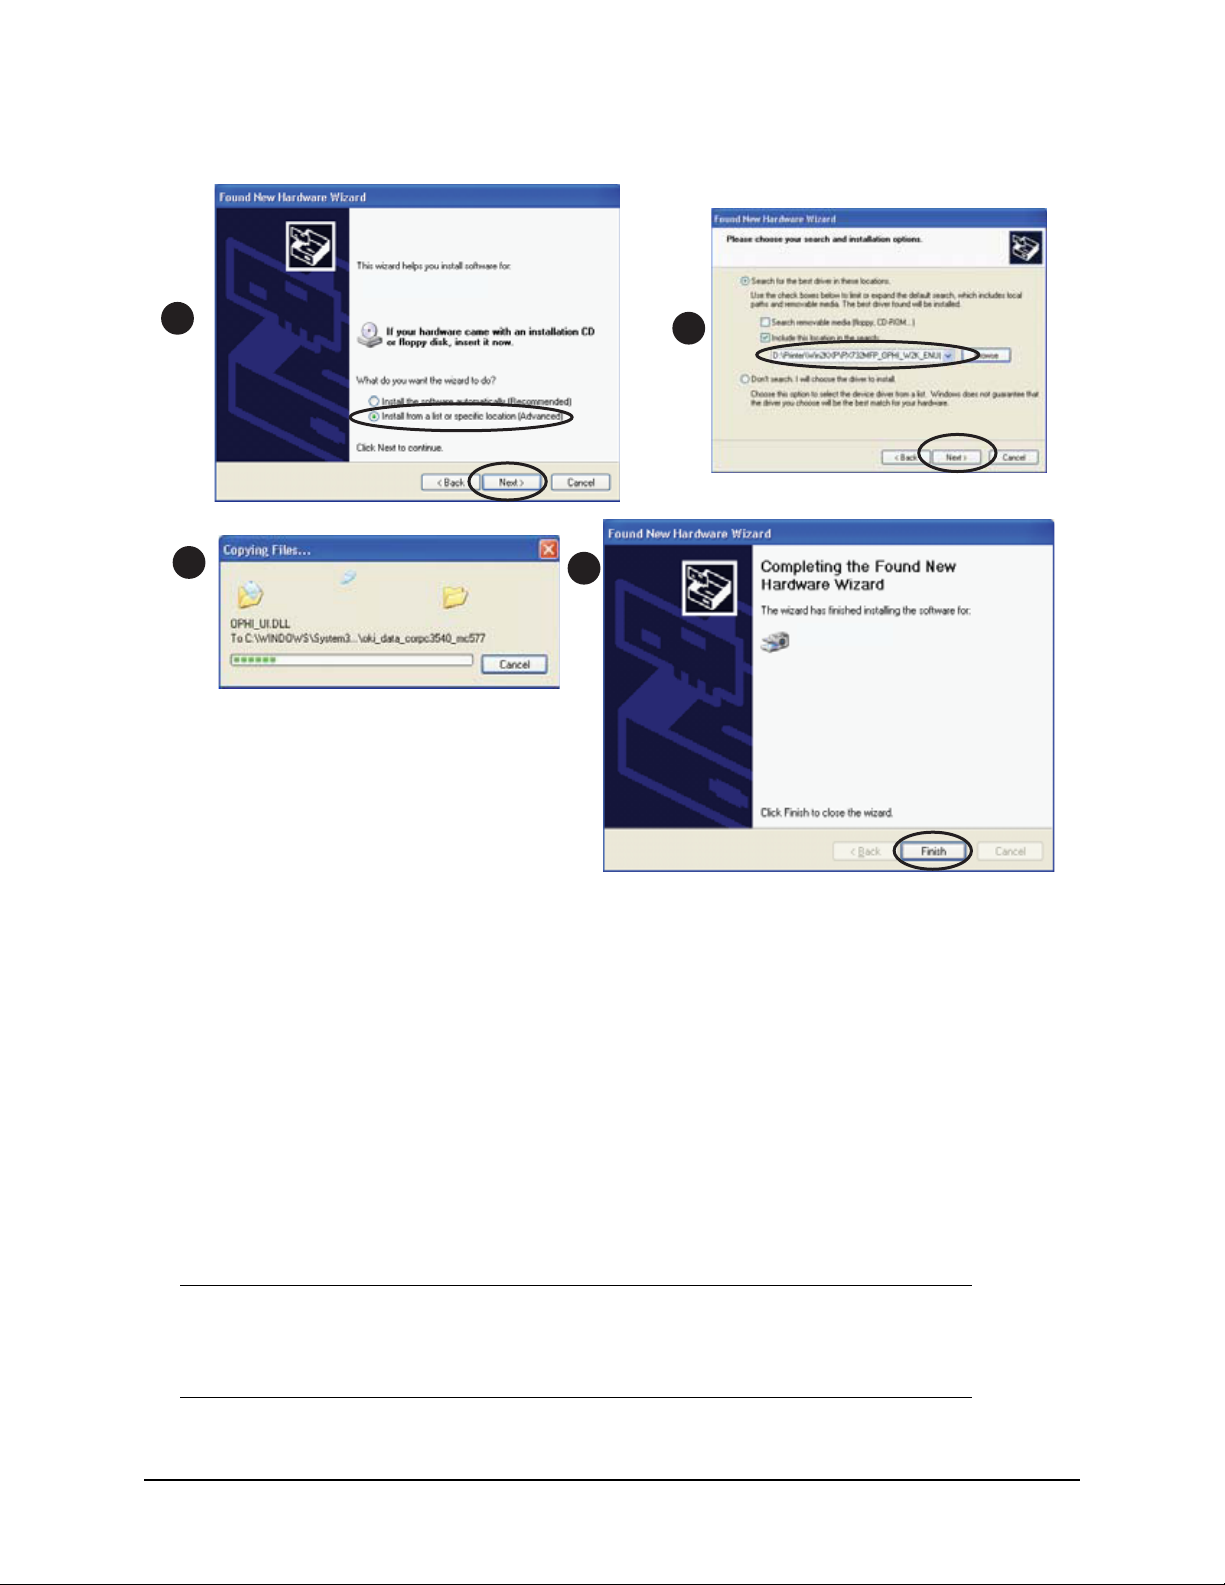
5. Next install the Printer driver
a
b
c
d
Mac OS X: Installing the Printer Driver
The information in this section is based on Mac OS X Leopard (10.5). Other versions
may appear slightly different, but the principles are the same.
1. Insert the CD-ROM and run the Oki driver installer program.
2. Follow the on-screen instructions to install the printer driver.
3. Attach the printer to a USB port on your computer.
4. Switch on the printer.
5. Choose Apple Menu > System Preferences > Print & Fax.
6. If the printer is already in the list of printers, click “-” to remove it.
Note
This is necessary as Leopard may not be using the correct Oki printer
driver files.
23 • Getting Started
Page 24
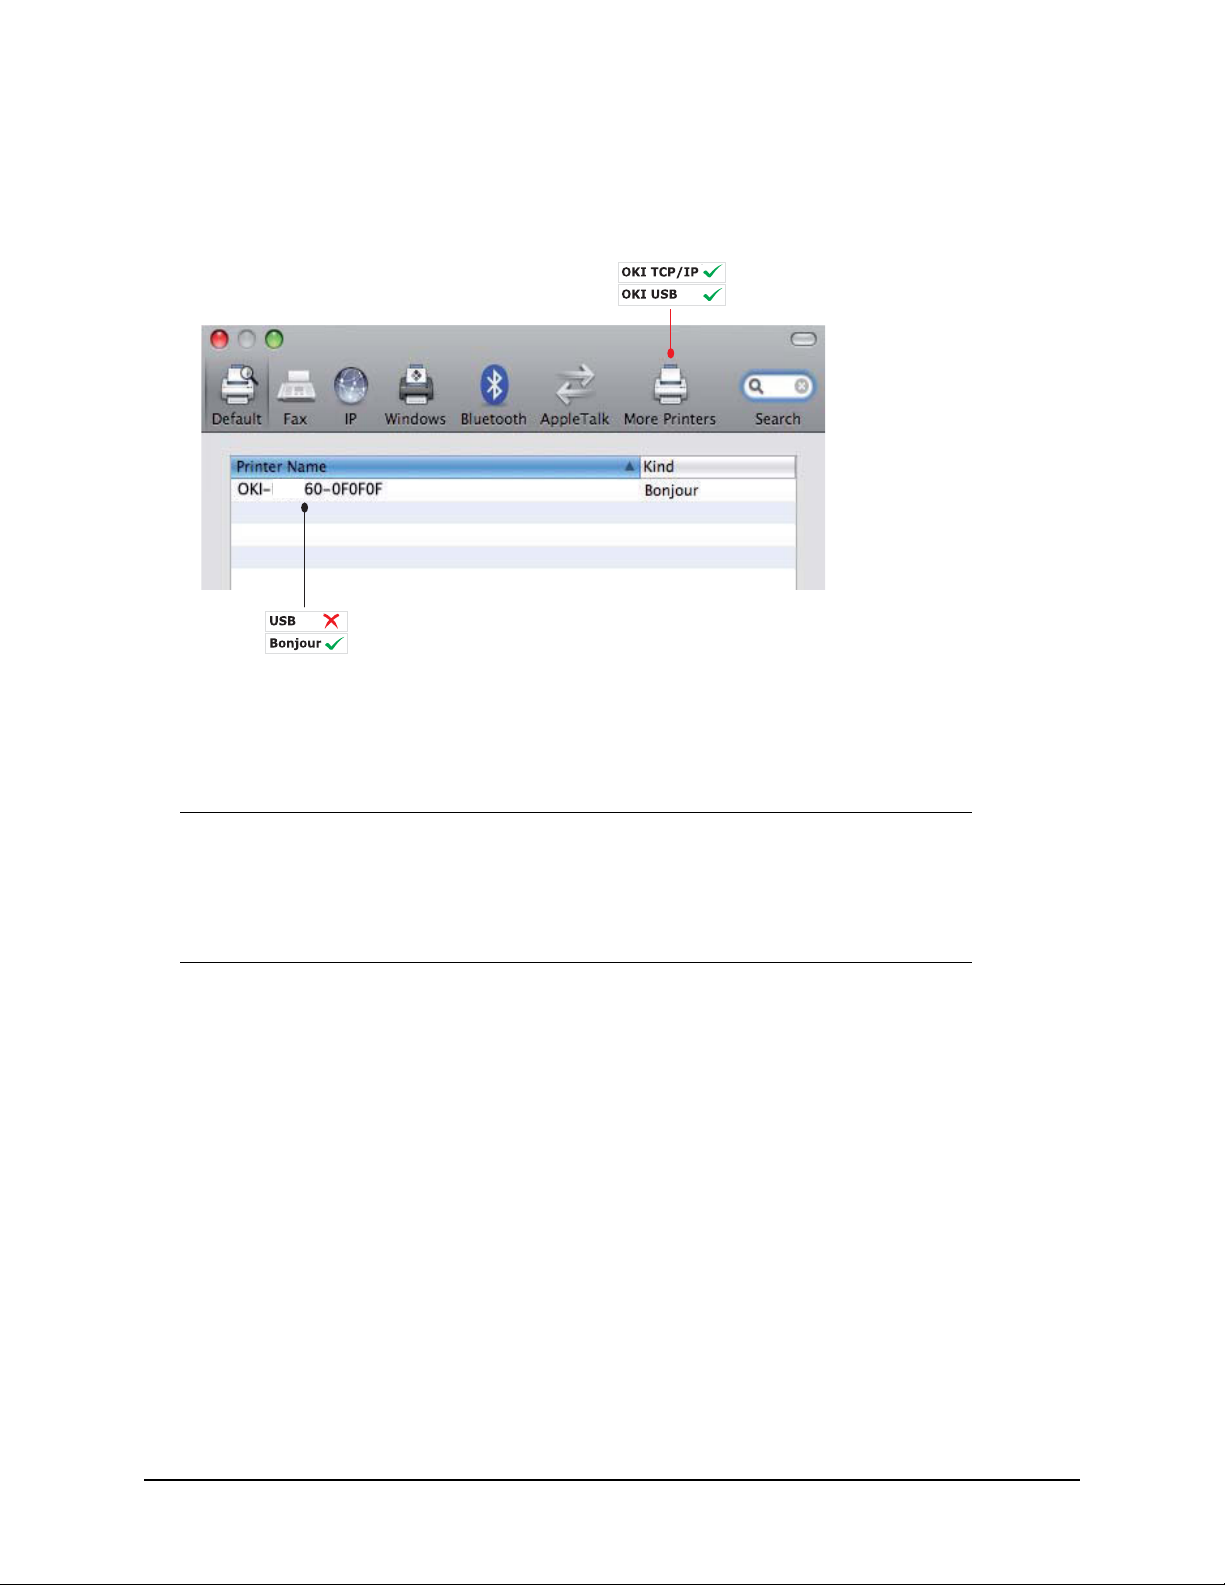
7. Click “+” to add a new printer.
8. Click More Printers.
9. Choose OKI USB from the pop-up menu.
MB4
10.Select your printer model and click Add.
The printer is added to the list of printers.
11.Restart your computer.
Note
Please refer to the readme file on the CD for details on installing the
appropriate Macintosh driver.
You can choose PCL or PS driver on the Macintosh Operating System.
Fax Driver: Windows Only
The fax driver allows you to send faxes directly from your computer without printing
the document first. With the fax driver you are sending the fax data from your
computer to the MFP, and then the MFP automatically sends the document.
Windows XP has built-in fax support: you can use your computer’s modem to send
faxes directly from your computer.
Installing the Fax Driver
This is installed as part of the Oki driver installer wizard.
MFP Setup Tool: Windows Only
Installation of the MFP setup utility is optional and can be found on the CD under the
Utilities folder.
24 • Getting Started
Page 25
The MFP setup tool can discover the devices over USB or network connections. To
discover, select File > Printer Discovery.
The MFP setup tool allows you to configure your unit. Refer to “Pre-configuration
information” on page 38 for detailed instructions.
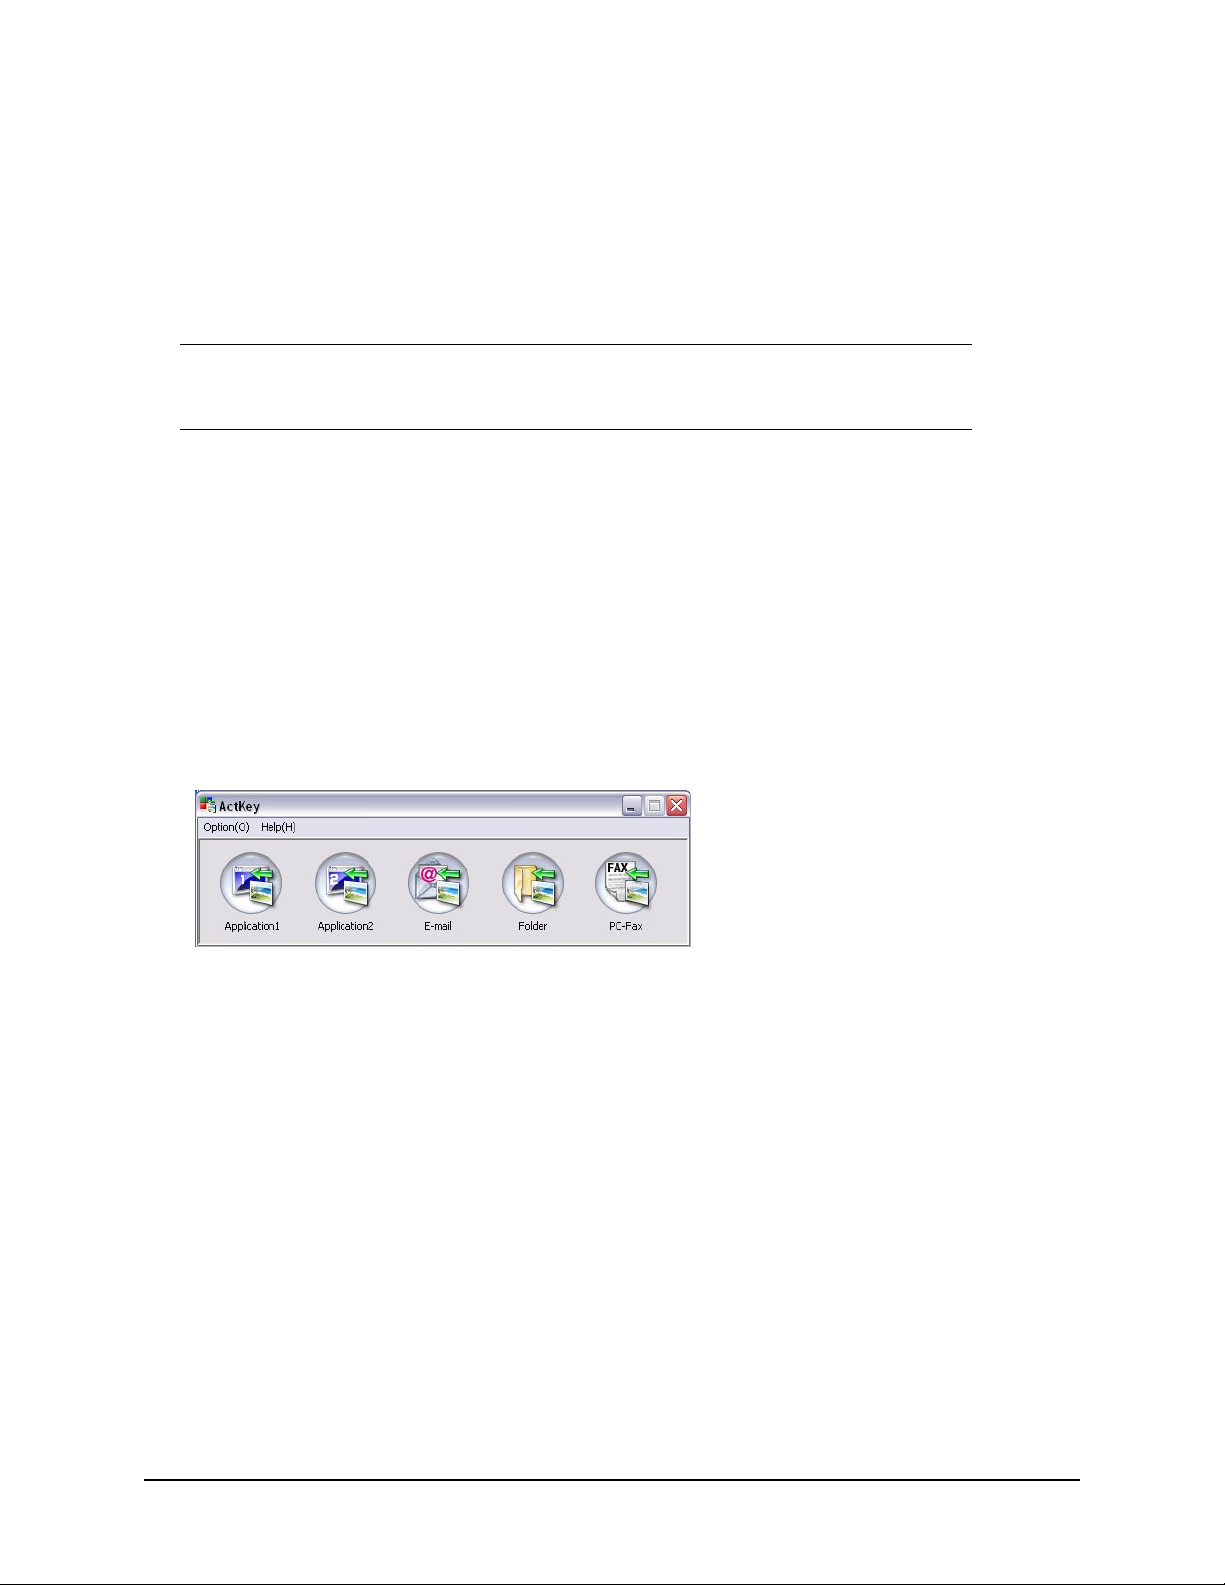
Actkey Utility: Windows Only, USB Only
Note
You must have the TWAIN driver installed.
The Actkey utility enables the unit to receive one key touch commands from a locally
connected computer.
Installation of the Actkey utility is optional. It is on the Driver/Utilities CD under the
Utilities folder.
Information on using the Actkey utility can be found in “Scan to PC” on page 79.
Setting up the Actkey Utility
1. Install the Actkey utility from the CD:
Set-up will place an “Actkey” icon on your desktop.
2. Double-click this icon to open the Actkey console.
25 • Getting Started
Page 26
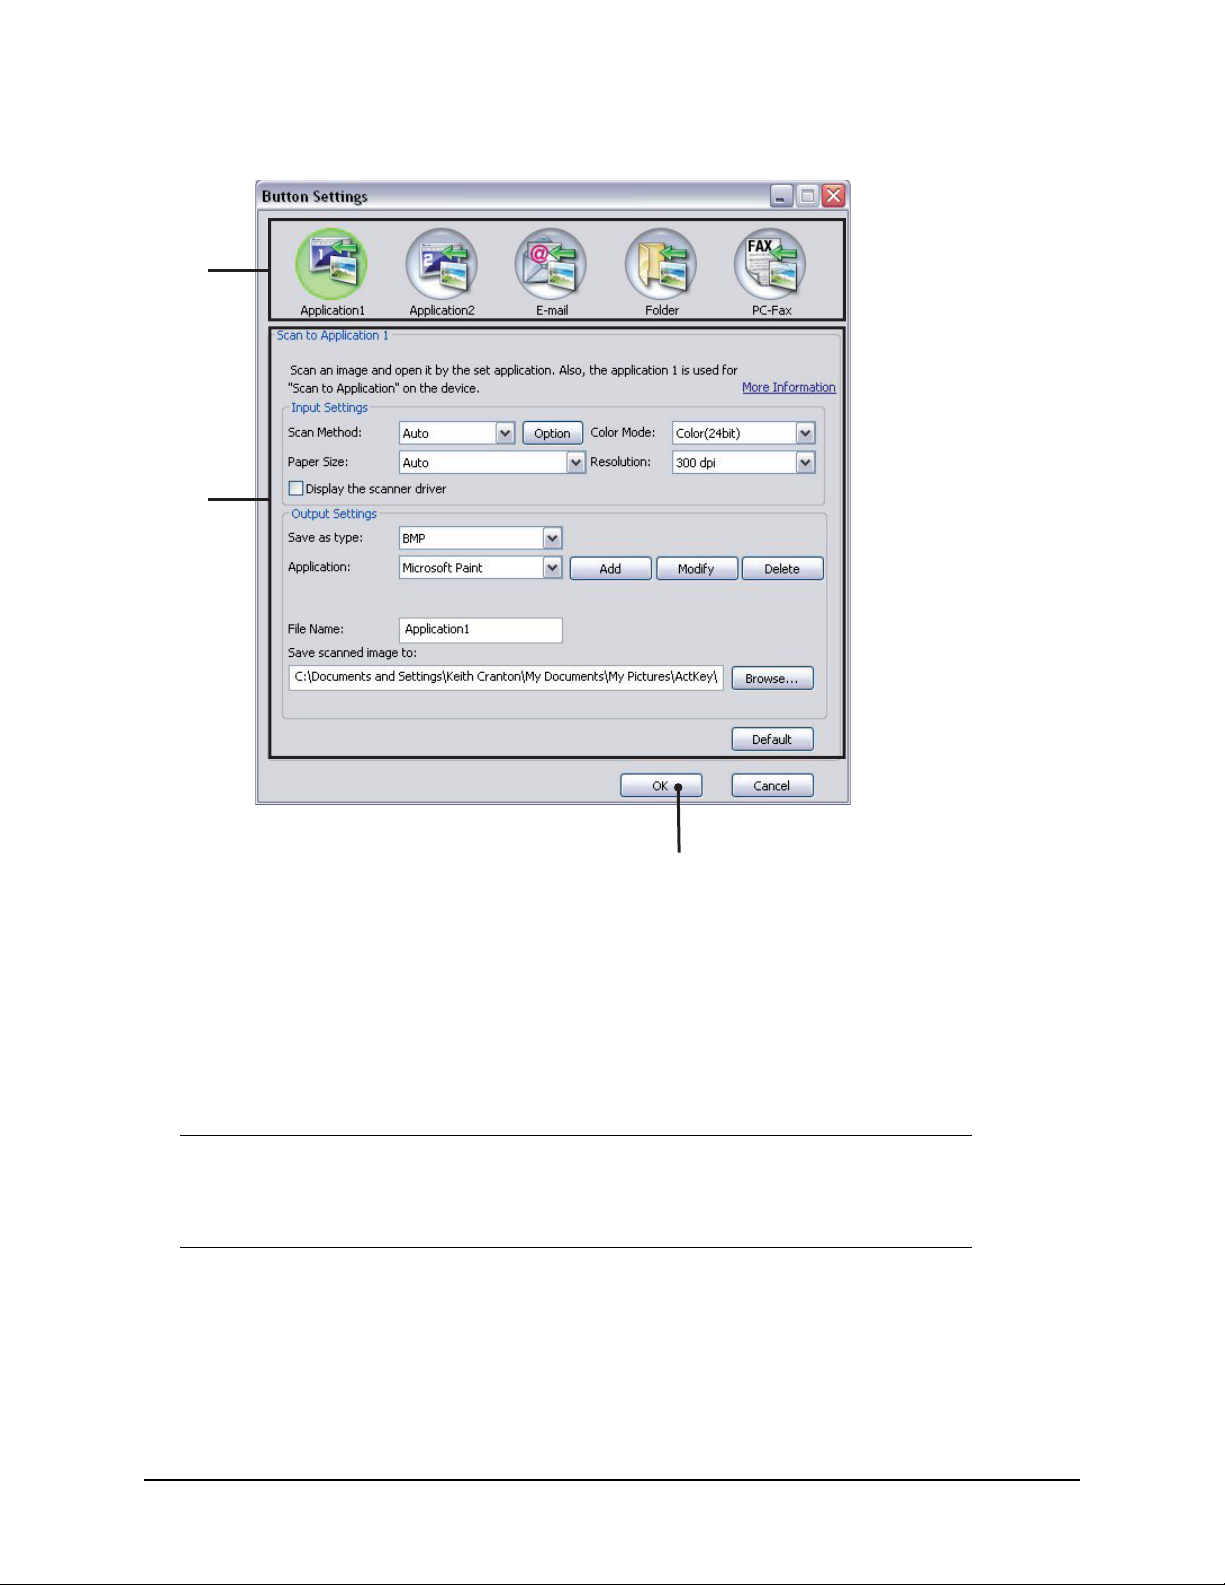
3. Select Options > Button Settings. The following screen displays.
1
2
3
4. Select the function you want to set in section (1).
5. Set the parameters for this function in section (2).
6. When you have completed settings, press OK (3).
The Utility returns to the Actkey console.
7. To use Actkey in Local PC mode (i.e. push scanning), it must be set as the
program to handle scanner events:
Note
The following example uses Windows XP. The steps may vary if you are
using any other operating system, but the principle is the same.
a. Select Start > Control Panel.
b. Double-click Scanners and Cameras.
c. Right-click the MFP icon and click Properties.
d. Select the Events tab.
26 • Getting Started
Page 27
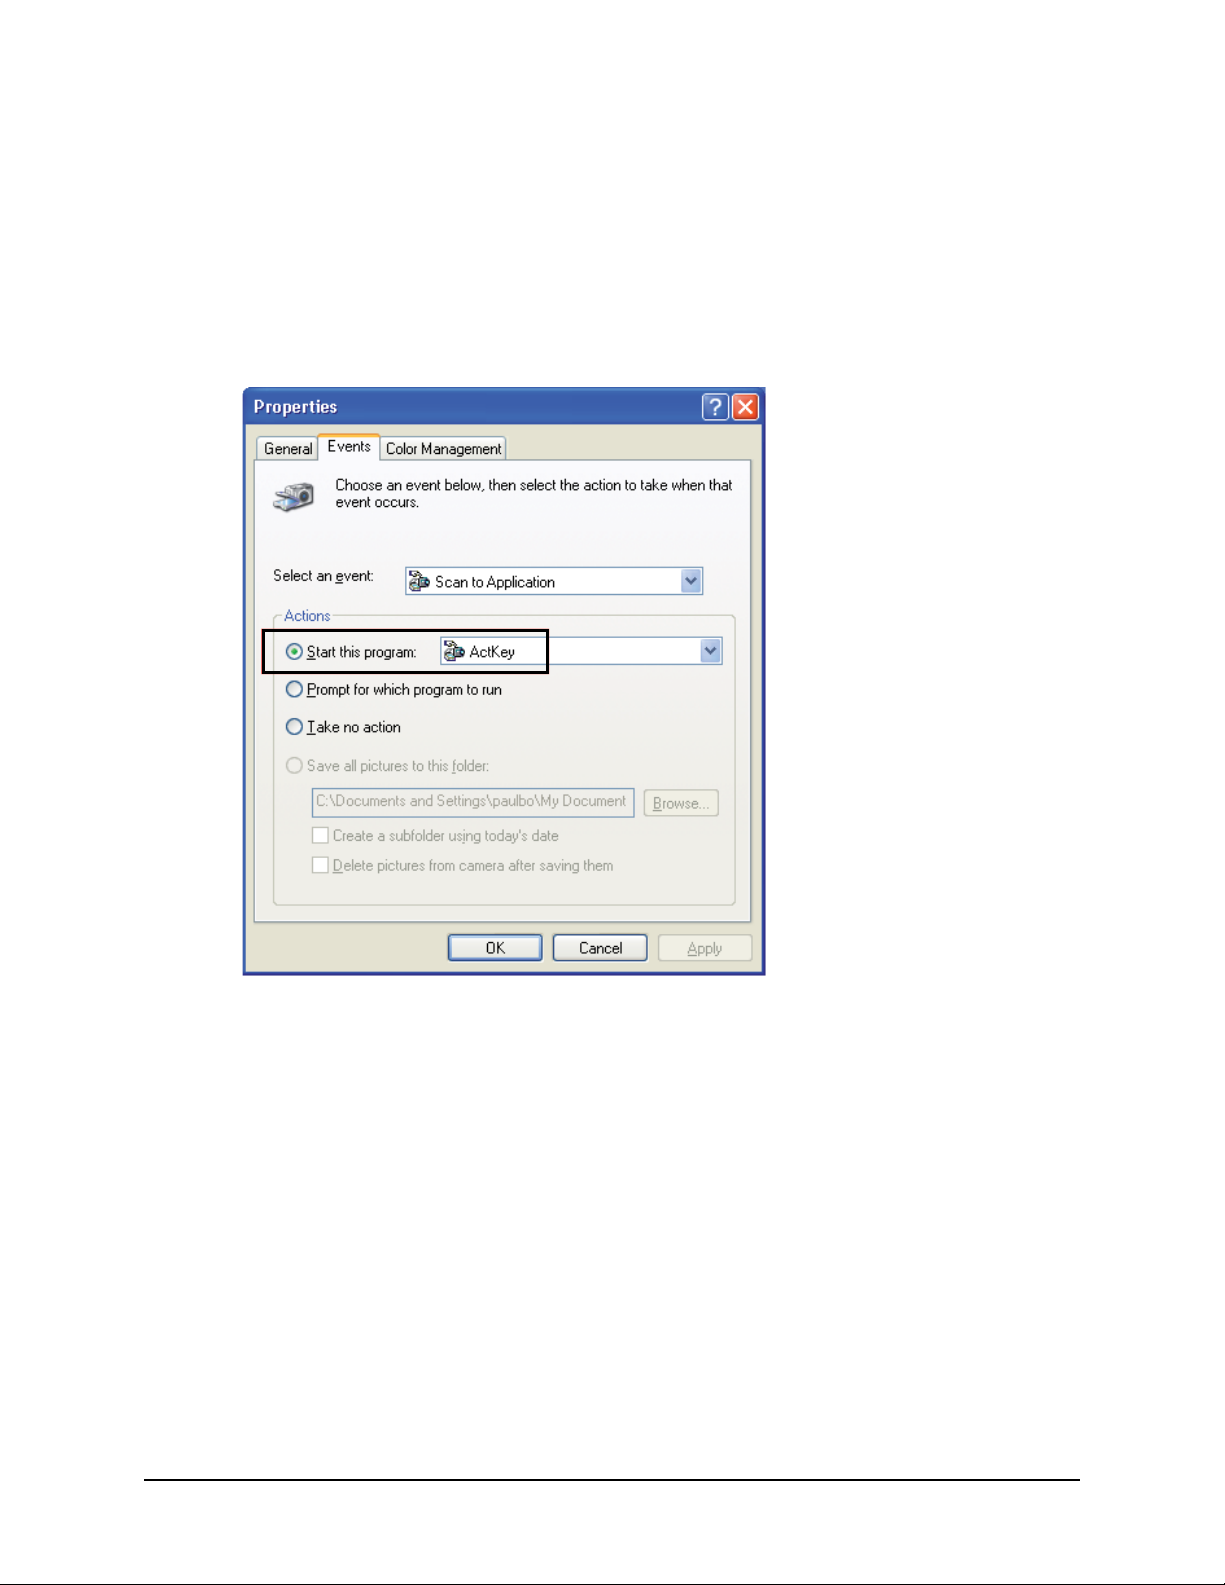
e. Choose an event from the Select an event drop-down menu.
f. In the Actions field, click Start this program and choose ActKey from the
dropdown menu.
g. Click Apply.
h. Repeat steps e to g for each event, e.g. Scan to Application, E-mail, Folder and
PC-Fax.
i. Click OK to confirm.
Paper Recommendations
Your MFP will handle a variety of print media, including a range of paper weights and
sizes, transparencies and envelopes. This section provides general advice on choice
of media, and explains how to use each type.
Standard Paper: The best performance will be obtained when using standard 60 to
120 g/m² paper designed for use in copiers and laser printers.
Not Recommended: Use of heavily embossed or very rough textured paper is not
recommended.
Letterhead Stationery: Pre-printed stationery can be used, but the ink must not offset
when exposed to the high fuser temperatures used in the printing process.
27 • Getting Started
Page 28

Tray 1
The paper tray can handle paper weights of 16 to 32 lb. US Bond (60 to 120 g/m²).
Size Dimensions Weight (US Bond g/m²)
Letter 8.5 x 11 inches Light
Legal 13 8.5 x 13 inches
Legal 13.5 8.5 x 13.5 inches
Legal 14 8.5 x 14 inches
Executive 7.25 x 10.5 inches
A5 148 x 210mm
B5 182 x 257mm
A4 210 x 297mm
• 16-17 lb. US Bond
• 60 - 63 g/m
Medium Light
• 18 lb. US Bond
• 64 - 74 g/m
Medium
• 20-24 US Bond
• 75 - 89 g/m
Medium Heavy
• 24-28 lb. US Bond
• 90 - 104 g/m
Heavy
• 28-32 lb. US Bond
• 105 - 120 g/m
2
2
2
2
2
Note
The optional second tray can also handle the above paper sizes except
for Statement.
If you have identical paper stock loaded in another tray (the optional 2nd or the multi
purpose tray) you can have the MFP switch to another tray when the current tray runs
out of paper. When printing from Windows applications, this function is enabled in the
driver settings. When printing from other systems, this function is enabled in the
Printer menu.
Multi Purpose Tray
The multi purpose tray can handle the same media sizes as the cassette trays but in
weights from 60g/m² up to 163g/m². For very heavy paper stock, use the face up
(rear cover) paper stacker. This ensures that the paper path through the MFP is
almost straight.
28 • Getting Started
Page 29

Use the multi purpose tray for printing on envelopes and transparencies. Up to 50
sheets of transparencies or 10 envelopes can be loaded at one time, subject to a
maximum stacking depth of 10 mm.
Size Dimensions Weight
Letter 8.5 x 11 inches
Legal 13 8.5 x 13 inches
Legal 13.5 8.5 x 13.5 inches
Legal 14 8.5 x 14 inches
Executive 7.25 x 10.5 inches
Statement 5.5 x 8.5 inches
A6 105 x 140 mm
A5 148 x 210 mm
A4 210 x 297 mm
B5 182 x 257 mm
Com-9 Envelope 98,.4 x 225.4 mm
Com-10 Envelope 104,7 x 241,3 mm
Monarch Envelope 98.4 x 190.5 mm
DL Envelope 109.9 x 219.9 mm
C5 Envelope 162 x 229 mm
C6 114 x 162 mm
Custom Sizes:
Width
Length
3.4 - 8.5 inches
86 - 216 mm
5.5 - 14 inches
140 - 355.6 mm
Light
• 16-17 lb.US Bond
• 60 - 63 g/m
Medium Light
2
• 18 lb. US Bond
• 64 - 74 g/m
Medium
• 20-24 US Bond
• 75 - 89 g/m
Medium Heavy
• 24-28 lb. US Bond
• 90 - 104 g/m
Heavy
• 28-32 lb. US Bond
• 105 - 120 g/m
2
2
2
2
Note
Label mode must be selected in the printer driver, if you want to print
on heavy media which exceeds 120 g/m
2
.
29 • Getting Started
Page 30

Envelopes
Caution!
Envelopes should be free from twist, curl or other deformations. They
should also be of the rectangular flap type, with glue that remains intact
when subjected to hot roll pressure fusing used in this type of printer.
Window envelopes are not suitable.
Transparencies
Caution!
Do not use transparencies designed for use in color laser printers and
photocopiers.
Recommended type is CG3300 by 3M (A4 or Letter size).
Labels
Caution!
Labels should cover entire carrier sheet. The carrier sheet or adhesive
must not be exposed to any part of the printer.
Face Down Stacker
The face down stacker on the top of the MFP can hold up to 150 sheets of 64g/m²
standard paper and can handle paper stocks up to 120g/m². Pages printed in reading
order (page 1 first) will be sorted in reading order (last page on top, facing down).
Face Up Stacker
For the face up stacker, cover at the rear of the MFP should be opened when required
for use. In this condition paper will exit via this path, regardless of driver settings.
Always use this stacker and the multi purpose feeder for heavy paper stocks.
Duplex Unit
The duplex unit provides automatic two-sided printing on the same range of paper
sizes as tray 2 (i.e. all cassette sizes except A6), using paper stocks from 75-105g/
m².
30 • Getting Started
Page 31

Loading Paper
Cassette Trays
1. Remove the paper tray from the MFP.
31 • Getting Started
Page 32

2. Adjust the rear stopper (3) and paper guides (4) to the size of paper being used.
For loading A4 or Legal size paper, push the lever in the arrow direction (b) and
extend the paper tray using the rear paper stopper.
3
b
4
3. Fan the paper to be loaded at the edges (1) and in the middle (2) to ensure that
all sheets are properly separated, then tap the edges of the stack on a flat
surface to make it flush again (3).
1
2
3
32 • Getting Started
Page 33

4. Load paper short edge feed (SEF) (1) (for letterhead paper load face down with
top edge towards the front of the paper tray) up to mark (a). The paper level
indicator (2) provides a visual indication of how much paper is left in the tray.
1
1
a
2
Note
For letter head stationery, load the paper face down with the top edge
towards the front of the paper tray
33 • Getting Started
Page 34

5. If required, set the correct media type in the Printer menu. .
Note
To prevent paper jams:
• Do not leave space between the paper and the guides and rear
stopper.
• Do not overfill the paper tray. Capacity depends on the type of
paper stock.
• Do not use damaged paper.
• Do not load paper of different sizes or types at the same time.
• Close the paper tray gently.
• Do not pull the paper tray out during printing (except as described
below for the 2nd tray)
• If you have two trays (optional second tray fitted) and you are
printing from the 1st (upper) tray, you can pull out the 2nd
(lower) tray during printing to reload it. However, if printing from
the 2nd tray, do not pull out the 1st tray. This will cause a paper
jam.
• For face down printing, make sure the face up (rear cover) stacker
is closed (the paper exits from the top of the MFP). Stacking
capacity is approximately 150 sheets, depending on paper weight.
• For face up printing, make sure the face up (rear cover) stacker is
open Always use the face up (rear cover) stacker for heavy paper
(card stock, etc.).
Caution!
Do not open or close the rear paper exit while printing as it may result in a
paper jam.
34 • Getting Started
Page 35

6. Replace the tray in the MFP.
Loading Paper: Multi Purpose Tray
1. Open the multi purpose tray (1). Fold out the paper support (a)
1
a
2
2. Press gently down on the paper platform (2) to ensure it is latched down.
35 • Getting Started
Page 36

3. Adjust the paper guides (3) to the size of paper being used. Do not exceed the
3
paper capacity of about 50 sheets or 10 envelopes. Maximum stacking depth is
10 mm (about 3/8-inch.
4. Press the tray latch button (4) inwards to release the paper platform, so that the
paper is lifted and gripped in place.
4
36 • Getting Started
Page 37

• For single-sided printing on headed paper load the paper into the multi
purpose tray with pre-printed side up and top edge into the MFP.
• For two-sided (duplex) printing on headed paper load the paper with preprinted side down and the top edge away from the MFP.
• Envelopes should be loaded face up with top edge to the left and short edge
into the MFP. Do not select duplex printing on envelopes.
• Load transparencies face up and top edge into the MFP.
5. Set the correct paper size for the multi purpose tray in the Printer menu.
a. Press the Down Arrow key repeatedly until Menu appears, then press Enter.
b. Navigate: Menu Function > Print Menu > Tray Configuration > MP Tray Config
> Paper Size.
37 • Getting Started
Page 38

Configuring your machine __________
Minimum configuration requirements
To make the best of this MFP, the following configuration is required:
To send faxes:
A PSTN telephone line connection.
To send e-mails:
• TCP/IP network.
• A SMTP and an optional POP3 server.
• Default “From” Address (this MFP’s Address).
To file document(s) via intranet
• FTP or CIFS Protocol environment.
• Windows 2000, Windows XP, Windows Vista, Mac OS X or FTP server.
Pre-configuration information
General
Ensure that you have the relevant permission/PIN numbers before starting.
The factory set default passwords/PIN are:
Administrator aaaaaa
PIN 000000
Network (webpage) aaaaaa
Note
The administrator password and PIN should be changed and maintained
by the system administrator.
38•Configuring your machine
Page 39

Fax set up
Your MFP has to be set up properly to allow faxing from the machine. The following
parameters must be set before using the fax function:
• Date and time
• Country code
• Local phone number
• Sender ID
See “Initial set up” on page 61 for details.
Note
If you ran the Oki driver installer program from the CD-ROM you may
have already set the time zone, date and time (Windows only) via the
Panel Language Setup utility.
Network set up
The MFP must also be set up properly on your network to perform scan to e-mail and
other functions. In order for other network devices to find the MFP on the network,
the following network parameters have to be set.
1. IP Address Set:
2. IP Address:. . .
3. Subnet Mask:. . .
4. Gateway Address:. . .
5. DNS Server:. . .
6. SMTP Server:. . .
7. SMTP Port:25
8. POP3 Server:. . .
9. POP3 Port:110
Explanation:
1. IP Address Set:
Choose Auto to obtain IP/subnet/gateway addresses automatically from DHCP
server. After changing setting from Manual to Auto, the MFP will automatically
reboot the network card.
2. IP Address:
The Internet Protocol (IP) address assigned to your machine by your network
administrator.
39•Configuring your machine
Page 40

3. Subnet Mask:
The net mask address assigned by your network administrator.
4. Gateway Address:
The gateway IP address assigned by your network administrator.
5. SMTP Server:
The IP address of your SMTP Mail Server assigned by your network administrator.
6. SMTP Port:
The port number of your SMTP Mail Server.
7. DNS Server:
The IP address of DNS Server assigned by your network administrator.
8. POP3 Server:
The IP address of your POP3 server.
9. POP3 Port:
The port number of your POP3 Server.
Enter the DNS name, or IP and port number of your POP3 server if your mail server
requires POP3 authentication, before sending e-mails from the machine.
Note
You must also set up the “From” details to allow e-mail sending.
40•Configuring your machine
Page 41

Notes
1. DHCP server: With DHCP (Dynamic Host Configuration
Protocol), a host can automatically be given a unique IP
address each time it connects to a network-making IP
address management an easier task for network
administrators. If the DHCP server is available from your
network, you do not need to enter TCP/IP, subnet mask,
gateway, and DNS information. Instead, this information will
be automatically given for the MFP.
2. IP Address: An IP (Internet Protocol) address uniquely
identifies a host connection to an IP network. System
administrator or network designer assigns the IP address.
The IP address consists of two parts, one identifying the
network and the one identifying your node. The IP address is
usually written as four numbers separated by periods. Each
number can be zero to 255. For example, 10.1.30.186 could
be an IP address.
3. SMTP: (Simple Mail Transfer Protocol) is the main
communication protocol used to send and receive e-mail on
the Internet.
4. DNS: (Domain Name System). The DNS server identifies
hosts via names instead of IP addresses. If the DNS server is
available on your network, you can enter the domain name
instead of digits for your SMTP or POP3 servers, such as
Pegasus.com.tw instead of 120.3.2.23.
5. POP3: POP3 is the latest Post Office Protocol 3, this is a
service that stores and serves e-mails for various client
machines that are not connected to the Internet 24 hours a
day. E-mails are held in POP3 until you log on.
Internet communication features
Scan to e-mail
The MFP allows you to deliver your scanned document to e-mail addresses on the
network. The document is first scanned and converted to a standard PDF, JPEG or
TIFF file format and then transmitted to remote recipients simultaneously as an
e-mail attachment.
When you send an e-mail to someone using this MFP, it uses Simple Mail Transfer
Protocol (SMTP) to transfer your outgoing e-mails to your SMTP mail server, and then
sends these e-mails to your recipients through the internet.
41•Configuring your machine
Page 42

Setting up an SMTP Server
1. Using the Down arrow key, scroll to Menu, then press Enter.
2. Using the Down arrow key, scroll to Admin setup, then press Enter.
3. Using the arrow keys and on-screen keypad, enter the Administrator password.
Highlight Done and press Enter.
4. Using the Down arrow key, scroll to Network Menu, then press Enter.
5. Using the Down arrow key, scroll to Mail Server Setup , then press Enter.
6. Press Enter to select SMTP server.
7. Press Enter.
8. Enter your IP address.
Note
Numbers are entered using the keypad.
When a number is entered from the keypad, the number currently
displayed is cleared and the number just entered is displayed as the first
digit. When another number is entered, the first number entered moves
to the left, and so on.
You can increment/decrement the digits using the UP/Down arrow keys.
9. To confirm, press the Enter key.
Note
To cancel the IP address, press the Stop key until you exit the menu
without saving the changes.
Scan to NetworkPC
Via the intranet with FTP (File Transfer Protocol) or CIFS (Common Internet File
System). The MFP allows you to save scanned documents directly to a designated
server or to a personal computer on the network in a standard PDF, JPEG, or TIFF file
format.
CIFS is the sharing system of Microsoft Windows. What is unique about this filing
function is that it allows all corporate users to share one machine to send documents
to each file folder on a designated server or individual computer.
The following settings or destinations must be defined by the system administrator
before the MFP can be used to distribute any scanned document(s) on the network.
• Network and E-mail parameters: Defines the parameters for TCP/IP, SMTP, and
POP3 protocols to send your scanned document to e-mail addresses.
42•Configuring your machine
Page 43

• Filing destinations: Defines the protocols and destinations to send your scanned
document to FTP servers or any personal computers on the network.
Note
1. If the system administrator has chosen DHCP, then the IP
address of TCP/IP, gateway, subnet mask, and DNS server
will be automatically given.
2. When installing the MFP for the first time, it is recommended
that the Administrator retain the default system settings.
The settings can be customized at a later date, once you are
familiar with the operation and functionality.
Configuration
There are a number of configuration options available which allow you to change the
scanner, fax and printer settings to suit your own needs. There are three methods
of configuring your MFP:
1. From the MFP’s web page.
2. From the MFP’s Setup Tool utility.
3. From the MFP control panel.
For illustration purposes only, the configuration options shown are as accessed via the
control panel.
43•Configuring your machine
Page 44

. . . from the web page
Type the IP address of the MFP in the URL field of your browser and then press Enter.
The MFP web page displays. For example: http://10.18.207.81
Note
The Administrative Settings are blocked by a password.
Refer to “Pre-configuration information” on page 38.
44•Configuring your machine
Page 45

. . . from the setup tool
If you have not already done so, install the setup tool as described in “MFP Setup Tool:
Windows Only” on page 24.
Note
The Administrative Settings are blocked by a password. Refer to “Preconfiguration information” on page 38.
45•Configuring your machine
Page 46

. . . from the control panel
1. Press the Down arrow key (1) on the control panel until Menu is highlighted, then
press Enter (2).
2. Press the Down arrow key (1) until Admin Setup is highlighted, then press Enter
(2).
Note
The Admin Setup option is blocked by a password. Refer to “Preconfiguration information” on page 38.
46•Configuring your machine
Page 47

The Printer Menu
Copy function
This is the default mode on Power up, with Access Control disabled. Use the Down
arrow key to select other functions and Enter to select an option.
Default option (if relevant) is highlighted.
LEVEL 2 DESCRIPTION OPTIONS
Copies: Number of copies required (default 1)
100%
Letter Paper Supply Legal13, Legal13.5,
Mixed Mode (Resolution)
Density:
Tray1
Off
Reduce/Enlarge copy A4->A5
0
Density of print -3 ~ 0 ~ +3
Input Tray:Selects cassette Tray or Multi
Purpose Tray
Collate:Sets collate function on or off On,
1
to 99
Leg14->Let
Leg13.5->Let
Leg13->Let
A4->B5
Fit to page
100%
B5->A4
Let->Leg13
Let->Leg13.5
Let->Leg14
A5->A4
Custom
Legal14,
A5, B5
Mixed
HiRes.Mixed,
HiRes.Photo
Tray 1,
MP Tray
Letter
, Photo,
Tray 2 ,
Off
, A4,
Off
1in1
E.E: Edge Erase: This sets the peripheral areas of the
M.S-R: Margin Shift - Right: This sets the amount to shift
M.S-B: Margin Shift - Bottom: This sets the amount to
Duplex On,
N-up:Selects how many prints per page
document to block out.
the document image to the right.
shift the document down.
ID Card Copy On,
47•Configuring your machine
Off
1in1
, 2in1, 4in1(Hor.),
4in1(Ver.)
0.00,
0.25, 0.50, 0.75,
1.00 inch
0
, 6, 13, 19, 25mm
0.00,
0.25, 0.50, 0.75,
1.00 inch
0
, 6, 13, 19, 25mm
0.00,
0.25, 0.50, 0.75,
1.00 inch
0
, 6, 13, 19, 25mm
Off
Page 48

Scan/scan to function
Use the Down arrow key to select this function and Enter to select an option.
E-mail
LEVEL 2 DESCRIPTION OPTIONS
Check
Address
Reply to: Choose Email “Reply to” Address Book:
Destination Choose Address from: Address Book:
Subject Choose from the default subject list (set by the
File Name A file name should be entered for the scanned
Displays the default address (set by the
administrator).
Screen Entry:
Number:
LDAP: Name
Screen Entry:
Number:
LDAP: Name
Subject List
administrator) or enter a subject.
images.
This file name can be entered in Key Pad Mode.
Up to 64 characters can be entered as text,
except for the following;
\ / : * ? " < > |
Screen Entry
N/A
Address:
Method: OR/AND
Search: Address
List
Address:
Method: OR/AND
Search: Address
List
Density Select density. -3, -2, -1,
Document
Size
File Format Select file format. PDF, TIFF
Select document size. A4,
Letter
Legal14
48•Configuring your machine
0
, 1, 2, 3
, Legal13, Legal13.5,
Page 49

Network PC
Note
The MFP must be connected to a Network server to enable Scan
to Network PC to be set up.
Profiles can be created and managed using the machine’s web
page or the MFP Setup Tool.
LEVEL 2 DESCRIPTION OPTIONS
Profile If any profiles have been created the list will be
displayed. Max 20 profiles can be created.
Color Select Select Color Color,
PC
LEVEL 2 DESCRIPTION OPTIONS
Email Scan to Email and save file
Folder Scan to PC based folder
Application Scan to Application1
Fax Scan to Facsimile and save file
B/W
Fax function
LEVEL 2 DESCRIPTION OPTIONS
Check Dest. Displays the selected destination fax number.
Fax No. Input a destination fax number.
Phone Book Select fax number from the phone book.
Mode Select the transmission resolution
Density Select density by entering a number in the range -3
to +3
Document
Size
Delayed
Time
Select document size A4
Select transmission time dd/mm/yyyy
Standard
Fine
Extra Fine
Photo
0
-3 ~
Letter
Legal13.5, Legal14
hh:mm
~ +3
, Legal13,
49•Configuring your machine
Page 50

Menu Function
LEVEL 2 ITEM DESCRIPTION/OPTIONS
View
Information
Supplies Life Toner (n.nk) Remaining toner nnn%
Drum Remaining nnn%
Network IPv4 Address Self explanatory xxx.xxx.xxx.xxx
Subnet Mask Self explanatory xxx.xxx.xxx.xxx
Gateway
Address
MAC Address Self explanatory xx.xx.xx.xx.xx.xx
NIC Program
Version
NIC Default
Version
System Serial Number Self explanatory xxxxxxxxxxxxxxxxxxxx
Asset Number Self explanatory xxxxxxxx
Lot Number Self explanatory xxxxxxxxxxxxxxxxxxxx
CU Version Self explanatory xx.xx
PU Version Self explanatory xx.xx.xx
Scanner Version Self explanatory x.xx.xx
Fax Version Self explanatory x.xx
Total Memory xx MB
Self explanatory xxx.xxx.xxx.xxx
Self explanatory xx.xx
Self explanatory xx.xx
xxxxxx
xxxxxx
Flash Memory
xx MB
[
Fxx
]
50•Configuring your machine
Page 51

LEVEL 2 ITEM DESCRIPTION/OPTIONS
Print
Information
Configuration Execute Prints out a report of the machine’s configuration
Network
Information
File List Execute
PCL Font List Execute
PS Font List Execute
IBM PPR Font
List
EPSON FX Font
List
Error Log Execute
Demo Page DEMO1 Execute Prints a Demonstration
MFP Usage
Report
Supplies Status
Report
Fax Activity
Report
Fax Protocol
Dump
Execute Prints out a report of the Network configuration
Execute
Execute
page
1
Execute Copies (
Execute Prints a report of the status of all consumables
Execute
Execute
to 99) Prints a full report of
the machine usage
Print System
Status
Execute
51•Configuring your machine
Page 52

LEVEL 2 ITEM DESCRIPTION/OPTIONS
Admin
Setup
System Setup Access Control Enable/
Power Save Time 1/5/15/30/60/120
minutes
Return to Stand-by Time 20/40/
seconds
Copy
Default Mode
Unit of Measure
Date Format
Report Full Print On/
Panel Contrast -10~0~+10
Near Life Status
Network Menu Network Setup TCP/IP
IP Version
NetBEUI
NetBIOS over TCP
Ether Talk
IP Address Set
IPv4 Address xxx.xxx.xxx.xxx
/Scan/Fax
inch
/mm
mm/dd/yyyy,
dd/mm/yyyy,
yyyy/mm/dd
Off
Enable
Enable
IPv4,
IPv6
Enable
Enable
Enable
Auto
/Manual
Disable
60
/120/180
/Disable
/Disable
IPv4 + IPv6,
/Disable
/Disable
/Disable
Subnet Mask xxx.xxx.xxx.xxx
Gateway Address xxx.xxx.xxx.xxx
DNS Server Primary xxx.xxx.xxx.xxx
DNS Server Secondary xxx.xxx.xxx.xxx
WINS Server Primary xxx.xxx.xxx.xxx
WINS Server Secondary xxx.xxx.xxx.xxx
Web
Tel n e t
FTP
Enable
Enable
Enable
/Disable
/Disable
/Disable
52•Configuring your machine
Page 53

LEVEL 2 ITEM DESCRIPTION/OPTIONS
Admin
Setup cont.
Network Menu
cont.
Network Setup
cont.
Mail Server
Setup
LDAP Server
Setup
SNMP
Network Scale Normal/Small
Hub Link Setting
Factory Defaults Execute
SMTP Server user defined
SMTP Port
SMTP Encryption None/SMTPS/STARTTLS
POP3 Server user defined
POP3 Port
POP Encryption None/POP3S/STARTTLS
Authentication Method
SMTP User ID user defined
SMTP Password user defined
POP User ID user defined
POP Password user defined
Server Settings LDAP Server: User
Enable
Auto Negotiate
100Base-TX Full/
100Base-TX Half/
10Base-T Full/
10Base-T Half
25
110
None
defined
/Disable
/SMTP/POP
/
Secure PrtcSrv
Setting
Port Number: 389
Timeout: 10~
Max. Entries: 2~
Search Root: User
defined
Attributes Name1: cn
Name2: sn
Name3: givenName
Mail Address: Mail
Additional Filter: User
defined
Authentication Method:
Simple/Digest-MD5/
Secure Protocol
Encryption
Domain
None
STARTTLS
Anonymous
/LDAPS/
30
~120
100
/
53•Configuring your machine
Page 54

LEVEL 2 ITEM DESCRIPTION/OPTIONS
Admin
Setup cont.
Printer Setup Copies
Duplex On/
Printer Setup
cont.
Scanner Setup Email Setup Add “To” Address
Media Check
X Dimension 86~
Y Dimension 140~279~297~356 millimeter
Resolution 600 dpi/600x1200 dpi/600x2400 dpi/1200x1200
Tone r S a ve
Mode
Default
Orientation
Form Length 5~
Edit Size CassetteSize/
1
- 999
Off
Enable
dpi
Enable
Potrait
Legal 13.5/Legal13/A4/A5/A6/B5/ Custom/Com-9
Envelope/Com-10 Envelope/Monarch Envelope/DL
Envelope/C5 Envelope/C6 Envelope
Default File Name User defined
Subject List #00, #01m, #02
/Disable
210
~216 millimeter
/Disable
/Landscape
60
~64~128 lines
Letter
/Executive/Statement/Legal14/
On
/Off
#03, #04
Default From User defined
Separation Limit 1/3/5/10/30
megabytes/
Auto Trans. Report On/
Off
No limit
54•Configuring your machine
Page 55

LEVEL 2 ITEM DESCRIPTION/OPTIONS
Admin
Setup Cont.
Fax Setup Clock
Adjustment
Basic Setup Service Bit On/
Fax Setup
(cont.)
Basic Setup
cont.
dd/mm/yyyy
hh:mm
Country Code Select the country in
Local Phone No. <enter>
Sender ID <enter>
MCF(Single Location) On/
MCF(Multi Location) On/
Error MCF On/
Image in MCF On/
H/Modem Rate 33.6 Kbps
TAD Mode Type1/Type2/
Tel Priority Mode On/
CNG Detection On/
T/F Timer Prg.
Remote Receive No.
Ring Response
Speaker Volume Off/Low/
Soft Ringer Volume Off/Low/Middle/
Use Up & Down arrow
keys to set and Right
arrow key to advance.
Off
which the MFP is
located.
Off
Off
Off
Off
28.8 Kbps
14.4 Kbps
9.6 Kbps
4.8 Kbps
Type3
Off
Off
20seconds
Off
, 000, 111, 222,
333, 444, 555, 666,
777, 888, 999, ***,
###
1 ring
seconds
, 35seconds
/ 5/10/15/20
Middle
/High
High
DRD Ty p e Type1 / Ty p e 2 / Typ e 3 /
Type4
Fax Line Setup Redial Tries 0 ~ 10 tries
Redial Interval 1 ~ 6 minutes
On
Off
/Off
MF
Dial Tone Detection On/
Busy Tone Detection
MF(Tone)/DP(Pulse) DP/
55•Configuring your machine
Page 56

LEVEL 2 ITEM DESCRIPTION/OPTIONS
Admin
Setup Cont.
PCL Setup Font Source
Font Number I0/C1/S1
Font Pitch 0.44 ~
Symbol Set Available sets
A4 Print Width 78/
White Page Skip On/
CR Function
LF Function
Print Margin
Pen Width Adjust
Tray ID#: PCL MNID 1 ~
PCL T0ID 1 ~
PCL T1ID
IBM PPR Setup Character Pitch
Font Condense 12CPI to 20CPI
Character Set
Resident/Resident2/
Downloade
CPI
80
Off
CR
/CR + LF
LF
/LF + CR
Normal
inch
On
/Off
1
~ 59
10
/12/17/20 CPI/
Proportional
12CPI to 12CPI
SET-2
d
10.00
column
/1/5 inch/1/6
2
~ 59
4
~ 59
/SET-1
~ 99.99
Symbol Set Available Sets
Letter O Style Enable/
Zero Character
IBM PPR Setup cont. Line Pitch
White Page Skip On/
CR Function
LF Function
Line Length
Form Length
TOF Position
Left Margin
Fit to Letter
Tex t H e i gh t
Disable
Normal
6 LPI
CR
LF
80
11
0.0
0.0
Enable
Same
/Slashed
/ 8 LPI
Off
/CR + LF
/LF + CR
/136 column
/11.7/12 inch
~ 0.1 ~ 1.0 inch
~ 0.1 ~ 1.0 inch
/Disable
/Diff
56•Configuring your machine
Page 57

LEVEL 2 ITEM DESCRIPTION/OPTIONS
Admin
Setup Cont.
EPSON FX Setup Character Pitch
Character Set
Symbol Set Available sets
Letter O Style Enable/
Zero Character
Line Pitch
White Page Skip On/
CR Function
Line Length
Form Length
TOF Position
Left Margin
Fit to Letter
Tex t H e i gh t
PS Setup L1 Tray TYPE1/TYPE2
Parallel Protocol ASCII/RAW
USB Protocol ASCII/RAW
10
/12/17/20CPI/
Proportional
SET-2/
Normal
6 LPI
CR
80
11
0.0
0.0
Enable
Same
SET-1
Disable
/Slashed
/8 LPI
Off
/CR + LF
/136 column
/11.7/12 inch
~ 0.1 ~ 1.0 inch
~ 0.1 ~ 1.0 inch
/Disable
/Diff
Network Protocol ASCII/RAW
Auto
Memory Setup Receive buffer size
Resource Save Auto/Off/0.1/0.2/0.5/
Change Password Select “New password” and enter
Verify Password
Settings Save Settings Execute
Reset Settings Execute
/0.1/0.2/0.5/1/2/4
MB
1/2/4 MB
57•Configuring your machine
Page 58

LEVEL 2 ITEM DESCRIPTION/OPTIONS
Printer
Menu
Tray
Configuration
Paper Feed
Auto Tray Switch
Tray Sequ e n c e
MP Tray Usage When Mismatching/Do not use
Tray1 Config Paper Size A4/A5/B5/Legal14/
Tray2 Config Paper Size A4/A5/B5/Legal14/
Tray1
/Tray2/MP Tray
On
/Off
Down
/Up/Paper Feed Tray
Legal13.5/Legal13/
Letter
Statement/Custom
Media Type
Media Weight Light/Medium Light/
Media Type
Media Weight Light/Medium Light/
Plain
Bond/Recycled/
Cardstock/Rough
Medium/ Medium
Heavy/ Heavy
Legal13.5/Legal13/
Letter
Custom
Plain
Bond/Recycled/
Cardstock/Rough
Medium/ Medium
Heavy/ Heavy
/Executive/
/Letterhead/
/Executive/
/Letterhead/
MP Tray Config Paper Size A4/A5/A6/B5/Legal14/
Media Type
Media Weight Light/Medium Light/
Legal 13.5/Legal13/
Letter
Statement/Custom/
Com-9 Envelope/Com10 Envelope/Monarch
Envelope/DL Envelope/
C5 Envelope/C6
Plain
Transparency/Labels/
Bond/Recycled/Card
Stock/Rough
Medium
Heavy/ Heavy
/ Executive/
/Letterhead/
/ Medium
58•Configuring your machine
Page 59

LEVEL 2 ITEM DESCRIPTION/OPTIONS
Printer
Menu Cont.
Printer Adjust Manual Timeout Off/30/60/120/180/240/300 secs.
Low Toner
Jam Recovery
Error Report On/
Start Up On/
Paper Black
Setting
Auto Continue On/
Timeout in Job Off/5/10/20/30/40/50/60/90/120/150/180/210/
Timeout Local 0/
Timeout Net 0/5~
Personality Auto/PCL/IBM PPR/EPSON FX/ PS3 EMULATION
Hex Dump Execute
Darkness -2 ~
Cleaning Execute
X Adjust -2.00 ~
Y Adjust -2.00 ~
Continue
On
/Off
-2 ~ 0 ~ +2
240/270/300 seconds
5
/Stop
Off
Off
Off
~40~290/295/300 seconds
90
~290/295/300 seconds
0
~ +2
0.00
~ +2.00 millimeter
0.00
~ +2.00 millimeter
Copy Menu
Duplex X Adjust -2.00 ~
Duplex Y Adjust -2.00 ~
Place Page
Job Build Scanning On/
Copies
Reduce/Enlarge A4>A5 / Leg14>Let / Leg13.5>Let /
Mode
Density -3/-2/-1/
Input Tray
Collate On/
Duplex On/
N-up
Edge Erase
Margin Shift Right
Margin Shift Bottom
Center
1
Leg13>Let / A4>B5 / Fit to Page /
Let>Leg13 / Let>Leg13.5 /
Let>Leg14 /A5>A4
Mixed
Tray1
1in1
0.00
0
0.00
0
0.00
0
0.00
~ +2.00 millimeter
0.00
~ +2.00 millimeter
/Left
Off
-99
/ Photo / HiRes.Mixed / HiRes.Photo
0
/+1/+2/+3
/Tray2/MP Tray
Off
Off
/2in1/4in1(Hor.)/4in1(Ver.)
/0.25/0.50/0.75/1.00 inch
/6/13/19/25mm
/0.25/0.50/0.75/1.00 inch
/6/13/19/25mm
/0.25/0.50/0.75/1.00 inch
/6/13/19/25mm
100% /
B5>A4 /
59•Configuring your machine
Page 60

LEVEL 2 ITEM DESCRIPTION/OPTIONS
Scanner
Menu
Fax Menu Auto Receive Fax
Scan to Email Job Build
Scanning
Density -3/-2/-1/0/+1/+2/+3
Document size A4/
Color Select Color/
Color Format File Format
Color Format
cont.
B/W Format Grayscale On/
Address Book Email Address
Scan to Network PC Color Select Color/
Mode
Density -3/-2/-1/
On/
Compression Rate
Resolution 100/
File Format
Compression Rate G3/
Resolution 100/150/
Group Address
Manual
Tel / Fa x
TAD
DRD
Standard
Off
Letter
B/W
/Legal13/Legal13.5/Legal14
PDF
/TIFF/JPEG
Low
/Medium/High
150
Off
PDF
/TIFF
G4
400/600 dpi
#00 to #99
G00
to G19
/Fine/Extra Fine/Photo
0
/+1/+2/+3
/200/300 dpi
/Raw
200
/300/
B/W
System
Shutdown
Document Size A4/
Phone Book Speed Dial/One touch dial #00 to #99
Shutdown Start Execute
Letter
/Legal13/Legal13.5/Legal14
Group Dial G00 to G09
60•Configuring your machine
Page 61

Setting the fax facility
Initial set up
The following parameters must be set before using the fax function on your MFP:
• Date and time
• Country code
• Local Phone No.
• Sender ID
There are other parameters that can be adjusted to suit your personal preferences
later if required, refer to fax set up table for details (See “Advanced set up” on
page 62.).
To set fax parameters:
1. Using the Down arrow key, scroll to Menu and press Enter.
2. Using the Down arrow key, scroll to Admin Setup and press Enter.
3. Using the arrow keys and on-screen keypad, enter the Administrator password.
Highlight Done and press Enter.
4. Using the Down arrow key, scroll to Fax Setup and press Enter.
5. Press Enter to select the Clock Adjustment menu.
6. Using the arrow keys and keypad, enter the time and date.
Note
Use the Right and Left arrow keys to move between digits.
7. Press Enter to confirm.
8. Using the Down arrow key, scroll to Basic Setup and press Enter.
9. Using the Down arrow key, scroll to Country Code and press Enter.
10.Using the arrow keys, scroll to the country in which the MFP is situated and press
Enter to confirm.
11.Using the Down arrow key, scroll to Local Phone No. and press Enter
12.Using the keypad or arrow keys, type in the local phone number press Enter to
confirm.
13.Using the Down arrow key, scroll to Sender ID and press Enter.
14.Using the keypad or arrow keys and the on-screen keypad, type in the sender ID.
15.Highlight Done and press Enter.
61•Configuring your machine
Page 62

16.Press the Left arrow key to exit the menu.
Note
If required, set the dialling method for your region (Pulse or Tone).
If connecting the machine through a private branch exchange (PBX) line, you
must also specify a dial prefix to allow the machine to obtain an external line
before dialling. Refer to “Connecting to a PBX” on page 64.
Advanced set up
Your machine offers a multitude of features which reduce the time required for
manual operation and make fax communications more efficient.
Adding a speed dial entry to the phone book
The machine can hold up to 100 speed dial numbers in the phone book. To assign a
speed dial number to the phone book:
1. Using the Down arrow key, scroll to Menu and press Enter.
2. Using the Down arrow key, scroll to Fax Menu and press Enter.
3. Using the Down arrow key, scroll to Phone Book and press Enter.
4. Press Enter to select Speed Dial/One Touch Dial.
5. Using the arrow keys, scroll to the required speed dial entry position and press
Enter.
6. Press Enter to select Fax.No.
7. Using the keypad, type in the destination fax number and press Enter.
Note
If the destination fax number has an “extension number”, press the “#”
button four times to insert a pause (P) between numbers. The machine
will enter a pause when dialling. See “ Character switching” on page 16.
The maximum length of a number is 32 digits.
8. Press Enter to select Name.
9. Using the keypad or arrow keys and the onscreen keypad, type in the name.
Note
The maximum length of a name is 16 characters.
10.Highlight Done and press Enter.
11.Using the Down arrow key, scroll to Done and press Enter to confirm and add
your entry to the phone book.
62•Configuring your machine
Page 63

12.Press the Left arrow key to exit the menu.
Adding a group entry to the phone book
The machine can hold up to 10 group dial settings.
To add a new group dial number to the phone book:
1. Using the Down arrow key, scroll to Menu and press Enter.
2. Using the Down arrow key, scroll to Fax Menu and press Enter.
3. Using the Down arrow key, scroll to Phone Book and press Enter.
4. Using the Down arrow key, scroll to Group Dial and press Enter.
5. Using the arrow keys, scroll to the required group dial entry position and press
Enter.
6. Press Enter to select Speed Dial List.
7. Scroll through the list of speed dial entries and press Enter to mark (*). When all
required entries are selected, press the Left arrow key.
8. Press Enter to select Group Name.
9. Using the keypad or arrows and the on-screen keypad, type in the name.
Note
The maximum length of a name is 16 characters.
10.Highlight Done and press Enter.
11.Using the Down arrow key, scroll to Done and press Enter to confirm and add
your entry to the phonebook.
12.Press the Left arrow key to exit the menu.
Deleting a speed dial entry from the phone book
To delete a speed dial entry from the phone book:
1. Using the Down arrow key, scroll to Menu and press Enter.
2. Using the Down arrow key, scroll to Fax Menu and press Enter.
3. Using the Down arrow key, scroll to Phone Book and press Enter.
4. Press Enter to select Speed Dial List/One Touch Dial.
5. Using the arrow keys, scroll to the required speed dial and press Enter.
6. Using the Down arrow key, scroll to Clear and press Enter.
7. Using the Up arrow key, scroll to Yes and press Enter.
8. Press the Left arrow key to exit the menu.
63•Configuring your machine
Page 64

Deleting a group dial entry from the phone book
To delete a group dial entry from the phone book:
1. Using the Down arrow key, scroll to Menu and press Enter.
2. Using the Down arrow key, scroll to Fax Menu and press Enter.
3. Using the Down arrow key, scroll to Phone Book and press Enter.
4. Using the Down arrow key, scroll to Group Dial and press Enter.
5. Using the arrow keys, scroll to the required group dial and press Enter.
6. Using the Down arrow key, scroll to Clear and press Enter.
7. Using the Up arrow key, scroll to Yes and press Enter.
8. Press the Left arrow key to exit the menu.
Connecting to a PBX
Private Branch Exchanges (PBXs) are private telephone systems used to route calls
internally, for example, in a company. When dialling a telephone number, if a prefix
is required to open an outside line, the line is connected to a PBX. If this MFP is going
to be connected to a PBX, press the # key three times to insert a “-”, then type in the
destination fax number. This will ensure the MFP waits until an outside line is available
before dialling the rest of the number.
Automatic redial
You can set the fax to automatically redial if the initial fax transmission fails. The
machine will redial on:
• Line busy
• No answer
• Communication error
To set auto-redial:
1. Using the Down arrow key, scroll to Menu and press Enter.
2. Using the Down arrow key, scroll to Admin Setup and press Enter.
3. Using the arrow keys and on-screen keypad, enter the Administrator password.
Highlight Done and press Enter.
4. Using the Down arrow key, scroll to Fax Setup and press Enter.
5. Using the Down arrow key, scroll to Fax Line Setup and press Enter.
6. Press Enter to select the Redial Tries.
7. Using the arrow keys, select the required number of redial attempts (between 0
and 10), then press Enter to confirm.
8. Using the Down arrow key, scroll to Redial Interval and press Enter.
9. Using the arrow keys, select the required redial interval (between 1 and 6
minutes), then press Enter to confirm.
10.Press the Left arrow key to exit the menu.
64•Configuring your machine
Page 65

Reception Mode
You can change the way your MFP handles incoming fax transmissions and telephone
calls (if you have a telephone handset connected) depending on your office
requirements. Choose from:
• Fax
• Manual
• Te l/Fax
• TAD
• DRD
To change the reception mode:
1. Using the Down arrow key, scroll to Menu and press Enter.
2. Using the Down arrow key, scroll to Fax Menu and press Enter.
3. Press Enter to select Auto Receive.
4. Using the arrow keys, select the required reception mode and press Enter.
5. Press the Left arrow key to exit the menu.
Adding a telephone handset
If you want to add a telephone handset to your MFP, connect the line to the Tel socket
(in certain countries it may be necessary to use a telephone plug adaptor).
You will also need to update the telephone settings to set the ring response:
1. Using the Down arrow key, scroll to Menu and press Enter.
2. Using the Down arrow key, scroll to Admin Setup and press Enter.
3. Using the arrow keys and on-screen keypad, enter the Administrator password.
Highlight Done and press Enter.
4. Using the Down arrow key, scroll to Fax Setup and press Enter.
5. Using the Down arrow key, scroll to Basic Setup and press Enter.
6. Using the Down arrow key, scroll to Ring Response and press Enter.
7. Using the arrow keys, select the required response setting (between 1 ring and
20 seconds) and press Enter.
8. Press the Left arrow key to exit the menu.
Note
You must also set the reception mode to the appropriate setting. See
“Reception Mode” on page 65.
Note
If the telephone handset is in use (off hook), dialling for speech
purposes is not available using the MFP keypad or speed dial keys.
65•Configuring your machine
Page 66

Managing the address book
The following section describes how to add/remove/modify e-mail addresses to/from
the Address Book.
Adding an email address entry
The machine can hold up to 100 e-mail addresses in the address book. To assign a
new email address to the address book:
1. Using the Down arrow key, scroll to Menu and press Enter.
2. Using the Down arrow key, scroll to Scanner Menu and press Enter.
3. Using the Down arrow key, scroll to Address Book and press Enter.
4. Press Enter to select Email Address.
5. Using the arrow keys, scroll to the required email address entry position and
press Enter.
6. Press Enter to select Address.
7. Using the keypad or arrows keys and the on-screen keypad, type in the new
email address.
Note
The maximum length of address is 80 characters.
8. Highlight Done and press Enter.
9. Press Enter to select Name.
10.Using the keypad or arrows keys and the on-screen keypad, type in the name.
Note
The maximum length of name is 16 characters.
If you do not enter a name, this column remains blank.
11.Highlight Done and press Enter.
12.Using the Down arrow key, scroll to Done and press Enter to confirm and add
your entry to the address book.
13.Press the Left arrow key to exit the menu.
66•Configuring your machine
Page 67

Deleting an email address entry
To delete an email address entry from the address book:
1. Using the Down arrow key, scroll to Menu and press Enter.
2. Using the Down arrow key, scroll to Scanner Menu and press Enter.
3. Using the Down arrow key, scroll to Address Book and press Enter.
4. Press Enter to select Email Address.
5. Using the arrow keys, scroll to the required email address and press Enter.
6. Using the Down arrow key, scroll to Clear and press Enter.
7. Using the Up arrow key, scroll to Yes and press Enter.
8. Press the Left arrow key to exit the menu.
Modifying an email address entry
To edit an email address entry from the address book:
1. Using the Down arrow key, scroll to Menu and press Enter.
2. Using the Down arrow key, scroll to Scanner Menu and press Enter.
3. Using the Down arrow key, scroll to Address Book and press Enter.
4. Press Enter to select Email Address.
5. Using the arrow keys, scroll to the required email address and press Enter.
6. If required, press Enter to select Address. Update the details:
7. Using the keypad or arrow keys and on-screen keypad, edit the email address.
8. Highlight Done and press Enter.
9. If required, use the Down arrow key to scroll to Name and press Enter. Update
the details:
10.Using the keypad or arrow keys and on-screen keypad, edit the email name.
11.Highlight Done and press Enter.
12.Using the Down arrow key, scroll to Done and press Enter.
13.Press the Left arrow key to exit the menu.
67•Configuring your machine
Page 68

Adding a group entry
The machine can hold up to 20 group addresses. To add a new group address to the
address book:
1. Using the Down arrow key, scroll to Menu and press Enter.
2. Using the Down arrow key, scroll to Scanner Menu and press Enter.
3. Using the Down arrow key, scroll to Address Book and press Enter.
4. Using the Down arrow key, scroll to Group Address and press Enter.
5. Using the arrow keys, scroll to the required group address entry position and
press Enter.
6. Press Enter to select Address List.
7. Scroll through the list of email address entries and press Enter to mark (*). When
all required entries are selected, press the Left arrow key.
8. Press Enter to select Group Name.
9. Using the keypad or arrows keys and the on-screen keypad, type in the name.
Note
The maximum length of a name is 16 characters.
If you do not enter a Group name, Group name column remains blank.
10.Highlight Done and press Enter.
11.Using the Down arrow key, scroll to Done and press Enter to confirm and add
your entry to the address book.
12.Press the Left arrow key to exit the menu.
Deleting a group address entry
To delete a group address entry from the address book:
1. Using the Down arrow key, scroll to Menu and press Enter.
2. Using the Down arrow key, scroll to Scanner Menu and press Enter.
3. Using the Down arrow key, scroll to Address Book and press Enter.
4. Using the Down arrow key, scroll to Group Address and press Enter.
5. Using the arrow keys, scroll to the required group address and press Enter.
6. Using the Down arrow key, scroll to Clear and press Enter.
7. Using the Up arrow key, scroll to Yes and press Enter.
8. Press the Left arrow key to exit the menu.
68•Configuring your machine
Page 69

Modifying a group address entry
To edit a group address entry from the address book:
1. Using the Down arrow key, scroll to Menu and press Enter.
2. Using the Down arrow key, scroll to Scanner Menu and press Enter.
3. Using the Down arrow key, scroll to Address Book and press Enter.
4. Using the Down arrow key, scroll to Group Address and press Enter.
5. Using the arrow keys, scroll to the required group address and press Enter.
6. If required, press Enter to select Address List. Update the details:
a. Using the arrow keys, scroll through the list and modify as required. Press
Enter to remove any address from the group listing; the “*” will be removed
from the address.
b. Press the Left arrow key to exit the list.
7. If required, use the Down arrow key to scroll to Group Name and press Enter.
Update the details:
a. Using the keypad or arrow keys and on-screen keypad, edit the email name.
b. Highlight Done and press Enter.
8. Using the Down arrow key, scroll to Done and press Enter.
9. Press the Left arrow key to exit the menu.
69•Configuring your machine
Page 70

Access Control ___________________
The operation and functionality of this machine can be limited to authorized
personnel only by the simple introduction of a 4 to 9 digit PIN (Personal
Identification Number). This is known as Access Control. The greater the number
of digits in the PIN - the more secure it is.
Your MFP supports the following PIN types:
• Administrator PIN; This is the PIN for the system administrator(s).
If a PIN is registered as an administrator, the Admin password entry screen is
displayed, and when an Admin password is entered, it will be authenticated as
an administrator.
• User PIN; This is PIN for general users.
If a PIN is registered as a general user, the function selection screen is
displayed, also after PIN entry, the function selection screen is displayed.
After using the machine, you will be expected to log out. Leaving the machine in
access control mode will render the machine not usable by unauthorised users.
Enabling Access Control
Access Control Enable/Disable is switched in Menu > Admin Setup > System Setup
> Access Control.
If your administrator has enabled access control on your machine, it will
automatically start up in access control mode. You will not be able to use it until
you have provided valid login information.
With Access Control set to enable, the display reverts to the System Setup screen
immediately following the setting change. If one of the functions such as Print, Fax
Send or PC Scan is running, the display will only revert to the System Setup screen
when the task has been completed.
Logging in
1. If the Enter PIN screen is displayed, use the keypad to enter your PIN.
2. Press Enter (or the Start button) to confirm.
Note
A valid PIN consists of 4 to 9 digits.
Numbers entered are not displayed on-screen, they are replaced by
“*”.
If the PIN entered in invalid, “Incorrect Password” is dispalyed for 3
seconds and the display reverts to the Enter the PIN screen.
3. At the Enter Password screen, use the on-screen keypad to enter your
password.
70 • Access Control
Page 71

4. Use the Up arrow key to highlight Done and press Enter to confirm.
Logging out
When you have finished using the machine, make sure you log out:
Note
With Access Control enabled, Logout options are displayed in the
Menu on the Mode Selection screen.
1. Using the Down arrow key, highlight Logout and then press Enter.
The Confirm Logout screen is displayed.
2. Using the Down arrow key, highlight Yes and then press Enter to confirm.
The display reverts to the Enter PIN screen.
Note
When the MFP control panel is left inactive for a prescribed length of
time, the display automatically reverts to the Enter PIN screen if
Access Control is enabled.
Operation time-out
When the MFP control panel is left inactive for a prescribed length of time
(Operation Time-out), the display automatically reverts to the idle screen if Access
Control is disabled.
If an error state occurs, Operation Time-out is disabled.
After Operation Time-out, the display automatically reverts to the Enter PIN
screen if Access Control is enabled.
The length of the Operation Time-out depends on the setting in Menu Mode >
Admin Setup > System Setup > Return to Standby Time.
71 • Access Control
Page 72

Operation _______________________
With its intuitive control panel, this Multi Function Product (MFP) is designed to be
easy to use.
Note
If Access Control has been enabled, you will first have to enter your
Password/PIN.
The following sections describe how to copy, fax, and scan your documents.
Loading document(s)
This MFP can scan/copy/send/fax document(s) either in the ADF (Automatic
Document Feeder) or on the glass. If you need to send multiple pages, load your
papers in the ADF. The ADF can hold up to 50 pages at one time.
If you need to scan/copy/send/fax pages from books, newspaper clippings, or paper
with wrinkles or curls, place them on the glass.
Placing document(s) in the ADF
Before using the ADF, please make sure that your paper meets the following
specifications:
• Document(s) can range in size from 5.8" x 8.2" (148 mm x 210m m) - 8.5" x 14"
(216 mm - 356 mm)
• Document(s) can range in weight from 16 to 28 lbs US Bond (60 - 105 g/m
sheet thickness up to 0.4" (11 mm).
• Document(s) should be square or rectangular and in good condition (not fragile or
worn).
• Document(s) should be free of curl, wrinkle, tears, wet ink, or punch holes.
• Document(s) should be free of staples, paper clips, paper sticky notes.
• Keep the glass clean and without any documents left on it.
Note
• Glossy paper should not be used on the ADF.
• You cannot scan A6 document in the ADF.
• To transmit irregular types of document(s), place the
document(s) on the glass or make a copy first and then transmit
the copy instead.
2
) with
72 • Operation
Page 73

1. If you have multiple pages, fan the pages to avoid paper jams. The ADF holds up
to 50 pages at one time.
1
2
3
2. Place the document with the text face UP in the ADF and make sure that the top
of each page is fed in first.
73 • Operation
Page 74

3. Adjust the Paper Guides (1) to centre the document in the ADF.
1
Placing document(s) on the glass
1. Open the document cover.
2. Place your document with the text face DOWN on the glass and align the top of
the page to the upper-left corner.
3. Close the document cover.
74 • Operation
Page 75

Copying
Note
Factory default setting is Copy mode.
Basic operation
1. Place your document(s) with text face Up in the ADF or face Down on the glass.
2. Set your copying options as required. For further details refer to the following
sections.
3. Then press the Start button.
Note
When using the ADF, in order to prevent paper jams, if you wish to
cancel the copy process, press the Stop button once to stop the process
and a second time to eject the paper.
Advanced operation
Using the options available, you can alter the copy output to suit your needs:
1. Press Enter button.
2. Select required parameter with Down arrow key and press Enter.
3. Pressing Up and Down arrow keys, select value and press Enter.
75 • Operation
Page 76

Options are (factory default settings in bold text):
MENU ITEM OPTIONS
Copies 1 - 99
Reduce/Enlarge A4>A5, Leg14>Let, Leg13.5>Let, Leg13>Let, A4>B5, Fit to
page, 100%, B5>A4, Let>Leg13, Let>Leg13.5, Let>Leg14,
A5>A4, Custom
Paper Supply Legal13, Legal13.5, Legal14, Letter, A4, A5, B5
Mode Mixed, Photo, HiRes.Mixed, HiRes.Photo
Density -3, -2, -1, 0, +1, +2, +3
Input Tray Tray1, Tray2 ( o pt io na l) , M P Tr a y
Collate On, Off
Duplex On, Off
N-up
1in1, 2in1, 4in1(Hor.), 4in1(Ver.)
a
Edge_Erase 0.00 inch, 0.25 inch, 0.50 inch, 0.75 inch, 1.00 inch or
0 mm, 6 mm, 13 mm, 19 mm, 25 mm
b
M_SHIFT_R 0.00 inch, 0.25 inch, 0.50 inch, 0.75 inch, 1.00 inch or
0 mm, 6 mm, 13 mm, 19 mm, 25 mm
c
M_SHIFT_B 0.00 inch, 0.25 inch, 0.50 inch, 0.75 inch, 1.00 inch or
0 mm, 6 mm, 13 mm, 19 mm, 25 mm
d
Id Card Copy On, Off
a. N-up can only be changed from 1in1 if paper size is set to A4 or Letter and documents are
scanned from the ADF. Collate always defaults to “Off”. Reduce/Enlarge to “100%”. Reduce/
enlarge to “100%,” Edge erase to “0mm (0.00in)” and Margin shift -Right/Bottom to “0mm
(0.00in)”.
b. The setting displayed, mm or inch, depends on the setting in Admin Setup - System Setup -
Unit of Measure in Menu Mode. If Edge Erase is set to other than “0 mm” or “0.00 in,” Reduce/
Enlarge always defaults to “100%”, N-up to “1in1”, and Margin Shift - Right/Bottom to “0 mm
(0.00 in)”.
c. Any parts of the image that do not fit on the paper as a result of this setting, are not printed.
The setting displayed mm or inch, depends on the setting in Admin Setup - System Setup Unit of Measure in Menu Mode. If Edge Erase is set to other than “0 mm” or “0.00 in,” Reduce/
Enlarge always defaults to “100%”, N-up to “1in1”, and Margin Shift - Right/Bottom to “0 mm
(0.00 in)”.
d. Any parts of the image that do not fit on the paper as a result of this setting, are not printed.
The setting displayed mm or inch, depends on the setting in Admin Setup - System Setup Unit of Measure in Menu Mode. If Edge Erase is set to other than “0 mm” or “0.00 in,” Reduce/
Enlarge always defaults to “100%”, N-up to “1in1”, and Margin Shift - Right/Bottom to “0 mm
(0.00 in)”.
4. Press the Left arrow key to return to the start menu.
76 • Operation
Page 77

Scanning
Basic Operation
1. Place your document(s) with the text face up in the ADF or face Down on the
glass.
2. Select Scan mode using the Down arrow button on the control panel.
3. Press Enter.
4. Press the Down arrow key and select the scan destination from the following
options:
•Email
•Network PC
•PC
5. Set your scanning options as required. For further details refer to the following
sections.
6. Then press the Start button.
Note
When using the ADF, in order to prevent paper jams, if you wish to
cancel the copy process, press the Stop/Cancel button once to stop the
process and a second time to eject the paper.
Scan To Email
1. Place your document(s) with text face Up in the ADF or face Down on the glass.
2. Using the Down arrow key, scroll to Scan and press Enter.
3. Press Enter to select Email.
4. Using the Up arrow key, scroll to Reply To and press Enter.
5. Set the reply address from either:
• Address Book - select from the address book entries
• Screen Entry - enter directly using the keypad
• Number - enter an address or group address number
• LDAP - select from a Lightweight Directory Access Protocol (LDAP) server
6. If prompted, select More and change address, otherwise select Done.
7. Using the Down arrow key, scroll to Destination and press Enter.
77 • Operation
Page 78

8. Set the destination address(s) from either:
• Address Book - select from the address book entries
• Screen Entry - enter directly using the keypad
• Number - enter an address or group address number
• LDAP - select from a Lightweight Directory Access Protocol (LDAP) server
If prompted, select More and add additional addresses, otherwise select Done.
9. Using the Down arrow key, scroll to Subject and press Enter.
10.Set the subject from either:
• Subject List
•Screen Entry
11.Using the Down arrow key, scroll to File Name and press Enter.
12.Using the keypad or arrow keys and the on-screen keypad, type in the file name.
13.Highlight Done and press Enter.
14.If required, adjust the density setting:
a. Using the Down arrow key, scroll to Density and press Enter.
b. Highlight the required setting and press Enter.
15.If required, adjust the document size:
a. Using the Down arrow key, scroll to *A4 and press Enter.
b. Highlight the required setting and press Enter.
16.If required, adjust the file format:
• If you are sending a color file;
(i) Using the Down arrow key, scroll to Color Select (Color) and press
Enter.
(ii) Highlight the required setting and press Enter.
• If you are sending a black and white file;
(i) Using the Down arrow key, scroll to Color Select (B/W) and press
Enter.
(ii) Highlight the required setting and press Enter.
78 • Operation
Page 79

Scan to Network PC
Before sending your document to a file server, profiles should be setup first to speed
up the process. A profile contains a list of filing parameters such as your filing
protocol, directory, file name and other scanning parameters. Add a new profile by
either entering the machine’s web page or installing and starting the Network Setup
Tool on the CD-ROM supplied.
Note
You can create up to 20 profiles.
1. Place your document(s) with text face Up in the ADF or face Down on the glass.
2. Using the Down arrow key, scroll to Scan and press Enter.
3. Using the Down arrow key, scroll to Network PC and press Enter.
4. The file server profile list is displayed. If no profiles exist, the profile list is blank.
5. Using the arrow keys, scroll to the required profile (filing destination) and press
Enter.
6. Press the Start button.
Scan to PC
Note
Ensure that the Actkey Utility is installed and set up first. Refer to
“Actkey Utility: Windows Only, USB Only” on page 25.
The scanner function can be controlled from either the MFP (Push Scan) or from the
PC (Pull Scan).
Push Scan
1. Place your document(s) with text face Up in the ADF or face Down on the glass.
2. Using the Down arrow key, scroll to Scan and press Enter.
3. Using the Down arrow key, scroll to PC and press Enter.
4. The Push Scan screen displays four options. Using the arrow keys, scroll to the
required function and press Enter:
a. Email
When the Email function is selected, the ActKey Utility executes PC scan in
accordance with your settings for “Scan to Email”. The scanned image data
79 • Operation
Page 80

is saved in the specified folder and is ready for the software to send as an
attachment. Complete the data on screen and send.
b. Folder
When the Folder function is selected the Actkey Utility executes PC scan in
accordance with your settings for “Scan to Folder”. The scanned image data
is saved in the specified folder.
c. Application
When the Application function is selected the Actkey Utility executes PC
scan in accordance with your settings for “Scan to Application1”. The
scanned image data is saved in the application specified by the Actkey
Utility.
d. Fax
When the Fax function is selected, the Actkey Utility executes PC scan in
accordance with your settings for Scan to PCFax. The scanned image data
is saved in the specified folder and is ready for the software to send as an
attachment. Complete the data on screen and send.
5. Press the Start button.
80 • Operation
Page 81

Pull Scan
Double click the Actkey Icon on your desktop. The Actkey console (below) will display.
The functions below, can now be controlled from the PC:
• Scan to Application1
• Scan to Application2
• Scan to Email
• Scan to Folder
• Scan to Fax
Scan to “Application2” works exactly the same as scan to Application1, simply
allowing an alternative application to be selected.
As the cursor passes over an icon, the parameters set for that icon appear in a text
box, a single click will select that option.
81 • Operation
Page 82

Faxing: Basic operation
Searching the phone book
To search the contents of the phone book, you can either:
• Use the arrow keys to scroll through the list and highlight the required entry.
Note
Lists of Speed Dials and Group Dials that have been added to the Phone
Book are displayed in the order Group Dial (G00~ G09) and Speed Dial/
One Touch Dial (#00~#99).
• Using the keypad to type in a search character, for example the first letters of the
name. Destinations whose initial character matches the entered character
appears on the screen.
Note
You can switch between numbers, upper-case/lower-case letters, and
symbols by pressing the same key multiple times. When pressing
multiple times, you must re-press the key within 2 seconds of the
previous press.
Refer to Character switching see “Character Switching” on page 16.
82 • Operation
Page 83

Sending a Fax
1. Place your document(s) with text face Up in the ADF or face Down on the glass.
2. Using the Down arrow key, scroll to Fax and press Enter.
3. Enter the destination fax number by either:
a. Selecting Fax No. and typing in the number using the numeric keypad.
Note
You can type in a destination number in full or type in a speed dial or
group dial number:
To enter a speed dial; press the “#” key and then enter the two-digit
speed dial number, for example “#29”.
To enter a group dial; press the “*” key and then enter the one-digit
group dial number, for example “*3”.
Fax number and ID registered in the selected dial number are
displayed.
(i) Press Enter.
(ii) At the continue prompt, select More to add additional numbers or
Done to confirm.
b. Selecting Phone Book and selecting the number from the phone book entries.
(i) Search the phone book entries, refer to “Searching the phone book”
on page 82.
(ii) Repeat until all required entries are selected.
(iii) Press the Left arrow key to exit the list.
4. If required, press the Up arrow key and scroll to Check Dest. to view /edit the list
of fax numbers:
• Press Enter to remove any entry from the list (no longer displays * next to
the entry).
• Press the Left arrow key to exit the list.
5. Press the Start button to send your document(s).
Note
If you wish to cancel faxing, press Stop to abort the operation.
Fax transmissions are sent in black and white only.
83 • Operation
Page 84

Faxing: Advanced operation
Changing the Fax Quality (Mode)
The machine is preset to “Standard”. If required, you can select Fine, ExtraFine, or
Photo to improve fax quality.
To change fax quality:
1. Follow “Sending a Fax” process steps 1 to 4.
2. Using the Down arrow key, scroll to Standard and press Enter.
3. Using the Down arrow key, scroll to the required quality setting and press Enter.
4. Press the Start button to send your document(s).
Note
After you have completed your fax operation, the machine will
automatically return to the preset value.
Adjusting Density
The machine is preset to the “Normal” level of Density. If your original document
comes with a lighter or darker contrast, you can improve the quality by adjusting the
density setting.
To change density:
1. Follow “Sending a Fax” process steps 1 to 4.
2. Using the Down arrow key, scroll to Density:0 and press Enter.
3. Using the Down arrow key, scroll to the required density setting and press Enter.
4. Press the Start button to send your document(s).
Note
After you have completed your fax operation, the machine will
automatically return to the preset value.
Document Size
The machine is preset to “Letter” size.
To change the document size:
1. Follow “Sending a Fax” process steps 1 to 4.
2. Using the Down arrow key, scroll to Letter and press Enter.
3. Using the Down arrow key, scroll to the required document size and press Enter.
84 • Operation
Page 85

4. Press the Start button to send your document(s).
Note
After you have completed your fax operation, the machine will
automatically return to the preset value.
Fax Receiving
Your MFP is set to receive faxes automatically, if you wish to change the reception
mode, refer to “Reception Mode” on page 65 for details.
Automatic fax receive (default mode)
When the MFP is in automatic fax receive mode:
• When ringing - Receiving start is displayed on Screen.
• While it is receiving a Fax - Fax Receiving, sender’s Fax. No., and the number of
pages are displayed until the reception of data from all pages is complete.
• Upon completion of Fax Receiving - Sender’s Fax no., the total number of received
pages and Receiving OK are displayed for 3 seconds, and the display changes to
the Mode Selection screen.
• When the machine is printing Fixed images, the screen displays are the same as
those for printing.
Note
Cancelling is disabled while the machine is receiving a fax.
If fax receiving fails, an error message displays until you press the Stop button:
• If an error occurs while a fax is being received, fax communication-related errors
are displayed.
• If an error occurs while a fax is printing, error messages displayed are the same
as those in print mode.
Manual Receive
Upon receiving an incoming call, the MFP will ring until you press the Start button to
receive the fax.
Refer to “Reception Mode” on page 65 for details on enabling manual receive mode.
Tel/Fax automatic switching
Telephone/Fax Mode (T/F): When incoming calls are a mixture of fax and telephone
calls, your best choice is the Telephone/Fax Mode. In this mode, the machine detects
whether the incoming call is a fax or voice call.
When the call is from another Fax machine, your machine will switch to fax mode and
receive the message. When the call is a voice call, your machine will ring like a
85 • Operation
Page 86

telephone. If you do not answer, your machine will switch back to fax mode to allow
the calling party to manually send a fax.
Refer to “Reception Mode” on page 65 for details on enabling Tel/Fax mode.
TAD interface
Telephone Answering Device Mode (TAD): Use this mode if you want the machine and
telephone answering machine to share the same phone line. Like Telephone/fax
mode, the TAD mode detects whether an incoming call is fax or voice call. Refer
to “Adding a telephone handset” on page 65 for more information.
To set up TAD mode:
1. Using the Down arrow key, scroll to Menu and press Enter.
2. Using the Down arrow key, scroll to Admin Setup and press Enter.
3. Using the arrow keys and on-screen keypad, enter the Administrator password.
Highlight Done and press Enter.
4. Using the Down arrow key, scroll to Fax Setup and press Enter.
5. Using the Down arrow key, scroll to Basic Setup and press Enter.
6. Using the Down arrow key, scroll to TAD Mode and press Enter.
7. Select the appropriate setting; Type1, Type2, Type3.
8. Press the Left arrow key to exit the menu.
Refer to “Reception Mode” on page 65 for details on enabling TAD mode.
DRD interface
Distinctive Ring Detection Mode (DRD): This mode is programmed for the fax to
answer only on a distinctive ring. You can have a single phone line to have two
numbers with distinct rings, one for regular phone calls and one for fax. If the phone
line is in use, and there is an incoming fax, the sender will receive a busy signal.
To set up DRD mode:
1. Using the Down arrow key, scroll to Menu and press Enter.
2. Using the Down arrow key, scroll to Admin Setup and press Enter.
3. Using the arrow keys and on-screen keypad, enter the Administrator password.
Highlight Done and press Enter.
4. Using the Down arrow key, scroll to Fax Setup and press Enter.
5. Using the Down arrow key, scroll to Basic Setup and press Enter.
6. Using the Down arrow key, scroll to DRD Type and press Enter.
7. Select the appropriate setting; Type1, Type2, Type3, Type4.
8. Press the Left arrow key to exit the menu.
Refer to “Reception Mode” on page 65 for details on enabling DRD mode.
86 • Operation
Page 87

Remote receiving
If you have an external telephone handset connected to your fax machine, you can
instruct your fax machine to begin receiving by entering a three-digit code on your
telephone keypad. This feature is useful when you answer a call on the external
phone, but need to switch the line over to your fax machine.
1. Using the Down arrow key, scroll to Menu and press Enter.
2. Using the Down arrow key, scroll to Admin Setup and press Enter.
3. Using the arrow keys and on-screen keypad, enter the Administrator password.
Highlight Done and press Enter.
4. Using the Down arrow key, scroll to Fax Setup and press Enter.
5. Using the Down arrow key, scroll to Basic Setup and press Enter.
6. Using the Down arrow key, scroll to Remote Receive No. and press Enter.
7. Select the appropriate setting; Off, 000, 111, 222, 333, 444, 555, 666, 777, 888,
999, ***, ###.
8. Press the Left arrow key to exit the menu.
Refer to “Reception Mode” on page 65.
Faxing: Printing Reports
Printing a fax activity report
1. Using the Down arrow key, scroll to Menu and press Enter.
2. Using the Down arrow key, scroll to Admin Setup and press Enter.
3. Using the arrow keys and on-screen keypad, enter the Administrator password.
Highlight Done and press Enter.
4. Press Enter to select System Setup.
5. Using the Down arrow key, scroll to Report Full Print and press Enter.
6. Using the Up arrow key, scroll to On and press Enter.
7. Press the Left arrow key twice to exit the menu.
8. Using the arrow keys, scroll to Print Information and press Enter.
9. Using the Down arrow key, scroll to Fax Activity Report and press Enter.
10.Press Enter to execute.
87 • Operation
Page 88

Printing transmission reports
1. Using the Down arrow key, scroll to Menu and press Enter.
2. Using the Down arrow key, scroll to Admin Setup and press Enter.
3. Using the arrow keys and on-screen keypad, enter the Administrator password.
Highlight Done and press Enter.
4. Using the Down arrow key, scroll to Fax Setup and press Enter.
5. Using the Down arrow key, scroll to Basic Setup and press Enter.
6. Using the Down arrow key, navigate to the required report and press Enter.
Choose from:
• MCF (Single Location) - this prints a transmission report after each fax.
• MCF (Multi Location) - this prints a summary report detailing which numbers
were successful and any that failed.
• Error MCF - this prints a report after each failed fax transmission.
• Image in MCF - this includes an image of the fax on each transmission
report.
7. Using the Up arrow key, scroll to On and press Enter.
8. Press the Left arrow key to exit the menu.
88 • Operation
Page 89

Faxing: Sending a Fax from your PC
Note
You must have the fax driver installed on your PC. Download the latest
fax driver from www.okiprintingsolutions.com.
1. From your application’s File menu, select Print.
2. In the Select Printer window, highlight the fax driver option.
3. Press the Preferences/Properties button to display the fax driver window.
4. On the Setup tab:
a. Select the appropriate media size from the drop-down menu.
b. Set the resolution to Fine, Normal or Fast.
c. Set the orientation to Portrait or Landscape.
5. On the Cover Sheet tab:
a. Set the cover sheet usage settings as appropriate.
b. Select a cover sheet format.
6. On the Sender tab:
a. Enter your name.
b. Enter your fax number.
c. If required select the Add an outside call number checkbox and enter Outside
call number as appropriate.
89 • Operation
Page 90

7. On the Recipient tab:
a. Click the Recipient...button.
b. Select a fax number from the Phone book panel on the right hand side. Refer
to “Adding fax numbers to the phone book” on page 91
c. Click the Add button to add this number to the recipient list.
d. Repeat b and c as required to create the recipient list.
e. If you need to remove a number from the recipient list, highlight the
appropriate name and then click the Delete button.
f. Once you have completed your list, click the OK button to close the Select
Recipients window.
8. Press the OK button to close the fax driver window.
9. Press OK to start sending your fax.
90 • Operation
Page 91

Using the Phone Book
Adding fax numbers to the phone book
To add a fax destination number to the phonebook:
1. From your application’s File menu, select Print.
2. In the Select Printer window, highlight the fax driver option.
3. Press the Preferences button to display the fax driver window.
4. Click the Phone book... button.
The phone book screen displays.
5. Select FAX number -> New (Fax number).
6. Type in the fax number destination Name.
7. Type in the required FAX number.
8. If required, type in a Comment.
9. Press the OK button to save.
91 • Operation
Page 92

Adding new groups numbers to the phone book
To add a new group to the phone book:
1. From your application’s File menu, select Print.
2. In the Select Printer window, highlight the fax driver option.
3. Press the Preferences button to display the fax driver window.
4. Click the Phone book... button.
The phone book screen displays.
5. Select Fax number -> New (Group).
6. Type in the Group name.
7. if required, type in a Comment.
8. Add recipients to the group list:
Note
Maximum 100 recipients in any one group.
a. Select a fax number from the Phone book panel on the right hand side.
Note
You can add a new fax number directly by clicking the New (FAX
number)... button and adding an entry to the phone book panel.
b. Click the Add -> button to add this number to the group list.
c. Repeat steps a and b as required to create the group list.
d. If you need to remove a number from the recipient list, highlight the
appropriate name and then press the <- Delete button.
9. Once you have completed your list, press the OK button to close the New Group
window.
Importing and exporting fax numbers
By using the import, export functions, you can manage fax numbers in a phonebook
created on another computer.
1. In Windows:
XP: select Start > Control Panel > Printer and Other Hardware > Printers and
Faxes.
Server 2003: select Start > Printers and Faxes.
2000: select Start > Settings > Printers.
2. Right-click your machine icon and select Printer Preferences.
3. In the Setup tab, click the Phone Book button.
92 • Operation
Page 93

4. From the pull-down menu, click Tool > Export.
5. In the Export File screen, enter a name for the file and click the Save button. The
phonebook is saved.
6. Import the saved phonebook file to the other computer:
a. In the fax driver installed on the computer that the phone book file was
imported, start the phonebook in the same way, and click Tool > Import in the
menu.
b. In the Import File screen, select a phone book file to import. When the Open
button is clicked, data is imported to the phone book.
Note
Registration of groups cannot be exported. (Destinations included in the
group are exported.)
If the same name is already included in the phonebook of the fax driver
to import, it is skipped.
93 • Operation
Page 94

Printer Settings in Windows ________
Your printer’s operator panel menus provide access to many options.
The Windows printer driver also contains settings for many of these items. Where
items in the printer driver are the same as those in the operator panel menus, and
you print documents from Windows, the settings in the Windows printer driver will
override those settings in the operator panel menus.
Printing preferences in Windows applications
When you choose to print your document from a Windows application program a
Print dialog box appears. This dialog usually specifies the name of the printer on
which you will print your document. Next to the printer name is a Properties
button.
When you click Properties a new window opens which contains a short list of the
printer settings available in the driver, which you can choose for this document.
The settings available from within your application are only those which you may
want to change for specific applications or documents. Settings you change here
will usually only last for as long as the particular application program is running.
94 • Printer Settings in Windows
Page 95

PCL emulation
Setup tab
1
2
3
4
5
6
1. Paper size should be the same as the page size of your document (unless you
wish to scale the printout to fit another size), and should also be the same as
the size of paper you will feed into the printer.
2. You can choose the source of the paper to feed, which may be Tray 1 (the
standard paper tray), Multi Purpose Tray, or Tray 2 (if you have the optional
second paper tray installed). You can also click on the appropriate part of the
screen graphic to select your preferred tray.
3. A variety of document finishing options can be selected, such as normal one
page per sheet, or N-up (where N can be 2 or 4) for printing scaled down
pages at more than one page per sheet.
4. Under 2-sided Printing, you can choose from auto or manual. Under manual 2-
sided Printing you can choose to print on one side of a sheet only or to use 2sided printing (duplex printing). Your printer allows you to carry out manual
duplex printing, meaning you must pass the paper through the printer twice.
For more information, see “2-sided (duplex) printing” on page 108. The Duplex
Help button also offers guidelines on how to carry out manual duplex printing.
5. If you have changed some printing preferences before and saved them as a
set, you can recall them to avoid having to set them individually each time
you need them.
6. A single on-screen button restores the default settings.
95 • Printer Settings in Windows
Page 96

Job options tab
1
2
3
4
5
6
7
1. The output resolution of the printed page can be set as follows.
• The ProQ1200 setting for Xxxxxn prints at 600 X 2400dpi. This setting
requires the most printer memory and takes the longest to print. Your
printed pages can be scaled to fit larger or smaller stationery. It is the
best option for printing photographs.
• The High Quality setting prints at 600 X 1200dpi for Xxxxxn and 1200 x
1200dpi for Xxxxxdn and Xxxxxdtn is the best option for printing vector
objects such as graphics and text.
• The Normal setting prints at 600 x 600dpi and is suitable for most printing
jobs.
• The Draft setting prints at 300 x 300dpi and is suitable for printing draft
documents that contain mainly text. You can select Toner Saving to save
toner for some print jobs.
2. Page orientation can be set to either portrait (tall) or landscape (wide). Both
views can be rotated by 180 degrees.
3. You can print watermark text behind the main page image. This is useful for
marking documents as draft, confidential, etc.
96 • Printer Settings in Windows
Page 97

If you would like to print on special stationery, such as forms and letterhead,
but do not want to use pre-printed stationery, you can create your own using
Overlays. For more information on Overlays and Macros refer to “Overlays and
Macros (Windows only)” on page 127. The Overlays button also offers guidelines
on how to carry out manual duplex printing.
4. In Raster (bitmap) mode, processing of the page image is done in the
computer leaving little processing for the printer to do, although the file size
may be large. In Vector mode, file sizes may be smaller and so transmission
over a network, for example, may be faster. These effects are more
pronounced for graphics printing than for text printing.
5. You can select up to 999 copies to print consecutively, although you will need
to top up the paper tray during such a long print run.
6. Your printed pages can be scaled to fit larger or smaller stationery, within a
range of 25% to 400% of the original size.
7. A single on-screen button restores the default settings.
97 • Printer Settings in Windows
Page 98

Image tab
1
2
3
4
5
1. Dithering produces an intermediate greyscale by adjusting the combination of
dots used in printing. Selecting a setting determines the degree of detail with
which a graphics image will be printed. Mesh determines that a screen of dots
is used for dithering while Line Art determines that an array of lines is used for
dithering.
2. Select dithering texture by setting the size of dots used in the halftone screen.
3. Set this control to print greyscale effects in black without dithering. Select the
check-box to disable greyscale printing or de-select the check-box to enable
greyscale printing.
4. You can manually adjust lightness (the higher the setting the lighter the print)
and contrast (the higher the setting the greater the contrast).
5. A single on-screen button restores the default settings.
98 • Printer Settings in Windows
Page 99

Setting from Windows control panel
When you open the driver properties window directly from Windows, rather than
from within an application program, a somewhat more extensive range of settings
is provided. Changes made here will generally affect all documents you print from
Windows applications, and will be remembered from one Windows session to the
next.
General tab
My Printer Properties
1
2
3
1. This area lists some of the main features of your printer, including optional
items.
2. This button opens the same windows as described earlier for items which can
be set from within application programs. Changes you make here, however,
will become the new default settings for all Windows applications.
3. This button prints a test page to ensure that your printer is working.
99 • Printer Settings in Windows
Page 100

Advanced tab
1
2
3
4
5
6
7
8
9
My Printer Properties
10
1. You can specify which times of day your printer will be available.
2. Indicates current priority, from 1 (lowest) to 99 (highest). Highest priority
documents will print first.
3. Specifies that documents should be spooled (stored in a special print file)
before being printed. The document is then printed in the background,
allowing your application program to become available more quickly. Options
follow:
This specifies that printing should not start until the last page has been spooled.
If your application program needs a lot of time for further computation in the
middle of printing, causing the print job to pause for more than a short period,
the printer could prematurely assume that the document has finished. Selecting
this option would prevent that situation, but printing will be completed a little
later, as the start is delayed.
This is the opposite choice to the one above. Printing starts as soon as possible
after the document begins spooling.
4. This specifies that the document should not be spooled, but printed directly.
Your application will not normally be ready for further use until the print job is
complete. This requires less disk space on your computer, since there is no
spool file.
100 • Printer Settings in Windows
 Loading...