

Page 1
OKIFAX
5050
Handbook
OF5050M.PM6 4/15/98, 9:23 AM1
Page 2

Every effort has been made to ensure that the information in
this document is complete, accurate, and up-to-date.
Okidata assumes no responsibility for the results of errors
beyond its control. Okidata also cannot guarantee that
changes in products made by other manufacturers and
referred to in this handbook will not affect the applicability
of the information in it. This handbook is subject to change
without notification.
© 1998 by Okidata. All rights reserved.
Written and produced by the OKIDATA Publications Services
Department. Please address any comments to:
Publications Services Department
OKIDATA
532 Fellowship Road
Mount Laurel, NJ 08054-3405
pubs@okidata.com
Visit the Okidata web site:
http://www.okidata.com
OKIDATA and OKIFAX are registered trademarks of Oki
Electric Industry Company, Ltd.; marques déposées de Oki
Electric Industry Company, Ltd. OKIDATA — marca
registrada Oki Electric Industry Company, Ltd.
As an Energy Star Partner, Okidata has determined that this product meets the Energy Star
guidelines for energy efficiency.
WARNING: Risk of electric shock. Aside
from replacing the toner and image drum
cartridge, do not disassemble or attempt to
service this unit yourself. Refer to a
qualified technician for service.
OF5050M.PM6 4/15/98, 9:23 AM2
Page 3

Federal Communications Commission
Requirements for End Users
This device has been granted a registration number by the
Federal Communications Commission, under Part 68 rules and
regulations for direct connection to the telephone lines. In order
to comply with these FCC rules, the following instructions must
be carefully read and applicable portions followed completely.
1. This equipment complies with Part 68 of FCC rules. On the
bottom of the equipment is a label that contains, among
other information, the FCC registration number and ringer
equivalence number (REN) for this equipment. If requested,
this information must be provided to the telephone company.
2. The following USOC jacks may be used with this equipment:
RJ11C.
3. The REN is used to determine the quantity of devices which may be
connected to the telephone line. Excessive REN’s on the telephone
line may result in the devices not ringing in response to an emergency call. In most, but not all areas, the sum of the REN’s should
not exceed five (5.0). To be certain of the number of devices that
may be connected to the line, as determined by the total REN’s,
contact the telephone company to determine the maximum REN for
your calling area.
4. If the equipment causes harm to the telephone network, the
telephone company will notify you in advance. But if advance notice
isn’t practical, the telephone company will notify the customer as
soon as possible. Also, you will be advised of your right to
file a complaint with the FCC if you believe it is necessary.
5. The telephone company may make changes in its facilities,
equipment, operations, or procedures that could affect the
operation of the equipment. If this happens, the telephone
company will provide advance notice in order for you to
make the necessary modifications to maintain uninterrupted
service.
6. If trouble is experienced with this equipment, please contact
the following for repair and/or warranty information:
OKIDATA
532 Fellowship Rd.
Mount Laurel, N.J. 08054-3405
Telephone: (609) 235-2600 or (800)-OKIDATA
If the trouble is causing harm to the telephone network, the
telephone company may request that you remove the equipment
from the network until the problem is resolved.
7. This equipment contains no user serviceable parts. Please contact
OKIDATA for service.
8. This equipment cannot be used on public coin service provided by
the telephone company. Connection to Party Line Service is subject
to state tariffs. Contact your state Public Utility Commission, Public
Service Commission, or Corporate Commission for information.
9. This equipment is hearing-aid compatible.
OF5050M.PM6 4/15/98, 9:23 AM3
Page 4

FCC Telephone Consumer Protection Act
The Federal Communications Commission Telephone Consumer
Protection Act of 1991 makes it unlawful for any person to use a
computer or other electronic device to send any message via a
telephone fax machine unless such message clearly contains in a
margin at the top or bottom of each transmitted page or on the first
page of the transmission, the date and time it is sent and an
identification of the business or other entity, or other individual
sending the message, and the telephone number of the sending
machine or such business, other entity, or individual.
To comply with this law, you must enter the following
information in your fax unit:
■ Date and time: see page 19 for instructions on doing this.
■ Name and telephone number which identify the source of
your fax transmission: see page 21 for instructions on doing
this.
company’s inside wiring associated with a single line
individual service may be extended by means of a certified
connector assembly (telephone extension cord). The
customer should be aware that compliance with the above
conditions may not prevent degradation of service in some
situations.
Repairs to certified equipment should be made by an
authorized Canadian maintenance facility designated by the
supplier. Any repairs or alterations made by the user to this
equipment, or equipment malfunctions, may give the
telecommunications company cause to request the user to
disconnect the equipment.
Users should ensure for their own protection that the
electrical ground connections of the power utility, telephone
lines and internal metallic water pipe system, if present, are
connected together. This precaution may be particularly
important in rural areas.
Industry Canada Requirements for End Users
The Industry Canada label identifies certified equipment.
This certification means that the equipment meets certain
telecommunications network protective, operational and safety
requirements. The Department does not guarantee the equipment
will operate to the user’s satisfaction.
Before installing this equipment, users should ensure that it is
permissible to be connected to the facilities of the local
telecommunications company. The equipment must also be installed
using an acceptable method of connection. In some cases, the
OF5050M.PM6 4/15/98, 9:23 AM4
■ Users should not attempt to make such connections them-
selves, but should contact the appropriate electric inspection
authority, or electrician, as appropriate.
The Load Number assigned to each terminal device denotes
the percentage of the total load to be connected to a
telephone loop which is used by the device, to prevent
Page 5

overloading. The termination of a loop may consist of any
combination of devices subject only to the requirement that
the total of the Load Numbers of all the devices does not
exceed 100.
L’etiquette du Industrie Canada identifie le materiel
homologue. Cette etiquette certifie que le materiel est
conforme a certaines normes de protection, d’exploitation et
de securite des reseaux de telecommuni- cations. Le
Ministere n’assure toutfois pas que le materiel fonctionnera a
la satisfaction de l’utilisateur.
Avant d’installer ce materiel, l’utilisateur doit s’assurer qu’ll
est permis de le raccorder aux installations de l’entreprise
locale de telecommunication. Le materiel doit egalement etre
installe en suivant une method acceptee de raccordement.
Dans certains cas, les fils interieurs de l’entreprise utilises
pour un service individuel a ligne unique peuvent etre
prolonges au moyen d’un dispositif homologue de
raccordement (cordon prologateur telephonique interne).
L’abonne ne doit pas oublier qu’il est possible que la
conformite aux conditions enoncees ci-dessus n’empechent
pas la degradation du service dans certaines situations.
Actuellement, les entreprises de telecommunication ne
permettent pas que l’on raccorde leur materiel a des jacks
d’abonne, sauf dans les cas precis prevus par les tarrifs
particuliers de ces entreprises.
Les reparations de materiel homologue doivent etre
effectuees par un centre d’entretien canadien autorise
designe par le fournisseur. La compagnie de telecommunications peut demander a l’utilisateur de debrancher un
appareil a la suite de reparations ou de modifications
effectuses par l’utilisateur ou a cause de mauvais
fonctionnement.
Pour sa propre protection, l’utilisateur doit s’assurer que tous
les fils de mise a la terre de la source d’energie electrique,
des lignes telephoniques et des canalisations d’eau
metalliques, s’il y en a, sont raccordes ensemble. Cette
precaution est particulierement importante dans les regions
rurales.
■ Avertissement: L’utilisateur ne doit pas tenter de faire ces
raccordements lui-meme; il doit avoir recoursa un service
OF5050M.PM6 4/15/98, 9:23 AM5
Page 6

d’inspection des installations electriques, ou a electricien,
selon le cas.
L’indice de charge (IC) assigne a chaque dispositif terminal
indique, pour eviter toute surcharge, le pourcentage de la
charge totale qui peut etre raccordee a un circuit
telephonique boucle utilise par ce dispositif. La terminaison
du circuit boucle peut etre constituee de n’import quelle
combinaison de dispositifs, pourvu que la somme des
indices de charge de l’ensemble des dispositifs ne depasse
pas 100.
Federal Communications Commission
Radio Frequency Interference Statement
This equipment has been tested and found to comply with the limits
for a Class B digital device, pursuant to Part 15 of the FCC rules.
These limits are designed to provide reasonable protection against
harmful interference in a residential installation. This
equipment generates, uses and can radiate radio frequency
energy and, if not installed and used in accordance with the
instructions, may cause harmful interference to radio
communications. However, there is no guarantee that interference
will not occur in a particular installation. If this equipment does
cause harmful interference to radio or television reception, which
can be determined by turning the equipment off and on, the user is
encouraged to try to correct the interference by one or more of the
following measures:
■ Reorient or relocate the receiving antenna.
■ Increase the separation between the equipment and the
receiver.
■ Plug the unit into an outlet on a circuit different from that to
which the receiver is connected.
■ Consult the dealer or an experienced radio television
technician for help.
A properly shielded interface cable must be used in order to
ensure compliance of this equipment with FCC regulations.
Changes or modifications not expressly approved by
OKIDATA may void your authority to operate this device.
Industry Canada Radio Interference Statement
This OKIDATA apparatus complies with Class B limits for radio
interference as specified in the Industry Canada Radio Interference
Regulations.
Industrie Canada Déclarations concernant les interférences
radio
Cet appareil OKIDATA est conforme aux critères établis par la
Classe B en ce qui concerne les interférences radio, tel que spécifié
par le Industrie Canada dans les Règlements relatifs aux interférences
Radio.
OF5050M.PM6 4/15/98, 9:23 AM6
Page 7

Safety
Installation Hints
■ Install your OKIFAX 5050 in a dust-free location away from
direct sunlight.
■ Do not plug your OKIFAX into a power source shared by
equipment which produces electrical noise (i.e., air
conditioners, etc.).
■ Leave electronic adjustments to authorized service
personnel.
■ The LINE terminal connects your fax machine to a
standard telephone line. To avoid damage to your
telephone system or to the OKIFAX, do not plug your fax
machine into anything other than a standard RJ-11C jack.
■ Your OKIFAX is intended to be grounded electrically and
is equipped with a three-wire grounded power cord. For
your safety, do not attempt to defeat your power cord’s
grounding plug.
■ The power outlet should be located near the
equipment and should be easily accessible.
■ The TEL port on the back of the unit is only suitable for
2-wire devices. Not all standard telephones will respond
to incoming ringing when connected to an extension
socket.
■ This equipment may not necessarily provide for the
effective hand-over of a call from a telephone connected
to the same line.
Operation and Maintenance
■ Use a dry cloth to clean the control panel and the main
body of the unit.
■ Aside from replacing the toner and image drum cartridge, do not
disassemble or attempt to service this unit yourself. Refer to a
qualified technician for service.
■ Pull out the AC plug before trying to remove any objects that may
have fallen into the machine.
■ If the unit becomes physically damaged, disconnect the
power cord immediately and arrange for its repair or
disposal.
OF5050M.PM6 4/15/98, 9:23 AM7
Page 8

■ When relocating your OKIFAX, always disconnect the
telephone line before disconnecting the power cord, then
reconnect the power cord first.
■ This unit is not intended to be used in parallel with any
other telephone devices.
Toner Cartridge and
Image Drum Unit Handling
■ Leave unused toner cartridges and image drum units in
their packages until needed. When replacing a toner
cartridge or image unit, re-use the packaging to dispose
of the old toner cartridge or image drum unit.
■ Do not expose these components to light for more than
five minutes. Never expose the green drum (inside the
image drum unit) to direct sunlight.
■ Always hold the image drum unit by the ends—never by
the middle. Never touch the surface of the green drum
inside the image drum unit.
■ Exercise care when removing the toner cartridge. Do not
let it touch your clothing or porous materials. The toner
powder causes permanent stains.
■ Small amounts of toner spilled on skin or clothing can be
readily removed with soap and cold water. Using heated
water will make removing the stain much more difficult.
Emergency First Aid
■ IF TONER IS SWALLOWED: Dilute by giving two glasses of water
and induce vomiting by administering Syrup of Ipecac
(follow manufacturer’s instructions). Seek medical
attention. Never attempt to induce vomiting or give
anything by mouth to a person who is unconscious.
■ IF TONER IS INHALED: Take person to an open area for fresh air.
Seek medical attention.
■ IF TONER GETS IN THE EYES: Flush eyes with large quantities of cool
water for 15 minutes, keeping eyelids open with fingers.
Seek medical attention.
■ See the Material Safety Data Sheet in the back of this Hand-
book for more information.
OF5050M.PM6 4/15/98, 9:23 AM8
Page 9

Direct Access
This special section of the Table of Contents points you directly to
the things you’re most likely to do with your OKIFAX 5050. See
the Table of Contents and Index for a complete listing of topics.
How to
Set or change the
Answer mode ....................................................... 20
Date ...................................................................... 19
Time ..................................................................... 19
User ID ................................................................. 21
Heading on outgoing faxes ................................... 21
Paper size .............................................................. 55
Program fax numbers
in One Touch (speed dial) keys .............................. 29
to Auto dial from the keyboard ............................. 29
in groups for sending faxes to multiple
locations ................................................................ 31
Find a programmed fax number ......................................... 3 4
Prepare documents for faxing ............................................ 3 2
Send a fax
to one location ...................................................... 34
to a preset group ................................................... 42
to several locations (broadcast) .............................. 42
at a later time ......................................................... 40
when another machine polls you ........................... 47
Receive a fax
manually .................................................................. 36
without printing it out .......................................... 37
Store in the OKIFAX’s memory ....................... 37
by polling another machine ................................... 47
to a confidential mailbox ....................................... 43
sent on legal size paper .......................................... 18
Make copies ........................................................................ 2 4
Understand error messages ................................................ 69
Replace
the toner cartridge ................................................. 63
the drum cartridge ................................................. 66
paper ..................................................................... 18
Get information
confirm that a fax was sent ............................... 35, 56
activity report ........................................................ 57
telephone directory listing ..................................... 58
messages on the display ........................................ 68
Deal with problems
print paper jams .................................................... 60
document jams ..................................................... 60
power failures ................................................... 38, 59
error messages on the display ................................ 69
Get service .......................................................................... 7 4
OF5050M.PM6 4/15/98, 9:23 AM9
Page 10

Contents
Introduction ........................................................................... 1
Features ..................................................................... 1
Product Options ....................................................... 2
Component Identification ........................................................ 3
What You Should Receive ......................................... 3
Components ............................................................. 4
Control Panel ............................................................ 6
Control Panel Keys and Indicators ............................ 7
The One Touch Keypad .......................................... 10
Using the One Touch Keys for Dialing ................. 10
Using the One Touch Keys for Selecting
Functions and Programming .......................... 10
Signal Tones .......................................................... 11
Installation .......................................................................... 12
Getting Started ........................................................ 12
Where to Install Your Fax Machine ....................... 12
Unpacking ............................................................... 12
Setting Up Your OKIFAX 5050.............................. 13
Install the Document Stacker ................................. 13
Remove the Protective Sheet .................................. 13
Install the Toner Cartridge .................................... 14
Connect to the Telephone Line ............................. 15
Option: Installing an External Handset ................ 15
Connecting an External Telephone or
Answering Machine ........................................... 17
Connect Power ...................................................... 17
Loading Paper ......................................................... 18
Setting the Date and Time ....................................... 19
Setting the Answering Mode ................................... 20
Answering Mode Options .................................... 20
Changing the Answering Mode ............................. 21
Setting the Fax Identification ................................... 21
Setting the Language ................................................ 22
Connecting to a PBX ............................................... 23
Copying ............................................................................... 2 4
Making Copies ........................................................ 24
Using the Manual Paper Feeder ............................. 25
Faxing: Dial Directories ........................................................... 27
Programming One Touch Keys ............................... 27
One Touch Parameters .......................................... 28
Chain Dialing ........................................................ 29
Programming Auto Dial Numbers.......................... 29
Programming Groups ............................................. 30
Faxing: Basic Operations ......................................................... 32
Preparing Documents for Faxing ............................. 32
Guidelines ............................................................ 32
OF5050M.PM6 4/15/98, 9:23 AM10
Page 11

Document Size ..................................................... 32
Multiple Page Documents ..................................... 32
Loading Documents ................................................ 33
Sending a Fax to a Single Location ........................... 34
Search Key Dialing ................................................. 34
Real-Time Dialing ................................................. 35
Redialing ............................................................... 35
Confirming Results ............................................... 35
Stopping a Transmission ...................................... 35
Shortcut Fax Number Programming ....................... 35
Receiving Faxes Manually ......................................... 36
Receiving Faxes in Memory ...................................... 37
Memory Reception Mode [MEM] ......................... 37
No Paper Reception .............................................. 37
Cancelling Messages Stored in Memory ................. 37
Rejecting Unsolicited Fax Messages—Closed
Network Option .................................................... 37
Power Failures and Memory .................................... 38
Using Voice Request ................................................ 38
To Initiate a Voice Request .................................... 39
To Answer a Voice Request ................................... 39
Faxing: Advanced Operations .................................................. 40
Sending a Fax at a Later Date and Time ................... 40
Sending a Delayed Fax From
the Document Feeder ........................................ 40
Sending a Delayed Fax From Memory ................... 41
Cancelling a Delayed Transmission ........................ 42
Sending a Fax to Multiple Locations
(Broadcasting) ........................................................ 42
Sending a Confidential Fax ...................................... 43
Receiving Confidential Faxes .................................... 43
Creating a Confidential Mailbox ............................ 43
Changing Your Password or Closing
a Mailbox ............................................................ 44
Printing a Confidential Message ............................... 45
Relay Broadcasting ................................................... 45
Relay Initiating Station .......................................... 45
Relay Key Station .................................................. 46
Relay Broadcast Report .......................................... 46
Initiating a Relay Broadcast .................................... 46
Polling ..................................................................... 47
Setting Your OKIFAX to be Polled...................... 47
Polling Documents from Other Fax Machines ...... 47
Dual Access ............................................................. 48
What You Can Do While Sending a Fax ............... 48
What You Can Do While Receiving a Fax ............. 48
What You Can Do While Making Copies ............. 48
Customizing Your OKIFAX ....................................................... 49
Customizing Features and Operations .................... 49
Viewing Your Current Settings ............................. 49
User Function Settings............................................. 49
OF5050M.PM6 4/15/98, 9:23 AM11
Page 12

User Function Settings List ................................... 49
Setting Distinctive Ring ......................................... 51
Changing Your User Function Settings ................. 53
Dial Parameter Settings ............................................ 54
Dial Parameter Settings List ................................... 54
Changing Your Dial Parameter Settings ................ 55
Service Function Settings ......................................... 55
Service Function Settings List ................................ 55
Fax Reports .......................................................................... 56
Understanding Reports ........................................... 56
Message Confirmation Report (MCF) ................... 56
Printing a Message Confirmation Report
Manually .............................................................. 56
Broadcast Entry Report ......................................... 56
Confidential Reception Report .............................. 57
Printing Reports ...................................................... 57
Activity Report ........................................................ 57
Broadcast Confirmation Report (MCF) ................. 58
Phone Directory .................................................... 58
Configuration Report ............................................ 58
Power Outage Report ............................................ 59
Codes Used in Reports ............................................ 59
Result Codes ......................................................... 59
Communication Codes ......................................... 59
Problem Solving ................................................................... 6 0
Clearing a Document Jam ........................................ 60
Clearing a Paper Jam ................................................ 60
Printing a Cleaning Page .......................................... 63
Replacing the Toner Cartridge .................................. 63
The “Change Drum Soon” Message ........................ 66
Replacing the Image Drum Cartridge ....................... 66
Resetting the Drum Counter ................................... 68
Display Panel Messages ............................................ 68
Normal Display .................................................... 68
Error Messages ..................................................... 69
Reading the Print Counters ..................................... 70
Problem Checklist .................................................... 70
Service and Support ................................................. 74
Your Dealer .......................................................... 74
The Okidata Customer Information System ......... 74
Okidata Faxable Facts ............................................ 74
Okidata on the Internet ......................................... 74
Okidata Customer Service Representatives ............. 74
Purchasing Supplies and Options .......................... 75
Limited Warranty .................................................. 75
Specifications ....................................................................... 77
Index ................................................................................... 7 8
Material Safety Data Sheet ...................................................... 8 4
OF5050M.PM6 4/15/98, 9:23 AM12
Page 13

Introduction
Thank you for purchasing this OKIFAX 5050 fax
machine. It uses advanced LED technology to transfer
faxed and copied images to plain paper quickly and
sharply.
Features
The OKIFAX 5050 includes these features:
■ One-Touch keys for automatic, single-key dialing of pre-
programmed telephone numbers.
■ Auto Dial numbers for automatic dialing of additional
pre-programmed telephone numbers.
■ Group programming to allow you to transmit a docu-
ment to multiple locations with a single
selection.
■ A search feature to allow you to look for pre-programmed
telephone numbers by name.
■ Mail boxes for confidential reception and
transmission.
■ Automatic redial and page re-transmission when a
telephone number is busy or when problems occur in
communication.
■ Advanced transmission and reception features,
including delayed transmission, transmission to
multiple locations, relay broadcast initiate, and
polling.
■ Advanced memory transmission and reception
features, including automatic reception into memory.
■ Reports to help you keep track of your OKIFAX’s
operations and settings.
■ High-speed scanning of original documents.
■ Photo (halftone) transmission in up to 64 shades of
gray.
■ Automatic power save mode.
■ An advanced dual access feature, which allows you
to load and prepare multiple documents for trans-
mission while your OKIFAX is sending or receiving
another message.
■ A manual paper tray to let you load a different type
of paper while making copies.
Introduction 1
Of5050hw.pm6 4/15/98, 9:25 AM1
Page 14

■ A closed network feature to let you limit who can
send faxes to your OKIFAX and whom your OKIFAX
can send faxes to.
■ A convenience copy feature that lets you make up to
99 sorted copies of an original document.
OKIFAX 5050 Features
■ 15 One Touch keys.
■ 64 Auto Dial numbers.
■ 10 groups.
■ 8 mailboxes for confidential reception.
■ Fax communication at up to 14,400 bits per second.
■ 256 KB of built-in memory.
Product Options
See page 75 for ordering information.
■ Optional memory board with battery backup
provides 1MB of non-volatile memory.
Order Number 70031501.
■ Handset with cradle connects directly to your OKIFAX
and works exactly like a telephone. Order Number
70031801.
■ Second Paper Tray adds an additional capacity of 500
sheets. When the main tray runs out, your OKIFAX
automatically switches to the second tray for uninter-
rupted printing. Order Number 70029401.
Of5050hw.pm6 4/15/98, 9:25 AM2
Page 15
Component Identification
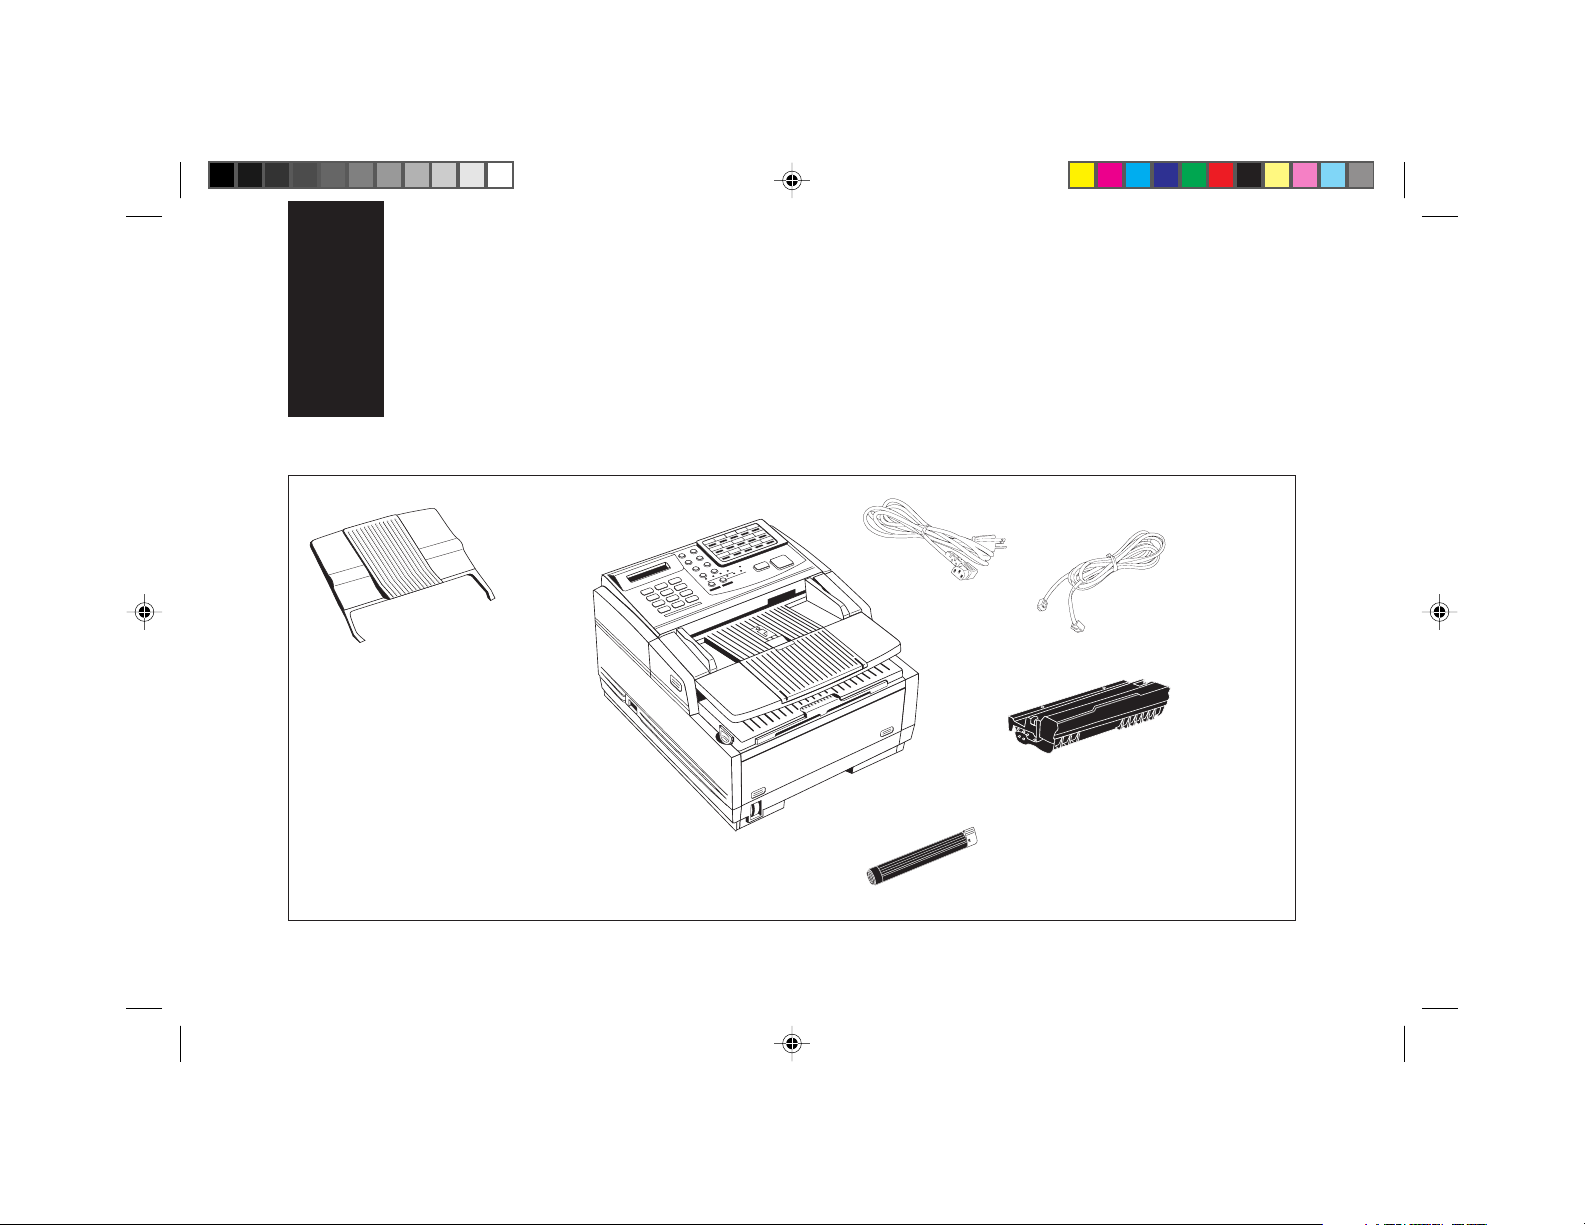
What You Should Receive
Power Cord
Document
Stacker
Handbook &
Quick Start Guide
Of5050hw.pm6 4/15/98, 9:25 AM3
OKIFAX 5050
Telephone
Cord
Image Drum Unit
(inside unit)
Toner Cartridge
Component Identification 3
Page 16

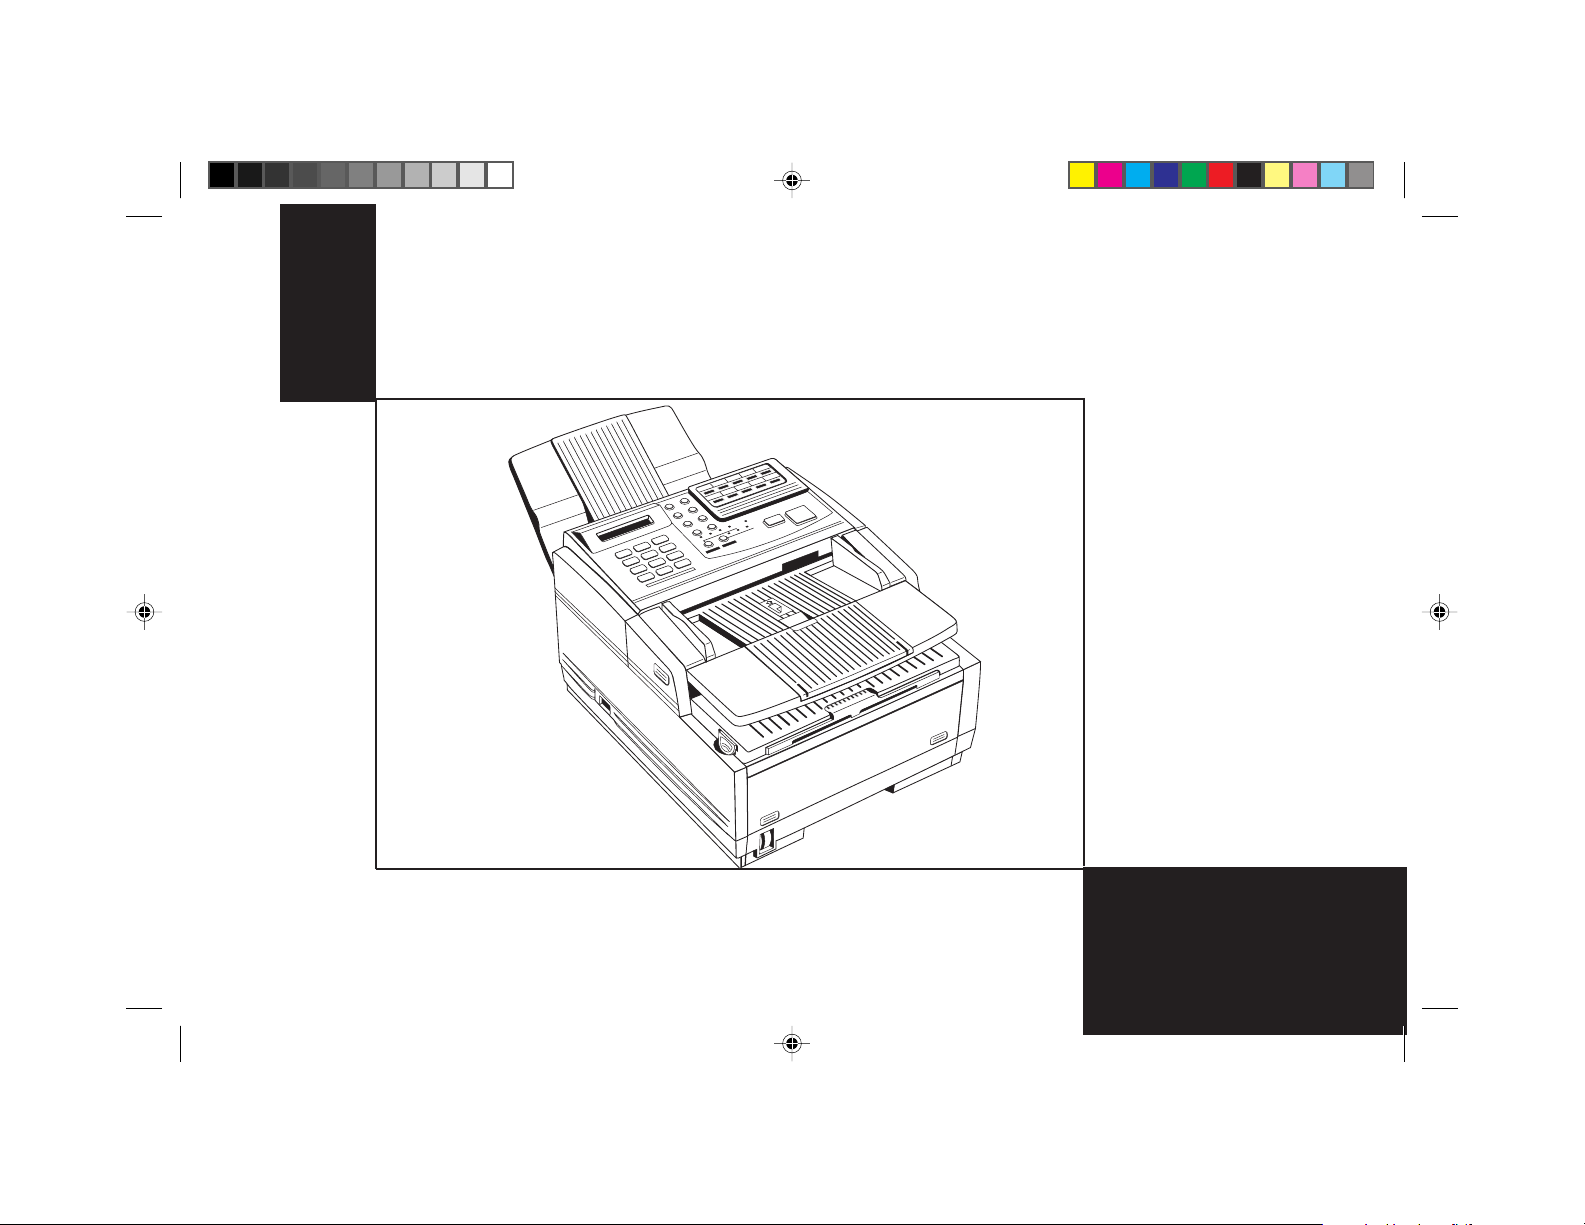
Components
Document Stacker
Holds your original
documents after they are
faxed or copied
Display Panel
Shows status of machine
and faxes in progress.
Numeric Keypad
Use to enter phone numbers, auto
dial numbers, or information
programmed into the OKIFAX.
Document Guides
Adjust these guides to the page
width of the documents that are to
be copied or faxed.
Power Switch
Press I to turn on, O to turn off.
One Touch Keypad
Use for preprogrammed one touch
dialing or for setting functions.
Paper Path Icon
Load documents
here face down.
Document Table
Covers the copy stacker and holds original
documents to be faxed or copied.
Document Table Extension
Flips out to support longer documents.
Front Panel
Gives you access to the manual paper
feeder. This allows you to bypass the
paper tray and feed a different type
of paper directly into the OKIFAX.
Paper Tray
Holds up to 250 sheets of paper.
Paper Indicator
Shows how much paper
is left in the paper tray.
4 Introduction
Of5050hw.pm6 4/15/98, 9:25 AM4
Page 17
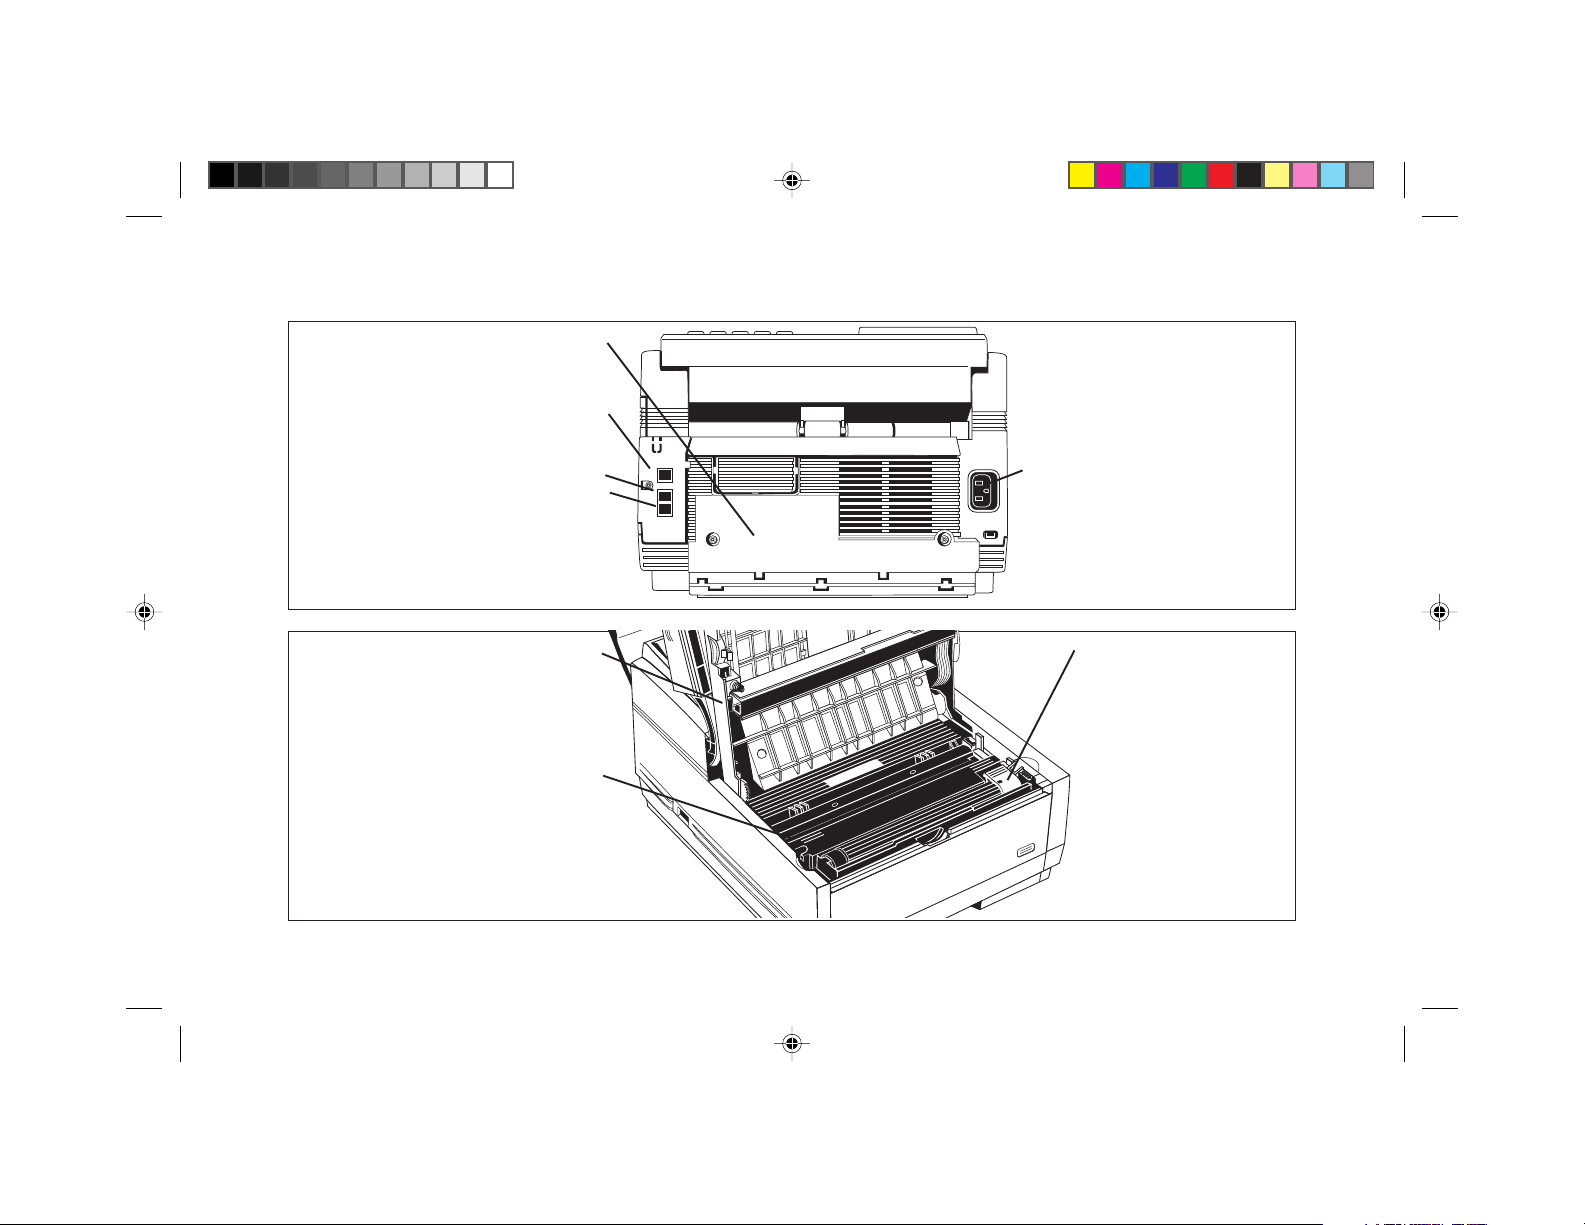
Components
PHEN
ALA
Back Cover
Open this cover to expose expansion slot to
install the optional memory expansion board.
LINE Jack
Jack for connecting to an outside
telephone line.
TEL 1 Jack
TEL 2 Jack
Jacks for connecting to an optional
handset, external phone, or answering
machine.
LED Printhead
This black bar writes received or copied
images onto the image drum. You
should clean this bar each time you
change the toner cartridge.
Image Drum Cartridge
The image drum cartridge contains
the green photosensitive drum
which receives images from the
LED print head and transfers them
to the printing paper.
AC Power Inlet
Plug the supplied AC power cord
into this inlet.
HY
HOOK
V. REQUEST
STD
DARK
COPY
FINE
NORMAL
LIGHT
EX FINE
DEF
PHOTO
3
ABC
2
MN
6
1
JKL
5
WXY
9
GHI
TUV
4
8
#
PRS
7
OQZ
0
*
Toner Cartridge
This black cylinder, installed
inside the image drum cartridge, contains the black powder that forms the image on
the paper. You need to install a
new toner cartridge when the
REPLACE TONER CART
message appears on the display.
Of5050hw.pm6 4/15/98, 9:26 AM5
Introduction 5
Page 18

Control Panel
6 Introduction
Of5050hw.pm6 4/15/98, 9:26 AM6
Page 19

Control Panel Keys and Indicators
1 Display Panel: Refer to this display for instructions and
information while your OKIFAX is performing operations or while you are entering information or changing
settings.
2 Copy key: After loading a document, press this key to make
a copy. When no documents are loaded, press this key
once to display a Message Confirmation Report about
your last transmission on the LCD Display Panel, and a
second time to receive a printed report. You can also use
the Copy key to program a manually entered fax number
into a One Touch key or Auto Dial number—see page 35
for details.
3 Hyphen key: When programming One Touch keys and
Auto Dial telephone numbers, use this key to tell your
OKIFAX to pause briefly before it dials the rest of the
telephone number.
4 Search key: The One Touch keys and Auto Dial numbers
can be programmed to have a name or location ID
associated with their telephone numbers. Using this key
by itself or in combination with the numeric keypad, you
can search for these numbers alphabetically. You can also
use the Search key to search for unassigned One Touch
keys and Auto Dial numbers.
5 Auto Rec key:
Use this key to switch your OKIFAX’s
answering mode. The answering mode controls how your
fax machine answers incoming calls and receives faxes. The
display will always indicate your current selection. See
“Setting the Answering Mode,” page 20, for more
information about the answering modes available.
6 Select Func tion key: Use this key to activate your OKIFAX’s
advanced transmission and reception functions, to obtain
reports and to start programming functions. To select a
function, press the Select Function key, then press the One
Touch key labeled with the function you want to use.
While programming or selecting other functions, pressing
the Select Function key a second time takes you directly
back to your fax machine’s standby mode.
7 Auto Dial key: Auto Dial numbers are abbreviated numbers
for rapid dialing. Rather than dialing the entire telephone
number, you can enter a 2-digit Auto Dial number
instead. You can also use the Location IDs (names)
associated with Auto Dial numbers to search for these
locations by name using the Search key.
8 Redial key: Press this key to manually redial the last number
dialed.
9 Hook/V. Request key: Press this key to open a telephone line
for manual dialing. You can hear the dialing through your
fax machine’s speaker.
Of5050hw.pm6 4/15/98, 9:26 AM7
Introduction 7
Page 20

If you have an optional telephone handset or external
telephone connected to your OKIFAX, you can also use
this key to initiate or answer a request for voice communication during a fax communication. Press this key while
transmitting to signal the operator at the other fax
machine that you want to talk to him or her at the end of
your transmission or after reception of any page has been
completed. To answer a voice request, press this key after
lifting your telephone handset.
10 One Touch keypad: Each of the keys on this keypad can be
programmed with a fax number. You can dial this
number by pressing the corresponding key. See page 10
for details. The keys are also used to control and program
OKIFAX functions.
One Touch labels: After programming a location into a One
11
Touch key, write the location’s name on the One Touch
label. Lift off the plastic cover above the One Touch label,
use a pencil to write in the name, then replace the cover.
12 Numeric keypad: When dialing, these 12 keys work just like
the keypad on a telephone. Also, use the keypad to enter
numbers, letters and other characters while programming
functions or information. After pressing the Search key,
use the numeric keypad to alphabetically search for the
names of locations programmed into your OKIFAX.
13 */Tone key:
If your OKIFAX is set to pulse dialing, this
key allows you to switch from pulse to tone dialing
during your current call. You can also use this key while
programming to create numbers with mixed pulse-then-
tone operation.
14 0/Unique key: When dialing, use this key to enter a zero.
When programming your Sender ID or a Location ID,
you can use this key to enter a variety of unique characters,
including: ! # & ‘ ( ) * + , - . / : ; = ? · ä ß ñ ö ü Æ Å Ø æ å
ø.
15 Transmit Resolution/Yes
§ key: After you load a document,
use this key to change the transmission resolution used.
Use STD for standard originals, FINE and EX.FINE for
detailed or small print originals, and PHOTO for originals
that include colors or many shades of gray.
Use this key also as the Yes § key when making
selections or to move your cursor to the left while entering
information.
©
16 Type of Original/No
key: Use this key to select the document
contrast after you load a document for transmission. Use
LIGHT for originals that are too light, NORMAL for
documents with good contrast, and DARK for originals
that are too dark.
©
Use this key also as the No
key when making selections
or to move your cursor to the right while entering
information.
8 Introduction
Of5050hw.pm6 4/15/98, 9:26 AM8
Page 21

17 Alarm indicator: This indicator glows red and an alarm
sounds to notify you of any problem that occurs. Check
the display panel for an explanation of the problem. To
turn the alarm indicator off, press the Stop key and correct
the problem.
Stop key: This key cancels the operation currently in
18
progress and turns off the Alarm Indicator. After loading
paper, installing a new toner cartridge, or correcting an
alarm condition, press this key to turn off the Alarm
Indicator. While you are programming, pressing the Stop
key takes you back step-by-step through the programming
functions you have already selected.
19 Start key: Press this key to initiate the operation indicated
on the display or to confirm information you have
entered into the display.
20 Plus key: In addition to its function as a programmable
One Touch key, this key is used for chain dialing, which
allows you to dial a number using any combination of
One Touch keys, Auto Dial numbers, and the numeric
keypad. When programming a chain dial number into a
One Touch key or Auto Dial number, press the Plus key
at the end of the first part of the number to indicate that
this is a chain dial number. See page 29 for details.
21 Space key: Use this key on the One Touch Keypad to enter
spaces while programming. Unlike the Pause and Hyphen
keys, spaces are used for easier reading only and have no
effect on dialing.
22 Pause key: Use this key on the One Touch keypad to enter
automatic 3-second pauses in dialing when programming
telephone numbers. For example, you can use this key to
tell your machine to wait for an outside or international
line to open. Pauses in telephone numbers are marked by
a “P” symbol.
Of5050hw.pm6 4/15/98, 9:26 AM9
Introduction 9
Page 22

The One Touch Keypad
The One Touch keys are your OKIFAX’s most important
tool. Use them for quick, one-touch dialing, and to access
most functions and programming options.
There are fifteen dedicated One Touch keys available.
Using the One Touch Keys for Dialing
To use a One Touch key for dialing, just press the appropriate One Touch key. For each key, you can program up
to two telephone numbers: a primary number, which will
always be dialed first, and an optional alternate number
which will be automatically dialed if the first number is
busy or if there is no answer. You can also use the Search
key to find locations programmed into One Touch keys.
Using the One Touch Keys for
Selecting Functions and Programming
Use One Touch keys 1–10 for selecting special transmission and reception functions, for obtaining reports, and
for quick access to programming functions.
To select a function:
1 Press the Select Function key.
2 Press the corresponding One Touch key.
1/Delayed TX key:
and date which you specify (within three days).
Use this key to send a fax at a later time
See page
40.
2/Broadcast Feeder TX key: Use this key to send a fax to mul-
tiple locations (page 42) or to switch from memory to the
document feeder when preparing to send a fax.
3/Confidential TX key: Use this key to send a confidential
document to a mail box (a secure memory storage area) in
the receiving fax machine. See page 43.
4/Relay Initiate TX key: Use this key to set up a relayed fax
transmission. During a relayed fax transmission, your
OKIFAX initiates the transmission by sending a document to a second fax machine, which then broadcasts the
message to a number of other fax machines. See page 45.
5/Polling key: When a document is loaded on the document
tray, use this key to set your OKIFAX to wait for another
fax machine to call and request the document to be sent
(polling transmission). When no document is loaded, use
this key to call another fax machine and request it to send
the documents loaded into it (polling reception). See page
47.
6/Report Print key: Use this key to print reports or phone
lists manually. See the “Reports” chapter for details.
7/Counter Display key: Your OKIFAX keeps track of the
number of pages it has printed and scanned. Use this key
to check the print and scan counters. It can also be used to
reset the drum counter after replacing the image drum
unit (this feature is available only when the “CHANGE
DRUM SOON” message displays).
10 Introduction
Of5050hw.pm6 4/15/98, 9:26 AM10
Page 23

8/Location Program key: Use this key to program One Touch
keys, Auto Dial numbers and groups. See the “Dial Directories” chapter.
9/User Program key: Use this key to program identification
information, to set the clock, and to change function and
dial parameter settings.
10/Message Print From Memory key: Your OKIFAX is set to re-
ceive messages into memory and not print them when it
runs low on toner. Using this key you can force messages
to print, although print quality may be poor because toner
is low. This key is also used to print confidential fax messages received into mail boxes in your OKIFAX’s
memory (page 45).
When no messages are in memory, use this key to print a
cleaning page to clear accumulated toner from the image
drum. See page 63.
Signal Tones
Your OKIFAX makes a number of sounds to inform
you of specific conditions.
Key Select tone: This is a short beep that occurs each time
you press a key.
Error tones: If you press a wrong or inappropriate key, your
OKIFAX emits three short beeps. If it experiences a
problem during communications, it emits three long
beeps. Press the Stop key to turn the error tone off, then
print a Message Confirmation Report to check the source
of the problem—to do this, press the Copy key twice with
no documents loaded.
Voice Request tone: During a fax session, either you or the
person at the remote fax machine may initiate a voice request. When the person at the remote machine either initiates or answers your voice request, your OKIFAX emits
a repetitive warbling sound.
End of Session tone: At the end of every successful fax session,
your OKIFAX emits a short beep to inform you that
there were no errors or problems in the communication.
Off-Hook Alarm tone: If it is equipped with the optional hand-
set, and if the handset is left off the hook, your OKIFAX
emits an intermittent warbling sound. To turn off the
sound, hang up the handset and press the Stop key.
Of5050hw.pm6 4/15/98, 9:26 AM11
Introduction 11
Page 24

Installation
Getting Started
To install your new OKIFAX, follow the instructions
from Unpacking to Setting the Fax Identification. You
must complete these steps for your OKIFAX to operate
properly.
If you have purchased an option package for your
OKIFAX, refer to the documentation you received with
that option for installation instructions.
Where to Install Your OKIFAX
■ Place your OKIFAX in a dust-free location away from
direct sunlight.
■ Allow several inches on each side of the machine to
ensure adequate ventilation.
■ Make sure that both power and telephone outlets are
available nearby.
■ Choose a location where the relative humidity is between
20% and 80%, and where the temperature is between
50°F (10°C) and 92°F (32°C).
12 Introduction
Unpacking
Before you begin, be sure that all the items listed below
are included in your package.
■ OKIFAX 5050
■ Toner cartridge (wrapped)
■ Image drum cartridge (inside machine)
■ Power cord
■ Telephone line cord
■ Document stacker tray
■ Quick Start Guide
Refer to the illustrations in the Component Identification
chapter.
Note: If any items are missing, contact your dealer
immediately. Keep your packing materials and carton in
case you ever need to ship or transport the unit.
Installation 12
Of5050hw.pm6 4/15/98, 9:26 AM12
Page 25
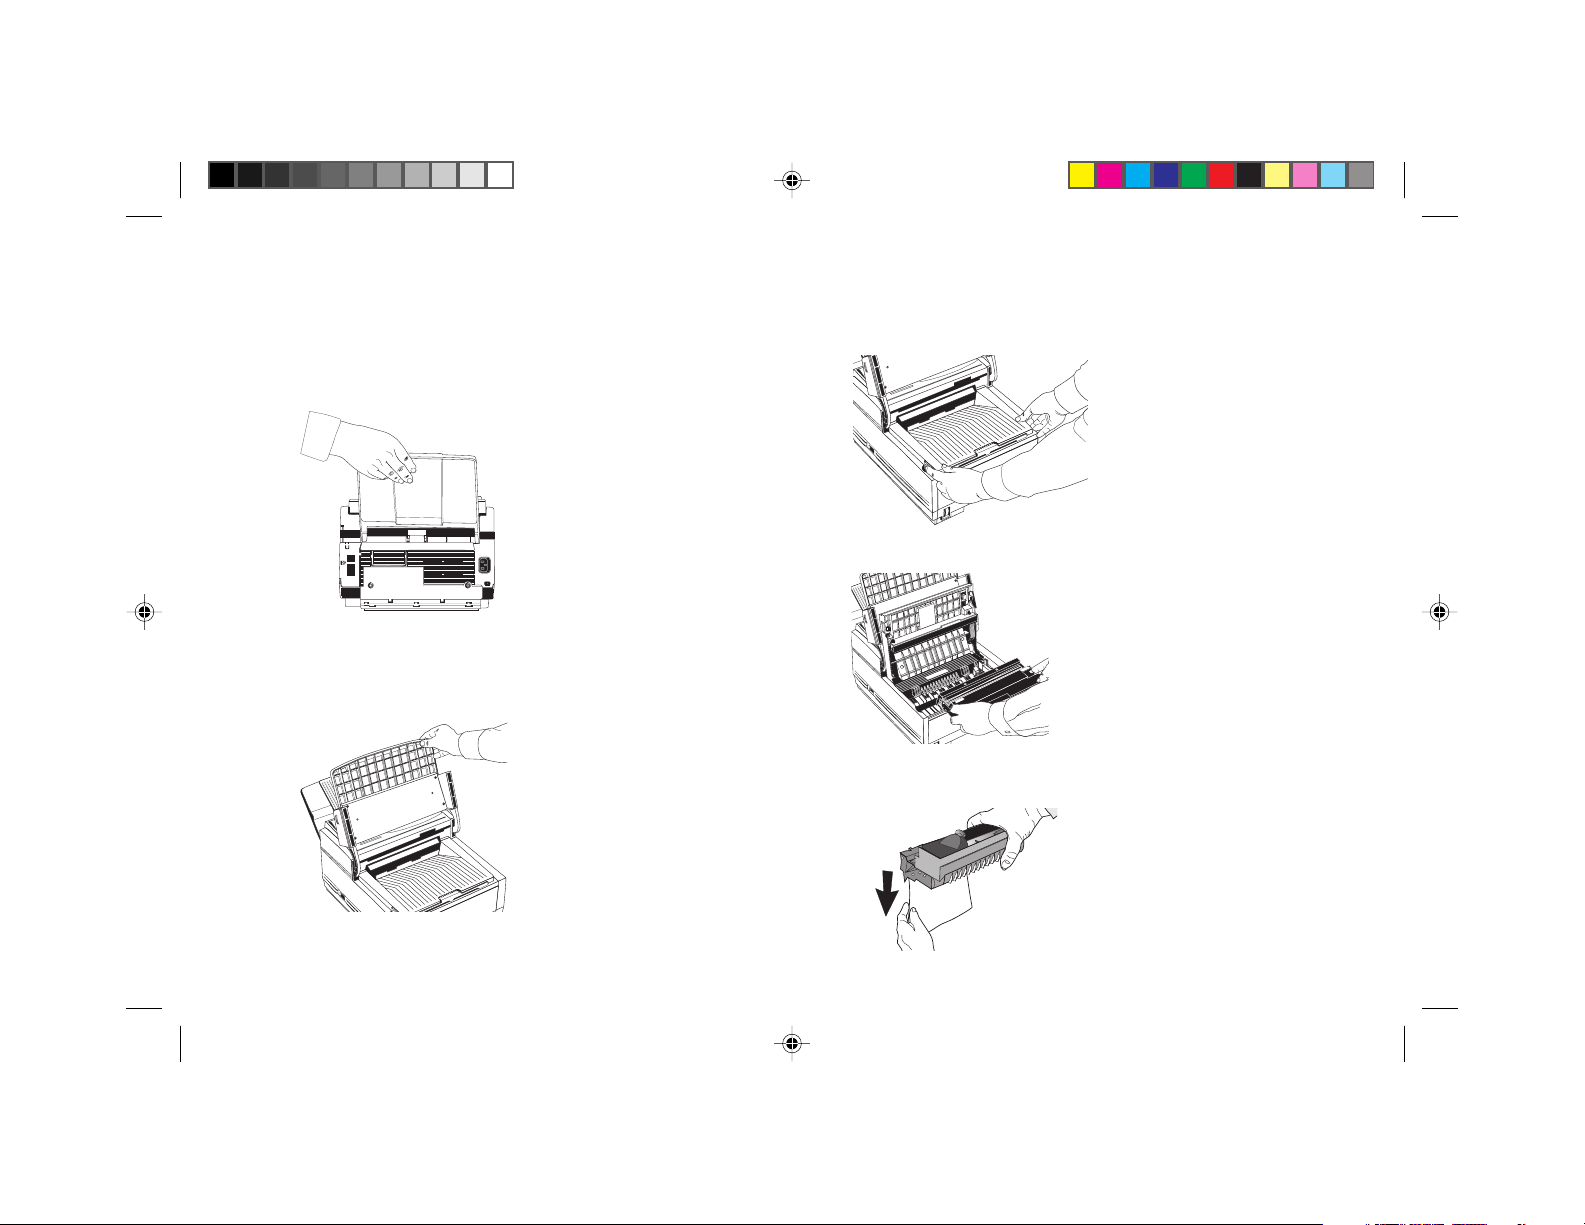
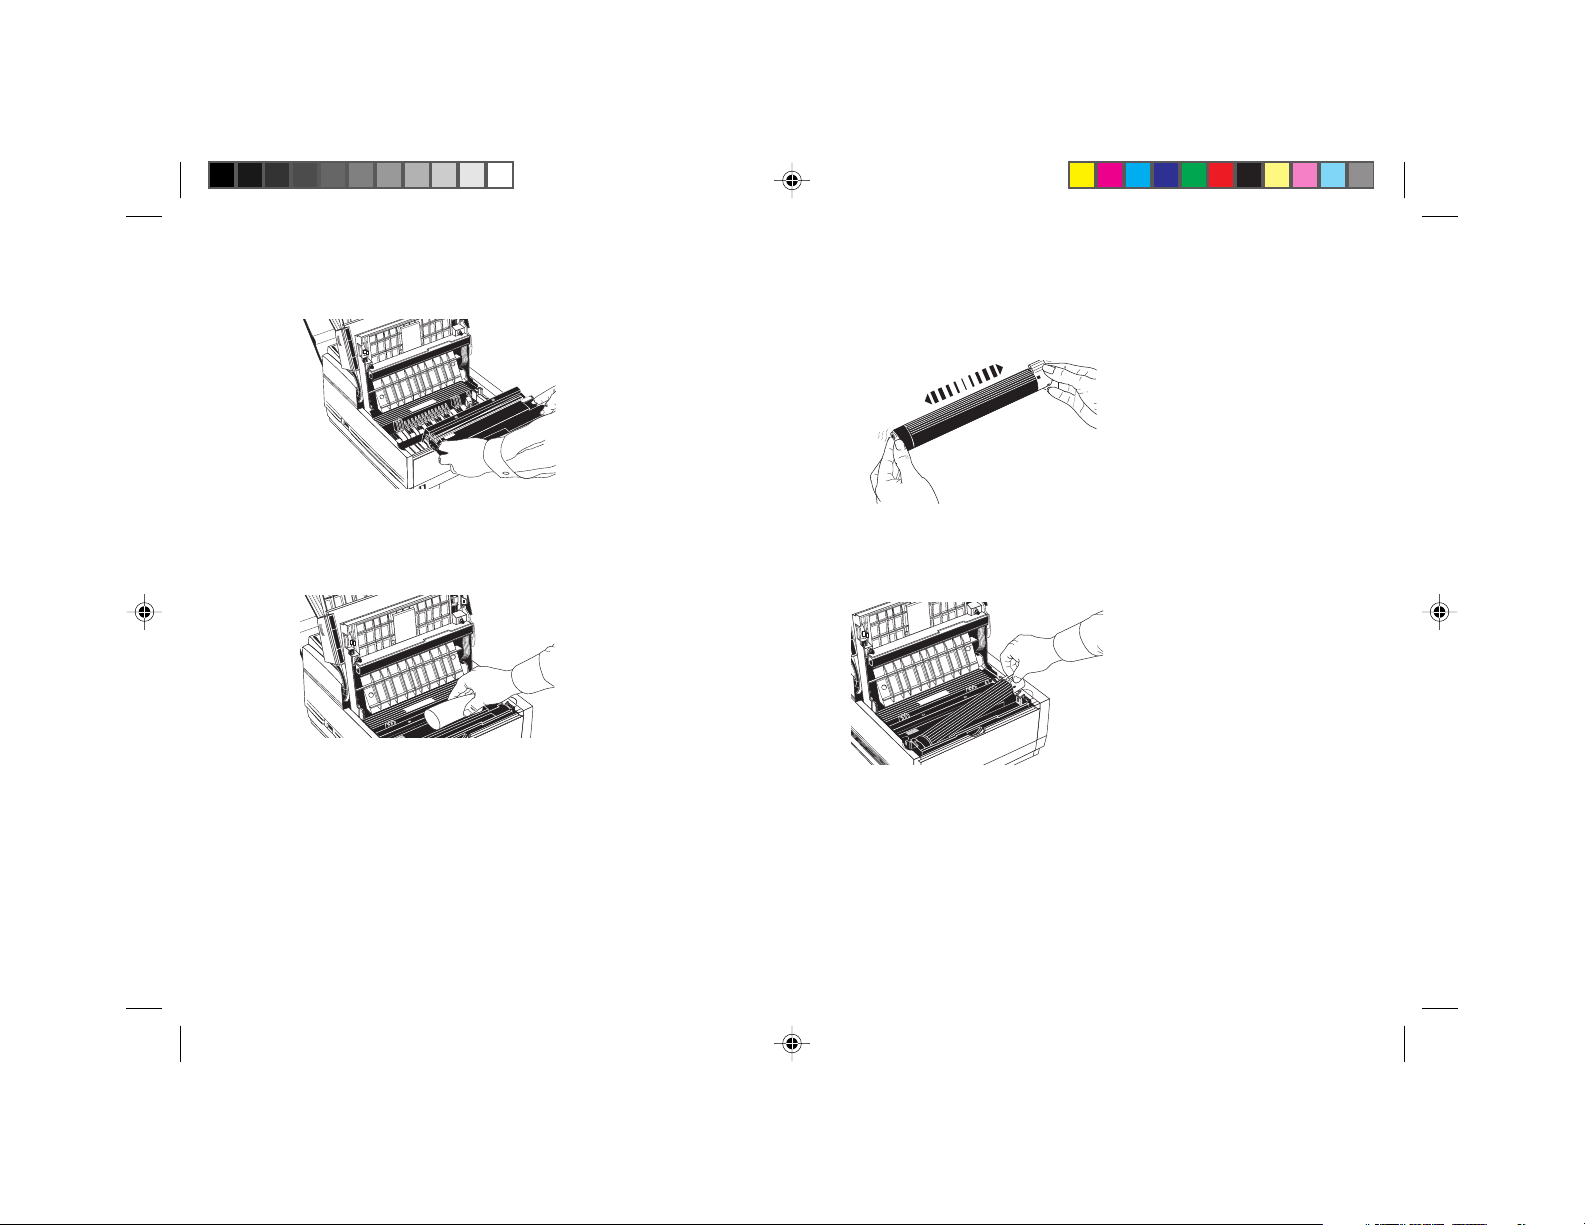
Setting Up Your OKIFAX 5050
EC
Install the Document Stacker
Slip the document stacker indents over the tabs on the
rear of the unit so that they click into place.
Remove the Protective Sheet
1 Lift up the document table.
SELECT
FUNCTION
AUTO REC
START
AUTO DIAL
SEARCH
REDIAL
STOP
ALARM
HYPHEN
HOOK
V. REQUEST
STD
DARK
COPY
FINE
NORMAL
LIGHT
EX FINE
DEF
PHOTO
3
ABC
2
MN
6
1
JKL
5
WXY
9
GHI
TUV
4
8
#
PRS
7
OQZ
0
*
2 Press in the cover release buttons on the side of the copy
stacker until it clicks open. Lift up the stacker.
AUTO R
DEF
3
ABC
2
1
JKL
5
GHI
TUV
4
8
PRS
7
OQZ
*
START
AUTO DIAL
SEARCH
REDIAL
STOP
ALARM
HYPHEN
HOOK
V. REQUEST
STD
DARK
COPY
FINE
NORMAL
LIGHT
EX FINE
PHOTO
MN
6
WXY
9
#
0
3 Take out the image drum cartridge.
SELECT
FUNCTION
AUTO REC
START
AUTO DIAL
SEARCH
REDIAL
STOP
ALARM
HYPHEN
HOOK
V. REQUEST
STD
DARK
COPY
FINE
NORMAL
LIGHT
EX FINE
DEF
PHOTO
3
ABC
2
MN
6
1
JKL
5
WXY
9
GHI
TUV
4
8
#
PRS
7
OQZ
0
*
PUSH
PUSH
4 Remove the protective sheet. Be careful not to touch the
green surface of the drum.
Installation 13
Of5050hw.pm6 4/15/98, 9:28 AM13
Page 26
5 Replace the image drum cartridge.
SELECT
FUNCTION
AUTO REC
DEF
3
ABC
2
1
JKL
5
GHI
TUV
4
8
PRS
7
*
START
AUTO DIAL
SEARCH
REDIAL
STOP
ALARM
HYPHEN
HOOK
V. REQUEST
STD
DARK
COPY
FINE
NORMAL
LIGHT
EX FINE
PHOTO
MN
6
WXY
9
#
OQZ
0
PUSH
PUSH
2 Unwrap the toner cartridge and gently shake it to
distribute the toner. Then carefully peel the tape
from the bottom of the toner cartridge.
Install the Toner Cartridge
1 Remove the sponge and discard.
SELECT
FUNCTION
AUTO REC
SEARCH
HYPHEN
DEF
3
ABC
2
MN
6
1
JKL
5
WXY
9
GHI
TUV
4
8
PRS
7
OQZ
0
*
START
AUTO DIAL
REDIAL
STOP
ALARM
HOOK
V. REQUEST
STD
DARK
COPY
FINE
NORMAL
LIGHT
EX FINE
PHOTO
#
Warning: Be c areful when handling the toner cartridge. Do not let
toner spill on your clothing or other porous materials. If you experience any problems with toner, see the Safety chapter at the beginning of this handbook.
14 Installation
Of5050hw.pm6 4/15/98, 9:29 AM14
3 With the ridged side facing up and the blue lever on
your right, insert the toner cartridge into the image
drum unit, left end first.
SELECT
FUNCTION
AUTO REC
SEARCH
HYPHEN
DEF
3
ABC
2
MN
6
1
JKL
5
WXY
9
GHI
TUV
4
8
#
PRS
7
OQZ
0
*
START
AUTO DIAL
REDIAL
STOP
ALARM
HOOK
V. REQUEST
STD
DARK
COPY
FINE
NORMAL
LIGHT
EX FINE
PHOTO
4 Push the lever forward to secure the cartridge.
Page 27
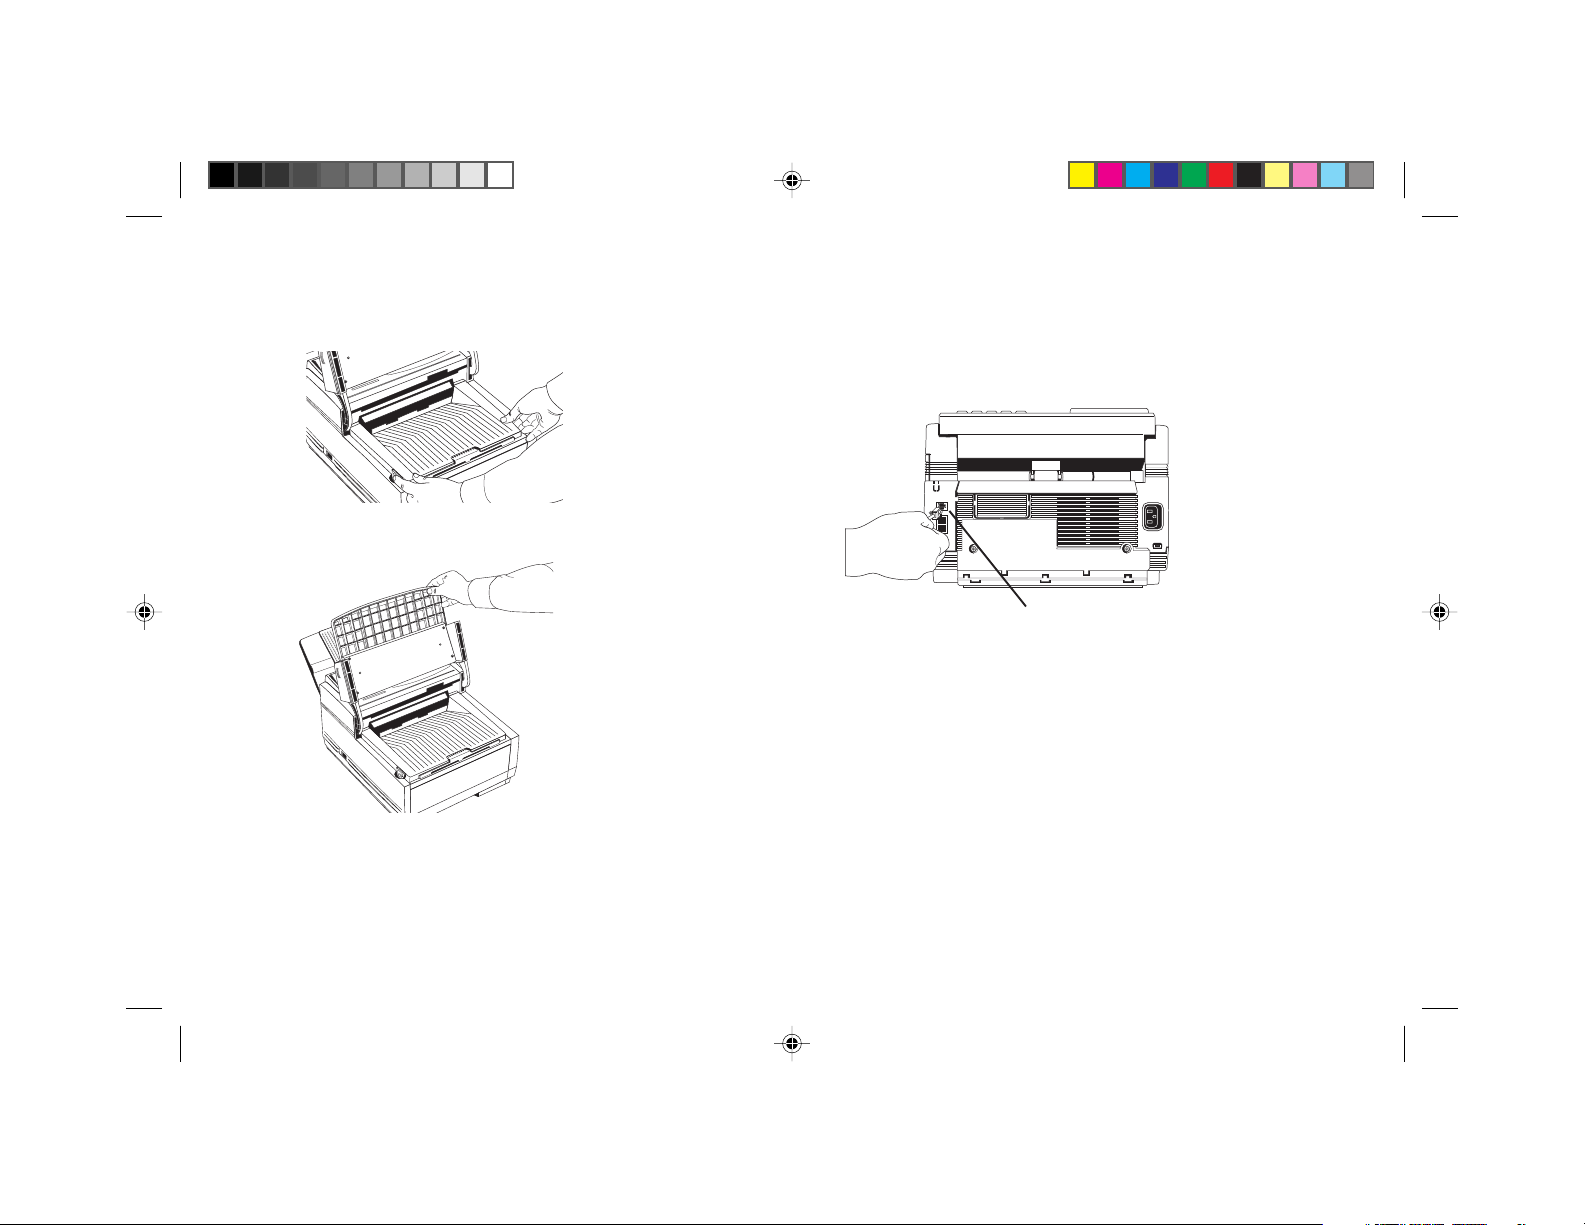
5 Close the copy stacker—push down until you hear both
RED
STO
sides click into place.
ALARM
HYPHEN
HOOK
V. REQUEST
STD
DARK
COPY
FINE
NORMAL
LIGHT
EX FINE
DEF
PHOTO
3
ABC
2
MN
6
1
JKL
5
WXY
9
GHI
TUV
4
8
#
PRS
7
OQZ
0
*
6 Close the document table.
Connect to the Telephone Line
Insert one end of the telephone cord into the LINE jack
in the back of the machine, and the other end into your
wall telephone jack.
LINE jack
SELECT
FUNCTION
AUTO REC
DEF
3
ABC
2
1
JKL
5
GHI
TUV
4
8
PRS
7
OQZ
*
START
AUTO DIAL
SEARCH
REDIAL
STOP
ALARM
HYPHEN
HOOK
V. REQUEST
STD
DARK
COPY
FINE
NORMAL
LIGHT
EX FINE
PHOTO
MN
6
WXY
9
#
0
Tip: Now, you can connect either an external
telephone or the external handset option for your
OKIFAX. See the instructions that follow.
Option: Installing an External Handset
If you purchased an external handset option with your
OKIFAX, follow these instructions to install it.
Installation 15
Of5050hw.pm6 4/15/98, 9:31 AM15
Page 28

1 Using the supplied screw, connect the handset cradle to
its base.
3 Plug one end of the handset cord into the handset and
the other end into the jack on the front of the cradle.
Place the handset in the cradle.
4 Insert the supplied telephone cord into the jack located
on the back of the cradle.
2 Position the handset cradle on the left side of the
OKIFAX.
16 Installation
Of5050hw.pm6 4/15/98, 9:31 AM16
5 Feed the telephone cord from the back of the cradle
through the cable run located on the back of the
OKIFAX
Feed cable here
Page 29
6 Insert the end of the cord into the TEL 1 or TEL 2 jack
on the back of the OKIFAX.
Wall jack
Tel 1, Tel 2
Note: The two TEL jacks are provided to allow you to
connect both an external handset and an answering
machine.
Connecting an External Telephone or Answering Machine
Important Note: Any external telephone or answering
machine connected to the OKIFAX must be FCC and CSA
approved.
Insert one end of the telephone cord into the TEL 1 or TEL
2 jack on the back of the OKIFAX, and the other end into
the jack in your external device.
To connect both an answering machine and a telephone, first
connect your answering machine to your OKIFAX, then plug
your external telephone’s cord into the telephone jack on your
answering machine.
Note: You must have the TAD mode feature turned on for an
answering machine to work with your OKIFAX. See Setting
the Answering Mode, page 20.
Line
TEL 1
TEL 2
LINE
TEL
Jack
Jack
Connect Power
1 Make sure the power switch is off.
2 Plug the power cord into the back of the unit.
Installation 17
Of5050hw.pm6 4/15/98, 9:31 AM17
Page 30
3 Plug the other end into a grounded AC power outlet.
4 Turn on your OKIFAX. After the unit warms up, the
time and current answering mode appear on the
display. Your OKIFAX is now in standby mode, ready to
send or receive faxes.
Time: 2:35 PM
14:35[FAX]
Answer mode
Loading Paper
Your OKIFAX 5050 can hold up to 250 sheets of
standard-weight (20 lb.) paper. For best results, use paper
specially made for laser printers or photocopiers. It can use
letter, legal, and A4 size paper.
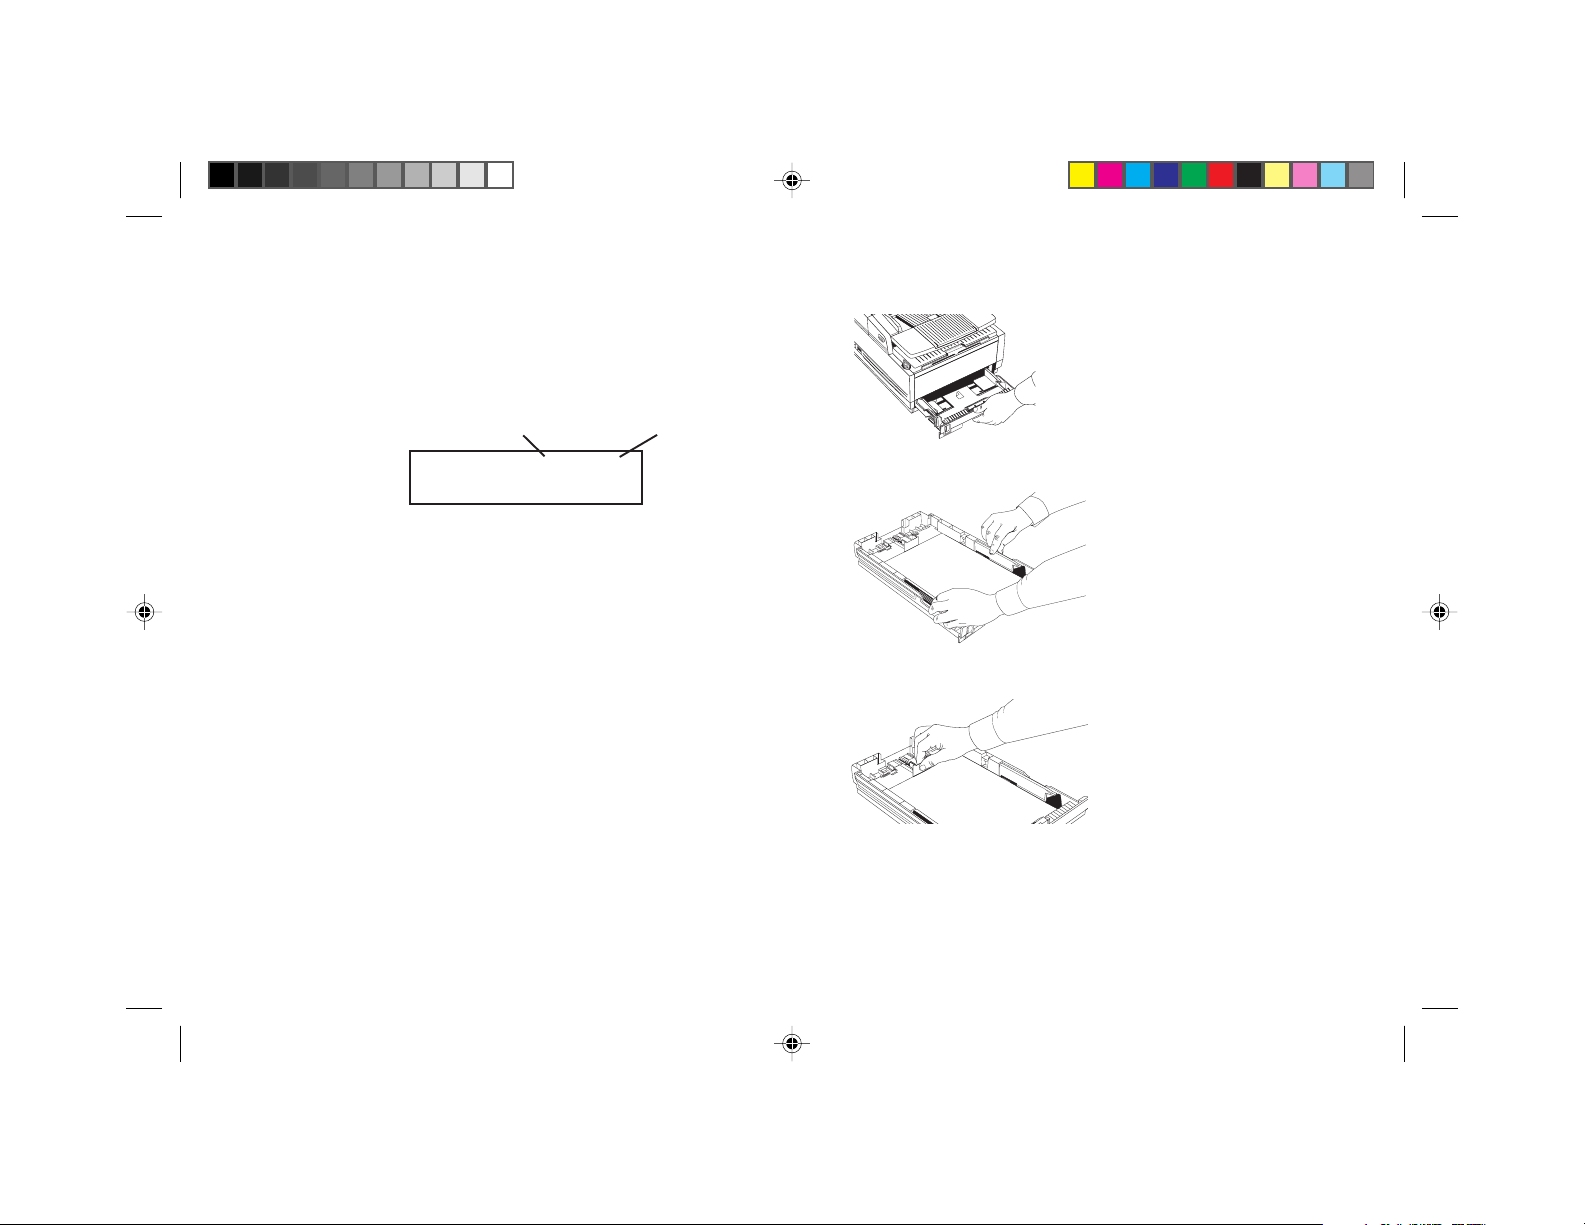
1 Pull the paper tray out of the machine.
2 Adjust the paper guides to the width of your paper.
Your OKIFAX automatically reduces the vertical length of
the page images it receives to fit on the paper loaded in it,
down to 75% of the original length. For example, if you
are receiving a document created originally on legal-size
paper, your OKIFAX can reduce the received pages to fit
on letter or A4 paper.
Note: Your OKIFAX is set at the factory to use letter size
paper. To use a different paper size, change the 1’ST PAPER SIZE user function setting to match your new paper
size. See page 52 for instructions.
18 Installation
Of5050hw.pm6 4/15/98, 9:31 AM18
3 If necessary, lift and adjust for the length of your paper.
Page 31

4 If you are using legal-size paper, pull out the extension at
the back of the paper tray.
7 Replace the paper tray. Push it forward until it locks.
5 Remove the paper from its wrapper (up to 250 sheets).
Note the “print side” notice printed on the label. Fan the
paper.
6 Load the paper into the paper tray, print side down.
Note: Be sure the paper is under the tabs on the sides of the
tray. Do not fill past the Paper Full mark. If necessary readjust
the guides for a snug–but not tight–fit.
Of5050hw.pm6 4/15/98, 9:31 AM19
Setting the Date and Time
1 Press the Select Function key.
2 Press the 9/User Program One Touch key located on the
OneTouch keypad.
3 On the numeric keypad, press 3. The display shows
3:CLOCK ADJUSTMENT.
4 Press the Yes § key. The display shows the
currently set date and time.
5 Using the numeric keypad, enter the new date (month/
day/year) and time in 24-hour format—8:00 AM is 08:00;
8:00 PM is 20:00.
6 Press the Yes § key to confirm your entry.
7 Press the Select Function key to finish.
Installation 19
Page 32

Setting the Answering Mode
The answering mode determines how your OKIFAX
handles incoming fax and voice calls. The standby display
shows the current answering mode.
Answering Mode Options
The answering mode you choose depends on how you
use your OKIFAX and what telephone equipment is connected to it. Read through the mode descriptions below,
then follow the instructions to change to the mode that
best fits your needs.
Manual Receive mode [TEL]: If you use the same line for both
fax and telephone calls and the majority of your incoming
calls are telephone calls, then the TEL answering mode is
your best choice. Each time someone calls, your OKIFAX
rings like a telephone—it does not automatically answer.
You can answer from either an external handset or telephone connected to your OKIFAX. If you pick up the
handset and hear fax tones, press the Start key to receive
the fax. If you do not answer the phone and someone
tries to send you a fax message, your machine will not accept it.
Auto Receive mode [FAX]: If your OKIFAX is connected to a
telephone line reserved only for fax communications, use
the Auto Receive mode. Your OKIFAX assumes all incoming calls are fax messages and automatically receives
them.
Telephone/Fax Auto Switch mode [T/F]: When incoming calls are a
mixture of fax and telephone calls, your best choice is the
Telephone/Fax mode. In this mode, your OKIFAX detects whether the incoming call is a fax or voice call. When
the call is from another fax machine, your machine
switches to fax mode and automatically receives the message. When the call is a voice call, your OKIFAX rings like
a telephone. If you do not answer within 35 seconds, your
OKIFAX switches back to fax mode to allow the calling
party to send a fax manually.
Telephone Answering Device mode [TAD]: Use this mode if you
have connected an answering machine to your OKIFAX.
Like Telephone/Fax mode, the Telephone Answering
Device mode detects whether an incoming call is a fax or
voice call. If it is a fax call, your OKIFAX receives the fax.
If it is a voice call, your OKIFAX rings just as it does in
Manual Receive mode. If no one answers the call, your answering machine activates, allowing the calling party to
leave a message. If you set the Remote Receive user function (page 52), the caller can send a fax at any time during
or after the recorded message by using their keypad to enter the remote receive number you have programmed.
This number activates fax reception. Add something like
this to your answering machine message: “To send a fax
now, press XX [the programmed number].”
Memory Receive mode [MEM]: When set to this mode, your
OKIFAX stores received faxes in memory and does not
print them out immediately. See page 37 for details
20 Installation
Of5050hw.pm6 4/15/98, 9:31 AM20
Page 33

Changing the Answering Mode
1 Press the Auto Rec key. A description of your current
selection displays.
2 Press the Auto Rec key again. Your OKIFAX switches to
the next setting.
3 Continue pressing the Auto Rec key until the selection
you want appears on the display. After a short pause, your
OKIFAX returns to standby mode displaying the new
setting.
Setting the Fax Identification
Fax machines must accurately identify the sender and the
telephone number of the sending fax machine on each
page of every fax they send. Programming this information
into your OKIFAX is required by law.
Sender ID: This is a descriptive title that identifies the
sender—usually the location of your OKIFAX or the
name of your company or office and the OKIFAX’s
number. It is printed at the top of every fax you send.
You can enter up to 32 characters. The first 16 characters of
your Sender ID will also be used as your Personal ID.
This Personal ID appears on the displays or reports of
other Okidata fax machines you communicate with.
TSI/CSI: This is the telephone number of your OKIFAX; it
appears on the displays of other non-Okidata fax machines you communicate with.
Call Back Number: This is a telephone number (not a fax
number) which the operator of the remote machine can
use to reach you. If you use the voice request function (see
page 38) while communicating with another fax machine
and no one is there to answer, your OKIFAX automatically sends a cover letter with a call back message. The message is printed on a separate sheet with the message
“Please call back” and a telephone number where you can
be reached—the number entered here.
To program your Fax ID:
1 Press the Select Function key.
2 Press the 9/User Program One Touch key. The display
shows 1:FUNC. PROGRAMMING.
3 On the numeric keypad, press 4. The display shows
4:SYSTEM DATA PRG.
4 Press the Yes § key. The display shows NO=<TSI/
CSI>, ID=<SENDER ID>.
5 After the display clears, enter the full telephone number
of your OKIFAX using the numeric
keypad.
Of5050hw.pm6 4/15/98, 9:31 AM21
Note: use the Hyphen key to enter a “+” character for
international numbers, and use the Space One Touch
key to enter spaces.
Installation 21
Page 34

6 Press the Start key to save your entry.
11 Press the Select Function key to finish.
7 Enter your Sender ID. This is a descriptive title up to 32
characters long. Refer to the instructions below.
To Do This Use
Enter numbers Numeric keypad (press once)
Enter spaces 14/Space One Touch key
Enter hyphens Hyphen key
Enter alphabet characters Locate the character you want on the
Enter a unique character Press the 0/Unique key repeatedly until
ñ ö ü Æ Å Ø æ å ø
Enter two successive Press the No © key to move to the
letters/numbers using next character
the same key
Move the cursor to Yes § and No © keys
make corrections
numeric keypad. Press that key repeatedly
until the character appears on the display
the character you want appears on the
display. The following characters are
available: ! # & ‘ ( ) * + , - . / : ; = ? · ä ß
8 Press the Start key to save your entry. The display shows
NO=<CALL BACK NO.>.
9 After the display clears, use the numeric keypad to enter
the telephone number for call back messages. Enter up to
20 characters.
Tip:
Use the 14/Space One Touch key to enter spaces.
10 Press the Start key to save your entry.
Setting the Language
Your OKIFAX 5050 comes with two languages installed—English and Spanish, French or Portuguese, depending on where you bought your unit—which appear
on the display and in reports. Follow the instructions below to switch languages.
1 Press the Select Function key.
2 Press the 9/User Program One Touch key. The
display shows 1:FUNC. PROGRAMMING.
3 Press the Yes § key. The display shows
FUNCTION NO. [ ]
ENTER 01-23.
4 Using the numeric keypad, enter 15. The display shows
USER LANGUAGE.
©
5 Press the No
key to switch to the other installed
language.
6 To accept the language change, press the Yes § key.
7 Press the Select Function key to finish.
22 Installation
Of5050hw.pm6 4/15/98, 9:31 AM22
Page 35

Connecting to a PBX
A PBX (Private Branch Exchange) is a private telephone
system used to route internal calls. If you have to dial a
prefix (access digit) to get an outside line, then your line is
connected to a PBX.
If you are connecting your OKIFAX to a PBX, follow the
instructions below. It can then detect the access digit at the
beginning of phone numbers you dial or program, and
automatically waits for a dial tone before dialing the rest of
the number.
Note:
Some PBX installations may require additional adjustments
to your OKIFAX. If you continue to have difficulty with fax communication after following these steps, contact Okidata.
1 Press the Select Function key.
2 Press the 9/User Program One Touch key.
3 On the numeric keypad, press 2. The display
shows 2:DIAL PARAMETER.
4 Press the Yes § key until the display shows
PBX LINE, [OFF].
©
5 Press the No
key. The display changes to
PBX LINE, [ON].
6 Press the Yes § key until the display shows
DIAL PREFIX, [OFF].
©
7 Press the No
key. The display changes to DIAL
PREFIX, [ ] ENTER 4DIGITS.
8 Using the numeric keypad, enter the number you normally
dial from your PBX to obtain an outside line—for
example, 9 before the number, such as 1-555-1212.
9 Press the 14/Space One Touch key repeatedly until the
display changes.
10 Press the Yes § key.
11 Press the Select Function key to finish. Keep in mind that
all of the outside telephone numbers you program into
your OKIFAX have to begin with your PBX’s access digit.
Note: To turn off the PBX LINE and DIAL PREFIX functions,
follow Steps 1-7 above. At Step 8, press the Space key
four times. Then skip to Step 10.
Installation 23
Of5050hw.pm6 4/15/98, 9:31 AM23
Page 36

Copying
Making Copies
You can use your OKIFAX as a stand-alone copier to
make up to 99 copies of a document at one time. The
default resolution for copies is FINE; you can also use
the Yes § key to change to a finer resolution before
you press the Copy key.
Document Type Resolution Resolution
Normal office STD (Standard) 100 X 200 dpi
documents
Documents with small FINE or EX. FINE FINE: 200 X 200 dpi
type or other fine details EX.FINE: 200 X 400 dpi
Documents with photos PHOTO 200 X 200 dpi
or many shades of gray
To make copies:
1 Adjust the document guides to the width of the paper you
are using.
to Use of Scan
Copying 24
2 Neatly stack your documents, then insert them face
down into the document feeder. Readjust the
document guides for a snug fit. Your OKIFAX will
grip the documents, and pull the bottom page into
the machine.
3 Press the Copy key. The display shows PRG. NO. OF
COPIES, [1SETS]. If you want to make just one copy,
you are finished. Your OKIFAX will pause briefly, then
begin copying.
4 To make multiple copies, enter the number of copies you
want to make on the numeric keypad. Then press the
Copy key again. Your OKIFAX begins making copies.
Of5050hw.pm6 4/15/98, 9:31 AM24
Page 37

5 To stop the copying process, press the Stop key.
Using the Manual Paper Feeder
Your OKIFAX’s manual paper feeder allows you to
make copies on a different type of paper than what you
normally keep in the paper tray. To make copies using
the manual paper feeder, follow the instructions below.
Note: The paper you use in the manual feeder must be the
same size as the paper in the paper tray—if it isn’t, the
paper will jam.
If you do want to put a different size paper in the manual
feeder, change the 1ST PAPER SIZE function setting to the
size you want to use—see page 52 for details. When you are
finished, be sure to reset 1ST PAPER SIZE to match the
paper in the tray.
1 Load your documents face down in the document feeder.
2 Press in on the lower half of your fax machine’s front panel
indents, just above the paper tray.
3 Pull the manual paper feeder down until it is horizontal.
4 Adjust the paper guides on the feeder.
Of5050hw.pm6 4/15/98, 9:31 AM25
Copying 25
Page 38

5 Insert a sheet of paper face up. Adjust the guides again
KL
5
*
to ensure that the paper is straight.
MN
6
WXY
9
TUV
8
#
OQZ
0
6 Press the Copy key (see the instructions above). If you
are making more than one copy, or copying a multipage
document, insert additional sheets when the previous
sheet is all the way through the machine.
26 Copying
Of5050hw.pm6 4/15/98, 9:31 AM26
Page 39

Faxing: Dial Directories
This chapter explains how to make faxing easier by
programming frequently used fax numbers into the One
Touch keys and the Auto Dial numbers available in your
OKIFAX 5050. It also explains how to organize the
programmed numbers into groups for easier faxing to
multiple locations.
Programming One Touch Keys
You can store up to two fax numbers with 32 digits in
each One Touch key: a main number and an optional alternate number which will be called if the main number is
busy. You can also enter a 16-character Location ID
(name) for each One Touch key.
■ The OKIFAX 5050 has 15 locations available.
Note: To find One Touch keys that are not yet programmed, repeatedly press the Search key.
1 Press the Select Function key.
2 Press the 8/+/Location Program One Touch key. The
display shows LOCATION PROGRAMMING
ENTER (SRCH, OT, A/D, #).
3 Press a One Touch key to program.
4 The display briefly shows NO=<FAX NO.>,
ID=<LOCATION ID> (or a previously programmed
fax number and Location ID).
5 After the display clears, enter the main fax number. Refer
to the instructions below.
To Do This Use
Enter numbers Numeric keypad (press once)
Enter spaces 14/Space One Touch key
Enter hyphens (-) Hyphen key
Enter pauses (i.e., to wait for
long distance or outside lines)
Add a switch from pulse */Tone key
to tone dialing for part
of the call
Move the cursor to Yes § and No © keys
make corrections
15/Pause One Touch key
6 Press the Start key to enter the number.
Of5050hw.pm6 4/15/98, 9:31 AM27
Faxing: Dial Directories 27
Page 40

7 Enter the Location ID. This is a descriptive title up to 16
characters long. Refer to the instructions below.
To Do This Use
Enter numbers Numeric keypad (press once)
Enter spaces Space One Touch key
Enter hyphens (-) Hyphen key
Enter alphabet characters Locate the character you want on the numeric
Enter a unique character Press the 0/Unique key repeatedly until
Enter two successive Press the No © key to move to the next
letters/numbers on character.
the same key.
Move the cursor to Yes § and No © keys
make corrections
keypad. Press that key repeatedly until the
character appears in the display.
the character you want appears in the display.
The following characters are available:
* + , - . / : ; = ? · ä ß ñ ö ü Æ Å Ø æ å ø.
! # & ‘ ( )
8 Press the Start key. The display shows
NO=<OR LOCATION> for about three seconds.
9 Enter the optional alternate fax number, if desired. Refer
to the instructions following Step 5.
10 Press the Start key to finish programming the
One Touch key. The display shows LOCATION
PROGRAMMING.
11 To continue programming One Touch keys, go
back to Step 3. If you are finished programming, press
the Select Function key.
28 Faxing: Dial Directories
12 Lift off the plastic cover above the One Touch label. Using
a pencil, write in the location name for your One Touch
key(s). Then replace the cover.
One Touch Parameters
If you are experiencing problems communicating with a
remote location in a very noisy telephone area, set up a
One Touch key for that location and try turning Echo
Protection on for that One Touch key. This helps the machine overcome noise and echo problems on the phone
line.
See the Problem Checklist sections for other suggestions.
1 Press the Select Function key.
2 Press the 9/User Program One Touch key.
The display shows 1:FUNC. PROGRAMMING.
3 Press the Yes § key.
The display shows FUNCTION NO. [ ].
4 Using the numeric keypad, enter 23.
The display shows 23:ONE TOUCH PARAM
©
YES [OT] NO[
].
5 Press the One Touch key for the location whose
settings you want to change. The display shows ECHO
PROTECTION, [OFF].
©
6 Press the No
key to switch Echo Protection on.
7 Press the Yes § key to confirm your selection.
The display shows 23:ONE TOUCH PARAM. [ ].
Of5050hw.pm6 4/15/98, 9:31 AM28
Page 41

8 Press the Select Function key to finish.
Tip: Switch Echo Protection back off if you later change
the location the One Touch key is used for.
Chain Dialing
Each fax number you enter or program into your
OKIFAX can be up to 32 digits long. There may be situations where you need to dial a number longer than that.
Or you may want to program portions of a number separately. For example, you may frequently send to different
extensions at the same company, or individuals may need
to enter a department code after the phone number for accounting purposes. These are situations where the chain
dialing feature is helpful.
To create a chain dial number, program up to the first 31
digits of the number into a One Touch key or Auto Dial
number. Then press the 8/Location Prog. One Touch key
to make this a chain dial number. Next, program the rest
of the number into another One Touch key or Auto Dial
number (or, you can leave the second part of the number
unprogrammed and enter it manually on the numeric keypad).
To use a chain dial number, select the One Touch key or
Auto Dial number programmed with the first part of the
chain dial number. The display will show: PRESS OT/
AD/SRCH KEY. Then select the One Touch key or Auto
Dial number programmed with the second part of the
chain dial number. If the second part of the chain dial
number was not programmed, enter it manually on the
numeric keypad. Press the Start key to begin sending the
fax.
Programming Auto Dial Numbers
For each Auto Dial number, you can enter a fax number
up to 32 digits long and a Location ID (name) up to 15
characters long.
To program Auto Dial numbers:
1 Press the Select Function key.
2 Press the 8/Location Prog. One Touch key.
The Display shows LOCATION PROGRAMMING.
3 Press the Auto Dial key.
4 Using the numeric keypad, enter a 2-digit number for the
Auto Dial number you want to program. You can use
numbers from 01 to 64.
5 The display briefly shows NO=<FAX NO.>,
ID=<LOCATION ID> (or a previously programmed
fax number and location).
Of5050hw.pm6 4/15/98, 9:31 AM29
Faxing: Dial Directories 29
Page 42

6 After the display clears, enter the fax number.
Refer to the instructions below.
To Do This Use
Enter numbers Numeric keypad (press once)
Enter spaces Space One Touch key
Enter hyphens (-) Hyphen key
Enter pauses (i.e., to Pause key
wait for long distance
or outside lines)
Add a switch from */Tone key
pulse to tone dialing
for part of the call
Move the cursor to Yes § and No © keys
make corrections
7 Press the Start key to register the number.
8 Enter the Location ID. This is a descriptive title up to 16
characters long. Refer to the instructions below.
To Do This Use
Enter numbers Numeric keypad (press once)
Enter spaces Space One Touch key
Enter hyphens Hyphen key
Enter alphabetical Locate the character you want on the numeric
characters keypad. Press that key repeatedly until the
character appears.
Enter a unique Press the 0/Unique key repeatedly until the
character. character you want appears. The following
characters are available: ! # & ‘ ( ) * + , - . / : ;
= ? · ä ß ñ ö ü Æ Å Ø æ å ø.
Enter two successive Press the No © key to move to the next letters/
numbers on character.
the same key
Move the cursor to Yes § and No © keys
make corrections
9
Press the Start key to finish programming the One Touch
key. The display shows AUTO DIAL NO. [ ].
10 To continue programming Auto Dial numbers, go back
to Step 4. If you are finished, press the Select Function
key.
Programming Groups
This feature allows you to create groups of fax numbers
you have already programmed as One Touch keys or Auto
Dial numbers. You can send the same fax to all the numbers in the group with one operation. This is useful if, for
example, you need to send weekly status updates to all the
members of a team working in separate locations.
■ You can program up to ten groups into your OKIFAX.
■ The OKIFAX 5050 can have up to 79 locations per group.
Note: This is different from relay broadcasting, where one
fax is sent to a remote machine, which then relays it to a
group of fax numbers.
1 Press the Select Function key.
30 Faxing: Dial Directories
Of5050hw.pm6 4/15/98, 9:32 AM30
2 Press the 8/Location Prog. One Touch key. The display
shows LOCATION PROGRAMMING.
Page 43

3 On the numeric keypad, press the # key. The display
shows GROUP SETTING.
4 Using the numeric keypad, enter the two-digit group
number you want to program. You can use numbers
from 01 to 10.
5 The display shows the number of your current group and
SELECT LOC.(S).
6 You can now add a location to your group (or delete a
location from it). Refer to the instructions below.
To Do This Use
Add a One Touch Press the One Touch key.
location Press Yes § to add it to the group.
Add an Auto Dial Press Auto Dial. Enter the 2-digit Auto location
Delete a previously Press the One Touch key. Press No © added
One Touch to delete it from the group.
location
Delete an Auto Dial Press the Auto Dial key. Enter the 2-digit
location Auto Dial number. Press No © to delete
Search for a location Press the Search key continuously until by name
to add or delete the location you want appears. Press
Dial number. Press Yes § to add it to
the group.
it from the group.
Yes § to add it to the group.
Press No © to delete it.
7 After you have completed your selection by pressing Yes §
©
or No
, the display shows SELECT LOC. again. Continue
to add or delete locations from your group. Each group can
contain up to a maximum of all of the One Touch and Auto
Dial locations available on your OKIFAX.
8 When you are finished programming your group, press the
©
key. The display shows LOCATION PROGRAM-
No
MING.
9 To program another group, go back to Step 3.
If you are finished, press the Select Function key.
Of5050hw.pm6 4/15/98, 9:32 AM31
Faxing: Dial Directories 31
Page 44

Faxing: Basic Operations
This chapter explains how to load documents for faxing,
how to send and receive faxes, how to use the closed
network and voice request features, and how your
OKIFAX handles power interruptions.
Preparing Documents for Faxing
Use the information in this section to make sure your
documents scan and fax easily and clearly.
Guidelines
■ Try to use good quality documents for your fax transmis-
sions. Documents that are typed or written with a black
felt-tip pen on white (or light) paper work best.
■ Do not send documents which are not rectangular.
■ Never use documents that have wet or sticky surfaces,
wrinkles, staples, or paper clips. However, your OKIFAX
can transmit documents that have been subject to normal
wear, such as documents with staple holes, letter folds
and minor corner folds.
■ If you are not sure how a document will fax, try making a
copy first: load the document face down and press the
Copy key.
■ If your documents are heavily bent, creased or torn, make
a copy on a photocopier and send the copy instead.
Document Size
All documents must have a minimum width of 5.8" (148
mm) and a minimum length of 5" (128 mm). Documents cannot be wider than 8.5" (216 mm) or longer than
14" (356 mm).
Note: Your OKIFAX can be set to accept documents of
unlimited length—see your Authorized OKIFAX Dealer..
Multiple Page Documents
Your OKIFAX can scan paper with a basis weight between 13 pounds (50 g/m
2
) and 28 pounds (105 g/m2).
You can load up to 30 sheets of standard 20-pound (80
2
) paper, such as photocopier paper. If you use lighter
g/m
or heavier paper, you can load up to 15 sheets. For very
heavy paper, load and send pages individually.
32 Faxing: Basic Operations
Of5050hw.pm6 4/15/98, 9:32 AM32
Page 45

When loading multiple-page documents, do not load paper thinner than 0.003" (0.08 mm) or thicker than 0.005"
(0.13 mm). For single-page documents, do not load paper
thinner than 0.002" (0.06 mm) or thicker than 0.006" (0.15
mm).
Loading Documents
To prevent paper jams and problems during operation,
stack your documents neatly, aligning their edges, before
loading. Do not load documents of different sizes at the
same time.
2 Stack your documents neatly, then insert them face down
into the document feeder. Readjust the document guides
for a snug fit.
Tip: You can load and prepare to transmit a document
while your OKIFAX is still sending or receiving another
message, as long as the document feeder is clear. To do
this, load the document, select your location and press
the Start key. Your document will be sent as a priority
when the current communication ends.
1 Adjust the document guides to the width of the paper you
are using.
Of5050hw.pm6 4/15/98, 9:32 AM33
3 Your OKIFAX will grip the documents and pull the
bottom page into the machine.
4 To obtain the best possible quality for the type of docu-
ment you are scanning or faxing, use the Yes § key to set
the resolution of your document. For most normal
documents, the default STD setting works well.
Document Type Resolution Resolution
Normal office documents STD (Standard) 200 X 100 dpi
Documents with small FINE or EX. FINE FINE: 200 X 200 dpi
type or other fine details EX.FINE: 200 X 400
Documents with photos PHOTO 200 X 200 dpi
or many shades of gray
to Use of Scan
dpi
Faxing: Basic Operations 33
Page 46

5 If necessary, use the No © key to adjust the level of contrast
in your document. For most documents, the default
NORMAL setting works best.
Document Type Contrast to Use
Documents with normal contrast NORMAL
Documents which are too light LIGHT
Documents which are too dark DARK
6 Your documents are now ready for faxing or copying.
Sending a Fax to a Single Location
1 Load your documents.
2 Select a location. Refer to the instructions below.
To Dial Using Do This
A One Touch key Press the One Touch key
An Auto Dial number Press the Auto Dial key, then enter the
two-digit Auto Dial number on the
The numeric keypad Dial as you would on a normal telephone.
An external telephone Pick up the handset of your external
numeric keypad.
If you make a mistake, press the Yes §
key to go back and re-enter the number.
Press the Start key when you have
finished entering numbers.
telephone and dial the number of the
machine you wish to transmit to. If the
receiving fax machine is in automatic
reception mode, you will hear a highpitched tone. If a person answers the
phone, ask them to press the Start key
on their machine.
3 If necessary, press the Start key to begin the transmission.
34 Faxing: Basic Operations
The table below explains some of the messages you may
see during a typical fax transmission.
Note: By default, One Touch keys and Auto Dial numbers
begin transmission automatically, without pressing the
Start key. The Auto Start setting lets you change this—
see page 54 for details.
Message Explanation
(location) The remote location’s Personal ID, TSI/CSI,
DIALING Your OKIFAX is dialing the number.
CALLING The line is ringing.
SENDING/XX.X Your OKIFAX is sending the
RESULT = OK The fax was sent successfully.
COMMUN. ERROR If the red alarm indicator lights and you see
Location ID or the telephone number you
entered will identify the location during
transmission.
message. XX.X indicates the transmission
speed in bits per second.
this or another error message, a problem
occurred during the communication.
Try resending the fax. Refer to the chapter on
Problem Solving for assistance.
Search Key Dialing
If you are not sure which One Touch key or Auto Dial
number contains the location you want to call, use the
Search key to look through an alphabetical list of all of the
Location IDs programmed into your OKIFAX.
Of5050hw.pm6 4/15/98, 9:32 AM34
Page 47

1 When selecting locations, press the Search key. The display
will show ENTER 1'ST CHAR.
You can redial a number manually at any time by pressing the
Redial key.
2 Repeatedly press the Search key to look through the entire
list of locations in alphabetical order, or locate the letter
you want on the numeric keypad, and press that key
repeatedly to look through Location IDs beginning with
that letter.
Real-Time Dialing
Normally, your OKIFAX dials the entire number of the
location you have selected at one time. Occasionally, you
may need to dial numbers in real time—one digit at a
time.
If your OKIFAX is equipped with a handset, you can dial
in real time by picking up the handset, or you can press
the Hook/Voice Request key.
Redialing
If the line is busy or if there is no answer, your OKIFAX
will wait, and then automatically redial the number. The
dial parameter settings determine how many times it will
redial and how long it will wait between attempts—see
page 54 for details.
Also, if your OKIFAX is transmitting from
memory and a communication error occurs, it will automatically redial the number and try to resend the fax.
Note: If a power loss occurs, the redial information is lost—
see “Power Failures and Memory,” page 38.
Confirming Results
After transmission, press the Copy key once (with no documents loaded) to see the result of your transmission on the
display. To print the report, press the Copy key a second time.
See the chapter on Reports for more information (page 56).
Stopping a Transmission
To stop a transmission in progress, follow the instructions
below.
Press the Stop key twice. The display shows STOPPED.
1
2 If documents are stuck partway through the document
feeder, you may see a RELOAD DOCUMENT message on
the display. Press the Stop key again. Your OKIFAX feeds the
document the rest of the way through the document feeder.
Shortcut Fax Number Programming
This convenient feature lets you program a number into your
OKIFAX for future use while you’re sending a fax to it. It
even finds the first available One Touch key (or Auto Dial
number, if all the One Touch keys are programmed) for you
to program.
Of5050hw.pm6 4/15/98, 9:32 AM35
Faxing: Basic Operations 35
Page 48

Use the following procedure:
1 Load the document.
2 Enter the fax number using the numerical keypad.
3 Press the Copy key. The display shows ONE TOUCH
NO.[01]. The number in brackets is the next unprogrammed One Touch key number. If all the One Touch
keys are programmed, the display shows AUTO DIAL
NO.[01], with the number of the next unprogrammed
Auto Dial number.
4 Press Yes § to program the location to the number
shown. Or press Search to cycle through the available
unprogrammed keys/numbers, then press Yes § to
program to the number you want. Press No © to stop
the process.
5 The display reads NO=5551212 [the fax number you
entered] ID=. Press Start, then enter the location ID. This
is a descriptive title up to 15 characters long. Refer to the
instructions below.
To Do This Use
Enter numbers Numeric keypad (press once)
Enter spaces Space One Touch key
Enter hyphens (-) Hyphen key
Enter alphabetical Locate the character you want on the numeric
characters keypad. Press that key repeatedly until the
character appears on the display.
Enter a unique Press the 0/Unique key repeatedly until the
character character you want appears. The following
Enter two successive Press the No © key to move to the next
letters/numbers on character.
the same key
Move the cursor to Yes § and No © keys
make corrections
characters are available: ! # & ‘ ( ) * + , - . / : ;
= ? · ä ß ñ ö ü Æ Å Ø æ å ø.
6 Press Start. The display shows NO=<LOCATION>.
7 Press Start. The display shows PROGRAMMING, then
DIALING, and the OKIFAX dials the number and sends
the fax.
Receiving Faxes Manually
If your OKIFAX is set to the manual receive
[TEL] mode,
it treats all incoming calls as voice conversations, and does
not automatically receive faxes.
Note: You must have a handset connected to the OKIFAX
in order to receive faxes manually.
To receive a fax while in manual receive mode:
1 When your telephone or fax machine rings, pick up the
telephone handset connected to it. If a person is on the
line, carry on your conversation.
2 If a remote fax machine is on the line, or if a person
wishes to fax you a document after a conversation, press
the Start key.
36 Faxing: Basic Operations
Of5050hw.pm6 4/15/98, 9:32 AM36
Page 49

3 When the RECEIVING message appears on the display,
hang up the handset.
4 After you receive the fax, a long beep tells you that the
transmission was successful.
Receiving Faxes in Memory
Note: This section does not apply when the OKIFAX is in
PC Fax mode. In that case, all faxes are automatically
stored on the computer's hard drive, regardless of the
conditions explained below.
Memory Reception Mode [MEM]
When your OKIFAX is set to Memory Reception mode
(see page 37), it receives all messages into its memory
without printing them out. MSG. IN MEMORY
displays.
■ To print messages stored in the machine, switch to Auto
Receive mode: press the Auto Rec. key repeatedly until
AUTO RECEIVE MODE displays. The OKIFAX
displays PROGRAMMING for a few seconds, then the
stored faxes print.
No Paper Reception
When your OKIFAX runs out of paper, incoming faxes
are stored in the machine’s memory. The MSG. IN
MEMORY, REPLACE PAPER message appears in the
display.
Load more paper. Your OKIFAX automatically prints out
any messages in memory as soon as paper is loaded.
Canceling Messages Stored in Memory
It is possible to erase messages received in memory
without printing them.
1 After you have followed the instructions to print out
messages stored in memory, the display shows MSG. IN
MEMORY, PRINTING.
2 To erase the message instead of printing it, press the Stop
key. The display shows CANCEL?
3 Press the Yes § key to erase the message from your
OKIFAX’s memory.
If there are more messages in memory, you will see MSG. IN
MEMORY, PRINTING again.Follow the steps above for
each message you want to erase. Keep in mind that there is
no way to identify which message you are erasing.
Rejecting Unsolicited Fax Messages—Closed Network Option
The closed network option lets you set your OKIFAX to
only transmit faxes to or receive faxes from locations programmed into One Touch keys or Auto Dial numbers. You
can also set it to receive faxes only from those programmed
locations. This is one way of reducing the number of unsolicited faxes, such as advertisements you receive. To use the
closed network function, follow the instructions below.
1 Press the Select Function key.
Faxing: Basic Operations 37
Of5050hw.pm6 4/15/98, 9:32 AM37
Page 50

2 Press the 9/User Program One Touch key. The
display shows 1:FUNC. PROGRAMMING.
3 Press the Yes § key. The display shows
FUNCTION NO. [ ].
■ If you have loaded documents on your OKIFAX’s
document feeder, any dialing or transmission settings
will be lost.
■ Redial information is lost.
4 Using the numeric keypad, enter 08. The display
shows 08:CLOSED NETWORK, and the current setting of
this function.
5 Press the No © key until the setting you want appears in the
display. Choose RX to limit reception only, T/R to limit both
transmission and reception, or OFF for no limitations on
transmission or reception.
6 Press the Yes § key to confirm the new setting.
7 Press the Select Function key to finish.
Power Failures and Memory
If power to your OKIFAX is interrupted, the problems listed
below will occur.
Note: You can prevent these problems by installing an
optional memory expansion board. These have a battery
back-up system that protects stored information for at least
one hour.
■ Any messages your OKIFAX has scanned into its memory
but not yet transmitted will be lost.
■ Any messages your OKIFAX has received into its memory
but not yet printed will be lost.
38 Faxing: Basic Operations
When power is restored, your OKIFAX prints a power
outage report to inform you of the power failure. Use
this report to determine which received messages you
may have lost, and to determine which transmissions
you may have to resend. See the Reports chapter for
more information.
Using Voice Request
The voice request feature allows you to have a conversation with a person at a remote fax machine after a fax
communication is finished. Either the person sending or
receiving the fax can initiate a voice request.
If you are sending a fax, you can answer a voice request only after all pages have been transmitted. If you
are receiving a fax, you can answer a voice request after reception of each page.
You will know if the person on the other fax machine
has issued a voice request when you hear a warbling
tone. If you do not respond in approximately six seconds, the voice request is automatically cancelled.
Of5050hw.pm6 4/15/98, 9:32 AM38
Page 51

Notes:
■
You need to have either the optional handset or an external telephone attached to the OKIFAX in order to use the
voice request function.
■ You can use the voice request function only when you
are using the document feeder to send a fax directly to a
single location. You cannot use it with memory, delayed,
relay, or broadcast faxing.
To Initiate a Voice Request
1 During a fax communication, press the Hook V Request key.
2 When the other party answers your request, your
OKIFAX emits a repetitive warbling sound. The display
shows LIFT HANDSET, PRESS VOICE REQUEST.
3 Lift your handset and press the Voice Request key.
Tip: If you press your Voice Request key to initiate a voice re-
quest in TX mode but no one is there to answer, your
OKIFAX automatically sends a call back message to the remote site. This message includes a telephone number
where you can be reached.
To Answer a Voice Request
Lift the handset and press the Hook V Request key.
Of5050hw.pm6 4/15/98, 9:32 AM39
Faxing: Basic Operations 39
Page 52

Faxing: Advanced Operations
Sending a Fax at a Later Date and Time
Your can program your OKIFAX up to three days in advance to send documents at a specified date and time.
You can send one delayed fax at a time either from the
document feeder or from memory. Refer to the table below to decide which method you want to use.
Delayed TX Features From From
and Limitations Feeder Memory
Number of locations One Multiple
Number of delayed faxes One Up to 5
loaded into your OKIFAX
at one time
OKIFAX can be used for No Yes
other transmissions while a
delayed fax is waiting to be sent?
Note: The OKIFAX 5050 sends from the feeder by default.
To change the default setting, see “Mem./Feeder SW.”,
page 53.
40 Faxing: Advanced Operations
Sending a Delayed Fax from the Document Feeder
1 Load your documents.
2 Press the Select Function key.
3 Press the 1/Delayed TX One Touch key. The display
shows DELAYED TX and today’s date.
4 If the transmission is to occur on the same day, skip to
©
step 6. Otherwise, press the No
key. The display shows
PRG. START DATE 0-9.
5 Using the numeric keypad, enter the date you wish the
transmission to begin—up to three days in advance.
6 Press the Yes § key. The display shows PRG. START
TIME 0-9.
7 Using the numeric keypad, enter the time you wish the
transmission to begin, in 24-hour format—8:00
08:00; 8:00
PM is 20:00.
AM is
8 Press the Yes § key. The display shows FEEDER TX.
9 Press the Yes § key.
Of5050hw.pm6 4/15/98, 9:32 AM40
Page 53

10 Select a location. Refer to the following instructions.
To Select Using Do This
A One Touch key Press the One Touch key.
An Auto Dial number Press the Auto Dial key, then enter the
A number dialed on Dial as you would on a normal
the numeric keypad telephone.
two-digit Auto Dial number on the
numeric keypad.
11 Press the Start key. Your OKIFAX begins waiting for the
time and date you have set before feeding the document
and sending the fax.
Sending a Delayed Fax From Memory
1 Load your documents.
2 Press the Select Function key.
3 Press the 1/Delayed TX One Touch key. The display
shows DELAYED TX and today’s date.
4 If the transmission is to occur on the same day, skip to
©
step 6. Otherwise, press the No
key. The display shows
PRG. START DATE 0-9.
5 Using the numeric keypad, enter the date you wish the
transmission to begin—up to three days in advance.
6 Press the Yes § key. The display shows PRG. START
TIME 0-9.
7 Using the numeric keypad, enter the time you wish
the transmission to begin, in 24-hour format—8:00
AM
is 08:00; 8:00 PM is 20:00.
8 Press the Yes § key. The display shows FEEDER TX.
©
9 Press the No
key.
10 Select a location. Refer to the instructions below.
To Select Using Do This
A One Touch key Press the One Touch key.
An Auto Dial number Press the Auto Dial key, then enter the
A number dialed on Dial as you would on a normal telephone.
the numeric keypad
A group Using the numeric keypad, press the #
two-digit Auto Dial number on the
numeric keypad.
key, then enter the number of the group
you want to use.
11 Press the Yes § key to confirm your selection. The
display shows SELECT LOCATION(S).
12 Repeat Steps 11 and 12 as often as necessary to
continue selecting locations.
13 When you are finished selecting locations, press the
©
key at the SELECT LOCATION(S) message.
No
14 If you have selected multiple locations, your OKIFAX
asks if you want to confirm your selections with a
printed report before proceeding. If you do, press the
Of5050hw.pm6 4/15/98, 9:32 AM41
Faxing: Advanced Operations 41
Page 54

Yes § key. After the report is printed, the display
shows BEGIN SCANNING? If you want to make
corrections, press the No
©
key and go back to Step
9. To remove a location, select the location in the
©
same way, but press the No
key to delete it from
your transmission.
15 When all of your selections are correct, press the
Start key. Your OKIFAX scans the documents into
memory and waits until the time and date you have
set before sending the fax. When scanning is
completed, your OKIFAX is available for other
transmission operations.
Canceling a Delayed Transmission
1 Press the Stop key. The display shows COMMUNI-
CATION CANCEL.
2 Press the Yes § key. The display shows the Loca-
tion ID of the delayed transmission currently loaded
in your OKIFAX.
3 Press the Yes § key.
4 If the delayed transmission was a feeder transmis-
sion, press the Stop key again to remove the
document from the document feeder.
Sending a Fax to Multiple Locations (Broadcasting)
1 Load your documents.
2 Press the Select Function key.
42 Faxing: Advanced Operations
3 Press the 2/Broadcast ↔ Feeder TX One Touch key.
The display shows BROADCAST/MEMORY TX.
4 Select a location. Refer to the instructions below.
To Select Using Do This
A One Touch key Press the One Touch key. (On the
An Auto Dial number Press the Auto Dial key, then enter the
two-digit Auto Dial number on the
A group Using the numeric keypad, press the #
key, then enter the number of the group you want to use.
A number dialed on Dial as you would on a normal telephone.
the numeric keypad
OKIFAX 5600, lift the main One Touch
keypad to access One Touch keys 16–30.)
numeric keypad.
5 Press the Yes § key to confirm your selection.
6 Repeat Steps 4 and 5 as often as necessary to continue
selecting locations.
7 When you are finished selecting locations, press the No
key at the SELECT LOCATION(S) message.
8 If you have selected multiple locations, your OKIFAX
asks if you want to confirm your selections with a printed
report before proceeding. If you do, press the Yes § key.
After the report is printed, the display shows BEGIN
SCANNING? If you want to make corrections, press the
©
key and go back to Step 4. To remove a location,
No
select the location in the same way, but press the No
©
key to delete it from your transmission.
©
Of5050hw.pm6 4/15/98, 9:32 AM42
Page 55

9 When all of your selections are correct, press the
Start key. Your OKIFAX scans the documents into
memory and begins transmitting the message.
Sending a Confidential Fax
Fax machines are often placed in public places where
everyone can look through the received faxes. If you
are communicating with another Okidata fax-capable
unit, you can use the confidential fax feature. The receiving machine will store the message in a confidential mailbox (in its memory) and will not print it until a
password is entered. This is an exclusive Okidata feature; you cannot use it with another manufacturer’s fax
machines.
Note: To send a confidential fax, you must know in advance the mailbox the message should be sent to. Ask
the person who will receive the fax to tell you
their mailbox number.
1 Load your documents.
2 Press the Select Function key.
3 Press the 3/Confidential TX One Touch key. The
display prompts you to enter the number of a
confidential mailbox on the receiving fax machine.
4 Using the numeric keypad, enter the number of
the confidential mailbox you are transmitting to.
5 Press the Yes §
key to confirm your entry. The
display shows SELECT LOCATION.
6 Select a location. Refer to the instructions below.
To Select Using Do This
A One Touch key Press the One Touch key.
An Auto Dial number
pad.
A number dialed on Dial as you would on a normal telephone.
the numeric keypad
Press the Auto Dial key, then enter the two-
digit Auto Dial number on the numeric key-
7 Press the Start key. Your OKIFAX begins sending the fax.
Receiving Confidential Faxes
If you need to receive a fax that should not be seen by
anyone else, have the person send the message from
another Okidata fax-capable unit as a confidential fax.
In order to do this, you must first set up a confidential
mailbox, as explained below. Then, give your mailbox
number to the person sending the message.
An incoming confidential fax is stored unprinted in
memory until you enter the password.
Creating a Confidentail Mailbox
The OKIFAX 5050 can have 8 confidential mailboxes.
Of5050hw.pm6 4/15/98, 9:32 AM43
Faxing: Advanced Operations 43
Page 56

1 Press the Select Function key.
2 Press the 9/User Program One Touch key. The
display shows 1: FUNC. PROGRAMMING.
3 Press 5 on the numeric keypad. The display shows
5:MAIL PASSWORD PRG.
4 Press the Yes § key. The display shows MAILBOX NO. [
].
5 Using the numeric keypad, enter the number of the
mailbox you want to use. You can use any number from
1 to 8.
6 Using the numeric keypad, enter the 4-digit password you
want to use with your mailbox.
7 Press the Yes § key to confirm your entry.
8 OKIFAX then asks you to enter another mailbox
number. To continue programming mailboxes, go back
to step 5. When you are finished, press the Select Function
key.
Changing Your Password or Closing a Mailbox
If you want to change the password of an existing
mailbox or if you want to delete one, follow the
instructions below—remember that a mailbox must be
empty before you can modify or delete it.
1 Press the Select Function key.
2 Press the 9/User Program One Touch key. The
display shows 1:FUNC. PROGRAMMING.
44 Faxing: Advanced Operations
3 Press 5 on the numeric keypad. The display shows
5:MAIL PASSWORD PRG.
4 Press the Yes § key. The display shows MAIL BOX NO.
[ ].
5 Using the numeric keypad, enter the number of the the
mailbox you want to modify or delete.
The display shows PRG. PASSWORD.
Note: If ILLEGAL OPERATION displays, the mailbox you
have selected contains one or more messages. You
must print out any messages in the mailbox before you
change its password.
6 Using the numeric keypad, enter the 4-digit password
currently used with that mailbox.
7 Press the No © key. The display shows PRG. PASS-
WORD again.
8 To create a new password, enter a new 4-digit number on
the numeric keypad. To close a mailbox, press the Space
One Touch key.
9 Pesss the Yes § key to accept the new password or close
the mailbox.
10 Your fax machine will ask you to enter another mailbox
number. To continue programming mailboxes, go back
to Step 5. If you are finished programming, press the
Select Function key.
Of5050hw.pm6 4/15/98, 9:32 AM44
Page 57

Printing a Confidential Message
Relay Broadcasting
Each time your OKIFAX receives a confidential
message, it automatically prints a confidential
reception report that tells you which mailbox number
received the message.
To print a received confidential fax:
1 Press the Select Function key.
2 Press the 10/Message Print from Memory One Touch
key. The display shows PRINT MEMORY MSG.?
3 Press the No © key. The display shows PRINT CONF.
RX MSG.
4 Press the Yes § key. The display shows MAIL BOX NO. [
].
5 Using the numeric keypad, enter the number of the mail
box you want to print from. The display shows PRG.
PASSWORD [ ].
Note:Note:
Note: If no message is stored in that mail box, the display
Note:Note:
shows NO DATA IN MEMORY.
6 Using the numeric keypad, enter the 4-digit password for
th email box you want to print from.
7 Press the Yes § key. The message prints.
TipTip
Tip: If you want to clear the mailbox without waiting for
TipTip
printing, press the Stop key at this point. The display
changes to CANCEL. Press the Yes § key to clear the
mail box.
Relay broadcasting allows one
unit
to send a document to another
capable unit
, which then re-sends (broadcasts) the
Okidata fax-capable
Okidata fax-
document to a number of other locations. This is
useful, for example, if you are sending a fax to a
number of locations in another area code: you only
need to send one transmission long distance, and it
can then be broadcast at local rates.
Note: This is different from group faxing, where a fax is sent
to a preprogrammed group of locations directly from
the OKIFAX.
Two different
Okidata fax-capable units
are involved in
transmitting a relay broadcast: the relay initiating station
and the relay key station, or hub.
Note: At this writing, the OKIFAX 2600 is the only Okidata
fax machine that can function as a relay key station.
Relay Initiating Station
Your OKIFAX 5050 can act as the relay initiating station,
which starts the relay broadcast by sending the original
documents. Before you can program your OKIFAX to
initiate a relay broadcast, you will need to obtain the following information from the operator of the
capable unit
you intend to use as a relay key station:
Okidata fax-
Relay Password: This is the 4-digit relay key word that
is programmed into the relay key station.
Faxing: Advanced Operations 45
Of5050hw.pm6 4/15/98, 9:32 AM45
Page 58

Relay Group Numbers: These 2-digit numbers are the numbers of groups of locations programmed into the relay
key station.
Relay Key Station
The relay key station is the
Okidata fax-capable unit
which receives the original fax message and then automatically relays or broadcasts the message to other remote fax machines.
For this feature to be available, the relay key station
must be an OKIFAX 2600.
Relay Broadcast Report
After the relay broadcast is completed, it is possible for
the relay key station to send a fax back to your
OKIFAX confirming the success of the relay broadcast.
For this function to work, your OKIFAX’s own telephone number must be programmed into Auto Dial
number 64.
Be sure to program the number in the format the relay key
station uses for dialing, including access digit, if any, etc.
Initiating a Relay Broadcast
1 Load your documents.
2 Press the Select Function key.
3 Press the 4/Relay Initiate TX One Touch key.
a.) The first time you use this feature, the display
shows:
RELAY PASSWORD
ENTER [ ]
- Using the numeric keypad, enter the 4-digit relay
password.
b.) If you have already used this feature, the display
shows:
RELAY PASSWORD [XXXX]
where XXXX is the last password you used.
- If the password is correct, go to step 4.
- If you want to use a different password, press the No
key, then use the numeric keypad to enter the password for
the relay key station you want to use.
4 Press the Yes § key.
a.) The first time you use this feature, the display reads:
REMOTE LIST NO. [ ]
ENTER 01-99
- Using the numerical keypad, enter the 2-digit relay group
number for the group you want to fax to.
b.) If you have already used this feature, the display shows:
REMOTE LIST NO. [XX]
where XX is the last list number you entered.
- If the list number is correct, go to step 5.
- If you want to fax to a different list, press the No
key. Then use the numeric keypad to enter the number
of the list you want to use.
©
©
46 Faxing: Advanced Operations
Of5050hw.pm6 4/15/98, 9:32 AM46
Page 59

5 Press the Yes § key. The display shows SELECT
LOCATION.
6 Select the location of the relay key station.
Refer to the instructions below.
To Select Using Do This
A One Touch key Press the One Touch key.
An Auto Dial number Press the Auto Dial key, then enter the
A number dialed on Dial as you would on a normal telephone.
the numeric keypad
two-digit Auto Dial number on the
numeric keypad.
7 Press the Start key. Your OKIFAX begins to connect to the
relay key station and transmit the fax to be relayed to the
selected group.
Polling
Normally, when you send faxes, you load documents, select a
location, and then press the Start key to begin transmission.
Sometimes it is more useful to load your documents on
your OKIFAX and set it to wait for the receiving fax
machine to call and collect them. This is known as setting your OKIFAX to be polled, or setting it for polling
transmission. Calling a remote fax machine to receive
documents someone else has loaded is known as polling or polling reception.
Notes:
■ Plan polling arrangements with the other party in
advance, so that everyone is aware of when documents will
be available.
■ Keep in mind that documents waiting to be polled stay
in the document feeder until they have been removed—
you won’t be able to use the document feeder for other
purposes until polling is completed.
Setting Your OKIFAX to be Polled
1 Load your documents.
2 Press the Select Function key.
3 Press the 5/Polling One Touch Key. The display shows
WAITING TO BE POLLED.
To Cancel Polling
1 Press Stop. The display reads COMMUNICATION
CANCEL.
2 Press the Yes § key. The display reads Cancel, then
MSG CONFIRMATION PRINTING. When the message
confirmation report prints, the display reads SELECT
LOCATION. Press Stop to remove documents.
Polling Documents from Other Fax Machines
1 With no documents loaded, press the Select Function
key.
Of5050hw.pm6 4/15/98, 9:32 AM47
Faxing: Advanced Operations 47
Page 60

2 Press the 5/Polling One Touch key. The display shows
POLLING RX, SELECT LOCATION.
3 Select a location. Refer to the instructions below.
To Select Using Do This
A One Touch key Press the One Touch key.
An Auto Dial number Press the Auto Dial key, then enter the
two-digit Auto Dial number on the
numeric keypad.
A number dialed on Dial as you would on a normal telephone.
the numeric keypad
4 Press the Start key. Your OKIFAX begins polling the remote
fax machine.
What You Can Do While Sending a Fax
After your OKIFAX has finished scanning a document
into memory—and while it is transmitting from
memory—you can:
n Load another document and prepare it for transmission.
You can continue to load documents as long as memory
is available in your OKIFAX. When the first transmission
is complete, the next fax will automatically be sent.
n Make copies.
What You Can Do While Receiving a Fax
While your OKIFAX is receiving a fax, you can:
Dual Access
Your OKIFAX’s dual access feature allows you to load
and prepare to transmit a document while your fax
machine is receiving or sending another fax from
memory. This feature increases your productivity and
reduces the time you spend waiting for operations to
finish.
Once you have loaded a document and the display
shows SELECT LOCATION, your OKIFAX is ready for
you to prepare the next transmission.
48 Faxing: Advanced Operations
Of5050hw.pm6 4/15/98, 9:32 AM48
n Load another document and prepare it for transmission.
You can continue to load documents as long as memory
is available in your OKIFAX. When the fax has been
received, the faxes you have loaded will automatically
be sent.
n Continue to receive faxes while earlier received mes-
sages are printing, if your OKIFAX is set to receive faxes
into memory.
What You Can Do While Making Copies
While your OKIFAX is making copies, you can:
n Continue to receive faxes while copies are printing, if your
OKIFAX is set to receive faxes into memory.
Page 61

Customizing OKIFAX 5050
Customizing Fax Features and Operations
Many of your OKIFAX 5050’s features and functions
have settings which can be changed to customize its operation. The user functions control a broad range of features, such as when certain reports print, and how the
OKIFAX responds to incoming calls. The dial parameters
control how the OKIFAX dials fax numbers; in most
cases, the settings are determined by the type of phone
service you have.
Viewing Your Current Settings
The configuration report lists the current settings of all
user functions, among other things—see page 58 for
details.
To print a configuration report:
1 Press the Select Function key.
2 Press the 6/Report Print One Touch key.
The display shows 1:ACTIVITY REPORT.
3 Using the numeric keypad, press 4.
The display shows 4:CONFIGURATION.
4 Press the Yes §
key. The report prints.
User Function Settings
User function settings allow you to customize the general
operation of your OKIFAX. Refer to the following User
Function Settings List to determine which settings you
may need to change, then refer to Changing Your User
Function Settings (page 53) to make the change.
User Function Settings List
01 MCF(SINGLE-LOC.): This function automatically prints a
Message Confirmation Report after each single-location
transmission or polling transmission. The report provides information about the transmission—see page 56
for details. Available settings are ON and OFF (default).
0 2 MCF(MULTI-LOC.): This function automatically prints a
Message Confirmation Report after each multiple-location
transmission. The report provides information about the
transmission—see page 56 for details. Available settings
are ON(default) and OFF.
Customizing 49
Of5050hw.pm6 4/15/98, 9:32 AM49
Page 62

0 3 ERR REPORT(MCF): This function automatically prints a
Message Confirmation Report each time an error occurs
during a transmission or polling transmission operation.
The report provides information about the transmission—see page 56 for details. Available settings are ON
(default) and OFF.
0 4 IMAGE IN MCF: When a message confirmation of a
memory transmission is printed, this function adds a portion of the first page of the document that was sent. This
feature makes it easier to identify a fax, but it may present
security problems if you are sending sensitive documents.
Available settings are ON (default) and OFF.
0 5 SENDER ID: This function controls the printing of your
OKIFAX’s Sender ID on the faxes you send. See page 21
for details. When turned on, the Sender ID will be printed
on each page slightly outside the image area of your document. The default setting is ON.
Note: In order to meet FCC requirements, you must have
this feature set to ON and have a valid Sender ID
programmed in your OKIFAX.
0 6 MONITOR VOLUME: This function sets the volume for
telephone line monitoring during dialing. Available settings are LOW (default), HIGH, and OFF.
0 7 BUZZER VOLUME: This function sets the volume of the
various tones your OKIFAX emits during operation.
Available settings are LOW, MIDDLE (default), and
HIGH.
0 8 CLOSED NETWORK: This function allows you to pro-
gram your OKIFAX to refuse to communicate with locations whose telephone numbers have not been programmed into your One Touch keys or Auto Dial locations. Using this function, you can set up a closed network of fax machines—see page 37 for details. If you do
not want your OKIFAX to transmit faxes to or receive
faxes from locations outside your network, select T/R. If
you only want your OKIFAX to refuse to receive faxes
from outside your network, select RX. Available settings
are OFF (default), T/R, and RX.
0 9 TX MODE DEFAULT: Your OKIFAX is set for the STD
(standard) resolution setting and the NORMAL contrast
setting. If you consistently send faxes that require some
other combination of transmission modes, use this function setting to change the default modes. While you are
programming, the new default combinations appear on
©
the lights above the Yes § and the No
keys. The de-
fault is STD/NORMAL.
10 T/F TIMER PROG.: When set to the telephone/fax an-
swering mode, your OKIFAX automatically distinguishes
between incoming voice and fax calls. If the incoming call
is a voice call, OKIFAX rings to tell you to pick up the
handset. If you do not answer, OKIFAX automatically
switches back to facsimile mode to allow the calling party
to send a fax. The T/F TIMER function controls how
long it waits before switching back to fax mode. Available
settings are 20 SECONDS or 35 SECONDS (default).
50 Customizing
Of5050hw.pm6 4/15/98, 9:32 AM50
Page 63

1 1 RING RESPONSE:
This function controls how long your
OKIFAX waits before answering an incoming telephone call.
The available settings are 1 RING (default), 5 SECONDS, 10
SECONDS, 15 SECONDS, or 20 SECONDS.
Note: At the default 1-ring setting, your OKIFAX answers calls
immediately, and you will not hear any ring. If you need to
hear the ring, change to one of the other settings.
12 DISTINCTIVE RING: Distinctive ringing is a service offered by
some telephone carriers. It lets you have different numbers
on one line, each with its own distinctive ring. You can then
use one number exclusively as a fax number without the expense of a second line. (Your local telephone carrier can provide you with more information about this service, which
usually has an additional charge.) To use this function, refer
to Setting Your Fax Machine’s Ring Pattern below. Available
settings are OFF (default) and ON.
Notes:Notes:
Notes:
Notes:Notes:
■ You must have your local telephone carrier’s
Distinctive Ring service.
■ Your OKIFAX must be in FAX or PC answer mode, and
the PBX dial parameter must be set to OFF. Other modes–
TEL, TEL/FAX, or TAD–will override Distinctive Ring.
■ This feature may not work properly if you have a
telephone other than a genuine Okidata optional handset
connected to your OKIFAX.
Setting Distinctive Ring
To set up your OKIFAX to recognize another ring
pattern:
1 Press the Select Function key.
2 Press the 9/User Program One Touch key.
The display shows 1:FUNC. PROGRAMMING.
3 Press the Yes § key. The display shows
FUNCTION NO. [ ].
4 Using the numeric keypad, enter 12. The display
shows DISTINCTIVE RING, OFF.
©
5 Press the No
key two times. The display changes
to
DISTINCTIVE RING, SET.
6 Press the Yes § key. The display changes to
SETUP FAX RING
CALL FAX NUMBER NOW.
7 Using a separate telephone line, dial the number
assigned to the OKIFAX within 90 seconds—if you
don’t have access to a second line, have someone else
make the call for you. When your OKIFAX begins to
ring, it automatically detects and remembers its
assigned ring pattern. Be sure to let it ring until either
RESULT=OK or RESULT=NG displays. When the
OKIFAX has sucessfully finished programming its
ring pattern, the display shows RESULT=OK.
Of5050hw.pm6 4/15/98, 9:32 AM51
Customizing 51
Page 64

Note: Occasionally, your OKIFAX may not be able to
detect its ring pattern on the first try. If this happens, the display shows RESULT=NG. Follow the instructions again from Step 6.
8 Press the Yes § key to confirm your selection.
9 Press the Select Function key to finish.
13 1'ST PAPER SIZE: This function allows you to specify
the size of paper you are using in the paper tray.
Available settings are LETTER (default), A4, LEGAL
13, and LEGAL 14.
14 Not used.
15 USER LANGUAGE: This function allows you to switch
between the two languages programmed into your
OKIFAX. Available settings are ENG. (English, the default) and SPA. (Spanish), FRE. (French), or POR. (Portuguese), depending on where you purchased your
OKIFAX.
16 INCOMING RING: This function controls the telephone ringing sound your OKIFAX makes when a
call comes in. When set to off, it does not ring during incoming calls. The available settings are:
■ ON (default): Only rings when set to Manual
Receive [TEL] mode or when the RING RESPONSE
function is set to 5, 10, or 20 seconds.
■ OFF: Does not ring when a call comes in.
■ DRC (distinctive ring cancel): Rings for each
incoming call with the same tone, even if you have set
function setting 12, DISCTINCTIVE RING to on.
17 REMOTE RECEIVE: This function lets you use an attached
phone to tell your OKIFAX to switch from telephone to
fax mode so it can receive an incoming fax. Use the keypad
of an external telephone to enter the remote receive number you have programmed into your OKIFAX.
In addition, if your OKIFAX is in TAD mode (see page
20), a caller can enter the programmed remote receive
number after leaving a voice message; this enables the
OKIFAX to receive a fax from the caller.
Available settings are OFF (default), 00, 11, 22, 33,
44, 55, 66, 77, 88, 99, **, and ##.
52 Customizing
Of5050hw.pm6 4/15/98, 9:32 AM52
Page 65

18 MEM./FEEDER SW.: This function controls how
OKIFAX normally transmits fax messages: by scanning
the document into memory first, or by transmitting directly from the document feeder. Available settings are
FEEDER (default) and MEMORY.
Note: If you are using the MEMORY setting and you send
a large number of faxes in one session, you may
encounter a MEM OVERFLOW error message. If this
occurs often, you can correct the problem either by
adding an optional memory upgrade or by changing to
the FEEDER setting.
2 0 ECM FUNCTION: The error correction mode function
may help your OKIFAX improve communication in areas
where telephone line conditions are marginal. See the
Troubleshooting section of this Handbook for other suggestions if you have communication problems. Available
settings are ON (default) and OFF.
2 1 REMOTE DIAGNOSIS: The remote diagnostics feature al-
lows a service person remotely to dial and service your
OKIFAX. Available settings are ON and OFF (default).
22 Not used.
23 ONE TOUCH PARAM: This function allows you to acti-
vate the Echo Protection feature for a specific One
Touch key, without changing the normal settings.
Echo Protection can improve communication with a
location in a noisy telephone area. For instructions
on changing One Touch Parameters settings for a
One Touch key, see page 28.
Changing Your User Function Settings
1 Press the Select Function key.
2 Press the 9/User Program One Touch key.
The display shows 1:FUNC. PROGRAMMING.
3 Press the Yes § key. The display shows FUNCTION
NO. [ ].
4 Using the numeric keypad, enter the 2-digit number of
the function you want to change. The display shows the
name of the selected function.
©
5 Repeatedly press the No
key until the setting you want
appears in the display.
Note: If you are changing the TX MODE DEFAULT settings, the new settings appear on the lights above the
Yes § and the No © keys
6 Press the Yes § key to confirm your selection. The
name of the next function setting appears in the
display.
7 Press the Select Function key to finish.
Of5050hw.pm6 4/15/98, 9:32 AM53
Customizing 53
Page 66

Dial Parameter Settings
These functions allow you to control the way your
OKIFAX dials telephone numbers. Refer to the Dial Parameter Settings List below to determine which settings
you may need to change, then refer to Changing Your
Dial Parameter Settings (page 55) to make the change.
Dial Parameter Settings List
REDIAL TRIES: This function controls how many times your
OKIFAX automatically redials a number that is busy or
does not answer. Available settings are from 0 to 10 tries.
Default: 3 tries.
REDIAL INTERVAL: This function controls how long your
OKIFAX waits between each automatic redial attempt.
Available settings are from 1 to 6 minutes. Default: 3
minutes.
DIAL TONE DETECT:
This function allows your OKIFAX to
wait for and detect a dial tone before proceeding with dialing. Available settings are ON and OFF.
Default: OFF.
BUSY TONE DETECT: This function allows your OKIFAX to
detect a busy tone when sending a fax. Available
settings are ON and OFF. Default: ON.
MF(TONE)/DP (PULSE): This function sets the dialing
method. Use the MF setting for Touch-Tone dialing,
or the DP setting for pulse dialing. Default: MF
(TONE).
PBX LINE: Turn this function on if your OKIFAX is connected to a PBX (Private Branch Exchange—a phone system used to route internal calls). Once this function has
been turned on and the access digit function has been programmed using the Dial Prefix parameter (below), your
OKIFAX recognizes the access digit you use in your PBX
to get an outside line.See the Dial Prefix function below
for mor information. Available settings are ON and OFF.
Default: OFF. See “Connecting to a PBX,” page 23, for instructions on changing this setting.
AUTO START: When this function is turned on, your
OKIFAX automatically dials as soon as you press a One
Touch key or enter an Auto Dial code—you do not have
to press Start. Available settings are ON and OFF. Default: ON.
DIAL PREFIX: If your OKIFAX is connected to a PBX, use
this function to specify the access digit used to obtain an
outside line from your PBX. You can enter a number
with up to four digits. When this parameter is programmed, the OKIFAX recognizes the access digit
when you enter a number and automatically pauses
for an outside line before dialing the rest of the
number. See “Connecting to a PBX,” page 23, for instructions on changing this setting. Available settings
are ON and OFF. Default: OFF.
54 Customizing
Of5050hw.pm6 4/15/98, 9:32 AM54
Page 67

Changing Your Dial Parameter Settings
1 Press the Select Function key.
2 Press the 9/User Program One Touch key.
3 On the numeric keypad, press 2. The display shows
2:DIAL PARAMETER.
4 Press the Yes § key until the display shows the dial
parameter you want to change.
©
5 Repeatedly press the No
key until the setting you want
appears in the display.
6 Press the Yes § key to confirm your selection. The name
of the next dial parameter setting appears in the display.
7 Press the Select Function key to finish.
Service Function Settings
In many cases, service function settings greatly change the
way your OKIFAX operates. To change any of these
settings, contact your Authorized OKIFAX Dealer.
Service Function Settings List
LONG DOC. TX: Normally OKIFAX does not scan
documents longer than 14 inches (360 mm). When this
function is on, your OKIFAX can scan and transmit
documents of any length for up to one hour.
MDY/DMY: This function specifies how OKIFFAX displays and
prints the date: month/day/year or day/month/year.
TIME/DATE PRINT: This function specifies how the time and date
are printed on the fax messages you transmit. Available
settings are: do not print date and time, print date and time at
the top of the first page only, and print date and time at the
top of every page.
TSI PRINT: When this function is on, the phone number of the
sending fax machine prints at the top of each page of the
message.
NO TONER MEM.RX: When this function is on, your OKIFAX
automatically receives messages in memory when it is low on
toner.
Of5050hw.pm6 4/15/98, 9:32 AM55
Customizing 55
Page 68

Fax Reports
Understanding Reports
Your OKIFAX 5050 provides a variety of useful reports
which help you understand its current settings, programming and operations.
Message Confirmation Report (MCF)
This report provides information about your last singlelocation fax transmission or polling transmission. Information in this report includes:
■ The date of the communication.
■ The total amount of time spent Sending or Receiving (S,
R-TIME).
■ The Location ID or telephone number of the fax machine
you were communicating with (DISTANT STATION
ID).
■ Service codes. Be sure to report these diagnostic codes if
you contact your Authorized Service Dealer about
communication problems.
■ If the fax was transmitted from memory (not directly
from the feeder), a portion of the first page prints after
the report (unless User Function 4, Image in MCF, is set
to OFF—see page 50).
Printing a Message Confirmation Report Manually
You can set your OKIFAX to print a message confirmation report after every transmission (see page 49), but it
may be more convenient to print a report only when you
want to.
After transmission, press the Copy key once (with no
documents loaded) to see a report confirming your transmission on the display. To print the report, press the
Copy key a second time.
■ The communication mode used.
■ The number of pages sent or received.
■ The result of the communication—see the end of this
chapter for a list of result codes and their meanings.
56 Faxing: Reports
Of5050hw.pm6 4/15/98, 9:32 AM56
Broadcast Entry Report
Each time you program a multiple-location transmission
(broadcast), your OKIFAX gives you the option of printing this report to confirm your entries. Information in
this report includes:
Page 69

■ The Location ID of the One Touch keys and Auto Dial
codes you have selected.
■ Telephone numbers you have entered using the numeric
keypad.
Confidential Reception Report
This report prints automatically each time your OKIFAX
receives a confidential message into a mail box.
Information in this report includes:
■ The date the message was received.
■ The total amount of time spent Sending or Receiving (S,
R-TIME).
■ The Location ID or telephone number of the fax machine
you were communicating with (DISTANT STATION
ID).
■ The number of the mail box that received the message.
■ The number of pages received.
■ The result of the communication.
■ Service codes. Be sure to report these diagnostic codes if
you contact your Authorized OKIFAX Dealer about
communication problems.
Printing Reports
The four reports described in this section—Activity
Report, Broadcast Confirmation Report, Phone Directory,
and Configuration Report—are printed using the 6/
Report Print One Touch key.
To print a report:
1 Press the Select Function key.
2 Press the 6/Report Print One Touch key. The display
shows 1:ACTIVITY REPORT. If you want to print an
activity report, skip to step 4.
©
3 Press the No
key repeatedly until the report you want
to print appears on the display.
4 Press the Yes § key. The report prints.
Activity Report
The activity report provides a record of your OKIFAX’s
communications. Information provided on this report includes:
■ The total amount of time spent sending faxes (“Calling”)
and the total amount of time spent receiving faxes
(“Called”).
■ The date, time and duration (S, R-TIME) of each
transmission or reception.
Of5050hw.pm6 4/15/98, 9:32 AM57
Faxing: Reports 57
Page 70

■ The name or telephone number of the fax machine you
were communicating with (DISTANT STATION ID). If
you were sending a fax, the telephone number or the
Location ID is printed. If you were receiving a fax, the
remote fax machine’s Personal ID or its telephone
number is printed.
■ The communication mode used for each transmission or
reception.
■ The number of pages sent or received.
■ The result of each communication.
■ Service codes. Be sure to report these diagnostic codes if
you contact your Authorized OKIFAX Dealer about
communication problems.
Note: This report does not list messages that were received without errors.
Broadcast Confirmation Report (MCF)
Use this report to confirm the results of a multiple-location transmission (broadcast). Information provided on
this report includes:
■ The date and time at which the broadcast started.
■ The total amount of time used to complete the broad-
cast.
■ For each location, the Location ID, the number of pages
sent and the result of the communication.
Phone Directory
This report provides a complete listing of all of the telephone numbers programmed into your OKIFAX’s One
Touch keys, Auto Dial codes and groups. The information includes:
■ The Location ID and main fax number for each One
Touch key and Auto Dial code.
■ The alternate number (OR) for each One Touch key.
■ The One Touch Parameter settings for each One Touch
key (PRM. ECHO).
■ A listing of all of the One Touch keys and Auto Dial
codes included in each group.
Configuration Report
The configuration report provides a list of the current operational settings of your OKIFAX. The information includes:
■ The current settings of all user functions (except for One
Touch Parameter settings, which appear in the telephone
directory).
■ The Sender ID (ID=), TSI/CSI (TEL NO.), and call back
number currently programmed into your OKIFAX.
■ Current dial parameter settings.
58 Faxing: Reports
Of5050hw.pm6 4/15/98, 9:32 AM58
Page 71

Power Outage Report
Codes Used in Reports
Certain information stored in your OKIFAX is lost if
power is interrupted under these circumstances:
■ If there is no optional memory expansion board
installed.
■ If there is optional memory installed, but power has been
interrupted for more than one hour.
In these cases, any documents stored in the OKIFAX’s
memory are erased.
If this happens, a report automatically prints listing all
messages lost because of the power outage. It includes all
faxes received into memory but not printed—most
commonly faxes in confidential mail boxes and faxes not
printed because there was no paper in the machine—the
date and time they were received, and Sender ID. It also
lists faxes in memory waiting to be sent, when they were
scheduled to be sent, and the intended recipient.
The information in this report can help you identify and
reconstruct any documents that were lost.
Result Codes
Result codes indicate the results of communications.
Code Description
BUSY The other machine’s line was busy or there was no answer.
A message was erased after being held in memory for 10 days
CANCL
COMP. A multiple-location transmission was completed.
COVER The cover was opened during the communication.
NO The transmission or reception failed.
OK The communication was completed successfully.
PUNIT This error code indicates a problem with the printing unit.
Contact service—page 78.
R_JAM A paper jam occurred in your OKIFAX while it was receiving
a fax, and it was unable to receive the entire message
in memory.
S_JAM A document jam occurred.
STOP
The Stop key was pressed, ending the communication session.
Communication Codes
.
Communication codes indicate the communication mode
used for a communication.
Code Description
B.C. Multiple-location transmission (broadcast).
BOX Reception into a personal mail box.
CALLING A communication initiated by your OKIFAX
CALLED A communication initiated by a remote fax machine.
Faxing: Reports 59
Of5050hw.pm6 4/15/98, 9:32 AM59
Page 72

Problem Solving
Clearing a Document Jam
When a document jams while being faxed or scanned,
your OKIFAX beeps, the red Alarm indicator lights, and
DOCUMENT JAM appears in the display. If the jammed
document looks as if it is positioned straight in your
feeder, press the Stop key to try to feed the document the
rest of the way through the feeder. If this fails, follow the
instructions below.
1 Grasp the control panel. Pull it up until it releases. Swing
the control panel up and out of the way.
60 Problem Solving
2 Pull out the jammed document.
3 Push the control panel back down until it locks.
Clearing a Paper Jam
If the Alarm indicator lights and your OKIFAX displays
PAPER JAM or NO PAPER when the paper tray still
contains paper, there may be one or more sheets of paper
jammed in the machine. If you are out of paper, follow
the Loading Paper instructions on page 18. To clear a
paper jam, follow the instructions below.
Of5050hw.pm6 4/15/98, 9:32 AM60
Page 73

Notes:
■ If you experience paper jams often, the type of paper
you are using may be the problem. For best results, select
paper developed specifically for photocopying or laser
printing. Be sure to fan the paper before loading it into your
paper tray.
■ Make sure the 1'ST PAPER SIZE user function is set for
the size paper you are using.
1 Lift the document table and swing it out of the way.
SELECT
FUNCTION
AUTO REC
DEF
3
ABC
2
1
JKL
5
GHI
TUV
4
8
PRS
7
OQZ
*
START
AUTO DIAL
SEARCH
REDIAL
STOP
ALARM
HYPHEN
HOOK
V. REQUEST
STD
DARK
COPY
FINE
NORMAL
LIGHT
EX FINE
PHOTO
MN
6
WXY
9
#
0
2 Push the buttons on the side of the copy stacker until you
hear a click. Lift the copy stacker up.
SELECT
FUNCTION
AUTO REC
DEF
3
ABC
2
MN
6
1
JKL
5
GHI
TUV
4
8
PRS
7
OQZ
0
*
START
AUTO DIAL
SEARCH
REDIAL
STOP
ALARM
HYPHEN
HOOK
V. REQUEST
STD
DARK
COPY
FINE
NORMAL
LIGHT
EX FINE
PHOTO
WXY
9
#
3 Lift the image drum cartridge out and set it aside.
SELECT
FUNCTION
AUTO REC
START
AUTO DIAL
SEARCH
REDIAL
STOP
ALARM
HYPHEN
HOOK
V. REQUEST
STD
DARK
COPY
FINE
NORMAL
LIGHT
EX FINE
DEF
PHOTO
3
ABC
2
MN
6
1
JKL
5
WXY
9
GHI
TUV
4
8
#
PRS
7
OQZ
0
*
PUSH
PUSH
Warning: Never expose the image drum unit to light
for more than 5 minutes. Never expose the image drum
unit to direct sunlight. Never touch the surface of the green
drum inside the image drum unit.
Of5050hw.pm6 4/15/98, 9:34 AM61
Problem Solving 61
Page 74

4 Pull out any paper you see jammed inside the machine.
C
INE
RMAL
SELECT
FUNCTION
AUTO REC
START
AUTO DIAL
SEARCH
REDIAL
STOP
ALARM
HYPHEN
HOOK
V. REQUEST
STD
DARK
COPY
FINE
NORMAL
LIGHT
EX FINE
DEF
PHOTO
3
ABC
2
MN
6
1
JKL
5
WXY
9
GHI
TUV
4
8
#
PRS
7
OQZ
0
*
7 Make sure the paper stop in the tray is properly adjusted: not
too loose, not too tight.
5 Pull out the paper tray. If any paper in the tray is damaged,
8 Slide the paper tray all the way back into the OKIFAX.
remove and replace it.
9 Place the image drum unit back into your OKIFAX. To make
sure that the image drum is positioned corrctly, press down
6 Push the paper down until it is under the plastic tabs.
firmly on both of the locations on the drum marked
“PUSH.”
F
NO
LIGHT
EX FINE
DEF
PHOTO
3
ABC
2
MN
6
1
JKL
5
WXY
9
GHI
TUV
4
8
#
PRS
7
OQZ
0
*
PUSH
PUSH
62 Problem Solving
Of5050hw.pm6 4/15/98, 9:35 AM62
Page 75

10 Close the copy stacker and push down until you hear a click.
Be sure both sides are latched.
SELECT
FUNCTION
AUTO REC
START
AUTO DIAL
SEARCH
REDIAL
STOP
ALARM
HYPHEN
HOOK
V. REQUEST
STD
DARK
COPY
FINE
NORMAL
LIGHT
EX FINE
DEF
PHOTO
3
ABC
2
MN
6
1
JKL
5
WXY
9
GHI
TUV
4
8
#
PRS
7
OQZ
0
*
Printing a Cleaning Page
If you notice repeating marks or imperfections on your
printouts, try printing a cleaning page.
The cleaning page process
■ Removes residual impurities from printing surfaces.
■ Reduces problems such as repeating marks, blotching, and
shading.
11 Close the document table.
SELECT
FUNCTION
AUTO REC
START
AUTO DIAL
SEARCH
REDIAL
STOP
ALARM
HYPHEN
HOOK
V. REQUEST
STD
DARK
COPY
FINE
NORMAL
LIGHT
EX FINE
DEF
PHOTO
3
ABC
2
MN
6
1
JKL
5
WXY
9
GHI
TUV
4
8
#
PRS
7
OQZ
0
*
Note: If you cannot remove jammed paper using the
procedure above and most of the jammed sheet has
emerged from the machine, use the following method. You
will probably need someone to help you.
■ Open the document stacker and copy stacker (steps 1
and 2 above).
■ Reach between the two stackers and push back the
blue output guide while pulling the paper out. Do not force
the paper: you could damage the mechanism or leave
paper fragments in it.
Of5050hw.pm6 4/15/98, 9:36 AM63
To print a cleaning page:
1 Make sure there are no messages in memory.
2 Press the Select Function key.
3 Press the 10/Message Print from Memory key.
4 Press the Yes § key. The cleaning page prints.
Replacing the Toner Cartridge
The number of pages you can print with one toner cartridge
varies depending on the type of documents you usually receive or copy. A toner cartridge will print about 2,000 lettersize pages at a typical print coverage of 4% (equivalent of
CCITT No. 1 test chart).
Note: The first toner cartridge in your new OKIFAX has to fill
the drum reservoir and saturate the developing roller with
toner. For this reason, it will need to be replaced sooner
than subsequent cartridges—after about 1,000 pages.
Problem Solving 63
Page 76

If your OKIFAX displays “TONER LOW” or “REPLACE
1
ABC
2
DEF
3
GHI
4
JKL
5
MN
6
PRS
7
TUV
8
WXY
9
*
OQZ
0
#
AUTO REC
SEARCH
AUTO DIAL
HYPHEN
REDIAL
COPY
HOOK
V. REQUEST
PHOTO
EX FINE
FINE
STD
LIGHT
NORMAL
DARK
ALARM
STOP
START
TONER CART.,” replace the toner cartridge with a new one
soon. If print density is high enough, you can continue to to
use the toner cartridge without replacing it until print quality
becomes unacceptable. Keep in mind that if you don’t
the cartridge soon, there is a risk that a fax will be unreadable
when it prints using an empty cartridge.
If the print density becomes low even before your OKIFAX
displays
“TONER LOW”
or “REPLACE TONER CART.,”
gently wipe the lens surface of the LED array (see Step 8). If
the print density does not improve, replace the toner cartridge.
Warning: Be careful when handling the toner cartridge. Do
not let toner spill on your clothing or other porous materials. Use cold water to clean up spilled toner; hot water
causes the stain to set.
1 Lift the document table into an upright position.
replace
2 Push in the cover release buttons on the side of the copy
stacker until you hear a click. Lift the copy stacker.
SELECT
FUNCTION
AUTO REC
START
AUTO DIAL
SEARCH
REDIAL
STOP
ALARM
HYPHEN
HOOK
V. REQUEST
STD
DARK
COPY
FINE
NORMAL
LIGHT
EX FINE
DEF
PHOTO
3
ABC
2
MN
6
1
JKL
5
WXY
9
GHI
TUV
4
8
#
PRS
7
OQZ
0
*
3 Pull the blue lever on the old toner cartridge all the way
toward you. Carefully pull the old toner cartridge out of the
image drum unit. Dispose of it in the plastic bag you received
with your new cartridge
SELECT
FUNCTION
AUTO REC
START
AUTO DIAL
SEARCH
REDIAL
STOP
ALARM
HYPHEN
HOOK
V. REQUEST
STD
DARK
COPY
FINE
NORMAL
LIGHT
EX FINE
DEF
PHOTO
3
ABC
2
MN
6
1
JKL
5
WXY
9
GHI
TUV
4
8
#
PRS
7
OQZ
0
*
4 Remove the new toner cartridge from its package and gently
shake it from side to side to distribute the toner. Then
carefully peel the white plastic tape from the bottom of the
toner cartridge.
64 Problem Solving
Of5050hw.pm6 4/15/98, 9:38 AM64
Page 77

5 With the ridged side facing up and the lever on your right,
insert the toner cartridge into the image drum unit. Slide the
left end of the cartridge in first, then lower the right end into
place.
SELECT
FUNCTION
AUTO REC
START
AUTO DIAL
SEARCH
REDIAL
STOP
ALARM
HYPHEN
HOOK
V. REQUEST
STD
DARK
COPY
FINE
NORMAL
LIGHT
EX FINE
DEF
PHOTO
3
ABC
2
MN
6
1
JKL
5
WXY
9
GHI
TUV
4
8
#
PRS
7
OQZ
0
*
SELECT
FUNCTION
AUTO REC
START
AUTO DIAL
SEARCH
REDIAL
STOP
ALARM
HYPHEN
HOOK
V. REQUEST
STD
DARK
COPY
FINE
NORMAL
LIGHT
EX FINE
DEF
PHOTO
3
ABC
2
MN
6
1
JKL
5
WXY
9
GHI
TUV
4
8
#
PRS
7
OQZ
0
*
8 Close the copy stacker and push down until you hear the copy
stacker click into place. Be sure that the cover latches on both
sides.
6 Once the toner cartridge is in place, push the lever all the way
toward the back of the OKIFAX to secure it and release the
toner.
SELECT
FUNCTION
AUTO REC
START
AUTO DIAL
SEARCH
REDIAL
STOP
ALARM
HYPHEN
HOOK
V. REQUEST
STD
DARK
COPY
FINE
NORMAL
LIGHT
EX FINE
DEF
PHOTO
3
ABC
2
MN
6
1
JKL
5
WXY
9
GHI
TUV
4
8
#
PRS
7
OQZ
0
*
7 Using the cleaning wipe provided with your new toner
cartridge, gently wipe back and forth across the full length of
the LED array. Let the array dry completely.
Of5050hw.pm6 4/15/98, 9:41 AM65
SELECT
FUNCTION
AUTO REC
START
AUTO DIAL
SEARCH
REDIAL
STOP
ALARM
HYPHEN
HOOK
V. REQUEST
STD
DARK
COPY
FINE
NORMAL
LIGHT
EX FINE
DEF
PHOTO
3
ABC
2
MN
6
1
JKL
5
WXY
9
GHI
TUV
4
8
#
PRS
7
OQZ
0
*
9 Close the document table.
SELECT
FUNCTION
AUTO REC
START
AUTO DIAL
SEARCH
REDIAL
STOP
ALARM
HYPHEN
HOOK
V. REQUEST
STD
DARK
COPY
FINE
NORMAL
LIGHT
EX FINE
DEF
PHOTO
3
ABC
2
MN
6
1
JKL
5
WXY
9
GHI
TUV
4
8
#
PRS
7
OQZ
0
*
Problem Solving 65
Page 78

The “CHANGE DRUM SOON” Message
The “CHANGE DRUM SOON” message is a warning that
the image drum cartridge in your OKIFAX may be
approaching the end of its usable life, which is approximately
20,000 pages, depending on the length and type of document
you receive or copy. It appears when the drum has used up
approximately 90% of its life, based on an internal calculation.
This message does not mean that you must replace the image
drum immediately, nor does it cause your OKIFAX to stop
working. In most cases, your image drum still has at least
10% of its productive life left. You can continue to use the
image drum as long as print quality is acceptable; however,
you should have a replacement image drum and toner
cartridge handy. Replace the drum when print quality
deteriorates below an acceptable level.
Replacing the Image Drum Cartridge
You need a new image drum if the faxes you receive are light
or have vertical streaks in them and you are not out of toner,
or if your OKIFAX displays a “CHANGE DRUM” message.
Contact your Authorized OKIFAX Dealer to order one.
Note: You must replace the toner cartridge when you
replace the image drum.
The life of an image drum depends on a number of factors,
including temperature and humidity, the type of paper you
use, and the number of pages per job.
Cautions:
■ Never expose the image drum unit to light for more
than 5 minutes.
■ Never expose the image drum unit to direct sunlight.
■ Never touch the surface of the green drum inside the
image drum unit.
■ Be careful not to scratch the green surface when you
put the drum down on a table or other surface.
To replace the Image Drum Cartridge:
1 Lift the doument table into an upright position.
SELECT
FUNCTION
AUTO REC
START
AUTO DIAL
SEARCH
REDIAL
STOP
ALARM
HYPHEN
HOOK
V. REQUEST
STD
DARK
COPY
FINE
NORMAL
LIGHT
EX FINE
DEF
PHOTO
3
ABC
2
MN
6
1
JKL
5
WXY
9
GHI
TUV
4
8
#
PRS
7
OQZ
0
*
66 Problem Solving
Of5050hw.pm6 4/15/98, 9:41 AM66
Page 79

2 Push in the cover release buttons on the side of the copy
stacker until you hear a click. Lift the copy stacker.
SELECT
FUNCTION
AUTO REC
START
AUTO DIAL
SEARCH
REDIAL
STOP
ALARM
HYPHEN
HOOK
V. REQUEST
STD
DARK
COPY
FINE
NORMAL
LIGHT
EX FINE
DEF
PHOTO
3
ABC
2
MN
6
1
JKL
5
WXY
9
GHI
TUV
4
8
#
PRS
7
OQZ
0
*
3 Remove the old image drum unit (with its toner cartridge),
wrap it in the packaging materials from your new image drum
unit, and discard it.
SELECT
FUNCTION
AUTO REC
START
AUTO DIAL
SEARCH
REDIAL
STOP
ALARM
HYPHEN
HOOK
V. REQUEST
STD
DARK
COPY
FINE
NORMAL
LIGHT
EX FINE
DEF
PHOTO
3
ABC
2
MN
6
1
JKL
5
WXY
9
GHI
TUV
4
8
#
PRS
7
OQZ
0
*
PUSH
PUSH
4 Remove the protective sheet from the new image drum. unit
5 Insert the new image drum unit into your OKIFAX. To
ensure that the image drum is positioned correctly, press
down firmly on both of the locations on the image drum
marked “PUSH.”
SELECT
FUNCTION
AUTO REC
START
AUTO DIAL
SEARCH
REDIAL
STOP
ALARM
HYPHEN
HOOK
V. REQUEST
STD
DARK
COPY
FINE
NORMAL
LIGHT
EX FINE
DEF
PHOTO
3
ABC
2
MN
6
1
JKL
5
WXY
9
GHI
TUV
4
8
#
PRS
7
OQZ
0
*
6 Install a new toner cartridge. Follow Steps 4-7 in “Replacing
the Toner Cartridge” in this chapter.
Of5050hw.pm6 4/15/98, 9:43 AM67
Problem Solving 67
Page 80

7 Close the copy stacker and push down until you hear the copy
stacker click into place. Besure that the cover latches on both
sides.
1
Wait until the time, date and answering mode appear on the
display. Then press the Select Function key.
2 Press the 7/Counter Display One Touch key. The display
shows DRUM COUNT.
SELECT
FUNCTION
AUTO REC
START
AUTO DIAL
SEARCH
REDIAL
STOP
ALARM
HYPHEN
HOOK
V. REQUEST
STD
DARK
COPY
FINE
NORMAL
LIGHT
EX FINE
DEF
PHOTO
3
ABC
2
MN
6
1
JKL
5
WXY
9
GHI
TUV
4
8
#
PRS
7
OQZ
0
*
8 Close the document table.
SELECT
FUNCTION
AUTO REC
START
AUTO DIAL
SEARCH
REDIAL
STOP
ALARM
HYPHEN
HOOK
V. REQUEST
STD
DARK
COPY
FINE
NORMAL
LIGHT
EX FINE
DEF
PHOTO
3
ABC
2
MN
6
1
JKL
5
WXY
9
GHI
TUV
4
8
#
PRS
7
OQZ
0
*
9 Follow the instructions in the next section to reset the drum
counter.
Resetting the Drum Counter
Important: Reset the drum counter only when you have
finished installing a new image drum. You can only reset
the counter when the "Change Drum Soon" message is on
the display.
68 Problem Solving
3 Press the Yes § key to clear the image drum unit counter.
4 Press the Select Function key to finish.
Display Panel Messages
This section lists the status and error messages that may
appear on the OKIFAX’s display panel, and explains what
they mean and how to correct any problem they indicate.
Note: The red Alarm indicator lights when there is an error
condition.
Normal Display
02:13 [FAX]
Under normal operating conditions, the top line of the
display shows the time and the answering mode—FAX,
TEL, T/F, MEM, FWD, or TAD.
Of5050hw.pm6 4/15/98, 9:44 AM68
Page 81

Error Messages
NO PAPER [FAX]
REPLACE PAPER
The paper tray is out of paper. Add more paper. If there
is paper in the tray, this message may indicate that paper
has jammed while feeding into the printer. Check the
paper path and remove any jammed paper–see “Clearing
a Printing Paper Jam” at the beginning of this chapter
(page 60).
If you run out of paper while printing a fax, the
remainder of the fax is stored in memory, and a “MSG
IN MEMORY ” message appears. After you reload
paper, stored faxes print automatically.
PAPER MIS-FEED [FAX]
CHECK PAPER OR PATH
Paper is jammed feeding from the paper tray into the
printer. Check the paper path and remove any jammed
paper–see “Clearing a Paper Jam” at the beginning of
this chapter (page 60).
PAPER JAM [FAX]
CHECK PAPER OR PATH
Paper may be jammed inside the printing mechanism .
Check the paper path and remove any jammed paper–see
“Clearing a Paper Jam” at the beginning of this chapter
(page 60).
DOCUMENT JAM [FAX]
CONFIRM AND "STOP"
A document to be faxed or scanned has jammed in the
scanner. Follow “Clearing a Document Jam” procedures at
the beginning of this chapter (page 60).
DOCUMENT MIS-FEED[FAX]
RELOAD DOCUMENT
A document to be faxed or scanned has not fed into the
scanner properly. Remove the document and reload it into
the document .
02:13 [FAX]
CHANGE DRUM SOON
The image drum is nearing the end of its projected life. Make
sure a new drum is available, and replace the drum when print
quality begins to deteriorate.
02:13 [FAX]
COVER OPEN
The stacker cover is not closed. Press down firmly on the
cover to make sure it is closed and latched on both sides.
Of5050hw.pm6 4/15/98, 9:44 AM69
Problem Solving 69
Page 82

02:13 [FAX]
REPLACE TONER CART.
Toner is running low in the toner cartridge. Replace the
cartridge as soon as possible. When you close the cover after
replacing the toner cartridge, the message clears.
COMMUN. ERROR
There is a problem communicating with a remote fax
machine. See page 71 for possible causes and solutions.
PRINTER ALARM 2 [FAX]
REFER TO USER GUIDE
or
PRINTER ALARM 4 [FAX]
REFER TO USER GUIDE
Open and close the cover. If this does not clear these
messages, turn off your OKIFAX and contact your
Authorized OKIFAX Dealer for service—see “Service and
Support,” page 74.
Reading the Print Counters
The print counters count the number of pages your
OKIFAX has printed or scanned in its lifetime. If you are
experiencing a problem, a service person may ask you to check
these counters.
70 Problem Solving
Note: If your OKIFAX’s image drum unit has reached the end
of its life, you will also use this function to reset the drum
counter (you can do this only if the "CHANGE DRUM SOON
message is on the display. Refer to “Replacing the Image
Drum Unit” in this chapter for more information.
1 Press the Select Function key.
2 Press the 7/Counter Display One Touch key.
The display shows your print unit counter.
©
3 Press the No
scanning unit counter.
4 Press the Select Function key to finish.
key. The display shows the
Problem Checklist
Your OKIFAX is a complex machine with many features and
functions. Many problems you experience may be due to
improper programming. If you are experiencing a problem,
read through the following list of problems and solutions
before calling your Authorized OKIFAX Dealer for service.
■ The display is blank. Make sure your OKIFAX is turned on.
Check the power cord to make sure that it is securely plugged
into the OKIFAX and into the wall outlet. Check your wall
outlet to make sure that it has power.
Of5050hw.pm6 4/15/98, 9:44 AM70
Page 83

■ Nothing happens when you press the control panel keys. Open and
close the upper cover.
If that does not solve the problem, turn the OKIFAX off,
wait ten seconds, then turn it on again.
■ The display tells you to replace paper even though there is paper in
the paper tray. Make sure that the paper is properly stacked in
the tray. Then check for a paper jam in the paper feed path.
■ Your documents jam in the scanner. Check the document for
wrinkles, tears or other damage. If it is damaged, try making a
copy of the document on a photocopier and faxing or
scanning the copy. Make sure there are no staples or paper
clips and that the paper is clean and dry. Make sure the
document is not wider than your OKIFAX can load.
■ Your OKIFAX won’t dial. Check the power cord and wall outlet.
Make sure that your telephone line (not your external
telephone or handset) is connected to the LINE outlet on the
back of your OKIFAX—see page 17. If you have an external
telephone connected, lift the handset and check for a dial tone.
If you do not hear one, there may be a problem with your
telephone line. If you do hear a dial tone, your OKIFAX may
be using the wrong dialing method (pulse or tone) for your
area. If you hear changing tones instead of dialing pulses and
you know that your area uses pulse dialing, refer to the
MF(TONE)/DP(PULSE) dial parameter setting on page 54.
■ The display shows a communication error. A “COMMUN.
ERROR” message indicates any of a number of problems.
• You may be trying to communicate with an incompatible
fax machine (your OKIFAX can only communicate with ITUT Group 3 fax machines).
• The remote machine may not be able to perform the
function that you want, such as polling or confidential
messages.
• The remote machine may be out of paper or experiencing a
paper jam.
• Bad telephone line conditions can cause communication
errors. Try sending the fax again and check to make sure you
are dialing the correct telephone number.
• If you have to dial a prefix number to get an outside line, or
if you are dialing internationally, you may need to enter a
pause (using the Pause One Touch key) after the dial prefix or
international dialing code to tell your machine to wait for a
dial tone.
• If you have frequent problems communicating with a
particular remote fax machine, try programming the number
into one of your One Touch keys and then changing the One
Touch Parameters for that One Touch key (see page 28).
• Lastly, either your OKIFAX or the remote fax machine may
need servicing. Try sending a fax to another location to check
your machine.
Of5050hw.pm6 4/15/98, 9:44 AM71
Problem Solving 71
Page 84

■ You sent a fax but the image the remote fax machine received was very
poor. If your document had a lot of small type, complex
illustrations, photos, or was very light or very dark, try
changing your resolution and contrast settings (see “Loading
Documents,” page 33). Copy the document on your
OKIFAX to preview how it will transmit. The problem may
be caused by telephone line interference. Try sending the
document again later.
■ You sent a fax but it was received completely blank. Make sure that
you have loaded your document face down.
■ You keep getting reports you do not want. Message Confirmation
Reports can be set to print automatically after each single or
multiple-location transmission; Error Reports can be set to
print after each failed transmission or reception. Check your
user function settings and turn off the reports you do not
want. See the chapters on Customizing OKIFAX and
Reports.
■ The image received on your OKIFAX was very poor. Contact the
person sending you the fax and ask them to change their
resolution and contrast settings. Ask the person to make a
copy of the document on their fax machine to make sure it is
working properly. Then ask them to send the fax again. If
you still have a problem, try making a copy of a document on
your machine to make sure it is working properly. If blotches
or recurring marks appear, print a cleaning page.
■ You tried dialing with a One Touch key or an Auto Dial code but
nothing happened. Make sure that something is programmed
into the One Touch key or Auto Dial code you are using.
Check the fax number to make sure it was entered correctly
(see the Dial Directories chapter). When you are dialing with
an Auto Dial code, be sure to press the Auto Dial key before
you enter the code. If your OKIFAX has the Auto Start
feature turned off, you will have to press the Start key before
dialing will begin (see page 55).
■ Your OKIFAX does not answer the phone or receive faxes. First make
sure that your OKIFAX is turned on and the power cord is
connected to the AC outlet. If you have a handset connected
to your OKIFAX, check that there is a dial tone on the phone
line. Also check the reception mode you are using—your
OKIFAX will not automatically receive faxes in manual
answering mode [TEL]. In TAD mode, the answering
machine answers the call first. See Setting the Answering
Mode, page 20.
■ Your received documents are light or have vertical streaks on them
and you are not out of toner. First, print a cleaning page—Press
the Select Function key, then press the 10/Msg. Print from
Memory key, then press the Yes § key. If that doesn’t help,
Gently wipe the lens surface of the LED array with a soft pad
moistened with rubbing alcohol, and then see if the machine
works properly (refer to “Replacing the Toner Cartridge,” page
63). If your OKIFAX still does not work properly, remove
the image drum unit (refer to “Replacing the Image Drum
Unit,” page 66), and tap the toner cartridge. If this does not
work, you may need to replace your image drum cartridge.
72 Problem Solving
Of5050hw.pm6 4/15/98, 9:44 AM72
Page 85

■ You set your OKIFAX for delayed transmission but it did not send.
Check the display to make sure that you have set the clock to
the correct time. See “Setting the Date and Time,” page 19.
■ Your OKIFAX disconnected before you could answer a voice request.
You must answer a voice request while the warbling tone is
sounding. When you hear the warbling tone, press the Voice
Request key after picking up your handset.
■ Your received faxes sometimes look distorted. If the document
received is wider or longer than the paper you have loaded
into your paper tray, your OKIFAX automatically reduces the
length of the document to fit on your paper. This type of
problem could also be communication related.
■ You are constantly receiving unsolicited advertising on your OKIFAX.
Try using the closed network function. See page 37.
■ Your OKIFAX will not poll a remote fax machine. Call the person at
the remote fax machine and make sure that they have loaded
documents and set their fax machine in polling transmission
mode.
■ Someone tried to send you a confidential fax but nothing happened.
You must set up a mail box before anyone can send you a
confidential fax. See “Receiving Confidential Faxes,” page 43.
Make sure the person sending you the fax knows the correct
mail box number.
■ Your OKIFAX is connected to a PBX and you cannot dial out. You
must enter your access digit to reach an outside line before the
telephone number for each number that you dial or program
into your machine. Also, your OKIFAX must be programmed for PBX operation before it will work. See “Connecting to a PBX,” page 23.
■ You want to answer an external telephone but your OKIFAX always
answers first. If you are using an external telephone, change
your OKIFAX’s incoming ring response user function
setting. See page 52.
Of5050hw.pm6 4/15/98, 9:44 AM73
■ Your OKIFAX does not immediately switch to TEL mode when you
make or receive a voice call. Try pressing the Stop key. Your
OKIFAX will return to standby mode so that you can
converse. This condition may happen infrequently due to
telephone line conditions, or the type of external telephone
used. Check the physical line connections—wall outlet and
cord. If this problem happens often, call your Authorized
OKIFAX Dealer for seervice.
Problem Solving 73
Page 86

Service and Support
This information is valid for the United States and Canada
only.
Okidata is firmly committed to the satisfaction of our
customers. If you have a problem that your customer
documentation cannot solve, contact these sources for
service or support:
Your Dealer
Consult the dealer location where you purchased your
OKIFAX, or call 1-800-OKIDATA (1-800-654-3282) for the location
of the nearest Authorized OKIDATA Service Dealer.
■ Prices and minimum charges may vary.
■ Proof of purchase is required for warranty work. Be
sure to retain your purchase documents.
The Okidata Customer Information System
For quick answers to commonly-asked questions, call 1-800-
OKIDATA
(1-800-654-3282). The Okidata Information System
Automated Attendant is available 24 hours a day, 7 days a week.
The system can provide immediate assistance with:
■ Basic Operating Procedures
■ Sales and Service Referrals
Okidata Faxable Facts
This on-line document retrieval system gives you aroundthe-clock access to product and support information through
your fax machine. Call 1-800-654-6651 and follow the
recorded instructions.
Okidata on the Internet
For the latest product information answers to common
questions, and other support, visit Okidata’s Web site:
http://www.okidata.com
Okidata Customer Service Representatives
Call 1-800-OKIDATA (1-800-654-3282) to speak with an Okidata
Customer Service Representative. Please be sure that you are calling
from a telephone close to your OKIFAX, so you can describe your
problem accurately. Our Customer Service Representatives are
trained on all current Okidata products. They can answer your
questions regarding:
■ Installation of your OKIFAX
■ Determination of OKIFAX issues that require service
■ Consumer relations
■ Parts and Consumable Referrals
■ Product Information
74 Problem Solving
Of5050hw.pm6 4/15/98, 9:44 AM74
Page 87

Purchasing Supplies and Options
LIMITED WARRANTY
Before you order, have the correct part number and description of the item.
■ Consult the Authorized OKIFAX Dealer where you
purchased your OKIFAX.
■ Call 1-800-OKIDATA (1-800-654-3282) for the nearest Autho-
rized Sales and Service location.
■ Check office supply catalogs or your local stationery store.
Most carry Okidata brand supplies.
Supplies/Options
■ Toner Cartridge: Order Number 52106701.
■ Image Drum: Order Number 56116901.
■ Optional Memory kit with battery backup provides 1MB
of non-volatile memory:
Order Number 70031501.
■ Telephone Handset: Order Number 70031801.
■ Second Paper Tray, model UST-550, with 500-page additional
capacity: Order Number 70029401.
OKIDATA, division of Oki America, Inc. (OKIDATA) warrants
this OKIFAX to be free from defect in material and workmanship
and will remedy any such defect according to the terms of this
Limited Warranty. This Limited Warranty extends to the original
purchaser only and does not extend to consumable items.
OKIDATA will, for a period of ninety (90) days from the date of
purchase, repair (or replace at its option) on site at the original
purchaser's facility and without charge any defective component(s)
of the OKIFAX, provided that this warranty service is performed
by an authorized OKIFAX service center or authorized third-party
service organization. From expiration of the ninety (90) day parts
and labor warranty until one (1) year from the date of purchase
(five [5] years in the case of the LED imaging array), OKIDATA
will provide replacements for defective components at no charge.
To make request or claim for service under the ninety (90) day
parts and labor coverage of this Limited Warranty, contact your
OKIFAX Authorized Dealer, authorized third-party service
provider, or OKIDATA.
To make request or claim for service under the parts-only portion
of this Limited Warranty the original purchaser must return the
OKIDATA product, shipping prepaid, in the original shipping
container or equivalent, to OKIDATA or an authorized OKIFAX
service center and assume the risk of loss or damage in transit. A
written receipt for the product, showing the date of purchase,
dealer's name, and serial number of the OKIFAX facsimile
machine, must accompany any request or claim for work to be
performed under this Limited Warranty.
Of5050hw.pm6 4/15/98, 9:44 AM75
Problem Solving 75
Page 88

This Limited Warranty shall not apply if the product has
been damaged due to abuse, misuse, misapplication,
accident, or as a result of service or modification by any
other than an authorized OKIFAX service center.
This warranty gives you specific legal rights, and you may
also have other rights which vary from state to state.
OKIDATA Service Locations
THERE ARE NO EXPRESS WARRANTIES OTHER THAN
THOSE ON THE FACE HEREOF AND DESCRIBED
ABOVE. NO WARRANTIES WHETHER EXPRESS OR
IMPLIED, INCLUDING, BUT NOT LIMITED TO, ANY
IMPLIED WARRANTIES OF MERCHANTABILITY OR FITNESS
FOR A PARTICULAR PURPOSE, SHALL EXTEND BEYOND
THE RESPECTIVE WARRANTY PERIOD DESCRIBED ABOVE.
Some states do not allow limitations on how long an implied
warranty lasts, so the above limitation may not apply to you.
OKIDATA SHALL NOT BE RESPONSIBLE OR LIABLE FOR
ANY SPECIAL, INCIDENTAL OR CONSEQUENTIAL DAMAGES OR LOSS ARISING FROM THE USE OF THIS PRODUCT. Some states do not allow the exclusion or limitation of
incidental or consequential damages, so the above exclusion
may not apply to you.
Additional information on obtaining service under this Limited
Warranty is available by contacting the OKIFAX dealer from
whom the product was purchased, by contacting OKIDATA
directly at 1-800-OKIDATA [1-800-654-3282] (U.S. and Canada,
English only) or at 1-609-222-5276 (Spanish only), or by contacting one of the listed service locations.
This Limited Warranty applies to all OKIFAX. However, the
procedure for obtaining service may vary outside the continental
United States. Contact your OKIFAX dealer for such warranty
service information.
76 Problem Solving
UNITED STATES
OKIDATA
Tel: 1-800-OKIDATA
1-800-654-3282
Fax: 1-609-222-5247
CANADA
OKIDATA
Tel: 1-800-OKIDATA
1-800-654-3282
Fax: 905-238-4427
MEXICO
Oki Data de Mexico,
S.A. de C.V.
Tel: 525-661-6860
Fax: 525-661-5861
ARGENTINA
Megatech
Fax: (541) 371-4123
Tel: (541) 371-4123 (tone
needed)
BRAZIL
Oki Data do Brasil, Ltda
Tel: (5511) 5589-1518
Fax: (5511) 5584-0267
CHILE
Teknos Comunicaciones
Tel: 56 (2) 555 5530
Fax: 56 (2) 550 2390
COLOMBIA
Soluciones Technologicas
Tel: ( 571) 218-2380
Fax: (571) 622-1280
VENEZUELA
MAI de Venezuela S.A.
Tel: 782.78.11
Fax: (02) 781.9390
Of5050hw.pm6 4/15/98, 9:44 AM76
Page 89

Specifications
Category Specifications
Type/compatibility Desktop ITU-T G3 transceiver
Modem speed 14.4/9.6/7.2/4.8/2.4 Kbps
Automatic fallback
Transmission speed As fast as 6 seconds per page
(ITU-T Test Chart #1)
Printing speed 8 pages per minute
Printing warmup time 20 seconds Standby to Print
Scan speed 6 seconds per page
Scan resolution horizontal: 300 dpi
vertical: 100 dpi, 200 dpi, 400 dpi
Halftone transmission 64 shades of gray
Scan width 8.5" (215 mm)
Protocol ITU-T G3
Communications Half duplex
Coding scheme MH/MR/MMR with ITU-T ECM
Recording paper Plain paper, letter, legal, or A4 size
Of5050hw.pm6 4/15/98, 9:44 AM77
Category Specifications
Paper Handling
Universal tray 250 sheets maximum; letter, legal, A4.
Manual feeder Single sheet only; letter, legal, A4.
Memory
Fax standard 256KB (up to 17 send/receive pages*)
Fax option boards 1MB board with battery backup
Environmental
Dimensions 13" x 16.5" x 9.6"
W x D x H (33cm x 42 cm x 24.5 cm),
Weight 28.7 lb (13 kg) with image drum
Power 120 VAC ± 10%, 50/60 Hz ± 2%
16—28 lb. (60.5—105.5 g/m
recommended
16—32 lb (60.5—120.2 g/m
(up to 100 send/receive pages*)
*Based on ITU-T Test Chart #1
excluding paper tray
or 220/240 VAC ± 10% , 50/60 Hz ±2%
*Based on ITU-T Test Chart #1
2
)
2
); 20 lb.
Specifications 77
Page 90

Index
Symbols
*/Tone key 8
0/Unique key 8
1/Delayed TX key 10, 40
10/Message Print From Memory key 11
1'ST PAPER SIZE: 52
2/Broadcast Feeder TX key 10, 42
3/Confidential TX key 10
4/Relay Initiate TX key 10, 46
5/Polling key 10, 47
6/Report Print key 10, 57
7/Counter Display key 10, 70
8/Location Program key 11, 27, 29, 31
9/User Program key 11, 19, 22, 23, 28, 51, 55, 56
A
Activity report 57
Alarm 9
Alarm indicator 9
alternate number 10
78 Index
Of5050hw.pm6 4/15/98, 9:44 AM78
Answering Machine
connecting 17
Answering machine 17, 20
Answering mode 20-21
setting 21
Auto Dial key 7, 29, 31
Auto Dial numbers 29-31, 72
Auto Rec key 7, 21
Auto Receive mode [FAX] 20
AUTO START 54
B
Broadcast confirmation report 58
Broadcast entry report 56
Broadcast Feeder TX key 10
Broadcasting 45-47
BUSY TONE DETECT 54
C
Call Back Number 21
Chain dalling 29
Page 91

CHANGE DRUM 66, 69
Cleaning page 11, 63
Clock
setting 19
Closed network 37, 50, 73
Codes
communication 59
report 59
COMM ERROR 71
Communication codes 59
COMMUNICATION ERROR 71
Components 3
Confidential fax 43
Confidential fax messages
receiving 43
sending 43
Confidential Reception Report 59
Confidential TX key 10
Configuration report 58
Contrast
transmit document 34
Control Panel 6, 7
Copy 7, 24
Copy key 7, 24
Counter Display key 10
Customer Information Center 74
Customer Service Representatives 74
D
Date
setting 19
Delayed TX key 10
Dial parameters 54-55
changing 55
DIAL PREFIX 54
DIAL TONE DETECT 54
Dialing
chain 29
One Touch 10
Display Panel 7
Display panel messages 68
Distinctive ring 51
setting 51-54
DOCUMENT JAM 60
Document jam
clearing 60
DOCUMENT MIS-FEED 69
Document stacker 13
Documents
loading 32
preparing 32
Drum counter
resetting 11, 68
Of5050hw.pm6 4/15/98, 9:44 AM79
Index 79
Page 92

E
Echo Protection 28
ECM FUNCTION 53
End of Session tone 11
Error Tones 11
External Telephone
connecting 17
F
Fax
sending 34-35
sending, confidential 43
sending, delayed 40, 73
sending, multiple locations 42
Fax Identification (Fax ID) 21-22
FAX mode 20
Faxable Facts 74
FWD 21, 22
G
Groups 30
H
Handset 35
installing 15
Hook/V. Request key 7, 35
Hyphen key 7
I
Image Drum Cartridge 5
replacing 66-68
INCOMING RING 52
Internet 74
J
Jam
document 71
printing paper 60-63
K
Key Select Tone 11
L
Language
setting 22, 52
LED array 65, 72
LED Print Head 5
LINE jack 15
Location ID 27, 28, 29, 30
Location Program key 11
LONG DOC. TX 55
80 Index
Of5050hw.pm6 4/15/98, 9:44 AM80
Page 93

M
O
Manual Receive mode [TEL] 20
MDY/DMY 55
MEM./FEEDER SW. 53
Memory
printing from 11
Memory reception 37
cancelling 37
Message Confirmation Report
user function settings 49
Message confirmation report 56
Message Print From Memory key 11
Messages
display panel 68
MF(TONE)/DP(PULSE) 54
Multiple locations
faxing 42
N
No © key 8
NO PAPER 69
NO TONER MEM.RX 55
Number
alternate 10
primary 10
Numeric keypad: 8
Off-Hook Alarm tone 11
One Touch keypad 8
One Touch keys 31, 72
location ID 27, 28
programming 27
ONE TOUCH PARAM 53
P
Paper
weight 18
PAPER OUT/JAM 60
PAPER JAM 60, 69
PAPER MIS-FEED 69
Pause key 9
PBX (Private Branch Exchange) 23, 54, 73
PBX LINE 54
Phone Directory 58
Plus key 9
Polling 47, 73
Polling key 10
Polling reception 10
Polling transmission 10
Power cord 17
Power outage report 38, 59
Primary number 10
Print counters 70
Index 81
Of5050hw.pm6 4/15/98, 9:44 AM81
Page 94

PRINTER ALARM 2 70
PRINTER ALARM 4 70
Printing paper jam
clearing 60-63
Private Branch Exchange (PBX) 23
R
Receiving Fax
in memory 37
manual 36
REDIAL INTERVAL 54
Redial key 7
REDIAL TRIES 54
Redialing 35
Reduction, automatic 18
REFER TO USER GUIDE 70
Relay broadcast report 46
Relay Broadcasting 45-47
Relay Initiate TX key 10
Relayed fax transmission 10
REMOTE DIAGNOSIS 52
REMOTE RECEIVE 52
REPLACE TONER CART 64, 70
Report Print key 10
Reports 72
activity 57
82 Index
broadcast confirmation 58
broadcast entry 56
codes 59
confidential reception 57
message confirmation 56
power outage 59
Resolution
transmit document 33
RING RESPONSE 51, 73
S
Search key 7, 34
Select Function key 7
Sender ID 21, 50
Service and Support 74
Service Function Settings 55
Signal Tones 11
Space key 9
Start 9
Start key 9
Stop 9
Stop key: 9
Supplies 75
T
T/F mode 20
T/F TIMER PROG. 50
Of5050hw.pm6 4/15/98, 9:44 AM82
Page 95

TAD MODE 55
TAD mode 17, 20
TEL jack 17
TEL mode 20
TEL/FAX SW. 55
Telephone Answering Device mode [TAD] 20
Telephone Line
connecting 15
Telephone/Fax mode [T/F] 20
Time
setting 19
TIME/DATE PRINT 55
Toner cartridge 5
installing 14
replacing 63-65
Transmission
stopping 35
Transmit Resolution 72
Transmit Resolution/Yes ß 8
TSI PRIN 55
TSI/CSI 21
TX MODE DEFAULT 50
Type of Original 72
U
User function settings 49-54
changing 53
User Program key 11
V
Voice Request 38, 73
answering 38
initiating 39
Voice Request Tone 11
Y
Yes § key 8
Of5050hw.pm6 4/15/98, 9:44 AM83
Index 83
Page 96

MATERIAL SAFETY DATA SHEETMATERIAL SAFETY DATA SHEET
MATERIAL SAFETY DATA SHEET
MATERIAL SAFETY DATA SHEETMATERIAL SAFETY DATA SHEET
OL "e" Series Toner
MSDS # 58093101
For more information, contact Okidata at:
532 Fellowship Road
Mount Laurel, NJ 08054
Emergency Information: 1-800-OKIDATA
Emergency First Aid Procedures
Emergency Procedure
Toner swallowed Dilute by giving two glasses of
(ingested). water and induce vomiting by
administering Syrup of Ipecac
(follow manufacturer’s instruc
tions). Seek medical attention.
NEVER give anything by mouth
or attempt to induce vomiting
in a person who is unconscious.
Toner inhaled. Remove person to fresh air.
Seek medical attention.
Toner gets in Flush eyes with large quantities
the eyes. of cool water for 15 minutes,
keeping the eyelids open with
fingers. Seek medical attention.
NoteNote
Note: Small amounts of toner on skin or clothing can
NoteNote
easily be removed with soap and cold water. Hot water
makes toner harder to remove.
Hazardous Ingredients
Styrene-Butyl Acrylate Copolymer (91% by weight)
CAS# 25767-47-9
OSHA TWA 15 mg/m
ACGIH TLV 10 mg/m
Carbon Black (5-7% by weight)
CAS# 1333-86-4
OSHA TWA 3.5 mg/m
ACGIH TLV 3.5 mg/m
Polypropylene (less than 3% by weight)
CAS# 9003-07-0
OSHA TWA 15 mg/m
ACGIH TLV 10 mg/m
Amorphous Fumed Silica (less than 1% by weight)
CAS# 67762-90-7
OSHA PEL 15.0 mg/m
ACGIH TLV 10.0 mg/m
NoteNote
: :
Note
: This product is not regulated under Section 313 of
NoteNote
: :
SARA, Title III.
3
for total dust
3
for total dust
3
3
3
for total dust
3
for total dust
3
for total dust
3
for total dust
Physical Data
Melting Point: 110°C (230°F)
Boiling Point: Not applicable
Vapor Pressure: Not applicable
Of5050hw.pm6 4/15/98, 9:45 AM84
Page 97

Vapor Density (Air=1): Not applicable
Evaporation Rate (Butyl Acetate=1): Not applicable
Specific Gravity (H
Solubility in water: Negligible
O=1): 1.15
2
Appearance and odor: Black granules, no odor
Fire and Explosion Hazard Data
Flash Point (Method Used): Not applicable
Flammable Limits
Lower Explosive Limit: Not applicable
Upper Explosive Limit: Not applicable
Extinguishing Media: Water, CO
Special Fire Fighting Procedures: Do not use methods that
, Dry Chemical, or Foam
2
may create a dust cloud, such as high pressure water and/or
steam
Unusual Fire and Explosion Hazards:
• Organic components decompose at 200-455°C (392-
851°F).
• Material may explosively combust when finely suspended
in air.
• Thermal decomposition of organic components may
result in release of oxides of carbon and nitrogen.
Health Hazard Data
Routes of Entry: Inhalation, Ingestion, Eyes, Skin.
Health Hazards:
1. Styrene-Butyl Acrylate Copolymer
Subcutaneous implantation of polymeric styrene powder
in rats has induced tumors at the site of implantation.
2. Carbon black
(Group 3 “Not Classifiable”; IARC)
Overexposure to carbon black is associated with causing
irritation, conjunctivitis, and corneal hypoplasia of the
eyes; minor irritation and eczema of the skin; and
irritation and bronchitis. Long-term inhalation exposure
may be associated with causing lung cancer.
3. Polypropylene
(Group 3 “Not Classifiable”; IARC)
Subcutaneous implantation of polypropylene powder in
rats has induced tumors at the site of implantation.
4. Amorphous Fumed Silica
(Group 3 “Not Classifiable”; IARC)
Overexposure to amorphous silica has been associated
with causing irritation of the lungs and pneumoconiosis.
Long-term inhalation exposure may be associated with
producing tumors in laboratory animals.
Of5050hw.pm6 4/15/98, 9:45 AM85
Page 98

Reactivity Data
Stability: Stable
Polymerization: Will not occur.
Hazardous Decomposition Products: Thermal decomposi-
tion may result in release of oxides of carbon and nitrogen.
Temperature: Do not expose to temperatures above 200°C
(392°F).
Incompatibility: Avoid exposure to strong oxidizers.
Spill Cleanup and Disposal
HEPA cartridge during cleanup.
Protective Gloves and/or Eye Protection: Not normally
required. For large spills, use rubber gloves and chemical
worker’s goggles during cleanup.
Ventilation: Outside of normal ventilation, not normally
required.
Other Protective Equipment and/or Hygienic Practices:
None
Spill Cleanup
Small Spills
1. Remove sources of ignition.
2. Clean up spill with wet cloth.
Large Spills
1. Remove sources of ignition.
2. Wear protective gear: respirator, rubber gloves, goggles (see
below)
3. Clean up spill with scoop, being careful not to generate a lot of
dust.
Waste Disposal: Follow appropriate federal, state and local
regulations.
Safe Handling and Use
Respiratory Protection: Not normally required. For large
spills, use NIOSH-approved full face-piece respirator with
Of5050hw.pm6 4/15/98, 9:45 AM86
Special Precautions
Precautions for Handling or Storage: Protect from high
heat. Avoid making dust.
Other Precautions: None
The information contained in this MSDS is based on data considered
accurate; however, no warranty is expressed or implied regarding the
accuracy of these data or the results to be obtained from the use
thereof. Vendor assumes no responsibility for injury to vendee or
third person party proximately caused by the product if reasonable
safety procedures are not adhered to as stipulated in the MSDS.
Furthermore, vendor assumes no responsibility for injury to vendee or
third person party proximately caused by abnormal use of the product
even if reasonable safety procedures are followed. Additionally, vendee
assumes the risk of his use of the product.
June 1997
 Loading...