

Page 1

Page 2

Every effort has been made to ensure that the information in this document is complete, accurate, and up-to-date.
The manufacturer assumes no responsibility for the results of errors beyond its control. The manufacturer also
cannot guarantee that changes in software and equipment made by other manufacturers and referred to in this
Guide will not affect the applicability of the information in it. Mention of software products manufactured by other
companies does not necessarily constitute endorsement by the manufacturer.
While all reasonable efforts have been made to make this document as accurate and helpful as possible, we make
no warranty of any kind, expressed or implied, as to the accuracy or completeness of the information contained
herein.
The most up-to-date drivers and manuals are available from the Oki Data website http://www.okidata.com and
http://my.okidata.com.
Copyright © 2003. All rights reserved.
Adobe, the Adobe logo, PostScript, PostScript 3 and the PostScript logo are trademarks of Adobe Systems
Incorporated.
Microsoft, Windows, Windows NT, Windows Server are either registered trademarks or trademarks of Microsoft
Corporation in the United States and/or other countries.
Permission has been obtained from Microsoft Corporation for use of software screen shots.
PCL, HP, HP-GL, HP-GL/2 and HP-UX are registered trademarks of Hewlett-Packard Corporation.
NetWare is a registered trademark of Novell, Inc., in the United States and other countries.
Macintosh, MacOS, AppleTalk, EtherTalk and TrueType are trademarks of Apple Computer, Inc., registered in the
U.S. and other countries.
Intel and Pentium are trademarks or registered trademarks of Intel Corporation or its subsidiaries in the United
States and other countries.
UNIX is a registered trademark of the Open Group in the United States and other countries.
Solaris, SunOS and NIS (Network Information Services) are trademarks or registered trademarks of Sun
Microsystems, Inc. in the United States and other countries.
All product/brand names are trademarks or registered trademarks of the respective holders.
As a member of the International Energy Star Program, Oki Data confirms this product satisfies
the requirements for International Energy Star Program standards.
Data Loss in Hard Disk/Compact Flash Disk
Saved data may be lost if hard disk/compact flash disk of the machine breaks down due to external shocks
or if the power is accidentally cut off in a manner not following the methods listed in manuals or other
documentation. Oki Data is not responsible for such data loss and any consequence caused by such data
loss.
Damage related to computer virus
Oki Data is not responsible for any breakdown of machines due to infection of computer virus.
Important
This manual is copyrighted with all rights reserved. Under the copyright laws, this manual may not be copied
or modified in whole or part, without the written consent of the publisher.
Parts of this manual are subject to change without prior notice.
We welcome any comments on ambiguities, errors, omissions, or missing pages.
Never attempt any procedure on the machine that is not specifically described in this manual. Unauthorized
operation can cause faults or accidents. Oki Data is not liable for any problems resulting from unauthorized
operation of the equipment.
59358501 Rev.
3.0
Page 3

Preface
Thank you for choosing this printer.
Keep this guide handy for a quick reference on using the printer. The illustrations used in
this guide are based on B6300.
This guide is written with the assumption that you are familiar with the basics kof operating
your computer and network.
In this manual, safety instructions are marked with the symbol .
Always read and follow these instructions before performing the required procedure.
This product is a “Class I Laser System” that does not emit dangerous laser beam. Op erate the machine
according to the instructions in the manual. Do not carry out any operation not menti oned in th e manual.
Otherwise, it may lead to unforeseen accident or machine breakdown.
Preface 3
Page 4

Conventions
1. In this guide, “computer” refers to both personal computers and workstations.
2. The following icons are used in this guide:
Important Indicates important information which you should read.
Note Indicates additional information on operations or features.
Refer to Indicates reference sources.
3. The following conventions are used in this guide:
Refer to “xxx” : The cross-reference is within this guide.
Refer to YYY : The cross-reference is not within this guide.
[ ] : Indicates items displayed on the computer and the printer control
< > : Indicates items such as buttons and indicators on the keyboard and
panel. Also indicates the title of printed reports/lists from the printer.
printer.
4 Conventions
Page 5

Contents
1 Basic Operations........................................................................................ 8
1.1 Main Components and Their Functions................................................................... 8
1.2 Switching On and Off the Power ........................................................................... 13
1.3 Power Saver Modes........................ ... ... .... ...................................... .... .................. 14
1.4 Cancelling/Checking Printing..................... ... ... ... .... ... ... ... ... .... ... ... ... .... ... ...... ... .... .. 14
1.5 Displaying Optional Accessory Configuration and Paper Tray Settings................ 16
This Printer ..............................................................................................................8
Standard Configuration .................... ....................................... ... ... .........................8
With Optional Accessories .....................................................................................9
Internal View ........................................................................................................10
Control Panel .........................................................................................................11
Display ............................... ................................................ .................................... 12
Print Screen .........................................................................................................12
Menu Screen .......................................................................................................12
Switching On the Power ........................................................... ... ... .......................13
Switching Off the Power .................... ... .... ... ... ... ....................................... ... ... .......13
Exiting the Power Saver Mode ............................................................................14
Cancelling Printing .................................................................................................14
Cancelling Printing of Data Being Printed or Received at the Printer ..................14
Cancelling Printing of All Print Data Received at the Printer ........ .... ... ... .............15
Cancelling Print Data That Are Being Processed at the Computer .....................15
Checking Status of Print Data ........................................... .... ... ... ... .... ... ... .............15
Checking in Windows ..........................................................................................15
Checking in OkiWebRemote ................................................................................15
2 Printing..................................................................................................... 17
2.1 Printing From the Computer.................................................................................. 17
Useful Print Features In the Properties Dialog Box .............................................17
2.2 Printing on Envelopes............ ... .... ... ... ... .... ... ....................................... ... ... ............ 18
Loading Envelopes ................................................................................................18
Printing on Envelopes ............................................................................................19
2.3 Printing on Transparencies....... .... ... ... ... .... ... ....................................... ... ... ............ 21
Loading Transparencies ........................................................................................21
Printing on Transparencies ....................................................................................21
2.4 Printing on Custom Size Paper/Long Paper.......................................................... 23
Loading Custom Size Paper ..................................................................................23
Setting Custom Paper Sizes ..................................................................................24
Printing on Custom Size Paper .............................................................................25
2.5 Print Confidential Document - Secure Print........................................................... 27
About Secure Print ......................................... ... .... ... ... ....................................... ...27
Configuring Secure Print .......................................................................................28
At the Computer ...................................................................................................28
At the Control Panel .............................................................................................29
2.6 Print After Checking Printing Result - Proof Print.................................................. 30
About Proof Print ............................ ... ... .... ... ... ....................................... ... .............30
Configuring Proof Print ..........................................................................................31
At the Computer ...................................................................................................31
At the Control Panel .............................................................................................32
2.7 Print at a Specified Time - Delayed Print... ... ... ....................................... ... ... ......... 33
Registering Delayed Print ......................................................................................33
Canceling Delayed Print ........................................................................................34
2.8 Direct Printing of PDF Files ................................................................................... 35
PDF Files That Can Be Printed ...........................................................................35
Printing PDF File ...................................................................................................35
Target OS ............................................................................................................35
Contents 1
Page 6

Printing PDF File ................. ... .... ... ... ... .... ... ....................................... ... ... .............35
2.9 Printing From Web Browser .................................................................................. 36
Data That Can Be Sent ........................................................................................36
Printing ................................ .................... ................... ................... .................... ...36
2.10 Printing via Electronic Mail - E-mail Printing.......................................................... 38
Environment Settings for E-mail Printing ...............................................................38
Setting the Network Environment ........................................................................38
Setting the E-mail Environment (at This Printer) .................................................39
Sending E-mails ............................................. ... .... ... ...................................... .... ...41
Attachments That Can Be Sent ...........................................................................41
Sending E-mails ...................................................................................................41
Receiving and Printing E-mails .................................... ................ ................... .......42
Points to Note When Sending E-mails ..................................................................42
Security Issues ....................................... ... ....................................... ... ................42
Setting Permitted Domain ....................................................................................42
Caution on Connecting This Printer to Internet Provider and Using E-mail Features
42
3 About Paper ............................................................................................. 43
3.1 About Paper.................. ... ... ... ... .... ... ....................................... ... ............................ 43
Usable Paper .........................................................................................................43
Standard Paper ................ ... ... .... ... ... ... ....................................... ... .......................44
Special Media ......................................................................................................45
Unusable Paper .....................................................................................................46
Storing and Handling Paper ..................................................................................47
3.2 Loading Paper....................................................................................................... 47
Loading Paper in a Paper Tray ..............................................................................47
Automatic Tray Selection .......................................................................................49
3.3 Setting Custom Paper Sizes.................................................................................. 50
3.4 Setting Paper Types............................................................................................ .. 51
Setting on the Control Panel ................................................................................51
4 Settings on the Control Panel................................................................... 52
4.1 Overview of the Common Menu................................................... ... .... ... ... ... ......... 52
Menu Configuration ...............................................................................................52
Changing Menu Settings .......................................................................................54
Basic Operations .................................................................................................54
Initializing Configured Values ..............................................................................54
Example: Changing the Low Power/Sleep Mode Settings ..................... ... ... .......55
4.2 Description of Menu Items..................... ....................................... ... .... .................. 58
Print Language ......................................................................................................58
ESCP ................................................................................................................... 58
HPGL ................................................................................................................... 58
PDF ............................... ................ ................ ................ ................ ................ .......58
PCL ............................... ................................................ ....................................... 59
Admin Menu ............................................. ... ... ....................................... ... ... ..........62
Network/Port ........................................................................................................ 62
System Settings ...................................................................................................74
Printer Settings ....................................................................................................77
Allocate Memory*3 (refer to P. 83) ......................................................................79
Init/Del Data .........................................................................................................81
Display Language ........................ ... ... ... ....................................... ... .... ...................82
4.3 Menu list................................................................................................................ 84
5 Troubleshooting........................................................................................ 89
5.1 When Paper Jams..................................................... ... ... ... ................................... 89
Inside Cover A .....................................................................................................90
Inside Paper Tray ................................................................................................90
5.2 When Problems Occur .................................... ... .... ... ...................................... .... .. 91
2 Contents
Page 7

5.3 When the Print Quality is Poor .............................................................................. 96
5.4 Message List ......................................................................................................... 99
Message List (alphabetical order) ........................................................................99
List of Error Codes ...............................................................................................102
5.5 Network Related Troubles................................................................................... 107
Using TCP/IP .......................................................................................................107
For Windows 95/Windows 98/Windows Me .......................................................107
For Windows NT 4. 0/Windows 2000/Windows XP ...........................................108
Using OkiWebRemote .........................................................................................109
5.6 Mail Related Troubles.......................................................................................... 110
6 Daily Care............................................................................................... 111
6.1 Replacing the Drum/Toner Cartridge................................................................... 111
Caution on Handling the Drum/Toner Cartridge ................................................111
Replacing the Drum/Toner Cartridge .................................................................112
6.2 Printing Reports/Lists .......................................................................................... 114
Types of Reports/Lists .........................................................................................114
Printing Reports/Lists ..........................................................................................116
6.3 Checking/Managing the Printer Status on the Computer .................................... 117
Settings for OkiWebRemote ................................................................................117
Computer OSs ...................................................................................................117
Browsers ............................. ................................................. .............................. 118
Web Browser Settings .......................................................................................118
Setting the Printer ..............................................................................................118
Procedure ............................................................................................................ 119
IP Filter Feature via IP Address List ....................................................................120
6.4 Checking Printer Status via E-mail...................................................................... 121
About Mail Notice Service ..................................... ... ...................................... .... .121
Settings for Mail Notice Service ...........................................................................121
Network Environment ................................ ....................................... ... ... ...........121
Setting the E-mail Environment (at This Printer) ...............................................122
Setting the Printer Driver Properties (at the Computer) ....... ... ... ... .... .................122
6.5 Checking Printed Pages...................................................................................... 123
Checking Total Printed Pages on Meter ..............................................................123
Checking Total Printed Pages on Print Meter Report ..........................................124
Print Results From the Print Meter Report . ... ... .... ... ...................................... .... .124
How to Print the Print Meter Report ........... ... ... ....................................... ... ... .....124
Initializing Print Meter Data ................................................................................125
6.6 Cleaning the Printer......................... ... ... .... ...................................... .... ... ............. 125
Cleaning the Exterior .........................................................................................125
Cleaning the Interior ..........................................................................................126
Cleaning the Feed Roll ......................................................................................127
6.7 When Moving the Printer.................................................... .... ... ... ....................... 129
A Appendix ................................................................................................ 131
A.1 Specifications ...................................................................................................... 131
Product Specifications ................................................. ... ... .... ... ... ... .....................131
This Printer ........................................................................................................131
Printable Area .......................... .... ... ... ... ....................................... ... .... .................134
A.2 Product Code List................................................................................................ 135
Printers ................................................................................................................135
Optional Accessories ...........................................................................................137
Consumables ..................................... .................... ................ ................... ...........138
Types of Consumables ......................................................................................138
Handling consumables ......................................................................................138
Regular Replacement Parts ...............................................................................138
A.3 Life of Consumables and Regular Replacement Parts........................................ 139
Life of Consumables ..........................................................................................139
Life of Regular Replacement Parts ....................................................................139
Contents 3
Page 8

Functional Parts .................................................................................................139
A.4 Output Size and Memory Capacity...................................................................... 140
PCL driver ..................... ... ... ... .... ... ... ... .... ...................................... .... ... ... ...........140
PostScript printer driver .....................................................................................141
A.5 Precautions and Limitations ................................................................................ 142
Precautions and Limitations of This Printer ......................................................... 142
Optional Hard Disk .............................................................................................142
When Print Result Is Different From the Settings ................................ ... ... ... .... .142
Optional Accessories .........................................................................................142
Meter Count in Duplex Printing ..........................................................................142
TCP/IP (LPD) .......................................................................................................143
Printer Settings ..................................................................................................143
Computer Settings .............................................................................................143
Switching Off the Power ....................................................................................143
Printing ................................ .................... ................... ................... .................... .1 44
TIFF File Format ..................................................................................................145
A.6 Printing Using the Serial Interface....................................................................... 147
Settings on the Printer .........................................................................................147
Settings on the Printer Driver ..............................................................................148
A.7 Glossary .............................................................................................................. 149
Index............................................................................................................. 155
4 Contents
Page 9

Contents 5
Page 10

The Objective of the International Energy
Star Program
To protect the global environment and conserve energy sources, the International Energy
Star Program encourages the following product features. Oki Data confirms this printer
satisfies the requirements for this program.
Low Power Mode Feature
This product has a power-saving feature, which switches the machine to low power mode
automatically if the machine is on and not operated for a certain period of time. In this mode
the machine stops power to the fuser and saves power. The default low power mode start
time is set at 5 minutes.
You can set the low power mode start time between 5 and 60 minutes in 1 minute intervals.
For details on how to set the time, refer to “Admin Menu” (P. 62).
Note
• The sleep mode feature in this machine saves further power consumption than the low power mode.
6 The Objective of the International Energy Star Program
Page 11

Illegal Copies and Printout s
Copying or printing certain documents may be illegal in your country. Penalties of fines
or imprisonment may be imposed on those found guilty. The following are examples of
items that may be illegal to copy or print in your country.
q Currency
q Checks
q Bank and government bonds and securities
q Passports and identification cards
q Copyright material or trademarks without the consent of the owner
q Postage stamps and other negotiable instruments
This list is not inclusive and no liability is assumed for either its completeness or
accuracy. In case of doubt, contact your legal counsel.
Illegal Copies and Printouts 7
Page 12

1 Basic Operations
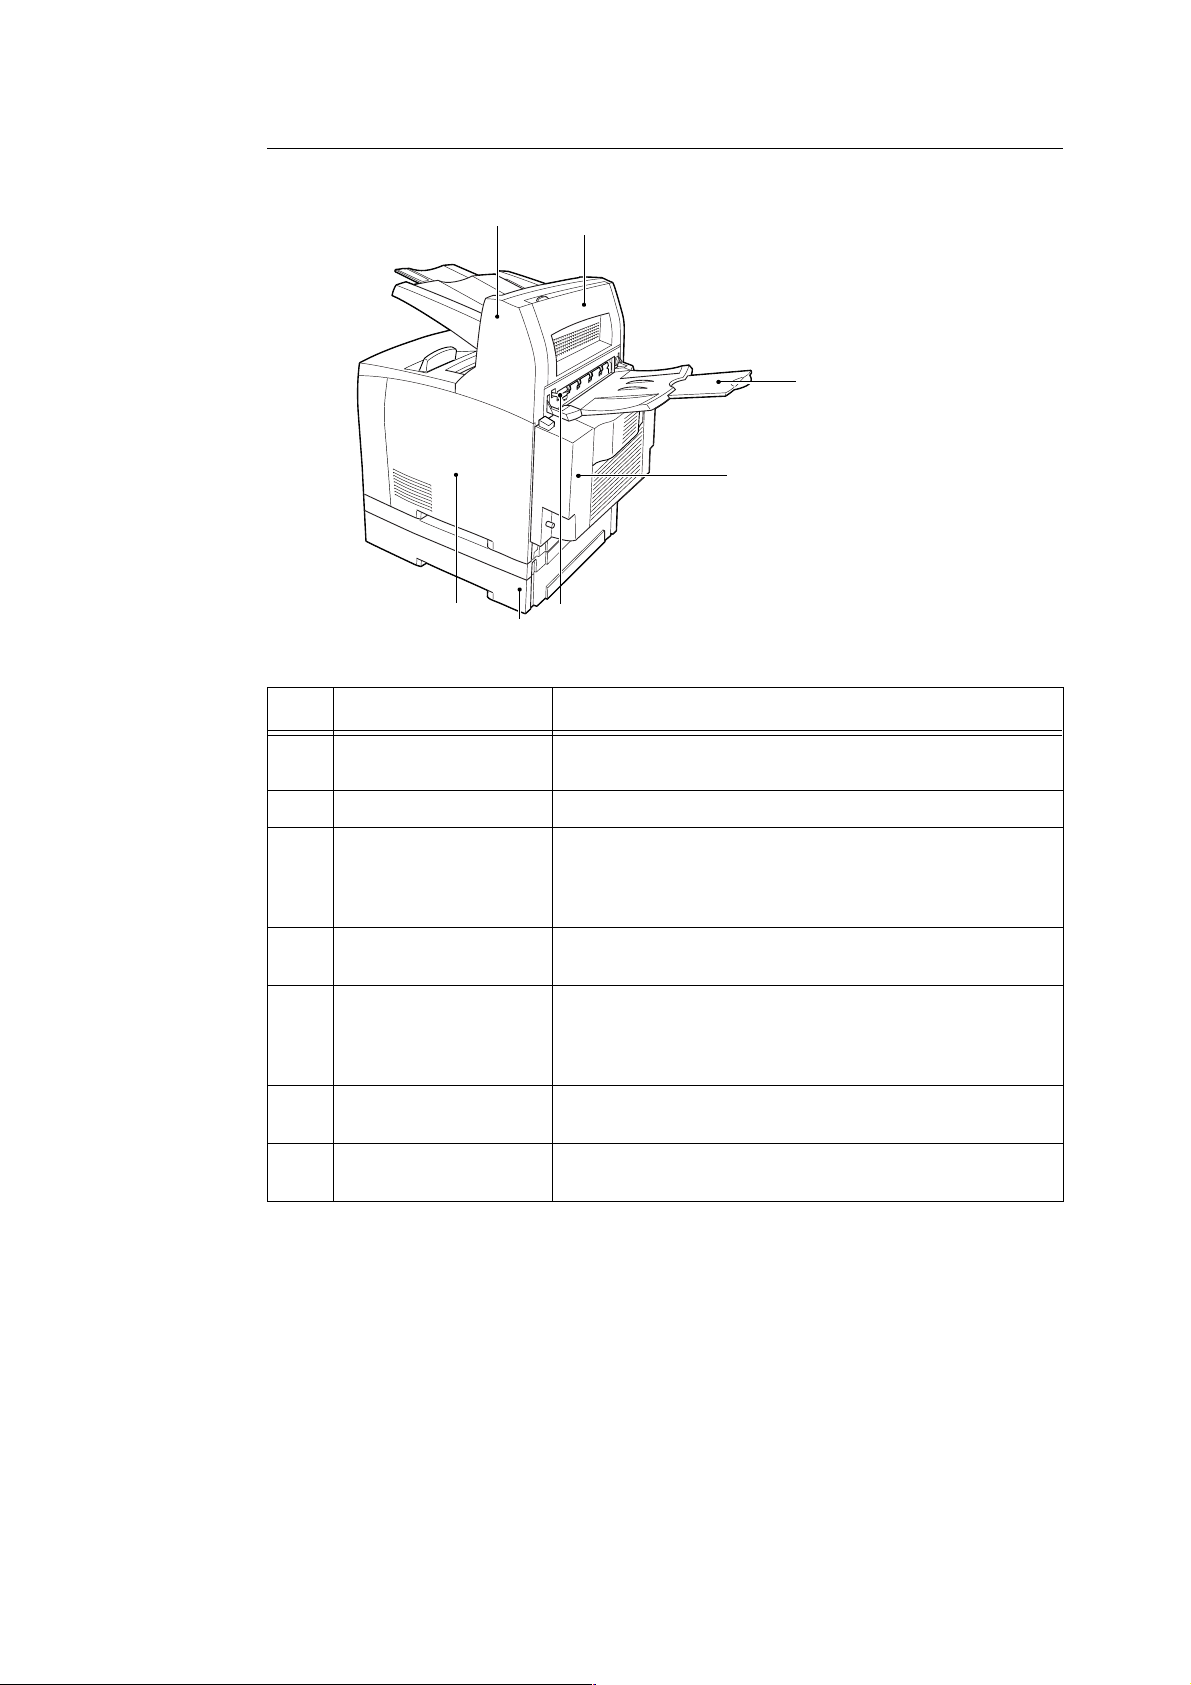
1.1 Main Components and Their Functions
This Printer
Standard Configuration
2
1
13
14
12
8
11
7
3654
No. Name Description
1 Center output tray Print jobs are output here with the printed side facing down.
2 Control panel Consists of the essential operation buttons, indicators and
display.
3 Ventila tion hole Releases heat to prevent the interior of the printe r from heating
up.
4 Paper meter A meter to check the amount of remaining paper. Attached to the
550 tray.
5 Tray 1 Sets the 150 tray.
6 Tray 2 250 tray is set for B6200 and 550 tray for B6300.
39 10
3
7 Power switch Switches the power of the printer on and off. Pressing t he switch
8 Paper stopper Raise this when printing on paper larger than Letter/A4 size.
9 Duplex unit connector For connecting the duplex unit.
10 Power cord connector For connecting the power cord.
11 Parallel connector For connecting the parallel cable.
12 Network connector For connecting the network cable when connecti ng this pri nter to
13 USB connector For connecting the USB cable.
14 Serial connector For connecting the serial cable.
8 1 Basic Operations
to the < > position switches it on and pressing it to the < >
position switches it off.
the network for use.
Page 13
With Optional Accessories
1
2
3
4
7
5
6
No. Name Description
1 Offset catch tray Allows you to st agger the out put position f or each print job (of fset
output). Can be installed to B6300.
2 Cover D Open this when paper is jammed inside the offset catch tray.
3 Rear tray Use this tray if you want to reduce curling of p aper when prin ti ng
heavyweight paper. Print jobs are output here with the printed
side facing up.
Can be installed to B6300.
4 Duplex unit (Cover C) Enables 2 sided printing. When paper is jammed inside the
duplex unit, it is described as cover C.
5 Rear output tray lever When the rear tray has been installed, the paper output location
can be switched between it and the center output tray. Raise the
lever to output to the rear tray and lower the l ever to output to the
center output tray.
6 Letter/A4 universal tray Can install up to two levels of an Letter/A4 universal tray (550) to
this printer.
7 Right detachable cover Remove this when installing optional accessories such as hard
disk and additional memory.
1.1 Main Components and Their Functio ns 9
Page 14
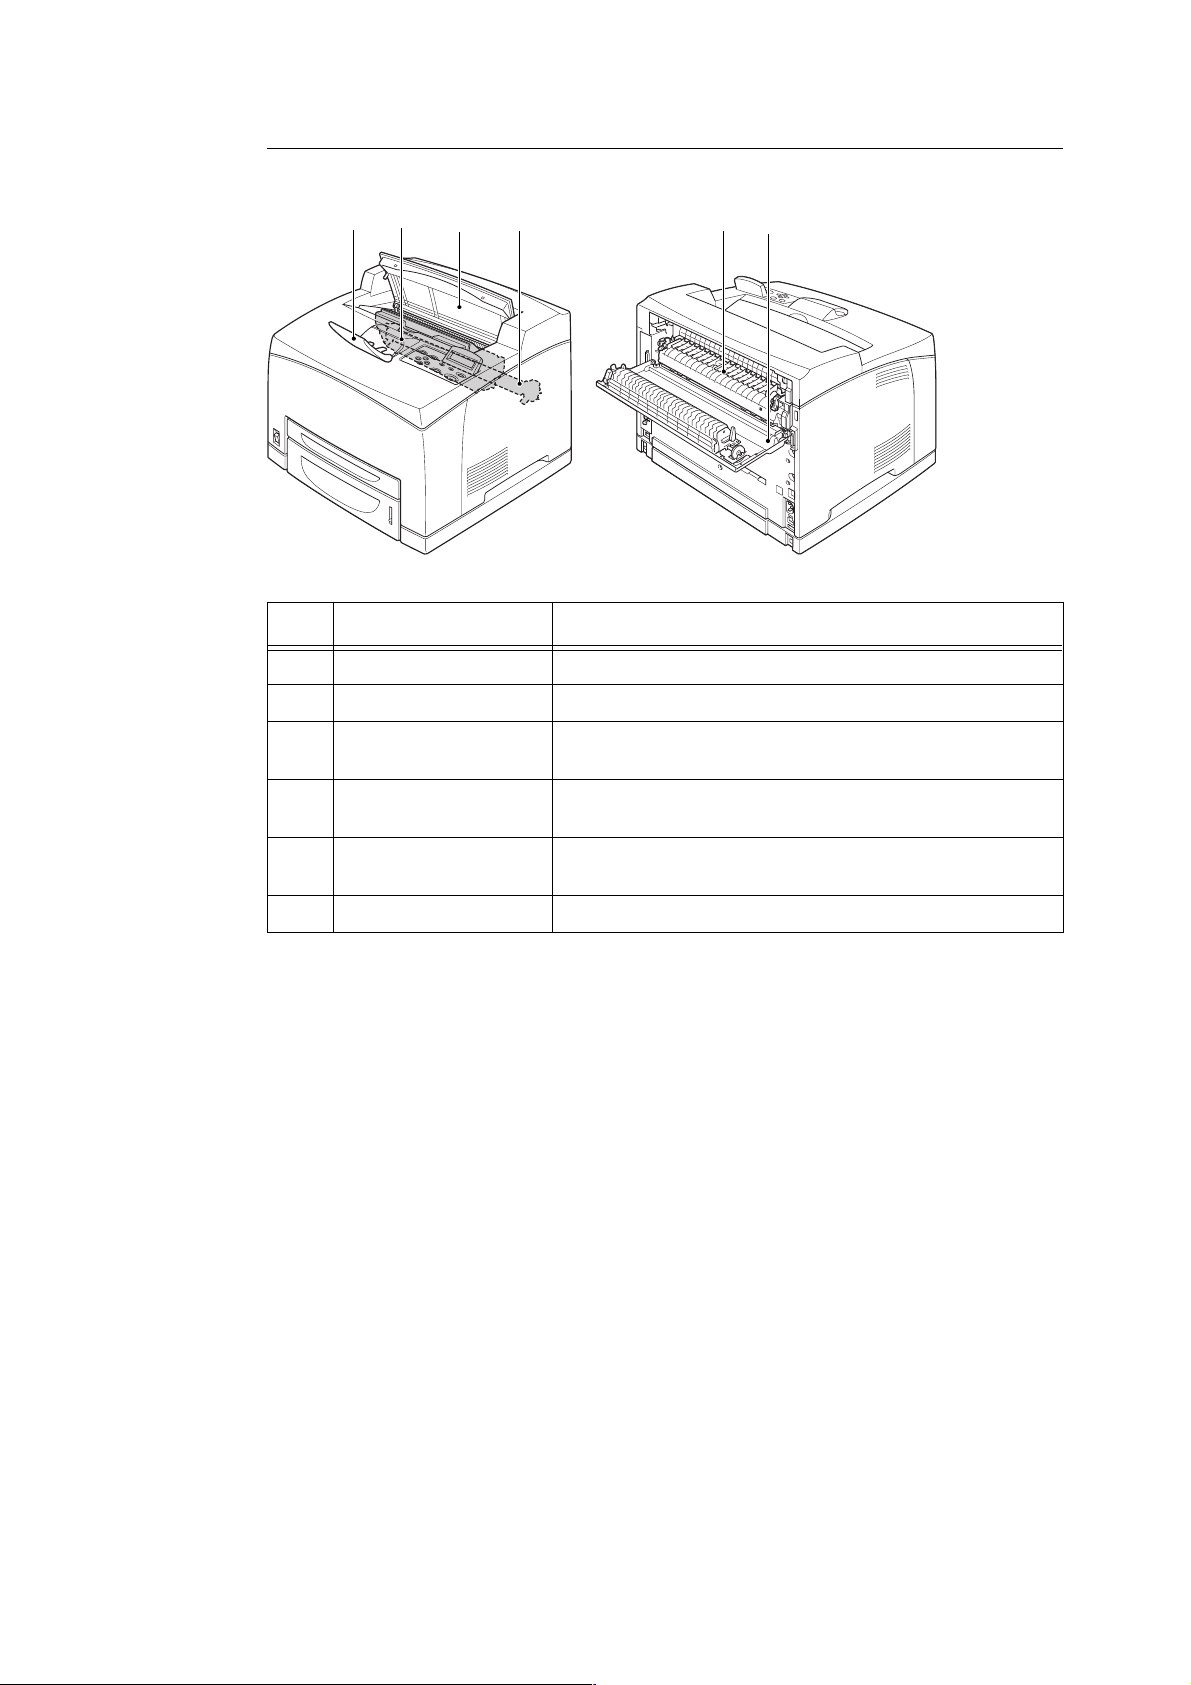
Internal View
1 2 3 5 4 6
No. Name Description
1 Paper stopper Raise this when printing on paper larger than Letter/A4 size.
2 Drum/toner cartridge Contains the toner and the photosensitive drum.
3 Cover A Open this when replacing the drum/toner cartridge and removing
jammed paper.
4 Fuser unit Fixes the toner on the paper. Do not touch this when using th e
printer as it is hot.
5 Transfer roll cartridge Transfers the toner image on the surf ace of the photosensitive
drum to the paper.
6 Cover B Open this when removing jammed paper.
10 1 Basic Operations
Page 15

Control Panel
12
354
6
789
No. Name Description
1 <MENU> button Press to move to menu operation.
2 <FEED/SELECT> button Press to set the menu candidate values. Use this to print report/
list also.
3 <READY> indicator When the light is on, the printer is ready to receive data from the
computer.
4 LCD display Displays the setting items, machine status, and messages.
Refer to
• “Display” (P.12)
5 <AT TENTION> indicator When the light is on, there is a malfunction in the printer.
6 <POWER SAVE> button/
indicator
7 <CANCEL> button Press to cancel printing.
8 <ON LINE> button Press to enter the offline status. When in the offline status, the
9
<> <> <> <>
buttons
Press to enter and exit the power saver mode. The light is on
when the machine is in the power saver mode.
machine cannot receive data or process printing. Press again to
exit the offline status and enter the online status (where the
machine can receive data from the computer).
Press these to move to the required menu, item and candidate
value on the display. Also, press the < > button when you are
doing secure/proof/delayed printing or when you are checking/
printing received mails manually.
Note
• When you are changing the candidat e v alues by the < >
< > buttons, you can press and hold down the buttons to
change the display continuously. Also, pressing the < > < >
buttons simultaneously will dis play the default values.
1.1 Main Components and Their Functio ns 11
Page 16
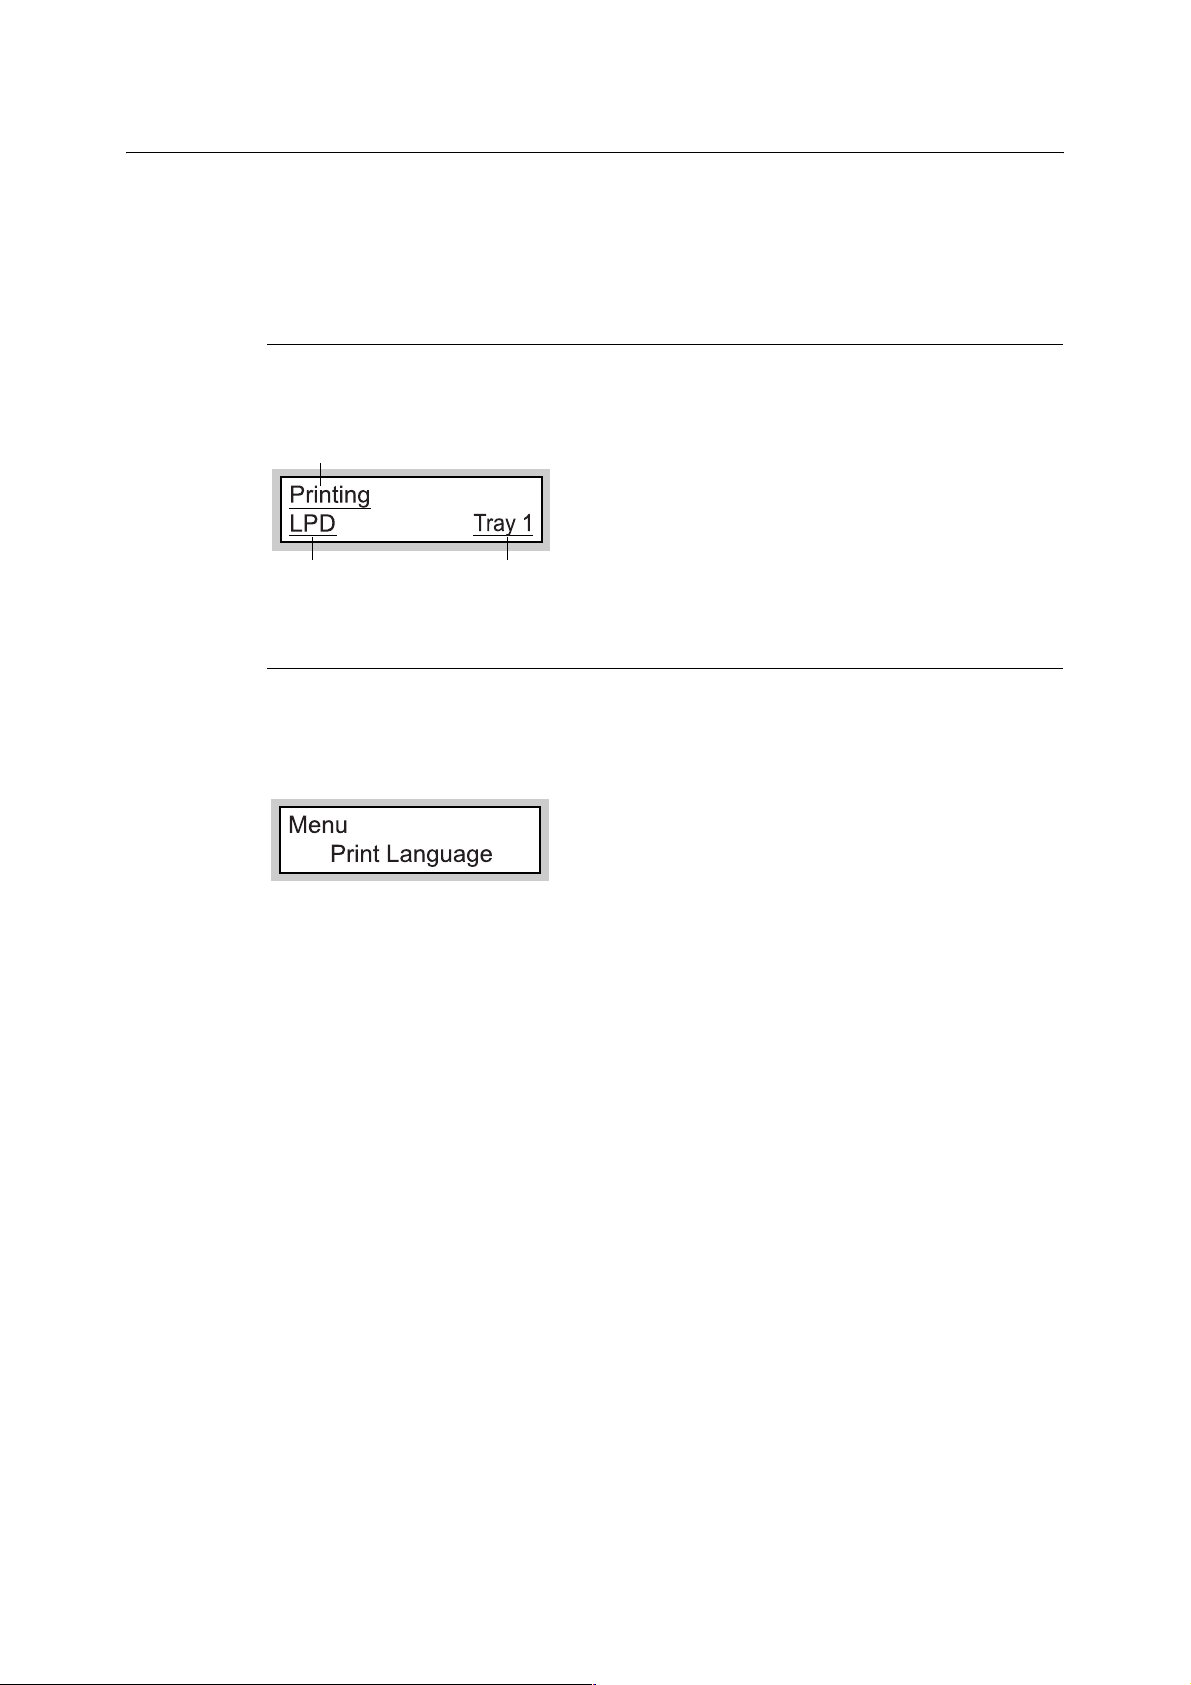
Display
Print
There are two types of screens shown: Print screen (for displaying printer status) and Men u
screen (for configuring settings).
Note
• The message displayed differs according to the options installed and setting status.
Print Screen
The Print screen appears when the machine is printing or waiting for data. The following
contents are shown on the screen.
er status
Port for receiving data
Feeding tray
Menu Screen
Screen for configuring settings related to the printer.
This screen appears when you press the <MENU> button. The initial Menu screen
displayed is as follows.
Refer to
• Items that can be set on the Menu screen: “4 Settings on the Control Panel” (P. 52)
12 1 Basic Operations
Page 17
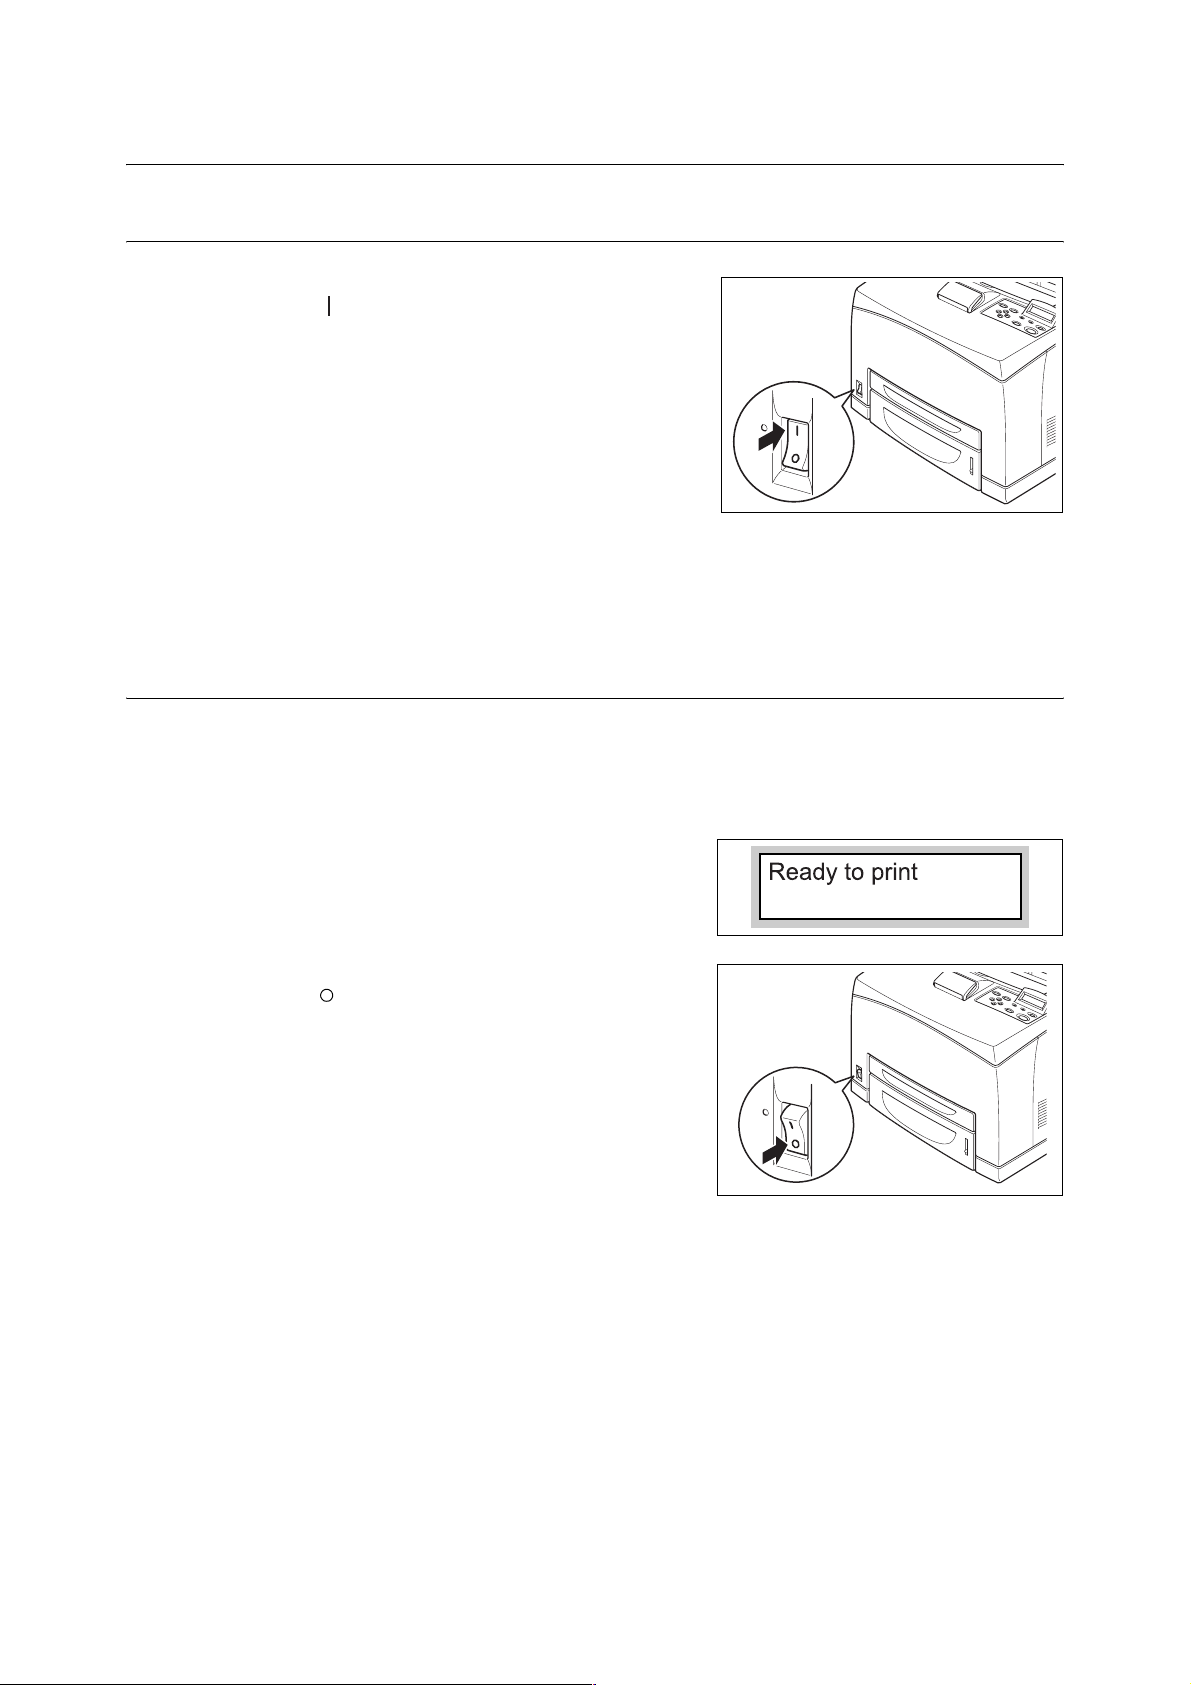
1.2 Switching On and Off the Power
Switching On the Power
1. Press the power switch of the printer to the
< > position.
2. When the power is on, “Please wait...” will
be displayed on the control panel. Check
that this display changes to “Ready to
print”.
Note
• When “Please wait... ” is dis pla yed, th e printer is in t he
process of warming up. Printing is unavailable during
this period. When the printer is ready for printing,
“Ready to print” will be displayed.
Important
• If error message is displayed, refe r to “Message List (alphabetical order)” (P. 99) on how to fix it.
Switching Off the Power
Important
• Do not switch off the power of the printer when printing is in progress. It may lead to a paper jam.
• Once the power is switched of f, pri nt dat a remaining in this printer or in formation saved in the me mory of
this printer will be deleted.
1. By checking the display on the control
panel, confirm that the printer is not
processing any data.
2. Press the power switch of this printer to the
< > position to switch the power off.
1.2 Switching On and Off the Power 13
Page 18

1.3 Power Saver Modes
This printer is equipped with a low power mode and a sleep mode to reduce power
consumption when it is left idle.
When no print data is received for 5 minutes, the printer will enter the low power mode.
When no data is received for a further 10 minutes (a total of 15 minutes lapse (default
settings) since the last received data), it will enter sleep mode. You can specify whether the
printer goes into low power mode or sleep mode. The time ranges to specify for the pr inter
to go into low power mode or sleep mode are 5 to 60 minutes respectively. Consumption of
power during the sleep mode is 10 W or less and the time required to exit from the sleep
mode to a print-ready status is about 10 seconds.
Note
• You can also enable either the low power mode or sleep mode.
• Both low power mode and sleep mode cannot be disabled at the same time.
• For details on low power/sleep mode and the procedure to change the settings, refer to “Example:
Changing the Low Power/Sleep Mode Settings” (P.55).
• The sleep mode setting has precedence when both the low power mode and sleep mode are enabled.
For example, when the sleep mode and low power mode time have been set to 15 minutes and 45
minutes respectively, the printer will go into sleep mode after no data has been received for 15 minutes.
It will continue to remain in sleep mode and will not go into low power mode after a further 30 minutes.
Exiting the Power Saver Mode
The printer automatically cancels its power save status once it receives data from the
computer. This status can also be cancelled by pressing the <POWER SAVE> button on
the control panel.
1.4 Cancelling/Checking Printing
Cancelling Printing
To cancel printing, you can either cancel the print job at this printer or at the computer.
Cancelling Printing of Data Being Printed or Received at the Printer
Press the <CANCEL> button on the control panel. However, pages being printed at the
moment will continue to be printed.
Note
• You can also cancel printing on the [Jobs] screen of OkiWebRemote.
14 1 Basic Operations
Page 19

Cancelling Printing of All Print Data Received at the Printer
Press the <ON LINE> button on the control panel, and then press the <CANCEL> button.
Press the <ON LINE> button again after the cancelling process is completed.
Cancelling Print Data That Are Being Processed at the Computer
Double-click the printer icon at the bottom right of the task bar in Windows.
From the displayed window, click the document name that you wish to delete a nd press the
<Delete> key.
Checking Status of Print Data
Checking in Windows
Double-click the printer icon on the task bar at the bottom right of the screen.
From the displayed window, check the column, [Status].
Checking in OkiWebRemote
You can check the status of the print job sent to the printer at the [Jobs] screen of
OkiWebRemote.
1.4 Cancelling/Checking Printing 15
Page 20

1.5 Displaying Optional Accessory Configuration and Paper Tray Settings
When using this printer as a network printer and having enabled SNMP protocol, you can
display on the printer driver, the optional accessory configu ration and settings configured at
the control panel such as paper type or size. These settings are displayed o n the [Options]
tab. This section explains the procedure using Windows XP as an example.
Important
• When using this printer as a local printer, this feature cannot be used. You have to man ually set the
items on the printer driver.
• The rear tray information cannot be obtained. You have to manually set the item.
• For paper size and paper type settings, you must configure them at the control panel beforehand. Even
if you change the settings here, they will not be reflected on the printer itself.
Note
• When using this feature, you have to activate the SNMP port (default: [Enable]) on the printer using the
control panel.
• For Windows NT 4. 0 /Windows 2000/ Windows XP, only users with administrator’s rights can change the
settings. Users without administrator’s rights can only check th e contents.
1. From the [Start] menu, click [Printers and Faxes] and then display the pr operties of the
printer to be used.
2. Click the [Options] tab.
3. Click [Get Information from Printer].
3
4
The properties of the printer can be displayed on the printer drive r.
4. Click [OK]. The contents of the [Options] tab will be updated based on the data
obtained from the printer.
Note
• The automatically detec ted paper si ze and orientat ion will be display ed as the paper size and orient ation
of [Paper Attributes].
• The paper type set on the control panel will be displayed as the paper type setting of [Paper Attributes].
16 1 Basic Operations
Page 21

2Printing
2.1 Printing From the Computer
This section explains the basic flow when printing from application software in a Windows®
environment.
(The procedure may differ according to the computer or system co nfiguration used.)
Important
• Do not switch off the power of this printer when printing is in progress. It may lead to a paper jam.
Note
• This section explains pri nting with the PCL driver as an example.
1. From the [File] menu of the application softwa re , s elect [Pr int].
2. Select this printer as the printer to be used to start printing. To use the various print
features of this printer, display the printer properties dialog box to set the necessary
items.
For details on each item and how to set them, refer to the Online Help for the printer
driver.
Important
• If the paper tray information is not correct, change the settings on the [Options] tab of the printer driver
before carrying on printing. For details on how to do the settings, refer to the Online Help for the printer
driver.
Paper tray
information
A
There are two ways to display Online
Help for the printer driver.
A. Click [?]. And then, cl ick the item you
want to know more about. The
explanation on the item will be
displayed.
B. Click [Help].
The [Help] window will be displayed.
B
Useful Print Features In the Properties Dialog Box
• [Basic] tab: Duplex, Multiple Up, Poster, Booklet Creation, Proof/Secure/Delayed Print
• [Tray/Output] tab: Transparency Separators, Job Offset, Covers
• [Watermarks] tab: Watermarks
Note
• You can set the print features in the properties dialog box from the printer icon in the window displayed
by selecting [Printers and Faxes] (or [Settings] > [Printers] depending on the OS).
2.1 Printing From the Computer 17
Page 22

2.2 Printing on Envelopes
The procedure to print on envelopes is as follows. For details on the envelopes tha t can be
used, refer to“Usable Paper” (P. 43).
Loading Envelopes
You have to close the flaps of the envelopes and load them with the address side facing up
in the orientation shown in the diagram below.
Paper feed direction
* The flap faces down
The following explains how to load the envelopes, using COM- 10 envelopes as an example,
in trays 1 to 4.
Important
• The reverse side of the envelope cannot be printed on.
Note
• For details on the procedure to load paper in a paper tray, refer to “Loading Paper in a Paper Tray”
(P. 47).
1. Load the envelopes in the portrait
orientation so that the flaps are turned to
the right side.
2. Slide the length guide and right width guide to the size of the loaded envelopes.
3. Close the lid of the paper tray and push the tray completely into the printer.
4. On the control panel, change the paper type to [Heavyweight 1]. For details, refer to
“3.4 Setting Paper Types” (P. 51).
18 2 Printing
5. On the control panel, change the paper size of the tray to [Custom] and then set the
paper size. For details, refer to “3.3 Setting Custom Paper Sizes” (P. 50).
Page 23

Printing on Envelopes
To print on envelopes, display the [Tray/Output] tab and [Basic] tab. This section explains
the procedure using WordPad on Windows XP as an example.
Note
• The way to display th e printer properties dial og box diff ers according to the appli cation softwa re. Refer to
the manual of each application software.
1. From the [File] menu, select [Print].
2. Select this printer as the printer to be used and click [Preferences].
3. Click the [Tray/Output] tab.
4. Select the loaded paper tray from [Paper Source] or click the [Specify Paper Type] to
display the [Specify Paper Type] dialog box and then select [Heavyweight 1] from
[Paper Type].
4
5. Click the [Basic] tab.
6. From [Paper Size], select the size of the original document.
6
7
2.2 Printing on Envelopes 19
Page 24

7. From [Output Size], select the envelope size.
8. If necessary, set [Turn Image by 180deg] and then click [OK].
9. Click [Print] in the [Print] dialog box to start printing.
20 2 Printing
Page 25

2.3 Printing on Transparencies
Loading Transparencies
Load transparencies in trays 1 to 4.
Important
• Transparencies with white frames or full-color transparencies cannot be used.
The way to load transparencies in the paper tray is the same as the way to load standard
size paper. For details, refer to “3.2 Loading Paper” (P. 47).
You must also set paper type for the paper tray in [Transparency] on the control panel.
Refer to “3.4 Setting Paper Types” (P. 51) to change the setting.
Printing on Transparencies
To print on transparencies, display the [Tray/Output] tab and [Basic] tab. This section
explains the procedure using WordPad on Windows XP as an example.
Note
• The way to display th e printer properties dial og box diff ers according to the appli cation softwa re. Refer to
the manual of your respective application software.
• Printing transp arencies continuously may lead to the output transparencies sticking to each other. As a
guide, remove the transparencies from the out put tray after about 20 sheets and then fan them to lo wer
their temperatures.
1. From the [File] menu, select [Print].
2. Select this printer as the printer to be used and click [Preferences].
3. Click the [Tray/Output] tab.
4. Select the loaded paper tray from [Paper Source] or click the [Specify Paper Type] to
display the [Specify Paper Type] dialog box and then select [Transparency] from
[Paper Type].
4
5. Click the [Basic] tab.
2.3 Printing on Transparen cies 21
Page 26

6. From [Paper Size], select the size of the original document.
6
7
7. From [Output Size], select the size of the transparency, and then click [OK].
8. Click [Print] in the [Print] dialog box to start printing.
22 2 Printing
Page 27

2.4 Printing on Custom Size Paper/Long Paper
This section explains how to print on custom size paper such as long paper.
The paper sizes that can be set on this printer are as follows:
n For tray 1 n For trays 2 - 4
Long edge:
127 to 900 mm
(5" to 35.4")
Short edge:
76 to 216 mm (3" to 8.5")
* T o load long-size paper wi th the long
edge exceeding 356 mm (14"), load
the paper with the edge protruding
from the tray.
Important
• Print quality on the part of the paper that extends beyond 356 mm cannot be guaranteed.
Loading Custom Size Paper
The way to load custom size paper with the long edge shorter than 356 mm in trays 1 to 4
is the same as loading standard size paper. For details, refer to “3.2 Loading Paper” (P. 47).
To load long paper in tray 1, follow the procedure below:
1. Pull the paper tray out to its maximum.
Note
• Pull the extendable part out to its maximum. For
details on the procedure to extend the p aper tray, refer
to “3.2 Loading Paper” (P. 47).
Long edge:
148 to 356 mm
(5.8" to 14")
Short edge:
98 to 216 mm (3.8" to 8.5")
2. Load the paper with the side to be printed
facing up. Curl up the back end of the paper
so that it will not fall from the tray.
3. Push the paper tray completely into the printer.
Important
• Do not close the lid of the paper tray.
2.4 Printing on Custom Size Paper/Long Paper 23
Page 28
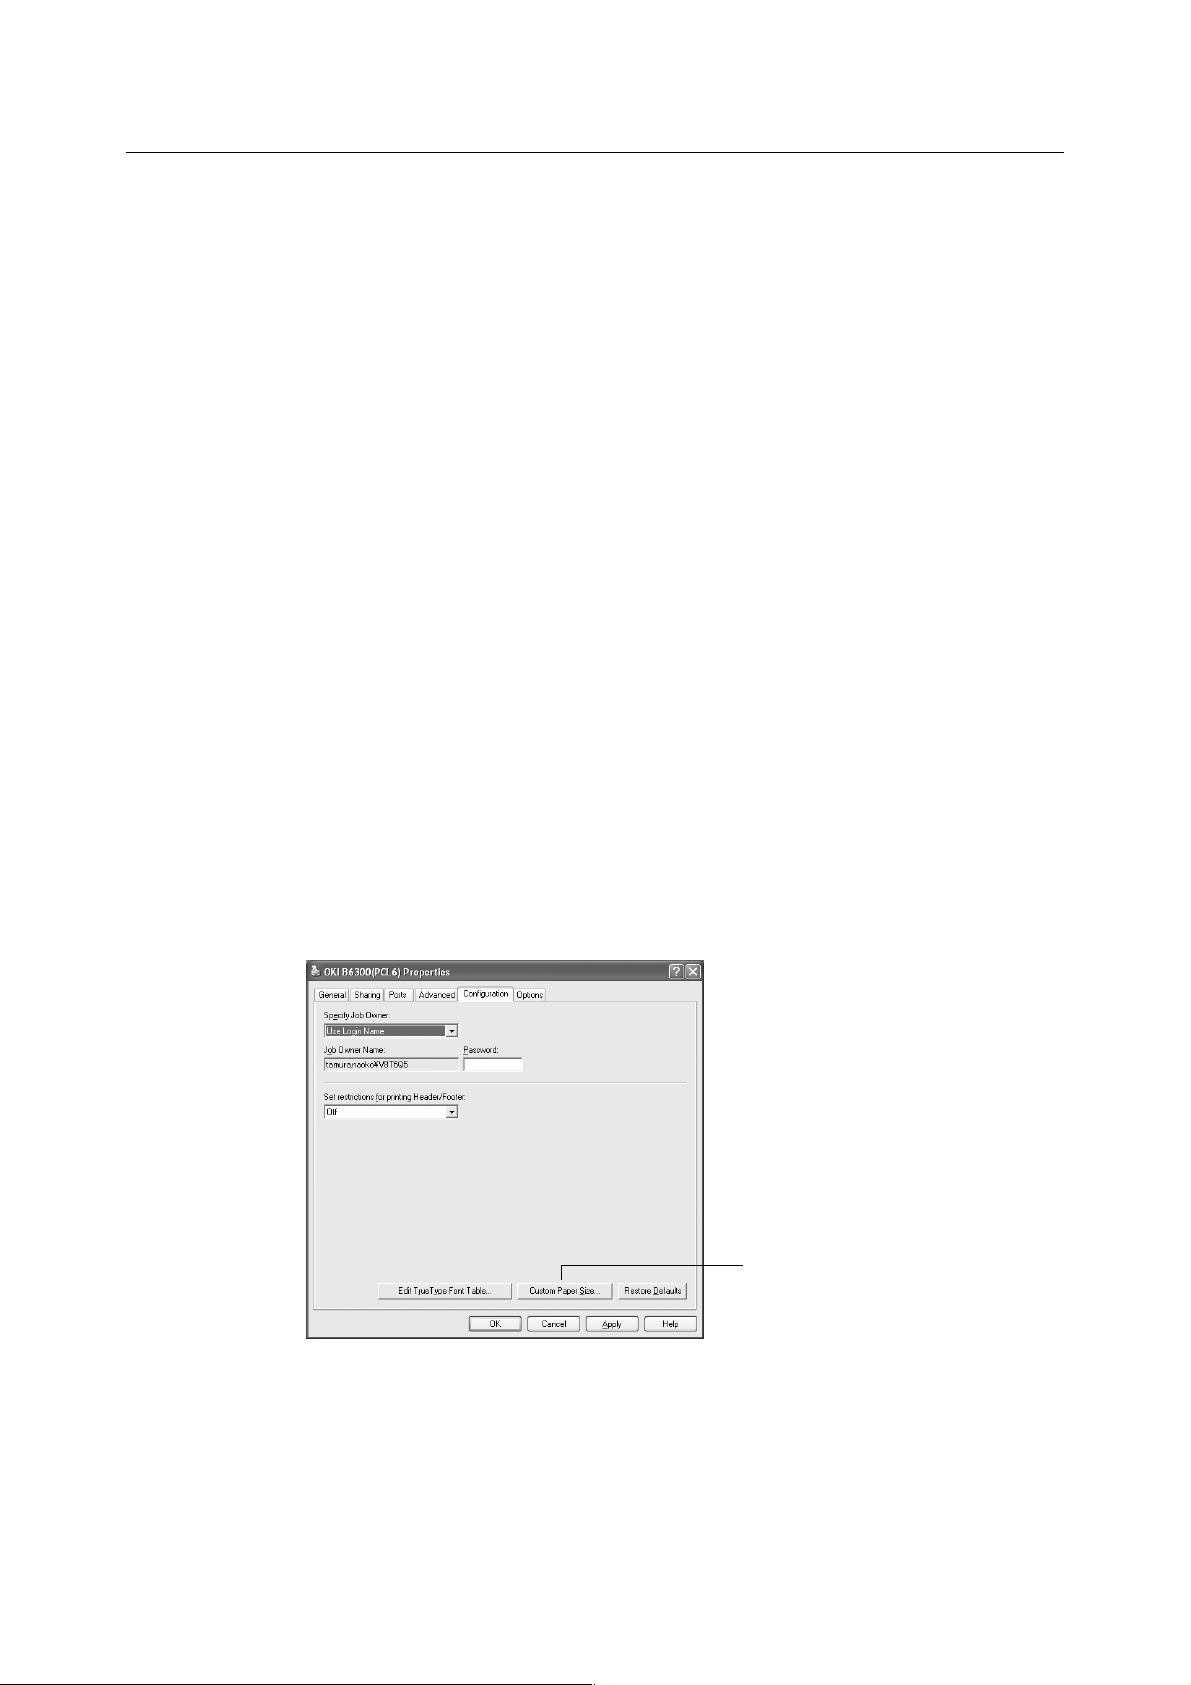
Setting Custom Paper Sizes
Before printing, set the custom size on the printer driver.
You have to configure the settings on the control panel too when load ing custom size paper
in trays 1 to 4 for printing. For details on setting the control panel, refer to “3.3 Setting
Custom Paper Sizes” (P. 50).
Important
• When setting the paper size on the printer driver and the cont rol panel, be sure to specify the same size
as the actual paper used. Setting the wrong size for print ing will cause the machine failure. This is
especially true if you configure a bigger size when using a narrow width paper.
On the printer driver, set the custom size in the [Custom Pape r Size] dialog box. This section
explains the procedure using Windows XP as an example.
Note
• For Windows NT 4.0/Windows 2000/Windows XP, only users with administrator’s rights can change the
settings. Users without the rights can only check the contents.
• When setting the [Custom Paper Size] dialog box on Windows NT 4.0/Windows 2000/Windows XP,
settings of other printers on the computer will also be affected as the form data base of the computer is
used by a local printer . For a shared printer on the network, sett ings of other shared printers on th e same
network in another computer will also be affected as the form data base on the server with existing print
queue is used. When setting on Windows 95/Windows 98/Wind ows Me, sett ings of oth er printers on the
computer will not be affected as the settin gs ar e for p aper sizes d efined by each printer ico n. Fo r share d
printers on the network, settings of other shared printers on the same network but in another computer
will not be affected as the settings are for paper sizes defined by each printer icon.
1. From the [Start] menu, click [Printers and Faxes] and then display the pr operties of the
printer to be used.
2. Click the icon of this printer, and then select [Properties] from the [File] menu.
3. Click the [Configuration] tab.
4. Click [Custom Paper Size].
4
24 2 Printing
Page 29
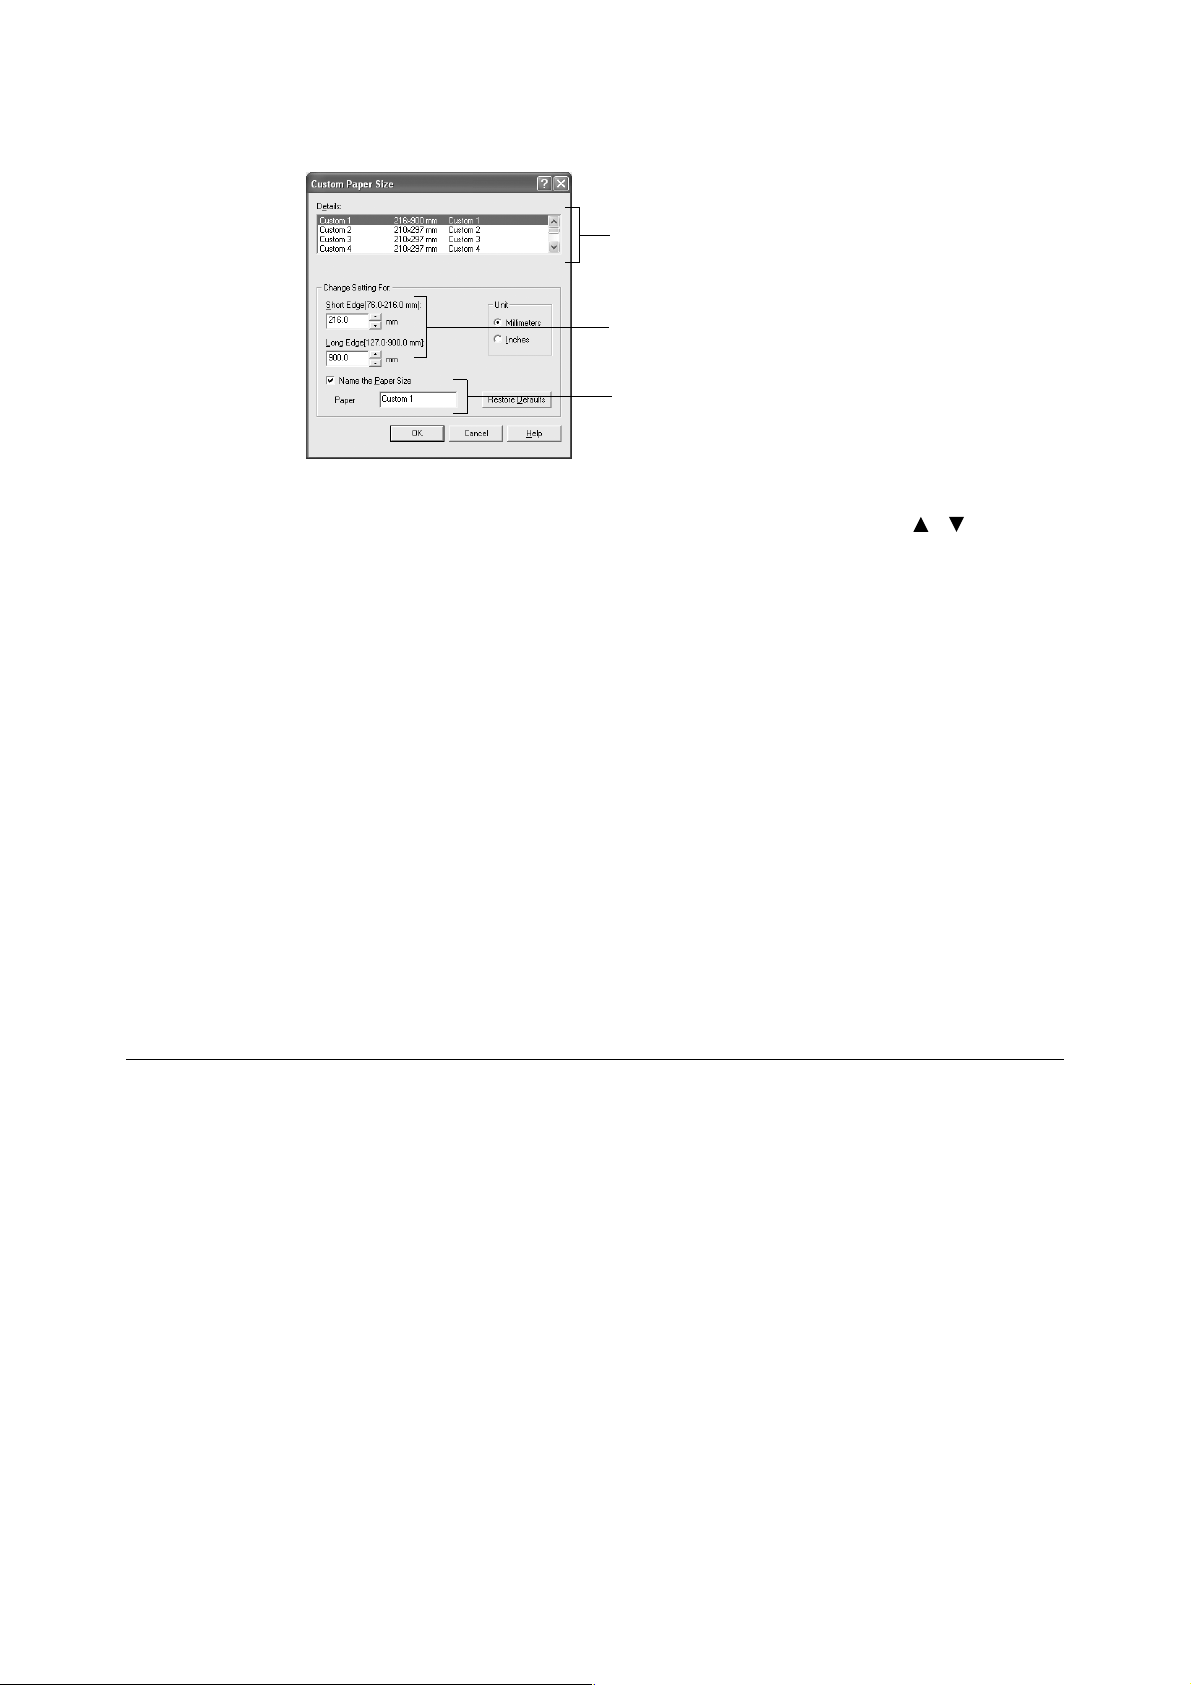
5. From the [Details] list box, select the custom setting to be defined.
5
6
7
6. Specify the length of the short edge and long edge under [Change Setting For].
You can specify the values either by entering them directly or using [ ] [ ].
The length of the short edge cannot be longer than the long edge, even if it is within the
specified range. The length of the long edge cannot be shorter than the short edge,
even if it is within the specified range.
7. To assign a paper name, select the [Name the Paper Size] check box and then enter
the name at [Paper Name]. Up to 14 characters can be used for the paper name.
8. If necessary, repeat steps 5 to 7 to define another custom size.
9. Click [OK].
10. When you have configured custom sizes for trays 1 to 4 using the control panel, click
[Get Information from Printer] on the [Options] tab.
The printer settings can be displayed on the printer driver.
Refer to
• “1.5 Displaying Optional Accessory Configuration and Paper Tray Settings” (P. 16)
11. Click [OK].
Printing on Custom Size Paper
The procedure to print on custom size paper is as follows.
This section explains the procedure using WordPad on Windows XP as an example.
Note
• The way to display the printer properties dialog box differs accordin g to the applicati on software. Refer to
the manual of your respective application software.
1. From the [File] menu, select [Print].
2. Select this printer as the printer to be used and click [Preferences].
2.4 Printing on Custom Size Paper/Long Paper 25
Page 30
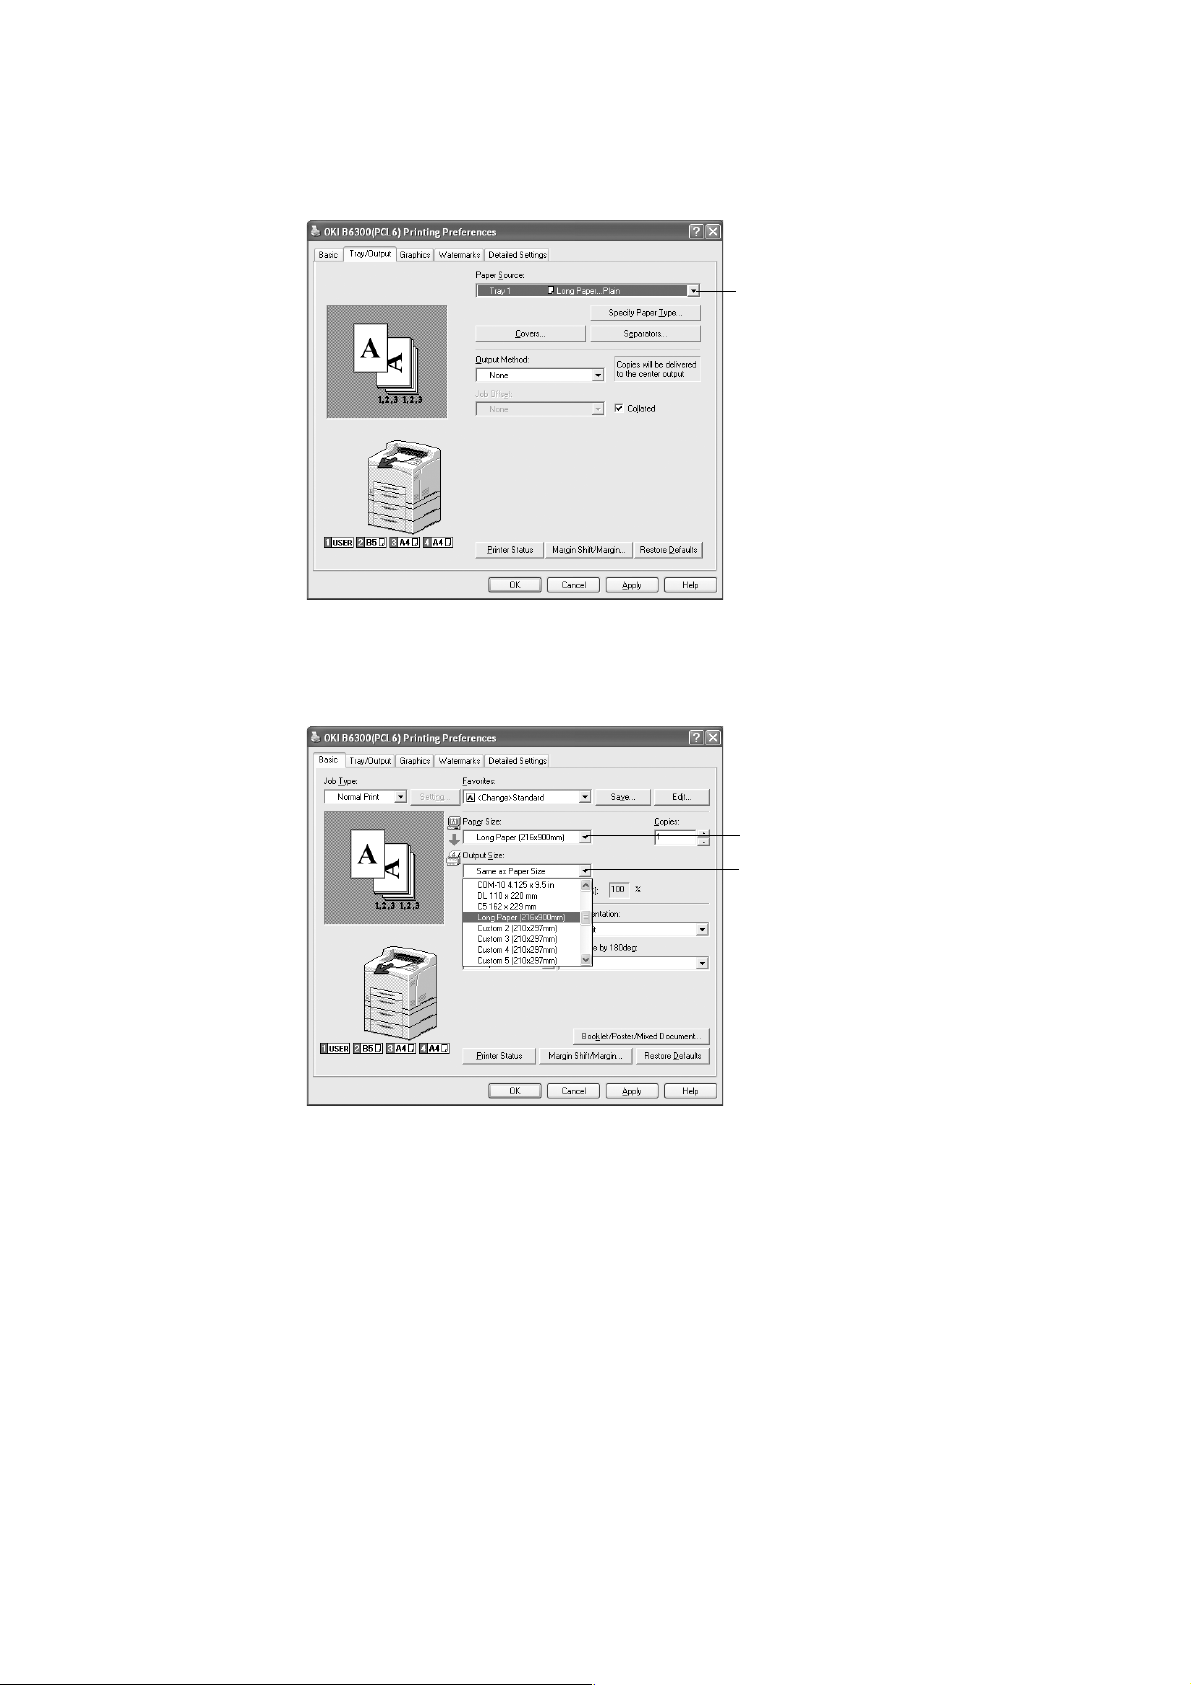
3. Click the [Tray/Output] tab.
4. Select the appropriate tray from [Paper Source].
4
5. Click the [Basic] tab.
6. From [Paper Size], select the size of the original document.
6
7
7. From [Output Size], select the registered custom size, and then click [OK].
8. Click [Print] in the [Print] dialog box to start printing.
26 2 Printing
Page 31

2.5 Print Confidential Document - Secure Print
When the hard disk (optional) has been installed, you can use the secure print feature.
Important
• The hard disk may be damaged and erase important data saved in the hard disk. We recommend you
back up your data.
About Secure Print
Secure Print is a feature that allows you to attach a password to a piece of print data on the
computer, send it to the printer for temporary storage, and start printing the data from the
control panel. You can also store the print data in the printer witho ut attaching a password.
By storing frequently-used data in the printer, you can print the data out by just operating
this printer, without sending them from the computer again and again.
Send
data
Note
• You can select whether to delete secure print data after printing. For details, refer to “At the Control
Panel” (P. 29).
• To delete all secure print data that has become redundant, refer to “Init/Del Data” (P. 81).
• If the setting of [Secure Print] on the control panel has been set t o [Disable] , secure pri nt dat a can not be
output.
Store in
printer
Use control panel
to output data
2.5 Print Confidential Document - Secure Print 27
Page 32

Configuring Secure Print
The procedure to configure Secure Print is as follows.
First of all, carry out the secure print settings at the computer and send data to the printer
for printing. Then, carry out the output procedure at the printer to output the print data.
At the Computer
This section explains the procedure using WordPad on Windows XP as an example. The
procedure is the same for other OSs.
Note
• The way to display the printer properties dialog box differs accordin g to the applicati on software. Refer to
the manual of your respective application software.
1. From the [File] menu, select [Print].
2. Select this printer as the printer to be used and click [Preferences].
3. From [Job Type] on the [Basic] tab, select [Secure Print].
3
28 2 Printing
4. Enter the user ID at [User ID].
You can enter up to eight characters for the user ID.
4
5
6
Page 33

5. To enter a password, enter it at [Password].
Enter up to 12 numeric characters.
6. From [Retrieve Document Name], select either [Enter Document Name] or [Auto
Retrieve]. If [Enter Document Name] is selected, specify a document name at
[Document Name] using up to 12 characters.
If [Auto Retrieve] is selected, the name of the document to be printed will become the
Document Name. However, if the printer cannot recognize a document name, it will
become the date/time (e.g. 09/03 10:30).
7. Click [OK].
8. Click [OK] on the [Basic] tab.
9. Click [Print] in the [Print] dialog box to start printing.
The document will be stored in the printer.
At the Control Panel
This section explains the procedure to print data stored in the printer by Secure Print.
Note
• You can also delete, without printing, secure print data stored in the printer. For details, refer to “Init/Del
Data” (P. 81).
1. Press the < > button.
2. Check that [Secure Print] is displayed and then press the < > button.
3. Press the < > or < > button until the required user is selected and then press the
< > button.
4. Move the cursor by the < > button and then enter the password (up to 12 digits) by
the < > and < > buttons.
5. Press the <FEED/SELECT> button.
6. Press the < > or < > button until the required document is selected and then press
the < > button.
7. After printing, press the < > or < > button to delete or save the document and then
press the < > button.
8. Press the <FEED/SELECT> button. Printing will start.
9. Press the <MENU> button when printing has completed.
Note
• The user ID displayed (up to eight characters) is the [User ID] set in the [Secure Print] dialog box of the
[Basic] tab of the printer driver.
• For the password, enter the [Password] set in the [Secure Print] dialog box of the [Basic] tab of the
printer driver. If [Password] is not set, there will be no setting on the control panel.
• The document name displayed (up to 12 characters) is the [Document Name] set in the [Secure Print]
dialog box of the [Basic] tab of the printer driver.
2.5 Print Confidential Document - Secure Print 29
Page 34

2.6 Print After Checking Printing Result Proof Print
When the hard disk (optional) has been installed, you can use the proof print feature.
Important
• The hard disk may be damaged and erase important data saved in the hard disk. We recommend you
back up your data.
About Proof Print
Proof Print is a feature that allows you to store the print data of multiple copies in the hard
disk, print out only the first set to check the print result and if satisfactory, print the remaining
copies from the control panel.
Note
• Proof print data that has become redundant can be deleted using the control panel. For details, refer to
“At the Control Panel” (P. 29).
Print only one document
Send
data
Store in
printer
If result is
OK
If result is
not OK
Print out remaining sets
using the control panel
Stop printing using the
control panel
30 2 Printing
Page 35

Configuring Proof Print
The procedure to configure Proof Print is as follows.
First of all, carry out the proof print settings at the computer and se nd data to the printer for
printing. Then, carry out the output procedure at the printer to output the print data.
At the Computer
This section explains the procedure using WordPad on Windows XP as an example.
Note
• The way to display the printer properties dialog box differs accordin g to the applicati on software. Refer to
the manual of your respective application software.
1. From the [File] menu, select [Print].
2. Select this printer as the printer to be used and click [Preferences].
3. On the [Basic] tab, set at least 2 for [Copies].
4. Select [Proof Print] from [Job Type].
Note
• You must set at least 2 for [Copies] before [Proof Print] can be selected.
4
2.6 Print After Checki ng Printin g Result - P roof Prin t 31
Page 36

5. Enter the user ID at [User ID].
You can enter up to eight characters for the user ID.
5
6
6. From [Retrieve Document Name], select either [Enter Document Name] or [Auto
Retrieve]. If [Enter Document Name] is selected, specify a document name at
[Document Name] using up to 12 characters.
If [Auto Retrieve] is selected, the name of the document to be printed will become the
Document Name. However, if the printer cannot recognize a document name, it will
become the date/time (e.g. 09/03 10:30).
7. Click [OK].
8. Click [OK] on the [Basic] tab.
9. Click [Print] in the [Print] dialog box to start printing.
At the Control Panel
This section explains the procedure to print and delete data stored in the printer by Proof
Print.
1. Press the < > button.
2. Press the < > or < > button until [Proof Print] is displayed and then press the < >
button.
3. Press the < > or < > button until the required user is selected and then press the
< > button.
4. Press the < > or < > button until the required document is selected and then press
the < > button.
5. Press the < > or < > button to print or delete the saved document and then press
the < > button.
6. Press the <FEED/SELECT> button. The document will be deleted or printed.
7. After the document is deleted or printed, press the <MENU> button.
32 2 Printing
Note
• The user ID displayed (up to eight characters) is the [User ID] set in the [Proof Print] dialog box of the
[Basic] tab of the printer driver.
• The document name displayed (up to 12 characters) is the [Document Name] set in the [Proof Print]
dialog box of the [Basic] tab of the printer driver.
Page 37

2.7 Print at a Specified Time - Delayed Print
When the hard disk (optional) has been installed, you can use the delayed print feature. The
delayed print feature allows you to store the data in the printer beforehan d and then pr int it
out automatically at the specified time.
Important
• The hard disk may be damaged and erase important data saved in the hard disk. We recommend you
back up your data.
• If the printer is switched off before the specified time, the specif ication of time will be undo ne and printing
will start once the power is switched on again. Do not switch off the power of the printer when using the
delayed print feature.
Note
• The time that can be specified for this feature is within 24 hours from the time you send the data for
printing.
Registering Delayed Print
The procedure to configure Delayed Print is as follows.
This section explains the procedure using WordPad on Windows XP as an example. The
procedure is the same for other OS.
1. From the [File] menu, select [Print].
2. Select this printer as the printer to be used and click [Preferences].
3. From [Job Type] on the [Basic] tab, select [Delayed Print].
3
2.7 Print at a Specif ied T ime - Delayed Print 33
Page 38

4. Set the time to start printing by [Hour] and [Minutes].
Use the 24-hour system.
4
5
5. From [Retrieve Document Name], select either [Enter Document Name] or [Auto
Retrieve]. If [Enter Document Name] is selected, specify a document name at
[Document Name] using up to 12 characters.
If [Auto Retrieve] is selected, the name of the document to be printed will become the
Document Name. However, if the printer cannot recognize a document name, it will
become the date/time (e.g. 09/03 10:30).
6. Click [OK].
7. Click [OK] on the [Basic] tab.
8. Click [Print] in the [Print] dialog box to start printing.
Printing will start at the specified time.
Canceling Delayed Print
Use the control panel to cancel Delayed Print or to print without waiting for the specified
time.
1. Press the < > button.
2. Press the < > or < > button until [Delayed Print] is displayed and then press the
< > button.
3. Press the < > or < > button until the required document is selected and then press
the < > button.
4. Press the < > or < > button to delete or immediately print the saved document and
then press the < > button.
5. Press the <FEED/SELECT> button.
The document will be deleted or printed.
6. After the document is deleted or printed, press the <MENU> button.
34 2 Printing
Note
• The document name displayed (up to 12 characters) is the [Document Name] set in the [Delayed Print]
dialog box of the [Basic] tab of the printer driver.
Page 39

2.8 Direct Printing of PDF Files
You can send a PDF file directly to the printer for printing without using the printer driver. As
the print data is sent directly to the printer, the printing process is simpler than printing with
the printer driver and it is done at a faster speed. The way to print a PDF file directly is as
follows.
n Using PostScript Feature
You can use the PostScript feature to send a PDF file to the printer directly for printing.
PDF Files That Can Be Printed
PDF files that can be printed are those created by Adobe Acrobat 4 and Adobe Acrobat 5
(except one part of the features added by PDF 1.4).
Note
• You may not be able to print some PDF files directly by the printer due to the way they were created.
When this happens, open the PDF files and use the printer driver to print them.
Printing PDF File
Here, we send the PDF file to the printer for printing using lpr command directly. Printing will
be done with the following items set according to the control panel settings.
• Copies • Passw ord
• Duplex • Collate
• Print mode • Paper size
Refer to
• “PDF” (P. 58)
Note
• When lpr command is used for printing, specify the number of copies by lpr command. The [Quantity]
setting on the control panel will become disabled. Also, if the number of copies is not specified by lpr
command, it will be treated as one copy.
When using lpr command to print PDF file, you have to use the control panel or
OkiWebRemote to activate the LPD port on the printer.
Refer to
• “Network/Port” (P. 62)
Target OS
Windows NT 4.0/Windows 2000/Windows XP
Printing PDF File
The following specification on the computer is an example of using lpr command to print
PDF file.
Note
• indicates space.
Example: Printing a [event.pdf] file with a printer IP address of 192.168.1.100.
C:\>lpr -S 192.168.1.100 -P lp event.pdf <Enter> key
2.8 Direct Printing of PDF Files 35
Page 40

2.9 Printing From Web Browser
You can print from the web browser using OkiWebRemote.
This feature can be used when the hard disk (optional) has been installed.
Important
• The hard disk may be damaged and erase important data saved in the hard disk. We recommend you
back up your data.
Data That Can Be Sent
The files that can be sent from the web browser and printed on this printer are as follows:
• T IFF file
• PDF file created by Adobe Acrobat 4 and Adobe Acrobat 5 (except one part of the
features added by PDF1.4)
Note
• The PDF files sent will be printed by using the PostScript feature and according to the [PDF] setting on
the control panel. For details on the print features of the PDF file in this printer, refer to “2.8 Direct
Printing of PDF Files” (P. 35).
• For details on the format of the TIFF file supported by this printer, refer to “TIFF File Format” (P. 145).
Printing
1. Activate the computer and web browser.
2. At the address column of the web browser, enter the IP address or URL of the printer
and then press the <Enter> key.
• Example of an IP address entry
• Example of a URL entry
The [Status] screen appears.
Note
• Depending on the web browser setting, the [Status] screen may not appear even if the IP address has
been entered. When this happens, refer to “Sett ings for OkiW ebRemote” (P. 1 17) f or det ails on checking
the web browser settings.
3. Click [Login] to login to the OkiWebRemote.
Note
• The user name (administrator’s name) for login to the OkiWebRemote is fixed at “root”. And the
password is the last six characters of the MAC address (factory default).
36 2 Printing
Page 41

4. Click [Print] on the displayed screen, configure settings, such as the file to be printed.
Note
• Print features that are not set here will be printed according to the following settings at the printer
receiving the data:
• TIFF file: The logical printer value set at [Printer] > [Printer Config] > [TIFF] > [Memory Settings] of
OkiWebRemote.
• PDF file: Value set at [PDF] on the control panel.
5. Click [Print].
Printing will start.
2.9 Printing From Web Browser 37
Page 42

2.10 Printing via Electronic Mail - E-mail Printing
When the hard disk (optional) has been installed and the printer is connected to a network,
enabling it to receive e-mails via TCP/IP communication, e-mails can be sent from the
computer to this printer.
Printing of e-mail contents and TIFF or PDF attachments can be done from this printer.
This feature is known as E-mail Printing.
Important
• The hard disk may be damaged and erase important data saved in the hard disk. We recommend you
back up your data.
Prints
automatically
E-mail
Environment Settings for E-mail Printing
To use the E-mail Printing feature, you need to configure server settings (such as SMTP
and POP3 servers) on your network environment.
Note
• Wrong e-mail environment settings may cause disru ptions in your network. Always ask your network
administrator to configure e-mail environment settings.
Setting the Network Environment
• Register user account
Prints
automatically
38 2 Printing
Page 43

Item
Setting the E-mail Environment (at This Printer)
Configure the following items according to your e-mail en vir on m en t un der [Ma inte n an ce ]
and [Network] of OkiWebRemote.
Note
• After configuring the settings, always click [Submit] and switch off/on the printer to reboot.
• Select the [Enable] at [Maintenance] > [Services Option] > [Receive E-mail] and switch of f/on the printer,
[E-mail Settings] will be displayed.
*: Default
Required settings
Item to be
set
Description Value
for the Receiving
Protocol
SMTP POP3
Maintenance
> Services
Option
Network >
General
Settings
Network >
TCP/IP
Receive
E-mail
Administrator
E-mail
Address
Machine Email Address
Host Name Set the host name of this
Get DNS
Address
DNS Address
1 to 3
DNS Name Set the DNS name. Up to 255 alphanumeric
Select [ENABLE]. • DISABLE*
•ENABLE
Set the internet service
administrator ’s e- m ai l ad d re s s.
Set the printer’s e-mail address.
The address set here will be
displayed in the [From] column
of the e-mail.
printer.
Select the check box to get the
DNS server address
automatically from the DHCP
server.
Set the DNS server address. xxx.xxx.xxx.xxx -
Up to 128 alphanumeric
characters can be entered
including the ASCII
characters for “@” (at
mark), “.” (full stop), “-”
(hyphen) and “_”
(underscore).
Up to 32 characters
• Manual*
•DHCP
characters can be entered,
including the ASCII
characters for “.” (full stop)
and “-” (hyphen).
-
-
2.10 Printing via Electronic Mail - E-mail Printing 39
Page 44

Item
Item to be
set
Description Value
*: Default
Required settings
for the Receiving
Protocol
SMTP POP3
Network > Email Settings
Receiving
Protocol
Print Mail
Headers and
Contents
POP3 Server
Address
POP3 Server
Check
Interval
POP User
Name
Set the e-mail receiving
method.
Set to print the attachments
(TIFF , PDF) of the receive d mail
together with the mail header.
To print all mail header
information such as the
receiving route, select [All
Headers and Contents].
Set the IP address of the POP3
server for receiving e-mails or
the FQDN (Fully Qualified
Domain Name).
Set the interval for checking emails in the POP3 server.
Set the user name for
connecting to POP3 server.
Only 1 user can be set.
•SMTP*
•POP3
• None
• Auto Mail Contents
• Basic Headers and
Contents*
• All Headers and Contents
Up to 128 alphanumeric
characters can be entered,
including the ASCII
characters for “.” (full stop)
and “-” (hyphen).
1 to 120 minutes
10 minutes*
Up to 64 alphanumeric
characters can be entered
including the ASCII
characters for “@” (at
mark), “.” (full stop), “-”
(hyphen) and “_”
(underscore).
-
-
-
POP User
Password
SMTP
Sending
Authenticaton
SMTP Server
Address
Set the password fo r POP User .
Enter the password again in
[Confirm Password].
Select the [POP before SMTP]
to confirm the user at the POP
server before sending e-mails
to the SMTP server.
Set the IP address of the SMTP
server for receiving e-mails or
the FQDN (Fully Qualified
Domain Name).
Up to 64 alphanumeric
characters can be entered.
• None*
•POP before SMTP
Up to 128 alphanumeric
characters can be entered,
including the ASCII
characters for “.” (full stop)
and “-” (hyphen).
-
-
-
40 2 Printing
Page 45

Sending E-mails
Attachments That Can Be Sent
The following files can be sent as an attachment.
• PDF file created by Adobe Acrobat 4 and Adobe Acrobat 5 (except one part of the
features added by PDF1.4)
• T IFF file
Note
• The PDF files sent will be printed by using the PostScript feature and according to the [PDF] setting on
the control panel. For details on the print features of the PDF file in this printer, refer to “2.8 Direct
Printing of PDF Files” (P. 35).
• For details on the format of the TIFF file supported by this printer, refer to “TIFF File Format” (P. 145).
Sending E-mails
This section explains how to send e-mails from the computer to each printer using Outlook
Express as an example.
1. Create mail contents using your mailing software and attach TIFF or PDF files if any.
Important
• Only text format can be used for the mail contents. Set the format of the e-mail content to text format in
your mailing software.
Note
• If the extension of the attached file is not “tif” or “pdf”, it may not be printed correctly.
• Maximum 31 documents can be attached.
2. Enter the printer’s e-mail address in the address column.
3. Send the e-mail. The printer will print the e-mail automatically after receiving it.
Note
• The attached documents will be printed according to the following settings at the printer receiving the
data. Note that specifying the offset output feature is invalid in any case.
• TIFF file attachment: The logical printer value set at [Printer] > [Printer Config] > [TIFF] > [Memory
Settings] of OkiWebRemote.
• PDF file attachment: Value set at [PDF] on the control panel.
2.10 Printing via Electronic Mail - E-mail Printing 41
Page 46

Receiving and Printing E-mails
This printer allows you to receive and print e-mails manually using the control panel.
1. Press the < > button.
2. Press the < > or < > button until [Mail Print] is displayed.
3. Press the < > button.
4. Press the <FEED/SELECT> button.
The printer starts to receive e-mails. E-mails will be printed once received.
Points to Note When Sending E-mails
Security Issues
E-mails are sent via the Internet, connecting computer s from all over the world. As a result,
caution must be made relating to security issues such that in formation is not easily seen or
altered by third parties.
Therefore, you are recommended to use methods to ensure that important information is
secured. You are also advised not to reveal the e-mail ad dress of this printer to thir d parties
to avoid receiving junk mails.
Setting Permitted Domain
You can configure this printer such that it only receives e-mails from specific domains by
using OkiWebRemote.
Caution on Connecting This Printer to Internet Provider and Using Email Features
• In the case where a flat-rate contract with the Internet provider exists and the user is not
always connected to the network, a telephone charge will be incurred every time this
printer retrieves data regularly from the mail server.
• Connect the printer to an IP masqueraded environment. Functionality of this printer is not
guaranteed when it is assigned global IP addresses.
• When receiving e-mails via POP, always apply an exclusive e-mail account for the printer.
Using a common e-mail account shared with other users will result in errors.
• When the internet connection speed is slow, it takes time to receive hug e da ta such as
image data.
• There are also providers that allow reception of e-mails via SMTP. Detailed adjustments
with the provider is required for such cases.
• When setting up the e-mail configuration in an environment where MTA support is set up
in private segments, match the operating config ur at ion .
42 2 Printing
Page 47

3 About Paper
3.1 About Paper
Using unsuitable paper may lead to paper jams, poor print quality, breakd own and damage
to your printer. In order to use the features of this printer effectively, we suggest usi ng only
paper that is recommended here.
When you use paper that is not recommended, contact our Printer Support Desk.
Usable Paper
The types of paper that can be used on this printer are as follows.
When printing on paper that is commonly sold, use the types of paper in the following table.
However, it is recommended to use paper in the next category, standard paper for clearer
printing.
Paper tray Size Weight Loading Capacity
Tray 1 Standard sizes that can be automatically
detected:
A5 , B5 , A4 ,
Executive (7.25 × 10.5") ,
Letter (8.5 × 11") , Legal (8.5 × 13") ,
Legal (8.5 × 14")
Others:
*1
A6
, COM-10 Envelope*1, Monarch
*1
, DL Envelope*1, C5 Envelope
*1
, COM-10 Envelope*1, Monarch
*1
, DL Envelope*1, C5 Envelope*1
*2
(98 × 148 - 216 × 356 mm)
Tray 2 to 4
(tray 3 and 4 are
optional)
Envelope
Custom*2 (76 × 127 - 216 × 900*3 mm)
Standard sizes that can be automatically
detected:
A5 , B5 , A4 ,
Executive (7.25 × 10.5") ,
Letter (8. 5 × 11") , Legal (8. 5 × 13") ,
Legal (8. 5 × 14")
Others:
A6
Envelope
Custom
*1
60 - 216 g/m
(16 - 57.5 lb)
60 - 216 g/m
(16 - 57.5 lb)
2
2
150 sheets (P paper) or 17. 5
mm or below
250-sheet tray: 250 sheets (P
paper) or 27.6 mm or below
550-sheet tray: 550 sheets (P
paper) or 59.4 mm or below
*1: Requires the paper size settings be done on the control panel.
*2: Requires the paper size settings be done on the control panel and the printer driver.
*3: Print quality on the part of the paper that extends beyond 356 mm cannot be guaranteed.
Important
• Printing on paper whose setting is different from the paper size or paper type selected on the printer
driver or loading paper into an unsuitable paper tray for printing may lead to paper jams. To ensure
printing is correctly done, select the correct paper size, paper type, and paper tray.
• The printed image may fade due to moisture such as water, rain or vapor . For deta ils, cont act our Pri nter
Support Desk.
3.1 About Paper 43
Page 48

Standard Paper
The following table shows the standard paper for this printer.
Paper
name
FX P
XEROX
4024
XEROX
4200
RX 80
(3R 91720)
Weight Paper type Paper characteristics and caution on usage
64 g/m
(17 lb)
75 g/m
(20 lb)
75 g/m
(20 lb)
80 g/m
(21.3 lb)
2
2
2
2
Plain Medium weight paper for internal distribution and
general office use.
Plain Medium weight paper for internal distribution and
general office use.
Plain Medium weight paper for internal distribution and
general office use.
Plain Medium weight paper for internal distribution and
general office use.
44 3 About Paper
Page 49

Special Media
The following types of paper can be used for printing on this printer. These types of paper
are called special media.
Paper name We ight Paper type
Transparencies
XEROX P/N
3R2780
XEROX P/N JE-001
XEROX P/N
3R91334
3M P/N CG3300
Labels
XEROX P/N
3R4469
Avery Laser Labels
P/N 5160
XEROX P/N V860
XEROX P/N
3R97408
Envelopes
Com#10
(104.8 × 241.3 mm)
C5 (162 × 229 mm)
DL (110 × 220 mm)
Monarch
(98.4 × 190.5 mm)
3" × 5" Oxford Index
Card (40801)
Classic Crest Super
Smooth Cover
3R3254 (Long Gain)
- Transparency Transparency without any white frame
- Heavyweight 1
- Heavyweight 1
- Heavyweight 1
Heavyweight 2
Paper characteristics and caution on
usage
Note
• As output transparencies may stick
together, remove the transparencies from
the output tray after about 20 sheets, an d
then fan them to lower their temperature.
or
Important
• The reverse side of the envelope cannot be printed on.
• It may take a very long time (maximum 60 seconds) to print custom size Heavyweight 2 paper.
Note
• For details on special media, such as heavyweight not listed in the table, contact our Printer Support
Desk.
• For details on printing transparencies and envelopes, refer to “2 Printing” (P. 17).
3.1 About Paper 45
Page 50

Unusable Paper
Using the following types of paper might cause paper jams, malfunctions or damage to the
machine. Do not use them.
• Fuji Xerox full-color transparencies (example: V556, V558, V302)
• Paper exclusively for ink-jet printer use
• Paper that is too thick or thin
• Paper that has been printed on before (including color printing)
• Wrinkled, folded or torn paper
• Wet paper
• Curled paper
• Paper with static electricity
• Adhesive paper
• Paper with special coatings
• Treated colored paper
• Paper using ink that will run at a temperature of 150°C (302°F)
• Thermal paper
• Carbon paper
• Paper with staples, paper clips, ribbons or tape
• Paper with rough surfaces such as pulp paper, or fibrous paper
• If acid paper is used, the characters might appear fuzzy. Replace it with alkaline paper.
• Envelopes that are not flat or have metal fasteners
• Labels that do not fully cover the adhesive backing
46 3 About Paper
Page 51

Storing and Handling Paper
Even for suitable papers, poor storage conditi ons may lead to a change in the paper qua lity,
paper jams, poor print quality and machine breakdown. Take note of the following points
when storing paper:
• Store paper in the following locations: Temperature of 10 - 30 °C (50 - 86°F) with a
relative humidity of 30 - 65%
• After opening a ream of paper, use the original cover sheets to wrap up the paper not
used and store it in a cabinet or a location with low humidity.
• Do not let the paper stand but store it in a flat location.
• Ensure that the paper is stored properly without being bent or curled.
• Store the paper in a location not exposed to direct sunlight.
3.2 Loading Paper
Loading Paper in a Paper Tray
Refer to
• Paper type and size that can be loaded in paper tray: “Usable Paper” (P. 43)
1. Place the paper tray on a flat surface and
remove the lid.
2. If the base plate of the paper tray is raised,
push it down.
3. When loading paper longer than Letter/A4
size, slide the left and right lock tabs in the
paper tray outwards to unlock them.
3.2 Loading Paper 47
Page 52

4. Hold the grip of the paper tray and pull its
extendable part to the front until it reaches
its maximum.
5. Squeeze the length guide and slide it to the
desired paper size (1). Squeeze the right
width guide and slide it to the desired paper
size (2).
6. Load the paper with the side to be printed
facing up and with all four corners aligned.
Important
• Do not place paper over the right width guide.
• Do not load paper exceeding the maximum fill line or the maximum capacity allowed.
• Align the right width guide with the paper wi dth correct ly. If the right width guide is not in place, the paper
will not be properly fed and this may cause paper jams.
7. Close the lid of the paper tray and push the tray completely into the printer.
Important
• The lid of the tray must be firmly closed. If not, the paper might become misaligned.
8. Depending on the types and sizes of the loaded pap er, you n eed to configur e settings
on the control panel. Change the paper type when non-plain paper such as recycle d
paper, heavyweight paper or transparencies are loaded. Configure the paper size
when custom size paper is loaded.
Refer to
• Paper type and size that can be loaded: “Usable Paper” (P. 43)
• Setting paper size: “3.3 Setting Custom Paper Sizes” (P. 50)
• Setting paper type: “3.4 Setting Paper Types” (P. 51)
48 3 About Paper
Page 53

Automatic Tray Selection
If you display the properties dialog box of the printer driver and select a paper type for
[Specify Paper Type] and [Auto] for [Paper Source] on the [Tray/Output] tab for printing, this
printer will be able to automatically detect paper trays loaded with the selected paper type
and then among them, select the tray that matches the size and orientation of the document
to be printed. This feature is known as automatic tray selection.
If there are multiple trays that match those criteria for automatic tray selection, a tray is
selected based on the settings for [Tray Priority] on the control panel.
In addition, if [None] is specified for [Specify Paper Type], a tray is selected based on the
settings of [Paper Priority] on the control panel. If the same priority is not assigne d to more
than one paper type, a tray is selected based on the setting s of [Tra y Prio rity].
Note
• If there are no paper trays that match the automatic tray selection, an error message prompting for
replenishment of paper will be displayed. You can configure the printer not to display this message but to
automatically select a nearest or larger paper size of the document for printing. (Substitute Tray)
• If paper runs out during printing, a paper tray containing paper of the same size and orientation of the
paper used for printing will be selected to continue printing (automatic tray switching). If [None] is
specified for [Specify Paper Type], the paper types that have not been specified for [Paper Priority] are
excluded from the options of the automatic tray selection and automatic tray switching.
• You can also set the paper tray priority in OkiWebRemote.
• If there are no paper trays that match the paper types that are set for [Specify Paper Type], a message
prompting to confirm printing on another paper type will be displayed. Press the <FEED/SELECT>
button to print on paper of another type or press <CANCEL> to cancel the job.
Refer to
• Setting on the control panel: “Printer Settings” (P. 77)
• Specify Paper Type: Online Help for the printer driver
3.2 Loading Paper 49
Page 54

3.3 Setting Custom Paper Sizes
To print on custom size paper loaded in trays 1 to 4, you must set the paper size on the
control panel.
You may also need to set it on the printer driver, depending on the paper size.
This section explains how to set the size on the control panel.
For details on registration from the printer driver, refer to “Setting Custom Paper Sizes”
(P. 24).
Important
• When setting the paper size on the printer driver and control panel, be sure to specify the same size as
the actual paper used. Setting the wrong size for printing will cause machine failure. This is especially
true if you configure a bigger size when using a narrow width paper.
Note
• To return to standard paper size settings, select [Auto] in step 6 below. This printer will automatically
detect the size and orientation of the loade d paper.
1. Press the <MENU> button to display the Menu screen.
2. Press the < > or < > button until [Admin Menu] is displayed, then press the < >
button.
3. Press the < > or < > button until [Printer Settings] is displayed, then press the < >
button.
4. Press the < > or < > button until [Paper Size] is displayed, then press the < >
button.
5. Press the < > or < > button until the required tray is displayed, then press the < >
button.
6. Press the < > button to display [Custom], then press the <FEED/SELECT> button.
7. Press the < > or < > button to display [Portrait (Y) Size] or [Landscape (X) Size],
then press the < > button.
Enter values for the paper size to be used by pressing the < > or < > button
8. Press the <FEED/SELECT> button.
9. Press the <MENU> button.
50 3 About Paper
Page 55

3.4 Setting Paper Types
Prior settings on the control panel are required for the types of paper loaded in trays 1 to 4.
For accurate image quality processing, refer to the following table an d se t the pa pe r typ es
on the control panel.
Important
• Paper type settings must match those of the actual paper loaded in the trays. Otherwis e, image quality
cannot be processed accurately. Toner may not fuse properly on the paper, resulting in dirty and poor
quality printouts.
• Changes in paper type settings on the printer driver are not reflected in this printer.
Refer to
• Paper and paper types that can be loaded: “Usable Paper” (P. 43)
Paper name Weight Paper type set in tray
FX P
FX EPR, FX Green 100
Label, envelope
JE001 - Transparency
60 - 90 g/m
(16-24 lb)
60 - 90 g/m
(16 - 24 lb)
90 - 156 g/m
(24 - 42 lb)
157 - 216 g/m
(42 - 57.5 lb)
2
2
2
2
Plain (default)
Recycled
Heavyweight 1
Heavyweight 2
Setting on the Control Panel
1. Press the <MENU> button to display the Menu screen.
2. Press the < > or < > button until [Admin Menu] is displayed, then press the < >
button.
3. Press the < > or < > button until [Printer Settings] is displayed, then press the < >
button.
4. Press the < > or < > button until [Paper Type] is displayed, then press the < >
button.
5. Press the < > or < > button until the required tray is displayed, then press the < >
button.
6. Press the < > or < > button until the correct paper type is displayed for the loaded
paper, then press the <FEED/SELECT> button.
7. Press the <MENU> button.
3.4 Setting Paper Type s 51
Page 56

4 Settings on the Control Panel
4.1 Overview of the Common Menu
Menu Configuration
There are two types of menus: common menu and mode menu.
The common menu is the menu from which you can set the common items for all print
modes. The mode menu is the menu fr om which you can set the specific items for each print
mode.
The common menu has the following structure:
• Common menu > Menu item > Item > Candidate value
The following diagram shows some parts of the com mo n me nu stru ct ur e.
Menu
Meter Reading
Admin Menu
Common menu Menu item Item Candidate value
Network/Port
System Settings
Parallel Port Status Enable
Meter 1
Meter 2
Meter 3
Print Mode
Disable
Auto
PS
52 4 Settings on the Control Panel
Page 57

The common menu has the following items:
Common menu Content
Print Language Contains the mode menus used for the ESC/P, HP-GL, HP-GL/2, or PCL
Emulation mode settings and for the PDF file direct printing feature settings.
Note
• Refer to “Print Language” (P. 58) for the items to be set for the PCL
emulation mode and the PDF file direct printing feature. Refer to
“Changing Menu Settings” (P. 54) for basic operations.
• For setting items for ESC/P, HP-GL, and HP-GL/2 emulation modes, refer
to each emulation settings guide.
Report/List The [Report/List] menu is used to print and check the internal data of this
printer such as the emulation mode settings, system settings, error history,
job history, font information, and the total count of outputs.
Refer to
• “6.2 Printing Reports/Lists” (P. 114)
Meter Reading The [Meter Reading] menu is used to display the printed paper count s on the
control panel.
Refer to
• “Checking Total Printed Pages on Meter” (P. 123)
Admin Menu The [Admin Menu] is used for the network/port settings, system settings
(such as alarm and Low Power/Sleep mode), print settings, memory
settings, initialization of printer setting values and hard disks, and form data
deletion settings.
Note
• You cannot set values for disabled ports.
• For details on how to set each admin menu, refer to “Admin Menu” (P. 62).
Refer to “Changing Menu Settings” (P. 54) for basic operations.
Display Language This menu is used to change the display languages on the control panel.
Note
• For details on how to change languages, refer to “Display Language”
(P. 82). Refer to “Changing Menu Settings” (P. 54) for basic operations.
4.1 Overview of the Common Menu 53
Page 58

Changing Menu Settings
Basic Operations
Press one of the following buttons to display the menu screen or set th e printer by browsing
though each menu structure.
Ready to print
1. To display the menu screen, press the <MENU> button at the print screen.
Menu
Print Language
2. To move between items, press the < > or < > button.
Menu
Admin Menu
3. To move between structure levels, press the < > or < > button. Press the
< > button to go to the lower level or press the < > button to return to the
upper level.
Admin Menu
Network/Port
Port Status
Enable
4. Press the <FEED/SELECT> button to confirm your
settings.The settings that have been confirmed are
displayed with the affix “ ”.
Port Status
Enable
5. Press the <MENU> button to return to the print screen.
Ready to print
Note
• If you want to change values after you have confirmed them by pressing the <FEED/SELECT> button
(which has the affix “ ”), you need to set them from the start again.
*
*
*
Initializing Configured Values
Display the item you want to initialize and then press both the < > and < > buttons at the
same time.
Once the change process is completed, the factory defaults will be displayed. Press the
<FEED/SELECT> button to confirm the value.
54 4 Settings on the Control Panel
Page 59

Example: Changing the Low Power/Sleep Mode Settings
This section describes how to set the common menu. In this example, you set the
transitional time to the low power mode to 15 minutes and the time to the sleep mode to 30
minutes.
Ready to print
1. Press the <MENU> button to display the Menu screen.
Menu
Print Language
2. Press the < > or < > button until [Admin Menu] is displayed.
Menu
Admin Menu
3. Press the < > button.
Admin Menu
Network/Port
4. Press the < > or < > button until [System Settings] is displayed.
Admin Menu
System Settings
5. Press the < > button.
System Settings
Alert Tone
6. Press the < > or < > button until [Low Power Mode] is displayed.
System Settings
Low Power Mode
7. Press the < > button. If the current setting is [Enable], go to step
10.
Low Power Mode
Disable
8. Press the < > or < > button until [Enable] is displayed.
Continued on next page
*
4.1 Overview of the Common Menu 55
Page 60

Continued from previous page
Low Power Mode
Enable
9. Press the <FEED/SELECT> button. This confirms the low
power mode setting and “ ” is displayed.
Low Power Mode
Enable
10. Press the < > button to return to [Low Power Mode].
System Settings
Low Power Mode
11. Press the < > or < > button until [Low Power Timer] is
System Settings
Low Power Timer
12. Press the < > button.
Low Power Timer
5 Mins
*
displayed.
*
13. Press the < > or < > button to set the transitional
time to the low power mode. The available setting
values range from 5 to 60 mins in increments of 1 min.
*
Low Power Timer
15 Mins
14. Press the <FEED/SELECT> button. This sets the
transition time to the low power mode and “ ” is
displayed.
Low Power Timer
15 Mins
15. Press the < > button to return to [Low Power Timer].
System Settings
Low Power Timer
16. Press the < > button to display [Sleep Mode].
Continued on next page
*
*
56 4 Settings on the Control Panel
Page 61

Continued from previous page
System Settings
Sleep Mode
17. Press the < > button. If the current setting is
[Enable], go to step 20.
Sleep Mode
Disable
*
18. Press the < > or < > button until [Enable] is
displayed.
Sleep Mode
Enable
19. Press the <FEED/SELECT> button. This
confirms the sleep mode setting and “ ” is
displayed.
Sleep Mode
Enable
*
20. Press the < > button to return to [Sleep
Mode].
System Settings
Sleep Mode
*
21. Press the < > or < > button until [Sleep
Mode Timer] is displayed.
System Settings
Sleep Mode Timer
22. Press the < > button.
Sleep Mode Timer
10 Mins
*
23. Press the < > or < > button to set
the transitional time to the sleep mode.
The available setting values range
from 5 to 60 mins in increments of 1
min.
Sleep Mode Timer
30 Mins
24. Press the <FEED/SELECT> button.
This sets the transition time to the
sleep mode and “ ” is displayed.
*
Sleep Mode Timer
30 Mins
*
25. Press the <MENU> button.
Ready to print
4.1 Overview of the Common Menu 57
Page 62

4.2 Description of Menu Items
This section describes the items that can be set in [Print Language], [Admin Menu], or
[Display Language].
Note
• Refer to “Checking Total Printed Pages on Meter” (P. 123) for the details of [Meter Reading].
• Refer to “6.2 Printing Reports/Lists” (P. 114) for the details of [Rep ort/List].
• Refer to “Changing Menu Settings” (P. 54) for details on how to set the menu.
• Detailed settings are available with OkiWebRemote.
Print Language
[Print Language] contains the mode menus used for the ESC/P, HP-GL, HP-GL/2, or PCL
Emulation mode settings and for the PDF file direct printing feature settings.
ESCP
For the items that can be set with this menu, refer to the ESC/P Emulation Settings Guide.
HPGL
For the items that can be set with this menu, refer to the HP-GL, HP-GL/2 Emulation
Settings Guide.
PDF
Makes settings for printing PDF file by sending it directly to a printer.
Refer to
• “2.8 Direct Printing of PDF Files” (P. 35)
Quantity
Specifies the copies to be printed between 1 to 999. The default is [1 Sets].
Note
• Depending on the protocol used for sending files, the settings of the protocol may overwrite the settings
you specify here.
Duplex
Makes settings for 2 sided printing.
Note
• You can set this item only when the 2 sided printing function is available.
[Off] (default)
Select this when you do not want to perform 2 sided printing.
[Long Edge Flip]
Select this to print a document so that the printed characters face toward you when paper
is flipped along the long edge.
[Short Edge Flip]
Select this to print a document so that the printed characters face toward you when paper
is flipped along the short edge.
58 4 Settings on the Control Panel
Page 63

Print Mode
Sets whether to have high quality or high speed.
[Normal] (default)
Select this to print documents at normal speed and normal quality.
[High Quality]
Selecting this decreases printing speed but prints images at high quality.
[High Speed]
Select this to print documents at high speed.
Password
* No. 1, to 4 of 4 are available (refer to P. 83).
If a password has been set for a PDF file, specify the password here in advance. Printing
will be performed only when the password set in the PDF file to be printed matches the
password specified here.
You can specify up to 32 alphanumeric characters.
Collated
Select this to set whether to collate multiple copies of the printout b y sets (sorted in the order
of page 1, 2, 3..., 1, 2, 3...).
The default is [Off].
Output Size
Specifies the paper size to be output.
[A4] (or [8.5 × 11"]) (default)
Select this to print on A4-size or 8.5 × 11" size paper. The items can be set may differ
depending on the countries.
[Auto]
Select this to print on a paper size that is automatically determined according to the size
and settings of the PDF file to be printed.
PCL
Sets the PCL emulation mode.
Paper Tray
Specifies the paper tray to be used for printing.
The candidate values are as follows:
[Auto] (default)
This searches for the tray loaded with the paper size specified in [Output Size] and
automatically feeds paper from it.
[Tray 1]
[Tray 2]
[Tray 3]
[Tray 4]
Note
• If [Auto] is selected and paper of the same size is loaded in multiple trays in the same direction, paper
will be fed from the tray specified as higher priority in [Tray Priority] under [Printer Settings] of Admin
Menu. The default of [Tray Priority] is Tray 1 (highest priority) > Tray 2 > Tray 3 (optional) > Tray 4
(optional) (lowest priority). If paper of the same size is loaded in multiple trays in different directions,
paper loaded in landscape direction will be used first.
• [Tray 3] and [Tray 4] will not be displayed when those optional trays are not installed.
4.2 Description of Menu Items 59
Page 64

Output Size
Specifies the paper size to be printed.
The candidate values are as follows:
[A4]
[A5] [B5]
[8.5 × 11] (Letter)
[8.5 × 14] (Legal)
[8.5 × 13] [7.25 × 10.5]
Note
• This default setting varies from [A4] to [8.5 × 11"] depending on the countries.
Output Tray
Specifies the output tray for printed paper.
[Center Tray] (default)
[Rear Tray]
[OffsetCatchTray]
Note
• [Rear Tray] is available only when the printer is B6300.
• [OffsetCatchTray] is available only when the optional offset catch tray is installed.
Orientation
The paper printing direction can be selected from [Portrait] and [Landscape]. The defa ult is
[Portrait].
Duplex
Specifies whether to perform 2 sided printing. The default is [Off].
When you select [On], you can select [Long Edge Flip] or [Short Edge Flip] as the binding
direction.
Note
• You can set this item only when the 2 sided printing function is available.
Font
Specifies the font used. The default is [23 Courier].
Symbol Set
Specifies the font for symbols. The default is [ROMAN-8].
Font Size
Specifies the font size. The default is [12.00]. You can specify a value between 4.00 and
50.00 in increments of 0.25.
Font Pitch
Specifies the character spacing.The default is [10.00]. You can specify a value between
6.00 and 24.00 in increments of 0.01.
Form Lines
Specifies the form line (the number of lines per form). This default setting varies from [64]
to [60] depending on the countries. You can specify a value between 5 and 128 in
increments of 1.
60 4 Settings on the Control Panel
Page 65

Quantity
Specifies the copies to be printed between 1 to 999. The default is [1 Sets].
ImageEnhance
Selects whether to perform image enhancement.
Image enhancement is a feature that makes the boundary line between black and white
smoother to decrease jags and enhance the visual appearance. The default is [On].
HexDump
Specifies whether to print the data sent from a computer in the ASCII code corresponding
to the hexadecimal notation format in order to check the data contents. The default is
[Disable].
Draft Mode
Specifies whether to print in draft mode. The default is [Disable].
Line Termination
Sets the line termination. The default is [Off].
4.2 Description of Menu Items 61
Page 66

Admin Menu
The [Admin Menu] is used for the network/port settings, system settings (for alarm, Power
Saver mode, and machine clock, etc.), printer settings, allocate memory settings,
initialization of printer setting values and hard disks, and form data deletion settings.
Network/Port
The [Network/Port] menu is used to set the type of the printer interface connected to a
computer and the necessary conditions for its communications.
Parallel
Select this to use a parallel port.
nPort Status
Specifies whether to enable or disable the parallel port when the printer turns on. The
default is [Enable], which means the parallel port is available.
Important
• If the memory is running out, you need to disable the port(s) you are not using or change the memory
allocation from [Allocate Memory].
nPrint Mode
Sets the print data process method (printer language to be used).
[Auto] (default)
Select this to make the printer automatically detect the printer language being used in the
data received from a computer and perform printing based on the detected data.
[PCL] [PS] [ESC/P] [HP-GL/2] [TIFF]
Select this to process the data received from a computer as the specified data type.
nPJL
This printer supports PJL commands that are independent from any pri nter languages. The
PJL commands are used to control print jobs and are required for printing using a printer
driver. In this menu, specify whether to enable or disable the PJL commands sent from a
computer. PJL commands allow you to specify the printer language to b e used for the next
data even while the printer is using a different printer language at the time. Normally, it
should be set to [Enable]. The default is [Enable].
*1 (refer to P. 83)
*2 (refer to P. 83)
nAdobe Protocol
Specifies the communications protocol for PostScript.
[Normal] (default)
Select this when the communications protocol is in ASCII format.
[Binary]
Select this when the communications protocol is in binary format. Selecting this may cause
the printing process to be faster than [Normal] depending on the printing data.
[TBCP]
Select this when you have to switch between ASCII and binary formats by using specific
control codes because they are both used as the communications protocol.
Note
• Select an option according to the data format output from the printer driver in a computer.
• Generally, accept the default setting, [Normal].
• This setting is only available when PostScript is used for printing.
62 4 Settings on the Control Panel
Page 67

nAuto Eject Time
*3 (refer to P. 83)
Sets the time interval for the printer to automatically print the remaining data when no further
data is received for a continuous period.
The time can be set between 5 to 1275 seconds in increments of 5 second s. The default is
[30 Secs]. When no data is received for the period specified here after the last data was
received, the printer determines it as job end.
nBi-directional
Specifies whether to enable or disable the bi-directional communication (IEEE1284) of the
parallel interface. The default is [Enable].
Serial
Select this to use a serial port.
Important
• When using the serial port, it is necessary to accommodate the port sett ing o f the print er driver t o that of
the printer. For details, refer to “Appendix A.6 Printing Using the Serial Interface” (P. 147)
nPort Status
Specifies whether to enable or disable the serial port when the printer turns on. The default
is [Enable], which means the serial port is available.
nPrint Mode
*1 (refer to P. 83)
Sets the print data process method (printer language to be used).
[Auto] (default)
Select this to make the printer automatically detect the printer language being used in the
data received from the computer and perform printing based on the detected data.
[PCL] [PS] [ESC/P] [HP-GL/2] [TIFF]
Select this to process the data received from the computer as the specified data type.
*2 (refer to P. 83)
nPJL
This printer supports PJL commands that are independent from any pri nter languages. The
PJL commands are used to control print jobs and are required for printing using a printer
driver. In this menu, specify whether to enable or disable the PJL commands sent from a
computer. PJL commands allow you to specify the printer language to b e used for the next
data even while the printer is using a different printer language at the time. Normally, it
should be set to [Enable]. The default is [Enable].
nAdobe Protocol
Specifies the communications protocol for PostScript.
[Normal] (default)
Select this when the communications protocol is ASCII format.
[Binary]
Select this when the communications protocol is in binary format. Selecting this may cause
the printing process to be faster than [Normal] depending on the printing data.
[TBCP]
Select this when you have to switch between ASCII and binary formats by using specific
control codes because they are both used as the communications protocol.
Note
• Select an option according to the data format output from the printer driver in the computer.
• Generally, accept the default setting, [Normal].
• This setting is only available when PostScript is used for printing.
4.2 Description of Menu Items 63
Page 68

nAuto Eject Time
Sets the time interval for the printer to automatically print the remaining data when no further
data is received for a continuous period.
The time can be set between 5 to 1275 seconds in increments of 5 second s. The default is
[30 Secs]. When no data is received for the period specified here after the last data was
received, the printer determines it as job end.
*3 (refer to P. 83)
nBaud rate
Sets the baud rate. Select from [9600bps] [1920 0bps] [38400bps] [576 00bps] [115200bps]
[4800bps]. The default is [9600bps].
nStop Bit
Select the stop bit from [1 bit] or [2 bits]. The default is [1 bit].
nParity
Sets the parity. Select from [Not Available] [Odd] [Even]. The default is [Not Available].
nXON - XOFF Control
Sets whether to enable or disable the XON/XOFF control at the flow control. The default is
[On].
nDTR Control
Sets the DTR control from [Fix-High] [Fix-Low] [Active-High] [Active-Low]. The default is
[Fix-High].
LPD
Select this to use LPD.
nPort Status
Specifies whether to enable or disable the LPD port when the printer turns on. The default
is [Enable], which means the LPD port is available.
Note
• To enable the LPD port, the IP address must be set.
Important
• If the memory is running out when the port is enabled, the port may be disabled automatically. In this
case, you need to disable the port(s) you are not using or change the memory allocation from [Allocate
Memory].
nPrint Mode
Sets the print data process method (printer language to be used).
[Auto] (default)
Select this to make the printer automatically detect the printer language being used in the
data received from a computer and perform printing based on the detected data.
[PCL] [PS] [ESC/P] [HP-GL/2] [TIFF]
Select this to process the data received from a computer as the specified data type.
nPJL
This printer supports PJL commands that are independent from any pri nter languages. The
PJL commands are used to control print jobs and are required for printing using a printer
driver. In this menu, specify whether to enable or disable the PJL commands sent from a
computer. PJL commands allow you to specify the printer language to b e used for the next
data even while the printer is using a different printer language at the time. Normally, it
should be set to [Enable]. The default is [Enable].
*1 (refer to P. 83)
*2 (refer to P. 83)
64 4 Settings on the Control Panel
Page 69

nConnect Time-Out
*3 (refer to P. 83)
Specifies the time interval for disconnection when no further data is received. You can
specify a value between 2 and 3600 seconds in increments of 1 second. The default is [16
Secs].
nTBCP Filter
Specifies whether to enable or disable the TBCP filter when processing PostScript data.
The default is [Disable].
nPort No.
Set the port number to 515 or a value between 8000 and 9999. The default is [515].
NetWare
Select this to use NetWare.
nPort Status
Specifies whether to enable or disable the NetWare port when the printer turns on. The
default is [Disable]. To use NetWare, set this to [Enable].
Important
• If the memory is running out when the port is enabled, the port may be disabled automatically. In this
case, you need to disable the port(s) you are not using or change the memory allocation from [Allocate
Memory].
nTranspt Protocol
Specifies the transport protocol used for NetWare. IPX/SPX, TCP/IP, or both protocols can
be specified. The default is [TCP/IP,IPX/SPX].
Note
• When using TCP/IP, both the IP addresses of a computer and the printer are required.
nPrint Mode
Sets the print data process method (printer language to be used).
[Auto] (default)
Select this to make the printer automatically detect the printer language being used in the
data received from a computer and perform printing based on the detected data.
[PCL] [PS] [ESC/P] [HP-GL/2] [TIFF]
Select this to process the data received from a computer as the specified data type.
nPJL
This printer supports PJL commands that are independent from any pri nter languages. The
PJL commands are used to control print jobs and are required for printing using a printer
driver. In this menu, specify whether to enable or disable the PJL commands sent from a
computer. PJL commands allow you to specify the printer language to b e used for the next
data even while the printer is using a different printer language at the time. Normally, it
should be set to [Enable]. The default is [Enable].
nNo. of Searches
Specifies how many times the file server is searched.
Specify a value between 1 and 100 in increments of 1, or set it to [No Limit]. The search
interval is 1 min. The default is [No Limit].
*1 (refer to P. 83)
*2 (refer to P. 83)
*3 (refer to P. 83)
4.2 Description of Menu Items 65
Page 70

nTBCP Filter
Specifies whether to enable or disable the TBCP filter when processing PostScript data.
The default is [Disable].
SMB
Select this to use SMB.
nPort Status
Specifies whether to enable or disable the SMB port when the printer turns on. The default
is [Enable], which means the SMB port is available.
Important
• If the memory is running out when the port is enabled, the port may be disabled automatically. In this
case, you need to disable the port(s) you are not using or change the memory allocation from [Allocate
Memory].
nTranspt Protocol
Specifies the transport protocol used for SMB. NetBEUI, TCP/IP, or both protocols can be
specified. The default is [TCP/IP].
Note
• When using TCP/IP, both the IP addresses of a computer and the printer are required.
nPrint Mode
Sets the print data process method (printer language to be used).
[Auto] (default)
Select this to make the printer automatically detect the printer language being used in the
data received from a computer and perform printing based on the detected data.
[PCL] [PS] [ESC/P] [HP-GL/2] [TIFF]
Select this to process the data received from a computer as the specified data type.
nPJL
This printer supports PJL commands that are independent from any pri nter languages. The
PJL commands are used to control print jobs and are required for printing using a printer
driver. In this menu, specify whether to enable or disable the PJL commands sent from a
computer. PJL commands allow you to specify the printer language to b e used for the next
data even while the printer is using a different printer language at the time. Normally, it
should be set to [Enable]. The default is [Enable].
*1 (refer to P. 83)
*2 (refer to P. 83)
nTBCP Filter
Specifies whether to enable or disable the TBCP filter when processing PostScript data.
The default is [Disable].
66 4 Settings on the Control Panel
Page 71

IPP
Select this to use IPP.
nPort Status
Specifies whether to enable or disable the IPP port when the printer turns on. The default
is [Disable]. To use IPP, set this to [Enable].
Note
• To enable the IPP port, IP address must be set.
Important
• If the memory is running out when the port is enabled, the port may be disabled automatically. In this
case, you need to disable the port(s) you are not using or change the memory allocation from [Allocate
Memory].
nPrint Mode
*1 (refer to P. 83)
Sets the print data process method (printer language to be used).
[Auto] (default)
Select this to make the printer automatically detect the printer language being used in the
data received from a computer and perform printing based on the detected data.
[PCL] [PS] [ESC/P] [HP-GL/2] [TIFF]
Select this to process the data received from a computer as the specified data type.
*2 (refer to P. 83)
nPJL
This printer supports PJL commands that are independent from any pri nter languages. The
PJL commands are used to control print jobs and are required for printing using a printer
driver. In this menu, specify whether to enable or disable the PJL commands sent from a
computer. PJL commands allow you to specify the printer language to b e used for the next
data even while the printer is using a different printer language at the time. Normally, it
should be set to [Enable]. The default is [Enable].
nAccess Control
Specifies whether to enable or disable the access right control when cancelling/deleting a
print job or setting/releasing the printer to/from pause state. The default is [Disable].
nDNS
Specifies whether to use the name registered in DNS (Domain Name System) in order to
recognize the printer. The default is [Enable], which means the DNS name is available. If
[Disable] is selected, the IP address is used for recognizing the printer.
4.2 Description of Menu Items 67
Page 72

nAdd Port No.
*3 (refer to P. 83)
Set the additional port number to 0, 80, or a value between 8000 and 9999. The default is
[80].
nConnect Time-Out
Specifies the time interval for disconnection when no further data is received. You can
specify a value between 0 and 65535 seconds in increments of 1 second. T he default is [60
Secs].
nTBCP Filter
Specifies whether to enable or disable the TBCP filter when processing PostScript data.
The default is [Disable].
EtherTalk
Select this to use EtherTalk.
nPort Status
Specifies whether to enable or disable the EtherTalk port when the printer turns on. The
default is [Disable]. To use EtherTalk, set this to [Enable].
Important
• If the memory is running out when the port is enabled, the port may be disabled automatically. In this
case, you need to disable the port(s) you are not using or change the memory allocation from [Allocate
Memory].
*2 (refer to P. 83)
nPJL
This printer supports PJL commands that are independent from any pri nter languages. The
PJL commands are used to control print jobs and are required for printing using a printer
driver. In this menu, specify whether to enable or disable the PJL commands sent from a
computer. PJL commands allow you to specify the printer language to b e used for the next
data even while the printer is using a different printer language at the time. Normally, it
should be set to [Enable]. The default is [Enable].
USB
Select this to use USB ports.
nPort Status
Specifies whether to enable or disable the USB port wh en the printer turn s on. The defa ult
is [Enable], which means the USB port is available.
Important
• If the memory is running out, you need to disable the port(s) you are not using or change the memory
allocation from [Allocate Memory].
68 4 Settings on the Control Panel
Page 73

nPrint Mode
*1 (refer to P. 83)
Sets the print data process method (printer language to be used).
[Auto] (default)
Select this to make the printer automatically detect the printer language being used in the
data received from a computer and perform printing based on the detected data.
[PCL] [PS] [ESC/P] [HP-GL/2] [TIFF]
Select this to process the data received from a computer as the specified data type.
*2 (refer to P. 83)
nPJL
This printer supports PJL commands that are independent from any pri nter languages. The
PJL commands are used to control print jobs and are required for printing using a printer
driver. In this menu, specify whether to enable or disable the PJL commands sent from a
computer. PJL commands allow you to specify the printer language to b e used for the next
data even while the printer is using a different printer language at the time. Normally, it
should be set to [Enable]. The default is [Enable].
nAuto Eject Time
*3 (refer to P. 83)
Sets the time interval for the printer to automatically print the remaining data when no further
data is received for a continuous period.
The time can be set between 5 to 1275 seconds in increments of 5 second s. The default is
[30 Secs]. When no data is received for the period specified here after the last data was
received, the printer determines it as job end.
nAdobe Protocol
Specifies the communications protocol for PostScript.
[Normal] (default)
Select this when the communication protocol is in ASCII format.
[Binary]
Select this when the communication protocol is in binary format. Selecting this may cause
the printing process to be faster than [Normal] depending on the printing data.
[TBCP]
Select this when you have to switch between ASCII and binary formats by using specific
control codes because they are both used as the communications protocol.
Note
• Select an option according to the data format output from the printer driver in a computer.
• Generally, accept the default setting, [Normal].
• This setting is only available when PostScript is used for printing.
4.2 Description of Menu Items 69
Page 74

Port9100
Select this to use Port9100.
nPort Status
Specifies whether to enable or disable the Port9100 port when the printer turns on. The
default is [Enable], which means the Port9100 port is available.
Note
• To enable the Port9100 port, the IP address must be set.
Important
• If the memory is running out when the port is enabled, the port may be disabled automatically. In this
case, you need to disable the port(s) you are not using or change the memory allocation from [Allocate
Memory].
nPrint Mode
*1 (refer to P. 83)
Sets the print data process method (printer language to be used).
[Auto] (default)
Select this to make the printer automatically detect the printer language being used in the
data received from a computer and perform printing based on the detected data.
[PCL] [PS] [ESC/P] [HP-GL/2] [TIFF]
Select this to process the data received from a computer as the specified data type.
*2 (refer to P. 83)
nPJL
This printer supports PJL commands that are independent from any pri nter languages. The
PJL commands are used to control print jobs and are required for printing using a printer
driver. In this menu, specify whether to enable or disable the PJL commands sent from a
computer. PJL commands allow you to specify the printer language to b e used for the next
data even while the printer is using a different printer language at the time. Normally, it
should be set to [Enable]. The default is [Enable].
nConnect Time-Out
*3 (refer to P. 83)
Specifies the time interval for disconnection when no further data is received. You can
specify a value between 2 and 65535 seconds in increments of 1 second. T he default is [60
Secs].
nPort No.
Set the port number to 9100 or a value between 8000 and 9999. The default is [9100].
nTBCP Filter
Specifies whether to enable or disable the TBCP filter when processing PostScript data.
The default is [Disable].
70 4 Settings on the Control Panel
Page 75

UPnP
Makes settings for UPnP (Universal Plug and Play).
nPort Status
Specifies whether to enable or disable the UPnP when the printer turns on. The default is
[Disable].
Important
• If the memory is running out when the port is enabled, the port may be disabled automatically. In this
case, you need to disable the port(s) you are not using or change the memory allocation from [Allocate
Memory].
SNMP
Set this to use SNMP. SNMP are required to use the application that remotely controls
multiple printers. The printer information is maintained in SNMP. The application obtains the
printer information from the SNMP.
nPort Status
Specifies whether to enable or disable the SNMP port when the printer turns on. The default
is [Enable], which means the SNMP port is available.
Important
• If the memory is running out when the port is enabled, the port may be disabled automatically. In this
case, you need to disable the port(s) you are not using or change the memory allocation from [Allocate
Memory].
nTranspt Protocol
Specifies the transport protocol used for SNMP. IPX, UDP, or both protocols can be
specified. The default is [UDP].
Note
• When using UDP, both the IP addresses of a computer and the printer are required.
• Refer to the application's manual for the protocol to be used: IPX or UDP.
nCommunity (R)
Specify the community name used for reading the printer management information (MIB)
with up to 12 alphanumeric characters. The default is [Unregistered].
nCommunity (R/W)
Specify the community name used for reading/writing the printer mana gemen t in forma tion
(MIB) with up to 12 alphanumeric characters. The default is [Unregistered].
nCommunity (Trap)
Specify the community name used for trapping with up to 12 alphanumer ic characters. The
default is [Unregistered].
* No.1 to 3 characters of 4 are available (refer to P. 83)
* No.1 to 3 characters of 4 are available (refer to P. 83)
* No.1 to 3 characters of 4 are available (refer to P. 83)
4.2 Description of Menu Items 71
Page 76

TCP/IP Settings
nGet IP Address
Specifies whether to automatically or manually retrieve the necessary information for using
TCP/IP (IP address, subnet mask, and gateway address) from the DHCP (Dynamic Host
Configuration Protocol) server with AutoIP feature, DHCP server, BOOTP, or RARP. For
the addresses you need to set manually, contact your network administrator. The default is
[DHCP/Autonet].
Note
• Changing the setting from [DHCP/Autonet], [DHCP], [BOOTP], or [RARP] to [Manual] may display the IP
address setting screen. If it is displayed, set the IP address manually.
nIP Address, Subnet Mask, Gateway Address
*3 (refer to P. 83)
These items are used to check the addresses that has been automatically obtained or to
set the addresses manually. Enter the address in the format of xxx.xxx.xxx.xxx. You can set
values between 0 and 255 for xxx.
Important
• Incorrect IP address may affect the overall network.
• If you enter an incorrect address when setting the subnet mask (e.g. when “0” is set for the bit in the
middle), the address returns to the previous values even if you press <MENU> button after setting
values.You cannot move to other menu items until you have set the correct values.
• Set the address only when you have to explicitly specify the gateway address.You do not need to set the
address if the gateway address can be set automatically.
OkiWebRemote
Specifies whether to use OkiWebRemote.
When [Enable] is specified, you can use OkiWebRemote to display the printer and job
status on the web browser and change the printer settings. The default is [Enable].
Note
• To enable OkiWebRemote, you need to set both the IP addresses of a computer and the printer.
Telnet
Specifies whether to enable or disable the telnet port when the printer turns on. The default
is [Enable], which means the telnet port is available.
Refer to
• Using the telnet: Network Print Environment User Guide
WINS Server
n Get DHCP Address
Specifies whether to automatically retrieve the IP address of WINS server that is required
for using WINS (Windows Internet Name Service). If you do not set it to automatically
retrieve the IP address, contact your network administrator for the addresses you need to
set manually. The default is [On].
Note
• Changing from [On] to [Off] may display the IP address setting screen. If it is displayed, set the IP
address manually.
72 4 Settings on the Control Panel
Page 77

nPrimary IP, Secondary IP
*3 (refer to P. 83)
These items are used to check the addresses that has been automatically obtained or to
set the addresses manually. Enter the address in the format of xxx.xxx.xxx.xxx. You can set
values between 0 and 255 for xxx. If the primary IP address is invalid, the secondary IP
address will become invalid too.
Important
• Incorrect IP address may affect the overall network.
Ethernet
Sets the communication speed/connector type of the Ethernet interface.
[Auto] (default)
Select this to switch between 100BASE-TX and 10BASE-T automatically.
[100BASE-TX]
Select this to use 100BASE-TX only.
[10BASE-T]
Select this to use 10BASE-T only.
IPX/SPX Frame Type
Sets the operational frame type of IPX/SPX.
[Auto] (default)
Select this to automatically set the frame type.
[Ethernet II]
Select this to use the Ethernet frame type.
[Ethernet 802.3]
Select this to use the IEEE802.3 frame type.
[Ethernet 802.2]
Select this to use the IEEE802.3/IEEE802.2 frame type.
[Ethernet SNAP]
Select this to use the IEEE802.3/IEEE802.2/SNAP frame type.
Filter
nIP Filter
Specifies whether to limit IP addresses that receive print jobs. Select [On] if you do not want
to receive print jobs from non-registered IP addresses. The default is [Off].
Note
• Even if [On] is set, it becomes invalid when all the registered IP addresses are “000.000.000.000”.
nIP Address
Registers the IP addresses that are allowed to receive jobs if you want to limit the IP
addresses. You can specify up to 10 IP addresses. Set the address masks fo r the registered
IP addresses. Enter the IP addresses and address masks in the format of xxx.xxx.xxx.xxx.
You can set values between 0 and 255 for xxx. For example, if you specfy “126.249.110.23”
in [IP Address] and “255.255.255.0” in [IP Address Mask], the addresses that are allowed
to receive jobs are “129.249.110.* (1 to 254)”.
*3 (refer to P. 83)
4.2 Description of Menu Items 73
Page 78

System Settings
[System Settings] menu is used to make the printer o peration settings such as for alarm and
Power Saver mode.
Alert Tone
Specifies whether to turn on the alarm when an error occurs in the printer. The default is
[Off]. You cannot adjust the sound volume.
Panel Settings
*3 (refer to P. 83)
nPanel Lock
Specifies whether to limit the menu operations with a password. Selecting [On] requires the
operator to enter the password. The default is [Off].
Note
• If [On] is selected but the password is not specified, t he password setting sc reen will be d isplayed. Enter
a 12-digit number as the password by pressing < > and < > buttons. You can move between digits
with the < > and < > buttons.
• You cannot specify “000000000000” as the password.
nChange Password
You can change the password for control panel limitations. Enter the current password (12digit number) to display the password input screen. Specify the new password.
Note
• If [On] is not set for [Panel Lock], the password cannot be changed.
OfflineAutoClear
Specifies whether to automatically turn off the offline status. Select [Off] or specify the time
to turn off the offline status between 1 and 30 mins in increments of 1 min. The default is
[Off].
*3 (refer to P. 83)
Low Power Mode
The Low Power mode is a feature that reduces the printer’s power consumption by
automatically decreasing the temperature of the fuser after a period of time. This item
specifies whether to use this feature. The default is [Enable].
Note
• If [Disable] is set for [Sleep Mode], you cannot set [Disable] for [Low Power Mode].
Refer to
• “Example: Changing the Low Power/Sleep Mode Settings” (P. 55)
Low Power Timer
Specify the transitional time to Low Power mode between 5 and 60 mins in increments of 1
min. Once the low power mode is turned on, the display of the control panel is turned off
and the lamp of the <POWER SAVE> button is lit. The default is [5 Mins].
Refer to
• “Example: Changing the Low Power/Sleep Mode Settings” (P. 55)
74 4 Settings on the Control Panel
Page 79

Sleep Mode
The Sleep mode is a feature that reduces the printer’s power consumption more effectively
than Low Power mode. This item specifies whether to use this feature. The default is
[Enable].
Note
• If [Disable] is set for [Low Power Mode], you cannot set [Disable] for [Sleep Mode].
Refer to
• “Example: Changing the Low Power/Sleep Mode Settings” (P. 55)
Sleep Mode Timer
*3 (refer to P. 83)
Specify the transitional time to Sleep mode between 5 and 60 mins in increments of 1 min.
Once the power saver mode is turned on, the display of the control panel is turned off and
the lamp of the <POWER SAVE> button is lit. The default is [10 Mins].
Refer to
• “Example: Changing the Low Power/Sleep Mode Settings” (P. 55)
Auto Job History
Specifies whether to automatically print information about the printed data that has been
processed in the printer ([Job History Report]).
[Do not print] (default)
Select this if you do not want to print the job history report automatically.
[Print]
Select this to print a report on the oldest 50 data histories that have not been output yet
when the memory capacity is full. This does not include the print data in processing or in
queue.
Report
Specifies whether to print reports/lists on 1 side or 2 sides of the paper when the 2 sided
printing function is available.
[1 Sided] (default)
[Duplex]
Print Area
Specfies whether to expand the printable area. The default is [Normal].
Banner Sheet
nBanner Output
Specifies whether to output the banner sheet. If you want to output it, specify whether to
output it at the beginning of, at the end of, or at the beginning and end of the document.
nBanner Tray
Specifies the tray from which the banner sheet is output from trays 1 to 4.
4.2 Description of Menu Items 75
Page 80

Secure Print
Specifies whether to use the secure print feature.
[Enable] (default)
Select this to use the secure print feature.
[Disable]
Select this to prohibit secure print.
Note
• This item is displayed when the hard disk (optional) is installed.
Machine Clock
Specifies the date (day/month/year) (for year, enter a number between 2 000 and 2099) and
time (hour/minute) (for hours, enter a number in 24-hour format) of the printer system clock.
The date/time specified here will be printed on reports and lists.
*3 (refer to P. 83)
nDate
Enter the date in the format of “dd/mm/yyyy” (e.g. 01/01/ 2002).
nTime
Enter the time in the format of “hh/mm” (e.g. 12/02).
nDate Format
Select the date display order from “yyyy/mm/dd” (year/month/day), “mm/dd/yyyy” (month/
day/year), and “dd/mm/yyyy” (day/month/year).
nTime Format
Select the time display from 12-hour display and 24-hour display.
nTime Zone
Specify the time zone if required.
nDaylight Savings, Start Date, End Date
Specify summer time if required.
Drum/Toner Life
When it is about time to replace the drum/toner cartridge, a message will appear on the
display. After the message is displayed, you can continue to print normally for about 100
sheets.
Specify whether to stop printing when the drum/toner cartridge needs to be replaced.
[Cancel Print] (default)
Select this to stop printing after the message notifying that it is about time to replace the
drum/toner cartridge was displayed and until it is replaced with a new one.
[Continue Print]
Select this not to stop printing even when the drum/toner cartridge needs replacing. Note
that continuous printing after the replacement time has passed may affect the print image
quality and the printer performance. It is recommended to install a new drum/to ner
cartridge.
mm/inch
Specifies the unit that is used on the control panel from [Millimeter (mm)] and [Inch (“)].
This default setting varies depending on the countries.
76 4 Settings on the Control Panel
Page 81

Printer Settings
[Printer Settings] menu is used to make settings for paper trays such as the auto tray
selection feature.
Substitute Tray
Specifies whether to print on paper loaded in another tray when there is no paper left in the
tray selected by the auto tray selection feature. If you want to replace paper, specify the
paper size.
[Off] (default)
Select this not to replace paper but display a message prompting you to load paper.
[Larger Size]
Select this to replace the paper with a larger size paper before printing in 100%
magnification ratio.
[Nearest Size]
Select this to replace the paper with the nearest size paper befo re printing. This may shrink
the images automatically as required.
Note
• If a computer issues the instruction about paper selection, it overwrites this setting.
Paper Type
Specifies the paper type to be loaded in trays. The default is [Plain] for a ll trays. The names
specified in [Paper Name] will be displayed for Customs 1 to 5.
Select from [Plain], [Recycled], [Heavyweight 1], [Heavyweight 2], [Transparency], and
[Custom 1] to [Custom 5].
Paper Priority
Specifies the priority of the paper type loaded in the tray specified with the auto tray
selection feature. The names specified in [Paper Name] will be displayed for Customs 1 to
5.
nPlain, Recycled, Heavyweight 1, Heavyweight 2, Custom 1 to Custom 5
Select the priority of each paper type from [Not Selected] and [1] to [9]. You can specify the
same priority for different paper types. In this case, the paper tray is selected based on the
settings in [Tray Priority]. If you set [Not Selected] for a paper type, the tray loaded with the
paper type will be excluded from the targets of auto tray selection. The default is [1] for plain
paper, [2] for recycled paper, and [Not Selected] for the others.
Refer to
• “Automatic Tray Selection” (P. 49)
Tray Priority
Specifies the priority of Trays 1 to 4 for auto tray selection when the optional trays are
installed.
n1 to 3
Set each tray to any of [1] to [3]. You cannot set the same tray for each priority number. That
means the trays that can be set [2] are other than the tray specified in [1], and the trays tha t
can be set [3] are other than the trays specified in [1] and [2]. The remaining trays are set
to [4]. The default priority is Tray 1 (highest priority) to Tray 4 (lowest priority).
4.2 Description of Menu Items 77
Page 82

Paper Size
Specifies the paper size to be loaded in trays.
Note
• For details on the paper sizes available for each tray, refer to “Usable Paper” (P. 43).
nTrays 1 to 4
[Auto] (default)
Select this to load the standard size paper.
[Custom]
Select this to load the custom size paper and specify the height and width in increments of
1 mm (0.1").
Paper Name
You can change Customs 1 to 5 displayed in [Paper Priority] and [Paper Type] to any
names.
nCustoms 1 to 5
Specify up to 12 alphanumeric characters.
* No.1 to 3 characters of 4 are available (refer to P. 83)
Job Offset
Specify how to perform offset output. This setting is only available when the optional offset
catch tray is installed.
[Offset Per Set] (default)
When printing multiple copies, each set of document is output with its position shifted per
set.
[Offset Per Job]
Select this to output the document with its position shifted per job.
[Off]
Select this if you do not want to perform offset output.
Print ID
Select this to print the user ID on a specified position.
The default is [Off].
Odd Page Duplex
Specifies whether to perform 1 sided printing or 2 sided printing for the first page when the
total number of pages is an odd number. This setting is only available when the 2 sided
printing function is available. The default is [1 Sided].
PaperSelect Mode
Specifies how to select paper when printing PostScript data.
[Auto] (default)
Select this mode when you want to use our PostScript driver. Selecting this will print on the
paper loaded in the tray specified by the printer driver.
[Select from tray]
Some applications create the PostScript pro gr am directly without using a printer driver. In
this case, a paper tray may not be selected correctly depending on the application.
Selecting [Select from tray] ensures that data is printed on the specified paper.
78 4 Settings on the Control Panel
Page 83

Print Unused Form
Specifies whether to cancel the job or to print data only if the form specified for printing is
not registered.
The default is [On (Data only)].
Default Paper Size
Specifies the default setting of the paper size when using E-mail printing feature, the paper
size when printing the reports, and the [Output Size] setting of the each print mode to [A4]
or [8.5×11"]. This default setting varies depending on the country wher e the printer is sold.
Allocate Memory
*3 (refer to P. 83)
[Allocate Memory] menu is used to change the capacity of the memory for each interfac e
and the form memory.
In this printer, you can change the following memory allocation.
• PS Memory
• HPGL auto layout memory
• Receive buffer memory
• P rin t pa ge buffe r
Important
• Changing the memory capacity will reset the memory and delete all data stored in each memory area.
• You cannot exceed the overall memory capacity during memory allocation. If the setting value exceeds
the actual memory capacity, the system will automatically adjust it at power on.
• If the memory is running out when the port is set to [Enable], the port may be disabled automatically. In
this case, you need to disable the port(s) you are not using or change the memory allocation. However,
the parallel and USB ports will not stop automatically.
Note
• The memory allocation settings (except the print page buffer set ting) are available in the control panel
and OkiWebRemote.
• The print page buffer is the area in which the actual print image can be drawn. The print page buffer is
allocated to the remaining area after the memory is allocated to all other uses. Therefore, you cannot
directly change the print page buffe r capaci ty. You can check the actual print page buf fer si ze in [System
Settings List]. You can also check it in OkiWebRemote. When you want to print a high-resolution
document, allocate memory so that the print page buf fer size is large.
PS
Specifies the memory capacity for PostScript.
Specify the memory capacity between 4. 50 and 96 .00 MB in incr e me n ts of 0. 25 MB. Th e
default is [12.00 M]. The maximum capacity you can set varies depending on the free
memory capacity.
HPGL Auto Layout
Specifies the memory capacity used for HP-GL, HP-GL/2 auto layout.
Specify the memory capacity between 64 and 5120 KB in increments of 32 KB. The default
is [64K]. The maximum capacity you can set varies depending on the free memory capacity.
If the hard disk (optional) is installed, the hard disk memory is used for the auto layout. You
cannot change its capacity. [Hard Disk] is displayed on the screen.
4.2 Description of Menu Items 79
Page 84

Buffer Size
For each interface, specify the memory capacity of the receive buffer (in which the data sent
from a computer is saved temporarily). For LPD, SMB, and IPP, specify the availability of
spool processing, locations, and memo ry cap a city.
You can change the receive buffer capacity depen ding on how busy the conditions are and
purposes. Increasing the receive buffer capacity may increase the disconnection speed of
the computer for each interface. The maximum capacity you can set varies depending on
the free memory capacity.
Note
• If a port is disabled, the items for it will not be displayed.
• Even if the memory capacity is increased, the disconnection speed of a computer may not be changed
due to the data volume sent from a computer.
nParallel, Serial, NetWare Memory, IPP Memory, USB Memory, Port9100 Memory
Specify the memory capacity between 64 and 1024 KB in increments of 32 KB. The default
is [64 K] for parallel and USB memories and [256 K] for the other memories.
Note
• [IPP Memory] is displayed when the hard disk (optional) is not installed. [IPP Spool] is displayed when
the hard disk is installed.
nEtherTalk Memory
Specify the memory capacity between 1024 and 2048 KB (64 and 1024 KB when the
mounted RAM is under 256 MB) in increments of 32 KB. The default is [1,024K].
nLPD Spool, SMB Spool
[Off] (default)
Select this if you do not want to perform spool processing. When the LPD or SMB data from
a computer is being processed, data from another computer cannot be received via the
same interface.
For LPD, specify the LPD specific receive buffer memory capacity between 1024 and 2048
KB (64 and 1024 KB when the mounted RAM is under 256 MB) in increments of 32 KB. The
default is [1,024K].
For SMB, specify the SMB specific receive buffer memory capacity between 64 and 1024
KB in increments of 32 KB. The default is [256K].
[Hard Disk]
Select this to perform spool processing. This uses the hard disk as the receive buffer for
spool processing. This item is displayed when the hard disk (optional) is installed.
80 4 Settings on the Control Panel
Page 85

[Memory]
Select this to perform spool processing. This uses the memory as the receive buffer for
spool processing.
If you select this option, specify the receive buffer memory capacity for spool processing
between 0.5 and 32.00 MB in increments of 0.25 MB. The default is [1.00 M]. Note that the
printer cannot receive data that is larger than the specified memory capacity. In this case,
select [Hard Disk] or [Off].
Important
• If LPR byte count is disabled in Windows 2000 and you send a document whose size is larger than the
spool memory capacity, the computer will repeatedly try to sen d the j ob. To stop this, open the [Port] tab
from the properties dialog box of the printer driver to enable the LPR byte count or change the memory
spool capacity to a value larger than the document size.
nIPP Spool
[Off] (default)
Select this if you do not want to perform spool processing. When IPP data from a computer
is being processed, data from another computer cannot be received via the same interface.
Specify the IPP specific receive buffer memory capacity between 64 and 1024 KB in
increments of 32 KB. The default is [256K].
[Hard Disk]
Select this to perform spool processing. This uses the hard disk as the receive buffer for
spool processing.
Note
• [IPP Spool] is displayed when the hard disk (optional) is installed. [IPP Memory] is displayed when the
hard disk (optional) is not installed.
Init/Del Data
[Init/Del Data] menu is used to delete data such as the printer setting values stored in the
NV memory and the form data registered in this printer. It is also used to initialize the hard
disk and meter reports.
Note
• Initialization will revert each setting value to default. Refer to “4.3 Menu list” (P. 84) for details.
NVM
Select this to initialize the NV memory. The NV memory is a nonvolatile memory that stores
the printer settings even after power off.
Initializing the NV memory will revert the value for each item to default.
Network/Port
Select this to initialize the network/port settings. Initializing the network/port settings will
revert the value for each settings to default.
4.2 Description of Menu Items 81
Page 86

Hard Disk
Select this to initialize the hard disk (optional). The data to be deleted during initialization
includes the additional fonts, the HP-GL and HP-GL/2 forms, the ESC/P user definition
data, and SMB folders. The secure print documents, proof print documents, delayed print
documents, and their logs will not be deleted.This item is displayed when the hard disk
(optional) is installed.
Compact Flash
Select this to initialize the Compact Flash. The forms and fonts stored in the Co mpact Flash
is deleted.
This item is displayed when the Compact Flash disk is set.
Print Meter
Select this to initialize the printer meter reports. Initialization will change the meter count to
“0”.
Refer to
• “Initializing Print Meter Data” (P. 125)
Form
If there are no forms registered, a message saying “Not registered” will be displayed.
n ESC/P Form
Select this to delete the forms for ESC/P emulation.
nDelete PCL Forms
Select this to delete the forms for PCL emulation. All the registered PCL forms are deleted.
Font
If there are no registered fonts, “Not registered” message will be displayed.
nDelete PCL Fonts
Select this to delete the fonts for PCL emulation. All the downloaded PCL fonts are de leted.
Stored Documents
Select this to delete the documents stored for secu re print. If there are no such documents,
“No stored documents” will be displayed.
This item is displayed when the hard disk (optional) is installed.
Display Language
Select the language you want to display on the control panel from [English] [French]
[German] [Italian] [Spanish] [Portuguese] [Russian] [Dutch] [Danish] [Swedish] [Norwegian]
[Polish] [Greek] [Turkish]. The default is [English].
82 4 Settings on the Control Panel
Page 87

*1
When [Auto] is set and the printer detects a prin ter language that is not installed in this
printer or an unsupported printer language, the data will be deleted.
*2
If a printer language that is not installed in this printer is specified by PJL commands,
the data will be deleted.
*3
When you are changing the candidate values by the < > < > buttons, you can press
and hold down the buttons to change the display contin uously. Also, pressing the < >
< > buttons simultaneously will display the default values.
*4
Character List
No. Character type Character
1 Blank Space
2 Alphabet ABCDEFGHIJKLMNOPQRSTUVWXYZabcdefghijkl
mnopqrstuvwxyz
3 Numbers 0123456789
4 Symbols !"#$%&'()*+,-./:;<=>?@[¥]^_`{ | }
4.2 Description of Menu Items 83
Page 88

4.3 Menu list
For details on each feature, refer to “4.2 Description of Menu Items” (P. 58).
• Main operation and buttons on the control panel
Display/Close the Menu screen <MENU> button
Switch between the menu levels
Switch between menu or items in the
same level
Move the cursor (_) of the setting value to
the right or left
Confirm setting <FEED/SELECT> button (<F/S> button in the following
Note
• indicates items that can be set when accessories are installed.
(1): Hard Disk (2): Duplex Unit
(3): Letter/A4 Universal Tray (4): Offset Catch Tray
(5): Rear Tray (6): Network Software Kit
(7): Compact Flash Disk (Only when the network function is optional)
• * indicates default value.
< > button (moves one level downwards) or < >
button (moves one level upwards)
< > button (displays the previous menu or item) or < >
button (displays the next menu or item)
< > button (moves to the right) or < > button (moves
to the left)
diagram)
Continued on next page
84 4 Settings on the Control Panel
Page 89

Continued from previous page
Continued on next page
4.3 Menu list 85
Page 90

Continued from previous page
86 4 Settings on the Control Panel
Page 91

From P. 85
From P. 85
4.3 Menu list 87
Page 92

From P. 85
88 4 Settings on the Control Panel
Page 93

5 Troubleshooting
5.1 When Paper Jams
CAUTION
• When removing jammed paper, make sure that no pieces of torn p aper are left in the
machine. A piece of paper remaining in the machine can cause fire. If a sheet of paper is
wrapped around the heat roller, or when clearing a jammed paper that is difficult or
impossible to see, do not try to remove it by yourself. Doing so can cause injuries or
burns. Switch off the machine immediately, and contact your dealers or our Printer
Support Desk.
Following the message on the control panel, open the cover and remove the jammed paper .
If paper is torn, check for any remaining torn pieces of paper.
Cover D (offset catch tray)
Cover B *1
Open Cover B (For B6300, raise the
lever as shown in the diagram and
open the cover B (1)). After opening
cover B, hold the part marked with
and open the cover of the fuser unit
(2) and remove any jammed paper.
CAUTION
• The fuser unit is hot. You may
get burnt if you touch it directly.
Cover A
When the optional offset catch tray
is installed, fold the tray first before
opening cover A.
When a message to remove the
drum/toner cartridge is displayed:
P. 90
Paper tray
Pull out the tray and follow
the procedure to remove
paper P. 90
Cover C *1 (duplex unit)
Push up the lever shown
in the diagram to open the
cover.
*1: Remove the rear tray when
opening the back cover.
5.1 When Paper Jams 89
Page 94

Inside Cover A
Follow the procedure below to remove any jammed paper when the con trol panel displa ys
the following messages: “Paper Jam Open Cover A” or “Remove cartridge Clear jam”
1. Open cover A, and holding the drum/toner cartridge by the grip, remove it from the
printer (1).
2. Turn the roll as shown in the diagram and
remove any jammed paper inside (2).
3. Return the drum/toner cartridge and cover A to their original positions.
Note
• When the optional offset catch tray is installed, close cover A first before returning the tray to its original
position.
• If you continue to print with the offset catch tray folded, this may cause a paper jam. Always use the
printer with the tray open.
Inside Paper Tray
Follow the procedure below to remove any jammed paper whe n the following messages are
displayed intermittently: “Pull out all trays. Clear jam”, “Clear jam and close Cover A”.
Pulling out paper trays
1. Pull out all paper trays and remove any
wrinkled paper.
2. Examine the inside of the printer and
remove any jammed paper.
After removing the paper
1. Push the paper trays completely back into
the printer.
2. Open and close cover A. Doing this will
clear the error message.
90 5 Troubleshooting
Page 95

5.2 When Problems Occur
Before treating the problem as a machine breakdown, refer to the fo llowing table and check
the printer condition again.
WARNING
• Never open or remove machine covers that are secured with screws unless specifically
instructed in the user guide. A high voltage component can cause electric sho ck.
• Do not try to alter the machine configuration, or modify any parts. An unauthorized
modification can cause smoke or fire.
Note
• Information on incorrect print processing will be stored in the [Job History Report]. When no print
processing is carried out, print the [Job History Report] and check the prin t st atus. Print da ta t hat cann ot
be correctly processed may be discarded. Refer to “6.2 Printing Reports/Lists” (P. 114) on how to print
the [Job History Report].
• Limitations of the printer and incorrect settings at the printer, computer and server corresponding to your
network environment may also result in printing problems. Refer to “Appendix A.5 Precautions and
Limitations” (P. 142) and the Network Print Environment User Guide.
Symptom Reason/Action
No power.
Is the power of the printer switched off? Push the power switch to the < > position to
switch on the power.
Refer to
• “1.2 Switching On and Off the Power” (P. 13)
Is the power cord disconnected or not securely connected? Switch off the power of the
printer and connect the power cord to the power outlet again. Then, switch on the
power to the printer.
Refer to
• Setup and Quick Reference Guide Connecting the Power Cord to Switch On the
Printer
Is the power cord connected to a power outlet with the correct voltage? Connect the
printer exclusively to a power outlet with a suitable vol tage and current rating.
Refer to
• Setup and Quick Reference Guide Safety Notes
5.2 When Problems Occur 91
Page 96

Symptom Reason/Action
Cannot print. Is the light of the <READY> indicator off ? If so, this printer is offline or in menu setting
mode. Fix the problem according to the following display status:
•“Off-line”
Press the <ON LINE> button to exit the off-line mode.
•Others
Press the <MENU> button to exit the menu setting mode.
Refer to
• “1.1 Main Components and Their Functions” (P. 8)
Is there a message displayed on the control panel? Follow the message to rectify the
problem.
Refer to
• “5.4 Messa g e Li s t” (P. 99)
When a parallel cable is used fo r connection, are you using a computer that support s bidirectional communication? By default, the bi-directional communication setting of the
printer is set to [Enable]. If the computer is not responding to bi-directional
communication, printing cannot be done. In this case, turn the bi-directional
communication setting to [Disable] on the control panel and then print again.
Refer to
• “Parallel” (P.62)
Is the memory sufficient? Use one of the following methods to rectify the problem.
• When [1200dpi] is selected for [Print Mode] in the [Graphics] t ab, set it to [600dpi].
• Select [On] for [Page Print Mode] in the [Detailed Settings] tab.
• Increase the print page buffer.
• Install the additional memory (optional) to increase the memory.
Print job sent but the light of
the <READY> indicator is not
blinking or on.
Light of <ATTENTION>
indicator is on.
Light of <ATTENTION>
indicator is blinking.
Refer to
• [Print Mode] / [Page Print Mode]: On-line Help for the printer driver
• Print page buffer: “Allocate Memory” (P. 79)
Is the interface cable disconnected? Switch off the power and check the connection of
the interface cable.
Is the interface configured? Check the port status of the int erface.
Refer to
• “Network/Port” (P. 62)
Is the computer environment correctly set up? Check the computer environment, such
as the printer driver.
Is there an error message displayed on the control panel? Check the displayed
message and rectify the error.
Refer to
• “5.4 Messa g e Li s t” (P. 99)
An error that you cannot rectify yourself has occurred. Record the displayed error
message or error code, switch off the power , pul l out the power plug from the outlet, and
then contact our Printer Support Desk.
92 5 Troubleshooting
Page 97

Symptom Reason/Action
Although no print job is sent,
the message “Printing” is
displayed on the control panel
(when using the parallel
interface).
Poor print quality . There may be a problem with the image. Refe r to the sect ion af ter thi s, “When the Pri nt
The correct characters are not
printed (printing garbage).
The printout is different from
what is displayed on the
screen.
The light of the <READY>
indicator is on and blinking but
there is no print output.
Did you switch on the power of the computer af ter switching on t he power to the print er?
Pressing the <CANCEL> button cancels the printing.
Note
• Check that you switch on the power of the computer when switching on the power to
the printer.
Quality is Poor” to rectify the problem.
Refer to
• “5.3 When the Print Quality is Poor” (P. 96)
This printer is printing with non-standard built-in fonts. Check the fonts used in the
application. Download the necessary fonts when using PostScript.
Did you change the TrueType font settings to printer fonts? Change to TrueType font
printing for [Specify Font] on the [Detailed Settings] tab of the printer driver.
Refer to
• On-line Help for the printer driver
There are jobs remaining in the printer. Cancel printing or force the remaini ng data to be
printed.
To forcibly print the job, press the <ON LINE> button to set the printer in offline mode,
then press the <FEED/SELECT> button. After the j ob h as b een printed , press th e <ON
LINE> button again to return the printer to online mode.
Note
• When a parallel/USB port is used, data may be transmitted in the middle of a job
depending on when the <ON LINE> button is pressed. In this case, subsequent print
data received after the <FEED/SELECT> button is pressed, will be recognized as a
new job. The data will be printed after the off-line mode has been cancelled.
Furthermore, it may not be printed properly.
Printing is taking up a lot of
time.
Top section of printed
document is missing.
Text is reduced.
Refer to
• Cancelling printing: “1.4 Cancelling/Checking Printing” (P. 14)
The receive buffer is insufficient. When printing documents of high resolution, reduce
the memory capacity of items not in use from [Allocate Memory] on the control panel,
and increase the print page buffer.
Increasing the receive buffer will speed up the printing process. Adjust the buffer size
according to the volume of data to be printed.
You are also recommended to disable ports not in use, and channel the memory to
other purposes.
Refer to
• “Allocate Memory” (P. 79)
Is [1200dpi] selected for [Print Mode]? Change the [Print Mode ] setting in the [Grap hics]
tab to [600dpi] to shorten the printing time.
Refer to
• On-line Help for the printer driver
Printing with TrueType fonts may take up printing time. Change the printing method for
TrueType fonts in [Specify Font] on the [Detailed Settings] tab of the printer driver.
Refer to
• On-line Help for the printer driver
Are the paper tray guides set in the correct positions?
Set the length guide and the right width guide in the correct positions.
Refer to
• “Loading Paper in a Paper Tray” (P. 47)
5.2 When Problems Occur 93
Page 98

Symptom Reason/Action
Paper cannot be fed.
Paper jam.
Multiple papers are fed.
Papers are fed at an angle.
Paper is wrinkled.
Is the paper correctly set? Load the paper correctly. For labels, transparencies or
envelopes, fan them well first to allow air to enter between each sheet before loading.
Refer to
• “3.2 Loading Paper” (P. 47)
Is the paper damp? Replace with paper from a new ream.
Refer to
• “3.2 Loading Paper” (P. 47)
Is the correct type of paper used? Load the correct type of paper.
Refer to
• “Usable Paper” (P. 43)
Is the paper tray set correctly? Pu sh the paper tray completely into the printer.
Is the printer placed on a flat location? Place the printer on a st able surface.
Refer to
• Setup and Quick Reference Guide Safety Notes
Are the paper tray guides set in the correct positions? Set the length guide and right
width guide in the correct positions.
Refer to
• “Loading Paper in a Paper Tray” (P. 47)
Have you used any picture papers? Clean the feed roll.
Refer to
• “Cleaning the Feed Roll” (P. 127)
Papers are fed in more than 1 sheet. Multiple feeding of papers may occur before the
sheets of paper loaded in the tray are used up. Fan the paper to be loaded and load
again. Replenish paper only when all the sheets of the loaded paper are used up.
94 5 Troubleshooting
Page 99

Symptom Reason/Action
Envelope is wrinkled. Envelopes can get wrinkled depending on the type used. Open cove r B of this printer
and lift up the levers at both ends of the fuser unit. The wri nkles can be reduced.
After printing the envelope, remember to return the levers to their original positions.
Strange noise. Is the printer placed on a flat location? Place the printer on a stable surface.
Refer to
• Setup and Quick Reference Guide Safety Notes
Is cover A open? Close cover A securely.
Is the paper tray set correctly? Pu sh the paper tray completely into the printer.
Are there foreign objects inside the printer? Switch off the power and remove any
foreign objects inside the printer. If the object cannot be removed unless the printer is
disassembled, contact our Printer Support Desk.
5.2 When Problems Occur 95
Page 100

5.3 When the Print Quality is Poor
When the print quality is poor, select the closest symptom from the following table to rectify
the problem.
If the print quality does not improve after carrying out the appropriate action, contact our
Printer Support Desk.
Symptom Reason/Action
Printing is light.
(faded, blurred).
The paper is damp. Replace with paper from a new ream.
Refer to
• “3.2 Loading Paper” (P. 47)
The drum/toner cartridge is defective/damaged or there is no more toner inside the
cartridge. Replace with a new drum/toner cartridge.
Refer to
• “6.1 Replacing the Drum/Toner Cartridge” (P. 111)
The Draft Mode feature is on. Uncheck the [Draft Mode] check box on the [Detailed
Settings] tab of the printer driver.
Refer to
• On-line Help for the printer driver
Levers on both sides of the fuser unit are raised. Open cover B of this printer and push
down the levers at both ends of the fuser unit.
Black spots or streaks are
printed.
Dirt appears at equal intervals. The feed route of the paper is stained. Print a few pages to remove the stains.
The drum/toner cartridge is defective or damaged. Replace with a new drum/toner
cartridge.
Refer to
• “6.1 Replacing the Drum/Toner Cartridge” (P. 111)
The drum/toner cartridge is defective or damaged. Replace with a new drum/toner
cartridge.
Refer to
• “6.1 Replacing the Drum/Toner Cartridge” (P. 111)
96 5 Troubleshooting
 Loading...