

Page 1

OKIFAX 5700/5900
PLAIN PAPER FAXPLAIN PAPER FAX
User's Guide
Page 2

English
Every effort has been made to ensure that the information in this document
is complete, accurate, and up-to-date. The manufacturer assumes no
responsibility for the results of errors beyond its control. The manufacturer
also cannot guarantee that changes in software and equipment made by
other manufacturers and referred to in this guide will not affect the
applicability of the information in it. Mention of software products
manufactured by other companies does not necessarily constitute
endorsement by the manufacturer.
First edition February 1999
Copyright © 1999. All rights reserved.
Energy Star is a trademark of the United States Environmental Protection
Agency
BABT Approval Number
Model A: OKIFAX 5700 BABT 609059
Model B: OKIFAX 5900 BABT 609058
This product complies with the requirements of the Council
Directives 89/336/EEC and 73/23/EEC on the
approximation of the laws of the member states relating to
electromagnetic compatibility and low voltage.
ii
Page 3

Contents
Safety Instructions . . . . . . . . . . . . . . . . . . . . . . . . . . . . .vi
Notes, Cautions and Warnings. . . . . . . . . . . . . . . . . . .viii
Chapter 1
Introduction
Features . . . . . . . . . . . . . . . . . . . . . . . . . . . . . . . . . . . . . 1-3
Product Options . . . . . . . . . . . . . . . . . . . . . . . . . . . . . . . 1-5
Component Identification. . . . . . . . . . . . . . . . . . . . . . . . 1-6
Control Panel Keys and Indicators. . . . . . . . . . . . . . . . . 1-10
Signal Tones. . . . . . . . . . . . . . . . . . . . . . . . . . . . . . . . . . 1-14
Chapter 2
Facsimile Functions
Menus and Functions . . . . . . . . . . . . . . . . . . . . . . . . . . . 2-3
Accessing Functions. . . . . . . . . . . . . . . . . . . . . . . . . . . . 2-5
Chapter 3
Installation
Getting Started . . . . . . . . . . . . . . . . . . . . . . . . . . . . . . . . 3-3
Machine Settings . . . . . . . . . . . . . . . . . . . . . . . . . . . . . . 3-13
English
Chapter 4
Directories and Basic Operations
Programming Dialling Directories. . . . . . . . . . . . . . . . . 4-3
Basic Operations . . . . . . . . . . . . . . . . . . . . . . . . . . . . . . 4-7
Chapter 5
Advanced Operations
Delayed Transmission . . . . . . . . . . . . . . . . . . . . . . . . . . 5-3
Priority Transmission. . . . . . . . . . . . . . . . . . . . . . . . . . . 5-5
Confidential Faxes . . . . . . . . . . . . . . . . . . . . . . . . . . . . . 5-6
Relay Broadcasting . . . . . . . . . . . . . . . . . . . . . . . . . . . . 5-9
Polling Transmission / Reception . . . . . . . . . . . . . . . . . 5-10
Call Forwarding . . . . . . . . . . . . . . . . . . . . . . . . . . . . . . . 5-13
Dual Access . . . . . . . . . . . . . . . . . . . . . . . . . . . . . . . . . . 5-15
iii
Page 4

English
Chapter 6
Customising
Viewing Current Settings . . . . . . . . . . . . . . . . . . . . . . . .6-3
Operation Functions . . . . . . . . . . . . . . . . . . . . . . . . . . . .6-3
Service Function Settings . . . . . . . . . . . . . . . . . . . . . . . .6-8
Options . . . . . . . . . . . . . . . . . . . . . . . . . . . . . . . . . . . . . .6-9
Chapter 7
Reports
Understanding Reports . . . . . . . . . . . . . . . . . . . . . . . . . .7-3
Printing Reports. . . . . . . . . . . . . . . . . . . . . . . . . . . . . . . .7-6
Chapter 8
Troubleshooting
Clearing Document Jams. . . . . . . . . . . . . . . . . . . . . . . . .8-3
Clearing Paper Jams . . . . . . . . . . . . . . . . . . . . . . . . . . . .8-4
Toner Cartridge Replacement . . . . . . . . . . . . . . . . . . . . .8-7
Image Drum Unit Replacement. . . . . . . . . . . . . . . . . . . .8-10
Cleaning Scanner Path. . . . . . . . . . . . . . . . . . . . . . . . . . .8-12
Reading Counters . . . . . . . . . . . . . . . . . . . . . . . . . . . . . .8-12
Problem Checklist . . . . . . . . . . . . . . . . . . . . . . . . . . . . . .8-13
Packaging for Transport. . . . . . . . . . . . . . . . . . . . . . . . . .8-15
Appendix A
Specifications and Function List
Machine Specifications . . . . . . . . . . . . . . . . . . . . . . . . . A-1
User Functions Tree . . . . . . . . . . . . . . . . . . . . . . . . . . . A-3
Appendix B
MFP PC Interface Kit
PC Printer . . . . . . . . . . . . . . . . . . . . . . . . . . . . . . . . . . . B-1
PC Scanner . . . . . . . . . . . . . . . . . . . . . . . . . . . . . . . . . . B-2
PC Fax Modem . . . . . . . . . . . . . . . . . . . . . . . . . . . . . . . B-2
IEEE-1284 Parallel Port . . . . . . . . . . . . . . . . . . . . . . . . B-2
iv
Page 5

Appendix C
Network Print Kit
Compatibility . . . . . . . . . . . . . . . . . . . . . . . . . . . . . . . . . C-1
Printer Specifications . . . . . . . . . . . . . . . . . . . . . . . . . . . C-1
Related LAN Options. . . . . . . . . . . . . . . . . . . . . . . . . . . C-1
Appendix D
ISDN G4 Board
Main Specifications . . . . . . . . . . . . . . . . . . . . . . . . . . . . D-1
Registration and Important Settings. . . . . . . . . . . . . . . .D-3
Appendix E
Statutory User Information (UK only)
English
v
Page 6

English
Safety Instructions
This product has been carefully designed to give you years of safe, reliable
performance. As with all electrical equipment, however, there are a few
basic precautions you should take to avoid hurting yourself or damaging
the product:
• Read the setup instructions in this manual carefully. Be sure to save it
for future reference.
• Read and follow all warning and instruction labels on the product itself.
• Unplug the machine before you clean it. Use only a damp cloth; do not
use liquid or aerosol cleaners.
• Place the machine on a firm, solid surface. If you put it on something
unsteady, it may fall and be damaged; if you place it on a soft surface,
such as a rug, sofa, or bed, the vents may become blocked, causing the
machine to overheat.
• To protect the machine from overheating, make sure no openings are
blocked. Do not put the machine on or near a heat source, such as a
radiator or heat register. Keep it out of direct sunlight. Allow enough
room around the machine for adequate ventilation and easy access.
• Do not use the machine near water, or spill liquid of any kind into it.
• Be certain that your power source matches the rating listed on the back
of the machine. If you are not sure, check with your supplier or with
your local power provider.
• This machine has an earthed, 3-pin plug as a safety feature, and it will
only fit into an earthed outlet. If you can not plug it in, you probably
have an older, non-earthed outlet; contact an electrician to have the
outlet replaced. Do not use an adapter to defeat the earthing.
• To avoid damaging the power cable, do not put anything on it or place
it where it will be walked on. If the cable becomes damaged or frayed,
replace it immediately.
• If you are using an extension cable or power strip with the machine,
make sure that the total current (amperes) required by all the equipment
on the extension is less than the extension's rating. The total ratings of
all equipment plugged into the outlet should not exceed 15 amperes.
• The power outlet into which you plug your machine must remain
accessible at all times.
• It is recommended that the machine be switched off prior to opening or
removing covers.
vi
Page 7

English
• Lifting the top cover may expose hot surfaces. Hot surfaces are clearly
labelled. Do NOT touch them.
• Do not poke anything into any ventilation slots; you could receive an
electrical shock or cause a fire.
• Apart from the routine maintenance described in the accompanying
documentation, do not try to service the machine yourself; opening or
removing covers may expose you to shocks or other hazards.
• Do not make any adjustments other than those outlined in the manual
as you may cause damage requiring extensive repair work.
If anything happens which indicates the machine is not working properly
or has been damaged, unplug it immediately and contact your supplier.
These are some of the things to look for:
• The power cable or plug is frayed or damaged.
• Liquid has been spilled into the machine, or it has been exposed to
water.
• The machine has been dropped, or the cabinet is damaged.
• The machine does not function normally when you are following the
operating instructions.
Machine Noise Information Ordinance 3. GSGV 18.1.1991:
The maximum sound pressure level is equal or less than 70 dB (A)
according to ISO 7779.
vii
Page 8

English
Notes, Cautions and Warnings
Note:
A note appears in this manual like this. A note provides additional
information to supplement the main text which may help you to use
and understand the product.
Caution:
A caution appears in this manual like this. A caution provides
additional information which, if ignored, may result in equipment
malfunction or damage.
WARNING:
A WARNING APPEARS IN THIS MANUAL LIKE THIS. A
WARNING PROVIDES ADDITIONAL INFORMATION
WHICH, IF IGNORED, MAY RESULT IN A RISK OF
PERSONAL INJURY.
viii
Page 9

Chapter 1
Introduction
In this chapter…
This chapter provides a description of your fax machine and lists its many
advanced features. It also lists the optional accessories available to further
extend the machine’s funcationality. A brief functional description of the
main controls and indicators is included, each of which is covered in
greater detail in later in this book.
Features . . . . . . . . . . . . . . . . . . . . . . . . . . . . . . . . . . . . . 1-3
Product Options . . . . . . . . . . . . . . . . . . . . . . . . . . . . . . . 1-5
Component Identification. . . . . . . . . . . . . . . . . . . . . . . . 1-6
Components. . . . . . . . . . . . . . . . . . . . . . . . . . . . . . . . 1-7
Control Panel Keys and Indicators. . . . . . . . . . . . . . . . . 1-10
One-Touch Keypad . . . . . . . . . . . . . . . . . . . . . . . . . . 1-12
Using one-touch keys for dialling . . . . . . . . . . . . 1-13
Using one-touch keys for search . . . . . . . . . . . . . 1-13
Using one-touch keys for programming. . . . . . . . 1-13
Accessing Second Panel of One-Touch Keys
(Model B only). . . . . . . . . . . . . . . . . . . . . . . . . . 1-14
Signal Tones. . . . . . . . . . . . . . . . . . . . . . . . . . . . . . . . . . 1-14
English
Introduction 1-1
Page 10

English
1-2 Chapter 1
Page 11

Your new plain-paper facsimile machine utilises advanced light-emitting
diode (LED) technology for quick and trouble-free transmission /
reception of data and images. In addition to the abundant standard features
common to our range of analogue facsimile machines, we now offer a
number of optional devices which expand machine functions and further
support your communications needs. These include MFP (multi-function
peripheral) software to interface the Bi-Centro board (provided as standard
equipment), a Network Print Kit, and an ISDN G4 board.
Features
The following is a summarised list of the many standard features offered
by your new facsimile machine:
User friendly control panel. Special programming keys, 40-key plate
✓
for pre-programmed telephone numbers, 10-key pad for standard
dialling and programming, and more.
80-character LCD (4 rows × 20 characters). Easy to read display for
✓
operation guidance, clock display, function information, etc.
Automatic Document Feeder (A.D.F.). Capacity of up to 50 sheets of
✓
recommended letter / A4 paper.
English
Speed dialling. Set up to 40 (Model A) or 80 (Model B) pre-
✓
programmed telephone numbers for automatic one-touch faxing, as
well as an additional 100 (Model A) or 150 (Model B) numbers for 2or 3-digit speed dialling.
Group dialling. Create as many as 20 groups of telephone numbers and
✓
send documents to multiple locations with a single selection (broadcast
faxing).
Automatic alternate call. Dials a second (alternative) telephone number
✓
if the number originally dialled is busy.
Alphanumeric telephone directory. Search for programmed telephone
✓
numbers by name.
33.6Kbps transmission rate. Fast, efficient communications.
✓
Large-capacity memory. 2.5MB (Model A) or 4.5MB (Model B).
✓
Half-tone transmission. Half-tone area of the document is processed
✓
with 64-scale gradation.
Introduction 1-3
Page 12

English
Advanced transmission and reception functions. Includes delayed
✓
transmission, broadcasting (multi-location transmission), confidential
message transmission / reception, relay broadcasting, polling, etc.
Automatic redial and page re-transmission. Ensures document
✓
transmission when a telephone number is busy or a problem occurs in
the communications process.
Advanced memory transmission / reception features. A number of
✓
convenient features including automatic reception into memory
without printing (e.g., ideal for reception of confidential
communications).
Dual-access operations. Allows two tasks to be conducted at once (e.g.,
✓
scan and prepare a document for transmission while another document
is being received).
Power savings. Power supply unit realises energy savings through low
✓
power consumption — only 0.5W in standby state. (Not available if
fitted with LAN board or ISDN board.)
Automatic answering mode detection. Distinguishes between incoming
✓
fax and voice communications, allowing the use of an answering
machine on the same telephone line.
Closed network. Prevents the reception of unsolicited communications.
✓
Fax forwarding. Document can be forwarded to a designated location
✓
after being stored in memory.
P-ERR fax reception. Documents can be received into memory during
✓
a printer error, such as out of paper, and forwarded on to another fax
machine for immediate reception and printing.
Polling. Allows the transmission and reception of documents from
✓
remote facsimile machines with polling capabilities.
Copier function. Make up to 99 copies of a document at one time.
✓
Progress reports. Enable tracking of transmission status, machine
✓
operations, settings and maintenance requirements.
1-4 Chapter 1
Page 13

Product Options
The following are optional devices which can be purchased to expand the
functions of your facsimile machine:
Second Paper Tray. Increases paper holding capacity by 500 sheets
✓
(universal size: legal, letter, A4).
Expanded Memory. Adds more memory to increase storage capacity.
✓
Available in 2.0 or 4.0-Mbyte boards.
Telephone Handset. Connects directly to the machine and operates like
✓
a standard telephone. (Handset should not be connected when ISDN G4
board is installed.)
MFP PC Interface Kit. Installation of Bi-Centro software (hardware
✓
provided as standard feature) enables a machine to operate as a multifunction peripheral (MFP) providing printer, scanner and FaxModem
capabilities when connected to a personal computer. (For further
details, please refer to Appendix B.)
Network Print Kit. Gives the option of utilising the Network Print
✓
Service via a local area network (LAN). (For further details, please
refer to Appendix C.)
ISDN G4 Board. Enables machine to operate over ISDN circuits in G4
✓
mode at ITU-T G4 specifications while maintaining communications
capability with G3 facsimile machines. This option is dealer installed.
(For further details, please refer to Appendix D.)
English
Introduction 1-5
Page 14
English
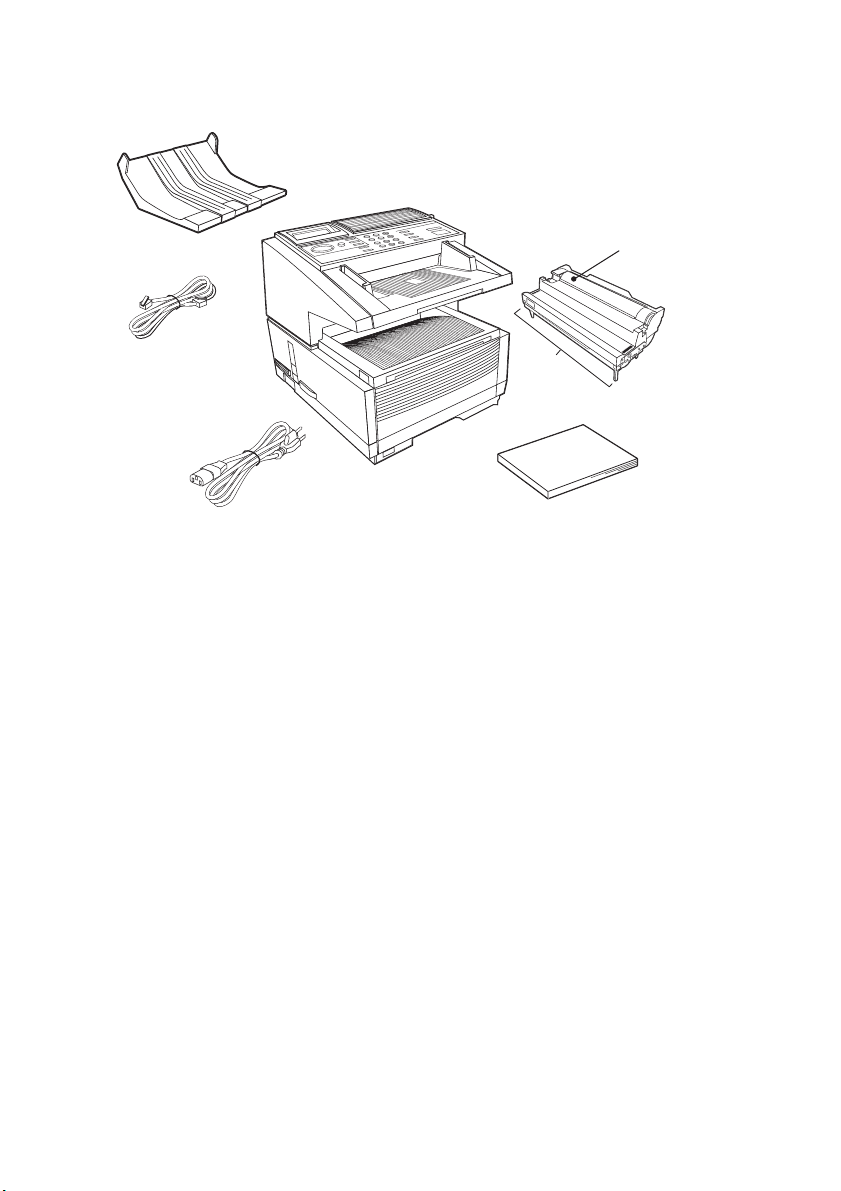
Component Identification
5
1
7
2
3
6
4
Your new fax machine package should contain the following items:
Fax machine main unit
1
Toner cartridge
2
Image drum unit (inside main unit)
3
User’s Guide (this manual)
4
Document stacker
5
AC power cable
6
Telephone line cable
7
If anything appears missing or damaged please contact your supplier as
soon as possible.
1-6 Chapter 1
Page 15
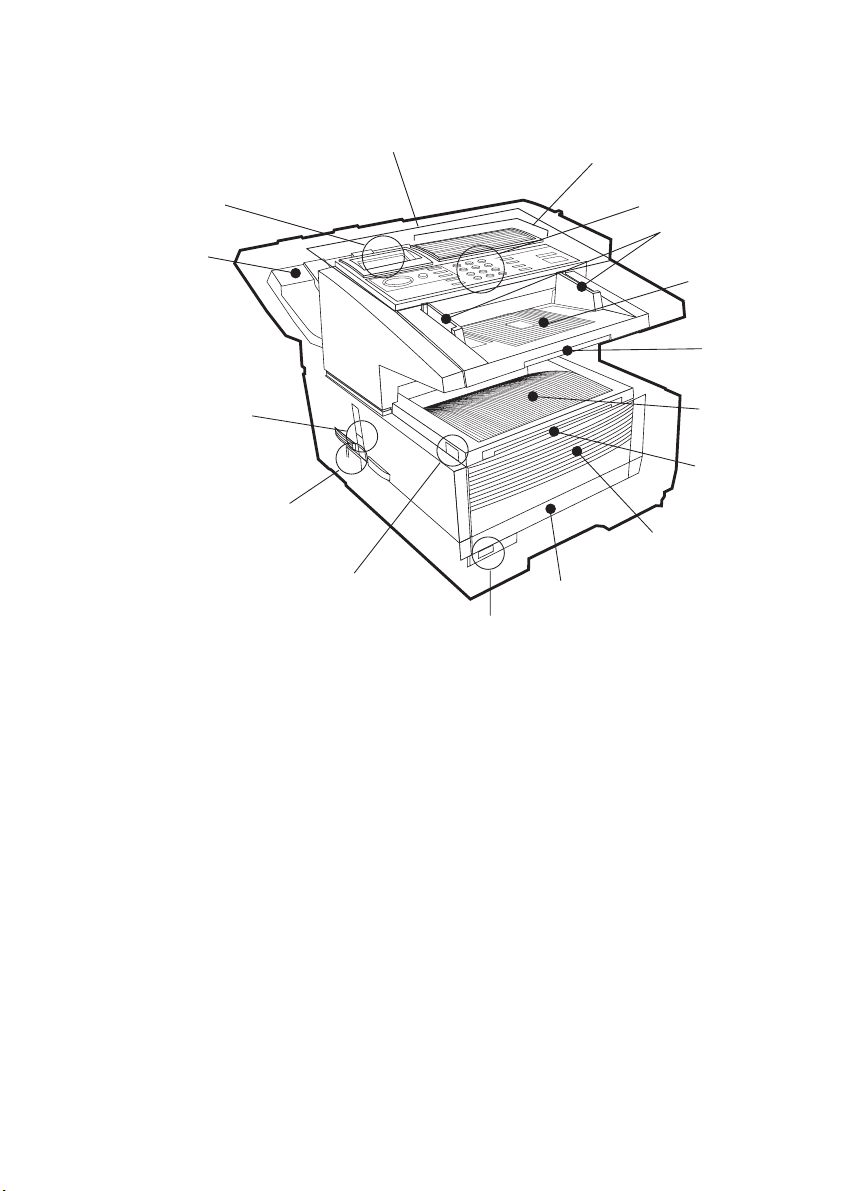
Components
English
15
14
13
12
11
1 One-Touch Keypad
16
10
— Use for one-touch dialling of pre-programmed
1
2
3
8
9
telephone numbers, as well as inputting alphabetic, numeric and special
characters, etc. for programming and ID entries.
4
5
6
7
2 Numeric Keypad
— Use to enter telephone numbers, program
information, manual dialling, etc.
3 Document Guides
— Adjust guides to the width of documents to be
faxed or copied.
4 Document Tray
— Holds documents to be faxed or copied (above
copy stacker tray).
5 Document Tray Extension
— Pullout extension for supporting long
documents.
6 Copy Stacker
7 Copy Stacker Extension
— Holds document copies after copying process.
— Pullout extension for supporting long
documents.
Introduction 1-7
Page 16
English
21
8 Front Panel
— Fold out for access to manual paper feeder (bypass
paper tray) when needing to feed different types of paper directly into
the machine.
9 Paper Tray
— Holds 250 sheets of paper (universal type: legal, letter,
A4).
10 Paper Indicator
— Indicator to show level of paper remaining in paper
tray.
11 Release Button
— Two buttons, one on each side, must be pressed to
gain entry to toner and image drum area.
12 Power Switch
13 Copy Output Lever
— Press I to turn on and O to turn off.
— In the up position, copies will exit the machine
facedown; in the down position, copies will exit face up. However, use
in the “face up” position is only possible when copying or when using
Network Print or PC Print.
14 Document Stacker
— Holds original documents after being faxed or
copied.
15 Display Panel
16 Control Panel (Programming Keys)
— Shows status of machine and operation in progress.
— Main keys used for
programming machine settings and operations.
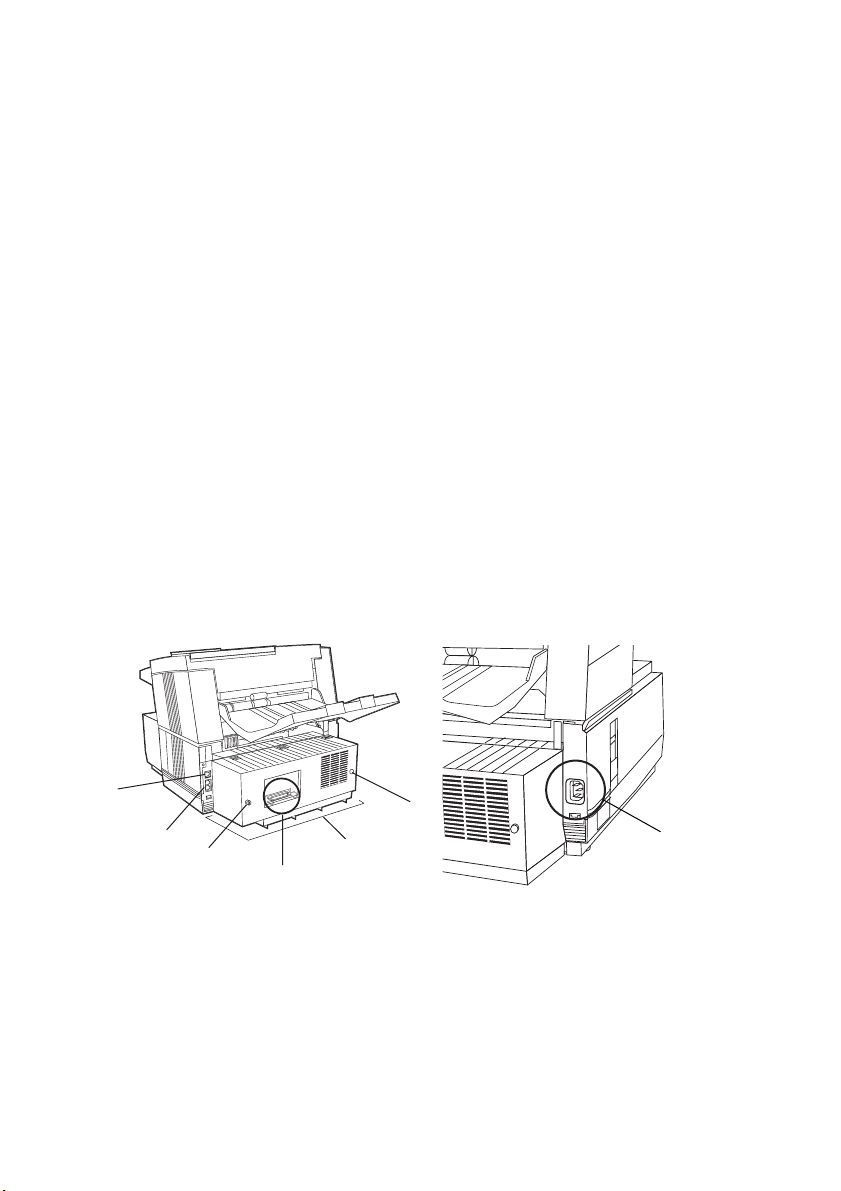
17
18
A
17 Line Jack
19
— Jack for connection to main outside telephone line.
20
18 TEL Jacks 1 (upper) and 2 (lower)
B
— Jacks for connecting optional
telephone handset, external telephone or answering machine.
19 IEEE-1284 Parallel Port
— Standard hardware for connection to
personal computer and operation of MFP (multi-function peripheral)
features.
1-8 Chapter 1
Page 17
English
20 Rear Cover
— Remove this cover to expose the expansion slots for
optional memory, ISDN board and network interface card. Use a
Phillips screwdriver to remove screws A and B. DO NOT remove any
other screws. Once you have installed the peripheral equipment,
reattach the rear cover, securing it tightly with screws A and B.
21 AC Power Socket
— Plug the AC power cable supplied with the unit
into this socket.
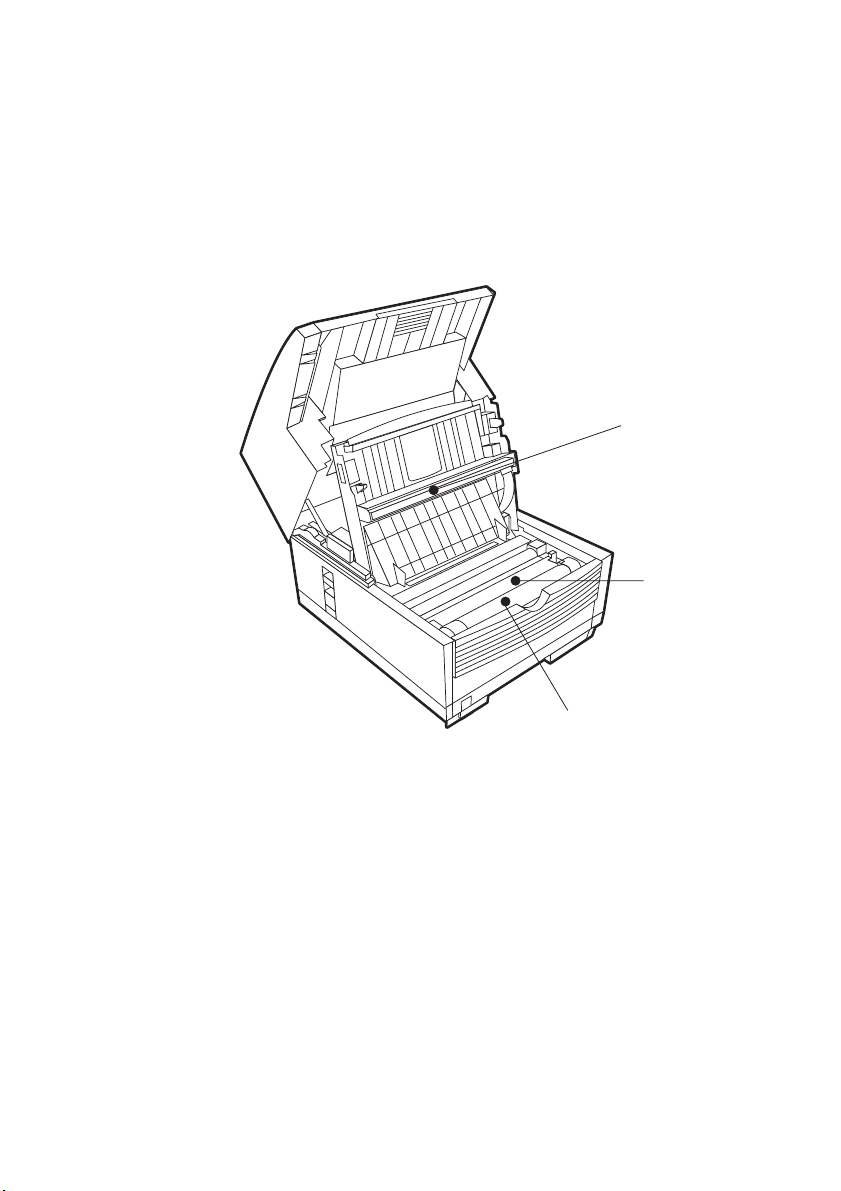
22
23
24
22 LED Print Head
— This black bar is the transfer mechanism that
writes received/copied information to the image drum. The print head
should be cleaned each time the toner cartridge is changed.
23 Image Drum Unit
— The image drum unit contains a photosensitive
drum (green in colour) which receives information from the LED print
head and transfers it to the printing paper.
24 Toner Cartridge
— This black cylinder, installed on the upper section
of the image drum unit, contains the black powder used as the
machine’s ink for printing data. Install a new toner cartridge when
prompted by a message on the display panel.
Only toner cartridges
specified for use in this machine and available from your authorised
dealer should be installed.)
Introduction 1-9
Page 18
English
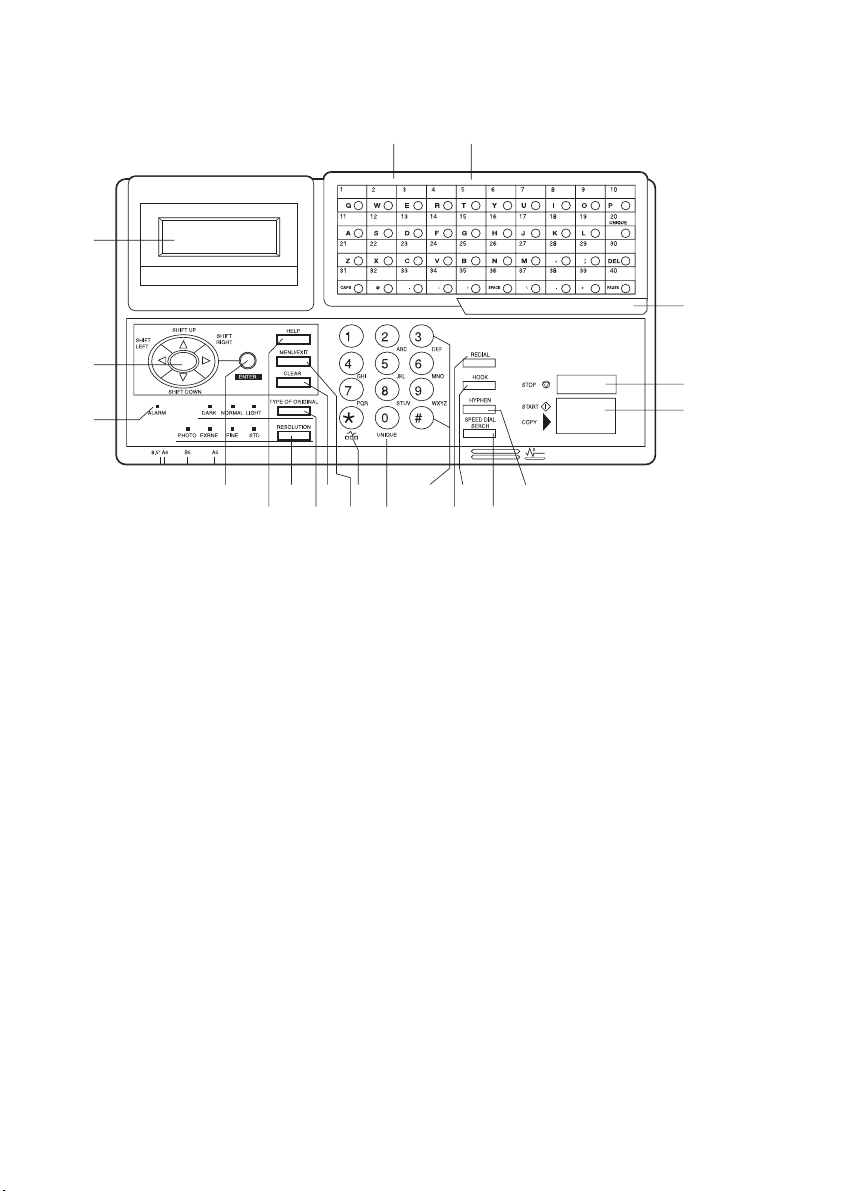
Control Panel Keys and Indicators
21 20
1
19
2
3
1 LCD panel:
4
678
5
10
9
121314
11
Shows instructions and information while the machine is
16
15
operating, or when entering information or changing settings.
2SHIFT
(
↑↓←→
) keys: Use these keys to move up, down, left or right
within the menu system or left / right when entering or editing
information.
3 ALARM indicator:
This indicator light will flash and an alarm will
sound to notify you if problems occur. To turn off the alarm indicator,
press the STOP key and correct the problem.
4ENTER key:
Use this key to choose a currently displayed menu option
or setting, or to confirm information entered.
5HELP key:
6RESOLUTION key
Press this key to print out a function list.
(PHOTO, EXFINE, FINE, STD indicator lights):
Use this key to set the desired resolution of the fax / copy after loading
your document. Use the PHOTO setting when the original document
includes half-tone images.
18
17
7 TYPE OF ORIGINAL key
(DARK, NORMAL, LIGHT indicator
lights): Use this key to set the contrast after loading the document. Use
LIGHT for originals that are too light, NORMAL for originals with
good contrast, and DARK for originals that are too dark.
1-10 Chapter 1
Page 19

English
8 CLEAR key:
Use this key to cancel ID, telephone number and
programming entries.
9 MENU/EXIT:
10 */TONE key:
Use this key to enter or exit from the menu system.
If the machine is set for pulse dialling, pressing this key
will switch from pulse to tone dialling during the current call. This key
can also be used during programming to create numbers with mixed
pulse-tone operation.
(Due to local regulations, this key may not be
available in some countries.)
11 0/UNIQUE key:
Use this key as “0” when dialling telephone numbers.
When programming the Sender ID, Location ID, etc., use this key to
enter unique characters (symbols and various European alphabetic
characters).
12 10-Key numeric keypad:
These 12 keys work like the keypad on a
standard telephone when dialling a telephone number. They are also
used when programming the machine, and to input speed dial numbers
after pressing the SPEED DIAL key. The “#” key is used for the
creation of groups of telephone numbers for batch transmission. After
a document is loaded, this key can also be used to select previously
programmed groups of telephone numbers for faxing.
13 REDIAL key:
Press this key to automatically redial the last telephone
number dialled on the machine.
14 HOOK key:
Use this key to open the telephone line for manual dialling
with the numeric keypad or external telephone handset. After pressing
this key, it will be possible to hear the dial tone and dialling code
through the machine’s speaker.
15 SPEED DIAL/SEARCH key:
After loading a document, press this
key and then enter the programmed Speed Dial (One-Touch or 2- or 3digit) number for the location. The speed dialling function will
automatically dial the telephone number and transmit the fax. After
pressing the SEARCH key, it is possible to search corresponding
location IDs when alphanumeric characters are entered. The SPEED
DIAL keycan also be used with the # key and numeric keypad for group
dialling.
16 HYPHEN key:
Use this key as the “–” character when programming
ID and PBX, public line, international telephone or Earthing / Flashing
switches. It is also used to type the “+” (for international numbers)
when entering TSI/CSI numbers.
Introduction 1-11
Page 20
English
17 START/COPY key:
document after loading the document and selecting the location, start
manual fax transmission or reception, return the machine to normal
operation from the Power Save mode, or start the copying function.
18 STOP key:
cancel the transmission of a fax (press twice within 3sec) or to cancel
an alarm (ALARM indicator light will illuminate). After loading paper
or installing a new toner cartridge or image drum unit, press this key to
cancel the alarm condition. It can also be used to return to higher
operational layers when programming the machine.
19 One-touch keypad latch to second panel (Model B only):
latch to reveal a second panel of one-touch keys.
20 One-touch keypad:
keypad functions, please refer to the next section.
21 One-touch labels:
touch key, write the name of the location on the label for the One-touch
key. (Remove the plastic covering the label, write the name using a
pencil, and then replace the cover.)
Use this key to cancel the operation shown on the display,
Use this key to initiate transmission of a
Lift this
For a detailed description of the One-touch
After programming a telephone number into a One-
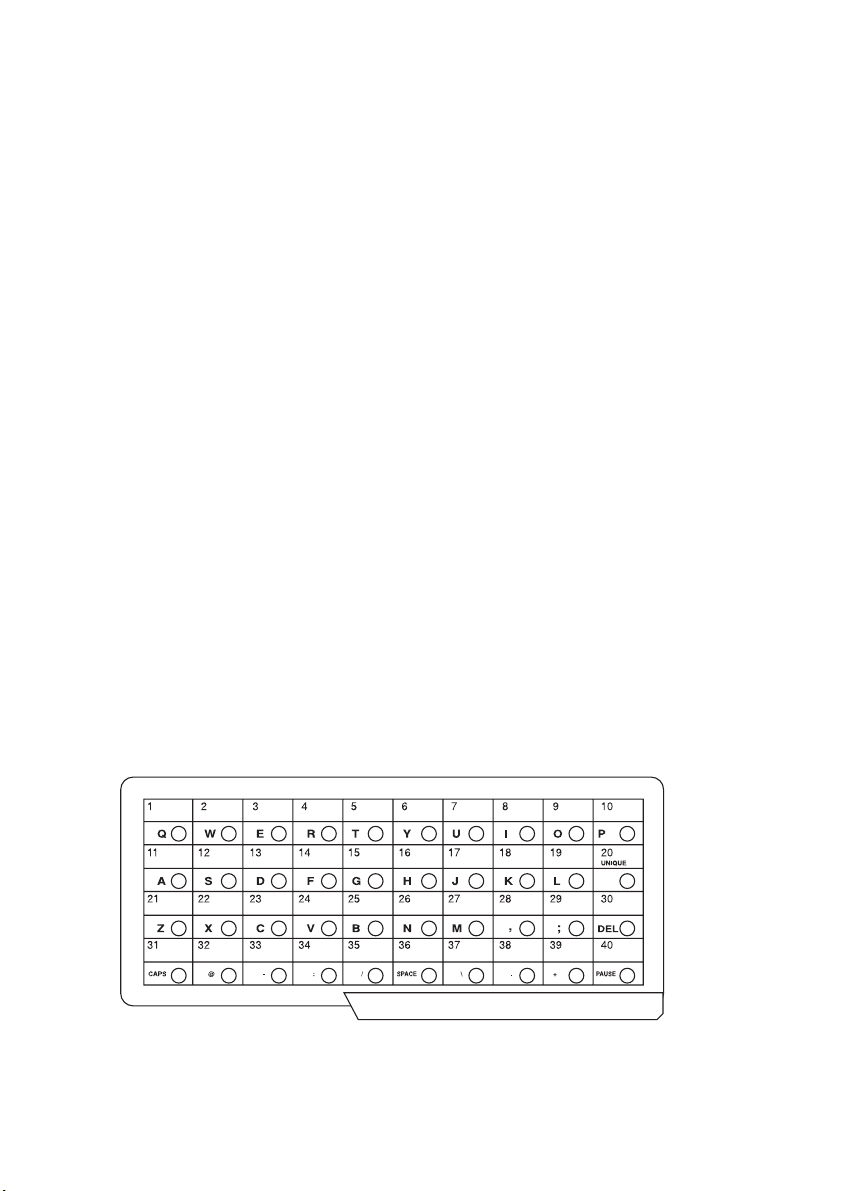
One-Touch Keypad
The one-touch keypad is the facsimile machine’s most convenient tool.
Use these keys for quick, one-touch dialling and programming of other
machine operations. You can also assign telephone numbers (up to 40
digits each) to a one-touch key, and alphanumeric names of up to 15
characters in length.
1-12 Chapter 1
Page 21

Using one-touch keys for dialling
To use one-touch keys for dialling, after the telephone number(s) for the
key have been programmed (
page 4-3
), simply load the document to be faxed and press the key for the
see “Programming Dialling Directories” on
location where the fax is to be sent. Two telephone numbers can be
programmed for each one-touch key, a primary number which is always
dialled first, and an alternate number which is automatically dialled if the
first number is busy or the call is not answered.
Using one-touch keys for search
After pressing the SEARCH key, use these keys to make an alphabetical
search for names of telephone numbers previously programmed.
Using one-touch keys for programming
The one-touch keys are also useful for programming names and telephone
numbers in the machine’s memory. In addition to the alphanumeric keys,
a number of special keys are provided for programming convenience:
English
Alaphabet keys
(one-touch keys #1 to #27, except #20): When
programming the Sender ID or Location ID, use these keys to enter
alphabet characters.
Special Character key
(one-touch key #20): Use the same as the “0” of a
10-keypad, and for entering symbols and special European alphabetic
characters.
DEL key
(one-touch key #30): Use this key to delete characters at the
position of the cursor in the display panel when entering ID, telephone
numbers or programming functions.
CAPS Key
(one-touch key #31): Use this key to switch between
uppercase and lowercase when entering alphanumeric characters.
SPACE key
(one-touch key #36): Use this key to enter spaces when
programming the machine. Unlike the PAUSE key, spaces provide easier
reading only and have no effect on dialling characteristics.
(one-touch key #39): Each fax number entered or programmed into
+ key
the machine can be up to 40 digits long. If there is a need to dial a number
longer than 40 digits, it is possible to dial the number using any
combination of Speed Dial numbers or the numeric keypad. To enter a
chain dial number into a Speed Dial number, press the + key at the 40th
position of the first part of the number to indicate it is a chain dial number,
then complete the process by following the procedures required for
Introduction 1-13
Page 22

English
inputting another Speed Dial number (in which the second part of the
number should be entered).
PAUSE key
second pauses in dialling when programming telephone numbers. For
example, use this key to tell the machine to wait for an outside or
international line to open. (Pauses in a telephone number dialling sequence
are indicated by a “P”.)
Accessing Second Panel of One-Touch Keys (Model B only)
To access the second panel of one-touch keys (41-80) grasp the latch at the
bottom of the keypad and lift up on the main panel, swinging it up and to
the rear. After pressing the desired key(s), close the main panel.
(one-touch key #40): Use this key to enter automatic 3-
Signal Tones
The machine emits a number of sounds to inform the user of specific
conditions.
Key Select tone
Error tone
three short beeps. If there is a problem with operations during
communication, the machine will emit five long beeps. Press the STOP
key to turn the error tone off, and then print a Message Confirmation
Report to check the source of the problem. To do this, press the COPY key
twice in succession with no documents loaded.
— This is a short beep emitted each time a key is pressed.
— If an inappropriate key is pressed, the machine will emit
End of Session tone
machine will emit a long beep to confirm that there were no errors or
problems in the communication.
Off-Hook Alarm tone
handset, and if the receiver of the handset is left out of the cradle when not
in use, the machine will emit an intermittent warbling sound. To turn off
the sound, return the receiver to its cradle and press the STOP key.
1-14 Chapter 1
— At the end of each successful faxing session, the
— If the machine is equipped with a telephone
Page 23

Chapter 2
Facsimile Functions
In this chapter…
The LCD display and some of the control panel keys provide you with
fingertip control of the operation of your fax machine. Although it may
seem a little complicated at first, you will soon become familiar with the
control menu system, described fully in this chapter.
Menus and Functions . . . . . . . . . . . . . . . . . . . . . . . . . . . 2-3
Menu level 1 . . . . . . . . . . . . . . . . . . . . . . . . . . . . . . . 2-3
Menu level 2 . . . . . . . . . . . . . . . . . . . . . . . . . . . . . . . 2-3
Menu level 3 . . . . . . . . . . . . . . . . . . . . . . . . . . . . . . . 2-4
Menu level 4 . . . . . . . . . . . . . . . . . . . . . . . . . . . . . . . 2-4
Accessing Functions. . . . . . . . . . . . . . . . . . . . . . . . . . . . 2-5
Step Access . . . . . . . . . . . . . . . . . . . . . . . . . . . . . . . . 2-5
Speed Access. . . . . . . . . . . . . . . . . . . . . . . . . . . . . . . 2-5
English
Facsimile Functions 2-1
Page 24

English
2-2 Chapter 2
Page 25

The programming keys on the left side of the control panel are designed to
provide simple operation of the numerous functions provided by the
machine. The following offers a brief explanation of how to use these
keys.
Menus and Functions
The menu system is like a large table with four columns and many rows.
Each function of your facsimile machine is arranged across one row of the
table. Some functions require all four columns, while others only need two
or three. The MENU/EXIT, ENTER, and the four SHIFT keys (
keys allow navigation up, down and across the table for selecting functions
and their settings.
Each major function category is listed in the left-most column (level 1) of
the table. When you first press the MENU/EXIT key you enter the menu
system at this level. The function category (row) at which you enter
depends on whether or not a document is loaded in the document feeder.
Menu level 1
When first switched on, the machine will wait in standby mode, showing
the time, machine mode and amount of memory available. By pressing
MENU/EXIT, the machine will enter the menu at level 1(Menu mode).
↑ ↓ → ←
English
)
To navigate this layer:
or
↑
↓
or STOP Return to the standby mode;
←
ENTER or
→
Move cursor up or down to the desired function;
Enter menu level 2 for the function selected.
Menu level 2
At this level up/down navigation is only possible within the function
selected at level 1. (To move to a completely different function category
press the ← or STOP key to move back to level 1, and then use the ↑ and
keys to move up or down the menu table to the required function.)
↓
To navigate this level::
or
↑
↓
or STOP Return to level 1;
←
ENTER or
Facsimile Functions 2-3
→
Move cursor up or down to the desired function;
Enter level 3 for the function indicated.
Page 26

English
Menu level 3
This level lists functions or settings specific to the function chosen at
level 2. If there is a number to the left of the function title, this function can
be accessed by a shortcut entry (
To navigate this level::
see “Speed Access” on page 2-5
).
or
↑
↓
or STOP Return to level 2;
←
ENTER or
→
Move cursor up or down to the desired function;
Enter level 4 for the function indicated.
Menu level 4
Where a further level of detail is required, level 4 lists functions and
settings specific to the function chosen at level 3. If there is a number to
the left of the function title, the function can be accessed by a shortcut
entry (
see “Speed Access” on page 2-5
To navigate this level::
or
↑
↓
or STOP Return to level 3;
←
ENTER or
→
Notes:
1 Pressing the STOP key at any time will return to the
preceding level.
2 Pressing MENU/EXIT at any time during the
programming process will exit from the menu system
and return the machine to standby mode.
Move cursor up or down to the desired function;
Determines or registers the function or setting
indicated and returns to the menu options in
level 3 or to standby mode.
).
2-4 Chapter 2
Page 27

Accessing Functions
English
There are two methods for accessing functions:
(speed)
access.
step access
and direct
Step Access
To access functions in a stepwise manner, the procedure is like that
described for navigating the menu levels. Begin by pressing MENU/EXIT,
and then use the programming keys to locate, enter and set the desired
function.
Speed Access
If the function is assigned a speed access number, typing this number in at
the menu display prompt at level 1 will bring up the setting or registration
display in level 4 for direct access.
Notes:
1 Speed access numbers are only assigned to SETUP
menu functions (level 4.)
2 Speed access can only be initiated from the level 1.
3 Numbers must be entered in 2-digit form (i.e., 00-99)
4 Speed access numbers are set at the factory and cannot
be changed. Some numbers are not available depending
on the country in which a machine was purchased and
whether or not the machine is equipped with the
appropriate option(s).
Table 2-1: Speed access numbers and their assigned functions
00 Clock Adjustment 01 TSI/CSI 02 Sender ID 03 Personal Box
04 Memory Password 05 Restrict ID 06 ISDN TID 07 ISDN Sub. No.
10 Auto Answer Mode 11 Monitor Volume 12 Buzzer Volume 13 User Language
14 Remote Diagnosis 15 TX Mode Default 16 No Toner Memory
18 Instant Dial 19 Restrict Access 20 ECM Function 21 Closed Network
22 Toner Save 23 Sender ID 24 1’ST Paper Size 25 2’ND Paper Size
26 Power Save Mode 27 ISDN Dial Mode 28 Speech Receive 40 Redial Tries
41 Redial Interval 42 Auto Start 43 Dial Tone Detect 44 Busy Tone Detect
45 MF/DP 46 Pulse Dial Rate 47 Pulse Make Ratio 48 Pulse Dial Type
49 MF Tone Duration 50 PBX Line 51 Flash/Earth/Normal 52 Dial Prefix
60 Incoming Ring 61 Remote Receive 62 T/F Timer Program 63 Continuous Tone
64 PC/FAX Switch 65 CNG Count 66 Ring Response 67 Distinctive Ring
70 MCF (Single Loc.) 71 MCF (Multiple Loc.) 72 Image in MCF 73 Error Report (MCF)
80 Auto Tray Switch 81 Paper Size Check 82 LAN Print Timeout 83 IP Address
84 Subnet Mask 85 Default Gateway
.
Receive
17 Memory Full Save
Some of the functions in this list cannot be accessed by the user. If
required, consult your supplier for details.
Facsimile Functions 2-5
Page 28

English
2-6 Chapter 2
Page 29

Chapter 3
Installation
In this chapter…
The information in this chapter will guide you through the installation and
initial setup of your machine. Certain basic settings need to be made, such
as entering the correct time and date. Some or all of these operations may
be performed by a professional installer. However if you need to perform
these tasks yourself, you will find the information you need in this chapter.
Getting Started . . . . . . . . . . . . . . . . . . . . . . . . . . . . . . . . 3-3
Where to Install Machine . . . . . . . . . . . . . . . . . . . . . 3-3
Unpacking . . . . . . . . . . . . . . . . . . . . . . . . . . . . . . . . . 3-3
Set Up . . . . . . . . . . . . . . . . . . . . . . . . . . . . . . . . . . . . 3-4
Inserting Toner Cartridge . . . . . . . . . . . . . . . . . . . 3-4
Attaching Document Stacker . . . . . . . . . . . . . . . . 3-6
Connecting Telephone Line . . . . . . . . . . . . . . . . . 3-7
Connecting External Telephone/
Answering Machine . . . . . . . . . . . . . . . . . . . . . . 3-7
Connecting Power Cable . . . . . . . . . . . . . . . . . . . 3-8
Loading Paper. . . . . . . . . . . . . . . . . . . . . . . . . . . . 3-9
Paper Stacker Settings . . . . . . . . . . . . . . . . . . . . . 3-10
Clock Adjustment. . . . . . . . . . . . . . . . . . . . . . . . . 3-11
Facsimile ID . . . . . . . . . . . . . . . . . . . . . . . . . . . . . 3-11
Machine Settings . . . . . . . . . . . . . . . . . . . . . . . . . . . . . . 3-13
Answering Modes . . . . . . . . . . . . . . . . . . . . . . . . . . . 3-13
Dial/Incoming Call Parameter Settings. . . . . . . . . . . 3-15
Dial Parameters . . . . . . . . . . . . . . . . . . . . . . . . . . 3-15
Incoming Call Parameters . . . . . . . . . . . . . . . . . . 3-16
Other Basic Parameters . . . . . . . . . . . . . . . . . . . . . . . 3-17
Paper-Size Setting . . . . . . . . . . . . . . . . . . . . . . . . . . . 3-17
Message Confirmation Report Options. . . . . . . . . . . 3-18
ISDN G4 Options . . . . . . . . . . . . . . . . . . . . . . . . . . . 3-18
English
Installation 3-1
Page 30

English
Connecting to a PBX . . . . . . . . . . . . . . . . . . . . . . . . .3-19
MFP PC Interface Kit . . . . . . . . . . . . . . . . . . . . . . . . .3-20
Network Print Kit . . . . . . . . . . . . . . . . . . . . . . . . . . . .3-20
ISDN G4 Board . . . . . . . . . . . . . . . . . . . . . . . . . . . . .3-20
3-2 Chapter 3
Page 31

Getting Started
To install your new facsimile machine, please thoroughly read and follow
the instructions provided in this chapter. There are a number of initial
settings that should be made before your fax can operate properly. Please
complete these steps before using the machine.
If you have purchased an option package with the machine, please refer to
the documentation received with that option as well as to the appendices
in this user’s guide.
Where to Install Machine
Place the machine in a dust-free location out of the path of direct
✓
sunlight.
Allow sufficient space on each side of the machine to ensure adequate
✓
ventilation.
Make sure that both power and telephone outlets are nearby and easily
✓
accessible.
Choose a location where relative humidity remains between 20-80%
✓
and temperature between 10-32°C (50-90°F).
English
Unpacking
Before beginning to set up the machine, confirm that all of the items listed
below were included in the facsimile carton. Remove the contents and
place the items on a sturdy, clean surface.
Facsimile unit
✓
Toner cartridge
✓
Image drum unit (inside facsimile unit)
✓
AC power cable
✓
Telephone line cable
✓
Document stacker
✓
This user’s guide
✓
Please refer to the illustration in Chapter 1.
Note:
If there is any item missing, immediately contact your supplier.
Installation 3-3
Page 32
English
Set Up
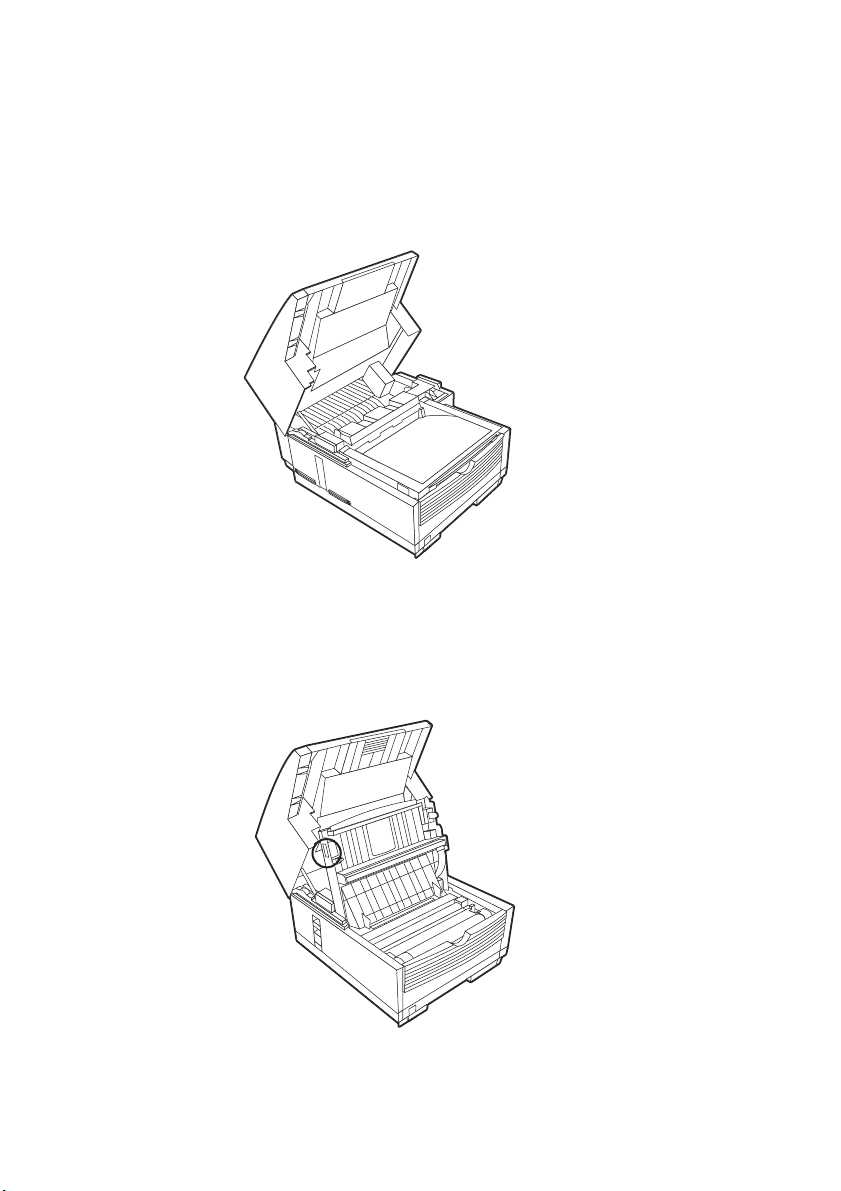
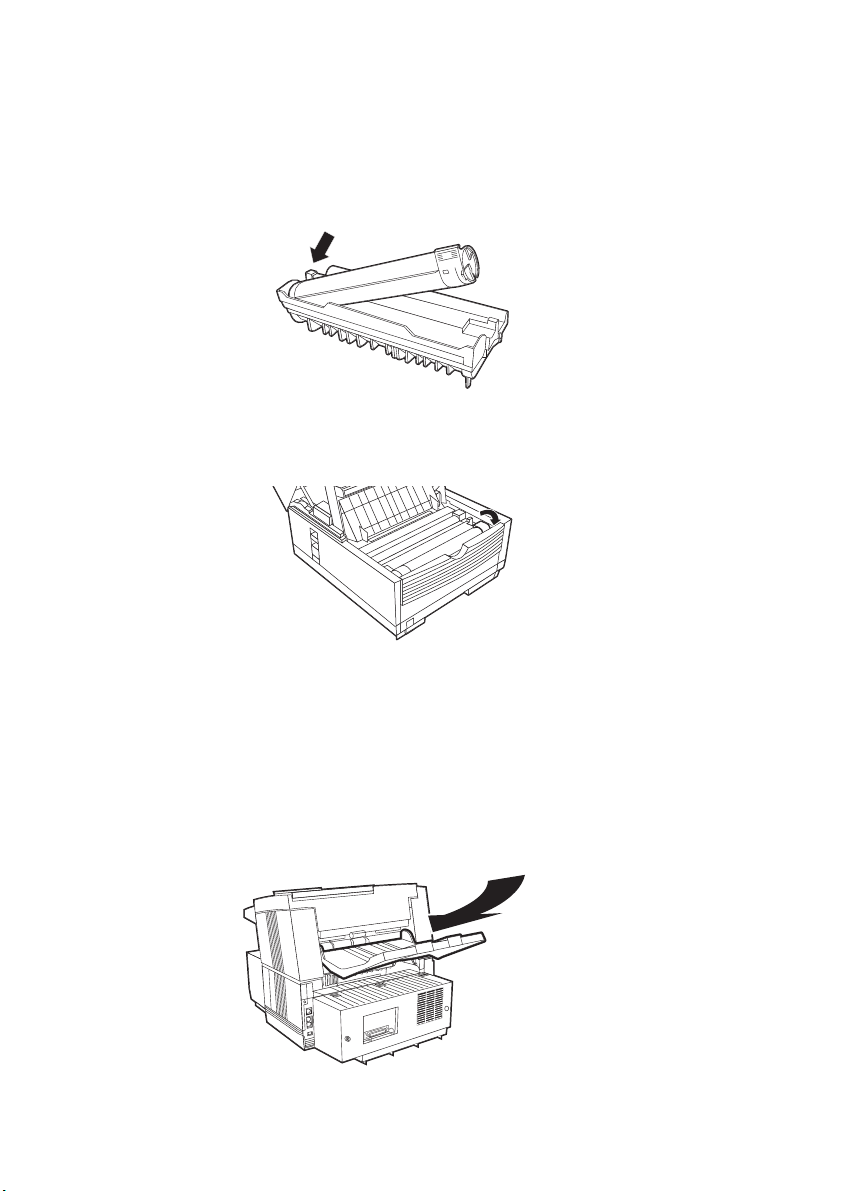
Inserting Toner Cartridge
Using both hands, carefully lift up on the document tray until it reaches
1
a semi-upright position. (The top half of the facsimile unit moves
upward and back on hinges to expose the copy stacker.)
To open the image drum/toner cartridge compartment, firmly press on
2
the release buttons on both sides of the copy stacker, releasing the
compartment latch. Open the compartment by lifting up on the copy
stacker section.
3-4 Chapter 3
Page 33
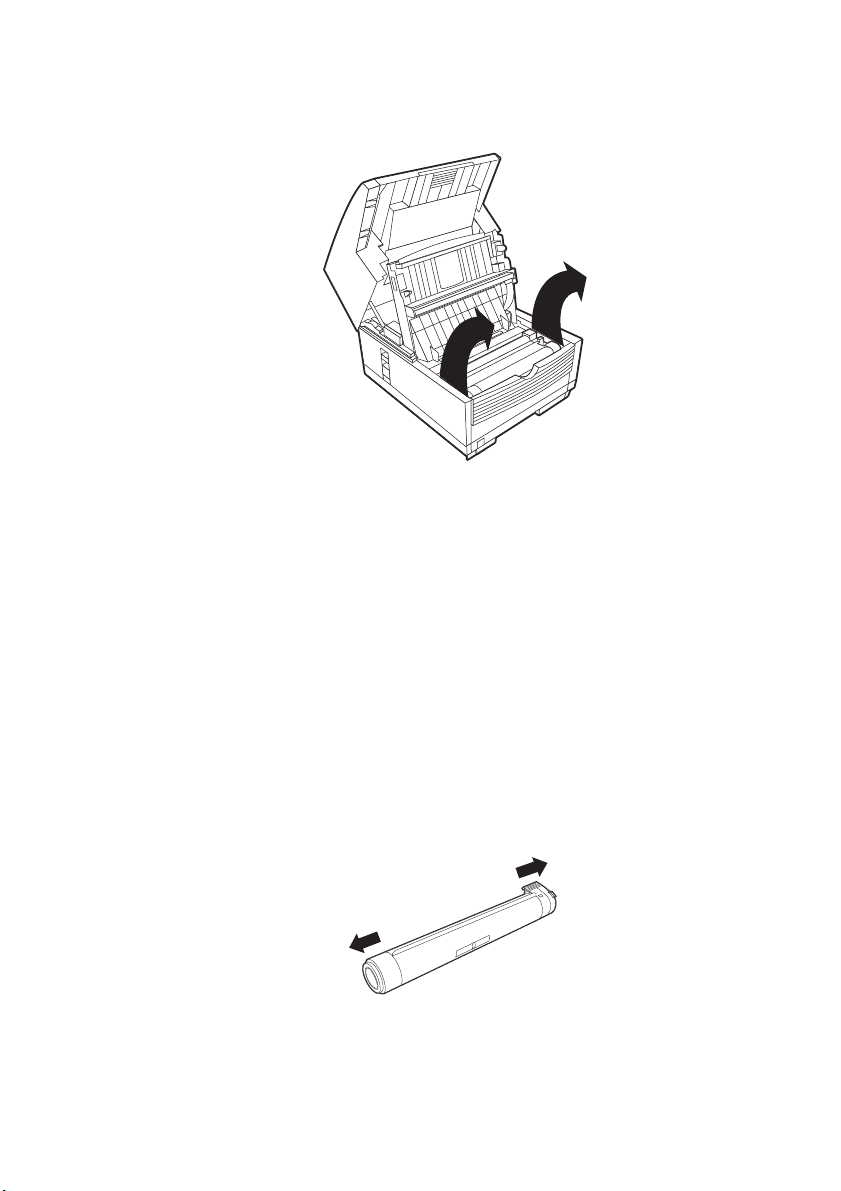
Only touching the image drum unit at the ends, carefully lift it out of
3
the compartment. Set the unit on a clean, dry surface out of direct
sunlight.
Remove the protective sheet from the image drum unit, and the packing
4
material from the toner well.
Place the image drum unit back into the machine. Press down firmly on
5
the locations marked “PUSH” (immediately above the toner well) until
the image drum snaps into place.
English
Caution:
Never expose the image drum unit for more than 5 minutes. Never
expose the image drum unit to direct sunlight. Always hold the
image drum unit by the ends. Never touch the surface of the green
drum in the image drum unit.
Before removing the toner cartridge from its packaging, check to
6
confirm that it is the correct cartridge for the machine. After confirming
it is the correct toner cartridge, remove it from the packaging and gently
shake it from side to side to evenly distribute the toner powder.
Caution:
This machine will only operate using the correct toner cartridges
specified for this facsimile machine. The use of any other toner
will result in machine malfunction, and display an operation error.
Installation 3-5
Page 34
English
Carefully peel the white plastic seal away from the bottom of the toner
7
cartridge. With the ridged side facing up and grey lever on the right,
insert the toner cartridge into the toner well left end first.
Caution:
Please be certain that the cartridge is not inserted backwards.
With the cartridge in place, push the grey lever forward to secure it and
8
release the toner.
Close the compartment latching the cover securely, return the upper
9
section of the machine to operating position, and reattach the document
stacker to the rear of the machine.
Attaching Document Stacker
Attach the document stacker at the document exit on the back of the
machine using the latching mechanism provided.
3-6 Chapter 3
Page 35
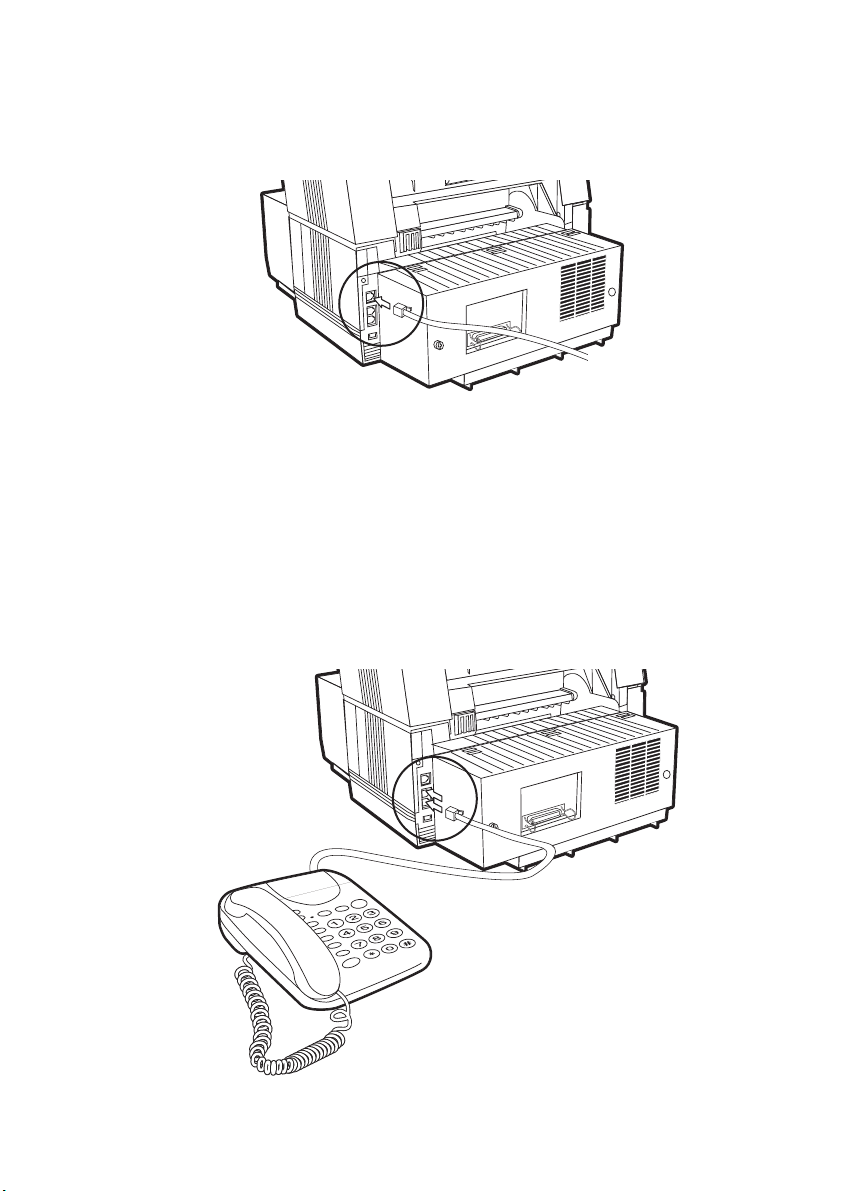
Connecting Telephone Line
Plug one end of the telephone line cable into the LINE socket
1
(uppermost telephone socket) on the rear of the machine.
Plug the other end of the cable into the wall telephone socket.
2
Note:
Be sure to connect this line before connecting external telephone or
optional handset to the machine.
Connecting External Telephone/Answering Machine
Plug the telephone cable into the TEL socket (located immediately
1
below the LINE socket) on the rear of the machine. (In certain countries
it may be necessary to use a telephone plug adapter).
English
Installation 3-7
Page 36

English
Notes:
1 If connecting both a telephone and answering machine, first
connect the answering machine to the facsimile machine, and
then connect the external telephone to the answering machine.
2 The TAD mode must be set in the “ON” position for an answering
machine to work with this facsimile machine. Please refer to
“Dialling/Incoming Call Modes” in this chapter.
Connecting Power Cable
WARNING:
BEFORE CONNECTING THE POWER CABLE, PLEASE
ENSURE THAT THE POWER SWITCH IS IN THE OFF
POSITION (O IS DEPRESSED).
Plug the corresponding end of the power cable into the power inlet on
1
the rear of the machine.
Plug the other end of the power cable into an earthed AC power socket.
2
WARNING:
CHECK TO CONFIRM THAT THE VOLTAGE OF THE
POWER OUTLET IS COMPATIBLE WITH THE OPERATING
VOLTAGE OF THE MACHINE. INSUFFICIENT OR
EXCESSIVE MAINS VOLTAGE WILL DAMAGE THE
MACHINE AND MAY ALSO BE HAZARDOUS TO THE
MACHINE OPERATOR.
Turn the power switch to the ON position (I depressed). After the
3
warm-up cycle, the time and current answering mode will be shown on
the display. The machine is now in standby mode.
3-8 Chapter 3
Page 37
Loading Paper
The standard paper tray can hold up to 250 sheets of standard-weight (75g/
m² – 20lb) paper. For best results, use paper specifically made for laser
printers or photocopiers. The machine is set for universal adjustment,
allowing the use of A4, letter or legal sized paper. The machine
automatically reduces the vertical length of received page images to fit on
the paper installed.
Notes:
1 Reduction down to 75% of the size of the original; e.g., if the
paper tray is loaded with A4 or letter-sized paper, a document
sent on legal paper will be reduced to fit on the paper loaded in
the machine.
2 Factory setting is for A4 paper. If another paper size will be used,
change the 1’ST PAPER SIZE setting of the user functions to
match the appropriate paper size.
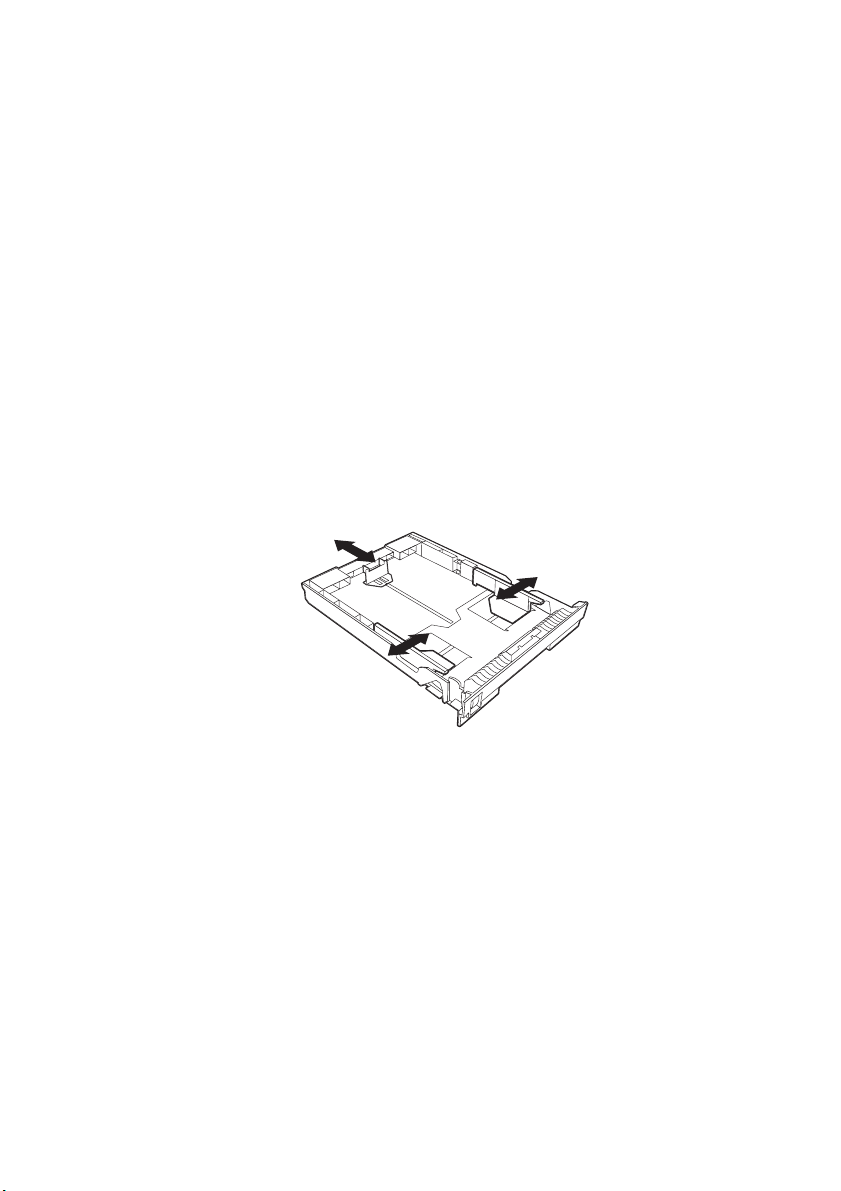
Remove the paper tray from the machine.
1
Adjust the paper guides to the width of the paper to be loaded.
2
English
Lift up on the paper length adjustment guide and set it to the length of
3
the paper. (If using legal paper, fold down the extension at the rear of
the tray.)
Load the paper, face down, into the tray (up to 250 sheets).
4
Return the paper tray to its slot, and push it in gently but firmly until it
5
latches in place.
Note:
Be sure the paper fits under the tabs at both edges of the tray. Do not
fill past the Paper Full marker.
Installation 3-9
Page 38
English
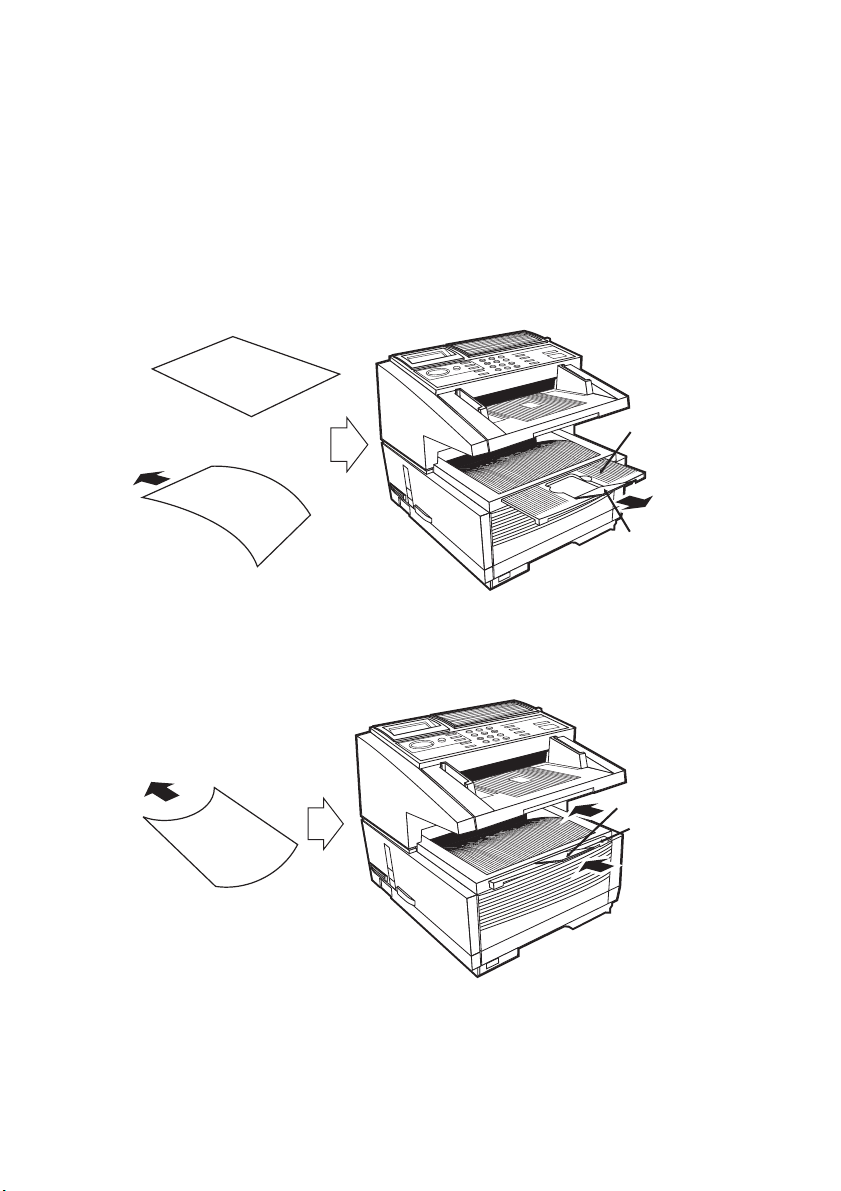
Paper Stacker Settings
The paper stacker should be set up to match the paper quality used in the
fax machine. If the paper stacker is not set correctly or if the paper is not
within the specified stacking capacity, the paper may not stack properly or
paper jams may occur. (If your paper has curled edges this may restrict the
stacking capacity of the machine.)
For paper with no curl or downward curling paper:
tray (1) and fold out the sub-stacker (2).
For upward curling paper:
and push the sub-tray back in again.
pull out sub-tray (1), fold out sub-stacker (2)
pull out the sub-
1
2
2
1
3-10 Chapter 3
Page 39

Clock Adjustment
To ensure that the correct date and time appear on transmitted and received
faxes, and also to enable use of the many time-sensitive features of your
fax machine, the system clock needs to be set. This section describes how
to set the correct date (mm/dd/yyyy or dd/mm/yyyy format set by product
region) and time (00:00-23:59). Speed access no. 00.
Press MENU/EXIT to enter the system menu.
1
Input speed access no. (00). The time and date prompt will be
2
displayed.
Input current date (xx/xx/xxxx) and time (hh:mm) using numeric keys
3
(0-9), then press ENTER.
Press MENU/EXIT to return to standby mode.
4
Note:
The input of invalid data (for example, the wrong date format was
used) will render the ENTER key ineffective.
Facsimile ID
The machine will use the information input under this function to identify
itself during communications. In most countries the programming of this
information into the machine before use is a legal requirement. In certain
countries this information must be set by the installation engineer and is
not user adjustable. In such cases the adjustments described here may not
appear in the standard menu.
English
TSI/CSI:
The telephone number assigned to this machine. It will be
printed on the top of faxes sent and appear on the displays and reports of
other facsimile machines communicated with. A TSI/CSI can be up to 20
characters long. Speed access no. 01.
Sender ID:
A descriptive title (usually the machine location or name of
company or office). This information will be printed at the top of every fax
sent. Up to 32 characters can be entered; the first 16 characters of the
Sender ID are also assigned as Personal ID, which may appear on the
displays or reports of other facsimile machines communicated with. Speed
access no. 02.
Press MENU/EXIT to enter the menu.
1
Input speed access no. 01 (TSI/CSI), and wait for the TSI/CSI prompt
2
message to appear.
Installation 3-11
Page 40

English
Input up to 20 numbers and characters (0-9/Hyphen/Space/+), press
3
ENTER.
Press
4
can also be accessed from the main menu by entering its speed access
code, 02.)
Input up to 32 numbers and characters (0-9/*/#/a-z/A-Z/Pause/Hyphen/
5
Space/+), press ENTER.
Press MENU/EXIT to return to standby mode.
6
to select Sender ID, and then press ENTER or →. (Sender ID
↓
3-12 Chapter 3
Page 41

Machine Settings
Answering Modes
The machine has a number of answering modes which determine how
incoming calls (both fax and voice) are handled. The current answering
mode is shown on the display when the machine is in standby mode. The
most appropriate mode varies depending on how the machine is used and
the external telephone devices connected to it. Review the answering
modes listed below, and then program the machine to the mode which best
meets your requirements. Speed access no. 10.
English
Auto Receive Mode (FAX):
connected to a telephone line dedicated to fax communications. The
machine will assume that all incoming calls are faxes and automatically
process them as such.
Manual Receive Mode (TEL):
telephone line is used for voice and fax communications and the majority
of incoming calls are voice oriented. Each time someone calls, the
machine will emit a ring like a telephone (ring disabled if ISDN board is
installed). The calls can be taken using an external telephone (or the
optional telephone handset) connected to the machine. If a fax tone is
heard when the receiver is picked up, simply press the START key and
then hang up the telephone to receive the fax. In this mode no incoming
calls will be answered automatically.
Telephone/Fax Automatic Switch Mode (T/F):
incoming calls are a mixture of fax and voice communications. In this
mode, the fax detects whether or not the incoming call is fax or voice
oriented. If the call is from another facsimile machine, the machine
switches to FAX and receives the message. If the call is voice oriented, the
machine will emit a ring like a telephone, and if the call is not answered it
will switch to the FAX to allow the calling party to send a fax manually.
This mode is not available if the optional ISDN G4 board is installed.
Telephone Answering Device/Fax Automatic Switch Mode (TAD):
This mode should be used if an answering machine is connected to the
facsimile machine. Like T/F, TAD detects whether or not the incoming
call is fax or voice oriented. If it is a fax, the machine will receive the
message without activating the answering machine. If the incoming call is
a voice communication, the machine will ring as it does when in TEL. If
the call goes unanswered, the machine transfers the call to the answering
machine, allowing the calling party to leave a message. If the caller
This is the best mode if the machine is
This is the best mode if the same
The best mode if
Installation 3-13
Page 42

English
decides to send a fax, the machine automatically switches modes to receive
the fax.
G4 board is installed.
Note that this receive mode is not available if the optional ISDN
Note:
TAD is normally not activated. To have it activated, please contact
your supplier.
Memory Reception Mode (MEM):
communications is stored in memory even if there is paper loaded in the
machine. The PRINT OPERATION function is used to print out the data
stored in memory when the machine is in MEM.
Note:
If a memory password has been set (see ”Memory Password” on
page 6-6), this mode cannot be changed to another mode without
first entering the password. After entering the password and
switching between modes, there is no need to enter the password
again when printing data from memory without returning to the
standby mode. However, faxes received and marked for confidential
or polling will be stored in memory and not forwarded.
Forwarding Mode (FWD):
receive all fax communications into memory, and then automatically send
the messages to the telephone number programmed into the Call
Forwarding function (
PC Mode (PC, optional):
is connected to a personal computer via the optional multifunction
peripheral (MFP) software. When activated, the machine does not respond
to the signal, but forwards it directly to the computer. Fax reception by the
computer is enabled upon receiving the call signal.
Note:
The optional MFP driver must be installed in the computer to use
this function.
When set to this mode the machine will
see ”Call Forwarding” on page 5-13
This mode is only available when the machine
Data from incoming fax
).
To Set Answering Mode:
Press MENU/EXIT to enter the menu.
1
Input speed access no. 10 (Auto Answer), and wait for the Auto Answer
2
prompt in the display
Press
3
Press MENU/EXIT to return to standby mode.
4
3-14 Chapter 3
or ↓ to select the desired mode, press ENTER.
↑
Page 43

Dial/Incoming Call Parameter Settings
Your facsimile machine offers a multitude of functions which reduce the
time required for manual operation and make fax communications more
efficient. Setting the following options before beginning use of the
machine will ensure that it performs according to expectations during
actual operation.
Note:
User adjustment of some of these functions is not permitted in some
countries. In such cases those functions will not be available for
setting.
Dial Parameters
English
Redialling Tries:
response it can automatically redial several times. Redialling tries are set
in one-try steps, the number of which is adjusted to meet the regulations of
the country where the machine is installed (France, 1-5 tries; other
countries, 0-10 tries). Speed access no. 40.
Redial Interval:
successive redial tries. The time interval (in 1-minute units) before
redialling is set to meet the regulations of the country where the machine
is installed (France, 1-12min; other countries, 1-6min). Speed access no.
41.
Auto Start:
begin dialling as soon as a location is selected by pressing a One-Touch
key or entering another Speed Dial number. There is no need to press the
START key. Available settings are ON and OFF. Speed access no. 42.
Dial Tone Detect*:
detect a dial tone before dialling. A dial tone must be detected if set to ON,
and need not be detected if set to OFF. Speed access no. 43.
Busy Tone Detect*:
tone when sending a fax. The available settings are ON and OFF. Speed
access no. 44.
Tone/Pulse (MF/DP)*:
machine. There are two common dialling methods; dialling with
monotone pulses (pulse dialling, DP) and dialling with different tones
(tone or multiple frequency (MF) dialling). Available settings are MF and
DP. Speed access no. 45
If the machine dials a number but fails to obtain a
This is the time that the machine waits between
With this function set to ON, the machine will automatically
This function allows the machine to wait for and
This function allows the machine to detect a busy
This function controls the dialling method of the
Installation 3-15
Page 44

English
MF (Tone) Duration*:
If the machine is set to MF, this function controls
the duration of the tones used for dialling (tone duration varies by
country). Available settings are 75, 85 and 100ms. Speed access no. 49.
PBX Line*:
This function must be turned on if the machine is connected
to a PBX. When the function is activated and the access digit function
programmed, the machine will recognise the access digit in the PBX to
obtain an outside line. After dialling the access digit, the machine will
pause to wait for an outside line before dialling the remainder of the
telephone number. Available settings are ON an OFF. Speed access no. 50.
Flash/Earth/Normal*:
If the machine is connected to a PBX, this
function sets the method of switching between the flash and earth modes
for PBX lines. Available settings are Normal, Flash and Earth. Speed
access no. 51.
Dial Prefix*:
If the machine is connected to a PBX, this function is used
to inform the machine the access number to use for obtaining an outside
line from the PBX. Up to four digits can be input for the prefix number.
Speed access no. 52.
* Choice cannot be made when ISDN G4 board is installed.
Incoming Call Parameters
Incoming Ring:
This function offers a soft ringing sound through the
machine’s built-in speaker when a call is received. If the function is set to
OFF, the machine will not emit a ringing sound to announce incoming
calls. If the function is set to ON, the machine will only emit a ringing
sound when the machine is set to TEL (manual receive mode) or Ring
Response is set to 5-20sec (except 1 ring). When set to DRC (Distinctive
Ring feature), the machine will emit a ringing sound for each incoming
call with the same tone even if the Distinctive Ring parameter is set to ON.
Available settings are ON, OFF and DRC. Speed access no. 60.
Remote Receive:
This function allows remote switching from telephone
to fax mode to receive an incoming fax. If you answer an incoming call on
a connected external telephone and hear a remote fax machine, you can
switch your fax machine into fax receive mode without having to press the
START key. Use the keypad of the optional handset or external telephone
to enter the remote receive number programmed into the machine.
Available settings are: OFF, 00, 11, 22, 33, 44, 55, 66, 77, 88, 99, ** or ##.
Speed access no. 61.
3-16 Chapter 3
Page 45

English
Continuous Tone:
for a continuous tone at the end of receiving a fax. Pressing the STOP key
turns off the tone. Speed access no. 63.
PC/FAX Switch:
will automatically switch to FAX when fax reception by a connected
personal computer is not possible (for example, if the PC is turned off or
your fax application is not running). When set to ON, the machine will
automatically switch to FAX. Fax reception is disabled when set to OFF.
Available settings are ON and OFF. Speed access no. 64.
When this function is set to ON, it is possible to choose
This function determines whether or not the machine
Other Basic Parameters
Monitor Volume:
operations. This function provides a 5-level audio adjustment of the
speaker (OFF, Low, Mid, High-Mid, High). Speed access no. 11.
Buzzer Volume:
a fax communication ends or, if an external telephone is connected, when
the receiver is not properly returned to its cradle after use. The settings are
Low, Middle and High. Speed access no. 12.
User Language:
the factory. The language programmed will be used for showing captions
on the display and for printing reports. Speed access no. 13.
Note:
Your supplier may be able to provide additional languages for
installation.
The machine is equipped with a speaker for monitoring
The machine is equipped with a buzzer that sounds when
Two language variations were installed in the machine at
Paper-Size Setting
The machine is capable of supporting two different paper settings (when
the 2nd-Tray option is installed).
1’ST Paper Size:
used in the machine. Speed access no. 24.
2’ND Paper Size:
cannot be made unless 2nd-Tray option is installed. Speed access no. 25.
Installation 3-17
Use this function to set the size of the paper primarily
Use this function to set a secondary paper size. Setting
Page 46

English
Message Confirmation Report Options
The Message Confirmation Report (MCF) is a very convenient feature
often used on a daily basis to ensure that faxes were sent or arrived at the
proper destinations. The following functions are for setting MCF
parameters.
MCF. (Single-Loc):
automatically for single location transmissions. When set to OFF, no
report will be printed out. Speed access no. 70.
MCF. (Multi-Loc):
transmission MCF’s will be printed automatically. When set to OFF, no
report will be printed out. Speed access no. 71.
Image in MCF. :
transmitted will be printed in the MCF. When set to OFF, no image will be
printed in the report. Speed access no. 72.
Err. Report (MCF.):
printed if a fax communication does not end with the service code 0000
(indicates a successful transaction). When set to OFF, the report is not
printed out automatically. Speed access no. 73.
Set in the ON state, a MCF will be printed out
Set in the ON state, single and miltiple location
Set in the ON state, a portion of the first page of the fax
Set in the ON state, an error report is automatically
ISDN G4 Options
If the machine comes installed with an ISDN G4 board, the following
parameters must be set prior to beginning fax operations. Additionally, the
incorporation of the ISDN board also disables a number of the parameters
set for analogue operations (see comments with those parameters listed).
ISDN Dial Mode:
method, either G4 or G3, when using the 10-key pad to dial. When set to
G4, communication will automatically take place at G4 if the remote
machine is G4 compatible. Speed access no. 27.
This mode is for setting the default communication
Speech Receive:
communications from the network. When set to OFF, all voice
communication signals are rejected automatically. Speed access no. 28.
ISDN Terminal ID (TID):
numeric digits for the country code, 20 numeric digits for the ISDN
subscriber number, and 10 alphabetic characters for the ISDN ID
(subscriber code). Speed access no. 06.
Note:
At least one of these three items must be input for this parameter.
3-18 Chapter 3
Set to ON, this parameter enables the reception of voice
ISDN TID requires the input of up to 3
Page 47

English
ISDN Sub No. (optional):
numeric digits for the sub address of the machine when in ISDN mode.
Speed access no. 07
To Set Dial, Incoming Call and Other Basic Parameters, as well as MCF
and ISDN G4 Options:
Press MENU/EXIT to enter the menu.
1
Input the speed access number of the parameter to be changed, and wait
2
for the appropriate display prompt.
When the display for the desired parameter is shown, press
3
select the setting (or input data where required), press ENTER.
Press MENU/EXIT to return to standby mode.
4
Repeat steps 1-4 until finished setting parameters.
5
The ISDN Sub No. requires the input of 19
or ↓ to
↑
Connecting to a PBX
Private Branch Exchanges (PBXs) are private telephone systems used to
route calls internally, for example, in a company. When dialling a
telephone number, if a prefix (access) number is required to open an
outside line, the line is connected to a PBX. If this machine is going to be
connected to a PBX, please make the following changes to enable the
machine to recognise the prefix digits in the telephone numbers used to
obtain access to the outside line. After dialling the prefix digits, the
machine will wait until the outside line is available (secondary dial tone
detected) before dialling the rest of the number.
Note:
Service assistance may be required to make changes in some
countries. Also, some PBX systems may require additional
adjustments to the machine. If there is any problem with fax
communications after changing parameters, please contact your
authorised dealer for assistance.
To Set PBX Parameters
Press MENU/EXIT to enter the menu.
1
Input speed access no. 50 (PBX LINE), wait the display prompt.
2
Press
3
Press
4
be accessed from the main menu by entering its speed access code, 51.)
Installation 3-19
or ↓ keys to select ON or OFF setting, press ENTER.
↑
to select Dial Prefix, press Enter or →.
↓
(Dial Prefix can also
Page 48

English
Input the digit(s) normally dialled to obtain an outside line from the
5
PBX, press ENTER.
Press MENU/EXIT to return to standby mode.
6
Notes:
1 Keep in mind that all of the outside telephone numbers
programmed into the machine must begin with the dial prefix of
the PBX.
2 To cancel these parameters at a later date, follow the above
instructions but set the PBX LINE parameter to OFF.
MFP PC Interface Kit
If the machine is equipped with a multifunction peripheral (MFP) PC
Interface Kit, please see Appendix A for information regarding functions.
For more detailed information, refer to the documentation received with
the PC interface product.
Network Print Kit
If the machine is equipped with an Ethernet Adapter, please see Appendix
C for information regarding Network Print Service functions and
specifications. For more detailed information, refer to the documentation
received with the NIC adapter.
ISDN G4 Board
If the machine is equipped with an ISDN G4 board, please see Appendix
D for information regarding the features and specifications of the machine
after board installation. For more detailed information, refer to the
documentation received with the ISDN board.
3-20 Chapter 3
Page 49

Chapter 4
Directories and Basic
Operations
In this chapter…
You will find out how to send and receive fax messages in this chapter,
and how to programme your most often used fax numbers into the
machine. You can even set up groups of remote fax numbers which enable
you to quickly and easily send fax messages to an entire distribution list.
Your machine can print incoming faxes automatically, or save them in its
internal memory for printing later. You can even set your machine so that
it will refuse to accept those annoying ‘junk mail’ faxes (advertising
circulars), if you wish. These are among the topics explained in this
chapter.
English
Programming Dialling Directories. . . . . . . . . . . . . . . . . 4-3
Speed Dial Numbers . . . . . . . . . . . . . . . . . . . . . . . . . 4-3
To Program Speed Dial Numbers. . . . . . . . . . . . . 4-3
Chain Dialling . . . . . . . . . . . . . . . . . . . . . . . . . . . . . . 4-4
To dial the number: . . . . . . . . . . . . . . . . . . . . . . . 4-5
Group Dialling. . . . . . . . . . . . . . . . . . . . . . . . . . . . . . 4-5
To Program Groups . . . . . . . . . . . . . . . . . . . . . . . 4-5
To Delete an Entry . . . . . . . . . . . . . . . . . . . . . . . . 4-6
To Dial a Group . . . . . . . . . . . . . . . . . . . . . . . . . . 4-6
Basic Operations . . . . . . . . . . . . . . . . . . . . . . . . . . . . . . 4-7
Preparing Documents . . . . . . . . . . . . . . . . . . . . . . . . 4-7
Document Size . . . . . . . . . . . . . . . . . . . . . . . . . . . 4-7
Multiple-Page Documents . . . . . . . . . . . . . . . . . . 4-7
Loading Documents . . . . . . . . . . . . . . . . . . . . . . . 4-7
Faxing to a Single Location . . . . . . . . . . . . . . . . . . . 4-8
Search Key Dialling . . . . . . . . . . . . . . . . . . . . . . . 4-9
Real-Time Dialling. . . . . . . . . . . . . . . . . . . . . . . . 4-9
Redialling . . . . . . . . . . . . . . . . . . . . . . . . . . . . . . . 4-9
Faxing to Multiple Locations . . . . . . . . . . . . . . . . . . 4-10
Directories and Basic Operations 4-1
Page 50

English
Message Confirmation Report (MCF. . . . . . . . . . . . .4-10
Cancelling Transmission . . . . . . . . . . . . . . . . . . . . . .4-11
Manual Receive Mode . . . . . . . . . . . . . . . . . . . . . . . .4-11
Receiving to Memory . . . . . . . . . . . . . . . . . . . . . . . . .4-11
To Print from Memory. . . . . . . . . . . . . . . . . . . . . .4-11
No Paper Reception . . . . . . . . . . . . . . . . . . . . . . . .4-12
No Toner Reception. . . . . . . . . . . . . . . . . . . . . . . .4-12
Cancelling Messages Stored in Memory . . . . . . . .4-12
Unsolicited Fax Rejection . . . . . . . . . . . . . . . . . . . . .4-12
To Set Closed Network . . . . . . . . . . . . . . . . . . . . .4-13
Power Failures and Memory. . . . . . . . . . . . . . . . . . . .4-13
Making Copies . . . . . . . . . . . . . . . . . . . . . . . . . . . . . .4-13
To Make Copies Using ADF. . . . . . . . . . . . . . . . .4-14
Manual Paper Feeder . . . . . . . . . . . . . . . . . . . . . . .4-14
Face up and face down stacking. . . . . . . . . . . . . . . . .4-15
Counters . . . . . . . . . . . . . . . . . . . . . . . . . . . . . . . . . . .4-15
To Access Print/Scan Counters . . . . . . . . . . . . . . .4-15
To Reset Image Drum Counter . . . . . . . . . . . . . . .4-16
Printer Cleaning . . . . . . . . . . . . . . . . . . . . . . . . . . . . .4-16
4-2 Chapter 4
Page 51

English
Programming Dialling Directories
This facsimile transceiver is equipped with 40 keys for rapid one-touch
dialling (Model B is equipped with a second hidden panel for an
equivalence of 80 keys). Up to two 40-digit numbers can be programmed
to each One-Touch key, a primary number and an alternative number that
is used if the primary number is busy or goes unanswered. It is also
possible to enter a 15 alphanumeric location ID (name) for each key. Once
programmed, these keys provide unparalleled convenience and savings in
time required for daily faxing operations.
Speed Dial Numbers
This function enables the automatic sending of faxes. The machine is
equipped with features which allow the transmission of faxes with the
push of a single key (One-Touch faxing), 2 and 3-digit ID speed dialling,
and speed dialling of groups of telephone numbers.
Model A
140 programmed Speed Dial numbers (1-40 assigned to One-
Touch keys)
Model B
230 programmed Speed Dial numbers (1-80 assigned to One-
Touch keys)
The information for programming a Speed Dial number includes a name
(Name), a primary location Number (LOC#), an alternate number (ALT#),
communications speed, Echo protection and G3/G4 selection.
Table 4-1: Information stored in Speed Dial Programming
Entry Description Type of Input
NAME 15 characters (max) Ten-keypad 0-9 / * / # / alphabetic
LOC#/ALT# 40 characters each
(max)
Comm. Speed Parameter selection 33.6K / 28.8K / 14.4K / 9.6K / 4.8K
Echo Protection Parameter selection ON / OFF
G3/G4 Selection* Parameter selection G3 mode / G4 mode
characters (uppercase, lowercase) /
special characters / Pause / Hyphen /
Space / +
Ten-keypad 0-9 / * / # / Pause / Hyphen /
Space / +
Other keys used in the programming process include MENU/EXIT,
SHIFT keys, ENTER, Capital (CAPS), CLEAR, and Delete (DEL).
To Program Speed Dial Numbers
Press MENU/EXIT to enter the menu.
1
2
Press
to select LOCATION PROGRAM, press ENTER or →.
↓
Directories and Basic Operations 4-3
Page 52

English
Press ENTER to select SPEED DIAL.
3
Input Speed Dial number to be programmed (one-touch, 2-digit, 3-
4
digit), press ENTER.
Input LOC # (telephone number), press ENTER.
5
Input Name, press ENTER.
6
Input ALT# (telephone number), press ENTER.
7
Press
8
Press
9
Press
10
This step required only if ISDN G4 board is installed. However, this
setting is specific to each Speed Dial number and is not affected by the
overall machine ISDN setting (speed access no. 27).
Repeat the above process from Step 3 until finished programming.
11
When finished, press MENU/EXIT to return the machine to standby
mode.
When finished with the programming of one-touch keys, lift the plastic
12
cover protecting the one-touch labels and (using a pencil) write the
names corresponding to the newly programmed keys on their
respective labels. Then replace the cover.
or ↓ to select Communication Speed, press ENTER.
↑
or ↓ to select Echo Protection, press ENTER.
↑
or ↓ keys to select mode (G4 or G3), press ENTER.*
↑
Notes:
1 When entering a new telephone number using the numeric
keypad, it is possible to register it to a Speed Dial number. After
entering the telephone number, press the SEARCH key. The
location of unregistered Speed Dial numbers will be displayed.
2 Switch the Echo Protection setting to OFF when changing the
location of a One-Touch key.
Chain Dialling
Even though the telephone number for each One-Touch key can be up to
40 digits long, there may be a need to dial numbers with more digits. This
function is provided for that purpose. To create a chain dial number,
program the first 39 digits into a Speed Dial number, press the Plus (+) key
(One-Touch key #39), and then program the rest of the number as if
programming another Speed Dial entry.
4-4 Chapter 4
Page 53

To dial the number:
Select the first Speed Dial number programmed.
1
When prompted by the display, enter the second Speed Dial number.
2
Press the START key to begin faxing.
3
Note:
The remaining part of the number not programmed in the first Speed
Dial number can also be input manually using the numeric keypad
when prompted by the display (step 2).
Group Dialling
This function enables the faxing of documents to multiple locations. Once
Speed Dial numbers have been programmed into the machine, this
function can be used to group numbers together for simultaneous faxing of
a document. As many as 20 different groups of telephone numbers can be
stored in memory, each group having a maximum limit of 140 locations
(Model A) or 230 locations (Model B). Each group is registered by a group
dial number, and can also be assigned a name for alphabetic search.
Note:
The same listing of characters as that for naming Speed Dial
numbers applies.
English
To Program Groups
Press MENU/EXIT to enter the menu.
1
Press
2
Press
3
Input group dial number and press ENTER.
4
At “SELECT LOCATION(S),” press SPEED DIAL.
5
Enter the Speed Dial number of the telephone number you want to add
6
to the group. Wait. The information for the telephone number to be
added will appear.
If the information is correct, press ENTER. (Location is now registered
7
in that group.)
Repeat steps 5-7 until all telephone numbers for the group have been
8
registered.
Input name and press ENTER.
9
Press MENU/EXIT to return to standby mode.
10
Directories and Basic Operations 4-5
to select LOCATION PROGRAM, press ENTER or →.
↓
to select GROUP, press ENTER or →.
↓
Page 54

English
To Delete an Entry
Follow the above directions, but at “SELECT LOCATION(S),” press
1 1
ENTER.
Press
2
Information for entry will be shown.
Press CLEAR. Entry is now deleted from group.
3
When finished, press MENU/EXIT to return to standby mode.
4
To Di a l a G r o up
Load the document(s).
1
Press SPEED DIAL.
2
Press the # key on the numeric keypad.
3
Input the group number using the numeric keypad and press ENTER.
4
Press ENTER again to confirm.
5
Press START to begin scanning and dialling.
6
or ↓ to select entry to be deleted, press CLEAR or ENTER.
↑
4-6 Chapter 4
Page 55

Basic Operations
Preparing Documents
Try to use good quality documents for transmissions. Documents that
✓
are typed or written in dark felt-tip ink on white (or light-coloured)
paper work best.
Do not send documents that are not rectangular in shape.
✓
Never try to send or copy documents that have wet or sticky surfaces,
✓
wrinkles, staples or paper clips.
If uncertain of how well a document will fax, first try making a copy of it.
✓
If a document is in extremely poor condition (creasing, torn, etc.), first
✓
make a copy using a photocopying machine, and then send the copy.
Document Size
For the machine to operate properly, all documents must be at least
148mm (5.8") in width and 128mm (5.6") in length. Maximum width and
length are 216mm (8.5") and 356mm (14"), respectively. Small documents
(less than 216mm wide) may be reproduced with a grey border.
English
Multiple-Page Documents
Your machine can scan paper with a base weight of 60-105g/m² (16-28lb).
It can hold up to 50 sheets of standard 75g/m² (20lb) paper (e.g.,
photocopier paper) in the document tray. If documents are printed on
heavier or lighter paper, up to 15 sheets can be loaded. For extremely
heavy paper, load and send one page at a time.
When loading multiple-page documents, do not fax documents printed on
paper that is thinner than 0.08mm (0.003") or thicker than 0.13mm
(0.005"). For single-page documents, do not load paper thinner than
0.06mm (0.002") or thicker than 0.15mm (0.006").
Loading Documents
In order to prevent paper jams and problems during scanning, neatly stack
and align the edges of documents before loading them into the document
tray. Do not load documents of different sizes at the same time.
Note:
A document can be loaded and prepared for transmission while the
machine is sending or receiving another message (as long as the
Directories and Basic Operations 4-7
Page 56

English
document tray is empty). To do this, load the document, select the
location and press the START key. The document will be sent after
completion of the current operation.
Adjust the document guides to the width of the documents being sent.
1
Neatly stack the documents, and then insert them face down into the
2
document tray. Readjust the document guides.
The machine will grip the documents and pull them in for transmission,
3
beginning with the bottom page first.
If necessary, adjust the
4
Table 4-3
Document is ready for faxing or copying
5
Table 4-2: Resolution settings
Original Document Set RESOLUTION to
Normal Standard (STD)
Small type/fine details Fine/Ex. Fine
Photos or many shades of grey Photo
Table 4-3: Contrast settings
Original Document Set TYPE OF ORIGINAL to
Normal contrast Normal
Contrast is too light Light
Contrast is too dark Dark
) to provide the best possible quality.
resolution (see Table 4-2
) and
contrast (see
Faxing to a Single Location
Load the document(s).
1
Select a location (
2
Table 4-4: Dialling a single location
To Dial Using Do This
One-Touch key Press the One-Touch key
2 or 3-digit dial Press SPEED DIAL key, then enter Speed Dial number using the
Search Press the SPEED DIAL key, then enter the first character using a
Numeric keypad Dial as if using a telephone. If a mistake is made, press the DEL
External telephone Pick up the receiver from its cradle and dial the number. If the
see Table 4-4
numeric keypad.
one-touch key.
button to move the cursor back and re-enter the correct number.
Press the START key when finished.
If the ISDN G4 board is installed, you will be prompted to select
either G3 or G3 transmission. Use the ↑ and ↓ keys to make your
selection and press ENTER. Then press START to begin.
receiving machine is in automatic reception mode, a high-pitched
tone will be heard. If someone answers, request that they press the
START key on their machine.
).
4-8 Chapter 4
Page 57

If necessary, press the START key to begin transmission.
3
The following messages may be shown on the display during a typical fax
transmission.
Table 4-5: Typical messages during fax transmission
Message Explanation
(location):
Calling:
Sending:
Result - OK:
Commun. Error:
Identity of the remote location such Personal ID, TSI/CSI, Location
ID or telephone number programmed into the machine.
The machine is dialling or calling.
Machine is transmitting a fax.
Fax was transmitted successfully.
If this or another error message appears, a problem occurred during
the communication. Try re-sending the fax. Refer to
“Troubleshooting” for assistance.
Search Key Dialling
If not sure which Speed Dial key is programmed with a certain location,
use the SEARCH key to look through the alphabetical telephone directory
of location IDs. After loading the document(s):
Press the SEARCH key, the display will show “ENTER 1’ST CHAR.”
1
Enter the first letter of the name of the desired location from the one-
2
touch keypad. (If the first character of the desired location is a unique
character, use one-touch key 20 to search for the character.)
English
Repeatedly press the letter key to scroll through the list of location IDs
3
beginning with that letter.
When the correct location is found, press the START key to begin
4
faxing.
Real-Time Dialling
The machine normally dials the entire telephone number of a location at
one time. However, telephone numbers can also be dialled in real time
(one digit at a time). To dial from the machine itself, press the HOOK key,
and dial using the numeric keypad on the machine’s control panel. Another
way to dial in real time is when an external telephone is connected. Pick
up the handset and dial using the keypad on the telephone.
Redialling
If a line is busy or there is no answer, the machine will wait and then
automatically redial the number. Additionally, if the machine is
transmitting from memory and a communication error occurs, it will
automatically redial the number and send the fax again. Manual redialling
Directories and Basic Operations 4-9
Page 58

English
of the last telephone number called is also possible at any time by pressing
the REDIAL key on the control panel.
Faxing to Multiple Locations
Load the document(s).
1
Select a location (
2
Table 4-6: Dialling to multiple locations
To Dial Using Do This
One-Touch key Press the One-touch key
2 or 3-digit dial Press SPEED DIAL key, then enter Speed Dial number using the
Search Press the SPEED DIAL key, then enter the first character using a
Numeric keypad Dial as if using a telephone. If a mistake is made, press the ← key to
Group dialling Press the SPEED DIAL key, then press the # key and enter the
Press the ENTER key.
3
Repeat steps 2 and 3 above until all groups and / or individual locations
4
see Table 4-6
numeric keypad.
one-touch key.
move the cursor back and re-enter the correct number (the DEL key
deletes the character at the current cursor position, or the CLEAR
key deletes all characters from the current cursor position to the
end).Up to 10 locations can be entered in this way.
If the ISDN G4 board is installed, you will be prompted to select
either G3 or G4 transmission. Use the ↑ and ↓ keys to make your
selection and press ENTER.
group number using the numeric keypad. Press ENTER to confirm
the displayed group.
).
for the broadcast have been entered.
Press the START key to begin scanning. Transmission will commence
5
after scanning is completed.
Note:
If confirming locations, two options are available: by report
printing, or by display. To return to scan / confirm mode, press
STOP twice.
Message Confirmation Report (MCF
The machine can be set to print out a MCF automatically after single and/
or multiple-location transmissions. If not set in the automatic mode,
MCF’s can still be printed at a later time. Please refer to the chapter
Reports for more detailed information.
4-10 Chapter 4
Page 59

Cancelling Transmission
If there is a need to stop a transmission while still in progress, do the
following:
Press the STOP key twice in succession.
1
The display will show “STOPPED”.
2
If a document is stuck partly in the feeder entrance or elsewhere in the
3
machine, a “RELOAD DOCUMENT” message may be displayed. If
so, press the STOP key one more time. The machine will feed the
document through the process to the document stacker.
Manual Receive Mode
Do the following to receive faxes when the machine is set to TEL:
When the machine rings announcing a phone call, pick up the handset
1
of the external phone. (If a person is on the line, normal voice
communication is possible.)
If a signal from a remote facsimile machine is heard or the party wishes
2
to send a fax after finishing a conversation, press the START key.
When the message “Manual RX Start” appears on the display, hang up
3
the handset.
English
The machine will emit a tone following line disconnection, informing
4
the transmission status (i.e., successful or unsuccessful tones).
Receiving to Memory
Memory Reception Mode (MEM): When set to MEM, the machine will
automatically receive messages into memory and store them there even
when there is paper loaded for printing. Data stored in memory can be
printed out using the PRINT FROM MEMORY function.
To Print from Memory
Press MENU/EXIT to enter the menu.
1
Press
2
Press
3
If a password is not required, data in memory will be printed out. If a
4
password is required, enter 4-digit password*, press ENTER.
Directories and Basic Operations 4-11
to select PRINT FROM MEMORY, press ENTER or →.
↓
to select PRINT MEMORY MSG., press ENTER or →.
↓
Page 60

English
Data in memory will be printed out.
5
* Password is only required when previously programmed and
machine answering mode is set to MEM (see Memory Password).
No Paper Reception
If the machine runs out of paper when receiving a fax, a message will be
displayed and the data not yet printed stored in memory automatically for
printing out later. (The machine will print the data stored in memory
automatically after paper is added to the paper tray.)
No Toner Reception
If the machine is running low on toner, and NO TONER MEMORY
RECEIVE is set to ON, a message will be displayed and incoming faxes
stored in memory automatically for printing later (rather than risk printing
illegible messages). If the machine receives a message to memory because
the toner level is low, “Message in memory” will be displayed.
When NO TONER MEMORY RECEIVE is set to OFF, a warning
message will be displayed.
Note:
When the “Toner low” message is shown, it is possible to use the
print from memory function to print the faxes stored in memory, but
the quality of the print cannot be guaranteed. Replace the toner
cartridge as soon as possible.
Cancelling Messages Stored in Memory
It is possible to erase messages stored in memory without printing them.
Follow the same instructions as for Print from Memory.
1
When prompted to print the message, press the STOP key.
2
When prompted to cancel the message, press ENTER key.
3
Unsolicited Fax Rejection
The machine provides a closed network option that allows the refusal of
unsolicited faxes. If activated, when there is an incoming call the machine
will compare the TSI (CIG) with the last four digits of the programmed
Speed Dial numbers. If there is no match, the incoming call will be refused
automatically, thus eliminating unsolicited faxes such as advertising. The
machine can also be set to neither send nor receive faxes from locations
whose telephone numbers are not programmed into the Speed Dial
4-12 Chapter 4
Page 61

memory. The available settings are limited reception (RX), limited
transmission and reception (TX/RX), and no limitations (OFF). Speed
access no. 21.
To Set Closed Network
Press MENU/EXIT to enter the menu.
1
Input speed access no. 21 (Closed Network), wait.
2
English
When CLOSED NETWORK display appears, press
3
setting, press ENTER.
Press MENU/EXIT to return to standby mode.
4
or ↓ to select
↑
Power Failures and Memory
Your machine is equipped with a battery to prevent the loss of data stored
in memory at the time of a power outage. The typical memory-backup time
with a fully charged battery is 72 hours. If data is still held in memory at
the time of power restoration, the machine will continue operations from
the point when power was lost (e.g., delayed transmission, redial waiting
conditions, etc. resume from point of power failure). If the data in memory
has been lost at the time of power restoration, the machine will print out a
Power Outage Report. Please refer to the chapter Reports for more
information.
Making Copies
The machine is capable of making up to 99 copies at one time. When
loaded with the recommended paper, the copy stacker capacity is 200 face
down or 10 sheets face up. Documents to be copied will be printed at a
resolution of 600 × 400dpi).
Directories and Basic Operations 4-13
Page 62

English
To Make Copies Using ADF.
Load the document(s) in the document tray.
1
Press COPY.
2
If only one copy is required, wait and the machine will begin copying
3
momentarily.
To make multiple copies:
Enter the number of copies required using the numeric keypad.
a)
Press COPY again, the machine will begin making multiple copies.
b)
Manual Paper Feeder
There is manual paper feeder tray built-in immediately above the paper
tray. To make a copy on paper different than that loaded in the paper tray,
fold down the manual paper feeder tray and manually insert the paper.
Load the document(s) in the document tray.
1
Fold down the manual paper feeder tray.
2
4-14 Chapter 4
Page 63

Insert a sheet of paper (face up) into the tray, and push into the slot until
3
the machine takes hold of the paper.
Press COPY (see instructions above).
4
Note:
If making more than one copy, paper must be continually fed one
sheet at a time.
Face up and face down stacking
The machine can stack copies with the printed side face up or face down.
The position of the copy output lever (see Chapter 1) on the left side of the
machine, above the power switch, determines how copies are stacked. In
the upper position copies will exit face down. In the lower position copies
will exit face up. However, the face up position may only be used when
copying or printing from a PC or via a network using the manual paper
feeder.
Note:
Ensure that the copy output lever is correctly located in one of its
two positions. A half-way setting will cause a paper jam. Also, do not
move the lever during print operation.
English
Counters
A number of different counters are provided for keeping track of machine
operations and maintenance needs. Counters available for user viewing
include the Print counter, for tracking how many times recording paper has
been printed, and the Scan counter, for tracking how many times a
document has been passed through the ADF (Scan).
To Access Print/Scan Counters
Press MENU/EXIT to enter the menu.
1
Press
2
Press
3
Press ENTER to return to menu level 3.
4
Press MENU/EXIT to return to standby mode.
5
There is also an image drum counter which you can reset after changing
6
the image drum. A message will be displayed when the service life of
Directories and Basic Operations 4-15
to select Counter, press ENTER or →.
↓
or ↓ keys to select counter , press Enter or →.
↑
Page 64

English
the drum has expired. Reset the drum counter only after replacing the
image drum.
To Reset Image Drum Counter
Press MENU/EXIT to enter the menu.
1
Press
2
Press ENTER or
3
Press CLEAR to delete the count.
4
When prompted to clear the counter, press ENTER to confirm that you
5
wish to clear (reset) the drum count.
Press MENU/EXIT to return to standby mode.
6
to select COUNTER, press ENTER or →.
↓
to enter DRUM COUNT.
→
Printer Cleaning
A printer cleaning function has been incorporated to clean the residual
toner off of the charge rollers. Perform printer cleaning periodically to
prevent the accumulation of toner on the charge rolls. (Build up may cause
unwanted marks and blurring in printed faxes or copies.)
Press MENU/EXIT to enter the menu.
1
Press
2
The display will indicate that cleaning is in progress.
The machine will return automatically to standby when cleaning is
complete.
to select PRINTER CLEANING, press ENTER or →.
↓
4-16 Chapter 4
Page 65

Chapter 5
Advanced Operations
In this chapter…
Once you are familiar with the basic operating features of your machine,
you may wish to take advantages of the many advanced features available.
For example, if your machine is located where many people have access
to it, you can set up confidential mailboxes to preserve certain messages in
memory, and only print them when the right person enters the correct
pasword. Polling features allow your machine to call other machines and
retrieve documents during silent hours, or respond to requests from remote
machine for documents you set as polling documents. These and other
advanced features are covered in detail in this chapter.
Delayed Transmission . . . . . . . . . . . . . . . . . . . . . . . . . . 5-3
To Send a Delayed Fax . . . . . . . . . . . . . . . . . . . . . . . 5-3
Delayed Batch Transmission. . . . . . . . . . . . . . . . . . . 5-4
To Send a Delayed Batch Fax (One Session). . . . 5-4
Cancelling Delayed Transmissions . . . . . . . . . . . . . . 5-4
Priority Transmission. . . . . . . . . . . . . . . . . . . . . . . . . . . 5-5
To Send a Priority TX . . . . . . . . . . . . . . . . . . . . . . . . 5-5
Confidential Faxes . . . . . . . . . . . . . . . . . . . . . . . . . . . . . 5-6
Sending Confidential Faxes . . . . . . . . . . . . . . . . . . . 5-6
Receiving Confidential Faxes . . . . . . . . . . . . . . . . . . 5-6
Programming Personal (Confidential) Mailboxes 5-7
To Create a Personal (Confidential) Mailbox . 5-7
Changing Password/Closing Mailbox . . . . . . . 5-7
To Change Password . . . . . . . . . . . . . . . . . . . . 5-7
To Close Mailbox . . . . . . . . . . . . . . . . . . . . . . 5-8
Printing Confidential Faxes . . . . . . . . . . . . . . . 5-8
Relay Broadcasting . . . . . . . . . . . . . . . . . . . . . . . . . . . . 5-9
Initiating a Relay Broadcast . . . . . . . . . . . . . . . . . . . 5-9
Setting the Relay Report No.. . . . . . . . . . . . . . . . . . . 5-9
Polling Transmission / Reception . . . . . . . . . . . . . . . . . 5-10
Bulletin Polling (Box) . . . . . . . . . . . . . . . . . . . . . . . . 5-10
To Create a Personal (Bulletin Polling) Mailbox. 5-10
English
Advanced Operations 5-1
Page 66

English
To Set Bulletin Polling . . . . . . . . . . . . . . . . . . . . .5-10
Printing Documents Scanned into Memory
for Bulletin Polling. . . . . . . . . . . . . . . . . . . . . . . . . .5-11
Memory Polling . . . . . . . . . . . . . . . . . . . . . . . . . . . . .5-11
To Set Memory Polling . . . . . . . . . . . . . . . . . . . . .5-11
Memory Polling (Bulletin) . . . . . . . . . . . . . . . . . . . . .5-12
Document Tray Polling . . . . . . . . . . . . . . . . . . . . . . .5-12
Polling Reception . . . . . . . . . . . . . . . . . . . . . . . . . . . .5-12
Printing or Cancelling Faxes Polled into Memory 5-13
Call Forwarding. . . . . . . . . . . . . . . . . . . . . . . . . . . . . . . .5-13
Forwarding . . . . . . . . . . . . . . . . . . . . . . . . . . . . . . . . .5-13
To Set Forwarding No. . . . . . . . . . . . . . . . . . . . . .5-13
To set the Auto Answer mode to forward . . . . . . .5-14
Forward On Paper or Toner Error . . . . . . . . . . . . .5-14
To Set Forwarding No. on P-ERR:. . . . . . . . . .5-14
Dual Access . . . . . . . . . . . . . . . . . . . . . . . . . . . . . . . . . . .5-15
During Fax Transmission . . . . . . . . . . . . . . . . . . . . . .5-15
During Fax Reception. . . . . . . . . . . . . . . . . . . . . . . . .5-15
When Making Copies . . . . . . . . . . . . . . . . . . . . . . . . .5-15
When Printing from Memory . . . . . . . . . . . . . . . . . . .5-16
5-2 Chapter 5
Page 67

Delayed Transmission
The Delayed Transmission feature enables the automatic transmission of
faxes at a specified time and date. By scanning the document and storing
the data in memory, your facsimile machine can send documents at up to
20 (Model A) or 30 (Model B) different specified times until 11:59pm
three days later.
To Send a Delayed Fax
Load the document(s).
1
Press MENU/EXIT to enter the menu.
2
Press ENTER or → to enter Delayed TX.
3
Press ↑ or ↓ to move between date and time settings, and ← or → to
4
move between columns.
Input the desired date and time, press ENTER key.
5
The display will prompt you for the location(s).
6
Input desired location using either Speed Dial numbers or numeric
7
keypad.
English
Press START key. The machine will scan the document(s) into
8
memory, and wait until the time programmed to begin transmission.
This process can be repeated up to 20 (Model A) or 30 (Model B) times
9
when memory is available.
After all memory is used, one more transmission is possible by setting
10
documents in the document tray and setting the machine as instructed
in steps 2-7.
Note:
Dates and times should be input using numeric keypad (0-9).Times
should be input following the format 0000-2359 (24-hour clock).
Advanced Operations 5-3
Page 68

English
Delayed Batch Transmission
This feature enables the delayed transmission of multiple communications
scanned into memory at a time programmed into the machine. Locations
planned for use with this function must be programmed into Speed Dial
numbers 31-40. Before inputting the following session(s), you must first
access the BATCH TX Time function in the LOCATION PROGRAM
menu and set the transmission time against one of the Speed Dial numbers
31-40.
To Send a Delayed Batch Fax (One Session)
Load the document(s).
1
Press MENU/EXIT key to enter the menu.
2
Press ↓ to select Delayed Batch TX, press Enter or →.
3
Enter the Speed Dial number of desired location (input number or press
4
the matching one-touch key) and press the ENTER key.
Press START key.
5
The machine will scan the document(s) into memory, and wait until the
time programmed to begin transmission.
Repeat the above steps to prepare multiple sessions.
6
Notes:
1 Only locations programmed into Speed Dial numbers 31-40 are
applicable.
2 Time must be input using the format 0000-2359 (24-hour clock).
3 There is no limit to the number of batch transmission sessions to
set using Speed Dial numbers (31-40), however, no more sessions
will be accepted once memory is filled.
Cancelling Delayed Transmissions
Follow the instructions provided below to cancel a delayed transmission
before it has been sent.
Press STOP.
1
The display will show CANCEL COMMUNICATION.
2
The display shows Location ID or Tel. No. of delayed transmissions
3
currently programmed in the machine.
5-4 Chapter 5
Page 69

Use the SHIFT keys to select transmission to cancel, and then press
4
ENTER.
The Location ID and Tel. No. of the selected transmission will be
5
displayed. After confirmation, press the CLEAR key.
Selected transmission will be cancelled.
6
For a delayed transmission from the document tray, press STOP again
7
to remove the document.
Press MENU/EXIT to return to standby mode.
8
Priority Transmission
When there is a need to ensure that a document is transmitted immediately,
the document(s) loaded and scanned under this feature hold priority over
previously scanned documents or the processing of messages received in
dual access or standby modes.
To Send a Priority TX
Load the document(s).
1
Press MENU/EXIT to enter the menu.
2
English
Use the SHIFT keys to select PRIORITY TX, and press ENTER or →.
3
Input desired location using Speed Dial number or numeric keypad.
4
Press START key.
5
The machine will scan the document(s) into memory and assign first
6
priority for transmission.
If all memory is used, the display will offer to send the pages scanned
7
so far.
To send scanned pages, press ENTER.
8
Advanced Operations 5-5
Page 70

English
Confidential Faxes
Facsimile machines are often located in open areas where passers by can
look through the messages received. If a remote machine is compatible
with this range of products or is equipped with a sub-address transmission
function, this machine can send confidential faxes to it.
Sending Confidential Faxes
When a confidential fax is sent, it is received to a personal mailbox (or subaddress number) that is only accessible using an access number (password)
for that mailbox. However, the address of the mailbox to which the fax is
to be directed must be known beforehand. (Ask the person who will
receive the fax to provide their mailbox address.) This machine can send
messages to up to 64 pre-designated mailboxes in remote machines.
Load the document(s).
1
Press MENU/EXIT to enter the menu.
2
Use the SHIFT keys to select CONFIDENTIAL TX, press ENTER or
3
.
→
Input the address* of the confidential mailbox using the numeric
4
keypad, press ENTER.
Input desired location using Speed Dial number or numeric keypad.
5
Press START key.
6
* The address can consist of up to 20 characters (0-9,Space,*,#).
The machine will dial the number and begin the faxing process.
Receiving Confidential Faxes
As with sending, this machine can receive confidential faxes only from
machines compatible with this range of products or machines equipped
with a sub-addressing function. Additionally, at least one confidential
mailbox must be set up before a confidential transmission can be received.
After setting up the mailbox, give the person who is to send the fax the
mailbox address. When a message is sent to that address, it will be stored
in memory, and cannot be printed until the proper password is input for
retrieval.
5-6 Chapter 5
Page 71

Programming Personal (Confidential) Mailboxes
Your facsimile machine is programmed for the creation and management
of 16 personal mailboxes. When set up, each mailbox is opened as a
Confidential
or
Bulletin Polling
box (the latter to be discussed later on).
Once a mailbox for receiving confidential messages has been created,
none of the messages sent to it can be printed until the password for that
box is correctly entered in the retrieval (printing) sequence. Speed access
no. 03.
To Create a Personal (Confidential) Mailbox
Press MENU/EXIT key to enter the menu.
1
Input speed access no. 03, wait.
2
Enter personal box number (1-16), press ENTER.
3
Use the SHIFT keys to select CONFIDENTIAL, press ENTER.
4
Input 4-digit numeric password (0000-9999), press ENTER.
5
Repeat steps 3-5 until the desired number of confidential mailboxes has
6
been created (up to 16).
Press MENU/EXIT to return to standby mode.
7
English
Changing Password/Closing Mailbox
If there is a need change the 4-digit password that is assigned to a
confidential box or a mailbox is to be closed for some reason, do as
instructed in the following. Speed access no. 03.
Note:
A mailbox must be empty before it can be modified or closed.
To Change Password
Press MENU/EXIT to enter the menu.
1
Input speed access no. 03, wait.
2
Enter the number of the personal mailbox to be modified/deleted, press
3
ENTER.
Press Enter to select Confidential
4
Input new 4-digit numeric password, press Enter.
5
Press MENU/EXIT to return to standby mode.
6
Advanced Operations 5-7
Page 72

English
To Close Mailbox
Press MENU/EXIT to enter the menu.
1
Input speed access no. 03, wait.
2
Enter the number of the personal mailbox to be modified/deleted, press
3
ENTER.
Use the SHIFT keys to select CLOSE, press ENTER.
4
At “Delete Box?”, press ENTER.
5
Press MENU/EXIT to return to standby mode.
6
Note:
If the message “Illegal Operation” is displayed during either
process, the mailbox selected contains one or more messages and
must be emptied before changes to the mailbox can be made.
Printing Confidential Faxes
Each time the machine receives a confidential fax it will print a
Confidential Reception Report automatically which lists the mailbox
number(s) that received fax(es).
Press Menu/Exit to enter Menu.
1
Press ↓ to select Print from Memory, press ENTER or →.
2
Press ↓ to select Print Personal Box, press ENTER or →.
3
Input personal mailbox number (1-16) holding message, press ENTER.
4
Input 4-digit password for mailbox, press ENTER.
5
Message will be printed, and machine will return to standby.
6
Notes:
1 If no message is stored in the personal mailbox, a message to that
effect will be displayed.
2 If you wish to delete a message without printing, when the
“Printing” message is displayed, press STOP. When prompted to
cancel, press ENTER to cancel without printing.
5-8 Chapter 5
Page 73

Relay Broadcasting
Relay broadcasting allows one facsimile machine to send a document to
another, which then re-sends (broadcasts) the document to a number of
other locations. Although this machine is capable of initiating a relay
broadcast, it will not function as a key relay station. (Key relay stations
must be compatible models for this function to operate correctly.)
Before sending documents in a relay broadcast operation, the 4-digit relay
password of the relay station and 2-digit identification numbers of the
remote stations (or groups of remote stations) must be obtained. After
making a relay transmission, the key relay station can send a report
confirming the completion of the broadcast. This report is sent to the
location specified by the telephone number programmed in the RELAY
REPORT NO. function. For this machine to receive the report, program its
telephone number as the relay report number.
Initiating a Relay Broadcast
Load the document(s).
1
Press MENU/EXIT to enter the menu.
2
Press ↓ to select Relay initiate TX, press Enter or →.
3
English
Input password (4-digit number) of key relay station, and press
4
ENTER.
Input desired location using the Speed Dial number or numeric keypad,
5
and press START.
The machine will scan the document(s) into memory and begin faxing
6
to the key relay station.
If all memory is used, the machine will offer to send pages scanned so
7
far.
To send scanned pages, press ENTER.
8
Setting the Relay Report No.
Press MENU/EXIT to enter the menu.
1
Press ↓ to select LOCATION PROGRAM, press ENTER or →.
2
Press ↓ to select RELAY REPORT NO., press ENTER or →.
3
Advanced Operations 5-9
Page 74

English
Input telephone number of desired location using numeric keypad (40
4
characters max.), press ENTER.
Press MENU/EXIT to return to standby mode.
5
Polling Transmission / Reception
Polling is a process in which documents are loaded into a machine, and the
machine is then set to wait for a call from a remote location before faxing.
If the local machine is set to hold data in memory for transmission to a
remote machine when contacted, the procedure is called
transmission
receives a fax from it, the procedure is called
. Similarly, if the machine calls a remote machine and
polling reception
Bulletin Polling (Box)
This feature enables remote machines to contact this machine and poll data
from specified personal mailboxes until all the documents stored have
been retrieved. Before bulletin polling can be conducted, personal
mailboxes must be opened for storage of the documents to be scanned. The
following procedures explain the opening of personal mailboxes and how
to set the machine for bulletin polling, respectively.
polling
.
To Create a Personal (Bulletin Polling) Mailbox
Press MENU/EXIT key to enter the menu.
1
Input speed access no. 03, wait.
2
Enter personal box number (1-16), press ENTER.
3
Use the SHIFT keys to select BULLETIN POLLING, press ENTER.
4
Repeat steps 3 and 4 until the desired number of bulleting polling
5
mailboxes has been created (up to 16).
Press MENU/EXIT to return to standby mode.
6
To Set Bulletin Polling
Load the document(s) to be stored for polling.
1
Press MENU/EXIT to enter the menu.
2
Press ↓ to select POLLING TX/RX, press ENTER or →.
3
Press ENTER to select POLLING TX.
4
Press ENTER to select BULLETIN POLL (BOX).
5
5-10 Chapter 5
Page 75

Input personal mailbox number (1-16), then press ENTER.
6
Document(s) will be scanned and stored in memory, and display will
7
indicate that you have a bulletin message in memory.
Printing Documents Scanned into Memory for Bulletin Polling
If there is a need to print out the document(s) scanned into memory for
bulletin polling, use the following procedure to print documents stored in
personal mailboxes.
Press MENU/EXIT to enter the menu.
1
Press ↓ to select Print from Memory, press Enter or →.
2
Press ↓ to select PRINT PERSONAL BOX, press ENTER or →.
3
Input personal mailbox number (1-16) holding document, press
4
ENTER.
Message will be printed, and machine will return to standby.
5
Notes:
1 If no message is stored in the personal mailbox, a message will
be displayed indicating that there is no data in memory.
2 If you wish to delete a message without printing, when the
“Printing” message is displayed, press STOP. When prompted to
cancel, press ENTER.
English
Memory Polling
This feature enables remote machines to contact this machine and poll data
directly from memory.
To Set Memory Polling
Load the document(s).
1
Press MENU/EXIT to enter the menu.
2
Press ↑ to select POLLING TX/RX.
3
Press ENTER to select POLLING TX.
4
Press ↓ to select MEMORY POLL, press ENTER.
5
Document(s) will be scanned and stored in memory, and a message
indicating that there are documents waiting to be polled will be displayed.
Advanced Operations 5-11
Page 76

English
Memory Polling (Bulletin)
This feature enables remote machines to contact this machine and poll data
directly from memory until all of the stored documents have been
retrieved.
Load the document(s).
1
Press MENU/EXIT to enter the menu.
2
Press ↑ to select POLLING TX/RX.
3
Press ENTER to select POLLING TX.
4
Press ↓ to select MEMORY POLL (BULL), press ENTER
5
Document(s) will be scanned and stored in memory, and a message
indicating that there are documents waiting to be polled will be displayed.
Document Tray Polling
This feature enables remote machines to poll the documents set in the
document tray (ADF).
Load the document(s).
1
Press MENU/EXIT to enter the menu.
2
Press ↑ to select POLLING TX/RX.
3
Press ENTER to select POLLING TX.
4
Press ↓ to select FEEDER POLL, press ENTER.
5
Display will show that there are documents waiting to be polled.
Polling Reception
This machine is capable of polling documents from remote machines.
However, the programming of polling reception is limited to only one
machine at a time. After a polling operation has been completed, the
polling of another machine is possible.
Press MENU/EXIT to enter the menu.
1
Press ↑ to select POLLING TX/RX, press ENTER.
2
Press ↓ to select POLLING RX, press ENTER.
3
Input mailbox numbers if required, maximum of 20 characters (0-9,
4
space, *, #), press ENTER.
5-12 Chapter 5
Page 77

Input desired location using the Speed Dial keys or the numeric keypad.
5
Press START to begin polling.
6
Printing or Cancelling Faxes Polled into Memory
This feature enables the retrieval or clearing of faxes stored in memory
after the polling of documents from remote machines. The feature can also
be used to print out documents scanned into the machine for Memory
Polling and Memory Polling (Bulletin) communications.
Press MENU/EXIT to enter the menu.
1
Press ENTER to select PRINT FROM MEMORY.
2
Press ↓ to select PRINT MEMORY POLL, press ENTER or →.
3
Faxes stored in memory are printed, and the machine then returns to
4
standby mode.
To cancel the message stored without printing, press STOP before the
documents have printed. Then press ENTER to confirm.
The machine returns to standby mode.
Call Forwarding
English
Forwarding
If a forwarding number has been entered, by setting the AUTO ANSWER
mode to FWD, incoming calls will be forwarded to the number specified.
One number of up to 40 characters (0-9 / * / # / + / Pause / Hyphen / Space)
can be entered.
To Set Forwarding No.
Press MENU/EXIT to enter the menu.
1
Press ↓ to select LOCATION PROGRAM, press ENTER or →.
2
Press ↓ to select FORWARDING NO., press ENTER or →.
3
Input telephone number, press ENTER.
4
Press MENU/EXIT to return to standby mode.
5
Advanced Operations 5-13
Page 78

English
To set the Auto Answer mode to forward
Press MENU/EXIT to enter the menu.
1
Press ↓ to select SETUP, press ENTER or →.
2
Press ↓ to select MACHINE SETTINGS, press ENTER or →.
3
Press ↓ to select AUTO ANSWER MODE, press ENTER.
4
Press ↓ to select FWD, press ENTER.
5
Press MENU/EXIT to return to standby mode.
6
Forward On Paper or Toner Error
When the machine is operating under any of the answering modes except
FWD, TEL or MEM and this function is activated, there is a reliable
backup against the problems of paper or toner shortages. If the machine
detects no more paper or insufficient toner, it will forward incoming faxes
to a predetermined location automatically. One number of up to 40
characters (0-9 / * / # / + / Pause / Hyphen / Space) can be entered. This
function can be used after entering a forwarding location.
To Set Forwarding No. on P-ERR:
Press MENU/EXIT to enter the menu.
1
Use the SHIFT keys to select LOCATION PROGRAM, press ENTER
2
or →.
Press ↓ to select FORWARDING P-ERR, press ENTER or →.
3
Input telephone number, press ENTER.
4
Press MENU/EXIT to return to standby mode.
5
Note:
Forwarding of faxes received as confidential or polling is not
possible, even in FWD mode.
5-14 Chapter 5
Page 79

Dual Access
A number of tasks can be performed simultaneously using the unique
dual-access
required between operations, and thus improves productivity.
During Fax Transmission
After a document has been scanned into memory and transmission has
begun, it is possible to:
Load another document and prepare it for transmission. This document
✓
will be scanned into memory while the preceding document is being
transmitted. Transmission settings can be single or multiple location or
even delayed. Additional documents can be loaded, scanned and set for
transmission as long as memory is available. After each transmission is
completed, the next set of documents loaded will be processed
automatically.
Register Speed Dial or Group telephone numbers.
✓
Make local copies.
✓
Continue operations in no paper / no toner status, with messages printed
✓
automatically after replenishing the paper or toner.
feature. This capability reduces the waiting time otherwise
English
During Fax Reception
When receiving a fax, it is possible to:
Load another document and prepare it for transmission. A document
✓
can be scanned into memory while a fax is being received.
Transmission settings can be for single or multiple location or even
delayed. Additional documents can be loaded, scanned and set for
transmission as long as memory is available. After the initial fax has
been received and connection terminated, the machine will begin
transmitting the documents loaded automatically.
Register Speed Dial or Group telephone numbers.
✓
When Making Copies
When making copies, it is possible to:
Receive faxes while copies are being printed (if the machine is set to
✓
receive faxes into memory).
Advanced Operations 5-15
Page 80

English
When Printing from Memory
When printing from memory, it is possible to:
Load another document and prepare it for transmission. A document
✓
can be scanned into memory while a fax is being received.
Transmission settings can be for single or multiple location or even
delayed. Additional documents can be loaded, scanned and set for
transmission as long as memory is available. After the location has been
entered transmission will begin.
Register Speed Dial or Group telephone numbers.
✓
5-16 Chapter 5
Page 81

Chapter 6
Customising
In this chapter…
Many of your facsimile machine’s features and settings can be altered to
suit diversified needs. In this chapter we list a number of user changeable
functions that can be used to customise machine operations.
Viewing Current Settings. . . . . . . . . . . . . . . . . . . . . . . . 6-3
To Print Configuration Report . . . . . . . . . . . . . . . . . 6-3
Operation Functions. . . . . . . . . . . . . . . . . . . . . . . . . . . . 6-3
Remote Diagnosis . . . . . . . . . . . . . . . . . . . . . . . . . . . 6-3
Transmission (TX) Mode Default. . . . . . . . . . . . . . . 6-3
Memory Full Save. . . . . . . . . . . . . . . . . . . . . . . . . . . 6-3
Instant Dial . . . . . . . . . . . . . . . . . . . . . . . . . . . . . . . . 6-4
Restrict Access . . . . . . . . . . . . . . . . . . . . . . . . . . . . . 6-4
ECM Function . . . . . . . . . . . . . . . . . . . . . . . . . . . . . . 6-4
Sender ID (ON/OFF). . . . . . . . . . . . . . . . . . . . . . . . . 6-4
Power Save Mode . . . . . . . . . . . . . . . . . . . . . . . . . . . 6-4
Pulse Dial Rate* . . . . . . . . . . . . . . . . . . . . . . . . . . . . 6-5
Pulse Make Ratio* . . . . . . . . . . . . . . . . . . . . . . . . . . 6-5
Pulse Dial Type* . . . . . . . . . . . . . . . . . . . . . . . . . . . . 6-5
T/F Timer Prg . . . . . . . . . . . . . . . . . . . . . . . . . . . . . . 6-5
CNG Count . . . . . . . . . . . . . . . . . . . . . . . . . . . . . . . . 6-5
Ring Response. . . . . . . . . . . . . . . . . . . . . . . . . . . . . . 6-5
Distinctive Ring. . . . . . . . . . . . . . . . . . . . . . . . . . . . . 6-5
Changing Operation Functions . . . . . . . . . . . . . . . . . 6-6
Memory Password. . . . . . . . . . . . . . . . . . . . . . . . . . . 6-6
To Set or Clear Memory Password . . . . . . . . . . . 6-6
Restricted Access ID . . . . . . . . . . . . . . . . . . . . . . . . . 6-7
To Set Restricted Access ID. . . . . . . . . . . . . . . . . 6-7
To Cancel Restricted Access ID. . . . . . . . . . . . . . 6-7
Service Function Settings. . . . . . . . . . . . . . . . . . . . . . . . 6-8
Long Document Scanning/Transmission
(Long Doc. Scan) . . . . . . . . . . . . . . . . . . . . . . . . . . 6-8
MYD/DMY . . . . . . . . . . . . . . . . . . . . . . . . . . . . . . . . 6-8
English
Customising 6-1
Page 82

English
Local Time / Date Print . . . . . . . . . . . . . . . . . . . . . . .6-8
TSI Print . . . . . . . . . . . . . . . . . . . . . . . . . . . . . . . . . . .6-8
Options . . . . . . . . . . . . . . . . . . . . . . . . . . . . . . . . . . . . . .6-9
Multifunction Peripheral (MFP) PC Interface Kit . . .6-9
Network Print Kit . . . . . . . . . . . . . . . . . . . . . . . . . . . .6-9
ISDN G4 Board . . . . . . . . . . . . . . . . . . . . . . . . . . . . .6-9
Expandable Memory. . . . . . . . . . . . . . . . . . . . . . . . . .6-9
6-2 Chapter 6
Page 83

Viewing Current Settings
Before making changes, it is helpful to print out a list of current settings as
an aid to determine features and functions which need to be changed. The
Configuration Report is best for this purpose.
To Print Configuration Report
Press MENU/EXIT to enter the menu.
1
Press ↓ to select REPORT PRINT, press ENTER or →.
2
Press ↓ to select CONFIGURATION, press ENTER or →.
3
Report will print out.
4
If print out of report is not required, press STOP.
5
Operation Functions
Remote Diagnosis
The remote diagnostics feature allows service personnel to remotely dial
and service the machine. Available settings are ON and OFF. Speed access
no. 14.
English
Transmission (TX) Mode Default
This function allows the machine’s default settings for original document
condition and transmission scanning resolution (TYPE OF ORIGINAL
and RESOLUTION keys, respectively) to be changed. The factory default
settings are standard (STD) and normal (NORMAL). If faxes which
require some other combination are often sent or received, use these
function settings to adjust machine operations to best fit the situation.
During the programming sequence, the new default combination will be
indicated on the control panel. Speed access no. 15.
Memory Full Save
With features like group dialling, “call origination” starts after an entire
document or set of documents is read into memory. If a document memory
overflow occurs the display will prompt whether the documents already
scanned in memory should be sent or deleted. The user then has the choice
of which option is appropriate. If the user makes no response after a short
Customising 6-3
Page 84

English
time period then the documents will be automatically sent if this function
is defaulted to ON, or deleted if the default is set to OFF. Available settings
are ON and OFF. Speed access no. 17.
Instant Dial
In the ON state, the document is scanned into memory and dialling starts
immediately. Although the function relies on memory availability,
connection to the remote location is confirmed and the document is
transmitted faster when memory is available. If it is set to OFF, the
machine first confirms contact with the remote location and then transmits
the document reading from the document tray (without scanning into
memory). Speed access no. 18.
Restrict Access
This function controls whether or not machine operation is restricted or
not. In the ON state, if RESTRICTION ID has been programmed, users
must enter a password before being allowed access to the machine’s
functions. Set to OFF, no password is required even if RESTRICTION ID
has been programmed. Speed access no. 19.
ECM Function
The error correction mode (ECM) function is provided to improve
communications in areas where telephone line conditions are very poor.
Available settings are ON and OFF. Speed access no. 20.
Sender ID (ON/OFF)
This function determines whether the Sender ID is to be printed on the
transmitted fax at the remote site. Available settings are ON and OFF: set
to ON, the ID is included on the fax. Speed access no. 23.
Power Save Mode
When this function is set to ON, the machine will automatically switch to
a low-energy mode after being idle for 10 minutes. Available settings are
ON and OFF. Speed access no. 26.
6-4 Chapter 6
Page 85

Pulse Dial Rate*
If the machine is set for pulse dialling, this function controls the rate of the
dialling pulses (which vary by country). Available settings are 10, 16 and
20pulses per second. Speed access no. 46.
Pulse Make Ratio*
If the machine is set for pulse dialling, this function controls the make rate
of the dialling pulses. Available settings are 33, 39 and 40%. Speed access
no. 47.
Pulse Dial Type*
If the machine is set for pulse dialling, this function controls the type of
pulse dialling it uses (types of pulse dialling vary by country). Available
settings are N, 10-N and N+1. Speed access no. 48.
T/F Timer Prg
When set to T/F (TEL/FAX), the machine will automatically distinguish
between incoming voice and fax communications. The T/F timer controls
how long the machine waits for the call to be answered before switching
to FAX mode. Available settings are 20 and 35sec. Speed access no. 62.
English
CNG Count
When set either in the T/F or TAD modes, the machine detects the type of
signal (calling tone, CNG) sent from the remote location and initiates fax
reception if required. This function sets the CNG detection number. The
available setting is 1-5 times (numeric keypad input). Speed access no. 65.
Ring Response
This function controls how long the machine waits before answering an
incoming call. The available settings are 1 ring, 5, 10, 15 and 20sec. Speed
access no. 66.
Distinctive Ring
Distinctive ringing is a service offered by some telephone service
providers that allows different telephone numbers to be assigned to a
single line, each number being assigned a distinctive ring. When an
incoming call is received, it is possible to identify the number being call
by the assigned ringing pattern. When set to ON, fax reception begins only
Customising 6-5
Page 86

English
after a programmed ring pattern is detected. If no ring pattern has been
programmed, the ring pattern defined for each country is used for detection
as the default setting. Available settings are ON (detected), OFF (not
detected) and SET (programmed). Speed access no. 67
Note:
The default setting (factory setting) is ON for the following countries
only: USA, AUS, NZL, SEN and HNG. All other countries must learn
the ring pattern using SET before being able to set the machine to
ON.
Changing Operation Functions
Press MENU/EXIT to enter the menu.
1
Input the speed access number of the parameter to be changed, wait.
2
When the display for the desired parameter is shown, use the SHIFT
3
keys to select the setting (or input data where required), press ENTER.
Press MENU/EXIT to return to standby mode.
4
Repeat steps 1-4 until finished setting parameters.
5
Memory Password
This is a 4-digit numeric password used when the machine is operating in
the Memory Only Reception Mode (MEM). People who do not know the
password cannot make changes to or print memory data when the machine
is in this mode. Registration of just one password is possible. Speed access
no. 04.
To Set or Clear Memory Password
Press MENU/EXIT to enter the menu.
1
Input speed dial access no. 04, wait.
2
Input 4-digit numeric password using numeric keypad, press ENTER.
3
If there is no current password registered, this password will now be
registered, and the machine will return to standby mode.
If there was a password registered previously and you have entered it
correctly, display will show “PASSWORD CLOSE?” If numbers do
not match, display will show “INVALID PASSWORD”. At
“PASSWORD CLOSE” press ENTER to confirm password
cancellation., then press MENU/EXIT to return to standby mode.
6-6 Chapter 6
Page 87

Restricted Access ID
This is a 4-digit numeric password that is must be input to gain access to
machine operations when the machine is set in the Restrict Access mode.
Up to 24 RESTRICTION ID passwords can be registered at one time.
Speed access no. 05
To Set Restricted Access ID
Press MENU/EXIT to enter the menu.
1
Input speed access no. 05, wait.
2
Input department number (1-24), press ENTER.
3
Input 4-digit password(000-999) using numeric keypad, press ENTER.
4
If number is already registered, display will show “ALREADY
5
EXIST”.
Input another 4-digit ID number, press ENTER.
6
Repeat steps 3-6 until all desired ID numbers have been registered.
7
Press MENU/EXIT to return to standby mode.
8
To Cancel Restricted Access ID
English
Press MENU/EXIT to enter the menu.
1
Input speed access no. 05, wait.
2
Input department number (1-24), press ENTER.
3
Input 4-digit password using numeric keypad, press ENTER.
4
If ID matches registered number, display will show “ID CLOSE?”
5
If no match with registered number, display will show “INVALID ID”.
At “ID CLOSE” press ENTER to confirm ID cancellation.
6
Press MENU/EXIT to return to standby mode.
7
Customising 6-7
Page 88

English
Service Function Settings
In many instances, the settings of service functions can affect the way a
facsimile machine operates. If there is a need to have any of the following
settings changed, please contact your supplier or and request service.
Long Document Scanning/Transmission (Long Doc. Scan)
Normally the machine will not scan documents longer than 356mm
(14in.). With this function set to ON, the machine is capable of scanning
and transmitting documents of any length for up to one hour.
MYD/DMY
This setting controls how the machine displays and prints the date (mm/
dd/yy or dd/mm/yy).
Local Time / Date Print
This setting controls if and how the time and date are printed on received
faxes. The machine can be set to print or not print time and date, print time
and date at the top of the first page only, or print time and date at the top
of every page.
TSI Print
With this setting in the ON state, the telephone number of the remote
machine is printed at the top of each page of the fax received.
6-8 Chapter 6
Page 89

Options
Multifunction Peripheral (MFP) PC Interface Kit
The MFP PC Interface Kit is basically a software package that allows your
machine to interface with a computer connected via a parallel data cable.
Once the optional MFP software is installed in the computer and a parallel
data cable attached to connect the two devices, the facsimile can provide
PC Fax, Printer and Scanner operations. (For further details, please see
Appendix B.)
Network Print Kit
The Ethernet Adapter gives your machine the compatibility to operate in
conjunction with a variety of LAN systems and protocols including Novell
and Microsoft. Installation of the NIC enables the option of utilising
Network Print Service; 10-page per minute, 600 dot per inch printing with
Hiper-W print emulation. (For further details, please see Appendix C.)
ISDN G4 Board
The ISDN G4 Board raises the machine operability to ITU-T G4
classification with digital communications at 64Kbit/s. Although PSTN
(public switched telephone network) settings are deactivated when
installed, the system is equipped with a setting to activate an automatic
fallback function that enables communications in either G3 or G4 mode,
depending on the classification of the remote machine. (For further details,
please see Appendix D.)
English
Expandable Memory
Your facsimile transceiver is equipped with a memory expansion slot
located behind the rear cover. Memory upgrade modules of 2MB and 4MB
are available for those users who require transmission and reception of
large volumes of data.
Contact your supplier for more information.
Customising 6-9
Page 90

English
6-10 Chapter 6
Page 91

Chapter 7
Reports
In this chapter…
Your machine can produce a variety of printed reports, some on demand
and some automatically. For example, a message confirmation report tells
you whether a particular fax transaction was successful or not. You may
want these after each transmission to keep as a kind of ‘receipt’ for
important messages.
Understanding Reports. . . . . . . . . . . . . . . . . . . . . . . . . . 7-3
Reports List . . . . . . . . . . . . . . . . . . . . . . . . . . . . . . . . 7-3
Message Confirmation Report . . . . . . . . . . . . . . . 7-3
Confidential Reception Report. . . . . . . . . . . . . . . 7-3
Broadcast Entry Report . . . . . . . . . . . . . . . . . . . . 7-3
Broadcast Message Confirmation Report. . . . . . . 7-3
Power Outage Report . . . . . . . . . . . . . . . . . . . . . . 7-4
Function List. . . . . . . . . . . . . . . . . . . . . . . . . . . . . 7-4
Configuration . . . . . . . . . . . . . . . . . . . . . . . . . . . . 7-4
Telephone Directory. . . . . . . . . . . . . . . . . . . . . . . 7-4
Group Directory . . . . . . . . . . . . . . . . . . . . . . . . . . 7-4
Activity Report . . . . . . . . . . . . . . . . . . . . . . . . . . . 7-4
Active Memory Files . . . . . . . . . . . . . . . . . . . . . . 7-5
Protocol Dump . . . . . . . . . . . . . . . . . . . . . . . . . . . 7-5
Help key Printout . . . . . . . . . . . . . . . . . . . . . . . . . 7-5
Printing Reports . . . . . . . . . . . . . . . . . . . . . . . . . . . . . . . 7-6
Codes Used in Reports . . . . . . . . . . . . . . . . . . . . . . . 7-6
Result Codes. . . . . . . . . . . . . . . . . . . . . . . . . . . . . 7-6
Communication Codes . . . . . . . . . . . . . . . . . . . . . 7-7
English
Reports 7-1
Page 92

English
7-2 Chapter 7
Page 93

Understanding Reports
A number of useful reports are provided to show the machine’s current
settings, programming and operations. Refer to the following list of reports
available to determine which of those is needed for a particular situation.
Some reports print automatically after completion of operations, while
others require retrieval by users. Please refer to “Printing Reports” for
instructions on how to print those reports that are not output automatically.
Reports List
Message Confirmation Report
This report provides information about the last single-location fax
transmission or polling transmission. Information in the report includes:
Faxing date, amount of time to send or receive fax (S,R-Time), location ID
or telephone number of the remote machine (Distant Station ID),
communications mode, number of pages in communication, results of
communication, and service codes.
If an error occurred during communication, a portion of the page where the
problem occurred can be printed after the report.
Confidential Reception Report
English
This report is automatically printed each time the machine receives a
confidential message into a mailbox. Information in this report includes:
Faxed date, amount of time spent receiving the fax (S,R-Time), location
ID or telephone number of the remote machine (Distant Station ID),
number of the mailbox holding the fax, number of pages received, results
of communication, and service codes.
Broadcast Entry Report
Each time a multiple-location transmission is programmed, the machine
will give the option of printing this report to confirm location entries.
Information in this report includes: Location ID of the Speed Dial numbers
selected, and telephone numbers entered manually using the numeric
keypad.
Broadcast Message Confirmation Report
This report can be used to confirm the results of multiple-location
transmissions. Information provided in this report includes: Date and time
the transmission started, amount of time required to complete the
Reports 7-3
Page 94

English
transmission, and the location ID, number of pages sent and results of the
communication for each location.
Power Outage Report
If power to the machine is interrupted, the failure may interfere with
operations such as delayed transmissions, messages received into
memory, etc. As soon as power to the machine is restored, it prints out a
report automatically to alert users of the power outage.
Function List
This report will print out a list of the user functions available for setting via
the menu shown on the display panel. (User Function Tree)
Configuration
This is a list of the current operational settings of the machine. The
information includes: current User Function settings (except for OneTouch key parameters, which appear in the Phone Directory), sender ID
(ID=), TSI/CSI (telephone number of machine), and dialling parameter
settings.
Telephone Directory
This report provides a complete listing of all of the telephone numbers
programmed into the machine’s Speed Dial numbers (One-Touch keys
and two- and three-digit numbers). The information includes: Location ID
and primary telephone number for each programmed One-Touch key and
two- and three-digit Speed Dial number, the alternate (secondary)
telephone number (OR) for each One-Touch key, parameter settings for
each One-Touch key (PRM. ECHO).
Group Directory
This report provides a list of the telephone numbers programmed into
groups assigned to Speed Dial numbers. Listing can be provided in
alphabetical listings of the names of the groups. (This report is not capable
of printing all groups, only the selected group will be printed.) The
information includes: List title, date and time of list, sender ID, group
number and ID, and telephone number.
7-4 Chapter 7
Page 95

Activity Report
This report provides a record of the last 30 communications made by the
machine. The information provided includes: Respective amounts of time
the machine spent sending and receiving faxes: date, time and duration
(S,R-TIME) of each transmission or reception; name or telephone number
of the remote machine communicated with (Distant Station ID);
communication mode for each transaction; number of pages in each
communication, results of each communication, and service codes. If you
were sending a fax, the telephone number or the Location ID will be
printed. For faxes received, the personal ID or telephone number of the
remote machine will be printed.
Note:
This report does not contain the results of messages received
without errors or received into memory.
Active Memory Files
This report provides a list of all the messages stored in the machine’s
memory, including both documents waiting for transmission and
documents received but not yet printed. The information provided in this
report includes: Date and time a message was scanned into memory for
transmission, name or telephone number of each remote location,*
communication mode for each activity, and number of pages in each
communication. For reception, the polling messages and the messages in
personal boxes are printed separately.
English
* For transmission, the telephone number or Location ID (location
name) of the remote location will be printed. For reception, the
number of entry and total pages are printed.
Note:
One use for this report is to list the session and message numbers of
faxes stored in memory if there is a need to erase one.
Protocol Dump
This report is printed out in the event of incomplete communications, and
can be helpful in determining the cause of interruption. Send the report to
your supplier or service centre if so requested.
Help key Printout
This report provides a detailed list of all menus and functions.
Reports 7-5
Page 96

English
Printing Reports
After sending a fax, press ENTER for a message confirmation report.
To print other reports:
Press MENU/EXIT to enter the menu.
1
Press ↓ to select REPORT PRINT, press ENTER or →.
2
Use the SHIFT keys to select the report to be printed, press ENTER or
3
.
→
Print out all reports required, then press MENU/EXIT to return to
4
standby mode.
Codes Used in Reports
Result Codes
Result codes indicate the results of communications.
Table 7-1: Result codes
Code Explanation
BUSY The line of the remote location was busy or there was no answer.
CANCL A confidential message was erased after being held in memory for 10 days.
COMP. A multiple-location transmission was completed.
COVERThe machine’s cover was opened during the communication.
NO Transmission or reception failed due to a communications error.
OK Transmission or reception was completed successfully.
PUNIT There is a problem with the printing unit. Contact service representative.
R_JAM A paper jam occurred while receiving a fax, when the machine was unable to
S_JAM A document jam occurred in the machine sending the fax.
PAPER Paper ran out during reception and there was insufficient memory available for
STOP Stop key was pressed, ending the session.
receive the entire message in memory.
the entire message.
7-6 Chapter 7
Page 97

Communication Codes
Communication codes indicate the communications mode used for a
communication.
Table 7-2: Communication codes
Code Explanation
B.C. Multiple-location transmission (broadcast).
CONF=(BOX NO.) Fax received to a personal mailbox.
CALLING A communication initiated by the local machine.
CALLED A communication initiated at a remote location.
POLLED Polling transmission initiated
POLLING Polling reception by the local machine
FWD Forwarding
BATCH Batch transmission
POLL=(BOX NO.) Bulletin polling
English
Reports 7-7
Page 98

English
7-8 Chapter 7
Page 99

Chapter 8
Troubleshooting
In this chapter…
If you encounter occassional problems operating your machine, the
information in this chapter may help you to quickly solve them. Fixing a
minor problem yourself is often much quicker, and sometimes more costeffective, than waiting for a service technician to help you. Some problems
are best referred to qualified personnel. In such cases this chapter will
advise you to do that.
Clearing Document Jams . . . . . . . . . . . . . . . . . . . . . . . . 8-3
Clearing Paper Jams. . . . . . . . . . . . . . . . . . . . . . . . . . . . 8-4
Toner Cartridge Replacement . . . . . . . . . . . . . . . . . . . . 8-7
Image Drum Unit Replacement . . . . . . . . . . . . . . . . . . . 8-10
Cleaning Scanner Path . . . . . . . . . . . . . . . . . . . . . . . . . . 8-12
Reading Counters. . . . . . . . . . . . . . . . . . . . . . . . . . . . . . 8-12
Problem Checklist . . . . . . . . . . . . . . . . . . . . . . . . . . . . . 8-13
Display Error Messages . . . . . . . . . . . . . . . . . . . . . . 8-14
Packaging for Transport. . . . . . . . . . . . . . . . . . . . . . . . . 8-15
English
Troubleshooting 8-1
Page 100

English
8-2 Chapter 8
 Loading...