

Okamura Zephyr Light Assembly Manual
Assembly Instruction & Instructions for Use
Thank you for purchasing Okamura “Zephyr light” product. This guidebook will enable to properly use
the “Zephyr light” product. Thoroughly read this guidebook and fully understand its content before using
the product. Also, we recommend having this handbook nearby whenever using the product.
(
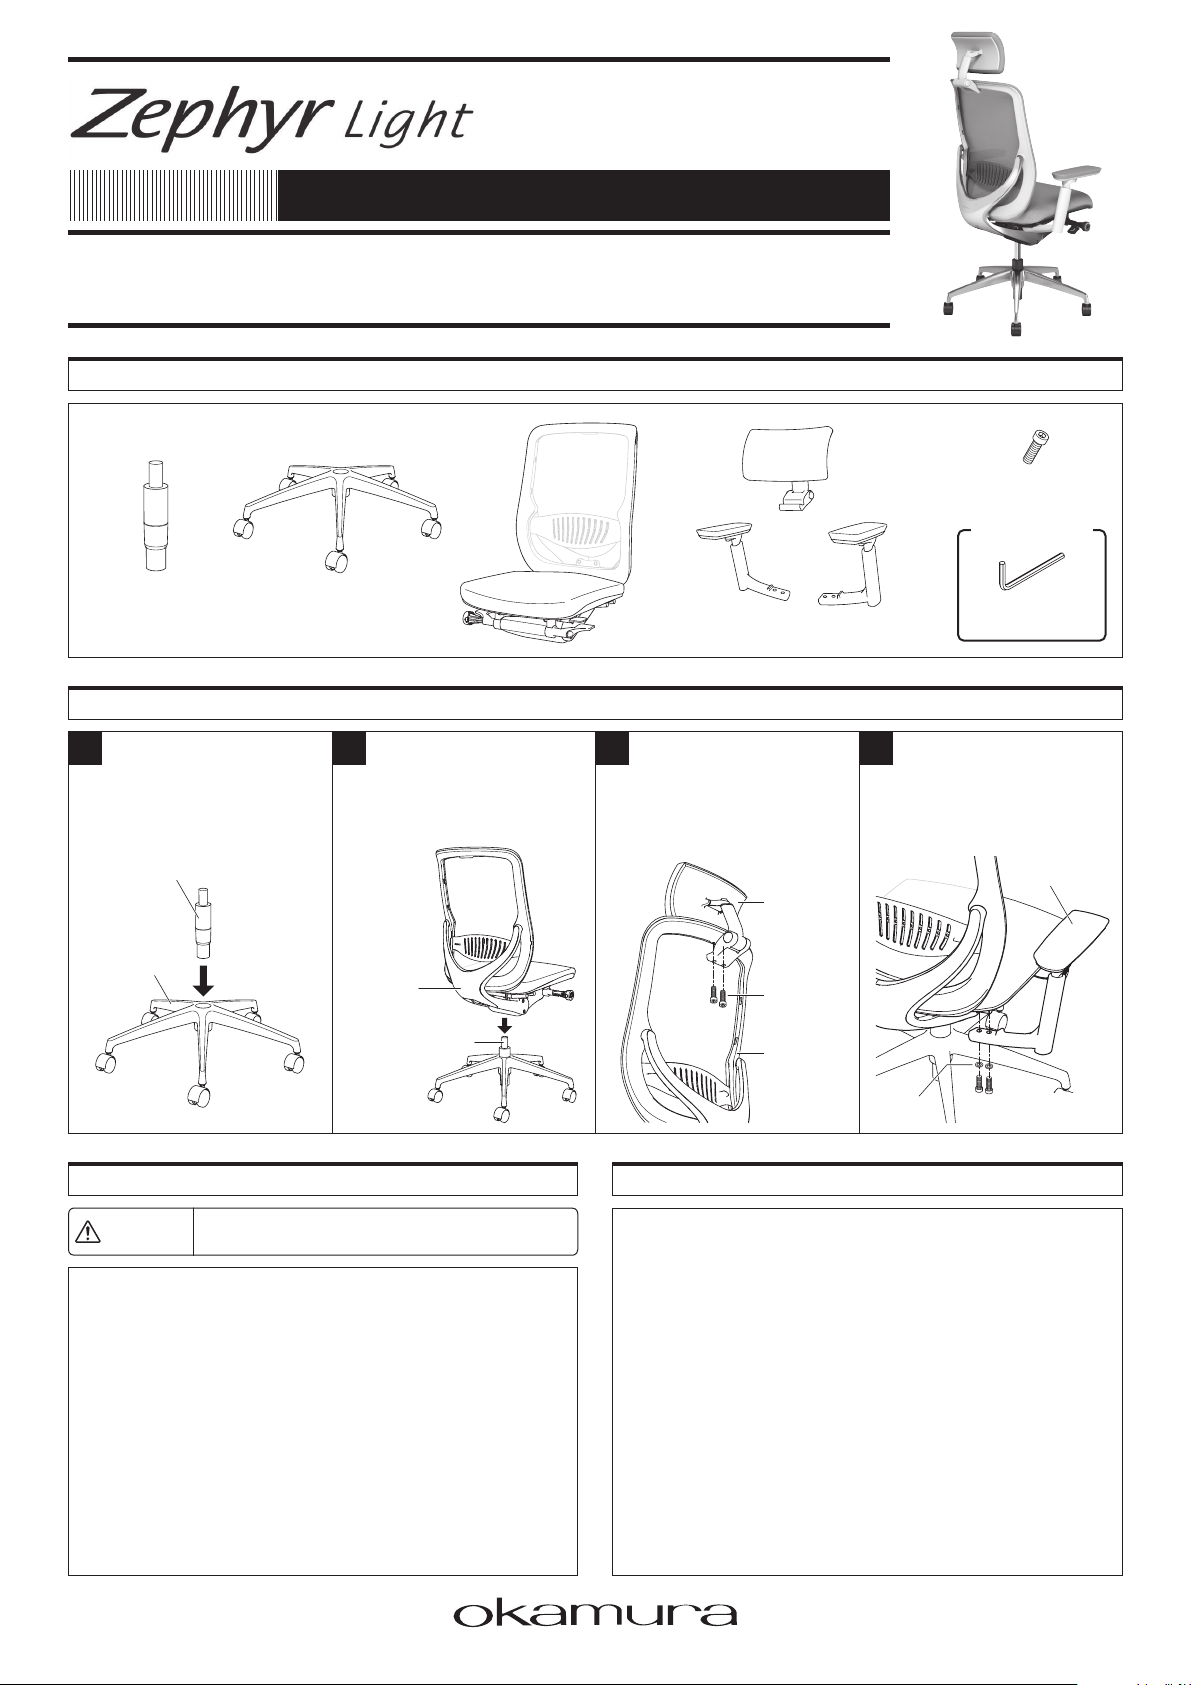
Component List
Seat height adjustment
gas spring ×1pcs.
Base ×1pcs.
Assembly Instruction
Gas spring attachment Main body attachment Headrest attachment
1 2 3 4
Place t he seat hight a dj ustment
gas spring to the 5-star base.
Seat height adjustment
gas spring
Place the main body on the seat
height adjustment gas spring.
Check the components before starting assembly
Headrest ×1pcs.
)
(Right
Main body
×1pcs.
Attach the headrest to the back of
the main body, and fasten using the
2 hexagon socket bolts (M6×20L).
Adjustable arm (Left and right
× 1 piece each
(
Follow the procedure correctly
Headrest
Hexagon socket bolt
(
M6×20L) × 6pcs.
Nominated Tools
)
(Left
)
hex key wrench
(
)
5mm
Adjustable arm attachment
Fasten the left and right adjustable
arms to the back of the main body
using the 2 hexag on socke t bolts
(
M6×20L). (Side
)
Adjustable arm
(
)
Right
)
)
Base
Safety Instructions
Caution
・
Do not handle roughly, or use improperly.
・Do not use as a carrier.
・Do not stand on the chair or sit on the front side of seat or armrest.
・Do not sit on any parts other than the seat.
・
Disassembly/repair.
The seat raising mechanism (gas spring) contains high pressure gas, and in
the event any irregularities are found, any disassembly or repair attempts by
the customer are extremely dangerous for this part in particular, so please
do not attempt disassembly or repair, contact our company's sales agent.
・
Do not disassemble or repair on your own. Please contact our
(
Make sure to follow these instructions)Instructions to Extend the Life of Product
Indicates that improper handling may caus e i nj ur y or
property damage.
Main body
Seat height adjustment
gas spring
official dealers when needed.
・
Do not insert hands into any gaps or movable parts.
Hexagon
socket bolt
(
)
M6×20L
Main body
Washer
・
Indoor use only.
・
Do not use outdoors or places with water, as exposure to moisture could
result in problems such as warping or the growth of mold.
・
Avoid keeping the product in direct sunlight as this could result in warping
or fading of colors due to exposure to the sun.
・
Instructions for Use and Maintenance.
If the product has become unsteady due to loosening of the bolts or screws
durin g u se, reti ghten them immediat el y. F requent maintena nc e o f t he
product during its use is the key to making it at last a long time.
・
Metal part and resin part care.
For daily care, briskly wipe with a well wrung-out, soft cloth. If there is any
significant dirt, wipe with thinned neutral detergent and carefully wipe down
with water to ensure no detergent remains, then wipe dry with a dry, soft cloth.
・
Mesh material, cushion part care.
After tapping the mesh section with your hand, use an electric vacuum to remove
any remaining dust. The cushion part cannot be cleaned, so if it becomes
significantly dirty, it is recommended to replace it with a new cushion part.
Hexagon socket bolt
(
)
M6×20L
85mm
90mm
50mm
28°
25mm
50mm50mm
①
②
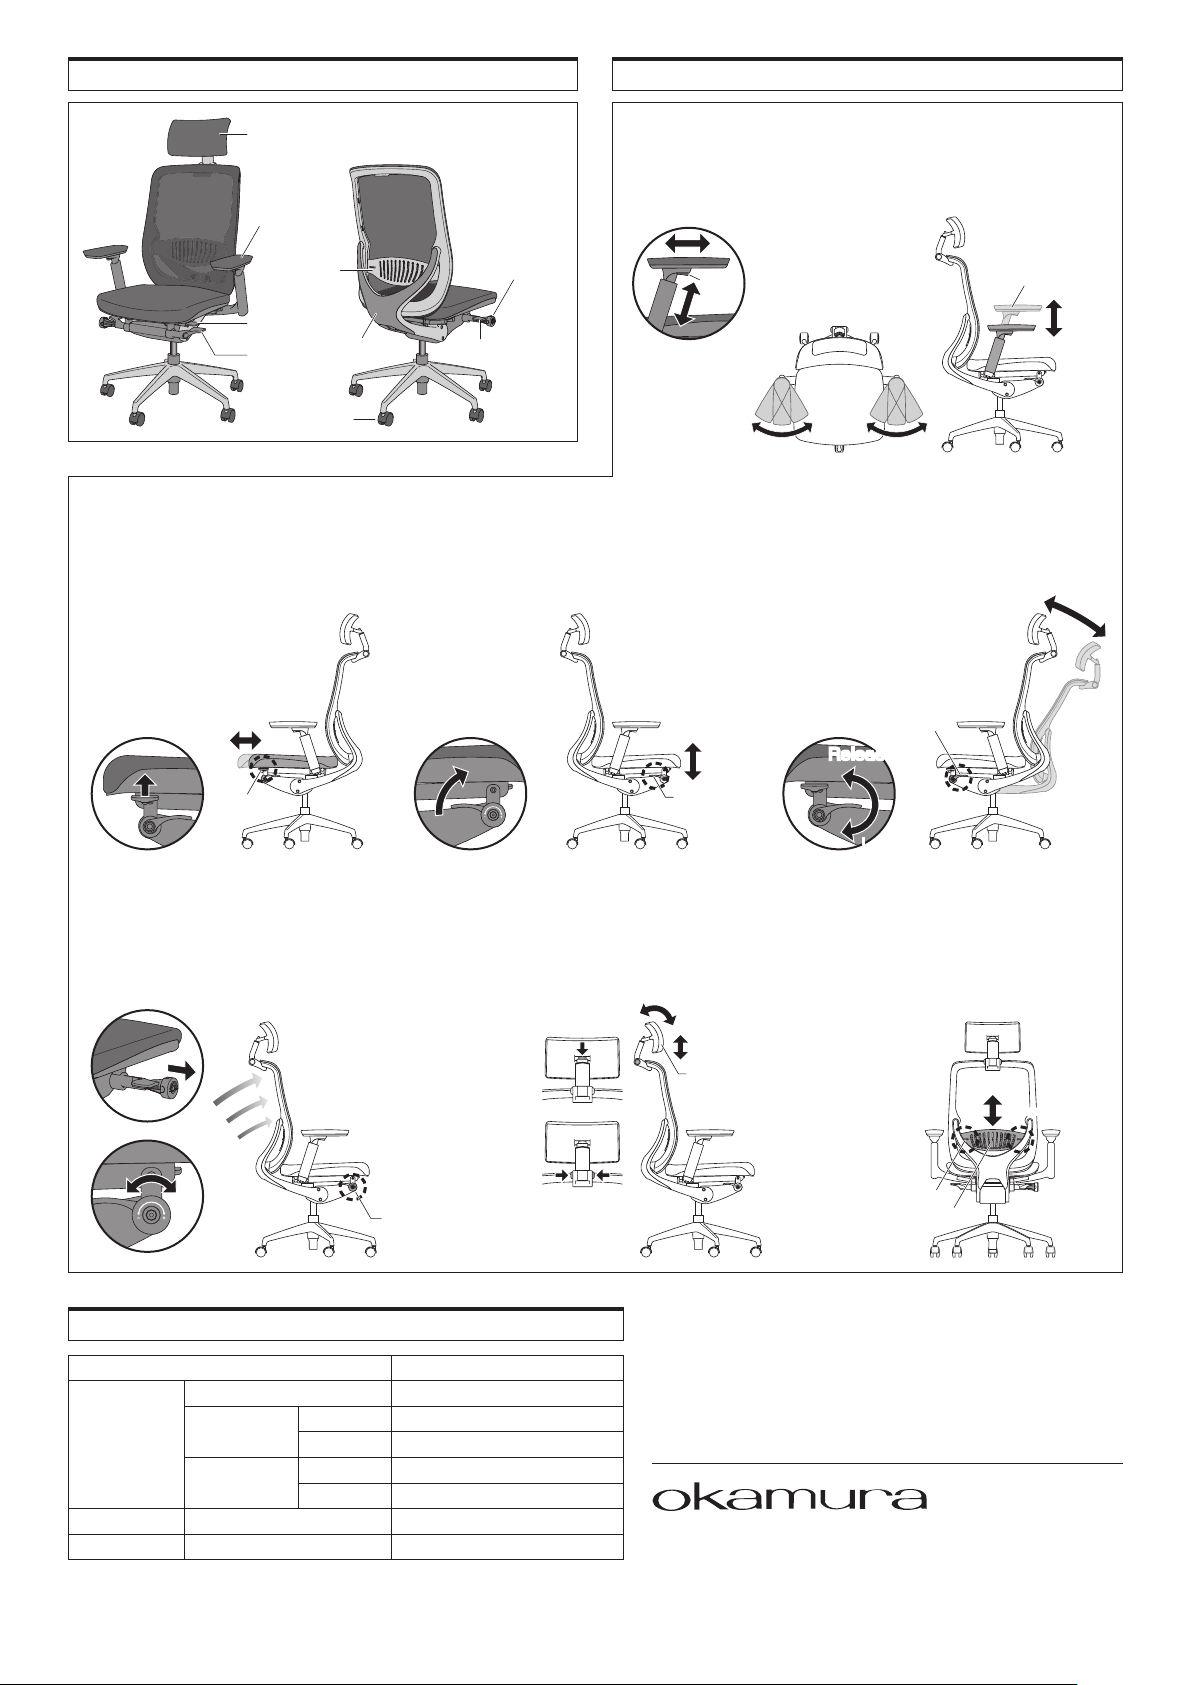
Adjustable arm
Seat slide
lever
Reclining
control lever
Reclining tension
adjustment knob
Seat height
adjustment lever
Headrest
Lumbar support
Lever
Part Names Operation
①
②
Button
■
Headrest
Adjustable arm
Adjustable arm height and angle adjustment
Arm height can be changed by pressing the buttons on the back of the
pads (stroke: 90mm). In addition, the angles of the arm pads can be
adjusted to suit different uses and can also be moved forward or back
(stroke : 60mm).
Lumbar
support
Seat slide lever
Frame
Caster
■
Seat depth adjustment
Reclining
control lever
With your weight raised slightly o ff the
se at, pull th e "sea t sli de le ver" o n the
bottom left of the seat upwards and pull
the seat slightly upwards while moving the
seat forwards or back.
Reclining tension
adjustment handle
Seat height
adjustment lever
■
Seat height adjustment
Adju st u sin g th e "seat heig ht a dju st men t lever"
on the bottom right of the seat. If the lever is lifted
upwards with a person's weight on it, the seat will
lower a nd will the n lock in place a t the p os it ion
when the lever is released. To raise the seat, pull the
lever upwards with
you r weight ra ised
slightly off the seat.
■
Reclining lock and release
Adjust the reclining state by pulling the "reclining
adjustment lever" on the bottom left of the seat.
Lean back against the seat and lower the lever at
the reclined position to lock the back in place.
Lift t he lever and lean light ly
against the back to release the
lock and put the back in the
free state.
ReleaseRelease
■
Reclining tension adjustment
①
Pull the tension adjustment handle on the bottom
right of the seat forwards.
②
Tu rn th e ten sio n adj ust ment hand le in t he "+"
direction to increase tension and in the "−" direction to
decrease tension. Adjust so that it is comfortable for you.
■
Headrest adjustment
(Only for moveable headrest type
①
To adjust height, lift the headrest upwards while
pushing the button the back of the headrest.
②
To adjust angle, adjust while pushing the buttons
on both sides of the headrest attachment part.
Materials
Part Material
Base / Frame Die-cast aluminum 〉ADC〈
Structural parts
Backrest Shell
Adjustable arm
Cushion Sheet / Fabric upholstery Molded polyurethane / Polyester
Mesh Backrest Polyester
※
〉○○〈 indicates the materials of the parts. This information is useful when recycling.
※
Please understand that product specifications might change without prior notification
when improvements are made to the product.
Inner frame Polypropylene 〉PP〈
Outer frame Polyamide 〉PA〈
Pad Thermoplastic-Elastomer 〉TPO〈
Cover Polypropylene 〉PP〈
LockLock
■
)
Lumbar support adjustment
Wh ile s e ate d, m ove b o th ha nds
behind the back of the chair, and
raise the levers on both sides with
your back sli ghtly away from the
back of the chair.
OKAMURACORPORATION
INTER NA TIONALSALES & MARKETINGDIV IS ION
2-14- 27 ,Akasaka,Mi na to-ku,Tokyo 10 7-0052,JAP AN
Tel: + 81-3-5561-408 5 Fax:+81-3 -5 561-4086
www.okamu ra .jp
http:
//
/
EUR001
2012-10
 Loading...