

Okamura 865SAR Assembly Manual
865SAR
Assembly Instruction Manual
Special Edition
Multipurpose Rack
Thank you very much for purchasing the
OKAMURA Study DESK. Before using this
product, care fully read this Assembly
Instruction Manual in order to fully understand and correctly assemble the product.
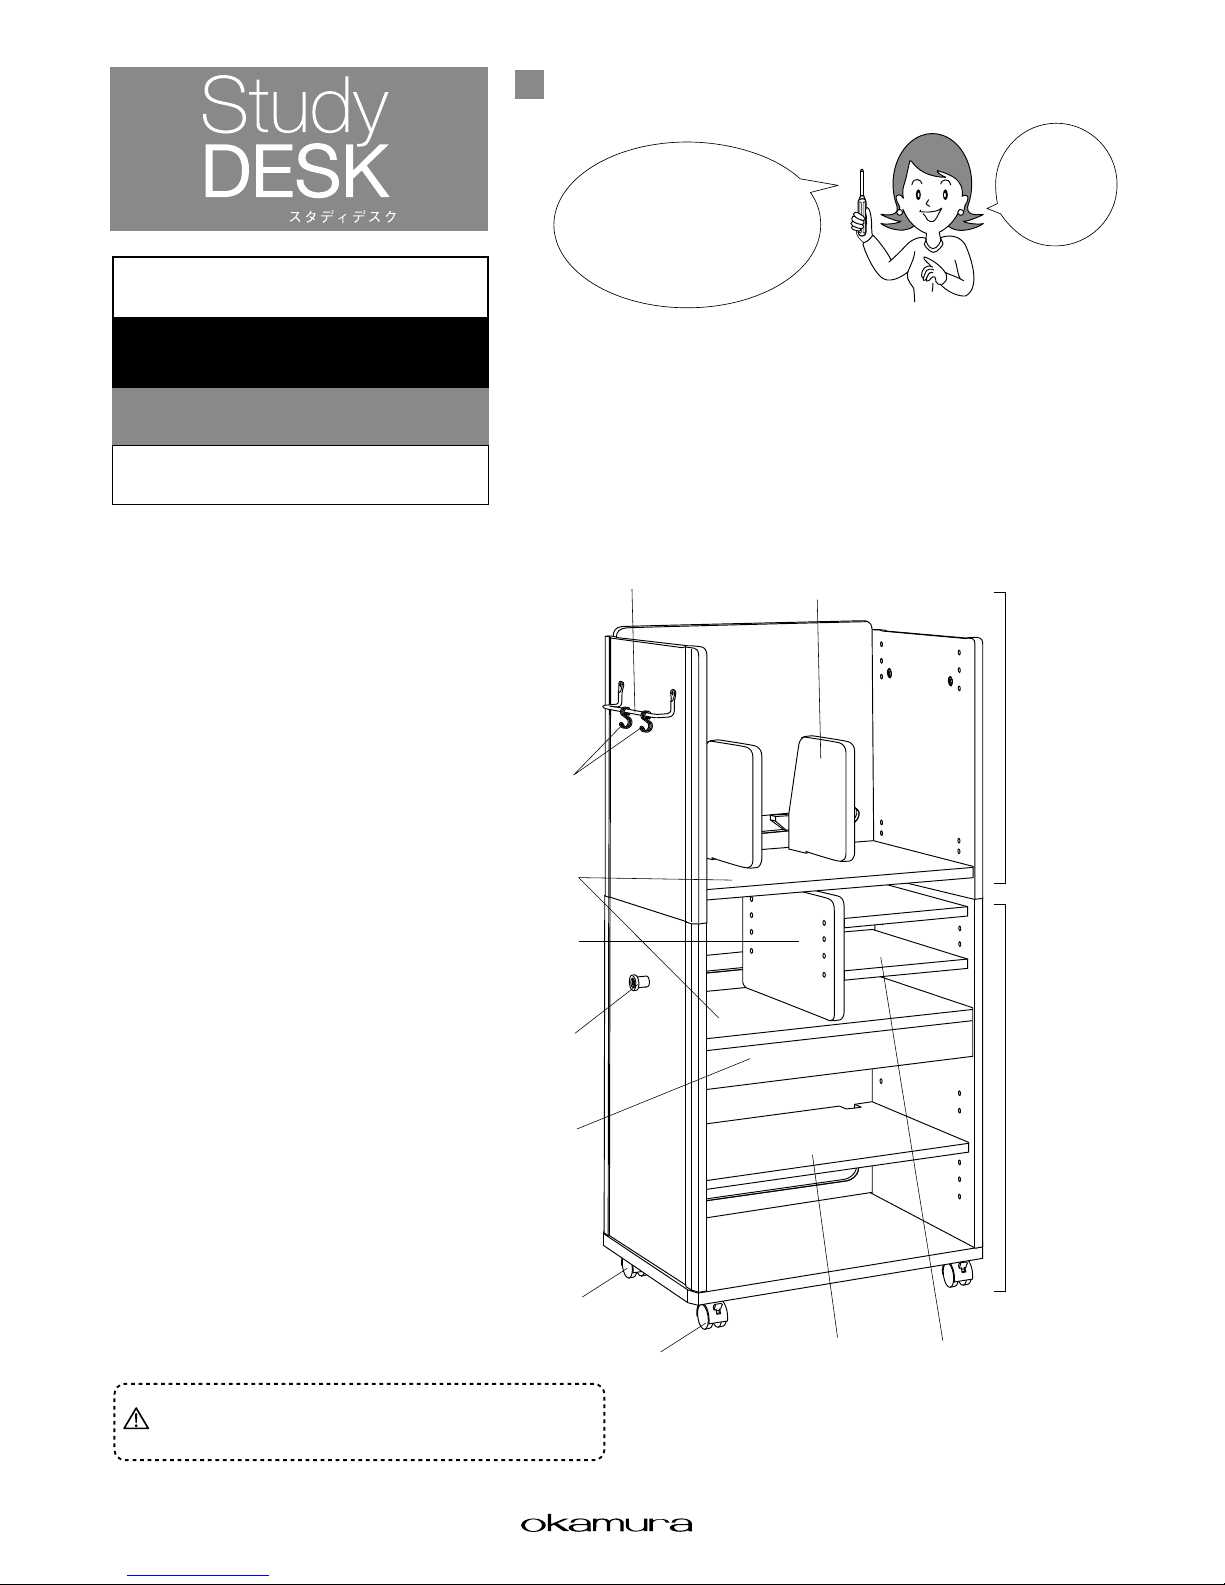
Assembly Final Drawing
(Name of each part)
A cross slot
screwdriver is required for
assembly. Please have one available.
* Do not use an electric screwdriver
because it may damage the
product.
Two
persons should
assemble this
product.
Movable divider
Upper unit
Lower unit
Hook hanger
T-shape hook
Caster
(without stopper)
Caster (with stopper)
Movable shelf
plate (large)
Drawer
Movable shelf
plate (small)
Center divider
Fixed shelf
S-shape hook
CAUTION
Mov eme nt in the fron t-back direction may re sult in
turnover, causing injury. Move in the lateral direction.

2
When the center divider is installed at the middle stageWhen the center divider is installed at the lower stage
1
Check before assembly.
Locations of Caution Seals
Warning label
(Attached to the fixed
shelf surface)
(Do not remove the warning labels)
Installation Location Reference Example for Movable Shelf Plate/Movable divider
The movable shelf plate and movable divider can be installed in combination with the center divider as shown in the following table.
Determine a completion state, and then carry out assembly work.
Movable shelf
plate (large)
Three stages
Movable divider
Movable divider
Movable shelf
plate (large)
Two stages
Movable
shelf plate
(small)
Four stages
Movable shelf
plate (large)
Three stages
Movable divider
Movable divider
Movable divider
Movable shelf
plate (large)
Two stages
Movable
shelf plate
(small)
Four stages
Movable shelf
plate (large)
Three stages
Movable shelf
plate (large)
Two stages
Movable
shelf plate
(small)
Four stages
Movable shelf
plate (large)
Three stages
Movable divider
Movable shelf
plate (large)
Two stages
Movable
shelf plate
(small)
Four stages
Movable shelf
plate (large)
Four stages
Movable shelf
plate (large)
Three stages
Movable divider
Movable shelf
plate (large)
Two stages
Movable
shelf plate
(small)
Four stages
Movable shelf
plate (large)
Three stages
Movable divider
Movable shelf
plate (large)
Two stages
Movable
shelf plate
(small)
Four stages
Movable shelf
plate (large)
Four stages
(* All are spaced with a pitch of 300mm.)
Details of Parts (make sure to check before assembly)
* Set the protective material on the floor and carry out parts installation work on the material so as not to damage the members.
❶Screw the casters of and into the caster installation holes on the
Product No. seal
(Attached to the
bottom back side)
Use a cross slot screwdriver for assembly.
* An electric screwdriver or electric tool may damage the product,
Center
divider

3
×8
×2
×2
×1
×4
×8
×
12
×2
×6
×1
×2
×5
×4
×3
1
Details of Parts (make sure to check before assembly)
T-shape hook
k
a
b
Connecting nut
(M6 × 12mm)
f
e
j
Both-side connecting
bolt (34mm/34mm)
Single-end
connection bolt
(24mm)
Cap for insert nut
Plug cap
(8mm)
S-shape hook
l m n
c
Actual size
Connecting bolt
(M6 × 10mm)
h
Hook hanger
g
i
d
Actual size
Connecting bolt
(M6 × 35mm)
Shelf plate
receiving dowel
Caster
(with stopper)
Caster
(without stopper)
Spanner (12mm)
Movable divider ×2
Lower unit ×1
Side panel (right and left) ×1
Rear panel ×1
Movable shelf plate (large) ×1 Movable shelf plate (small) ×2Center divider ×1
Fixed shelf plate ×1
Installation of caster
* Set the protective material on the floor and carry out parts installation work on the material so as not to damage the members.
❶Screw the casters of and into the caster installation holes on the
back of the lower unit bottom plate to install.
When screwing to the end, securely tighten the bolts and nuts with the
spanner of .
Lower unit
Caster (without stopper)
Caster (with stopper)
n
l
m
m
l
Use a cross slot screwdriver for assembly.
* An electric screwdriver or electric tool may damage the product,
therefore, use a manual screwdriver.
 Loading...