

Page 1

Page 2

1
Contents
Preface ............................................................................. 2
Cautions Before Use ............................................................... 2
Operational Condition ............................................................. 2
Product Warranty and Liability .................................................... 2
1 Product Description ............................................................... 3
1.1 PC System Requirements ........................................................ 3
1.2 Product Appearance and Feature Icons .......................................... 3
2. Basic Configuration (prior to first time use) .................................... 4
2.1 Inserting a microSD Card ...................................................... 4
2.2 Power On ...................................................................... 4
2.3 Setting Date and Time ......................................................... 6
2.4 Loop Setting .................................................................. 6
3. Advanced Settings: ............................................................... 6
3.1 Video Parameter Settings ...................................................... 6
3.2 Text Overlay: Date and Time, License Plate Number, Off......................... 7
3.3 Setting Language .............................................................. 7
3.4 GPS: On/Off ................................................................... 8
3.5 Taking a Picture .............................................................. 8
4. Reviewing Videos and Pictures .................................................... 8
4.1 Review Video on Camera Screen or TV: .......................................... 8
4.2 Review Pictures ............................................................... 8
4.3 File Protection ............................................................... 9
4.4 Review Video on a TV .......................................................... 9
4.5 Review Video on a PC .......................................................... 9
Appendix ........................................................................... 11
Page 3

2
Preface
Cautions Before Use
Because of “Distracted Driving Legislation” in many countries, do not operate the
product while you are operating the vehicle.
Avoid exposing this product to dusty, dirty, or sandy areas to reduce the risk of
damaging components.
Do not expose the product to high temperature. High temperature may shorten the life
span of electronic device, damage the battery, or warp/melt specific plastic parts.
Do not set up the product in a cold environment - when the product is heated to its
correct temperature, the temperature change will condense moisture inside and damage
the circuit.
Do not disassemble or modify the product. Doing so may void the warranty or lead to
electric shock from the high-pressure internal components.
Do not drop or otherwise inflict impact on the product. Impact may damage internal
components.
Do not clean the product with chemicals, cleaning solution, or high concentration
detergent. Clean it gently with a soft, slightly damp cloth.
Operational Condition
The extreme working temperature range is -10ºC – 60ºC (14℉ - 140℉). However, it is
recommended to keep the working temperature below -10ºC – 40ºC (14℉ - 104℉).
Do not operate or expose the product under following conditions:
— Direct sunlight
— High temperatures
— Extremely dusty areas
— Near air conditioners, heaters, or other extreme temperature sources
— In a closed car, especially parked in direct sunlight
— Violent vibration area
Product Warranty and Liability
Our company shall not be responsible for any problems occurring from use in violation
of directions in the User’s Manual.
The product is an assistive device for safe driving, and our company shall not be
responsible for any damages stemming from product failure and/or data loss.
Because of “Distracted Driving Legislation” in many countries, do not operate the
product while you are operating the vehicle.
The product uses the recorded and/or stored images upon any shock, incident and/or accident
to a vehicle, but does not guarantee that all the images are recorded and/or stored.
Page 4

3
1 Product Description
The OJOcam Pro2 is equipped with a windshield mount and an optional built-in GPS receiver
for location tracking purposes.
Images from the camera are stored on microSD card (optional) for future reference. The camera
uses the leading video compression technology (H.264) for the best video quality with minimum
storage requirements.
OJOcam Pro2 is very small and can be discretely mounted on windshield.
1.1 PC System Requirements
· Windows 8/7/Vista/XP operating system
· Intel Core 2 Duo CPU or better
· Minimum 2GB of RAM (4GB is recommended)
· Standard USB 2.0 port or better
· Video card with minimum of 64MB video memory
1.2 Product Appearance and Feature Icons
Page 5

4
1. Windshield mount w/ GPS receiver (GPS is optional); attach 3M sticker here and stick to
windshield. If no GPS receiver is included, it is as a bracket only.
2. Micro USB port (connect to car charger or USB)
3. Analog video out port
4. Up/Menu/Mute
5. OK
6. Down/Emergency
7. System indicator
8. Lens
9. Micro USB (only supply power when connecting to the car charger or USB)
10. Power on/off/reset (long press to reset)
11. HDMI port
12. microSD card slot (card is optional and sold separately)
13. Microphone
14. Speaker
2. Basic Configuration (prior to first time use)
2.1 Inserting a microSD Card
With power off, Insert a microSD card (sold separately) into the OJOcam Pro2 for saving
recorded files.
Caution: For OC-0803 without internal memory, the camera does not record video if no microSD
card is in place.
Samsung Class 6 and Sandisk Ultra UHS-1 Class 10 micro sd cards are recommended (please
avoid low speed card (below class4) for the camera. To void data loss, only remove the MicroSD
card from OjoCam camera when the power is off.
2.2 Power On
Press and hold the Power button for 2 seconds to turn ON/OFF the power, or connect the car
charger and the product will turn on when the car starts. (Note- Some vehicle cigarette
lighters have live D.C. Voltage regardless of whether the ignition key is on or off. In
this case the camera is activated without the use of the vehicle ignition switch. In this
case the motion detection feature can be used when you are not in the vehicle).
Page 6
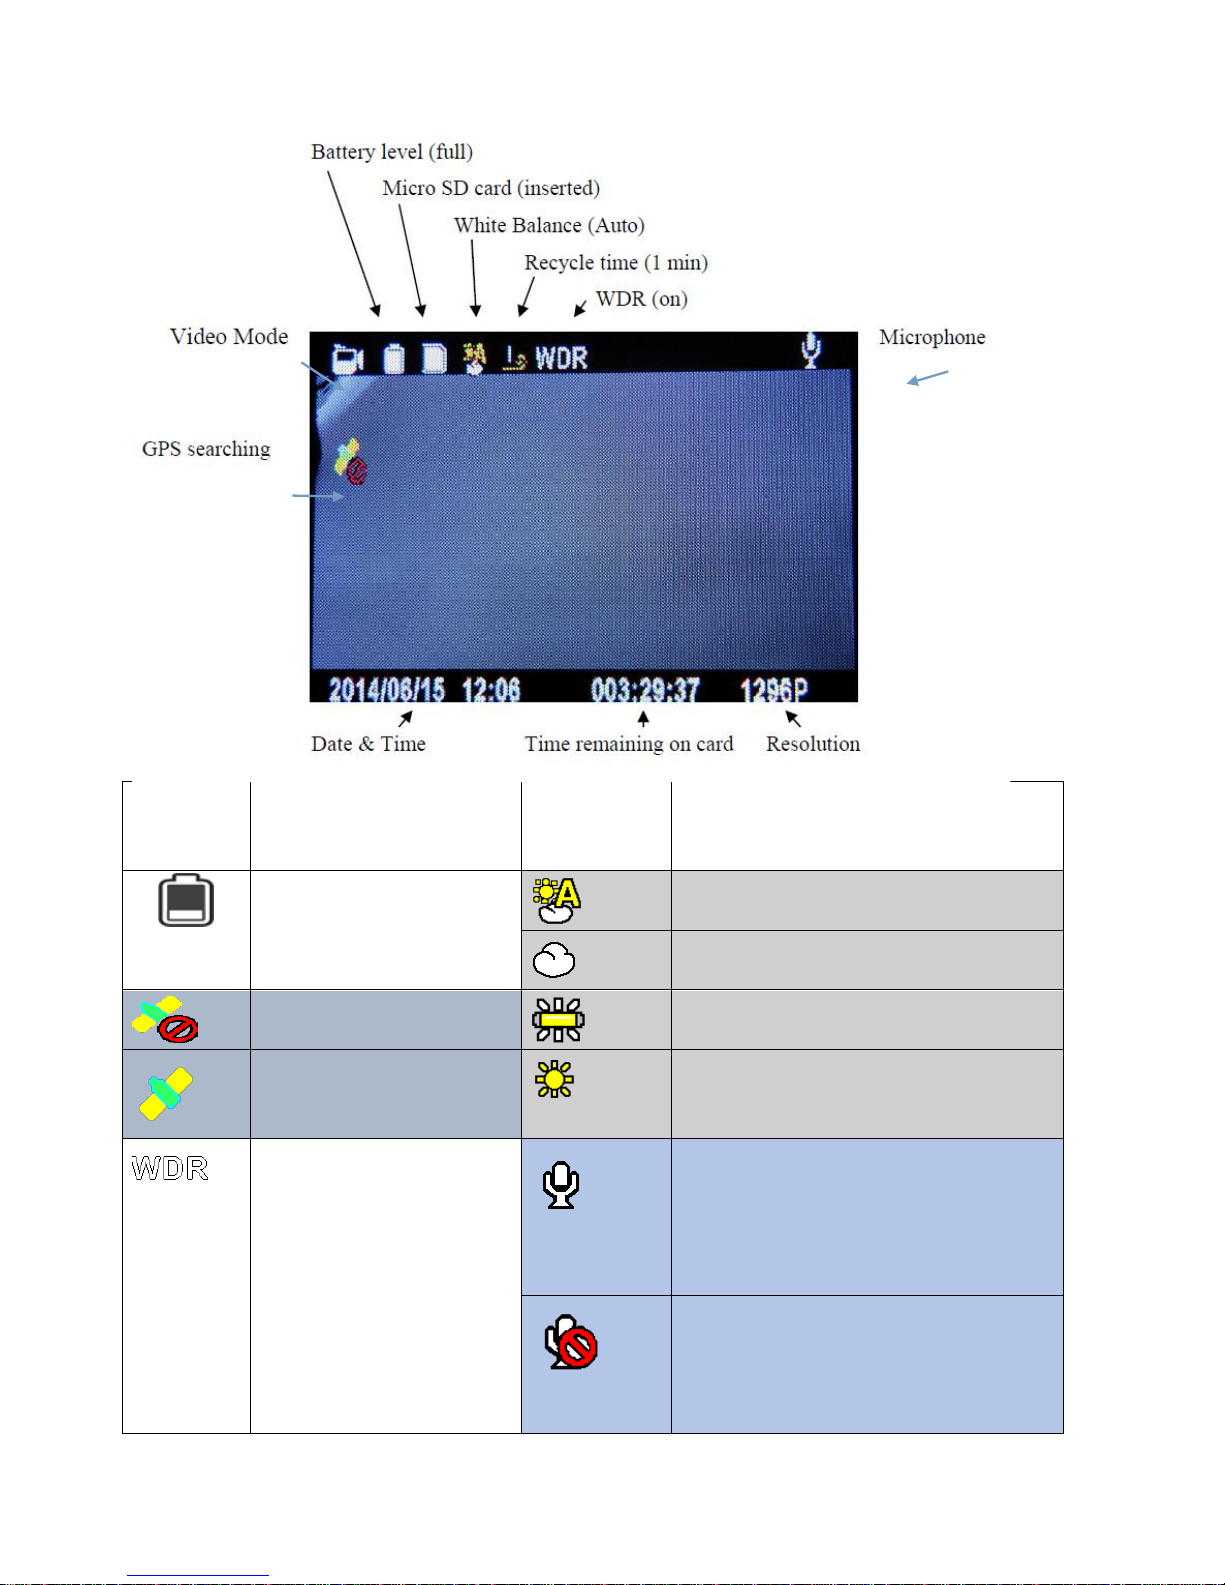
5
000:00:15
Remaining recording
time on the micro sd
card.
1296P
Current recording resolution
Battery level
indicator
White Balance mode: Auto
White Balance Mode: Cloudy
Acquiring GPS Signal
White Balance Mode: Florescent
GPS signal locked
White Balance Mode: Sunny
Wide Dynamic Range mode
on. This feature would
improve the video
quality under high
contrast scenes.
Once the feature is
disabled, the WDR icon
would not be displayed
on the screen.
Microphone/Audio recording
enabled.
Microphone/Audio recording
disabled.
Page 7

6
2.3 Setting Date and Time
Turn on the camera using the Power button. Press Menu (long press the Up button) then press
Up and Down buttons to choose Date and Time. Press OK button to confirm.
2.4 Recycle Setting/Loop Recording
Off, 1 minute, 3 minutes, 5 minutes
1. Off Mode
a. The camera cannot start recording automatically when the ignition is on. Also, the
camera will stop recording when microSD card is full.
b. Maximum file size of each recorded video file is 3.66GB. When it reaches the maximum,
the recording is automatically split and saved as another file.
c. If the microSD card is full, the previous files will not be deleted; when card is
full, the display will show "card full" and the camera cannot continue recording.
2. When the “Recycle” Setting mode is "1 min," "3min," or “5min"
a. When car ignition is on, (Note- Some vehicle cigarette lighters have live D.C. Voltage
regardless of whether the ignition key is on or off. In this case the camera is activated
without the use of the vehicle ignition switch. The camera will start recording
automatically.
b. If the microSD card is out of space, the previous saved file will be automatically
overwritten.
3. Advanced Settings:
3.1 Video Parameter Settings
Read this chapter to configure the setup and fine-tune the functions.
Note: Some Parameter Settings may be slightly different for some models.
Turn on the camera using the Power button. Press Menu (long press the Up button), then press
Up and Down buttons to choose icons. Press the OK button to confirm.
1. Video Resolution: 2304*1296@30fps,1920*1080@30fps,1280*720@30fps
2. Video quality: Super fine, normal, fine
3. AE (Automatic Exposure) mode: please leave it at the default value.
4. WDR (Wide Dynamic Range): ON/OFF (turn on to provide clear images even under backlighting.)
5. LDWS (Lane Departure Warning System):ON/OFF (turn on to warn a driver when the car begins
to move out of its line.) Due to the liability issue, we stop supporting the feature.
Page 8

7
6. LDWS CALIBRATION: Red line is the Skyline, Yellow line is hood line
7. Flicker: 50/60Hz (For United States and Canada, please choose 60Hz)
8. White Balance: Auto (recommended), Sunny, Cloudy, Fluorescent, Incandescent (White
Balance is for correction under different lighting conditions. When White Balance is set
to Auto, the camera will automatically compensate for different lighting conditions)
9. EV (Exposure Value):-2.0,-1.7,-1.3,-1,-0.7,-0.3,0,+0.3,+0.7,+1.0,+1.3,+1.7,+2
10. Recycle/Loop setting: 1min, 3mins, 5mins, OFF
11. Motion detect: off/on
12. Time set: time off set, year/ month/day Time
If the unit comes with the optional GPS, the UTC time offset needs to be adjusted to your
time zone. The time setting is accessible via camera menu Time. Check the Internet for
a list of UTC offset for time zones.
13. AUTO power off: 1min, 3mins,5mins, off
14. Power off screen : off/1minutes/3 minutes/5minutes
15. Date/Time Stamp: Driver Number stamp/OFF/Date Time
16. Driver Number stamp (a customizable text overlay field)
17. G-sensor Sensitive: 2G/2.5G/3G/3.5G/4G/4.5G, CLOSE
4.5G and 2G are the most and least sensible setting.
18. G-sensor calibration: Yes / No
19. GPS: On/off (only for the camera with GPS function)
20. Language: English/Russian/Chinese
21. Default setting: Yes/No (This function will restore all the settings to the factory
defaults.)
22.Format: Yes/no (Use this function to format a storage card - note that all the data stored
on memory card will be erased, please back up information before proceeding with this
operation)
23. Firmware version: Display firmware version information
3.2 Text Overlay: Date and Time, License Plate Number, Off
• In Car Mode, the location coordinates (latitude and longitude) will be displayed on the
LCD screen (GPS version only).
• After setting up Date, Time, and License Plate Number, if driver number is not shown on
the screen, it means the device has insufficient storage space.
• Driver Number is 9-character license plate number.
3.3 Setting Language
Turn on the camera using the Power button. Press Menu (long press the Up button),then
press Up and Down buttons to choose language. Press OK button to confirm.
Page 9
8
3.4 GPS: On/OFF
GPS Tracking (only available with optional GPS Module installed)
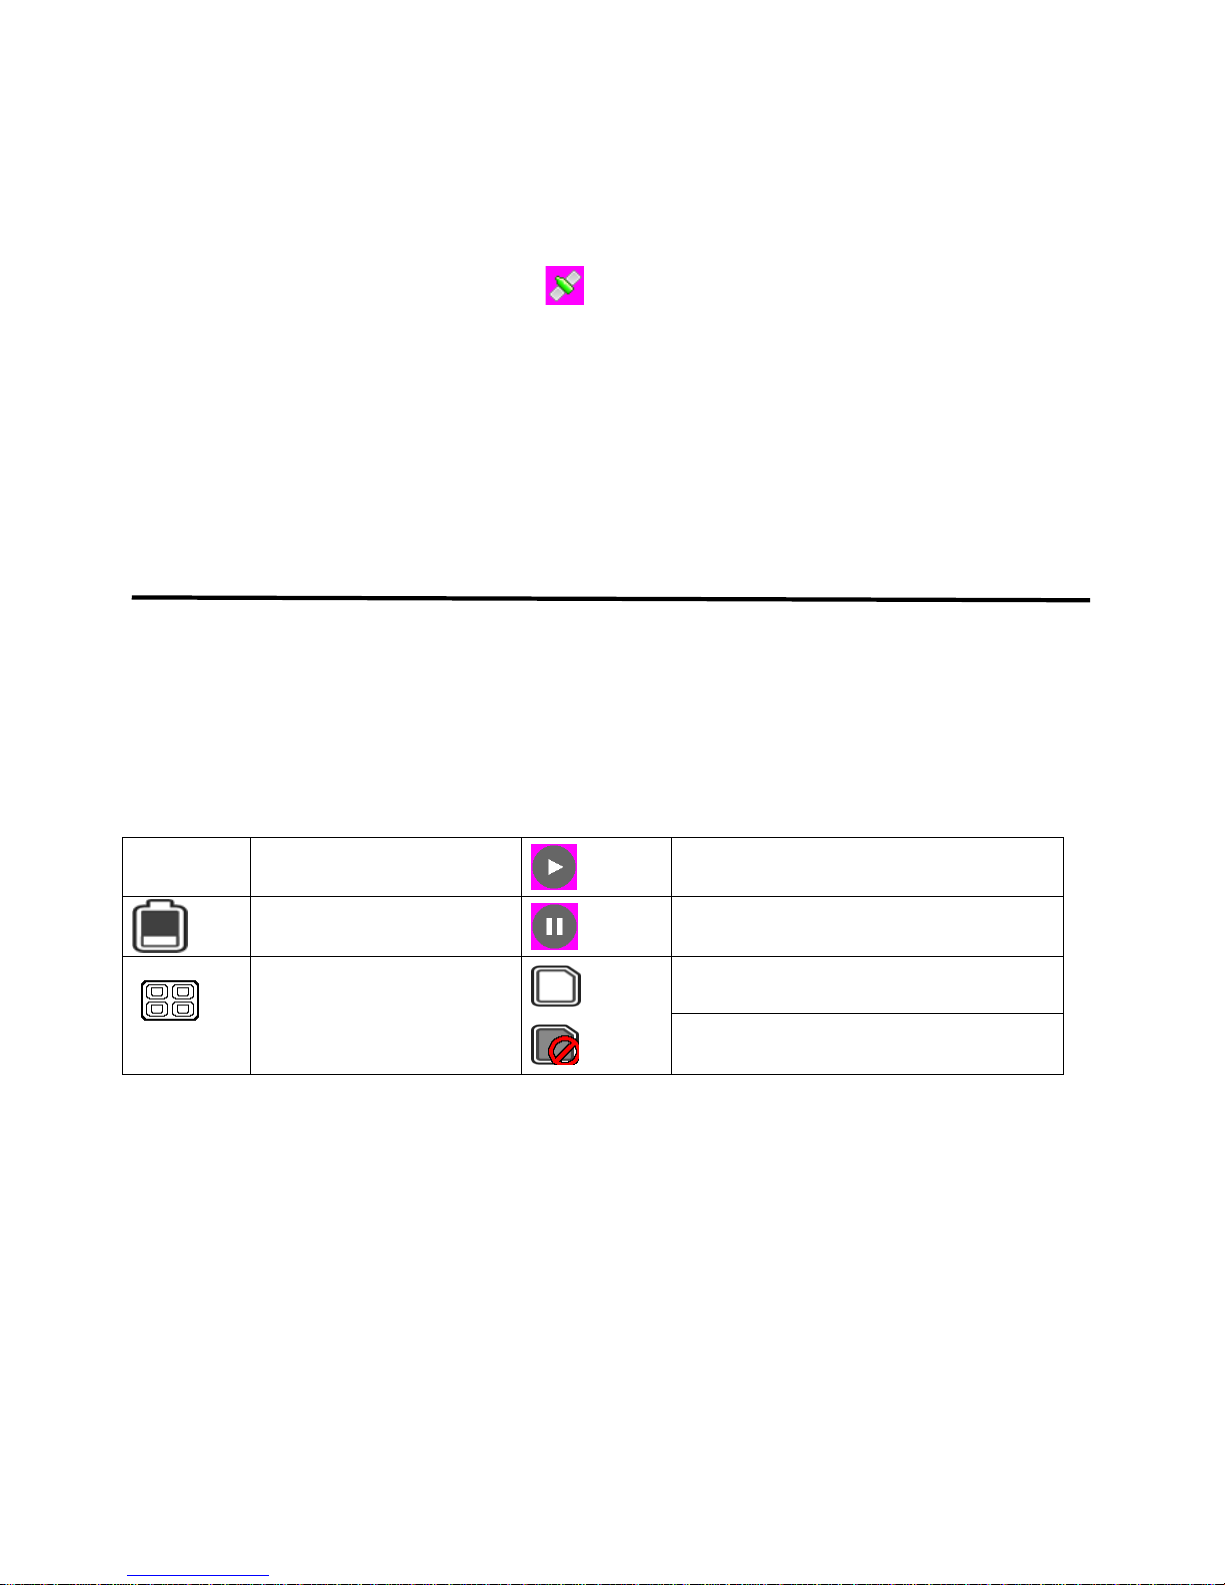
1. Plug the GPS Module into the device. Satellite searching will begin automatically.
2. When a GPS signal is located, will be showed on the display.
3. When taking picture in Camera mode, the location will be automatically logged on the
microSD card.
3.5 Taking a Picture
Long press the OK button to take a picture
4. Reviewing Videos and Pictures
4.1 Review Video on Camera Screen or TV
• Long press the Down button and select Movie Reviewing to display the latest video files
on the LCD screen
• Long press the Up button to access video options: Delete File, Protect File, AutoPlay.
• Press the OK button to confirm
• Long press the Down button twice to return to previous mode
000:00:15
Playback time
Play
Battery
Pause
Video playback Mode
Memory Card available
Micro sd card not detected
4.2 Reviewing the Pictures
• Long press the Down button to enter Picture Review mode, then long press the Down button
again to review the pictures
• Long press the Up button to access picture options: Delete File, Protect File, AutoPlay
• Press the OK button to confirm
• Long press the Down button to return to previous mode
Page 10
9
4.3 File Protection
4.3.1 When reviewing the video:
1. Long press the Down button and select Movie Reviewing to display the latest video files
on the LCD screen
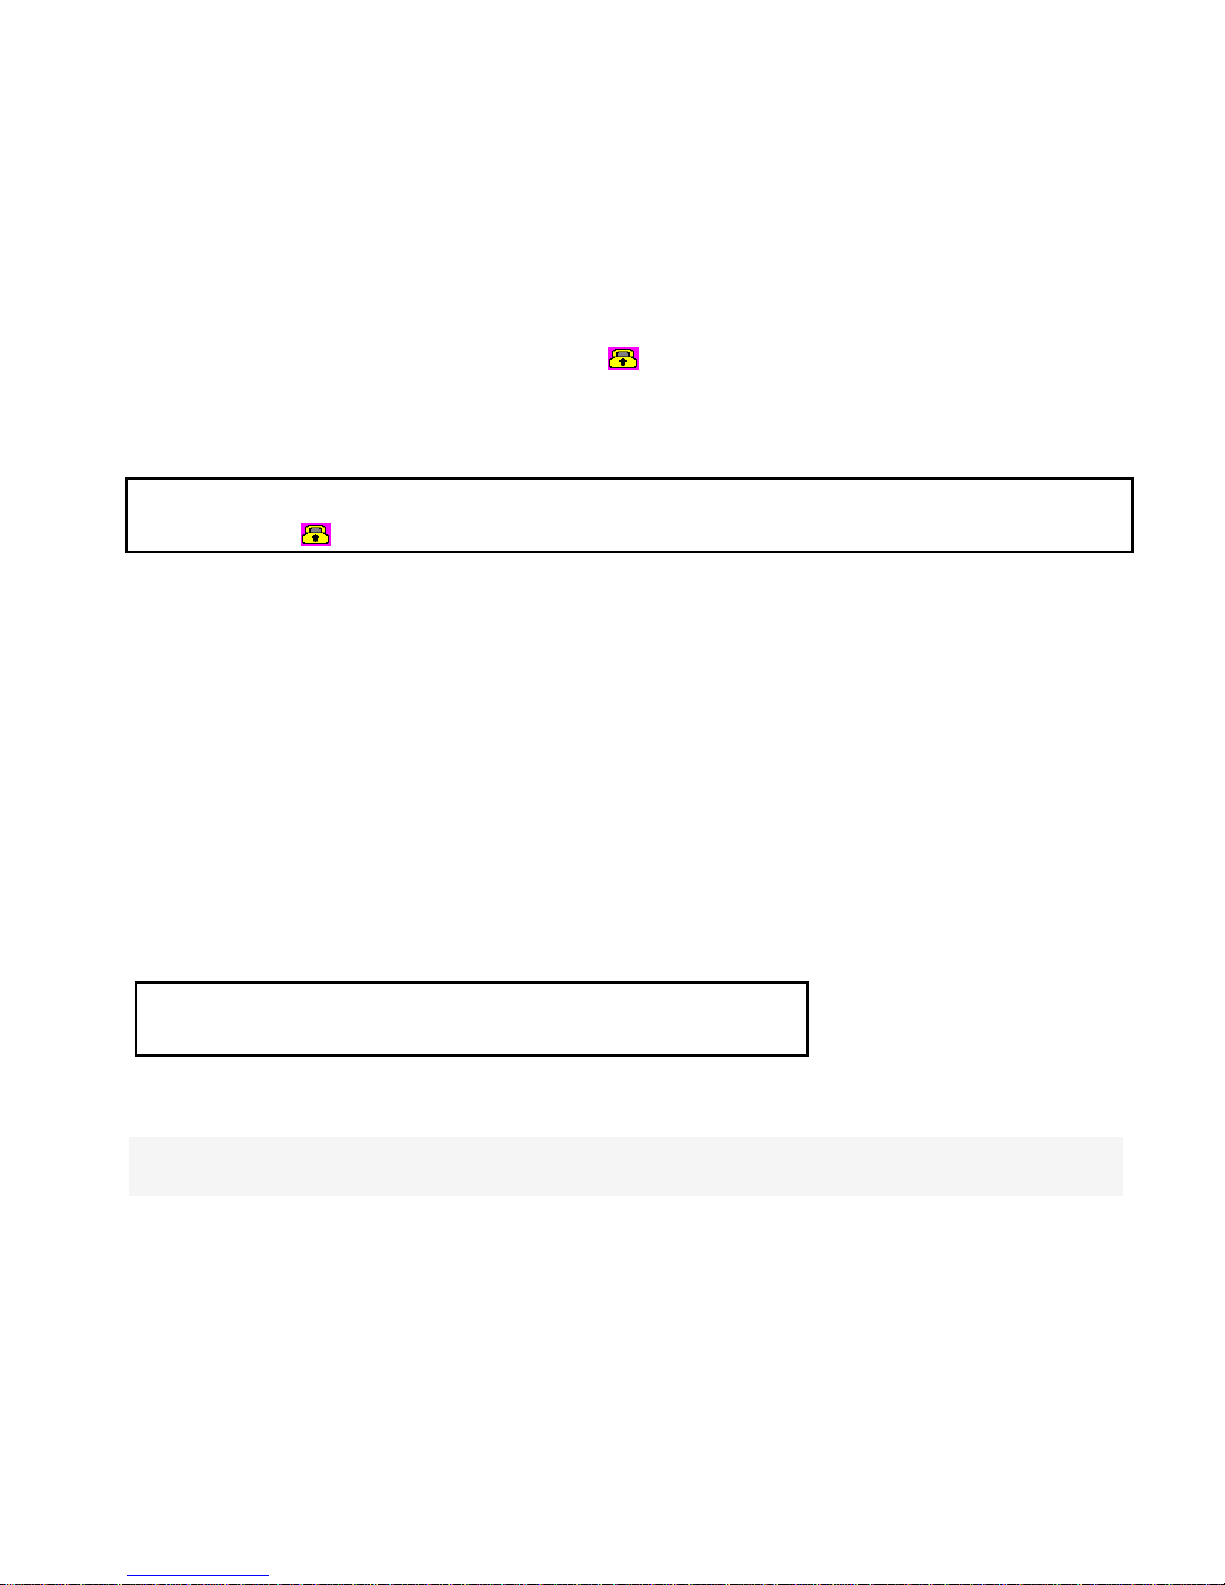
2. Long press the Up button to select the Protect File option, then setup protection for
one file or all, etc. - files marked with are protected
3. Press the OK button to confirm
4. Long press the Down button twice return to previous mode
Attention: To unlock files, repeat the steps above. After being unlocked, no files will
be marked with
Under the Loop Record setting, the previous file is not protected. This mode protects only
the last cycle-recorded file.
4.3.2 When Recording (Emergency Recording)
Press the Down button and the current file will be saved, locked, and cannot be deleted.
When you copy the video to another storage device, the copied file will be locked.
4.4 Review Video on a TV
When connecting to an HDTV, you can display video files or pictures in high resolution.
Use the HDMI cable (included) to connect to High Definition TV.
Attention:
Only playback function works when TV is connected.
4.5 Review Video on a PC
Connect the device to a computer with the provided USB cable. This puts the camera into
USB mode (effective under Recording Settings: Off).
When the camera is connected to the PC, it appears as a removable disk in Windows Explorer.
Page 11
10
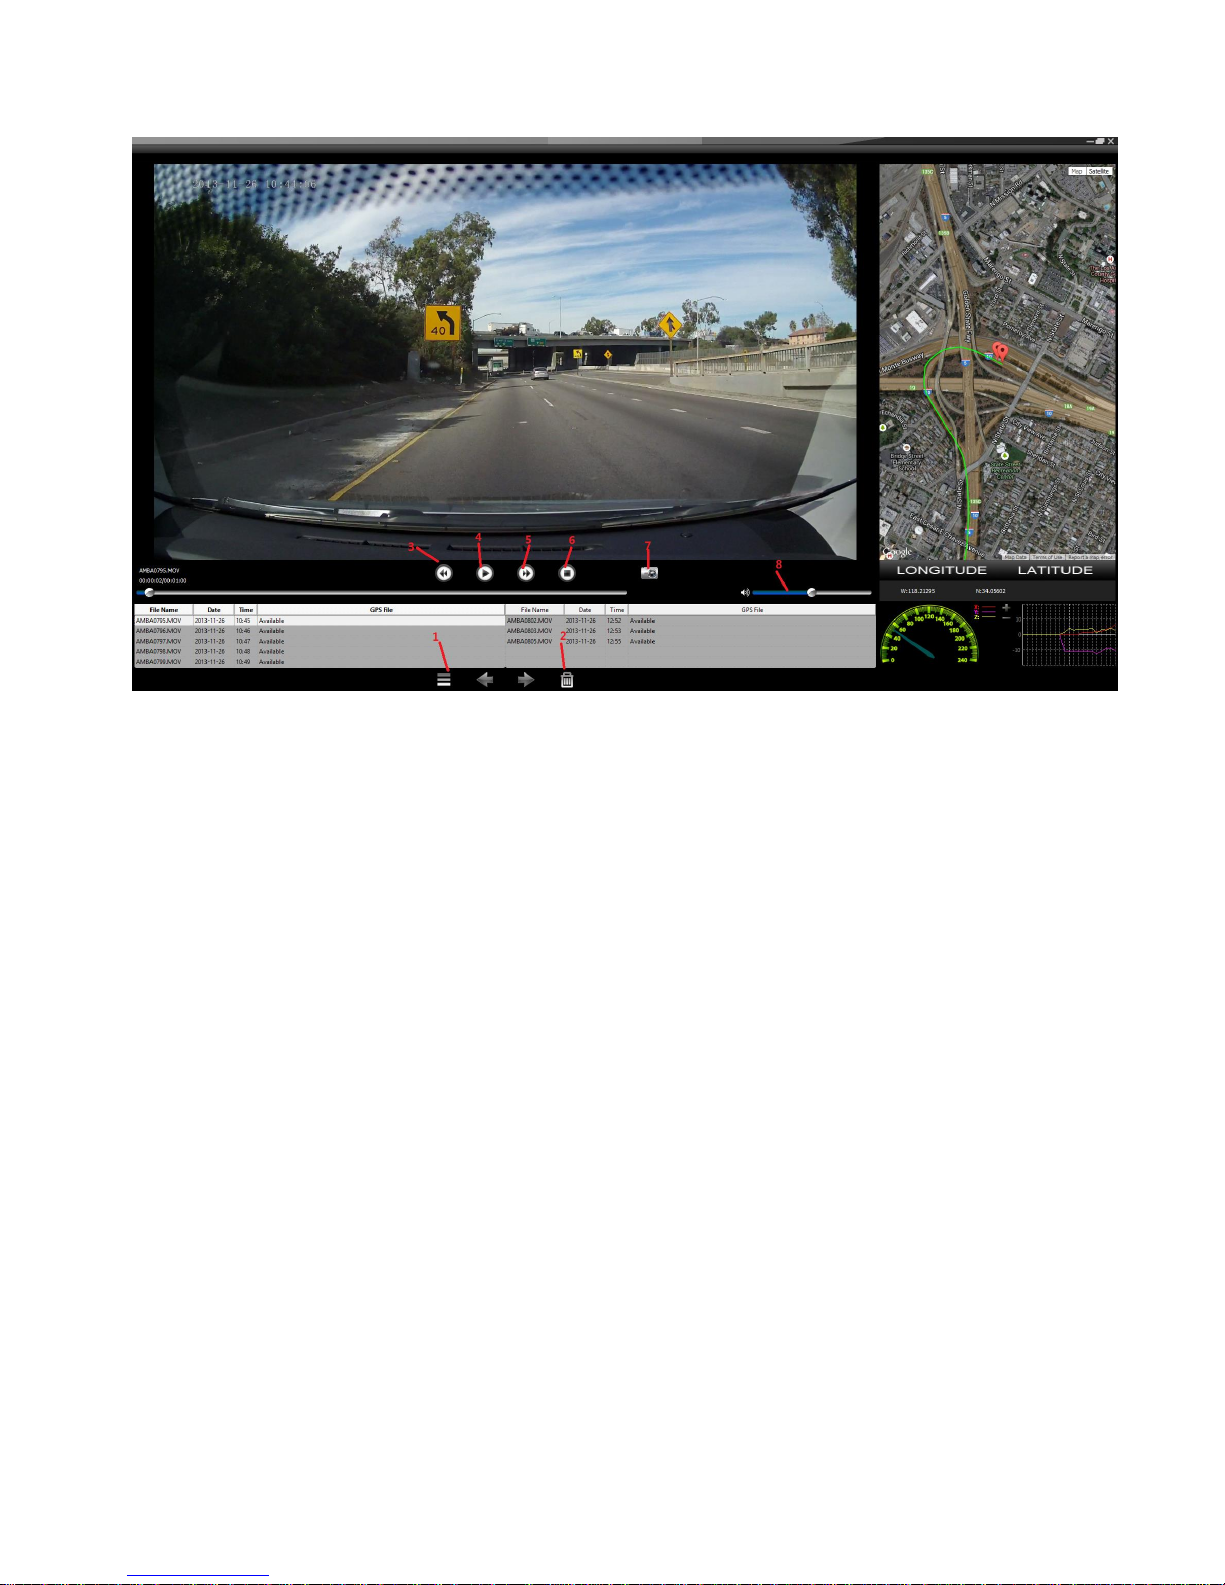
1. Open video file: browse to the microSD card and browse to the video file
2. Delete a file from the playlist
3. Jump to the previous file on the playlist
4. Play video
5. Jump to the next file on the playlist
6. Stop video playback
7. Take a snapshot of the video
8. Volume control (when audio recording is enabled)
You can find the video player on the CD, or from the microSD card once it is in use by the
camera. Follow the steps below:
Connect the machine (with card) with computer
There are 2 removable disks (if your machine has a built-in card function, you will
see 3 removable disks)
Find the flash disk (one of the removable disks, not the card disk), open it, and
copy the file to your computer’s hard drive; double-click to unzip the file to a folder
Find the GPS Player in the folder, open it, you will get a GPS player with a Google
map (like the picture above)
After you record the video with GPS attached, connect the camera to the computer,
and browse to the microSD card folder → DCIM → 100MEDIA
Select the video to playback
Page 12

11
Appendix
Specifications
Image Sensor
AR0330 CMOS
Chip
Ambarella ,A7LA50D 1296P@30FPS
Lens
130 Wide angle
Storage Media
Up to 32GB microSD card (class 6)
ISO
Auto
Display
1.5″ TFT
Still images
Format: JPEG (Image Resolution:3MP)
Quality: Auto
Videos
Compression Format: H.264 (MOV)
Resolution: 2304×1296@30fps,1920×1080@30fps,
1280×720@30fps
Audio
Built-in Microphone/Speaker
Mounting method
Double Sided Tape to be mounted on windshield
White Balance
Auto (recommended)
Sunny
Cloudy
Fluorescent
Incandescent
Exposure
Compensation
-2.0EV~+2.0EV
Time and Date
On/Off, Date and Time Watermarking Function
Output
HDMI HD Audio-Video Output
PC Interface
USB 2.0
AV Output Format
NTSC/PAL
Battery
Built-in Lithium Ion Battery
Page 13
12
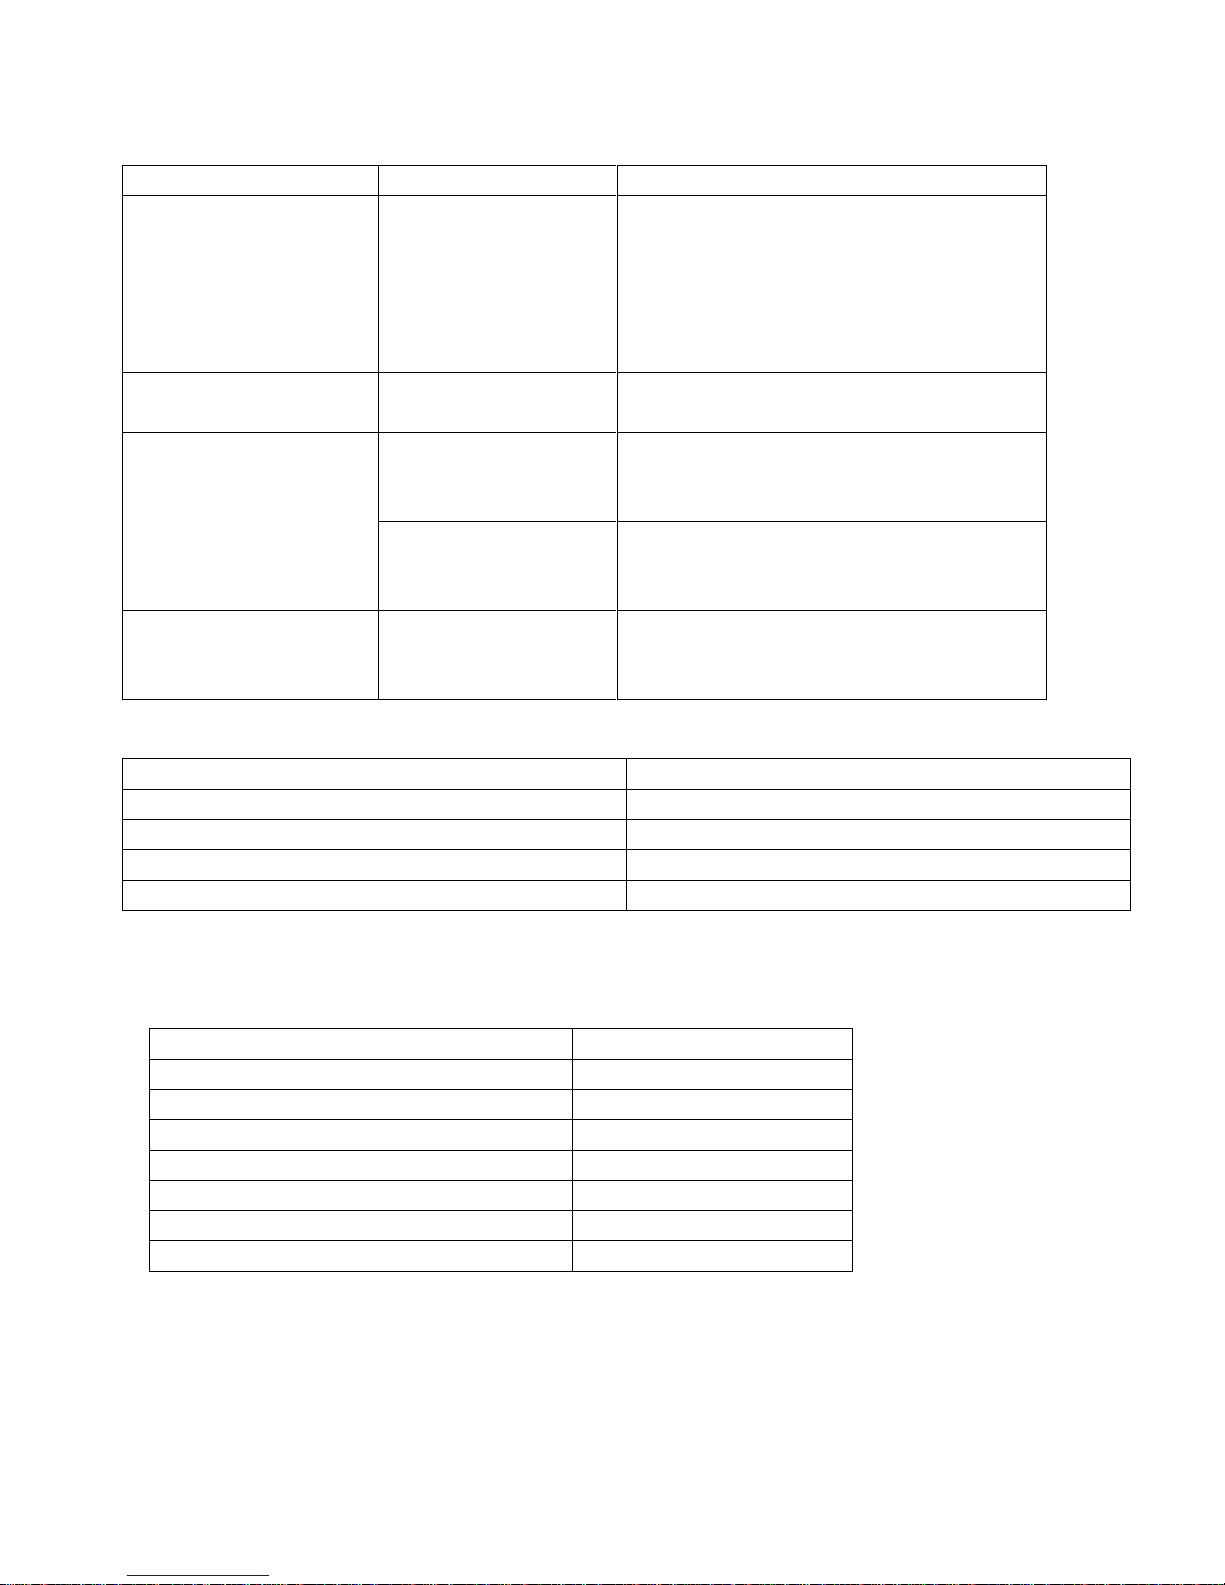
Troubleshooting
Question
Possible Reasons
Solutions
The device suddenly
turned off
Auto Off Function is
On;
Low Battery
Turn on the recorder and check
settings;
charge the battery
The memory card is full, delete the
files or format card (Backup important
files to a backup device).
Captured images are
not saved
Power is off before
the images are saved
Charge the battery
Memory card cannot be
used
Memory card is
write-protected
Disable write protection on the
microSD card
Memory card contains
non-DCF images from
other cameras
Format the memory card; before
formatting, make sure to backup files
Buttons are not
responding
Short-circuit when
connecting device
with other equipment
Long press the Power button
Light Indicators
Charging, Not Recording
Solid Red
Standby/Battery Charged
Solid Blue
Recording, Battery Charged
Blinking Blue
Recording, Charging Battery
Blinking Blue/Red
Package Contents
Quantity (Pcs.)
OJOCam Pro2 camera
1
Car Charger
1
USB Cable
1
HDMI Cable
1
Spare Double-Sided Sticker
1
Mounting Bracket with GPS Receiver
1
Quick Start Guide
1
NOTE: We reserve the rights to change package contents without notice
Page 14

13
Glossary of Terms
Codec - In communications engineering, a codec is usually a coder/decoder. Codecs are used
in integrated circuits or chips that convert e.g. analog video and audio signals into a
digital format for transmission. The codec also converts received digital signals back into
analog format. A codec uses analog-to-digital conversion and digital-to-analog conversion
in the same chip.
Codec can also mean compression/decompression, in which case it is generally taken to mean
an algorithm or computer program for reducing the size of large files and programs.
Frame - A frame is a complete video image. In the 2:1 interlaced scanning format of the
RS-170 and CCIR formats, a frame is made up of two separate fields of 262.5 or 312.5 lines,
interlaced at 60 or 50 Hz to form a complete frame, which appears at 30 or 25 Hz. In video
cameras with a progressive scan, each frame is scanned line-by-line and not interlaced;
most are also displayed at 30 and 25 Hz.
Frame Rate - The frame rate used to describe the frequency at which a video stream is updated
is measured in frames per second (fps). A higher frame rate is advantageous when there is
movement in the video stream, as it maintains image quality throughout.
Image Compression - Image compression minimizes the file size (in bytes) of an image. Two
of the most common compressed image formats are JPEG and GIF.
JPEG (Joint Photographic Experts Group) - Together with the GIF file format, JPEG is an
image file type commonly used on the web. A JPEG image is a bitmap, and usually has “.jpg”
or ".jpeg" as the file suffix. When creating a JPEG image, it is possible to configure the
level of compression. As the lowest compression (i.e. the highest quality) results in the
largest file, there is a trade-off between image quality and file size.
NTSC (National Television System Committee) - NTSC is the television and video standard
in the United States. NTSC delivers 525 lines at 60 half-frame per second.
PAL (Phase Alternating Line) - PAL is the dominant television standard in Europe. PAL delivers
625 lines at 50 half-frames per second.
Pixel (Picture Element) - A pixel is one of the many tiny dots that make up a digital image.
The color and intensity of each pixel represents a tiny area of the complete image.
USB (Universal Serial Bus) - A plug-and-play interface between a computer and peripheral
devices, such as scanners, printers, etc.
Page 15

14
About the User’s Manual
We have tried our best to make sure that what in this User’s Manual is correct and up to
date, however, we cannot guarantee that all content without error. If there is a difference
between the manual and device, please take the device as standard. We reserve the right
to change content or technical regulations without prior notification. In addition, the
manufacturer reserves the right to change technical specification without prior
notification.
If the accessories listed are different from those included with the actual product, please
take the actual product as standard.
More info can be found in our FAQs at http://www.ojocam.com/faq/
Page 16

15
 Loading...