

Page 1
Type WLCT
USER MANUAL
57541 09/04 - (BJ)
Type: WLCT
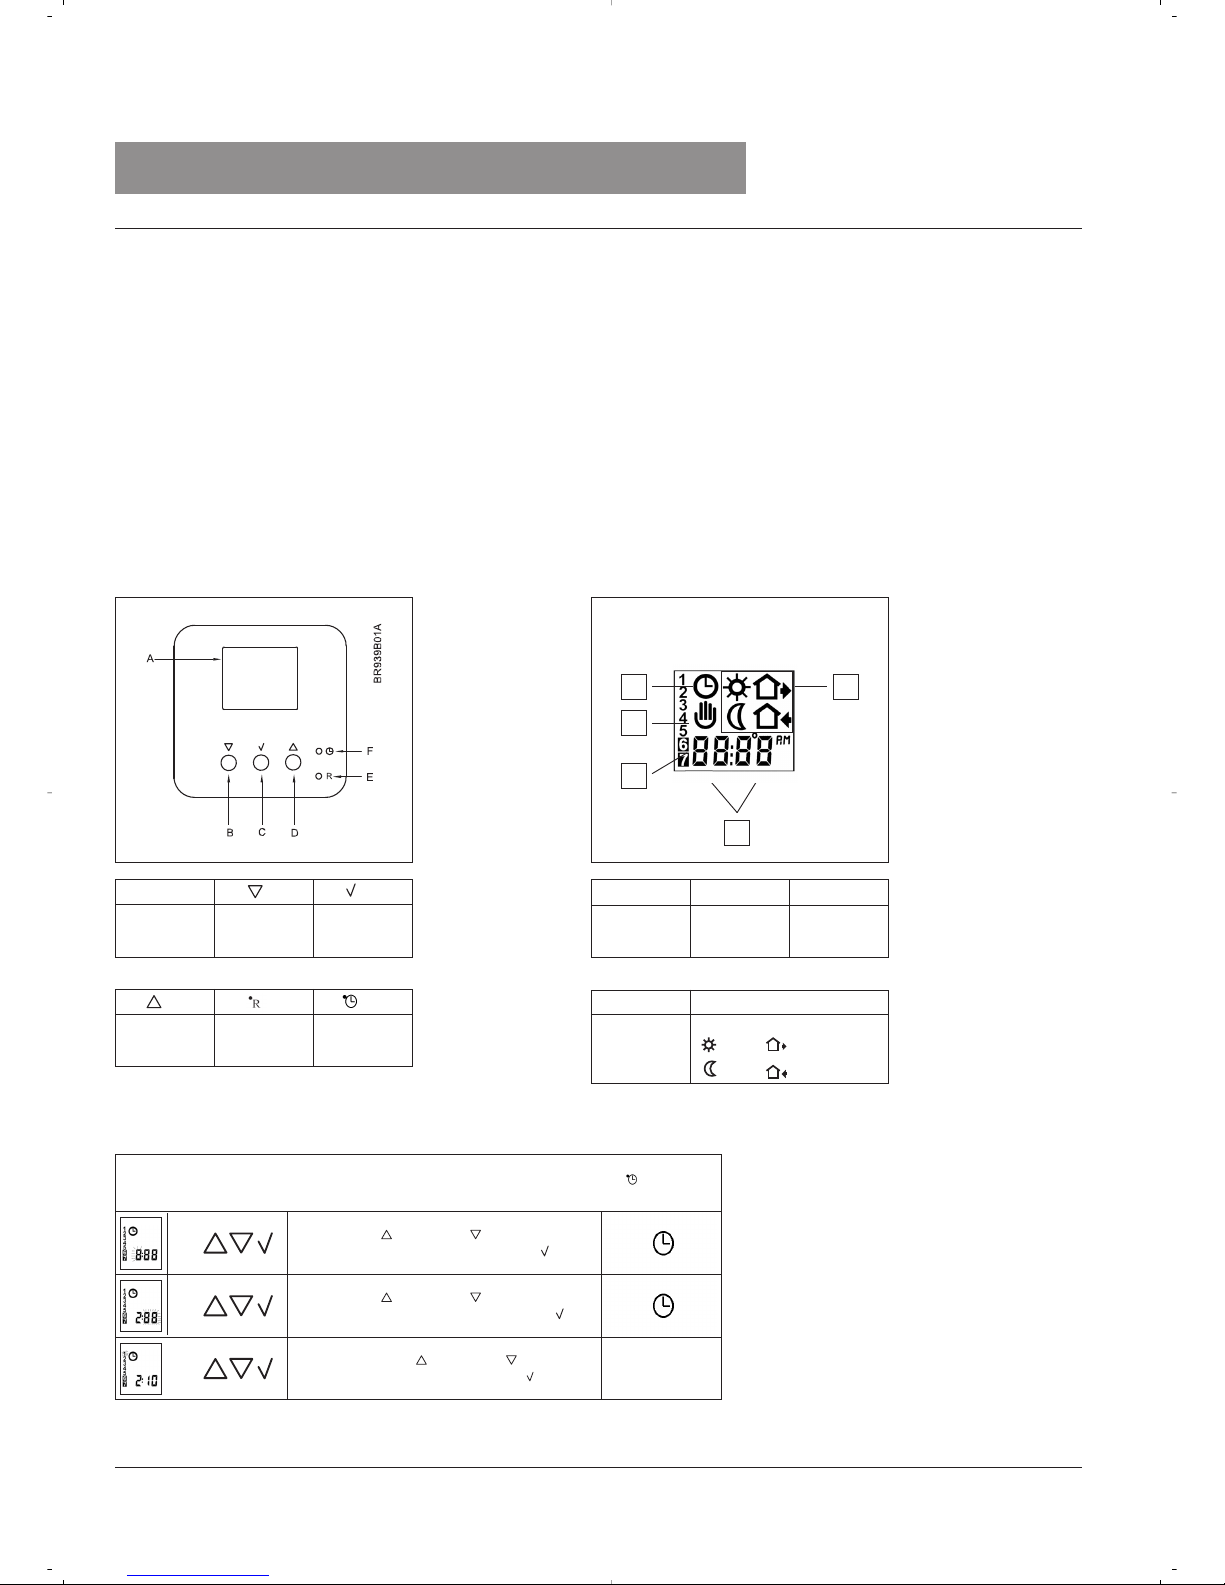
Fig. 1 - Buttons
Display symbols
K
I
G
H
J
F:E:
B:
C:
D:
A:
Pin button
adjust of
clock
Reset to
factory
setting
Adjustment
down
OK accept
Adjustment
up
Display
G: H: I:
J:
K:
Automatic
mode
Manual
mode
Time and
temperature
Day number 4-event symbol
1. Getting started
Introduction
The clock thermostat type WLCT is part of the underfloor heating system type WLM. The thermostat can be set to control one single room, or it can be set
as a master to control a group of thermostats / rooms/zones.
All the thermostats that are part of that group will follow the times and temperatures programmed into the clock thermostat. For example, if the temperature
programmed in the clock thermostat is 22°C, all the thermostats / rooms belonging to that group will then also be controlled at 22°C. Depending on the
types of thermostats used you can adjust the temperature + or -4°C in different rooms, giving a possible room setpoint of +18 to +26°C.
The clock thermostat can be programmed to work at different temperatures during the day allowing lower temperatures during times that the room is
unoccupied. Lower temperatures will lower your energy costs without reducing the comfort. All thermostats that are part of the group will follow any new
time or temperatures programmed in the clock thermostat.
When it leaves the factory, the thermostat has a preset program suitable for most installations.
You only need to set the clock and day, and define the thermostats / rooms that should belong to the group.
The thermostat has a pin button marked R (see fig. 1), allowing you, at any time, to reset the thermostat to the factory settings. These are listed at the end of
this manual with space for you to record your own weekly schedule.
Setting the thermostat into operation
☞
☞
☞
1-7
Press the UP ( ) or DOWN ( ) buttons to select
the correct hours and press OK button ( ).
Press the UP ( ) or DOWN ( ) buttons to select
the correct minutes and press OK button ( ).
Then press the UP ( ) or DOWN ( ) button to
select the correct day and press OK ( ) button.
First time power is connected the clock and day will be flashing and must be set. If you need to
adjust the time of the thermostat at a later date, insert a pin into the hole marked (see fig. 1)
for setting of time and day. Adjustment should be made for change in summer and winter time.
Wake
Night
Out
Home
Page 2
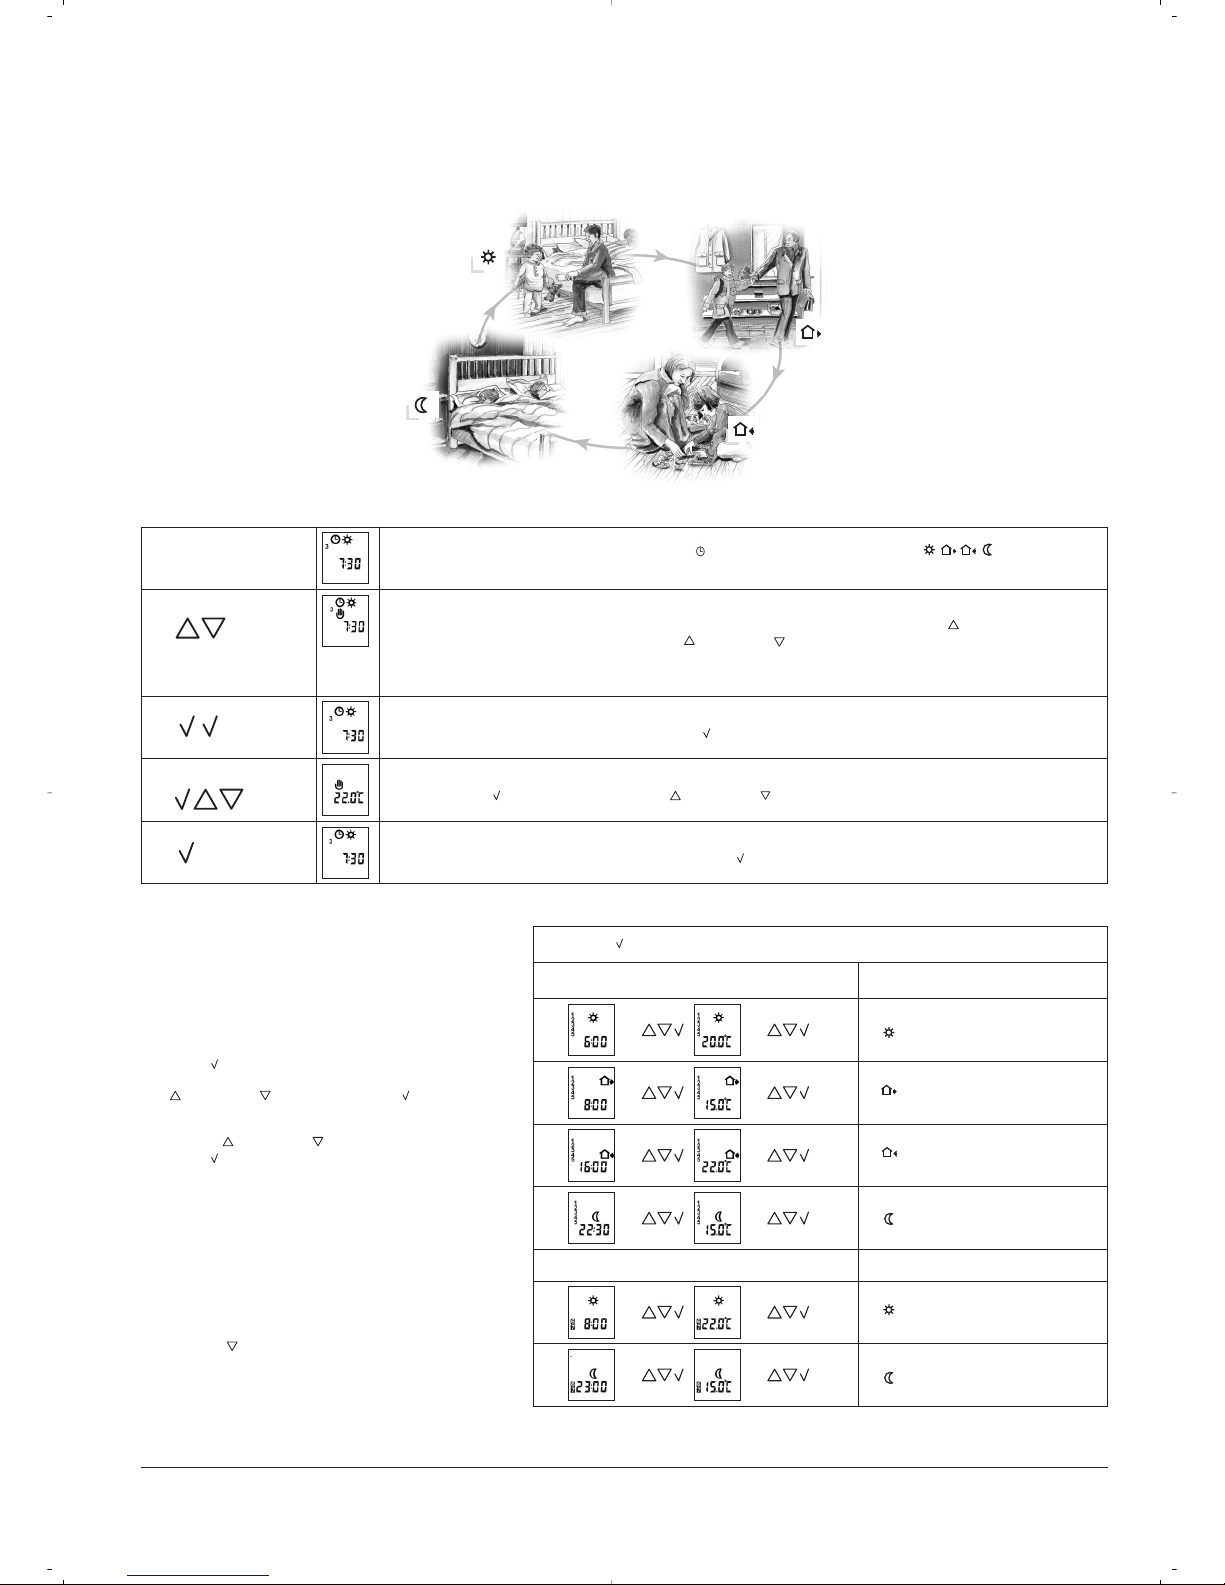
2. Daily use of the thermostat
4-event clock mode
The day has been split into 4 events describing a typical day. When the thermostat is in this 4-event mode it will change the temperature to the required level
automatically at the programmed times. As standard the thermostat has 5 days with 4 events (two ON’s and two OFF’s), and 2 days with 2 events (one ON
and one OFF). For programming see 3. Please, refer to item 4-PRO to alter the daily event sequence.
4-event clock mode/
automatic mode:
Comfort mode:
☞
☞
Manual mode:
☞
☞
Temporary override
To temporarily override any temperature in the 4-event schedule program, press the UP ( ) button once, to show
the temperature in the display, and press UP ( ) or DOWN ( ) again to increase or decrease the temperature.
The display will flash for 5 seconds, and will then revert to the time. The override will operate until the next
programmed event when the thermostat will resume the automatic programme.
In automatic mode, the clock function symbol ( ) and one of the 4-event symbols ( ) will be
indicated. Programming see 3.
Cancel comfort mode
To cancel the temporary override, press the OK ( ) button twice.
Permanent override:
During holidays, the scheduled 4-event program can be overridden.
Press the OK ( ) button, and then the UP ( ) or DOWN ( ) button until the override temperature is set. The set
temperature will remain in the display and the unit will now operate to this temperature permanently.
Cancel manual mode
To cancel the permanent override state press the OK ( ) button once, and the unit will resume automatic function.
5 secs.
5 secs.
☞
☞
☞
☞
☞
☞
☞
☞
Press OK ( ) button for 3 secs. to begin programming
: Time and temperature
: Time and temperature
: Time and temperature
: Time and temperature
Day 1 - 5
Day 6 - 7
☞ ☞
: Time and temperature
☞ ☞
: Time and temperature
3. Programming
4-event time and temperature
For each event, the start time and required
temperature needs to be set.
For example, in the morning you wish the heating to
start at 07:00 and the temperature to rise to 25˚C.
Press OK ( ) button for 3 seconds and the start time
is displayed. Change this to 07:00 with the
UP ( ) or DOWN ( ) button. Press OK ( ) to
confirm.
The temperature is now displayed. Change this to 25˚C
with the UP ( ) or DOWN ( ) button.
Press OK ( ) button to confirm. This action can now
be repeated for the second, third and fourth event.
These settings will be valid for days 1-5 showing on
the display. To program the days 6 and 7, repeat the
above. Days 6 and 7 are usually Saturday and Sunday,
and only have two events (generally morning ON and
evening OFF).
The temperature can be set within the range of +5 to
+35˚C. It is also possible to select the heating OFF at
that event by reducing the setting to 5˚C, and then
pressing the ( ) once more.
Note that when programming the “Sleep” time
(event 4), please ensure that this time is before
midnight (00:00).
Page 3

INFO - Information
The values of the actual measured room temperature and the floor temperature can be seen.
The floor temperature is only shown if a floor sensor is installed.
4. Advanced settings and read-out
PRO - 4-event sequence
It is possible to change the factory event sequence of Days 1-5 - 4 event, and days 6 & 7 – 2 event. Days 1 to 5 are usually Monday to
Friday, whilst days 6 & 7 are usually Saturday & Sunday. An EVENT is either an ON or an OFF operation. You can select from the
following sequences which are displayed in the form of a code.
☞
✚
☞
☞
4 events 5 days, 2 events 2 days indicated by Code 4:52
4 events 6 days, 2 events 1 days indicated by Code 4:61
4 events 7 days indicated by Code 4:70
2 events 7 days indicated by Code 2:70
2 events 5 days, 2 event 2 days indicated by Code 2:52
Select the required sequence with the OK ( ) button.
☞
☞
Hi Li - Floor sensor. Max and min allowed temperature of the floor surface
A limit sensor can be connected to the clock thermostat.
Max limitation is used for safety to prevent high floor temperatures. For example wooden floor constructions which should not be
allowed to exceed a maximum of 27°C. The value can be set from 5°C up to 55°C. The value can also be set to OFF (adjust the
temperature to 55°C and push button up once more).
Low limitation is used where the temperature of the floor is required never to fall below the minimum set temperature. Example in
kitchens or bathrooms with tiles. The value can be set from 5°C up to 55°C. The value can also be set to OFF (adjust the
temperature to 5°C and push button down once more). Remember the max limit temperature must be set higher than the min limit
temperature.
The limit temperatures defined in the clock thermostat will be valid for all the thermostats with limit sensor (type WLTD-19) which
are part of the group of thermostats allocated to the WLCT unit.
SCAL - Time and temperature scale selection
☞
☞
☞
☞
The maximum allowable floor temperature setting is shown. Use
the UP ( ) or DOWN ( ) button to increase or reduce, and OK
( ) button to accept.
The display will now show LoLi. Press OK ( ) button to continue.
The minimum allowable floor temperature setting. Use the UP ( )
or DOWN ( ) button to increase or reduce and OK ( ) button to
accept.
You can select either ˚C or ˚F scale, and 12 or 24 hour clock as
follows:
Press UP ( ) or DOWN ( ) button to change settings. Confirm
the required scale with the OK button ( ) button.
☞
☞
☞
☞
☞
☞
Press both UP ( ) and DOWN ( ) buttons together for 3 seconds. INFO is displayed.
Continue pressing the UP( ) button until you reach one of the desired sub menus, PRO, Hi Li, Scal, and ArEA (For explanations, see
below. Select the sub menu with the OK ( ) button.
Press UP ( ) or DOWN ( ) button to show the different
readouts.
No changes can be made here. Use the OK ( ) button to end.
Software version
Room temperature
Floor temperature
☞
☞
☞
☞
☞
}
}
}
Page 4

Press the pin button R for 3 secs. and the thermostat returns to
factory settings.
Remember to set time, day and area zone.
5. Reset to factory setting
OJ ELECTRONICS A/S
Stenager 13B · DK-6400 Sønderborg
Tel. +45 73 12 13 14
Fax +45 73 12 13 13
oj@oj.dk · www.oj.dk
4-event time and temperature
Day 1-5
06:00
Time Own settings Temperature Own settings
08:00
16:00
22:30
08:00
23:00
27ºC
4:52
4-event sequence
Day 6-7
20ºC
15ºC
22ºC
15ºC
22ºC
15ºC
Factory settings
High limit
temperature
Low limit
temperature
Scale
17ºC
24H,ºC
Group
Off
Off
Off
Off
Off
Off
Off
Off
Off
Off
Off
Off
Off
Off
Kitchen
Living room
Room
On
On
Ch 1
Ch 2
Ch 3
Ch 4
Ch 5
Ch 6
Ch 7
Ch 8
Ch 9
Ch 10
Ch 11
Ch 12
Ch 13
Ch 14
Example
Ch 1
Ch 2
Insert the room name in the box against each Ch number,
and add ON if it is controlled by a clock thermostat.
Set the Channels / Rooms (Ch) to ON if they should follow the
settings of this clock thermostat.
In total 14 channels / rooms can be controlled.
☞
☞
☞
Press OK ( ) button to end programming and to return to
scheduled programme.
☞
ArEA - Zone
The thermostats / rooms that are to be set as part of the WLCT group will follow the temperature settings of the clock thermostat. For
example, a group could be the living room kitchen, and children’s rooms having a high room temperature during afternoon and early
evening, and a lower temperature during the early part of the day and at night. Each thermostat will have a channel number,
designated CH1, CH2 etc. The appropriate channel number of any thermostat is determined by the numbered output on the master
control which is actually switching the valve/actuator for that area.
For example, a system may have the kitchen thermostat operating master output # 4, and the childrens room thermostat operating
master output #5. If the WLCT clock thermostat is then situated in the living room, and operating output #1, then the WLCT needs to
be programmed to control outputs 1, 4, & 5. ( Each non clock thermostat will have been set to operate its appropriate output channel,
see separate instructions).
To do this, enter the ArEA sub menu., and press OK ( ) button. CH 1 will be displayed; use the OK ( ) button and then the UP ( )
button to change the setting to ON. Press OK ( ) and CH 2 is displayed. Use the UP ( ) button until CH4 is displayed, press OK ( ),
and change to ON. Repeat this for CH 5. All three thermostats will now operate under the control of the WLCT clock thermostat.
In total up to 14 Channels can be programmed in this way, and it is possible to have more than a single clock thermostat, each with its
own sub thermostats operating to its schedule and temperatures.
57541
 Loading...