

Page 1
USER MANUAL
GFCI
Test
R
Reset
®
BR928A08
A
B
C
D
E
F
H
I
G
☞
☞
☞
☞☞☞
Type UCCG, UCDG
7611C 08/09 (DJU)
5
Product program
This user manual covers following thermostats with built-in GFCI
CCG-9991 Incl. floor sensor 3m (10ft), 120Vac 50/60 Hz supply.
U
CCG-9999 With built-in room sensor, 120/240Vac 50/60 Hz supply.
U
UCDG-9999 With 2 sensors; built-in room sensor and incl. floor sensor 3m (10ft), 120Vac 50/60 Hz supply.
ntroduction
I
he thermostat is an electronic on/off thermostat for control of temperature by means of an NTC sensor either placed externally or internally in the thermostat.
T
The thermostat has integrated a Ground Fault Circuit Interrupter (GFCI).
he thermostat is capable of switching on your heating system at pre determined times on different days of the week. It is possible to set 4 periods called events
T
each day with different temperatures. From factory a default schedule is programmed suitable for most installations. Unless you change these settings the
thermostat will operate to this default program. Working with lower temperatures during times that the room is unoccupied will lower your energy costs without
educing the comfort. The thermostat has an adaptive function that automatically changes the start time of a heating period so that the desired temperature is
r
eached at the time that you set. After 5 days the adaptive function has learned when the heating must be switched on.
r
The thermostat type UCCG-9991 has an external temperature sensor that is normally placed in the floor construction. In this configuration the thermostat
ontrols the temperature of the floor and not the temperature within the room.
c
he thermostat type UCCG-9999 has a built-in temperature sensor. In this configuration the thermostat controls the temperature of the room.
T
The thermostat type UCDG-9999 has a built-in temperature sensor and an external temperature sensor. In this configuration the thermostat controls the
emperature within the room and use the external temperature sensor as limit sensor avoiding too high or too low temperatures in the floor construction.
t
The thermostat has a pin button marked R, allowing you to reset the thermostat to factory settings. These are listed at the end of this manual with space for
you to record your own weekly schedule.
. Getting started
1
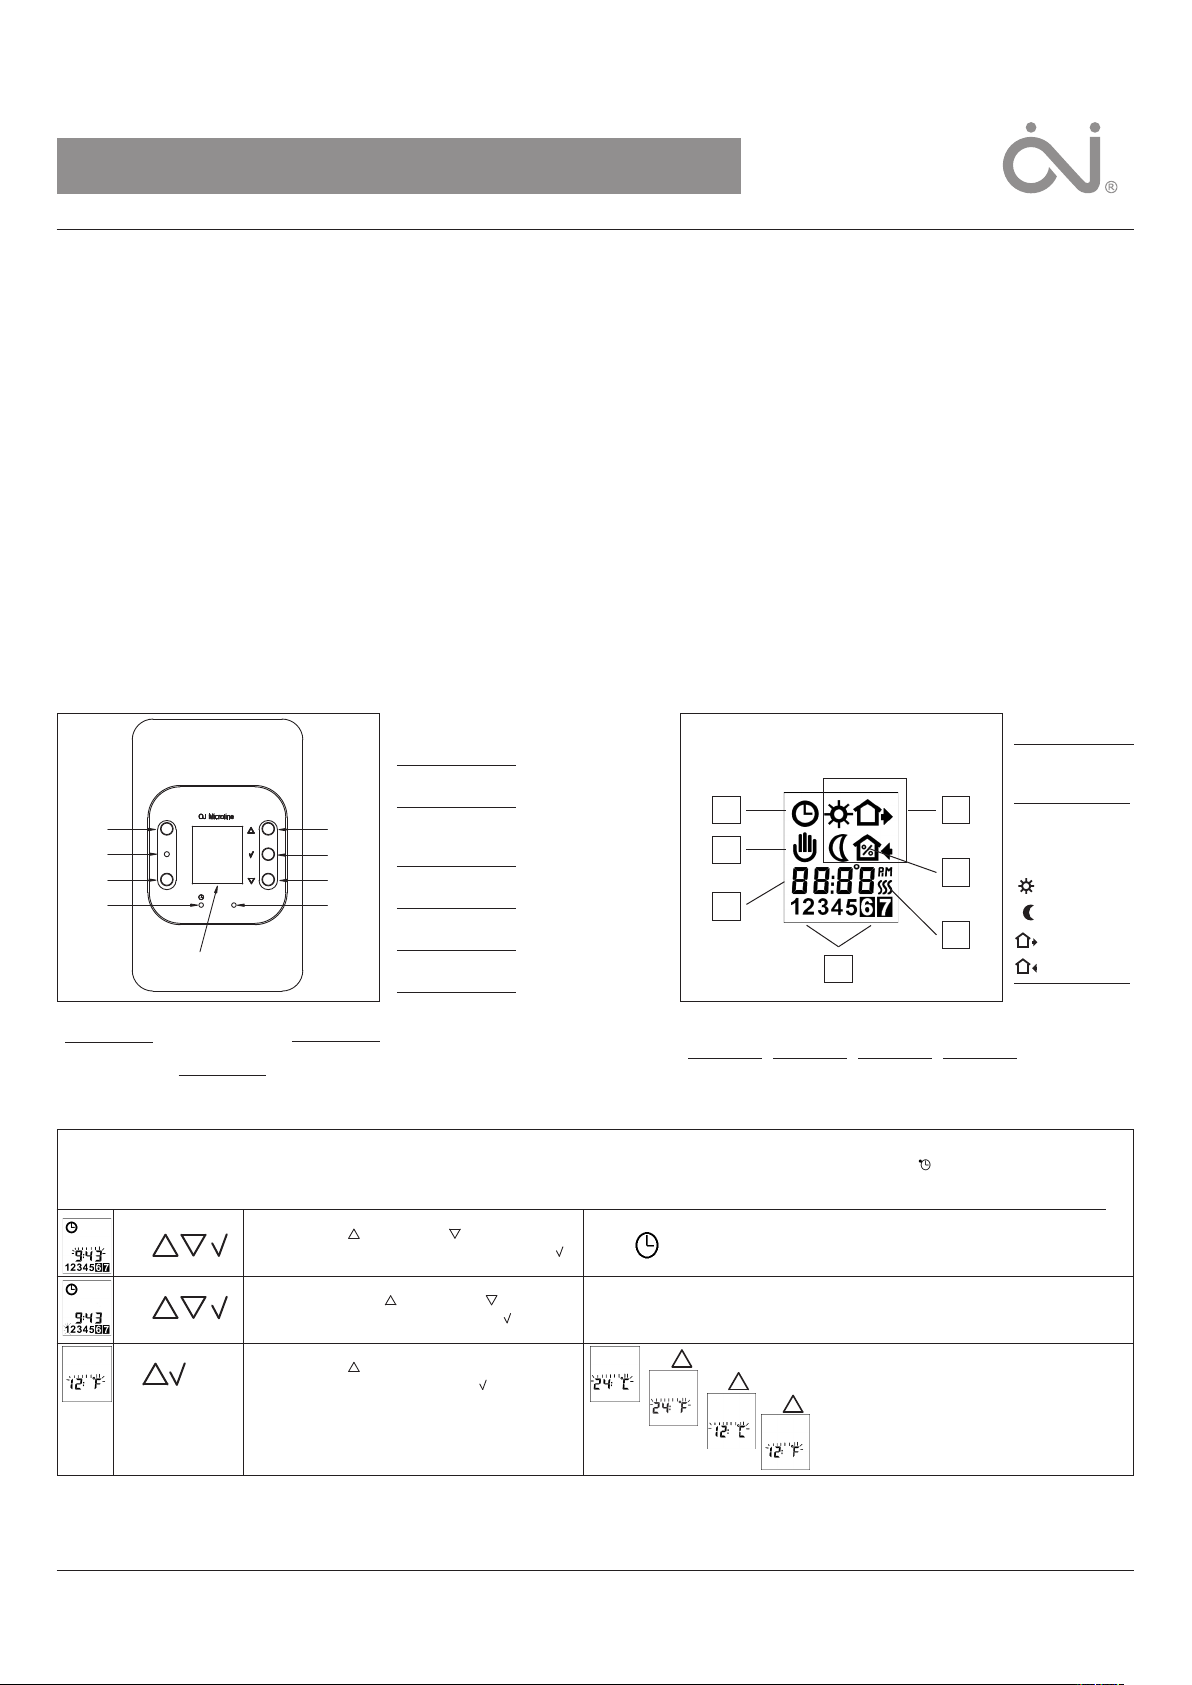
isplay symbols
uttons
B
A:
Reset of GFCI
B:
Red light
indicating
ground fault
C:
Test of GFCI
:
D
in button
P
djust of clock
a
:
E
Display
F:
Reset to factory
setting
G:
Adjustment down
H:
OK - accept
I:
Adjustment up
D
J:
Clock
function
N:
eating on
H
O: %
onitoring of
M
J
P
K
O
L
N
M
K:
Manual
mode
L:
Time and
temperature
M:
Day
number
switch-on time
P:
4-event
symbol:
Wake
Night
Out
Home
Setting the thermostat into operation
First time power is connected the clock and day will be flashing and must be set. After setting of time and day, selection of time scale (12 h or 24 h) and
temperature scale (°C or °F) can be selected. If you need to adjust the time of the thermostat at a later date, insert a pin into the hole ( ) for setting of time and
day. Adjustment must be made for summer and winter time. Setting of time and temperature scale can also be done under "advanced settings and read-out see 4.
Press the UP ( ) or DOWN ( ) buttons to
select the correct time and press OK button ( ).
Then press the UP ( ) or DOWN ( ) button to
select the correct day and press OK ( ) button.
Press the UP ( ) button to select time and
temperature scale and press OK ( ) button.
1-7
© 2009 OJ Electronics A/S
1
Page 2
hecking GFCI
☞
6
☞
☞
6
☞
☞☞☞☞☞☞☞
☞
☞
☞
☞
☞
C
t is important that the GFCI has been checked for correct installation and function.
I
o check the GFCI: Testing can only be performed if the thermostat has a heating demand. Adjust the set point until the heating symbol ()appears, use the
T
( ), to increase the heating demand. Wait 10 secs. to let the thermostat work according to the new set point. Press the button "TEST".
he test is conclusive if the red light on the thermostat lightens, and the display signs disappear. If this does not occur, check the installation. Press on RESET
T
utton to reset the GFCI. The red light should disappear and the display will return to normal appearance. Push ok accept button ( ) to cancel the previously
b
set temperature. If the test fails, check your heating cable and the thermostat. The GFCI test should be carried out monthly.
f the GFCI trips in normal operation, without pressing the TEST button, there could be a ground fault! To check whether it is a ground fault or a nuisance
I
ripping, press RESET. If this cause the red light to shot off and not comes on again, it was a nuisance tripping and the system is functioning. If this cannot be
t
done there is a ground fault! Check your heating cable, the sensor cable and the thermostat.
xchange the defective part.
E
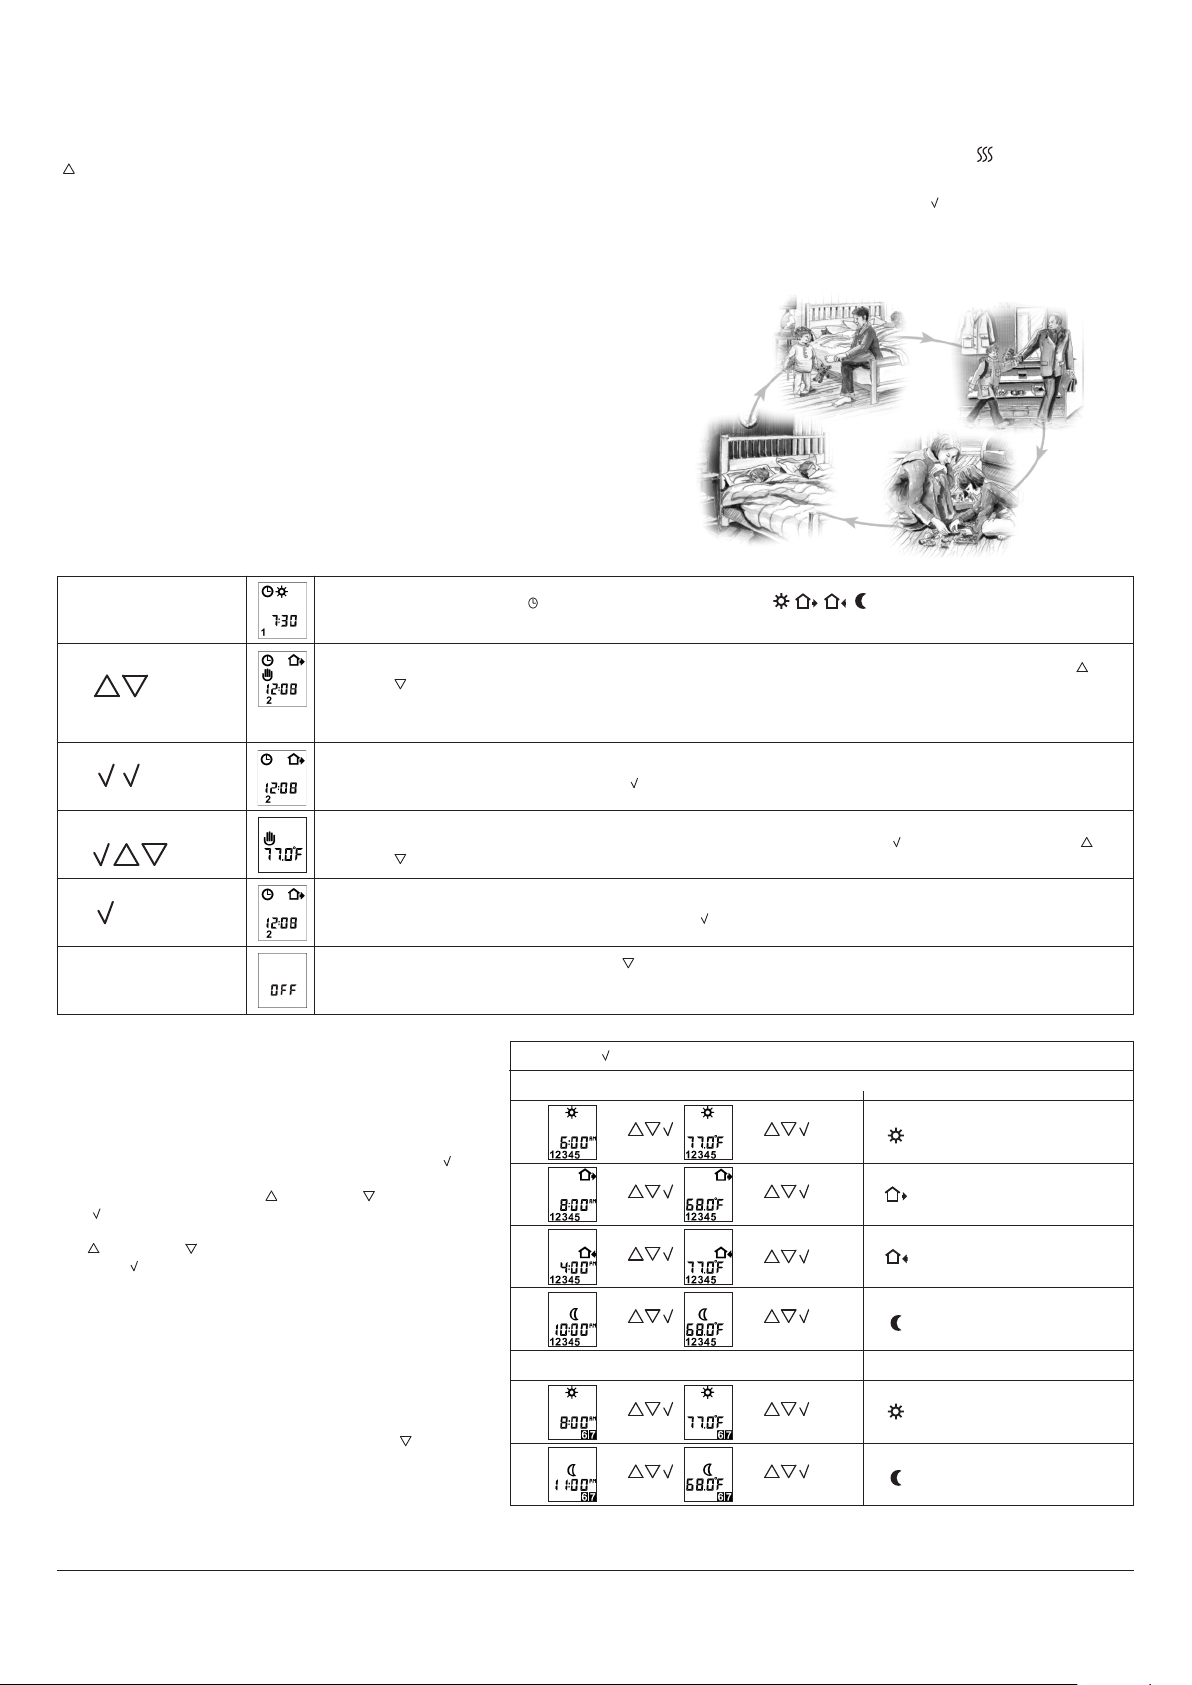
2. Daily use of the thermostat
4-event clock mode
he day has been split into 4 events describing a typical day. When the thermostat is in 4-
T
vent mode it will automatically adjust the temperature according to the required temperature
e
to the required time. As standard the thermostat has 5 days with 4 events, and 2 days with 2
vents. Programming see 3.
e
4-event clock mode:
Comfort mode:
secs.
5
Manual mode:
5 secs.
OFF
3. Programming
4-event time and temperature
For each event, the start time and required temperature must be
set.
For example, in the morning you wish the heating to start at
07:00 a.m. and the temperature to rise to 77˚F. Press OK ( )
button for 3 seconds and the start time is displayed. Change
this to 07:00 a.m. with the UP ( ) or DOWN ( ) button. Press
OK ( ) to confirm.
The temperature is now displayed. Change this to 77˚F with the
UP ( ) or DOWN ( ) button.
Press OK ( ) button to confirm. This action can now
be repeated for the second event.
he clock function symbol ( ) and one of the 4-event symbols ( ) will be indicated.
T
Programming see 3.
emporary override: To temporarily override the temperature in the 4-event schedule program, press the UP ( ) or
T
DOWN ( ) button once, to show the temperature, and press again to increase or decrease the temperature.
The display will flash for 5 seconds, and will then revert to the time. The override will operate until the next
programmed event when the unit will resume the automatic program.
Cancel comfort mode:
To cancel the override state, press the OK ( ) button twice.
Permanent override:
During holidays, the scheduled 4-event program can be overridden. Press the OK ( ) button, and then the UP ( ) or
DOWN ( ) button until the override temperature is set. The unit will now operate to this temperature permanently.
Cancel manual mode:
To cancel the permanent override state press the OK ()button once, and the unit will resume automatic function.
To turn the thermostat OFF, press DOWN
DO NOT USE THE TEST BUTTON ON THE GFCI TO SWITCH OFF THE HEATING INSTALLATION.
The GFCI will automatically be reset after a disconnection of the mains supply
until OFF appears in the display.
()
Press OK ( ) button for 3 secs. to begin programming
Day 1 - 5
: Time and temperature
: Time and temperature
: Time and temperature
These settings will be valid with days 1-5 showing on the
display. To program the days 6 and 7, repeat the above. Days 6
and 7 are usually Saturday and Sunday, and only have two
events.
The temperature can be set within the range of +41°F to +104˚F.
It is also possible to select the heating OFF at that event by
reducing the setting to 41˚F, and then pressing the ( ) once
more.
2
: Time and temperature
Day 6 - 7
: Time and temperature
: Time and temperature
© 2009 OJ Electronics A/S
Page 3
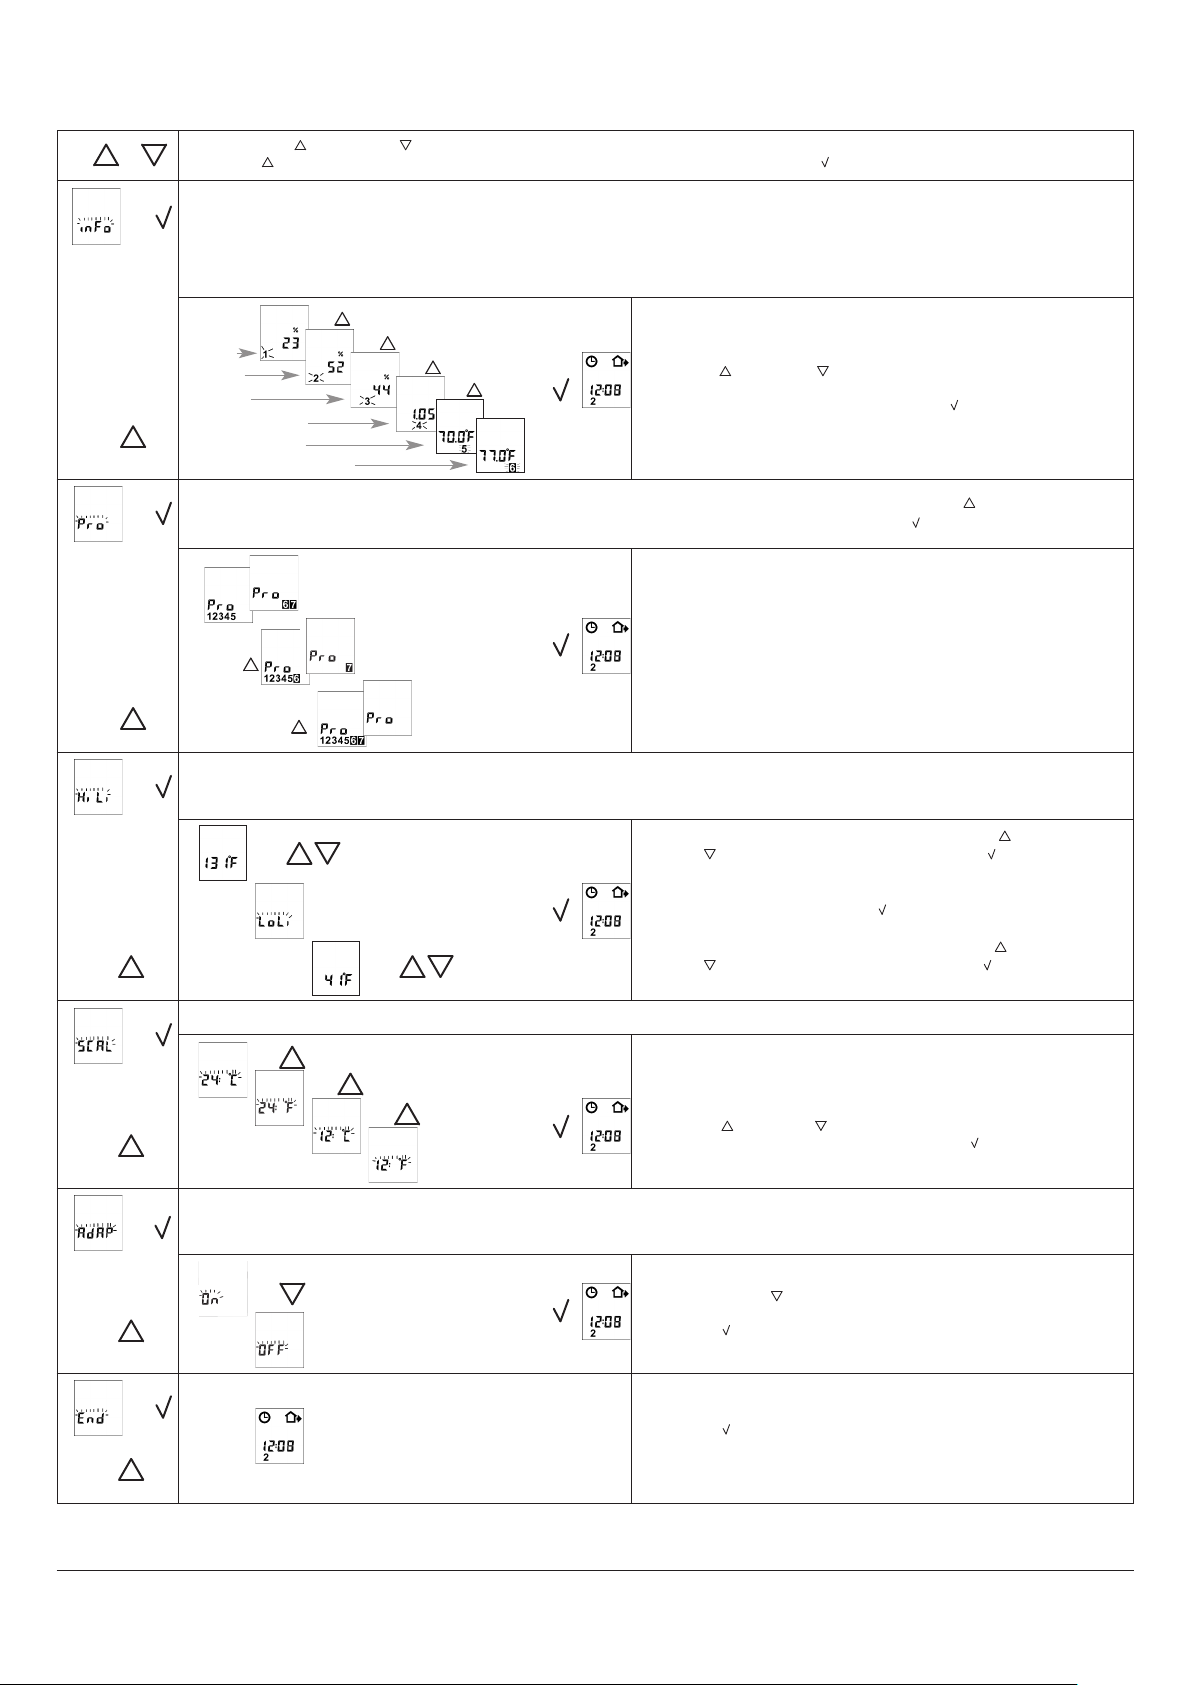
. Advanced settings and read-out
☞
✚
☞
☞
☞
☞
}
}
☞☞☞
☞
☞
☞
☞
}
}
☞
☞☞☞
☞☞☞
☞
4
ress both UP ( ) and DOWN ( ) buttons together for 3 seconds. INFO is displayed.
P
ress UP ( ) button until you reach the desired sub menu. Select the sub menu with the OK ( ) button.
P
onitoring of energy consumption. The thermostat calculates average time it has been switched on allowing you to monitor your energy
M
onsumption. In the thermostat you can read out:. Total switch-on time in percentage in the latest 2 days, 30 days or 365 days.
c
Calculation of operational costs per day: (switch-on time:100) x kW x kWh-price x 24 h per day
xample: Read-out: 30 % in the latest 365 days
E
days
2
0 days
3
65 days
3
Software version
Control sensor
Limit sensor (for UCDG)
-event sequence. The present event sequence flashes: Days 1-5, followed by days 6-7. To change, press the UP ( ) button until you
4
have days 1-6 and then day 7 flashing, or all 7 days are flashing. Select the required sequence with the OK ( ) button.
S
Cost of power: 0.2 USD/ kWh - Calculation: (30:100) x 1.2 kW x 0.2 USD/ kWh x 24 h = 1.7 USDper day
ize of heating system: 1.2 kW (ask the installer)
ress UP ( ) or DOWN ( ) button to show the different readouts.
P
o changes can be made here. Use the OK ( ) button to end.
N
-2: 4 events in 5 days +
5
2 events in 2 days.
6-1: 4 events in 6 days +
7-0: 4 events in 7 days
Max and min allowed temperature range. The temperature setting range of 41˚ to 104˚F can be limited to prevent a too high or too low
temperature being selected. For example, a wood floor covering should not be allowed to exceed a maximum of 81˚F. Low limitation is
used where the temperature of the floor is required never to fall below the minimum set temperature.
Maximum allowed temperature setting. Use the UP ( ) or
DOWN ( ) button to increase or reduce, and OK ( ) button to
accept.
Next is displayed LoLi. Press OK ( ) button to continue.
Minimum allowed temperature setting. Use the UP ( ) or
DOWN ( ) button to increase or reduce and OK ( ) button to
accept.
Time and temperature scale selection
You can select either ˚C or ˚F scale, and 12 or 24 hour clock as
follows:
Press UP ( ) or DOWN ( ) button to change settings.
Confirm the required scale with the OK button ( ) button.
Adaptive function: This function enables the thermostat to calculate when it needs to switch ON so that the required temperature is
reached at the set time. With a start time of 07:00 a.m. therefore, the thermostat may switch ON as early as 06:00 a.m. so that the desired
temperature of 77˚F is achieved by 07:00 a.m. Without this function set, the thermostat will start to heat at the time you set.
2 events in 1 day
Press the DOWN ( ) button to switch between on and off.
Press OK ( ) button to confirm.
Press OK ( ) button to end programming and to return to
scheduled programme.
© 2009 OJ Electronics A/S
3
Page 4
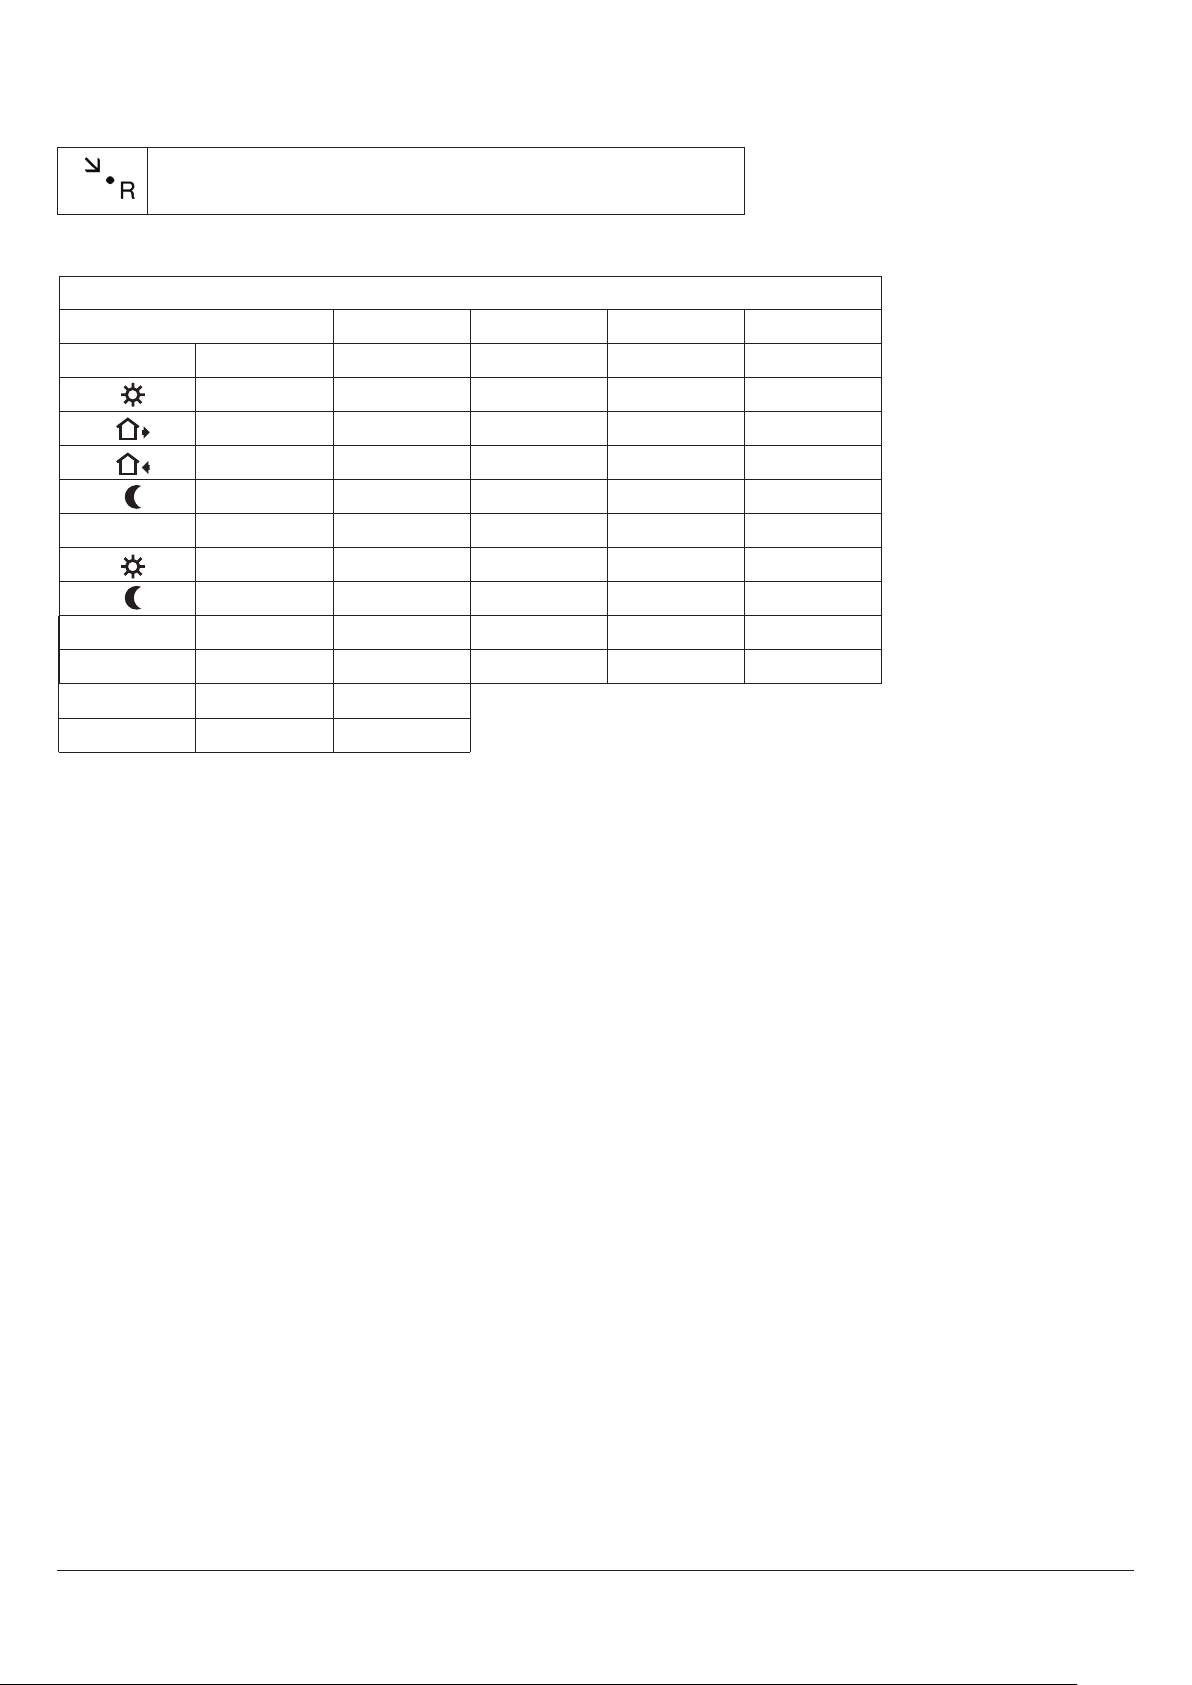
. Reset to factory setting
5
ress the pin button for 3 secs. and the thermostat returns to factory settings. Time,
P
day and scale for time (12h, 24h) and temperature (˚F, ˚C) read-out are also reset and
ust be set according to “Setting the thermostat into operation”.
m
actory settings
F
4-event time and temperature
Day 1-5
Time
CCG-9991
U
/floor sensor
w
CCG-9999
U
/room sensor
w
CDG-9999
U
/dual sensor
w
06:00 a.m.
08:00 a.m.
:00 p.m.
4
0:00 p.m.
1
ay 6-7
D
8:00 a.m.
0
11:00 p.m.
4-event sequence
i-Low temp.
H
Scale
Adaptive control
5:2
31˚F / 41˚F OFF/OFF OFF/OFF 82˚F / 59˚F
1
12 H / ˚F
ON
6. Failure codes
E0 = Internal failure, replace thermostat
E1 = Built-in sensor short-circuit or disconnected,
replace thermostat
E2 = External sensor short-circuit or disconnected
7. Technical data
Supply: . . . . . . . . . . . . . . . . . 120/240V AC 50/60 Hz
Load: . . . . . . . . . . . . 15A maximum (resistive load)
Power: . . . . . . . . . . . . . . . . . . . 1.800 W at 120V AC
3.600 W at 240V AC *
GFCI: . . . . . . . . . . . . . . . . . . . . . . . . 5 mA trip level
Temperature range: . . . . +5 to +40°C, +40 to +104˚F
Amb. Temperature range:
Thermostat: . . . . . . . . . . . 0 to +40°C, +32 to +104˚F
GFCI: . . . . . . . . . . . . . -35 to +65°C, -31 to +149˚F
77˚F / 25˚C
68˚F / 20˚C
7˚F / 25˚C
7
8˚F / 20˚C
6
7˚F / 25˚C
7
68˚F / 20˚C
68˚F / 20˚C
59˚F / 15˚C
0˚F / 21˚C
7
9˚F / 15˚C
5
70˚F / 21˚C
59˚F / 15˚C
68˚F / 20˚C
59˚F / 15˚C
0˚F / 21˚C
7
9˚F / 15˚C
5
70˚F / 21˚C
59˚F / 15˚C
*) Only type UTCG-9999 and UCCG-9999.
OJ ELECTRONICS A/S
Stenager 13B · DK-6400 Sønderborg
Tel. +45 73 12 13 14 · Fax +45 73 12 13 13
oj@oj.dk · www.oj.dk
4
© 2009 OJ Electronics A/S - ® The OJ trademark is a registred trademark belonging to OJ Electronics A/S
Page 5

Français
GFCI
Test
R
Reset
®
BR928A08
A
B
C
D
E
F
H
I
G
☞
☞
☞
☞☞☞
rogrammation du produit
P
e guide d'utilisation contient des renseignements sur les modèles de thermostat avec disjoncteur de fuite à la terre intégré.
C
UCCG-9991avec capteur de plancher 3 m
CCG-9999avec capteur de pièce
U
CDG-9999 avec deux capteurs; un capteur de pièce et un capteur de plancher 3 m
U
Introduction
e thermostat est du type on/off pour le contrôle de température par une sonde NTC externe ou interne.
L
e thermostat possède un disjoncteur de fuite à la terre intégré.
L
Le thermostat peut activer le système de chauffage à des heures prédéterminées pour des jours différents de la semaine. Il est possible de régler quatre pério-
es (appelées événements) à des températures différentes chaque jour. Un horaire par défaut, qui convient à la plupart des installations, a été programmé en
d
sine. À moins que vous ne modifiiez ces réglages, le thermostat fonctionnera selon ce programme par défaut. Si vous réglez le chauffage à une température
u
plus basse lorsque la pièce est inoccupée, vous couperez les coûts d'énergie sans réduire le confort. Le thermostat est muni d'une fonction adaptative qui
odifie automatiquement l'heure de début de la période de chauffage afin que la température désirée soit atteinte à l'heure que vous avez réglée. Après cinq
m
ours, la fonction adaptative sait quand activer le système de chauffage.
j
Le modèle de thermostat UCCG-9991 est muni d'un capteur de température externe que l'on place normalement dans le plancher. De cette façon, le thermostat
ontrôle la température du plancher et non celle de la pièce.
c
e modèle de thermostat UCCG-9999 est doté d'un capteur de température intégré. Dans cette configuration, le thermostat contrôle la température de la pièce.
L
Le modèle de thermostat UCDG-9999 est doté d'un capteur de température intégré et d'un capteur de température externe. Dans cette configuration, le
thermostat contrôle la température à l'intérieur de la pièce et utilise le capteur de température externe comme une sonde de limite pour empêcher que la
empérature du plancher ne soit trop élevée ou trop faible.
t
Le thermostat dispose d'un bouton miniature identifié d'un R qui vous permet de le réinitialiser aux réglages de l'usine. Ces réglages sont énumérés à la fin de
ce guide. Il y a aussi de l'espace afin que vous puissiez prendre en note votre propre horaire hebdomadaire.
1. Début
ymboles de l'affichage
Touches
A:
Réinitialisation
du disjoncteur
de fuite à la
terre
B:
Voyant rouge
indicateur de
mise à la masse
défectueuse
C:
Vérification
du disjoncteur
de fuite à la
terre
:
D
outon miniature pour le
B
réglage de l’horloge
:
E
Affichage
:
F
Remise aux réglages
effectués en usine
G:
Ajustement vers le bas
H:
OK - acceptation
I:
Ajustement vers le haut
S
J:
Fonction
d’horloge
N:
Chauffage en circuit
O:
Pourcentage de
J
P
K
O
L
N
M
K:
Mode
Manual
L:
Heure et
température
M:
Numéro
de jour
temps en circuit
:
P
Symboles des quatre
événements:
Éveil
Nuit
Hors de la maison
À la maison
Activation du thermostat
À la première mise en alimentation, l'heure et le jour clignoteront et il faudra les régler. Après avoir réglé l'heure et la date, il est possible de sélectionner le
mode d'affichage des heures (12 ou 24 heures) et l'échelle de température (°C ou °F). Si vous devez ultérieurement régler l'heure du thermostat, insérez un
objet pointu dans l'orifice ( ) pour régler l'heure et le jour de nouveau. Il faut aussi ajuster le thermostat en fonction de l'heure d'hiver et de l'heure d'été. On
peut également régler le mode d'affichage des heures et l'échelle de température dans les réglages avancés (voir la section 4).
Appuyez sur les touches de défilement vers le haut (UP ) ou vers le bas (DOWN ) pour
régler l'heure, puis appuyez sur la touche OK ( ).
Appuyez sur les touches de défilement vers le haut (UP ) ou vers le bas (DOWN ) pour
régler le jour, puis appuyez sur la touche OK ( ).
1-7
Appuyez sur la touche de défilement vers le haut
(UP ) pour régler le mode d'affichage des heures et l'échelle de température, puis
appuyez sur la touche OK ( ).
© 2009 OJ Electronics A/S
5
Page 6

érification du disjoncteur de fuite à la terre (GFCI)
☞
6
☞
☞
6
☞
☞☞☞☞☞☞☞
☞
☞
☞
☞
☞
V
l est important de vérifier l'installation et le fonctionnement du disjoncteur de fuite à la terre.
I
est du disjoncteur: Pour vérifier le fonctionnement du disjoncteur, il faut qu'il y ait une demande de chauffage au thermostat. Réglez la demande de chauffage
T
au thermostat jusqu'à ce que le symbole ()s'affiche. Servez-vous de la touche ( ) pour augmenter la demande. Patientez dix secondes pour laisser le
hermostat s'adapter à la nouvelle demande, puis appuyez sur la touche TEST. Le test est concluant si le voyant rouge du thermostat s'allume et que les signes
t
ur l'affichage disparaissent. Dans le cas contraire, vérifiez l'installation. Appuyez sur la touche RESET pour réinitialiser le disjoncteur de fuite à la terre. Le
s
voyant rouge devrait s'éteindre et l'affichage revenir à la normale. Appuyez sur la touche d'acceptation ( ) pour annuler le réglage de température précédent. Si
le test échoue, vérifiez le câble chauffant et le thermostat. Le test du disjoncteur de fuite à la terre devrait être effectué mensuellement.
i le disjoncteur se déclenche en mode de fonctionnement normal, sans qu'il soit nécessaire d'appuyer sur la touche TEST, cela pourrait indiquer la présence
S
'une mise à la masse défectueuse. Pour vérifier s'il s'agit d'une mise à la masse
d
défectueuse ou d'un déclenchement intempestif, appuyez sur la touche de
éinitialisation (RESET). Si le voyant rouge s'éteint et qu'il ne se rallume pas, il s'agissait
r
'un déclenchement intempestif et le système fonctionne correctement. Dans le cas
d
ontraire, il y a effectivement une mise à la masse défectueuse ! Vérifiez le câble
c
chauffant, le câble du capteur et le thermostat, puis remplacez la pièce défectueuse.
. Usage quotidien du thermostat
2
ode d'horaire divisé en quatre événements
M
Le jour type a été divisé en quatre événements. Lorsque le thermostat est en mode
e quatre événements, il règle automatiquement la température de la pièce requise à
d
'heure établie. Le thermostat de série commande quatre événements par jour sur
l
une période de cinq jours, et deux événements par jour sur une période de deux
jours.
oir en page 3 pour la programmation.
V
ode d’horaire divisé en
M
quatre événements:
ode confort
M
s
5
e symbole de l'horloge ( ) et un des quatre symboles d'événement ( ) s'afficheront.
L
oir en page 3 pour la programmation.
V
Fonctionnement prioritaire temporaire: Pour contourner temporairement le réglage de température du
programme en quatre événements, appuyez sur les touches de défilement vers le haut (UP ) ou vers le bas
DOWN ) pour afficher la température, et appuyez sur les touches de nouveau pour augmenter ou réduire la
(
empérature. L'affichage clignotera pendant cinq secondes, puis reviendra au mode d'affichage de l'heure. Le
t
réglage de température prioritaire subsistera jusqu'à l'activation du prochain événement automatique programmé.
Annulation du mode confort: Pour annuler l'état prioritaire, appuyez sur la touche OK ( ) à deux reprises.
Mode manuel:
5 s
Désactivation
3. Programmation
Heure et température des quatre événements
Pour chaque événement, il faut régler l'heure de début de
la période de chauffage et la température.
Vous pourriez par exemple désirer que le chauffage
commence à 7 h dans la matinée et que la température
s'élève à 77°F. Appuyez sur la touche OK ( ) pendant trois
secondes pour afficher l'heure de début de la période de
chauffage. Réglez l'heure à 7 h à l'aide des touches de
défilement vers le haut (UP ) ou vers le bas (DOWN ) .
Appuyez sur la touche OK ( ) pour confirmer.
La température s'affiche. Réglez-la à 77°F à l'aide des
touches de défilement vers le haut (UP ) ou vers le bas
(DOWN ). Appuyez sur la touche OK ( ) pour confirmer.
Répétez ces étapes pour le deuxième événement.
Ces réglages sont valides pour les jours 1 à 5 qui sont
affichés. Répétez les étapes ci-dessus pour programmer
les jours 6 et 7. Il n'y a que deux événements pour les
jours 6 et 7, qui sont habituellement le samedi et le
dimanche.
La plage de température est réglable de 41°F à 104°F. Il
est également possible de mettre le chauffage hors circuit
pour cet événement en réduisant la température à 41°F et
en appuyant sur la touche ( ) à nouveau.
Fonctionnement prioritaire permanent: Durant les congés, par exemple, il est possible de contourner l'horaire
du programme en quatre événements. Appuyez sur la touche OK (), puis sur les touches de défilement vers le
haut (UP ) ou vers le bas (DOWN ) pour régler la température désirée. L'appareil maintiendra la température de
la pièce à ce niveau de façon permanente.
Annulation du mode manuel: Pour annuler l'état prioritaire permanent, appuyez sur la touche OK ( ) une fois et
l'appareil reprendra la programmation automatique.
Pour désactiver le thermostat, appuyez sur la touche de défilement vers le bas ( ) jusqu'à ce que le témoin « OFF »
s'affiche.
N'UTILISEZ PAS LA TOUCHE D'ESSAI DU DISJONCTEUR DE FUITE À LA TERRE POUR DÉSACTIVER
L'INSTALLATION DE CHAUFFAGE.
Le disjoncteur de fuite à la terre se réinitialisera automatiquement par suite d'une coupure de l'alimentation secteur.
Appuyez sur la touche OK ( ) pendant trois secondes pour commencer la programmation
Jours 1 à 5
: Heure et température
:
Heure et température
:
Heure et température
:
Heure et température
Jours 6 à 7
:
Heure et température
:
Heure et température
6
© 2009 OJ Electronics A/S
Page 7

. Réglages avancés et lectures
☞
✚
☞
☞
☞
☞
}
}
☞☞☞
☞
☞
☞
}
}
☞☞☞☞☞
☞☞☞
☞
4
ppuyez simultanément sur les touches de défilement vers le haut (UP ) et vers le bas (DOWN ) pendant trois secondes. L'afficheur
A
ontre « INFO ».Appuyez sur la touche de défilement vers le haut (UP ( ) jusqu'au sous-menu recherché. Sélectionnez le sous-menu en
m
ppuyant sur la touche OK ( ).
a
urveillance de la consommation d'énergie.
S
Le thermostat calcule son temps moyen de fonctionnement afin de vous permettre de surveiller la consommation d'énergie.
Vous pouvez prendre les lectures suivantes du thermostat : Temps total en circuit, en pourcentage, durant les 2, 30 ou 365 derniers jours.
alcul des coûts d'exploitation par jour : (temps en circuit/100) x kW x coût du kWh x 24 h par jour
C
xemple: Lecture : 30 % au cours des 365 derniers jours. Puissance du système de chauffage : 1,2 kW (demandez à l'installateur)
E
jours
2
0 jours
3
65 jours
3
ersion du logiciel
V
Capteur de régulation
Capteur de régulation (pour UCDG)
équence en quatre événement. La séquence d'événements en cours clignote : les jours 1 à 5 d'abord, puis les jours 6 et 7. Pour la
S
modifier, appuyez sur la touche de défilement vers le haut (UP ) jusqu'à ce que les jours 1 à 6 clignotent, puis le jour 7, ou jusqu'à ce que
ous les sept jours clignotent. Sélectionnez la séquence désirée en appuyant sur la touche OK ( ).
t
Coût de l'électricité : 0,20 $US/kWh. Calcul : (30 %) x 1,2 kW x 0,20 $US/kWh x 24 h = 1,73 $US par jour
Appuyez sur les touches de défilement vers le haut (UP ) ou
ers le bas (DOWN ) pour afficher les différentes
v
ectures.
l
Vous ne pouvez effectuer aucun changement ici. Appuyez sur la
touche OK ( ) pour quitter.
-2: 4 événements en 5 jours +
5
-1: 4 événements en 6 jours +
6
événements en 2 jours.
2
événements en 1 jour
2
7-0: 4 événements en 7 jours
Maximum et minimum permisde la plage de température. On peut limiter la plage de température, réglable de 41°F à 104°F, afin de prévenir le
réglage d'une température trop élevée ou trop basse. Par exemple, la température d'un revêtement de plancher de bois ne devrait pas dépasser
81°F. La limite de température basse sert auxendroits où la température d'un plancherne doitpas tomber sous la température minimumréglée.
Réglage de la limite de température élevée permise. Utilisez les
touches de défilement vers le haut (UP ) ou vers le bas
(DOWN ) pour augmenter ou réduire la température, puis
appuyez sur la touche OK ( ) pour confirmer.
L'afficheur montre « LoLi». Appuyez sur la touche OK ( ) pourcontinuer.
Réglage de la limite de température basse permise. Utilisez les
touches de défilement vers le haut (UP ) ou vers le bas
(DOWN ) pour augmenter ou réduire la température, puis
appuyez sur la touche OK ( ) pour confirmer.
Sélection du mode d'affichage des heures et de l'échelle de température
Vous pouvez choisir d'afficher la température en degrés Celsius ou
Fahrenheit et de diviser le jour en périodes de 12 ou 24 heures de la
façon suivante :
Appuyez sur les touches de défilement vers le haut (UP ) ou vers le
bas (DOWN ) pour modifier les réglages. Confirmez l'échelle ou la
division du jour requise en appuyant sur la touche OK ( ).
Fonction adaptative. Cette fonction permet au thermostat de calculer à quel moment il doit se mettre en circuit pour que la pièce soit à la
température requise à l'heure réglée. Donc, si le début de la période de chauffage est réglée à 7 h, il se peut que le thermostat se mette en
circuit aussi tôt que 6 h afin que la pièce soit à la température requise de 77°F à 7 h. Si vous n'activez pas cette fonction, le thermostat
lancera le système de chauffage à l'heure que vous avez réglée.
Appuyez sur la touche de défilement vers le bas (DOWN ) pour
commuter entre l'activation et la désactivation de cette fonction.
Appuyez sur la touche OK ( ) pour confirmer.
Appuyez sur la touche OK ( ) pour mettre fin à la programmation et
revenir à l'horaire programmé.
© 2009 OJ Electronics A/S
7
Page 8

. Remise aux réglages effectués en usine
5
ppuyez sur le bouton miniature pendant trois secondes et le thermostat reviendra aux réglages effectués
A
en usine. Les paramètres d'heure, de jour, d'affichage des heures (12 ou 24 heures) et d'échelle de
empérature (°F ou °C) sont aussi réinitialisés et doivent être réglés de nouveau comme c'est décrit à la
t
ection « Activation du thermostat ».
s
Réglage en usine
eure et température des quatre événements
H
ours 1 à 5
J
eure
H
6:00 am
0
8:00 am
0
:00 pm
4
CCG-9991
U
Avec capteur de
plancher
7˚F / 25˚C
7
8˚F / 20˚C 59˚F / 15˚C
6
7˚F / 25˚C 70˚F / 21˚C
7
CCG-9999
U
avec capteur de
pièce
8˚F / 20˚C
6
CCG-9999
U
avec deux
capteurs
8˚F / 20˚C
6
9˚F / 15˚C
5
0˚F / 21˚C
7
0:00 pm
1
Jours 6 et 7
08:00 am
11:00 pm
équence en
S
quatre
5:2
événements
Limites supérieure
et inféreure de
131˚F / 41˚F OFF/OFF OFF/OFF 82°F/59°F
température
Échelle
Commande
adaptative
12 H / ˚F
En circuit
6. Codes de dérangement
E0 = Défectuosité interne; remplacez le thermostat
E1 = Capteur interne court-circuité ou déconnecté;
remplacez le thermostat
E2 = Capteur externe court-circuité ou déconnecté
7. Fiche technique
Source d’alimentation . . . . . . 120/240 V c.a.50/60 Hz
Charge . . . . . . . . . . 15A maximum (charge résistive)
Puissance . . . . . . . . . . . . . . . . . 1.800 W à 120 V c.a.
3.600 W à 240 V c.a. *
GFCI: . . . . . . . seuil e déclenchement réglé à 5 mA
Plage de témperature . . . . +5 à +40°C, +40 to +104˚F
Plage de témperature ambiante:
Thermostat: . . . . . . . . . . de 0 à +40°C, +32 à +104˚F
GFCI: . . . . . . . . . . . . . . . -35 à +65°C, -31 à +149˚F
9˚F / 15˚C
8˚F / 20˚C
6
5
77˚F / 25˚C 70˚F / 21˚C
68˚F / 20˚C 59˚F / 15
9˚F / 15˚C
5
70˚F / 21˚C
59˚F / 15
*) Seuls UTCG-9999 et UCCG-9999.
OJ ELECTRONICS A/S
Stenager 13B · DK-6400 Sønderborg
Tel. +45 73 12 13 14 · Fax +45 73 12 13 13
oj@oj.dk · www.oj.dk
8
© 2009 OJ Electronics A/S - ® OJ est une marque déposée de OJ Electronics A/S
Page 9

Español
GFCI
Test
R
Reset
®
BR928A08
A
B
C
D
E
F
H
I
G
☞
☞
☞
☞☞☞
rograma de producto
P
ste manual del usuario cubre los siguientes termostatos con interruptor GFCI integrado:
E
UCCG-9991 Incluido el sensor de piso 3m
CCG-9999 Con sensor de temperatura ambiente integrado
U
CDG-9999 Con 2 sensores; sensor de temperatura ambiente integrado y sensor de piso 3 m
U
Introducción
l termostato es un dispositivo de ON/OFF (encendido/apagado) para el control de temperatura por medio de un sensor NTC colocado dentro o fuera del
E
ermostato.
t
El termostato tiene integrado un interruptor de circuito de fallo a tierra (Ground Fault Circuit Interrupter - GFCI).
l termostato es capaz de activar su sistema de calefacción a horas predeterminadas en días diferentes de la semana. Es posible establecer 4 períodos
E
lamados eventos cada día con diferentes temperaturas. En la fábrica se programa un horario predeterminado adecuado para la mayoría de las instalaciones. A
l
menos que usted cambie estos ajustes, el termostato funcionará con este programa predeterminado. El funcionamiento con temperaturas menores durante las
oras en que la habitación no esté habitada reducirá sus costos de energía sin sacrificar su comodidad. El termostato tiene una función adaptativa que cambia
h
utomáticamente la hora de activación de un período de calefacción de manera que se alcance la temperatura deseada a la hora que usted lo establezca.
a
Después de 5 días la función adaptativa habrá aprendido a qué hora deberá activarse la calefacción.
l termostato tipo UCCG-9991 tiene un sensor de temperatura externo que normalmente se coloca en la construcción del piso. En esta configuración el
E
ermostato controla la temperatura del piso y no la temperatura ambiente en la habitación.
t
El termostato tipo UCCG-9999 tiene integrado un sensor de temperatura. En esta configuración el termostato controla la temperatura de la habitación. El
termostato tipo UCDG-9999 tiene un sensor de temperatura integrado y un sensor de temperatura externo. En esta configuración, el termostato
ontrola la temperatura ambiente en la habitación y utiliza el sensor de temperatura externo como sensor limitador para evitar las temperaturas demasiado altas
c
demasiado bajas en la construcción del piso.
o
El termostato tiene un botón de clavija marcado con una R, el cual le permite restablecer el termostato a los valores preestablecidos de fábrica. Estos valores se
indican al final de este manual con espacio para que usted anote su propio horario semanal..
1. Instrucciones iniciales
Botones
:
D
Botón de clavija
ajuste del reloj
E:
Pantalla
F:
Restablecimiento del ajuste
de fábrica
G:
Ajuste de reducción
H:
OK – aceptar
I:
Ajuste de aumento
A:
Restablecimiento
del GFCI
B:
La luz roja
indica el fallo
a tierra
C:
Prueba del
GFCI
Ajuste del termostato en funcionamiento
La primera vez que se conecta la alimentación eléctrica, parpadearán la hora y el día, y será necesario establecerlos. Después de establecer la hora y el día, se
puede seleccionar la escala de tiempo (12 h o 24 h) y la escala de temperatura (°C o °F). Si es necesario ajustar la hora del termostato en una fecha posterior,
introduzca una clavija en el orificio ( ) para establecer la hora y el día. Es necesario realizar ajustes para la hora de verano y de invierno. El establecimiento de la
escala de tiempo y de la temperatura se puede realizar también desde "ajustes avanzados y lectura" véase 4.
Pulse los botones UP ( ) (Arriba) o DOWN ( )
(Abajo) para seleccionar la hora correcta y pulse
el botón OK ( ) (Aceptar).
Después pulse el botón UP ( ) o DOWN ( )
para seleccionar el día correcto y pulse el botón
OK ( ).
Pulse el botón UP ( ) para seleccionar la
escala de tiempo y la temperatura y pulse el
botón OK ( ).
Símbolos de la pantalla
J
K
L
J:
Función del
reloj
1-7
K:
Modo
manual
M
L:
Hora y
temperatura
P
O
N
M:
Número de
día
N:
Calefacción encendida
O: %
Monitoreo de la hora
de encendido
P:
Símbolo de 4 eventos:
Día
Noche
Fuera de casa
En casa
© 2009 OJ Electronics A/S
9
Page 10

erificación del GFCI
☞
6
☞
☞
6
☞
☞☞☞☞☞☞☞
☞
☞
☞
☞
☞
V
s importante inspeccionar el GFCI y verificar que esté instalado y funcionando correctamente.
E
ara inspeccionar el GFCI: Se puede realizar las pruebas solamente si el termostato tiene una demanda de calefacción. Calibre el punto de ajuste hasta que
P
aparezca el símbolo (), use el botón ( ) para aumentar la demanda de calefacción. Espere 10 segundos para dejar que el termostato funcione de acuerdo
on el nuevo punto de ajuste. Pulse el botón "TEST". La prueba es concluyente si se enciende la luz indicadora roja en el termostato, y desaparecen los
c
ímbolos en la pantalla. Si esto no ocurre, verifique la instalación. Pulse el botón RESET (Restablecer) para restablecer el GFCI. La luz roja deberá desaparecer y
s
la pantalla recuperará la apariencia normal. Pulse el botón ok - aceptar ()para cancelar la temperatura establecida previamente. Si falla la prueba, verifique su
cable calefactor y el termostato. Se recomienda probar mensualmente el GFCI.
i el GFCI se dispara en funcionamiento normal, sin pulsar el botón de prueba TEST, ¡quizá
S
haya un fallo a tierra! Para verificar si existe un fallo a tierra o un disparo de interferencia, pulse
ESET. Si esto causa que se apague la luz y no se vuelve a encender, se trataba de un
R
isparo de interferencia y el sistema está funcionando. Si esto no se puede realizar, ¡existe un
d
allo a tierra! Inspeccione el cable calefactor, el cable del sensor y el termostato. Cambie la
f
pieza defectuosa.
. Uso diario del termostato
2
Modo de reloj de 4 eventos
El día se ha dividido en 4 eventos que describen un día típico. Cuando el termostato se
ncuentra en modo de 4 eventos se ajustará automáticamente la temperatura según la
e
emperatura programada a la hora programada. Como estándar, el termostato tiene 5 días con
t
4 eventos, y 2 días con 2 eventos. Para programación véase 3.
Modo de reloj de 4
eventos:
odo de confort:
M
5 seg.
Se indicará el símbolo de función de reloj ( ) y uno de los símbolos de los 4 eventos ( ).
Para programación véase 3.
nulación temporal: Para anular temporalmente la temperatura en el programa de horario de 4 eventos, pulse el
A
botón UP ( ) o DOWN ( ) una vez, para visualizar la temperatura, y vuelva a pulsarlo para aumentar o reducir la
temperatura.
Cancelación del modo de confort:
Para cancelar el estado de anulación, pulse dos veces el botón OK ( ).
Modo manual:
5 seg.
OFF (APAGADO)
3. Programación
Hora y temperatura para 4 eventos
Es necesario establecer la hora de inicio y la temperatura
deseada para cada evento.
Por ejemplo, en la mañana usted desea que la calefacción
comience a las 07:00 AM y que la temperatura ascienda a 77° F.
Pulse el botón OK ( ) durante 3 segundos y aparecerá la hora
de inicio. Con el botón UP ( ) o DOWN ( ) cambie este valor
a 07:00 AM. Pulse OK ( ) para confirmar.
Ahora aparece la temperatura en la pantalla. Con el botón UP
( ) o DOWN ( ) cambie este valor a 77° F.
Pulse el botón OK ( ) para confirmar. Ahora se puede repetir
esta acción para el segundo evento.
Estos ajustes serán válidos para los días 1-5 que se muestran
en la pantalla. Para programar los días 6 y 7, repita el
procedimiento anterior. Los días 6 y 7 son usualmente el
sábado y el domingo, y solamente tienen dos eventos.
Anulación permanente:
Durante los días feriados, se puede anular el horario programado de 4 eventos. Pulse el botón OK ( ), y después el
botón UP ( ) o DOWN ( ) hasta que se establezca la temperatura de anulación. Así, la unidad funcionará
permanentemente con esta temperatura.
Cancelación del modo manual:
Para cancelar el estado de anulación permanente, pulse una vez el botón OK ( ), y la unidad reanudará la función
automática.
Para apagar (OFF) el termostato, pulse DOWN
NO USE EL BOTÓN DE PRUEBA EN EL GFCI PARA APAGAR LA INSTALACIÓN DE CALEFACCIÓN.
El GFCI se restablecerá automáticamente después de la desconexión de la red de alimentación principal.
hasta que en la pantalla aparezca OFF.
()
Pulse el botón OK ( ) durante 3 segundos para comenzar la programación
Día 1 – 5
: Hora y temperatura
: Hora y temperatura
: Hora y temperatura
: Hora y temperatura
Día 6 - 7
La temperatura se puede establecer dentro de los límites de
+41 °F a +104 °F. Además es posible seleccionar el apagado
(OFF) de la calefacción al reducir el valor de ajuste a 41 °F, y
después pulsar el ( ) una vez más.
10
: Hora y temperatura
: Hora y temperatura
© 2009 OJ Electronics A/S
Page 11

. Ajustes avanzados y lectura
☞
✚
☞
☞
☞
☞
}
}
☞☞☞
☞
☞
☞
}
}
☞
☞☞☞
☞☞☞
☞
☞
4
ulse simultáneamente los botones UP ( ) y DOWN ( ) durante 3 segundos. INFO aparece en la pantalla.
P
ulse el botón UP ( ) hasta llegar al submenú deseado. Seleccione el submenú con el botón OK ( ).
P
onitoreo del consumo de energía.
M
l termostato calcula el tiempo promedio que ha estado encendido para permitirle monitorear su consumo de energía. En el termostato
E
puede leer: Tiempo total de encendido en porcentaje durante los 2 días, 30 días o 365 días recién pasados.
Cálculo de los costos diarios de operación: (Hora de encendido:100) x kW x precio por kWh x 24 h por día
jemplo: Lectura: 30 % en los
E
días
2
0 días
3
65 días
3
Versión de software
Sensor de control
Sensor de límite (para UCDG)
Secuencia de 4 eventos. Parpadea la secuencia de evento actual: Días 1-5, seguidos por los días 6-7. Para cambiar los valores, pulse el
otón UP ( ) hasta que los días 1-6 y después el día 7 estén parpadeando, o todos los 7 días estén parpadeando. Con el botón OK ( ),
b
eleccione la secuencia que desee.
s
Pulse el botón UP ( ) o DOWN ()para visualizar las diferentes
ecturas.
l
o se puede efectuar cambios aquí. Use el botón OK ()para
N
erminar.
t
-2: 4 eventos en 5 días + 2 eventos en 2 días
5
6-1: 4 eventos en 6 días + 2 eventos en 1 día
7-0: 4 eventos en 7 días
Rango de temperaturas máx. y mín. permisibles. Se puede limitar el rango de ajuste de temperaturas de 41° a 104° F a fin de prevenir
la selección de temperaturas demasiado altas o demasiado bajas. Por ejemplo, no se debe permitir que los pisos de madera excedan
una temperatura máxima de 81° F. El límite inferior se utiliza donde se requiere que la temperatura del piso nunca caiga por debajo de la
temperatura mínima establecida.
Ajuste de la máxima temperatura permisible. Use el botón UP ( ) o
DOWN ( ) para aumentar o reducir el valor y el botón OK ( ) para
aceptarlo.
A continuación aparece LoLi. Pulse el botón OK ( ) para continuar.
Ajuste de la mínima temperatura permisible. Use el botón UP (( )) o
DOWN ( ) para aumentar o reducir el valor y el botón OK ( ) para
aceptarlo.
Selección de escala de tiempo y temperatura
Puede seleccionar la escala °C o °F, y formato de reloj de 12 ó 24
horas de la manera siguiente:
Pulse el botón UP ( ) hasta llegar al submenú deseado.
Con el botón OK ( ), confirme la escala que desee.
Función adaptativa: Esta función permite que el termostato calcule cuándo debe encenderse (ON) para alcanzar la temperatura
requerida a la hora establecida. Por lo tanto, con una hora de inicio de 07:00 AM, el termostato puede encenderse tan temprano como a
las 06:00 AM para alcanzar la temperatura deseada de 77° F a las 07:00 AM. Si no se establece esta función, el termostato accionará la
calefacción a la hora que usted establezca.
Pulse el botón DOWN ( ) para alternar entre encendido y
apagado.
Pulse el botón OK ( ) para confirmar.
Pulse el botón OK ( ) para terminar la programación y regresar
al horario programado.
© 2009 OJ Electronics A/S
11
Page 12

. Restablecimiento del ajuste de fábrica
57611C
5
ulse el botón de clavija durante 3 segundos y el termostato regresa a los ajustes de
P
fábrica. También se restablecen las lecturas de hora, día y escala para el tiempo (12 h,
4 h) y la temperatura (°F, °C) y deberán establecerse de acuerdo con "Ajuste del
2
ermostato para el funcionamiento”.
t
justes de fábrica
A
Hora y temperatura para 4 eventos
Día 1-5
Hora
06:00 AM
UCCG-9991
con sensor
e piso
d
77˚F / 25˚C
UCCG-9999
con sensor de
emperatura
t
mbiente
a
68˚F / 20˚C
UCDG-9999
con sensor
oble
d
68˚F / 20˚C
08:00 AM
:00 PM
4
0:00 PM
1
ía 6-7
D
8:00 AM
0
11:00 PM.
ecuencia de 4
S
ventos.
e
Temperatura
máxima y mínima
Escala
Control adaptativo
6. Códigos de error
E0 = Fallo interno, cambie el termostato
E1 = Sensor integrado en cortocircuito o
desconectado, cambie el termostato
E2 = Sensor externo en cortocircuito o
desconectado
7. Technical data
Alimentación:. . . . . . . . . . . . . 120/240 V CA 50/60 Hz
Carga: . . . . . . . 15 A como máximo (carga resistiva)
Potencia:. . . . . . . . . . . . . . . . . . . 1,800 W a 120 V CA
GFCI: . . . . . . . . . . . . . . . . nivel de disparo de 5 mA
Rango de temperatura: . +5 a +40° C, +40 a +104° F
Rango de temperatura ambiente
Termostato: . . . . . . . . . . . 0 a +40° C, +32 a +104° F
GFCI: . . . . . . . . . . . . . -35 a +65° C, -31 a +149° F
5:2
31˚F / 41˚F OFF/OFF OFF/OFF 82˚F / 59˚F
1
12 H / ˚F
ON
3,600 W a 240 V CA *
68˚F / 20˚C
7˚F / 25˚C
7
8˚F / 20˚C
6
7˚F / 25˚C
7
68˚F / 20˚C
59˚F / 15˚C
0˚F / 21˚C
7
9˚F / 15˚C
5
70˚F / 21˚C
59˚F / 15˚C
59˚F / 15˚C
0˚F / 21˚C
7
9˚F / 15˚C
5
70˚F / 21˚C
59˚F / 15˚C
*) Único tipo UTCG-9999 y UCCG-9999.
OJ ELECTRONICS A/S
Stenager 13B · DK-6400 Sønderborg
Tel. +45 73 12 13 14 · Fax +45 73 12 13 13
oj@oj.dk · www.oj.dk
12
© 2009 OJ Electronics A/S - ® OJ es una marca comercial registrada de OJ Electronics A/S
 Loading...