

Page 1
English
Type OCC3 / OCD3
USER MANUAL
57695 05/08 - (BJ)
Type: OCC3 / OCD3
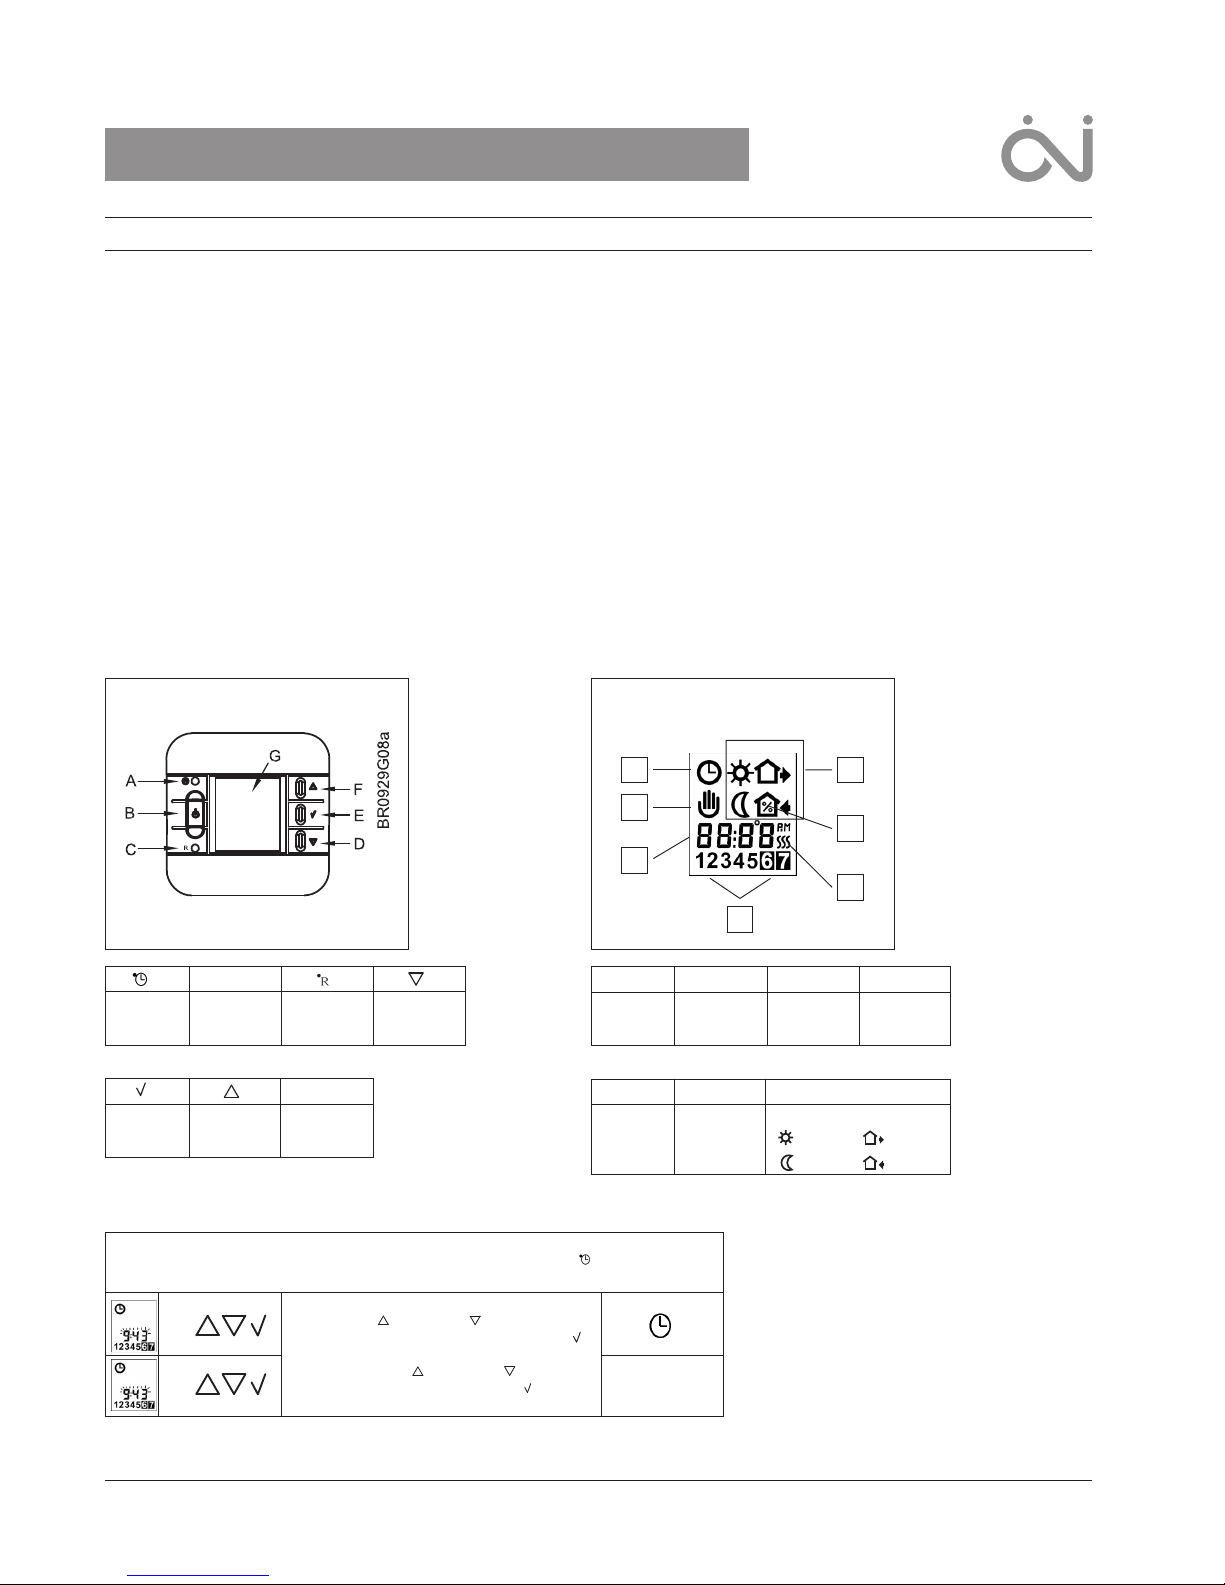
Buttons
Display symbols
N
M
L
K
H
I
J
A: B: C: D:
E: F: G:
Pin button
adjust of
clock
On/off Reset to
factory
setting
Adjustment
down
OK accept
Adjustment upDisplay
H: I: J: K:
L: M: N:
Clock
function
Manual
mode
Time and
temperature
Day number
Heating on %
Monitoring
of switch-on
time
4-event symbol
1. Getting started
Introduction
The thermostat is capable of switching on your heating system at pre determined times on different days of the week. It is possible to set 4 periods called
events each day with different temperatures. From factory a default schedule is programmed suitable for most installations. Unless you change these
settings the thermostat will operate to this default program.
Working with lower temperatures during times that the room is unoccupied will lower your energy costs without reducing the comfort. The thermostat has an
adaptive function that automatically changes the start time of a heating period so that the desired temperature is reached at the time that you set. After 3
days the adaptive function has learned when the heating must be switched on.
The thermostat has a built-in temperature sensor and an externally temperature sensor. In this configuration the thermostat controls the temperature within
the room and use the externally temperature sensor as limit sensor avoiding too high or too low temperatures in the floor construction.
The thermostat has a pin button marked R, allowing you to reset the thermostat to factory settings. These are listed at the end of this manual with space for
you to record your own weekly schedule.
The display is backlit when operating the buttons. The heating element is switched off when the light is on in the display.
The heating system can be switched off on the built-in interrupter. The Microprocessor taking care of the time will still be supplied with power whereby time
and day will be maintained. When the heating is required and the thermostat is switched on, it will continue the 4-event programme based on present time
and day.
Setting the thermostat into operation
☞
☞
1-7
Press the UP ( ) or DOWN ( ) buttons to
select the correct time and press OK button ( ).
Then press the UP ( ) or DOWN ( ) button to
select the correct day and press OK ( ) button.
First time power is connected the clock and day will be flashing and must be set. If you need to
adjust the time of the thermostat at a later date, insert a pin into the hole for setting of time
and day. Adjustment must be made for summer and winter time.
Wake
Night
Out
Home
1
Page 2
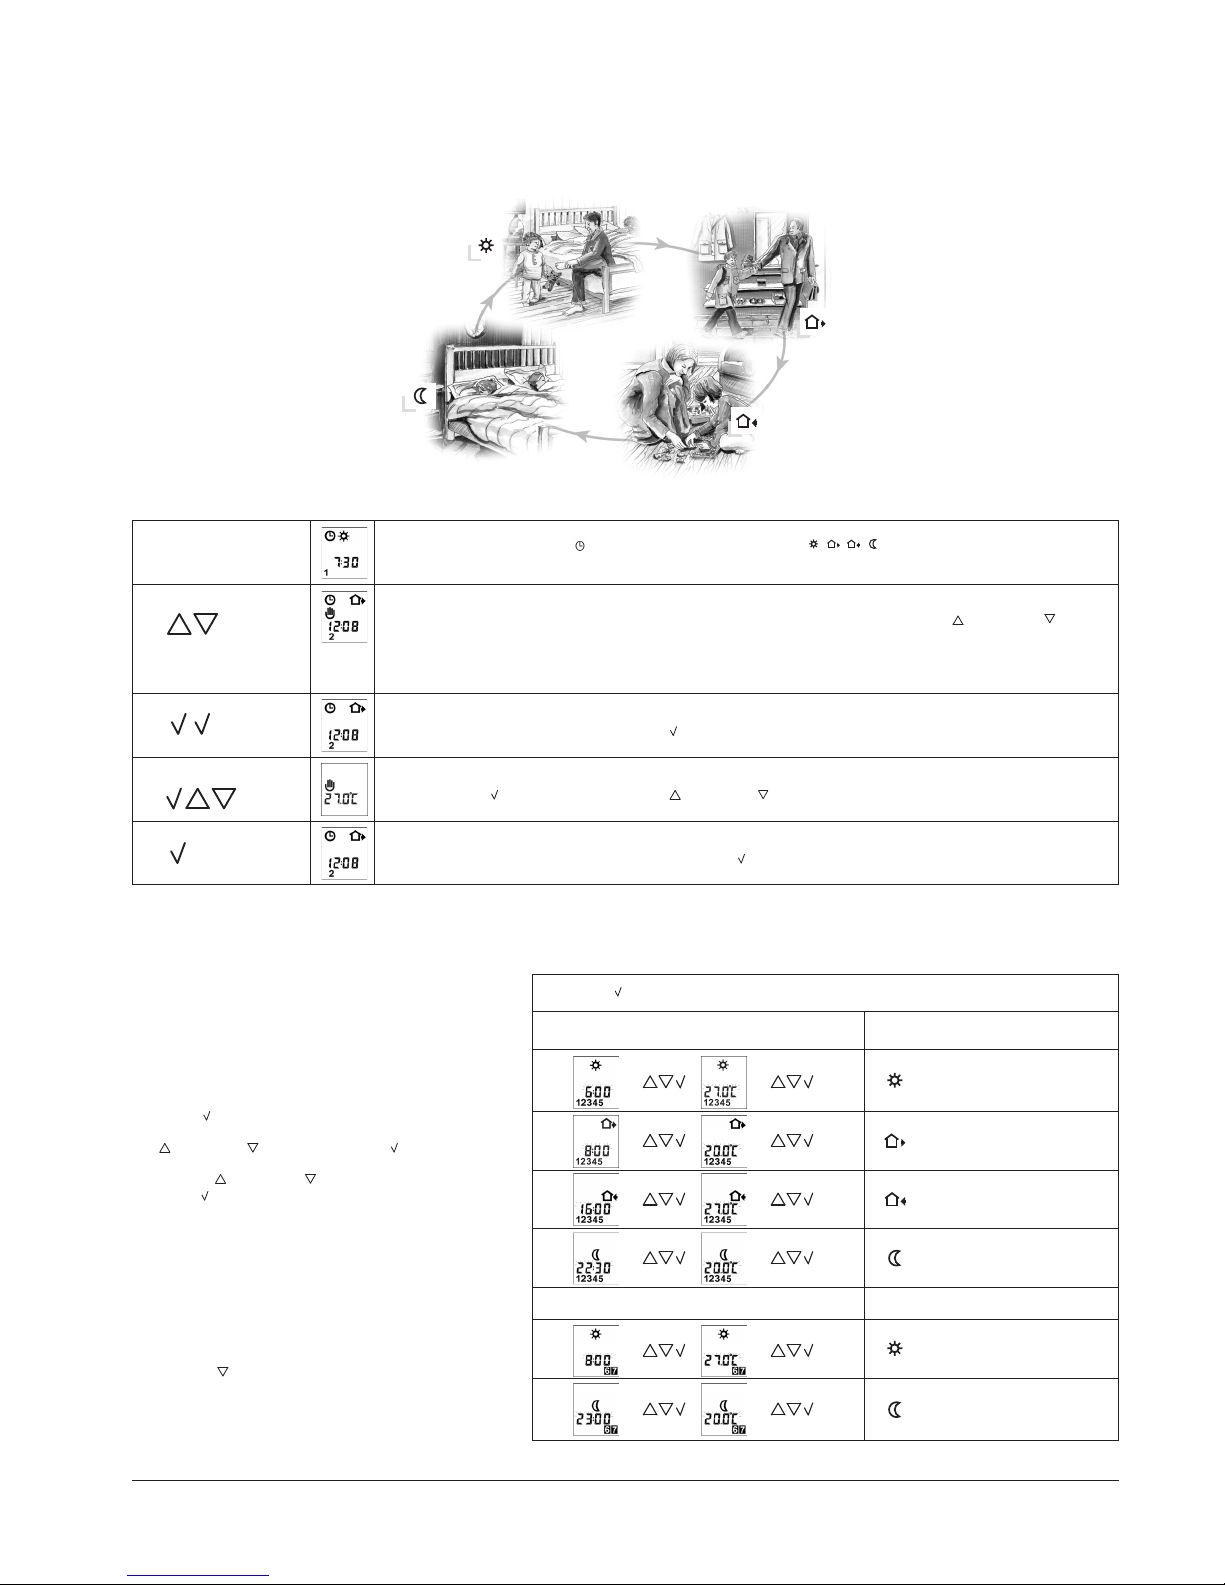
2. Daily use of the thermostat
4-event clock mode
The day has been split into 4 events describing a typical day. When the thermostat is in 4-event mode it will automatically adjust the temperature according
to the required temperature to the required time. As standard the thermostat has 5 days with 4 events, and 2 days with 2 events. Programming see 3.
4-event clock mode:
Comfort mode:
☞
☞
Manual mode:
☞
☞
Temporary override
To temporarily override the temperature in the 4-event schedule program, press the UP ( ) or DOWN ( ) button
once, to show the temperature, and press again to increase or decrease the temperature. The display will flash for
5 seconds, and will then revert to the time. The override will operate until the next programmed event when the
unit will resume the automatic programme.
The clock function symbol ( ) and one of the 4-event symbols ( ) will be indicated.
Programming see 3.
Cancel comfort mode
To cancel the override state, press the OK ( ) button twice.
Permanent override:
During holidays, the scheduled 4-event program can be overridden.
Press the OK ( ) button, and then the UP ( ) or DOWN ( ) button until the override temperature is set.
The unit will now operate to this temperature permanently.
Cancel manual mode
To cancel the permanent override state press the OK ( ) button once, and the unit will resume automatic function.
5 secs.
5 secs.
☞
☞
☞
☞
☞
☞
☞
☞
Press OK ( ) button for 3 secs. to begin programming
: Time and temperature
: Time and temperature
: Time and temperature
: Time and temperature
Day 1 - 5
Day 6 - 7
☞ ☞
: Time and temperature
☞ ☞
: Time and temperature
3. Programming
4-event time and temperature
For each event, the start time and required
temperature must be set.
For example, in the morning you wish the heating to
start at 07:00 and the temperature to rise to 21˚C.
Press OK ( ) button for 3 seconds and the start time
is displayed. Change this to 07:00 with the
UP ( ) or DOWN ( ) button. Press OK ( ) to confirm.
The temperature is now displayed. Change this to 21˚C
with the UP ( ) or DOWN ( ) button.
Press OK ( ) button to confirm. This action can now
be repeated for the second event.
These settings will be valid with days 1-5 showing on
the display. To program the days 6 and 7, repeat the
above. Days 6 and 7 are usually Saturday and Sunday,
and only have two events.
The temperature can be set within the range of +5 to
+40˚C. It is also possible to select the heating OFF at
that event by reducing the setting to 5˚C, and then
pressing the ( ) once more.
2
Page 3
Monitoring of energy consumption
The thermostat calculates average time it has been switched on allowing you to monitor your energy consumption.
In the thermostat you can read out:. Total switch-on time in percentage in the latest 2 days, 30 days or 365 days.
Calculation of operational costs per day: (switch-on time:100) x kW x kWh-price x 24 h per day
Example: Read-out: 30 % in the latest 365 days
Size of heating system: 1,2 kW (ask the installer)
Cost of power: 0,2 EUR / kWh
Calculation: (30:100) x 1,2 kW x 0,2 EUR / kWh x 24 h = 1,7 EUR per day
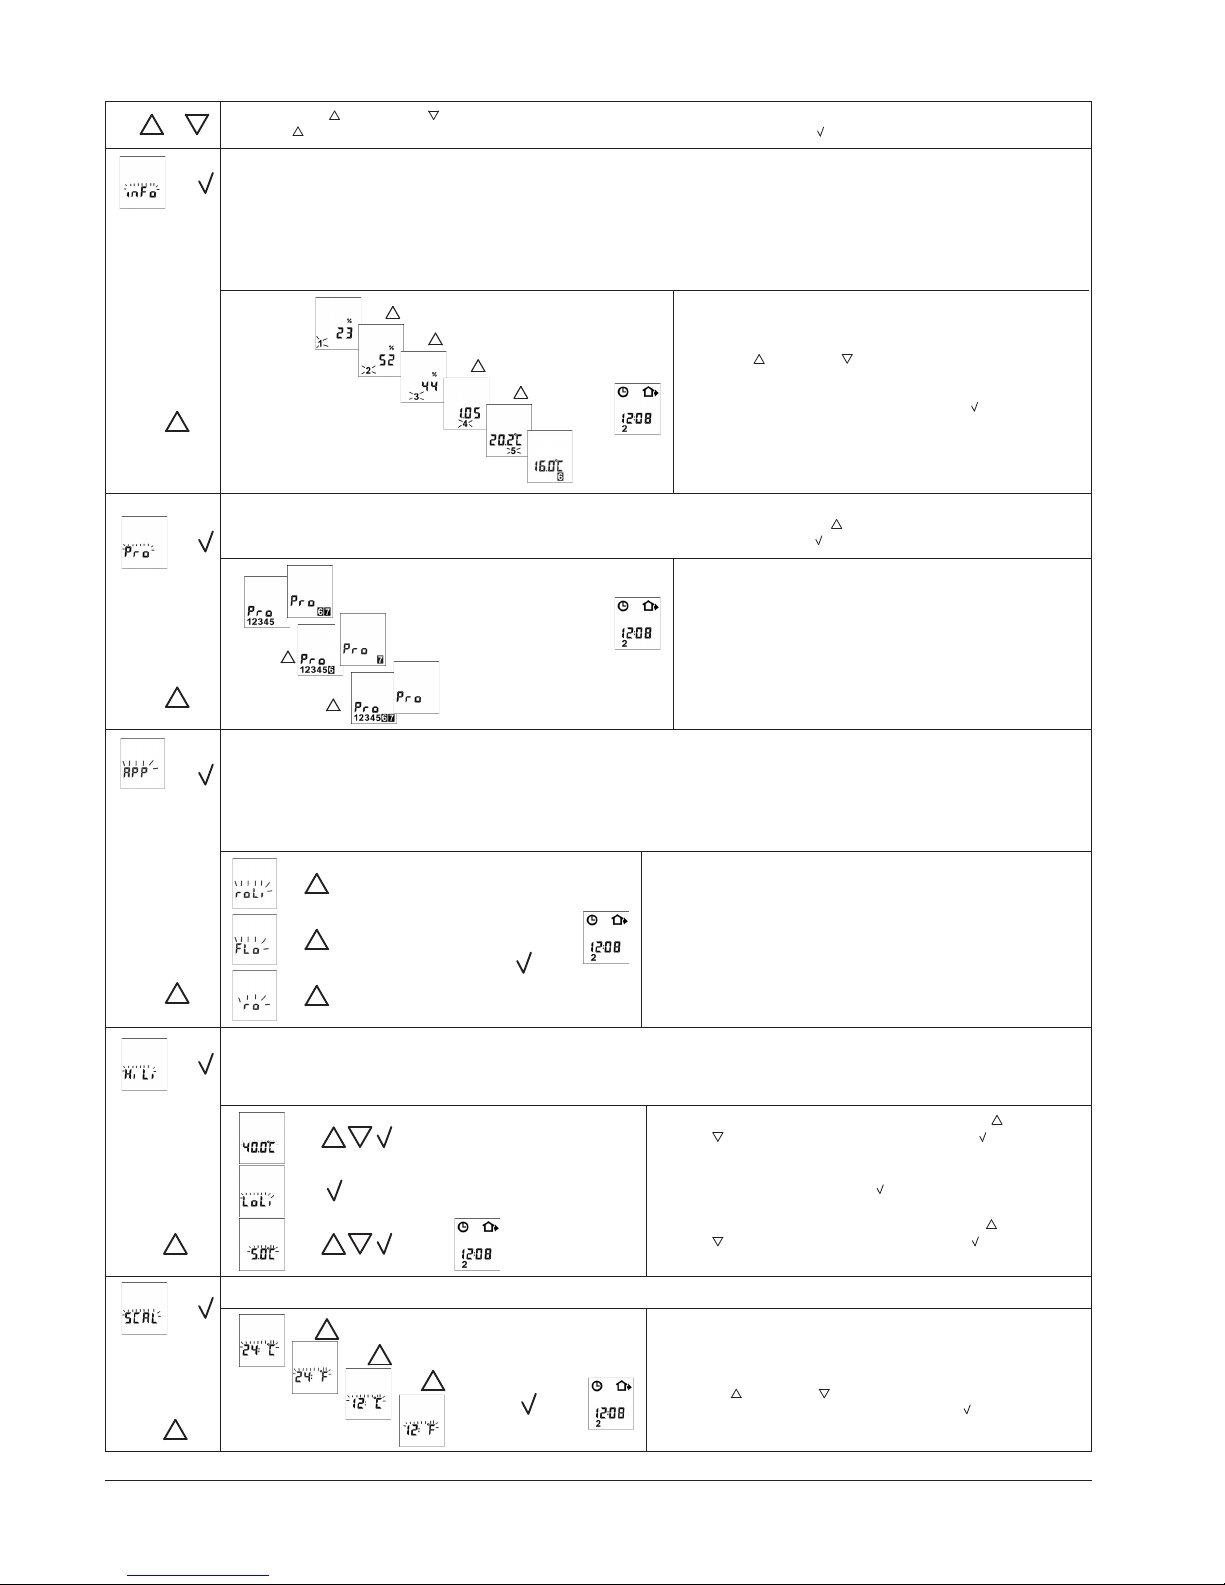
4. Advanced settings and read-out
4-event sequence
The present event sequence flashes: Days 1-5, followed by days 6-7. To change, press the UP ( ) button until you have days 1-6
and then day 7 flashing, or all 7 days are flashing. Select the required sequence with the OK ( ) button.
☞
✚
☞
☞
5-2: 4 events in 5 days +
2 events in 2 days.
6-1: 4 events in 6 days +
2 events in 1 day
7-0: 4 events in 7 days
☞
☞
}
2 days
30 days
365 days
Software version
Regulation sensor
Limit sensor
(visible if configurated as OCD3)
}
Max and min allowed temperature range. The temperature setting range of +5˚ to +40˚C can be limited to prevent a too high or too
low temperature being selected under manual or comfort mode. For OCD3 with limit sensor the max. and min. temperature range refer
to the temperature of the limit sensor. For example: A wood floor covering should not be allowed to exceed a maximum of 27˚C. Low
limitation is used where the temperature of the floor is required never to fall below the minimum set temperature.
Time and temperature scale selection
☞
☞
☞
☞
Maximum allowed temperature setting. Use the UP ( ) or
DOWN ( ) button to increase or reduce, and OK ( ) button
to accept.
Next is displayed LoLi. Press OK ( ) button to continue.
Minimum allowed temperature setting. Use the UP ( ) or
DOWN ( ) button to increase or reduce and OK ( ) button
to accept.
You can select either ˚C or ˚F scale, and 12 or 24 hour clock
as follows:
Press UP ( ) or DOWN ( ) button to change settings.
Confirm the required scale with the OK button ( ) button.
☞
☞
}
☞
☞
☞
☞
Press both UP ( ) and DOWN ( ) buttons together for 3 seconds. INFO is displayed.
Press UP( ) button until you reach the desired sub menu. Select the sub menu with the OK ( ) button.
Press UP ( ) or DOWN ( ) button to show the different
readouts.
No changes can be made here. Use the OK ( ) button to
end.
Selection of type (only visible in type OCD3)
Type OCD3-1999 has a built-in temperature sensor and an externally temperature sensor. In this configuration the thermostat controls
the temperature within the room and use the externally temperature sensor as limit sensor
Type OCD3 can be changed into type OCC3-1991 with an external temperature sensor that normally is placed in the floor construction.
In this configuration the thermostat controls the temperature of the floor and not the temperature within the room. OCD3 can also be
changed into type OCC3-1999 with a built-in temperature sensor. In this configuration the thermostat controls the temperature of the
room, and the external temperature sensor should not be installed.
OCD3-1999 With 2 sensors;
built-in room sensor and
incl. floor sensor 3m
OCC3-1991 Incl. floor sensor 3m
OCC3-1999 With built-in room sensor
☞
☞
}
☞
☞
☞
3
Page 4

Press the pin button for 3 secs. and the thermostat returns to factory settings. Time
and day is also reset and must be set according to “Setting the thermostat into
operation”.
Note that a OCD3 that has been modified to a OCC3 (see 4. Advanced settings
and read-out, selection of type) will return to a OCD3. Failure code E2 will be
displayed if the external sensor has been removed.
5. Reset to factory setting
6. Failure codes
E0 = Internal failure, replace thermostat
E1 = Built-in sensor short-circuit or disconnected, replace thermostat
E2 = External sensor short-circuit or disconnected
OJ ELECTRONICS A/S
Stenager 13B · DK-6400 Sønderborg
Tel. +45 73 12 13 14 · Fax +45 73 12 13 13
oj@oj.dk · www.oj.dk
Adaptive function:
This function enables the thermostat to calculate when it needs to switch ON so that the required temperature is reached at the set
time. With a start time of 07:00 therefore, the thermostat may switch ON as early as 06:00 so that the desired temperature of 25˚C is
achieved by 07:00. Without this function set, the thermostat will start to heat at the time you set.
}
☞
☞
☞
Press the DOWN ( ) button to switch between on and off.
Press OK ( ) button to confirm.
Press OK ( ) button to end programming and to return to
scheduled programme.
☞
☞
4
4-event time and temperature
Day 1-5
06:00
Time Temperature
OCC3-1991 OCC3-1999 OCD3-1999
08:00
16:00
22:30
08:00
23:00
Hi-Low temp.
5:2
24 H / ˚C
ON
4-event sequence
Scale
Adaptive control
Day 6-7
25˚C 20˚C 20˚C
15˚C 15˚C
22˚C 22˚C
15˚C 15˚C
22˚C 22˚C
15˚C 15˚C
55˚C/5˚C 28˚C/15˚C
20˚C
27˚C
20˚C
27˚C
20˚C
55˚C/5˚C
Factory settings
Page 5

Nederlands
Type OCC3 / OCD3
GEBRUIKSHANDLEIDING
Type: OCC3 / OCD3
Knoppen
Display symbolen
N
M
L
K
H
I
J
A: B: C: D:
E: F: G:
Stiftknop
voor het
instellen
van de klok
Aan/uit Op de
fabriekinstel ling resetten
Instelling
neer
OK aanvaarden
Instelling op Display
H: I: J: K:
L: M: N:
Klokfunctie Hand-
bediening
Tijd en
temperatuur
Dagnummer
Verwarming aan% Bewaking
van de
inschakeltijd
1. Een goed begin
Inleiding
De thermostaat kan uw verwarmingssysteem aanzetten op vooringestelde tijden op verschillende dagen van de week. Er kunnen elke dag 4 perioden met
verschillende temperaturen worden ingesteld die als standen worden aangeduid. Het op de fabriek geprogrammeerde schema is geschikt voor de meeste
installaties. Tenzij u deze instellingen wijzigt, zal de thermostaat in dit default programma werken.
Indien u de temperatuur verlaagt wanneer u niet in de kamer bent, zult u uw energiekosten verlagen zonder dat dit ten koste van het comfort gaat. De
thermostaat heeft een aanpassingsfunctie die de starttijd van de verwarmingsperiode automatisch wijzigt zodat de gewenste temperatuur bereikt wordt op
de door u ingestelde tijd. Na 3 dagen heeft de aanpassingsfunctie geleerd wanneer de verwarming moet worden ingeschakeld.
De thermostaat heeft een ingebouwde èn een externe temperatuursensor. In deze configuratie regelt de thermostaat de temperatuur in de kamer en gebruikt
de externe temperatuursensor als een limietsensor om te hoge of lage temperaturen in de vloerconstructie te vermijden.
De thermostaat heeft een stiftknop (met R aangeduid), waarmee u de thermostaat op de fabriekinstellingen kunt resetten. Deze staan vermeld achterin deze
handleiding, waar u ook uw eigen wekelijkse schema kunt noteren.
Het display wordt verlicht wanneer de knoppen worden ingedrukt. Het verwarmingselement wordt uitgeschakeld wanneer het display is verlicht.
Het verwarmingssysteem is uit te schakelen op de ingebouwde schakelaar. De microprocessor die de tijd registreert, zal niet worden uitgeschakeld, zodat
de tijd en dag bewaard blijven. Wanneer verwarming gewenst is en de thermostaat wordt ingeschakeld, zal het 4-standen programma op de actuele tijd en
dag doorgaan.
De thermostaat in bedrijf stellen
☞
☞
1-7
Druk op OP ( ) of NEER ( ) om de juiste tijd te
selecteren en druk dan op OK ( ).
Druk op OP ( ) of NEER ( ) om de juiste dag te
selecteren en druk dan op OK ( ).
De eerste keer dat de stroom wordt aangesloten, knipperen de klok en dag die moeten worden
ingesteld. Als u de tijd van de thermostaat op een later tijdstip wilt wijzigen, prikt u een stift in
het gat om de tijd en dag in te stellen. De zomer- en wintertijd moeten worden ingesteld.
Overdag
Nacht
Uit
Thuis
5
4-standen symbool
Page 6

2. Dagelijks gebruik van de thermostaat
4-standen instelling klok
De dag is in 4 standen ingedeeld die een typisch verloop van een dag voorstellen. Wanneer de thermostaat in de 4-standen instelling staat, zal hij de
temperatuur automatisch afstellen op de op die tijd gewenste temperatuur. De thermostaat heeft als standaard 5 dagen met 4 standen en 2 dagen met
2 standen. Zie 3 voor programmeren.
4 standen instelling
klok
Comfort stand
☞
☞
Handbediening
☞
☞
Tijdelijk opheffen
Om de temperatuur in het 4-standen schema tijdelijk op te heffen, drukt u één keer op OP ( ) of NEER ( )
om de temperatuur op te roepen, en nogmaals om de temperatuur hoger of lager te zetten. Het display zal
gedurende 5 seconden knipperen en dan naar tijd teruggaan. Het opheffen zal doorgaan totdat de volgende
geprogrammeerde stand in het automatische programma van de unit begint.
De symbolen voor de klokfunctie ( ) en één van de 4-standen symbolen ( ) zullen worden
aangegeven. Zie 3 voor programmeren.
Comfort stand annuleren
Druk twee keer op OK ( ) om het opheffen te annuleren.
Permanent opheffen
Tijdens vakanties is het ingestelde 4-standen programma op te heffen.
Druk op OK ( ) en daarna op OP ( ) of NEER ( ) totdat de ophef-temperatuur is ingesteld.
De unit zal nu onafgebroken op deze temperatuur werken.
Handbedieningstand annuleren
Druk één keer op OK ( ) om de permanente ophef-stand te annuleren. De unit zal teruggaan naar de
automatische functie.
5 sec.
5 sec.
☞
☞
☞
☞
☞
☞
☞
☞
Druk 3 seconden op OK ( ) om het programmeren te starten
: Tijd en temperatuur
: Tijd en temperatuur
: Tijd en temperatuur
: Tijd en temperatuur
Dag 1 - 5
Dag 6 - 7
☞ ☞
: Tijd en temperatuur
☞ ☞
: Tijd en temperatuur
3. Programmeren
4-standen tijd en temperatuur
Voor elke stand moet de starttijd en de gewenste
temperatuur worden ingesteld.
Voorbeeld: ‘s ochtends wilt u dat de verwarming om
07:00 start en dat de temperatuur tot 21˚C stijgt. Druk
3 seconden op OK ( ) en de starttijd zal verschijnen.
Wijzig deze in 07:00 met OP ( ) of NEER ( ). Druk op
OK ( ) om te bevestigen.
Nu verschijnt de temperatuur. Wijzig deze in 21˚C met
de OP ( ) of NEER ( ) knoppen.
Druk op OK ( ) om te bevestigen. Deze handeling is
nu te herhalen voor de tweede stand.
Deze instellingen zullen gelden voor de dagen 1-5 die
op het display verschijnen. Herhaal het bovenstaande
om de dagen 6 en 7 te programmeren. De dagen 6 en
7 zijn gewoonlijk zaterdag en zondag, en hebben
alleen twee standen.
De temperatuur is instelbaar binnen het bereik +5 tot
+40˚C. Het is ook mogelijk om verwarming UIT te
selecteren door de instelling naar 5˚C te verlagen en
nogmaals op ( ) te drukken.
6
Page 7

Het energieverbruik controleren
De thermostaat berekent de gemiddelde tijd dat hij is ingeschakeld, zodat u uw energieverbruik kunt controleren.
In de thermostaat kunt u uitlezen: de totale ingeschakelde tijd in procenten van de afgelopen 2 dagen, 30 dagen of 365 dagen.
Berekenen van de bedrijfskosten per dag: (ingeschakelde tijd:100) x kW x kWu-prijs x 24 u per dag
Voorbeeld:Uitlezing: 30 % in de afgelopen 365 dagen
Vermogen van het verwarmingssysteem: 1,2 kW (informeer bij de installateur)
Energiekosten: 0,2 EUR / kWh
Rekensom: (30:100) x 1,2 kW x 0,2 EUR / kWu x 24 u = 1,7 EUR per dag
4. Geavanceerde instellingen en uitlezing
4-standen sequentie
De sequentie van de actuele stand gaat knipperen: Dag 1-5, gevolgd door dag 6-7. Druk om deze instelling te wijzigen op OP ( )
totdat dag 1-6 en dan dag 7 of alle 7 dagen knipperen. Selecteer de gewenste sequentie met OK ( ).
☞
✚
☞
☞
5-2: 4 standen voor 5 dagen +
2 standen voor 2 dagen.
6-1: 4 standen voor 6 dagen +
2 standen voor 1 dag
7-0: 4 standen voor 7 dagen
☞
☞
}
2 dagen
30 dagen
365 dagen
Softwareversie
Sensorregeling
Limietsensor
(zichtbaar indien als OCD3 geconfigureerd)
}
Max. en min. toegestane temperatuurbereik. Het bereik van de temperatuurinstelling +5˚ tot +40˚C is te begrenzen om te voorkomen dat er in
de handbediening- of comfort-stand een te hoge of te lage temperatuur wordt geselecteerd. Voor het bereik van de max. en min. temperatuur van
de OCD3 wordt verwezen naar de temperatuur van de limietsensor. Voorbeeld: In een houten vloer zou de temperatuur niet boven maximum 27˚C
mogen komen. De lage limiet wordt gebruikt als het gewenst is dat de vloertemperatuur niet onder de minimum ingestelde temperatuur daalt.
Tijd en temperatuurschaal selecteren
☞
☞
☞
☞
Maximum toegestane temperatuurinstelling. Gebruik OP ( ) of
NEER ( ) om te verhogen of te verlagen en OK ( ) om te
aanvaarden.
Daarna verschijnt LoLi. Druk op OK ( ) om door te gaan.
Minimum toegestane temperatuurinstelling. Gebruik de OP ( )
of NEER ( ) knoppen om te verhogen of te verlagen en OK ( )
om te aanvaarden.
U kunt als volgt voor ˚C of ˚F schaal en 12 of 24 urenaanduiding
kiezen:
Druk op de OP ( ) of NEER ( ) knop om in te stellen waarden
te wijzigen. Bevestig de gewenste schaal met OK ( ).
☞
☞
}
☞
☞
☞
☞
Druk 3 seconden gelijktijdig op OP ( ) en NEER ( ). INFO verschijnt.
Druk op OP ( ) totdat het gewenste submenu verschijnt. Selecteer het submenu met OK ( ).
Druk op OP ( ) of NEER ( ) om de verschillende
uitlezingen te bekijken.
Hier kunnen geen wijzigingen worden aangebracht. Druk op
OK ( ) om af te sluiten.
Type selecteren (alleen zichtbaar bij type OCD3)
Type OCD3-1999 heeft een ingebouwde temperatuursensor en een externe temperatuursensor. In deze configuratie regelt de
thermostaat de temperatuur in de kamer, en gebruikt de externe temperatuursensor als limietsensor.
Type OCD3 is te veranderen in type OCC3-1991 met een externe temperatuursensor die gewoonlijk in de vloerconstructie wordt
aangebracht. In deze configuratie regelt de thermostaat de temperatuur van de vloer en niet de temperatuur in de kamer.
De OCD3 is ook te veranderen in type OCC3-1999 met een ingebouwde temperatuursensor. In deze configuratie regelt de
thermostaat de temperatuur van de kamer en dan moet de externe temperatuursensor niet geïnstalleerd worden.
OCD3-1999 Met 2 sensors;
ingebouwde kamersensor en
incl. vloersensor 3m
OCC3-1991 Incl. vloersensor 3m
OCC3-1999 Met ingebouwde kamersensor
☞
☞
}
☞
☞
☞
7
Page 8

57695
Druk 3 seconden op de stiftknop en de thermostaat wordt op de fabrieksinstelling
gereset. De tijd en dag worden ook gereset en moeten worden ingesteld volgens de
“De thermostaat in bedrijf stellen”.
Let erop dat een OCD3 die is veranderd in een OCC3 (zie 4. Geavanceerde
instellingen en uitlezing. Type kiezen) weer terug zal gaan naar een OCD3.
Foutencode E2 zal verschijnen als de externe sensor is verwijderd.
5. Op de fabrieksinstelling resetten
6. Foutencodes
E0 = Interne fout, thermostaat vervangen
E1 = Ingebouwde sensor kortgesloten of uitgeschakeld, thermostaat
vervangen
E2 = Externe sensor kortgesloten of uitgeschakeld
OJ ELECTRONICS A/S
Stenager 13B · DK-6400 Sønderborg
Tel. +45 73 12 13 14 · Fax +45 73 12 13 13
oj@oj.dk · www.oj.dk
Aanpasfunctie:
Met deze functie kan de thermostaat berekenen wanneer hij op AAN moet inschakelen zodat de gewenste temperatuur op de
ingestelde tijd bereikt is. De thermostaat moet bij een starttijd van 07:00 dan al om 06:00 inschakelen zodat de temperatuur om 07:00
de gewenste 25˚C bereikt heeft. Zonder deze ingestelde functie zal de thermostaat gaan verwarmen op de door u ingestelde tijd.
}
☞
☞
☞
Druk op NEER ( ) om tussen aan en uit te switchen.
Druk op OK ( ) om te bevestigen.
Druk op OK ( ) om het programmeren af te sluiten en terug te
gaan naar het schemaprogramma.
☞
☞
8
4-standen tijd en temperatuur
Dag 1-5
06:00
Duur Temperatuur
OCC3-1991 OCC3-1999 OCD3-1999
08:00
16:00
22:30
08:00
23:00
Hoog-Laag temp.
5:2
24 H / ˚C
ON
4-standen
sequentie
Schaal
Adaptieve regelaar
Dag 6-7
25˚C 20˚C 20˚C
15˚C 15˚C
22˚C 22˚C
15˚C 15˚C
22˚C 22˚C
15˚C 15˚C
55˚C/5˚C 28˚C/15˚C
20˚C
27˚C
20˚C
27˚C
20˚C
55˚C/5˚C
Fabrieksinstellingen
57695
 Loading...