

OiTEZ DP-C02 User Manual

User Manual
DP-C02
Baby Monitor
EN

Attentions
Warning
Oriental Inspiration Limited reserves the right to the
interpretation of the product and correlative contents.
Please stop using the product if any abnorma l phenome na.
Please use neutral solvent to clean the blot, do not use orga nic
solvent.
Do not modify any accessories, or our company won't responsible for any
malfunctions and calamities may cause.
Do not put the product into fire, or our company won't responsible for any
malfunctions and calamities may cause.
Power supply accessories must be operated in the right way as user manual,
or our company won't responsible for any malfunctions and calamites may
cause.
C las s B d i gi tal de vic e, pu r su ant to pa rt 15 of th e F CC Rul es . T hes e l im i ts
Thi s e q ui pm ent ha s b e en te s ted an d f o un d t o c om ply wi th t he li m its fo r a
ar e desig ned to prov ide rea sonab le prot ectio n again st harm ful int erfer ence in
a r esi de nt ial i nst al la tio n. T his e qui pm en t g en era te s, us es an d can r adiat e
radio f re quency e ne rg y an d, if not i ns ta ll ed a nd used in ac co rd an ce w it h the
instruct ion s, ma y cau se harmful interference to r adi o com mun ications.
Ho we ver, th ere is no guarant ee t ha t interfe re nce will not occur in a parti cu lar
ins ta lla tio n. If th is eq uip me nt doe s cau se ha rmf ul in ter fe r en ce to ra dio o r
televis io n recepti on , which c an be d et er mi ned b y turning t he eq ui pm en t off
and on, t he user is enc our aged to try to corr ect the interfe ren ce by one or mor e
of the follo win g mea sur es:
—Reorien t or re loc ate t he receiving antenna.
—Increas e the s epa rat ion between the equipment an d rec eiv er.
—Connect t he eq uip men t into an outlet on a circuit different from that to
which the re cei ver i s con nected.
—Consult t he de ale r or an e xperienced radio/TV tech nic ian f or he lp.
FCC Statement
Th is equipme nt complie s with FCC RF r ad ia ti on e xp os ur e li mi ts set forth for
an unc ont rol l ed en v ir o nm e nt . T his tr ans mit t er mu s t n ot be co - lo c at e d o r
opera tin g in conjunc tio n with any oth er an tenna or tra nsm itter. This equipme nt
should be installed and operated with a m in im um d is ta nce of 2 0 ce nt im et er s
between th e rad iat or an d your body.
Th is e qu ipment comp li es w ith Part 15 of t he F CC R ules. Opera ti on i s su bj ect
to t he f ollowin g two condi ti ons:
(1 ) This devi ce m ay not caus e ha rmful int erferen ce, and
(2 ) This devi ce m ust accep t any inter fe rence rec eived , in cluding i nterfer ence
th at m ay cause un desired o pe ratio n.
FCC Radiation Exposure Statement
Caution!
Th e manufa ct ur er i s not responsi bl e for any r adio o r TV i nt er fe rence ca used
by un au th or ized mo di ficatio ns t o t hi s equip me nt . Such mo dificat io ns could
void the use r aut hor ity t o operate the equipment.
com p lia n ce wit h t h e e sse n tia l r e qui rem e nts an d ot her rel eva n t
pro v isi o ns of Dir e cti ve 1 999 /5/E C
Here b y, Net o p I n d ust r i al C o.Lt d de c l ares tha t th i s d e v ice is i n

Part List
2
1
Contents
1
Product Overview
5
Warranty Terms and Con ditio ns
4
Screen Display
3
Setup before Use
3
4
Specifications
5
Contents
Product Overview
Please che ck an d con fir m all the accessories are avai lab le be for e use.
Paren t Unit X 1
a
Baby Un it x 1
b
c
d
Main Un it x 1
Outpu t:DC 6.0V= 500mA
DP-C 02
Baby Monito r
-1-
※
※
※
※
※
※
※
※
※
meters (at line of sign).It is compact, lightweight,easy to setup and use.
To guarantee all the functions into fully p lay and p rolon g the ser vice
specifications and the manual witho ut prio r notif icati on.
Thank you for buying our baby minitor 'DP-C02'.It enables you to see
and hear yo ur infant j us t about any wh er e in your h ouse within 3 00
li fe , pl ea se rea d the user manual carefully before installat io ns and
keep the product under well cleaning an d maint enanc e.
In li ne wit h the po lic y of con ti nue d d eve lo pme nt, if t her e are an y
amendments on the appearance,color or assemblies, please refer to
the re a lob jec t .Ou r c omp a ny res erv e s t he rig ht t o a men d o n t he
Installations
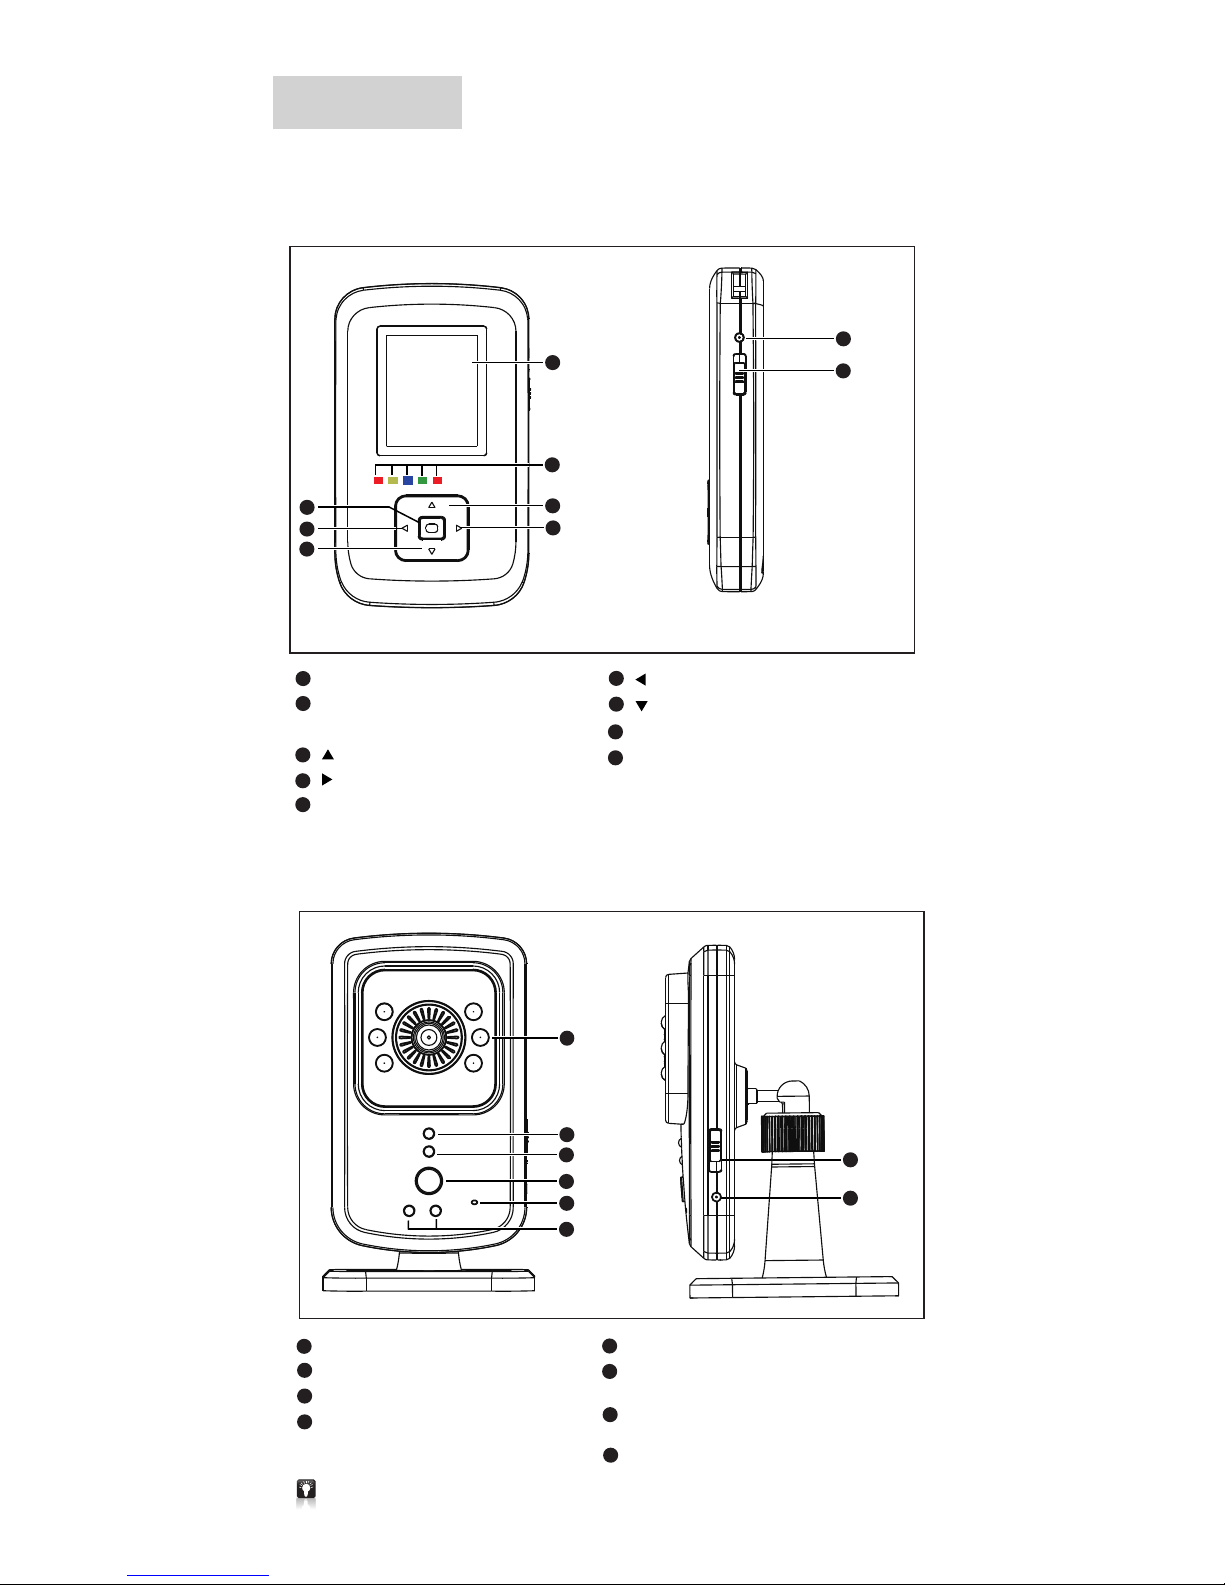
Parent Unit LED Indicators
Adapt er X 2
Part List
6
7
5
2
4
3
8
9
7
8
1
2
3
4
5
6
1
2
4
3
8
7
5
6
1.Parent Unit
2.Baby Unit
-2-
1
LED Indication
Red/Yellow/B lue/Gree n/Red) (
Up
Down
Enter
Left
Right
DC Jack
DC Jack
Power switch
(Up side is on / down side is off)
Power switch
(Up side is on / dow n side is off)
Night Vision I R LED
Power On LED indicators
Whi le dis connecting , hold on thi s key to p air BU a nd PU, t ill pa ired s ucce ssfu lly , th e rele ase .
Whi le con necting, press this key to tur n on/o ff nig ht lig ht.
Microphone hole
Night Light
R ed/ Yellow)
LED Indicators
(
1.8" Color TFT Display 128 x 160
Parent Unit LED Indicators
Parent Unit Night Light
Function Key
1
2
3
5
6
7
4
9
8
Setting Before Use
1.
2.
*
×
3
3
4
4
112
2
*
×
1
2
3
4
5
4
+
1
6
7
8
9
12
10
11
-3-
2
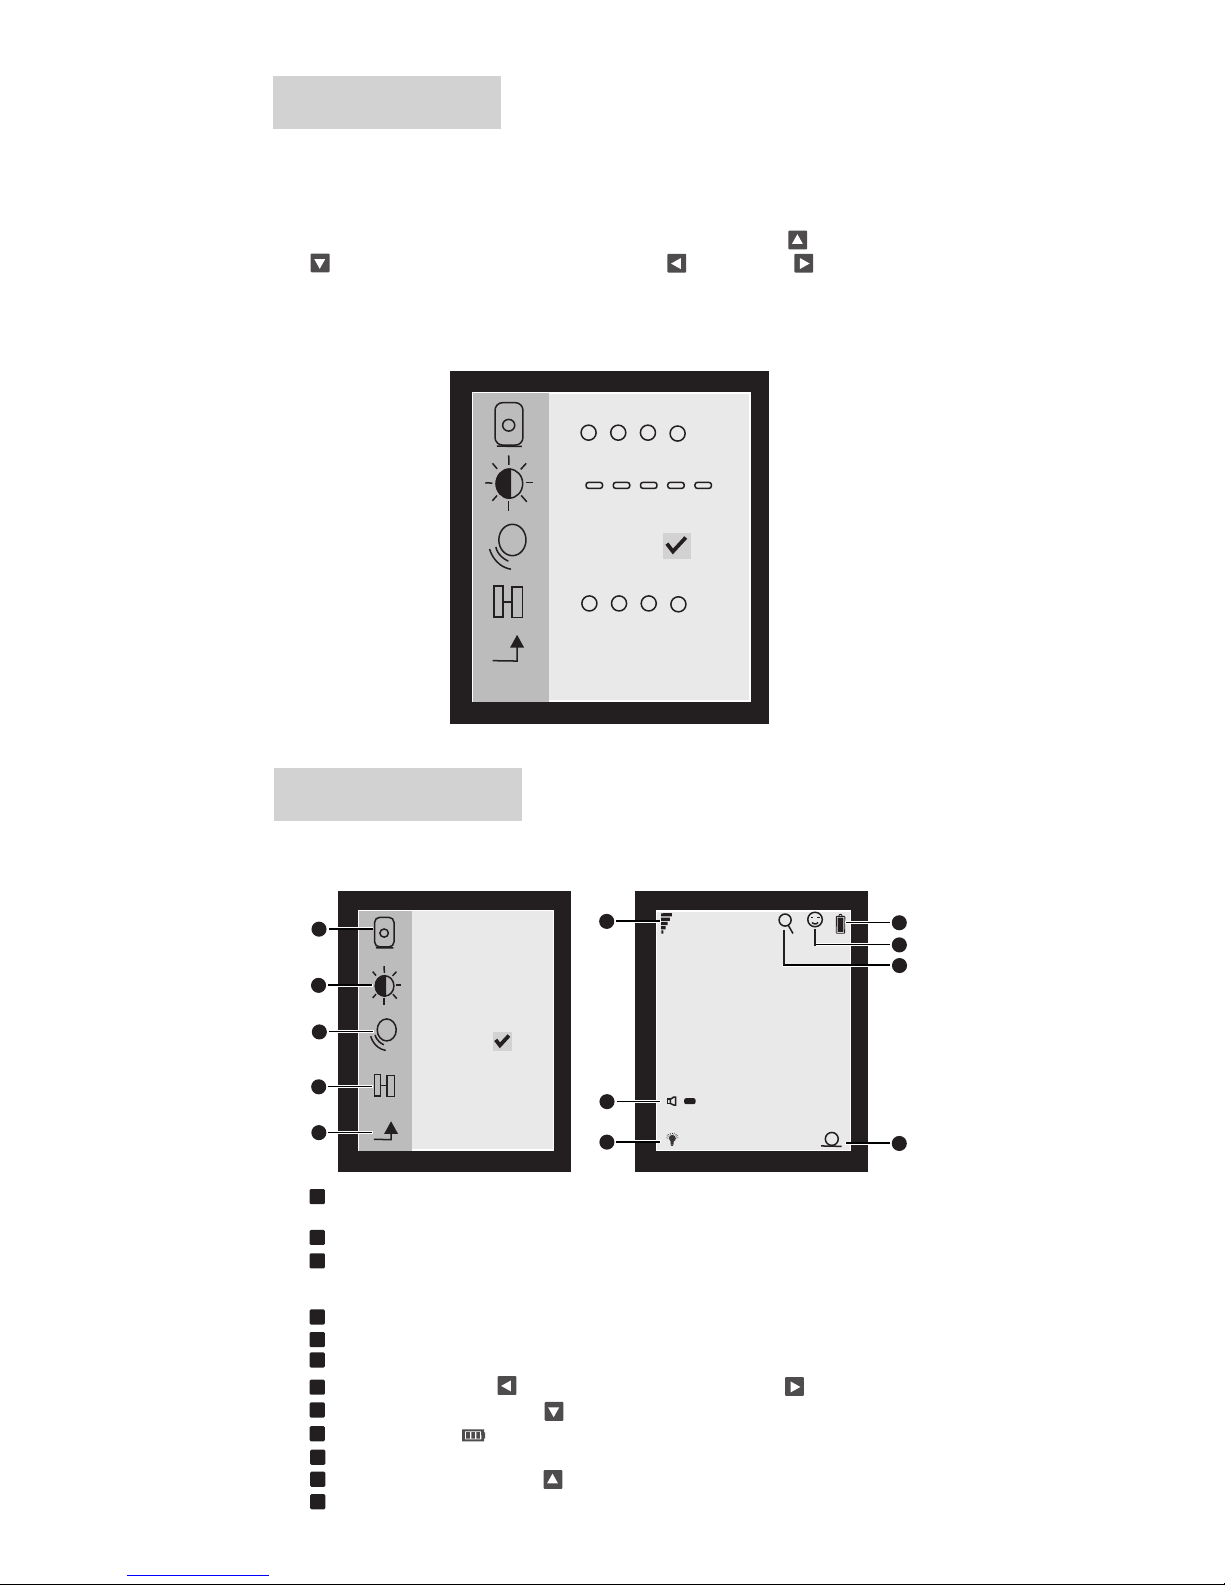
Brightne ss se tti ng: 5 l evels adjustable
3
and therei s a smi le fa ce di splay on LCD.
VOX functi on ON/ OFF: While this VOX is on ,Paren t unit will go to sleep mode
to save power automatically , It can be powered on by Baby unit microphone ,
9
Battery ca pac ity
*Fir st time use the pro duct, plea se pair baby u nit and pare nt unit.
Light press on parent unit <Enter> to enter into menu for data setting,
all the data will be factory default if not set up.
Press on <Enter> to enter into menu setting. Use < Up > or <Do wn
> to select setting and then Use <Left > or <Right > to select
setting.
*
After ente rin g int o men u, there are baby unit selecti on, b rig htn ess setting,
VOX functi on on /off, an d pai rin g fun ction.
Screen Display
Menu Functions
1
Ba by unit selection: Up t o 4 baby un it s se le ct ab le , th e selected baby u ni t
number wil l dis pla y on th e lower right corner.
4
Pairing function: Pair baby unit and parent unit, up to 4 baby units can be paired .
5
Enter : Ente r / Qui t Men u
6
Signal str eng th
7
Volume: Press on <Left > to volume down and press on <Right > to volume up.
8
Night ligh t: Pr ess o n <Do wn > to turn on / off .
10
VOX functi on on
11
Zoom in / Out, p res s on <U p > to ad just to X2, X4
12
The paring b aby u nit n o
Yellow
ON
Worki ng Stat us
Red Red
Green
Blue
ONONON
ON
ON
ON
ON
ON
ON
FLASH
FLASH
OFFOFFOFFOFF
OFF
OFF
OFF
OFF OFFOFF
OFFOFF
OFF
(Off u nder ba ttery i n full ch arge)
2.
1.
*
3
4
1 2
-4-
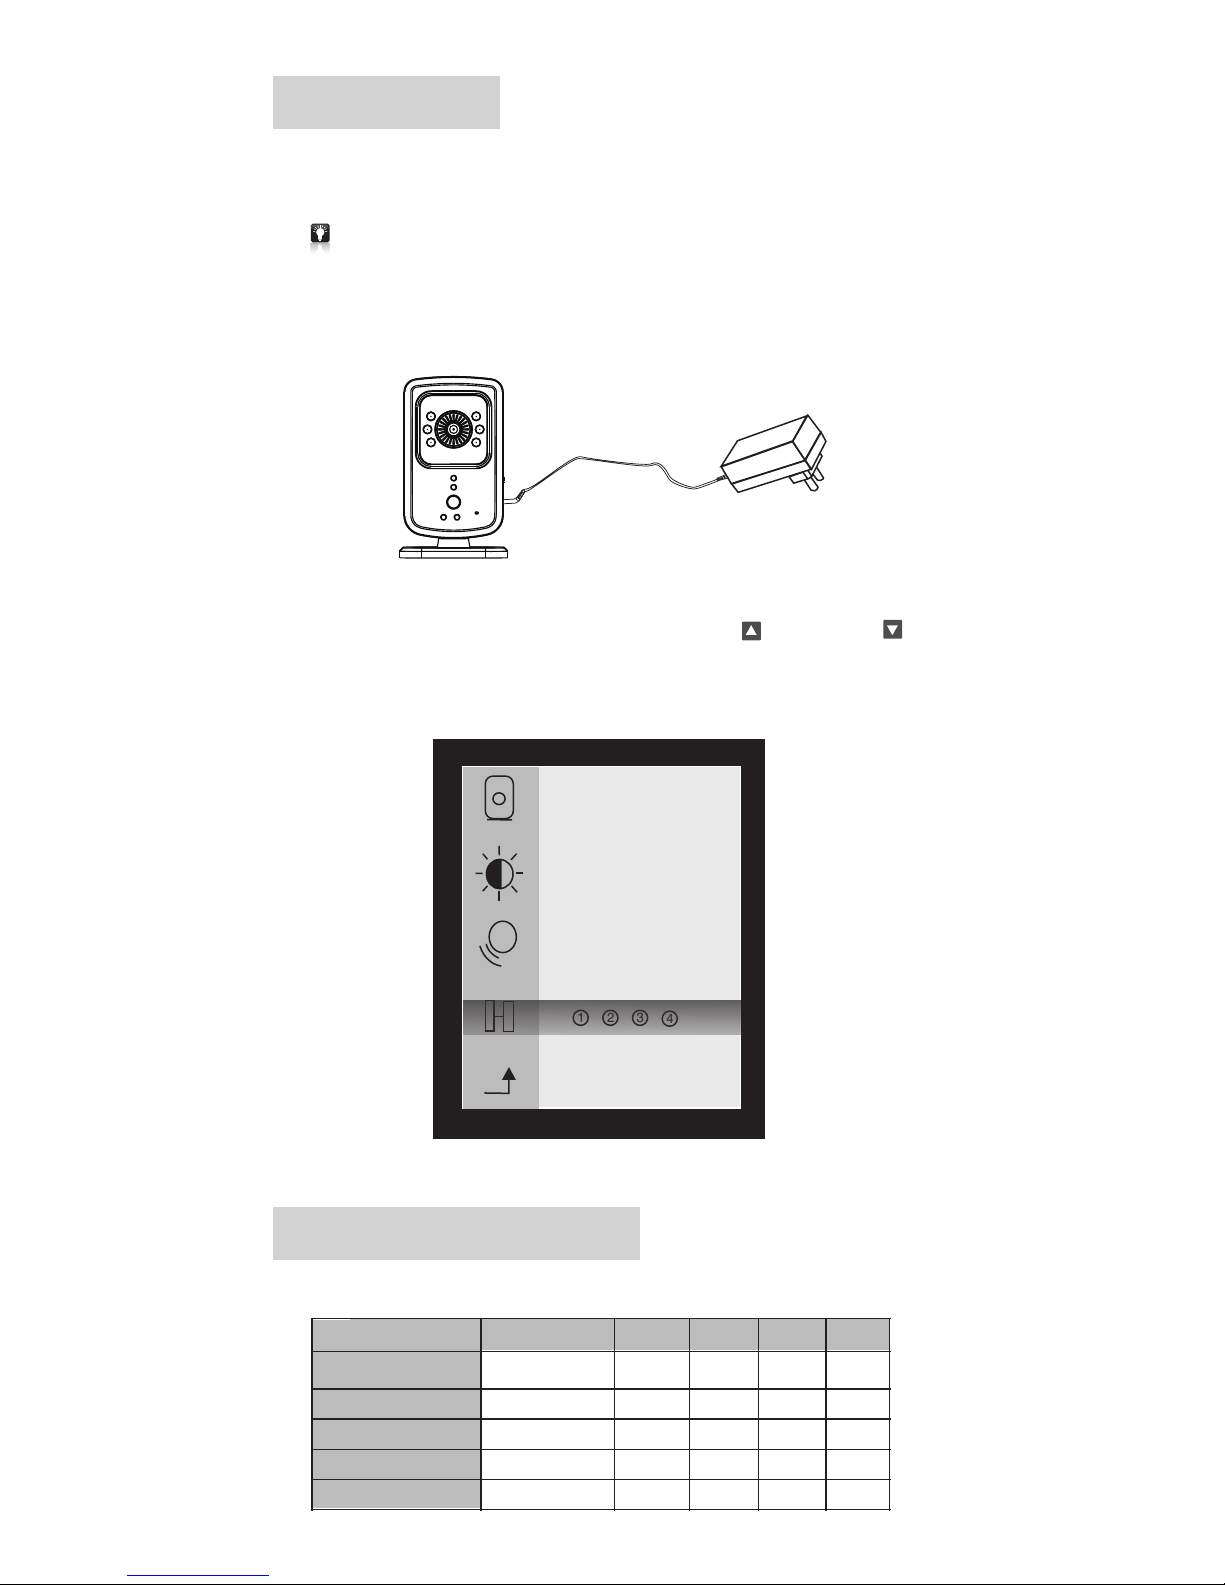
Installations
Pl ea se enter into menu se tt in gs t o set up the date & ti me and other
se tt in gs before installations.
*
* All the data a re fa cto ry de faults if not set up.
Setting me tho d ple ase r efer to setting before Use.
*One p arent unit can pair more baby u nits,up to 4 pcs.
Pu t the baby unit i n the best pl ace you can her e and see. Conn ect it
to adapter and slide up power switch to turn it on and the red LED with
light up. The bl ue LED on p arent u nit will flash.
*Night vi sio n IR LE D wil l light up automatically acc ord ing t o dar kness.
Slide up parent unit power switch to turn on and you'll hear the sound
of drip-drip-drip which means paring with baby unit is not successful.
Press on <Enter> to enter into menu and use <Up > and <Down >
to enter into pairing function. Select a baby unit to pare and after paring
is successful, the selected baby unit number will display on the lower
right corner and the sound will disappe ar.
Parent Unit LED Indicators
Connect to DC
Power On
Successful Paring
Low Volume
High Volume
Specifications
-5-
Storage Temperatue
-30~70 ℃
2.4GHZ FHS S
54°
65 x 35 x 105mm
90G
-10~40 ℃
Working Temperature
Weight( )Parent Uni t
Size( )P are nt Un it
Power supp ly
Audio
LCD Displa y
Lens Viewing Angle
Built-in M icr oph one / S peaker
Image Sens or
Digital Technology
VGA COMS Night Vision IR
300M(at li ne of s ign )
Tra nsm ission Range
1.8"Colo r TFT Display,1 28x 160
5V Adapter / 6V-500mA output, Built-in Li-ion Battery 400nA

 Loading...