

Page 1
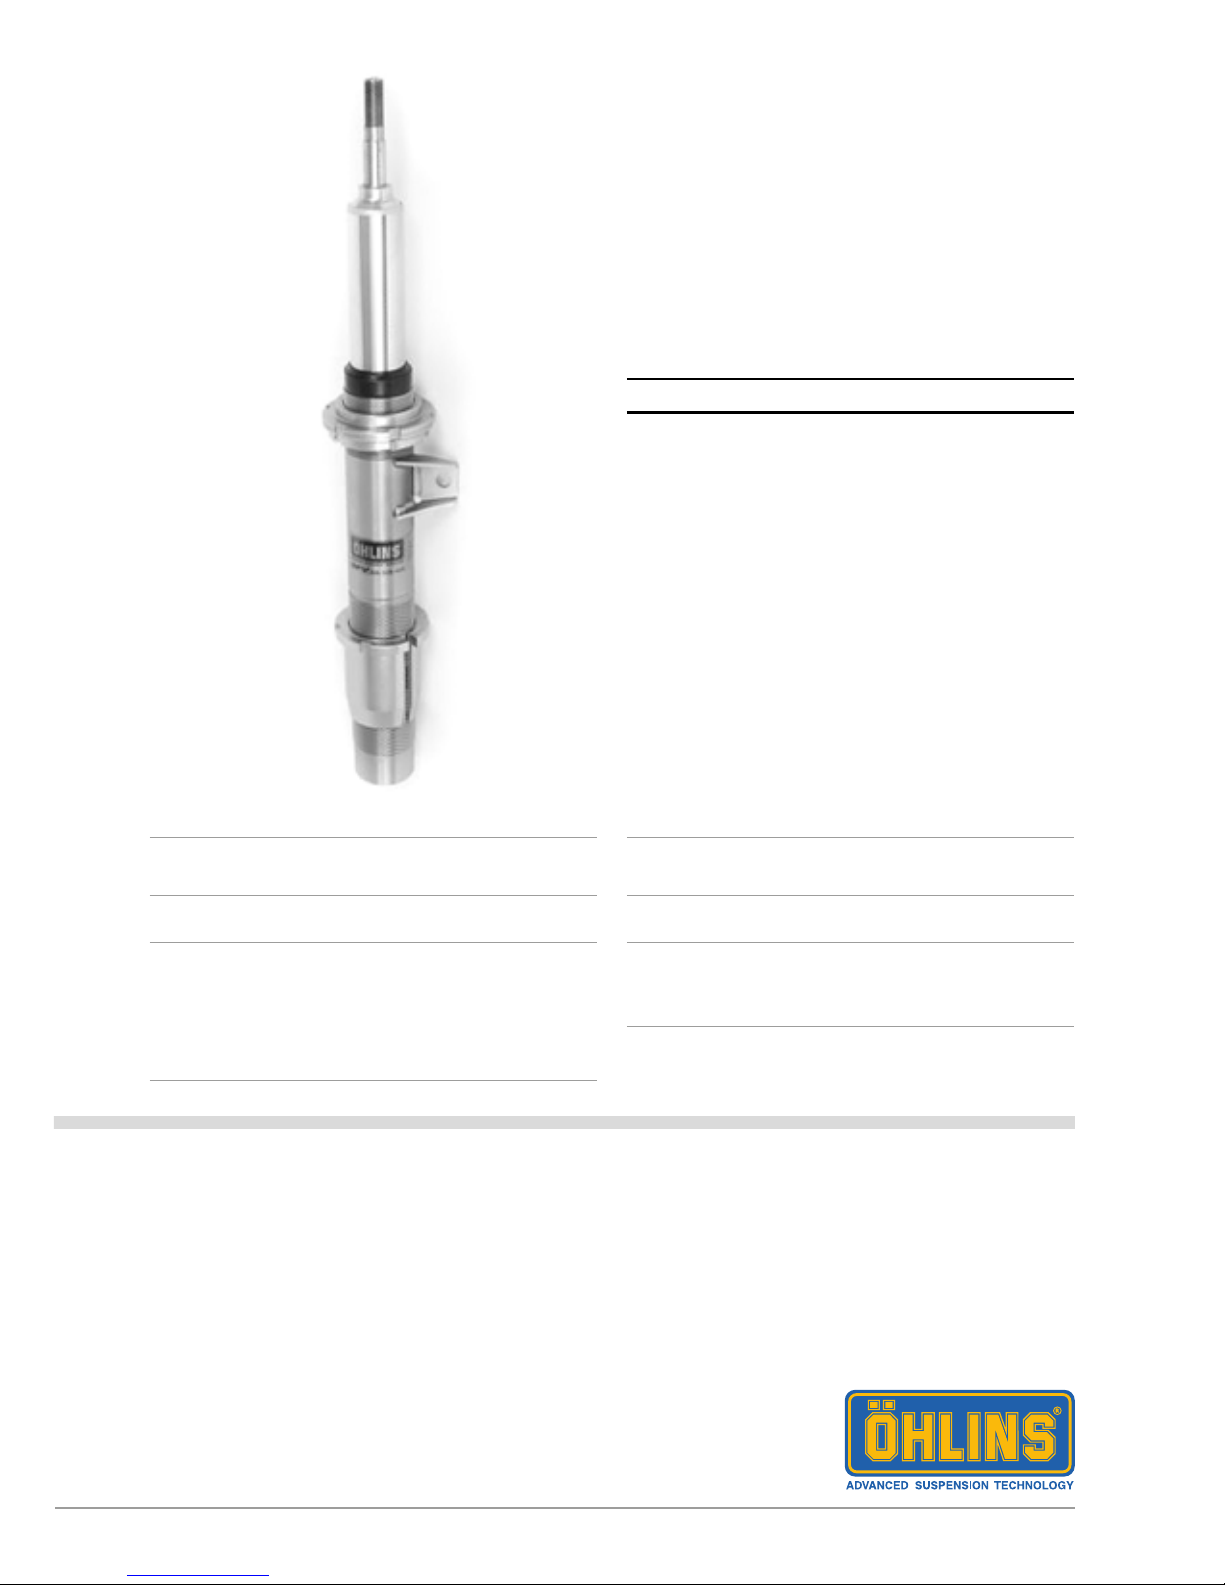
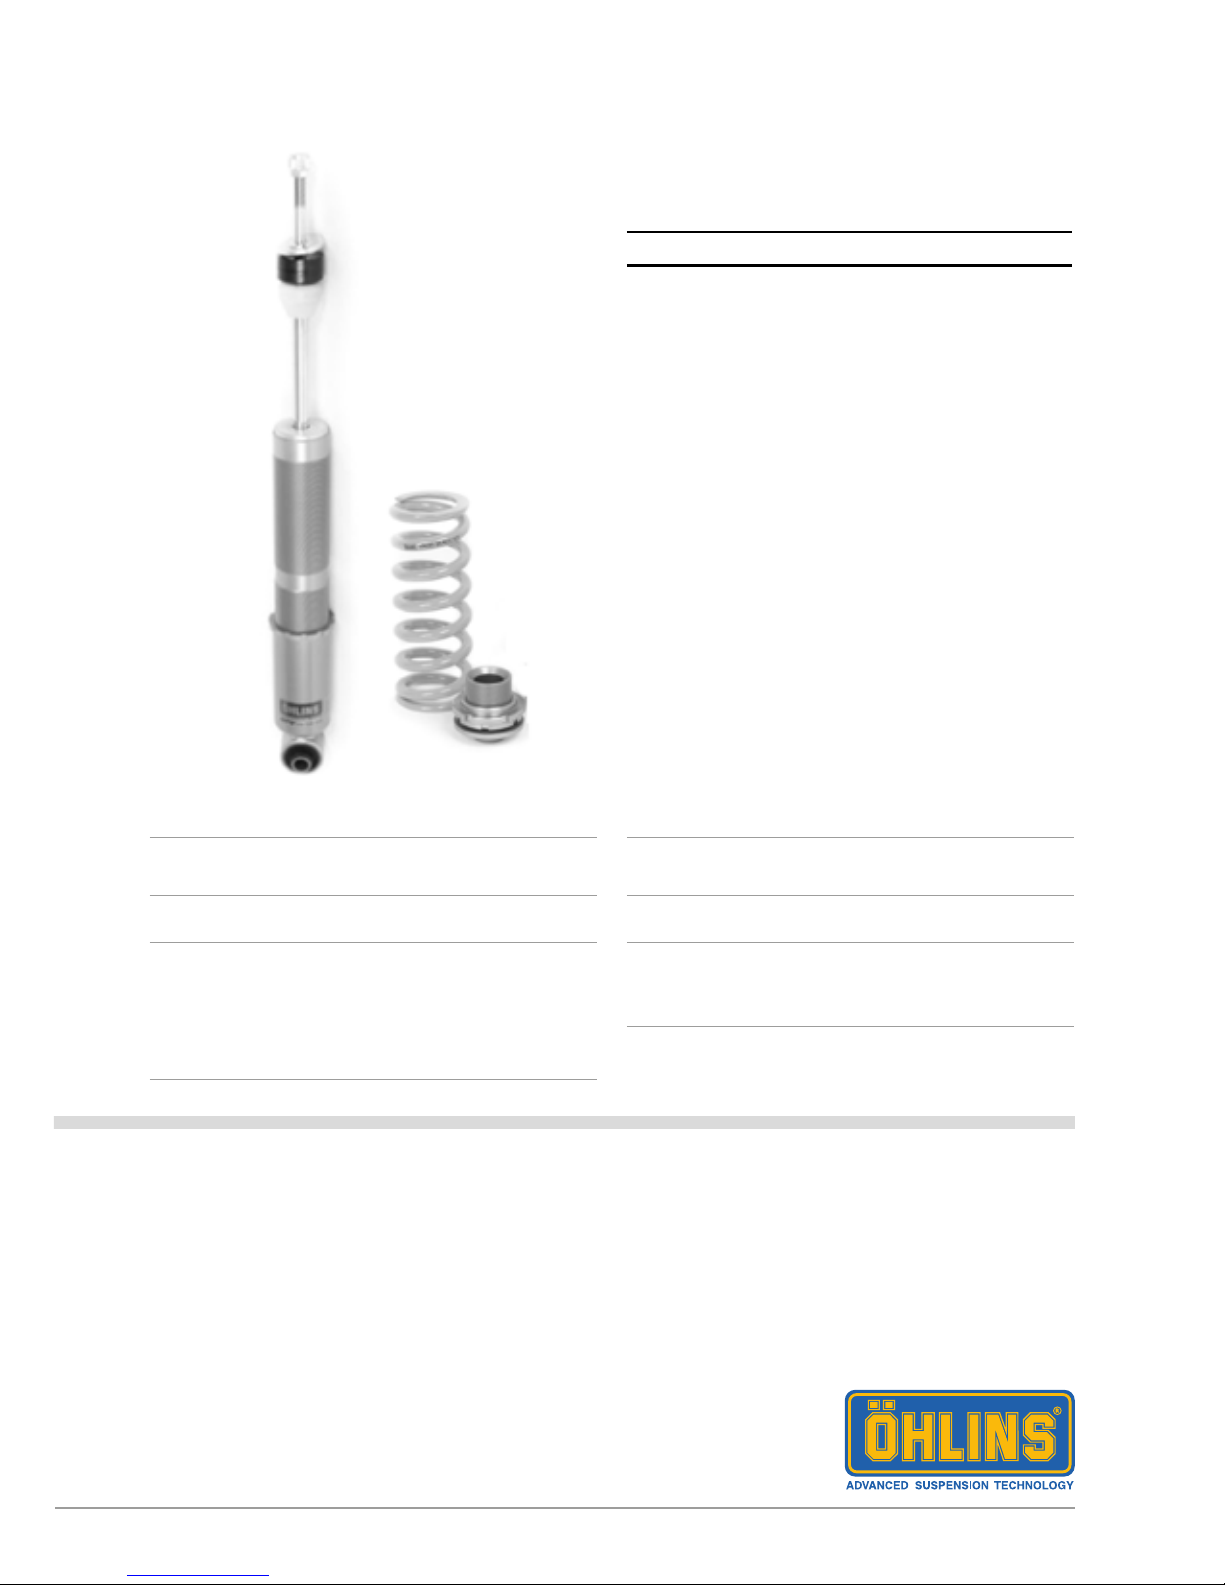
Shock absorber for BMW 1M (E82) - front
BMZ MN01
Mounting Instructions
Note!1
Please note that this image is a general representation
of the product and may differ slightly from your product.
Note!1
Please note that during storage and transportation,
especially at high ambient temperature, some of the oil
and grease used for assembling may leak and stain the
packaging. This is in no way detrimental to the product,
wipe off the excessive oil/grease with a cloth.
Note!1
Before installing this product, check the contents of the
kit. If anything is missing, please contact an Öhlins dealer.
Warning!⚠
Before installing this product, read the Öhlins Owner’s
Manual. The shock absorber is an important part of the
vehicle and the vehicle stability.
Kit Contents
Description Pcs
Shock absorber 2
Dust boot 2
Spring 2
Lock nut M14 2
Plastic spacer 2
Spacer 2
Lower spring seat 2
Lock nut 2
Used for front and rear
C-spanner 2
Sticker Öhlins 1
Owner’s manual 1
Page 2
2
1
Raise the vehicle, use jack stands.
2
Remove the front wheels.
Note!1
Support the wheel hubs on each side of the vehicle not
to damage the brake hoses.
3
Loosen the lower and the upper strut attach
ment bolts. Remove the original struts from
the vehicle. Note the anti roll bar bracket
position.
4
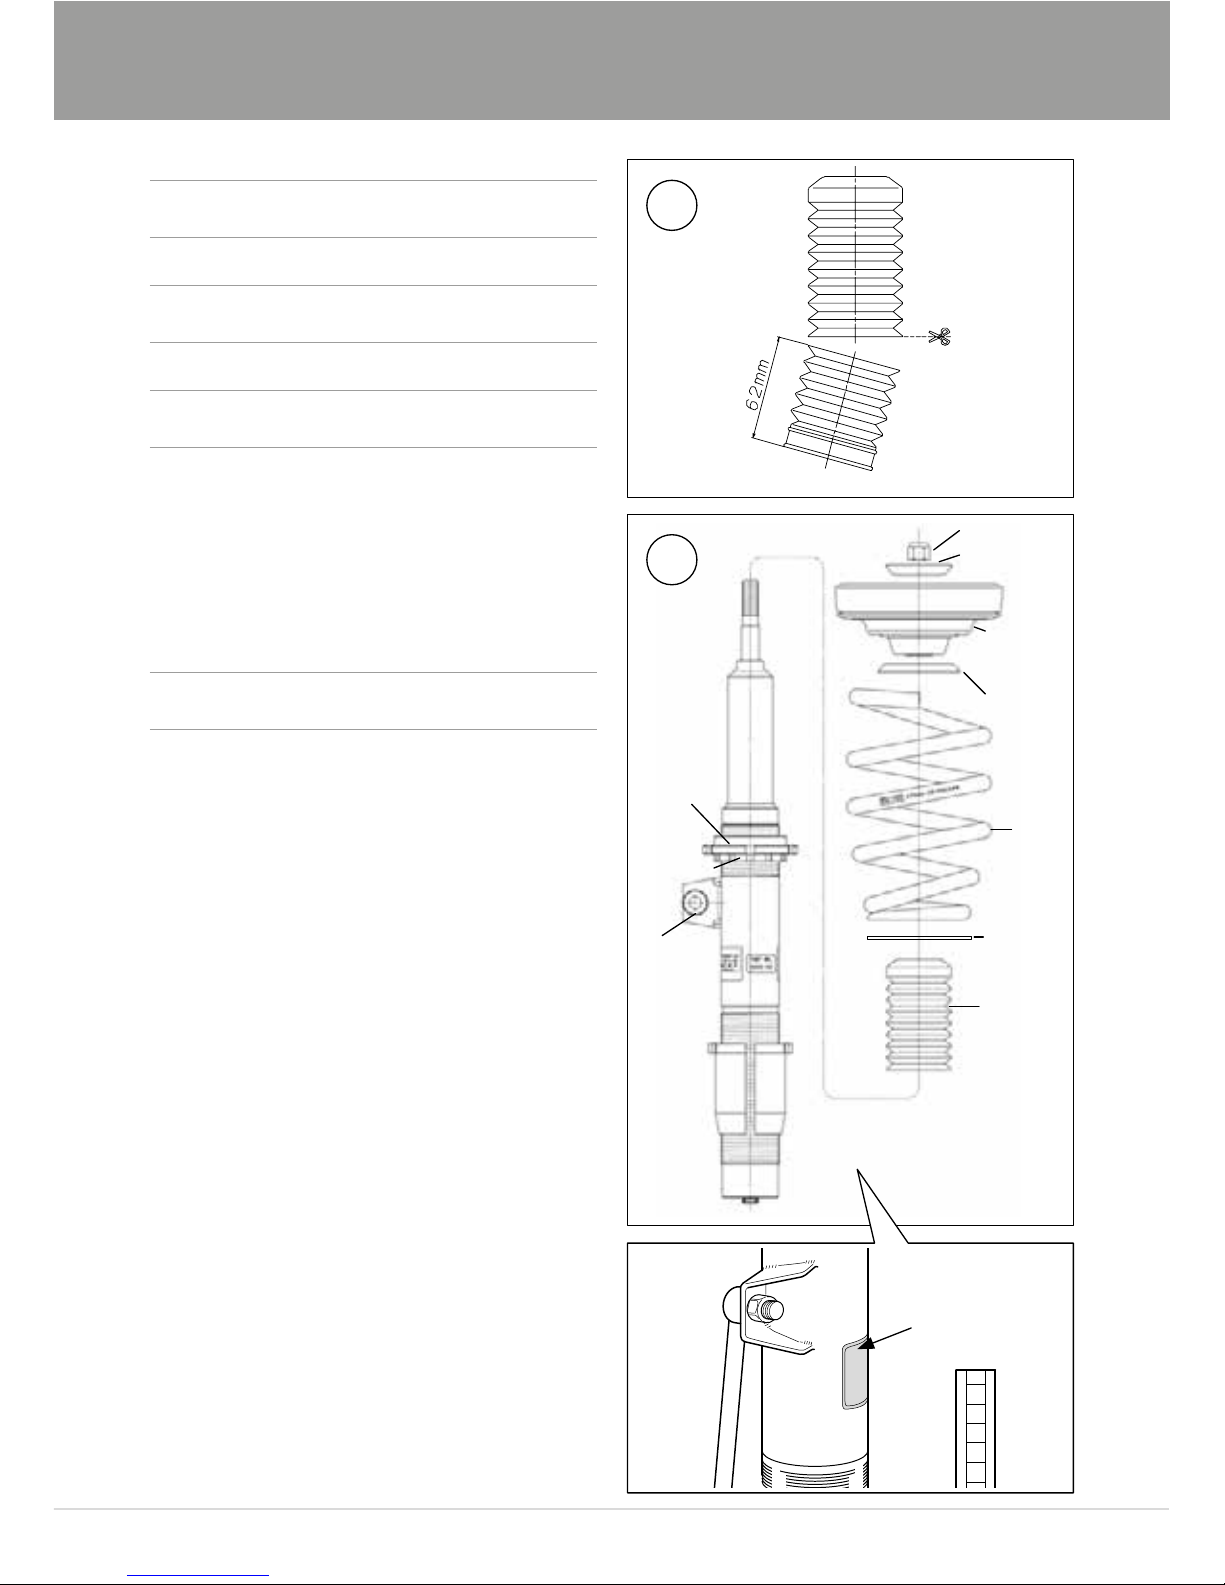
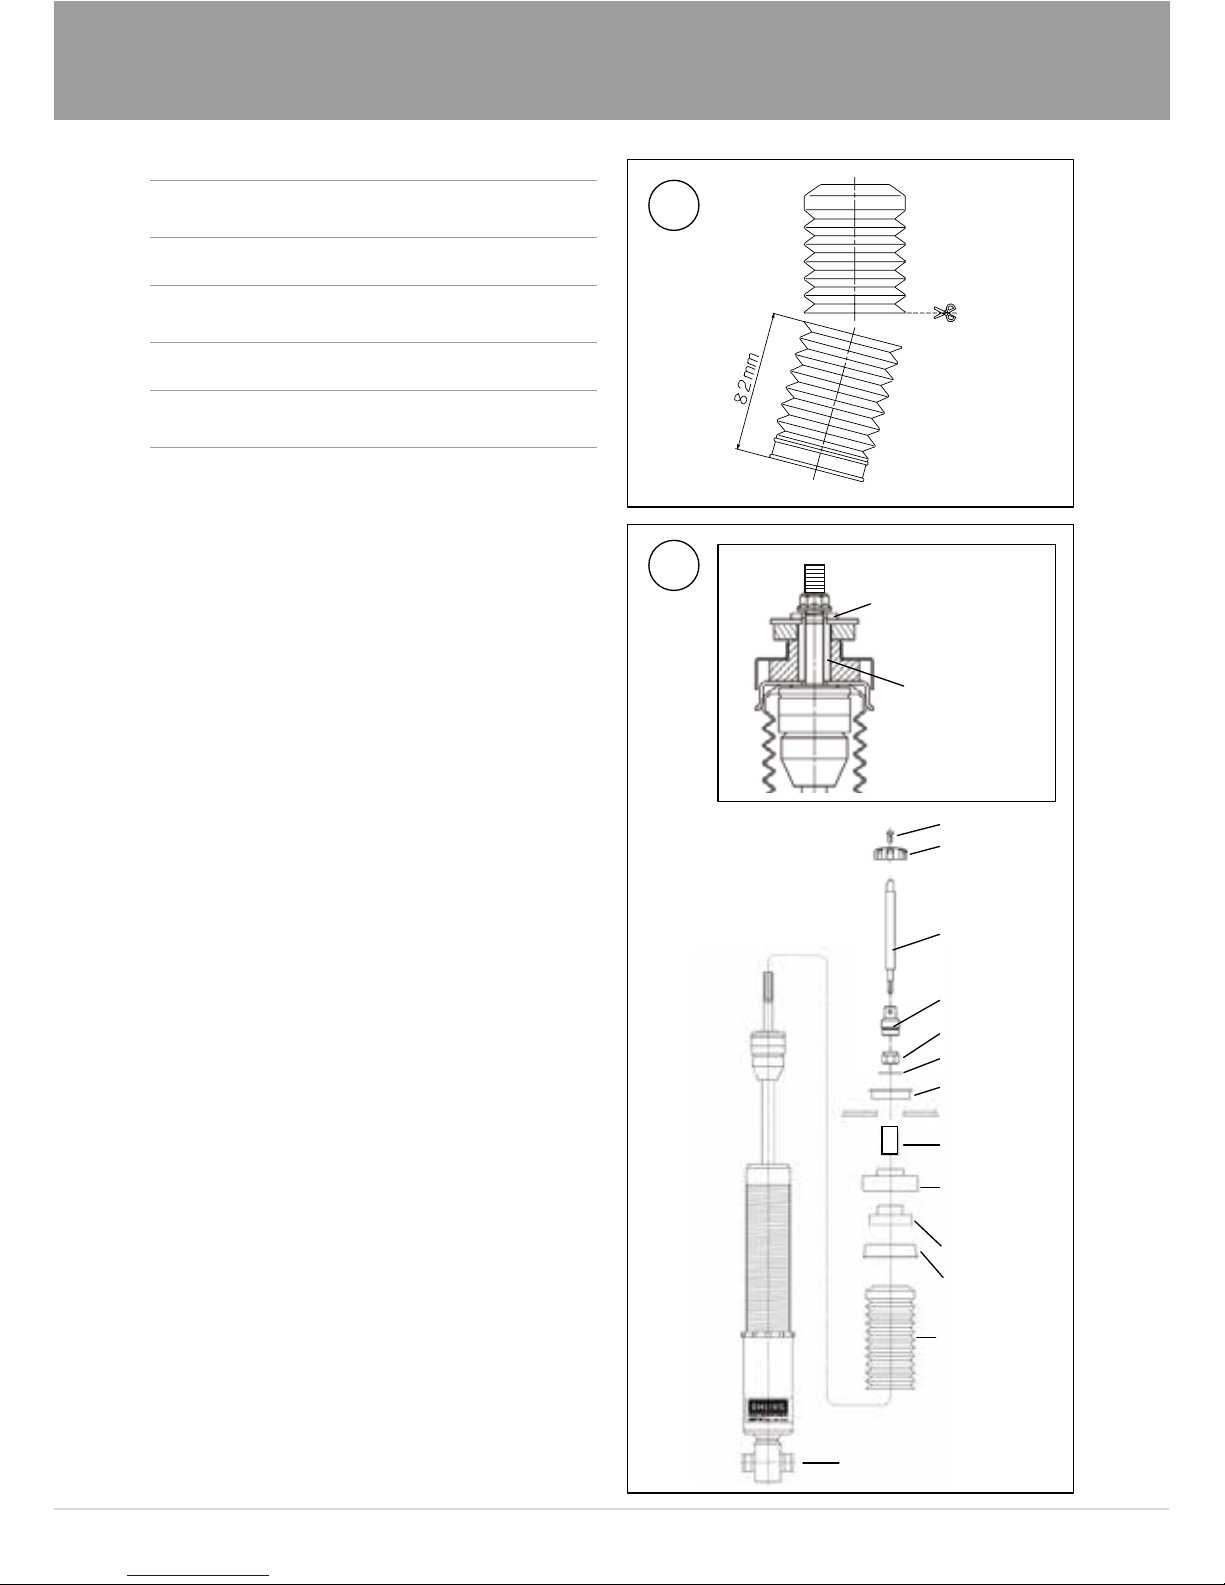
Cut the dust boot 62 mm from the lower end
according to the gure.
5
Assemble the shock absorber according to the
gure. Install the Öhlins McPherson struts on
the vehicle according to the vehicle service
manual. Install the strut with the sticker facing
the wheel to achieve correct position of the
anti roll bar link, see note in step 3.
MOUNTING INSTRUCTIONS
Warning!⚠
We strongly recommend to have an Öhlins dealer install
this product.
Warning!⚠
If working on a raised vehicle, ensure that it is securely
supported to prevent it from tipping over.
Note!1
When working on this product, see the Vehicle Service
Manual for vehicle specic procedures and important data.
4
5
Lower
spring seat
Lock nut
Spacer
Lock nut M14
Original
top mount
Original
washer
Original
washer
Plastic
spacer
Dust boot
Sticker
Anti roll
bar link
Brake disc
Spring
Page 3
3
MOUNTING INSTRUCTIONS
6
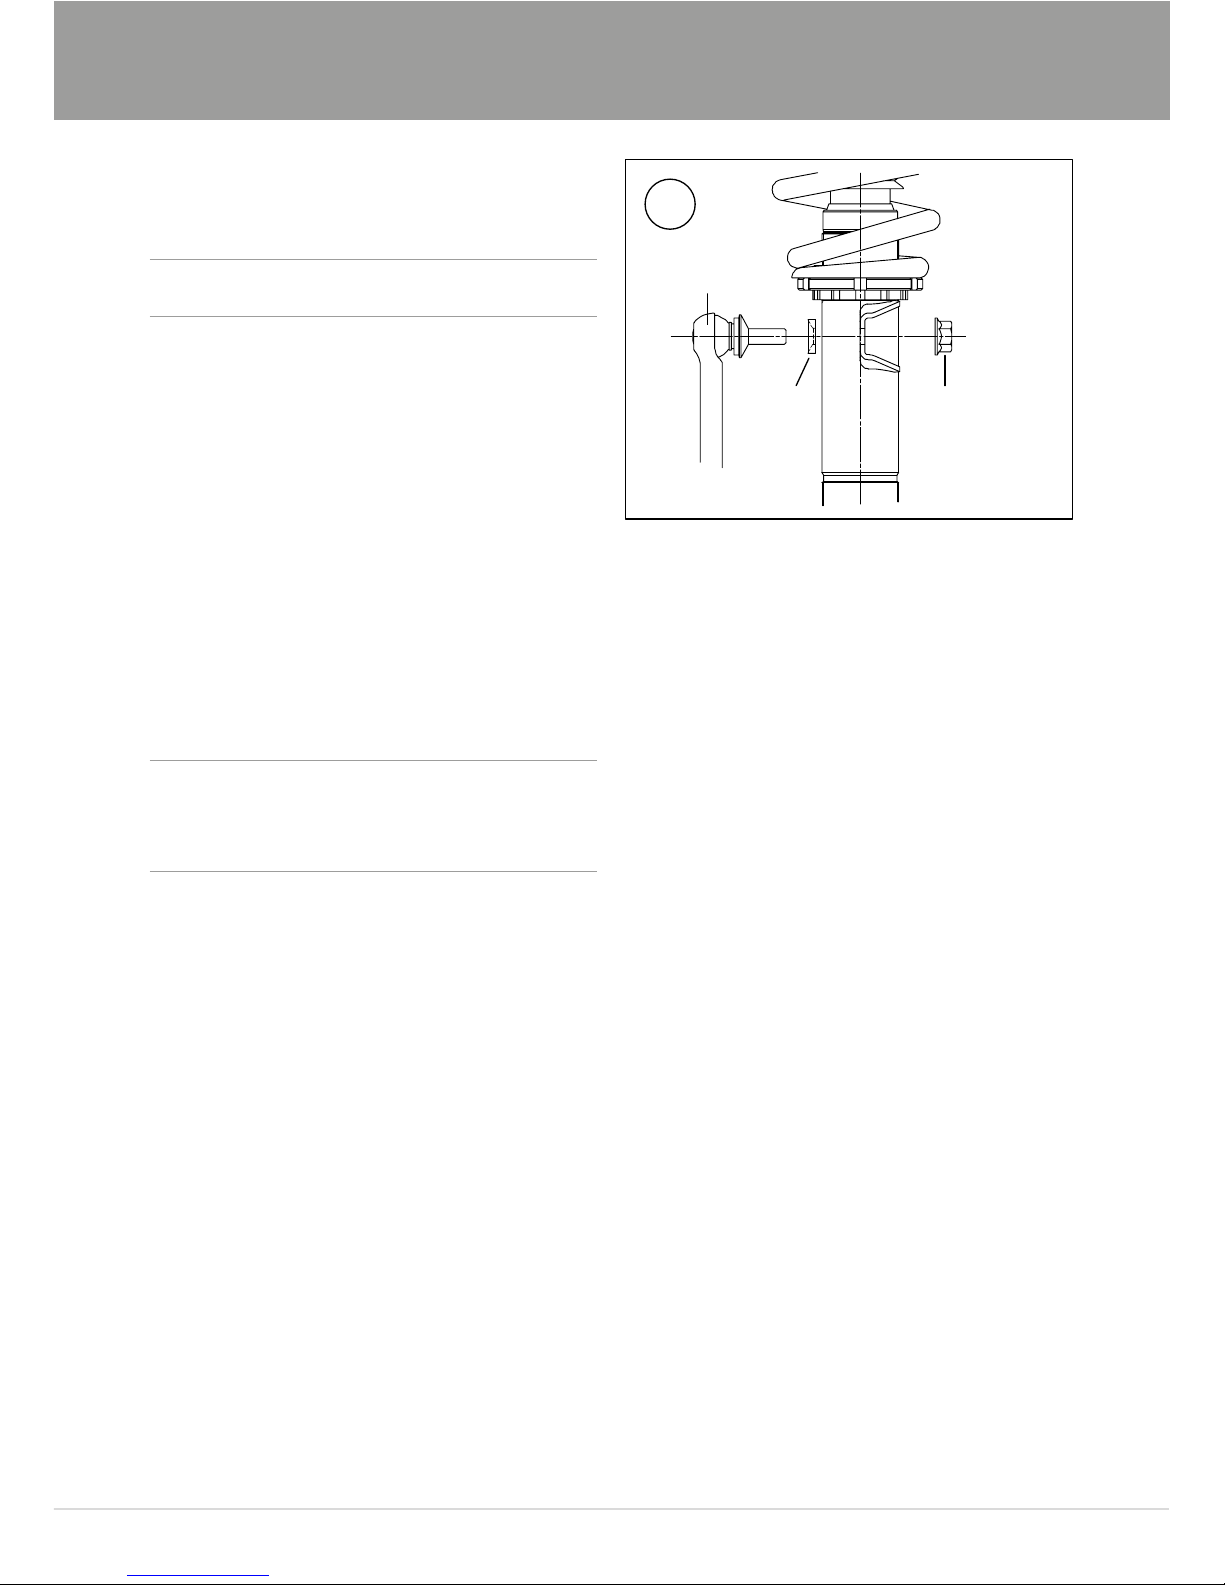
Install the stabilizer link.
Note!1
Use an Allen key to hold the shock absorber in position
when tightening the top mount nut.
7
Raise the wheel hub with a jack to ensure that
the height adjuster is correctly seated on top
of the hub carrier/upright.
8
Tighten:
Lower spring seat and lock ring: 50-60 Nm
Lock nut: 35-40 Nm
9
Make sure that all removed parts are rein
stalled in the same way as they were before
the installation of the Öhlins shock absorbers.
Caution!✋
Ensure that all screws are tightened to the correct
torque and that nothing fouls or restricts movement
of the shock absorber when the suspension is fully
compressed or extended.
Stabilizer
link
Spacer
Original nut
6
Page 4
Öhlins Racing AB
Box 722
S-194 27 Upplands Väsby, Sweden
Phone +46 8 590 025 00
fax +46 8 590 025 80
© Öhlins Racing AB. All rights
reserved. Any reprinting or
unauthorized use without the written
permission of Öhlins Racing AB
is prohibited.
Öhlins products are subject to
continuous improvement and
development, therefore, although
these instructions include the most
up-to-date information available at
the time of printing, minor updates
may occur.
To nd the latest information
contact an Öhlins distributor.
Please contact Öhlins if you have
any questions regarding the
contents in this document.
SETUP DATA
Warning!⚠
Before riding, always make sure that the basic settings
made by Öhlins are according to recommended Setup Data. Read about adjustments and setting up in
the Öhlins Owner’s Manual before you make any
adjustments. Contact an Öhlins dealer if you have any
questions about setting up.
ADJUSTMENTS
Rebound setting
Track 3 clicks
Winding road 7 clicks
Street 12 clicks
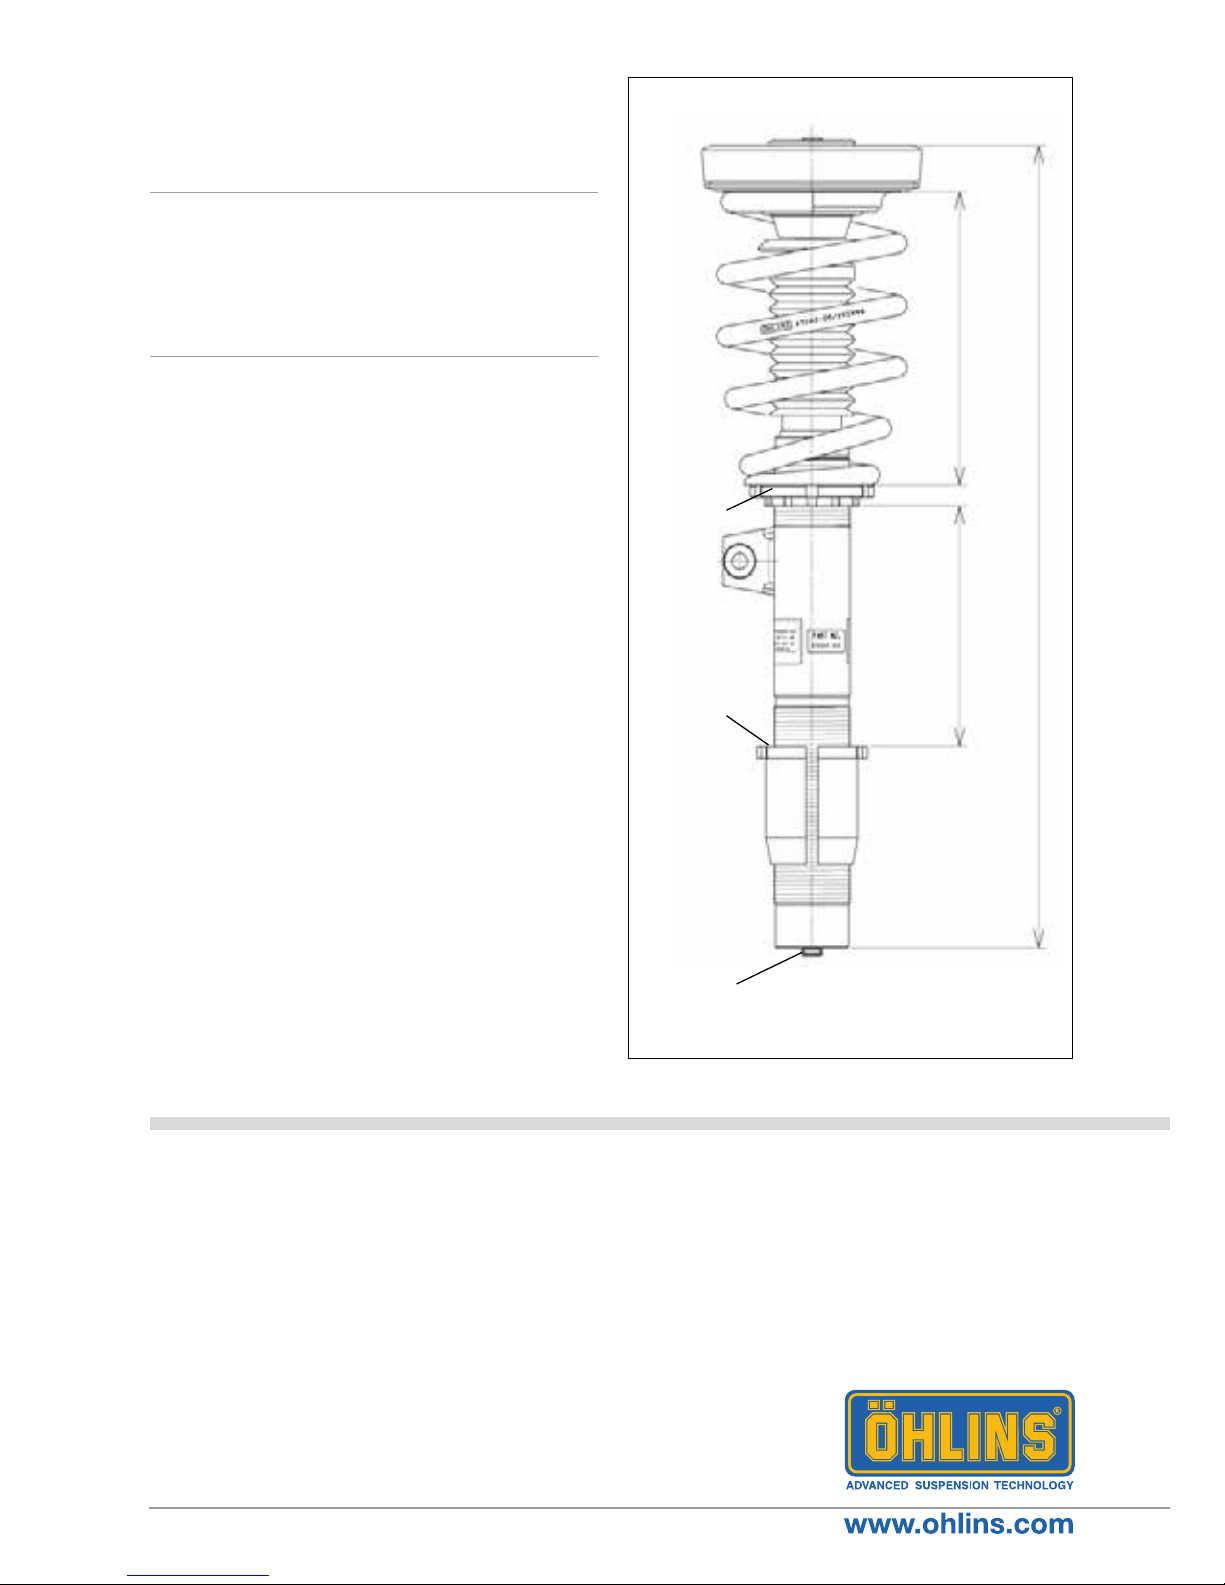
Spring preload 6 mm
Spring
Free length 200 mm
Installed length 194 mm
Spec H200/ ID65 60 N/mm
Vehicle Height
With the preload and height adjustments in
standard positions, the vehicle is lowered
approximately 15 mm compared to the original
suspension.
Height adjustment range:
Standard position ±15 mm.
Spring
preload
adjuster
Height
adjuster
194163
529
Rebound
adjuster
Part no. MI_BMZMN01_front_2
Issued 2016-09-07
Page 5
Shock absorber for BMW 1M (E82) - rear
BMZ MN01
Mounting Instructions
Kit Contents
Description Pcs
Shock absorber 2
Lock nut M10 2
Bushing spacer 4
Dust boot 2
Spring 2
Spring preload adjuster 2
Rubber seat 2
Adjuster cable 2
Adjuster knob 2
Adjuster screw 2
Flexibel spacer 2
Washer 2
Lower plastic seat 2
Spring seat 2
Lock nut 4
Allen key 1
Note!1
Please note that this image is a general representation
of the product and may differ slightly from your product.
Note!1
Please note that during storage and transportation,
especially at high ambient temperature, some of the oil
and grease used for assembling may leak and stain the
packaging. This is in no way detrimental to the product,
wipe off the excessive oil/grease with a cloth.
Note!1
Before installing this product, check the contents of the
kit. If anything is missing, please contact an Öhlins dealer.
Warning!⚠
Before installing this product, read the Öhlins Owner’s
Manual. The shock absorber/front fork/steering damper is
an important part of the vehicle and the vehicle stability.
Page 6
6
1
Raise the vehicle, use jack stands.
2
Remove the rear wheels.
3
Remove the lower and the upper attachments
and remove the original shock absorbers.
4
Cut the dust boot 82 mm from the lower end
according to the gure.
5
Assemble the shock absorber according to
the gure. Do not install the adjuster knob and
screw yet.
MOUNTING INSTRUCTIONS
4
5
Lock nut M10
Washer
Original bushing
Vehicle body
Original spacer
Bushing spacer
Original rubber
cover
Original bushing
Original washer
Lock ring
Lower
bracket
Adjuster screw
Adjuster knob
Adjuster cable
Adjuster
Washer
Original spacer
Warning!⚠
We strongly recommend to have an Öhlins dealer install
this product.
Warning!⚠
If working on a raised vehicle, ensure that it is securely
supported to prevent it from tipping over.
Note!1
When working on this product, see the Vehicle Service
Manual for vehicle specic procedures and important data.
Dust boot
Page 7
7
MOUNTING INSTRUCTIONS
7
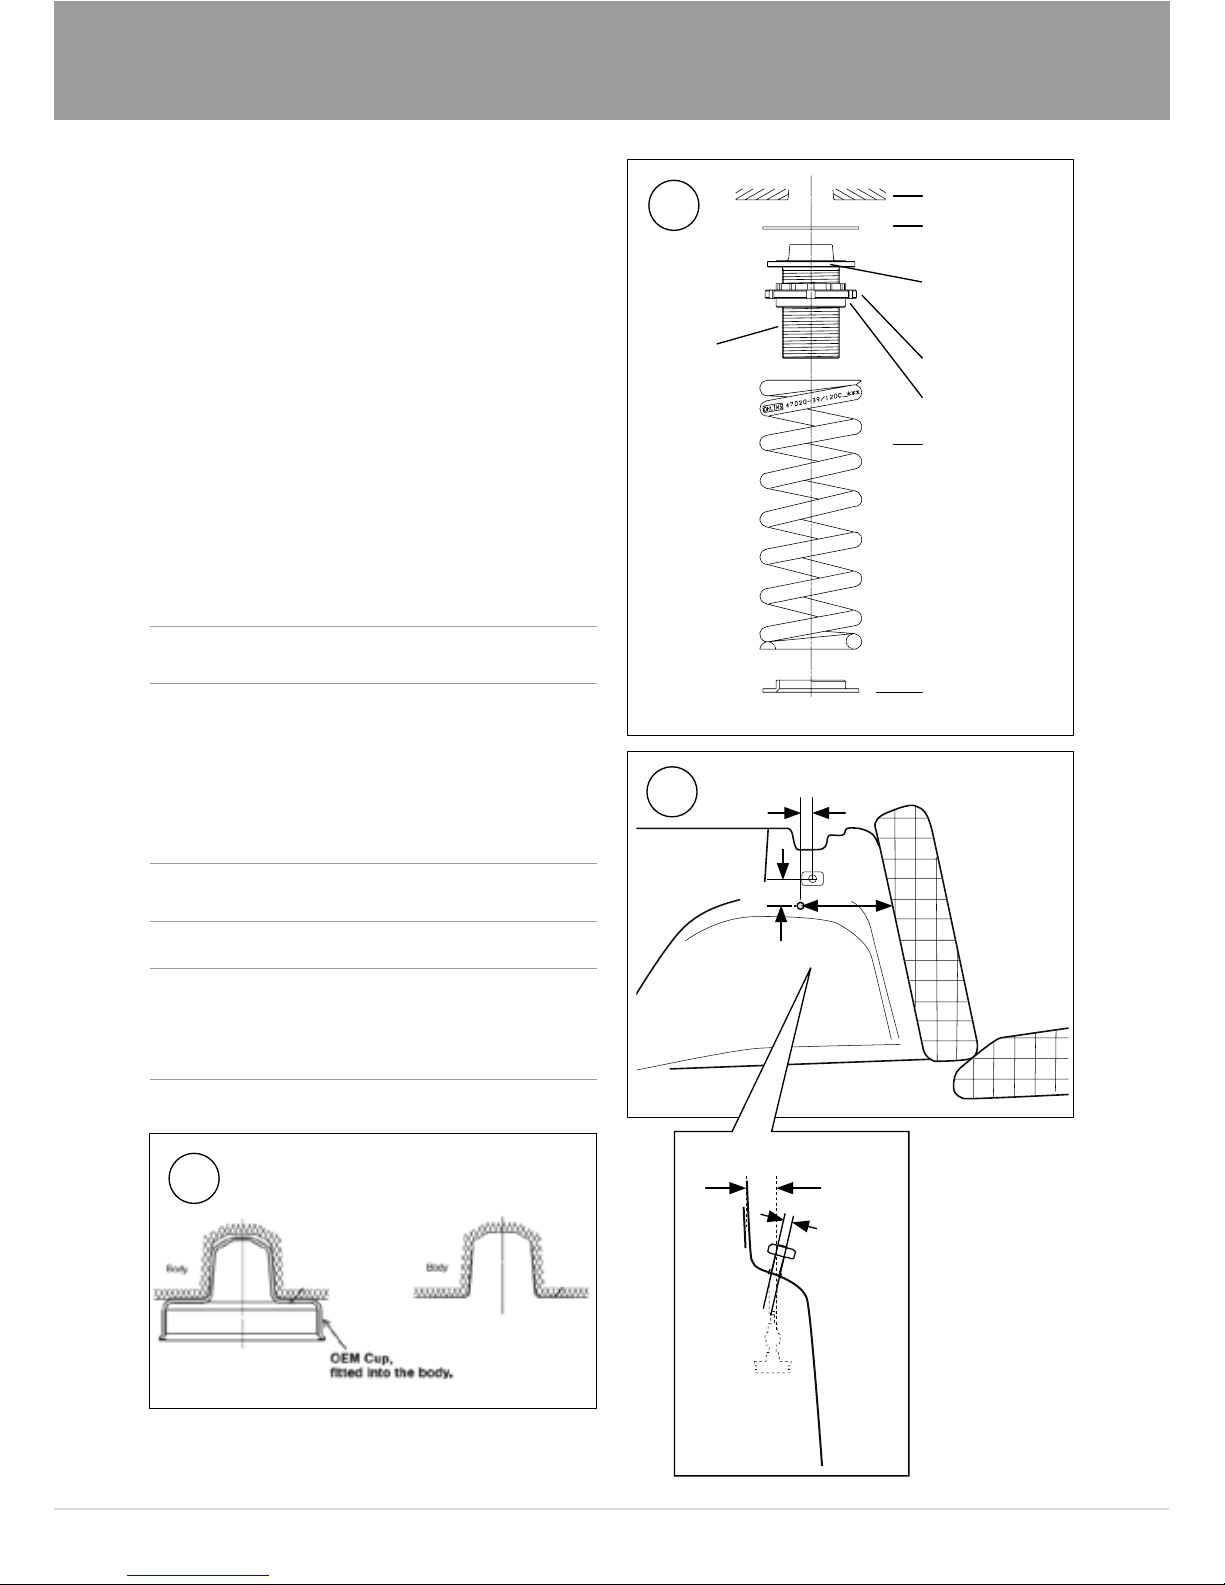
Vehicle body
Rubber seat
Lock nut
Flexibel
spacer
Spring seat
Spring preload
adjuster
Spring
Lower plastic
seat
6
Remove the OEM upper spring cup accord
-
ing to gure.
7
Install the Öhlins spring and the spring
preload adjuster according to the gure.
8
Install the Öhlins shock absorbers on the vehi
-
cle according to the vehicle service manual.
9
Cut a 12-25 mm hole for the control wire and
adjustment knob in the side panel according
to the gure.
Note!1
When tightening the top mount nut, the shock absorber
shaft must be held in position with a 5mm Allen key.
10
Tighten:
Lower spring seat and lock ring: 50-60 Nm
Lock nut: 30 Nm
Note!1
Lower the vehicle so that the suspension is slightly
compressed before tightening the screws.
Caution!✋
Ensure that all screws are tightened to the correct
torque and that nothing fouls or restricts movement of
the shock absorber/front fork/steering damper when the
suspension is fully compressed or extended.
5 mm
20 mm
20 mm
Ø 10-15 mm
side panel
Rear seat
back rest
side panel
270 mm
Inside the trunk.
Left side.
9
6
Page 8
Öhlins Racing AB
Box 722
S-194 27 Upplands Väsby, Sweden
Phone +46 8 590 025 00
fax +46 8 590 025 80
© Öhlins Racing AB. All rights
reserved. Any reprinting or
unauthorized use without the written
permission of Öhlins Racing AB
is prohibited.
Öhlins products are subject to
continuous improvement and
development, therefore, although
these instructions include the most
up-to-date information available at
the time of printing, minor updates
may occur.
To nd the latest information
contact an Öhlins distributor.
Please contact Öhlins if you have
any questions regarding the
contents in this document.
SETUP DATA
Warning!⚠
Before riding, always make sure that the basic settings
made by Öhlins are according to recommended Setup Data. Read about adjustments and setting up in
the Öhlins Owner’s Manual before you make any
adjustments. Contact an Öhlins dealer if you have any
questions about setting up.
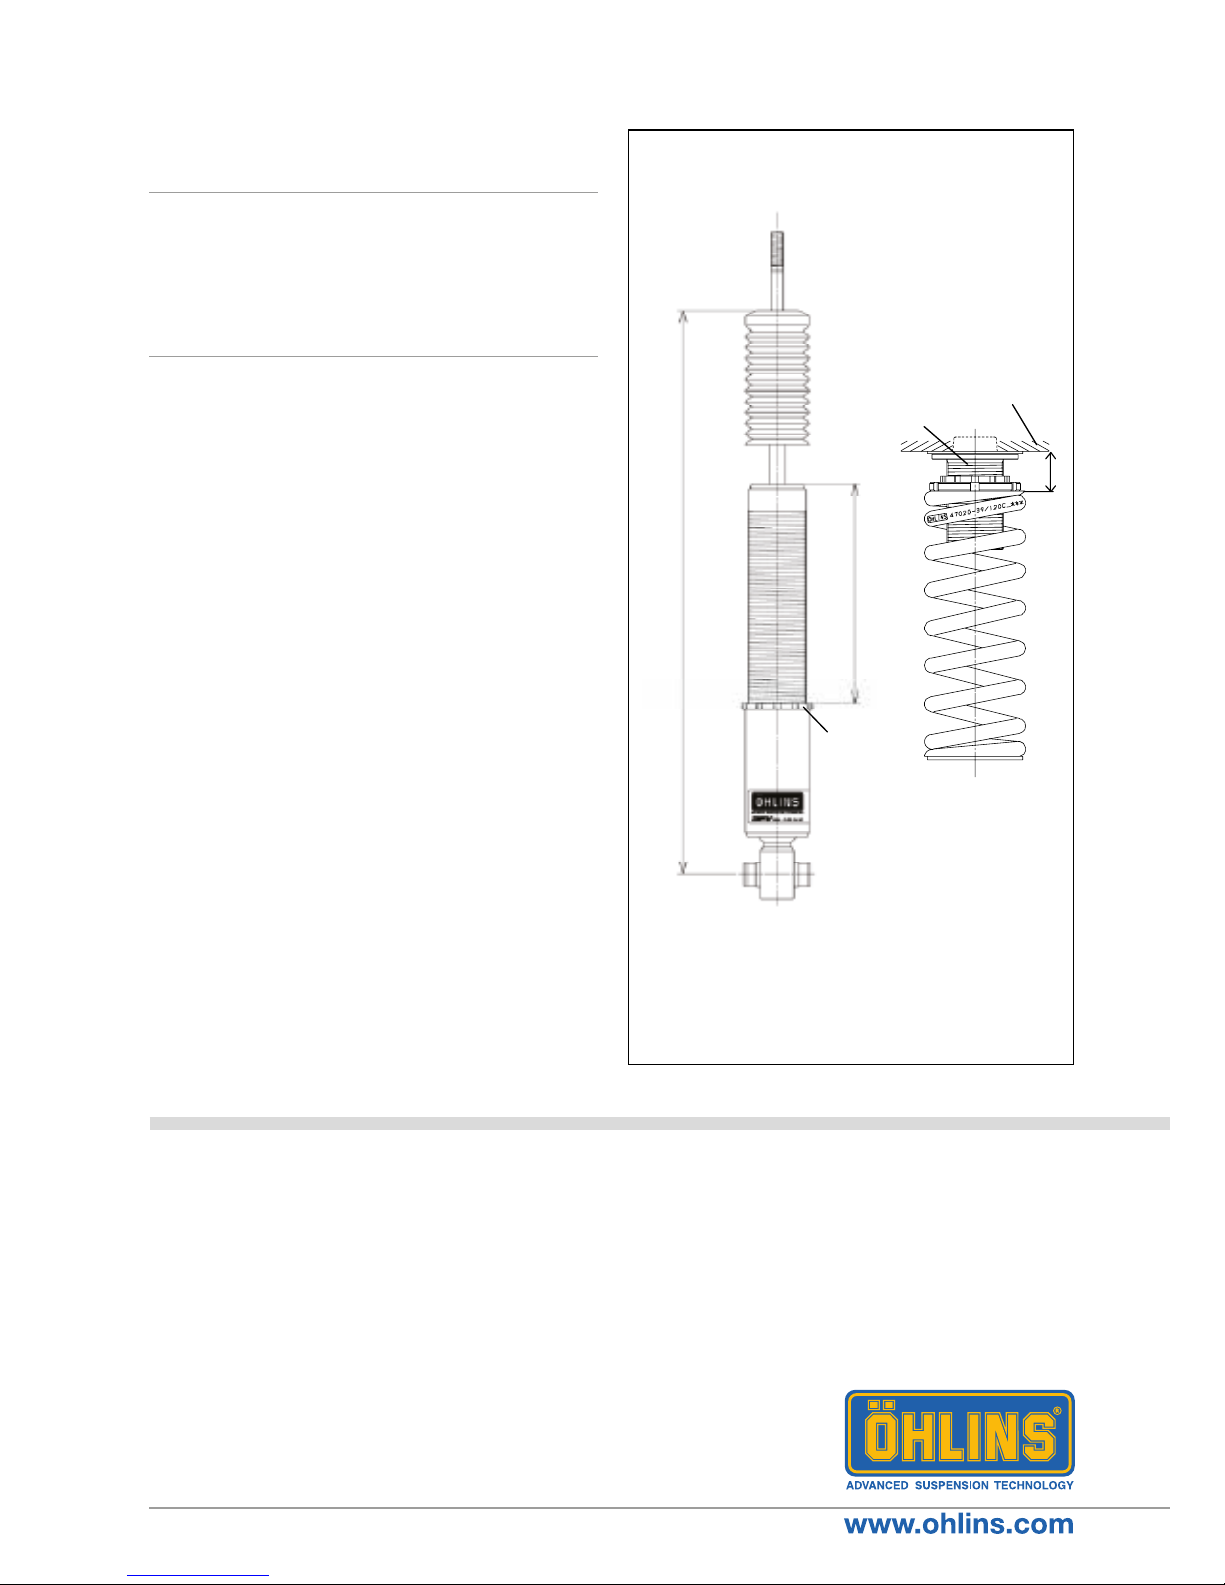
ADJUSTMENTS
Rebound setting
Track 3 clicks
Winding road 7 clicks
Street 12 clicks
Spring preload adjuster height 37 mm
Spring
Spec H250/ ID65 110 N/mm
Vehicle Height
With the preload and height adjustments in
standard positions, the vehicle is lowered
approximately 5 mm compared to the original
suspension.
1 turn on the height adjuster moves the posi
-
tion 1,5 mm.
䚷
Vehicle
body
Spring
preload
adjuster
Length
adjuster
523
223
37
Part no. MI_BMZMN01_rear_2
Issued 2016-09-07
 Loading...