

Oh!FX SIROCCO Instruction Manual

SIROCCO
INSTRUCTION MANUAL


INSTRUCTION MANUAL
INTRODUCTION OF THE SIROCCO MACHINE
SIROCCO is the new multi-eects machine manufactured by Oh!FX.
SIROCCO machine works at low voltage, that is, at 30V. A feature which completely eliminates
the risk of electrocution even if the machine is accidentally immersed in water.
The motor speed of the SIROCCO machine is adjustable and so you can regulate the intensity
of the eect required. Thanks to its system of interchangeable heads, you can easily replace
the head of your machine in order to create many other professional stage eects, with even
better performance than other machines designed specically for one particular eect.
With the SIROCCO machine and its range of heads, you can create up to six completely
dierent eects. Heads available for dierent eects:
Sky dancer or wind eect: To elevate air men and sky dancers to a height of up to 8 meters
in an easy-to-use way.
Foam cannon: Creates a jet of dense and dry foam, projecting it up to 12 meters.
Foam generator: Hanging at a height, it produces and drops down cascades of large amounts
of foam.
Snow: Creates an excellent articial snowfall at a distance of up to 15 meters with the ability
to covering a large area. Very realistic eect.
Vulcano: An eect never seen before. Creates a spectacular 10 meters column of confetti
with a volcano eect. An incredible eect achieved by operating several machines at once.
Confetti: Blows and propels in a continual manner all kinds of confetti up to 10 - 15 meters.
GENERAL TECHNICAL SPECIFICATIONS
REF: SIRSIZE *motor in horizontal position: 42 x 56 x 69 cm
SIROCCO WEIGHT: 25,70 Kg
POWER SUPPLY WEIGHT: 3,90 Kg
VOLTAGE IN: 100-240V. 50-60 Hz
WORKING VOLTAGE: 30V. DC
PROTECTION: IP-68 (not applicable to the power supply)
NOMINAL POWER: 720W
WORKING TEMP.: -40/+110 ºC
MOTOR ROTATION SPEED: 1200-4750 RPM
NOISE LEVEL: 85,6 dBa A 1m
TIME FROM 0 RPM TO MAX SPEED: 10s
3

INSTRUCTION MANUAL
SIROCCO SKY DANCER
SIROCCO machine is equipped as standard with the SKY DANCER head. The SKY DANCER
head is able to elevate air men and sky dancers to a height of up to 8 meters in an easy-touse way.
TECHNICAL SPECIFICATIONS
REF: SIR-SKY/M
SIZE *motor in vertical position: 46 x 56 x 64 cm
MACHINE AND HEAD WEIGHT: 27,50 Kg
HEAD WEIGHT: 1,80 Kg
POWER SUPPLY WEIGHT: 3,90 Kg
VOLTAGE IN: 100-240V. 50-60 Hz
WORKING VOLTAGE: 30V. DC
NOMINAL POWER: 720W
PROTECTION: IP-68 (not aplicable to the power supply)
WORKING TEMP.: -40/+110 ºC
MOTOR ROTATION SPEED: 1200-4750 RPM
NOISE LEVEL: 85,6 dBa A 1m
TIME FROM 0 RPM TO MAX SPEED: 10s
6
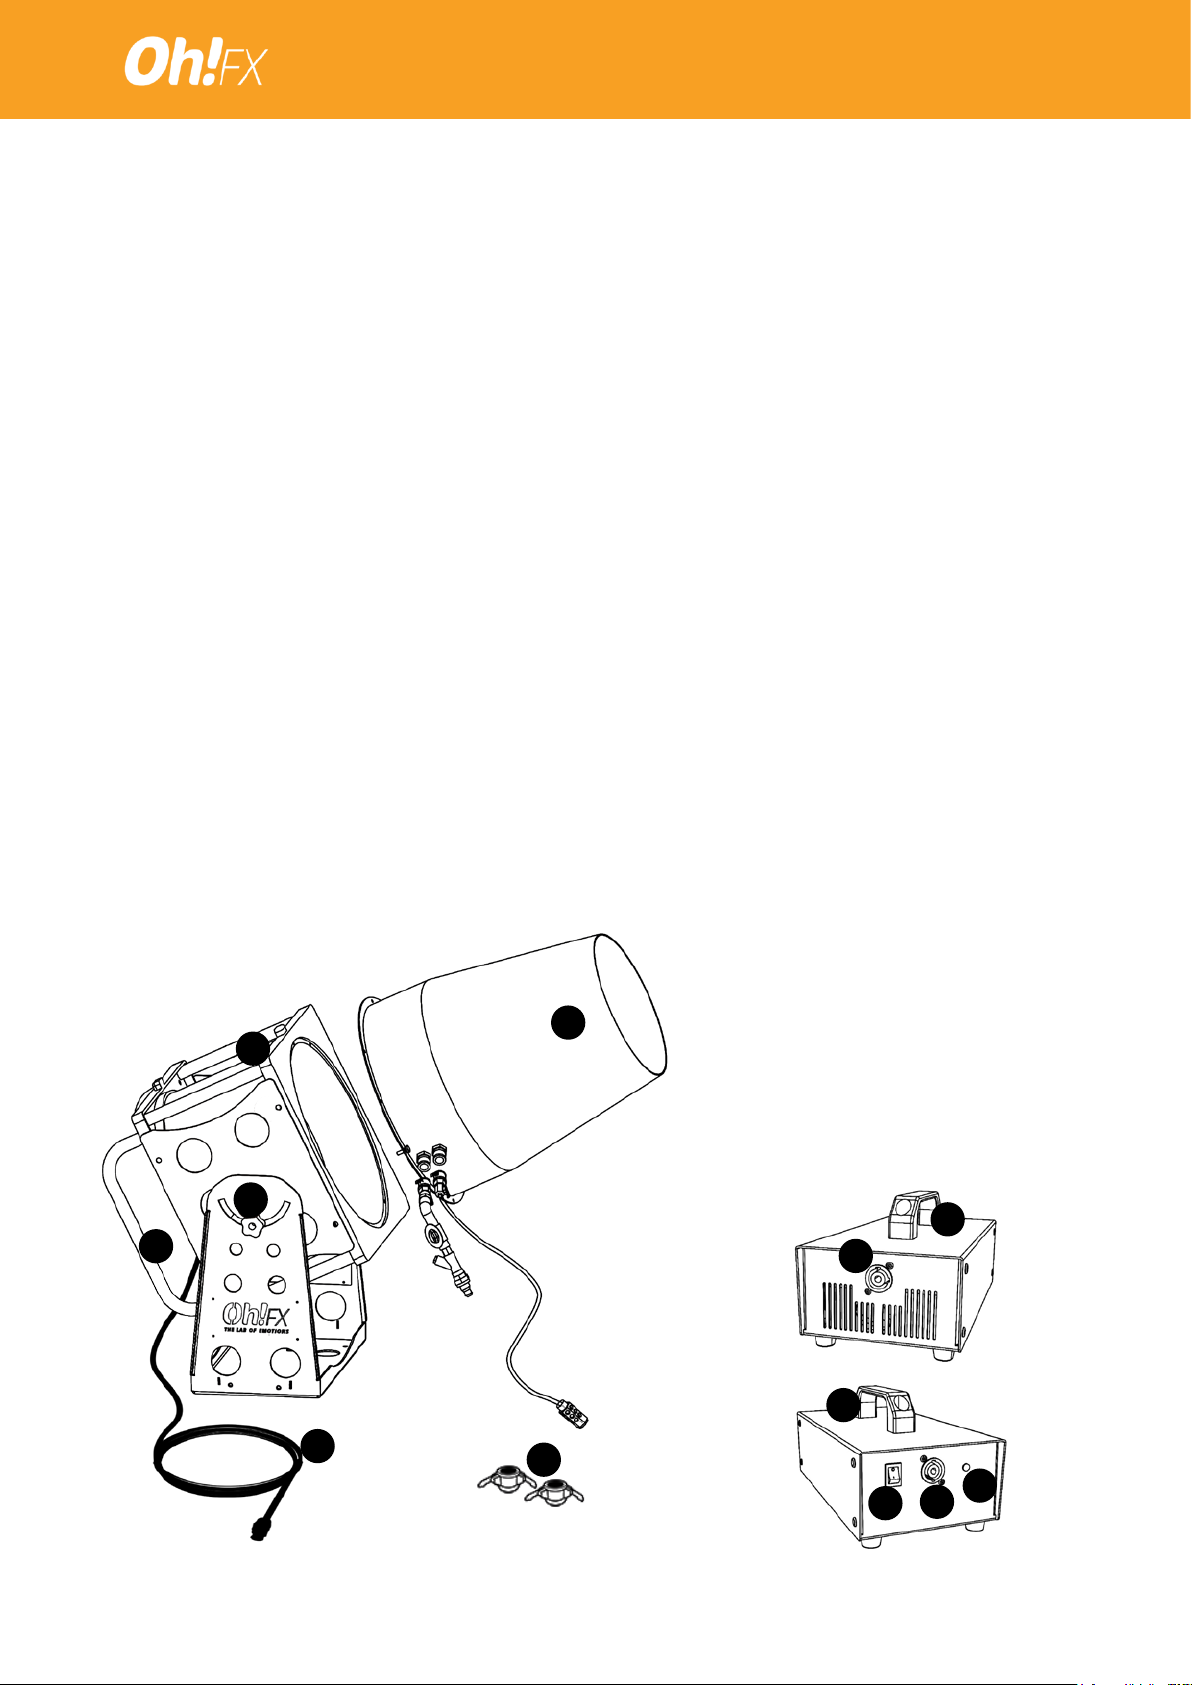
PARTS
1. Power supply
2. Power Input (powercon connector)
3. Power supply switch
4. Led indicator
5. Low voltage power output
6. SIROCCO machine & SKY DANCER head
7. SIROCCO power cord
8. Switch / speed regulator
9. Locking knobs
10. Handles
11. Fastening screws
12. Velcro strip
11
8
12
Picture 1
2
10
9
7
7
Picture 2
1
1
4
5
3
4

INSTRUCTION MANUAL
ASSEMBLY AND OPERATION
1. PREPARING THE MACHINE:
1.1. Place the machine on a at and stable surface, with enough height available so that
the sky dancer fabric can be propelled upwards without coming into contact with anything
around it.
1.2. Loosen the locking knobs (9) and position the turbine vertically as shown in Picture 1
1.3. Tighten the locking knobs (9).
1.4. Loosen and remove the fastening screws (11) of the head which is attached to the
SIROCCO machine and remove the head.
2. ATTACHING THE HEAD:
2.1. Attach the SIROCCO SKY DANCER head to the turbine as shown in Picture 2 using
the fastening screws (11).
2.2. Attach the air man or sky dancer. Generally these accessories has a Velcro strip
on the inside of the fabric, which needs to be attached to the Velcro strip (12) around
the head, making sure that it is attached properly and there are no spaces where air can
escape.
2.3. In the event that the air man or sky dancer does not have a Velcro strip, attach it
tightly using a sling.
3. ELECTRICAL CONNECTION:
3.1. Position the power supply (1) so that it is protected and covered from water and
cannot get wet.
3.2. Connect the power supply (1) to the electric current by means of the power input (2).
3.3. Make sure that the power socket is earthed.
3.4. Turn on the power supply switch (3) and check that the indicator LED (4) is on.
3.5. Connect the SIROCCO power cord (7) to the low voltage power output (5) of the
power supply.
4. OPERATION:
4.1. Turn the speed regulator and switch (8) to maximum. You can also leave it powered on
during assembly of the machine and turn on it up by means of the power supply switch (3).
4.2. Visually check that everything is working correctly at the beginning and that your air
man or sky dancer is not coming into contact with any object.
5. STOPPING AND DISASSEMBLY:
5.1. Turn the speed regulator and switch (8) to zero to turn o the motor.
5.2. Turn o the power supply (1) and disconnect the machine.
5

INSTRUCTION MANUAL
CAUTION
• SIROCCO machine provided with this head has been designed for the eect outlined. Any
use other than the one outlined excludes Oh!FX from all liability and warranty.
• Disconnect the machine from the power supply before changing the head and/or rear grid.
• Never start the motor without having a head and the rear grid in position and their screws
tightened.
• Do not wet or cover the power supply. To clean it, use a damp cloth and dry it immediately.
• In case of malfunction, do not attempt to disassemble the machine and contact your
dealer. Any unauthorized alteration will invalidate the warranty.
• Only an adult and qualied person can operate the machine.
6
INSTRUCTION MANUAL
SIROCCO FOAM CANNON
SIROCCO machine equipped with the SIROCCO FOAM head is a powerful foam jet. It
creates a dry and light foam jet which is projected up to 12 meters.
TECHNICAL SPECIFICATIONS
REF : SIR-FOAM/M
SIZE *motor in horizontal position :
92 x 56 x 69 cm
MACHINE AND HEAD WEIGHT: 31,40 Kg
HEAD WEIGHT: 5,70 Kg
POWER SUPPLY WEIGHT: 3,90 Kg
VOLTAGE IN: 100-240V. 50-60 Hz
WORKING VOLTAGE: 30V. DC
NOMINAL POWER: 720W
PROTECTION: IP-68 (not aplicable to the power supply)
WATER WORKING TEMP.: +15/+40 ºC
MOTOR ROTATION SPEED: 1200-4750 RPM
NOISE LEVEL: 85,6 dBa A 1m
TIME FROM 0 RPM TO MAX SPEEDb: 10s
MIN / MAX WATER PRESSURE: 39 / 87 PSI – 2,7 / 6 BAR
RANGE: 0-12 m
6
8
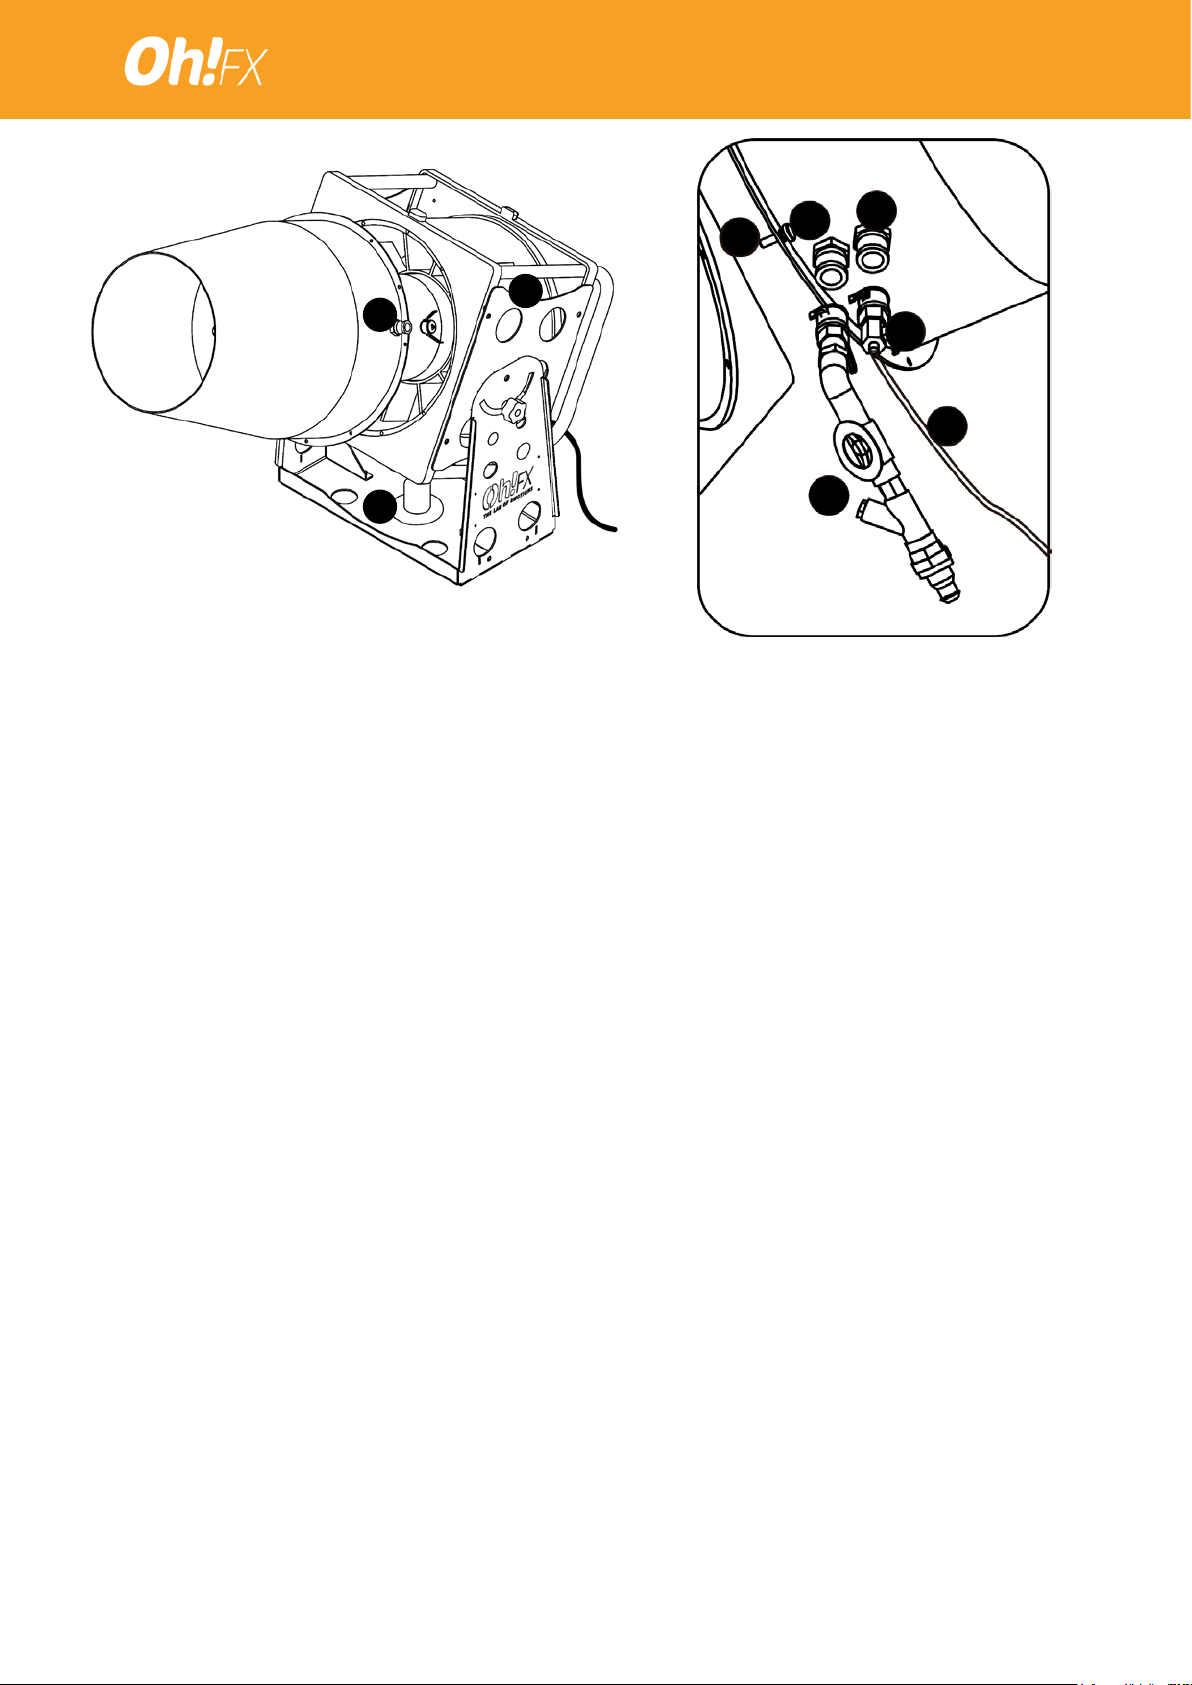
PARTS
1. Power supply
2. Power Input (powercon connector)
3. Power supply switch
4. Led indicator
5. Low voltage power output
6. SIROCCO machine & FOAM CANNON
head
7. SIROCCO power cord
8. Switch / speed regulator
9. Locking knobs
10. Accomodation for tripod
11. Handles
12. Fastening screws.
13. Water connection (WATER)
14. Foam uid connection (FLUID)
15. PREMIX connection.
16. Stopper cap (x2)
17. Inlet water tap
18. Foam uid Absorption tube
19. Inlet foam uid tap
11
9
1
2
1
7
Picture 1
16
4
5
3
7
INSTRUCTION MANUAL
12
13
8
15
10
Picture 2
ASSEMBLY AND OPERATION
1. PREPARING THE MACHINE:
1.1. Place the machine on a at and stable surface.
1.2. Loosen the locking knobs (9) and position the turbine vertically as shown in Picture 1.
1.3. Now tighten the locking knobs (9).
1.4. Loosen and remove the fastening screws (12) of the head which is attached to the
SIROCCO machine and remove the head.
14
19
18
17
Picture 3
2. ATTACHING THE HEAD AND POSITIONING THE MACHINE:
2.1. Attach the SIROCCO FOAM CANNON head to the turbine as shown in Picture 2
using the fastening screws (12).
2.2. Once the head is attached you can place the machine in its working location either
directly on a at and stable surface, or on a tripod also resting on a at and stable surface
and tting it into the tripod accomodation (10), or even better on the ightcase we propose,
by inserting the tube piece included with the ightcase into its accommodation for tripod.
Using a tripod or the ightcase tripod, allows you to rotate the machine, covering thus a
larger área.
2.3. Make sure that the tripod is rustproof, that it can bear up to 50kg and that it has
enough leg span to give it stability (minimum 100cm between legs). The height of the
tripod should never exceed 130cm.
2.4. Loosen the locking knobs (9) and tilt the motor + head assembly to about 45º from
the ground. Then tighten the locking knobs (9) again.
3. HOSE CONNECTIONS:
3.1. Connecting the SIROCCO machine without PREMIX:
*The machine is usually connected directly to the water network having the foam uid
separately.
*In such case you need to have a minimum water pressure of 2,7 BAR (39 PSI).
8

INSTRUCTION MANUAL
*If the water network doesn’t reach that recommended pressure, you can use a water
pump (see the FAQ section for more information).
3.1.1. Connect the inlet water tap (17) to the machine’s water connection
(WATER) (13).
3.1.2. With the inlet water tap (17) in “closed” position, connect a water hose to the
free socket of the inlet water tap (17) and turn on the general tap of its water point
(water network or pump).
3.1.3. The PREMIX connection (15) must be covered with a stopper cap (16).
*The PREMIX connection is only used to work with a pump and a tank with a mixture
of water and foam uid (premix).
3.1.4. Connect the foam uid absorption tube (18) to the foam uid connection
(FLUID) (14).
3.1.5. Insert the lter at the end of the foam uid absorption tube (18) into the readyto-use foam uid container and check that the inlet foam uid tap (19) is fully open.
3.2. Connecting the SIROCCO machine with PREMIX:
*The machine is fed with the nal mixture (water + foam uid) directly by means of a pump.
See the FAQ section for the specications of the recommended pump.
3.2.1. Connect the inlet water tap (17) to the machine’s PREMIX connection (15).
3.2.2. With the inlet water tap (17) in “closed” position, connect the hose coming
from the PREMIX tank to the free socket of the inlet water tap (17) and turn on the
pump (not included).
3.2.3. The water connection (WATER) (13) and foam uid connection (FLUID) (14)
must be covered with the stopper caps (16) supplied.
4. ELECTRICAL CONNECTION:
4.1. Position the power supply (1) so that it is protected and covered from water and
cannot get wet.
4.2. Connect the power supply (1) to the electric current by means of the power input (2).
4.3. Make sure that the power socket is earthed.
4.4. Turn on the power supply switch (3) and check that the indicator LED (4) is on.
4.5. Connect the SIROCCO power cord (7) to the low voltage power output (5) of the
power supply.
5. OPERATION:
5.1. Turn the speed regulator and switch (8) to maximum.
5.2. Once the motor is at full speed, open the inlet water tap (17).
5.3- The machine will draw a little water and immediately after that it will start to produce
foam.
5.4. You can adjust the distance and density of the foam by adjusting the speed regulator
and switch (8) and the inlet water tap(17).
6. STOPPING AND DISASSEMBLY:
6.1. Close the inlet water tap (17).
6.2. Turn the speed regulator and switch (8) to zero to turn o the motor.
6.3. Turn o the power supply (1) and disconnect the machine.
9
 Loading...