

Page 1
TM
Scout
Instruction Manual
Balanzas Scout
Manual de Instrucciones
Balances Scout
Mode d’emploi
Series Balances - SKX
TM
- SKX Series
TM
Séries - SKX
TM
Bilance Serie Scout
Manuale d’Istruzioni
TM
Scout
Bedienungsanleitung
Waagen-Serien – SKX
- SKX
Page 2

Page 3
CAUTION: Read all safety warnings before installing, making connections, or
servicing this equipment. Failure to comply with these warnings could result in
personal injury and/or property damage. Retain all instructions for future
reference.
SCOUTTM SERIES BALANCES - SKX EN-1
1. INTRODUCTION
This manual contains installation, operation and maintenance instructions for the Scout SKX
Series Balances. Please read the manual completely before using the balance.
1.1 Definition of Signal Warnings and Symbols
Safety notes are marked with signal words and warning symbols. These show safety issues and
warnings. Ignoring the safety notes may lead to personal injury, damage to the instrument,
malfunctions and false results.
Signal Words
WARNING For a hazardous situation with medium risk, possibly resulting in injuries or
death if not avoided.
CAUTION For a hazardous situation with low risk, resulting in damage to the device or
the property or in loss of data, or injuries if not avoided.
Attention For important information about the product.
Note For useful information about the product.
Warning Symbols
General Hazard Electric Shock Hazard
1.2 Safety Precautions
Verify that the local AC power supply is within the input voltage range printed on the AC
adapter’s data label.
Only connect the AC adapter to a compatible grounded electrical outlet.
Do not position the scale such that it is difficult to disconnect the AC adapter from the
power receptacle.
Make sure that the power cord does not pose a potential obstacle or tripping hazard.
This equipment is intended for indoor use and should only be operated in dry locations.
Operate the equipment only under ambient conditions specified in the user instructions.
Do not operate the equipment in hazardous or unstable environments.
Do not drop loads on the pan.
Only use approved accessories and peripherals.
Disconnect power from the equipment before cleaning or servicing.
Service should only be performed by authorized personnel.
2. INSTALLATION
2.1 Installing Components
Refer to the illustrations and instructions below to identify and assemble your Scout balance
with its components. All components must be assembled before using the balance.
Page 4
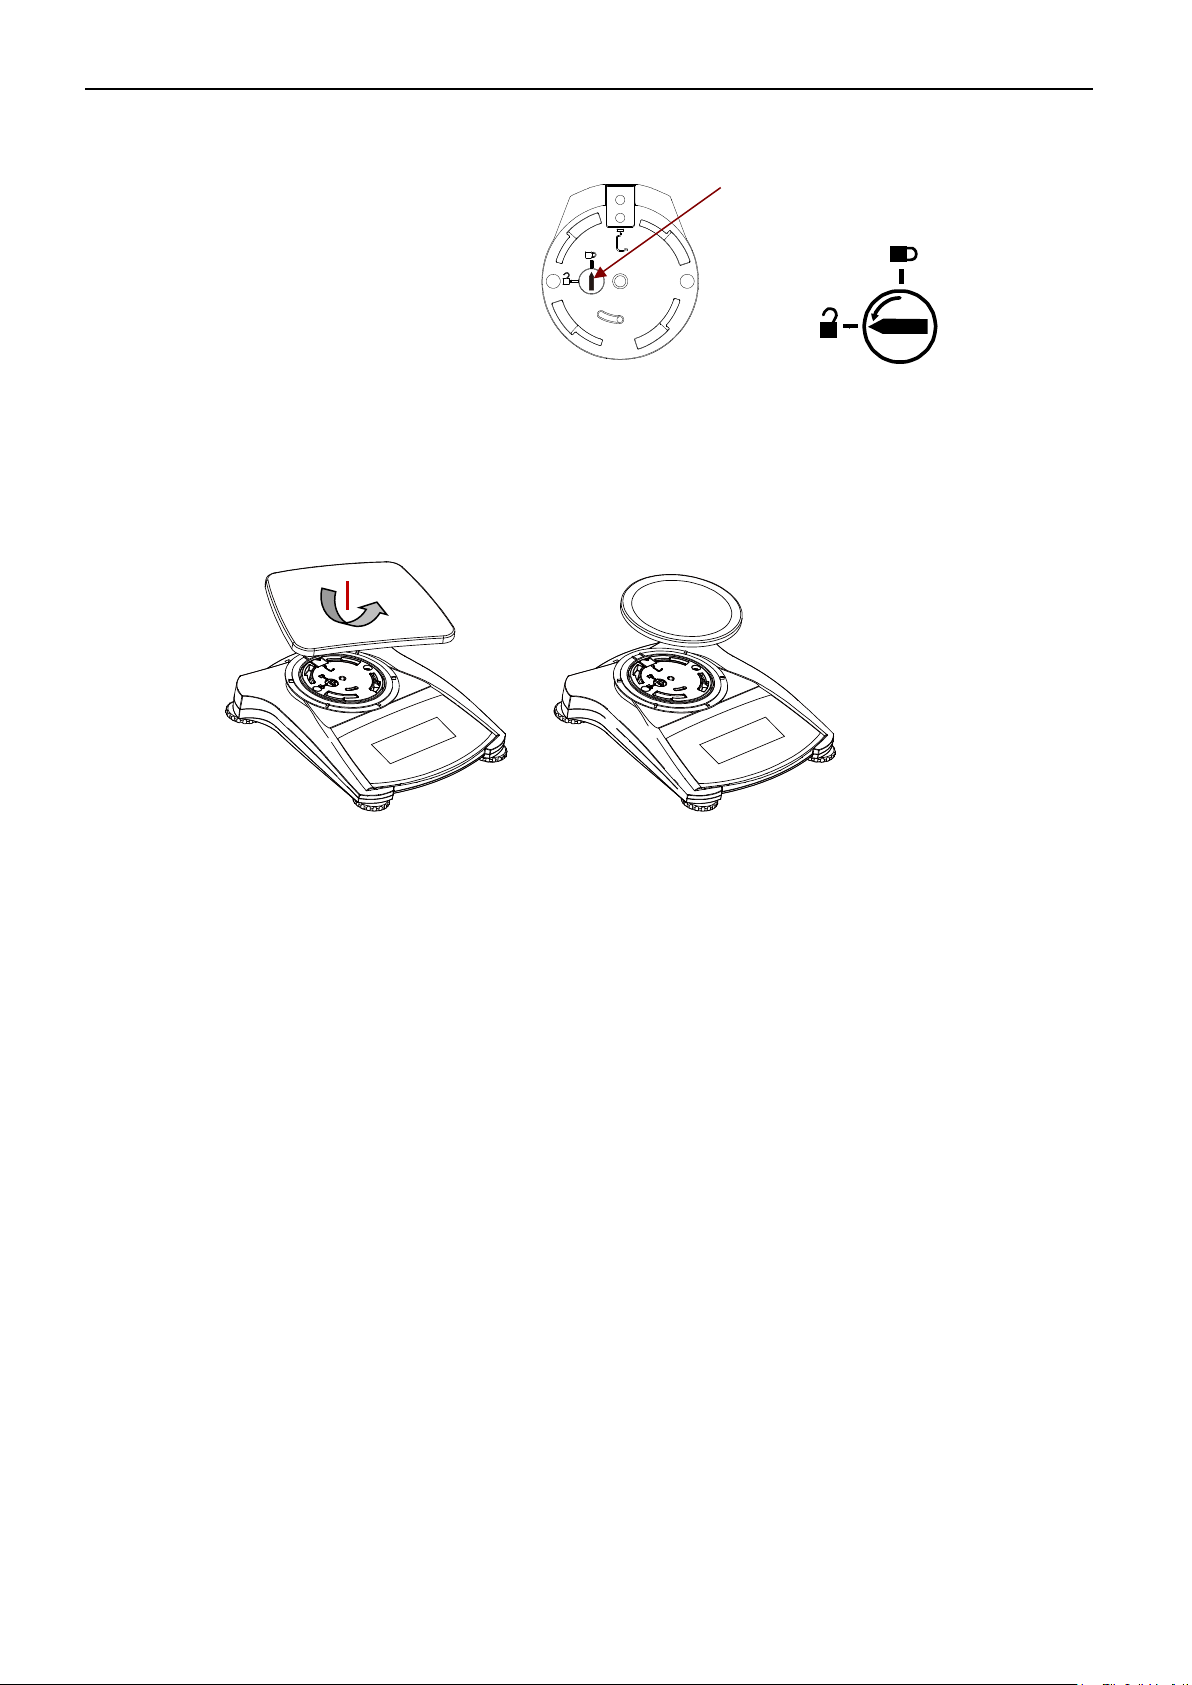
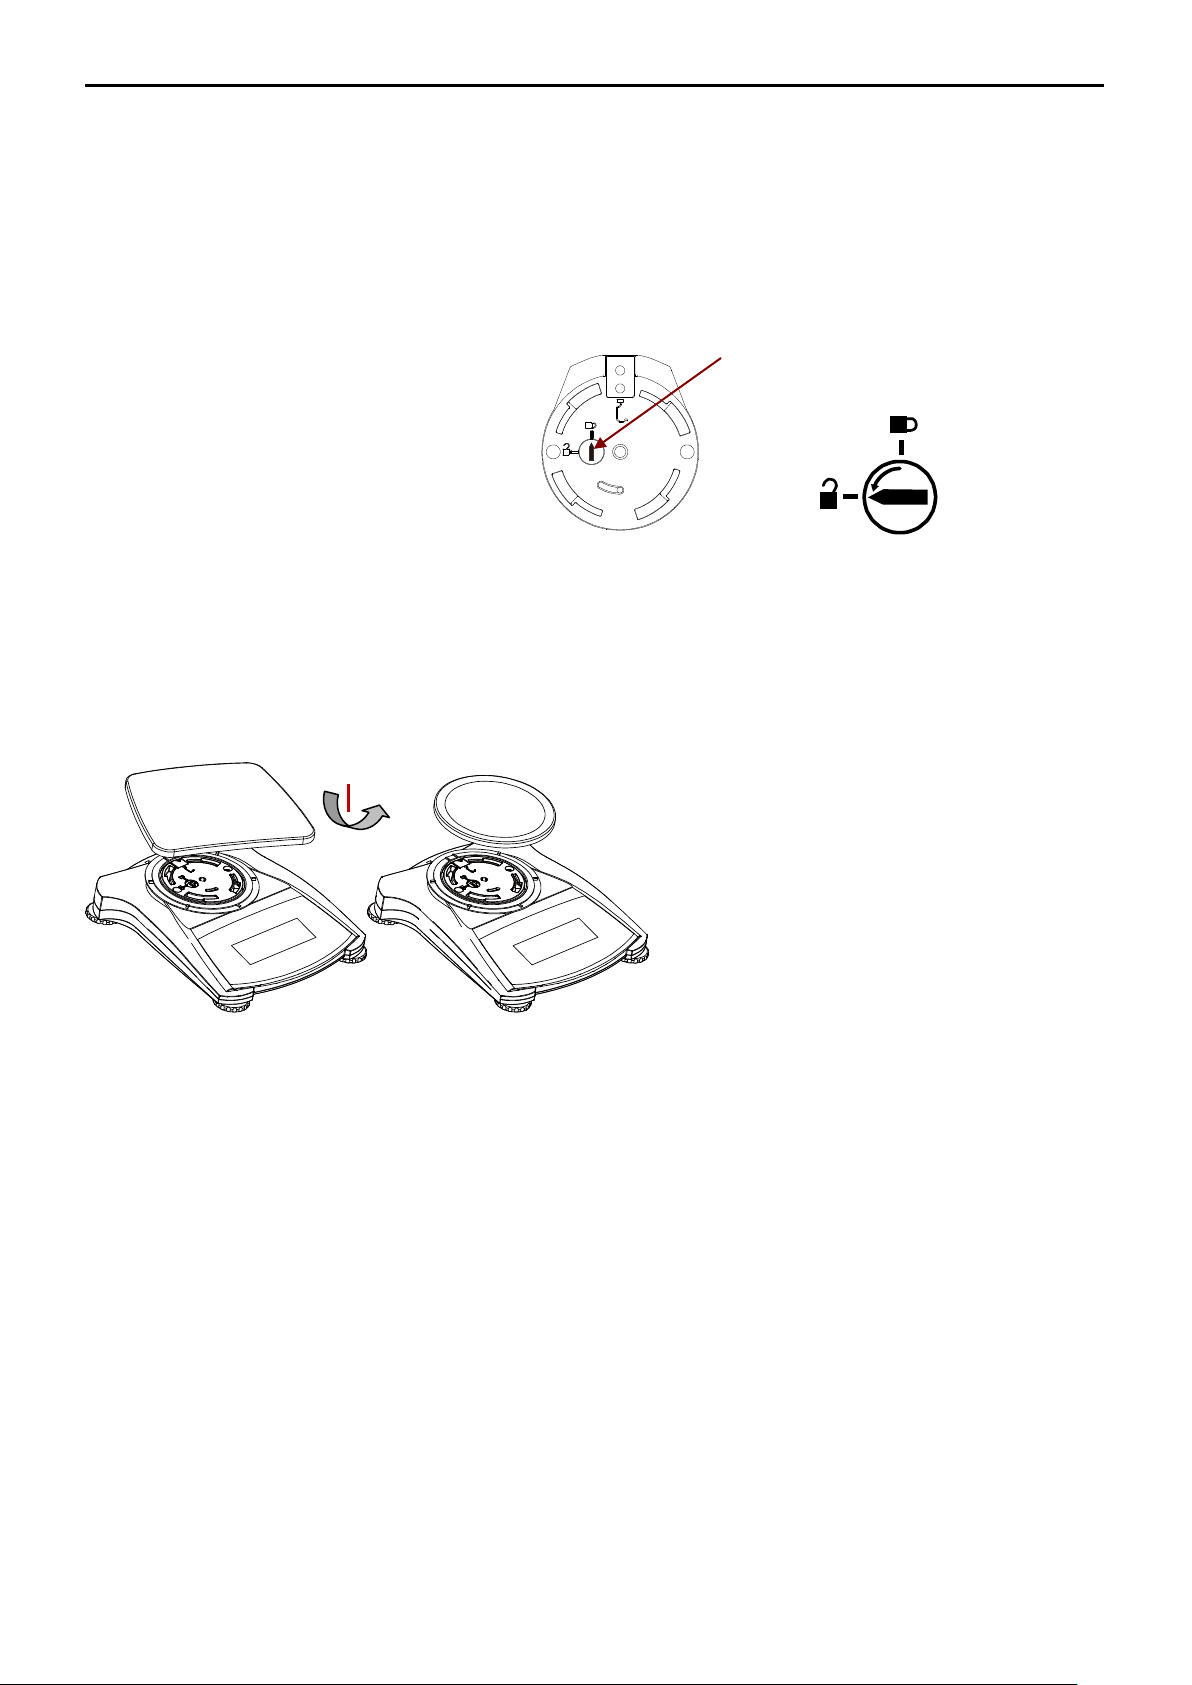
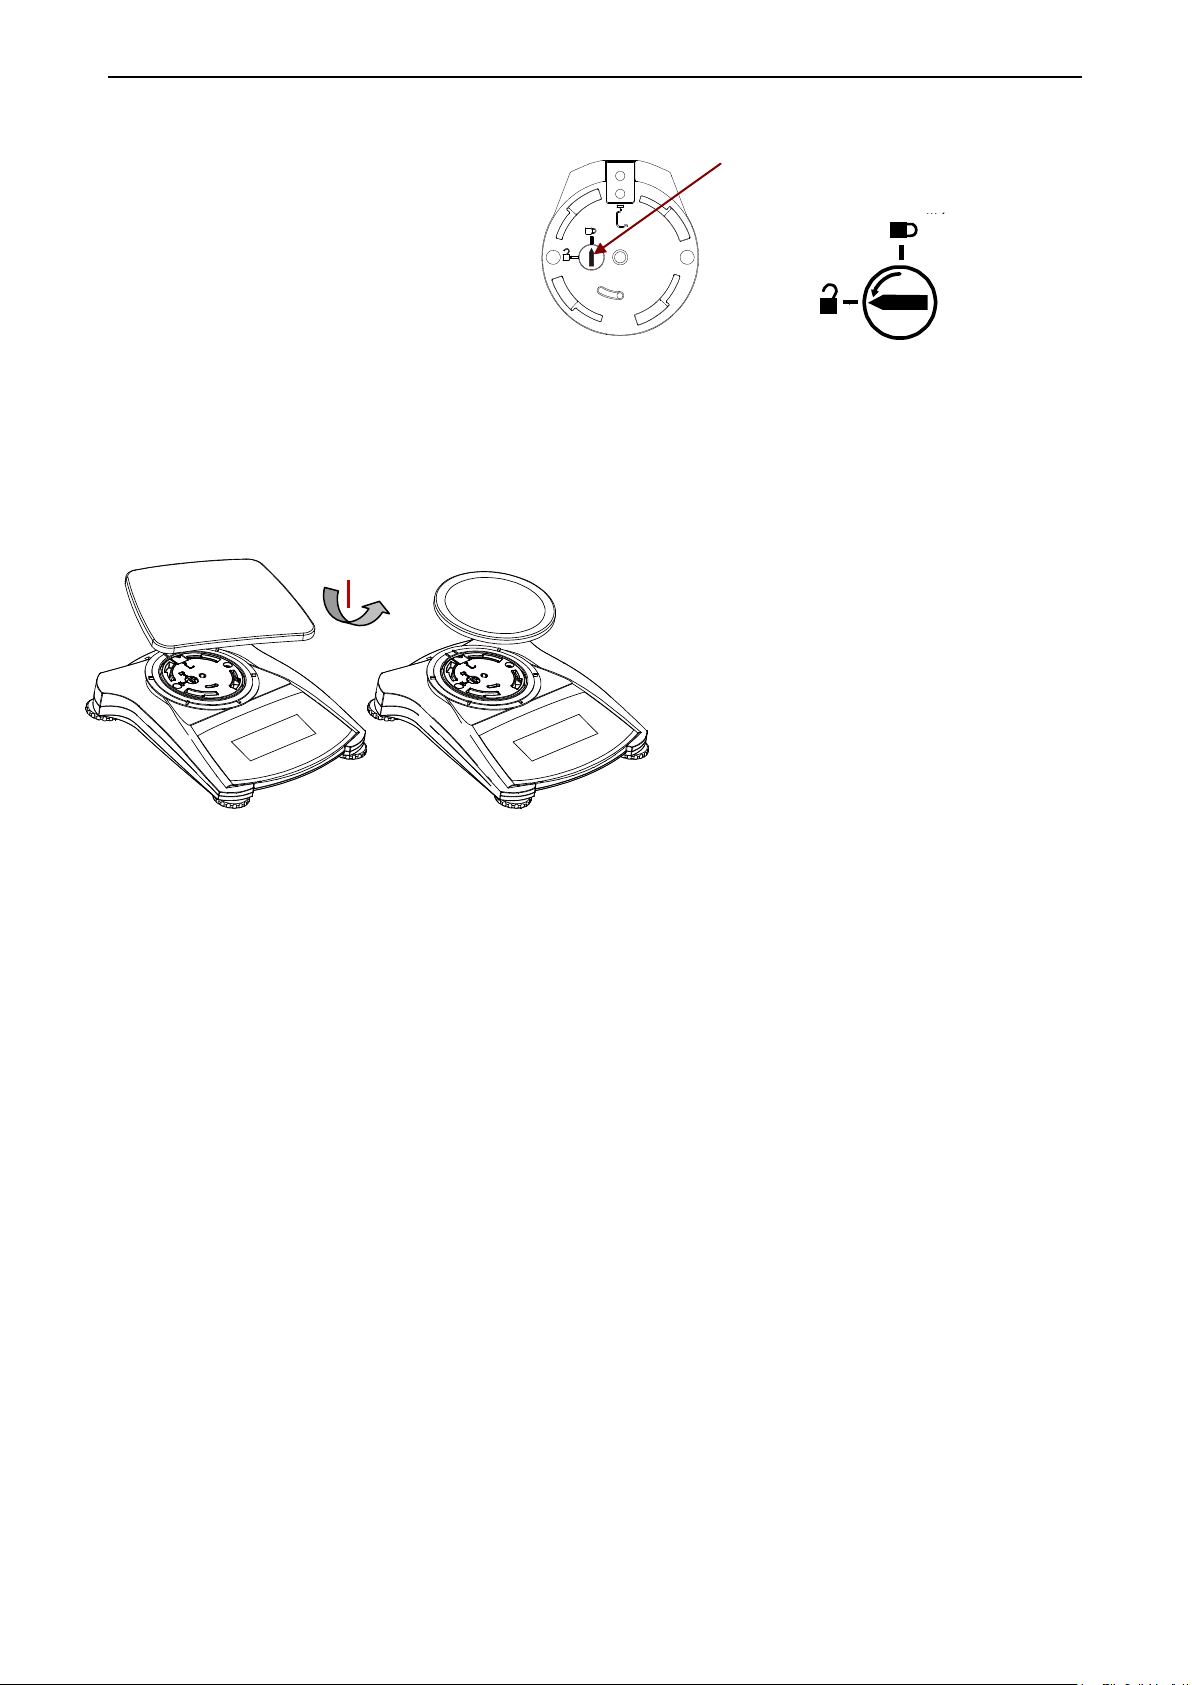
Release the red Transportation Lock on
the sub-platform of the balance by
turning the red pointer 90 counterclockwise.
Figure 2-1. Transportation Lock
Sub-platform
Transportation
Locked Position
Unlocked
Position
EN-2 SCOUTTM SERIES BALANCES - SKX
2.1.1 Releasing the Shipping Lock
2.1.2 Installing the Weighing Pan
Balances with a rectangular pan are placed into the sub-platform as shown and rotated counterclockwise until it locks. Round pans are placed straight down on sub-platform.
Figure 2-2. Pan Installation
2.2.3 Security Slot
A security slot is provided at the rear of the balance allowing the balance to be secured by an
optional cable and lock accessory.
2.3 Selecting the Location
For best performance, the Scout SKX balance should be used in a clean, stable environment.
Do not use the balance in environments with excessive drafts, with rapid temperature changes,
near magnetic fields or near equipment that generates magnetic fields, or vibrations.
Page 5
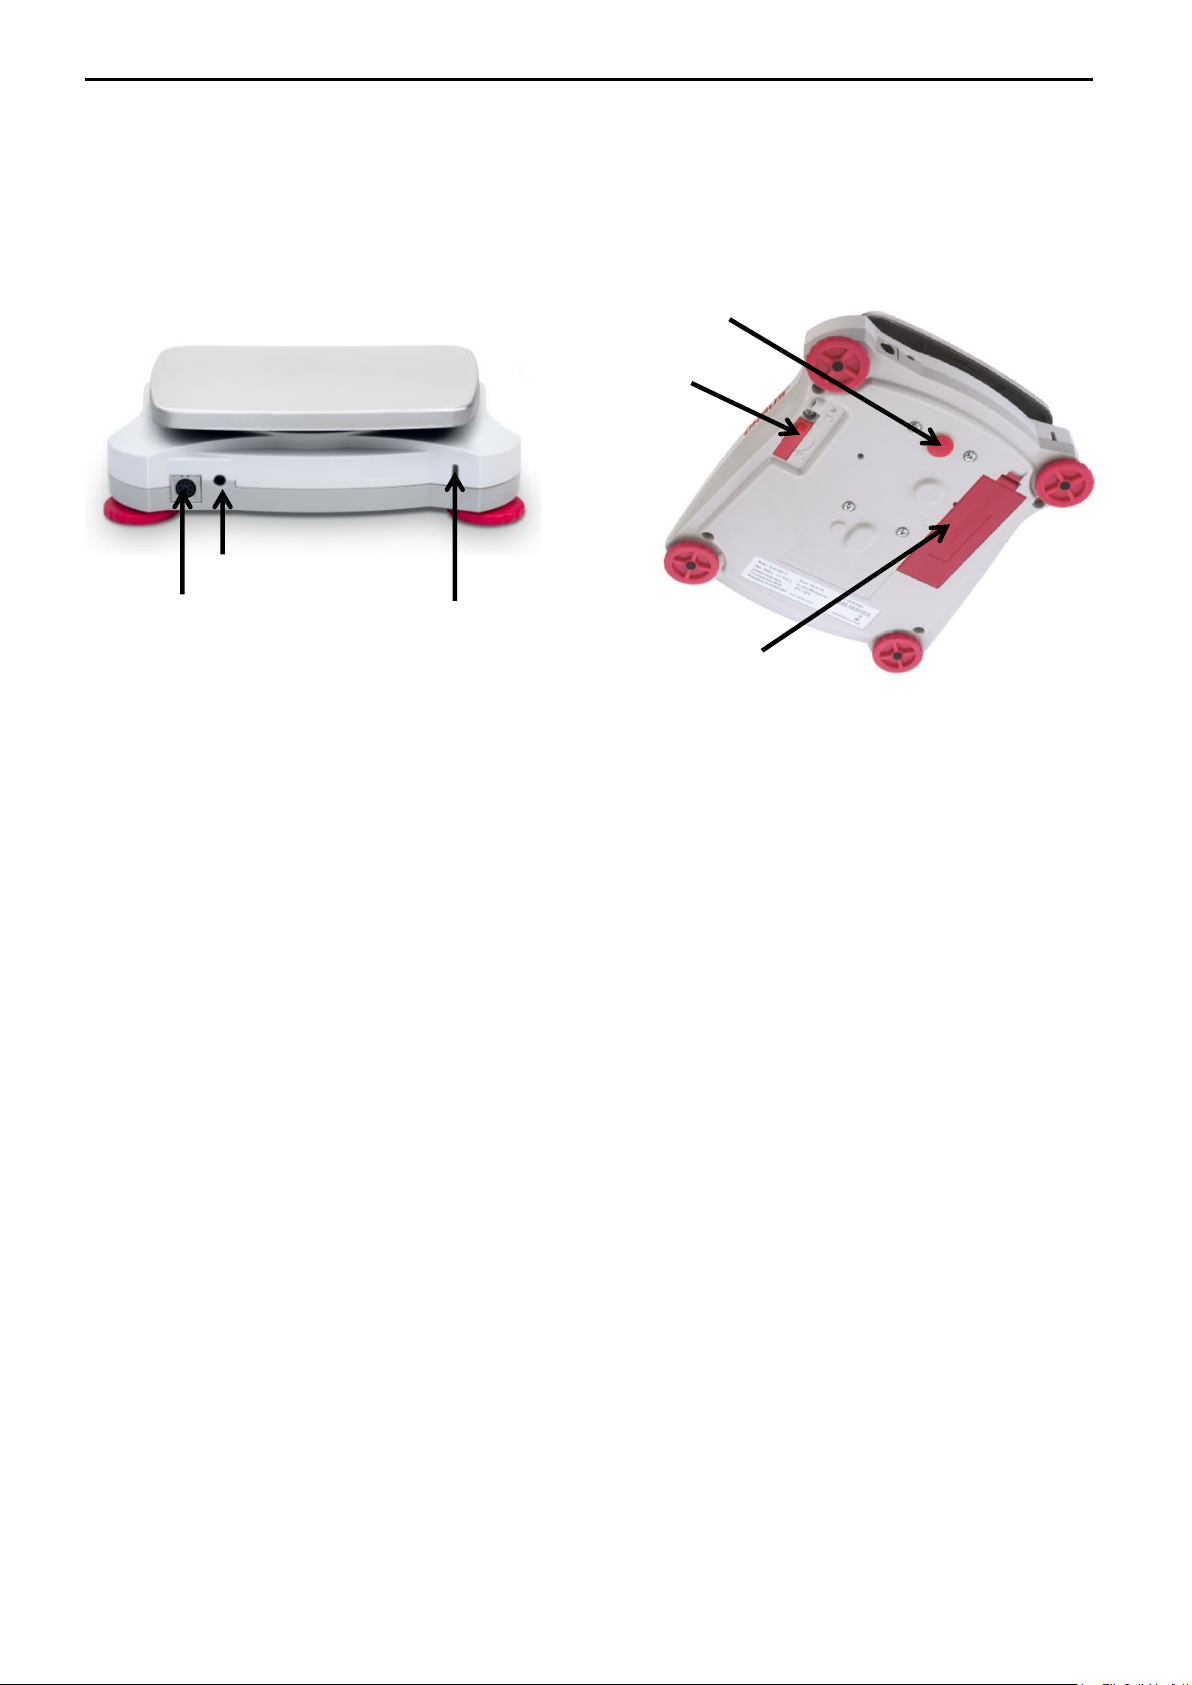
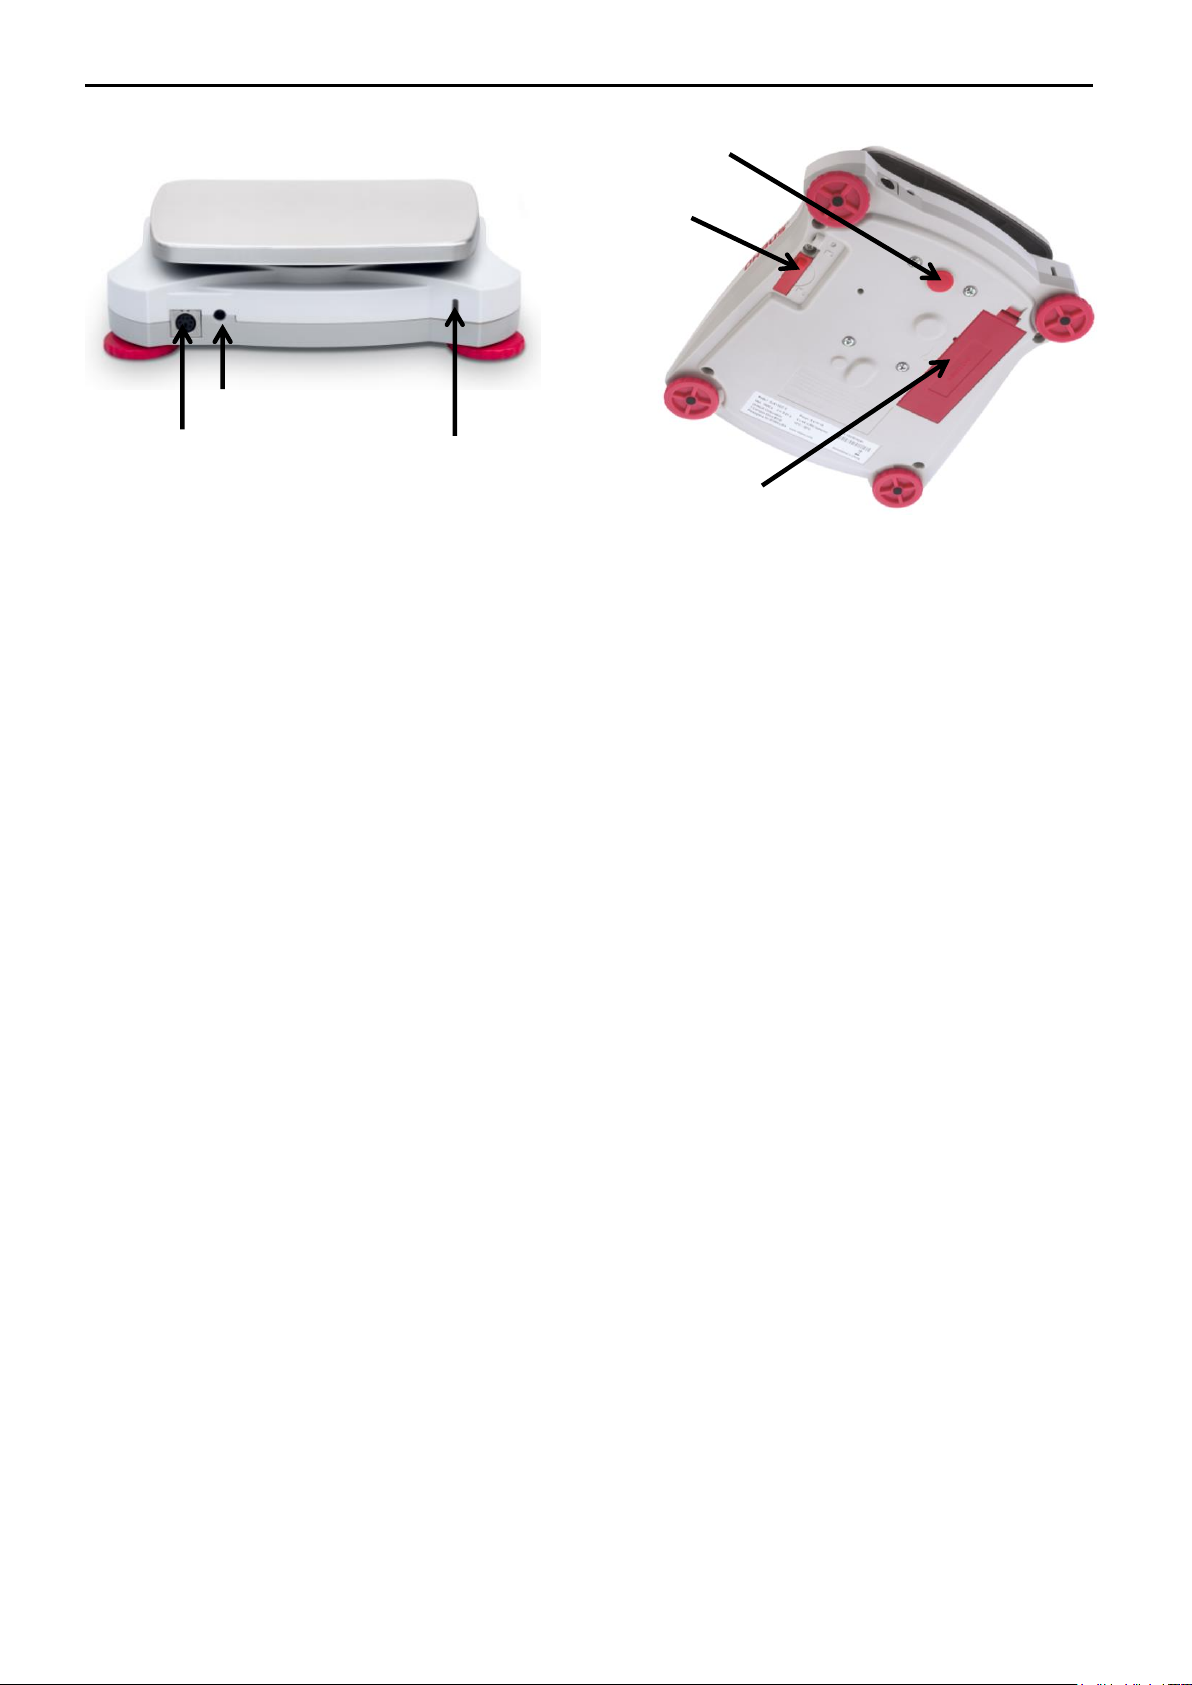
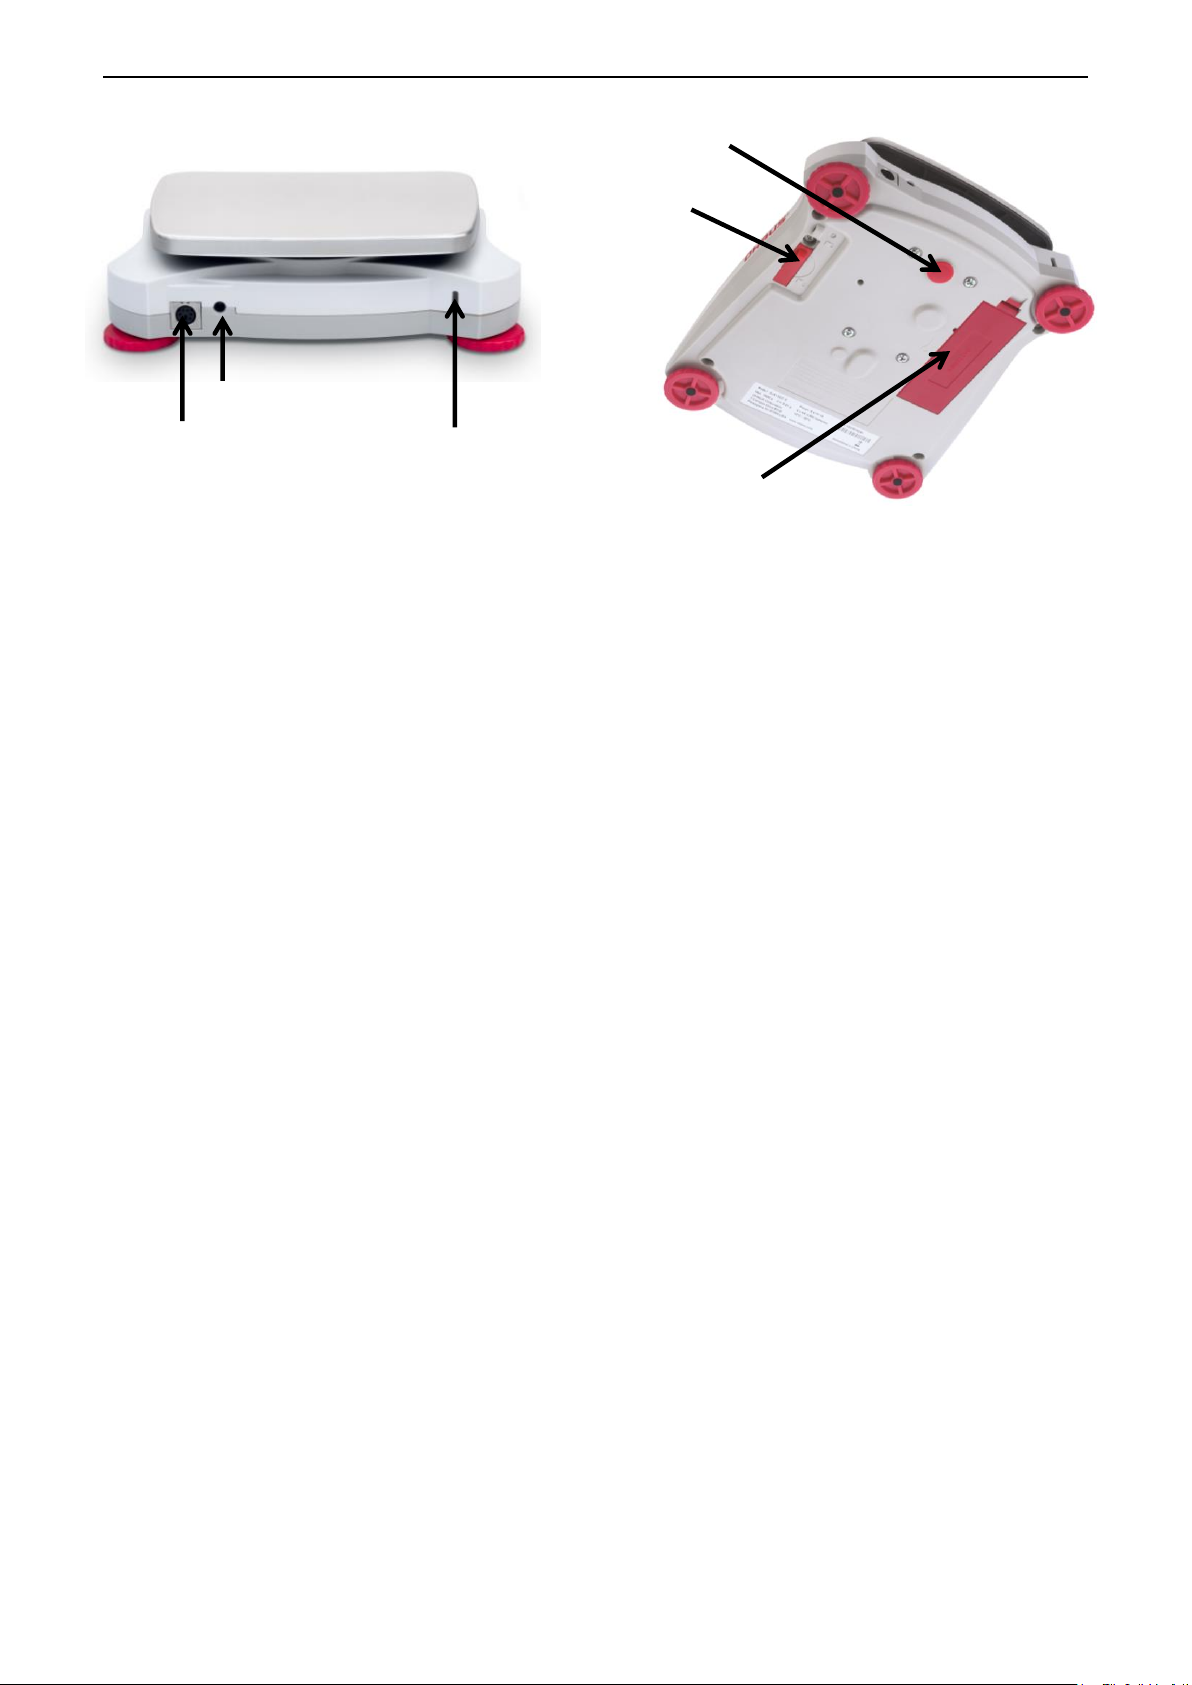
AC Adapter Input Jack
Battery Compartment Cover
Interface Connection
Security Switch
Weigh Below Hole
Security slot (Anti-theft lock slot)
SCOUTTM SERIES BALANCES - SKX EN-3
2.4 Connecting Power
AC Adapter Installation
AC power is used to power the scale when battery power is not needed. First, connect the AC
Adapter (supplied) to the AC Adapter Input receptacle at the rear of the balance then connect
the AC plug to an electrical outlet.
Figure 2-3. Rear and bottom view of balance
Battery Installation
Install the four “AA” batteries with polarity as shown in the battery compartment.
Note:
After power on, it is recommended to let the balance warm up for at least 5 minutes before
using it.
2.5 Initial Calibration
When the Balance is first installed, and when it is moved to another location, it must be
calibrated to ensure accurate weighing results. The balance can be manually calibrated with
external masses. Have the appropriate calibration masses available before beginning
calibration. Refer to the Calibration Section for masses and calibration procedure.
Page 6
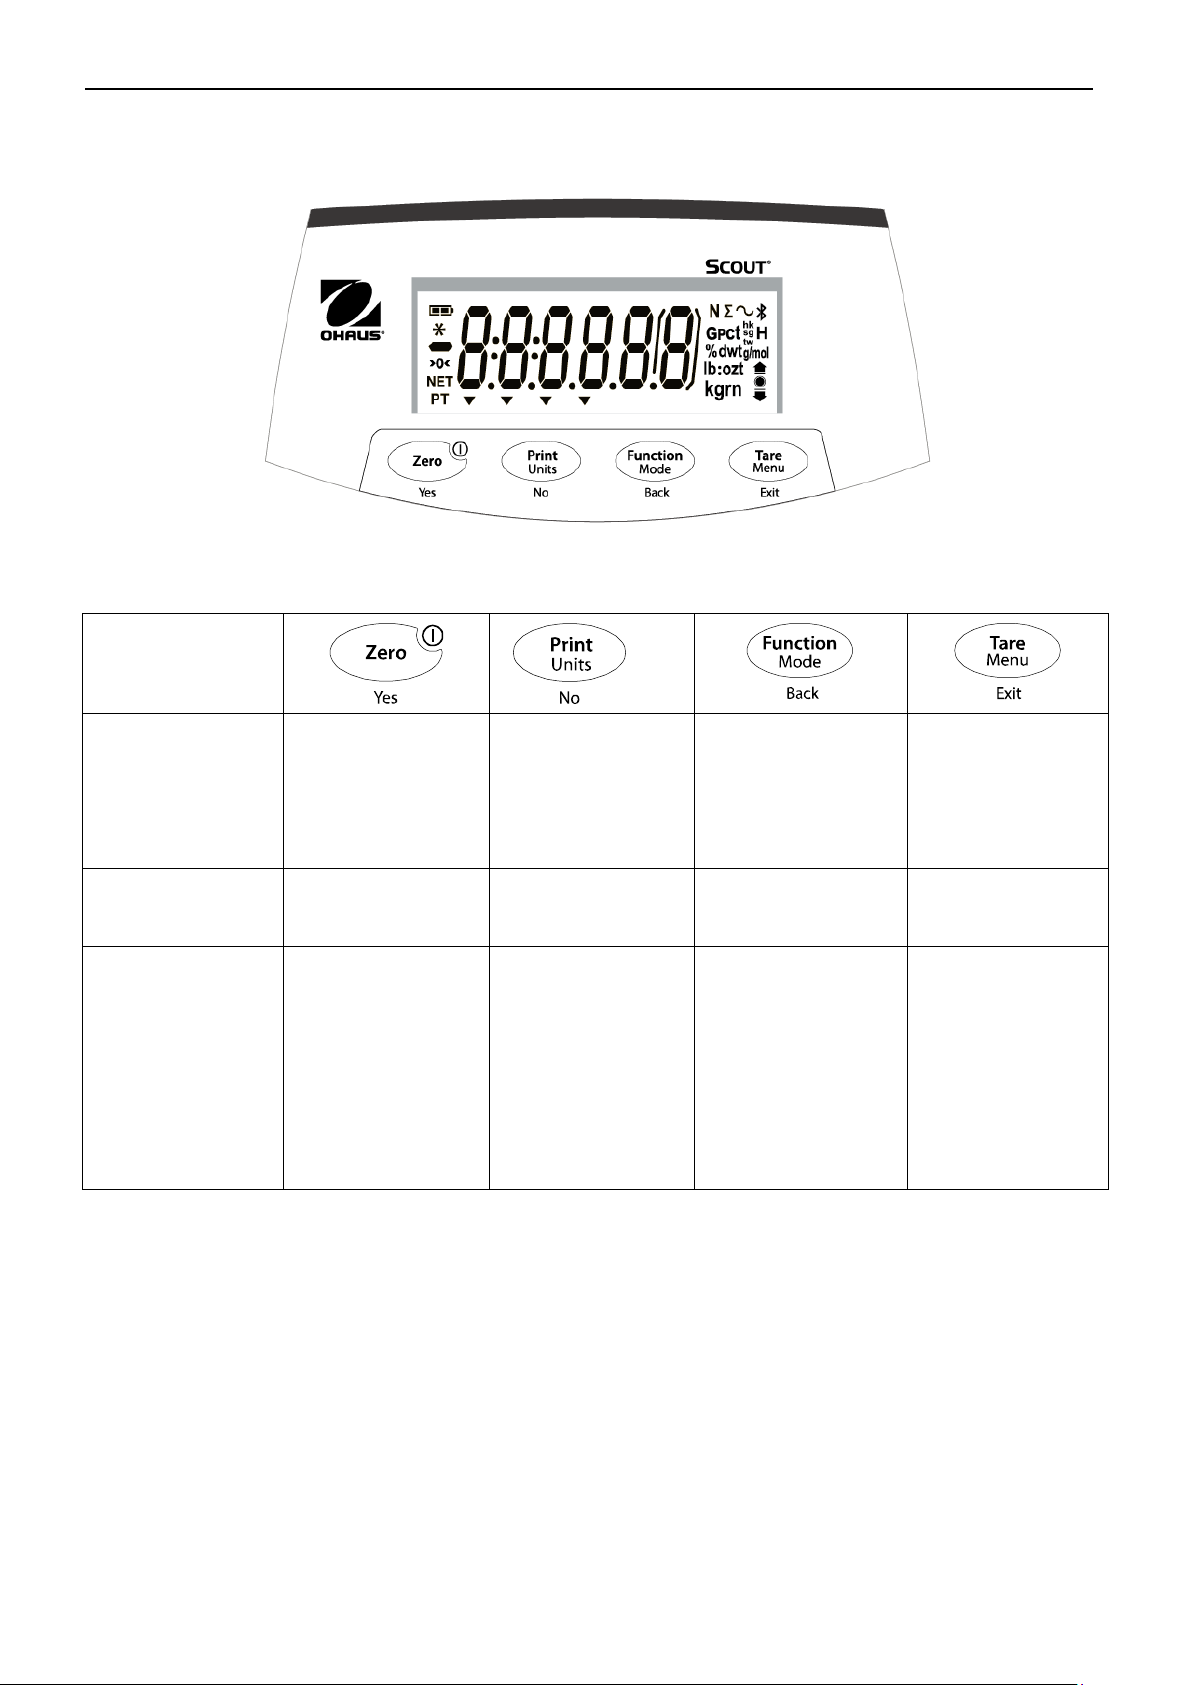
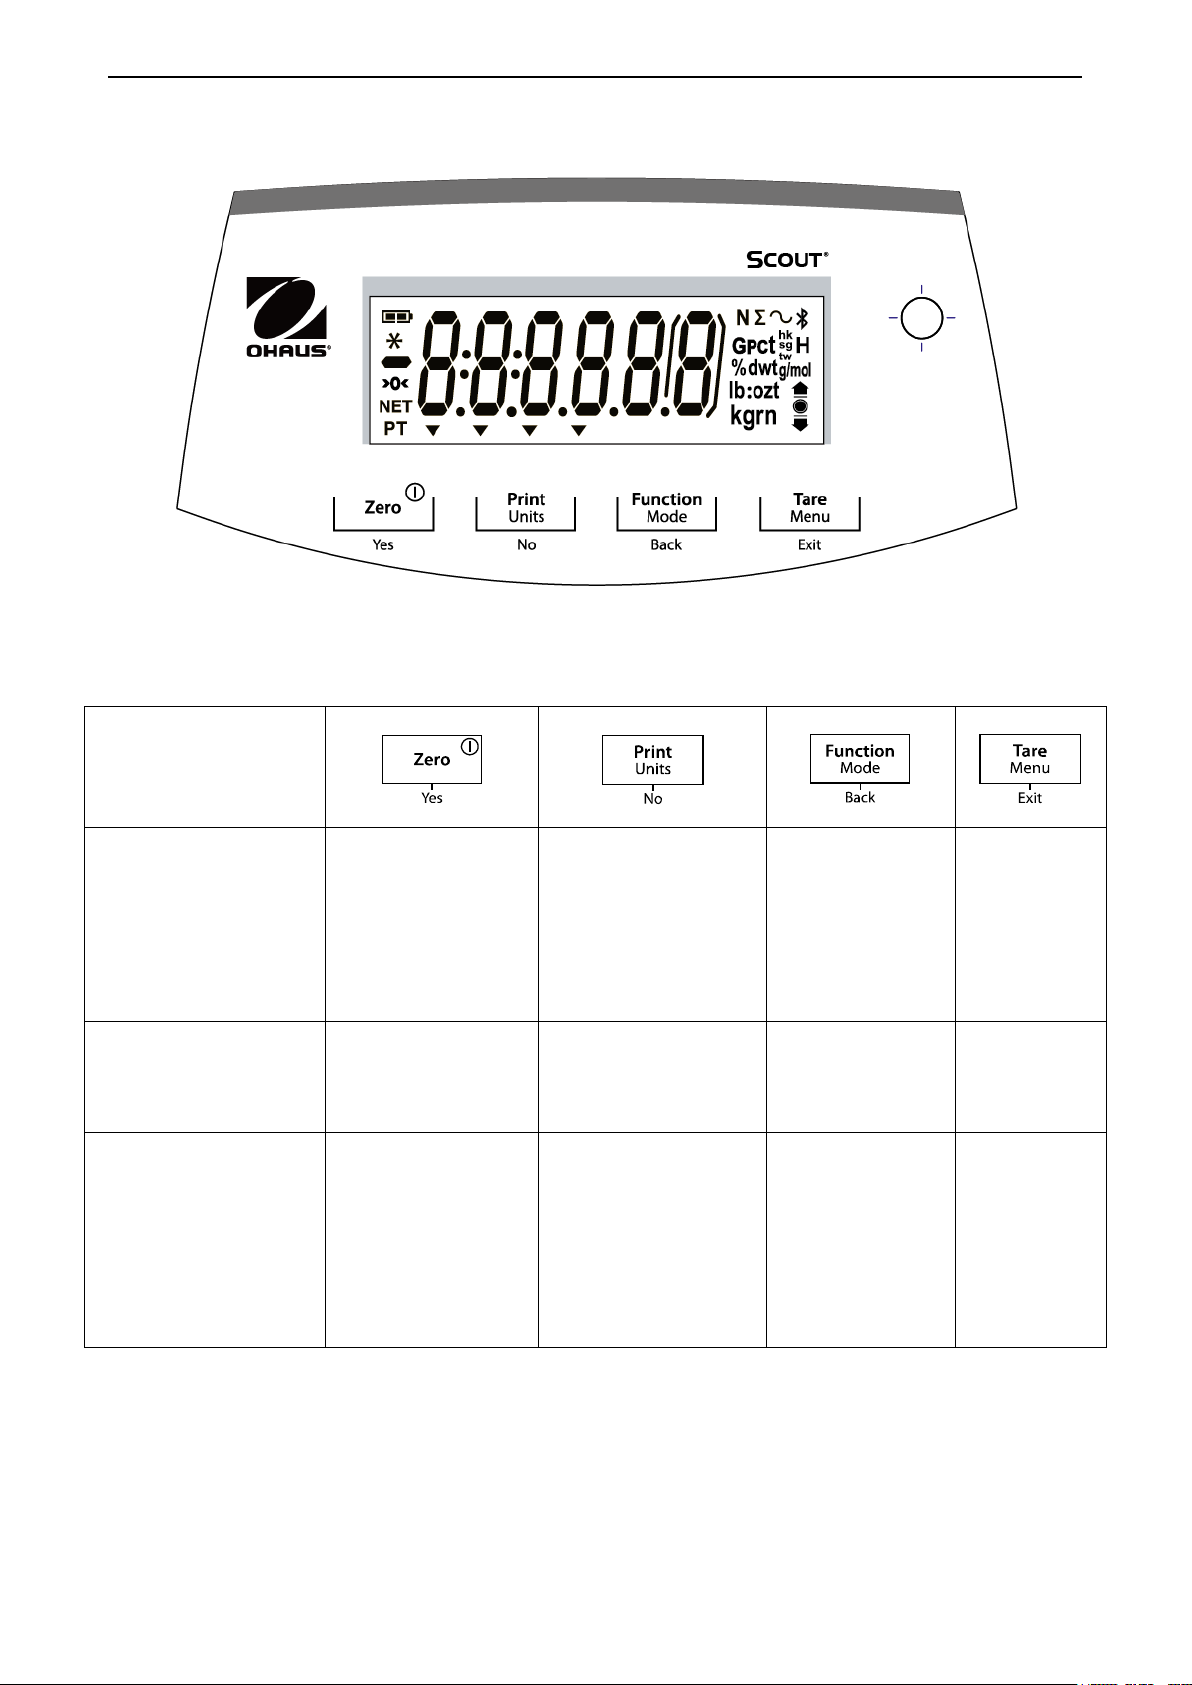
Button
Primary Function
(Short Press)
Zero/On
Turns the balance
on
If balance is On,
sets Zero
Print
Sends the current
value to the
selected COM ports
if AUTOPRINT is
set to Off.
Function
Initiates an
application mode.
Tare
Enter/clear a tare
value.
Secondary Function
(Long Press)
Zero/Off
Turns the balance
Off.
Units
Changes the
weighing unit.
Mode
Allows changing the
application mode.
Menu
Enter the User
menu.
Menu Function
(Short Press)
Yes
Accepts the current
setting on the
display.
No
Advances to the
next menu or menu
item.
Rejects the current
setting on the
display and
advances to the
next available
setting.
Back
Moves Back to
previous menu item.
Exit
Exits the User
menu.
Aborts the
calibration in
progress.
EN-4 SCOUTTM SERIES BALANCES - SKX
3. OPERATION
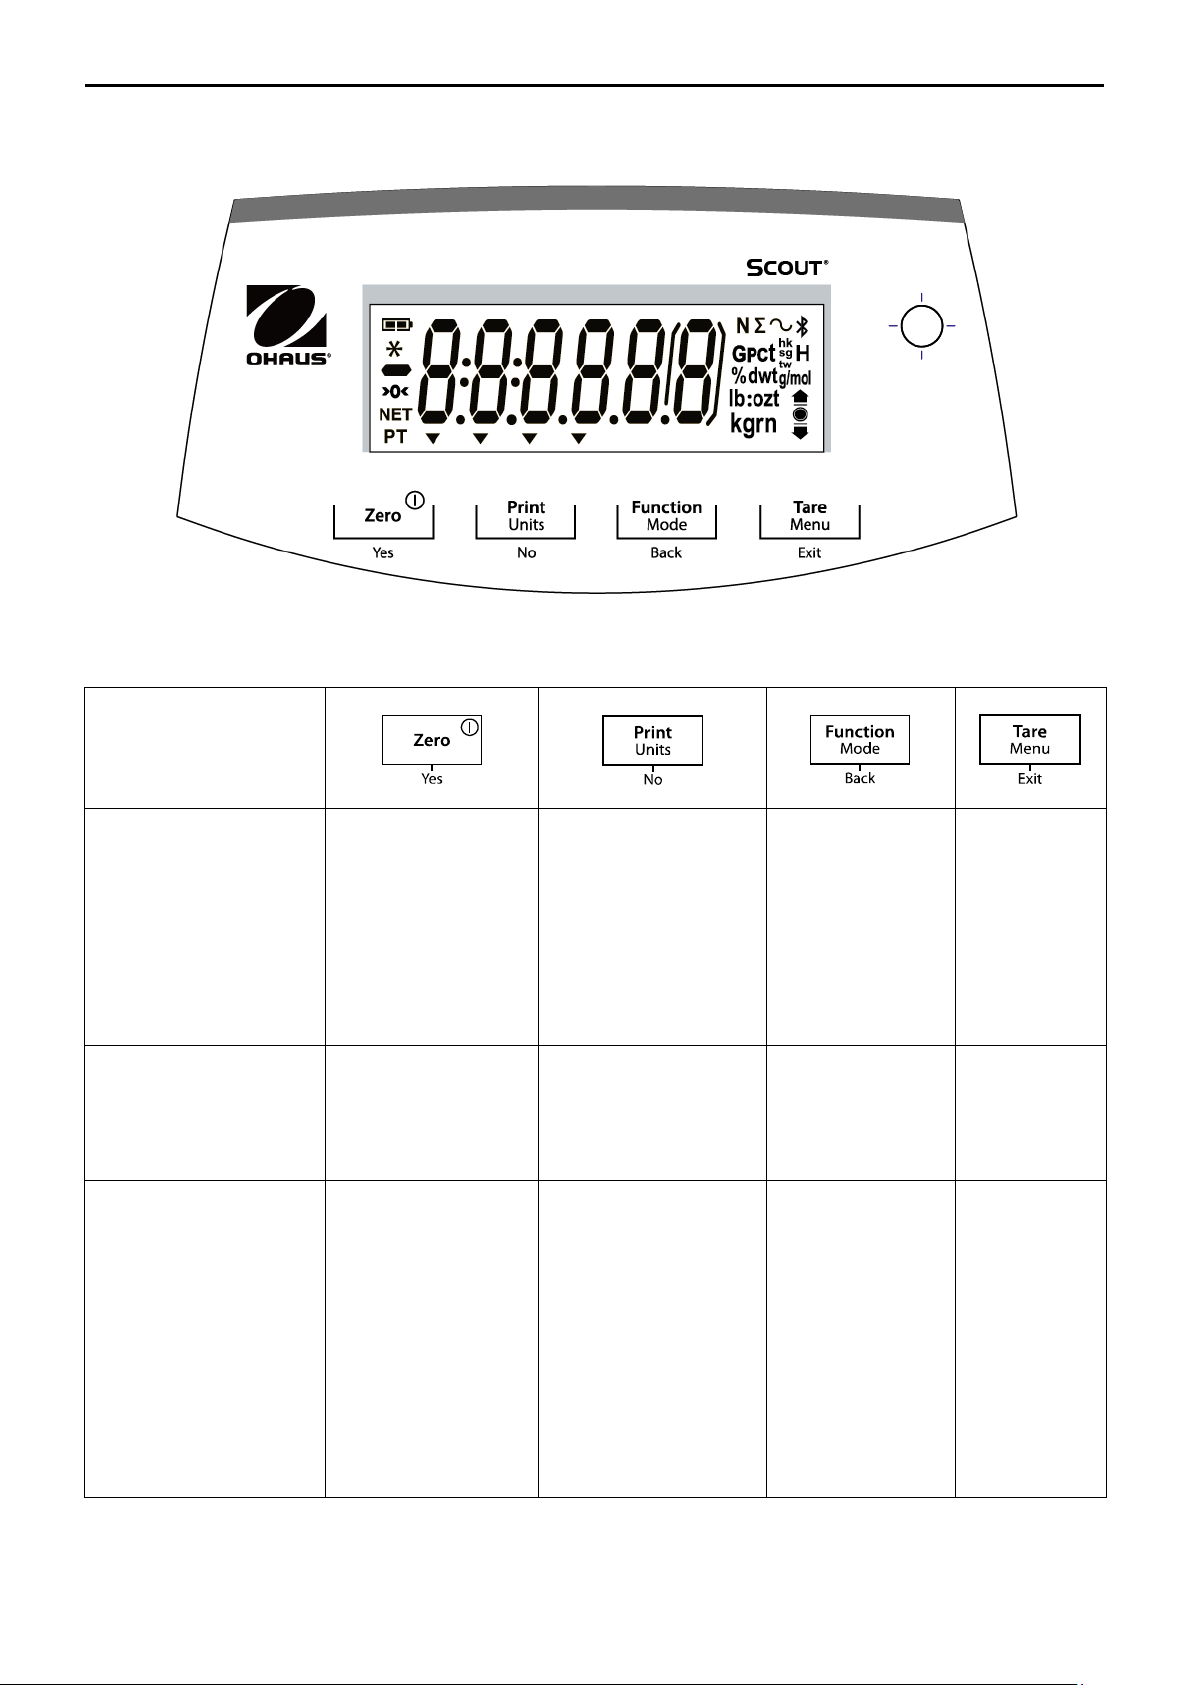
3.1 Controls
Figure 3-1. Scout Control Panel
TABLE 3-1. Button Functions
Notes: 1 Short Press: Press less than 1 second.
2
Long Press: Press and hold for more than 2 seconds
Page 7
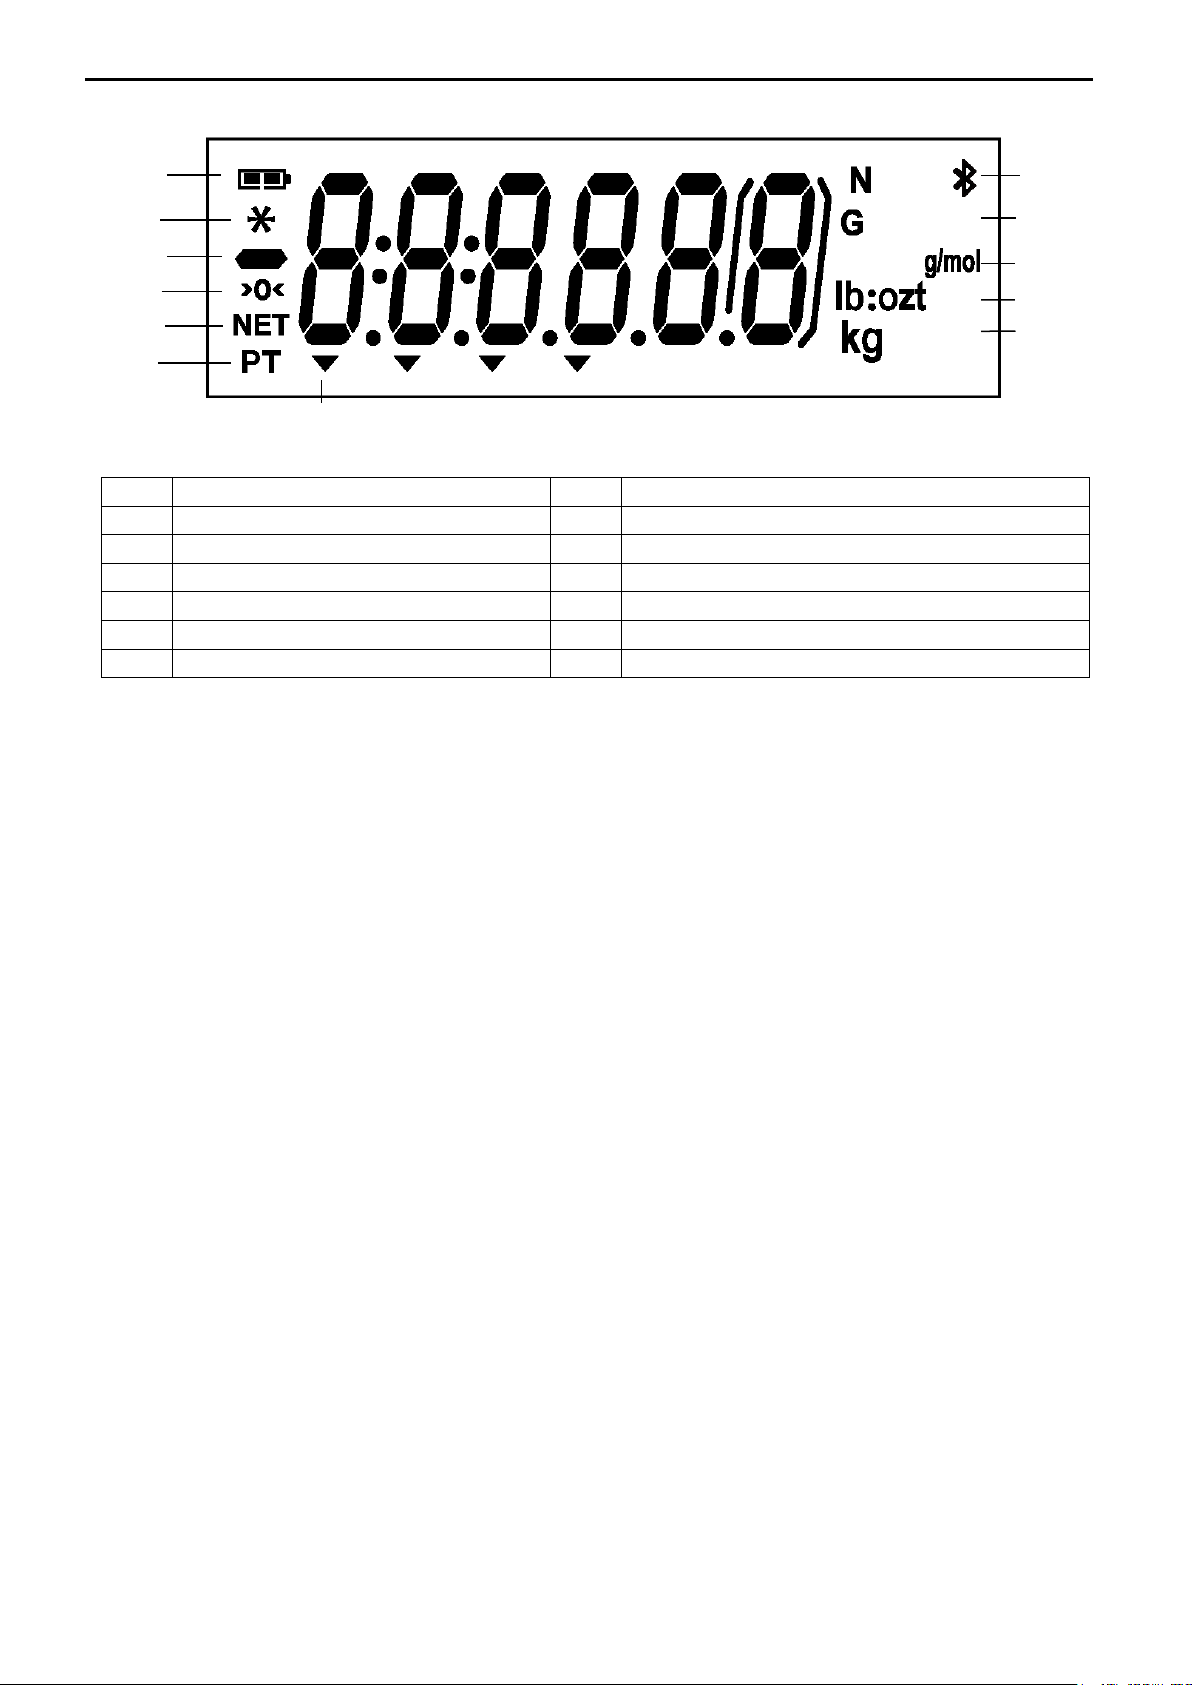
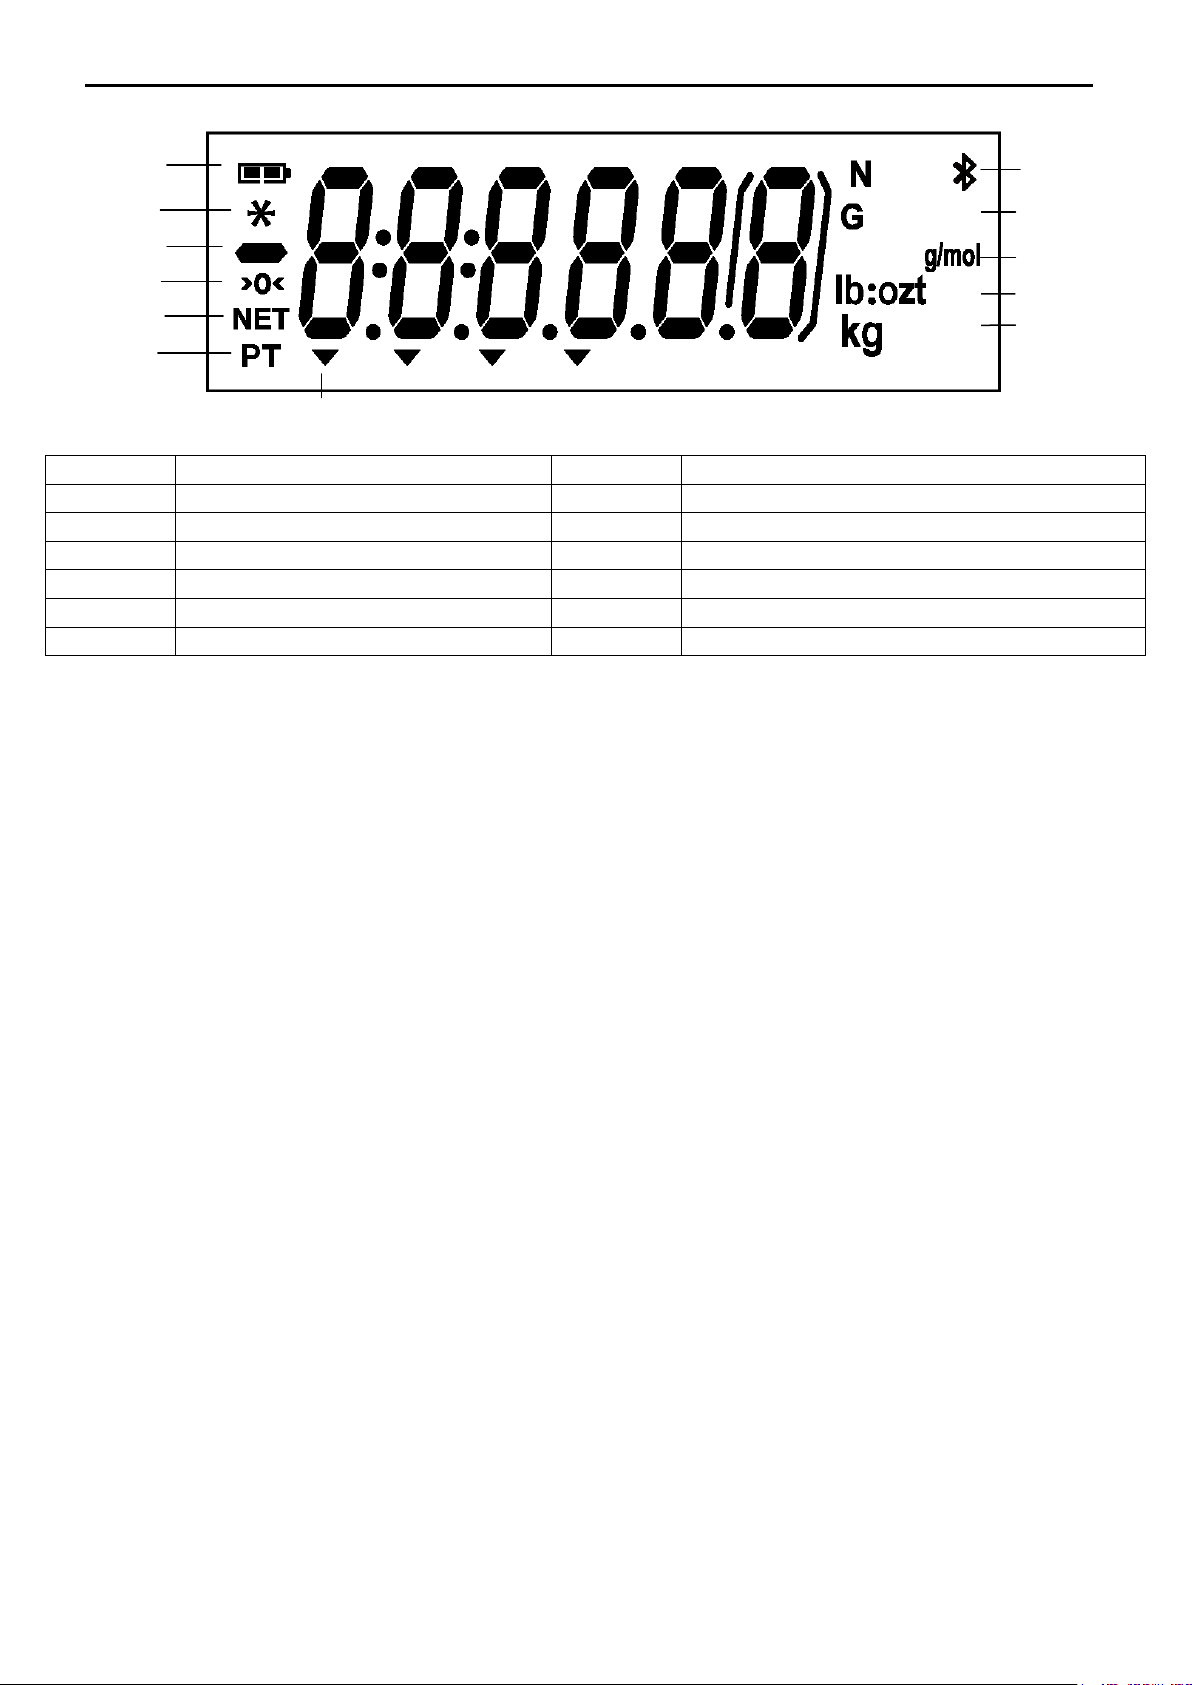
Item
Description
Item
Description
1
Battery charge symbol
7
Pointer symbols
2
Stable weight symbol
8
Kilogram, grain symbols
3
Negative symbol
9
Pound, Ounce, Pound:Ounce symbols
4
Center of Zero symbol
10
g/mol symbol
5
NET symbol
11
G symbol
6
Preset Tare symbol
12
Newton, Bluetooth symbols
2
3
4
1
5
6
8
9
10
11
12
7
SCOUTTM SERIES BALANCES - SKX EN-5
Figure 3-2. Scout Display
TABLE 3-2. Display Symbols
3.2 Turning Balance On/Off
To turn the balance on, press and hold the On/Zero Off button for 1 second. The balance
performs a display test, momentarily displays the software version, and then enters the active
weighing mode.
To turn the balance off, press and hold the On/Zero Off button until OFF is displayed.
3.3 Calibration Operation
When the balance is operated for the first time, a span calibration is recommended to ensure
accurate weighing results. Before performing the calibration, be sure to have the appropriate
calibration weights. Ensure that the Security switch is set to unlocked position.
Press and hold Menu until [mMeNU] (Menu) is displayed. When the button is released, the display
will show [C.A.L]. Press Yes to accept. [SpaN] will then be shown. Press Yes to begin the span
calibration.
[--C--] will be displayed while zero reading is stored. Next, the display shows the calibration
weight value (press No to toggle value). Place the specified calibration mass on the pan. [--C--]
will be displayed while the reading is stored. The display will show [done] if the calibration was
successful. The balance returns to the previous application mode and is ready for use.
3.4 Weighing Mode
This mode is the factory default setting.
1. If needed, press and hold Mode until [wWeIGH] (Weigh) is displayed.
2. If required, place an empty container on the pan and press Tare.
3. Add sample to the pan or container. The display shows the weight of the sample.
Page 8
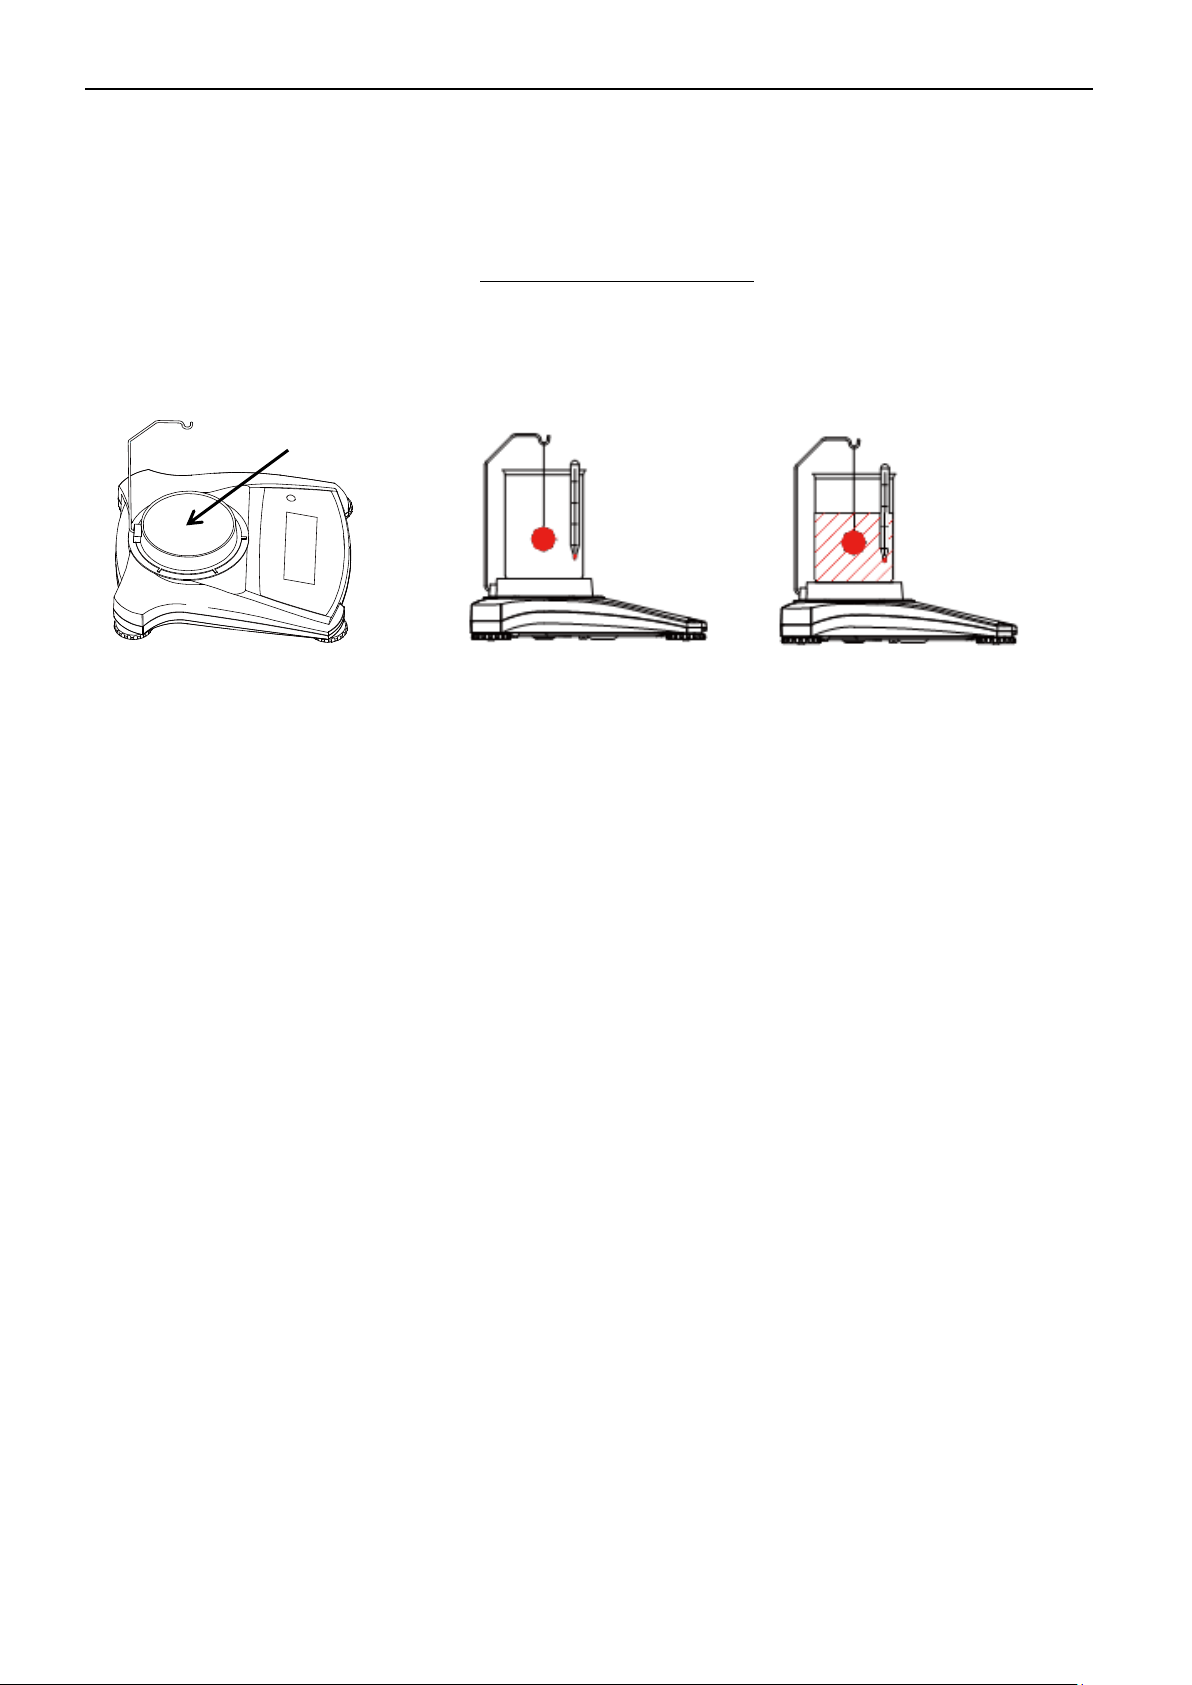
Beaker stand
Preparation
Air Weight
Wet Weight
EN-6 SCOUTTM SERIES BALANCES - SKX
3.5 Density Mode
This mode allows the user to calculate the specific gravity of a sample when using the density
kit. Density mode has been initiated when “G” and the current unit is displayed.
The sample is weighed in air suspended from the hook and then weighed in water. The formula
is
𝑑𝑟𝑦 𝑤𝑒𝑖𝑔ℎ𝑡
𝑑𝑟𝑦 𝑤𝑒𝑖𝑔ℎ𝑡 − 𝑤𝑒𝑡 𝑤𝑒𝑖𝑔ℎ𝑡
Preparation
Prepare the balance as shown below. Remove the balance pan, insert the hook and install the
beaker stand (beaker is not supplied). Then press the Zero/On button to turn the balance on.
Figure 3-3. Density Setup
Density setup
1. Press and hold Mode until [SPEC.Gr] is displayed. [Air.wWt] will then be displayed.
2. Place the sample on the hook as described above and press Yes to store the dry weight
value. [wW.wWt] will then be displayed.
3. Suspend the sample in water and press Yes to store the wet weight value. The specific
gravity value is now displayed and “G” is blinking while the unit icon is turned off.
Notes: Specific Gravity has no unit of measure.
For large samples it is recommended to use the weighing below feature instead of the
hook.
3.6 Mole Weighing Mode
To enter the Mole Weighing mode from any application mode, press and hold the Mode key
until [mMoLE] is displayed. When the Mode key is released, the display shows [Clr.mMS].
1. Press the Yes key to clear the stored Molar Mass. Press the No key to recall the existing
Molar Mass. If no Molar Mass was stored, the [Clr.mMS] display is skipped and inputting a
Molar Mass is required.
2. If there is a Molar Mass stored, the current Molar Mass will be displayed and flashing.
3. Press the No key to begin editing the Molar Mass.
5. Press the No key to increment the flashing digit.
6. Press the Back key to decrement the flashing digit.
7. Press the Yes key to accept the value and move one digit to the right.
Notes: If the setting exceeds the limit, the display returns to the previously stored value.
The most left number can be set to 0, 1, 2, 3, 4, 5, 6, 7, 8, 9,-. All other numbers can be
The available settings are from 0.01 to 999.99.
The Molar Mass unit is g/mol.
Display Molar Mass:
Press Function key to display the existing Molar Mass value for 2 sec.
New Molar Mass:
To enter a new Molar Mass press and hold the Function/Mode key until [mMoLE] is displayed.
set to 0, 1, 2, 3, 4, 5, 6, 7, 8, 9.
Page 9
Sub-Menus
C.a.l
S.e.t.u.p
M.o.d.e
U.n.i.t
E.n.d
User Menu Items:
Span
Lin
Reset
Yes/No
Filter
Low/Med/High
AZT
0.5/1/3/Off
StableRange
0.5/1/2//5
Backlight
Off/On/Auto
Auto Tare
Off/On/On-acc
Auto Off
Off/1/5/10
Reset
Yes/No
Weighing
On/Off
Density
On/Off
Mole
On/Off
Reset
g
kg
N
oz
lb
lb:oz
End
End
End
End
Span: Perform
Linearity: Perform
End Calibration: Exit menu
No/Back
Long press -
Enter menu
Short press -
Accept
Short press –
Go
menu
Yes
Exit
Short press –
Exit
SCOUTTM SERIES BALANCES - SKX EN-7
4. MENU SETTINGS
The User Menu allows the customizing of balance settings.
Note: Additional Sub-Menus may be available if Interface Options are installed. See Interface
User Manual for the additional setting information.
4.1 Menu Navigation
User Menu:
Next/Prev.
menu
Notes: Some Units/Modes may not be available in all models.
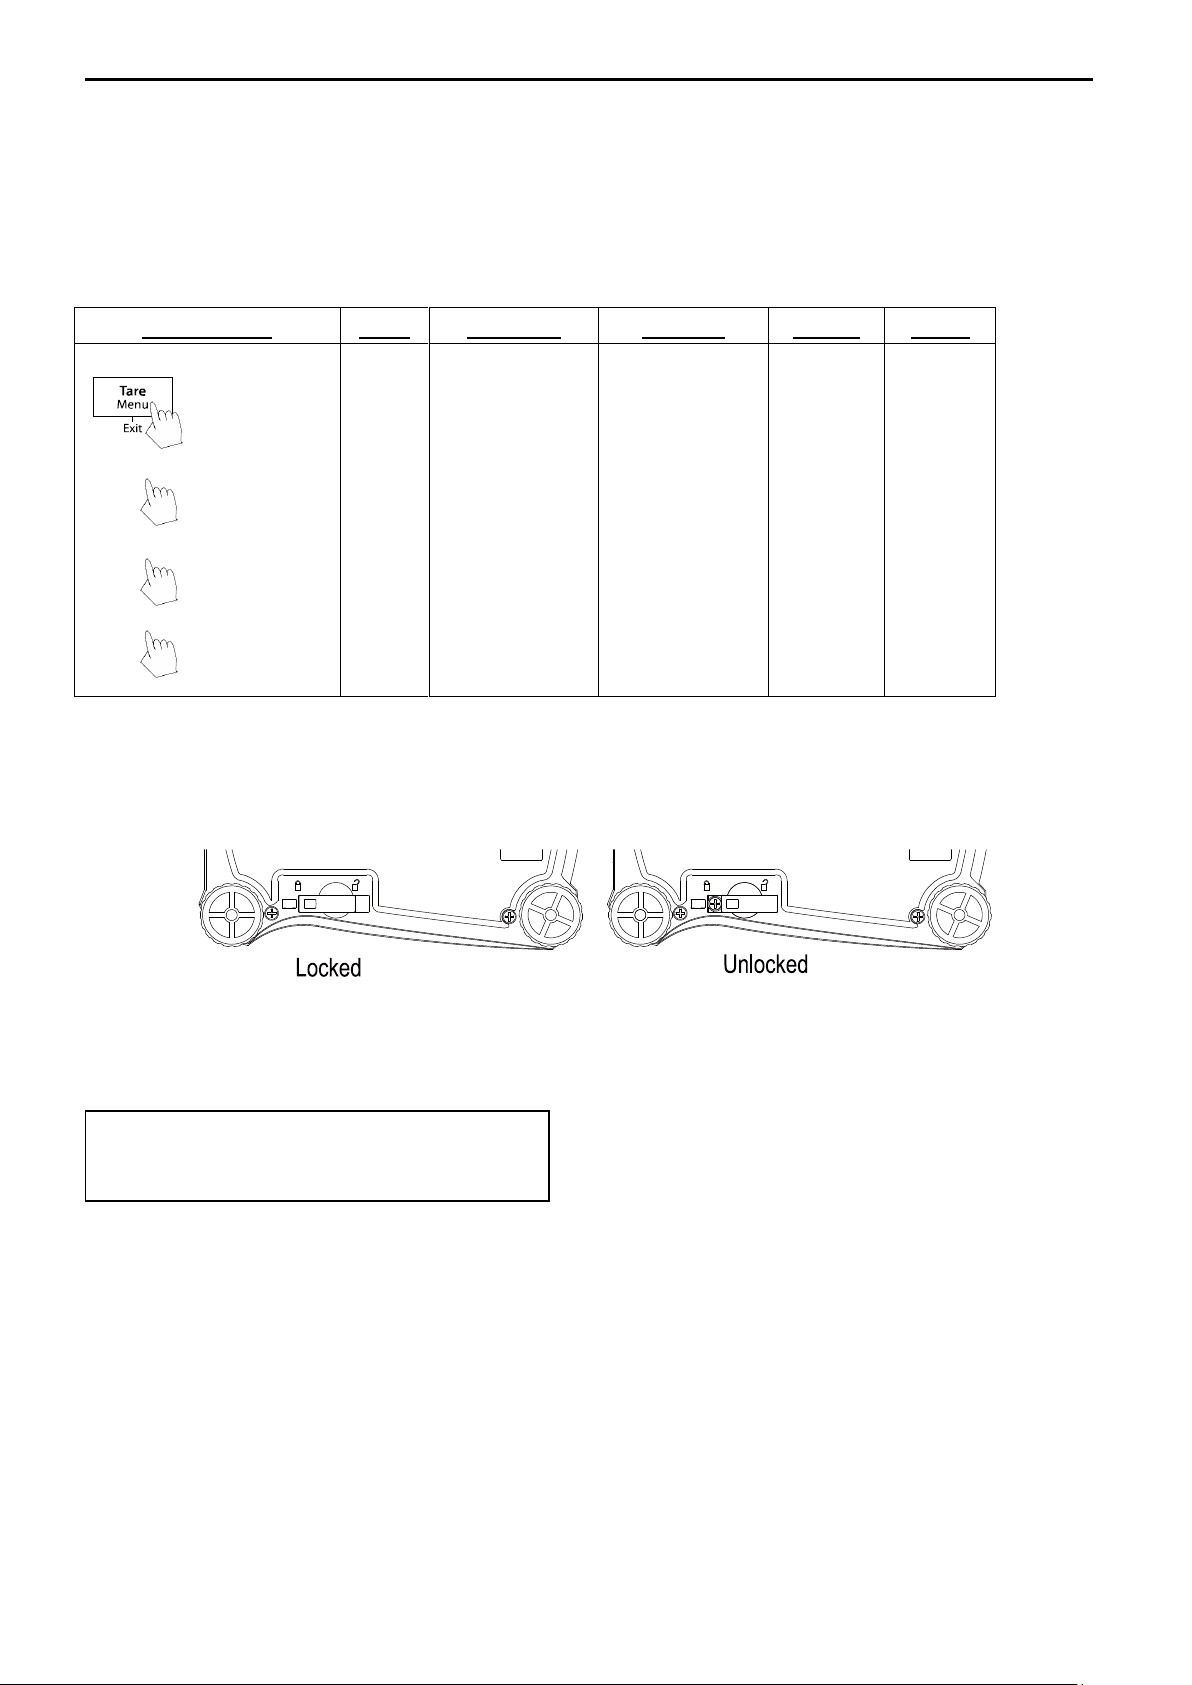
When the Security Switch is in locked position, the Calibration function is hidden, Units are
locked to the current setting.
Security switch:
4.2 Calibration Menu
Enter this menu to perform calibrations.
Span [SpaN]
Initiates a span calibration procedure (zero and span)
Lin [LIN]
Initiates a linearity calibration procedure (zero, mid-point and span).
End Cal [End]
Advance to the next menu or return to the top of the current menu.
Page 10
Reset: no, yes
Filter: Low, Med, High
Auto Zero Tracking: off, 0.5d, 1d, 3d
Stable: 0.5d, 1d, 2d, 5d
Backlight: off, on, auto
Auto Tare: off, on, on-acc
Auto Off: off, 1, 5, 10
End Setup: Exit menu
EN-8 SCOUTTM SERIES BALANCES - SKX
4.3 Setup Menu
Enter this menu to set balance parameters.
Note: Bold always represents factory default value.
Reset [reset]
Reset the Setup menu to factory defaults.
NO = not reset
YES = reset
Filter [FiLtEr]
Set the amount of signal filtering.
LOW = less stability, faster stabilization time
MED = normal stability, stabilization time
HI = greater stability, slower stabilization time
AZT [AZt]
Set the automatic zero tracking functionality.
OFF = disabled
0.5d = the display will maintain zero until a change of 0.5 division per second has
been exceeded.
1d = the display will maintain zero until a change of 1 division per second has been
exceeded.
3d = the display will maintain zero until a change of 3 divisions per second has been
exceeded.
Stable Range [Stable]
Set the amount the reading can vary while the stability symbol remains on.
0.5d = 0.5 balance division
1d = 1 balance division
2d = 2 balance divisions
5d = 5 balance divisions
Back Light [b.Light]
Sets backlight functionality.
OFF = always off
ON = always on
AUTO = turns on when a button is pressed or the displayed weight changes.
Note: When connected with power pack, the backlight is always on.
Auto Tare [A.tArE]
Set the automatic tare functionality.
OFF = Automatic Tare is disabled
ON = the first stable gross weight is tared
ON-ACC = stable gross loads within the accept limits are tared (in Check weighing mode)
Page 11
Reset: no, yes
Weigh: off, on
Density: off, on
Mole: off, on
End Mode: Exit menu
g: off, on
kg: off, on
N: off, on
oz: off, on
lb: off, on
lb:oz: off, on
End Unit: Exit menu
SCOUTTM SERIES BALANCES - SKX EN-9
Auto off [A.OFF]
Set the automatic shut off functionality.
OFF = disabled
1 = powers off after 1 minute of no activity
5 = powers off after 5 minutes of no activity
10 = powers off after 10 minutes of no activity
End Setup [End]
Advance to the next menu or return to the top of the current menu.
4.4 Mode Menu
This menu activates modes so they will be available for use with the Mode button.
Reset [reset]
Reset the Mode menu to factory defaults.
NO = not reset
YES = reset
Weigh [wWEIGH]
Set the status.
OFF = disabled
ON = enabled
Density [spec.Gr]
Set the sub-mode
OFF = disabled
ON = enabled
Mole [mMole]
Set the sub-mode
OFF = disabled
ON = enabled
Advance to the next menu or return to the top of the current menu.
End Mode [End]
4.5 Unit Menu
This menu activates units so they will be accessible with the Units button. The units in the menu
must be turned “on” to be active.
Note: Available units vary by model and local regulations.
Page 12
Use an optional interface connectivity kit to
connect the balance either to a computer or a
printer.
Below Interface kit accessories are available:
RS232, USB Host, USB Device, Ethernet,
Bluetooth®*.
Figure 4-4. Rear of the balance
* Interface kits may vary according to local regulations
The Bluetooth® word mark and logos are registered trademarks owned by Bluetooth SIG, Inc. and
any use of such marks by OHAUS is under license.
Interface
connection
AC Adapter
Jack
Security Slot
Weigh Below Hook
Weigh Below Hook installed
Weigh below opening
EN-10 SCOUTTM SERIES BALANCES - SKX
4.6 Additional Features
Weigh Below Hook
The Scout Balance is equipped with a weigh below hook for weighing below the balance.
The weigh below hook is located at the reverse side of the battery cover as shown below.
To use this feature, remove the red protective cover underneath for the weigh below opening.
Attention: Before turning the balance over, remove the Pan and Pan
Support (if present), and turn the transportation lock to “locked” position to
prevent damage.
Figure 4-2. Weigh below
The balance can be supported using lab jacks or any other convenient method. Ensure the
balance is level and secure and that the transportation lock has been released. Power on the
Balance, then use a string or wire to attach items to be weighed.
Figure 4-3. Weigh below application
Connecting the Interface
Page 13
WARNING: Electric Shock Hazard. Disconnect the equipment from the power
supply before cleaning. Electric Shock Hazard.
Symptom
Possible Cause
Cannot turn on
No power to balance
Poor accuracy
Improper calibration
Unstable environment
Cannot calibrate
Security switch in locked position
Err 8.1
Weight exceeds power on zero range.
Err 8.2
Weight below power on zero range.
Err 8.3
Over load (weight exceeds rated capacity)
Err 8.4
Under load (pan removed)
Err 8.5
Tare out of range
Err 8.6
Displayed value exceeds 999999 (possible in Totalization mode)
ref.err
Parts counting or percentage error – sample weight <1d. Balance
shows error then exits parts counting or goes to [Clr.ApU].
Lo.ref
Percent Reference weight or APW is too low for accurate results
CAL E
Fail to do calibration.
USB.Err
Cannot find menu or app file in U-disk.
DESCRIPTION
Item Number
DESCRIPTION
Item Number
RS232 kit
30268982
Stacking Kit, x1
30268988
USB Host kit
30268983
Specific Gravity kit
30269020
USB Device Kit
30268984
Auxiliary Display Kit
30269019
Bluetooth Kit*
30268985
Carrying Case
30269021
Ethernet Kit
30268986
In-Use Cover
30269022
Stacking Kit, x6
30268987
Printers and Cables
Contact OHAUS
SCOUTTM SERIES BALANCES - SKX EN-11
5. MAINTENANCE
5.1 Cleaning
The housing may be cleaned with a cloth dampened with a mild detergent if necessary.
Attention: Do not use solvents, chemicals, alcohol, ammonia or abrasives to clean the housing
or control panel.
5.2 Troubleshooting
The following table lists common problems and possible causes and remedies.
If the problem persists, contact OHAUS or your authorized dealer.
TABLE 5-1
5.3 Service Information
If the troubleshooting section does not resolve or describe your problem, contact your
authorized OHAUS service agent. For service assistance or technical support in the United
States call toll-free 1-800-672-7722 ext. 7852 between 8:00 AM and 5:00 PM EST. An OHAUS
product service specialist will be available to provide assistance. Outside the USA, please visit
our web site, www.ohaus.com to locate the OHAUS office nearest you.
5.4 Accessories
TABLE 5-2. ACCESSORIES
Note: * Bluetooth kit is only available in certain regions according to the local regulations.
Page 14
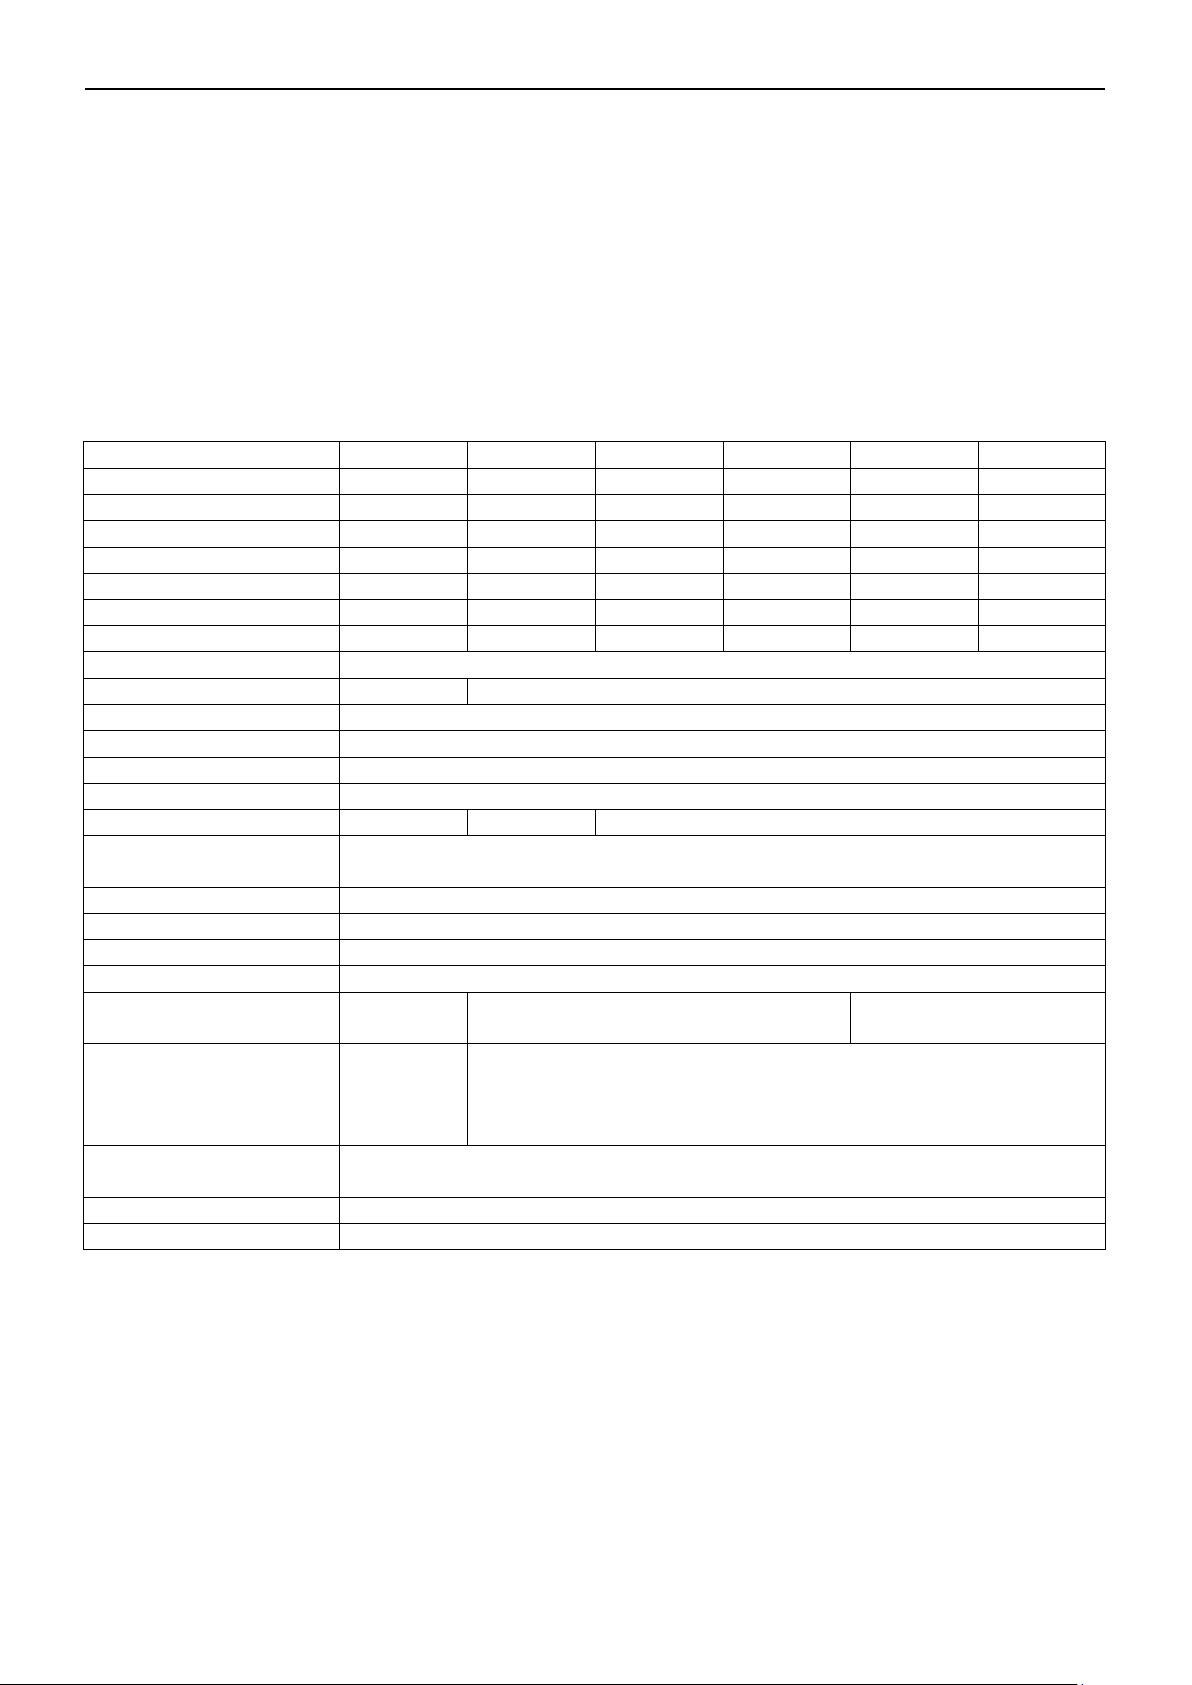
Model
SKX123
SKX222
SKX422
SKX622
SKX1202
SKX2202
Capacity (g)
120
220
420
620
1200
2200
Readability (g)
0.001
0.01
0.01
0.01
0.01
0.01
Repeatability (Std. Dev.) (g)
0.002
0.01
0.01
0.01
0.02
0.02
Linearity (g)
0.003
0.01
0.01
0.02
0.03
0.03
Span Calibration Mass*
100 g
200 g
200 g
300 g
1 kg
2 kg
Linearity Calibration Mass
50, 100 g
100, 200 g
200, 400 g
300, 600 g
500 g, 1 kg
1 kg, 2 kg
Stabilization Time (s)
1.5 1 1 1 1.5
1.5
Construction
ABS plastic housing with 304 stainless steel (SST) pan
Draftshield
Yes
No
Calibration
User-selectable external span or linearity calibration / Digital with external weight
Tare Range
Full Capacity by subtraction
Weighing Units**
g, kg, N, oz, lb, lb:oz
Application Modes
Weighing, Density Determination, Mole Weighing
Typical Battery Life
80 hours
120 hours
80 hours
Specified Temperature
Range
10° C (50°F) to 40° C (104° F) at 10% to 80% relative humidity, non-condensing
Storage Conditions
-20° C (-4° F) to 55° C (131° F) at 10% to 90% relative humidity, non-condensing
Communication
RS232, USB Host, USB Device, Ethernet or Bluetooth*** (all available as accessory)
Display Type
Backlit LCD: 6-digit 7-segment with white LED backlight
Display Size
0.78 in / 20 mm digits
Pan Size (W x D)
Ø 93 mm /
3.7 in
Ø 120 mm / 4.7 in
170 x 140 mm /
6.7 x 5.5 in
Balance Dimensions
(W x D x H)
202 x 222 x
103 mm /
8 x 8.7 x 4.1
in
202 x 224 x 54 mm / 8 x 8.8 x 2.1 in
Shipping Dimensions
(W x D x H)
300 x 250 x 129mm / 11.8 x 9.8 x 5.1 in
Net Weight
1 kg / 2.2 lb
Shipping Weight
1.6 kg / 3.5 lb
EN-12 SCOUTTM SERIES BALANCES - SKX
6. TECHNICAL DATA
The technical data is valid under the following ambient conditions:
Indoor use only
Operating temperature range: +5 °C to +40 °C
Relative humidity: 10% to 80% at 31°C , decreasing linearly to 50% at 40°C, non-condensing
Altitude: Up to 2000 m
Power: AC power adaptor input 100-240V 50/60 Hz and output 5 V DC 1 A, or 4 AA batteries
Pollution degree: 2
Main supply voltage fluctuations: up to ± 10% of the nominal voltage
6.1 Specifications
TABLE 6-1. SPECIFICATIONS
Notes:
* Calibration weights are included with models up to 620g capacity for certain regions.
** Availability is dependent on model and region.
*** Bluetooth kit is only available in certain regions according to the local regulations
Page 15
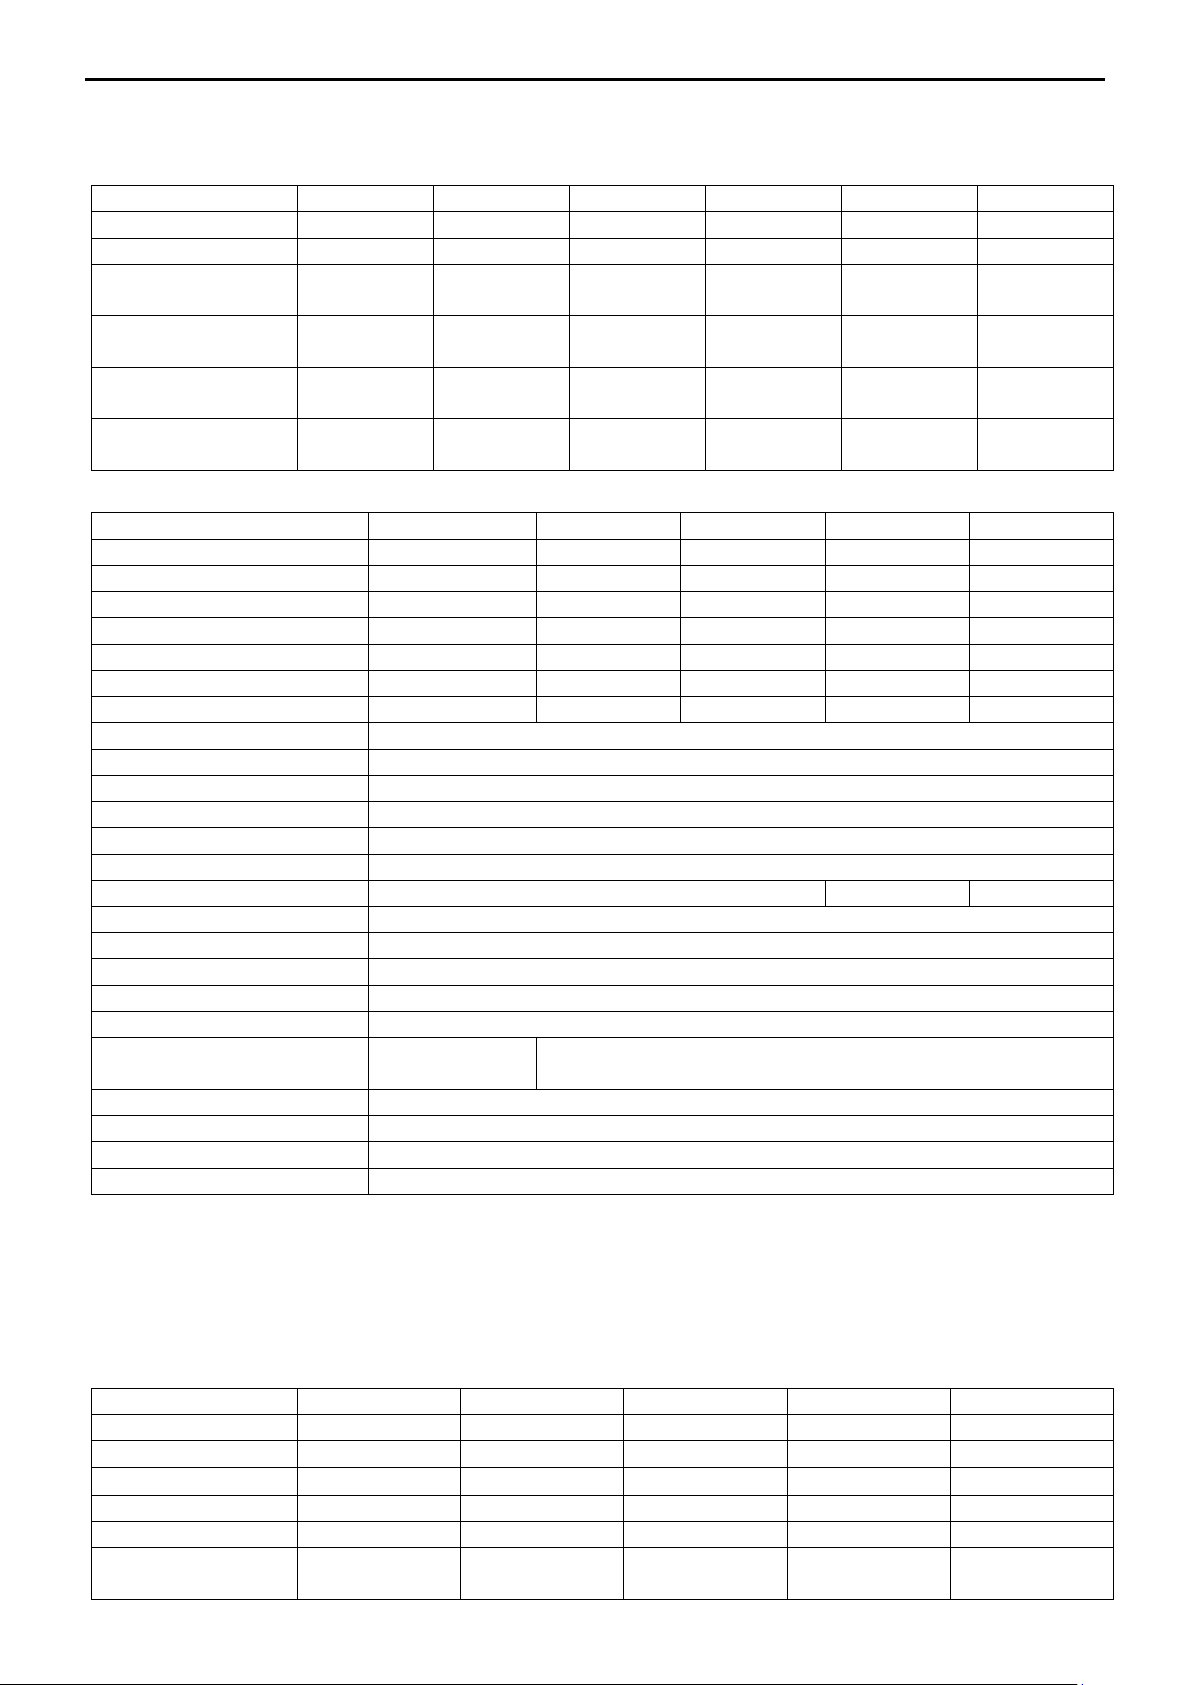
Model
SKX123
SKX222
SKX422
SKX622
SKX1202
SKX2202
Gram (g)
120 x 0.001
220 x 0.01
420 x 0.01
620 x 0.01
1200 x 0.01
2200 x 0.01
Kilogram (kg)
/ / /
/
1.2 x 0.00001
2.2 x 0.00001
Newton (N)
1.17679 x
0.00001
2.1574 x 0.0001
4.1188 x 0.0001
6.0801 x 0.0001
11.7679 x
0.0001
21.5744 x
0.0001
Ounce (oz)
4.23290 x
0.00005
7.7600 x 0.0005
14.8150 x
0.0005
21.8700 x
0.0005
42.3290 x
0.0005
77.6030 x
0.0005
Pound (lb) / /
/
1.36690 x
0.00005
2.64555 x
0.00005
4.85020 x
0.00005
Pound:Ounce (lb:oz)
/ / /
1lb:5.8700oz x
0.0005oz
2lb:10.3290oz x
0.0005oz
4lb:13.6030oz x
0.0005oz
Model
SKX421
SKX621
SKX2201
SKX6201
SKX8200
Capacity (g)
420
620
2200
6200
8200
Readability (g)
0.1
0.1
0.1
0.1
1
Repeatability (Std. Dev.) (g)
0.1
0.1
0.1
0.1
1
Linearity (g)
0.1
0.1
0.1
0.2
1
Span Calibration Mass*
200 g
300 g
2 kg
5 kg
8 kg
Linearity Calibration Mass
200, 400 g
300, 600 g
1 kg, 2 kg
3 kg, 6 kg
4 kg, 8 kg
Stabilization Time (s)
1 1 1 1 1
Construction
ABS plastic housing with 304 stainless steel (SST) pan
Draftshield
No
Calibration
User-selectable external span or linearity calibration / Digital with external weight
Tare Range
Full Capacity by subtraction
Weighing Units**
g, kg, N, oz, lb, lb:oz
Application Modes
Weighing, Density Determination, Mole Weighing
Typical Battery Life
120 hours
80 hours
120 hours
Specified Temperature Range
10° C (50°F) to 40° C (104° F) at 10% to 80% relative humidity, non-condensing
Storage Conditions
-20° C (-4° F) to 55° C (131° F) at 10% to 90% relative humidity, non-condensing
Communication
RS232, USB Host, USB Device, Ethernet or Bluetooth*** (all available as accessory)
Display Type
Backlit LCD: 6-digit 7-segment with white LED backlight
Display Size
0.78 in / 20 mm digits
Pan Size (W x D)
Ø 120 mm /
4.7 in
170 x 140 mm / 6.7 x 5.5 in
Balance Dimensions (W x D x H)
202 x 224 x 54 mm / 8 x 8.8 x 2.1 in
Shipping Dimensions (W x D x H)
300 x 250 x 129mm / 11.8 x 9.8 x 5.1 in
Net Weight
1 kg / 2.2 lb
Shipping Weight
1.6 kg / 3.5 lb
Model
SKX421
SKX621
SKX2201
SKX6201
SKX8200
Gram (g)
420 x 0.1
620 x 0.1
2200 x 0.1
6200 x 0.1
8200 x 1
Kilogram (kg) / /
2.2 x 0.0001
6.2 x 0.0001
8.2 x 0.001
Newton (N)
4.119 x 0.001
6.080 x 0.001
21.574 x 0.001
60.801 x 0.001
80.41 x 0.01
Ounce (oz)
14.815 x 0.005
21.870 x 0.005
77.600 x 0.005
218.700 x 0.005
289.25 x 0.05
Pound (lb)
/
1.3670 x 0.0005
4.8500 x 0.0005
13.6685 x 0.0005
18.080 x 0.005
Pound:Ounce (lb:oz)
/
1lb:5.870oz x
0.005oz
4lb:13.600oz x
0.005oz
13lb:10.700oz x
0.005oz
18lb:1.25oz x
0.05oz
SCOUTTM SERIES BALANCES - SKX EN-13
TABLE 6-2. SPECIFICATIONS (Cont.)
Capacity x Readability:
TABLE 6-3. SPECIFICATIONS (Cont.)
Notes:
* Calibration weights are included with models up to 620g capacity for certain regions.
** Availability is dependent on model and region.
*** Bluetooth kit is only available in certain regions according to the local regulation
TABLE 6-4. SPECIFICATIONS (Cont.)
Capacity x Readability:
Page 16
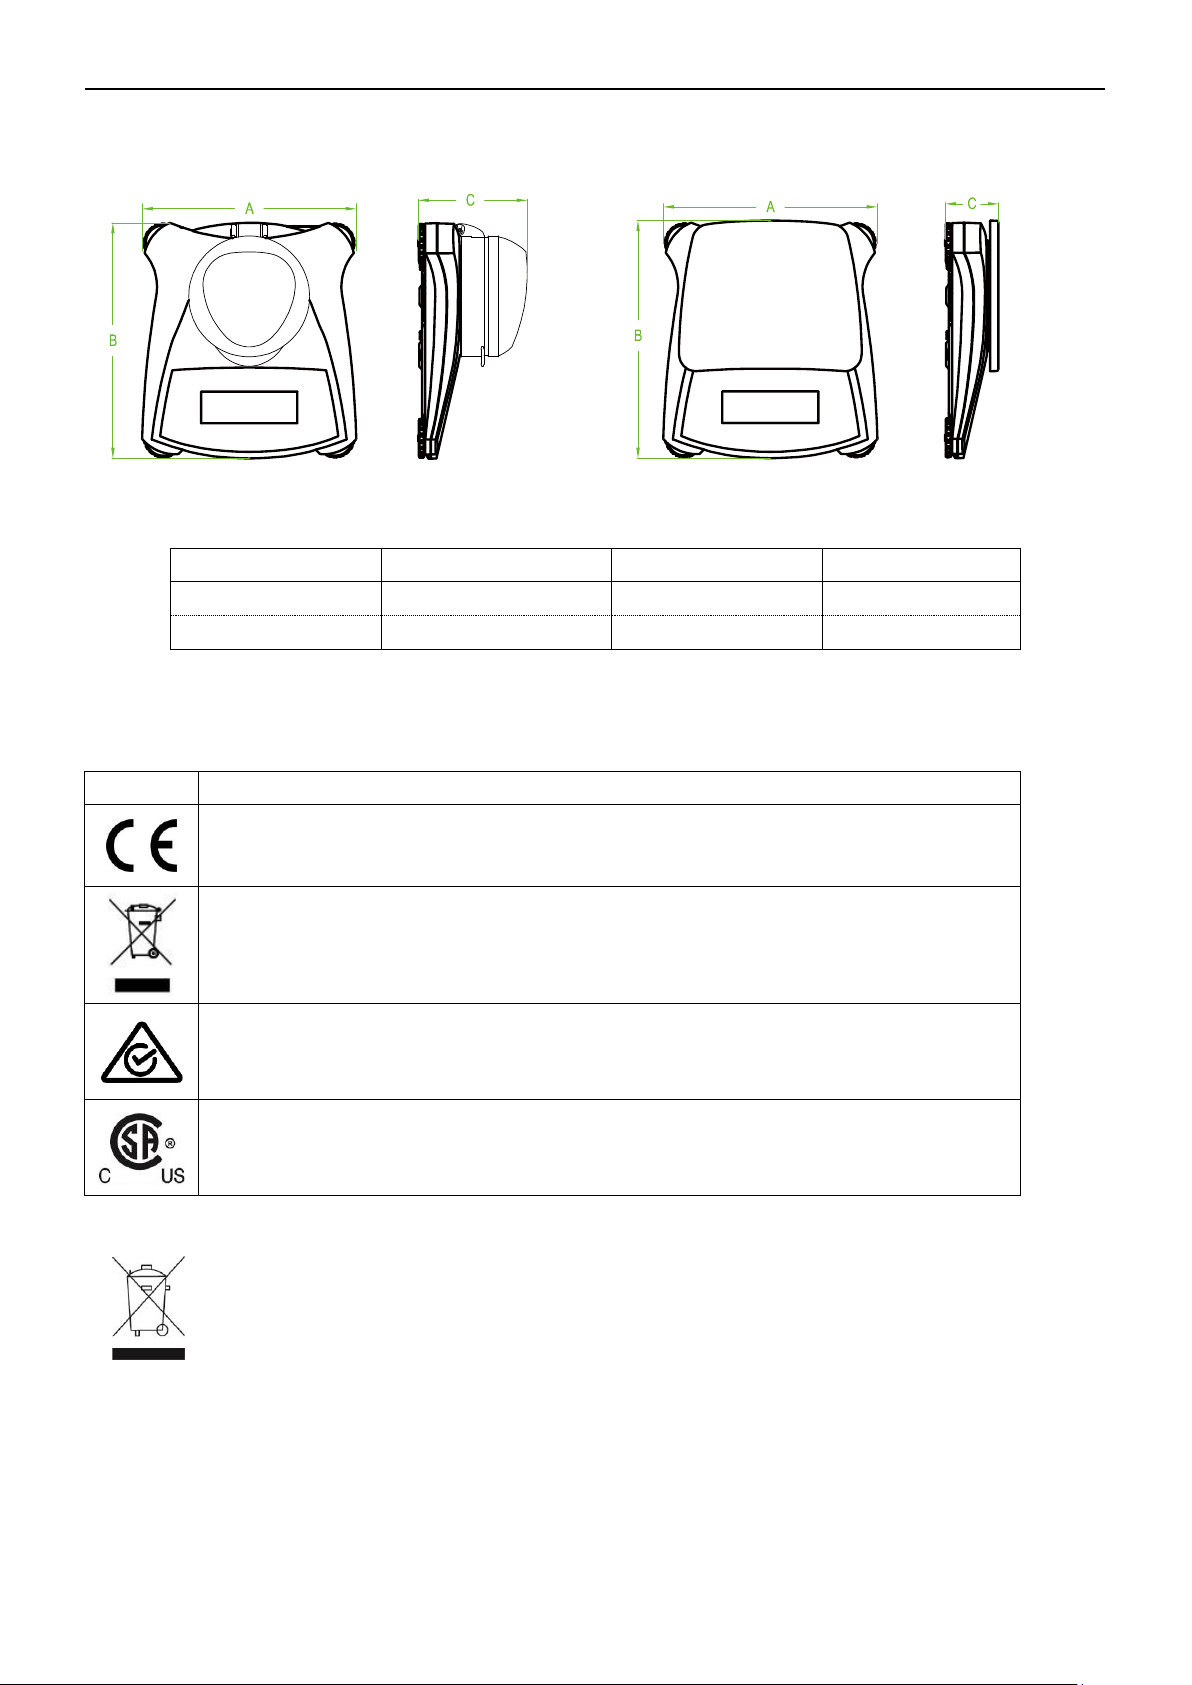
Model A B C
with draftshield
202 mm / 8.0 in.
222 mm / 8.7 in.
103 mm / 4.1 in.
w/o draftshield
202 mm / 8.0 in.
224 mm / 8.8 in.
54 mm / 2.1 in.
Mark
Standard
EN 61010-1, EN 61326-1
Refer to the declaration of conformity online at www.ohaus.com/ce.
This product complies with the EU Directive 2002/96/EC (WEEE). Please
dispose of this product in accordance with local regulations at the collecting
point specified for electrical and electronic equipment. For disposal
instructions in Europe, refer to www.ohaus.com/weee.
AS/NZS 61000.6.1, AS/NZS 61000.6.3
CAN/CSA-C22.2 No. 61010-1, UL Std. No. 61010-1
Disposal
In conformance with the European Directive 2002/96/EC on Waste Electrical and
Electronic Equipment (WEEE) this device may not be disposed of in domestic
waste. This also applies to countries outside the EU, per their specific
requirements.
Please dispose of this product in accordance with local regulations at the collecting point
specified for electrical and electronic equipment. If you have any questions, please contact
the responsible authority or the distributor from which you purchased this device.
Should this device be passed on to other parties (for private or professional use), the content
of this regulation must also be related.
Disposal instructions in Europe are available online at www.ohaus.com/weee.
Thank you for your contribution to environmental protection.
EN-14 SCOUTTM SERIES BALANCES - SKX
6.2 Drawings
Figure 6.1 Dimensions
6.3 Compliance
Compliance to the following standards is indicated by the corresponding mark on the product.
Page 17

SCOUTTM SERIES BALANCES - SKX EN-15
FCC Note
This equipment has been tested and found to comply with the limits for a Class B digital device,
pursuant to Part 15 of the FCC Rules. These limits are designed to provide reasonable
protection against harmful interference in a residential installation. This equipment generates,
uses and can radiate radio frequency energy and, if not installed and used in accordance with
the instructions, may cause harmful interference to radio communications. However, there is no
guarantee that interference will not occur in a particular installation. If this equipment does
cause harmful interference to radio or television reception, which can be determined by turning
the equipment off and on, the user is encouraged to try to correct the interference by one or
more of the following measures:
- Reorient or relocate the receiving antenna.
- Increase the separation between the equipment and receiver.
- Connect the equipment into an outlet on a circuit different from that to which the receiver is
connected.
- Consult the dealer or an experienced radio/TV technician for help.
Industry Canada Note
This Class B digital apparatus complies with Canadian ICES-003.
ISO 9001 Registration
In 1994, OHAUS Corporation, USA, was awarded a certificate of registration to ISO 9001 by
Bureau Veritus Quality International (BVQI), confirming that the OHAUS quality management
system is compliant with the ISO 9001 standard’s requirements. On June 21, 2012, OHAUS
Corporation, USA, was re-registered to the ISO 9001:2008 standard.
Page 18

EN-16 SCOUTTM SERIES BALANCES - SKX
LIMITED WARRANTY
OHAUS products are warranted against defects in materials and workmanship from the date of
delivery through the duration of the warranty period. During the warranty period OHAUS will
repair, or, at its option, replace any component(s) that proves to be defective at no charge,
provided that the product is returned, freight prepaid, to OHAUS. This warranty does not apply if
the product has been damaged by accident or misuse, exposed to radioactive or corrosive
materials, has foreign material penetrating to the inside of the product, or as a result of service
or modification by other than OHAUS. In lieu of a properly returned warranty registration card,
the warranty period shall begin on the date of shipment to the authorized dealer. No other
express or implied warranty is given by OHAUS Corporation. OHAUS Corporation shall not be
liable for any consequential damages.
As warranty legislation differs from state to state and country to country, please contact OHAUS
or your local OHAUS dealer for further details.
Page 19
PRECAUCIÓN : Lea atentamente todas las advertencias en material de
seguridad antes de proceder a la instalación, de llevar a cabo conexiones u
operaciones de mantenimiento en estos equipos. Del incumplimiento del
contenido de estas advertencias podrían resultar daños personales y/o
materiales. Conserve estas instrucciones para poder consultarlas en el futuro.
Balanzas Scout
TM
SKX Series ES 1
1. INTRODUCCIÓN
Este manual contiene las instrucciones para la instalación, el funcionamiento y el
mantenimiento de las Balanzas de la gama Scout SKXSeries. Por favor, lea este manual en su
integridad antes de proceder a utilizar la balanza.
1.1 Definición de los símbolos y señales de advertencia
Las notas en materia de seguridad se hallan señalizadas con términos y símbolos de
advertencia. Los mismos pueden transmitir informaciones sobre cuestiones y alertas de
seguridad. Señalan cuestiones y advertencias de seguridad. Ignorar las indicaciones en materia
de seguridad puede ser causa de daños tanto personales como al dispositivo, averías y
lecturas erróneas.
Términos de advertencia
ALERTA Indica una situación de un nivel de riesgo o peligro medio, de la que
podrían resultar daños o incluso la muerte en el caso de no evitarse.
PRECAUCIÓN Indica una situación de un nivel de riesgo o peligro bajo, de la que
podrían resultar daños materiales, daños al dispositivo o las pérdida de
datos, o daños físicos, en el caso de no evitarse.
Atención Para informaciones de relevancia sobre el producto.
Nota Para informaciones de utilidad sobre el producto.
Símbolos de advertencia
Riesgos general Riesgos de descarga eléctrica
1.2 Precauciones de seguridad
Compruebe que la alimentación eléctrica de corriente AC está en el rango del voltaje de
entrada impreso en la etiqueta del adaptador.
Conecte el adaptador AC únicamente a un enchufe compatible que disponga de toma de
tierra.
No colocar la balanza de tal modo que resulte difícil de desconectar el adaptador AC de la
toma de corriente.
Asegúrese de que el cable de corriente no represente un obstáculo potencial o pueda
provocar caídas y/o tropiezos.
Este equipo ha sido concebido y fabricado para ser utilizado en espacios interiores, y
debería hacerse uso del mismo en emplazamientos secos.
Haga funcionar el equipo únicamente en las condiciones ambientales señalas las
instrucciones del usuario.
No hacer funcionar el equipo en entornos peligrosos o inestables.
No dejar caer objetos o cargas sobre la bandeja.
Hacer uso únicamente de los accesorios y periféricos aprobados por el fabricante.
Desconectar el equipo de la red eléctrica antes de proceder a su limpieza o efectuar
operaciones de mantenimiento.
Las operaciones de mantenimiento deben de ser únicamente llevadas a cabo por personal
autorizado.
Page 20
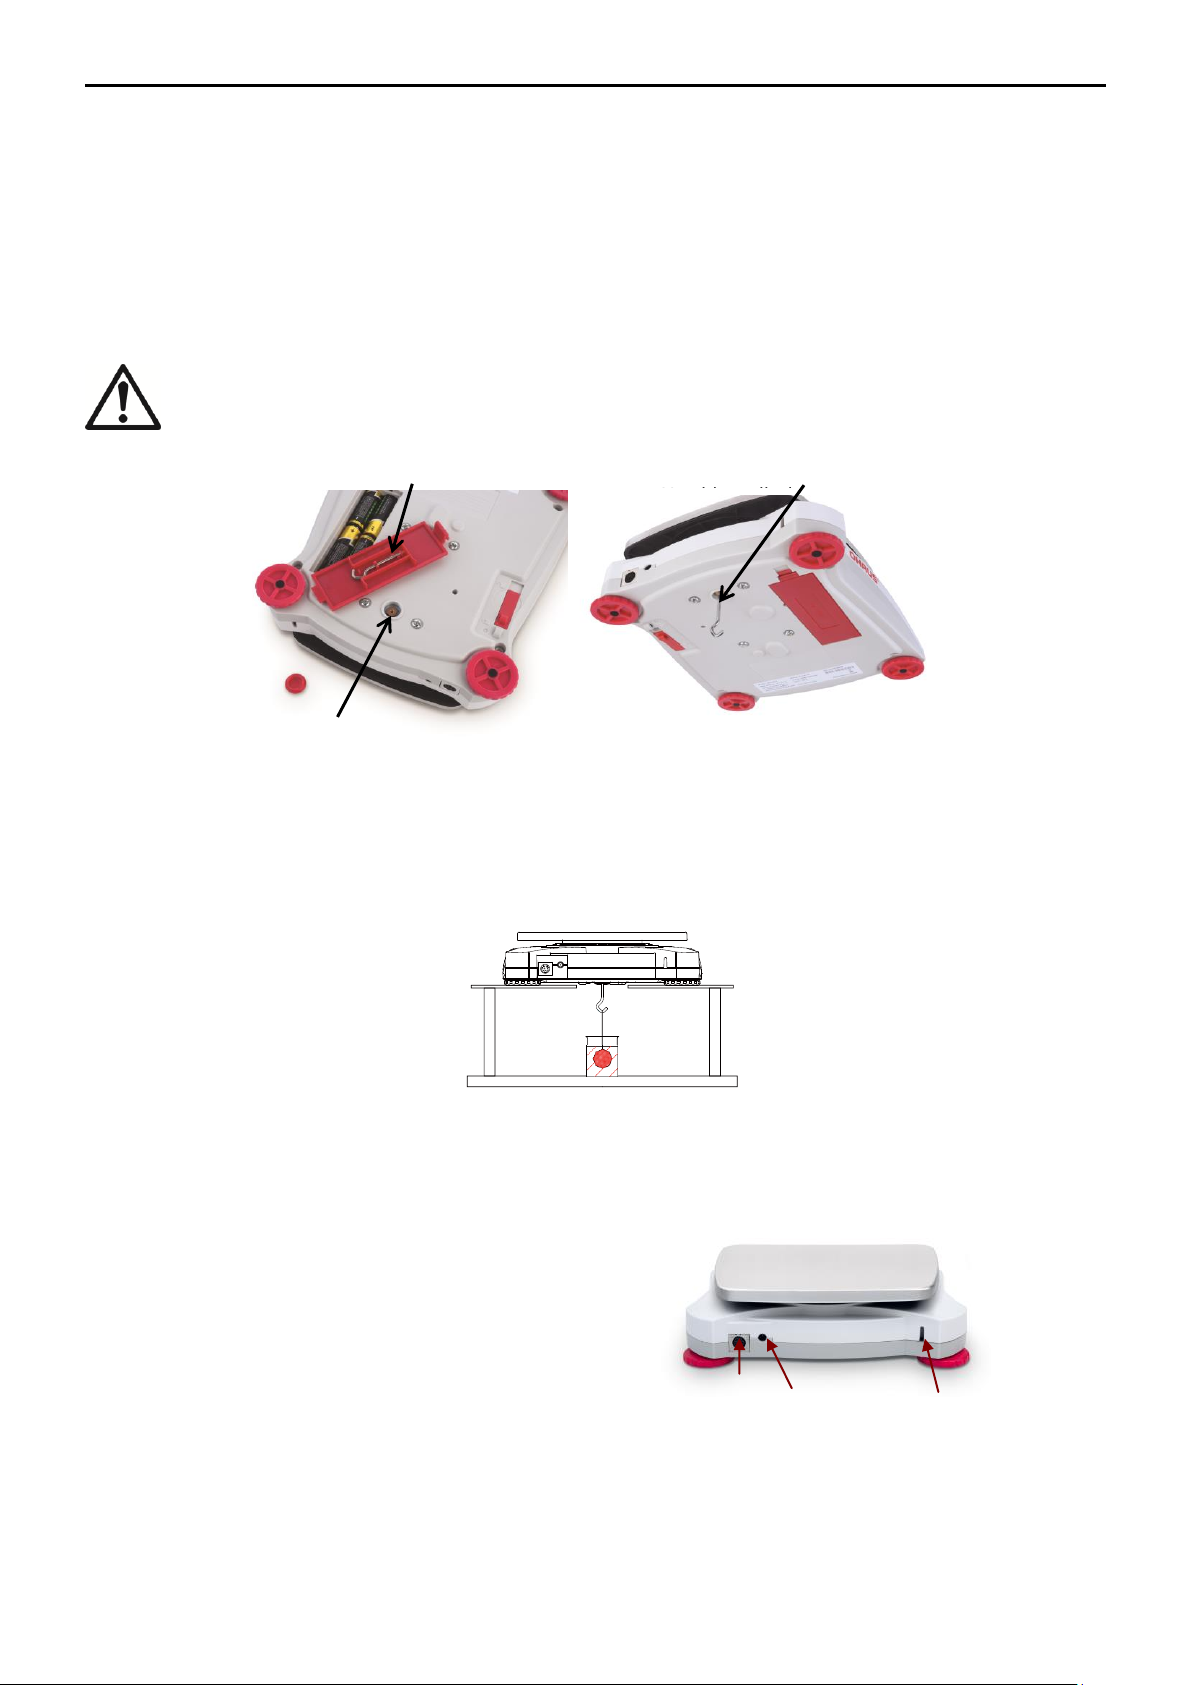
Desbloquee el cierre / bloqueo de
transporte girando el puntero rojo 90
grados en el sentido contrario a las
agujas del reloj (de DchaaIzda) para
desbloquearlo.
Gráfico 2-1. Bloqueo de transporte
Sub-platforma
Indicador del
bloqueo de
transporte
Posición de
bloqueo
Posición de
desbloqueo
ES 2 Balanzas Scout
TM
SKX Series
2. INSTALACIÓN
2.1 Instalación de componentes
Consulte las instrucciones y los gráficos que aparecen a continuación para identificar y efectuar
el montaje de los componentes de su balanza Scout. Todas los elementos y componentes
deben de ser montados antes de hacer uso de la balanza.
2.1.1 Desbloqueo del cierre de seguridad de transporte
2.1.2 Instalar la bandeja de pesaje
Las balanzas provistas de una bandeja rectangular se deben colocar encajándolas en la subplataforma como se muestra a continuación y girándolas en el sentido contrario a las agujas del
reloj (de Dcha a Izda) hasta que se produzca el encaje. Las bandejas redondas se colocan
directamente sobre el soporte de la bandeja.
Gráfico 2-2. Instalación de la bandeja de pesaje
2.2.3 Ranura de seguridad
Existe una ranura de seguridad en la parte trasera de la balanza que permite el aseguramiento
de la balanza mediante un cable opcional y un accesorio de cierre de bloqueo.
2.3 Seleccionar el emplazamiento idóneo
Para mejorar sus condiciones de funcionamiento, la balanza Scout debería ser colocada en un
entorno limpio y estable. No hacer uso de la balanza en entornos con excesivas corrientes de
aire, sometidos a cambios bruscos de temperatura, a proximidad de campos magnéticos o
cerca de equipos que generen vibraciones o campos magnéticos.
2.4 Conexión a la corriente eléctrica
Instalación del adaptador AC
Se puede utilizar la corriente AC para hacer funcionar la balanza cuando no resulte necesario la
energía de las pilas / baterías. Primero, conectar el adaptador AC (suministrado con el equipo)
al jack de la conexión de entrada del adaptador AC situado en la partes posterior de la balanza
y luego conecte el enchufe AC a una toma de corriente eléctrica.
Page 21
Conexión del jack del
adaptador AC
Cubierta del compartimento de las
pilas
Conexión de Interfaz
Interruptor de
seguridad
Orificio de pesaje inferior
Ranura de seguridad (cierre de
bloqueo anti-robo)
Balanzas Scout
TM
SKX Series ES 3
Figure 2-3. Partes posterior e inferior de la balanza
Instalación de pilas / baterías
Instalar cuatro pilas “AA” con la polaridad tal y como se señala en el comportamiento de las
pilas.
Nota:
Después de la alimentación, se recomienda dejar que el equilibrio caliente durante al menos 5
minutos antes de usarla.
2.5 Calibración inicial
Cuando se instala la balanza por primera vez, y cuando el equipo es desplazado a otro
emplazamiento, debe de procederse a su calibrado para garantizar la precisión de los
resultados de pesaje.
De un modo alternativo, las balanzas SKX pueden ser calibradas manualmente mediante el uso
de masas externas.
Debe de disponer de las masas de calibrado adecuadas antes de iniciar el proceso de
calibrado. Por favor, consulte el apartado de calibrado en lo referente a las masas y al proceso
de calibrado.
Page 22
Botón
Función primaria
(Pulsación corta)
Cero/On -
encendido
Enciende la
balanza
Si la balanza está
encendida, la
configura a cero
Imprimir
Envía el valor actual
al Puerto de
comunicación
seleccionado si el
modo AUTOPRINT
(impresión
automática) está en
Off .apagado.
Función
Inicia un modo
de aplicación.
Tara
Introducir /
borrar un
valor de tara.
Función secundaria
(Pulsación larga)
Zero/Off -
apagado
Apaga la balanza.
Unidades
Modifica la unidad
de pesaje.
Modo
Permite la
modificación del
modo de
aplicación.
Menú
Acceder al
menú del
usuario.
Función Menú
(Pulsación corta)
Yes - Sí
Acepta la
configuración
actual que aparece
en pantalla.
No
Permite avanzar
hasta el siguiente
menú o el siguiente
elemento del menú.
Anula la
configuración que
aparece en la
pantalla y avanza
hasta la siguiente
configuración
disponible.
Atrás
Permite volver
hacia atrás al
elemento
anterior del
menú.
Salir
Permite salir
del Menú del
usuario.
Interrumpe el
proceso de
calibrado en
curso.
ES 4 Balanzas Scout
3. FUNCIONAMIENTO
3.1 Controles
Gráfico 3-1.Panel de Control Scout
TABLA 3-1. Botones de funciones
TM
SKX Series
Notas:
2
1
Pulsación corta : Pulsar durante menos de 1 segundo.
Pulsación larga : Pulsar y mantener pulsado durante más de 2 segundos.
Page 23
Elemento
Descripción
Elemento
Descripción
1
Símbolo de carga de la batería
7
Símbolos del cursor
2
Símbolo de peso estable
8
Símbolos de Kilogramos, grano
3
Símbolo “Negativo”
9
Libras, Onzas, Símbolos de Libras:Onzas
4
Símbolo Cero centrado
10
Símbolo g/mol
5
Símbolo NETO
11
Símbolo G
6
Símbolo Tara configurada
12
Símbolos Newtons, Bluetooth
2
3
4
1
5
6
8
9
10
11
12
7
Balanzas Scout
TM
SKX Series ES 5
Gráfico 3-2. Pantalla de la Balanza Scout
TABLA 3-2. Símbolos mostrados en pantalla
3.2 Encendido / apagado de la balanza
Encender la balanza, pulsar y mantener pulsado el botón [On/Zero Off]– Encendido / Cero –
Apagado durante 1 segundo. La balanza efectuará una comprobación automática de la pantalla
y mostrará momentáneamente la versión del software, y luego iniciará el modo de pesaje activo.
Para apagar la balanza, pulsar y mantener pulsado el botón [On/Zero Off]- Encendido / Cero –
Apagado hasta que se muestra OFF (apagado) en pantalla.
3.3 Operación de calibración
Cuando se pone en marcha la balanza primera vez, se recomienda llevar a cabo una
calibración de rango para garantizar la precisión de los resultados de pesaje. Antes de efectuar
el calibrado, asegúrese de disponer de los pesos de calibrado adecuados. Asegúrese de que el
interruptor de seguridad está en la posición de desbloqueo.
Pulsar y mantener pulsado Menu hasta que [mMeNU] (Menú) se muestre en pantalla. Cuando se
suelte el botón, la pantalla mostrará el mensaje [C.A.L]. Pulsar Yes - sí para aceptar. Entonces
se mostrará el mensaje [SpaN] en pantalla. Pulsar Yes - sí para iniciar el calibrado de rango.
Se mostrará el mensaje [--C--] mientras que se almacena la lectura del “cero”. Seguidamente,
se mostrará en pantalla el valor del peso de calibrado. Pulsar la tecla [No] para modificar dicho
valor. Colocar la masa de calibrado especificada en la bandeja. Se mostrará el mensaje [--C--]
mientras que se almacena la lectura en la memoria. Se mostrará el mensaje [done] si el
calibrado se ha llevado a cabo con éxito. La balanza volverá al modo de la aplicación anterior y
se encuentra preparada para ser utilizada.
3.4 Modo de pesaje
Este es el modo de la configuración por defecto de salida de fábrica.
1. Si fuese necesario, pulsar y mantener pulsado el botón [Mode] hasta que [wWeIGH] (Weigh –
peso) aparezca en pantalla.
2. Si fuese necesario, coloque un recipiente vacío sobre la bandeja y pulse Tare - Tara.
3. Coloque una muestra sobre la bandeja o en el recipiente. El peso de la muestra se
mostrará en la pantalla.
Page 24
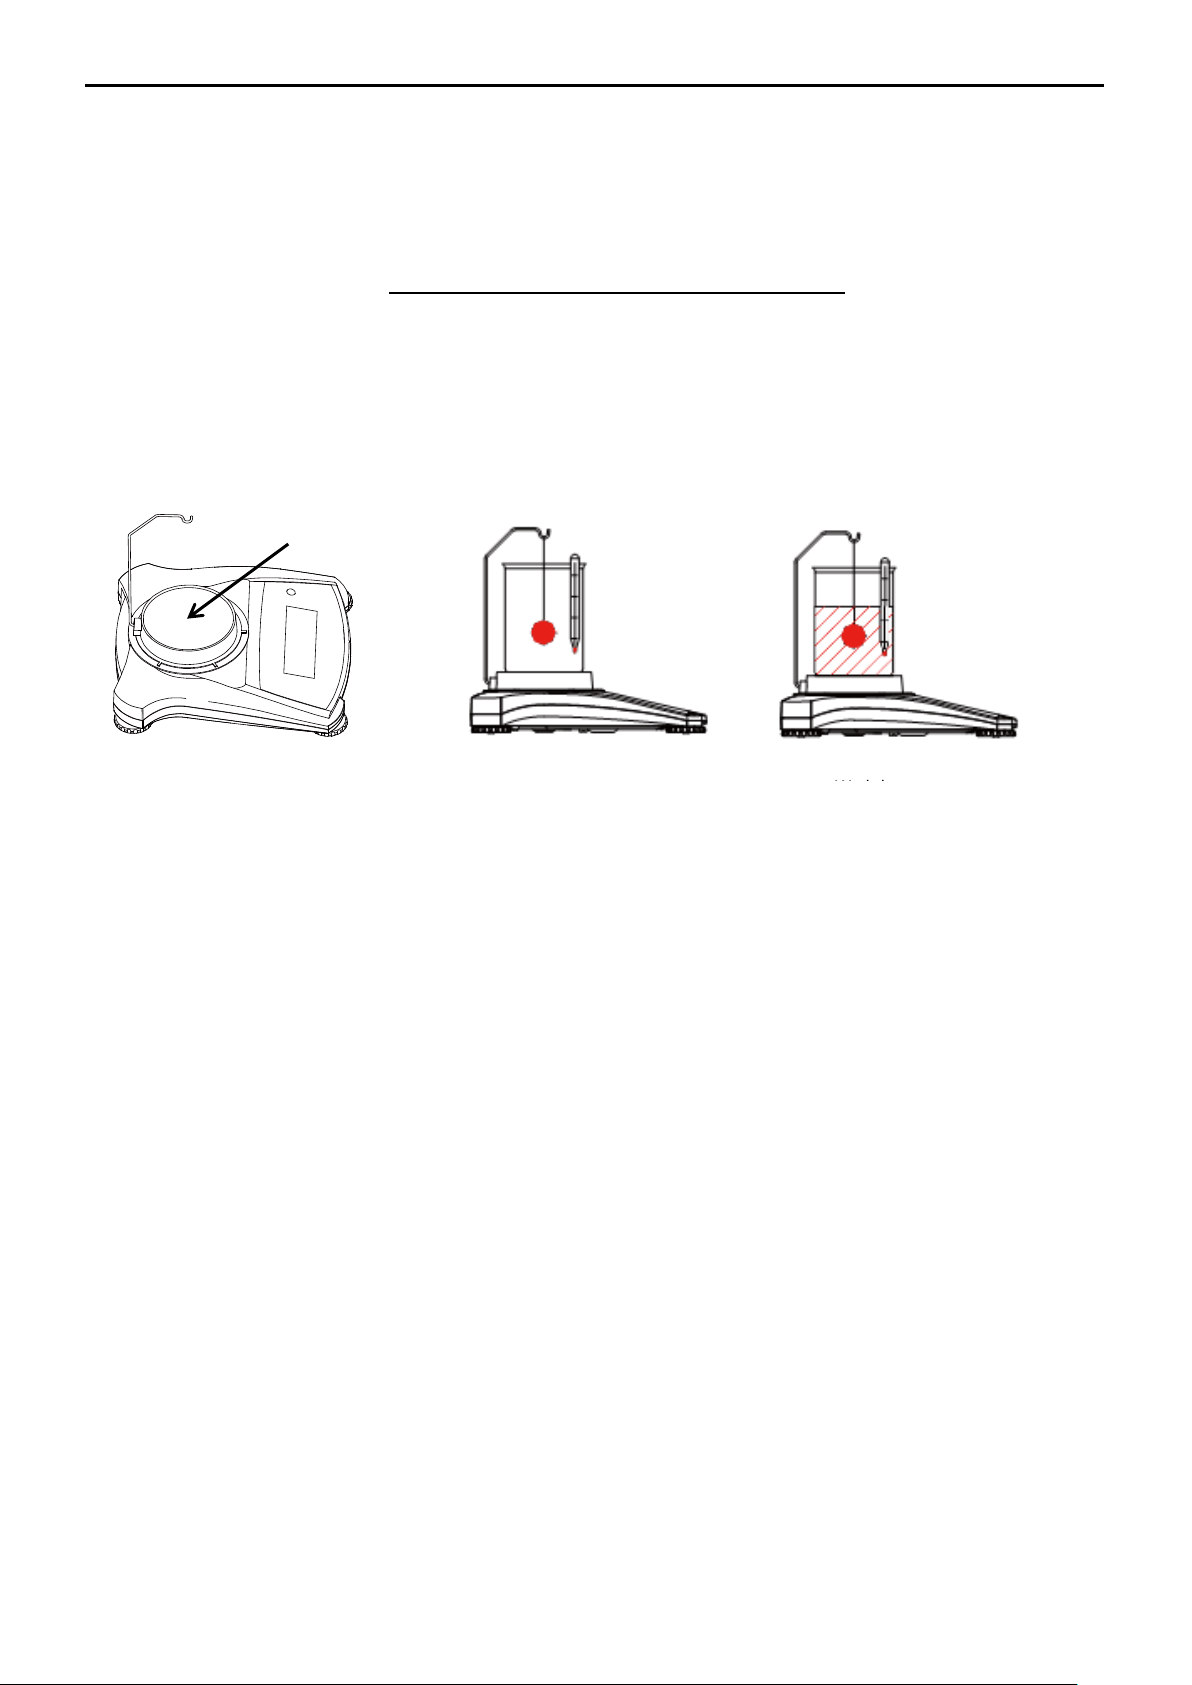
Soporte del vaso
Preparación
Peso en el aire
Peso en inmersión
ES 6 Balanzas Scout
TM
SKX Series
3.5 Modo Densidad
Este modo permite al usuario calcular la gravedad específica de una muestra mediante el uso
del Kit de Densidad kit. Density; el modo de densidad se inicia cuando “G” y la unidad
actualmente en uso aparecen en pantalla.
La muestra es pesada suspendida en el aire del gancho, y luego pesada en inmersión en agua.
La formula a aplicar es la siguiente :
𝑝𝑒𝑠𝑜 𝑒𝑛 𝑆𝑒𝑐𝑜
peso en seco – peso húmedo / en inmersión
Preparación
Preparar la balanza como se muestra a continuación. Extraer la bandeja de la balanza, insertar
el gancho e instalar el vaso de precipitado / recipiente y su suporte (el vaso de precipitado /
recipiente no se suministra con el equipo). Luego pulsar el botón [Zero/On]– cero / encendido
para encender la balanza.
Gráfico 3-3. Configuración para la medición de densidad
Configuración de Densidad
1. Pulsar y mantener pulsado el botón Mode hasta que [SPEC.Gr] aparezca en pantalla.
Entonces aparecerá en pantalla [Air.wWt].
2. Colocar la muestra en el gancho como se ha descrito con anterioridad y pulsar Yes - sí
para almacenar en la memoria el valor del peso en seco. Entonces aparecerá en
pantalla [wW.wWt].
3. Suspender el elemento de muestra en inmersión en el agua y pulsar Yes – sí para
almacenar en la memoria el valor del peso húmedo / en inmersión . Se mostrará en
pantalla el valor de la gravedad específica y “G” parpadeará en pantalla mientras el
icono de las unidades está apagado.
Notas: La gravedad específica no tiene unidad de medida.
Para muestras y objetos de mayo tamaño se recomienda utilizar la función de pesaje inferior en
vez del gancho.
3.6 Modo de pesaje de Mol
Para entrar en el modo de pasaje de Mol desde cualquier modo de aplicación, pulsar y
mantener pulsada la tecla Mode hasta que [mMoLE] aparezca en pantalla. Cuando suelte el
botón Mode, la pantalla mostrará el siguiente mensaje [Clr.mMS].
1. Pulsar la tecla [Yes] – Sí, para borrar la Masa Molar almacenada en la memoria. Pulsar No
para usar el dato almacenado en la memoria
Masa Molar. Si no hay ninguna Masa Molar almacenada en la memoria, no aparecerá en la
pantalla el mensaje [Clr.mMS] y será necesario introducir una Masa Molar.
2. Si existe una Masa Molar almacenada en la memoria, la Masa Molar actualmente
almacenada en la memoria se mostrará en la pantalla y parpadeará de modo intermitente.
3. Pulsar la tecla No para iniciar la edición / introducción de la Masa Molar.
Page 25
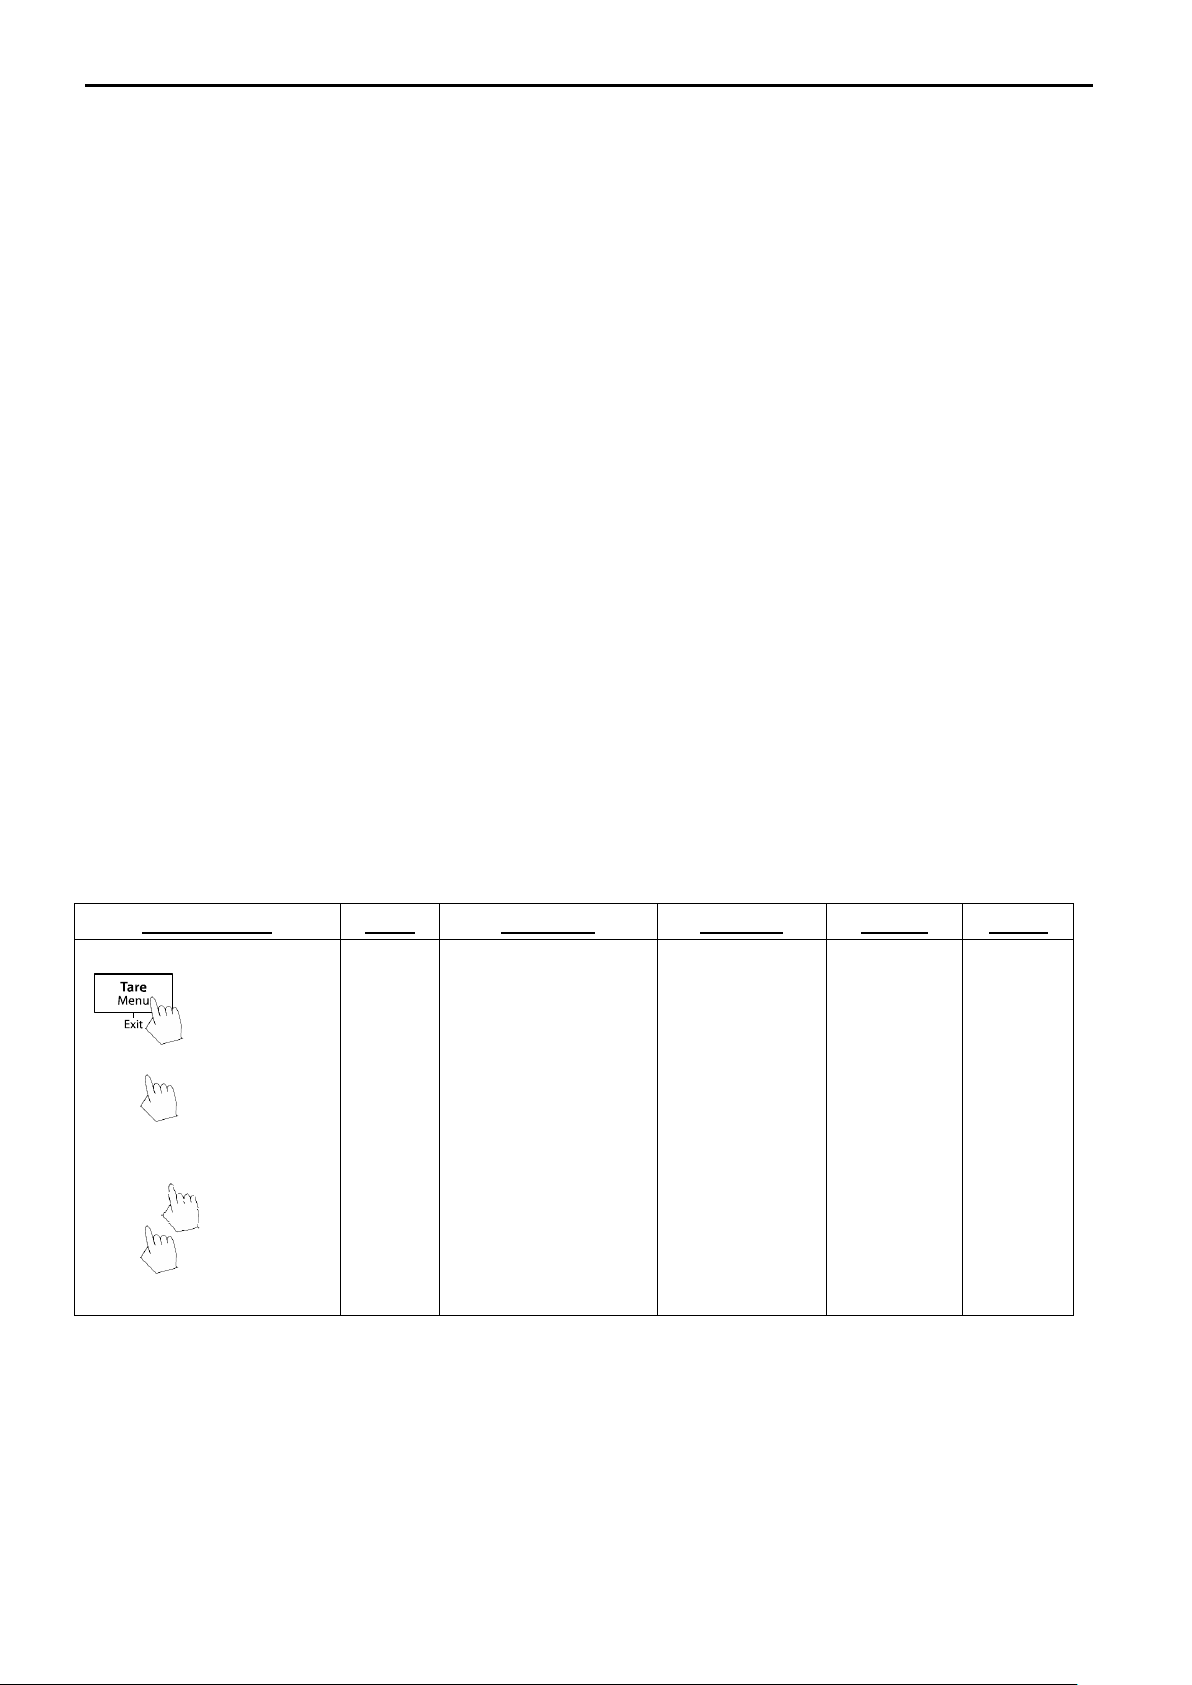
Sub-Menús
C.a.l
S.e.t.u.p
M.o.d.e
U.n.i.t
E.n.d
Elementos del Menú
Rango
Lineal
Reconfigurar
Sí/No
Filtro
Bajo/Medio/Alto
AZT- Retorno a cero
automático
0.5/1/3/Off
Rango estable
0.5/1/2//5
Iluminación trasera
Off/On/Auto
Tara Automática
Off/On/On-acc
Apagado automático
Off/1/5/10
Reconfigurar
Sí/No
Pesaje
On- encendido
/Off - apagado
Densidad
On- encendido
/Off - apagado
Mol
On- encendido
/Off - apagado
Reconfigurar
g
kg
N
oz
lb
lb:oz
Fin
Fin
Fin
Fin
No/Back
No/Atrás
Pulsiónlarga –
Acceder al
menú
Pulsióncorta Aceptar
Pulsión corta –
Ir al menú
Siguiente /
Anterior
Yes –
Sí
Exit
Salir
Pulsión corta –
Salir del menú
Balanzas Scout
TM
SKX Series ES 7
5. Pulsar la tecla No para incrementar el dígito que parpadea de modo intermitente.
6. Pulsar la tecla [Back] atrás para reducir el dígito que parpadea de modo intermitente.
7. Pulsar la tecla Yes – Sí para aceptar el valor que aparece en pantalla y desplazar un dígito
hacia la derecha.
Notas:Si la configuración supera el límite establecido, la pantalla volverá al valor almacenado
en la memoria con anterioridad.
El número más la izquierda pude ser configurado en 0, 1, 2, 3, 4, 5, 6, 7, 8, 9,-. Todos
los demás números pueden ser configurados en 0, 1, 2, 3, 4, 5, 6, 7, 8, 9.
Las demás configuraciones van de 0.01 a 999.99.
La unidad de masa molar es g/mol.
Mostrar en pantalla la Masa Molar :
Pulsar el botón Función [Function] durante 2 segundos para mostrar en pantalla la Masa
Molar actualmente almacenada en la memoria.
Nueva Masa Molar :
Para introducir una nueva Masa Molar pulsar y mantener pulsado el botón de la Función / Modo
hasta que aparezca [mMoLE] en pantalla.
4. Configuraciones del MENÚ
El Menú Usuario (UserMenu) permite personalizar la configuración de la balanza.
Nota :Pueden hallarse disponibles Sub-Menús adicionales si se instalan accesorios / opciones
de Interfaz. Consulte el Manual del usuario del Interfaz para obtener información adicional
sobre las configuraciones adicionales.
4.1 Menu Navigation
UserMenu:
Notas: Algunas Unidades / Modos pueden no hallarse disponibles en todos los modelos.
Cuando el interruptor de seguridad está en la posición de bloqueo, la función de Calibrado se
halla oculta, las Unidades se hallan bloqueadas en la configuración actual (la que se halle
activa en ese momento.
Page 26
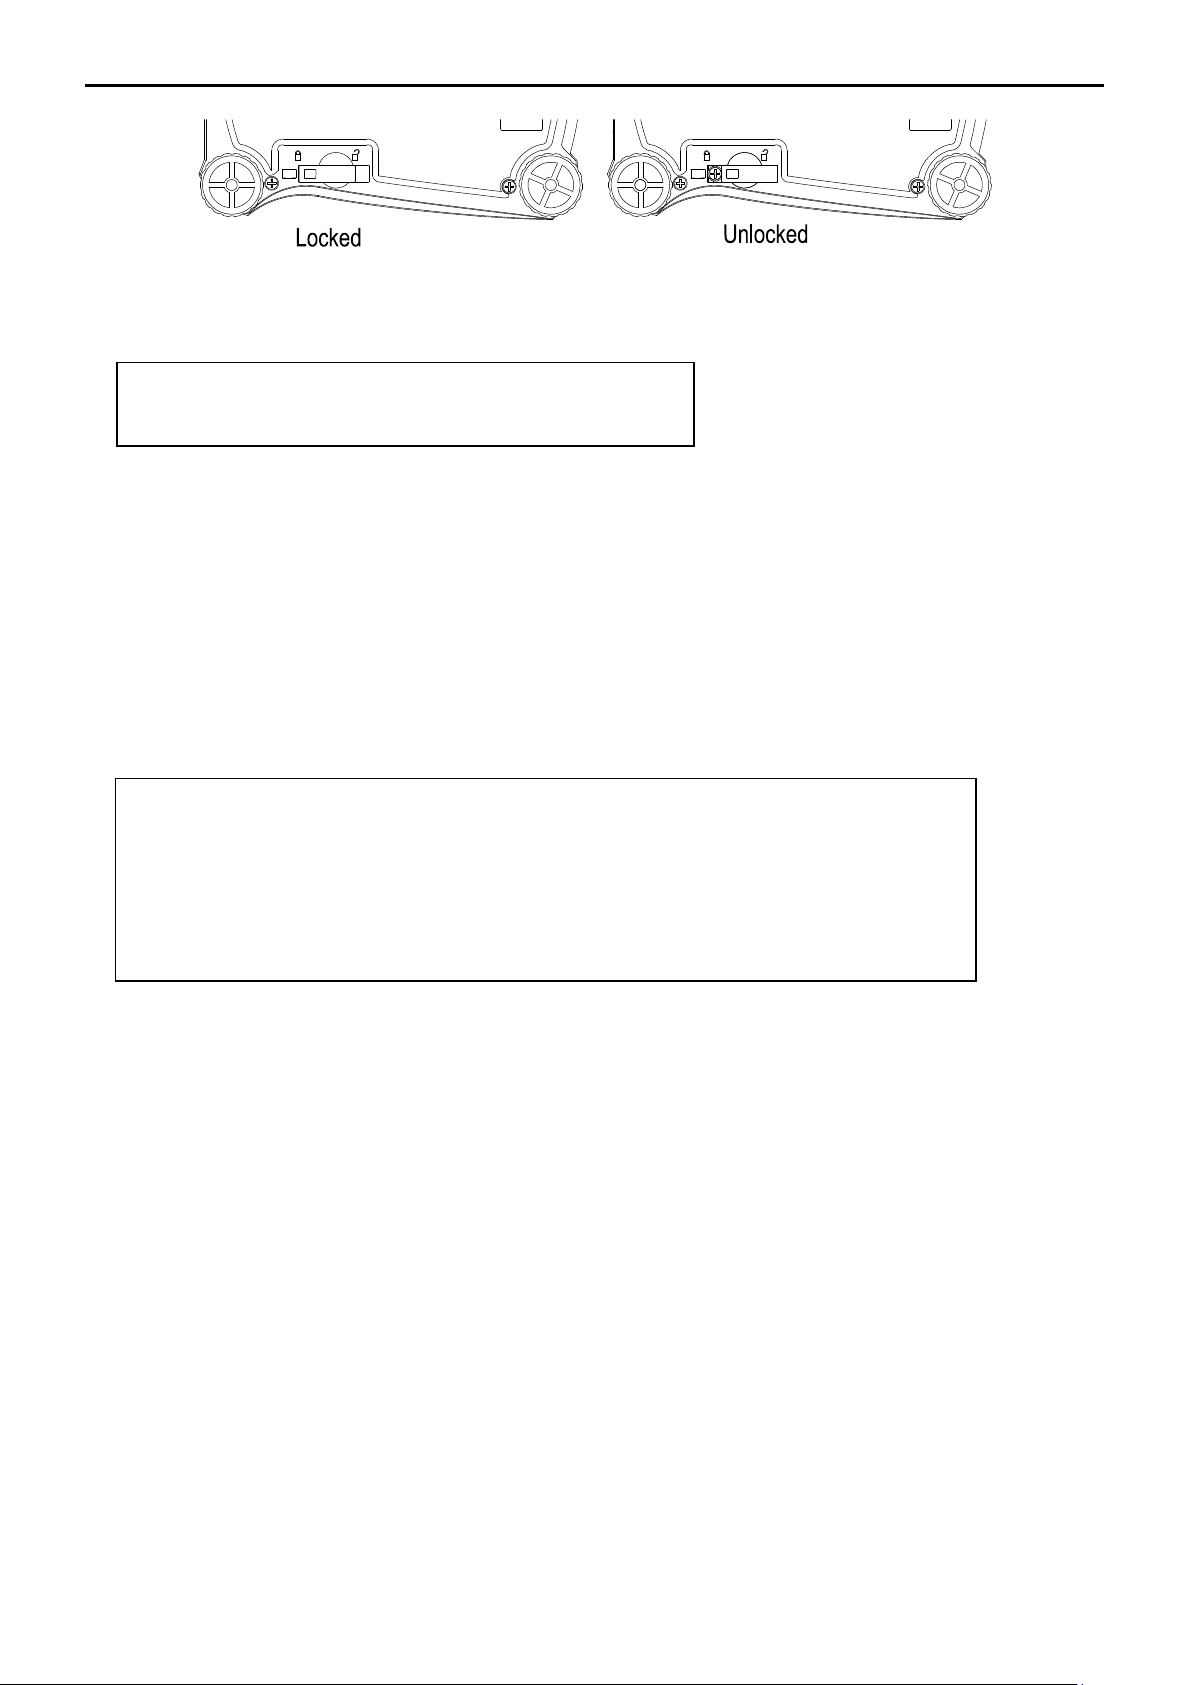
Span- Rango : Efectuar
Linearity – Linealidad : Efectuar
Finalizar calibrado: Salir del menú
Reset – Reconfigurar : no, yes - sí
Filter – Filtro : Low - Bajo, Med - Medio, High - Alto
Retorno a cero automático : off - apagado, 0.5d, 1d, 3d
Estable : 0.5d, 1d, 2d, 5d
Iluminación trasera : off - apagado, on - encendido, auto - automático
Tara automática : off - apagado, on- encendido, on-acc
Apagado automático : off - apagado, 1, 5, 10
Fin configuración : Salir del menú
ES 8 Balanzas Scout
TM
Interruptor de seguridad :
4.2 Menú de Calibrado
Entrar en este menú para llevar a cabo operaciones de calibrado.
Span - Rango [SpaN]
Inicia el procedimiento de calibrado de rango (cero y rango)
Lin [LIN]
Inicia el procedimiento de calibrado de linealidad (cero, punto medio y rango).
End Cal [End] – Finalizar calibrado
Permite avanzar hacia el menú siguiente o volver a la parte superior del menú actual.
SKX Series
4.3 Menú de configuración
Entrar en este menú para configurar los parámetros de la balanza.
Nota :En negrita aparecen siempre los valores de salida de fábrica por defecto.
Reset– Reconfigurar [reset]
Permite reconfigurar el menú de configuración a los valores de salida de fábrica establecidos.
NO - No = no reconfigurar
YES - Sí = reconfigurar
Filter– Filtro [FiltEr]
Configurar el nivel del filtrado de la señal.
LOW - Bajo = menor estabilidad, tiempo de estabilización más rápido
MED - Medio = estabilidad normal, tiempo de estabilización
HI - Alto = mayor estabilidad, tiempo de estabilización más lento
AZT– Retorno automático a cero [AZt]
Configurar la función de vuelta automática a cero (automaticzero tracking).
Apagado = desactivada
0.5d = Se mostrará el valor cero en pantalla hasta que se supere un cambio de 0.5
1d = Se mostrará el valor cero en pantalla hasta que se supere un cambio de 1
3d = Se mostrará el valor cero en pantalla hasta que se supere un cambio de 3
divisiones por segundo.
divisiones por segundo.
divisiones por segundo
Page 27
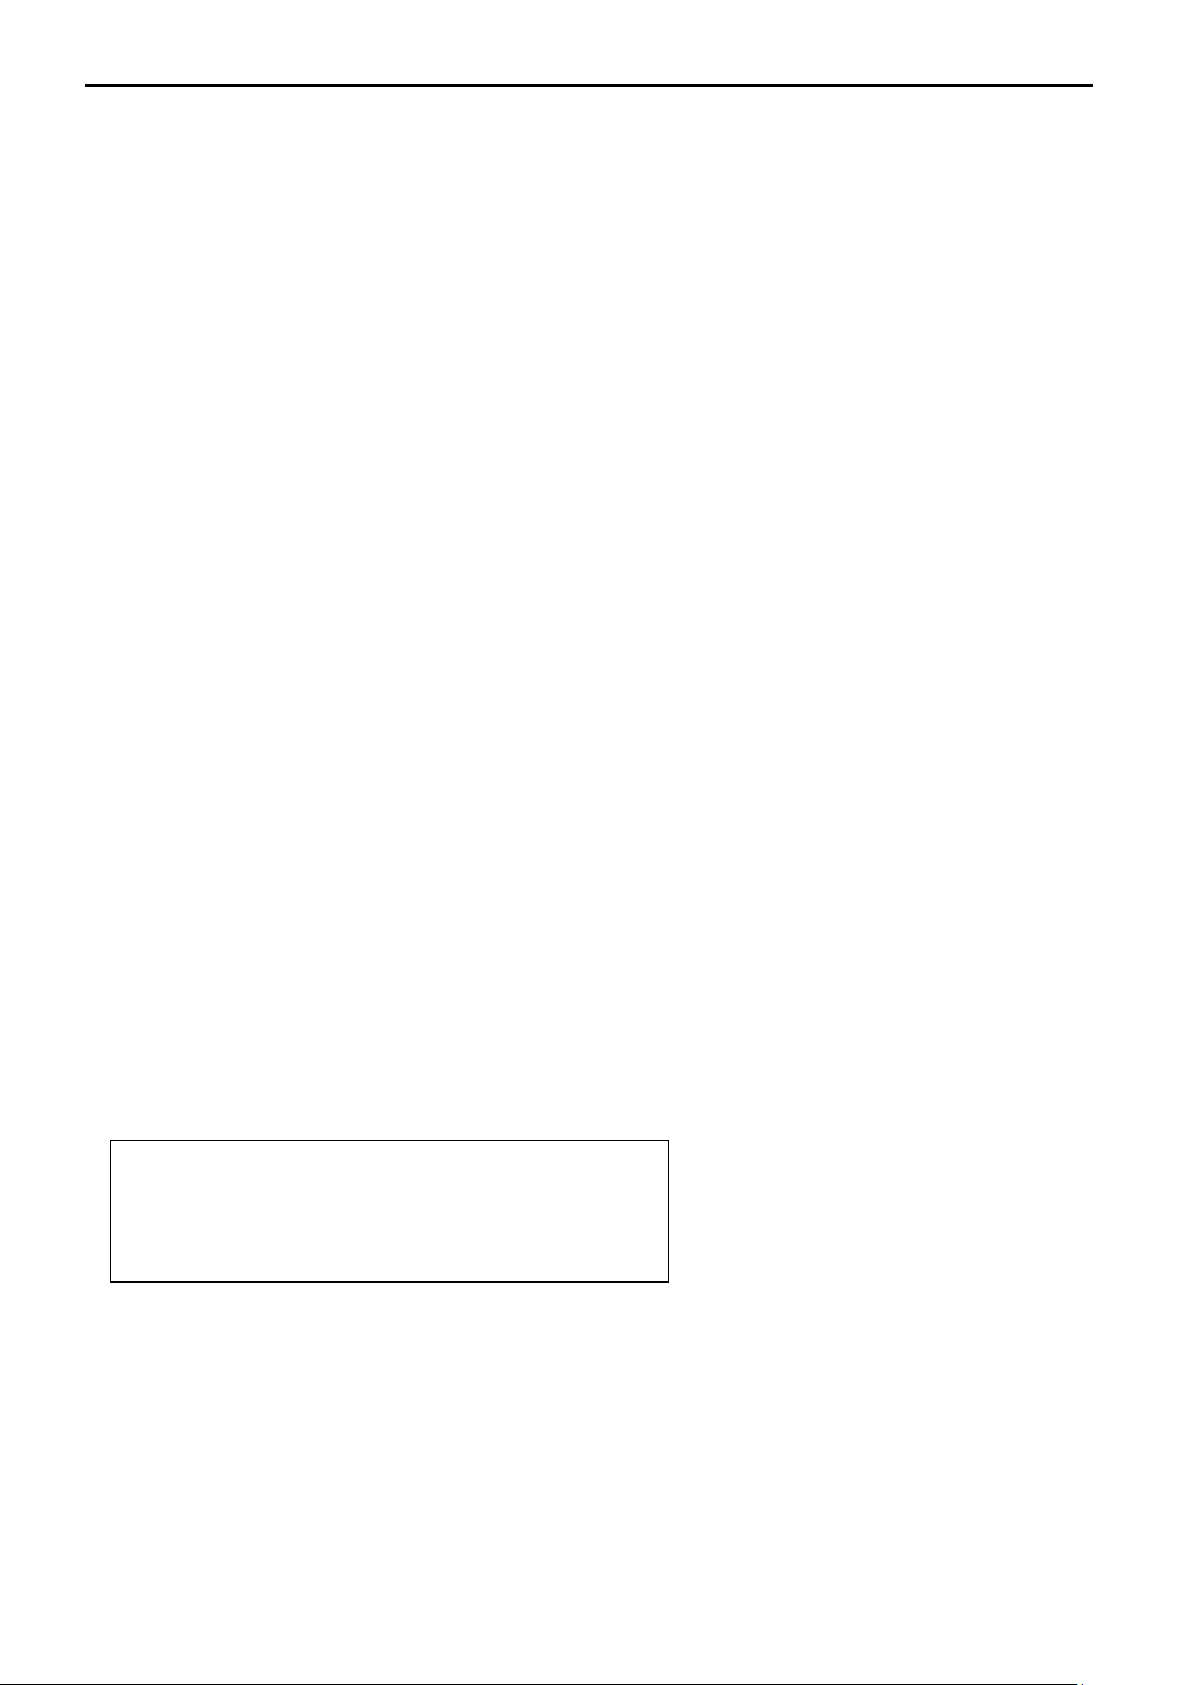
Reconfigurar : no, sí
Peso : off - apagado, on - encendido
Densidad : off - apagado, on - encendido
Mol: off - apagado, on - encendido
EndMode: Salir del menú
Balanzas Scout
TM
SKX Series ES 9
Stable Range – Rangoestable [Stable]
Configurar la cantidad en la que puede variar la lectura mientras se mantiene encendido el
símbolo de estabilidad.
0.5d = 0.5 balance division – división de la balanza
1d = 1 balance division – división de la balanza
2d = 2 balance division – división de la balanza
5d = 5 balance division – división de la balanza
Back Light– Iluminación trasera [b.Light]
Permite configurar la función de la iluminación trasera.
OFF - Apagado = siempre apagada
ON - Encendido = siempre encendida
AUTO - Automático = encendida cuando se pulsa un botón o se produce un cambio en
el peso mostrado en pantalla.
Note: Cuando el dispositivo se halla conectado al pack de alimentación, la iluminación trasera
estará siempre encendida.
Auto Tare– Tara automatic[A.tArE]
Permite configurar la función de tara automática.
OFF – Apagado = La función de Tara Automática(AutomaticTare) estará desactivada
ON – encendido = Se efectúa la tara con relación al primer pesaje bruto estable
ON-ACC = Las cargas brutas estables dentro de los límites aceptados están
sujetas a tara (en el modo de pesaje de Comprobación -
Checkweighingmode)
Auto off - Apagado automático [A.OFF]
Configurar la función de apagado automático.
OFF - apagado = desactivado
1 = apaga el equipo tras 1 minuto sin actividad
5 = apaga el equipo tras 5 minutos sin actividad
10 = apaga el equipo tras 10 minutos sin actividad
EndSetup– Finalizar configuración [End]
Avanzar hacia el menú siguiente o volver a la parte superior del menú actual.
4.4 Modo Menú
Este menú activa modos y funciones para que se hallen disponibles para ser utilizados
mediante el botón [Mode].
Reconfigurar - Reset [reset]
Reconfigurar el menú Modea la configuración por defecto de salida de fábrica.
NO = noreconfigurar
YES - Sí = reconfigurar
Peso - Weigh [wWeIGH]
Configurar el estatus.
OFF – Apagado = desactivado
ON – Encendido = activado
Page 28
g: off - apagado, on - encendido
kg: off - apagado, on - encendido
N: off - apagado, on - encendido
oz: off - apagado, on - encendido
lb: off - apagado, on - encendido
lb:oz: off - apagado, on - encendido
End Unit: Salirdelmenú
ES 10 Balanzas Scout
Densidad – Density [SPEC.Gr]
Configurar el estatus.
OFF – Apagado = desactivado
ON – Encendido = activado
Mol [mMole]
Configurar el sub-modo
OFF = apagado / desactivado
ON = encendido / activado
Avanzar hasta el menú siguiente para volver a la parte superior del menú actual.
EndMode [End] – Salir del menú
TM
SKX Series
4.5 Menú unidades
Este menú activa las unidades para resulten accesibles con el botón [Units] Unidades. Las
unidades en menú deben de estar encendidas “on” para hallarse activas.
Nota : Las unidades disponibles pueden varias en función del modelo y de las distintas
normativas nacionales aplicables.
Page 29
Puede utilizar un kit interfaz de conectividad
adicional para conectar la báscula a un
ordenador o a una impresora.
Se hallan disponibles los distintos accesorios de
Kit que se describen a continuación :
RS232, Host USB, DispositivoUSB, Ethernet,
Bluetooth®*.
Gráfico 4-4. Parte posterior de la balanza
* Los kits de interfaces disponibles pueden estar sujetos a cambios de acuerdo con las
distintas normativas nacionales aplicables
Conexión de
Interfaz
Jack del
adaptador AC
Ranura de
seguridad
Gancho de pesaje inferior
Instalación del gancho de pesaje inferior
Apertura del pesaje inferior
Balanzas Scout
TM
SKX Series ES 11
4.6 Características adicionales
Gancho de pesaje inferior
La balanza Scout se halla equipada con un gancho inferior para efectuar pesajes por debajo de
la balanza.
El gancho de pesaje se halla situado en la parte trasera de la cubierta de las pilas como se
muestra a continuación. Para poder hacer uso de esta característica y funcionalidad tiene que
quitar la cobertura roja de protección para abrir la parte inferior de la báscula.
Atención :Antes de girar la balanza, quitar la tapa y el apoyo de la tapa (si la hay), y
gire la clavija de bloqueo de transporte hacia la posición de “bloqueo” para evitar que
el equipo sufra daños.
Gráfico 4-2. Pesaje inferior
La balanza puede apoyarse mediante el uso de soportes de laboratorio o cualquier otro método
adecuado. Asegúrese de que la balanza se encuentra nivelada y apoyada con seguridad y que
el bloqueo de transporte ha sido anulado. Encienda la balanza, y use una cuerda o un alambre
para fijar los elementos que deban de ser pesados.
Gráfico 4-3. Aplicación de pesaje inferior / peso colgante
Conectando el Interfaz
La palabra y el logotipo Bluetooth® son marcas registradas propiedad de Bluetooth SIG,
Inc., OHAUS hace uso de dichas marcas al amparo de sus licencias de utilización.
Page 30
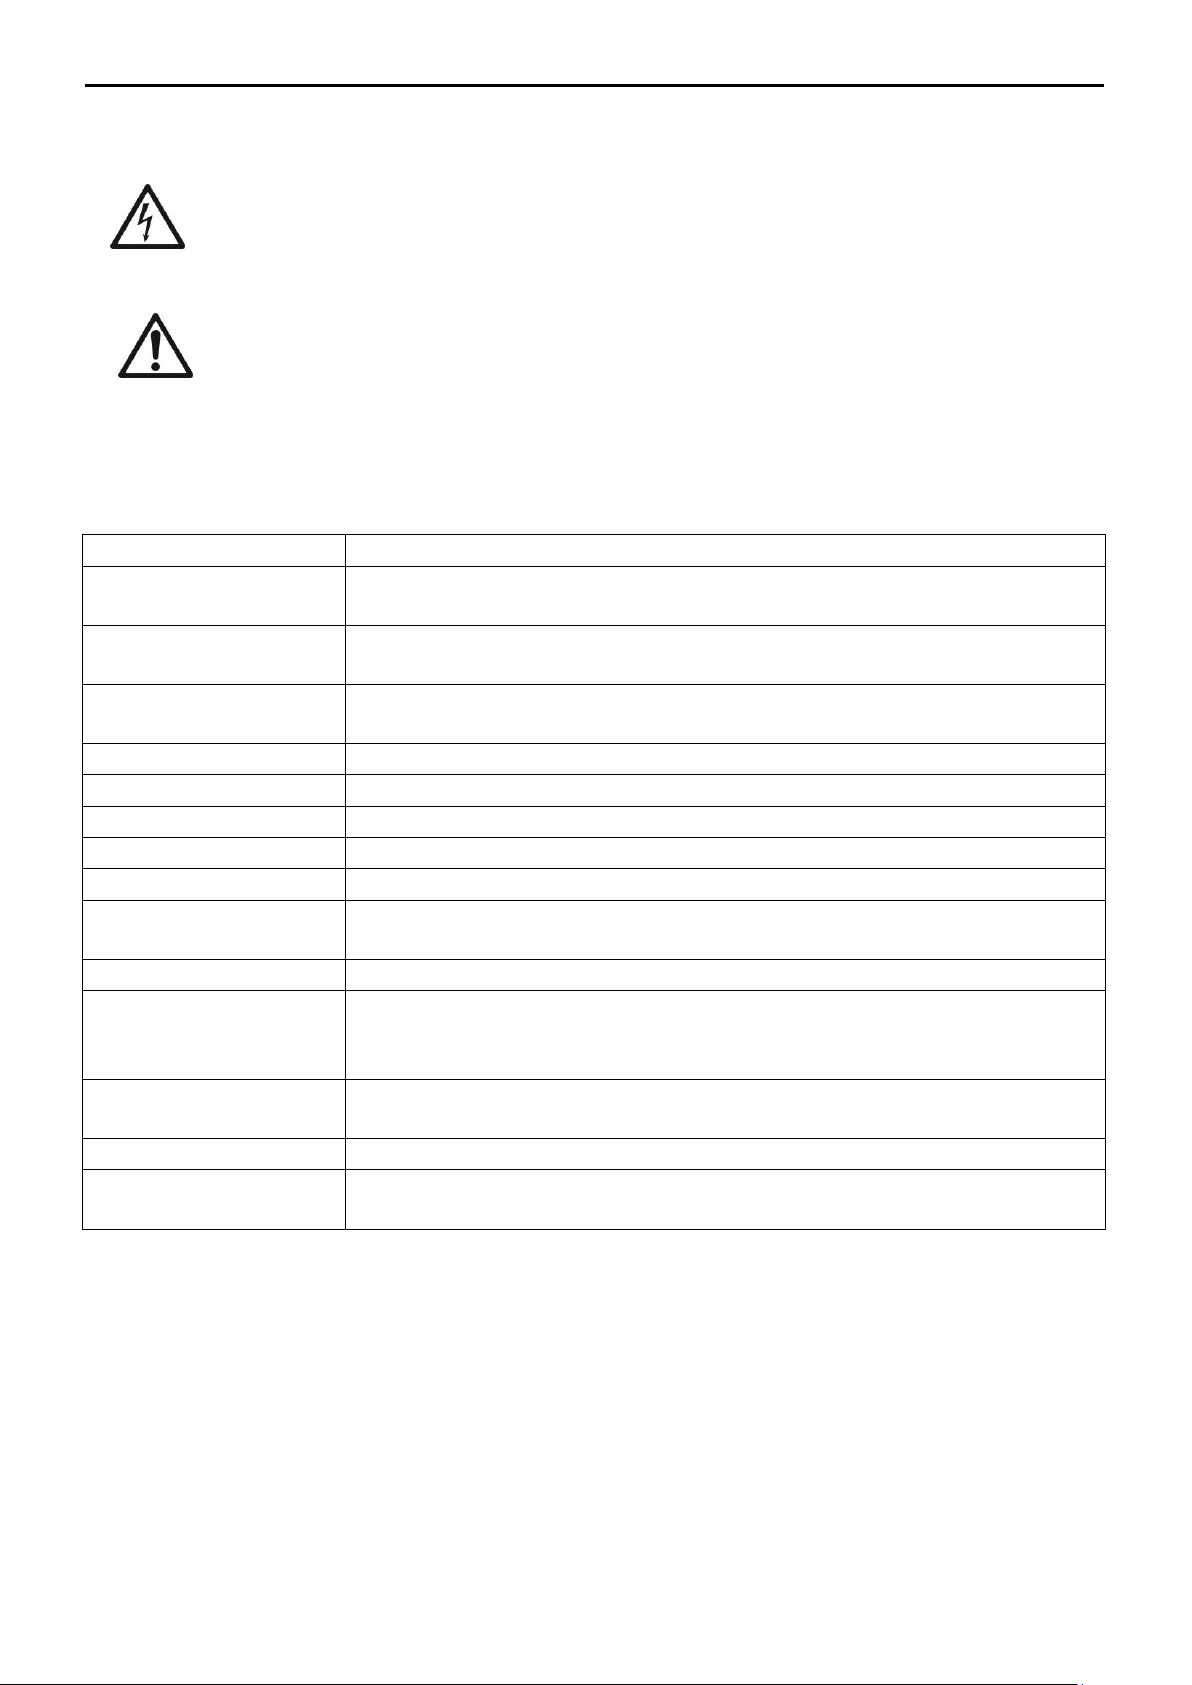
PRECAUCIÓN : Riesgo de shock / descarga eléctrica. Desconectar el equipo de
la toma / fuente de corriente eléctrica antes de proceder a su limpieza.
Síntoma
Causa probable
No se puede encender
el dispositivo
La balanza no recibe alimentación / corriente
Escasa precisión
Calibrado inadecuado
Entorno inestable
No puede efectuarse el
calibrado
El interruptor de seguridad está en la posición de cierre
Err 8.1
El peso sobrepasa la potencia en el rango cero.
Err 8.2
La potencia en el pesaje inferior se halla en rango cero.
Err 8.3
Sobrecarga (el peso sobrepasa la capacidad del rango establecido)
Err 8.4
Carga insuficiente (sin bandeja de pesaje)
Err 8.5
Tara fuera de rango
Err 8.6
El valor mostrado en pantalla sobrepasa 999999 (posible en modo de
Totalización)
Err 8.7
Posición interna de pesaje desconocida
ref.err
Error de recuento de partes o de porcentaje – peso de la muestra<1d.
La balance señala un error y luego sale del modo de recuento de
partes o se pone en modo [Clr.APU].
Lo.ref
Peso de referencia de porcentaje o APW demasiado bajo para obtener
resultados precisos
CAL E
Error a la hora de efectuar el calibrado.
USB.Err
No se puede hallar el fichero de la aplicación (app file) o el menú en el
disco U.
ES 12 Balanzas Scout
TM
SKX Series
5. MANTENIMIENTO
5.1 Limpieza
La carcasa puede limpiarse con un paño humedecido con un detergente suave si fuese
necesario.
Atención :No utilizar disolventes, productos químicos, alcohol, amoniaco o
productos abrasivos para limpiar la carcasa o el panel de control.
5.2 Resolución de problemas
La tabla siguiente contiene una lista de problemas habituales y sus posibles causas y
soluciones. Si el problema persiste, por favor, contacte con OHAUS o su agente autorizado.
TABLA5-1
5.3 Información sobre el servicio técnico
Si el apartado de resolución de problemas no le resulta útil para resolver un problema, puede
ponerse en contacto con su agente autorizado OHAUS. Para servicio o soporte técnico en los
Estados Unidos puede llamar al servicio de atención al cliente al número gratuito :1-800-6727722 ext. 7852entre las 8:00 AM y las 5:00 PM EST. Un especialista en los productos
OHAUSse hallará disponible para brindarle la asistencia técnica necesaria. Si reside fiera de la
Estados Unidos, por favor, visite nuestra web :www.ohaus.com o localice las oficinas de
OHAUSmás cercanas.
Page 31
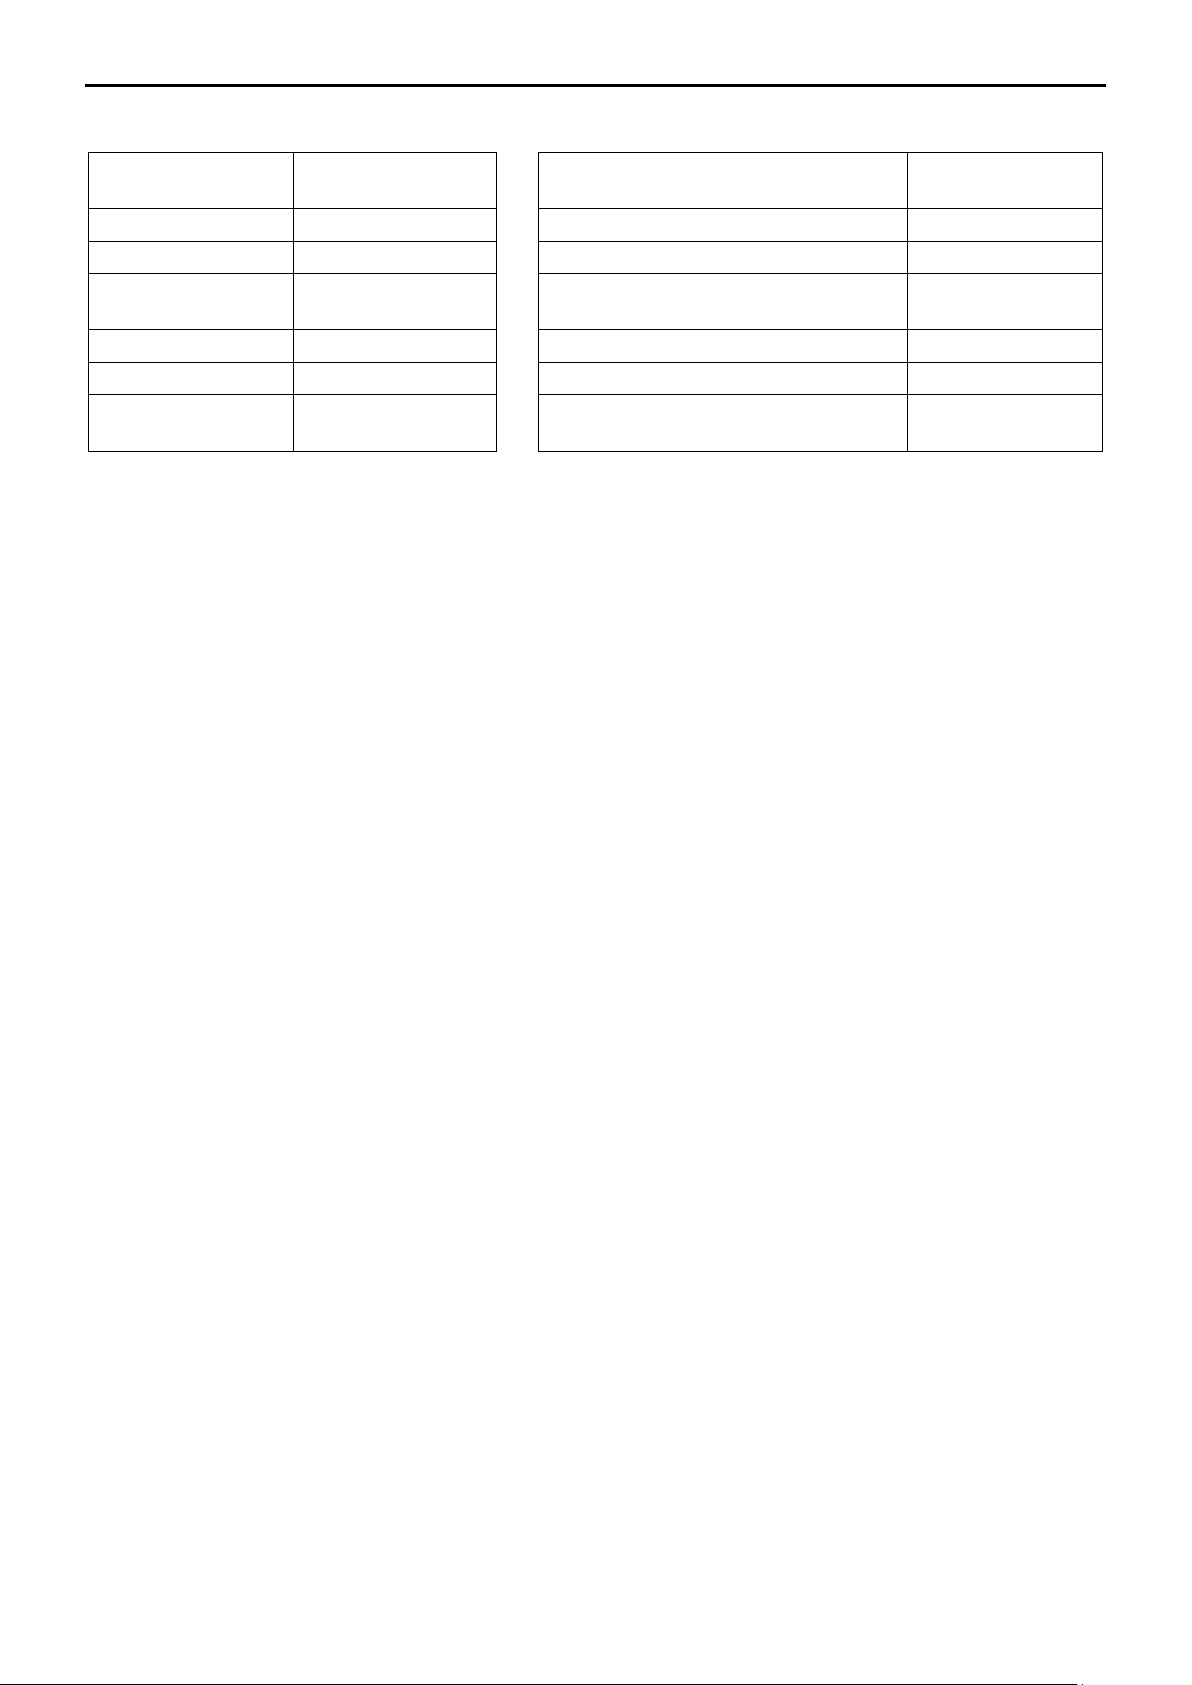
DESCRIPCIÓN
Número del
artículo
DESCRIPCIÓN
Número del
artículo
Kit RS232
30268982
Kit de apilado “Stacking Kit”, x1
30268988
Kit Host USB
30268983
Kit de gravedad específica
30269020
Kit dispositivo
USB
30268984
Kit de pantalla / visor auxiliar AuxiliaryDisplay Kit
30269019
Kit Bluetooth*
30268985
Maletín de transporte
30269021
Kit Ethernet
30268986
Cubierta / paraviento de uso
30269022
Kit de apilado
“Stacking Kit”, x6
30268987
Cables e impresoras
Contacte con
OHAUS
Balanzas Scout
TM
SKX Series ES 13
5.4 Accesorios
TABLA 5-2. ACCESORIOS
Nota :El Kit* Bluetooth se halla únicamente disponible en algunas regiones o países de acuerdo
con las normativas aplicables a nivel nacional.
6. Datos Técnicos
Los datos técnicos son válidos únicamente en las siguientes condiciones ambientales :
Usa únicamente en entornos interiores
Rango de temperaturas de funcionamiento operativo :+5 °C a +40 °C
Humedad relativa :10% a 80% a 31°C , con decrecimiento lineal hasta el 50% a 40°C, sin condensación
Altitud :Hasta 2000 m
Alimentación :Corriente AC – Adaptador de corriente 100-240V 50/60 Hz y salida 5V DC 1 A, o 4 pilas AA
Nivel de polución : 2
Fluctuaciones de voltaje de la corriente principal :hasta ± 10% del voltaje nominal
Page 32
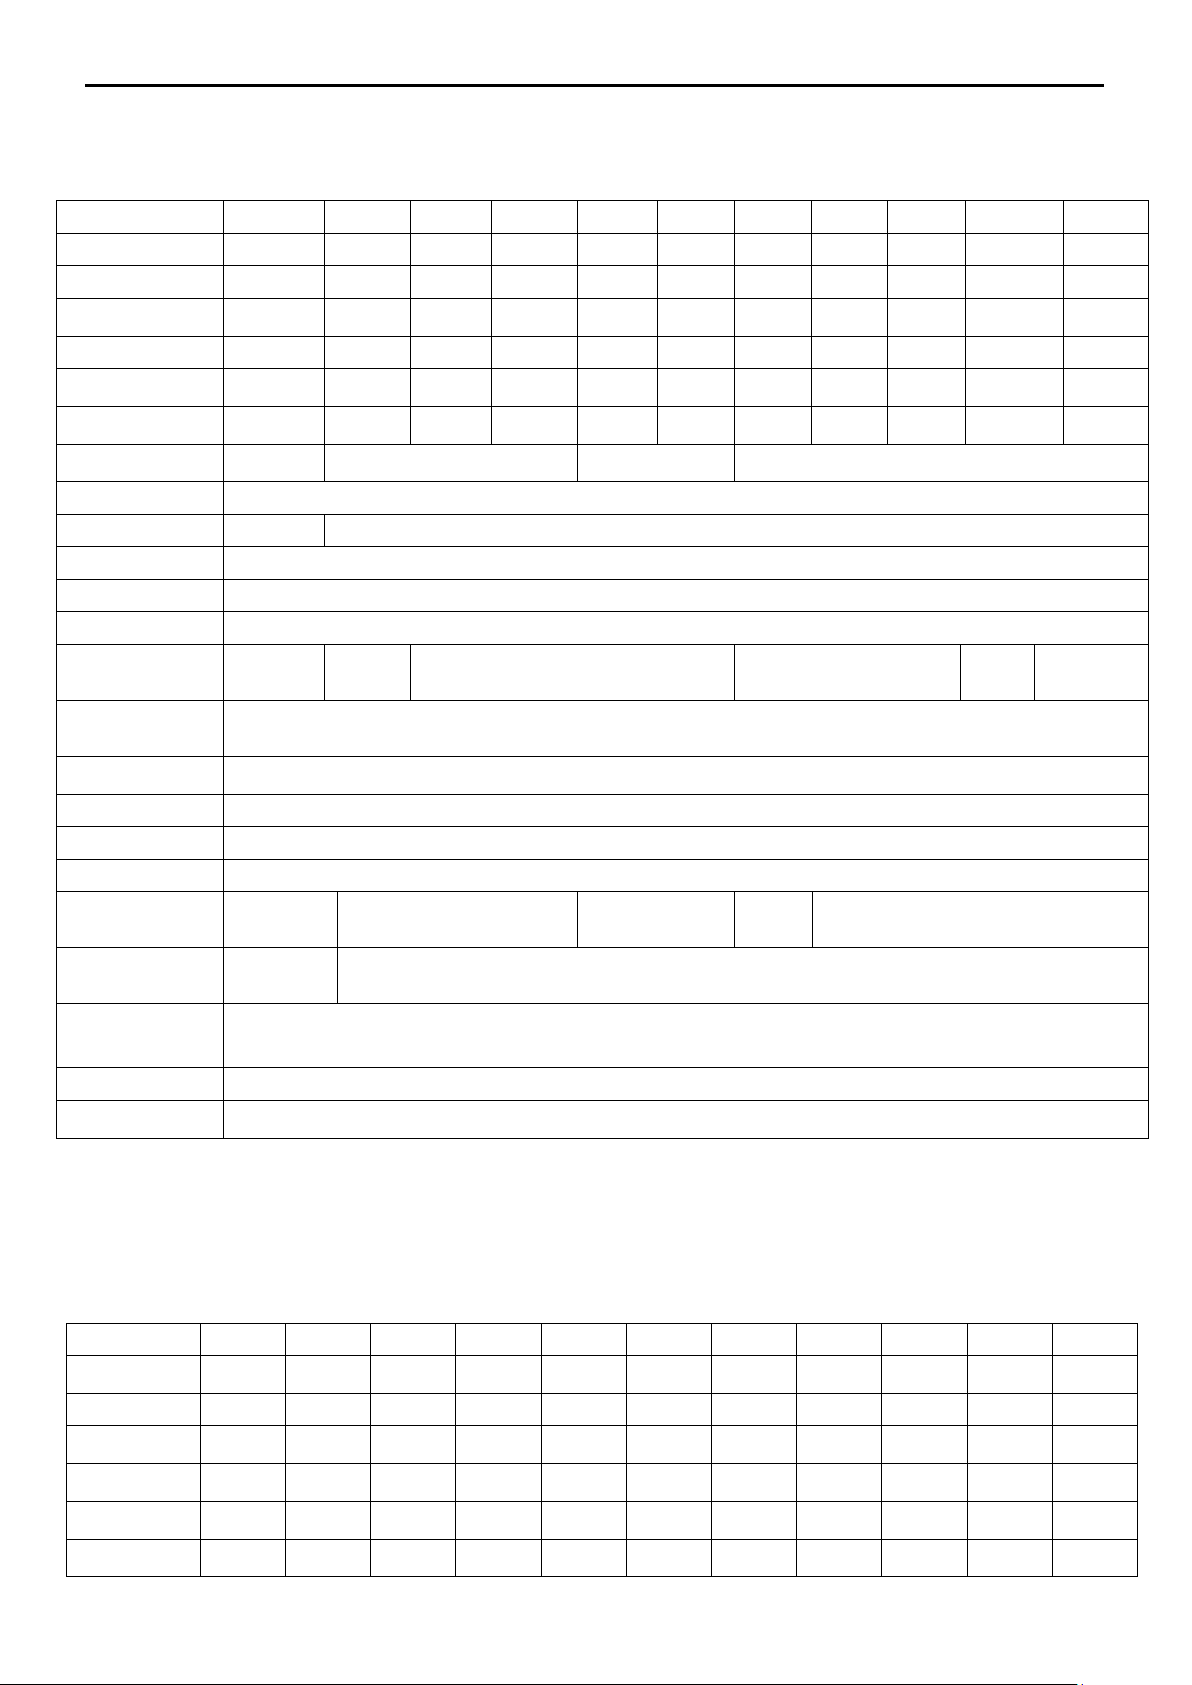
Modelo
SKX123
SKX222
SKX422
SKX622
SKX1202
SKX2202
SKX421
SKX621
SKX2201
SKX6201
SKX8200
Capacidad (g)
120
220
420
620
1200
2200
420
620
2200
6200
8200
Legibilidad (g)
0.001
0.01
0.01
0.01
0.01
0.01
0.1
0.1
0.1
0.1
1
Repetibilidad
(Std. Dev.) (g)
0.002
0.01
0.01
0.01
0.02
0.02
0.1
0.1
0.1
0.1
1
Linealidad (g)
0.003
0.01
0.01
0.02
0.03
0.03
0.1
0.1
0.1
0.2
1
Masa de calibrado de
amplitud*
100 g
200 g
200 g
300 g
1 kg
2 kg
200 g
300 g
2 kg
5 kg
8 kg
Masa de calibrado de
linealidad
50, 100 g
100, 200 g
200,
400 g
300, 600 g
500 g,
1 kg
1 kg,
2 kg
200,
400 g
300,
600 g
1 kg,
2 kg
3 kg, 6 kg
4 kg, 8 kg
Tiempo(s) de
estabilizació n
1.5 1 1.5
1
Fabricado en
Carcasa en ABS &placa de 304 acero inoxidable
Cubierta / paraviento
Sí
No
Rango de Tara
Plena capacidad por sustracció n
Unidades de pesaje*
g, kg, N, oz, lb, lb:oz
Modos de aplicació n
Pesaje, Determinació n de la densidad,Pesaje de Mol
Tiempo de
funcionamiento de las
baterías (a 20ºC)
80 horas
120 horas
80 horas
120 horas
80 horas
120 horas
Rango de temperaturas
de funcionamiento
operativo específico
+10° C a +40°C a10% a 80% Humedad relativa, sin condensació n
Condiciones de
almacenamiento
-20° C a +55°C a10% a 90% Humedad relativa, sin condensació n
Comunicació n
RS232, dispositivo USB, Ethernet, Bluetooth***, Host USB Host (todos disponibles como accesorio)
Tipo de pantalla
LCD con iluminació n trasera : 6-dígitos 7-segmentos con iluminació n trasera LED de luz blanca
Tipo de pantalla
20 mm / 0.78 pulgadas dígitos
Tamañ o de la bandeja
(A x D)
Ø 93mm/3.7
pulgadas
Ø 120 mm / 4.7 pulgadas
170 x 140 mm /
6.7 x 5.5 pulgadas
Ø 120mm
/ 4.7
pulgadas
170 x 140 mm / 6.7 x 5.5 pulgadas
Dimensiones para la
balanca (Largo x Ancho
x Alto)
202 x 222 x
103 mm /
8 x 8.7 x 4.1 in
202 x 224 x 54 mm / 8 x 8.8 x 2.1 in
Dimensiones para el
transporte / envío
(Largo x Ancho x Alto)
300 x 250 x 129 mm / 11.8 x 9.8 x 5.1 pulgadas
Peso Neto
1 kg
Peso para el transporte /
envío
1.6 kg
Modelo
SKX123
SKX222
SKX422
SKX622
SKX1202
SKX2202
SKX421
SKX621
SKX2201
SKX6201
SKX8200
Grammo (g)
120 x 0.001
220 x 0.01
420 x 0.01
620 x 0.01
1200 x 0.01
2200 x 0.01
420 x 0.1
620 x 0.1
2200 x 0.1
6200 x 0.1
8200 x 1
Kilogramo (kg)
/ / /
/
1.2 x 0.00001
2.2 x 0.00001
/
/
2.2 x 0.0001
6.2 x 0.0001
8.2 x 0.001
Newton (N)
1.17679 x
0.00001
2.1574 x
0.0001
4.1188 x
0.0001
6.0801 x
0.0001
11.7679 x
0.0001
21.5744 x
0.0001
4.119 x 0.001
6.080 x 0.001
21.574 x
0.001
60.801 x
0.001
80.41 x 0.01
Onzas (oz)
4.23290 x
0.00005
7.7600 x
0.0005
14.8150 x
0.0005
21.8700 x
0.0005
42.3290 x
0.0005
77.6030 x
0.0005
14.815 x
0.005
21.870 x
0.005
77.600 x
0.005
218.700 x
0.005
289.25 x 0.05
Libra (lb)
/ / /
1.36690 x
0.00005
2.64555 x
0.00005
4.85020 x
0.00005
/
1.3670 x
0.0005
4.8500 x
0.0005
13.6685 x
0.0005
18.080 x
0.005
Libra: Onza (lb: oz)
/ / /
1lb:5.8700oz
x 0.0005oz
2lb:10.3290oz
x 0.0005oz
4lb:13.6030oz
x 0.0005oz
/
1lb:5.870oz
x 0.005oz
4lb:13.600oz
x 0.005oz
13lb:10.700oz
x 0.005oz
18lb:1.25oz
x 0.05oz
ES 14 Balanzas Scout
6.1 Características técnicas
TABLA 6-1. CARACTERÍSTICAS TÉCNICAS
TM
SKX Series
Notas:
* Las pesas de calibración se incluyen con los modelos de hasta 620g capacidad de ciertas regiones.
** Las unidades de pesaje disponibles, los modos de aplicación y los Kits de interfaces opcionales están sujetos a
cambios de acuerdo con las normativas nacionales aplicables.
*** Kit Bluetooth sólo está disponible en ciertas regiones de acuerdo con las regulaciones locales.
Capacidad x Legibilidad
Page 33
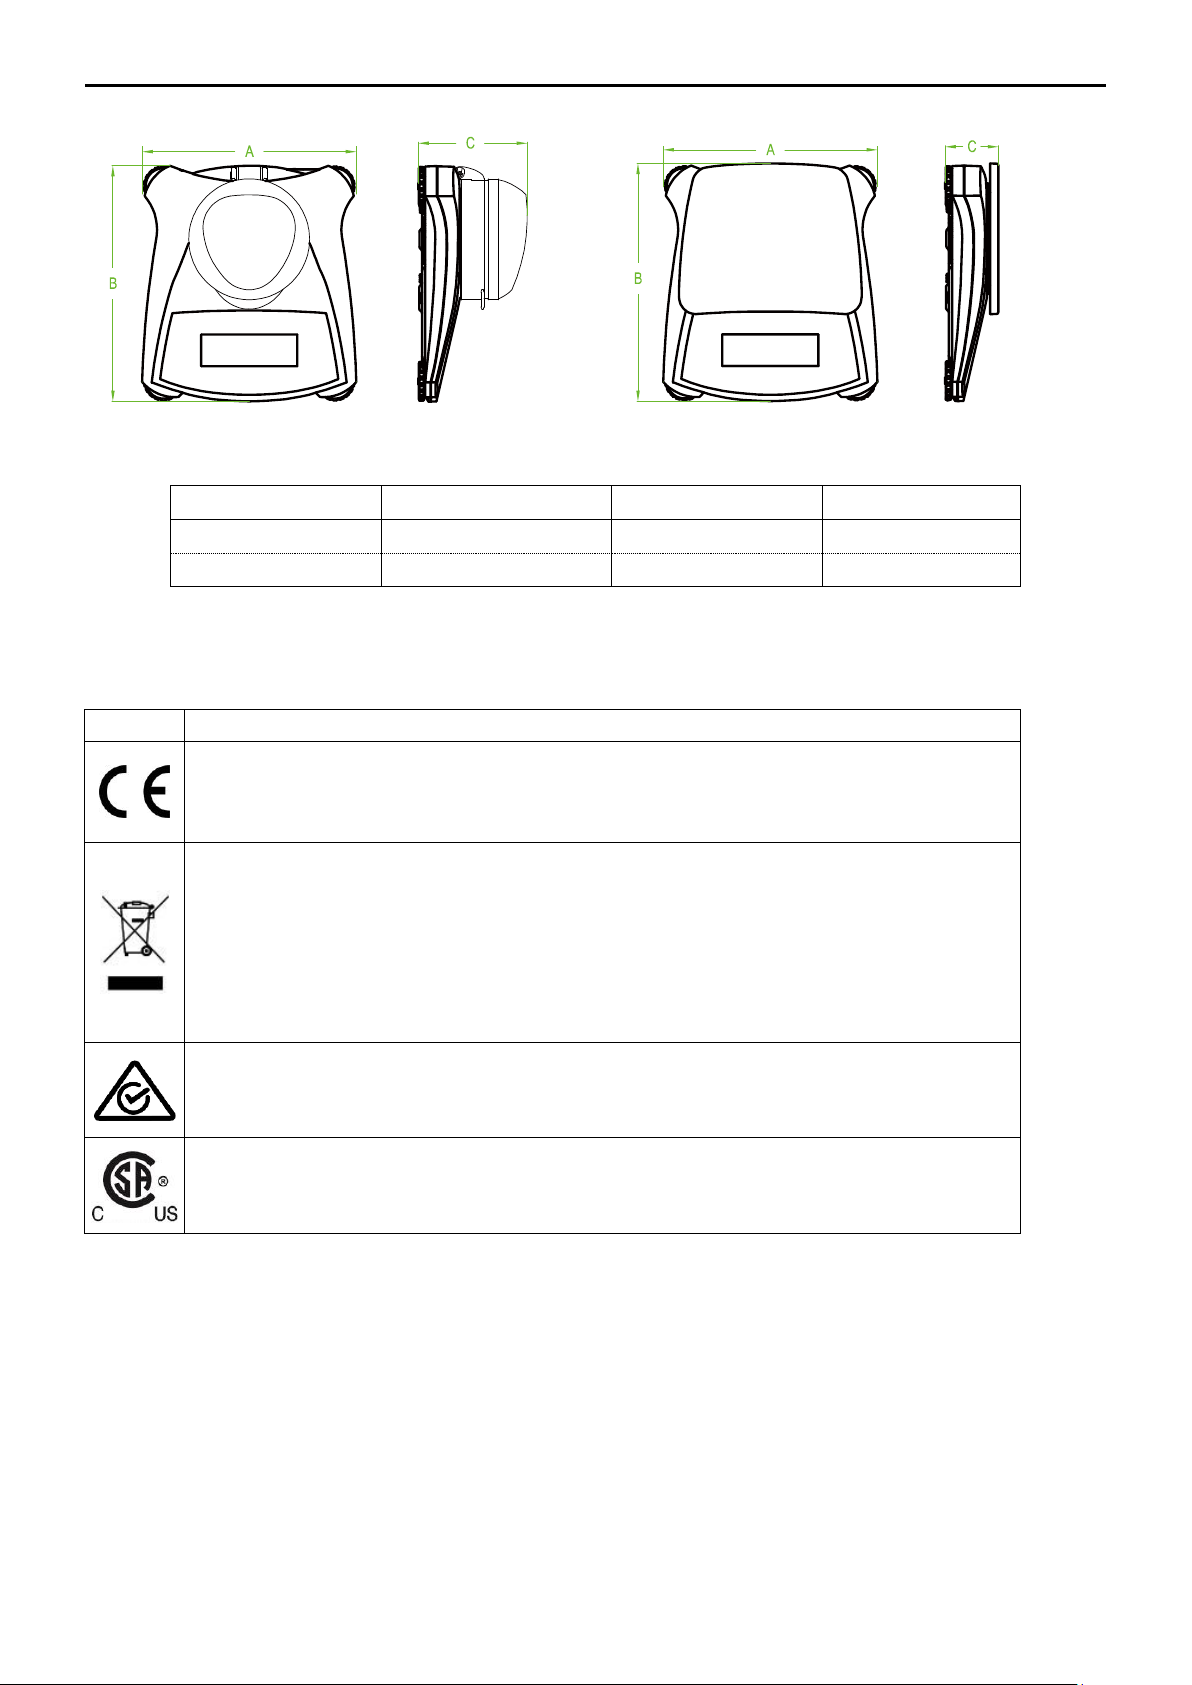
Modelo A B C
Con cubierta
202 mm/8.0in.
222 mm/8.7in.
103 mm/4.1in.
Sin cubierta
202 mm/8.0in.
224 mm/8.8in.
54 mm/2.1in.
Marcaje
Estándar
EN 61010-1, EN 61326-1
Consultar la declaración de conformidad en nuestra página web
:www.ohaus.com/ce.
Este producto comple con la directiva de la Unión Europea EU Directive
2002/96/EC (WasteElectrical and ElectronicEquipment - WEEE). Por favor, a
la eliminación de este producto de conformidad con la normativa aplicables
en los puntos de recogida especificados para dispositivos y equipos
eléctricos y electrónicos. Para las consultar instrucciones sobre la eliminación
de residuos aplicable en Europa, por favor, consulte nuestra página web :
www.OHAUS.com/weee.
AS/NZS 61000.6.1, AS/NZS 61000.6.3
CAN/CSA-C22.2 No. 61010-1, UL Std. No. 61010-1
Balanzas Scout
TM
6.2 Gráficos
SKX Series ES 15
Gráfico 6.1 Dimensiones
6.3 Cumplimiento de la normativa vigente
Compliance to the following standards is indicated by the corresponding mark on the product.
Page 34
En cumplimiento con la Directiva Europea 2002/96/EC sobre la gestión de
residuos de equipos eléctricos y electrónicos (Waste Electrical and Electronic
Equipment - WEEE) este dispositivo no puede ser desechado junto con los
residuos domésticos. Esto también es de aplicación otros países fuera de la
Unión Europea, de acuerdo con sus normativas propias de aplicación.
Por favor, une vez concluida su vida útil, proceda a la eliminación de este
producto de conformidad con las normas aplicables en los puntos de
recogida especificados para dispositivos y equipos eléctricos y electrónicos.
Si tiene alguna duda o pregunta, por favor póngase en contacto con las
autoridades responsables o con el distribuidor donde efectuó la compra del
dispositivo.
En el caso de efectuarse la venta de este dispositivo a terceros (para su uso
privado o profesional), también se transfiere la responsabilidad en cuanto al
respeto de esta normativa.
Para las instrucciones sobre la eliminación de residuos aplicable en Europa,
por favor, consulte nuestra página web : www.OHAUS.com/weee.
Gracias por contribuir a la protección del medio ambiente.
ES 16 Balanzas Scout
GESTIÓN DE RESIDUOS
TM
SKX Series
Nota de la FCC (Comisión Federal de Comunicaciones)
Este equipo ha sido probado y ha quedado establecido que cumple con los límites establecidos
para dispositivos digitales de Clase B, en cumplimiento del apartado 15 de la normativa FCC
(Comisión Federal de Comunicaciones). Estos límites han sido concebidos y diseñados para
suministrar una protección razonable contra las interferencias nocivas en instalaciones
residenciales. Este equipo usa, genera y puede emitir energías de radio-frecuencia, y, en el
caso de no estar instalado y usarse el mismo de acuerdo con las instrucciones del fabricante,
pueden producirse interferencias perjudiciales o peligrosas con las comunicaciones por radio.
No obstante, no existe garantía alguna de que dichas interferencias no ocurran en una
instalación en concreto. Si este equipo provoca interferencias perjudiciales o peligrosas en la
recepción de radio o televisión, lo cual puede determinarse encendiendo y apagando el
dispositivo, se recomienda que el usuario intente corregir la interferencia llevando a cabo una o
varias de las acciones siguientes :
- Reorientar o colocar en otro emplazamiento la antena de recepción.
- Incrementar la distancia entre el equipo y el receptor.
- Conectar el equipo en un enchufe de toma de corriente de un circuito distinto al cual se halle
conectado el receptor.
- Por favor, consulte con su agente autorizado / concesionario o con un técnico especializado
en radio/TV para obtener la ayuda adecuada.
Aviso de Industry Canada
Este aparato digital de la Clase B cumple con la norma canadiense ICES-003.
Registro ISO 9001
En 1994, Ohaus Corporation de Estados Unidos, recibió un certificado de registro a ISO 9001
de Bureau Veritus Quality International (BVQI), lo que confirma que el sistema de gestión de
calidad de Ohaus es compatible con los requisitos de la norma ISO 9001. El 21 de junio de
2012, Ohaus Corporation, EE.UU., volvió a registrarse en el estándar ISO 9001:2008.
Page 35

Balanzas Scout
Los productos de Ohaus están garantizados contra defectos en materiales y mano de obra
desde la fecha de entrega hasta el término del periodo de garantía. Durante el período de
vigencia de la garantía, Ohaus reparará, o, a su opción, sustituirá sin cargo alguno cualquier
componente que demuestre estar defectuoso, siempre que el producto se devuelva a Ohaus,
flete prepagado.
Esta garantía no es válida si el producto ha sido dañado por accidente o mal uso, expuesto a
materiales radiactivos o corrosivos, tiene materiales extraños que han penetrado en el interior
del producto, o ha sido sometido a reparaciones o modificaciones por personas o empresas
distintas a Ohaus. En caso de no existir una tarjeta de registro de garantía enviada
adecuadamente al fabricante, el periodo de garantía comenzará en la fecha de envío al
distribuidor autorizado. Ohaus Corporation no otorga ninguna otra garantía expresa o
implícita. Ohaus Corporation no será responsable de ningún daño indirecto.
Ya que la legislación sobre garantías difiere de un estado a otro y de país a país, póngase en
contacto con Ohaus o su distribuidor local de Ohaus para obtener más detalles.
TM
SKX Series ES 17
GARANTÍA LIMITADA
Page 36

Page 37
ATTENTION : Lire toutes les mises en garde de sécurité avant l’installation, la
réalisation de connexions ou l’entretien de cet appareil. Ne pas se conformer à
ces mises en garde peut causer des blessures et/ou des dégâts matériels.
Conserver toutes les instructions pour future référence.
Balances ScoutTM Séries – SKX FR-1
1. INTRODUCTION
Ce manuel contient des instructions d'installation, d'exploitation et d’entretien pour les balances
Scout Séries SKX. Bien vouloir lire complétement le manuel avant d'utiliser la balance.
1.1 Définition des marques et symboles de mise en garde
Les consignes de sécurité sont marquées avec des messages et symboles de mise en garde.
Ceux-ci illustrent les questions de sécurité et les avertissements. Ignorer les consignes de
sécurité peut entraîner des blessures, des dégâts à l'appareil, des dysfonctionnements et des
résultats erronés.
Messages de mise en garde
MISE EN GARDE Pour une situation dangereuse à risque moyen, pouvant entraîner
des blessures ou la mort si non évité.
AVERTISSEMENT Pour une situation dangereuse à faible risque, pouvant entraîner des
dégâts à l’appareil, aux biens, la perte de données ou des blessures
si non évitée.
Attention Pour une information importante relative au produit.
Note Pour une information utile relative au produit.
Symboles de mise en garde
Risque d'ordre général Risque de choc électrique
1.2 Précautions de sécurité
Vérifier que l’alimentation électrique locale corresponde à la plage de tension indiquée sur
l’étiquette des données de l’adaptateur en courant alternatif.
Ne brancher uniquement l’adaptateur en courant alternatif qu’à une prise avec mise à la
terre.
Ne pas placer la balance de telle façon qu’il soit difficile de débrancher l'adaptateur secteur
de la prise de courant.
S’assurer que le cordon d'alimentation ne constitue pas un obstacle potentiel ou un risque
lors d’un déplacement.
Cet équipement est destiné à une utilisation en intérieur et ne doit être utilisé dans des
endroits secs.
Ne faire fonctionner l'appareil que dans les conditions ambiantes spécifiées dans ce mode
d’emploi.
Ne pas faire fonctionner l'équipement dans des environnements dangereux ou instables.
Ne pas laisser tomber les charges sur le plateau.
N’utiliser uniquement que des accessoires et des périphériques approuvés.
Couper l'alimentation électrique de l'équipement avant le nettoyage ou l'entretien.
Il est nécessaire que seul du personnel qualifié effectue l'entretien.
2. INSTALLATION
2.1 Installation des composants
Se reporter aux illustrations et aux instructions ci-dessous pour identifier et assembler la
balance Scout et ses composants. Tous les composants doivent être assemblés avant d'utiliser
la balance.
Page 38
Libérer le verrou de transport rouge en
tournant le pointeur rouge de 90 degrés
vers la gauche pour déverrouiller.
Figure 2-1. Verrou de transport
Sous-plateforme
Indicateur de
Position
Position
déverrouillée
FR-2 Balances ScoutTM Séries – SKX
2.1.1 Déverrouillage du verrou de transport
2.1.2 Installation du plateau de pesée
Placer les moules rectangulaires dans la sous-plateforme comme illustré et exercer une rotation
vers la gauche jusqu'à leur verrouillage. Les plateaux ronds sont placés du haut vers le bas sur
la sous-plateforme.
Figure 2-2. Installation du plateau
2.2.3 Encoche de sécurité
Il est prévu à l'arrière de la balance une encoche de sécurité qui permet de sécuriser la balance
avec un câble en option muni d’une serrure.
2.3 Choix de l'emplacement
Pour de meilleurs résultats, il est nécessaire d’utiliser la balance Scout dans un environnement
propre et stable. Ne pas utiliser la balance dans des environnements avec des courants d'air
importants, avec des changements rapides de température, près de champs magnétiques ou à
proximité d'appareils générant des champs magnétiques ou des vibrations.
2.4 Raccordement de l’alimentation électrique
Installation de l’adaptateur pour courant alternatif
L’alimentation électrique secteur est utilisée pour alimenter la balance lorsque l’utilisation des
piles n’est pas nécessaire. Tout d'abord, brancher l'adaptateur secteur (fourni) au connecteur
femelle à l'arrière de la balance, puis brancher le cordon sur une prise électrique.
Page 39
Connecteur femelle de
Battery Compartment Cover
Connexion de l’interface
Interrupteur de
sécurité
Ouverture de pesée par
Encoche de sécurité (encoche de
Balances ScoutTM Séries – SKX FR-3
Figure 2-3. Vue arrière et du dessous de la balance
Installation des piles
Installer les quatre piles « AA » en respectant la polarité indiquée dans le logement des piles.
Note:
Après la mise sous tension, il est recommandé de laisser le reste chaude pendant au moins 5
minutes avant de l'utiliser.
2.5 Calibrage initial
Lors de la première installation de la balance, et lorsque celle-ci est déplacée vers un autre
emplacement, on doit procéder à son étalonnage pour garantir des résultats de pesage précis.
Alternativement, il est possible d’étalonner les balances manuellement avec des masses
externes.
Disposer des masses d’étalonnage appropriées avant de commencer l’étalonnage. Se reporter
à la section Étalonnage pour les masses et la procédure d'étalonnage.
Page 40
Bouton
Fonction primaire
(Appui bref)
Zéro/Activé
Mettre la balance
sous tension
Si la balance est
allumée, définit
zéro
Impression
Envoie la valeur
actuelle aux ports
COM sélectionnés,
si AUTOPRINT est
réglé sur désactivé.
Fonction
Lance un mode
d'application.
Tare
Saisir/Efface
r une valeur
de tare.
Fonction secondaire
(Appui long)
Zéro/Désactivé
Met la balance
hors tension
Unités
Change l'unité de
pesage.
Mode
Permet de
modifier le mode
d'application.
Menu
Entrer dans
le menu
utilisateur.
Fonction menu
(Appui bref)
Oui
Accepte le réglage
présent à l'écran.
Non
Avance au menu ou
élément de menu
suivant.
Rejette le réglage
présent à l'écran et
passe au paramètre
disponible suivant.
Retour
Revient en
arrière au menu
précédent.
Sortie
Quitte le
menu
utilisateur.
Abandonne
l'étalonnage
en cours.
FR-4 Balances ScoutTM Séries – SKX
3. OPÉRATION
3.1 Commandes
Figure 3-1 Panneau de commande Scout
TABLEAU 3-1. Fonctions des boutons
Remarque : 1 Appui bref : Appuyer moins de une seconde.
2
Appui long : Appuyer et maintenir enfoncé pendant plus de deux secondes.
Page 41
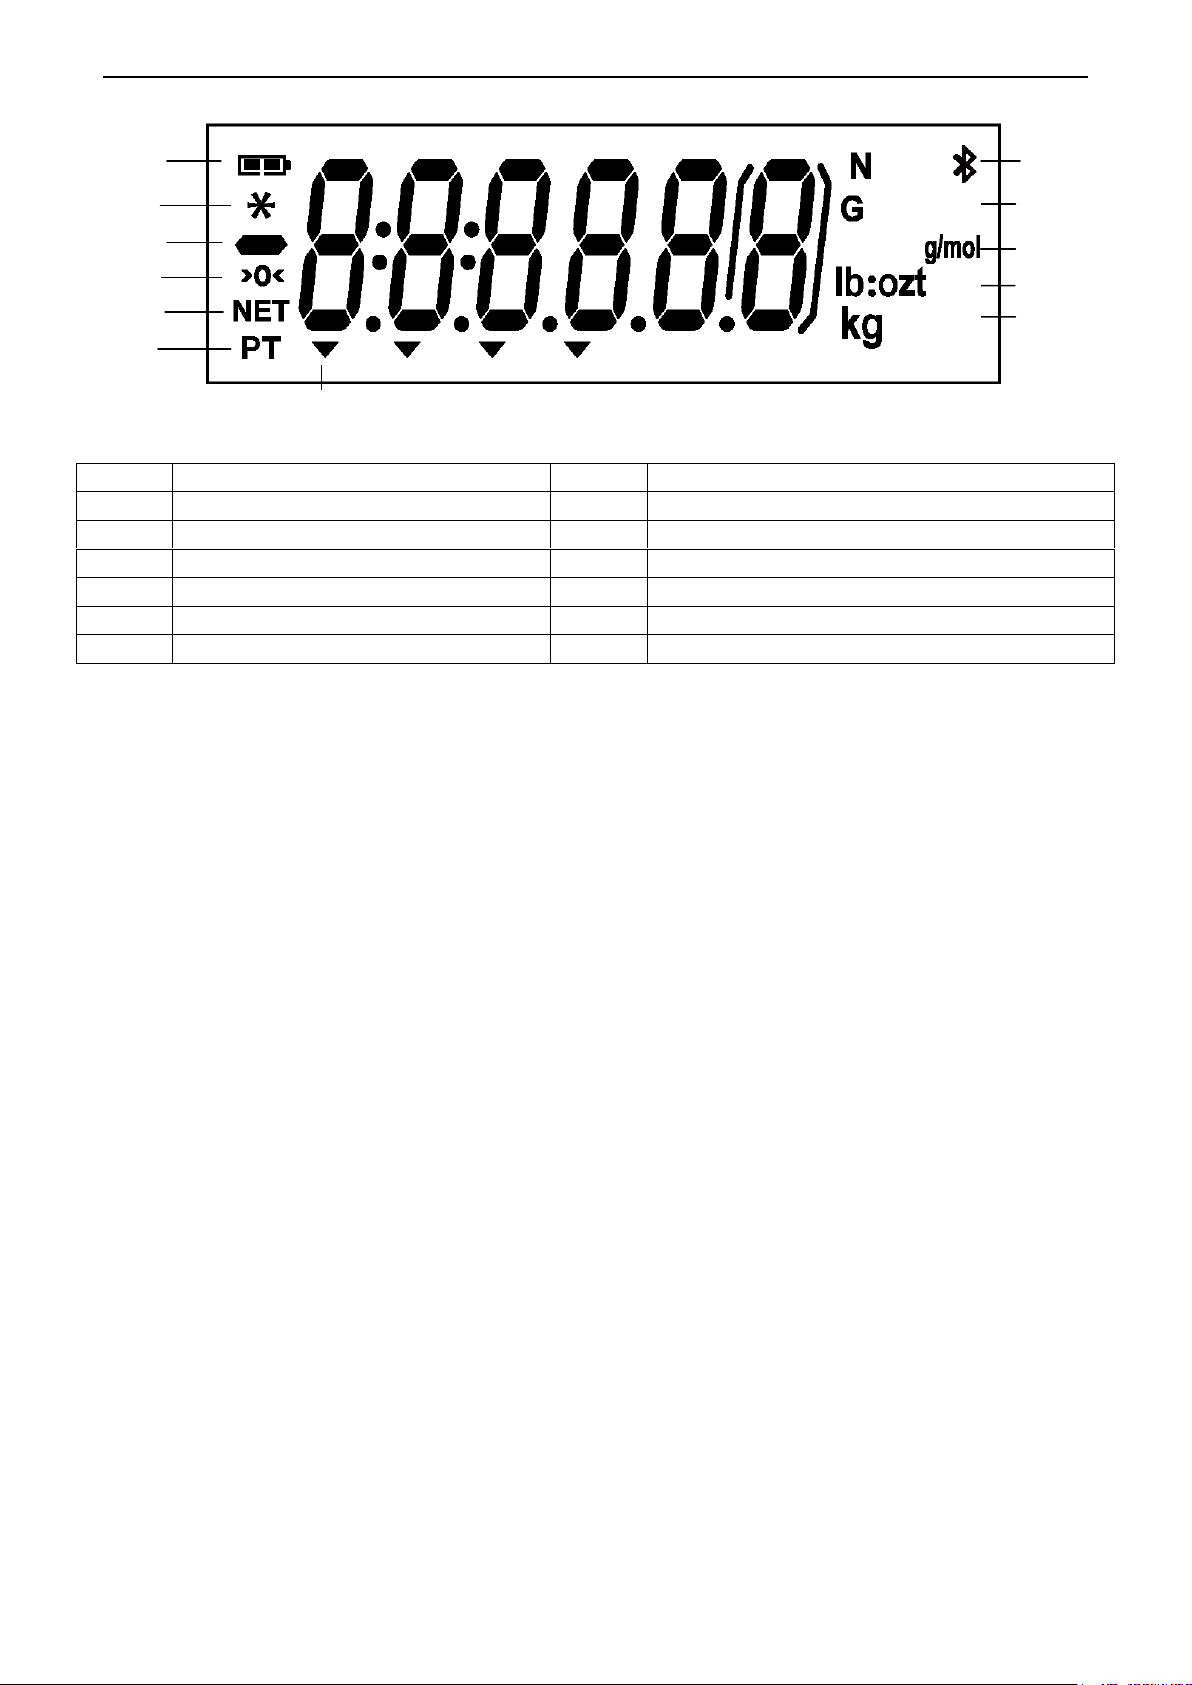
Article
Description
Article
Description
1
Symbole de charge de la batterie
7
Symboles de pointeur
2
Symbole poids stable
8
Symboles kilogramme, grain
3
Symbole négatif
9
Symboles once, livre/once
4
Symbole Centre de zéro
10
Symbole g/mol
5
Symbole NET
11
Symbole B
6
Symbole tare préréglée
12
Symboles Newton, Bluetooth
2
3
4
1
5
6
8
9
10
11
12
7
Balances ScoutTM Séries – SKX FR-5
Figure 3-2. Affichage Scout
TABLEAU 3-2. Affichage des symboles
3.2 Allumer et éteindre la balance
Pour allumer la balance, appuyer et maintenir le bouton On/Zero Off pendant une seconde. La
balance effectue un test d'affichage, affiche momentanément la version du logiciel, puis entre
dans le mode de pesage actif.
Pour éteindre la balance, appuyer et maintenir le bouton On/Zero Off jusqu'à ce que OFF soit
affiché.
3.3 Opération calibration
Lorsque la balance est utilisée pour la première fois, un étalonnage par intervalle est
recommandé pour garantir des résultats de pesage précis. Avant d'effectuer l'étalonnage,
s’assurer d'avoir les masses d'étalonnage appropriées. S’assurer que le commutateur de
sécurité soit en position déverrouillée.
Appuyer et maintenir Menu jusqu’à ce que [mMeNU] (Menu) soit affiché. Lorsque le bouton est
relâché, l'écran affiche [C.A.L]. Appuyer sur Oui pour valider. [SpaN] est alors affiché. Appuyer sur
Oui pour débuter l’étalonnage par intervalle.
[--C--] est affiché pendant que l’indication zéro est stockée. Ensuite, l'écran affiche la valeur de
la masse d’étalonnage. Appuyer sur la touche Non bascule la valeur. Placer la masse
d’étalonnage indiquée sur le plateau. [--C--] est affiché pendant que l’indication est stockée.
L’affichage indique [done] si l’étalonnage est réussi. La balance revient au mode d'application
précédent et est prête à l'emploi.
3.4 Mode de pesée
Ce mode est le réglage par défaut de l'usine.
1. Le cas échéant, appuyer et maintenir Mode jusqu’à ce que [wWeIGH] (Pesée) soit affiché.
2. Le cas échéant, placer un récipient vide sur le plateau et appuyer Tare.
3. Ajouter l'échantillon sur le plateau ou dans le récipient. L'écran affiche le poids de
l'échantillon.
Page 42
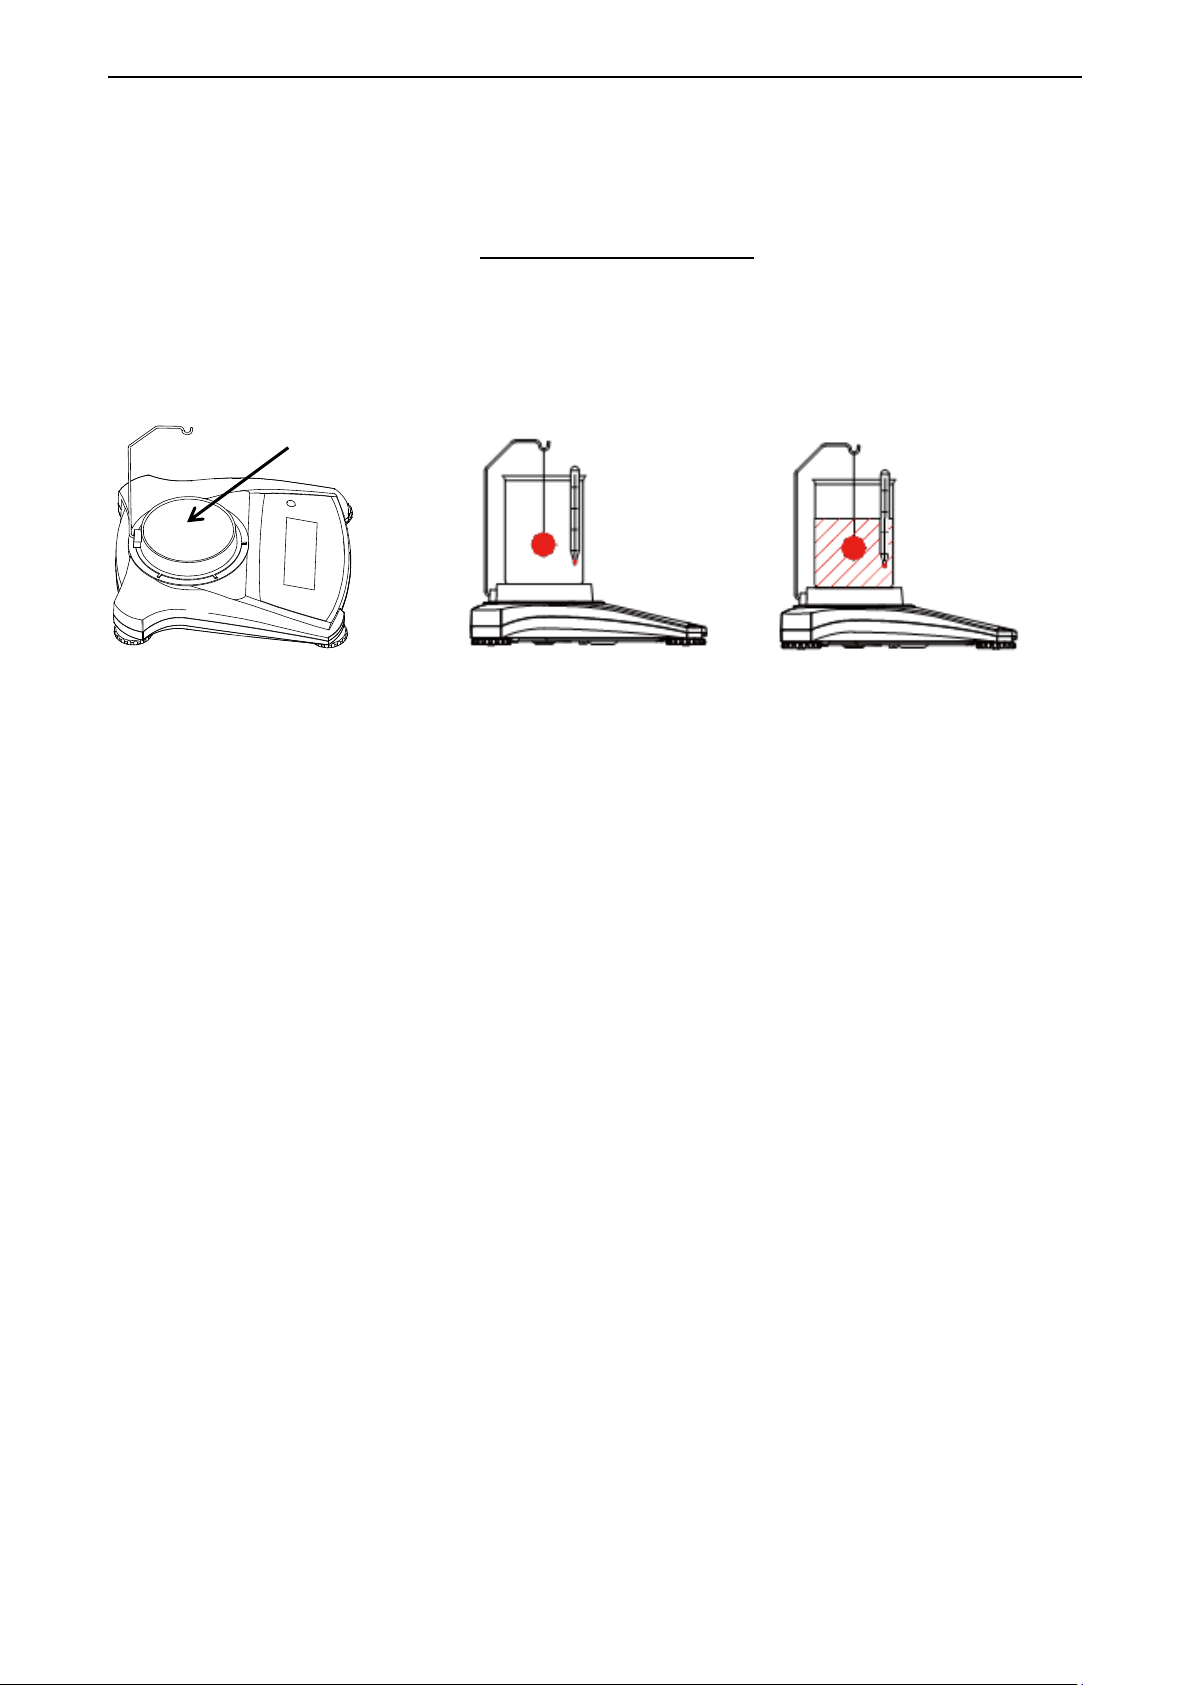
Support de bécher
Préparation
Pesée aérienne
Pesée humide
FR-6 Balances ScoutTM Séries – SKX
3.5 Mode masse volumique
Ce mode permet à l'utilisateur de calculer la masse volumique d'un échantillon lors de
l'utilisation du kit de densité. Le mode masse volumique est lancé lorsque « G » et l'unité
actuelle sont affichés.
L'échantillon est pesé dans l'air suspendu au crochet, puis pesé dans l'eau. La formule est
𝑝𝑜𝑖𝑑𝑠 𝑠𝑒𝑐
𝑝𝑜𝑖𝑑𝑠 𝑠𝑒𝑐 − 𝑝𝑜𝑖𝑑𝑠 ℎ𝑢𝑚𝑖𝑑𝑒
Préparation
Préparer la balance comme illustré ci-dessous. Retirer le plateau de la balance, insérer le
crochet et poser le support du bécher (bécher non fourni). Puis appuyer sur Marche/Zéro pour
allumer la balance.
Figure 3-3. Calcul de la masse volumique
Calcul de la masse volumique
1. Appuyer et maintenir Menu jusqu’à ce que [SPEC.Gr] soit affiché. [Air.wWt] est ensuite
affiché.
2. Placer l'échantillon sur le crochet comme décrit ci-dessus et appuyer sur OUI pour
stocker la valeur de poids sec. [wW.wWt] est alors affiché.
3. Mettre l'échantillon en suspension dans l'eau et appuyer sur Oui pour stocker la valeur
du poids en milieu humide. La valeur du poids spécifique est maintenant affichée et
« G » clignote pendant que l'icône de l’unité est désactivée.
Remarque : Le poids spécifique n'a pas d'unité de mesure.
Pour des échantillons volumineux, il est recommandé d'utiliser la pesée par en-dessous au lieu
d’une pesée au crochet.
3.6 Mode de pesée molaire
Pour entrer dans le mode de pesée molaire à partir de toute application, appuyer et maintenir la
touche Mode jusqu’à ce que [mMoLE] soit affiché. Lorsque la touche Mode est relâchée,
l’affichage indique [Clr.mMS].
1. Appuyer sur la touche Oui pour effacer la masse molaire stockée. Appuyer sur la touche
Non pour rappeler celle existante
Masse molaire. Si aucune masse molaire n’a été stockée, l'affichage [Clr.mMS] est ignoré et
l'introduction d'une
Nouvelle masse molaire est nécessaire.
2. S’il y a une masse molaire stockée, la masse molaire actuelle est affichée et clignote.
3. Appuyer sur la touche Non pour commencer à modifier la masse molaire.
5. Appuyer sur la touche Non pour augmenter le chiffre clignotant.
6. Appuyer sur la touche Retour pour diminuer le chiffre clignotant.
7. Appuyer sur la touche Oui pour valider la valeur et passer d'un chiffre vers la droite.
Remarque : Si le paramètre dépasse la limite, l'affichage revient à la valeur précédemment
stockée. Le nombre le plus à gauche peut être réglé sur 0, 1, 2, 3, 4, 5, 6, 7, 8, 9, -. Tous les
autres chiffres peuvent être0, 1, 2, 3, 4, 5, 6, 7, 8, 9.
Les réglages disponibles vont de 0,01 à 999,99.
L'unité de masse molaire est le g/mol.
Page 43
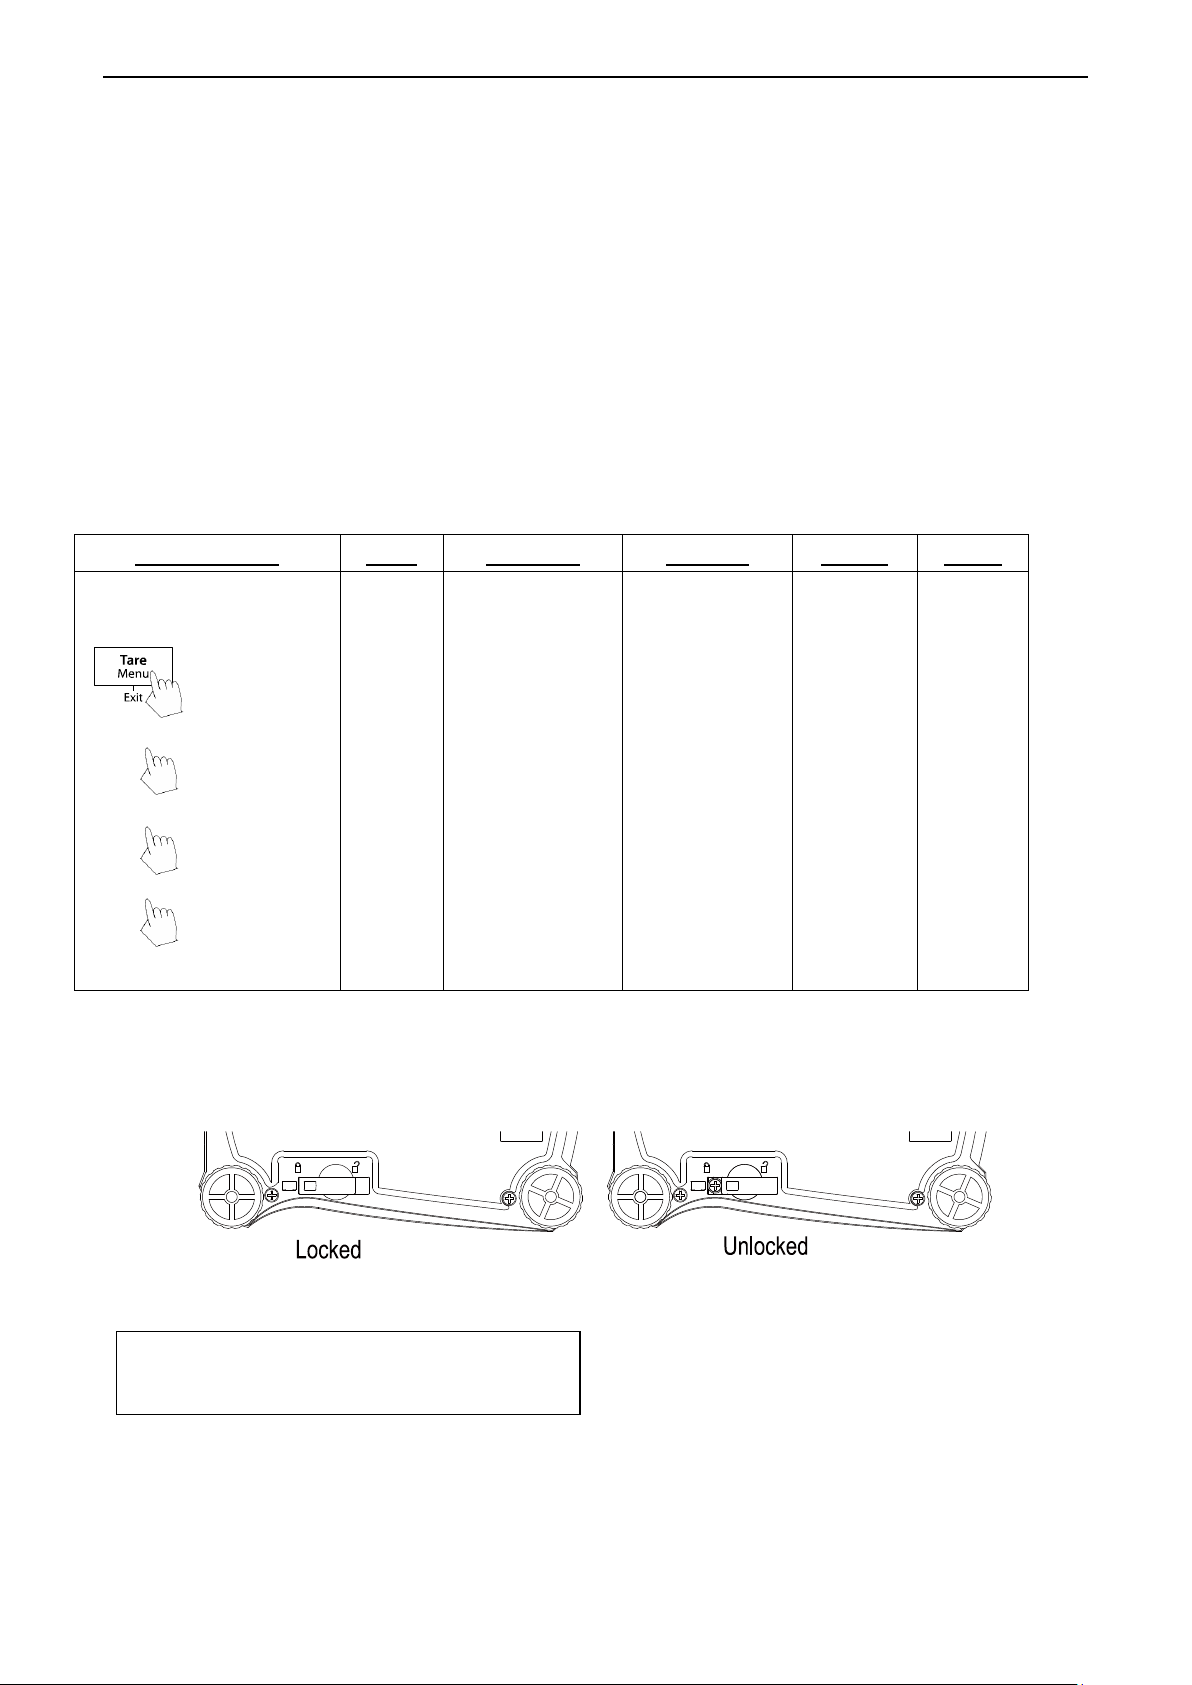
Sous-menus
C.a.l
S.e.t.u.p
M.o.d.e
U.n.i.t
E.n.d
Articles du menu
utilisateur :
Intervalle
Linéaire
Réinitialiser
Oui/Non
Filtre
Faible/Moyen/Élevé
AZT
0,5/1/3/5
Plage stable
0,5/1/2//5
Rétro-éclairage
Off/On/Auto
Tarage
automatique
Off/On/Sur
demande
Arrêt
automatique
Arrêt/1/5/10
Réinitialiser
Oui/Non
Pesée :
Allumé/Éteint
Masse
volumique
Allumé/Éteint
Mole
Allumé/Éteint
Réinitialiser
g
kg
N
oz
lb
lb/oz
Fin
Fin
Fin
Fin
Non/Reto
ur
Appui long -
Entrer dans le
Appui court Accepter
Appui court Aller menu
suivant/précéd
Oui
Sortie
Appui court Sortie menu
Intervalle : Effectuer
Linéarité : Effectuer
Fin du calibrage : Menu de fin
Balances ScoutTM Séries – SKX FR-7
Affichage de la masse molaire :
Appuyez sur la touche de fonction pour afficher la valeur de masse molaire existante pendant
2 sec.
Nouvelle masse molaire :
Pour saisir une nouvelle masse molaire, appuyer et maintenir la touche Fonction/Mode
jusqu'à ce que [mMoLE] soit affiché.
4. PARAMÈTRES MENU
Le Menu utilisateur permet la personnalisation des paramètres de la balance.
Remarque : Des sous-menus supplémentaires peuvent être disponibles si des options
d'interface sont installées. Se reporter à « interface » dans le manuel de l'utilisateur pour les
informations de configuration supplémentaires.
4.1 Menu Navigation
User Menu:
Remarque : Certaines unités / modes peuvent ne pas être disponibles sur tous les modèles.
Lorsque l'interrupteur de sécurité est en position verrouillée, la fonction d'étalonnage est
masquée, les unités sont verrouillées sur le réglage actuel.
Interrupteur de sécurité :
4.2 Menu d’étalonnage
Entrer dans ce menu pour effectuer des étalonnages.
Intervalle [SpaN]
Lance la procédure d'étalonnage par intervalle (zéro et intervalle)
Linéaire [LIN]
Lance une procédure d'étalonnage par linéarité (zéro, point milieu et intervalle).
Fin d’étalonnage [End]
Avancer au menu suivant ou revenir au début du menu actuel.
Page 44
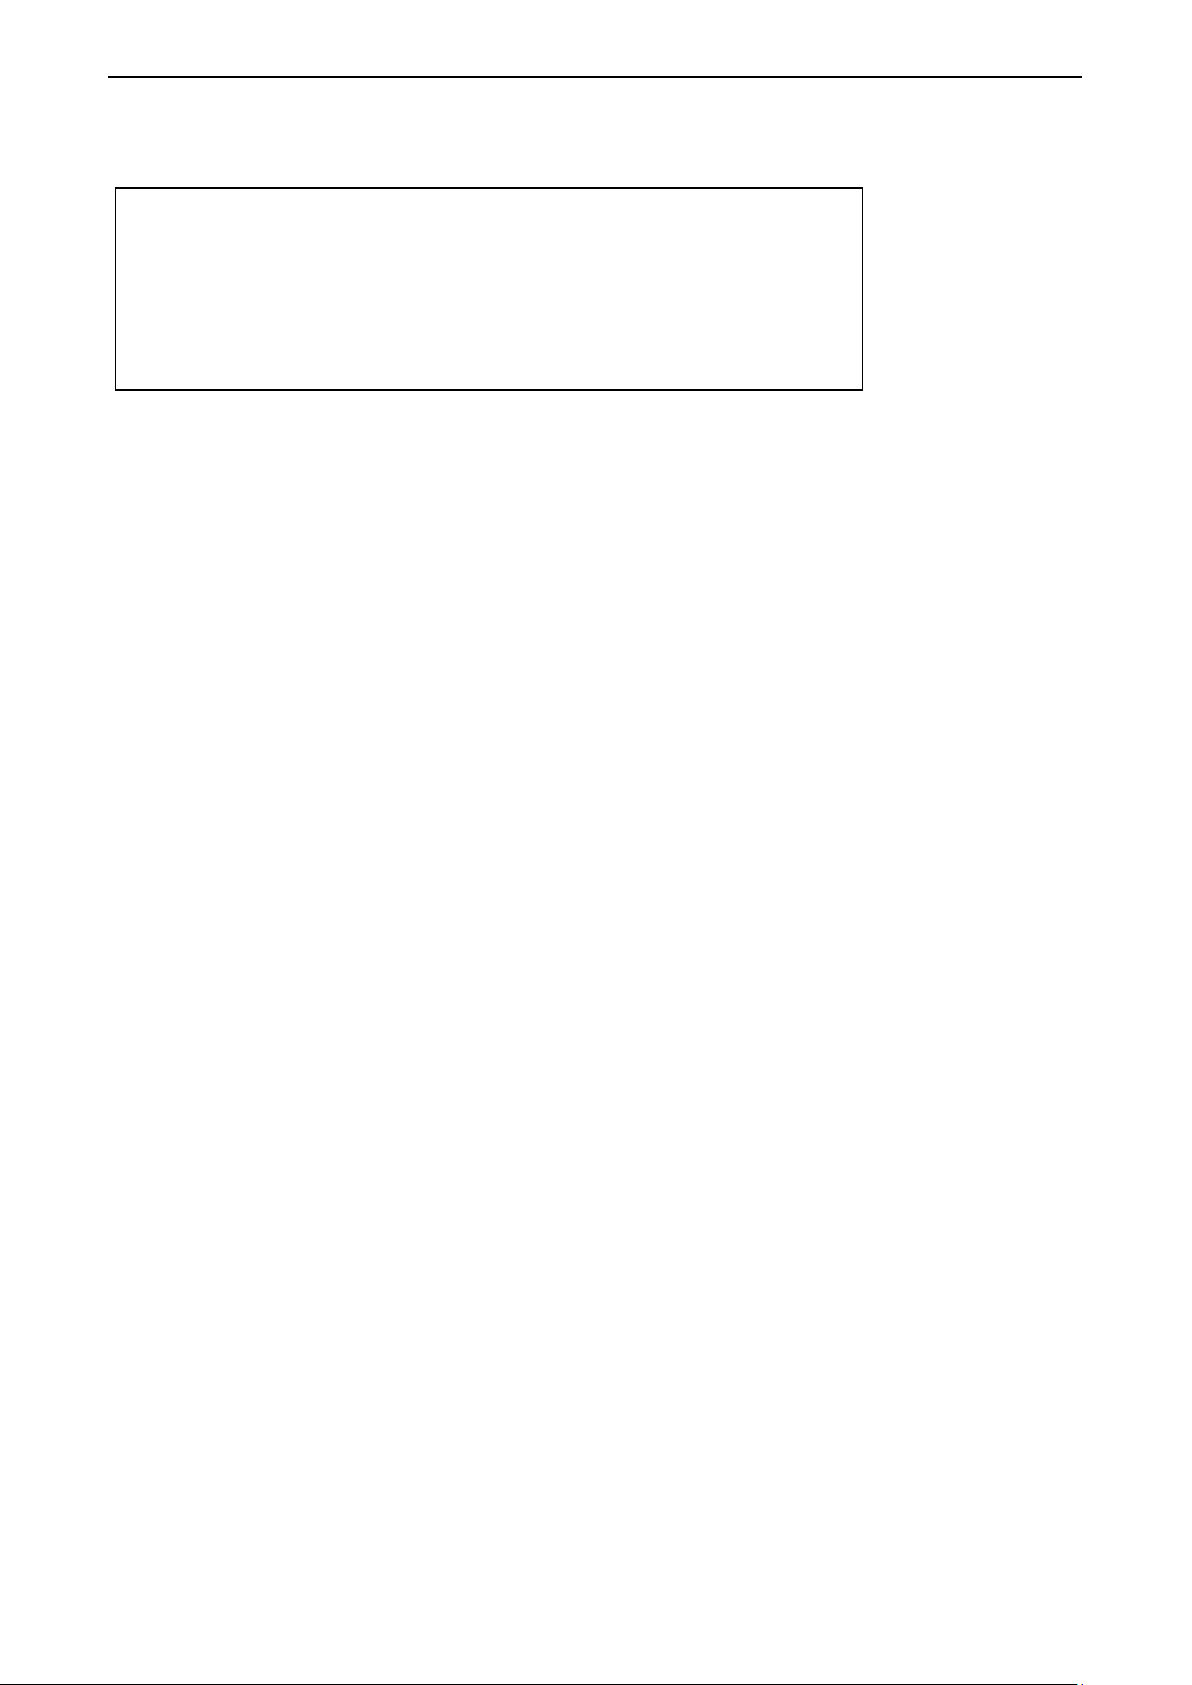
Réinitialiser : non, oui
Filtre : Faible, Moyen, Élevé
Suivi du zéro automatique : Off, 0,5 d, 1 d, 3 d
Stable : 0,5 d, 1 d, 2 d, 5 d
Rétroéclairage : Off, On, Auto
Tarage automatique : off, on, on-acc
Arrêt automatique off, 1, 5, 10
Fin de configuration : Menu de fin
FR-8 Balances ScoutTM Séries – SKX
4.3 Menu de paramétrage
Entrer dans ce menu pour définir les paramètres de la balance.
Remarque : * Les caractères gras représentent toujours la valeur usine par défaut.
Réinitialiser [reset]
Réinitialiser le menu de configuration aux valeurs d'usine par défaut.
NON = ne pas réinitialiser
OUI = réinitialiser
Filtre [FiltEr]
Régler la quantité de filtrage du signal.
Faible = moins de stabilité, délai de stabilisation plus rapide
Moyen = stabilité et délai de stabilisation normale,
Élevé = plus de stabilité, délai de stabilisation plus lent
AZT [AZt]
Régler la fonctionnalité de suivi automatique de zéro.
ÉTEINT = désactivé
0,5 d = l'affichage maintient zéro jusqu'à ce qu'un changement de 0,5 division par
seconde ait été dépassé.
1 d = l'affichage maintient zéro jusqu'à ce qu'un changement de 1 division par
seconde ait été dépassé.
3 d = l'affichage maintient zéro jusqu'à ce qu'un changement de 3 divisions par
seconde ait été dépassé.
Plage stable [Stable]
Régler de combien la marge d’indication peut varier tandis que le symbole de stabilité demeure
allumé.
0,5 d = 0,5 division balance
1 d = 1 division balance
2 d = 2 divisions balance
5 d = 5 divisions balance
Rétro-éclairage [b.light]
Paramétrer la fonctionnalité de Rétro-éclairage.
Éteint = toujours éteint
Allumé = toujours allumé
Auto = allumé lorsqu’on appuie sur un bouton ou que le poids affiché change.
Remarque : Lorsque connecté avec un bloc d'alimentation, le rétro-éclairage est toujours
allumé.
Tarage automatique [A.tArE]
Paramétrer la fonctionnalité de tarage automatique.
Éteint = Le tarage automatique est désactivé
Marche = Le premier poids brut stable est taré
Marche-Acc = les charges brutes stables à l’intérieur des limites sont tarées (dans le
mode de Contrôle de pesée)
Page 45
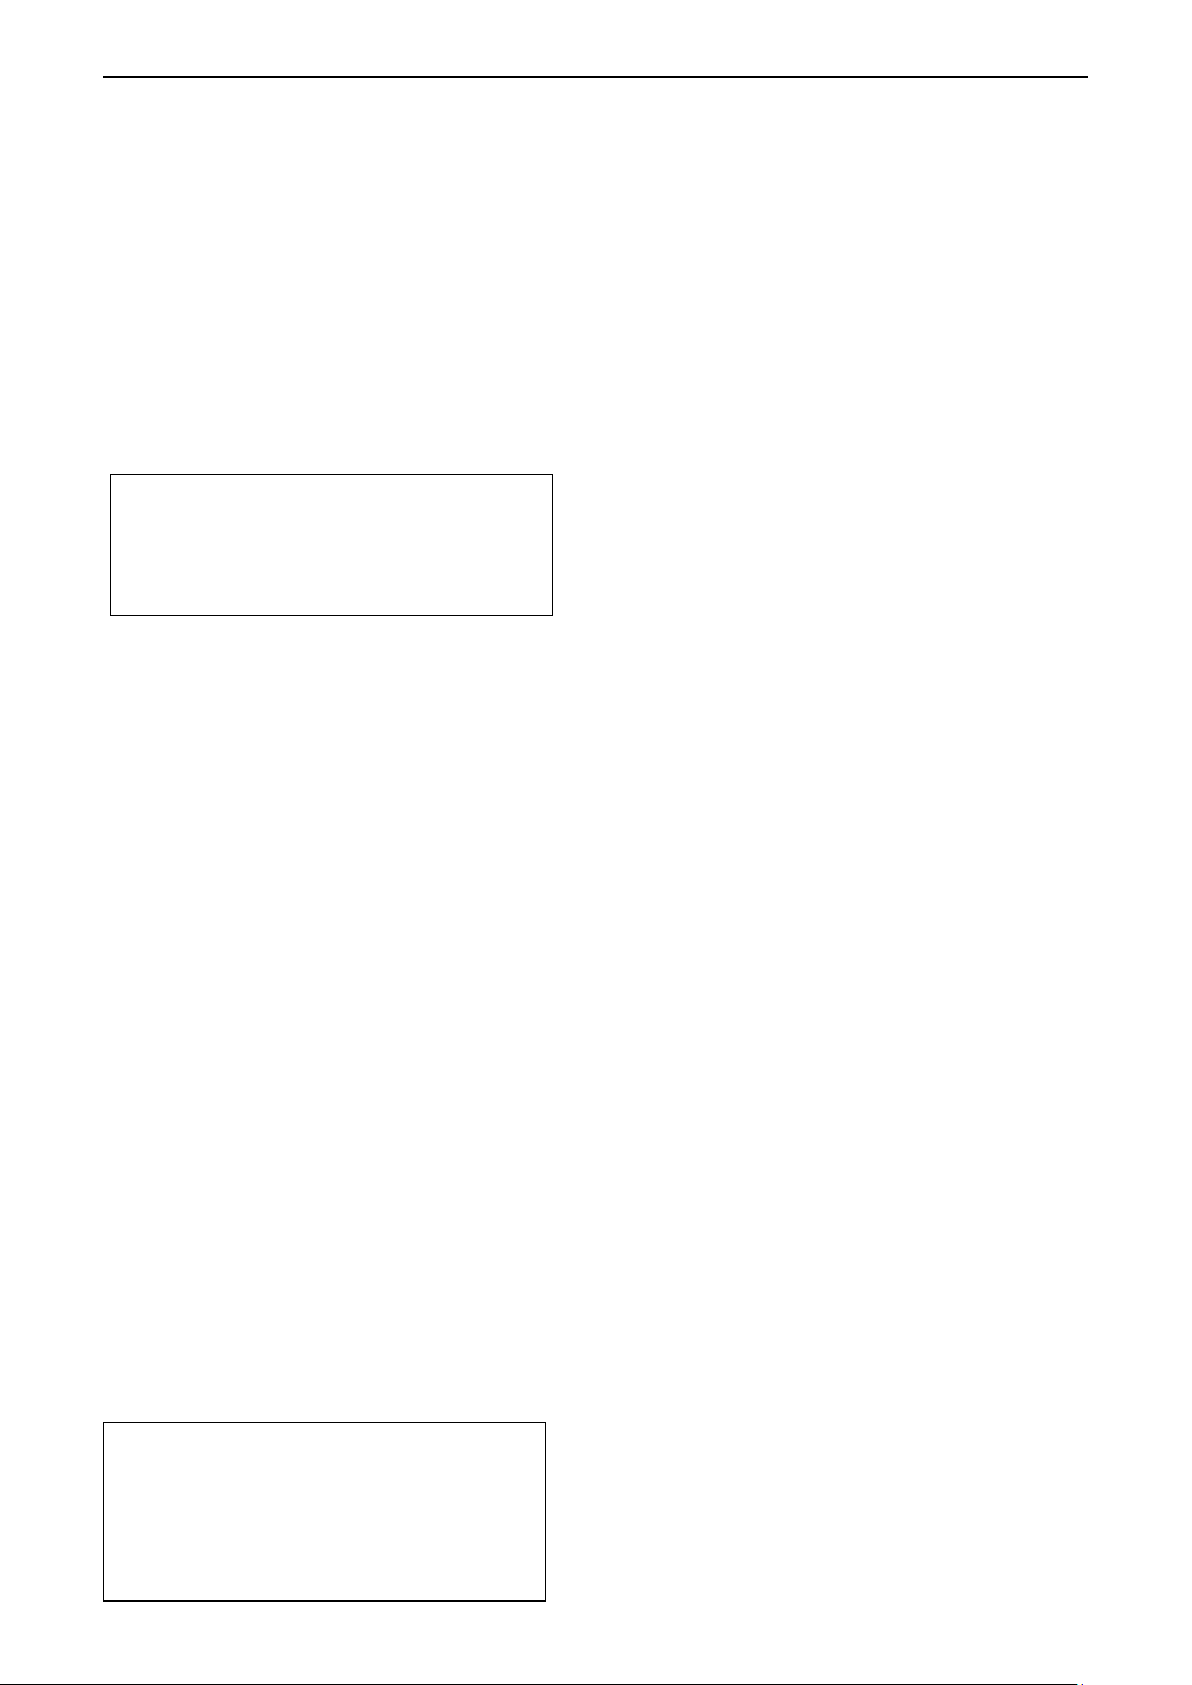
Réinitialiser : non, oui
Pesée : Éteint, Allumé
Masse volumique: Éteint, Allumé
Mole : Éteint, Allumé
Mode fin : Menu de fin
g : Éteint, Allumé
kg : Éteint, Allumé
N : Éteint, Allumé
oz : Éteint, Allumé
lb : Éteint, Allumé
lb :oz : Éteint, Allumé
Unité finale : Menu de fin
Balances ScoutTM Séries – SKX FR-9
Auto désactivé [A.OFF]
Régler la fonctionnalité d’arrêt automatique.
ÉTEINT = désactivé
1 = s'éteint après 1 minute sans activité
5 = s'éteint après 5 minutes sans activité
10 = s'éteint après 10 minutes sans activité
Fin du paramétrage [End]
Avancer au menu suivant ou revenir au début du menu actuel.
4.4 Menu principal
Ce menu active des modes de sorte qu'ils soient accessibles en vue d’une exploitation avec le
bouton Mode.
Réinitialiser [reset]
Réinitialiser le menu Mode aux valeurs d'usine par défaut.
NON = ne pas réinitialiser
OUI = réinitialiser
Pesée [wWeIGH]
Définir le statut.
ÉTEINT = désactivé
ALLUMÉ = activé
Masse volumique[SPEC.gr]
Définir le statut.
ÉTEINT = désactivé
ALLUMÉ = activé
Mole[mMole]
Régler le sous-mode
ÉTEINT = désactivé
ALLUMÉ = activé
Avancer au menu suivant ou revenir au début du menu actuel.
Mode fin [End]
4.5 Menu unités
Ce menu active des unités de sorte que celles-ci soient accessibles avec le bouton Unités. Les
unités dans le menu doivent être activées pour être fonctionnelles.
Remarque : Des unités disponibles varient en fonction du modèle et des réglementations
locales.
Page 46
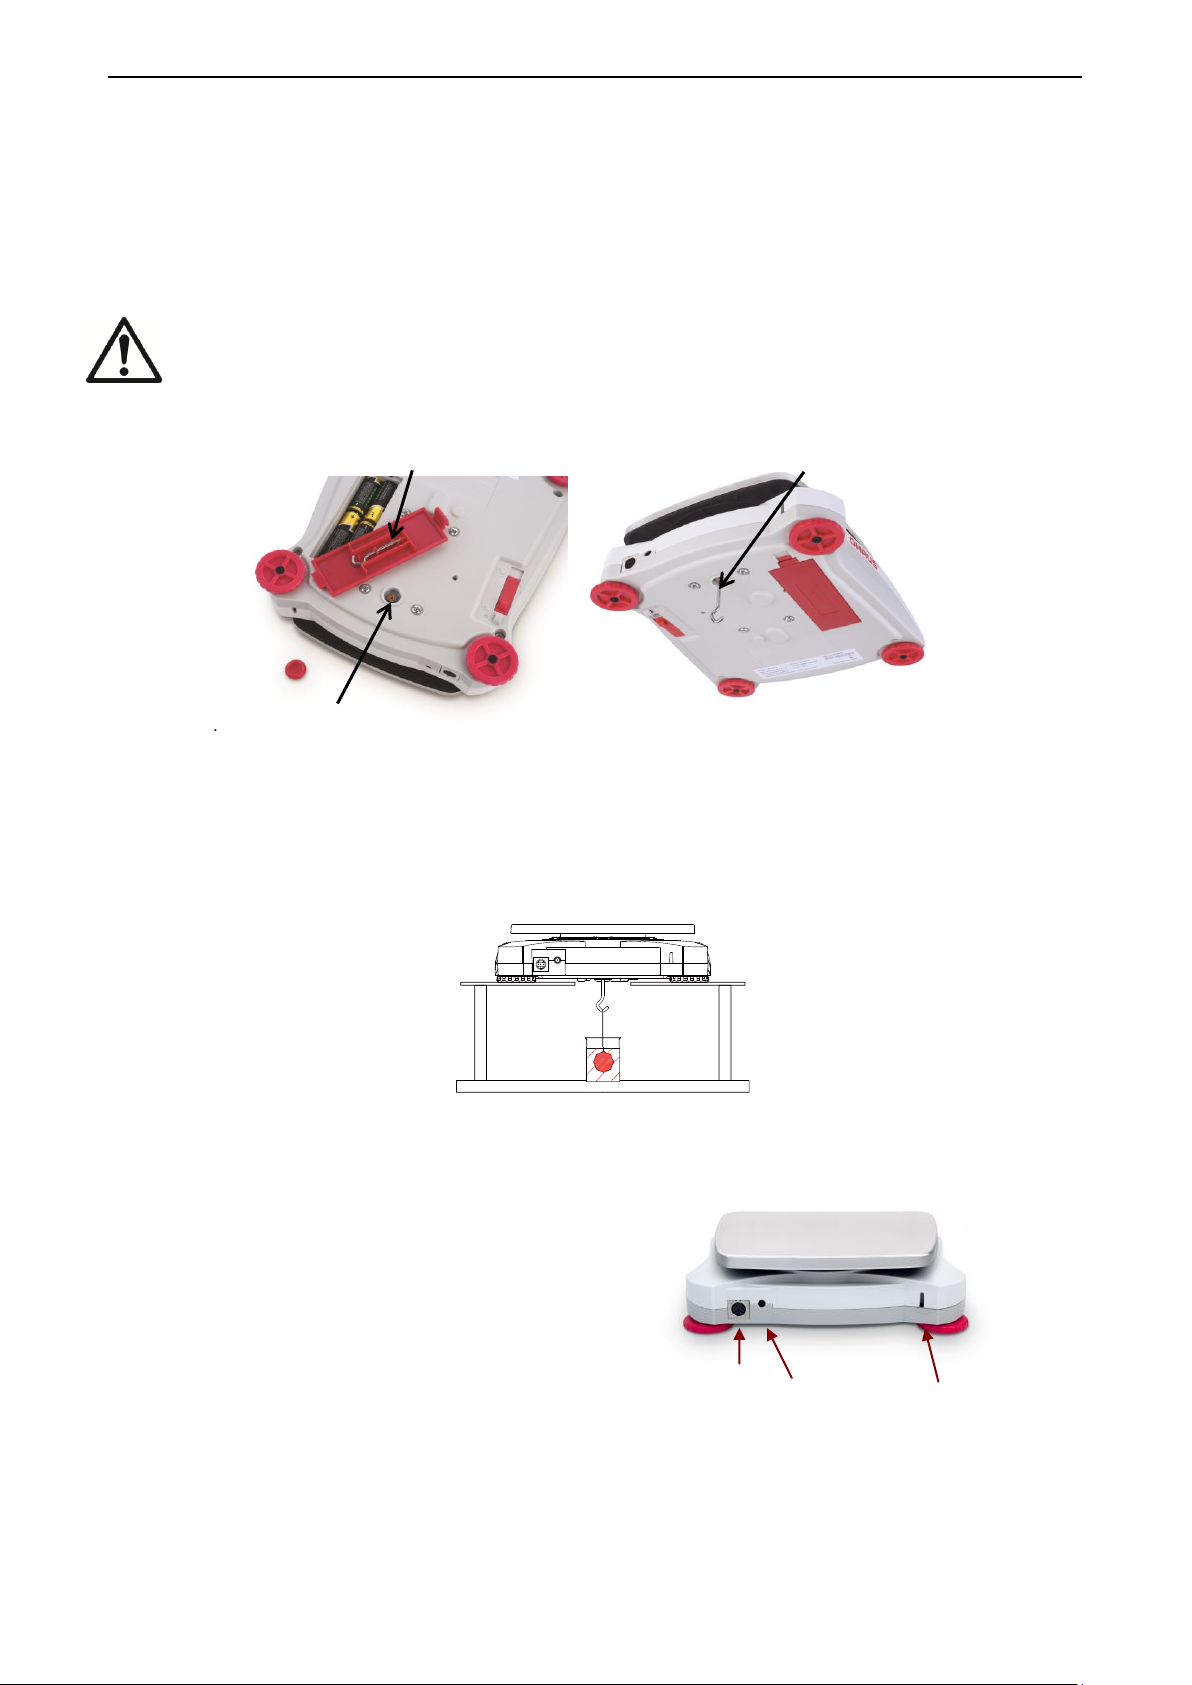
Utilisez une interface de connectivité en option
pour connecter la balance, soit à un ordinateur,
soit à une imprimante.
Ci-dessous, les accessoires disponibles du kit
d'interface :
RS232, Hôte USB, Périphérique USB, Ethernet,
Bluetooth®*.
Figure 4-4. Arrière de la balance
* Ces kits d'interface varient selon les réglementations locales
Interface
Connexion
Adaptateur pour
courant alternatif
Fiche
Encoche de
sécurité
Crochet de pesée par en-dessous
Crochet de pesée par en-dessous installé
Ouverture de pesée par
FR-10 Balances ScoutTM Séries – SKX
4.6 Fonctionnalités supplémentaires
Crochet de pesée par en-dessous
La balance Scout est équipée d'un crochet de pesée par en-dessous pour le pesage sous la
balance. Le crochet de pesage par en-dessous se trouve à l’envers du capot de la batterie
comme illustré ci-dessous. Pour utiliser cette fonctionnalité, ôter le capot de protection rouge
situé en dessous pour accéder à l’ouverture de pesée par en-dessous.
Attention: Avant de retourner la balance, retirer le plateau et le support de plateau (si
présent). Tourner le verrou de transport en position « verrouillée » pour éviter des
dommages.
Figure 4-2. Pesée par en-dessous
On peut soutenir la balance à l’aide de vérins de laboratoire ou autre méthode pratique.
S’assurer que la balance soit de niveau et stable et que le verrou de transport ait été libéré.
Mettre la balance sous tension, puis utiliser une chaîne ou un fil pour attacher les articles à
peser.
Figure 4-3. Application de pesée par en-dessous
Connexion de l'interface
Les marques verbales et les logos Bluetooth® sont des marques déposées appartenant à
Bluetooth SIG, Inc. ; l’exploitation de ces marques par OHAUS est autorisée sous licence.
Page 47
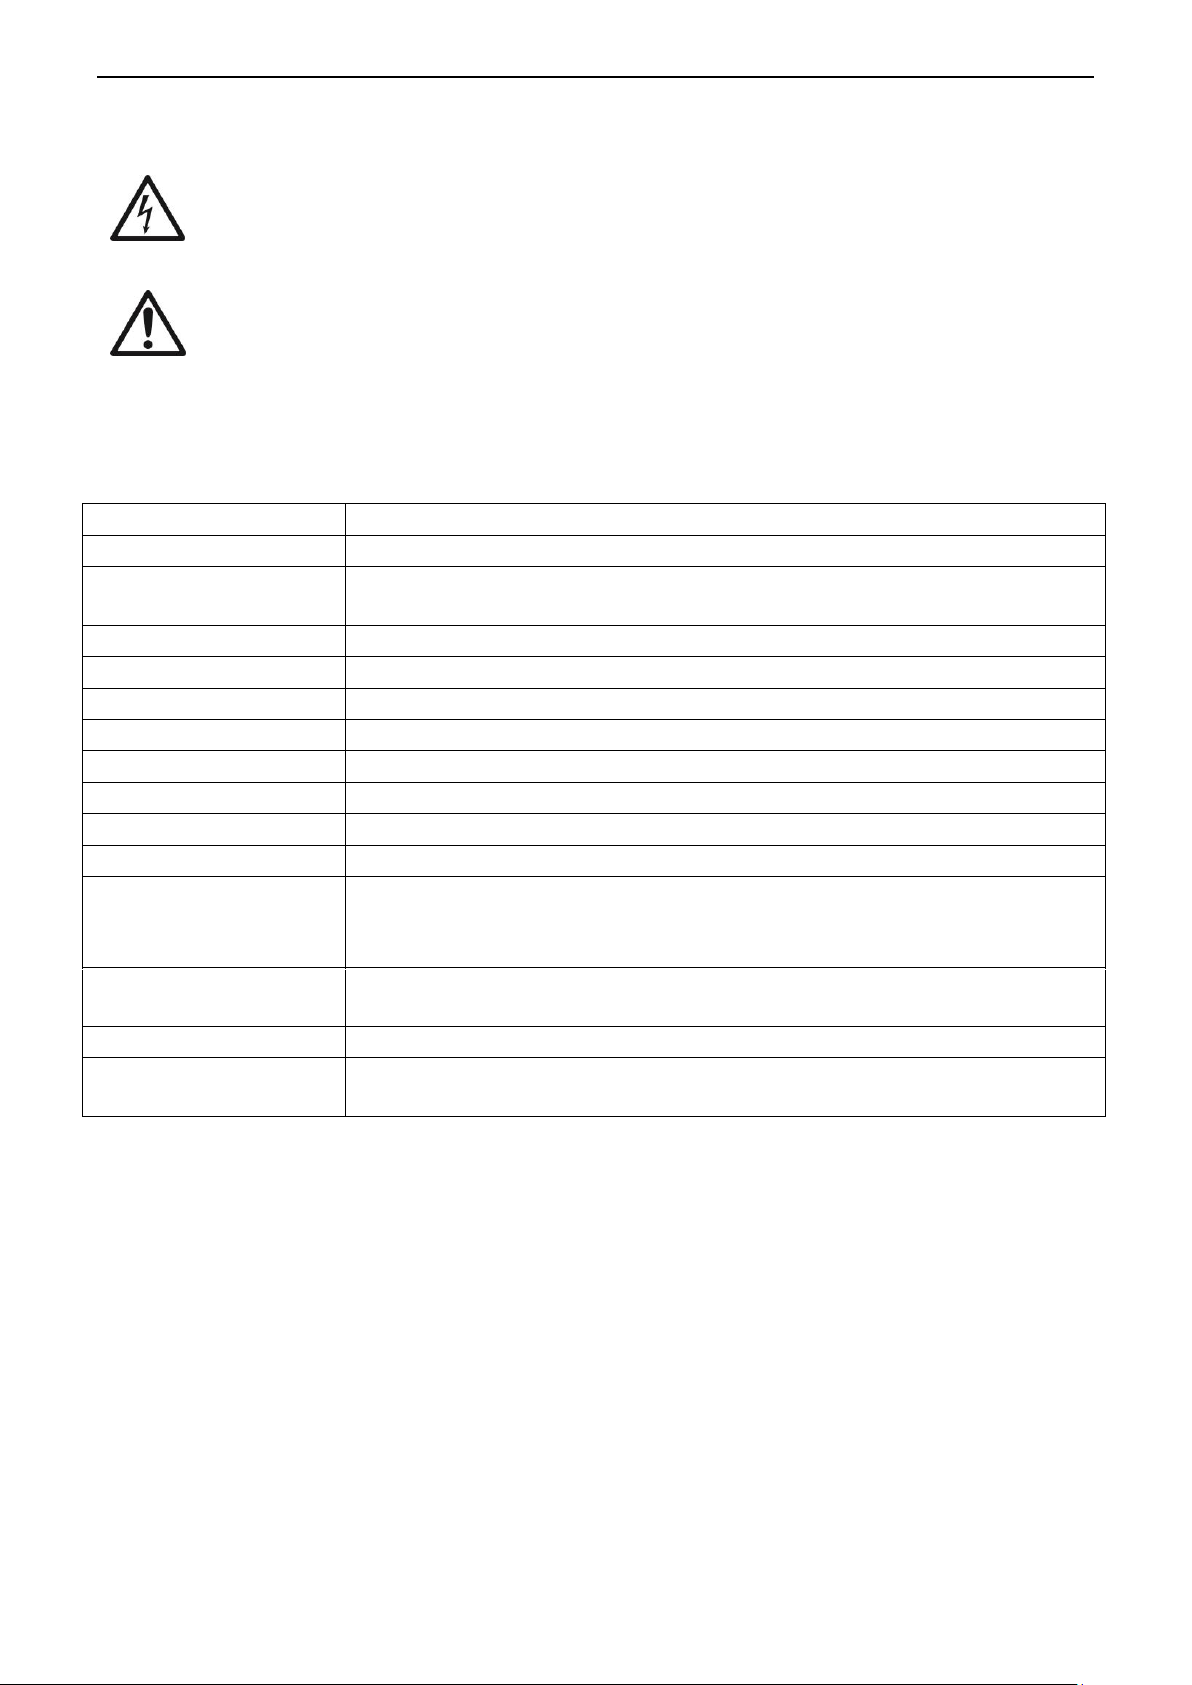
ATTENTION : Danger de choc électrique. Débrancher l'appareil de l'alimentation
électrique lors du nettoyage.
Symptôme
Cause possible
Impossible d'allumer
La balance n'est pas alimentée
Mauvaise précision
Étalonnage incorrect
environnement instable
Impossible d’étalonner
Interrupteur de sécurité en position verrouillée
Err 8.1
Poids supérieur à la puissance sur la gamme zéro.
Err 8.2
Poids inférieur à la puissance sur la gamme zéro.
Err 8.3
En surcharge (poids excède la capacité nominale)
Err 8.4
En sous charge (plateau enlevé)
Err 8.5
Tare hors plage
Err 8.6
Valeur affichée dépasse 999999 (possible dans le mode totalisation)
Err 8.7
Position inconnue du poids interne
Ref.err
Erreur de comptage de pièces ou de pourcentage - poids échantillon
< 1 d. Balance affiche une erreur et quitte ensuite le comptage de
pièces ou va à [Clr.APU].
Lo.ref
Le poids de référence de pourcentage ou d’APW est trop faible pour
des résultats précis
CAL E
Échec d'étalonnage.
USB.Err
Ne peut pas trouver le menu ou fichier d’application dans le disque
« U ».
Balances ScoutTM Séries – SKX FR-11
5. ENTRETIEN
5.1 Nettoyage
Le boîtier peut être nettoyé avec un chiffon humide et un détergent doux si nécessaire.
Attention : Ne pas utiliser de solvants, de produits chimiques, d'alcool,
d'ammoniaque ou de produits abrasifs pour nettoyer le boîtier ou le panneau de
commande.
5.2 Dépannage
Le tableau suivant répertorie les problèmes courants, leurs causes possibles et leurs solutions.
Si le problème persiste, contacter OHAUS ou votre revendeur agréé.
TABLEAU 5-1.
5.3 Service d'information
Si la section de dépannage ne permet pas de résoudre ou ne décrit pas le problème, contacter
l’agent d’entretien agréé OHAUS. Pour un service d'assistance ou une prise en charge
technique aux États-Unis, composer le numéro gratuit 1-800-672-7722, poste 7852 entre 8h00
et 17h00 (GMT - 5). Un spécialiste du service produit OHAUS est disponible pour apporter son
aide. En dehors des États-Unis, bien vouloir se rendre sur notre site web, www.ohaus.com
pour rechercher la filiale OHAUS la plus proche.
Page 48
DESCRIPTION
Numéro d'article
DESCRIPTION
Numéro d'article
Kit RS232
30268982
Kit de superposition, x 1
30268988
Kit hôte USB
30268983
Kit de poids spécifique
30269020
Kit clef USB
30268984
Kit d'affichage auxiliaire
30269019
Kit Bluetooth*
30268985
Mallette de transport
30269021
Kit Ethernet
30268986
Housse
30269022
Kit de
superposition, x 6
30268987
Imprimantes et câbles
Contacter OHAUS
FR-12 Balances ScoutTM Séries – SKX
5.4 Accessoires
TABLEAU 5-2. ACCESSOIRES
Remarque : * Le kit Bluetooth n’est disponible qu’uniquement dans certaines régions
conformément à la réglementation locale.
6. FICHE TECHNIQUE
Les données techniques sont valides en vertu des conditions ambiantes suivantes :
Utilisation en intérieur uniquement
Plage de température de fonctionnement +5 °C à +40 °C
Humidité relative: 10 % à 80 % à 31 °C sans condensation, diminution linéaire jusqu'à 50 % à
40 °C
Altitude : Jusqu'à 2 000 m
Puissance : Adaptateur courant alternatif 100-240 V 50/60 Hz et sortie 5 V CC (courant continu)
1 A ou 4 piles AA
Taux de pollution : 2
Variations de l’alimentation électrique : jusqu'à ± 10 % de la tension nominale
Page 49
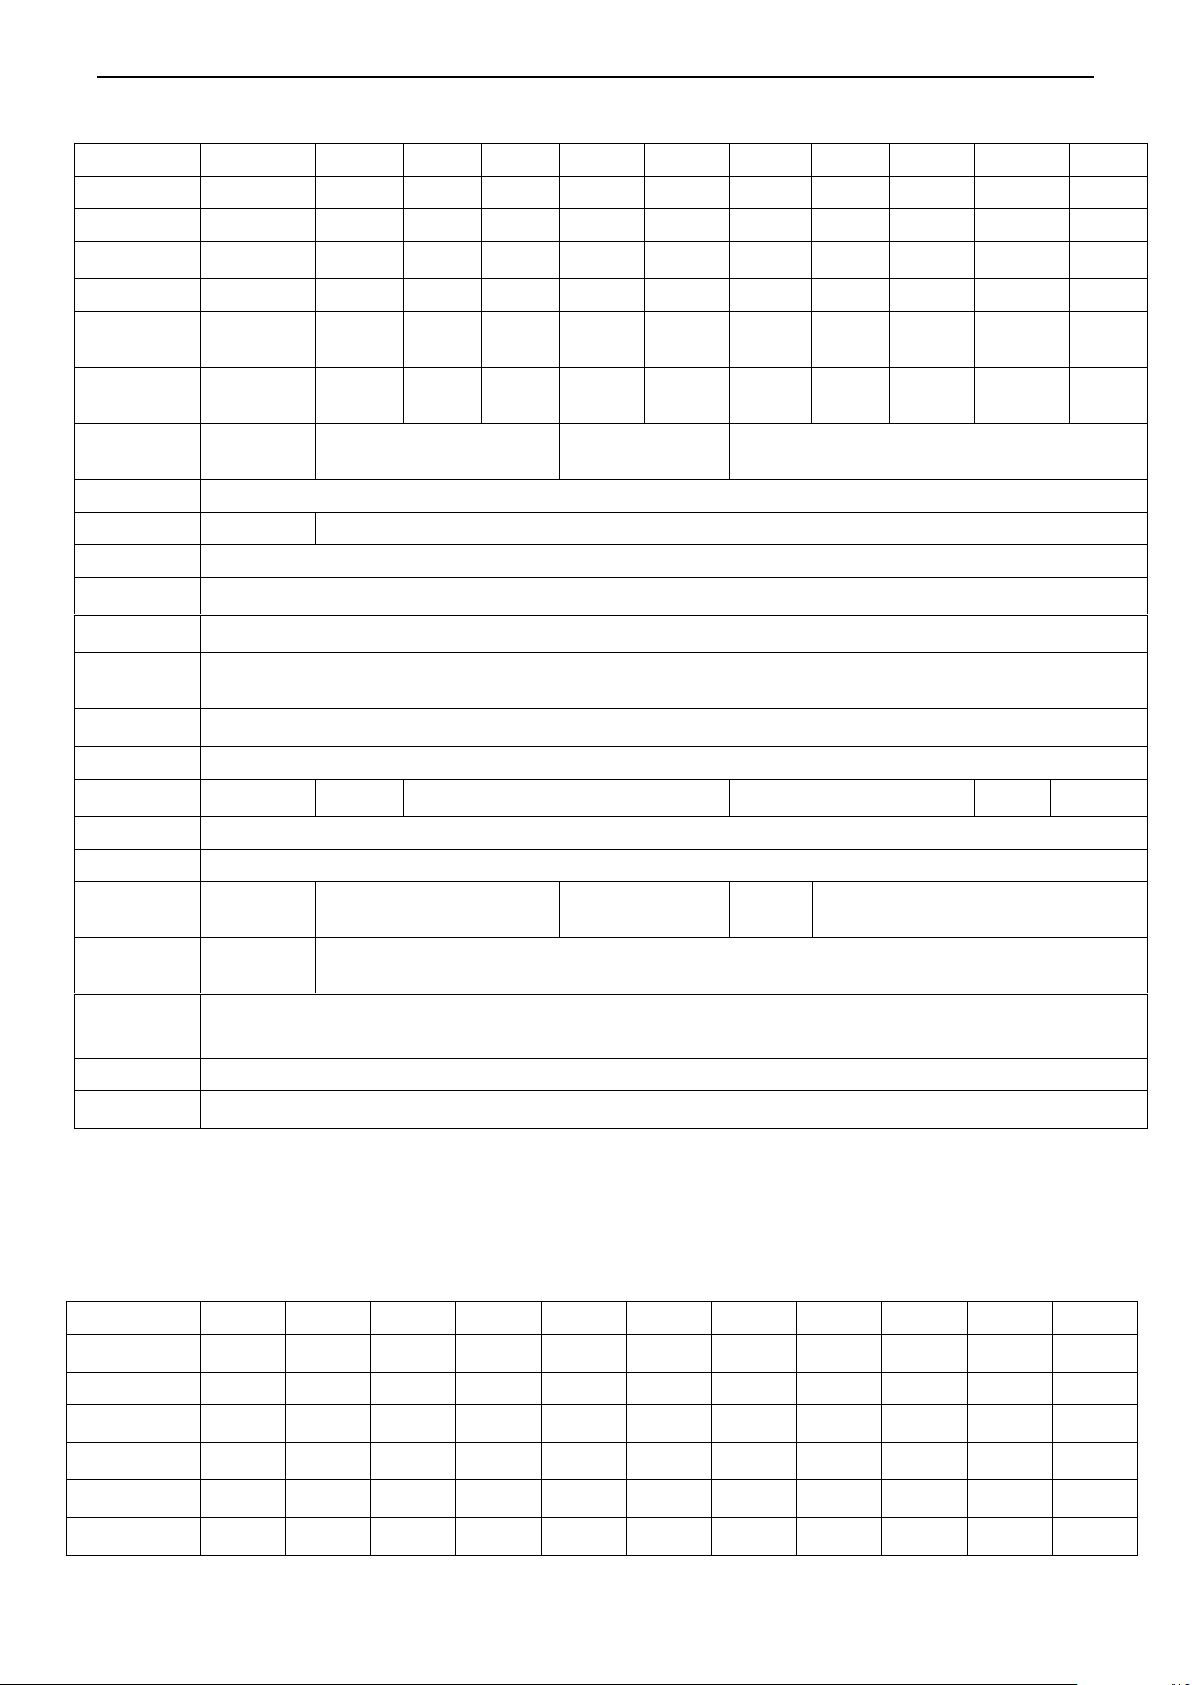
Modè le
SKX123
SKX222
SKX422
SKX622
SKX1202
SKX2202
SKX421
SKX621
SKX2201
SKX6201
SKX8200
Capacité (g)
120
220
420
620
1200
2200
420
620
2200
6200
8200
Pré cision (g)
0.001
0.01
0.01
0.01
0.01
0.01
0.1
0.1
0.1
0.1
1
Ré pé tabilité
(Dev. Std.) (g)
0.002
0.01
0.01
0.01
0.02
0.02
0.1
0.1
0.1
0.1
1
Liné arité (g)
0.003
0.01
0.01
0.02
0.03
0.03
0.1
0.1
0.1
0.2
1
Masse
d'é talonnage par
intervalle*
100 g
200 g
200 g
300 g
1 kg
2 kg
200 g
300 g
2 kg
5 kg
8 kg
Masse
d'é talonnage
liné aire
50, 100 g
100, 200 g
200,
400 g
300,
600 g
500 g,
1 kg
1 kg, 2 kg
200,
400 g
300,
600 g
1 kg, 2 kg
3 kg, 6 kg
4 kg,
8 kg
Temps de
stabilisation
(sec.)
1,5 1 1,5
1
Construction
Boîtier en ABS et plateau en 304 acier inoxydable
Pare-vent
Oui
Non
Plage de tare
Pleine capacité par soustraction
Unité s de
pesage**
g, kg, N, oz, lb, lb: oz
Modes
d'application
Pesage, calcul de masse volumique, pesé e molaire
Plage de
tempé ratures
spé cifié es
+10 ° C à +40 °C à 10 % à 80 % Humidité relative, sans condensation
Conditions de
stockage
-20 ° C à +55 °C à 10 % à 90 % Humidité relative, sans condensation
Communication
RS232, Pé riphé rique USB, Ethernet, Bluetooth***, Hô te USB (tous disponibles en tant qu'accessoire)
Autonomie de la
batterie (à 20 ºC)
80 heures
120 heures
80 heures
120 heures
80hours
120 heures
Type d'affichage
Ré tro-é clairage par LCD : 6 chiffres 7 segments avec ré tro-é clairage blanc
Taille de l'é cran
20 mm / 0,78 pouce en chiffres
Taille du plateau
(L x P)
Ø 93 mm / 3,7
pouces
Ø 120 mm / 4,7 pouces
170 x 140 mm /
6,7 x 5,5 pouces
Ø 120 mm
/ 4,7
pouces
170 x 140 mm / 6,7 x 5,5 pouces
Dimensions
d'balance
(L x P x H)
202 x 222 x 103
mm /
8 x 8.7 x 4.1 in
202 x 224 x 54 mm / 8 x 8.8 x 2.1 in
Dimensions
d'expé dition
(L x P x H)
300 x 250 x 129 mm / 11,8 x 9,8 x 5,1 pouces
Poids net
1 kg
Poids
d’expédition
1,6 kg
Modè le
SKX123
SKX222
SKX422
SKX622
SKX1202
SKX2202
SKX421
SKX621
SKX2201
SKX6201
SKX8200
Gramme (g)
120 x 0.001
220 x 0.01
420 x 0.01
620 x 0.01
1200 x 0.01
2200 x 0.01
420 x 0.1
620 x 0.1
2200 x 0.1
6200 x 0.1
8200 x 1
Kilogrammo (kg)
/ / /
/
1.2 x 0.00001
2.2 x 0.00001
/
/
2.2 x 0.0001
6.2 x 0.0001
8.2 x 0.001
Newton (N)
1.17679 x
0.00001
2.1574 x
0.0001
4.1188 x
0.0001
6.0801 x
0.0001
11.7679 x
0.0001
21.5744 x
0.0001
4.119 x 0.001
6.080 x 0.001
21.574 x
0.001
60.801 x
0.001
80.41 x 0.01
Once (oz)
4.23290 x
0.00005
7.7600 x
0.0005
14.8150 x
0.0005
21.8700 x
0.0005
42.3290 x
0.0005
77.6030 x
0.0005
14.815 x
0.005
21.870 x
0.005
77.600 x
0.005
218.700 x
0.005
289.25 x 0.05
Pound (lb)
/ / /
1.36690 x
0.00005
2.64555 x
0.00005
4.85020 x
0.00005
/
1.3670 x
0.0005
4.8500 x
0.0005
13.6685 x
0.0005
18.080 x
0.005
Pound: Once (lb: oz)
/ / /
1lb:5.8700oz
x 0.0005oz
2lb:10.3290oz
x 0.0005oz
4lb:13.6030oz
x 0.0005oz
/
1lb:5.870oz
x 0.005oz
4lb:13.600oz
x 0.005oz
13lb:10.700oz
x 0.005oz
18lb:1.25oz
x 0.05oz
Balances ScoutTM Séries – SKX FR-13
6.1 Spécifications
TABLEAU 6-1. SPÉCIFICATIONS
Remarque :
* Poids d'étalonnage sont inclus avec les modèles jusqu'à 620g capacité de certaines régions.
** Les unités de pesage disponibles, les modes d'application et le kit d'interface en option varient en fonction des
réglementations locales.
*** Kit Bluetooth est uniquement disponible dans certaines régions en fonction des réglementations locales.
Capacité x Précision
Page 50
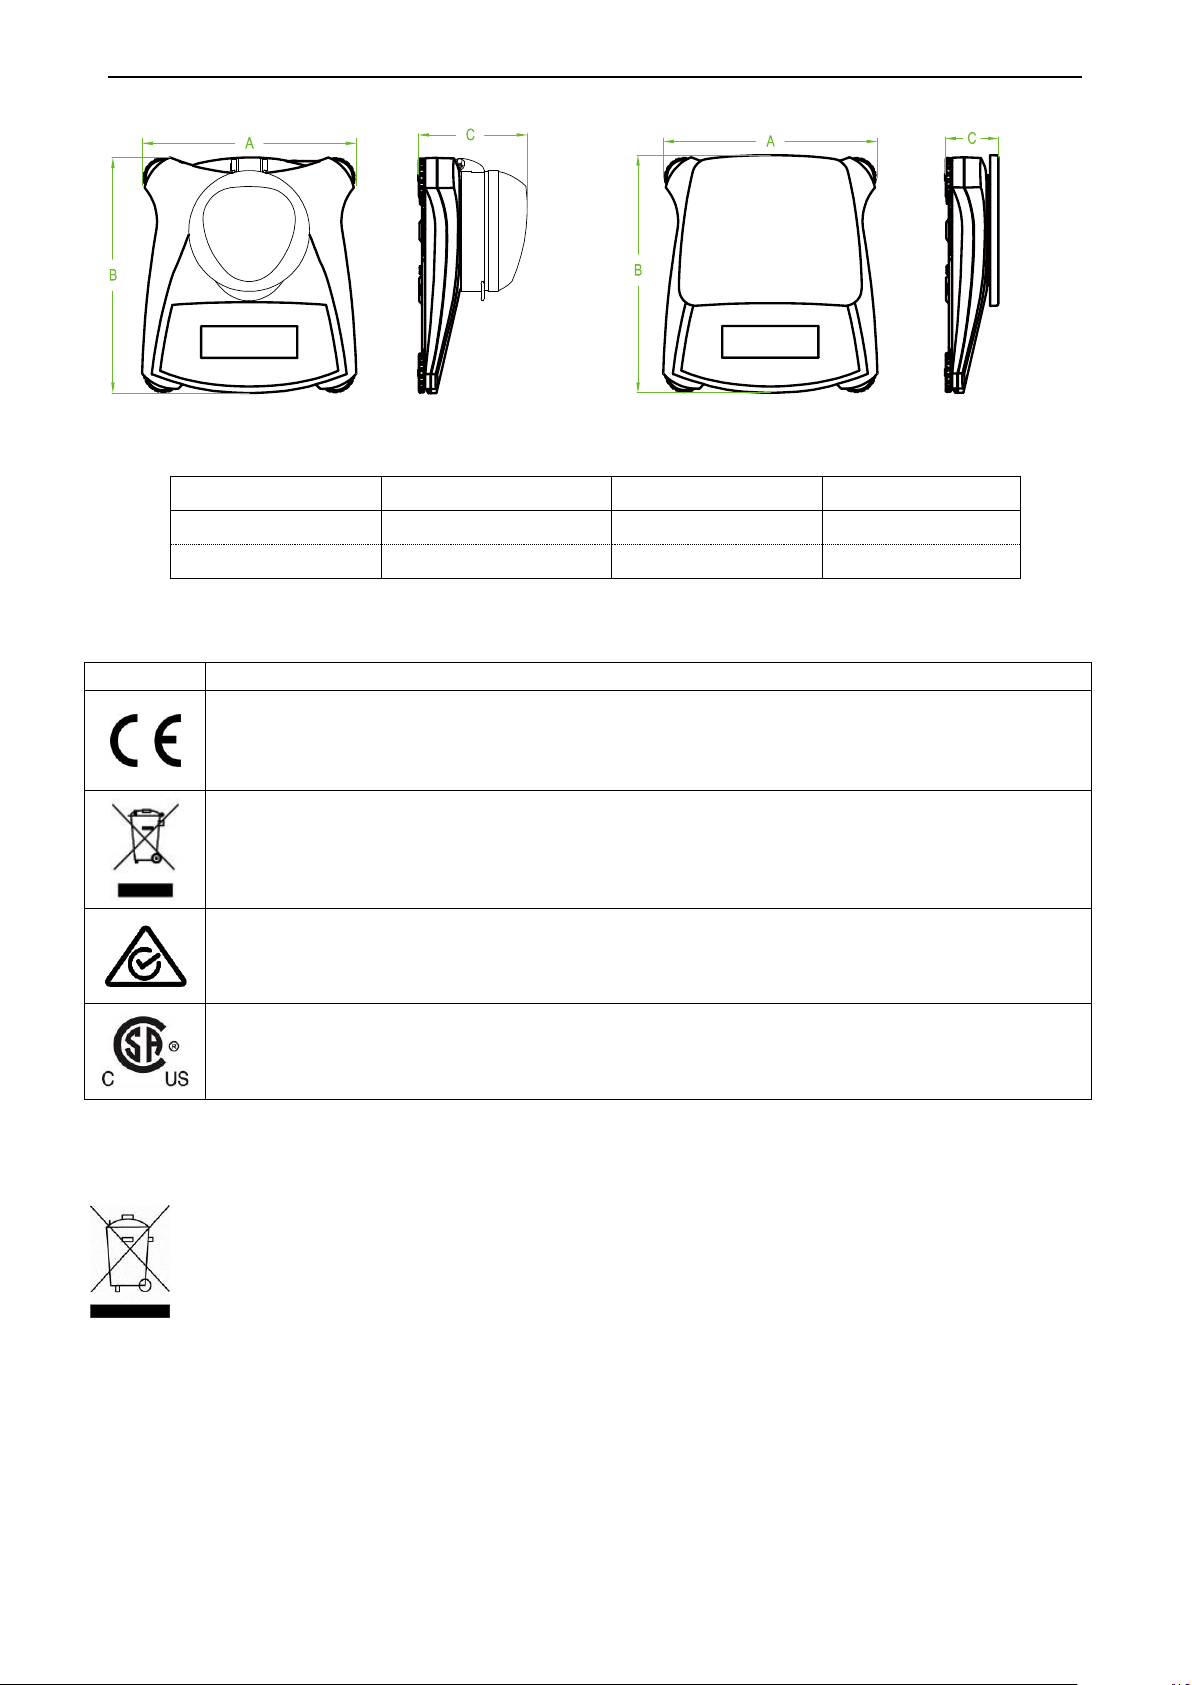
Modèle
A B C
avec cage de pesée
202 mm / 8,0 pouces
222 mm / 8,7 pouce
103 mm / 4,1 pouces
sans cage de pesée
202 mm / 8,0 pouces
224 mm / 8,8 pouces
54 mm / 2,1 pouces
Marquage
Standard
EN 61010-1, 61326-1
Se reporter à la déclaration de conformité en ligne sur www.ohaus.com/ce.
Ce produit est conforme à la Directive européenne 2002/96/CE (DEEE). Bien
vouloir mettre au rebut ce produit, conformément à la réglementation locale, au
point spécifié pour les équipements électriques et électroniques. Pour obtenir des
instructions d'élimination en Europe, se rendre sur le site www.ohaus.com/weee.
AS/NZS 61000.6.1, AS/NZS 61000.6.3
CAN/CSA-C22.2 No. 61010-1, UL Std. No. 61010-1
En conformité avec la Directive européenne 2002/96/CE relative aux déchets
d'équipements électriques et électroniques (DEEE), cet appareil ne peut être éliminé
avec les déchets ménagers. Cela vaut également pour les pays hors de l'Union
européenne, à raison de leurs exigences spécifiques.
Bien vouloir mettre au rebut ce produit, conformément à la réglementation locale, au
point spécifié pour les équipements électriques et électroniques. Pour toute question,
communiquer avec l'autorité responsable ou le distributeur auprès duquel cet appareil
a été acheté.
Si cet appareil devait être transmis à d'autres parties (pour un usage privé ou
professionnel), le contenu de cette réglementation demeure applicable.
Pour obtenir des instructions d'élimination en Europe, se reporter à
www.OHAUS.com/weee.
Merci pour de contribuer à la protection de l'environnement.
FR-14 Balances ScoutTM Séries – SKX
6.2 Drawings
Figure 7.1 Dimensions principales
6.3 Compliance :
La conformité aux normes suivantes est indiquée par la marque correspondante sur le produit.
MISE AU REBUT
Page 51

Balances ScoutTM Séries – SKX FR-15
Note FCC
Cet équipement a été testé et jugé conforme aux limites d'un dispositif numérique de classe B,
conformément à la partie 15 du règlement du FCC. Ces limitations sont conçues pour fournir
une protection raisonnable contre les interférences nuisibles dans une installation résidentielle.
Cet équipement génère, utilise et peut émettre des radiofréquences. Si celui-ci n’est pas installé
et utilisé conformément aux instructions, il peut provoquer des interférences dans les
communications radio. Cependant, il n'y a aucune garantie que des interférences ne puissent
pas survenir dans une installation particulière. Si cet équipement provoque des interférences
compromettant la réception de la radio ou de la télévision, ce qui peut être vérifié en allumant et
éteignant l'équipement, l'utilisateur est encouragé à essayer de corriger l'interférence par l’une
ou plusieurs des mesures suivantes :
- Réorienter ou déplacer l'antenne de réception.
- Augmenter la distance entre l'équipement et le récepteur.
- Connecter l'équipement à une sortie sur un circuit différent de celui sur lequel est branché le
récepteur connecté.
- Consulter le revendeur ou un technicien radio/TV qualifié.
Note : Industry Canada
Cet appareil numérique classe B est conforme à l'ICES-003 canadien.
Certification ISO 9001
En 1994, Ohaus Corporation, États-Unis, a reçu la certification ISO 9001 du Bureau Veritas
Quality International
(BVQI), qui confirme que le système de gestion de la qualité de Ohaus est conforme aux
spécifications de la norme ISO 9001. Le 21 juin 2012, Ohaus Corporation, USA, a reçu la
certification de la norme ISO 9001:2008.
GARANTIE LIMITÉE
Les produits Ohaus sont garantis contre des défauts matériels et vices de fabrication à partir
de la date de livraison et durant toute la durée de la période de garantie. Pendant la période
de garantie, Ohaus va réparer, ou, selon son propre choix, remplacer sans frais tout (tous)
composant(s) qui s'avère(ent) défectueux, à condition que le produit soit retourné, port payé,
à Ohaus.
Cette garantie ne s'applique pas, si le produit a été endommagé par accident ou utilisation
incorrecte, exposé à des matériaux radioactifs ou corrosifs, si des corps étrangers ont
pénétré à l'intérieur du produit ou après une maintenance ou modification réalisée par des
intervenants n'appartenant pas à Ohaus. Au lieu de l'envoi en retour en due forme d'une
carte d'enregistrement de la garantie, la période de garantie commence à la date de
l'expédition au revendeur autorisé. Ohaus Corporation ne fournit aucune autre garantie
expresse ou impliquée. Ohaus Corporation décline toute responsabilité pour des dommages
consécutifs.
Comme la législation relative aux garanties diffère d'un état à l'autre et d'un pays à l'autre,
veuillez contacter Ohaus ou votre revendeur local Ohaus pour plus de détails.
Page 52

Page 53
VORSICHT: Lesen Sie alle Sicherheitshinweise vor der Installation und bevor
Sie eine Verbindungen herstellen oder das Gerät warten. Nichtbeachtung dieser
Hinweise kann zu Verletzungen und/oder Sachschäden führen. Bewahren Sie
alle Anleitung zum späteren Nachschlagen auf.
SCOUTTM WAAGEN-SERIEN - SKX DE-1
1. EINFÜHRUNG
Dieses Handbuch enthält Installations-, Betriebs- und Wartungsanleitung für die Scout SKX
Waagen-Serien. Bitte lesen Sie das Handbuch bevor Sie die Waage benutzen.
1.1 Definition von Warnhinweisen und Symbolen
Sicherheitshinweise sind mit Warnhinweisen und Symbolen gekennzeichnet. Diese weisen auf
Sicherheitsprobleme und Warnungen hin. Nichtbeachtung der Sicherheitshinweise kann zu
Verletzungen, Schäden am Gerät, Fehlfunktionen und falschen Ergebnissen führen.
Begriffsbedeutungen
WARNUNG Weist auf eine gefährliche Situation mit mittlerem Risiko hin, die wenn sie
nicht vermieden wird, möglicherweise zu Verletzungen oder Tod führen
kann.
VORSICHT Weist auf eine gefährliche Situation mit geringem Risiko hin, die zu
Schäden am Gerät oder am Eigentum oder zu Verlust von Daten oder
Verletzungen führen kann, wenn sie nicht vermieden wird.
Achtung Wichtige Informationen über das Produkt.
Hinweis Nützliche Informationen über das Produkt.
Warnsymbole
Allgemeine Gefahr Stromschlaggefahr
1.2 Sicherheitsvorkehrungen
Überprüfen Sie, ob die lokale Netzspannung innerhalb der Bandbreite der
Eingangsspannung liegt, die auf dem Datenetikett des Netzteils aufgedruckt ist.
Verbinden Sie das Netzteil nur mit einer kompatiblen und geerdeten Steckdose.
Stellen Sie die Waage nicht so, dass es schwierig ist, das Netzteil von der Steckdose zu
trennen.
Stellen Sie sicher, dass das Netzkabel nicht zu einem potenziellen Hindernis oder einer
Stolperfalle wird.
Dieses Gerät ist für den Gebrauch in Gebäuden vorgesehen und sollte nur in trockenen
Räumen betrieben werden.
Betreiben Sie das Gerät nur unter den in dieser Anleitung angegebenen
Umgebungsbedingungen.
Betreiben Sie das Gerät nicht in explosionsgefährdeten oder instabilen Umgebungen.
Lassen Sie die Lasten nicht auf die Waagschale fallen.
Verwenden Sie nur zugelassenes Zubehör und Peripheriegeräte.
Nehmen Sie das Gerät vor Reinigungs- und Wartungsarbeiten vom Stromnetz.
Reparaturen sollten nur von autorisiertem Personal durchgeführt werden.
2. INSTALLATION
2.1 Installieren der Komponenten
Schauen Sie auf die Abbildungen und Anweisungen unten, um die Komponenten zu
identifizieren und zu sehen, wie Sie diese an Ihre Scout Waage montieren. Alle Komponenten
müssen vor Verwendung der Waage zusammengebaut werden.
Page 54
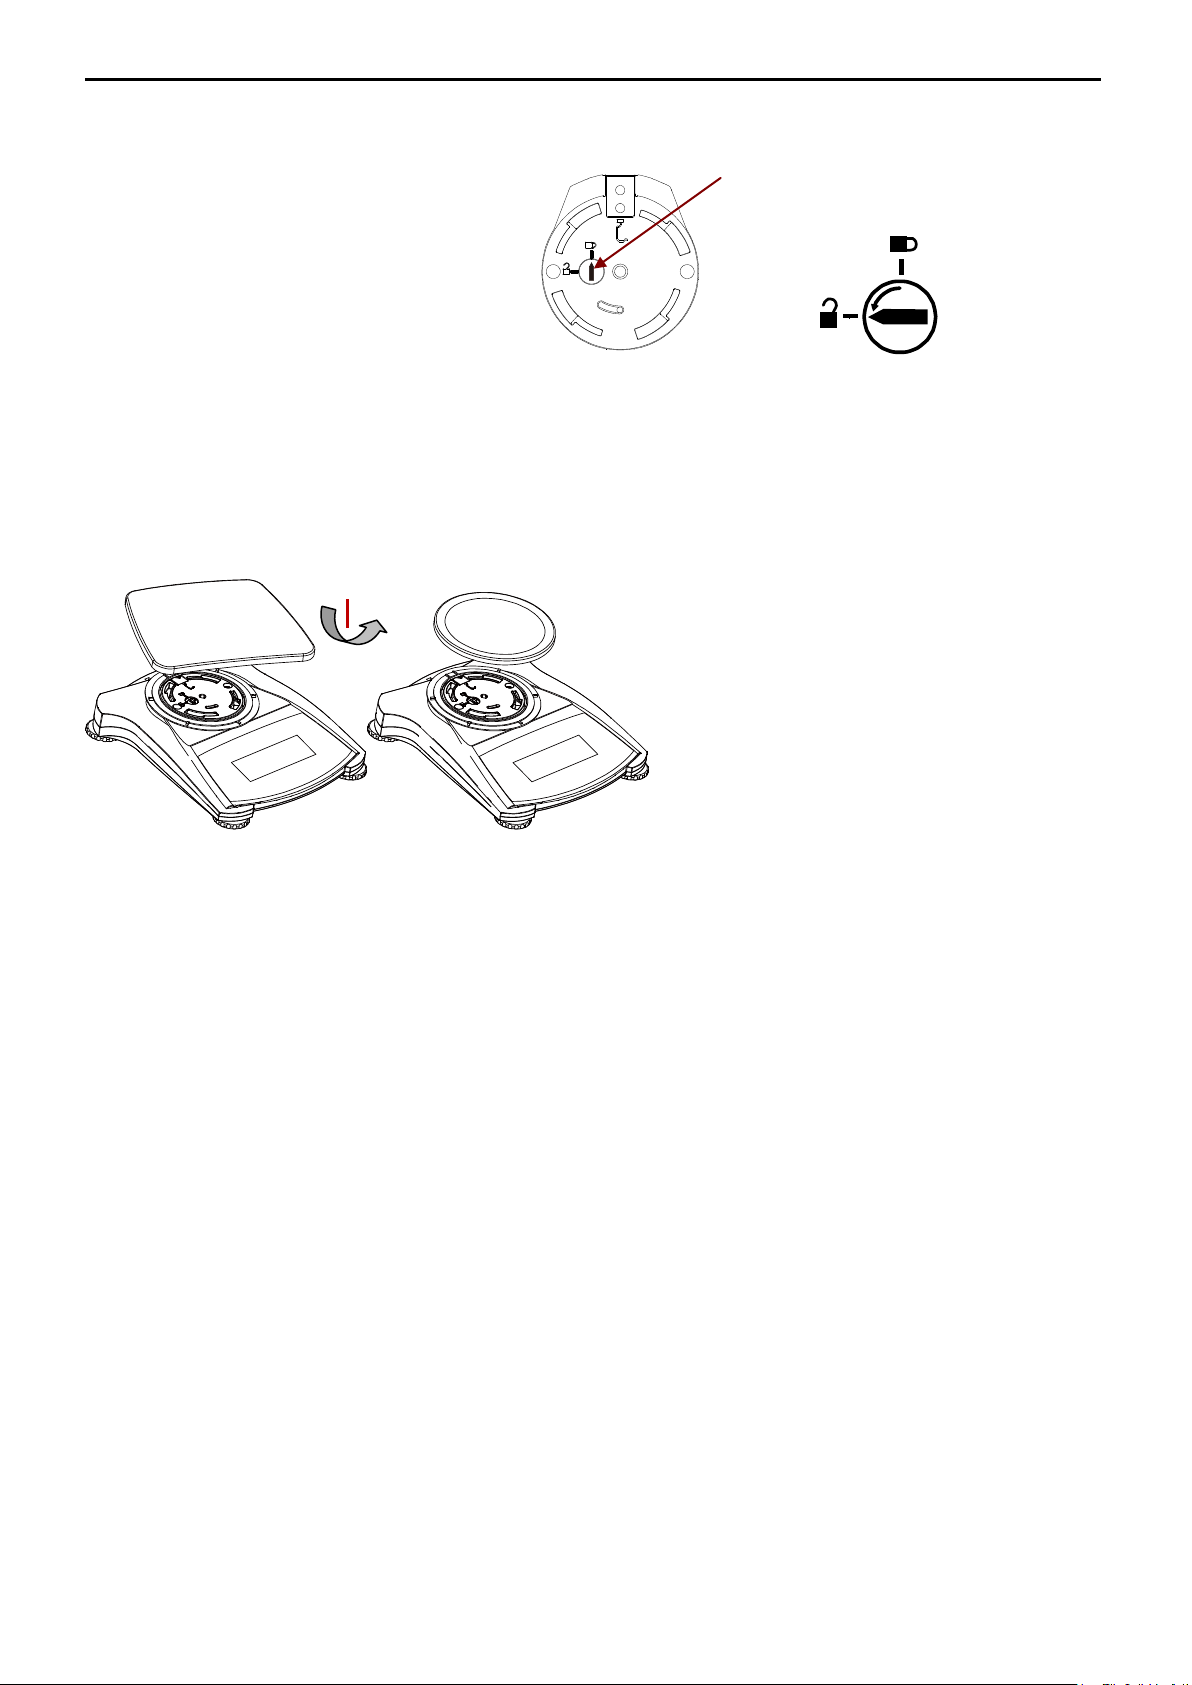
Lösen Sie die rote Transportsicherung,
indem Sie den roten Zeiger zum
Entriegeln um 90 Grad gegen den
Uhrzeigersinn drehen.
Abbildung 2-1. Transportsicherung
Sub-platform
Transport-Verriegelungsanzeige
Verriegelte Position
Entriegelte
Position
DE-2 SCOUTTM WAAGEN-SERIEN - SKX
2.1.1 Lösen der Transportsperre
2.1.2 Installieren der Waagschale
Bei Waagen mit einer rechteckigen Waagschale wird diese wie gezeigt auf die Unterplattform
gesetzt und gegen den Uhrzeigersinn gedreht bis sie einrastet. Runde Waagschalen werden
gerade nach unten auf die Unterschale aufgesetzt.
Abbildung 2-2. Waagschalen-Installation
2.2.3 Sicherheitsslot
Ein Sicherheitsslot befindet sich auf der Rückseite der Waage und ermöglicht, die Waage mit
einem optionalen Kabel und Schlosszubehör zu sichern.
2.3 Stellplatz auswählen
Für eine optimale Leistung sollte die Scout Waage in einer sauberen, stabilen Umgebung
verwendet werden. Verwenden Sie die Waage nicht in Umgebungen mit übermäßiger Zugluft,
mit starken Temperaturschwankungen, in der Nähe von Magnetfeldern oder in der Nähe von
Geräten, die Magnetfelder oder Vibrationen erzeugen.
2.4 Stromversorgung anschließen
Netzadapter Installation
Wenn Batteriestrom nicht benötigt wird, wird zum Betrieb der Waage Wechselstrom verwendet.
Schließen Sie zuerst das Netzteil (mitgeliefert) an der Rückseite der Waage an den
Netzteileingang an, dann erst stecken Sie den Netzstecker in eine Steckdose.
Page 55
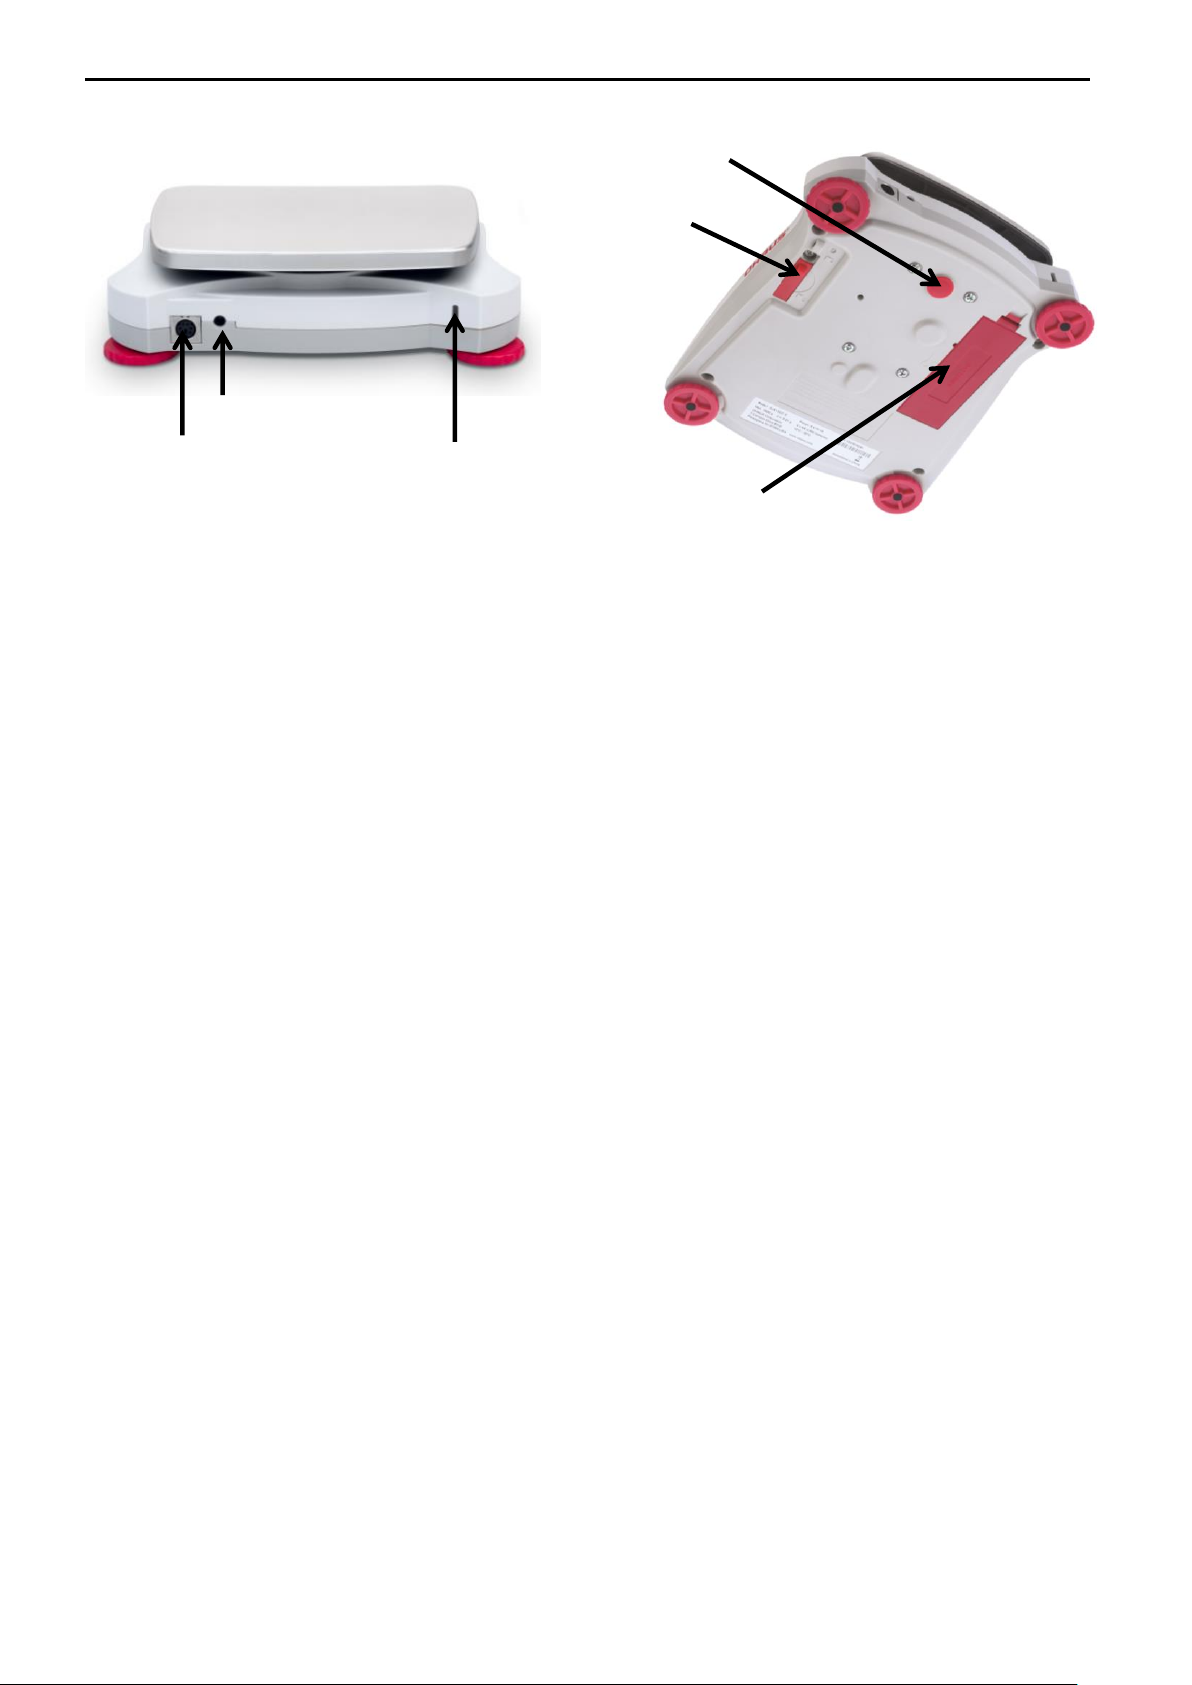
Netzadapter
Batteriefachdeckel
Schnittstellenanschluss
Sicherheitsschalter
Öffnung für Unterflurwägen
Sicherheitsslot (Slot für Anti-
SCOUTTM SERIES BALANCES – SKX DE-3
Abbildung 2-4. Rück- und Unteransicht der Waage
Batterieinstallation
Setzen Sie die vier "AA" Batterien mit richtiger Polarität ein, so wie es im Batteriefach angezeigt
ist.
Hinweis:
Nach dem Einschalten wird empfohlen, vor der Verwendung des Bilanz warm für mindestens 5
Minuten zu lassen.
2.5 Anfängliche Kalibrierung
Wenn die Waage zum ersten Mal installiert oder an eine andere Stelle bewegt wird, muss sie,
um genaue Wiegeergebnisse zu gewährleisten kalibriert werden.
Alternativ können die Waagen mit externen Massen manuell kalibriert werden.
Haben Sie die richtigen Kalibrierungsgewichte zur Hand, bevor Sie mit der Kalibrierung
beginnen. Schauen Sie für die Kalibrierung in den Abschnitt Massen und
Kalibrierungsverfahren.
Page 56
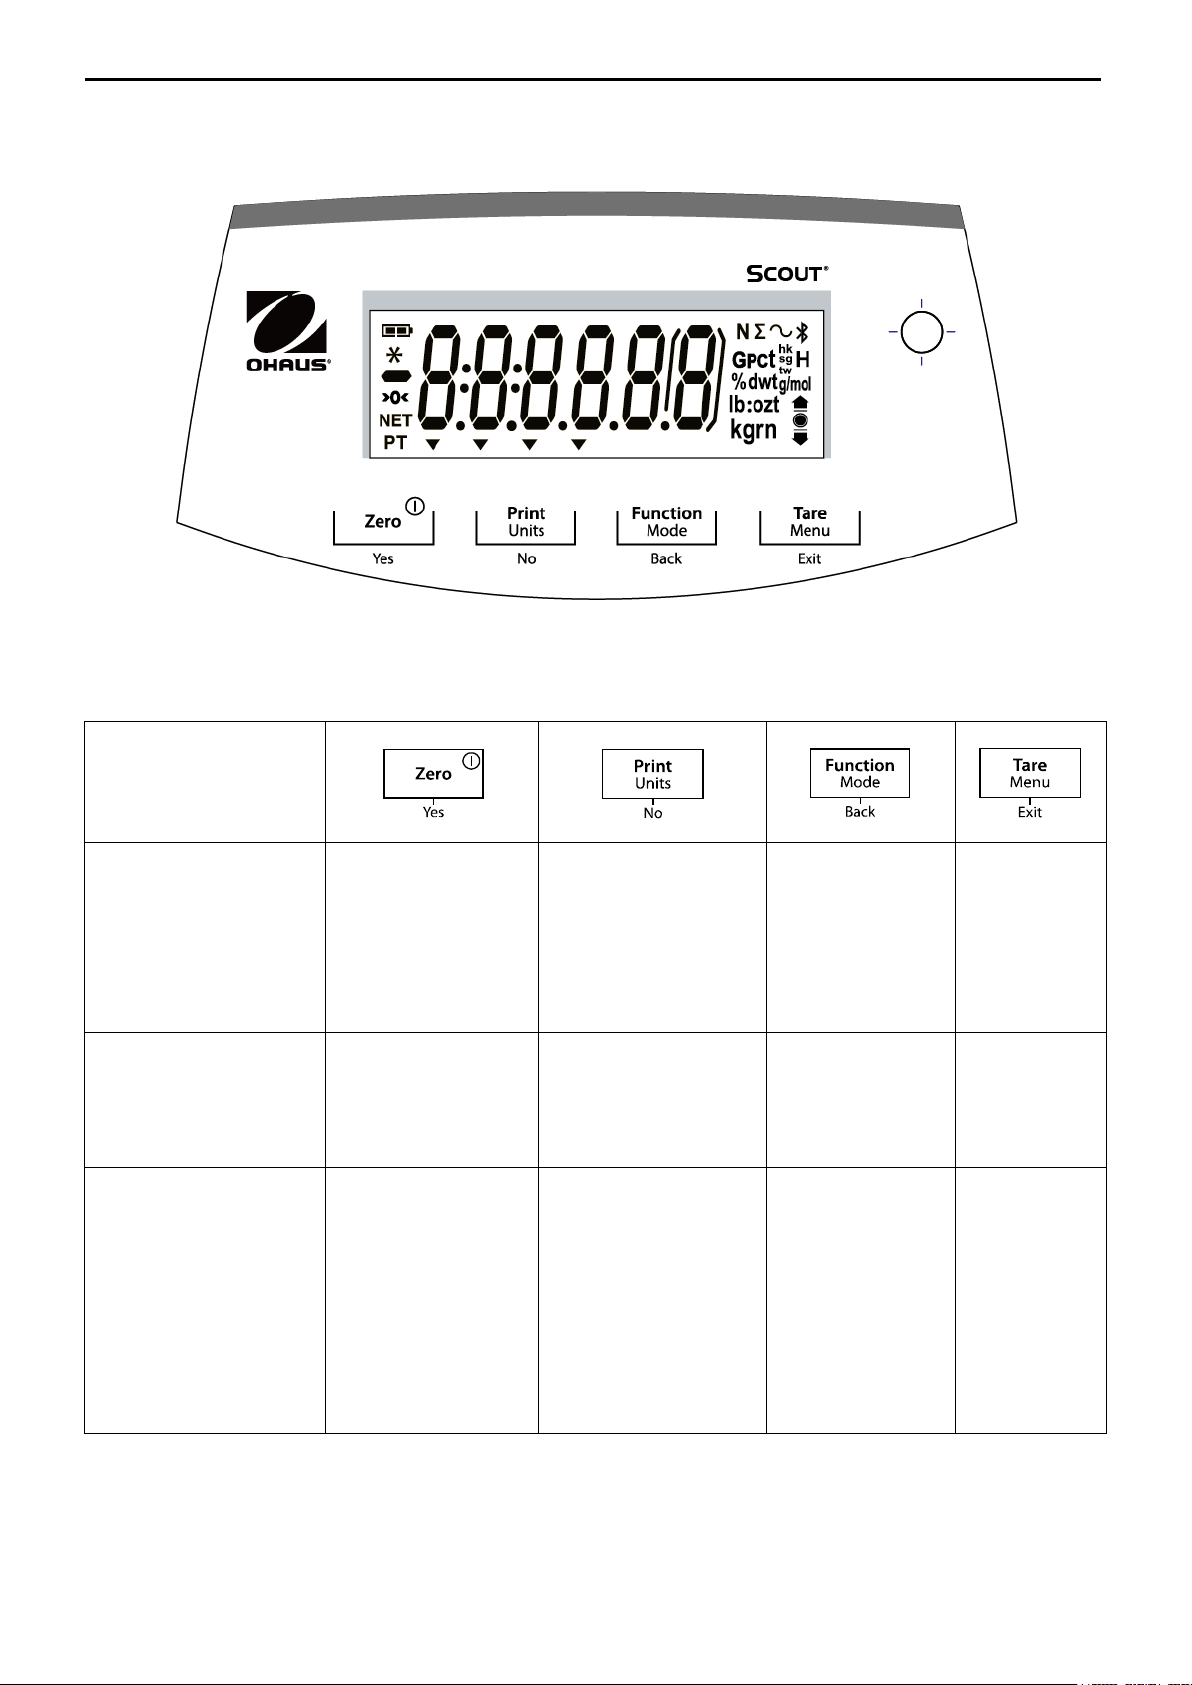
Taste
Primärfunktion
(Kurz drücken)
Zero/Ein
Schaltet die Waage
ein.
Wenn die Waage
eingeschaltet ist,
steht sie auf Zero
(Null)
Drucken
Sendet den
aktuellen Wert an
die ausgewählten
COM-Ports, wenn
AUTOPRINT auf
Aus gestellt ist.
Funktion
Initiiert einen
Anwendungsmo
dus.
Tara
Eingeben/de
aktivieren
eines TaraWerts.
Sekundärfunktion
(Lange drücken)
Zero/Aus
Schaltet die Waage
aus.
Einheiten
Ändert die
Wiegeeinheit.
Modus
Ermöglicht die
Änderung des
Anwendungsmo
dus.
Menü
Geht ins
Benutzerme
nü.
Menüfunktion
(Kurz drücken)
Ja
Akzeptiert die
aktuelle Einstellung
auf dem Display.
Nein
Geht weiter zum
nächsten Menü oder
Menüpunkt.
Lehnt die aktuelle
Einstellung auf dem
Display ab und geht
zur nächsten
verfügbaren
Einstellung weiter.
Zurück
Geht zurück zum
vorherigen
Menüpunkt.
Beenden
Beendet das
Benutzerme
nü.
Bricht die
laufende
Kalibrierung
ab.
DE-4 SCOUTTM WAAGEN-SERIEN - SKX
3. BETRIEB
3.1 Bedienelemente
Abbildung 3-1. Scout Bedienungsfeld
TABELLE 3-1. Tastenfunktionen
Hinweise: 1 Kurzes Drücken: Drücken für weniger als 1 Sekunde.
2
Langes Drücken: Drücken und halten für länger als 2 Sekunden.
Page 57
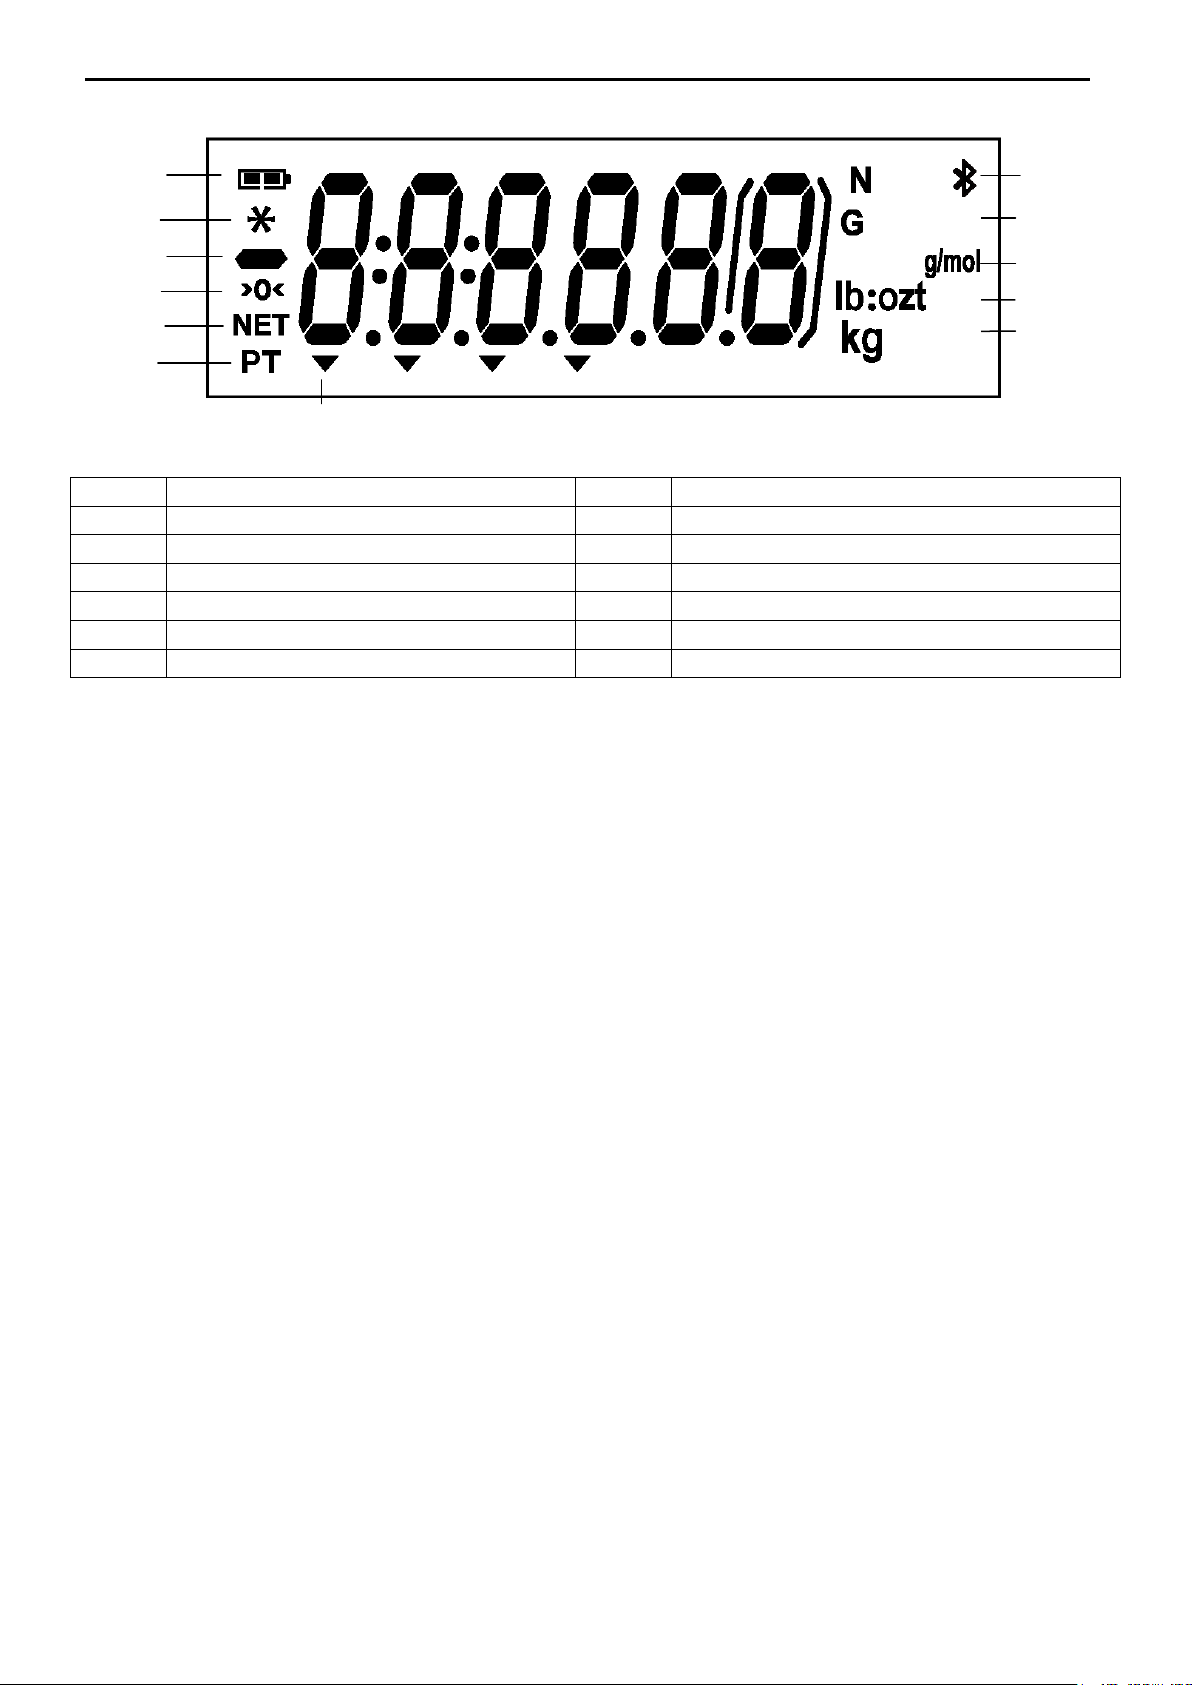
Artikel
Beschreibung
Artikel
Beschreibung
1
Akku-Ladesymbol
7
Zeiger-Symbole
2
Stabiles Gewichtssymbol
8
Symbole Kilogramm, Kornstärke
3
Negatives Symbol
9
Symbole Pound, Unze, Pfund: Unze
4
Symbol Zentrieren des Nullwerts
10
g/mol Symbol
5
NET Symbol
11
G Symbol
6
Symbol Voreingestellte Tara
12
Newton, Bluetooth Symbole
2
3
4
1
5
6
8
9
10
11
12
7
SCOUTTM SERIES BALANCES – SKX DE-5
Abbildung 3-2. Scout Display
TABELLE 3-2. Display-Symbole
3.2 Waage Ein/Aus
Um die Waage zu aktivieren, drücken und halten Sie die Ein/Zero Aus-Taste für 1 Sekunde.
Die Waage führt einen Anzeigetest durch, zeigt kurz die Software-Version, und geht dann in
den aktiven Wiegemodus.
Um die Waage zu deaktivieren, drücken und halten Sie die Ein/Zero Aus-Taste, bis AUS
angezeigt wird.
3.3 Kalibriervorgang
Wenn die Waage zum ersten Mal betätigt wird, wird eine umfassende Kalibrierung empfohlen,
um genaue Wiegeergebnisse zu gewährleisten. Vor der Durchführung der Kalibrierung stellen
Sie sicher, dass Sie die entsprechenden Kalibrierungsgewichte haben. Vergewissern Sie sich,
dass sich der Sicherheitsschalter auf der Position entriegelt befindet.
Drücken und halten Sie Menü bis [mMeNU] (Menü) angezeigt wird. Wenn die Taste losgelassen
wird, erscheint auf dem Display [C.A.L]. Drücken Sie Ja, um zu akzeptieren. [SpaN] wird danach
angezeigt. Drücken Sie Ja, um die Bereichskalibrierung zu beginnen.
[--C--] wird angezeigt, während der Nullwert gespeichert wird. Als nächstes zeigt das Display
den Kalibrierungsgewichtswert. Drücken der Nein-Taste schaltet den Wert um. Legen Sie das
angegebene Kalibrierungsgewicht auf die Waagschale. [--C--] wird angezeigt, während der
Wert gespeichert wird. Das Display zeigt [done] wenn die Kalibrierung erfolgreich war. Die
Waage kehrt zum vorherigen Anwendungsmodus zurück und ist einsatzbereit.
3.4 Wiegemodus
Wiegemodus ist die Werkseinstellung.
1. Falls erforderlich, drücken und halten Sie Modus bis [wWeIGH] (Wiegen) angezeigt wird.
2. Stellen Sie einen leeren Behälter auf die Schale und drücken Sie auf Tara.
3. Fügen Sie der Schale oder dem Behälter eine Probe hinzu. Das Display zeigt das Gewicht
der Probe.
Page 58
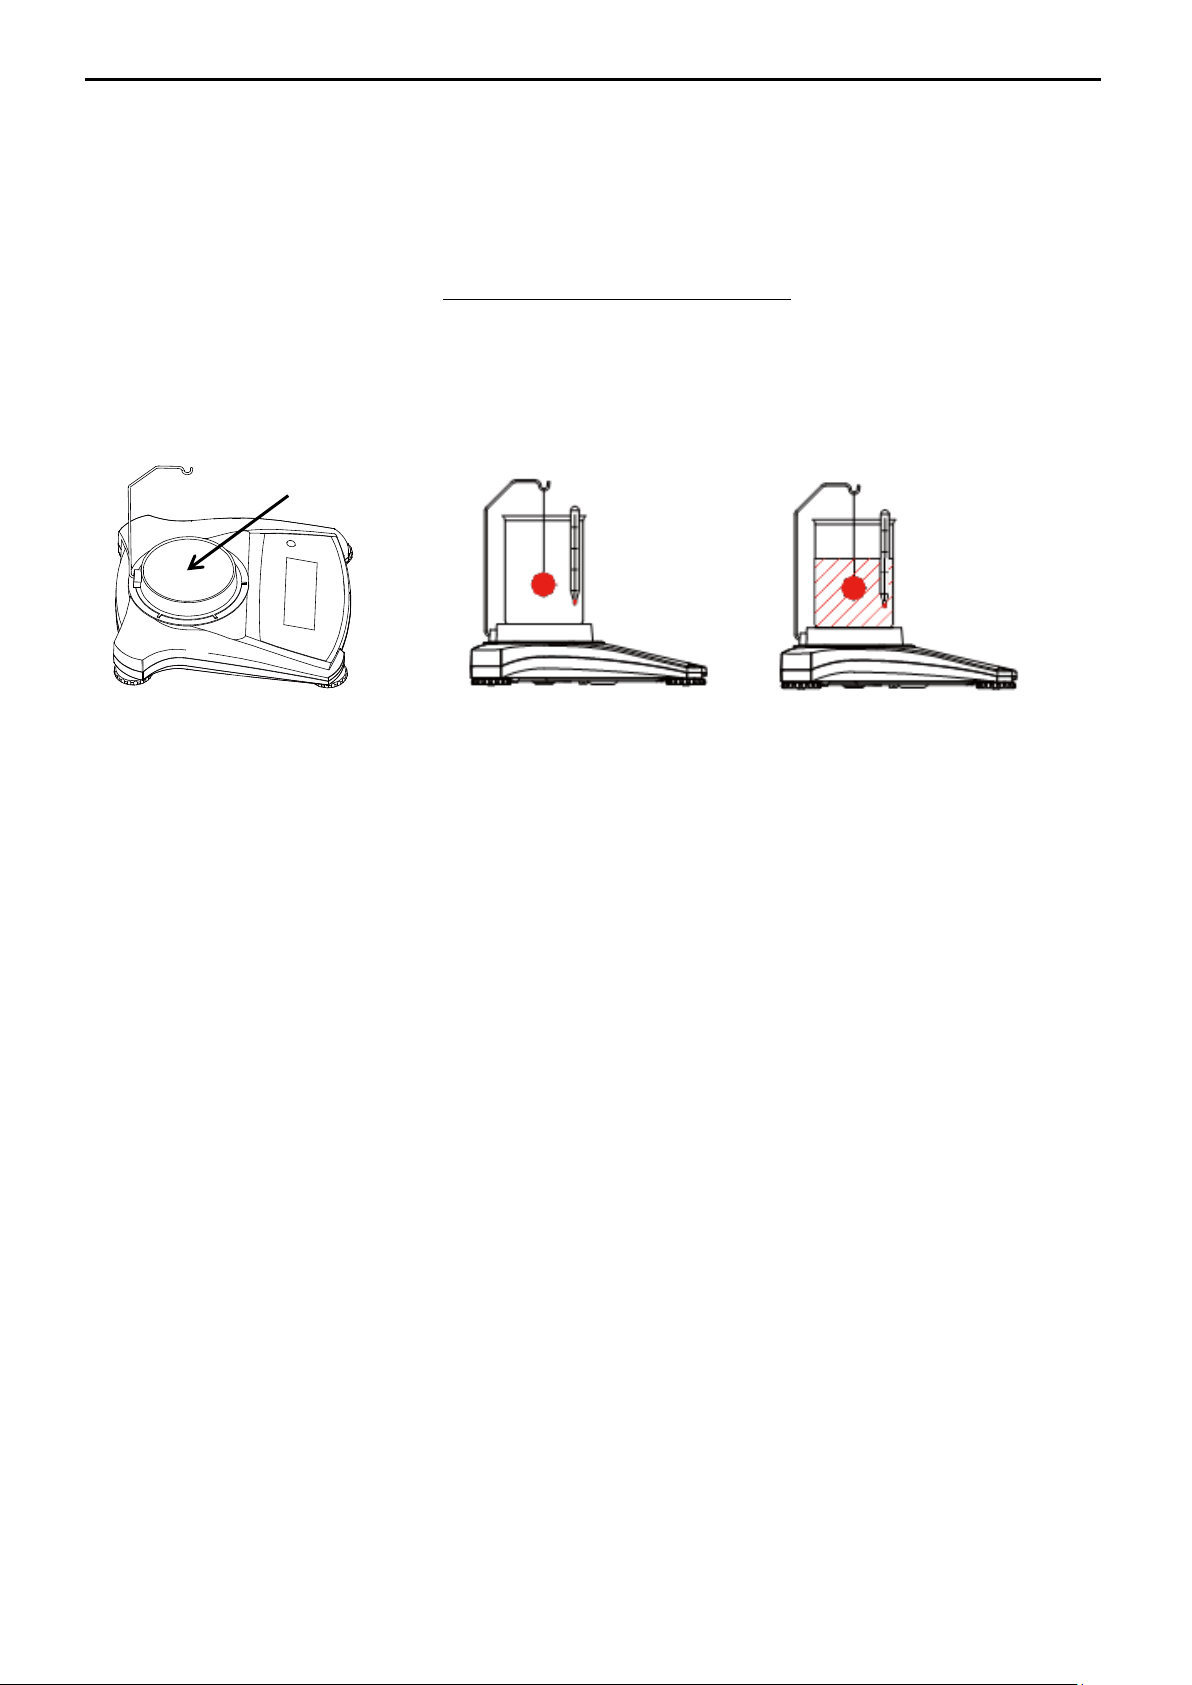
Glasbechergestell
Vorbereitung
Luftgewicht
Nassgewicht
DE-6 SCOUTTM WAAGEN-SERIEN - SKX
3.5 Dichte-Modus
Dieser Modus ermöglicht es einem Benutzer der das Dichte-Kit verwendet, das spezifische
Gewicht einer Probe zu berechnen. Der Dichte-Modus ist eingeleitet, wenn "G" und die aktuelle
Einheit angezeigt werden.
Die Probe wird in Luft auf dem Haken aufgehängt und anschließend in Wasser gewogen. Die
Formel lautet:
𝑇𝑟𝑜𝑐𝑘𝑒𝑛𝑔𝑒𝑤𝑖𝑐ℎ𝑡
𝑇𝑟𝑜𝑐𝑘𝑒𝑛𝑔𝑒𝑤𝑖𝑐ℎ𝑡 − 𝑁𝑎𝑠𝑠𝑔𝑒𝑤𝑖𝑐ℎ𝑡
Vorbereitung
Bereiten Sie die Waage wie rechts dargestellt vor: Entfernen Sie die Waagschale, bringen Sie
den Haken an und installieren Sie das Glasbechergestell (der Glasbecher wird nicht
mitgeliefert). Drücken Sie dann die Zero/Ein-Taste, um die Waage einzuschalten.
Abbildung 3-3. Dichteeinstellung
Dichteeinstellung
1. Drücken und halten Sie Modus bis [SPEC.Gr] angezeigt wird. [Air.wWt] wird danach
angezeigt.
2. Hängen Sie wie oben beschrieben die Probe an den Haken und drücken Sie auf Ja, um
den Trockengewichtswert zu speichern. [wW.wWt] wird danach angezeigt.
3. Hängen Sie die Probe in Wasser und drücken Sie auf Ja, um den Nassgewichtswert zu
speichern. Der Wert des spezifischen Gewichts wird nun angezeigt und "G" blinkt,
während das Symbol Einheit ausgeschaltet ist.
Hinweise: Spezifisches Gewicht hat keine Maßeinheit.Für große Proben empfiehlt es sich,
anstelle des Hakens die Wiegefunktion unten zu verwenden.
3.6 Mole Wiegemodus
Um aus jeder Anwendung in den Mole-Wiegemodus zu gelangen, drücken und halten Sie die
Taste Modus bis [mMoLE] angezeigt wird. Wenn die Taste Modus losgelassen wird, zeigt das
Display [Clr.mMS ].
1. Drücken Sie die Taste Ja , um die gespeicherten Molmasse zu löschen. Drücken Sie die
Taste Nein, um die bestehende Molmasse zurückzurufen. Falls keine Molmasse
gespeichert wurde, wird die [ Clr.mMS ] Anzeige übersprungen und die Eingabe einer
Molmasse erforderlich.
2. Wenn eine Molmasse gespeichert ist, wird die aktuelle Molmasse angezeigt und blinkt.
3. Drücken Sie die Taste Nein, um mit der Bearbeitung der Molmasse zu beginnen.
5. Drücken Sie die Taste Nein, um die blinkende Ziffer zu erhöhen.
6. Drücken Sie die Zurück-Taste, um den blinkenden Wert zu verringern.
7. Drücken Sie die Taste Ja, um den Wert zu bestätigen und um eine Stelle nach rechts zu rücken.
Hinweise: Wenn die Einstellung den Grenzwert überschreitet, kehrt die Anzeige zu dem
zuvor gespeicherten Wert zurück.
Die linke Zahl kann auf 0, 1, 2, 3, 4, 5, 6, 7, 8, 9, - eingestellt werden. Alle anderen Zahlen
können auf 0, 1, 2, 3, 4, 5, 6, 7, 8, 9 eingestellt werden.
Page 59
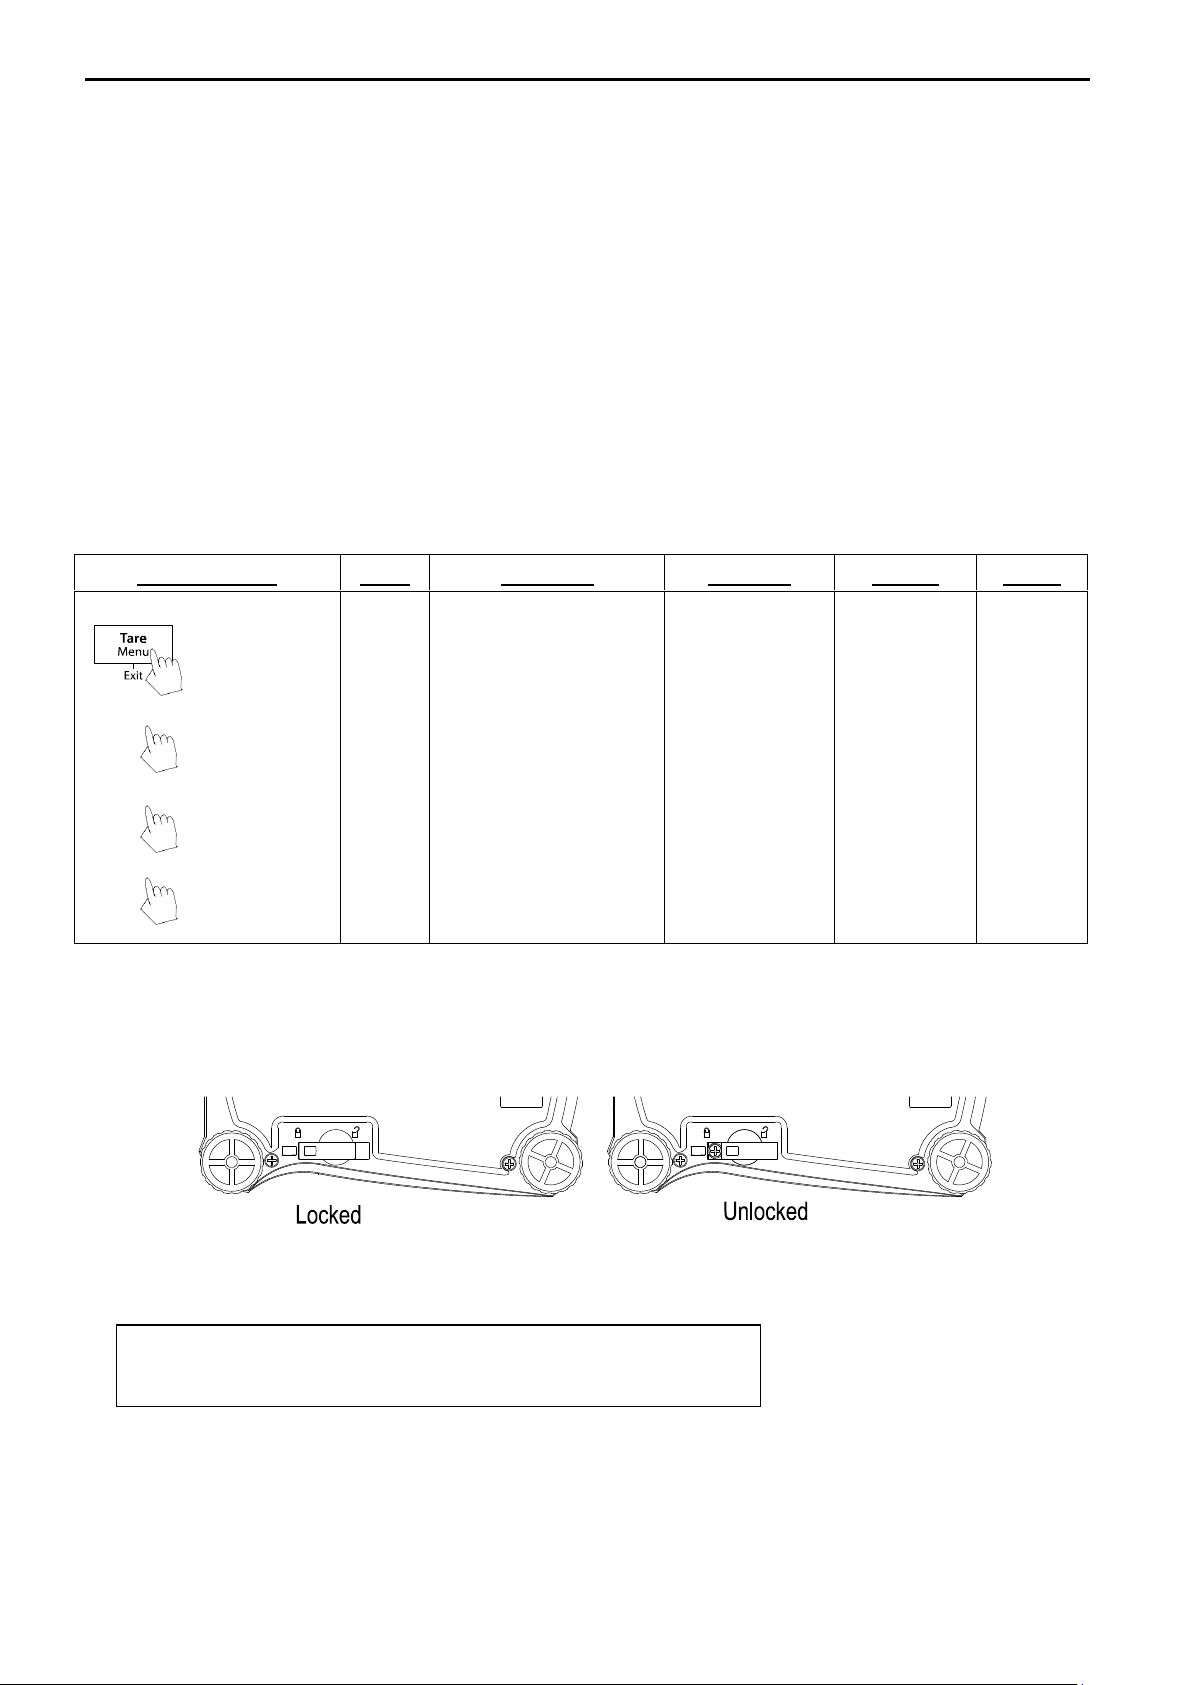
Untermenüs
C.a.l
S.e.t.u.p
M.o.d.e
U.n.i.t
E.n.d
Benutzermenü Artikel:
Bereich
Lin
Zurücksetzen
Ja/Nein
Filter
Niedrig/Mittel/Hoch
AZT
0,5/1/3/Aus
Stabiler Bereich
0.5/1/2//5
Hintergrundbeleuchtung
Aus/Ein/Auto
Auto Tarieren
Aus/Ein/Ein-acc
Auto-Aus
Aus/1/5/10
Zurücksetzen
Ja/Nein
Wiegen:
Ein-/ausschalten
Dichte
Ein-/ausschalten
Mole
Ein-/ausschalten
Zurücksetzen
g
kg
N
oz
Pfund
lb: oz
Ende
Ende
Ende
Ende
Nein/Zurü
ck
Lange drücken -
Sie kommen ins
Kurzes Drücken Akzeptieren
Kurzes Drücken-
nächsten/vorheri
gen Menü
Ja
Beenden
Kurzes Drücken
Beenden Menü
Bereich: Durchführen
Linearität: Durchführen
Kalibrierung beenden: Menü verlassen
SCOUTTM SERIES BALANCES – SKX DE-7
Die verfügbaren Einstellungen reichen von 0,01 bis 999,99.
Die Einheit der Molmasse ist g/mol.
Molmasse anzeigen:
Drücken Sie die Funktionstaste, um den vorhandenen Molmassewert für 2 Sekunden anzuzeigen.
Neue Molmasse:
Um eine neue Molmasse einzugeben, halten Sie die Taste Funktion/Modus bis [ mMoLE ]
angezeigt wird.
4. MENU SETTINGS
The User Menu allows the customizing of balance settings.
Note: Additional Sub-Menus may be available if Interface Options are installed. See Interface
User Manual for the additional setting information.
4.1 Menüführung
Benutzermenü:
Hinweise: Einige Elemente/Modi sind möglicherweise nicht in allen Modellen verfügbar.
Wenn der Sicherheitsschalter in Sperrstellung ist, wird die Kalibrierungsfunktion ausgeblendet
und die Einheiten werden auf der aktuellen Einstellung gesperrt.
Sicherheitsschalter:
4.2 Menü Kalibrierung
Gehen Sie auf dieses Menü, um Kalibrierungen durchzuführen.
Bereich [SpaN]
Initiiert ein Bereichskalibrierungsverfahren (Null und Bereich)
Lin [LIN]
Initiiert ein Linearitätskalibrierungsverfahren (Null, Mittelpunkt und Bereich).
End Cal [End]
Geht zum nächsten Menü oder zurück zum Anfang des aktuellen Menüs.
Page 60
Zurücksetzen: Nein, Ja
Filter: Niedrig, Mittel, Hoch
Automatische Nullverfolgung: aus, 0,5d, 1d, 3d
Stabil: 0,5 d,1d, 2d, 5d
Hintergrundbeleuchtung: aus, ein, Auto
Auto Tara: aus, ein, ein-Acc
Auto-Aus: aus, 1, 5, 10
Einstellung beenden: Menü verlassen
DE-8 SCOUTTM WAAGEN-SERIEN - SKX
4.3 Menü Einstellungen
Gehen Sie in dieses Menü, um die Parameter der Waage einzustellen.
Hinweis: Fett repräsentiert immer die Standard-Werkseinstellung.
Zurücksetzen [reset]
Setzen Sie das Einstellungsmenü auf die Werkseinstellungen zurück.
NEIN = nicht zurücksetzen
JA = zurücksetzen
Filter [FiltEr]
Stellen Sie die Stärke der Signalfilterung ein.
NIEDRIG = schnellere Stabilisierungszeit mit weniger Stabilität.
MED = normale Stabilität, Stabilisierungszeit
HI = größere Stabilität, langsamere Stabilisierungszeit
AZT [AZt]
Stellen Sie die automatische Nullverfolgungsfunktion ein.
AUS = deaktiviert
0,5d = das Display wird Zero beibehalten bis eine Änderung von 0,5 Divisionen pro
Sekunde überschritten wurde.
1d = das Display wird Zero beibehalten bis eine Änderung von 1 Division pro
Sekunde überschritten wurde.
3d = das Display wird Zero beibehalten bis eine Änderung von 3 Divisionen pro
Sekunde überschritten wurde.
Stabiler Bereich [Stable]
Stellen Sie den Betrag ein, den der Messwert variieren darf.
0,5d = 0,5 Waagen-Strichteilung
1d = 1 Waagen-Strichteilung
2d = 2 Waagen-Strichteilung
5d = 5 Waagen-Strichteilung
Hintergrundbeleuchtung [b.Light]
Stellt die Hintergrundbeleuchtungsfunktion ein.
AUS = immer ausgeschaltet
EIN = immer an
AUTO = schaltet sich ein, wenn eine Taste gedrückt wird oder sich das angezeigte
Gewicht verändert.
Hinweis: Bei angeschlossenem Netzteil ist die Hintergrundbeleuchtung immer an.
Auto Tarieren [A.tArE]
Stellen Sie die automatische Tarierfunktion ein.
AUS = Automatisches Tarieren ist deaktiviert
EIN = das erste stabile Bruttogewicht wird tariert
EIN-ACC = stabile Bruttolasten werden innerhalb der akzeptierten Grenzwerte tariert (im
Kontrollwiegemodus)
Page 61
Zurücksetzen: Nein, Ja
Wiegen: aus, ein
Dichte: aus, ein
Mole: aus, ein
Modus beenden: Menü verlassen
g: aus, ein
kg: aus, ein
N: aus, ein
oz: aus, ein
lb: aus, ein
lb:oz: aus, ein
Einheit beenden: Menü verlassen
SCOUTTM SERIES BALANCES – SKX DE-9
Auto aus [A.OFF]
Stellen Sie die automatische Abschaltfunktion ein.
AUS = deaktiviert
1 = schaltet sich nach 1 Minute Inaktivität aus
5 = schaltet sich nach 5 Minuten Inaktivität aus
10 = schaltet sich nach 10 Minuten Inaktivität aus
Einstellung beenden [End]
Weiter zum nächsten Menü oder zurück zum Anfang des aktuellen Menüs.
4.4 Menümodus
Dieses Menü aktiviert Modi, so dass sie für die Verwendung mit der Modus-Taste zur Verfügung
stehen werden.
Zurücksetzen [reset]
Setzen Sie das Menü Modus auf die Werkseinstellung zurück.
NEIN = Nicht zurücksetzen
JA = Zurücksetzen
Wiegen [wWeIGH]
Legen Sie den Status fest.
AUS = deaktiviert
EIN = aktiviert
Dichte [SPEC.Gr]
Legen Sie den Status fest.
AUS = deaktiviert
EIN = aktiviert
Mole[mMole]
Set the sub-mode
OFF = disabled
ON = enabled
Advance to the next menu or return to the top of the current menu.
Beenden des Modus [End]
4.5 Einheiten Menü
Dieses Menü aktiviert Einheiten so, dass sie mit der Taste Einheiten zugänglich werden. Die
Einheiten müssen im Menü "eingeschaltet" werden, um aktiv zu sein.
Hinweis: Verfügbare Einheiten variieren je nach Modell und lokalen Vorschriften.
Page 62
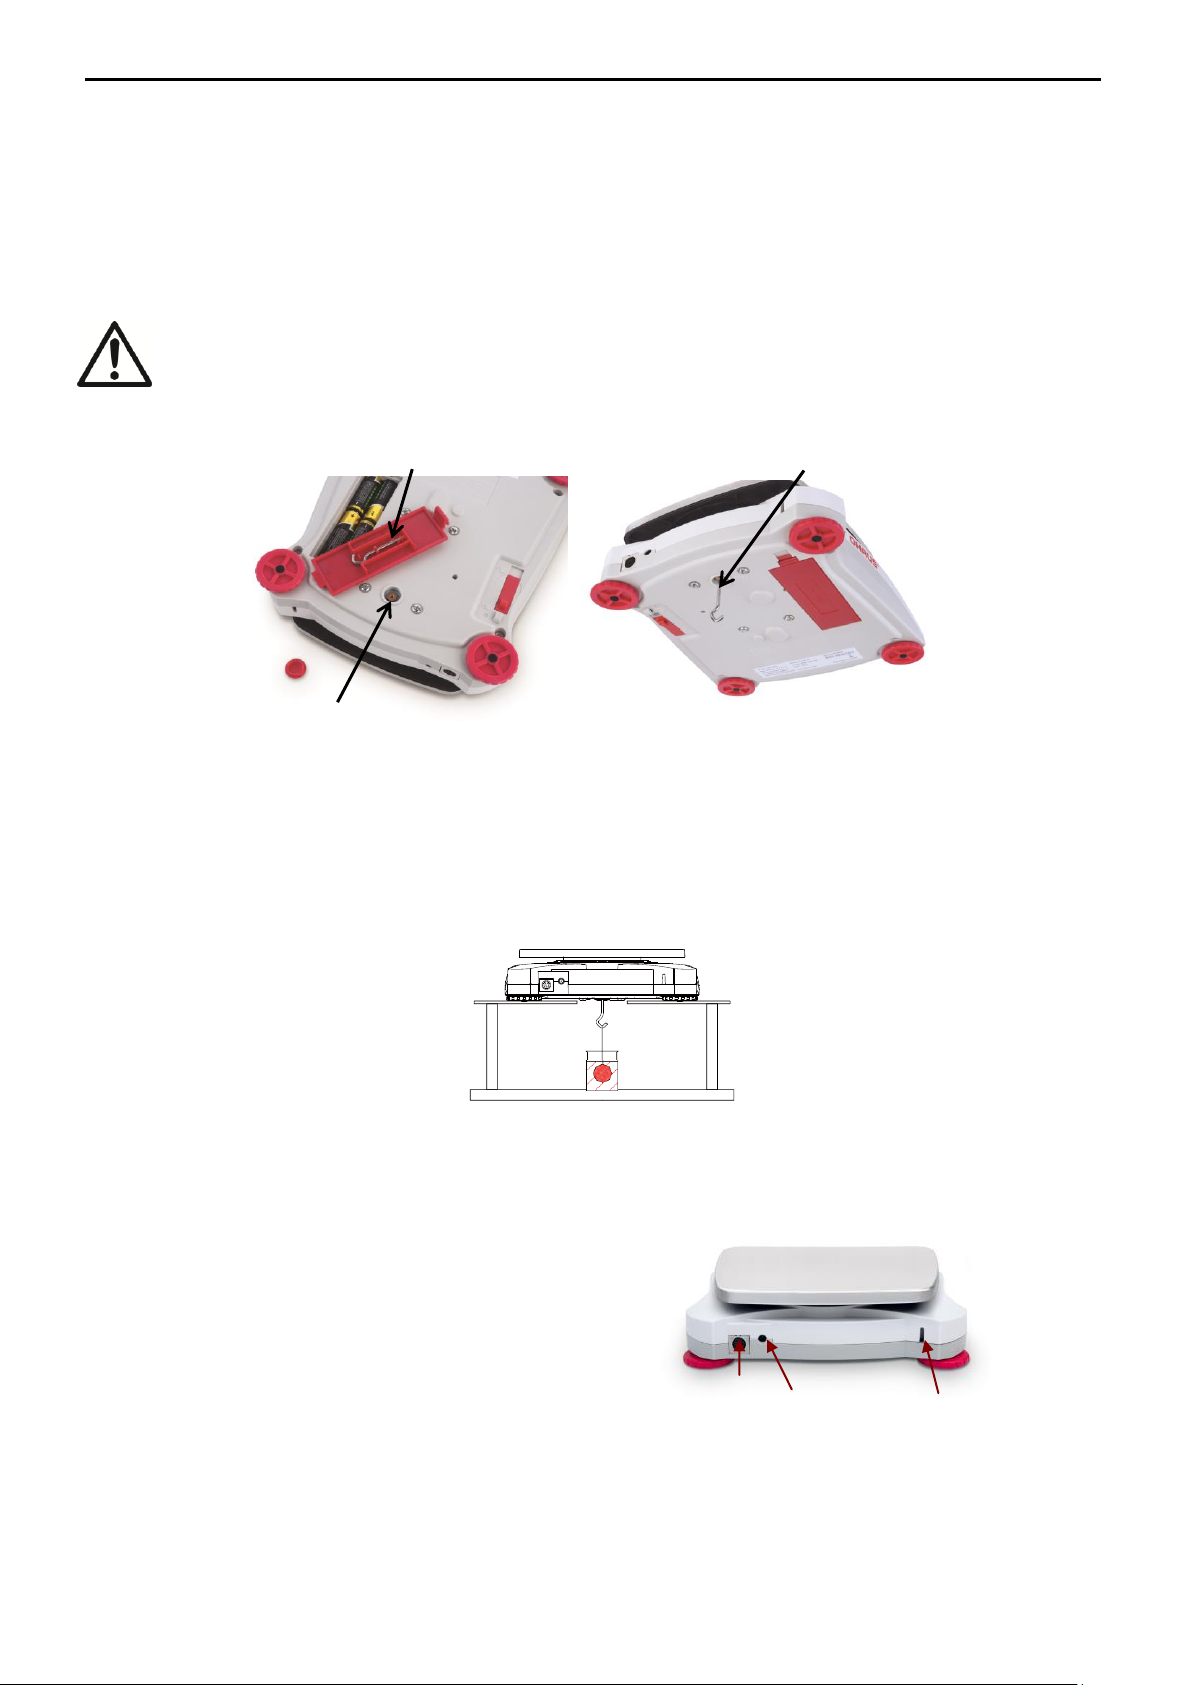
Verwenden Sie ein optionales
Schnittstellenverbindungs-Kit, um die Waage
entweder mit einem Computer oder einem
Drucker zu verbinden.
Das Schnittstellen-Kit unten ist als Zubehör
erhältlich:
RS232, USB Host, USB-Gerät, Ethernet,
Bluetooth®*.
Abbildung 4-3. Rückseite der Waage
* Schnittstellen-Kits können nach den örtlichen Bestimmungen variieren
Unterflurwiegehaken
Unterflurwiegehaken installiert
Unterflurwiegeöffnung
Schnittstelle
Verbindung
Wechselstrom
Netzteil
Buchse
Sicherheits-
Slot
DE-10 SCOUTTM WAAGEN-SERIEN - SKX
4.6 Zusätzliche Funktionen
Unterflurwiegehaken
Die Scout Waage ist mit einem Unterflurwiegehaken für Unterflurwägungen ausgerüstet.
Die Unterflurwiegehaken befindet sich wie unten angezeigt an der Rückseite der
Batterieabdeckung.
Um diese Funktion zu verwenden, entfernen Sie zum Wiegen die rote Schutzabdeckung
unterhalb der Öffnung.
Achtung: Bevor Sie die Waage drehen, entfernen Sie die Waagschale und
Waagschalenhalterung (falls vorhanden) und stellen Sie die Transportsicherung
auf die Position "verriegelt", um Schäden zu vermeiden.
Abbildung 4-2. Wiegen unterhalb
Die Waage kann mit Laborständern oder einer anderen geeigneten Methode gestützt werden.
Stellen Sie sicher, dass die Waage eben und sicher steht, und dass die Transportsicherung
freigegeben wurde. Schalten Sie die Waage ein, dann verwenden Sie eine Schnur oder einen
Draht, um die Gegenstände zu befestigen, die gewogen werden sollen.
Abbildung 4-3. Unterflurwiege-Anwendung
Anschließen der Schnittstelle
Bluetooth® Warenzeichen und Logos sind eingetragene Warenzeichen der Bluetooth SIG,
Inc. und die Verwendung dieser Marken durch OHAUS erfolgt unter Lizenz.
Page 63
WARNUNG: Stromschlaggefahr. Trennen Sie das Gerät während der Reinigung
von der Stromversorgung.
Symptom
Mögliche Ursache
Lässt sich nicht
einschalten
Zur Waage gelangt kein Strom
Schlechte Genauigkeit
Unsachgemäße Kalibrierung
Instabiles Umfeld
Kann nicht kalibrieren
Sicherheitsschalter in Verriegelungsposition
Err 8.1
Gewicht überschreitet die Leistung auf dem Nullbereich.
Err 8.2
Gewicht unterschreitet die Leistung auf dem Nullbereich.
Err 8.3
Überlast (Gewicht übersteigt die Nennkapazität)
Err 8.4
Unterlast (Waagschale entfernt)
Err 8.5
Tara außerhalb des Bereichs
Err 8.6
Angezeigter Wert 999999 (möglich im Modus Summieren)
Err 8.7
Unbekannte interne Gewichtsposition
ref.err
Stückzählen oder Prozentfehler - Probengewicht <1d. Waage zeigt
Fehler, beendet dann Stückzählung oder geht auf [Clr.APU].
Lo.ref
Prozent Referenzgewicht oder APW ist für genaue Ergebnisse zu
niedrig
CAL E
Kalibrierung gescheitert.
USB.Err
Kann Menüs und Anwendungsdateien auf U-Disk nicht finden.
SCOUTTM SERIES BALANCES – SKX DE-11
5. INSTANDHALTUNG
5.1 Reinigung
Das Gehäuse kann wenn nötig mit einem feuchten Tuch und einem milden Reinigungsmittel
gereinigt werden.
Achtung: Verwenden Sie keine Lösungsmittel, Chemikalien, Alkohol, Ammoniak
oder Scheuermittel, um damit das Gehäuse oder Bedienfeld zu reinigen.
5.2. Fehlerbehebung
In der folgenden Tabelle finden Sie die am häufigsten auftretenden Probleme und ihre
möglichen Ursachen sowie Lösungsmöglichkeiten.
Wenn das Problem weiterhin besteht, wenden Sie sich an OHAUS oder Ihren autorisierten
Händler.
TABELLE 5-1.
5.3 Service-Informationen
Wenn der Abschnitt zur Fehlerbehebung Ihr Problem nicht löst oder beschreibt, kontaktieren Sie
Ihren autorisierten OHAUS Service-Agent. Für Hilfe oder um den technischen Support in den
USA zu erreichen, rufen Sie von 8.00 bis 17.00 Uhr EST. gebührenfrei 1-800-672-7722 ext.
7852 an. Ein OHAUS Produktservice-Spezialist wird Ihnen zur Verfügung stehen, um Hilfe zu
leisten. Außerhalb der USA besuchen Sie bitte unsere Website, www.ohaus.com, um eine
OHAUS Niederlassung in Ihrer Nähe zu finden.
Page 64
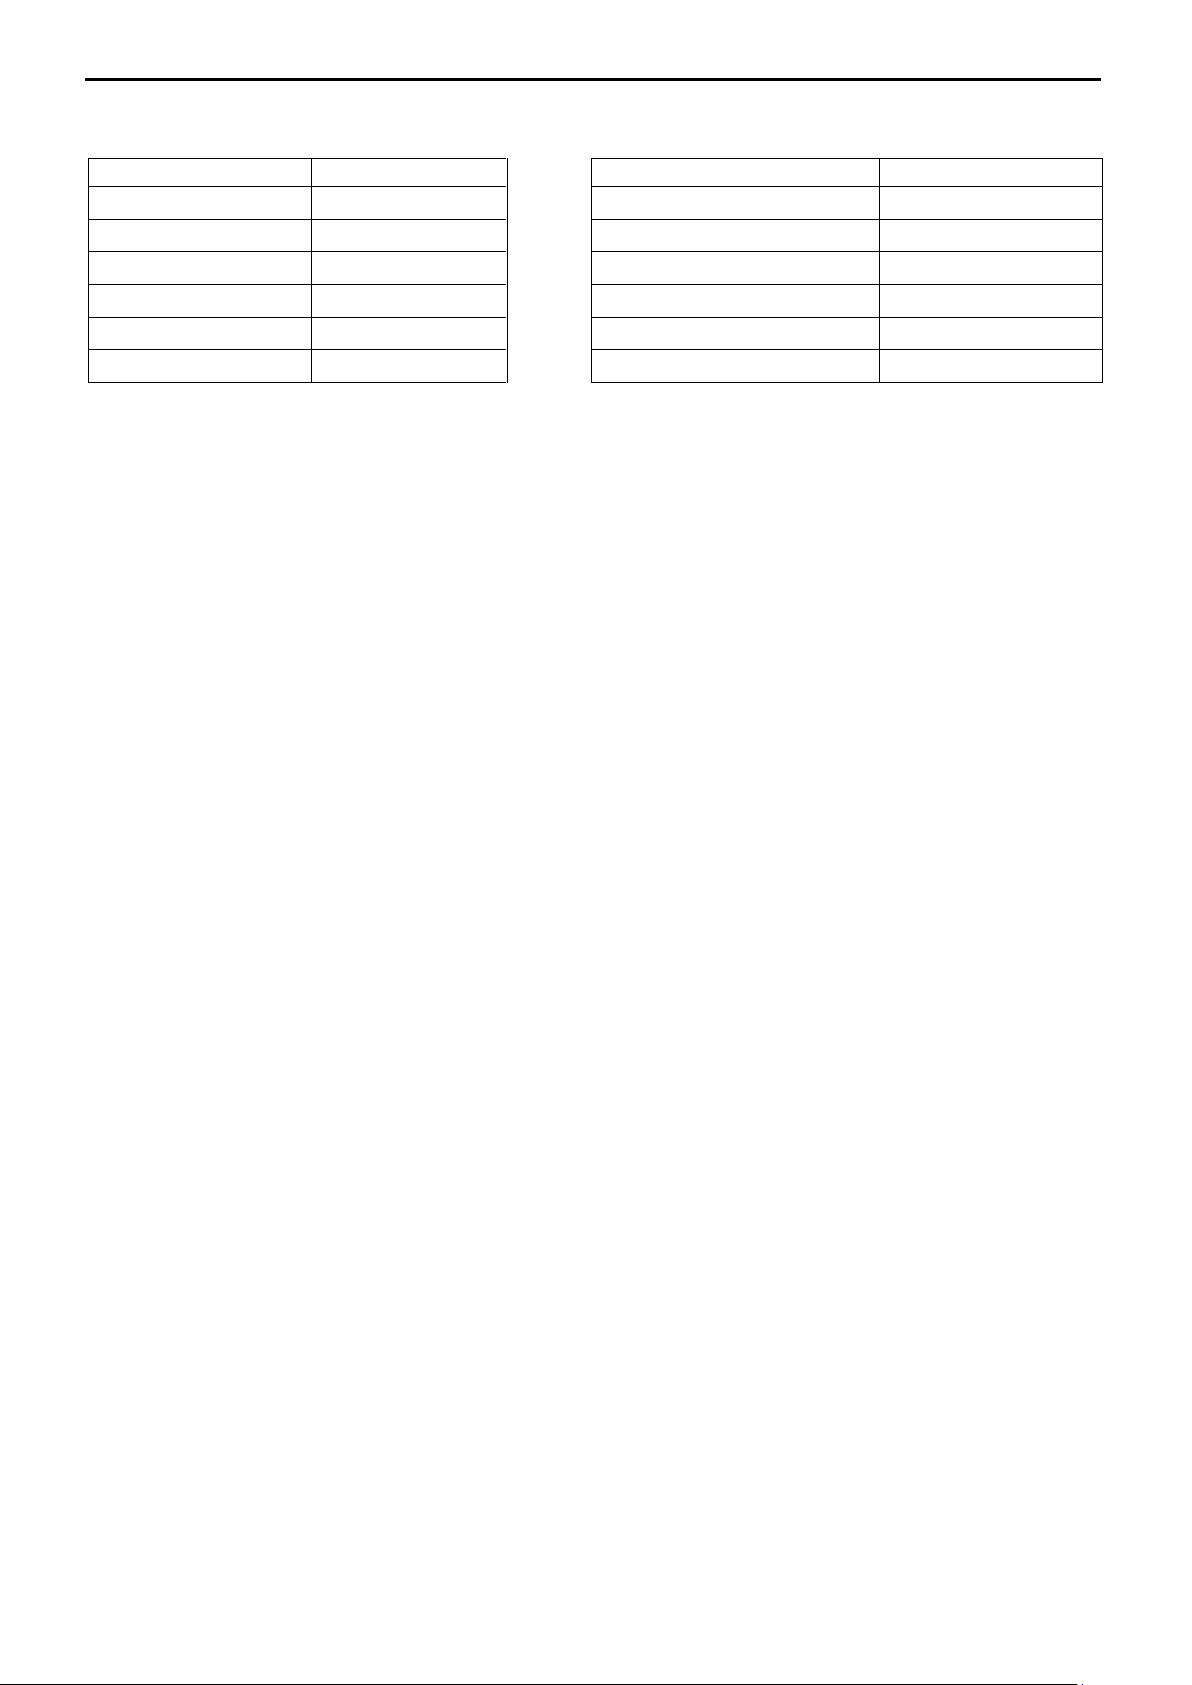
BESCHREIBUNG
Artikelnummer
BESCHREIBUNG
Artikelnummer
RS232-Kit
30268982
Stacking-Kit, x1
30268988
USB-Host Kit
30268983
Spezifisches Gewicht-Kit
30269020
USB-Gerät Kit
30268984
Hilfsanzeige-Kit
30269019
Bluetooth-Kit*
30268985
Tragetasche
30269021
Ethernet-Kit
30268986
Benutzungs-Abdeckung
30269022
Stacking-Kit, x6
30268987
Drucker und Kabel
Kontakt OHAUS
DE-12 SCOUTTM WAAGEN-SERIEN - SKX
5.4 Zubehör
TABELLE 5-2. ZUBEHÖR
Hinweis: *Bluetooth-Kit ist nur in bestimmten Regionen und gemäß der örtlichen Bestimmungen verfügbar.
6. TECHNISCHE DATEN
Die technischen Daten gelten unter den folgenden Umgebungsbedingungen:
Nur im Innenbereich verwenden
Betriebstemperaturbereich: +5 ° C bis +40 ° C
Relative Luftfeuchtigkeit: 10% bis 80% bei 31 ° C, linear abnehmend bis 50% bei 40 ° C, nicht
kondensierend
Höhe: Bis zu 2000 m
Stromversorgung: Wechselstromadapter Eingang 100-240V 50/60 Hz und Ausgang 5V DC 1 A
oder 4 AA-Batterien
Verschmutzungsgrad: 2
Hauptversorgungsspannungsschwankungen: bis zu ± 10% der Nennspannung
Page 65
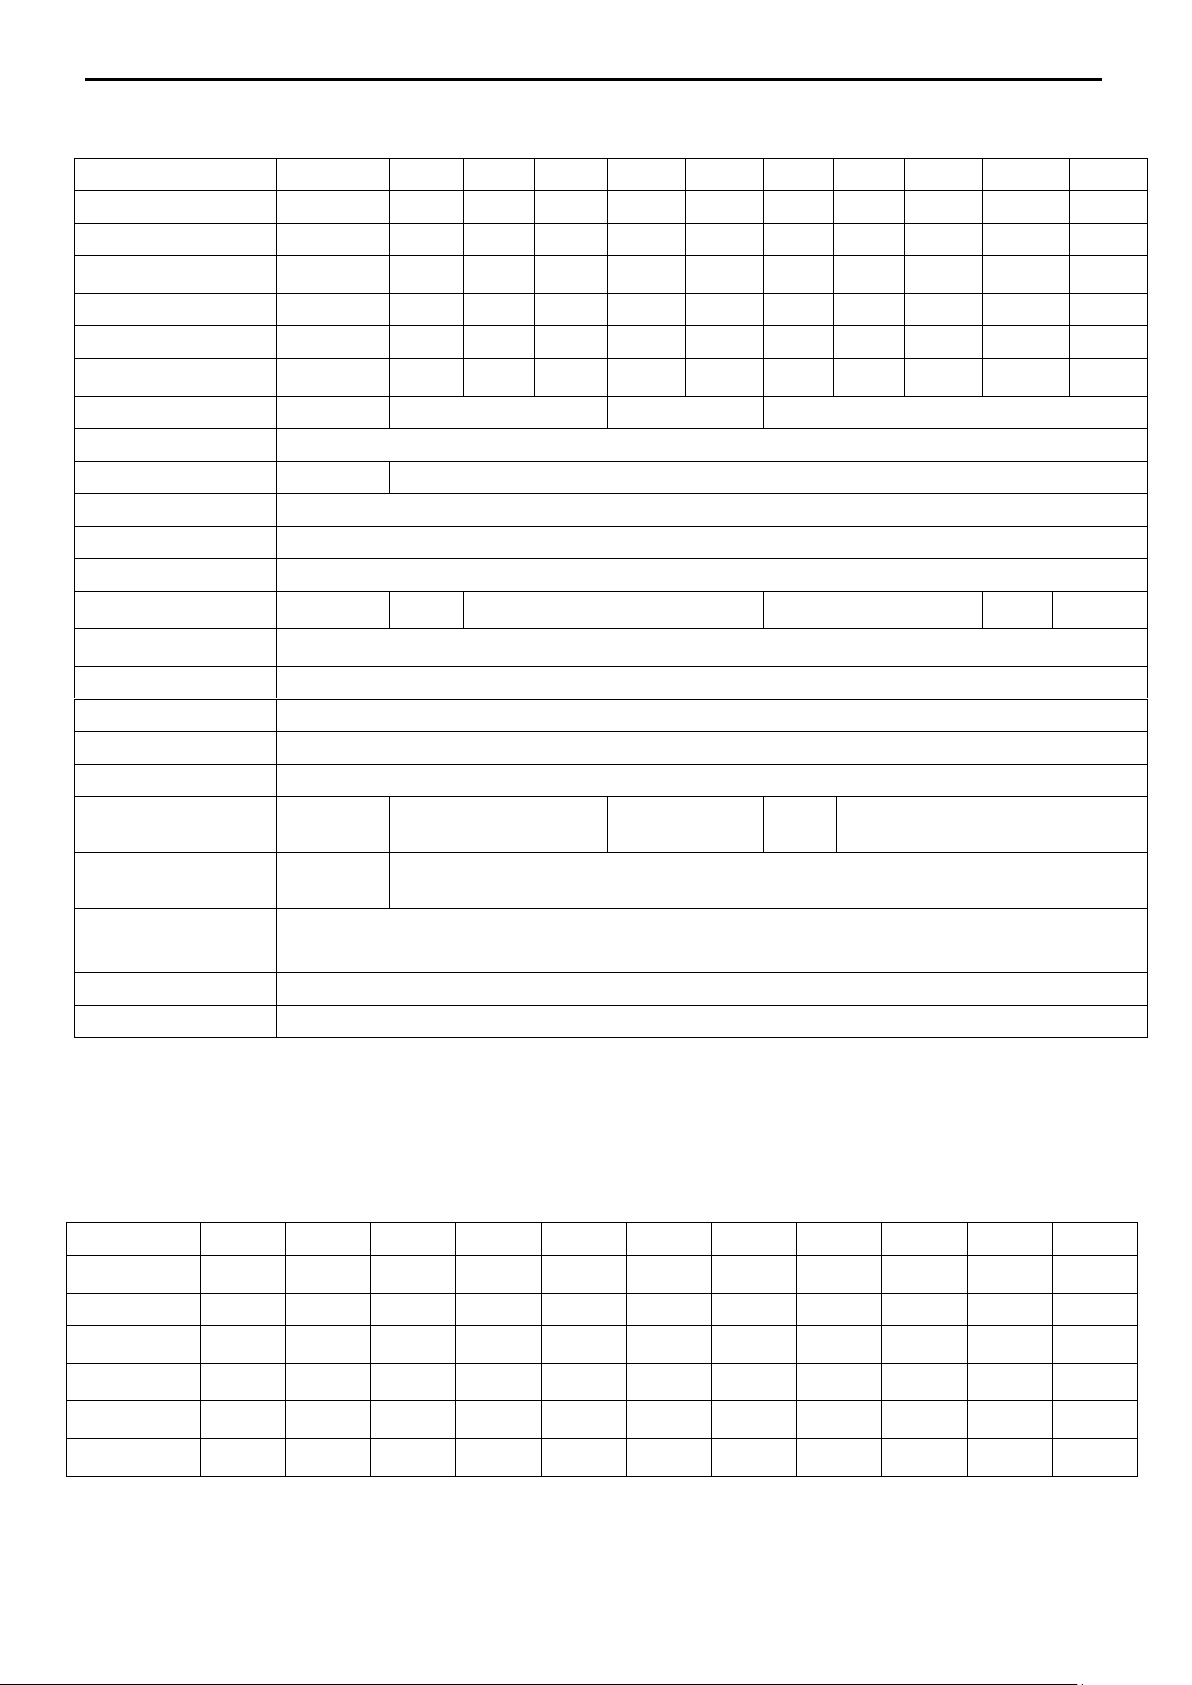
Modell
SKX123
SKX222
SKX422
SKX622
SKX1202
SKX2202
SKX421
SKX621
SKX2201
SKX6201
SKX8200
Kapazitä t (g)
120
220
420
620
1200
2200
420
620
2200
6200
8200
Lesbarkeit (g)
0.001
0.01
0.01
0.01
0.01
0.01
0.1
0.1
0.1
0.1
1
Wiederholbarkeit
(Std. Bez.) (g)
0.002
0.01
0.01
0.01
0.02
0.02
0.1
0.1
0.1
0.1
1
Linearitä t (g)
0.003
0.01
0.01
0.02
0.03
0.03
0.1
0.1
0.1
0.2
1
Bereichskalibrierungsmassen*
100 g
200 g
200 g
300 g
1 kg
2 kg
200 g
300 g
2 kg
5 kg
8 kg
Linearitä tskalibrierungsmassen
50, 100 g
100,
200 g
200,
400 g
300,
600 g
500 g,
1 kg
1 kg,
2 kg
200,
400 g
300,
600 g
1 kg,
2 kg
3 kg, 6 kg
4 kg,
8 kg
Stabilisierungszeit(en)
1.5 1 1.5
1
Konstruktion
ABS-Gehä use und 304 Edelstahl-Waagschale
Windschutz
Ja
Nein
Tarierbereich
Volle Kapazitä t durch Subtraktion
Wiegeeinheiten**
g, kg, N, oz, lb, lb: oz
Anwendungsmodi
Wä gen, Dichtebestimmung, Mole wiegen
Akkubetriebszeit (bei 20 ° C)
80 Stunden
120
Stunden
80 Stunden
120 Stunden
80
Stunden
120
Stunden
Spezifizierter
Temperaturbereich
+10 ° C bis +40 ° C bei 10% bis 80% Relative Luftfeuchtigkeit, nicht kondensierend
Lagerbedingungen
-20 ° C bis +55 ° C bei 10% bis 90% Relative Luftfeuchtigkeit, nicht kondensierend
Kommunikation
RS232, USB-Gerä t, Ethernet, Bluetooth***, USB Host (alle als Zubehö r erhä ltlich)
Anzeigetyp
Hintergrund beleuchtete LCD: 6-stelliges 7-Segment mit weiß er LED Hintergrundbeleuchtung
Displaygrö ß e
20 mm / 0,78 Zoll Ziffern
Waagschalengrö ß e (B x T)
Ø 93mm / 3,7
Zoll
Ø 120 mm / 4,7 Zoll
170 x 140 mm /
6,7 x 5,5 Zoll
Ø 120
mm / 4,7
Zoll
170 x 140 mm / 6,7 x 5,5 Zoll
Waag Dimensionen
202 x 222 x
103 mm /
8 x 8.7 x 4.1 in
202 x 224 x 54 mm / 8 x 8.8 x 2.1 in
Versandabmessungen
(B x T x H)
300 x 250 x 129 mm / 11,8 x 9,8 x 5,1 Zoll
Nettogewicht
1 kg
Versandgewicht
1,6 kg
Modell
SKX123
SKX222
SKX422
SKX622
SKX1202
SKX2202
SKX421
SKX621
SKX2201
SKX6201
SKX8200
Gramm (g)
120 x 0.001
220 x 0.01
420 x 0.01
620 x 0.01
1200 x 0.01
2200 x 0.01
420 x 0.1
620 x 0.1
2200 x 0.1
6200 x 0.1
8200 x 1
Kilogramm (kg)
/ / /
/
1.2 x 0.00001
2.2 x 0.00001
/
/
2.2 x 0.0001
6.2 x 0.0001
8.2 x 0.001
Newton (N)
1.17679 x
0.00001
2.1574 x
0.0001
4.1188 x
0.0001
6.0801 x
0.0001
11.7679 x
0.0001
21.5744 x
0.0001
4.119 x 0.001
6.080 x 0.001
21.574 x
0.001
60.801 x
0.001
80.41 x 0.01
Unze (oz)
4.23290 x
0.00005
7.7600 x
0.0005
14.8150 x
0.0005
21.8700 x
0.0005
42.3290 x
0.0005
77.6030 x
0.0005
14.815 x
0.005
21.870 x
0.005
77.600 x
0.005
218.700 x
0.005
289.25 x 0.05
Pfund (lb)
/ / /
1.36690 x
0.00005
2.64555 x
0.00005
4.85020 x
0.00005
/
1.3670 x
0.0005
4.8500 x
0.0005
13.6685 x
0.0005
18.080 x
0.005
Pfund: Unze (lb: oz)
/ / /
1lb:5.8700oz
x 0.0005oz
2lb:10.3290oz
x 0.0005oz
4lb:13.6030oz
x 0.0005oz
/
1lb:5.870oz
x 0.005oz
4lb:13.600oz
x 0.005oz
13lb:10.700oz
x 0.005oz
18lb:1.25oz
x 0.05oz
SCOUTTM SERIES BALANCES – SKX DE-13
6.1 Spezifikationen
TABELLE 6-1. TECHNISCHE DATEN
Hinweis:
* Kalibrierung Gewichte werden mit Modellen bis zu 620g Kapazität für bestimmte Regionen enthalten.
** Verfügbare Wiegeeinheiten, Anwendungsmodi und optionale Schnittstellenkits variieren abhängig von örtlichen
Vorschriften.
*** Bluetooth Installationssatz ist in bestimmten Regionen nach den örtlichen Vorschriften nur zur Verfügung.
Kapazität x Lesbarkeit
Page 66
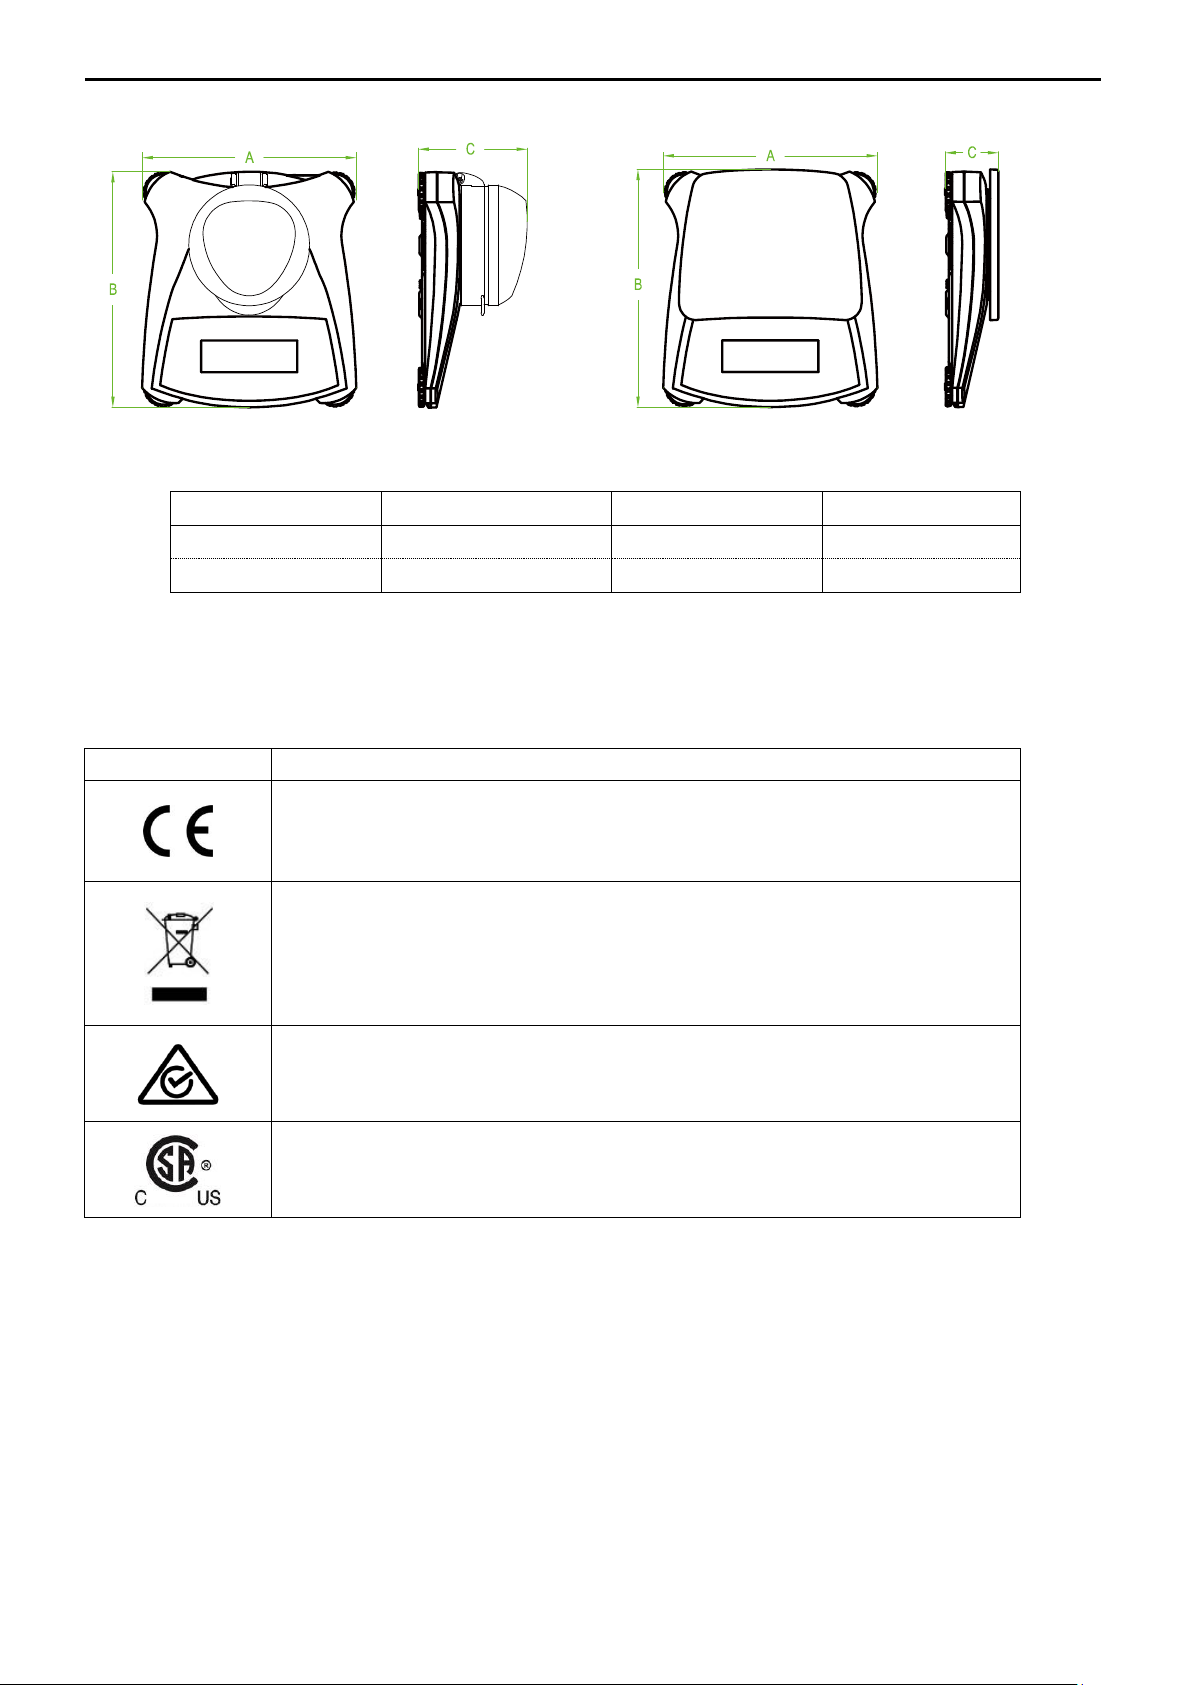
Modell A B C
mit Windschutz
202 mm / 8,0 Zoll
222 mm / 8,7 Zoll
103 mm / 4,1 Zoll
w/o Windschutz
202 mm/ 8,0 Zoll
224 mm / 8,8 Zoll
54 mm / 2,1 Zoll
Kennzeichnung
Standard
EN 61010-1, EN 61326-1
Die Konformitätserklärung finden Sie im Internet unter
www.ohaus.com/ce.
Dieses Produkt entspricht der EU-Richtlinie 2002/96/EG (WEEE).
Bitte entsorgen Sie dieses Produkt gemäß den örtlichen
Bestimmungen bei einer ausgewiesenen Sammelstelle für elektrische
und elektronische Geräte. Anweisungen zur Entsorgung in Europa
finden Sie unter www.ohaus.com/weee.
AS/NZS 61000.6.1, AS/NZS 61000.6.3
CAN/CSA-C22.2 No. 61010-1, UL Std. No. 61010-1
DE-14 SCOUTTM WAAGEN-SERIEN - SKX
6.2 Zeichnungen
Abbildung 7.1 Abmessungen
6.3 Compliance
Konformität mit den folgenden Normen wird durch die entsprechende Markierung auf dem
Produkt angezeigt.
Page 67
VERFÜGUNG
In Übereinstimmung mit der europäischen Richtlinie 2002/96/EG für Elektround Elektronik-Altgeräte (WEEE) darf dieses Gerät nicht mit dem Hausmüll
entsorgt werden. Dies gilt auch für Länder außerhalb der EU, nach deren
jeweiligen speziellen Anforderungen.
Bitte entsorgen Sie dieses Produkt gemäß den örtlichen Bestimmungen bei einer
ausgewiesenen Sammelstelle für elektrische und elektronische Geräte. Wenn Sie
irgendwelche Fragen haben, kontaktieren Sie bitte die zuständige Behörde oder den
Händler, bei dem Sie dieses Gerät erworben haben.
Sollte dieses Gerät an andere Parteien (für private oder berufliche Nutzung) übergeben
werden, muss der Inhalt dieser Verordnung ebenfalls weitergegeben werden.
Anweisungen zur Entsorgung in Europa finden Sie unter www.OHAUS.com/weee.
Vielen Dank für Ihren Beitrag zum Umweltschutz.
SCOUTTM SERIES BALANCES – SKX DE-15
FCC-Hinweis
Dieses Gerät wurde getestet und erfüllt gemäß Teil 15 der FCC-Bestimmungen die Grenzwerte
für ein Gerät der Klasse B. Diese Grenzwerte sollen in einer Wohnumgebung einen
angemessenen Schutz gegen störende Interferenzen gewährleisten. Dieses Gerät erzeugt und
verwendet Hochfrequenzenergie und wenn es nicht in Übereinstimmung mit den Anweisungen
installiert und verwendet wird, kann es Störungen des Funkverkehrs verursachen. Es gibt
jedoch keine Garantie, dass bei einer bestimmten Installation keine Störungen auftreten. Falls
dieses Gerät Störungen des Radio- oder Fernsehempfangs verursacht, die durch Drehen des
Geräts untermauert werden können, sollte der Benutzer versuchen, die Störungen durch eine
oder mehrere der folgenden Maßnahmen zu beseitigen:
- Richten Sie die Empfangsantenne anders aus.
- Vergrößern Sie den Abstand zwischen dem Gerät und dem Empfänger.
- Schließen Sie das Gerät an eine andere, vom Stromkreis des Empfängers unabhängige
Steckdose an.
- Bitten Sie den Händler oder einen erfahrenen Radio-/Fernsehtechniker um Hilfe.
Industriehinweis für Kanada
Dieses Klasse B Digitalgerätist konform mit dem kanadischen ICES-003.
ISO 9001 Registrierung
Ohaus Corporation, USA wurde 1994 von BureauVeritas Quality International (BVQI) die ISO
9001 Zertifizierung verliehen. Die Zertifizierung bestätigt, dass das
Qualitätsmanagementsystem von Ohaus die Anforderungen für den ISO 9001 Standard erfüllt.
Am 21 Juni 2009 wurde Ohaus Corporation, USA für den ISO 9001:2008 Standard erneut
zertifiziert.
Page 68

DE-16 SCOUTTM WAAGEN-SERIEN - SKX
BESCHRÄNKTE GARANTIE
OhausgewährtfürProdukteab Datum der Auslieferung und über die Dauer der
GarantiezeiteineGarantie auf die Freiheit von Material- und Herstellungsmängeln. Während der
Garantiezeit repariert oder ersetzt Ohaus wahlweise alle Komponenten, die Defekte aufweisen,
kostenlos unter der Voraussetzung, dass das Produkt freigemacht an Ohaus zurückgesendet
wird.
Diese Garantie ist ungültig, wenn das Produkt versehentlich oder missbräuchlich beschädigt
oder radioaktiven oder zersetzenden Stoffen ausgesetzt wurde, Fremdstoffe ins Innere des
Produktes eingedrungen sind, oder wenn der Defekt aus einer nicht von Ohaus durchgeführten
Modifikation oder Serviceleistung resultiert. Falls keine ausgefüllte Garantiekarte vorliegt
beginnt die Garantiezeit mit dem Datum der Auslieferung an den autorisierten Händler. Darüber
hinaus gewährt Ohaus Corporation weder eine ausdrückliche noch eine implizierte Garantie.
Ohaus Corporation haftet nicht für Folgeschäden.
Da die gesetzlichen Rahmenbedingungen zur Garantie von Staat zu Staat unterschiedlich
sindbitten wir Sie, Ohaus oder Ihren örtlichen Ohaus Händler für genauere Informationen zu
kontaktieren.
Page 69
PRECAUZIONE: Leggere tutti gli avvertimenti di sicurezza prima di installare,
eseguire collegamenti o manutenzione di questa attrezzatura. Il mancato
rispetto di questi avvertimenti potrebbe causare lesioni personali e/o
danneggiamenti ai beni. Tenere tutte le istruzioni per futuri riferimenti.
BILANCE SERIE SCOUTTM - SKX IT-1
1. INTRODUZIONE
Il presente Manuale contiene istruzioni per l’installazione, il funzionamento e la manutenzione
per le Bilance di Serie Scout SKX. Si prega di leggere il Manuale completamente prima di
utilizzare la bilancia.
1.1 Definizione dei Segnali di Avvertimento e Simboli
Le note di Sicurezza sono segnate con parole di segnali e simboli di avvertimento. Queste
mostrano problemi di sicurezza e di avvertimenti. Ignorando le note di sicurezza può risultare in
lesioni personali, danneggiamenti allo strumento, malfunzioni e risultati falsi.
Parole di Segnali
AVVERTIMENTO Per situazioni pericolose con medio rischio, possibilmente risultanti
con lesioni o morte, se non evitate.
PRECAUZIONE Per situazioni pericolose con basso rischio, risultanti in
danneggiamenti al dispositivo o ai beni o nella perdita dei dati, o
lesioni, se non evitate.
Attenzione Per informazioni importanti sul prodotto.
Nota Per informazioni utili sul prodotto.
Simboli di avvertimento
Pericolo Generale Pericolo di Scossa Elettrica
1.2 Precauzioni di Sicurezza
Controllare che l’alimentazione elettrica CA locale sia entro la gamma di tensione
d’ingresso stampata sull’etichetta dei dati dell’adattatore CA.
Collegare solamente l’adattatore CA a un’uscita di messa a terra elettrica compatibile.
Non collocare la bilancia in modo che sia difficile di scollegare l’adattatore CA dal recipiente
dell’alimentazione elettrica.
Assicurarsi che il cavo dell’alimentazione elettrica non dovesse essere un potenziale
ostacolo o un pericoloso inciampo.
Questa attrezzatura è intesa per uso interno e dovrebbe essere utilizzata solamente in
luoghi asciutti.
Utilizzare l’attrezzatura solamente sotto condizioni ambientali specificate nelle istruzioni
dell’utente
Non utilizzare l’attrezzatura in ambienti pericolosi o instabili.
Non far cadere il piatto di pesata della bilancia.
Utilizzare solamente accessorie e periferiche approvati.
Scollegare l’alimentazione elettrica dall’attrezzatura prima di pulirla o di eseguire revisione.
La revisione deve essere eseguita da personale autorizzato.
2. INSTALLAZIONE
2.1 Installazione dei Componenti
Fare riferimento alle illustrazioni e istruzioni qui di seguito per identificare e montare la vostra
bilancia Scout con i propri componenti. Tutti i componenti devono essere assemblati prima di
utilizzare la bilancia.
Page 70
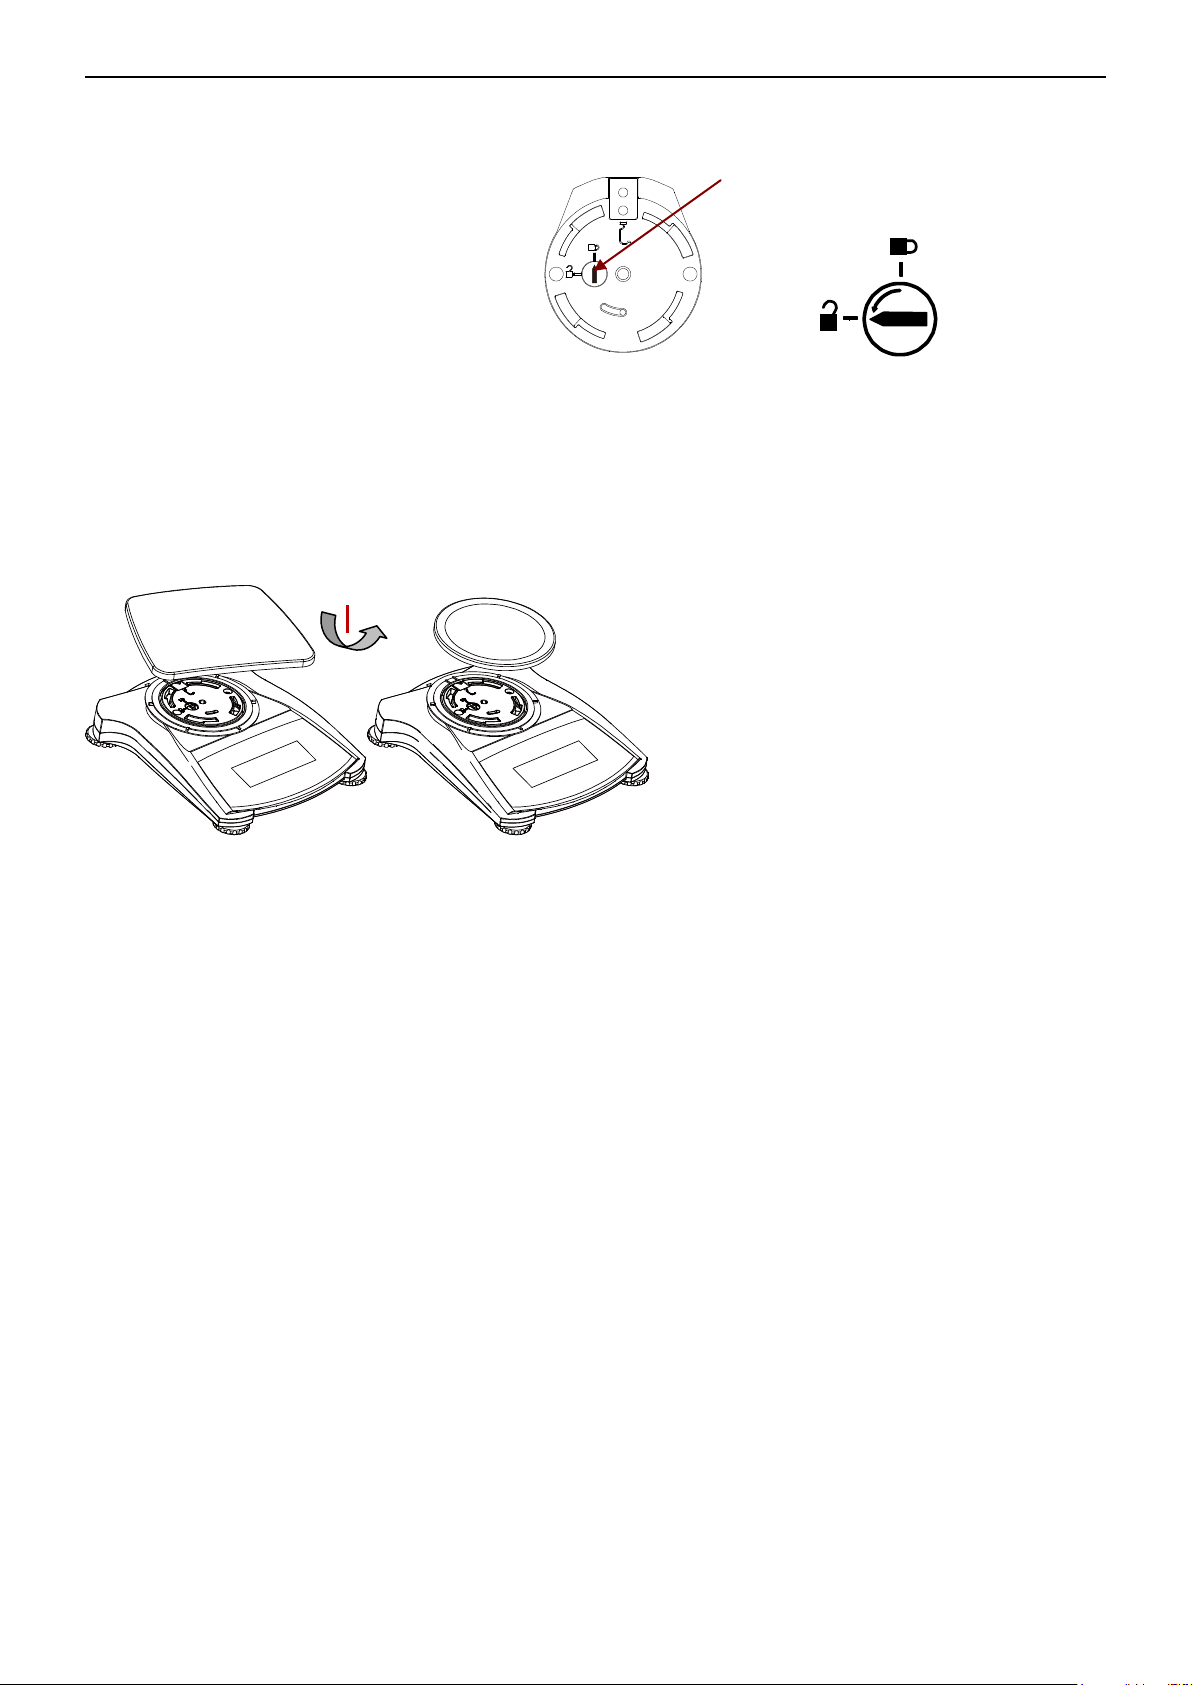
Liberare il blocco trasporto rosso girando
il puntatore rosso di 90 gradi in senso
antiorario per sbloccare.
Figura 2-1. Blocco Trasporto
Sottopiattaforma
Puntatore di
Posizione
Posizione
Sbloccata
IT-2 BILANCE SERIE SCOUTTM - SKX
2.1.1 Liberare il Blocco Spedizione
2.1.2 Installazione del piatto di pesata della bilancia
Nelle bilance con piatto di pesata rettangolare, questo è posto sulla sotto-piattaforma come
mostrato e ruotato in senso antiorario finché si blocchi. Piatti di pesata tondi sono posti
direttamente sul sottopiatto di pesata.
Figura 2-2. Installazione del piatto di pesata
2.2.3 Fessura di Sicurezza
Esiste una fessura di sicurezza nel retro della bilancia consentendo alla stessa di essere fissata
con una corda a scelta e accessorio di bloccaggio.
2.3 Selezionare la Posizione
Per un miglior rendimento, la bilancia Scout deve essere utilizzata in un pulito e stabile
ambiente. Non utilizzare la bilancia in ambienti con eccessive correnti d’aria, con rapidi
cambiamenti di temperatura, presso campi magnetici o presso attrezzature che generano campi
magnetici, o vibrazioni.
2.4 Collegamento all’Alimentazione
Installazione dell’Adattatore CA
L’alimentazione elettrica CA è utilizzata per alimentare la bilancia quando l’alimentazione
elettrica della batteria non è richiesta. In primo luogo, collegare l’Adattatore CA (fornito)
all’ingresso del connettore di alimentazione dell’Adattatore nel retro della bilancia e quindi
collegare la spina CA a una presa elettrica.
Page 71
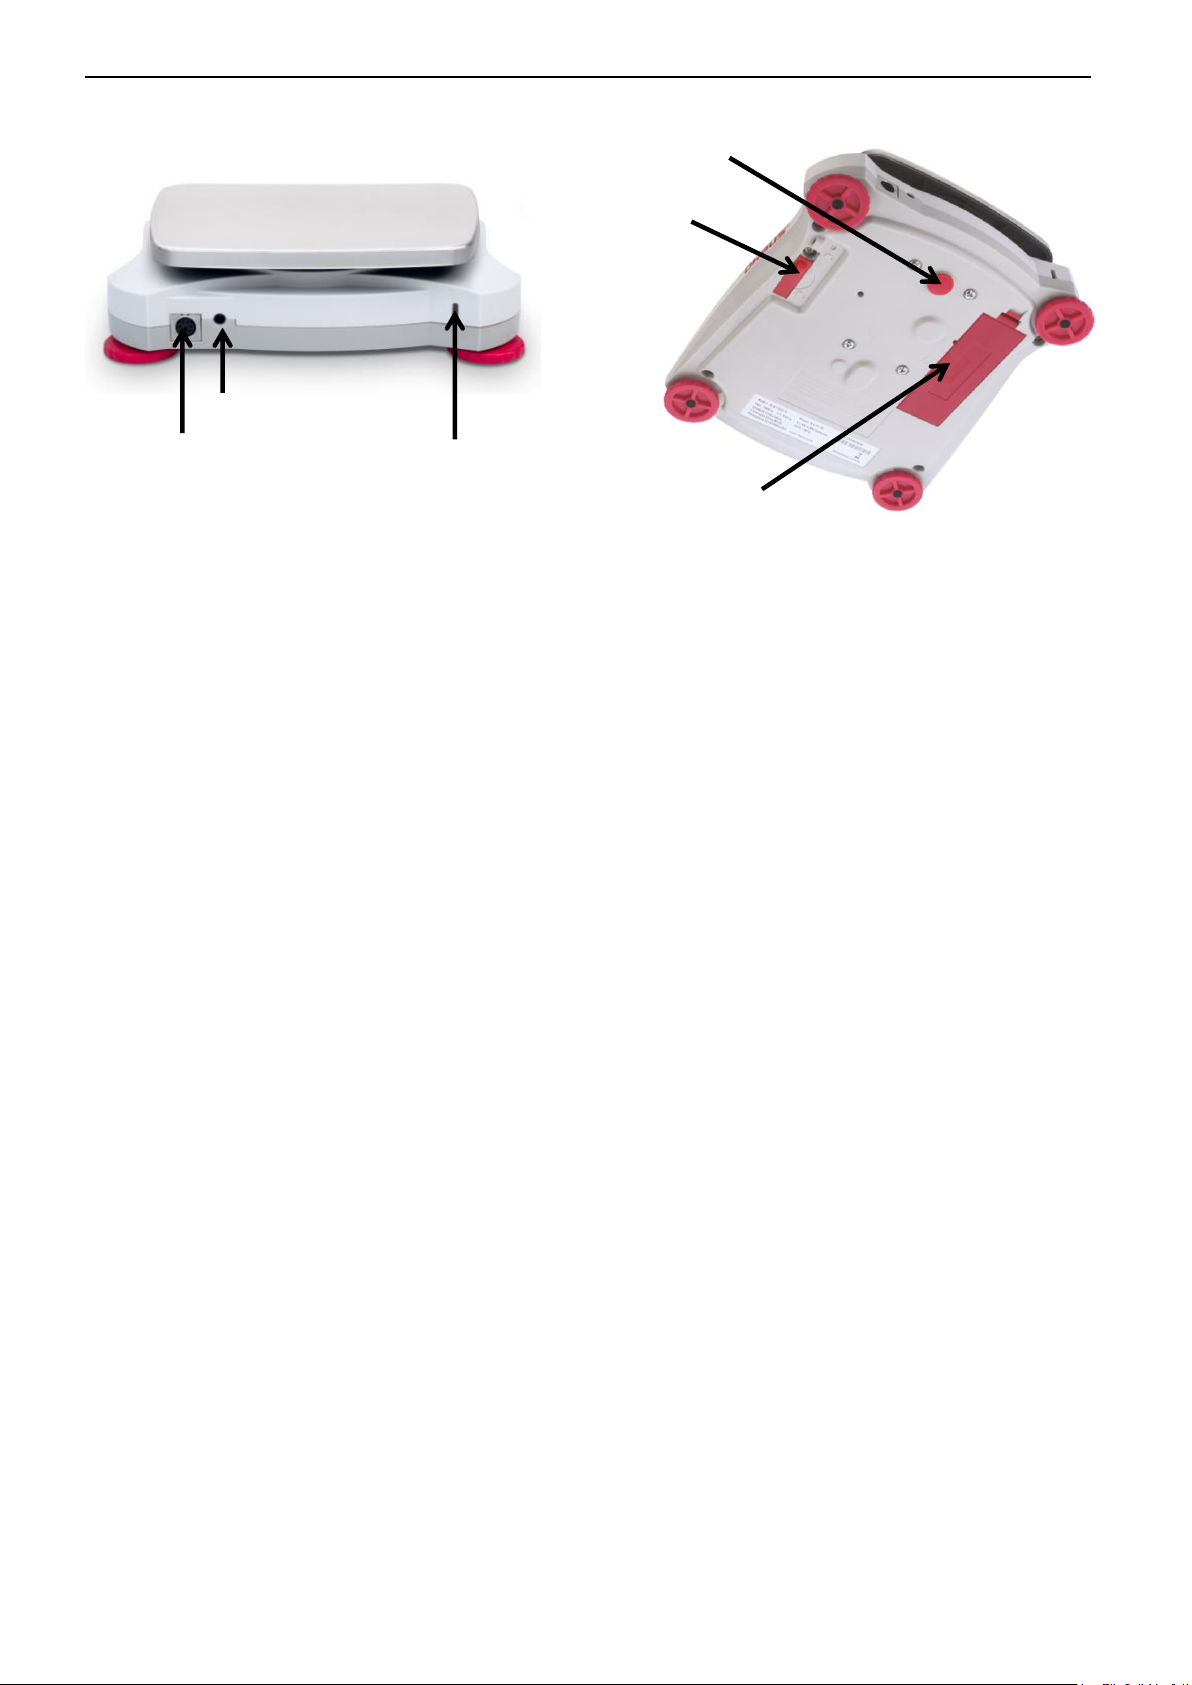
Ingresso del connettore di
alimentazione dell’Adattatore CA
Coperchio del Compartimento
della Batteria
Collegamento
d’Interfaccia
Coperchio
dell’Interruttore
di Sicurezza
Coperchio del Peso
Sotto il Buco
Fessura di Sicurezza (Fessura di
blocco Anti.Furto)
BILANCE SERIE SCOUTTM - SKX IT-3
Figura 2-3. Vista Retro e Sotto la bilancia
Installazione della Batteria
Installare le quattro batterie “AA” con polarità come mostrato nel compartimento della batteria
Nota:
Dopo l'accensione, si consiglia di lasciare che il caldo bilancia per almeno 5 minuti prima di
utilizzarlo.
2.5 Calibrazione iniziale
Quando la bilancia è installata per la prima volta, e quando è spostata in un’altra posizione,
deve essere calibrata per assicurare precisi risultati di pesata.
In alternativa, le bilance possono essere calibrate con masse esterne.
Bisogna avere le masse di calibrazione appropriate disponibili prima d’iniziare la calibrazione.
Fare riferimento alla Sezione Calibrazione per la procedura delle masse e calibrazione
Page 72
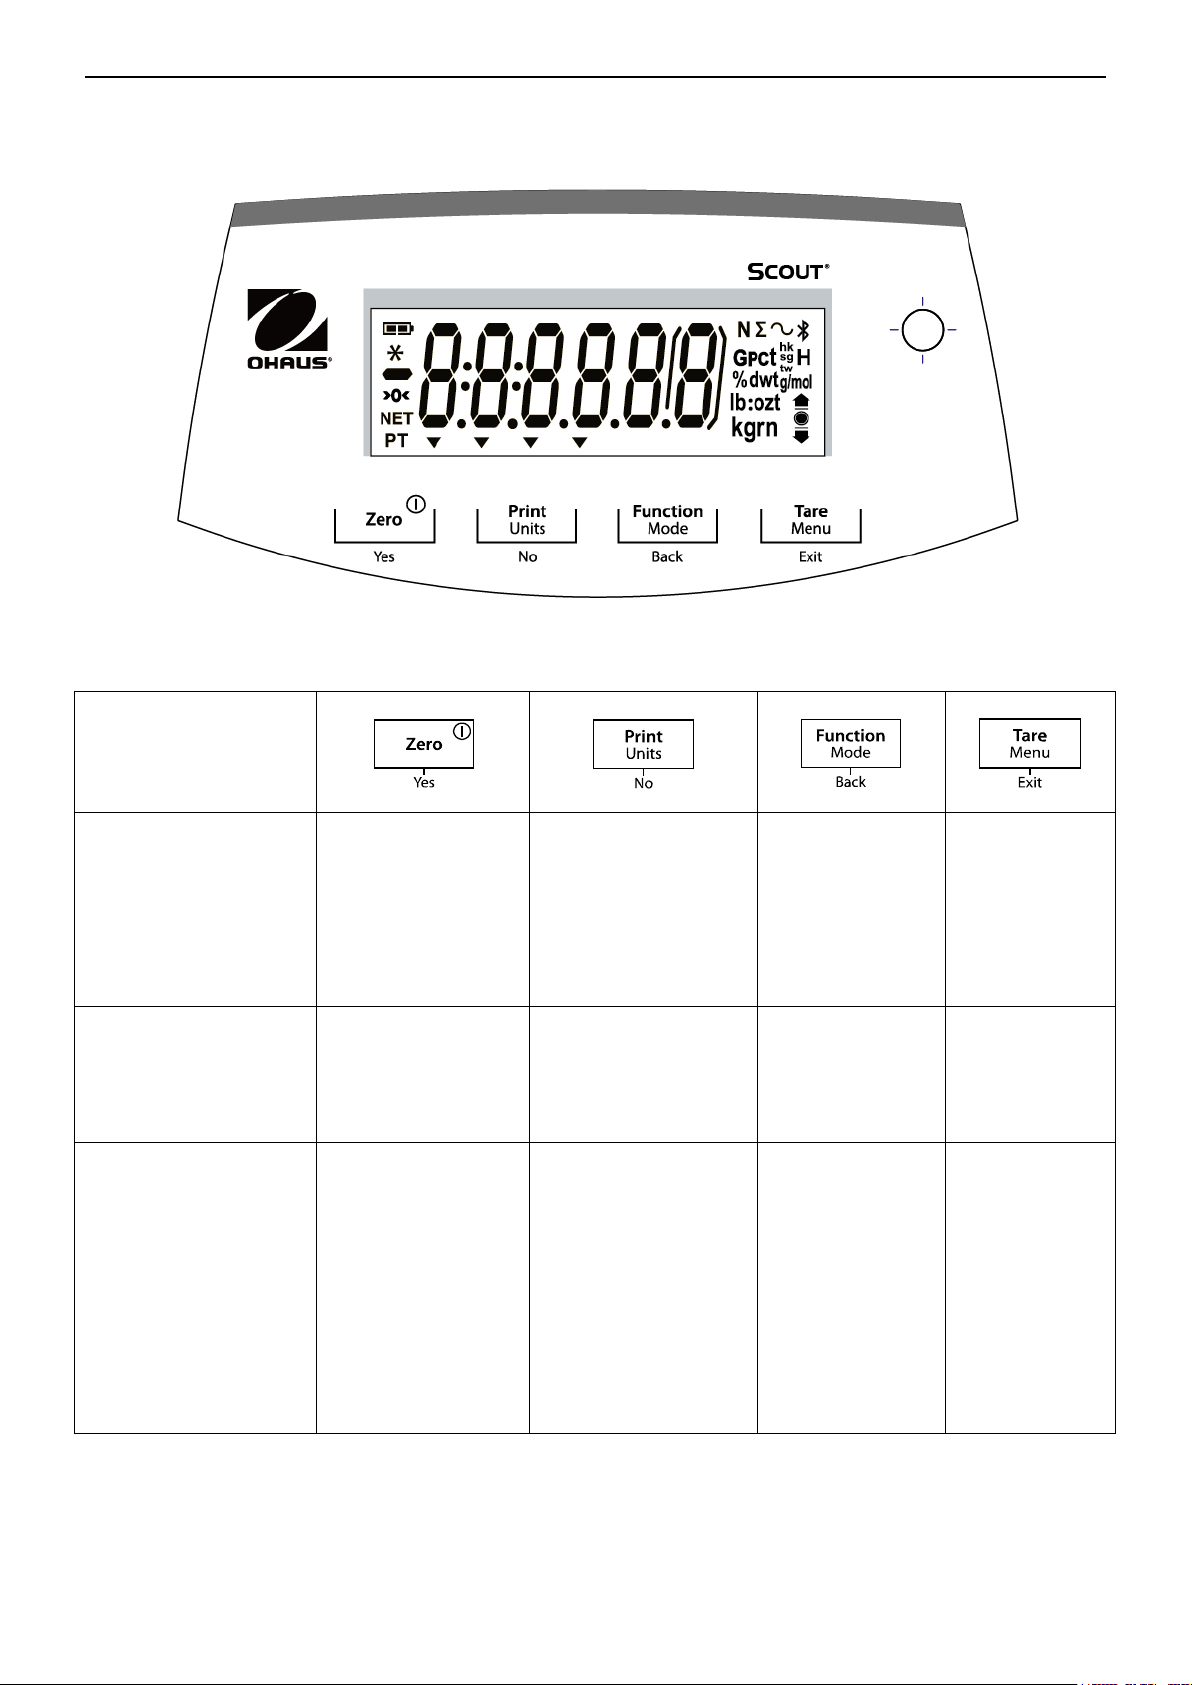
Pulsante
Funzione Primaria
(Premuta Breve)
Zero/Acceso
Accende la
bilancia.
Se la bilancia è
Accesa, imposta
Zero.
Stampa
Invia il valore attuale
ai portali COM
selezionati se
AUTOSTAMPA sia
impostata a Spento.
Funzione
Inizia un modo
d’applicazione.
Tara
Invia/cancella
un valore di
tara.
Funzione Secondaria
(Premuta Lunga)
Zero/Spento
Spegne la bilancia.
Unità
Cambia l’unità di
pesata
Modo
Consente di
cambiare il
modo
d’applicazione
Menù
Invia il menu
Utente.
Funzione Menù
(Premuta Breve)
Si
Accetta
l’impostazione
attuale sul display.
No
Avanza al prossimo
menù o menù
oggetto.
Respinge
l’impostazione
attuale sul display e
avanza alla
successiva
impostazione
disponibile.
Indietro
Si Sposta
Indietro al
precedente
menù oggetto.
Uscita
Esce dal menù
Utente.
Interrompe la
calibrazione in
corso
IT-4 BILANCE SERIE SCOUTTM - SKX
3. OPERAZIONE
3.1 Comandi
Figura 3-1. Panello di Controllo Scout
TAVOLA 3-1. Pulsante delle Funzioni
Print Units = Unità di Stampa Function Mode = Modo di Funzione Tare Menu = Menù di Tara
Nota:
2
1
Premuta Breve: Premere per meno di 1 secondo.
Premuta Lunga: Premere e mantenere premuto per più di 2 secondi.
Page 73
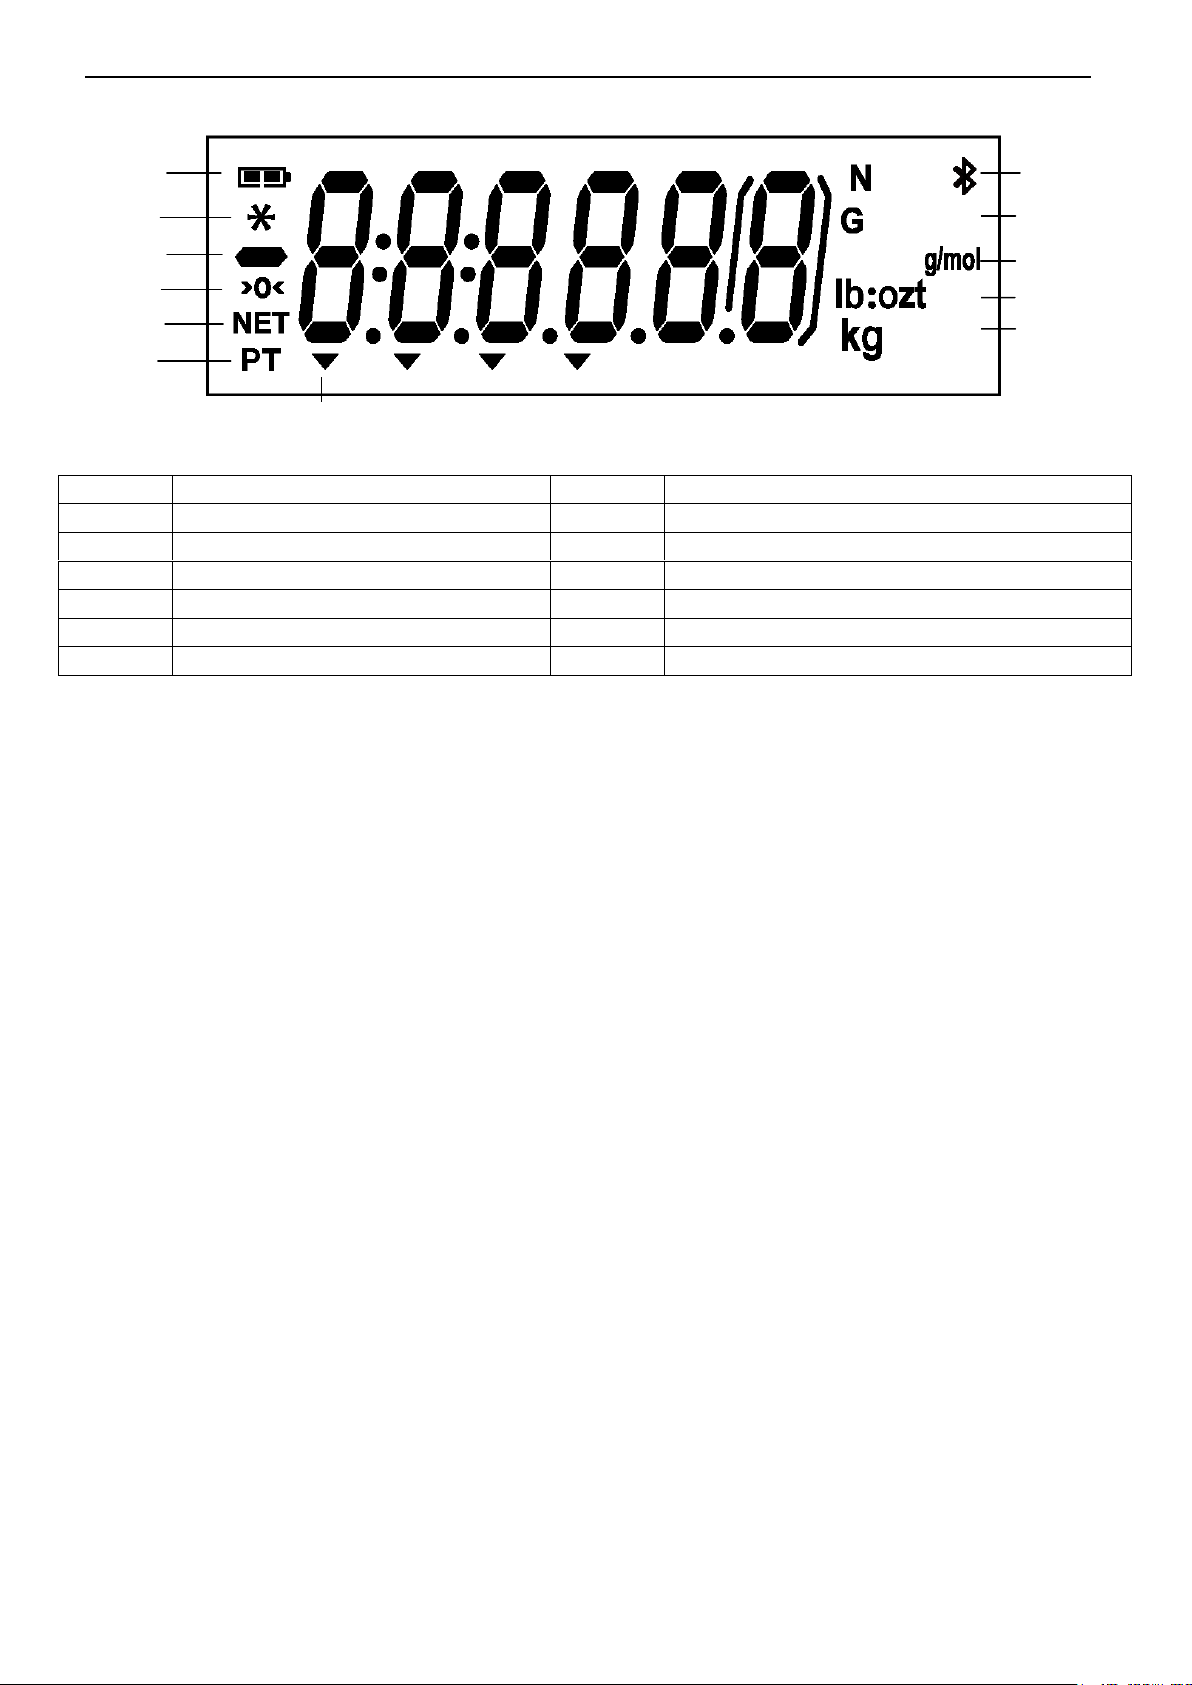
Oggetto
Descrizione
Oggetto
Descrizione
1
Simbolo carica batteria
7
Simboli Puntatori
2
Simbolo peso stabile
8
Simboli Kilogrammo, grano
3
Simbolo negativo
9
Simboli Libbra, Oncia, Libbra:Oncia
4
Simbolo Centro dello Zero
10
Simbolo g/mol
5
Simbolo NETTO
11
Simbolo G
6
Simbolo Tara predefinita
12
Simboli Newton, Bluetooth
2
3
4
1
5
6
8
9
10
11
12
7
BILANCE SERIE SCOUTTM - SKX IT-5
Figura 3-2. Display della Scout
TABLE 3-2. Simboli di Display
3.2 Accendere/Spegnere la Bilancia
Per accendere la bilancia, premere e trattenere il pulsante Acceso/Zero Spento per 1 secondo.
La bilancia esegue un test del display, momentaneamente visualizza la versione software, e
quindi invia il modo di pesata attivo.
Per spegnare la bilancia, premere e trattenere il pulsante Acceso/Zero Spento finché viene
visualizzato SPENTO.
3.3 Funzionamento Calibrazione
Quando la bilancia è utilizzata per la prima volta, si raccomanda una calibrazione del campo per
assicurare precisi risultati di pesata. Assicurarsi di avere gli appropriati pesi di calibrazione
prima di eseguire la calibrazione e che l’Interruttore di Sicurezza sia impostato alla posizione di
sblocco.
Premere e trattenere il Menù finché il [mMeNU] (Menù) sia visualizzato. Quando il pulsante è
liberato, il display mostrerà [C.A.L]. Premere Si per accettare. [SpaN] sarà quindi mostrato.
Premere Si per iniziare la calibrazione del campo.
[--C--] sarà visualizzato mentre la lettura zero viene memorizzata. Di seguito, il display mostra
il valore del peso di calibrazione. Premere il tasto No per attivare il valore. Porre la specificata
massa di calibrazione sul piatto di pesata della bilancia. [--C--] sarà visualizzato mentre la
lettura zero viene memorizzata. Il display mostrerà [done] se la calibrazione avesse avuto
successo. La bilancia ritorna al precedente modo d’applicazione ed è pronta da utilizzare.
3.4 Modo di Pesata
Questo modo è l’impostazione predefinita della fabbrica.
1. Se necessario, premere e trattenere Modo finché [wWeIGH] (Pesare) è visualizzato.
2. Se necessario, porre un recipiente vuoto sul piatto di pesata della bilancia e premer Tara.
3. Aggiungere il campione sul piatto di pesata della bilancia oppure sul recipiente. Il display
mostra il peso del campione.
Page 74
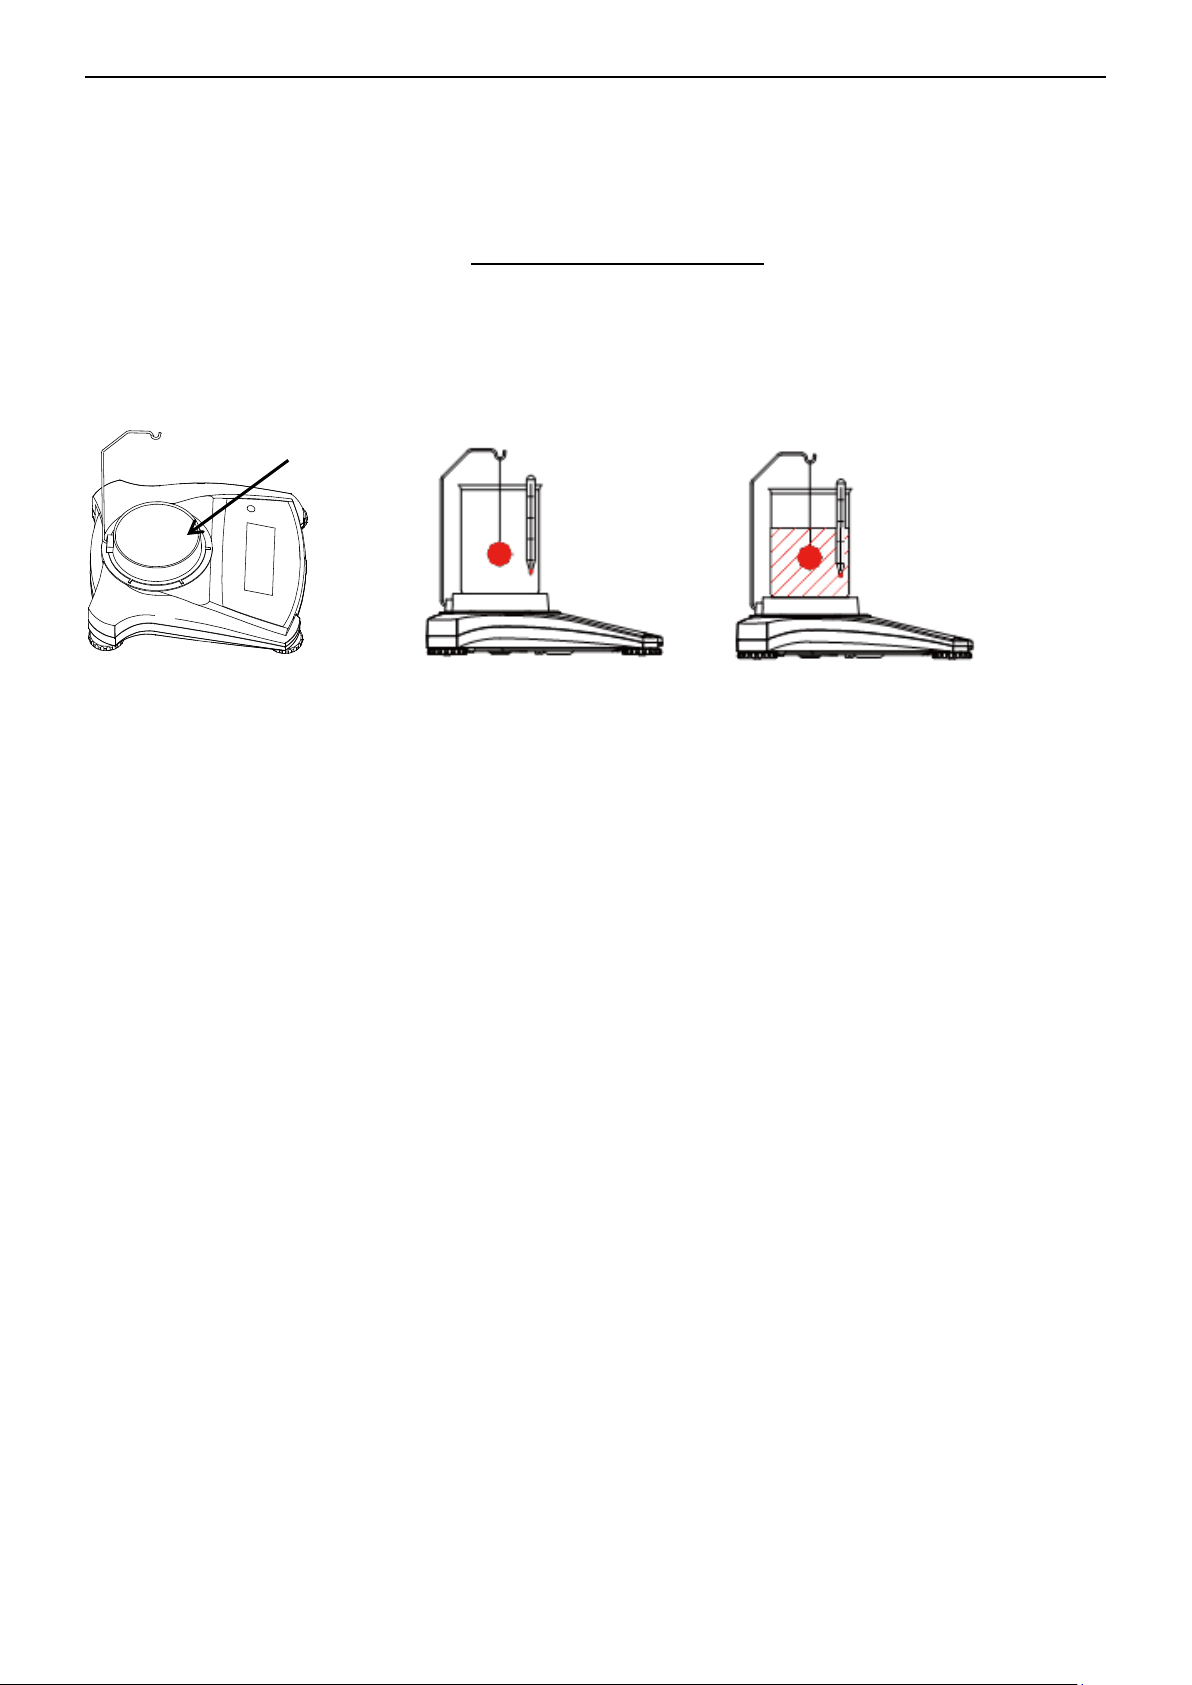
Supporto bicchiere
Preparazione
Peso bagnato
Peso in aria
IT-6 BILANCE SERIE SCOUTTM - SKX
3.5 Modo di Densità
Questo modo consente all’utente di calcolare il peso specifico di un campione nell’utilizzare il kit
della densità. Modo di Densità è stato iniziato quando “G” e l’attuale unità sono visualizzati
Il campione è pesato in aria sospesa dal gancio e quindi pesato in acqua. La formula è;
𝑝𝑒𝑠𝑜 𝑠𝑒𝑐𝑐𝑜
𝑝𝑒𝑠𝑜 𝑠𝑒𝑐𝑐𝑜 − 𝑝𝑒𝑠𝑜 𝑏𝑎𝑔𝑛𝑎𝑡𝑜
Preparazione
Preparare la bilancia come mostrato qui di seguito. Rimuovere il piatto di pesata della bilancia
inserire il gancio e installare il supporto del bicchiere (non fornito). Quindi premere il pulsante
Zero/Acceso per accendere la bilancia.
Figura 3-3. Impostazione della Densità
Impostazione della densità
1. Premere e trattenere Modo finché [SPEC.Gr] sia visualizzato. [Air.wWt] sarà quindi
visualizzato.
2. Porre il campione sul gancio come descritto qui sopra. Premere Si per memorizzare il
valore del peso secco. [wW.wWt] sarà quindi visualizzato.
3. Sospendere il campione in acqua. Premere Si per memorizzare il valore del peso
bagnato. Il valore del peso specifico è ora visualizzato e “G” lampeggia mentre l’icona
dell’unità è spento
Nota: Il peso specifico non ha unità di misurazione.
Per grandi campioni si raccomanda di utilizzare la pesata sotto la caratteristica invece del
gancio.
3.6 Modo di Pesata Molare
Per inviare il modo di Pesata Molare da qualsiasi modo d’applicazione, premere e trattenere il
tasto Modo finché [mMoLE] sia visualizzato. Quando il tasto Modo è liberato, il display mostra
[Clr.mMS].
1. Premere il tasto SI per cancellare la Massa Molare memorizzata. Premere il tasto NO per
richiamare l’esistente Massa Molare. Se nessuna Massa Molare sia stata memorizzata, il
[Clr.mMS] display è tralasciato e l’invio di una Massa Molare è richiesta.
2. Se dovesse esistere una Massa Molare memorizzata, l’attuale Massa Molare sarà
visualizzata e lampeggiante.
3. Premere il tasto No per iniziare la modifica della Massa Molare.
5. Premere il tasto No per incrementare la cifra lampeggiante.
6. Premere il tasto Indietro per diminuire la cifra lampeggiante.
7. Premere il tasto Si per accettare il valore e spostarsi di una cifra verso la destra
Nota: Se le impostazioni dovessero eccedere il limite, il display ritorna al valore memorizzato
Il numero più a sinistra può essere impostato a 0, 1, 2, 3, 4, 5, 6, 7, 8, 9,-. Tutti gli altri
in precedenza.
Page 75
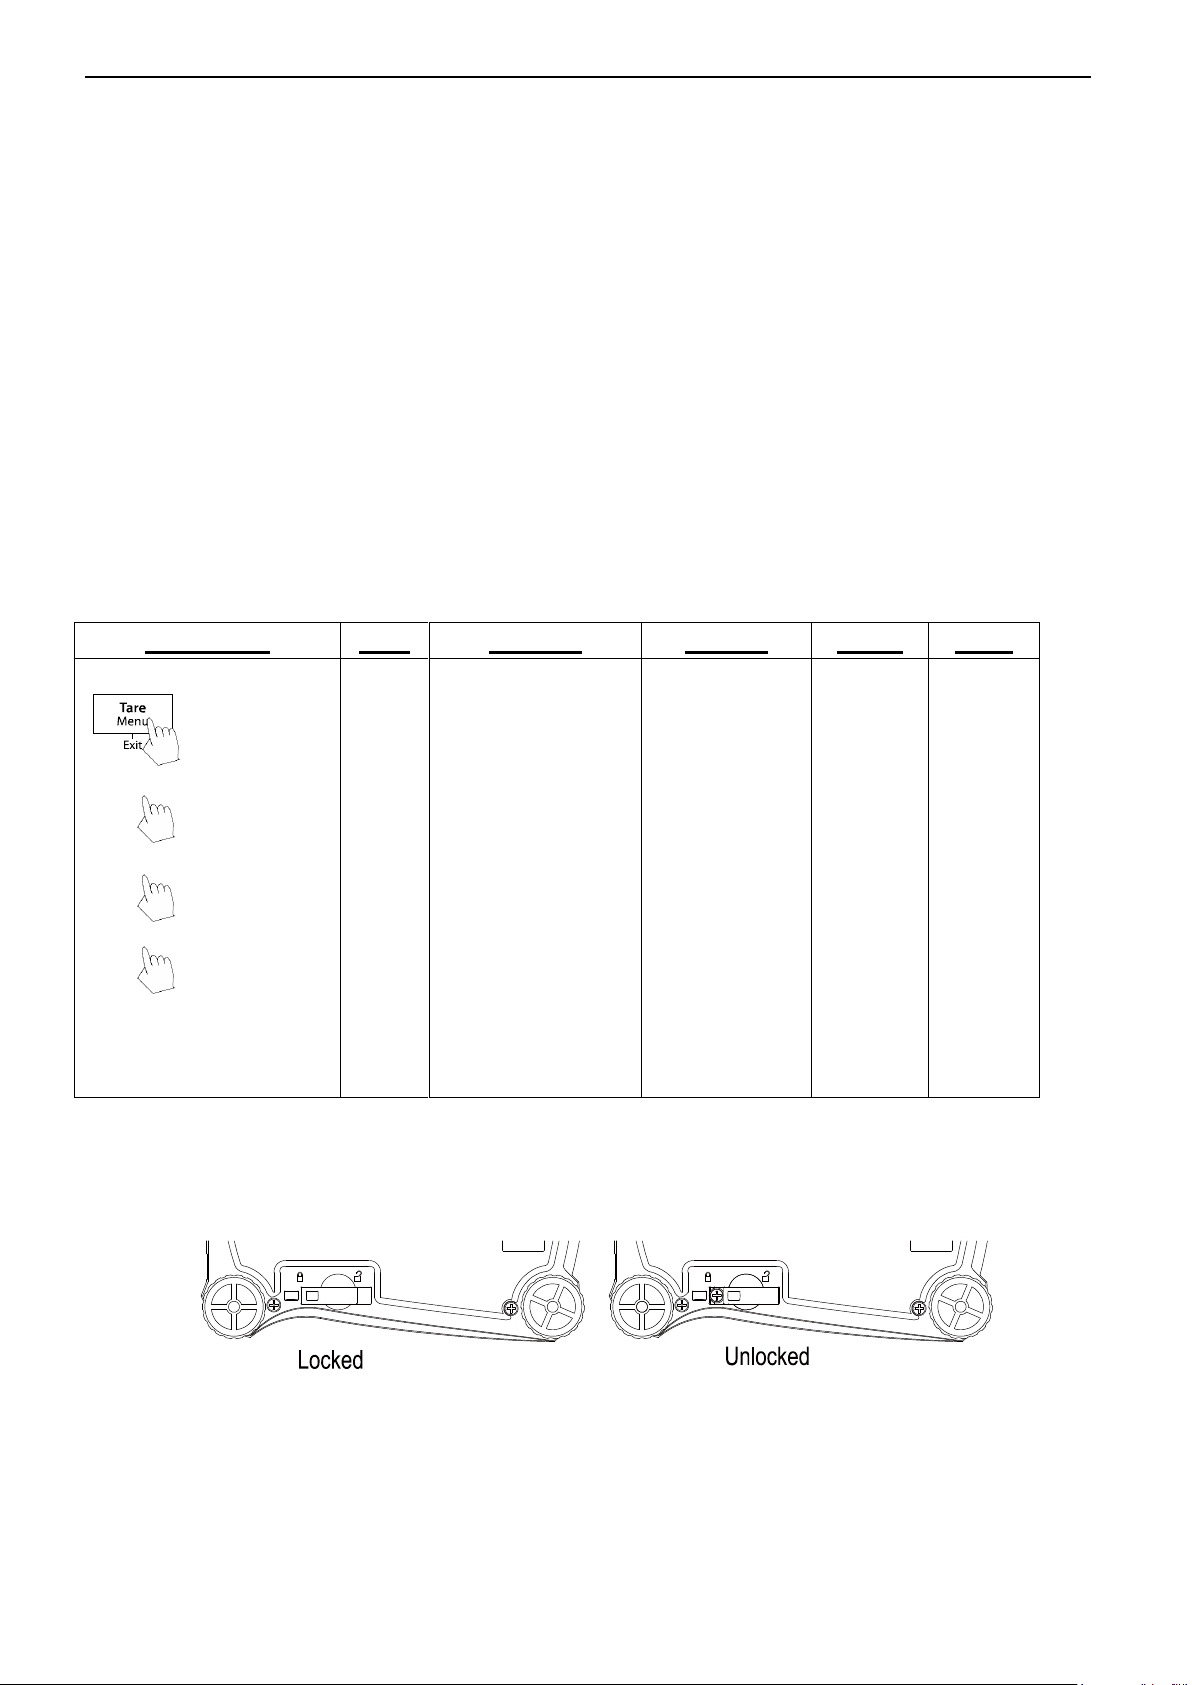
Sottomenù
C.a.l
S.e.t.u.p
M.o.d.e
U.n.i.t
E.n.d
Menù Oggetti dell’Utente
Campo
Lin
Reimpostare
Si/No
Filtrare
Basso/Medio/Alto
AZT (Tracc. Autom.
di Zero)
0,5/1/3/Spento
Gamma Stabile
0,5/1/2//5
Retroilluminazione
Spento/Acceso/Auto
Auto Tara
Spento/Acceso/Acceso-
acc
Auto Spento
Spento/1/5/10
Reimposta
Si/No
Pesata
Acceso/Spento
Densità
Acceso/Spento
Molare
Acceso/Spento
Reimposta
g
kg
N
oz
lb
lb:oz
Fine
Fine
Fine
Fine
No/Back
Premuta lunga Inviare menù
Premuta corta Accettare
Premuta corta –
Vai al
Succ/preced.
Yes
Uscire
Premuta corta –
Menu di Uscita
BILANCE SERIE SCOUTTM - SKX IT-7
numeri possono essere impostati a 0, 1, 2, 3, 4, 5, 6, 7, 8, 9.
Le impostazioni medie sono dal 0,01 al 999,99.
L’unità della Massa Molare è g/mol.
Display della Massa Molare:
Premere il tasto Funzione per visualizzare l’esistente valore della Massa Molare 2 secondi.
Nuova Massa Molare:
Per inviare una nuova Massa Molare premere e trattenere il tasto Funzione/Modo finché
[mMoLE] sia visualizzato.
4. MENU SETTINGS
The User Menu allows the customizing of balance settings.
Nota: Additional Sub-Menus may be available if Interface Options are installed. See Interface
User Manual for the additional setting information.
4.1 Menù di Navigazione
Menù Utente:
Nota: Alcune Unità/Modi potrebbero non essere disponibili in tutti i modelli.
Quando l’Interruttore di Sicurezza è nella posizione bloccata, la funzione Calibrazione è
nascosta e le Unità sono bloccate all’attuale impostazione.
Interruttore di Sicurezza:
Page 76
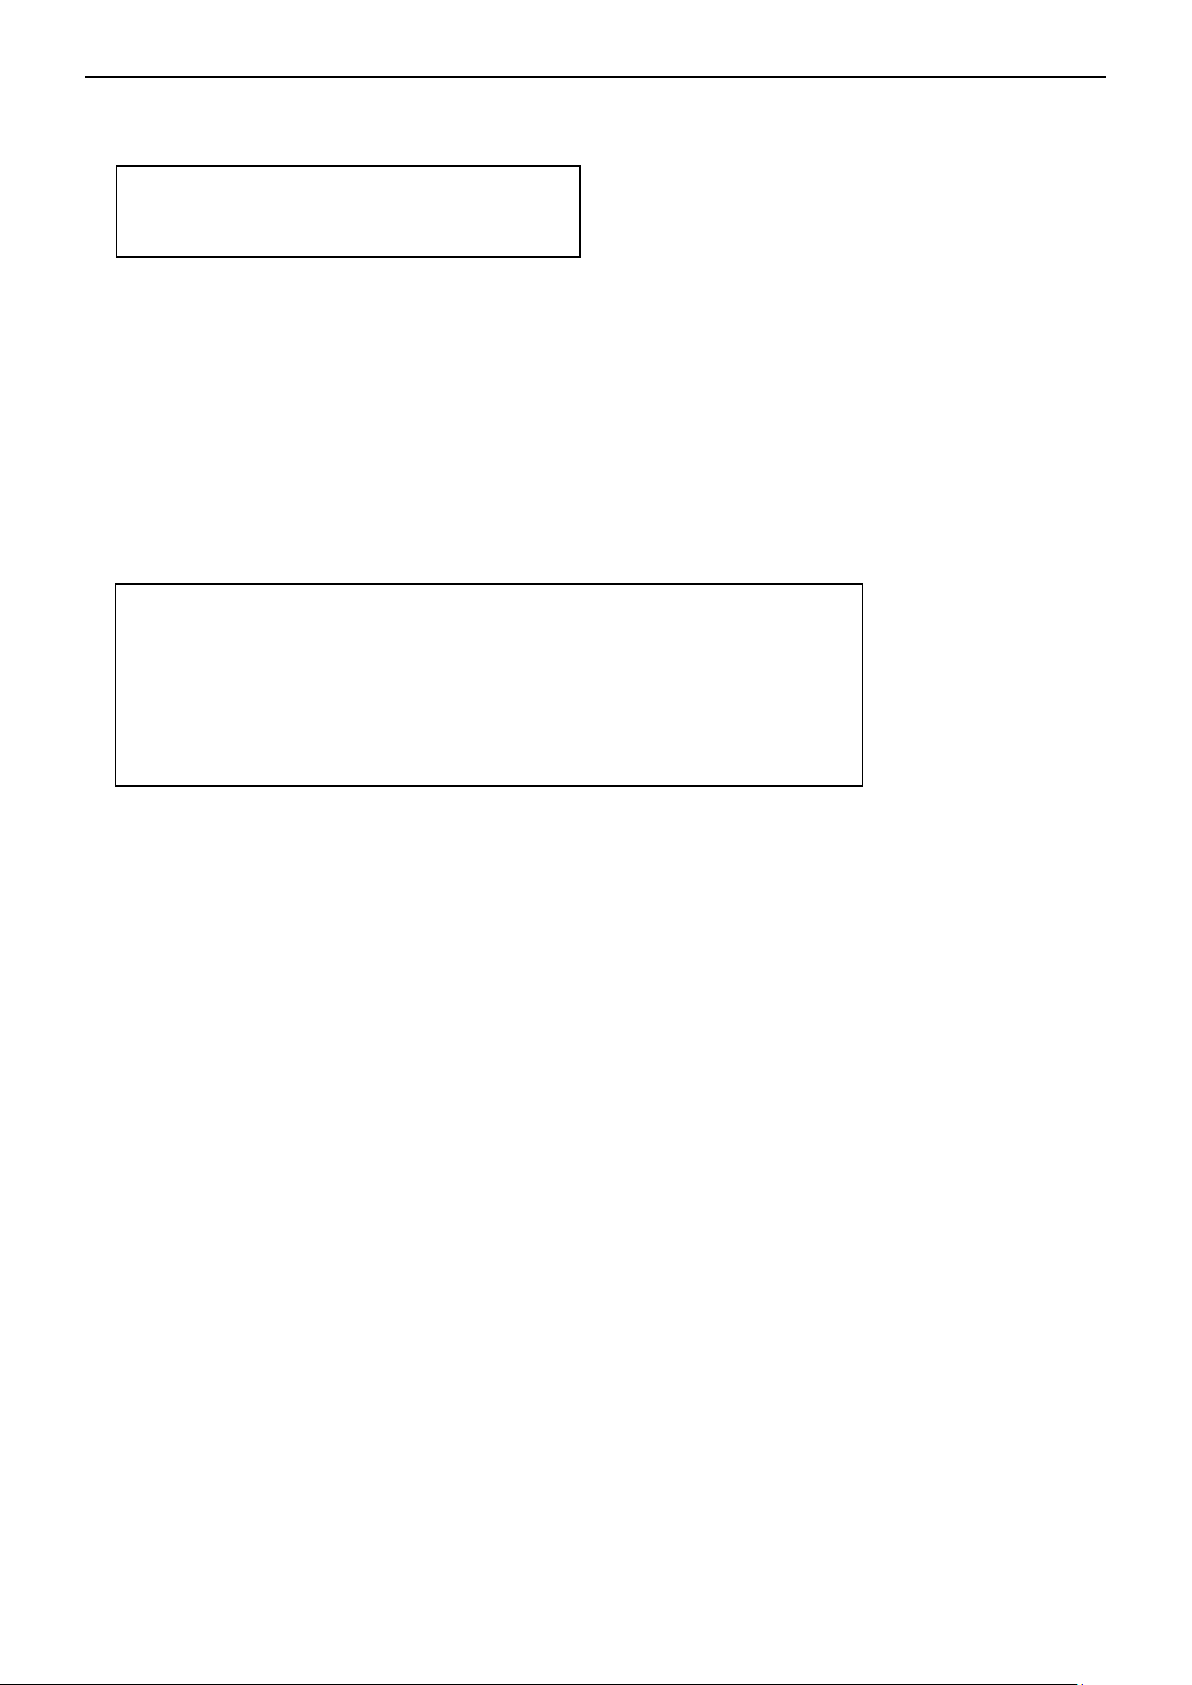
Campo: Esegui
Linearità: Esegui
Fine della Calibrazione: Menù di Uscita
Reimpostare no, si
Filtro Basso, Medio, Alto
Monitoraggio Zero Automatico: spento, 0.5d, 1d, 3d
Stabile: 0,5d, 1d, 2d, 5d
Retroilluminazione: spento, on, auto
Tara Automatica: spento, acceso, acceso-acc
Spento Automatico: spento, 1, 5, 10
Fine dell’Impostazione: Uscita dal menù
IT-8 BILANCE SERIE SCOUTTM - SKX
4.2 Menù di Calibrazione
Inviare il presente menù per eseguire calibrazioni.
Campo [Span]
Inizia una procedura di calibrazione del campo (zero e campo)
Lin [LIN]
Inizia una procedura di calibrazione lineare (zero, punto mediano e campo).
Fine Cal [End]
Avanzare al menù successivo o tornare in cima del menù attuale.
4.3 Menù di Impostazione
Inviare il presente menù per impostare i parametri della bilancia.
Nota: Il grassetto rappresenta sempre il valore predefinito dalla fabbrica.
Reimpostare [reset]
Predefinire il menù di reimpostazione a quelli predefiniti dalla fabbrica.
NO = non reimpostare
SI = reimpostare
Filtro [FiltEr]
Impostare la quantità di segnali di filtraggio.
BASSO = meno stabilità, tempo di stabilizzazione più veloce
MEDIO = stabilità normale, tempo di stabilizzazione
ALTO = più grande stabilità, tempo di stabilizzazione più lento
AZT [AZt]
Impostare il funzionamento di Tracciabilità Automatica di Zero.
SPENTO = disabilitato
0,5d = il display tratterà lo zero finché un cambiamento di 0,5 divisioni per secondo sia
stato ecceduto.
1d = il display tratterà lo zero finché un cambiamento di 1,0 divisione per secondo sia
stato ecceduto.
3d = il display tratterà lo zero finché un cambiamento di 3,0 divisioni per secondo sia
stato ecceduto.
Gamma Stabile [Stable]
Impostare la quantità di lettura che può variare mentre il simbolo di stabilità rimane acceso.
0,5d = 0,5 divisione bilancia
1d = 1 divisione bilancia
2d = 2 divisioni bilancia
5d = 5 divisioni bilancia
Page 77
Reimpostare: no, si
Peso: spento, acceso
Densità: spento, acceso
Molare: spento, acceso
Fine di Modo: Uscita dal menù
BILANCE SERIE SCOUTTM - SKX IT-9
Retroilluminazione [b.Light]
Imposta funzionalità della retroilluminazione.
SPENTO = sempre spento
ACCESO = sempre acceso
AUTOMATICO = si accende quando un pulsante è premuto o se il peso visualizzato cambia.
Nota: Quando collegato con l’alimentatore, la retroilluminazione è sempre accesa.
Auto Tara [A.tArE]
Imposta il funzionamento della tara automatica.
SPENTO = La tara automatica è disabilitata
ACCESO = Il primo peso lordo stabile è tarato
ACCESO -ACC = i lordi carichi stabili entro i limiti accettabili sono tarati (in modo di
controllo pesata)
Automatico spento [A.OFF]
Imposta il funzionamento del spegnimento automatico.
SPENTO = disabilitato
1 = alimentazioni spente dopo 1 minuto di inattività
5 = alimentazioni spente dopo 5 minuti di inattività
10 = alimentazioni spente dopo 10 minuti di inattività
Impostazione di Fine [End]
Avanzare al menù successivo o ritornare in cima all’attuale menù.
4.4 Modo di Menu
Questo menu attiva i modi in maniera da essere disponibili per essere utilizzabili con il pulsante
Modo.
Reimpostare [reset]
Reimpostare il menù di Modo alle impostazioni di fabbrica.
NO = non reimpostare
SI = reimpostare
Peso [wWeIGH]
Impostare lo stato.
SPENTO = disabilitato
ACCESO = abilitato
Densità [spec.Gr]
Impostare lo stato:
SPENTO = disabilitato
ACCESO = abilitato
Molare[mMole]
Impostare il sotto-modo
SPENTO = disattivato
ACCESO = attivato
Avanzare al menu successivo o tornare in cima dell’attuale menù.
Fine del Modo [End]
Page 78
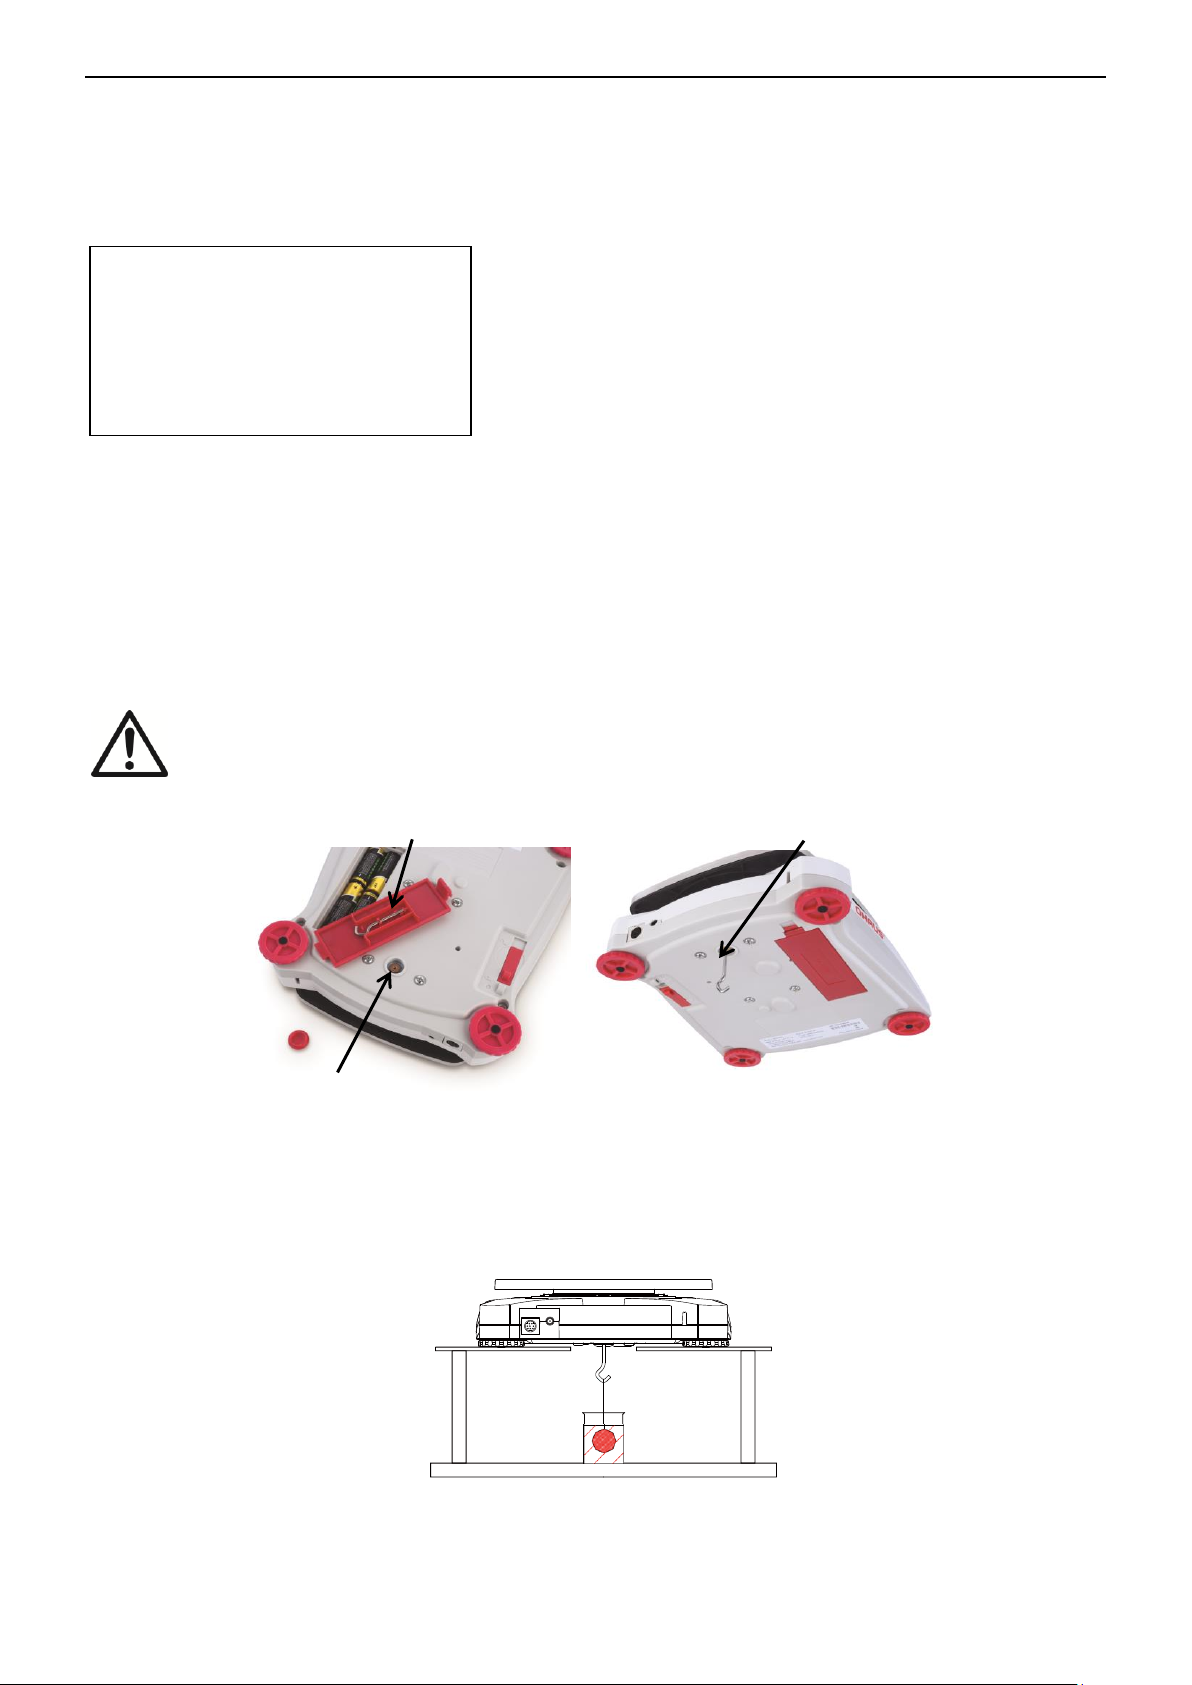
g: spento, acceso
kg: spento, acceso
N: spento, acceso
oz: spento, acceso
lb: spento, acceso
lb:oz: spento, acceso
Fine dell’Unità: Uscita dal menù
Pesata Sotto il Gancio
Pesata Sotto il Gancio installato
Apertura della pesata di sotto
IT-10 BILANCE SERIE SCOUTTM - SKX
4.5 Menù di Unità
Questo menù attiva unità in modo che saranno accessibili con il pulsante Unità. Le unità nel
menù devono essere “accese” per essere attive.
Nota: Le unità disponibili variano secondo il modello e i regolamenti locali.
4.6 Caratteristiche Supplementari
Pesata Sotto il Gancio
La Bilancia Scout è equipaggiata con una peseta sotto il gancio per pesare sotto la bilancia.
La peseta sotto il gancio è localizzata nel lato retro del coperchio della batteria come mostrato
qui di seguito.
Per utilizzare tale caratteristica, rimuovere il sottostante coperchio rosso di protezione per
l’apertura della pesata di sotto
Attenzione: Prima di capovolgere la bilancia rimuovere il Piatto di Pesata della
Bilancia e il Piatto di Sostegno (se dovesse essere presente) e capovolgere il blocco
trasporto nella posizione di “bloccaggio” per prevenire danneggiamenti.
La bilancia può essere sorretta utilizzando dei martinetti da laboratorio o un altro metodo
conveniente. Assicurarsi che la bilancia sia a livello e fissa e che il blocco trasporto sia stato
liberato. Collegare l’alimentazione elettrica alla bilancia e quindi utilizzare uno spago o un fil di
ferro per fissare gli oggetti da pesare.
Figura 4-2. Pesata di Sotto
Figura 4-3. Applicazione Peseta di Sotto
Page 79
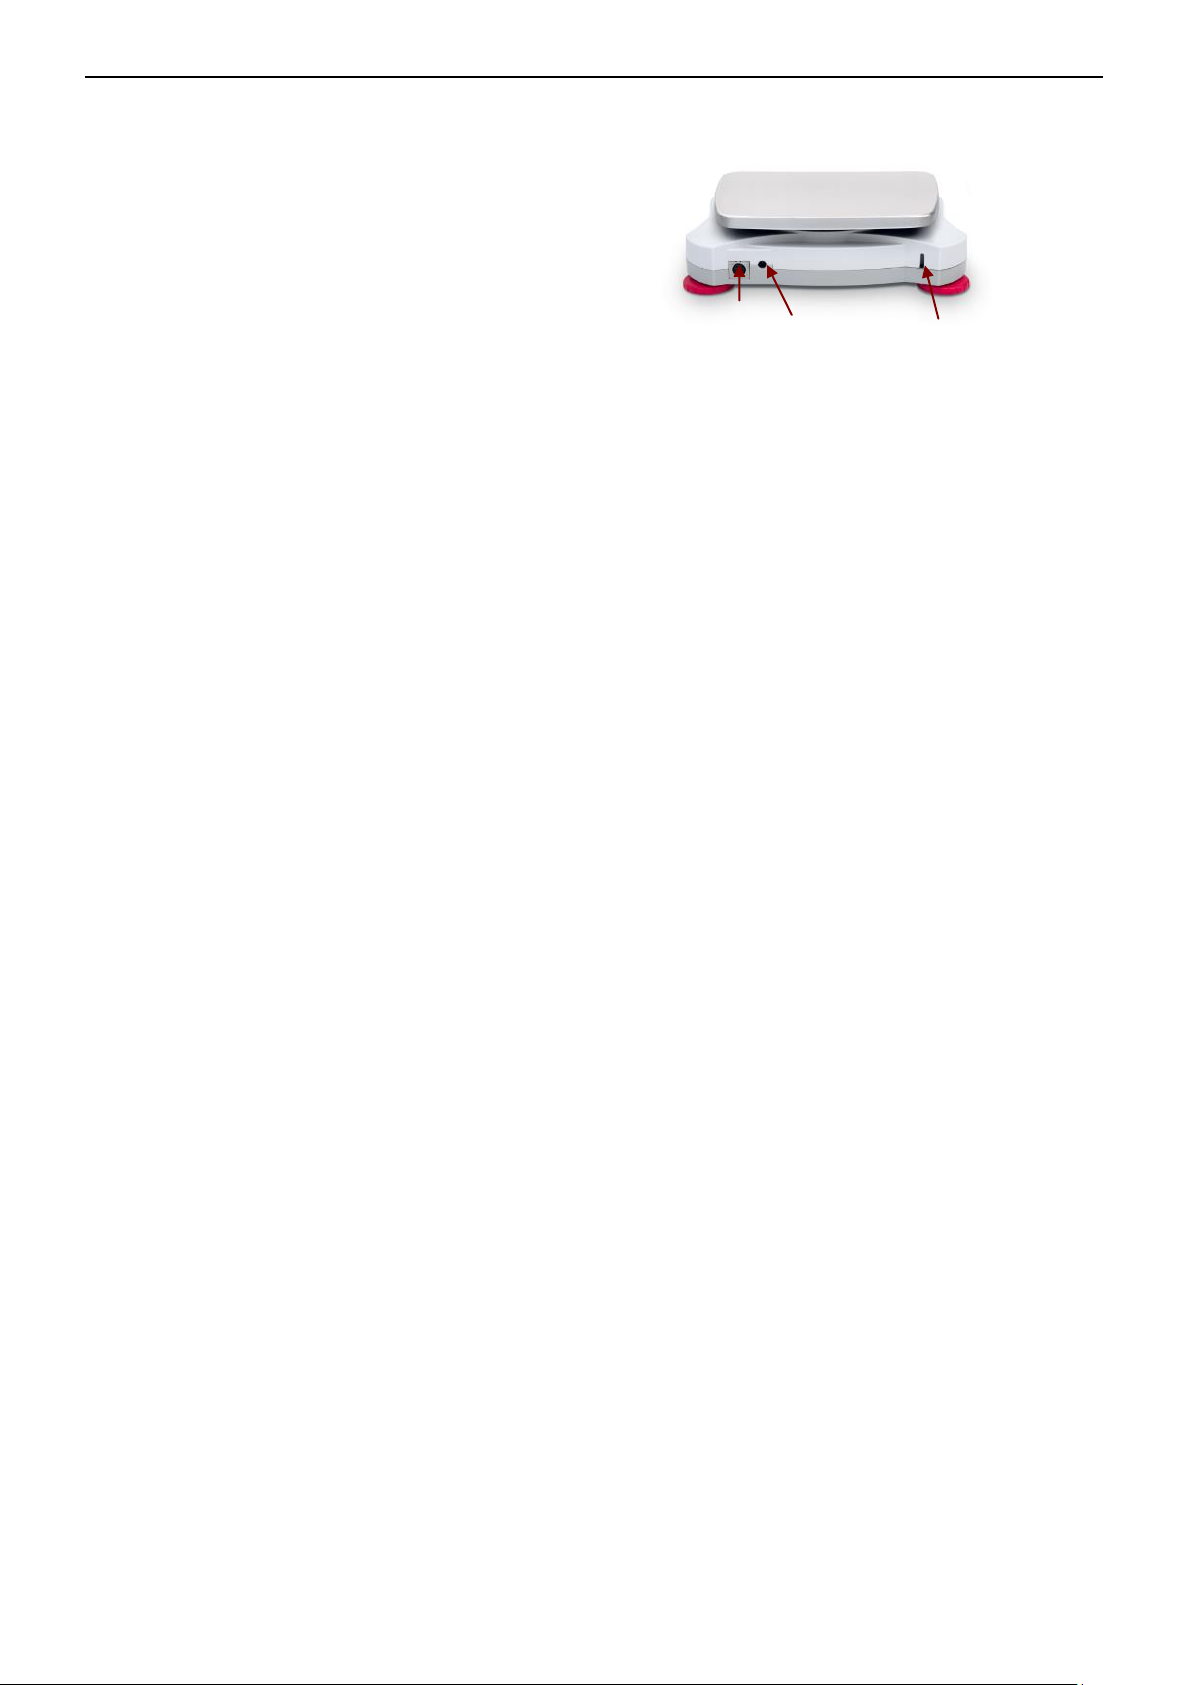
Utilizzare un kit di collegamento interfaccia
opzionale per collegare la bilancia sia a un
computer oppure a una stampante.
I seguenti accessori del kit d’Interfaccia sono
disponibili:
RS232, USB Host, USB Dispositivo, Ethernet,
Bluetooth®*.
Figura 4-4. Retro della bilancia
* I kit d’Interfaccia possono variare secondo i regolamenti locali.
Collegamento
Interfaccia
Adapter
Jack CA
Fessura di Sicurezza
BILANCE SERIE SCOUTTM - SKX IT-11
Collegare l’Interfaccia
La parola “marchio” Bluetooth® così come il logo sono marchi registrati appartenenti alla
Bluetooth SIG. Inc., e qualsiasi utilizzo di questi marchi dalla OHAUS è sotto licenza.
Page 80
AVVERTIMENTO: Pericolo di Scossa Elettrica. Scollegare l’attrezzatura
dall’alimentazione elettrica prima della pulizia.
Sintomo
Possibile Causa
Non si accende
Non esiste alimentazione elettrica alla bilancia
Scarsa precisione
Calibrazione impropria
Ambiente instabile
Non si calibra
Interruttore di sicurezza in posizione bloccata
Err 8.1
Peso eccede l’alimentazione elettrica nella gamma zero.
Err 8.2
Peso sotto l’alimentazione elettrica nella gamma zero.
Err 8.3
Sovraccarico (peso eccede capacità nominale)
Err 8.4
Sottocarico (piatto di pesata della bilancia rimosso)
Err 8.5
Tara fuori portata
Err 8.6
Il valore visualizzato eccede 999999 (possibile nel modo
Totalizzazione)
Err 8.7
Posizione peso interno non noto
ref.err
Conteggio pezzi o errore percentuale – peso campione <1d. Bilancia
mostra errore e quindi esce dal conteggio dei pezzi o va al [Clr.APU].
Lo.ref
Percentuale del peso di Riferimento o l’APW è troppo basso per dei
risultati precisi.
CAL E
Non riesce a calibrare.
USB.Err
Non può trovare il menù o file app nell’U-disco.
IT-12 BILANCE SERIE SCOUTTM - SKX
5. MANUTENZIONE
5.1 Pulizia
La sede può essere pulita con un panno inumidito con un leggero detergente se necessario.
Attenzione: Non utilizzare solventi, prodotti chimici, alcool, ammoniaca o abrasivi
per pulire la sede o il panello di comando.
5.2 Risoluzione dei Problemi
La seguente tavola elenca problemi comuni e possibili cause e rimedi.
Se il problema persiste, contattare la OHAUS o il vostro rivenditore autorizzato.
TAVOLA 5-1
5.3 Informazioni di Servizio
Se la Sezione Risoluzione dei Problemi non solve o descrive il vostro problema, contattare il
vostro agente di servizio autorizzato OHAUS. Per assistenza di servizio o appoggio tecnico
negli Stati Uniti telefonare con chiamata a carico del destinatario il numero 1-800-672-7722 est.
7852 tra le 08:00 AM and e le 05:00 PM EST. Un addetto specialista al servizio dei prodotti
OHAUS sarà disponibile per darvi assistenza. Al di fuori degli USA, si prega di visitare il nostro
sito web www.ohaus.com per localizzare l’Ufficio OHAUS più vicino a Voi.
Page 81

DESCRIZIONE
Numero
dell’oggetto
DESCRIZIONE
Numero dell’oggetto
Kit RS232
30268982
Kit di accatastamento,
x1
30268988
Kit host USB
30268983
Kit Peso specifico
30269020
Kit USB Dispositivo
30268984
Kit Display Ausiliario
30269019
Kit Bluetooth*
30268985
Valigetta Portaoggetti
30269021
Kit Ethernet
30268986
Coperchio In-Uso
30269022
Kit di accatastamento, x6
30268987
Stampanti e Cavi
Contattare la OHAUS
BILANCE SERIE SCOUTTM - SKX IT-13
5.4 Accessori
TAVOLA 5-2. ACCESSORI
Nota: * Il kit Bluetooth è solamente disponibile in certe regioni secondo i Regolamenti locali.
6. DATI TECNICI
I dati tecnici sono validi sotto le seguenti condizioni ambientali:
Per l’Interno utilizzare solamente:
Gamma di temperatura operativa: da +5 °C a +40 °C
Umidità Relativa: da 10% all’80% a 31 °C , decrescendo linearmente a 50% a 40 °C,non-condensato
Altitudine: Fino a 2.000 m
Alimentazione elettrica: un alimentazione elettrica CA con ingresso adattatore da 100-240V 50/60
Hz e uscita 5V CC 1 A, o 4 batterie AA
Grado d’inquinamento: 2
Fluttuazioni di tensione dell’alimentazione elettrica principale fino a ± 10% della tensione nominale
Page 82
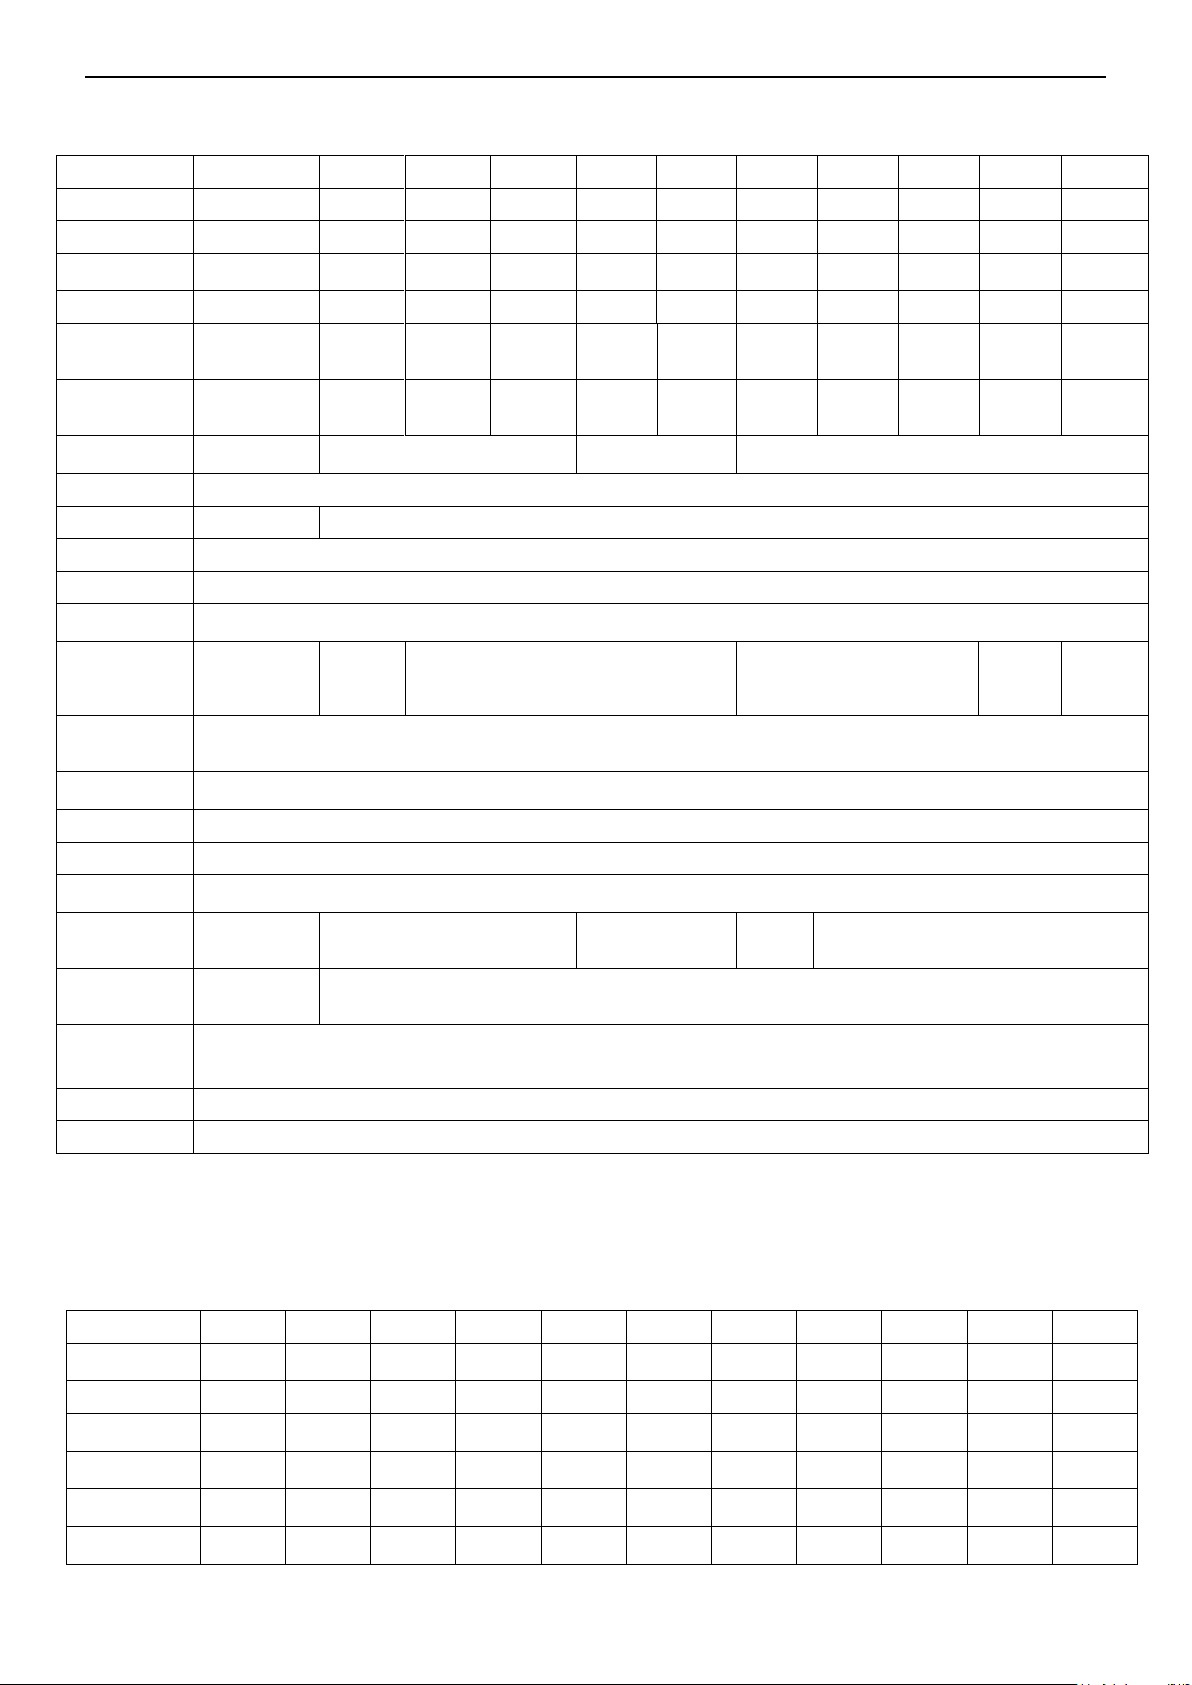
Modello
SKX123
SKX222
SKX422
SKX622
SKX1202
SKX2202
SKX421
SKX621
SKX2201
SKX6201
SKX8200
Capacità (g)
120
220
420
620
1200
2200
420
620
2200
6200
8200
Leggibilità (g)
0.001
0.01
0.01
0.01
0.01
0.01
0.1
0.1
0.1
0.1
1
Ripetibilità
(Dev. Std.) (g)
0.002
0.01
0.01
0.01
0.02
0.02
0.1
0.1
0.1
0.1
1
Linearità (g)
0.003
0.01
0.01
0.02
0.03
0.03
0.1
0.1
0.1
0.2
1
Massa
Calibrazione
Campo*
100 g
200 g
200 g
300 g
1 kg
2 kg
200 g
300 g
2 kg
5 kg
8 kg
Massa
Calibrazione
Linearità
50, 100 g
100, 200 g
200, 400 g
300, 600 g
500 g, 1
kg
1 kg, 2 kg
200, 400
g
300, 600
g
1 kg, 2 kg
3 kg, 6 kg
4 kg, 8 kg
Tempo (i di)
Stabilizzazione
1.5 1 1.5
1
Costruzione
alloggiamento in plastica ABS con 304 piatto in acciaio inox
Paravento
Si
No
Gamma Tara
Piena Capacità per sottrazione
Unità di Peso*
g, kg, N, oz, lb, lb:oz
Modi
d’Applicazione
Pesata, Determinazione della Densità , Pesata Molare
Tempo di
funzionamento
della batteria (a 20
ºC)
80 ore
120 ore
80 ore
120 ore
80ore
120 ore
Gamma di
temperatura
specificata
da +10 ° C a +40 ° C da 10% all’80% Umidità Relativa, non-condensato
Condizioni di
archiviazione
da -20 ° C a +55 °C da 10% all’90% Umidità Relativa, non-condensato
Comunicazione
RS232, USB host, dispositivi USB, Ethernet o Bluetooth *** (tutti disponibili come accessorio)
Tipo del Display
Retroilluminazione LCD: 6-cifret 7-segmenti con LED bianco retro-acceso
Dimensioni del
Display
20 mm / 0.78 in cifre
Dimensioni Piatto
di Pesata della
Bilancia (W x D)
Ø 93mm/3.7in
Ø 120 mm / 4.7 in
170 x 140 mm /
6.7 x 5.5 in
Ø 120mm
/ 4.7in
170 x 140 mm / 6.7 x 5.5 in
Dimensioni Bilance
(W x D x H)
202 x 222 x 103
mm /
8 x 8.7 x 4.1 in
202 x 224 x 54 mm / 8 x 8.8 x 2.1 in
Dimensioni
Spedizione (W x D
x H)
300 x 250 x 129 mm / 11.8 x 9.8 x 5.1 in
Peso Netto
1 kg
Peso di Spedizione
1.6 kg
Modello
SKX123
SKX222
SKX422
SKX622
SKX1202
SKX2202
SKX421
SKX621
SKX2201
SKX6201
SKX8200
Gram (g)
120 x 0.001
220 x 0.01
420 x 0.01
620 x 0.01
1200 x 0.01
2200 x 0.01
420 x 0.1
620 x 0.1
2200 x 0.1
6200 x 0.1
8200 x 1
Chilogrammo (kg)
/ / /
/
1.2 x 0.00001
2.2 x 0.00001
/
/
2.2 x 0.0001
6.2 x 0.0001
8.2 x 0.001
Newton (N)
1.17679 x
0.00001
2.1574 x
0.0001
4.1188 x
0.0001
6.0801 x
0.0001
11.7679 x
0.0001
21.5744 x
0.0001
4.119 x 0.001
6.080 x 0.001
21.574 x
0.001
60.801 x
0.001
80.41 x 0.01
Ounce (oz)
4.23290 x
0.00005
7.7600 x
0.0005
14.8150 x
0.0005
21.8700 x
0.0005
42.3290 x
0.0005
77.6030 x
0.0005
14.815 x
0.005
21.870 x
0.005
77.600 x
0.005
218.700 x
0.005
289.25 x 0.05
Pound (lb)
/ / /
1.36690 x
0.00005
2.64555 x
0.00005
4.85020 x
0.00005
/
1.3670 x
0.0005
4.8500 x
0.0005
13.6685 x
0.0005
18.080 x
0.005
Pound: Ounce (lb: oz)
/ / /
1lb:5.8700oz
x 0.0005oz
2lb:10.3290oz
x 0.0005oz
4lb:13.6030oz
x 0.0005oz
/
1lb:5.870oz
x 0.005oz
4lb:13.600oz
x 0.005oz
13lb:10.700oz
x 0.005oz
18lb:1.25oz
x 0.05oz
IT-14 BILANCE SERIE SCOUTTM - SKX
6.1 Specifiche
TAVOLA 6-1. SPECIFICHE
Nota:
* pesi di calibrazione sono inclusi con modelli fino a 620g capacità di alcune regioni.
** Le Disponibili Unità di Pesata, i Modi d’Applicazione e il kit d’Interfaccia Opzionale variano secondo i regolamenti
locali.
*** Kit Bluetooth è disponibile solo in alcune regioni secondo le normative locali.
Capacità x Leggibilità
Page 83
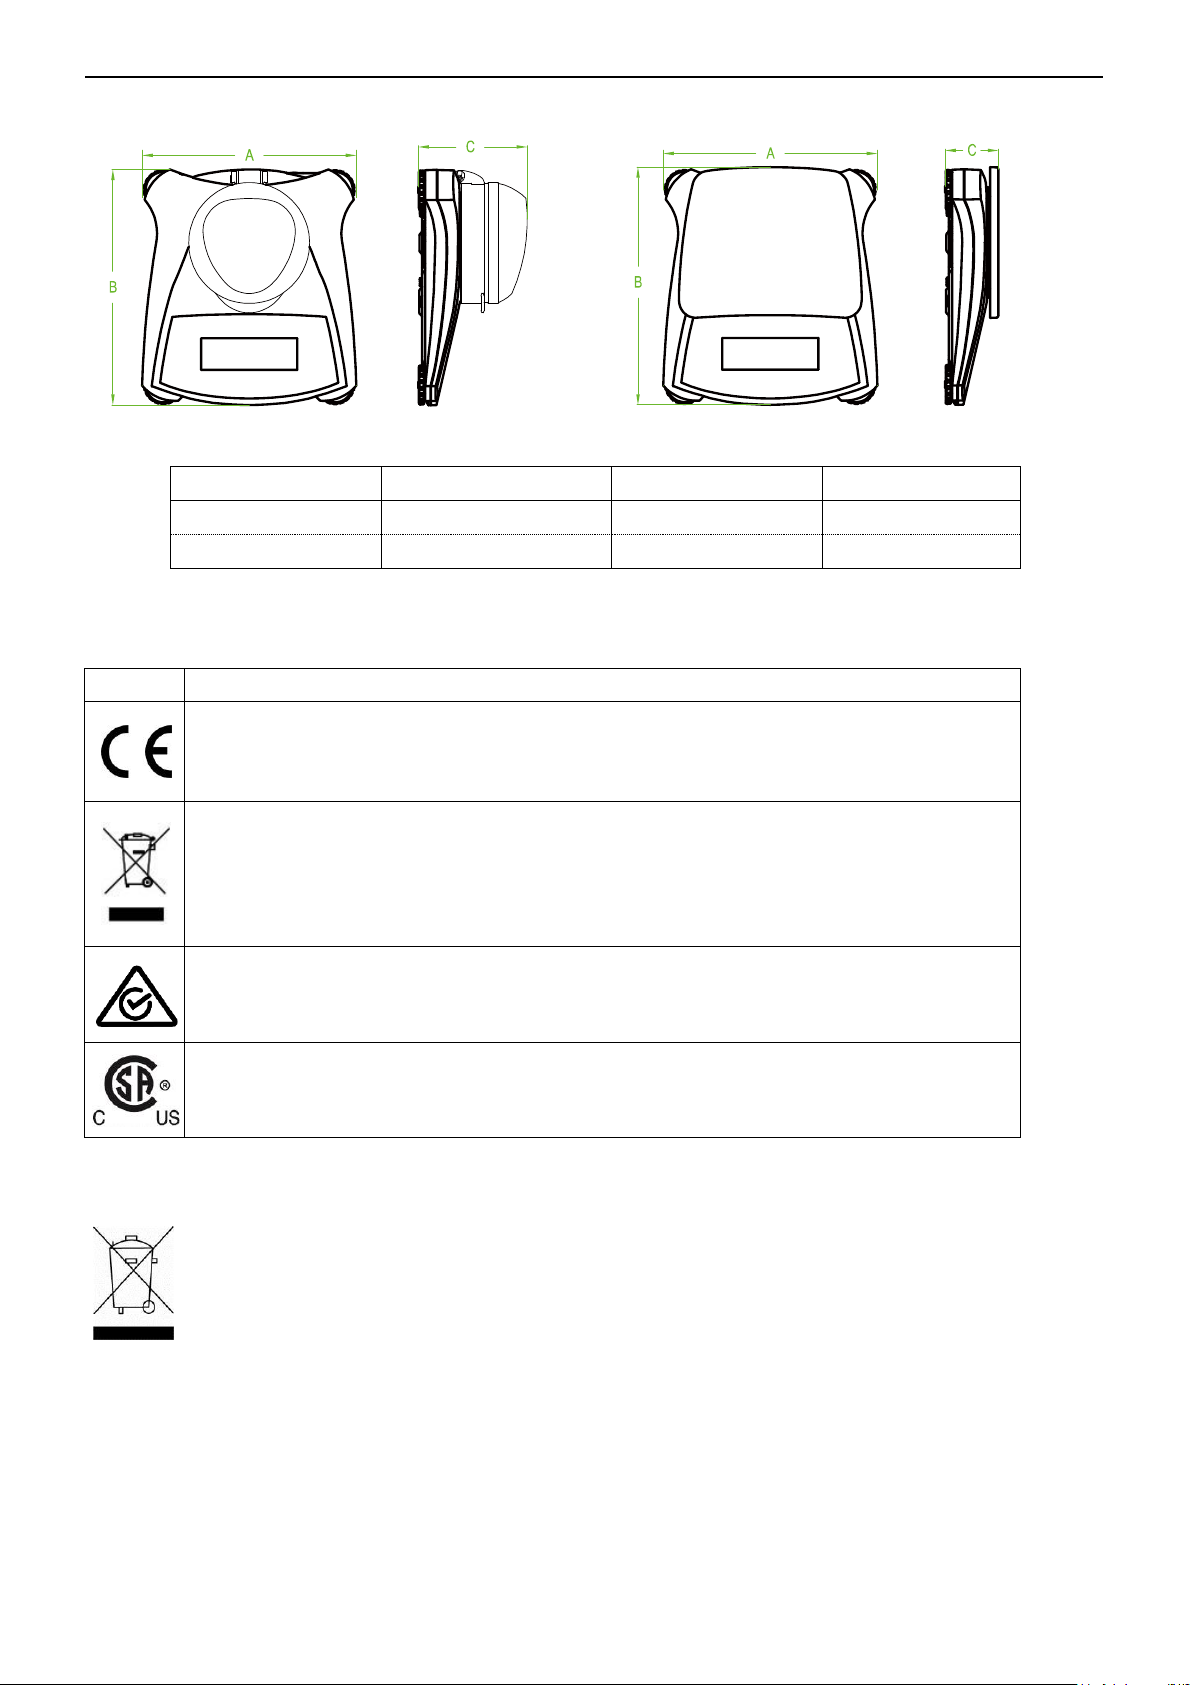
Modello A B C
con paravento
202 mm/8.0in.
222 mm/8.7in.
103 mm/4.1in.
w/o paravento
202 mm/8.0in.
224 mm/8.8in.
54 mm/2.1in.
Segno
Norma
EN 61010-1, EN 61326-1
Fare riferimento alla dichiarazione di conformità online nel sito web
www.ohaus.com/ce.
Questo prodotto è conforme alla Direttiva dell’UE 2002/96/EC (WEEE). Si
prega di disporre questo prodotto secondo i regolamenti locali nel punto di
raccolta specificato per l’attrezzatura elettrica ed elettronica. Per le istruzioni
di come disporre i rifiuti in Europa, fare riferimento al sito web
www.ohaus.com/weee.
AS/NZS 61000.6.1, AS/NZS 61000.6.3
CAN/CSA-C22.2 No. 61010-1, UL Norma No. 61010-1
In conformità alla Direttiva Europea 2002/96/CE sui rifiuti di apparecchi elettrici ed
elettronici, RAEE (WEEE), il presente dispositivo non può essere smaltito nei rifiuti
domestici. Questo vale anche per i Paesi al di fuori dell'UE, per le loro specifiche
esigenze.
Si prega di smaltire il presente prodotto in conformità alle normative locali presso il
punto di raccolta indicato per gli apparecchi elettrici ed elettronici. Se avete delle
domande, si prega di mettersi in contatto l'autorità responsabile o il distributore da cui
avete acquistato il presente dispositivo.
Se il presente dispositivo dovesse essere ceduto a terzi (per uso privato o
professionale), il contenuto della presente normativa deve anche essere in relazione.
Per le istruzioni di smaltimento in Europa, fare riferimento a www.OHAUS.com/weee
Vi ringraziamo per il vostro contributo alla tutela dell’ambiente.
BILANCE SERIE SCOUTTM - SKX IT-15
6.2 Disegni
Figura 6.1 Dimensioni
6.3 Conformità
La conformità alle seguenti Norme è indicata dal segno corrispondente sul prodotto.
SMALTIMENTO
Page 84

IT-16 BILANCE SERIE SCOUTTM - SKX
Nota FCC
L’attrezzatura è stata sottoposta a prove ed è conforme ai limiti di un dispositivo digitale di
Classe B ai sensi della Parte 15 delle Regole FCC (Commissione Federale sulle
Comunicazioni). Tali limiti sono progettati per fornire una ragionevole protezione da interferenze
dannose in installazioni residenziali. Tale attrezzatura genera, utilizza e può radiare energia di
frequenza radio e, se non fosse installata e utilizzata secondo le istruzioni, può causare
interferenze dannose alle comunicazioni radio. Tuttavia, non esiste garanzia non avrà luogo
delle interferenze in un’installazione particolare. Se tale attrezzatura dovesse causare
interferenze dannose alla ricezione radiofonica o televisiva, che possono essere determinate
accendendo e spegnendo l’attrezzatura, l’utente è incoraggiato di cercare di correggere le
interferenze con una o più delle seguenti misure:
- Orientare diversamente o ricollocare l’antenna ricevente
- Aumentare la separazione tra l’attrezzatura e il ricevitore
- Collegare l’attrezzatura in una presa di un circuito diverso da quello dove è collegato il
ricevitore.
- Consultare il rivenditore o un qualificato tecnico radio/TV per aiuto
Nota sul settore in Canada
Questa unità digitale di classe B è conforme alla normativa ICES-003 canadese.
Registrazione ISO 9001
Nel 1994, la Ohaus Corporation, Stati Uniti, ha ricevuto il certificato di registrazione ISO 9001
dal Bureau Veritus Quality International (BVQI), a conferma che il sistema di gestione della
qualità di Ohaus è conforme ai requisiti dello standard ISO 9001. Il 21 giugno 2012, la Ohaus
Corporation, Stati Uniti, ha ricevuto nuovamente la registrazione dello standard ISO 9001:2008.
GARANZIA LIMITATA
I prodotti Ohaus sono garantiti contro difetti nei materiali e nella lavorazione dalla data di
consegna per tutta la durata del periodo di garanzia. Durante il periodo di garanzia Ohaus
riparerà o, a sua discrezione, sostituirà gratuitamente qualsiasi componente/i che si dimostri
essere difettoso, purché il prodotto venga restituito, spese prepagate, a Ohaus.
La presente garanzia non vale se il prodotto è stato danneggiato accidentalmente o a causa di
uso improprio, esposto a materiali radioattivi o corrosivi, se sono stati fatti penetrare al suo
interno corpi estranei, oppure in conseguenza di interventi di riparazione o modifica realizzati
da personale non Ohaus. Invece di una scheda di registrazione di garanzia correttamente
restituita, il periodo di garanzia inizierà alla data di spedizione del rivenditore autorizzato.
Ohaus Corporation non rilascia alcun'altra garanzia esplicita o implicita. Ohaus Corporation
non sarà responsabile per eventuali danni conseguenti.
Dato che la legislazione sulla garanzia varia da uno Stato all'altro e da un Paese all'altro, per
ulteriori dettagli contattare Ohaus o il rivenditore Ohaus locale.
Page 85

Page 86

Page 87

Page 88

EN-18 SCOUTTM SERIES BALANCES - SKX
OHAUS Corporation
7 Campus Drive
Suite 310
Parsippany, NJ 07054 USA
Tel: +1 973 377 9000
Fax: +1 973 944 7177
With offices worldwide / Con oficinas alrededor del mundo / Avec des bureaux dans le monde
entier / Weltweite Geshäftsstellen / Con uffici in tutto il mondo.
www.ohaus.com
*30269039*
P/N 30269039 B © 2016 OHAUS Corporation, all rights reserved / todos los derechos
reservados / tous droits réservés / Alle Rechte vorbehalten / tutti i diritti riservati.
Printed in China / Impreso en la China / Imprimé en Chine / Gedruckt in China / Stampato in
Cina
 Loading...