

Page 1
Skipper 5000
User Guide
Page 2

Page 3

Table of Contents
1 Your new retail scale 3
1.1 Most important functions .................................................................................. 3
1.2 Safety instructions............................................................................................ 3
1.3 Further documents ........................................................................................... 3
1.4 Maintenance ................................................................................................... 3
1.5 Intended use ................................................................................................... 3
1.6 Conventions and symbols used in this user manual ............................................ 4
1.7 Device overview .............................................................................................. 5
1.7.1 Display............................................................................................ 5
1.7.2 Keyboard ......................................................................................... 6
1.7.3 Function keys ................................................................................... 6
1.7.4 Connections ..................................................................................... 7
1.8 Legal for trade ................................................................................................. 7
2 Setup and device settings 8
2.1 Contents ......................................................................................................... 8
2.2 Setting up the scale.......................................................................................... 8
2.2.1 Requirements for scale's location........................................................ 8
2.2.2 Levelling the scale............................................................................. 8
2.2.3 Mounting the tower............................................................................ 9
2.3 Inserting paper ................................................................................................ 10
2.3.1 Paper format .................................................................................... 10
2.3.2 Inserting the ticket roll........................................................................ 10
2.4 Inserting the battery.......................................................................................... 11
2.5 Connecting to mains power .............................................................................. 11
2.6 Turning on ...................................................................................................... 12
2.7 Turning off ...................................................................................................... 12
2.8 Restarting ....................................................................................................... 12
2.9 Cleaning......................................................................................................... 12
2.10 Disposal......................................................................................................... 13
3 Fast and easy operation 14
3.1 Log in / log out................................................................................................ 14
3.2 Free input ....................................................................................................... 14
3.3 Working with PLUs .......................................................................................... 15
3.3.1 Calling up a PLU............................................................................... 15
3.3.2 Calling up a PLU with preset keys ....................................................... 15
3.3.3 Using quantity PLUs and multiplication................................................ 16
3.4 Taring ............................................................................................................ 17
3.4.1 Taring a container............................................................................. 17
3.4.2 Manual tare...................................................................................... 17
3.4.3 Customer tare / Basket function .......................................................... 18
3.5 Zeroing........................................................................................................... 18
3.6 Weighing with 100 g price unit ......................................................................... 19
3.7 Working with several vendors ........................................................................... 19
3.7.1 Working with several vendors on one scale (multiple vendors) .............. 19
3.7.2 Working with several scales (floating vendor) ...................................... 20
3.8 Voiding........................................................................................................... 20
3.9 Refunding ....................................................................................................... 21
3.10 Reopening a ticket ........................................................................................... 21
3.11 Changing prices .............................................................................................. 22
3.11.1 Overwriting a price temporarily ........................................................... 22
3.11.2 Overwriting a price permanently.......................................................... 22
Table of Contents 1Skippper 5000
Page 4

3.12 Granting a discount ......................................................................................... 23
3.12.1 Granting a discount on a single item ................................................... 23
3.12.2 Granting a discount on the total sum................................................... 23
3.12.3 Granting a pre-defined discount .......................................................... 24
3.13 Payment......................................................................................................... 24
3.13.1 Working with return ........................................................................... 24
3.13.2 Working without return....................................................................... 25
3.13.3 Working with multiple payment........................................................... 25
3.14 Cash in / cash out ........................................................................................... 26
3.15 Assigning a group VAT ..................................................................................... 26
3.16 Backup / restore data via USB device ................................................................. 27
3.16.1 Recommended USB devices ............................................................... 27
3.16.2 Backup data to a USB device / restoring data from a USB device ............ 27
4 Menu 28
4.1 Menu operation ............................................................................................... 28
4.1.1 Entering the menu............................................................................. 28
4.1.2 Key functions in the menu.................................................................. 28
4.1.3 Navigating in the menu...................................................................... 28
4.1.4 Ending the menu............................................................................... 29
4.1.5 Text input......................................................................................... 29
4.2 Menu description ............................................................................................. 30
4.2.1 Overview.......................................................................................... 30
4.2.2 Data menu....................................................................................... 32
4.2.3 Configuration menu........................................................................... 35
4.2.4 Reports menu................................................................................... 40
4.3 Configuration tips ............................................................................................ 42
4.3.1 Tips for setting up and configuring PLUs .............................................. 42
4.3.2 Example for creating a PLU ................................................................ 43
4.3.3 Setting up a barcode ......................................................................... 44
4.3.4 Setting up the keyboard ..................................................................... 46
4.3.5 Setting up a floating vendor scale network with data synchronization ...... 48
4.3.6 Reports............................................................................................ 50
4.3.6.1 Setting up basic reports ................................................................ 50
4.3.6.2 Setting up combination reports ...................................................... 51
5 What to do, if ...? 52
6 Technical data and accessories 55
6.1 Technical data................................................................................................. 55
6.2 Compliance .................................................................................................... 55
6.3 Options/Accessories......................................................................................... 55
Table of Contents2 Skippper 5000
Page 5

1 Your new retail scale
1.1 Most important functions
Congratulations on your new scale. This robust scale with its battery operation, connectable cash
drawer and integrated ticket printer facilitates comfortable, mobile selling while maintaining the
highest accuracy.
Your new scale not only stands out due to its mobility, but also due to its network-capability and fast
data transfer to and from a computer. This lets you, for example, operate integrated scales which are
connected to quickly and easily create sales reports.
1.2 Safety instructions
Basic safety instructions
• Read these operating instructions prior to using your scale.
• Follow these operating instructions carefully.
• Store these operating instructions near the scale for future reference.
• Do not allow untrained personnel to operate or to clean the scale.
• Do not open the scale.
• Always unplug the scale before cleaning and maintenance.
Safety instructions for battery operation
• The battery must not come into contact with chemical solvents, oil or water.
• Keep batteries away from heat and fire.
• Do not open the battery.
CAUTION
Risk of explosion if the battery is replaced by an incorrect type
− Dispose of used batteries according to the instructions.
1.3 Further documents
For further documents regarding your new retail scale (e.g. Manuals, Data Sheet) please refer to the
following website:
http://www.ohaus.com/skipper5000
1.4 Maintenance
• Only authorized personnel is allowed to open and repair the scale. Please contact your local
representative.
1.5 Intended use
• Use the scale only for weighing in accordance with this manual.
• Use the scale in dry locations only.
• Any other type of use and operation beyond the limits of the technical specifications is considered
as not intended.
Misuse
• Do not use the scale in industrial and harsh environment.
Your new retail scale 3Skippper 5000
Page 6
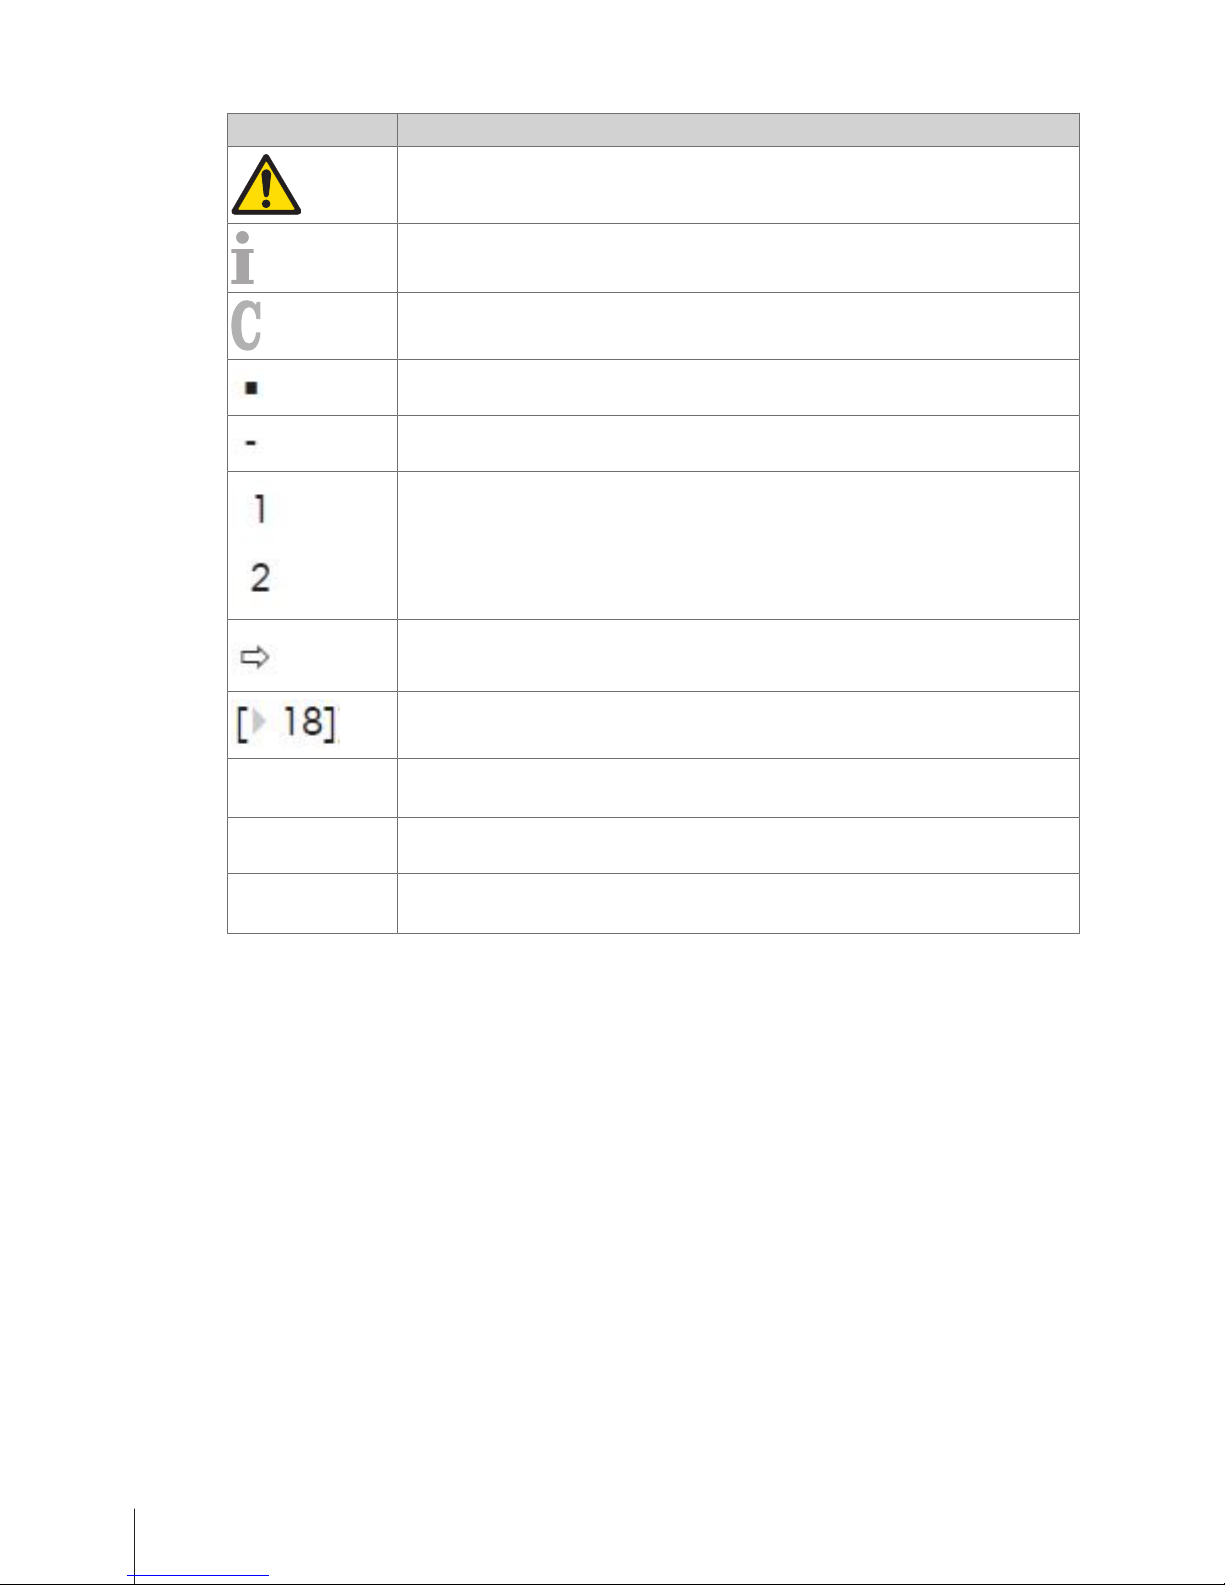
1.6 Conventions and symbols used in this user manual
Symbol Description
Safety sign that warns the user of situations resulting in death, serious injury or
material damage, in case of non-compliance with the indicated safety advices.
General information that makes working with the device easier.
Configuration requirements and tips.
Precondition for an action.
Individual action that must be carried out.
Action sequence that must be carried out in the order stated.
Result of an action or an action sequence.
Cross-reference (example: reference to page 18)
System is
restarting
Message on the scale's display
[Save Price] key Preset key on the scale's keyboard [Setting up menu items on preset
keys}Page47]
"Void" • Menu or sub-menu name
• Setting in a menu/sub-menu
Your new retail scale4 Skippper 5000
Page 7
1.7 Device overview
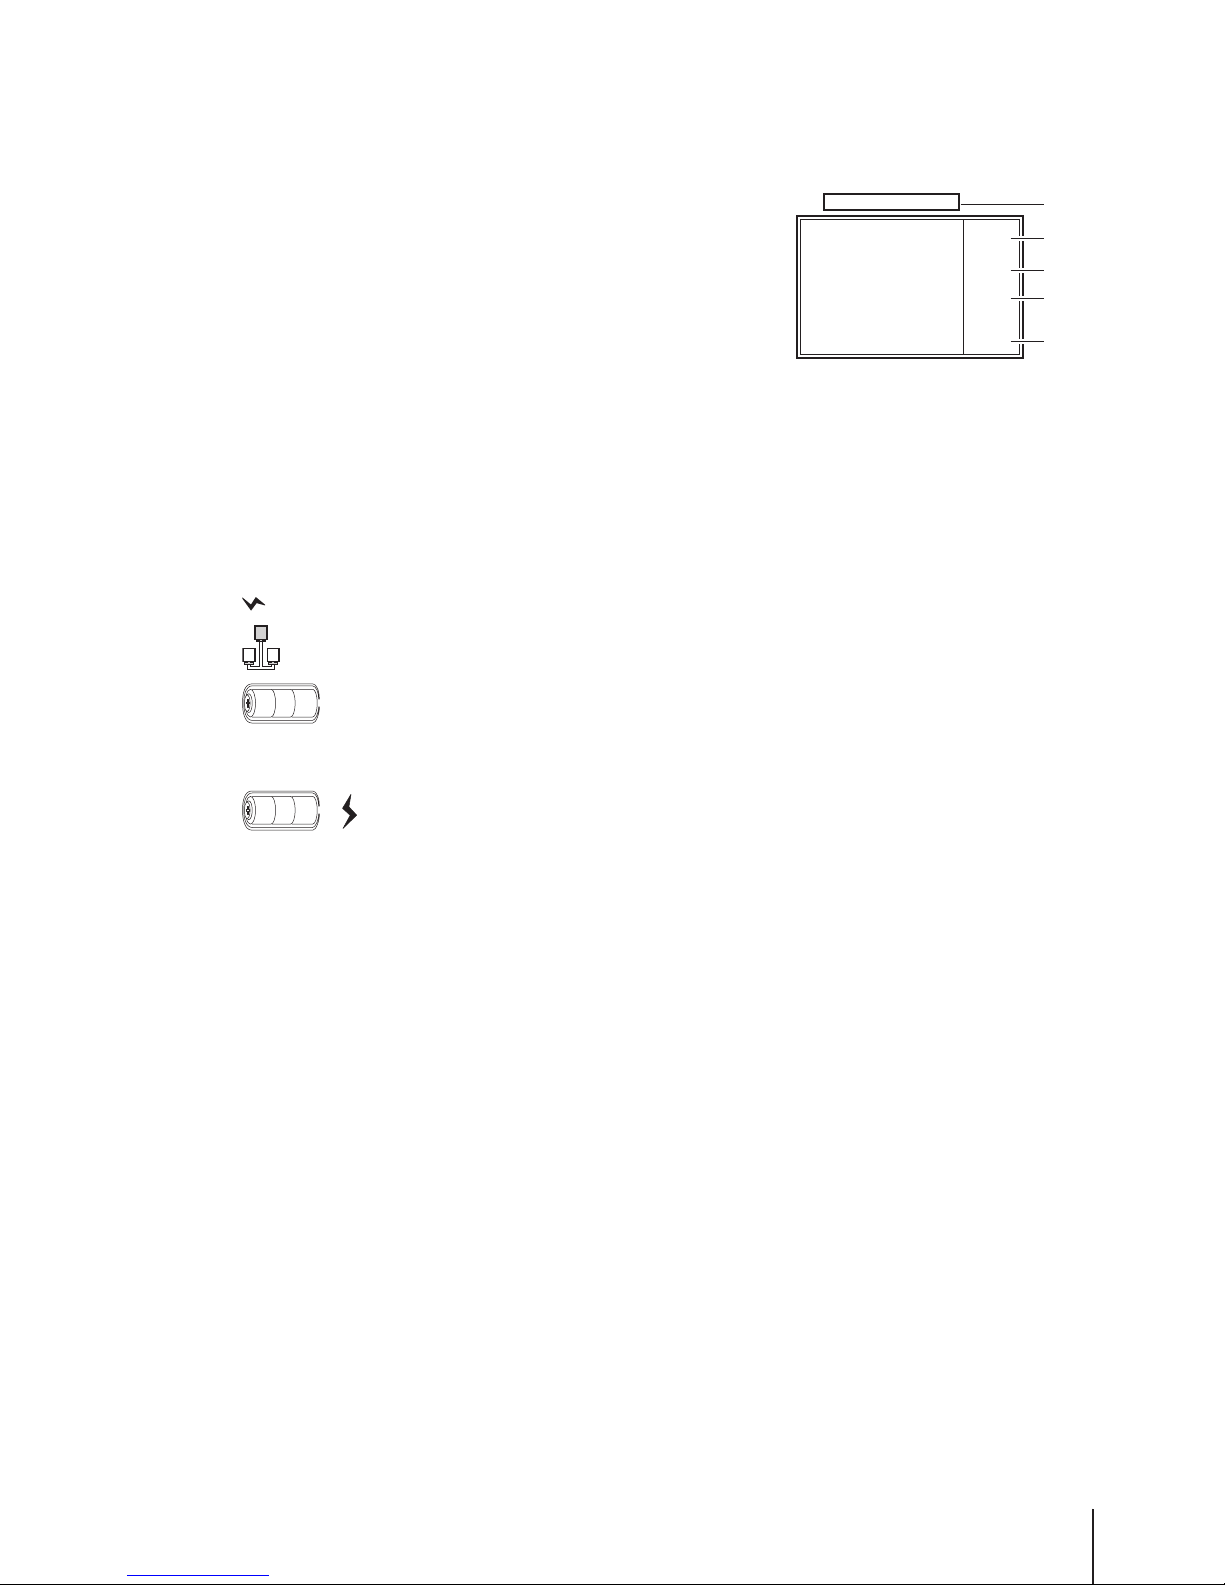
1.7.1 Display
The display is laid out as follows, seen both from the customer and the vendor point of view:
1
Metrological information
Max 6/15kg Min 40g e=2/5g
kg
$/kg
$
$
2
1
3
4
5
2
Weight display
3
Unit price
4
Price
5
Field for instructions or status messages
In addition to the weight and price, the following status messages and indicators can be displayed:
–>0<–
Gross weight is zero
NET
Net weight
X
Quantity mode
PLU
PLU number is displayed
ST
Refund mode
LS
Large sale mode
Connected to mains power supply
Network/communication status
Illuminated: the scale is in battery-powered operation, the number of illuminated segments
is indicating the charging status
Flashing: battery too low
Charge or replace battery.
Flashing and power supply operation symbol illuminated: battery is charging
Your new retail scale 5Skippper 5000
Page 8
1.7.2 Keyboard
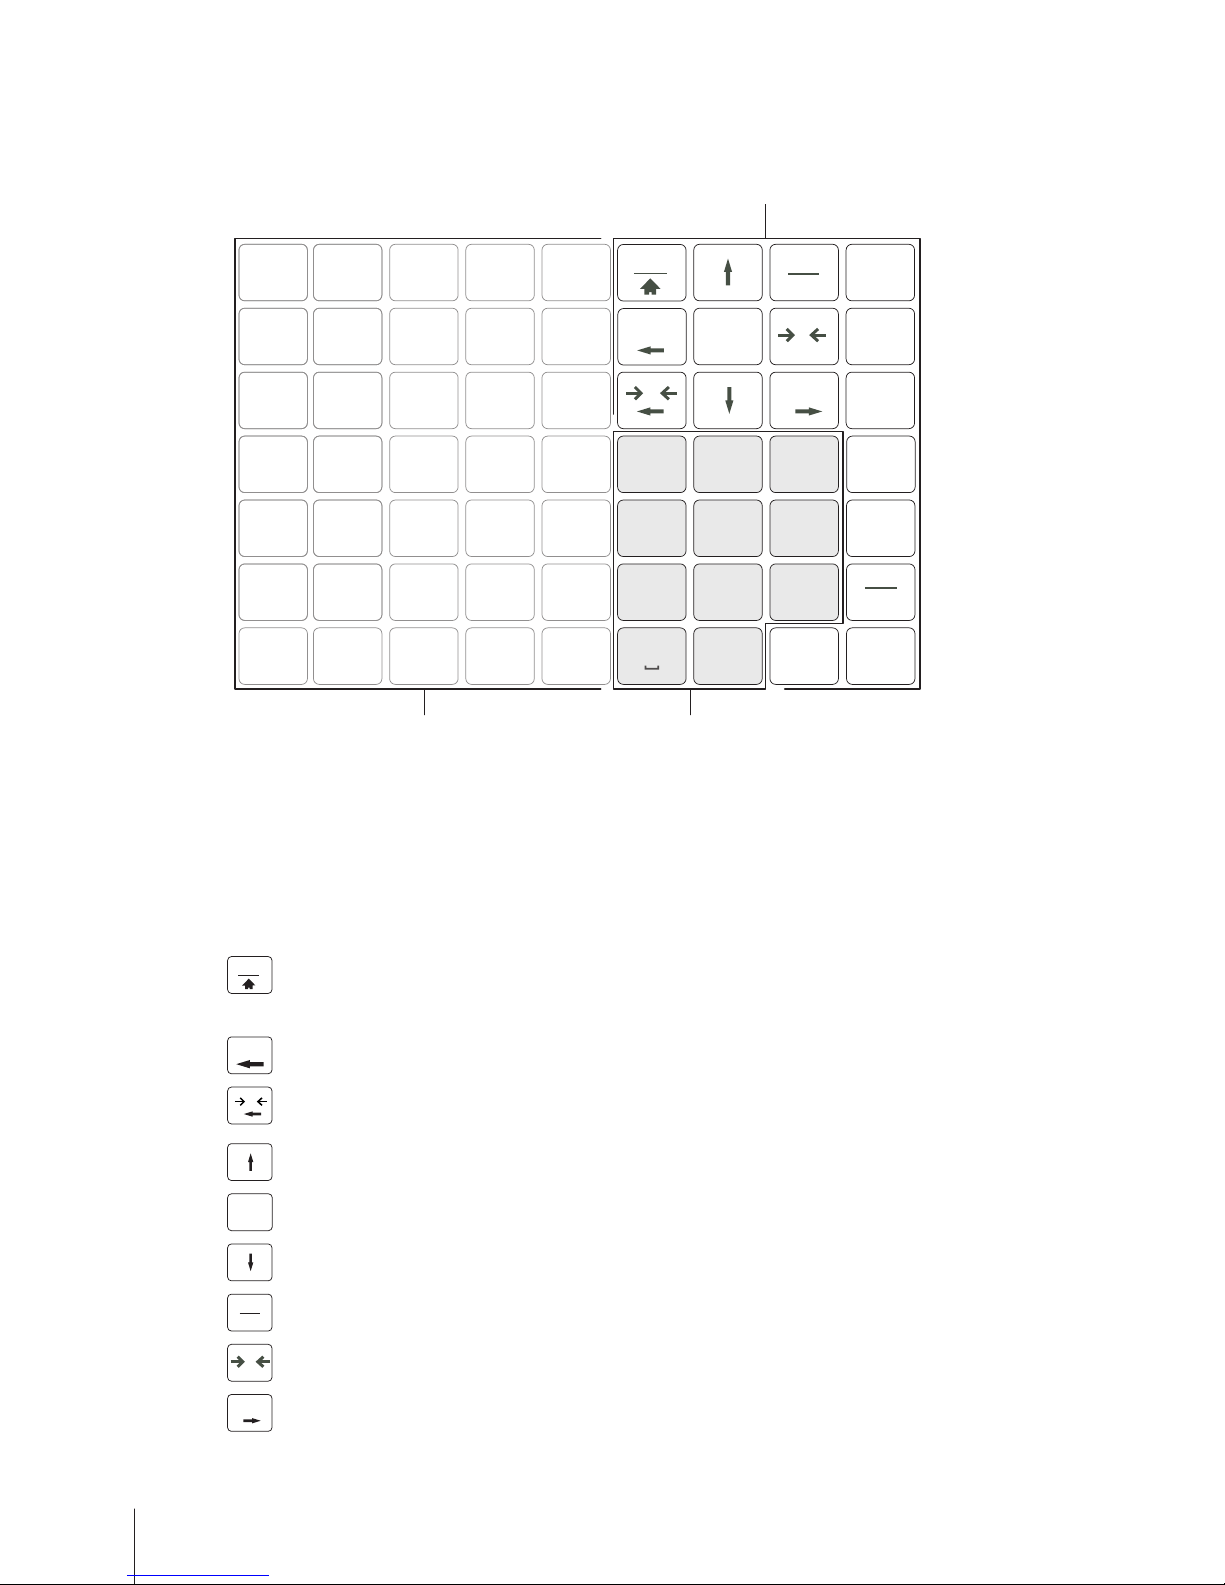
The keyboard is divided into three sections:
7
!?
8
ABC
9
DEF
5
JKL
4
GHI
6
MNO
2
TUV
1
PQRS
3
WXYZ
0
_
00
#
C
1
2
3
Menu
Login
Logout
Fn
Disc
TOK
Back
-
Void
X
PLU
*
Pay
V
0
1
Number keys
3
Preset keys
2
Function keys
In addition to their main function, some function keys have one or more auxiliary functions.
1.7.3 Function keys
Key Name Function
Menu
Menu key • Enter the menu
• Press and hold or double click to quickly return to the
weighing mode
Back
Back key Go back to previous screen or clear booking and PLU calling
0
Zero key Zeroing
Left key Go to left item
Arrow up key Go to previous item
OK
OK key Confirm selection
Arrow down key Go to next item
Login
Logout
Login / Logout key Enter the vendor assignment menu
T
Tare key Tare the scale
Void
Void key Cancel the item
Right key Go to right item
Your new retail scale6 Skippper 5000
Page 9
Disc
Discount key Enter the discount in percent or absolute value
_
Minus key Access negative price entry
X
Quantity key Enter quantity
PLU
PLU key Switch between entering the price by PLU number and directly
entering the unit price
*
Pay
Star key Subtotal items or close payment
V
Vendor key Confirm item entry, call up ticket or close payment
C
Clear key Clear all entries
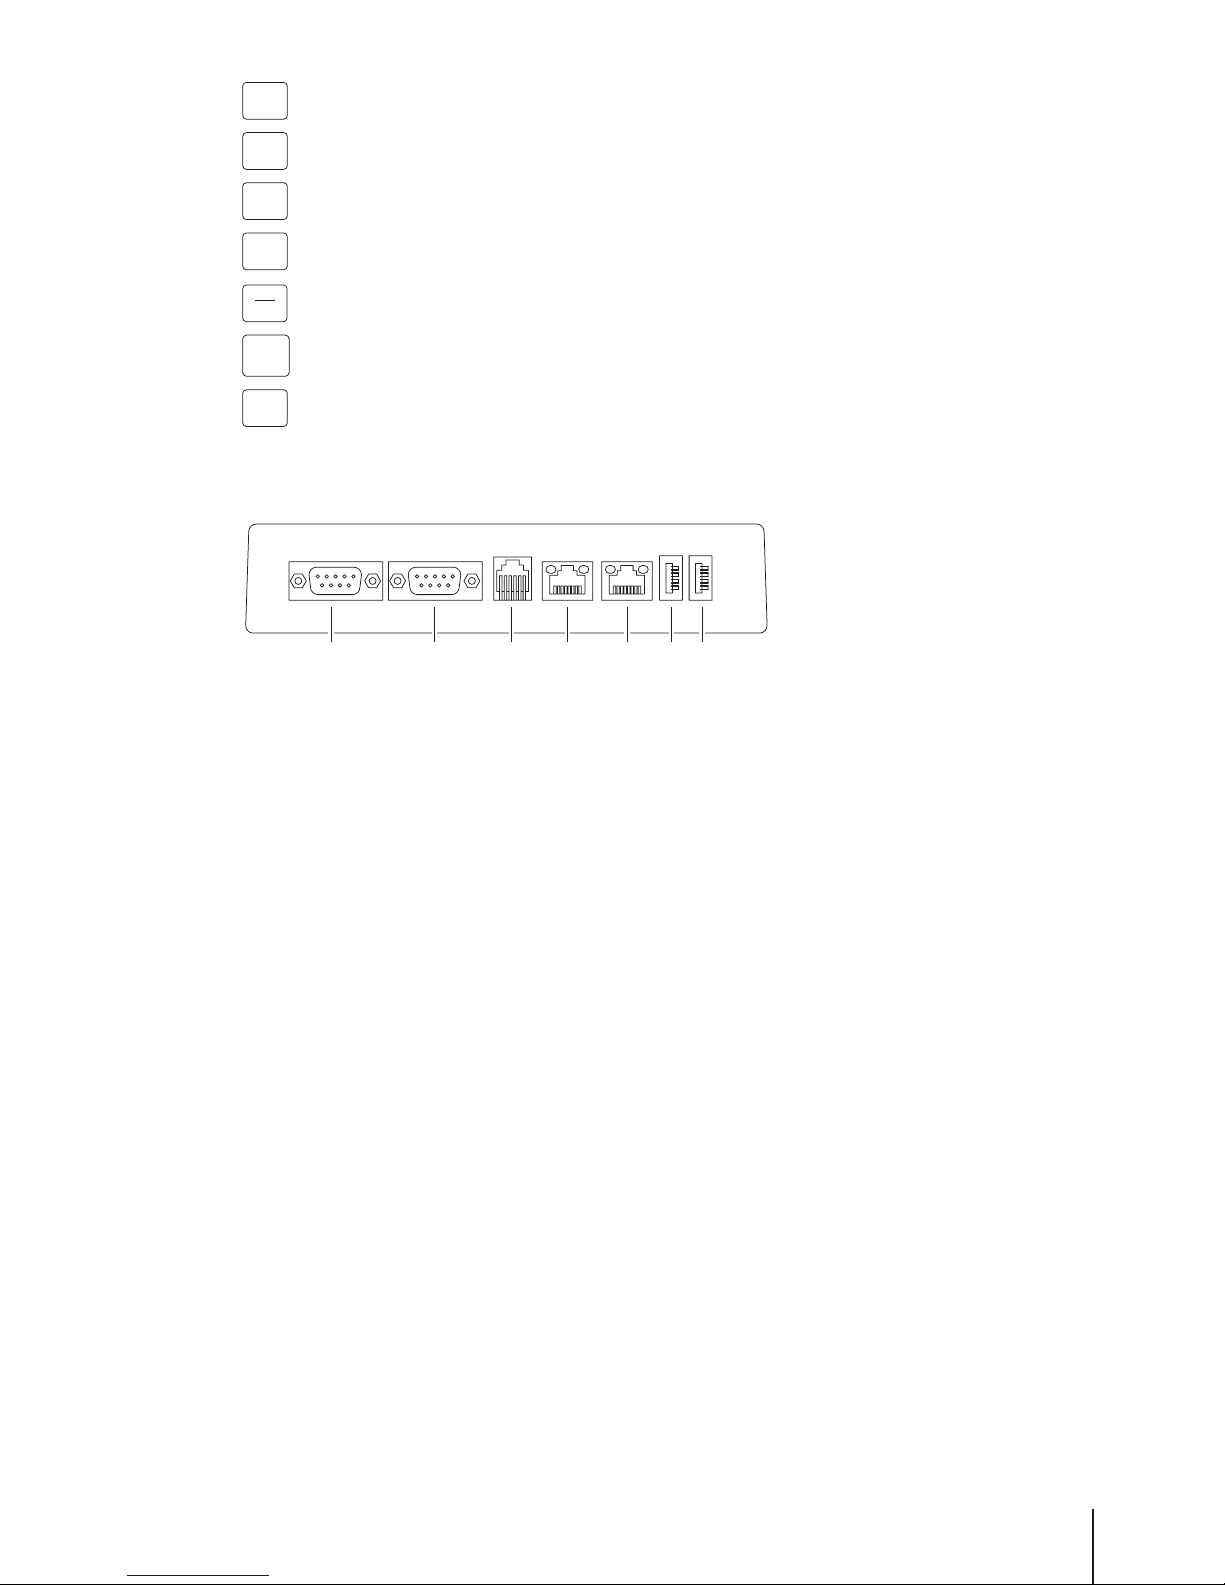
1.7.4 Connections
The following connections are located at the bottom side of the scale:
1 2 3 4 5 6 7
1
RS-232/COM A, for a scanner or computer
5
LAN B, to set up a network of scales
2
RS-232/COM B, for a scanner or computer
6
USB 1, to connect a USB device
3
Cash drawer connection
7
USB 2, to connect a USB device
4
LAN A, to set up a network of scales
1.8 Legal for trade
When the scale is used in trade or a legally controlled application, it must be set up, verified and
sealed in accordance with local weights and measures regulations. It is the responsibility of the
purchaser to ensure that all pertinent legal requirements are met. As verification requirements vary by
jurisdiction, the purchaser should contact their local weights and measures office if they are not
familiar with the requirements.
For products sold in Europe, the verification process has been completed at the place of manufacture.
These products have been sealed and the type plate includes supplemental metrology markings. They
may be put into service immediately. If required by local W & M authorities, additional stickers will
already be applied on the device.
For products sold in other regions, the verification process must be performed at the place of use.
To prevent access to calibration and metrological settings, the scale must be sealed using a paper
seal or wire seal.
Your new retail scale 7Skippper 5000
Page 10
2 Setup and device settings
2.1 Contents
Check that the delivery is complete:
• Scale
• Stainless steel weighing pan
• Power cable
• Ticket roll
• Manual
2.2 Setting up the scale
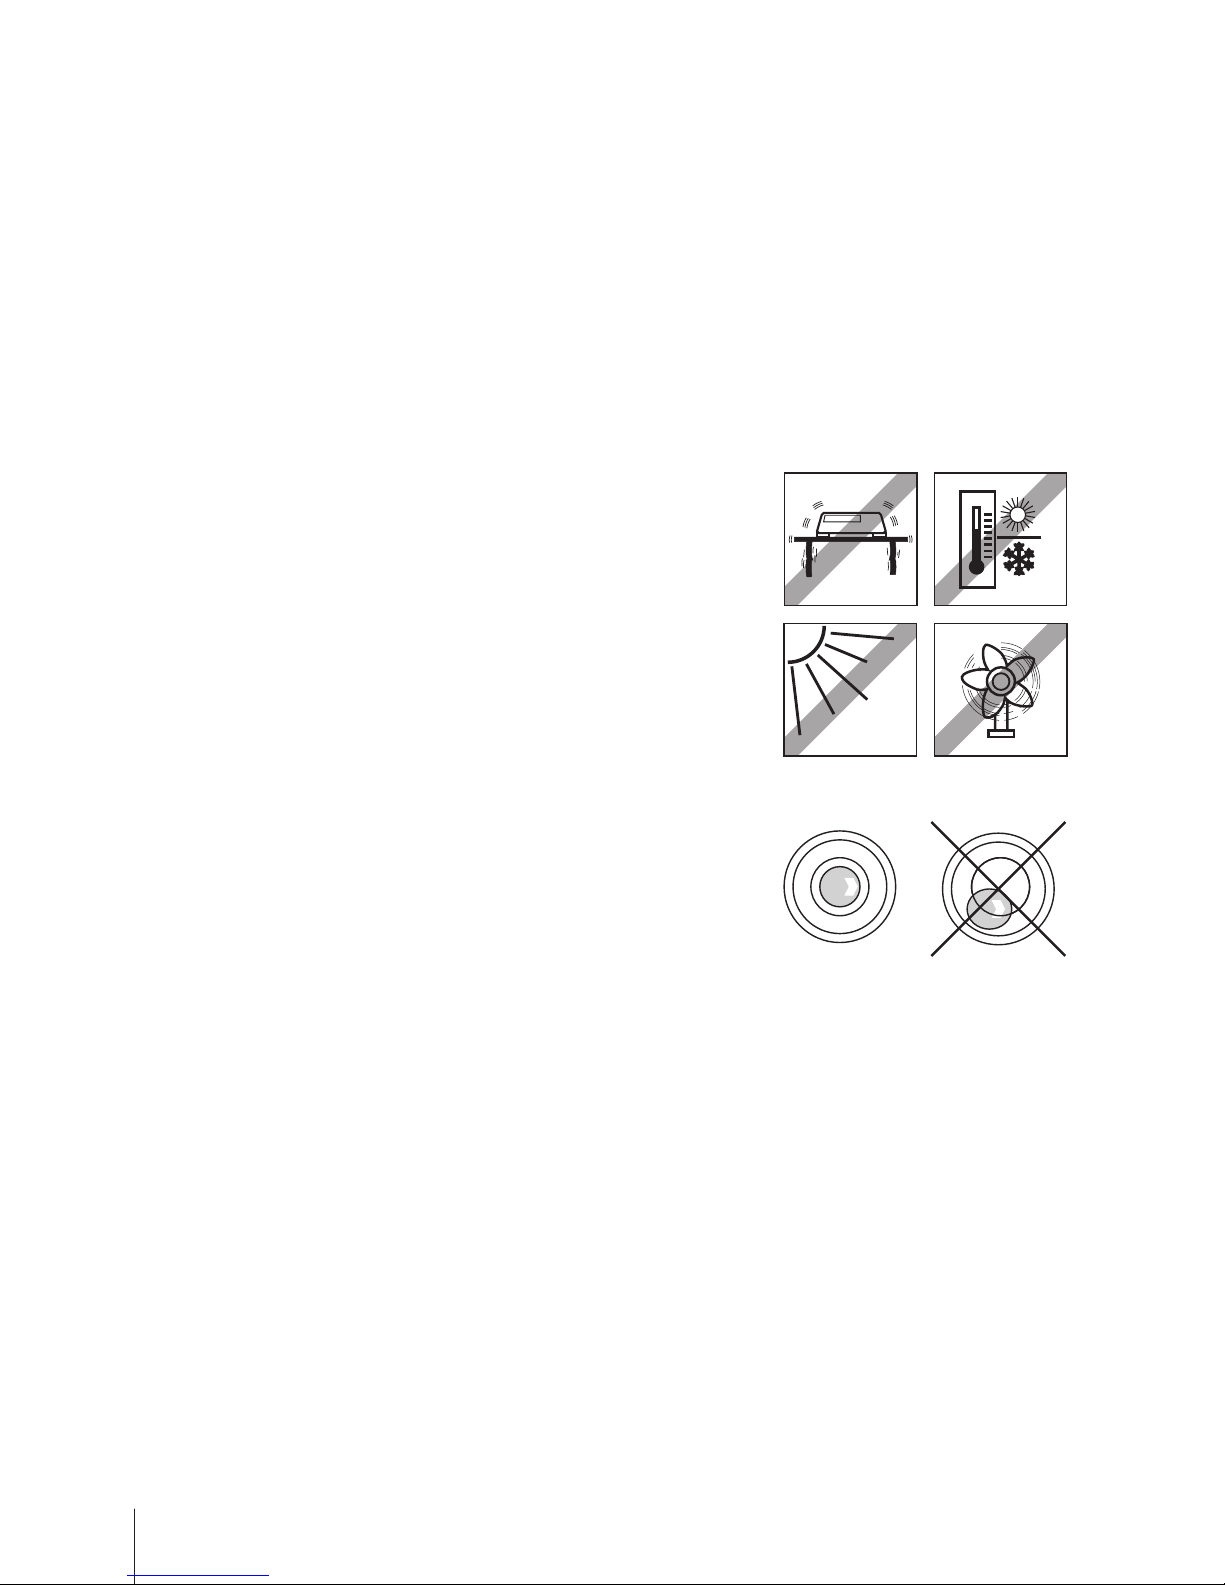
2.2.1 Requirements for scale's location
The right location is critical to weighing accuracy.
Conditions for an ideal location:
• No shocks and vibrations
• No excessive temperature fluctuations
• No direct sunlight
• No strong drafts
− Select a stable, vibration-free and preferably horizontal location for
your scale.
2.2.2 Levelling the scale
Only a perfectly levelled scale delivers accurate weighing results. The
scale is equipped with a level indicator to make it easier to level the
scale.
− To level the scale, turn the scale's adjustable feet until the air
bubble in the level indicator is positioned in the inner circle.
Setup and device settings8 Skippper 5000
Page 11
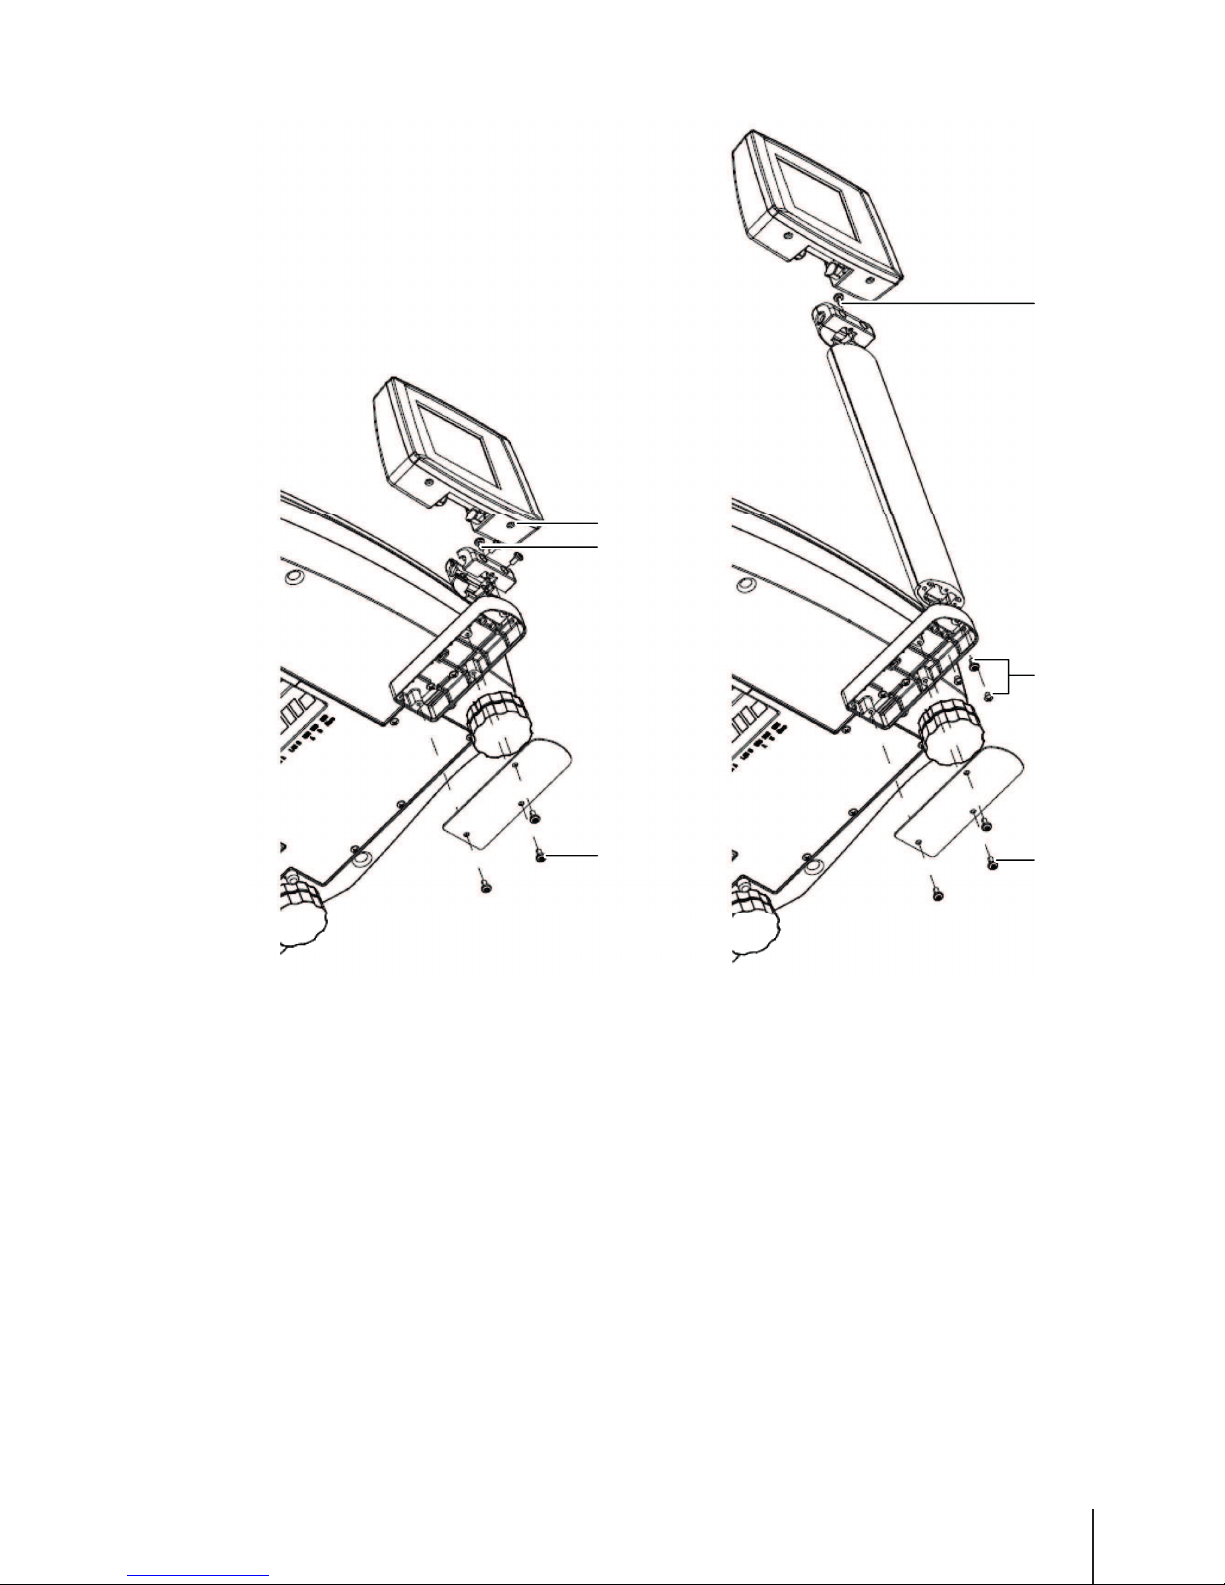
2.2.3 Mounting the tower
1
2
3
4
1
3
1 Remove the 3 screws (1) on the bottom of the scale to remove the cover plate.
2 Disconnect the cables and pull the cable out of the scale.
3 Remove the 2 screws (2) under the display and take off the display.
4 Remove screw (3) and take off the adapter.
5 Pass the cable through the tower.
6 Mount the adapter on the tower with screw (3).
7 Close the display with 2 screws (2).
8 Mount the tower on the tower base with the 3 screws (4).
9 Connect the cable.
10 Mount the cover plate with screws (1).
Setup and device settings 9Skippper 5000
Page 12
2.3 Inserting paper
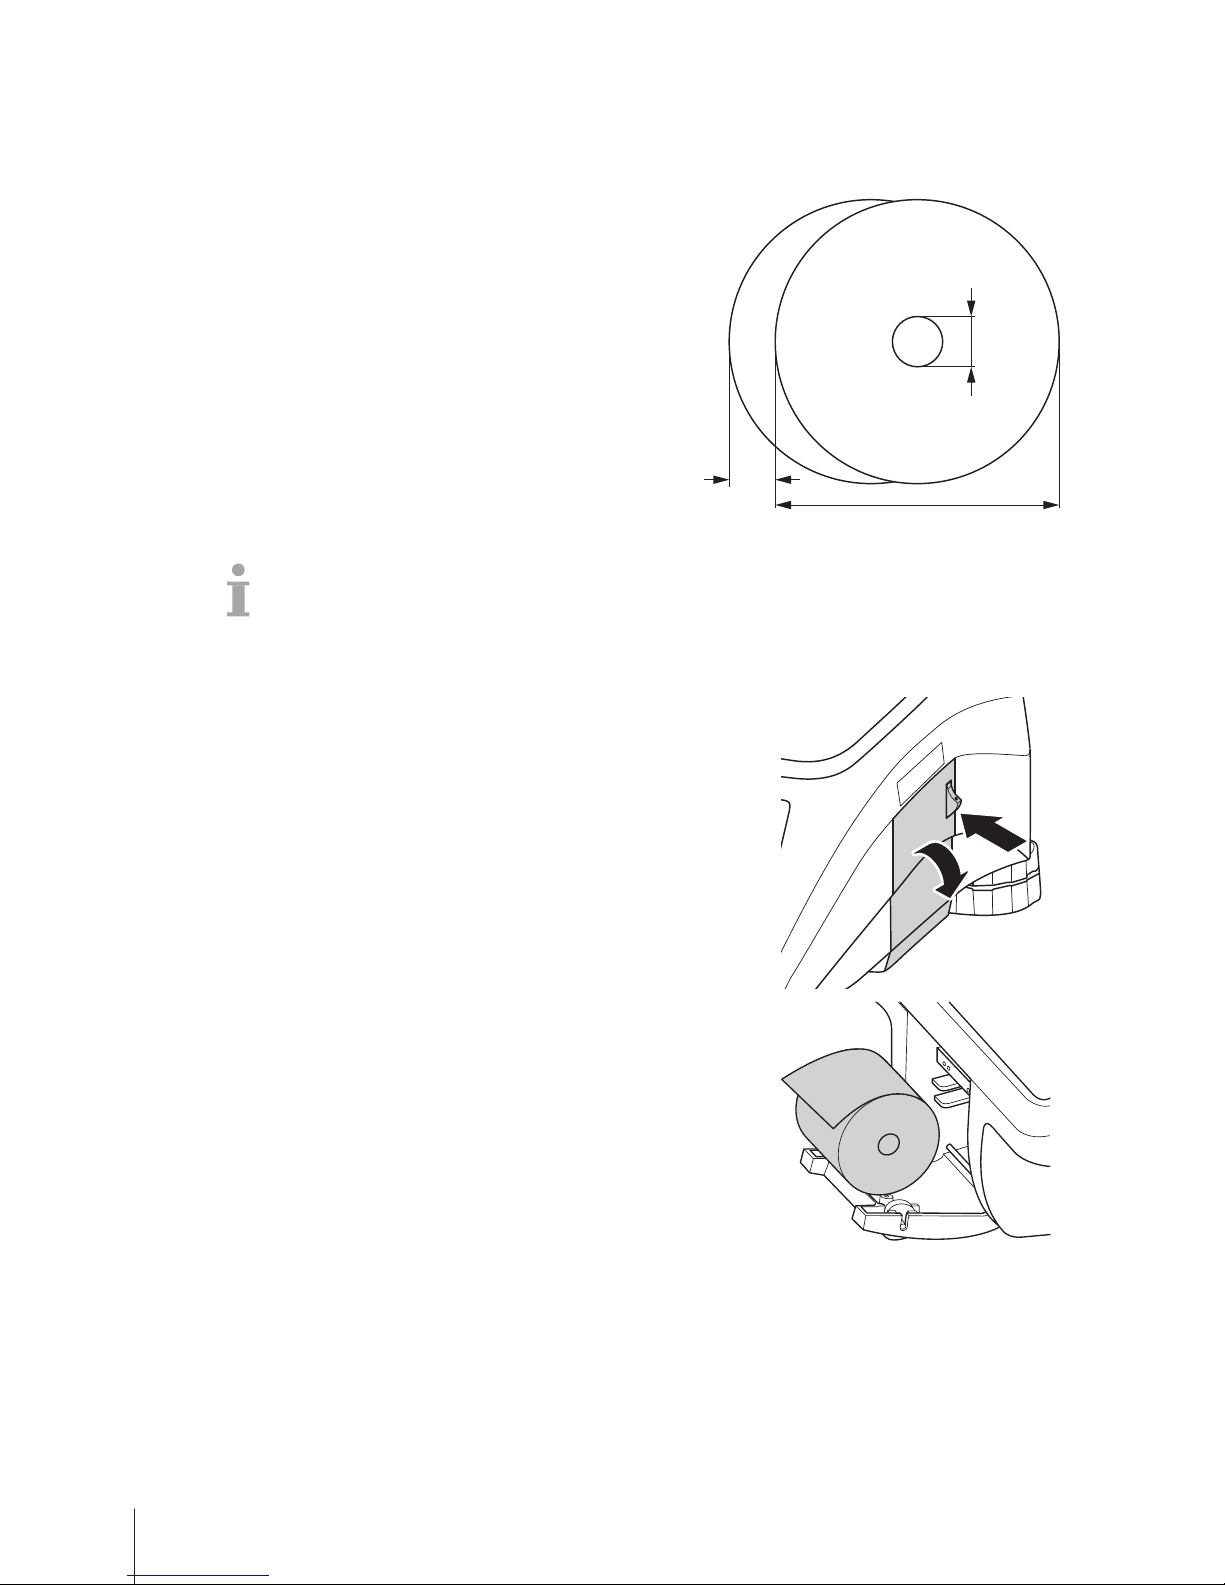
2.3.1 Paper format
Ticket rolls must have the following dimensions:
A
max. 57 mm
A
B
C
B
max. 63 mm
C
10.5 - 14 mm
• The paper used must not be thicker than 0.12 mm.
• The paper weight should not be less than 48 g/m
2
, the paper weight recommended is 55 g/m2.
• Do not slam the printer door as this will damage the printer.
2.3.2 Inserting the ticket roll
− To open the printer door press the button on the printer door.
1 Put the ticket roll into the paper compartment.
2 Pull the paper to the outside.
3 Close the printer door and tear off the excess paper.
Setup and device settings10 Skippper 5000
Page 13
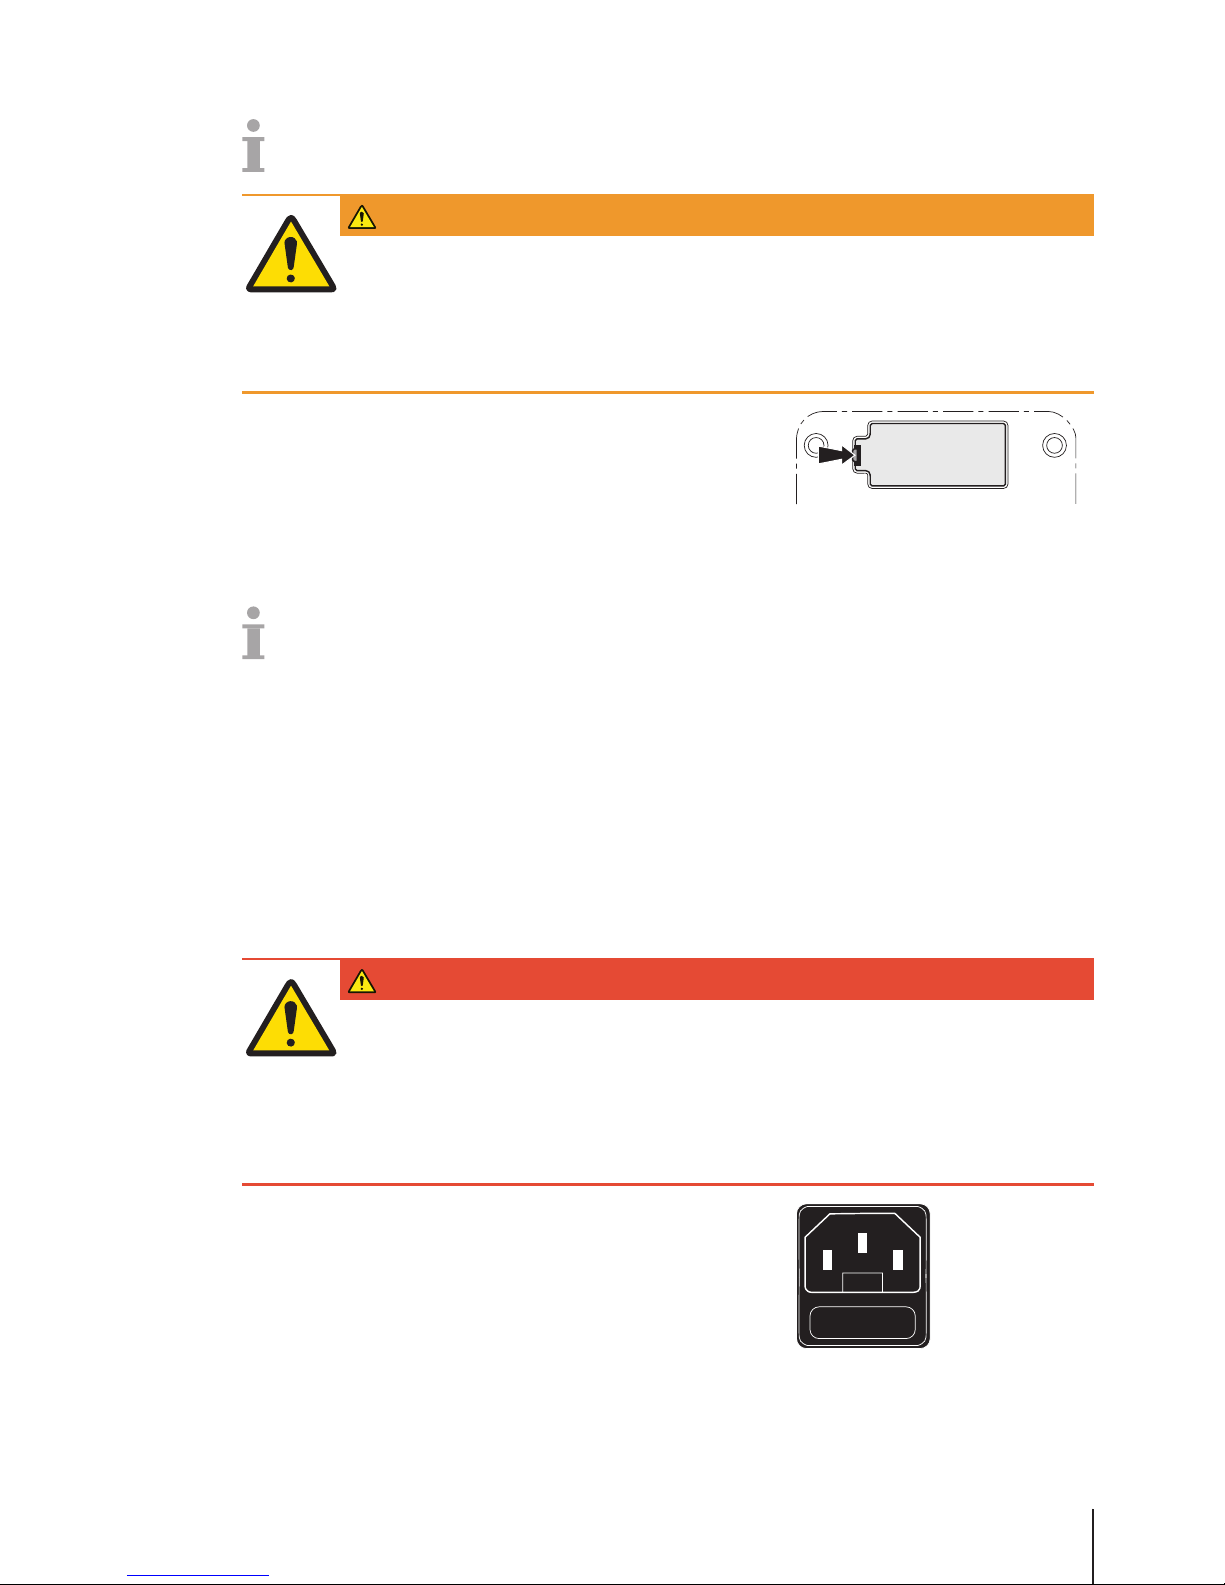
2.4 Inserting the battery
The scale can be battery-operated.
WARNING
Damage to the battery
The battery can be damaged if it is installed incorrectly.
1 Pay attention to the correct battery polarity. The positive pole (+) and negative
pole(–) must not be short circuited.
2 Only use original manufacturer batteries.
1 Remove the weighing pan.
2 Remove the battery compartment cover.
3 Connect the battery to the connector in the battery compartment.
4 Place the battery in the battery compartment.
5 Close the battery compartment.
6 Put the weighing pan back on.
• The battery life is affected by charging and discharging conditions.
• If correctly used, the battery life can reach approx. 500 charging cycles.
• A fully charged battery lasts up to 20 hours. The battery capacity depends on the intensity of use
and decreases with age.
• The battery's operating time is reduced when the battery has not been used over a longer period of
time (two months).
• It is recommended that the battery is charged at least every 3 months.
• If the battery was not used over a longer period of time, charge the battery at least three times and
use it until it is completely discharged.
• The charging time decreases if the battery is not fully discharged.
• Battery specification: Lead acid battery, 12 V / 5.5 Ah.
2.5 Connecting to mains power
DANGER
Electrical shock hazard
1 Only connect the device to a properly grounded outlet.
2 Only use the power cord supplied with the device.
3 Use power outlets which are easily accessible and located no further than the
length of the power cord.
4 Do not remove the ground plug.
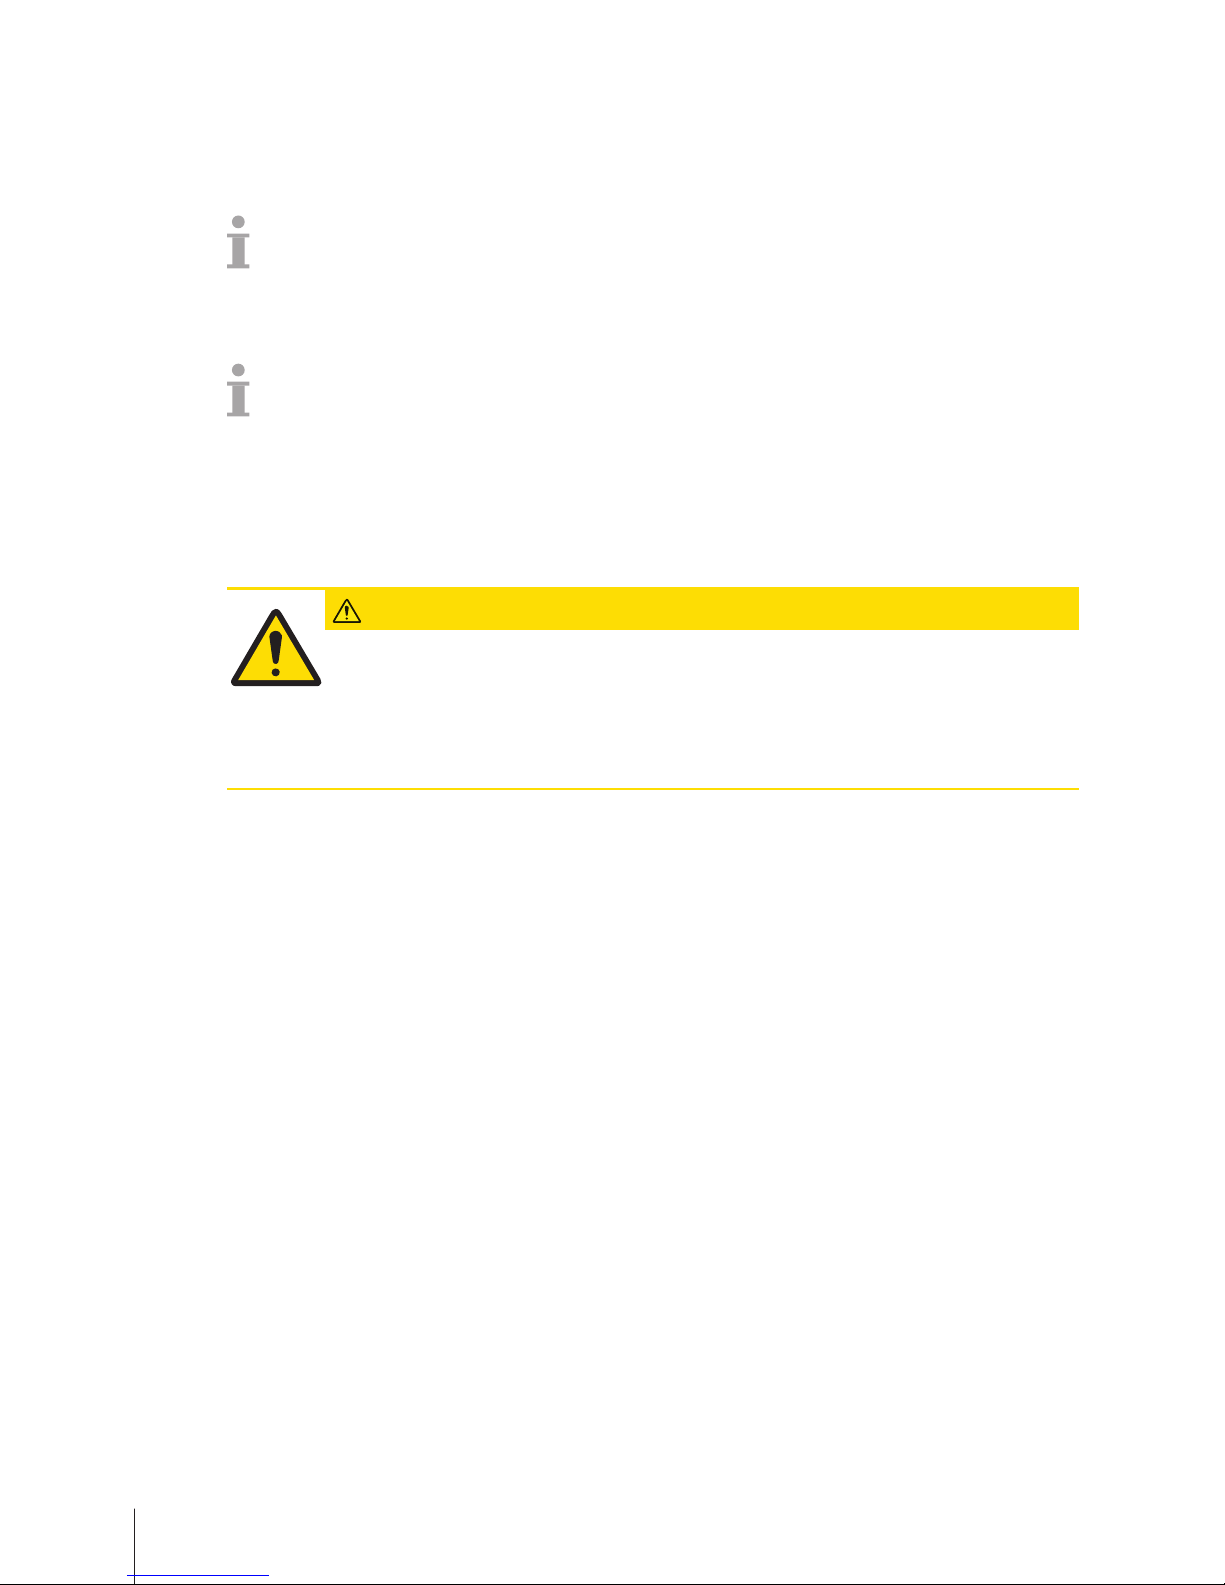
1 Connect the supplied power cable to the power connection socket
at the bottom of the scale.
2 Plug the power plug into a correctly grounded power outlet.
Setup and device settings 11Skippper 5000
Page 14
2.6 Turning on
− Turn the scale on using the switch at the right bottom of the scale.
ð The GEO value and the software version are displayed.
ð The scale is ready when the weight display appears.
The display may turn off automatically after 10 minutes if this is configured in the energy saving
settings.
2.7 Turning off
− Turn the scale off using the switch at the right bottom of the scale.
After 5 minutes an automatic backup is initiated. Restarting the scale during this process may take
more time than usually.
2.8 Restarting
− Press the switch at the right bottom of the scale until the message System is restarting
appears.
2.9 Cleaning
CAUTION
Damage to the device
1 Turn off and unplug the device before cleaning.
2 Do not open the device.
3 Make sure that no fluids get inside the device.
4 Do not use scouring powders or plastic dissolving cleaning agents for cleaning.
1 Remove the weighing pan and clean it with a commercially available household detergent.
2 If heavily soiled, clean the surface of the device with a damp cloth that has been dipped in water
containing a mild washing-up liquid and has been wrung out well.
Setup and device settings12 Skippper 5000
Page 15

2.10 Disposal
In accordance with the requirements of European Directive 2002/96/EC on Waste
Electrical and Electronic Equipment (WEEE), this device may not be disposed of
with domestic refuse. This also applies for countries outside the EU in accordance
with their respective national regulations.
− Please dispose of this product in accordance with local regulations for the separate collection of
waste electrical and electronic equipment.
Should you have any questions, please contact the corresponding authorities or the dealer from
whom this device was purchased.
If this device is passed on (for example for further private or commercial/industrial use), this
regulation is also to be passed on.
Many thanks for your contribution to the protection of the environment.
Battery disposal
Batteries contain heavy metals and therefore cannot be disposed of in the normal refuse.
− Observe local regulations on the disposal of materials that are hazardous to the environment.
For disposal instructions in Europe, refer to http://www.ohaus.com/weee
Setup and device settings 13Skippper 5000
Page 16
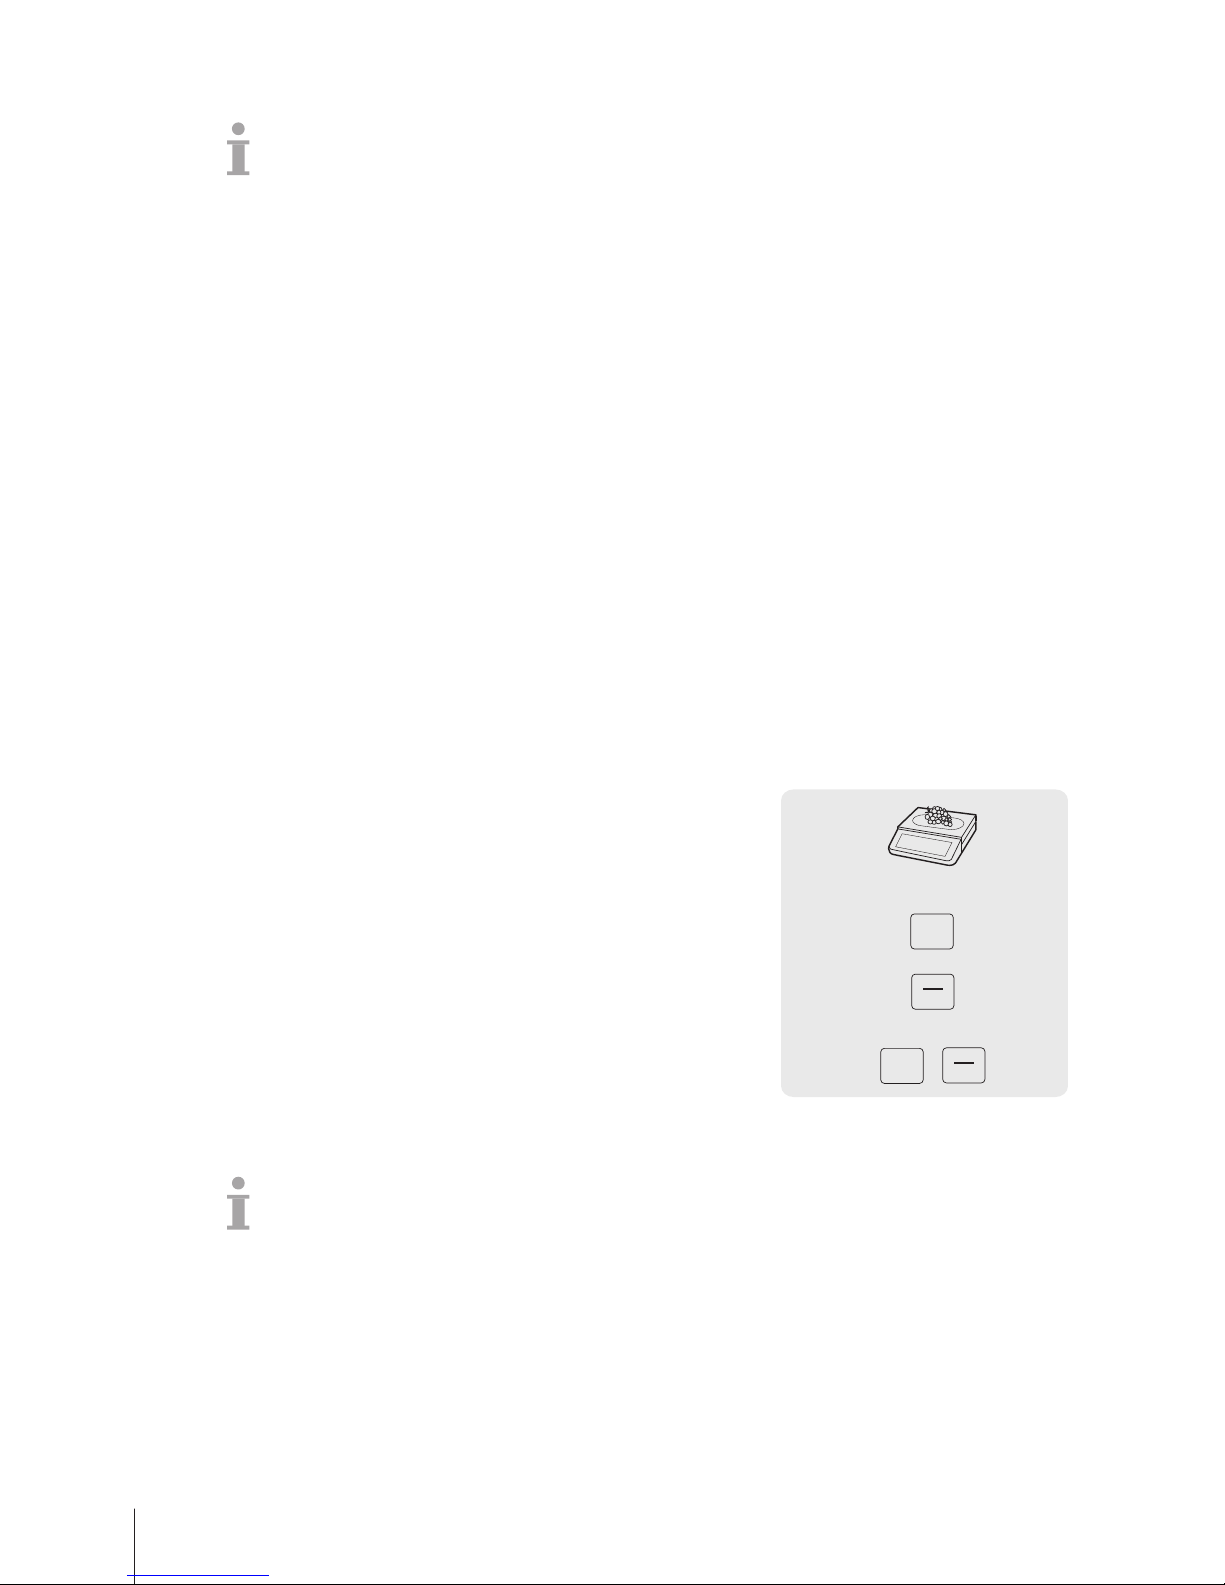
3 Fast and easy operation
The applications described in this chapter refer to working with one vendor.
3.1 Log in / log out
The scale allows to have different Vendor keys for different vendors. Each active vendor has to be
assigned to a particular Vendor key. Prior to using a vendor, the user needs to log in on the scale, in
order for the assignment to become active.
There are two ways to log in:
For vendors already assigned to a Vendor key
− Use the key for the first time.
For vendors not yet assigned to a Vendor key
− Press the Vx key for several seconds.
ð The scale logs in the related vendor or asks for the password when needed.
Alternative option via Login/ Logout menu
1 Press the [Login/ Logout] key.
ð The display shows the list of vendors with their status.
2 Use the arrow keys to navigate between the vendors.
3 Use the OK key to log in/ log out.
3.2 Free input
You can immediately use your scale for weighing and selling, without prior configuration. With the
factory settings, the scale can total several entries and calculate the customer change.
1 If Enter PLU number is displayed, press the PLU key.
ð Direct Price is displayed.
2 Place the item on the scale.
3 Enter the unit price (price/kg) using the number keys.
4 Confirm the entry with the Vendor key.
5 For more items, repeat steps 1 to 4.
6 Total items with the Star key.
7 Enter the customer payment.
8 Complete the transaction with the Vendor key or the Star key
(depends on payment closing key configuration).
ð The scale calculates the change and prints the ticket.
0 … 9
V
.../kg
…
*
Pay
0 … 9€
V
/
*
Pay
• When pressing the PLU key long, the default switches permanently from "Enter PLU number" to
"Direct price".
• If you do not want to use the customer change function, omit step 7. In this case, press the Vendor
key immediately after the Star key.
• Enter the price as usual without the decimal point, but with all the decimal places.
Fast and easy operation14 Skippper 5000
Page 17

3.3 Working with PLUs
You can save your item data in the scale's PLU memory and easily call it up later.
PLUs are created in sub-menu F111.
3.3.1 Calling up a PLU
1 If Direct Price is displayed, press the PLU key.
ð Enter PLU number is displayed.
2 Place the item on the scale.
3 Enter the corresponding PLU number.
ð The unit price and item name appear in the display.
4 Confirm the entry with the Vendor key.
5 For more items, repeat steps 1 to 4.
6 Complete the transaction as described in section [Free
input}Page14].
0 … 9
V
PLU
• When pressing the PLU key long, the default switches permanently from "Direct price" to "Enter PLU
number".
• If you discover that you have entered the wrong PLU number before you have confirmed the entry
with the Vendor key, you can clear it with the Clear key and then enter the correct PLU.
3.3.2 Calling up a PLU with preset keys
• You can save the most important PLUs to the keys in the keyboard.
• There are two layers of preset keys.
Preset keys on the first layer
1 Place the item on the scale.
2 Press the relevant preset key, e.g., "Grape".
ð The unit price and item name appear in the display.
3 Confirm the entry with the Vendor key.
4 For more items, repeat steps 1 to 3.
5 Complete the transaction as described in section [Free
input}Page14].
V
Grape
Preset keys on the second layer
1 Place the item on the scale.
2 Press the relevant preset key twice.
ð The unit price and item name appear in the display.
3 Confirm the entry with the Vendor key.
4 For more items, repeat steps 1 to 3.
5 Complete the transaction as described in section [Free
input}Page14].
V
Grape
Grape
Fast and easy operation 15Skippper 5000
Page 18

3.3.3 Using quantity PLUs and multiplication
With the multiplication function, you can enter several items for a PLU.
1 If Direct Price is displayed, press the PLU key.
ð Enter PLU number is displayed.
2 Enter the PLU number of the item.
ð The unit price and the item name appear in the display.
3 Press the X key to call up the multiplication function.
4 Enter the number of items.
5 Confirm the entry with the Vendor key.
ð The multiplication function ends.
6 For more items, repeat steps 2 to 5.
7 Complete the transaction as described in section [Free
input}Page14].
0 … 9
0 … 9
V
X
PLU
#
Fast and easy operation16 Skippper 5000
Page 19
3.4 Taring
3.4.1 Taring a container
This function depends on the metrological limitation of the scale.
If you fill containers with your products or customers bring their own container, the tare function
makes sure that only the contents are weighed and paid.
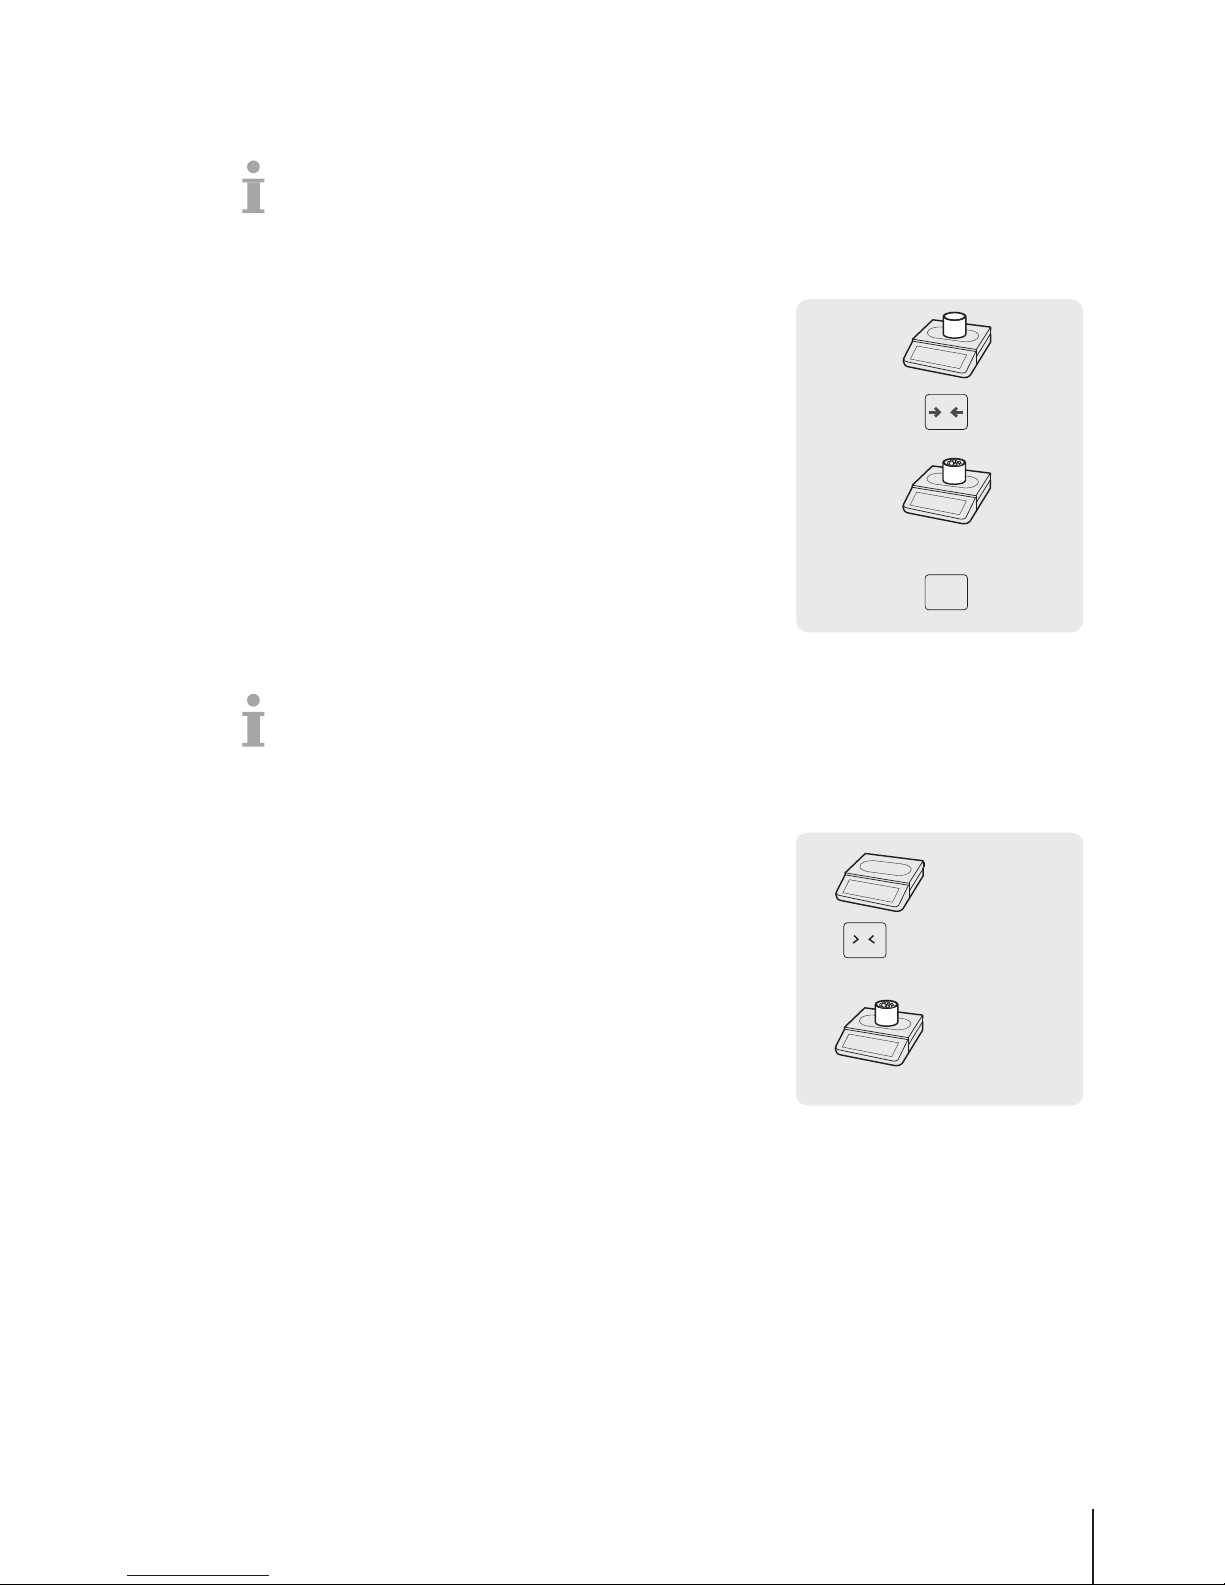
1 Place the empty container on the scale.
2 Press the Tare key.
ð The scale is tared.
ð The weight display is reset to 0.000 kg and the NET symbol
appears.
3 Fill the container with the goods to be weighed.
4 Call up the PLU by PLU number or directly enter the unit price.
5 Confirm the entry with the Vendor key.
6 Complete the transaction as described in section [Free
input}Page14].
V
0 … 9
PLU
T
3.4.2 Manual tare
This function depends on the metrological limitation of the scale.
If you know the weight of the container you can enter the tare weight via keyboard and weigh the full
container.
§ The scale is empty and the weight display is 0.
1 Press the Tare key.
2 Enter the tare weight via keyboard.
ð The scale is tared.
ð The weight display shows the negative tare weight.
3 Place the full container on the scale.
ð The net weight and the tare weight are displayed.
4 Call up the PLU by PLU number or directly enter the unit price.
5 Confirm the entry with the Vendor key.
6 Complete the transaction as described in section [Free
input}Page14].
0 … 9
0.000 kg
-0.345 kg
PT 0.345 kg
1.375 kg
PT 0.345 kg
…
T
Fast and easy operation 17Skippper 5000
Page 20
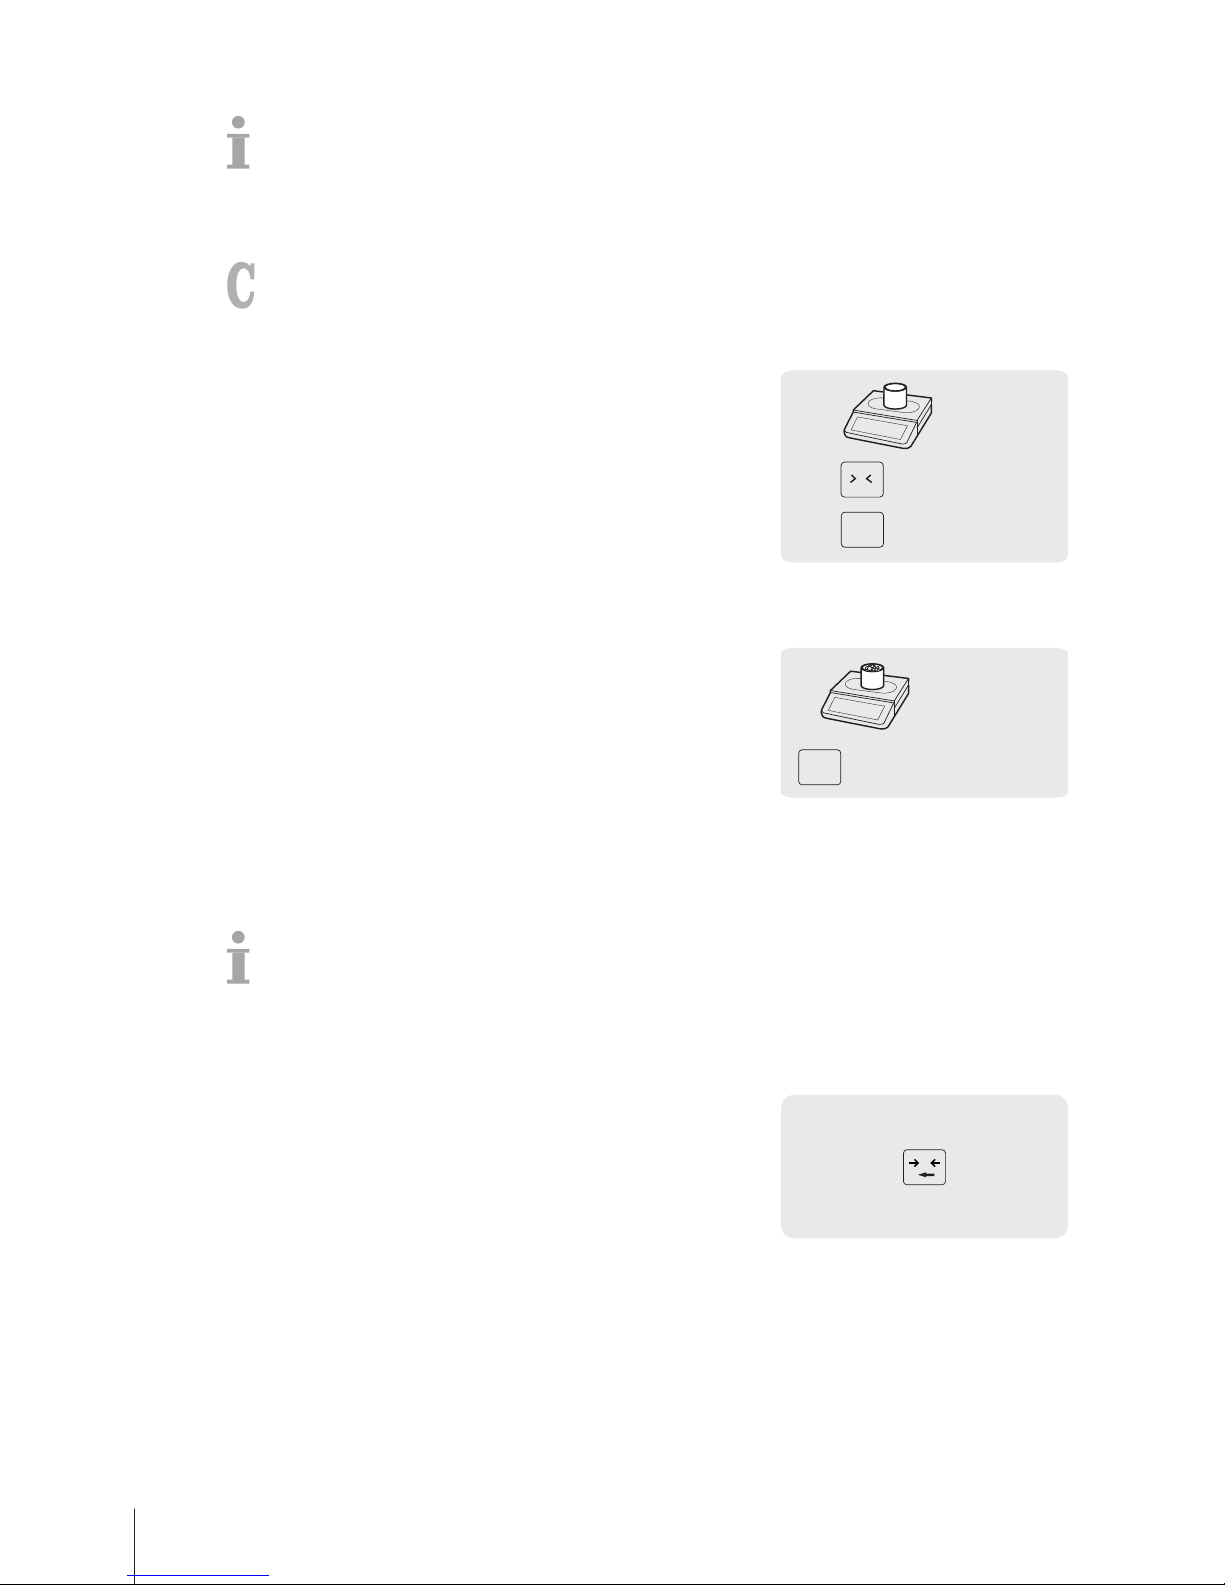
3.4.3 Customer tare / Basket function
A maximum of 999 basket weighs can be saved. If you have reached basket number 999, the scale
automatically creates and prints a basket report. The basket number is then reset to 1.
Your customers pick fruit themselves, e.g., strawberries, and bring their own baskets. With the
"Customer tare" function you can save the weight of each basket and recall it when weighing. This
way, your customer only pays for what was actually picked.
To do so, the following settings must be made:
• Keys defined as [Save Customer Tare] and [Recall Customer Tare] in sub-menu F232.
Saving customer tare weights
1 Place the customer's empty container on the scale.
2 Press the Tare key to tare the container.
3 Press the [Save Customer Tare] key.
ð The tare weight is saved.
ð A ticket with the number and weight of the container is printed.
Save
Cus Tare
0.432 kg
# 123
0.000 kg
NET 0.432 kg
T
Recalling customer tare weights
1 Place the full container on the scale.
ð The gross weight is displayed
2 Press the [Recall Customer Tare] key.
ð A list with the customer tare tickets is displayed.
3 Select the customer tare ticket you want to proceed with.
ð The net and tare weights are displayed.
4 Complete the transaction as described in section [Free
input}Page14].
2.357 kg
T 0.432 kg
Recall
Cus Tare
2.789 kg
0 ... 9
3.5 Zeroing
This function depends on the metrological limitation of the scale.
Due to soiling on the weighing pan or unfavourable external influences, it is possible that the weight
display of an unloaded weighing pan may no longer be 0.000 kg. In such cases, the scale must be
reset to zero.
− Press the Zero key.
ð The weight display is set to zero.
0.010 kg
0.000 kg
0
Fast and easy operation18 Skippper 5000
Page 21
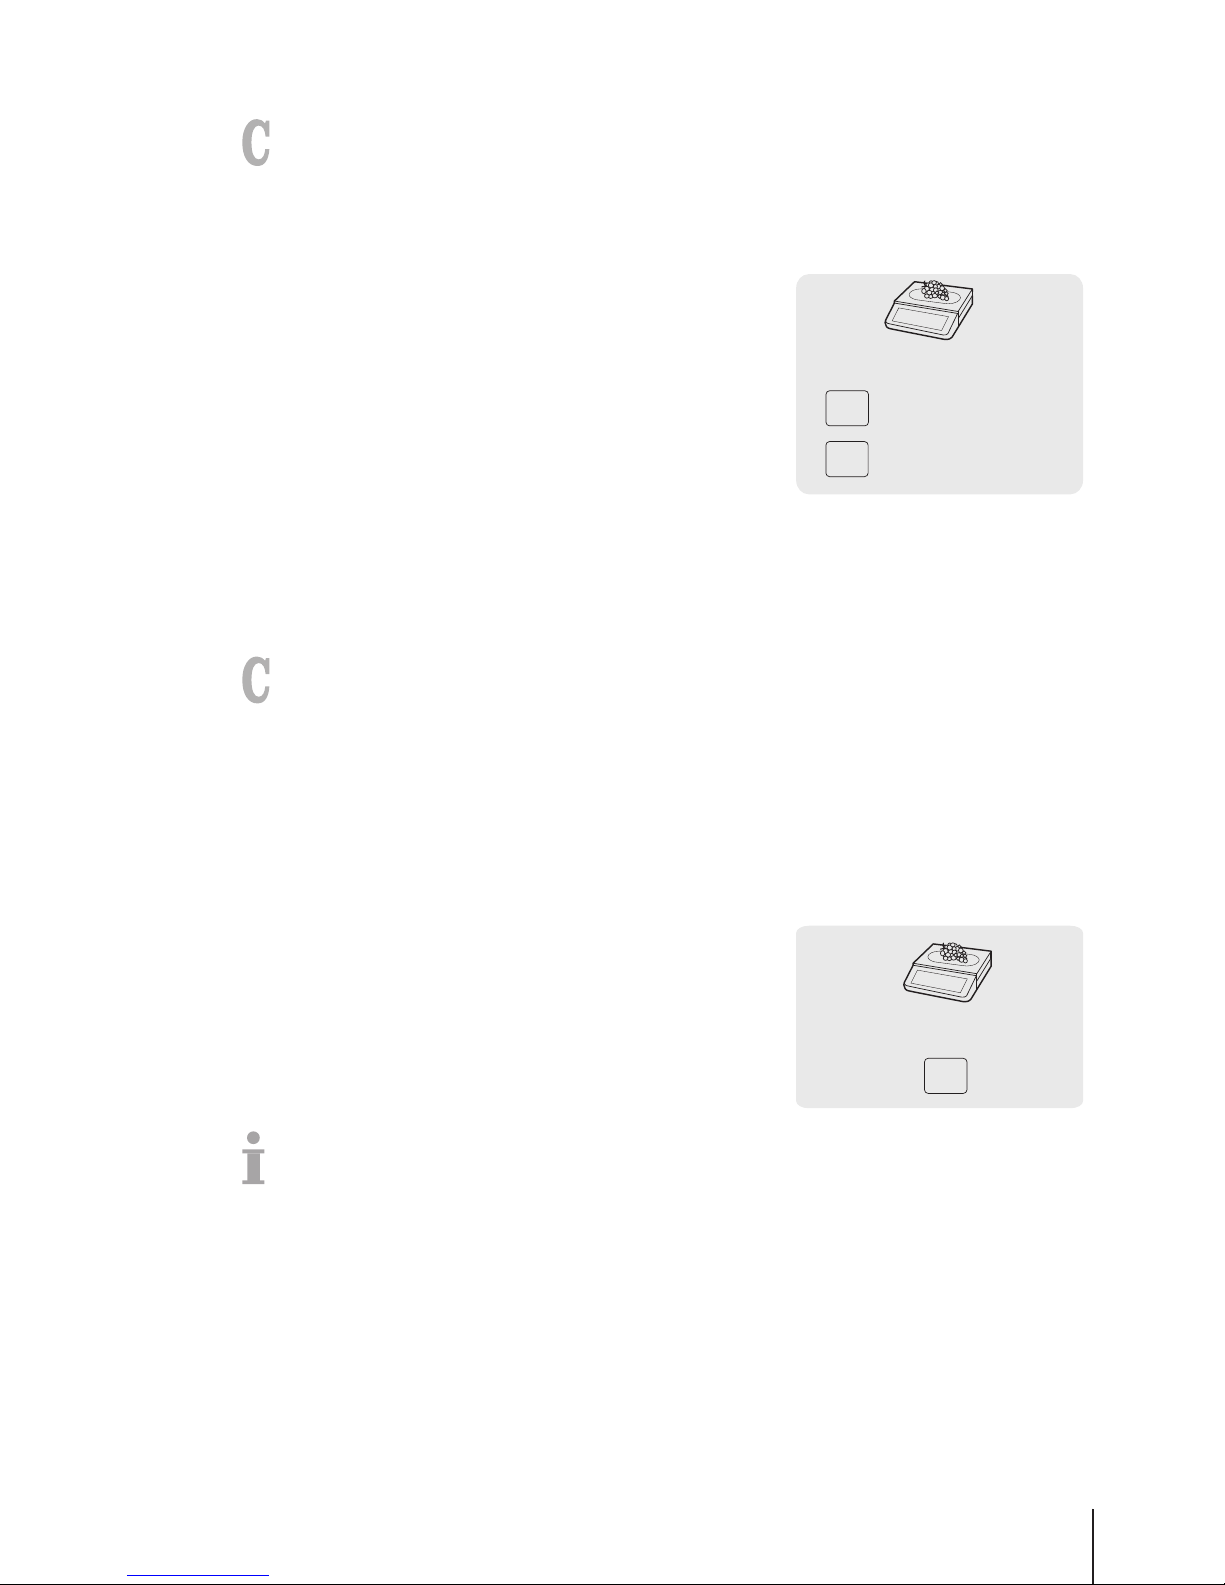
3.6 Weighing with 100 g price unit
For many products, customers are used to a price per 100 g. If the PLU is defined with unit kg, the
following settings must be made for weighing with 100 g price unit:
• "100 g" enabled in sub-menu F215.
• A key defined as [100 g] key in sub-menu F232.
• The PLU unit price can be divided by 10, e.g., 2.90.
1 Place the item on the scale.
2 Call up the PLU.
ð The unit price (per kg) and item name appear in the display.
3 Press the [100 g] key.
ð The 100 g indicator and the unit price per 100 g is displayed
for this item.
4 Confirm the weight with the Vendor key.
5 For more items, repeat steps 1 to 4.
6 Complete the transaction as described in section [Free
input}Page14].
V
25.90 /kg
2.59 /100g
100g
PLU
3.7 Working with several vendors
3.7.1 Working with several vendors on one scale (multiple vendors)
For working with several vendors on one scale the following settings must be made:
• Define up to 16 vendors in sub-menu F121.
• Select "Vendor Mode = Multi Vendor" in sub-menu F233.
• Either assign additional Vendor keys in F232 or select "Vendor key = V + Vendor ID" in sub-menu
F233.
When working with several vendors on one scale, each vendor has to use his/her Vendor key to enter
items.
Example
Vendor 2 has weighed several items and wants to complete his/her transaction.
1 Place the item on the scale.
2 Call up the PLU by PLU number or directly enter the unit price.
3 Confirm the entry with the Vendor key V2.
4 For more items, repeat steps 1 to 3.
5 Complete the transaction as described in section [Free
input}Page14].
0 … 9
V2
PLU
• If more than one vendor is active, the vendor's entry is hidden after approx. 2 seconds to prevent
incorrect entries.
• If a vendor tries to complete a transaction without his/her Vendor key, the message USER IDENT
appears.
• The vendor messages are retained when the scale is turned off and back on.
Fast and easy operation 19Skippper 5000
Page 22
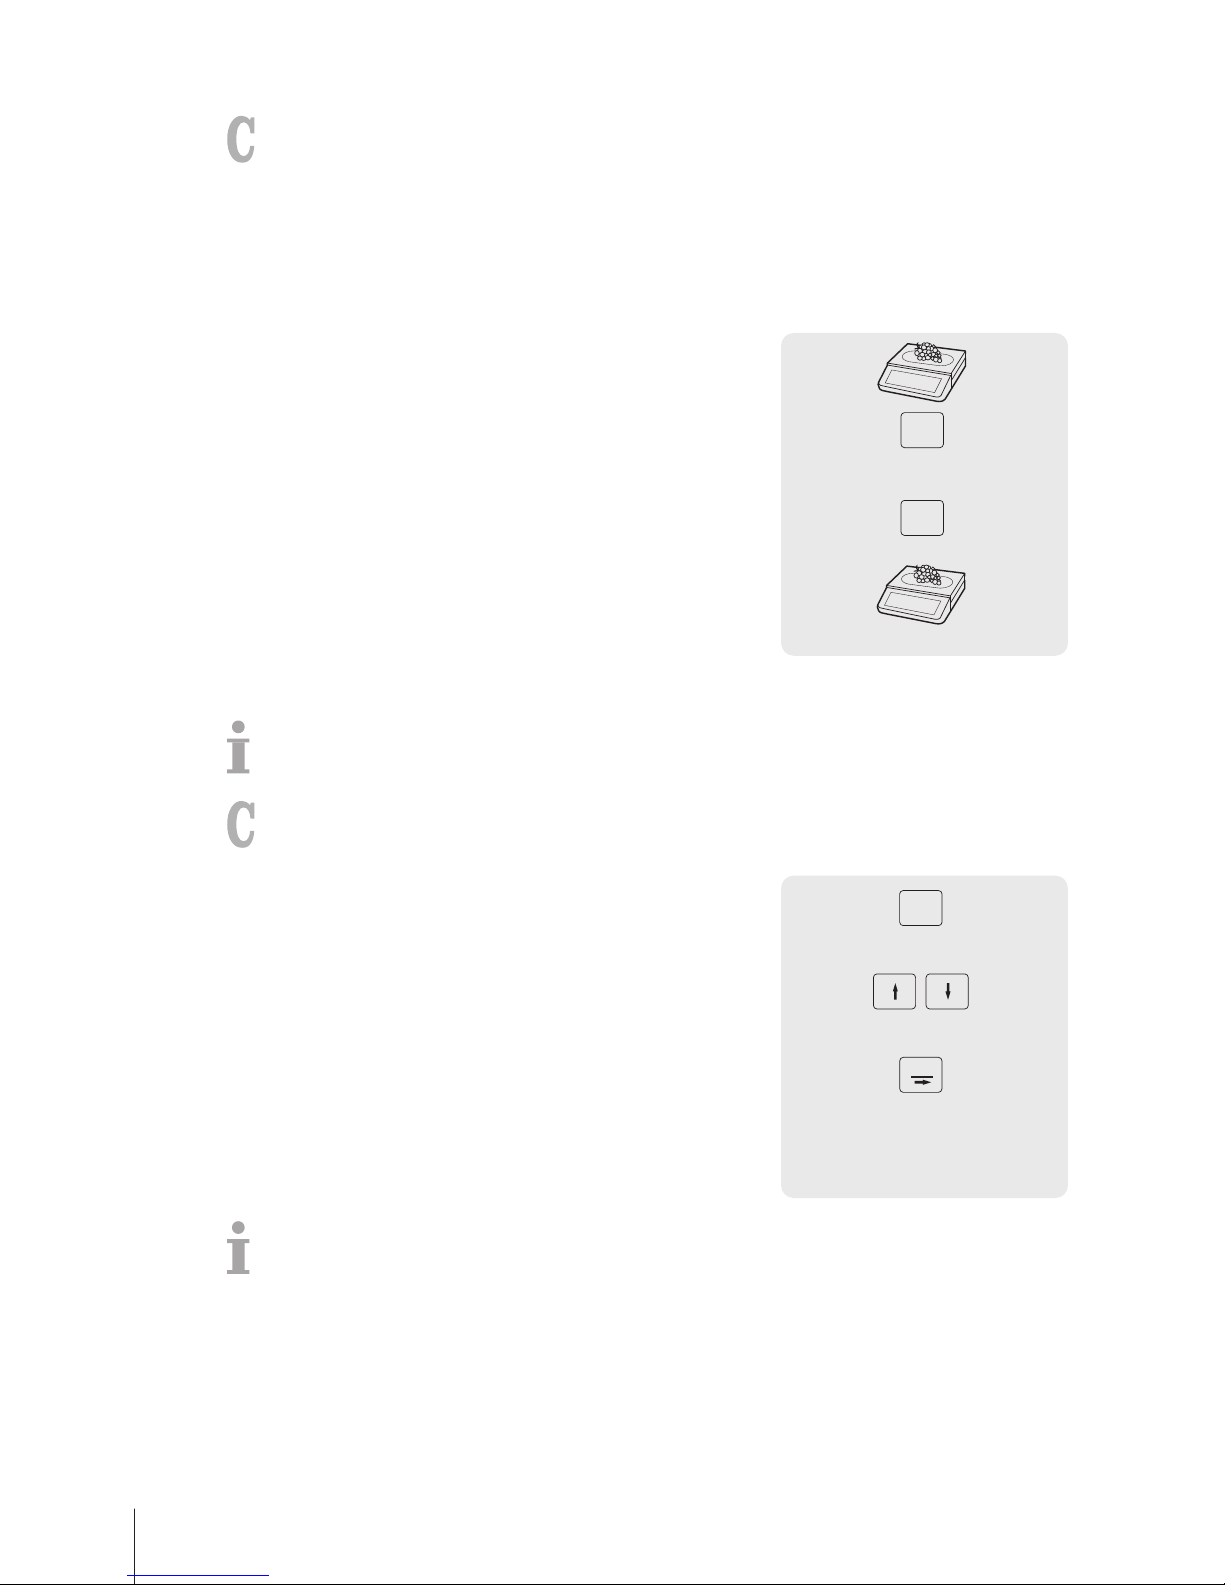
3.7.2 Working with several scales (floating vendor)
With floating vendors, each vendor can work with any scale in a network of scales. To do so, the
following settings must be made:
• Define up to 16 vendors in sub-menu F121.
• Select "Vendor Mode = Floating Vendor" in sub-menu F233.
• Either assign additional Vendor keys in F232 or select "V key = V + Vendor ID" in sub-menu F233.
Example
Vendor 2 enters item 1 on scale A, item 2 on scale B and completes the transaction on scale C.
1 Place the item on any scale in the network, e.g., scale A.
2 Call up the PLU by PLU number or directly enter the unit price.
3 Confirm the entry with the Vendor key V2.
4 For more items, repeat steps 2 to 3 with any scale in the network,
e.g., scale B.
5 Complete the transaction on any scale in the network as
described in section [Free input}Page14].
0 … 9
…
A
PLU
V2
B
3.8 Voiding
Your customer decides not to buy one or more items which have already been weighed, but not paid.
In this case, you can void unwanted items.
To do so, the following setting must be made:
• "Void" must be enabled in sub-menu F212.
1 Press the Vendor key.
ð The ticket is called up.
2 Select the item which shall be voided.
3 Press the Void key to delete the selected item.
4 For more items, repeat steps 2 and 3.
5 Complete the transaction as described in section [Free
input}Page14].
…
Void
V
Double press the Void key to delete all items.
Fast and easy operation20 Skippper 5000
Page 23
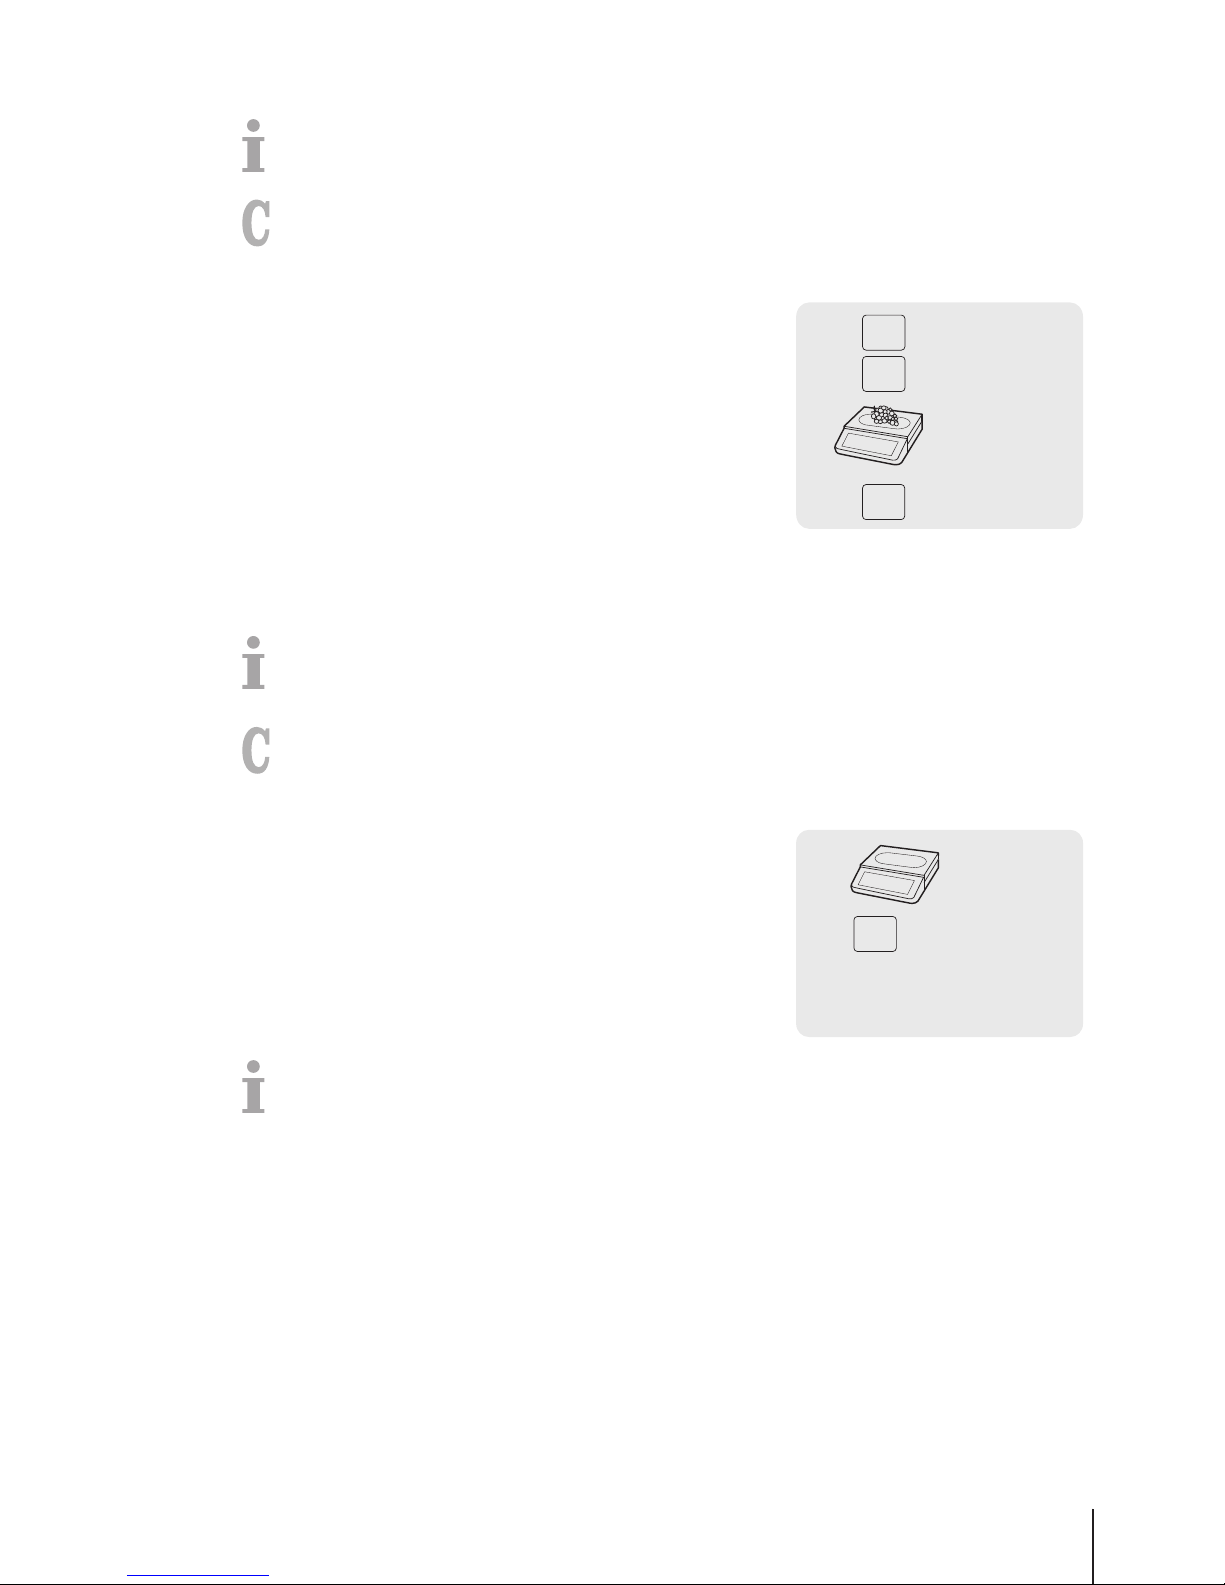
3.9 Refunding
Your customer has paid for an item, but would like to return it.
To partially or completely refund the sales price, the following settings must be made:
• Refund enabled in sub-menu F212.
• A key defined as [Refund] in sub-menu F232.
1 Call up the PLU.
ð The unit price and item name appear in the display.
2 Press the [Refund] key.
If required, enter password.
3 Place the item to be refunded on the scale or enter the quantity
and confirm with the Vendor key.
ð The price to be refunded is displayed with negative sign.
4 For more items, repeat steps 1 to 3.
5 Complete the transaction as described in section [Free
input}Page14].
V
Refund
0 … 9
Password
–5.90
PLU
3.10 Reopening a ticket
You have finished the transaction with the Star key and the ticket was printed. Now the customer
would like to return an item. In this case, you can reopen the ticket. To reopen a ticket, the vendor
who recalls the ticket cannot have an open ticket.
To reopen the ticket, the following settings must be made:
• "Reopen ticket" enabled in sub-menu F218.
• A key defined as [Ticket Reopen] in sub-menu F232.
1 Press the [Ticket Reopen] key.
ð Ticket No. is displayed.
2 Enter the number of the ticket you want to reopen and confirm
with the Vendor key.
3 Make the required changes.
4 Complete the transaction as described in section [Free
input}Page14].
Reopen
12345
0 … 9
…
• When a ticket is reopened, a new ticket number is assigned to it.
• On the printout of the reopened ticket both the old and new ticket numbers are printed.
Fast and easy operation 21Skippper 5000
Page 24
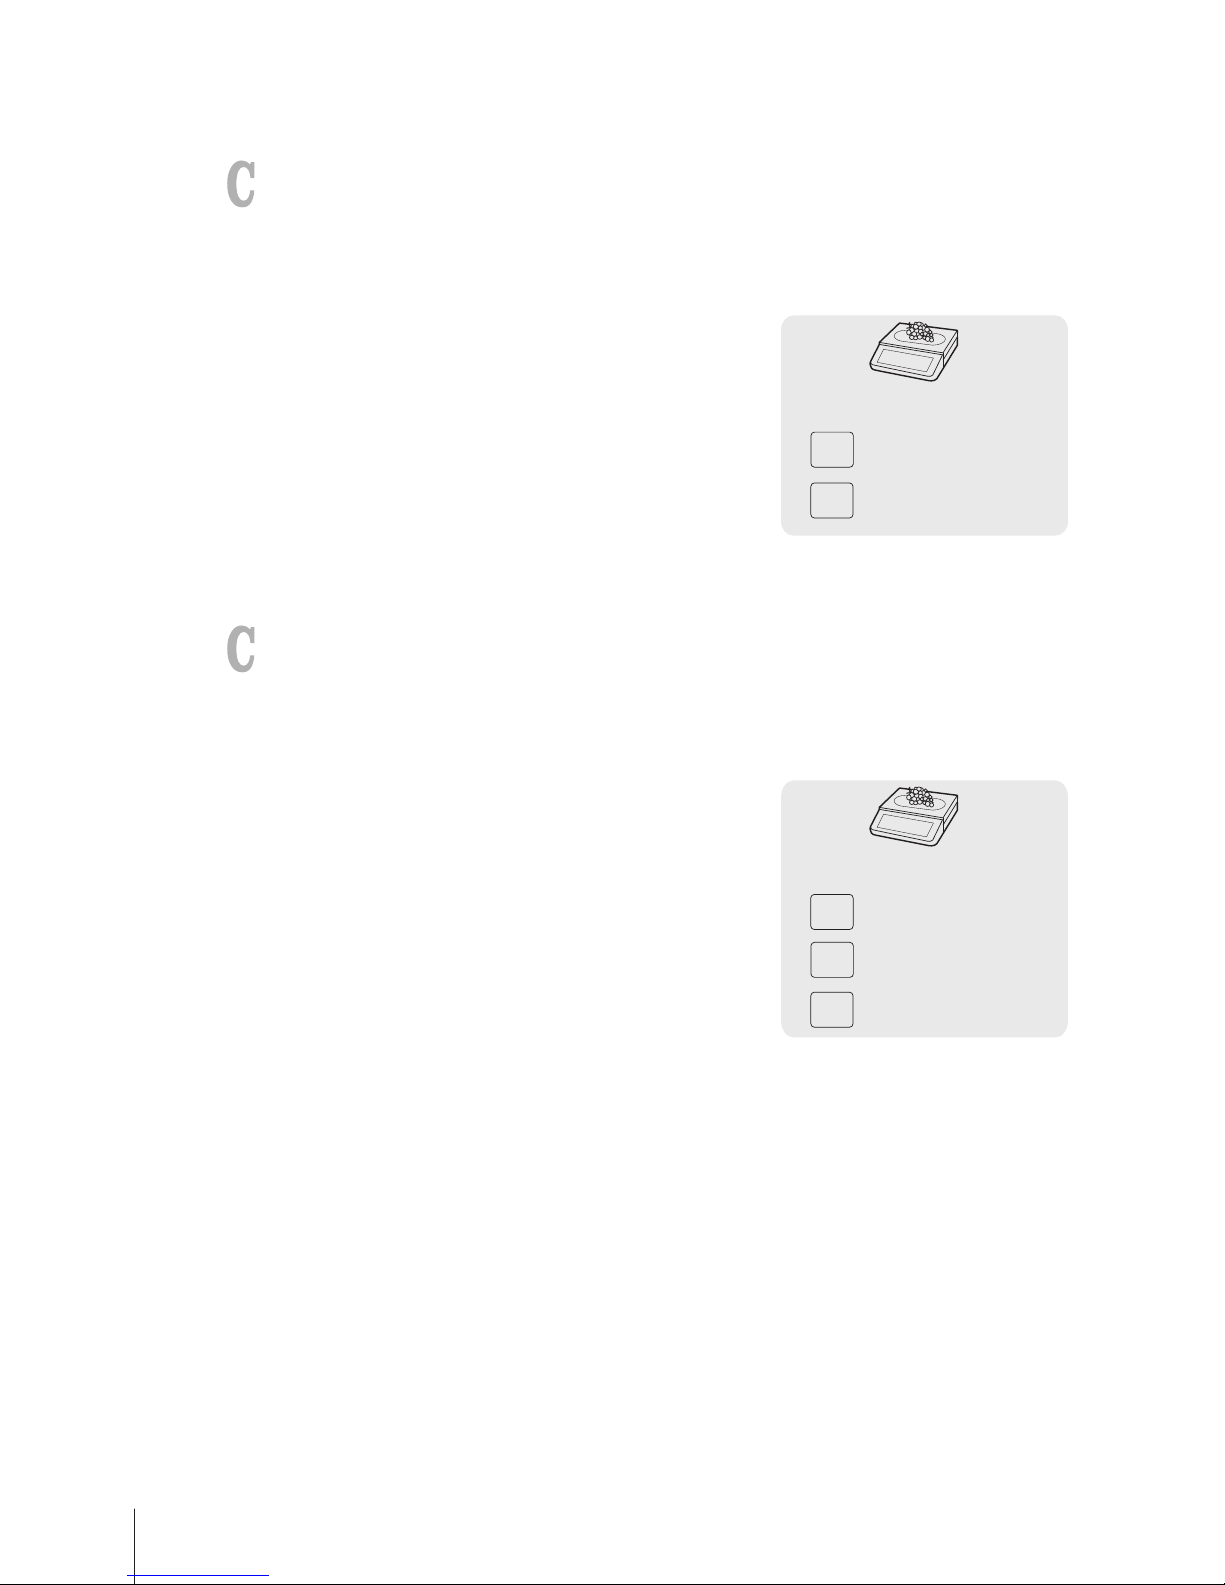
3.11 Changing prices
3.11.1 Overwriting a price temporarily
To be able to change a PLU price, the following settings must be made:
• "Overwrite Price" enabled or set to "Up to PLU" in sub-menu F215.
• If the price overwrite is "Up to PLU", the functionality must be enabled for each PLU individually in
sub-menu F111.
• A key defined as [Overwrite Price] in sub-menu F232.
1 Call up the PLU.
2 Press the [Overwrite Price] key and enter the new unit price
directly.
3 Complete the transaction as described in section [Free
input}Page14].
V
25.90 /kg
Overwrite
Price
PLU
20.00 /kg
0 ... 9
3.11.2 Overwriting a price permanently
To be able to change a PLU price permanently, the following settings must be made:
• "Overwrite Price" enabled or set to "Up to PLU" in sub-menu F215.
• If the price overwrite is "Up to PLU", the functionality must be enabled for each PLU individually in
sub-menu F111.
• Keys defined as [Save Price] and [Overwrite Price] in sub-menu F232.
1 Call up the PLU.
2 Press the [Overwrite Price] key and enter the new unit price
directly.
3 Press the [Save Price] key.
ð The new price is now saved permanently.
4 Complete the transaction as described in section [Free
input}Page14].
V
25.90 /kg
Save
Price
PLU
20.00 /kg
0 ... 9
Overwrite
Price
Fast and easy operation22 Skippper 5000
Page 25
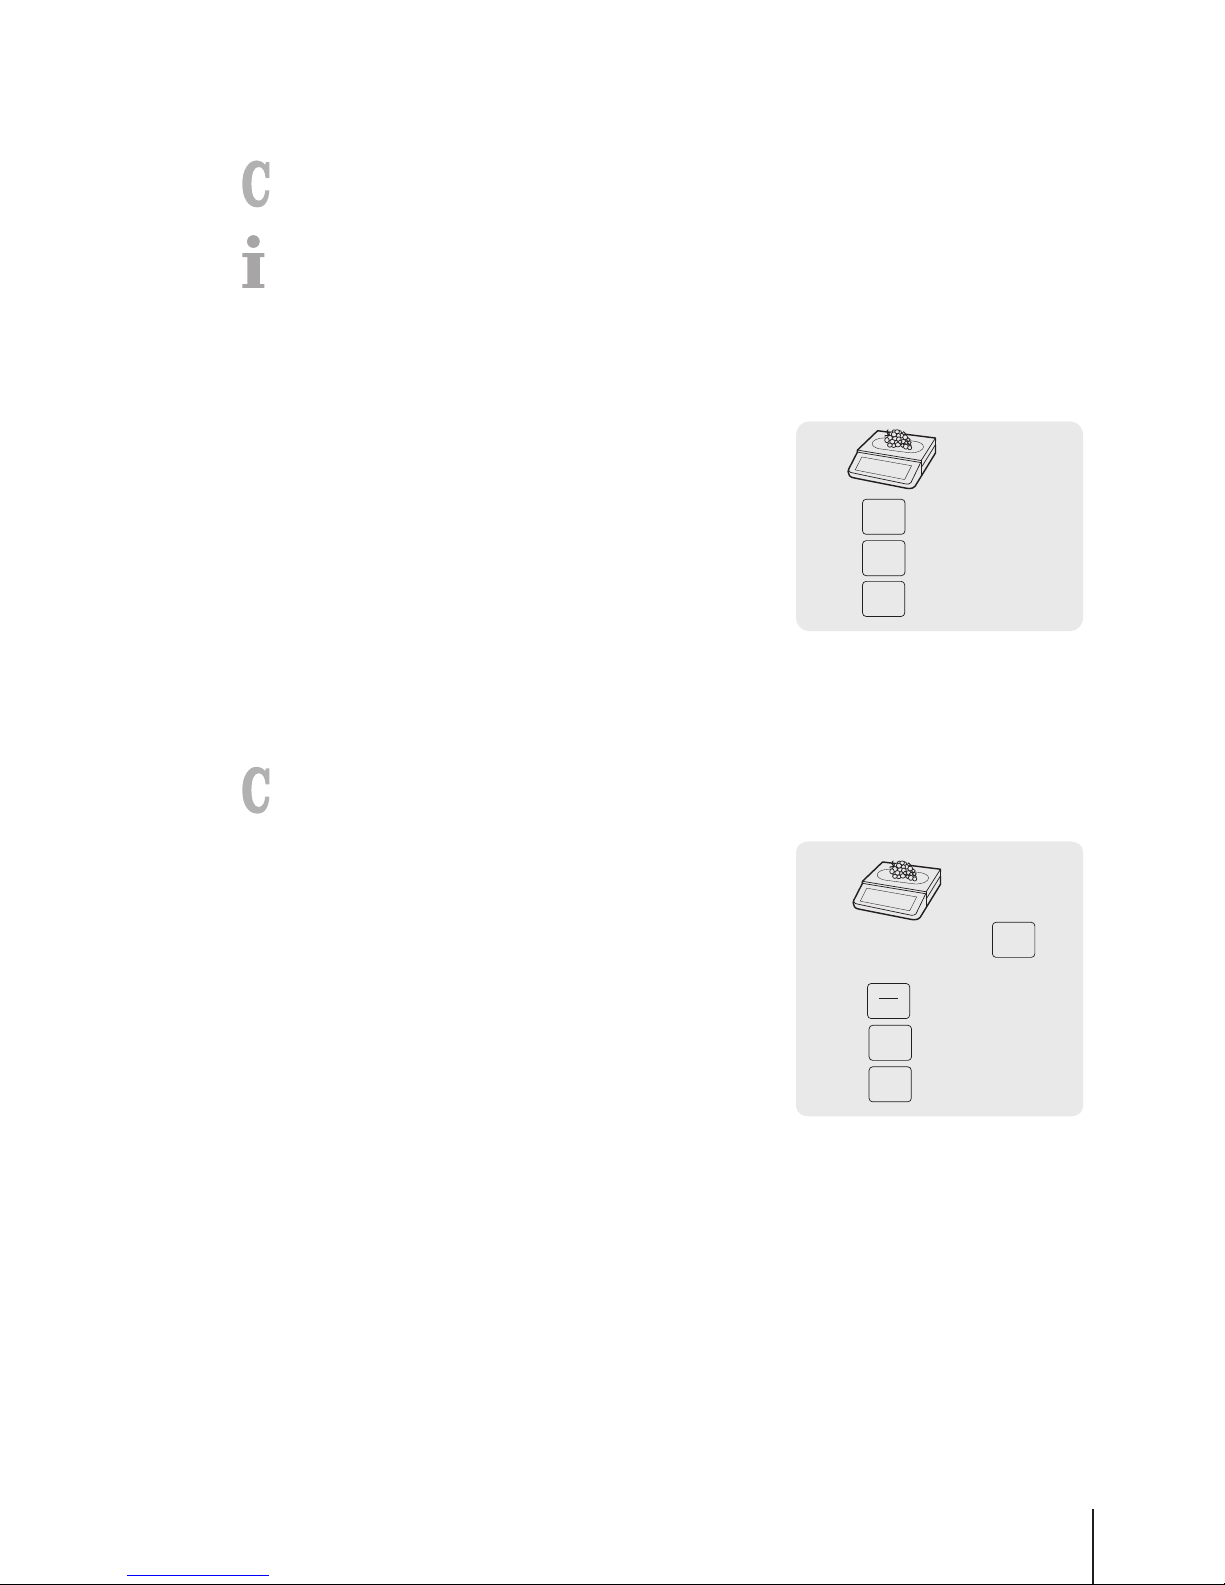
3.12 Granting a discount
3.12.1 Granting a discount on a single item
To grant a discount, the following setting must be made:
• "Discount on Unit Price" or "Discount on Total Price" enabled in sub-menu F217.
When choosing "Discount on Unit Price", the reduction is applied to price per weight/unit. When
choosing "Discount on Total Price", the reduction is applied to the calculated item price.
Example:
• PLU 1: 10 EUR per kg
• Weighed good: 200 g
• Discount on total price: 10% on 2 EUR
1 Place the item on the scale.
2 Call up the PLU.
ð The unit price and item name appear in the display.
3 Press the [Discount] key.
4 Enter the discount value.
5 Confirm the discount with the Vendor key.
ð The reduced price is displayed.
6 For more items, repeat steps 1 to 5.
7 Complete the transaction as described in section [Free
input}Page14].
V
25.90
Disc
10
23.31
3.12.2 Granting a discount on the total sum
To grant a discount, the following setting must be made:
• "Discount on Sales Total" enabled in sub-menu F217.
1 Book the customer's items and confirm each item with your
Vendor key.
2 Total items with the Star key.
3 Press the [Discount] key.
4 Enter the discount value.
5 Confirm the discount with the Vendor key.
ð The reduced total price is displayed.
6 Complete the transaction as described in section [Free
input}Page14].
0 … 9
…
Total 57.85
V
*
Pay
V
10
52.06
Disc
Fast and easy operation 23Skippper 5000
Page 26
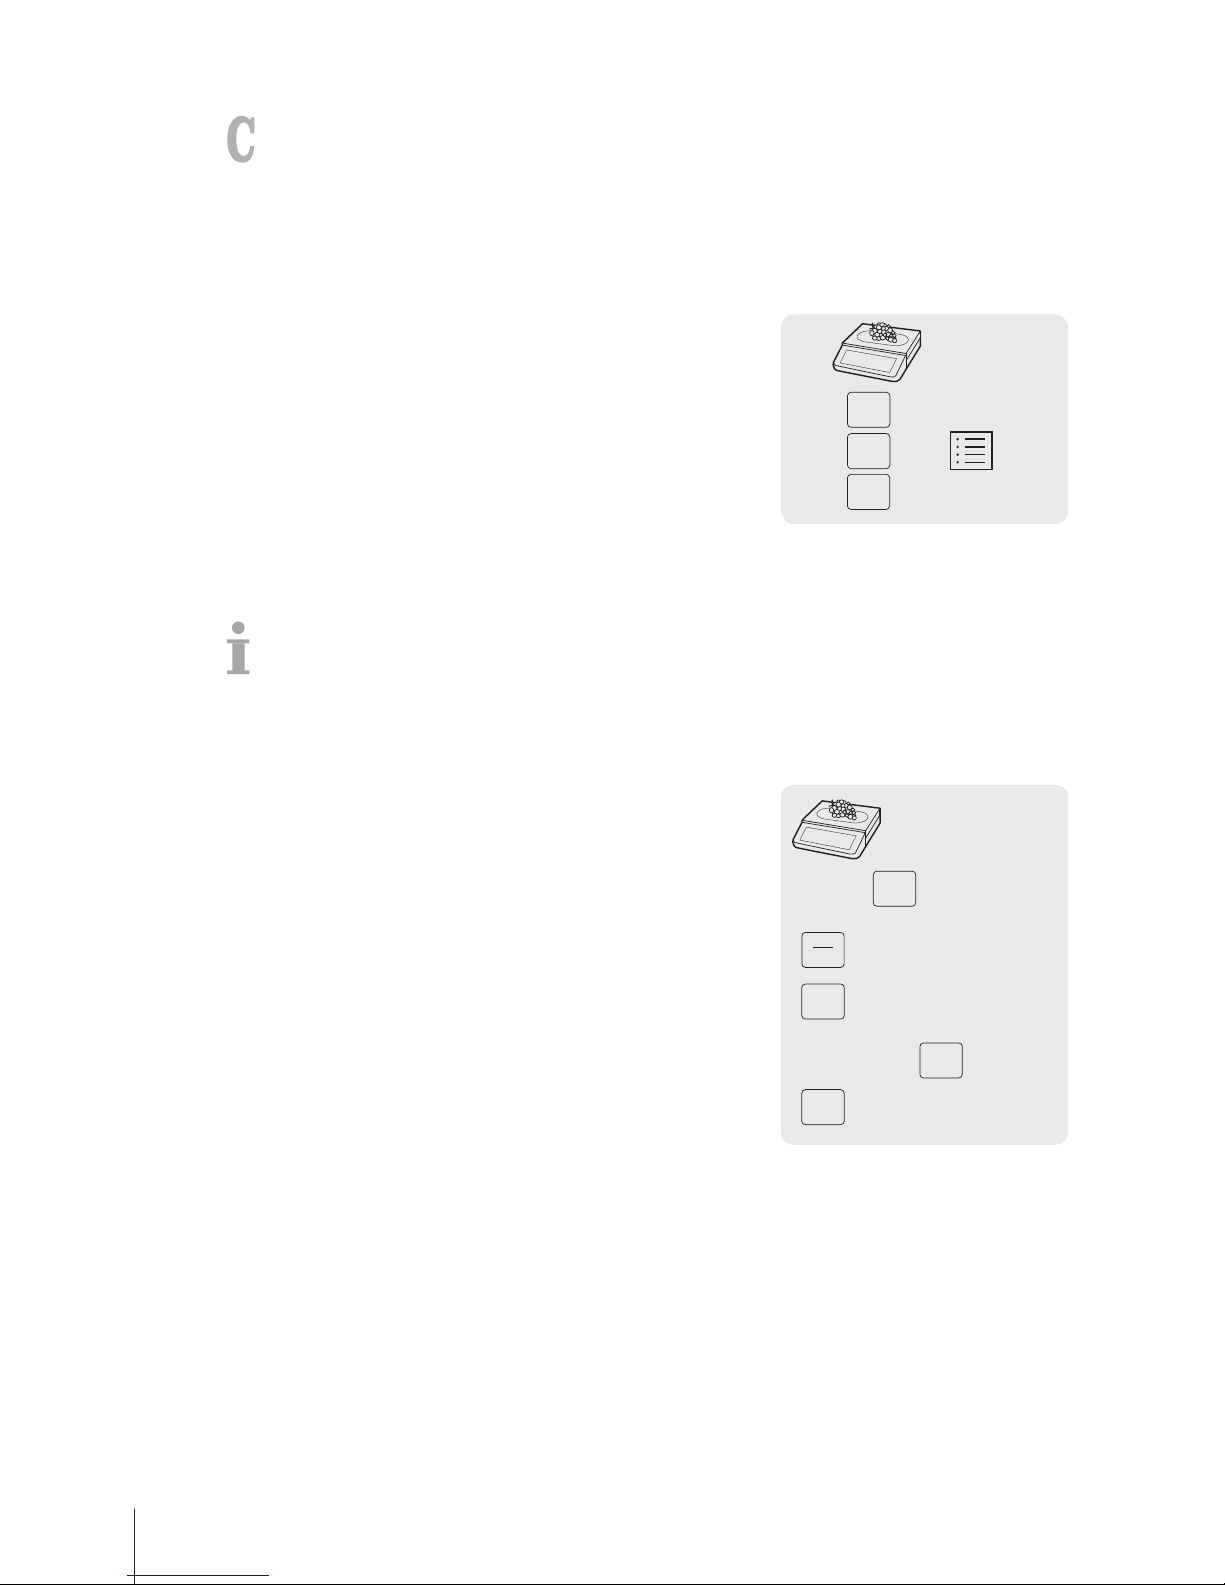
3.12.3 Granting a pre-defined discount
To grant a pre-defined discount, the following settings must be made:
• Discounts defined in sub-menu F131.
• One of the following settings enabled in sub-menu F217.
– "Discount on Unit Price"
– "Discount on Total Price"
– "Discount on Sales Total"
1 Place the item on the scale.
2 Call up the PLU.
ð The unit price and item name appear in the display.
3 Press the [Discount List] key.
4 Select the desired discount value from the list.
5 Confirm the discount with the Vendor key.
ð The reduced price is displayed.
6 For more items, repeat steps 1 to 5.
7 Complete the transaction as described in section [Free
input}Page14].
V
25.90
Disc
23.31
To grant a pre-defined discount on the total sum, total items with the Star key and press the [Discount
List] key.
3.13 Payment
3.13.1 Working with return
1 Book the customer's items and confirm each item with the Vendor
key.
2 Total items with the Star key.
3 Press the Vendor key.
4 Enter amount given by the customer and confirm with the Vendor
key.
0 … 9
…
V
*
Pay
Total 57.85
V
60
Change 2.15
Cash
V
Fast and easy operation24 Skippper 5000
Page 27
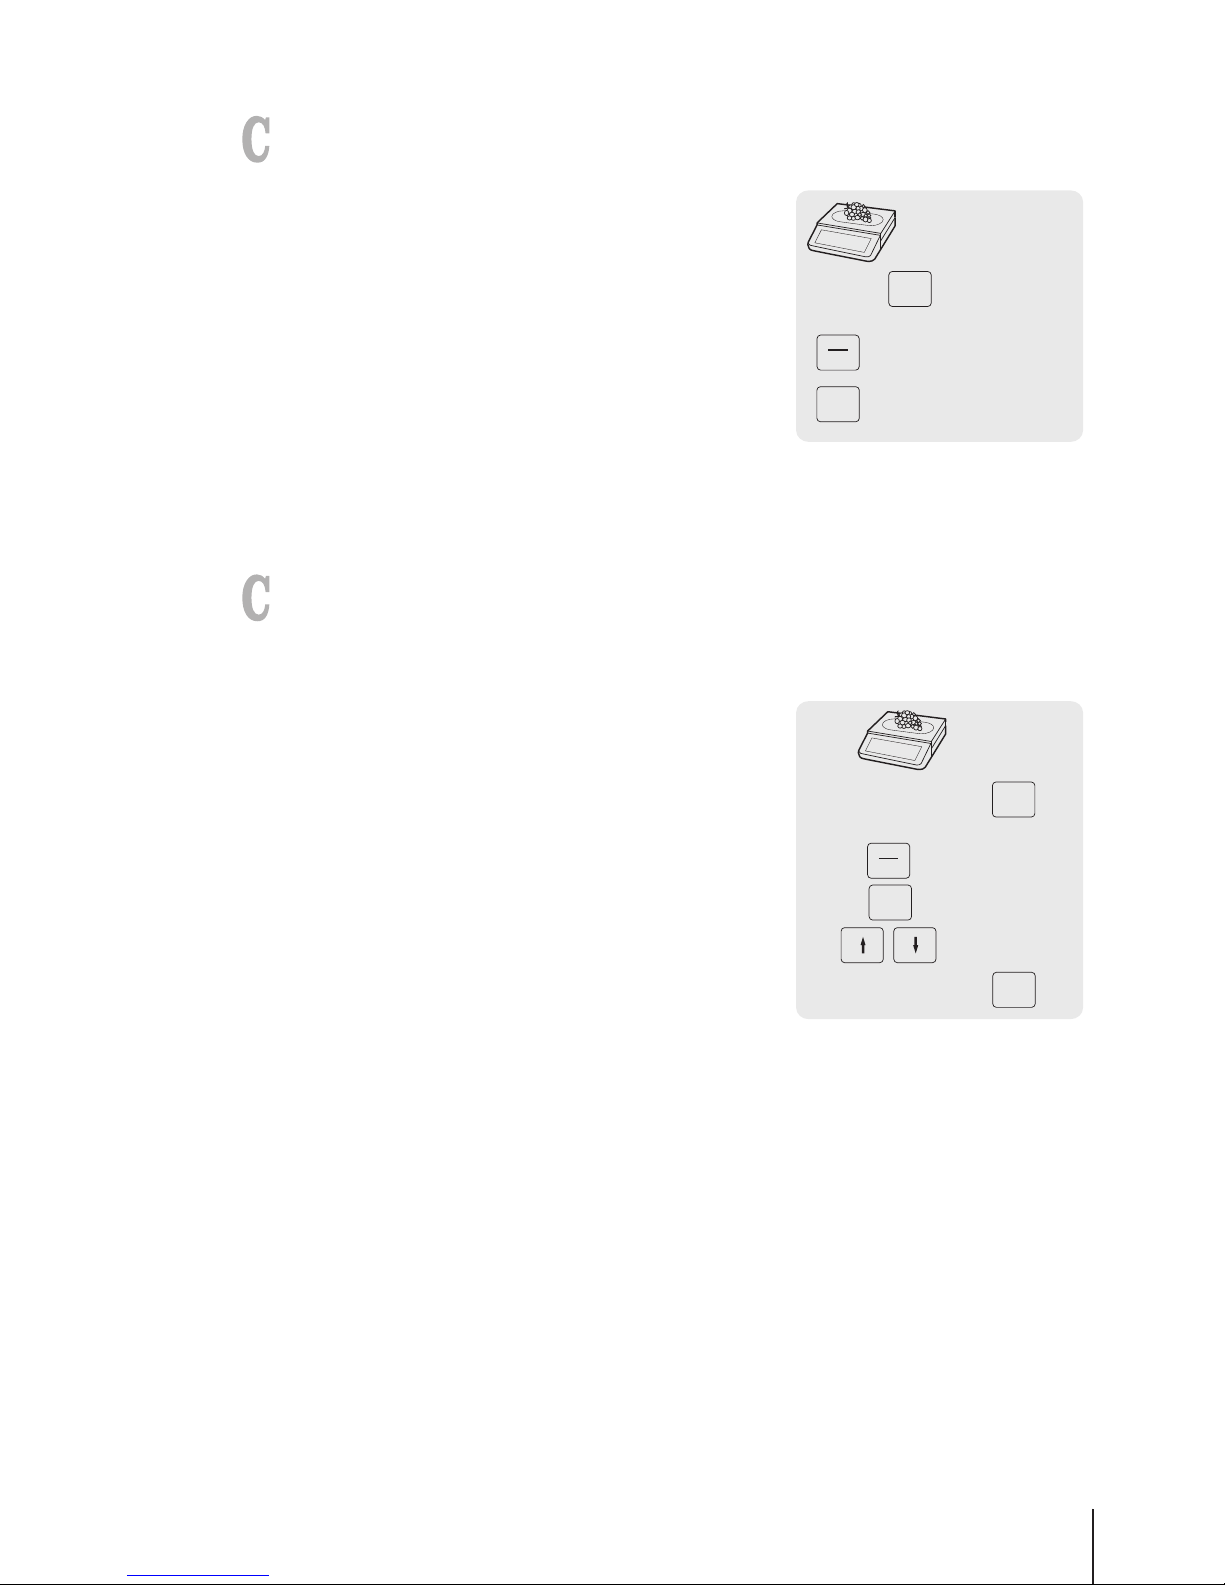
3.13.2 Working without return
For direct ticket print, without entering the payment screen when working with a single vendor, enable
"Direct Printout" in sub-menu F245.
1 Book the customer's items and confirm each item with the Vendor
key.
2 Total items with the Star key.
3 Press the Vendor key.
0 … 9
…
*
Pay
Total 57.85
V
V
3.13.3 Working with multiple payment
For multiple payment, e.g., with credit cards, cheques and vouchers, the following settings must be
made:
• Payments defined in sub-menu F141.
• "Multiple Payment" enabled in sub-menu F218.
1 Book the customer's items and confirm each item with your
Vendor key.
2 Total items with the Star key.
3 Press the Vendor key.
4 Select from the displayed payments.
5 Confirm the payment with the Vendor key.
6 Enter the amount and confirm with the Vendor key.
7 For multiple payment, repeat steps 3 to 6.
8 Complete the transaction as described in section [Free
input}Page14].
0 … 9
…
Total 57.85
V
*
Pay
Payment
1 Cheque
5 Voucher
0 … 9
V
Fast and easy operation 25Skippper 5000
Page 28
3.14 Cash in / cash out
The scale offers the possibility to log cash in / cash out operations without a transaction. To do so,
the following settings must be made:
• Keys defined as [Cash In] and/or [Cash Out] in sub-menu F232.
1 Press the [Cash In] or [Cash Out] key respectively.
2 Enter the amount of cash (e.g., 5000) and confirm with the OK key.
ð The entered amount will show up in the cash report.
3.15 Assigning a group VAT
The group VAT will only be applied when working with free price items or when the PLU VAT rate has
not been defined.
To be able to allocate a group VAT to a free price item or PLU, the following settings must be made:
• A VAT rate assigned to the group in sub-menu F113.
• The group assigned to a preset key.
1 If Enter PLU number is displayed, press the PLU key.
ð Direct Price is displayed.
2 Place the item on the scale.
3 Enter the unit price (price/kg) with the number keys.
4 Press the [Group] key.
ð The group is assigned and the respective VAT rate is used.
5 Confirm the entry with the Vendor key.
6 For more items, repeat steps 1 to 5.
7 Complete the transaction as described in section [Free
input}Page14].
0 … 9
V
V
.../kg
0 … 9
Group
Fast and easy operation26 Skippper 5000
Page 29
3.16 Backup / restore data via USB device
3.16.1 Recommended USB devices
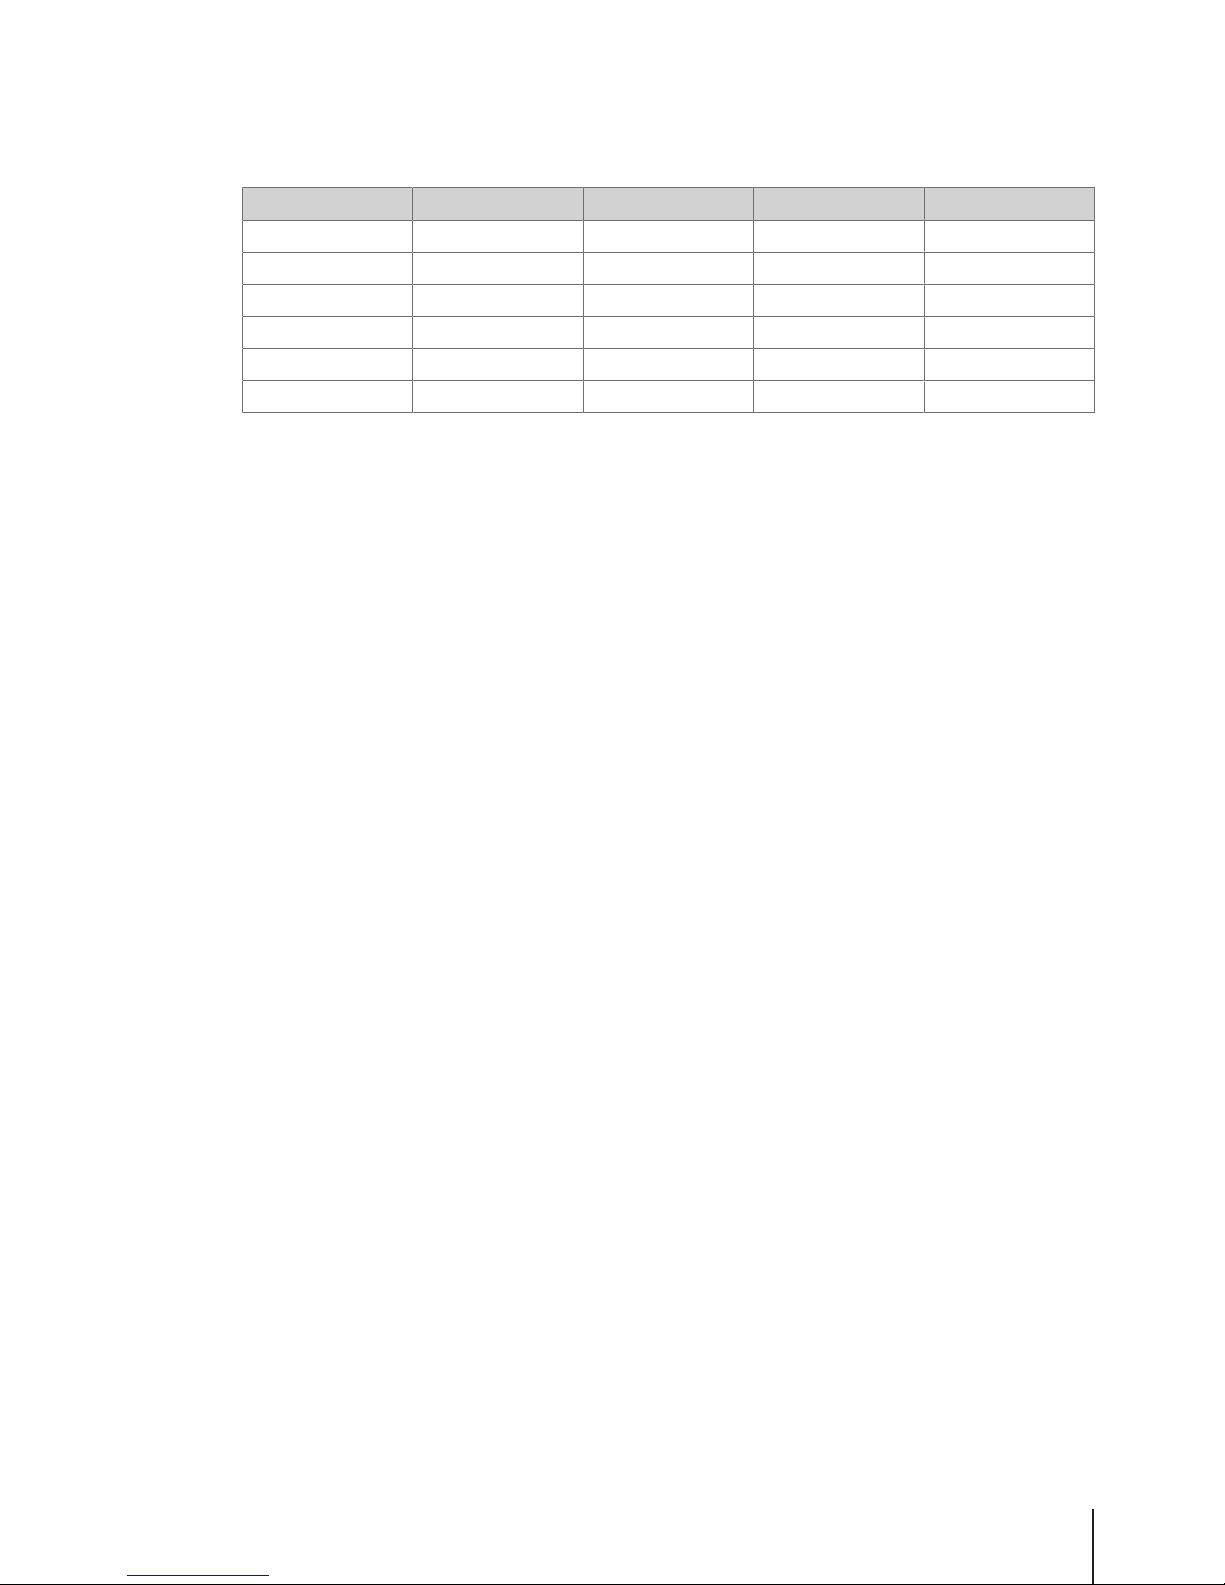
For saving or loading data to or from a USB device we recommend the following:
Brand Capacity Memory format USB interface Recognition time
HP 8 GB FAT32 USB 2.0 < 1 second
KDATA 8 GB FAT32 USB 2.0 < 1 second
KINGSTON 16 GB FAT32 USB 3.0 < 1 second
SanDisk 8 GB FAT32 USB 2.0 < 1 second
TOSHIBA 8 GB FAT32 USB 2.0 < 1 second
BIZKEY 8 GB FAT32 USB 2.0 45 to 50 seconds
3.16.2 Backup data to a USB device / restoring data from a USB device
1 Plug the USB device into the USB connector at the bottom of the scale.
2 Use the Arrow up / Arrow down keys to select "Backup data to USB" respectively "Restore data
from USB" and confirm with the OK key.
3 Use the Arrow up / Arrow down keys to move through the options:
"Item data" – scale data
"Configuration" – scale configuration, bitmap and label, if available
"Transaction log" – transaction log file only
"All data" – item data, configuration data and transaction log file
4 Select or deselect an option by using the OK key.
5 Start back up/restore with soft key or Vendor key.
ð The selected data are transmitted to or from the USB device.
ð When the data transmission is finished, Accomplished will be displayed.
6 Unplug the USB device.
Fast and easy operation 27Skippper 5000
Page 30
4 Menu
4.1 Menu operation
4.1.1 Entering the menu
Default password: 2666666
1 Press the Menu key.
2 Enter the password.
3 Confirm the entry with the OK key.
Password 0 … 9
OK
Menu
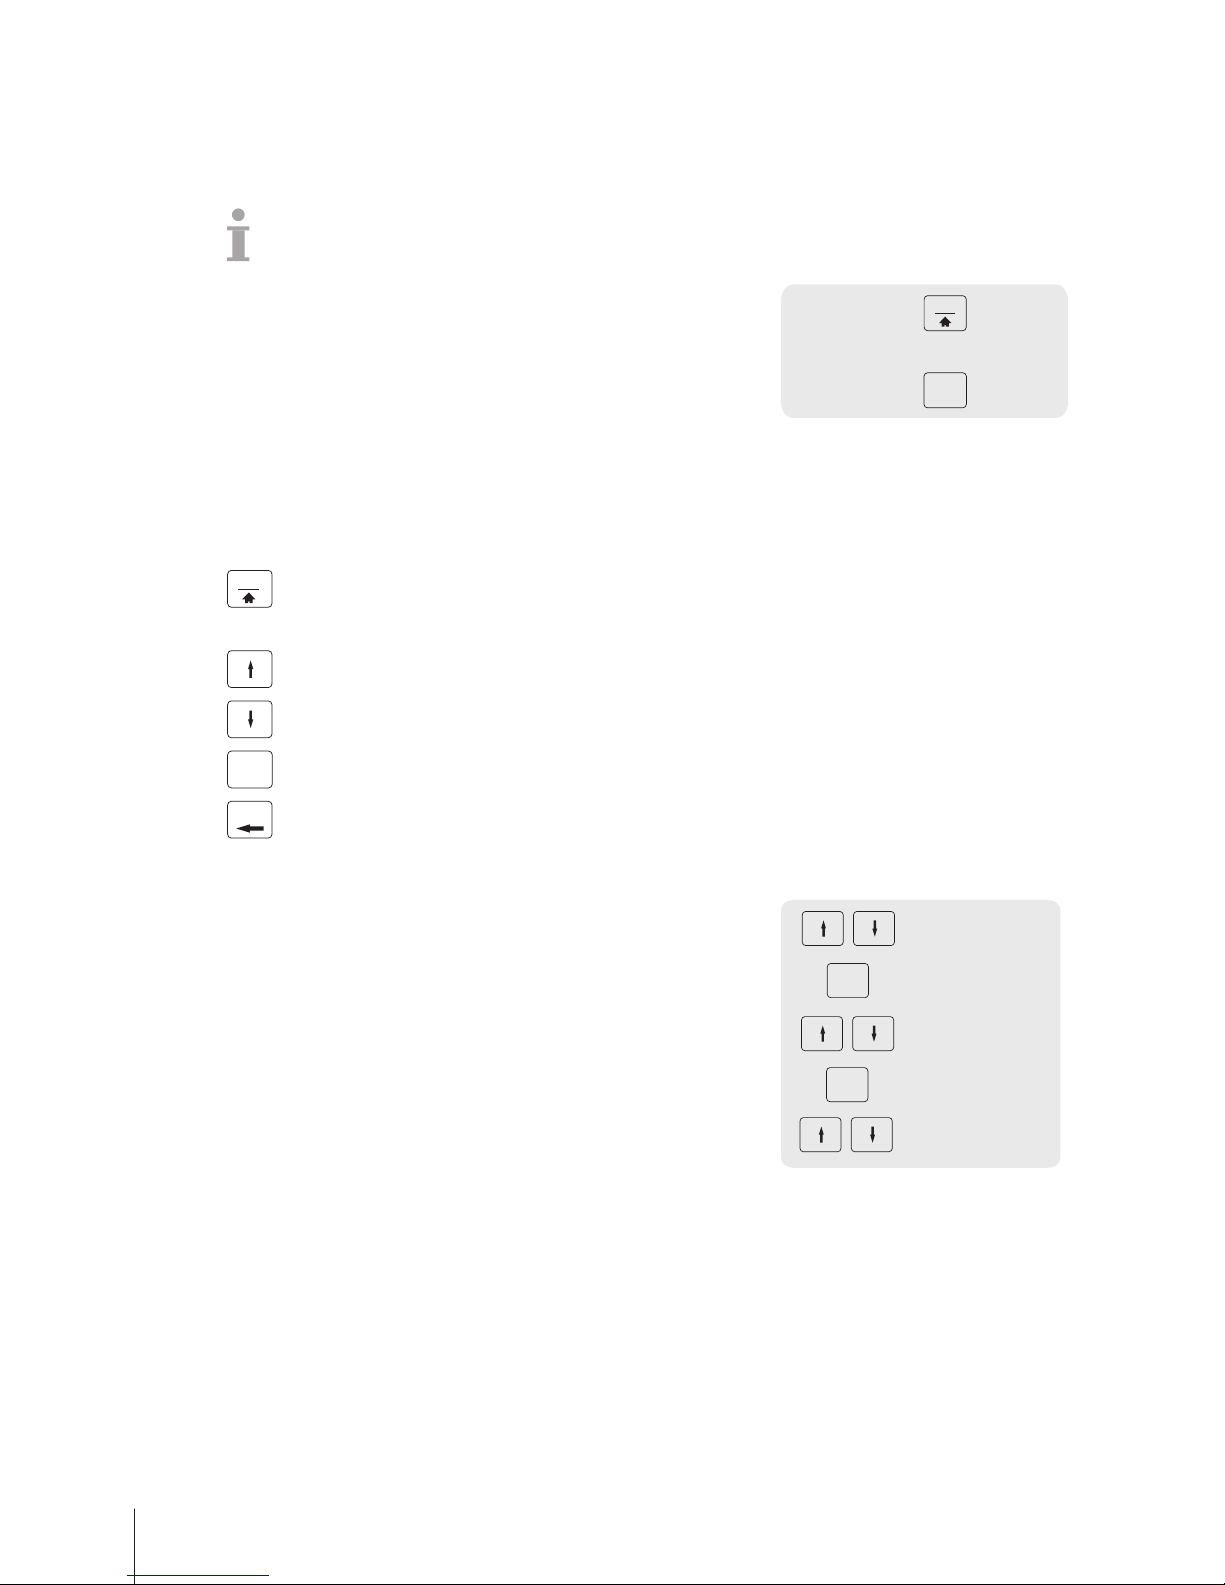
4.1.2 Key functions in the menu
The following keys can be used in the menu:
Key Name Function
Menu
Menu key • Enter the menu
• Press and hold or double click to quickly return to the
weighing mode
Arrow up key Go to previous item
Arrow down key Go to next item
OK
OK key Confirm selection
Back
Back key Go to previous level
4.1.3 Navigating in the menu
1 Enter the menu.
2 Use the Arrow up / Arrow down keys to select a menu on the
highest level, e.g., F 1 Data.
3 Confirm the selection with the OK key.
4 Use the Arrow up / Arrow down keys to select a menu, e.g.,
F11ItemData.
5 Confirm the selection with the OK key.
6 Use the Arrow up / Arrow down keys to select a sub-menu, e.g.,
F111PLUDatabase/Edit.
OK
F 1 Data
OK
F 11 Item Data
F 111 PLU
Database/Edit
Direct access to the sub-menu
1 Enter the menu.
2 Enter menu or sub-menu number, e.g., F111.
3 Confirm the entry with the OK key.
Menu28 Skippper 5000
Page 31

4.1.4 Ending the menu
− Press and hold the Menu key until the weight display appears
again.
ð The scale is now in the normal operating mode.
– or –
− Press the Back key repeatedly until the normal operating mode is
displayed.
Menu
Back
…
0.000 kg
0.000 kg
…
Back
4.1.5 Text input
Text input on the scale works like on a mobile phone.
Example
Entering article name "Apple":
Key Action Display
8
Press once A
1
Press once Ap
1
Press once App
5
Press three times Appl
9
Press twice Apple
The entered characters are shown in the display. Repeatedly pressing the [00|#] key shows the
following values in the given sequence:
Abc
Lower case letters, first letter uppercase
ABC
Upper case letters
abc
Lower case letters
Uni
Unicode characters
Symbol
Special symbols
Menu 29Skippper 5000
Page 32
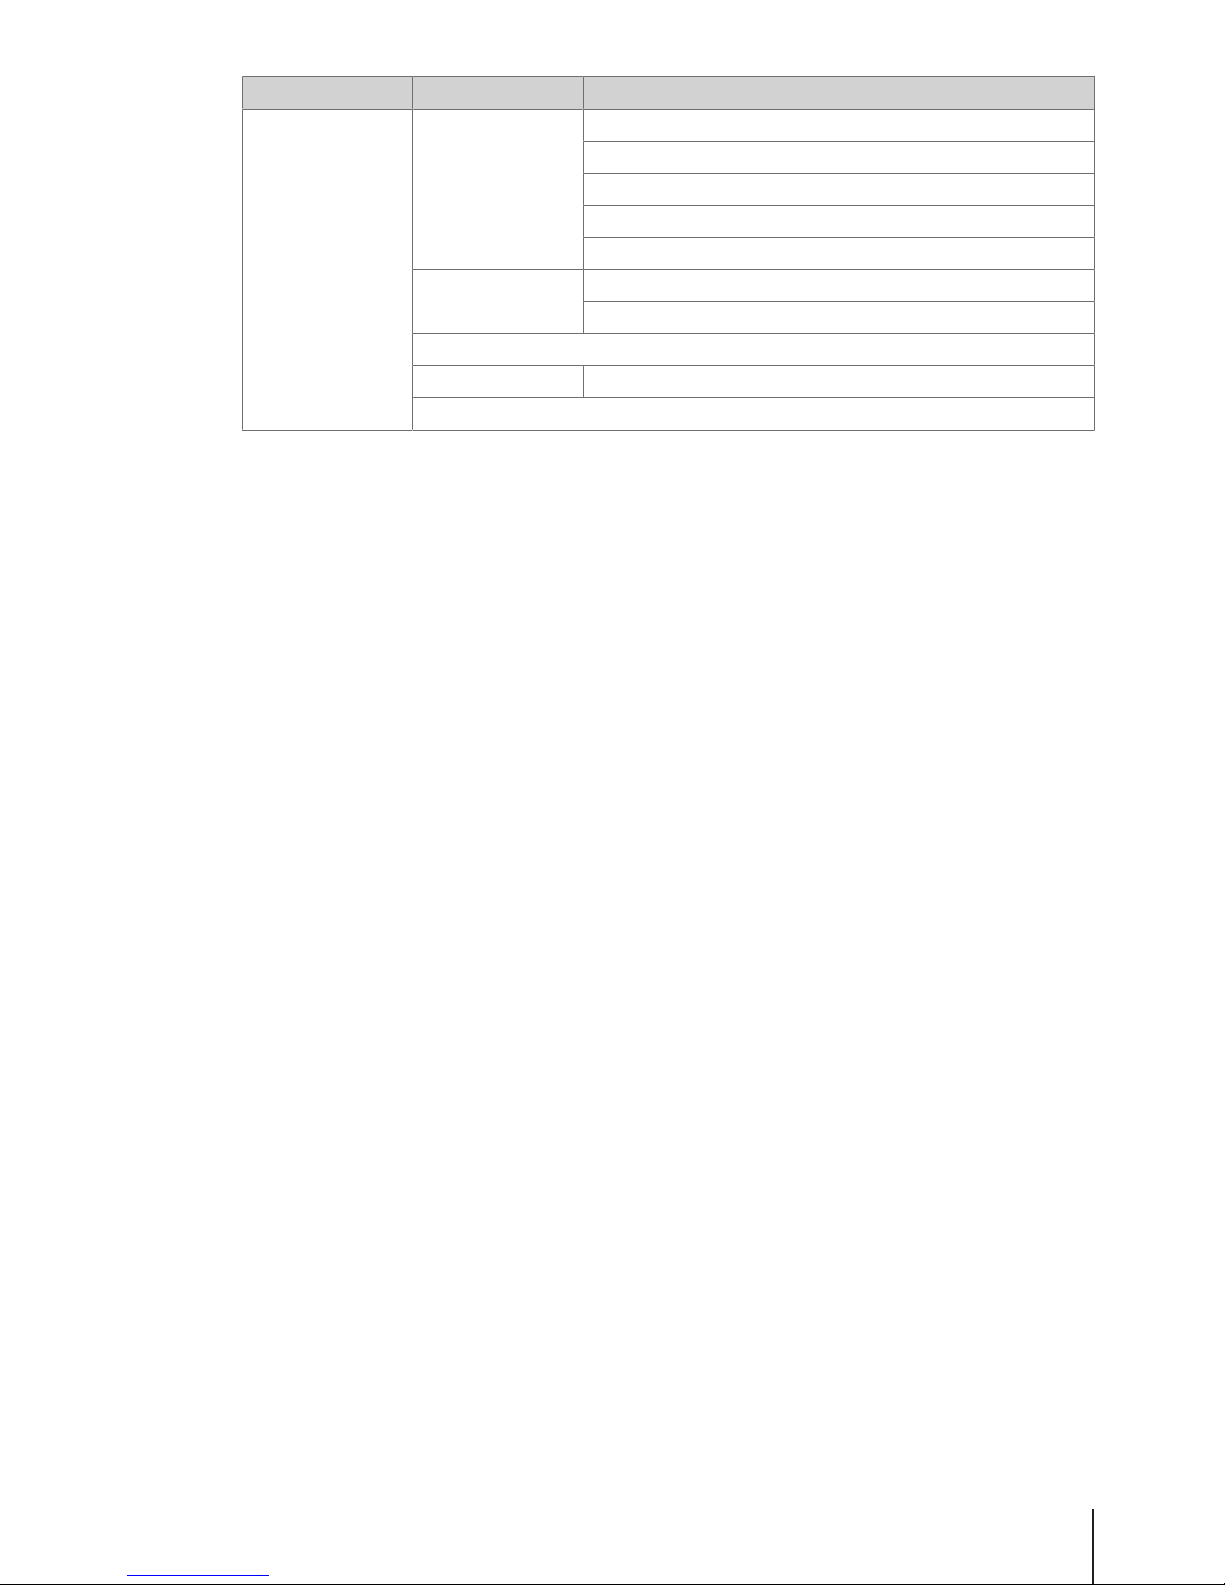
4.2 Menu description
4.2.1 Overview
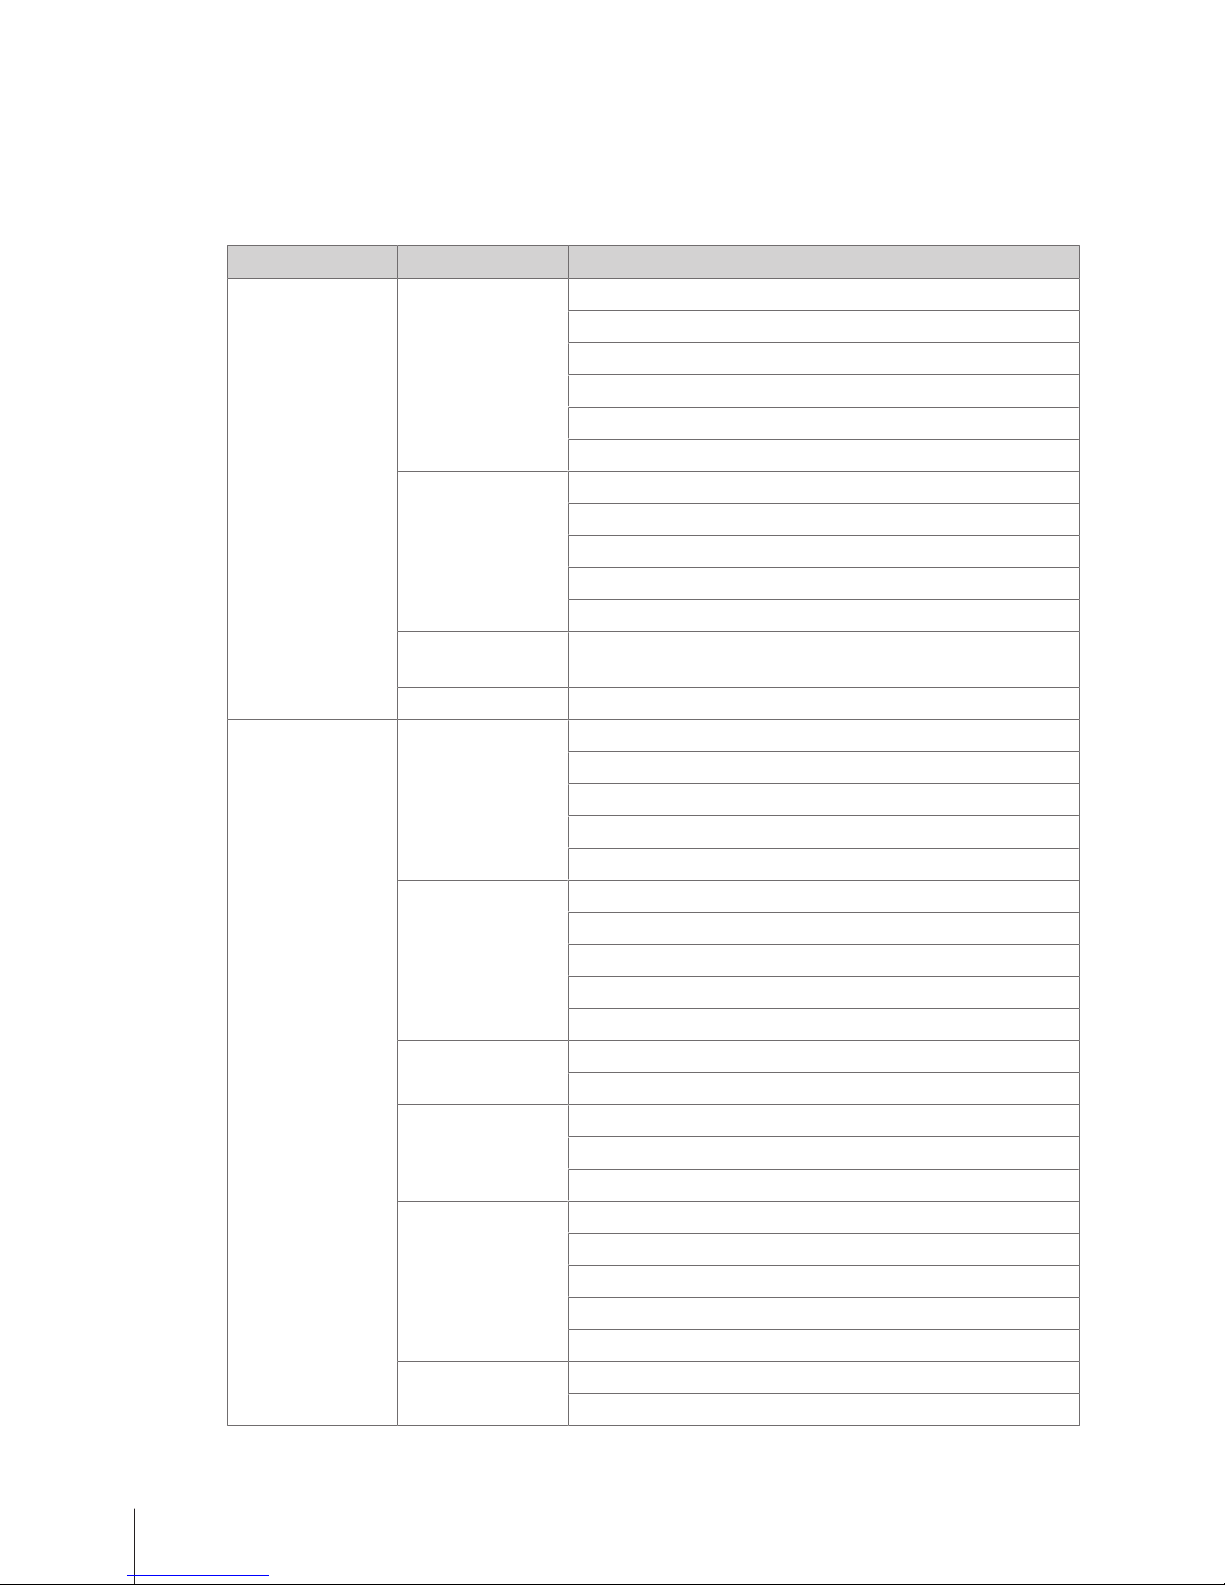
In the menu, you can set up the scale to handle your special sales and back office tasks. Specific
functions and groups are only accessible if you have a license. Ask your sales representative for this.
The menu features are organized in the following menu tree:
Menu group Menu Sub-menus
F1 Data F11 Item Data F111 PLU Database/ Edit
F113 Group
F115 Preset Tare
F116 Barcode
F117 VAT
PLU List Printout
F12 Data
Warehouse
F121 Vendor
F122 Scale
F123 Store
F126 Description text by Type
F128 Running Message
F13 Price
Management
F131 Discount
F14 Payment F141 Payment Method
F2 Configuration F21 Operation
Center
F211 Item Recall
F212 Item Registration
F215 Price
F217 Discount
F218 Payment
F23 General
Settings
F231 PLU Editing Fields
F232 Function Key
F233 Vendor
F235 Licenses
Training
F24 Printing F245 Ticket Configuration
F246 Ticket Content
F25 Connectivity F251 Network
F256 Transaction Log Server
F257 Data Server
F27 Control Panel F271 Display
F272 Sound
F273 Power Management
F274 Date and Time
F275 Language
F28 System F282 Reset
Printout System Info
Menu30 Skippper 5000
Page 33
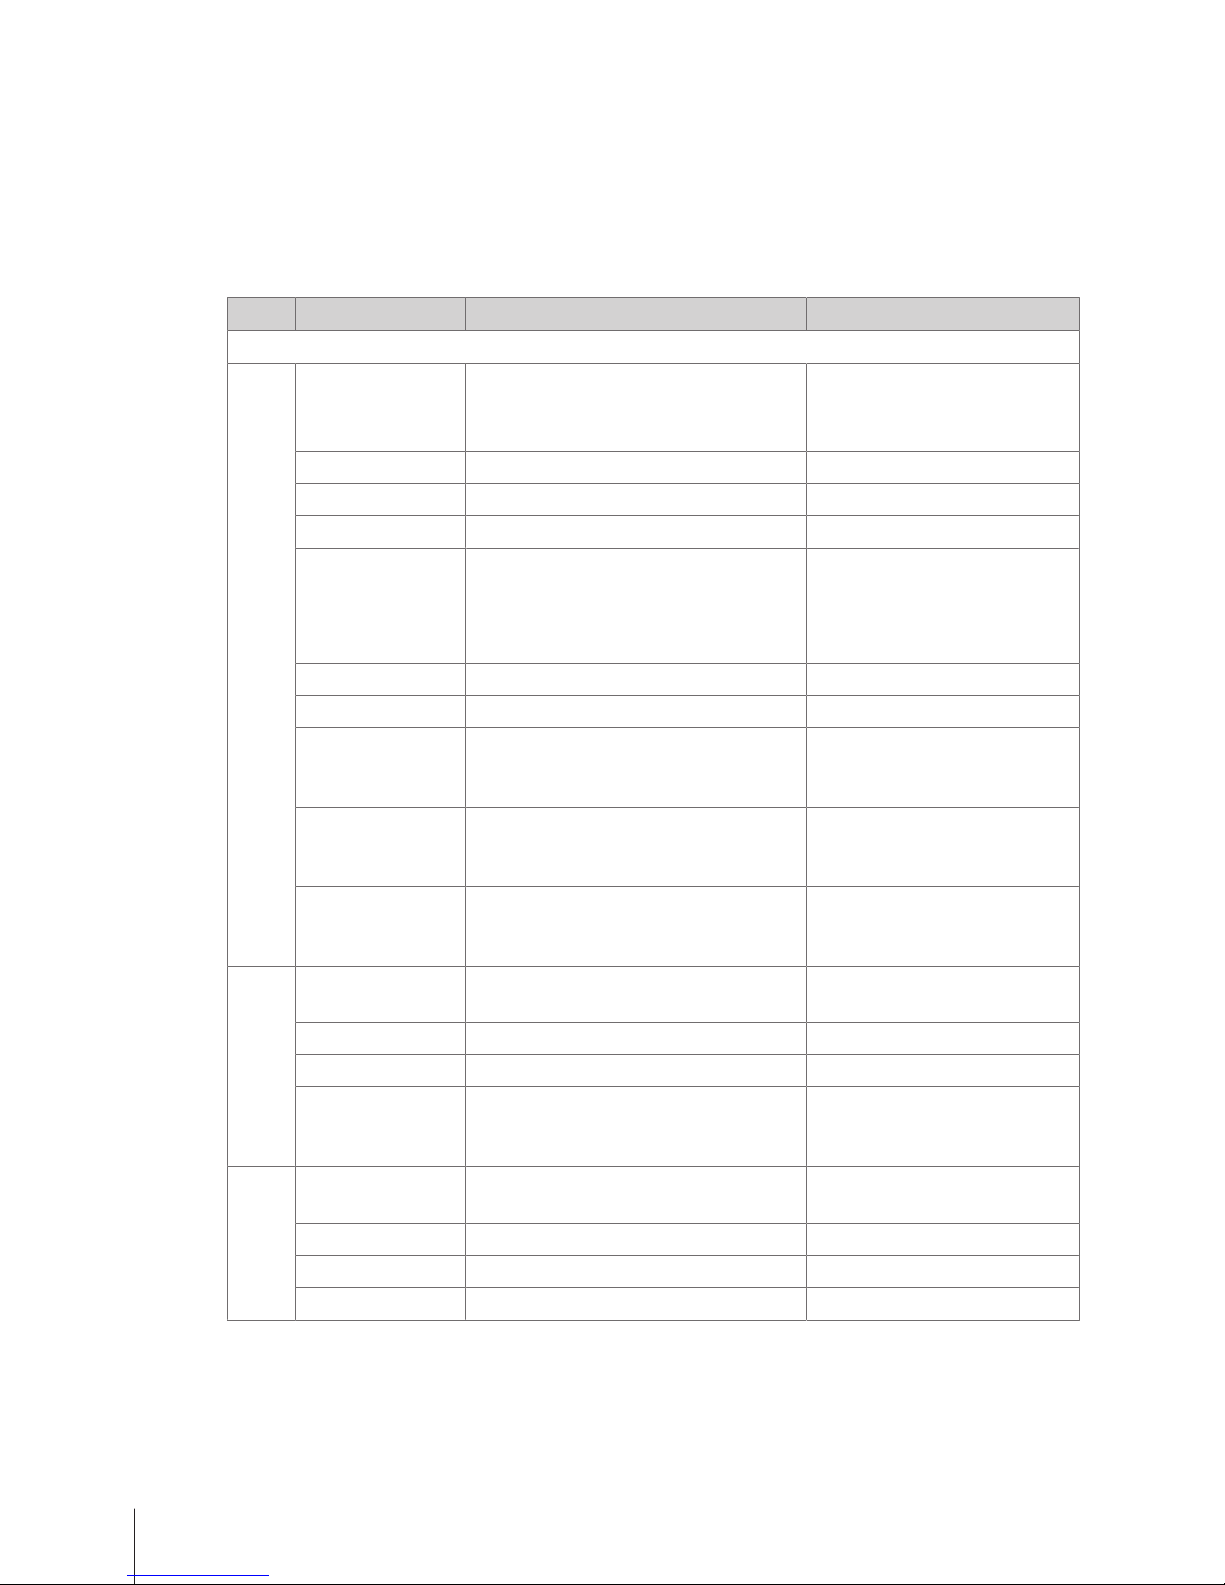
Menu group Menu Sub-menus
F3 Reports F31 Basic Reports F311 Sales Report
F312 PLU Report
F313 VAT Report
F314 Vendor Report
F316 Group Report
F32 Advanced
Reports
F321 Cash Report
F322 Customer Tare Report
F33 Combination Report
F34 Delete Report Delete Sales Report
F35 Sales Journal
Menu 31Skippper 5000
Page 34
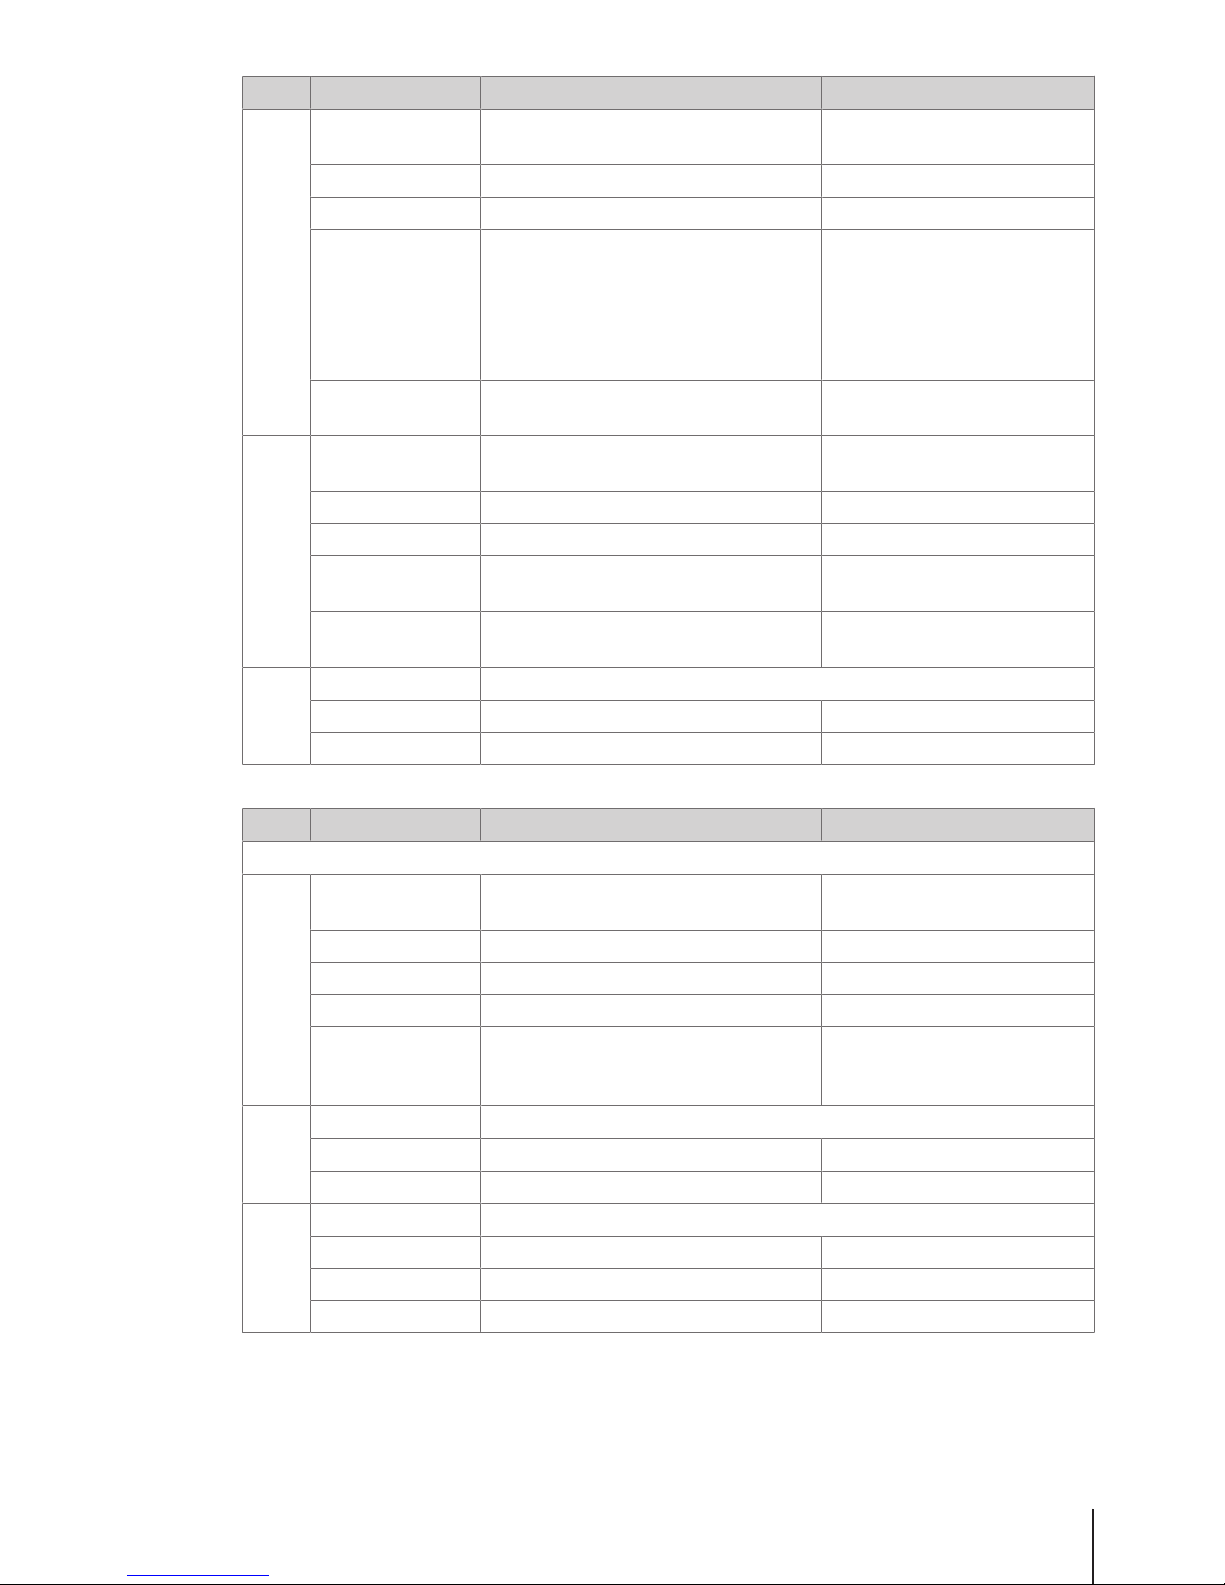
4.2.2 Data menu
In the Data menu group you are able to enter the following data:
• Item Data
• Data Warehouse
• Price Management
• Payment
No. Display Description Possible values
F11 Item Data
F111 PLU Database/
Edit
Edit PLUs
The available PLU items depend on the
setting of F231 PLU Editing Fields
Create New?
Existing items
Item Number Enter the item (PLU) number 1 … 99'999'999
Article Name Enter the article name Max. 64 characters
Unit Price # Enter unit price 0.01 … 9'999.99
Unit of Measures Select the unit of measures
• For weight articles use units kg or
100g.
• Use PCS only for piece articles.
1 kg
2 100g
3 PCS
4 Others
Discount Allow discount for this PLU Enable/disable
Price Overwriting Allow overwriting the price for this PLU Enable/disable
Group Select a PLU group 1 None
# Existing groups
# New (refer to F113)
Preset Tare Select a preset tare 1 None
# Existing preset tare values
# New (refer to F115)
VAT Select a VAT 1 None
# Existing VATs
# New (refer to F117)
F113 Group Define PLU groups
Create New?
Existing groups
Group ID Enter ID of the PLU group 1 … 99
Group Name Enter name of the PLU group Max. 32 characters
VAT ID Select a VAT 1 None
# Existing VATs
# New (refer to F117)
F115 Preset Tare Define tare presets for frequently used
tare weights
Create New?
Existing tare presets
Tare ID Enter preset tare ID 1 … 99
Tare Name Enter preset tare name Max. 32 characters
Tare Value Enter preset tare weight Depending on the scale capacity
Menu32 Skippper 5000
Page 35
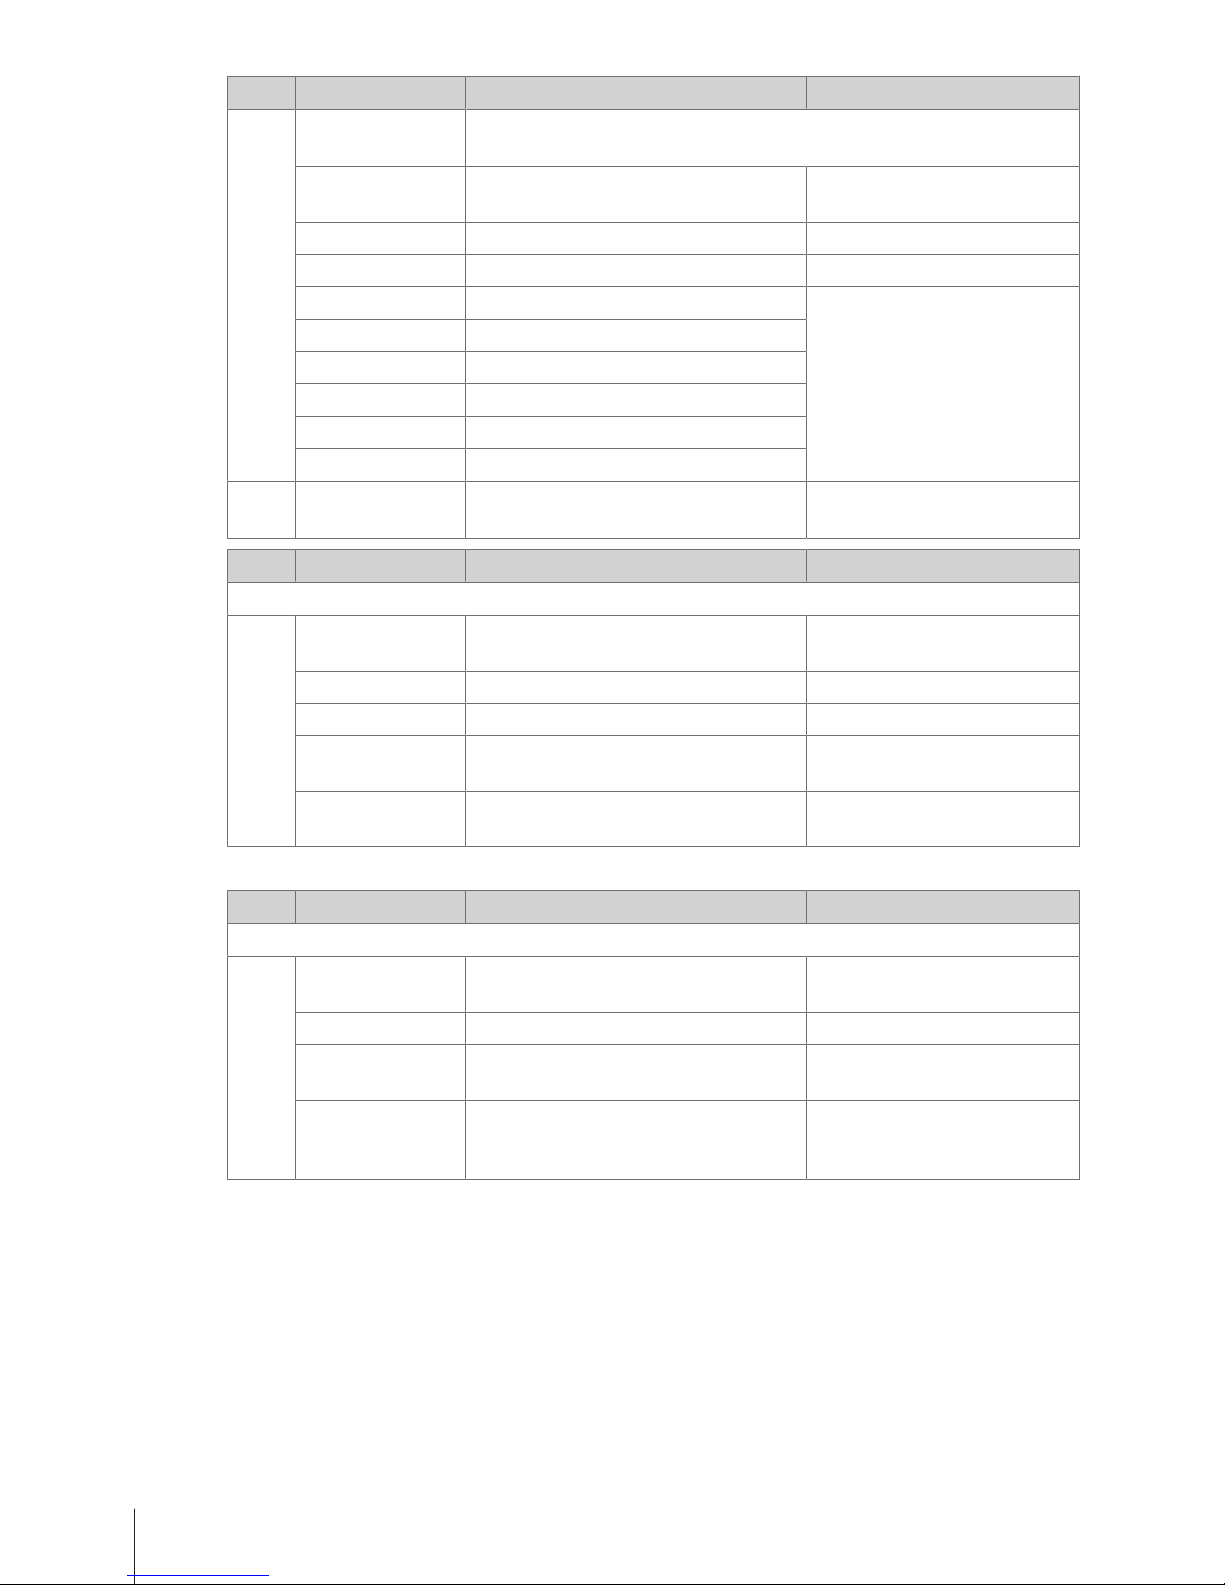
No. Display Description Possible values
F116 Barcode Define barcode
Create New?
Existing barcode presets
Barcode ID Enter barcode ID 1 … 99
Barcode Name Enter barcode name Max. 32 characters
Barcode Type Select barcode type EAN8
# EAN13
# ITF25
# Code128
# UPC-A
# QRCode
Barcode Format Enter barcode format [Setting up a
barcode}Page44]
F117 VAT Define VATs
Create New?
Existing VATs
VAT ID Enter VAT ID 1 … 99
VAT Name Enter VAT name Max. 20 characters
VAT Inhouse Enter VAT value for inhouse-
consumption, e.g., in a restaurant
1 … 100 (%)
VAT Take-Away
Food
Enter VAT value for take-away food 1 … 100 (%)
PLU List Printout Print out a list of the PLUs entered
Start PLU Number Enter start PLU number 1 … 99'999'999
End PLU Number Enter end PLU number 1 … 99'999'999
No. Display Description Possible values
F12 Data Warehouse
F121 Vendor Define vendors
Create New?
Existing vendors
Vendor ID Enter vendor ID 1 … 16
Vendor Name Enter vendor name Max. 32 characters
Vendor Password Enter vendor password 1 … 9'999'999
Vendor Map Key Assign a Vendor key
For assigning more Vendor keys refer to
F232
1 None
# Existing vendors
F122 Scale Enter scale data
Scale ID Enter scale ID 1 … 16
Scale Name Enter scale name Max. 32 characters
F123 Store Enter store data
Store ID Enter store ID 1 … 99
Store Name Enter store name Max. 32 characters
Store Logo Enter store logo Max. 32 characters
Menu 33Skippper 5000
Page 36
No. Display Description Possible values
F126 Description text by
Type
Enter texts, organized by the text type
Header Text Enter header texts
Create New?
# Existing items
ID Enter ID of the header text 1 … 99'999'999
Text Enter header text Max. 64 characters
Footer Text Enter footer text
Refer to Header Text
ID Enter ID of the footer text
Text Enter footer text
Branch Text Enter branch text, e.g., address
ID Enter ID of the branch text
Text Enter branch text
F128 Running Message Enter a multiline text for running
display in the bottom line
Max. 300 characters
No. Display Description Possible values
F13 Price Management
F131 Discount Define discounts
Create New?
# Existing discounts
Discount ID Enter discount ID 1 … 99
Discount Name Enter discount name Max. 32 characters
Discount Value Enter discount value 0 ... 100 (%)
1 … 999999.99
Discount Type Select type of discount 1 Absolute
2 Percentage
No. Display Description Possible values
F14 Payment
F141 Payment Method Define up to 3 payment methods
Create New?
Existing methods
Payment Method ID Enter ID of the payment method 0 ... 3
Payment Method
Name
Enter name of the payment method Max. 32 characterrs
Amount Input Type Select amount input type Free Input
# Limited Free Input
# Fixed to Open Amount
Menu34 Skippper 5000
Page 37
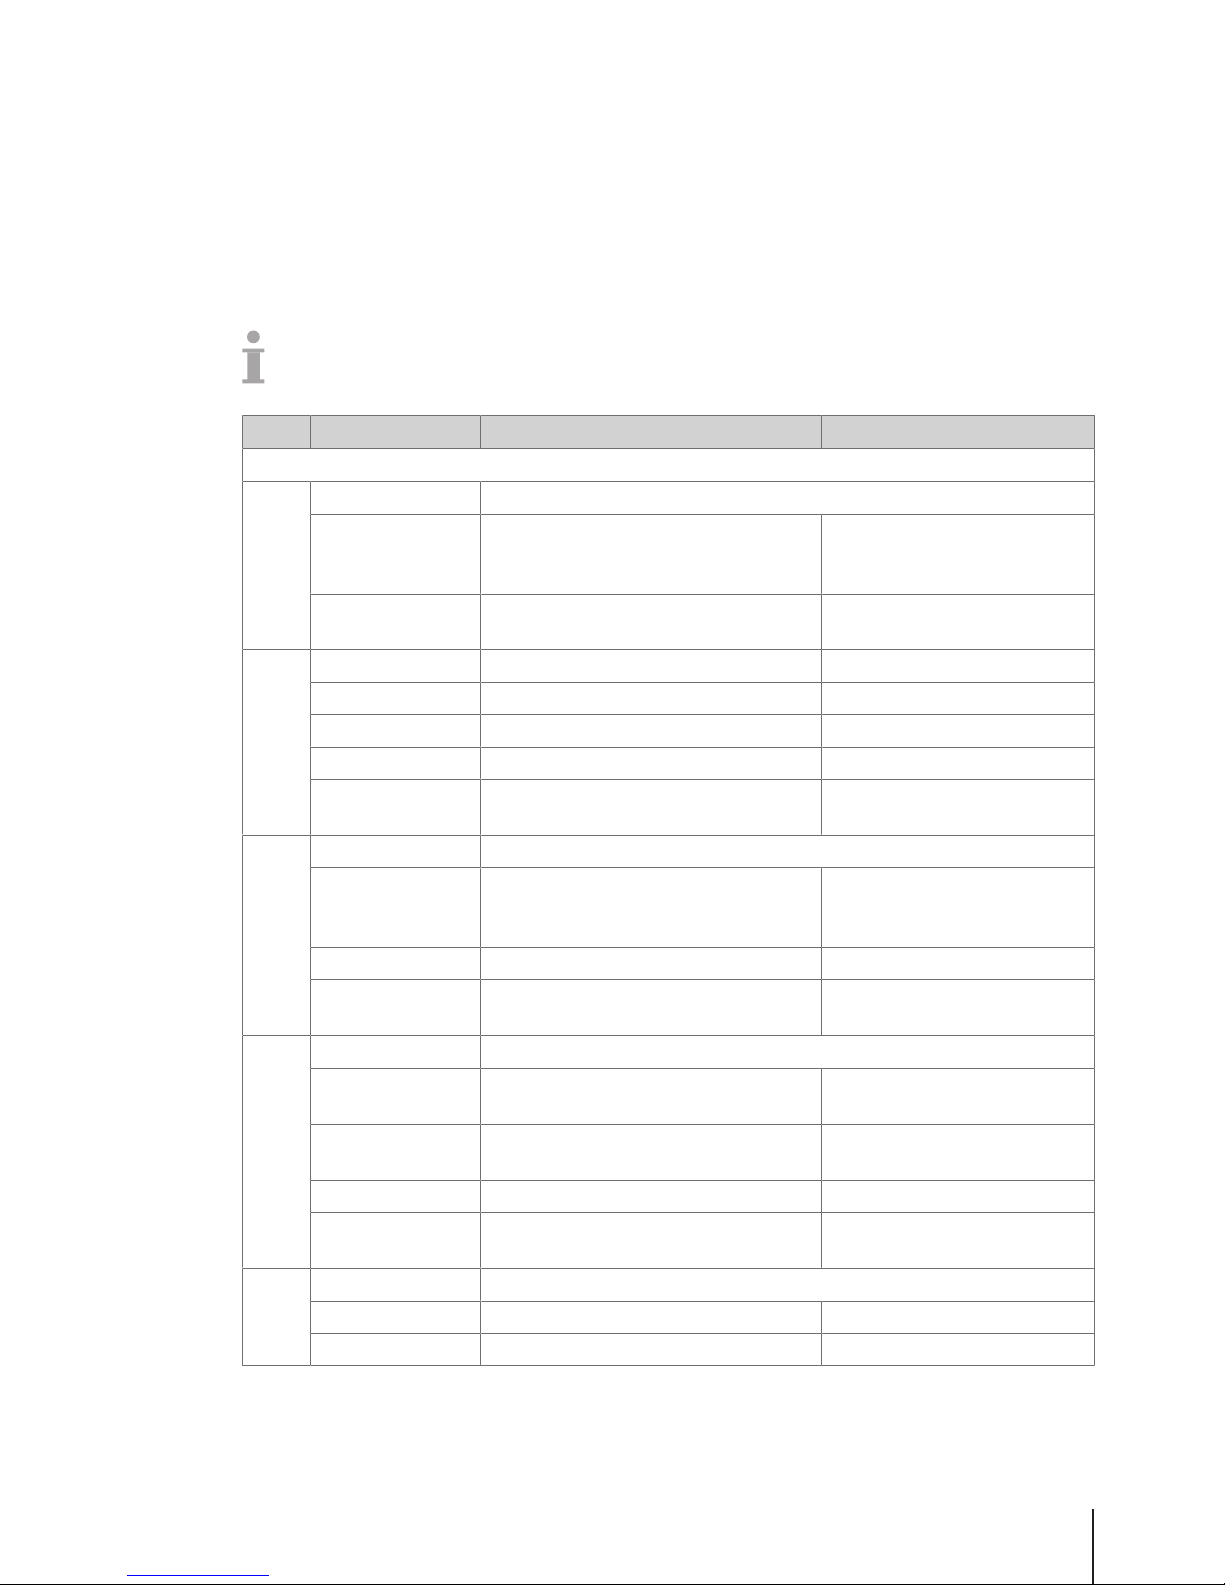
4.2.3 Configuration menu
In the Configuration menu group you are able to enter the following data:
• Operation Center: configure operation (registration, tare, price, discount, VAT, ...)
• General Settings: configure PLU, key mapping, vendors, ...
• Printing: configure printing
• Connectivity: configure connectivity
• Control Panel: configure settings of the control panel (display settings, sound settings)
• System: reset of data base, reset of scale, ...
Some functions not only have to be enabled, but also must have a key assigned to them, refer to
F232.
In the following, these functions are marked with a *.
No. Display Description Possible values
F21 Operation Center
F211 Item Recall Define item recall
Source of PLU Select data source for recalling PLUs 1 Local
2 Remote
3 Remote + Local
Data Sync at
startup
When starting up the scale, synchronize
the PLU data with the server
Enable/Disable
F212 Item Registration Define item registration
Large Sales Enable/disable large sales mode Enable/Disable
Void Enable/disable voiding Enable/Disable
Refund Enable/disable refund mode Enable/Disable
Fix Option Fix tare or both tare and PLU 1 Tare only
2 Tare and PLU
F215 Price Define entering of the price
Overwrite Price* Configuring price overwriting: either
generally or depending on the PLU
settings in sub-menu F231
1 Enable
2 Disable
3 Up to PLU
Direct Price Entry Enable/disable direct price entry Enable/Disable
100g* Enable/disable weighing with 100 g
price unit
Enable/Disable
F217 Discount Define the discount methods on the scale
Discount on Total
Price
Enable/disable discount on the total price Enable/Disable
Discount on Sales
Total
Enable/disable discount on the total
sales
Enable/Disable
Percent Discount Enable/disable discount in percent Enable/Disable
Absolute Discount Enable/disable an absolute discount
(rebate)
Enable/Disable
F218 Payment Define the payment methods on the scale
Reopen ticket Enable/disable ticket reopening Enable/Disable
Multiple Payment Enable/disable multiple payment Enable/Disable
Menu 35Skippper 5000
Page 38
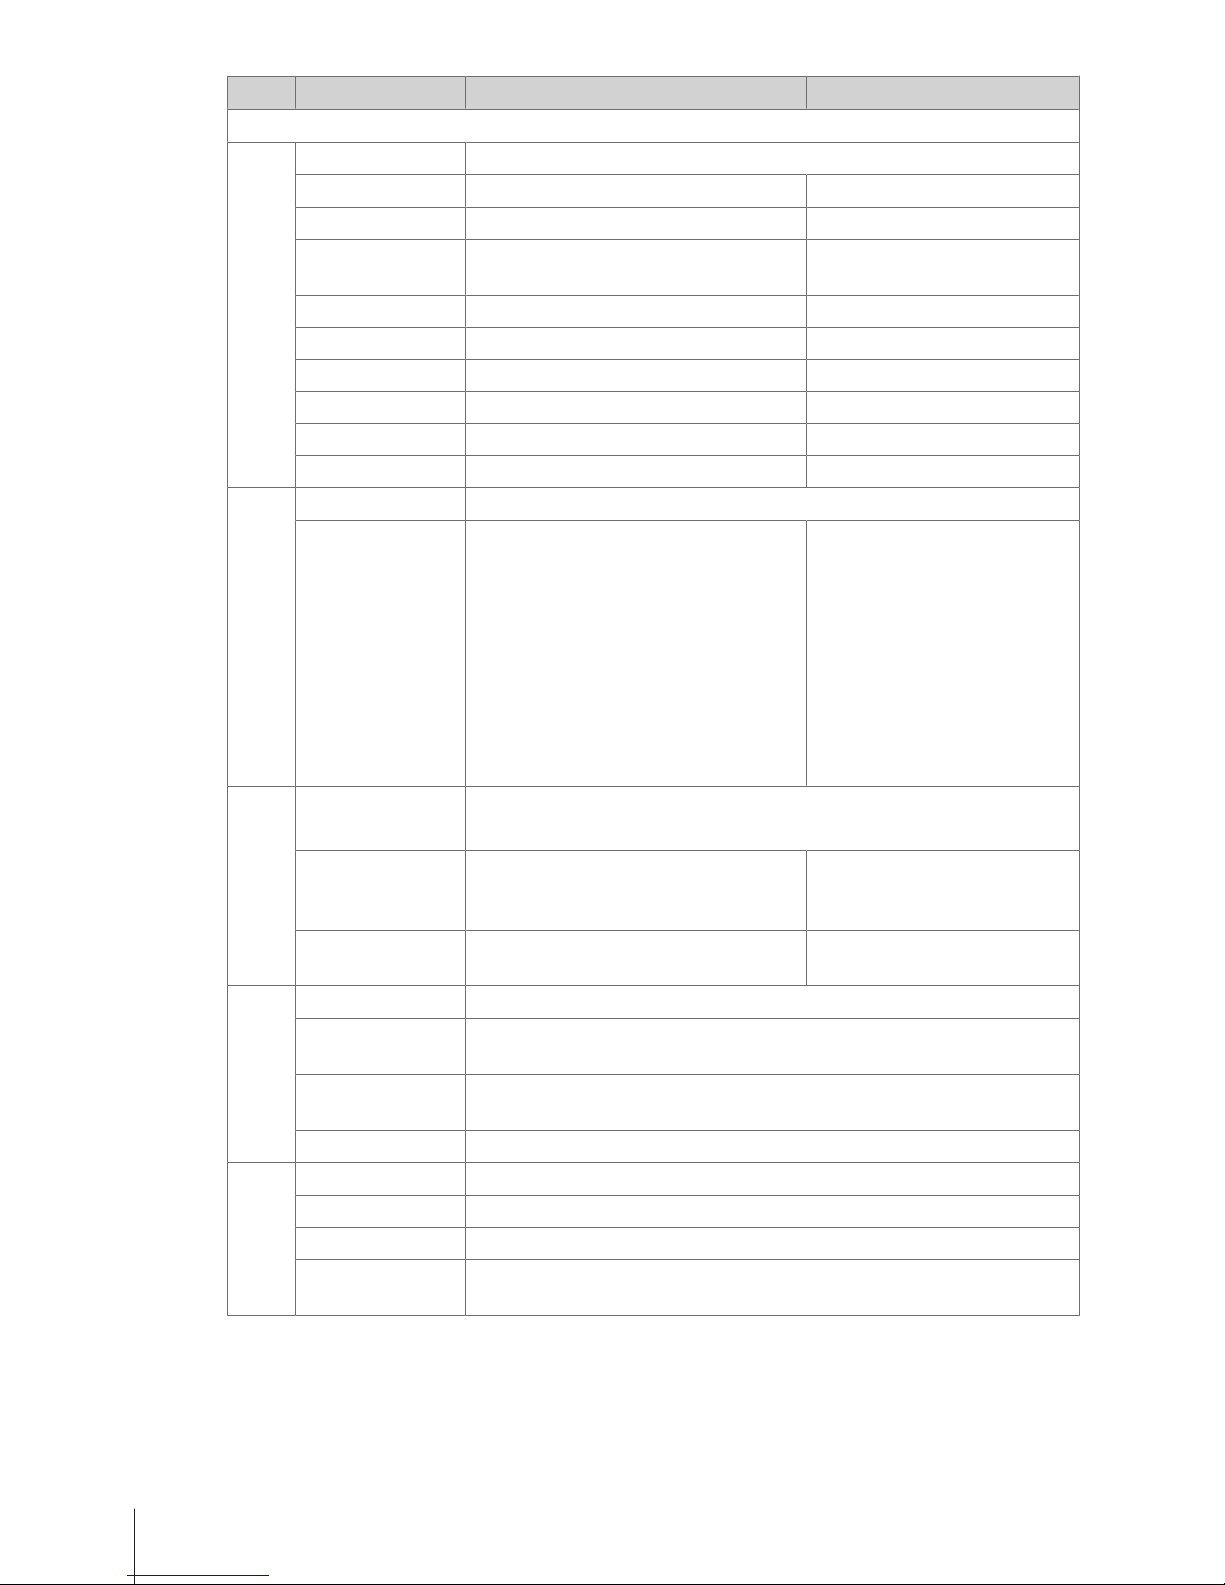
No. Display Description Possible values
F23 General Settings
F231 PLU Editing Fields Configure PLU data
Article Number Switching Article Number on/off On/Off
Article Name Switching Article Name on/off On/Off
Number of Unit
Prices
Select number of unit prices 1 None
2 (1 unit price)
Group Switching Group on/off On/Off
VAT Switching VAT on/off On/Off
Preset Tare Switching Preset Tare on/off On/Off
Unit of Measures Switching unit of measures on/off On/Off
Discount Switching discount on/off On/Off
Price Overwriting Switching price overwriting on/off On/Off
F232 Function key Map the preset key to a function
Key Mapping 1 Select a function.
2 Press the desired preset key until a
beep is heard.
3 For a preset key on the second level,
press the desired preset key until a
second beep is heard.
ð When the function is mapped, the
coordinates of the preset key are
displayed, e.g., L3C1 (Line3,
Column1).
The key mapping list items
depend on the scale configuration
F233 Vendor Define the method of working with vendors
For creating a new vendor and defining Vendor keys refer to F121 and F232
Vendor Mode Select the vendor mode 1 Single Vendor
2 Multi Vendor
3 Floating Vendor
Vendor Key Select the method of calling up the
vendor
1 As V1 key
2 V + Vendor ID
F235 Licenses Configuring options
Input license Input the license number.
For more information on your options call your local sales representative.
Printout Licence
State
Select to print licence state
Input LID Enter licence ID
Training Configuring training function
Disable Training function disabled
Enable by Scale Training function enabled on the scale
Enable by Vendor Training function only for an individual vendor
Menu36 Skippper 5000
Page 39
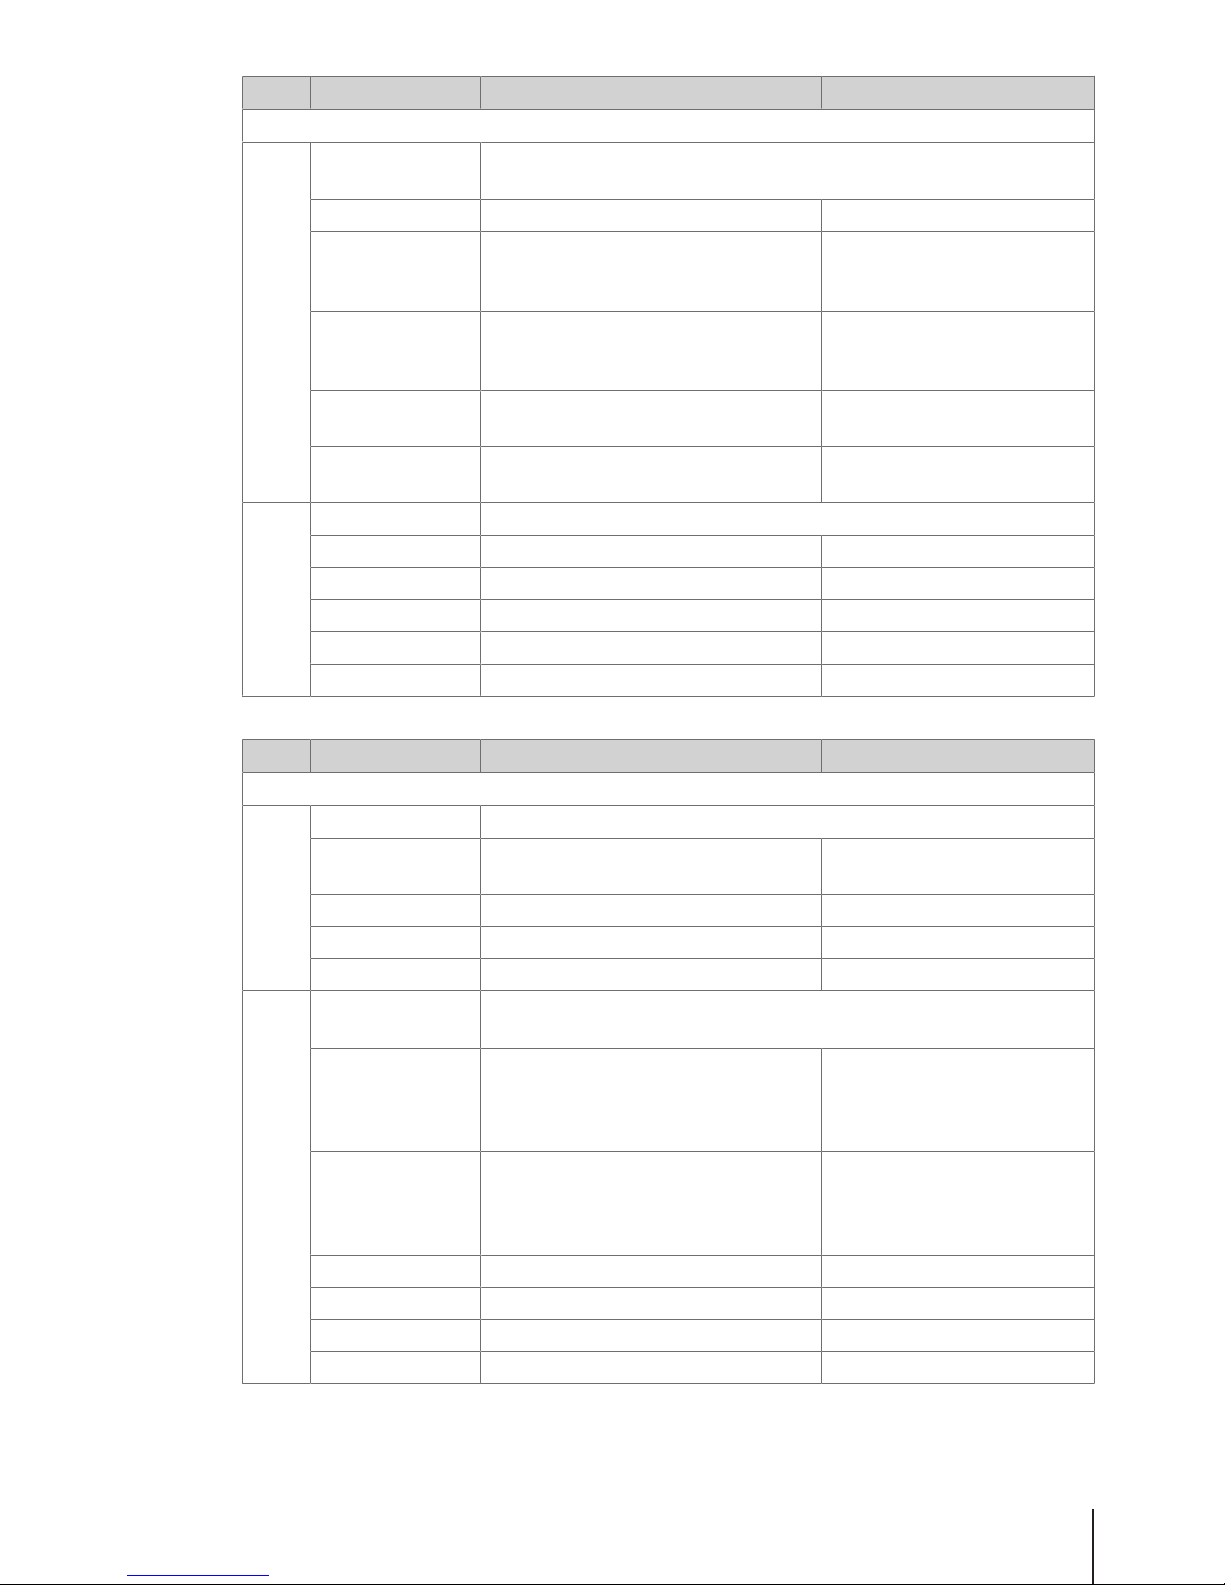
No. Display Description Possible values
F24 Printing
F245 Ticket Configu-
ration
Define ticket printing
Direct Printout Enable/disable direct printout Enable/disable
Copy Tickets Select the method of ticket copy printing Auto print
# On demand
# No
Talon Select the method of talon printing Auto print
# On demand
# No
Ticket Bottom Feed
Length
Enter the length of auto feed 0 … 40
Unit [mm]
Paper Feed Length Enter the length of a manual feed 0 ... 99
Unit [mm]
F246 Ticket Content Define ticket content
Logo Printing a logo on the ticket Yes/No
Header Text Select a header text to print on the ticket 1 ... 99'999'999
Footer Text Select a footer text to print on the ticket 1 ... 99'999'999
VAT Select VAT to print on the ticket
Barcode Select a barcode to print on the ticket
No. Display Description Possible values
F25 Connectivity
F251 Network Network settings
IP Mode Select IP mode 1 Automatic
2 Static
IP Address Enter IP address
Mask Enter mask
Gateway Enter gateway
F256 Transaction Log
Server
Transaction Log Server settings
Forwarding Select forwarding settings None
# Immediate
# Daily
# Overflow
Service Type Select service type None
# Forward Auto
# Forward to IP
# Server
IP Address Enter IP address
Port Enter port number
Overflow action Select overflow action
Forward Start forwarding
Menu 37Skippper 5000
Page 40
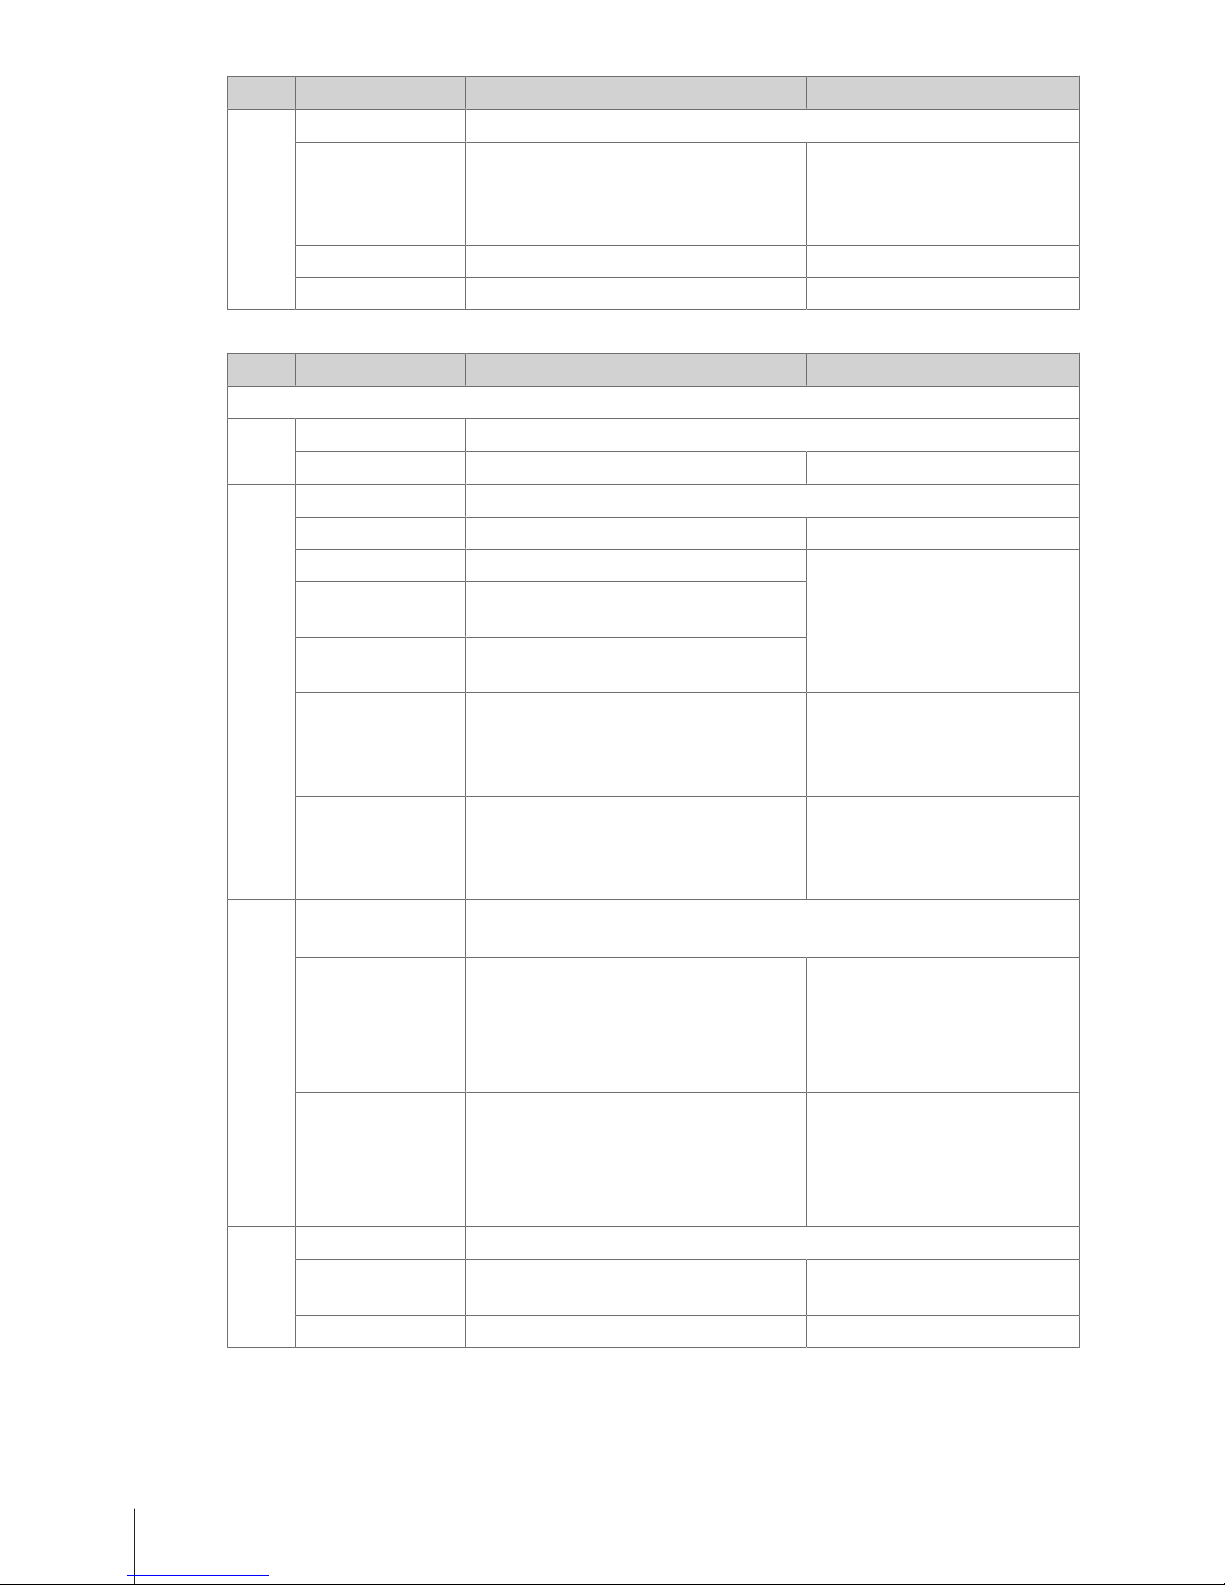
No. Display Description Possible values
F257 Data Server Data server setting
Data Server Type None
# Retrieve Auto
# Retrieve from IP
# Server
IP Address Enter ID
Port Enter port number
No. Display Description Possible values
F27 Control Panel
F271 Display Set up display
Contrast Enter the value of contrast 0 … 100
F272 Sound Set up sound
Beeper Switch Beeper on/off On/Off
Error Sound Select frequency of the error sound 1 4186 Hz
2 3951 Hz
3 3250 Hz
4 ...
Key Sound Select frequency of the beeper when
pressing a key
Key Sound Config. Select frequency of the beeper when
configuring a key
Startup Sound Select frequency of the beeper during
start-up
1 1976 Hz
2 1760 Hz
3 1568 Hz
4 ...
Shutdown Sound Select frequency of the beeper during
shut-down
1 988 Hz
2 880 Hz
3 784 Hz
4 ...
F273 Power
Management
Set up power management (Screensaver)
Backlight Off Time Select time after which the background
lighting is turned off when there is no
change in weight or no key is pressed.
The lower the setting, the longer the
battery operation time.
1 Never
2 1 min
3 2 min
4 5 min
5 10 min
Auto Off Time Select time after which the sleep function
is activated when there is no change in
weight or no key is pressed.
The lower the setting, the longer the
battery operation time.
1 Never
2 10 min
3 20 min
4 30 min
5 60 min
F274 Date and Time Set date and time
Date Enter day, month, year in the displayed
format
Time Enter hours, minutes, seconds
Menu38 Skippper 5000
Page 41
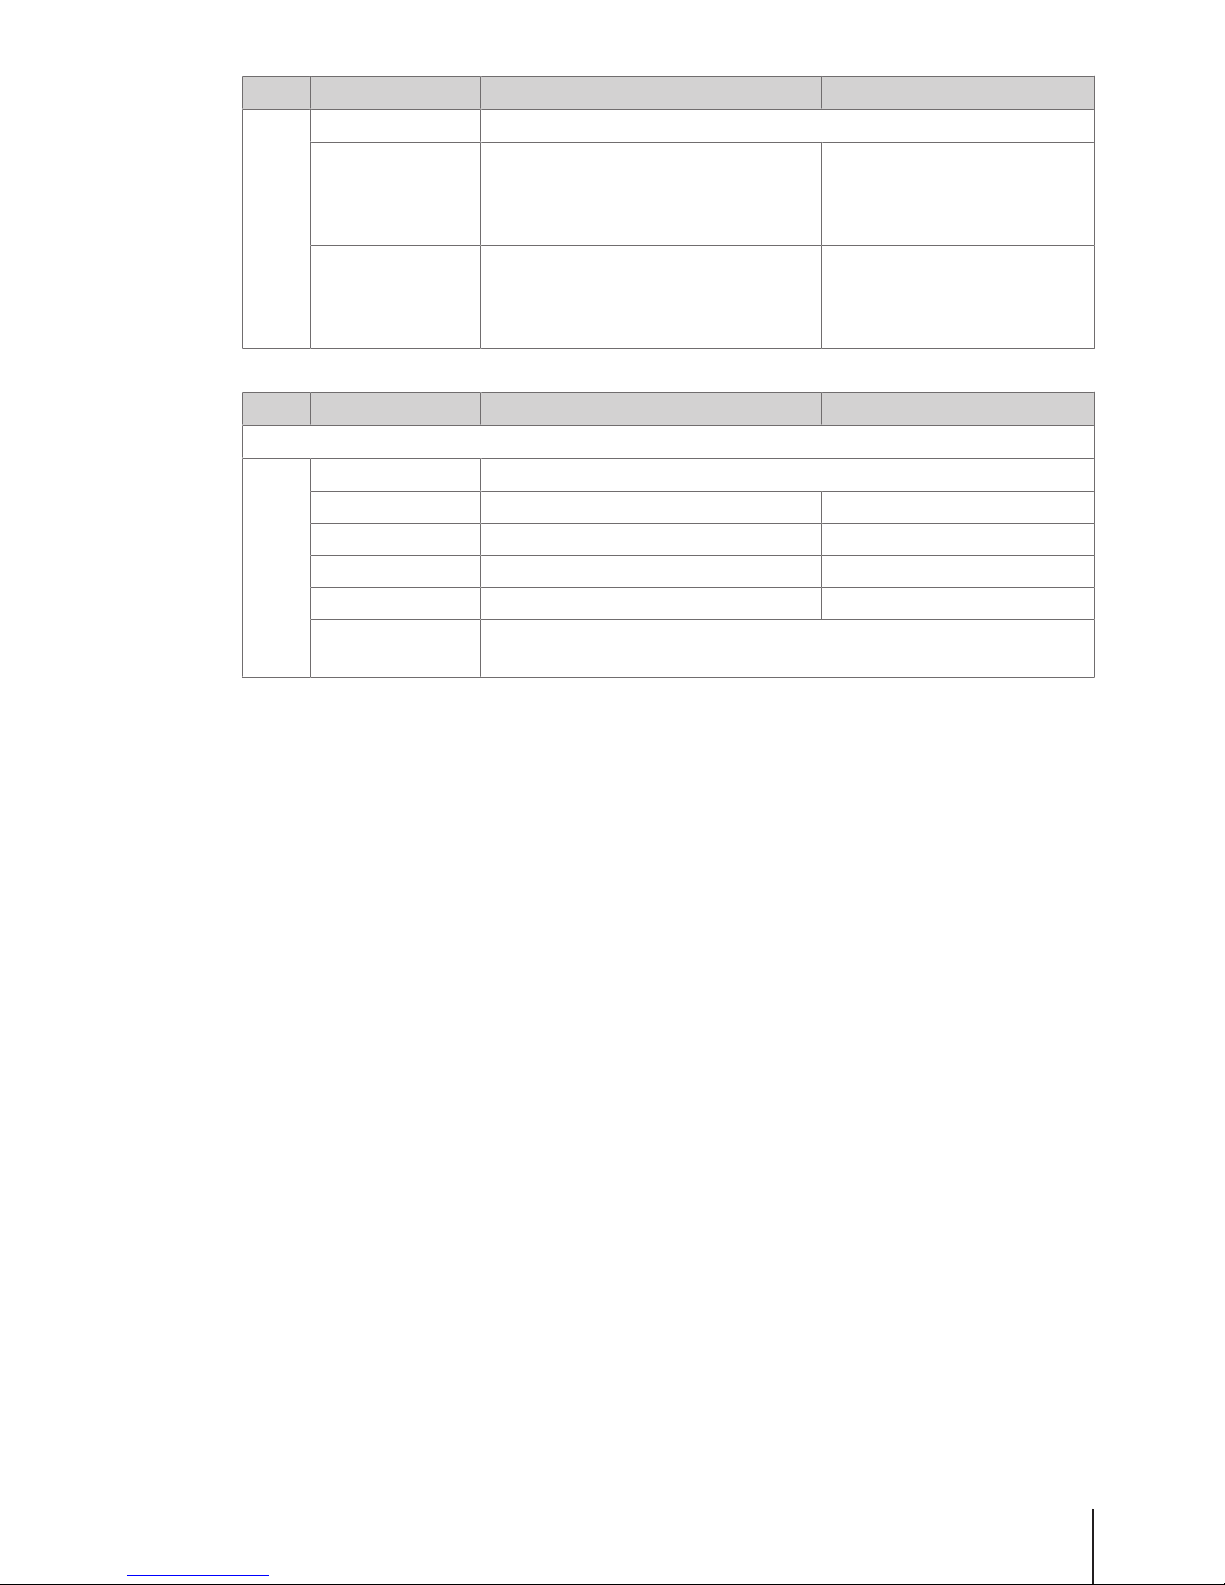
No. Display Description Possible values
F275 Language Set display language
Display Language Select the display language 1 English
2 French (Français)
3 German (Deutsch)
...
Print language Select the printout language 1 English
2 French (Français)
3 German (Deutsch)
...
No. Display Description Possible values
F28 System
F282 Reset Resetting the scale
Clear Database Delete database Yes/No
Factory Default Reset scale to factory settings Yes/No
Ticket Start Number Reset start number of the ticket counter 1 … 99'999'998
Ticket max Number Reset maximum ticket counter 1 … 99'999'999
Printout System
Info
Print system information
Menu 39Skippper 5000
Page 42
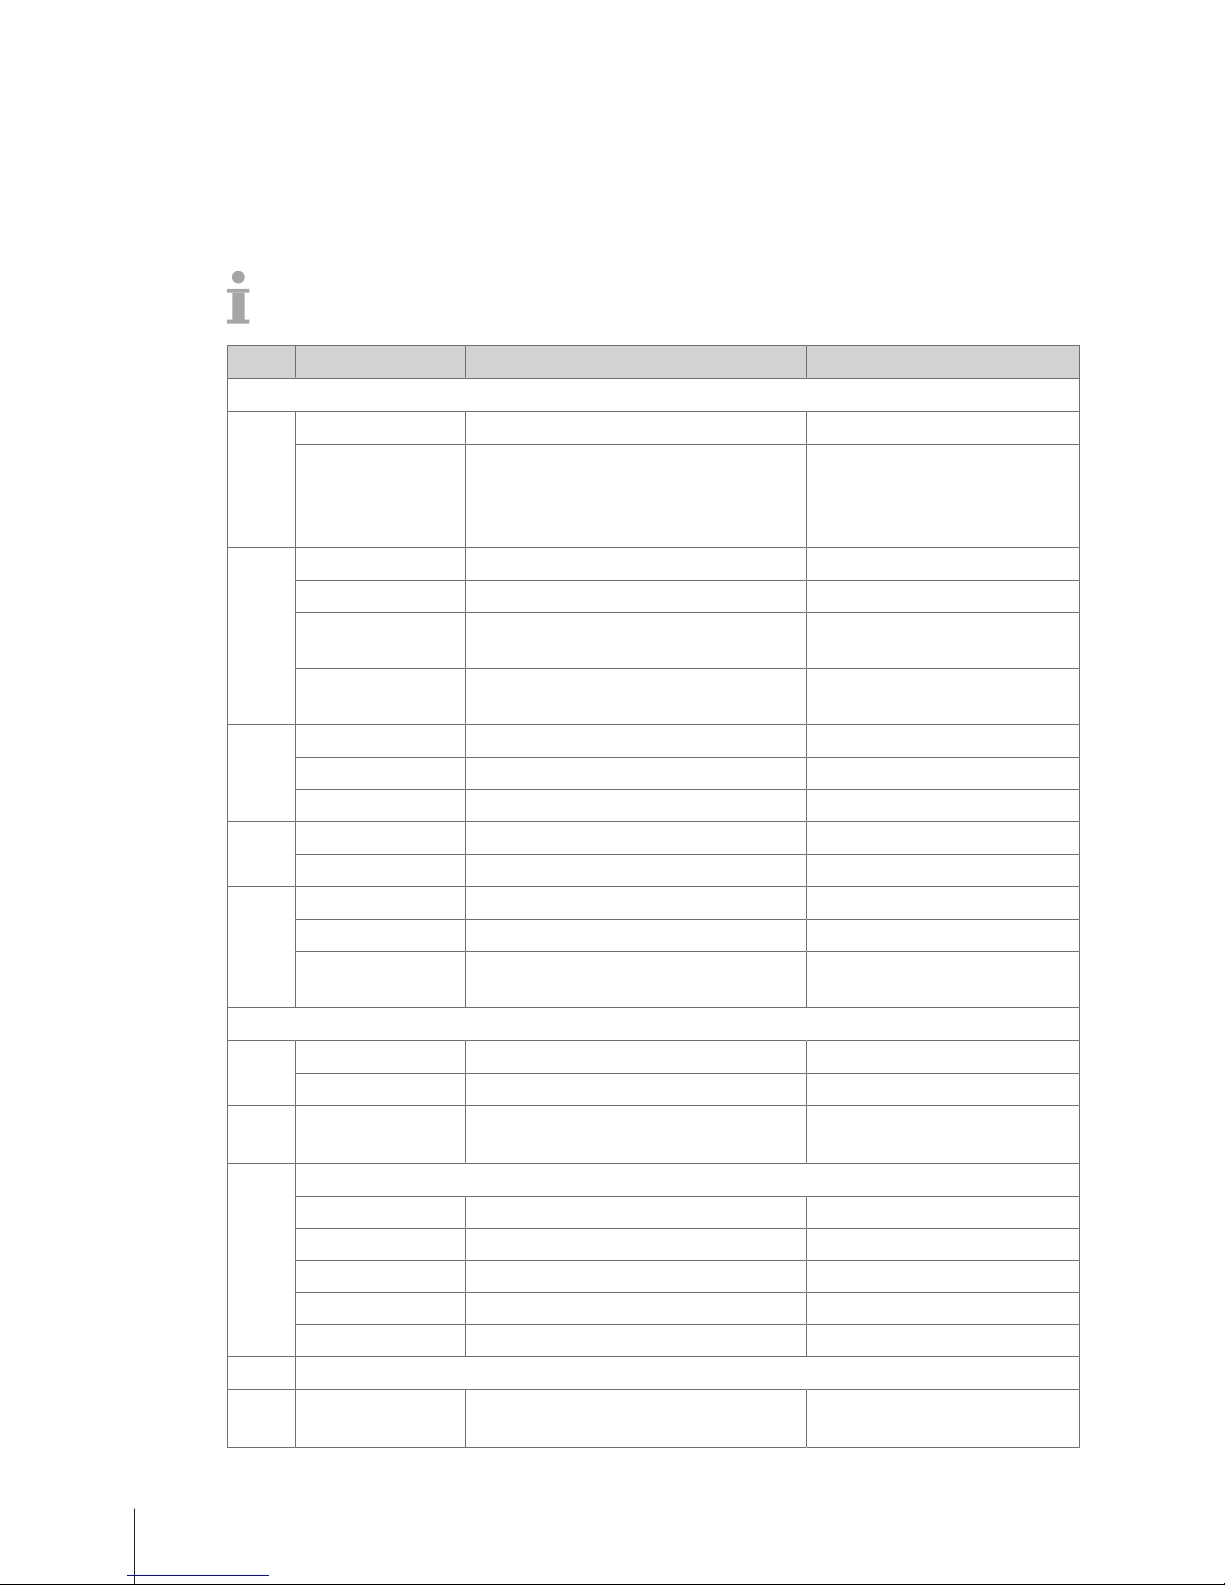
4.2.4 Reports menu
In the Reports menu group you are able to create the following reports:
• Basic Reports: Sales Report, PLU Report, Vendor Report, ...
• Advanced Reports: Cash Report, Customer Tare Report, ...
• Combination Reports
• Delete Report
Assign keys in sub-menu F232 to call up your reports.
No. Display Description Possible values
F31 Basic Reports
F311 Sales Report Create a sales report
Period Filter Define the period of the report 1 Today
2 Yesterday
3 Day before yesterday
4 Since last Deletion
F312 PLU Report Create a PLU report
Period Filter Define the period of the report Refer to F311
Sort by Define sorting method 1 By Number
2 By Amount
Report Format Define the type of the report 1 Simple
2 Detailed
F313 VAT Report Create a VAT report
Period Filter Define the period of the report Refer to F311
Sort by Define sorting method Refer to F312
F314 Vendor Report Create a vendor report
Period Filter Define the period of the report Refer to F311
F316 Group Report Create a group report
Period Filter Define the period of the report Refer to F311
Sort by Define sorting method 1 By Number
2 By Amount
F32 Advanced Reports
F321 Cash Report Create a cash report
Period Filter Define the period of the report Refer to F311
F322 Customer Tare
Report
Create a customer tare report
F33 Combination Report
Sales Report Include sales report Yes/No
PLU Report Include PLU report Yes/No
VAT Report Include VAT report Yes/No
Vendor Report Include vendor report Yes/No
Group Report Include group report Yes/No
F34 Delete Report
Delete Sales
Report
Delete sales report
Yes/No
Menu40 Skippper 5000
Page 43

No. Display Description Possible values
F35 Sales Journal
Sales Journal
status
Enable/disable sales journal Enable/disable
Report Format Select format of the sales journal 1 Detailed
2 Simple
Menu 41Skippper 5000
Page 44

4.3 Configuration tips
4.3.1 Tips for setting up and configuring PLUs
Step 1: Configuring content of a PLU
In the factory setting, an item (PLU) offers the following data fields. In sub-menu 231, the data fields
can be modified.
• Article Number
• Article Name
• Unit Price
• Unit of Measures
• Customized Unit
• Discount
• Price Overwriting
• Group
• Preset Tare
• VAT
Step 2: Organizing your products
The scale offers groups to organize your products. If desired, go to the following sub-menus:
• F113: Groups
Step 3: Editing lists
For many PLU items the scale offers lists to select from instead of entering the data directly when
editing the PLU. To create lists, go to the following sub-menus:
• F115: Preset Tare
• F117: VAT
Menu42 Skippper 5000
Page 45
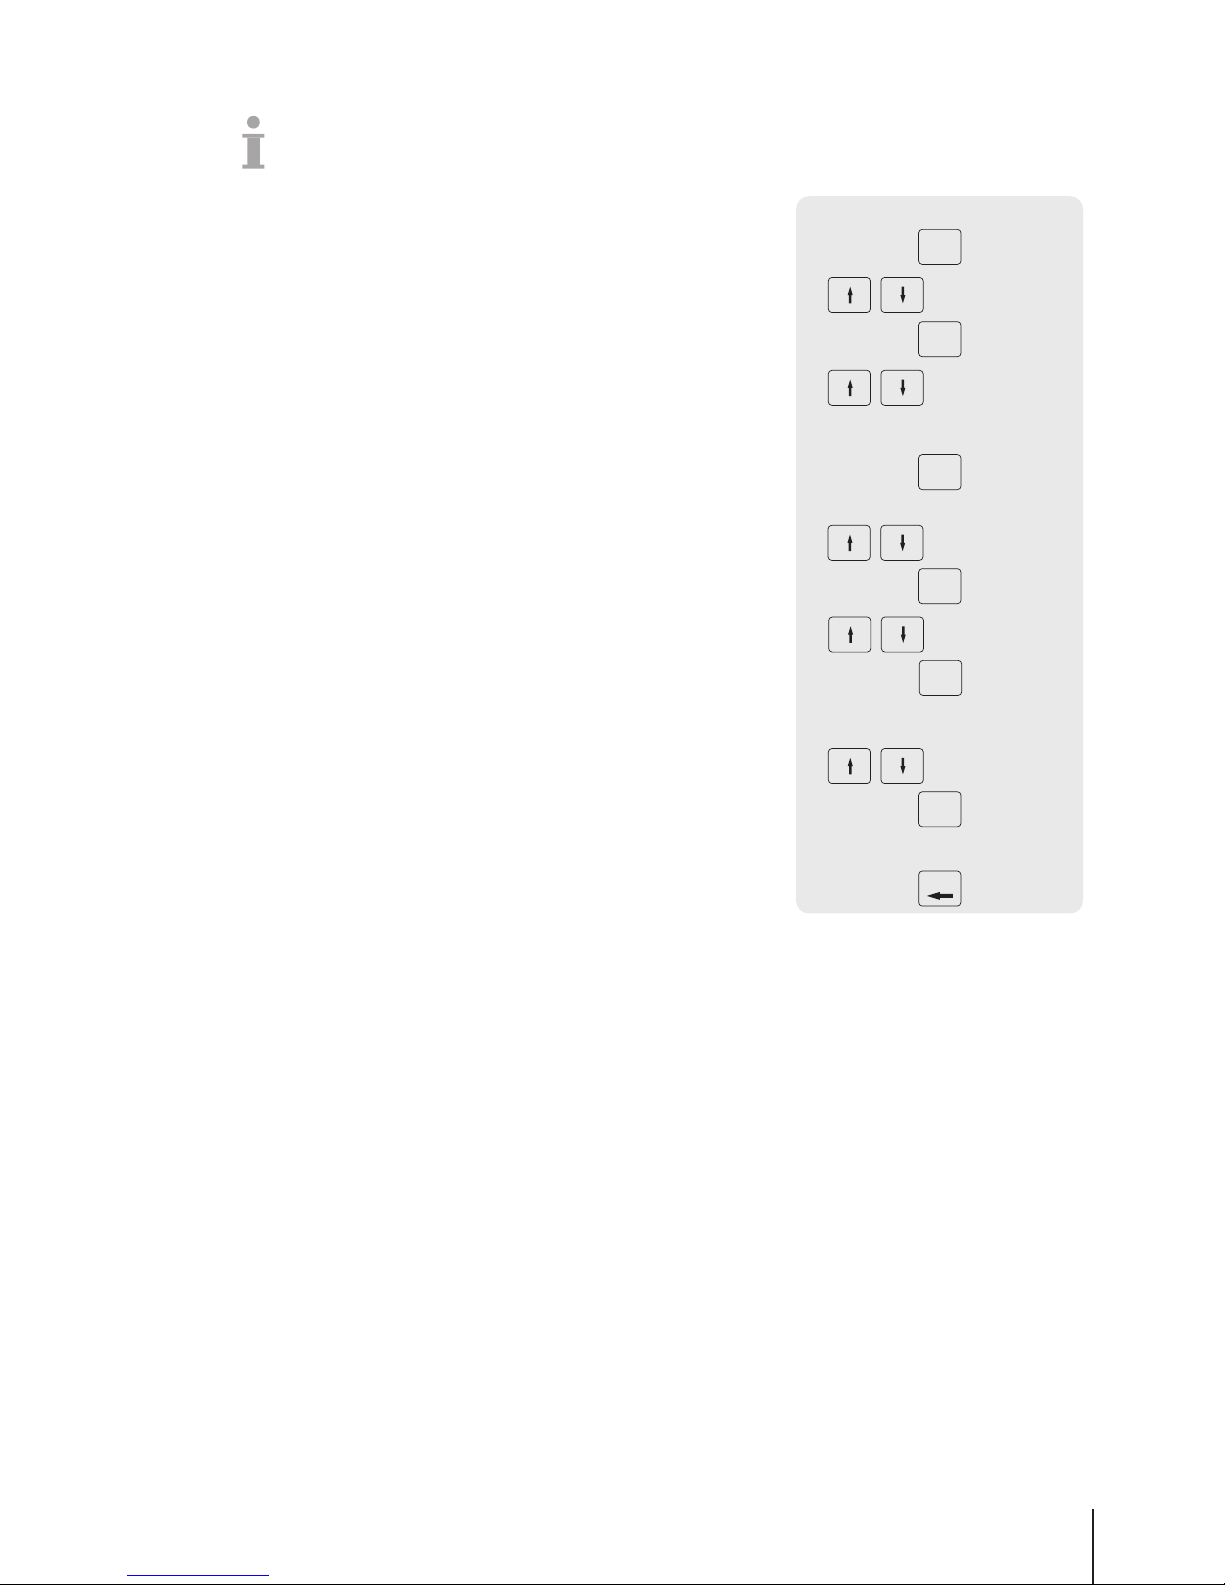
4.3.2 Example for creating a PLU
For operating the menu, refer to [Entering the menu}Page28].
1 Enter the menu and navigate to sub-menu
F111PLUDatabase/Edit.
2 Press the OK key.
3 Use the arrow keys to select Create New? and confirm with
the OK key.
4 Select Item Number and confirm with the OK key.
5 Enter an unused item number and confirm with the OK key.
6 Use the arrow keys to step through the configured PLU items.
7 Use the OK key to edit an item.
8 Enter numerical values, e.g., price, and confirm with the OK key.
9 Use the arrow keys to select from a list, e.g., units of measure,
and confirm with the OK key. Selecting New opens the menu to
create a new list entry, e.g., a new group.
10 When all mandatory entries are made, press the Back key
repeatedly until the normal selling display is shown.
ð All settings are saved automatically.
F111
0…9
…
…
OK
Create New?
Group
Item Number
New
– or –
OK
OK
OK
OK
OK
5 Cheese
Back
Menu 43Skippper 5000
Page 46
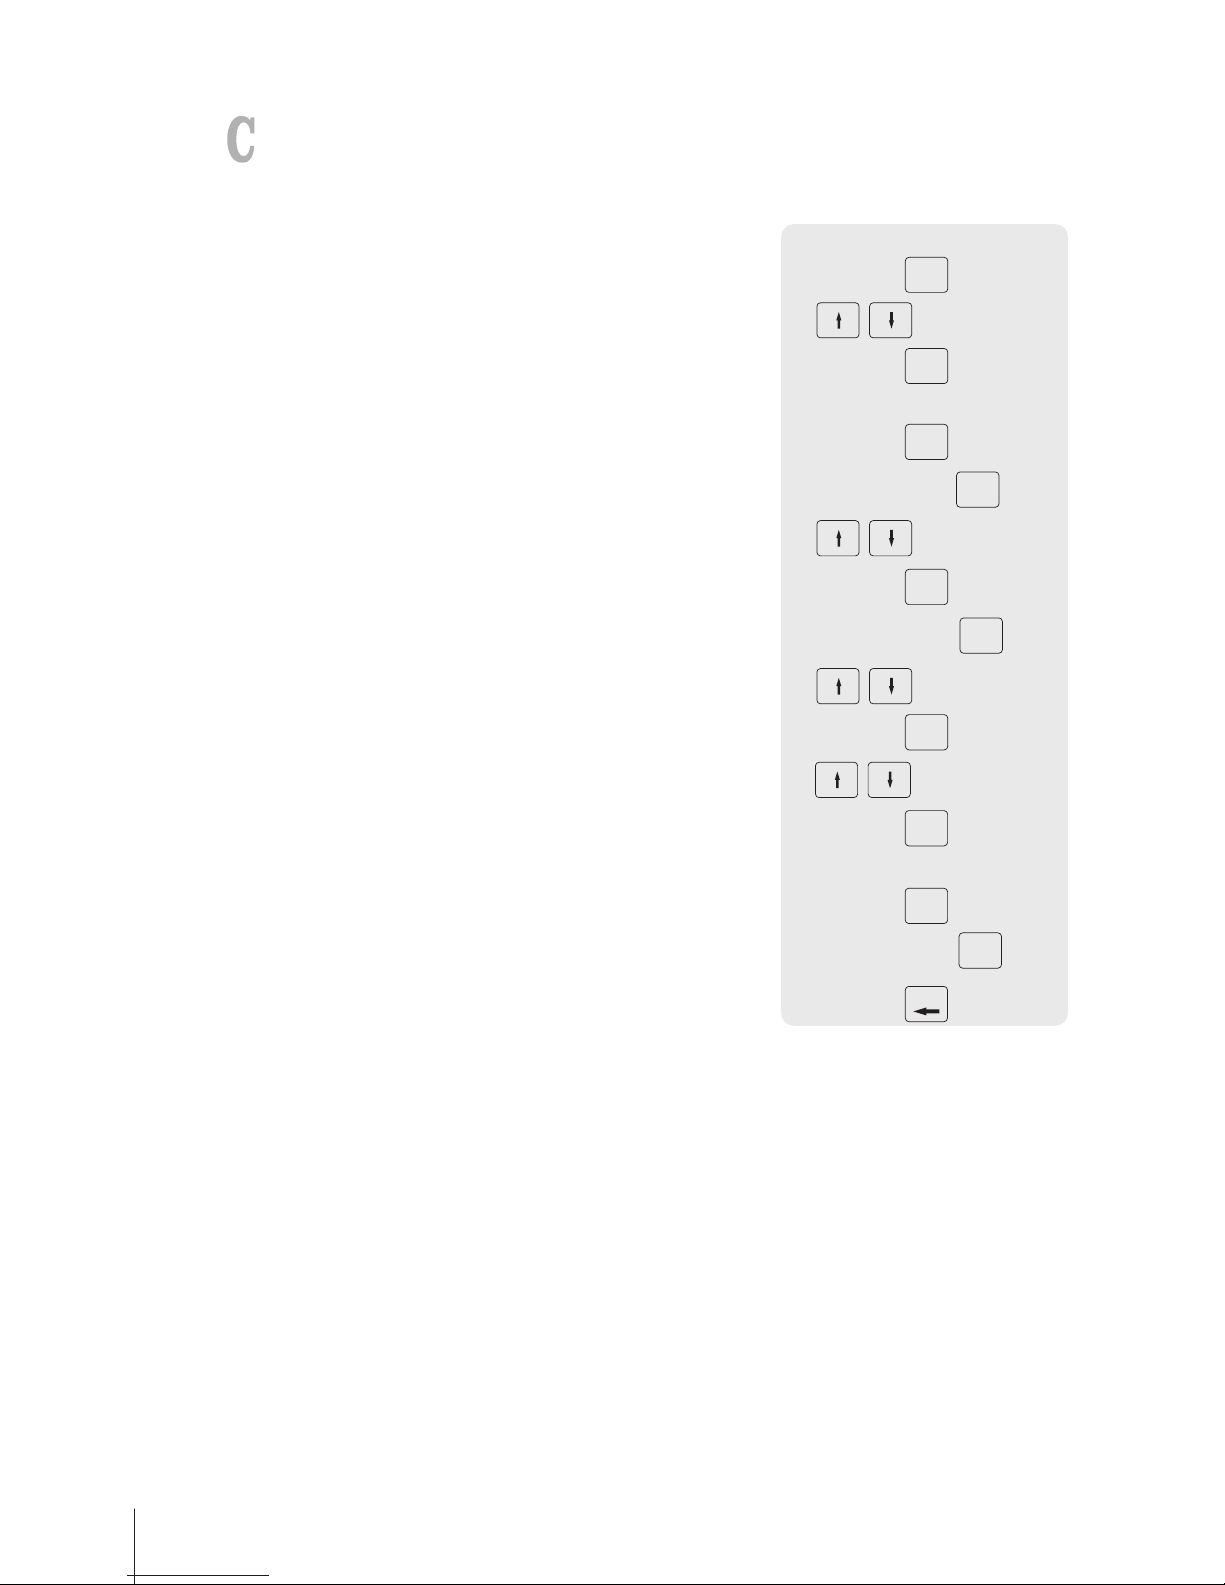
4.3.3 Setting up a barcode
The barcode must first be defined in sub-menu F116.
Configuring a barcode
1 Enter the menu and navigate to sub-menu F116 Barcode.
2 Press the OK key.
3 Use the arrow keys to select "Create New ?" and confirm with the
OKkey.
4 Select "Barcode ID" and confirm with the OK key.
5 Enter an unused barcode ID number and confirm with the OK key.
ð The next available barcode ID number is shown as default.
6 Use the arrow keys to select "Barcode Name" and confirm with the
OK key.
7 Define a name as reference with the keyboard for this barcode
and confirm with the OKkey.
8 Select "Barcode Type" and confirm with the OK key.
9 Use the arrow keys to select the desired barcode type and confirm
with the OK key.
ð Barcode type EAN 8 and EAN 13 from the GS1 standard are
available.
10 Select "Barcode Format" and confirm with the OK key.
11 Use the keyboard to enter the placeholders, see table below.
12 Confirm with the OK key.
13 Press the Back key repeatedly to return to the main menu/main
screen.
F116
OK
OK
0…9
Barcode ID
OK
OK
Create New?
Barcode Name
OK
Back
OK
Barcode Type
OK
Barcode Format
OK
0…9
OK
0…9
OK
EAN 8
Menu44 Skippper 5000
Page 47
Content Placeholder Length
Scale ID G 2-5
Vendor ID O 2-4
Current date D 2 (YY), 4 (YYMM), 6
(YYMMDD)
Current time J 2 (HH), 4 (HHMM), 6
(HHMMSS)
Counts of transaction Q 2-4
Total Price B 4-7
Ticket ID N 2-8
Barcode Check digit C 1
Examples:
Barcode type Configuration
Barcode EAN 8 with Ticket ID NNNNNNNC
Barcode EAN 8 with Item Number AAAAAAAC
Barcode EAN 8 with Total price BBBBBBBC
Barcode EAN 13 with Ticket ID + Vendor ID NNNNNNNOOOOC
Barcode EAN 13 with Ticket ID + Total price NNNNNNNBBBBBC
Barcode EAN 13 with "flag" fix identifier (21) + Item
Number + Total price
21AAAAABBBBBC
Assigning a barcode to a ticket
Once the barcode is defined, it needs to be assigned to the ticket.
• Only 1 barcode can be printed per ticket.
• If the barcode definition is wrong, no barcode will be printed. Please contact you service represen-
tative.
1 Enter the menu and navigate to sub-menu F246 Ticket
Content.
2 Press the OK key.
3 Use the arrow keys to select "Barcode" and confirm with the OK
key.
4 Enter the barcode ID number (reference) created before and
confirm with the OK key.
5 Press the Back key to return to the main menu/main screen.
F246
OK
OK
0…9
OK
Barcode
Back
Menu 45Skippper 5000
Page 48
4.3.4 Setting up the keyboard
The keypad offers keys for custom assignment either as PLU preset keys or as function keys.
7
!?
8
ABC
9
DEF
5
JKL
4
GHI
6
MNO
2
TUV
1
PQRS
3
WXYZ
0
_
00
#
C
1
Menu
Login
Logout
Fn
Disc
TOK
Back
-
Void
X
PLU
*
Pay
V
0
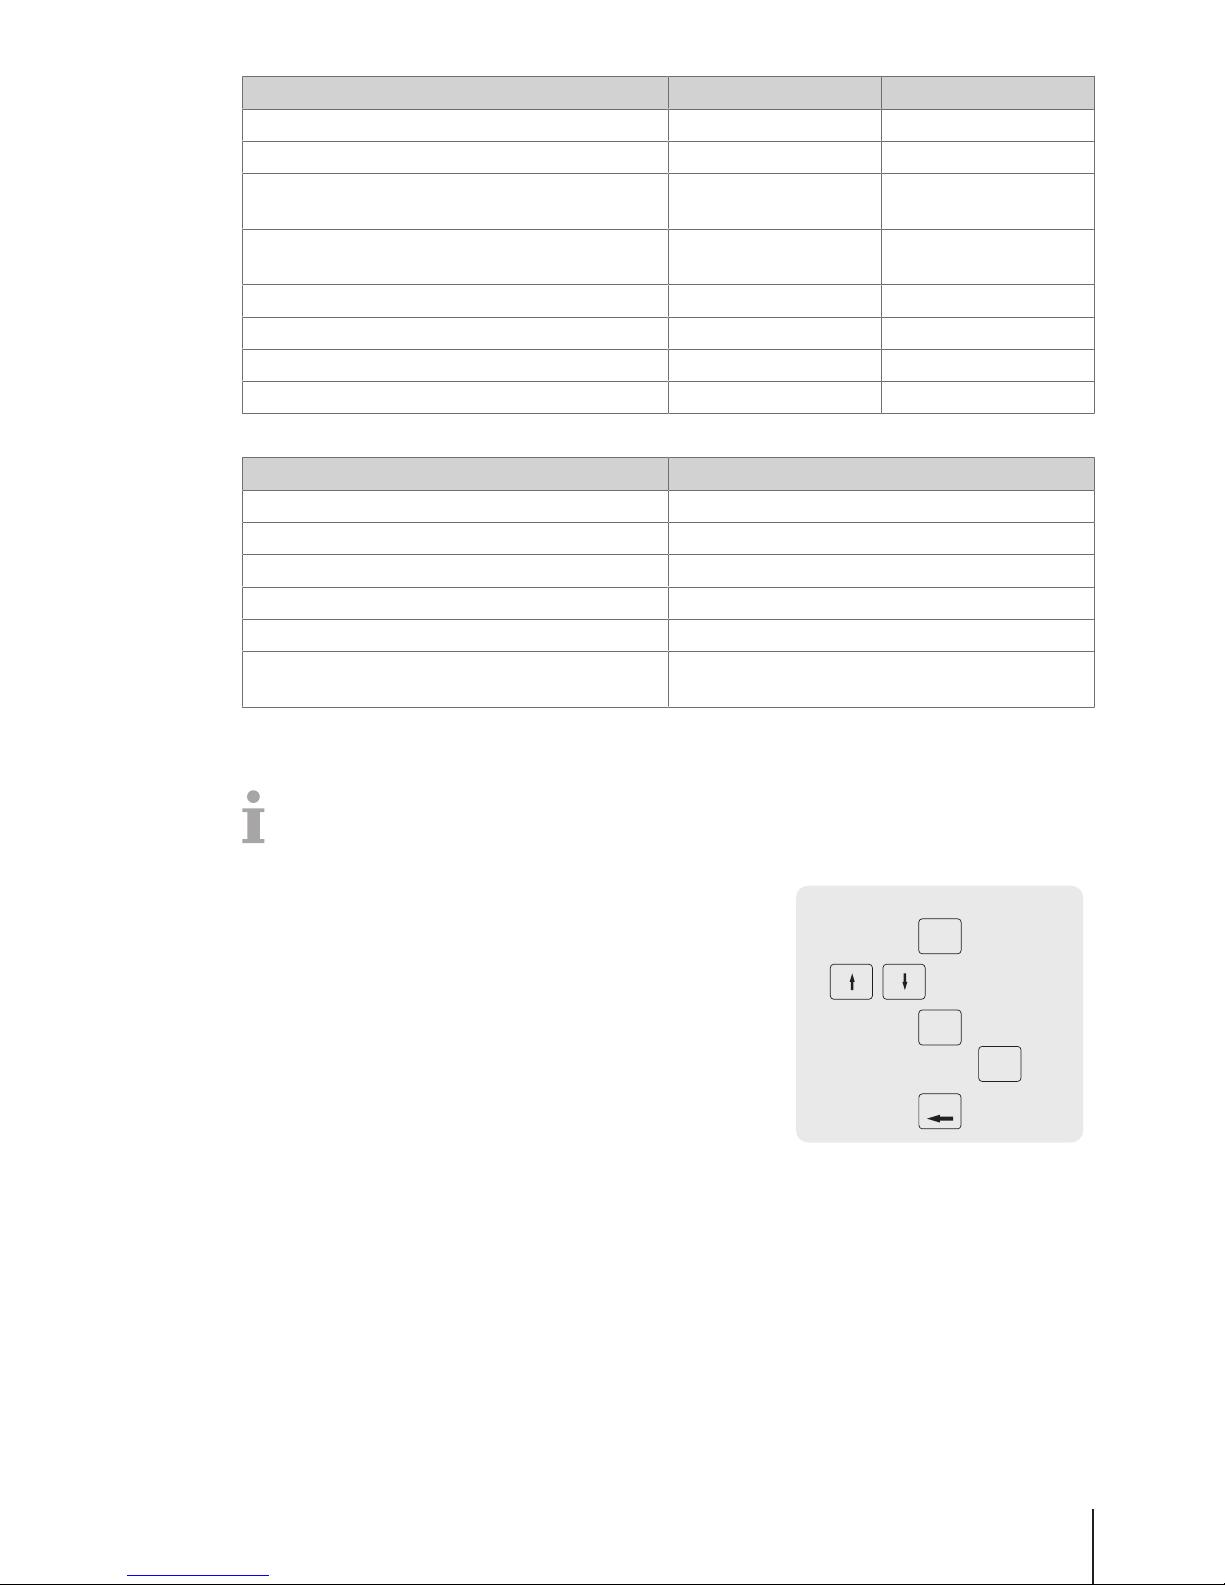
Setting up PLU preset keys
You can save the most important PLUs to the keys in the keypad. The scale offers two layers of preset
keys.
For information on how to create PLUs, see [Example for creating a PLU}Page43].
1 Enter the menu and navigate to sub-menu
F111PLUDatabase/Edit.
2 Press the OK key.
3 Use the arrow keys to select an existing PLU.
– or –
Recall PLU number.
ð The unit price (per kg) and item name appear in the display.
4 Press the desired preset key until a beep is heard.
ð The PLU has been assigned successfully to the preset key of
the first layer.
5 To assign a PLU to the second layer, press the desired preset key
until a second beep is heard.
6 Repeat steps 3 and 4 or 3 and 5 for further PLUs.
7 To leave the menu, press the Back key repeatedly until the normal
selling display is shown.
F111
10 Apple
OK
Menu46 Skippper 5000
Page 49
Setting up function keys
You can assign the most frequently used functions to the keys on the keyboard.
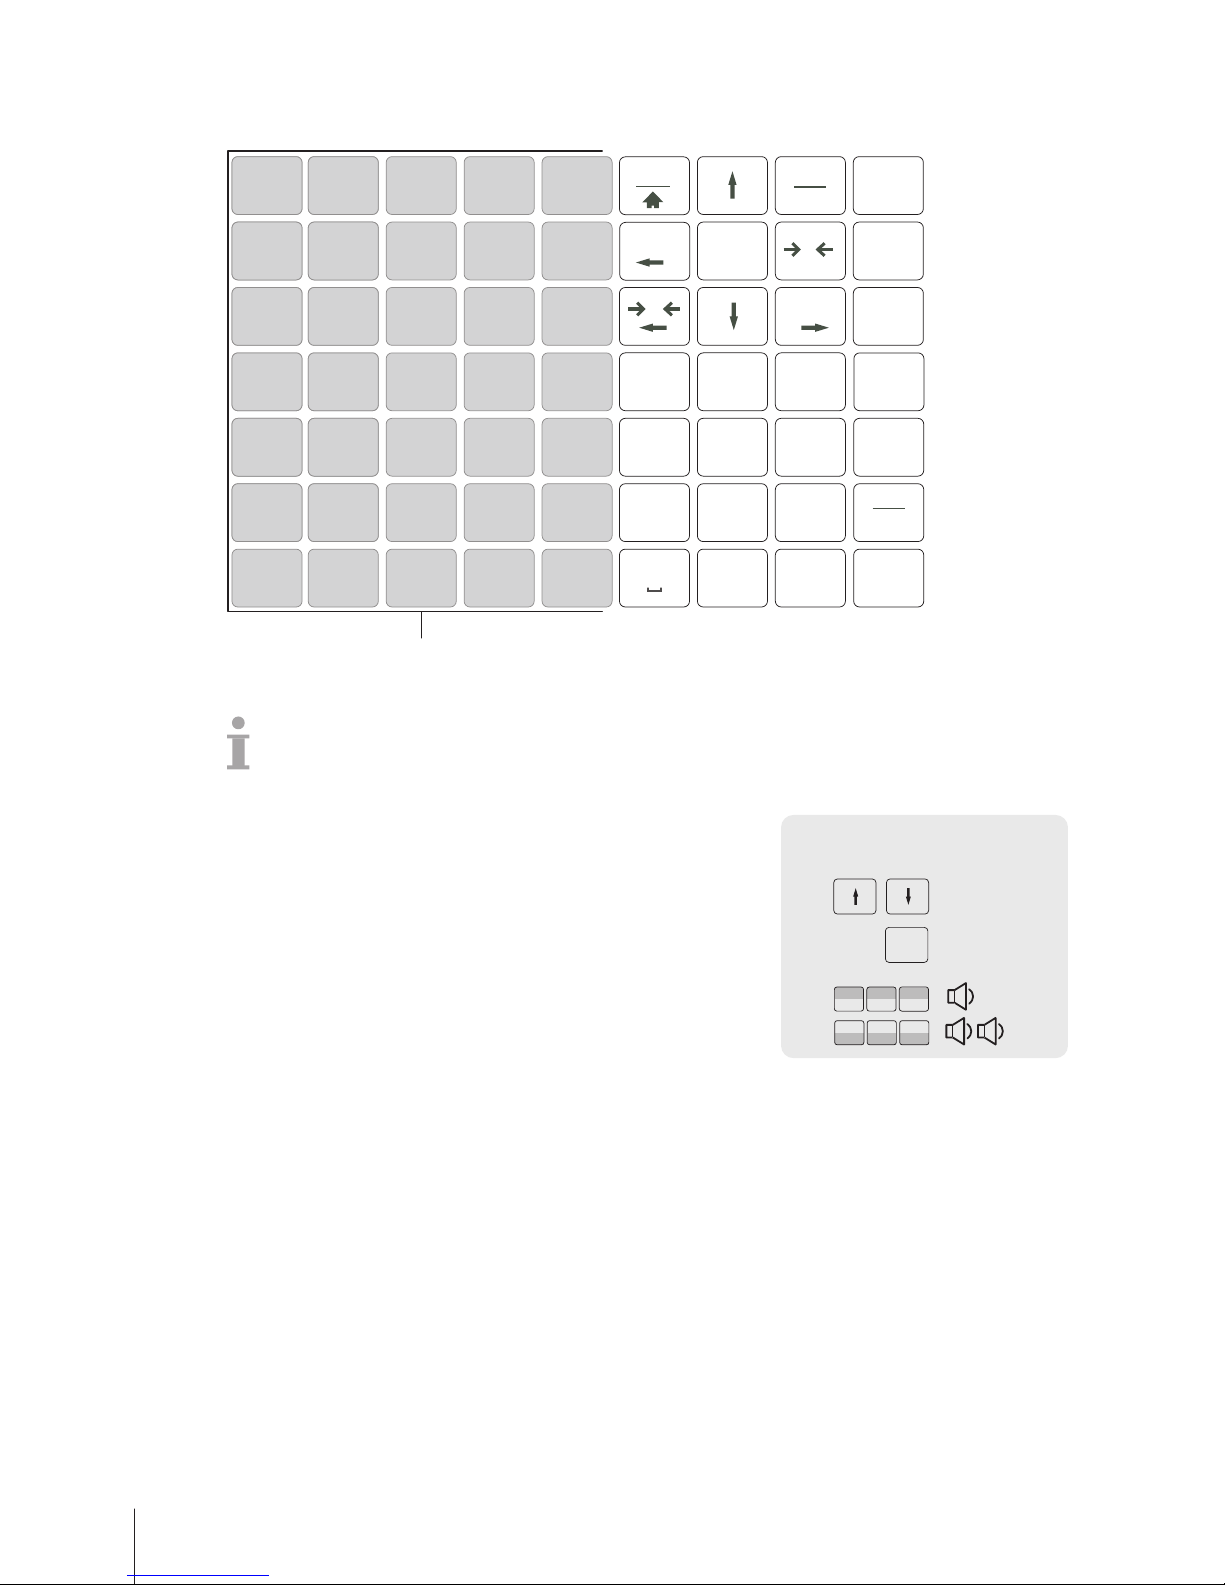
1 Enter the menu and navigate to sub-menu F232
Keymapping.
2 Select a function.
3 Press the desired preset key until a beep is heard.
4 For a preset key on the second level, press the desired preset key
until a second beep is heard.
5 When the function is mapped, the coordinates of the preset key
are displayed, e.g., L3 C1 (Line 3, Column 1).
F232
14 Fix Key
1 L3 C4
– or –
2 L3 C4
Setting up menu items on preset keys
You can assign shortcuts for the most frequently used menu items to the keys on the keypad.
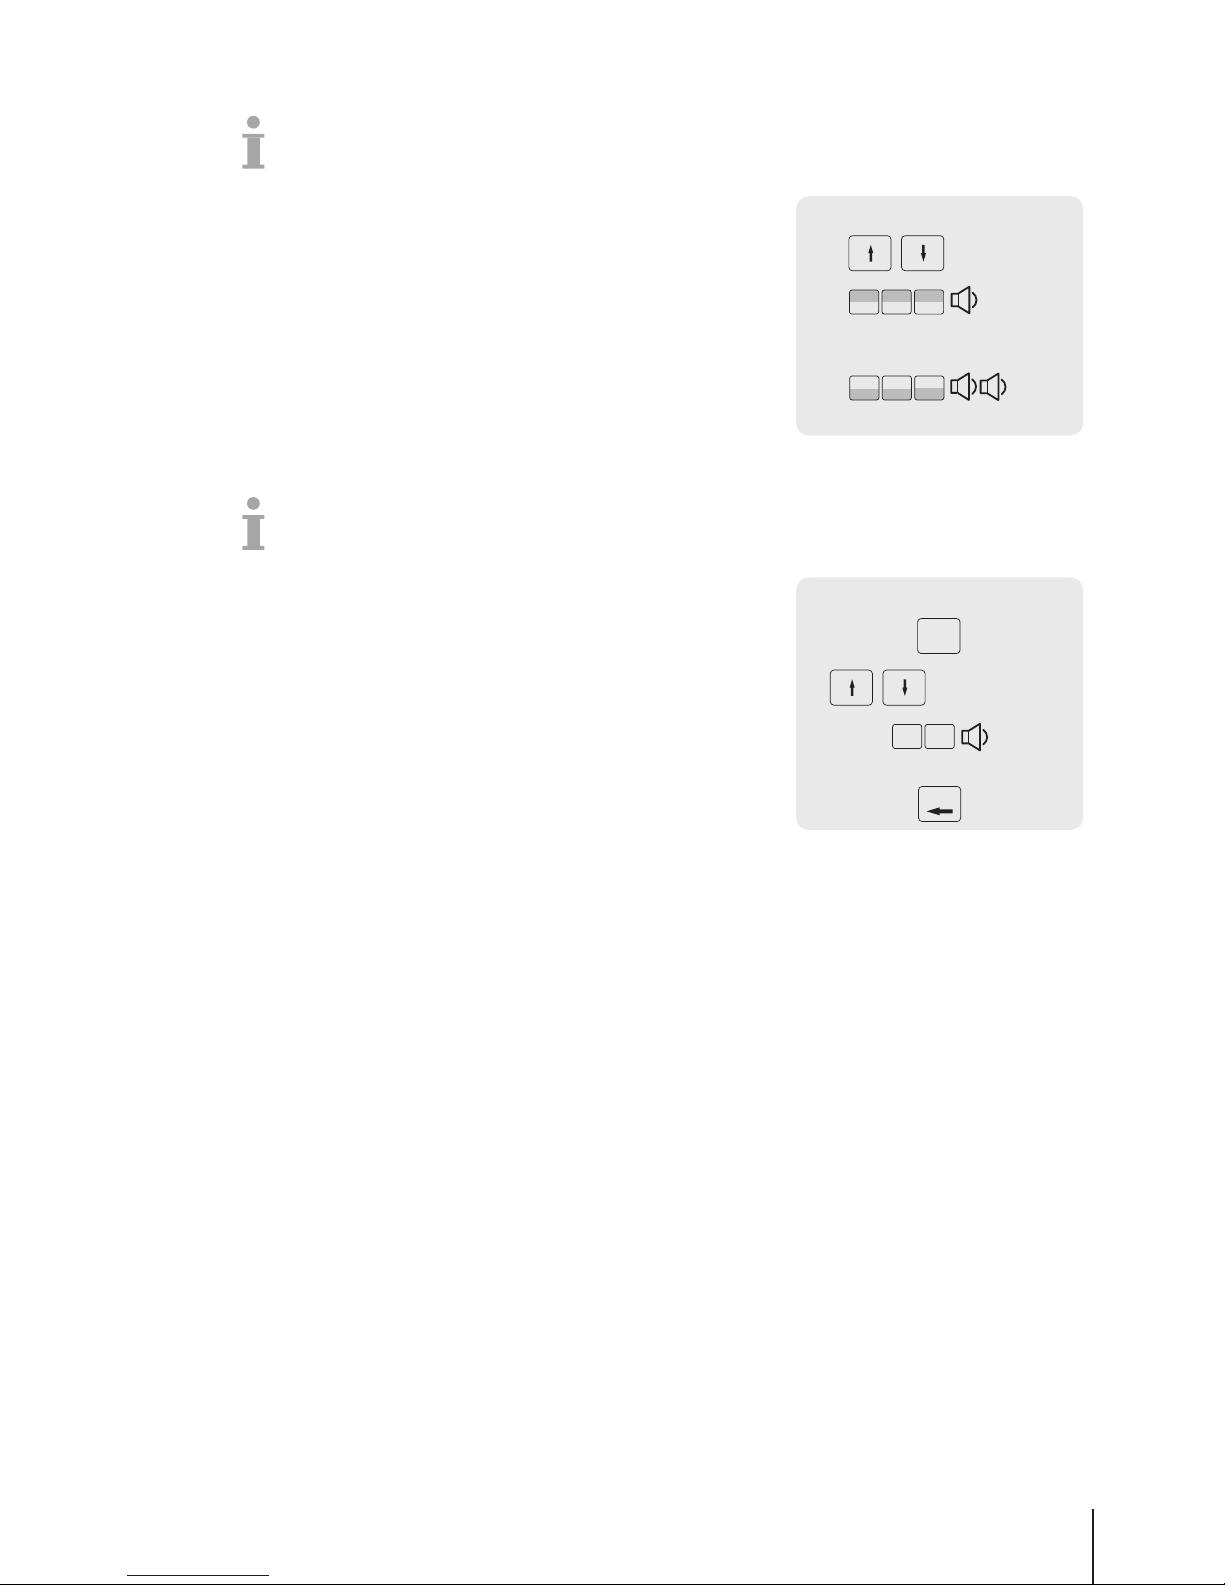
1 Enter the menu and navigate to the desired sub-menu, e.g.,
F113 Group.
2 Press the OK key.
3 Use the arrow keys to select an existing group.
4 Press the desired preset key until a beep is heard.
ð The group is assigned to the preset key of the first layer.
5 For further menu items, repeat steps 3-4.
6 Press the Back key repeatedly to return to the main menu / main
screen.
F113
PLU Group
OK
…
Back
Menu 47Skippper 5000
Page 50

4.3.5 Setting up a floating vendor scale network with data synchronization
You can set up different network types depending on your needs, e.g., with or without data synchronization.
This example shows you how to set up a floating vendor scale network with data synchronization. For
this option, you will define one scale as "Data Server/ Master" (where the data are managed) and the
other scales as "Client" (where the data will be recalled from).
Configuring the "Data Server/Master" scale
1 Enter the menu and navigate to sub-menu F251 Network.
2 Ensure that "IP Mode" is set to "Automatic".
ð The scales are in the same network and can communicate
with each other.
3 Navigate to sub-menu F257 Data Server.
4 Define the scale as "Data Server/ Master" by changing the "Data
Server Type" to "Server".
5 Navigate to sub-menu F211 Item Recall.
6 Ensure that "Source of PLU" is set to "Local".
7 Ensure that "Data Synch at Start up" is set to "Disabled".
8 Navigate to sub-menu F233 Vendor.
9 Set "Vendor Mode" to "Floating Vendor".
F251
OK
OK
F257
OK
OK
IP Mode: Automatic
Data Server / Master:
OK
OK
Vendor Mode: Floating Vendor
OK
F211
Source of PLU: Local
OK
Data Synch at Start up: Disabled
OK
F233
Data Server Type: Server
Menu48 Skippper 5000
Page 51

Configuring the "Client" scale
You need to configure each client scale individually.
1 Enter the menu and navigate to sub-menu F251 Network.
2 Ensure that "IP Mode" is set to "Automatic".
ð This configuration ensures that your scales are in a network
and can communicate with each other.
3 Navigate to sub-menu F257 Data Server.
4 Define the scale as "Client" by changing the "Data Server Type" to
"Retrieve Auto".
5 Navigate to sub-menu F211 Item Recall.
6 Ensure that "Source of PLU" is set to "Remote + Local".
7 Ensure that "Data Synch at Start up" is set to "Enable".
8 Navigate to sub-menu F233 Vendor.
9 Set "Vendor Mode" to "Floating Vendor".
10 Restart the client scale/s in order to synchronize the item data,
e.g., vendor, group etc., with the "Data Server/Master" scale.
F251
OK
OK
F257
OK
OK
IP Mode: Automatic
Client:
OK
OK
Vendor Mode: Floating Vendor
OK
F211
Source of PLU: Remote + Local
OK
Data Synch at Start up: Enable
OK
F233
Data Server Type: Retrieve Auto
If you work with static IP addresses, the data retrieve settings in "Data Server Type" must be changed
to "Retrieve from IP".
Menu 49Skippper 5000
Page 52
4.3.6 Reports
4.3.6.1 Setting up basic reports
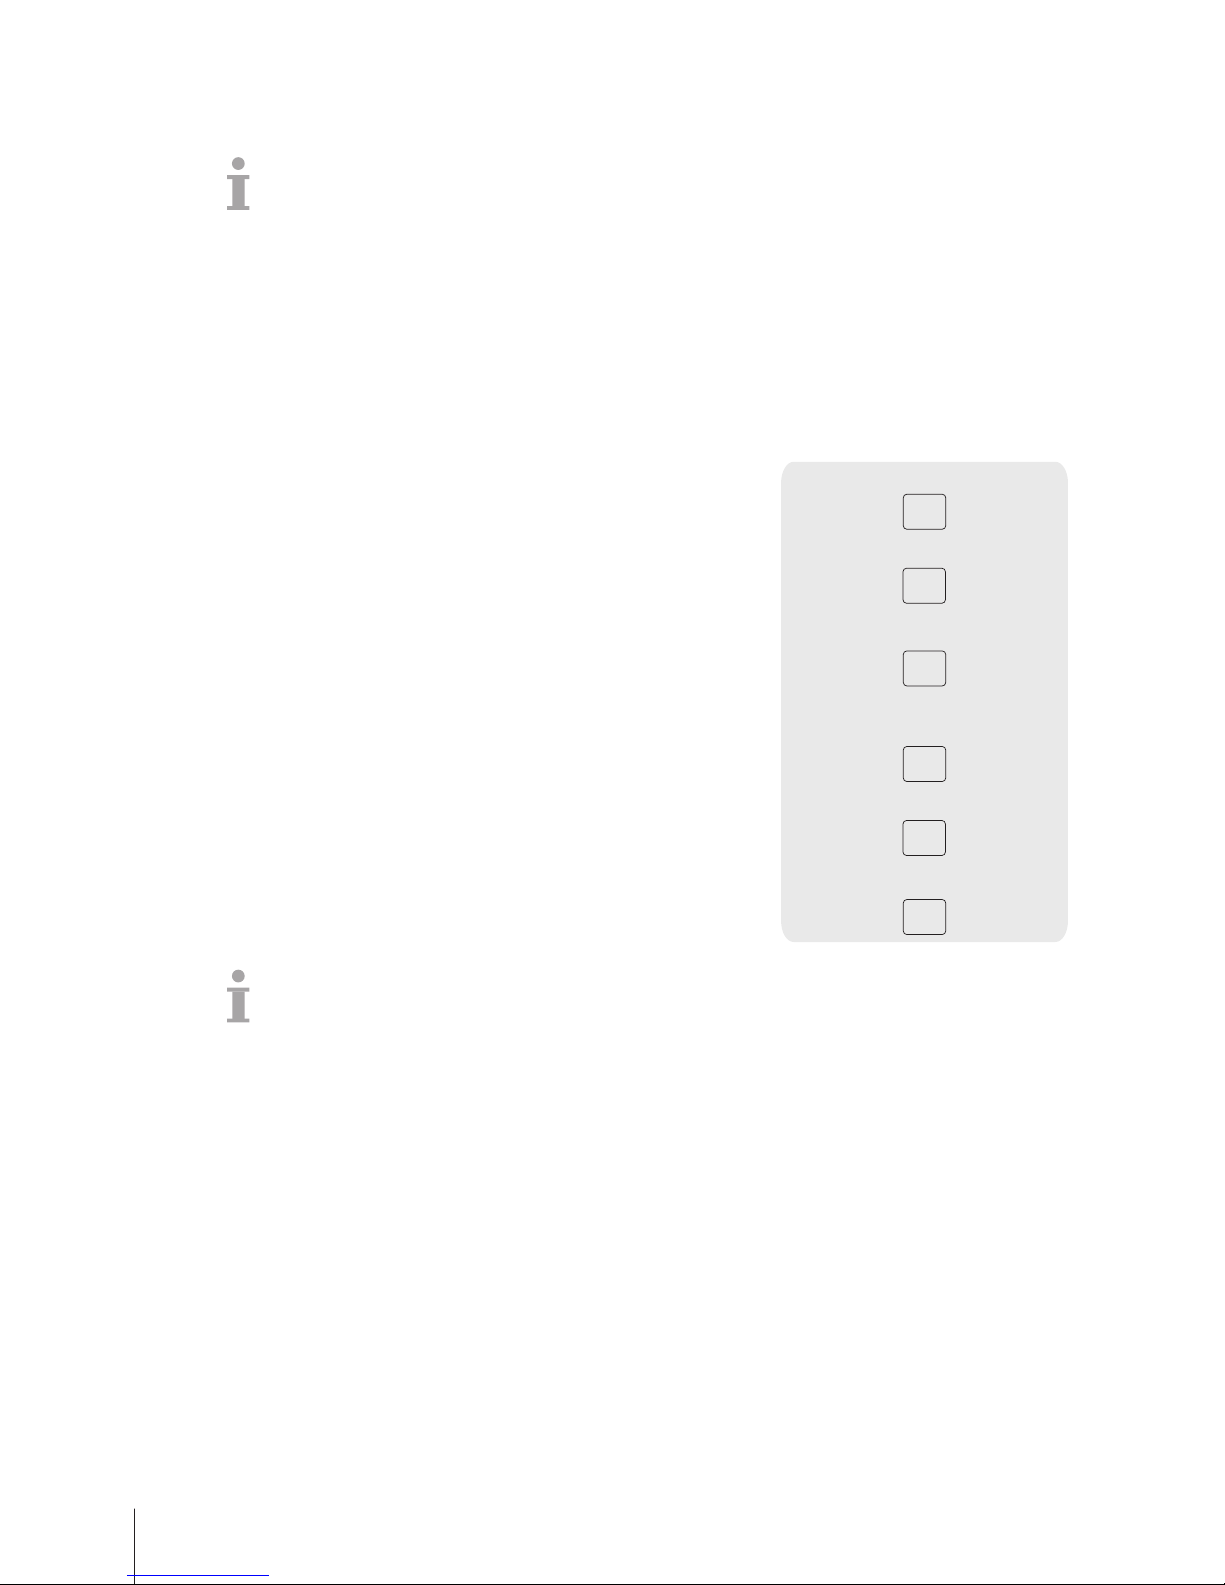
• Basic reports are based on 4 counters which are summing up the quantity for different information:
"Sales Report", "PLU Report", "VAT Report", "Vendor Report", "Category Report", "Group Report".
• All reports can be available for 4 time periods: "Today", "Yesterday", "Day Before Yesterday" and
"Since last delete".
• The daily report (e.g., "Today") will be shifted to yesterday when the date changes. It will always
be empty in the morning when starting the scales. In order to ensure correct data for all time
periods ("Today", "Yesterday", "Day Before Yesterday"), the corresponding 3 report types cannot be
deleted.
• Only the "Since last delete" report will actually be deleted when pressing the [Delete Reports] key.
This allows you to have different reports running at the same time.
Example
1 Enter the menu and navigate to sub-menu
F31 Basic Reports.
2 Select the report you would like to set up/ print out, e.g., F311
Sales Report.
3 Set "Period Filter" to "Today".
4 Print out a report at the end of the day and repeat printout the
entire week.
5 At the end of the week, navigate to the sub-menu F311 Sales
Report.
6 Set "Period Filter" to "Since last delete".
ð The turnover of the entire week will be printed.
7 Delete the report only once a week.
F31
OK
OK
Period Filter: Today
F311
OK
…
F31
OK
Period Filter: Since last delete
F311
OK
OK
• As long as all scales are in the network and running, the report printed on one scale will include
the data from all other scales in the network.
• If one scale in the network is switched off, the data from this scale will not be taken into account in
the report.
• Deleting the report will not delete the Sales Journal. Deleting the Sales Journal will not delete the
report counters.
Menu50 Skippper 5000
Page 53

4.3.6.2 Setting up combination reports
Combination reports allow you to print several reports at once. You can define the content of the
combination report in sub-menu F33.
1 Enter the menu and navigate to sub-menu F33 Combination
Report.
2 Use the arrow keys to navigate to the required report type.
3 Select/ deselect a report type and confirm with the OK key.
4 To add mor report types, repeat steps 2-3.
ð All reports set to "Yes" will be part of the combination report.
5 To print the combination report, press the Star key.
– or –
Define a preset key in menu F232 and initiate the print-out via
keyboard.
F33
OK
PLU Report
Sales Report
OK
*
Pay
OK
The time period of each report is defined in its respective sub-menu. It is therefore possible to have
different time periods in the combination report, e.g., a sales report of "Today" and a PLU report "Since
last Deletion".
Menu 51Skippper 5000
Page 54
5 What to do, if ...?
In case of an operating error, the error message will be displayed for approx. 1 second in the bottom
line of the display. Error messages can be cleared with the Clear key.
No. Message Description / Remedy
1 Operation denied • Defined preconditions for operation are not met
• System configuration / user rights are not setup to perform the requested
action
• System currently in a status where the operation is not allowed
2 Tare not allowed • The weight must be bigger than 0.000 kg and not exceed the max. allowed
value
3 Weight not stable • Outside conditions like vibrations or wind can prevent the system from
displaying the right weight value
4 Discount denied • Promotion rules are violated
• Negative unit price or total price
• Lack of user rights
5 Print transactions • To switch working modes or reopen a ticket all recorded sales transactions
need to be printed or must be suspended
6 Item not found • Item not found in the database, temporarily locked or out of stock
7 Memory full − Clear the memory to continue work
8 Tare not found • Tare number not found and cannot be recalled
9 Paper empty − Insert a new ticket roll
10 Ticket not found • Ticket number not found in the memory
11 Vendor not active − Login
− When the vendor was working on another device which is not reachable
anymore, go back to this device
12 Negative weight • The displayed weight must not be less than 0.000 kg when working with
by-weight PLUs
13 Weigh again • After transactions the weight needs to be lifted off the weighing pan
14 Weight too large • The weight exceeds the weighing capacity of the scale
15 No data • A sales record can only be recorded if a PLU was recalled or an item price
entered manually
17 Weight too small • Printing below 20 e not supported
− Check if the weighing pan is being lifted through external influences
18 Select vendor • To access sales slip view or payment screens, the vendor needs to be
identified by pressing the Vendor key
19 Count limits − Enter a valid value for by-count articles (1 ... 9999)
20 Invalid input • Value not permitted or exceeding size limit
21 List entry not found • List entry not found
22 Enter amount − Enter the amount of the payment via keypad
23 Card not accepted • Card could not be read
• Payment could not be processed
• Discounts could not be granted
24 Payment denied • The vendor does not have the adequate rights level to process refunds
25 VAT not defined • VAT rates for Inhouse or Take-Away Food are not setup for some or all
articles and still require definition
27 Unknown error • No detailed description available
What to do, if ...?52 Skippper 5000
Page 55

No. Message Description / Remedy
28 Void denied • Void operation could not be processed by credit card reader
− Try it again
29 All keys blocked • All defined Vendor keys currently used by other vendors
30 Password not
correct
− Reenter the correct password
31 Power failure • AC power is not stable or battery is running low
• The system will shut down automatically
32 Network failure • Network connection cannot be established
• Data transmission in the network is constantly or temporarily blocked
− Check cable connections or wireless connections
33 Scanner not found • Communication to the scanner cannot be established
34 Barcode denied • Barcode format not supported
• Barcode cannot be read
35 Open transactions • When shutting down, the system detected not printed or suspended trans-
actions
36 Vendor not
identified
− Identify yourself by pressing your Vendor key
37 Remove weight − Remove the weight from the weighing pan when starting up
38 Suspend memory
full
− Before suspending another sales transaction, please recall at least one
suspended transaction
40 Value out of range − Enter a smaller or bigger value
42 Old tare deleted • There have been too many tare values recorded. The oldest tare value was
deleted to store the most recent tare value
46 Close cash drawer • Cash drawer timing limit exceeded
− Close cash drawer in order to continue working
47 Payment not
complete
• Customer still has to pay a certain amount
48 Preset tare not
defined
− Define preset tares
49 Ticket not found • Ticket number could not be found in the log file for reopening
50 Total or unit price
not defined
− Start transaction again from the beginning
51 Memory achieving
size limits
• About 85 % of the assigned memory is full
− To avoid blocking of the system, enter configuration mode and choose the
preferred backup method
52 Ticket not close − Close or suspend the ticket
53 Take goods up and
down again
• Movement on the weighing pan not below the minimum booking weight
since the last booking
− Lift off the weighing goods and put them down again
54 Weight below
purchase lower
limit
• The current weighing goods have a purchase lower limit
− Increase the weight
55 Weight above
purchase upper
limit
• The current weighing goods have a purchase upper limit
− Reduce the weight
56 Precious goods − Weigh precious goods on a high resolution scale
What to do, if ...? 53Skippper 5000
Page 56
No. Message Description / Remedy
60 Enter refund mode − Switch to refund mode to perform a refund
61 100 g not
supported
• Unit price cannot be divided by 10, e.g., 2.95
− For the 100 g function only use unit prices which can be divided by 10,
e.g,. 2.90
64 Printer head too hot − Wait until the printer head has cooled down
67 Date is invalid − Enter a valid date in the displayed format
68 Time is invalid − Enter a valid time in the displayed format
69 Vendor not found • The vendor with the entered ID does not exist
70 Vendor login other
key
− Vendor already logged in with another key
73 Over transaction
limit
• Transaction quantity has exceeded upper limit
74 Server is failure • Data remote server unreachable
75 Memory is full • Memory of the database is full
76 Battery Low − Recharge battery otherwise the scale will turn off automatically
What to do, if ...?54 Skippper 5000
Page 57

6 Technical data and accessories
6.1 Technical data
Scale data
Max. load / increments 6 / 15 kg multi interval, e = 2 / 5 g
15 / 30 kg multi interval, e = 5 / 10 g
15 kg single interval, e = 5 g
Display
Weight display 6 digits
Unit price display 6 digits
Total price 7 digits
Tare 5 digits
Ambient conditions
Operating temperature –10 °C to +40 °C
Storage temperature –10 °C to +50 °C
Humidity max. 85% relative humidity, non-condensing
Altitude up to 2000 m
Electrical data
Power supply 100 to 240 V AC, 50 / 60 Hz or 12 / 24 V DC
Mains supply voltage fluctuation up to ±10 % of the nominal voltage
Installation category II
Degree of pollution 2
6.2 Compliance
Compliance to the following standards is indicated by the corresponding mark
on the product.
This product conforms to the EMC directive 2014/30/EC, the Low Voltage
Directive 2014/35/EC and the Non-automatic Weighing Instruments Directive
2014/31/EC. The complete Declaration of Conformity is available online at
http://www.ohaus.com/ce
6.3 Options/Accessories
The following options/accessories are available to enhance the performance of your scale:
• Tower to position the customer display at eye level
• Battery for mobile operation
If you would like to add an option/accessory to your scale, please contact your sales representative.
Technical data and accessories 55Skippper 5000
Page 58

Technical data and accessories56 Skippper 5000
Page 59

Page 60

OHAUS Corporation
7 Campus Drive, Suite 310
Parsippany, NJ 07054 USA
OHAUS Europe GmbH
Im Langacher 44
8606 Greifensee
Switzerland
With offices worldwide
www.ohaus.com
30217561
Subject to technical changes.
© Ohaus Corporation, all rights reserved 12/2016
30217561C en
 Loading...