

Page 1
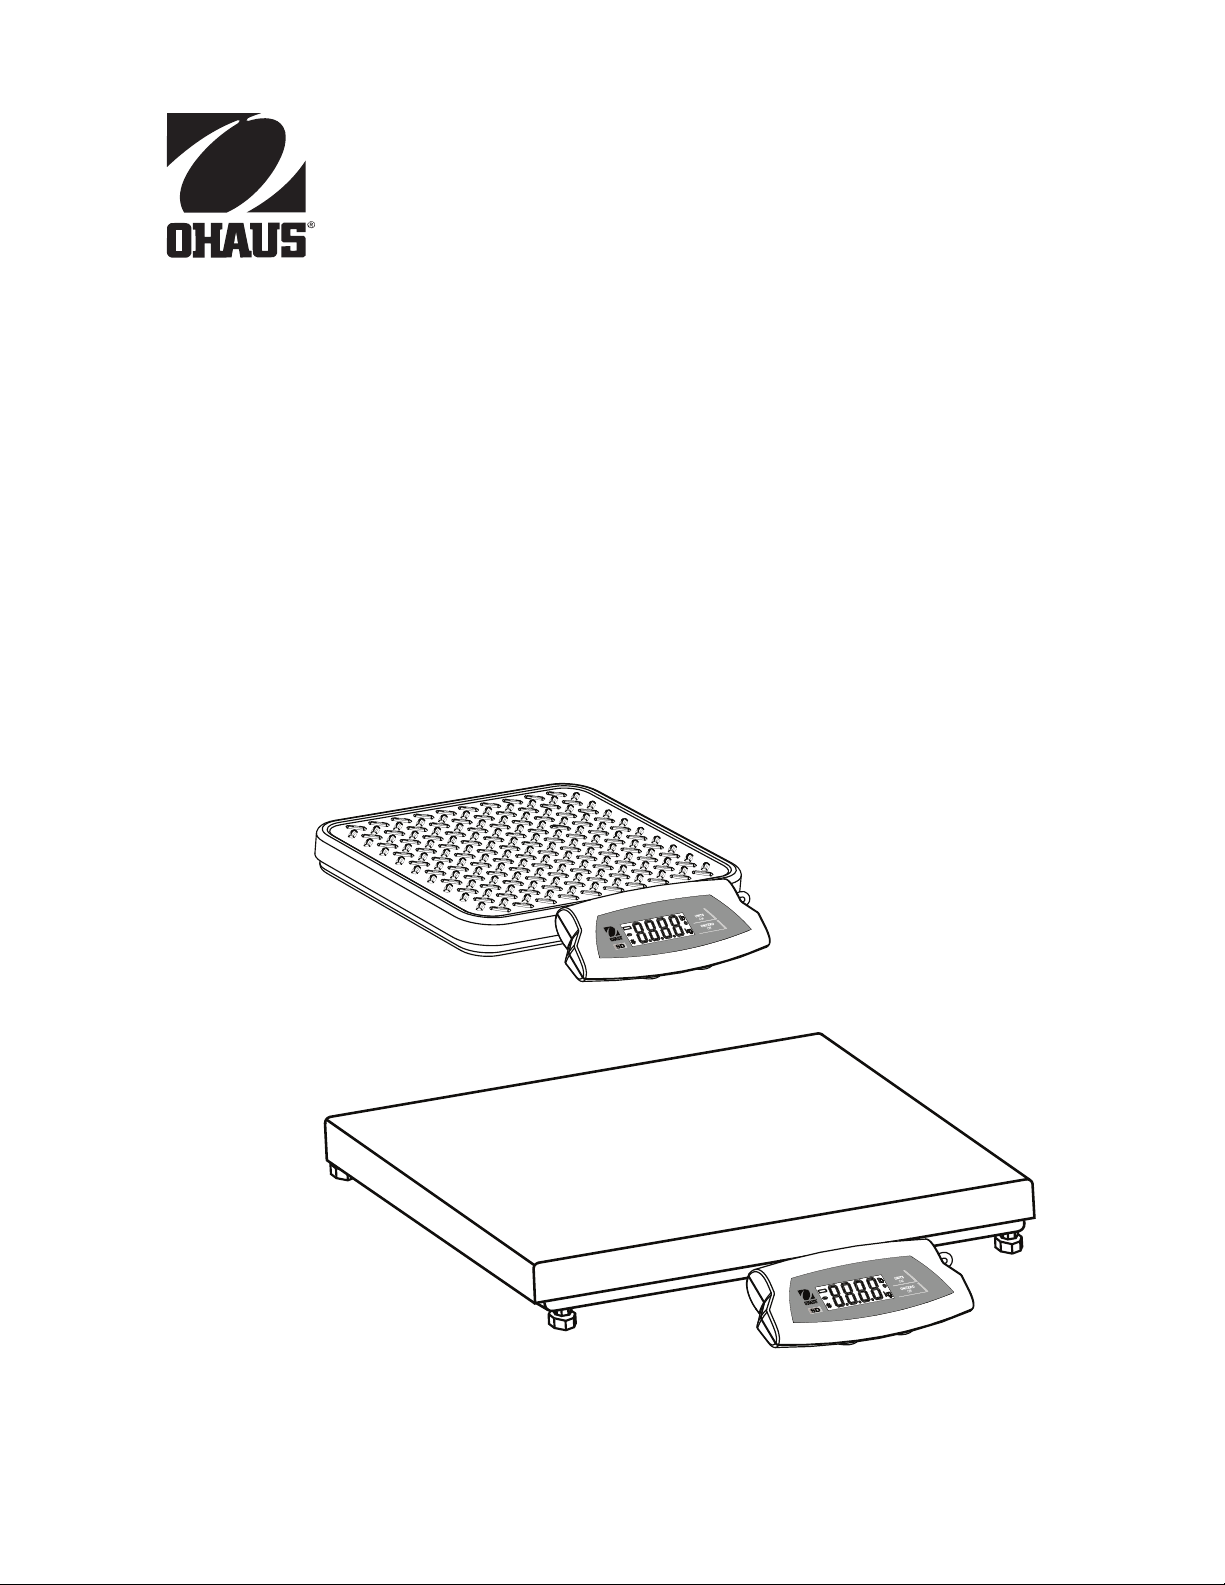
SD Series Bench Scale
Báscula de mesa de la serie SD
Balance de table Série SD
Tischwaage der SD-Serie
Bilancia da banco serie SD
i
Find Quality Products Online at: [email protected]
www.GlobalTestSupply.com
Page 2

Disposal
In conformance with the European Directive 2002/96 EC on Waste Electrical and Electronic Equipment (WEEE) this device may not be disposed of in domestic waste. This also
applies to countries outside the EU, per their specific requirements.
Please dispose of this product in accordance with local regulations at the collecting point
specified for electrical and electronic equipment.
If you have any questions, please contact the responsible authority or the distributor from
which you purchased this device.
Should this device be passed on to other parties (for private or professional use), the
content of this regulation must also be related.
Thank you for your contribution to environmental protection.
Eliminación de residuos
De conformidad con las exigencias de la directiva europea 2002/96 CE sobre residuos de
aparatos eléctricos y electrónicos (RAEE), este equipo no puede eliminarse como basura
doméstica. Esta prohibición es asimismo válida para los países que no pertenecen a la
UE cuyas normativas nacionales en vigor así lo reflejan.
Elimine este producto, según las disposiciones locales, mediante el sistema de recogida
selectiva de aparatos eléctricos y electrónicos.
Si tiene alguna pregunta al respecto, diríjase a las autoridades responsables o al distribuidor que le proporcionó el equipo.
Si transfiere este equipo (por ejemplo, para la continuación de su uso con fines privados,
comerciales o industriales), deberá transferir con él esta disposición.
Muchas gracias por su contribución a la conservación medioambiental.
Elimination
En conformité avec les exigences de la directive européenne 2002/96 CE relative aux
déchets d‘équipements électriques et électroniques (DEEE), cet appareil ne doit pas être
éliminé avec les déchets ménagers. Logiquement, ceci est aussi valable pour les pays en
dehors de l’UE conformément aux règlementations nationales en vigueur.
Veuillez éliminer cet appareil conformément aux prescriptions locales dans un conteneur
séparé pour appareils électriques et électroniques.
Pour toute question, adressez-vous aux autorités compétentes ou au revendeur chez qui
vous avez acheté cet appareil.
En cas de remise de cet appareil (p. ex. pour une utilisation privée ou artisanale/industrielle), cette prescription doit être transmise en substance.
Merci pour votre contribution à la protection de l’environnement.
iv
Find Quality Products Online at: [email protected]
www.GlobalTestSupply.com
Page 3

Entsorgung
In Übereinstimmung mit den Anforderungen der Europäischen Richtlinie 2002/96 EG
über Elektro- und Elektronik-Altgeräte (WEEE) darf dieses Gerät nicht mit dem Hausmüll
entsorgt werden. Sinngemäss gilt dies auch für Länder ausserhalb der EU entsprechend
den geltenden nationalen Regelungen.
Bitte entsorgen Sie dieses Produkt gemäss den örtlichen Bestimmungen in einer getrennten
Sammlung für Elektro- und Elektronikgeräte.
Bei allfälligen Fragen wenden Sie sich bitte an die zuständige Behörde oder den Händler,
bei dem Sie dieses Gerät erworben haben.
Bei Weitergabe dieses Gerätes (z.B. für private oder gewerbliche/industrielle Weiternutzung) ist diese Bestimmung sinngemäss weiterzugeben.
Vielen Dank für Ihren Beitrag zum Schutz der Umwelt.
Smaltimento
In conformità a quanto stabilito dalla Direttiva Europea 2002/96 CE in materia di apparecchi elettrici ed elettronici (RAEE), questo strumento non può essere smaltito come i
normali rifiuti. Tale presupposto resta valido anche per i Paesi al di fuori dei confini della
UE, conformemente alle norme nazionali in vigore.
Si prega quindi di smaltire questo prodotto separatamente e in modo specifico secondo le
disposizioni locali relative alle apparecchiature elettriche ed elettroniche.
Per qualsiasi chiarimento, rivolgersi agli enti preposti o al rivenditore dell‘apparecchiatura
stessa.
In caso di cessione dello strumento (per es. per ulteriore utilizzo privato o aziendale/industriale), si prega di comunicare anche questa disposizione.
Si ringrazia per il contributo alla tutela dell‘ambiente.
v
Find Quality Products Online at: [email protected]
www.GlobalTestSupply.com
Page 4

FCC Note
This equipment has been tested and found to comply with the limits for a Class B digital device, pursuant
to Part 15 of the FCC Rules. These limits are designed to provide reasonable protection against harmful
interference in a residential installation. This equipment generates, uses and can radiate radio frequency
energy and, if not installed and used in accordance with the instructions, may cause harmful interference
to radio communications. However, there is no guarantee that interference will not occur in a particular
installation. If this equipment does cause harmful interference to radio or television reception, which can
be determined by turning the equipment off and on, the user is encouraged to try to correct the interference by one or more of the following measures:
• Reorient or relocate the receiving antenna.
• Increase the separation between the equipment and receiver.
• Connect the equipment into an outlet on a circuit different from that to which the receiver is connected.
• Consult the dealer or an experienced radio/TV technician for help
Industry Canada Note
This Class B digital apparatus complies with Canadian ICES-003.
Cet appareil numérique de la classe A est conforme à la norme NMB-003 du Canada.
EMC Australia / New Zealand: AS/NZS4251.1, AS/NZS4252.1
ISO 9001 Registration
In 1994, Ohaus Corporation, USA, was awarded a certificate of registration to ISO 9001 by Bureau Veritus Quality International (BVQI), confirming that the Ohaus quality management system is compliant with
the ISO 9001 standard’s requirements. On May 15, 2003, Ohaus Corporation, USA, was re-registered to
the ISO 9001:2000 standard.
Registro ISO 9001
En 1994, Bureau Veritus Quality International (BVQI) le otorgó a Ohaus Corporation, EE.UU., un certificado de registro ISO 9001 el cual confirma que el sistema administrativo de calidad de Ohaus cumple
con los requerimientos del estándar ISO 9001. En mayo 15 del 2003, Ohaus Corporation, EE.UU., fue
registrada nuevamente al estándar ISO 9001:2000.
Enregistrement ISO 9001
En 1994, le Bureau Veritus Quality International (BVQI) a octroyé la certification d’enregistrement ISO
9001 à Ohaus Corporation, États-Unis d’Amérique, confirmant que le système de gestion de la qualité
Ohaus était conforme aux conditions normalisées de l’ISO 9001. Le 15 mai 2003, Ohaus Corporation,
États-Unis d’Amérique, a été ré-enregistrée à la norme ISO 9001:2000.
Registrierung nach ISO 9001
Im Jahr 1994 wurde der Ohaus Corporation, USA, ein Zertifikat der Registrierung nach ISO 9001 vom
Bureau Veritus Quality International (BVQI) verliehen, in dem bestätigt wird, dass das Ohaus-Qualitätsmanagementsystem den Anforderungen der Norm ISO 9001 entspricht. Am 15. Mai 2003 wurde die
Ohaus Corporation, USA, gemäß der Norm ISO 9001:2000 neu registriert.
Registrazione ISO 9001
Nel 1994, Ohaus Corporation, USA, ha ricevuto il certificato di registrazione ISO 9001 da Bureau Veritus
Quality International (BVQI), come conferma che il sistema di gestione della qualità Ohaus risponde alle
caratteristiche standard di ISO 9001. Il 15 Maggio 2003, Ohaus Corporation, USA, è stata riregistrata per
la normativa ISO 9001:2000.
vi
Find Quality Products Online at: [email protected]
www.GlobalTestSupply.com
Page 5

SD SERIES BENCH SCALE EN-1
Ohaus SD Series Bench Scale
INSTRUCTION MANUAL
• The contents of this manual applies to all models of the SD Series Bench
Scale.
• Calibration weights are not provided with this product.
• For best results, use the product within the specified operating temperature
range.
• For best accuracy, perform your measurements in a clean environment, free
of electrostatic and magnetic fields, dust and dirt, moisture, vibration and air
currents.
• Use your SD Series Bench Scale with care, gently loading items to be weighed
on the center of the platform. Avoiding rough treatment will aid in extending
the life of your Scale.
Find Quality Products Online at: [email protected]
www.GlobalTestSupply.com
Page 6
EN-2 SD SERIES BENCH SCALE
Introduction
This manual covers operation for the Ohaus SD Series Bench Scales.
Unpacking
SD Series Bench Scale is shipped with the following components:
• Indicator • AC Power Adapter
• Scale Base • This Instruction Manual
• Mounting Brackets • Warranty Card
Leveling Scale Platform
The Scale Base should be placed on a level, stable surface before operation.
Models SD75L and SD200L are equipped with adjustable leveling feet. Adjust the
four leveling feet under the platform to level it.
Power Options
AC Adapter Operation
• The AC Adapter (included) may be used to power the system when battery
power is not available.
• Check that the AC input power as marked on the Adapter matches the
available power source.
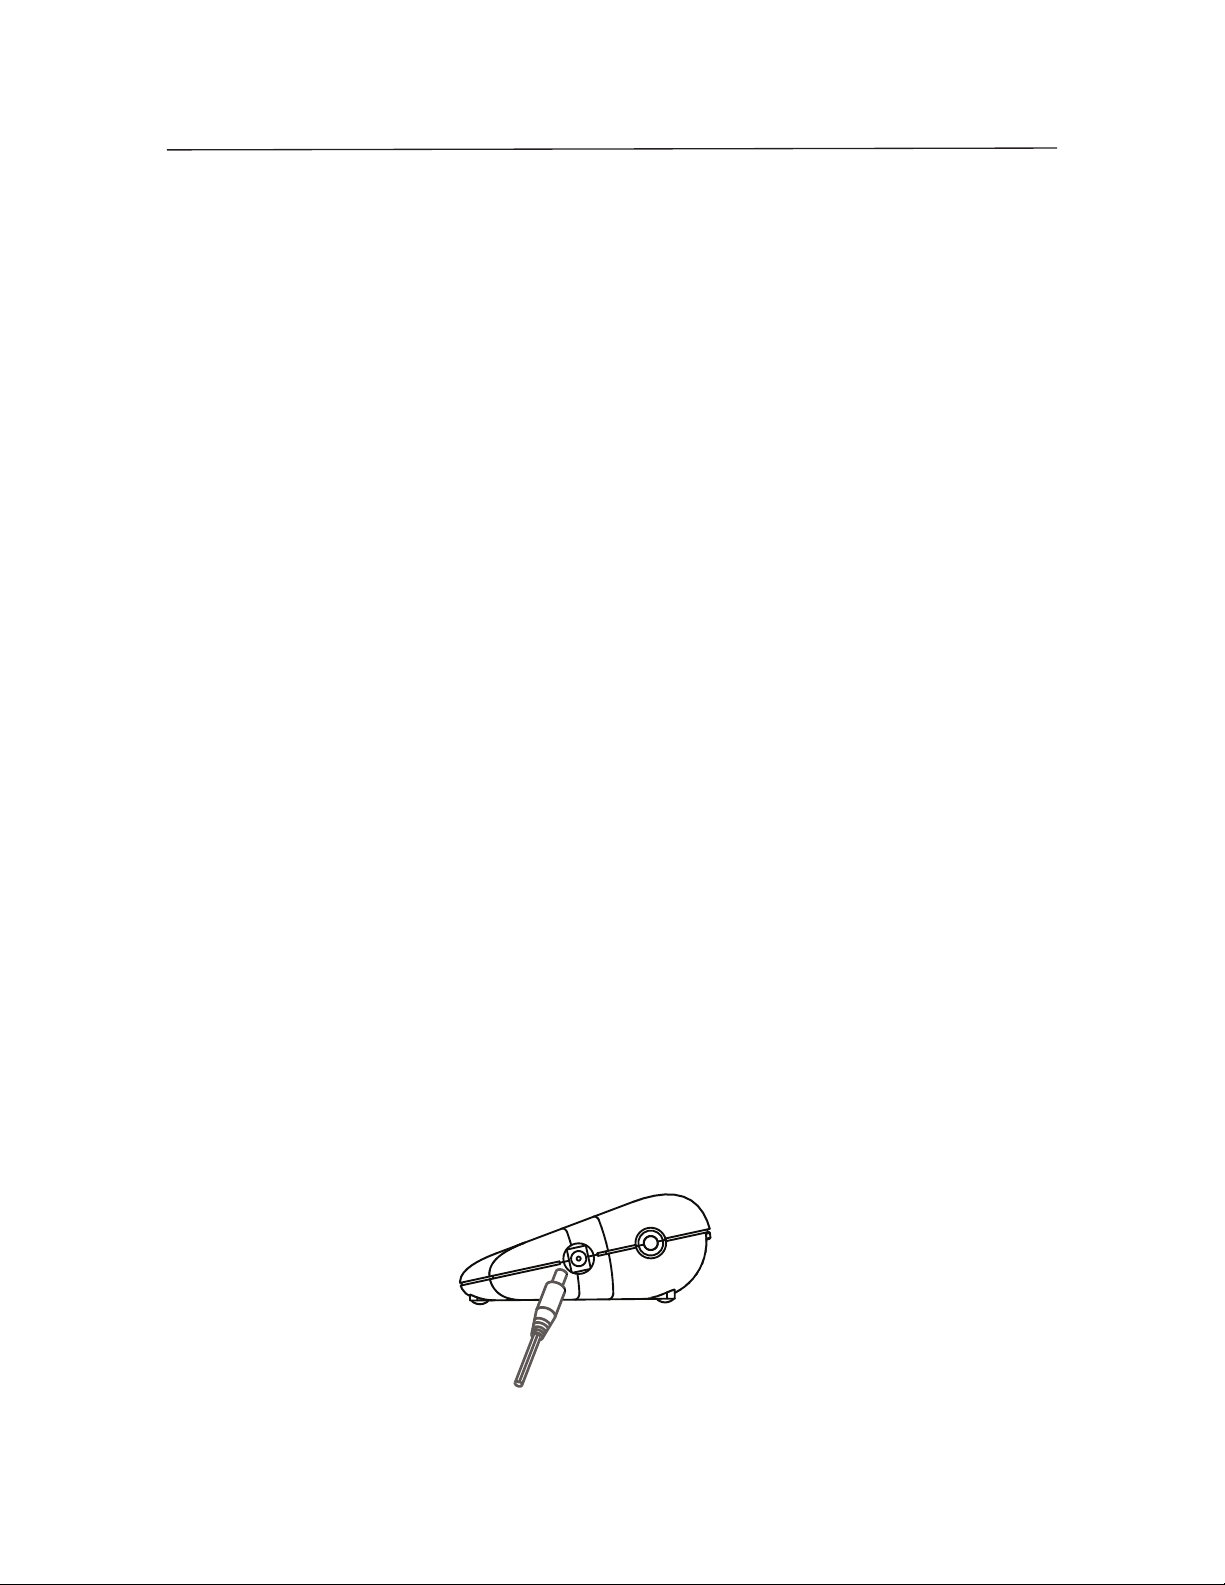
• Connect the round plug of the AC Adapter to the power input jack at the side of
the Indicator housing. See Figure 1.
• Plug the AC Adapter into an AC power outlet.
Figure 1. Connecting Adapter Plug to Indicator.
Find Quality Products Online at: [email protected]
www.GlobalTestSupply.com
Page 7

SD SERIES BENCH SCALE EN-3
Battery Installation (Optional)
• Open the battery cover on the bottom of the Indicator and install three “C”
size (LR14) alkaline batteries into the compartment. Orient the batteries as
shown on the inside cover. Close the battery cover.
NOTE: Batteries are not included.
Figure 2. Battery Installation.
CAUTION: Do not dispose of used batteries in domestic waste. Follow
the proper disposal or recycling requirements in accordance with local
laws and regulations.
Indicator Mounting and Placement Options
• Table Top Placement:
The Indicator may be placed on a flat table surface without additional
hardware. Four rubber feet provide reduced slippage on most surfaces.
• Direct Wall Mounting:
The Indicator may be mounted directly to a wall using two screws (not
included). Select appropriate size screws that fit into the holes at the bottom
of the Indicator housing. See Figure 3. When mounting to a wall without a
solid backing, use appropriate anchoring hardware.
Find Quality Products Online at: [email protected]
www.GlobalTestSupply.com
Page 8

EN-4 SD SERIES BENCH SCALE
120mm / 4.72”
Figure 3. Direct Wall Mount Arrangement.
• Bracket Wall Mounting/Table Mounting:
Attach the two mounting brackets as shown in Figure 4. Position the
Indicator where desired on the wall or table. Install 2 screws (not supplied)
into the ends of each bracket to secure them to the surface. When mounting
to a wall without solid backing, use appropriate anchoring hardware.
MOUNTING NOTES:
1. When attaching brackets: Insert round pins into holes at bottom of
Indicator, slide each bracket back to lock in place.
2. Mounting brackets may be attached in two different orientations to provide
optimum viewing angle.
3. Some mounting positions may require that the brackets be attached to the
work surface before being attached to the indicator.
120mm / 4.72”
90mm / 3.54”
Figure 4. Bracket Wall & Table Mount Arrangements.
Find Quality Products Online at: [email protected]
www.GlobalTestSupply.com
Page 9
SD SERIES BENCH SCALE EN-5
Product Features & Operation
SD
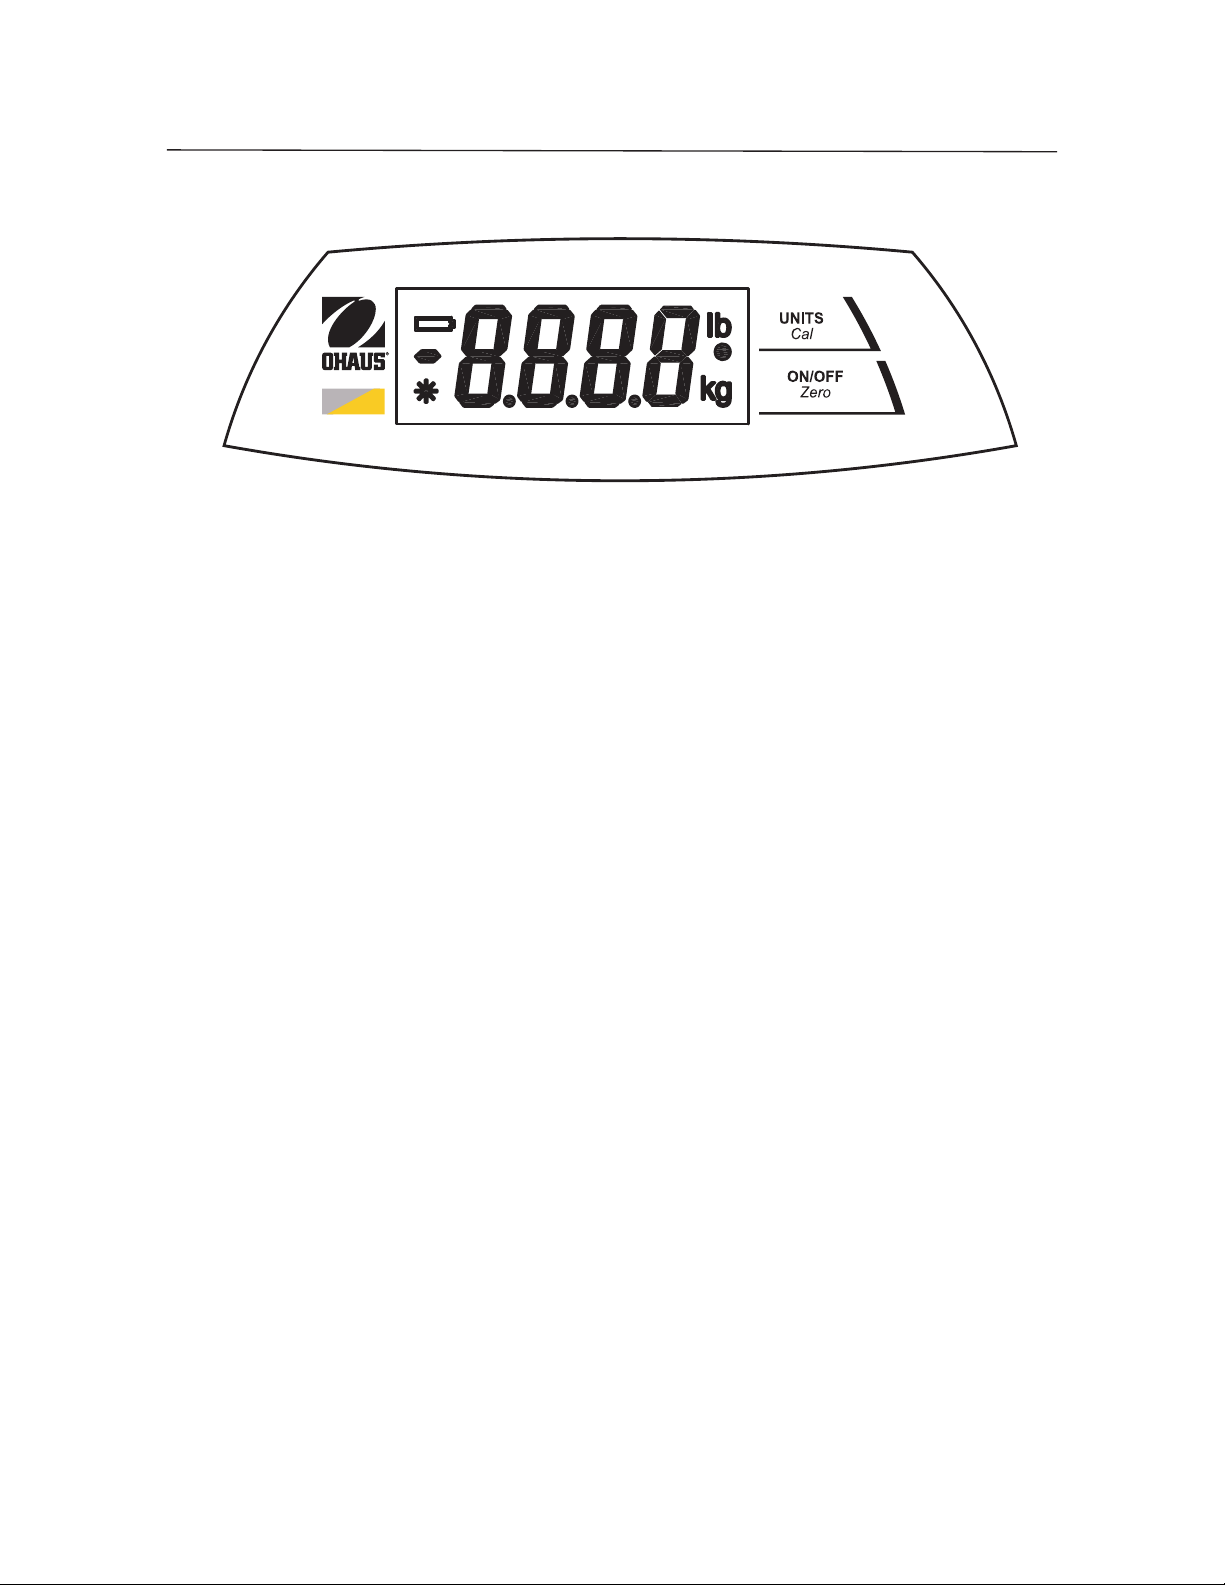
Figure 5. Indicator Panel Controls.
Two Button Keypad
• ON/ZERO
is on, a short press zeroes the scale, and a long press turns the scale off.
• UNITS
A short press initiates countdown during Dynamic Weighing Mode.
A long press initiates the calibration process.
Off
: A short press turns on the scale when it is off. When the scale
Cal
: A short press changes the weighing unit and weighing mode.
Display Window
• Large 7-Segment Numeric Characters: Weight (mass) values are
shown using 4 digits including negative sign and decimal places. Prompts
for calibration and possible error conditions are also shown using these
digits.
•
Stable Reading Indication: A * will appear in the lower left corner of
the display to indicate when the reading is stable.
•
right side of the display.
•
selected unit during this mode.
Find Quality Products Online at: [email protected]
Weighing Unit Indication: The weighing unit selected appears on the
Dynamic Weighing Mode Indication: A • will flash next to the
www.GlobalTestSupply.com
Page 10

EN-6 SD SERIES BENCH SCALE
• Low Battery Indication: The battery symbol on the left side of the
display
approximately 12 hours of operation remain.
depleted, the scale will momentarily display “Lo bAt” and shut off.
indicates a low battery condition. When first displayed ,
When the battery is fully
Operation
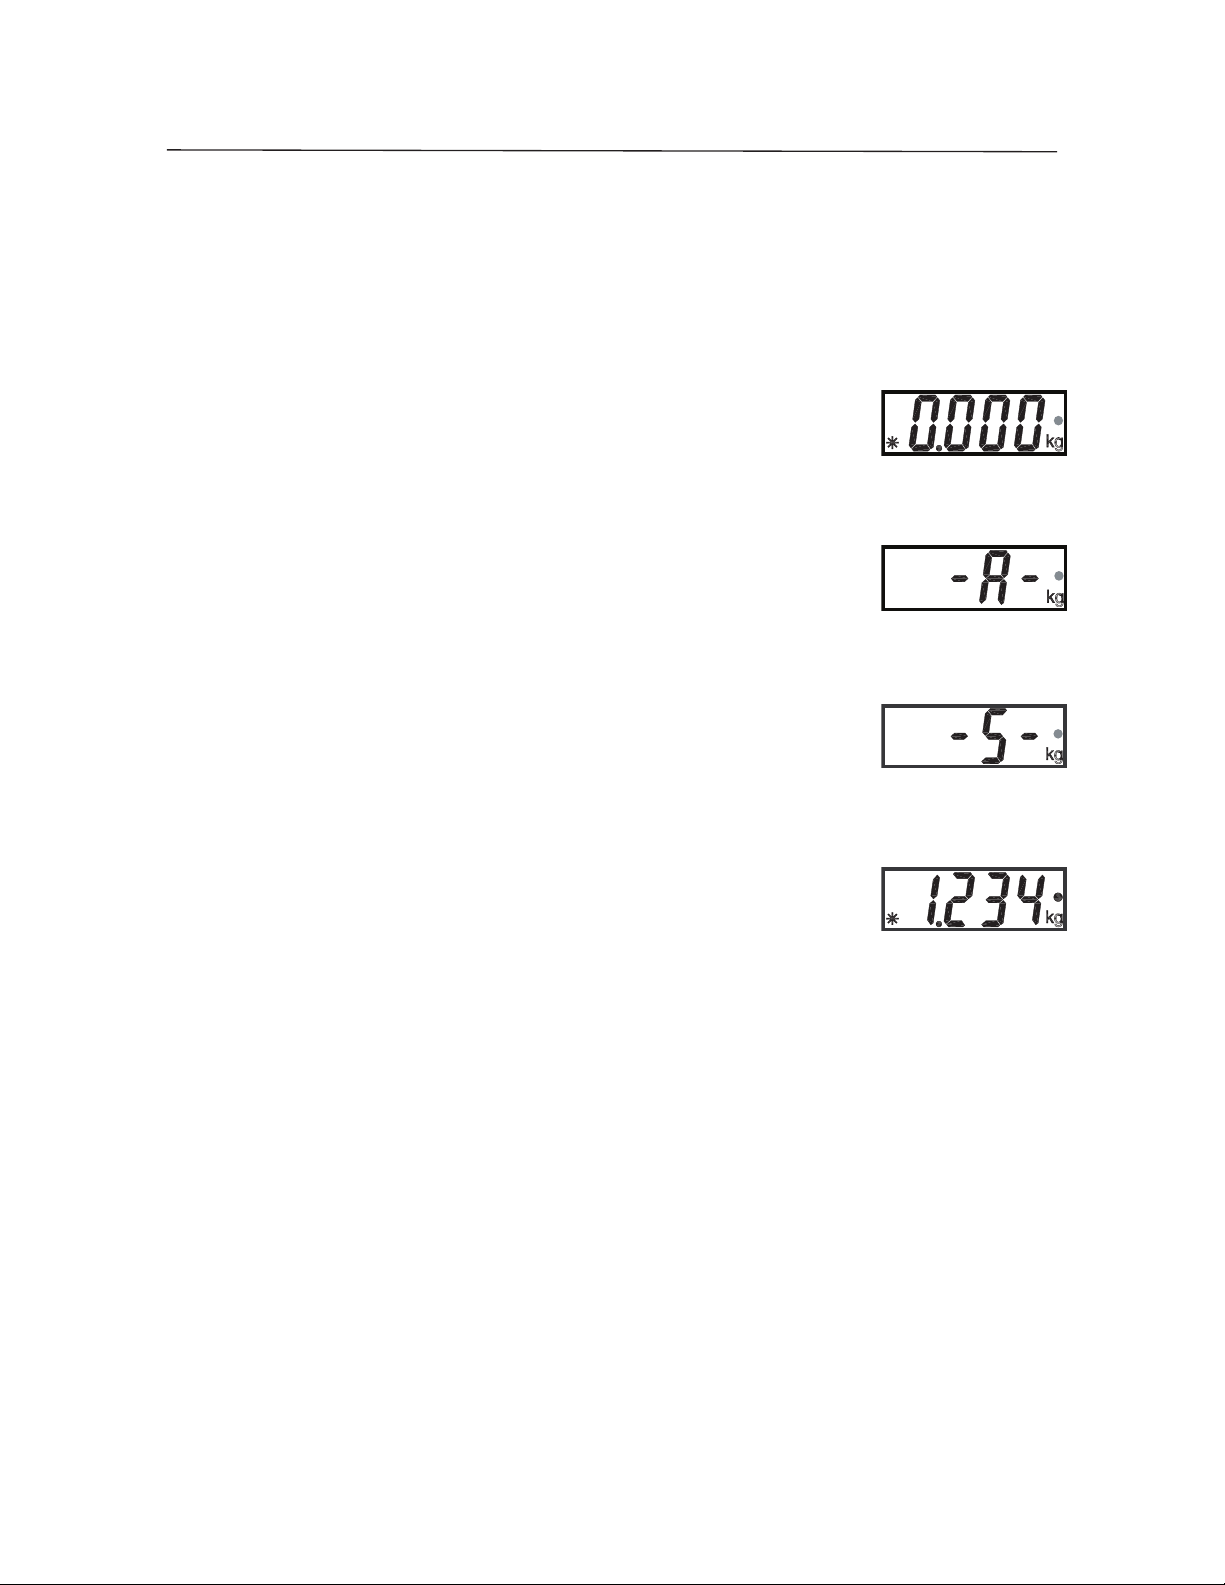
• Power Up Test: When the ON/ZERO
is turned on, all display segments will appear for a short time, followed by
the software version. The display will then reset to zero.
•
returns to zero. When adding additional mass, the ON/ZERO
may be used repeatedly until the full capacity of the scale is reached.
When a container is used, the ON/ZERO
simulate a Tare function. Additional mass may then be added as a NET
Zero Function: By pressing the ON/ZERO
Off
button is pressed, the scale
Off
button, the scale display
Off
button
Off
button may be used to
weight. When removing both the sample and container from the scale, a
negative value may be displayed. Zero the scale again before subsequent
usage.
Off
NOTE: The ON/ZERO
displayed values are within +2% of full capacity. Above 2%, the range is
limited to full capacity by subtraction.
•
zeroed value will be displayed as a negative number. To return to normal
operation, the negative value is cleared from the display by pressing the
ON/ZERO
•
Negative Values: When a load is removed from the scale, any previously
Off
button
Overload: If the applied load exceeds the capacity of the scale, an “E” is
button will perform a true zero setting function when
.
displayed. Remove the load and the scale will return to normal operation.
Find Quality Products Online at: [email protected]
www.GlobalTestSupply.com
Page 11
SD SERIES BENCH SCALE EN-7
• Auto Shut-Off: To extend battery life, the scale will automatically turn off
after approximately four minutes of inactivity. This feature is only active
during battery operation.
Dynamic Weighing
1. With platform empty, press the UNITS
indicator • flashes next to the desired measuring unit.
2. Place a mass on the platform. The scale will show “-A-”.
NOTE: If using a container, press ON/ZERO
weight and return to zero.
3. With a mass on the platform or container, a short press of
UNITS
5 seconds.
4. The averaged weight is then displayed. The indicator •
stops flashing when the process is complete.
Cal
will start the averaging countdown from
Cal
button until the
Off
to tare the
5. The display will hold until a button is pressed.
6. To repeat the process press
platform or container.
7. To Exit, remove the mass from the platform or container and
press
Find Quality Products Online at: [email protected]
UNITS
Cal.
www.GlobalTestSupply.com
UNITS
Cal
with a mass on the
Page 12
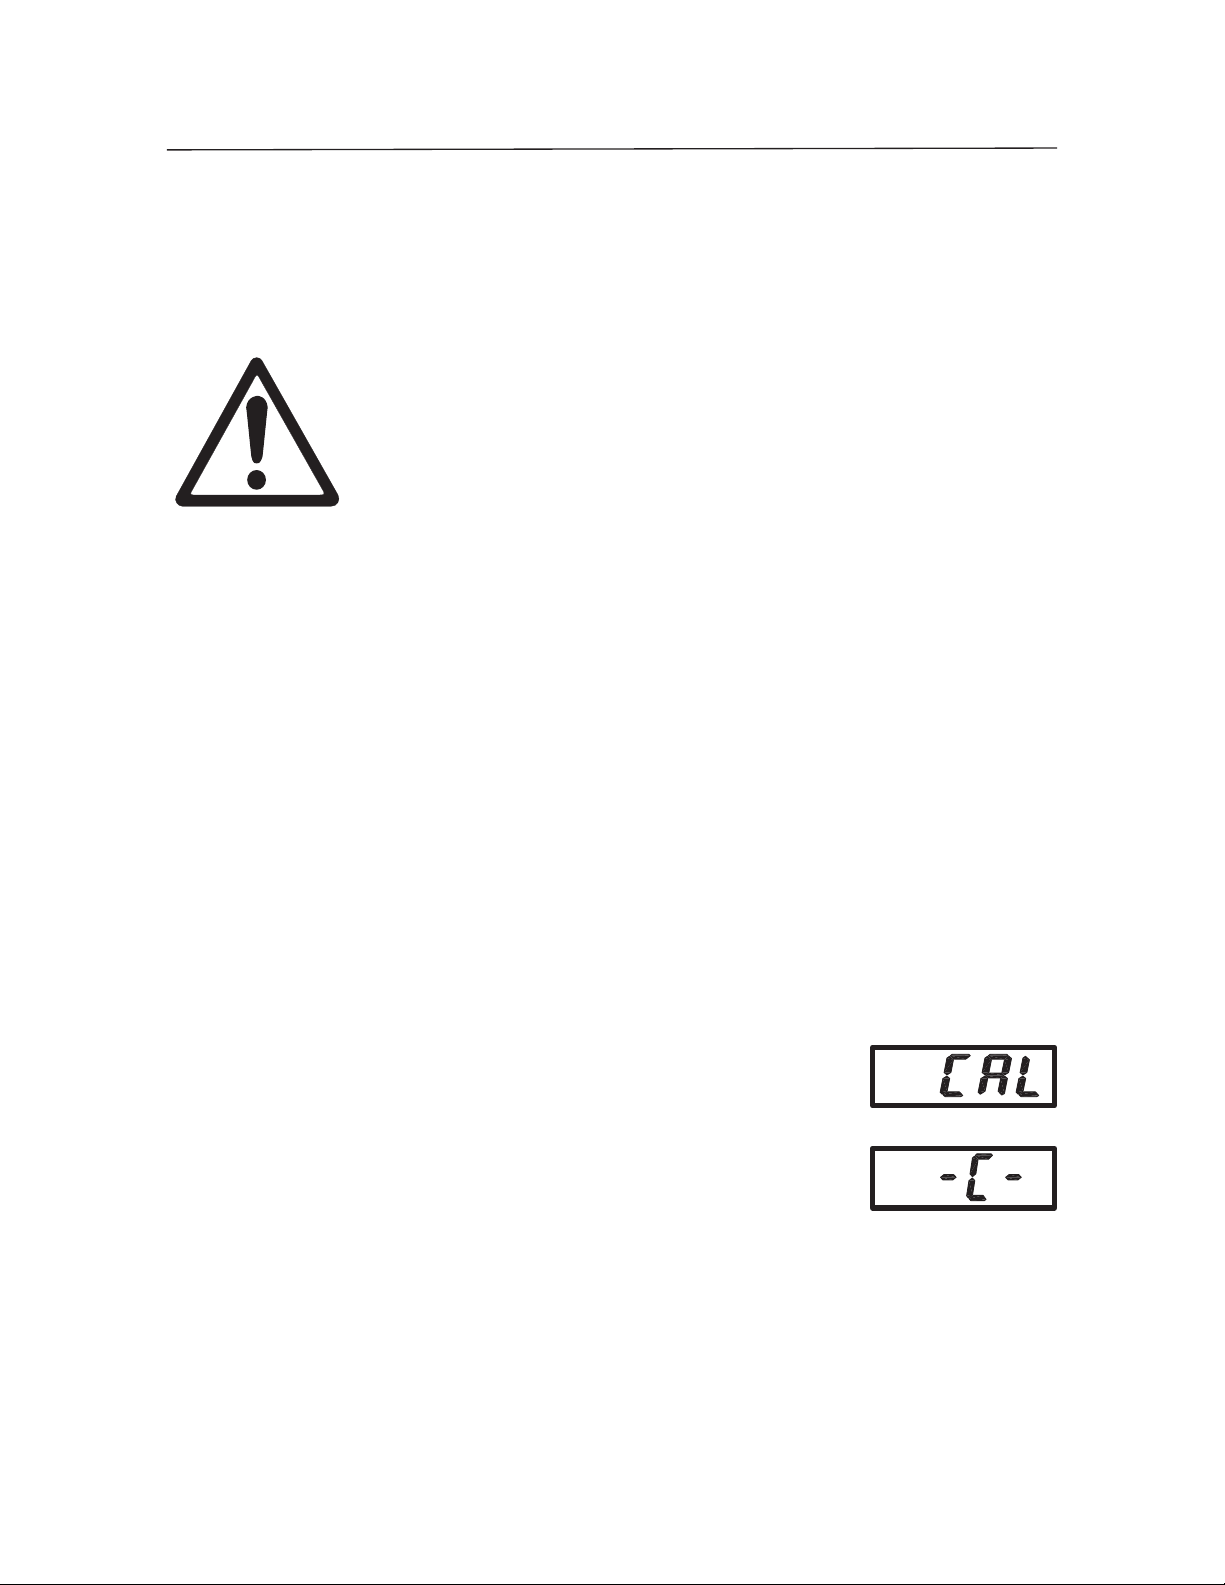
EN-8 SD SERIES BENCH SCALE
Calibration
For best results, calibrate the scale at regular intervals. (Calibration weights are not
supplied with the scale.)
AS THEY ARE VERY HEAVY. IMPROPER LIFTING METHODS OR
MISUSE OF CALIBRATION WEIGHTS MAY RESULT IN PERSONAL
INJURY. MULTIPLE WEIGHTS MAY BE USED TO EQUAL THE
REQUIRED CALIBRATION WEIGHT.
1. Allow the scale to warm up and stabilize for a least two minutes before
commencing the calibration procedure.
2. To select the weighing unit to be used for calibration, press the UNITS
button until the correct unit is displayed.
NOTE: The calibration process can be stopped at any time by pressing the
USE EXTREME CARE WHEN HANDLING CALIBRATION WEIGHTS
CAUTION
Cal
UNITS
weights will need to be available before starting the calibration (see
specification table). Calibration is unavailable in Dynamic Weighing Mode.
3. Press and hold the UNITS
4. With the platform empty, press the ON/ZERO
capture the scale zero. The display will show “-C-”
Cal
button or by turning the scale off. The correct span calibration
Cal
button until “CAL” is displayed.
Off
button to
Find Quality Products Online at: [email protected]
www.GlobalTestSupply.com
Page 13
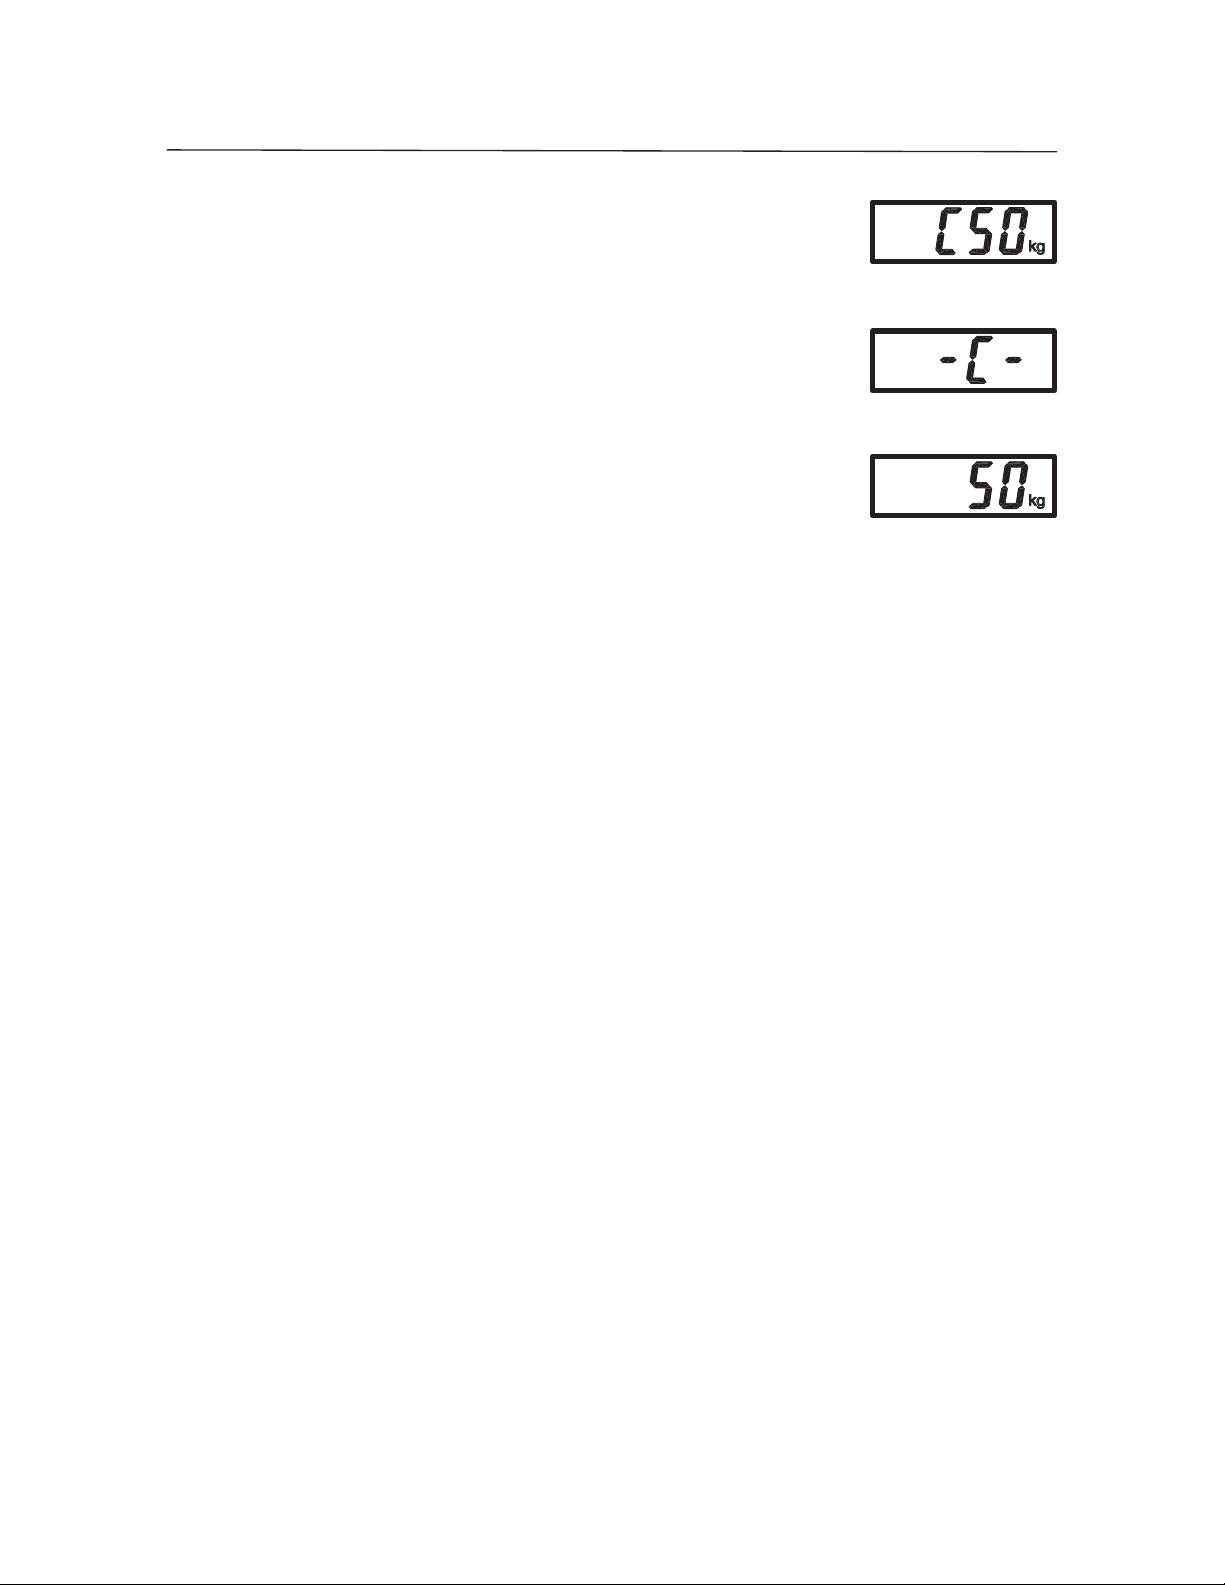
SD SERIES BENCH SCALE EN-9
5. After the zero is captured, the required span calibration
weight in the selected unit is displayed.
6. Place the calibration weight on the platform and press
Off
ON/ZERO
button. The display will again show “-C-”.
7. After span capture, the display will return to the normal
weighing mode.
NOTE: The message “CAL E” will appear if an incorrect calibration weight
was applied. Repeat the procedure using the correct calibration weight.
Calibration Locking: By use of an internal switch, the calibration function may be
locked (disabled), and unauthorized recalibration prevented.
1. With the scale powered off, remove the back housing section of the indicator
by unscrewing the four screws at the bottom.
2. Slide the switch on the PCB (marked SW3) to the position marked “CAL LOCK”.
3. Reassemble the housing.
4. If required, place tamper evident sealing labels over the screw holes or over
the housing edges.
If later recalibration is required, the housing will need to be reopened and the lock
switch returned to the original position.
NOTE: When the lock switch is set to the CAL LOCK position, the power-on zero
range is reduced to 10% of full capacity.
Find Quality Products Online at: [email protected]
www.GlobalTestSupply.com
Page 14
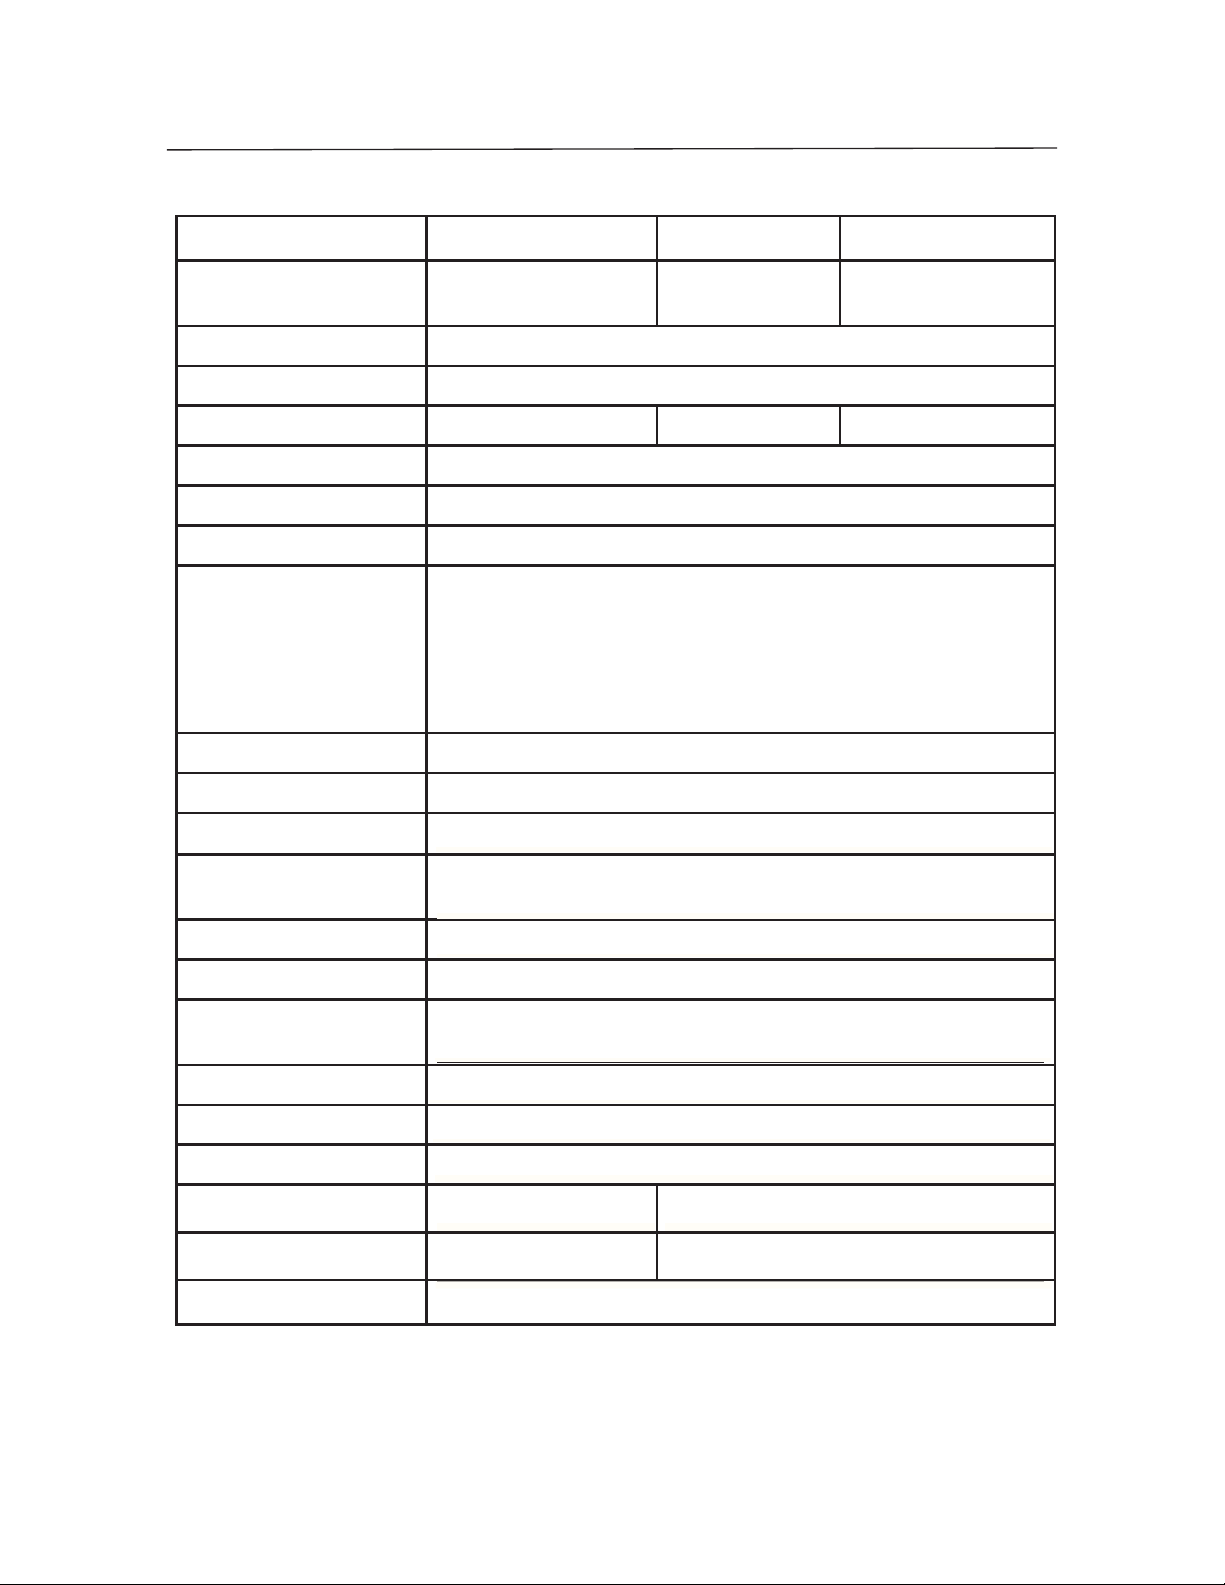
EN-10 SD SERIES BENCH SCALE
Specifications (Standard Base Models)
Model SD35 SD75 SD200
Capacity x Readability 35 x 0.02kg
77 x 0.05lb
Weighing Units kg, lb
Modes Simple Weighing, Dynamic Weighing
Calibration Weights 25kg/50lb 50kg/100lb 100kg/200lb
Stabilization Time Within 3 seconds
Zero Range To capacity by subtraction
Maximum Overload 150%
Error Indications: “E”
“CALE”
“UnSt”
“ErrE”
“Lo bat OFF”
“Lo Line OFF”
Underload Indication Negative value
Auto Shut-Off 4 minutes no activity (battery operation only)
Battery Operating Time 360 hours
- Over load, Under load, Power on Over/Under load
- Calibration Error
- Unstable at Power on
- Memory Error
- Low battery shut down
- Low line voltage shut down (Power Adapter)
75 x 0.05kg
165 x 0.1lb
200 x 0.1kg
440 x 0.2lb
Operating Temperature
Range
Cable Length
Display
Scale Base Size 316mm L x 280mm W x 45mm H /
Indicator Size
Battery power requirements
AC Adapter
Net Weight
Shipping Weight
Shipping Carton Size
41° to 104° F / 5° to 40°C at 10% to 80% relative humidity,
non-condensing
1.8m / 72” (uncoiled)
4 Digit, LCD, 0.8”/20mm high
12.4” x L x 11” W x 1.77” H
210mm L x 91mm W x 39mm H / 8.27” L x 3.58” W x 1.54” H
3 “C” Alkaline batteries (LR14)
9-12 Volt DC, 100mA
2.6kg / 5.8lb
3.7kg / 8.1lb
380mm L x 100mm W x 465mm H / 15” L x 3.94” W x 18.3” H
3.3kg / 7.3lb
4.3kg / 9.5lb
Find Quality Products Online at: [email protected]
www.GlobalTestSupply.com
Page 15

SD SERIES BENCH SCALE EN-11
Specifications (Large Base Models)
Model SD75L SD200L
Capacity x Readability 75 x 0.05kg
165 x 0.1lb
Weighing Units kg, lb
Modes Simple Weighing, Dynamic Weighing
Calibration Weights 50kg/100lb 100kg/200lb
Stabilization Time Within 3 seconds
Zero Range To capacity by subtraction
Maximum Overload 150%
Error Indications: “E”
“CALE”
“UnSt”
“ErrE”
“Lo bat OFF”
“Lo Line OFF”
Underload Indication Negative value
Auto Shut-Off 4 minutes no activity (battery operation only)
Battery Operating Time 360 hours
- Over load, Under load, Power on Over/Under load
- Calibration Error
- Unstable at Power on
- Memory Error
- Low battery shut down
- Low line voltage shut down (Power Adapter)
200 x 0.1kg
440 x 0.2lb
Operating Temperature
Range
Cable Length
Display
Scale Base Size 520mm L x 400 mm W x 75 mm H / 20.5” L x 15.7” W x 3” H
Indicator Size
Battery power requirements
AC Adapter
Net Weight 14kg / 31lb
Shipping Weight 15.5kg / 34lb
Shipping Carton Size
41° to 104° F / 5° to 40°C at 10% to 80% relative humidity,
non-condensing
1.8m / 72” (uncoiled)
4 Digit, LCD, 0.8”/20mm high
210mm L x 91mm W x 39mm H / 8.27” L x 3.58” W x 1.54” H
3 “C” Alkaline batteries (LR14)
9-12 Volt DC, 100mA
600mm L x 480mm W x 230mm H /
24” L x 19” W x 9” H
Find Quality Products Online at: [email protected]
www.GlobalTestSupply.com
Page 16
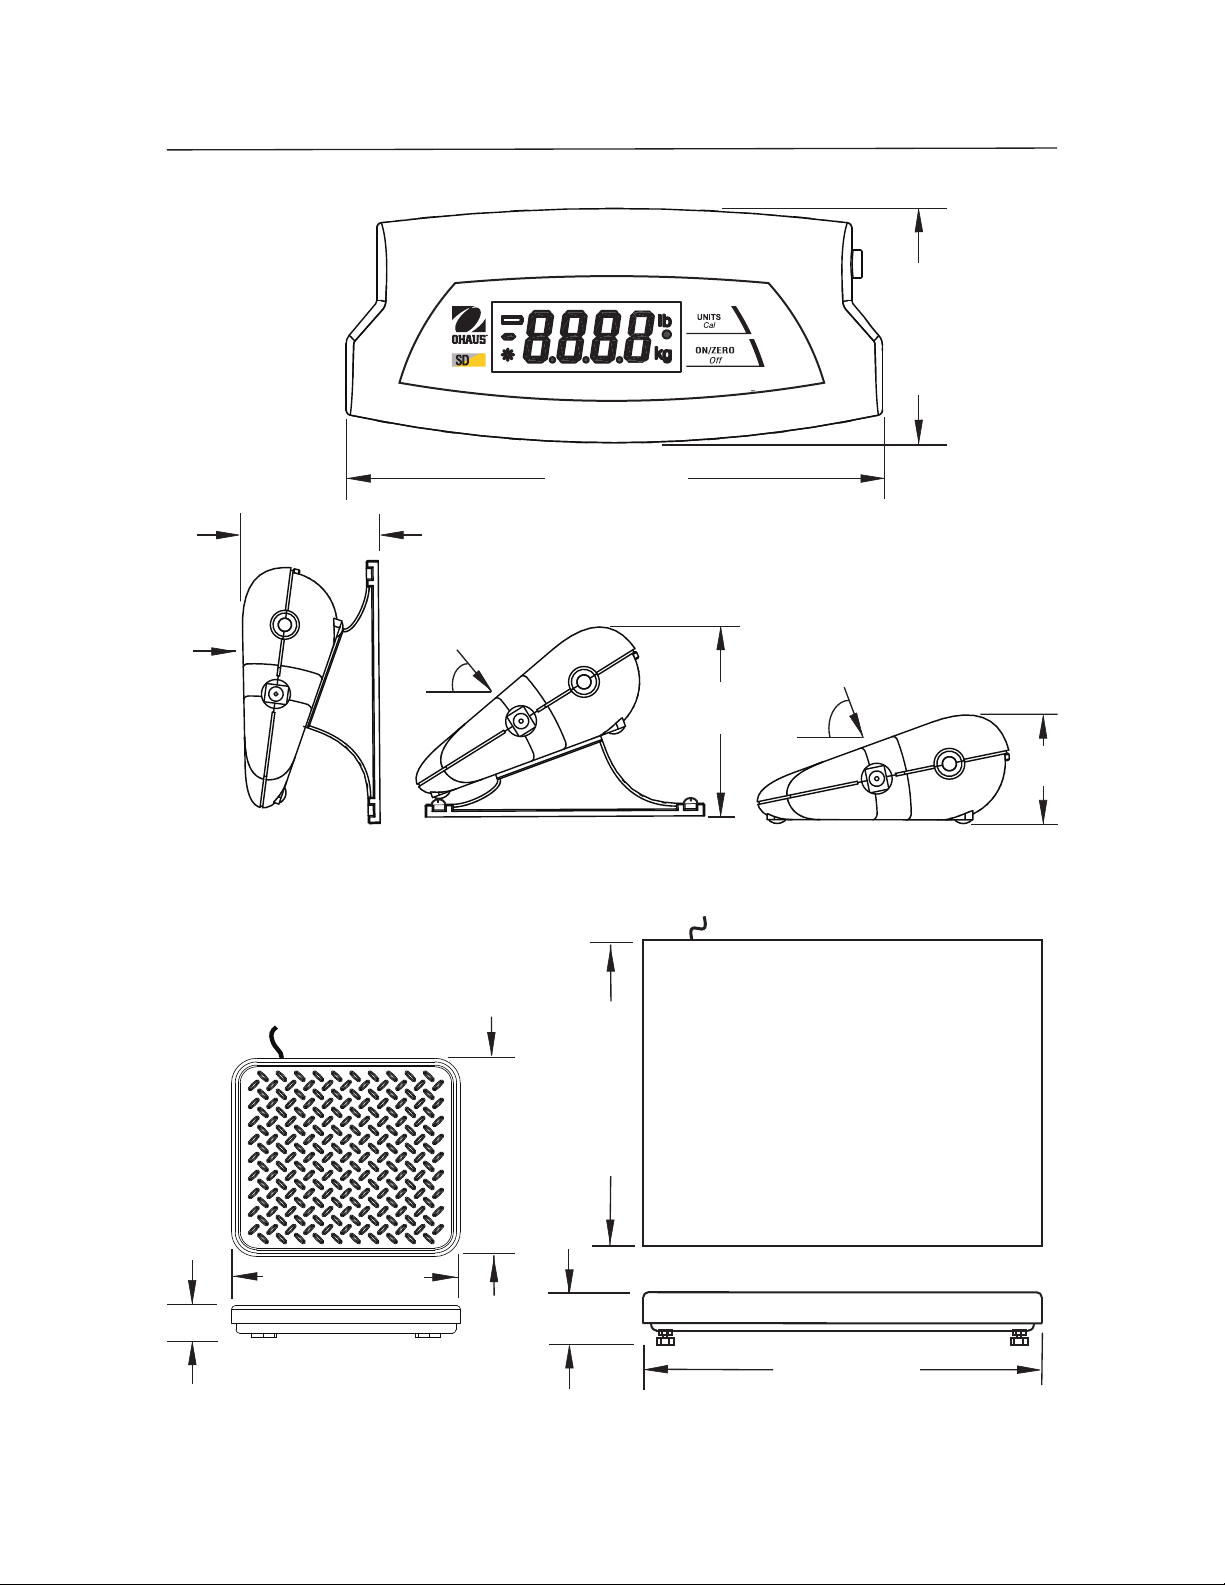
EN-12 SD SERIES BENCH SCALE
53mm /2.09”
91mm / 3.58”
210mm / 8.27”
0º
45mm / 1.77”
50º
69mm /
2.72”
70º
Figure 5. Indicator Overall Dimensions, Available Viewing Angles.
400 mm / 15.7”
280mm / 11.02”
75mm / 3”
316mm / 12.44”
39mm /
1.54”
520mm / 20.5”
Standard Base Large Base
Figure 6. Scale Base Overall Dimensions.
Find Quality Products Online at: [email protected]
www.GlobalTestSupply.com
Page 17

SD SERIES BENCH SCALE EN-13
LIMITED WARRANTY
Ohaus products are warranted against defects in materials and
workmanship for duration of the warranty. During the warranty period
Ohaus will repair, or, at its option, replace any components) that proves
to be defective at no charge, provided that the product is returned, freight
prepaid, to Ohaus. This warranty does not apply if the product has been
damaged by accident or misuse, exposed to radioactive or corrosive
materials, has foreign material penetrating to the inside of the product,
or as a result of service or modification by other than Ohaus. In lieu
of product registration, the warranty period shall begin on the date of
shipment to the authorized dealer. No other express or implied warranty
is given by Ohaus Corporation. Ohaus Corporation shall not be liable for
any consequential damages. As warranty legislation differs from state to
state and country to country, please contact Ohaus or your local Ohaus
dealer for further details.
Find Quality Products Online at: [email protected]
www.GlobalTestSupply.com
Page 18

BÁSCULA DE MESA DE LA SERIE SD ES-1
Báscula de mesa de la serie SD de Ohaus
MANUAL DE INSTRUCCIONES
• El contenido de este manual aplica para todos los modelos de básculas
de mesa de la Serie SD.
• Los pesos de calibración no son suministrados con este producto.
• Para mejores resultados, utilice el producto dentro del rango de temperatura
operativa especificado.
• Para una mejor exactitud, realice sus mediciones en un ambiente limpio,
libre de campos electrostáticos y magnéticos, polvo, contaminación,
humedad, vibraciones y corrientes de aire.
• Utilice su báscula de mesa de la Serie SD con cuidado, colocando
suavemente los artículos a ser pesados en el centro de la plataforma.
Evitar brusquedades ayudará a extender la vida de su báscula.
Find Quality Products Online at: [email protected]
www.GlobalTestSupply.com
Page 19

ES-2 BÁSCULA DE MESA DE LA SERIE SD
Introducción
Este manual cubre la operación de las básculas de mesa de la Serie SD de Ohaus.
Desembalaje
La báscula de mesa de la Serie SD es enviada con los siguientes componentes:
• Indicador • Adaptador de corriente CA
• Base de la báscula • Este manual de instrucciones
• Soportes de montaje • Tarjeta de garantía
Nivelación de la plataforma de la báscula
La base de la báscula debe estar colocada sobre una superficie nivelada y estable
antes de operarla. Les modelos SD75L y SD200L sea équipés de pieds ajustables.
Ajuste las cuatro patas niveladoras bajo la plataforma para nivelarla.
Opciones de corriente
Operación con el adaptador CA
• El adaptador de corriente alterna (incluido) puede ser utilizado para
suministrar corriente al sistema cuando la corriente de baterías no
esté disponible.
• Revise que la corriente alterna entrante señalada en el adaptador coincida
con la fuente de corriente disponible.
• Conecte el enchufe redondo del adaptador de corriente alterna a la toma
de entrada de corriente al lado de la caja del indicador. Vea la Figura 1.
• Conecte el adaptador de corriente alterna en un enchufe de corriente alterna.
Figura 1. Conexión del enchufe del adaptador al indicador.
Find Quality Products Online at: [email protected]
www.GlobalTestSupply.com
Page 20

BÁSCULA DE MESA DE LA SERIE SD ES-3
Instalación de baterías (Opcional)
• Abra la cubierta de baterías en la parte inferior del indicador e instale tres
baterías alcalinas de tamaño “C” (LR14) dentro del compartimiento. Oriente
las baterías como se muestra en la parte interna de la cubierta. Cierre la
cubierta de baterías.
NOTA: Las baterías no están incluidas.
Figura 2. Instalación de baterías.
PRECAUCIÓN: no desechar las baterías con la basura del domestic. Siga
los requerimientos de desecho y reciclaje de acuerdo a las leyes y
normas locales.
Montaje del indicador y opciones de la colocación
• Colocación De la Tapa De Tabla:
El indicador puede colocarse sobre la superficie plana de una mesa sin
ningún aditamento adicional. Cuatro patas de caucho evitan que resbale
en la mayoría de las superficies.
• Montaje directo en una pared:
El indicador puede montarse directamente en una pared utilizando dos
tornillos (no incluidos). Seleccione tornillos del tamaño apropiado que
quepan en los hoyos en la parte inferior de la caja del indicador. Vea la
Figura 3. Cuando monte el indicador en la pared sin un apoyo sólido,
utilice los aditamentos de anclaje apropiados.
Find Quality Products Online at: [email protected]
www.GlobalTestSupply.com
Page 21

ES-4 BÁSCULA DE MESA DE LA SERIE SD
120mm / 4,72”
Figura 3. Configuración para el montaje directo en la pared.
• Soporte de montaje en pared y montaje en mesa:
Fije los dos soportes de montaje como se muestra en la Figura 4. Ubique
el indicador donde desee, en la pared o sobre la mesa. Instale dos tornillos
(no incluidos) en los extremos de cada soporte para asegurarlos a la
superficie. Cuando monte el indicador en la pared sin un apoyo sólido,
utilice los aditamentos de anclaje apropiados.
NOTAS DE MONTAJE:
1. Cuando fije los soportes: Introduzca los pasadores redondos en los hoyos
en la parte inferior del indicador y deslice cada soporte para asegurarlo.
2. Los soportes de montaje pueden fijarse en dos orientaciones diferentes
para proporcionar un ángulo de visión óptimo.
3. Algunas posiciones de montaje pueden requerir que los soportes se fijen
a la superficie de trabajo antes de fijar el indicador.
120mm / 4,72”
90mm / 3,54”
Figura 4. Configuraciones del soporte en pared y del montaje en mesa.
Find Quality Products Online at: [email protected]
www.GlobalTestSupply.com
Page 22

BÁSCULA DE MESA DE LA SERIE SD ES-5
Características y operación del producto
SD
Figura 5. Controles del panel del indicador.
Teclado con dos botones
• ON/ZERO
Cuando la báscula está encendida, una presión breve pone la báscula en
ceros y una presión prolongada la apaga.
• UNITS
prolongada inicia el proceso de calibración.
Off
: Una presión breve enciende la báscula cuando está apagada.
Cal
: Una presión breve cambia la unidad de pesaje. Una presión
Ventana de visualización
• Caracteres numéricos grandes de 7 segmentos: Los valores de
peso (masa) son mostrados utilizando cuatro dígitos incluyendo el signo
negativo y los lugares decimales. Los avisos para calibración y condiciones
posibles de error también se muestran utilizando estos dígitos.
•
Indicación de lectura estable: En la esquina inferior izquierda de la
pantalla aparecerá un
•
aparece en el lado derecho de la pantalla.
Find Quality Products Online at: [email protected]
Indicación de unidad de pesaje: La unidad de pesaje seleccionada
www.GlobalTestSupply.com
* para indicar que la lectura es estable.
Page 23

ES-6 BÁSCULA DE MESA DE LA SERIE SD
• Indicación de batería baja: El símbolo de batería en el lado izquierdo
de la pantalla
están exhibidas, sigue habiendo aproximadamente 12 horas de la
operación. Cuando la batería esté totalmente agotada, la báscula mostrará
momentáneamente “Lo bAt” y se apagará
indica una condición de batería baja. Cuando primero
.
Operación
•
Prueba de encendido
la báscula enciende, todos los segmentos de la pantalla aparecerán durante
un momento, seguido por una versión del software. La pantalla entonces
reiniciará en cero.
•
la báscula regresa a cero. Cuando se agrega masa adicional, el botón
ON/ZERO
capacidad total de la báscula. Cuando se utiliza un recipiente, el botón
ON/ZERO
Función de cero
Off
Off
puede utilizarse para simular una función de Tara. Entonces
: Presionando el botón ON/ZERO
puede utilizarse repetidamente hasta que se alcance la
: Cuando se presiona el botón ON/ZERO
Off
, la pantalla de
Off,
puede adicionarse masa como un peso NETO. Cuando se quiten la muestra
y el recipiente de la báscula, puede aparecer un valor negativo. Ponga en
cero la báscula antes de continuar utilizándola.
Off
NOTA: El botón ON/ZERO
cero verdadero cuando los valores mostrados estén dentro del +2% de la
capacidad total. Por encima del 2%, la gama es limitada a la capacidad
completa por la substracción.
•
valor previamente en cero será mostrado como un número negativo.
Para retornar a la operación normal, el valor negativo es borrado de la
pantalla presionando el botón ON/ZERO
•
aparece una “E”. Remueva la carga y la báscula regresará a la operación
Valores negativos
Sobrecarga
: Si la carga aplicada excede la capacidad de la báscula,
: Cuando se quita una carga de la báscula, cualquier
realizará una función de configuración de
Off .
normal.
Find Quality Products Online at: [email protected]
www.GlobalTestSupply.com
Page 24

BÁSCULA DE MESA DE LA SERIE SD ES-7
• Apagado automático: Para aumentar la vida de las baterías, la báscula
se apagará automáticamente después de aproximadamente cuatro minutos
de inactividad. Esta característica está activa únicamente durante la operación
con baterías.
Pesaje dinámico eración
1. Presione el botón UNITS
que destelle la indicación • al lado de la unidad de medida
deseada.
2. Ponga una masa en la plataforma. La báscula
mostrará “-A-”.
3. Con una masa en la plataforma o recipiente, una pulsación
corta de UNITS
promedio desde 5 segundos.
4. El peso promediado se muestra a continuación. El indicador
• deja de destellar cuando el proceso se ha completado.
NOTA:
para tarar el peso y regresar al cero.
Si está usando un recipiente, presione
Cal
iniciará el conteo regresivo de
Cal
con la plataforma vacía hasta
ON/ZERO
Off
5. La pantalla se mantendrá hasta que se presione un botón.
Cal
6. Para repetir el proceso presione UNITS
en la plataforma o recipiente.
7. Para salir, retire la masa de la plataforma o recipiente y
Cal
presione UNITS
Find Quality Products Online at: [email protected]
.
www.GlobalTestSupply.com
con una masa
Page 25

ES-8 BÁSCULA DE MESA DE LA SERIE SD
Calibración
Para mejores resultados, calibre la báscula a intervalos regulares. (Los pesos de
calibración no se suministran con la báscula.)
CALIBRACIÓN, YA QUE SON MUY PESADOS. LOS MÉTODOS
INADECUADOS DE LEVANTAMIENTO O EL MAL USO DE LOS
PESOS DE CALIBRACIÓN PUEDEN RESULTAR EN LESIONES
PERSONALES. PUEDEN UTILIZARSE MÚLTIPLES PESOS PARA
IGUALAR EL PESO DE CALIBRACIÓN REQUERIDO.
1. Permita que la báscula se caliente y estabilice por lo menos durante dos
minutos antes de comenzar el procedimiento de calibración.
2. Para seleccionar la unidad de pesaje a ser utilizada para la calibración,
presione el botón UNITS
correcta.
NOTA: El proceso de calibración puede detenerse en cualquier momento
TENGA MUCHO CUIDADO CUANDO MANIPULE LOS PESOS DE
PRECAUCIÓN
Cal
hasta que se muestre en pantalla la unidad
Cal
presionando el botón UNITS
los pesos del intervalo de calibración estén disponibles antes de comenzar
la calibración (vea la tabla de especificaciones). La calibración no está
disponible en el modo de pesaje dinámico.
3. Presionen sostenido el botón UNITS
muestre en pantalla “CAL”.
4. Con la plataforma vacía, presione el botón ON/ZERO
para capturar el cero de la báscula. La pantalla mostrará “-C-”.
o apagando la báscula. Es necesario que
Cal
hasta que se
Off
Find Quality Products Online at: [email protected]
www.GlobalTestSupply.com
Page 26

BÁSCULA DE MESA DE LA SERIE SD ES-9
5. Después de capturar el cero, aparece en pantalla el peso
requerido para el intervalo de calibración en la unidad
seleccionada.
6. Coloque el peso de calibración sobre la plataforma y
Off
presione el botón ON/ZERO
. La pantalla mostrará
nuevamente “-C-”.
7. Después de la captura del intervalo, la pantalla volverá
al modo de pesaje normal.
NOTA: El mensaje “CAL E” aparecerá si se aplica un peso de calibración
incorrecto. Repita el procedimiento usando el peso correcto de la
calibración.
Bloqueo de la calibración: Utilizando un interruptor interno se puede bloquear la
función de calibración (inhabilitada) y así puede prevenirse una nueva calibración
no autorizada.
1. Con la báscula apagada, remueva la sección posterior de la caja del
indicador desatornillando los cuatro tornillos en la parte inferior.
2. Deslice el interruptor en la PCB (señalado como SW3) a la posición marcada
como “CAL LOCK”.
3. Reensamble la caja.
4. Si lo requiere, coloque sellos de seguridad contra abertura no autorizada
sobre los hoyos de los tornillos o sobre los bordes de la caja.
Si se necesita una nueva calibración, tendrá que abrir nuevamente la caja y regresar
el interruptor de bloqueo a la posición original.
NOTA: Cuando el interruptor esté colocado en la posición CAL LOCK, el rango de
encendido en cero se reduce al 10% de la capacidad total.
Find Quality Products Online at: [email protected]
www.GlobalTestSupply.com
Page 27

ES-10 BÁSCULA DE MESA DE LA SERIE SD
Especificaciones (Modelos Bajos Estándares)
Modelo SD35 SD75 SD200
Capacidad y legibilidad 35 x 0,02 kg
77 x 0,05 lb
Unidades de pesaje kg, lb
Modos Pesaje simple, Pesaje dinámico
Pesos de calibración 25 kg/50 lb 50 kg/100 lb
Tiempo de estabilización Dentro de 3 segundos
Rango de cero A la capacidad por la substracción.
Sobrecarga máxima 150%
Indicaciones de error: “E”
“CALE”
“UnSt”
“ErrE”
“Lo bat OFF”
“Lo Line OFF”
Indicación de sobrecarga Valor negativo
Apagado automático 4 minutos sin actividad (sólo con operación con baterías)
Tiempo de operación con
baterías
- Sobrecarga, carga insuficiente, sobrecarga/carga insuficiente en el encendido
- Error de calibración
- Inestable en el encendido
- Error de memoria
- Apagado por batería baja
- Apagado por baja tensión de línea (adaptador de corriente)
75 x 0,05 kg
165 x 0,1 lb
360 horas
200 x 0,1 kg
440 x 0,2 lb
100 kg/200 lb
Rango de temperatura
operativa
Longitud del cable
Pantalla
Tamaño de la base de la
báscula
Tamaño del indicador
Requerimientos de corriente de las baterías
Adaptador CA
Peso neto
Peso de embarque
Tamaño del cartón de
embalaje
41° a 104° F / 5° a 40° C a una humedad relativa del 10% al 80%
sin condensación
1,8 m / 72” (desenrollado)
4 dígitos, LCD, alto de 0.8”/20 mm
316 mm L x 280 mm An x 45 mm Al /
12,4” L x 11” An x 1,77” Al
210 mm L x 91mm An x 39mm Al / 8,27” L x 3,58” An x 1,54” Al
3 baterías alcalinas “C” (LR14)
9-12 Voltios CD, 100 mA
2,6 kg /5,8 lb
3,7 kg /8,1 lb
380 mm L x 100 mm An x 465mm Al / 15” L x 3.94” An x 18.3” Al
3,3 kg / 7,3 lb
4,3 kg / 9,5 lb
Find Quality Products Online at: [email protected]
www.GlobalTestSupply.com
Page 28
BÁSCULA DE MESA DE LA SERIE SD ES-11
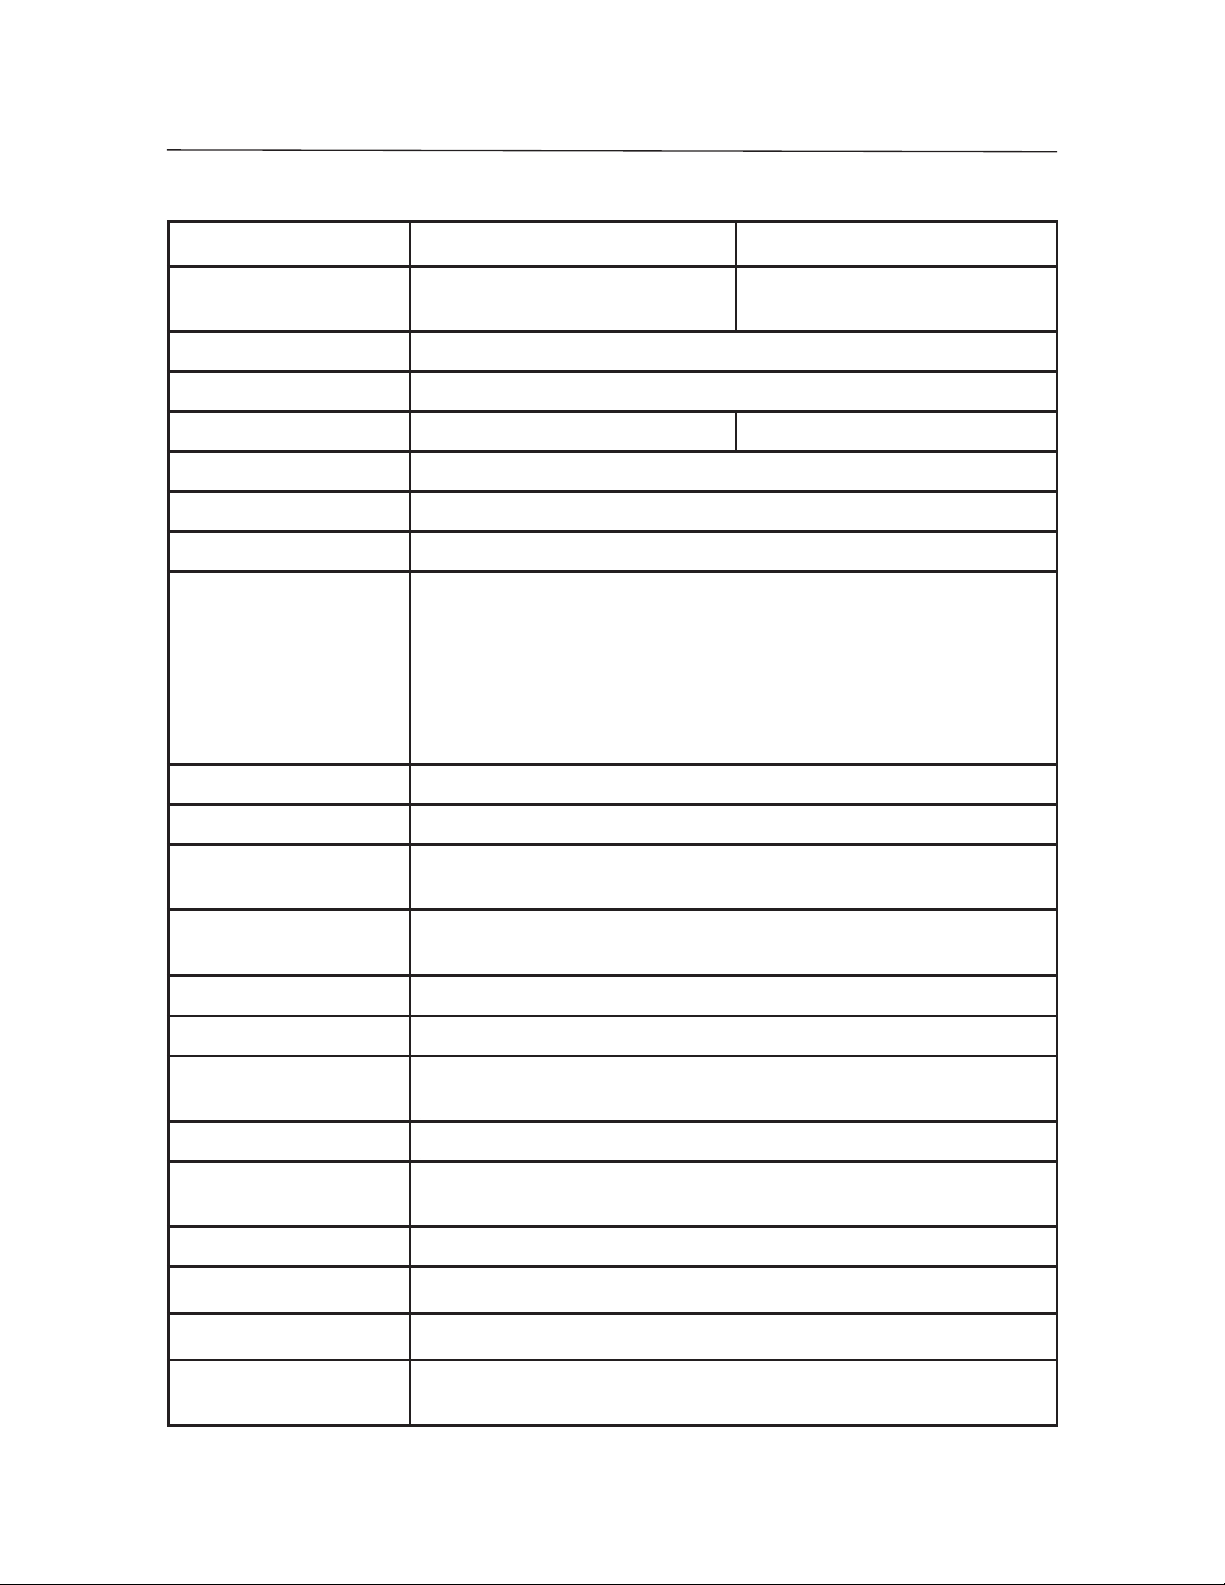
Especificaciones (Modelos Bajos Grandes)
Modelo SD75L SD200L
Capacidad y legibilidad 75 x 0,05 kg
165 x 0,1 lb
Unidades de pesaje kg, lb
Modos Pesaje simple, Pesaje dinámico
Pesos de calibración 50 kg/100 lb
Tiempo de estabilización Dentro de 3 segundos
Rango de cero A la capacidad por la substracción.
Sobrecarga máxima 150%
Indicaciones de error: “E”
“CALE”
“UnSt”
“ErrE”
“Lo bat OFF”
“Lo Line OFF”
Indicación de sobrecarga Valor negativo
Apagado automático 4 minutos sin actividad (sólo con operación con baterías)
Tiempo de operación con
baterías
- Sobrecarga, carga insuficiente, sobrecarga/carga insuficiente en el encendido
- Error de calibración
- Inestable en el encendido
- Error de memoria
- Apagado por batería baja
- Apagado por baja tensión de línea (adaptador de corriente)
360 horas
200 x 0,1 kg
440 x 0,2 lb
100 kg/200 lb
Rango de temperatura
operativa
Longitud del cable
Pantalla
Tamaño de la base de la
báscula
Tamaño del indicador
Requerimientos de corriente de las baterías
Adaptador CA
Peso neto 14 kg / 31 lb
Peso de embarque 15.5 kg / 34 lb
Tamaño del cartón de
embalaje
41° a 104° F / 5° a 40° C a una humedad relativa del 10% al 80%
sin condensación
1,8 m / 72” (desenrollado)
4 dígitos, LCD, alto de 0.8”/20 mm
520 mm L x 400mm An x 230 mm Al /
20,5” L x 15,7” An x 3” Al
210 mm L x 91mm An x 39mm Al / 8,27” L x 3,58” An x 1,54” Al
3 baterías alcalinas “C” (LR14)
9-12 Voltios CD, 100 mA
600 mm L x 480 mm An x 230 mm Al /
24” L x 19” An x 9” Al
Find Quality Products Online at: [email protected]
www.GlobalTestSupply.com
Page 29

ES-12 BÁSCULA DE MESA DE LA SERIE SD
210mm / 8,27”
53mm /2,09”
91mm / 3,58”
0º
50º
69mm /
2,72”
70º
Figura 5. Dimensiones generales del indicador, ángulos de visualización disponibles.
400 mm / 15,7”
280mm / 11,02”
45mm / 1,77”
316mm / 12,44”
75mm / 3”
39mm /
1,54”
520mm / 20,5”
Base estándar
Base grande
Figura 6. Dimensiones generales de la base de la báscula.
Find Quality Products Online at: [email protected]
www.GlobalTestSupply.com
Page 30

BÁSCULA DE MESA DE LA SERIE SD ES-13
GARANTÍA LIMITADA
Los productos de Ohaus están garantizados contra defectos materiales y de
fabricación desde la fecha de entrega hasta la terminación del periodo de garantía.
Durante el periodo de garantía, Ohaus reparará o, a su discreción, reemplazará
cualquier componente que considere defectuoso sin ningún cargo, con la condición
de que el producto sea devuelto a Ohaus con el flete pagado. Esta garantía no aplica
si el producto ha sido dañado por un accidente o uso indebido, ha sido expuesto
a materiales radioactivos o corrosivos, algún material extraño ha penetrado al
interior del producto, o como resultado de un mantenimiento o modificación
hechos por alguien distinto a Ohaus. En lugar de una tarjeta de registro de garantía
devuelta apropiadamente, el periodo de garantía comienza en la fecha de envío
al distribuidor autorizado. Ninguna otra garantía expresa o implícita es ofrecida
por Ohaus Corporation. Ohaus Corporation no será responsable de ningún daño
resultante. Ya que la legislación sobre garantías difiere de un estado a otro y de
un país a otro, por favor consulte a Ohaus o a su distribuidor autorizado de Ohaus
para mayores detalles.
Find Quality Products Online at: [email protected]
www.GlobalTestSupply.com
Page 31

BALANCE DE TABLE SÉRIE SD FR-1
Balances de table de la série SD Ohaus
MANUEL D’INSTRUCTION
•
• Les poids du calibrage ne sont pas fournis avec ce produit.
• Pour obtenir les meilleurs résultats, utilisez le produit dans la plage de
températures de fonctionnement indiquée.
• Pour optimiser la précision, effectuez vos mesures dans un environnement
propre, sans champs électrostatiques ni magnétiques, sans poussière, sans
humidité, sans vibration ni courant d’air.
• Utilisez votre balance série SD avec soins, en plaçant soigneusement les
objets à peser sur le centre de la plate-forme. Évitez de manipuler le balance
brusquement pour prolonger sa vie utile.
Ce manuel est destiné à tous les modèles de la balance de table de la série SD
.
Find Quality Products Online at: [email protected]
www.GlobalTestSupply.com
Page 32

FR-2 BALANCE DE TABLE SÉRIE SD
Introduction
Ce manuel porte sur le fonctionnement des balances de table de la série SD Ohaus.
Déballage
La balance de table de la série SD est livrée avec les composants suivants :
• Indicateur • Adaptateur de courant CA.
• Base de la balance • Ce manuel d’instruction
• Supports de montage • Carte de la garantie
Mise à niveau de la balance
La base de la balance doit être installée sur une surface stable, à niveau avant de
commencer les opérations. Les modèles SD75L et SD200L est équipés de pieds
ajustables. Réglez les quatre pieds ajustables sous la plate-forme pour mettre la
balance à niveau.
Options d’alimentation
Adaptateur CA
• L’adaptateur CA (inclus) peut être utilisé pour alimenter le système lorsque
les batteries ne sont pas disponibles.
• Vérifiez que l’alimentation d’entrée CA telle que marquée sur l’adaptateur
correspond à la source d’alimentation disponible.
• Branchez la fiche ronde de l’adaptateur CA dans la prise d’entrée
d’alimentation située sur le côté du boîtier de l’indicateur. Voir la figure 1.
• Branchez l’adaptateur CA dans une prise d’alimentation CA.
Figure 1. Branchement de la fiche de l’adaptateur dans l’indicateur.
Find Quality Products Online at: [email protected]
www.GlobalTestSupply.com
Page 33

BALANCE DE TABLE SÉRIE SD FR-3
Installation des piles (optionnelle)
• Ouvrez le couvercle de la pile situé en bas de l’indicateur et installez trois
piles alcalines de taille C (LR14) dans le compartiment. Orientez les piles
selon l’illustration à l’intérieur du couvercle. Fermez le couvercle des piles.
REMARQUE : Les piles ne sont pas incluses.
Figure 2. Installation des piles.
ATTENTION : Ne pas éliminer les batteries usées dans une perte de
domestique. Respecter les conditions d’élimination ou de recyclage
conformément aux lois et règlements locaux en vigueur.
Support d’indicateur et options de placement
• Placement de dessus de table:
L’indicateur peut être placé sur une table plate sans aucun autre matériel
supplémentaire. Quatre pieds en caoutchouc garantissent une bonne
stabilité sur la majorité des surfaces.
• Montage mural direct:
L’indicateur peut être monté directement sur un mur à l’aide de deux vis (non
incluses). Sélectionnez des vis de taille appropriée qui rentrent dans les trous
en bas du boîtier de l’indicateur. Voir la figure 3. Lors du montage sur un
mur sans support solide, utilisez le matériel d’ancrage approprié.
Find Quality Products Online at: [email protected]
www.GlobalTestSupply.com
Page 34
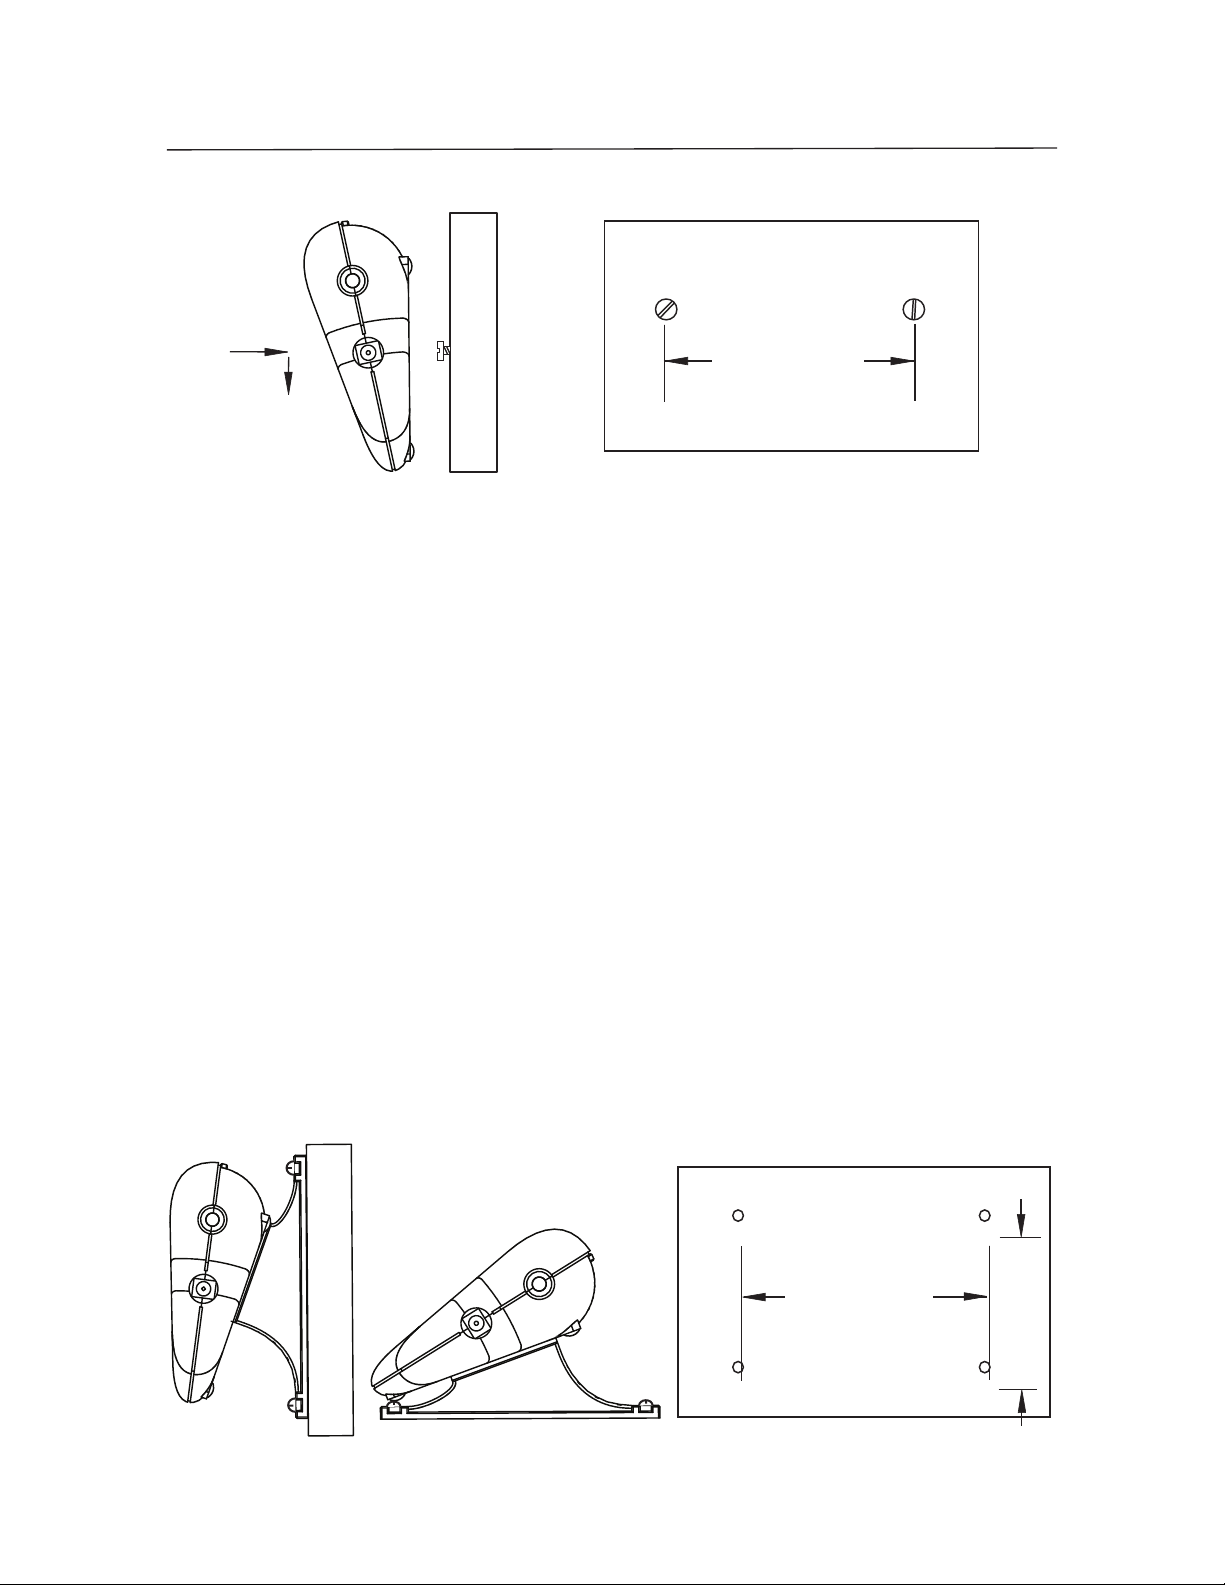
FR-4 BALANCE DE TABLE SÉRIE SD
120mm / 4,72po.
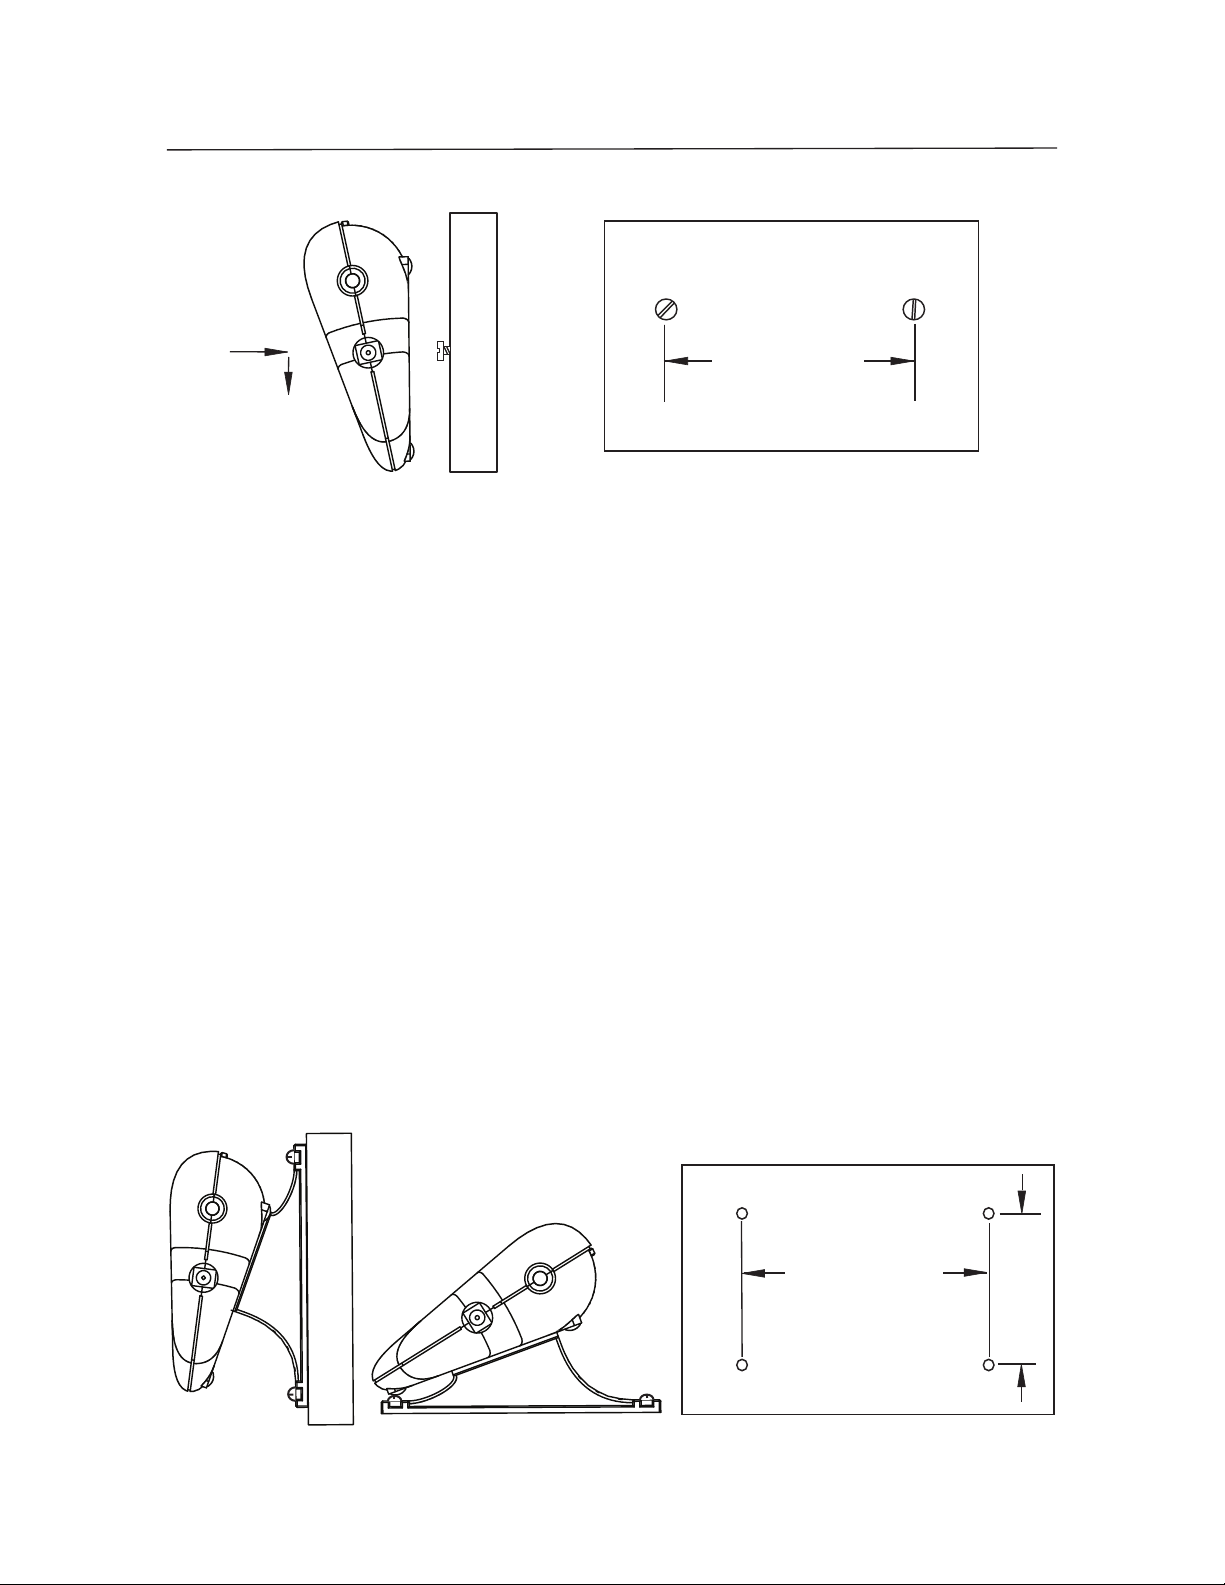
Figure 3. Montage mural direct.
• Support, montage mural/montage sur table
Fixez les deux brides de montage (voir la figure 4). Placez l’indicateur à
l’endroit souhaité sur le mur ou sur la table. Installez les 2 vis (non fournies)
sur les extrémités de chacun des supports pour les fixer à la surface. Lors du
montage sur un mur sans support solide, utilisez le matériel d’ancrage
approprié.
REMARQUES SUR LE MONTAGE :
1. Lors de la fixation des supports : Placez des goupilles rondes dans les
trous en bas de l’indicateur, faites glisser chaque support vers l’arrière
pour le bloquer.
2. Les supports de montage peuvent être fixés dans deux sens afin d’offrir un
angle de vue optimal.
3. Certaines positions de montage peuvent requérir que les supports soient
fixés à la surface de travail avant d’être fixés à l’indicateur.
120mm / 4,72po.
90mm / 3,54po.
Figure 4. Installation du support pour le montage mural et sur la table.
Find Quality Products Online at: [email protected]
www.GlobalTestSupply.com
Page 35
BALANCE DE TABLE SÉRIE SD FR-5
Caractéristiques et fonctionnement du produit
SD
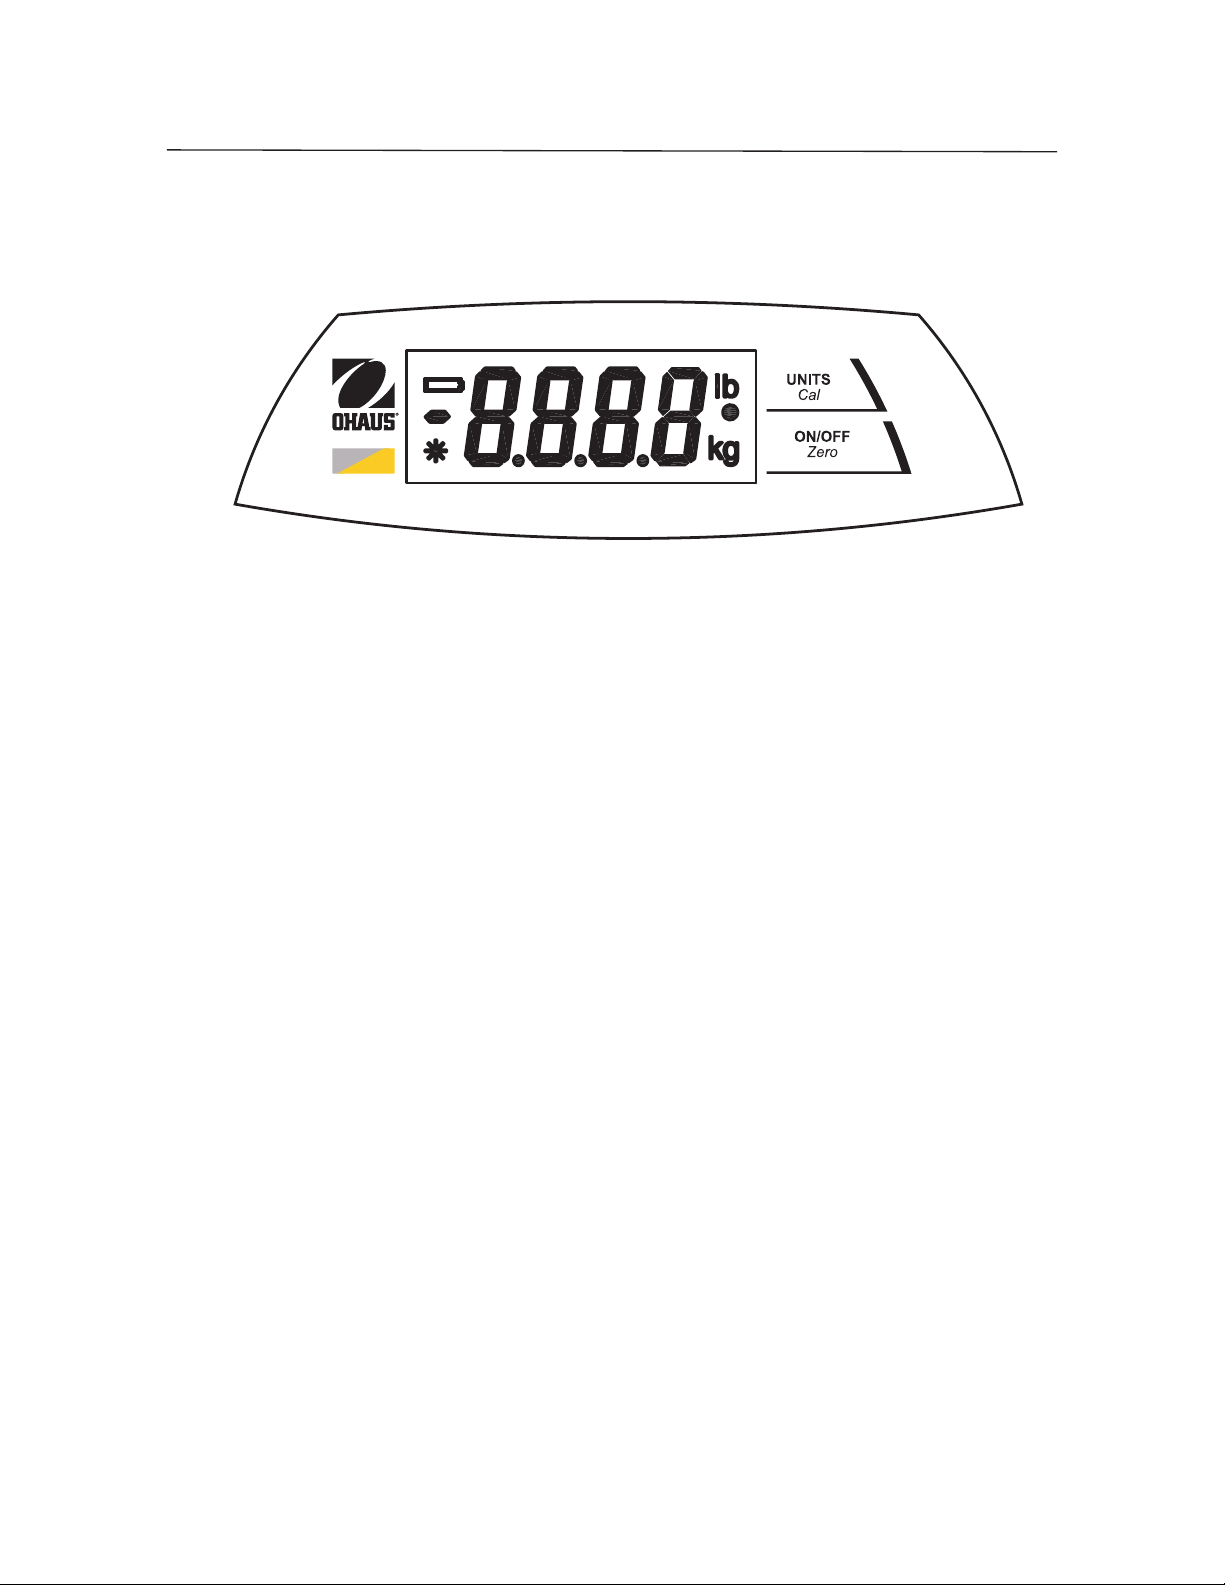
Figure 5. Commandes du panneau de l’indicateur.
Pavé à deux boutons
• ON/ZERO
en marche (si elle est désactivée). Lorsque la balance est en marche,
appuyez rapidement sur ce bouton pour mettre la balance à zéro et appuyez
longuement sur ce bouton pour désactiver la balance.
• UNITS
pesage. Appuyez longuement sur ce bouton pour lancer le processus de
calibrage.
Off
: Appuyez rapidement sur ce bouton pour mettre la balance
Cal
: Appuyez rapidement sur ce bouton pour changer l’unité de
Fenêtre d’affichage
• Caractères numériques larges à 7 segments : Les valeurs du
poids (de la masse) sont indiquées à l’aide de 4 chiffres, y compris le signe
moins et les décimales. Des invites de calibration et les états d’erreur
possibles sont également indiqués à l’aide de ces chiffres.
• Indication de lecture stable : Un astérisque (*) s’affiche en bas à
gauche de l’affichage pour indiquer à quel moment la lecture est stable.
•
apparaît à droite de l’affichage.
Find Quality Products Online at: [email protected]
Indication de l’unité de pesage : L’unité de pesage sélectionnée
www.GlobalTestSupply.com
Page 36

FR-6 BALANCE DE TABLE SÉRIE SD
• Indication du niveau bas des piles : Le symbole d’une pile à gauche
de l’écran
approximativement 12 heures d’opération demeurent. Lorsque les piles sont
totalement usées, la balance affiche temporairement « Lo bAt » (Niveau bas
pile) et s’arrête
indique un niveau bas des piles. Une fois d’abord montrées,
.
Fonctionnement
• Test de mise sous tension : Lorsque vous appuyez sur le bouton
Off
ON/ZERO
d’affichage apparaissent momentanément suivis de la version du logiciel.
L’affichage est ensuite remis à zéro.
•
l’affichage de la balance à zéro. Lorsque vous ajoutez une masse
supplémentaire, appuyez plusieurs fois sur le bouton ON/ZERO
ce que la capacité totale de la balance soit atteinte. Lorsque vous utilisez
un conteneur, appuyez sur le bouton ON/ZERO
Fonction du zéro : Appuyez sur le bouton ON/ZERO
, la balance est mise sous tension, tous les segments
Off
pour remettre
Off
Off
pour simuler la fonction
jusqu’à
Tare. Vous pouvez ensuite ajouter une masse additionnelle comme poids
NET. Lorsque vous enlevez l’échantillon et le conteneur de la balance, une
REMARQUE : Le bouton ON/ZERO
fonction de remise à zéro lorsque les valeurs affichées sont dans les +2 %
de la capacité totale. Au-dessus de 2%, la gamme est limitée à la pleine
capacité par soustraction.
•
toute valeur précédemment mise à zéro s’affiche avec un nombre négatif.
P
pour effacer la valeur négative
•
un message d’erreur « E » s’affiche. Enlevez la charge et la balance est prête
valeur négative peut s’afficher. Remettez la balance à zéro avant toute utilisation.
Off
permet d’effectuer une véritable
Valeurs négatives : Lorsque vous enlevez une charge de la balance,
our revenir à un fonctionnement normal, appuyez sur le bouton ON/ZERO
.
Off
Surcharge : Si la charge appliquée dépasse la capacité de la balance,
à fonctionner normalement.
Find Quality Products Online at: [email protected]
www.GlobalTestSupply.com
Page 37

BALANCE DE TABLE SÉRIE SD FR-7
• Arrêt automatique : Pour prolonger la vie de la pile, la balance s’arrête
automatiquement après quatre minutes d’inactivité. Cette fonction est
uniquement active pendant le fonctionnement sur pile.
Pesage dynamique
1. Avec la plate-forme vide, appuyez sur le bouton UNITS
jusqu’à ce que le symbole • clignote près de l’unité de
mesure souhaitée
2. Placez une masse sur la plate-forme. La balance
affiche « -A- ».
REMARQUE: Si vous utilisez un conteneur, appuyez sur
Off
ON/ZERO
3. Avec une masse sur la plate-forme ou le conteneur,
appuyez rapidement sur UNITS
à rebours de la moyenne dans les 5 secondes.
4. Le poids moyen s’affiche. Le symbole • cesse de clignoter
pour tarer le poids et revenir à zéro.
Cal
pour lancer le compte
Cal
lorsque le processus est terminé.
5. L’affichage est conservé jusqu’à ce que vous appuyiuez sur le bouton.
Cal
6. Pour répéter le processus, appuyez sur UNITS
masse sur la plate-forme ou le conteneur.
7. Pour quitter, enlevez la masse de la plate-forme ou le conteneur
Cal
et appuyez sur UNITS
Find Quality Products Online at: [email protected]
www.GlobalTestSupply.com
.
avec une
Page 38
FR-8 BALANCE DE TABLE SÉRIE SD
Calibrage
Pour obtenir les meilleurs résultats, calibrez la balance à des intervalles réguliers.
(Les poids de calibrage ne sont pas fournis avec la balance).
SONT EFFECTIVEMENT TRÈS LOURDS. TOUTE MÉTHODE DE
LEVAGE INCORRECTE OU TOUTE UTILISATION INAPPROPRIÉE
DES POIDS DE CALIBRAGE PEUT ENTRAÎNER DES BLESSURES.
PLUSIEURS POIDS PEUVENT ÊTRE UTILISÉS POUR OBTENIR LE
POIDS DE CALIBRAGE REQUIS.
1. Attendez que la balance se réchauffe et se stabilise pendant deux minutes
avant de lancer la procédure de calibrage.
2. Pour sélectionner l’unité de pesage à utiliser pour le calibrage, appuyez sur le
bouton UNITS
REMARQUE : Vous pouvez annuler la procédure de calibrage à n’importe quel
MANIPULER LES POIDS DE CALIBRAGE AVEC SOIN. CES POIDS
Cal
jusqu’à ce que l’unité appropriée s’affiche.
ATTENTION
moment en appuyant sur UNITS
poids appropriés du calibrage de la portée doivent être disponibles avant
de commencer le calibrage (voir le tableau des spécifications). Le calibrage
n’est pas disponible en mode de pesage dynamique.
3. Appuyez sur le bouton
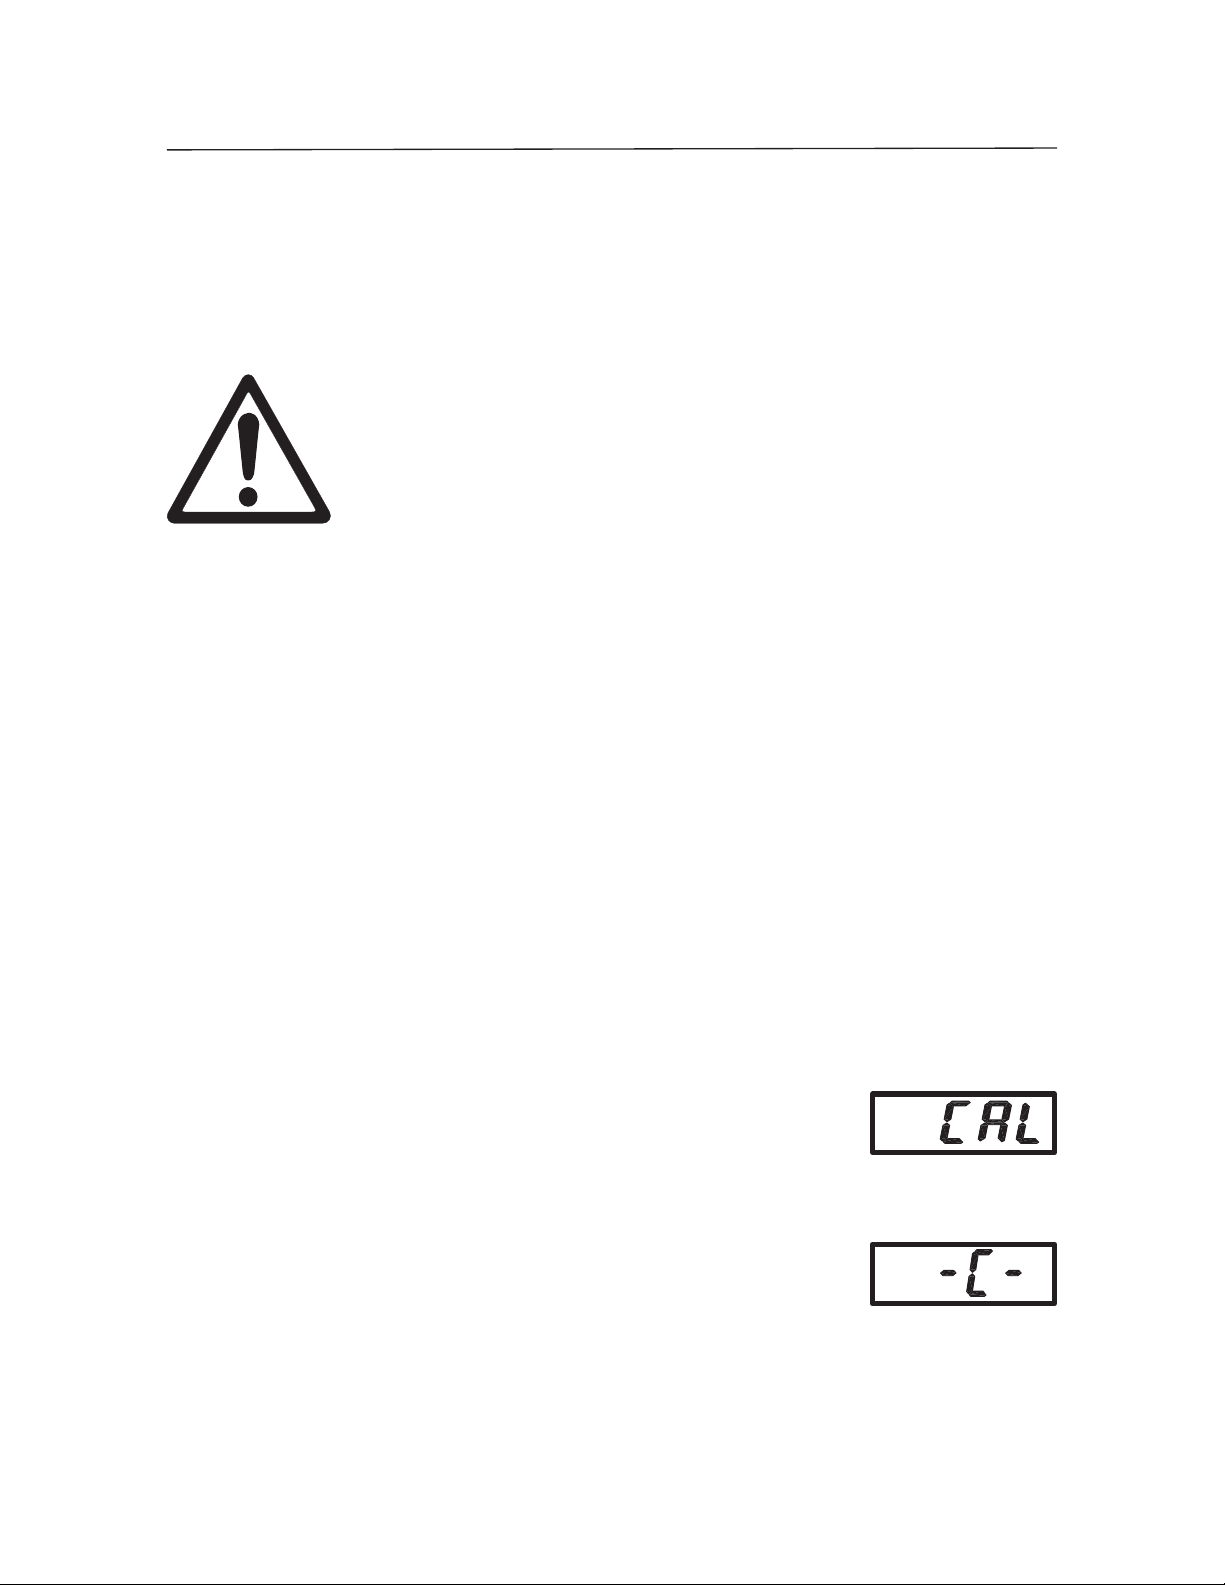
enfoncé jusqu’à ce que le message CAL s’affiche.
4. Lorsque la plate-forme est vide, appuyez sur le bouton ON/ZERO
capturer le zéro de la balance. L’affichage indique « -C- ».
UNITS
Cal
ou en mettant la balance sur arrêt. Les
Cal
que vous maintenez
Off
pour
Find Quality Products Online at: [email protected]
www.GlobalTestSupply.com
Page 39

BALANCE DE TABLE SÉRIE SD FR-9
5. Après avoir capturé le zéro, le poids de calibrage de
la portée requise s’affiche dans l’unité sélectionnée.
6. Placez le poids de calibrage sur la plate-forme et appuyez
Off
ensuite sur ON/ZERO
. L’affichage indique à
nouveau « -C- ».
7. Après la capture de la portée, l’affichage revient au mode
de pesage normal.
REMARQUE : Le message « CAL E » s’affiche si un poids de calibrage incorrect
a été appliqué. Répétez le procédé en utilisant le poids correct de calibrage.
Verrouillage du calibrage : Vous pouvez verrouiller la fonction de calibrage (la
désactiver) à l’aide de l’interrupteur interne pour empêcher tout recalibrage non
autorisé.
1. Une fois la balance hors tension, enlevez le boîtier arrière de l’indicateur
en dévissant les quatre vis en bas
2. Placez l’interrupteur sur le PCB (marqué SW3) en position CAL LOCK.
3. Réassemblez le boîtier.
4. Si besoin, placez des étiquettes inviolables sur les trous des vis ou sur les
bords du boîtier.
Si un recalibrage ultérieur est requis, le boîtier doit être rouvert et l’interrupteur de
verrouillage remis en position initiale.
REMARQUE : Lorsque l’interrupteur de verrouillage est en position CAL LOCK, la
plage de zéro de la mise sous tension est réduite à 10 % de la capacité totale.
Find Quality Products Online at: [email protected]
www.GlobalTestSupply.com
Page 40
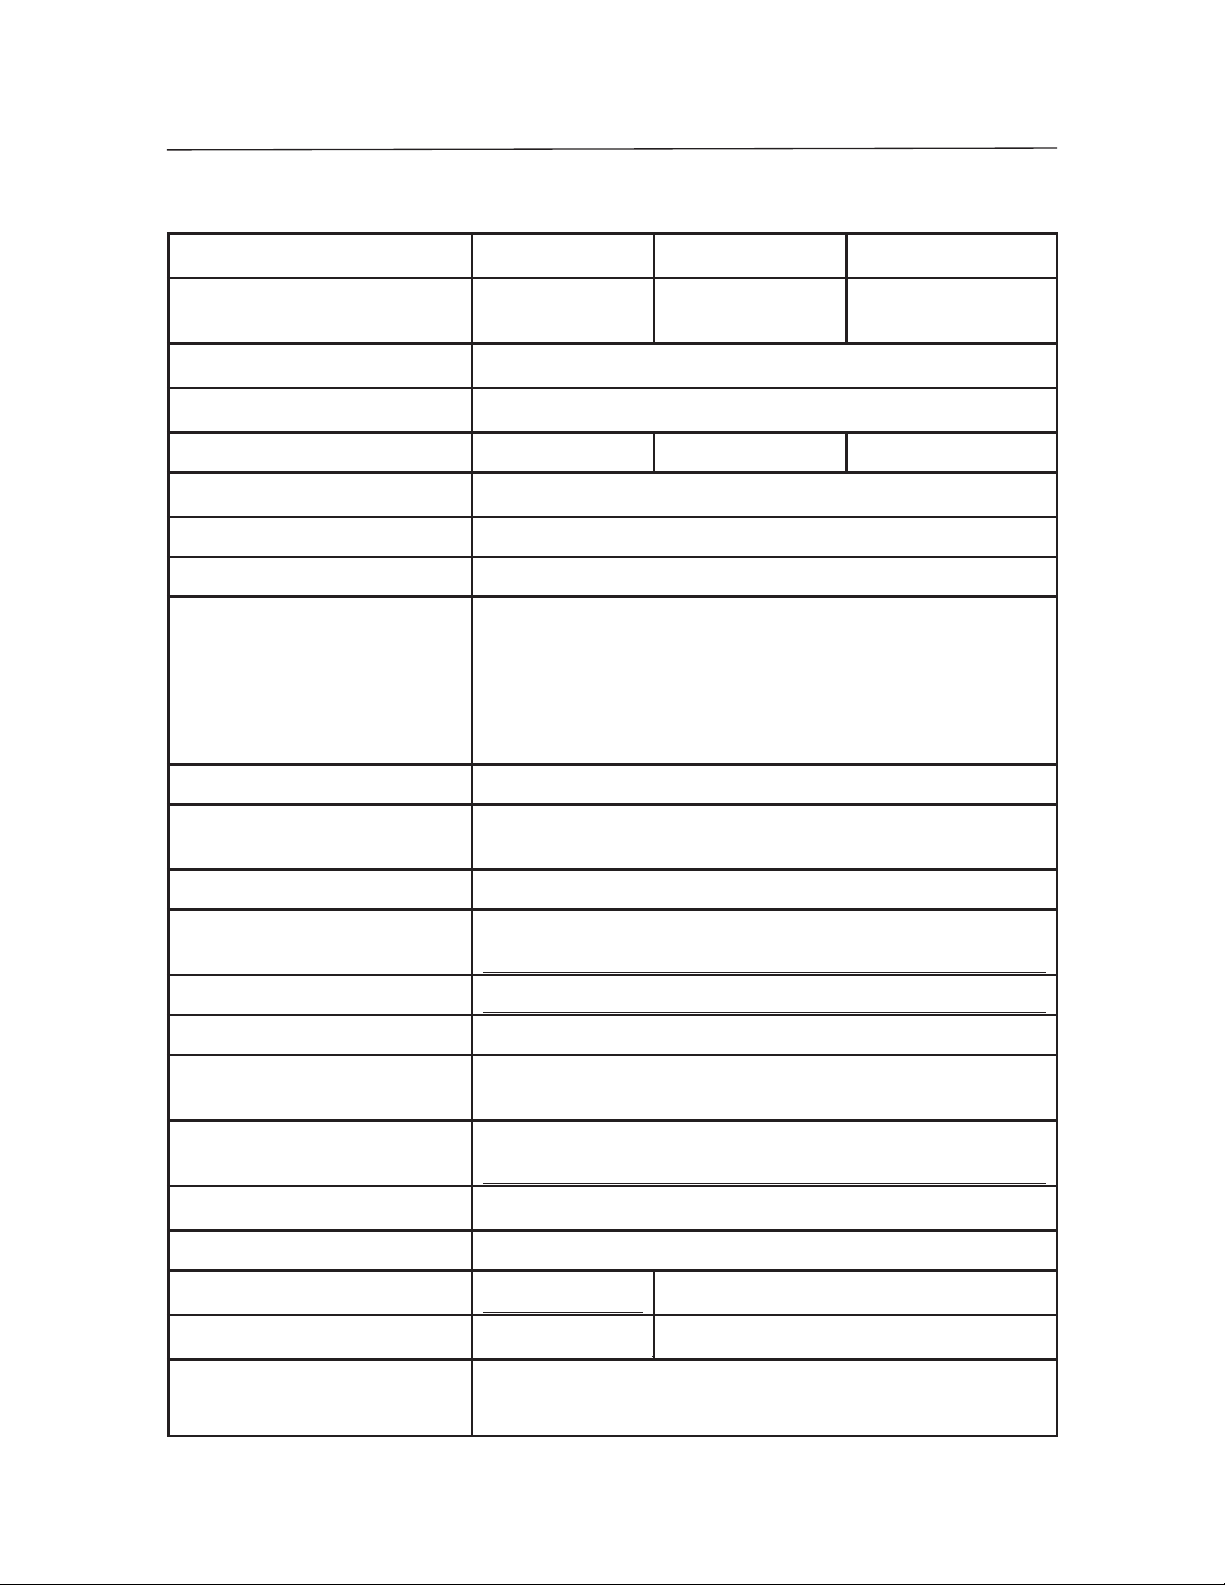
FR-10 BALANCE DE TABLE SÉRIE SD
Characteristics techniques (Modèles Bas Standard)
Modèle SD35 SD75 SD200
Capacité x Précision 35 x 0,02 kg
77 x 0,05 lb
Unités de pesage kg, lb
Modes Pesage simple, Pesage dynamique
Poids de calibrage 25 kg/50 lb 50 kg/100 lb
Temps de stabilisation Dans les 3 secondes
Plage de zéro À la capacité par soustraction.
Surcharge maximum 150%
Indications d’erreur : “E”
“CALE”
“UnSt”
“ErrE”
“Lo bat OFF”
“Lo Line OFF”
Indication de sous-charge. Valeur négative
Arrêt automatique 4 minutes sans activité (fonctionnement
- Surcharge, Sous-charge, Sur/sous-charge à la mise en marche
- Erreur de calibrage
- Instable à la mise en marche
- Erreur de mémoire
- Arrêt causé par niveau bas de la batterie
- Arrêt causé par basse tension secteur (adaptateur alimentation)
75 x 0,05 kg
165 x 0,1 lb
sur pile uniquement)
200 x 0,1 kg
440 x 0,2 lb
100 kg/200 lb
Durée de fonctionnement sur pile
Plage de la température de
fonctionnement
Longueur de câble
Affichage
Dimensions de la base de la
balance
Dimensions de l’indicateur
Piles requises
Adaptateur CA
Poids net
Poids à l’expédition
Dimensions du carton d’emballage
360 heures
5° à 40°C d’humilité relative 10 % à 80%, sans condensation
1,8m / 72 po. (déroulé)
4 chiffres, LCD, 0,8 po./20 mm de hauteur
316 mm Longueur x 280 mm Largeur x 45 mm Hauteur /
12,4 po. x L x 11 po. x 1,77 po
210 mm Longueur x 91 mm Largeur x 39 mm Hauteur / 8,27
po. x 3,58 po. x 1,54 po
3 piles alcalines C (LR14)
9-12 VCC, 100 mA
2,6 kg / 5,8 lb
3,7 kg /8,1 lb
380 mm Longuer x 100 mm Largeur x 465 mm hauteur / 15 po. x 3,94
3,3 kg / 7,3 lb
4,3 kg / 9.5 lb
po. x 18,3 po.
Find Quality Products Online at: [email protected]
www.GlobalTestSupply.com
Page 41
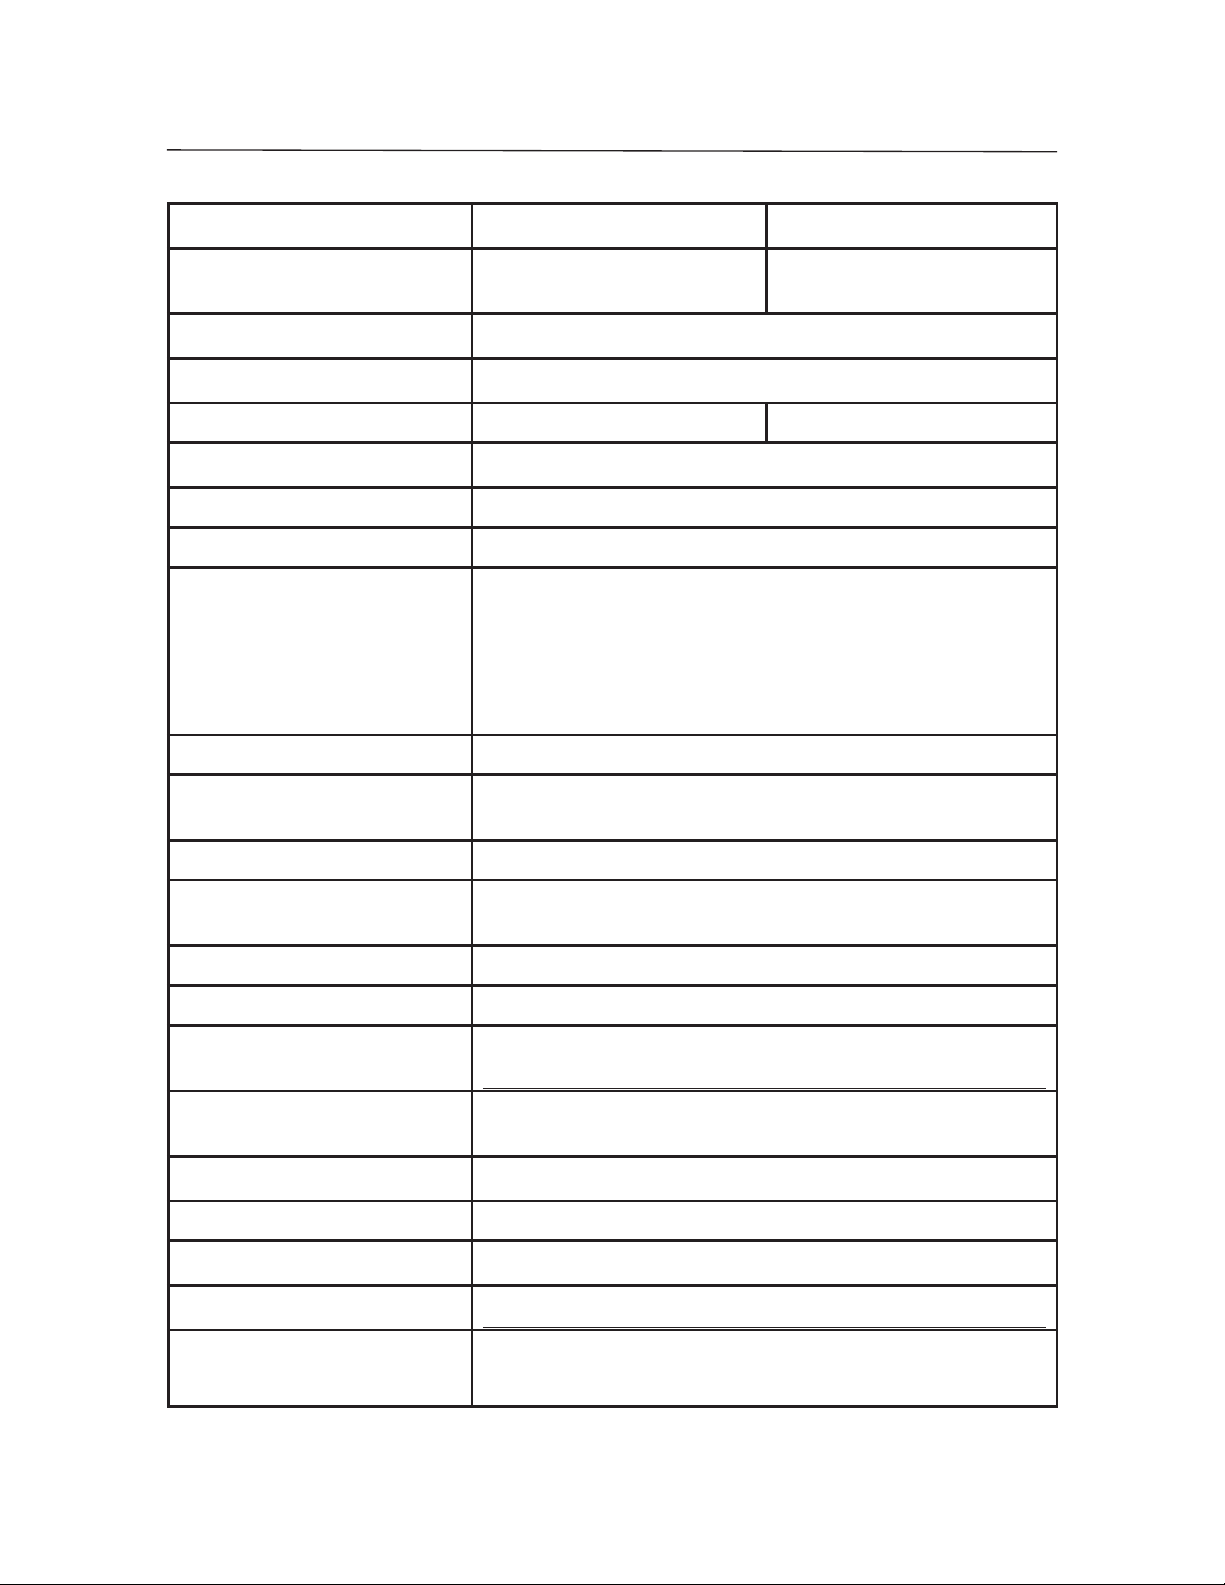
BALANCE DE TABLE SÉRIE SD FR-11
Characteristics techniques (Grands Modèles Bas)
Modèle SD75L SD200L
Capacité x Précision 75 x 0,05 kg
165 x 0,1 lb
Unités de pesage kg, lb
Modes Pesage simple, Pesage dynamique
Poids de calibrage 50 kg/100 lb
Temps de stabilisation Dans les 3 secondes
Plage de zéro À la capacité par soustraction.
Surcharge maximum 150%
Indications d’erreur : “E”
“CALE”
“UnSt”
“ErrE”
“Lo bat OFF”
“Lo Line OFF”
Indication de sous-charge. Valeur négative
Arrêt automatique 4 minutes sans activité (fonctionnement
- Surcharge, Sous-charge, Sur/sous-charge à la mise en marche
- Erreur de calibrage
- Instable à la mise en marche
- Erreur de mémoire
- Arrêt causé par niveau bas de la batterie
- Arrêt causé par basse tension secteur (adaptateur alimentation)
sur pile uniquement)
200 x 0,1 kg
440 x 0,2 lb
100 kg/200 lb
Durée de fonctionnement sur pile
Plage de la température de
fonctionnement
Longueur de câble
Affichage
Dimensions de la base de la
balance
Dimensions de l’indicateur
Piles requises
Adaptateur CA
Poids net
Poids à l’expédition
Dimensions du carton d’emballage
360 heures
5° à 40°C d’humilité relative 10 % à 80%, sans condensation
1,8m / 72 po. (déroulé)
4 chiffres, LCD, 0,8 po./20 mm de hauteur
316 mm Longueur x 280 mm Largeur x 45 mm Hauteur /
12,4 po. x L x 11 po. x 1,77 po
210 mm Longueur x 91 mm Largeur x 39 mm Hauteur / 8,27
po. x 3,58 po. x 1,54 po
3 piles alcalines C (LR14)
9-12 VCC, 100 mA
14 kg / 31 lb
15.5 kg / 34 lb
380 mm Longuer x 100 mm Largeur x 465 mm hauteur / 15 po. x 3,94
po. x 18,3 po.
Find Quality Products Online at: [email protected]
www.GlobalTestSupply.com
Page 42
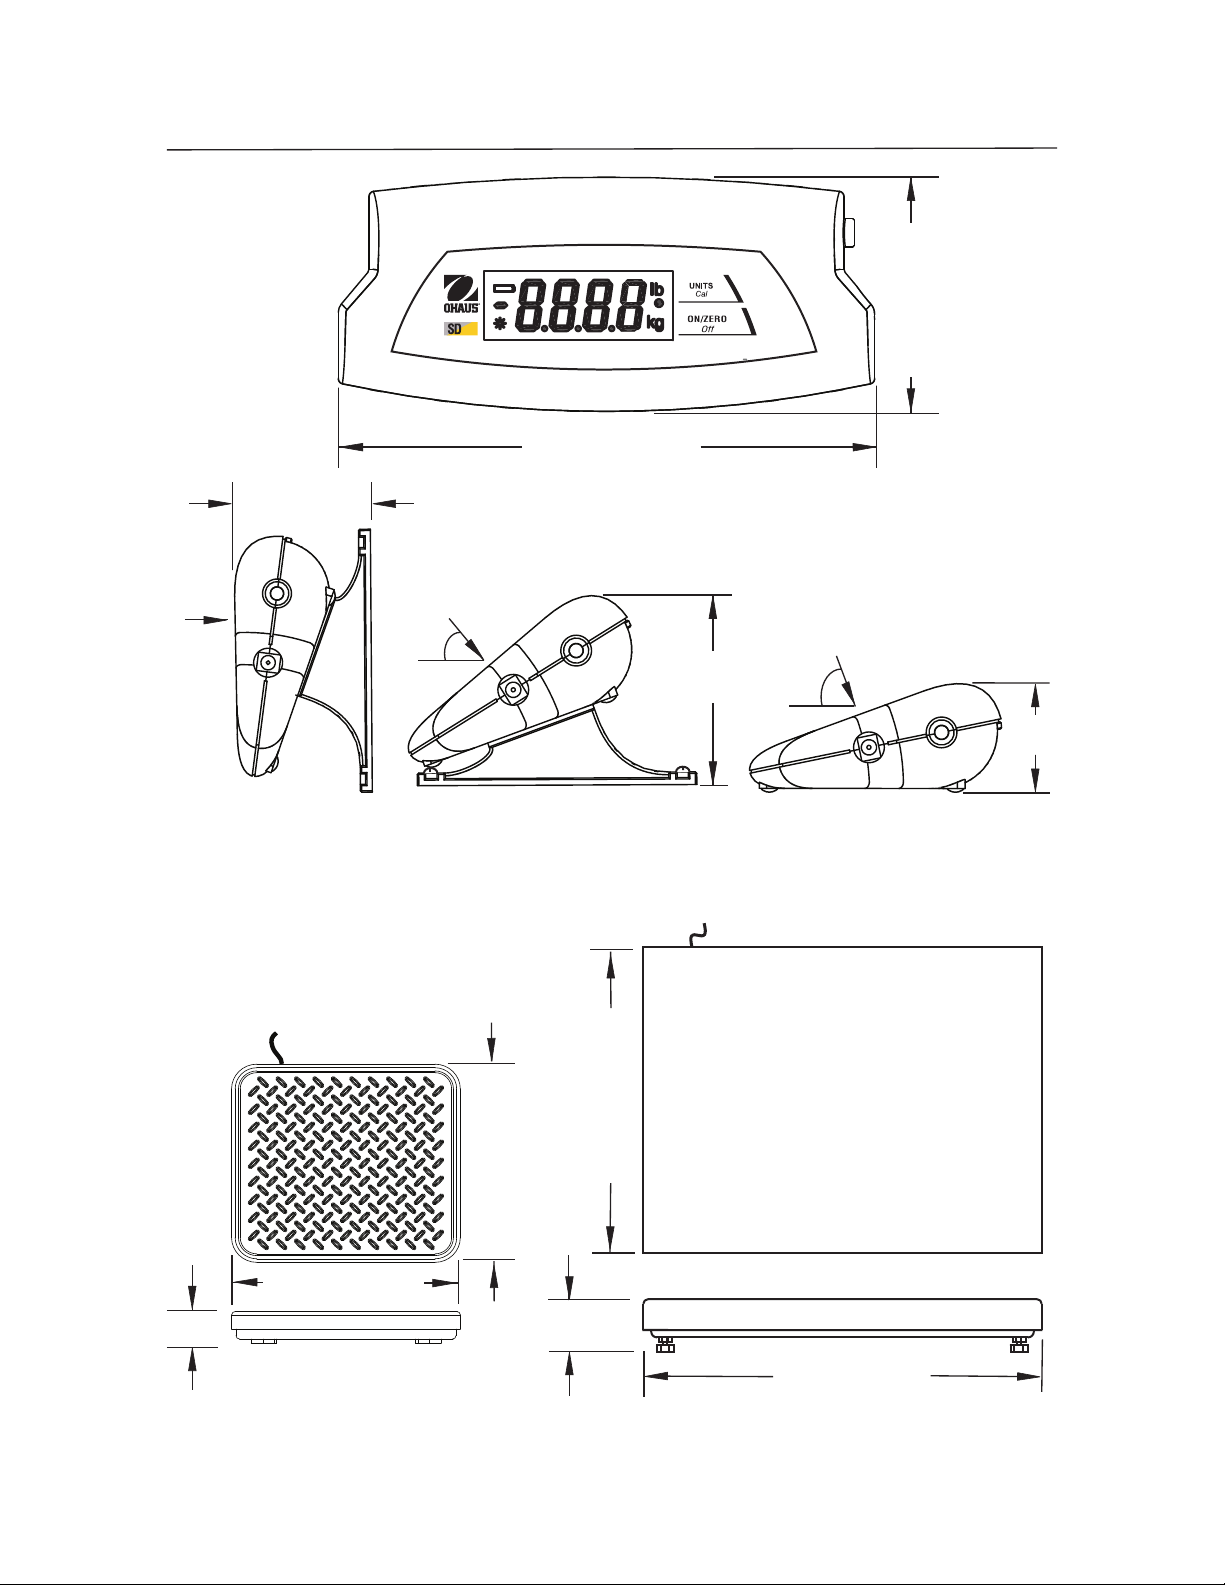
FR-12 BALANCE DE TABLE SÉRIE SD
210mm / 8,27po.
53mm /2,09po.
91mm / 3,58po.
0º
50º
69mm /
2,72po.
70º
39mm /
1,54po.
Figure 5. Dimensions hors tout de l’indicateur – Angles de visualisation disponibles.
400 mm / 15,7po.
45mm / 1,77 po.
280mm / 11,02po.
316mm / 12,44po.
Standard Base
75mm / 3po.
520mm / 20,5 po.
Grande Base
Figure 6. Dimensions hors tout de la base de la balance.
Find Quality Products Online at: [email protected]
www.GlobalTestSupply.com
Page 43

BALANCE DE TABLE SÉRIE SD FR-13
GARANTIE LIMITEE
Ohaus garantit que ses produits sont exempts de défauts matériels et de fabrication
pendant la durée de la garantie. Selon les termes de cette garantie, Ohaus s’engage,
sans frais de votre part, à réparer ou, selon son choix, remplacer toutes les pièces
déterminées défectueuses, sous réserve que le produit soit retourné, frais payés
d’avance, à Ohaus. Cette garantie n’entre pas en vigueur si le produit a subi des
dommages suite à un accident ou une utilisation erronée, a été exposé à des matériaux
radioactifs ou corrosifs, contient des matériaux étrangers ayant pénétré à l’intérieur ou
suite à un service ou une modification apportés par des techniciens autres que ceux
d’Ohaus. En l’absence d’enregistrement du produit, la période de garantie commence à
la date de l’expédition au revendeur agréé. Aucune autre garantie expresse ou implicite
n’est offerte par Ohaus Corporation. En aucun cas, Ohaus Corporation ne peut être
tenu responsable des dommages indirects. Dans la mesure où les lois régissant les
garanties varient d’un État à l’autre et d’un pays à l’autre, veuillez contacter Ohaus ou
votre représentant local agréé Ohaus pour de plus amples informations.
Find Quality Products Online at: [email protected]
www.GlobalTestSupply.com
Page 44

TISCHWAAGE DER SD-SERIE DE-1
Ohaus-Tischwaage der SD-Serie
BEDIENUNGSANLEITUNG
•
• Es sind keine Kalibriergewichte im Lieferumfang des Produkts enthalten.
• Die besten Ergebnisse werden erzielt, wenn man das Produkt im
vorgegebenen Betriebstemperaturbereich betreibt.
• Zur Erzielung der besten Genauigkeit müssen die Messungen in einer
sauberen Umgebung durchgeführt werden, die frei von elektrostatischen
und magnetischen Feldern, Staub und Schmutz, Feuchtigkeit, Vibrationen
und Luftströmungen ist.
• Gehen Sie mit Ihrer Tischwaage der SD-Serie vorsichtig um, und legen
Sie die zu wägenden Gegenstände vorsichtig in die Mitte der Plattform.
Der Inhalt dieses Handbuchs gilt für alle Modelle der Tischwaage der SD-Serie.
Wenn Sie Ihre Waage pfleglich behandeln, verlängern Sie dadurch deren
Lebensdauer.
Find Quality Products Online at: [email protected]
www.GlobalTestSupply.com
Page 45

DE-2 TISCHWAAGE DER SD-SERIE
Einleitung
Dieses Handbuch behandelt die Bedienung von Ohaus-Tischwaagen der SD-Serie.
Auspacken
Im Lieferumfang der Tischwaage der SD-Serie sind folgende Komponenten enthalten:
• Indikator • Netzadapter
• Wägebrücke • Diese Bedienungsanleitung
• Montagehalterungen • Garantiekarte
Nivellieren der Waagenplattform
Die Wägebrücke sollte vor der Inbetriebnahme auf eine ebene, stabile Oberfläche
gestellt werden. Die Modelle SD75L und SD200L sind mit verstellbaren
Nivellierfüßen ausgestattet. Zur Nivellierung der Plattform werden die vier
Nivellierfüße unten eingestellt.
Leistungsoptionen
Betrieb des Netzadapters
• Der Netzadapter (im Lieferumfang enthalten) kann zum Betreiben des
Systems verwendet werden, wenn kein Batteriestrom zur Verfügung steht.
• Stellen Sie sicher, dass die auf dem Adapter angegebene
Wechselstromeingangsleistung mit der verfügbaren Stromquelle
übereinstimmt.
• Schließen Sie den runden Stecker des Netzadapters an der
Stromeingangsbuchse auf der Seite des Indikatorgehäuses an.
Siehe Abbildung 1.
• Stecken Sie den Netzadapter in eine Netzsteckdose ein.
Abbildung 1. Anschließen des Adaptersteckers am Indikator.
Find Quality Products Online at: [email protected]
www.GlobalTestSupply.com
Page 46

TISCHWAAGE DER SD-SERIE DE-3
Installation der Batterien (optional)
• Öffnen Sie die Batterieabdeckung auf der Unterseite des Indikators und legen
Sie drei Alkalibatterien der Größe „C“ (LR14) in das Fach ein. Richten Sie die
Batterien so wie auf der Innenseite der Abdeckung gezeigt aus. Schließen
Sie die Batterieabdeckung.
HINWEIS: Batterien sind nicht im Lieferumfang enthalten.
Abbildung 2. Einlegen der Batterien.
VORSICHT: Entledigen Sie sich nicht benutzte Batterien in der
Hausangestelltvergeudung. Folgen Sie der korrekten Beseitigung oder
Wiederverwertung Anforderungen in Übereinstimmung mit lokalen
Gesetzen und Regelungen.
Indikatormontage und Plazierung Wahlen
• Tabelle Oberseite Plazierung:
Der Indikator kann auf eine flache, ebene Fläche gestellt werden, wobei keine
zusätzlichen Befestigungsmittel notwendig sind. Vier Gummifüße sorgen auf
den meisten Oberflächen für ein vermindertes Rutschen.
• Direkte Wandmontage:
Der Indikator kann mit zwei Schrauben (nicht im Lieferumfang enthalten)
Größe, die in die Löcher an der Unterseite des Indikatorgehäuses passen.
Siehe Abbildung 3. Wenn das Gerät an einer Wand ohne feste Verstärkung
montiert wird, verwenden Sie geeignete Befestigungsmittel zum Verankern.
Find Quality Products Online at: [email protected]
direkt an einer Wand montiert werden. Wählen Sie Schrauben einer geeigneten
www.GlobalTestSupply.com
Page 47
DE-4 TISCHWAAGE DER SD-SERIE
120mm / 4,72”
Abbildung 3. Direkte Wandmontage.
• Wandmontage mit Halterung/Tischmontage:
Befestigen Sie die zwei Montagehalterungen (siehe Abb. 4). Positionieren
Sie den Indikator an die gewünschte Stelle an der Wand oder auf dem Tisch.
Bauen Sie zwei Schrauben (nicht im Lieferumfang enthalten) in die Enden
jeder Halterung ein, um sie an der Oberfläche zu befestigen. Wenn das Gerät
an einer Wand ohne feste Verstärkung montiert wird, verwenden Sie geeignete
Befestigungsmittel zum Verankern.
MONTAGEHINWEISE:
1. Befestigen von Halterungen: Führen Sie runde Stifte in Löcher an der
Unterseite des Indikators ein und schieben Sie jede Halterung zurück,
bis sie einrastet.
2. Die Montagehalterungen können in zwei unterschiedlichen Ausrichtungen
m
ontiert werden, um einen optimalen Betrachtungswinkel zu gewährleisten.
3. Bei einigen Montagepositionen müssen die Halterungen eventuell an der
Arbeitsfläche befestigt werden, bevor sie am Indikator befestigt werden.
120mm / 4,72”
Abbildung 4. Wandmontage mit Halterung u. Tischmontage.
90mm / 3,54”
Find Quality Products Online at: [email protected]
www.GlobalTestSupply.com
Page 48

TISCHWAAGE DER SD-SERIE DE-5
Produktmerkmale u. Bedienung
SD
Abbildung 5. Bedienelemente am Indikatorbedienfeld.
Tastenfeld mit zwei Tasten
• ON/ZERO
die Waage eingeschaltet, wenn sie ausgeschaltet ist. Wenn die Waage
eingeschaltet ist, wird durch kurzes Drücken dieser Taste die Waage auf
Null gestellt. Durch langes Drücken wird die Waage ausgeschaltet.
• UNITS
Wägeeinheit geändert. Durch langes Drücken wird das Kalibrierungsverfahren
eingeleitet.
Off
(Ein/Null Aus): Durch kurzes Drücken auf diese Taste wird
Cal
(Einheiten Kalibrierung): Durch ein kurzes Drücken wird die
Anzeigefenster
• Große numerische Zeichen mit 7 Segmenten: Die Gewichtswerte
werden mithilfe von 4 Ziffern einschließlich Minuszeichen und Dezimalstellen
angezeigt. Außerdem werden mit diesen Ziffern Eingabeaufforderungen für
die Kalibrierung und mögliche Fehlerzustände angezeigt.
•
erscheint ein
•
der rechten Seite der Anzeige.
Find Quality Products Online at: [email protected]
Stabile Messwertanzeige: In der unteren linken Ecke der Anzeige
* und zeigt an, wann ein Messwert stabil ist.
Gewichtseinheitsanzeige: Die gewählte Gewichtseinheit erscheint auf
www.GlobalTestSupply.com
Page 49

DE-6 TISCHWAAGE DER SD-SERIE
• Niedrige Batterieanzeige: Das Batteriesymbol auf der linken Seite der
Anzeige
angezeigt werden, bleiben ungefähr 12 Stunden des Betriebes. Wenn die
Batterie ganz leer ist, wird auf der Waage kurz die Meldung „Lo bAt“
(Niedriger Batteriestand) eingeblendet, und die Waage schaltet sich aus
zeigt einen niedrigen Batteriezustand an. Wenn sie zuerst
.
Betrieb
• Einschalttest: Wird die Taste ON/ZERO
schaltet sich die Waage ein; alle Anzeigesegmente werden kurzzeitig
eingeblendet, und anschließend erscheint die Softwareversion. Die Anzeige
stellt sich dann auf Null zurück.
•
Waagenanzeige auf Null zurück. Beim Hinzufügen von zusätzlichen
Gewichten kann die Taste ON/ZERO
die volle Kapazität der Waage erreicht ist. Wenn ein Behälter verwendet wird,
kann die Taste ON/ZERO
Nullfunktion: Durch das Drücken auf ON/ZERO
Off
Off
zum Simulieren der Tarafunktion verwendet
Off
(EIN/NULL Aus) gedrückt,
Off
kehrt die
wiederholt verwendet werden, bis
werden. Zusätzliche Gewichte können dann als NET (Netto) -Gewicht
hinzugefügt werden. Wenn sowohl die Probe als auch der Behälter von der
Waage abgenommen werden, wird eventuell ein negativer Wert angezeigt.
Stellen Sie die Waage vor einer erneuten Verwendung wieder auf Null.
HINWEIS: Die Taste ON/ZERO
aus, wenn Anzeigewerte innerhalb von +2 % der vollen Kapazität liegen.
Über 2% wird die Strecke auf die volle Kapazität durch Abzug begrenzt.
•
jeder zuvor auf Null gestellte Wert als negative Zahl angezeigt. Um zum
normalen Betrieb zurückzukehren, wird der negative Wert durch Drücken der
Taste ON/ZERO
•
erscheint auf der Anzeige ein „E“. Nehmen Sie die Last ab und die Waage
Negative Werte: Wenn eine Last von der Waage abgenommen wird, wird
Off
aus der Anzeige gelöscht
Überlast: Wenn die aufgelegte Last die Kapazität der Waage überschreitet,
Off
führt eine echte Nulleinstellungsfunktion
.
kehrt zum Normalbetrieb zurück.
Find Quality Products Online at: [email protected]
www.GlobalTestSupply.com
Page 50

TISCHWAAGE DER SD-SERIE DE-7
• Automatisches Ausschalten: Zum Verlängern der Lebensdauer der
Batterien schaltet sich die Waage nach ca. vier Minuten ohne Aktivität
automatisch aus. Diese Funktion ist nur im Batteriebetrieb aktiv.
Dynamisches Wägen
1. Wenn die Plattform leer ist, drücken Sie die Taste
UNITS
Maßeinheit blinkt.
2. Legen Sie ein Gewicht auf die Plattform. Auf der Anzeige
erscheint „-A-“.
HINWEIS: Drücken SIe bei Verwendung eines Behälters auf
ON/ZERO
zurückzukehren.
3. Während sich ein Gewicht auf der Plattform bzw. im
Behälter befindet, wird durch kurzes Drücken auf UNITS
ein Countdown von 5 Sekunden für die Mittelung gestartet.
4. Dann wird das gemittelte Gewicht angezeigt. Der Indikator •
Cal
, bis die Anzeige • neben der gewünschten
Off
, um das Gewicht zu tarieren und zu Null
Cal
hört zu blinken auf, wenn der Vorgang abgeschlossen ist.
5. Die Wert wird so lange angezeigt, bis eine Taste gedrückt wird.
Cal
6. Zum Wiederholen des Vorgangs drücken Sie auf UNITS
während sich ein Gewicht auf der Plattform oder im Behälter befindet.
7. Zum Beenden nehmen Sie das Gewicht von der Plattform oder
aus dem Behälter und drücken UNITS
Find Quality Products Online at: [email protected]
www.GlobalTestSupply.com
Cal
.
,
Page 51

DE-8 TISCHWAAGE DER SD-SERIE
Kalibrierung
Zur Erzielung der besten Ergebnisse muss die Waage in regelmäßigen Abständen
kalibriert werden. (Es sind keine Kalibriergewichte im Lieferumfang der Waage
enthalten.)
VORSICHTIG VORGEGANGEN WERDEN, DA SIE SEHR SCHWER
SIND. FALSCHE HEBEMETHODEN ODER DER MISSBRAUCH
VON KALIBRIERGEWICHTEN KANN ZU VERLETZUNGEN FÜHREN.
UM DAS ERFORDERLICHE KALIBRIERGEWICHT ZU ERREICHEN,
KÖNNEN MEHRERE GEWICHTE VERWENDET WERDEN.
1. Lassen Sie die Waage mindestens zwei Minuten lang aufwärmen und sich
stabilisieren, bevor mit dem Kalibrieren begonnen wird.
2. Zur Auswahl der für die Kalibrierung zu verwendenden Wägeeinheit drücken
Sie die Taste UNITS
HINWEIS: Die Kalibrierung kann jederzeit durch Drücken der Taste
BEIM UMGANG MIT KALIBRIERGEWICHTEN MUSS EXTREM
Cal
, bis die richtige Einheit angezeigt wird.
VORSICHT
Cal
UNITS
Beginn der Kalibrierung müssen die richtigen Messspannenkalibriergewichte
zur Verfügung stehen (siehe Tabelle mit Spezifikationen). Im dynamischen
Wägemodus steht keine Kalibrierung zur Verfügung.
3. Drücken und halten Sie die Taste
bis „CAL“ eingeblendet wird.
4.
Waagennullwert zu erfassen. Auf der Anzeige erscheint „-C-“.
Drücken Sie die Taste ON/ZERO
oder durch Ausschalten der Waage abgebrochen werden. Vor
UNITS
Off
Cal
gedrückt,
bei leerer Plattform, um den
Find Quality Products Online at: [email protected]
www.GlobalTestSupply.com
Page 52

TISCHWAAGE DER SD-SERIE DE-9
5. Nach Erfassung der Null wird das erforderliche
Messspannen-Kalibriergewicht in der ausgewählten
Einheit angezeigt.
6. Legen Sie das Kalibriergewicht auf die Plattform und
Off
drücken Sie die Taste ON/ZERO
. Auf der Anzeige
erscheint erneut „-C-“.
7. Nach der Messspannenerfassung kehrt die Anzeige zum
normalen Wägemodus zurück.
HINWEIS: Die Meldung „CAL E“ wird eingeblendet, wenn ein falsches
Kalibriergewicht aufgelegt wurde. Wiederholen Sie das Verfahren mit dem
korrekten Kalibrierung Gewicht.
Kalibrierungsverriegelung:
Die Kalibrierfunktion kann mithilfe eines internen Schalter
verriegelt (deaktiviert) werden, sodass eine unbefugte Kalibrierung verhindert wird.
1. Bauen Sie bei ausgeschalteter Waage den rückwärtigen Teil des
Indikatorgehäuses aus, indem Sie die vier Schrauben an der Unterseite
herausschrauben.
2. Schieben Sie den Schalter auf der Platine (mit der Markierung SW3) in die
Position mit der Markierung „CAL LOCK“.
3. Bauen Sie das Gehäuse wieder zusammen.
4. Kleben Sie nach Bedarf manipulationssichere Etiketten über die
Schraubenlöcher oder die Gehäusekanten.
Wenn später eine erneute Kalibrierung erforderlich ist, muss das Gehäuse wieder
geöffnet und der Sperrschalter muss wieder in die ursprüngliche Position gebracht
werden.
HINWEIS: Wird der Sperrschalter in die Position CAL LOCK gestellt, dann wird der
Nullbereich beim Einschalten auf 10 % der vollen Kapazität reduziert.
Find Quality Products Online at: [email protected]
www.GlobalTestSupply.com
Page 53

DE-10 TISCHWAAGE DER SD-SERIE
Technische Daten (Standardwägebrücke)
Modell SD35 SD75 SD200
Kapazität x Ablesbarkeit 35 x 0,02 kg
77 x 0,05 lb
Wägeeinheiten kg, lb
Modi Einfaches Wägen, dynamisches Wägen
Kalibrierungsgewichte 25 kg/50 lb 50 kg/100 lb
Stabilisierungszeit Innerhalb von 3 Sekunden
Nullbereich
Maximale Überlast 150%
Fehleranzeigen: “E”
“CALE”
“UnSt”
“ErrE”
“Lo bat OFF”
“Lo Line OFF”
Unterlastanzeige Negativer Wert
Automatisches Ausschalten 4 Minuten ohne Aktivität (nur Batteriebetrieb)
Batteriebetriebszeit 360 Stunden
- Überlast, Unterlast, Über-/Unterlast beim Einschalten
- Kalibrierungsfehler
- Beim Einschalten instabil
- Speicherfehler
- Ausschalten bei schwacher Batterie
- Ausschalten bei niedriger Leitungsspannung (Netzadapter)
75 x 0,05 kg
165 x 0,1 lb
Zur Kapazität durch Abzug.
200 x 0,1 kg
440 x 0,2 lb
100 kg/200 lb
Betriebstemperaturbereich
Kabellänge
Anzeige
Wägebrückengröße 316 mm L x 280 mm B x 45 mm H /
Indikatorgröße
Batterieleistungsanforderungen
Netzadapter
Nettogewicht
Versandgewicht
Versandkartongröße
41 ° bis 104 °F / 5 ° bis 40 °C bei 10 % bis 80 % relativer
Feuchte, nicht kondensierend
1,8 m / 72” (ausgezogen)
4-stellig, LCD, 0,8”/20 mm hoch
12,4” x L x 11” B x 1,77” H
210 mm L x 91 mm B x 39 mm H /
8,27” L x 3,58” B x 1,54” H
3 Alkalibatterien der Größe „C“ (LR14)
9-12 Volt DC, 100 mA
2,6 kg /5,8 lb
3,7 kg /8,1 lb
3,3 kg / 7,3 lb
4,3 kg / 9,5 lb
380 mm L x 100 mm B x 465 mm H /
15” L x 3,94” B x 18,3” H
Find Quality Products Online at: [email protected]
www.GlobalTestSupply.com
Page 54
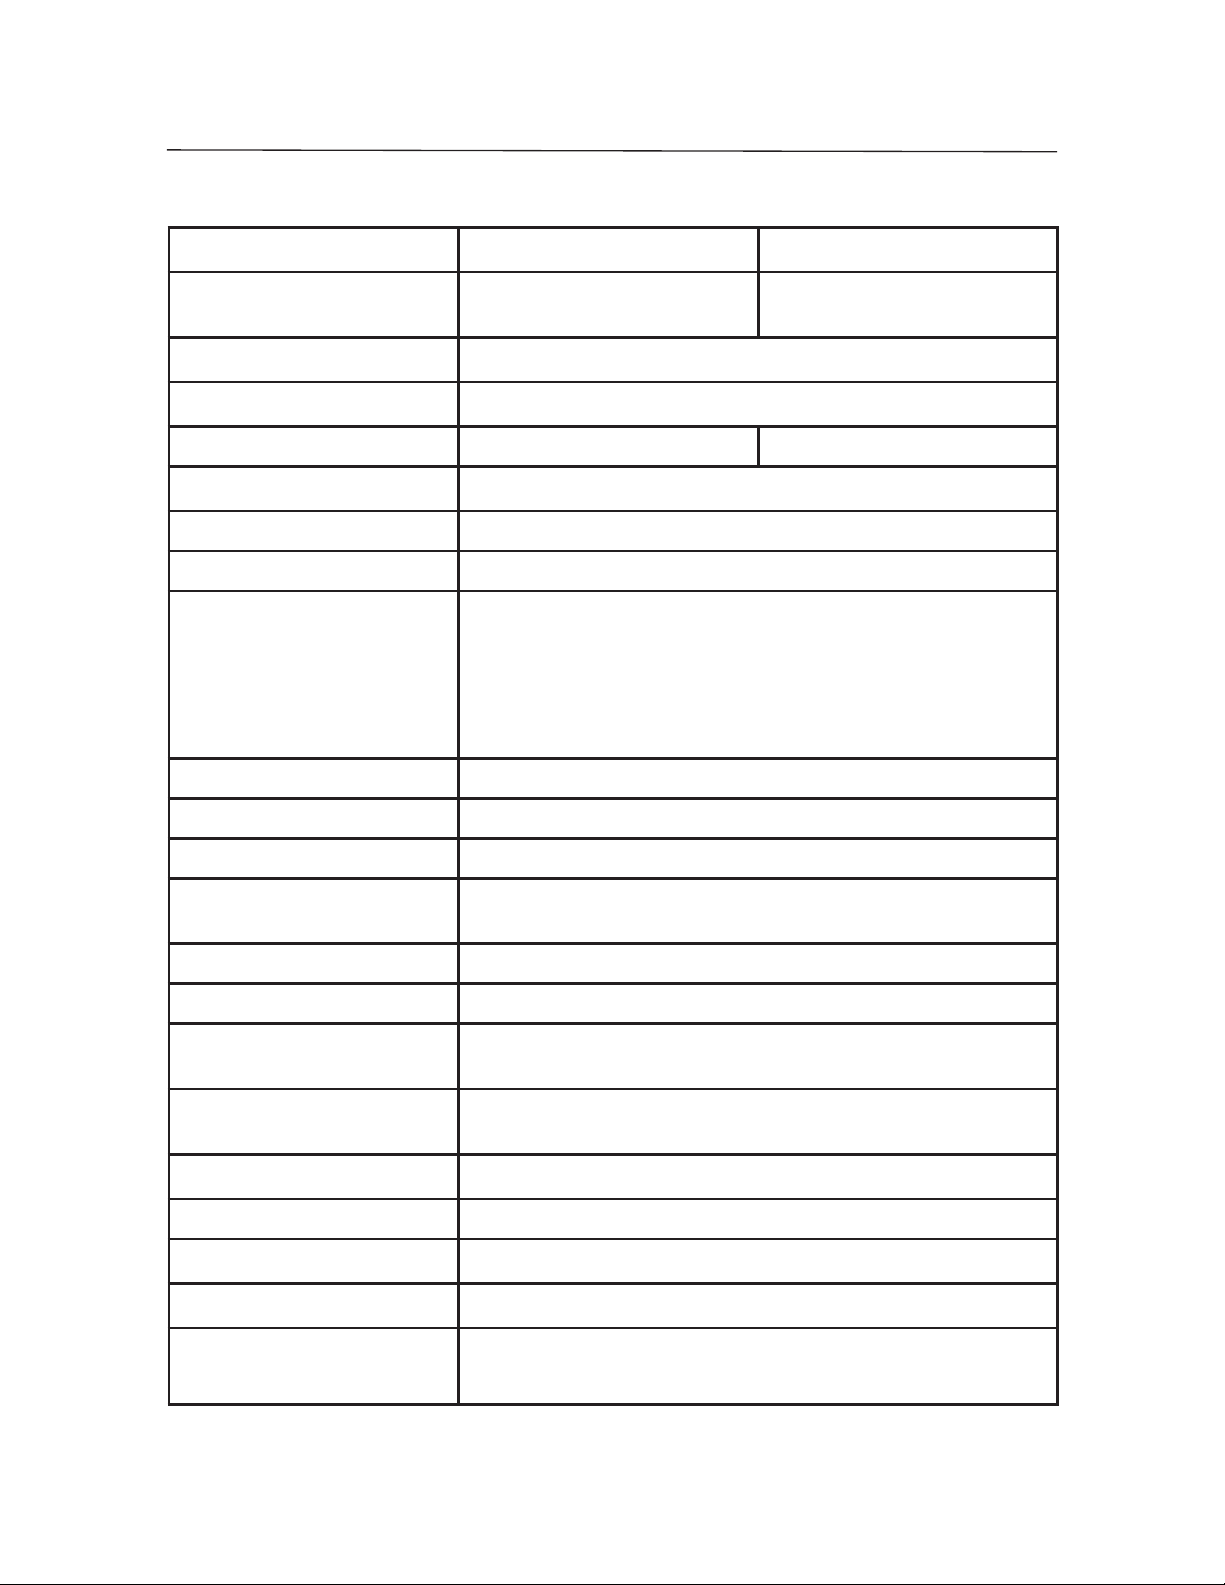
TISCHWAAGE DER SD-SERIE DE-11
Technische Daten (Große Wägebrücke)
Modell SD75L SD200L
Kapazität x Ablesbarkeit 75 x 0,05 kg
165 x 0,1 lb
Wägeeinheiten kg, lb
Modi Einfaches Wägen, dynamisches Wägen
Kalibrierungsgewichte 50 kg/100 lb
Stabilisierungszeit Innerhalb von 3 Sekunden
Nullbereich
Maximale Überlast 150%
Fehleranzeigen: “E”
“CALE”
“UnSt”
“ErrE”
“Lo bat OFF”
“Lo Line OFF”
Unterlastanzeige Negativer Wert
Automatisches Ausschalten 4 Minuten ohne Aktivität (nur Batteriebetrieb)
Batteriebetriebszeit 360 Stunden
- Überlast, Unterlast, Über-/Unterlast beim Einschalten
- Kalibrierungsfehler
- Beim Einschalten instabil
- Speicherfehler
- Ausschalten bei schwacher Batterie
- Ausschalten bei niedriger Leitungsspannung (Netzadapter)
Zur Kapazität durch Abzug.
200 x 0,1 kg
440 x 0,2 lb
100 kg/200 lb
Betriebstemperaturbereich
Kabellänge
Anzeige
Wägebrückengröße 520 mm L x 400 mm B x 75 mm H /
Indikatorgröße
Batterieleistungsanforderungen
Netzadapter
Nettogewicht
Versandgewicht
Versandkartongröße
41 ° bis 104 °F / 5 ° bis 40 °C bei 10 % bis 80 % relativer
Feuchte, nicht kondensierend
1,8 m / 72” (ausgezogen)
4-stellig, LCD, 0,8”/20 mm hoch
20,5” x L x 15,7” B x 3” H
210 mm L x 91 mm B x 39 mm H /
8,27” L x 3,58” B x 1,54” H
3 Alkalibatterien der Größe „C“ (LR14)
9-12 Volt DC, 100 mA
14 kg / 31 lb
15.5 kg / 34 lb
600 mm L x 480 mm B x 230 mm H /
24” L x 19” B x 9” H
Find Quality Products Online at: [email protected]
www.GlobalTestSupply.com
Page 55

DE-12 TISCHWAAGE DER SD-SERIE
53mm /2,09”
91mm / 3,58”
210mm / 8,27”
0º
50º
69mm /
2,72”
70º
Abbildung 5. Gesamtabmessungen des Indikators, verfügbare Betrachtungswinkel.
400 mm / 15.7”
39mm /
1,54”
280mm / 11.02”
45mm / 1.77”
316mm / 12.44”
Standardwägebrücke
75mm / 3”
520mm / 20.5”
Große Wägebrücke
Abbildung 6. Gesamtabmessungen der Wägebrücke.
Find Quality Products Online at: [email protected]
www.GlobalTestSupply.com
Page 56

TISCHWAAGE DER SD-SERIE DE-13
BESCHRÄNKTE GARANTIE
Auf Ohaus-Produkte wird für die Dauer des Garantiezeitraums eine Garantie gegen
Material- und Herstellungsmängel gegeben. Während des Garantiezeitraums wird
Ohaus kostenlos jegliche Komponente(n), die sich als defekt erweist (erweisen),
reparieren oder nach eigenem Ermessen ersetzen, wenn das Produkt bei Vorauszahlung
der Versandkosten an Ohaus zurückgeschickt wird. Die Garantie gilt nicht, wenn
das Produkt durch einen Unfall oder durch Missbrauch beschädigt wurde, wenn es
radioaktiven oder korrodierenden Materialien ausgesetzt wurde, wenn Fremdkörper
das Innere des Produkts durchdrungen haben oder wenn es auf Grund einer Reparatur
oder Modifikation beschädigt wurde, die nicht von Ohaus durchgeführt wurde.
Anstelle des Datums der Produktregistrierung beginnt der Garantiezeitraum am Datum
der Lieferung an den Vertragshändler. Die Ohaus Corporation gibt keine sonstige
ausdrückliche oder stillschweigende Garantie. Die Ohaus Corporation ist nicht für
irgendwelche Folgeschäden haftbar. Da die Gesetzgebung in Bezug auf Garantien von
Bundesstaat zu Bundesstaat und von Land zu Land unterschiedlich ist, wenden Sie
sich bitte an Ohaus oder Ihren örtlichen Ohaus-Händler, wenn Sie weitere Einzelheiten
erfahren wollen.
Find Quality Products Online at: [email protected]
www.GlobalTestSupply.com
Page 57

BILANCIA DA BANCO SERIE SD IT-1
Bilancia da banco serie SD Ohaus
MANUALE D’ISTRUZIONI
• I contenuti del presente manuale si applicano a tutti i modelli della bilancia
da banco serie SD.
• I pesi di taratura non vengono forniti con questo prodotto.
• Per risultati ottimali, utilizzare il prodotto alla temperatura di funzionamento
specificata.
• Per una precisione ottimale, effettuare le misurazioni in un ambiente pulito,
in assenza di campi elettrostatici e magnetici, polvere e sporco, umidità,
vibrazioni e correnti d’aria.
• Utilizzare la bilancia da banco serie SD con attenzione, caricando con cura
gli articoli da pesare al centro della piattaforma. Se si evita di trattare la
bilancia rudemente si contribuirà ad allungarne la durata.
Find Quality Products Online at: [email protected]
www.GlobalTestSupply.com
Page 58

IT-2 BILANCIA DA BANCO SERIE SD
Introduzione
Il presente manuale tratta del funzionamento delle bilance da banco serie SD Ohaus.
Disimballaggio
La bilancia da banco serie SD Ohaus è dotata dei seguenti componenti:
• Indicatore • Alimentatore di rete
• Base della bilancia • Questo manuale di istruzioni
• Staffe di montaggio • Scheda di garanzia
Livellamento della piattaforma della bilancia
La base della bilancia deve essere posizionata su una superficie stabile e
orizzontale prima del funzionamento. I modelli SD75L e SD200L sono dotati di
piedini di livellamento regolabili. Regolare i quattro piedini di livellamento al di sotto
della piattaforma per livellarla.
Opzioni di alimentazione
Funzionamento dell’alimentatore di rete
• Quando l’alimentazione a batteria non è disponibile, per avviare il sistema è
possibile utilizzare l’alimentatore di rete (incluso).
• C
• Collegare la presa tonda dell’alimentatore di rete al jack di ingresso
dell
• Inserire l’alimentatore di rete in una presa di alimentazione.
ontrollare che l’alimentazione di ingresso CA contrassegnata sull’alimentatore
di rete corrisponda alla sorgente di alimentazione disponibile.
’alimentazione a lato dell’alloggiamento dell’indicatore. Vedere la Figura 1.
Figura 1. Collegamento della presa dell’alimentatore all’indicatore.
Find Quality Products Online at: [email protected]
www.GlobalTestSupply.com
Page 59

BILANCIA DA BANCO SERIE SD IT-3
Installazione della batteria (opzionale)
• Aprire il coperchio della batteria nella parte inferiore dell’indicatore e installare
le tre batterie alcaline “C” (LR14) nel compartimento. Orientare le batterie
come illustrato sulla parte interna del coperchio. Chiudere il coperchio della
batteria.
NOTA: le batterie non sono incluse.
Figura 2. Installazione della batteria.
ATTENZIONE: non disfarsi delle batterie usate nei contenitori per la
raccolta dei rifiuti normali. Attenersi ai requisiti di smaltimento
riciclaggio corretto in conformità con le norme e le disposizioni locali.
Montaggio dell’indicatore ed opzioni di disposizione
• Disposizione del piano d’appoggio:
L’indicatore può essere posizionato su una superficie piana senza l’ausilio
di hardware aggiuntivo. Quattro piedini di gomma consentono di ridurre lo
scivolamento su gran parte delle superfici.
• Montaggio diretto a parete:
L’indicatore può essere montato direttamente su parete utilizzando due viti
(non incluse). Selezionare viti delle dimensioni appropriate che si adattino ai
fori sulla parte inferiore dell’alloggiamento dell’indicatore. Vedere la Figura 3.
Quando si effettua il montaggio su una parete priva di una struttura resistente,
utilizzare hardware di ancoraggio appropriato.
Find Quality Products Online at: [email protected]
www.GlobalTestSupply.com
Page 60
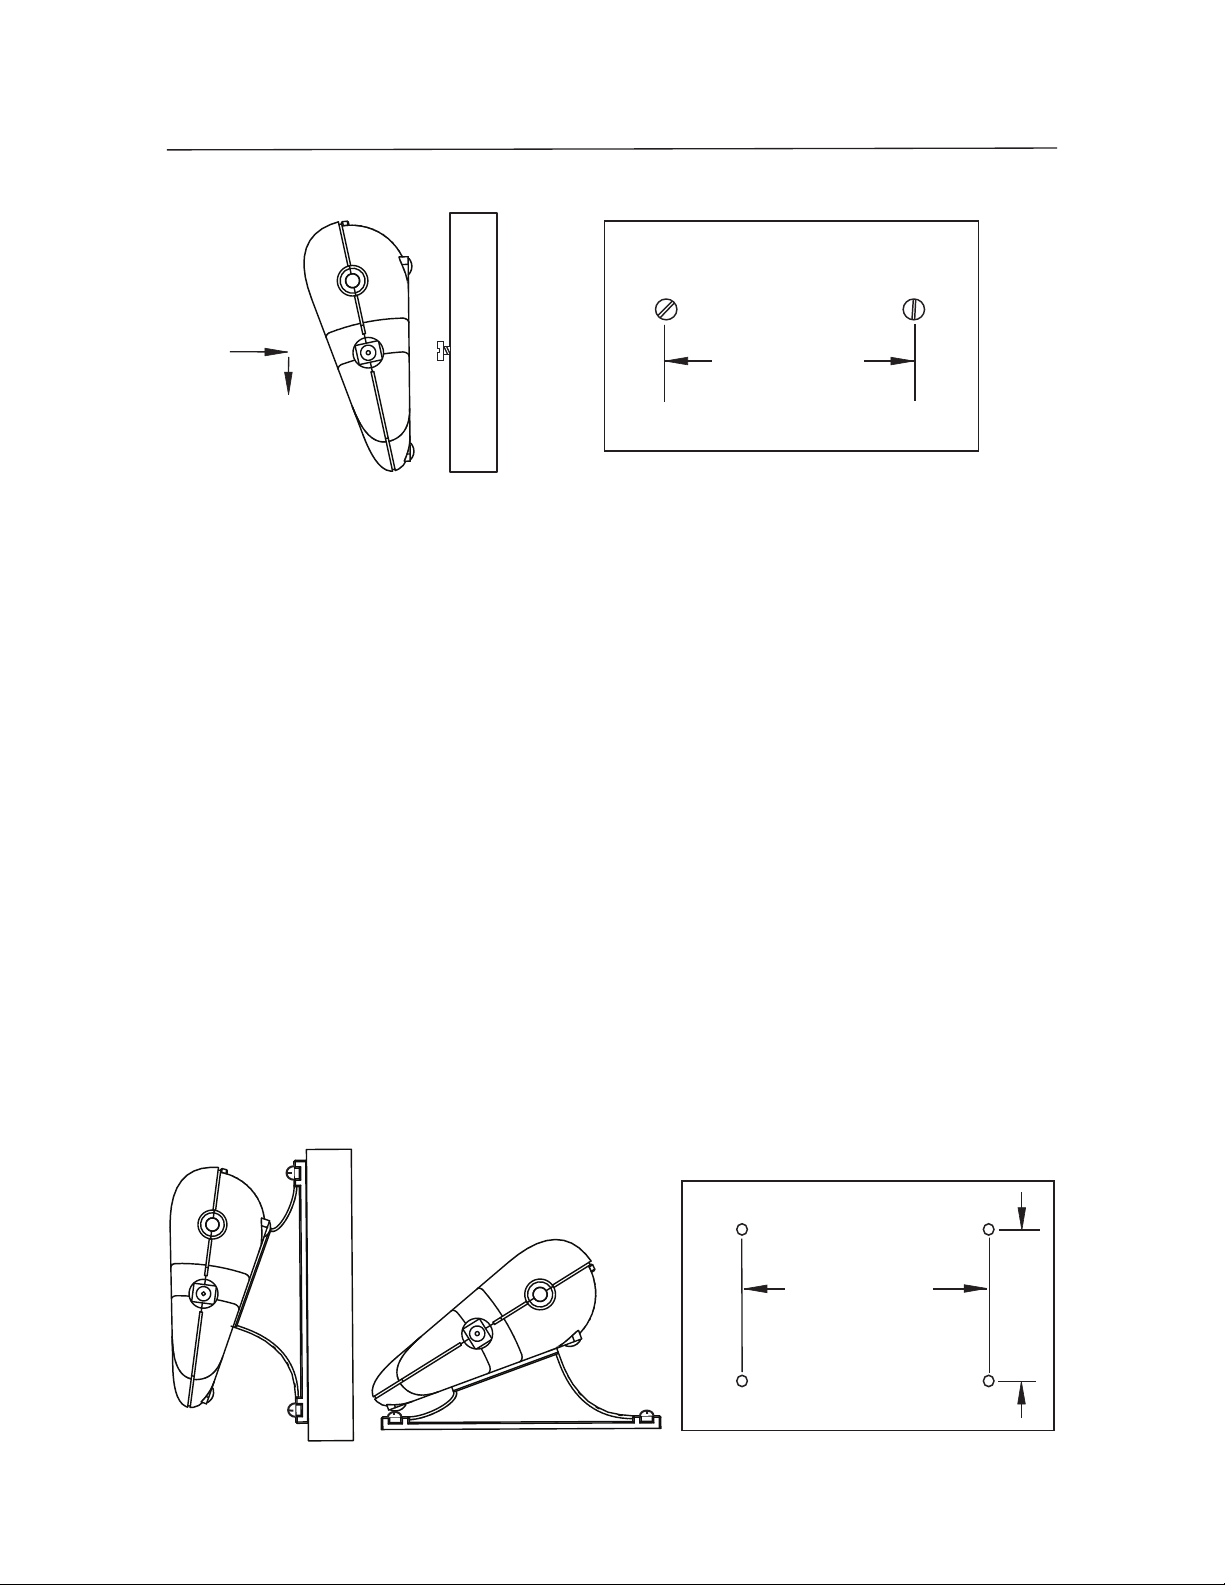
IT-4 BILANCIA DA BANCO SERIE SD
120 mm / 4,72”
Figura 3. Esecuzione del montaggio a parete diretto.
• Montaggio su piano/a parete con staffe:
Collegare due staffe di montaggio come illustrato in Figura 4. Posizionare
l’indicatore laddove desiderato sulla parete o sul piano. Installare due viti
(non fornite) agli estremi di ogni staffa per fissarli alla superficie. Quando si
effettua il montaggio su una parete priva di una struttura resistente, utilizzare
hardware di ancoraggio appropriato.
NOTE DI MONTAGGIO:
1. Quando si attaccano le staffe: inserire gli spinotti tondi nei fori sulla parte
inferiore dell’indicatore e far scorrere ogni staffa all’indietro per bloccarla
in posizione.
2. Per fornire un angolo di visuale ottimale, è possibile attaccare le staffe di
montaggio in due differenti orientamenti.
3. Alcune posizioni di montaggio possono richiedere che le staffe vengano
attaccate alla superficie di lavoro prima di essere attaccate all’indicatore.
120 mm / 4,72”
Figura 4. Esecuzione del montaggio su piano e a parete con staffe.
90 mm / 3,54”
Find Quality Products Online at: [email protected]
www.GlobalTestSupply.com
Page 61
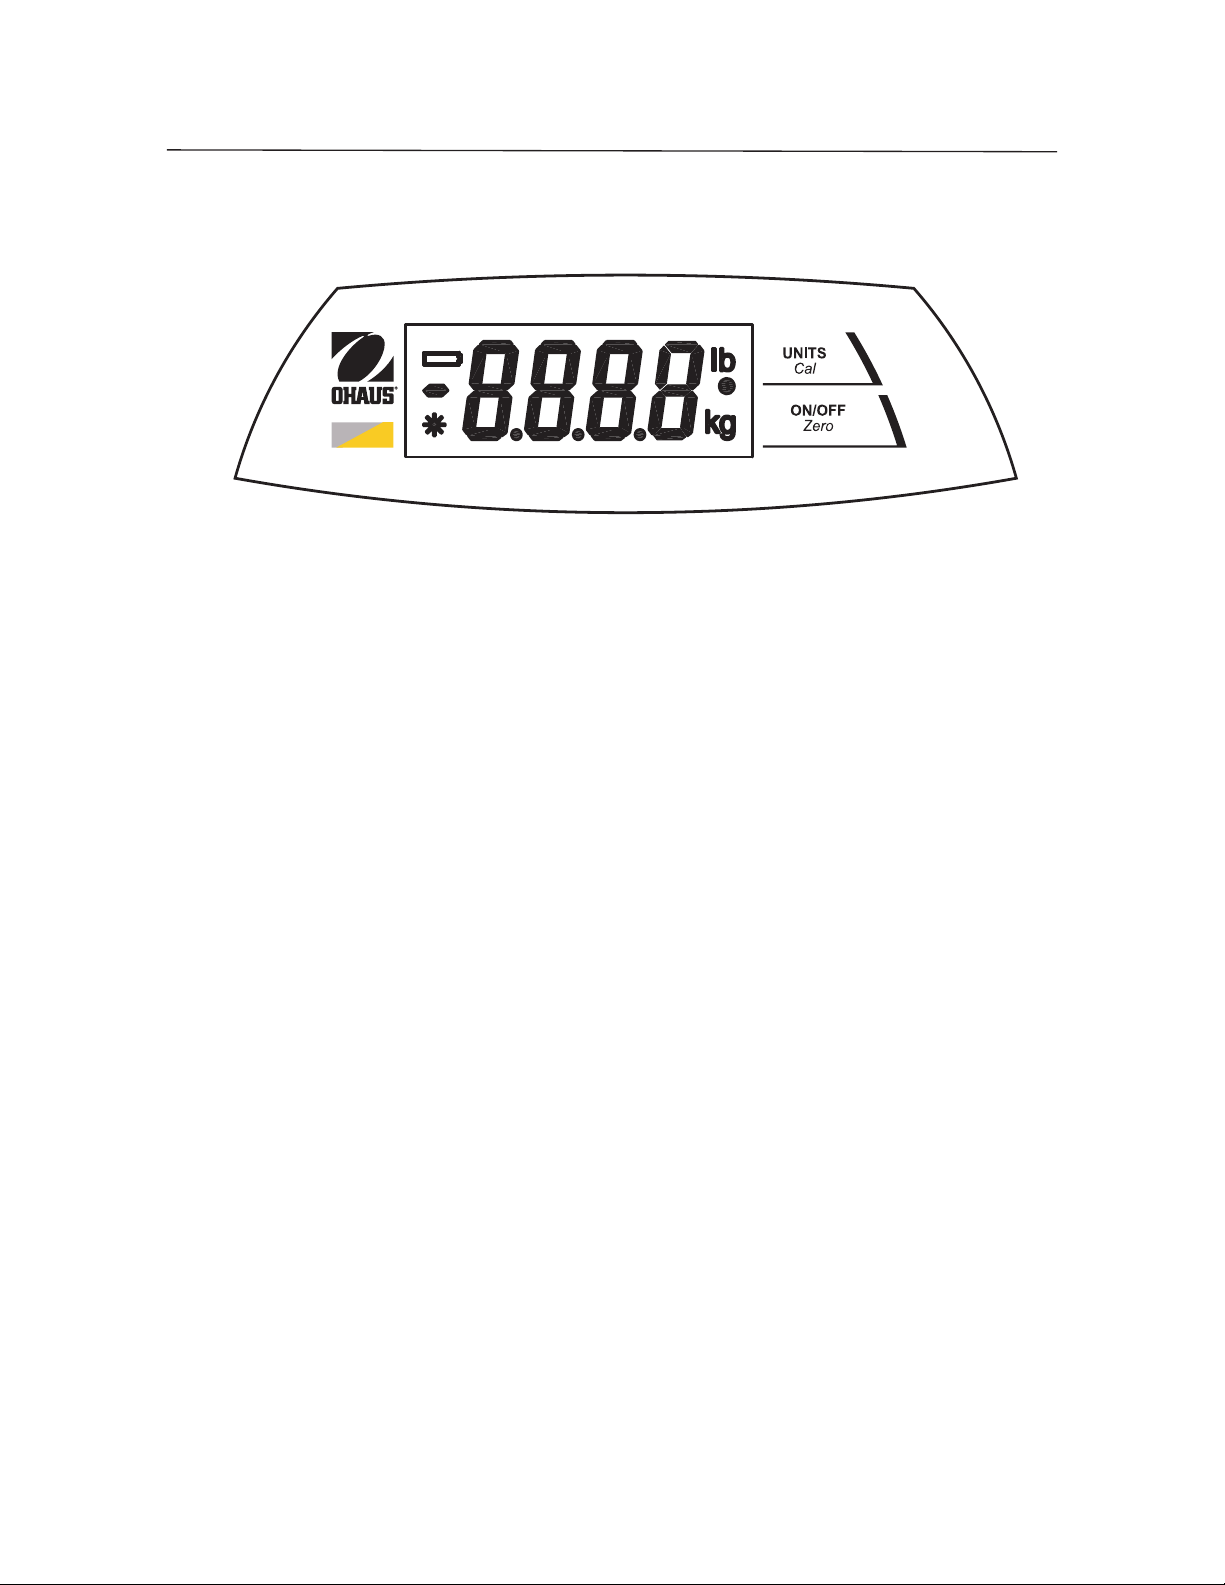
BILANCIA DA BANCO SERIE SD IT-5
Caratteristiche e funzionamento del prodotto
SD
Figura 5. Controlli del pannello dell’indicatore.
Tastierino a due pulsanti
• Pulsante ON/ZERO
la bilancia quando è spenta. Quando la bilancia è accesa, una pressione
breve l’azzera e una lunga la spegne.
• Pulsante UNITS
di pesa. Una pressione lunga avvia il processo di taratura.
Off
(Acceso/Zero spento): una pressione breve accende
Cal
(Taratura unità): una pressione breve modifica l’unità
Finestra del display
• Caratteri numerici grandi a 7 segmenti: i valori del peso (massa)
vengono visualizzati utilizzando 4 cifre incluso il segno negativo e le cifre
decimali. Anche i prompt per la taratura e possibili condizioni di errore
vengono visualizzati utilizzando queste cifre.
•
Indicazione di lettura stabile: per indicare quando la lettura è stabile,
viene visualizzato un
•
visualizzata sul lato destro del display.
Find Quality Products Online at: [email protected]
Indicazione di unità di peso: l’unità di peso selezionata viene
www.GlobalTestSupply.com
* nell’angolo in basso a sinistra del display.
Page 62

IT-6 BILANCIA DA BANCO SERIE SD
• Indicatore di batteria in esaurimento: il simbolo della batteria sul
Una volta in primo luogo visualizzate, circa 12 ore del funzionamento
rimangono. Quando la batteria è completamente scarica, la bilancia
visualizza momentaneamente il messaggio “Lo bAt” (Batteria in esaurimento)
e si spegne
lato sinistro del display indica una condizione di batteria in esaurimento.
.
Funzionamento
• Test di accensione: quando si preme il pulsante ON/ZERO
(Acceso/Zero spento), la bilancia si accende e tutti i segmenti del display
vengono visualizzati per un breve periodo di tempo a cui segue una revisione
del software. Quindi il display si azzera.
•
spento), il display della bilancia ritorna a zero. Quando si aggiunge una
massa addizionale, è possibile utilizzare il pulsante ON/ZERO
Zero spento
Funzione Zero: premendo il pulsante ON/ZERO
) ripetutamente fino a raggiungere la piena capacità della bilancia.
Off
(Acceso/Zero
Off
Off
(Acceso/
Q
aggiungere
il campione che il contenitore dalla bilancia, potrebbe essere visualizzato un
valore negativo. Prima del successivo uso, azzerare nuovamente la bilancia.
NOTA: il pulsante ON/ZERO
funzione di impostazione zero quando i valori visualizzati sono entro il +2%
della piena capacità. Superiore a 2%, la gamma è limitata a capienza
completa da sottrazione.
•
valore precedentemente azzerato viene visualizzato come numero negativo.
Per tornare al normale funzionamento, i valori negativi vengono cancellati dal
display premendo il pulsante ON/ZERO
uando si utilizza un contenitore, per simulare una funzione di tara è possibile
utilizzare il pulsante ON/ZERO
un’ulteriore massa come peso NETTO. Quando si rimuovono sia
Off
(Acceso/Zero spento). È possibile
Off
(Acceso/Zero spento) eseguirà una vera
Valori negativi: quando si rimuove un carico dalla bilancia, qualunque
Off
(Acceso/Zero spento
)
.
•
visualizzata la lettera “E”. Rimovendo il carico la bilancia tornerà al normale
funzionamento.
Find Quality Products Online at: [email protected]
Sovraccarico: se il peso applicato supera la capacità della bilancia, viene
www.GlobalTestSupply.com
Page 63

BILANCIA DA BANCO SERIE SD IT-7
• Spegnimento automatico: per allungare la durata della batteria, la
bilancia si spegne automaticamente dopo circa quattro minuti di inattività.
Questa funzione è attiva solo durante il funzionamento della batteria.
Pesa dinamica
1. Con la piattaforma vuota, premere il pulsante UNITS Cal
(Unità / Taratura) finché l’indicazione • non lampeggia
accanto all’unità di misura desiderata.
2. Posizionare una massa sulla piattaforma. La bilancia
visualizzerà “-A-”.
NOTA: Se si utilizza un contenitore, premere ON/ZERO Off
(Acceso/Zero spento) per tarare il peso e tornare allo zero.
3. Con una massa sulla piattaforma o sul contenitore,
premendo il tasto UNITS Cal (Unità / Taratura) si avvia il
conteggio alla rovescia di media da 5 secondi.
4. Viene quindi visualizzato il peso medio. L’indicatore •
smette di lampeggiare quando il processo è completo.
5. Il display lo visualizza fino a quando non si preme un pulsante.
6. Per ripetere il processo premere UNITS Cal (Unità / Taratura) con
una massa sul piattaforma o nel contenitore.
7. Per uscire, rimuovere la massa dalla piattaforma o dal contenitore
e premere UNITS Cal (Unità / Taratura).
Find Quality Products Online at: [email protected]
www.GlobalTestSupply.com
Page 64
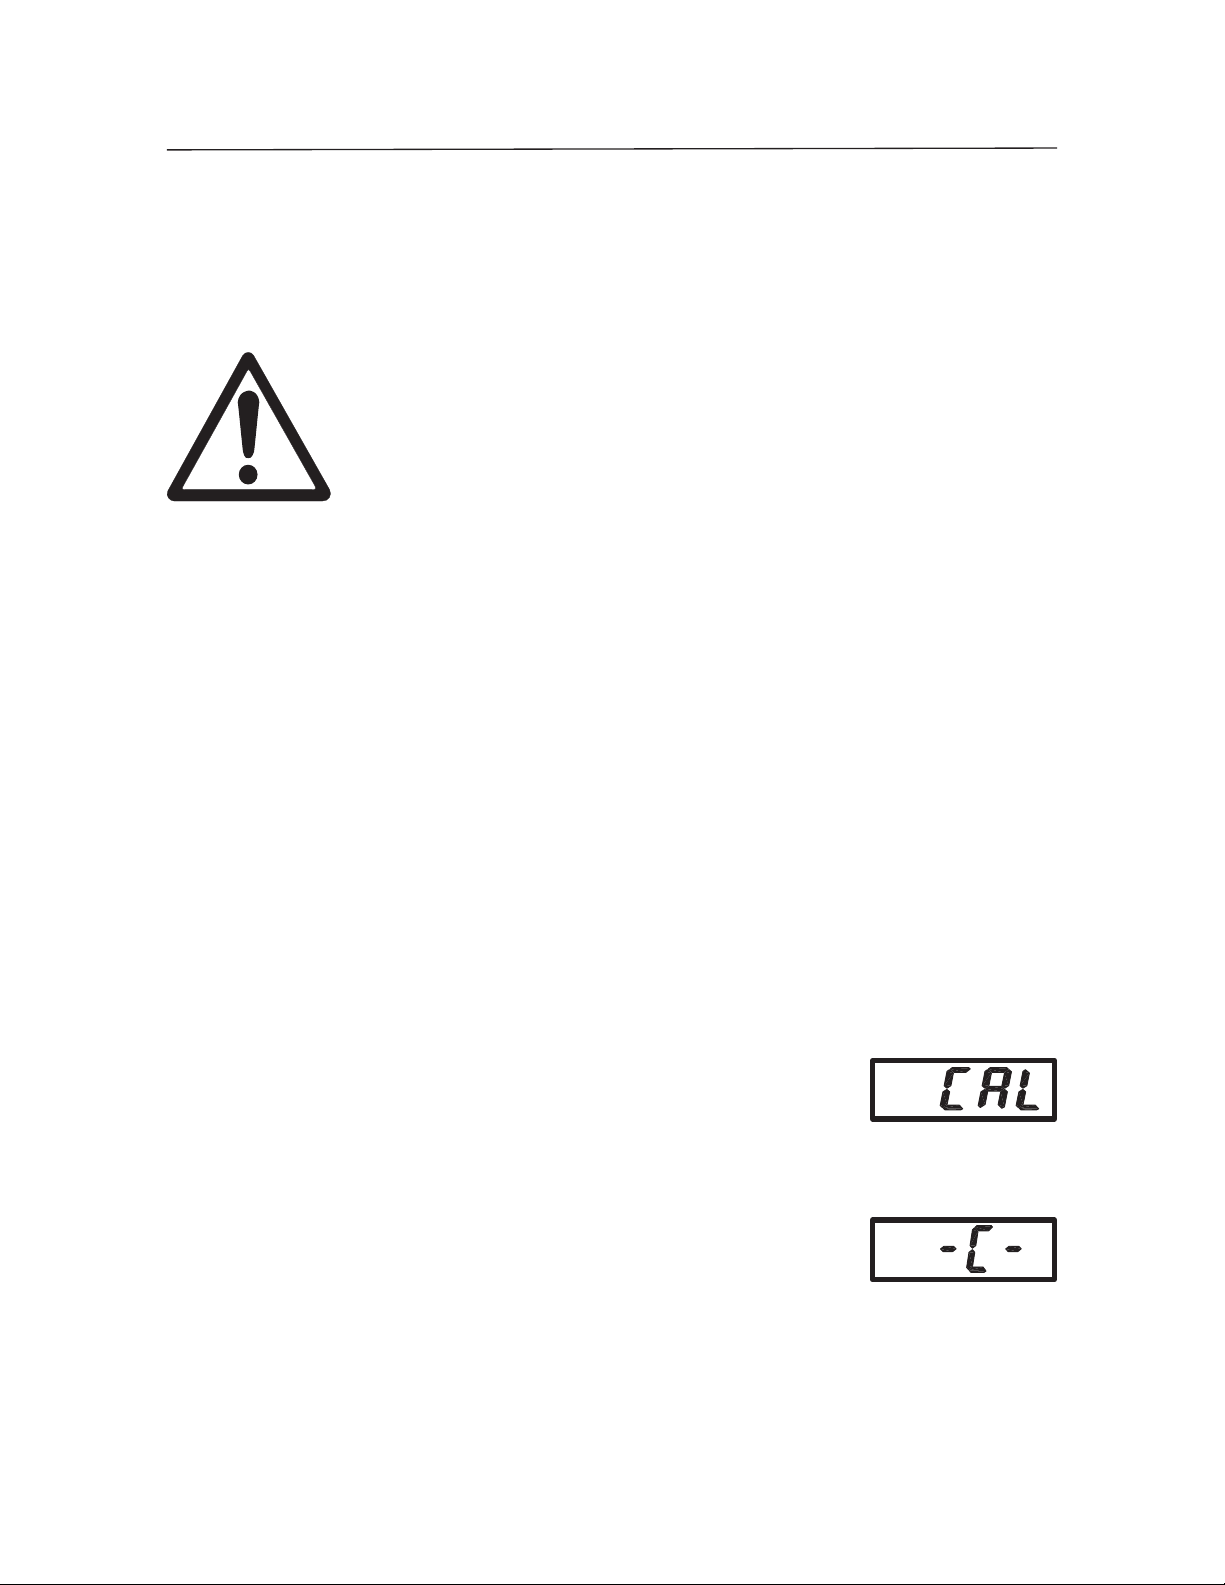
IT-8 BILANCIA DA BANCO SERIE SD
Taratura
Per risultati ottimali, tarare la bilancia a intervalli regolari (i pesi di taratura non
vengono forniti con la bilancia).
PESANT
TARATURA P
OTTENERE IL PESO DI TARATURA RICHIESTO, È POSSIBILE
UTILIZZARE PIÙ PESI.
1. Prima di iniziare la procedura di taratura, far riscaldare e stabilizzare la
bilancia per almeno due minuti.
2. Per selezionare l’unità di pesa da utilizzare per la taratura, premere il pulsante
UNITS
NOTA: il processo di taratura può essere interrotto in qualsiasi momento
PRESTARE LA MASSIMA ATTENZIONE DURANTE LA GESTIONE
DEI PESI DI TARATUR
I. M
ETODI DI
Cal
(Taratura unità) finché non viene visualizzata la corretta unità.
ATTENZIONE
A, DAL MOMENTO CHE
SOLLEVA
OSSONO CAUSARE LESIONI PERSONALI. PER
MENTO IMPROPRI DEI PESI DI
SONO MOLTO
Cal
premendo il pulsante UNITS
Prima di avviare la taratura, devono essere disponibili i pesi di taratura del
corretto intervallo (vedere la tabella delle specifiche). La taratura non è
disponibile nella modalità di pesa dinamica.
3. Tenere premuto il pulsante
“CAL” (Taratura).
4. Con la piattaforma vuota, premere il pulsante ON/ZERO
(Acceso/Zero spento
display visualizzerà “-C-”.
fino a quando non viene visualizzato il messaggio
UNITS
)
per catturare lo zero della bilancia. Il
(Taratura unità) o spegnendo la bilancia.
Cal
(Taratura unità)
Off
Find Quality Products Online at: [email protected]
www.GlobalTestSupply.com
Page 65

BILANCIA DA BANCO SERIE SD IT-9
5. Una volta catturato lo zero, viene visualizzato il peso di
taratura dell’intervallo richiesto con l’unità selezionata.
6. Posizionare il peso di taratura sulla piattaforma e premere
il pulsante ON/ZERO
(Acceso/Zero spento
). Il display
Off
visualizzerà di nuovo “-C-”.
7. Dopo aver catturato l’intervallo, il display tornerà alla
normale modalità di pesa.
NOTA: se è stato applicato un peso di taratura non corretto, verrà visualizzato
il messaggio “CAL E”. Ripeti la procedura usando il peso corretto di calibratura.
Blocco della taratura: mediante un interruttore interno, è possibile bloccare
(disabilitare) la funzione di taratura e impedire una ritaratura non autorizzata.
1. Con la bilancia accesa, rimuovere la sezione posteriore dell’alloggiamento
dell’indicatore svitando le quattro viti nella parte inferiore.
2. Far scorrere l’interruttore sul PCB (contrassegnato con SW3) alla posizione
contrassegnata con “CAL LOCK” (Blocco taratura).
3. Rimontare l’alloggiamento.
4. Se richiesto, posizionare le evidenti etichette sigillanti del pestello sopra i fori
della vite o sopra i margini dell’alloggiamento.
Se è necessaria una ritaratura successiva, sarà necessario riaprire l’alloggiamento e
rimettere l’interruttore di blocco in posizione originale.
NOTA: quando l’interruttore di blocco è impostato nella posizione CAL LOCK (Blocco
taratura), l’intervallo zero di accensione è ridotto al 10% della piena capacità.
Find Quality Products Online at: [email protected]
www.GlobalTestSupply.com
Page 66

IT-10 BILANCIA DA BANCO SERIE SD
Specifiche (Modelli Bassi Standard)
Modello SD35 SD75 SD200
Capacità x Leggibilità 35 x 0,02 kg
77 x 0,05 libbre
Unità di pesa kg, lb
Modalità Pesare semplice, pesare dinamico
Pesi di taratura 25 kg/50 libbre 50 kg/100 libbre
Tempo di stabilizzazione Entro 3 secondi
Intervallo zero A capienza da sottrazione.
Sovraccarico massimo 150%
Indicazioni di errore “E”
“CALE”
“UnSt”
“ErrE”
Lo bat OFF”
“Lo Line OFF
Indicazione di sottocarico
Spegnimento automatico
Tempo operativo della
batteria
- Sovraccarico, Sottocarico, Attivazione sovraccarico/sottocarico
- Errore di taratura
- Instabilità all’accensione
- Errore memoria
- Interruzione: batteria quasi scarica
- Interruzione: bassa tensione di linea (alimentazione di rete)
4 minuti senza attività (solo funzionamento a batteria)
75 x 0,05 kg
165 x 0,1 libbre
Valore negativo
360 ore
200 x 0,1 kg
440 x 0,2 libbre
100 kg/200 libbre
Temperatura di funzionamento
Lunghezza del cavo
Display
Dimensioni della base
della bilancia
Dimensioni
dell’indicatore
Requisiti di alimentazione della batteria
Alimentatore di rete
Peso netto
Peso di spedizione
Dimensioni della scatola
di imballo
da 5 a 40 ºC (da 41 a 104 ºF) dal 10% al 80% di umidità relativa, senza condensa
1,8 m /72” (non avvolto)
4 cifre, LCD, altezza 20 mm/0,8”
lunghezza x larghezza x altezza:
316 mm x 280 mm x 45 mm /
12,4” x 11” x 1,77”
lunghezza x larghezza x altezza:
210 mm x 91 mm x 39 mm / 8,27” x 3,58” x 1,54”
3 batterie alcaline “C” (LR14)
9-12 Volt CC, 100 mA
2,6 kg /5,8 libbre
3,7kg / 8,1 libbre
3,3 kg / 7,3 libbre
4,3 kg / 9,5 libbre
lunghezza x larghezza x altezza:
380 mm x 100 mm x 465 mm / 15” x 3,94” x 18,3”
Find Quality Products Online at: [email protected]
www.GlobalTestSupply.com
Page 67

BILANCIA DA BANCO SERIE SD IT-11
Specifiche (Grandi Modelli Bassi)
Modello SD75L SD200L
Capacità x Leggibilità 75 x 0,05 kg
165 x 0,1 libbre
Unità di pesa kg, lb
Modalità Pesare semplice, pesare dinamico
Pesi di taratura 50 kg/100 libbre
Tempo di stabilizzazione Entro 3 secondi
Intervallo zero A capienza da sottrazione.
Sovraccarico massimo 150%
Indicazioni di errore “E”
“CALE”
“UnSt”
“ErrE”
Lo bat OFF”
“Lo Line OFF
Indicazione di sottocarico
Spegnimento automatico
Tempo operativo della
batteria
- Sovraccarico, Sottocarico, Attivazione sovraccarico/sottocarico
- Errore di taratura
- Instabilità all’accensione
- Errore memoria
- Interruzione: batteria quasi scarica
- Interruzione: bassa tensione di linea (alimentazione di rete)
Valore negativo
4 minuti senza attività (solo funzionamento a batteria)
360 ore
200 x 0,1 kg
440 x 0,2 libbre
100 kg/200 libbre
Temperatura di funzionamento
Lunghezza del cavo
Display
Dimensioni della base
della bilancia
Dimensioni
dell’indicatore
Requisiti di alimentazione della batteria
Alimentatore di rete
Peso netto
Peso di spedizione
Dimensioni della scatola
di imballo
da 5 a 40 ºC (da 41 a 104 ºF) dal 10% al 80% di umidità relativa, senza condensa
1,8 m /72” (non avvolto)
4 cifre, LCD, altezza 20 mm/0,8”
lunghezza x larghezza x altezza: 520 mm x 400 mm x 75 mm / 20,5” x 15,7” x 3”
lunghezza x larghezza x altezza:
210 mm x 91 mm x 39 mm / 8,27” x 3,58” x 1,54”
3 batterie alcaline “C” (LR14)
9-12 Volt CC, 100 mA
14 kg / 31 libbre
15.5 kg / 34 lb
lunghezza x larghezza x altezza:
600 mm x 480 mm x 230 mm / 24” x 19” x 9”
Find Quality Products Online at: [email protected]
www.GlobalTestSupply.com
Page 68

IT-12 BILANCIA DA BANCO SERIE SD
53 mm /2,09”
91 mm / 3,58”
210 mm / 8,27”
0º
50º
69 mm /
2,72”
70º
Figura 5. Dimensioni complessive dell’indicatore, angoli di visuale disponibili.
400 mm / 15.7”
39 mm /
1,54”
280mm / 11.02”
45mm / 1.77”
316mm / 12.44”
Bassi Standard
75mm / 3”
520mm / 20.5”
Grande Bassi
Figura 6. Dimensioni complessive della base della bilancia.
Find Quality Products Online at: [email protected]
www.GlobalTestSupply.com
Page 69

BILANCIA DA BANCO SERIE SD IT-13
GARANZIA LIMITATA
I prodotti Ohaus sono garantiti contro difetti nei materiali e nella lavorazione per tutta
la durata della garanzia. Durante il periodo di garanzia, Ohaus riparerà o, a sua
scelta, sostituirà tutti i componenti che siano difettosi senza costo alcuno, purché
il prodotto venga rinviato, con spese prepagate, alla Ohaus. Questa garanzia non è
valida se il prodotto è stato danneggiato o trattato con poca cura, esposto a materiali
radioattivi o corrosivi, se vi siano penetrati materiali estranei o in seguito ad assistenza
eseguita da personale non Ohaus. In assenza di registrazione del prodotto, il periodo
di garanzia avrà inizio dal momento della spedizione del prodotto al rivenditore
autorizzato. Non viene rilasciata nessun’altra garanzia espressa o implicita da parte
della Ohaus Corporation. Ohaus Corporation non sarà responsabile per qualsiasi
danno indiretto. Vista la diversità di normativa tra i vari Stati in termini di garanzia,
contattare direttamente la Ohaus o il rivenditore locale Ohaus per ulteriori dettagli.
Find Quality Products Online at: [email protected]
www.GlobalTestSupply.com
 Loading...