

Page 1
99 Washington Street
Melrose, MA 02176
Phone 781-665-1400
Toll Free 1-800-517-8431
Visit us at www.TestEquipmentDepot.com
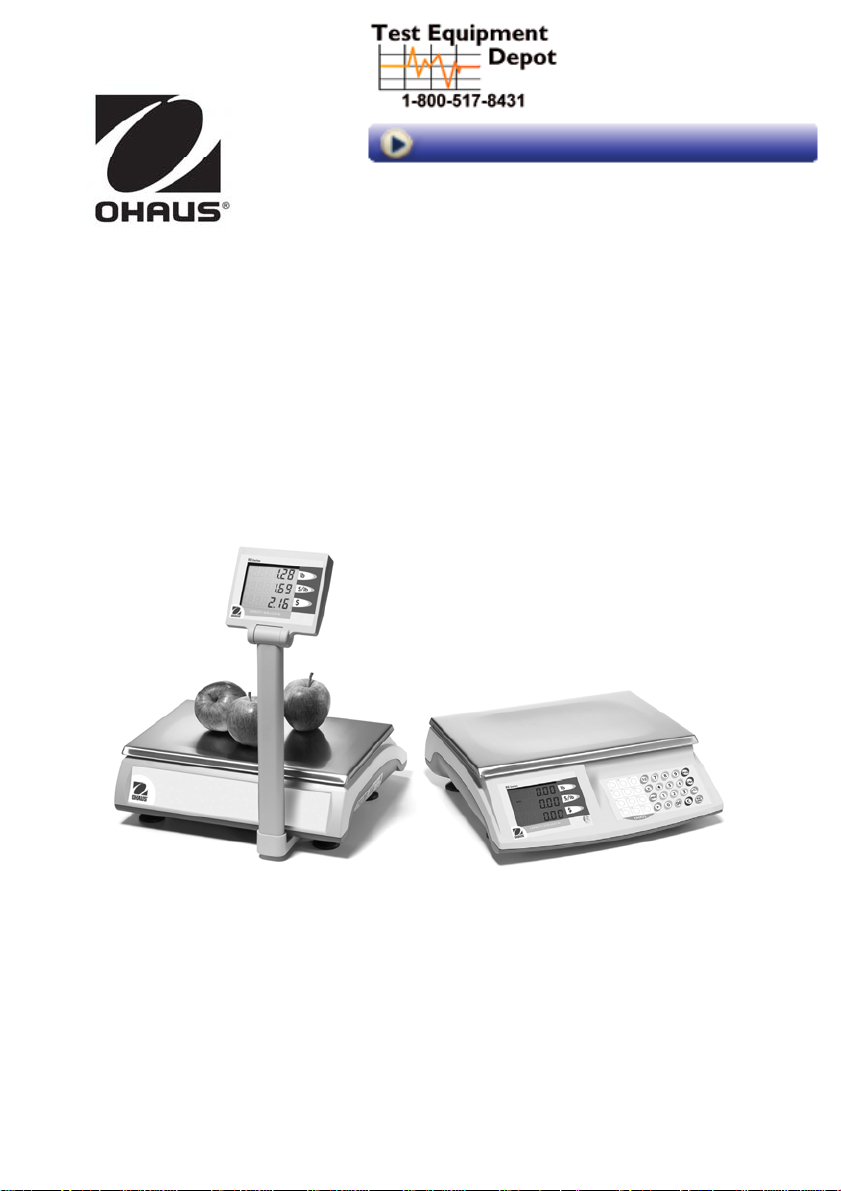
RE Series Price Computing Scale
RE-C (with Tower) Model RE Model
Page 2

Page 3

RE Series EN-1
1. INTRODUCTION.....................................................................................................2
2. INSTALLATION ......................................................................................................2
2.1 Unpacking................................................................................................2
2.2 Assembling...............................................................................................2
2.3 Selecting the Location.................................................................................3
2.4 Leveling the Scale......................................................................................3
2.5 Connecting Power......................................................................................3
3. OVERVIEW OF CONTROLS AND FUNCTIONS..............................................................5
3.1 Control Panel............................................................................................5
3.2 Customer Display......................................................................................5
3.3 Keys and Display Indicators........................................................................6
4. OPERATIONS........................................................................................................7
4.1 Turning the Unit On and Off.........................................................................7
4.2 Backlight Operation....................................................................................7
4.3 Zero Operation...........................................................................................7
4.4 Manual (Pushbutton) Tare..........................................................................7
4.5 Pre-set (Keyboard) Tare .............................................................................7
4.6 Weighing and Pricing.................................................................................8
4.7 Hold Function............................................................................................8
4.8 Pre-pack Weighing Function .......................................................................8
4.9 PLU Function (Price Lookup).......................................................................9
4.10 By-Count Function ...................................................................................10
4.11 Accumulation (Totalize) Function...............................................................10
4.12 Fractional Pricing.....................................................................................11
5. SCALE SETTINGS.................................................................................................12
5.1 Accessing the User Setup Mode.................................................................12
5.2 User Setup Parameters .............................................................................12
6. CALIBRATION AND SEALING .................................................................................13
6.1 Calibration..............................................................................................13
6.2 Type Approval Sealing..............................................................................15
7. TROUBLESHOOTING............................................................................................16
7.1 Cleaning.................................................................................................16
7.2 Troubleshooting.......................................................................................17
8. TECHNICAL DA
8.1 Specifications..........................................................................................18
8.2 Drawings................................................................................................19
8.3 Compliance ............................................................................................20
LIMITED WARRANTY...................................................................................................21
TA................................................................................................18
Page 4

EN-2 RE Series
1. INTRODUCTION
This manual contains installation, operation and maintenance instructions for the RE
Series scale. Please read the manual completely before installatio n a nd operation.
Safety Precautions
For safe and dependable operation of this scale, please comply with the
following safety precautions:
• Verify that the input voltage printed on the AC Adapter and the plug type
matches the local AC power supply.
• Make sure that the power cord does not pose an obstacle or tripping
hazard.
• Disconnect the scale from the power supply when cleaning the scale.
• Do not operate the scale in hazardous or unstable environments.
• Do not drop loads on the platform.
• Use only approved accessories and peripherals, as available.
• Operate the scale only under ambient conditions specified in these
instructions.
• Service should be performed by authorized personnel only.
2. INSTALLATION
2.1 Unpacking
Unpack and verify that the following components have been included:
• Scale Unit
• Weighing Pan
• Power Adapter
Save the packaging material. This packaging ensures the ideal protection for
the storage or transport of the product.
2.2 Assembling
For tower models only, install the tower display first by removing the
retaining screw at the bottom of the tower, and the bottom plate of the tower
bracket at the back of the scale. Route the connector through the tower
bracket before mounting the tower, plug the connector into the bottom socket,
affix the tower to the bracket, then re-install the bottom plate of the tower
bracket.
• Instruction Manual
• Tower assembly (tower models only)
Page 5
RE Series EN-3
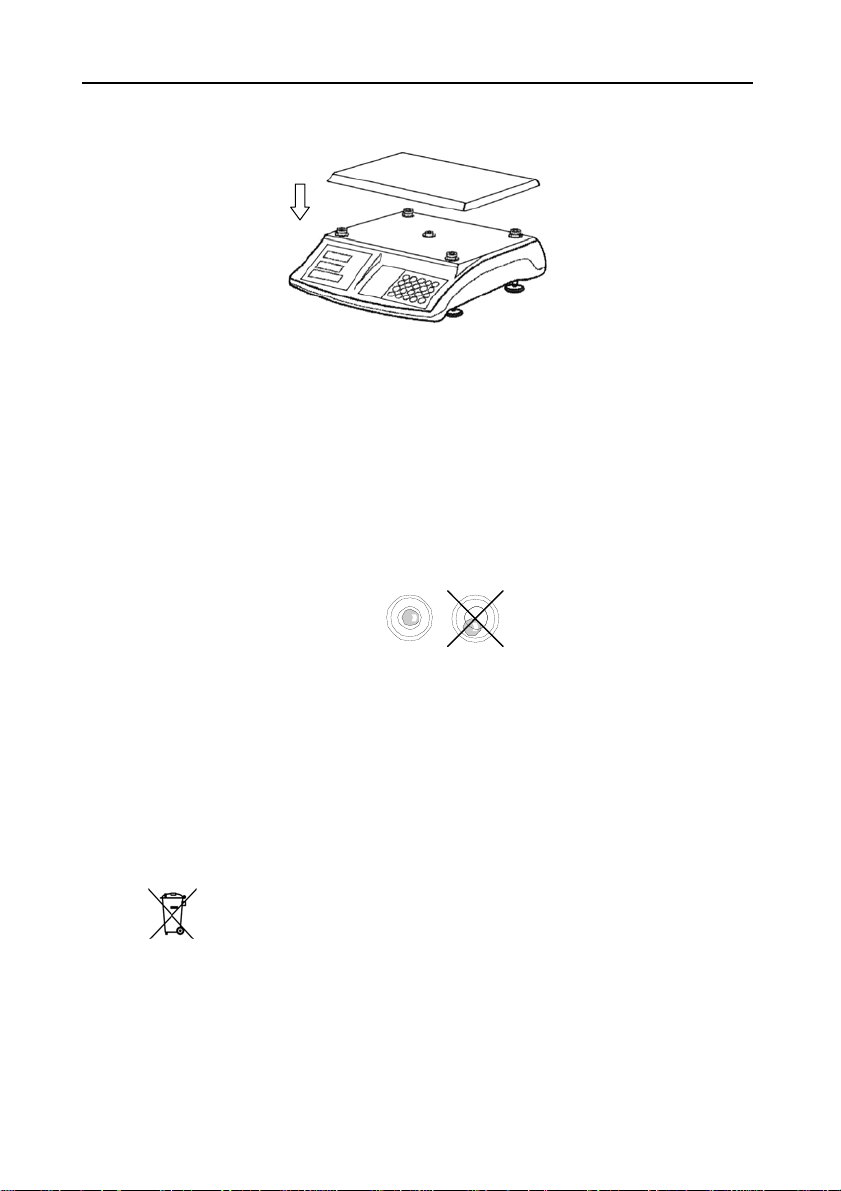
Install the weighing pan as illustrated below, with the pan properly aligned.
2.3 Selecting the Location
Operate the scale on a firm, level surface. Avoid locations with rapid
temperature changes, excessive air currents, vibrations, electromagnetic
fields, heat or direct sunlight.
2.4 Leveling the Scale
Adjust the leveling feet until the bubble is centered in the circle of the level
indicator (located on the front panel). Ensure that the scale is level each
time its location is changed.
2.5 Connecting Power
2.5.1 AC Power
Verify that the intended AC power source matches the AC adapter rating.
Connect the adapter to the power receptacle underneath and to the right of
the scale, then plug the AC adapter into a properly grounded power outlet.
2.5.2 Battery Operation
Dispose of the batteries according to local laws and regulations.
This scale can operate with six D-size standard alkaline batteries (not
included). To install, unplug the scale first from the power supply. Open the
battery cover (located at the bottom of the scale) by gently depressing the
two cover buttons, then install the batteries as illustrated on the battery
holder. Re-close the cover by gently inserting it back into position and the
two cover buttons snap into place.
Page 6

EN-4 RE Series
When running on batteries, the battery cursor is displaye d and indicates the
state of the battery power:
Battery is full
About 2/3 battery power remaining
About 1/3 battery power remaining
Battery power is critical; batteries need to be changed
2.5.3 Battery Power Saving Feature
When powered on batteries, the scale will enter sleep mode (Weight display
will show “
SLEEP
”, and Unit Price and Total Price displays will be blank)
after the pre-set minutes of inactivity. It reactivates when a key is pressed or
an item placed on the pan. The scale can also be set to power off
automatically after the pre-set minutes of inactivity.
By default, these features are enabled. See Section 5.2 to disable these
power saving functions.
Page 7
RE Series EN-5
3. OVERVIEW OF CONTROLS AND FUNCTIONS
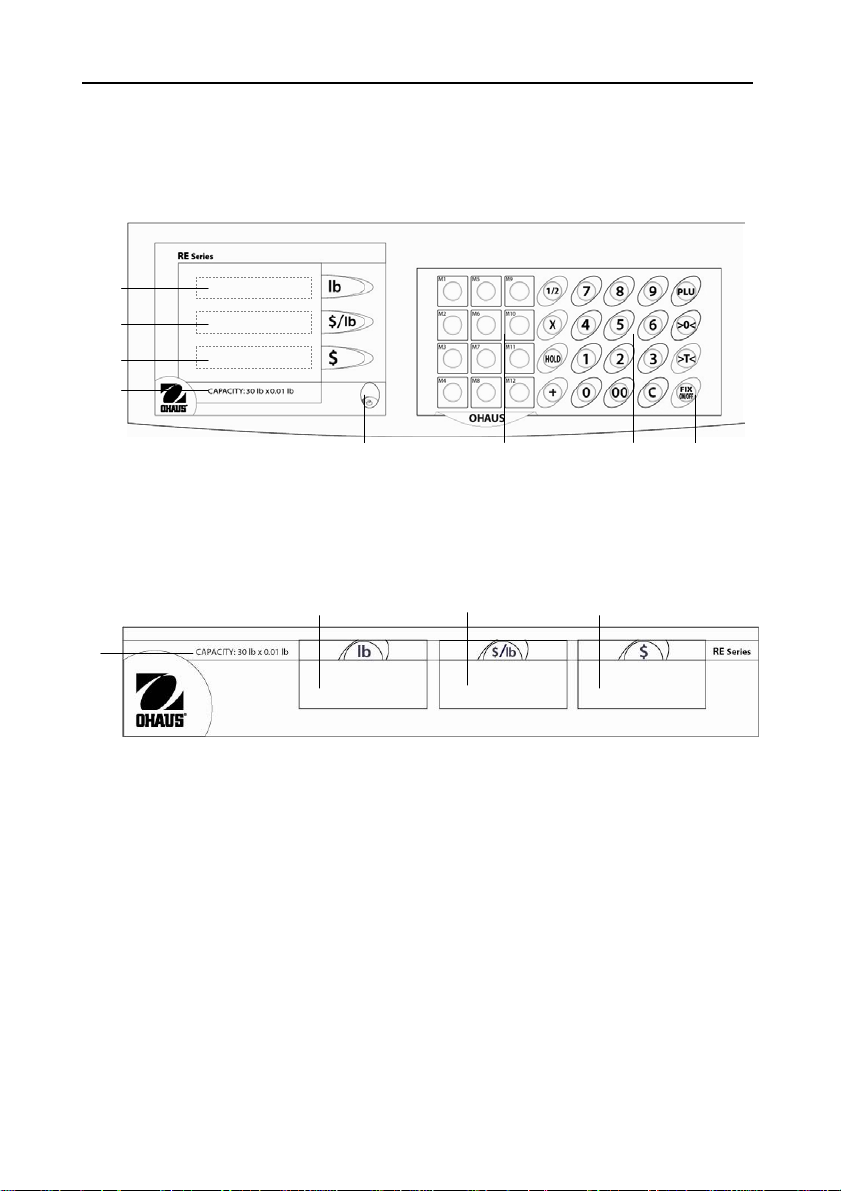
3.1 Control Panel
1
2
3
4
7
3.2 Customer Display
5 8
6
1 2 3
4
Weight display
1
Unit Price display
2
Total Price display
3
Weights & Measures marking
4
Leveling Indicator
5
Memory Keys / Pull-out Tab
6
Numeric Keypad
7
On/Off Key
8
Page 8
EN-6 RE Series
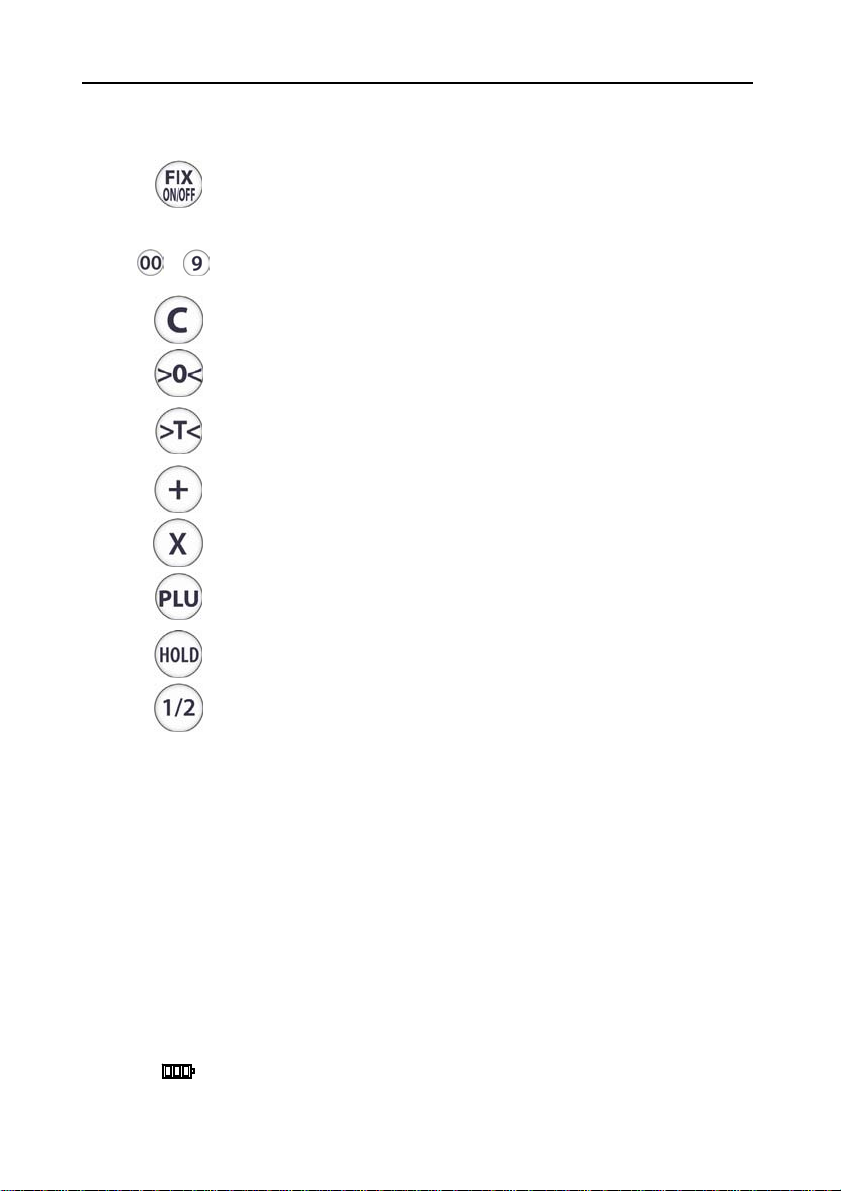
3.3 Keys and Display Indicators
• Short press turns the scale on; long press turns the scale off
• Activates Pre-pack weighing; displayed Unit Price is fixed
• In SETUP Mode, accepts the displayed setting and proceeds to the next step
• Numeric keys to enter Unit Price, Tare, PLU number and Pre-set (keyboard)
to
Tare
• Clears the keyboard input or Accumulation data
• Zeros the display
• In SETUP Mode, toggles back to the previous step
• Registers the weight of the object on the weighing pan as a Tare value
• In SETUP Mode, toggles through the available settings
• Adds displayed Total Price into Accumulation memory
• Activates the By-Count operation and calculates the price of the item
• Stores or recalls a PLU
• In SETUP Mode, ends the setup mode
• Holds the displayed Total Price when the item is removed from the pan
• Activates ¼ and/or ½ Fractional Pricing mode (as enabled in the Service Setup
ZERO • Indicates scale is at Center of Zero
mode)
PT • Indicates keyboard Tare or tare recalled from PLU
NET • Indicates Net (Gross minus Tare) value; push-button Tare exists
FIX • Indicates Unit Price is fixed
X • Indicates scale is in By-Count mode
1/2
1/4
ADD • Indicates scale is in Accumulation mode; data exists in Accumulation memory
TOTAL • Indicates displayed Total Price is added into Accumulation memory
• Indicates ½ lb pricing is activated
• Indicates ¼ lb pricing is activated
• Indicates battery operation and power level
Page 9

RE Series EN-7
4. OPERATIONS
4.1 Turning the Unit On and Off
Short-press [ON/OFF] to turn the scale on; long-press to turn the scale off. If
a weight on the pan exceeds the power-on zero range (±10% of the scale
------
capacity), “
to capture zero. Ideally, allow 15~30 minutes for the scale to warm up
before use.
4.2 Backlight Operation
With the scale on, press and hold [C] until the long beep. Upon release, the
scale beeps twice and the backlight turns on (repeat this step to turn off, or
when the scale is restarted). The backlight temporarily switches off after 15
seconds of inactivity, and reactivates with a key press or item placed on the
pan.
4.3 Zero Operation
Press [>0<] to zero the displayed weight (the weight must be stable and
within ±2% of the scale capacity). Center of Zero is indicated by the >0<
annunciator.
4.4 Manual (Pushbutton) Tare
4.4.1 Storing a Pushbutton Tare
Place an empty container on the pan, then press [>T<]. The Weight display
will show a net value of “
Remove the container, and the negative value displayed will be equivalent to
the Tare weight.
4.4.2 Clearing a Pushbutton Tare
Press [>T<] with the pan empty.
4.5 Pre-set (Keyboard) Tare
4.5.1 Storing a Keyboard Tare
Enter the known Tare value (up to the scale capacity, and in increments of
the scale readability) via the numeric keypad, then press [>T<]. The Weight
” will be displayed. Remove the excess weight for the scale
0.00
”, and the NET annunciator will turn on.
Page 10

EN-8 RE Series
display will show the Tare as a negative net value (with the pan empty), and
the PT and NET annunciators will turn on as the Tare weight is registered.
4.5.2 Recalling a Keyboard Tare
With the PT annunciator on, press [>T<]. “
displayed. Press [>T<] again to return to normal weighing mo de.
4.5.3 Clearing a Keyboard Tare
With the PT annunciator on, press [>C<].
Pt
” and the pre-set tare value are
4.6 Weighing and Pricing
Place the item to be weighed on the pan, then enter the Unit Price via the
numeric keypad. The item weight will be shown in the Weight display, the
unit price in the Unit Price display, and the resulting total price in the Total
Price display.
The Unit Price and Total Price values are cleared automatically when the item
is removed from the pan (Unit Price will be retained if the scale is in Pre-pack
Mode – see Section 4.8).
4.7 Hold Function
After performing a price transaction (Section 4.6), press [HOLD] to keep the
Total Price displayed (the HOLD annunciator will turn on). Press [HOLD]
again to clear the display and return to normal weighing.
4.8 Pre-pack Weighing Function
When weighing and pricing items of the same price and/ or tare value, enter
these values only once with the Pre-pack function.
1. Enter the Unit Price, and/or Keyboard Tare value (Section 4.5.1).
2. Press [FIX]. The FIX annunciator will turn on.
3. Weigh and price items repeatedly without losing the Unit Price/Tare
values.
4. When pre-pack weighing is finished, press [C] to clear the values and
return to normal weighing.
Page 11

RE Series EN-9
4.9 PLU Function (Price Lookup)
The PLU function is used for quick storage and recall of the unit price and
tare value of frequently sold goods. There are two ways to enter PLU data: a)
via the PLU key, and b) via the Memory (M1…M12) keys.
4.9.1 PLU Function via the PLU Key
The unit price is looked up by simply entering the PLU number via the
numeric keypad. The PLU function can store up to 100 PLU’s.
4.9.1.1 Storing a PLU
1. Enter the Unit Price, and/or Keyboard Tare value (Section 4.5.1).
2. Press and hold [PLU] until the long beep. “PLu” will be
displayed.
3. Enter the PLU number (1-100). The scale beeps twice,
indicating that the PLU data was stored.
4.9.1.2 Recalling a PLU (with auto-PLU search f unction on – Sec.
5.2)
Enter the PLU number with the pre-stored data, then press [PLU]. The
corresponding Unit Price/Tare value will be displayed.
4.9.1.3 Recalling a PLU (with auto-PLU search f unction off – Sec.
5.2)
Press [PLU], then the PLU number with the pre-stored data. The
corresponding Unit Price/Tare value will be displayed.
Note: If entering a PLU number with no stored data, “
show momentarily in the Weight display.
4.9.2 PLU Function via the Memory Keys
The scale has 12 memory keys M1…M12 to store and recall up to 12 or 24
PLU’s (depending on the setting in the setup mode -- Section 5.2). The Mkeys can be used together with the pull-out tab (where the PLU information
can be written for quick reference).
4.9.2.1 Storing a PLU into Memory
1. Enter the Unit Price, and/or Keyboard Tare value (Section 4.5.1).
2. Press and hold the desired M-key until the long beep (any preexisting stored data in that memory location will be overwritten).
noPLu
” will
Page 12

EN-10 RE Series
3. If set to store two PLU’s per M-key, press and hold the desired Mkey until the long beep, then quickly press the M-key again
within 1 second. “
is stored in the second memory location of that M-key.
4.9.2.2 Recalling a PLU from the M-Key
1. Press the M-key with the pre-stored data. The corresponding
Unit Price/Tare value will be displayed.
2. If set to store two PLU’s per M-key, quick press the M-key twice
within 1 second. “
corresponding Unit Price/Tare value.
Note: If pressing an M-key with no stored data, “
momentarily in the Weight display.
L2
” appears momentarily to indicate the data
L2
” appears momentarily, then the
noPLu
” will show
4.10 By-Count Function
The By-Count function is used as reference to calculate the price of nonweighing items, e.g., the price for 36 pieces when 3 pieces cost a total of
$1.50.
3
1. Enter the deal quantity (1-99), e.g., “
annunciator will turn on to indicate the scale is in the By-Count mode.
1.50
1.50
”.
2. Enter the deal price, e.g., “
display will show “
3. Enter the quantity to be sold, e.g., “
18.00
“
quantity as needed.
4. To end the By-Count function and return to normal weighing mode,
press [C].
” is shown in the Total Price display. Keep entering another
”, then press [X]. The X
”, then press [FIX]. The Unit Price
36
”. The resulting total price of
4.11 Accumulation (Totalize) Function
The Accumulation function is used to add the Total Price of several
weighings.
4.11.1 Accumulating
1. Perform a pricing transaction as described in Section 4.6.
2. Press [+]. The displayed Total Price is added to the accumulation
memory, and the ADD and TOTAL annunciators will turn on.
Page 13

RE Series EN-11
3. The Weight display will show “
1
” (the number of weighings), and the Total Price display will show the
“
accumulated Total Price value.
4. Remove the item, then repeat steps 1 and 2 until all desired transactions
are finished. The corresponding total numbe r of weighings and
accumulated price will be displayed.
5. If using the Pre-pack function (the Unit Price is fixed), press [+] again
after step 2 to proceed to the next accumulation.
4.11.2 Recalling and Clearing Accumulation
With the pan empty, press [+]. The accumulated total number of weighings
and total price will be displayed. To clear accumulation memory, press [C]
at this time. The scale returns to normal weighing mode and the ADD
annunciator will turn off.
Total
”, the Unit Price display will show
4.12 Fractional Pricing
If permitted by state law, and with Fractional Pricing enabled in the Service
Setup mode accordingly, press [1/2] successively to price in $ per ½ lb (1/2
annunciator will turn on), $ per ¼ lb (1/4 annunciator will turn on), return to
normal Unit Price mode.
To enable Fractional Pricing in the Service Setup mode:
1. Perform Step 1 in Section 6.1.
2. “
S1 oFF ”
3. “
SCL”
4. “
Step 1
parameters Step 1 to 18*.
5. When “
pricing), press [>T<] to change the setting to “
proceed to the next parameter.
6. When “
pricing), press [>T<] to change the setting to “
proceed to “
7. When “
weighing mode.
is displayed momentarily. Press [PLU] [5] [5] [5] [5] [5].
is displayed. Press [FIX].
” is displayed. Press [FIX] successively to move through
Step 18 oFF
Step 19 oFF
SAVE
SAVE
” is displayed, press [FIX] to save changes and restart to
” is displayed (this parameter enables ¼ lb
on
”, then press [FIX] to
” is displayed (this parameter enables ½ lb
on
”, then press [PLU] to
”.
* Note: Do not change the setting of any other parameter unless
specified above. Other parameters are service settings intended for
authorized servicing use only. If inadvertently changing settings, the scale
may be turned off at any time to abort setup without saving any changes.
Page 14
EN-12 RE Series
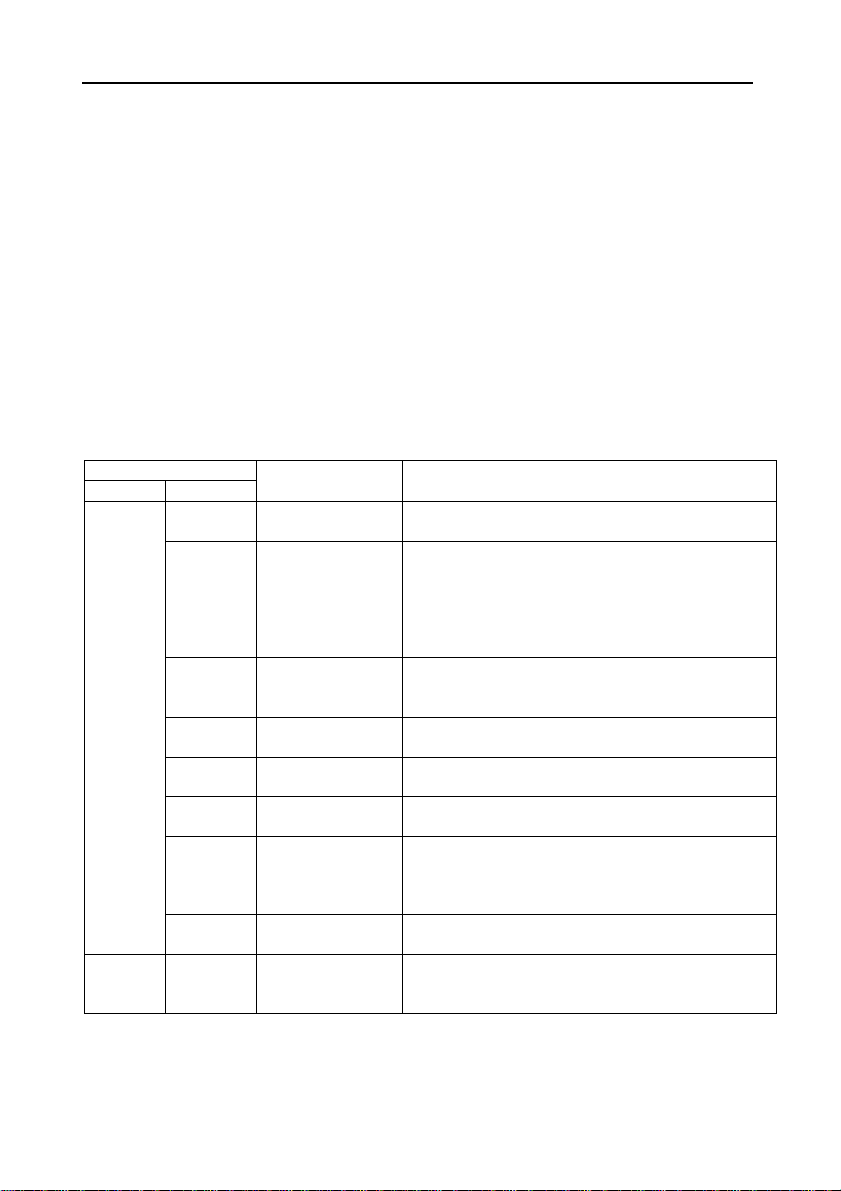
5. SCALE SETTINGS
5.1 Accessing the User Setup Mode
Press [PLU] [4] [4] [4] [4]. “
To navigate in the User Setup Mode:
• Press [FIX] to accept the displayed setting and proceed to the next step
• Press [>T<] to toggle through available settings
• Press [>0<] to return to the previous steps
• Press [PLU] to end setup and proceed to “Save”
5.2 User Setup Parameters
Window Display
Weight Unit Price Description Available Settings
oP StEP 1
Step 2
Step 3
Step 4
Step 5
Step 6
Step 7
Step 8
Save
Note:
Bold settings are defaults.
Key-press beeper
Sleep /
Automatic Poweroff
(battery operation
only)
Automatic clearing
of tare and unit
price
Pre-pack (Fix)
Mode
Auto PLU ON : Search PLU automatically
1 or 2 PLU’s
per M-key
Filtering level 0 : No filtering
Communication
Save or Abort
oP
” will be displayed, then press [FIX].
ON : Enables this function
OFF : Disables this function
0 : Sleep mode disabled / Auto-off disabled
1 : Sleep mode disabled / Auto-off after 30 min.
2 : Sleep mode after 5 min. / Auto-off disabled
3 : Sleep mode after 5 min. / Auto-off after 30 min.
4 : Sleep mode after 15 min. / Auto-off disabled
5 : Sleep mode after 15 min. / Auto-off after 30 min.
ON : Auto-clear when weight is removed from the
pan
OFF : Manual clear by pressing [C]
ON : Enables this function
OFF : Disables this function
OFF : Search PLU after pressing [PLU]
ON : 2 PLU’s can be stored per M-key
OFF : Only 1 PLU can be stored per M-key
1 : Low (faster display speed)
2 : Normal
3 : High
0, 1, 2, 3
(not applicable; do not change)
Save : Saves changes and restarts to weighing mode
Abort : Restarts to weighing mode without saving
changes
Page 15
RE Series EN-13
6. CALIBRATION AND SEALING
6.1 Calibration
For best results, calibrate the scale at regular intervals. Temperature
changes, geographic gravity variations, altitude changes and abuse are few
reasons why a scale may need recalibration.
Note: The following procedure requires the us e of hand tools and calibration
weights. If unable to perform the calibration, contact a n a uthorized Ohaus
service organization.
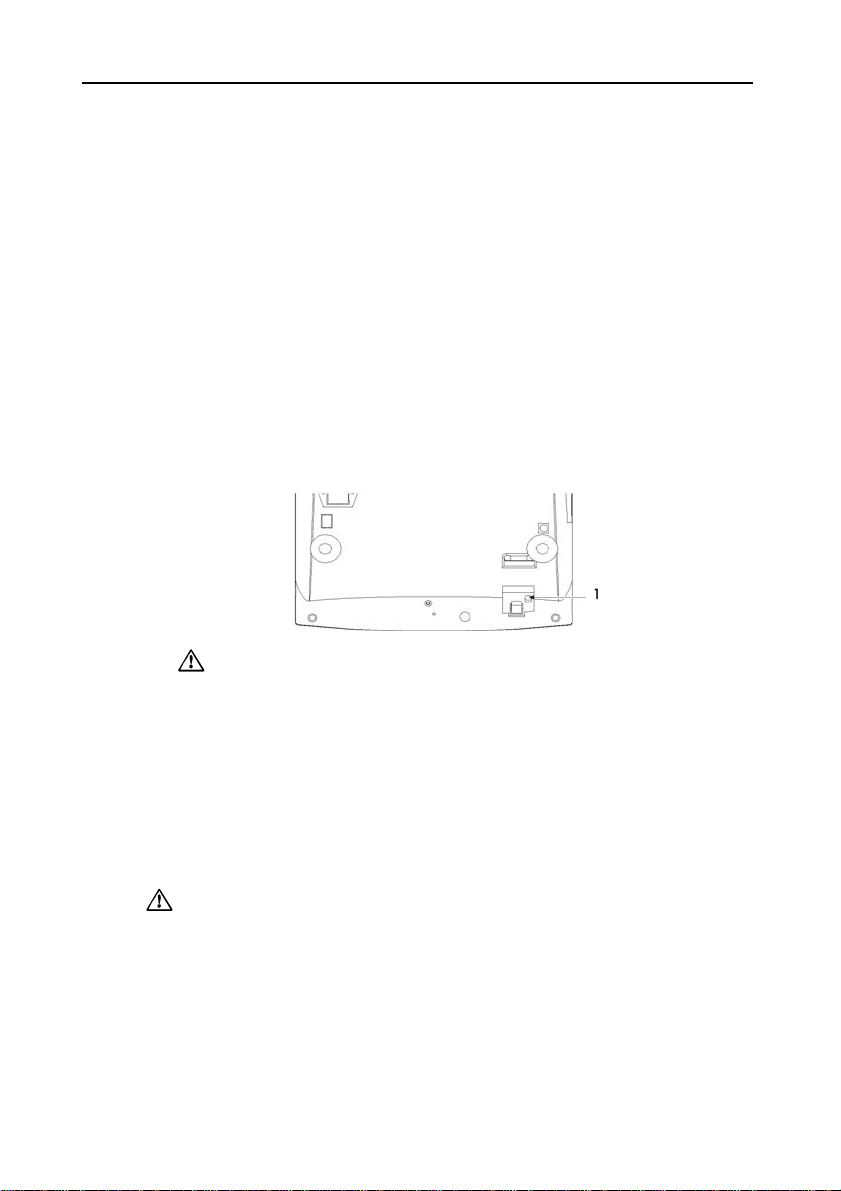
1. With the scale on, remove any sticker or sealing screw (1), then gently
press the switch inside the access hole. A narrow screwdriver may be
inserted through the hole to press the switch.
Note: When accessing the bottom of the scale, avoid placing the
scale upside down on the pan or sub-platform. Place the scale on its
side.
S1 oFF ”
2. “
[3].
SEt
3. “
succeeding parameters: “
Note: Press [>0<] at any time to return to the previous parameter, or
the scale may be turned off at any time to abort setup without saving
any changes.
4. When “
“
CAL Y
5. When “
sequence.
is displayed momentarily. Press [PLU] [2] [4] [6] [8] [1]
” is displayed. Press [FIX] successively to move through the
GEo”, “SingLE”, “CAL n”.
CAL n
” is displayed, press [>T<] to change the setting to
”.
CAL Y
” is displayed, press [FIX] to enter the Span Calibration
Page 16
EN-14 RE Series
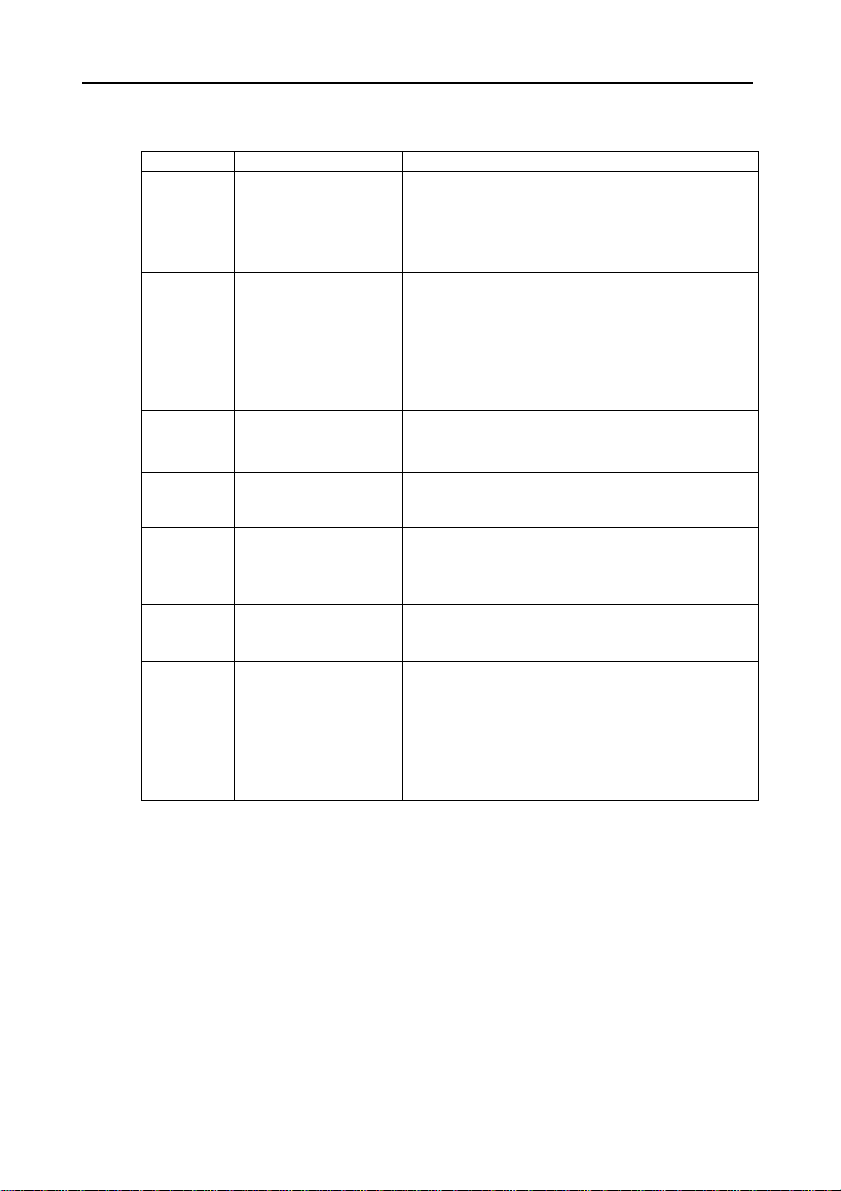
6. Span Calibration Sequence:
Display Description Actions
Lb
Calibration Unit:
kg or lb
Press [FIX] to select desired unit and proceed to the
next step.
If needing to switch between kg and lb, press
[>T<].
CAP 30
------
5 ... 0
Add20
5 ... 0
Save
Scale Capacity
(in the Calibration Unit
selected)
Establish zero Ensure the pan is empty and the scale stable.
Countdown The countdown will repeat if the scale is not stable
2/3 calibration point
Countdown The countdown will repeat if the scale is not stable
Save or Abort
Press [FIX] to select the displayed setting and
proceed to the next step. Make sure the displayed
value matches the scale model’s capacity.
Do not press [>T<], which will toggle through other
capacity settings that may not match the scale
model’s.
Press [FIX] to initiate countdown sequence.
during this process.
Press [>T<] to switch between 2/3 or full capacity,
then Place the indicated weight on the pan, then
press [FIX] to proceed to the next step.
during this process.
Remove the weight from the pan, then press [FIX]
to save settings and restart scale to weighing mode.
If needing to abort calibration and retain previous
calibration data, press [>T<] (“Abort” will be
displayed) then [FIX] at this time (or turn the scale
off at any time during the process).
Page 17
RE Series EN-15
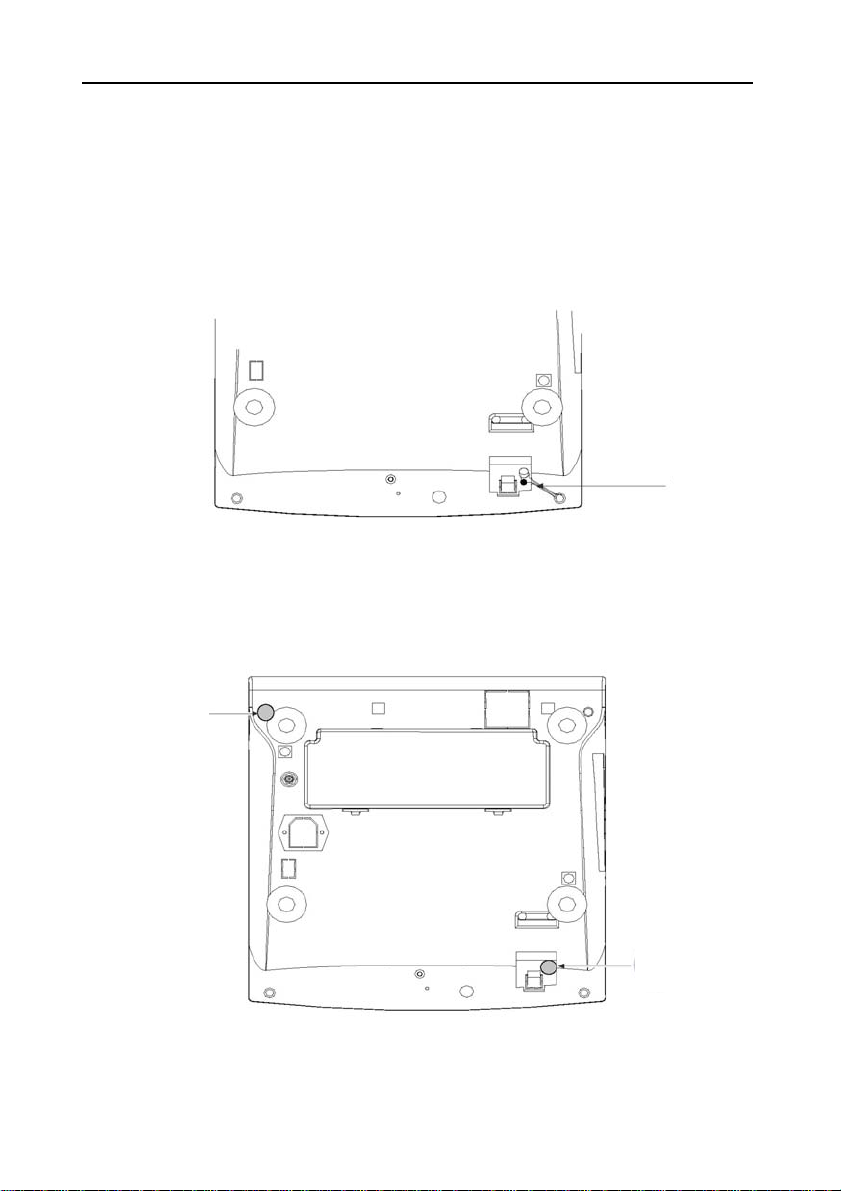
6.2 Type Approval Sealing
After the scale has been found to comply with local regulations by respective
approving authorities, the scale may be sealed in the following manner:
6.2.1 Wire Sealing
(1) Install the 2 cross drilled sealing screws securely as illustrated below.
Run the wire into the holes, then apply the seal in place.
1
6.2.2 Sticker Sealing
With screws installed, apply stickers to any of the positions illustrated below
(2).
2
2
Page 18

EN-16 RE Series
7. MAINTENANCE
7.1 Cleaning
Comply with safety precautions when cleaning and maintaining the scale
• Turn off and disconnect the scale from the power supply during
cleaning.
• Wipe the exterior components of the scale using a soft cloth dampened
with water and a mild detergent (DO NOT use acids, alkalis, strong
solvents or abrasive cleaning agents).
• Inspect the scale regularly. Ensure that the housing, pan and subplatform are clean and free from foreign material.
• DO NOT allow liquids to enter the scale.
• DO NOT open the scale; no user repairable components inside. Service
should be performed by authorized personnel only.
• DO NOT carry the scale by the pan or sub-platform.
• DO NOT place the scale upside down. If accessing the bottom, place
the scale on its side.
Page 19
RE Series EN-17
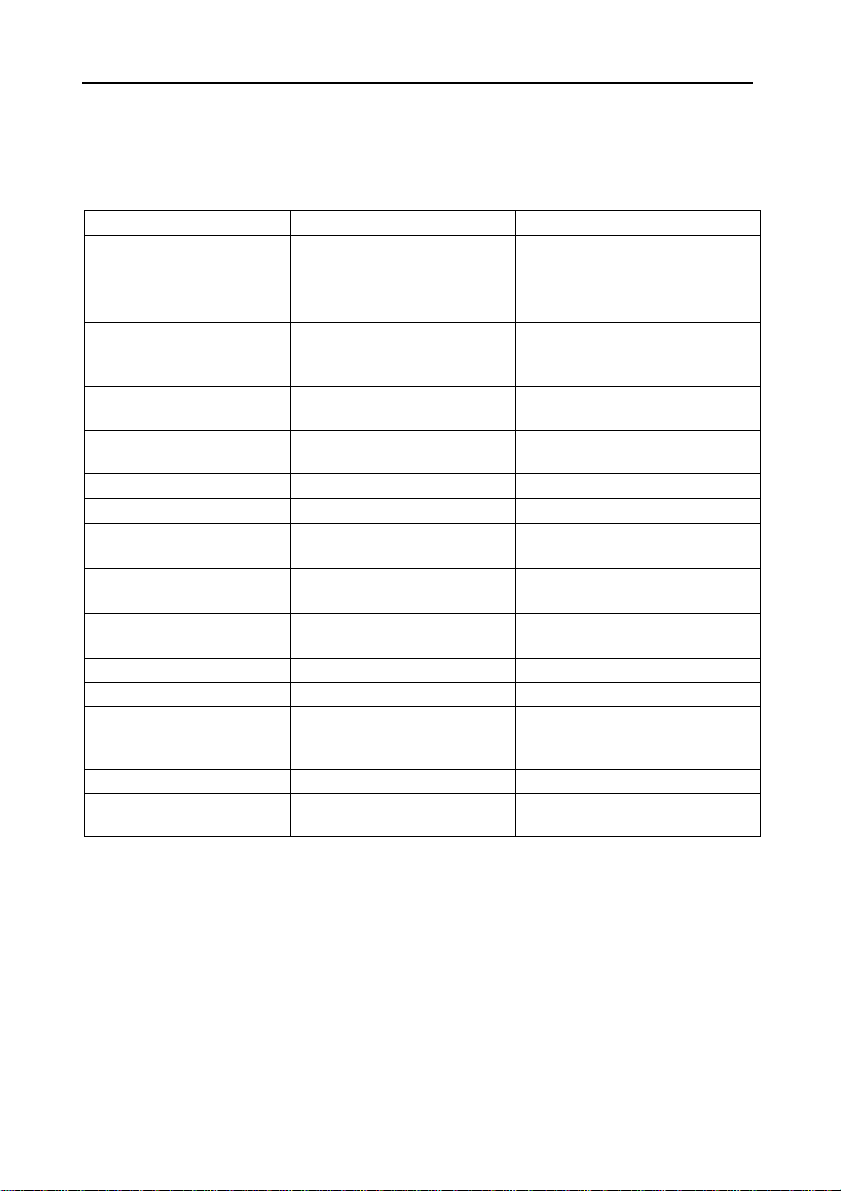
7.2 Troubleshooting
The following table lists common problems, possible causes and remedies.
If the problem persists, contact Ohaus or your authorized O ha us dealer.
Symptom Possible Causes Remedy
Scale will not turn on. AC power not connected to
Weight reading does not
stabilize.
Scale does not display
accurately.
------ Weight display
^^^^^^ Weight display
^^^^^^ Total Price display
uuuuuu Weight display
”E 11“ displayed RAM error Turn the scale off and on again.
”E 16“ displayed ROM error Recalibrate the scale.
”E 18“ displayed EEPROM error Return scale for service.
”E 31“ displayed By-Count operation error Enter only up to 2 digits (99)
”E 33“ displayed Accumulation total price >
”E 34“ displayed PLU number > 100 Enter correct PLU number: 1-100
“noPLu“ displayed PLU data not found Store data in the PLU number or M-
scale or to outlet.
No power in outlet.
Battery discharged.
Unstable environment.
Interference under pan or sub-
platform.
Improper calibration. Calibrate the scale using proper
Weight exceeds power-on zero
range
Overload condition Reduce the load on the pan.
Price > 9999.99 Reduce the load on the pan.
Underload condition Install the pan.
999.99 or the number of
transactions > 99
Connect scale to power.
Connect to different power outlet.
Replace battery.
Ensure a stable environment.
Ensure that the weighing pan and
sub-platform are unobstructed.
calibration weights.
Remove excess weight from the
pan during power-on.
Re-zero the scale.
Return scale for service.
Return scale for service.
Clear accumulation memory and
start anew
key
Page 20
EN-18 RE Series
8. TECHNICAL DATA
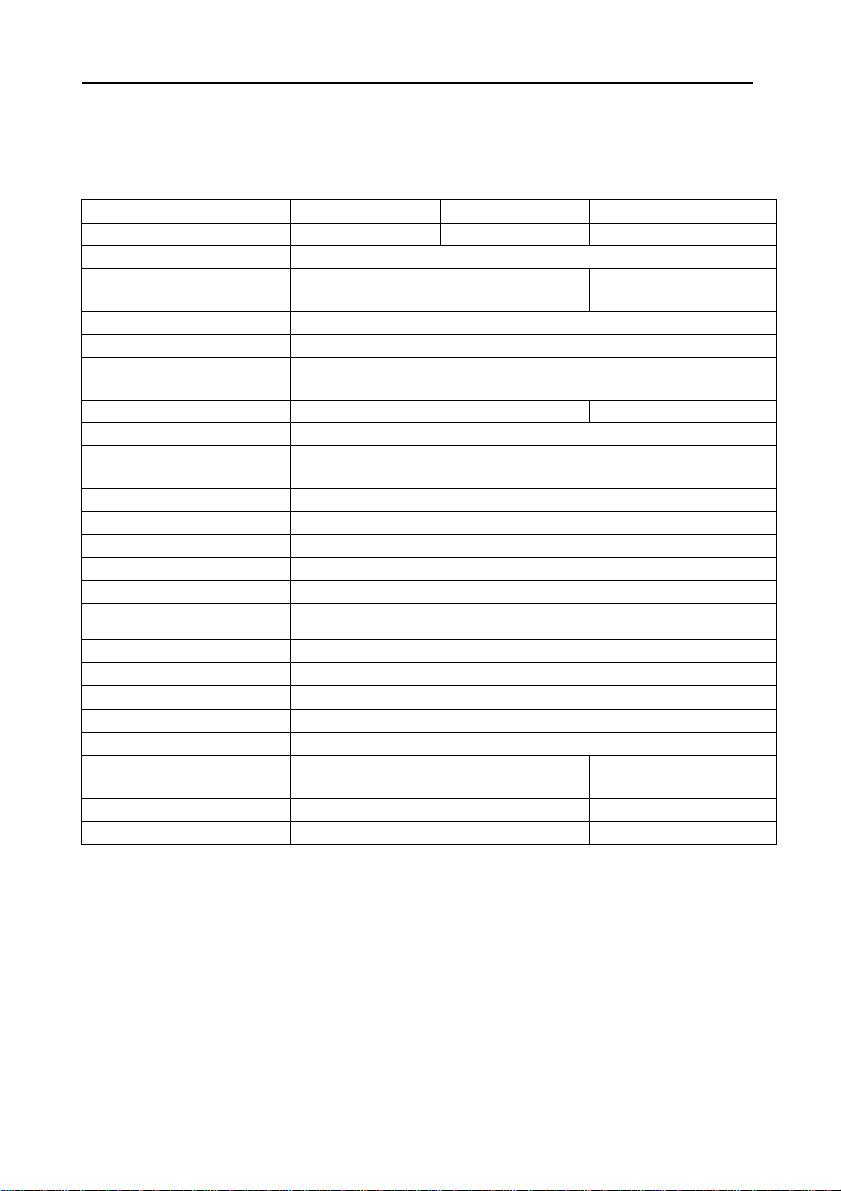
8.1 Specifications
Model RE15US RE30US RE15CUS
Capacity x Readability 30 lb x 0.01 lb 60 lb x 0.02 lb 30 lb x 0.01 lb
NTEP* Displayed Resolution 3,000d
Construction High-grade polymer housing,
Pan Dimensions 9.5 x 13.5 in. / 242 x 342 mm
Leveling Components 4 adjustable rubber feet with integral front mounted level bubble indicator
Display Backlit LCD, Weight - Unit Price - Total Price
Front and rear Front and tower
Weighing Units lb
Application Modes 100 PLU memory, 24 pre-set keys, By-Count Pricing, Fractional Pricing,
Keyboard Numeric, 32-key tactile membrane switch with key-press beeper
Span Calibration 2/3 and full scale capacity
Tare Range To full capacity by subtraction
Zero Range At power-on: ±10% / keyboard: ±2% Full Scale Capacity
Stabilization Time within 2 seconds
Power 12VDC 800mA AC Adapter (included) /
Battery Operation 60~70 hours of continuous use
Safe Overload 150% Full Scale Capacity
Operating Temperature Range
Storage Temperature Range
Humidity Range
Shipping Dimensions 18.3W x 16.5D x 8.7H in. /
Scale Unit Weight 7.8 lb / 3.5 kg 9.0 lb / 4.1 kg
Shipping Weight 12.0 lb / 5.5 kg 13.4 lb / 6.1 kg
80% max up to 88°F/31°C, decreasing linearly to 50% at 104°F/40°C
stainless steel pan
6-digit, 7-segment, 0.55 in. /13.5 mm high characters
Pre-pack Mode, Accumulat ion
6 D-cell alkaline batteries (not included)
14°F to 104°F / -10°C to 40°C
-13°F to 122°F /-25°C to 50°C
465W x 419D x 221H mm
* NTEP CC No. 08-058
with tower
17.8W x 16.4D x 8.7H in. /
452W x 417D x 221H mm
Page 21
RE Series EN-19
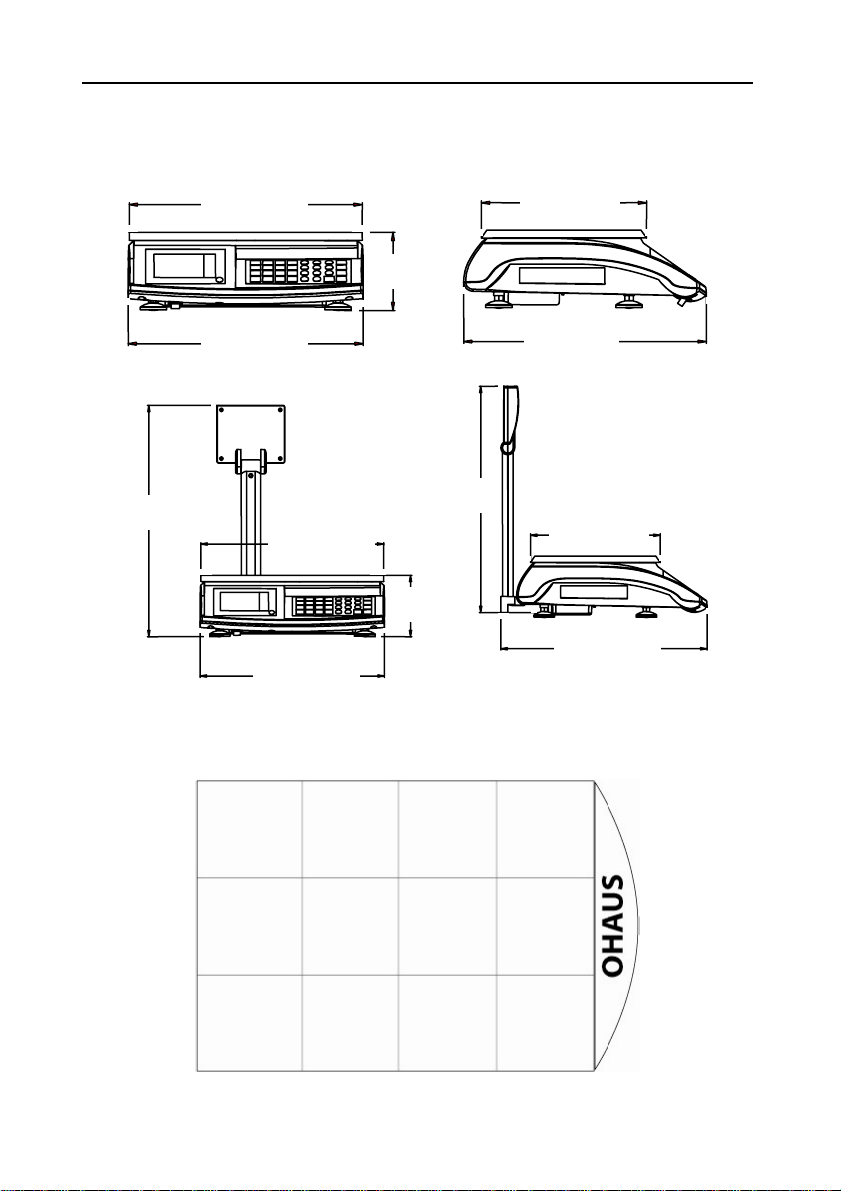
8.2 Drawings
14.5” / 342 mm
4.5” /
115 mm
9.5” / 242 mm
17” /
432 mm
13.6” / 345 mm
16.7” /
423 mm
13.5” / 342 mm
4.5” /
115 mm
13.6” / 345 mm
Memory Keys Pull-out Tab Template:
14” / 356
mm
9.5” / 242 mm
15.2” / 385 mm
Page 22
EN-20 RE Series
8.3 Compliance
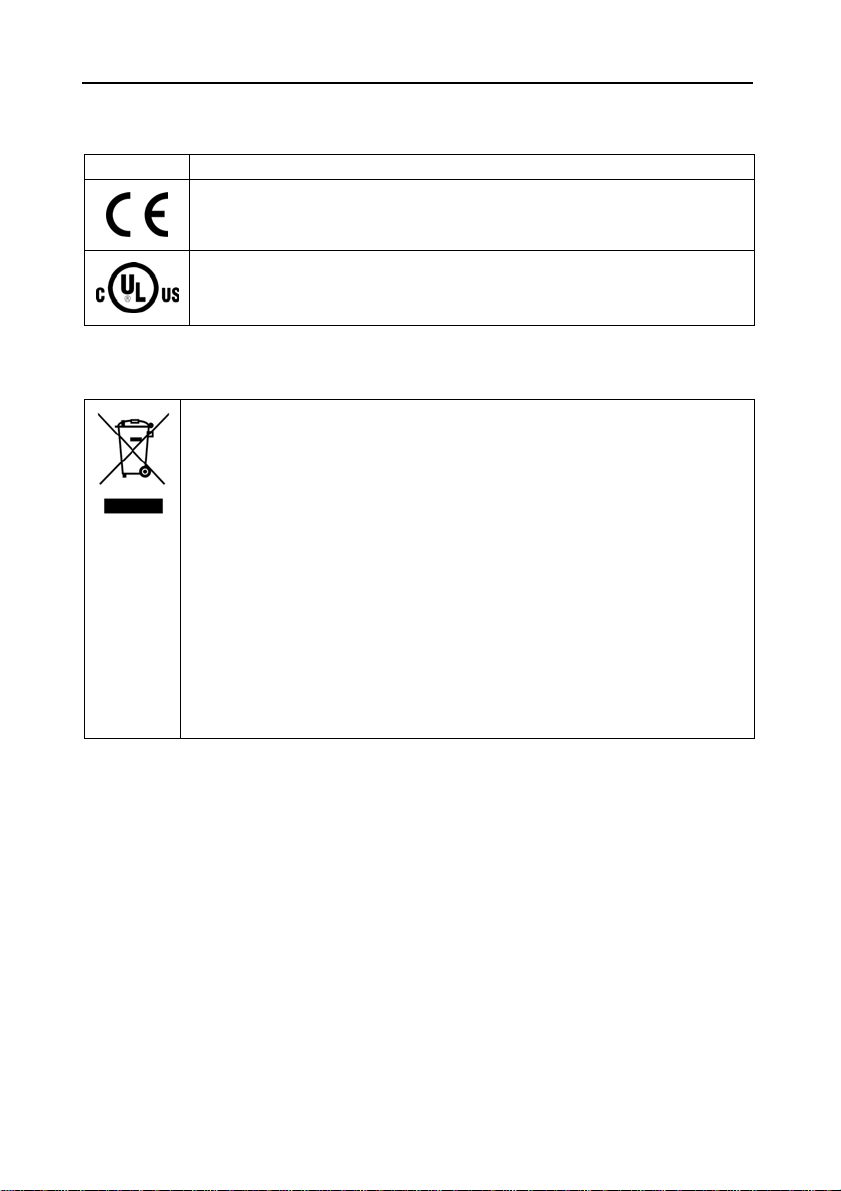
Compliance to the following standards is indicated by the corresponding mark on the product.
Marking Standard
This product conforms to the EMC directive 2004/108/EC, the Low Voltage Directive
2006/95/EC and the Non-automatic Weighing Instruments Directive 90/384/EEC.
The complete Declaration of Conformity is available from Ohaus Corporation.
UL60950-1: 2003
EC Emissions Note
This device complies with EN61326/CISPR 11 Class B Group 1.
Disposal
In conformance with the European Directive 2002/96/EC on Waste Electrical and
Electronic Equipment (WEEE) this device may not be disposed of in domestic waste.
This also applies to countries outside the EU, per their specific requirements.
Please dispose of this product in accordance with local regulations at the collecting
point specified for electrical and electronic equipment.
If you have any questions, please contact the responsible authority or the distributor
from which you purchased this device.
Should this device be passed on to other parties (for private or professional use), the
content of this regulation must also be related.
Thank you for your contribution to environmental protection.
For disposal instructions in Europe, refer to www.ohaus.com/weee.
FCC Note
This equipment has been tested and found to comply with the limits for a Class B digital device, pursuant
to Part 15 of the FCC Rules. These limits are designed to provide reasonable protection against harmful
interference when the equipment is operated in a commercial environment. This equipment generates,
uses, and can radiate radio frequency energy and, if not installed and used in accordance with the
instruction manual, may cause harmful interference to radio communications. Operation of this
equipment in a residential area is likely to cause harmful interference, in which case the user will be
required to correct the interference at their own expense.
Industry Canada Note
This Class B digital apparatus complies with Canadian ICES-003.
Cet appareil numérique de la classe B est conforme à la norme NMB-003 du Canada.
ISO 9001 Registration
In 1994, Ohaus Corporation, USA, was awarded a certificate of registration to ISO 9001 by Bureau
Veritus Quality International (BVQI), confirming that the Ohaus quality management system is compliant
with the ISO 9001 standard’s requirements. On May 15, 2003, Ohaus Corporation, USA, was reregistered to the ISO 9001:2000 standard.
Page 23

RE Series EN-21
LIMITED WARRANTY
Ohaus products are warranted against defects in materials and workmanship from the date of delivery
through the duration of the warranty period. During the warranty period, Ohaus will repair, or, at its
option, replace any component(s) that proves to be defective at no charge, provided that the product is
returned, freight prepaid, to Ohaus.
This warranty does not apply if the product has been damaged by accident or misuse, exposed to
radioactive or corrosive materials, has foreign material penetrating to the inside of the product, or as a
result of service or modification by other than Ohaus. In lieu of a properly returned warranty registration
card, the warranty period shall begin on the date of shipment to the authorized dealer. No other express
or implied warranty is given by Ohaus Corporation. Ohaus Corporation shall not be liable for any
consequential damages.
As warranty legislation differs from state to state and country to country, please contact Ohaus or your
local Ohaus dealer for further details.
Page 24

*80252577*
P/N 80252577 © 2008 Ohaus Corporation, all rights reserved
Printed in China
Test Equipment Depot - 800.517.8431 - 99 Washington Street Melrose, MA 02176 - TestEquipmentDepot.com
 Loading...