

Page 1
Quick Start Guide Navigator
PREPARATION FOR USE
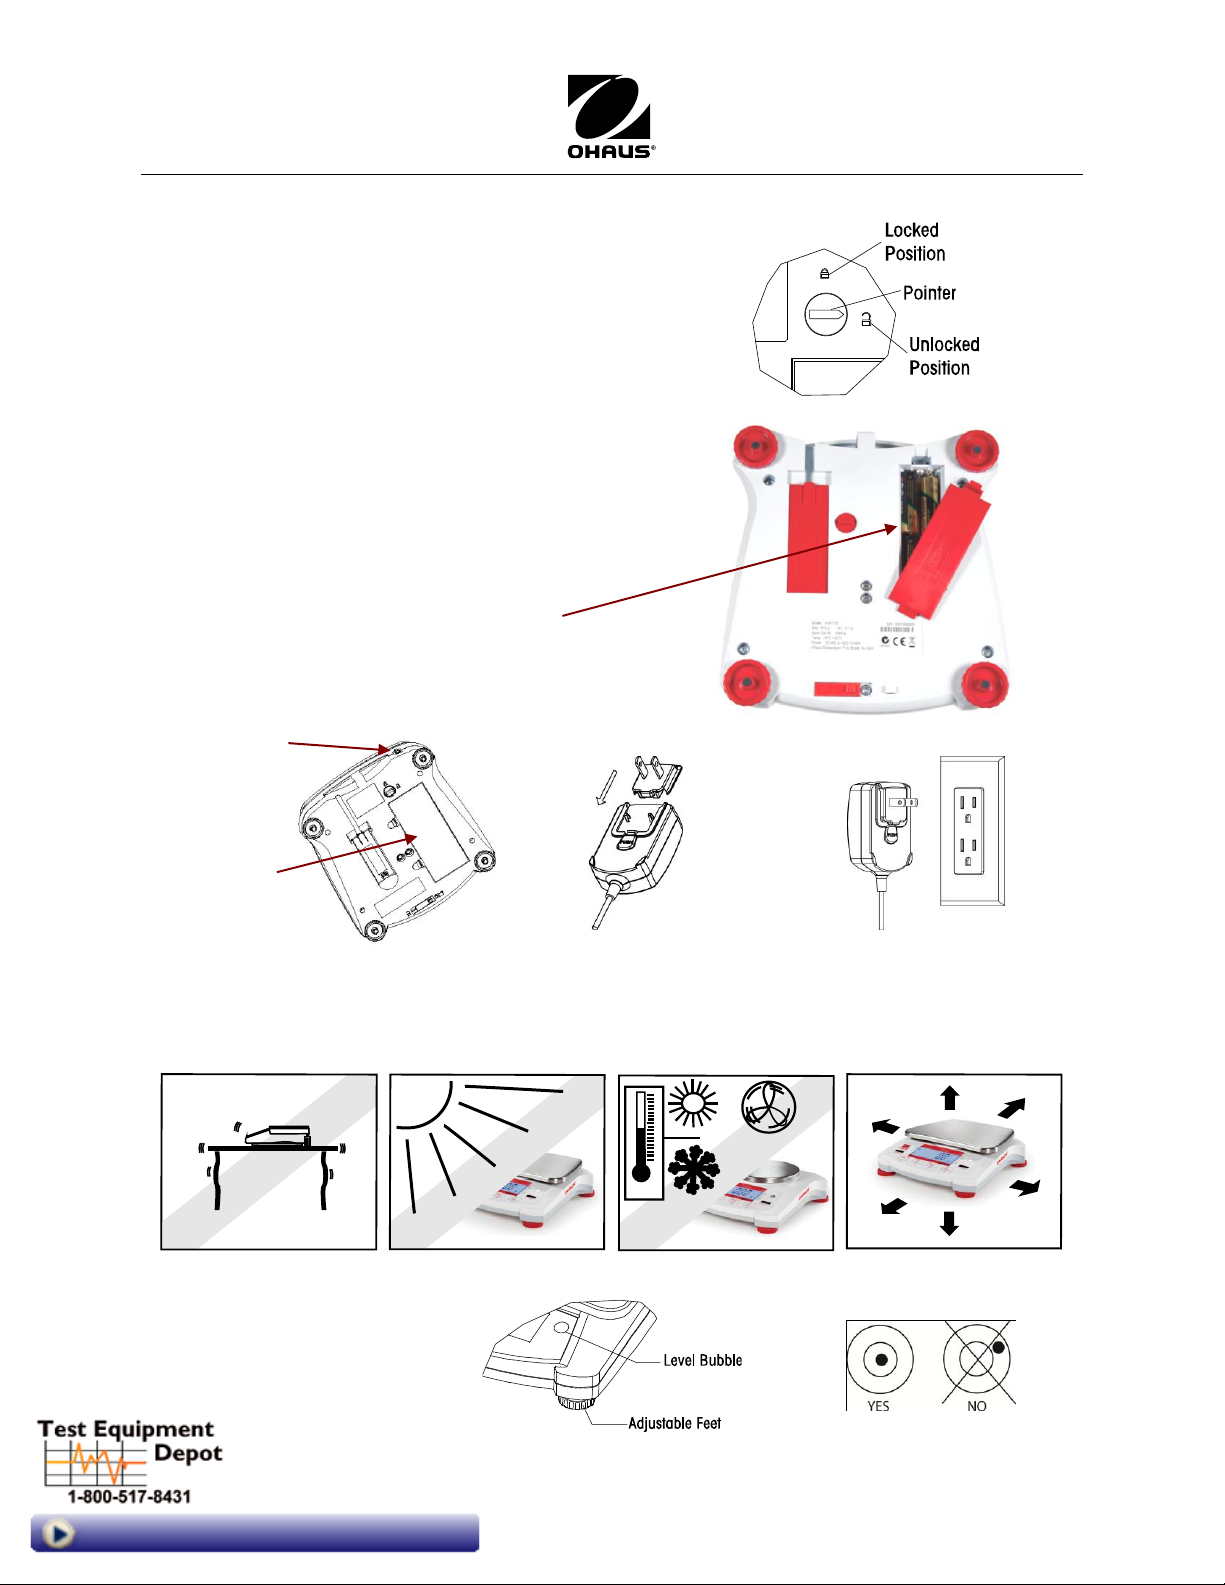
Release Shipping Lock under the balance
Rotate the pointer to the unlocked position.
Note: No shipping lock on Approved models.
Connect Power
Ensure voltage identification label matches local
line voltage. If not, do not connect the unit.
Contact Ohaus or your dealer.
Battery Installation
Install the batteries with polarity as shown in the
battery compartment.
Use the AC Adapter to power the balance
when battery power is not needed.
Connect the AC Adapter plug
to the input jack.
Slide appropriate power
plug for your country onto
the adapter housing.
Connect AC Adapter to
the proper AC supply.
Adjust the leveling feet so
the bubble is centered
in the circle.
Battery
Cover
Input Jack
Balance
SELECTING THE LOCATION: Place on a firm, steady surface with sufficient space.
Visit us at www.TestEquipmentDepot.com
Avoid excessive air current, vibrations, heat sources, or rapid temperature changes.
99 Washington Street
Melrose, MA 02176
Phone 781-665-1400
Toll Free 1-800-517-8431
i Navigator
Balance Quick Start Guide
Page 2
Navigator
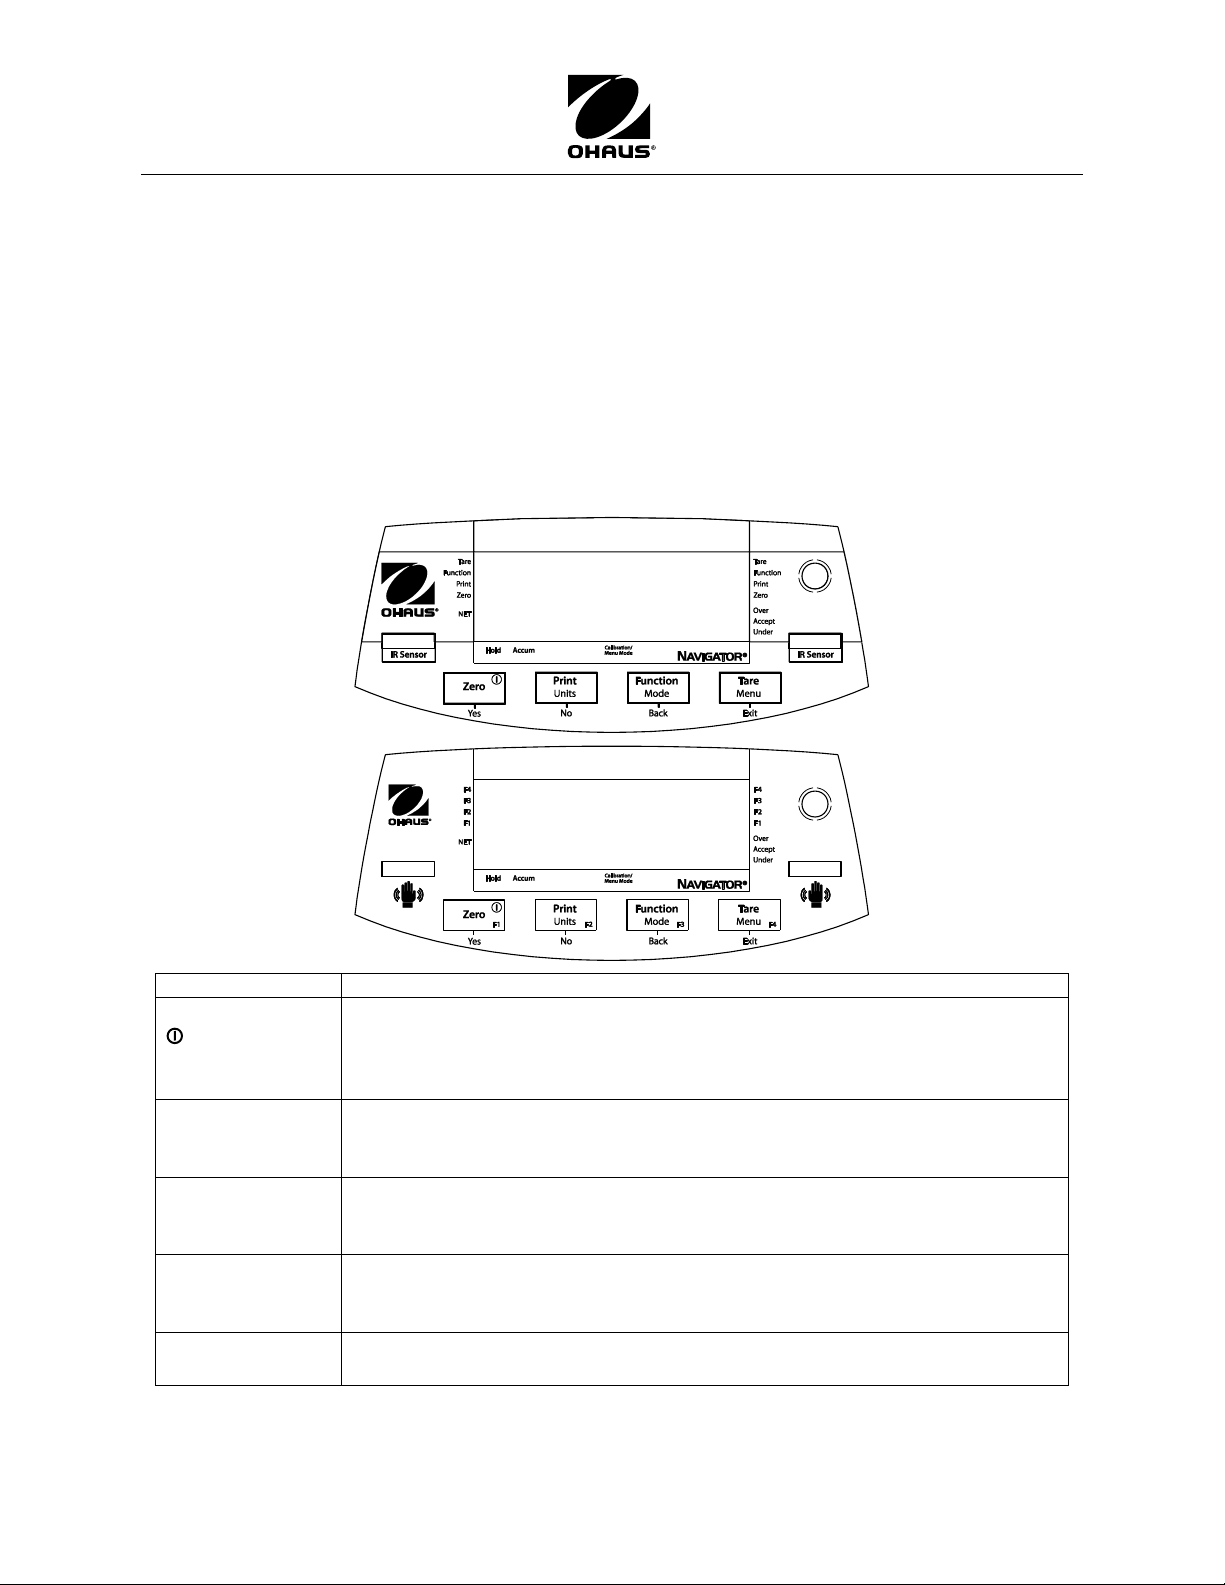
Button
Functions
Zero
Yes
Short Press (when on): Sets display to zero
(when off): Turns balance on
Long Press (when on): Turns the balance off
Short Press (in Menu): Selects/accepts displayed setting
Print
Units
No
Short Press: See Interface Manual for operation description.
Long Press: Toggles through active units
Short Press (in Menu): Toggles through available settings
Function
Mode
Back
Short Press: Selects function setting
Long Press: Selects active Mode
Short Press (in Menu): returns to previous settings
Tare
Menu
Exit
Short Press: Enter / clear a Tare value
Long Press: Enters User Menu
Short Press (in Menu): Quickly exit User Menu
IR Sensor-Left
IR Sensor-Right
IR Sensors can be programmed to act as “touchless” buttons.
(See Setup Menu, back page, to program sensors to act as specific buttons.)
Control panel for
Standard (non-
approved) models
Control panel for
approved models
Balance Quick Start Guide
SAFETY PRECAUTIONS
Before plugging in the balance, verify that local power supply matches voltage printed on
power adapter. (Use only the adapter provided with the balance.)
Disconnect the balance from the power supply when cleaning.
Do not operate this product in hazardous or unstable environments.
Do not drop loads on the pan.
Use only approved accessories and peripherals, as available.
Operate the product only under ambient conditions specified in the Instruction Manual.
Service should be performed by authorized personnel only.
CONTROLS
IR Sensors can be activated by a hand or other object placed about 12mm (½ inch) above the sensor. Activation
distance varies with the reflective nature of the object. If unwanted activations occur, sensors can be turned off.
Navigator
Balance Quick Start Guide ii
Page 3
5
5
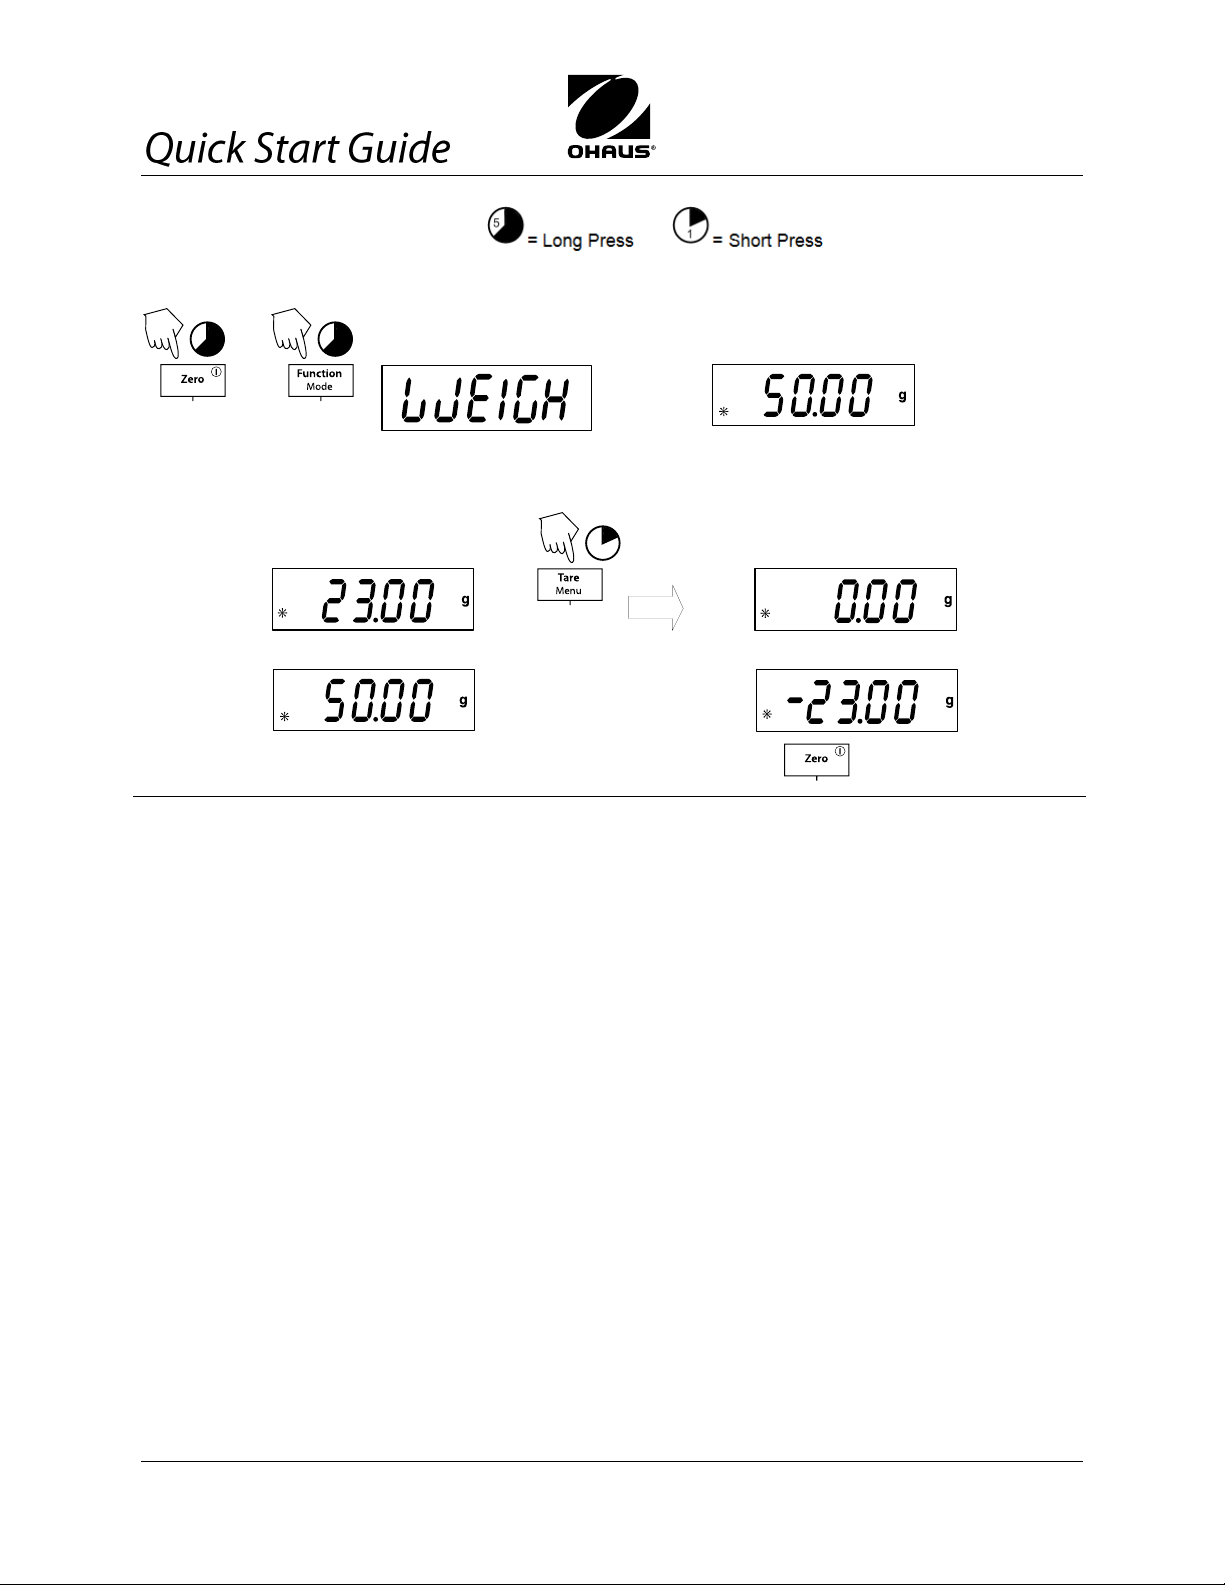
Display shows:
To use a container and Tare, see below.
Place sample on platform (example 50g):
(Container weight)
1
(Container weight tared)
(Place material in container)
(Material and container removed)
(50g sample)
To remove tare, press:
ADDITIONAL OPERATIONS
Navigator
Balance
OPERATION
Weighing
First press Zero to Power on. Then long-press Function/Mode until
Taring a Container’s Weight
Taring zeros the container weight. With balance on, place an empty container on the platform.
wJeIGH
appears.
Use the Mode Menu to activate: (See back page for details of menu navigation.)
Parts Counting, Percent Weighing, Display Hold, Accumulation, or Checkweigh.
Parts Counting counts large numbers of items based on the weight of a reference count.
Set an Average Piece Weight (APW) or use a previously stored APW.
Balance calls for a stored sample size [Put 10], which can be changed to 5, 20, 50 or 100.
Place indicated pieces on pan, press Yes. Display shows count. (Press Function to see APW.)
Percent Weighing measures weight of a sample as percentage of a reference weight.
Set a Reference Weight or use a previously stored one. (Press Function to see current Ref Weight.)
After establishing Ref Weight, place sample on pan. Display shows percentage of Ref Weight.
To clear stored Ref Weight, press Yes when [CLr.rEF] is displayed.
Display-Hold mode captures and stores the highest stable weight value. With Hold activated, place
sample on pan. When balance detects highest stable weight, “Hold” indicator blinks and displayed weight
will not change. Press Function to release the held weight value.
Accumulation stores the total of a series of weight measurements. Add first item, its weight is displayed.
Press Function to store weight. [ACCUmM] flashes; display shows total weight. Remove first item, add next
item. Balance displays weight. Press Function to store. [ACCUmM] flashes; display shows new total weight.
Repeat for all items to be added. To clear total, press and hold Mode until [ACCUM] appears. Press Yes
when [CLr.Acc] appears.
Checkweigh sets low and high weight limits for portion control. (Press Function to view low and high
reference weight limits.) To set new limits, press Yes when [CLr.rEF] appears (after selecting [CHECK].)
Balance displays [SEt. Lo]. Press Yes to view “Low” value; repeat No until desired number appears, then
Yes. Repeat for all numbers, and same procedure for [SEt. Hi]. When limits are set or accepted, place
sample on Pan. Accept indicator shows weight is within acceptable range. To clear stored reference
values press and hold Mode until [CHECK] appears. When [CLr.ref ] appears, press Yes.
iii Navigator
Balance Quick Start Guide
Page 4
Navigator
5
(Release button)
N
1
(Acquiring zero value)
N
1
N1N
1
(Weigh Mode)
Y
1
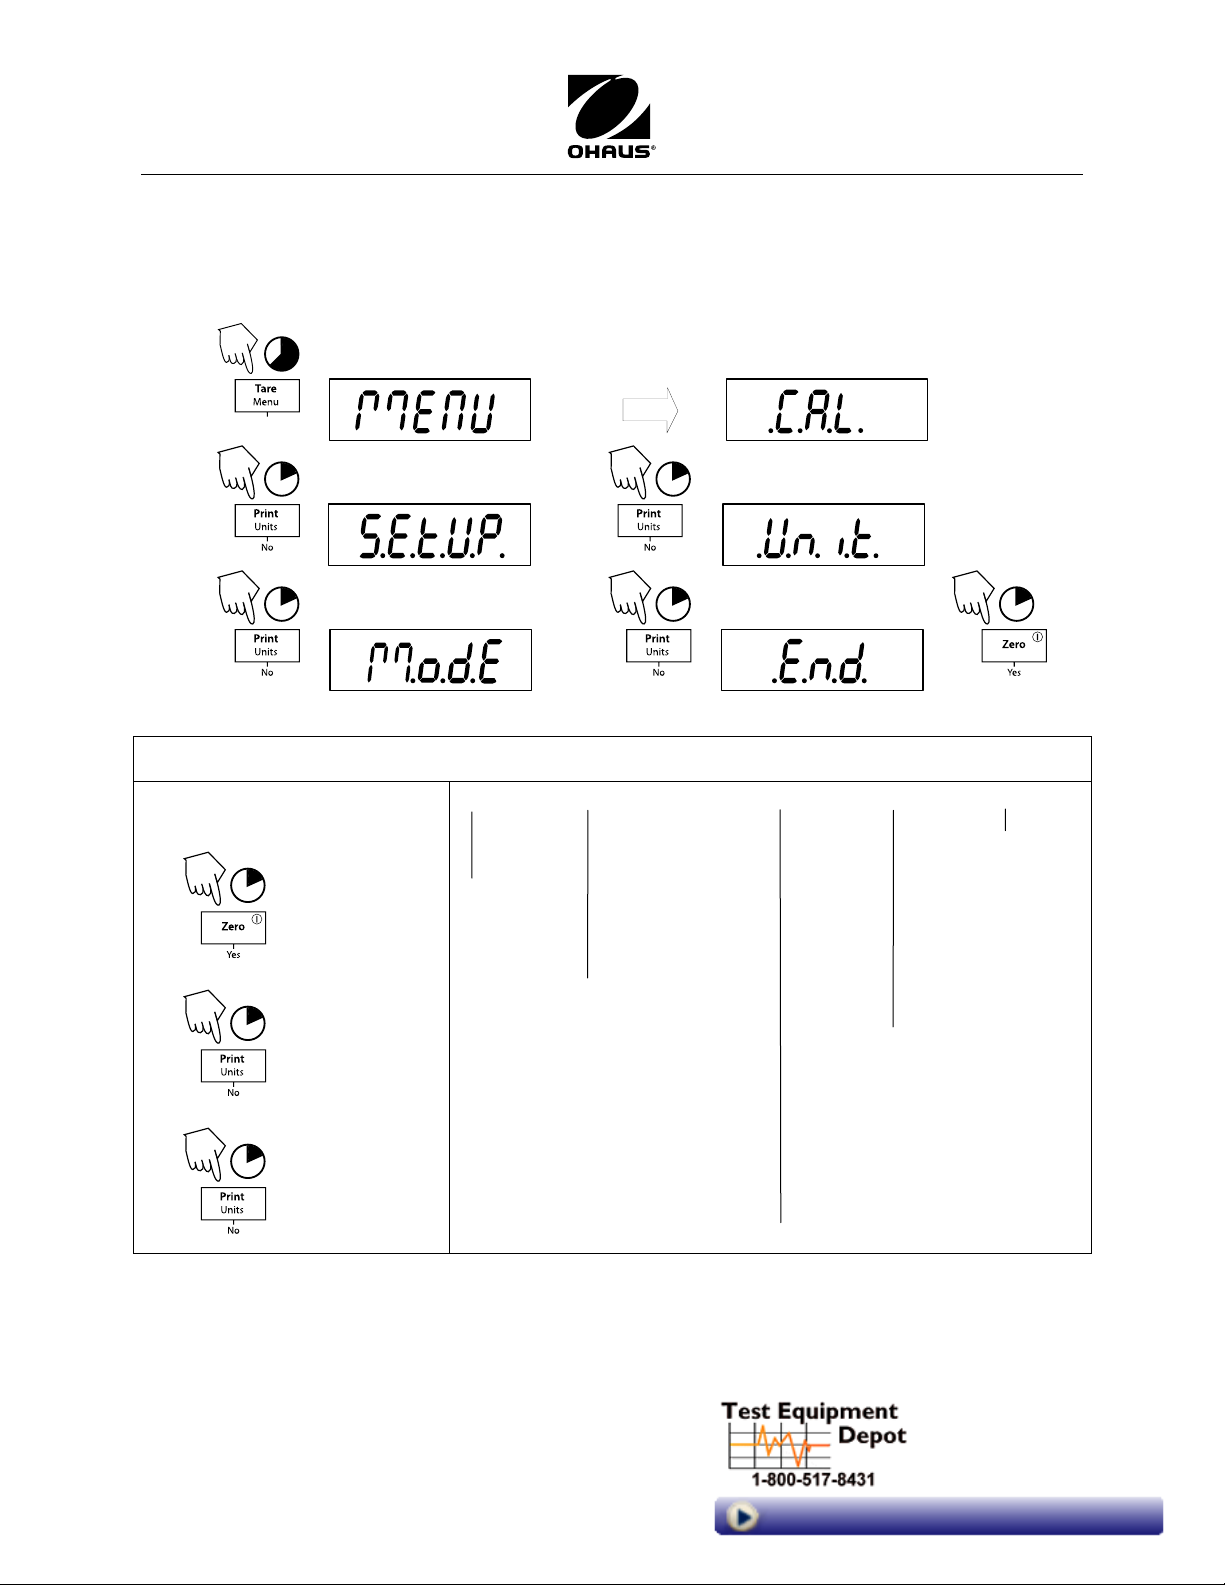
MENU STRUCTURE
Accepting/Bypassing Menu Items
Start with menu item displayed.
Cal
Span
– yes/no
Lin
– yes/no
Setup
A-Off
–on/off
Display
–on/off /dim/off
Bright
–hi/mid/low
IR Sensor
Ir.LEFT/Ir.RGHT
–Off/Tare/Function/
Print/Zero/Display
Units
Ct
gr
g
kg
N
oz
ozt
t
hk
t
sg
t
tw
t
dwt
lb
lb:oz
End
Mode*
Count
–on/off
Percent
–on/off
Hold
– on/off
Accum
– on/off
Check
– on/off
*
Weigh is
always
active
End
Yes/No
Y
1
= YES Accept
N
1
= NO
N
1
(Short presses
advance
through menu)
Balance Quick Start Guide
MENU NAVIGATION
There are five main menus: .C.A.L., .S.E.T.U.P., .U.N.I.T.S., M.O.D.E., and .E.N.D.
(Start with the balance off and the Lock Switch off: see page ii).
The sequence is shown below.
(Balance returns to weigh mode.)
*83033981* P/N 83033981
Navigator
Balance Quick Start Guide iv
Units must be “turned on” to be active.
For oz and lb:oz, choose dec or frac readouts.
Note: Available units and modes vary by model
and local regulations.
99 Washington Street
Melrose, MA 02176
Phone 781-665-1400
Toll Free 1-800-517-8431
Visit us at www.TestEquipmentDepot.com
 Loading...