

Page 1
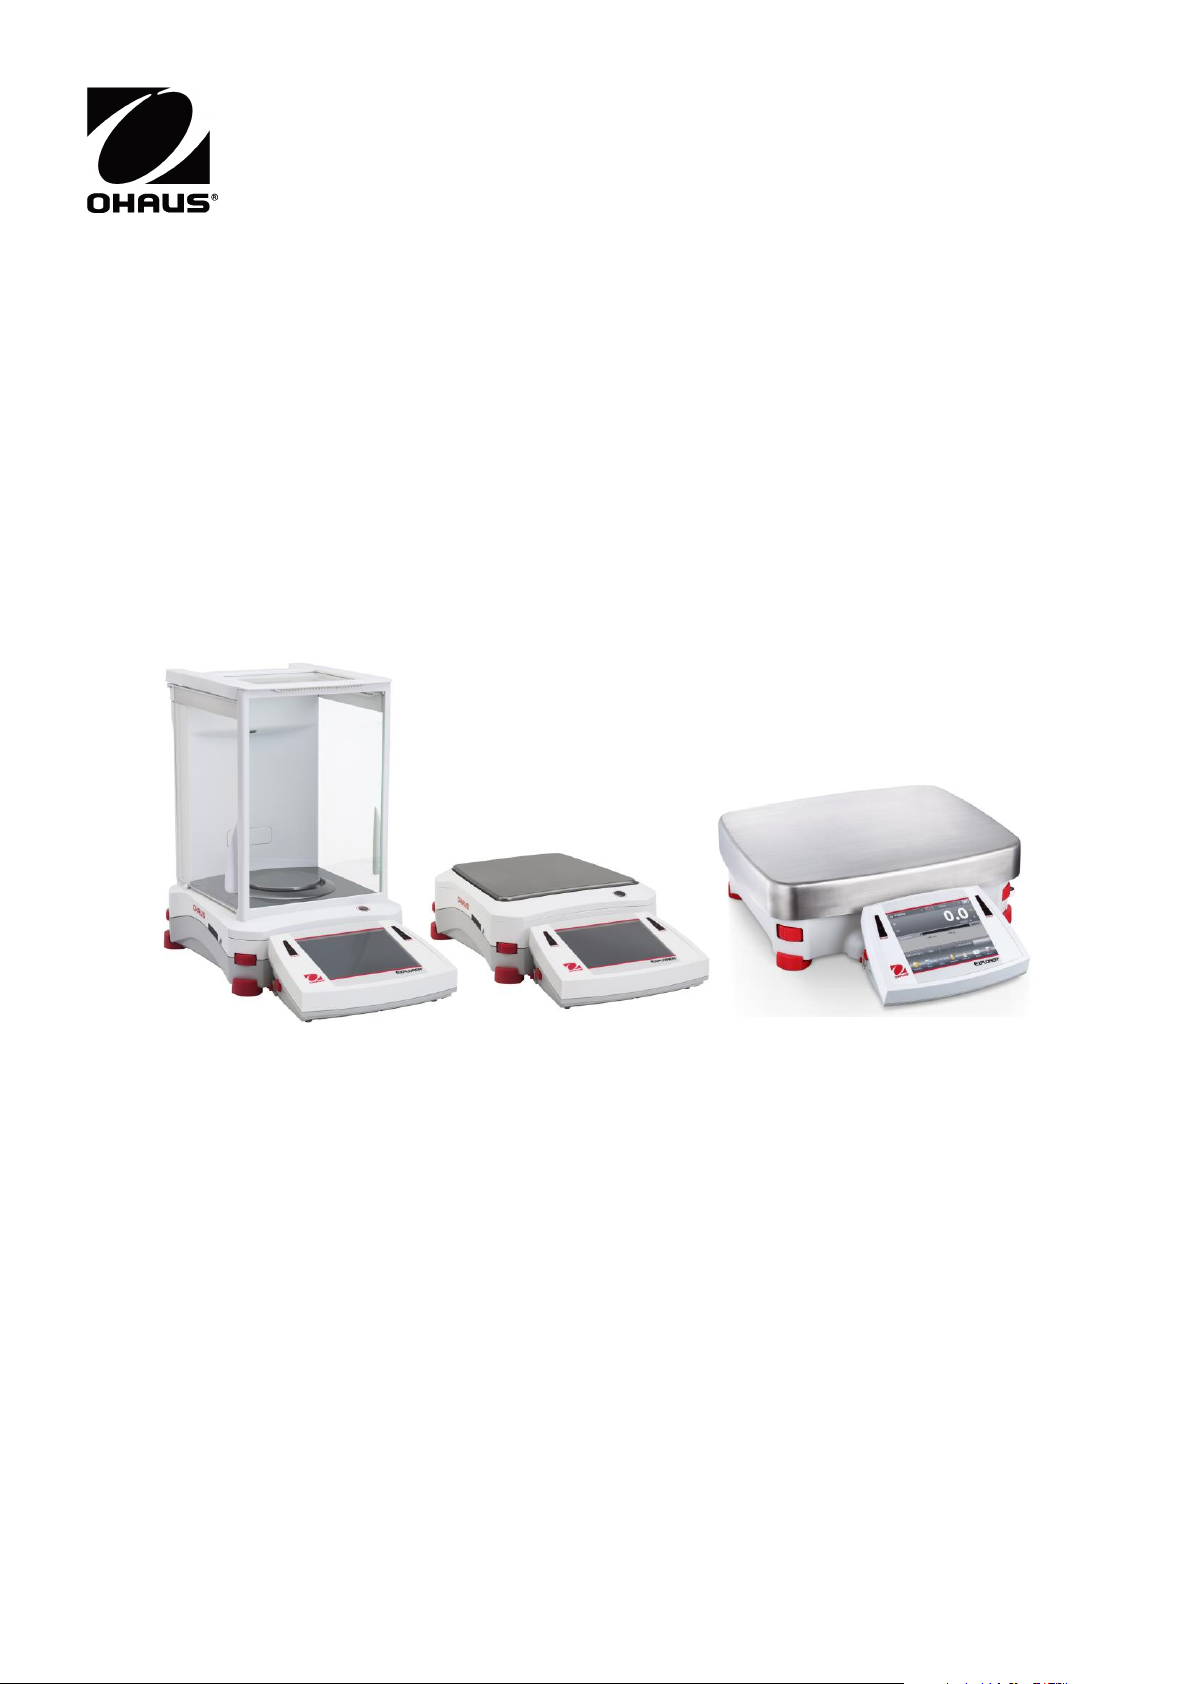
Explorer® Balances
Instruction Manual
Find Quality Products Online at: [email protected]
www.GlobalTestSupply.com
Page 2

Page 3

EXPLORER BALANCES EN-1
TABLE OF CONTENTS
1. INTRODUCTION ................................................................................................................................................... 5
1.1 Description ................................................................................................................................................... 5
1.2 Features ....................................................................................................................................................... 5
1.3 Safety Precautions ....................................................................................................................................... 6
2. INSTALLATION .................................................................................................................................................... 7
2.1 Unpacking .................................................................................................................................................... 7
2.2.1 Terminal Setup ......................................................................................................................................... 8
2.2.2 Installing the Wind Ring, Weighing Platform on Semi-Micro models ....................................................... 8
2.2.3 Installing the Wind Ring, Weighing Platform on Models EX1241, EX2241, and EX3241 ......................... 8
2.2.7 Installing the Glass Shelf (on Semi-Micro models) ................................................................................ 10
2.2.8 Installing the Weighing Pan & Wind Shield – Non-Draft Shield Models ................................................ 10
2.3 Selecting the Location ................................................................................................................................ 11
2.4 Leveling the Equipment .............................................................................................................................. 11
2.5 Connecting Power ...................................................................................................................................... 11
2.5.1 Models with AC Adapter ......................................................................................................................... 11
2.5.2 Models with AC Power Cord .................................................................................................................. 12
2.5.3 Power ON Button on EX12001, EX24001 and EX35001....................................................................... 12
2.6 Connecting the Interface ............................................................................................................................ 12
2.7 Adjusting the View Angle of the Terminal .................................................................................................. 12
2.8 Remote Terminal Operation ................................................................................................................... 13
2.8.1 Separating the Terminal from the Weighing Base ................................................................................. 13
2.8.2 Terminal Mounting .................................................................................................................................. 13
2.9 Initial Calibration ......................................................................................................................................... 14
3. OPERATION ....................................................................................................................................................... 15
3.1 Overview of Display, Home Screen ........................................................................................................... 15
3.2 Principal Functions and Main Menu .......................................................................................................... 15
3.3 Overview of Parts and Features ................................................................................................................. 16
3.4 Overview of Parts and Features –Draft Shield Models .............................................................................. 17
3.5 Overview of Parts and Features – Non-Draft Shield Models ..................................................................... 18
3.6 Overview of Parts and Features – EX12001, EX24001 and EX35001 ...................................................... 19
3.7 Overview of Parts and Features – Terminal .............................................................................................. 20
3.8 Functions and Their Icons .......................................................................................................................... 21
3.8.1 Standby .................................................................................................................................................. 21
3.8.2 Printing Data ........................................................................................................................................... 21
3.8.3 Zero Operation ....................................................................................................................................... 21
3.8.4 TouchLess Sensor Status ...................................................................................................................... 21
3.8.5 AutoCal ................................................................................................................................................ 21
3.8.6 Menu ...................................................................................................................................................... 21
3.8.7 More ...................................................................................................................................................... 21
3.8.8 Level Assist ............................................................................................................................................ 21
3.8.9 Graduations ............................................................................................................................................ 22
3.8.10 Routine Test ........................................................................................................................................... 22
3.8.11 Applications ............................................................................................................................................ 22
3.8.12 Taring a Container .................................................................................................................................. 22
3.8.13 Weighing Units ....................................................................................................................................... 22
3.8.14 Ionizer (only for EX225D/AD and EX225/AD) ........................................................................................ 22
3.8.15 Preset Tare ............................................................................................................................................. 22
3.8.16 Calibration Test ...................................................................................................................................... 22
3.8.17 Calculator ............................................................................................................................................... 22
3.8.18 Stopwatch ............................................................................................................................................... 23
3.8.19 Logout .................................................................................................................................................... 23
3.9 Ionizer (EX225D/AD and EX225/AD only) and Glass Shelf ...................................................................... 23
4. APPLICATION .................................................................................................................................................... 24
4.1 Weighing .................................................................................................................................................... 25
4.1.1 Edit Settings ........................................................................................................................................... 25
4.1.2 Application Setup ................................................................................................................................... 27
4.1.3 Save to USB ........................................................................................................................................... 28
4.1.4 Auto Save to USB .................................................................................................................................. 28
4.1.5 Statistics for Weighing ............................................................................................................................ 28
4.2 Parts Counting ........................................................................................................................................... 30
4.2.1 Standard Parts Counting (default) .......................................................................................................... 30
Find Quality Products Online at: [email protected]
www.GlobalTestSupply.com
Page 4

EN-2 EXPLORER BALANCES
4.2.2 Application Setup ................................................................................................................................... 33
4.2.3 Parts Counting – Check ......................................................................................................................... 34
4.2.4 Parts Counting – Fill ............................................................................................................................... 35
4.2.5 Statistics for Parts Counting ................................................................................................................... 36
4.3 Percent Weighing ....................................................................................................................................... 38
4.3.1 Edit Settings ........................................................................................................................................... 38
4.3.2 Application Setup ................................................................................................................................... 40
4.4 Check Weighing ......................................................................................................................................... 41
4.4.1 Standard Check Weighing (default) ....................................................................................................... 41
4.4.2 Edit Settings ........................................................................................................................................... 41
4.4.3 Application Setup ................................................................................................................................... 42
4.4.4 Check Weighing – Nominal/Weight Tolerance Mode ............................................................................ 43
4.4.5 Check Weighing – Nominal/Percent Tolerance Mode ........................................................................... 44
4.4.6 Display Settings ...................................................................................................................................... 45
4.4.7 Statistics for Check Weighing ................................................................................................................ 46
4.5 Dynamic/Animal Weighing ......................................................................................................................... 47
4.5.1 Edit Settings ........................................................................................................................................... 48
4.5.2 Application Setup ................................................................................................................................... 48
4.5.3 Dynamic Weighing – Semi-Auto ............................................................................................................ 49
4.5.4 Dynamic Weighing – Automatic ............................................................................................................. 50
4.5.5 Statistics for Dynamic Weighing ............................................................................................................. 51
4.6 Filling .......................................................................................................................................................... 52
4.6.1 Edit Settings ........................................................................................................................................... 52
4.6.2 Application Setup ................................................................................................................................... 53
4.6.3 Statistics for Filling ................................................................................................................................. 54
4.7 Totalization ................................................................................................................................................. 56
4.7.1 Totalization – Manual (Default) .............................................................................................................. 56
4.7.2 Application Setup ................................................................................................................................... 57
4.7.3 Totalization – Automatic ......................................................................................................................... 58
4.8 Formulation ................................................................................................................................................ 59
4.8.1 Free Formulation (default) ...................................................................................................................... 59
4.8.2 Application Setup ................................................................................................................................... 60
4.8.3 Recipe Formulation ................................................................................................................................ 61
4.9 Differential Weighing .................................................................................................................................. 64
4.9.1 Item Settings .......................................................................................................................................... 64
4.9.2 Application Setup ................................................................................................................................... 66
4.9.3 Differential Weighing with Auto-Process On .......................................................................................... 67
4.10 Density Determination ................................................................................................................................ 68
4.10.1 Measuring the Density of a Solid Using Water (default) ........................................................................ 68
4.10.2 Application Setup ................................................................................................................................... 70
4.10.3 Measuring the Density of a Buoyant Material Using Water ................................................................... 71
4.10.4 Measuring the Density of a Solid Using an Auxiliary Liquid ................................................................... 71
4.10.5 Measuring the Density of a liquid using a Calibrated Sinker (not supplied) ........................................... 72
4.10.6 Measuring the Density of Porous Material Using Oil ............................................................................. 74
4.11 Peak Hold ................................................................................................................................................... 76
4.11.1 Peak Hold – Semi-Automatic (default) ................................................................................................... 76
4.11.2 Application Setup ................................................................................................................................... 77
4.11.3 Peak Hold – Manual ............................................................................................................................... 78
4.11.4 Peak Hold – Automatic ........................................................................................................................... 79
4.12 Ingredient Costing (not available in semi-micro models) ........................................................................... 80
4.12.1 Item Settings .......................................................................................................................................... 80
4.12.2 Application Setup ................................................................................................................................... 83
4.13 Pipette Adjustment (not available in EX12001, EX24001, EX35001) ........................................................ 84
4.13.1 Pipette Adjustment – Manual (default) ................................................................................................... 84
4.13.2 Begin Pipette Adjustment Process ......................................................................................................... 86
4.13.3 Application Setup ................................................................................................................................... 87
4.14 Statistical Quality Control (SQC) ................................................................................................................ 88
4.14.1 Edit Settings ........................................................................................................................................... 88
4.14.2 Begin the SQC Process ......................................................................................................................... 89
4.14.3 Application Setup ................................................................................................................................... 90
4.15 Fill Weight Variation ................................................................................................................................... 92
4.15.1 Edit Settings ........................................................................................................................................... 92
4.15.2 Begin the Fill Weight Variation Process ................................................................................................. 94
Find Quality Products Online at: [email protected]
www.GlobalTestSupply.com
Page 5

EXPLORER BALANCES EN-3
4.15.3 Application Setup ................................................................................................................................... 95
4.16 Statistics ..................................................................................................................................................... 95
4.17 Library ........................................................................................................................................................ 96
4.17.1 Creating a Library Record ...................................................................................................................... 96
4.17.2 Retrieving a Library Record ................................................................................................................... 97
4.17.3 Deleting a Stored Library Record ........................................................................................................... 97
4.18 Additional Features .................................................................................................................................... 97
4.18.1 Weigh Below .......................................................................................................................................... 97
5. MENU SETTINGS ............................................................................................................................................... 98
5.1 Menu Navigation ........................................................................................................................................ 98
5.1.1 Changing Settings .................................................................................................................................. 98
5.2 Main Menu .................................................................................................................................................. 98
5.3 Calibration .................................................................................................................................................. 99
5.3.1 Calibration sub-menu ............................................................................................................................. 99
5.3.2 Internal Calibration (AutoCal™) ............................................................................................................. 99
5.3.3 Automatic Calibration ............................................................................................................................. 99
5.3.4 AutoTMInterval (Hours) .......................................................................................................................... 100
5.3.5 AutoCal™ Adjustment .......................................................................................................................... 100
5.3.6 Span Calibration ................................................................................................................................... 100
5.3.7 User Calibration .................................................................................................................................... 101
5.3.8 Calibration Test .................................................................................................................................... 101
5.4 User Management .................................................................................................................................... 102
5.5 User Settings ............................................................................................................................................ 104
5.5.1 User Settings Sub-menu ...................................................................................................................... 104
5.5.2 Change Password ................................................................................................................................ 104
5.5.3 Language ............................................................................................................................................. 104
5.5.4 Volume ................................................................................................................................................. 104
5.5.5 Display Settings .................................................................................................................................... 104
5.5.6 Functions Configuration ....................................................................................................................... 105
5.5.7 TouchLess Sensor Setup ..................................................................................................................... 105
5.5.8 Draft Shield light ................................................................................................................................... 105
5.5.9 Ionizer (seconds) .................................................................................................................................. 105
5.6 Balance Setup .......................................................................................................................................... 106
5.6.1 Balance Set-up sub-menu .................................................................................................................... 106
5.6.2 Stable Range ........................................................................................................................................ 106
5.6.3 Filter level ............................................................................................................................................. 106
5.6.4 Auto Zero Tracking ............................................................................................................................... 106
5.6.5 Audible Signal ...................................................................................................................................... 106
5.6.6 Auto Tare .............................................................................................................................................. 107
5.6.7 Gross Indicator ..................................................................................................................................... 107
5.6.8 Legal For Trade .................................................................................................................................... 107
5.6.9 Graduations .......................................................................................................................................... 107
5.6.10 Date & Time ......................................................................................................................................... 108
5.7 Applications .............................................................................................................................................. 109
5.7.1 Turning an Application ON/OFF ........................................................................................................... 109
5.8 Weighing Units ......................................................................................................................................... 109
5.8.1 Units Sub-menu .................................................................................................................................... 109
5.8.2 Turning a Unit ON/OFF ........................................................................................................................ 110
5.8.3 Custom Units ........................................................................................................................................ 110
5.9 GLP and GMP Data ................................................................................................................................. 111
5.9.2 GLP Data Sub-menu ............................................................................................................................ 111
5.9.3 Header .................................................................................................................................................. 111
5.9.4 Balance Name ...................................................................................................................................... 111
5.9.5 Project Name ........................................................................................................................................ 111
5.10 Communication ........................................................................................................................................ 112
5.10.1 Communication Sub-menu ................................................................................................................... 112
5.10.2 Baud Rate ............................................................................................................................................ 112
5.10.3 Transmission ........................................................................................................................................ 112
5.10.4 Handshake ........................................................................................................................................... 113
5.10.5 Alternate Command ............................................................................................................................. 113
5.10.6 Print Output .......................................................................................................................................... 113
5.10.7 Auto Print .............................................................................................................................................. 113
5.10.8 Print Calibration Data ........................................................................................................................... 114
Find Quality Products Online at: [email protected]
www.GlobalTestSupply.com
Page 6

EN-4 EXPLORER BALANCES
5.10.9 Print Content ........................................................................................................................................ 114
5.10.10 Print Layout .......................................................................................................................................... 117
5.10.11 Data Transfer Function ........................................................................................................................ 117
5.11 Library ...................................................................................................................................................... 118
5.12 Diagnostics ............................................................................................................................................... 118
5.12.1 Routine Test ......................................................................................................................................... 118
5.12.2 Level Bubble Light (not available in EX12001, EX24001, EX35001) .................................................. 119
5.12.3 Draft Shield Light (Analytical models) .................................................................................................. 119
5.12.4 Sensors ................................................................................................................................................ 119
5.12.5 Automatic draftshield door ................................................................................................................... 119
5.12.6 Data Maintenance ................................................................................................................................ 119
5.12.7 Service Mode ....................................................................................................................................... 119
5.13 Factory Reset ........................................................................................................................................... 120
5.13.1 Factory Reset Sub-menu ..................................................................................................................... 120
5.13.2 Reset Calibration .................................................................................................................................. 120
5.13.3 Reset User Settings ............................................................................................................................. 120
5.13.4 Reset Balance Setup............................................................................................................................ 120
5.13.5 Reset Application Modes ..................................................................................................................... 120
5.13.6 Reset Weighing Units ........................................................................................................................... 120
5.13.7 Reset GLP and GMP Data ................................................................................................................... 120
5.13.8 Reset Communication .......................................................................................................................... 120
5.13.9 Reset All (Global Reset) ....................................................................................................................... 120
5.14 Securing the Menu and Key Lock menu settings ..................................................................................... 120
5.15 Information ............................................................................................................................................... 121
5.15.1 Using Information ................................................................................................................................. 121
6. LEGAL FOR TRADE ........................................................................................................................................ 122
6.1 Settings .................................................................................................................................................... 122
6.2 Verification ................................................................................................................................................ 122
6.3 Sealing ..................................................................................................................................................... 122
7. PRINTING ......................................................................................................................................................... 123
7.1 Connecting, Configuring and Testing the Printer/Computer Interface ..................................................... 123
7.2 Printout Examples .................................................................................................................................... 124
7.3 Output Format .......................................................................................................................................... 134
8. MAINTENANCE ................................................................................................................................................ 135
8.1 Calibration ................................................................................................................................................ 135
8.2 Cleaning ................................................................................................................................................... 135
8.3 Troubleshooting ....................................................................................................................................... 135
8.4 Service Information .................................................................................................................................. 135
9. TECHNICAL DATA ........................................................................................................................................... 136
9.1 Specifications ........................................................................................................................................... 136
9.2 Drawings and Dimensions ....................................................................................................................... 143
9.3 Parts and Accessories ............................................................................................................................. 145
9.4 Icons List .................................................................................................................................................. 146
9.5 Communication ........................................................................................................................................ 151
9.5.1 Interface Commands ............................................................................................................................ 151
9.5.2 RS232 (DB9) Pin Connections ............................................................................................................. 154
9.6 The USB Interface .................................................................................................................................... 154
10. SOFTWARE UPDATES .................................................................................................................................... 157
11. COMPLIANCE .................................................................................................................................................. 158
Find Quality Products Online at: [email protected]
www.GlobalTestSupply.com
Page 7
EXPLORER BALANCES EN-5
1. INTRODUCTION
1.1 Description
The Explorer balance is a precision weighing instrument that will provide you with years of service if properly cared
for. The Ohaus Explorer balances are available in capacities from 120 grams to 35,000 grams.
1.2 Features
Modular Design: Ohaus Explorer balances are composed of two interconnected modules: a Terminal and a Base.
Depending on the user’s needs, the unit can be operated with the Terminal either attached to, or remote from, the
Base, with a single interconnect cord 1 meter long.
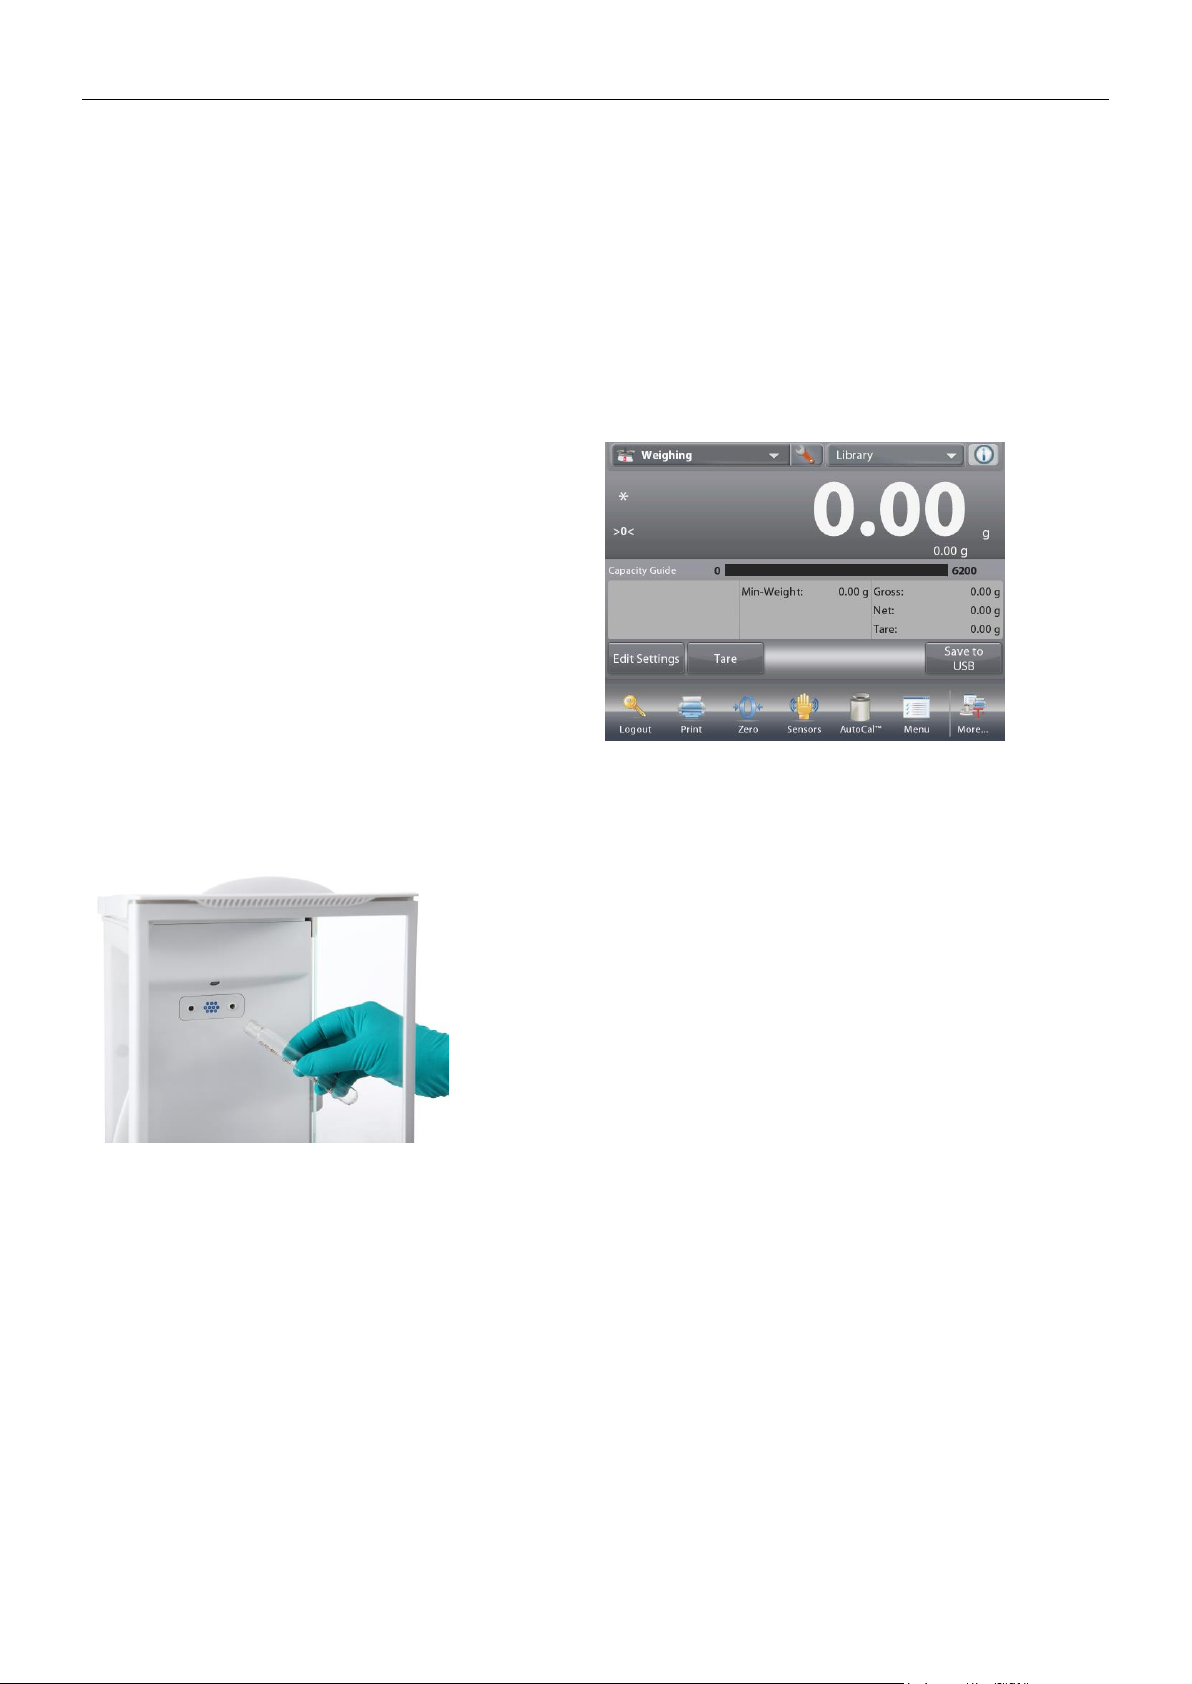
Touch Controls: Quick, graphical access to all control
functions, over a dozen applications and many features.
Touchless Sensors: can be assigned functions when
activated: Zero, Print, Ionizer+Tare, Automatic
draftshield door, ionizer etc.
Statistics: available in Weighing, Counting, Percent
Weighing, Check Weighing, Dynamic Weighing, Filling.
Ionizer (EX225D/AD and EX225/AD only)
The Ionizer generates bipolar ions continuously by DC corona
discharge separately from positive and negative discharge electrodes
and directs the ionized air onto the charged body to eliminate static
electricity. The generated ions are well-balanced in polarity and can
eliminate static electricity regardless of the polarity of the charged
body.
Static electricity
Generally, insulators such as plastics are prone to be charged with
static electricity when the ambient relative humidity is below 45%RH.
This may affect weighing and cause a measurement error of several
milligrams. The Ionizer can eliminate static electricity very effectively.
How to activate the Ionizer
The Ionizer can be activated or turned off by either the touchless sensors (see section 5.4.9) or through the
function icons by pressing the Ionizer icon on the application home screen.
Find Quality Products Online at: [email protected]
www.GlobalTestSupply.com
Page 8
EN-6 EXPLORER BALANCES
1.3 Safety Precautions
Definition of Signal Warnings and Symbols
Safety notes are marked with signal words and warning symbols. These show safety issues and warnings. Ignoring
the safety notes may lead to personal injury, damage to the instrument, malfunctions and false results.
WARNING
For a hazardous situation with medium risk, possibly resulting in
severe injuries or death if not avoided.
CAUTION
For a hazardous situation with low risk, resulting in damage to the
device or the property or in loss of data, or minor or medium
injuries if not avoided.
ATTENTION
For important information about the product. May lead to
equipment damage if not avoided.
NOTE
For useful information about the product.
Warning Symbols
General hazard
Explosion hazard
Safety Notes
CAUTION: Read all safety warnings before installing, making connections, or servicing this equipment.
Failure to comply with these warnings could result in personal injury and/or property damage. Retain all
instructions for future reference.
Operate the equipment only under ambient conditions specified in these instructions.
Do not operate the equipment in wet, hazardous or unstable environments.
Use only approved accessories and peripherals.
Service should only be performed by authorized personnel.
If the equipment is used in a manner not specified by the manufacturer, the protection provided by
the equipment may be impaired.
This equipment is for indoor use only.
Do not place the equipment upside down on the platform.
Dry off any liquid spills immediately! The instrument is not watertight.
Do not immerse the equipment in water or other liquids.
Only connect the power cord to a compatible grounded electrical outlet.
Make sure that the power cord does not pose a potential obstacle or tripping hazard.
Verify that the AC adapter's input voltage range and plug type are compatible with the local AC
mains power supply.
Do not position the equipment such that it is difficult to reach the power connection.
Ensure that vibrations due to machinery near the installation site are kept to a minimum.
Only use weights within the scale's capacity as specified in these instructions.
Do not drop loads on the platform.
Use your scale with care, gently loading items to be weighed onto the center of the pan. Avoiding
rough treatment will aid in the life of your scale.
For best results, use the equipment in the specified optimum operating temperature.
WARNING: When using chemicals and solvents, comply with the instructions of the producer and the
general lab safety rules.
WARNING: Never work in an environment subject to explosion hazards! The housing of the instrument is
not gas tight. (Explosion hazard due to spark formation, corrosion caused by the ingress of gases).
CAUTION: Battery is to be replaced only by an authorized Ohaus service dealer. Risk of explosion can
occur if the rechargeable battery is replaced with the wrong type or if it is not properly connected. Dispose of
the rechargeable battery according to local laws and regulations.
Safety precautions for the Ionizer:
WARNING: ELECTRICAL SHOCK HAZARD
AVOID TOUCHING THE ELECTRODE PINS WHILE THE IONIZER IS TURNED ON.
Find Quality Products Online at: [email protected]
www.GlobalTestSupply.com
Page 9
EXPLORER BALANCES EN-7
2. INSTALLATION
2.1 Unpacking
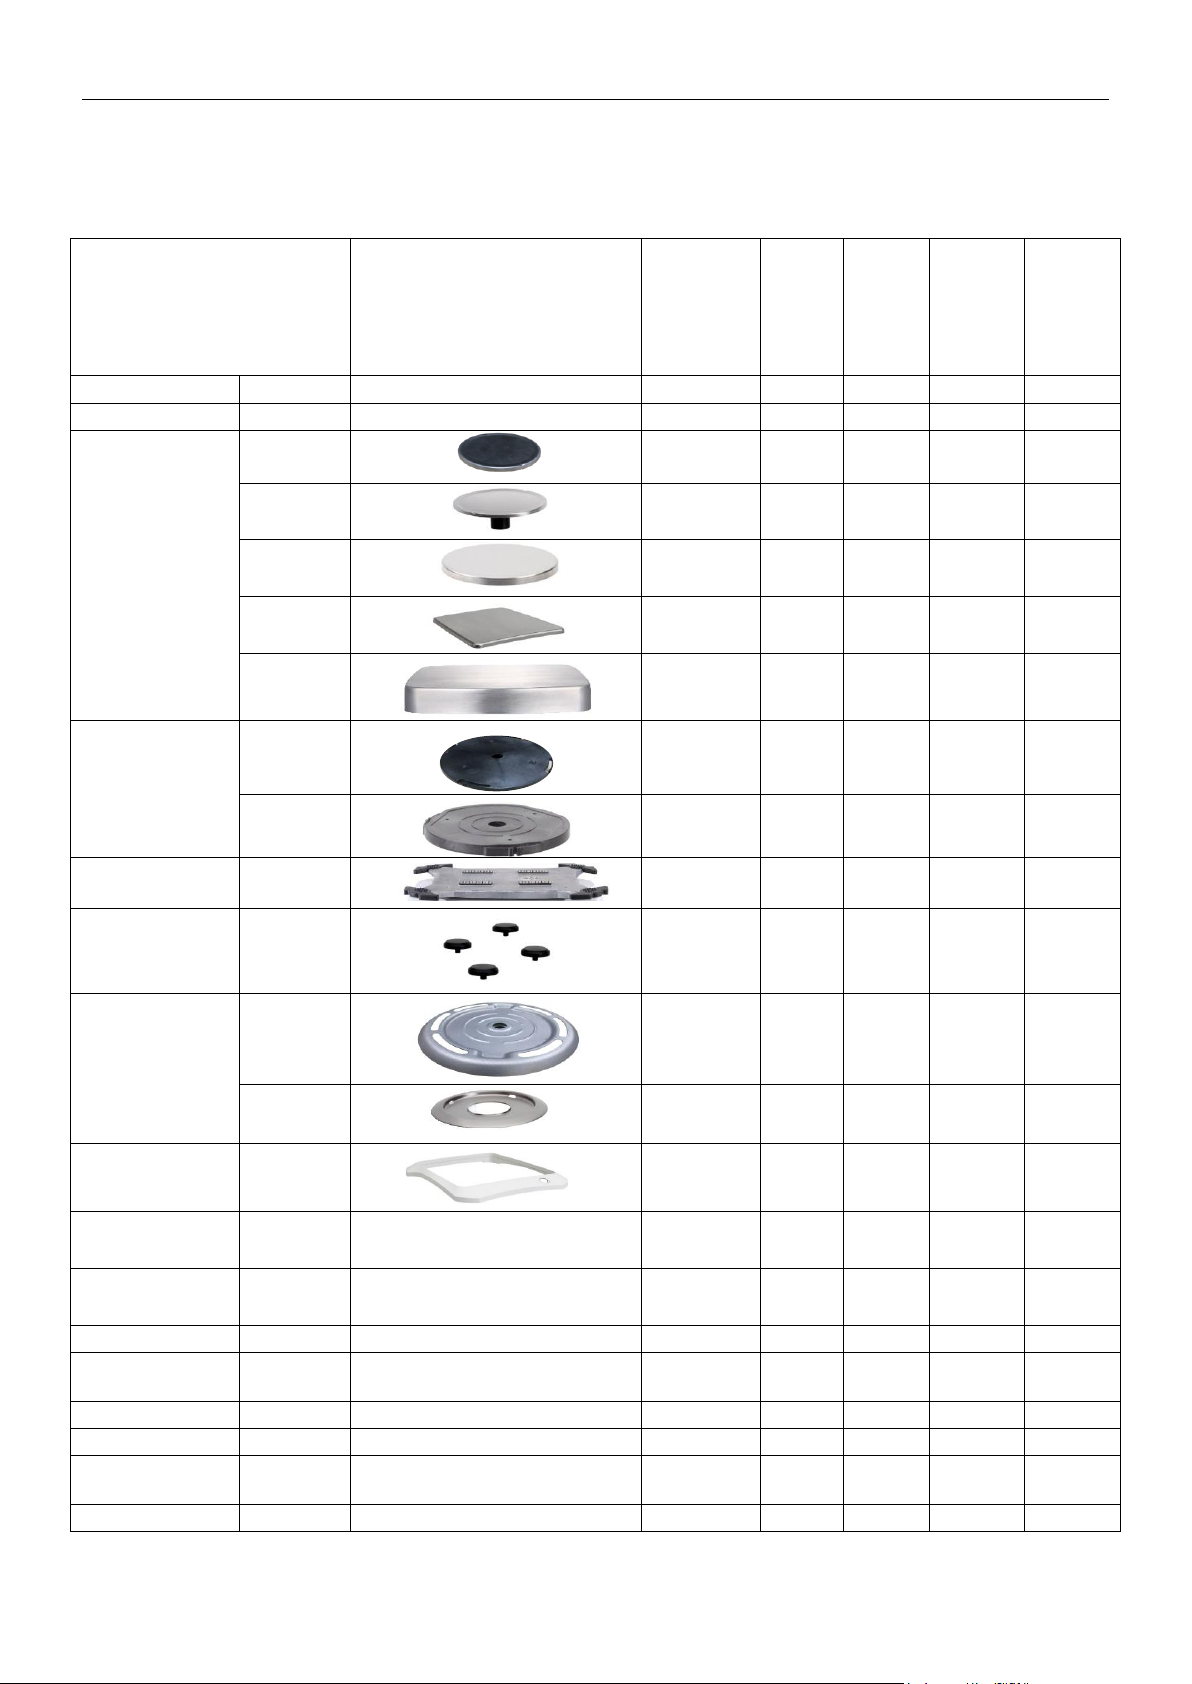
Carefully remove your Explorer balance and each of its components from the package. The included components
vary depending on the balance model (see table below). Save the packaging to ensure safe storage and transport.
Included Component
Photo
EX125
EX125D
EX225D1
EX2251
EX1241
EX2241
EX3241
EX2232
EX4232
EX623
EX1103
EX22022
EX42022
EX62012
EX62022
EX10201
EX10202
EX12001
EX24001
EX35001
Terminal
X X X X X
Weighing Base
X X X X X
Weighing Platform
80 mm
Diameter
X
90 mm
Diameter
X
130 mm
Diameter
X
190 x 200
mm
X
311 x 377
mm
X
Sub-Platform
80 mm
Diameter
X
130 mm
Diameter
X
Spider
X
Support Caps
(4 Pcs)
X
Wind Ring
X
X
Wind Shield
X
Draft Shield
Assembly
X X X
Glass Shelf
Assembly
X
Power Adapter
X X X X
Power Cord
(Country
specific)
X X X X X
Use Cover
Terminal X X X X X
Warranty Card
X X X X X
USB Extension
Cable
X
Dust Cover
X
Notes: 1 Includes Automatic draftshield door Model
2 Includes ExCal Model
Find Quality Products Online at: [email protected]
www.GlobalTestSupply.com
Page 10
EN-8 EXPLORER BALANCES
2.2 Installing Components
Refer to the illustrations and instructions below to identify and assemble your Explorer balance with its components.
All components must be assembled before using the balance.
2.2.1 Terminal Setup
When the Explorer is delivered, the Terminal is already attached (docked) to the Base. No additional setup is
necessary. However, for Draft Shield models, the Terminal needs to be detached temporarily in order to assemble
parts of the Draft Shield. Refer to the illustrations and instructions below to identify and assemble your Explorer
Balance.
Note: The Terminal is identical for all Explorer Balance models.
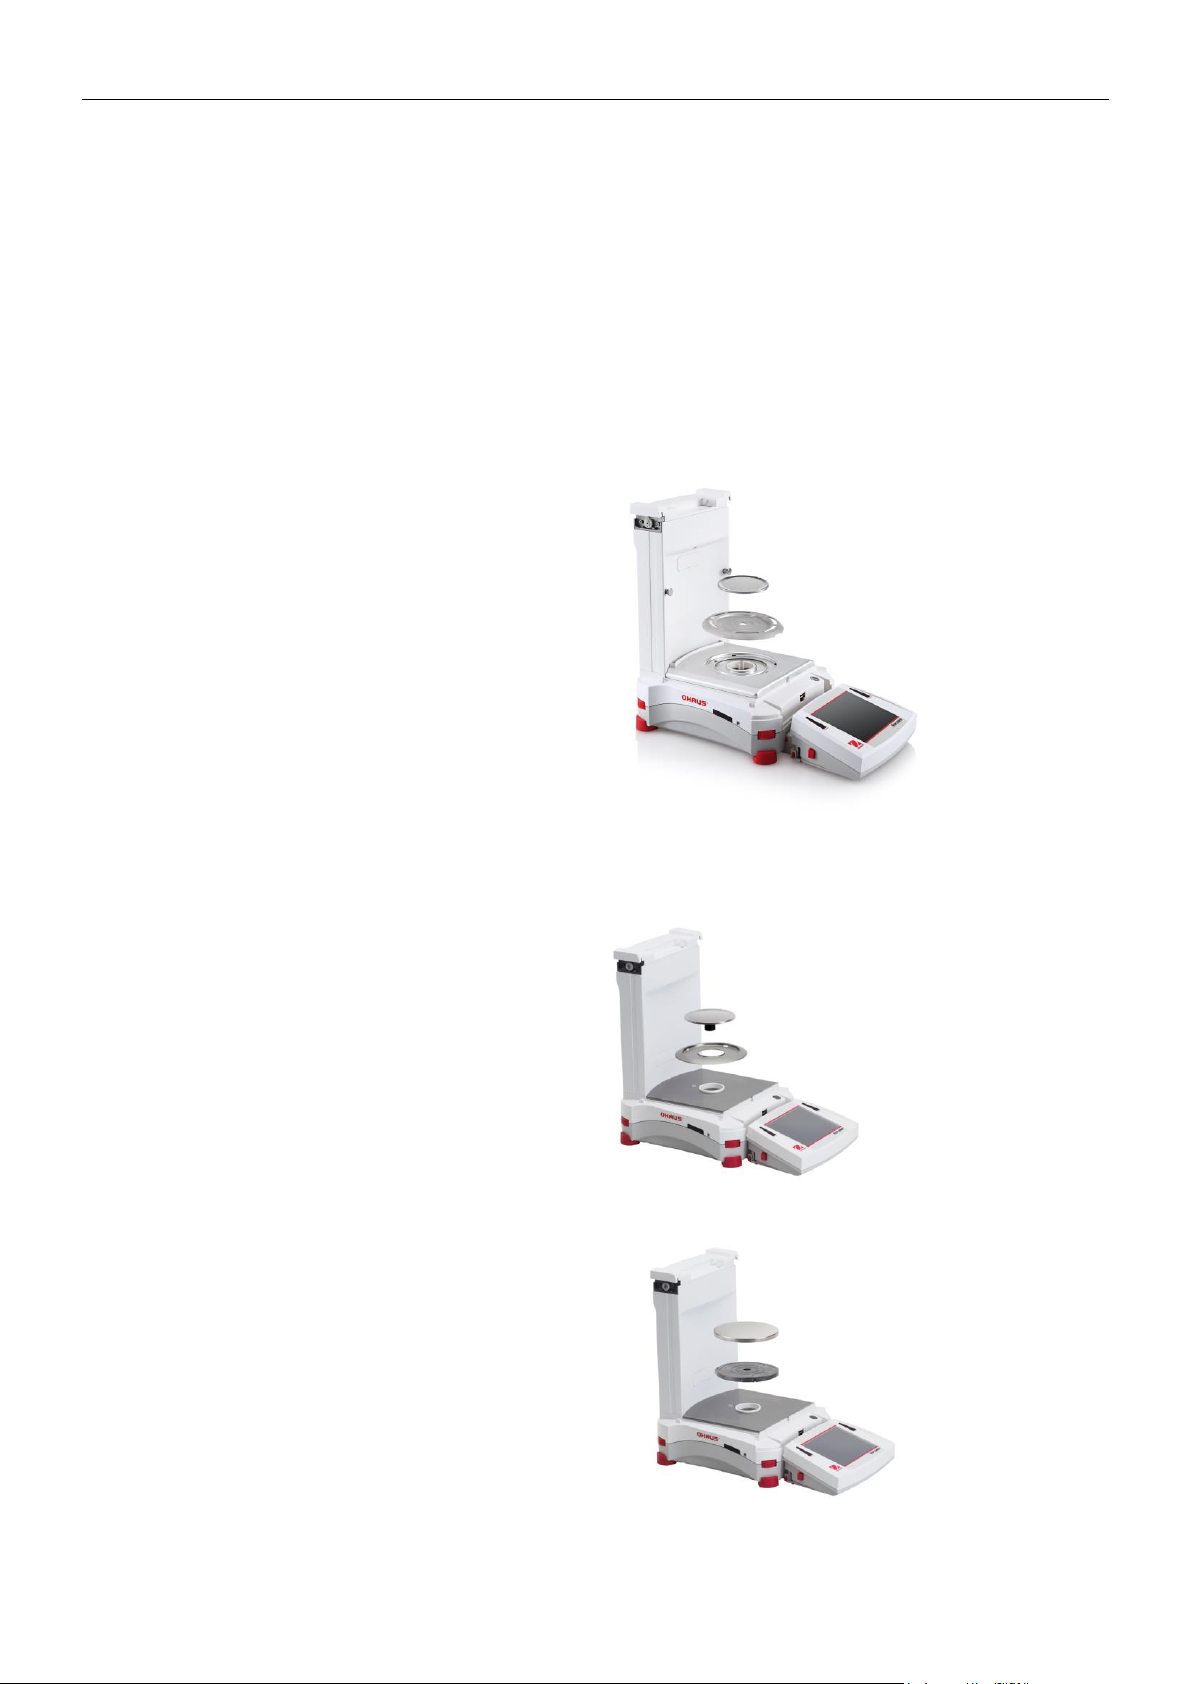
2.2.2 Installing the Wind Ring, Weighing Platform on Semi-Micro models
Note: Assembly instructions also apply to models with the suffix M or N.
1. Place the Wind Ring in position.
2. Insert the Platform Assembly
onto the Mounting Cone located
in the center of the Balance.
2.2.3 Installing the Wind Ring, Weighing Platform on Models EX1241, EX2241, and EX324
1
Note: Assembly instructions also apply to models with the suffix M or N.
3. Place the Wind Ring in position.
4. Insert the Platform Assembly
onto the Mounting Cone located
in the center of the Balance.
2.2.4 Installing the Sub-Platform and Weighing Pan on Models EX2232, EX4232, EX623 and EX1103
1. Place the Sub-platform in
position.
2. Position the Platform on the
Sub-platform.
Find Quality Products Online at: [email protected]
www.GlobalTestSupply.com
Page 11
EXPLORER BALANCES EN-9
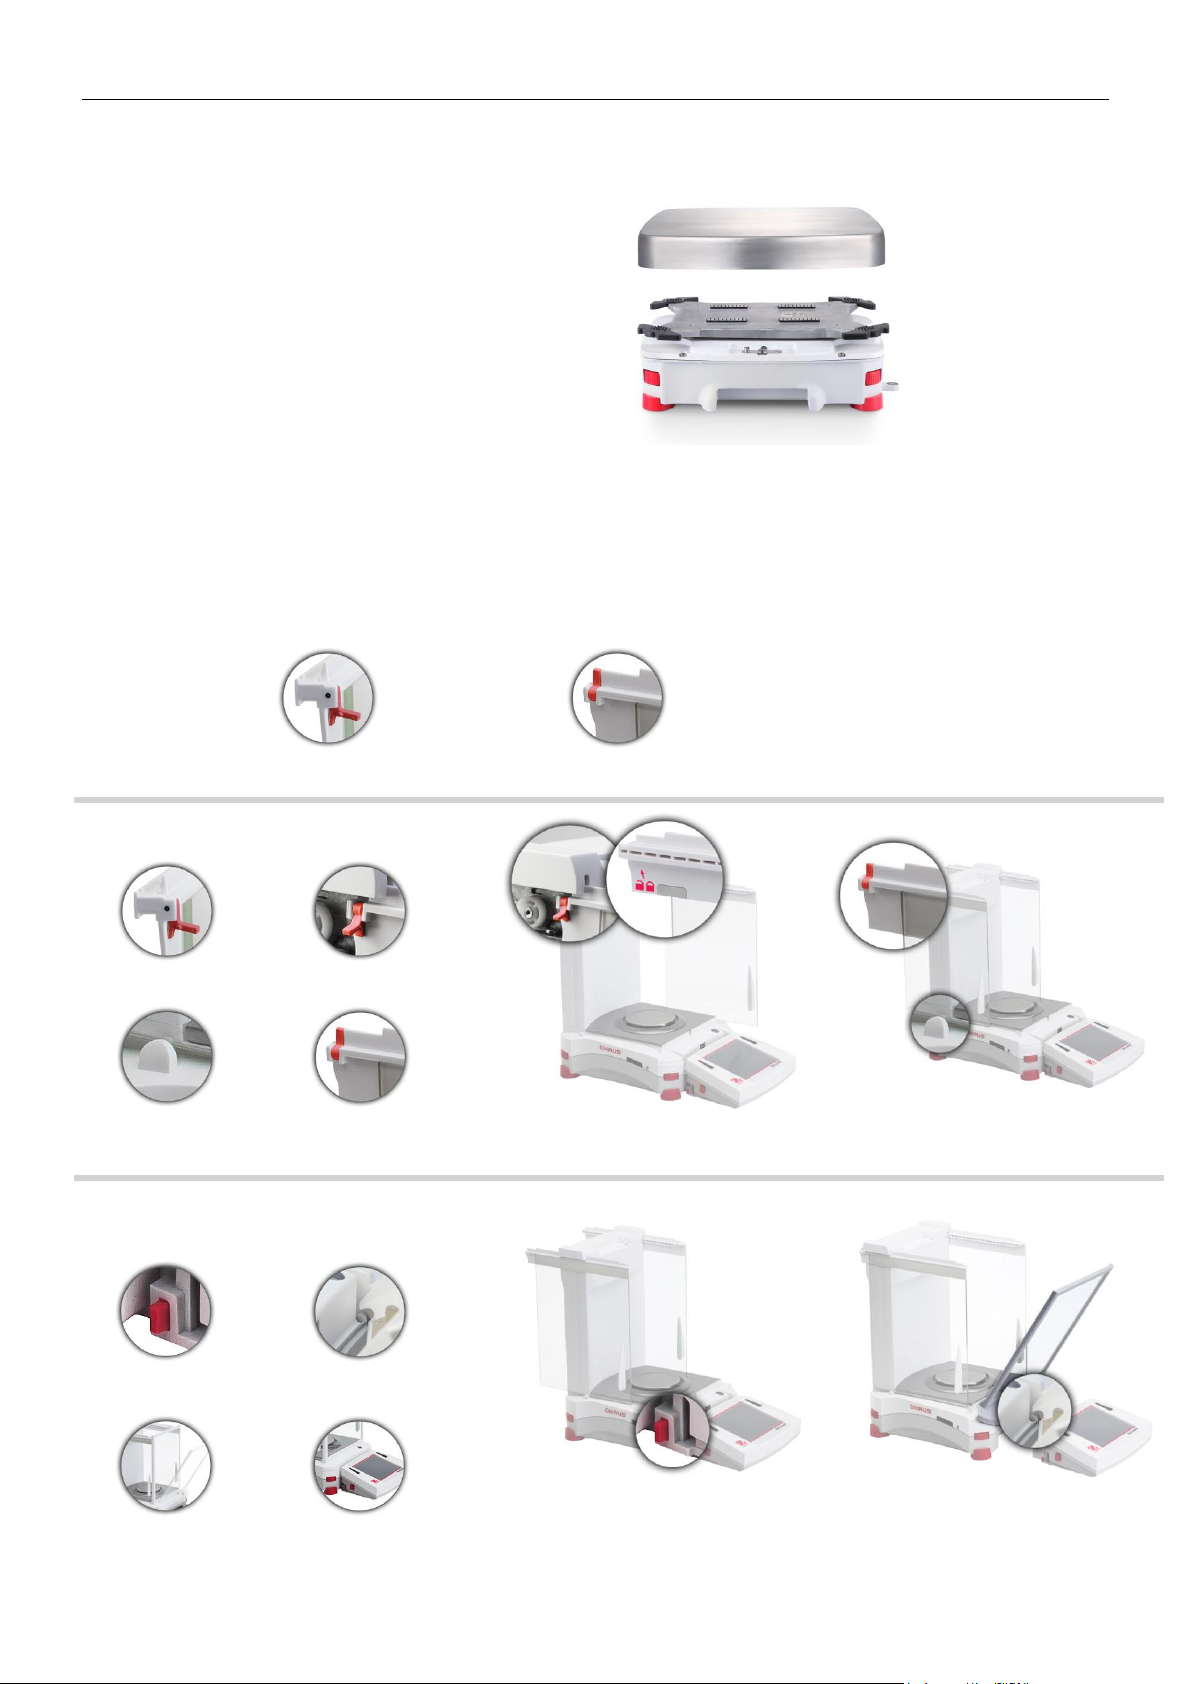
2.2.5 Installing the Weighing Pan on Models EX12001, EX24001 and EX35001
1. Position the Platform on the
base.
Notes: 1 Includes Automatic draftshield door Model
2 Includes ExCal Model
2.2.6 Installing the Draft Shield Glass and Doors on Draft Shield Models
1. Carefully remove each of the four glass Draft Shield sections from the packaging.
NOTE: Before installing side doors, be sure to set the lock tabs in the proper position, as shown here.
UNLOCK:
LOCK:
2. Follow the steps below to install side, front and top doors of the Draft Shield.
Side Door Installation
1. Unlock
2. Align
3. Clear
4. Lock
Position glass door to slide. Open lock tab (top); insert in top groove and slide inside bottom groove. Close lock tab.
Front Panel Installation
1. Release
terminal
2. Align
3. Push to
rear
4. Reconnect
terminal
Press button to separate Terminal from Base. Seat panel’s hooked ends in base. Swing panel to vertical position.
Find Quality Products Online at: [email protected]
www.GlobalTestSupply.com
Page 12
EN-10 EXPLORER BALANCES
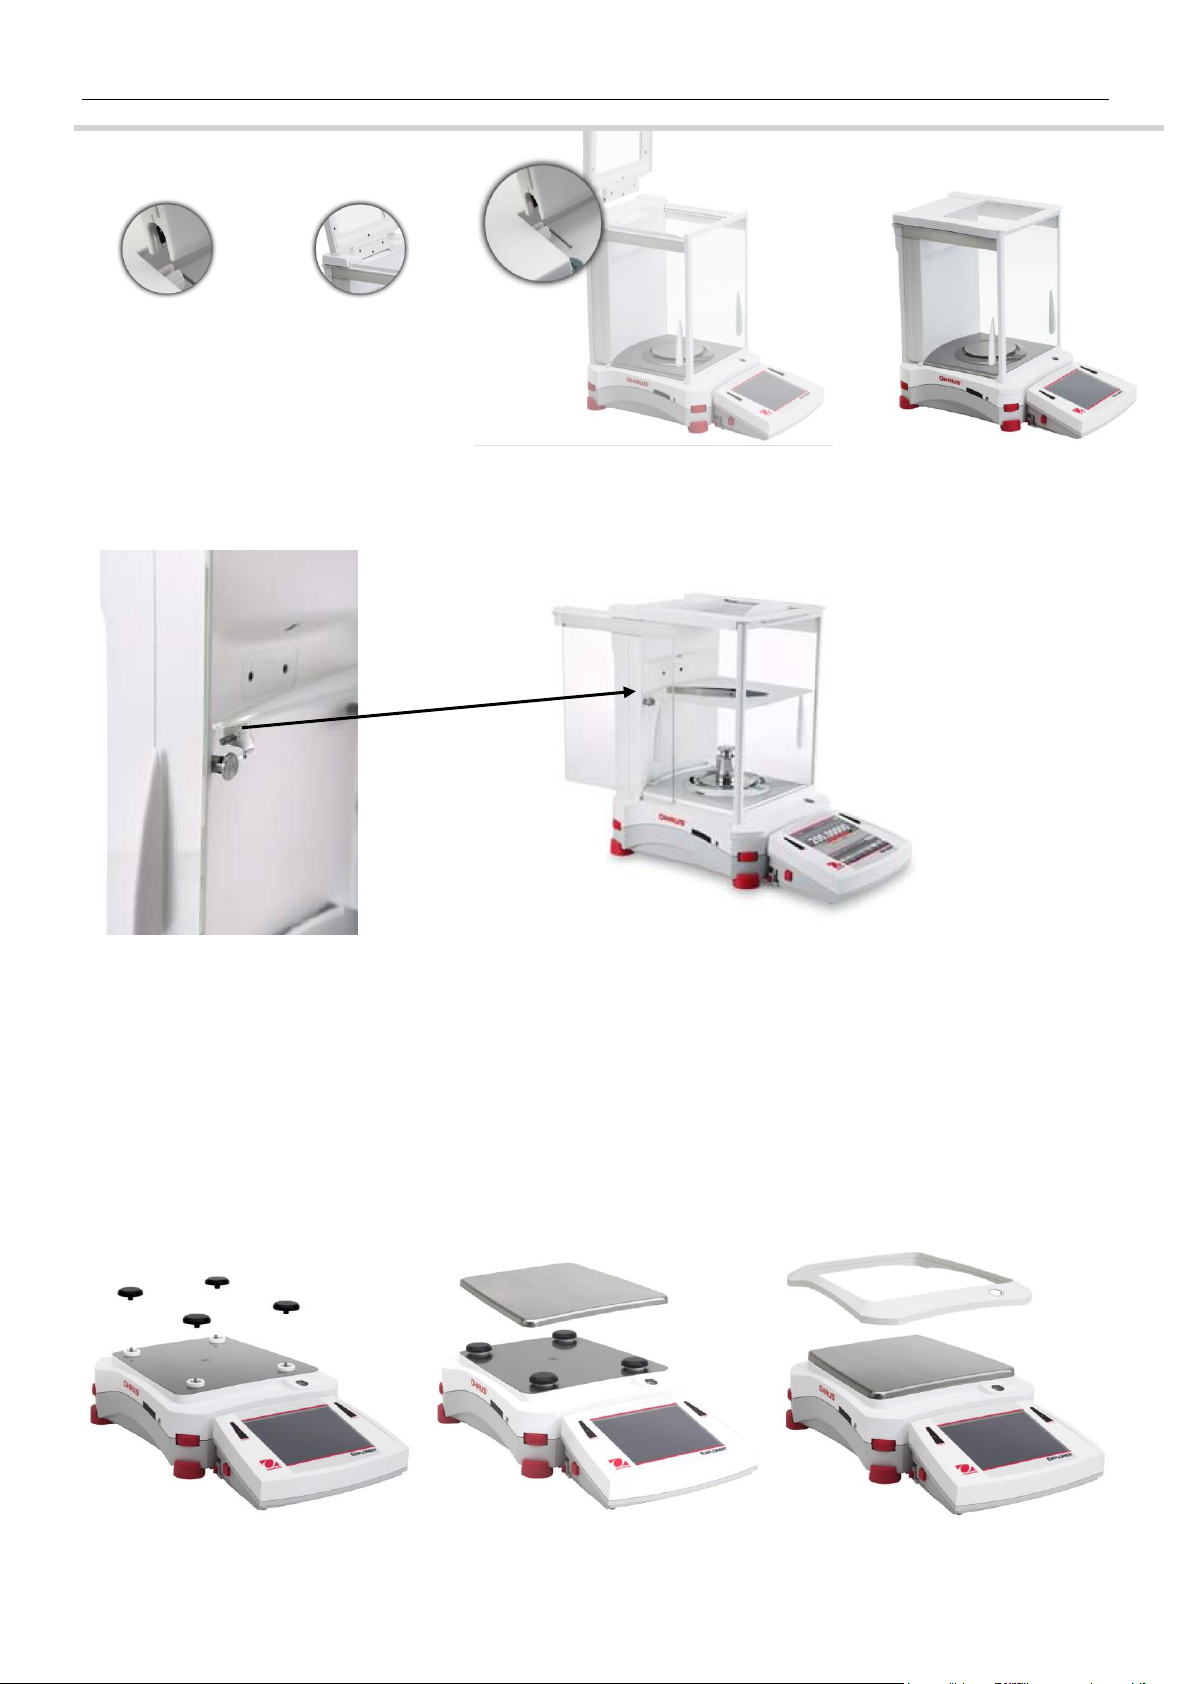
Top Door Installation
1. Align
2. Press Down
Insert Top Door’s hooked ends in grooved pegs. Press gently to seat. Check for smooth movement. Close door.
2.2.7 Installing the Glass Shelf (on Semi-Micro models)
Align and press down the shelf on the two supporting pegs.
Note: If the sliding doors and top lid have been installed, first open the sliding glass doors on both sides and open
the top lid to make space for the glass shelf.
2.2.8 Installing the Weighing Pan & Wind Shield – Non-Draft Shield Models
Note: Assembly instructions also apply to models with the suffix M or N.
1. Place the four Support Caps onto the Balance as shown.
2. Place the Weighing Pan on the Support Caps
3. Place the Wind Shield onto the Balance as shown.
Note: The balance can be operated without the Wind Shield. However, depending on ambient conditions the
displayed results may be slightly less stable.
Find Quality Products Online at: [email protected]
www.GlobalTestSupply.com
Page 13
EXPLORER BALANCES EN-11
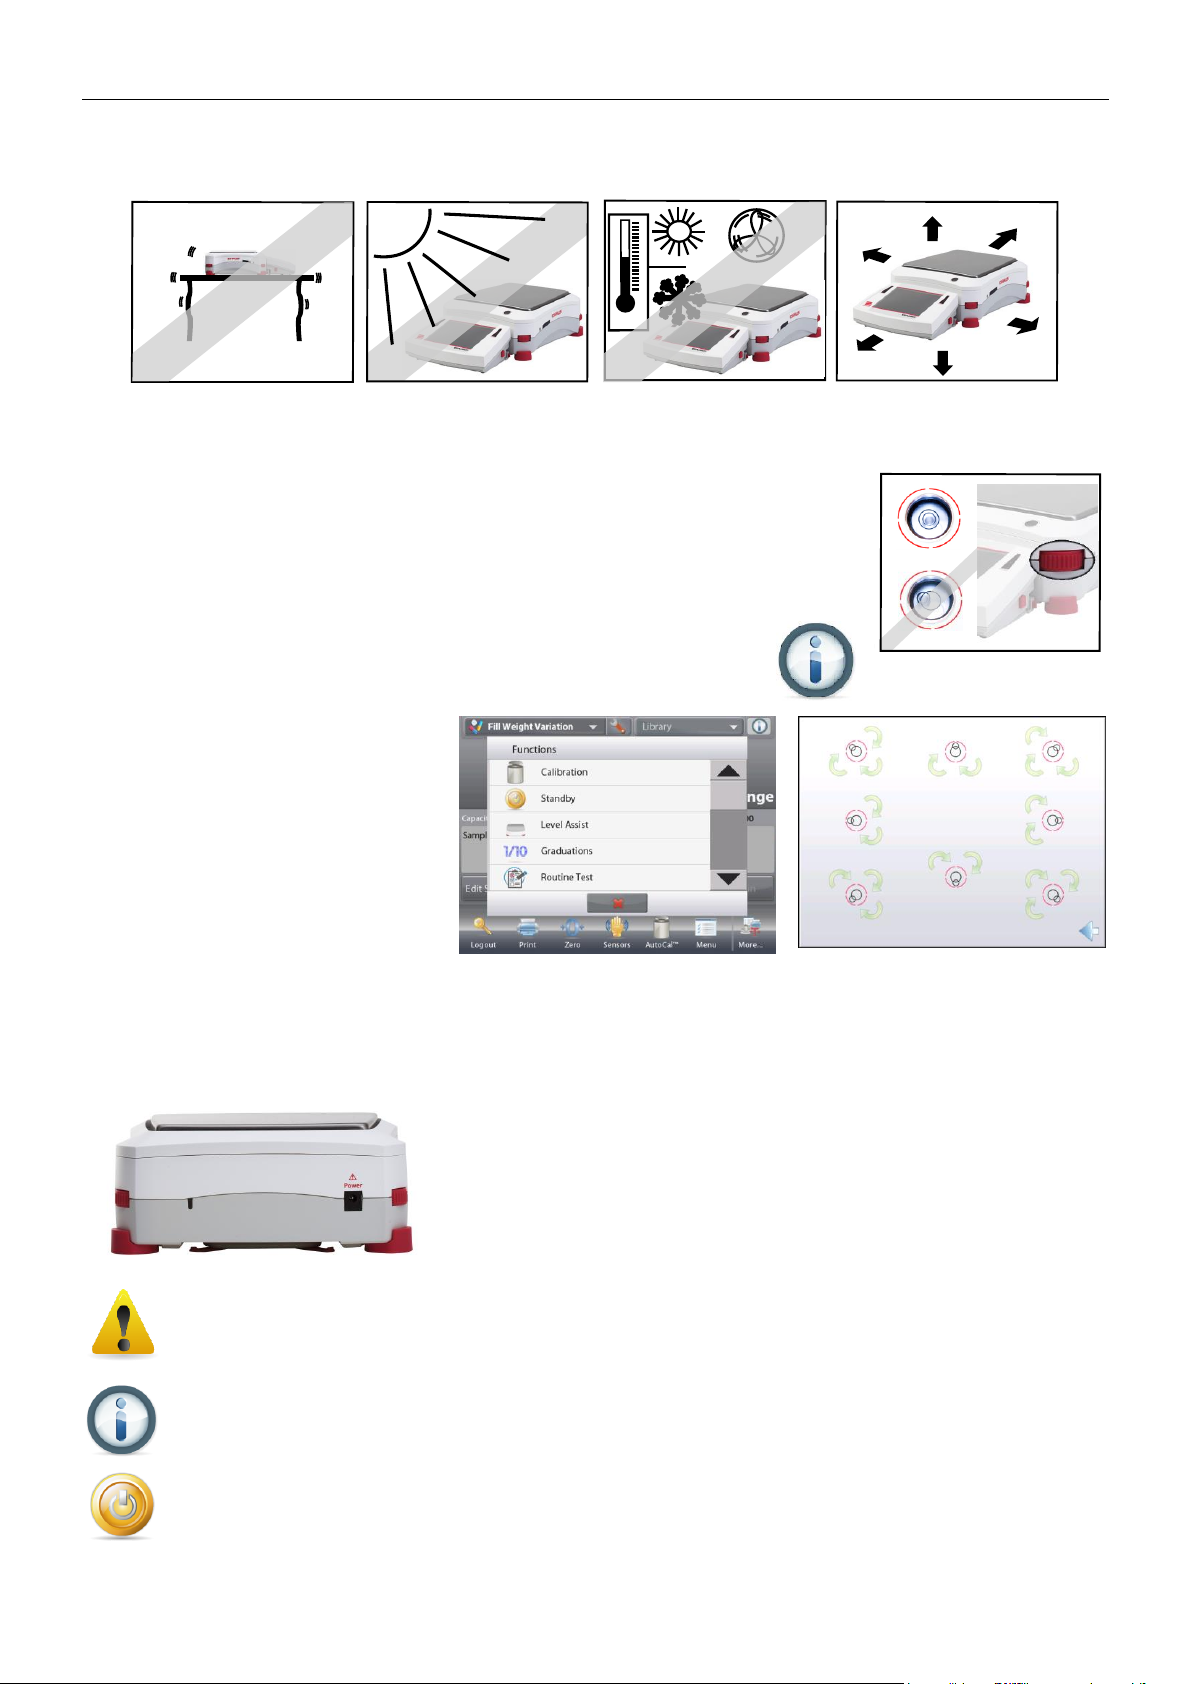
2.3 Selecting the Location
Avoid excessive vibrations, heat sources, air current, or rapid temperature changes. Allow sufficient space.
Note: Interface cables connect to the terminal. The terminal can be detached and mounted on a wall or
positioned on a table separate from the balance.
2.4 Leveling the Equipment
The Explorer has an illuminated level indicator as a reminder that the balance should
be leveled for accurate weighing. There is a level bubble in a small round window on
the front of the Base. To level the balance, adjust the Leveling Thumbwheels at each
corner until the bubble is centered in the circle.
Be sure the equipment is level each time its location is changed.
Note: The feet cannot rotate. The Thumbwheels must be used for leveling.
See the Level Assist screen in the Information Menu.
To see the Level Assist menu, touch
More on the bottom-right corner of the
main screen. Then touch Level Assist.
The Level Assist screen shows which
direction to turn the thumbwheels to
center the level bubble.
2.5 Connecting Power
2.5.1 Models with AC Adapter
For models supplied with an AC adapter, connect the DC output connector to the power receptacle on the rear of
the base. Then connect the AC power cord to a suitable electrical outlet.
Note: EX12001, EX24001 and EX35001 do not have AC Adapter
Caution: For use with CSA certified (or equivalent approved) power source,
which must have a limited current output.
Note: Allow equipment to warm up for 60 minutes for optimal weighing performance.
Standby: When unit is plugged in, it starts in Standby mode. Press the Standby icon to start.
Find Quality Products Online at: [email protected]
www.GlobalTestSupply.com
Page 14
EN-12 EXPLORER BALANCES
2.5.2 Models with AC Power Cord
For models with an AC power cord, connect the power cord to a suitable electrical grounded outlet
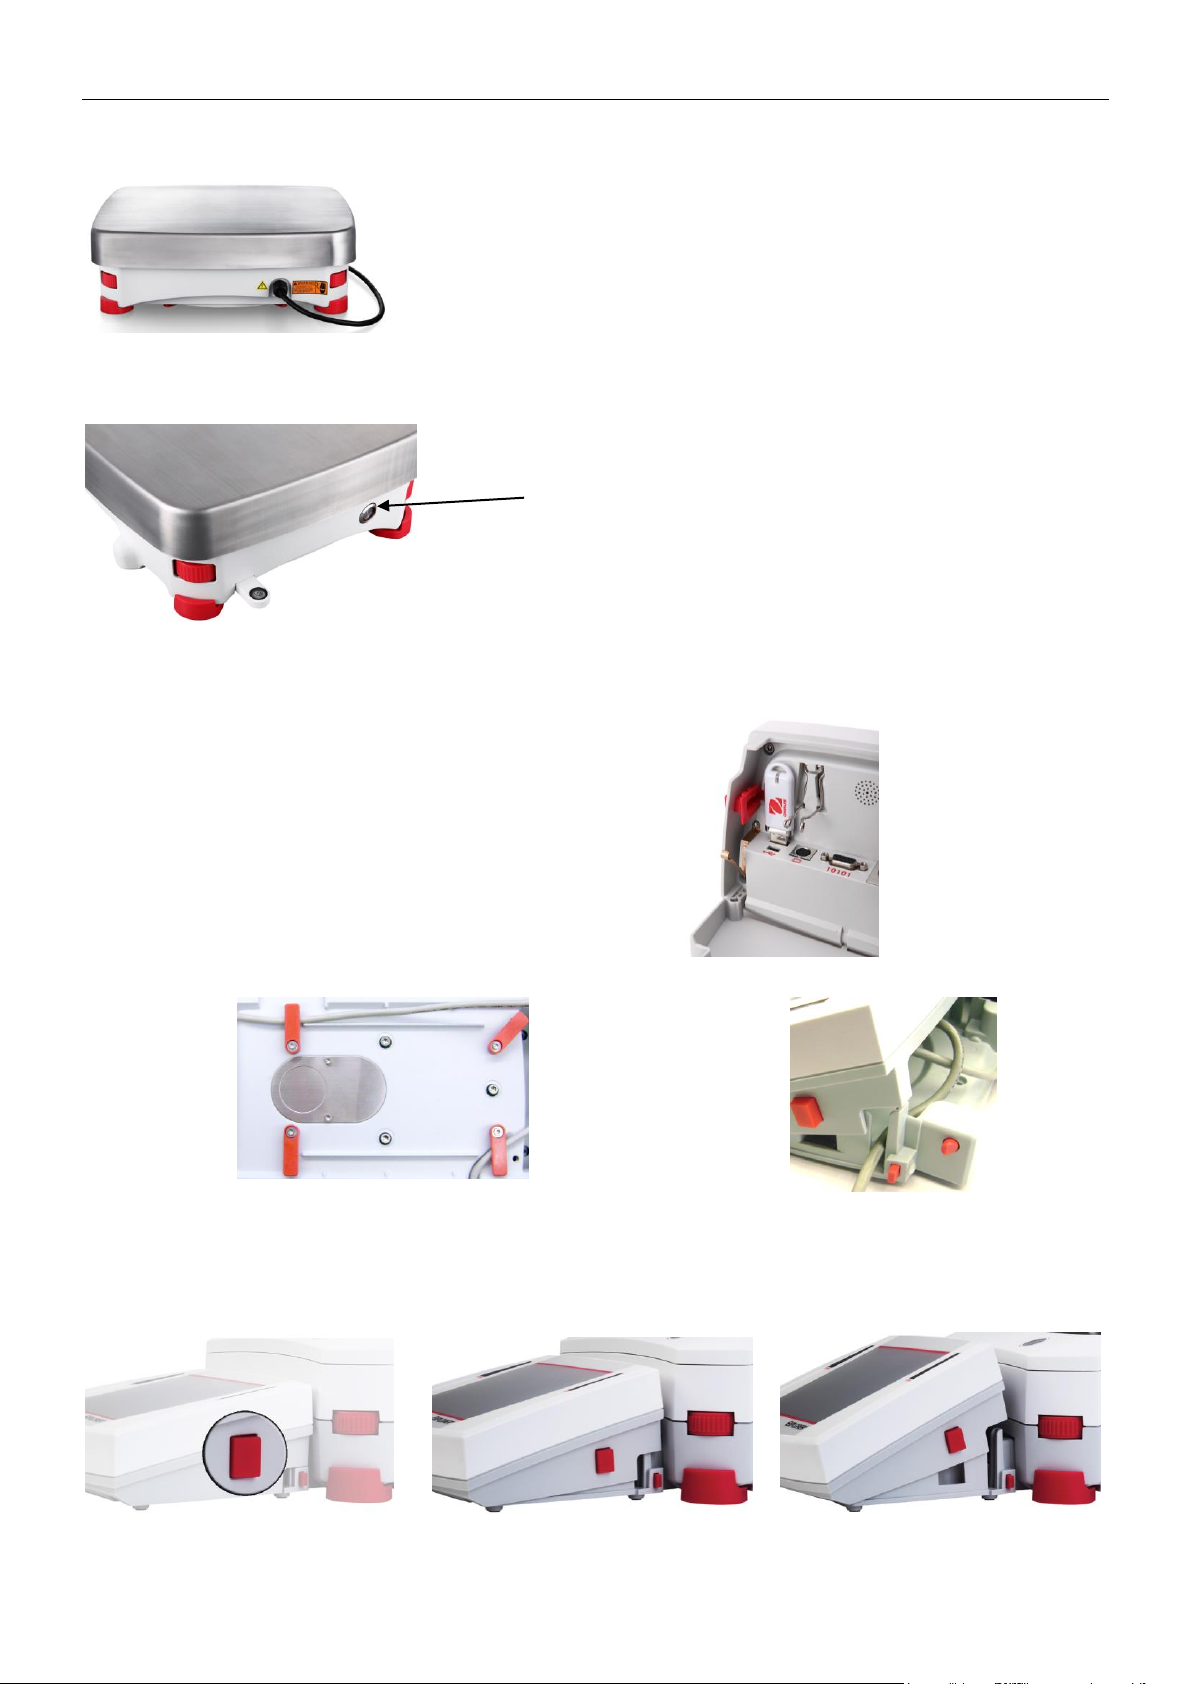
2.5.3 Power ON Button on EX12001, EX24001 and EX35001
The models EX12001, EX24001 and EX35001 have no AC Adapter. Just connect the power plug to a suitable
electrical outlet and press the ON button on the side of the base (see figure below).
Power ON button on the side of the base (EX12001, EX24001 and EX35001)
2.6 Connecting the Interface
Use the built-in RS-232 (10101) Port to connect either to a
computer or a printer with a standard (straight-through) serial
cable. Or connect using the scale’s USB ports.
Note: For configuration and interface commands, see the
Communication Menu Settings section.
For Connecting, Configuring and Testing the Printer/Computer
Interface, and for sample Print Output Formats, see the Printing
section.
Interface connections on back of Terminal.
Thread printer cable along cable coils on bottom of balance. Or pass cable through groove near release button.
2.7 Adjusting the View Angle of the Terminal
To adjust the Terminal display’s viewing angle, press in the Terminal Adjust buttons on both sides of the Terminal.
Power ON Button
Find Quality Products Online at: [email protected]
www.GlobalTestSupply.com
Page 15
EXPLORER BALANCES EN-13
2.8 Remote Terminal Operation
The Terminal communicates with the weighing base via the Terminal cable. This cable must be plugged into the
Terminal for the Explorer to display properly. If desired, the Explorer balance may be operated either with the
Terminal attached (as-shipped), or remotely (up to 1 meter away).
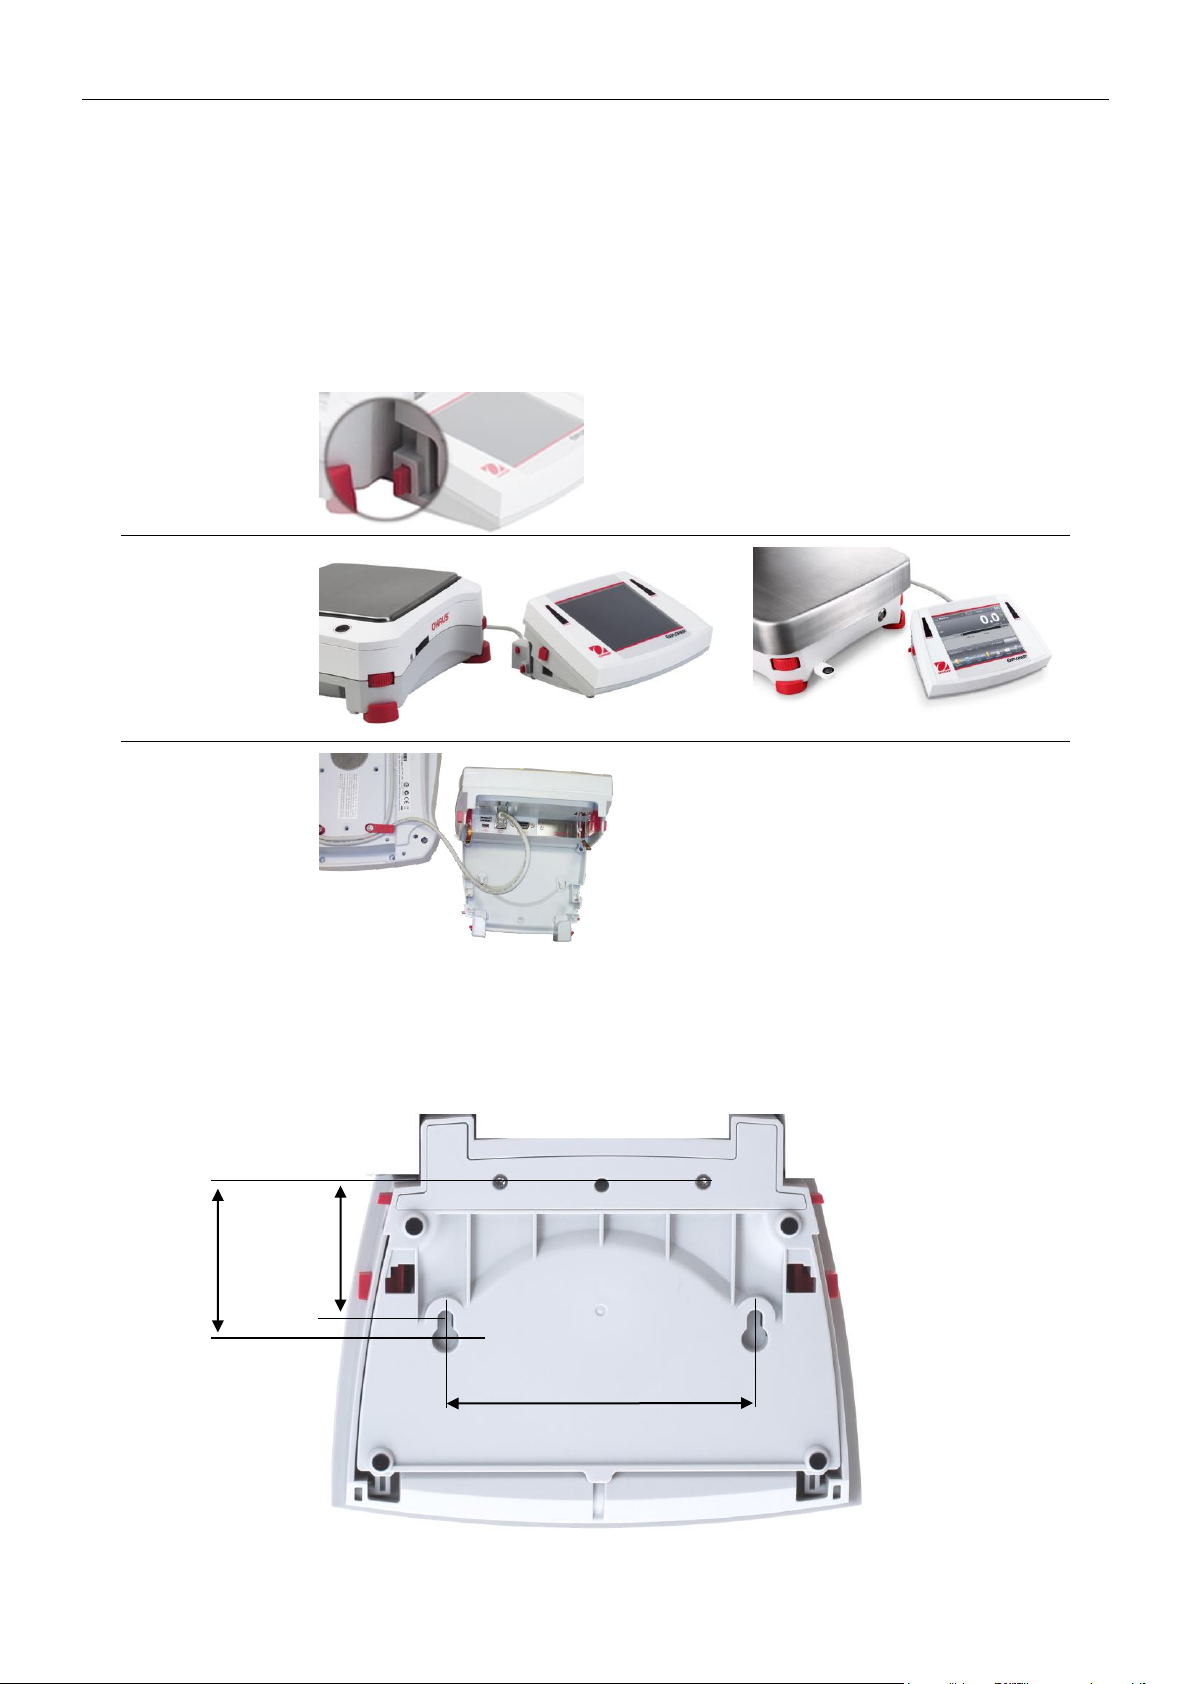
2.8.1 Separating the Terminal from the Weighing Base
1. To detach, press both the Release buttons inward (both at the same time) and gently pull the Terminal
towards you (outward) until the Terminal is detached. These Release buttons disengage the two hooks
holding the Terminal to the Base. A cable is attached to the Terminal. Take care to not damage or
disconnect this cable.
2. To reattach the Terminal, press in the two Release buttons and slide the Terminal into the Base until the
Terminal hooks click and engage to hold the Terminal in place.
Release Button
Base and Terminal
Terminal Cable
Note: If a longer operation distance is required, a Terminal Extension cable is available as an accessory.
2.8.2 Terminal Mounting
If desired, the Terminal may be mounted to a wall or table using fasteners (not supplied) that are appropriate for the
type of mounting surface The Terminal bracket will accommodate 4mm (#8) screws. Locate the mounting holes as
shown in Figure 2-1.
Figure 2-1. Terminal Mounting Dimensions.
56.5 mm
2.2 in
112 mm / 4.4 in
48.5 mm
1.9 in
Find Quality Products Online at: [email protected]
www.GlobalTestSupply.com
Page 16

EN-14 EXPLORER BALANCES
2.9 Initial Calibration
When the Balance is first installed, and when it is moved to another location, it must be calibrated to ensure
accurate weighing results. The Explorer Balances have built in AutoCal which can calibrate the balance
automatically and does not require calibration masses. If preferred, the balance can be manually calibrated with
external masses. Have the appropriate calibration masses available before beginning calibration. Refer to the
Calibration Section for masses and calibration procedure.
Find Quality Products Online at: [email protected]
www.GlobalTestSupply.com
Page 17
EXPLORER BALANCES EN-15
3. OPERATION
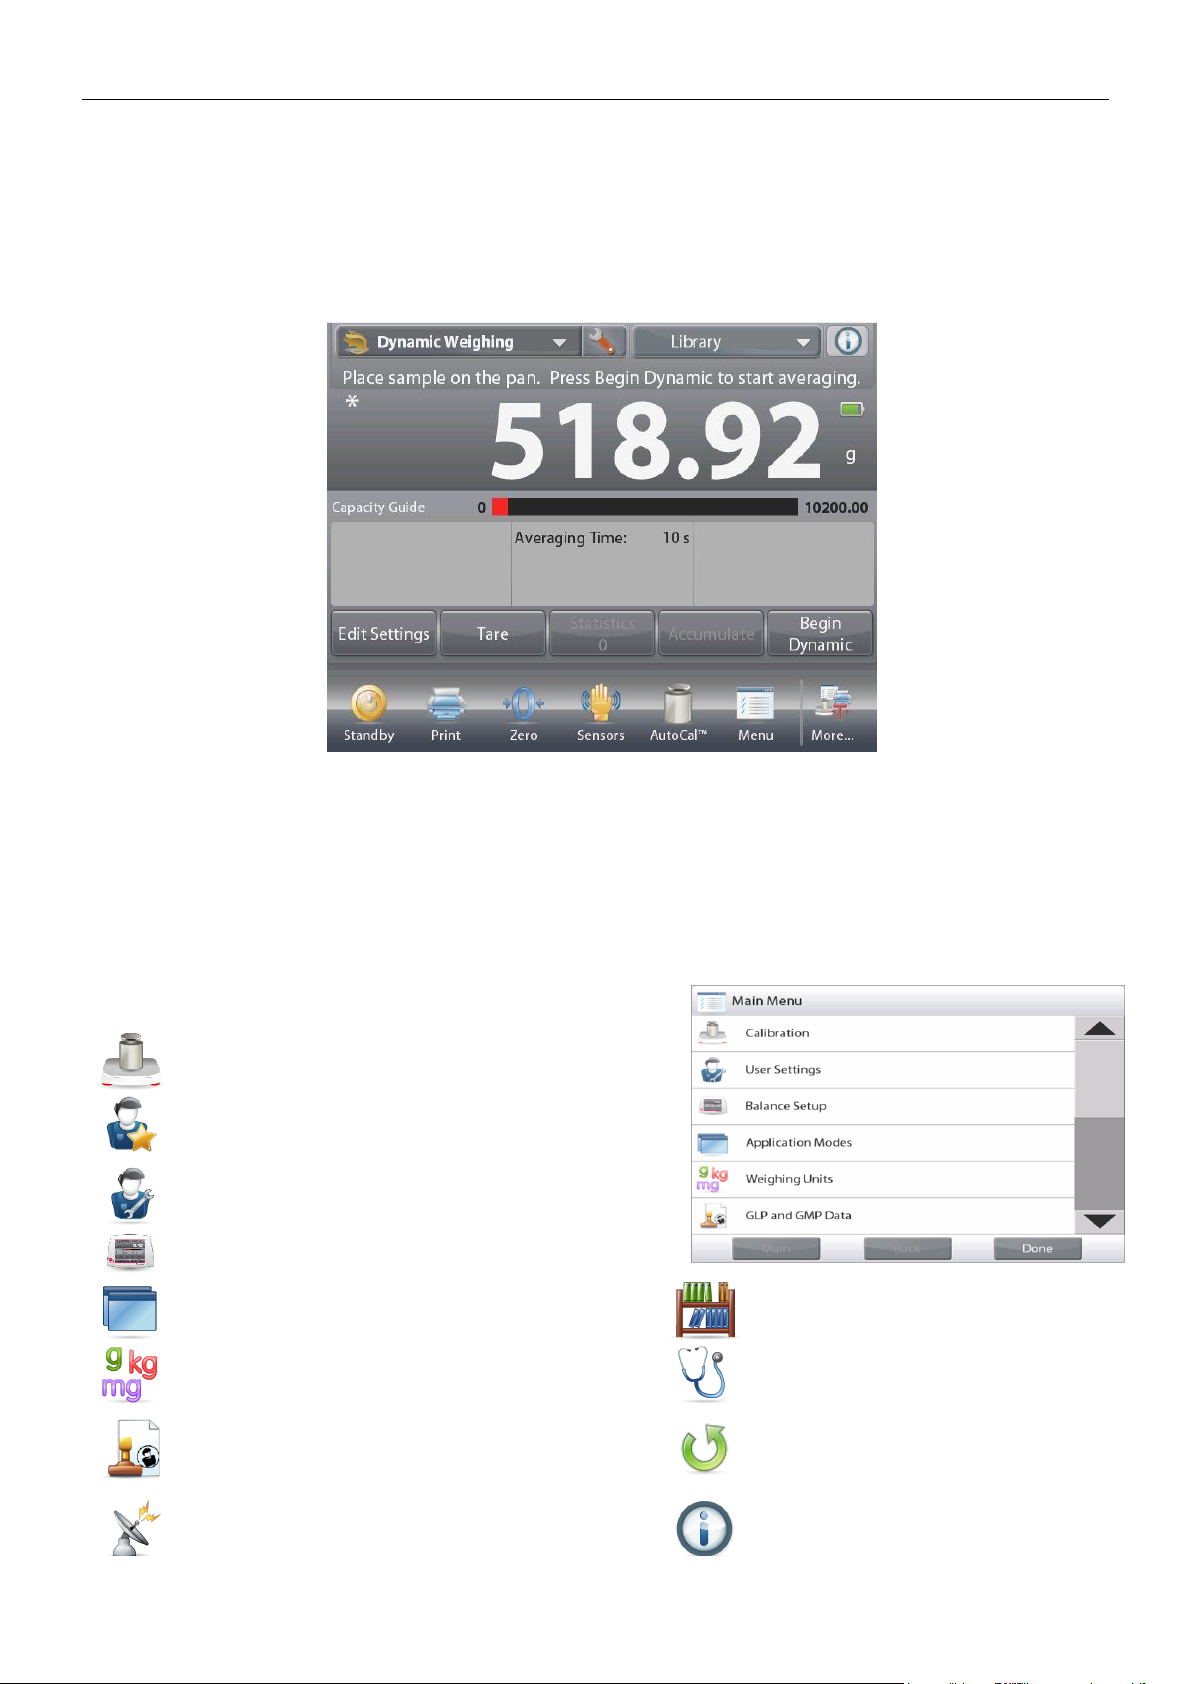
3.1 Overview of Display, Home Screen
This equipment utilizes a touch-sensitive display. Touch areas and Buttons to control the equipment’s functions.
CONTROLS
Touch to access application setup menu
Touch to change
applications
Touch to access
available libraries
Touch for information menu
Instructional Messages
Stability (*), Net (NET),
Gross (G) and/or center
of zero (>0<) indicators
Battery life indicator (shown
when powered by optional
battery pack)*
Touch unit indicator to
change weighing unit
Capacity or Status Guides:
Vary by application
Result Fields:
Information varies by
application
Application Buttons:
Functions vary by
application
Touch icons to perform
specific functions or
access other functions
*Battery pack is only for EX12001, EX24001, EX35001 and their related models.
3.2 Principal Functions and Main Menu
Weighing: Press Tare to set the display to zero. Place an item on the pan. Display indicates gross weight.
Taring: With no load on the pan, press Tare to set the display to zero. Place an empty container on the pan
and press Tare. Add material to the container and its net weight is displayed. Remove container and
container’s weight appears as a negative number. Press Tare to clear.
MENU & SCREEN NAVIGATION
Touch Menu to open the menu list.
Touch and drag the Scroll bar to view additional items.
Calibration:
Touch to view calibration options.
User Management:
Touch to view user management settings.
User Settings:
Touch to view user preferences.
Balance Setup:
Touch to view balance settings.
Application Modes:
Touch to view application modes.
Library:
Touch to delete all Library records.
Weighing Units:
Touch to view weighing units.
Diagnostics:
Touch to view Diagnostics items.
GLP and GMP Data:
Insert user data for traceability.
Factory Reset:
Touch to do a Factory reset.
Communication:
Touch to view COM Device Settings and Print
Settings.
Information:
Touch to view list of topics.
Find Quality Products Online at: [email protected]
www.GlobalTestSupply.com
Page 18
EN-16 EXPLORER BALANCES
Ionizer
(EX*AD
models
only)*
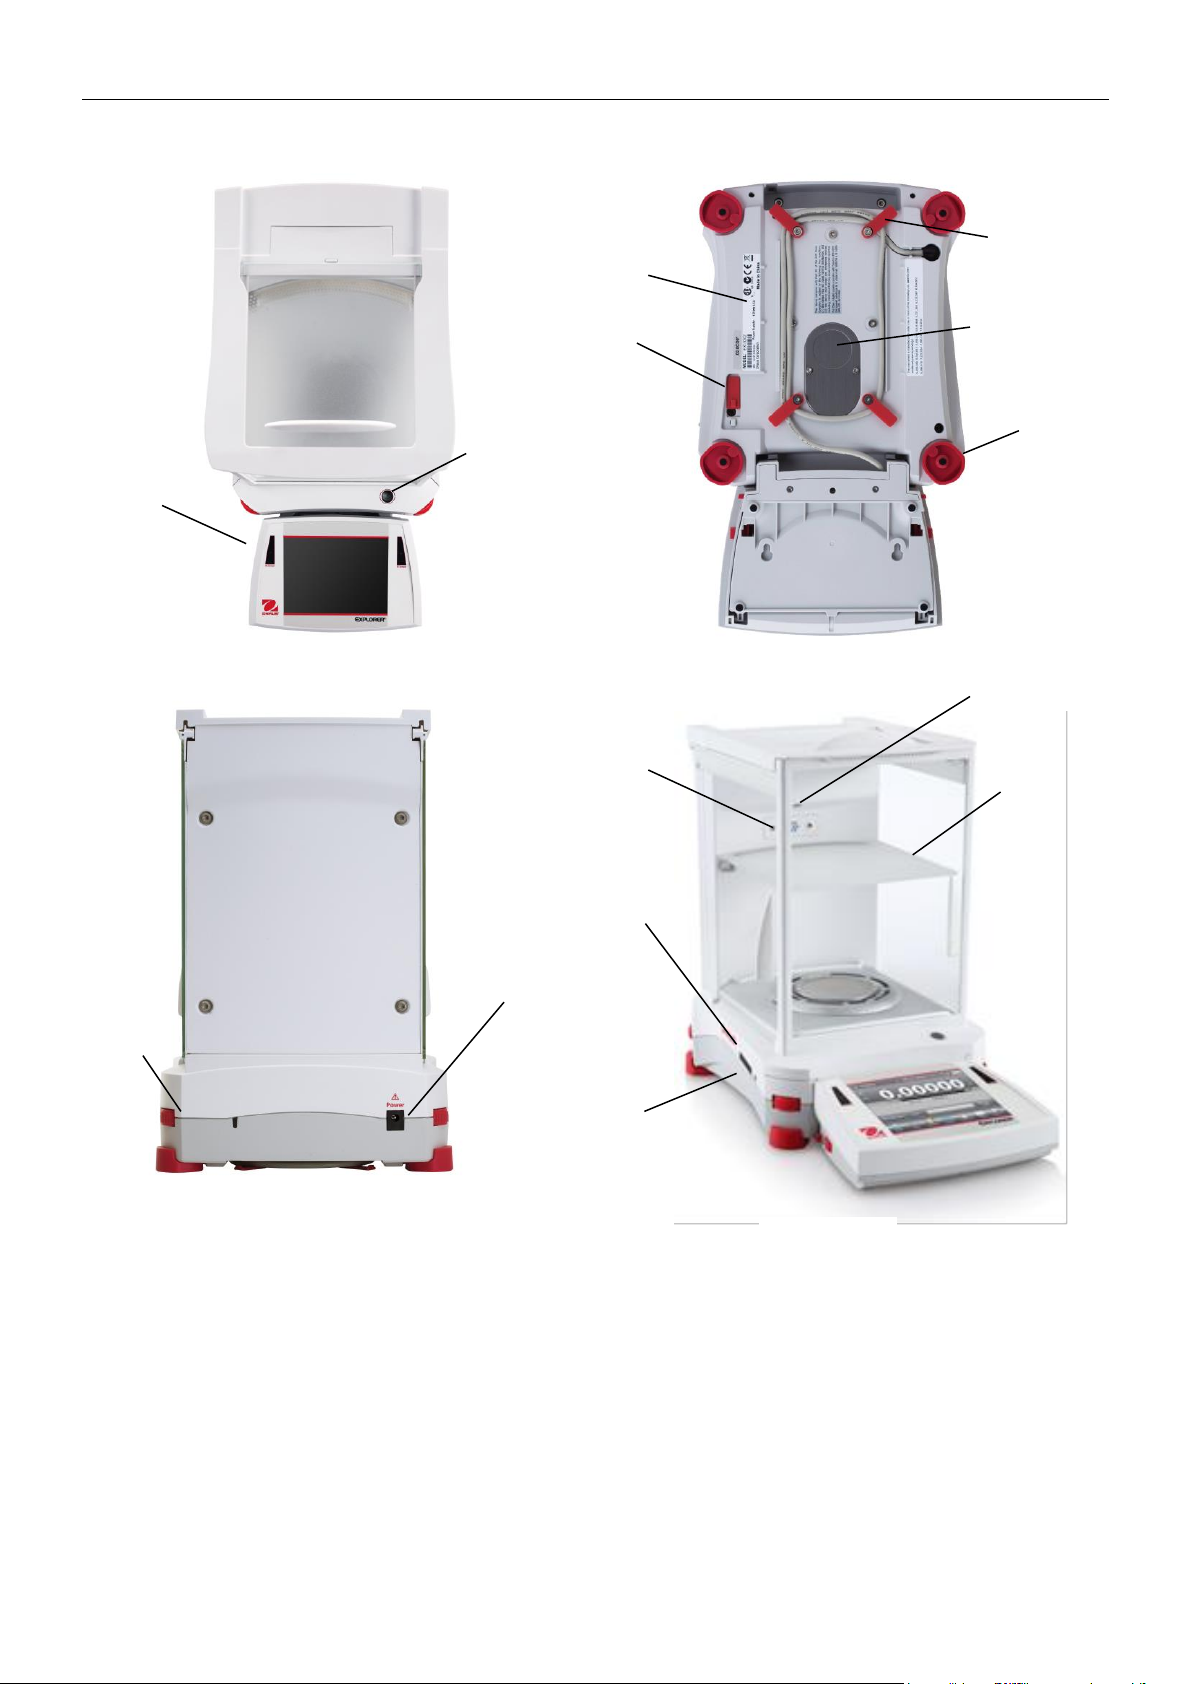
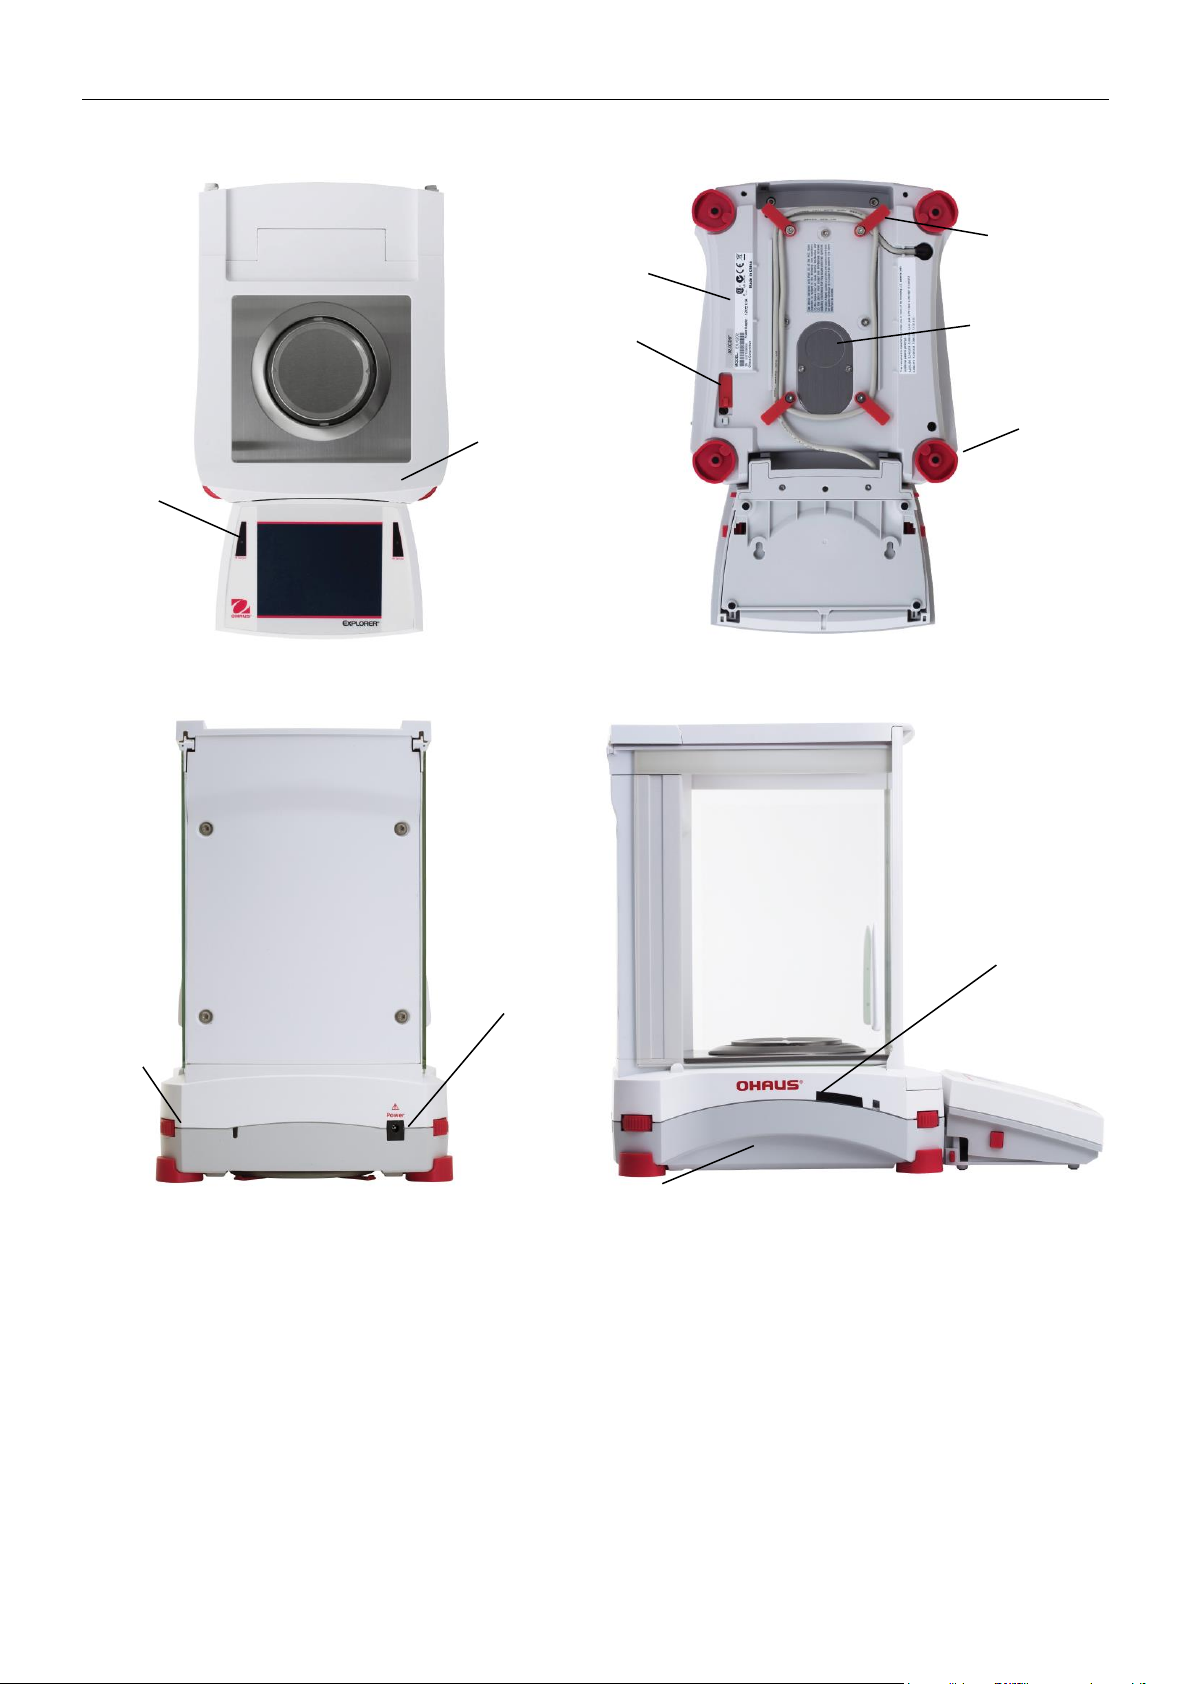
3.3 Overview of Parts and Features
Top View
Rear View
Bottom View
Figure 3-1. Explorer Semi-Micro Balance
Leveling
Thumbwheels
Data label
Terminal cable
storage clips
Lock switch
Weigh
Below
Access
Foot; NonAdjustable
Type label (Far side)
(M, N models only)
Touchless
Sensors
Power
Connection
Draft Shield
Light
Illuminated
Level
Indicator
Touchless
Sensors with
Indicator Lights
Side View
Glass Shelf
Find Quality Products Online at: [email protected]
www.GlobalTestSupply.com
Page 19
EXPLORER BALANCES EN-17
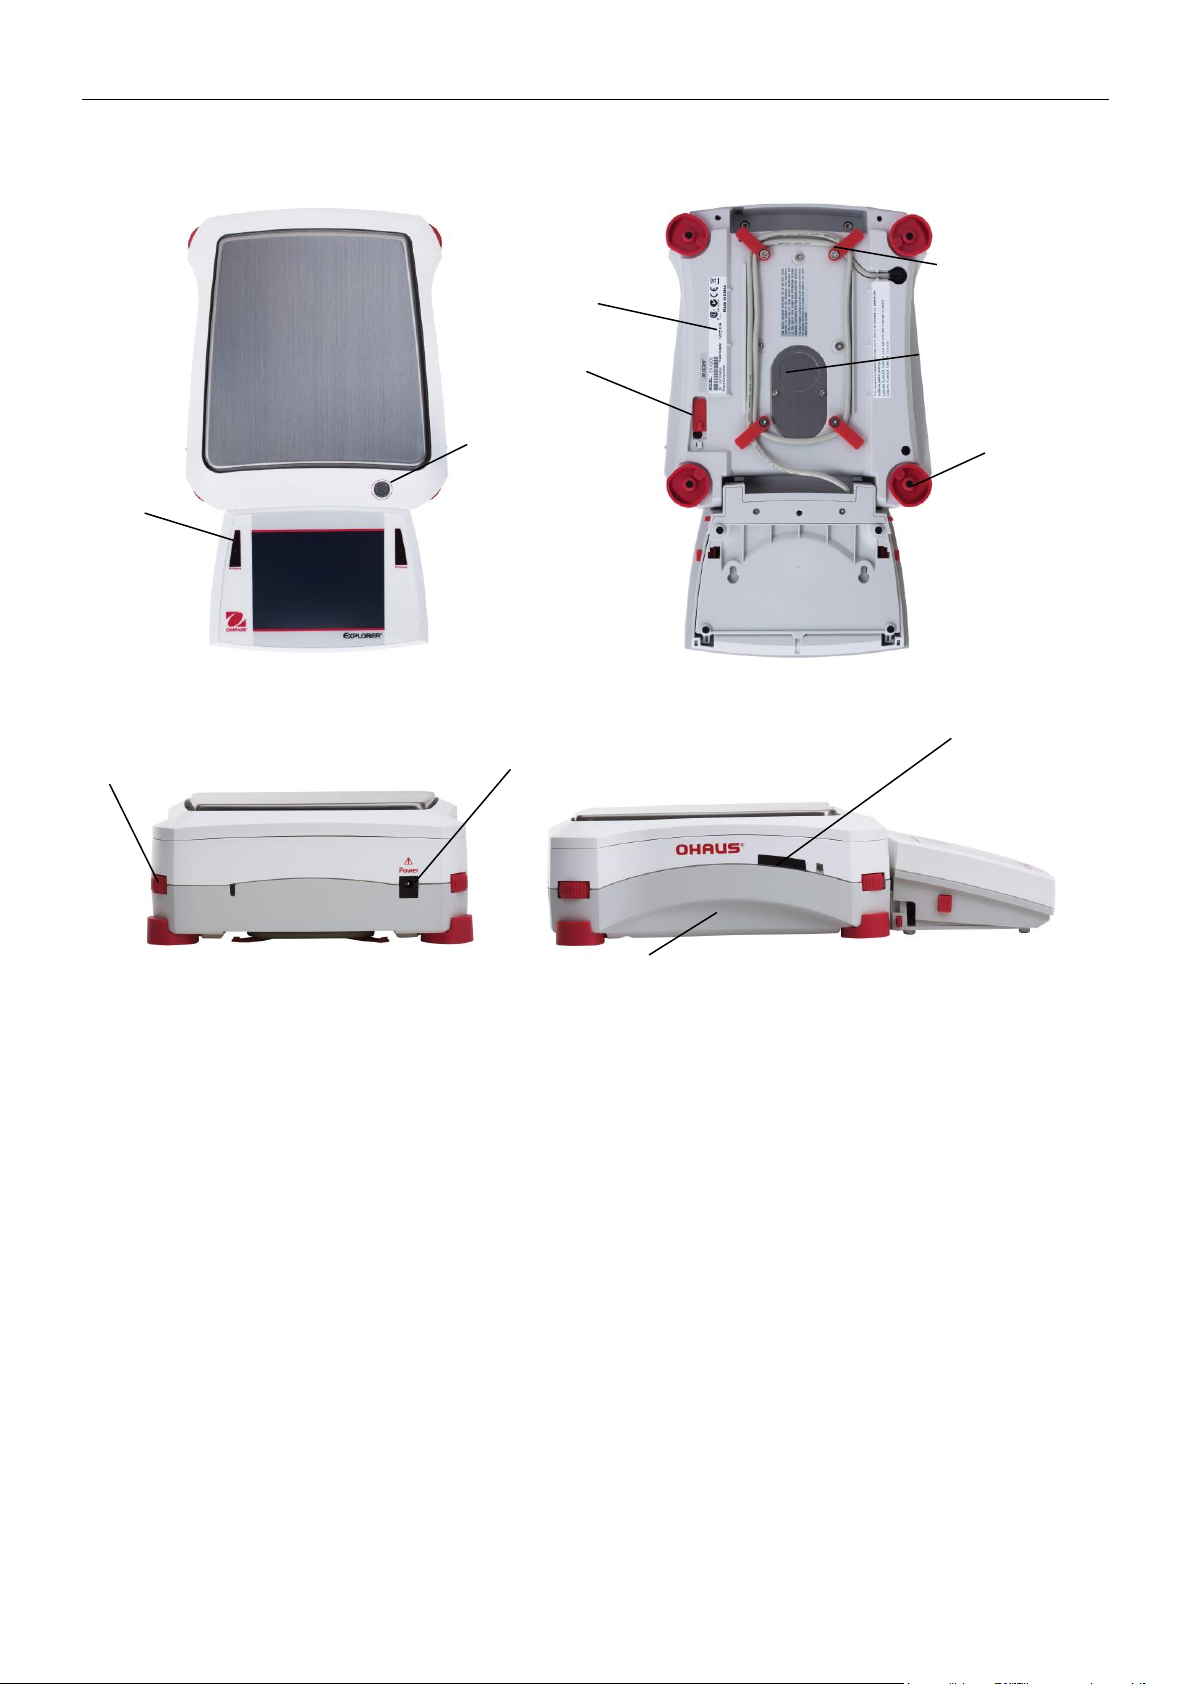
3.4 Overview of Parts and Features –Draft Shield Models
Top View
Rear View
Bottom View
Side View
Figure 3-2. Explorer Base
Leveling
Thumbwheels
Data label
Terminal cable
storage clips
Lock switch
Weigh
Below
Access
Foot; NonAdjustable
Type label (Far side)
(M, N models only)
Touchless
Sensors
Power
Connection
Draft Shield
Light
Illuminated
Level
Indicator
(hidden)
Touchless
Sensors with
Indicator Lights
Find Quality Products Online at: [email protected]
www.GlobalTestSupply.com
Page 20
EN-18 EXPLORER BALANCES
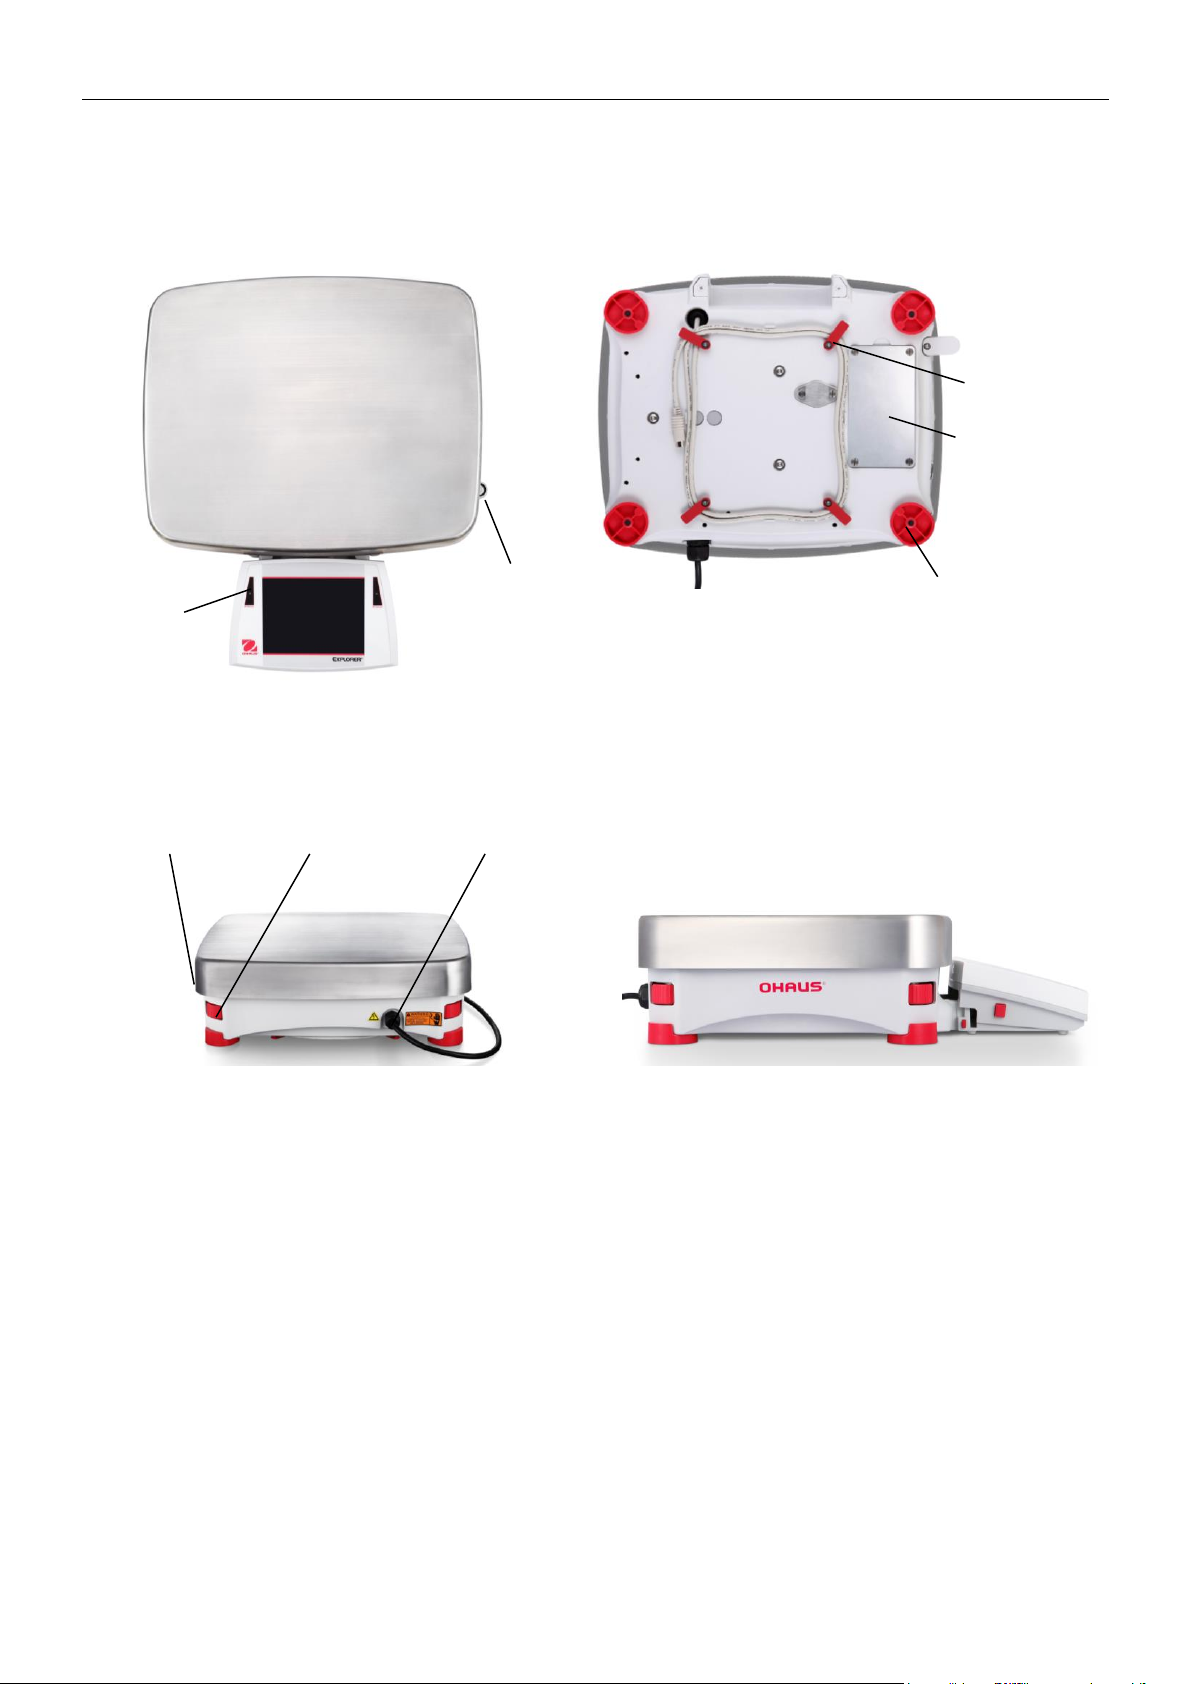
3.5 Overview of Parts and Features – Non-Draft Shield Models
Top View
Rear View
Bottom View
Side View
Figure 3-3. Explorer Base
Illuminated
Level
Indicator
Touchless
Sensors
Touchless
Sensors with
Indicator Lights
Type label (Far side)
(M, N models only)
Data label
Terminal cable
storage clips
Lock switch
Weigh
Below
Access
Foot; NonAdjustable
Leveling
Thumbwheels
Power
Connection
Find Quality Products Online at: [email protected]
www.GlobalTestSupply.com
Page 21
EXPLORER BALANCES EN-19
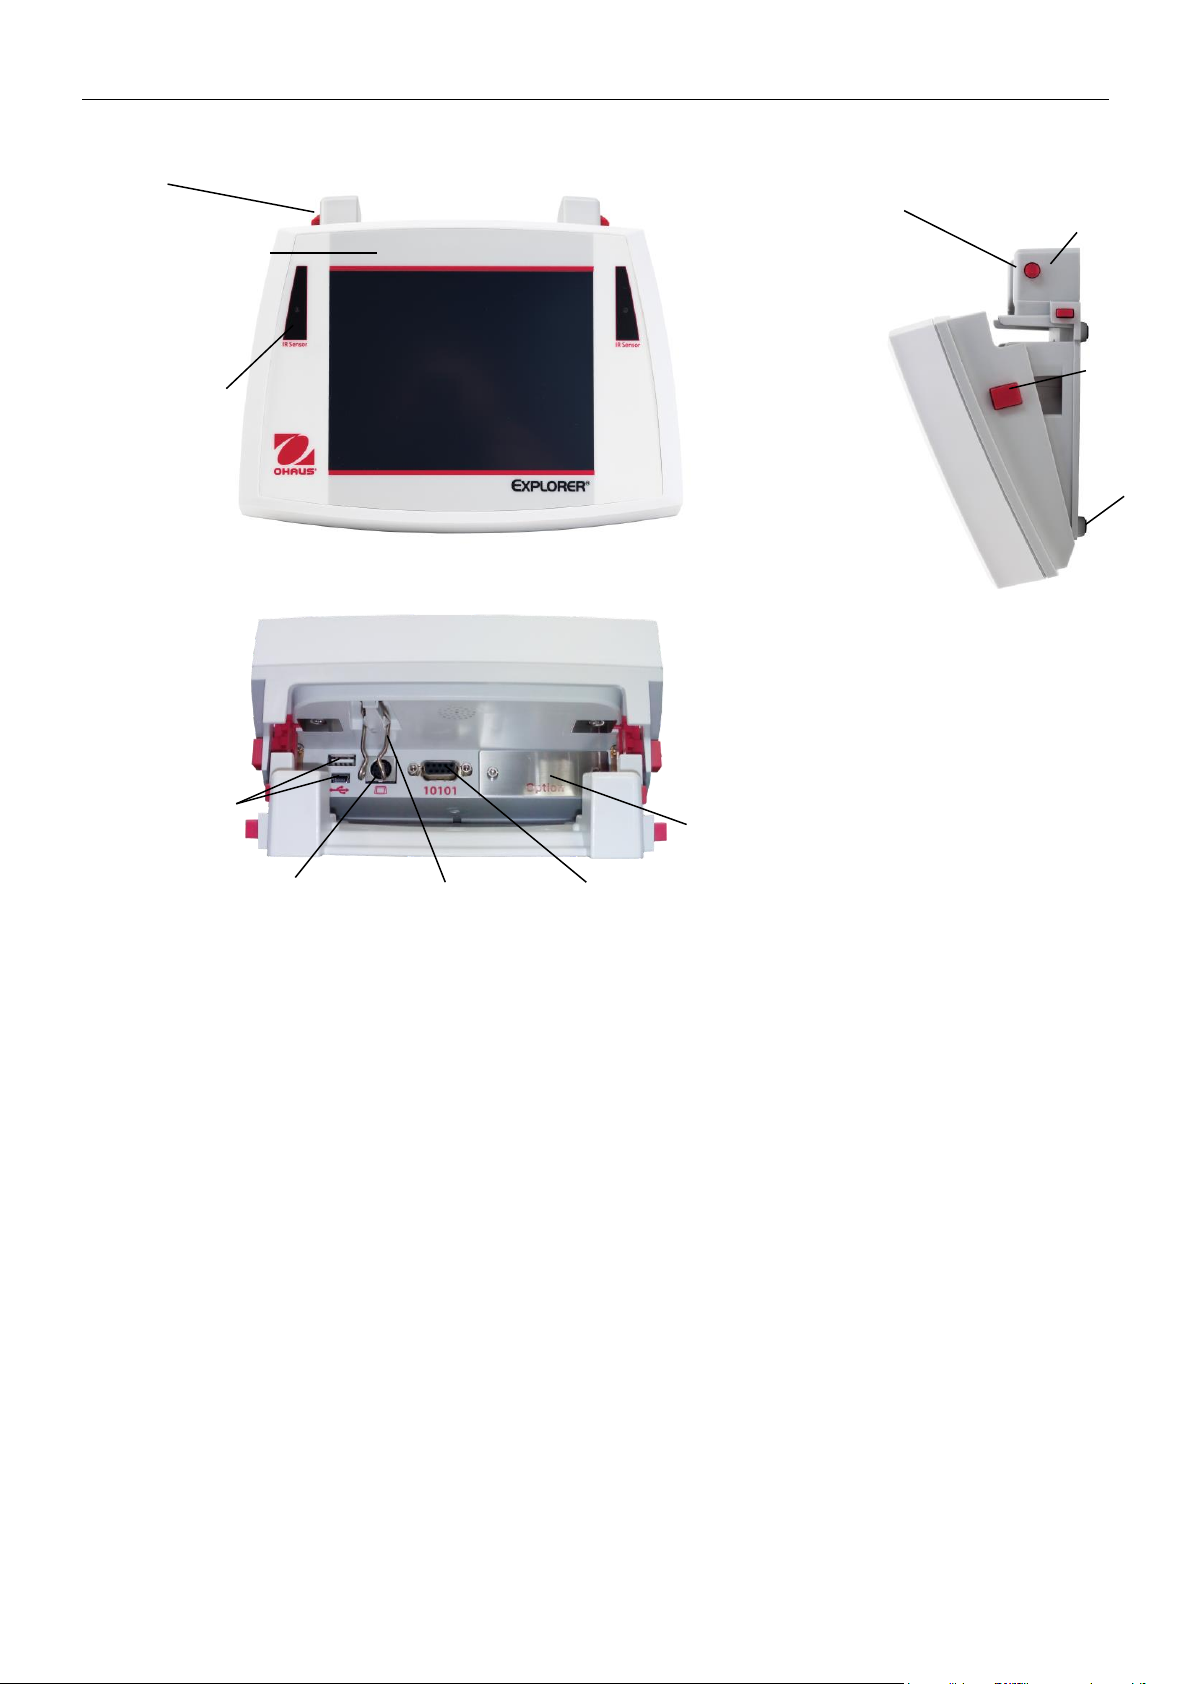
3.6 Overview of Parts and Features – EX12001, EX24001 and EX35001
Top View Bottom View
Rear View Side View
Figure 3-4. Explorer Base
Touchless
Sensors
Level
Indicator
Power
Connection
Leveling
Thumbwheels
Foot; NonAdjustable
Terminal cable
storage clips
Battery cover
Power button
Find Quality Products Online at: [email protected]
www.GlobalTestSupply.com
Page 22
EN-20 EXPLORER BALANCES
3.7 Overview of Parts and Features – Terminal
Top View
Back View
Side View
Figure 3-5. Explorer Terminal
Hooks
(to attach
Capacity sticker
(Approved models
only)
Touchless
Sensors with
Indicator Lights
Terminal
Bracket
Terminal
Release
Buttons
Angular
Adjust
Buttons
Foot
USB Device
Connections
Terminal
Cable
(from Base)
Terminal
Cable Clamp
RS232
Connection
Option
Port
Find Quality Products Online at: [email protected]
www.GlobalTestSupply.com
Page 23
EXPLORER BALANCES EN-21
3.8 Functions and Their Icons
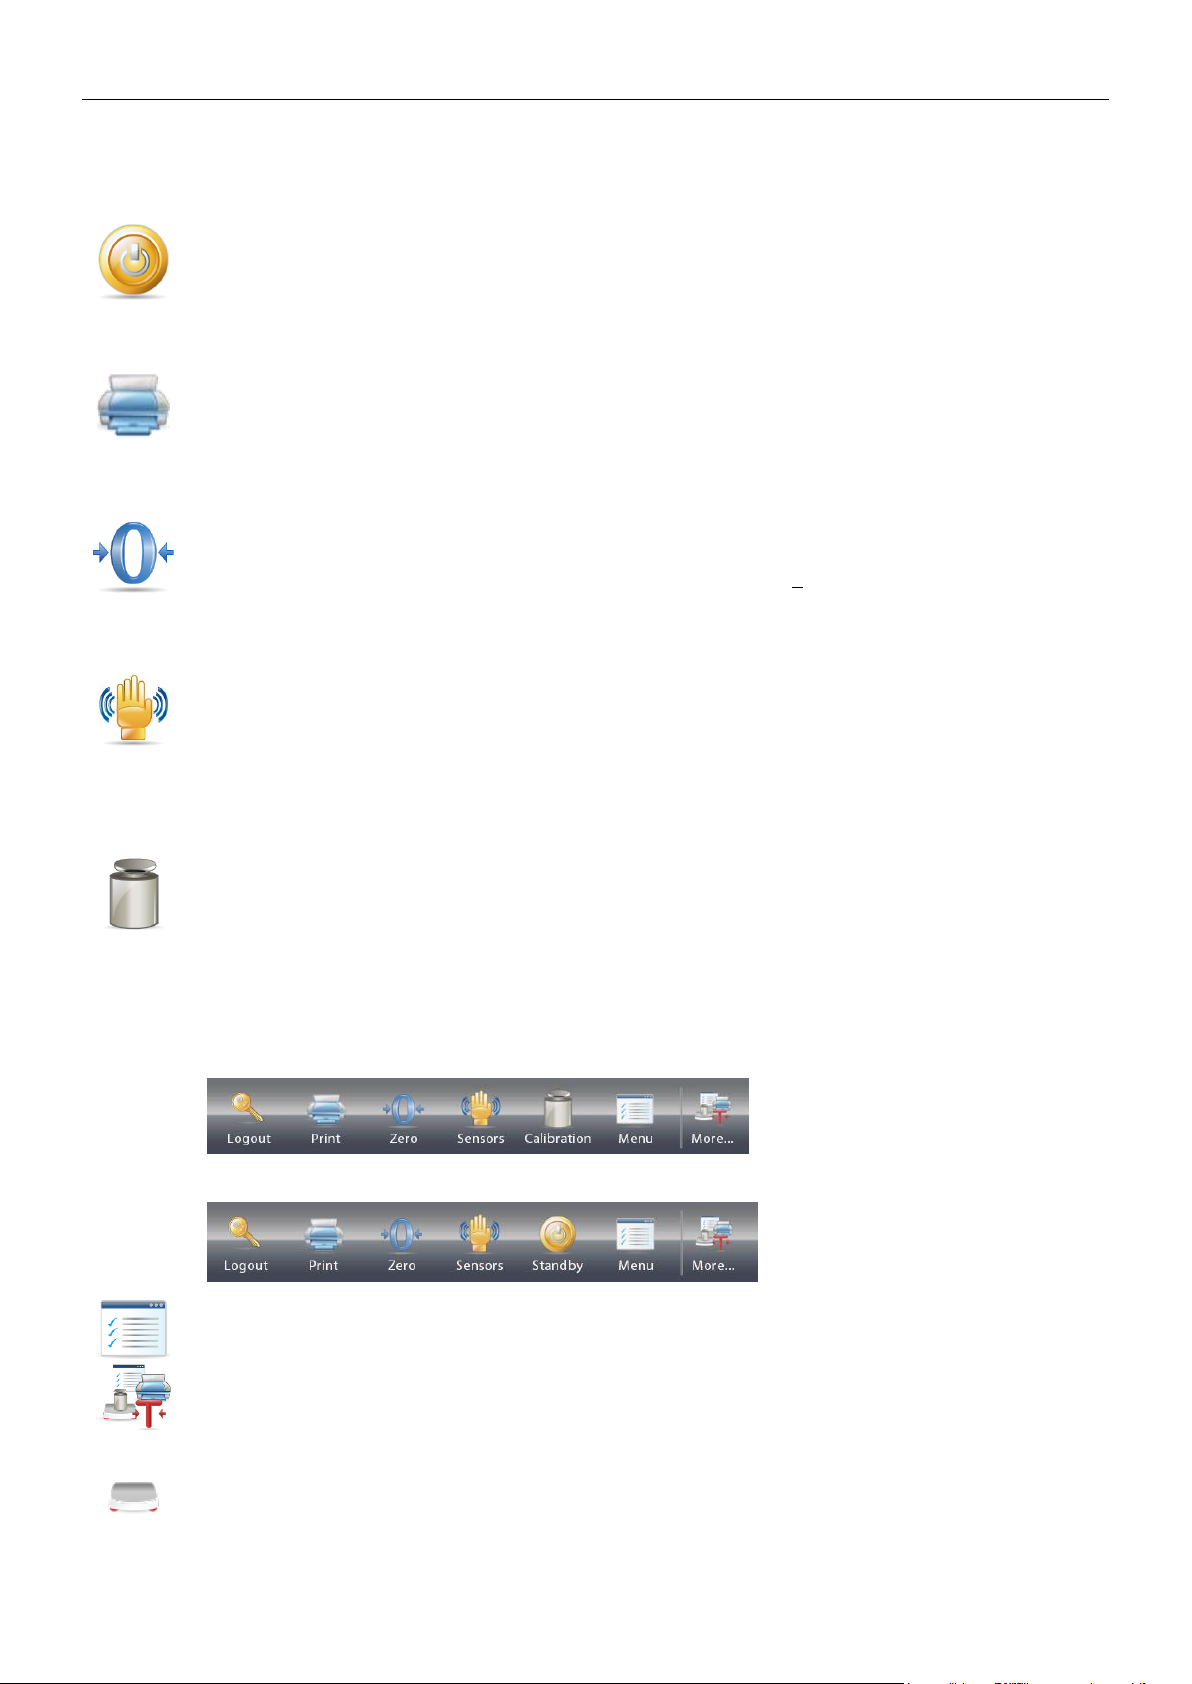
Seven Icons are initially available to operate the Balance and access the Menu. These Icons can be customized
based on user preference. For setup information, see User Settings.
3.8.1 Standby
Touch Standby to shut down the display.
Note: After initial start-up (Section 2), in Standby your balance needs no warm-up time and is
immediately available for weighing by touching the Start-up icon.
3.8.2 Printing Data
Touch Print to send the displayed value to a printer or computer via the active COM port.
Note: Ensure proper setup of connections, printing and interface parameters.
Note: Data may also be printed using the Touchless Sensors by configuring these for Printing.
Data may also be printed using the P command from a computer connected to the COM port.
3.8.3 Zero Operation
Remove the load from the pan and touch Zero to set the display to zero. When weighing pan is
empty, the >0< indicator turns on when the measurement is within + ¼ division (d) of the zero setting.
Note: The balance also features Auto Zero Tracking (AZT) that automatically maintains a Center of
Zero within the tolerances set in the AZT menu (see Balance Settings).
3.8.4 TouchLess Sensor Status
Explorer balances have four TouchLess sensors that can be assigned a unique function when
activated (e.g., zero, print, ionizer+tare, Automatic draftshield door etc).
To assign a task for each TouchLess sensor, press Sensors.
Note: To activate a sensor, move an object over it (from a distance of 1-2 inches or 3 cm). The sensor
shows a green light and beeps when activated. If the sensor cannot be activated (sensor is disabled
during certain instances, like when the Menu is displayed) the sensor shows a red light.
3.8.5 AutoCal
When AutoCal is ON, the balance performs a self calibration. AutoCal will automatically calibrate the
Balance (using the internal mass) each time a change in temperature significant enough to affect
accuracy, or after every 11 hours and for Semi-Micro models, the AutoCal system is triggered by 3
hours as default setting.
Touch AutoCal™ to initiate. (Default status is ON.)
Note: It is not available in ExCal.
For Non-Approved models, when AutoCal Internal Calibration is turned off, it changes to span
calibration.
For Approved models, when AutoCal Internal Calibration is turned off, it is hidden.
3.8.6 Menu
Touch Menu to enter the balance’s menu list.
3.8.7 More
Touch More to access Level Assist, Zero, Tare, Units, Pretare, Cal Test, Calculator, Stopwatch,
Graduation and Routine Test.
3.8.8 Level Assist
For assistance with Leveling the Balance; the Level Assist screen shows which direction to turn the
thumbwheels to center the level bubble.
Find Quality Products Online at: [email protected]
www.GlobalTestSupply.com
Page 24
EN-22 EXPLORER BALANCES
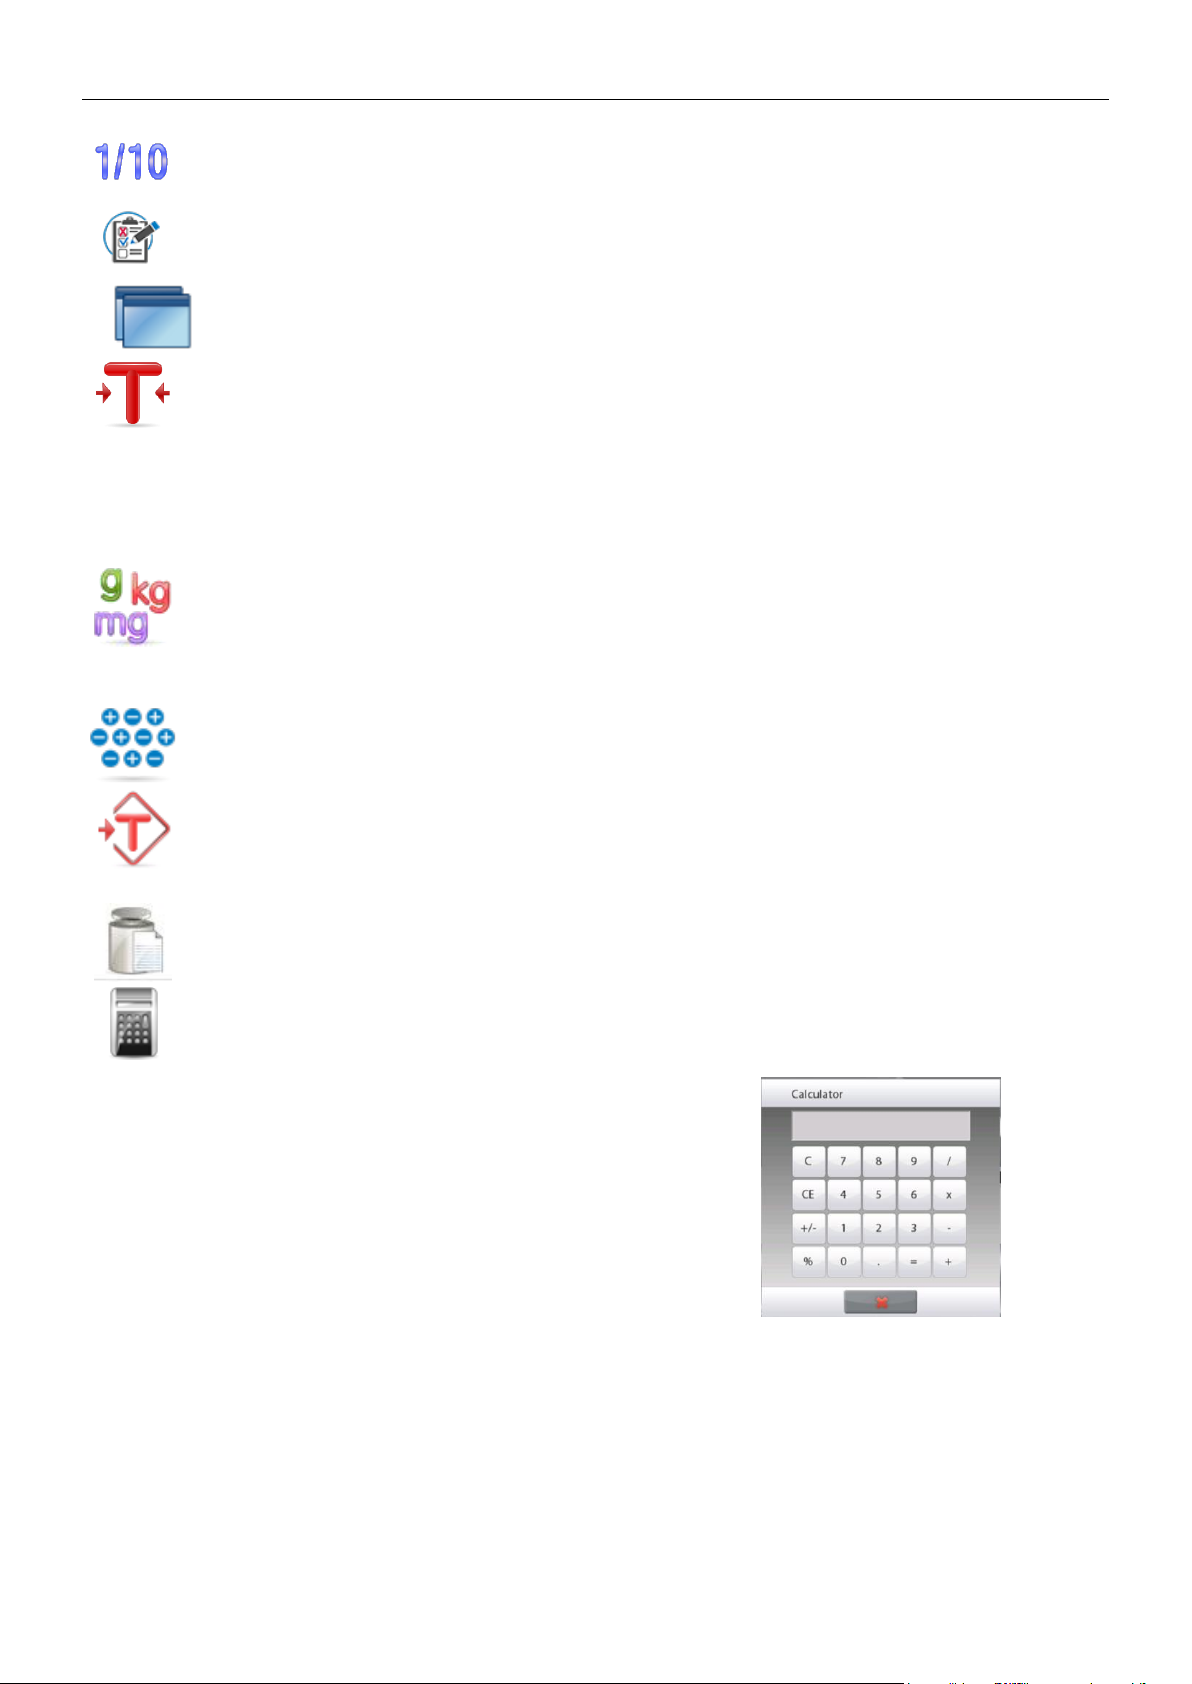
3.8.9 Graduations
Touch Graduations to set 1d or 10d resolution for display.
3.8.10 Routine Test
Touch Routine Test to perform 10 times repeatability test by using the test weight close to working
point.
3.8.11 Applications
The balance can be configured to operate in various Application modes.
Touch Applications to choose – or the top button in the Application area.
3.8.12 Taring a Container
Taring sets the weight of a container as zero, so only the weight of objects held in the container
(net weight) is displayed.
Manual Tare – Place the empty container on the pan and touch Tare when stable.
Add material to the container. The net weight of the material is displayed.
To clear the Tare value, remove the container from the pan and touch Tare.
3.8.13 Weighing Units
The balance can be configured to measure in a variety of weighing units, including three (3) custom
units. Touch Units to choose from the displayed list. (Scroll down to see all options.)
Note: The active weighing Unit can also be accessed by touching the unit area of the Main Display
line; If a unit is not displayed in the list, it must first be turned on via the User Menu.
3.8.14 Ionizer (only for EX225D/AD and EX225/AD)
The Ionizer is used to eliminate static electricity. To use the Ionizer, touch the Ionizer icon. A pop-up
window will appear with the text: ‘The ionizer is neutralizing the static charges.
3.8.15 Preset Tare
To enter a Preset Tare, press the Icon and then enter a value;
enter 0 to clear the Preset Tare. The display will show the PT symbol and the tare value as a negative
number.
3.8.16 Calibration Test
is used to compare a known calibration weight against the last stored span calibration data.
3.8.17 Calculator
To use the built-in calculator application, touch Calculator. A four function calculator with addition,
subtraction, multiplication and division mathematical operations is available.
Perform a numeric operation using the keypad.
Press = to view the result.
To Clear the display: Press CE to clear the entry, C to clear
all
Touch x to close and return to the current Application.
Note: Calculator is not available in software version 1.10.
Find Quality Products Online at: [email protected]
www.GlobalTestSupply.com
Page 25
EXPLORER BALANCES EN-23
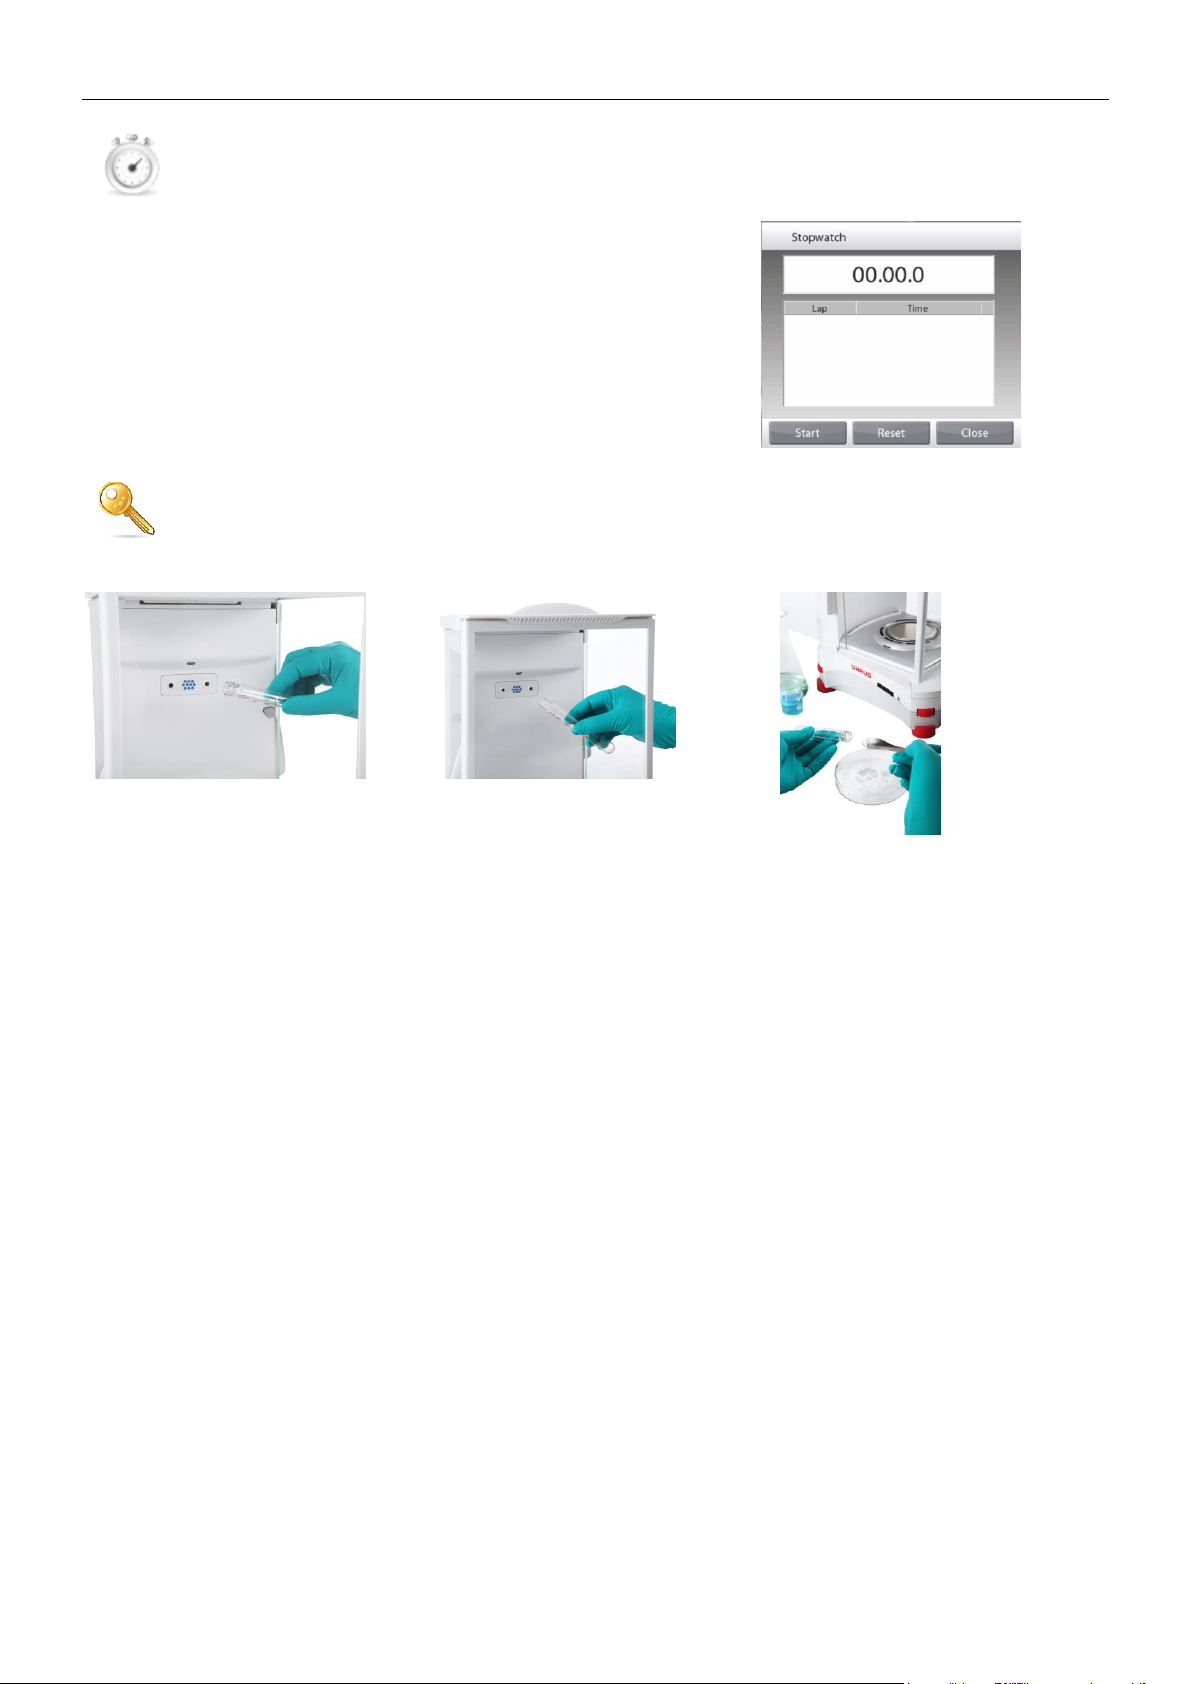
3.8.18 Stopwatch
To use the built-in stopwatch application, touch Stopwatch. A countdown timer with interval (lap)
timer is available.
Press Start to begin using the Stopwatch timer.
Press Reset to reset the timer to Zero.
Touch Close to close and return to the current Application.
3.8.19 Logout
Used for User logout and return to User Login screen. This feature is only active if a user profile has
been created and a User has logged in.
3.9 Ionizer (EX225D/AD and EX225/AD only) and Glass Shelf
Step 1.
Place the glass tube in front of the
ionizer while the IR sensor has
activated the ionizer
Step 2.
After about 3 to 5 seconds, remove
the sample. The static electricity is
now eliminated
Step 3.
Sampling
Find Quality Products Online at: [email protected]
www.GlobalTestSupply.com
Page 26
EN-24 EXPLORER BALANCES
4. APPLICATION
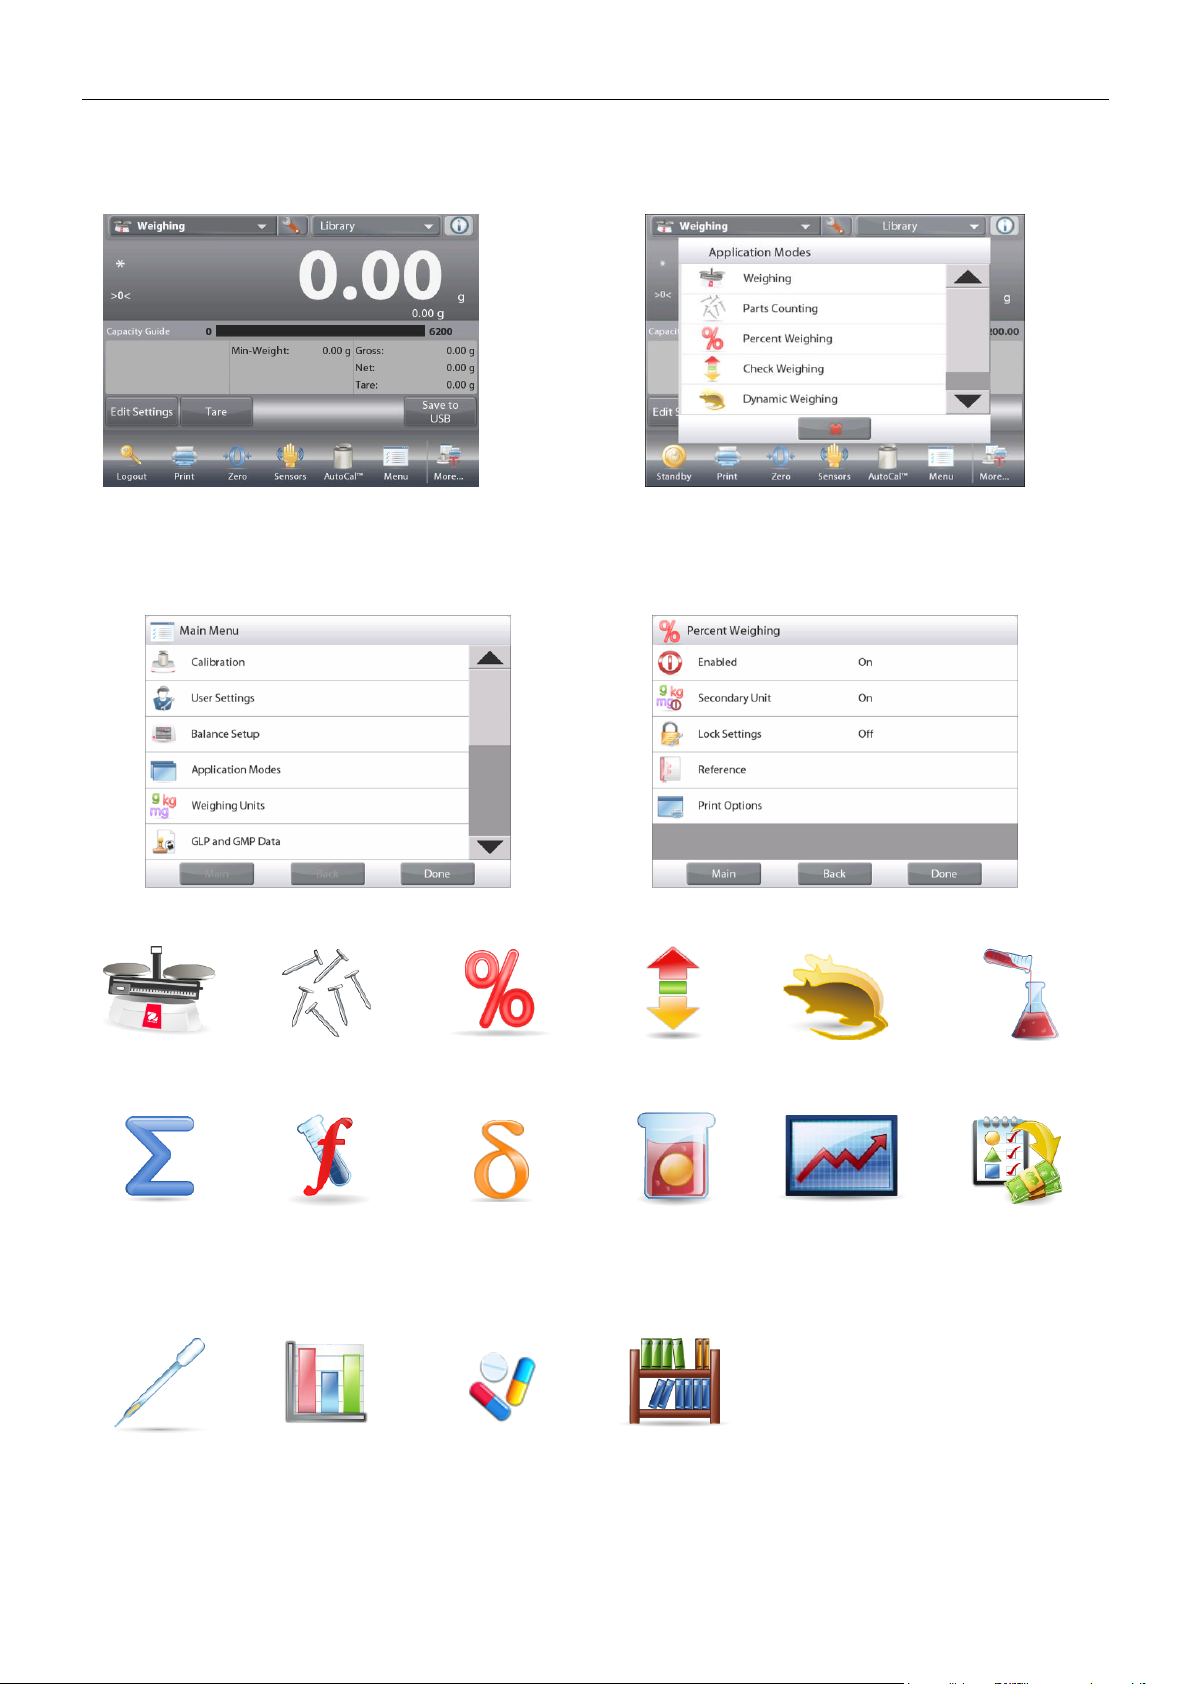
The balance can be configured to operate in various Application modes.
Touch Applications to choose – or the top button in the Application area:
Note: If an application mode does not appear in the list of available Applications it must be enabled in the User
Menu: touch Menu, then select Application Modes. The full list of modes appears. Touch the one you want to
enable. Then touch Enabled in the setup menu for that application mode – Percent Weighing in the example
below. Each enabled mode appears in the Applications menu.
The Explorer Balance incorporates the following Applications.
Weighing
Parts
Counting
Percent
Weighing
Check
Weighing
Dynamic
(Animal)
Weighing
Filling
Totalization
Formulation
Differential
Weighing
Density
Determination
Peak Hold
(High Point)
Ingredient
Costing
(not available in
(Semi-Micro
models)
Pipette
Adjustment
(not available in
EX12001,
EX24001,
EX35001)
SQC
Fill Weight
Variation
Library
(complements
most
Applications)
Find Quality Products Online at: [email protected]
www.GlobalTestSupply.com
Page 27
EXPLORER BALANCES EN-25
4.1 Weighing
Note: Before using any application, be sure the balance has been leveled and calibrated.
Use this application to determine the weight of items in the selected unit of measure.
Note: The Explorer is shipped with all units enabled.
Weighing
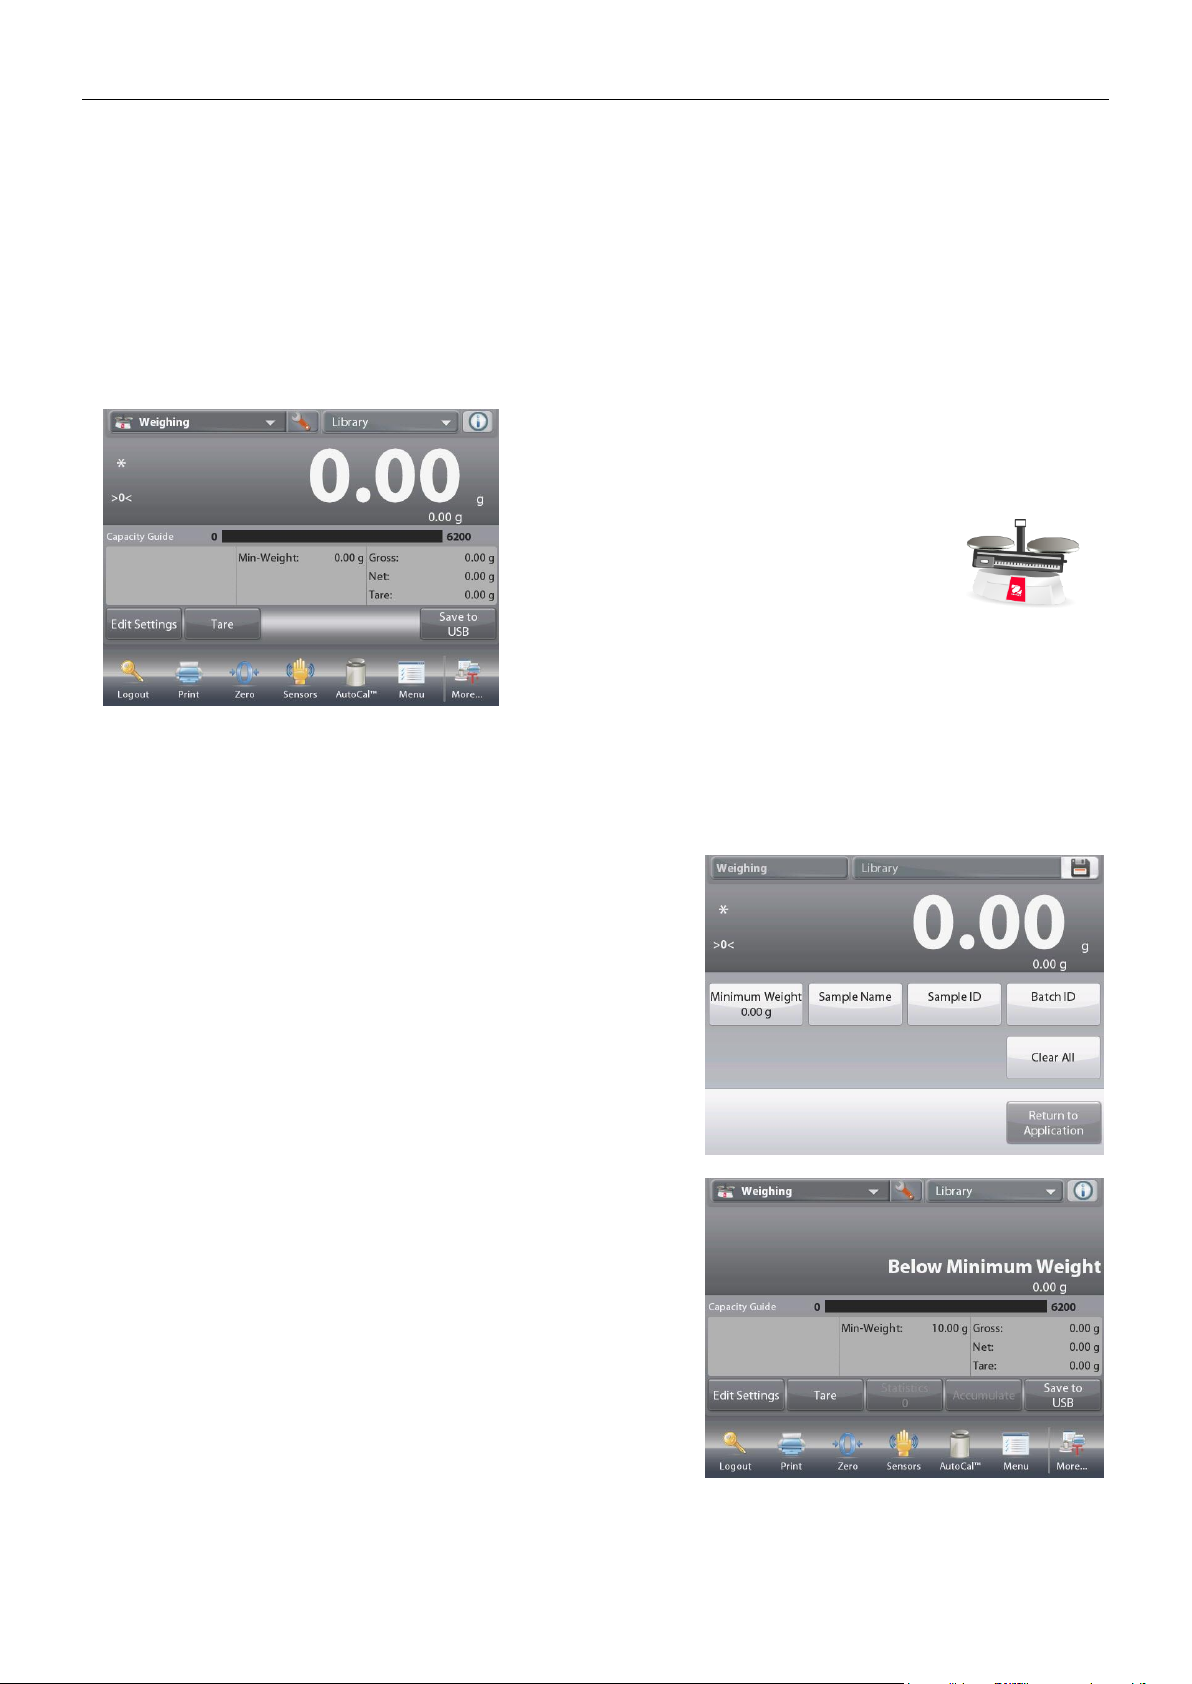
1. In the upper left portion of the home screen, select Weighing (this application is the default).
2. Press Tare or Zero if necessary to begin.
3. Place objects on the pan to display the weight. When stable, the * appears.
4. The resulting value is displayed in the main Weighing Line in the active unit of measure.
The WEIGHING Home screen
Main Display Line
Second Display Line (not shown)
Reference Fields
Application Buttons
Functions
Application Icon
4.1.1 Edit Settings
To view or adjust the current settings
Touch the
Edit Settings
button. The Settings screen appears.
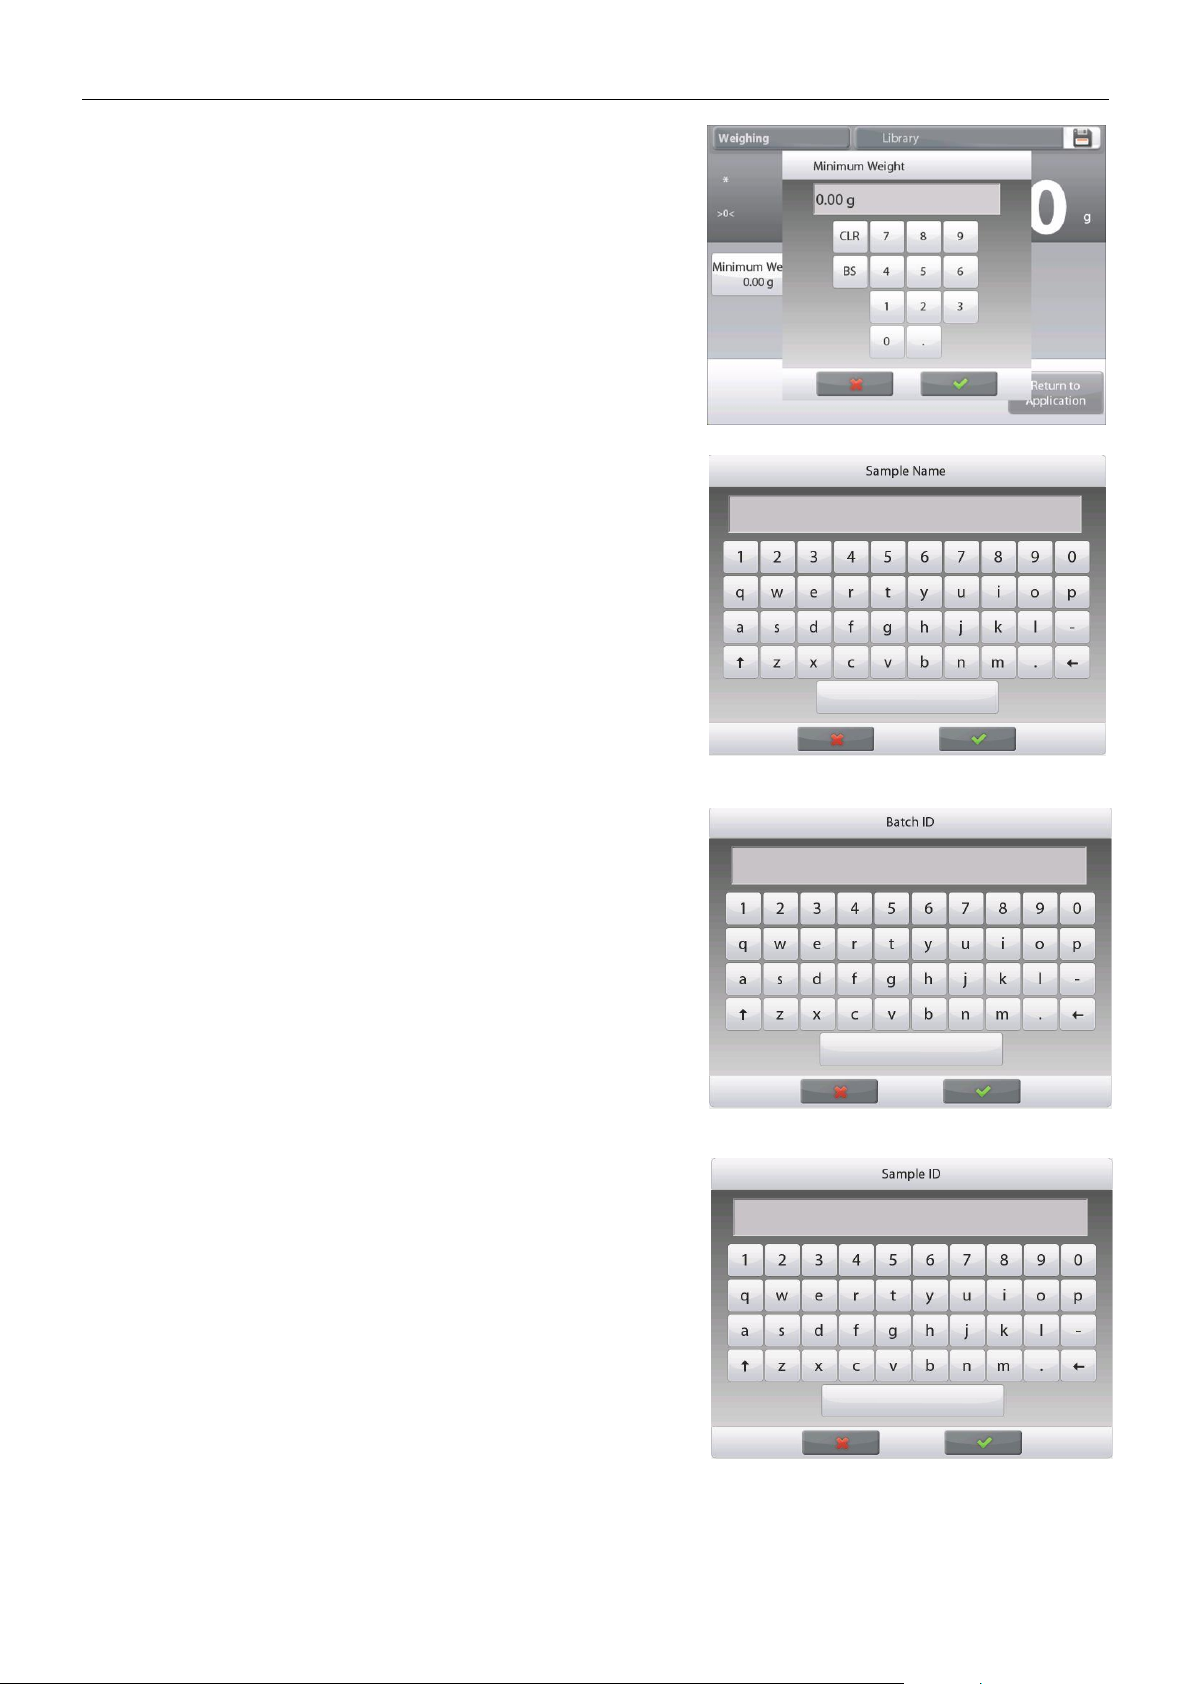
Minimum Weight: establish a minimum weight value to
be used to verify a reading.
Sample Name:
establish a name for your sample
Batch ID:
establish an ID for your sample batch.
Sample ID: establish an ID for your sample.
Clear All: clear all items in Edit Settings to default
settings.
To adjust the Minimum Weight value, touch the
Minimum Weight
button.
If an actual weight is below the established Minimum
Weight value, the screen will show Below Minimum
Weight.
Find Quality Products Online at: [email protected]
www.GlobalTestSupply.com
Page 28
EN-26 EXPLORER BALANCES
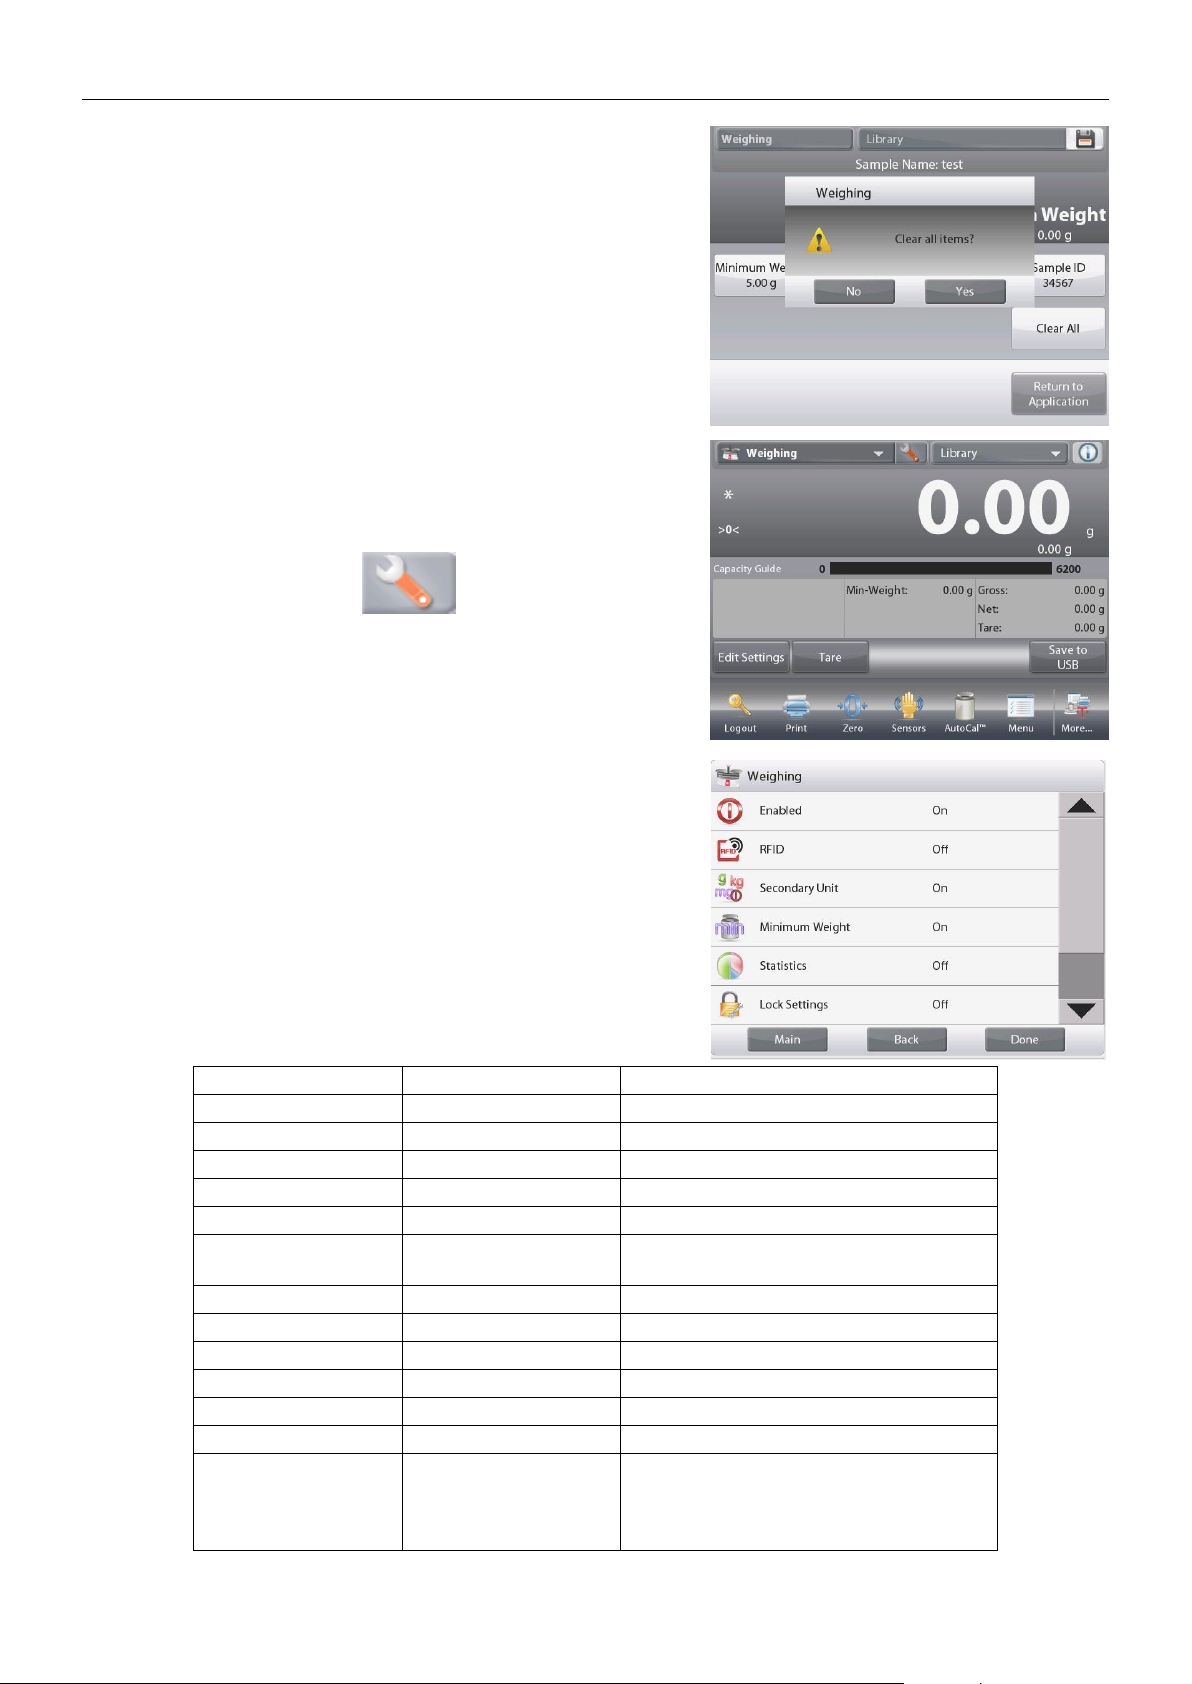
A numeric input window appears.
Use the keys to enter the desired Minimum Weight,
then press .
The display reverts to the previous screen with the
new Minimum Weight value highlighted: orange.
To return to the Weighing home screen, touch
Return to Application at bottom-right of that screen.
To input a sample name, touch the Sample Name
button. Enter the desired sample name, and then
press.
You can use bar code scanner to input sample name,
batch ID, Sample ID, or use RFID reader to get the
sample name.
To input a batch ID, touch the Batch ID button. Enter the
desired ID, and then press.
To input a Sample ID, touch the Sample ID button. Enter
the desired ID, and then press.
Find Quality Products Online at: [email protected]
www.GlobalTestSupply.com
Page 29
EXPLORER BALANCES EN-27
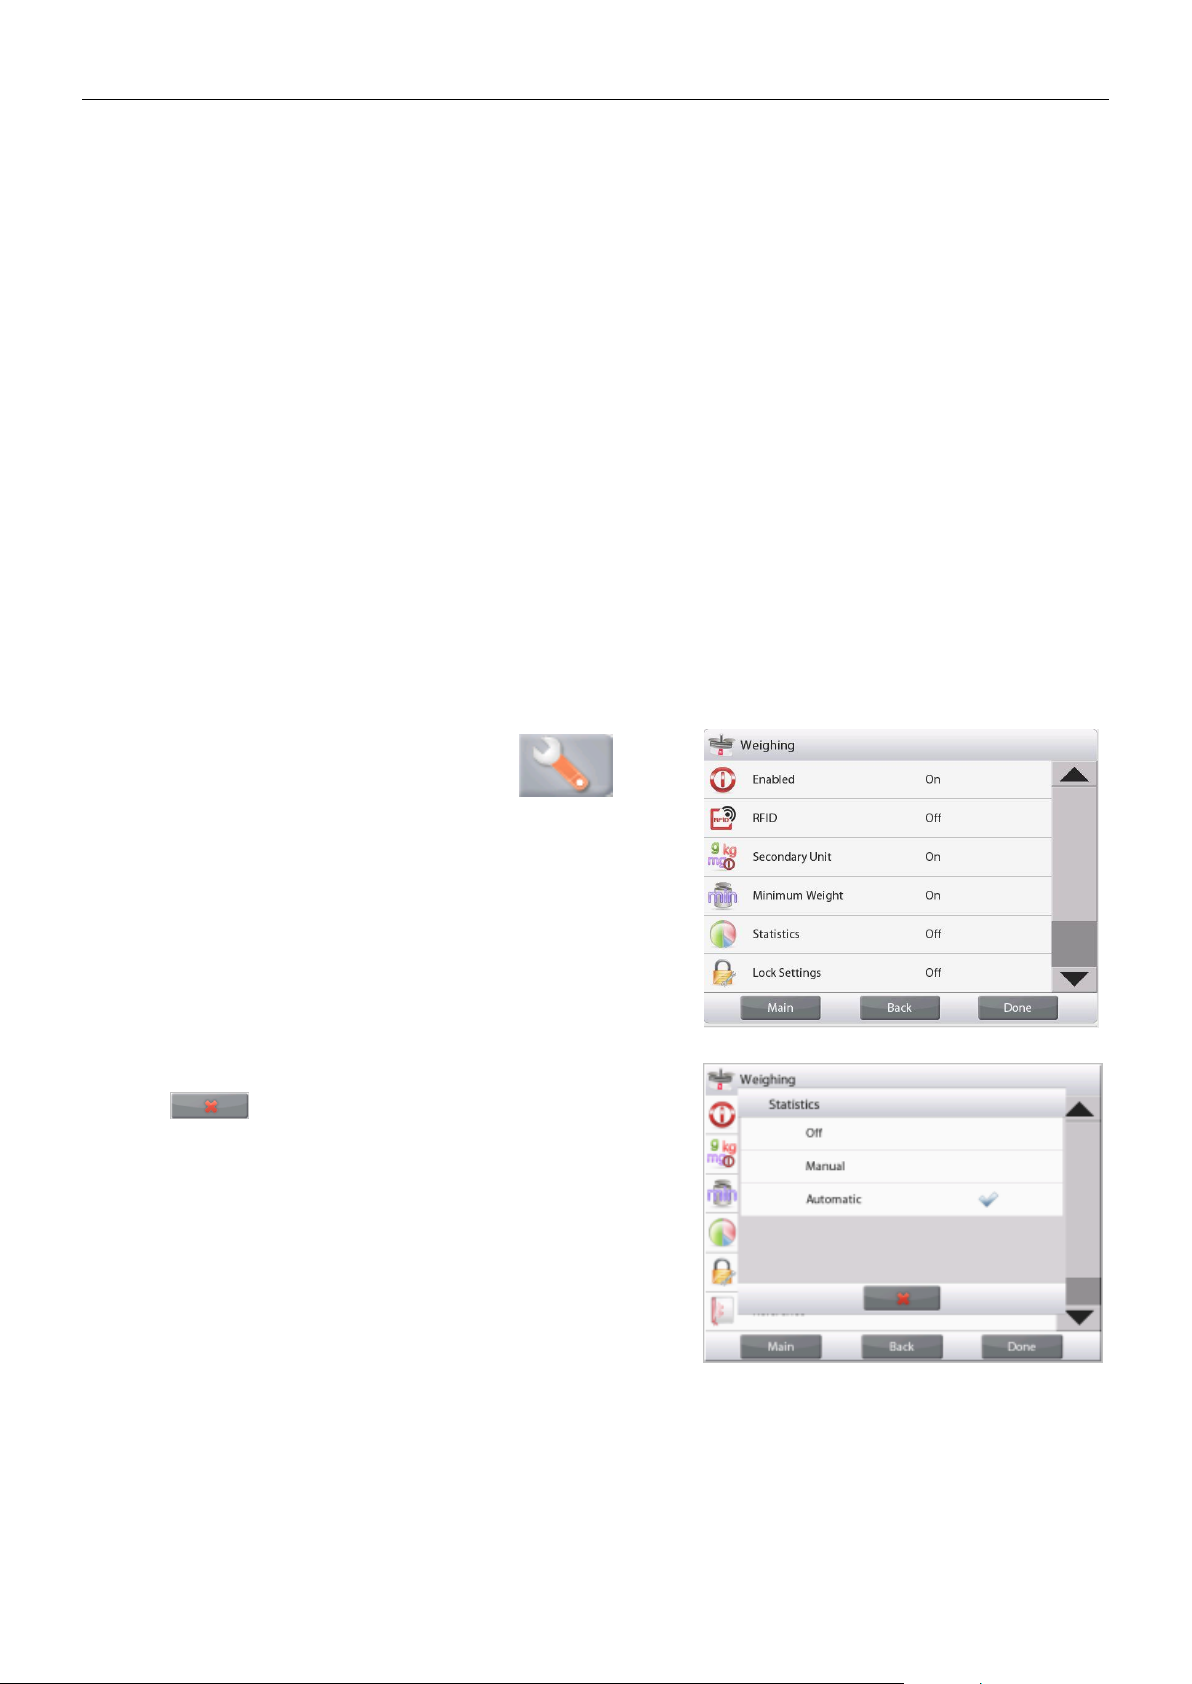
To clear the Minimum Weight, Sample Name, Batch
ID and Sample ID you set, touch the Clear All button.
Touch Yes to confirm.
4.1.2 Application Setup
The Application can be customized for various user preferences.
Touch the
Setup Icon
(wrench) to enter
Application Setup
.
The Application Setup Menu is now displayed.
Select the list item to view or change the setting as
desired.
To return to the Application home screen, touch Done.
The Weighing Application Setups are below (defaults in Bold)
Item
Available Settings
Comments
Enabled
On, Off
Turns Application on/off
RFID
On, Off
To read RFID code to get sample name
Secondary Unit
On, Off
To show the Second Display line
Minimum Weight
On, Off
To enable Min Weight
Statistics
Off, Manual, Auto
Lock Settings
On, Off
Press to lock the current setting(s) so
they cannot be changed.
Reference fields
Min Weight
On, Off
Min Weight is displayed
Gross
On, Off
Gross weight is displayed
Net
On, Off
Net weight is displayed
Tare
On, Off
Tare weight is displayed
Print Options
See Printing Section.
Min Weight
On, Off, Below
Minimum Weight
Below Minimum Weight: both the
weight value and the text "Below
Minimum Weight" will be printed when
weight is below minimum.
Note: When RFID is turned on, the RS232 printing function will be disabled.
Find Quality Products Online at: [email protected]
www.GlobalTestSupply.com
Page 30
EN-28 EXPLORER BALANCES
4.1.3 Save to USB
Insert the USB flash drive into the USB slot located on the front of the balance. Next, press the Save to USB button
to save the data to the USB flash drive. Once saved, the button will momentarily change color to orange.
Notes: The first time a USB flash drive is connected to the balance there might be some delay time before the
button Save to USB works. This is due to that the balance is creating the necessary folders on the USB flash drive
where the data will be stored.
Save to USB applies to Weighing, Parts Counting, Percent Weighing, Check Weighing and Filling.
4.1.4 Auto Save to USB
Data can be automatically saved to USB when AutoPrint is set On in the USB communication.
The On Stable, Interval and Continuously Auto Print functions can be selected and used for Auto Save to USB.
Auto Save to USB applies to Weighing, Parts Counting, Percent Weighing, Check Weighing and Filling.
4.1.5 Statistics for Weighing
The Statistics function allows you to compare a number of samples and examine the relative deviation of each
sample from the mean, along with other statistical data. A minimum of three samples is required.
Statistics can be determined manually (requires key press after each step) or automatically (weights are
automatically recorded when stable). To use the Statistics function, enable it in the Application Setup menu.
This feature is available in Weighing, Counting, Check Weighing, Dynamic/Animal Weighing and Filling
applications.
Application Setup: First, enable Statistics
Touch the Setup Icon (wrench) to
enter Setup menu to enable
Statistics.
The Statistics options screen
appears.
Enable the desired mode (Manual, Auto)
Press to return to the Setup menu.
After you click your preference, the window will close
automatically.
Find Quality Products Online at: [email protected]
www.GlobalTestSupply.com
Page 31
EXPLORER BALANCES EN-29
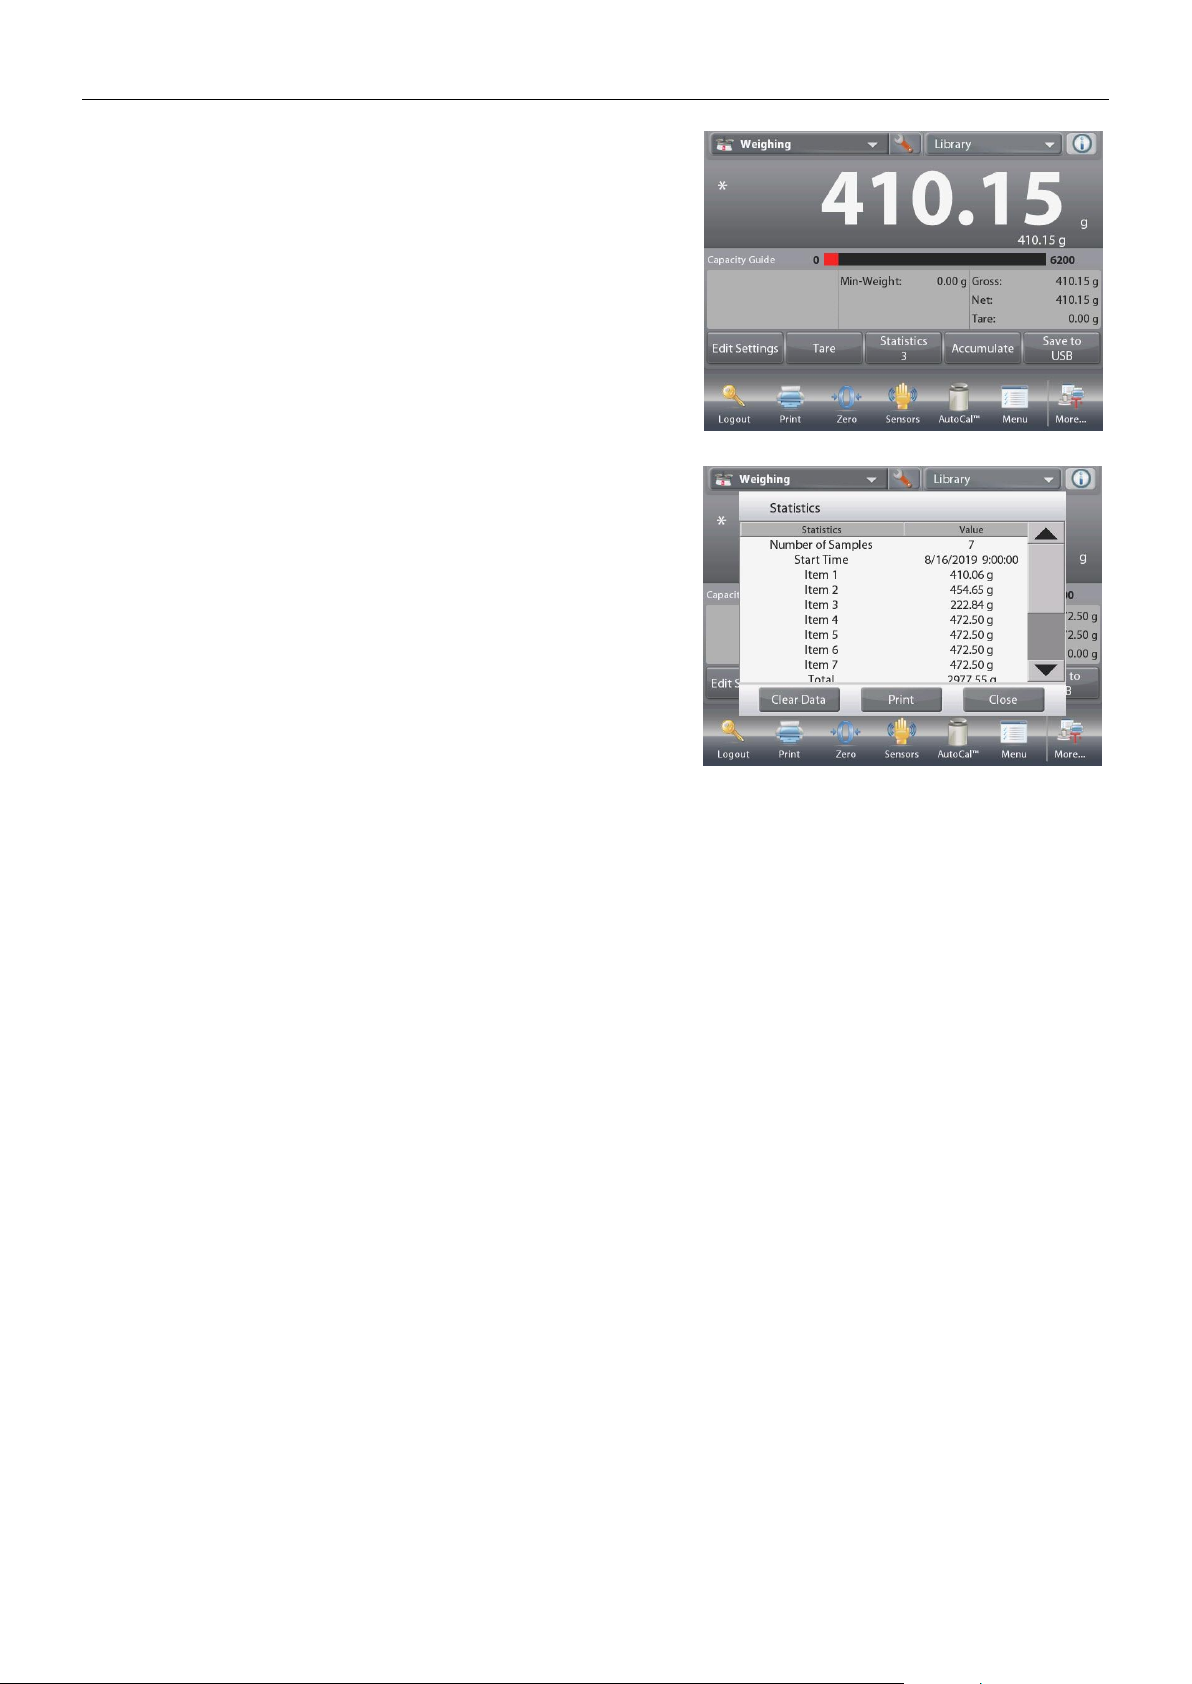
Accumulating displayed values & viewing data – Manual
Once Statistics-Manual is enabled, two buttons appear on
the Application screen: Statistics and Accumulate.
Application – Auto Mode
Statistics Auto mode is similar to Manual mode, except the
Accumulate button is not shown. The weight of each sample
is automatically captured. The current sample must be
removed before capturing the next sample.
When stable, the
Statistics
button lights briefly to show the
item is added to the set, and the data set quantity increments
by one.
Continue to add items to build the data set.
Press the
Statistics
button to view the results, as shown here.
Press Print to send results to the enabled COM port.
Press
Close
to return to the Application home screen without
clearing the current statistics set.
Press
Clear Data
to clear results and return to the home
screen.
Find Quality Products Online at: [email protected]
www.GlobalTestSupply.com
Page 32
EN-30 EXPLORER BALANCES
4.2 Parts Counting
Use this application to count samples of uniform weight. Three different modes can be selected:
Standard Counting, Check Counting, or Fill Counting.
4.2.1 Standard Parts Counting (default)
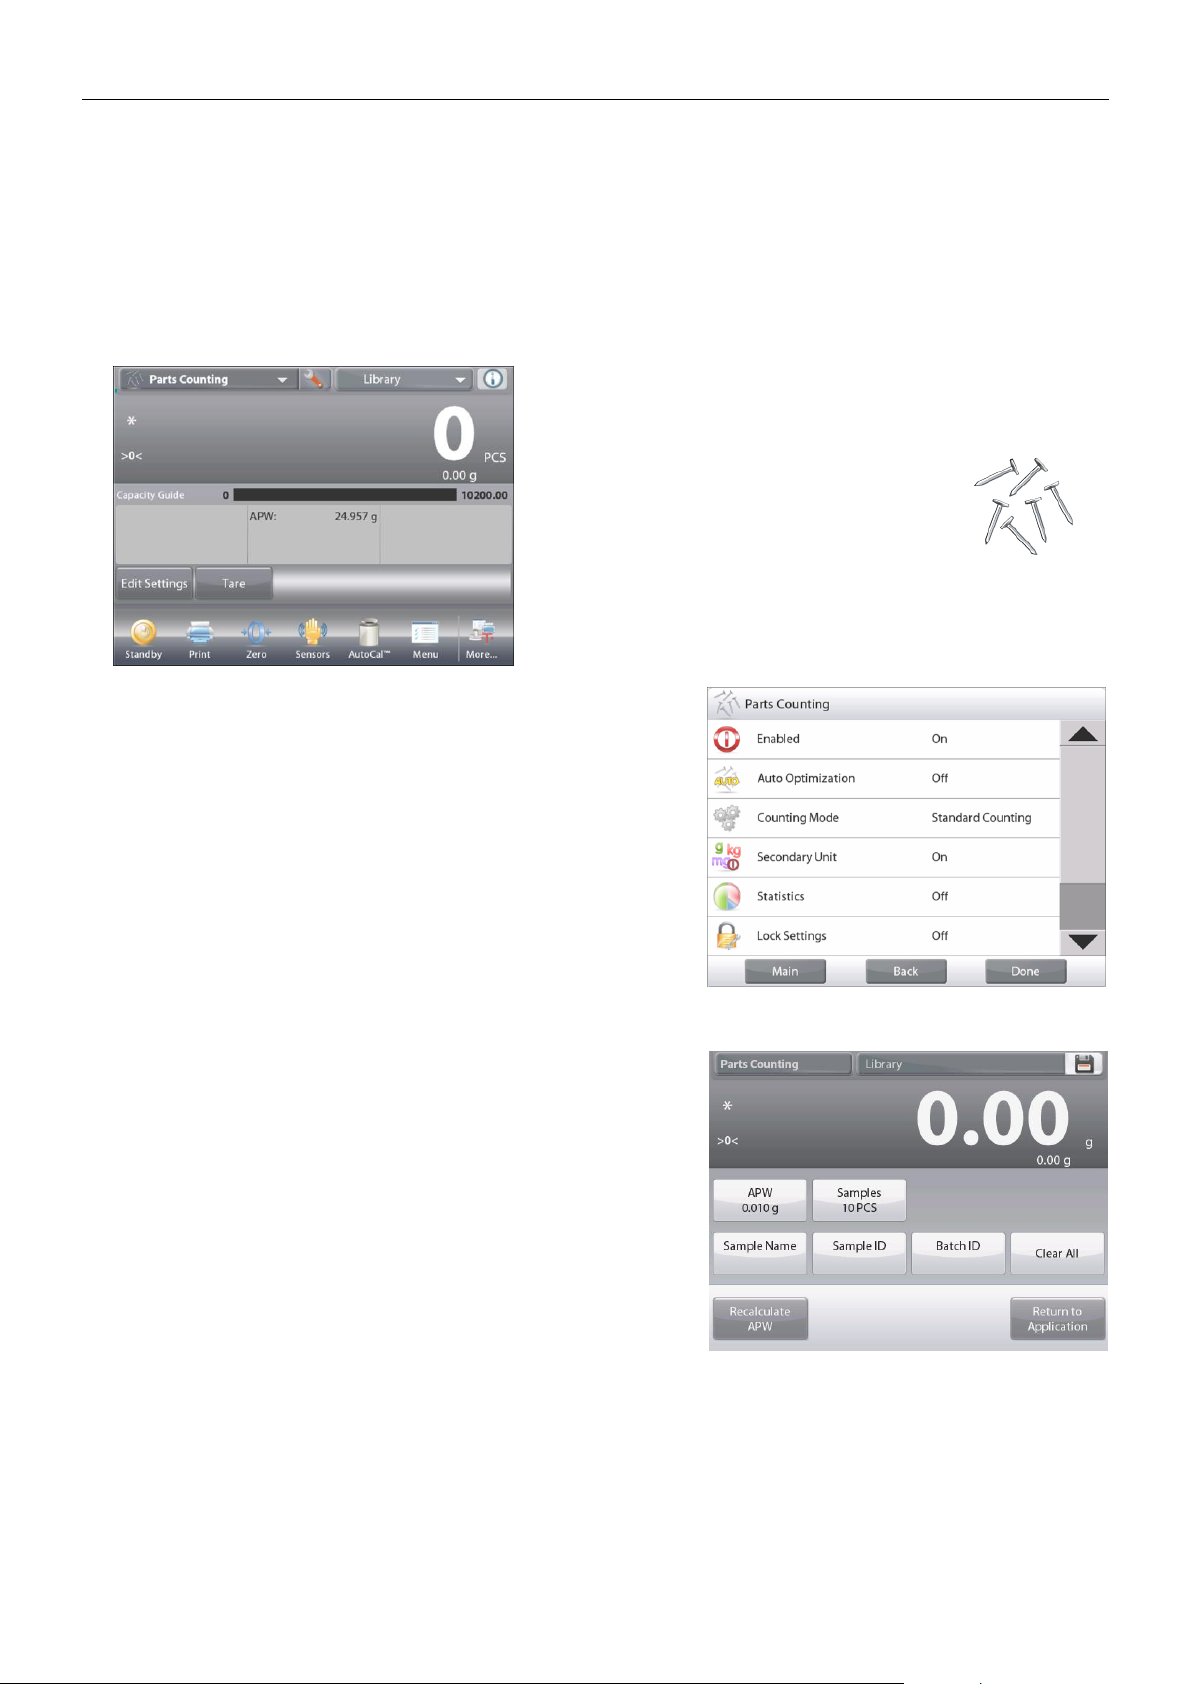
In the upper left portion of the home screen, select Counting.
The default (or last) Average Piece Weight (APW) is displayed.
Place objects on the pan to display the number of pieces.
The PARTS COUNTINGStandard Home screen
Main Display Line
Second Display Line
Reference Fields
Application Buttons
Functions
Application Icon
Auto Optimization improves counting accuracy:
it re-calculates the piece weight automatically as
parts are added.
By default Auto Optimization is Off.
4.2.1.1 Edit Settings: To view or adjust the current settings, touch the Edit Settings button:
The Settings screen is now displayed.
Settings available: APW, Sample Size, Sample Name,
Sample ID, Batch ID, Clear All.
Note: please refer to section 4.1.1 for details about setting
Sample Name, Sample ID, Batch ID and Clear All.
Functions available:
Recalculate APW,
Return to Application
Establish an Average Piece Weight (APW)
Each time a new type of part is counted, the nominal weight of
one piece (Average Piece Weight or APW) must be established
using a small quantity of pieces. This APW is stored until
replaced by another APW.
There are two methods to establish the APW value:
1. The actual APW is known; or
2. The APW must be derived by weight. For this case the
current sample size will be used
To choose a different value, establish it beforehand, using the Sample Size button. (See below.)
Find Quality Products Online at: [email protected]
www.GlobalTestSupply.com
Page 33
EXPLORER BALANCES EN-31
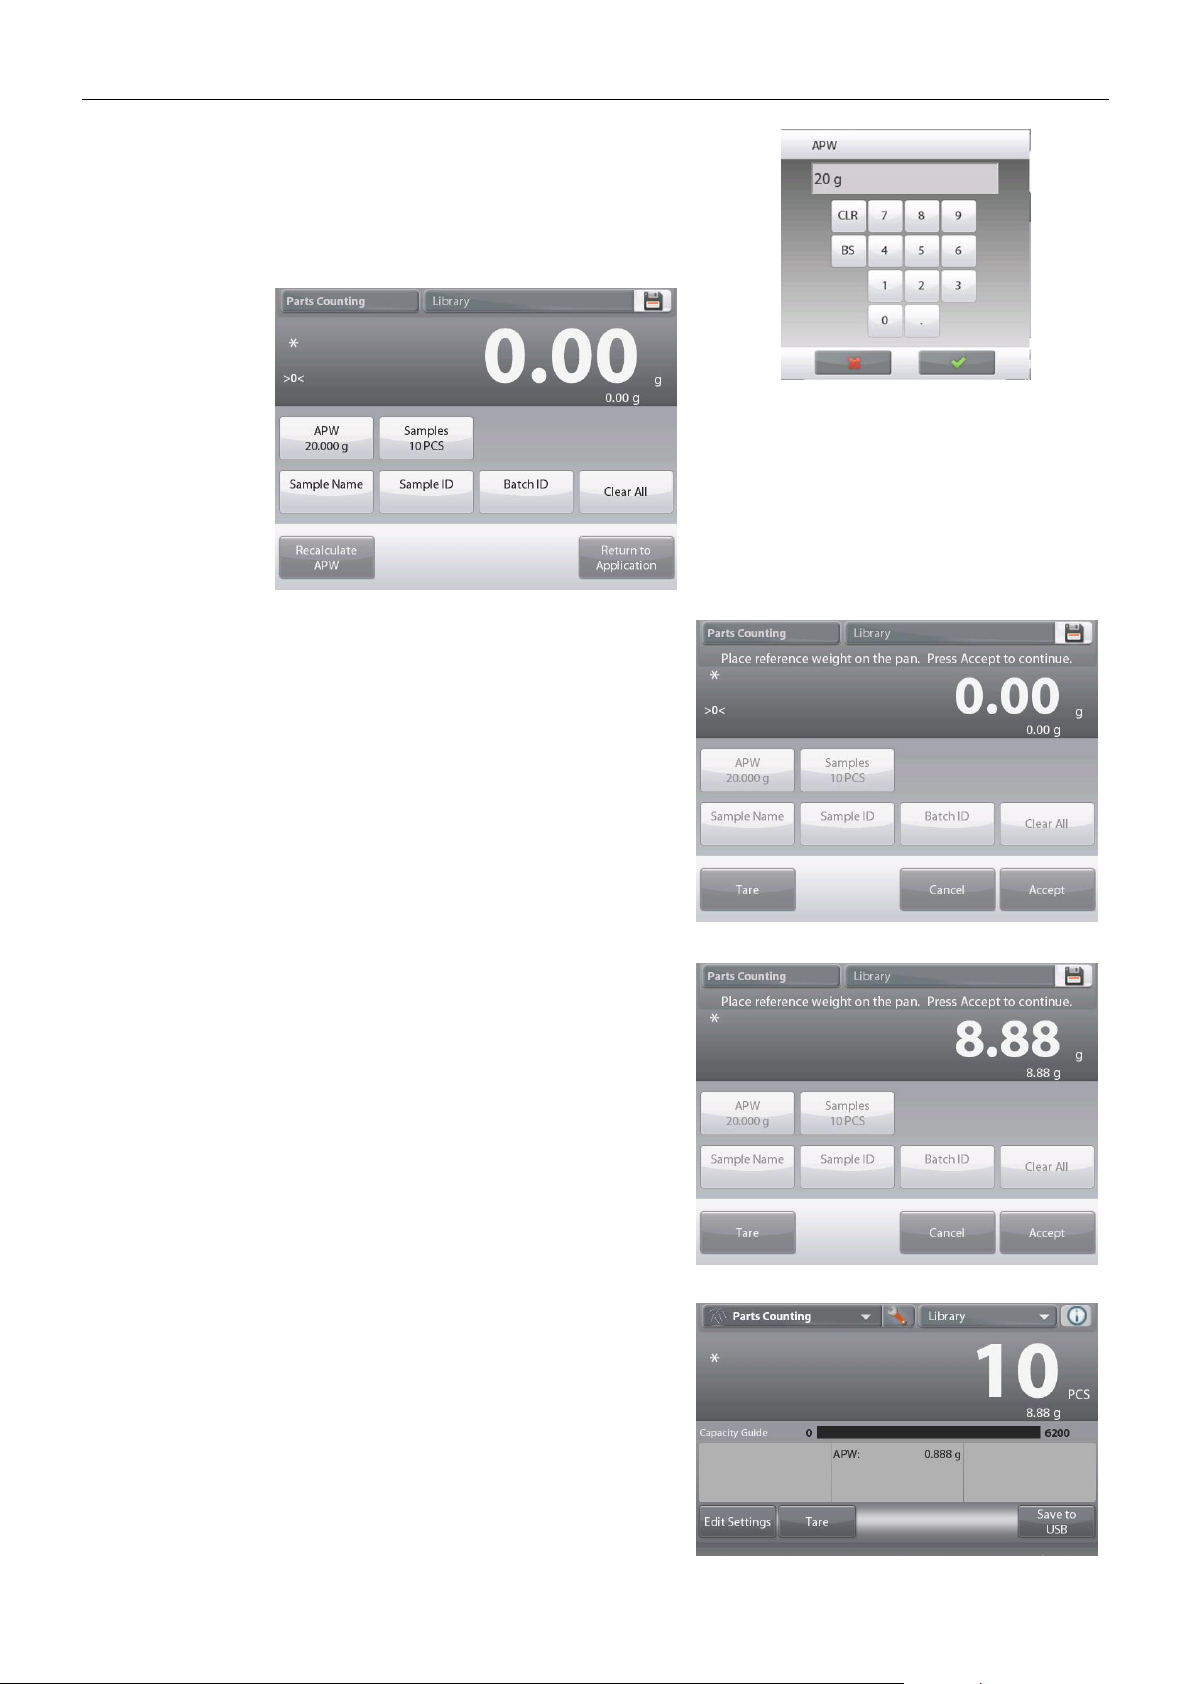
Set a known Average Piece Weight (APW)
To adjust the APW value directly, touch the
APW
button.
A numeric input window appears.
Key in the desired APW Weight, then press .
The display returns to the previous screen with the
new APW value highlighted.
To return to the Counting home screen,
touch Return to Application.
Set a new Average Piece Weight (APW) – Derived
To establish a new APW, touch the Recalculate APW button.
The APW Screen is displayed.
Note: The sample size that is displayed will be used.
To use a different sample size, change that first. (See below.)
Follow the screen instructions to establish a new APW.
Actions available: Tare, Cancel, or Accept
Press
Accept
to capture the value and return to the Settings
screen.
The Settings screen returns with the new APW value
highlighted.
To return to the Counting home screen,
touch
Return to Application.
The home screen shows 10 pieces at the new APW
Find Quality Products Online at: [email protected]
www.GlobalTestSupply.com
Page 34
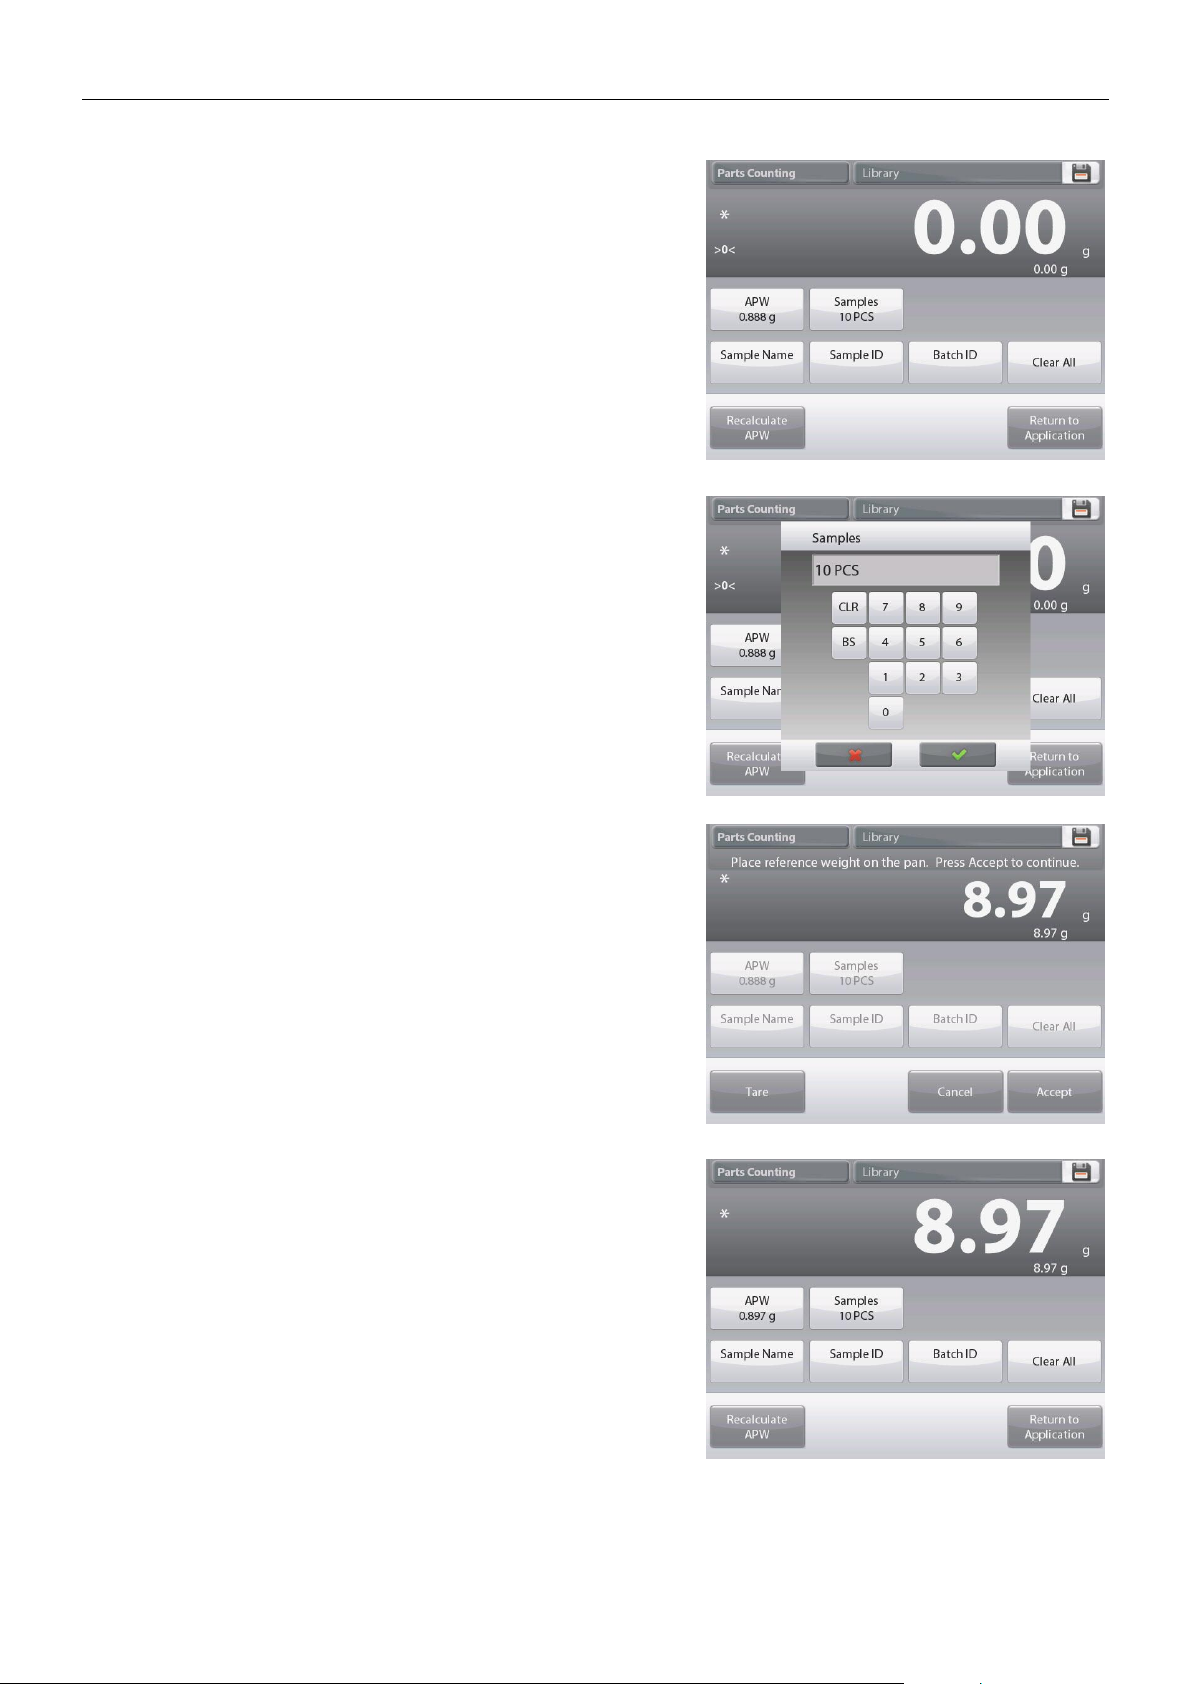
EN-32 EXPLORER BALANCES
4.2.1.2 Sample Size
The sample size can be 1 to 10 000 pieces. The default sample
size is 10. Once a sample size is changed, the balance will
immediately open the Recalculate APW screen, expecting to
establish a new APW.
The current sample size is shown on the
Settings
screen.
To adjust the sample size, touch the
Samples
button.
A numeric input window appears.
Key in the desired Sample Size, then press .
The next screen appears, with the message to place the number
of pieces entered in the numeric input window.
Place the indicated number of pieces on the platform.
Then touch either Tare, Cancel, or Accept.
Press
Accept
to capture the value and return to
the Settings screen.
The Settings screen appears with the new APW value
highlighted.
To begin counting pieces, touch
Return to Application
.
Find Quality Products Online at: [email protected]
www.GlobalTestSupply.com
Page 35
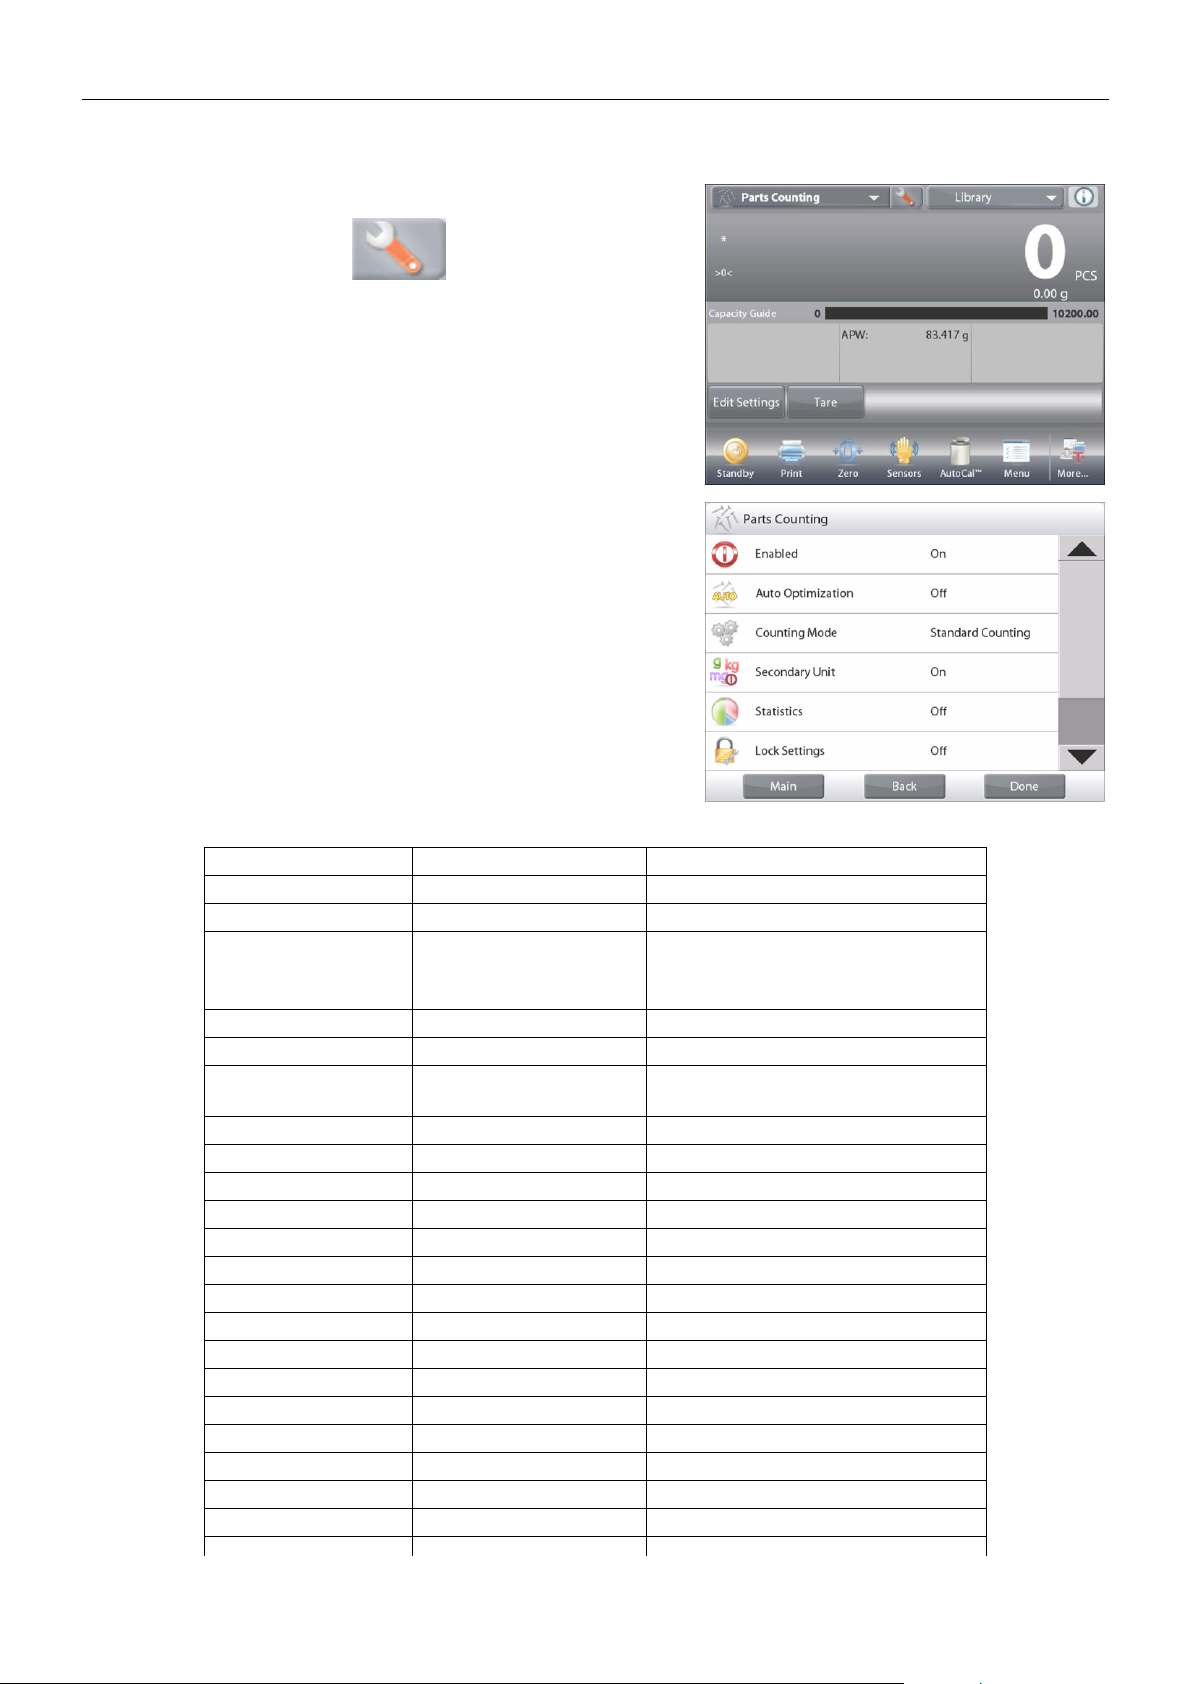
EXPLORER BALANCES EN-33
4.2.2 Application Setup
The Application can be customized for various user preferences.
Touch the
Setup Icon
(wrench) to enter
Application Setup
.
The Application Setup Menu appears.
Select the list item to view or change the setting as
desired.
To return to the Application home screen, touch
Done
.
The Counting Application Setups are below (defaults in Bold).
Item
Available Settings
Comments
Enabled
On, Off
Turns Application on/off
Auto Optimization
On, Off
Counting Mode
Standard Counting,
Check Counting,
Fill Counting
Select the Mode
Secondary Unit
On, Off
To show the Second Display line
Statistics
Off, Manual, Auto
Lock Settings
On, Off
Press to lock the current setting(s)
so they cannot be changed.
Reference fields
APW
On, Off
The APW is displayed
Gross
On, Off
Gross weight is displayed
Net
On, Off
Net weight is displayed
Tare
On, Off
Tare weight is displayed
Target
On, Off
Used for Check-Fill only
Difference
On, Off
Used for Check-Fill only
Over Limit
On, Off
Used for Check-Counting only
Under Limit
On, Off
Used for Check-Counting only
Print Options
See Printing Section.
APW
On, Off
Sample Size
On, Off
Target
On, Off
Used for Check-Fill only
Difference
On, Off
Used for Check-Fill only
Over Limit
On, Off
Used for Check-Counting only
Under Limit
On, Off
Used for Check-Counting only
Find Quality Products Online at: [email protected]
www.GlobalTestSupply.com
Page 36
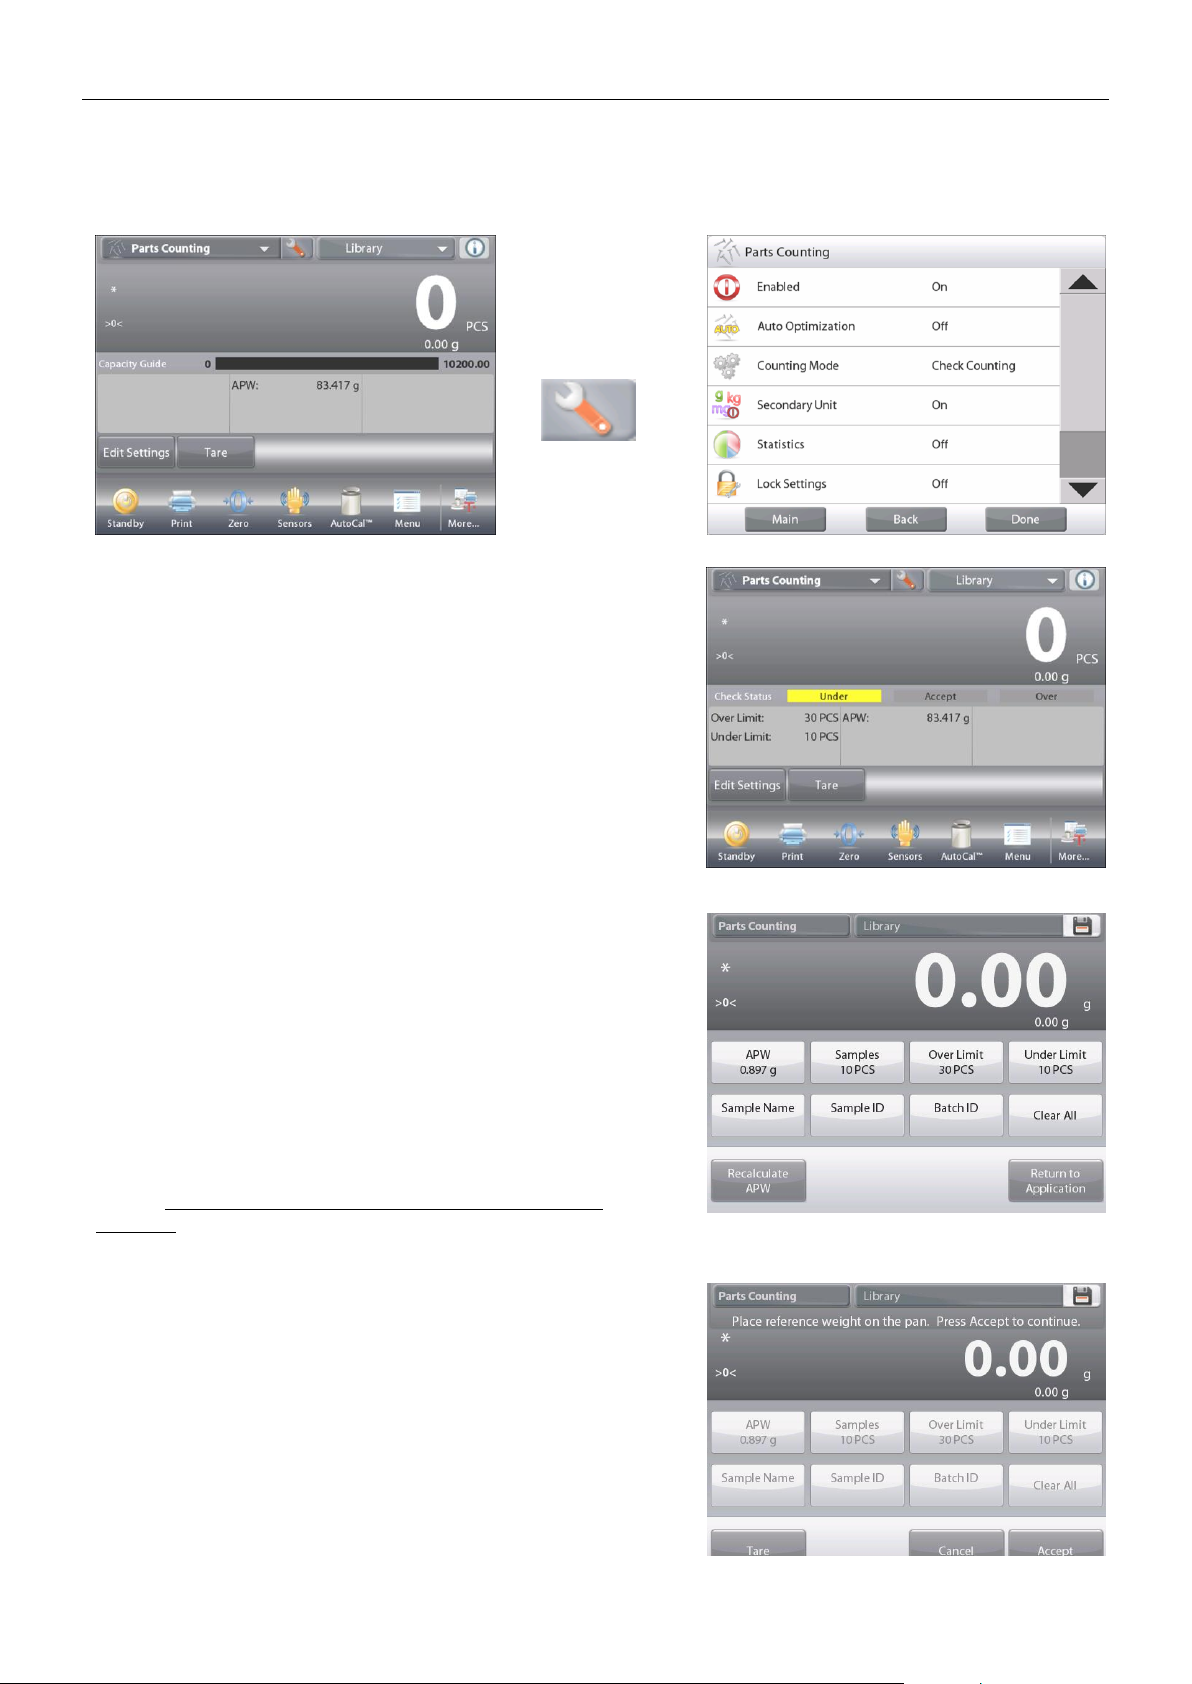
EN-34 EXPLORER BALANCES
4.2.3 Parts Counting – Check
This feature permits establishing a set quantity of pieces as criteria for similar items that can be quickly checked
against a sample.
Press the
Setup
(wrench)
button to enter
the Counting
Setup menu.
Change
Counting
Mode to
Check
Counting.
The PARTS COUNTING – Check Home screen
Main Display Line
Second Display Line
Reference Fields
Application Buttons
Functions
The default (or last) Average Piece Weight (APW) is
displayed. Place objects on the pan to display the
Check Status (number of pieces).
4.2.3.1 Edit Settings: To use the Parts Counting-Check mode,
the Over Limit and Under Limit values must be set.
The Average Piece Weight and standard sample size can also
be set. Follow these steps:
Touch the
Edit Settings
button. The Settings screen appears.
The buttons for
APW, Samples, Sample Name, Sample ID,
Batch ID, Clear All.
Note:
please refer to section 4.1.1 for details about setting
Sample Name, Sample ID, Batch ID and Clear All.
Over Limit
and
Under Limit
show default (or previously set)
values. You can also touch
Batch ID
to set an ID for your
samples. To change any value, touch the button. A keyboard
screen appears.
(See keyboard screens, next page.)
To set a new average piece weight, press the
Recalculate APW button.
A new screen appears with the message:
Place reference weight on the pan. Press Accept to
continue.
After following these instructions, press Return to Application
on the main Edit Settings screen.
Find Quality Products Online at: [email protected]
www.GlobalTestSupply.com
Page 37
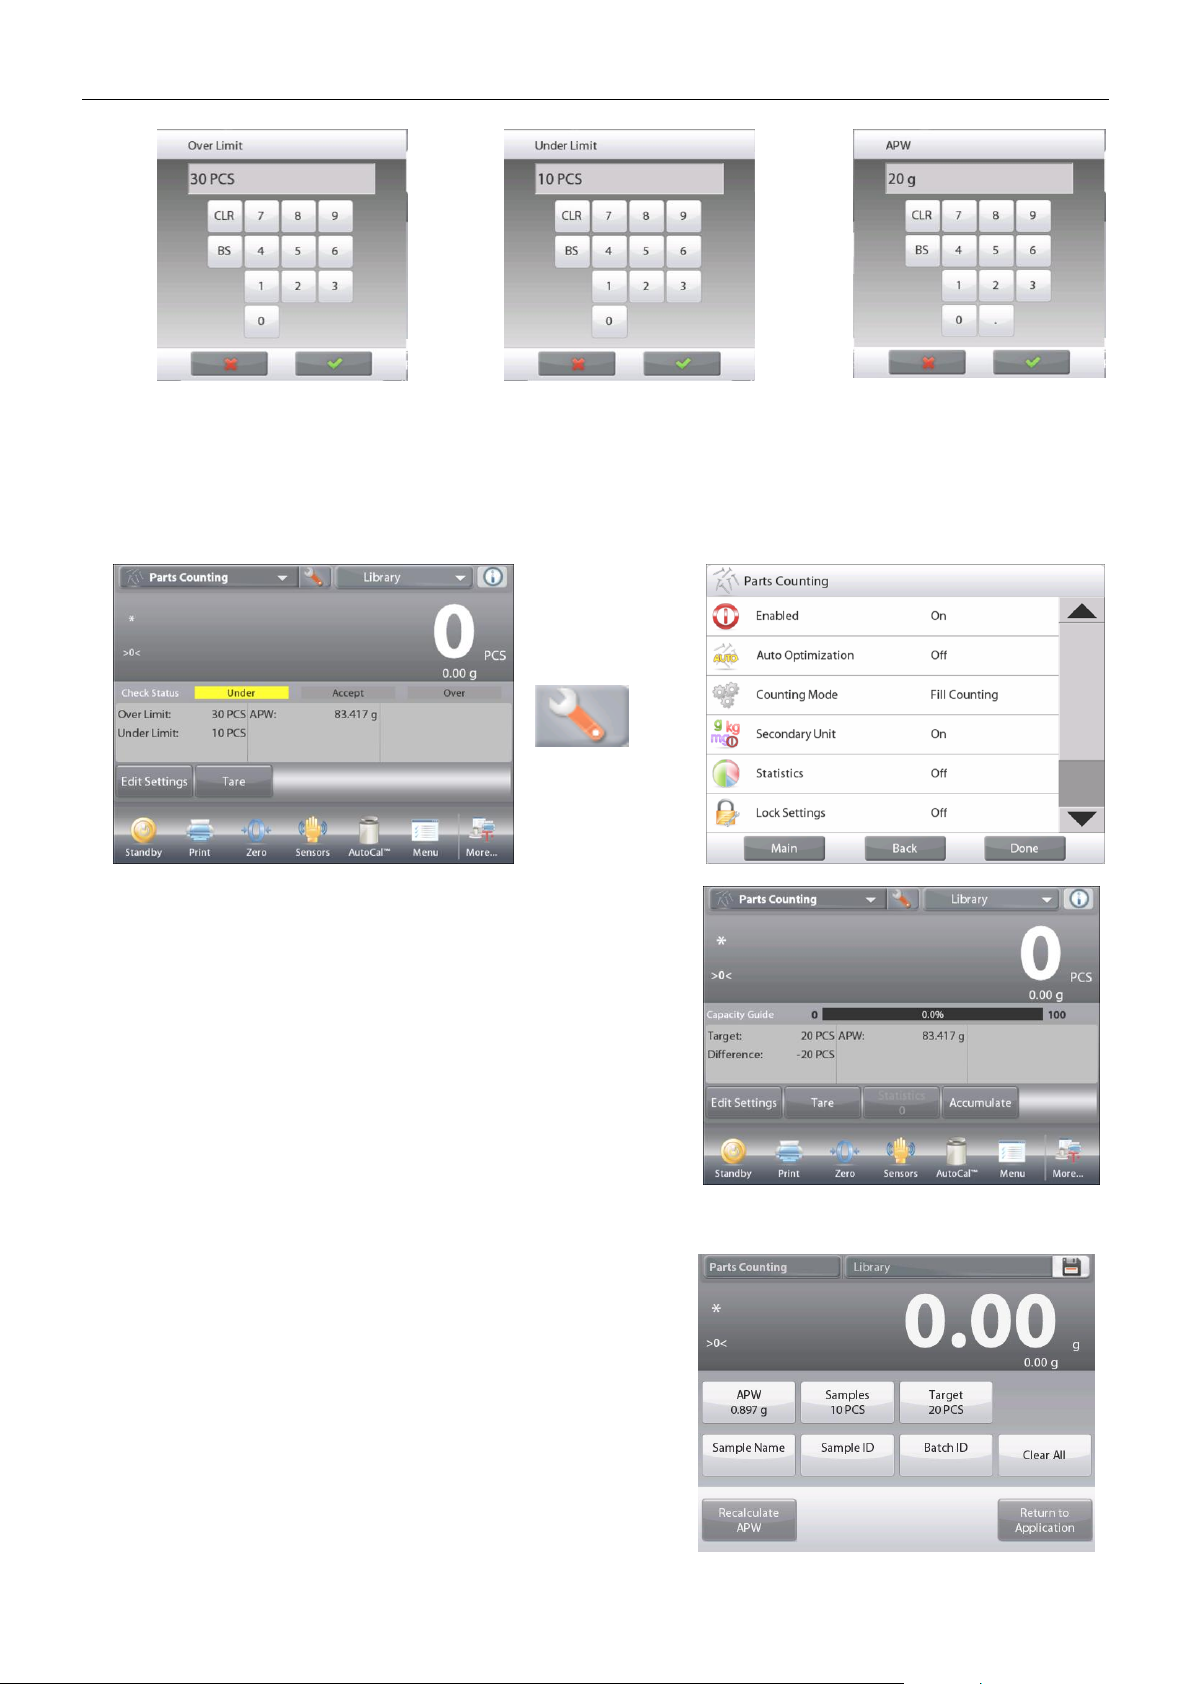
EXPLORER BALANCES EN-35
4.2.4 Parts Counting – Fill
This feature permits establishing a set quantity of pieces as a reference, so when pieces are added, their
percentage of the reference amount appears. A Progress bar indicates the percentage.
In the upper left portion of the home screen, select Parts Counting.
(The option will appear if it has been enabled in the Application Modes menu.)
Press the Setup
(wrench) button
to enter the
Counting Setup
menu.
Change
Counting Mode
to Fill
Counting.
The PARTS COUNTING – Fill Home screen
Main Display Line
Second Display Line
Reference Fields
Application Buttons
Functions
The default (or last) Average Piece Weight (APW) is displayed.
Place objects on the pan to display the Fill Status.
4.2.4.1 Edit Settings: Touch the Edit Settings button.
The Settings screen appears.
The buttons for APW, Samples and Target show
default (or previously set) values.
To change values, touch the button.
A keyboard screen appears.
Key in the new value, and press .
Note:
please refer to section 4.1.1 for details about
setting Sample Name, Sample ID, Batch ID and Clear
All.
To set a new average piece weight,
press Recalculate APW.
Find Quality Products Online at: [email protected]
www.GlobalTestSupply.com
Page 38
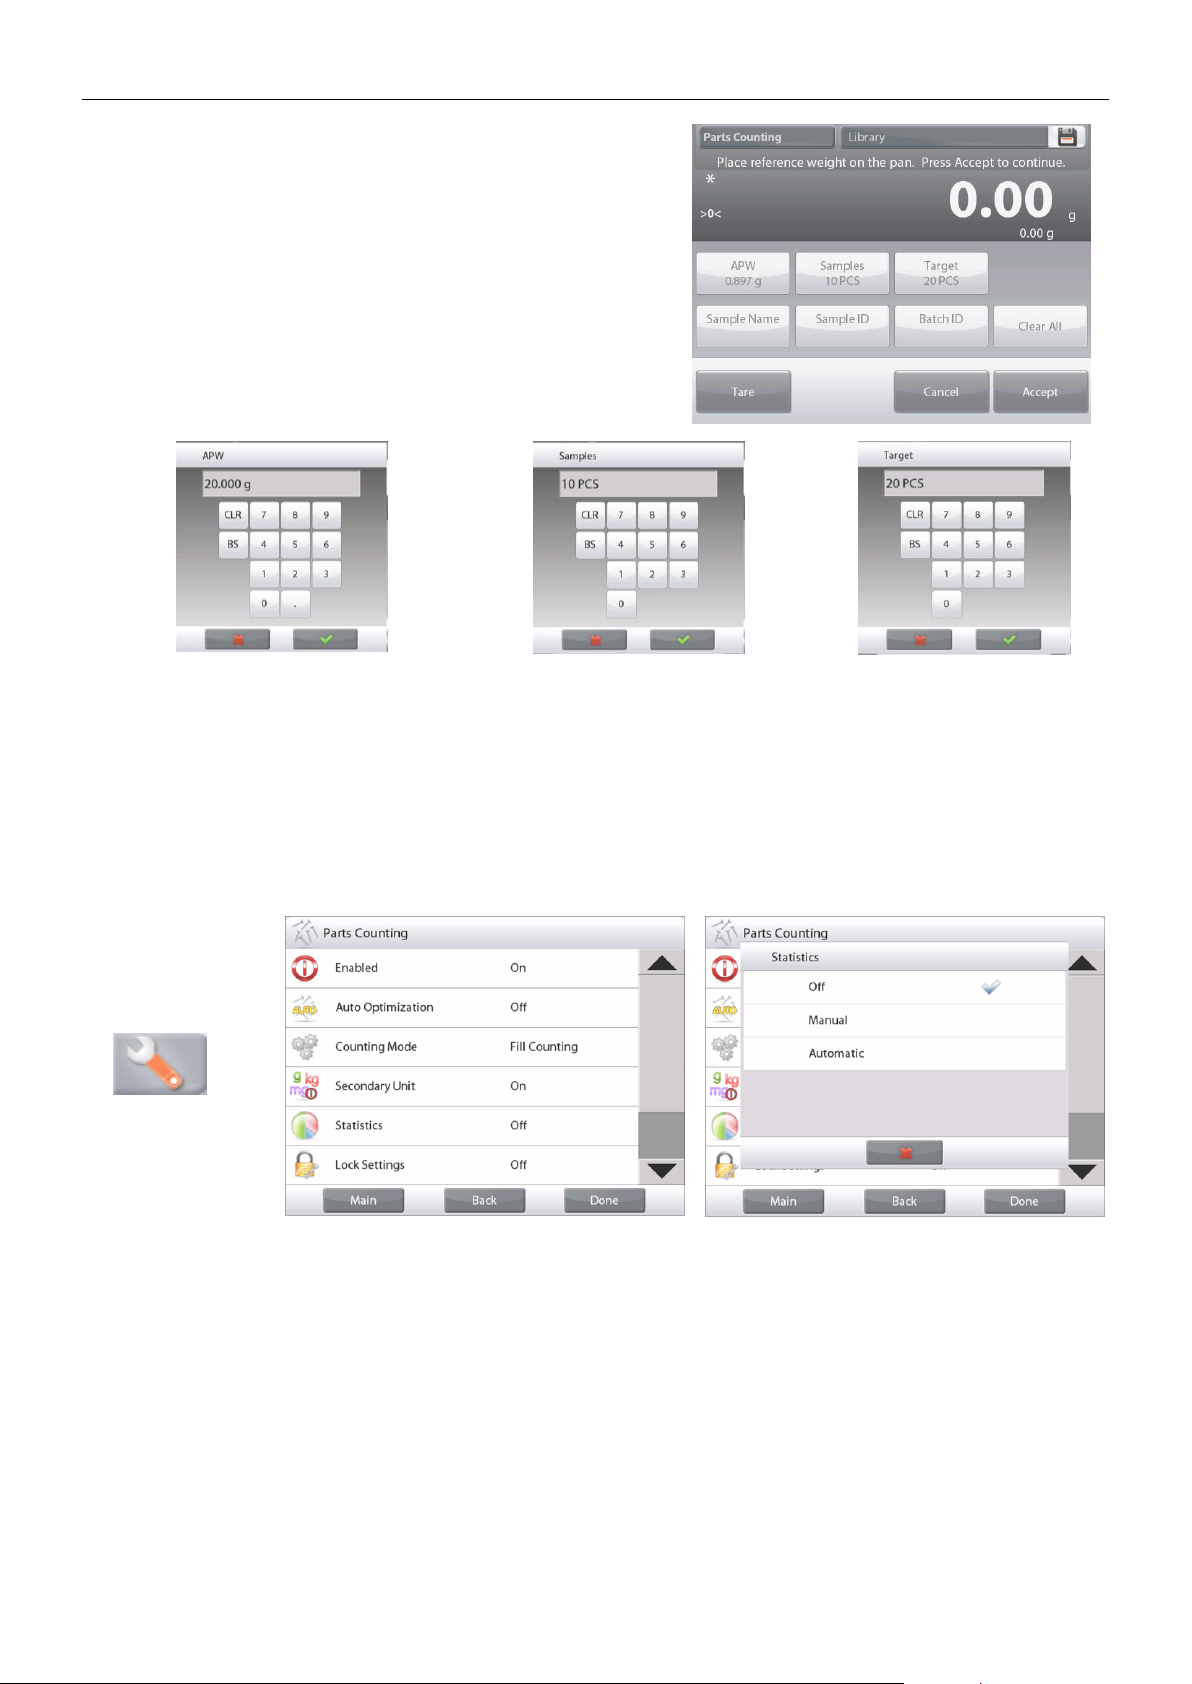
EN-36 EXPLORER BALANCES
A new screen appears saying:
Place reference weight on the pan. Press Accept to
continue.
This establishes a new reference weight with a sample.
Alternatively, fill in values in the screens for
APW, Samples and Target, as shown below.
After following these instructions, and setting all values
as desired, press Return to Application.
4.2.5 Statistics for Parts Counting
Use the Statistics function to compare a number of samples and examine the relative deviation of the samples
along with other statistical data. A minimum of three samples is required.
Statistics can be determined manually (Manual mode, with key press after each step) or automatically
(Auto Mode: weights are automatically recorded when stable).
To use the statistics function, enable it first in the Application Setup menu.
Application Setup
First, Enable Statistics
Touch the Setup
Icon wrench (as
above) to enter
Setup menu.
Press Statistics and choose either Manual or Automatic, then press Close.
Press Done on the main options menu to return to the home screen.
Find Quality Products Online at: [email protected]
www.GlobalTestSupply.com
Page 39
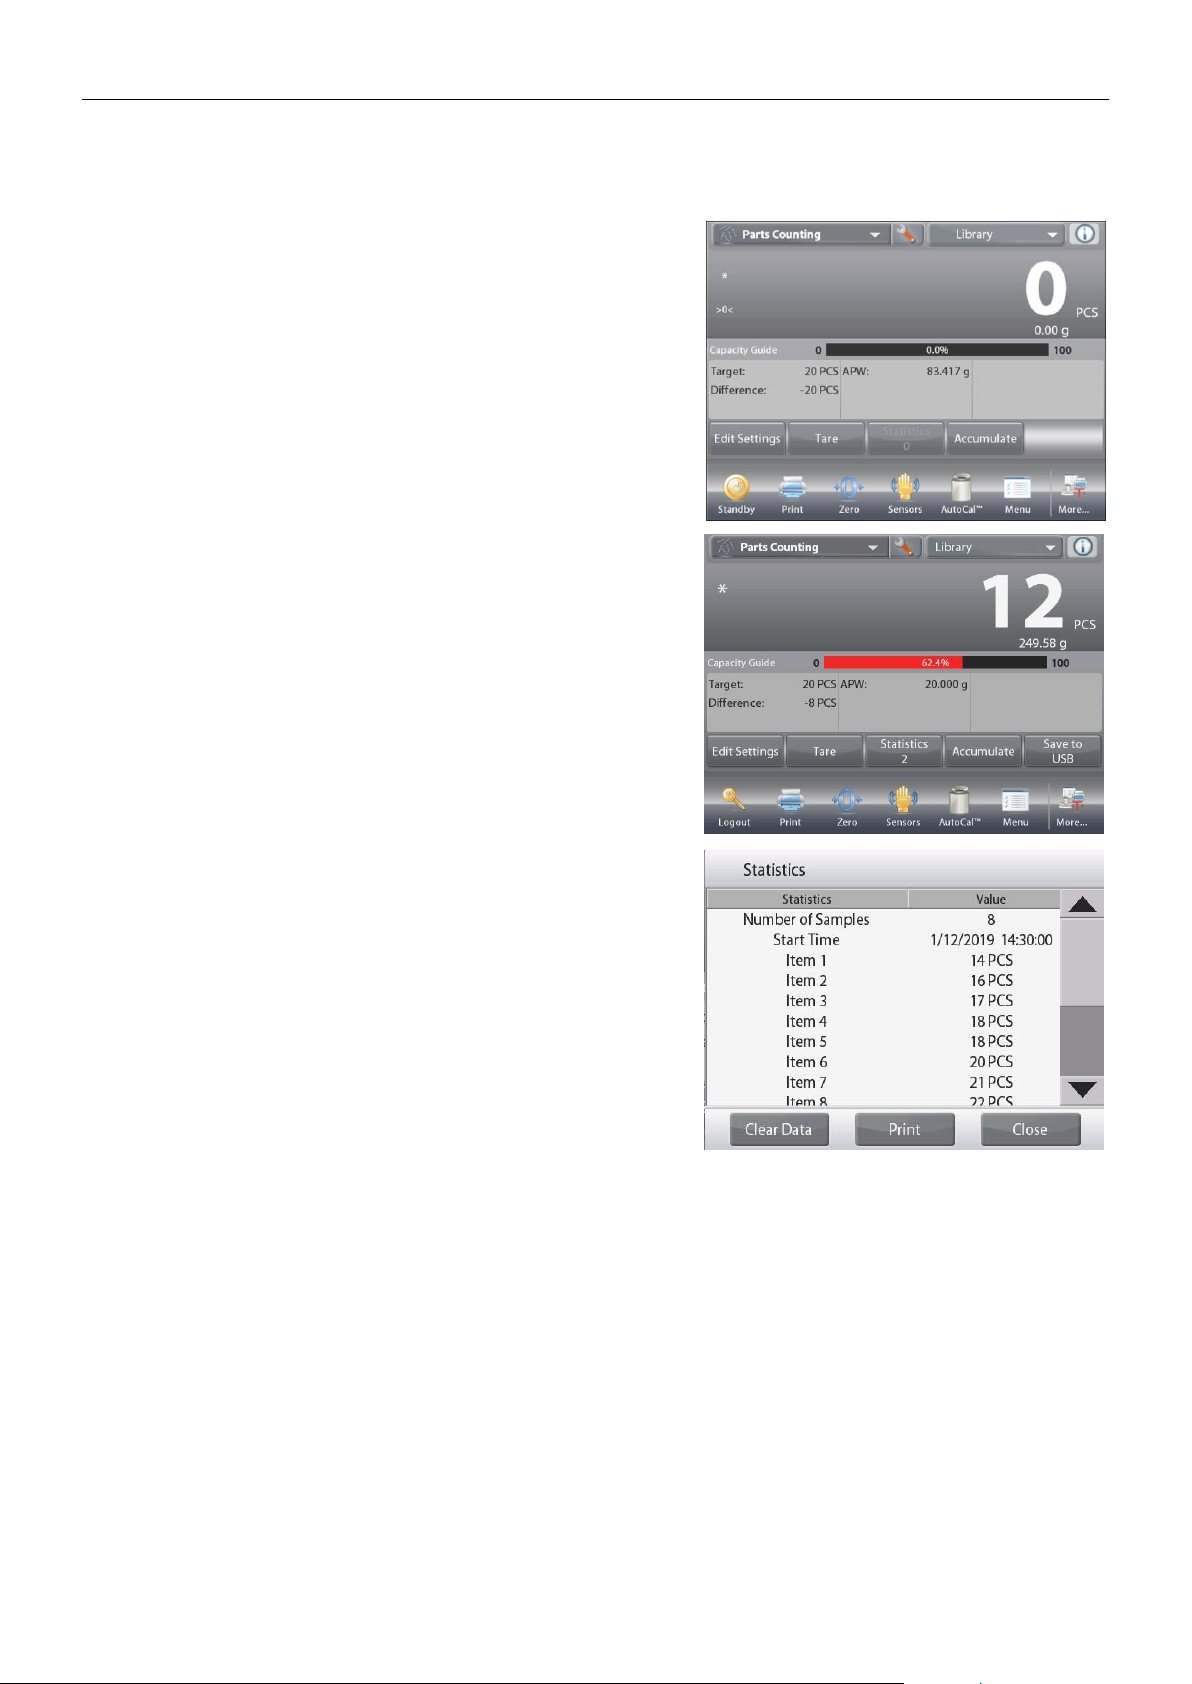
EXPLORER BALANCES EN-37
Accumulating displayed values & Viewing data – Manual
Once Statistics is enabled, two buttons appear on the Application screen:39
Statistics and Accumulate.
To add the sample to the data set, place the item on the pan and
press Accumulate.
When stable, the Statistics button lights briefly to show the item
is added to the set and the data set quantity increments by one.
Continue to add items and press Accumulate to build the
statistical data set
At any time, press the
Statistics
button to view the results.
The Statistics Results screen
Press Print to send to the enabled COM port
Press Close to return to the Application home screen with
the current statistics set or
Press
Clear Data
to clear the results and return to the
Application home screen.
Statistics – Automatic
Statistics Automatic mode is similar to manual mode (above) except the first stable weight is automatically
captured. Thus the Accumulate button is not used.
Find Quality Products Online at: [email protected]
www.GlobalTestSupply.com
Page 40
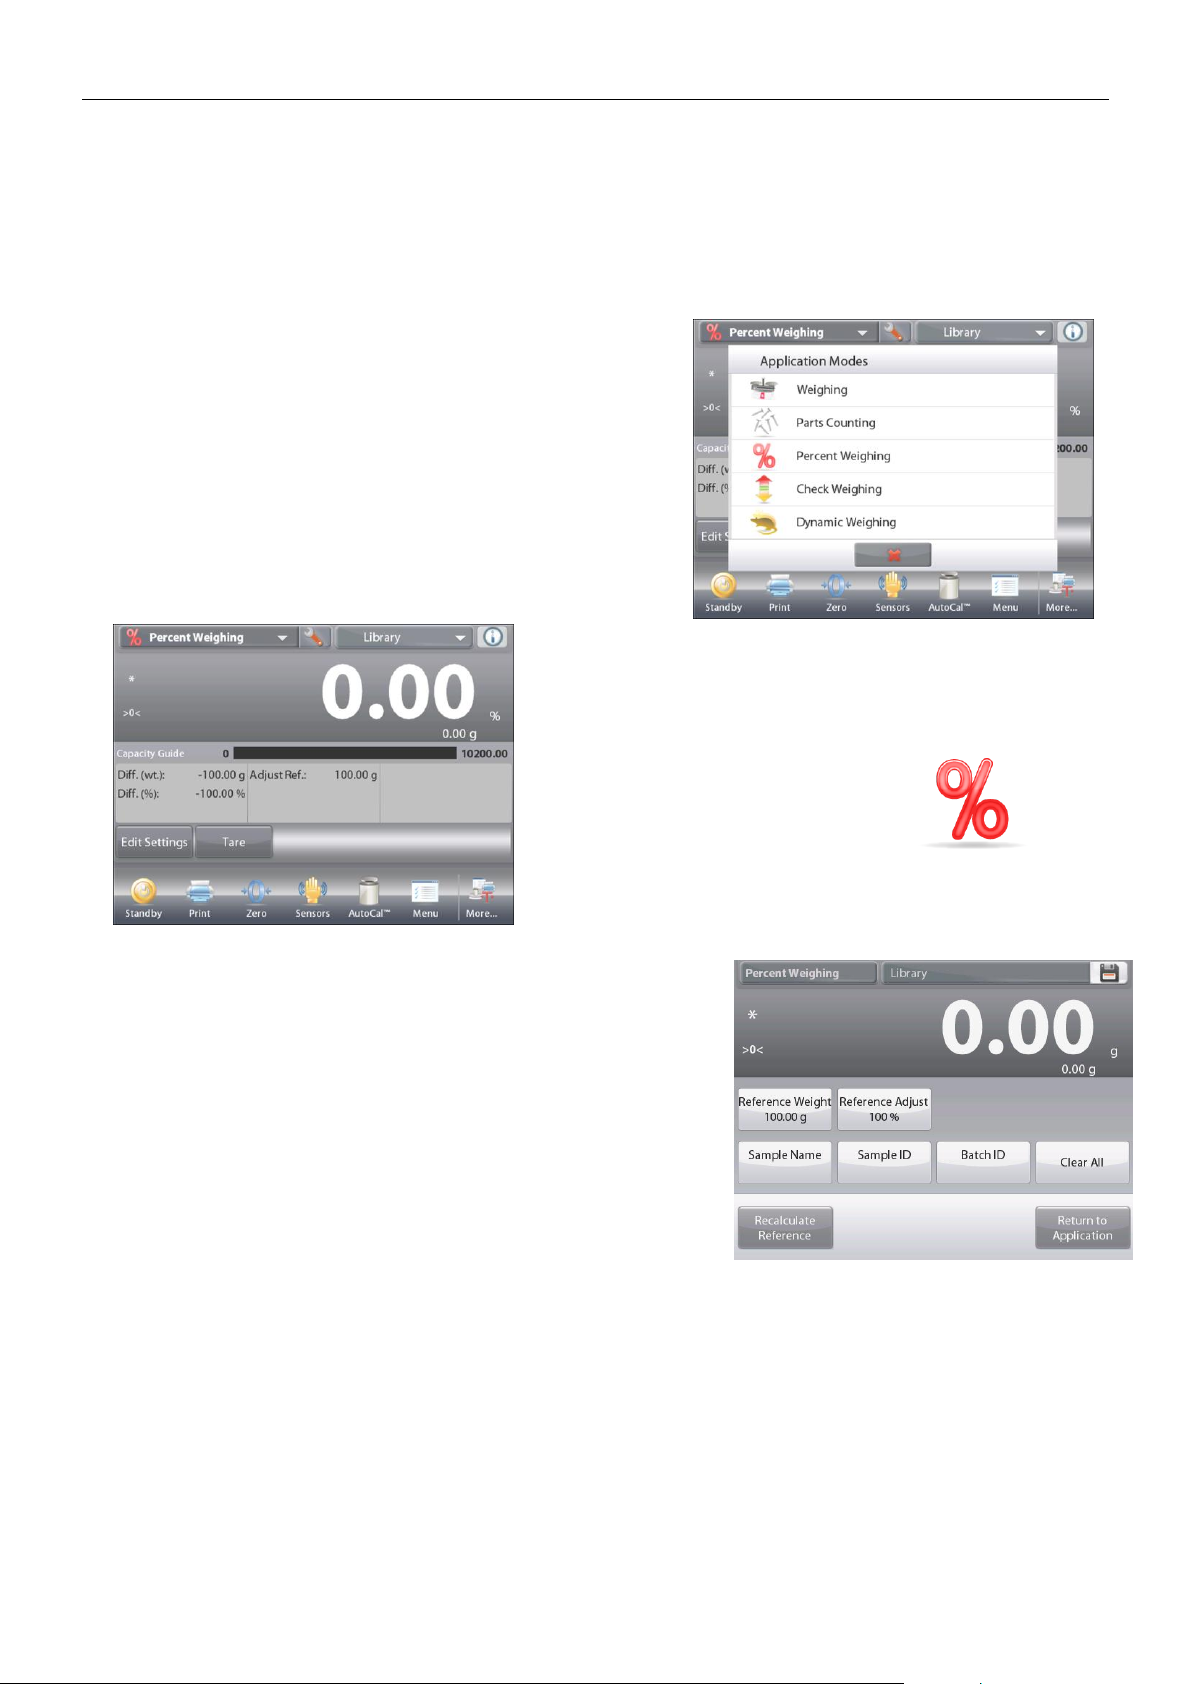
EN-38 EXPLORER BALANCES
4.3 Percent Weighing
Use Percent Weighing to measure the weight of a sample displayed as a percentage of a pre-established
Reference Weight.
The default (or last) Reference Weight is displayed.
Place an object on the pan. The difference between the sample and the Reference Weight is displayed as both a
weight and a percentage.
To Access Percent Weighing:
Press the upper left portion of the home screen,
so the available Application Modes are visible.
Select Percent Weighing.
The Percent Weighing Home Screen appears.
The PERCENT WEIGHING Home screen
Main Display Line
Second Display Line
Reference Fields
Application Buttons
Functions Application Icon
4.3.1 Edit Settings
To view or adjust the current settings
To adjust the Application settings, touch the
Edit Settings
button.
(See above.)
The Settings screen is now displayed.
Settings available:
Reference, Reference Adjust, Sample
Name, Sample ID, Batch ID, Clear All.
Note: please refer to section 4.1.1 for details about setting
Sample Name, Sample ID, Batch ID and Clear All.
Functions Available:
Recalculate Reference,
Return to Application
Establishing a Reference Weight
There are two methods to establish the Reference Weight value:
1. Direct: If the actual Reference Weight is known, it can be entered directly;
2. Derived: The sample’s weight can be used to establish the reference weight.
Find Quality Products Online at: [email protected]
www.GlobalTestSupply.com
Page 41
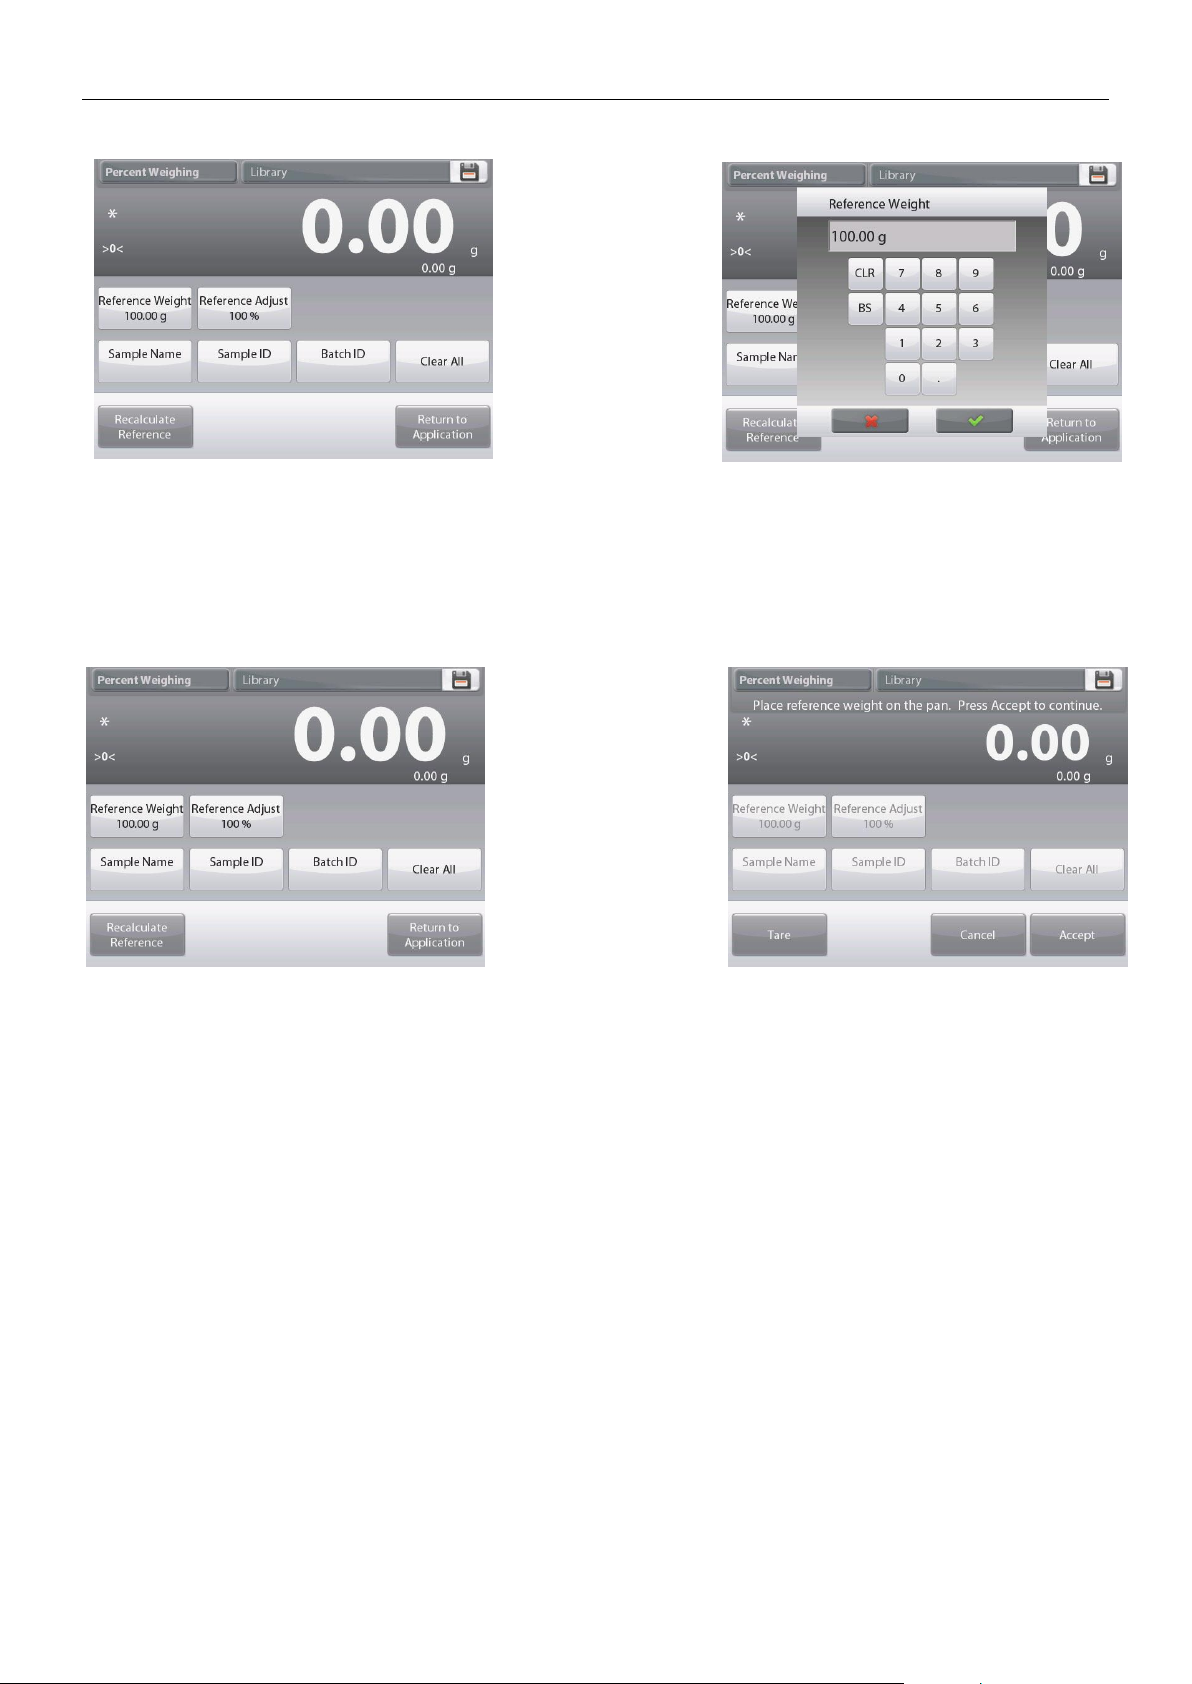
EXPLORER BALANCES EN-39
Establishing a Known Reference Weight
The current
Reference weight
value is shown on
the Settings screen.
To adjust the
Reference weight
directly, touch the
Reference
button.
A numeric input
window appears.
Key in the desired Reference Weight, then press .
The display returns to the previous screen with the new value highlighted.
To return to the Percent Weighing home screen, touch
Return to Application
.
Using a Sample to Establish a Derived Reference Weight
To establish a new
Reference weight
value, touch the
Recalculate
Reference button.
The New
Reference screen
appears. Follow
the screen
instructions to
establish a new
Reference Weight.
Actions available: Tare, Cancel, or Accept.
Press
Accept
to capture the value and return to the Settings screen.
The display returns to the Settings screen with the new Reference weight value highlighted momentarily.
To return to the Percent weighing home screen, touch Return to Application.
Reference Weight Adjustment (Reference Adjust)
The Reference Weight adjustment can be 1 to 1000 percent.
Examples: 100% means the sample is displayed as compared to 100% of the Reference Weight.
25% means the sample is displayed as compared to 25% of the Reference Weight.
Find Quality Products Online at: [email protected]
www.GlobalTestSupply.com
Page 42
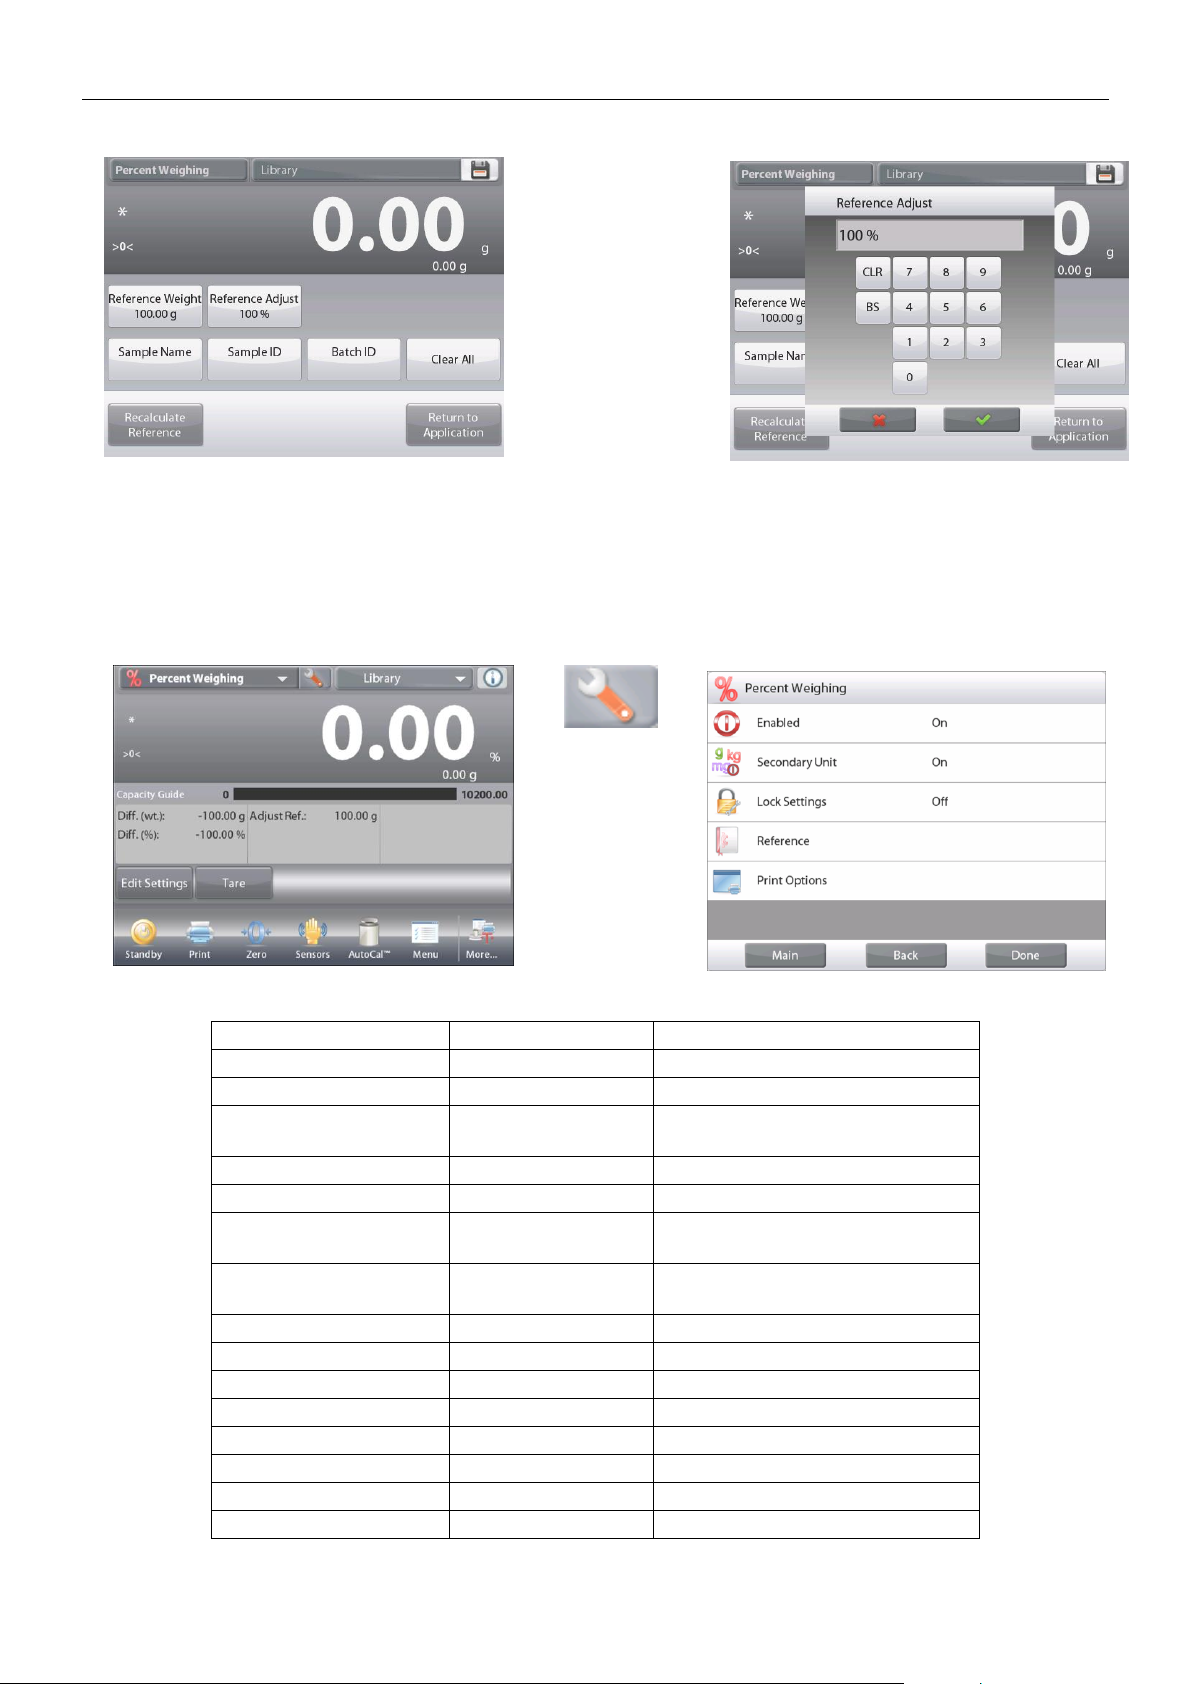
EN-40 EXPLORER BALANCES
The Edit Settings screen shows current Reference Adjust value. To change it, touch Reference Adjust button.
A numeric input
window appears.
Key in the desired
Reference Weight
Adjustment,
then press .
The display returns to the previous screen with the new value highlighted momentarily.
To return to the Percent weighing home screen, touch
Return to Application
.
4.3.2 Application Setup
The Application can be customized for various user preferences. Press Setup (wrench) from the home screen.
The
Setup
Menu
appears.
Select the item
to view or
change.
To return to the
Application
home screen,
press
Done
.
Percent Weighing Application Setups (defaults in Bold)
Item
Available Settings
Comments
Enabled
On, Off
Turns Application on/off
Secondary Unit
On, Off
To show the Second Display line
Lock Settings
On, Off
Press to lock the current setting(s)
so they cannot be changed.
Reference fields
Reference Weight
On, Off
The Reference is displayed
Difference (weight)
On, Off
Displays the Difference to the
reference weight.
Difference (percent)
On, Off
Displays the Difference to the
reference weight as percentage.
Gross
On, Off
Gross weight is displayed
Net
On, Off
Net weight is displayed
Tare
On, Off
Tare weight is displayed
Print Options
See Printing Section.
Reference Weight
On, Off
Reference Adjust
On, Off
Difference (weight)
On, Off
Difference (percent)
On, Off
Find Quality Products Online at: [email protected]
www.GlobalTestSupply.com
Page 43
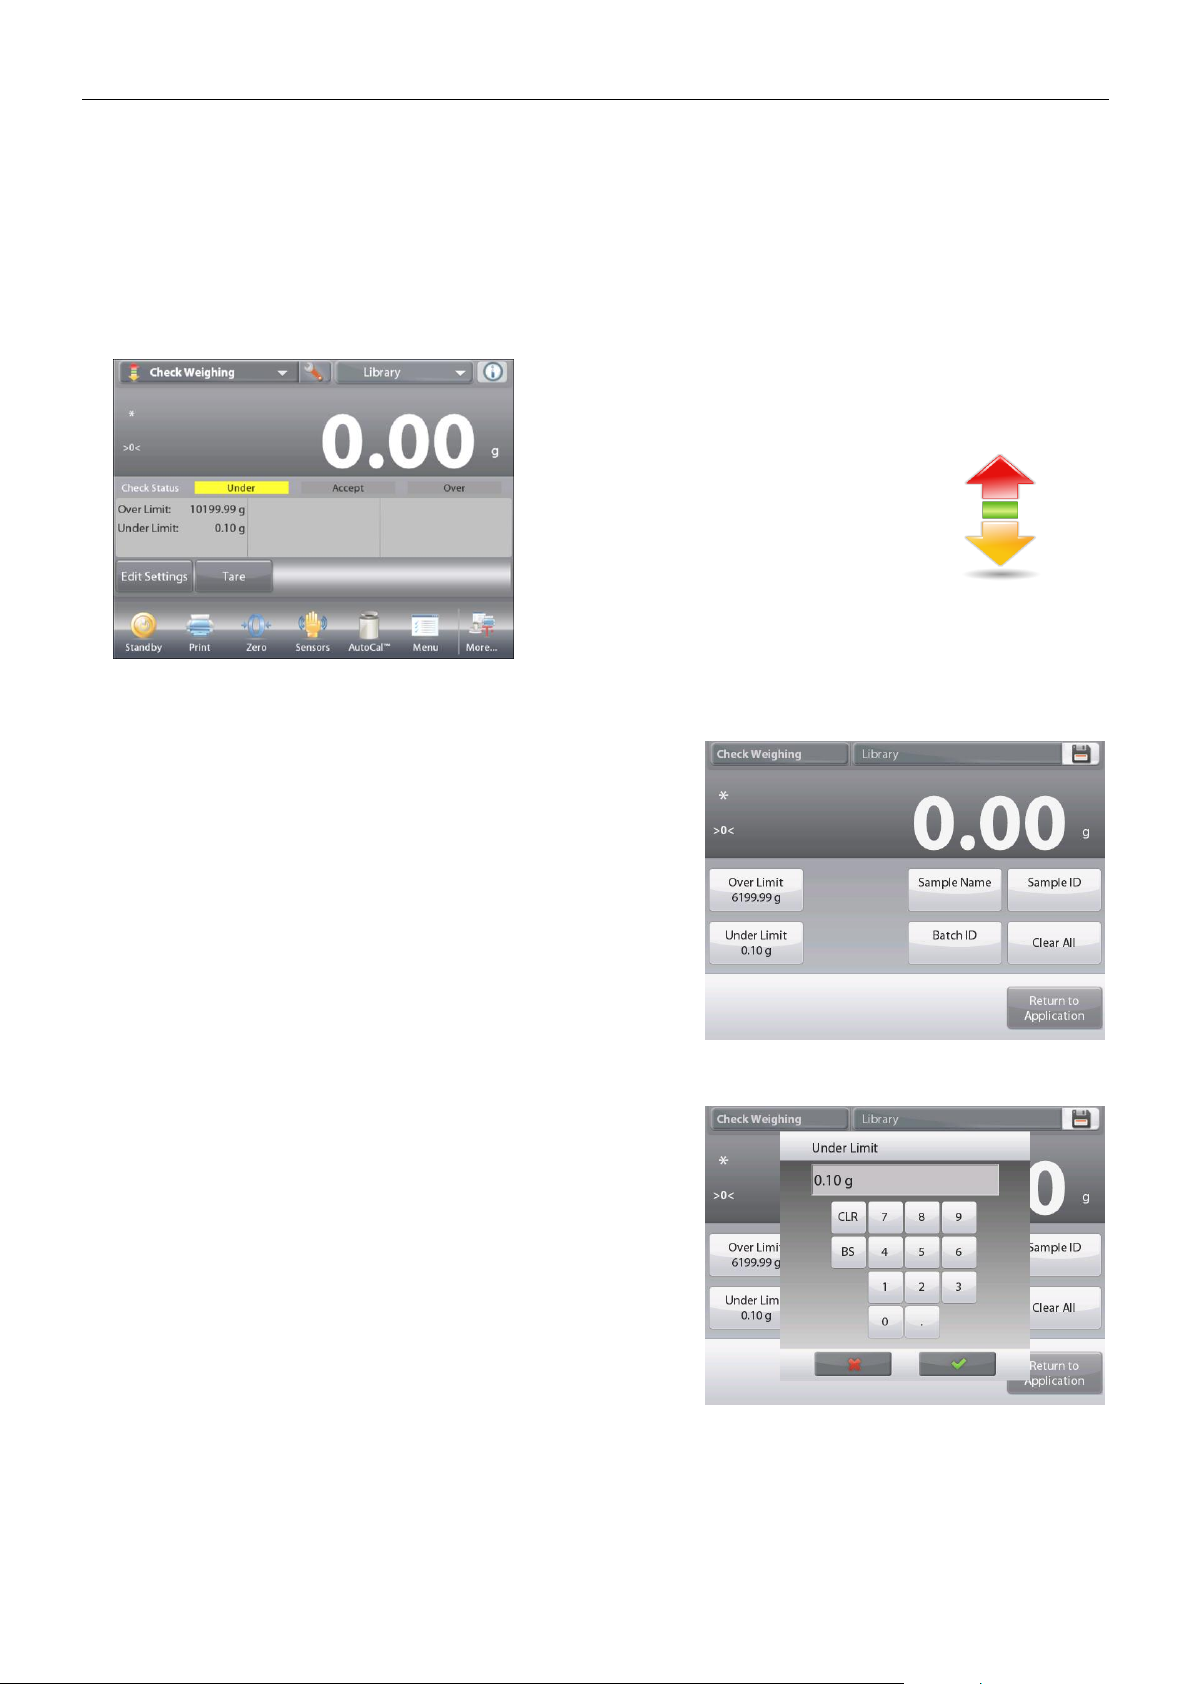
EXPLORER BALANCES EN-41
4.4 Check Weighing
Check Weighing is used to compare the weight of a sample against target limits. Three different modes can be
selected: Over and Under, Nominal Weight Tolerance, or Nominal Percent Tolerance.
4.4.1 Standard Check Weighing (default)
In the upper left portion of the home screen, select Check Weighing.
The default (or last) Check weigh limits are displayed. Place objects on the pan. The Under/Accept/Over status
is shown in the progress bar area while the actual weight of the item is shown on the main Display Line.
The CHECK WEIGHING Home screen
Main Display Line
Second Display Line
Reference Fields
Application Buttons
Application Icon
Functions
4.4.2 Edit Settings
To view or adjust the current settings
Touch the
Edit Settings
button. The Settings screen appears.
The Application Settings Screen.
Settings available:
Over Limit, Under Limit, Sample
Name, Sample ID, Batch ID, Clear All.
Note: please refer to section 4.1.1 for details about setting
Sample Name, Sample ID, Batch ID and Clear All.
Functions Available:
Return to Application
The check limit values are displayed in the settings screen.
To set the Over Limit value, touch the Over Limit button
To set the Under Limit value, touch the
Under Limit
button
A numeric input window appears.
Enter the desired Limit Weight, then press .
The display returns to the previous screen with the new value
highlighted momentarily.
To return to the CHECK WEIGHING home screen,
touch
Return to Application
.
Find Quality Products Online at: [email protected]
www.GlobalTestSupply.com
Page 44
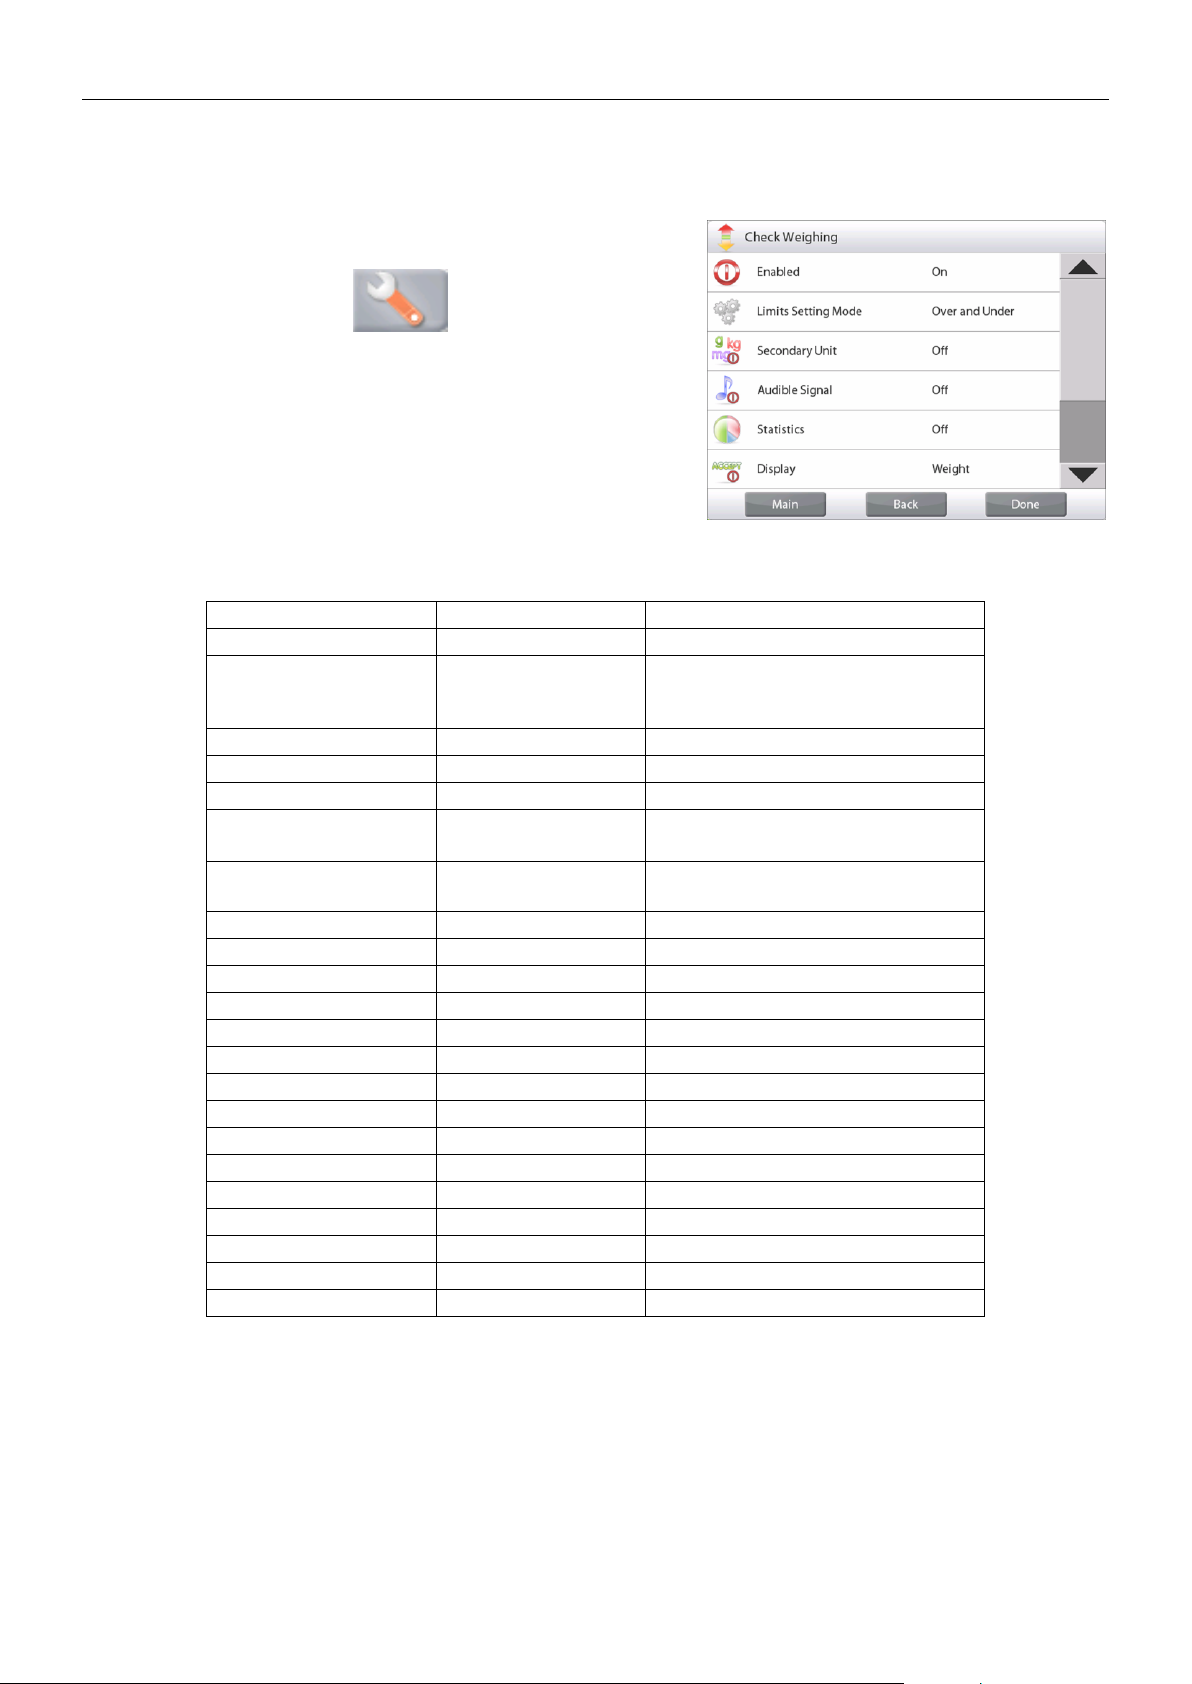
EN-42 EXPLORER BALANCES
4.4.3 Application Setup
The Application can be customized for various user preferences.
Touch the Setup Icon (wrench) to enter the Application Setup
from the home screen:
The
Setup
Menu is now displayed.
Select the list item to view or change the setting as
desired.
To return to the Application home screen, touch
Done
.
Check Weighing Application Setups (defaults in Bold)
Item
Available Settings
Comments
Enabled
On, Off
Turns Application on/off
Limits Setting Mode
Over and Under,
Nominal/Weight Tol,
Nominal/Percent Tol.
To select the Mode
Secondary Unit
On, Off
To show the Second Display line
Audible Signal
On, Off
Beeps if reading is under or over.
Statistics
Off, Manual, Auto
Display Setting
Weight,
Check Status
To show Weight or Check Status
on Main Display Line
Lock Settings
On, Off
Press to lock the current setting(s)
so they cannot be changed.
Reference fields
Over Limit
On, Off
Over weight limit
Under Limit
On, Off
Over weight limit
Gross
On, Off
Gross weight is displayed
Net
On, Off
Net weight is displayed
Tare
On, Off
Tare weight is displayed
Target
On, Off
Used for Nominal Checkweigh
Positive Tolerance
On, Off
Used for Nominal Checkweigh
Negative Tolerance
On, Off
Used for Nominal Checkweigh
Print Options
See Printing Section.
Over Limit
On, Off
Under Limit
On, Off
Target
On, Off
Used for Nominal Checkweigh
Positive Tolerance
On, Off
Used for Nominal Checkweigh
Negative Tolerance
On, Off
Used for Nominal Checkweigh
Find Quality Products Online at: [email protected]
www.GlobalTestSupply.com
Page 45
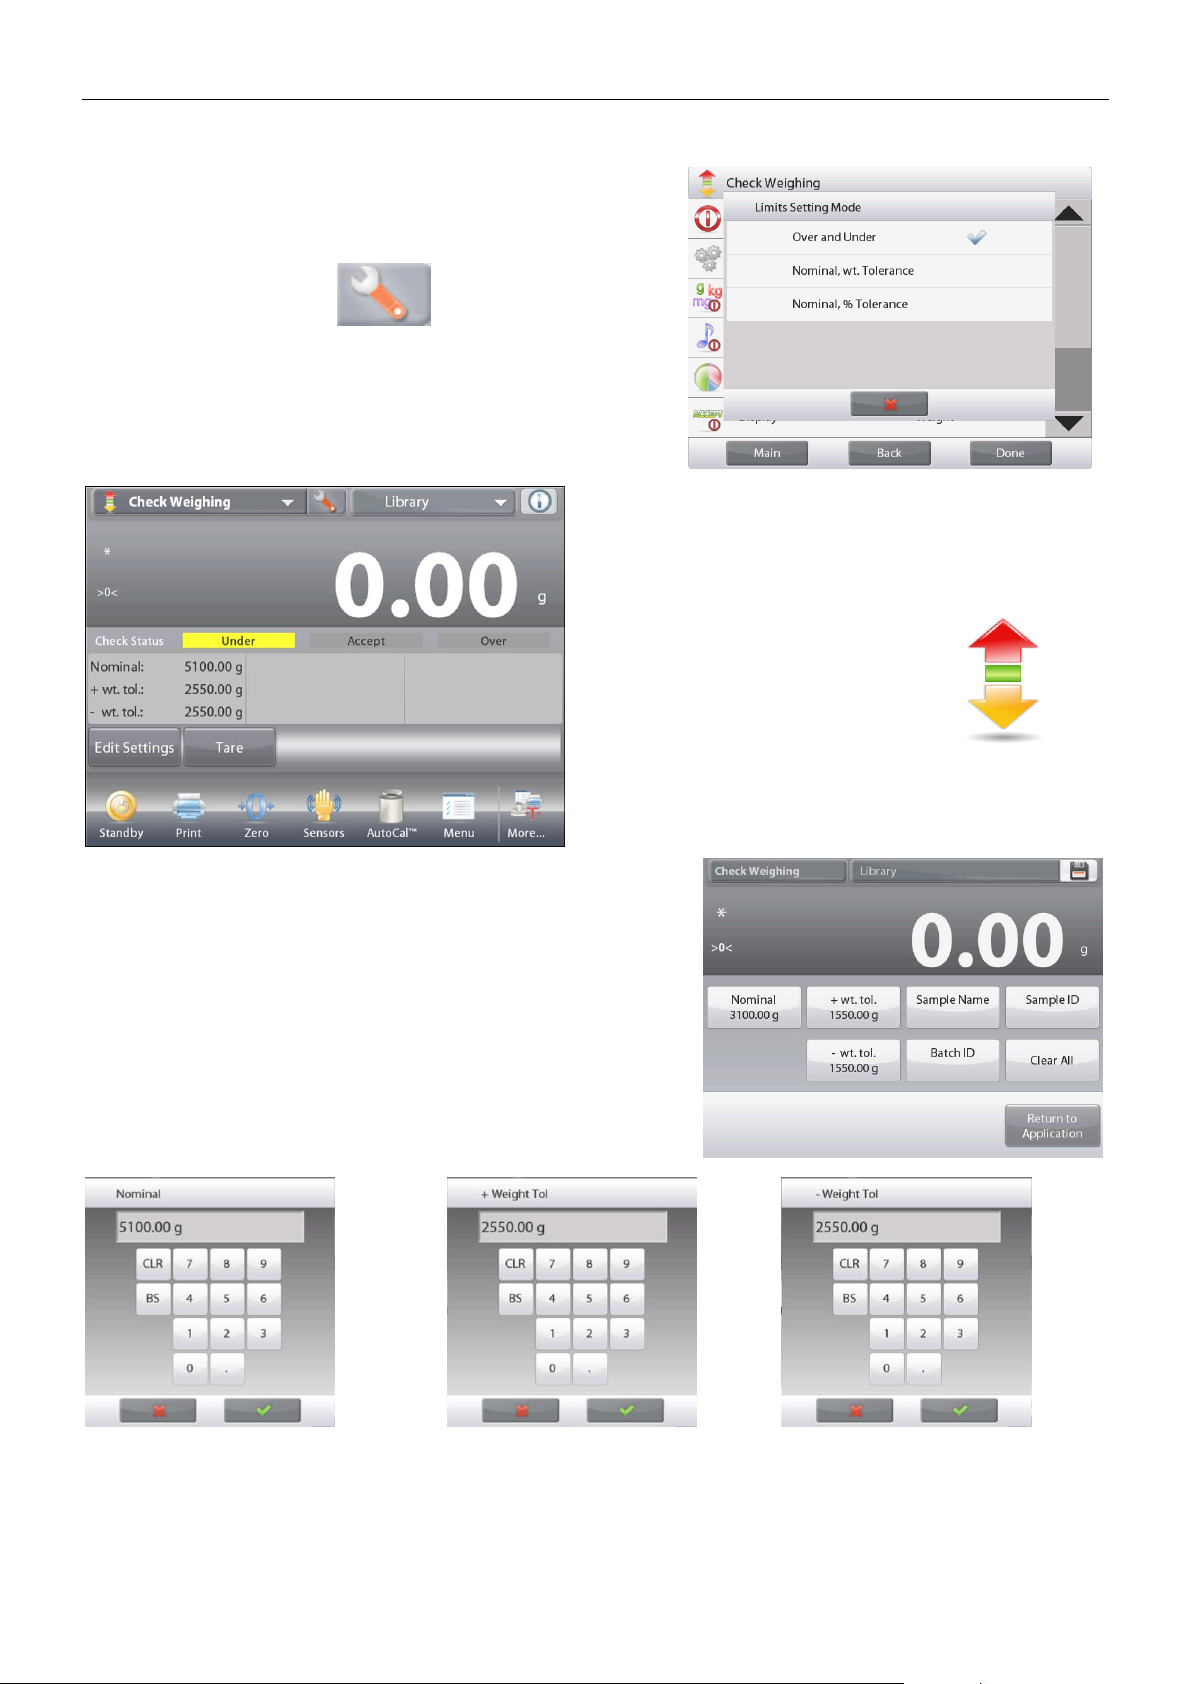
EXPLORER BALANCES EN-43
4.4.4 Check Weighing – Nominal/Weight Tolerance Mode
With this feature you can establish a Target or Nominal weight
value and pre-set tolerance in weight.
To enable this feature, enter the Setup menu.
Change the mode to Nominal/wt. Tolerance.
The Check Weighing options screen returns.
Press Done to begin Check Weighing.
Main Display Line
Second Display Line (not shown)
Reference Fields
Application Buttons
Functions Application Icon
To use this mode, touch Edit Settings to set the Nominal, and
Upper and Lower Tolerance values (in weight).
(See keyboards below.)
Press Return to Application when settings are complete.
Note: please refer to section 4.1.1 for details about setting
Sample Name, Sample ID, Batch ID and Clear All.
Find Quality Products Online at: [email protected]
www.GlobalTestSupply.com
Page 46
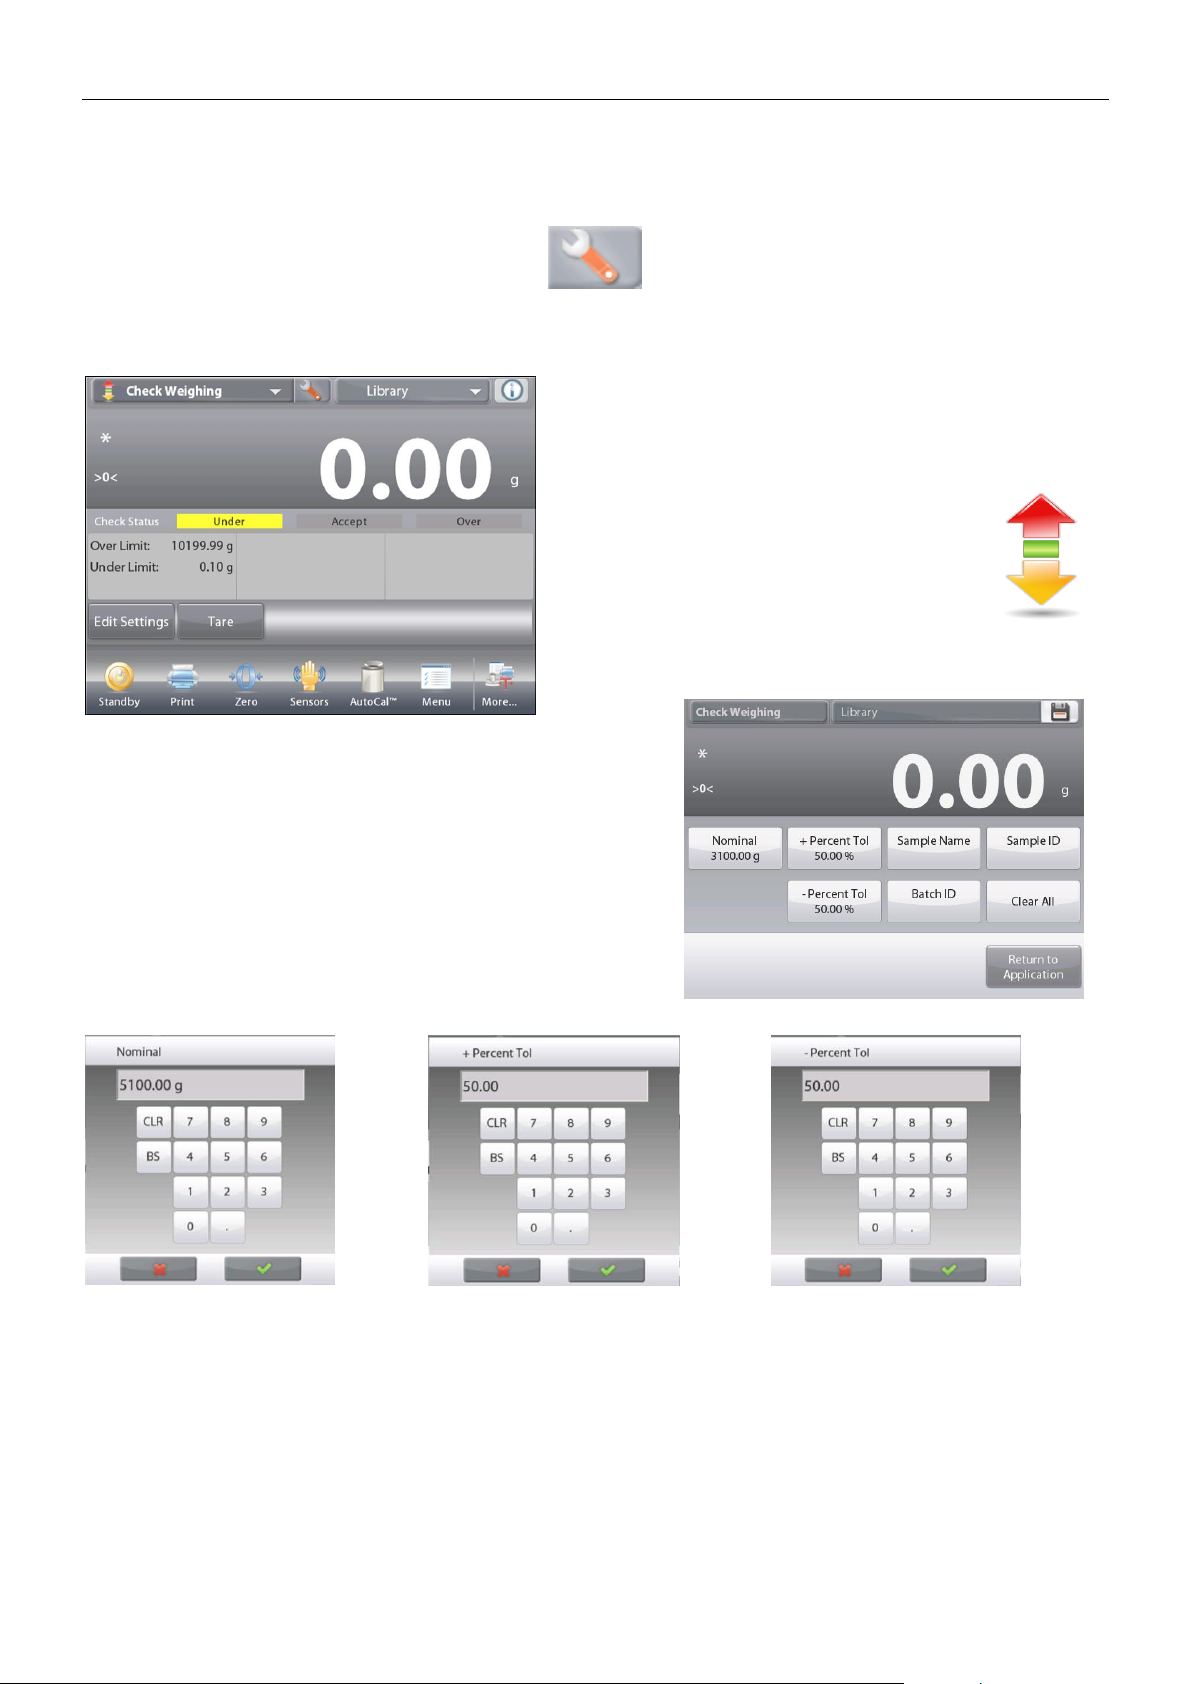
EN-44 EXPLORER BALANCES
4.4.5 Check Weighing – Nominal/Percent Tolerance Mode
With this feature you can establish a Target or Nominal weight value and pre-set tolerance in percent.
To enable this feature, enter the Setup menu.
Change the mode to Nominal, % Tolerance. The Check Weighing options screen returns.
Press Done to begin Check Weighing.
The CHECK WEIGHING – Nominal/Percent Tolerance
home screen
Main Display Line
Second Display Line (not shown)
Reference Fields
Application Buttons
Application Icon
Functions
To use this mode, touch Edit Settings to set the Target
Weight, and Upper and Lower Tolerance values (in percent).
(See keyboards below.)
Press Return to Application when settings are complete.
Note: please refer to section 4.1.1 for details about setting
Sample Name, Sample ID, Batch ID and Clear All.
Find Quality Products Online at: [email protected]
www.GlobalTestSupply.com
Page 47
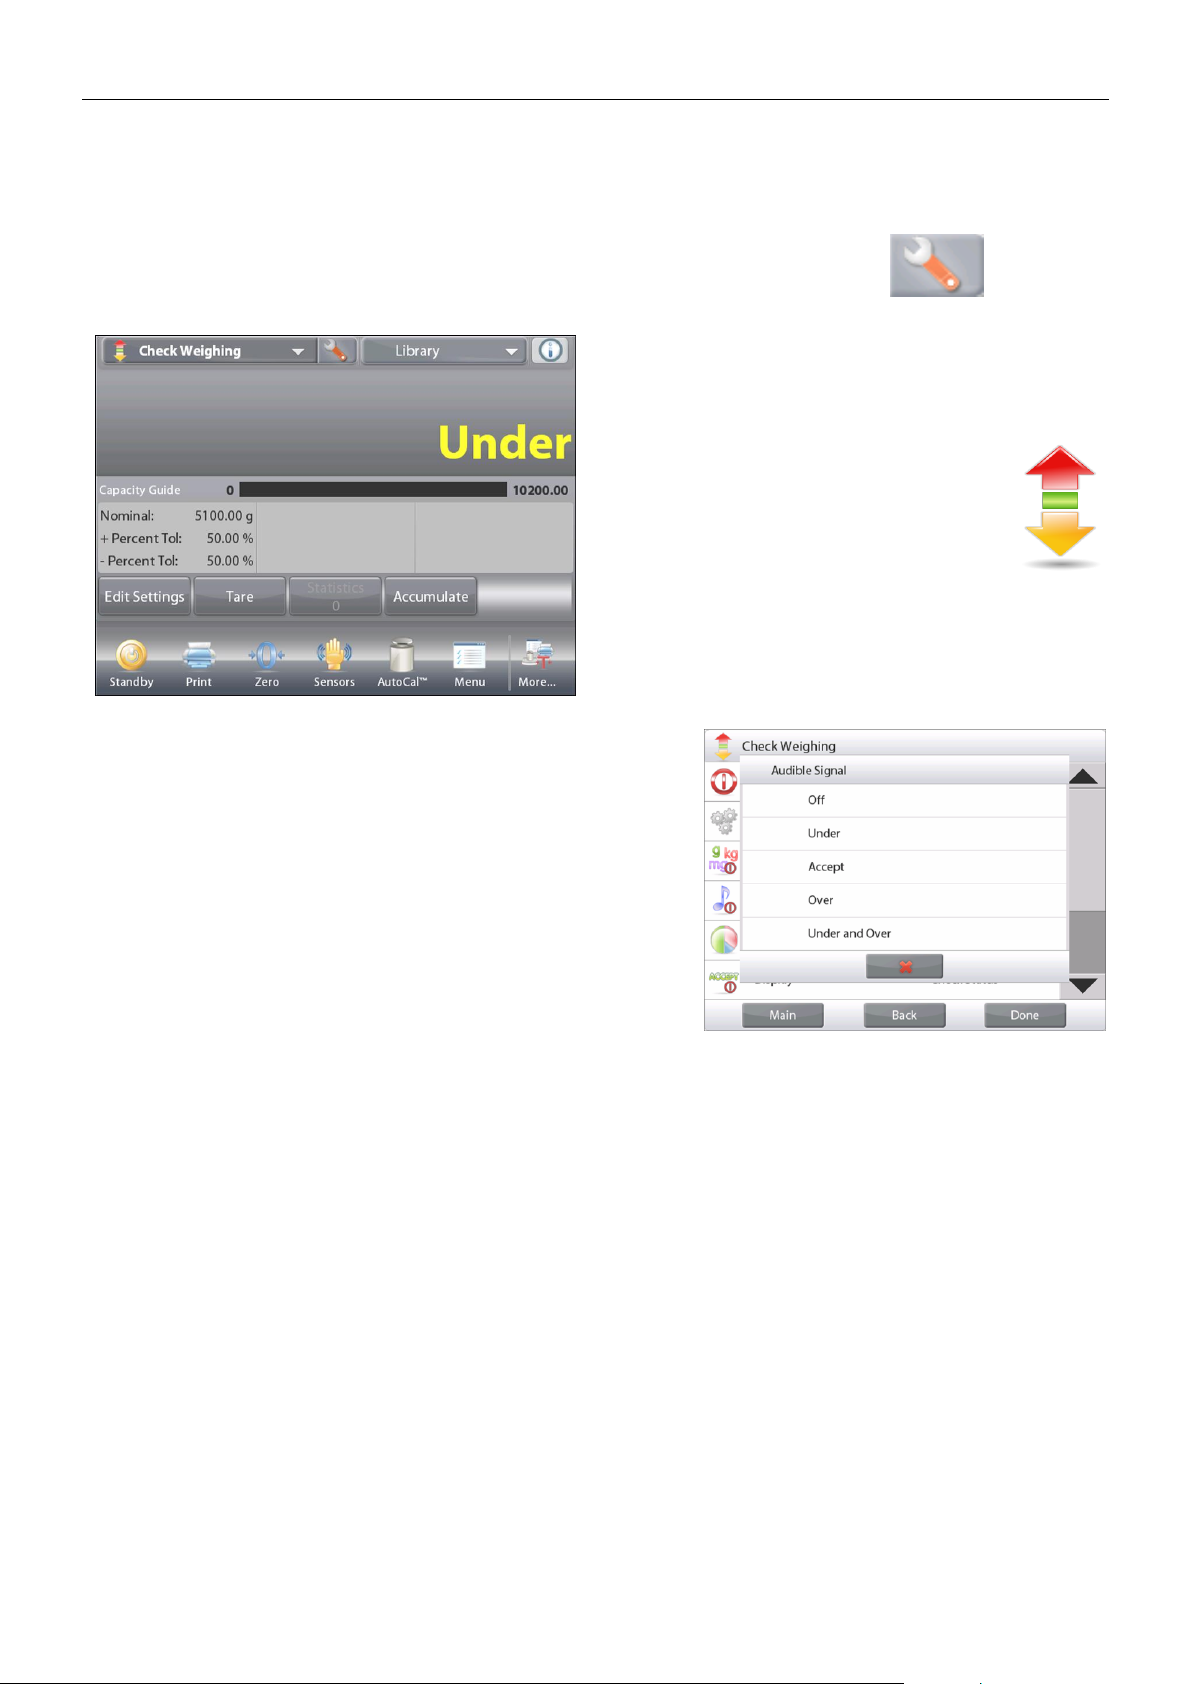
EXPLORER BALANCES EN-45
4.4.6 Display Settings
The results can be displayed with the check status (Under, Accept, or Over) either in the Progress bar (Weighing)
or in the main Weighing Line (Check Status).
To display the results in the main Weighing Line, set the Display Setting to
Check Status, using the Application Setup screen.
(The default value is Weight.)
The CHECK WEIGHING home screen with
Display set to Check Status
Main Display Line
Second Display Line
Reference Fields
Application Buttons
Application
Icon
Functions
To enable audible signals for Under, Accept, and Over,
Touch Audible Signal-On in the Application Setup screen.
Find Quality Products Online at: [email protected]
www.GlobalTestSupply.com
Page 48
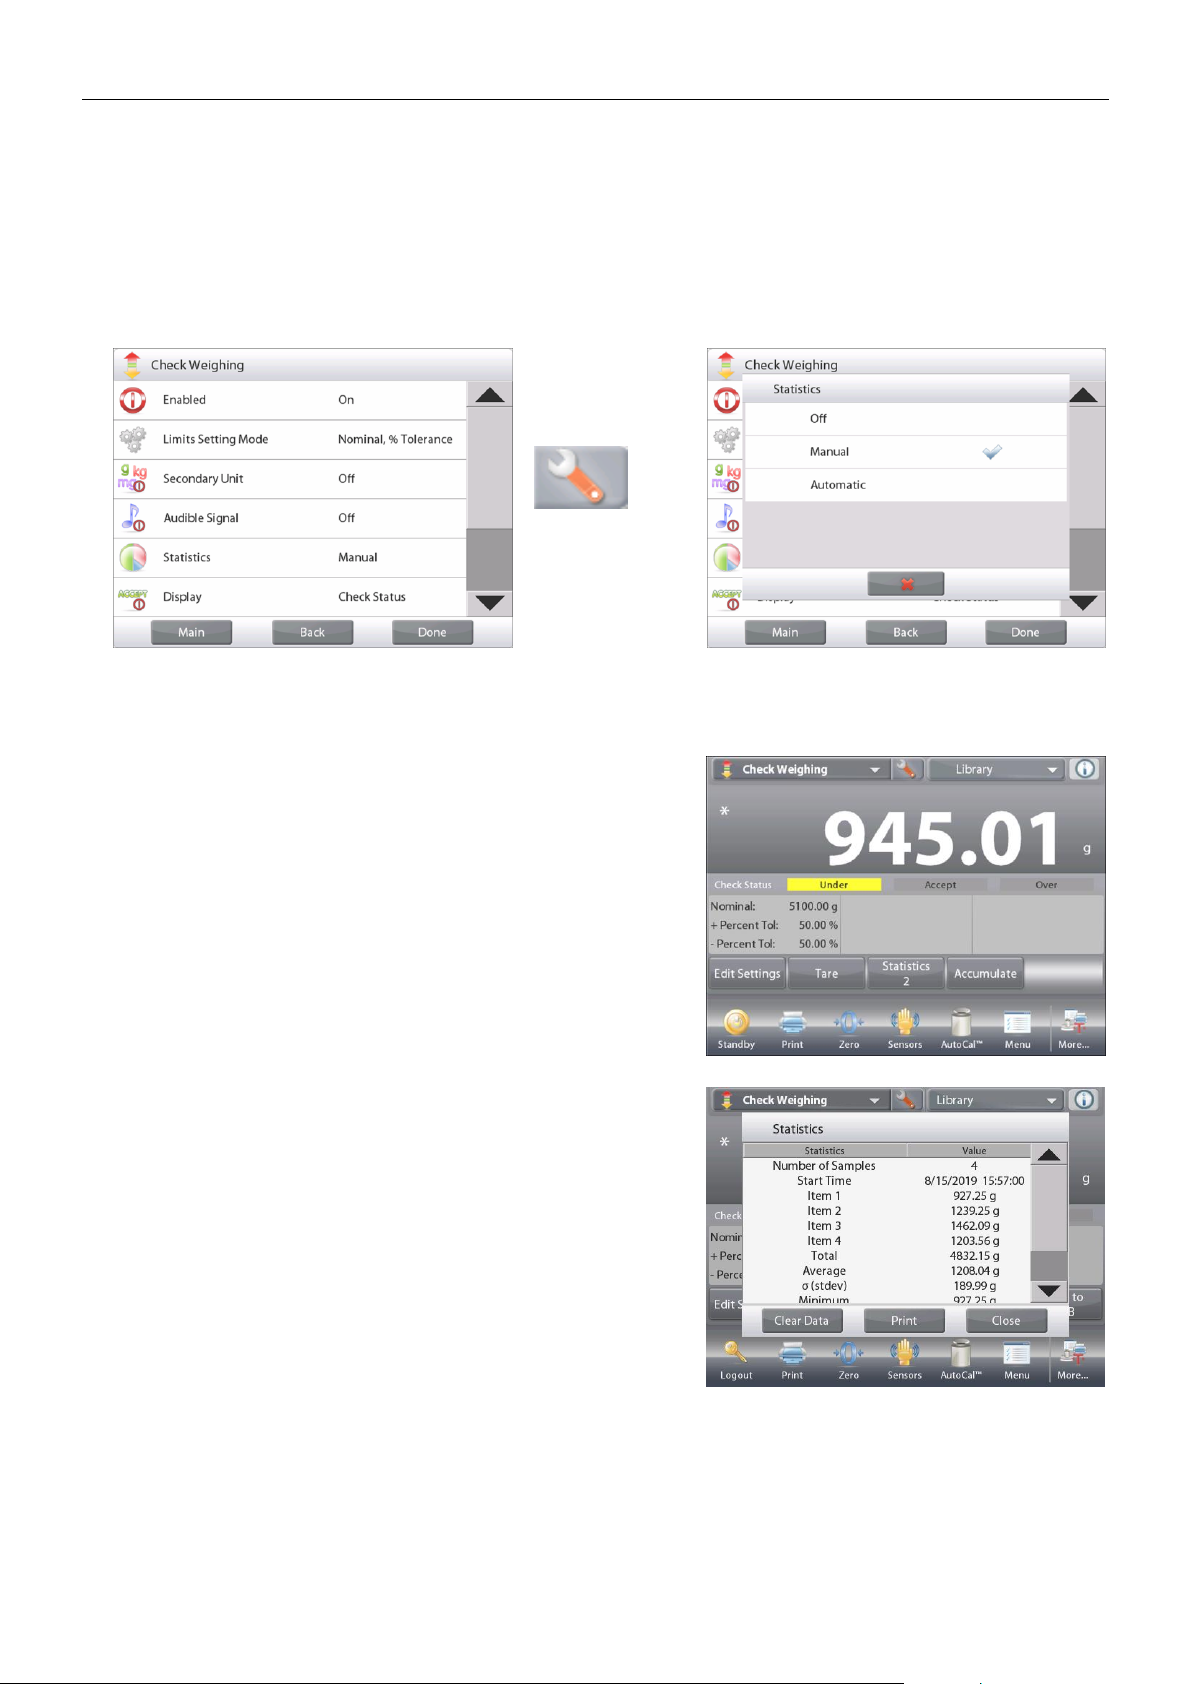
EN-46 EXPLORER BALANCES
4.4.7 Statistics for Check Weighing
Use the Statistics function to compare a number of samples and examine the relative deviation of the samples
along with other statistical data. A minimum of three samples is required.
Statistics can be determined manually (with key press after each step) or automatically (weights recorded
automatically when stable). To use the statistics function, enable it first in the Application Setup menu.
Application Setup
First, Enable Statistics.
Touch the
Setup
Icon wrench to
enter Setup
menu.
Touch
Statistics
.
Choose either
Manual
or
Automatic
, then
press
Done
.
Accumulating Displayed Values & Viewing Data – Manual
Once Statistics is enabled, two buttons appear on the Application screen: Statistics and Accumulate.
To add the sample to the data set, place the item on the pan and
press Accumulate.
When stable, the
Statistics
button momentarily lights to show
the item is added to the set and the data set quantity increments
by one.
Continue adding items and pressing Accumulate to build the
statistical data set
At any time, press the
Statistics
button to view the results.
The Statistics Results screen
Press Print to send to the enabled COM port
Press Close to return to the Application home screen
with the current statistics set.
Press
Clear Data
to clear the results and return to
the Application home screen.
Statistics – Automatic
Statistics Automatic mode is similar to manual mode (above) except the first stable weight is automatically
captured. Thus the Accumulate button is not used.
Find Quality Products Online at: [email protected]
www.GlobalTestSupply.com
Page 49
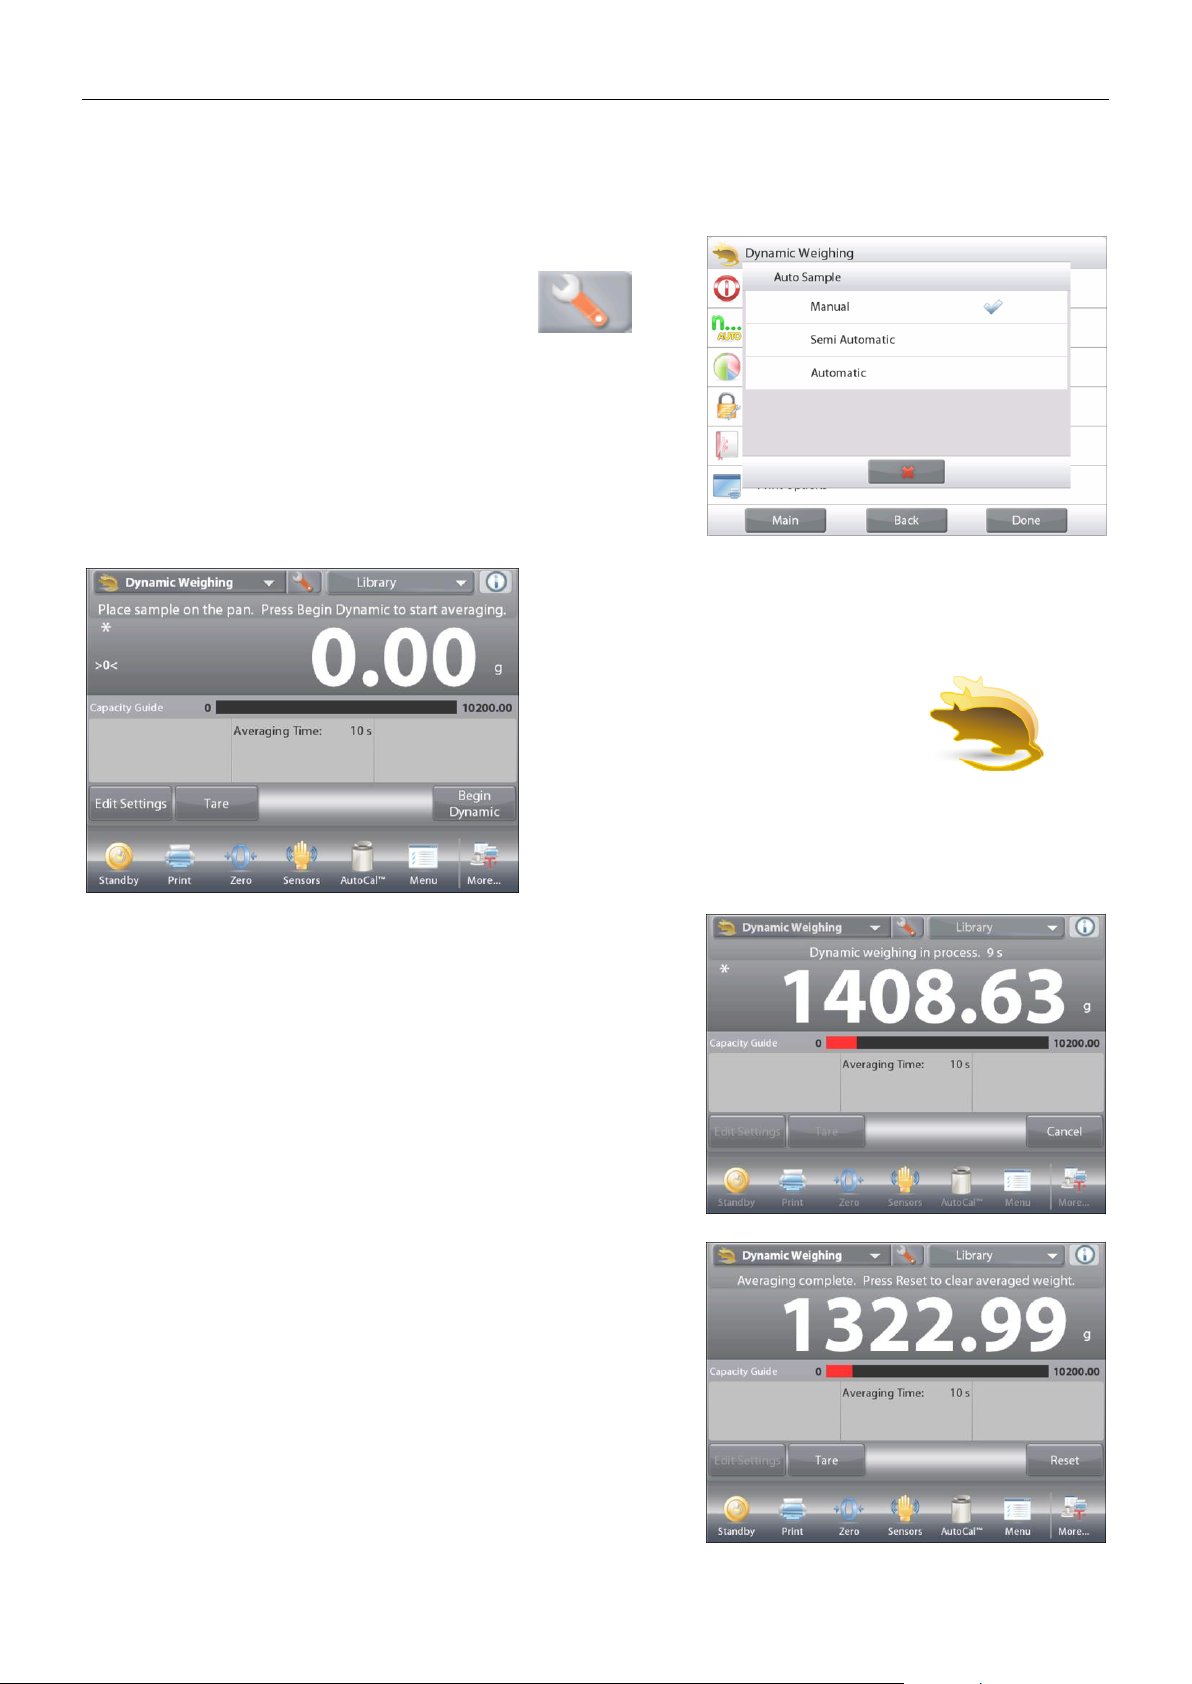
EXPLORER BALANCES EN-47
4.5 Dynamic/Animal Weighing
Use this application to weigh an unstable load, such as a moving animal. Three different start/reset modes can be
selected: Manual (start and stop via key press), Semi-Automatic (auto-start with manual reset), and Automatic
(start and stop automatically).
Dynamic Weighing – Manual (default)
To set the mode, touch the Setup wrench:
When you make a selection, the Setup options
screen re-appears.
Press Done.
On the Dynamic Weighing home screen, the
default (or last) Averaging Time is displayed.
Follow the screen instructions.
The DYNAMIC WEIGHING Home screen
Main Display Line
Second Display Line
Reference Fields
Application Buttons
Functions Application Icon
Place objects on the pan.
Press the Begin Dynamic button.
The balance begins a countdown (averaging process).
During the countdown, the information line displays the time
remaining.
If necessary, press Cancel to quit and return to the Home screen.
When the countdown ends, the result is displayed and held.
Press Reset to clear the held weight and return to the Initial
screen.
Note:
Clear the pan before beginning a new Dynamic Weighing
cycle.
Find Quality Products Online at: [email protected]
www.GlobalTestSupply.com
Page 50
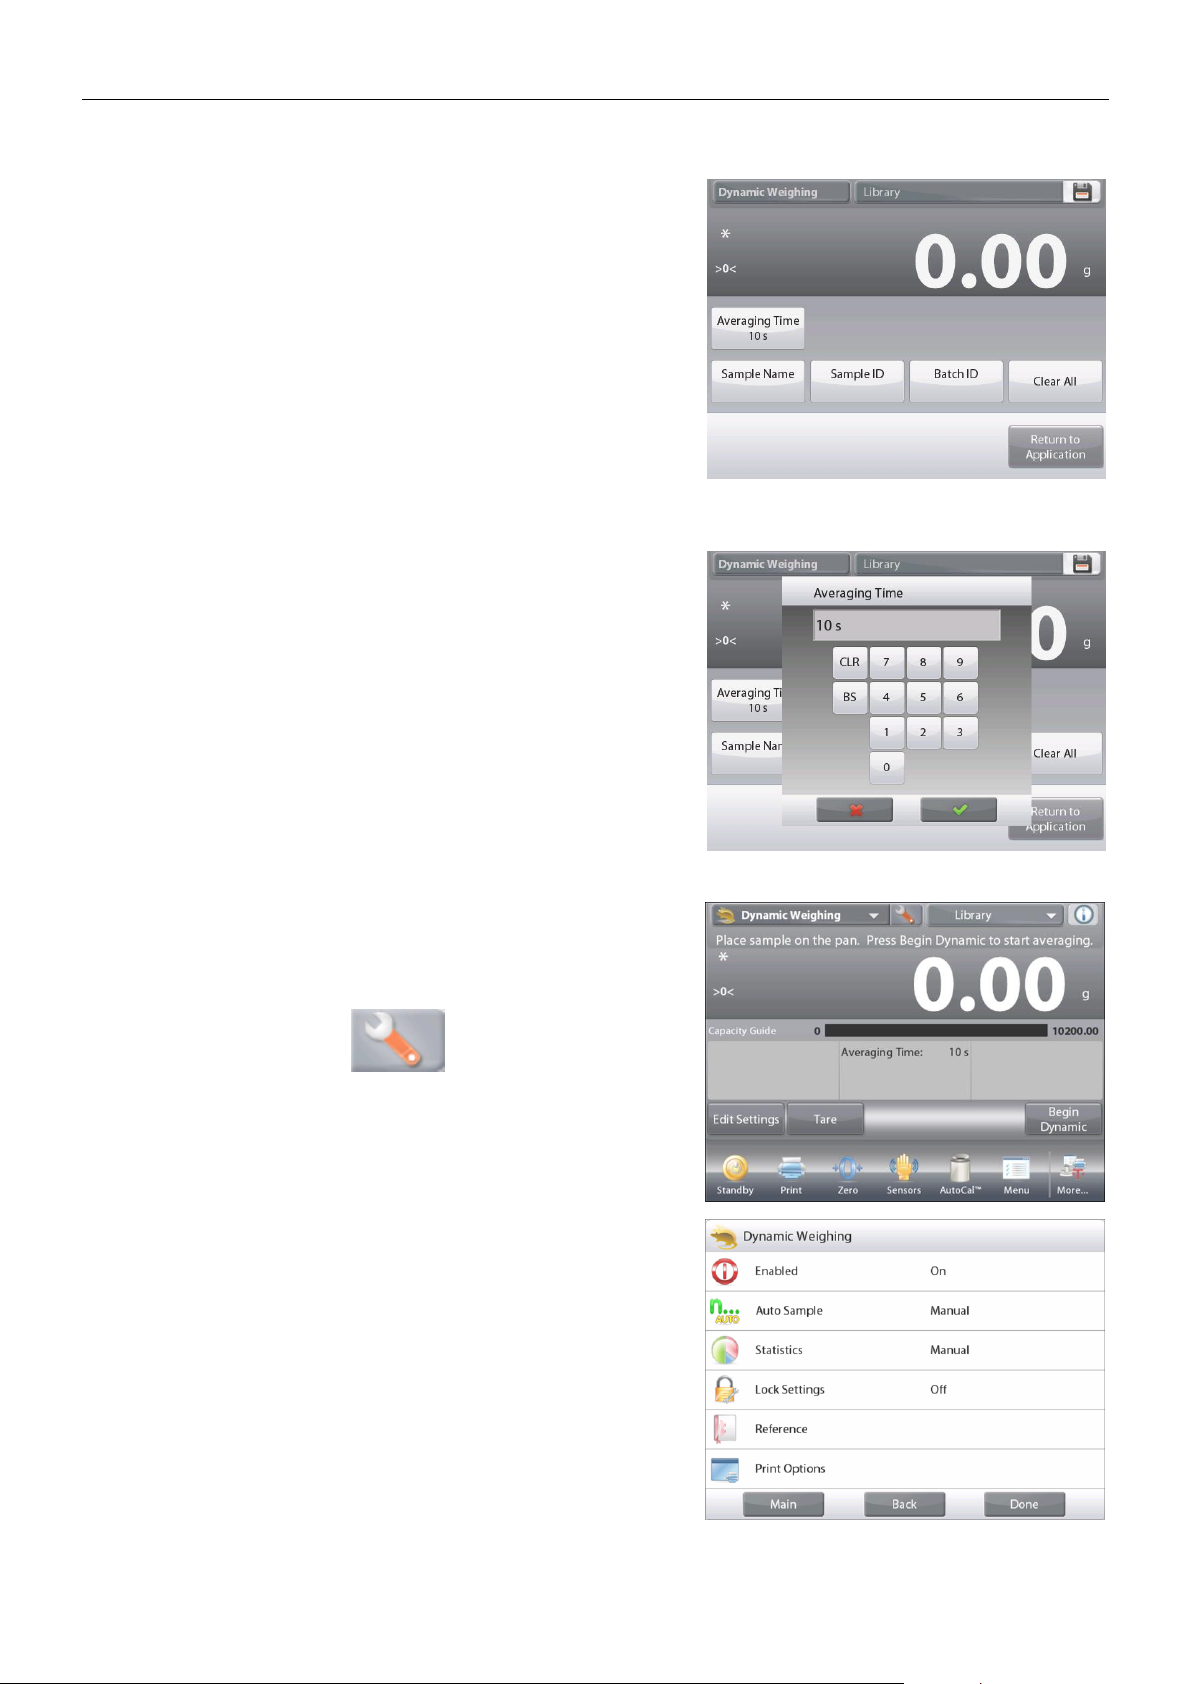
EN-48 EXPLORER BALANCES
4.5.1 Edit Settings
To view or adjust the current settings:
Press the
Edit Settings
button.
(See Home Screen, previous page.)
The Settings screen appears.
The Application Settings Screen.
Settings available:
Averaging Time, Sample Name,
Sample ID, Batch ID, Clear All.
Note: please refer to section 4.1.1 for details about setting
Sample Name, Sample ID, Batch ID and Clear All.
Functions Available:
Return to Application
The Averaging Time can be set from 1 to 99 seconds.
The default value is 10. To change it, press the button.
A numeric input window is displayed.
Key in the desired Averaging Time, then press Done.
The display returns to the previous screen with the new value
highlighted.
To return to the Dynamic Weighing home screen,
touch
Return to Application
.
4.5.2 Application Setup
The Application can be customized for various user
preferences.
Touch the Setup wrench to enter the Application Setup
from the home screen.
The
Setup
Menu appears.
Select the list item to view or change the setting as desired.
To return to the Application home screen, press Done.
Find Quality Products Online at: [email protected]
www.GlobalTestSupply.com
Page 51
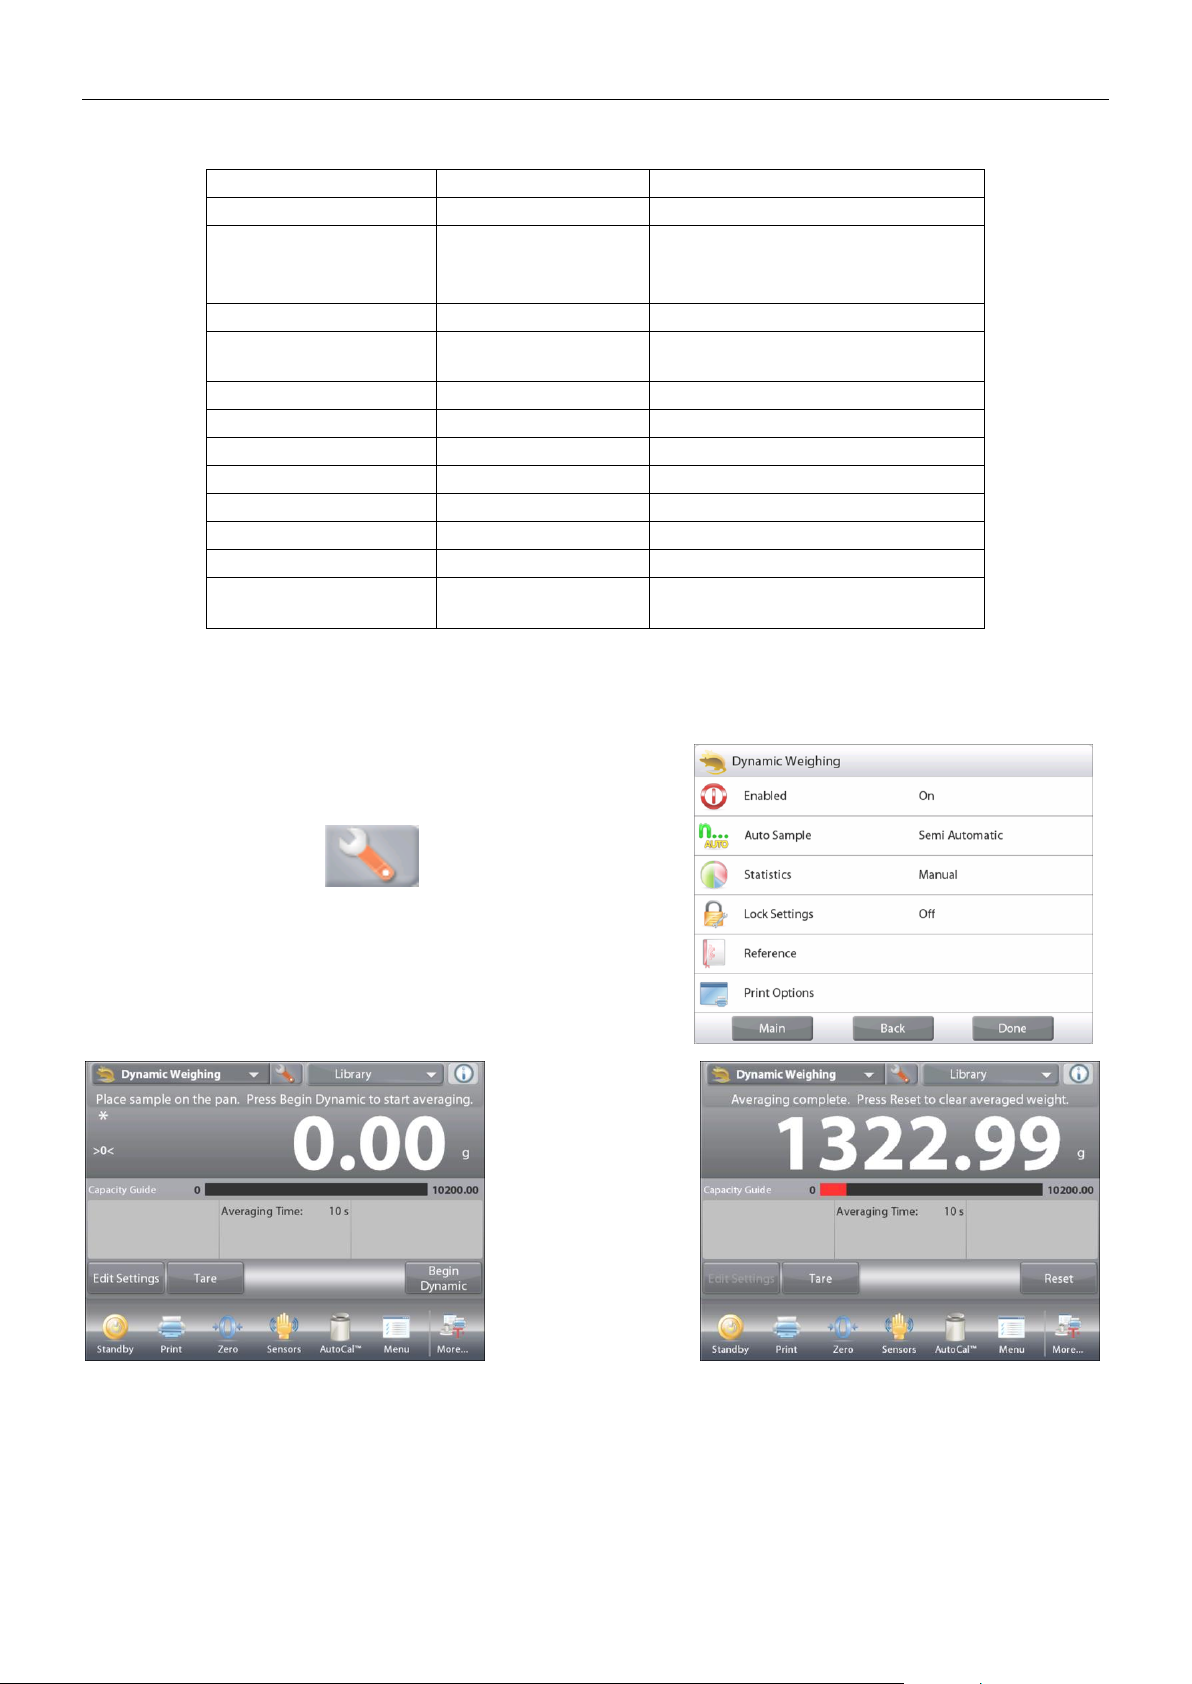
EXPLORER BALANCES EN-49
Dynamic Weighing Application Setups (defaults in Bold)
Item
Available Settings
Comments
Enabled
On, Off
Turns Application on/off
Auto Sample Mode
Manual,
Semi Automatic
Automatic
To select the Mode
Statistics
Off, Manual, Auto
Lock Settings
On, Off
Press to lock the current setting(s)
so they cannot be changed.
Reference fields
Averaging Time
On, Off
Time in Seconds
Gross
On, Off
Gross weight is displayed
Net
On, Off
Net weight is displayed
Tare
On, Off
Tare weight is displayed
Print Options
See Printing Section.
Averaging Time
On, Off
Auto Print
On, Off
To print automatically after
weighing process is finished.
4.5.3 Dynamic Weighing – Semi-Auto
The cycle begins when an object (animal) is placed on the pan, but the held value must be reset manually.
To enable this feature, touch the Setup Icon (wrench) in the
top-center of the main screen to enter the
Dynamic Weighing Setup menu.
Change the mode to Semi Automatic.
The Dynamic – Semi-Automatic screen appears with the
default (or last) Averaging Time displayed.
Place specimen
on the Pan. The
cycle starts
automatically.
After the cycle
ends, the weight
reading is held.
Press the
Reset
button to clear the
reading and return
to zero.
Find Quality Products Online at: [email protected]
www.GlobalTestSupply.com
Page 52
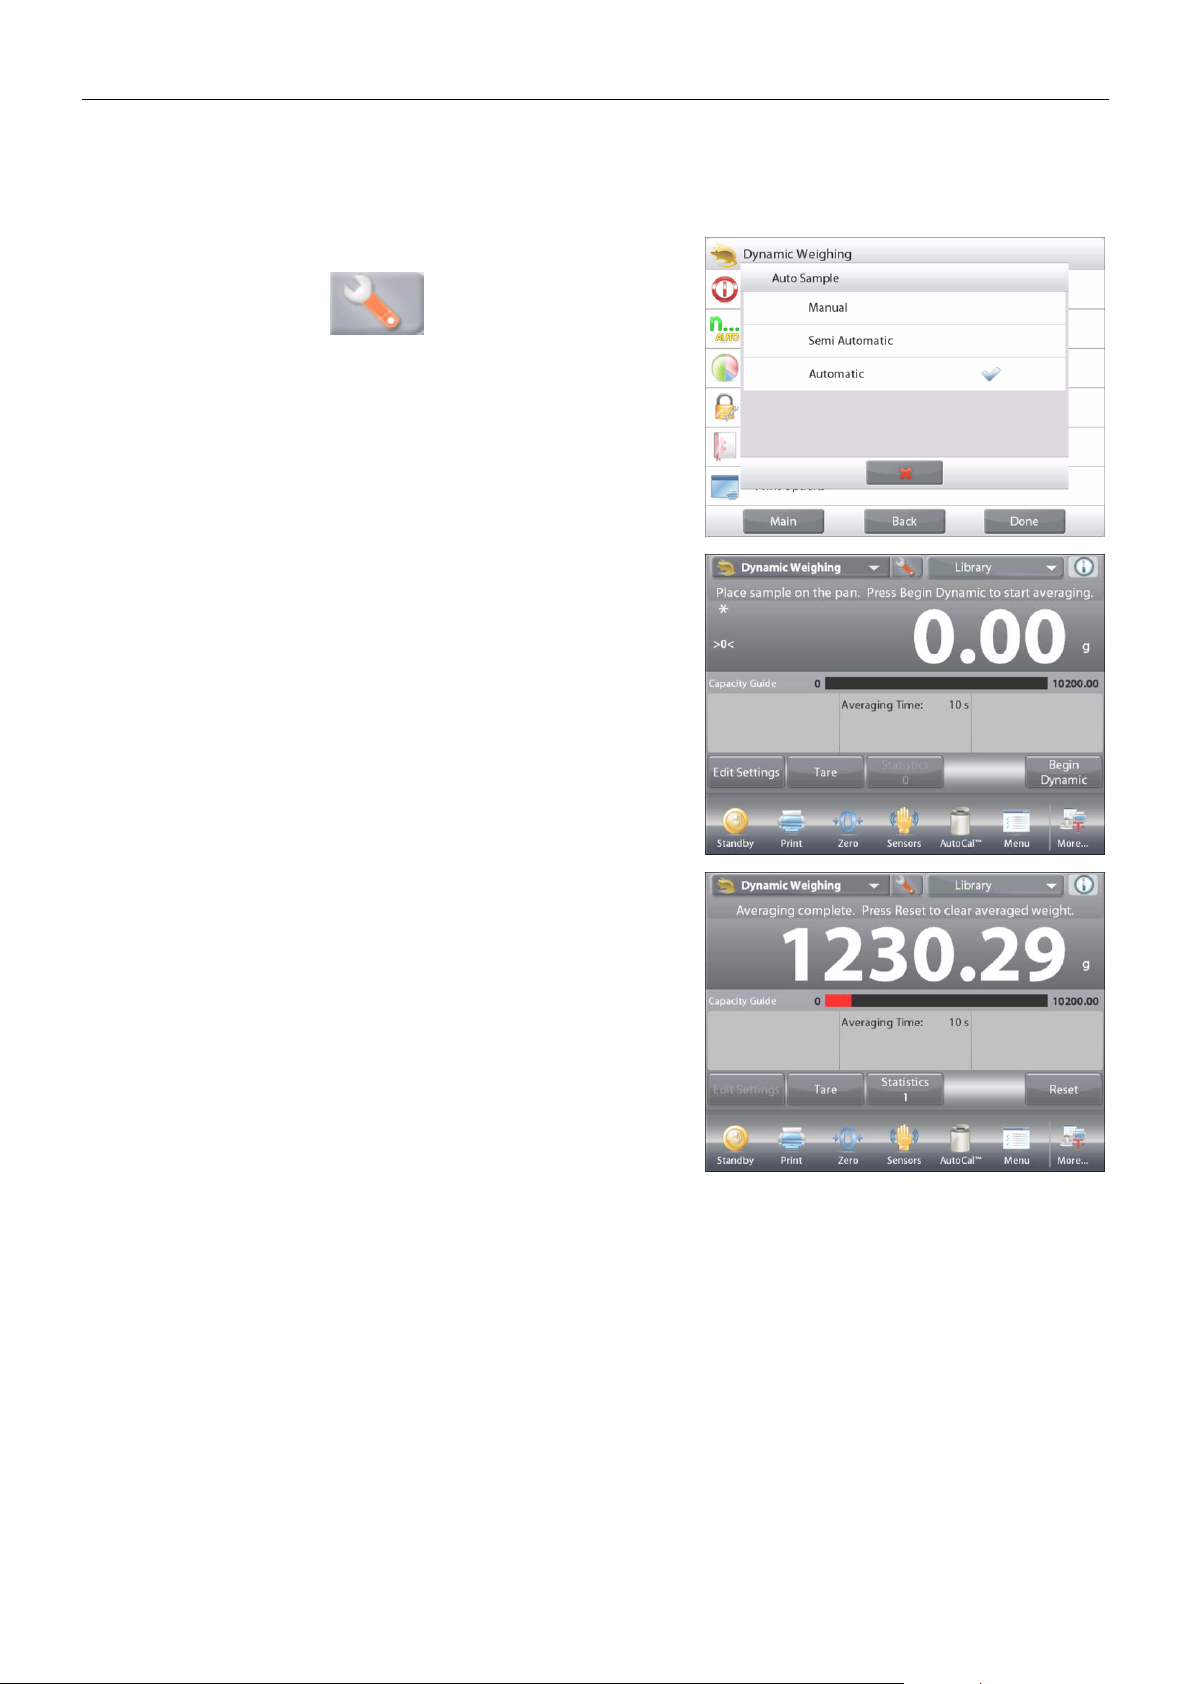
EN-50 EXPLORER BALANCES
4.5.4 Dynamic Weighing – Automatic
The cycle begins when an object (animal) is placed on the pan, and the held value is automatically reset
when the object is removed from the pan (10-second delay).
To enable this feature, enter the Dynamic Weighing Setup menu.
Press Auto Sample, and change the mode to Automatic.
The Dynamic – Automatic screen appears with the default
(or last) Averaging Time displayed.
Place objects on the pan to begin.
The cycle starts automatically.
After the cycle ends, remove the sample and the balance returns to
the Home screen automatically.
Find Quality Products Online at: [email protected]
www.GlobalTestSupply.com
Page 53
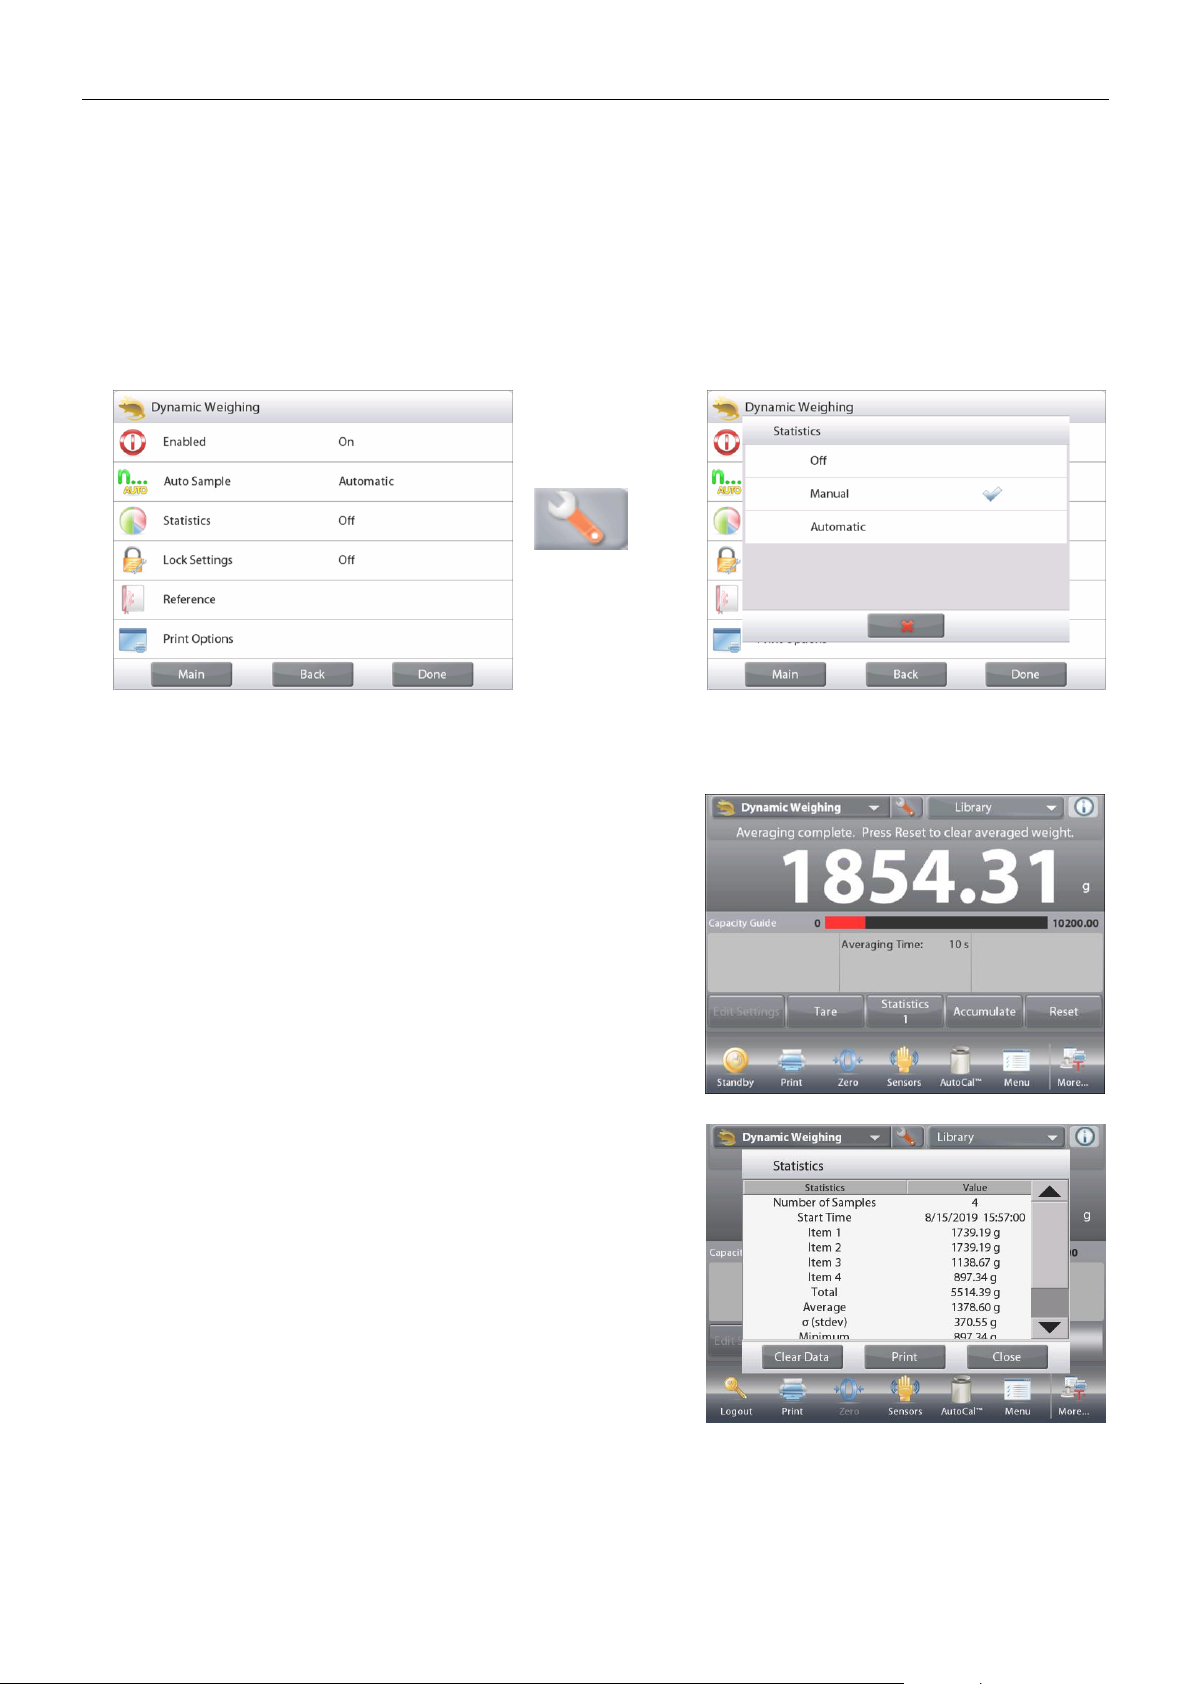
EXPLORER BALANCES EN-51
4.5.5 Statistics for Dynamic Weighing
Use the Statistics function to compare a number of samples and examine the relative deviation of the samples
along with other statistical data. A minimum of three samples is required.
Statistics can be determined manually (Manual mode, with key press after each step) or automatically
(Automatic Mode: weights are automatically recorded when stable). To use the statistics function, enable it first
in the Application Setup menu.
Application Setup
First, Enable Statistics
Touch the
Setup
Icon wrench to
enter Setup
menu.
Press
Statistics
.
Choose either
Manual
or
Automatic
mode, then
press
Done
.
Accumulating Displayed Values & Viewing Data – Manual
Once Statistics is enabled, two buttons appear on the Application screen: Statistics and Accumulate.
To add the sample to the data set, place the item on the pan
and press Accumulate.
When stable, the
Statistics
button momentarily lights to show
the item is added to the set and the data set quantity increments
by one.
Continue adding items and pressing Accumulate to build the
statistical data set
At any time, press the
Statistics
button to view the results.
The Statistics Results screen
Press Print to send to the enabled COM port
Press Close to return to the Application home screen
with the current statistics.
Press
Clear Data
to clear the results and return to the
Application home screen.
Statistics – Automatic
Statistics Automatic mode is similar to manual mode (above) except the first stable weight is automatically
captured. Thus the Accumulate button is not used.
Find Quality Products Online at: [email protected]
www.GlobalTestSupply.com
Page 54
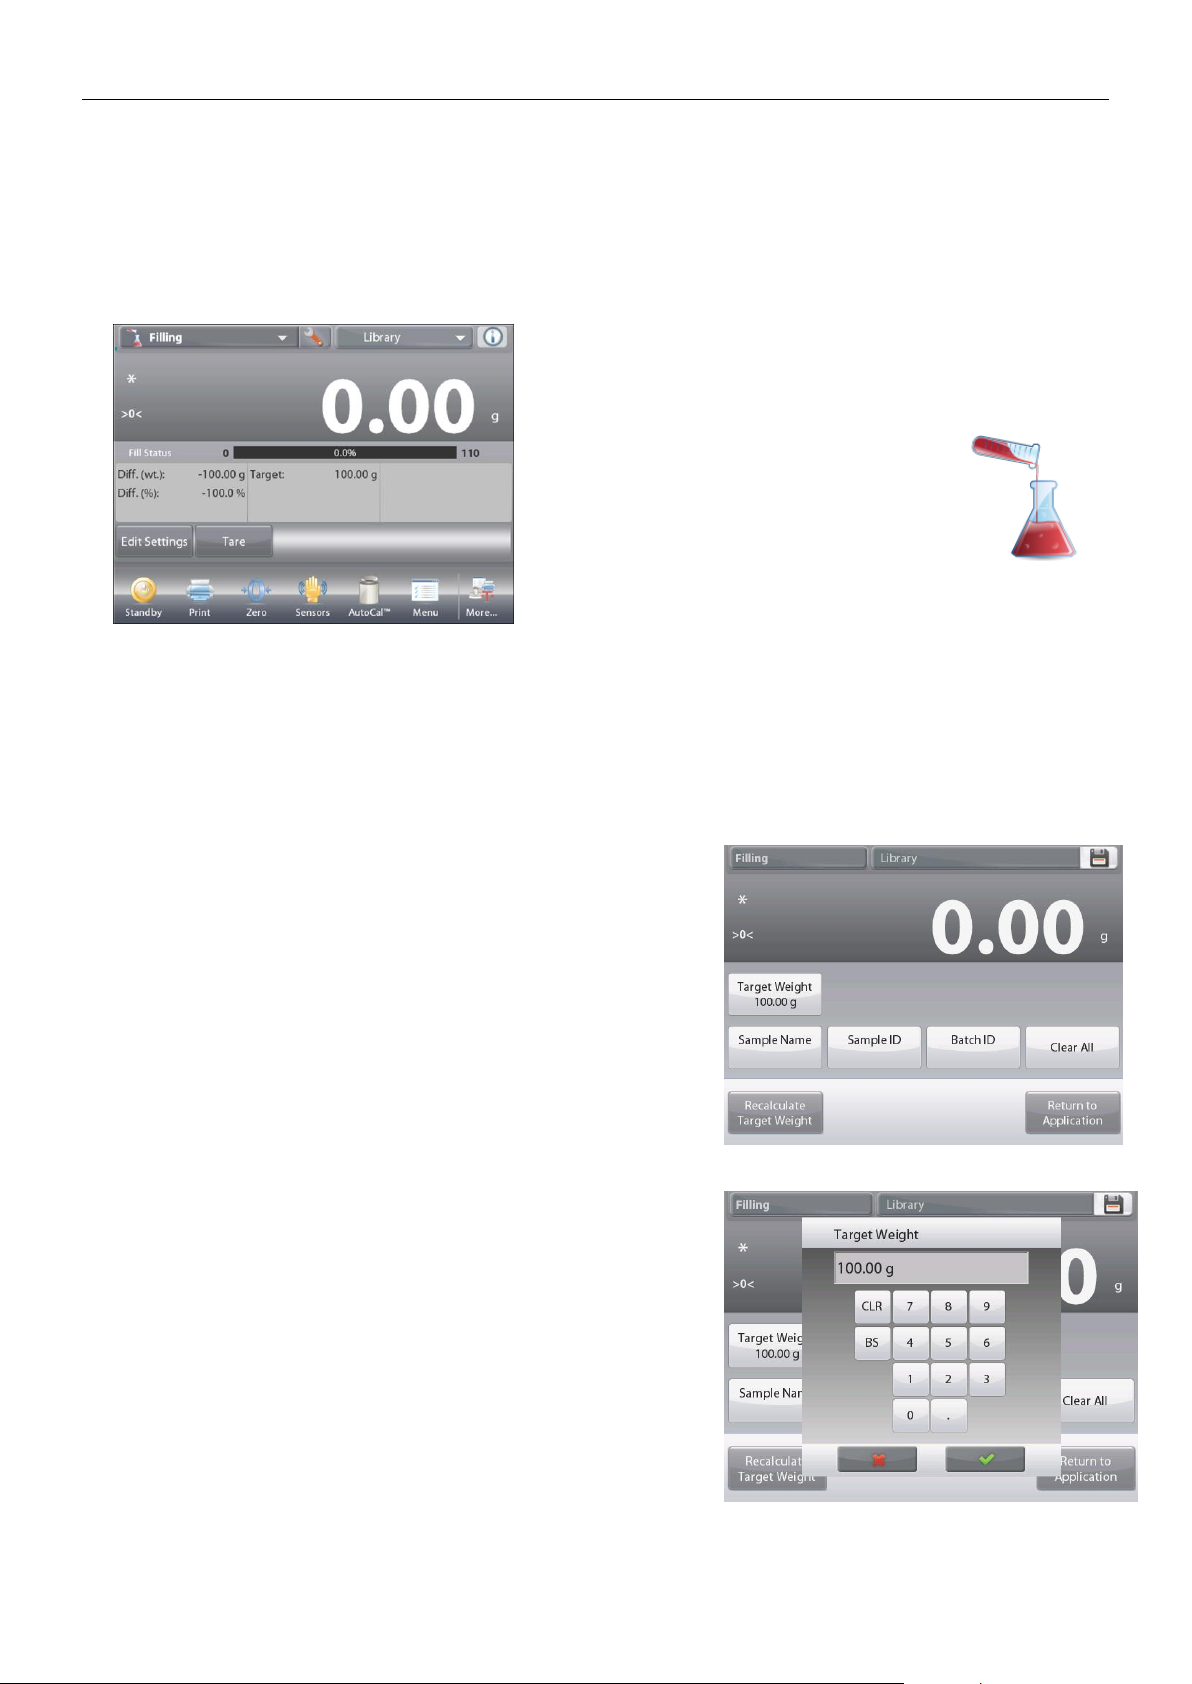
EN-52 EXPLORER BALANCES
4.6 Filling
This application allows the user to slowly fill a container to a pre-determined target weight. The progress bar
displays the filling status, and within 10 percent of the target value the progress bar converts to fine resolution
(+/– 10%) for accurate results.
In the upper left portion of the home screen, select Filling.
The default (or last) Target weight is displayed. Place objects on the pan to begin.
The FILLING Home screen
Main Display Line
Second Display Line
Reference Fields
Application Buttons
Functions Application Icon
The progress bar displays the filling status, and within 10 percent of the target value, the progress bar converts
to fine resolution display.
4.6.1 Edit Settings
To view or adjust the current settings:
Touch the
Edit Settings
button.
The Settings screen appears:
Settings available:
Target Weight, Sample Name, Sample
ID, Batch ID, Clear All.
Note: please refer to section 4.1.1 for details about setting
Sample Name, Sample ID, Batch ID and Clear All.
Functions Available:
Recalculate Target Weight
,
Return to Application
Establish a Target Weight
Each time a new item is used for filling, the Target Weight
(fill-to weight) must be established.
There are two (2) methods to establish the Target Weight:
1. The actual Target Weight is known; or
2. The Target Weight can be derived from a sample.
Establish using a Known Target Weight
The current Target Weight appears on the
Settings
screen, on the
Target Weight
button. (See above.)
To adjust the Target weight value directly,
touch the
Target Weight
button.
A numeric input window appears.
Enter the desired Target Weight, then press .
The display returns to the previous screen with the new value
highlighted.
Press
Return to Application
to go to the
Filling
home screen.
Find Quality Products Online at: [email protected]
www.GlobalTestSupply.com
Page 55
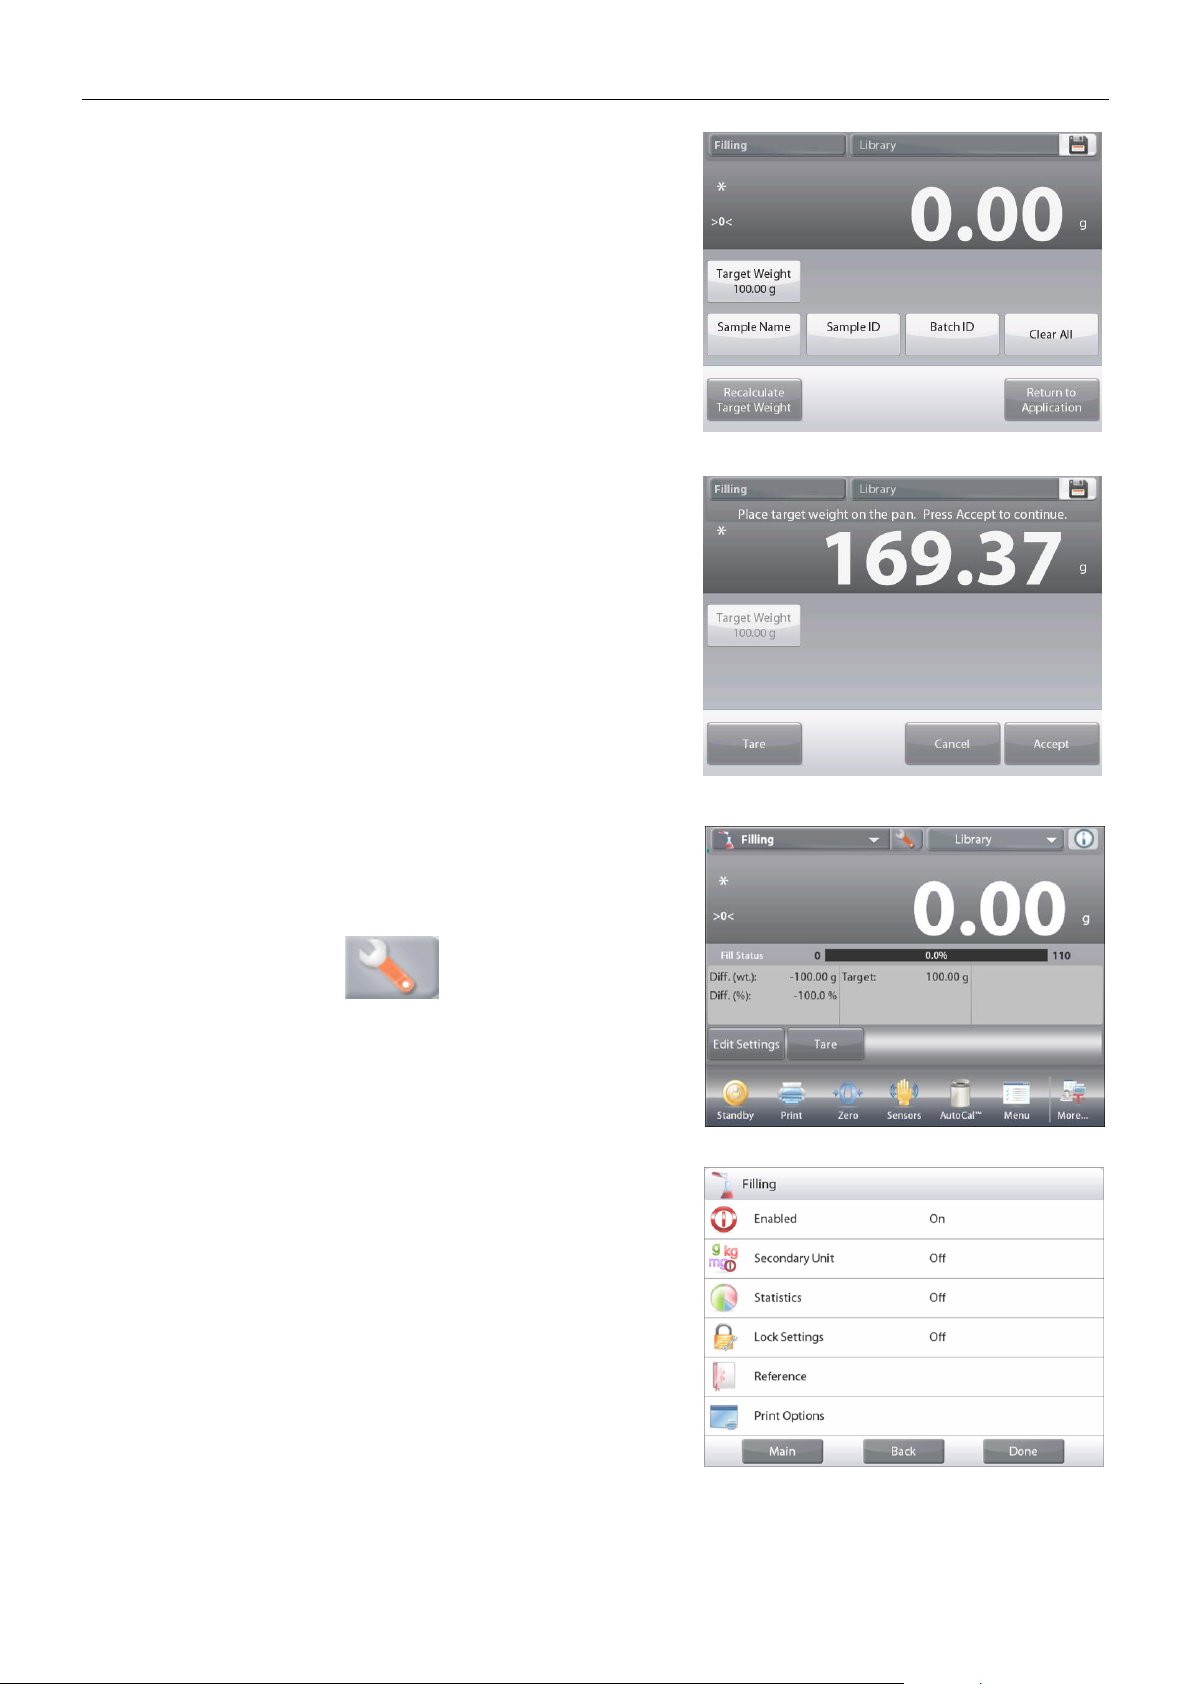
EXPLORER BALANCES EN-53
Using a Sample to establish new Target Weight – Derived
To establish a new Target Weight value,
press the Recalculate Target Weight button.
The New Target Screen appears, with a message:
Place the target weight on the pan. Press Accept to
continue
.
Place the weight on the pan (or in a tared container).
Press
Accept
to return to the Settings screen.
The display returns to the Settings screen with the new
Target Weight value highlighted momentarily.
To return to the Filling home screen,
touch
Return to Application
.
4.6.2 Application Setup
The Application can be customized for various user
preferences.
Touch the
Setup
Icon (wrench) to enter the Application Setup
menu from the home screen.
The Setup Menu appears.
Select the list item to view or change the setting as
desired.
To return to the Application home screen, touch
Done
.
Find Quality Products Online at: [email protected]
www.GlobalTestSupply.com
Page 56
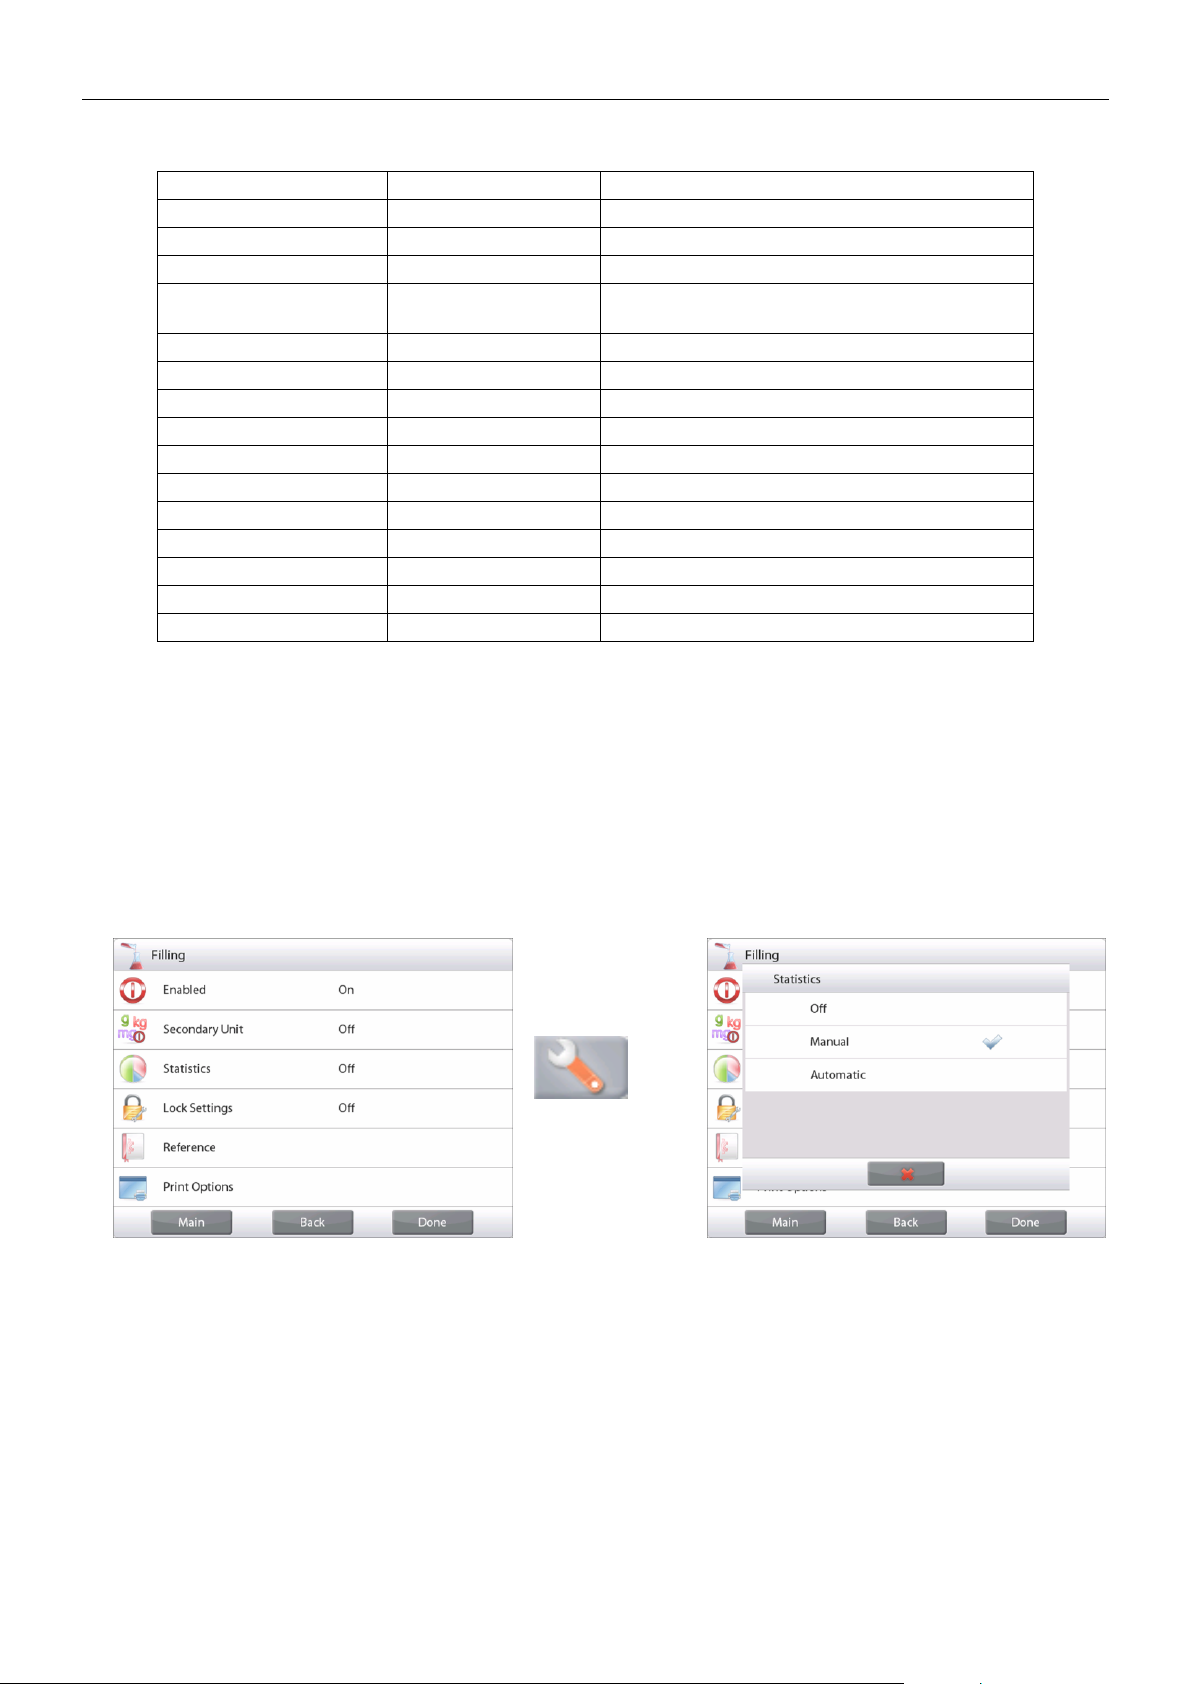
EN-54 EXPLORER BALANCES
The Filling Application Setups (defaults in Bold)
Item
Available Settings
Comments
Enabled
On, Off
Turns Application on/off
Secondary Unit
On, Off
To show the Second Display line
Statistics
Off, Manual, Auto
Lock Settings
On, Off
Press to lock the current setting(s) so they
cannot be changed.
Reference fields
Target Weight
On, Off
The Target weight is displayed
Difference (Weight)
On, Off
Displays the Difference to the Target weight
Difference (Percent)
On, Off
Displays the Difference to the Target weight
Gross
On, Off
Gross weight is displayed
Net
On, Off
Net weight is displayed
Tare
On, Off
Tare weight is displayed
Print Options
See Printing Section.
Target Weight
On, Off
Difference (Weight)
On, Off
Difference (Percent)
On, Off
4.6.3 Statistics for Filling
Use the Statistics function to compare a number of samples and examine the relative deviation of the samples
along with other statistical data. A minimum of three samples is required.
Statistics can be determined manually (Manual mode, with key press after each step) or automatically
(Automatic Mode: weights are automatically recorded when stable). To use the statistics function, enable it first
in the Application Setup menu.
Application Setup
First, Enable Statistics
Touch the Setup
Icon wrench (see
below) to enter
Setup menu.
Touch
Statistics
.
Choose either
Manual
or
Automatic
mode, then
press
Done
.
www.GlobalTestSupply.com
Find Quality Products Online at: [email protected]
Page 57
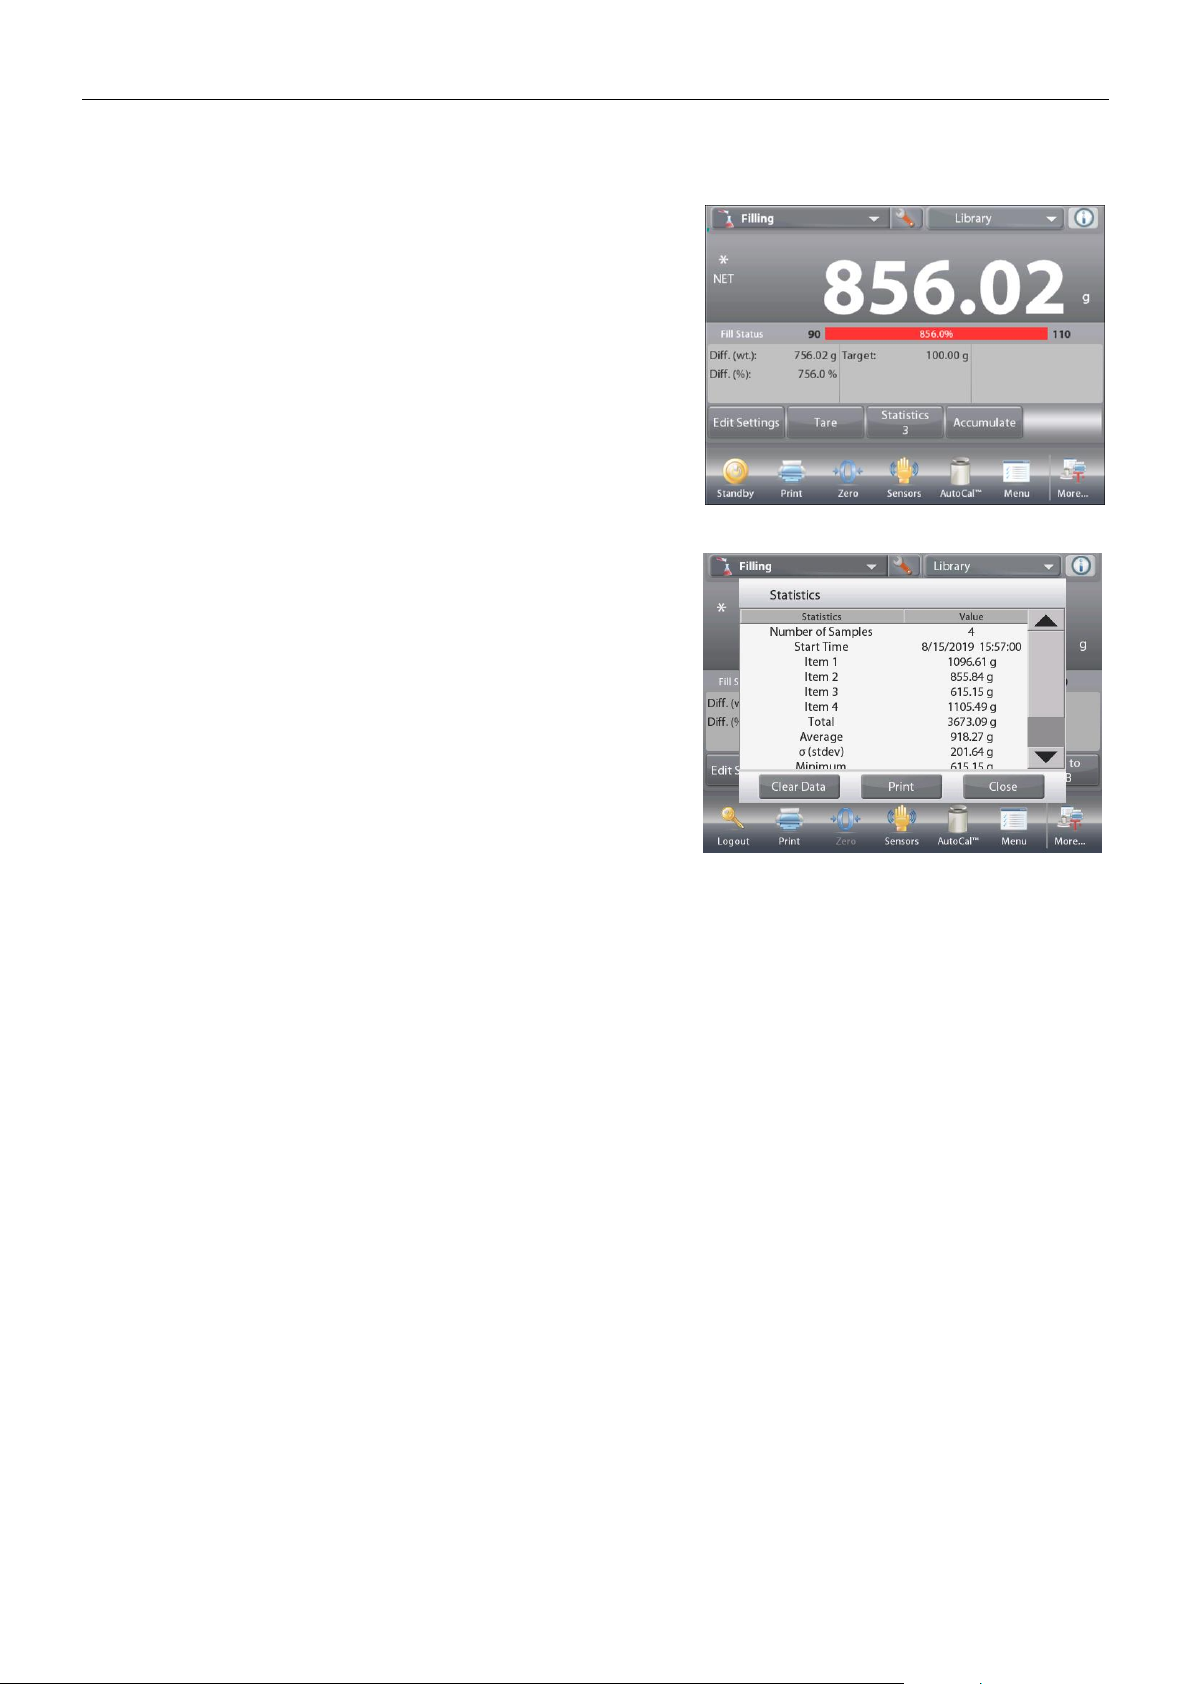
EXPLORER BALANCES EN-55
Accumulating Displayed Values & Viewing Data – Manual
Once Statistics is enabled, two buttons appear on the Application screen: Statistics and Accumulate.
To add the sample to the data set, place the item on the pan
and press Accumulate.
When stable, the
Statistics
button momentarily lights to show
the item is added to the set and the data set quantity increments
by one.
Continue adding items and pressing Accumulate to build the
statistical data set.
At any time, press the
Statistics
button to view the results.
The Statistics Results screen
Press Print to send to the enabled COM port
Press Close to return to the Application home screen
with the current statistics set.
Press
Clear Data
to clear the results and return to the
Application home screen.
Statistics – Automatic
Statistics Automatic mode is similar to manual mode (above) except the first stable weight is automatically
captured. Thus the Accumulate button is not used.
Find Quality Products Online at: [email protected]
www.GlobalTestSupply.com
Page 58
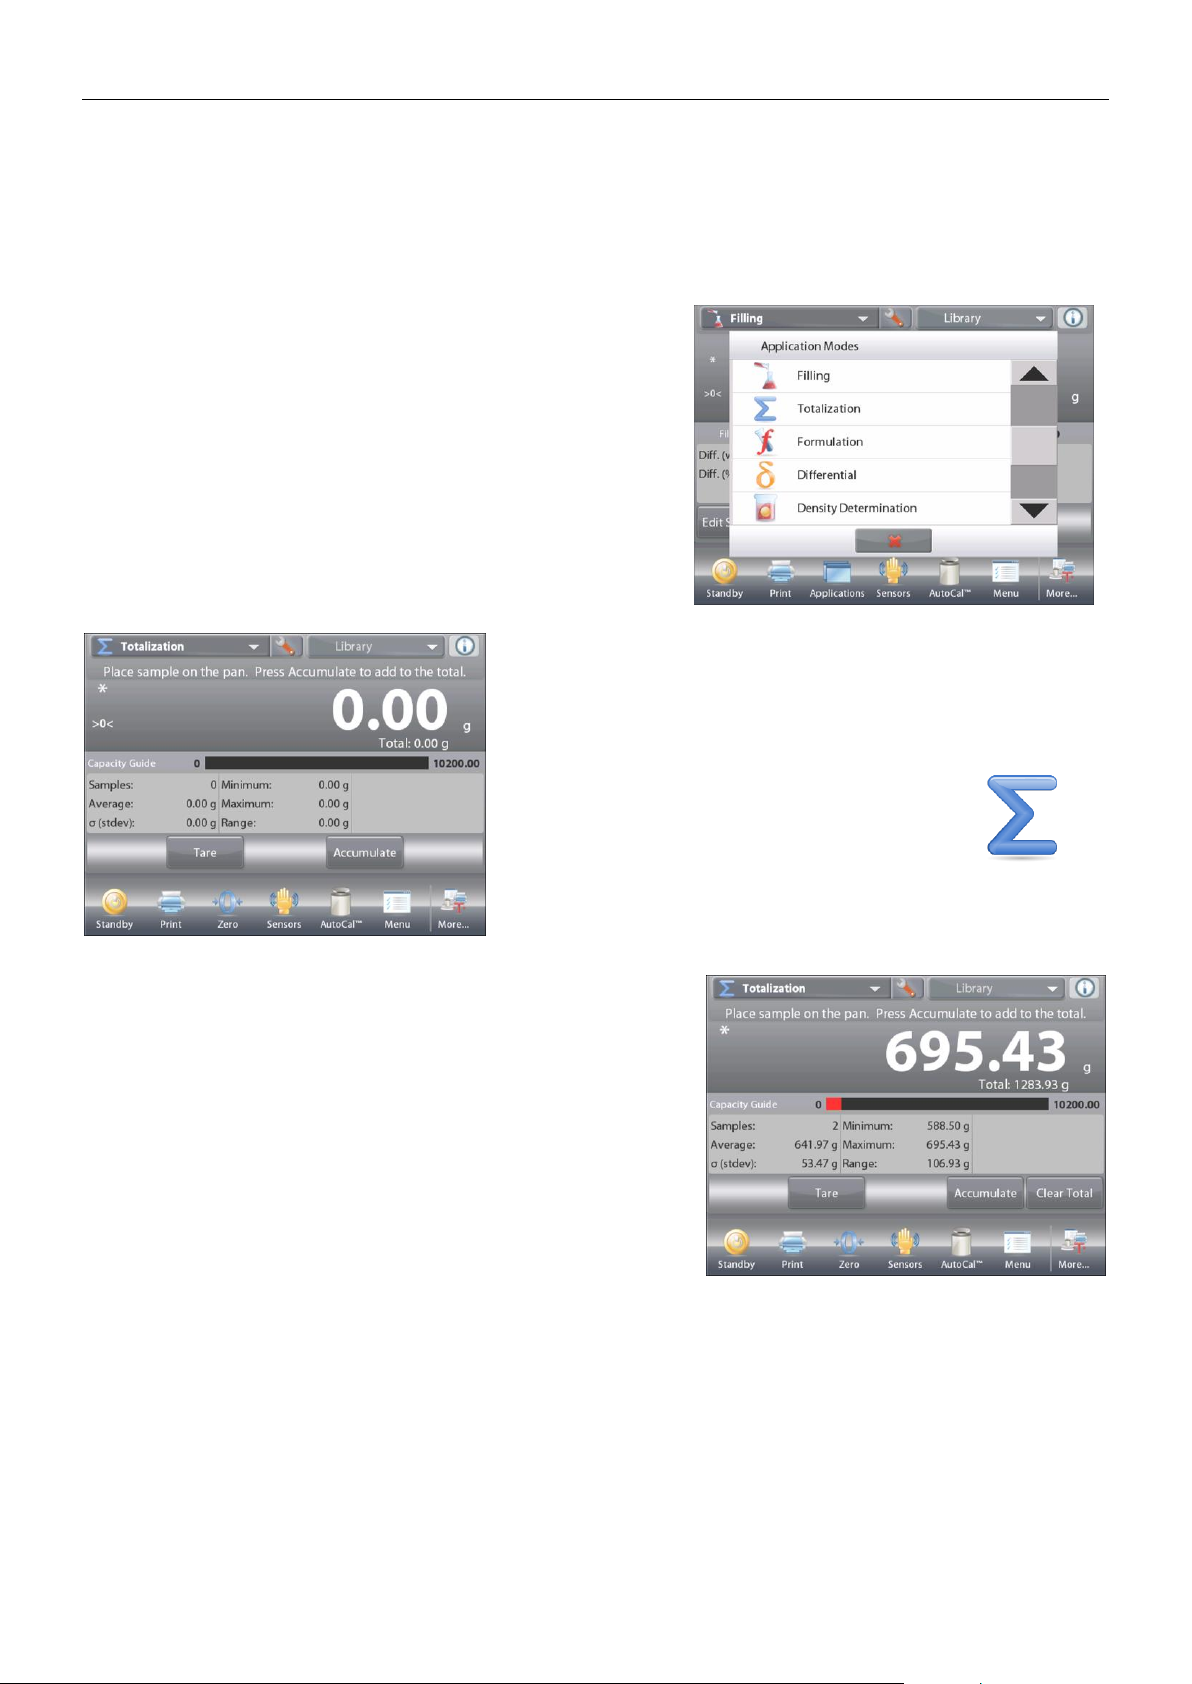
EN-56 EXPLORER BALANCES
4.7 Totalization
Totalization measures the cumulative weight of a sequence of items. Two different Totalization accumulation
modes can be selected: Manual accumulation (requires key press) and Automatic accumulation.
The cumulative total may exceed the capacity of the Balance.
4.7.1 Totalization – Manual (Default)
Touch the upper left portion of the home screen.
A drop-down menu appears. Select Totalization if it is present.
(If not, touch the Menu icon in the bottom-left corner, then
choose Application Modes, scroll down to find Totalization,
press it, then press Enabled to turn it On. It will now appear in
the Application Modes menu on the home screen.
Place objects on the pan to begin.
The TOTALIZATION Home screen
Main Display Line
Second Display Line
Reference Fields
Application Buttons
Functions Application Icon
The sample weight is shown on the Main Display Line.
Press Accumulate to add the weight of the item to the total.
When stable, the new total is shown on the secondary Display Line.
Remove the item from the weighing pan, then add the next item
and continue as above.
When finished, press the
Clear Total
button to reset the
Second Display Line to zero.
Find Quality Products Online at: [email protected]
www.GlobalTestSupply.com
Page 59
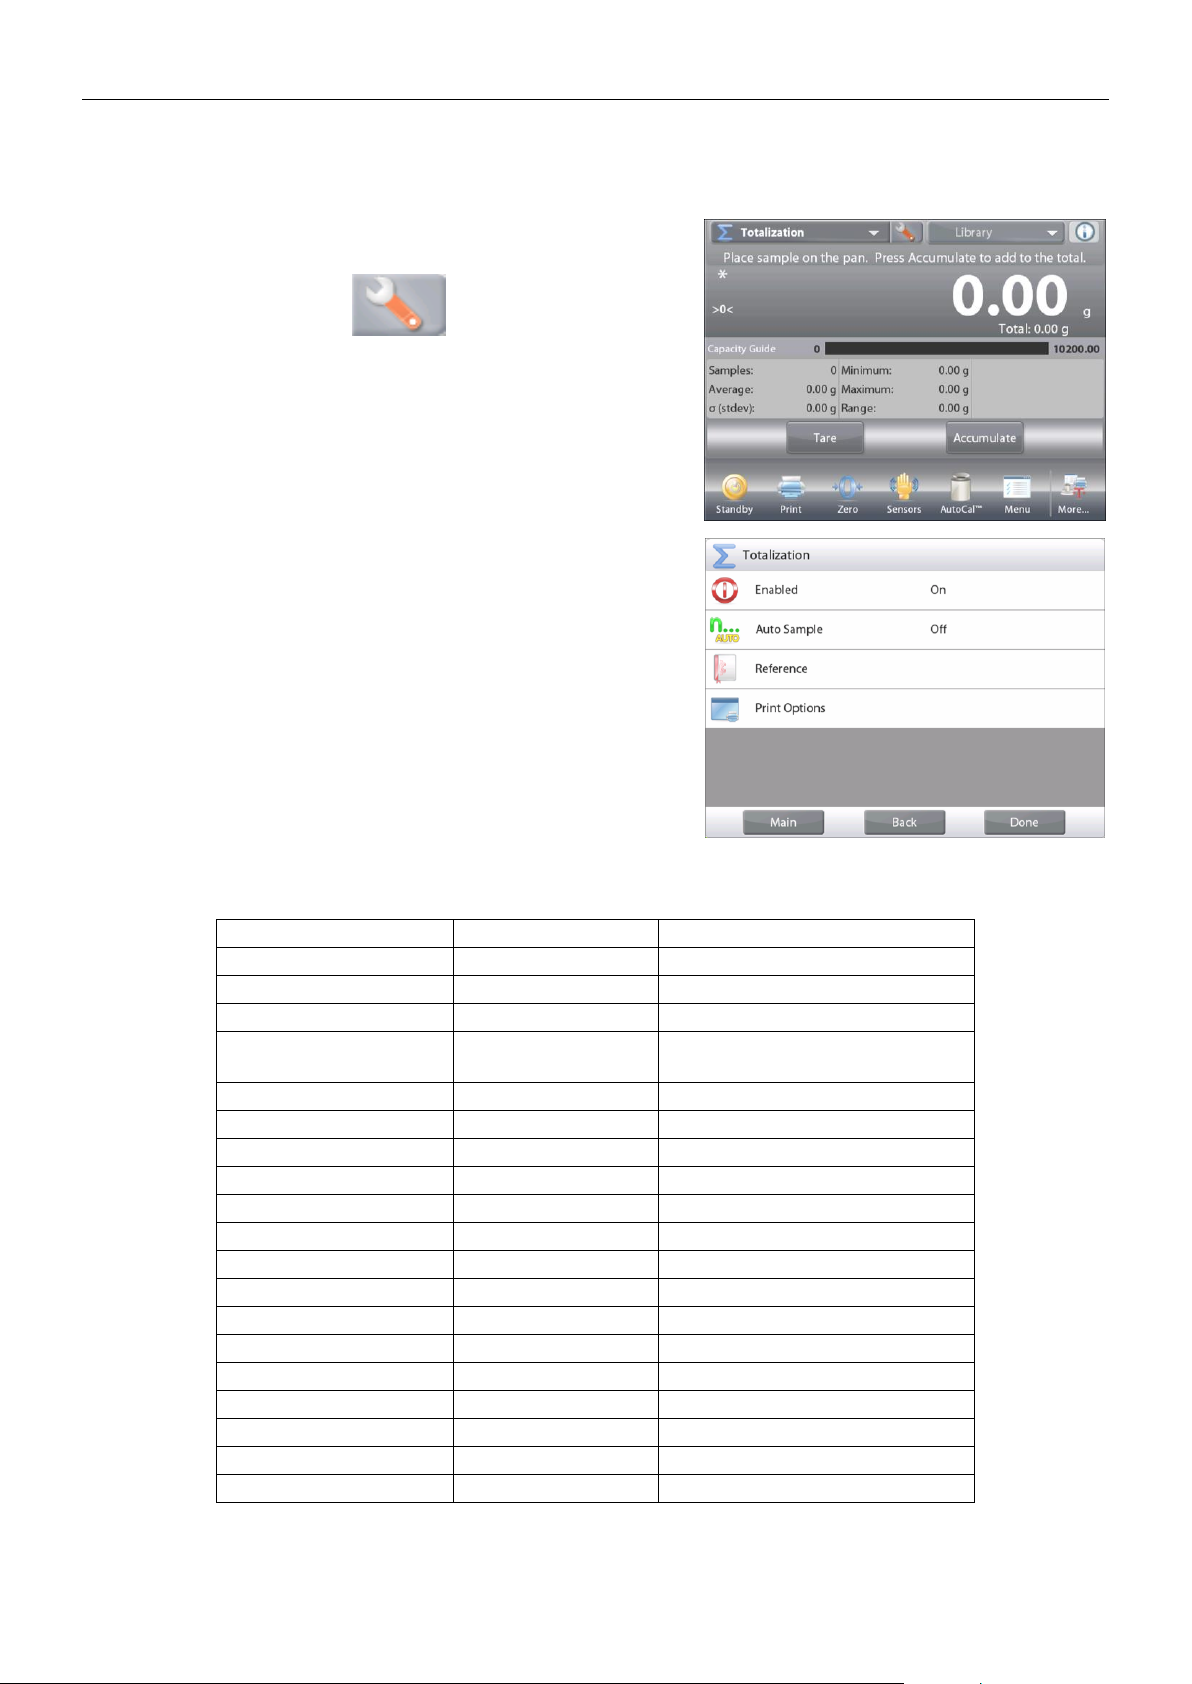
EXPLORER BALANCES EN-57
4.7.2 Application Setup
The Application can be customized for various user preferences.
Touch the Setup Icon (wrench) to enter the Application Setup
from the home screen.
The Setup Menu appears.
Select the list item to view or change the setting as
desired.
To return to the Application home screen, touch Done.
The Totalization Application Setups (defaults in Bold)
Item
Available Settings
Comments
Enabled
On, Off
Turns Application on/off
Auto Sample Mode
On, Off
To select the mode
Reference fields
Samples
On, Off
To display the number of
samples weighed
Average (weight)
On, Off
Displays the Average
Standard deviation
On, Off
Displays the standard deviation
Minimum (weight)
On, Off
Displays the Minimum value
Maximum (weight)
On, Off
Displays the Maximum value
Range
On, Off
Displays the Range
Gross
On, Off
Gross weight is displayed
Net
On, Off
Net weight is displayed
Tare
On, Off
Tare weight is displayed
Print Options
See Printing Section.
Samples
On, Off
Average (weight)
On, Off
Standard Deviation
On, Off
Minimum (weight)
On, Off
Maximum (weight)
On, Off
Range
On, Off
Find Quality Products Online at: [email protected]
www.GlobalTestSupply.com
Page 60
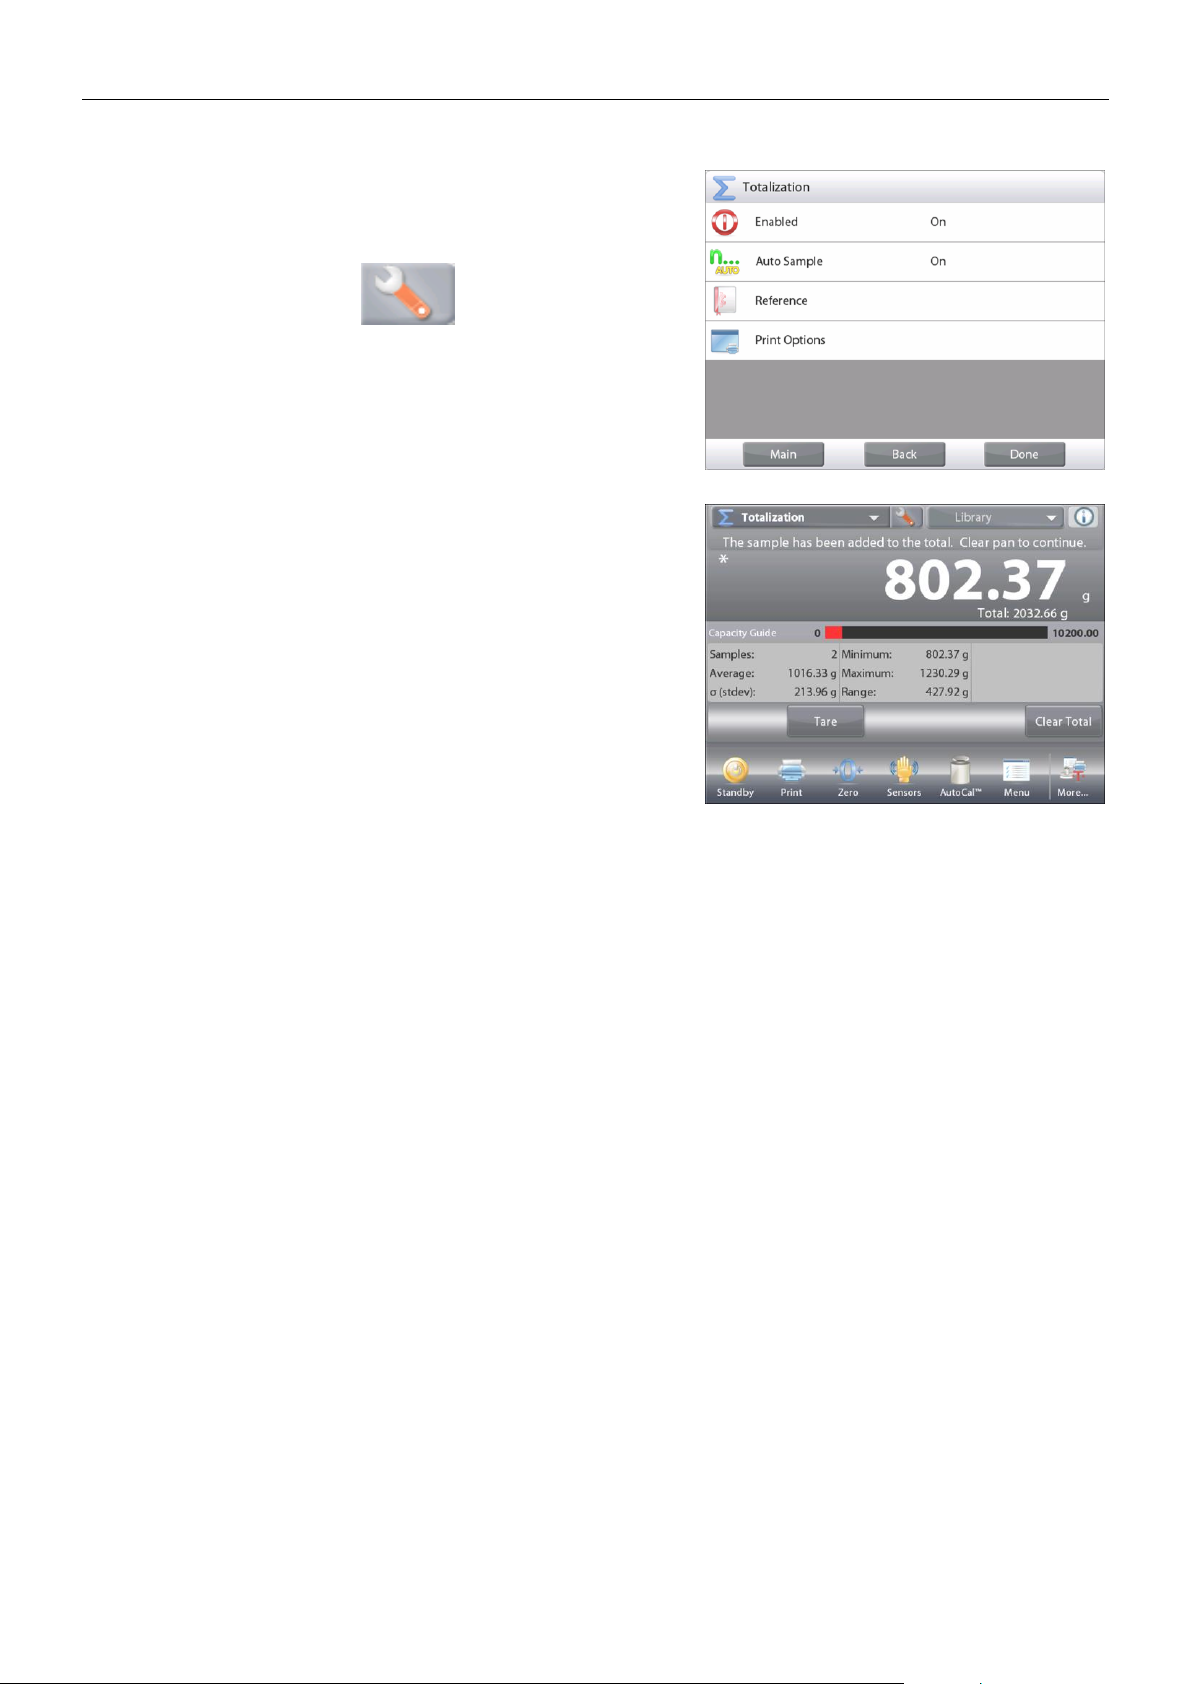
EN-58 EXPLORER BALANCES
4.7.3 Totalization – Automatic
The weight of the item is added automatically (when stable).
To enable this feature:
1. Touch the Setup Icon (wrench) to enter Application Setup.
2. Press Auto Sample to turn this feature On.
Clear the pan (if necessary). Add a new sample.
The item weight is shown on the Main Display Line.
The weight of the item is automatically added (when stable) to the
total. The new total is shown on the Second Display Line.
Remove the item from the weighing pan, then add the next item
and continue the same as in manual mode.
When finished, press the
Clear Total
button to reset the
Second Display line to zero.
Find Quality Products Online at: [email protected]
www.GlobalTestSupply.com
Page 61
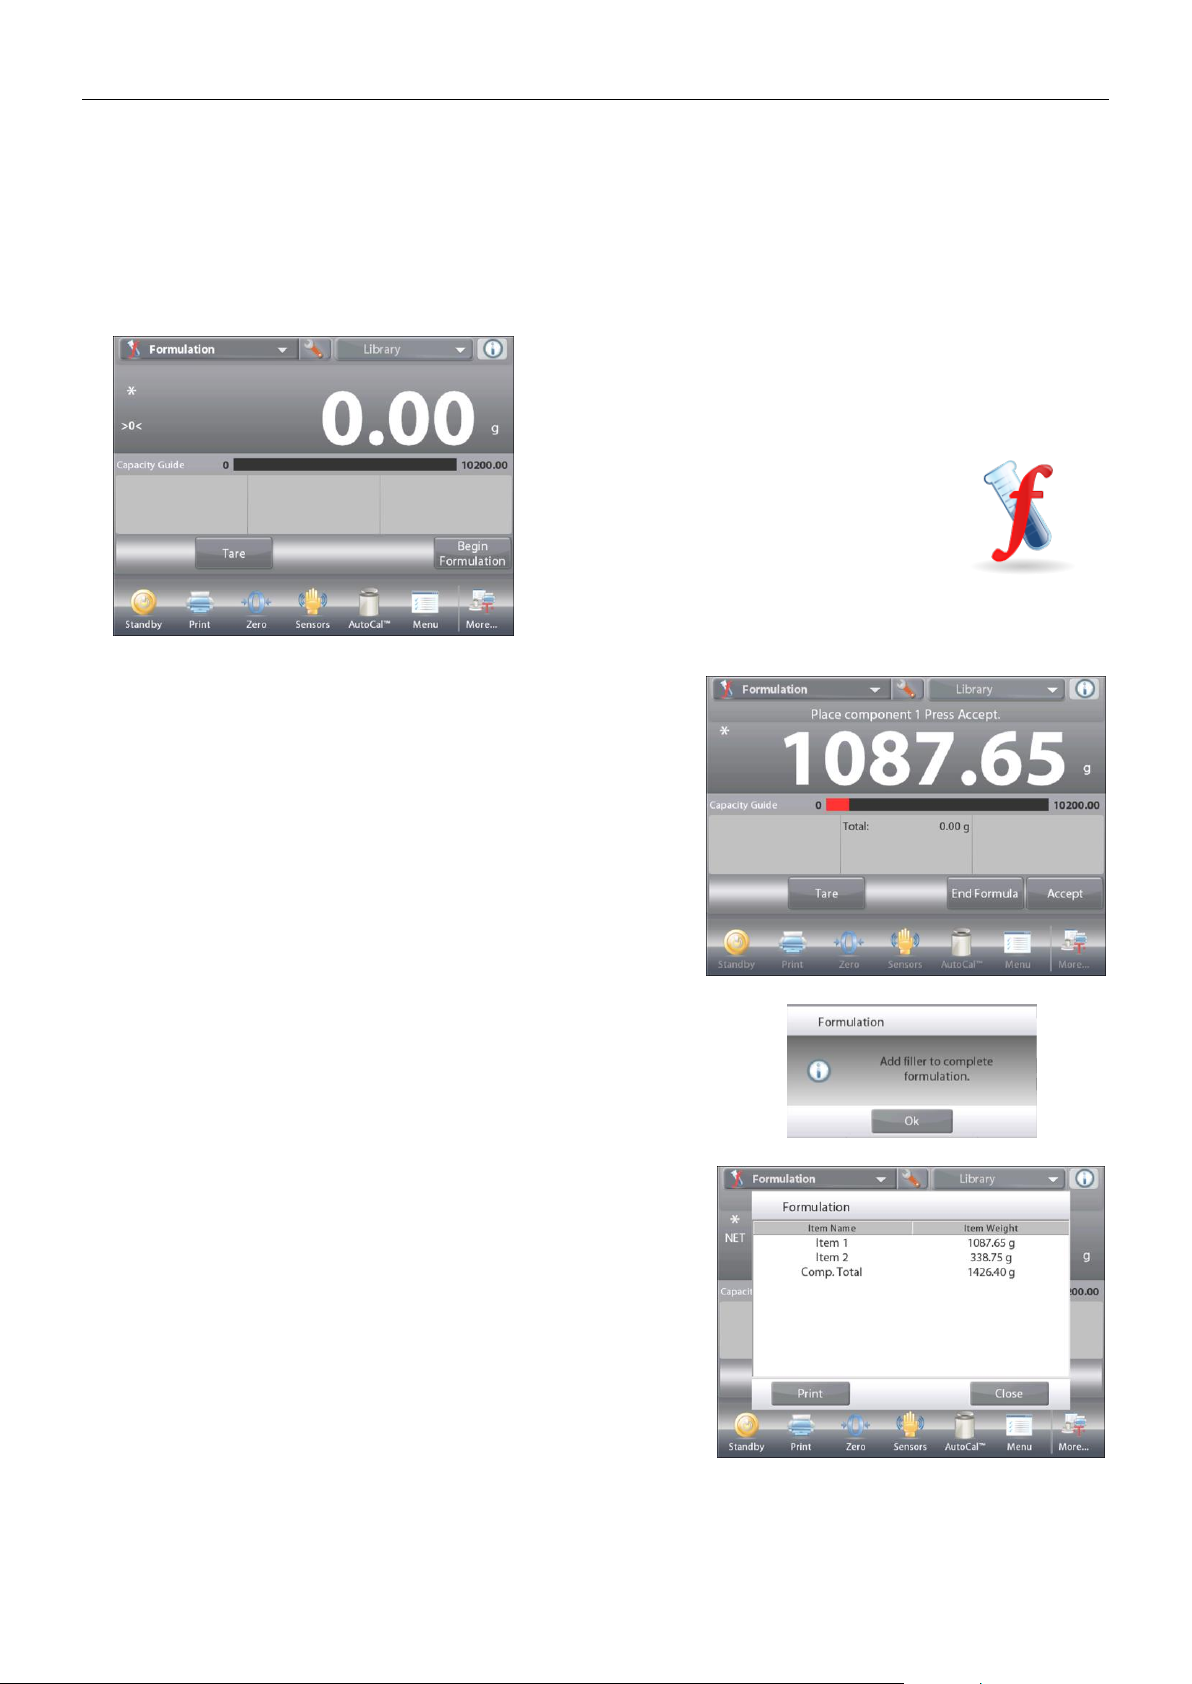
EXPLORER BALANCES EN-59
4.8 Formulation
Use this application for compounding and recipe making. The number of components can be 2 to 99.
Formulation has two available modes of operation: Free Formulation and Recipe Formulation.
4.8.1 Free Formulation (default)
This mode of Formulation allows the user to freely add components. A filler material is asked for at the end.
In the upper left portion of the home screen, select Formulation.
The FREE FORMULATION Home screen
Main Display Line
Second Display Line
Reference Fields
Application Buttons
Functions Application Icon
To start the compounding process, press
Begin Formulation
.
A prompt says Place component 1 then press Accept.
The item weight is displayed on the main display Line.
Place the first ingredient on the pan (or in a tared container).
Press Accept to store the first component.
A prompt says Place item 2. Press Accept.
Continue adding components and pressing Accept to store the
weight of the individual components until the formula is
complete.
The Total line shows the total weight of all the components.
Press
Print
at any time in the process to print the recipe.
Then press End Formula.
The display may prompt for a Filler material.
If the formula calls for a filler material, press OK.
A popup message window appears, prompting for the
Filler Material to be added.
Add the filler if needed, then press Accept.
(If no filler is needed, press Accept without adding filler.)
The results are then displayed in a pop-up window.
Free Formulation Results
Press Print to send data to the enabled COM port
Press Close to close the Results window and return to the
Application home screen
Find Quality Products Online at: [email protected]
www.GlobalTestSupply.com
Page 62
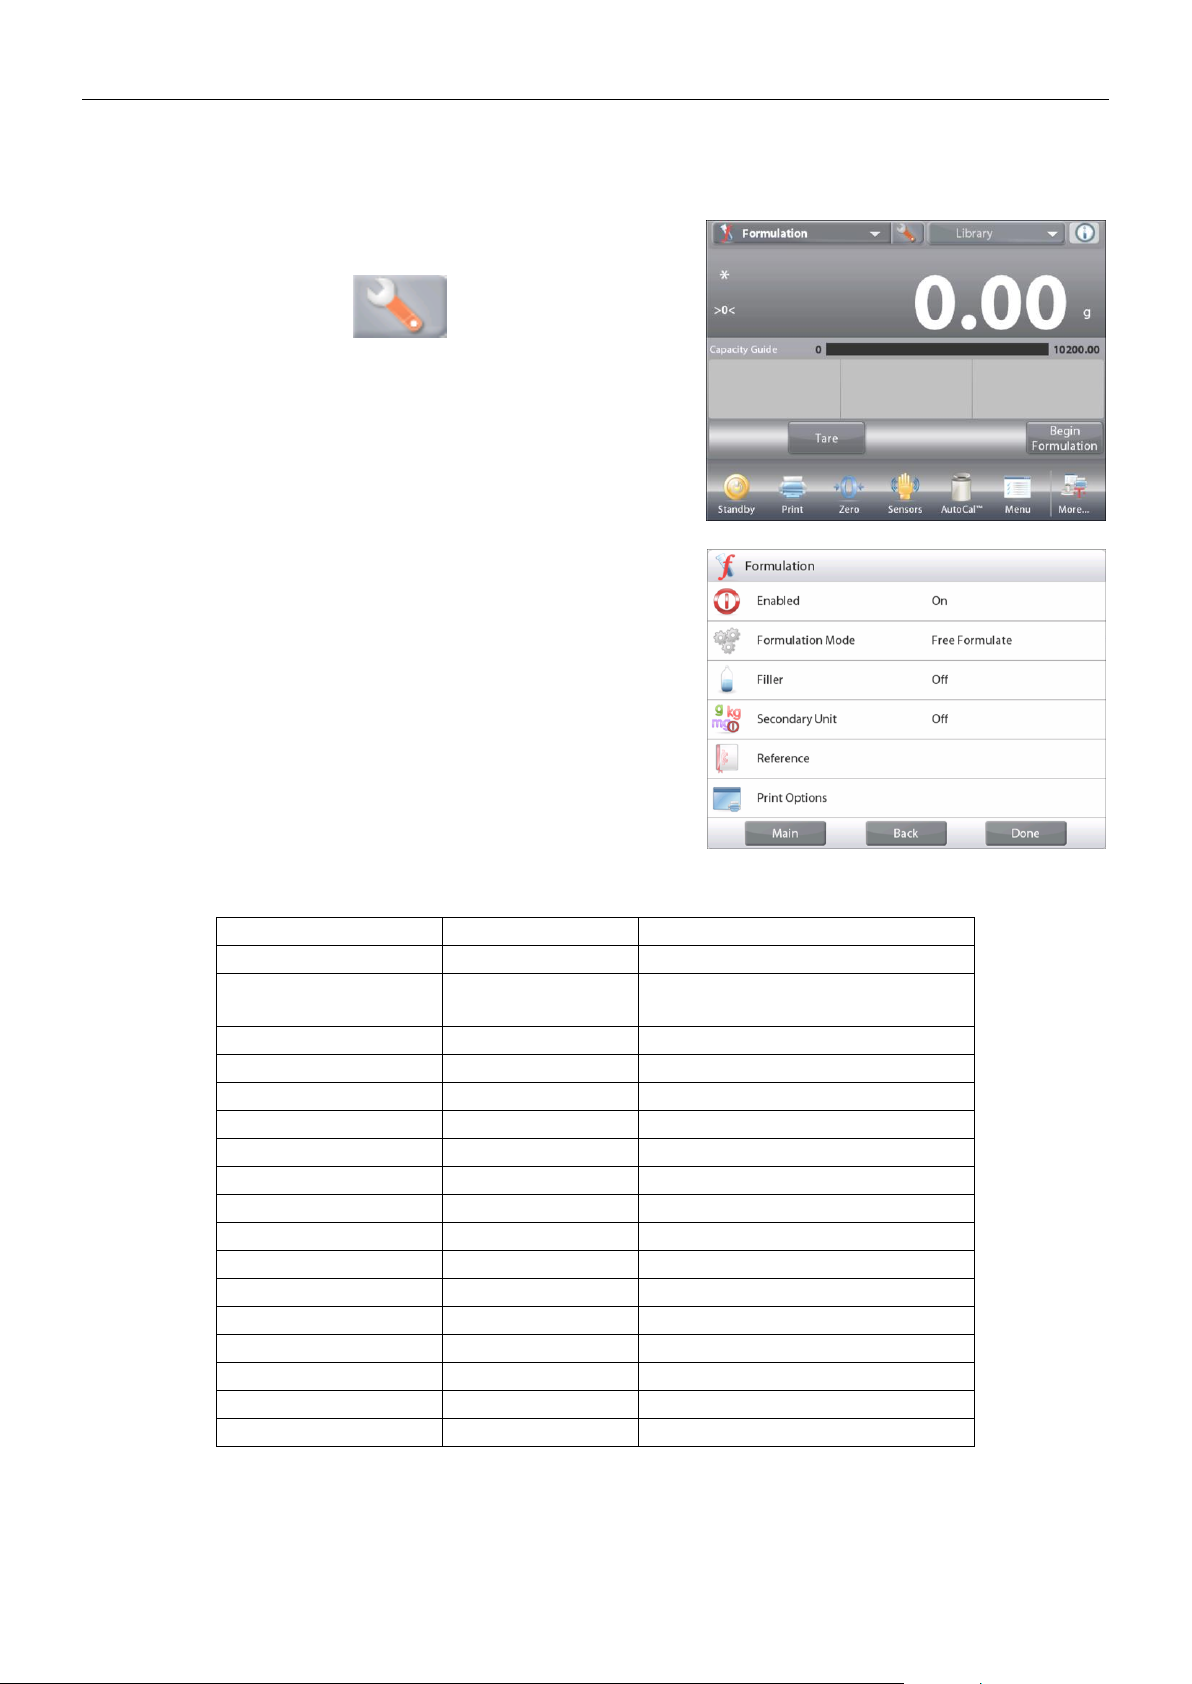
EN-60 EXPLORER BALANCES
4.8.2 Application Setup
The Application can be customized for various user preferences.
Touch the
Setup
icon (wrench) to enter
Application Setup
from the home screen.
The
Setup Menu
appears.
Select the list item to view or change the setting as
desired.
To return to the Application home screen, touch
Done
.
The Formulation Application Setups (defaults in Bold)
Item
Available Settings
Comments
Enabled
On, Off
Turns Application on/off
Mode
Free Formulate,
Recipe Based
To select the mode
Filler
On, Off
To prompt for a filler material
Secondary Unit
On, Off
To show the Second Display line
Reference fields
Total
On, Off
Total is displayed
Gross
On, Off
Gross weight is displayed
Net
On, Off
Net weight is displayed
Tare
On, Off
Tare weight is displayed
Target
On, Off
For Recipe Based mode
Difference (weight)
On, Off
For Recipe Based mode
Difference (percent)
On, Off
For Recipe Based mode
Print Options
See Printing Section.
Total
On, Off
Target
On, Off
For Recipe Based mode
Difference (weight)
On, Off
For Recipe Based mode
Difference (percent)
On, Off
For Recipe Based mode
Find Quality Products Online at: [email protected]
www.GlobalTestSupply.com
Page 63
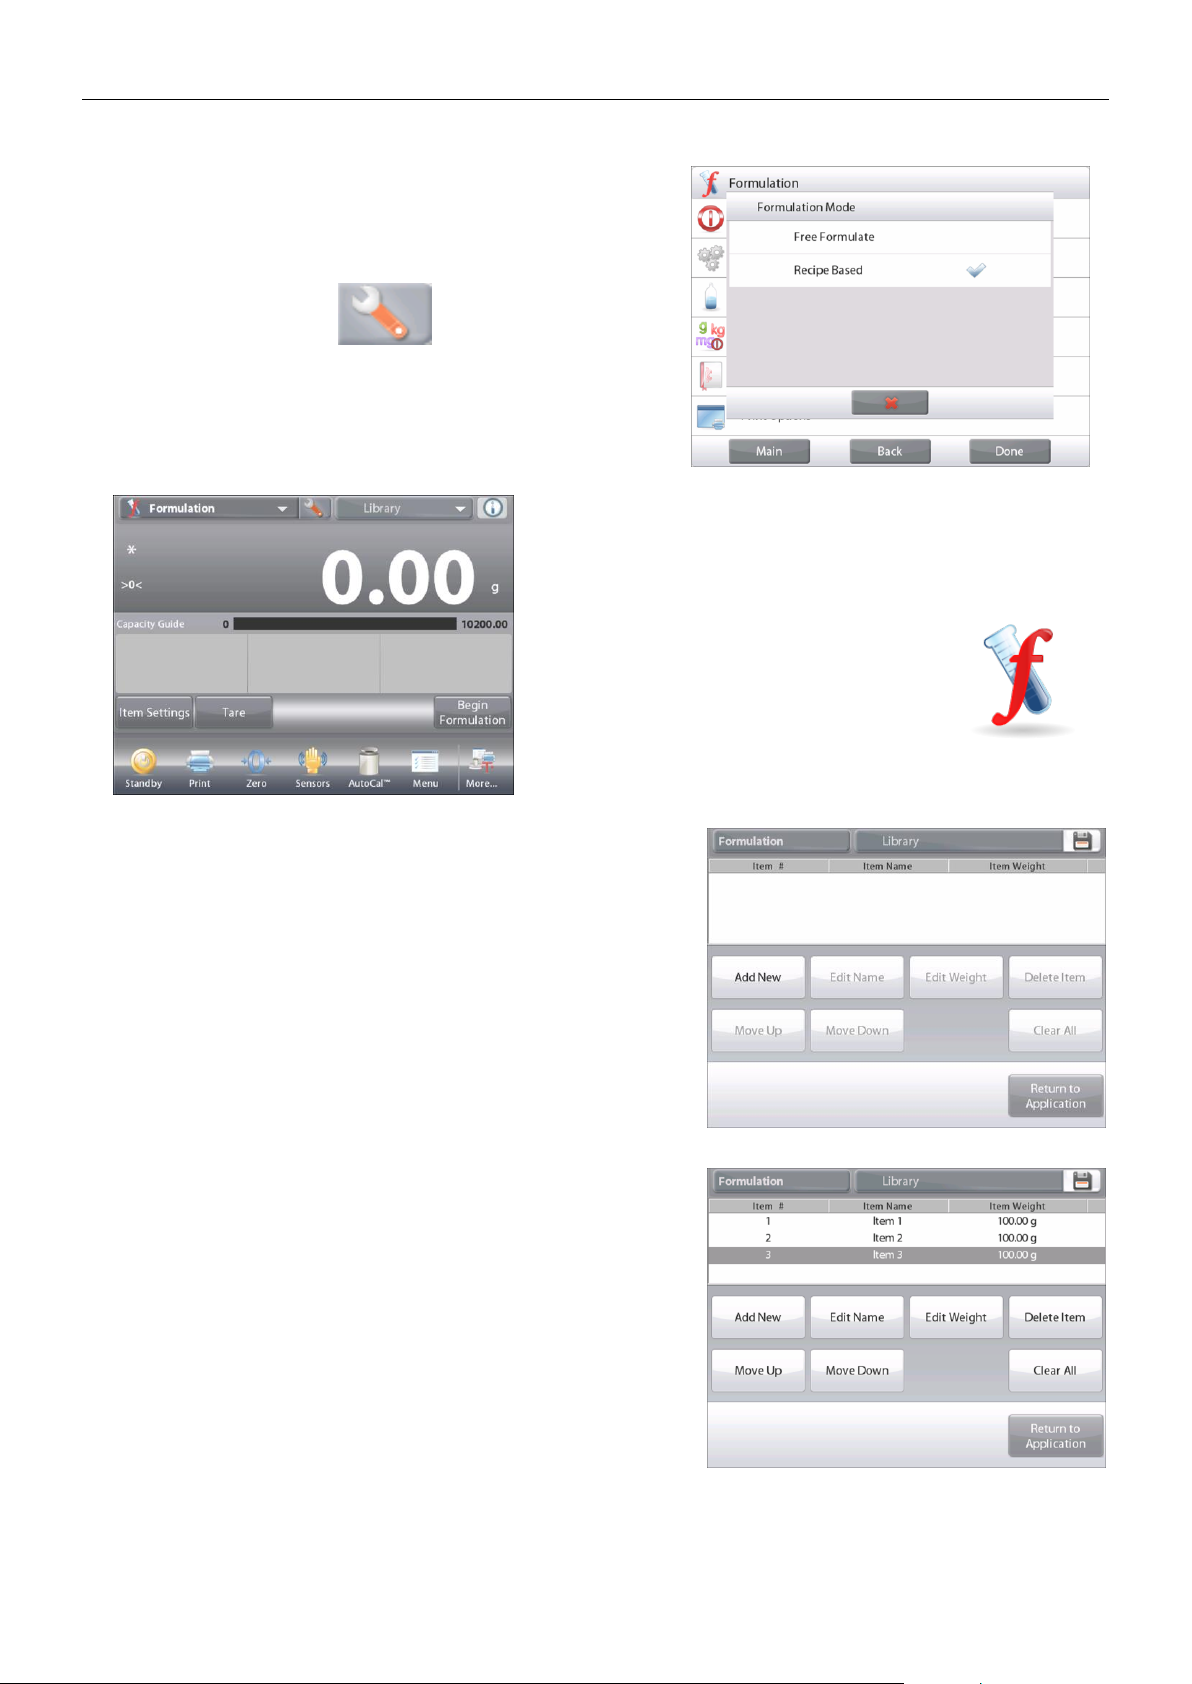
EXPLORER BALANCES EN-61
4.8.3 Recipe Formulation
Recipe Formulation requires the formula to be entered first,
followed component by component.
To enable this feature, press the Setup icon (wrench) to
enter the Formulation Setup menu.
Change the mode to Recipe Based.
Press Done in the main setup options screen.
The RECIPE FORMULATION Home screen
Main Display Line
Second Display Line
Reference Fields
Application Buttons
Functions Application Icon
Press Begin Formulation.
If no items have been previously set up, the Settings screen
appears.
If items already exist in memory, Formulation begins.
Press the Add New button.
A new default component is added to the end of the Formula
(default Name, Weight).
To change the default component Name, Press Edit Name.
The alpha-numeric entry screen appears.
Find Quality Products Online at: [email protected]
www.GlobalTestSupply.com
Page 64
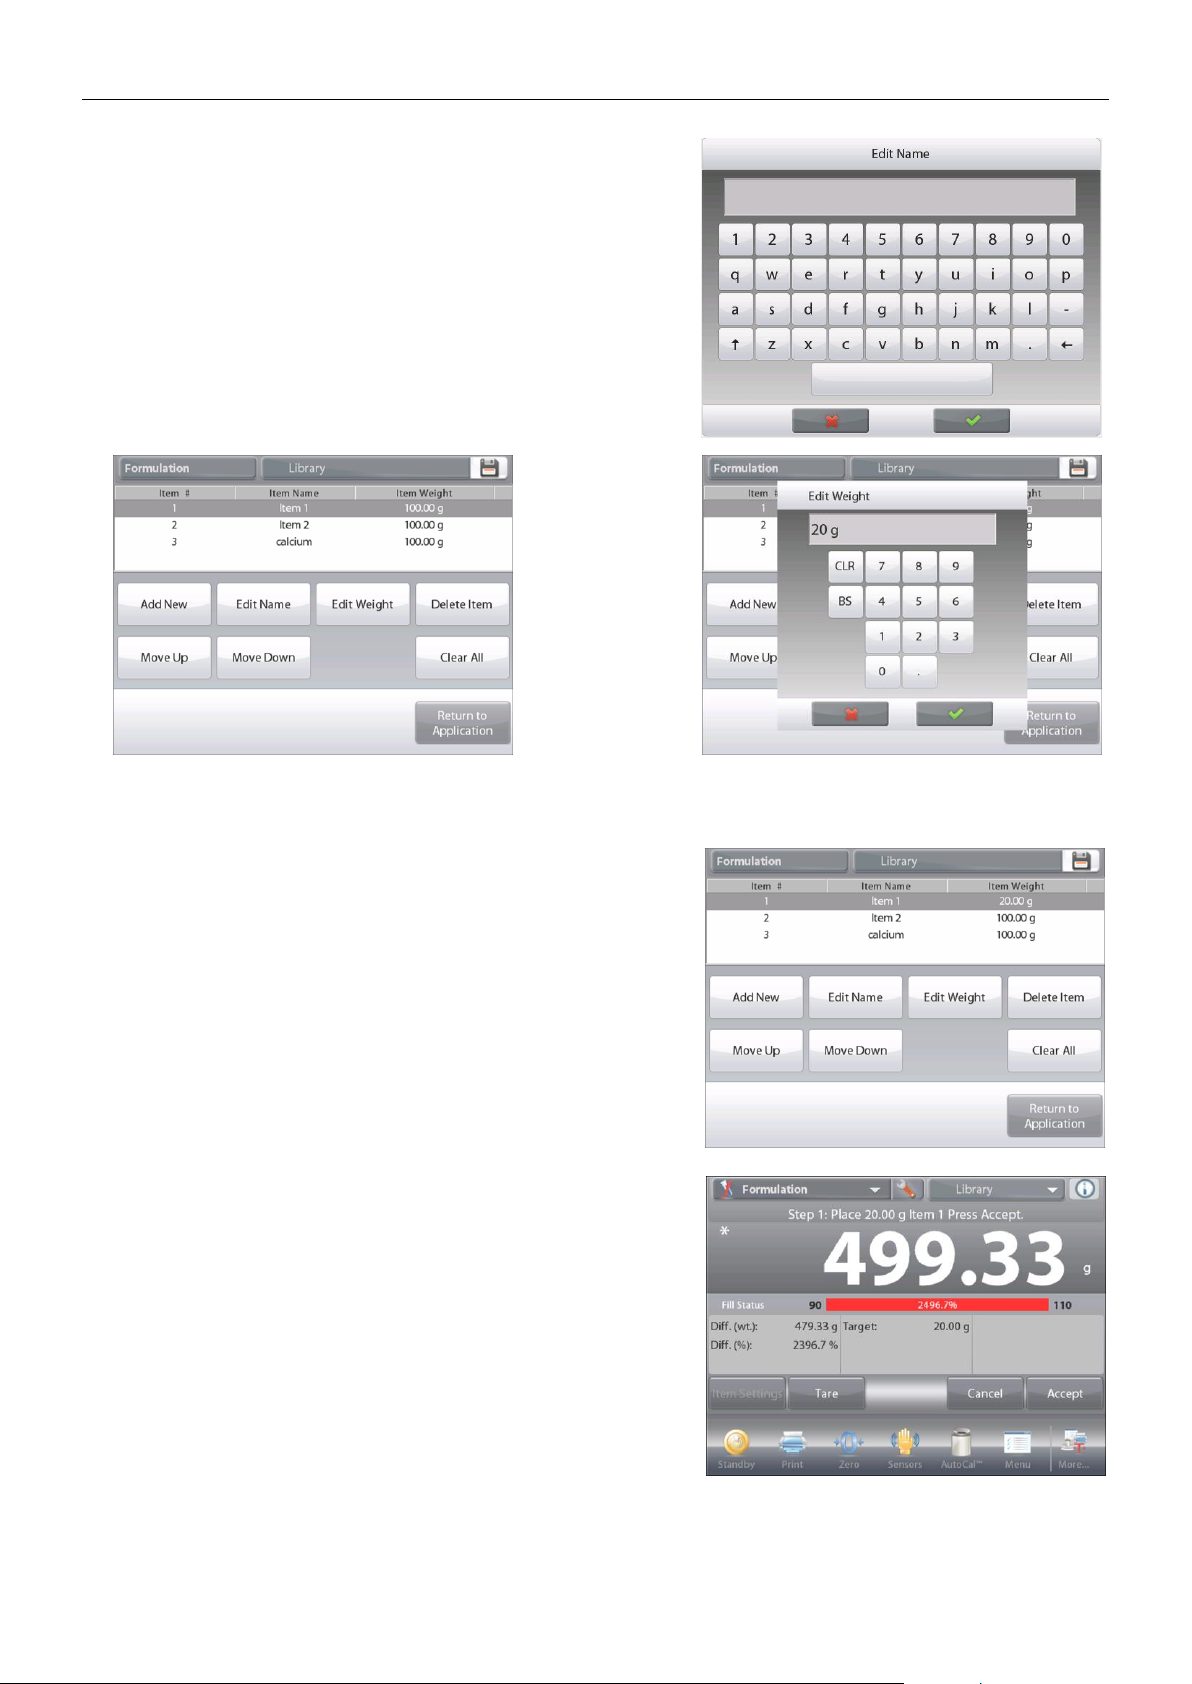
EN-62 EXPLORER BALANCES
The display returns to the previous screen with the new value highlighted momentarily.
Continue adding components as required for your formula.
To change the order of a component in the formula, touch the
item to highlight it, then press Move Up or Move Down.
To delete a component, touch the item to highlight it, and
press Delete Item.
To clear all components, press Clear All.
A confirmation is required.
When finished, press
Return to Application
.
Press Begin Formulation. Follow the screen instructions:
Add the required component in the formula.
The component weight is shown on the Main Display Line.
The progress bar displays the fill status. Within 10 percent of the
target value the progress bar converts to fine resolution display.
Press Accept to add the weight of the component to the total.
The new total appears on the Second Display Line.
The Difference to the target is displayed for each component
(in weight and percent).
Follow the screen instructions to continue adding components
and pressing Accept to complete the Formula.
When finished, the Formulation Results screen is displayed.
Enter the new name, then press .
The display returns to the previous screen with the new value
highlighted momentarily.
To change the
default
component
weight, press
Edit Weight.
The numeric
entry screen
appears.
Enter the new
weight, then
press .
Find Quality Products Online at: [email protected]
www.GlobalTestSupply.com
Page 65
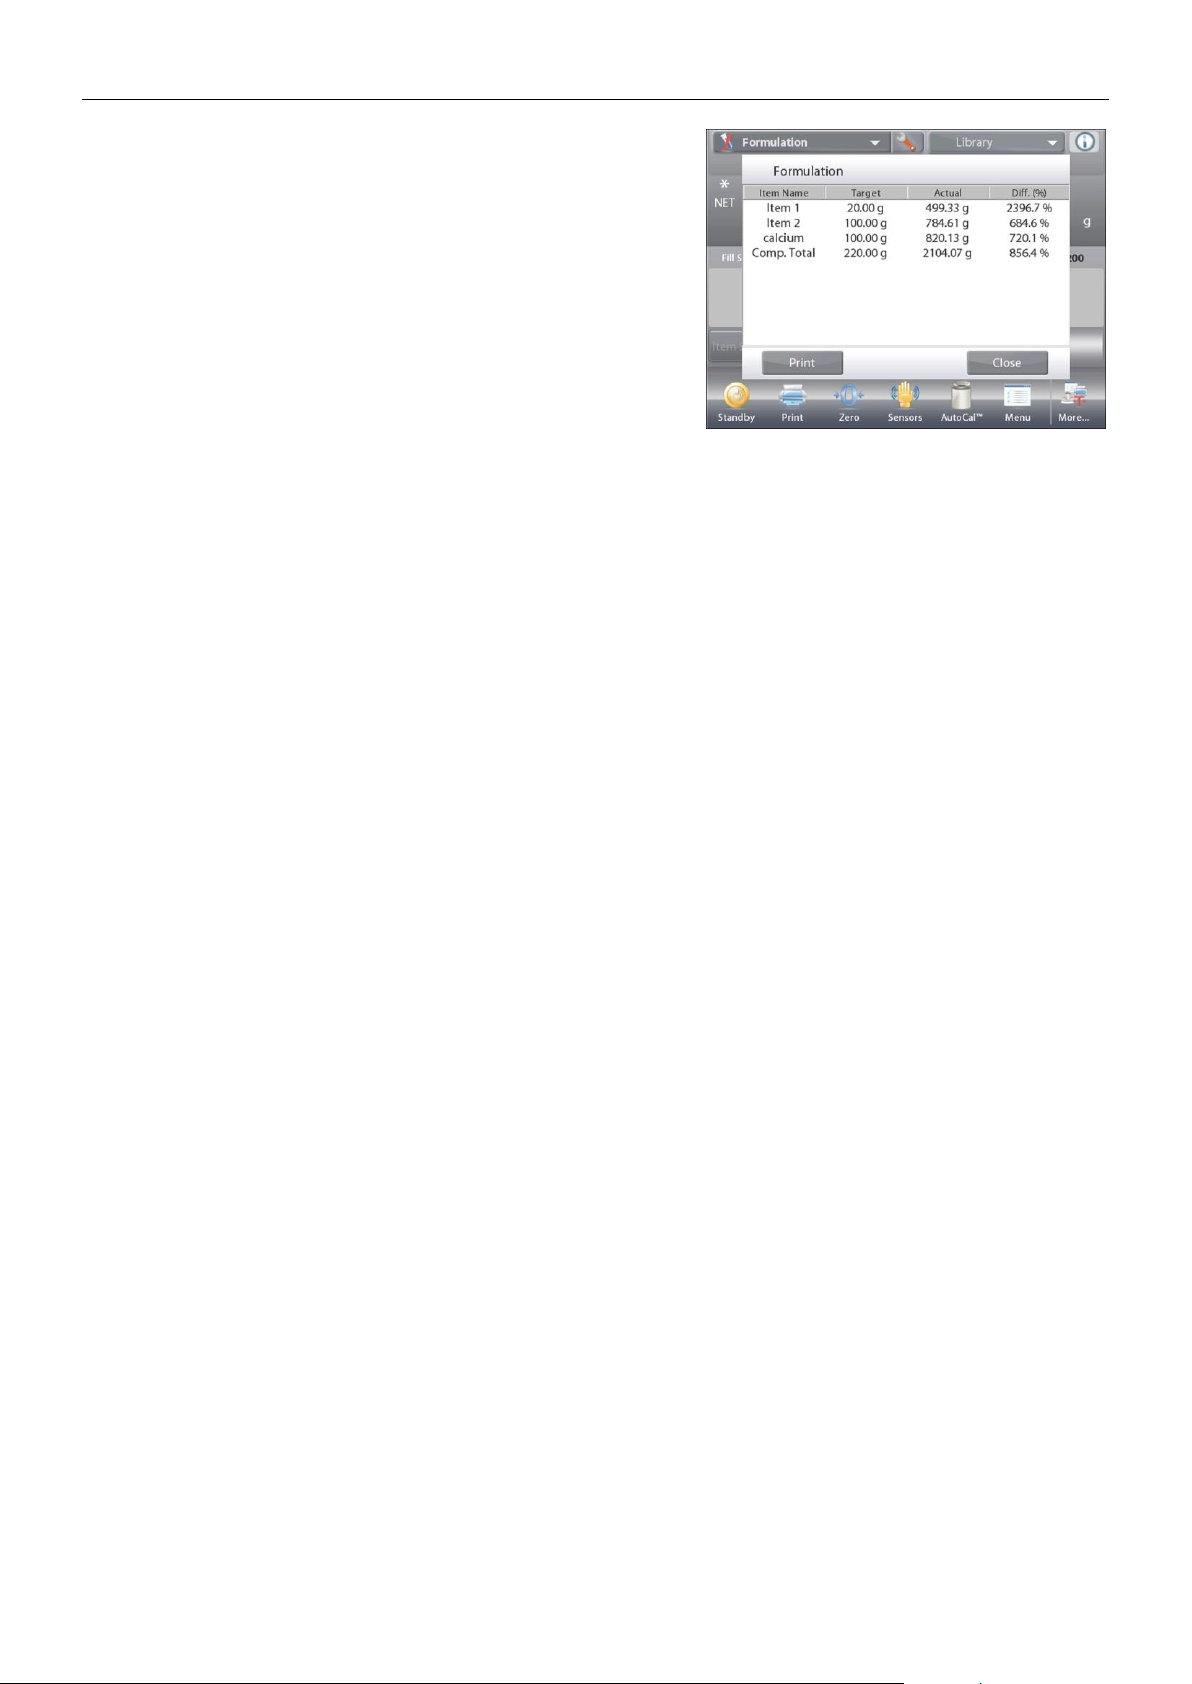
EXPLORER BALANCES EN-63
Formulation Results
Press Print to send the results to the enabled COM port.
To close the Results window and return to the Application home
screen, press
Close
.
Find Quality Products Online at: [email protected]
www.GlobalTestSupply.com
Page 66
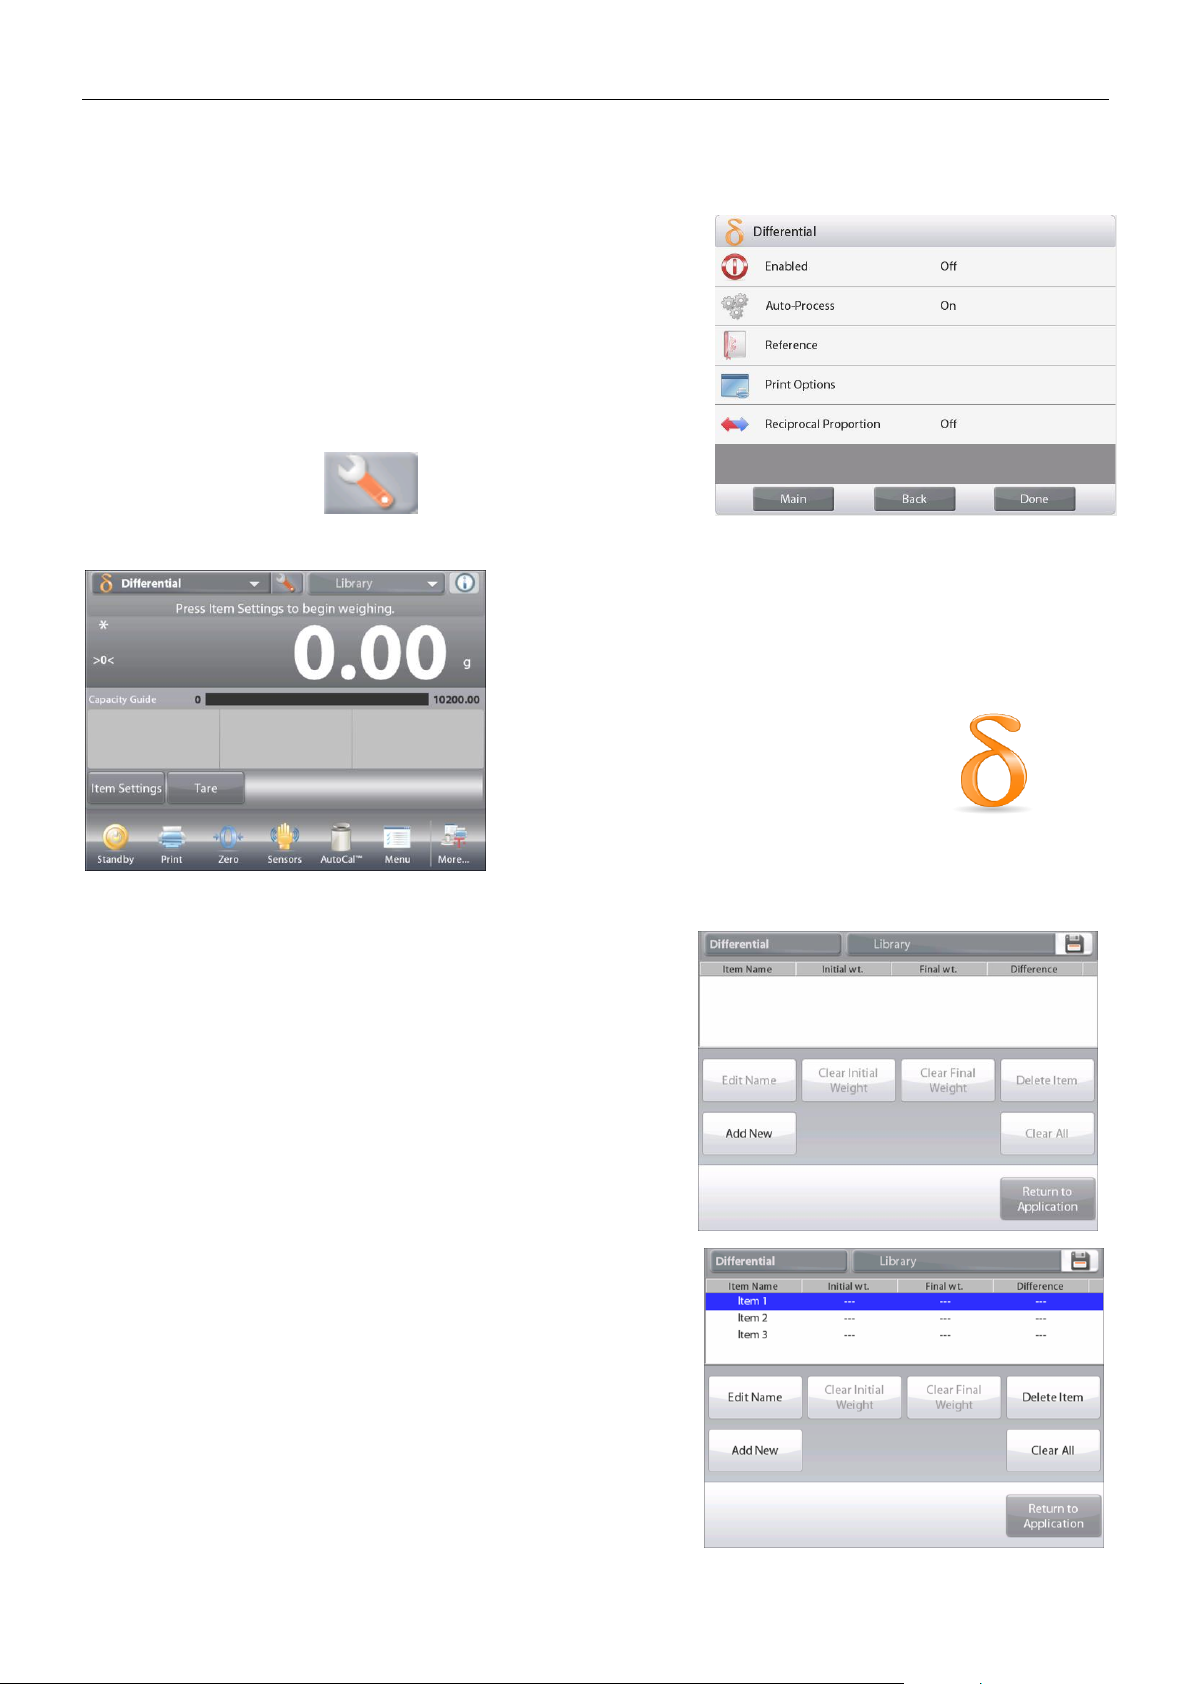
EN-64 EXPLORER BALANCES
4.9 Differential Weighing
Differential weighing stores weight values so samples can be dried or processed and the difference in weight
calculated. Up to 99 samples can be stored.
Differential weighing has two operating modes:
Auto-Process On, where the initial and final weights are
sequentially gathered for a set of items, with no need to
return to Item Settings.
Auto-Process Off, where initial and final weights are
gathered separately for each item, after each item is
selected in Item Settings.
Touch the
Setup
icon (wrench) to enter
Application Setup
from
the home screen.
The DIFFERENTIAL WEIGHING Home screen
Main Display Line
Second Display Line
Reference Fields
Application Buttons
Functions Application Icon
4.9.1 Item Settings
Press
Item Settings
to set up items in memory.
To set up the item, Press Add New.
New items are added with default name and weight information
(no initial or final weights).
To change the default Item Name, press Edit Name.
The alpha-numeric entry screen appears.
Find Quality Products Online at: [email protected]
www.GlobalTestSupply.com
Page 67
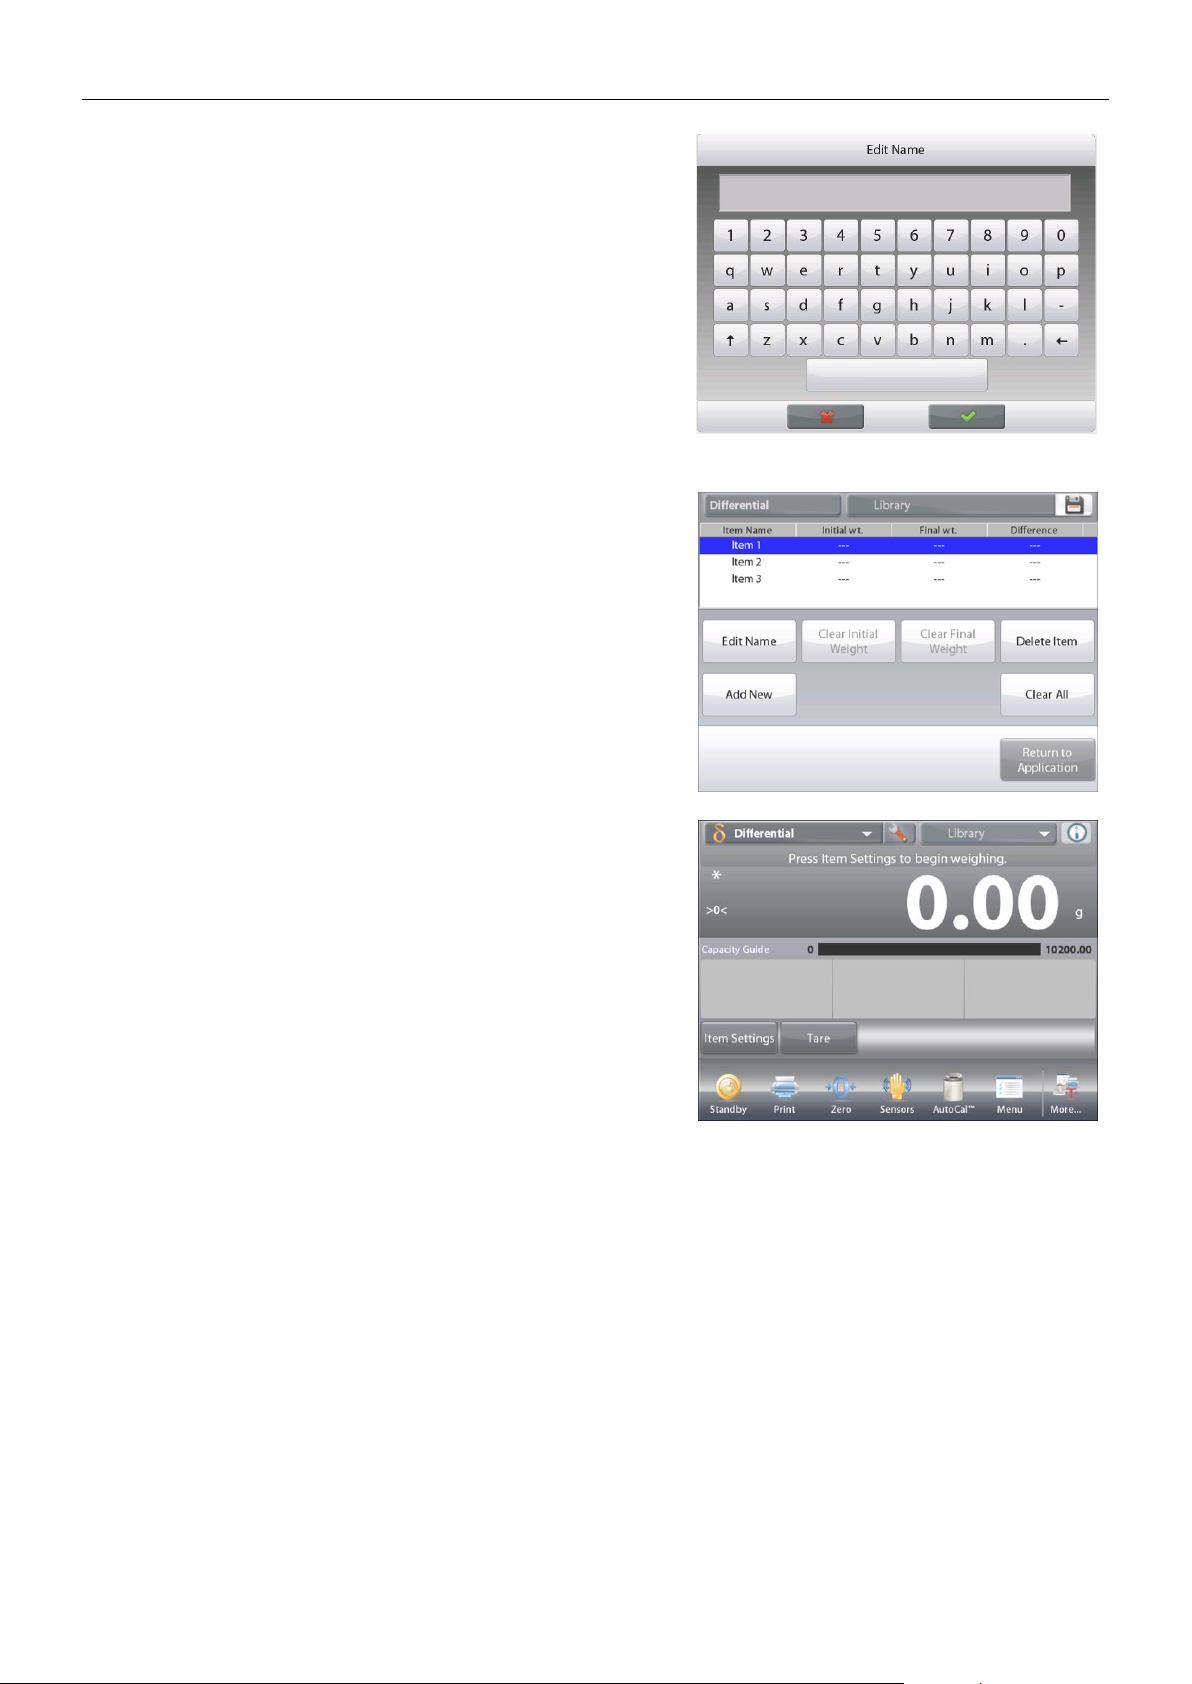
EXPLORER BALANCES EN-65
Enter the new name, then press .
The display returns to the previous screen with the new value
highlighted momentarily.
Continue adding items as required using Add New.
New items can be added at any time.
To delete an item, touch the item to highlight it,
then press Delete Item.
To Clear the item initial weight press Clear Initial Weight.
(This feature is disabled if no initial weight is stored.)
To Clear the item’s final weight, press Clear Final Weight.
(This feature is disabled if no final weight is stored.)
To clear all items, press Clear All, then confirm.
When finished, press
Return to Application
.
On the main Application screen, follow the screen instructions:
Add the first item, then press Accept to store the value.
The initial weights of the defined item are recorded first, then
the final weights of the items are collected next.
Once the item’s initial weight and a final weight are stored, the
values are displayed along with the Difference in weight and
percent.
The items are stored in memory. To begin a new Differential
weighing session, delete the initial and/or final weights.
Find Quality Products Online at: [email protected]
www.GlobalTestSupply.com
Page 68
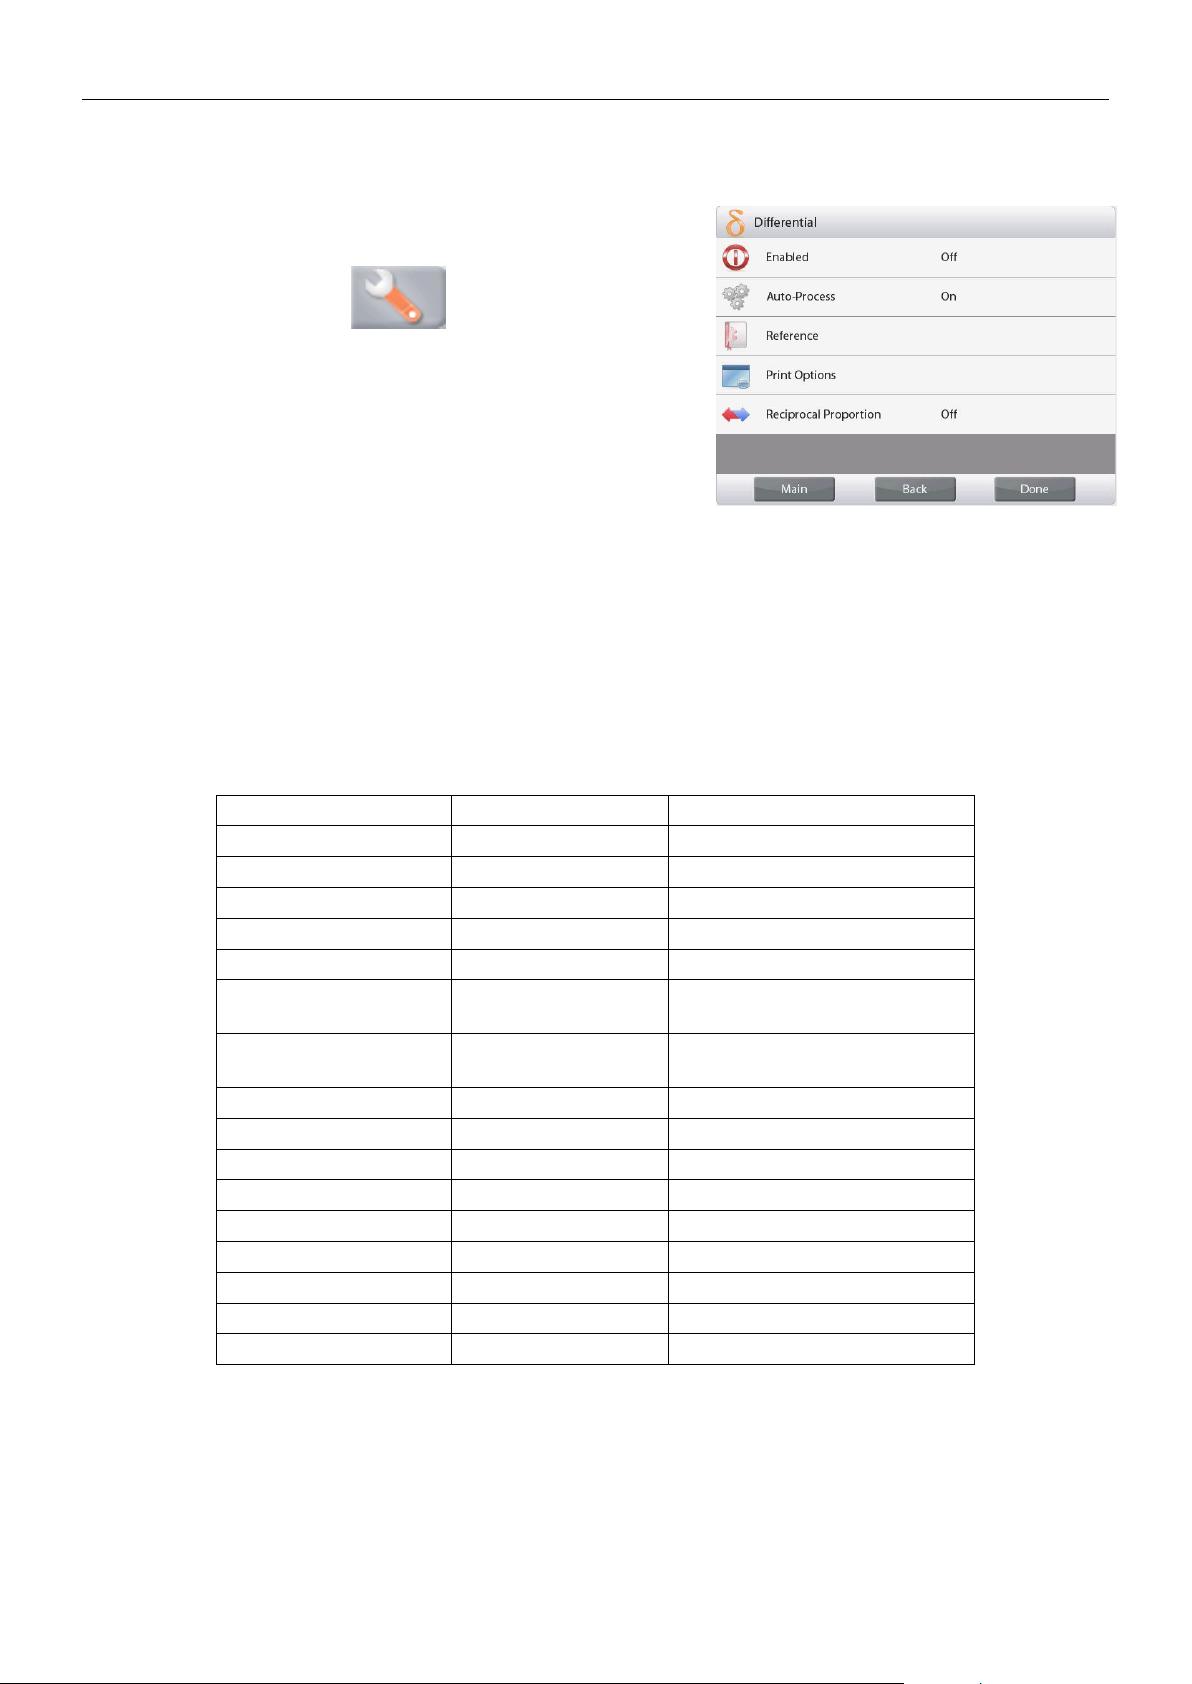
EN-66 EXPLORER BALANCES
4.9.2 Application Setup
The Application can be customized for various user preferences.
Touch the
Setup
icon (wrench) to enter
Application Setup
from the home screen.
The
Setup
Menu appears.
Select the list item to view or change the setting as desired.
To return to the Application home screen, touch
Done
.
Reciprocal Proportion
When it is turned on, Diff.(wt.) and Diff.(%) will be counted as
the following:
Diff (wt) = Initial weight – Final weight
Diff (%) = (Initial weight – Final weight) / Initial weight
When it is turned off, the result will be counted by Final weight
minus Initial weight.
The Differential Weighing Application Setups (defaults in Bold)
Item
Available Settings
Comments
Enabled
On, Off
Turns Application on/off
Auto-Process Mode
On, Off
To select the mode
Reference fields
Initial Weight
On, Off
The initial weight is displayed
Final Weight
On, Off
The final weight is displayed
Difference (Weight)
On, Off
Displays the Difference to initial
in weight
Difference (Percent)
On, Off
Displays the Difference to initial
in percent
Gross
On, Off
Gross weight is displayed
Net
On, Off
Net weight is displayed
Tare
On, Off
Tare weight is displayed
Print Options
See Printing Section.
Initial Weight
On, Off
Final Weight
On, Off
Difference (Weight)
On, Off
Difference (Percent)
On, Off
Reciprocal Proportion
On, Off
Find Quality Products Online at: [email protected]
www.GlobalTestSupply.com
Page 69
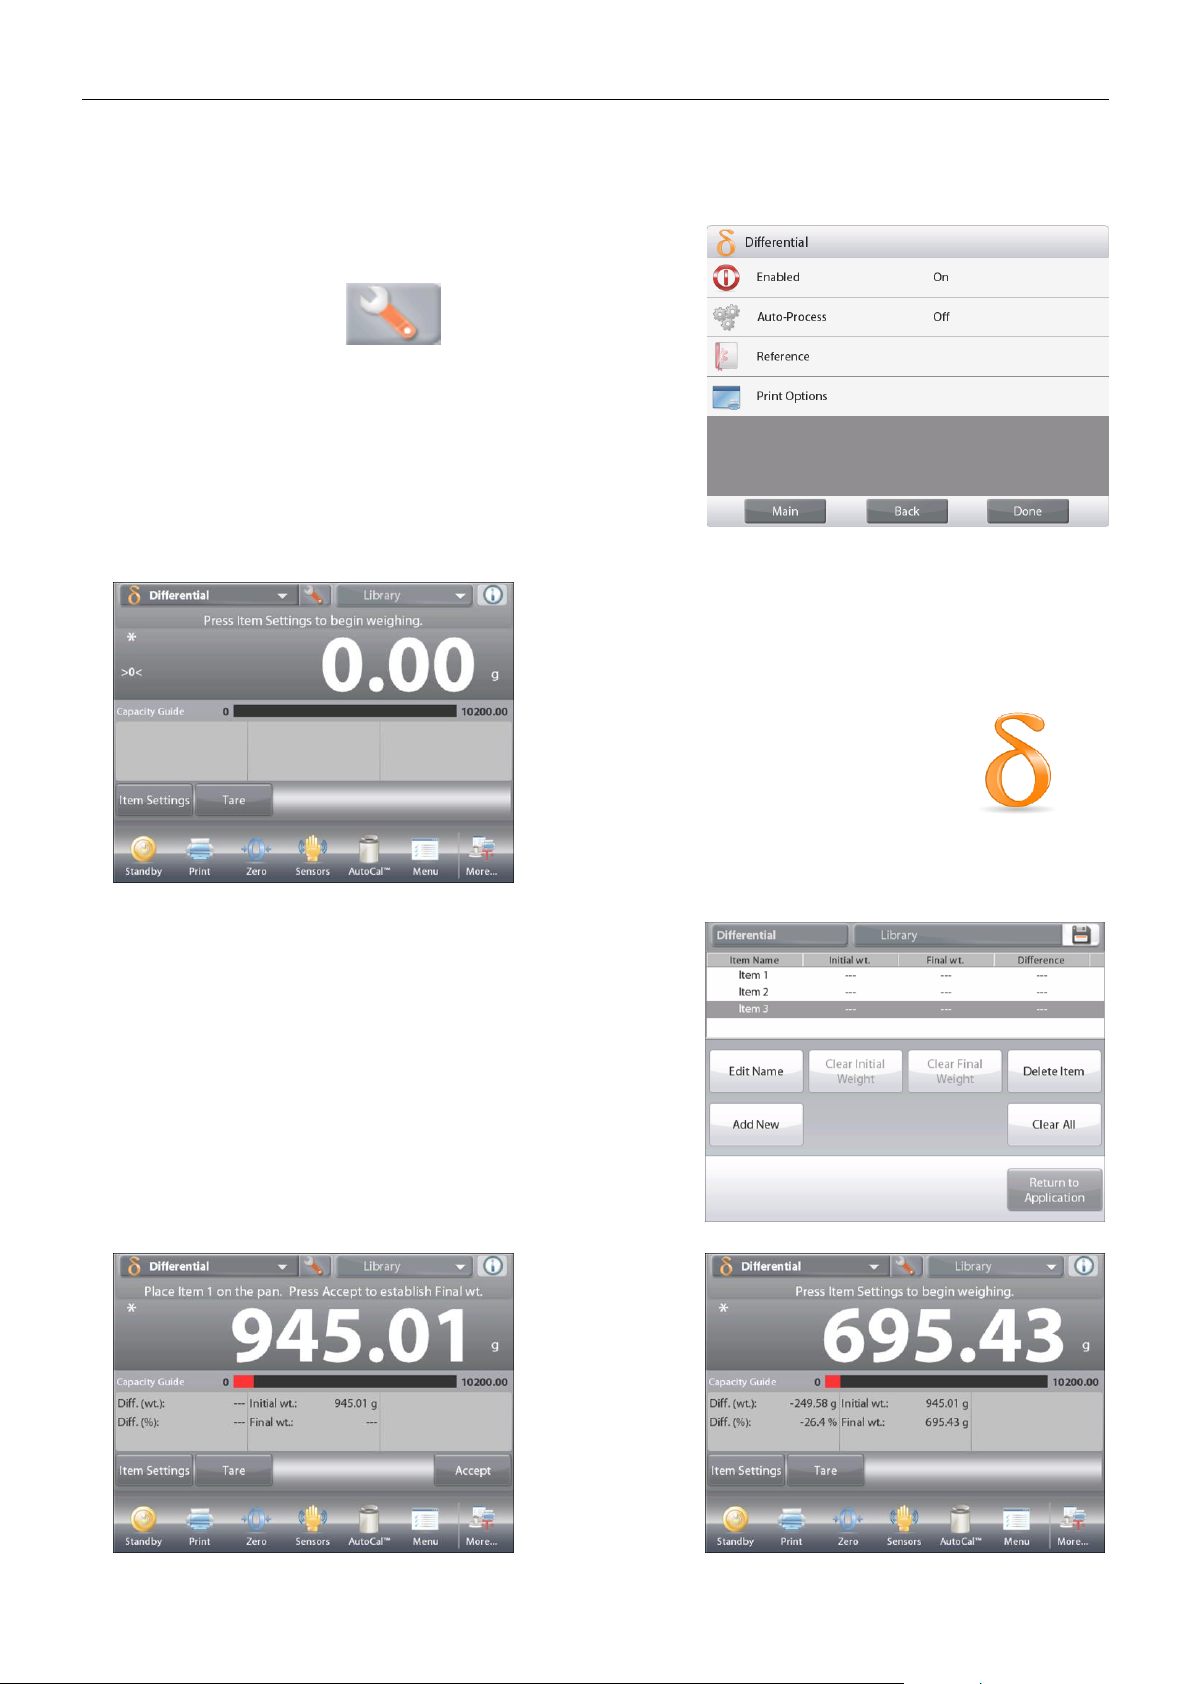
EXPLORER BALANCES EN-67
4.9.3 Differential Weighing with Auto-Process On
Differential weighing with Auto Process On requires the initial and final weights to be sequentially gathered for a
single item.
To enable this feature, touch the Setup icon (wrench) from the
home screen to enter Application Setup.
Press Auto Process to turn it On.
Follow the screen instructions to begin.
The DIFFERENTIAL WEIGHING – Auto Home screen
Main Display Line
Second Display Line (not shown)
Reference Fields
Application Buttons
Functions Application Icon
Follow the screen instructions:
Press
Item Settings
to set up items in memory if necessary.
Use the buttons as necessary.
Follow the same steps as shown on page 57.
Press
Return to Application
when ready.
A message prompts for Item 1 to be placed on the pan again,
then to press
Accept to establish Final Weight
.
After
Accept
is
pressed, the difference between initial and
final weights
appears in the
Reference
Fields.
A message
prompts to start
the process
again, if
desired.
Find Quality Products Online at: [email protected]
www.GlobalTestSupply.com
Page 70
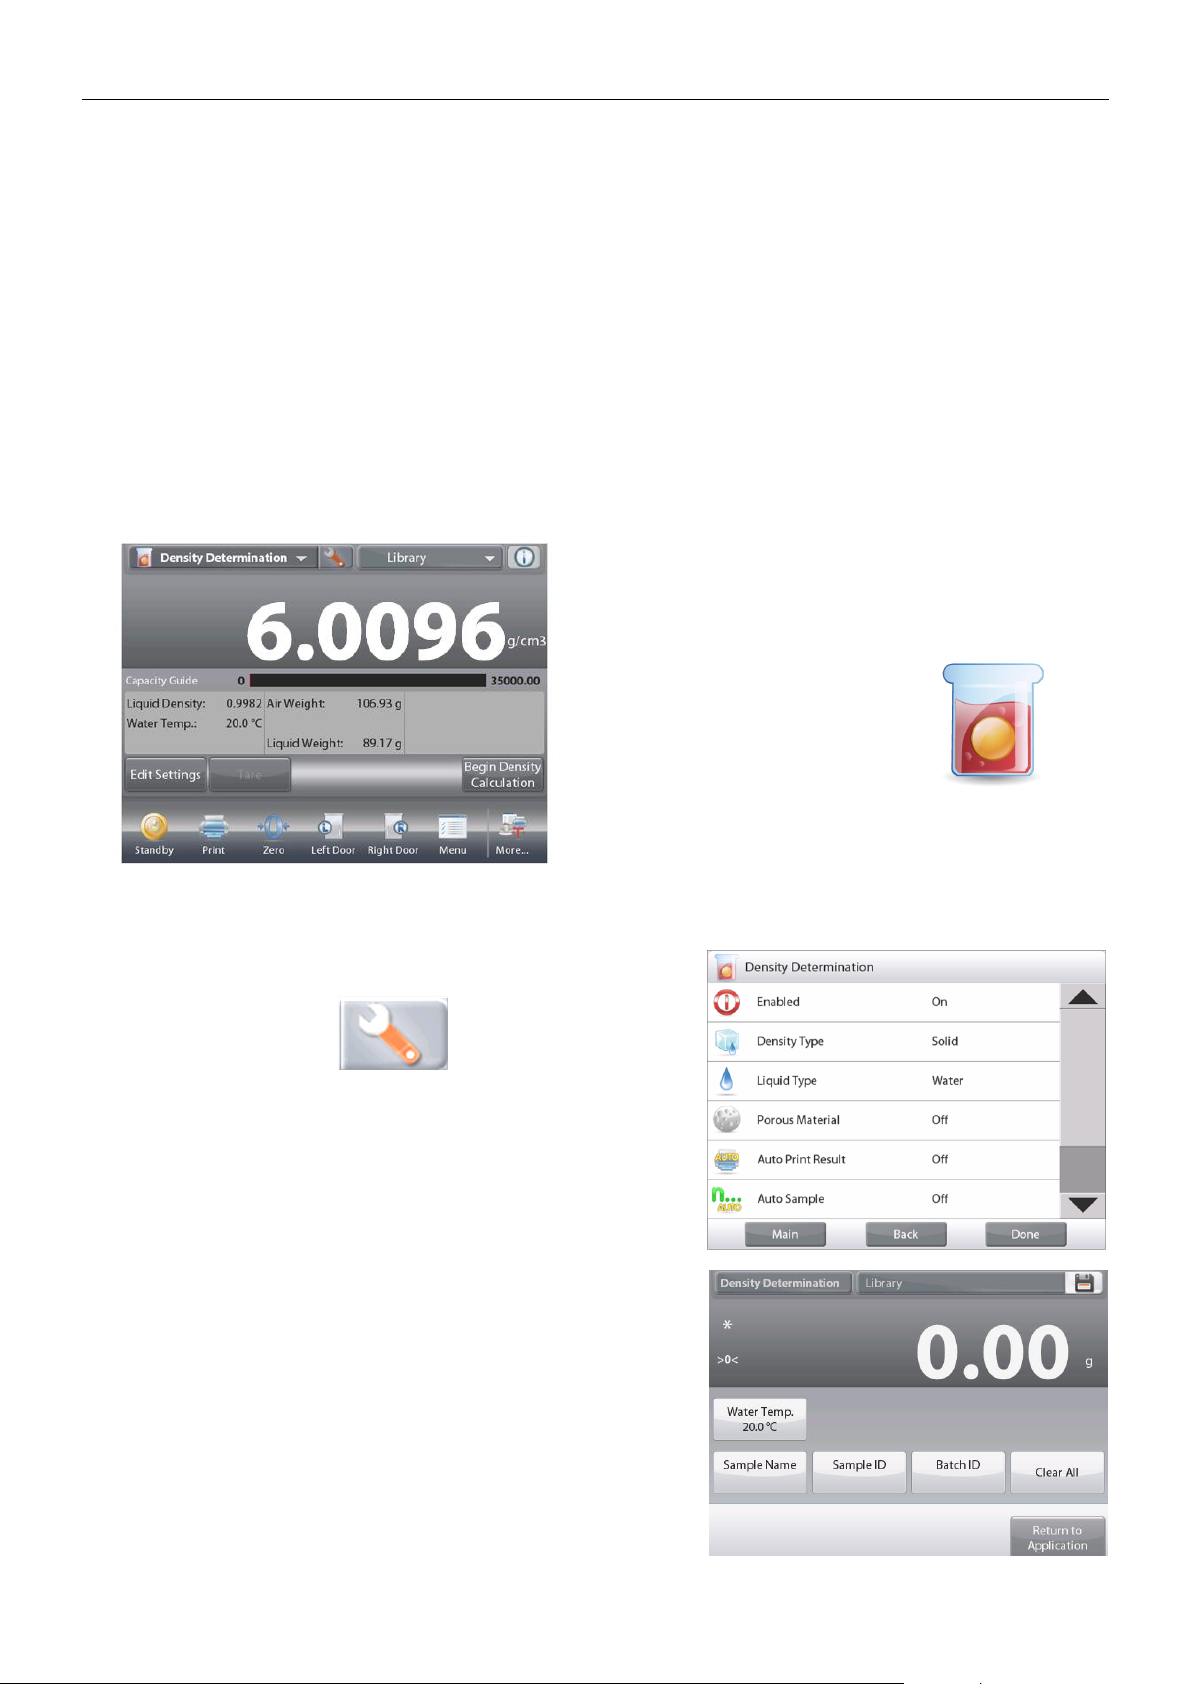
EN-68 EXPLORER BALANCES
4.10 Density Determination
The Explorer can be used to determine an object’s density. Four types of density determination can be made:
1. Solids more dense than water
2. Solids less dense than water
3. Liquid density
4. Porous material (impregnated with oil)
A density determination kit is designed to be used with Ohaus Explorer balances. Illustrations in this procedure
refer to the density kit. However, you may use whatever lab apparatus that suits the requirements for density
measurements. The balance software includes a built-in reference density table for water at temperatures
between 10°C and 30°C. Review this entire section before attempting density measurements.
When making density measurements the material should weigh at least 10 mg on an analytical balance and 100
mg on a precision balance.
Density can be determined manually (with a key press after each step) or automatically (weights are
automatically recorded). Before making density measurements, establish the Application Settings.
The DENSITY DETERMINATION Home screen
Main Display Line
Second Display Line (not shown)
Reference Fields
Application Buttons
Functions Application Icon
4.10.1 Measuring the Density of a Solid Using Water (default)
Press the Setup button (the wrench) to open the Density
Determination Settings screen.
Confirm the following Setups are selected:
Density Type: Solid
Liquid Type: Water
Porous Material: Off
Press
Done
to return to the Density Determination home screen.
The Edit Settings Screen.
Settings available:
Water Temp, Sample Name, Sample ID,
Batch ID, Clear All.
Note: please refer to section 4.1.1 for details about setting
Sample Name, Sample ID, Batch ID and Clear All.
Functions Available:
Return to Application
To adjust the water temperature value,
touch the Water Temp button.
The balance calculates water density based on the water
temperature value entered (internal lookup table).
Find Quality Products Online at: [email protected]
www.GlobalTestSupply.com
Page 71
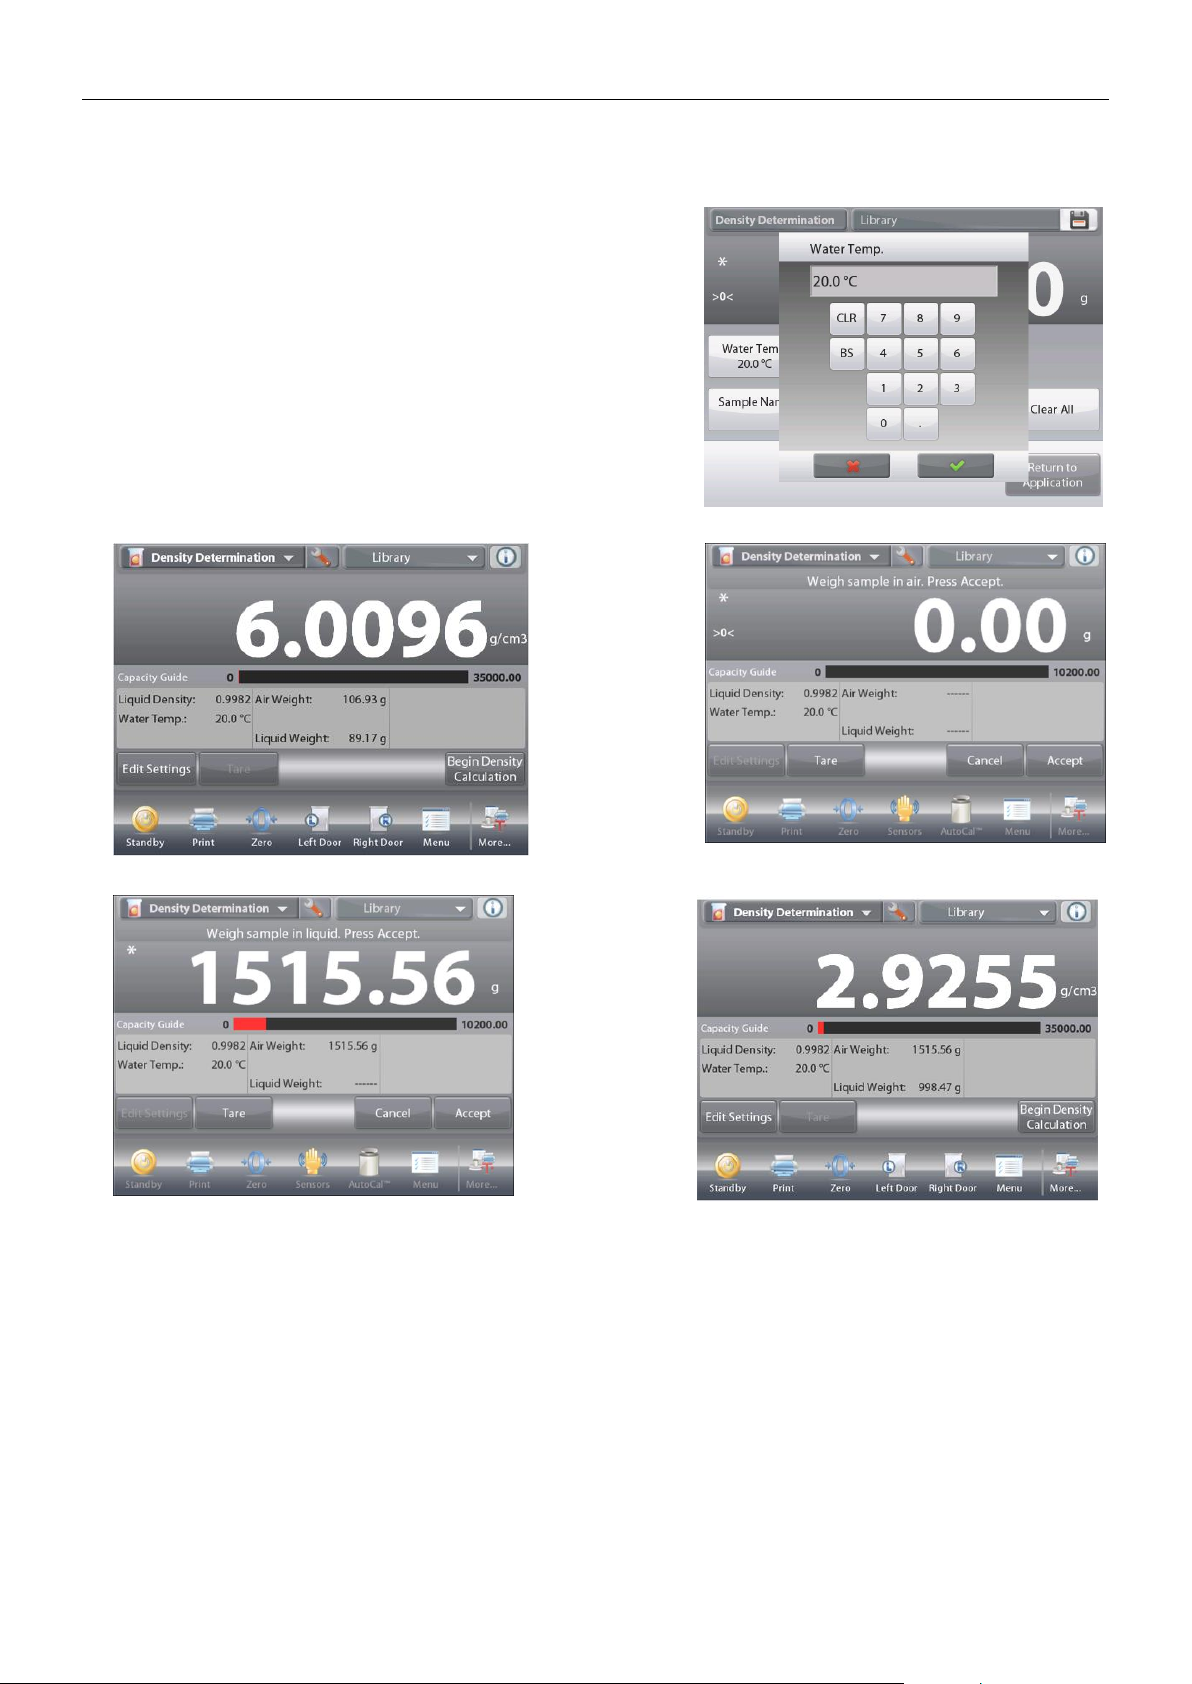
EXPLORER BALANCES EN-69
Measure the actual water temperature using a precision
thermometer.
A numeric input window appears.
Enter the actual water temperature, then press Done.
The display returns to the previous screen with the new value
highlighted.
To return to the Density Determination home screen,
touch Return to Application.
To begin the Density Determination process,
press
Begin Density Determination
.
(See below.)
Step 1 of 2 –
Weigh the
Sample in Air.
Press
Begin
Density
Calculation
.
Follow screen
instructions,
then press
Accept
to store the dry
sample weight
(“in air”).
Step 2 of 2 –
Weigh the
Sample
Submerged in
the Liquid.
Follow the
screen
instructions,
then press
Accept
to store the
sample weight
(submerged
in liquid).
Once the necessary weights have been determined, the density of the sample is displayed in g/cm3
(along with the weight in air, weight in water) on the Application screen.
Press
Begin Density Determination
to reset all the weight values and restart the process.
Find Quality Products Online at: [email protected]
www.GlobalTestSupply.com
Page 72
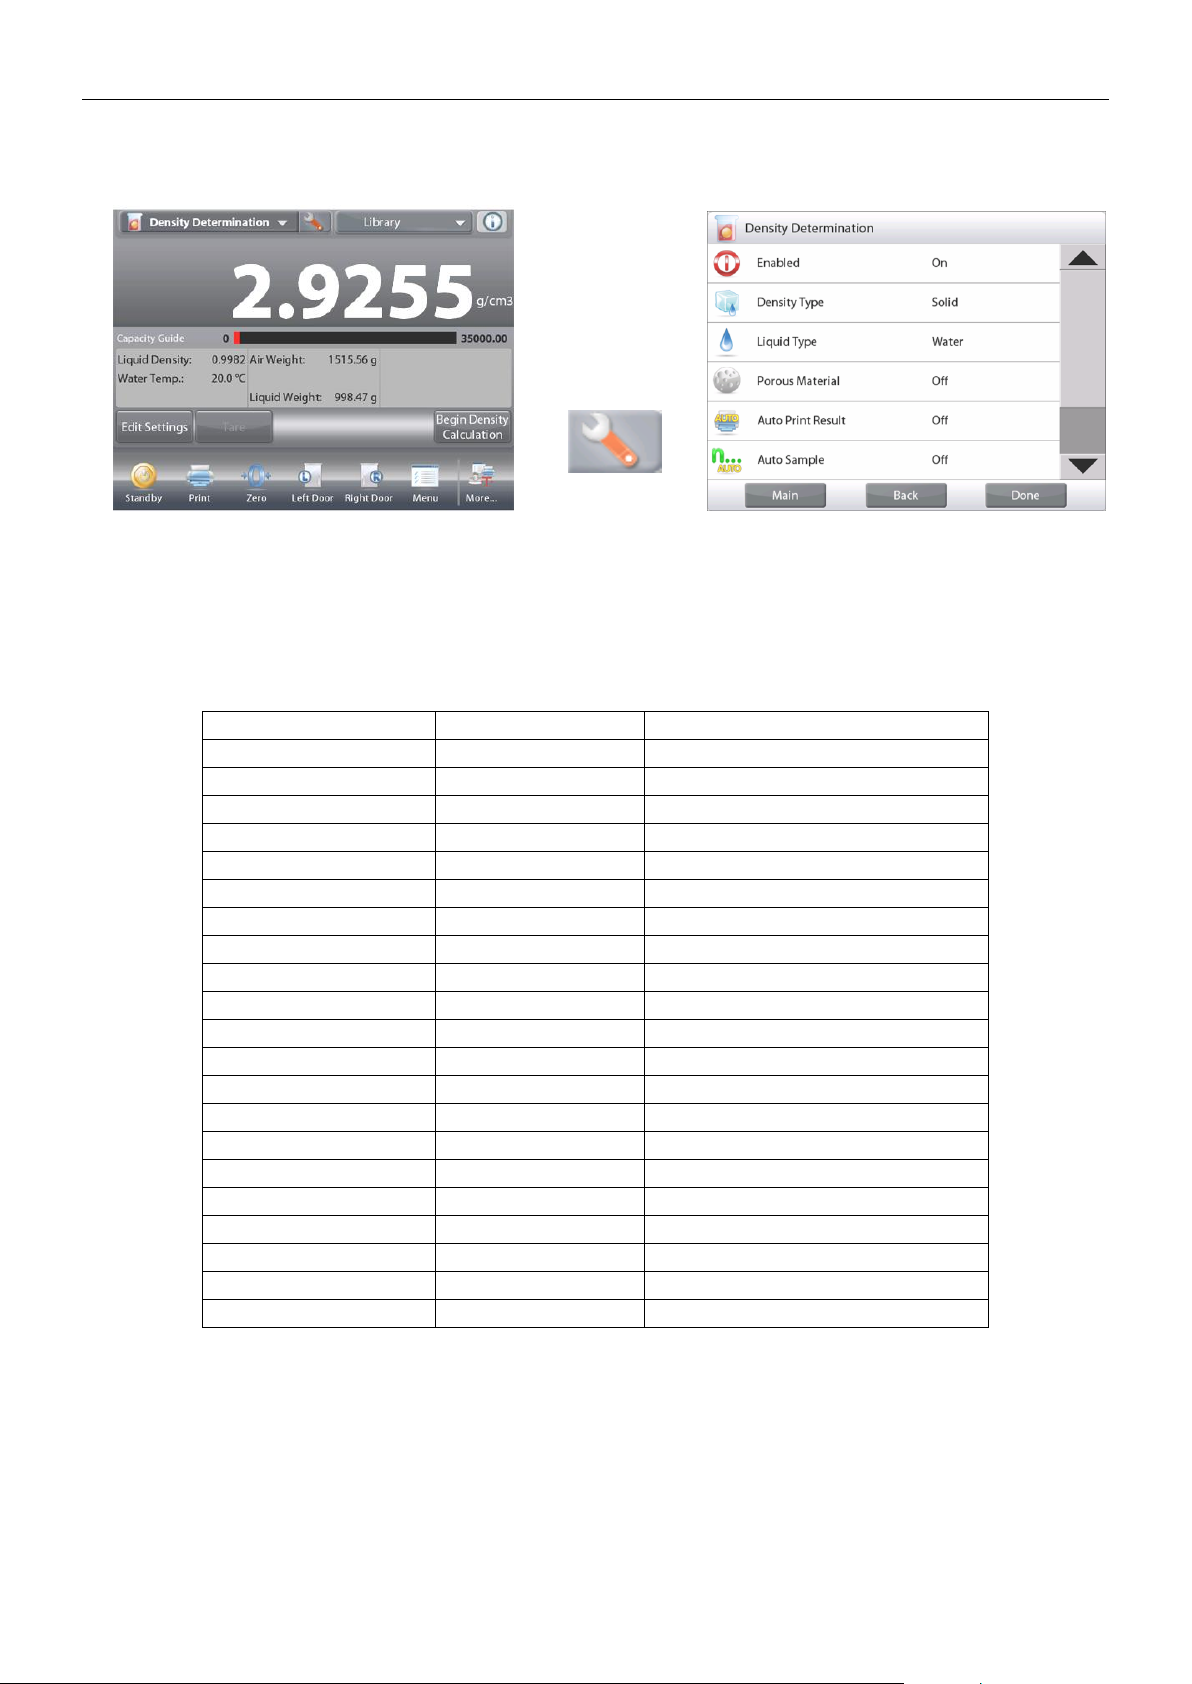
EN-70 EXPLORER BALANCES
4.10.2 Application Setup
The Application can be customized for various user preferences.
Touch the
Setup
Icon
(wrench) to
enter
Application
Setup from the
home screen.
The
Setup Menu
appears.
Select the list item to view or change the setting as
desired.
To return to the Application home screen, touch
Done
.
The Density Application Setups (defaults in Bold)
Item
Available Settings
Comments
Enabled
On, Off
Turns Application on/off
Density Type
Solid, Liquid
To select either solid or liquid
Liquid Type
Water, Other
Liquid used during measurements
Porous Material
On, Off
To select Porous material
Auto Print Result
On, Off
To automatically print results
Auto Sample Mode
On, Off
To select the mode
Reference fields
Liquid Density
On, Off
Test liquid’s density is displayed
Water Temperature
On, Off
The water temp is displayed
Oil density
On, Off
The test oil’s density is displayed
Weight in Air
On, Off
The sample weight is displayed
Oiled Weight
On, Off
The sample weight is displayed
Weight in Liquid
On, Off
The sample weight is displayed
Sinker volume
On, Off
Displays volume of the Sinker
Print Options
See Printing Section.
Porous Material
On, Off
Liquid Type
On, Off
Liquid Density
On, Off
Water Temperature
On, Off
Weight in Air
On, Off
Weight in Liquid
On, Off
Find Quality Products Online at: [email protected]
www.GlobalTestSupply.com
Page 73
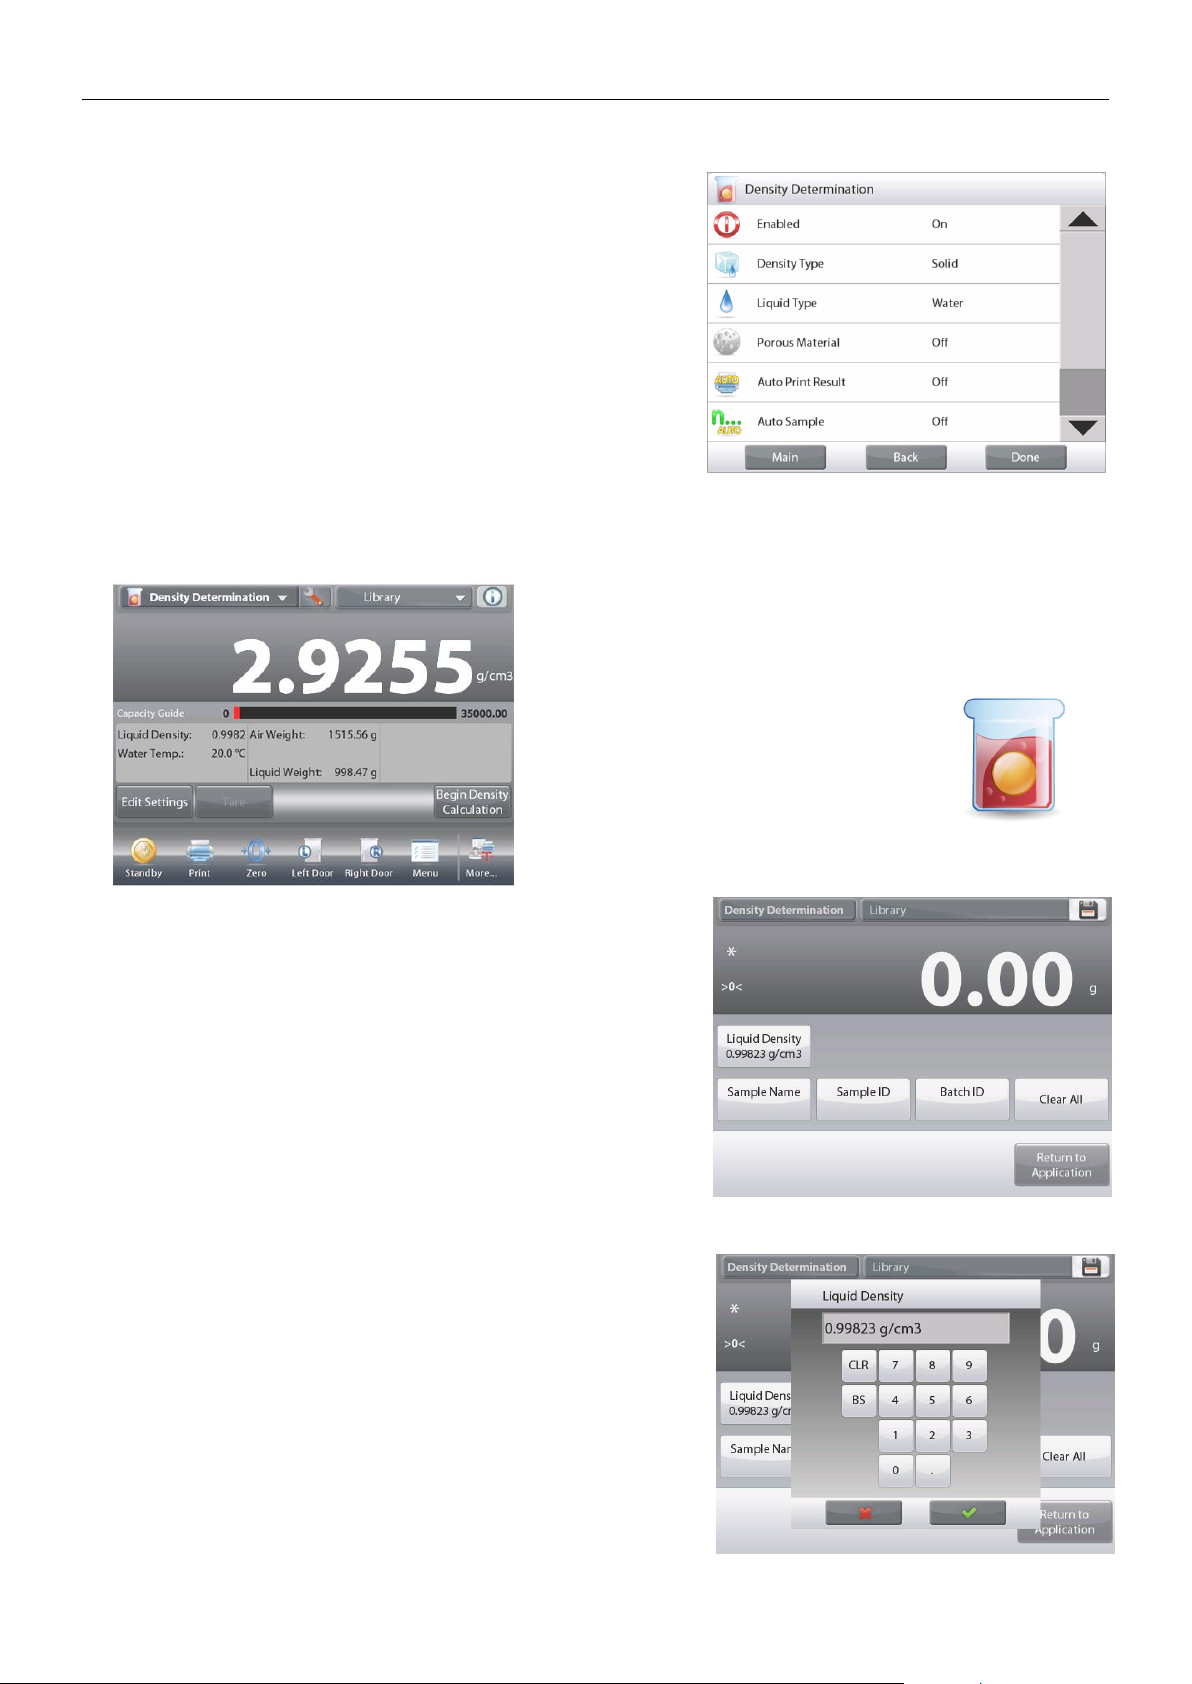
EXPLORER BALANCES EN-71
4.10.3 Measuring the Density of a Buoyant Material Using Water
Press the Setup button (the wrench) to open Settings screen.
Confirm the following Setups are selected:
Density Type: Solid
Liquid Type: Water
Porous Material: Off
Press
Done
to return to the Density Determination home screen.
Follow the same procedure as Solid Material above, except in
Density Determination step 2, push the sample down into the
liquid until it is fully submerged.
4.10.4 Measuring the Density of a Solid Using an Auxiliary Liquid
To enable this feature, enter the Density Setup menu and select the following:
Density Type: Solid; Liquid Type: Other; Porous Material: Off. (See Application Setup.)
The DENSITY DETERMINATION – SOLID Home screen
Main Display Line
Second Display Line
Reference Fields
Application Buttons
Functions Application Icon
Confirm the default values displayed (Liquid Density, etc) are
correct.
To edit the default values, touch
Edit Settings
and the
application Settings screen appears.
Settings available:
Liquid Density, Sample Name, Sample
ID, Batch ID, Clear All.
Note: please refer to section 4.1.1 for details about setting
Sample Name, Sample ID, Batch ID and Clear All.
Functions Available:
Return to Application
To adjust the Liquid Density value, touch the Liquid Density
button.
Measure the actual liquid density of the Density setup and enter
it.
A numeric input window appears.
Key in the density in g/cm3, then press .
The display returns to the previous screen with the
new value highlighted.
Find Quality Products Online at: [email protected]
www.GlobalTestSupply.com
Page 74
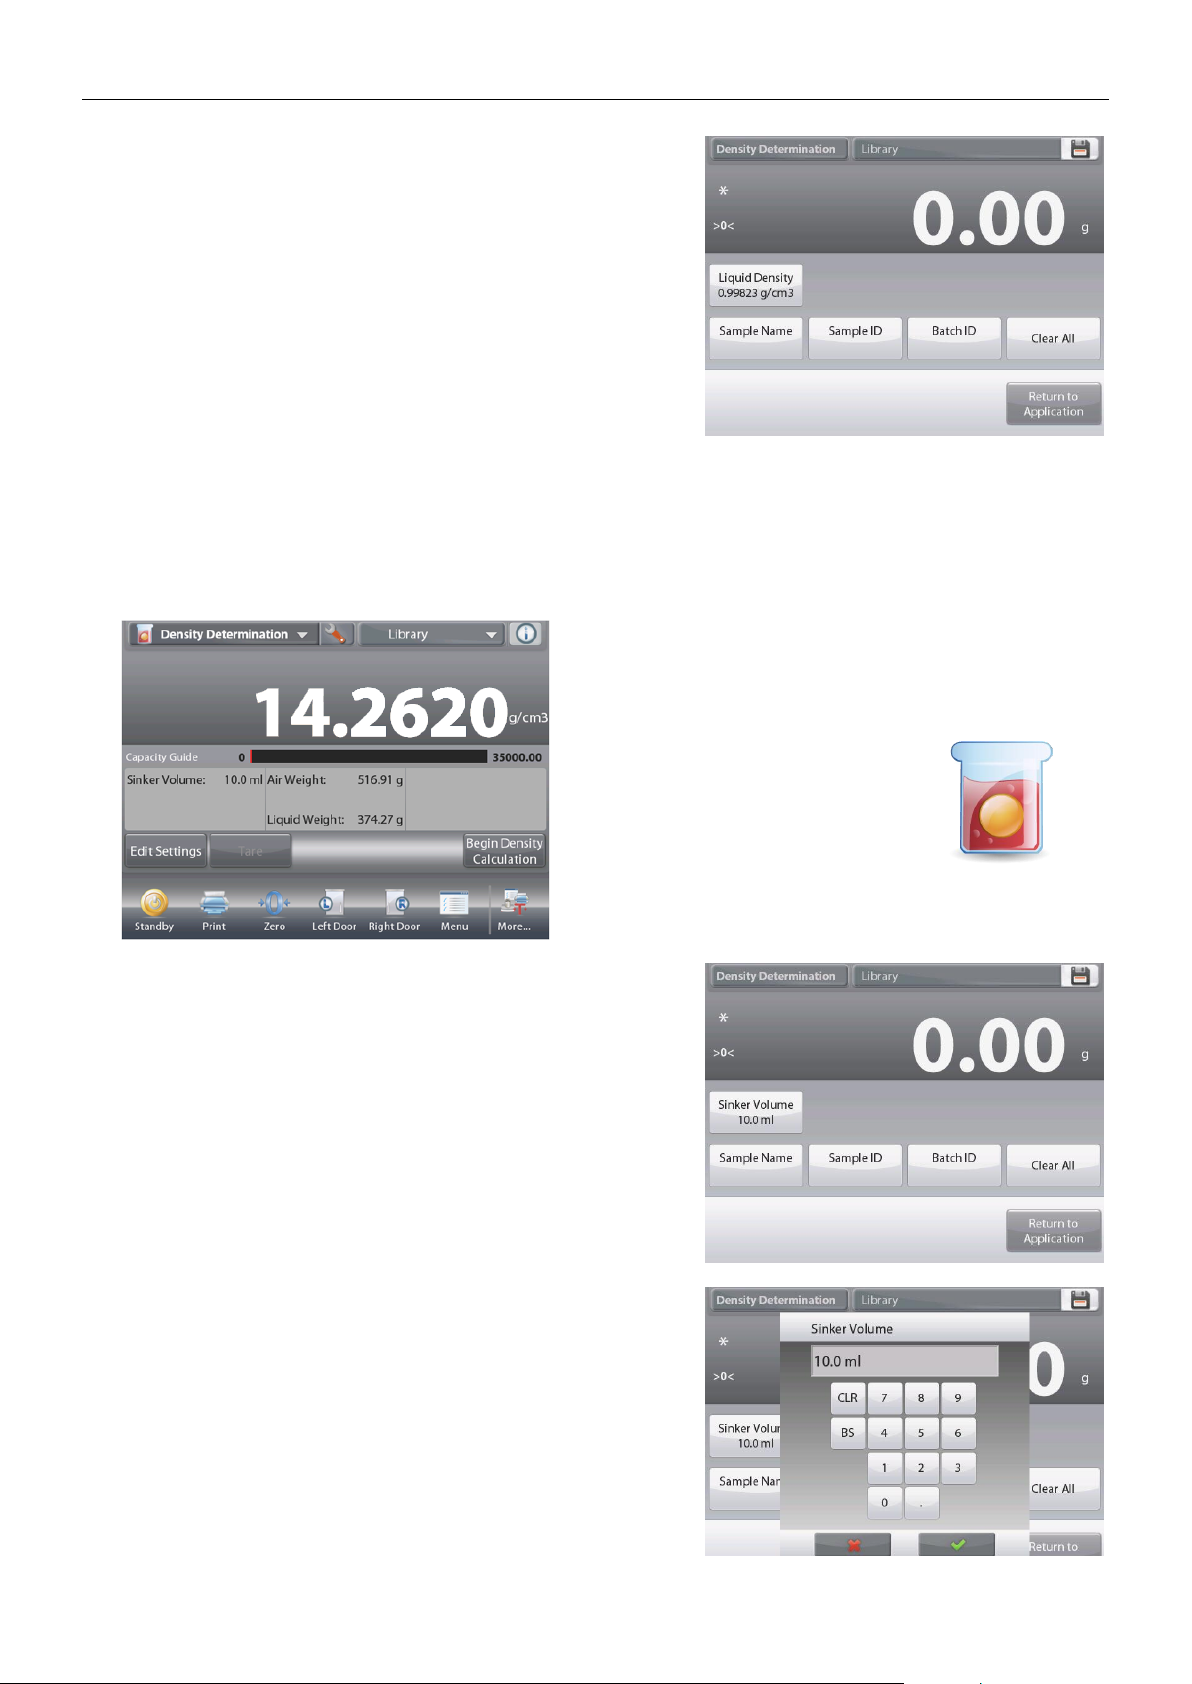
EN-72 EXPLORER BALANCES
To return to the Density Determination home screen,
touch Return to Application.
Begin the Density determination process as per above.
4.10.5 Measuring the Density of a liquid using a Calibrated Sinker (not supplied)
Enable this feature, enter the Density Setup menu and select the following; Density Type: Liquid.
(See Application Setup.)
Note: when the Density Type is set to Liquid, the Liquid type and Porous material selections are disabled.
The DENSITY DETERMINATION – LIQUID Home screen
Main Display Line
Second Display Line
Reference Fields
Application Buttons
Functions Application Icon
Confirm that the default value displayed (sinker volume) is
correct. To edit the default values, touch
Edit Settings
and the
Settings screen is now displayed:
Settings available:
Sinker Volume, Sample Name,
Sample ID, Batch ID, Clear All.
Note: please refer to section 4.1.1 for details about setting
Sample Name, Sample ID, Batch ID and Clear All.
Functions Available:
Return to Application
To adjust the Sinker volume value, touch the
Sinker Volume
button.
A numeric input window is displayed.
Key in the desired value, then press .
The display returns to the previous screen with the new value
highlighted.
To return to the Density Determination home screen,
touch Return to Application.
Press
Begin Density Determination
to start the process.
Find Quality Products Online at: [email protected]
www.GlobalTestSupply.com
Page 75
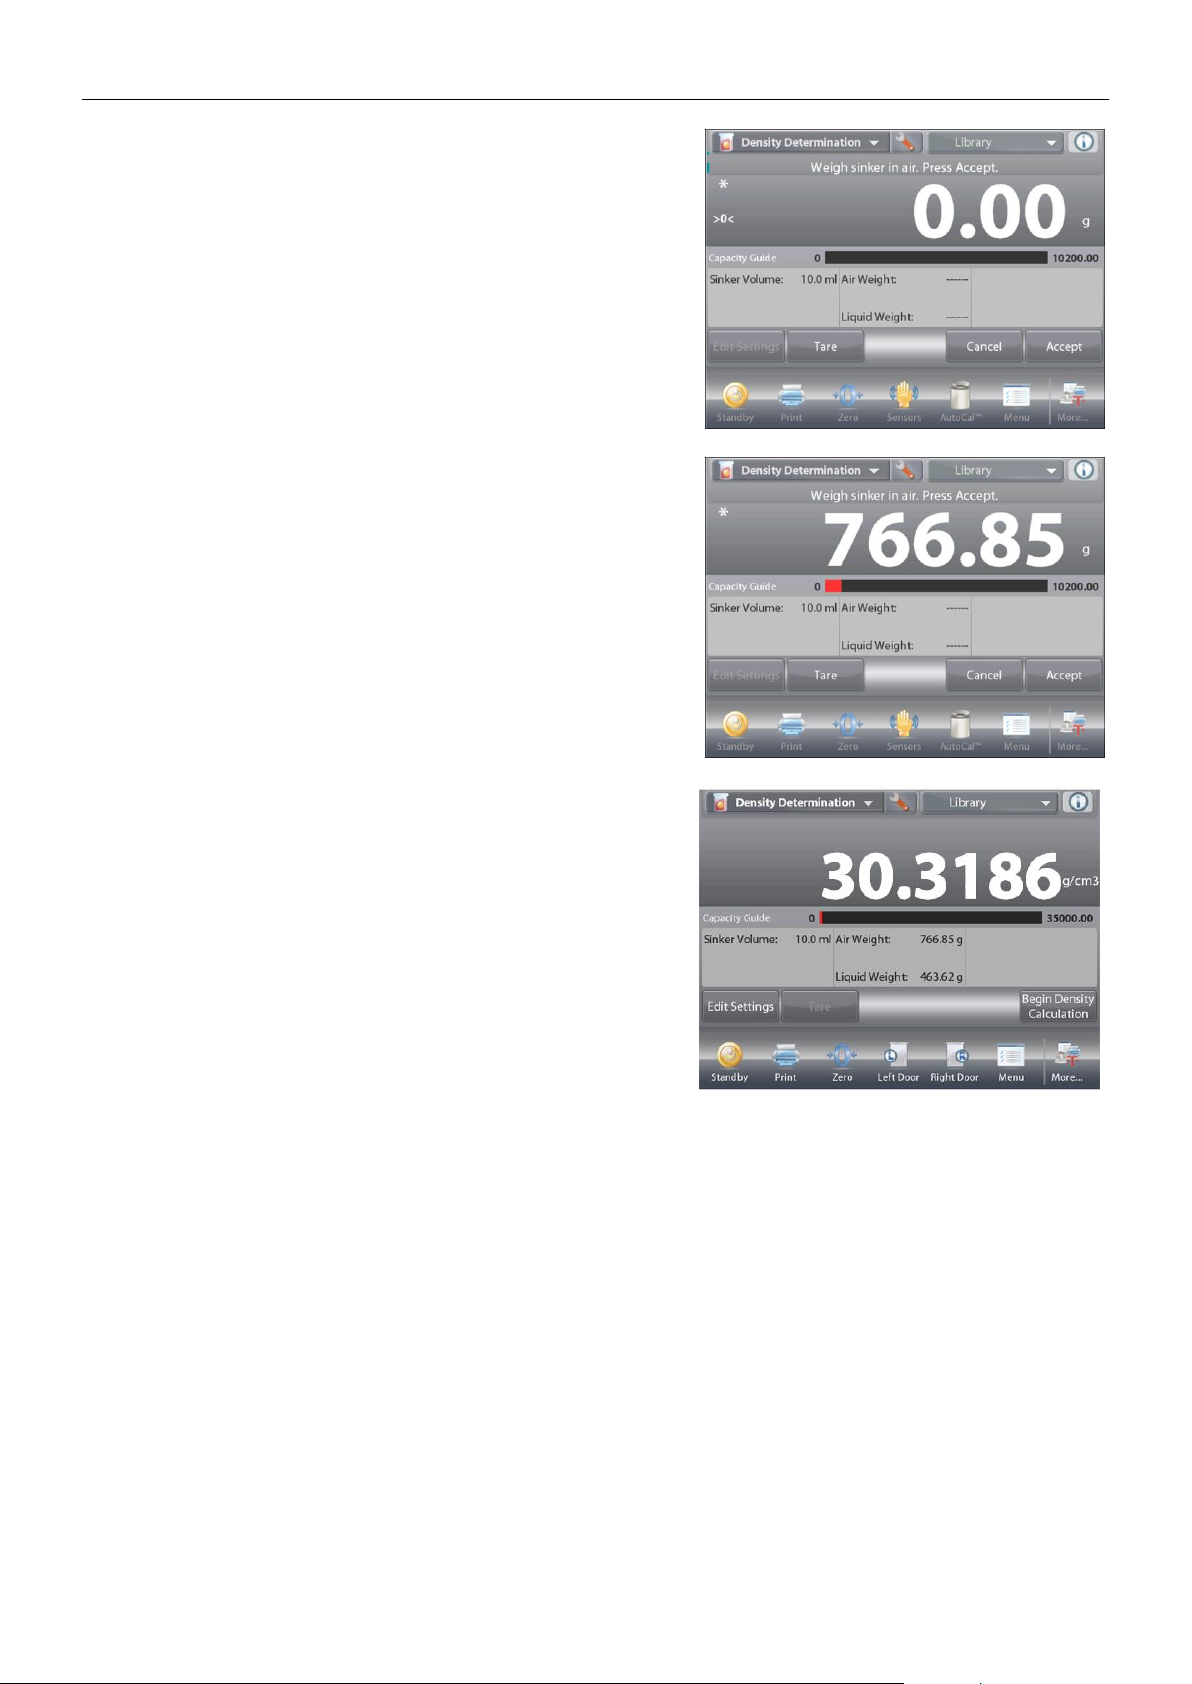
EXPLORER BALANCES EN-73
Step 1 of 2 – Weigh the Sinker in Air.
Follow the screen instructions, then press
Accept
to store the sinker weight (“in air”).
Step 2 of 2 – Weigh the Sinker Submerged in the Test
Liquid.
Follow the screen instructions, then press Accept
to store the sinker weight (submerged in liquid).
Once the necessary weights have been determined,
the density of the Liquid sample is displayed in g/cm3
(along with the weight in air, weight in water)
on the Application screen.
Press
Begin Density Determination
to reset all the weight
values and restart the process.
Find Quality Products Online at: [email protected]
www.GlobalTestSupply.com
Page 76
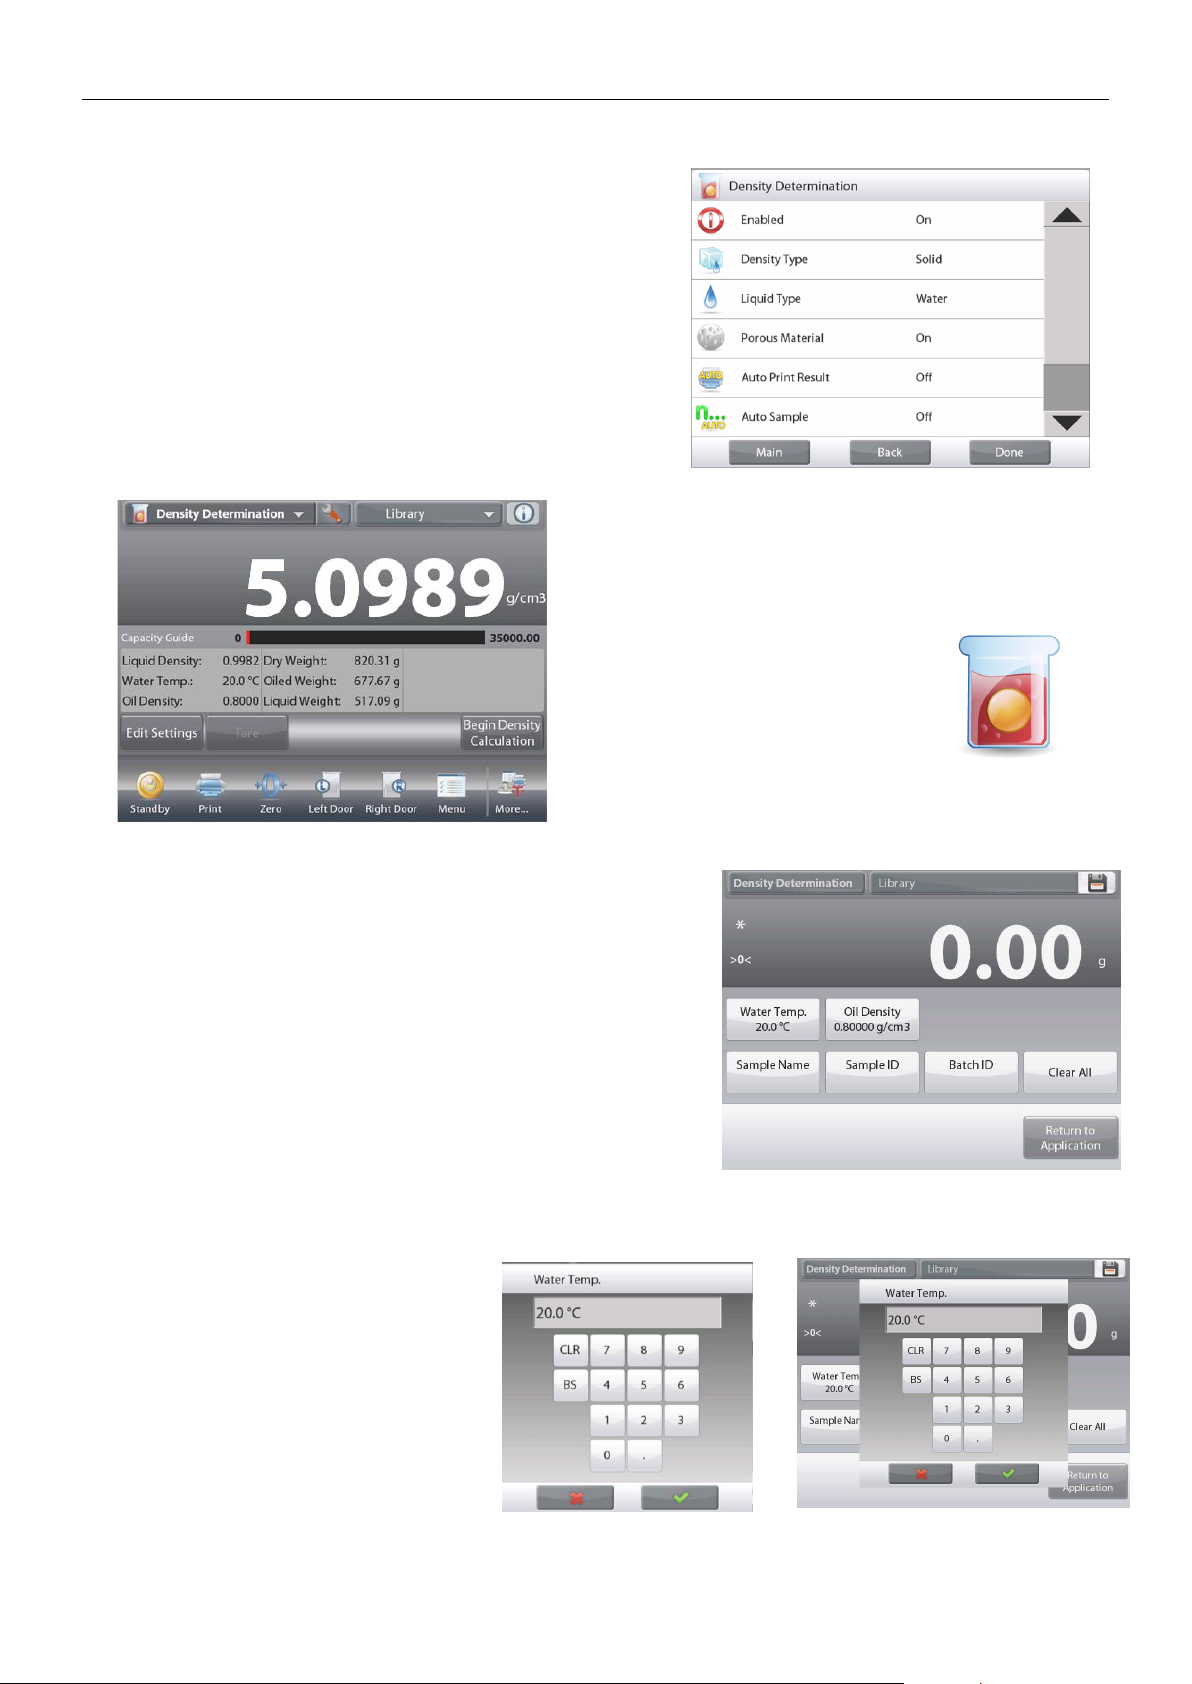
EN-74 EXPLORER BALANCES
4.10.6 Measuring the Density of Porous Material Using Oil
To enable this feature, enter the Density Determination
Setup menu, and set the following:
Density Type: Solid
Liquid Type: Water
Porous Material: On
The DENSITY DETERMINATION – POROUS Home screen
Main Display Line
Second Display Line
Reference Fields
Application Buttons
Functions Application Icon
Confirm the default values displayed (Water Temp) are correct.
To edit the default values, touch
Edit settings
.
The Settings screen appears.
Settings available:
Water Temp, Oil Density, Sample
Name, Sample ID, Batch ID, Clear All.
Note: please refer to section 4.1.1 for details about setting
Sample Name, Sample ID, Batch ID and Clear All.
Functions Available:
Return to Application
The balance calculates water density based on the water
temperature value entered (look-up table).
Measure the actual water temperature using a precision
thermometer.
To adjust the Water Temperature or Oil Density values,
touch the Water Temp or Oil Density button.
Numeric input windows appear.
Key in the desired value,
then press .
The display returns to the previous
screen with the new value highlighted.
To return to the Density Determination
home screen, touch
Return to Application.
Find Quality Products Online at: [email protected]
www.GlobalTestSupply.com
Page 77
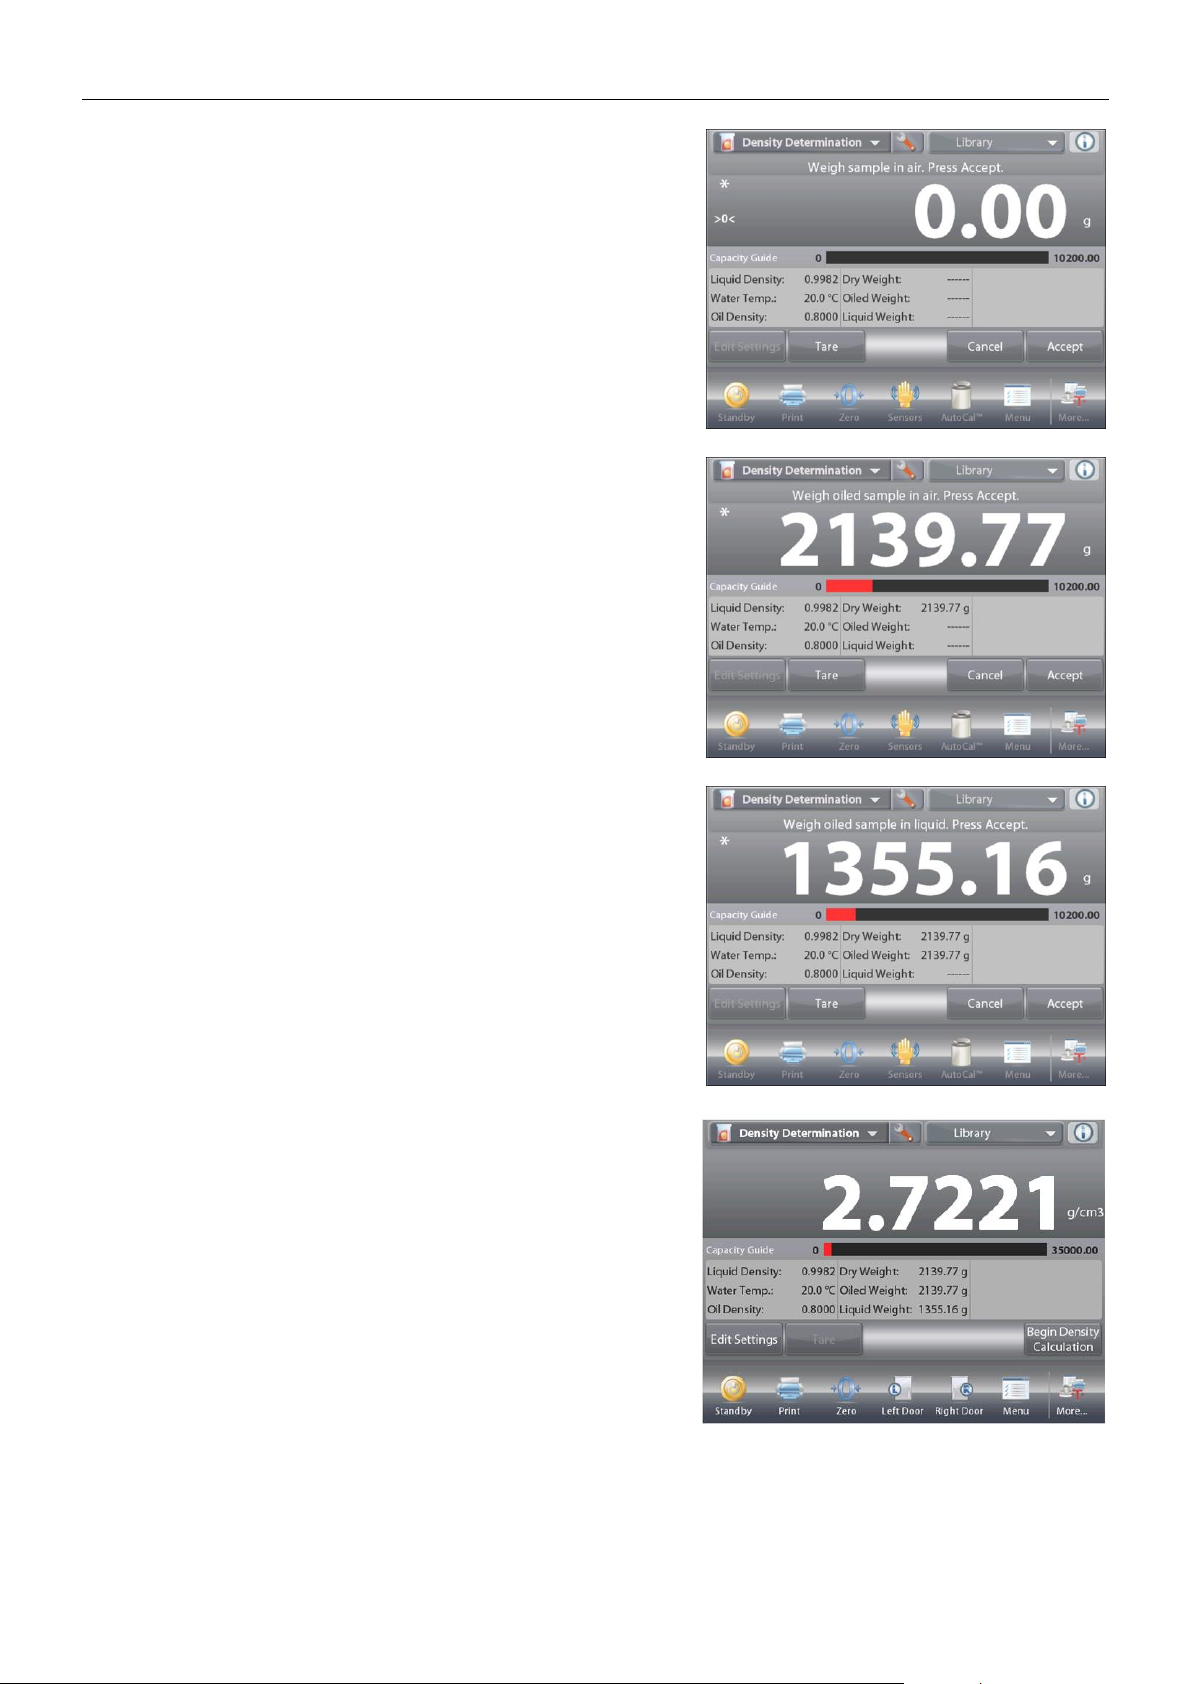
EXPLORER BALANCES EN-75
Press Begin Density Calculation.
Step 1 of 3 – Weigh the Un-Oiled Sample in Air.
Follow the screen instructions then press
Accept
to store the
dry sample weight (in air).
Step 2 of 3 – Weigh the Oiled Sample in Air.
Follow the screen instructions then press
Accept
to store the sample weight (oiled).
Step 3 of 3 – Weigh the Oiled Sample Submerged in Liquid.
Follow the screen instructions then press
Accept
to store the oiled sample weight (submerged in liquid).
Once the necessary weights have been determined, the density
of the sample is displayed in g/cm3 (along with the weight in air,
un-oiled and oiled, and weight in water) on the Application
screen
The value stays on the display until Begin Density
Determination is touched.
Press
Begin Density Determination
to reset all the weight
values and restart the process.
Find Quality Products Online at: [email protected]
www.GlobalTestSupply.com
Page 78
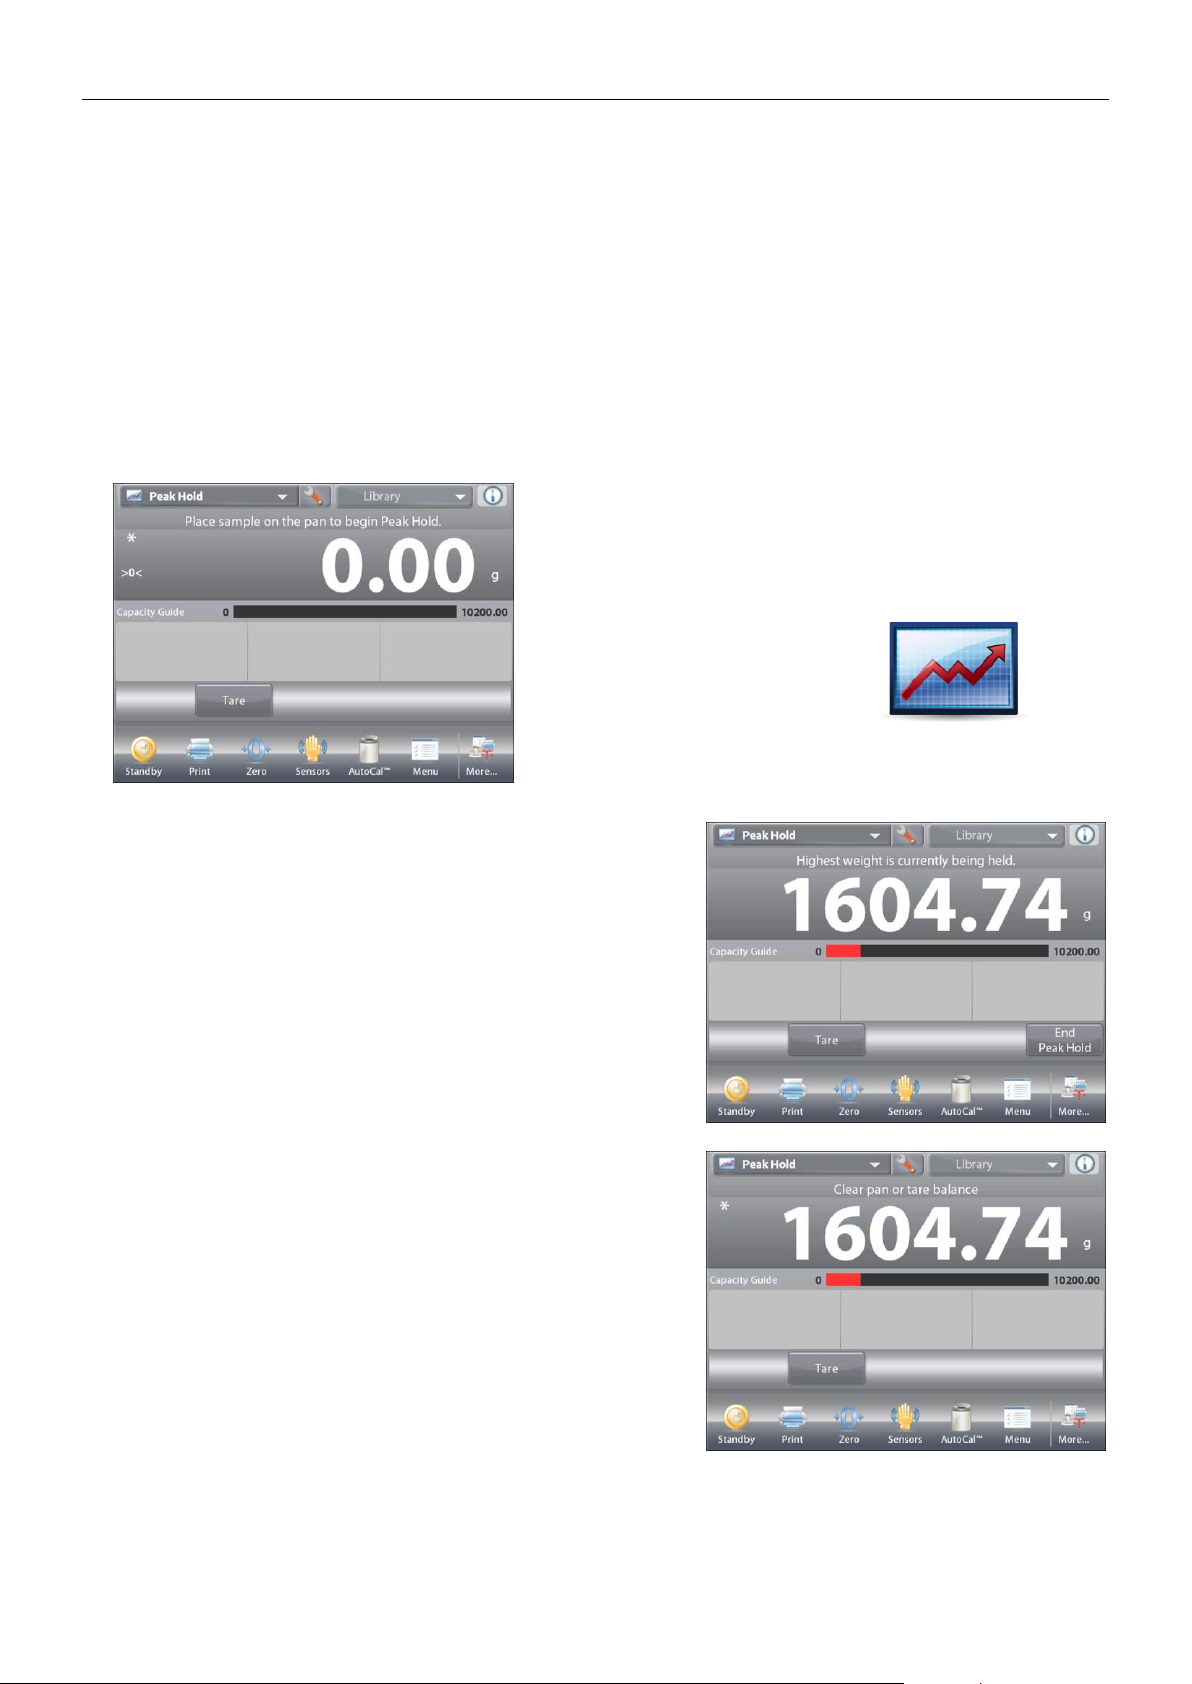
EN-76 EXPLORER BALANCES
4.11 Peak Hold
The Peak Hold application allows the user to capture and store the highest stable or unstable weight in a series of
weight measurements.
Three different start/reset modes can be selected:
Manual (start and stop the capture via key press),
Semi-Automatic (start automatically/reset manually); and
Automatic (start and stop the capture automatically).
This application allows both stable and unstable weights to be captured.
4.11.1 Peak Hold – Semi-Automatic (default)
In the upper left portion of the home screen, select Peak Hold.
Follow the screen instructions to begin.
The PEAK HOLD Home screen
Main Display Line
Second Display Line
Reference Fields
Application Buttons
Functions Application Icon
Place item on the pan. The capture process starts automatically.
The highest reading is held on the display.
To release the reading, press
End Peak Hold
.
The following screen appears.
Clear the pan or press
Tare
to reset the display and re-start the
process.
Find Quality Products Online at: [email protected]
www.GlobalTestSupply.com
Page 79
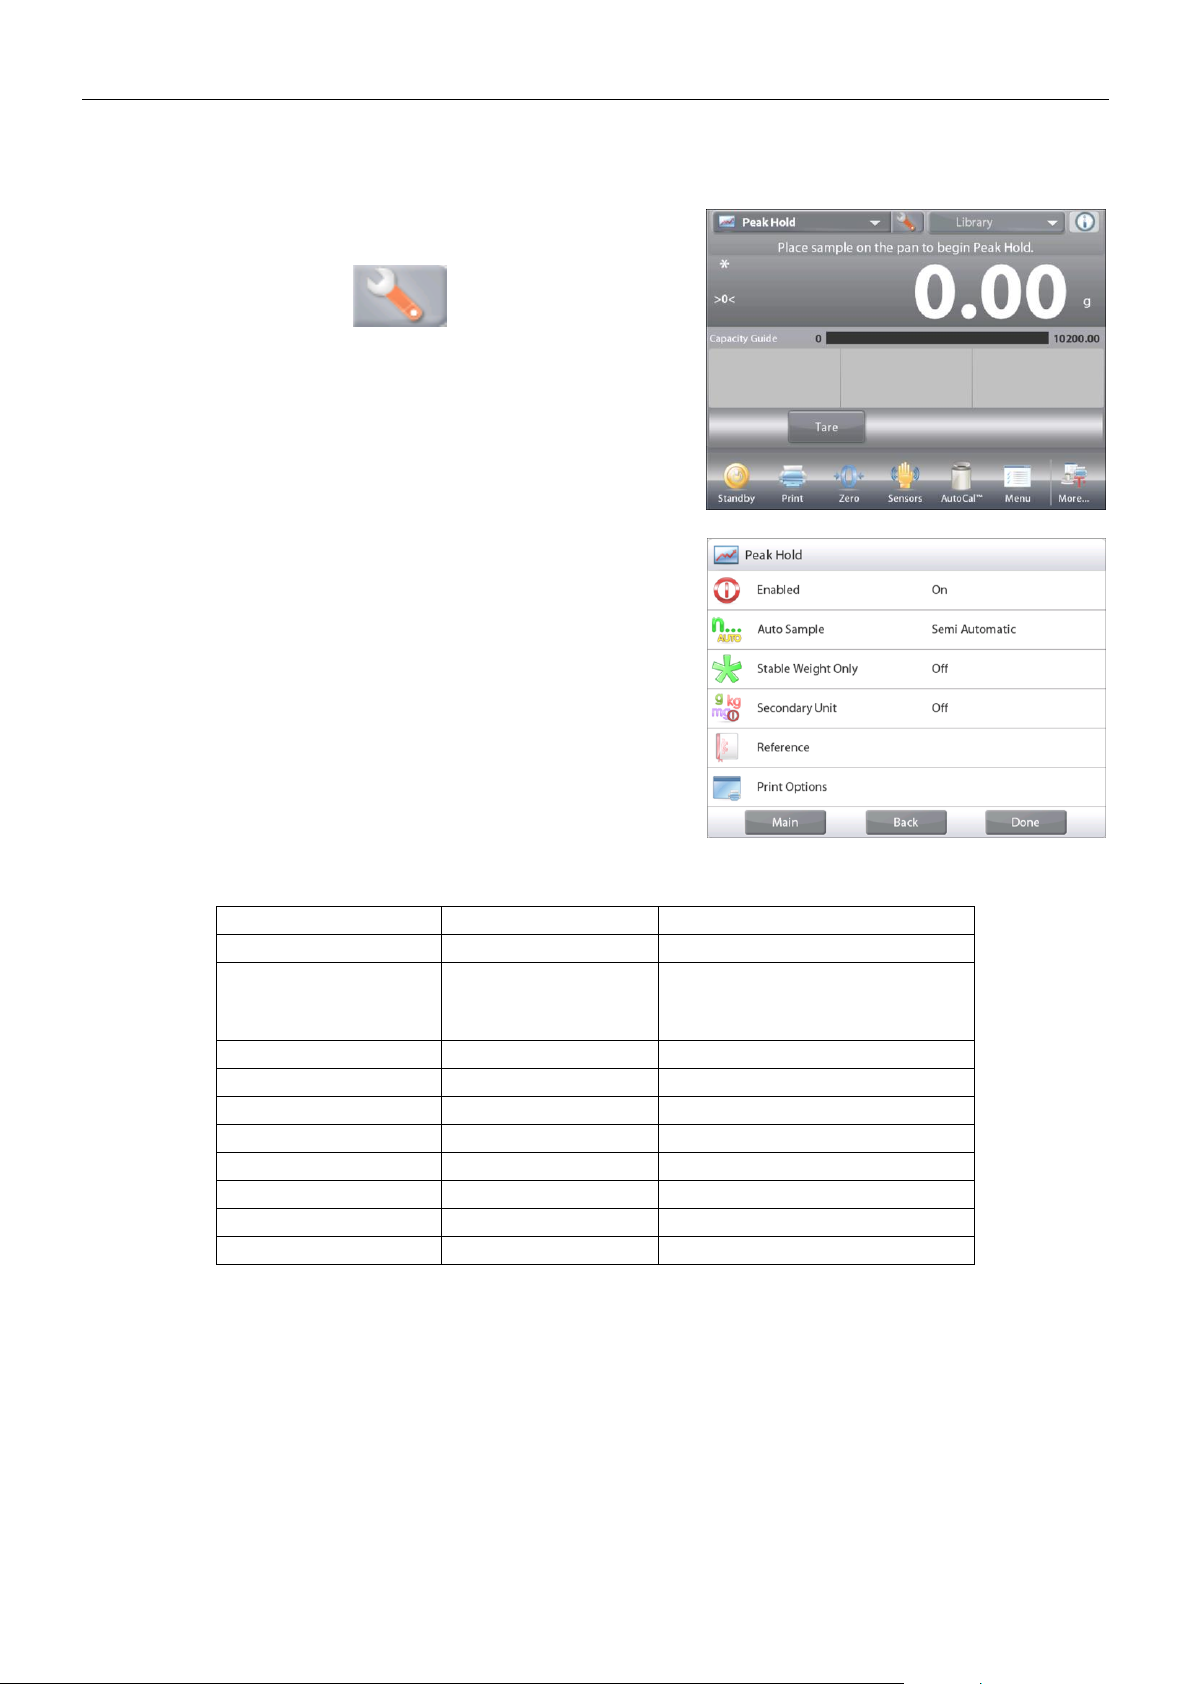
EXPLORER BALANCES EN-77
4.11.2 Application Setup
The Application can be customized for various user preferences.
Touch the
Setup
icon (wrench) to enter
Application Setup
from
the home screen.
The
Setup Menu
appears.
Select the list item to view or change the setting as
desired.
To return to the Application home screen, touch
Done
.
The Peak Hold Application Setups (defaults in Bold).
Item
Available Settings
Comments
Enabled
On, Off
Turns Application on/off
Auto Sample Mode
Manual,
Semi Automatic
Automatic
To select the mode of operation
Stable Weight Only
On, Off
To capture Stable values only
Secondary Unit
On, Off
To show the Second Display line
Reference fields
Gross
On, Off
Gross weight is displayed
Net
On, Off
Net weight is displayed
Tare
On, Off
Tare weight is displayed
Print Options
See Printing Section.
Stable Weight Only
On, Off
Find Quality Products Online at: [email protected]
www.GlobalTestSupply.com
Page 80
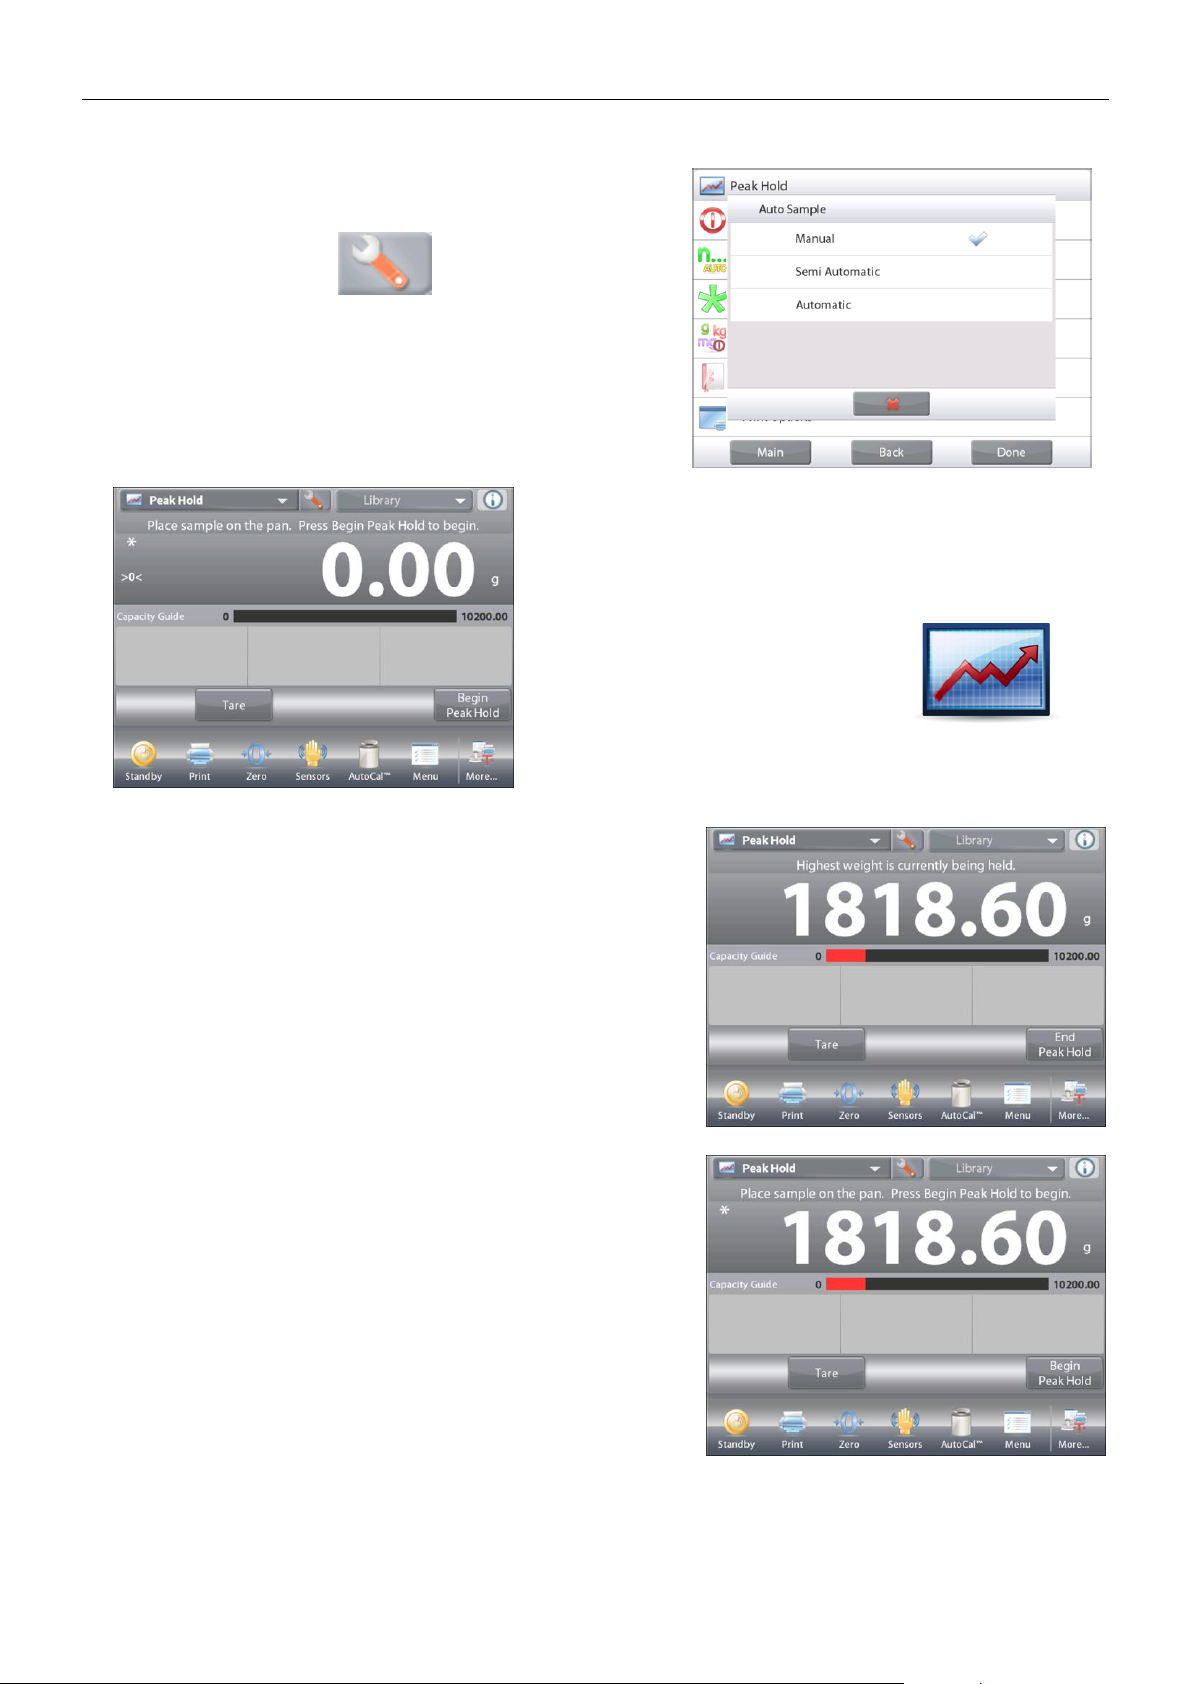
EN-78 EXPLORER BALANCES
4.11.3 Peak Hold – Manual
For manual start and reset, choose Manual mode.
To enable this feature, enter the Peak Hold Setup menu:
Change the mode to Manual.
The PEAK HOLD – Manual Home screen
Main Display Line
Second Display Line
Reference Fields
Application Buttons
Functions Application Icon
Follow the screen instructions: Place item on the pan.
Press
Begin Peak Hold
to begin the capture process.
The following screen appears:
The highest stable weight reading is held indefinitely.
Press
End Peak Hold
then clear the pan to reset the display
and re-start the process.
Find Quality Products Online at: [email protected]
www.GlobalTestSupply.com
Page 81
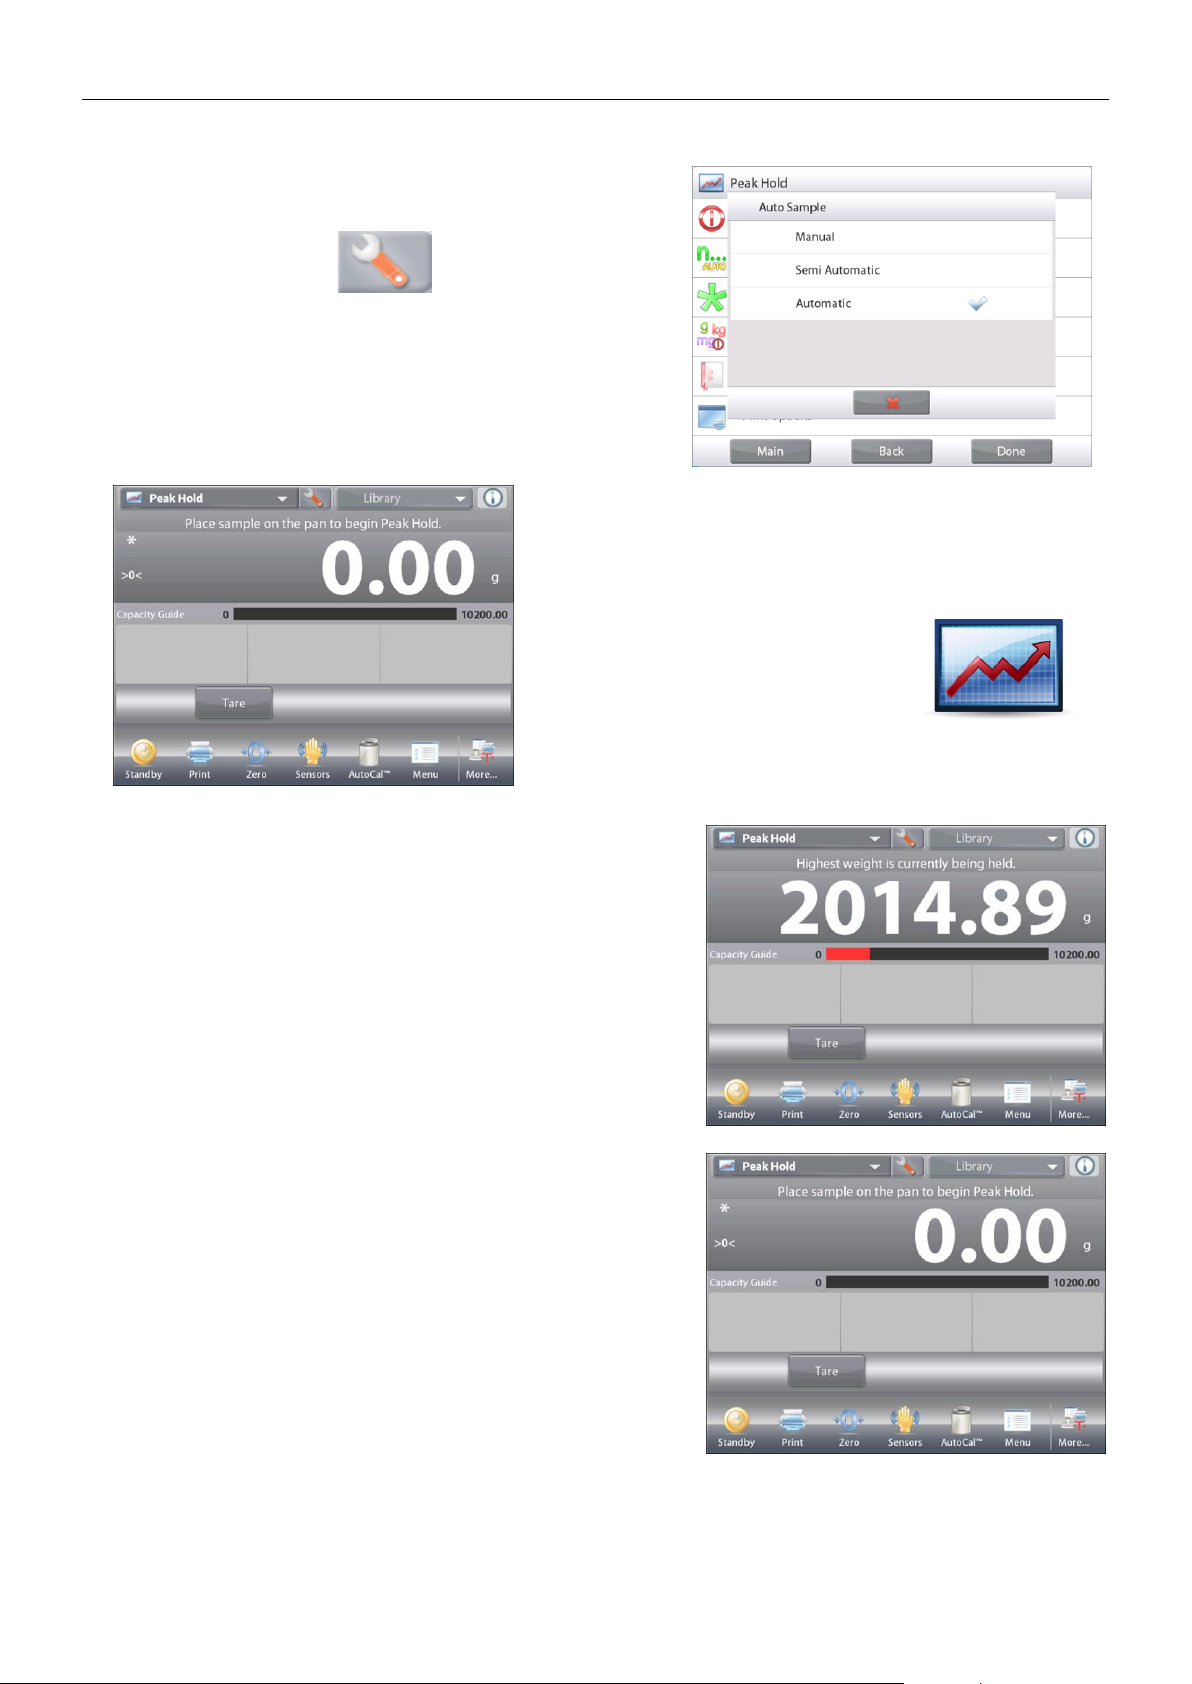
EXPLORER BALANCES EN-79
4.11.4 Peak Hold – Automatic
For automatic start and reset, choose Automatic mode.
To enable this feature, enter the Peak Hold Setup menu.
Change the mode to Automatic.
The HIGH POINT – Auto Home screen
Main Display Line
Second Display Line
Reference Fields
Application Buttons
Functions Application Icon
Place item on the pan. The capture process starts automatically.
The highest stable weight reading is held until the weight is
removed.
The process starts automatically once the weight is removed
from the pan (
after 10 second delay
).
Find Quality Products Online at: [email protected]
www.GlobalTestSupply.com
Page 82
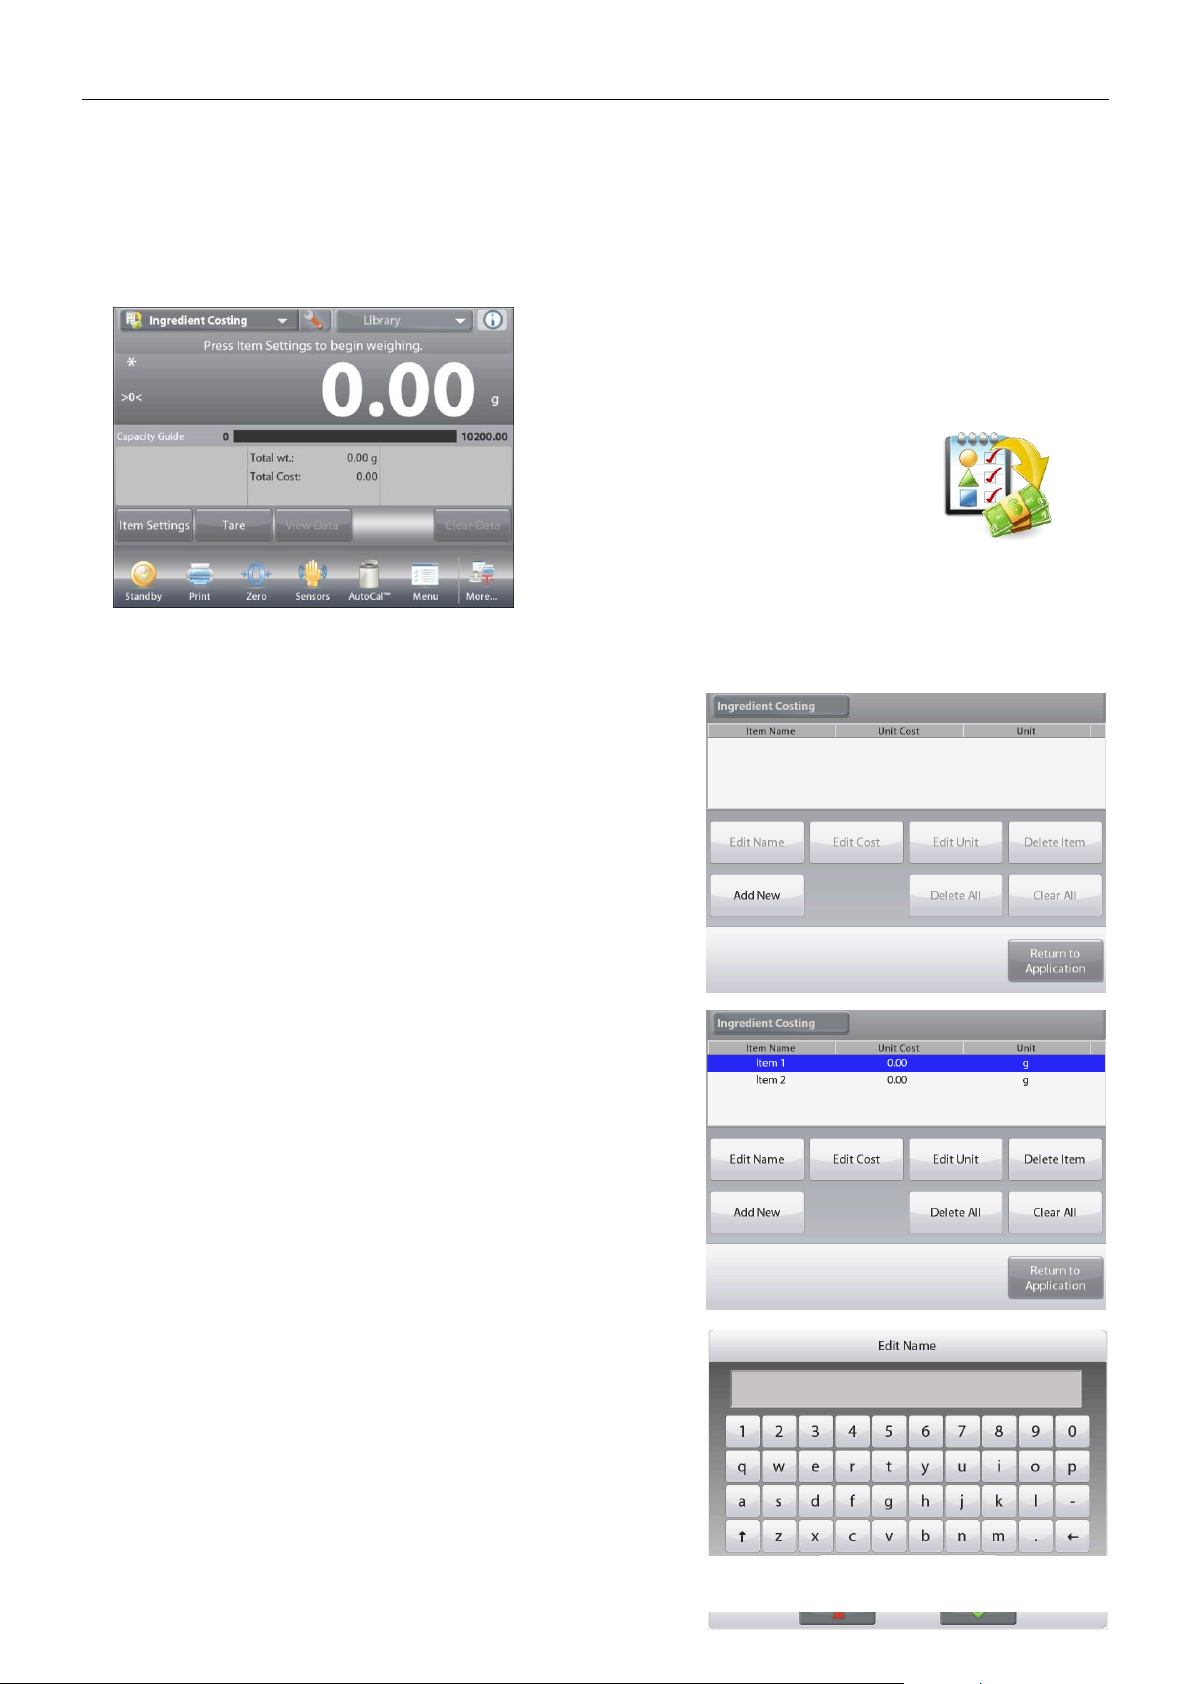
EN-80 EXPLORER BALANCES
4.12 Ingredient Costing (not available in semi-micro models)
This application allows the user to determine the cost of a formula or recipe based on the known cost and quantity
of the components or ingredients. Up to 99 components are allowed.
In the upper left portion of the home screen, select Ingredient Costing.
Follow the screen instructions to begin.
The INGREDIENT COSTING Home screen
Main Display Line
Second Display Line
Reference Fields
Application Buttons
Functions Application Icon
4.12.1 Item Settings
Press Item Settings to set up items in memory.
The Edit Settings Screen.
Settings available: Add New, Edit name, Edit Cost,
Edit Unit, Delete Item, Clear All
Functions Available:
Return to Application
To set up the item(s) in memory, Press Add New.
A new item is added (default Name) with default info
(cost per weight and weight unit).
To change the default item name, Press Edit Name.
The alpha-numeric entry screen appears.
Enter the new name, then press .
The display returns to the previous screen with the new value
highlighted momentarily.
Find Quality Products Online at: [email protected]
www.GlobalTestSupply.com
Page 83
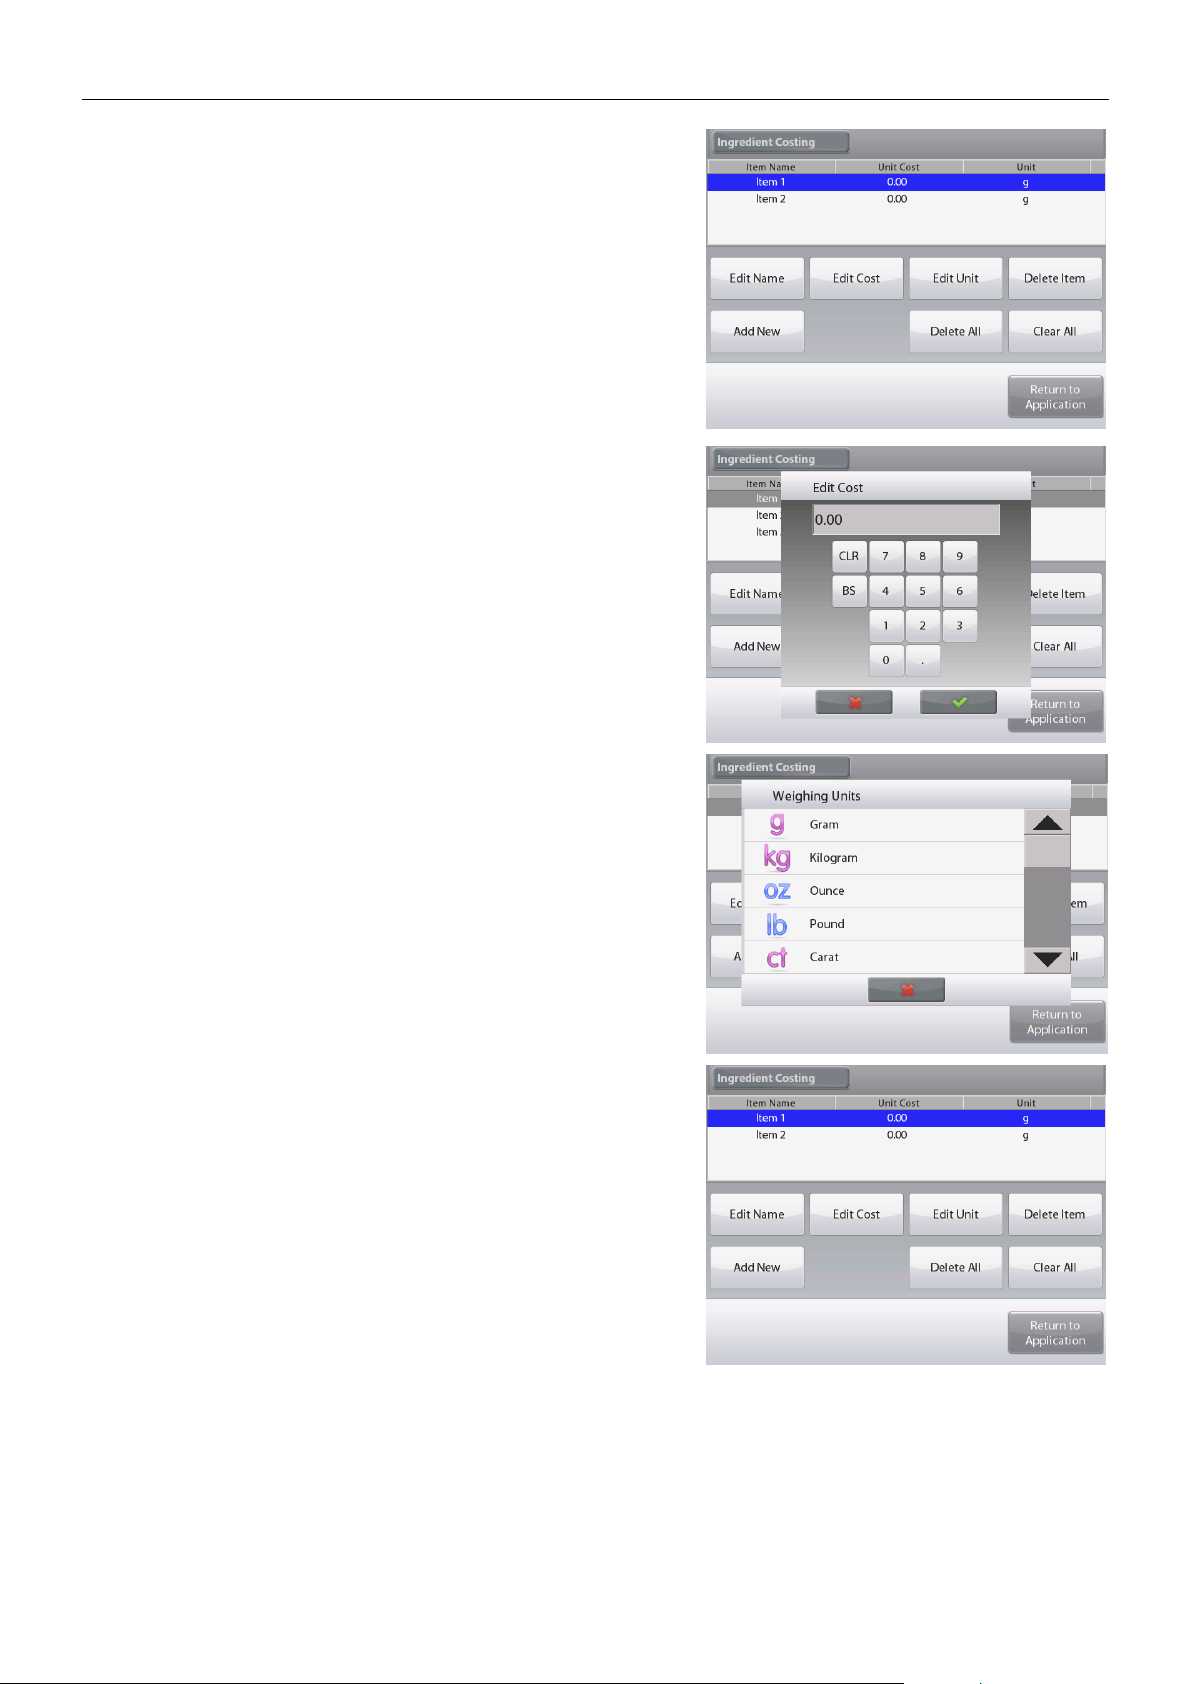
EXPLORER BALANCES EN-81
To change the default component cost per unit,
Press Edit Cost.
The numeric entry screen appears.
Enter the new weight, then press .
The display returns to the previous screen with the new value
highlighted momentarily.
To change the default component Unit, press Edit Unit.
The Weighing Units screen appears.
Continue adding items as required, using Add New.
New items can be added at any time.
To delete an item, touch the item to highlight it,
then press Delete Item.
To clear all items, press Clear All. A confirmation is required.
When finished, press
Return to Application
.
Find Quality Products Online at: [email protected]
www.GlobalTestSupply.com
Page 84
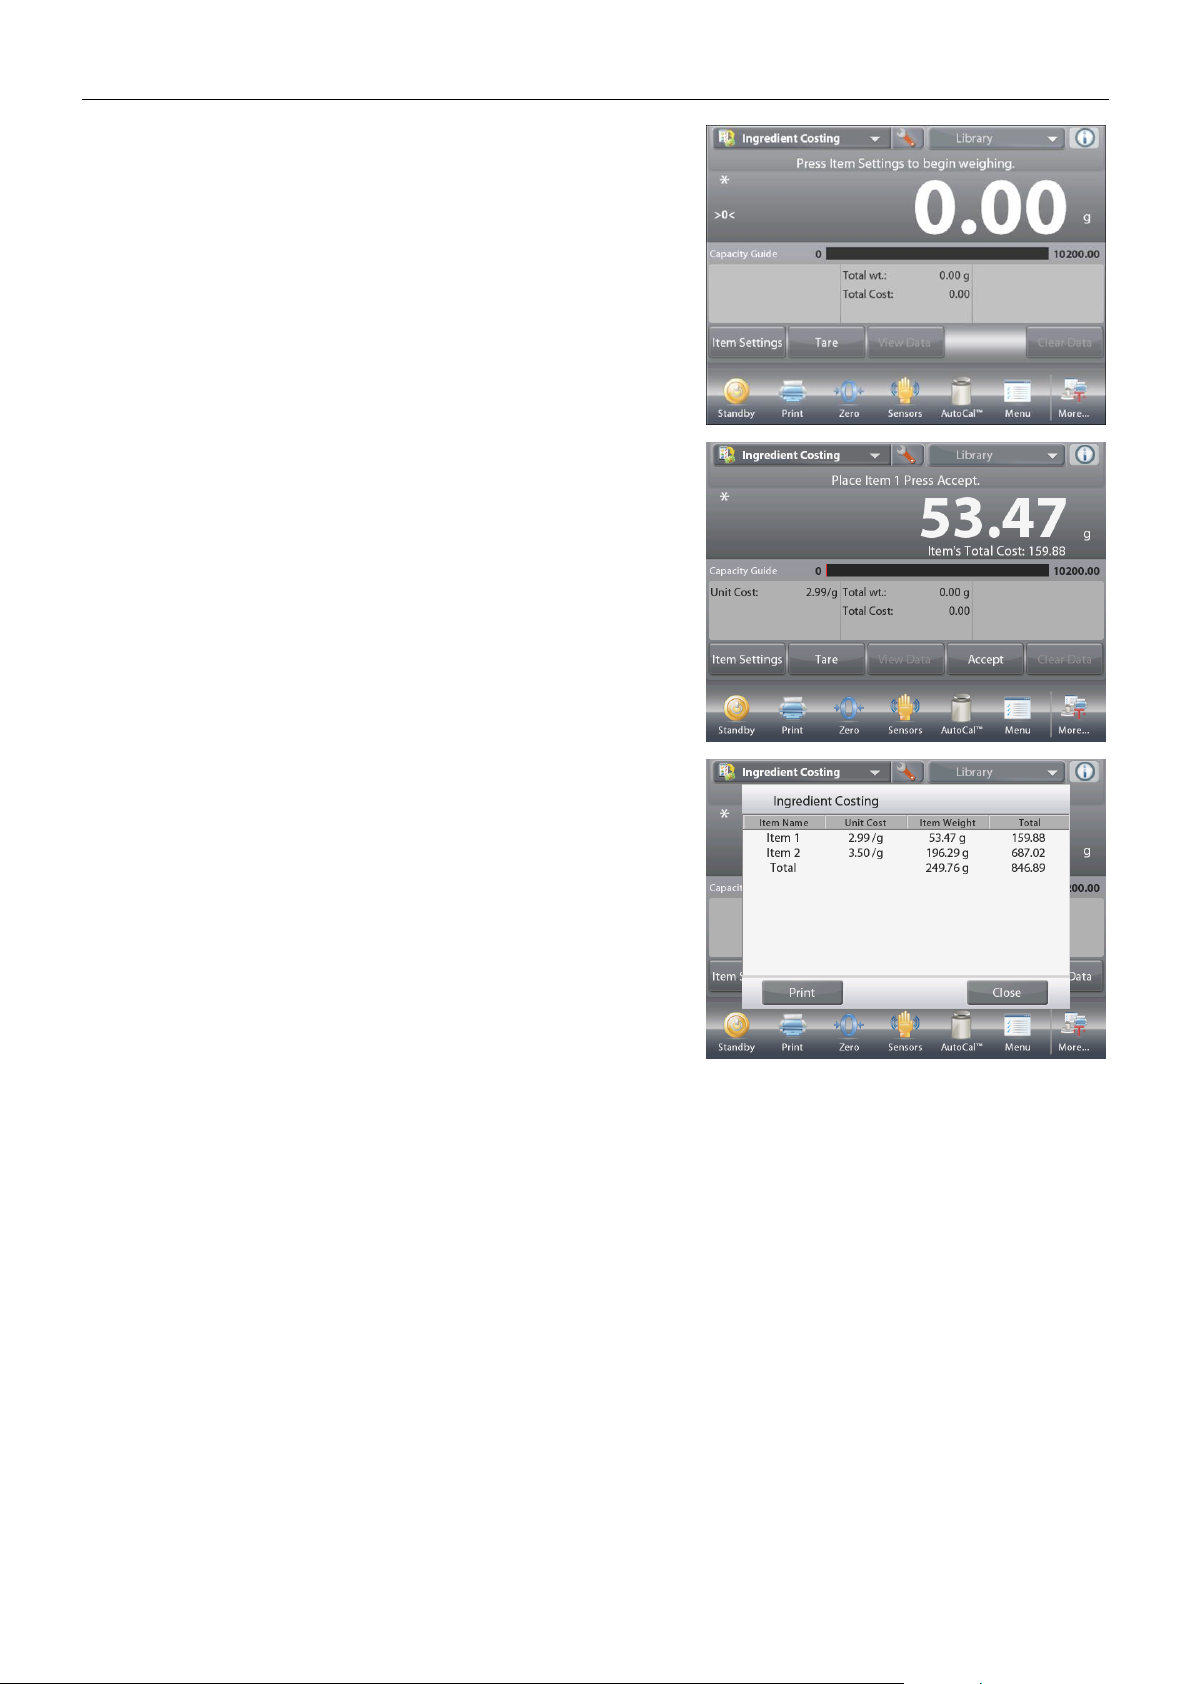
EN-82 EXPLORER BALANCES
Once setup is complete and the application screen is displayed,
follow the screen instructions:
Add the first item then press Accept to store the value in
memory.
The weight of the item is recorded,
then the screen prompts for the next component.
Unit Cost, Total Weight
and
Total Cost
are also displayed.
Continue follow the screen instructions to add the items to the
pan and touch the Accept button until each item has been
weighed.
Press the View Data button at any time to show the current
results: (Item, Item Cost and Item Weight).
After the last item has been weighed, press View Data to see
the results.
(Cancel the current data set by pressing
Clear Data
.)
Ingredient Costing Results.
Press Print to send the data to the enabled COM port.
Press Close to close the results window and return to the
Application home screen.
Find Quality Products Online at: [email protected]
www.GlobalTestSupply.com
Page 85
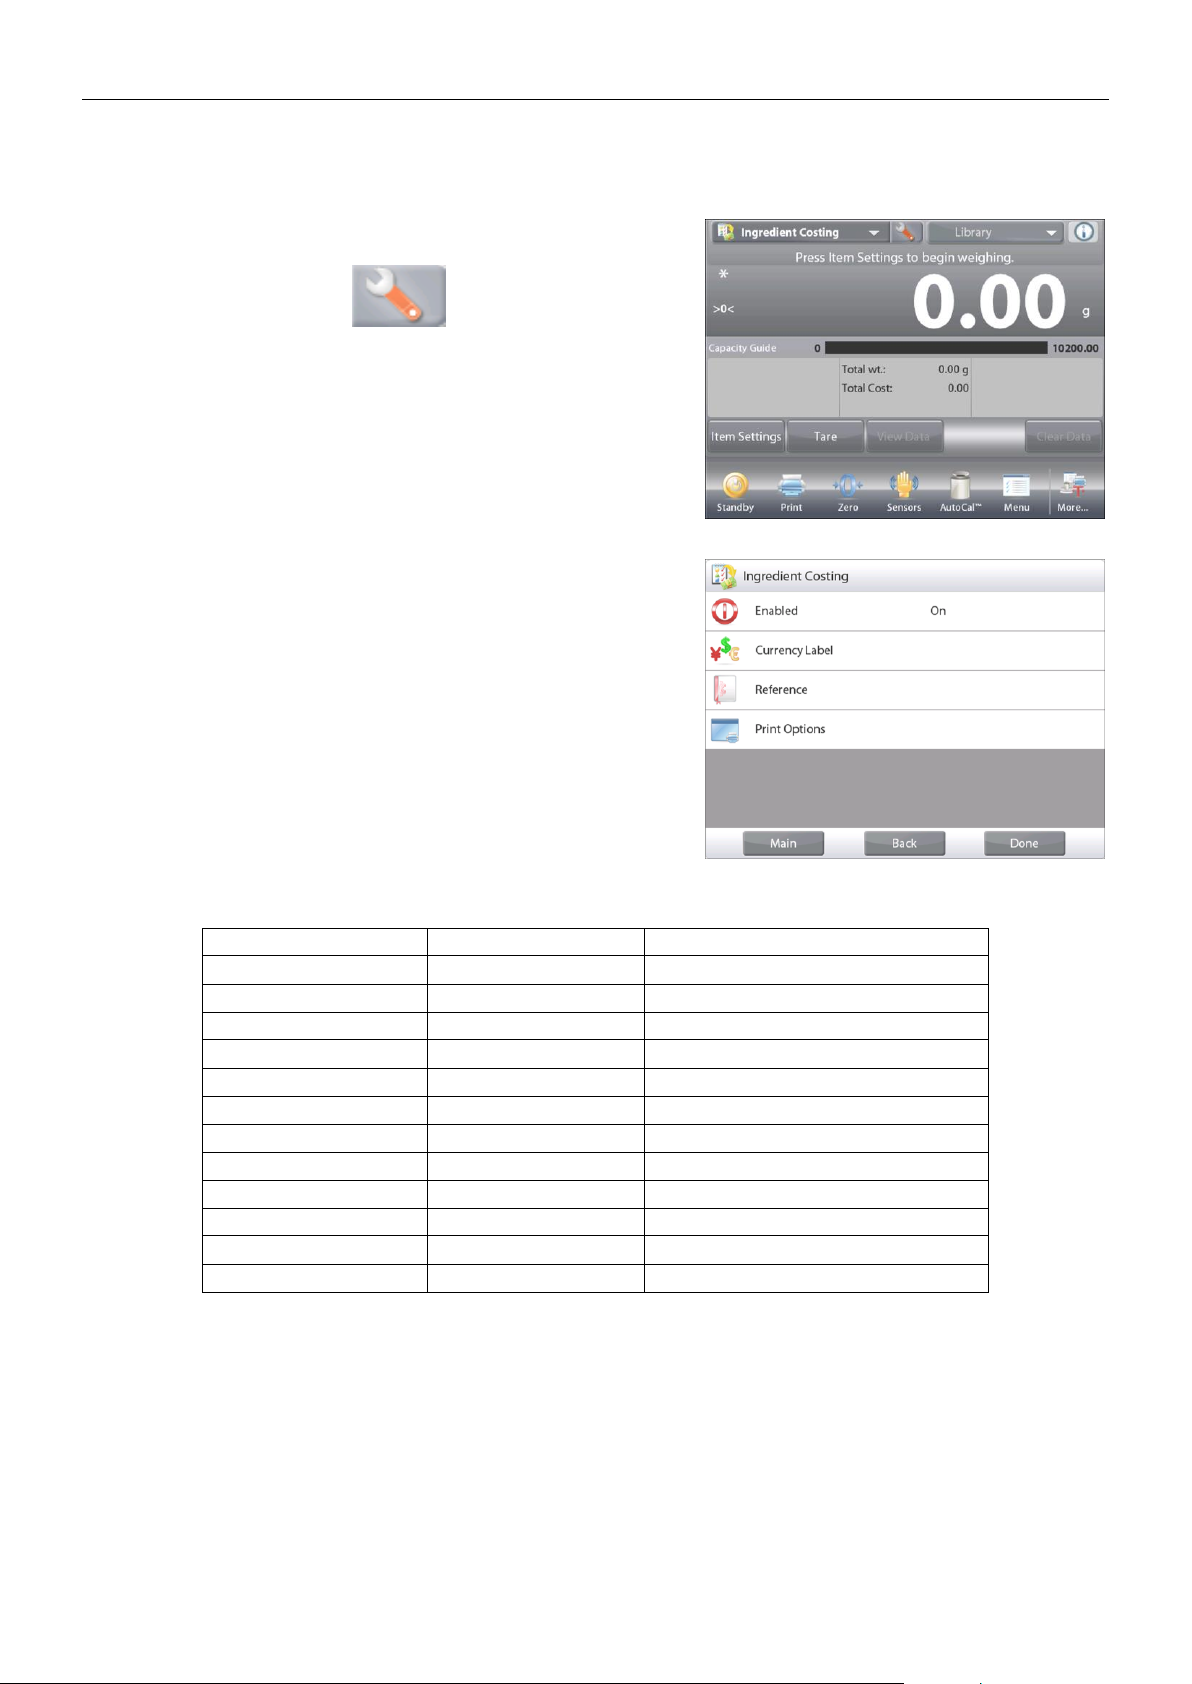
EXPLORER BALANCES EN-83
4.12.2 Application Setup
The Application can be customized for various user preferences.
Touch the
Setup
Icon (wrench) to enter Application Setup from
the home screen.
The
Setup Menu
is now displayed.
Select the list item to view or change the setting as
desired.
To return to the Application home screen, touch
Done
.
The Ingredient Costing Application Setups (defaults in Bold)
Item
Available Settings
Comments
Enabled
On, Off
Turns Application on/off
Currency label
None, various
To select the Currency label
Reference fields
Unit Cost
On, Off
To display the Item cost
Total Weight
On, Off
To display the Total weight
Total Cost
On, Off
To display the Total cost
Gross
On, Off
Gross weight is displayed
Net
On, Off
Net weight is displayed
Tare
On, Off
Tare weight is displayed
Print Options
See Printing Section.
Total Weight
On, Off
Total Cost
On, Off
Find Quality Products Online at: [email protected]
www.GlobalTestSupply.com
Page 86
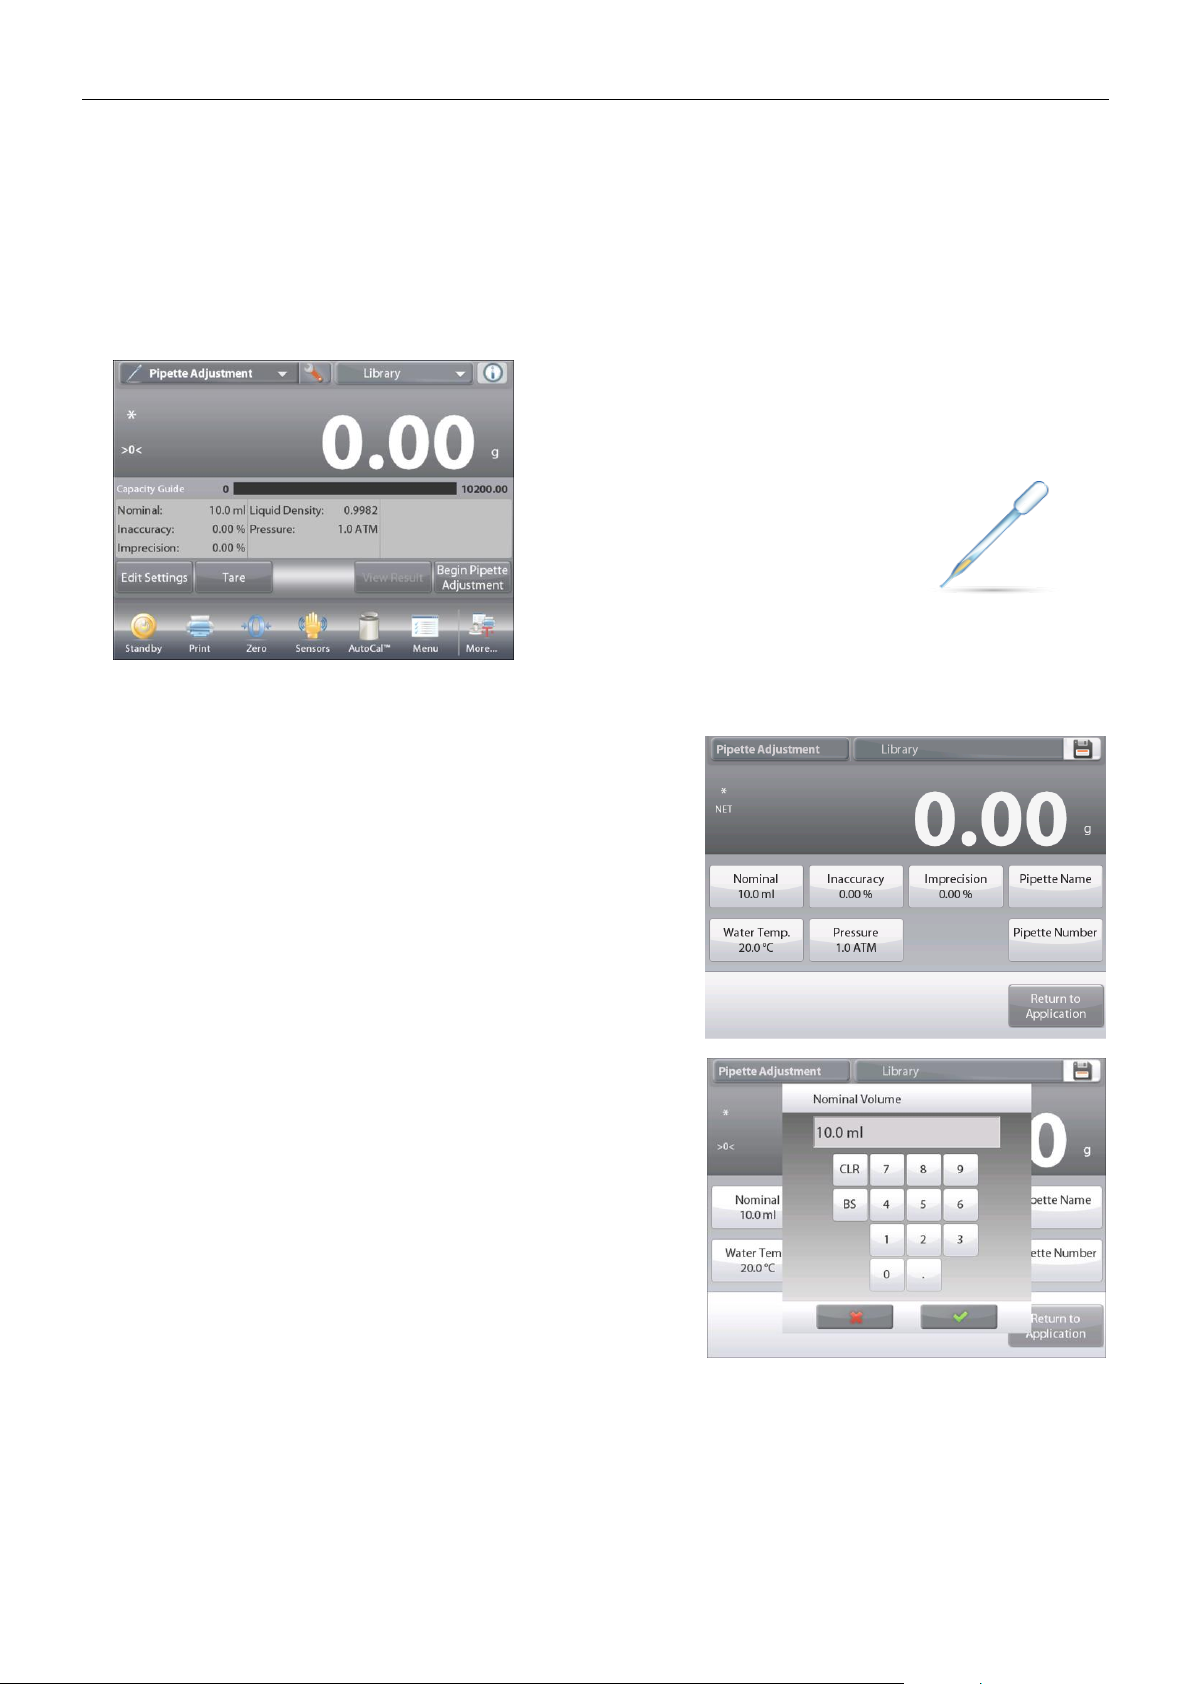
EN-84 EXPLORER BALANCES
4.13 Pipette Adjustment (not available in EX12001, EX24001, EX35001)
Pipette adjustment checks the accuracy and precision values of pipettes by weight analysis. The balance has a
built-in density reference table for water at temperatures between 10°C and 30°C. If other liquids are used for
pipette calibration, enter the liquid’s density at current room temperature in g/cm3. Since all calculations are made
within the balance, the atmospheric pressure is also required.
Pipette adjustment can be accomplished manually (with a key press after each step) or automatically (weights
are automatically recorded when stable). Calculations made within the balance provide results of inaccuracy and
imprecision. Up to 30 samples can be used.
The PIPETTE ADJUSTMENT Home screen
Main Display Line
Second Display Line
Reference Fields
Application Buttons
Functions Application Icon
4.13.1 Pipette Adjustment – Manual (default)
Confirm the default values displayed are correct:
Nominal, Inaccuracy, Imprecision, Density, Atmospheric
Pressure, Water Temperature, etc.
To edit the default values, touch the
Edit Settings
button.
The Edit Settings Screen.
Settings available: Nominal Capacity, Water Temp,
Inaccuracy, Atmospheric Press,
Imprecision, Pipette Name,
Pipette Number
Functions Available:
Return to Application
To adjust the pipette Nominal Capacity value,
touch the Nominal button.
Enter the Nominal Capacity in the keyboard screen that
appears, and press .
The display returns to the previous screen with the new value
highlighted.
Note:
Capacity can be measured in mL or uL, depending on the
Application Setup.
Find Quality Products Online at: [email protected]
www.GlobalTestSupply.com
Page 87
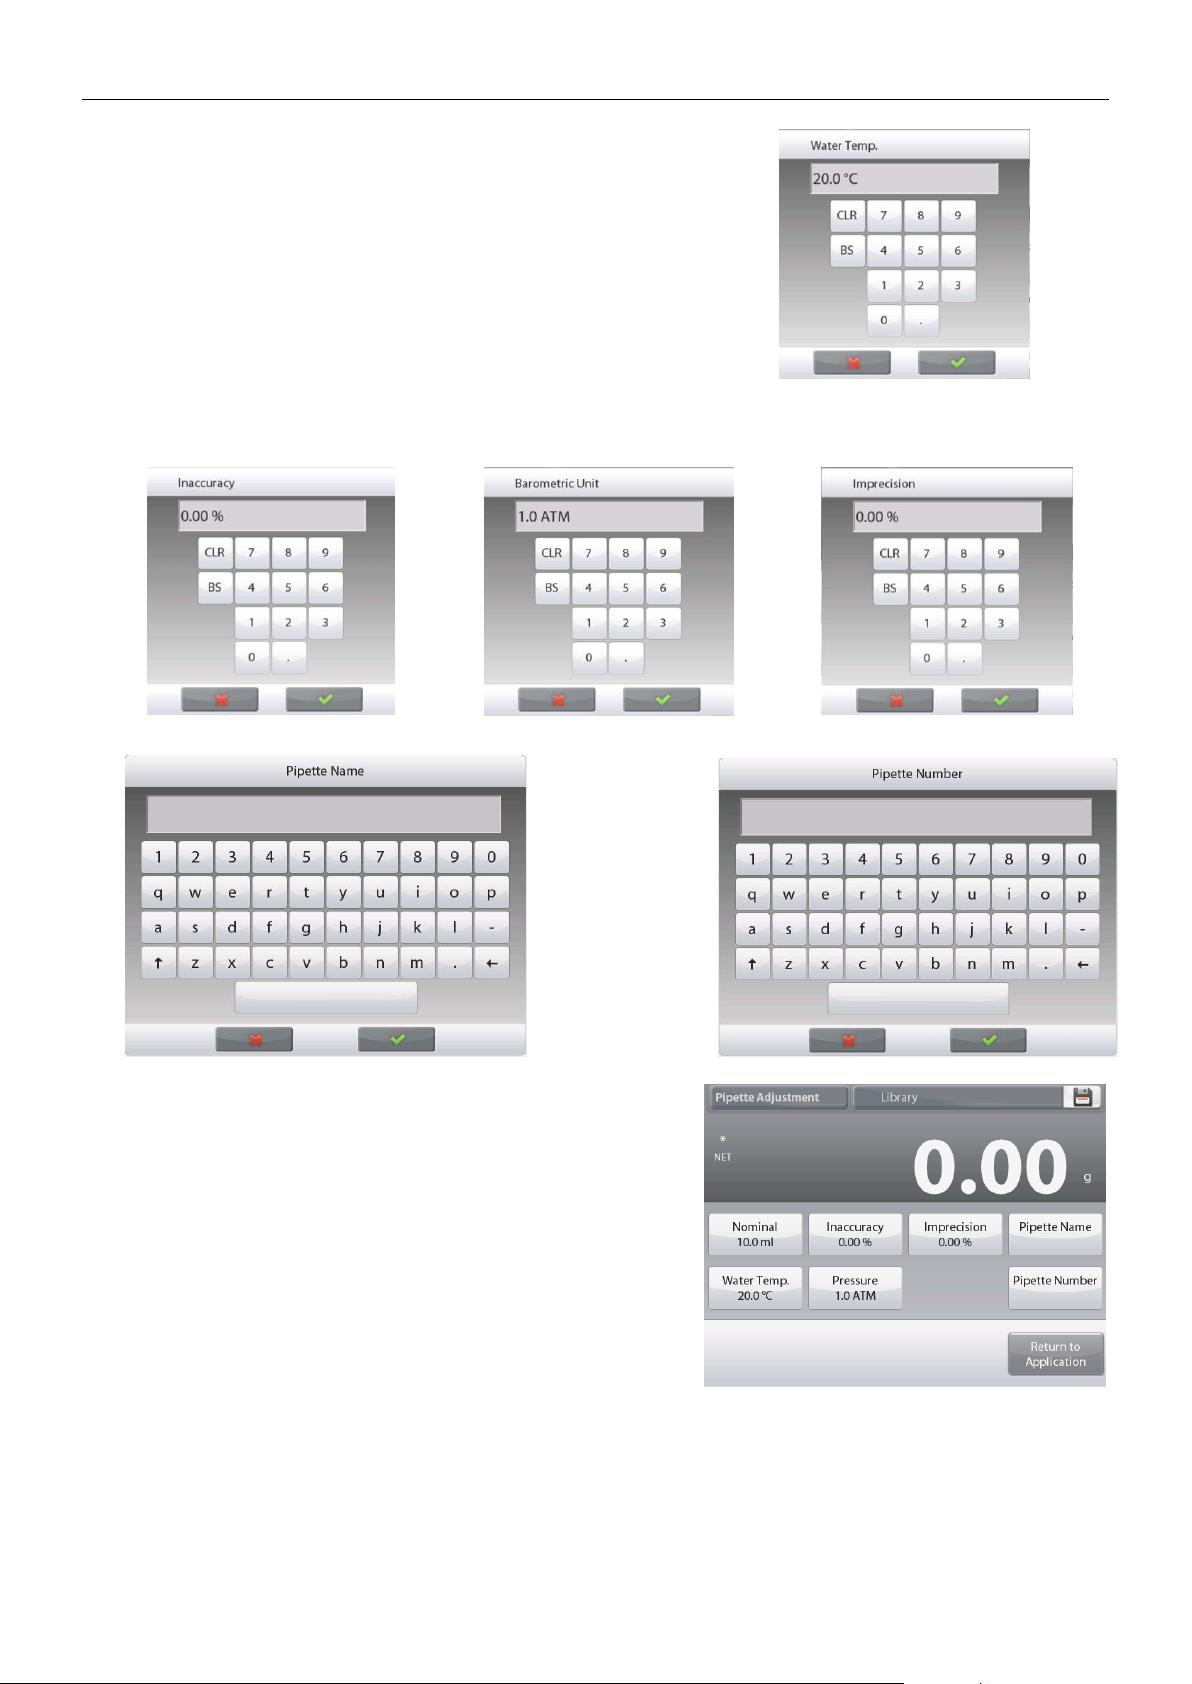
EXPLORER BALANCES EN-85
To adjust the water temperature, touch the Water Temp button.
The balance calculates water density based on the water
temperature value entered. Measure the actual water
temperature using a precision thermometer.
A numeric input window is displayed.
Key in the desired temperature, then press .
The display returns to the previous screen with the new value
highlighted.
Continue to enter the required information
following the above procedure:
Pipette Inaccuracy, via the Inaccuracy button
Barometric Pressure, via the Barometric Pressure button
Pipette Imprecision, via the Imprecision button
Pipette Name, via the Pipette Name button
Pipette Number
, via the
Pipette number
button
When finished, press Return to Application.
The Application home screen appears, and you can begin the
Pipette Adjustment process.
Find Quality Products Online at: [email protected]
www.GlobalTestSupply.com
Page 88
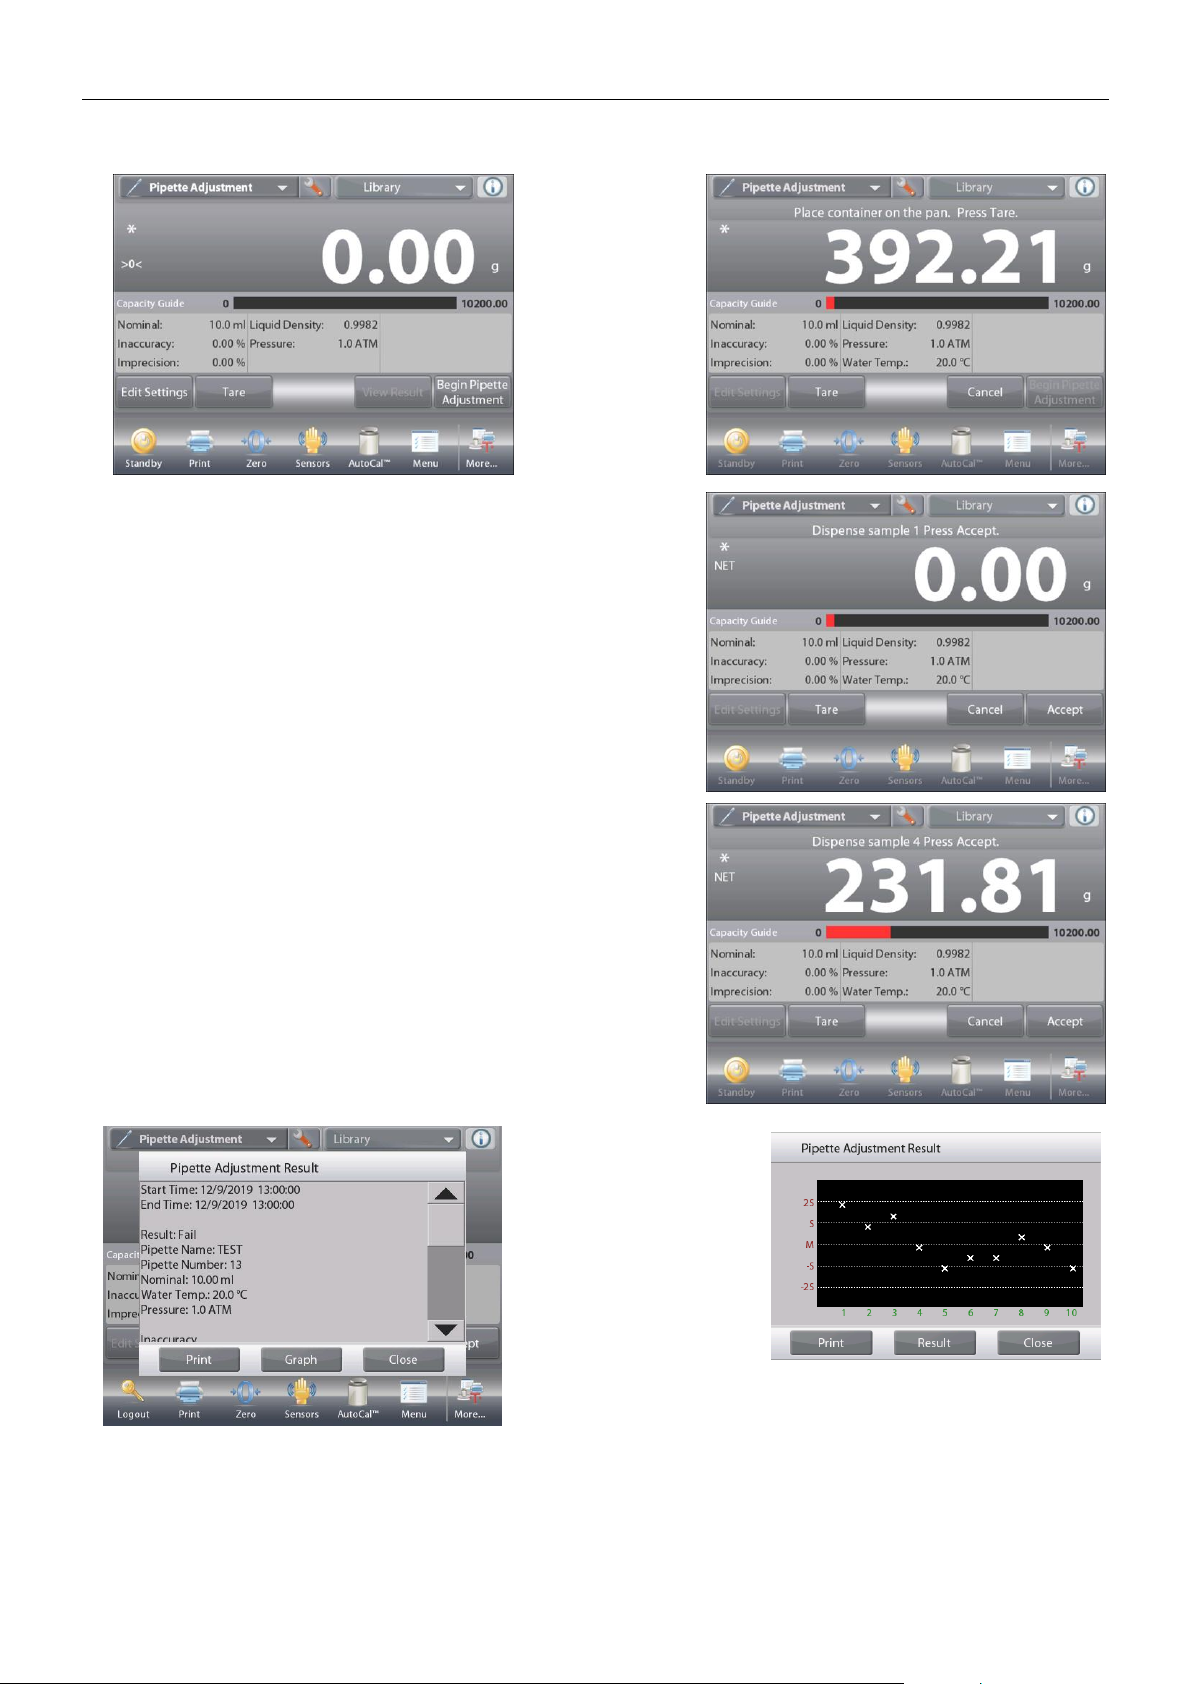
EN-86 EXPLORER BALANCES
4.13.2 Begin Pipette Adjustment Process
Touch
Begin Pipette
Adjustment.
Follow the
screen
instructions, to
Place container
on the pan.
Then Press
Tare.
Step 1 – Dispense the First Sample
Follow the screen instructions, then press
Accept
to store the
first sample weight (liquid).
Continue to follow the screen instructions by dispensing
samples and pressing Accept to store each sample weight
(liquid).
The default number of samples is 10.
It can be changed in Setup, from 2 to 30 samples.
Once all the sample
weights have been
dispensed,
the Results screen is
automatically
displayed.
Press
Graph
to see
results plotted. Press
Result
to return to the
result screen. Press
Close
to return to the
Pipette Adjustment
home screen.
Note: To view either the results or graph screens again from the home screen, press the View Result button.
To start a new Pipette Adjustment process, press Begin Pipette Adjustment.
Find Quality Products Online at: [email protected]
www.GlobalTestSupply.com
Page 89
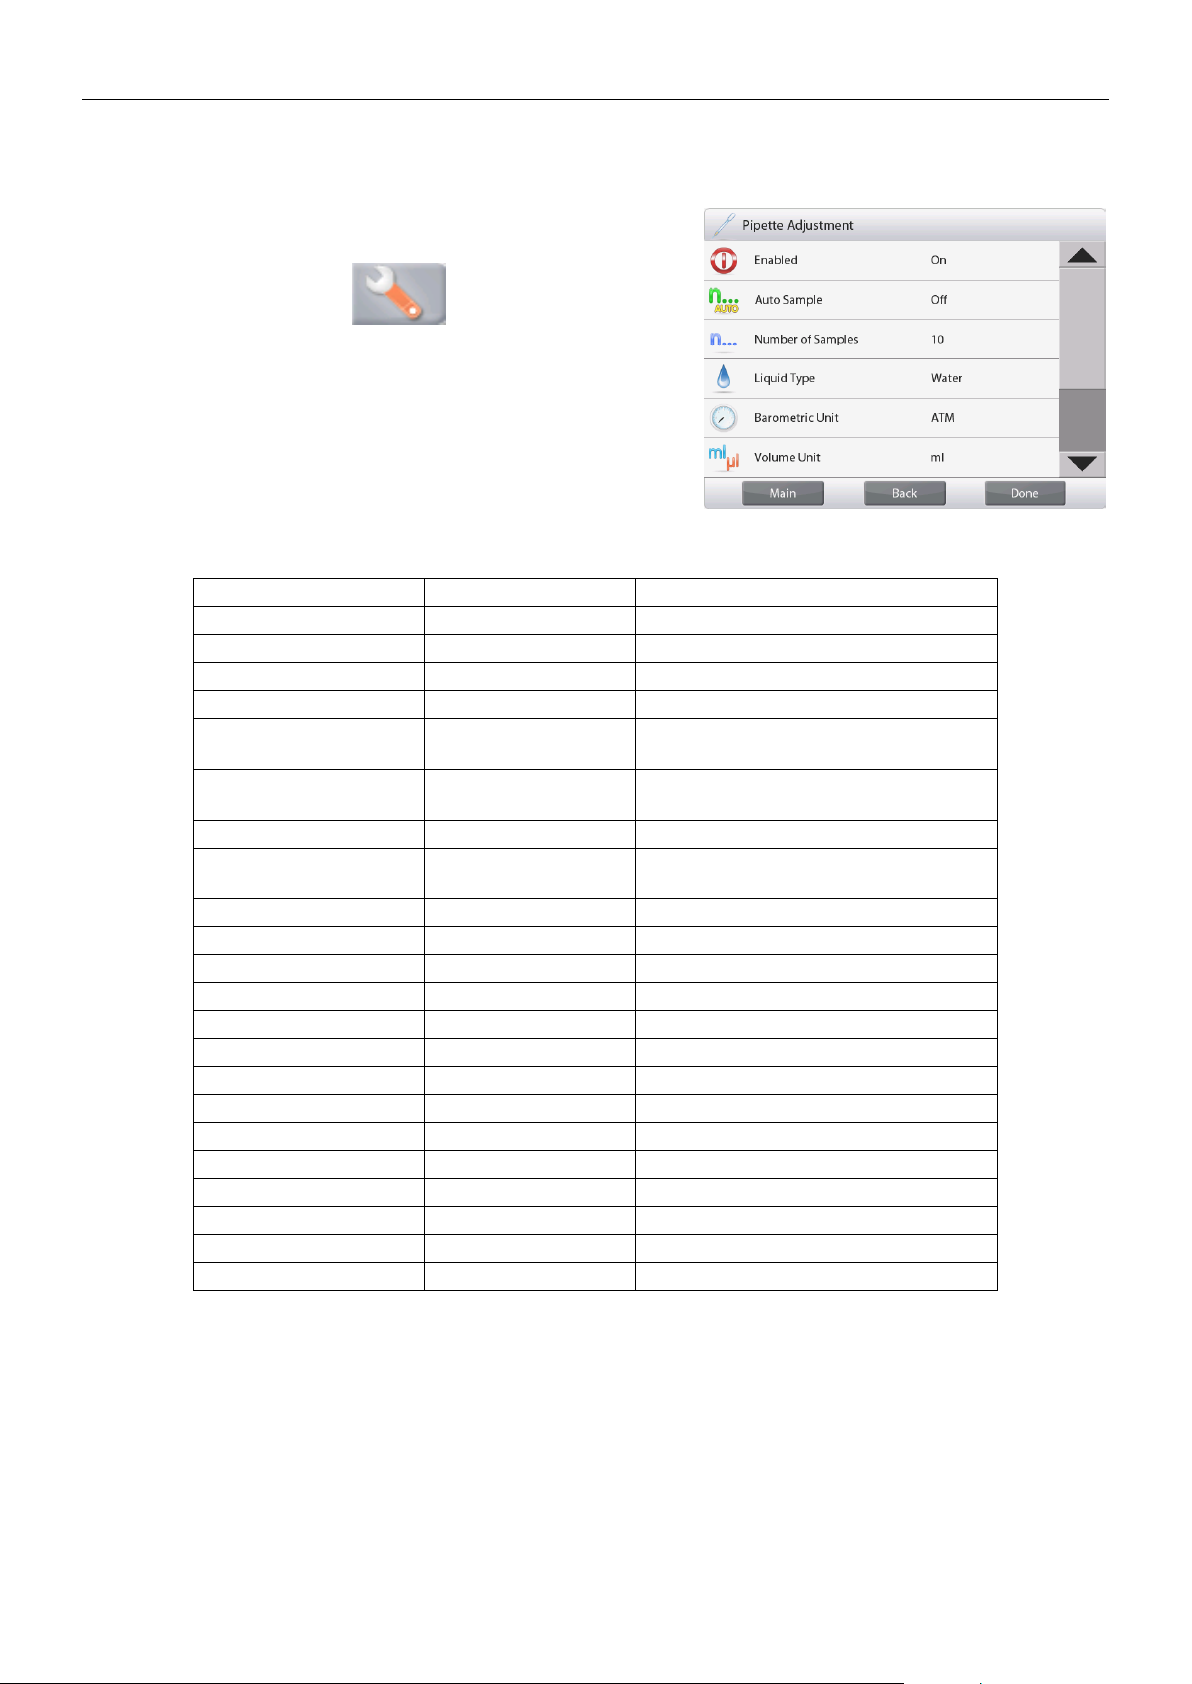
EXPLORER BALANCES EN-87
4.13.3 Application Setup
The Application can be customized for various user preferences.
Touch the
Setup
Icon (wrench) to enter the
Application Setup
from the home screen.
The
Setup Menu
appears.
Select the list item to view or change the setting as
desired.
To return to the Application home screen, touch
Done
.
The Pipette Adjustment Application Setups (defaults in Bold)
Item
Available Settings
Comments
Enabled
On, Off
Turns Application on/off
Auto Sample Mode
On, Off
To select the mode of operation
Number of Samples
2 – 30 (default 10)
To select the number of samples
Liquid Type
Water, Other
Liquid used during measurements
Unit of Pressure
ATM, inHg, KPa,
mbar, mmHg, PSIA
To select Atmospheric Pressure unit
Volume Unit (Pipette
capacity unit)
ml, μl
Nominal capacity unit
Secondary Unit
On, Off
To show the Second Display line
Lock Settings
On, Off
Press to lock the current setting(s) so
they cannot be changed.
Reference fields
Nominal Volume
On, Off
Nominal capacity displayed
Inaccuracy
On, Off
Inaccuracy value displayed
Imprecision
On, Off
Imprecision value displayed
Liquid Density
On, Off
Liquid density value displayed
Pressure
On, Off
Barometric Pressure value displayed
Water Temperature
On, Off
Water temperature is displayed
Print Options
See Printing Section.
Nominal Volume
On, Off
Inaccuracy
On, Off
Imprecision
On, Off
Liquid Density
On, Off
Pressure
On, Off
Water Temperature
On, Off
Find Quality Products Online at: [email protected]
www.GlobalTestSupply.com
Page 90
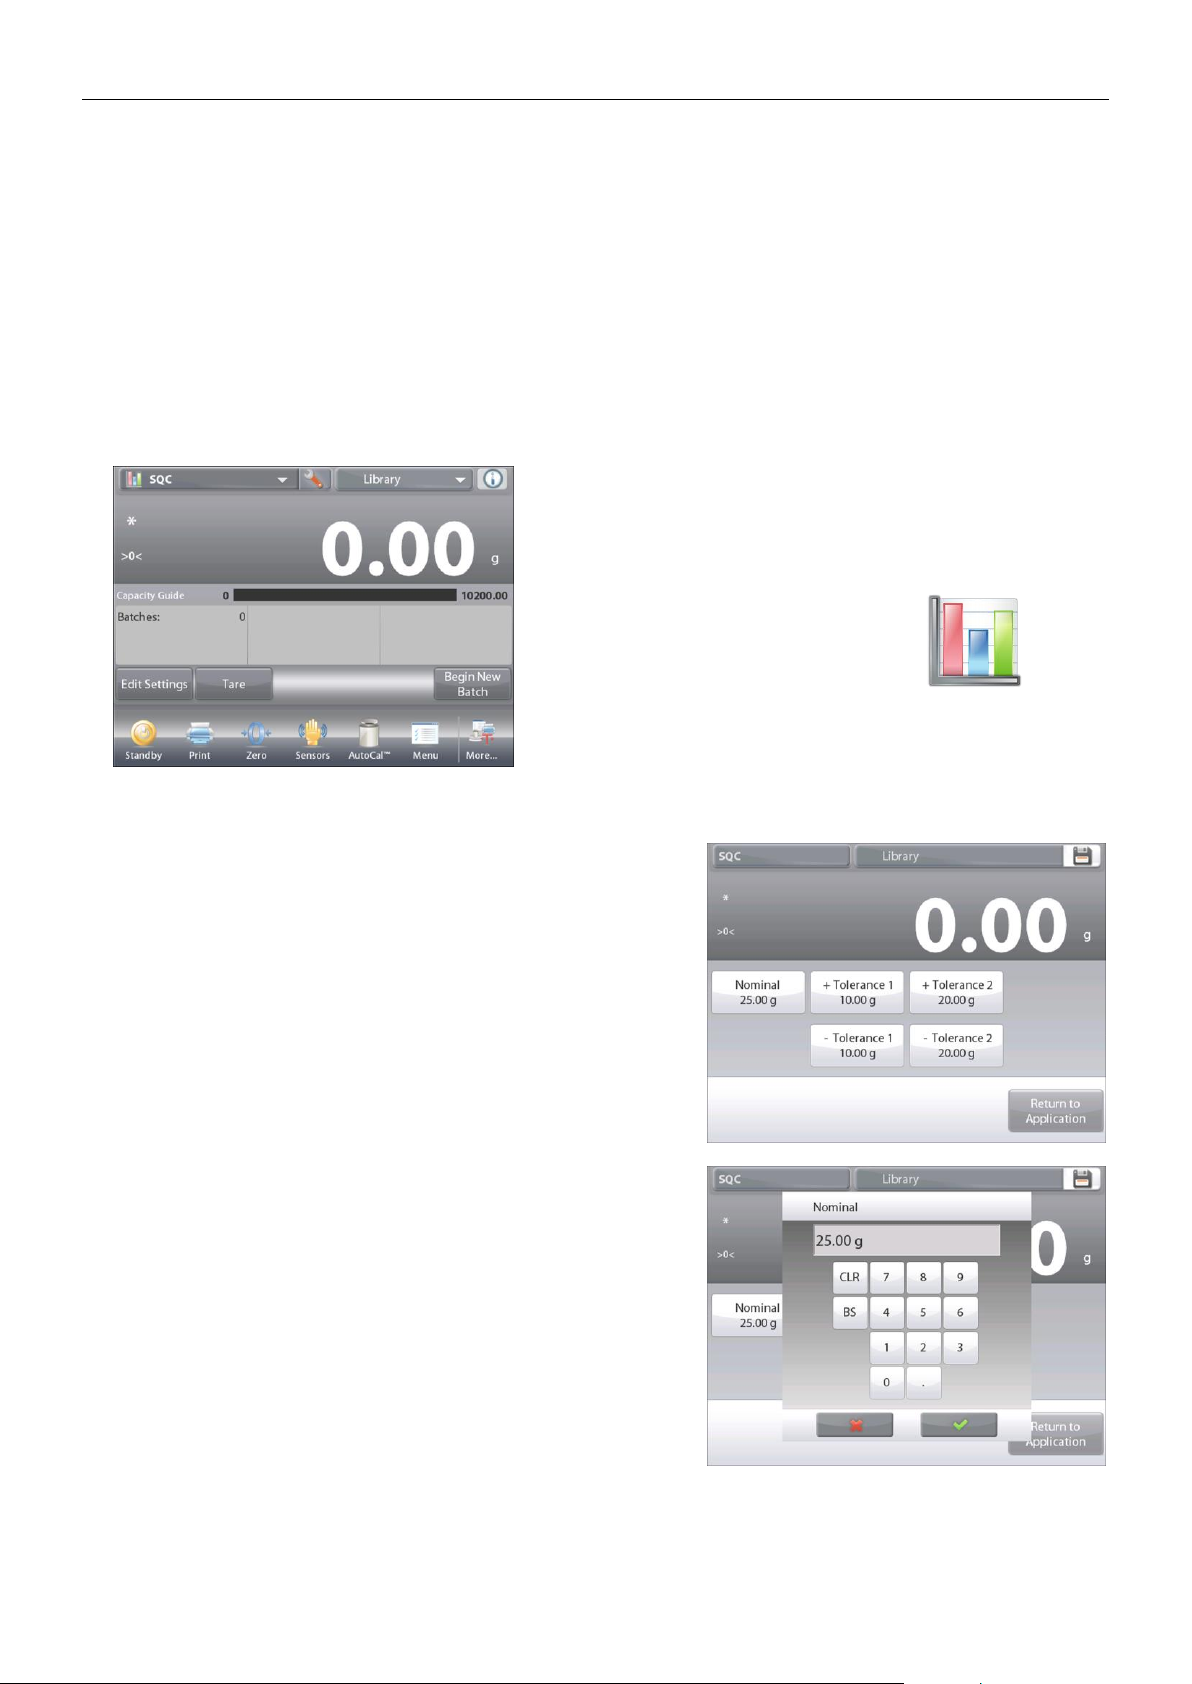
EN-88 EXPLORER BALANCES
4.14 Statistical Quality Control (SQC)
The Statistical Quality control (SQC) feature is useful during various types of process filling operations, to monitor
and/or control the process to eliminate under- and over-filling.
As samples are weighed and stored in the balance, a Trend Analysis is developed and can be displayed.
Up to 10 batches with up to 80 samples in a batch are visible for quality control purposes. Each batch of samples
is shown, with the maximum, minimum, standard deviation and mean values for each batch. An on-going
examination of the relative deviation of the samples along with other statistical data can be viewed.
The filling process operation can be effectively monitored by observing the results on the View Trace screen.
SQC collection can be done manually (Manual mode, requires key press after each step) or
automatically (Auto Mode, the weights are automatically recorded when stable).
In the upper left portion of the home screen, select SQC.
The SQC Home screen
Main Display Line
Second Display Line
Reference Fields
Application Buttons
Functions Application Icon
4.14.1 Edit Settings
Confirm the default values (
Nominal, Inaccuracy, Imprecision
,
Density, Atmospheric Pressure, Water Temperature
, etc.)
are correct.
To view/edit the default values, touch the
Edit Settings
button.
The Settings screen appears.
Settings available: Nominal Target weight,
+Tolerance 1, –Tolerance 1,
+Tolerance 2, –Tolerance 2
Functions Available:
Return to Application
To adjust the Nominal Target weight value,
touch the Nominal button.
A numeric input window appears.
Key in the desired Nominal Weight, then press .
The display returns to the previous screen with the new value
highlighted.
Find Quality Products Online at: [email protected]
www.GlobalTestSupply.com
Page 91
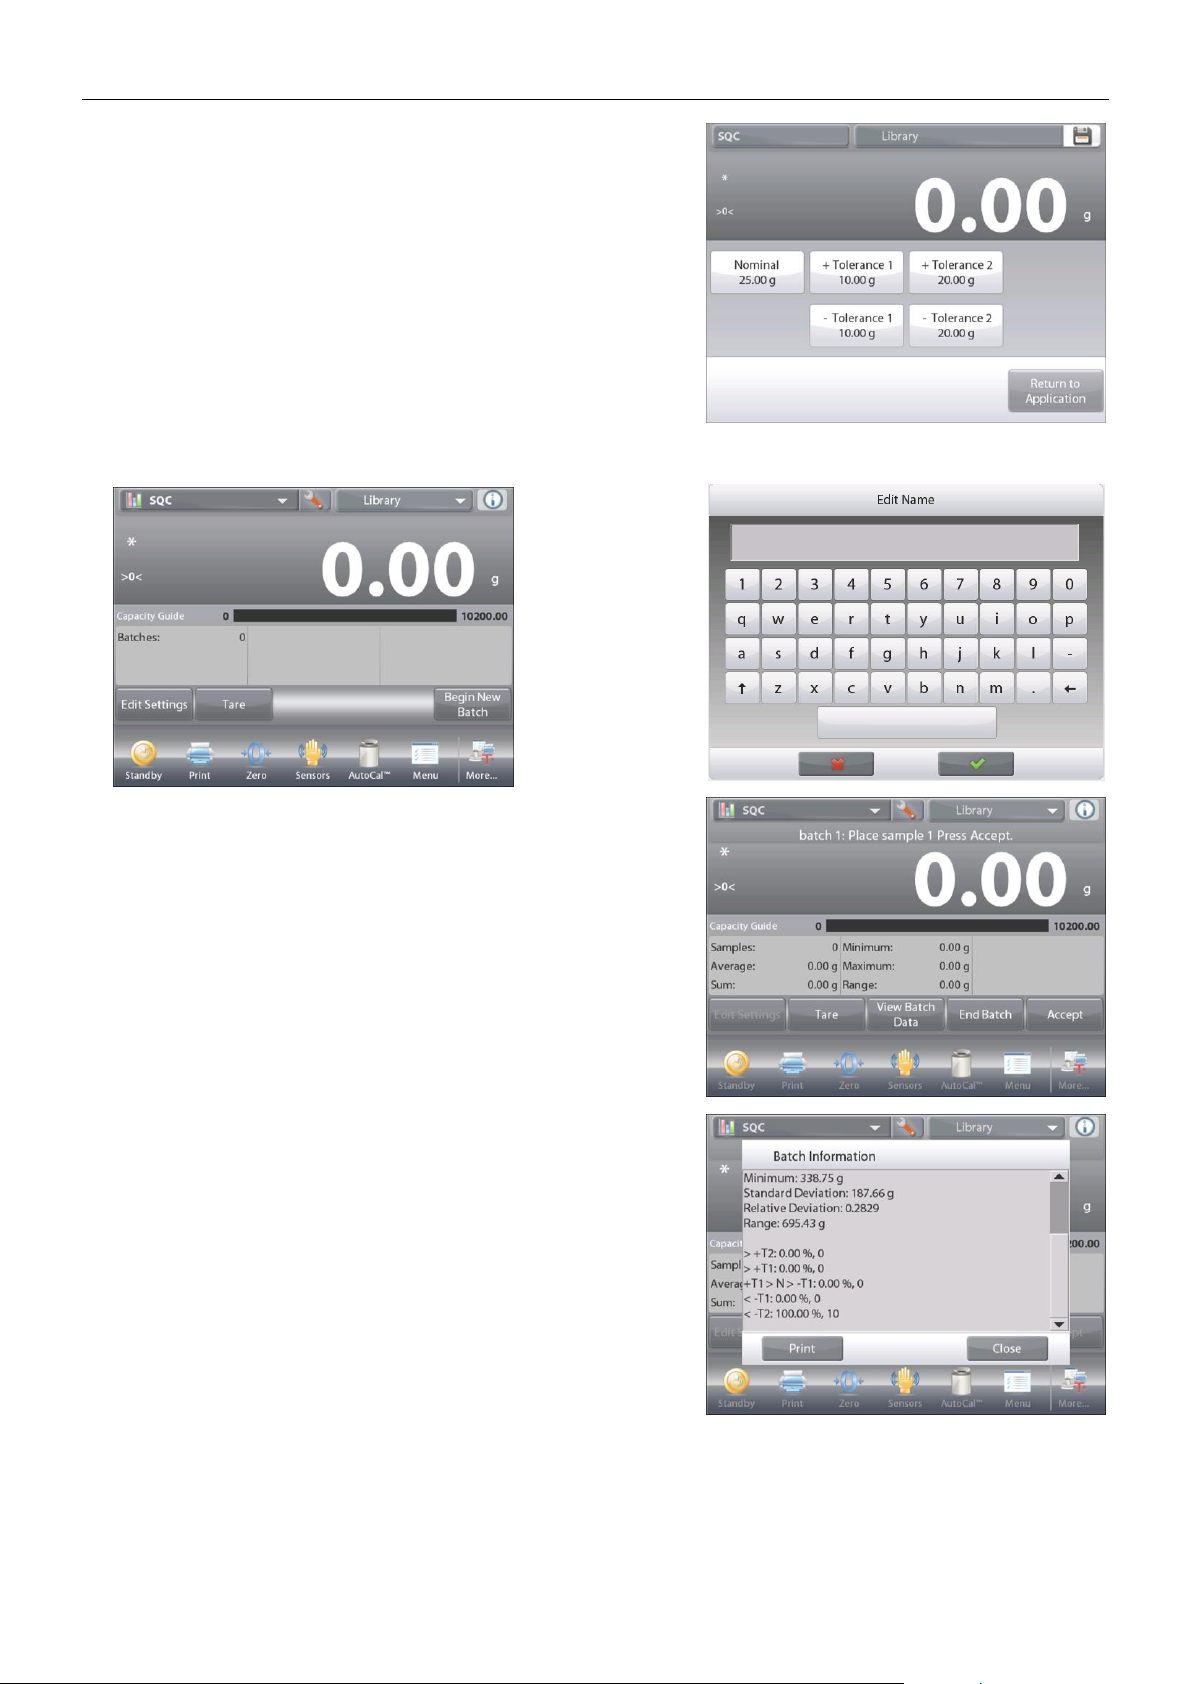
EXPLORER BALANCES EN-89
Continue to enter the required information following the above
procedure:
Positive Tolerance 1, via the +Tolerance 1 button.
Negative Tolerance 1, via the –Tolerance 1 button.
Positive Tolerance 2, via the +Tolerance 2 button.
Negative Tolerance 2, via the –Tolerance 2 button.
Tolerances can be in either weight (default) or percent –
See
Application Setup
, Section 4.14.3.
When finished, press Return to Application and the SQC home
screen appears.
4.14.2 Begin the SQC Process
Touch the
Begin
New Batch
button.
First Batch: the
screen prompts
for the Batch
name.
Enter the Batch
name, then
press .
The Process screen is then displayed.
Follow the screen instructions, then press Accept
to store the sample weight.
The current number of
Samples
, along with the
Average, Sum
,
Minimum
value,
Maximum
value, and
Range
are displayed.
Continue to follow the screen instructions by weighing samples
and pressing Accept to store each sample’s weight.
The sample size is 10 (default).
It can be changed in Setup from 2 to 130 pieces.
At any time, press
End Batch
to see the Individual results
screen, showing results for the current Batch.
Once all the samples have been weighed,
the
Results
screen appears automatically.
If the COM interface is enabled, press
Print
to send the results
either to a computer or a printer.
Press
Close
to return to the current Batch process.
A message offers the chance to save the batch, if desired.
Find Quality Products Online at: [email protected]
www.GlobalTestSupply.com
Page 92
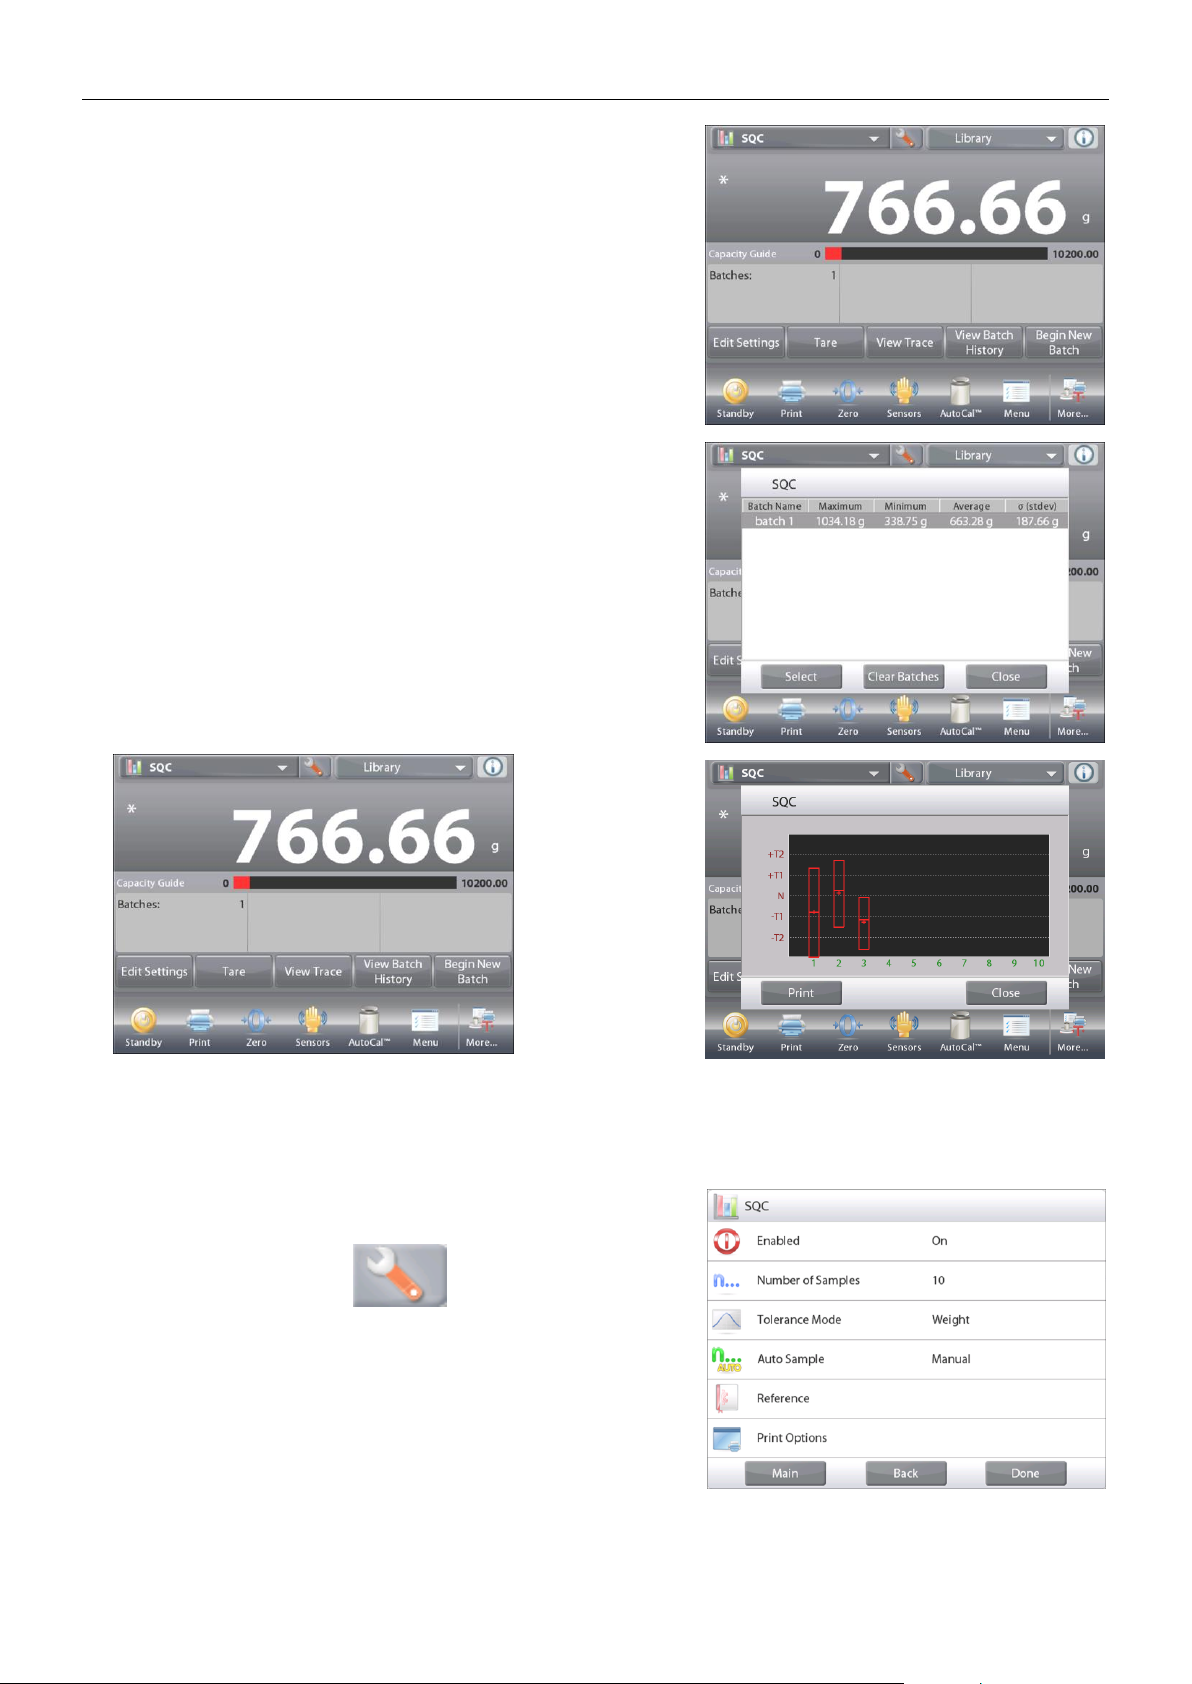
EN-90 EXPLORER BALANCES
To view the process results of this batch (and any other saved
batch), press the
View Batch History
button.
The Batch History screen shows the basic information –
Maximum, Minimum, Average (mean), and Standard
Deviation – for all currently saved batches.
Press Select to see (and print) the Batch Information screen for
any saved batch.
Press Clear Batches to reset SQC results and
return to the SQC home screen
Press
Close
to return to the SQC home screen to
begin another batch or to view process results.
To view the
Process results
graphically
(batch
comparison),
press the View
Trace button.
Press Print or
Close as
above.
4.14.3 Application Setup
The Application can be customized for various user preferences.
Touch the
Setup
Icon (wrench) to enter
Application Setup
from
the home screen.
The
Setup Menu
is now displayed.
Select the list item to view or change the setting as
desired.
To return to the Application home screen, touch
Done.
Find Quality Products Online at: [email protected]
www.GlobalTestSupply.com
Page 93
EXPLORER BALANCES EN-91
The SQC Application Setups (defaults in Bold)
Item
Available Settings
Comments
Enabled
On, Off
Turns Application on/off
Number of Samples
2 – 130 (default 10)
To select the number of samples in a Batch
Tolerance Mode
Weight,
Percent
Tolerance used during measurements
Auto Sample Mode
Manual,
Semi Automatic,
Automatic
To select the mode of operation
Lock Settings
On, Off
Press to lock the current setting(s) so they
cannot be changed.
Reference fields
Number of Batches
On, Off
The total batches
Number of Samples
On, Off
The total samples
Average
On, Off
The Average value is displayed
Total
On, Off
The Sum value is displayed
Maximum
On, Off
The Maximum value is displayed
Minimum
On, Off
The Minimum value is displayed
Range
On, Off
The Range is displayed
Print Options
See Printing Section.
Number of Batches
On, Off
Number of Samples
On, Off
Average
On, Off
Total
On, Off
Maximum
On, Off
Minimum
On, Off
Range
On, Off
Find Quality Products Online at: [email protected]
www.GlobalTestSupply.com
Page 94
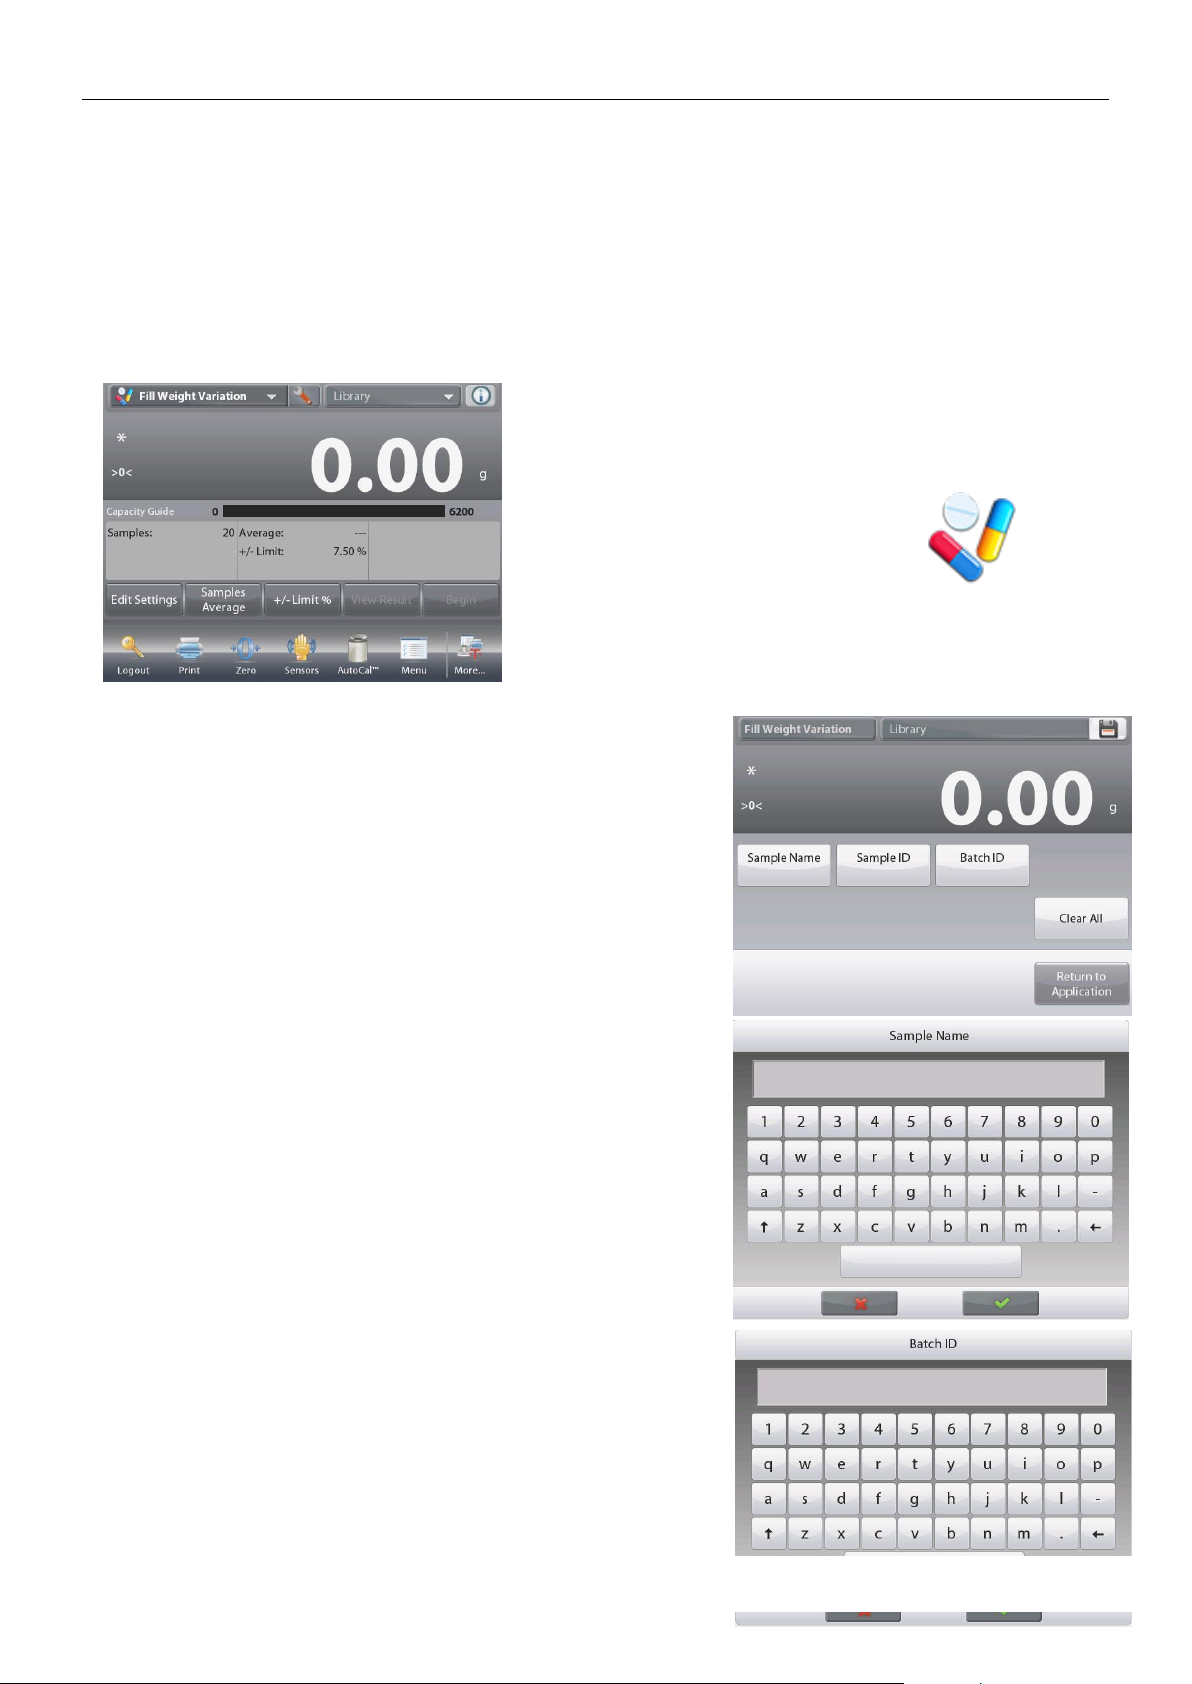
EN-92 EXPLORER BALANCES
4.15 Fill Weight Variation
Fill weight variation application is the workstation to check whether the individual pill weight is in the tolerance of
the average of total pill weight. To ensure the consistency of dosage units, each unit in batch should have a drug
substance content within a narrow range around the label claim.
As samples are weighed and stored in the balance, you can check the result by press View Result on the screen.
A maximum number of 99 samples can be tested. Each sample is shown with weight, difference compared to the
average weight, and if it is accepted or failed.
In the upper left portion of the home screen, select Fill Weight Variation.
The Fill Weight Variation Home screen
Main Display Line
Second Display Line
Reference Fields
Application Buttons
Functions Application Icon
4.15.1 Edit Settings
To edit values, touch the Edit Settings button. The Settings
screen appears.
Touch the Sample Name button. Enter the desired sample
name, and then press.
You can also use bar code scanner or RFID reader to input
sample name.
Touch the Batch ID button. Enter the desired ID, and then
press.
Find Quality Products Online at: [email protected]
www.GlobalTestSupply.com
Page 95
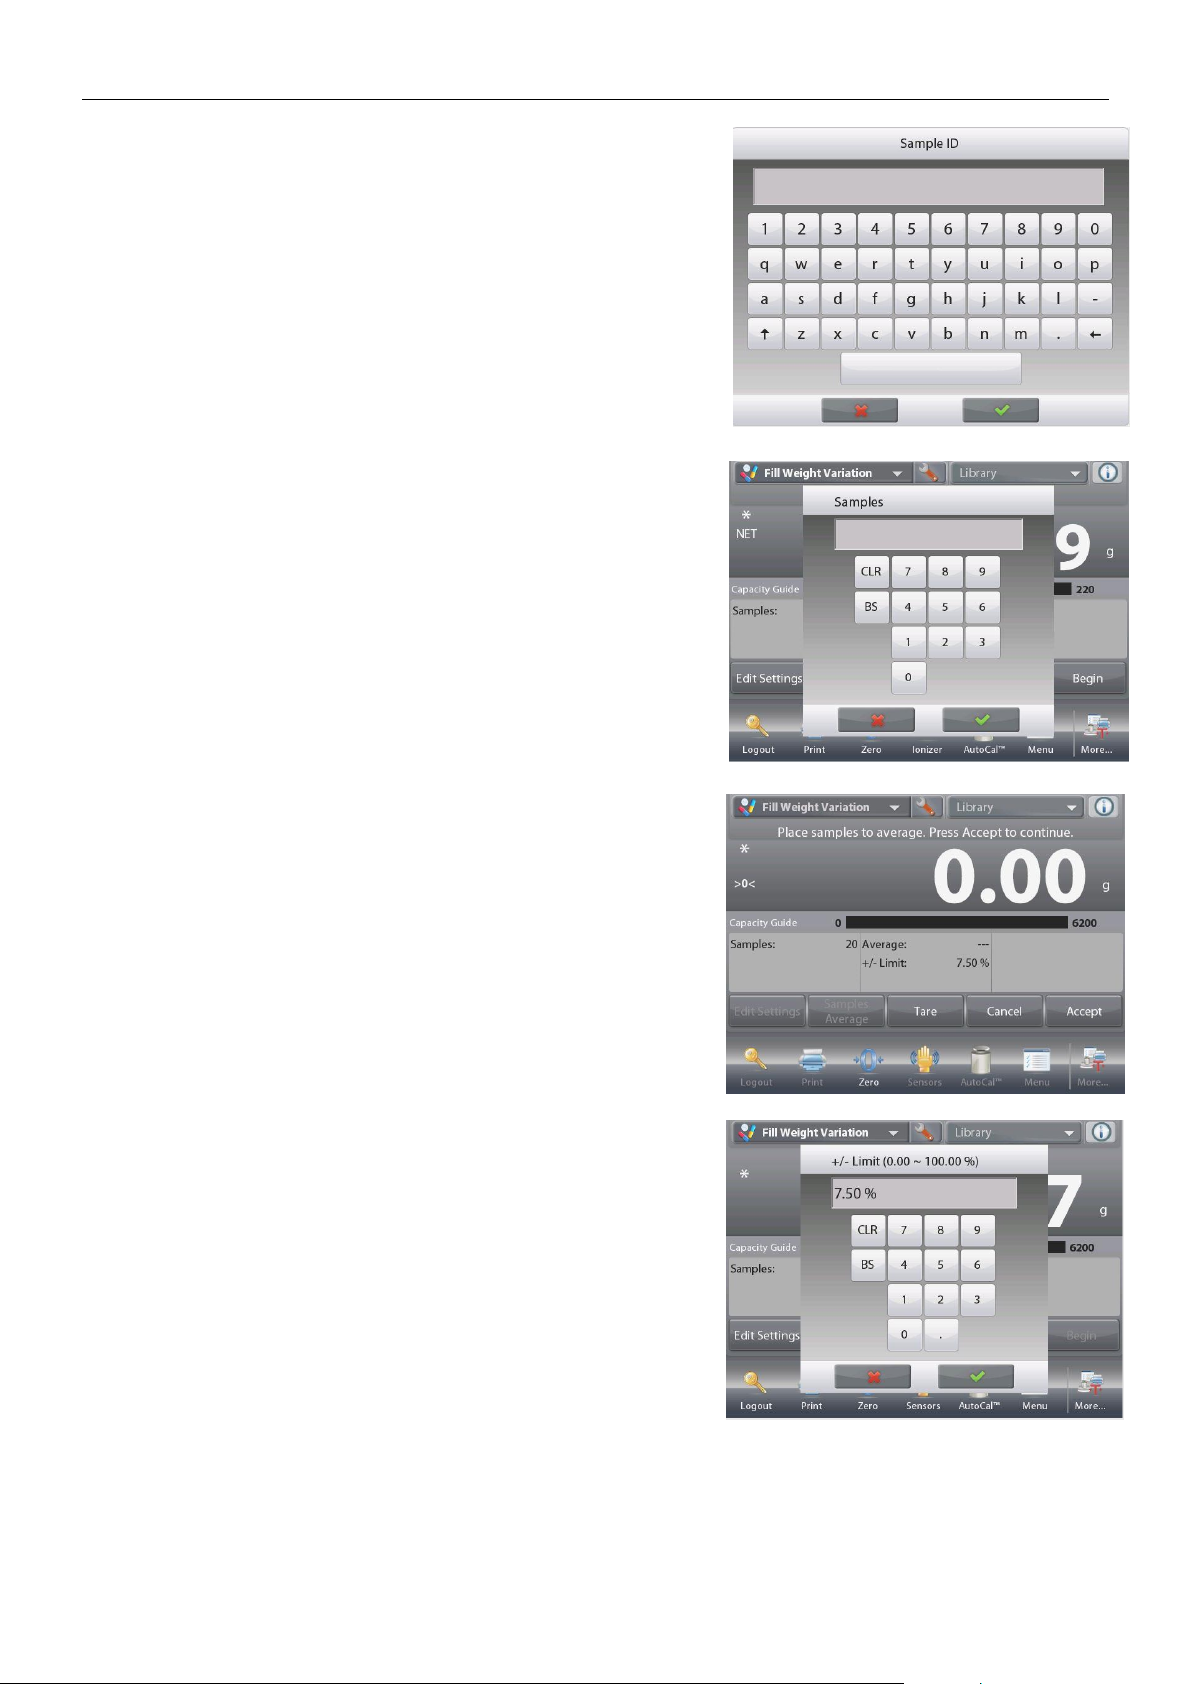
EXPLORER BALANCES EN-93
Touch the Sample ID button. Enter the desired sample name,
and then press.
Then touch the Return to Application button to return to the
main screen.
Touch the Samples Average button.
A numeric input window appears.
Key in the number of samples, then press.
The default value is 20 pieces.
A new screen appears with the message:
Place samples to average. Press Accept to continue.
Place all samples together on the pan to calculate the sample
average weight. Then touch the Accept button to continue.
Touch the +/- Limit % button to set the variation percent of the
sample average weight that can be accepted. Sample weight
within this value will be counted as accepted.
The default value is 7.50%.
Find Quality Products Online at: [email protected]
www.GlobalTestSupply.com
Page 96
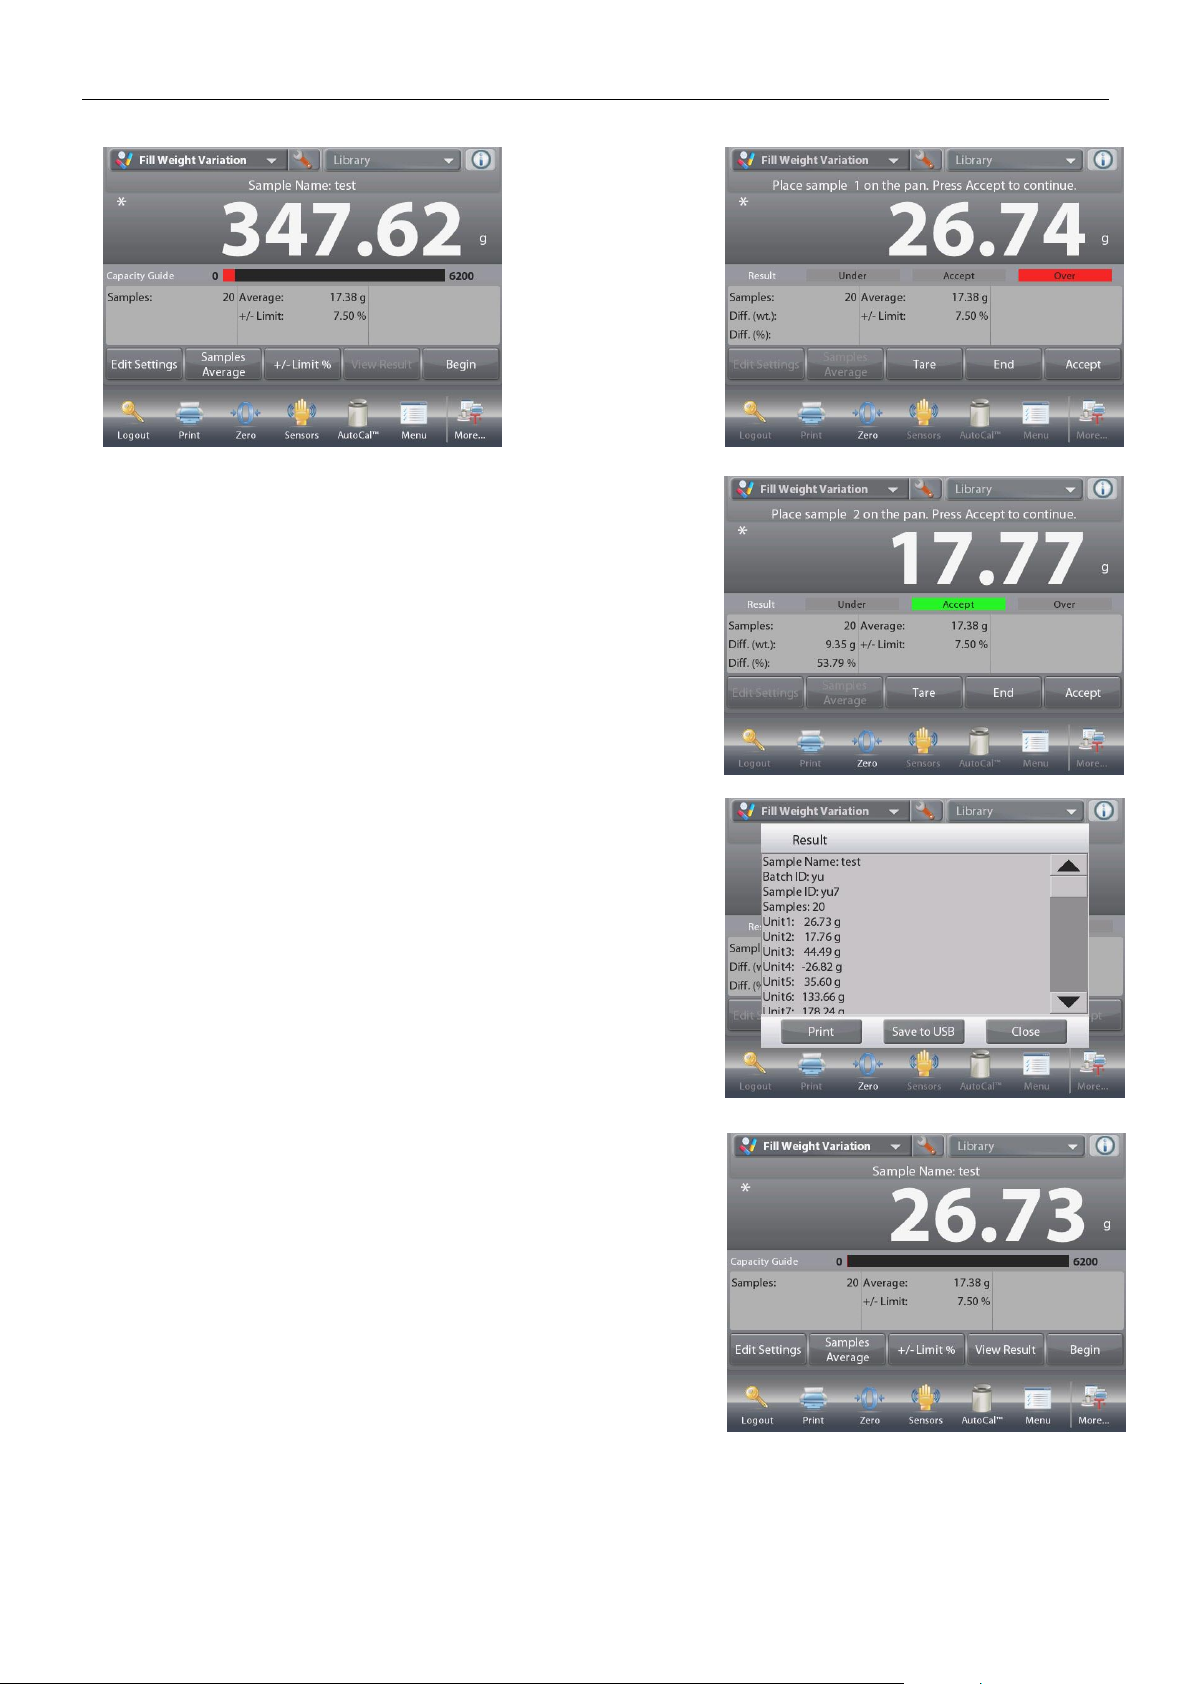
EN-94 EXPLORER BALANCES
4.15.2 Begin the Fill Weight Variation Process
Touch
Begin.
Follow the screen
instructions to
place sample 1 on
the pan. Then
Press Accept.
After that follow the onscreen instruction to place sample 2
on the pan, and touch the Accept button to continue.
When a sample is placed, the screen will show if the result is
Under, Accept or Over the +/- Limit % value you set.
Continue to follow the screen instructions to weigh samples
and touch the Accept button to store each sample’s weight.
The maximum sample number is 99.
It can be changed from 1 to 99.
Once all the samples have been weighed, the
Results
screen appears automatically.
Setup the proper connectivity and press Print to send the
results to PC or printer.
See Communication Setup, Section 5.10 for details.
Insert a USB flash drive to the balance if you need to save
the result to it. Once the drive is inserted, you will see a
Save
to USB
button. Touch the button to save the result.
Touch
Close
to return to the current process.
To view the result again later, touch the View Result button.
Find Quality Products Online at: [email protected]
www.GlobalTestSupply.com
Page 97
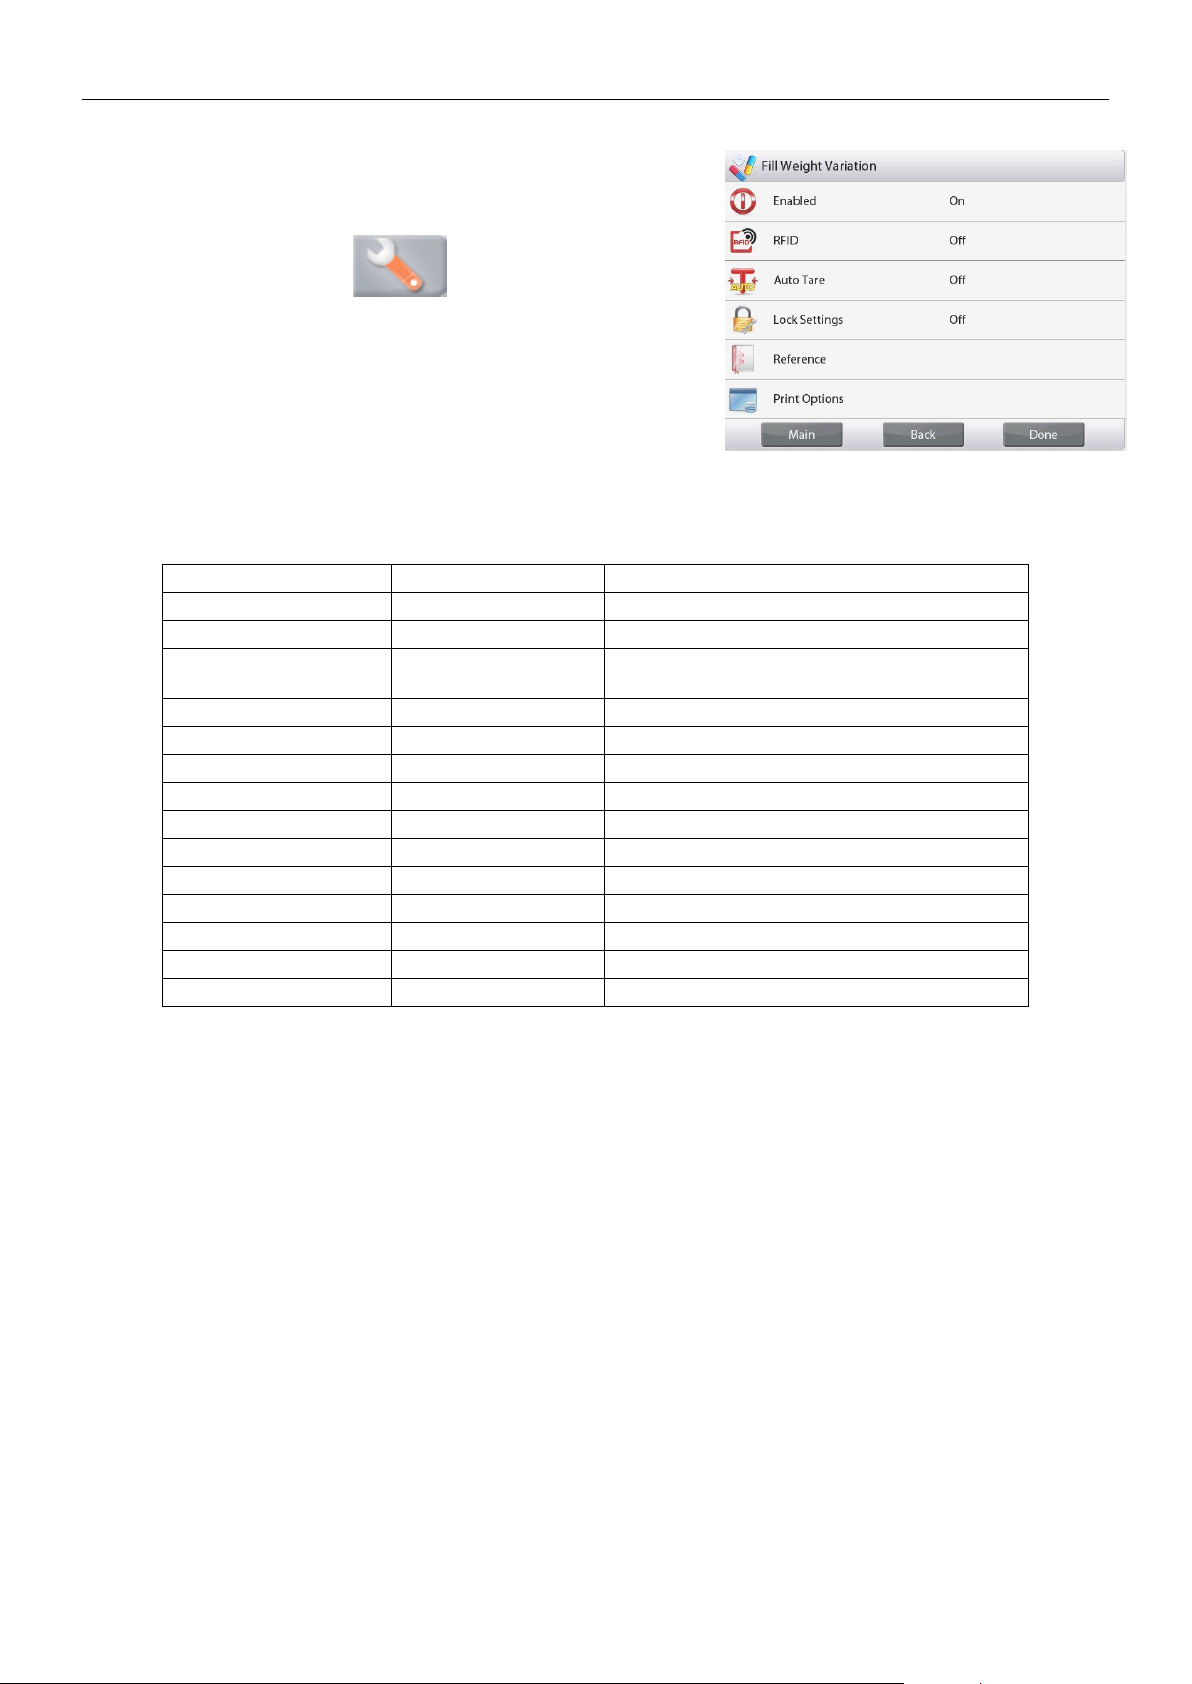
EXPLORER BALANCES EN-95
4.15.3 Application Setup
The Application can be customized for various user preferences.
Touch the Setup Icon (wrench) to enter Application Setup from
the home screen.
The Setup Menu is now displayed.
Select the list item to view or change the setting as desired.
To return to the Application home screen, touch
Done
.
When Auto Tare is enabled, the sample will be tared
automatically after Accept is pressed and the sample weight is
stored.
The Fill Weight Variation Application Setups (defaults in Bold)
Item
Available Settings
Comments
Enabled
On, Off
Turns Application on/off
RFID
On, Off
Enable to scan RFID code
Lock Settings
On, Off
Press to lock the current setting(s) so they
cannot be changed.
Reference
Difference Weight
On, Off
Weight difference is displayed
Difference Percent
On, Off
Weight difference percentage is displayed
Average
On, Off
Weight average is displayed
+/- Limit %
On, Off
+/- Limit value is displayed
Gross
On, Off
Gross weight is displayed
Net
On, Off
Net weight is displayed
Tare
On, Off
Tare weight is displayed
Print Options
Average
On, Off
+/- Limit %
On, Off
4.16 Statistics
Statistics are used to compare a number of samples and examine the relative deviation of the samples along with
other statistical data. A minimum of three samples is required.
Statistics can operate manually (key press after each step) or automatically (weights automatically recorded
when stable). To use the statistics feature, enable it in the Application Setup menu.
This feature is available in Weighing, Counting, Check Weighing, Dynamic Weighing and Filling applications.
Find Quality Products Online at: [email protected]
www.GlobalTestSupply.com
Page 98
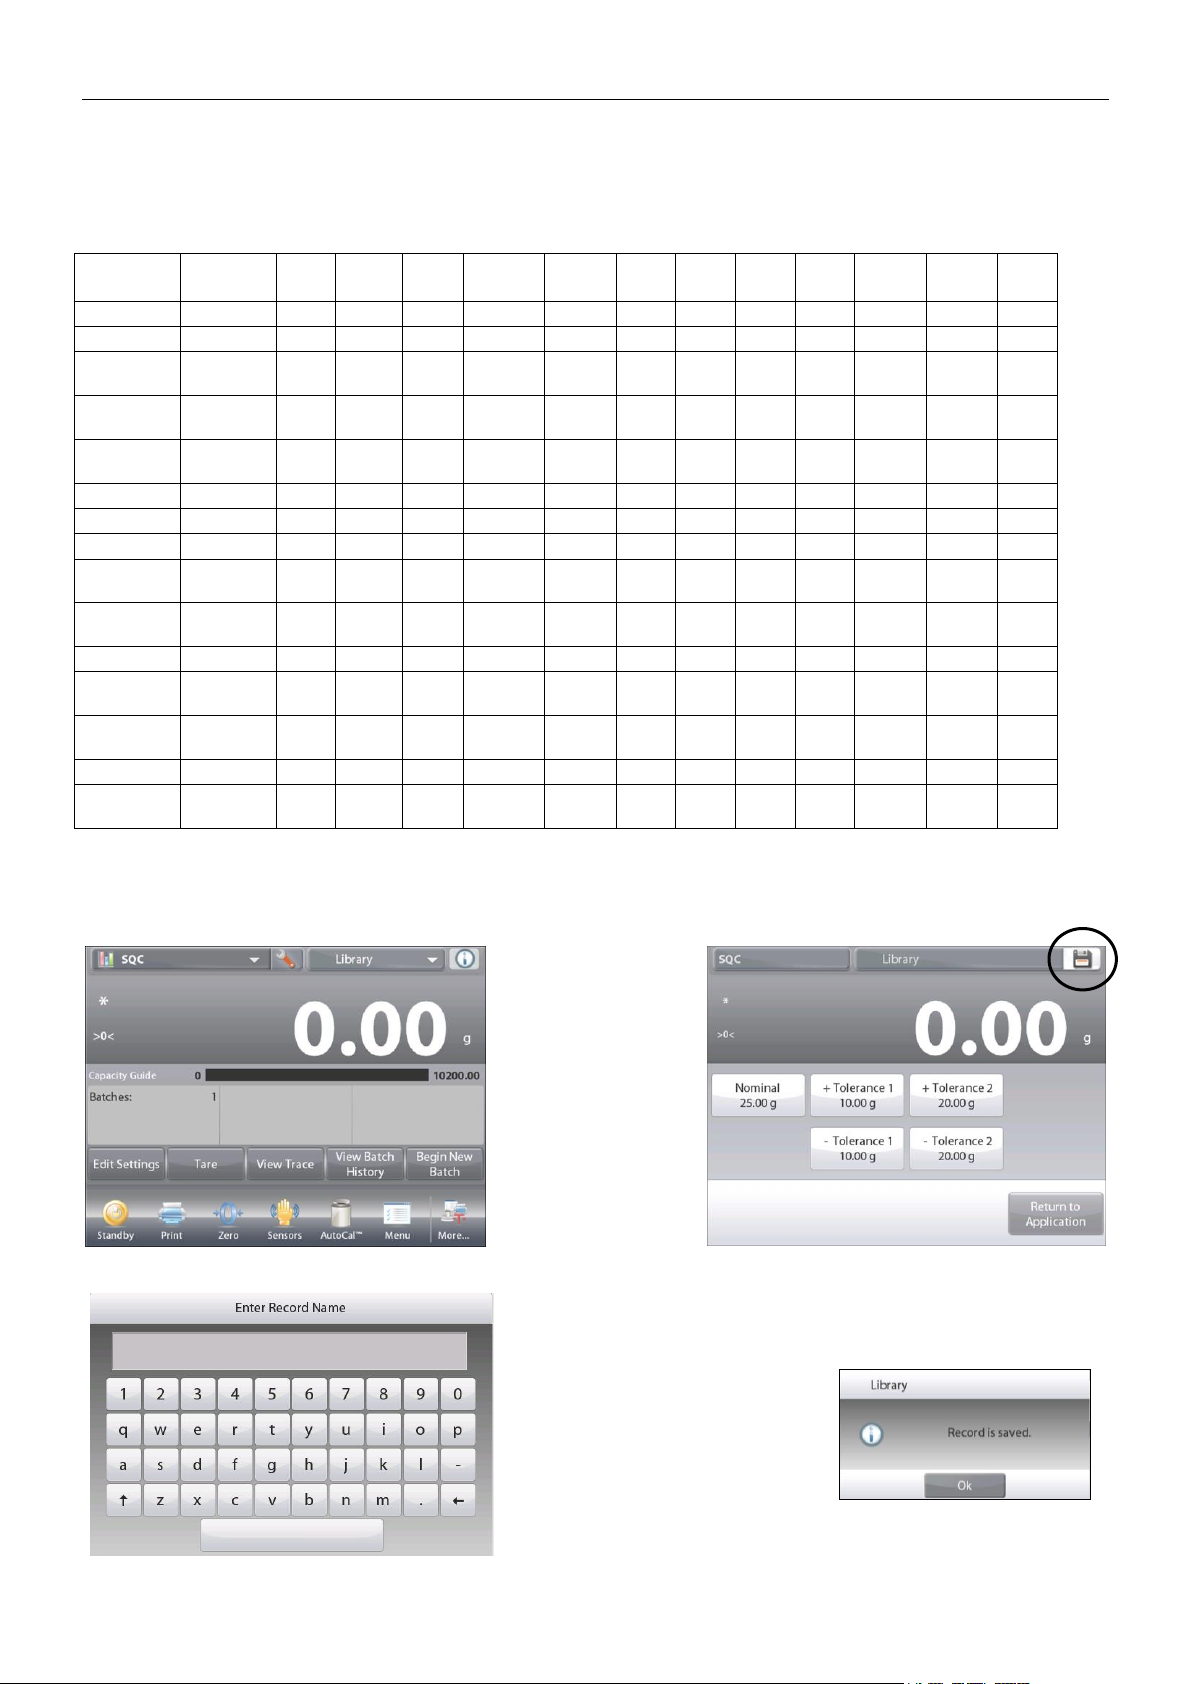
EN-96 EXPLORER BALANCES
4.17 Library
When an item is processed on a regular basis, the item’s data may be stored in memory for future use. This
memory is referred to as the Balance’s Library.
The following data is stored for the Application used:
Application
Parameters
and setups
Name
Preset
Tare
APW
Ref Wt.
or Target
Sample
size
Under
Limit
Over
Limit
Level
Mode
Sample
Name
Sample
ID
Batch
ID
Weighing
x x x x x x
Counting x x x x x x x x x x
x
Percent
Weighing
x x x x
x x x
Check
Weighing
x x x x x
x
x x x
Dynamic
Weighing
x x x
x
x x x
Filling x x x x x x x Totalization
Formulation
x x
Differential
Weighing
Density
Determination
x x
x x x
Peak Hold
Ingredient
Costing
Pipette
Adjustment
x x
SQC x x
Fill Weight
Variation
4.17.1 Creating a Library Record
To create a Library record, the Settings screen is used. From the home screen, touch the Edit Settings button.
The Settings screen is now displayed.
Touch the
Edit
Settings
button.
The
Settings
screen appears.
Confirm the
application settings;
then touch Save
(the diskette,
top-right).
An alphanumeric
entry screen
appears, to enter
the Library Record
name.
Enter the Record name,
then press .
Note: Library Record names
can be 8 characters or less.
A
Record is saved
message
appears. Press OK, then…
Press
Return to Application
.
Find Quality Products Online at: [email protected]
www.GlobalTestSupply.com
Page 99
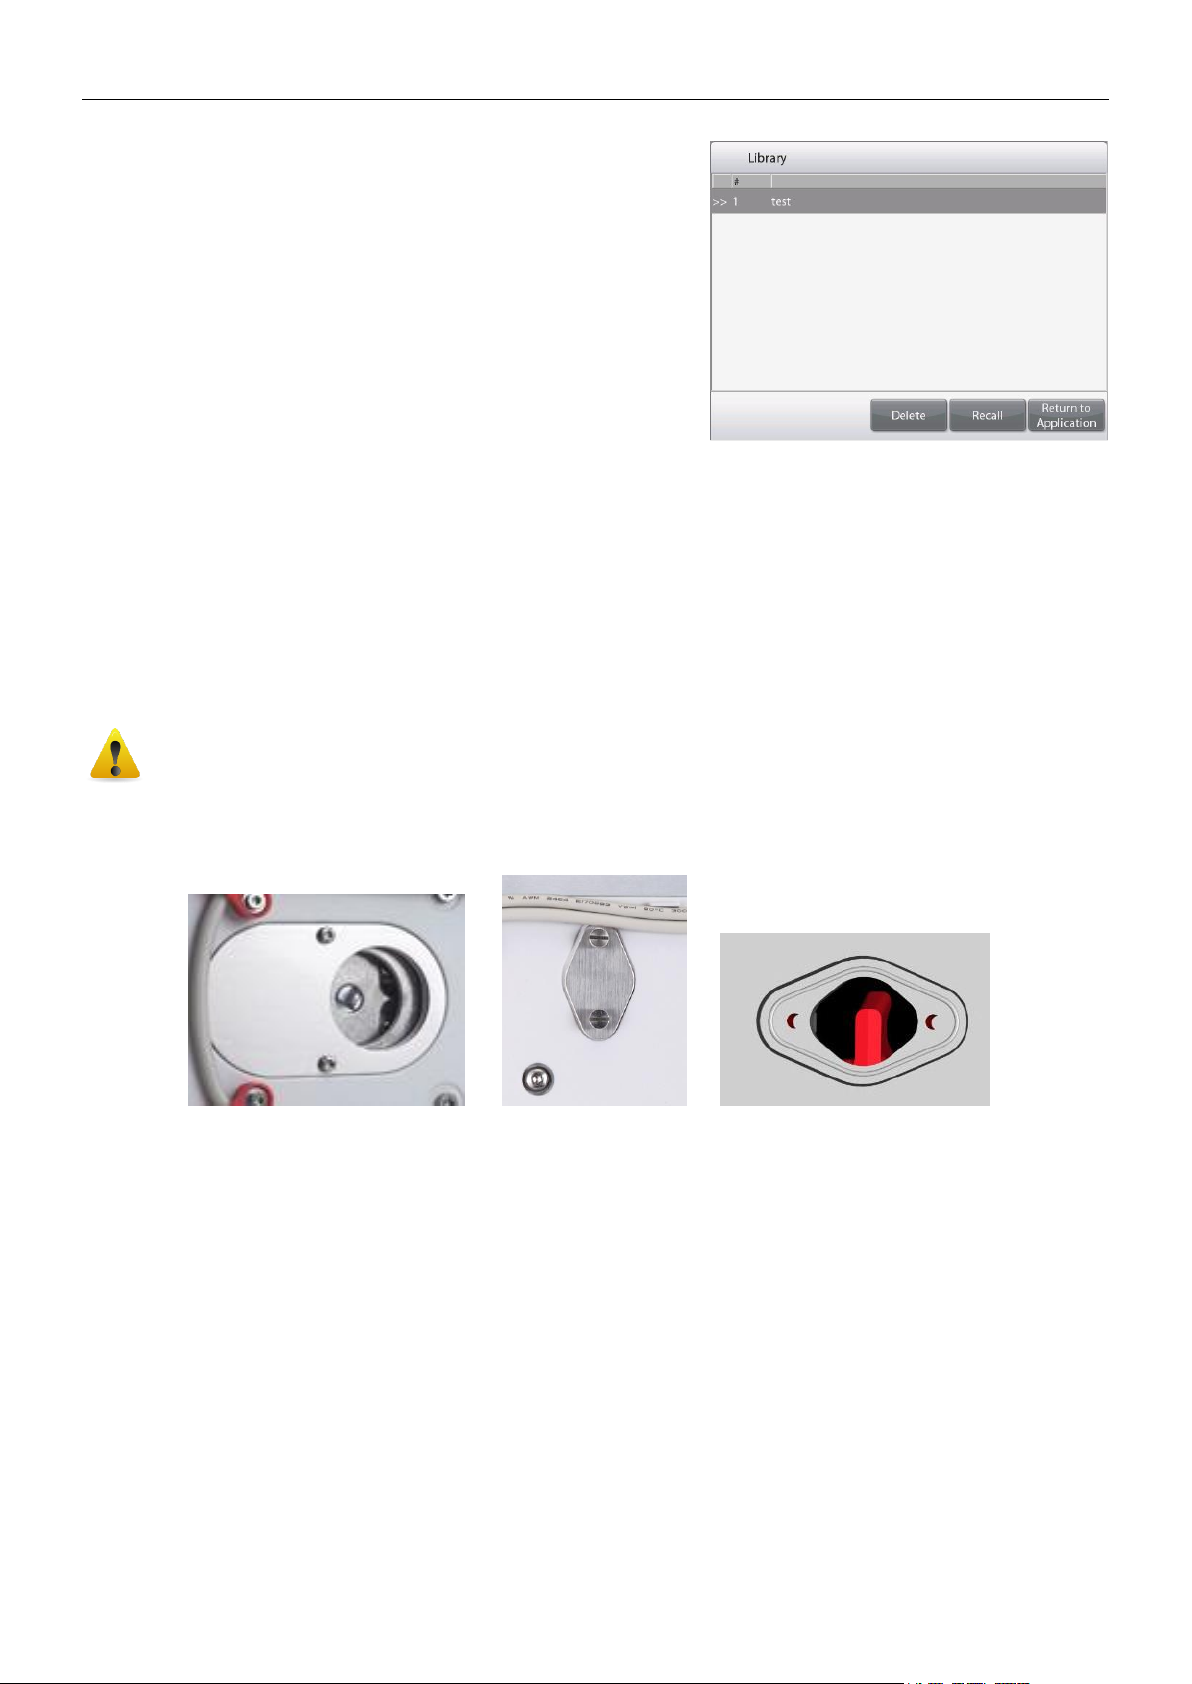
EXPLORER BALANCES EN-97
4.17.2 Retrieving a Library Record
Load a Library record from the home screen.
Press the
Library
bar in the upper right area of the screen.
(It shows the name of the most recently used library file.)
The Library manager popup is now displayed.
Touch the Library Record to highlight it, then touch Recall
to load the record’s settings into the Application.
Then press
Return to Application
to return to the home screen
with the Library name displayed and the stored parameters active.
4.17.3 Deleting a Stored Library Record
To delete a stored record, follow “Retrieving a Library Record” above, but press Delete instead of Recall.
4.18 Additional Features
4.18.1 Weigh Below
The Explorer Balance is equipped with a weigh below hook for weighing below the balance.
Note: before turning the balance over, remove the Pan, Pan Support, Wind Ring/Shield and Draft Shield
elements (if present) to prevent damage.
CAUTION: Do not place the balance on the pan support cone or Load cell Pins
To use this feature, remove power from the balance, then remove the protective cover for the weigh below
opening (2 screws). The protective cover is reversible for easy storage.
With Cover Without Cover
The balance can be supported using lab jacks or any other convenient method. Ensure the balance is level and
secure. Power on the Balance, then use a string or wire to attach items to be weighed.
Find Quality Products Online at: [email protected]
www.GlobalTestSupply.com
Page 100
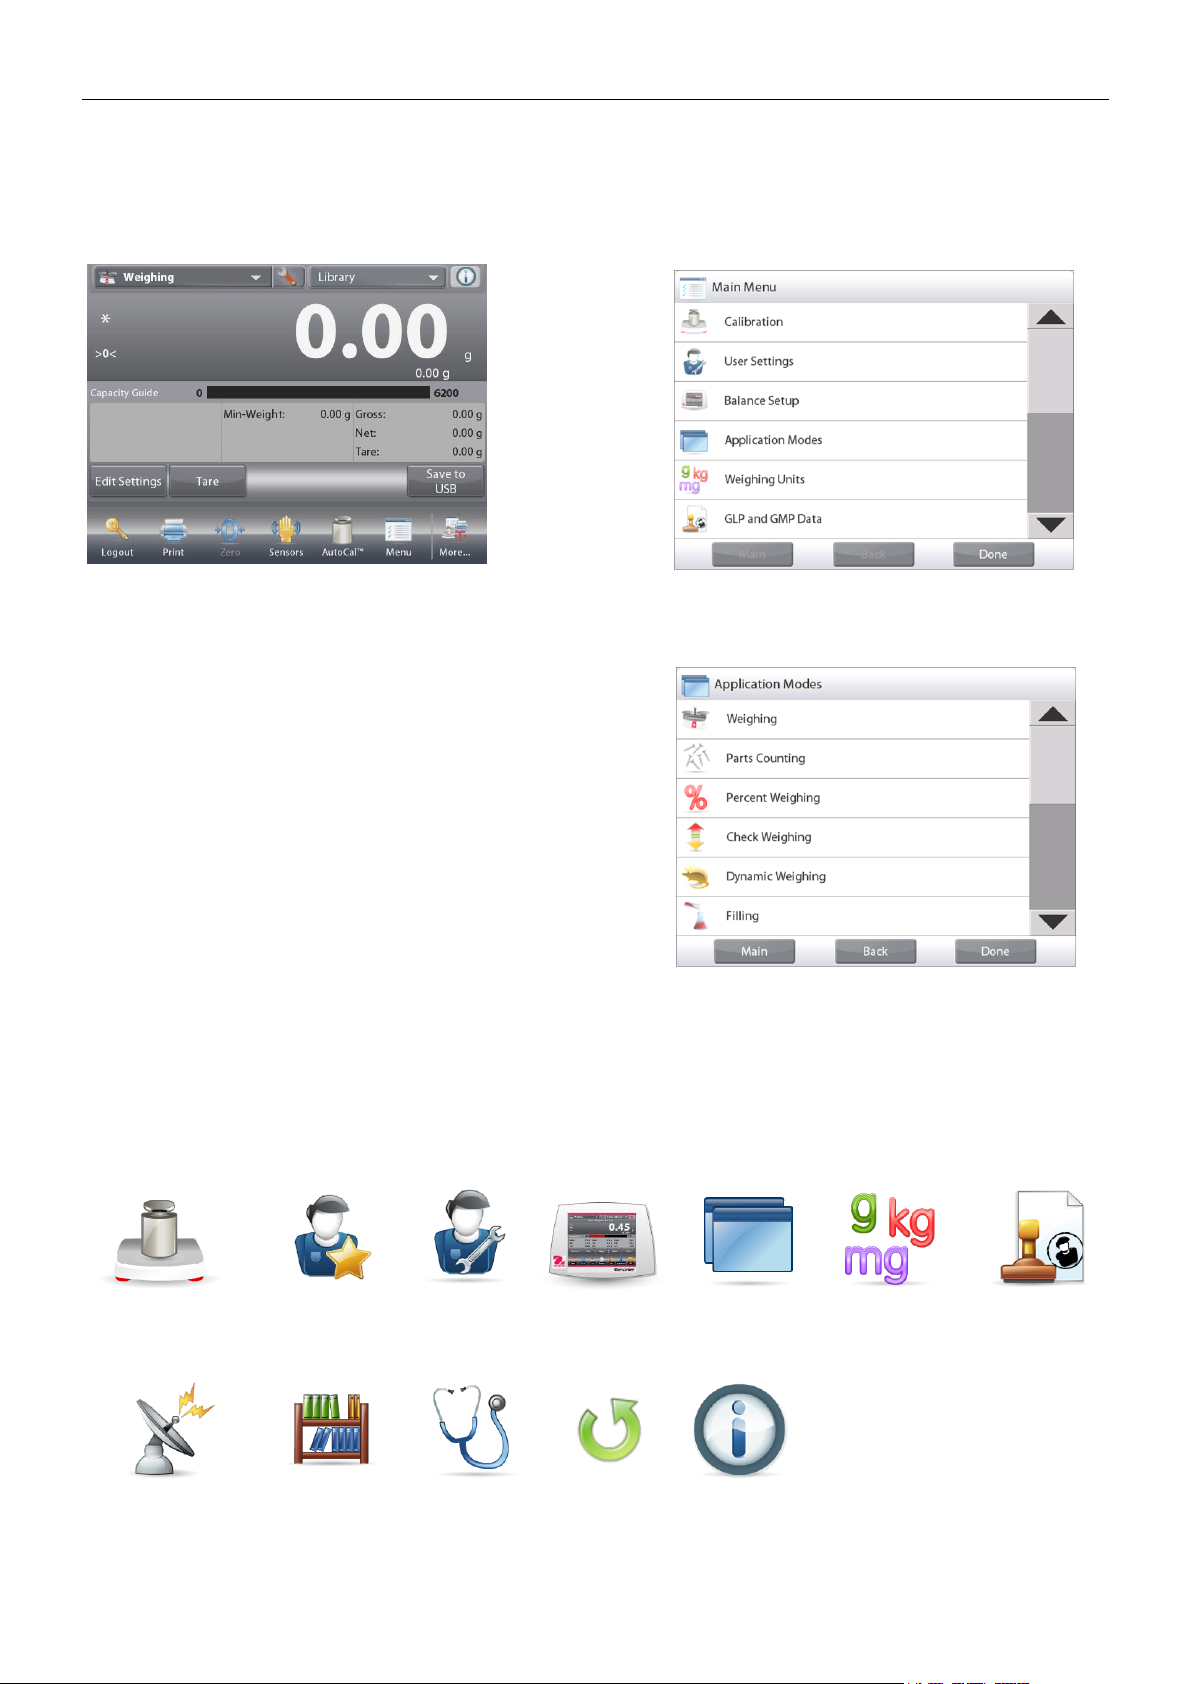
EN-98 EXPLORER BALANCES
5. MENU SETTINGS
5.1 Menu Navigation
All menu navigation is performed by touching the display. To enter the Menu, touch Menu from any Application
Home screen. The Main menu appears, with buttons for Main, Back and Done. Continue touching the
appropriate list item to navigate to the Menu items or touch a button to change location.
5.1.1 Changing Settings
To change a menu setting, navigate to that setting using the following steps:
Enter the Menu
From any Application screen, Touch Menu.
The Main Menu List appears on the display.
Select the Sub-Menu
Scroll down to the selected item of the Main Menu List
and touch it. The Sub-Menu appears.
Select the Menu Item
Continue until the desired setting is chosen in the
Menu list. Touch the setting to change it.
The changed setting will be displayed as highlighted
for 2 seconds to confirm the changed value.
Exit the Menu and Return to the Current Application
After the setting is confirmed, touch Done to return to the Application.
Note: at any time the Main, Back & Done buttons can be touched to navigate to the desired area of the menu or
return to the current Application.
5.2 Main Menu
The Explorer balance Main menu structure is illustrated below.
Calibration
User
Management
User
Settings
Balance
Setup
Application
Modes
Weighing
Units
GLP and GMP
Data
Communication
Library
Diagnostics
Factory
Reset
Information
Find Quality Products Online at: [email protected]
www.GlobalTestSupply.com
 Loading...