

Page 1

Ohaus CorporationOhaus Corporation
Ohaus Corporation
Ohaus CorporationOhaus Corporation
29 Hanover Road
Florham Park NJ
07932-0900
DIAL-O-GRAM® BALANCE
Model 310
and
CENT-O-GRAM® BALANCE
Model 311
Instruction Manual
1
Page 2
INTRODUCTION INTRODUCTION
INTRODUCTION
INTRODUCTION INTRODUCTION
This manual covers Installation and Operation for the Ohaus Dial-O-Gram® Balance
Model 310 and Cent-O-Gram® Balance Model 311.
DESCRIPTIONDESCRIPTION
DESCRIPTION
DESCRIPTIONDESCRIPTION
Ohaus Dial-O-Gram® Balance Model 310 and Cent-O-Gram® Balance Model 311 are
manufactured from high grade precision zinc castings for the base and precision
aluminum castings for the beam. Agate bearings, hardened steel knife edges, and
stainless steel pans ensure a high standard of quality for these products.
The 3-point base together with the special floating bearing principle and beam design
eliminates the need to have a level adjustment. Zeroing is easily and quickly achieved
by means of a counter balancing knob at the end of the beam. The balances are
intended for use in education, and industry applications. They produce quick readings
due to their damping mechanism. Both balances can also be used to make specific
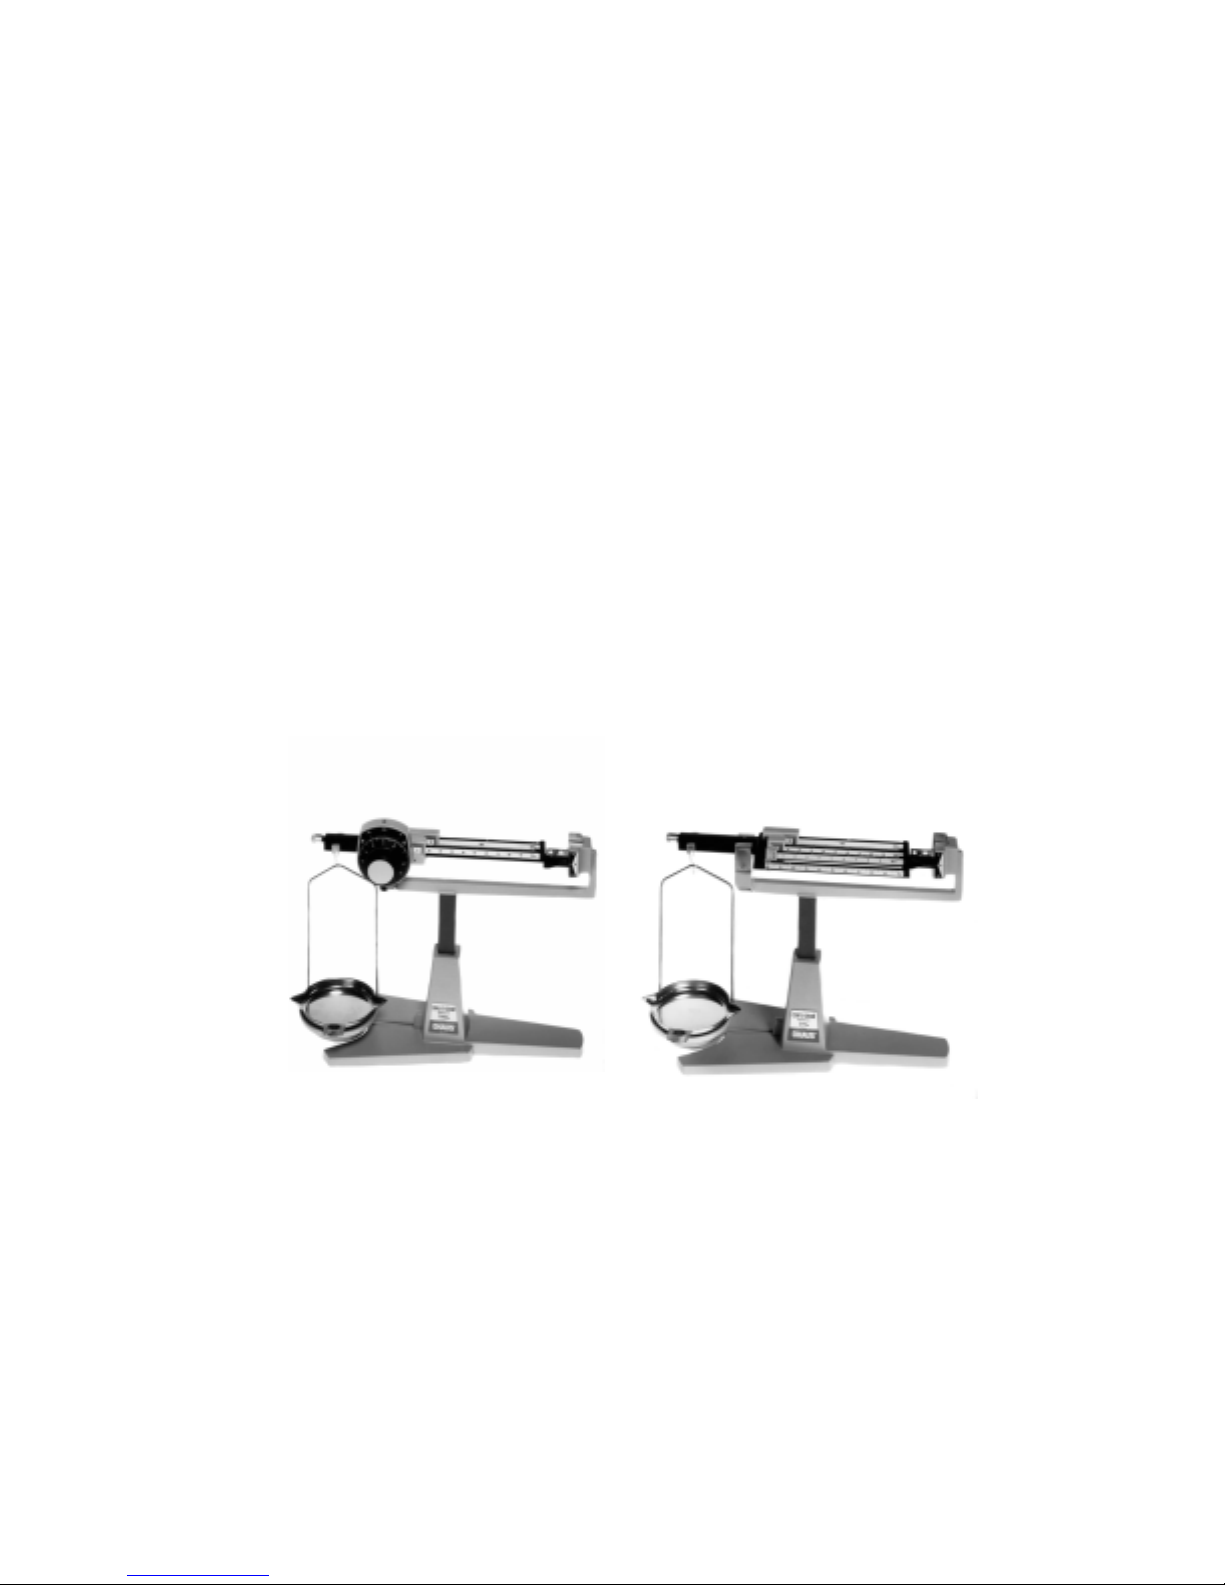
gravity measurements. Model 310 has two beams, each with a sliding poise, and a
graduated dial and vernier which enables readings of 0.01 g. Capacity of the Model
310 is 310 grams. Model 311 has four beams, each with a sliding poise. Capacity
of the Model 311 is 311 grams with a readability of 0.01 g.
Figure 1. Model 310.
UNPACKING AND ASSEMBLY INSTRUCTIONSUNPACKING AND ASSEMBLY INSTRUCTIONS
UNPACKING AND ASSEMBLY INSTRUCTIONS
UNPACKING AND ASSEMBLY INSTRUCTIONSUNPACKING AND ASSEMBLY INSTRUCTIONS
The balance has been shipped with each component packed securely in a protective,
Figure 2. Model 311.
2
Page 3
expanded polystyrene container. Follow these instructions and you can assemble
your balance in just a few minutes.
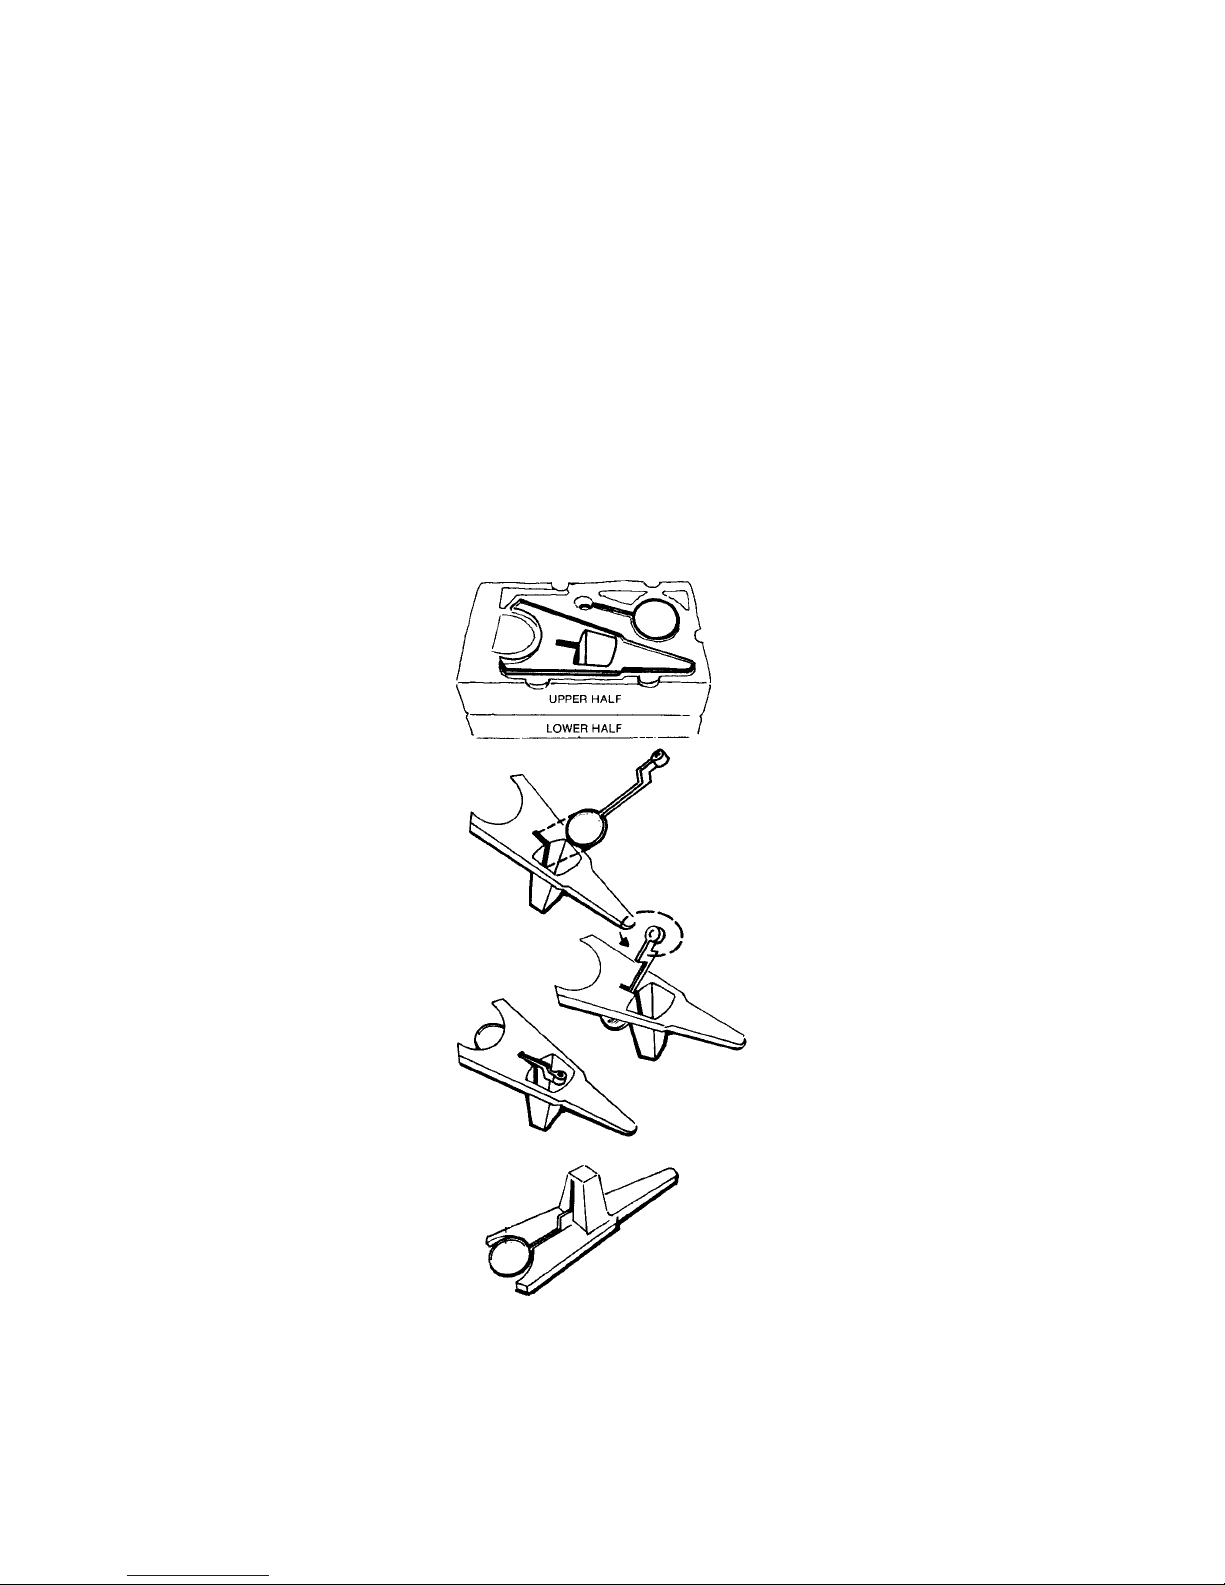
1. Remove the poly-container from the shipping carton and place it so that you
can see the base and specific gravity stand. See Figure 3.
2. Cut the strap and lift off the upper half of the poly-container. Remove the base
and specific gravity stand. Hold the base upside down. Insert the round, flat end
of the stand through the slot in the base. Rotate stand into position as shown in
Figure 4. It will turn easily if you rotate it as soon as the round end clears the
opening. When the base and the specific gravity stand are upright, the OHAUS
on the stand must be facing down.
Figure 3.
SPECIFIC GRAVITY DETERMINATIONSSPECIFIC GRAVITY DETERMINATIONS
SPECIFIC GRAVITY DETERMINATIONS
SPECIFIC GRAVITY DETERMINATIONSSPECIFIC GRAVITY DETERMINATIONS
Figure 4.
3
Page 4
UNPACKING AND ASSEMBLY INSTRUCTIONS (CUNPACKING AND ASSEMBLY INSTRUCTIONS (C
UNPACKING AND ASSEMBLY INSTRUCTIONS (C
UNPACKING AND ASSEMBLY INSTRUCTIONS (CUNPACKING AND ASSEMBLY INSTRUCTIONS (C
ontont
ont
ontont
.).)
.)
.).)
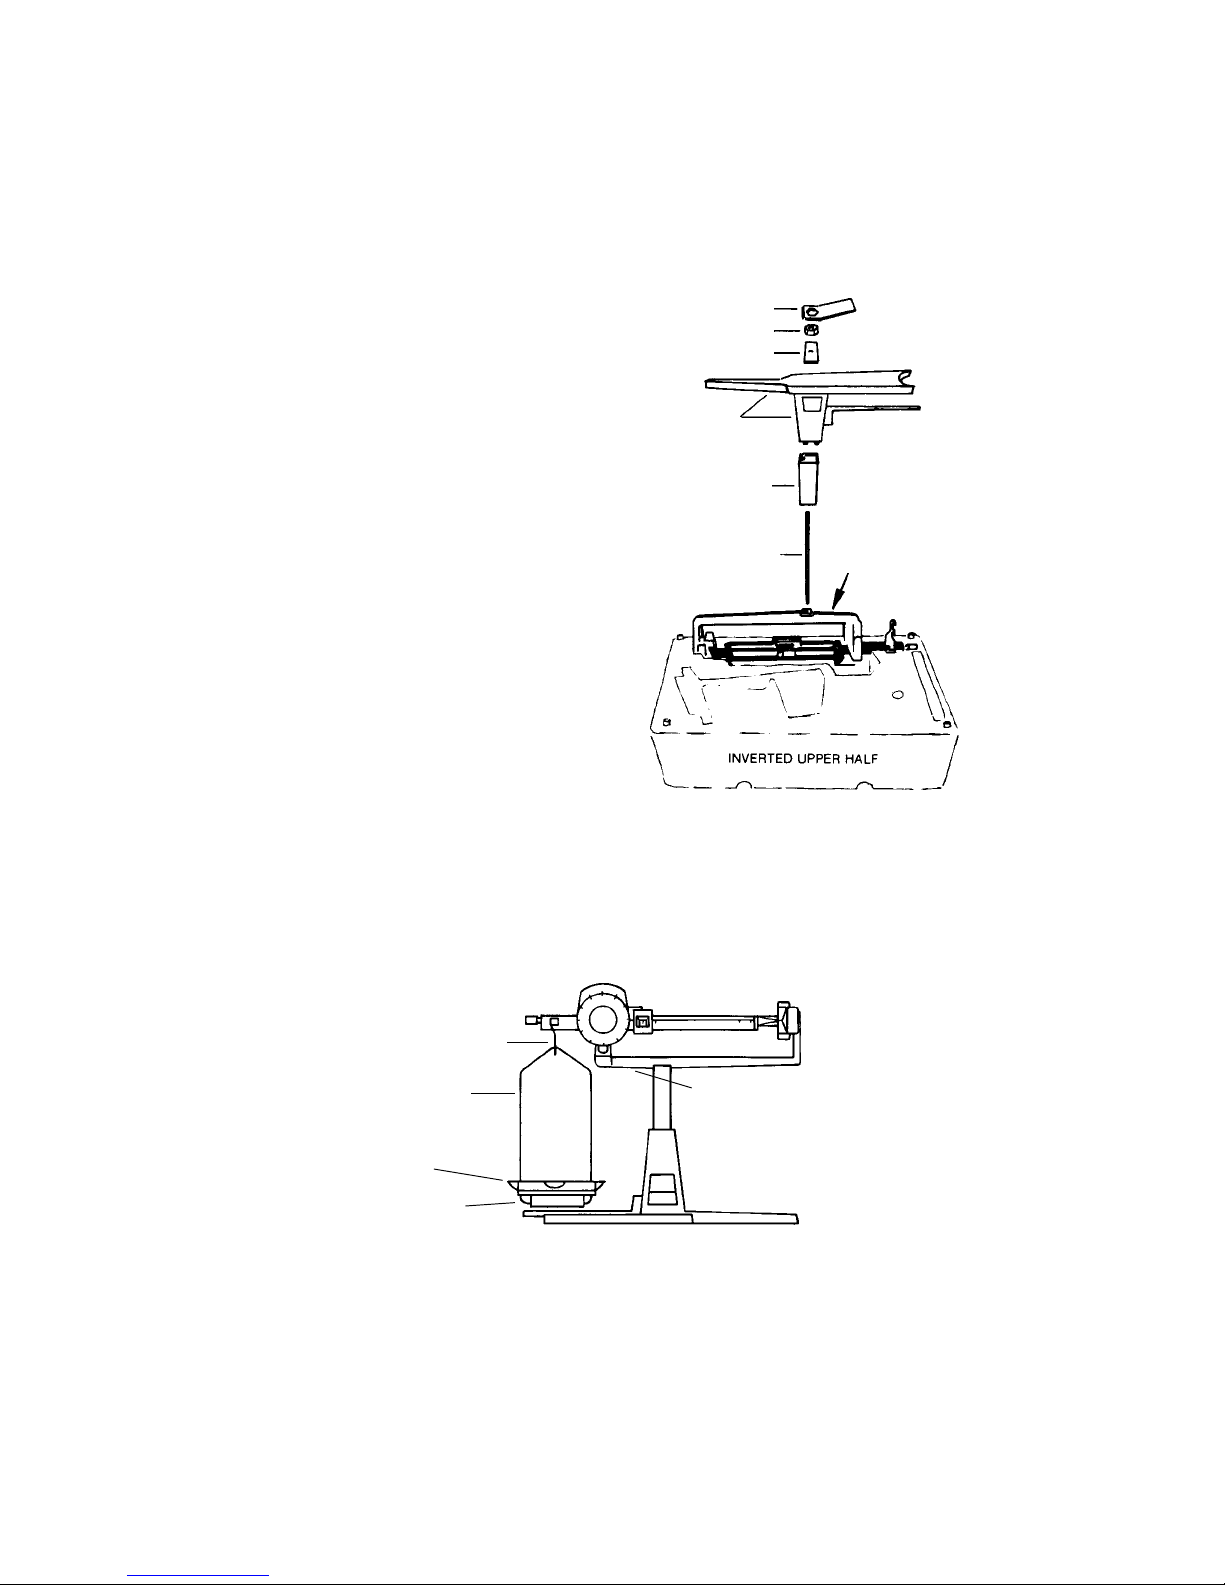
3. Remove the balance head from the
lower half of the poly-container. Invert
the balance head and nest it in the
recess of the top half of the polycontainer. See Figure 5.
4. Screw the threaded rod into the hole in
the balance until it stops.
5. Slide the column down over the
threaded rod. Hold the base and
specific gravity stand in your left hand
and slide them down over the threaded
rod. (The column, base and balance
head support bracket are keyed for
correct assembly orientation.)
6. Slip the strap over the threaded rod
into the recessed area of the base.
Tighten the nut securely with the throw
away wrench.
7. Turn the balance over. If the specific
gravity stand is not already nested in
the base, lift the round section, and it
will slide down.
Wrench
Nut
Strap
Base and
Specific
Gravity Stand
Column
Threaded Rod
Balance Head
Figure 5.
8. Place the pan on the pan support and
insert the pan bow in the upper
notch of the end loop as shown in
Figure 6.
End Loop
Pan Bow
Pan
Pan Support
Figure 6.
Support Bracket
4
Page 5

ZEROING THE BALANCEZEROING THE BALANCE
ZEROING THE BALANCE
ZEROING THE BALANCEZEROING THE BALANCE
Slide all poises to their respective zero positions. Turn dial to zero position. You can
now zero the balance by rotating the knurled balance compensator knob at the left end
of the beam until the pointer on the right lines up with zero. (Note how quickly the
magnetic damping brings the pointer to rest.)
Check the balance periodically since foreign material may accumulate on the beam
or pan and cause a slight change in the zero balance position of the pointer. Whenever
the balance is moved to a new location, the balance should be checked and zeroed
again, if necessary.
WEIGHINGWEIGHING
WEIGHING
WEIGHINGWEIGHING
Weighing is a very simple and rapid operation. Place the specimen on the pan of the
balance. Proceed as follows for the fastest method of weight determination.
Model 310Model 310
Model 310
Model 310Model 310
1. Move the 200 gram poise on the rear beam to the first notch which causes the
pointer to drop, then move it back one notch, causing the pointer to rise.
2. Repeat this procedure with the 100 gram poise.
3. Turn the knob slowly until the pointer is exactly centered on the zero indicator.
4. The weight of the specimen is the sum of the values of both poise positions, the
dial position and the vernier reading.
NOTE: With a little practice, you will become proficient in learning exactly how fast to
turn the dial to come exactly to balance position the first time.
Shortcut procedures may be used in instances where approximate weight of the
specimen is known, as follows:
For specimens less than 100 grams, omit step 1.
For specimens less than 10 grams, omit steps 1and 2.
Figure 7. Example of 146.74 Gram Reading.
5
Page 6
READING THE VERNIER - Model 310READING THE VERNIER - Model 310
READING THE VERNIER - Model 310
READING THE VERNIER - Model 310READING THE VERNIER - Model 310
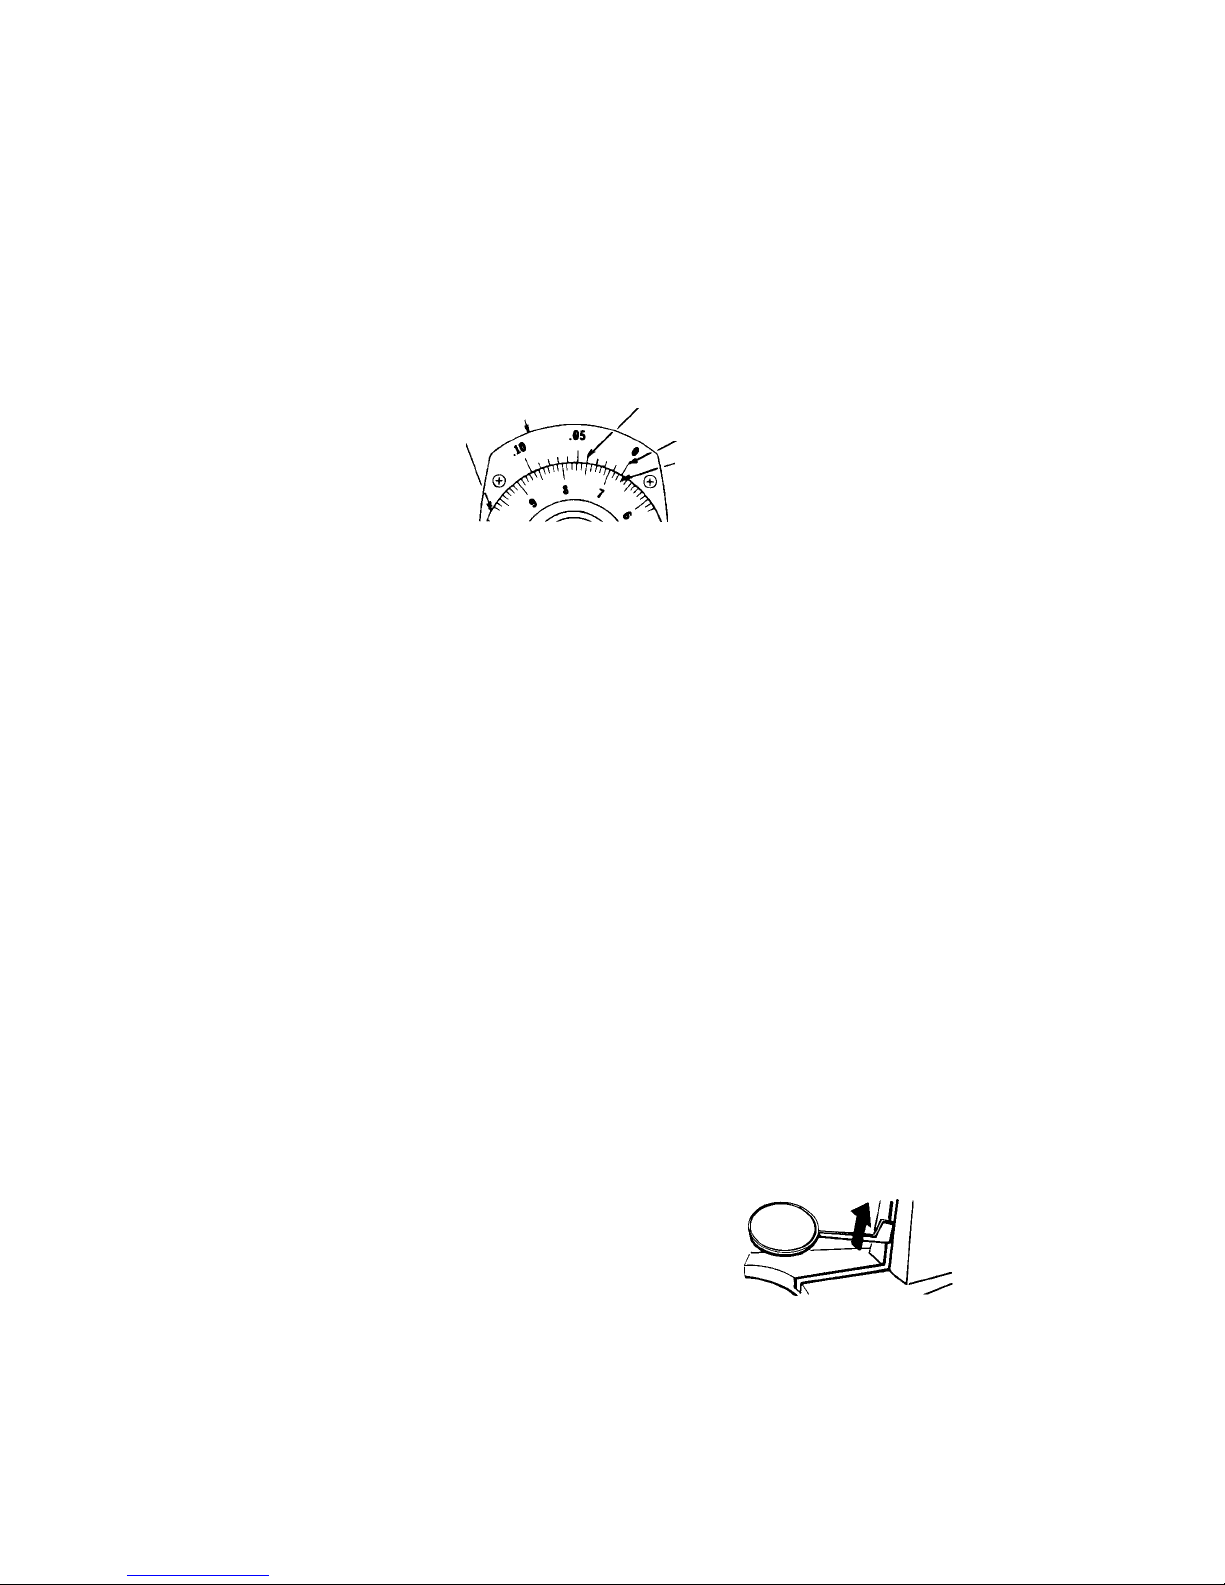
Each graduation on the dial has a value of 0.1 gram. A vernier adjacant to the dial
breaks down these values in 0.01 gram increments. To read the vernier, read the
nearest gram value to the right of the zero vernier graduation. Add to that the vernier
graduation value at the vernier line which most closely lines up with any of the other
dial graduations. Figure 8 indicates a reading of 6.74 grams.
Vernier
Dial
0.04 gram Vernier Graduation
Zero Vernier Graduation
6.70 gram Graduation
Model 311Model 311
Model 311
Model 311Model 311
1. Working from the rear beam forward, move the 200 gram poise on the rear beam
to the first notch which causes the pointer to drop, then move it back one notch,
causing the pointer to rise
2. Repeat this procedure with the 100 gram poise.
3. Repeat this procedure with the 10 gram poise.
4. Slide the 1 gram poise to the position which brings the pointer to zero. The weight
of the specimen is the sum of values of all poise positions, read directly from the
graduated beams. See Figure 9.
NOTE: With a little practice, you will become proficient in learning exactly how fast to
turn the dial to come exactly to balance position the first time.
Shortcut procedures may be used in instances where approximate weight of the
specimen is known, as follows:
For specimens less than 100 grams, omit step 1.
For specimens less than 10 grams, omit steps 1and 2.
For specimens less than 1 gram, omit steps 1, 2 and 3.
Figure 8. Vernier Dial Reading of 6.74 Grams.
Figure 9. Example of 183.6 Gram Reading
Specific Gravity determinations are easily made on the
balance. Swing the pan support and pan out of the way.
Raise the specific gravity platform to the desired position
by grasping the round end. Release platform at desired
elevation and it will lock in that position.
SPECIFIC GRAVITY DETERMINATIONS (CSPECIFIC GRAVITY DETERMINATIONS (C
SPECIFIC GRAVITY DETERMINATIONS (C
SPECIFIC GRAVITY DETERMINATIONS (CSPECIFIC GRAVITY DETERMINATIONS (C
Figure 10.
ontont
.).)
ont
.)
ontont
6
.).)
Page 7

The specimen can then be suspended from a fine wire or thread from the lower hook
of the end loop into a beaker or other suitable container of water or other liquid. If a
great number of determinations are to be made on small solids, the use of a Model
# 113 gem Holder, Counter Weight and Beaker is recommended. This provides a rapid
method of weighing the object under water and eliminates the cumbersome task of
tying a string or piece of fine metal to the object.
SOLIDS - (denser than water)SOLIDS - (denser than water)
SOLIDS - (denser than water)
SOLIDS - (denser than water)SOLIDS - (denser than water)
To determine specific gravity of solids denser than water, the specimen should be first
weighed in air and then weighed immersed in water.
S. G. = Weight in air
Weight in air minus weight in water
SOLIDS - (less dense than water)SOLIDS - (less dense than water)
SOLIDS - (less dense than water)
SOLIDS - (less dense than water)SOLIDS - (less dense than water)
To determine the specific gravity of solids less dense than water, it is necessary to
attach a sinker and then make the following weighings:
a. Weight of body in air.
b. Combined weight of body in air plus sinker in water .
c. Weight of both body and sinker in water.
Specific Gravity = a
b-c
CARE AND MAINTENANCECARE AND MAINTENANCE
CARE AND MAINTENANCE
CARE AND MAINTENANCECARE AND MAINTENANCE
With reasonable care, your Balance can be kept in good working order. Keep it clean
and do not drop it. Foreign matter can be most easily removed with an air syringe.
When the balance is not used, it should be protected by a balance cover. (Part No.
110). Never apply oil or any lubricant to the knife edges or bearings; this will lower
the accuracy of the balance. From time to time, it may be necessary to clean the
damping magnet faces. This is best done by inserting a piece of adhesive-backed
tape into the damper vane slot (right side of beam), and pressing it against the magnet
face. The tape will pick up foreign material and prevent it from interfering with
movement of the damper vane.
OPTIONAL ACCESSORIESOPTIONAL ACCESSORIES
OPTIONAL ACCESSORIES
OPTIONAL ACCESSORIESOPTIONAL ACCESSORIES
DESCRIPTION PART NO
Balance Cover 110-00
Gem Holder Kit 113-00
Test Tube Kit 76912-01
SERVICE INFORMATIONSERVICE INFORMATION
SERVICE INFORMATION
SERVICE INFORMATIONSERVICE INFORMATION
For Service assistance in the United States, please call Ohaus Corporation toll-free
at (800) 526-0659. An Ohaus Product Service Specialist will be available to help you.
7
Page 8

LIMITED WARRANTYLIMITED WARRANTY
LIMITED WARRANTY
LIMITED WARRANTYLIMITED WARRANTY
Ohaus products are warranted against defects in materials and
workmanship from the date of delivery through the duration of the
warranty period. During the warranty period Ohaus will repair, or, at its
option, replace any component(s) that proves to be defective at no
charge, provided that the product is returned, freight prepaid, to
Ohaus.
This warranty does not apply if the product has been damaged by
accident or misuse, exposed to radioactive or corrosive materials, has
foreign material penetrating to the inside of the product, or as a result
of service or modification by other than Ohaus. In lieu of a properly
returned warranty registration card, the warranty period shall begin on
the date of shipment to the authorized dealer. No other express or
implied warranty is given by Ohaus Corporation. Ohaus Corporation
shall not be liable for any consequential damages.
As warranty legislation differs from state to state and country to
country, please contact Ohaus or your local Ohaus dealer for further
details.
Ohaus Corporation
29 Hanover Road,
Florham Park, NJ 07932, USA
Tel: (973) 377-9000,
Fax: (973) 593-0359
With offices worldwide.
P/N 4547-03 R1299 © Ohaus Corporation 1982, 1999, all rights reserved.
8
 Loading...