

Page 1

Adventurer Pro Balances
Instruction Manual
Page 2

Page 3

Adventurer Pro
TABLE OF CONTENTS
1. INTRODUCTION ......................................................................................... EN-3
1.1 Description ............................................................................................... EN-3
1.2 Features ................................................................................................... EN-3
1.3 Safety Precautions ..................................................................................... EN-3
2. INSTALLATION ........................................................................................... EN-4
2.1 Unpacking ................................................................................................ EN-4
2.2 Installing Components ............................................................................... EN-4
2.2.1 Assembly of Models AV412, AV812, AV2101, AV2102, AV3102,
AV4101, AV4102, AV8101 ............................................................. EN-4
2.2.2 Assembly of Models AV64, AV114, AV213, AV264, AV313, AV413,
AV513 ......................................................................................... EN-5
2.2.3 Assembly of Model AV53 ............................................................... EN-8
2.2.4 Assembly of Models AV212............................................................ EN-9
2.3. Selecting the Location ................................................................................ EN-9
2.4 Leveling the Balance .................................................................................. EN-9
2.5 Connecting Power ................................................................................... EN-10
2.5.1 AC Adapter.................................................................................. EN-10
2.5.2 Battery Installation ....................................................................... EN-10
2.5.3 Turning Power On and Off ............................................................ EN-10
2.6 Initial Calibration ..................................................................................... EN-10
3. OPERATION ................................................................................................. EN-11
3.1 Overview of Controls & Display Functions.................................................... EN-11
3.1.1 Models AV53, AV212, AV412, AV812, AV1502, AV2101,
AV4101, AV8101 ........................................................................ EN-11
3.1.2 Models AV64, AV64C, AV114, AV114C, AV212C, AV53C, AV213,
AV213C, AV313C, AV264, AV264C, AV412C, AV413, AV413C,
AV513C, AV812C, AV2101C, AV2102, AV2102C, AV3101C,
AV3102, V4101C, AV4102, AV4102C, AV8101C .......................... EN-11
3.2 Button Control Functions .......................................................................... EN-12
3.3 Using the Button Control Functions ............................................................ EN-14
3.3.1 Setting the Balance to Zero ......................................................... EN-14
3.3.2 Taring ........................................................................................ EN-14
3.3.3 Changing Units of Measure .......................................................... EN-14
3.3.4 Changing Application modes ....................................................... EN-14
3.3.5 Printing Data .............................................................................. EN-14
3.4 MenuEN-16
3.4.1 Menu Structure ............................................................................ EN-15
3.4.2 Menu Navigation ........................................................................ EN-16
3.4.3 Changing Settings ...................................................................... EN-16
EN-1
Page 4

EN-2
Adventurer Pro
3.5 Application Modes ................................................................................... EN-17
TABLE OF CONTENTS (Cont.)
3.5.1 Weighing ................................................................................... EN-17
3.5.2 Parts Counting ........................................................................... EN-17
3.5.3 Percent Weighing ........................................................................ EN-18
3.5.4 Check Weighing ......................................................................... EN-19
3.5.5 Animal Weighing ......................................................................... EN-20
3.5.6 Display Hold ............................................................................... EN-21
3.5.7 Totalize ...................................................................................... EN-22
3.6 Additional Features .................................................................................. EN-22
3.6.1 Weigh Below ............................................................................... EN-22
3.6.2 Battery Operation ......................................................................... EN-23
3.7 Balance Settings ..................................................................................... EN-24
3.7.1 Calibration .................................................................................. EN-24
3.7.2 Calibration Masses ..................................................................... EN-29
3.7.3 Setup ........................................................................................ EN-30
3.7.4 Readout ..................................................................................... EN-30
3.7.5 Mode ........................................................................................ EN-30
3.7.6 Unit ........................................................................................... EN-31
3.7.7 Print-1 and Print-2 ...................................................................... EN-31
3.7.8 RS232-1 and RS232-2 ............................................................... EN-32
3.7.9 GLP Data ................................................................................... EN-33
3.7.10 GLP Print .................................................................................... EN-34
3.7.11 Reset ......................................................................................... EN-34
3.7.12 Lockout ...................................................................................... EN-35
3.7.13 End ........................................................................................... EN-35
3.8 Legal for Trade (LFT) ................................................................................ EN-35
3.9 Sealing Access to the Balance Settings ....................................................... EN-36
3.10 Printing Data .......................................................................................... EN-36
4. MAINTENANCE .............................................................................................. EN-37
4.1 Calibration ............................................................................................. EN-37
4.2 Cleaning ................................................................................................ EN-37
4.3 Troubleshooting ...................................................................................... EN-37
4.4 Service Information .................................................................................. EN-38
4.5 Parts ..................................................................................................... EN-38
4.6 Accessories ............................................................................................. EN-39
5. TECHNICAL DATA ........................................................................................... EN-40
5.1 Drawings ................................................................................................ EN-41
5.2 Specifications ......................................................................................... EN-43
5.3 Capacity x Readability ............................................................................. EN-46
5.4 Communication ...................................................................................... EN-49
5.4.1 Commands ................................................................................. EN-49
5.4.2 Connections ................................................................................ EN-50
Limited Warranty ............................................................................................... EN-51
Page 5

Adventurer Pro EN-3
1 INTRODUCTION
This manual contains installation, operation and maintenance instructions for the Ohaus Adventurer
Pro balances. Please read the manual completely before using the balance.
1.1 Description
The Adventurer Pro balances are precision weighing instruments that will provide you with years of
service if properly cared for. The Adventurer Pro balances are available in capacities from 51 grams
to 8100 grams.
1.1.1 Model Name Designations
Example: AV214CDR
AV = Product family abbreviation Adventurer Pro
214 = 210g model with 0.0001g readability
C = With internal calibration (INCAL)
D = Dual range model
nd
R = 2
interface installed (RS232)
U = 2nd interface installed (USB)
1.2 Features
The Adventurer Pro balances include many standard features. These include:
• Battery* or AC Adapter operation (AC Adapter included)
• Weighing, Parts Counting, Percent Weighing, Check Weighing, Animal Weighing
Display Hold and Totalize application modes.
• In-use cover
• RS232 interface
• Integral security bracket
• Weigh below hook
* Battery operation is only available on certain models.
The Adventurer Pro also offers several optional features
• Internal Calibration
• USB interface
• Second RS232 Interface
1.3 Safety Precautions
Please follow these safety precautions:
• Verify that the input voltage printed on the AC Adapter matches the local AC power
supply.
• Use the balance only in dry locations.
• Do not operate the balance in hostile environments.
• Do not drop loads on the platform.
• Do not place the balance upside down, without first installing the cone cover.
• Service should be performed only by authorized personnel.
Page 6

Adventurer ProEN-4
2 INSTALLATION
2.1 Unpacking
Carefully remove your Adventurer Pro balance and each of its components from the package. Save
the packaging to ensure safe storage and transport.
2.2 Installing Components
Use the illustrations and instructions below to identify and assemble your Adventurer Pro model
with its components. All components must be installed before using the balance.
2.2.1 Assembly of Models AV412, AV812, AV2101, AV2102, AV3102,
AV4101, AV4102, AV8101
Note: Assembly instructions also apply to models with the suffix C, CR, CU, R or U.
1. Insert the Sub-platform on the Mounting Cone located in the center of
the balance. Align the Sub-platform so that it is fully seated on the cone.
2. Place the Weighing Pan on the Sub-platform.
3. For applicable Adventurer Pro models, place the Wind Ring over the pins located on
the perimeter of the balance.
Weighing Pan
Wind Ring
(INCAL models)
Pin
Sub-platform
Mounting Cone
Page 7

Adventurer Pro EN-5
2.2.2 Assembly of Models AV64, AV114, AV213, AV264, AV313, AV413,
AV513C, AV53C
Note: Assembly instructions also apply to models with the suffix C, CR, CU, R or U.
1. Insert the Platform Assembly on the Mounting Cone in the center of the balance.
2. Carefully remove each of the five (5) glass Draft Shield sections from its packing.
You will note that two (2) of these are plain, two (2) contain handles, and the
other is set in a plastic frame. These sections or panels comprise the front and rear,
side doors, and top (respectively) of the Draft Shield. The Draft Shield contains
four (4) upright posts and two (2) cross-members which act as a framework for
insertion of the panels.
3. Install the plain glass panels to form the front and rear of the Draft Shield.
• Select a plain glass panel and insert the bottom edge of the glass in the
recessed slot in front of the balance, as shown.
• As you push the top edge of the glass panel toward the cross-member, reach
inside the top of the framework and depress the small clip located under the
cross-member.
• Press the glass panel into the framework until you feel the glass slip into place.
• Release the clip when the glass panel is fully inserted.
• Repeat these steps to install the other plain glass panel on the opposite side of
the framework.
Clip Locations
Close-up of Clip
Platform Assembly
Glass Rear Panel
Mounting Cone
Recessed Slot
Glass Front
Page 8

Adventurer ProEN-6
2.2.2 Assembly of Models AV64, AV114, AV213, AV264, AV313, AV413,
AV513, AV53C (Cont.)
4. Install the glass doors in the sides of the Draft Shield framework.
Note: The glass doors must be inserted in the Draft Shield framework before inserting the top door;
likewise, you must remove the top door before you remove the side doors.
• Hold and position each door so that the handle is near the front of the balance and
the small notch on the bottom edge of the door is lined up with the tab that protrudes
from the side of the balance housing (shown below).
• Insert the top edge of the glass door into the recessed area under the top crossmember of the Draft Shield framework.
• Slide the notch on the bottom edge over the tab and slip the door in place.
5. The door may now be opened by sliding it toward the back of the balance.
Left Door
Close-up of Tab
Right Door
Close-up of Notch
Page 9

Adventurer Pro EN-7
2.2.2 Assembly of Models AV64, AV114, AV213, AV264, AV313, AV413,
AV513C, AV53C (Cont.)
6. Install the top door panel.
• Insert the top door in the Draft Shield by holding the door vertically over the top of
the Draft Shield framework, as shown.
• Position the back edge of the door so that it lines up with two small hinges located
on the rear cross-member.
• Gently press the door on to the hinges, until it snaps into place.
• Tilt the door forward to close.
Top Door
Close-up view of recessed hinge on
Draft Shield cross-member
Page 10

Adventurer ProEN-8
2.2.3 Assembly of Model AV53
Note: Assembly instructions also apply to models with the suffix R or U.
1. Insert the Sub-platform on the mounting cone in the center of the balance.
2. Place the Weighing Pan on the Sub-platform.
3. Attach the Draft Shield by inserting the round bottom edge in the circular
recessed slot, as shown.
4. Place the metal cover on top of the Draft Shield.
Draft Shield Cover
Round Edge
of Draft Shield
Weighing Pan
Sub-platform
Mounting Cone
Circular Recessed
Slot
Page 11

Adventurer Pro EN-9
2.2.4 Assembly of Models AV212
Note: Assembly instructions also apply to models with the suffix C, CR, CU, R or U.
1. Insert the Sub-platform on the Mounting Cone located in the center of the balance.
2. Place the Weighing Pan on the Sub-platform.
3. Place the Wind ring over the shoulder of the balance.
Weighing Pan
Sub-platform
Wind ring
Mounting Cone
2.3 Selecting the Location
Locate the balance on a firm, steady surface. Avoid locations with excessive air current, vibrations,
heat sources, or rapid temperature changes.
2.4 Leveling the Balance
Before the balance is used, the feet should be adjusted so that the scale is level with the surface.
This will enable accurate weighing. You will see a level bubble indicator in a small round
window on the front of the balance. Level the balance by adjusting the leveling feet so the bubble
is centered in the circle, as seen below.
Balance Level
Page 12

Adventurer ProEN-10
2.5 Connecting Power
2.5.1 AC Adapter
Connect the AC Adapter to the wall outlet. Connect the plug into the receptacle on the rear of the
balance.
For use with CSA Certified (or equivalent approved) power source, which must have a
limited circuit output.
2.5.2 Battery Installation
Some Adventurer Pro models operate with batteries. To install batteries, remove the pan and its
components and install the cone cover to protect the load cell.
CAUTION:CAUTION:
CAUTION:
CAUTION:CAUTION:
To protect the balance from damage while installing
batteries, make sure the cone cover is in place.
Remove the battery comparment cover from the bottom of the balance. Install 4 AA (LR6) batteries
in the compartment, aligning the batteries according to the + and - symbols. With the balance
in an upright position, remove the cone cover and re-install the pan and its components.
2.5.3 Turning Power On and Off
Press the On/Zero button to turn power on.
The balance performs a segment check. The balance then
displays the last selected application mode.
To turn power off, press and hold the
is displayed, then release the button.
Off
button until OFF
2.6 Initial Calibration
When the balance is first installed, and when it is moved to another location, it must be calibrated
to ensure accurate weighing results. Have the appropriate calibration masses available before
beginning calibration. Refer to Section 3.7.1 for masses and calibration procedure.
IMPORTANT:IMPORTANT:
IMPORTANT:
IMPORTANT:IMPORTANT:
Balance should acclimate to its new surroundings for at least 4 hours. Balance
electronics should be warmed up for 1 hour prior to use.
Page 13

Adventurer Pro EN-11
3 OPERATION
3.1 Overview of Controls & Display Functions
3.1.1 Models AV53, AV212, AV412, AV812, AV2101, AV4101, AV8101
8
7
1
2
3
4
6
5
Top Views Bottom View
14
Rear View
17
13
18
3.1.2 Models AV64, AV64C, AV114, AV114C, AV212C, AV53C, AV213,
AV213C, AV313, AV313C, AV264, AV264C, AV412C, AV413,
AV413C, AV513C, AV812C, AV2101C, AV2102, AV2102C,
AV3101C, AV3102, AV4101C, AV4102, AV4102C, AV8101C
8
15
1
7
16
6
5
9
10
11
12
10
9
12
23
4
Top Views
17
14
Bottom View
16
18
13
Rear View
Page 14

Adventurer ProEN-12
3.1 Overview of Controls and Display Functions (Cont.)
19 20
33
32
31
30
29
No. Description No. Description
1 On / Zero / Off / Yes Button 18 Lock Switch
2 Print Unit / No Button 19 Primary (7 segment) display
3 Level Bubble 20 Brackets
4 Function Mode / Back button 21 Units of Measurement
5 Tare Menu-Cal / Exit Button 22 Memory Indicator
6 Display 23 Battery Strength Indicator
7 Pan 24 Pieces Indicator
8 Type label on side of housing 25 Secondary (14 Segment) Display
27
28
TABLE 3.1-1 ADVENTURER PRO CONTROLS AND DISPLAY FUNCTIONS.
26
25
Digital Display Window
24
21
22
23
9 Data label 26 Gross Indicator
10 Weigh Below Opening 27 Brutto Indicator
11 Battery Compartment 28 Tare Indicator
12 Leveling feet 29 Preset Tare Indicator
13 COM 1 Connector 30 Net Indicator
14 COM 2 Connector 31 Stability Indicator
(AV...R and AV...U Models only)
15 Wind Ring 32 Negative Indicator
16 Draft Shield 33 Center of Zero Indicator
17 Power Connector
Page 15

Adventurer Pro EN-13
3.2 Button Control Functions
Four multifunction buttons are used to to operate the balance and navigate the menus. The
function of each button is shown below.
Primary
Function
Secondary
Function
Menu
Function
Yes No Back Exit
On/Zero
•If balance is off,
turns balance on.
•If balance is on,
sets zero.
Off
•Turns balance off.
Yes
•Accepts the
current (blinking)
setting on the
display.
Print
•Sends current
display value to
the serial
interface.
Unit
•Change
weighing unit.
No
•Rejects the
current setting
(blinking) on the
display.
•Increments a
value being
entered.
Function
•Operation is
dependent on the
application
mode.
Mode
•Change
application
mode.
Back
•Reverts back to
previous menu
item.
• Decrements a
value being
entered.
Press and Release
Press and Hold
Menu Function
Tare
• Performs tare
operation.
Menu-Cal
•Enter the User
menu.
Calibration is the
first sub-menu.
Exit
•Immediately
exits menu mode.
•Aborts a
calibration in
progress.
Page 16

EN-14
Adventurer Pro
3.3 Using the Button Control Functions
3.3.1 Setting the Balance to Zero
Remove the load from the pan and press the Zero button to set the display to zero.
When the weighing pan or platform is empty, The Center of Zero indicator turns on when the
measurement is within
3.3.2 Taring
Taring refers to the action of allowing for the weight of a container so that only the weight of objects
held in the container (net weight) is displayed.
To Tare
Place the empty container on the pan and press the Tare button.
Add material to the container. The net weight of the material is displayed.
To clear the Tare value, remove the container from the pan and press the Tare button.
Auto Tare
Auto Tare automatically compensates for container weight so the balance displays net weight.
Auto Tare must be set ON in the Setup sub-menu (See Section 3.7.2 Setup Sub-menu).
The secondary display shows PLACE CONTAINER (blinking). When the container is placed on the
pan, it is automatically tared and Net weight is displayed. The Tare value is automatically cleared
when the container is removed from the pan.
Preset Tare
Use the xT command in the command table to enter a preset tare value through a computer.
To clear the Tare value, enter a value of 0.0. See Section 5.4.1.
+ 1/4 d of the zero setting.
3.3.3 Changing Units of Measure
The Adventurer Pro can be configured to measure in a variety of units, including custom units. The
Unit Sub-menu is used to enable or disable a specific unit.
To select a unit of measure:
Press and hold the
Note: If the desired unit is not displayed, it must be turned on in the Unit menu (See Section 3.7.5).
Unit
button, then release it when the desired unit is displayed.
3.3.4 Changing Application Modes
The Adventurer Pro can be configured to operate in various application modes. The Mode Submenu is used to enable or disable a specific application mode.
Press and hold the
display. Note: If the desired mode is not displayed, it must be turned on in the Mode menu. See
Section 3.7.4.
Mode
button and release it when the desired mode is shown on the secondary
3.3.5 Printing Data
Press the Print button to send the displayed value to the COM port (See Section 3.10).
Note: The port must have Auto Print set to OFF.
Page 17

Adventurer Pro EN-15
3.4 MENU
3.4.1 Menu Structure
The Adventurer Pro balance menu structure is illustrated below.
CALIBRATION (3.7.1)
Internal Calibration (InCal)
Span
Linearity
Calibration test (CalTest)
Calibration Adjust (Cal Adj)
End Cal
PRINT-1 (3.7.7)
Output When Stable
GLP Tare
Auto Print
Content Num Only Header,
Gross, Net, Tare,
Ref, Result, GLP
Layout Line Format
4LF
Form Feed
List
End Print-1
SETUP (3.7.3)
Legal Trade
Auto Tare
Auto Off
Back Light *
End Setup
UNIT (3.7.6)
mg
g
kg
oz
lb
ct
dwt
oz t
GN
N
t HK
t SC
t TW
m
Tical
Baht
Meshgal
Tola
Custom
End Unit
READOUT (3.7.4)
Auto Zero
Filter
Gross Ind.
End Read
MODE (3.7.5)
Weigh
Count
Percent
Check Weigh
Animal
Display Hold
Totalize
End Mode
PRINT-2 (Optional)
Output When Stable
GLP Tare
Auto Print
Content Num Only Header,
Gross, Net, Tare,
Ref, Result, GLP
Layout Line Format
4LF
Form Feed
List
End Print-2
RESET (3.7.11)
Setup
Readout
Mode
Unit
Print-1
Print-2
RS232-1
RS232-2
GLP Data
GLP Print
Lockout
Global
End Reset
RS232-1 (3.7.8)
Baud
Parity
Handshake
End RS1
GLP PRINT (3.7.10)
Time
Balance ID
User ID
Project ID
Difference
Name
End GLP Prt
LOCKOUT (3.7.12)
Cal
Setup
Readout
Mode
Unit
Print-1
Print-2
RS232-1
RS232-2
GLP Data
GLP Print
Reset
Lock Set
End Lockout
RS232-2 (Optional)
Baud
Parity
Handshake
End RS2
GLP DATA (3.7.9)
User ID
Proj ID
Time
Date
End GLP Data
END (3.7.13)
* Only included on models with
battery operation.
Page 18
EN-16
Adventurer Pro
3.4.2 Menu Navigation
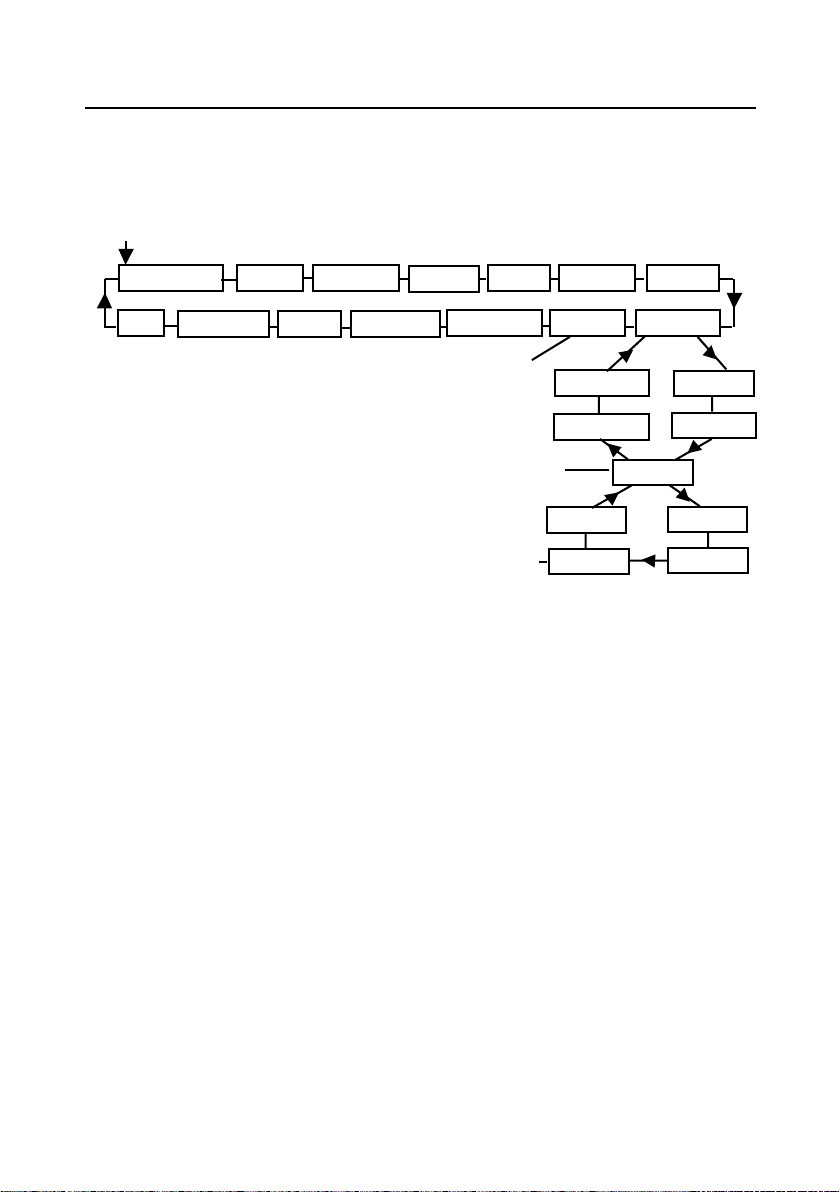
The Adventurer Pro menu structure consists of three levels. The top level is the main menu which
consists of a number of sub-menus.
Enter
CALIBRATION SETUP READOUT MODE UNIT PRINT-1 PRINT-2
END LOCKOUT RESET GLP PRINT GLP DATA RS232-2 RS232-1
SECOND LEVEL
The second level of the menu structure is the
sub-menu level. Each sub-menu is a loop that
consists of a number of menu items.
BOTTOM LEVEL
The bottom level of the menu structure is the
menu item level. Each menu item level consists
of two or more settings
TOP LEVEL
Typical Sub-menu
Typical Menu Item
Typical Setting
END RS232
HANDSHAKE
PARITY
8 NOP
7 NOP
POWER
BAUD
7 EVEN
7 ODD
3.4.3 Changing Settings
To change a menu setting, perform the following steps:
ENTER THE MENU
Press and hold the
Release the button and the first sub-menu appears on the secondary (14-Segment) display
(blinking).
Note: When the secondary display is blinking, press Yes to accept.
Press No or Back or view another selection.
Menu
button until MENU appears on the primary (7-Segment) display.
SELECT THE SUB-MENU
Press the No button to select the next sub-menu or the Back button to select the previous sub-menu
in the loop. Press the Yes button to select the sub-menu that appears on the secondary display
(blinking). The sub-menu name now appears on the primary display and the first menu item in the
sub-menu now appears on the secondary display (blinking).
SELECT THE MENU ITEM
Press the No button to select the next setting or the
loop. Press the Yes button to select and save the setting on the secondary display (blinking) as the
new menu item setting.
EXIT THE MENU
Press the Exit button at any time to quickly exit the menu or select END sub-menu and press the Yes
button.
Back button to select the previous setting in the
Page 19
Adventurer Pro EN-17
3.5 Application Modes
The Adventurer Pro balance incorporates Weighing, Parts Counting, Percent Weighing, Check
Weighing, Animal Weighing, Display Hold and Totalize application modes. The default setting
has the weighing mode turned on and all other application modes turned off.
Note: Before using any application modes, they must be turned on in the Mode menu (See Section 3.3.4).
3.5.1 Weighing
Use this mode to determine the weight of items in the selected unit of measure. The Adventurer Pro
is shipped with grams enabled. Before using other units of measure, these units must be turned on
in the Unit menu ( See Section 3.7.5 ).
Weigh
Press and hold
release the button.
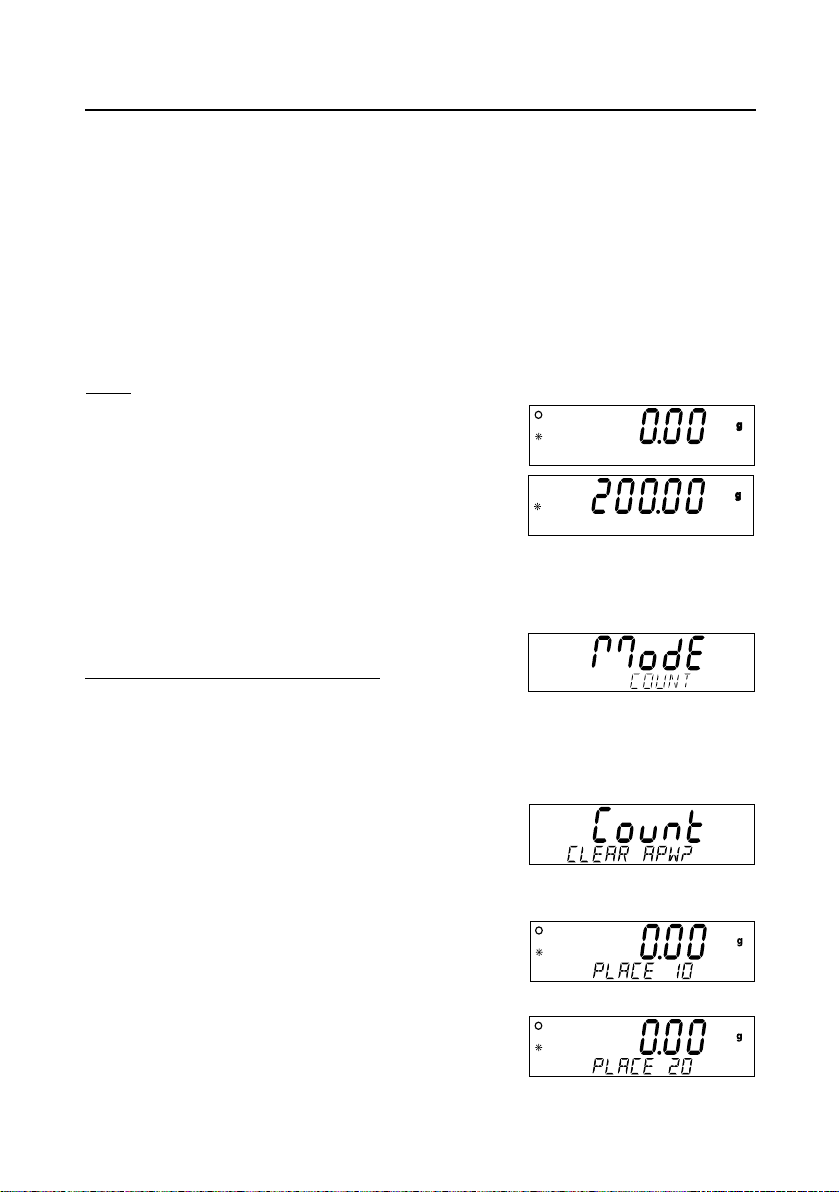
Press Zero
Place objects to be weighed on the pan to display the weight.
The example displays a 200 gram weight.
3.5.2 Parts Counting
Use the Parts Counting Mode to count samples of uniform weight.
Mode
until the display shows WEIGH, then
to zero the balance.
Press and hold
button.
Establish an Average Piece Weight (APW).
Each time a new type of part is counted, the nominal weight of
one piece (Average Piece Weight) must be established using a
small quantity of pieces. This APW is stored until replaced by
another APW.
If an APW has already been established, Count is displayed
with Clear APW? blinking.
Press No to use the previously saved APW.
Otherwise, press Yes to establish a new APW.
The current weight (0.00) is shown on the primary display
and the default sample size (PLACE 10) is shown on the
secondary display.
To change the sample size, press and hold the No button to
increment the sample size through the range of 1 to 100.
Release the button when the desired sample size appears on
the secondary display.
Mode
until Count is displayed, then release the
(Clear APW? blinking)
Page 20
EN-18
Adventurer Pro
3.5.2 Parts Counting (Cont.)
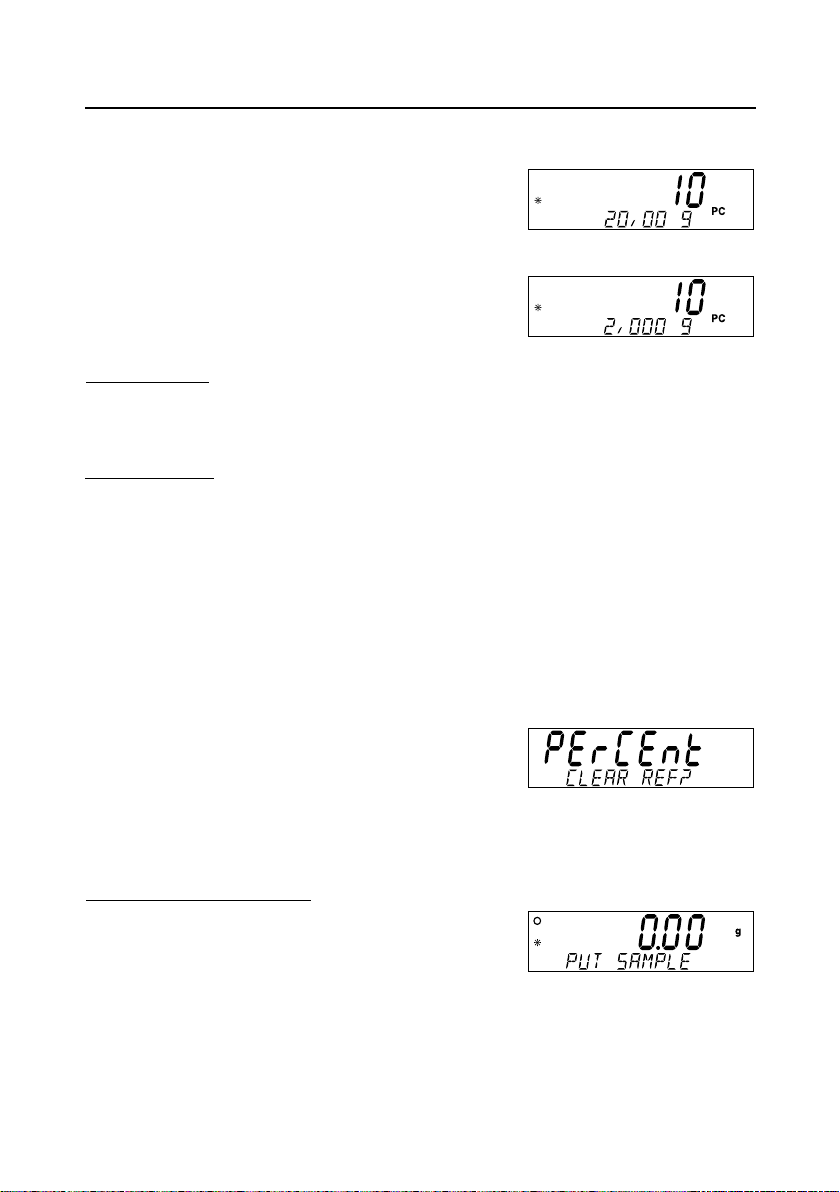
Place the specified number of parts on the pan.
Press the Function button to accept. The primary display will
now indicate the number of parts. The weight is shown on the
secondary display.
Pressing the Function button momentarily displays the APW
on the secondary display. The example shows an APW of
2.000g.
Clearing the APW
Press and hold the
secondary display.
APW Optimization
The only adjustment for Parts Counting is APW Optimization. APW Optimization is set On or Off
in the Mode menu when Parts Counting is turned On. When APW Optimization is set on, the APW
is automatically optimized. This results in more accurate parts counting. The factory default is On.
When a new APW has been established, APW Optimization occurs when the number of pieces
added to the pan are between one and three times the number already on the pan. The secondary
display will momentarily indicate APW OPT.
Mode
button until COUNT is shown on the
3.5.3 Percent Weighing
Use the Percent Weighing Mode to measure the weight of a sample as a percentage of a preestablished reference weight. Refer to Section 3.3.4 to enable Percent Weighing.
Press and hold the
release the button. The primary display shows PERCENT.
If a Reference Weight is stored in memory, the secondary
display shows CLEAR REF? (blinking). Press No to use the
stored reference weight and begin Percent Weighing.
Press Yes to clear the saved Reference Weight.
Mode
button. When PERCENT displays,
Establishing a Reference Weight
If no Reference Weight is stored, a Reference Weight must be
established. The secondary display shows PUT SAMPLE. The
current weight is shown on the primary display.
Page 21
Adventurer Pro EN-19
3.5.3 Percent Weighing (Cont.)
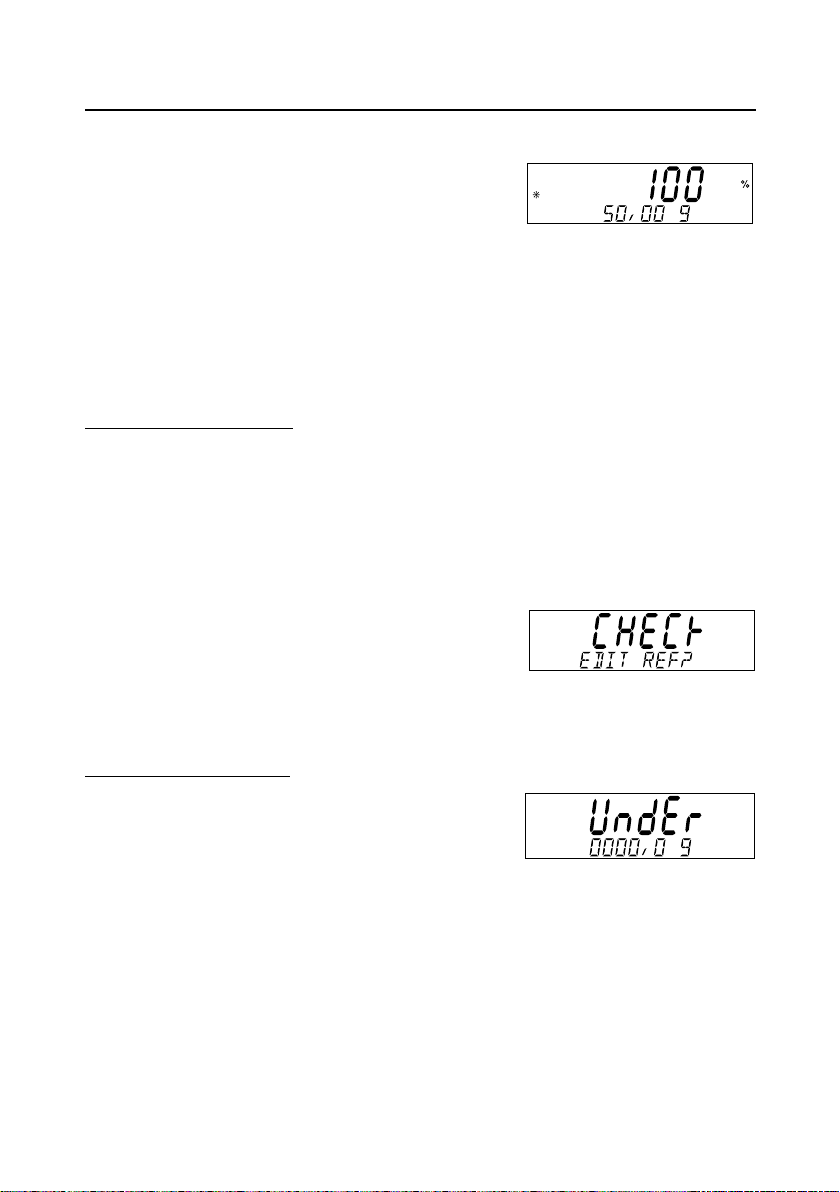
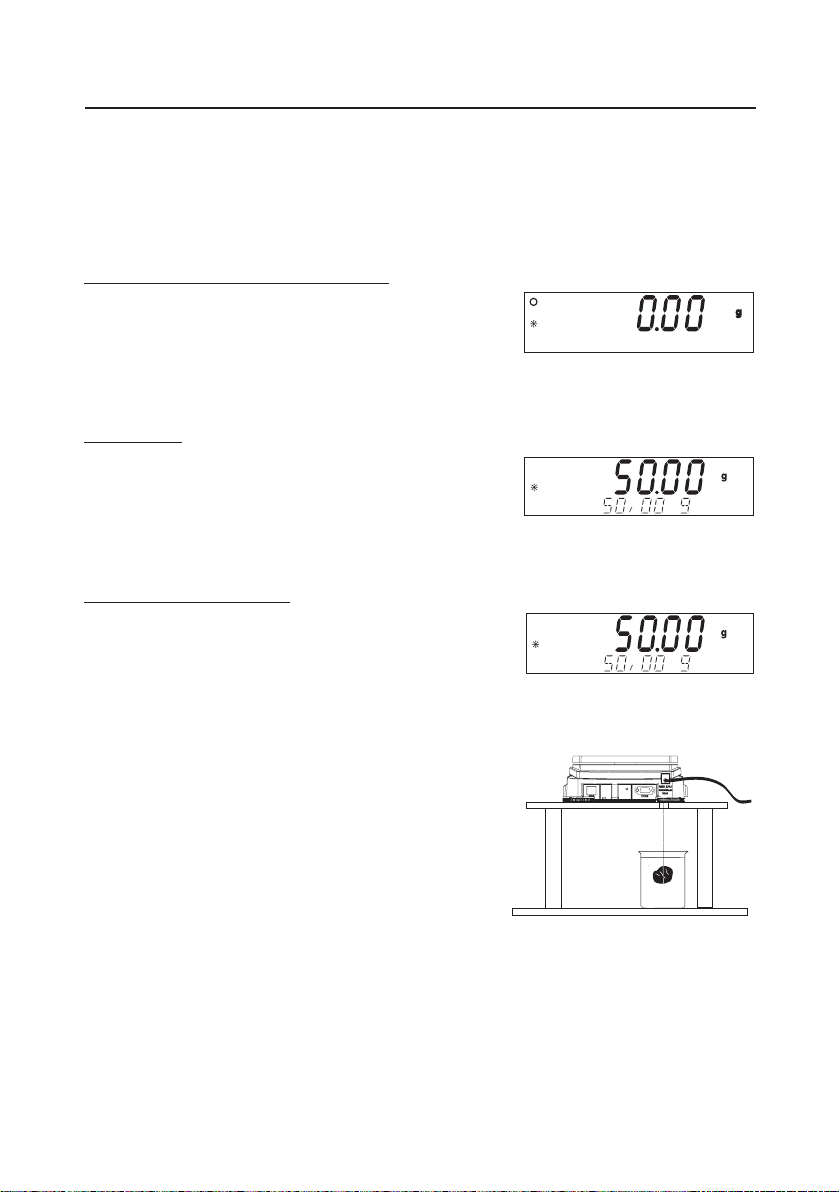
Place the sample on the pan and press the Function button.
This example illustrates 50 grams as the reference weight.
Remove the reference weight and place the item to be compared
on the pan. The balance indicates the actual percentage on
the primary display. The secondary display indicates the weight
in the selected measuring unit.
Pressing the Function button momentarily displays the reference
weight on the secondary display.
Clearing the Reference Weight
Press and hold the
the secondary display.
Mode
button until PERCENT is shown on
3.5.4 Check Weighing
Check Weighing is used to compare the weight of a sample
against target limits.
Press and hold the
displayed, release the button. If Check Weighing limits
previously have been set and stored in memory, the secondary
display shows Edit REF? (blinking). Press No to use the
stored limits and begin Check Weighing, or press Yes to set
Check Weighing limits.
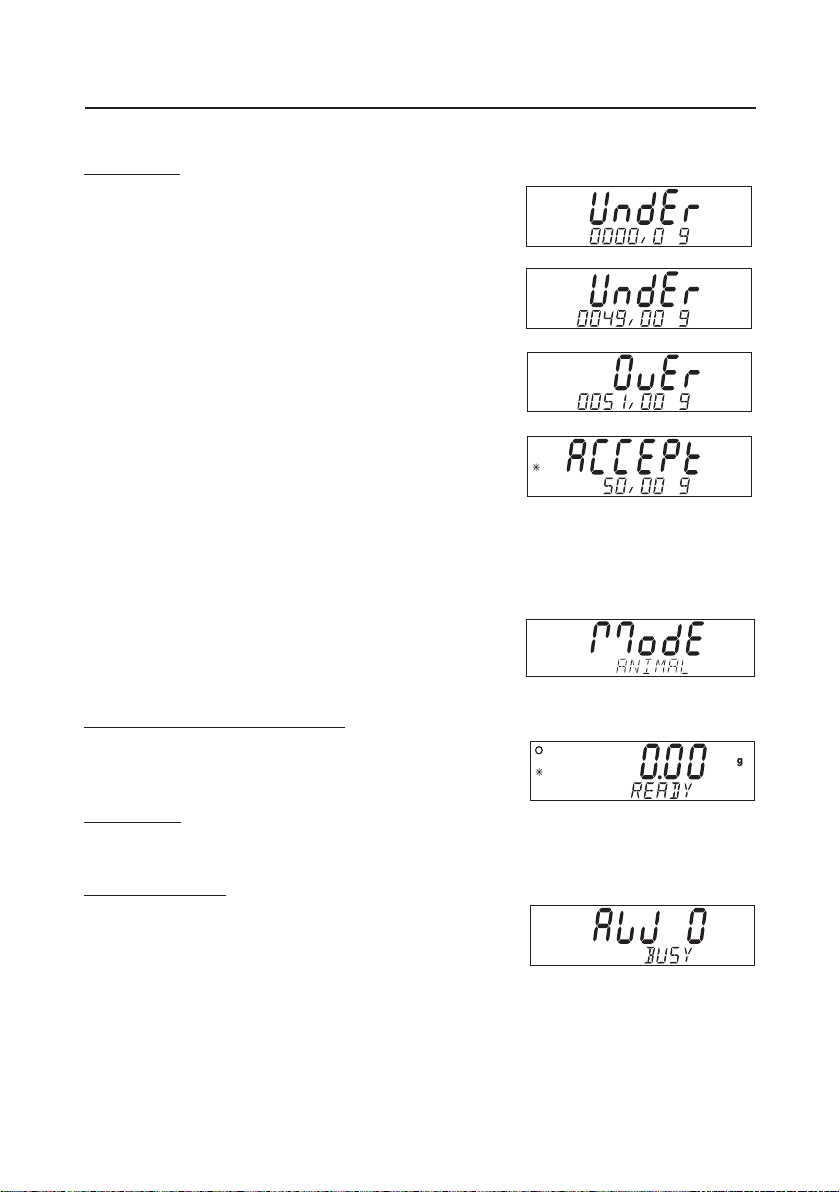
Setting Under and Over Limits
The primary display shows UNDER or OVER indicating which
limit is being entered. The secondary display shows the
previous setting or all zeros if no limit was stored (blinking).
Press the Yes button to accept this setting. Press the No
button to edit this setting. The Under limit is the first to be
edited, followed by the Over limit.
Mode
button. When Check Weighing is
Page 22
EN-20
3.5.4 Check Weighing (Cont.)
Editing Limits
The limits are edited one digit at a time. The digit being edited
is blinking. Its value can be incremented by pressing the No
button or decremented by pressing the Back button. When
the desired value is displayed, press the Yes button to accept
the value and proceed to the next digit. When all digits have
been edited, the new limit value is shown (blinking) on the
secondary display. Press the Yes button to accept the new
limit value or the No button to edit the limit value. When
editing of the Over limit is complete, Check Weighing begins.
Place the sample on the pan. The UNDER/ACCEPT/OVER
status is shown on the primary display while the actual weight
of the item is shown on the secondary display.
3.5.5 Animal Weighing
Enter this mode to weigh an unstable load, such as a moving
animal. Refer to Section 3.4.3 to enable Animal Weighing.
Mode
Press and hold
displayed. The balance alternately shows READY and ANIMAL
on the secondary display.
. Release
Mode
when ANIMAL is
Adventurer Pro
Automatic and Semi-Automatic Mode
The animal cycle begins when an animal is placed on the
pan.
Manual Mode
The animal cycle begins when the Function button is pressed.
During Animal Cycle
The primary display shows the countdown from the level
setting (5, 10 or 15 seconds) to AWO. The secondary display
alternately shows ANIMAL and BUSY.
Page 23

Adventurer Pro EN-21
3.5.5 Animal Weighing (Cont.)
Completed Animal Cycle
The primary display shows the weight of the animal and the secondary display alternates between
ANIMAL and HOLD.
Automatic Mode
The balance returns to the Ready condition when the animal is removed from the pan. If the
Function button is pressed before the animal is removed from the pan, the primary display shows
the actual weight and the secondary display alternates between ANIMAL and CLEAR PAN until the
animal is removed from the pan. The balance then returns to the Ready condition.
Semiautomatic and Manual Modes
Remove the animal from the pan and press the Function button to return to the Ready condition.
If the Function button is pressed while the animal is on the pan, the primary display shows the
actual weight and the secondary display alternates between ANIMAL and CLEAR PAN. The balance
returns to the Ready condition when the animal is removed from the pan. The Animal Weigh level
and mode settings are made in the Mode menu.
3.5.6 Display Hold
The Display Hold Mode allows the user t o capture and store the highest (stable) weight in a series
of weight measurrements. The Display Hold Mode provides the user with three (3) operating
modes: Automatic, Semi-automatic and Manual.
Automatic Mode :
Highest stable weight captured automatically.
Ready for next measurement automatically when pan is cleared.
Semi-Automatic Mode :
Highest stable weight captured automatically. Ready for next measurement after pressing
FUNCTION key.
Manual Mode :
Press Function button to take measurement. Ready for next measurement after presssing Function
button.
Clear Peak :
Press and hold Function button - release when Mode>DISP/HOLD appears. In all modes, the
actual weight is shown on the primary display when READY or CLEAR PAN is shown on the
secondary display. The current Peak value is shown on the primary display when HOLD is shown
on the secondary display. Display icons annunciate weighing unit, stability and center of zero
when actual weight is displayed. The weighing unit only is annunciated when the Peak weight is
displayed.
Page 24
EN-22
Adventurer Pro
3.5.7 Totalize
Totalize measures the cumulative weight of items. Refer to Section 3.4.3 to enable totalizing.
Press
Mode
, then release the button when Totalize is displayed. The primary display shows the
current weight. The secondary display alternates between TOTALIZE and the current totalized
weight.
Adding Weight to the Total Automatic Mode
Place the item on the weighing pan. The weight of the item is
shown on the primary display. The weight of the item is
added automatically to the total weight and the new total is
shown on the secondary display. Remove the item from the
weighing pan, then add the next item.
Manual Mode
Place the item on the weighing pan. The weight of the item is
shown on the primary display. Press the Function button to
add the weight of the item to the total. The new total is shown
on the secondary display. Remove the item from the weighing
pan, then add the next item.
Clearing the Totalized Weight
Press and hold the
the secondary display.
Mode
button until TOTALIZE is shown on
3.6 Additional Features
3.6.1 Weigh Below
The Adventurer Pro balance is equipped with a weigh below
hook.
Note: Before turning the balance over, install the cone cover
to prevent damage to the loadcell.
To use this feature, remove power from the balance and remove
the protective cover for the weigh below opening.
The balance can be supported using lab jacks or any other
convenient method. Make sure the balance is level and secure.
Use a string or wire to attach items to be weighed.
Page 25
Adventurer Pro EN-23
3.6.2 Battery Operation
Refer to Section 5.2 to determine if your Adventurer Pro model operates on battery power when AC
power is not supplied. Models with the battery operation feature will display the battery change
indicator, as shown below. If batteries are installed and AC power is not present, the balance
operation is affected as follows:
• The LCD backlight is normally off to conserve power. The backlight turns on when the
display becomes unstable or when a button is pressed. The backlight turns off 5
seconds after the display becomes stable or after 5 seconds with no button presses. The
backlight is always off if the Backlight menu setting is OFF.
• Auto Off is set to 5 minutes. If continuous operation is desired, change the Auto Off
menu setting to Off.
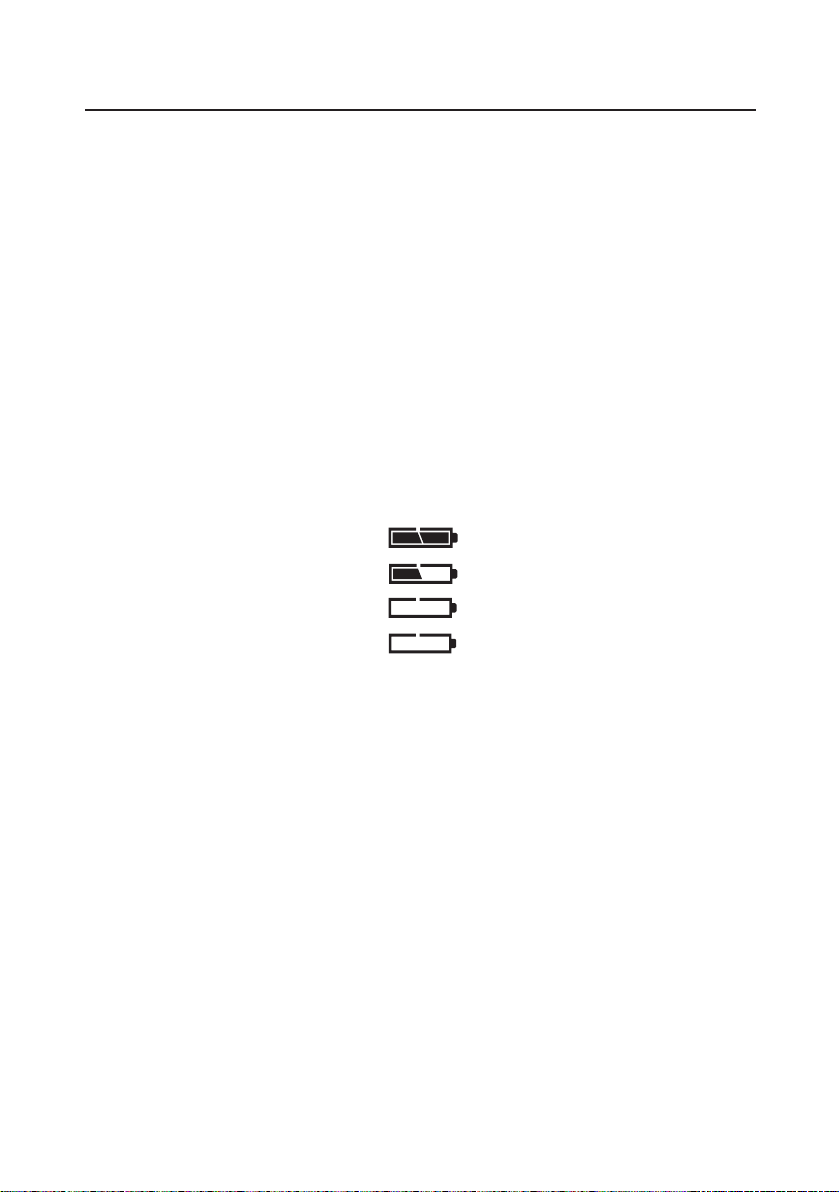
• The battery charge level is annunciated by means of a three segment battery symbol on
the display as follows:
Full charge
2/3 charge
1/3 charge
Replace batteries
(Flashing)
Page 26

EN-24
Adventurer Pro
3.7 Balance Settings
Refer to Section 3.4.2 to enter and navigate the menus.
3.7.1 Calibration
Adventurer Pro balances offer a choice of five calibration methods: Internal Calibration (InCALTM),
Span Calibration, Linearity Calibration, Calibration Test
TM
InCal InCal
•
InCal
- For models equipped with Internal calibration (InCALTM), calibration of the
InCal InCal
balance is accomplished by an internal mass.
SpanSpan
Span
- Span calibration ensures that the balance reads correctly within
•
SpanSpan
specifications using two weight values: zero and a weight value between
25% and 100% of the balance’s capacity.
LinearityLinearity
•
Linearity
LinearityLinearity
- Linearity calibration minimizes deviation between actual and displayed
weights within the balance’s weighing range. Three weight values are
used: zero, a weight value at midpoint of the balance's weighing range,
and a weight value at or near the balance’s specified capacity.
Cal Test Cal Test
•
Cal Test
Cal Test Cal Test
- Calibration test allows the stored calibration data to be tested against the
current mass being used for the test.
TM
and Calibration Adjust.
Cal Adj Cal Adj
Cal Adj
•
Cal Adj Cal Adj
- For models equipped with InCal
TM
, allows adjustment of the internal
calibration.
Notes: Calibration may be locked out to prevent unauthorized personnel from changing calibration.
if calibration has been locked out, you can only access Cal Test on InCal
TM
models.
Before beginning calibration, have masses available. Masses required for calibration are
listed in the table in section 3.7. 2. Default Span Calibration Points are shown in Bold
print.
Page 27
Adventurer Pro EN-25
Internal Calibration (InCal models)
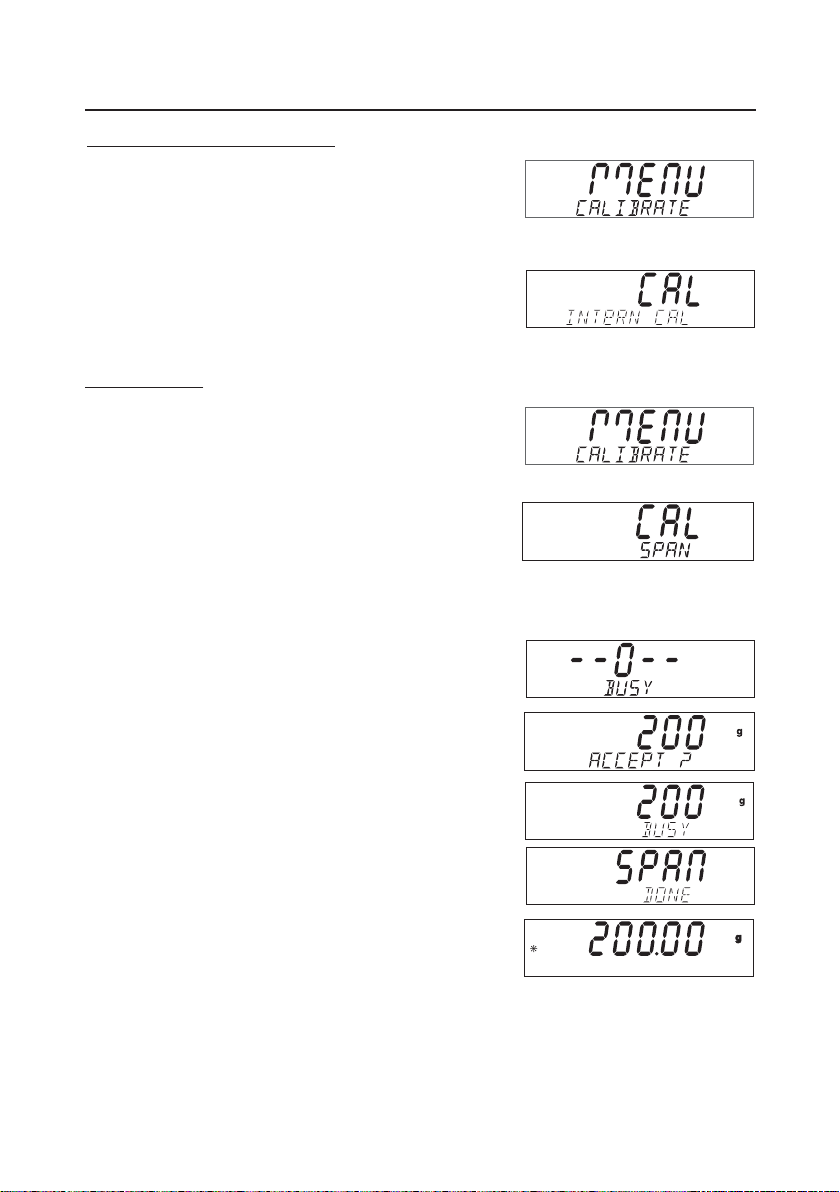
Models equipped with the internal calibration can be calibrated
without using an external weight. With the balance on, press
and hold the
displayed, then release the button.
Press Yes to initiate the internal calibration process. When
internal calibration is finished, the balance returns to the
currently selected mode.
Span Calibration
With the balance on, press and hold the
until MENU is displayed, then release the button. CALIBRATE
(blinking) is displayed.
Note: If the balance has InCal, press the No button to advance
to span calibration.
Press the Yes button to enter span calibration.
Press the Yes button to initiate span calibration.
First the zero reading is taken. Next the display shows the
default span calibration weight value.
Menu-Cal
button until MENU CALIBRATE is
Menu-Cal
button
Press No to change to an alternate calibration weight. Press
Yes when the desired calibration weight is displayed.
Place the specified calibration weight on the platform. After
calibration, remove the weight from the platform.
To abort calibration at any time, press the Exit button.
Page 28
EN-26
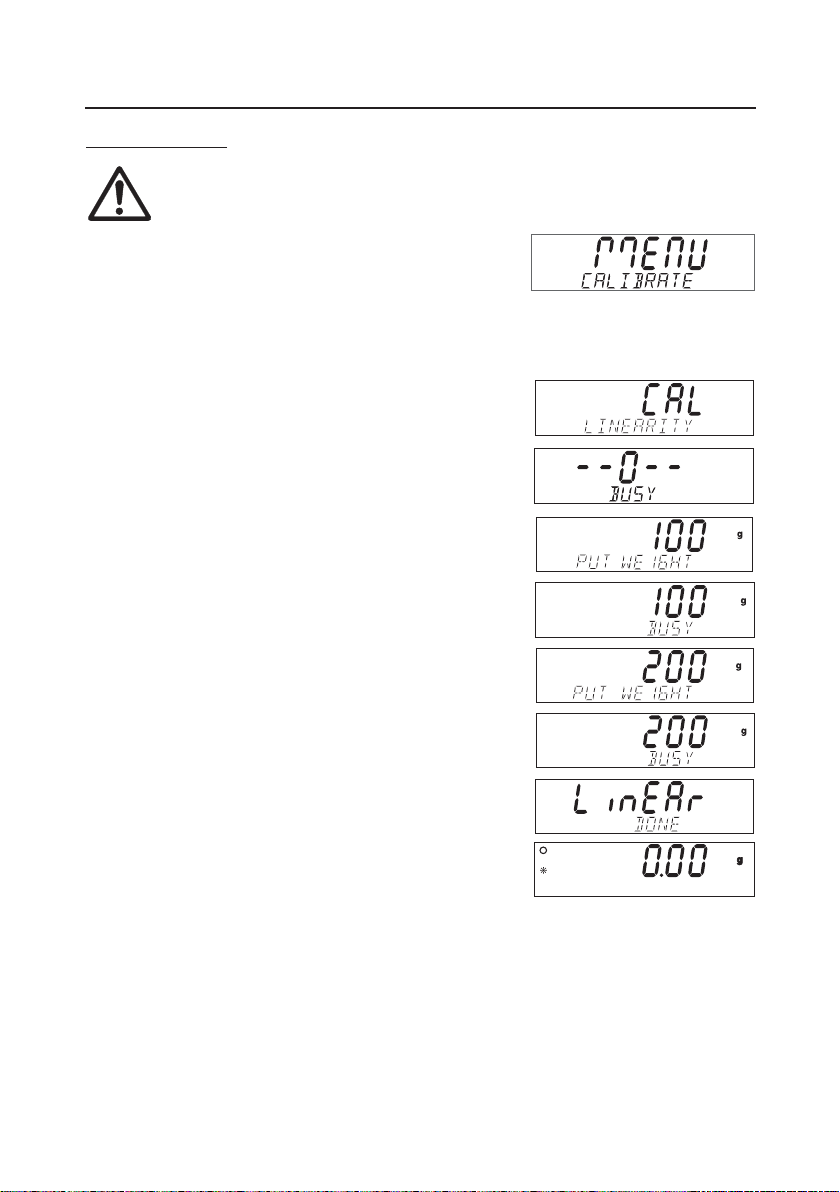
Linearity Calibration
NOTICE:
Linearity Calibration is required only if the linearity error exceeds tolerance in
specification table.
With the balance on, press and hold the
until MENU CALIBRATE is displayed, then release the button.
CALIBRATE (blinking).
Menu-Cal
button
Adventurer Pro
Press the
Note: If the balance has InCal, press the No button to advance
to linearity calibration. CAL LINEARITY (blinking) is displayed.
Press the Yes button and follow the screen instructions. Use
the weight values shown on the primary display.
First the zero reading is taken. Next the display shows the first
calibration weight value. PUT WEIGHT (blinking) is displayed.
Place the specified calibration weight on the platform.
After a few seconds, place the second specified calibration
weight on the plattform. PUT WEIGHT (blinking) is displayed.
After a few seconds, the calibration weight is displayed.
LINEAR DONE is momentarily displayed when calibration is
completed.
After calibration, remove weight from platform. To leave the
menu, press Exit.
To abort calibration at any time, press the Exit button.
Yes button to enter calibration.
Page 29
Adventurer Pro EN-27
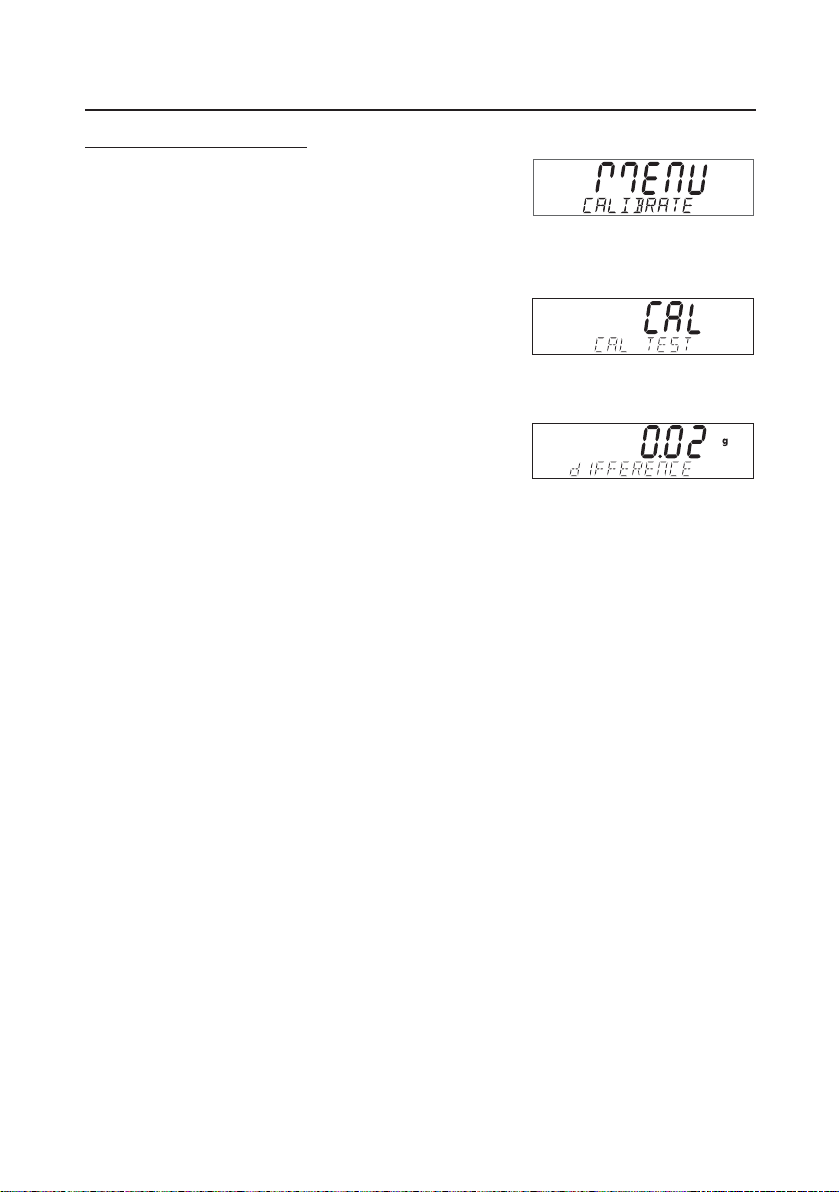
Calibration Test (InCal models)
Calibration test allows a check of a known calibration mass
against the last stored calibration information in the balance.
Press and hold the
displayed.
Press Yes to enter calibration.
Press No until CAL TEST is displayed.
Press Yes and follow the screen instructions.
Place the specified weight on the platform. After a short period,
the display indicates the difference in weight from the last
calibration, and then will display the calibration weight on the
platform. After the test, remove the calibration weight from the
platform. To leave the menu, press Exit.
Menu-Cal
button until MENU CALIBRATE is
(Example)
Page 30
EN-28
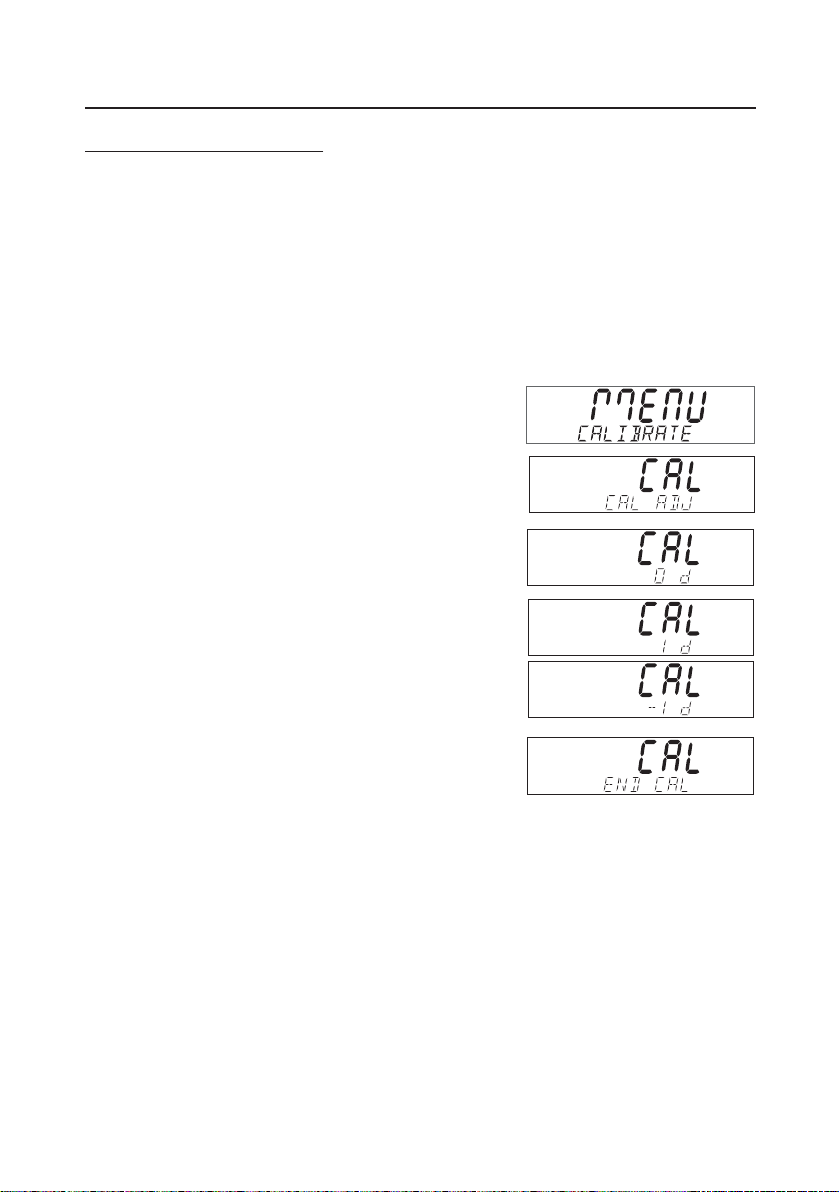
Calibration Adjust (InCal models)
Calibration Adjust may be used to adjust the result of the internal calibration by ±100 divisions.
::
Note
: Before making a calibration adjustment, perform an internal calibration. To verify whether an
::
adjustment is needed, place a test mass on the platform and note the difference (in divisions)
between the nominal mass value and the actual reading. Refer to Section 3.7.2 and use the
highest value from the Span Calibration Points column as the test mass. If the difference is within
±1 division, calibration adjustment is not required. If the difference exceeds ±1 division, calibration
adjustment is recommended. Following a calibration adjustment, repeat the internal calibration
and verification procedures.
Adventurer Pro
To perform a calibration adjustment, press the
and release it when MENU CALIBRATE is displayed.
Press Yes to enter the Calibration sub-menu. Press No until
CAL ADJ is displayed.
Press Yes to enter the CAL ADJ menu item and view the current
setting. If the actual reading was less than the nominal mass
value, a positive adjustment is required. Press No
setting matches the difference noted earlier in the procedure. If
the actual reading was greater than the nominal mass value, a
negative adjustment is required. Press
matches the difference noted earlier in the procedure. Press Yes
to accept and store the setting.
Menu-Cal
BackBack
Back until the setting
BackBack
button
until the
Page 31
Adventurer Pro EN-29
ASTM OIML
500g500g
500g500g
500g 1 E2
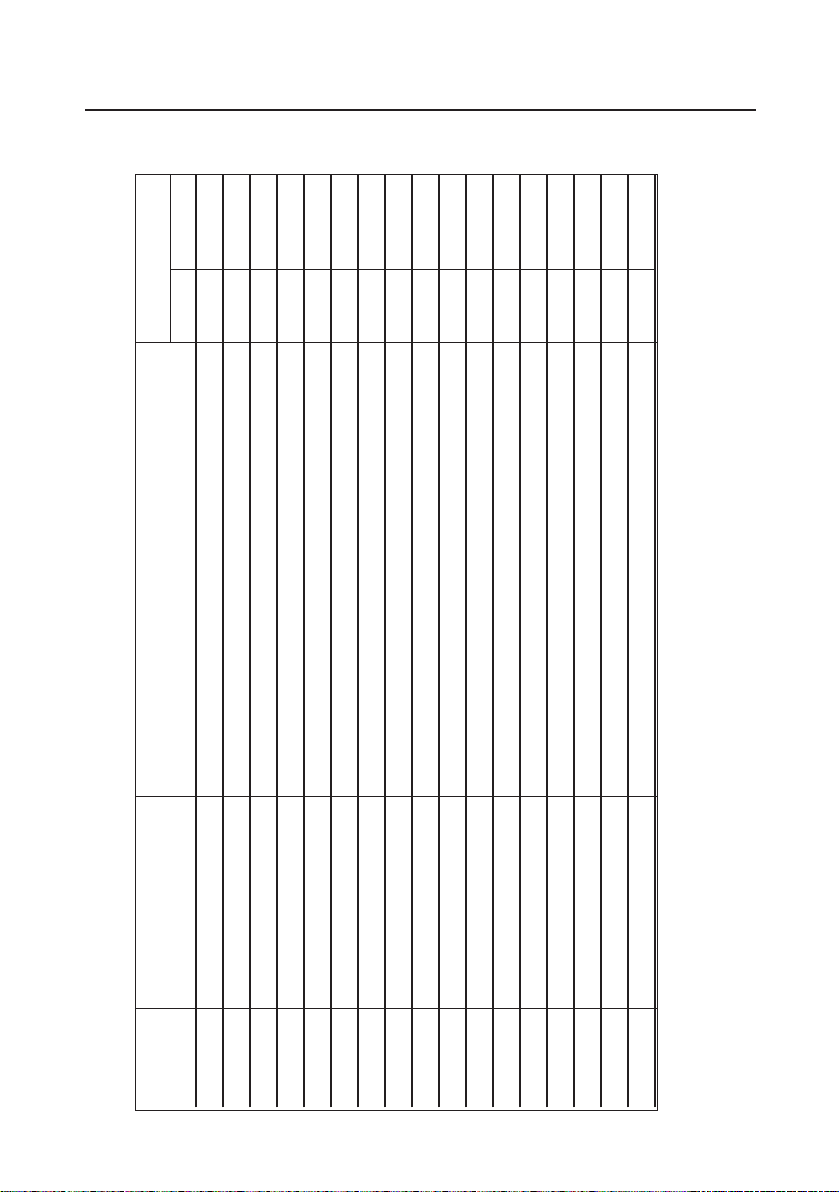
Model Linearity Calibration Points Span Calibration Points (1) Weight Class
AV53 25g / 50g 30g, 40g, 50g 2F1
3.7.2 Calibration Masses
AV64 20g / 50g 40g, 50g, 60g 1 E2
AV114 50g / 100g 50g / 100g 1E2
AV212 100g / 200g 50g, 100g, 150g, 200g 2F1
AV213 100g / 200g 100g, 200g 1E2
AV264 150g / 250g 200g, 250g 1E2
AV313 150g / 300g 150g, 200g, 250g, 300g 1E2
AV412 200g / 400g 100g, 200g, 300g, 400g 2 F1
AV413 200g / 400g 200g, 300g, 400g 1E2
AV513 200g / 500g 200g, 300g, 400g,
AV812 400g / 800g 200g, 300g, 400g, 500g, 600g, 700g, 800g 2 F1
AV2101 1000g / 2000g 500g, 1000g, 1500g, 2000g 2F1
AV2102 1000g / 2000g 1000g, 2000g 1E2
AV3102 2000g / 3000g 1000g, 2000g, 3000g 1E2
AV4101 2000g / 4000g 1000g, 2000g, 3000g, 4000g 2 F1
AV4102 2000g / 4000g 2000g, 3000g, 4000g 1E2
AV8101 4000g / 8000g 2000g, 3000g, 4000g, 5000g, 6000g, 7000g, 8000g 2 F1
Page 32
Adventurer ProEN-30
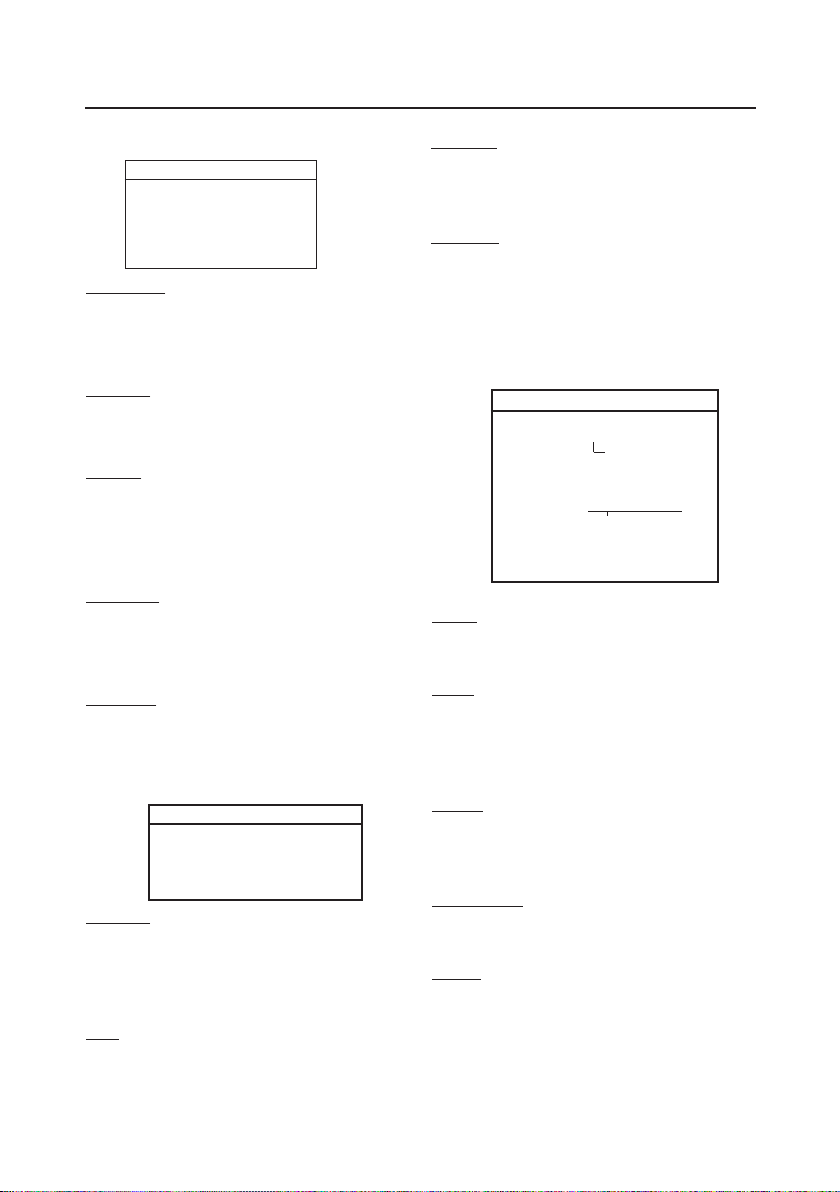
3.7.3 Setup
SETUP
Legal Trade On/Off
Auto Tare On/Off
Auto Off Off, 1, 2, 5 min
Back Light On/Off
End Setup
Legal Trade
When set On, the balance operates in
compliance with Weights and Measures
regulations.
Auto Tare
When set On, the balance will automatically
tare the first item placed on the pan.
Auto Off
When set to 1, 2 or 5 minutes, the balance will
turn off in the selected time interval if there has
been no activity. Set to OFF for continuous
operation.
Back Light
Used to set the display back light on or off. This
sub-menu is only included on models with
battery operation.
End Setup
Press the Yes button, to advance to the Readout
submenu. Press the
No button to return to the
LEGAL TRADE menu item.
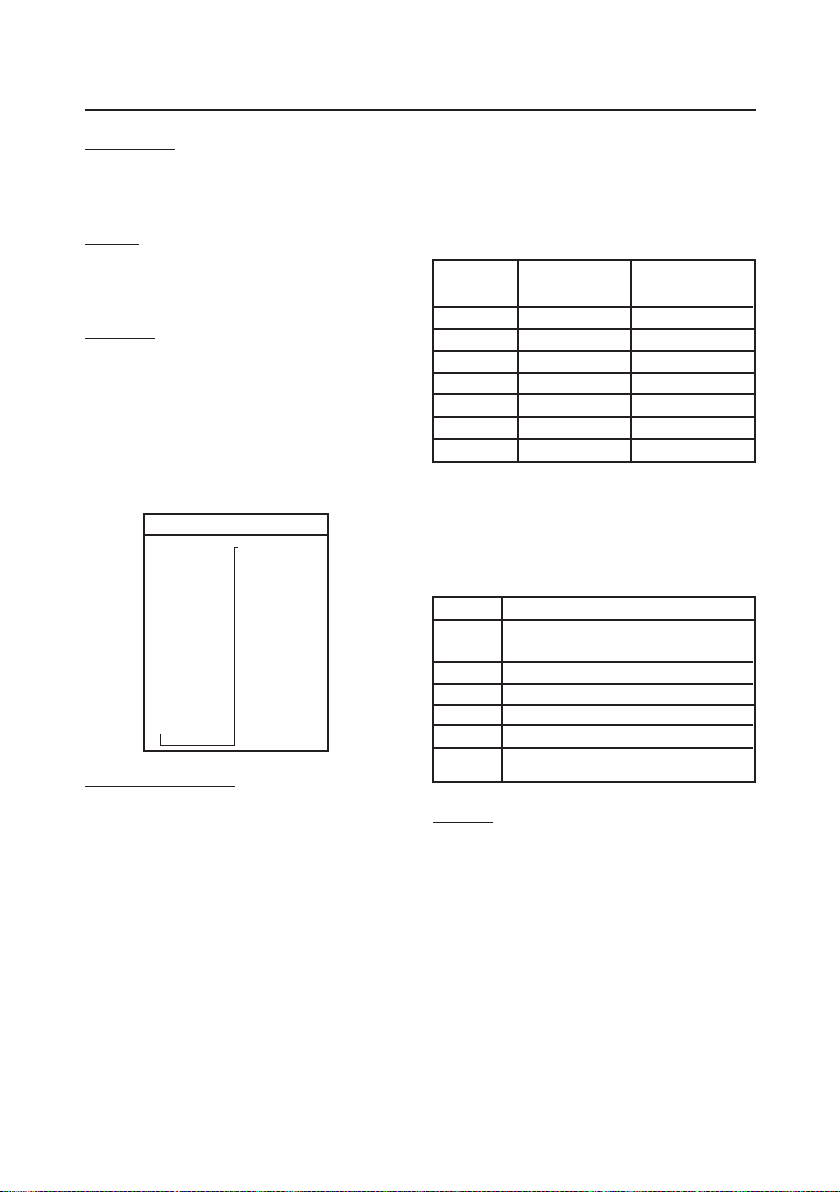
3.7.4 Readout
READOUT
Auto Zero Off, .5d, 1d, 2d, 5d
Filter Low, Medium, High
Gross Ind. G, B, Off
End Read
Auto Zero
Allows setting the balance auto zero level
setting: .5, 1, 2 or 5 divisions. Balance
maintains zero until threshold is exceeded.
Filter
Allows setting the balance filter level: Low,
Medium, High. Compensates for vibration or
excessive air currents.
Gross Ind.
Allows setting the gross indicator to G (gross),
B (brutto) or Off.
End Read
Press the
Yes button to advance to the Mode
submenu. Press No to return to Auto Zero.
3.7.5 Mode
The Mode submenu is used to turn Application
modes On or Off.
MODE
Weigh On/Off
Count On/Off
Percent On/Off
Check Weigh On/Off
Animal Auto, Semi, Man, Off
Display Hold Off, Auto, Semi, man
Totalize On/Off
End Mode
Weigh
Use to set the Weighing Mode On or Off.
Count
Use to set the Counting Mode On or Off. If
Count is set On, APW optimize can be set On
or Off.
Percent
Allows setting the percent weighing mode On
or Off.
Check Weigh
Use to set the Check Weighing Mode On or Off.
Animal
Use to set the Animal Weighing Mode to: Auto,
Semi, Manual or Off. If set to Auto, Semi or
Manual, level (averaging period) can be set to
5, 10 or 15 seconds.
Apw Optimize On/Off
Level sec 5,10, 15
Page 33
EN-31Adventurer Pro
Display Hold
Use to set the Display Hold Mode to Auto, Semi-
automatic or Manual.
Totalize
Use to set the Totalize Mode to Auto, Manual or
Off.
End Mode
Press the Yes button to advance to the Unit
submenu. Press No to return to Weigh.
3.7.6 Unit
The Unit submenu is used to turn measuring
units On or Off. Available measuring units vary
by model.
UNIT
mg On/Off
g On/Off
kg On/Off
oz On/Off
lb On/Off
ct On/Off
dwt On/Off
ozt On/Off
GN On/Off
N On/Off
t HK On/Off
t SC On/Off
Defining Custom Unit
Set Custom to ON in the Unit menu to enable
and define the Custom Unit. The custom unit is
defined by a conversion factor and a least
Significant Digit (LSD). The conversion factor
is used by the balance to convert grams to the
custom weighing unit and is defined by entering
a factor and an exponent. The factor is a value
between 0.1000000 and 1.999999 inclusive.
The exponent moves the decimal point of the
factor to the right for positive values or to the left
for negative values.
t TW On/Off
m On/Off
Tical On/Off
Baht On/Off
Meshgal On/Off
Tola On/Off
Custom On/Off
End Unit
Enter the Factor, following the instructions for
Editing Limits in Section 3.5.4. Enter the
Exponent and LSD using the Yes No buttons.
Factor Exponent Conversion
(+3 to -3) Factor
.1234 3 123.4
.1234 2 12.34
.1234 1 1.234
.1234 0 .1234
.1234 -1 .01234
.1234 -2 .001234
.1234 -3 .0001234
Custom Unit = Conversion Factor x Grams.
The LSD is the value by which the displayed
weight is incremented or decremented.
LSD Result
.5 Adds one decimal place
Display counts by 5
1 Display counts by 1
2 Display counts by 2
5 Display counts by 5
10 Display counts by 10
100 Display counts by 100
End Unit
Press the Yes button to advance to the Print-1
submenu. Press
No to return to the first available
unit.
3.7.7 Print-1 and Print-2
The Print-1 submenu is used to set printing
parameters for an external printer or computer.
Print-2 contains an identical menu and is used
when the optional COM2 port is installed.
Page 34
Adventurer ProEN-32
3.7.7 Print-1 and Print-2 (Cont.)
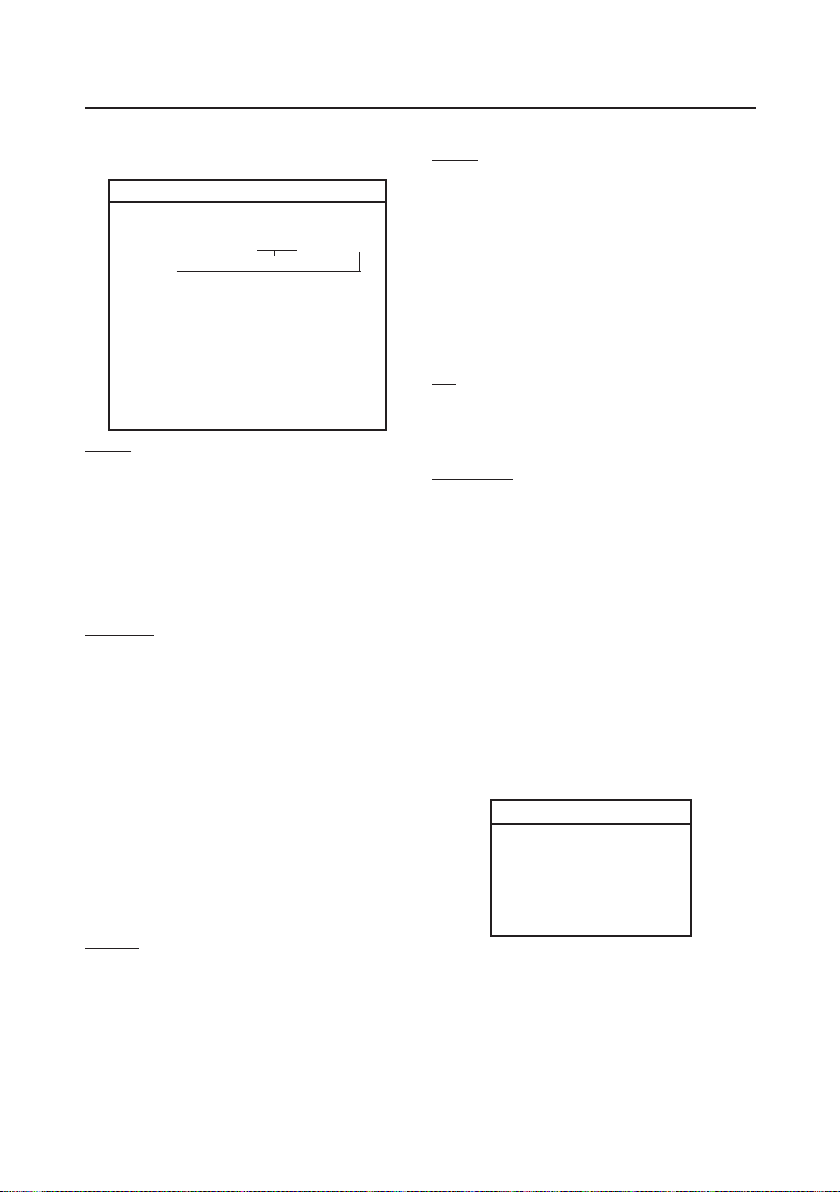
PRINT-1
Output When Stable On/Off
GLP Tare On/Off
Auto Print Off, Cont., Interval, When Stable
1 -3600 seconds
Stable- Load, Load & Zero
Content Num Only-Off, all others
On-Header,Gross,Net, Tare,
Ref, Result,GLP
Layout Line Format -Multi, Single
4LF-Yes/No
Form Feed-Yes/No
List Yes/No
End Print-1
Output
Set When Stable to On to print only stable values.
Set When Stable to Off to print stable or unstable
values.
Set GLP Tare to On to print GLP data once after
a tare operation. Set GLP Tare to Off to disable
this feature.
Auto Print
When set to Continuous, the displayed value is
printed continuously. When set to Interval, the
displayed value is printed at the user specified
time interval (1 to 3600 seconds).
If set to When Stable, the balance will
automatically print the displayed value when
stability is achieved. An additional setting must
be made to determine if only stable non-zero
values will be printed (load setting) or if stable
zero and non-zero values will be printed (Load
& Zero). When set to Off, the Auto print feature
is disabled.
Content
All of these features can be set On or Off. Numeric
data only, Header, Gross, Net, Tare, Reference,
Result, GLP. (See sample printout 3.10)
Layout
Determines the format of data output to a printer
or computer. If Line Format is set to Multi, a
multi-line printout is generated. If it is set to
Single, a single line printout is generated. If 4
LF is set to yes, 4 line feeds are appended to the
printout. If Form feed is set to Yes, a form feed is
appended to the printout. This is useful for
printing to page printers.
List
When Yes is selected, a printout of balance
settings is generated.
End Print-1
Press the Yes button to advance to the next
menu, Print-2 if COM2 is installed or RS2321 if COM2 is not installed. Pressing
No returns
to Output menu item.
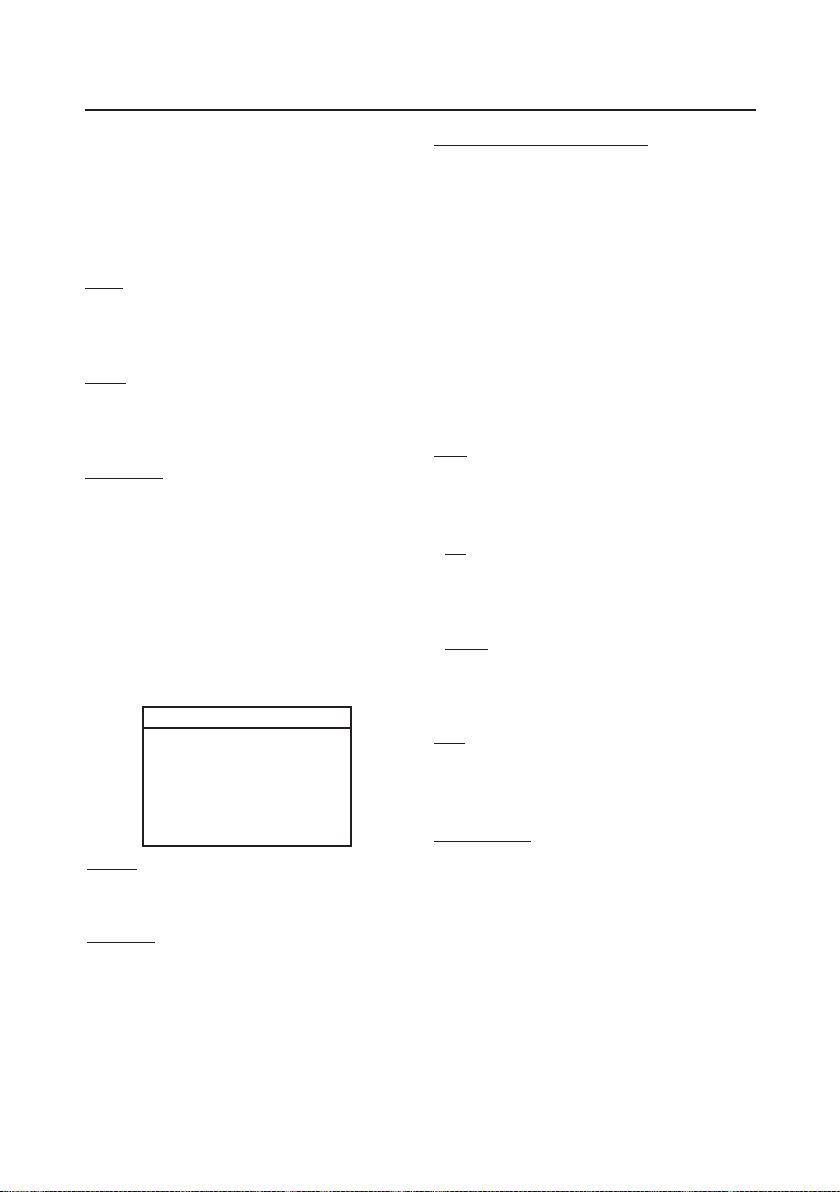
3.7.8 RS232-1 and RS232-2
The RS232-1 submenu is used to set
communication parameters for an external printer
or computer.
RS232-2 contains an identical menu and is
available when the optional COM2 port is
installed.
RS232-1
Baud 600..2400...19200
Parity 7 Even, 7 Odd, 7 No
Handshake Off, XONXOFF
End RS1
Par, 8 No Parity
Hardware
Page 35
EN-33Adventurer Pro
3.7.8 RS232-1 and RS232-2 (Cont.)
When the balance is operated from batteries,
the menu item is available and the default setting
is Off. To enable COM1, Power must be turned
On.
Baud
Baud rates of 600, 1200, 2400, 4800, 9600
and 19,200 are available.
Parity
Parity settings of 7 even, 7 Odd, 7 No Parity
and 8 No Parity are available.
Handshake
Settings of Off, XONXOFF and (for RS232-1
only) Hardware are available.
End RS1 (RS2)
Pressing the Yes button will advance to the
RS232-2 (or GLP Data) submenu. Pressing
No returns to the Power (or Baud) menu item.
3.7.9 GLP Data
GLP DATA
User ID Set...
Proj ID Set...
Time Type-12hr, 24hr,
Set..., Adj-60, +60
Date Type mdy,...dym
Set...
End GLP Data
User ID
Used to enter a User ID up to 10 characters.
Project ID
Used to enter a Project ID up to 10 characters.
Entering a User ID or Project ID
Enter the user or Project ID one character at a
time. The character to be entered is highlighted
by a blinking cursor (underscore). Press the No
button repeatedly to scroll through the list of
available characters: (space), -, 0 through 9, A
through Z. Press the Yes button to select the
displayed character and move the cursor one
position to the right. After the tenth character is
entered, the ten character ID will blink. Press
the No button to change the displayed ID or the
Yes button to accept the ID and proceed to the
next menu item.
Time
Type
Set the type to 12 hours or 24 hours.
Set
Set the current time using the format selected
in the type menu item.
Adjust
Enter an adjustment value from -60 to + 60
seconds per day.
Date
Set the date type: M/D/Y, D/M/Y, Y/M/D,
M/Y/D, Y/D/M, D/Y/M and the actual date.
End GLP Data
Press the Yes button to advance to the GLP
Print submenu. Press the No button to return to
User ID.
Page 36
Adventurer ProEN-34
3.7.10 GLP Print
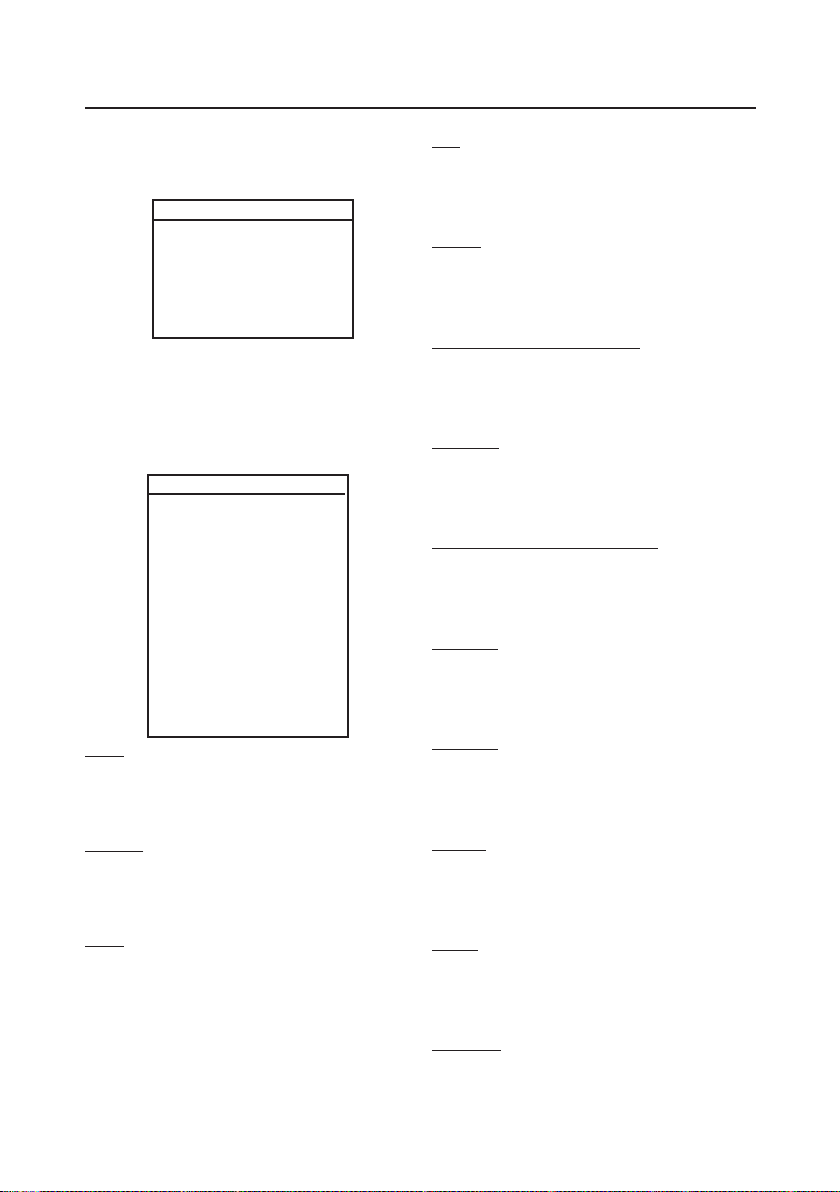
Select GLP items to be printed by setting them to
On.
GLP PRINT
Time On/Off
Balance ID On/Off
User ID On/Off
Project ID On/Off
Difference On/Off
Name On/Off
End GLP Prt
End GLP Print
Press the Yes button to advance to the reset
submenu. Press the No button to return to Time.
3.7.11 Reset
RESET
Setup RESET?
Readout RESET?
Mode RESET?
Unit RESET?
Print-1 RESET?
Print-2 RESET?
RS232-1 RESET?
RS232-2 RESET?
GLP Data RESET?
GLP Print RESET?
Lockout RESET?
Global
RESET?
End Reset
Setup
Select Yes to return all Setup menu items to their
factory settings.
Unit
Select Yes to return all Unit menu items to their
factory settings.
Print-1
Select Yes to return all Print-1 menu items to
their factory settings.
Print-2 (If COM2 is installed)
Select Yes to return all print-2 menu items to
their factory settings.
RS232-1
Select Yes to return all RS232-1 menu items to
their factory settings.
RS232-2 (If COM2 is installed)
Select Yes to return all RS232-2 menu items to
their factory settings.
GLP Data
Select Yes to return all GLP Data menu items to
their factory settings.
GLP Print
Select Yes to return all GLP Print menu items to
their factory settings.
Readout
Select Yes to return all Readout menu items to
their factory settings.
Mode
Select Yes to return all Mode menu items to their
factory settings.
Lockout
Select Yes to return all Lockout menu items to
their factory settings.
Global
Select Yes to return the menu items in all sub-
menus to their factory settings.
End Reset
Press the Yes button to advance to the Lockout
menu. Press the No button to return to Setup.
Page 37
EN-35Adventurer Pro
3.7.12 Lockout
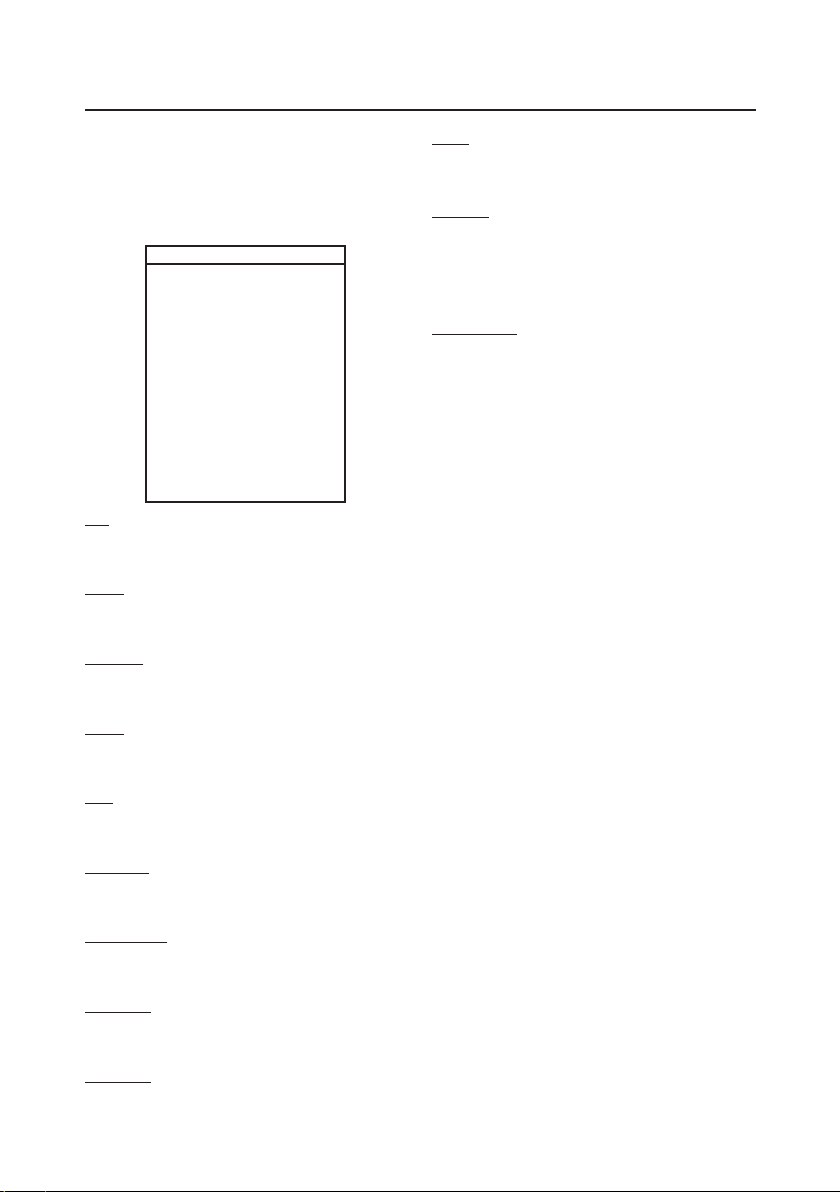
Use this submenu to prevent unauthorized
changes to menu settings. If a submenu is
locked, its menu item settings can be viewed
but not changed.
LOCKOUT
Cal On/Off
Setup On/Off
Readout On/Off
Mode On/Off
Unit On/Off
Print-1 On/Off
Print-2 On/Off
RS232-1 On/Off
RS232-2 On/Off
GLP Data On/Off
GLP Print On/Off
Reset On/Off
Lock Set On/Off
End Lockout
Cal
Set On to lock and hide the Calibration Menu.
Setup
Set On to lock the Setup Menu.
Readout
Set On to lock the Readout Menu.
Mode
Set On to lock the Mode Menu.
Reset
Set On to lock the Reset Menu.
Lock Set
Set On to lock all submenu lock settings. When
set Off, the lock settings for all menus are
accessible. To turn Lock Set off, refer to section
End Lockout
Press the Yes button to advance to the End
menu. Press the No button to return to the Cal
menu.
3.7.13 E nd
The End menu is used to exit the menus and
return to previous application
3.8 Legal for Trade (LFT)
Specific Adventurer Pro models have been
designed to comply with OIML, EEC, NTEP and
Measurement Canada weights and measures
regulations. Contact Ohaus for further details
about availability.
When the LEGAL TRADE menu item setting is
set to ON, the following conditions apply:
• The CALIBRATION menu is hidden.
Unit
Set On to lock the Unit Menu.
Print-1/2
Set On to lock the Print-1/2 Menu.
RS232-1/2
Set On to lock the RS232-1/2 Menu.
GLP Data
Set On to lock the GLP Data Menu.
GLP Print
Set On to lock the GLP Print Menu.
• The LEGAL TRADE menu item is
hidden.
• The AUTO ZERO menu item setting is
set to 0.5d and locked.
• The OUTPUT WHEN STABLE menu
item setting is set to ON and locked.
• The CONTINUOUS setting in the AUTO
PRINT menu item is hidden.
Page 38
Adventurer ProEN-36
3.9 Sealing Access to the Balance Settings
When used in conjunction with the Lockout menu, the balance may be sealed to prevent or detect
unauthorized changes to the balance settings. For legal for trade applications, the balance must
be sealed to prevent access to the metrological parameters.
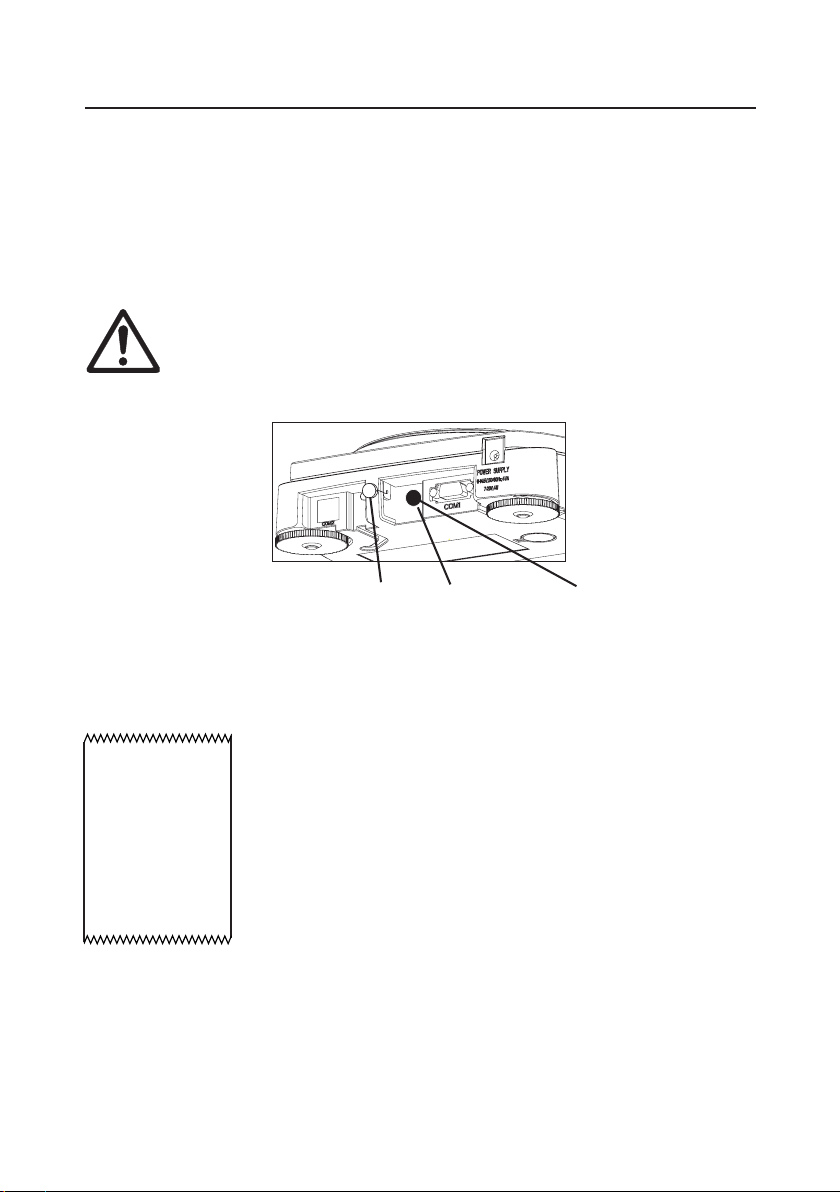
To seal the balance, cover the Lock switch access hole at the rear of the balance. A paper seal, and
a wire seal may be installed as shown.
To regain access to the locked balance settings, break the seal and press the
recessed Lock switch momentarily while OHAUS is displayed during power up.
Sealing the Balance
/
$
(
6
Wire Seal Paper Seal
Rear of the Balance
Lock Switch
(Under Seal)
3.10 Printing Data
Printing data to an external computer or printer requires that the communication parameters in the
RS232-1 and/or RS232-2 submenus be set to match external device communication parameters.
04/01/05 12:30 PM // if GLP SET> Time is ON
Bal ID 1234567 // If GLP SET> Balance ID is ON
USER ID ABCDEFGHIJ // If GLP SET> User ID is ON
PROJ ID 1234567890 // If GLP SET> Proj ID is ON
Name....................... // If GLP SET > Name is ON
0.0200kg G // Gross ON - G, B or [space] as determined in Readout submenu.
0.0200kg T // Tare ON
0.0000kg NET // Net ON
0.0200kg G // Gross ON - G, B or [space] as determined in Readout submenu.
// If a tare value is entered, these three items are printed if selected in the definitiion string.
// Otherwise, gross is printedif selected in the definition string.
Page 39
EN-37Adventurer Pro
4. MAINTENANCE
4.1 Calibration
Periodically verify calibration by placing an accurate weight on the balance and if calibration is
required, refer to section 3.7.1.
4.2 Cleaning
If cleaning is required, use a soft cloth dampened with water and a mild detergent. Do not allow
liquids to enter the balance. Do not use harsh chemicals to clean the balance, as the finish may
be damaged.
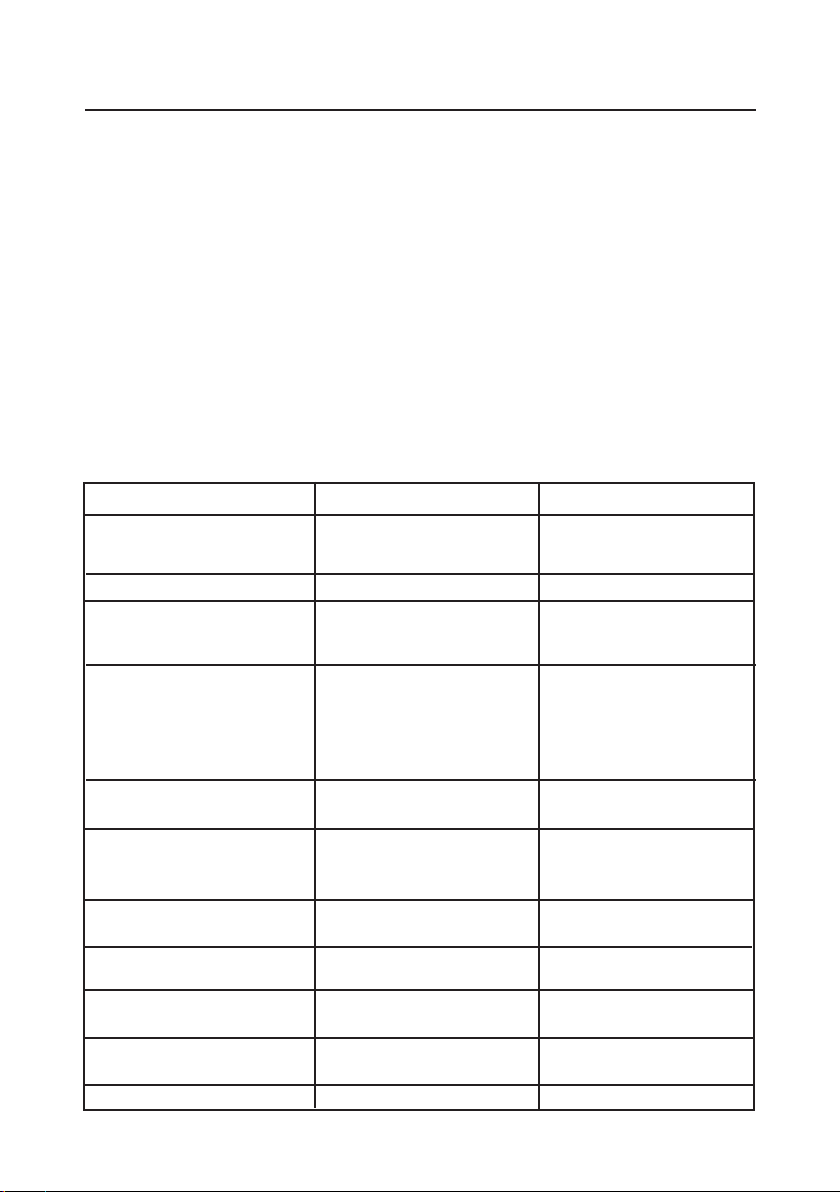
4.3 Troubleshooting
The following table lists common problems, possible causes and remedies. If the problem persists,
contact Ohaus or your authorized Ohaus dealer.
Symptom Possible Cause Remedy
Balance will not turn on • AC power not connected • Connect AC adapter
• Batteries discharged • Replace batteries
Battery indicator is flashing • Batteries are weak • Replace batteries
Balance does not display • Improper calibration • Perform calibration
accurately • Unstable environment • Move balance to a
suitable location
Cannot calibrate the balance • Calibration menu locked • Turn Calibration menu
lock off
• LFT set to on • Turn LFT off
• Unstable weight reading • Eliminate vibration and
drafts.
Cannot change Menu settings • Submenu locked • Unlock submenu
• LFT set to on • Turn LFT off
Error 7.0 • Unstable weight reading • Eliminate vibration and
when defining the drafts.
reference weight.
Error 8.1 • Weight reading exceeds • Clear platform.
Power On Zero limit.
Error 8.2 • Weight reading below • Put platform on
Power On Zero limit. balance.
Error 8.3 • Weight reading exceeds • Clear platform.
overload limit.
Error 8.4 • Weight reading below • Put platform on
underload limit. balance.
Error 9.0 • Internal fault. • Return balance for service.
Page 40
Adventurer ProEN-38
4.3 Troubleshooting (Cont.)
Symptom Possible Cause Remedy
Error 9.5 • Production calibration • Return balance for service.
not present.
Error 9.8 • user calibration data not • Calibrate balance.
present. (Required for
LFT ON only)
Error 53 • EEPROM checksum error. • Cycle power on, off. I f
balance fails to operate,
return for service.
LOW REF WT • Average piece weight too • See section 3.5.3.
small. (Warning)
REF WT Err • Reference weight too small • Increase sample size.
The weight on the pan is
too small to define a valid
reference weight.
------ • Busy (tare, zero, printing) • Wait until completion.
4.4 Service Information
If the Troubleshooting section does not resolve or describe your problem, contact your authorized
Ohaus Service Agent. For Service assistance or technical support in the United States, call toll-free
1-800-526-0659 between 8:00 AM and 5:00 PM EST. An Ohaus product service specialist will
be available to provide assistance. Outside the USA, please visit our web site, www.ohaus.com to
locate the office nearest you.
4.5 Parts
Description Ohaus Part Number
AC adapters
Output: 12 VAC 500 mA
• US 120V/60Hz 12102320
• Euro 230V/50Hz 12102321
• UK 230V/50Hz 12102322
• Australia 230V/50Hz 12102323
Output: 9 VDC 500 mA
• Japan 100V/50Hz 12102324
Page 41

EN-39Adventurer Pro
4.5 Parts (Cont.)
Description Ohaus Part Number
In-Use Cover Kit
(10 x 7.6 in. / 25.4 x 19.3 cm housing) 12103980
In-Use Cover Kit
(11.8 x 8.7 in. / 30 x 22 cm housing) 12103879
Top Door Kit 12103873
Glass Door Kit (8.7 in. / 22 cm draftshield) 12103645
Glass Door Kit (5 in. / 12.5 cm draftshield) 12103646
Replacement Pans
• Round pan (3.5 in. / 9 cm diameter) 12103856
• Round pan (3.9 in. / 10 cm diameter) 12102939
• Round pan (4.7 in. / 12 cm diameter) 12102940
• Rectangular pan (5.8 x 6.3 in. / 14.9 x 16.2 cm) 12103941
• Rectangular pan (7.6 x 8 in. / 19.3 x 20.3 cm) 12103880
4.6 Accessories
Security device 76288-01
RS232 Cables
• Cable, DB9M-DB9F 80500525
• Cable, DB9M-DB25F 80500524
• Cable, DB9M-SF42 Printer 80500571
• Cable, DB9M-Apple 80500562
SF42 Printer SF42
Page 42

Adventurer ProEN-40
5. TECHNICAL DATA
Ambient conditions
The technical data are valid under the following ambient conditions:
• Ambient temperature: 10 °C to 30 °C
• Relative humidity: 15 % to 80 % at 31 °C non-condensing, decreasing linearly to 50
% at 40 °C
• Height above sea level: Up to 2000 m
Operability is assured at ambient temperatures between 5 and 40 °C
Power
• AC adapter - To national standard as per list in Section 4.6. Balance power input
6-14.5 VAC, 50/60Hz 4VA or 7-20VDC, 4W
• Batteries - 4 x AA (LR6) 1.5 V (not included), typical 20 h with alkaline batteries.
Materials
• Housing base: plastic (ABS/PC)
• Top Housing: plastic (ABS/PC)
• Platform: 18/10 stainless steel
Protection
• Protected against dust and water
• Pollution degree: 2
• Installation category: Class II
• EMC: see declaration of conformity
Page 43
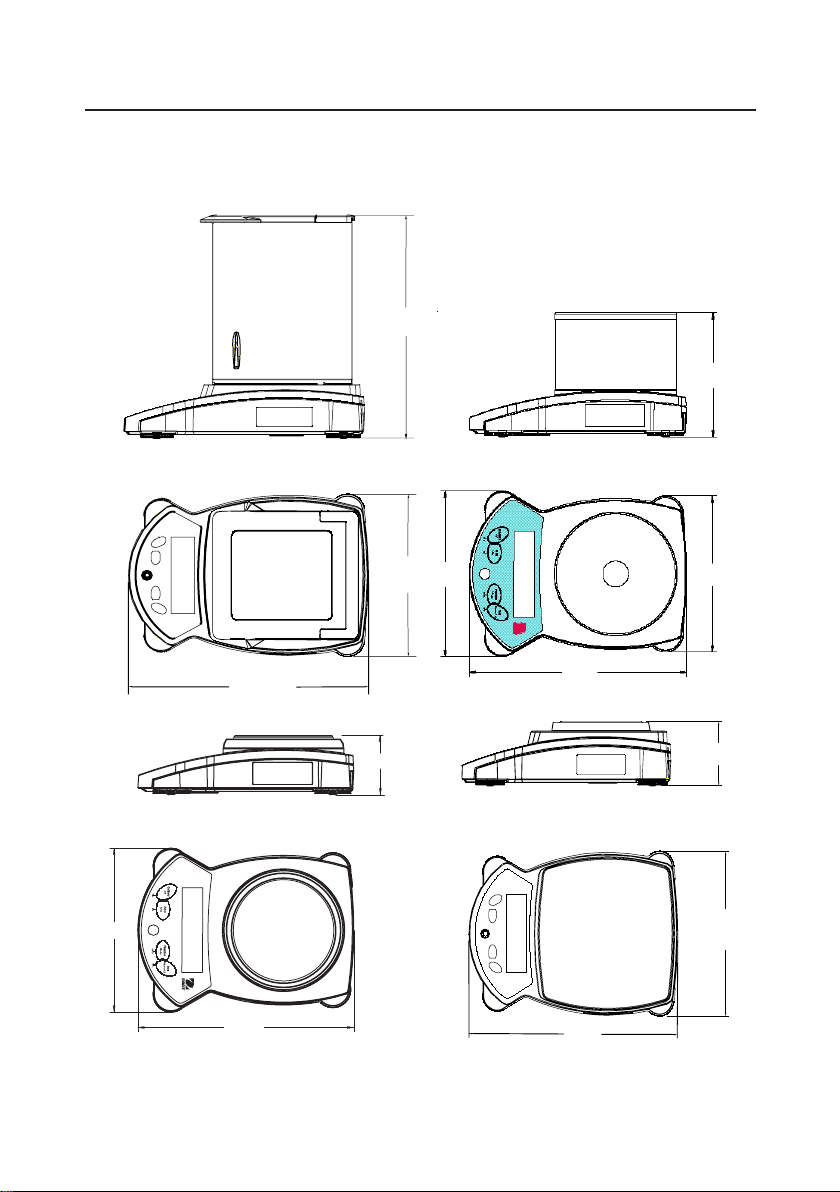
5.1 Drawings
EN-41Adventurer Pro
A
BAB
C
Figure 5-1
A
B
C
Figure 5-3
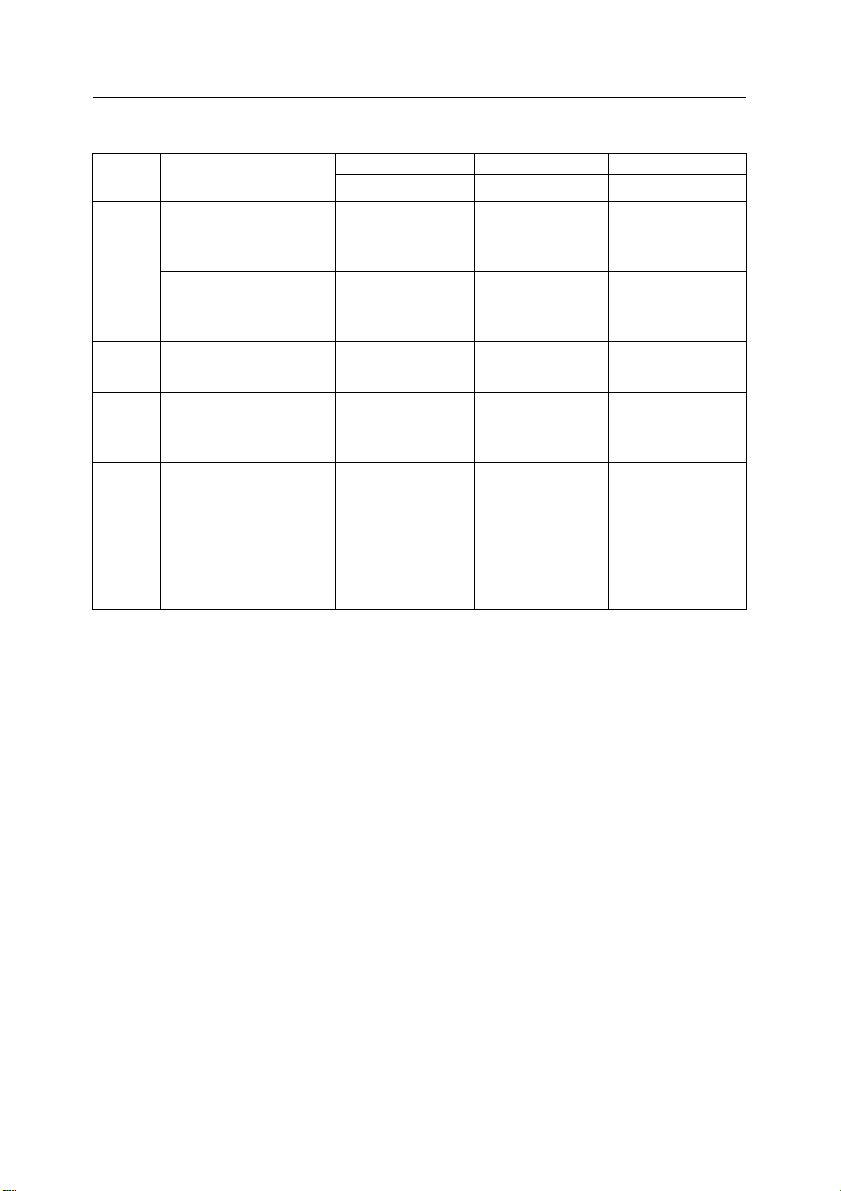
Note: See table on next page for model designations and dimensions.
C
Figure 5-2
A
B
C
Figure 5-4
Page 44
EN-42 Adventurer Pro
5.2 Drawings (Cont.)
A B C
FIGURE MODELS
AV64, AV64C, AV114,
AV114C, AV264,
AV264C
5-1
AV53C, AV213, AV213C,
AV313, AV313C, AV413,
AV413C, AV513C
5-2 AV53 14.5 cm
5-3 AV212, AV412, AV812,
AV2101, AV4101,
AV8101
5-4 AV212C, AV412C,
AV812C, AV2101C,
AV2102, AV2102C,
AV3102, AV3102C,
AV4101c, AV4102,
AV4102C, AV4102C,
AV8101C
OVERALL HEIGHT OVERALL WIDTH OVERALL DEPTH
30 cm
12 in
19 cm
7.5 in.
5.7 in
7.2 cm
2.8 in.
8.5 cm
3.3 in.
22 cm
8.7 in
22 cm
8.7 in.
19.3 cm
7.6 in.
19.3 cm
7.6 in.
22 cm
8.7 in
30 cm
11.8 in.
30 cm
11.8 in.
25.4 cm
10 in.
25.4 cm
10 in.
30 cm
11.8cm
Page 45
Adventurer Pro EN-43
5. TECHNICAL DATA
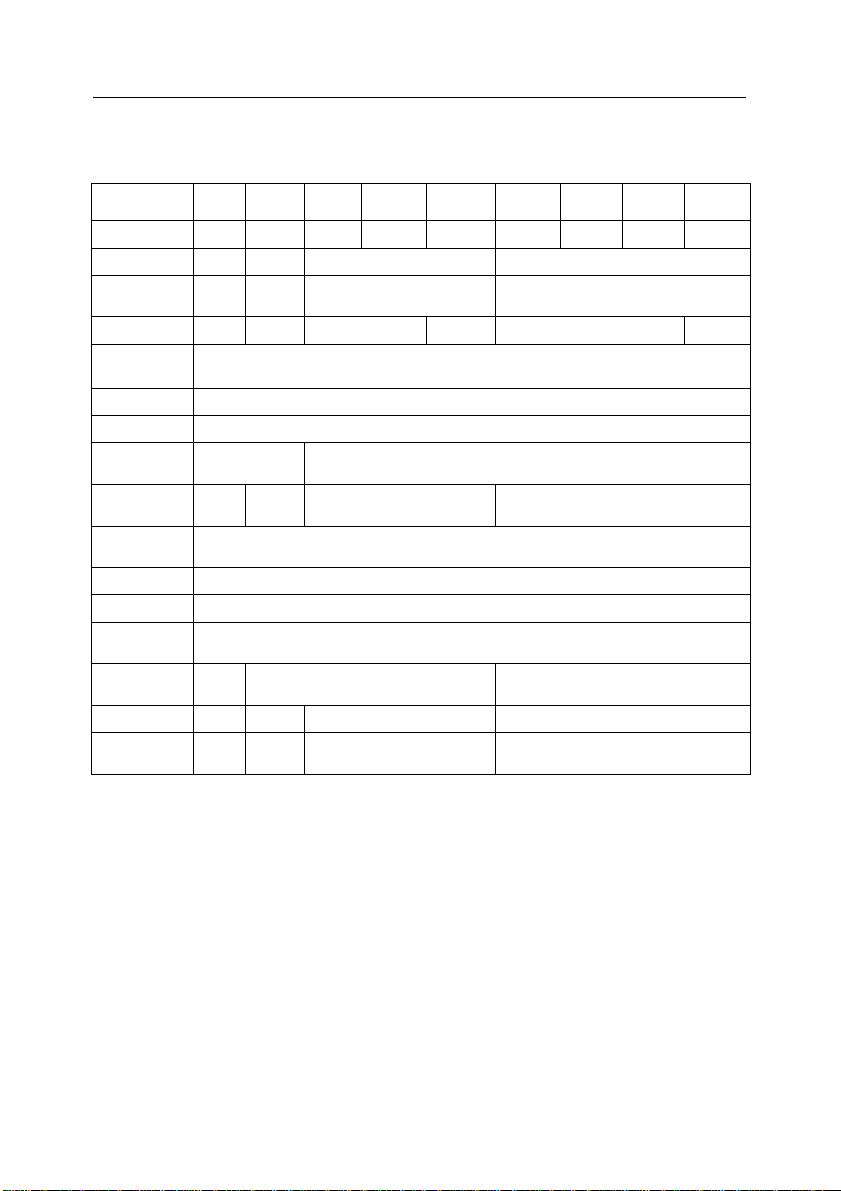
5.2 Specifications
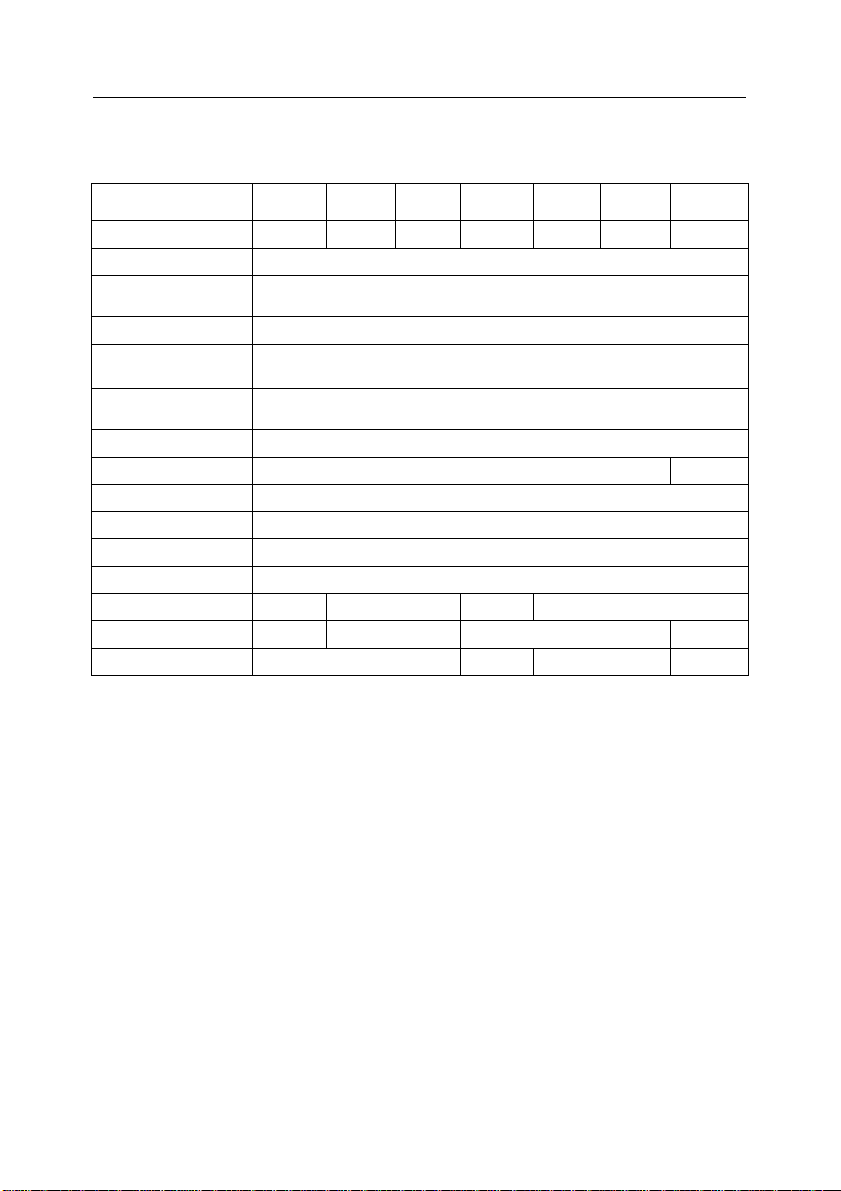
Item Number
Capacity 51 51 65 110 260 210 310 410 510
Readability 0.001 0.001 0.0001 0.0001
Repeatability
(Std. dev.) (g)
Linearity (g) ±0.002 ±0.002 ±0.002 ±0.003 ±0.002 ±0.003
Weighing Units
Application Modes Weighing, Parts Counting, Percent Weighing, Check Weighing, Animal Weighing, Display Hold, Totalize
Tare Range To Capacity by Subtraction
Stabilization
Time(s)
Draft Shield Height
Over Platform
Power
Requirements
Calibration Digital with External Weight
Display Type 2-Line LCD w/Backlight
Display Size
(in/cm)
Platform Size
(in/cm)
Net Weight (lb/kg) 3.1 / 1.4 7.3 / 3.3 8.7 / 4.0 7.3 / 3.3
Net Weight
(with InCal) (lb/kg)
* Also operates on 4 AA batteries (not included)
** Internal calibration option available on “C” models
† Unit availability depends on model
AV53* AV53C**
0.001 0.001 0.0001 0.0001
† Milligram, Gram, Kilogram, Ounce, Pound, Carat, Pennyweight, Ounce Troy, Grain, Newton,
Hong Kong Tael, Singapore Tael, Taiwan Tael, Momme, Tical, Baht, Mesghal, Tola, Custom
2.5 3
2.75 / 7 4.5 / 11.5 8.6 / 22 4.5 / 11.5
3.9 / 10 3.5 / 9 dia. 4.7 / 12 dia.
- - 8.2 / 3.7 9.6 / 4.4 8.2 / 3.7
AV64
AV64C**
AV114
AV114C**
AV264
AV264C**
AC Adapter (included)
4 x 1 / 10 x 2.5
AV213C**
AV213
AV313
AV313C**
AV413
AV413C**
AV513C**
Page 46
EN-44 Adventurer Pro
5. TECHNICAL DATA
5.2 Specifications (cont)
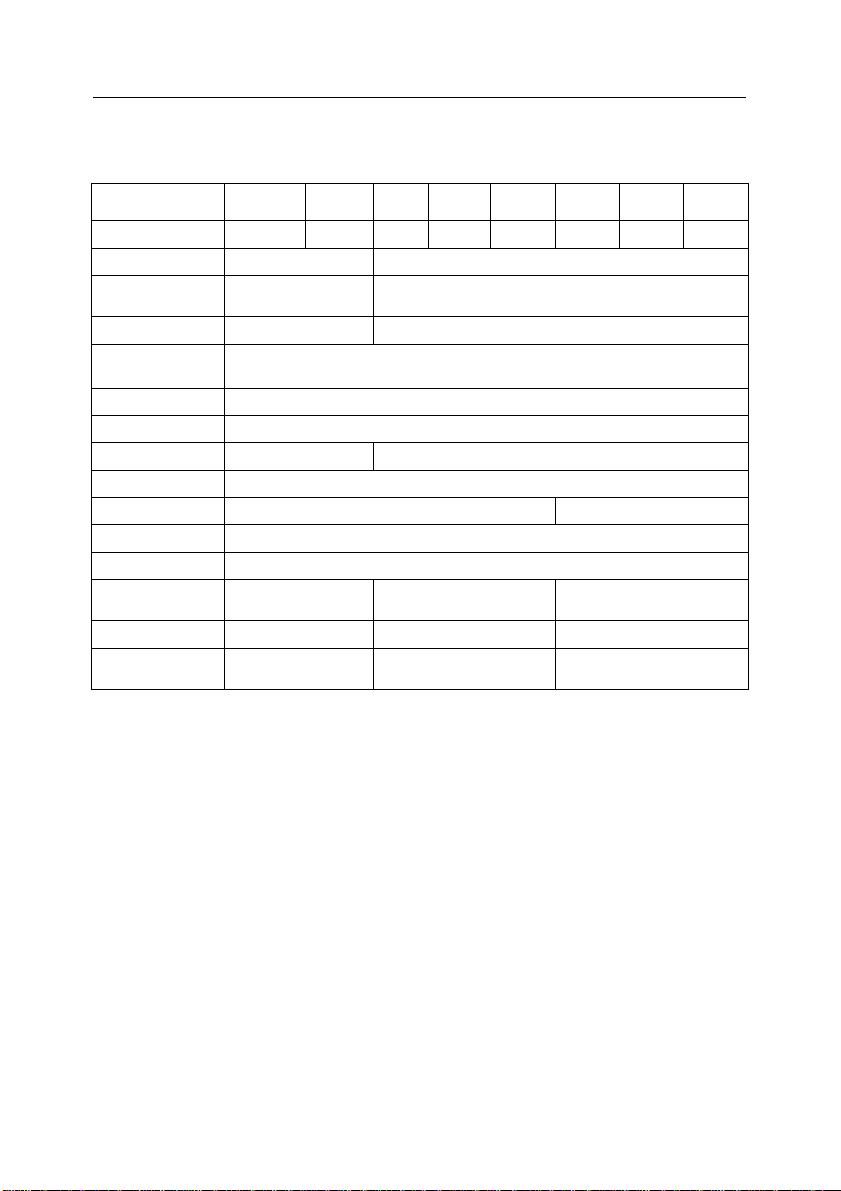
Item Number
Capacity 210 410 810 210 410 810 2100
Readability 0.01
Repeatability
(Std. dev.) (g)
Linearity (g) ±0.02
Weighing Units
Application Modes Weighing, Parts Counting, Percent Weighing, Check Weighing, Animal Weighing, Display Hold,
Tare Range To Capacity by Subtraction
Stabilization Time(s) 2 3
Power Requirements AC Adapter (included)
Calibration Digital with External Weight
Display Type 2-Line LCD w/Backlight
Display Size (in/cm) 4 x 1 / 10 x 2.5
Platform Size (in/cm) 4.7 / 12 dia. 5.8 x 6.3 / 14.9 x 16.2 4.7 / 12 dia.
Net Weight (lb/kg) 2.6 / 1.2 3.3 / 1.5 - - 6.1 / 2.8
Net Weight (with InCal) (lb/kg) - - 5.7 / 2.6 7.5 / 3.4 6.9 / 3.2
* Also operates on 4 AA batteries (not included)
** Internal calibration option available on “C” models
*** Non-InCal without draft ring
† Unit availability depends on model
AV212* AV412* AV812* AV212C** AV412C** AV812C**
0.01
† Milligram, Gram, Kilogram, Ounce, Pound, Carat, Pennyweight, Ounce Troy, Grain, Newton,
Hong Kong Tael, Singapore Tael, Taiwan Tael, Momme, Tical, Baht, Mesghal, Tola, Custom
Totalize
6.6 x 7.1 / 16.8 x 18***
AV2102
AV2102C**
Page 47
Adventurer Pro EN-45
5. TECHNICAL DATA
5.2 Specifications (cont)
Item Number AV3102
Capacity 3100 4100 2100 4100 8100 2100 4100 8100
Readability 0.01 0.1
Repeatability
(Std. dev.) (g)
Linearity (g) ±0.02 ±0.2
Weighing Units
Application Modes Weighing, Parts Counting, Percent Weighing, Check Weighing, Animal Weighing, Display Hold, Totalize
Tare Range To Capacity by Subtraction
Stabilization Time(s) 3 2
Power Requirements AC Adapter (included)
Calibration Digital with External Weight Internal Calibration
Display Type 2-Line LCD w/Backlight
Display Size (in/cm) 4 x 1 / 10 x 2.5
Platform Size (in/cm) 6.6 x 7.1 / 16.8 x 18
Net Weight (lb/kg) 6.1 / 2.8 3.3 / 1.5 - -
Net Weight (with InCal)
(lb/kg)
* Also operates on 4 AA batteries (not included)
**Internal calibration option available on “C” models
† Unit availability depends on model
AV3102C**
† Gram, Kilogram, Ounce, Pound, Carat, Pennyweight, Ounce Troy, Grain, Newton, Hong Kong Tael,
non InCal without draft ring
AV4102
AV4102C**
0.01 0.1
Singapore Tael, Taiwan Tael, Momme, Tical, Baht, Mesghal, Tola, Custom
6.9 / 3.2 - - 7.5 / 3.4
AV2101* AV4101* AV8101* AV2101C* AV4101C* AV8101C*
5.8 x 6.3 /
14.9 x 16.2
6.6 x 7.1 / 16.8 x 18
Page 48
EN-46 Adventurer Pro
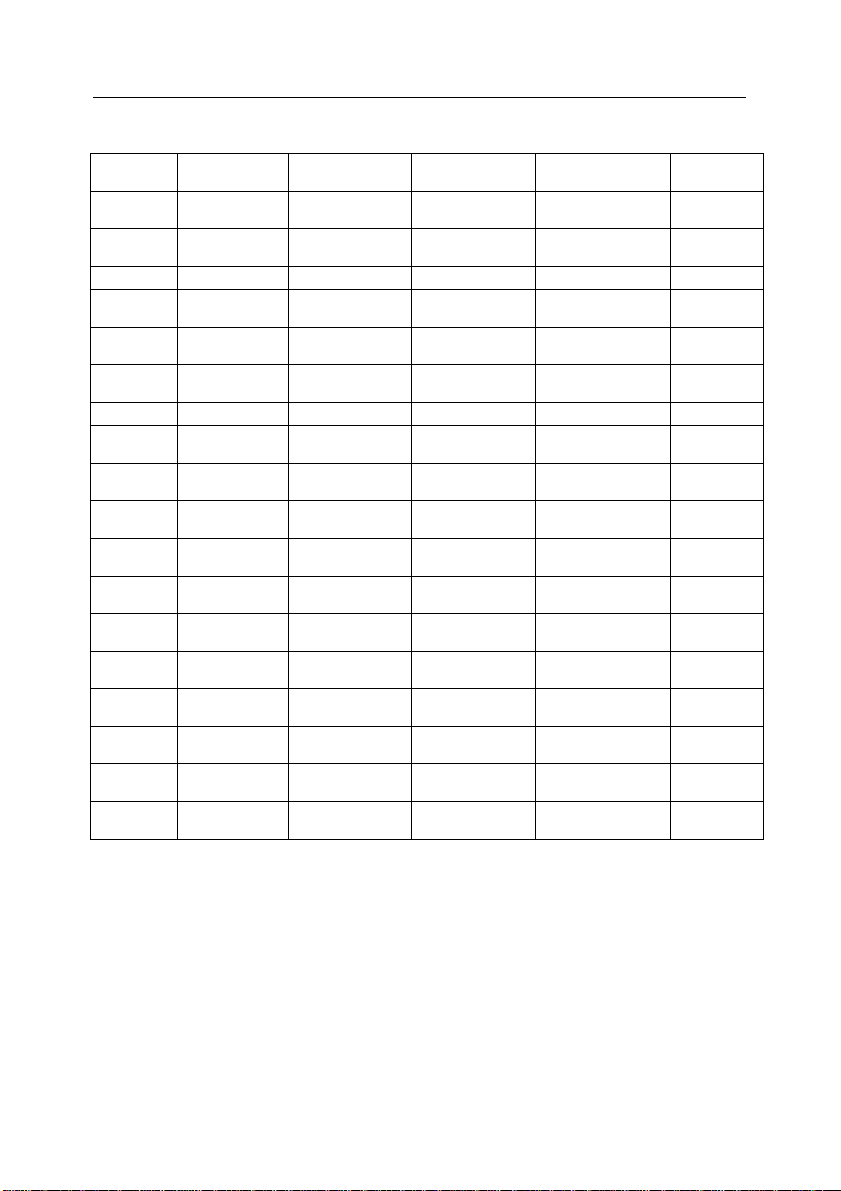
5.3 Capacity x Readability
Unit AV53
baht 3.3553 x 0.0001 4.27632 x 0.00001 7.23684 x 0.00001 17.10526 x 0.00001 13.8158 x
carat 255.000 x 0.005 325.0000 x 0.0005 550.0000 x 0.0005 999.995 / 1300.000 x
grain 787.06 x 0.02 1003.104 x 0.002 1697.570 x 0.002 4012.414 x 0.002 3240.80 x 0.02
gram 51.000 x 0.001 65.0000 x 0.0001 110.0000 x 0.0001 260.0000 x 0.001 210.000 x
kilogram 0.051000 x
mesghal 11.0670 x 0.0005 14.10495 x 0.00005 23.86990 x 0.00005 56.41975 x 0.00005 45.5700 x
milligram 51000 x 1 65000 x 0.1 110000 x 0.1 260000 x 0.1 210000 x 1
momme 13.6000 x 0.0005 17.33335 x 0.00005 29.33335 x 0.00005 69.33335 x 0.00005 56.0000 x
Newton 0.50014 x 0.00001 0.637432 x 0.000001 1.078732 x 0.000001 2.549729 x 0.000001 2.05940 x
ounce 1.79895 x 0.00005 2.292805 x 0.000005 3.880135 x 0.000005 9.171230 x 0.000005 7.40755 x
ounce troy 1.63970 x 0.00005 2.089800 x 0.000005 3.536585 x 0.000005 8.359185 x 0.000005 6.75165 x
pennyweight 32.794 x 0.001 41.7960 x 0.0001 70.316 x 0.0001 167.1839 x 0.0001 135.033 x
pound 0.112435 x
tael
(Hong Kong)
tael
(Singapore)
tael
(Taiwan)
tical 3.1232 x 0.0001 3.98057 x 0.00001 6.73635 x 0.00001 15.92227 x 0.00001 12.8603 x
tola 4.372 x 0.0001 5.57267 x 0.00001 9.43067 x 0.00001 22.29067 x 0.00001 18.0040 x
AV53C
0.000001
0.000005
1.36260 x 0.00005 1.736620 x 0.000005 2.938900 x 0.000005 6.946485 x 0.000005 5.61060 x
1.34925 x 0.00005 1.719605 x 0.000005 2.910100 x 0.000005 6.878420 x 0.000005 5.55555 x
1.36000 x 0.00005 1.733335 x 0.000005 2.933335 x 0.000005 6.933335 x 0.000005 5.60000 x
AV64
AV64C
0.210000 x 0.
0.462970 x
AV114
AV114C
AV264
AV264C
0.0005 / 0.001
AV213
AV213C
0.0001
1050.000 x
0.005
0.001
000001
0.0005
0.0005
0.00001
0.00005
0.00005
0.001
0.000005
0.00005
0.00005
0.00005
0.0001
0.0001
Page 49
Adventurer Pro EN-47
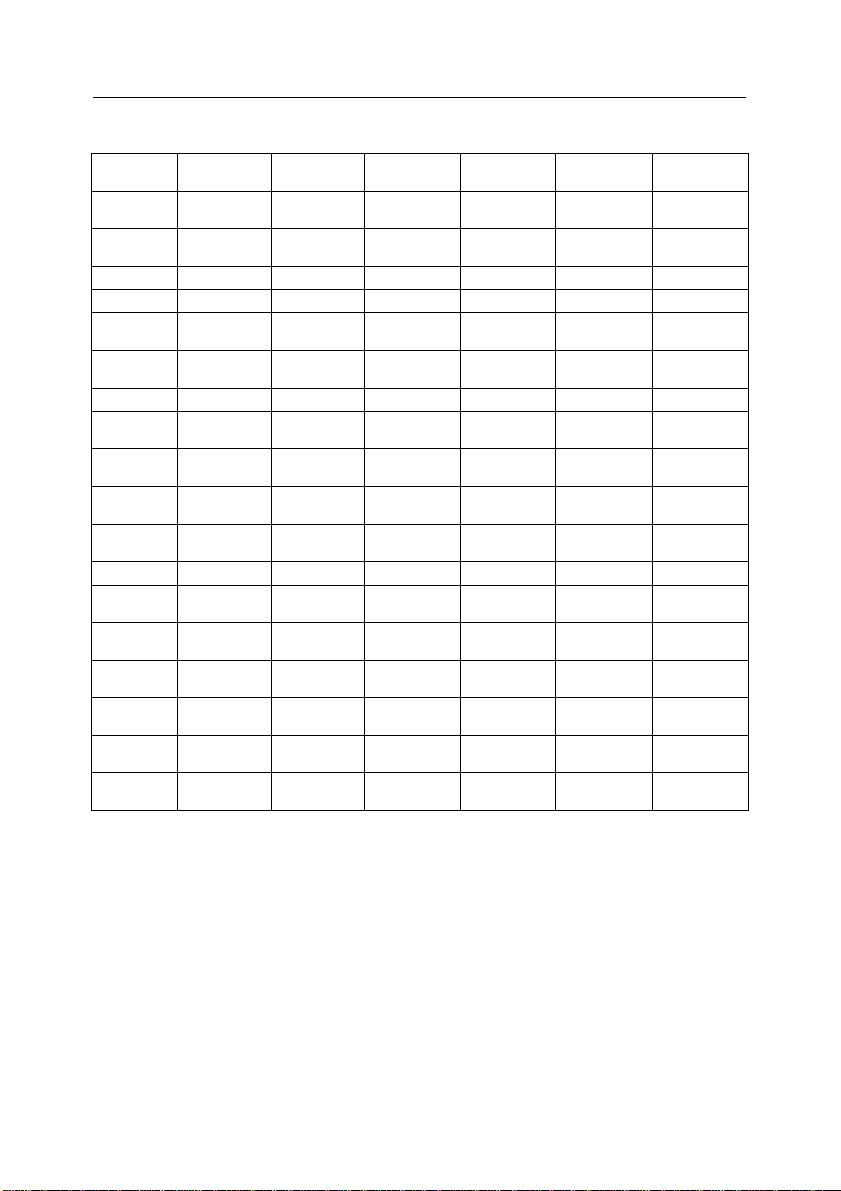
5.3 Capacity x Readability (cont.)
Unit AV313
baht 20.3947 x
carat 1550.000 x
grain 4784.03 x 0.02 6327.28 x 0.02 7870.50 x 0.02 3240.8 x 0.2 6327.4 x 0.2 12500.2 x 0.2
gram 310.00 x 0.001 410.00 x 0.001 510.00 x 0.001 210.00 x 0.01 410.00 x 0.01 810.00 x 0.01
kilogram 0.310000 x
mesghal 67.2699 x
milligram 31000 x 1 41000 x 1 51000 x 1
momme 82.6667 x
Newton 3.04006 x
ounce 10.93495 x
ounce troy 9.96672 x
pennyweight 199.335 x 0.001 263.636 x 0.001 327.938 x 0.001 135.03 x 0.01 263.64 x 0.01 520.84 x 0.01
pound 0.683432 x
tael
(Hong Kong)
tael
(Singapore)
tael
(Taiwan)
tical 18.9842 x
tola 26.5773 x
AV313C
0.0001
0.005
0.000001
0.0005
0.0005
0.00001
0.00005
0.00005
0.000005
8.28233 x
0.00005
8.20110 x
0.00005
8.26667 x
0.00005
0.0001
0.0001
AV413
AV413C
26.9737 x
0.0001
2050.000 x
0.005
0.41000 x
0.000001
109.3335 x
0.0005
109.3335 x
0.0005
4.02073 x
0.00001
14.46230 x
0.0001
13,18180 x
0.00005
0.903895 x
0.000005
10.95405 x
0.00005
10.84675 x
0.00005
10.93335 x
0.00005
25.1082 x
0.0001
35.1507 x
0.0001
AV513
AV513C
33.5526 x 0.001 13.816 x 0.001 26.974 x 0.001 53.289 x 0.001
2550.000 x
0.005
0.51000 x
0.000001
110.6695 x
0.0005
136.000 x
0.0005
5.00139 x
0.00001
17.98970 x
0.0001
16.39690 x
0.00005
1.124360 x
0.000005
13.62580 x
0.00005
13.49230 x
0.00005
13.60000 x
0.00005
31.2321 x
0.0001
43.7240 x
0.0001
AV212
AV212C
1050.00 x 0.05 2050.00 x 0.05 4050.00 x 0.05
0.21000 x
0.00001
45.570 x 0.005 88.970 x 0.005 175.770 x 0.005
56.000 x 0.005 109.335 x 0.005 216.000 x 0.005
2.0594 x 0.0001 4.0207 x 0.0001 7.9434 x 0.0001
7.4075 x 0.0005 14.4625 x
6.7515 x 0.0005 13.1820 x
0.46295 x
0.00005
5.6105 x 0.0005 10.9540 x
5.5555 x 0.0005 10.8465 x
5.6000 x 0.0005 10.9335 x
12.860 x 0.001 25.108 x 0.001 49.604 x 0.001
18.0004 x 0.001 69.444 x 0.001 69.444 x 0.001
AV412
AV412C
0.41000 x
0.00001
0.0005
0.0005
0.90390 x
0.00005
0.0005
0.0005
0.0005
AV812
AV812C
0.81000 x
0.00001
28.5720 x
0.0005
26.0420 x
0.0005
1.78575 x
0.00005
21.6410 x
0.0005
21.4290 x
0.0005
21.6000 x
0.0005
Page 50
EN-48 Adventurer Pro
5.3 Capacity x Readability (cont.)
Unit AV2102
baht 138.158 x 0.001 203.947 x 0.001 269.737 x 0.001 138.16 x 0.01 269.74 x 0.01 532.89 x 0.01
carat 105.000 x 0.05 15500.00 x 0.05 20500.00 x 0.05 10500.0 x 0.5 20500.0 x 0.5 40500.0 x 0.5
grain 32408.0 x 0.2 47840.3 x 0.2 63272.8 x 0.2 32408 x 2 63274 x 2 125002 x 2
gram 2100.00 x 0.01 3100.00 x 0.01 4100.00 x 0.01 2100.0 x 0.1 4100.0 x 0.1 8100.0 x 0.1
kilogram 2.10000 x
mesghal 455.700 x 0.005 672.699 x 0.005 899.695 x 0.005 455.70 x 0.05 899.70 x 0.05 1757.70 x 0.05
milligram
momme 560.000 x 0.005 826.667 x 0.005 1093.335 x
Newton 20.5940 x
ounce 74.0755 x
ounce troy 67.5165 x
pennyweight 1350.33 x 0.01 1993.35 x 0.01 2636.36 x 0.01 1350 x 0.1 2636 x 0.1 5208.4 x 0.1
pound 4.62970 x
tael
(Hong Kong)
tael
(Singapore)
tael
(Taiwan)
tical 128.603 x 0.001 189.842 x 0.001 251.082 x 0.001 128.60 x 0.01 251.0 x 0.01 496.04 x 0.01
tola 180.040 x 0.001 265.773 x 0.001 351.507 x 0.001 180.04 x 0.01 351.51 x 0.01 694.4 x 0.01
AV2102C
0.00001
0.0001
0.0005
0.0005
0.00005
56.1060 x
0.0005
55.5565 x
0.0005
56.000 x 0.0005 82.6667 x
AV3102
AV3102C
3.10000 x
0.00001
30.4006 x
0.0001
109.3495 x
0.0005
99.6672 x
0.0005
6.83432 x
0.00005
82.8233 x
0.0005
82.0120 x
0.0005
0.0005
AV4102
AV4102C
4.10000 x
0.00001
0.005
40.2073 x
0.0001
144.6230 x
0.0005
131.8180 x
0.0005
9.03895 x
0.00005
109.5405 x
0.0005
108.4675 x
0.0005
109.3335 x
0.0005
AV2101
AV2101C
2.1000 x 0.0001 4.1000 x 0.0001 8.1000 x 0.0001
560.00 x 0.05 1093.35 x 0.05 2160.00 x 0.05
20.594 x 0.001 40.20 x 0.001 79.434 x 0.001
74.075 x 0.005 144.625 x 0.005 285.720 x 0.005
67.515 x 0.005 131.820 x 0.005 260.420 x 0.005
4.6295 x 0.0005 9.0390 x 0.0005 17.8575 x
56.105 x 0.005 109.540 x 0.005 216.410 x 0.005
55.555 x 0.005 108.465 x 0.005 214.290 x 0.005
56.00 x 0.005 109.335 x 0.005 216.000 x 0.005
AV4101
AV4101C
AV8101C
0.0005
AV8101
Page 51

EN-49Adventurer Pro
5.4 Communication
The balance is equipped with an RS232 interface (COM1). Some models are also equipped with
a second RS232 interface (COM2). Connecting the balance to a computer enables you to operate
the balance from the computer, as well as receive data such as displayed weight.
5.4.1 Commands
Commands listed in the following table will be acknowledged by the balance. The balance will
return “ES” for invalid commands.
Command Function
IP Immediate Print of displayed weight (stable or unstable).
P Print displayed weight (stable or unstable).
CP Continuous Print. 0P ends Continous Print.
SP Print displayed stable weight.
SLP Auto Print stable non-zero displayed weight.
SLZP Auto Print stable non-zero weight and stable zero reading.
xP Interval Print x = Print Interval (1-3600 seconds) 0P ends Interval Print.
H Enter Print Header Lines
Z Same as pressing Zero Key
T Same as pressing Tare Key.
xT Establish a preset Tare value in grams. X= preset tare value in grams.
PT Prints Tare weight stored in memory.
PM Print current mode (weighing mode).
M Scroll to the next enabled mode.
PU Print current weighing unit.
U Scroll to the next enabled unit.
OFF Turns balance OFF.
ON Turns balance on.
PSN Print Serial Number.
PV Print Version: name, software revision and LFT ON (if LFT is set ON).
x# Set PC reference weight (x) in grams. (Must have an APW stored.)
P# Print PC reference weight.
x% Set % reference weight (x) in grams. (Must have reference weight stored.)
P% Print percent reference weight.
xAW Set Animal Weigh Level to x. (x = 3, 7, 10, 13 seconds)
PAW Print Animal Weigh Level.
BAW Begin Animal cycle. (Manual Mode)
CW Clear locked weight (weight < threshold) in Manual and Semi-Auto modes.
xCO Set Checkweighing Over Limit in grams.
xCU Set Checkweighing Under Limit in grams.
PCO Print Checkweighing Over Limit.
PCU Print Checkweighing Under Limit.
PTIME Print current time.
PDATE Print current date.
xAW Set AW Mode, x=A (Automatic), x=S (Semi-Automatic), x= M (Manual)
Page 52
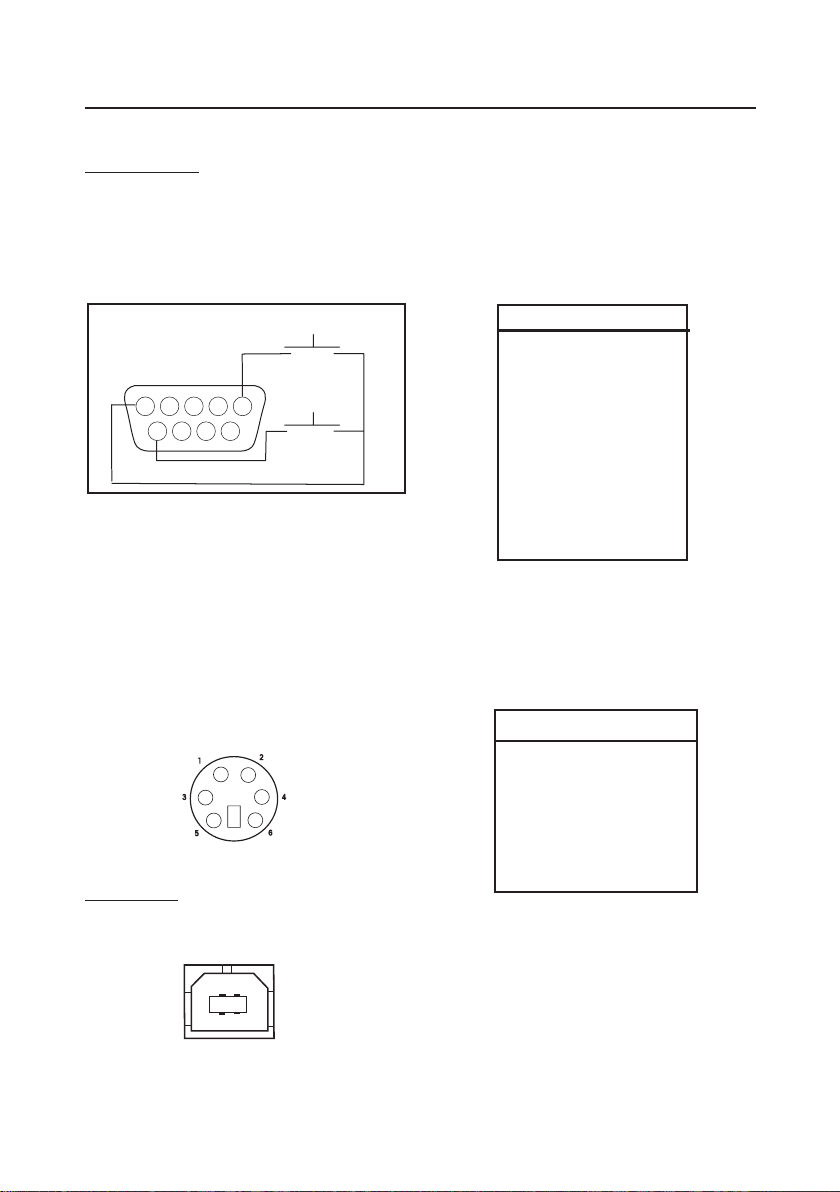
5.4.2 Connections
RS232 Interface
On the rear of the balance, the 9-pin female
subminiature “D” connector COM 1, is provided
for interfacing to other devices. The pin
connections are shown in the illustration below.
Adventurer ProEN-50
TARE*
PRINT*
COM 1 Connector
* External PRINT and/or TARE switches may be
installed as shown in the diagram. Momentary
contact switches must be used. To enable this
feature, contact Ohaus Aftermarket.
A 6-pin Mini DIN connector is provided when
the optional second RS232 interface is
installed.
COM 2 MINI DIN Connector
USB Interface
A USB Type B connector is provided when the
optional USB interface is installed.
COM1 Pin Connections
1 – Remote Tare
2 – TxD
3 – RxD
4 – DSR
5 – Ground
6 – DTR
7 – CTS
8 – RTS
9 – Remote Print
COM2 Pin Connections
1 – TxD
2 – RxD
3 – Ground
4 – Vout
5 – reserved for future use
6 – No connection
COM 2 USB Type B Connector
Page 53
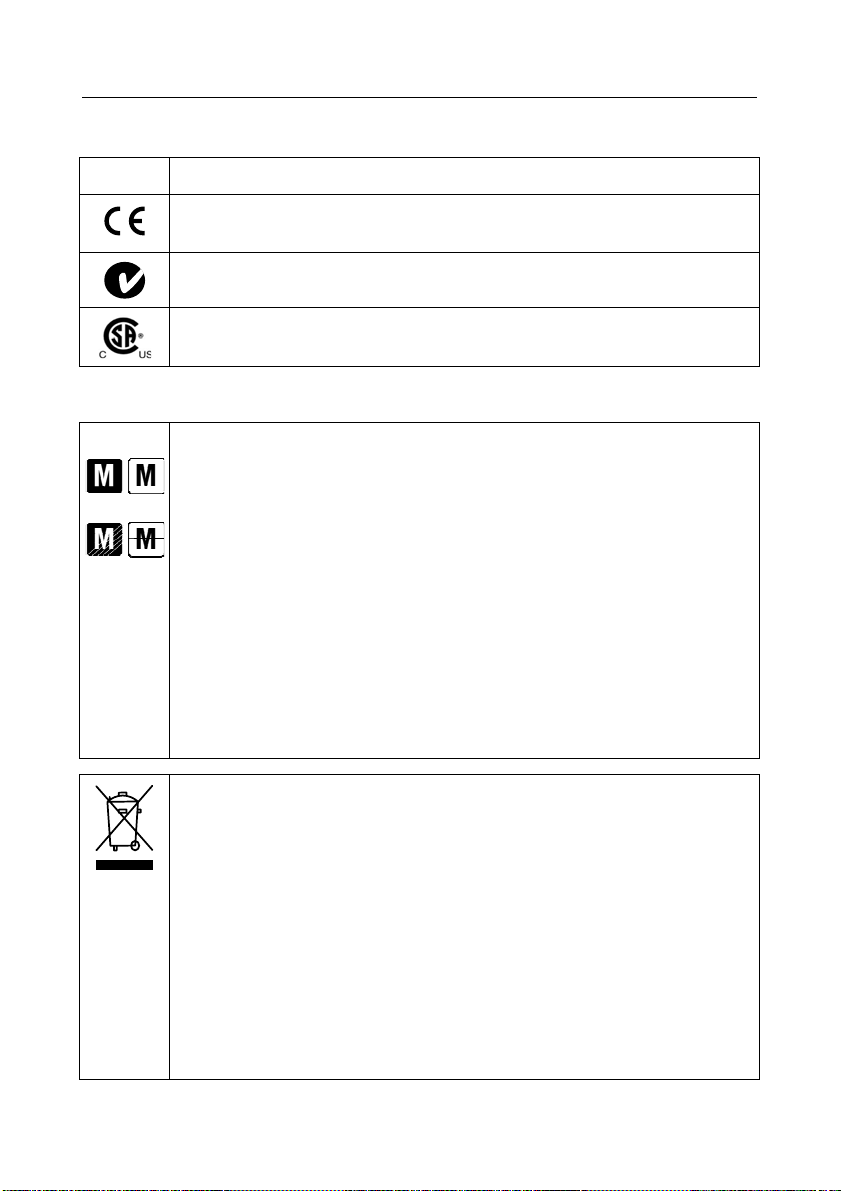
Adventurer Pro EN-51
5.5 Compliance
Compliance to the following standards is indicated by the corresponding mark on the product.
Marking Standard
This product conforms to the EMC directive 2004/108/EC, the Low Voltage Directive
2006/95/EC and the Non-automatic Weighing Instruments Directive 90/384/EEC.
The complete declaration of Conformity is available online at www.ohaus.com.
AS/NZS4251.1, AS/NZS4252.1
CAN/CSA-C22.2 No. 1010.1-92; UL Std. No. 61010A-1
EC Emissions Note
This device complies with EN55011/CISPR 11 Class B Group 1.
Important notice for verified weighing instruments
Weighing instruments verified at the place of manufacture bear one of the preceding marks
on the packing label and the green ‘M’ (metrology) sticker on the descriptive plate. They
may be put into service immediately.
Weighing instruments to be verified in two stages have no green ‘M’ (metrology) on the
descriptive plate and bear one of the preceding identification marks on the packing label.
The second stage of the initial verification must be carried out by the approved service
organization of the authorized representative within the EC or by the national weights and
measures (W+M) authorities.
The first stage of the initial verification has been carried out at the manufacturer’s work.
It comprises all tests according to the adopted European standard EN45501:1992,
paragraph 8.2.2.
If national regulations limit the validity period of the verification, the user of the weighing
instrument must strictly observe the re-verification period and inform the respective W+M
authorities.
Disposal
In conformance with the European Directive 2002/96 EC on Waste Electrical and Electronic
Equipment (WEEE) this device may not be disposed of in domestic waste. This also
applies to countries outside the EU, per their specific requirements.
Please dispose of this product in accordance with local regulations at the collecting point
specified for electrical and electronic equipment.
If you have any questions, please contact the responsible authority or the distributor from
which you purchased this device.
Should this device be passed on to other parties (for private or professional use), the
content of this regulation must also be related.
For disposal instructions in Europe, refer to www.ohaus.com, choose your country then
search for WEEE.
Thank you for your contribution to environmental protection.
Page 54

EN-52 Adventurer Pro
FCC Note
This equipment has been tested and found to comply with the limits for a Class A digital
device, pursuant to Part 15 of the FCC Rules. These limits are designed to provide
reasonable protection against harmful interference when the equipment is operated in a
commercial environment. This equipment generates, uses, and can radiate radio
frequency energy and, if not installed and used in accordance with the instruction
manual, may cause harmful interference to radio communications. Operation of this
equipment in a residential area is likely to cause harmful interference in which case the
user will be required to correct the interference at his own expense.
Industry Canada Note
This Class A digital apparatus complies with Canadian ICES-003.
Cet appareil numérique de la classe A est conforme à la norme NMB-003 du Canada.
ISO 9001 Registration
In 1994 Ohaus Corporation, USA, was awarded a certificate of registration to ISO 9001
by Bureau Veritus Quality International (VQI), confirming that the Ohaus quality
management system is compliant with the ISO 9001 standard’s requirements. On May 21,
2009, Ohaus Corporation, USA, was re-registered to the ISO 9001:2008 standard.
LIMITED WARRANTY
Ohaus products are warranted against defects in materials and workmanship
from the date of delivery through the duration of the warranty period. During the
warranty period Ohaus will repair, or, at its option, replace any component(s)
that proves to be defective at no charge, provided that the product is returned,
freight prepaid, to Ohaus.
This warranty does not apply if the product has been damaged by accident or
misuse, exposed to radioactive or corrosive materials, has foreign material
penetrating to the inside of the product, or as a result of service or modification
by other than Ohaus. In lieu of a properly returned warranty registration card, the
warranty period shall begin on the date of shipment to the authorized dealer. No
other express or implied warranty is given by Ohaus Corporation. Ohaus
Corporation shall not be liable for any consequential damages.
As warranty legislation differs from state to state and country to country, please
contact Ohaus or your local Ohaus dealer for further details.
Page 55

Page 56

Ohaus Corporation
7 Campus Drive
Suite 310
Parsippany, NJ 07054, USA
Tel: (973) 377-9000
Fax: (973) 944-7177
With offices worldwide
www.ohaus.com
© 2011 Ohaus Corporation, all rights reserved
*80251161*
P/N 80251161B Printed in China
 Loading...