

Page 1

Instruction Manual
Stirrer Large Capacity STLC1DG
Stirrer Large Capacity STLC2DG
Revision 3
10/29/2020
Page 2

Table of ConTenTs
Package Contents . . . . . . . . . . . . 1
Service Information . . . . . . . . . . . . 1
Installation . . . . . . . . . . . . 2
Maintenance & Servicing . . . . . . . . . . . . 2
Environmental Conditions . . . . . . . . . . . . 2
Safety Instructions . . . . . . . . . . . . 3
Standards & Regulations . . . . . . . . . . . . 3
Control Panel . . . . . . . . . . . . 4
Specifications . . . . . . . . . . . . 5
Operating Instructions . . . . . . . . . . . . 5-6
Troubleshooting . . . . . . . . . . . . 6
PaCkage ConTenTs
Model STLC1DG or Model STLC2DG Large Capacity Stirrer
Power cord
Spin bar
Instruction manual
1
serviCe informaTion
If the troubleshooting section does not resolve or describe your problem, contact your
authorized OHAUS service agent. For service assistance or technical support in the
United States call toll-free 1-800-672-7722 ext. 7852 between 8:00 AM and 5:00 PM EST.
An OHAUS product service specialist will be available to provide assistance. Outside the
Serial Number: _______________________________________________________
Date of Purchase: ____________________________________________________
Supplier: ___________________________________________________________
Page 3
insTallaTion
Upon receiving the Ohaus Large Capacity Stirrer, check to ensure that no damage
has occurred in shipment. It is important that any damage that occurred in transport
is detected at the time of unpacking. If you do find such damage the carrier must be
notified immediately.
After unpacking, it requires two (2) people to lift the Large Capacity Stirrer, from the
bottom of the unit, to place on a level bench, table or floor, away from explosive
vapors. Ensure that the surface on which the unit is placed will withstand typical heat
produced by the unit. Always place the unit on a sturdy work surface.
The Large Capacity Stirrer is supplied with a power cord that is inserted into the
IEC connector on the left side of the unit first, then it can be plugged into a properly
grounded outlet. The 120V unit plugs into a 120 volt, 50/60 Hz source.
mainTenanCe & serviCing
The Large Capacity Stirrer is built for long, trouble-free, dependable service.
No lubrication or other technical user maintenance is required. It needs no user
maintenance beyond keeping the surfaces clean. The unit should be given the care
normally required for any electrical appliance. Avoid wetting or unnecessary exposure
to fumes. Spills should be removed promptly. Do not use a cleaning agent or solvent
on the front panel or top plate which is abrasive or harmful to plastics, nor one which
is flammable. Always ensure the power is disconnected from the unit prior to any
cleaning. If the unit ever requires service, contact your Ohaus representative.
environmenTal ConDiTions
Operating Conditions: Indoor use only.
Temperature: 5 to 40°C (41 to 104°F)
Humidity: 20% to 80% relative humidity, non-condensing
Altitude: 0 to 6,562 ft (2000 M) above sea level
Non-Operating Storage:
Temperature: -20 to 65°C (-4 to 149°F)
Humidity: 20% to 80% relative humidity, non-condensing
Installation Category II and Pollution Degree 2 in accordance with IEC 664.
equiPmenT DisPosal
This equipment must not be disposed of with unsorted waste. It is your responsibility
to correctly dispose of the equipment at life-cycle-end by handing it over
to an authorized facility for separate collection and recycling. It is also
your responsibility to decontaminate the equipment in case of biological,
chemical and/or radiological contamination, so as to protect the persons
involved in the disposal and recycling of the equipment from health hazards.
For more information about where you can drop off your waste of equipment, please
contact your local dealer from whom you originally purchased this equipment. By doing
so, you will help to conserve natural and environmental resources and you will ensure that
your equipment is recycled in a manner that protects human health.`
2
Page 4
safeTy insTruCTions sTanDarDs & regulaTions
Please read the entire instruction manual before operating the Large Capacity Stirrer.
use the Large Capacity Stirrer in a hazardous atmosphere or with hazardous
materials for which the unit was not designed. Also, the user should be aware
that the protection provided by the equipment may be impaired if used with
accessories not provided or recommended by the manufacturer, or used in a
manner not specified by the manufacturer.
Always operate unit on a level surface for best performance and maximum
safety.
lift unit by the top plate.
Heavy walled glass or polypropylene container recommended when stirring
at high speeds. If spin bar de-couples at higher speeds, thin walled glass
containers may break.
To avoid electrical shock, completely cut off power to the unit by disconnecting
the power cord from the unit or unplug from the wall outlet. Disconnect unit
from the power supply prior to maintenance and servicing.
Spills should be removed promptly. Do not immerse the unit for cleaning.
operate the unit if it shows signs of electrical or mechanical damage.
Earth Ground - Protective Conductor Terminal
Alternating Current
Ohaus hereby declares under it’s sole responsibility that the construction of this
product conforms in accordance with the
following standards:
Safety standards:
IEC 61010-1 Safety requirements for electrical equipment for measurement,
control and laboratory use. Part: General Requirements.
IEC 61010-2-051 Part II: Particular requirements for laboratory equipment for
mixing and stirring.
UL Std. No. 61010-1
CSA/CAN C22.2 No. 0-M91
CSA/CAN C22.2 No. 61010-1-04
EMC standards:
EN61000-3-2 EN61000-3-3
EN61000-4-2 EN61000-4-3
EN61000-4-4 EN61000-4-5
EN61000-4-6 EN61000-4-11
IEC 61326
Associated EU guidelines:
EMC directive 2014/30/EU
LVD directive 2014/35/EU
RoHS directive 2015/863/EU
3
Page 5
D.
B.
E.
C.
F.
ConTrol Panel
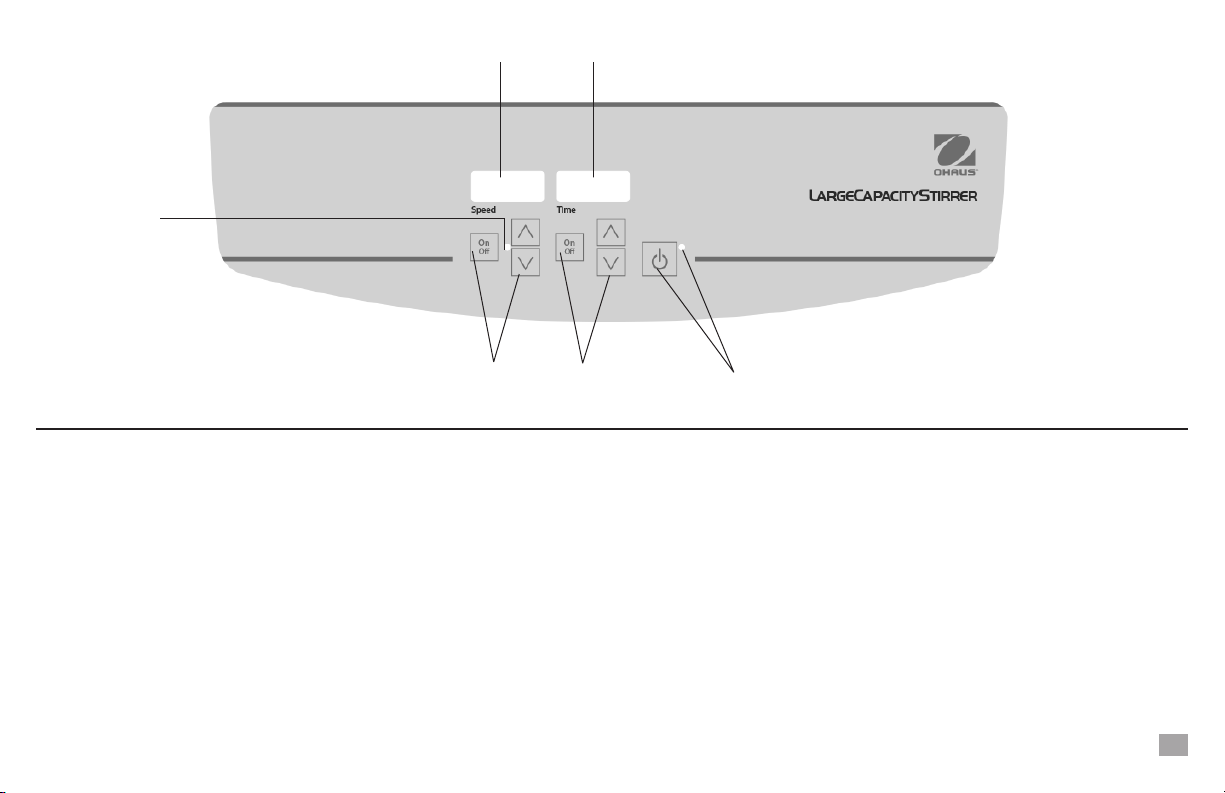
The front panel of the Large Capacity Stirrer contains all the controls and displays
needed to operate the unit.
A. Standby button/standby indicator light: The standby indicator light will illuminate
when the unit is plugged in. The unit will be in standby mode. Press the standby
button to activate the speed and time functions. The standby indicator light will shut
off and the speed display and time display will illuminate. Press the standby button
again and the unit will once again be in standby mode.
B. Speed display: Displays the speed of the stirrer.
C. Up/down arrows: for set-point control. On/off button: starts/stops stir function.
D. Stir indicator light: will be illuminated when the unit is stirring.
A.
E. Time display: Displays accumulated time (continuous mode) or how much time
is remaining (timed mode). F. Up/down arrows for set-point control. On/off button
starts/stops the time function. The display range is from 0 to 9,999 minutes in one
(1) second increments. The display will indicate minutes and seconds until the timer
reaches 99 minutes and 59 seconds (99:59), then the display will automatically
display minutes up to 9,999.
4
Page 6
sPeCifiCaTions
Overall dimensions (L x W x H): 28.5 x 26.75 x 5.25”
(72.4 x 68 x 13.3cm)
Top plate dimensions (L x W): 21.25 x 25” (54 x 63.5cm)
Electrical (50/60 Hz)
Model STLC1DG: 120 volts: 1 amp, 41 watts
Model STLC2DG: 120 volts: 1 amp, 82 watts
Fuses: 5mm x 20mm, 5 amp quick acting
Speed range:
Model STLC1DG: 100 to 1800rpm (increased in 10rpm
increments)
Model STLC2DG: 100 to 1650rpm (increased in 10rpm
increments)
Speed stability: ±2%
Weight capacity: 425lbs (193kg)
Volume (H2O):
Model STLC1DG: 100L
Model STLC2DG: 200L
Timer: digital, 1 second to 9,999 minutes
(increased in 1 second increments)
Controls: see page 4
Ship weight: 63lbs (28.6kg)
oPeraTing insTruCTions
The Large Capacity Stirrer has been designed for the speed and time functions to
work independently of one another. The speed can be re-set without re-setting the
timer and the timer can be stopped and started without interrupting the stirring function.
1. Getting ready:
a. Plug the power cord into a properly ground outlet. The standby indicator light
will illuminate, verifying power to the unit.
b. Press the standby button in order to move the unit from standby mode. The
standby indicator light will turn off and the speed/time displays will illuminate
and display the previously used settings.
2. Setting speed:
a. Press the up/down arrows below the speed display until you reach the desired
speed. When you release the arrow button, the unit will blink off and then on
indicating the new set speed has been accepted.
b. Press the on/off button to start the stirring function. The indicator light below
the speed display will illuminate to indicate the stirring function is in-use. While
accelerating, the indicator light will blink until set-point is reached and then will
remain lit until stirring has ceased. The microprocessor controlled ramping
feature slowly increases speed until the set-point is reached which helps to
avoid splashing and provides excellent low end control. The microprocessor
also regulates the stirring speed, sensing your requirements whether stirring
an aqueous, viscous, or semi-solid solution.
c. Speed adjustments can be made without interrupting stirring by using the up/
down arrows below the speed display. After the change has been made and
you release the arrow button, the unit will blink off and then on indicating the
new set speed has been accepted.
d. To stop the stirring function, press the on/off button below the speed display.
3. Setting time to zero (0:00) and continuous mode: Accumulated time.
a. Press and hold the on/off button below of the time display. After three (3)
seconds, the display will indicate the previous set time.
5
Page 7
oPeraTing insTruCTions
b. Simultaneously press both the up and the down arrows, the display will indicate
zero (0:00). The unit time is now set to zero (0:00) minutes. Alternately, you can
use the up/down arrows to get to zero (0:00).
c. Press the on/off button below the time display. The display will indicate accumu-
lated time. The up/down arrows will become inactive. To stop timer, press the
on/off button again. IMPORTANT: This will NOT interrupt the shaking function.
Press the on/off button below the speed display to interrupt the shaking function.
4. Setting timed mode: Programmed time.
a. Press the up/down arrows below the time display until you reach the desired
time.
b. Start this function by pressing the on/off button below the time display. The unit
will run for the selected time, the up/down arrows will become inactive while
the timer is running. The unit will stop shaking when time display reaches zero
(0:00). Four (4) audible beeps will indicate the time down function is complete.
The time display will default back to the set time. To repeat this function for the
same set time, simply depress the on/off button again.
c. To interrupt an automatic timing cycle before it is completed, press the on/off
button below the time display. The display will flash off and on to indicate the
time function is on “hold”. IMPO RTANT: This will NOT interrupt the shaking
function. Press the on/off button below the speed display to interrupt the shaking
function. Restart the timer by pressing the on/off button below the time display.
Unit will continue counting down to zero (0:00). When the display reaches zero
(0:00), you will hear the four (4) audible beeps that indicate the count down
function is complete and the shaking function will stop.
5. Turning unit off:
a. To turn the unit off, press the standby button. The speed and time displays
will be blank, the standby indicator light will illuminate. The stirrer should be
kept in standby mode when not in use. To completely cut off power to the unit,
disconnect the power cord from the unit or un-plug from the wall outlet.
OPERATING TIPS
Built-in memory maintains the last used speed and time settings during a power
interruption.
The stirrer increases speed at a steady rate until the set-point is reached, if the spin
bar is too large or the liquid is too viscous, the stirrer may not reach its set-point or
become de-coupled from the units drive magnet. The set-point speed needs to be
reduced. The unit is designed to ramp slowly to assure that the spin bar stays coupled.
* The model STLC2DG/200L unit contains a larger spin bar with a center pivoting
ring. Ring may need to be replaced after eight (8) hours of use. Contact your Ohaus
representative for replacement spin bars or rings.
TroubleshooTing
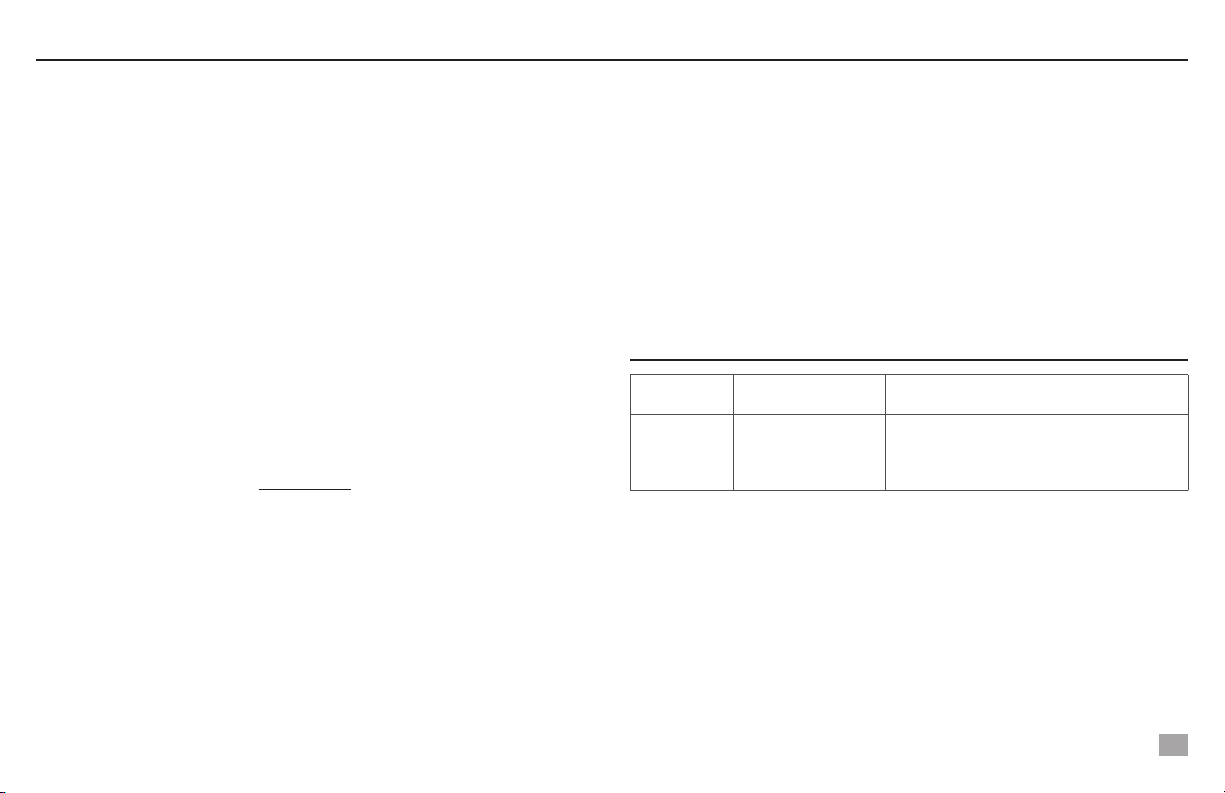
Problem Cause Solution
Error should not be addressed by the end
E1 Motor locked/failure
user. Switch the unit off and contact your
Ohaus Representative for repair.
6
Page 8

Manual de instrucciones
Agitador de gran capacidad STLC1DG
Agitador de gran capacidad STLC2DG
Revision 3
10/29/2020
Page 9

ÍnDiCe
Contenido del paquete . . . . . . . . . . . . 10
Información de servicio . . . . . . . . . . . . 10
Instalación . . . . . . . . . . . . 11
Mantenimiento y servicio . . . . . . . . . . . . 11
Condiciones ambientales . . . . . . . . . . . . 12
Instrucciones de seguridad . . . . . . . . . . . . 12
Normas y reglamentos . . . . . . . . . . . . 12
Panel de control . . . . . . . . . . . . 13
Especificaciones . . . . . . . . . . . . 13
Instrucciones de operación . . . . . . . . . . . . 13-14
Solución de problemas . . . . . . . . . . . . 14
ConTeniDo Del PaqueTe
Modelo STLC1DG o Modelo STLC2DG Agitador de gran capacidad
Cable de alimentación
Barra de giro
Manual de instrucciones
9
informaCión Del serviCio
Si la sección de resolución de problemas no resuelve o no describe su problema, póngase en
contacto con su agente de servicio autorizado de OHAUS. Para obtener asistencia de servicio
o soporte técnico en Estados Unidos, llame al número gratuito 1-800-672-7722 ext. 7852 entre
las 8:00 a.m. y las 5:00 p.m., hora del este.
Un especialista en servicio de productos de OHAUS estará disponible para proporcionarle asistencia. Fuera de los Estados Unidos, visite nuestro sitio web, www.ohaus.com para localizar la
oficina de Ohaus más cercana a usted.
Número de serie: _______________________________________________________
Fecha de compra: ____________________________________________________
Proveedor: ___________________________________________________________
Page 10
insTalaCión
Al recibir el agitador de gran capacidad de Ohaus, compruebe que no se ha producido
ningún daño en el envío. Es importante que cualquier daño ocurrido en el transporte
sea detectado en el momento de desempaquetar. Si se encuentran tales daños, el
transportista debe ser notificado inmediatamente.
Después de desembalar, se requiere que dos (2) personas levanten el Agitador de
Gran Capacidad, desde la parte inferior de la unidad, para colocarlo en un banco,
mesa o piso nivelado, lejos de los vapores explosivos. Asegúrese de que la superficie
sobre la que se coloca la unidad soportará el calor típico producido por la unidad.
Coloque siempre la unidad sobre una superficie de trabajo resistente.
El Agitador de Gran Capacidad se suministra con un cable de alimentación que se
inserta primero en el conector IEC del lado izquierdo de la unidad, y luego se puede
enchufar en una toma de corriente con conexión a tierra adecuada. La unidad de 120
V se conecta a una fuente de 120 voltios, 50/60 Hz. La unidad de 230V se enchufa a
una fuente de 230 voltios, 50/60 Hz
manTenimienTo y serviCio
El agitador de gran capacidad está construido para un servicio largo, sin problemas
y fiable. No requiere lubricación ni otro tipo de mantenimiento técnico por parte del
usuario. No necesita mantenimiento por parte del usuario más allá de mantener
las superficies limpias. La unidad debe recibir los cuidados que normalmente se
requieren para cualquier aparato eléctrico. Evite la humectación o la exposición
innecesaria a los vapores. Los derrames deben ser eliminados rápidamente. No
utilice un agente de limpieza o disolvente en el panel frontal o en la placa superior
que sea abrasivo o dañino para los plásticos, ni uno que sea inflamable. Asegúrese
siempre de que la alimentación esté desconectada de la unidad antes de cualquier
limpieza. Si en algún momento la unidad requiere mantenimiento, póngase en
contacto con su representante de Ohaus.
ConDiCiones ambienTales
Condiciones de operación: Sólo para uso en interiores.
Temperatura: 5 a 40°C (41 to 104°F)
Humedad: 20% a 80% de humedad relativa, sin condensación
Altitud: 0 a 6.562 pies (2000 M) sobre el nivel del mar
Almacenamiento no operativo:
Temperatura: -20 a 65°C (-4 a 149°F)
Humedad: 20% a 80% de humedad relativa, sin condensación
Categoría de Instalación II y Grado de Contaminación 2 de acuerdo con la IEC 664.
eliminaCión Del equiPo
Este equipo no debe ser desechado con los residuos sin clasificar. Es su
responsabilidad desechar correctamente el equipo al final de su vida
útil entregándolo a un centro autorizado para su recogida y reciclaje
por separado. También es su responsabilidad descontaminar el equipo
en caso de contaminación biológica, química y/o radiológica, para
proteger de los peligros para la salud a las personas que participan en
la eliminación y el reciclaje del equipo.
Para obtener más información sobre dónde puede dejar los residuos del equipo,
póngase en contacto con el distribuidor local al que compró el equipo originalmente.
De este modo, ayudará a conservar los recursos naturales y medioambientales y
se asegurará de que el equipo se recicla de forma que se proteja la salud humana.
10
Page 11
insTruCCiones De seguriDaD
Por favor, lea todo el manual de instrucciones antes de operar el Agitador de
Gran Capacidad.
No utilice el Agitador de Gran Capacidad en una atmósfera peligrosa o con
materiales peligrosos para los cuales la unidad no fue diseñada. Además, el
usuario debe tener en cuenta que la protección que proporciona el equipo
puede verse afectada si se utiliza con accesorios no proporcionados o
recomendados por el fabricante, o si se utiliza de una manera no especificada
por el fabricante.
Haga funcionar siempre la unidad en una superficie plana para obtener el
mejor rendimiento y la máxima seguridad.
Levante la unidad por la placa superior.
Se recomienda utilizar un contenedor de vidrio o polipropileno de paredes
gruesas cuando se agita a altas velocidades. Si la barra de rotación se
desacopla a velocidades más altas, los contenedores de vidrio de paredes
finas pueden romperse.
Para evitar una descarga eléctrica, corte completamente la alimentación
de la unidad desconectando el cable de alimentación de la unidad o
desenchufándolo de la toma de corriente. Desconecte la unidad de la
fuente de alimentación antes de realizar cualquier tipo de mantenimiento o
reparación.
Los derrames deben ser eliminados inmediatamente. No sumerja la unidad
para su limpieza.
Haga funcionar la unidad si muestra signos de daños eléctricos o mecánicos.
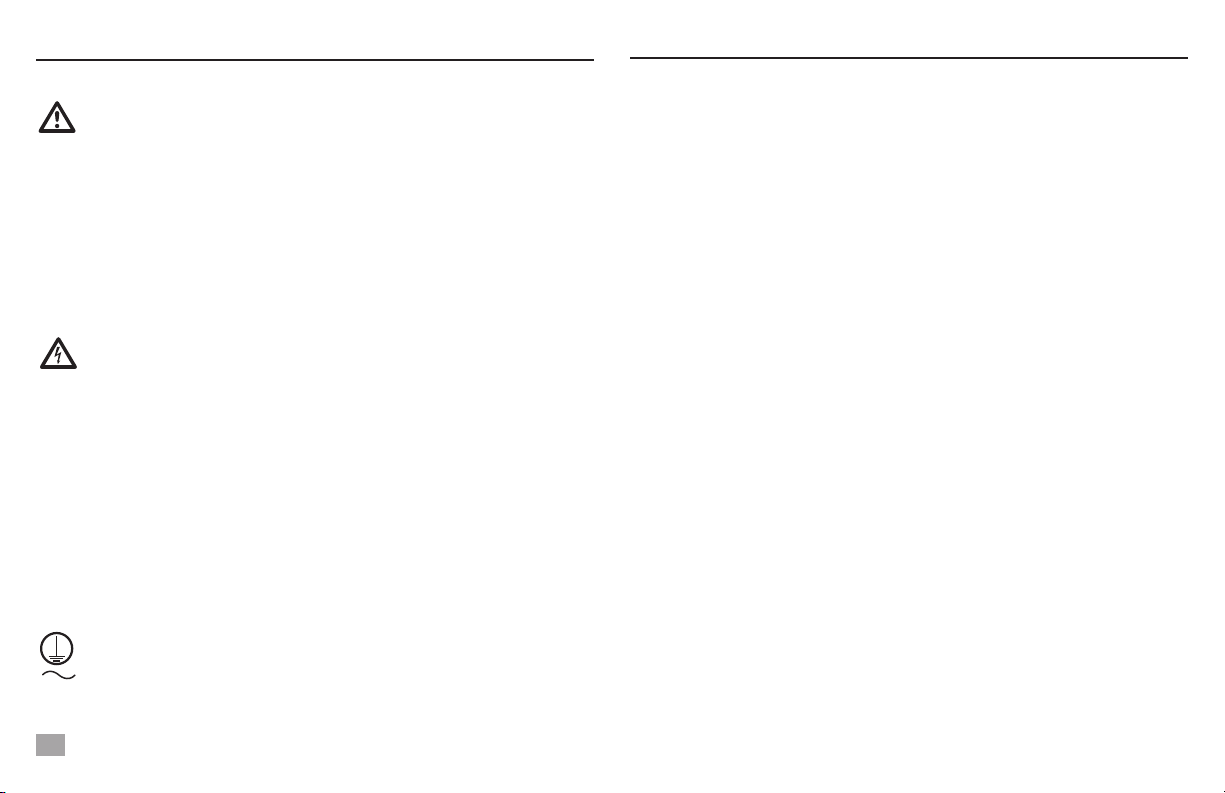
Conexión a tierra - Terminal del conductor de protección
Corriente alterna
normas y reglamenTos
Ohaus declara bajo su exclusiva responsabilidad que la construcción de este
producto se ajusta a la
siguiendo las normas:
Normas de seguridad:
IEC 61010-1 Requisitos de seguridad para equipos eléctricos de medición,
control y uso en laboratorio. Parte: Requisitos generales.
IEC 61010-2-051 Parte II: Requisitos particulares para equipos de laboratorio
para mezcla y agitación.
UL Std. No. 61010-1
CSA/CAN C22.2 No. 0-M91
CSA/CAN C22.2 No. 61010-1-04
Estándares EMC:
EN61000-3-2 EN61000-3-3
EN61000-4-2 EN61000-4-3
EN61000-4-4 EN61000-4-5
EN61000-4-6 EN61000-4-11
IEC 61326
Directrices de la UE asociadas:
Directiva EMC 2014/30/EU
Directiva LVD 2014/35/EU
Directiva RoHS 2015/863/EU
11
Page 12
D.
B.
E.
C.
F.
Panel De ConTrol
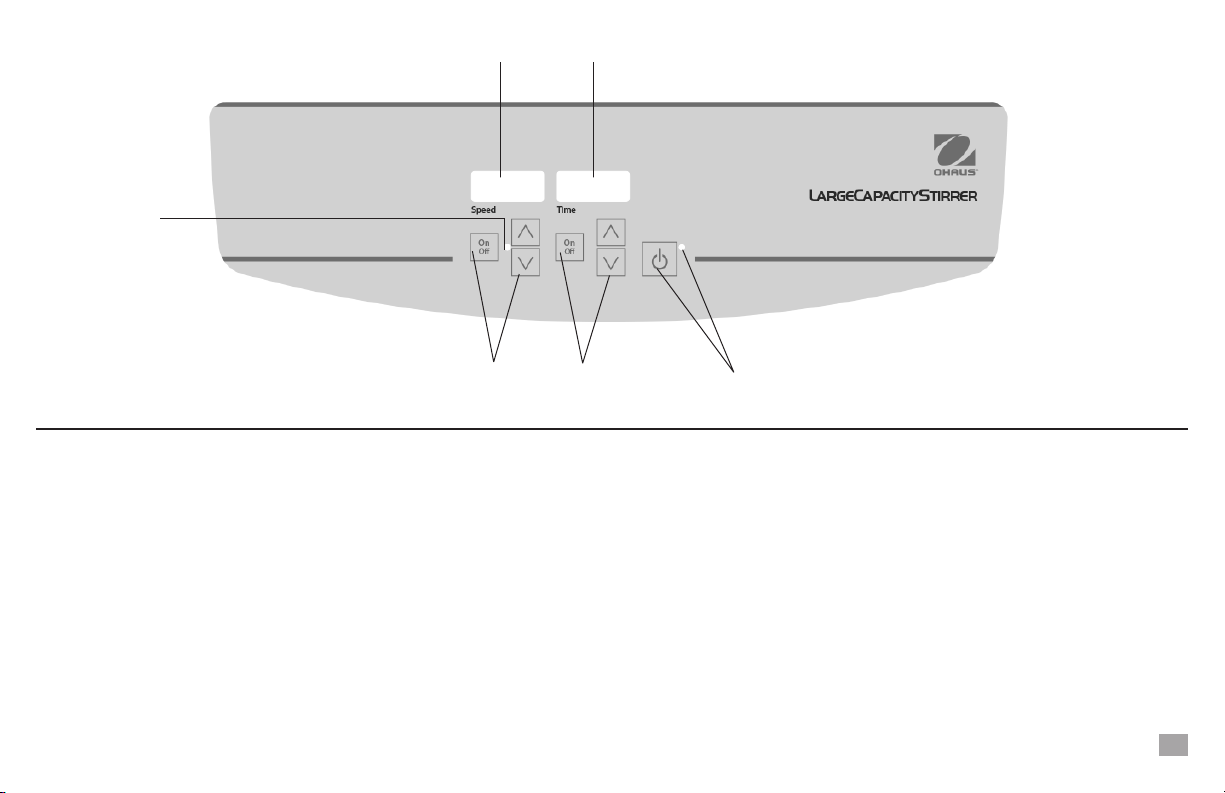
El panel frontal del Agitador de Gran Capacidad contiene todos los controles y
pantallas necesarios para operar la unidad.
A. A. Botón de Standby/luz indicadora de espera: La luz indicadora de espera se
iluminará cuando la unidad esté enchufada. La unidad estará en modo de espera.
Pulse el botón de Standby para activar las funciones de velocidad y tiempo. La luz
indicadora del modo de espera se apagará y se iluminará la pantalla de velocidad
y la pantalla de tiempo. Vuelva a pulsar el botón de Standby y la unidad volverá a
estar en modo de espera.
B. Pantalla de velocidad: Muestra la velocidad del agitador.
C. Flechas arriba/abajo: para el control del punto de ajuste. Botón de encendido/
apagado: inicia/para la función de agitación.
A.
D. D. Luz indicadora de agitación: se ilumina cuando la unidad está agitando.
E. Indicador de tiempo: Muestra el tiempo acumulado (modo continuo) o el tiempo
restante (modo temporizado). F. Flechas arriba/abajo para el control del punto de
ajuste. El botón de encendido/apagado inicia/para la función de tiempo. El rango de
visualización va de 0 a 9.999 minutos en incrementos de un (1) segundo. La pantalla
indicará los minutos y los segundos hasta que el temporizador alcance los 99 minutos
y 59 segundos (99:59), luego la pantalla mostrará automáticamente los minutos hasta
9.999.
12
Page 13
esPeCifiCaCiones
Dimensiones totales (L x W x H): 28,5 x 26,75 x 5,25”.
(72.4 x 68 x 13.3cm)
Dimensiones de la placa superior (L x W): 54 x 63,5 cm.
Eléctrico (50/60 Hz)
Modelo STLC1DG: 120 voltios: 1 amperio, 41 vatios
230 voltios: 0,5 amperios, 41 vatios
Modelo STLC2DG: 120 voltios: 1 amperio, 82 vatios
230 voltios: 0,5 amperios, 82 vatios
Fusibles: 5mm x 20mm, 5 amperios de acción rápida
Rango de velocidad:
Modelo STLC1DG: 100 a 1800rpm (incrementado en
incrementos de 10rpm)
Modelo STLC2DG: 100 a 1650rpm (incrementado en
incrementos de 10rpm)
Estabilidad de la velocidad: ±2%
Capacidad de peso: 425 libras (193 kg)
Volumen (H2O):
Modelo STLC1DG: 100L
Modelo STLC2DG: 200L
Temporizador: digital, 1 segundo a 9.999 minutos
(incrementado en incrementos de 1 segundo)
Controles: ver página 4
Peso del envío: 63 libras (28,6 kg)
13
insTruCCiones De oPeraCión
El agitador de gran capacidad ha sido diseñado para que las funciones de velocidad y tiempo
funcionen independientemente una de la otra. La velocidad puede ser reajustada sin necesidad
de reajustar el temporizador y el temporizador puede ser detenido y puesto en marcha sin interrumpir la función de agitación.
1. Preparándose:
a. Enchufe el cable de alimentación en una toma de tierra adecuada. La luz indicadora de espera
se iluminará, verificando la alimentación de la unidad.
b. Pulse el botón de espera para que la unidad pase del modo de espera. La luz
indicadora del modo de espera se apagará y las pantallas de velocidad/tiempo se iluminarán y
mostrarán los ajustes utilizados anteriormente.
2. Ajuste de la velocidad:
a. Presione las flechas arriba/abajo debajo de la pantalla de velocidad hasta que alcance la
velocidad deseada. Cuando suelte el botón de la flecha, la unidad parpadeará de forma intermitente y luego se encenderá para indicar que se ha aceptado la nueva velocidad establecida.
b. Presione el botón de encendido/apagado para iniciar la función de agitación. La luz indicadora
debajo de la pantalla de velocidad se iluminará para indicar que la función de agitación está en
uso. Mientras se acelera, la luz indicadora parpadeará hasta que se alcance el punto de ajuste
y luego permanecerá encendida hasta que la agitación haya cesado. La función de agitación
controlada por el microprocesador aumenta lentamente la velocidad hasta que se alcanza el
punto establecido, lo que ayuda a evitar las salpicaduras y proporciona un excelente control de
la parte inferior. El microprocesador también regula la velocidad de agitación, detectando sus
requerimientos ya sea que se agita una solución acuosa, viscosa o semisólida.
c. Los ajustes de velocidad se pueden realizar sin interrumpir la agitación utilizando las flechas
arriba/abajo debajo de la pantalla de velocidad. Después de que se haya hecho el cambio y se
suelte el botón de la flecha, la unidad parpadeará para indicar que se ha aceptado la nueva
velocidad establecida.
d. Para detener la función de agitación, presione el botón de encendido/apagado debajo de la
pantalla de velocidad.
3. Ajuste de la hora a cero (0:00) y del modo continuo: Tiempo acumulado.
a. Mantenga pulsado el botón de encendido/apagado situado debajo de la pantalla de la hora.
Después de tres (3) segundos, la pantalla indicará el tiempo previamente ajustado.
Page 14
insTruCCiones De oPeraCión
b. Presione simultáneamente las flechas arriba y abajo, la pantalla indicará cero (0:00). El
tiempo de la unidad está ahora ajustado a cero (0:00) minutos. Alternativamente, puede usar las
flechas arriba/abajo para llegar a cero (0:00).
c. Presione el botón de encendido/apagado debajo de la pantalla de la hora. La pantalla indicará
el tiempo acumulado. Las flechas arriba/abajo se desactivarán. Para detener el temporizador,
presione el botón de encendido/apagado nuevamente. IMPORTANTE: Esto NO interrumpirá la
función de agitación. Presione el botón de encendido/apagado debajo de la pantalla de velocidad
para interrumpir la función de agitación.
4. Ajuste del modo temporizador: Tiempo programado.
a. Presione las flechas arriba/abajo debajo de la pantalla de tiempo hasta que llegue a la hora
deseada.
b. Inicie esta función pulsando el botón de encendido/apagado debajo de la pantalla de la hora.
La unidad funcionará durante el tiempo seleccionado, las flechas arriba/abajo se desactivarán
mientras el temporizador esté en funcionamiento. La unidad dejará de temblar cuando la pantalla
de tiempo llegue a cero (0:00). Cuatro (4) pitidos audibles indicarán que se ha completado la
función de reducción del tiempo. La pantalla de la hora volverá a la hora establecida por defecto.
Para repetir esta función durante el mismo tiempo establecido, simplemente vuelva a pulsar el
botón de encendido/apagado.
c. Para interrumpir un ciclo de temporización automática antes de que se complete, presione el
botón de encendido/apagado debajo de la pantalla de la hora. La pantalla se apagará y encenderá
de manera intermitente para indicar que la función de tiempo está en “espera”. IMPORTANTE:
Esto NO interrumpirá la función de agitación. Pulse el botón de encendido/apagado debajo de
la pantalla de velocidad para interrumpir la función de agitación. Reinicie el temporizador pul
sando el botón de encendido/apagado debajo de la pantalla de tiempo. La unidad continuará la
cuenta atrás hasta cero (0:00). Cuando la pantalla llegue a cero (0:00), escuchará los cuatro (4)
pitidos audibles que indican que la función de cuenta regresiva se ha completado y la función
de agitación se detendrá.
CONSEJOS DE FUNCIONAMIENTO
La memoria incorporada mantiene los últimos ajustes de velocidad y tiempo utilizados durante una interrupción de energía.
El agitador aumenta la velocidad a un ritmo constante hasta que se alcanza el punto de ajuste, si la barra de rotación es demasiado grande o el líquido es demasiado
viscoso, es posible que el agitador no alcance su punto de ajuste o que se desacoplen del imán de accionamiento de las unidades. Es necesario reducir la velocidad
del punto de ajuste. La unidad está diseñada para que se acelere lentamente para
asegurar que la barra de rotación se mantenga acoplada.
* El modelo STLC2DG/200L contiene una barra de rotación más grande con un
anillo de pivote central. El anillo puede necesitar ser reemplazado después de
ocho (8) horas de uso. Póngase en contacto con su representante de Ohaus para
obtener barras de giro o anillos de repuesto.
soluCión De Problemas
Problema Causa Solución
-
E1
Motor bloqueado/
falla
El error no debe ser abordado por el
usuario final. Apague la unidad y contacte
con su representante de Ohaus para su
reparación.
5. Apagar la unidad:
a. Para apagar la unidad, pulse el botón de espera. Las pantallas de velocidad y tiempo estarán
en blanco, la luz indicadora de espera se iluminará. El agitador debe mantenerse en el modo de
espera cuando no esté en uso. Para cortar completamente la alimentación de la unidad, desconecte
el cable de alimentación de la unidad o desenchúfelo de la toma de corriente.
14
 Loading...