

Page 1
Scout
TM
Series Balances - STX
Instruction Manual
TM
Balanzas Scout
Series - STX
Manual de instrucciones
TM
Balances Scout
Séries - STX
Mode d’emploi
TM
Scout
Waagen - Serien - STX
Bedienungsanleitung
TM
Bilance Serie Scout
- STX
Manuale d’Istruzioni
Page 2

STX EN-0
TABLE OF CONTENTS
1. INTRODUCTION ............................................................................................... 1
1.1 Description ................................................................................................................................................... 1
1.2 Definition of Signal Warnings and Symbols ................................................................................................. 1
1.3 Safety Precautions ....................................................................................................................................... 1
1.4 Features ......................................................................................................................................................... 2
2. INSTALLATION ................................................................................................. 4
2.1 Installing Components ................................................................................................................................. 2
2.1.1 Releasing the Transportation Lock .......................................................................................................... 2
2.1.2 Installing the Weighing Pan ..................................................................................................................... 2
2.1.3 Security Slot ............................................................................................................................................. 2
2.2 Selecting the Location .................................................................................................................................. 3
2.3 Leveling the Balance ..................................................................................................................................... 3
2.4 Connecting Power ........................................................................................................................................ 3
2.5 Calibration .................................................................................................................................................... 4
3. OPERATION...................................................................................................... 5
3.1 Controls ........................................................................................................................................................ 5
3.2 Overview of Display, Home Screen ............................................................................................................. 5
3.3 Principal Functions and Main Menu ............................................................................................................ 6
4. APPLICATIONS ................................................................................................ 8
4.1 Weighing ...................................................................................................................................................... 7
4.1.1 Item Settings ............................................................................................................................................ 7
4.1.2 Sample Name .......................................................................................................................................... 8
4.1.3 Print / Save to USB .................................................................................................................................. 8
4.1.4 Menu……………………………………… .................................................................................................. 8
4.2 Parts Counting ............................................................................................................................................. 8
4.2.1 Item Settings ............................................................................................................................................ 9
4.2.2 APW/Samples .......................................................................................................................................... 9
4.3 Percent Weighing ....................................................................................................................................... 10
4.3.1 Item Settings .......................................................................................................................................... 11
4.3.2 Recalculate Reference Weight .............................................................................................................. 11
4.4 Dynamic/Animal Weighing ......................................................................................................................... 12
4.4.1 Item Settings .......................................................................................................................................... 13
4.5 Density Determination ................................................................................................................................ 14
4.5.1 Measuring the Density of a Solid Using Water (default) ........................................................................... 14
4.5.2 Measuring the Density of a Solid Using an Auxiliary Liquid ..................................................................... 16
4.5.3 Measuring the Density of a liquid using a Calibrated Sinker (not supplied) .............................................. 16
4.5.4 Measuring the Density of Porous Material Using Oil ................................................................................ 18
4.6 Check Weighing ......................................................................................................................................... 19
4.6.1 Item Settings .......................................................................................................................................... 20
4.6.2 Limits…………………………………………. ........................................................................................... 20
4.7 Display Hold ............................................................................................................................................... 21
4.7.2 Display Hold Mode .................................................................................................................................... 22
4.7.3 Peak hold mode ........................................................................................................................................ 22
4.8 Totalization ................................................................................................................................................... 22
4.9 Mole Weighing ............................................................................................................................................. 23
4.9.1 Item Settings ............................................................................................................................................. 23
4.9.2 Enter Molar Mass ...................................................................................................................................... 24
4.9.3 Calculate Molarity ..................................................................................................................................... 24
4.10 Additional Features .................................................................................................................................... 24
4.10.1 Weigh Below ........................................................................................................................................... 24
4.10.2 Connecting the Interface ......................................................................................................................... 24
5. MENU SETTINGS ........................................................................................... 26
5.1 Menu Navigation ........................................................................................................................................ 26
5.1.1 Changing Settings .................................................................................................................................. 26
5.2 Main Menu ................................................................................................................................................. 26
5.2.1 Calibration .................................................................................................................................................. 27
5.2.1.1 Span Calibration ..................................................................................................................................... 27
5.2.1.2 Linearity Calibration ................................................................................................................................ 27
5.2.2 Balance Setup ............................................................................................................................................ 28
Page 3

STX EN-1
5.2.3 Weighing Units ........................................................................................................................................... 30
5.2.4 Data Maintenance ...................................................................................................................................... 31
5.2.5 Communication .......................................................................................................................................... 31
5.2.6 GLP and GMP Data ................................................................................................................................... 36
5.2.7 Factory Reset ............................................................................................................................................. 37
5.2.8 Lockout ....................................................................................................................................................... 37
6. MAINTENANCE .............................................................................................. 39
6.1 Calibration ................................................................................................................................................... 38
6.2 Cleaning ...................................................................................................................................................... 38
6.3 Troubleshooting .......................................................................................................................................... 38
6.4 Service Information ..................................................................................................................................... 38
7. TECHNICAL DATA ......................................................................................... 40
7.1 Specifications .............................................................................................................................................. 39
7.2 Drawings and Dimensions .......................................................................................................................... 41
8. SOFTWARE UPDATES .................................................................................. 42
9. COMPLIANCE ................................................................................................. 43
Page 4

Page 5
STX EN-1
General Hazard
Electric Shock Hazard
Caution: Read all safety warnings before installing, making connections, or servicing
this equipment. Failure to comply with these warnings could result in personal injury
and/or property damage. Retain all instructions for future reference.
1. INTRODUCTION
1.1 Description
The Scout STX balance is a high quality weighing instrument that will provide you with years of
service if properly cared for. Models are available with ranges from 120g to 8200g.
1.2 Definition of Signal Warnings and Symbols
Safety notes are marked with signal words and warning symbols. These show safety issues and
warnings. Ignoring the safety notes may lead to personal injury, damage to the instrument,
malfunctions and false results.
Signal Words
WARNING For a hazardous situation with medium risk, possibly resulting in injuries or
death if not avoided.
CAUTION For a hazardous situation with low risk, resulting in damage to the device or
the property or in loss of data, or injuries if not avoided.
Attention For important information about the product.
Note For useful information about the product.
Warning Symbols
1.3 Safety Precautions
Verify that the input voltage range printed on the data label and the plug type matches
the local AC power to be used.
Make sure that the power cord does not pose a potential obstacle or tripping hazard.
Use the balance only in dry locations.
Do not drop loads on the pan.
Use only approved accessories and peripherals.
Operate the equipment only under ambient conditions specified in these instructions.
Disconnect the equipment from the power supply when cleaning.
Do not operate the equipment in hazardous or unstable environments.
Service should only be performed by authorized personnel.
Do not position the balance such that it is difficult to reach the power connection.
Page 6
EN-2 STX
Touch Controls: Quick, graphical access to all
control functions, applications and features.
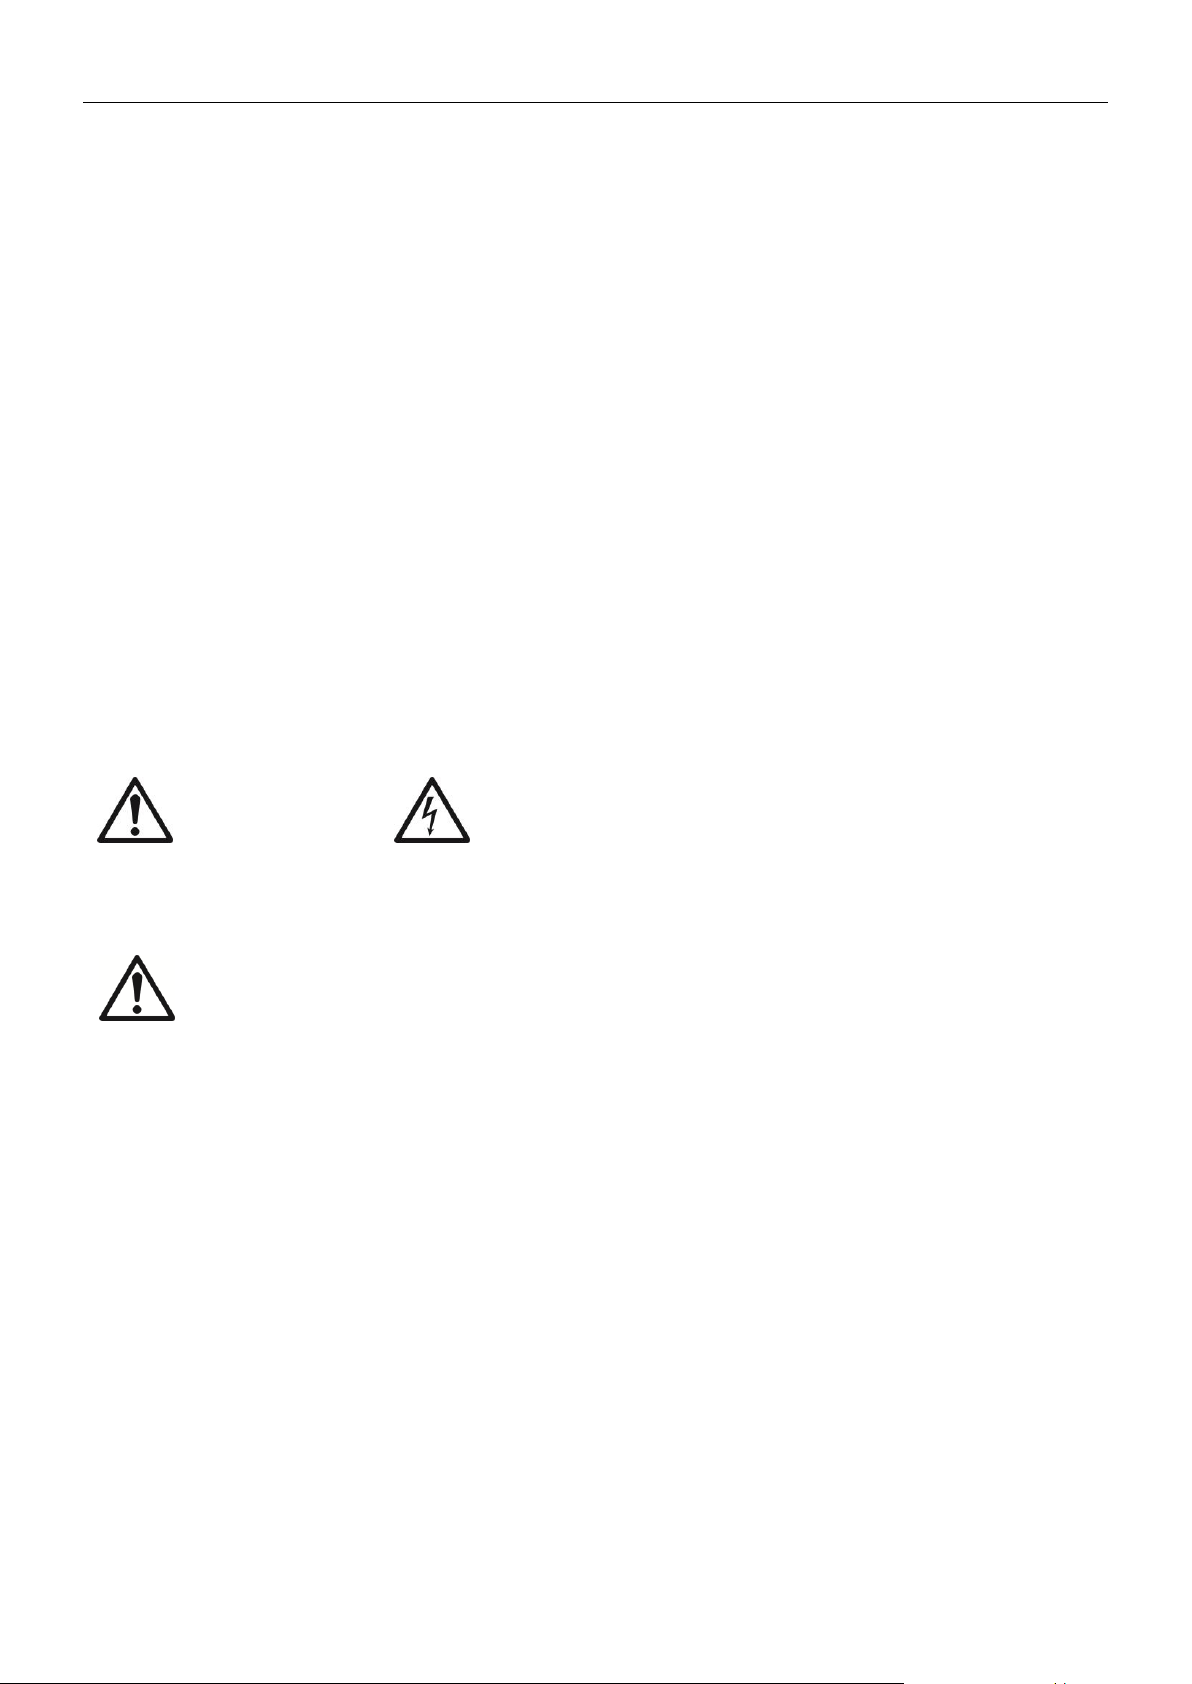
Release the red transportation lock on the
sub-platform of the balance by turning the
pointer 90 counter-clockwise.
Unlocked
Position
Locked
Position
Sub-platform
Transportation
1.4 Features
2. INSTALLATION
2.1 Installing Components
Refer to the illustrations and instructions below to identify and assemble your Scout balance
with its components. All components must be assembled before using the balance.
2.1.1 Releasing the Transportation Lock
2.1.2 Installing the Weighing Pan
Balances with a rectangular platform are placed into the sub-platform and rotated counterclockwise until it locks. Round platforms are placed straight down on sub-platform.
2.1.3 Security Slot
A security slot is provided at the rear of the balance allowing the balance to be secured by an
optional cable and lock accessory.
Page 7
STX EN-3
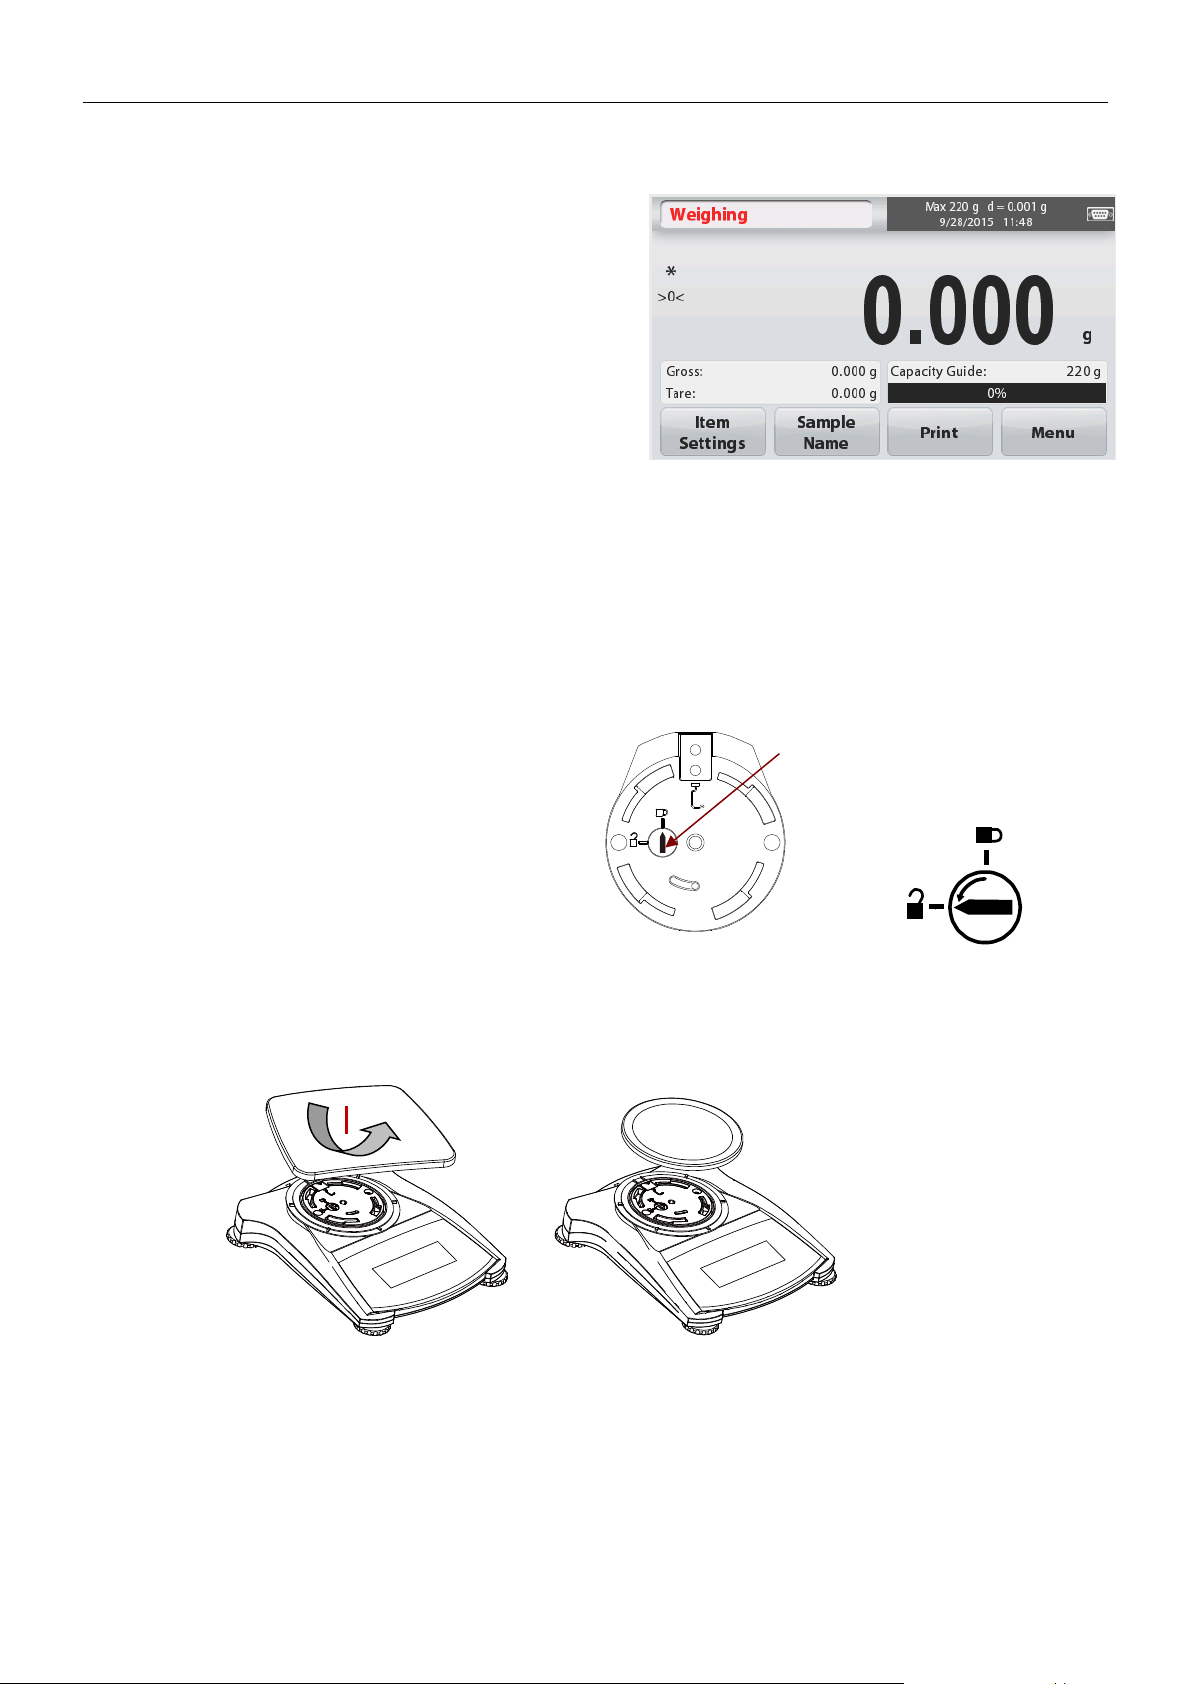
2.3 Leveling the Balance
The Scout has an illuminated level indicator as a reminder that
the balance should be leveled for accurate weighing. There is a
level bubble in a small round window on the front of the
balance. To level the balance, adjust the feet at each corner
until the bubble is centered in the circle.
Be sure the balance is level each time its location is changed.
See the Level Assist screen in the User Settings Menu.
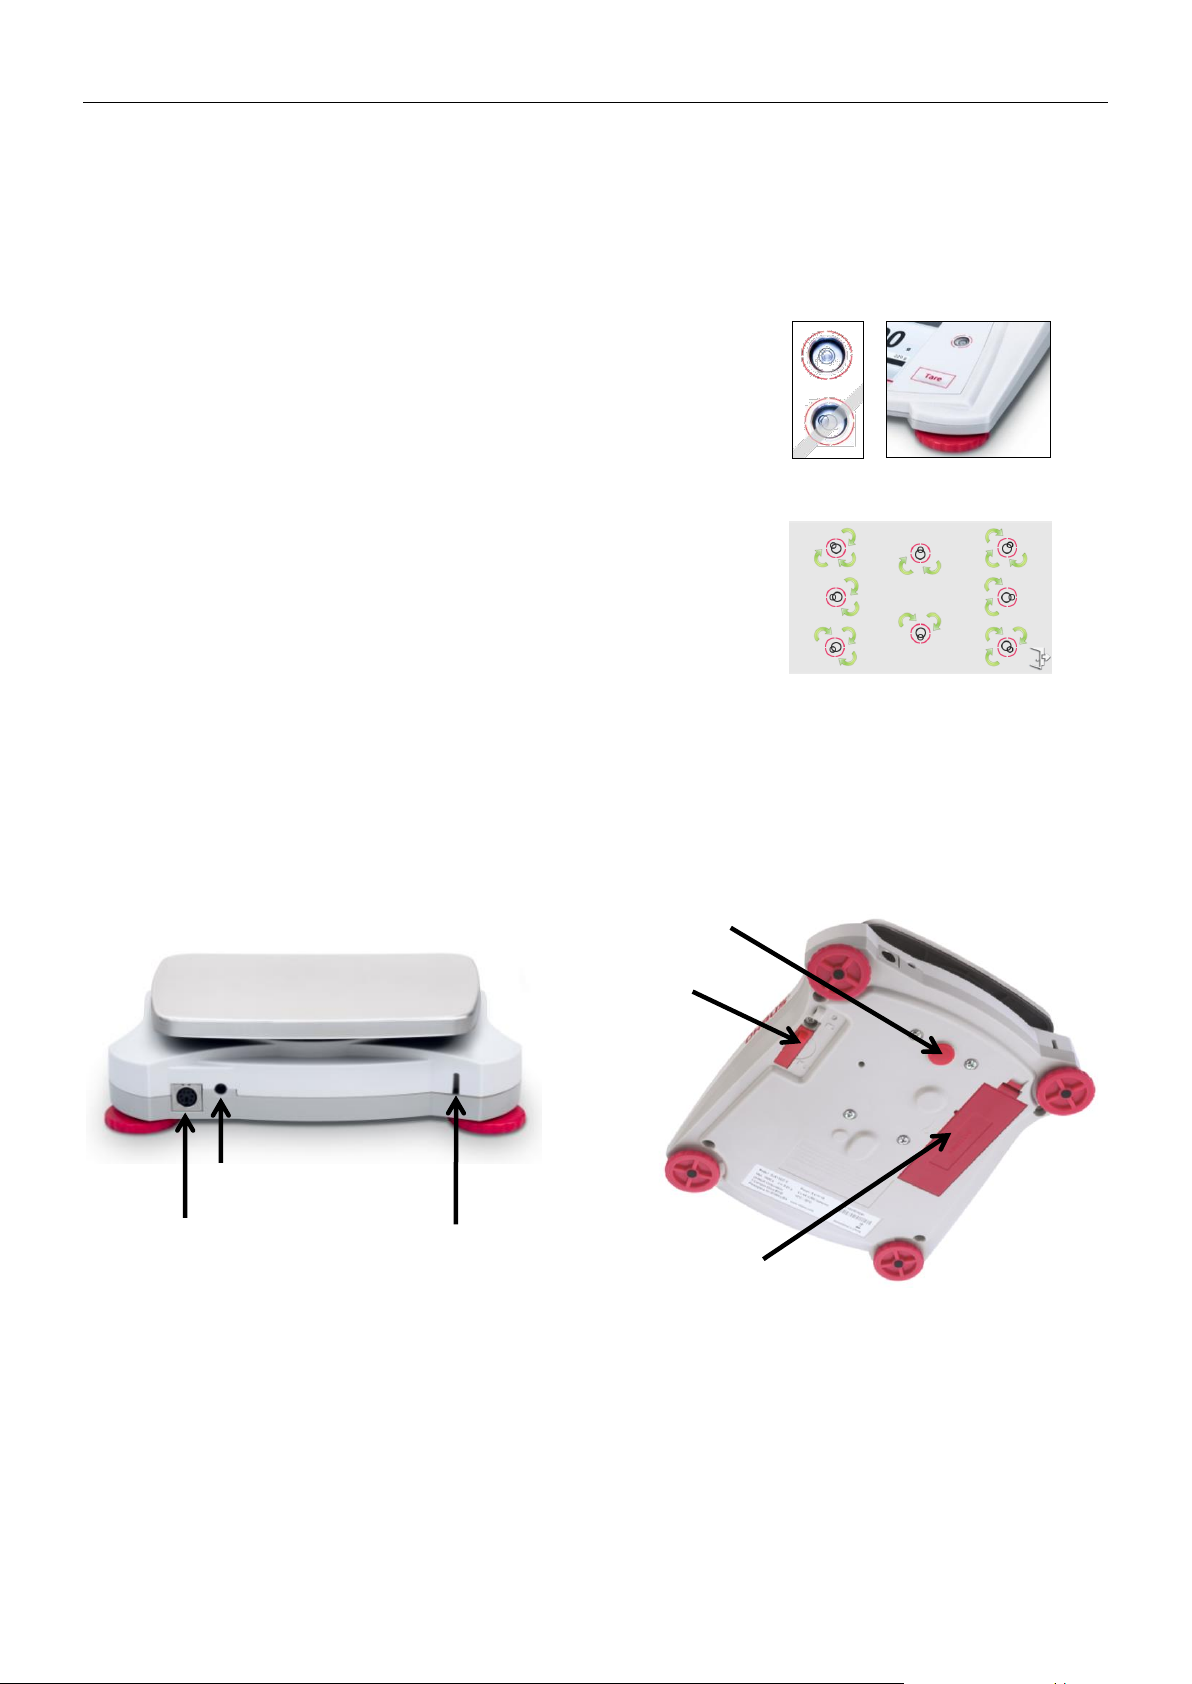
AC Adapter Input Jack
Battery Compartment Cover
Interface Connection
Security Switch
Weigh Below Hole
Security slot (Anti-theft lock slot)
2.2 Selecting the Location
For best performance, the Scout balance should be used in a clean, stable environment. Do not
use the balance in environments with excessive drafts, with rapid temperature changes, near
magnetic fields or near equipment that generates magnetic fields, or vibrations.
2.4 Connecting Power
AC Adapter Installation
AC power is used to power the balance when battery power is not needed. First, connect the
AC Adapter (supplied) to the AC Adapter Input jack at the rear of the balance then connect the
AC plug to an electrical outlet.
Battery Installation
Install the four “AA” batteries with polarity as shown in the battery compartment.
Note:
After power on, it is recommended to let the balance warm up for at least 5 minutes before
using it.
Page 8

EN-4 STX
2.5 Calibration
When the Balance is first installed, and when it is moved to another location, it must be
calibrated to ensure accurate weighing results. If preferred, the balance can be manually
calibrated with external masses. Have the appropriate calibration masses available before
beginning calibration. Refer to the Calibration and Specification Sections for masses and
calibration procedure.
Page 9
STX EN-5
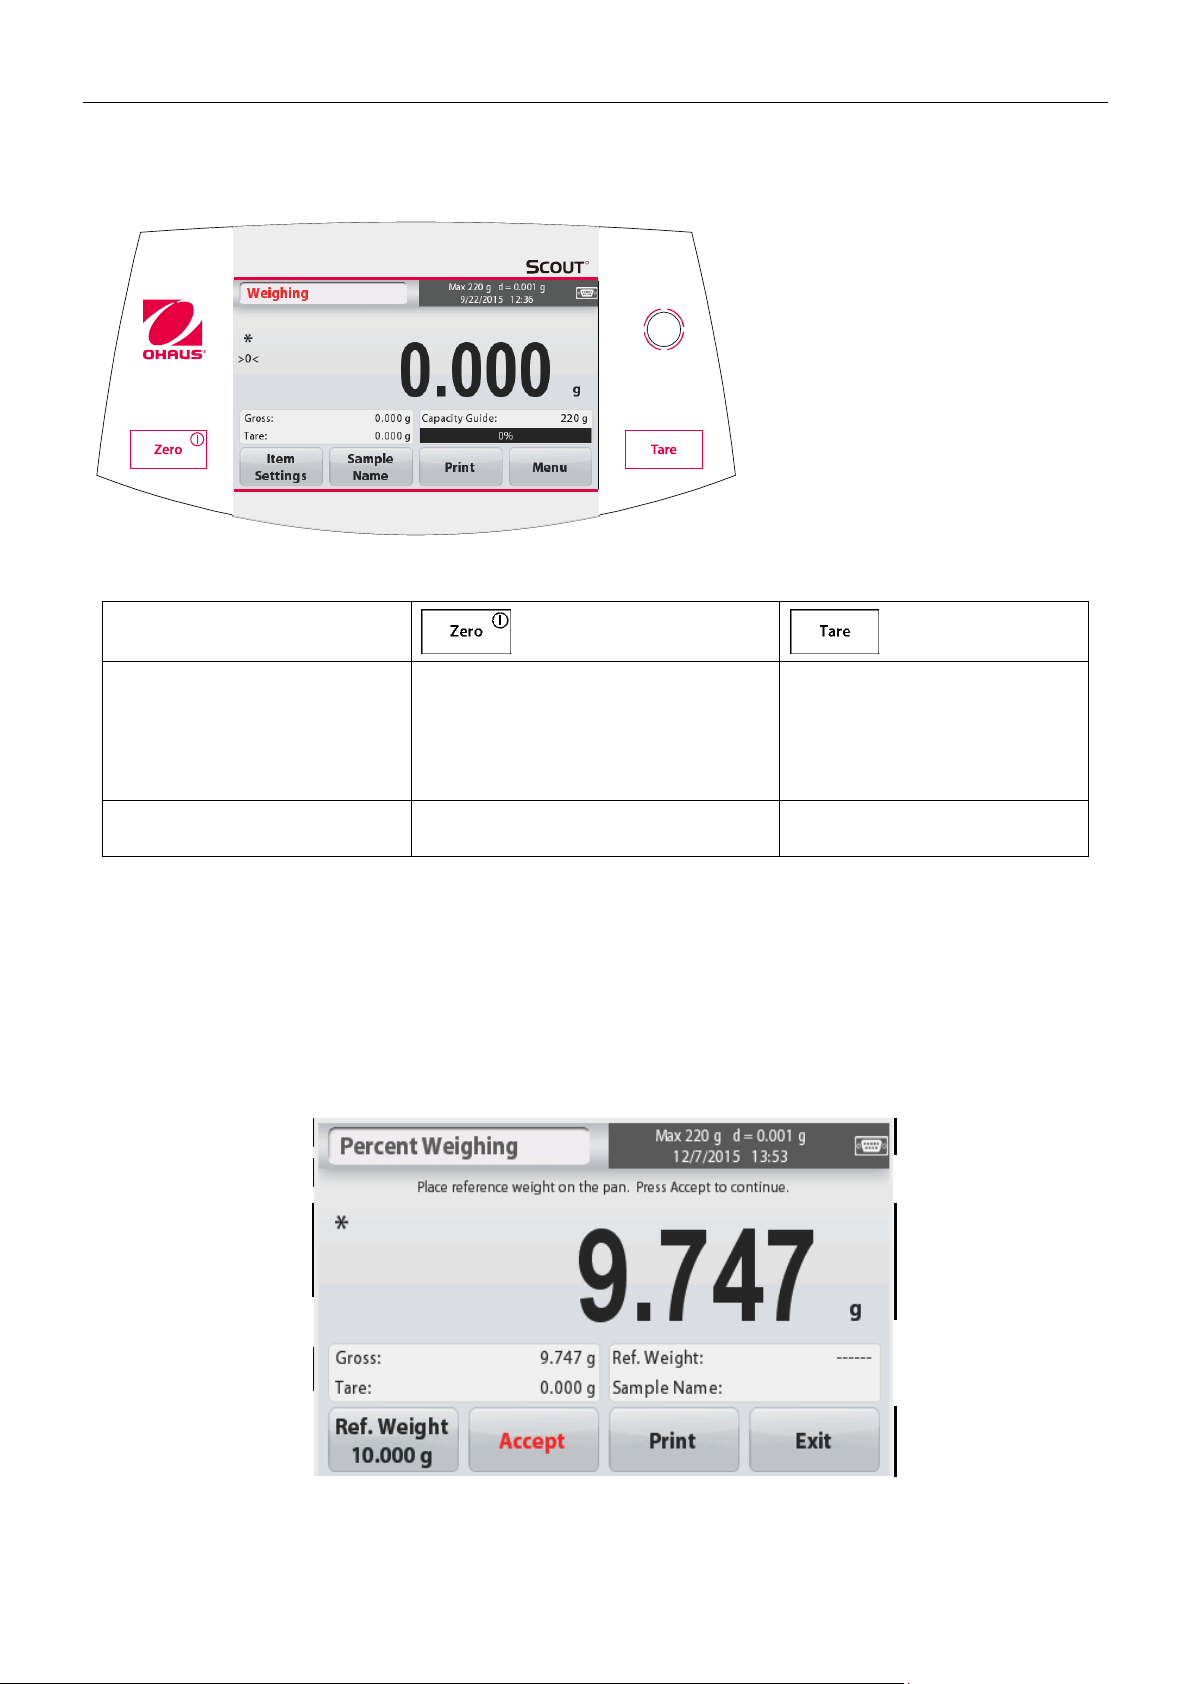
Button
Primary Function
(Short Press1)
On
Turns the balance on
Zero
If balance is On, sets Zero
Tare
Enter/clear a tare value.
Secondary Function
(Long Press2)
Off
Turns the balance Off.
Application
Instructional Messages
Stability (*), Net (NET),
Gross (G) and/or center
of zero (>0<) indicators
Reference Fields
Application Buttons:
Functions vary by
application
Result Field: Information
varies by application
Touch g to change unit
Capacity and readability
3. OPERATION
3.1 Controls
Button Functions
Table 3-1.
Notes: 1 Short Press: Press less than 1 second.
2
Long Press: Press and hold for more than 2 seconds.
3.2 Overview of Display, Home Screen
This equipment utilizes a touch-sensitive display. Touch areas and Buttons to control the
equipment’s functions.
Main Application Screen:
Page 10
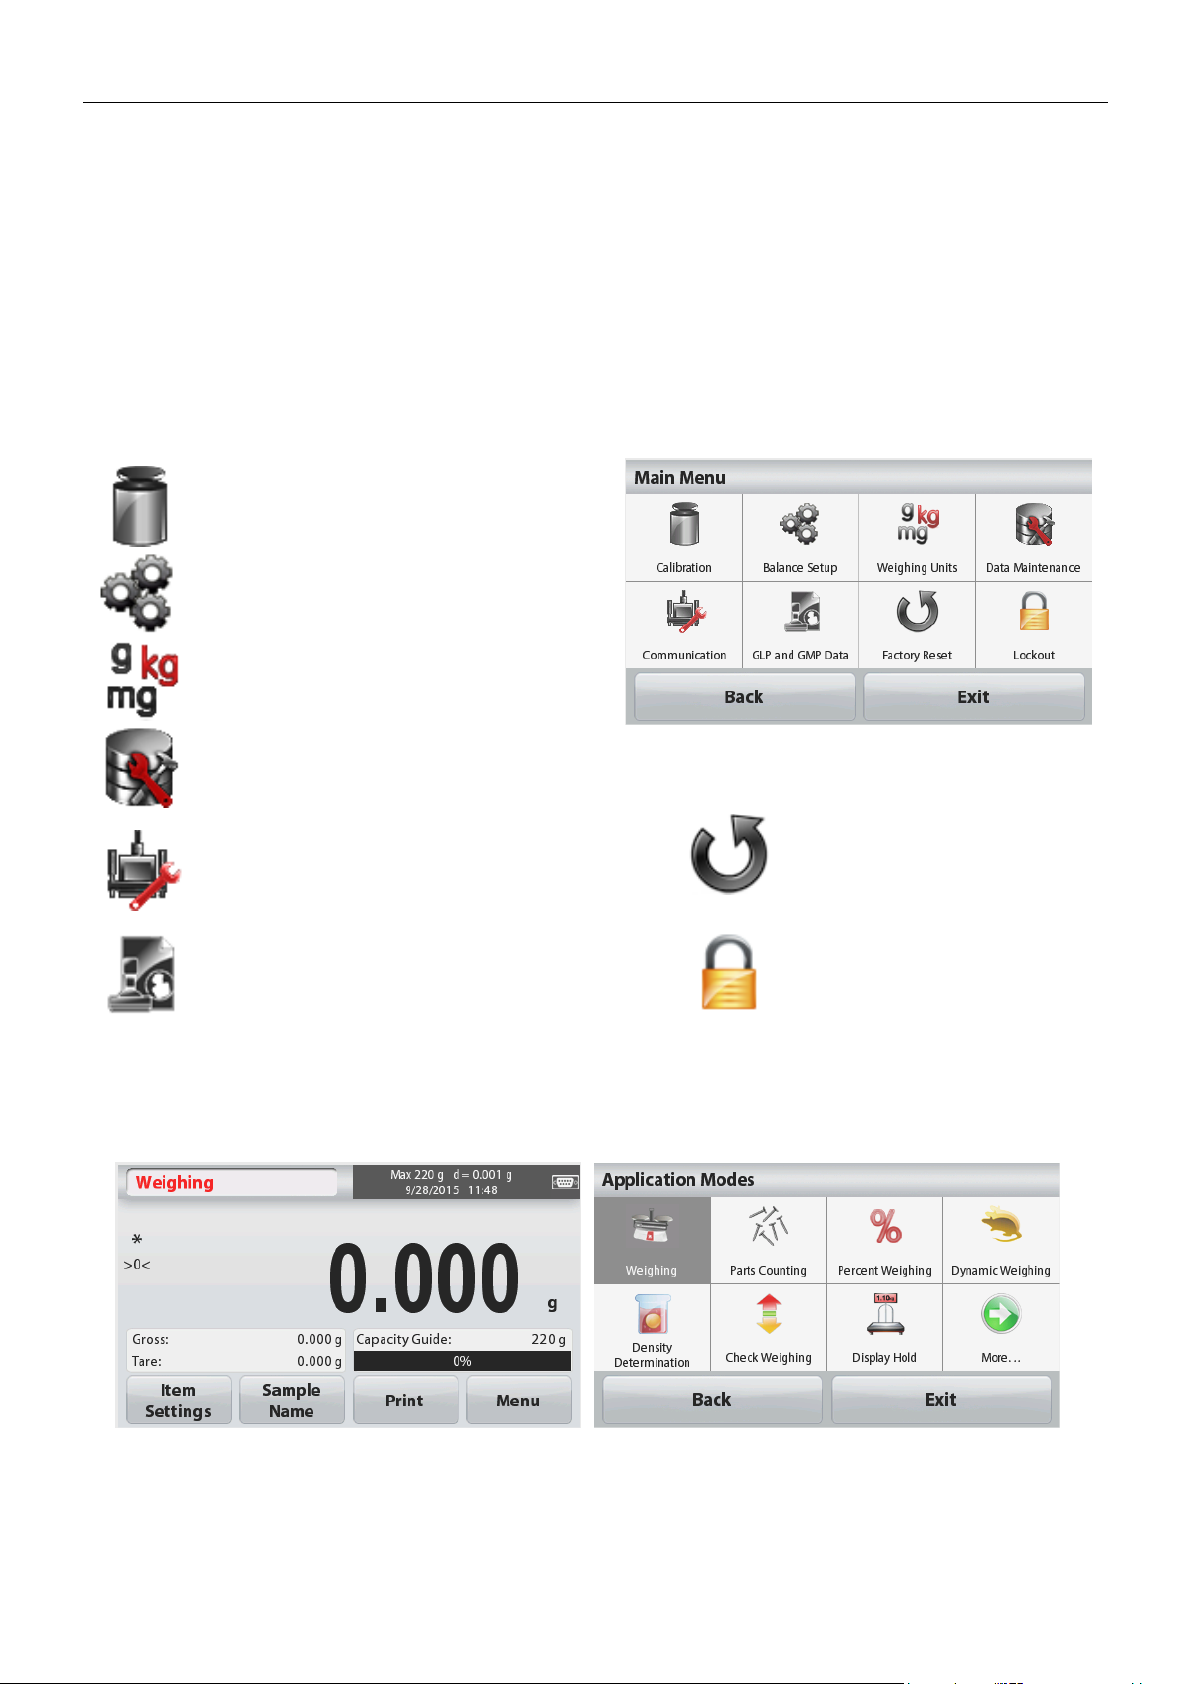
EN-6 STX
Touch Menu to open the menu list.
Calibration:
Touch to view calibration options.
Balance Setup:
Touch to view balance settings.
Weighing Units:
Touch to view weighing units.
Data Maintenance:
Touch to view data maintenance options.
Communication:
Touch to view COM Device Settings and
Print Settings.
Factory Reset:
Touch to do a Factory reset.
GLP and GMP Data:
Insert user data for traceability.
Lockout:
Touch to access the Lockout
menu list.
Secondary
result line and
unit-of-measure
indicator
Instructional Message
line
Stability indicator,
NET, G, and/or
>0< (center of 0).
Capacity Bar:
Color indicates capacity
used. Meaning varies by
application.
Primary
result line and
unit-of-measure
indicator
Results lines –
meaning varies by
application.
Touch control
function Icons
to…
…access more functions
…Call up the menu or specific functions…
Tare and application
buttons – functions vary
by application
Touch control
function Icons
to…
…access more functions
…Call up the menu or specific functions…
3.3 Principal Functions and Main Menu
Weighing: Press Zero to set the display to zero. Place an item on the pan. Display indicates
gross weight.
Taring: With no load on the pan, press Tare to set the display to zero. Place an empty
container on the pan and press Tare. Add material to the container and its net weight
is displayed. Remove container and container’s weight appears as a negative
number. Press Tare to clear.
MENU & SCREEN NAVIGATION
4. APPLICATIONS
The balance can be configured to operate in various Application modes.
Touch the top left button in the Application area to choose the mode:
Page 11
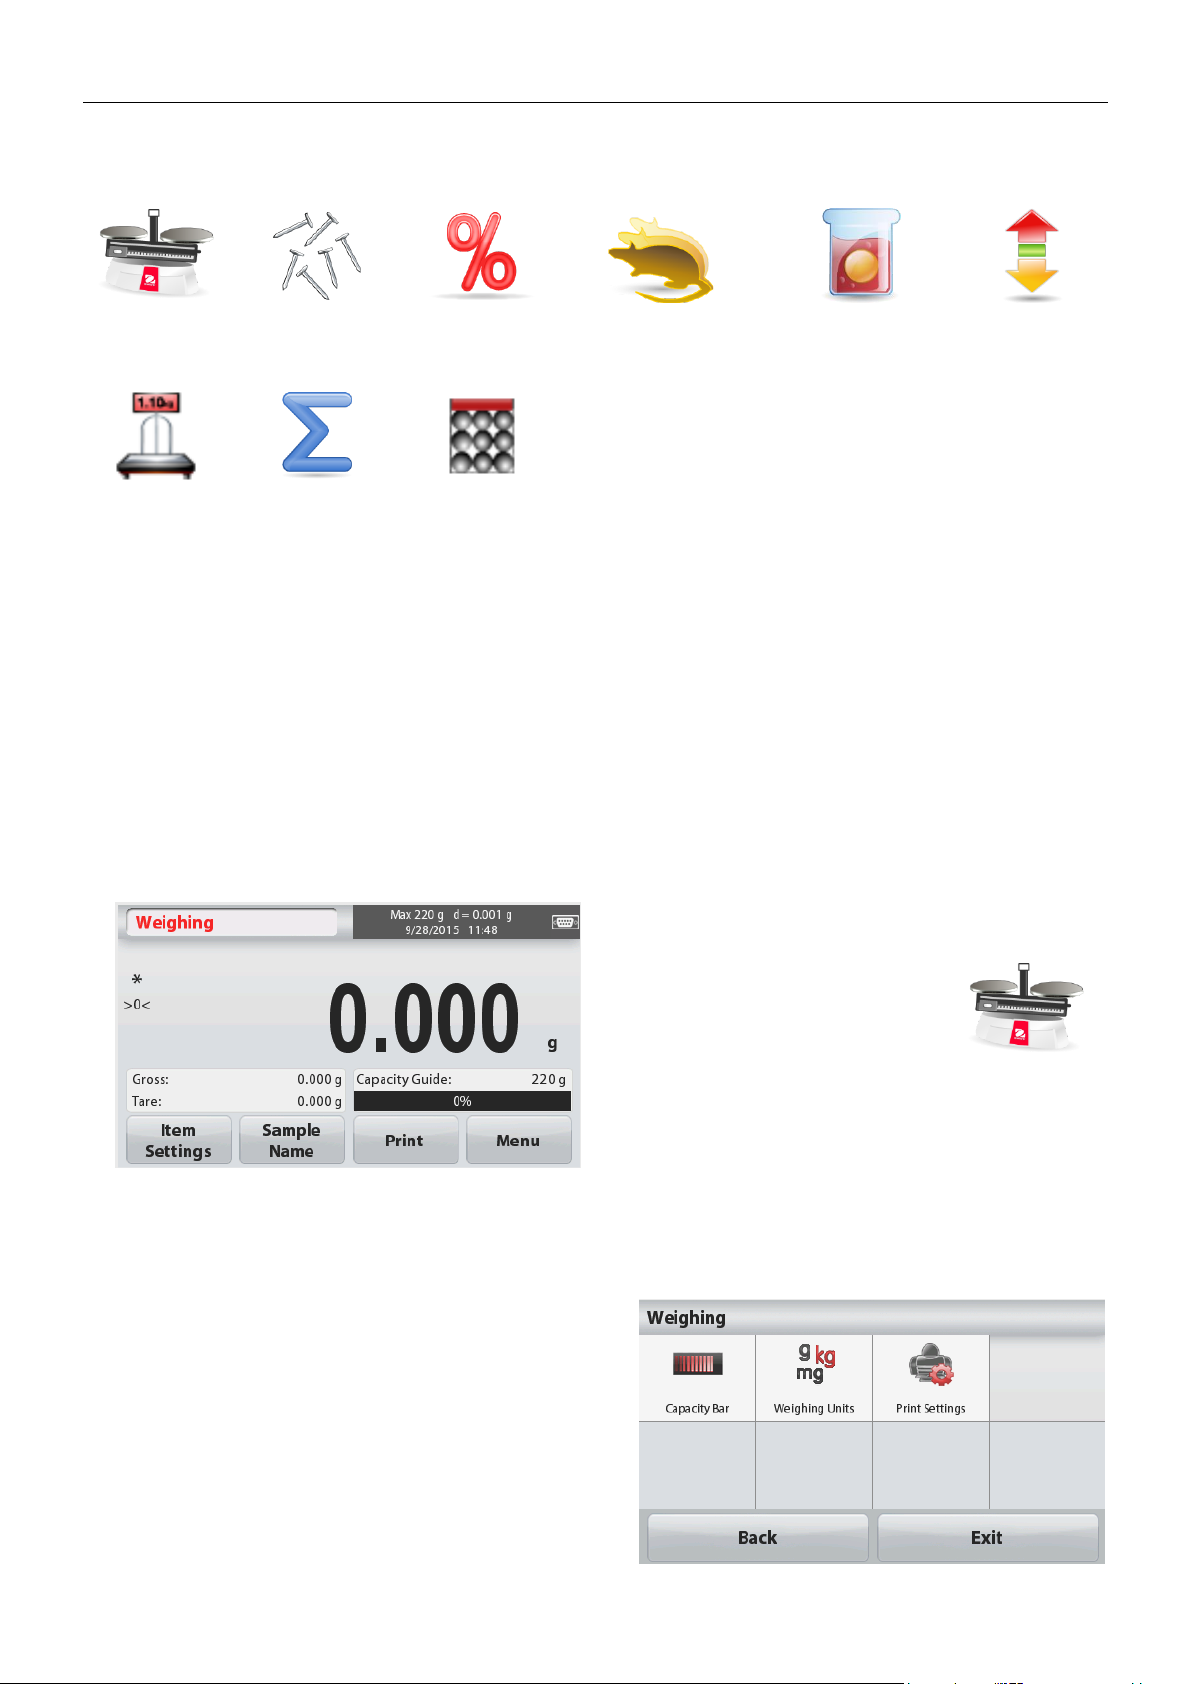
STX EN-7
Weighing
Parts
Counting
Percent
Weighing
Dynamic
(Animal)
Weighing
Density
Determination
Check
Weighing
Display
Hold
Totalization
Mole
Main Display Line
Reference Fields
Application Buttons
Application
Icon
To view or adjust the current settings
Touch the
Item Settings
button. The Settings
screen appears.
Capacity Bar:
Set to On to display the
capacity guide on the weighing main screen.
Weighing Units:
Select the displayed unit.
Print Settings:
To view or adjust the print
settings.
The Scout Balance incorporates the following Applications.
Note: Before using any application, be sure the balance has been leveled and calibrated.
4.1 Weighing
Use this application to determine the weight of items in the selected unit of measure.
Weighing
1. In the upper left portion of the home screen, select Weighing (this application is the
default).
2. Press Tare or Zero if necessary to begin.
3. Place objects on the pan to display the weight. When stable, the * appears.
The resulting value is displayed in the main Weighing Line in the active unit of measure.
The WEIGHING Home screen:
4.1.1 Item Settings
Page 12
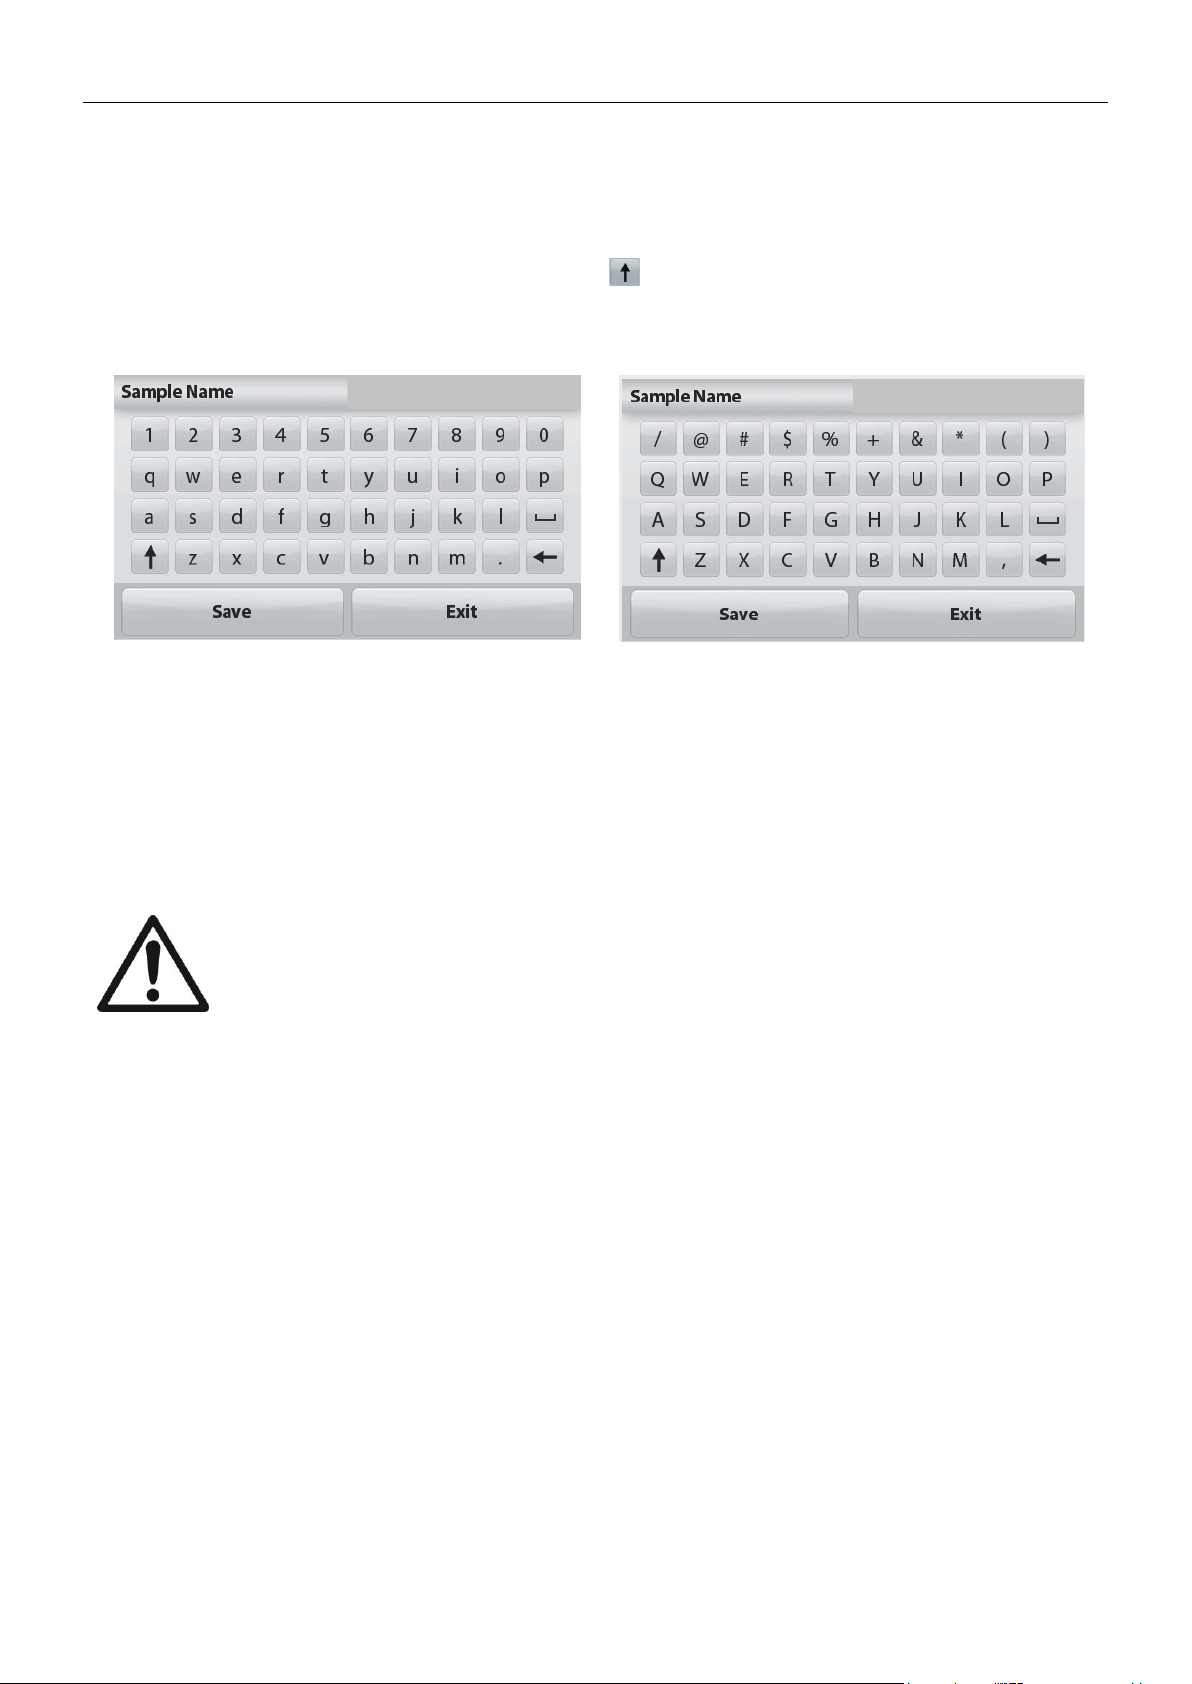
EN-8 STX
Enter a sample name with the alphanumerical keypad and then press Save to store the name
and return to weighing mode main screen. Press to alternate between Lower and Upper
case characters.
Lower Case:
Upper Case:
Print the information based on the settings in Print Settings menu.
Note: This button will be disabled if the optional interface kit (buy separately) is not installed.
When the USB Host interface kit is installed, “Save to USB” will be shown.
Save to USB
Insert the USB flash drive into the USB slot. Next, press the Save to USB button to save the
data to the USB flash drive. Once saved, the button will momentarily change color to orange.
CAUTION:
Depending on the USB drive used, all data might not be transferred from the
balance or the display might freeze. If this happens, unplug the USB flash drive
and try another USB flash drive.
Ohaus takes no responsibility if data on USB flash drive is erased or if the USB
flash drive breaks while it is connected to the balance.
To minimize the risk of problems arising, Ohaus suggests using a high quality
USB flash drive.
For more information, please refer to USB Host instruction manual.
To view the Main Menu options.
4.1.2 Sample Name
4.1.3 Print / Save to USB
4.1.4 Menu
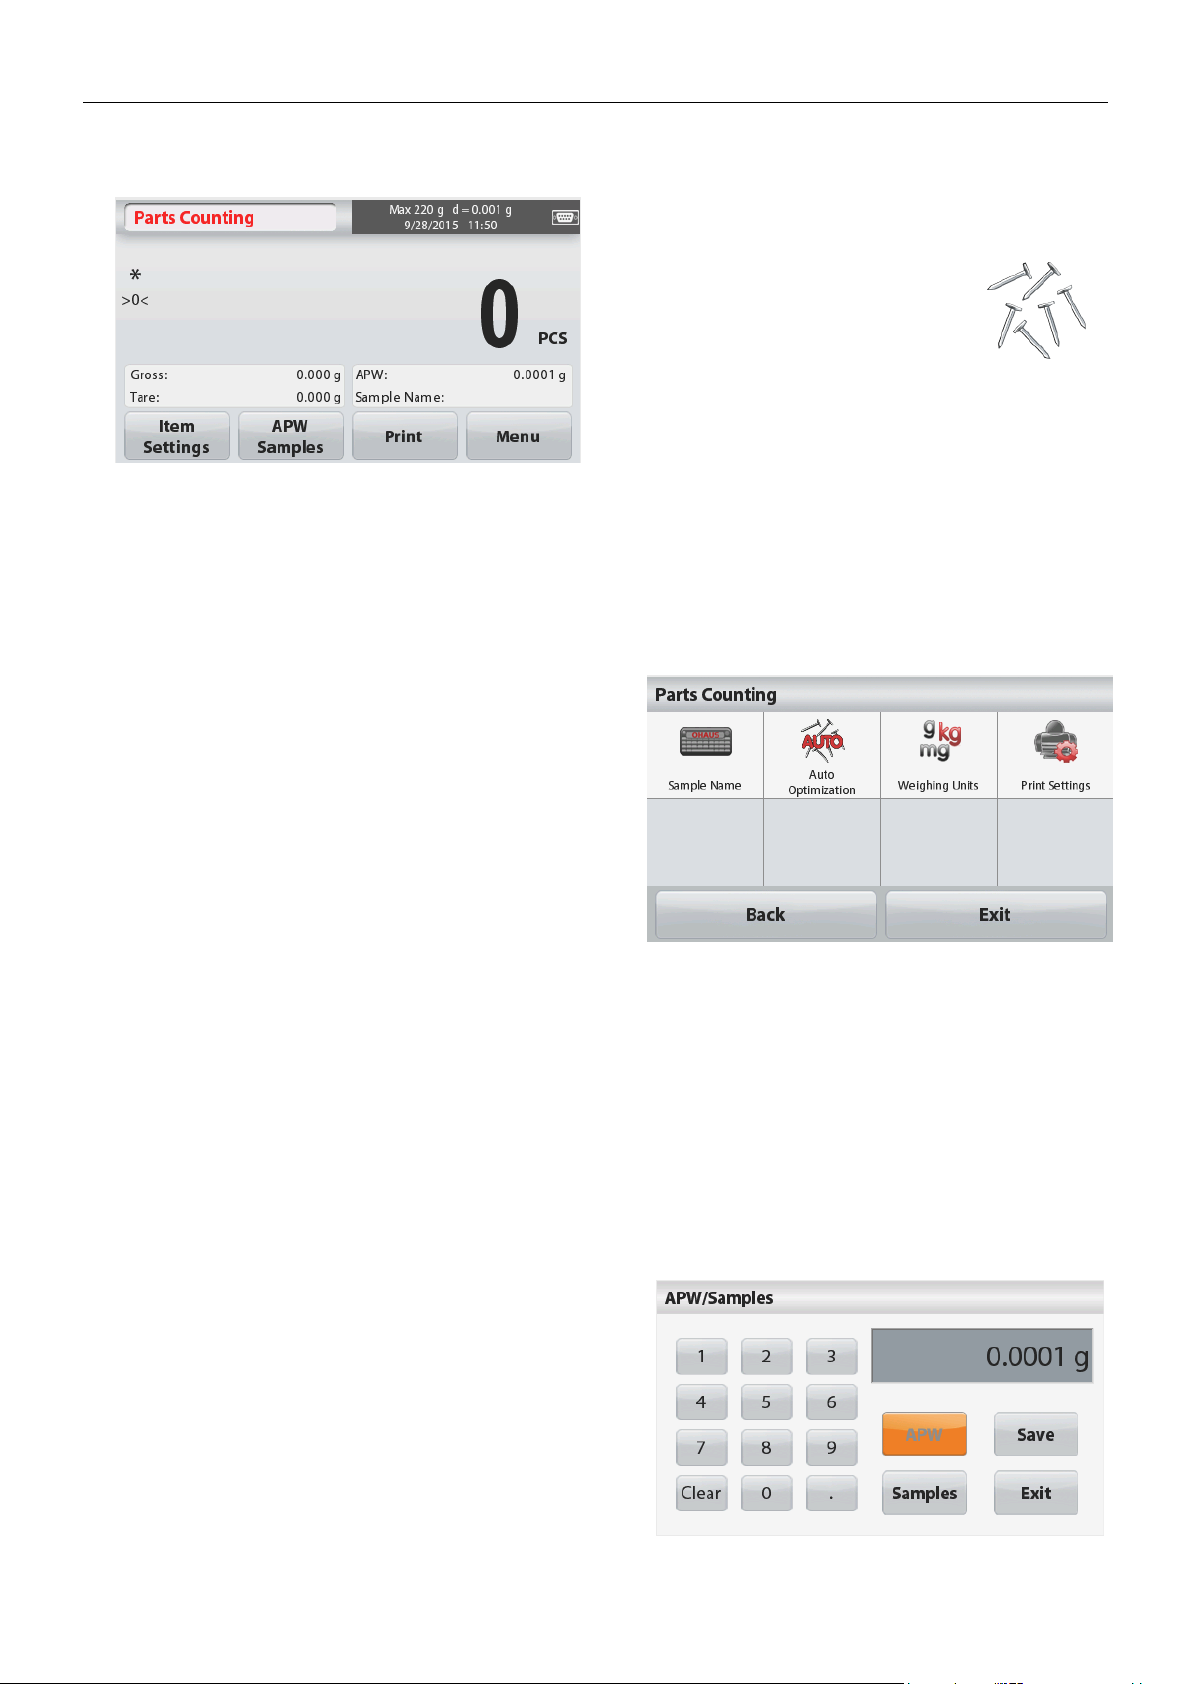
4.2 Parts Counting
Use this application to count samples of uniform weight.
1. In the upper left portion of the home screen, select Parts Counting.
2. Press Tare or Zero if necessary to begin.
3. Establish an Average Piece Weight (APW), the default (or last) APW is displayed.
4. Place objects on the pan to display the number of pieces on Main Display Line.
Page 13
STX EN-9
Main Display Line
Reference Fields
Application Buttons
Application
Icon
4.2.1 Item Settings
To view or adjust the current settings, touch the Item Settings button:
Touch the
Item Settings
button. The Settings
screen appears.
Sample Name: Enter a sample name
with the alphanumerical keypad and then
press Save to store the name and return
to Item Settings screen as shown to the
right.
Auto Optimization:
It re-calculates the
piece weight automatically to improve
counting accuracy as parts are added.
By default Auto Optimization is
Off
.
Weighing Units:
Select the displayed
unit.
Print Settings:
To view or adjust the print
settings.
4.2.2 APW/Samples
Enter to set APW and Sample size in pieces by
the numerical keypad.
Establish an Average Piece Weight (APW)
Each time a new type of part is counted, the
nominal weight of one piece (Average Piece
Weight or APW) must be established using a
small quantity of pieces. This APW is stored until
replaced by another APW.
There are two methods to establish the APW
value: APW and Samples.
The PARTS COUNTING Standard Home screen:
Page 14
EN-10 STX
APW:
Set a known Average Piece Weight (APW)
To adjust the APW value directly, touch the
APW
button
.
A numeric input window appears.
Key in the desired APW Weight, then press
Save.
The display returns to the application home
screen with the new APW value in the reference
field.
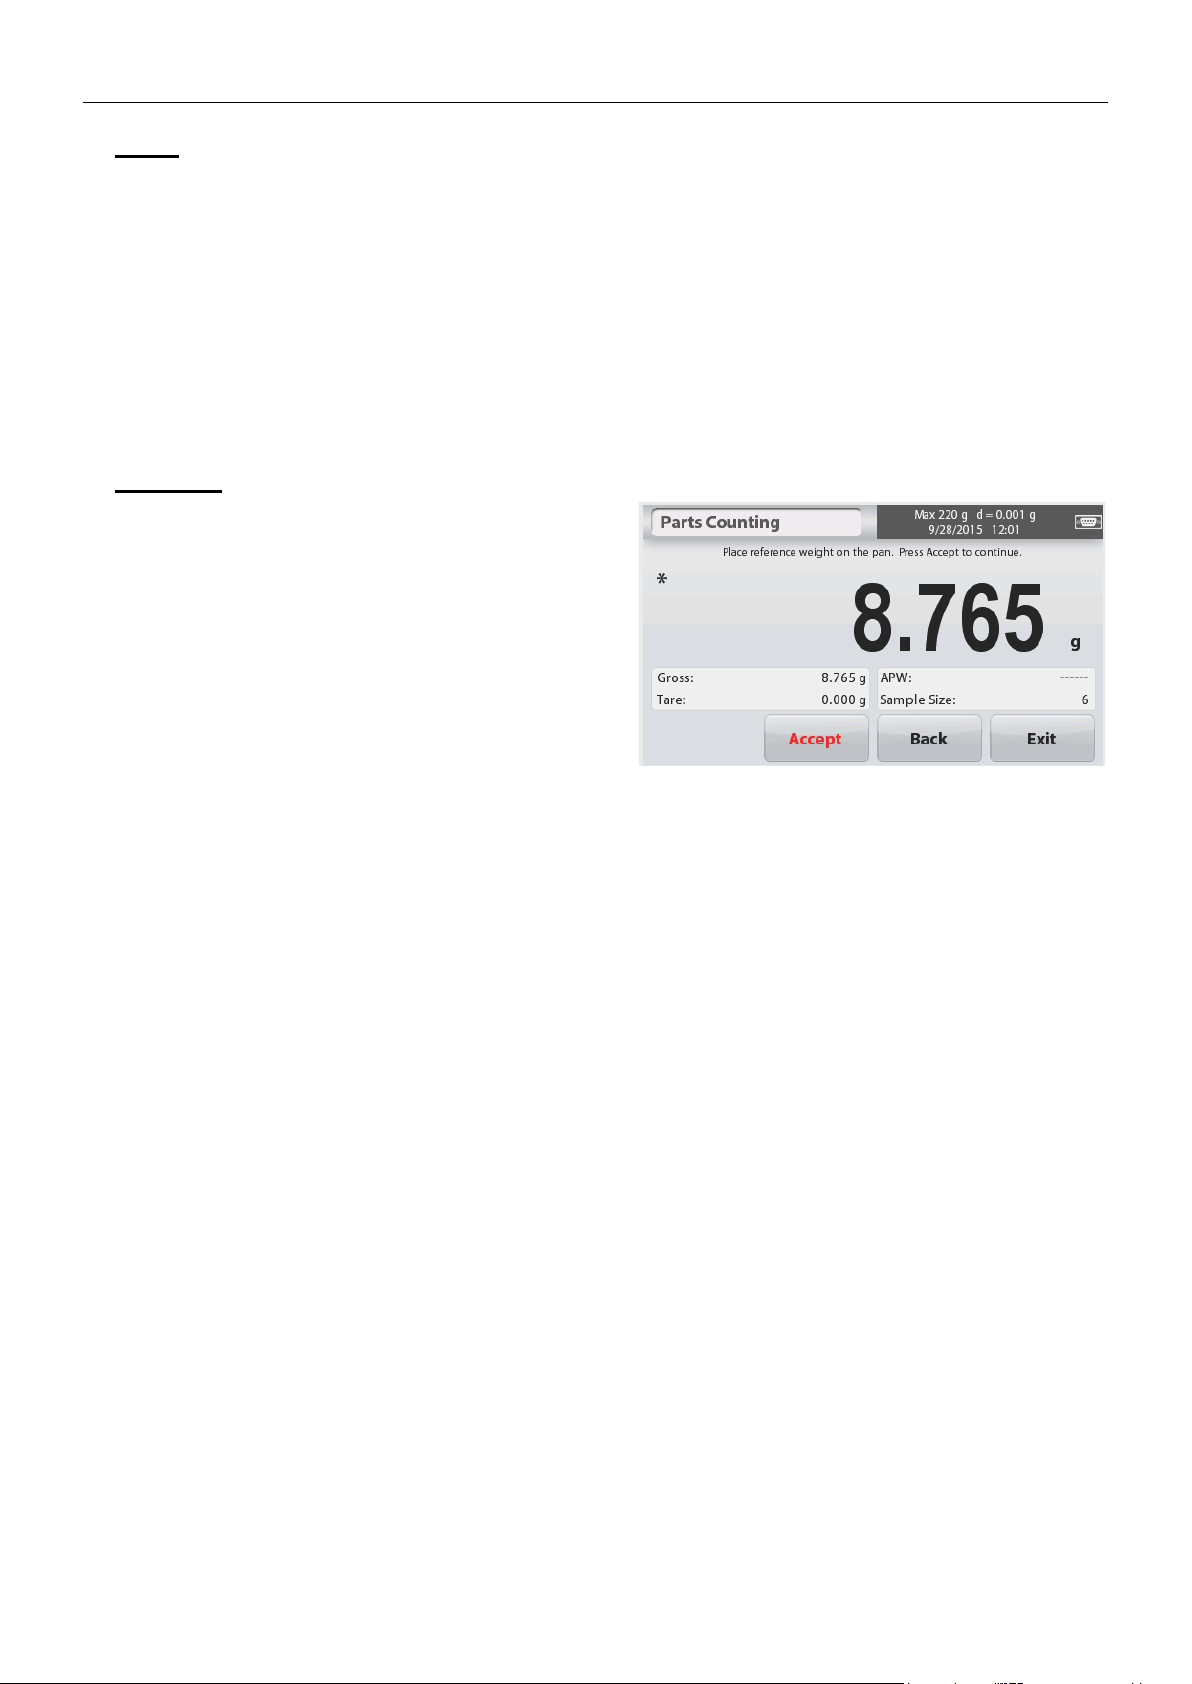
Samples:
Set a new Average Piece Weight (APW) –
Derived
To establish a new APW, touch the Samples
button.
A numeric input window appears.
Key in the desired Sample Size (1 to 10000
pieces), then press
Save
.
The display returns to the application home
screen. Follow the screen instructions to
establish a new APW.
Place the reference weight on the pan and
press Accept to continue. The sample size
displayed will be used. The new APW value is
shown in the reference field.
The Main screen returns with the new APW
value calculated.
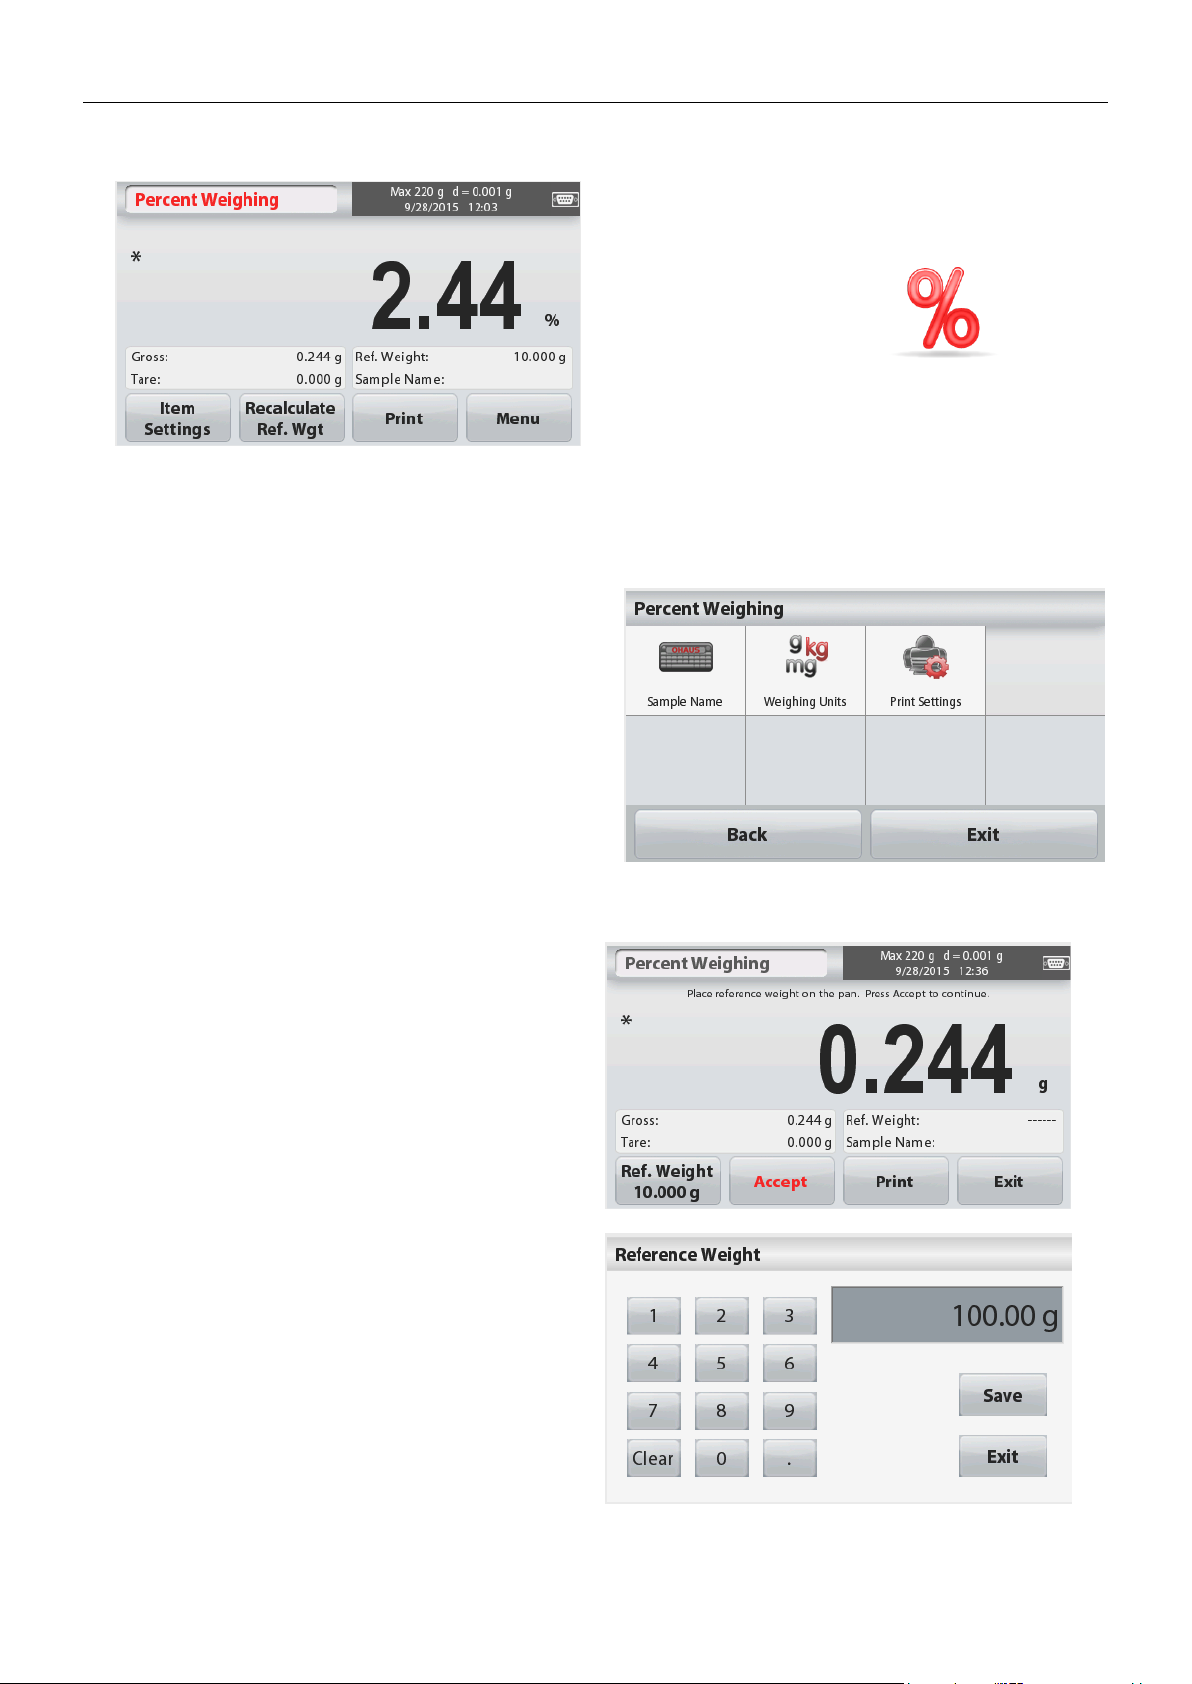
4.3 Percent Weighing
Use Percent Weighing to measure the weight of a sample displayed as a percentage of a preestablished Reference Weight.
The default (or last) Reference Weight is displayed.
1. In the upper left portion of the home screen, select Percent Weighing.
2. Place an object on the pan. The difference between the sample and the Reference Weight
is displayed as both a weight and a percentage.
Page 15
STX EN-11
The PERCENT WEIGHING Home screen:
Main Display Line
Reference Fields Application Icon
Application Buttons
Touch the
Item Settings
button. The Settings
screen appears.
Sample Name:
Enter a sample name with
the alphanumerical keypad and then press
Save to store the name.
Weighing Units:
Select the displayed unit.
Print Settings:
To view or adjust the print
settings.
To establish a new reference weight value,
touch the Recalculate Ref. Weight button.
Follow the screen instructions to establish a
new reference weight.
Alternatively, press the Ref. Weight button
from the Percent Weighing Recalculate Ref.
Wgt screen to establish a new reference
weight manually through a numerical keypad.
Key in the desired Reference Weight, then
press Save.
The display returns to the Percent Weighing
home screen.
4.3.1 Item Settings
To view or adjust the current settings
4.3.2 Recalculate Reference Weight
Page 16
EN-12 STX
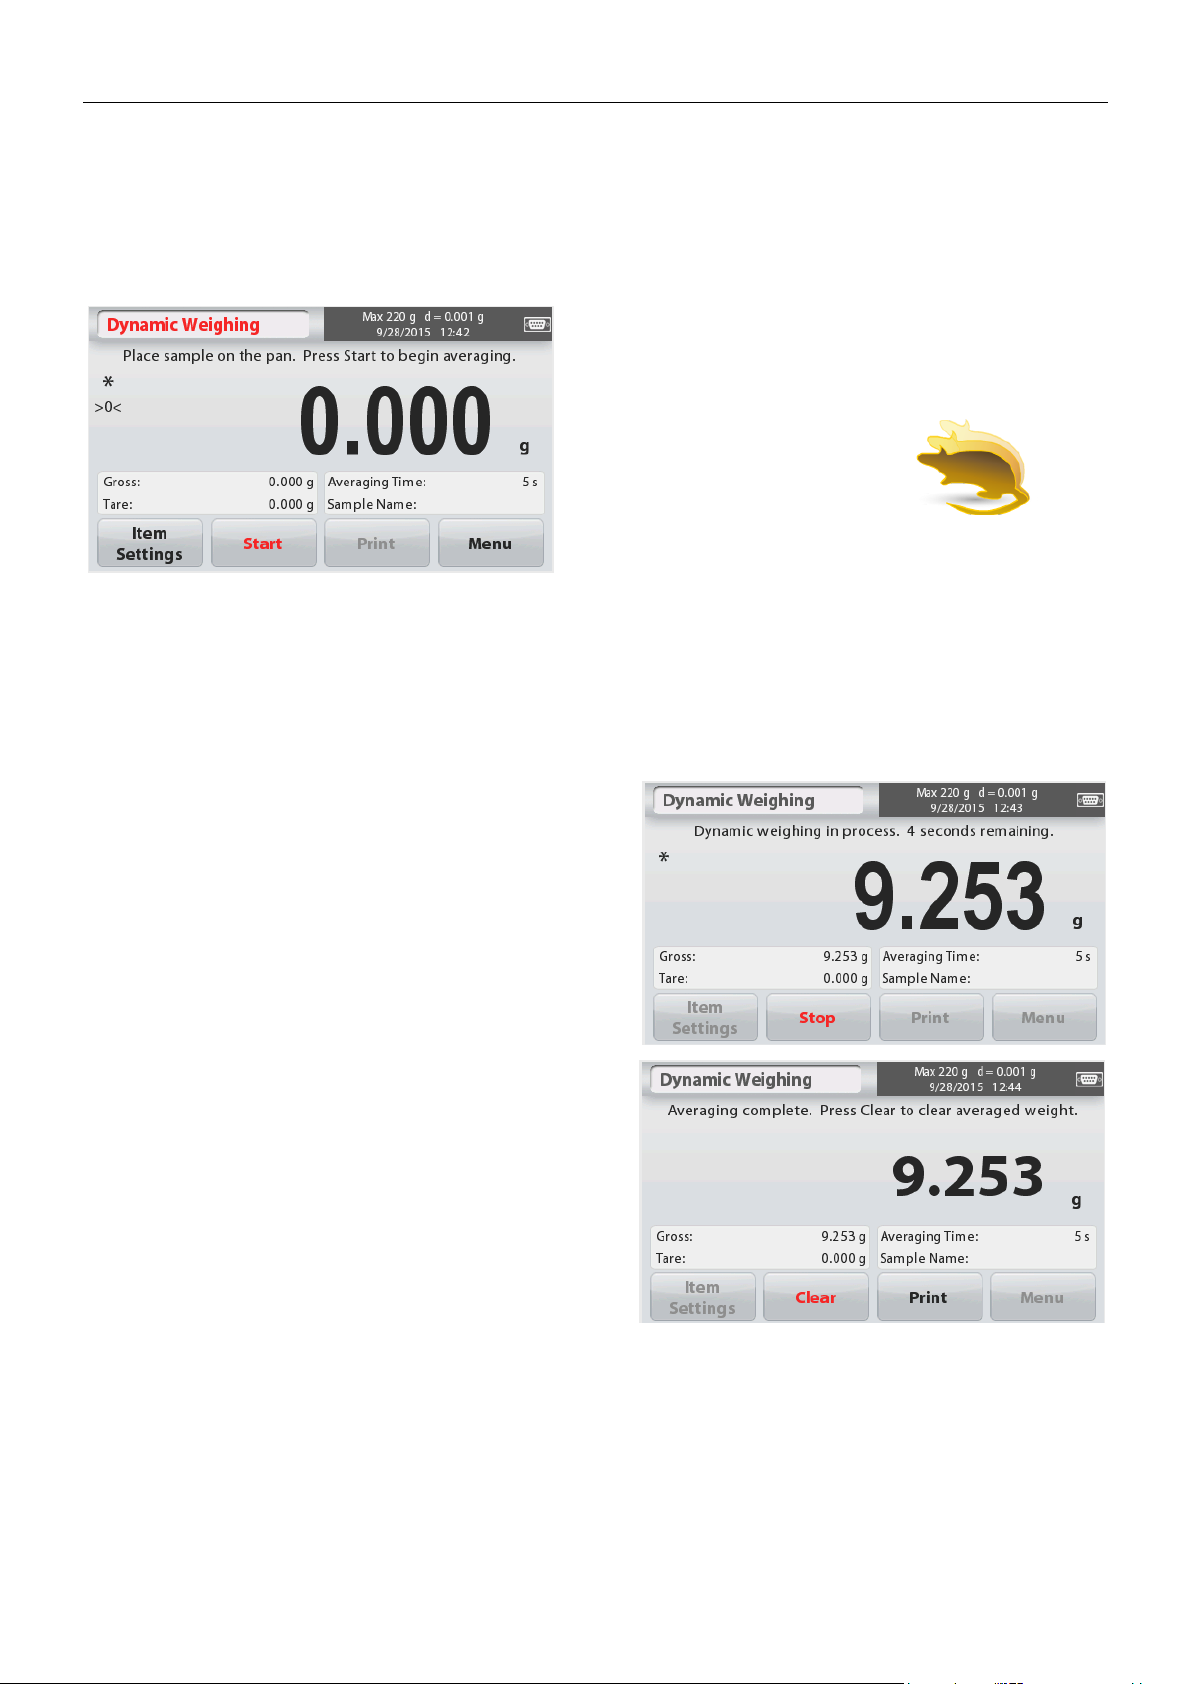
Main Display Line
Reference Fields
Application Buttons Application Icon
Dynamic Weighing – Manual (default)
1. In the upper left portion of the home screen, select Dynamic Weighing.
2. Press Tare or Zero if necessary to begin.
3. Place objects on the pan. Press the
Start
button.
4. The balance begins a countdown (averaging
process).
During the countdown, the information line
displays the time remaining.
If necessary, press
Stop
to quit and return to
the Home screen.
5. When the countdown ends, the result is
displayed and held.
Press Clear to clear the held weight and
return to the Initial screen.
Note:
Clear the pan before beginning a new
Dynamic Weighing cycle.
4.4 Dynamic/Animal Weighing
Use this application to weigh an unstable load, such as a moving animal. Two different
start/reset modes can be selected: Manual (start and stop via key press) and Automatic (start
and stop automatically).
The DYNAMIC WEIGHING Home screen:
Page 17
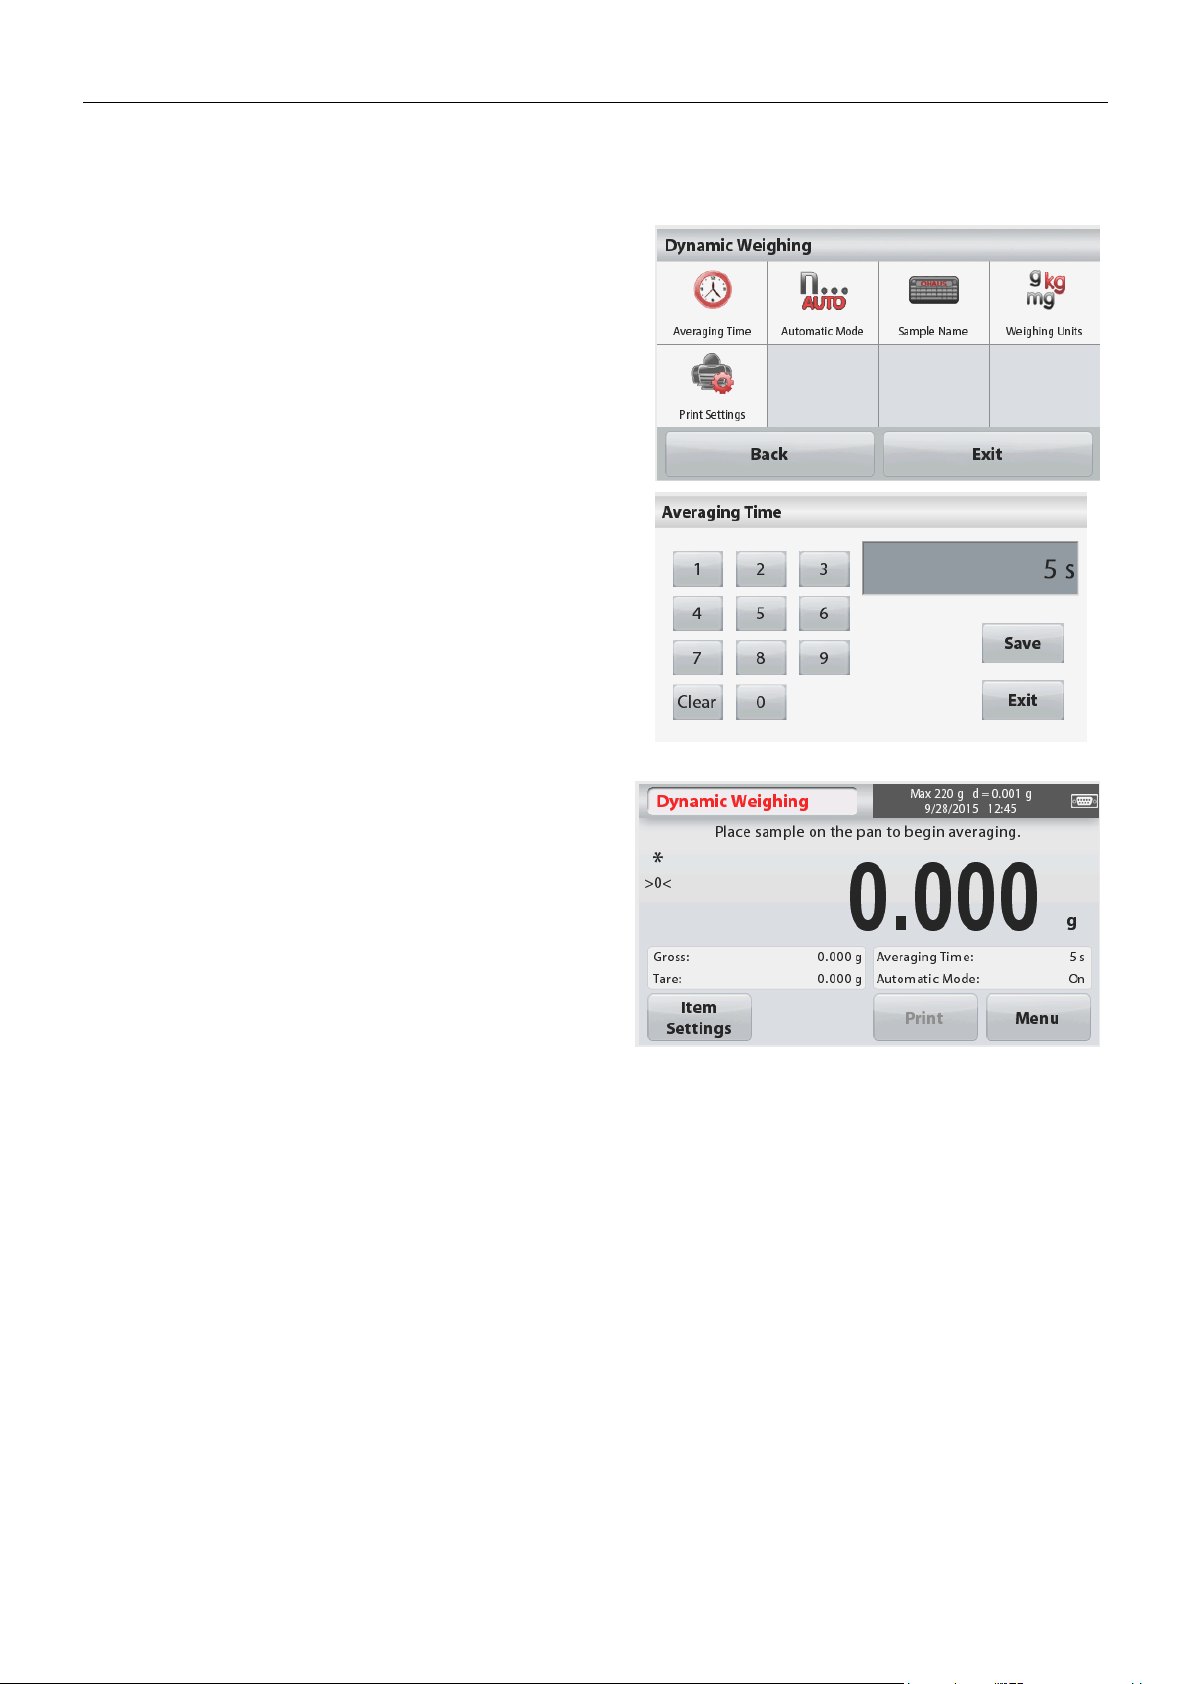
STX EN-13
Touch the
Item Settings
button. The Settings
screen appears.
Averaging Time:
The Averaging Time can be
set from 1 to 99 seconds.
The default value is 5 seconds.
Automatic Mode:
The cycle begins when an object (animal) is
placed on the pan, and the held value is
automatically reset when the object is removed
from the pan (10-second delay).
Sample Name:
Enter a sample name with the
alphanumerical keypad and then press Save to
store the name.
Weighing Units:
Select the displayed unit.
Print Settings:
To view or adjust the print
settings.
4.4.1 Item Settings
To view or adjust the current settings:
Page 18
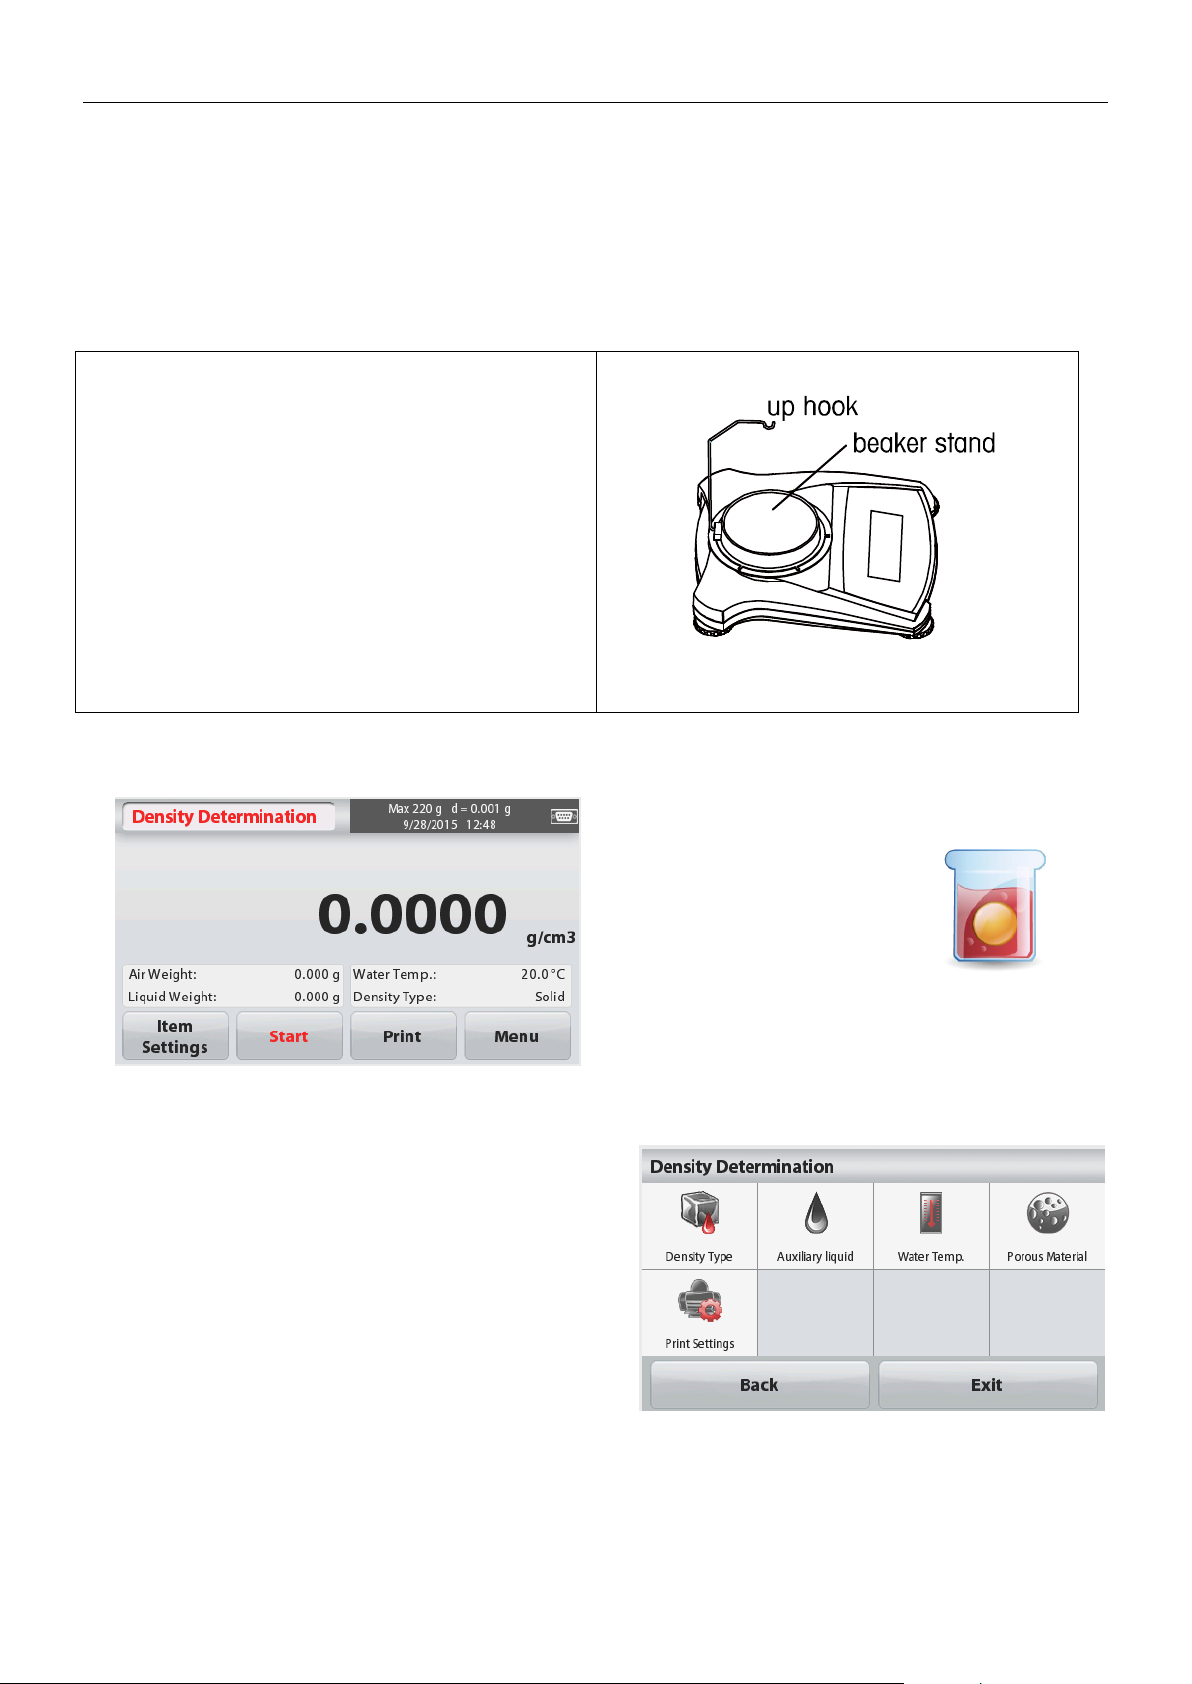
EN-14 STX
Prepare the balance as shown right
1. Turn off the balance.
2. Remove the balance platform.
3. Insert they up hook and install the beaker
stand (beaker is not supplied).
4. Power on the balance
5. In the upper left portion of the home
screen select Density Determination.
6. Follow below instructions to determine the
object’s density.
Main Display Line
Reference Fields Application Icon
Application Buttons
Press the Item Settings button to open the
Density Determination Settings screen.
Confirm the following Setups are selected:
Density Type: Solid
Auxiliary Liquid: Water
Porous Material: Off
To adjust the water temperature value,
touch the Water Temp button.
A numeric input window appears.
Enter the actual water temperature, then press
Save.
4.5 Density Determination
The Scout can be used to determine an object’s density including solid and liquid.
A density determination kit (not included, buy separately) is designed to be used with Ohaus
Scout STX. However, you may use whatever lab apparatus that suits the requirements for
density measurements. The weigh below hook is recommended to use if the solids weight is
more than 200g.
The DENSITY DETERMINATION Home screen:
4.5.1 Measuring the Density of a Solid Using Water (default)
Page 19
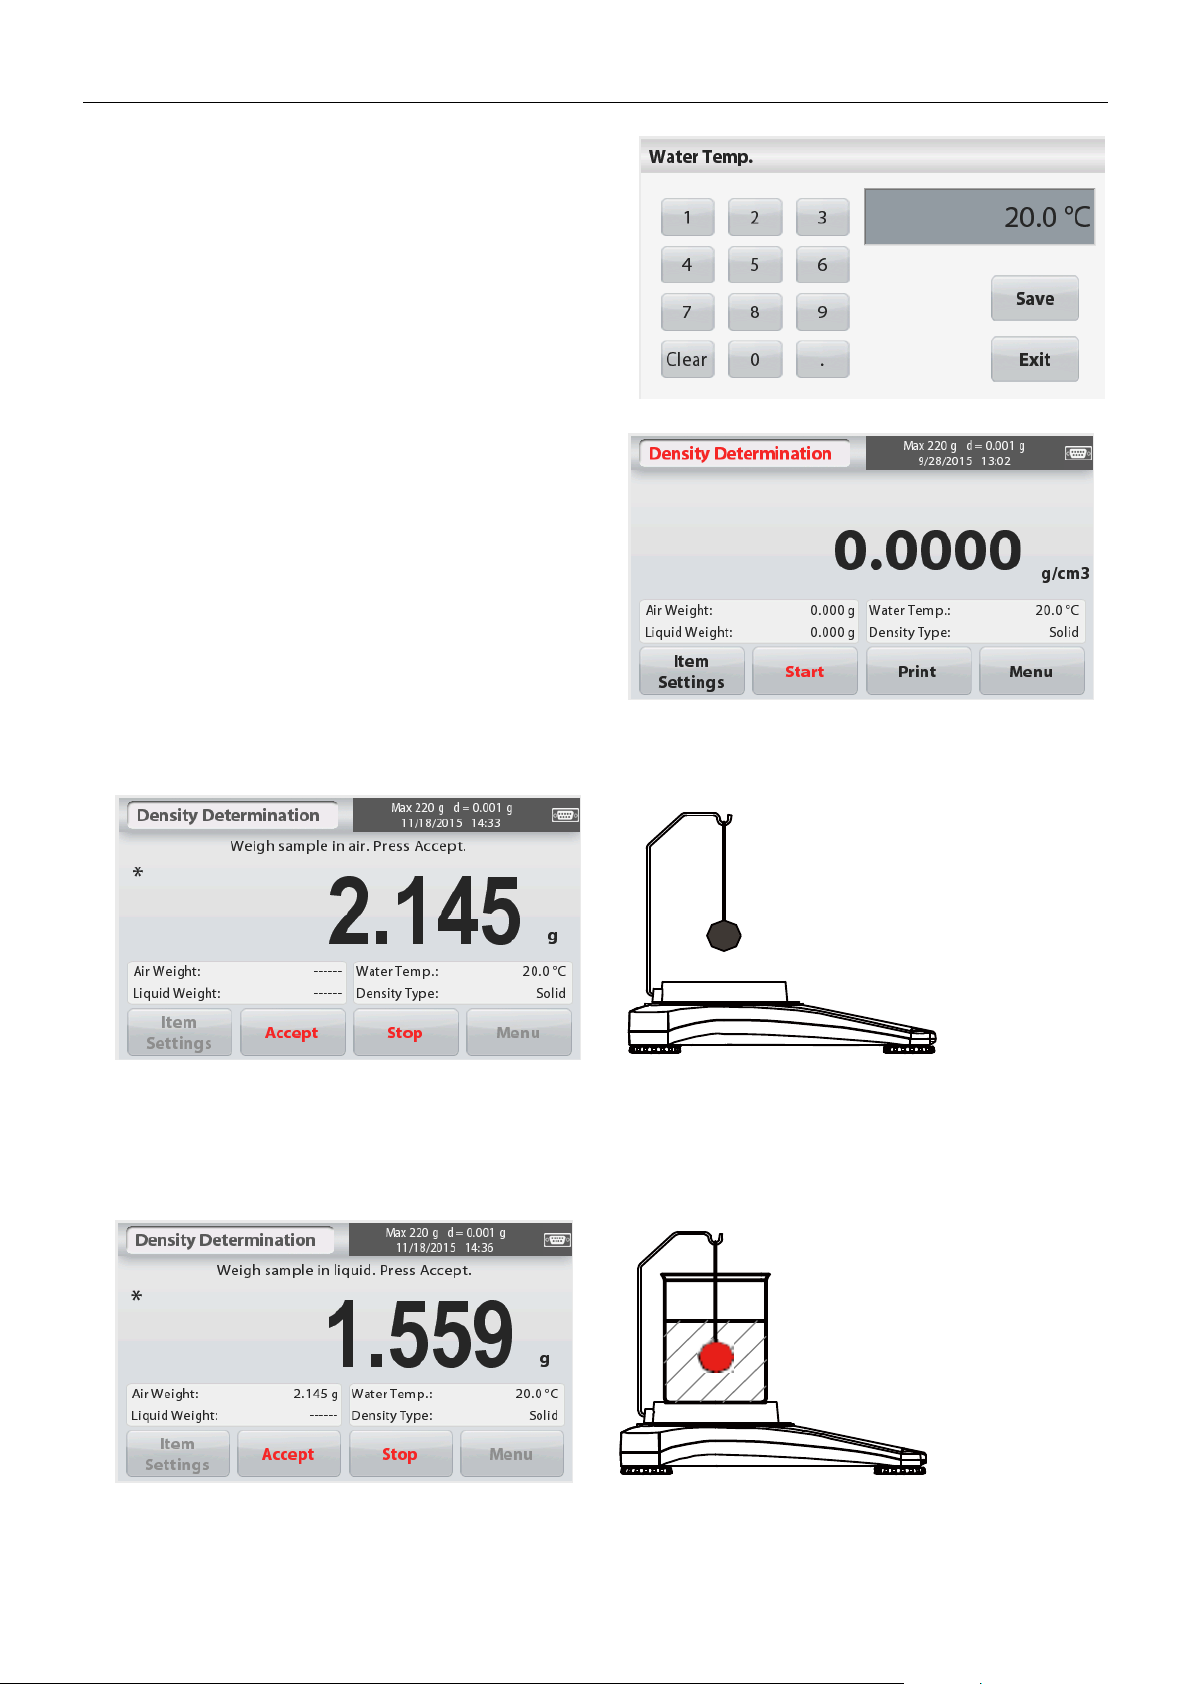
STX EN-15
The balance calculates water density based on
the water temperature value entered (internal
lookup table). Measure the actual water
temperature using a precision thermometer.
Press
Back
to return to the Density
Determination home screen.
To begin the Density Determination process,
press
Start
.
Step 1 of 2 – Weigh the Sample in Air.
Press Start. Follow screen instructions, and then press Accept to store the dry sample weight
(“in air”).
Step 2 of 2 – Weigh the Sample Submerged in the Liquid.
Follow the screen instructions, then press Accept to store the sample weight (submerged in
liquid).
Page 20
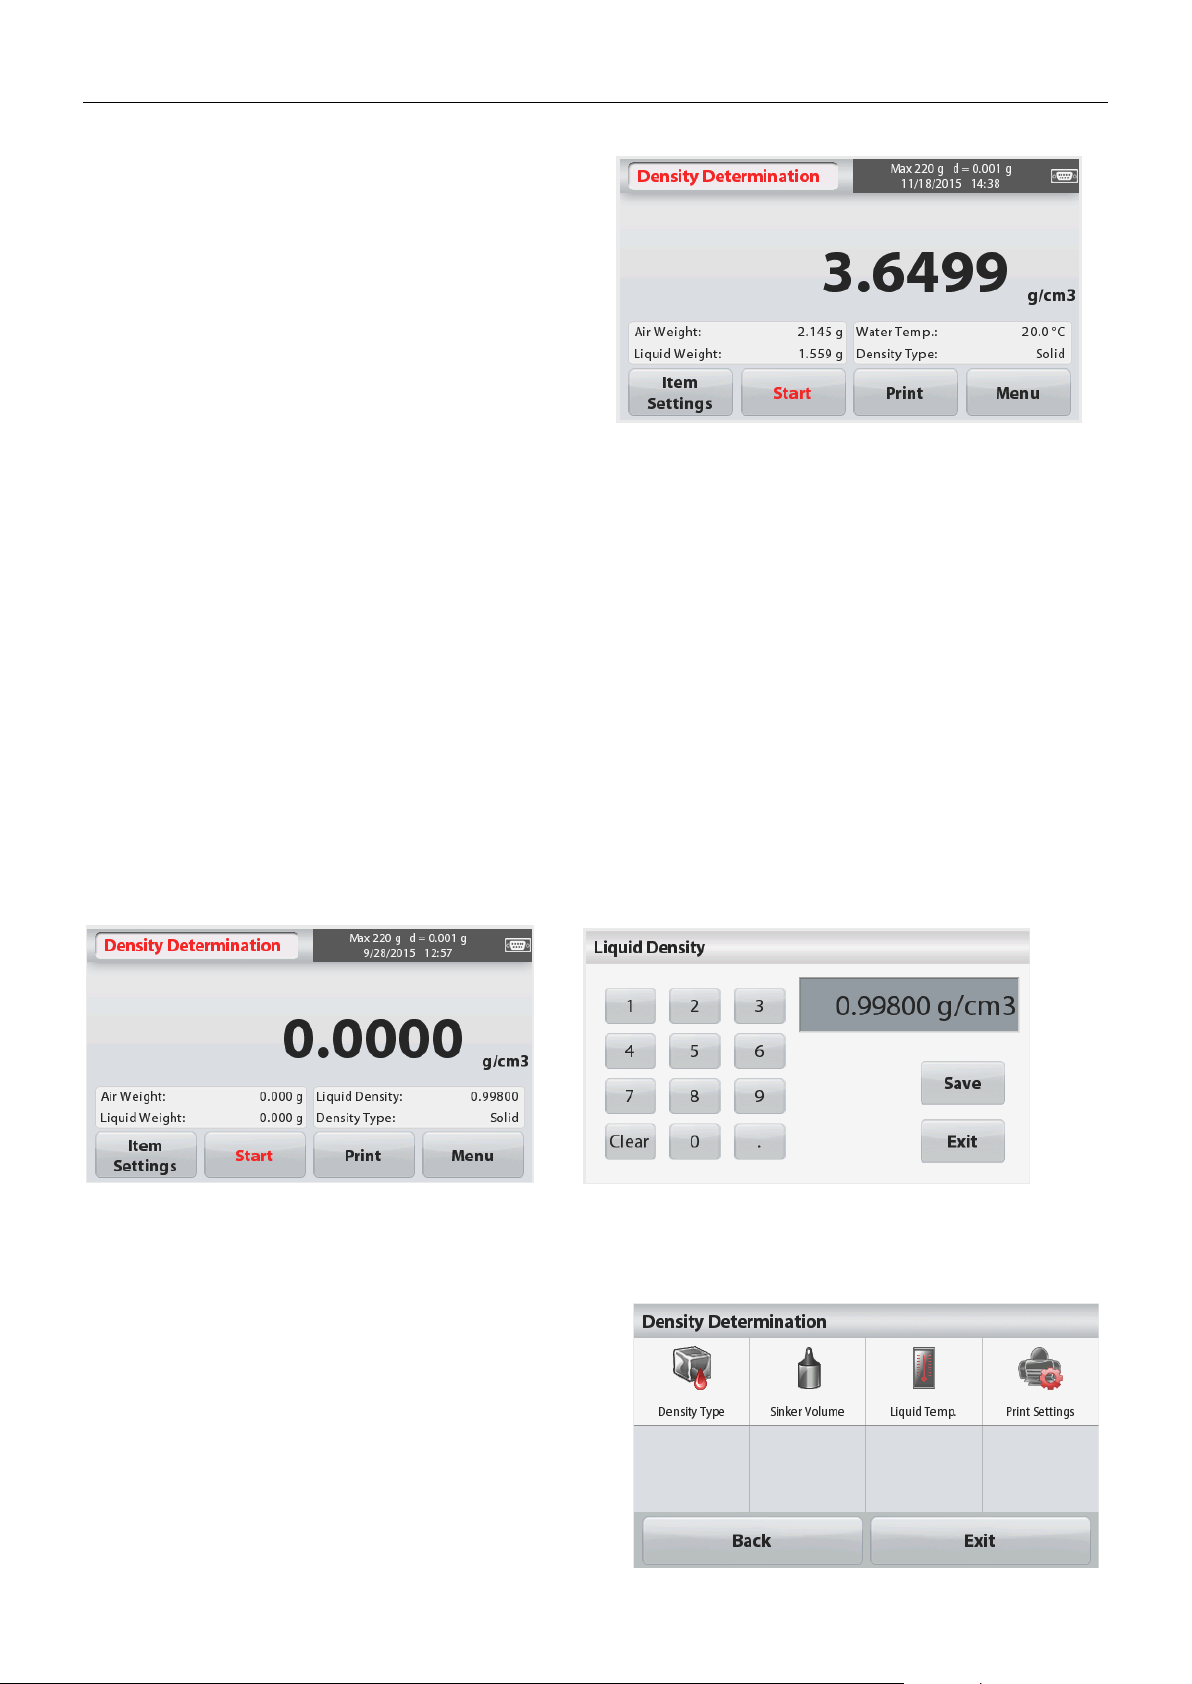
EN-16 STX
Once the necessary weights have been
determined, the density of the sample is
displayed in
g/cm
3
(along with the weight
in air, weight in water) on the Application
screen.
Density Type: Liquid
Note: when the Density Type is set to Liquid, the
Liquid type and Porous material selections are
disabled.
Press
The balance can also be used to measure the Density of a Buoyant Material Using Water.
Follow the same procedure as Solid Material above, except in Density Determination step 2,
push the sample down (requires special tool, not supplied) into the liquid until it is fully
submerged.
to reset all the weight values and restart the process.
Start
4.5.2 Measuring the Density of a Solid Using an Auxiliary Liquid
To enable this feature, enter the Item Settings screen and select the following:
Density Type: Solid
Auxiliary Liquid: Other
Porous Material: Off
Confirm the default values displayed (Liquid Density, etc) are correct.
Begin the Density determination process by pressing Start and following the screen
instructions.
4.5.3 Measuring the Density of a liquid using a Calibrated Sinker (not
supplied)
Enable this feature, enter the Density Item Settings screen and select the following;
Page 21

STX EN-17
Confirm that the default value displayed (sinker
volume) is correct. To edit the default values,
touch
Sinker Volume
.
A numeric input window is displayed.
Key in the desired value, then press Save.
The display returns to the previous screen.
Edit the Liquid temperature if required.
To return to the Density Determination home
screen, touch Back.
Press
Start
to start the process.
Step 1 of 2 – Weigh the Sinker in Air.
Follow the screen instructions, then press
Accept
to store the sinker weight (“in air”).
Step 2 of 2 – Weigh the Sinker Submerged
in the Test Liquid.
Follow the screen instructions, then press
Accept
to store the sinker weight (submerged
in liquid).
Once the necessary weights have been
determined, the density of the Liquid sample is
displayed in g/cm3(along with the weight in air,
weight in water) on the Application screen.
Press
Start
to reset all the weight values and
restart the process.
Page 22
EN-18 STX
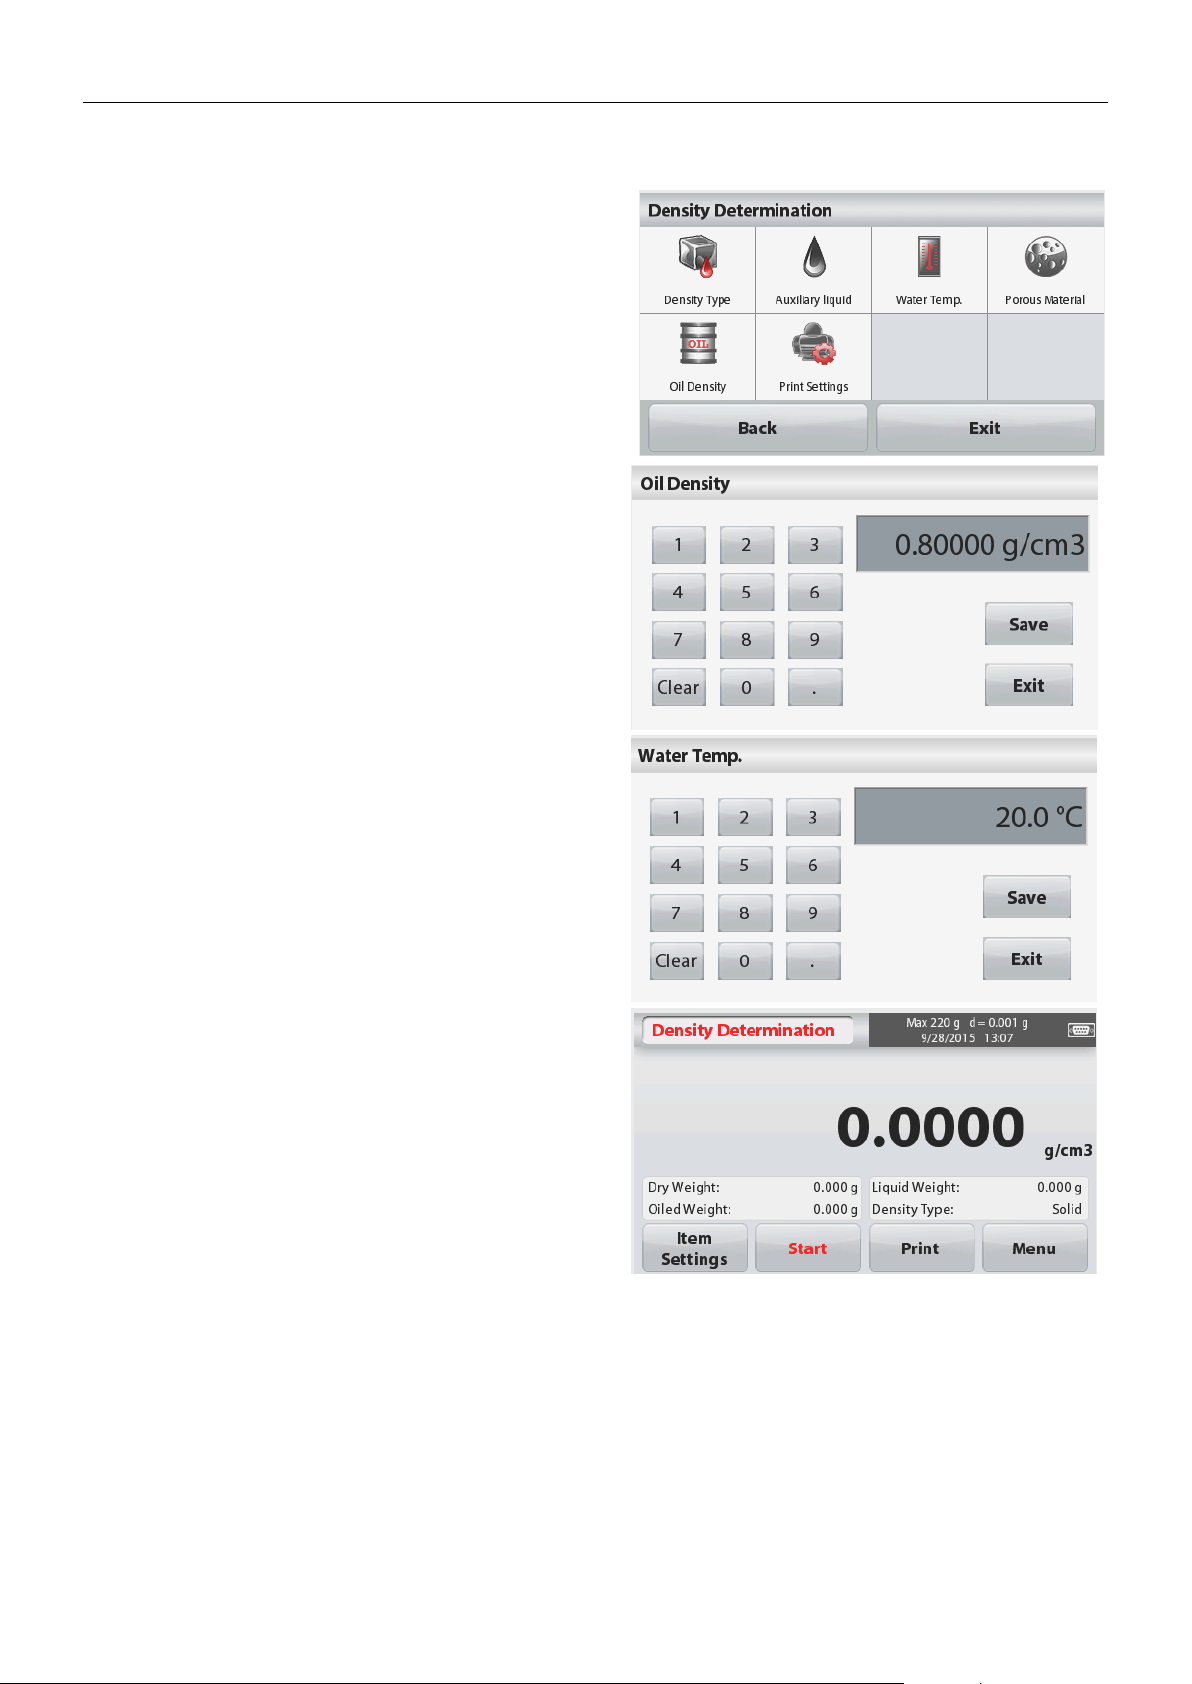
To enable this feature, enter the Item Settings
screen, and select the following:
Density Type: Solid
Auxiliary Liquid: Water
Porous Material: On
To adjust the Water Temperature or Oil
Density values, touch the Water Temp or Oil
Density button.
The balance calculates water density based
on the water temperature value entered (lookup table).
Measure the actual water temperature using a
precision thermometer.
Numeric input windows appear.
Key in the desired value, then press Save.
To return to the Density Determination home
screen, touch Exit.
Press Start to begin density determination.
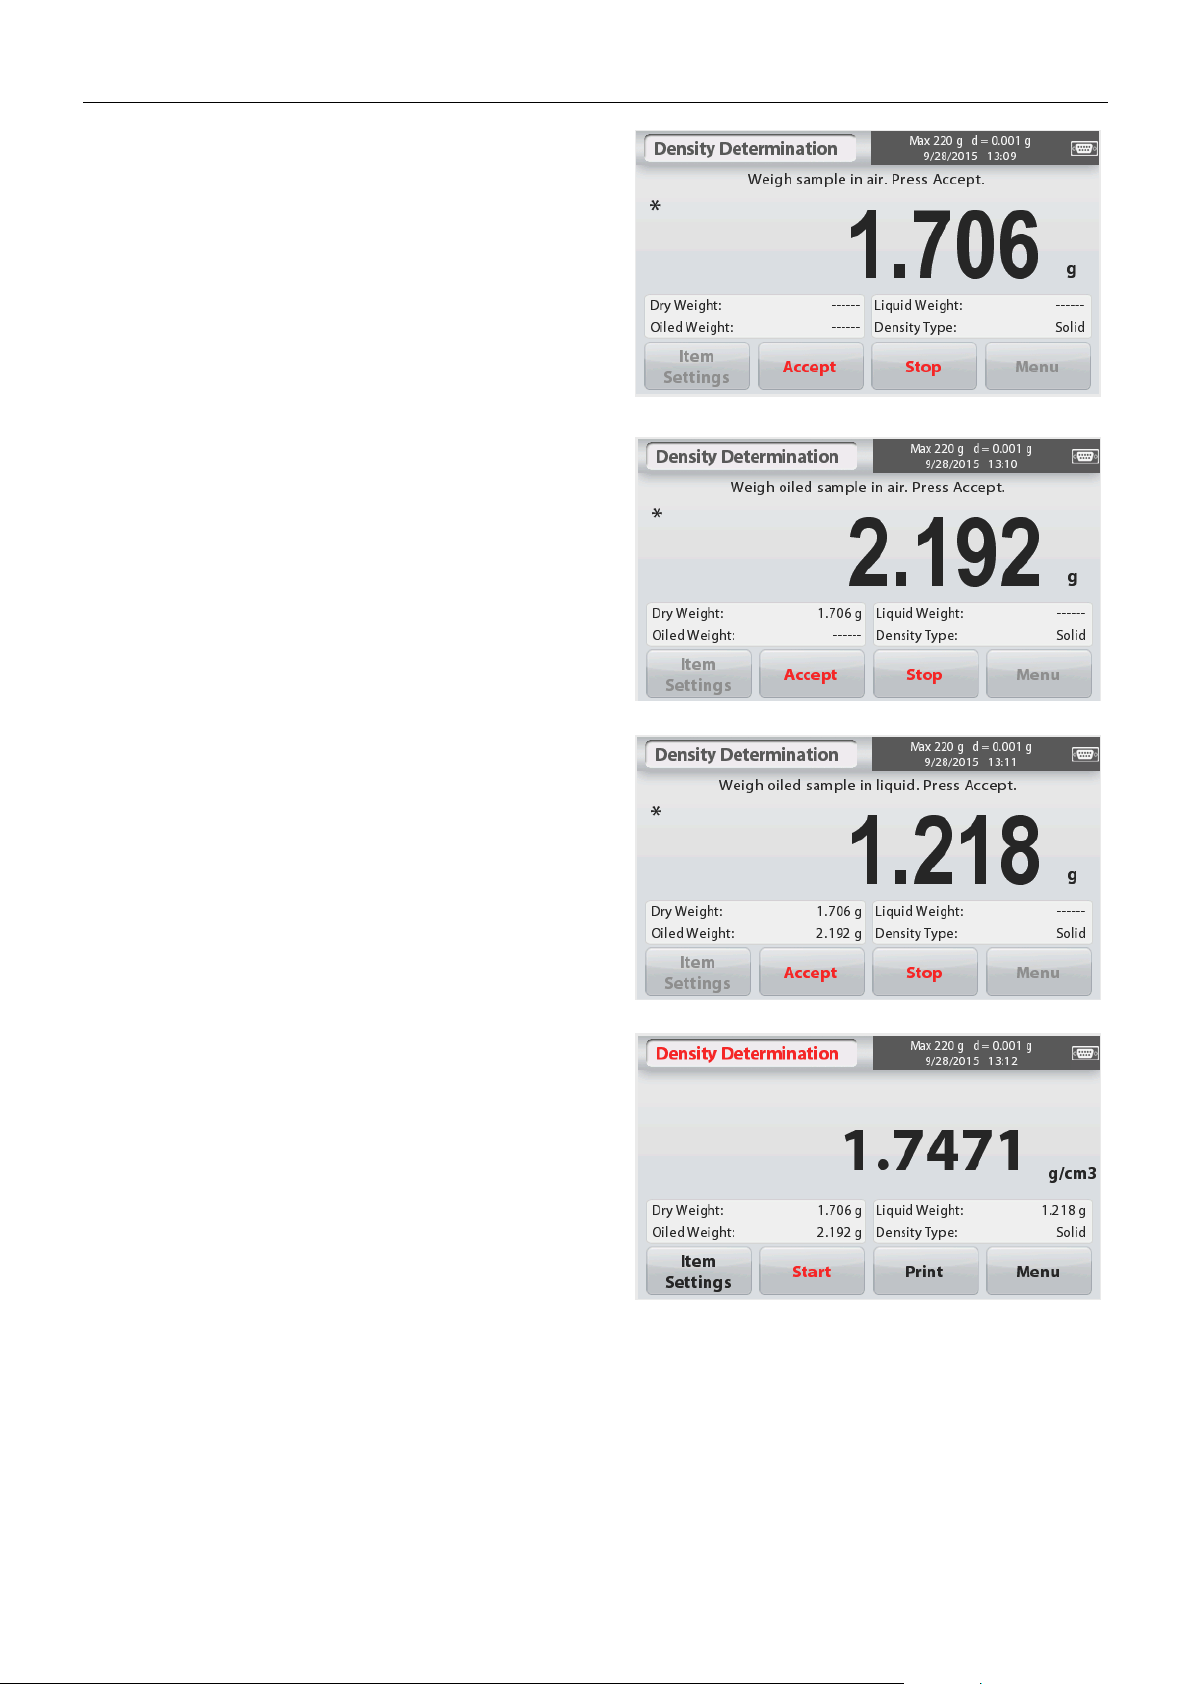
Step 1 of 3 – Weigh the Un-Oiled Sample in
Air.
Follow the screen instructions then press
Accept
to store the dry sample weight (in air).
4.5.4 Measuring the Density of Porous Material Using Oil
Page 23
STX EN-19
Step 2 of 3 – Weigh the Oiled Sample in Air.
Follow the screen instructions then press
Accept
to store the sample weight (oiled).
Step 3 of 3 – Weigh the Oiled Sample
Submerged in Liquid.
Follow the screen instructions then press
Accept
to store the oiled sample weight (submerged
in liquid).
Once the necessary weights have been
determined, the density of the sample is
displayed in g/cm3 (along with the weight in
air, un-oiled and oiled, and weight in water) on
the Application screen
The value stays on the display until Start is
touched.
Press
Start
to reset all the weight values and
restart the process.
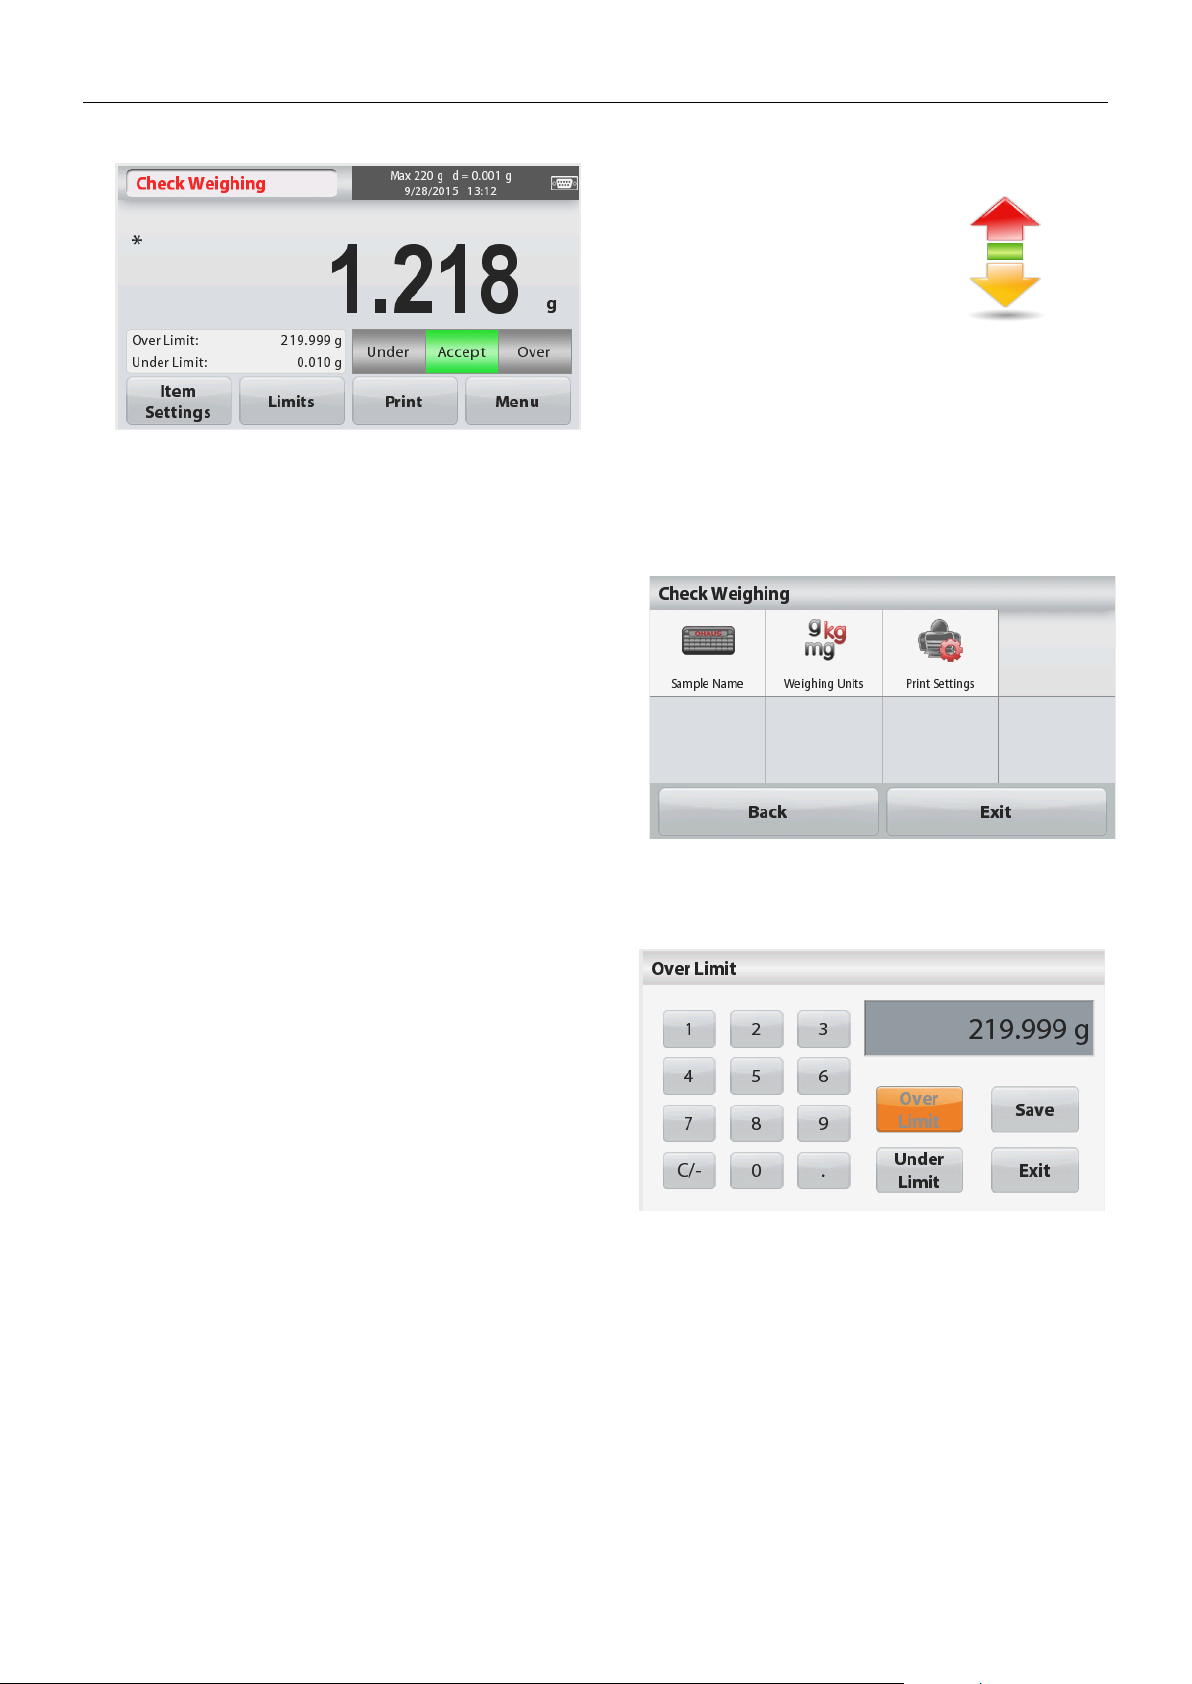
4.6 Check Weighing
Check Weighing is used to compare the weight of a sample against target limits.
1. In the upper left portion of the home screen, select Check Weighing.
2. The default (or last) Check weigh limits are displayed.
3. Place objects on the pan.
4. The Under/Accept/Over status is shown in the progress bar area while the actual weight of
the item is shown on the main Display Line.
Page 24
EN-20 STX
Main Display Line
Reference Fields Application Icon
Application Buttons
Touch the Item Settings button. The Settings
screen appears.
Sample Name: Enter a sample name.
Weighing Units: Select the displayed unit.
Print Settings: To view or adjust the print
settings
Touch the
Limits
button. The limits settings
screen appears.
The check limit values are displayed in the
settings screen.
To set the Over Limit value, touch the Over
Limit button and then enter the desired limit
weight.
To set the Under Limit value, touch the
Under
Limit
button and then enter the desired limit
weight.
When finished, press
Exit
to return to
application home screen.
The CHECK WEIGHING Home screen:
4.6.1 Item Settings
To view or adjust the current settings
4.6.2 Limits
To view or adjust the current settings
Positive Check
Positive check is used to determine when the material added to the balance is within the target
range. In this case the UNDER and OVER limits must be positive values. (The OVER limit must
be greater than the UNDER limit.)
Add material to the balance until it is within the ACCEPT range.
Page 25
STX EN-21
Main Display Line
Reference Fields Application Icon
Application Buttons
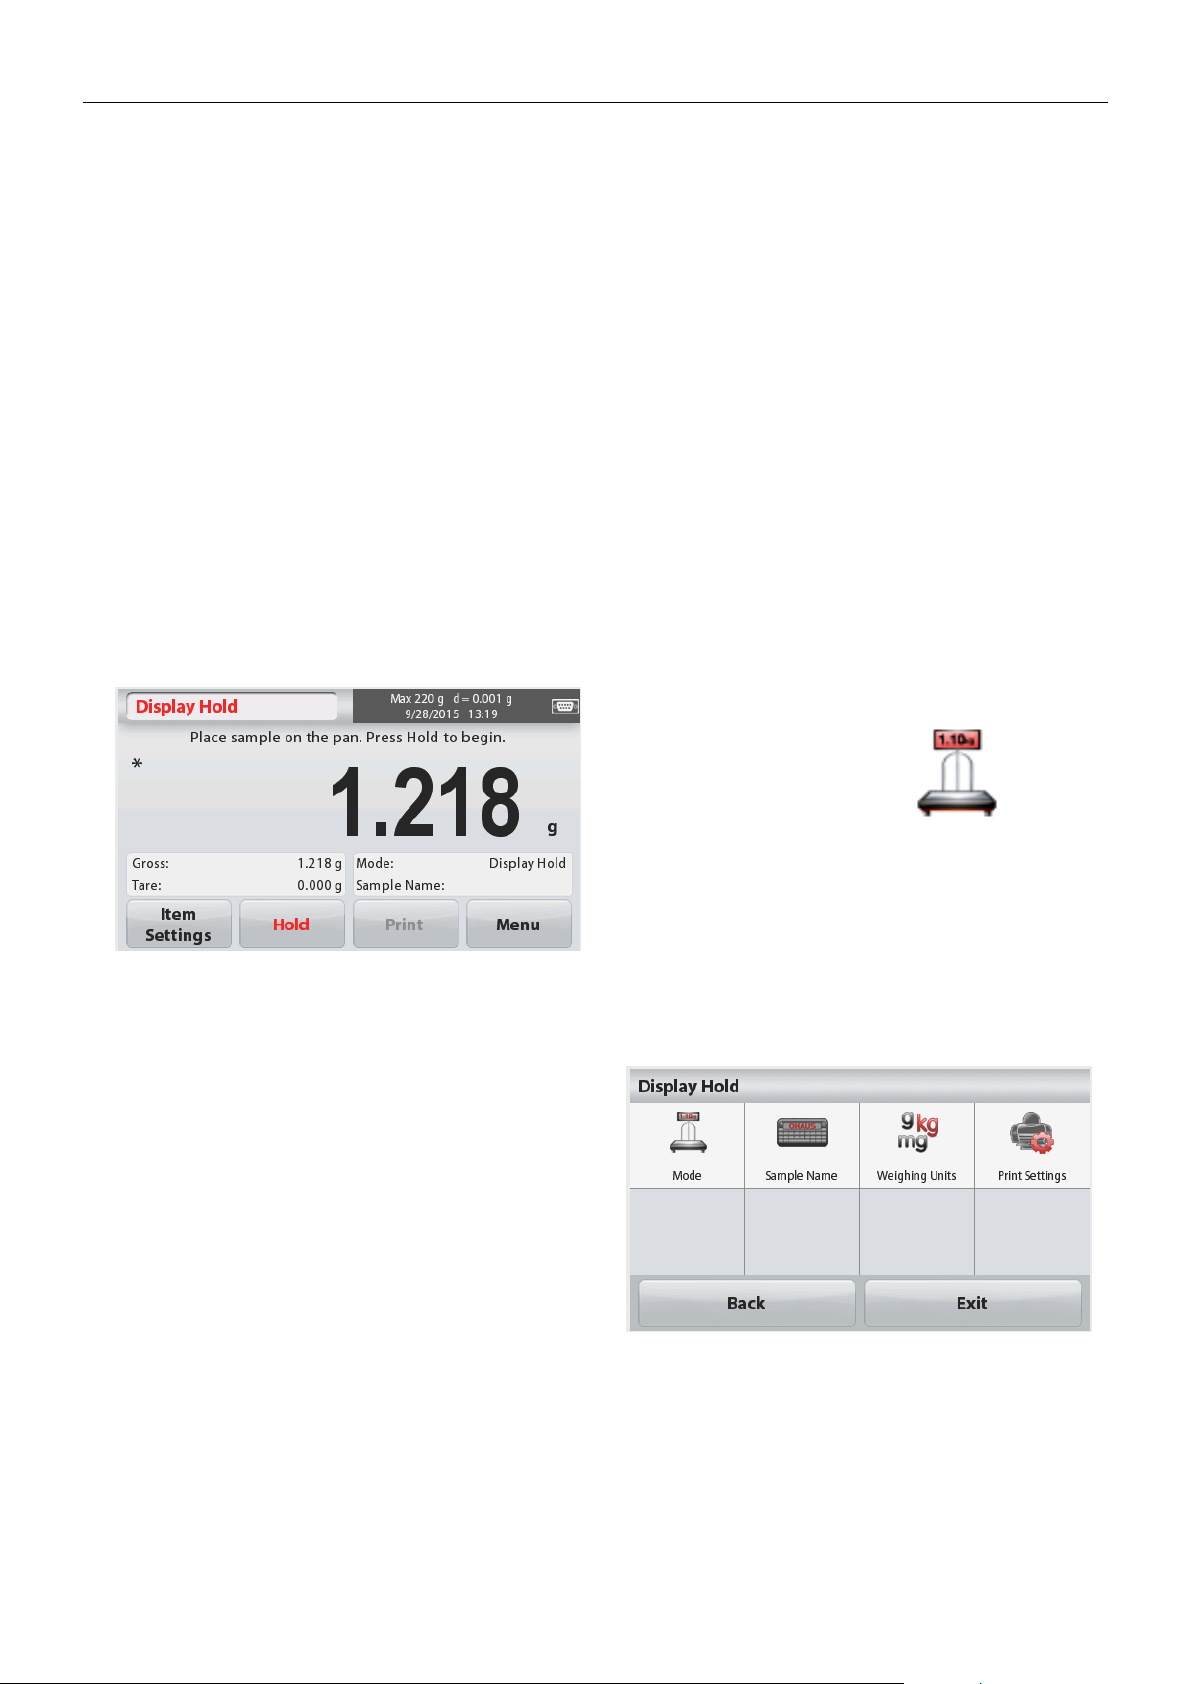
Touch the Item Settings button. The Settings
screen appears.
Mode: Select the mode to either Peak Hold or
Display Hold (default).
Sample Name: Enter a sample name.
Weighing Units: Select the displayed unit.
Print Settings: To view or adjust the print
settings
Negative Check
Negative check is used to determine when the material removed from the balance is within the
target range. In this case the UNDER and OVER limits are both negative values.
(The UNDER limit must be greater than the OVER limit.)
Place the item to be weighed on the balance and press TARE.
Remove a portion of the item until it is within the ACCEPT range.
Zero Check
Zero check is used when comparing subsequent samples to an initial reference sample. In this
case, the UNDER limit must be a negative value and the OVER limit must be a positive value.
Place the reference item on the balance and press TARE. Remove the reference sample and
place the item to be compared on the balance to determine if it is within the ACCEPT range.
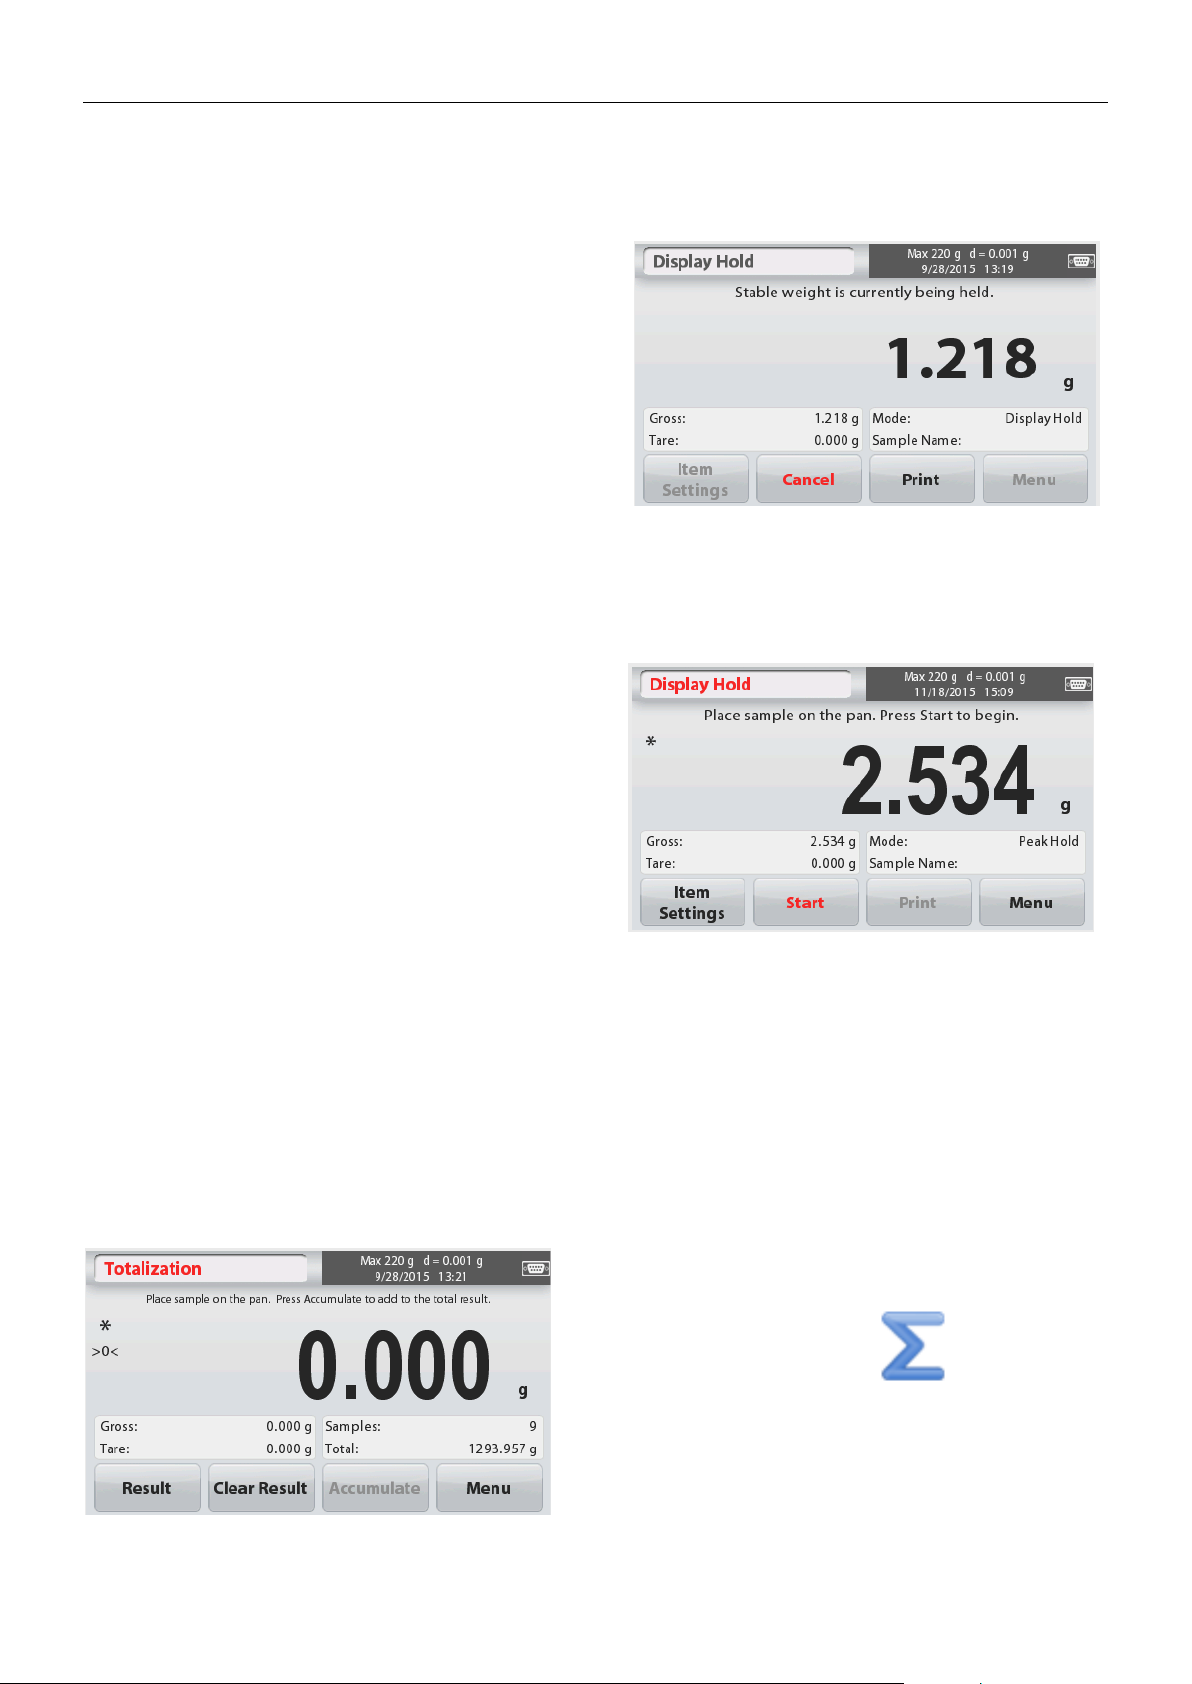
4.7 Display Hold
The Display hold application allows the user to capture and store the highest stable weight in a
series of weight measurements.
In the upper left portion of the home screen, select Display hold.
The DISPLAY HOLD Home screen:
4.7.1 Item Settings
To view or adjust the current settings:
Page 26
EN-22 STX
1. Place item on the pan and press
Hold
.
The capture process starts.
2. The Main Display Line now shows the first
stable weight.
3. Press Clear to remove the hold and return
to Display Hold Home screen.
1. Select Peak Hold Mode in Item settings
(see section 4.7.1).
2. Place item on the pan and press
Start
.
The capture process starts.
3. Continue to weigh items. The highest
stable weight will be held.
4. Press
Stop
to remove the hold and return
to normal operation screen.
1. Touch the upper left portion of the home screen.
Application menu appears. Touch the More icon to
enter next page then select Totalization if it is
present.
2. Place items on the pan to begin.
Main Display Line
Reference Fields Application Icon
Application Buttons
4.7.2 Display Hold Mode
This mode allows the user to hold a stable weight reading.
Follow the screen instructions to begin.
4.7.3 Peak hold mode
This mode allows the user to hold the highest stable weight reading.
Follow the screen instructions to begin.
4.8 Totalization
Totalization measures the cumulative weight of a sequence of items. The cumulative total may
exceed the capacity of the Balance. The maximum number of samples (n) is 99.
The TOTALIZATION Home screen:
Page 27
STX EN-23
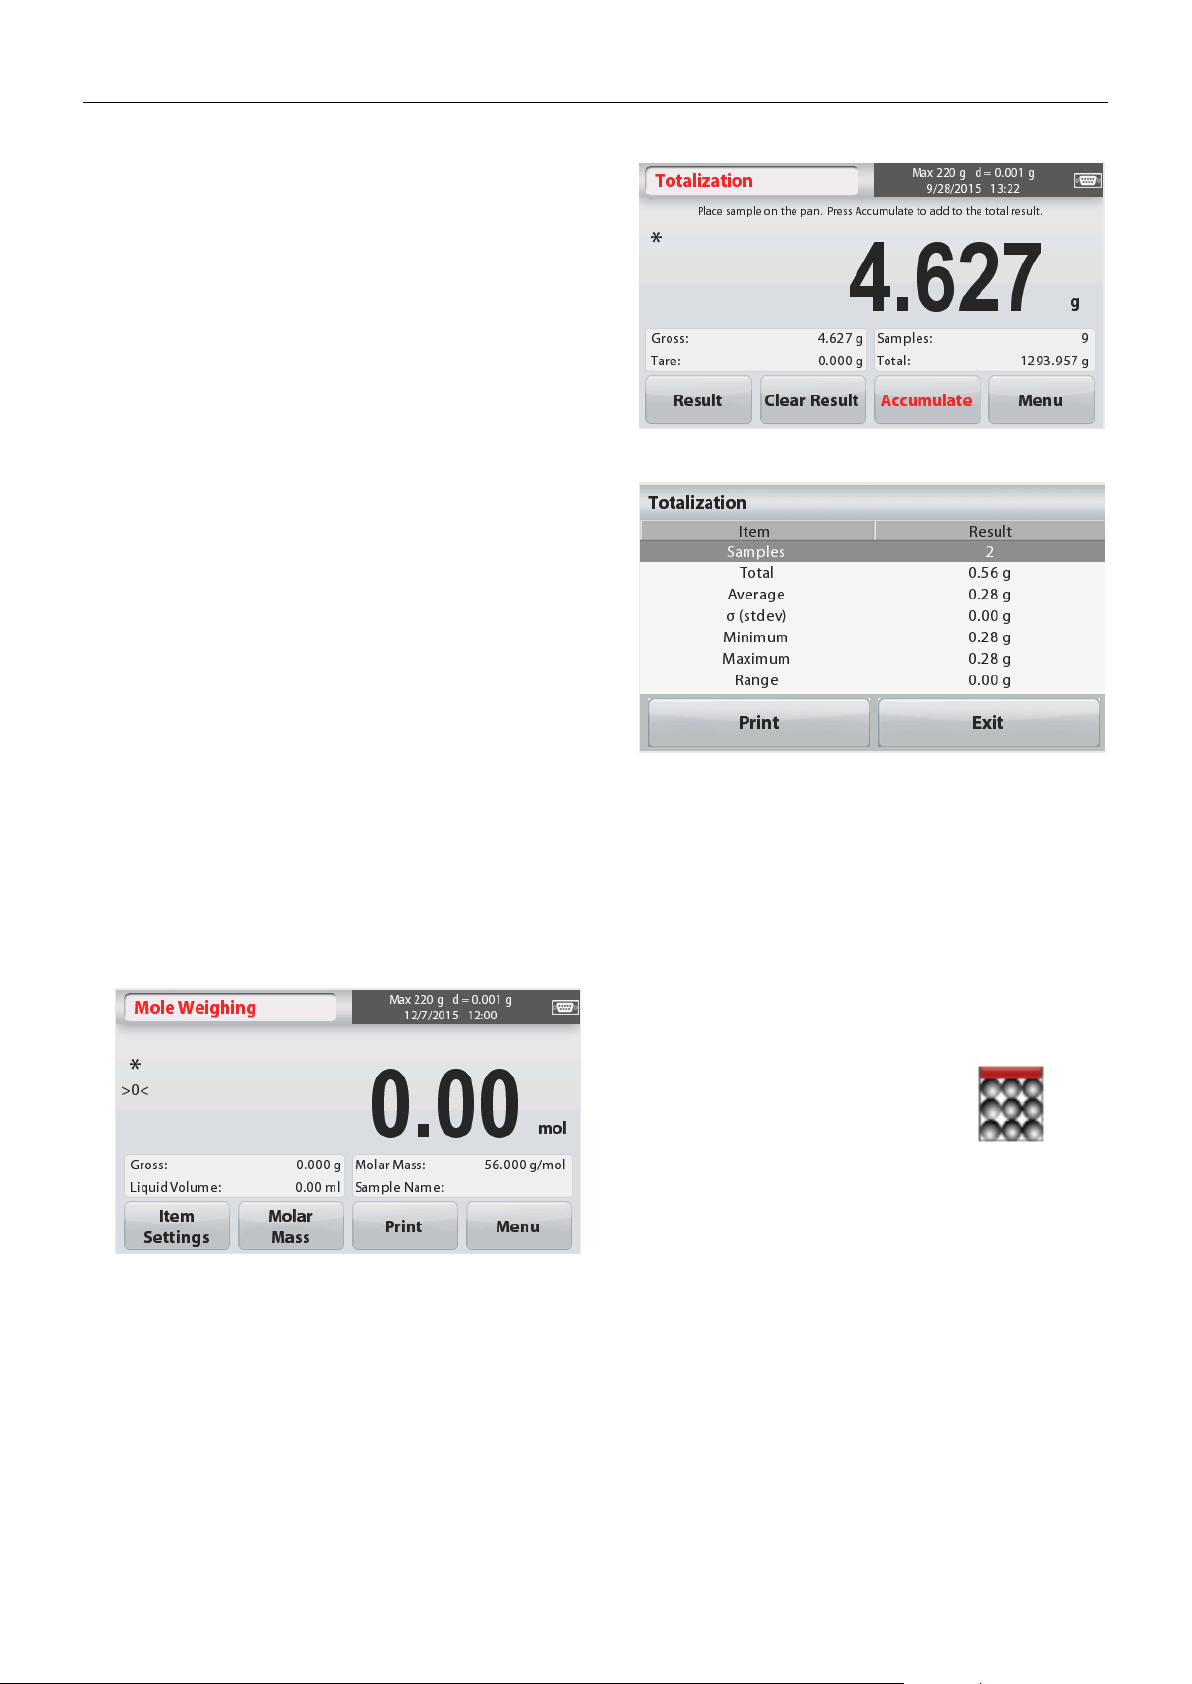
The sample weight is shown on the Main Display
Line.
3. Press Accumulate to add the weight of the
item to the total.
When stable, the new total is shown on the
secondary Display Line.
4. Remove the item from the weighing pan, then
add the next item and continue as above.
5. Press
Result
to view the accumulation results
and if needed print them out or save to a USB
flash drive.
6. When finished, press the
Clear Result
button.
A confirmation window will appear.
Press
Yes
to reset the total weight to zero.
Press No to return to the main screen.
Main Display Line
Reference Fields Application Icon
Application Buttons
4.9.1 Item Settings
To view or adjust the current settings:
Touch the Item Settings button. The Settings
screen appears.
Liquid Volume: Set the Solution volume of
the Liquid if molarity info is required.
Sample Name: Enter a sample name.
4.9 Mole Weighing
Use this application to measure the amount of a sample.
1. In the upper left portion of the home screen, select Mole (if it does not appear, press the
More icon).
2. Press Molar Mass to set the Molar mass of the substance.
3. Place the substance on the pan to begin.
The Mole Weighing Home screen:
Page 28

EN-24 STX
Weighing Units: Select the displayed unit for
gross and tare.
Print Settings:
To view or adjust the print
settings
4.9.2 Enter Molar Mass
Press
Molar Mass
, and use the numeric
keypad to enter the required Molar Mass value
of the substance, and then press
Save
.
4.9.3 Calculate Molarity
The Molarity is only calculated when the Liquid
Volume is set up. If Liquid Volume is set, the
Molarity value can be seen at the bottom right
window block.
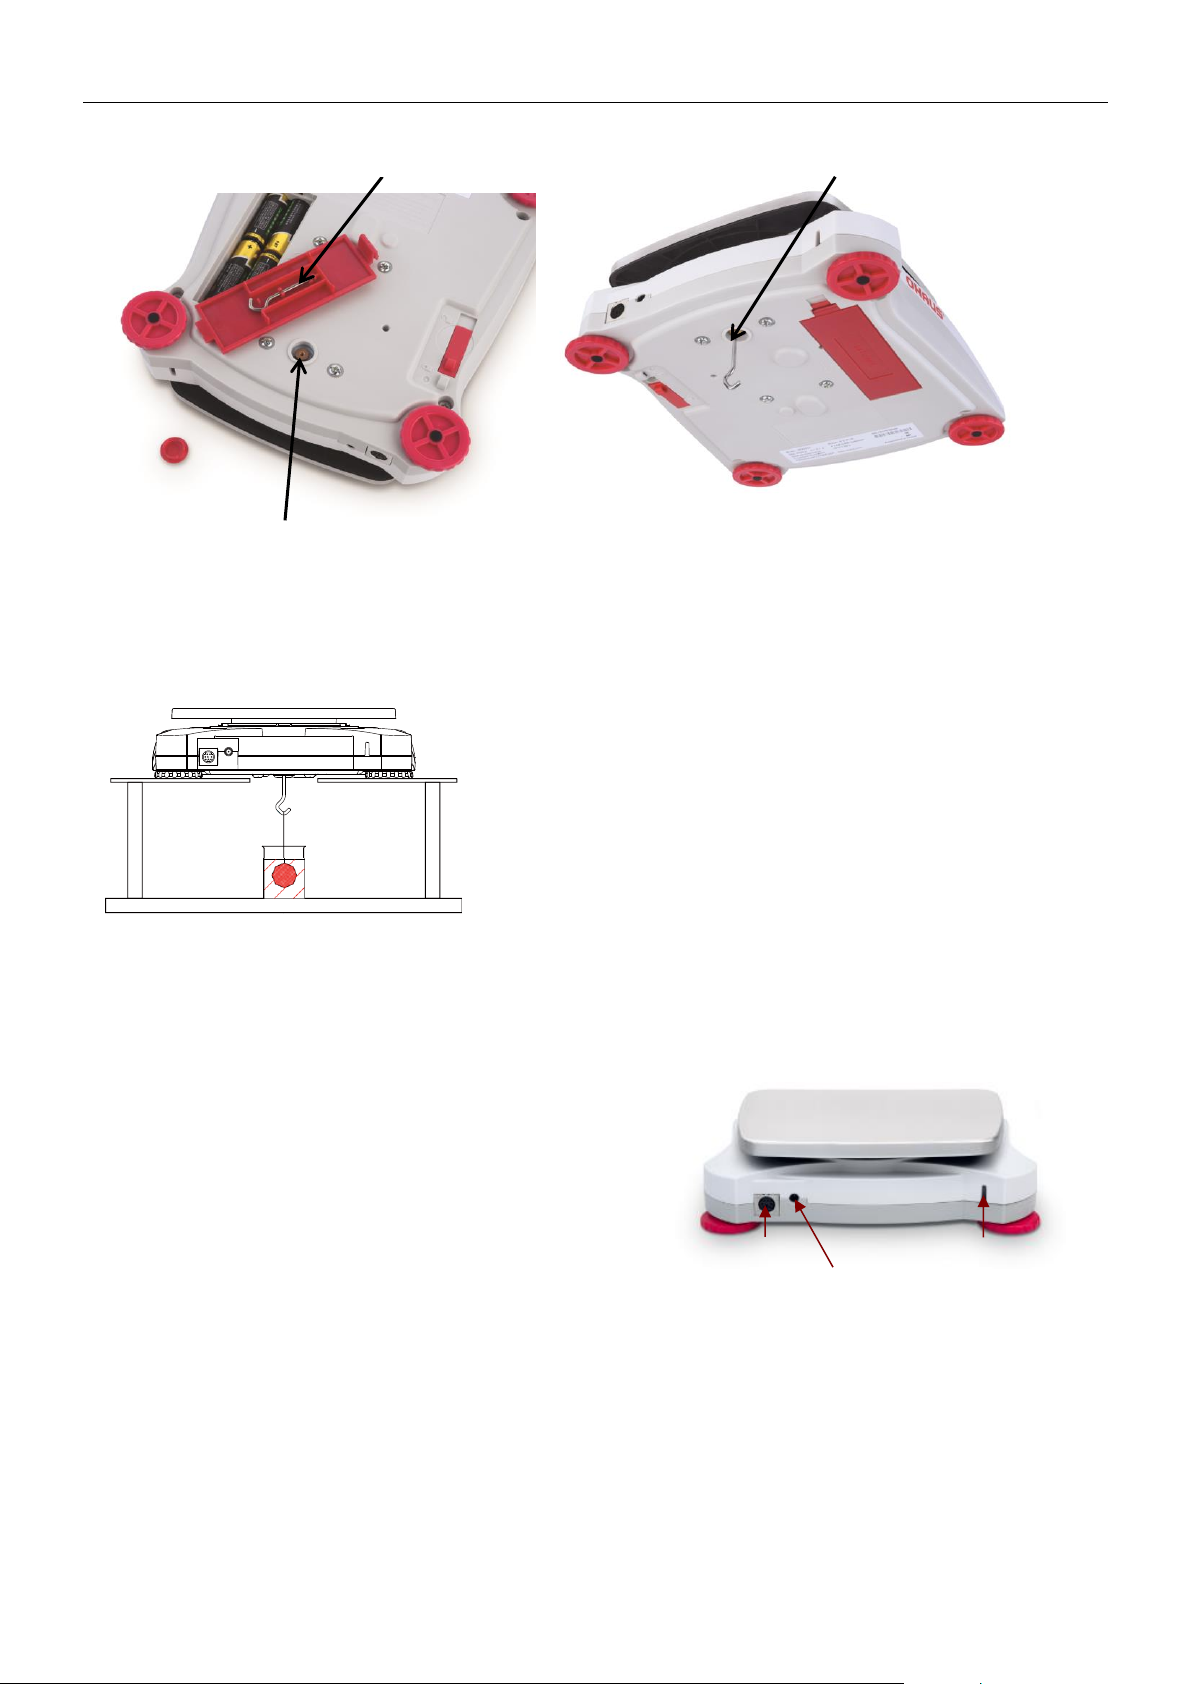
4.10 Additional Features
4.10.1 Weigh Below
The Scout Balance is equipped with a weigh below hook for weighing below the balance.
The weigh below hook is located at the reverse side of the battery cover as shown below.
To use this feature, remove the red protective cover underneath for the weigh below opening.
Attention:
Support (if present), and turn the transportation lock to “locked” position to
prevent damage.
Before turning the balance over, remove the Pan and Pan
Page 29
STX EN-25
Use an optional interface connectivity kit to
connect the balance either to a computer, printer
or OHAUS auxiliary display.
Below Interface kit accessories are available:
RS232, USB Host, USB Device, Ethernet,
Bluetooth®*.
Interface connection on the rear of the
balance:
* Interface kits may vary according to local regulations
Interface connection
AC Adapter Jack
Security Slot
Weigh Below Hook
Weigh Below Hook installed
Weigh below opening
The balance can be supported using lab jacks or any other convenient method. Ensure the
balance is level and secure and that the transportation lock has been released. Power on the
Balance, then use a string or wire to attach items to be weighed.
4.10.2 Connecting the Interface
The Bluetooth® word mark and logos are registered trademarks owned by Bluetooth SIG,
Inc. and any use of such marks by OHAUS is under license.
Page 30

EN-26 STX
Enter the Menu
From any Application screen, Touch Menu.
The Main Menu List appears on the display.
Select the Sub-Menu
Locate to the desired item of the Main Menu
List and touch it. The Sub-Menu appears.
Select the Menu Item
Continue until the desired setting is chosen in
the Menu list. Touch the setting to change it.
The changed setting will be displayed as
highlighted yellow for about 1 second to
confirm the changed value.
5. MENU SETTINGS
5.1 Menu Navigation
All menu navigation is performed by touching the display. To enter the Menu, touch Menu
from any Application Home screen. The Main menu appears, with buttons for Back and Exit.
Continue touching the appropriate list item to navigate to the Menu items or touch a button to
change location.
When the Security Switch is in locked position, the Calibration and Lockout menus will be
hidden.
Security switch:
5.1.1 Changing Settings
To change a menu setting, navigate to that setting using the following steps:
Exit the Menu and Return to the Current Application
After the setting is confirmed, touch Back or Exit to return to the Application.
Page 31

STX EN-27
Span
Calibration
Linearity
Calibration
5.2.1.1 Span Calibration
Span calibration uses two calibration points, one at zero load and the other at
specified full load (span). For detailed calibration mass information please see the
specification tables in section 7.
Before beginning calibration, make sure the menu Security Switch is unlocked.
With the balance turned ON and no load on the pan, touch Span Calibration to
initiate the procedure. Additional calibration values to be used are shown on the
display. The best accuracy is achieved using the mass closest to the full span value.
Note: To change the span calibration point, touch the alternate weight shown on the
display.
Follow the screen instructions and place the specified calibration weight on the
balance when prompted to do so. When complete, the display shows the Span
calibration status and returns to the current application.
5.2.1.2 Linearity Calibration
Linearity calibration uses three calibration points; zero, mid-capacity and full
capacity.
Before beginning calibration, make sure the menu Security Switch is off.
With no load on the balance, press Linearity Calibration from the calibration sub-
menu and follow the screen instructions.
Place the specified calibration weight on the balance and the calibration process
completes.
The display shows status, then returns to the current application.
5.2 Main Menu
The Scout balance Main menu structure is illustrated below.
5.2.1 Calibration
Scout STX balances offer a choice of two calibration methods: Span Calibration and
Linearity Calibration.
Note: Do not disturb the balance during any calibration.
Calibration sub-menu
Page 32

EN-28 STX
Language
User Settings
Filter Level
Auto Zero Tracking
Stability
Auto Tare
Date & Time
Language
Set the language displayed for menus and displayed messages.
There are 9 languages available. The selectable languages are region dependent
as follows:
Method-1:
English / German / French / Spanish / Italian / Russian / Chinese / Japanese / Korean
Method-2:
English / German / French / Spanish / Italian / Polish/ Turkish / Czech / Hungarian
User Settings
Touch Calibrate
Brightness
Auto Dim
Auto Off
Level Assist
Touch Calibrate
Perform a calibration of the displays touch
functionality. Follow the screen instructions.
Brightness
Set the brightness level of the display.
Low = low screen resolution
Medium = normal screen resolution
High = high screen resolution
Auto Dim
Set the time after inactivity the display will dim.
Off, 10 s, 30 s, 60 s
Note: When AC Power is connected, Auto Dim is disabled.
Auto Off
Set the time after inactivity the equipment will automatically turn off.
Off, 1 min, 5 mins, 10 mins
Note: Auto Off only works at gross or when the security switch is
in on position.
5.2.2 Balance Setup
Enter this sub-menu to customize Balance display functionality.
Balance Setup sub-menu
Factory default settings are shown below in bold.
Page 33

STX EN-29
Level Assist
Shows how to level the equipment by adjusting the feet.
Filter level
Set the amount of signal filtering.
LOW = faster stabilization time with less stability.
MEDIUM = normal stabilization time with normal stability.
HIGH = slower stabilization time with more stability.
Auto Zero Tracking
Set the automatic zero tracking functionality.
OFF = disabled.
0.5 Division = display maintains zero up to a drift of 0.5 graduation per second. = display maintains zero up to a drift of 0.5 graduation per second
1 Division = display maintains zero up to a drift of 1 graduation per second.
3 Divisions = display maintains zero up to a drift of 3 graduations per second.
Stability
Set the amount the reading can vary while the stability symbol remains on.
0.5 Division = 0.5 graduation
1 Division = 1 graduation
2 Divisions = 2 graduations
5 Divisions = 5 graduations
Auto Tare
Set the automatic Tare status.
OFF = disabled.
ON = enabled.
“Place container on the pan” will be displayed when an Automatic Tare is about to
start.
A Deactivate button is displayed underneath the text. Press this button to deactivate
the Automatic Tare function
Date and Time
Set the date and time.
Change the format (if desired), then enter the current value.
Date: Touch M/D/Y to reposition the Month, Day and Year.
Time: Touch 24 HRS to change the time format to 12HRS.
Press Save to confirm the new value.
Page 34

EN-30 STX
milligram
gram
kilogram
carat
ounce
ounce troy
pound
pound ounce
pennyweight
grain
newton
Hong Kong
Tael
Singapore
Tael
Taiwan Tael
tical
tola
Custom Unit
1
5.2.3 Weighing Units
Enter this sub-menu to activate the desired units of measure.
Note: Due to national laws, the indicator may not include some of the units of measure listed.
Units Sub-menu
5.2.3.1 Custom Unit
Use the Custom Unit to display weight in an alternative unit of measure. The custom unit is
defined using a conversion factor based on gram unit, where the conversion factor is the
number of custom units per gram expressed in scientific notation (Factor x 10^Exponent).
Name
The Custom Unit’s name can be customized up to 3 characters. It should be different
from existing weighing units.
Factor
Set the conversion factor (0.1 to 1.99) using the numeric keypad.
The default setting is 1.0.
Exponent
Set the factor multiplier.
100 = multiply the factor by 1
101 = multiply the factor by 10
102 = multiply the factor by 100
103 = multiply the factor by 1000
10-3 = divide the factor by 1000
10-2 = divide the factor by 100
10-1 = divide the factor by 10
Least Significant Digit
Set the graduation.
Settings of 0.5, 1, 2, 5, 10, 100 are available.
Note: Custom Unit is locked at Off position when the Security Switch is set to the
locked position.
Page 35

STX EN-31
Export to
USB
Import from
USB
Balance Info
Export to USB*
Export data to USB flash drive. Two types of data can be exported:
- Application Mode Settings = APW, Ref.Weight etc.
- Menu Settings = balance setup functions etc.
Note: The function Save to USB needs to be set to ON to enable data transfer
to USB.
Import from USB*
Import data from USB flash drive
Application Mode Settings = import balance setup and application settings
Menu Settings = import menu settings
Balance Info
Information about the balance: Balance Type, Balance ID, Capacity, Readability
and software version.
RS-232
Print Settings
Baud Rate
Transmission
Handshake
5.2.4 Data Maintenance
Data Maintenance sub-menu:
*Only available when USB Host is connected, and USB flash drive is installed.
5.2.5 Communication
Enter this menu to define external communication methods and to set printing parameters.
Data may be output to either a printer or PC
Factory default settings are shown in bold.
Notes: The RS232, Ethernet, Bluetooth, USB Device and USB Host menu is only available if the
optional Interface is installed.
Communication Sub-menu
Choosing a Settings item brings up yet another menu level:
RS-232 Sub- Menu:
Page 36

EN-32 STX
Baud Rate
Set the baud rate (bits per second).
1200 = 1200 bps
2400 = 2400 bps
4800 = 4800 bps
9600 = 9600 bps
19200 = 19200 bps
38400 = 38400 bps
57600 = 57600 bps
115200 = 115200 bps
Transmission
Set the data bits, stop bit, and parity.
7 EVEN 1 = 7 data bits, even parity
7 ODD 1 = 7 data bits, odd parity
7 NONE 1 = 7 data bits, no parity
8 NONE 1 = 8 data bits, no parity
7 EVEN 2 = 7 data bits, even parity
7 ODD 2 = 7 data bits, odd parity
7 NONE 2 = 7 data bits, no parity
8 NONE 2 = 8 data bits, no parity
Handshake
Set the flow control method.
NONE = no handshaking
Xon-Xoff = XON/XOFF handshaking
Print Output
Auto Print
Print Content
Feed
Format
Alt.
Command
Print Output
Stable Weight Only
Set the printing criteria.
OFF = values are printed immediately, regardless of stability.
ON = values are printed only when the stability criteria are met.
Numeric Value Only
Set the printing criteria
OFF = All data values are printed
ON = Only numeric data values are printed
Note: The selected character can only be used for one command.
Print Settings Sub- Menu:
Page 37

STX EN-33
PwWr.UN
ON STABILITY
Single Header Only
Set the printing criteria.
OFF = Headers will be printed for every print requirement
ON = Headers will be printed once a day
Print Options*
Set the printing criteria.
Printer = Print data to a printer
PC = Print data to a PC
Note: If language selection is set to Chinese, Japanese or Korean, these options
shall match the actual peripheral device.
Auto Print
Set the automatic printing functionality.
OFF = disabled
ON Stability = printing occurs each time the stability criteria are
met.
Interval (seconds) = printing occurs at the defined time interval.
Continuous = printing occurs continuously.
When ON Stability is selected, set the conditions for printing.
Load = Prints when the displayed load is stable.
Load and Zero = Prints when the displayed load or zero reading is
stable.
When INTERVAL is selected, set the time interval using the numeric
keypad.
Settings of 1 to 3600 seconds are available.
Print Content
Enter this sub-menu to define the content of the printed data.
See details below:
Page 38

EN-34 STX
Selection
Set the status.
Select All = all options will be turned on
Deselect All = all options will be
turned off
Header
Set the status.
OFF = the user defined header is not
printed.
ON = the user defined header is
printed.
USER DEFINED TEXT
USER DEFINED TEXT
USER DEFINED TEXT
USER DEFINED TEXT
USER DEFINED TEXT
Note: The header information must be
defined using the H x “text” interface
command.
(See Section 5.1.)
Date and Time
Set the status.
OFF = the time and date are not
printed.
ON = the time and date are printed.
01/31/10 12:30 PM
Balance ID
Set the status.
OFF = the Balance ID value is not
printed.
ON = the Balance ID value is
printed.
Balance Id:
XXXXXXX
Balance Name
Set the status.
OFF = the Balance Name is not
printed.
ON = the Balance Name is
printed.
Balance Name: XXXXXXX
User Name
Set the status.
Sample Name
Set the status.
OFF = the Sample Name is not
printed.
ON = the Sample Name is printed.
Result
Set the status.
OFF = the displayed reading is not
printed.
ON = the displayed reading is
printed.
Gross
Set the status.
OFF = the gross weight is not printed.
ON = the gross weight is
printed.
12.000 kg
Net
Set the status.
OFF = the net weight is not
printed.
ON = the net weight is printed.
Tare
Set the status.
OFF = the tare weight is not
printed.
ON = the tare weight is printed.
Information
Set the status.
OFF = the reference info is not
printed.
ON = the reference info is printed.
Note: See below for more clarification
10.000 kg NET
Page 39

STX EN-35
OFF = the User Name is not
printed.
ON = the User Name is printed.
User Name:
XXXXXXXXXXXX
Project Name
Set the status.
OFF = the Project Name is not
printed.
ON = the Project Name is
printed.
Application Name
Set the status.
OFF = the Application Name is not
printed.
ON = the Application Name is
printed.
Project Name:
XXXXXXXXXXXX
Application Name:
XXXXXXXXXXXX
Signature Line
Set the status.
OFF = the Signature Line is not
printed.
ON = the Signature Line is printed.
Signature:__________________
Verified by: _______________
Note: “Verified by” is to be signed by an
officer from local metrological regulation
office to assert that the weighing and/or
calibration results are in accordance with
regulations.
Footer
Set the status.
OFF = the user defined footer is not
printed.
ON = the user defined footer is
printed.
USER DEFINED TEXT
USER DEFINED TEXT
USER DEFINED TEXT
USER DEFINED TEXT
USER DEFINED TEXT
Feed
Set the paper feed.
1 LINE = move the paper up one line after printing.
4 LINE = move the paper up four lines after printing.
Format
Set the printing format.
SINGLE LINE = a single line printout is generated. A TAB
delimiter is added between each data output.
MULTIPLE LINES = a multiple line printout is generated. A CRLF is
added after each data output.
Alt Command (Alternate Print Command)
Alternate Print Command
Set the alternate command character for Print.
Settings of A to Z are available. The default setting is empy, except
P.T or Z.
Page 40

EN-36 STX
Alternate Tare Command
Set the alternate command character for Tare.
Settings of A to Z are available. The default setting is empty, except
P&Z.
Alternate Zero Command
Set the alternate command character for Zero.
Settings of A to Z are available. The default setting is empty, except
P&T.
Print Settings Menu:
Note: If security switch is set to locked, the print Output-Stable setting is not reset.
A TAB delimiter is added between each data output.
Header
Balance Name
User Name
Project Name
Footer
Header
Enables the printing of GLP headings. There are up to 5 headings
available.
Alphanumeric settings up to 25 characters are
available for each Header setting. .
Balance Name
Set the balance identification.
Alphanumeric settings up to 25 characters are available.
The default setting is blank.
User Name
Set the user identification.
Alphanumeric settings up to 25 characters are available.
The default setting is Scout.
Project Name
Enter this menu to set the Project identification.
Alphanumeric settings up to 25 characters are available.
The default setting is blank.
Footer
Enables the printing of GLP headings. There are 2 headings available.
Alphanumeric settings up to 25 characters are
available for each Header setting. .
5.2.6 GLP and GMP Data
Enter this menu to set the Good laboratory Practices (GLP) data.
GLP Data Sub-menu
Page 41

STX EN-37
Calibration
Balance Setup
Weighing Units
Data Maintenance
Communication
GLP and GMP Data
Factory Reset
5.2.7 Factory Reset
Use this sub-menu to reset the menus to their Factory default settings.
Reset All = reset all menus to their factory default setting.
Exit = return to main screen without resetting any menus.
Note: Calibration data is not affected.
5.2.8 Lockout
Use this menu to lock/unlock certain menus to prevent unauthorized changes to menu
settings. Once locked, a small lock will appear on the menu icon and user will not be
able to enter that menu.
Lockout Sub-menu
Click on a menu and choose.
OFF = the sub-menu is not locked.
ON = the sub-menu is locked.
Page 42

EN-38 STX
WARNING: Electrical Shock Hazard. Disconnect the Scout Balance
from the power supply before cleaning.
Make sure that no liquid enters the interior of the Terminal or Base.
Symptom / Display
Possible Cause
Remedy
Balance will not turn on
No power to Balance
Verify connection and voltage
Poor accuracy
Improper calibration
Unstable environment
Perform calibration
Move balance to suitable location
Cannot calibrate
Security switch set to on
Unstable environment
Incorrect calibration masses
Turn security switch off
Move balance to suitable location
Use correct calibration masses
Cannot change menu
settings
Security switch set to on
Turn security switch off
Low Reference weight
Reference weight too small
The weight on the pan is too
small to define a valid reference
weight.
Increase sample size
Invalid Piece Weight
Average piece weight is too
small
Increase average piece weight
Operation Timeout
Weight reading is not stable
Move balance to suitable location
------
Busy (tare, zero, printing)
Wait until completion
6. MAINTENANCE
6.1 Calibration
Periodically verify calibration by placing an accurate weight on the balance and viewing the
result. If calibration is required, perform a Balance internal calibration.
6.2 Cleaning
Attention: Do not use solvents, harsh chemicals, ammonia or abrasive cleaning agents.
Clean the Balance at regular intervals.
Housing surfaces may be cleaned with a lint-free cloth slightly dampened with water or a mild
cleaning agent.
6.3 Troubleshooting
TABLE 6-1. TROUBLESHOOTING
6.4 Service Information
If the troubleshooting section does not resolve or describe your problem, contact your
authorized OHAUS service agent. For service assistance or technical support in the United
States call toll-free 1-800-672-7722 ext. 7852 between 8:00 AM and 5:00 PM EST. An OHAUS
product service specialist will be available to provide assistance. Outside the USA, please visit
our web site, www.ohaus.com to locate the OHAUS office nearest you.
Page 43

STX EN-39
Model
STX123
STX223
STX222
STX422
STX622
STX1202
Capacity (g)
120
220
220
420
620
1200
Readability (g)
0.001
0.001
0.01
0.01
0.01
0.01
Repeatability (Std. Dev.) (g)
0.002
0.002
0.01
0.01
0.01
0.02
Linearity (g)
0.003
0.003
0.01
0.01
0.02
0.03
Span Calibration Mass*
100 g
200 g
200 g
200 g
300 g
1 kg
Linearity Calibration Mass
50, 100 g
100, 200 g
100, 200 g
200, 400 g
300, 600 g
500 g, 1 kg
Stabilization Time (s)
1.5
1
1.5
Construction
ABS plastic housing with 304 stainless steel (SST) pan
Draftshield
Yes
No
Calibration
User-selectable external span or linearity calibration / Digital with external weight
Tare Range
Full Capacity by subtraction
Weighing Units**
mg, g, kg, ct, N, oz, ozt, dwt, lb, lb:oz, grn,Tael (HongKong),Tael (Singapore),Tael (Taiwan),
tical, tola, Customer unit 1
Application Modes
Weighing, Parts Counting, Percent Weighing, Check Weighing, Animal / Dynamic Weighing,
Totalization, Density Determination, Display Hold, Mole Weighing
Typical Battery Life
7 hours
Specified Temperature Range
10° C (50°F) to 40° C (104° F) at 10% to 80% relative humidity, non-condensing
Storage Conditions
-20° C (-4°F) to 55° C (131° F) at 10% to 90% relative humidity, non-condensing
Communication
RS232, USB Host, USB Device, Ethernet or Bluetooth*** (all available as accessory)
Display Type
Full-Color Touchscreen WQVGA Graphic LCD
Display Size
4.3 in / 109 mm (diagonal)
Pan Size (W x D)
Ø 93 mm / 3.7 in
Ø 120 mm / 4.7 in
170 x 140 mm /
6.7 x 5.5 in
Balance Dimensions
(W x D x H)
202 x 222 x 103 mm /
8 x 8.7 x 4.1 in
202 x 224 x 54 mm / 8 x 8.8 x 2.1 in
Shipping Dimensions
(W x D x H)
300 x 250 x 129mm / 11.8 x 9.8 x 5.1 in
Net Weight
1 kg / 2.2 lb
Shipping Weight
1.6 kg / 3.5 lb
7. TECHNICAL DATA
7.1 Specifications
Ambient conditions
Indoor use only
Operating temperature: +5 °C to +40 °C
Relative humidity: 10% to 80% at 31 °C, decreasing linearly to 50 % at 40 °C, noncondensing
Altitude: Up to 2000 m
Power: AC power adaptor input 100-240 V 50/60 Hz and output 5 V DC 1 A, or 4 AA
batteries
EMC: See Declaration of Conformity
Pollution degree: 2
Installation category: II
Main supply voltage fluctuations: up to ± 10% of the nominal voltage
TABLE 7-1. SPECIFICATIONS
Notes:
* Calibration weights are included with models up to 620g capacity.
** Availability is dependent on model and region.
*** Bluetooth kit is only available in certain regions according to the local regulations
Page 44

EN-40 STX
Model
STX123
STX223
STX222
STX422
STX622
STX1202
Gram (g)
120 x 0.001
220 x 0.001
220 x 0.01
420 x 0.01
620 x 0.01
1200 x 0.01
Milligram (mg)
120000 x 1
220000 x 1
/ / /
/
Kilogram (kg)
/ / / / /
1.2 x 0.00001
Carat (ct)
600 x 0.005
1100 x 0.005
1100 x 0.05
2100 x 0.05
3100 x 0.05
6000 x 0.05
Newton (N)
1.17679 x
0.00001
2.15744 x
0.00001
2.1574 x 0.0001
4.1188 x 0.0001
6.0801 x 0.0001
11.7679 x
0.0001
Ounce (oz)
4.23290 x
0.00005
7.76030 x
0.00005
7.7600 x 0.0005
14.8150 x
0.0005
21.8700 x
0.0005
42.3290 x
0.0005
Ounce Troy (ozt)
3.85810 x
0.00005
7.07320 x
0.00005
7.0730 x 0.0005
13.5030 x
0.0005
19.9335 x
0.0005
38.5810 x
0.0005
Pennyweight (dwt)
77.162 x 0.001
141.463 x 0.001
141.46 x 0.01
270.07 x 0.01
398.67 x 0.01
771.62 x 0.01
Pound (lb) / / / /
1.36690 x
0.00005
2.64555 x
0.00005
Pound:Ounce
(lb:oz)
/ / /
/
1lb:5.8700oz x
0.0005oz
2lb:10.3290oz x
0.0005oz
Grain (grn)
1851.88 x 0.02
3395.12 x 0.02
3395.0 x 0.2
6481.6 x 0.2
9568.0 x 0.2
18518.8 x 0.2
Model
STX2202
STX421
STX621
STX2201
STX6201
STX8200
Capacity (g)
2200
420
620
2200
6200
8200
Readability (g)
0.01
0.1
0.1
0.1
0.1
1
Repeatability (Std. Dev.) (g)
0.02
0.1
0.1
0.1
0.1
1
Linearity (g)
0.03
0.1
0.1
0.1
0.2
1
Span Calibration Mass*
2 kg
200 g
300 g
2 kg
5 kg
8 kg
Linearity Calibration Mass
1 kg, 2 kg
200, 400 g
300, 600 g
1 kg, 2 kg
3 kg, 6 kg
4 kg, 8 kg
Stabilization Time (s)
1.5
1
Construction
ABS plastic housing with 304 stainless steel (SST) pan
Draftshield
Yes
No
Calibration
User-selectable external span or linearity calibration / Digital with external weight
Tare Range
Full Capacity by subtraction
Weighing Units**
mg, g, kg, ct, N, oz, ozt, dwt, lb, lb:oz, grn,Tael (HongKong),Tael (Singapore),Tael
(Taiwan), tical, tola, Customer unit 1
Application Modes
Weighing, Parts Counting, Percent Weighing, Check Weighing, Animal / Dynamic
Weighing, Totalization, Density Determination, Display Hold, Mole Weighing
Typical Battery Life
7 hours
Specified Temperature Range
10° C (50°F) to 40° C (104° F) at 10% to 80% relative humidity, non-condensing
Storage Conditions
-20° C (-4°F) to 55° C (131°F) at 10% to 90% relative humidity, non-condensing
Communication
RS232, USB Host, USB Device, Ethernet or Bluetooth*** (all available as accessory)
Display Type
Full-Color Touchscreen WQVGA Graphic LCD
Display Size
4.3 in / 109 mm (diagonal)
Pan Size (W x D)
170 x 140 mm
/
6.7 x 5.5 in
Ø 120 mm /
4.7 in
170 x 140 mm / 6.7 x 5.5 in
Balance Dimensions
(W x D x H)
202 x 224 x 54 mm / 8 x 8.8 x 2.1 in
Shipping Dimensions
(W x D x H)
300 x 250 x 129mm / 11.8 x 9.8 x 5.1 in
Net Weight
1 kg / 2.2 lb
Shipping Weight
1.6 kg / 3.5 lb
TABLE 7-2. SPECIFICATIONS (Continued)
Capacity x Readability:
TABLE 7-3. SPECIFICATIONS (Continued)
Page 45

STX EN-41
Model
STX2202
STX421
STX621
STX2201
STX6201
STX8200
Gram (g)
2200 x 0.01
420 x 0.1
620 x 0.1
2200 x 0.1
6200 x 0.1
8200 x 1
Kilogram (kg)
2.2 x 0.00001
/
/
2.2 x 0.0001
6.2 x 0.0001
8.2 x 0.001
Carat (ct)
11000 x 0.05
2100 x 0.5
3100 x 0.5
11000 x 0.5
31000 x 0.5
41000 x 5
Newton (N)
21.5744 x
0.0001
4.119 x 0.001
6.080 x 0.001
21.574 x 0.001
60.801 x 0.001
80.41 x 0.01
Ounce (oz)
77.6030 x
0.0005
14.815 x 0.005
21.870 x 0.005
77.600 x 0.005
218.700 x
0.005
289.25 x 0.05
Ounce Troy (ozt)
70.7320 x
0.0005
13.500 x 0.005
19.930 x 0.005
70.730 x 0.005
199.335 x
0.005
263.60 x 0.05
Pennyweight (dwt)
1414.63 x 0.01
270.1 x 0.1
398.7 x 0.1
1414.6 x 0.1
3986.7 x 0.1
5270 x 1
Pound (lb)
4.85020 x
0.00005
/
1.3670 x
0.0005
4.8500 x
0.0005
13.6685 x
0.0005
18.080 x 0.005
Pound:Ounce (lb:oz)
4lb:13.6030oz
x 0.0005oz
/
1lb:5.870oz x
0.005oz
4lb:13.600oz x
0.005oz
13lb:10.700oz
x 0.005oz
18lb:1.25oz x
0.05oz
Grain (grn)
33951.2 x 0.2
6480 x 2
9570 x 2
33950 x 2
95680 x 2
126540 x 20
Model A B C
with draftshield
202 mm / 8.0 in.
222 mm / 8.7 in.
103 mm / 4.1 in.
w/o draftshield
202 mm / 8.0 in.
224 mm / 8.8 in.
54 mm / 2.1 in.
Notes:
* Calibration weights are included with models up to 620g capacity.
** Availability is dependent on model and region.
*** Bluetooth kit is only available in certain regions according to the local regulations
TABLE 7-4. SPECIFICATIONS (Continued)
Capacity x Readability:
7.2 Drawings and Dimensions
Fully assembled dimensions
Figure 7-1. Dimensions
Page 46

EN-42 STX
8. SOFTWARE UPDATES
Ohaus is continuously improving its balance software. To obtain the latest release, please
contact your Authorized Ohaus Dealer or Ohaus Corporation.
Page 47

STX EN-43
Mark
Standard
This product complies with the applicable harmonized standards of EU Directives
2011/65/EU (RoHS), 2014/30/EU (EMC), 2014/35/EU (LVD) and 2014/31/EU
(NAWI). The EU Declaration of Conformity is available online at
www.ohaus.com/ce.
EN 61326-1
CAN/CSA-C22.2 No. 61010-1,
UL Std. No. 61010-1
Disposal
In conformance with the European Directive 2002/96/EC on Waste Electrical and
Electronic Equipment (WEEE) this device may not be disposed of in domestic
waste. This also applies to countries outside the EU, per their specific
requirements.
The Batteries Directive 2006/66/EC introduces new requirements from
September 2008 on removability of batteries from waste equipment in EU
Member States. To comply with this Directive, this device has been designed for
safe removal of the batteries at end-of-life by a waste treatment facility.
Please dispose of this product in accordance with local regulations at the
collecting point specified for electrical and electronic equipment.
If you have any questions, please contact the responsible authority or the
distributor from which you purchased this device.
Should this device be passed on to other parties (for private or professional use),
9. COMPLIANCE
Compliance to the following standards is indicated by the corresponding mark on the product.
Important notice for verified weighing instruments in the EU
When the instrument is used in trade or a legally controlled application it must be set up,
verified and sealed in accordance with local weights and measures regulations. It is the
responsibility of the purchaser to ensure that all pertinent legal requirements are met.
Weighing Instruments verified at the place of manufacture bear the following supplementary
metrology marking on the descriptive plate.
Weighing Instruments to be verified in two stages have no supplementary metrology marking on
the descriptive plate. The second stage of conformity assessment must be carried out by the
applicable weights and measures authorities.
If national regulations limit the validity period of the verification, the user of the weighing
instrument must strictly observe the re-verification period and inform the weights and measures
authorities
As verification requirements vary by jurisdiction, the purchaser should contact their local
weights and measures office if they are not familiar with the requirements.
Page 48

EN-44 STX
the content of this regulation must also be related.
For disposal instructions in Europe, refer to
www.ohaus.com/weee.
Thank you for your contribution to environmental protection.
FCC Note
This equipment has been tested and found to comply with the limits for a Class B digital device,
pursuant to Part 15 of the FCC Rules. These limits are designed to provide reasonable
protection against harmful interference in a residential installation. This equipment generates,
uses and can radiate radio frequency energy and, if not installed and used in accordance with
the instructions, may cause harmful interference to radio communications. However, there is no
guarantee that interference will not occur in a particular installation. If this equipment does
cause harmful interference to radio or television reception, which can be determined by turning
the equipment off and on, the user is encouraged to try to correct the interference by one or
more of the following measures:
- Reorient or relocate the receiving antenna.
- Increase the separation between the equipment and receiver.
- Connect the equipment into an outlet on a circuit different from that to which the receiver
is connected.
- Consult the dealer or an experienced radio/TV technician for help.
Industry Canada Note
This Class A digital apparatus complies with Canadian ICES-003.
ISO 9001 Registration
In 1994, OHAUS Corporation, USA, was awarded a certificate of registration to ISO 9001 by
Bureau Veritus Quality International (BVQI), confirming that the OHAUS quality management
system is compliant with the ISO 9001 standard’s requirements. On June 21, 2012, OHAUS
Corporation, USA, was re-registered to the ISO 9001:2008 standard.
LIMITED WARRANTY
Ohaus products are warranted against defects in materials and workmanship from the date of
delivery through the duration of the warranty period. During the warranty period Ohaus will
repair, or, at its option, replace any component(s) that proves to be defective at no charge,
provided that the product is returned, freight prepaid, to Ohaus.
This warranty does not apply if the product has been damaged by accident or misuse, exposed
to radioactive or corrosive materials, has foreign material penetrating to the inside of the
product, or as a result of service or modification by other than Ohaus. In lieu of a properly
returned warranty registration card, the warranty period shall begin on the date of shipment to
the authorized dealer. No other express or implied warranty is given by Ohaus Corporation.
Ohaus Corporation shall not be liable for any consequential damages.
As warranty legislation differs from state to state and country to country, please contact Ohaus
or your local Ohaus dealer for further details.
Page 49

Balanzas ScoutTMSeries – STX ES 1
ÍNDICE
1. INTRODUCCIÓN ............................................................................................... 3
1.1 Descripción ................................................................................................................................................... 3
1.2 Definición de los símbolos y señales de advertencia .................................................................................. 3
1.3 Precauciones de seguridad .......................................................................................................................... 3
1.4 Características ............................................................................................................................................. 4
2. INSTALACIÓN .................................................................................................. 4
2.1 Instalación de componentes ........................................................................................................................ 4
2.1.1 Desbloqueo del cierre de seguridad de transporte .................................................................................. 4
2.1.2 Instalar la bandeja de pesaje ................................................................................................................... 4
2.1.3 Ranura de seguridad ............................................................................................................................... 4
2.2 Seleccionar el emplazamiento idóneo ......................................................................................................... 4
2.3 Equilibrado de la balanza ............................................................................................................................. 5
2.4 Conexión a la corriente eléctrica .................................................................................................................. 5
2.5 Calibrado ...................................................................................................................................................... 5
3. FUNCIONAMIENTO .......................................................................................... 6
3.1 Controles ...................................................................................................................................................... 6
3.2 Visión general de la pantalla, Pantalla principal ......................................................................................... 6
3.3 Principales Funcionesy Menú Principal (MainMenu) ................................................................................... 7
4. APLICACIONES ................................................................................................ 8
4.1 Pesaje .......................................................................................................................................................... 8
4.1.1 Configuración de elementos .................................................................................................................... 9
4.1.2 Nombre de la muestra ............................................................................................................................. 9
4.1.3 Print / Saveto USB – Imprimir / Guardar en dispositivo USB .................................................................. 9
4.1.4 Menu – Menú……………………………………… ................................................................................... 10
4.2 Recuento de elementos ............................................................................................................................. 10
4.3 Persaje procentual ..................................................................................................................................... 12
4.3.1 Configuración de elementos .................................................................................................................. 13
4.3.2 Recalcular el peso de referencia ........................................................................................................... 13
4.4 Pesaje dinámico /Animales ........................................................................................................................ 14
4.4.1 Configuración de elementos .................................................................................................................. 15
4.5 Determinación de la densidad .................................................................................................................... 15
4.5.1 Medición de la densidad de un sólido mediante el uso de agua (método por defecto) ........................... 16
4.5.2 Medición de la densidad de un sólido mediante el uso de un líquido auxiliar .......................................... 18
4.5.3Medición de la densidad de un sólido mediante el uso de un peso calibrado (nosuministrado) ............... 18
4.5.4 Medición de la Densidad de un material poroso mediante el uso de aceite ............................................ 20
4.6 Pesaje de comprobación ............................................................................................................................ 22
4.6.1 Configuración de elementos .................................................................................................................. 22
4.6.2 Limites…………………………………………. ......................................................................................... 23
4.7 Fijación de un valor en pantalla ................................................................................................................. 24
4.7.2 Modo DisplayHold– Fijación de un valor en pantalla ................................................................................ 24
4.7.3 Modo Peakhold– Fijación en pantalla del valor más elevado ................................................................... 25
4.8 Totalization – Totalización .......................................................................................................................... 25
4.9 Pesaje de mol............................................................................................................................................. 26
4.9.1 Configuración de elementos ..................................................................................................................... 26
4.9.2 Introducir masa molar(Molar Mass) .......................................................................................................... 27
4.9.3 Cálculo de la Molaridad ............................................................................................................................ 27
4.10 Características adicionales ........................................................................................................................ 27
4.10.1 Gancho de pesaje inferior ....................................................................................................................... 27
4.10.2 Conectando el Interfaz ............................................................................................................................ 28
5. CONFIGURACIONES DEL MENÚ .................................................................. 29
5.1 Navegación en el Menú ............................................................................................................................. 29
5.1.1 Modificaciones / ajustes en el menú ...................................................................................................... 29
5.2 Menú principal ............................................................................................................................................ 30
5.2.1 Calibrado .................................................................................................................................................... 30
5.2.1.1 Calibrado de Rango ................................................................................................................................ 30
5.2.1.2 Calibrado Lineal ...................................................................................................................................... 30
5.2.2 Configuración de la balanza ....................................................................................................................... 31
5.2.3 Unidades de pesaje ................................................................................................................................... 33
5.2.4 Data Maintenance – Conservación / almacenamiento de datos ............................................................... 34
5.2.5 Comunicaciones ......................................................................................................................................... 34
5.2.6 Datos GLP y GMP ...................................................................................................................................... 39
Page 50

ES 2 Balanzas ScoutTMSeries – STX
5.2.7 Reconfiguración de salida de fábrica por defecto ...................................................................................... 40
5.2.8 Bloqueo ...................................................................................................................................................... 40
6. MANTENIMIENTO ........................................................................................... 39
6.1 Calibrado .................................................................................................................................................... 41
6.2 Limpieza ..................................................................................................................................................... 41
6.3 Resolución de problemas ........................................................................................................................... 41
6.4 Información sobre el servicio técnico ......................................................................................................... 42
7. DATOS TÉCNICOS ......................................................................................... 42
7.1 Características técnicas ............................................................................................................................. 42
7.2 Gráficos y Dimensiones ............................................................................................................................. 45
8. ACTUALIZACIONES DE PROGRAMAS DE SOFTWARE ............................ 45
9. CUMPLIMIENTO DE LA NORMATIVA VIGENTE .......................................... 46
Page 51

Balanzas ScoutTMSeries – STX ES 3
PRECAUCIÓN :
Lea atentamente todas las advertencias en material de
seguridad antes de proceder a la instalación, de llevar a cabo conexiones u
operaciones de mantenimiento en estos equipos. Del incumplimiento del
contenido de estas advertencias podrían resultar daños personales y/o
materiales. Conserve estas instrucciones para poder consultarlas en el futuro.
1. INTRODUCCIÓN
1.1 Descripción
Las balanzas Scout STX son un instrumento de medición de gran calidad que le proporcionará
años de servicio y funcionamiento si lleva a cabo su mantenimiento del modo adecuado. La
gama de modelos disponibles van de 120g a 8200g.
1.2 Definición de los símbolos y señales de advertencia
Las notas en materia de seguridad se hallan señalizadas con términos y símbolos de
advertencia. Los mismos pueden transmitir informaciones sobre cuestiones y alertas de
seguridad. Señalan cuestiones y advertencias de seguridad. Ignorar las indicaciones en materia
de seguridad puede ser causa de daños tanto personales como al dispositivo, averías y
lecturas erróneas.
Términos de advertencia
ALERTA
PRECAUCIÓN
Atención
Nota
Símbolos de advertencia
Riesgos general Riesgos de descarga eléctrica
Para informaciones de utilidad sobre el producto.
Indica una situación de un nivel de riesgo o peligro medio, de la que
podrían resultar daños o incluso la muerte en el caso de no evitarse.
Indica una situación de un nivel de riesgo o peligro bajo, de la que
podrían resultar daños materiales, daños al dispositivo o las pérdida de
datos, o daños físicos, en el caso de no evitarse.
Para informaciones de relevancia sobre el producto.
1.3 Precauciones de seguridad
Compruebe que el rango del voltaje de entrada impreso en la etiqueta de datos técnicos
y el tipo de enchufe de toma de corriente se corresponden con la fuente de energía AC
disponible a nivel local que deba de ser utilizada.
Asegúrese de que el cable de corriente no represente un obstáculo potencial o pueda
provocar caídas y/o tropiezos.
Utilice la balanza únicamente en un lugar seco.
No dejar caer objetos o cargas sobre la bandeja.
Hacer uso únicamente de los accesorios y periféricos aprobados por el fabricante.
Haga uso del equipo únicamente en las condiciones ambientales especificadas en estas
instrucciones.
Desconecte el equipo de la fuente de energía cuando efectúe tareas de limpieza en el
mismo
No hacer funcionar el equipo en entornos peligrosos o inestables.
Las operaciones de mantenimiento deben de ser únicamente llevadas a cabo por
personal autorizado.
No coloque la balanza de un modo en que resulte difícil alcanzar la toma de corriente.
Page 52

ES 4 Balanzas ScoutTMSeries – STX
Control táctil :Un acceso rápido mediante
gráficos a todas las funciones de control, las
aplicaciones y las características técnicas del
dispositivo.
Desbloquee el cierre / bloqueo de
transporte girando el puntero rojo 90
grados en el sentido contrario a las
agujas del reloj (de DchaaIzda) para
desbloquearlo.
Sub-platforma
Indicador del
bloqueo de
transporte
Posición de
bloqueo
Posición de
desbloqueo
1.4 Características
2. INSTALACIÓN
2.1 Instalación de componentes
Consulte las instrucciones y los gráficos que aparecen a continuación para identificar y efectuar
el montaje de los componentes de su balanza Scout. Todas los elementos y componentes
deben de ser montados antes de hacer uso de la balanza.
2.1.1 Desbloqueo del cierre de seguridad de transporte
2.1.2 Instalar la bandeja de pesaje
Las balanzas provistas de una bandeja rectangular se deben colocar encajándolas en la subplataforma como se muestra a continuación y girándolas en el sentido contrario a las agujas del
reloj (de Dcha a Izda) hasta que se produzca el encaje. Las bandejas redondas se colocan
directamente sobre el soporte de la bandeja.
2.1.3 Ranura de seguridad
Existe una ranura de seguridad en la parte trasera de la balanza que permite el aseguramiento
de la balanza mediante un cable opcional y un accesorio de cierre de bloqueo.
2.2 Seleccionar el emplazamiento idóneo
Para mejorar sus condiciones de funcionamiento, la balanza Scout debería ser colocada en un
entorno limpio y estable. No hacer uso de la balanza en entornos con excesivas corrientes de
aire, sometidos a cambios bruscos de temperatura, a proximidad de campos magnéticos o
cerca de equipos que generen vibraciones o campos magnéticos.
Page 53

Balanzas ScoutTMSeries – STX ES 5
2.3 Equilibrado de la balanza
La balanza Scout dispone de un indicador iluminado que sirve
para recordar que la balanza debe hallarse equilibrada para un
pesaje preciso. Hay una burbuja de equilibrado en una pequeña
ventana en la parte frontal de la balanza. Para equilibrar la
balanza, ajustar los soportes en cada una de las esquinas hasta
que la burbuja quede centrada en el círculo. Asegúrese de que
el equipo sea equilibrado cada vez que se cambia el equipo de
emplazamiento.
Compruebe la pantalla de asistencia al nivelado en el Menú de
Configuraciones del usuario (UserSettingsMenu).
Conexión del jack del
adaptador AC
Cubierta del compartimento de las
pilas
Conexión de Interfaz
Interruptor de
seguridad
Orificio de pesaje inferior
Ranura de seguridad (cierre de
bloqueo anti-robo)
2.4 Conexión a la corriente eléctrica
Instalación del adaptador AC
Se puede utilizar la corriente AC para hacer funcionar la balanza cuando no resulte necesario la
energía de las pilas / baterías. Primero, conectar el adaptador AC (suministrado con el equipo)
al jack de la conexión de entrada del adaptador AC situado en la partes posterior de la balanza
y luego conecte el enchufe AC a una toma de corriente eléctrica.
Figure 2-4. Partes posterior e inferior de la balanza
Instalación de pilas / baterías
Instalar cuatro pilas “AA” con la polaridad tal y como se señala en el comportamiento de las
pilas.
Nota: Después de la alimentación, se recomienda dejar que el equilibrio caliente durante al
menos 5 minutos antes de usarla.
2.5 Calibrado
Cuando se instala la balanza por primera vez, y cuando el equipo es desplazado a otro
emplazamiento, debe de procederse a su calibrado para garantizar la precisión de los
resultados de pesaje. De un modo alternativo, las balanzas pueden ser calibradas
manualmente mediante el uso de masas externas. Debe de disponer de las masas de calibrado
adecuadas antes de iniciar el proceso de calibrado. Por favor, consulte el apartado de calibrado
en lo referente a las masas y al proceso de calibrado.
Page 54

ES 6 Balanzas ScoutTMSeries – STX
Botón
Función primaria
(Pulsación corta1)
On - encendido
Enciende la balanza
Cero
Si la balanza está encendida, la
configura a cero
Tara
Introducir / borrar un valor
de tara.
Función secundaria
(Pulsación larga2)
Off - apagado
Apaga la balanza.
Aplicación activa
Mensajes de
instrucciones
Estabilidad (*), Neto
(NET), Bruto (G) y/o
indicadores de
centrado del cero (>0<)
Campos de referencia
Botones de Aplicaciones :
Las funciones disponibles
cambian en función de la
aplicación activa
Campo de resultados :
La información está
sujeta a cambios en
función de la aplicación
activa
Tocar “g” para cambiar
de unidad de medida
Capacidad y legibilidad
3. FUNCIONAMIENTO
3.1 Controles
Botones de funciones
Tabla 3-1.
Notas:
1
Pulsación corta : Pulsar durante menos de 1 segundo.
2
Pulsación larga : Pulsar y mantener pulsado durante más de 2 segundos.
3.2 Visión general de la pantalla, Pantalla principal
Este equipo dispone de una pantalla táctil. ÁreasTáctiles y Botones que permiten controlar las
funciones del equipo.
Pantalla principal de Aplicaciones:
Page 55

Balanzas ScoutTMSeries – STX ES 7
TocarMenu – Menú para abrir el listado del menú.
Calibration / Calibrado :
Tocar para ver las opciones de calibrado.
Balance Setup / Configuración de la
Balanza :
Tocar para ver la configuración de la
balanza.
WeighingUnits / Unidades de pesaje :
Tocar para ver las unidades de pesaje.
Data Maintenance / Mantenimiento –
conservación de datos :
Tocar para ver las opciones de
mantenimiento / salvaguardia de datos.
Communication / Comunicaciones :
Tocar para ver las configuraciones COM y
de impresión del dispositivo.
Factory Reset / Reconfigurar a
salida de fábrica :
Tocar para restablecer la
configuración de la salida de
fábrica.
GLP and GMP Data / Datos GLP y GMP :
Insertar los datos del usuario para
cuestiones relacionadas con la
trazabilidad.
Lockout / Bloqueo :
Tocar para acceder al listado del
menú de bloqueo.
Secondary
result line and
unit-of-measure
indicator
Instructional Message
line
Stability indicator,
NET, G, and/or
>0< (center of 0).
Capacity Bar:
Color indicates capacity
used. Meaning varies by
application.
Primary
result line and
unit-of-measure
indicator
Results lines –
meaning varies by
application.
Touch control
function Icons
to…
…access more functions
…Call up the menu or specific functions…
Tare and application
buttons – functions vary
by application
Touch control
function Icons
to…
…access more functions
…Call up the menu or specific functions…
3.3 Principales Funcionesy Menú Principal (MainMenu)
Pesaje : Pulsar Cero para configurar el valor que se muestra en pantalla a cero. Colocar un
elemento en la bandeja. La pantalla indicará el peso bruto.
Tara : Sin que haya ninguna carga en la bandeja, pulsar Tare – Tara para configurar el
valor mostrado en pantalla a cero. Colocar un recipiente vacío en la bandeja y pulsar
Tare - Tara. Añadiralgún material al recipiente y aparecerá en pantalla su peso neto.
Quite el recipiente de la bandeja y el peso del recipiente aparecerá como un número
negativo. Pulse Tare - Tara para borrarlo.
MENÚ&NAVEGACIÓN EN LA PANTALLA
Page 56

ES 8 Balanzas ScoutTMSeries – STX
Weighing -
Pesaje
PartsCounting –
Recuento de
elementos
PercentWeighing
– Pesaje
porcentual
Dynamic (Animal)
Weighing -
Pesajedinámico
(Animales)
DensityDetermination
– Determinación de
densidad
CheckWeighing
– Comprobación
de peso
DisplayHold–
Fijación en
pantalla
TotalizationTotalización
Mole – Mol
(molecular)
4. APLICACIONES
La balanza puede ser configurada para funcionar de modo operativo en varios modos de
Aplicación.
Tocar el botón situado arriba a la izquierda en el área de Aplicaciones (Applicationárea) para
seleccionar el modo de la aplicación :
The Scout Balance incorporates the following Applications.
Nota :Antes de usar cualquiera de las aplicaciones, asegúrese de que la balanza ha sido
equilibrada y calibrada.
4.1 Pesaje
Utilice esta aplicación para determinar el peso de los elementos en la unidad de medida
seleccionada.
Pesaje
1. En la parte superior izquierda de la pantalla principal, seleccionar Weighing– Pesaje
(esta es la aplicación por defecto).
2. PulsarTare - Tara o Zero - Cerosi resulta necesario para comenzar.
3. Colocar objetos sobre la ventaja para mostrar el peso en pantalla. Cuando el peso es
estable aparece *en pantalla. El valor resultante aparecerá en la línea principal de
pesaje (Weighing Line) en la unidad de medida activada en ese momento.
Page 57

Balanzas ScoutTMSeries – STX ES 9
Línea principal de la pantalla
Campos de referencia
Botones de la aplicación
Icono de la
Aplicación
Para ver o ajustar la configuración actual
Tocar el botón
ItemSettings – Configuración
de elementos
. Aparecerá la pantalla de
configuración.
Capacity Bar – Barra de capacidad:
Configurar enOnpara mostrar en pantalla la
guía de capacidad en la pantalla principal de
pesaje.
WeighingUnits – Unidades de pesaje:
Seleccionar la unidad de pesaje que se
mostrará en pantalla.
PrintSettings – Configuración de
impression:
Para ver o modificar las
configuraciones de impresión.
Introducir el nombre de la muestra con el teclado alfanumérico y luego pulsar [Save] –
guardar, para almacenar el nombre en la memoria y volver a la pantalla principal del modo de
pesaje.Pulsar para pasar de los caracteres en minúsculas a los caracteres en mayúsculas.
Caracteres en minúsculas :
Caracteres en mayúsculas :
Imprime la información en base a las configuraciones en el menú
PrintSettings(configuraciones de impresión).
Nota :Este botón se hallará desactivado su el kit optativo (se compra por separado)no está
instalado.
Cuando se instala el kit de interfaz Host USB, aparecerá en pantalla la función “Saveto USB” –
Almacenar en USB.
La pantalla principal de WEIGHING / Pesaje :
4.1.1 Configuración de elementos
4.1.2 Nombre de la muestra
4.1.3 Print / Saveto USB – Imprimir / Guardar en dispositivo USB
Page 58

ES 10 Balanzas ScoutTMSeries – STX
Save to USB – Almacenar en USB
Insertar el flash drive USB en la ranura de la conexión USB. Luego pulsar “Saveto USB” –
Almacenar en USB para guardar los datos en el flash drive USB. Una vez que los datos han
sido almacenados, el botón cambiará de color momentáneamente al naranja.
PRECAUCIÓN :
Dependiendo del controlador de USB utilizado, es posible que no todos los datos
emitidos desde la balanza sea almacen o puede bloquearse la pantalla. Si esto
ocurre, desconectar el flash drive USB y pruebe con otro dispositivo flash drive
USB.
Ohausno asume ninguna responsabilidad en el caso producirse el borrado de
datos en el dispositivo flash drive USB o si se produce la rotura o avería del flash
drive USB mientras se halla conectado a la balanza. Para minimizar el riesgo de
que surjan problemas, Ohaus sugiere usar un flash drive USB de buena calidad.
Para obtener más información sobre este particular, por favor consulte el manual de
instrucciones del interfaz Host USB.
Para ver las opciones principales del Menú Principal (MainMenu).
Línea principal de la pantalla
Campos de referencia
Botones de la aplicación
Icono de la
Aplicación
4.1.4 Menu – Menú
4.2 Recuento de elementos
Utilice esta aplicación para contar muestras de peso uniforme / estándar.
1. En la parte superior izquierda de la pantalla principal, seleccione PartsCounting –
Recuendo de elementos.
2. Pulsar Tare - Tara o Zero - Cerosi resulta necesario para comenzar.
3. Establecer un Peso Medio del Elemento (AveragePieceWeight :APW), el APW por defecto
(o el último) APW se muestra en pantalla.
4. Colocar los objetos sobre la balanza para que aparezca en pantalla el número de
elementos en la línea principal de la pantalla (MainDisplay Line).
La Pantalla principal estándar de recuento de elementos (PARTS COUNTING Standard Home
screen):
Page 59

Balanzas ScoutTMSeries – STX ES 11
4.2.1 Configuración de distintos elementos
Para ver o modificar / ajustar la configuración actual, tocar el botón Configuración de
elementos :
Tocar el botón
Configuración de elementos
.
Aparecerá la pantalla de configuración.
SampleName- Nombre de la muestra: Introducir
el nombre de la muestra mediante el teclado
alfanumérico y luego pulse [Save] – guardar, para
almacenar el nombre introducido y volver a la
pantalla de configuración de elementos
(ItemSettingsscreen) que se muestra a la derecha.
Auto Optimization – Optimización automática:
Permite re-calcular de modo automático el peso
de las piezas individuales / unitarias para mejorar
el recuento a medida que se añaden más
elementos.
Por defecto la función de Auto
Optimization(Optimización automática) está
apagada /
Off
.
WeighingUnits – Unidades de pesaje:
Selecciona la unidad de pesaje que aparecerá en
pantalla.
PrintSettings – Configuración de impresión:
Para ver o modificar / ajustar las configuraciones
de impresión.
4.2.2 APW/Samples (Peso medio del
elemento / muestras)
Entrar para configurar el APW (peso medio del
elemento) y el tamaño medio de la muestra
(número de elementos) mediante el teclado
numérico.
Establecar un Peso Medio del Elemento
(AveragePieceWeight - APW)
Cada vez que se recuenta un nuevo tipo de
elemento o de parte / artículo, se debe establecer
el peso nominal de una unidad
(AveragePieceWeight– Peso medio del elementoo
APW) usando una pequeña cantidad de
elementos o de artículos. – Peso medio del
elemento o APW queda almacenado en la
memoria hasta que sea sustituido por otro – Peso
medio del elemento- APW.
Existen dos métodos para establecer el valor del
– Peso medio del elemento o APW y las
Muestras.
Page 60

ES 12 Balanzas ScoutTMSeries – STX
APW – Peso Medio Unitario del Elemento:
Configurar un peso medio unitario del
elementoconocido (APW)
Para ajustar directamente el peso medio del
elemento, tocar el botón
APW
.
Aparecerá una pantalla que permite introducir un
dato numérico.
Teclee el peso medio del elemento (APW)
deseado, y luego pulse[Save] (Guardar).
La pantalla vuelve a la pantalla principal de la
aplicación con el nuevo valor de peso medio del
elemento (APW) en el campo de referencia.
Muestras:
Configurar un nuevo peso medio del
elemento (AveragePieceWeight- APW) –
Derivado
Para establecer un nuevo peso medio del
elemento - APW, tocar el botón [Samples] -
muestras.
Aparecerá una pantalla que permite introducir un
valor numérico.
Teclear el tamaño deseado de la muestra
(SampleSize : de 1 a 10.000 unidades), y luego
pulsar
[Save] - guardar
.
La pantalla vuelve a la pantalla principal de la
aplicación. Siga las instrucciones que aparecen
en pantalla para establecer un nuevo peso medio
del elemento :APW.
Coloque el peso de referencia en la bandeja y pulse
[Accept] - Aceptar para continuar. Se utilizará el
tamaño de la muestra que aparece en pantalla. El
nuevo valor del peso medio de la muestra (APW
value) aparecerá en el campo de referencia.
Volverá a aparecer la pantalla principal con el cálculo
del nuevo peso medio de la muestraAPW value).
4.3 PercentWeighing – Pesaje procentual
Utilizar el pesaje porcentual (PercentWeighing) para medir el peso de una muestra y que el
mismo se muestre expresado en un porcentaje de un peso de referencia (Reference Weight)
pre-establecido.
Aparecerá en pantalla el Peso de Referencia (Reference Weight) por defecto (o el último).
1. En el botón superior izquierdo de la pantalla principal, seleccionar Pesaje Porcentual
(PercentWeighing).
2. Colocar un objeto en la bandeja. La diferencia entre el peso de la muestra y el Peso de
Referencia (Reference Weight) aparecerá en pantalla tanto como peso como expresado en
porcentaje.
Page 61

Balanzas ScoutTMSeries – STX ES 13
La pantalla principal delPesaje porcentual (PERCENT WEIGHING) :
Línea principal de la pantalla
Campos de referencia Icono de la Aplicación
Botones de la aplicación
Tocar el botón
ItemSettings – Configuración
de elementos
. Aparecerá la pantalla de
configuración.
SampleName - Nombre de la muestra:
Introducir el nombre de la muestra mediante
el teclado alfanumérico y luego pulse [Save] –
guardar, para almacenar el nombre
introducido.
WeighingUnits – Unidades de pesaje:
Selecciona la unidad de pesaje que aparecerá
en pantalla.
PrintSettings – Configuración de
impresión :
Para ver o modificar / ajustar las
configuraciones de impresión.
Para establecer un nuevo valor de peso de
referencia (referenceweightvalue), tocar el
botón Recalculate Ref. Weight (Recalcular
el peso de referencia). Sig alas instrucciones
que aparecen en pantalla para establecer un
nuevo peso de referencia.
De modo alternativo, pulsar el botón Ref.
Weight (peso de referencia) situado en la
pantalla :PercentWeighingRecalculate Ref.
Wgtscreen– Recalcular Peso de referencia del
Pesaje porcentual para introducir
manualmente un peso a mediante el teclado
numérico.
Teclear el Peso de Referencia (Reference
Weight) deseado, y luego pulsar[Save] -
Guardar.
La pantalla volverá a la pantalla principal del
modo de pesaje porcentual (PercentWeighing
home screen).
4.3.1 Configuración de elementos
Para ver o modificar / ajustar la configuración actual
4.3.2 Recalcular el peso de referencia (Reference Weight)
Page 62

ES 14 Balanzas ScoutTMSeries – STX
Línea principal de la pantalla
Campos de referencia
Botones de la aplicaciónIcono de la Aplicación
Pesaje dinámico - DynamicWeighing – Manual (modo por defecto)
1. En la parte superior izquierda de la pantalla principal, seleccionar DynamicWeighing –
Pesaje Dinámico.
2. Pulsar Tare - Tara o Zero – Cero si resulta necesario para comenzar.
3. Colocar los objetos sobre la bandeja. Pulsar el botón
[Start] - Inicio
.
4. La balanza inicia una cuenta atrás (proceso de
cálculo de una media).
Durante la cuenta atrás, la línea de información
mostrará el tiempo restante.
Si fuese necesario, pulsar
Stop – detener
para
parar y volver a la pantalla principal.
5. Cuando concluye la cuenta atrás, el resultado
del pesaje se muestra y se mantendrá fijado en la
pantalla.
Pulsar Clear - borrar, para borrar el peso
mostrado de modo fijo en pantalla y volver a la
pantalla de inicio.
Nota :
Limpiar / despejar la bandeja antes de
iniciar un nuevo ciclo de pesaje dinámico
(DynamicWeighingcycle).
4.4 Pesaje dinámico /Animales
Utilizar esta aplicación para pesar cargas inestables, como animales vivos (en movimiento).
Pueden seleccionar dos modos de inicio – reconfiguración (start/reset) :Manual(start& stop –
iniciar y detener mediante el pulsado de teclas) yAutomatic - Automático (start& stop - iniciar
y detener de modo automático).
La Pantalla principal de Pesaje Dinámico - DYNAMIC WEIGHING:
Page 63

Balanzas ScoutTMSeries – STX ES 15
Tocar el botón
ItemSettings – Configuración
de elementos
. Aparecerá la pantalla de
Configuración (Settingsscreen).
Averaging Time – Tiempo medio :
El tiempo
medio puede configurarse de 1 a 99 segundos.
El valor por defecto es de 5 segundos.
AutomaticMode – Modo automático :
El ciclo se inicia cuando se coloca un objeto
(animal) sobre la bandeja, y el valor mostrado
de modo fijo en pantalla se vuelve a configurar
/ resetea (reset) automáticamente cuando se
retira el objeto de la bandeja (con una demora
de 10segundos).
SampleName - Nombre de la muestra
:Introducir el nombre de la muestra mediante
el teclado alfanumérico y luego pulse [Save] –
guardar, para almacenar el nombre
introducido.
WeighingUnits – Unidades de pesaje
:
Selecciona la unidad de pesaje que aparecerá
en pantalla.
PrintSettings – Configuración de impresión:
Para ver o modificar / ajustar las
configuraciones de impresión.
4.4.1 ItemSettings – Configuración de elementos
Para ver o modificar / ajustar la configuración actual :
4.5 Density Determination – Determinación de la densidad
La balanzaScoutpuede ser utilizada para determinar la densidad de un objeto, incluidos sólidos y
líquidos.
Hemos diseñado y desarrollado un kit de determinación de la densidad(densitydeterminationkit;not
incluido, se vende por separado)para ser utilizado de modo conjunto con las balanzas OhausScout
STX. No obstante, Ud. es libre de utilizar cualquier tipo de instrumental de laboratorio que satisfaga las
necesidades para efectuar mediciones de densidad. Se recomienda hacer uso del gancho de pesaje
por suspensión si el peso del sólido es superior a 200g.
Page 64

ES 16 Balanzas ScoutTMSeries – STX
Prepare la balanza como se muestra en el gráfico
situado a la derecha :
1. Apagar la balanza (Power off).
2. Extraer la plataforma de la balanza.
3. Insertar el gancho superior de pesaje en
suspensión y el soporte del vaso / recipiente (el
vaso no se suministra con el equipo).
4. Encender la balanza (Poweron).
5. En la parte superior izquierda de la pantalla
principal seleccionar DensityDetermination –
Determinación de la densidad.
6. Siga las instrucciones para determinar la
densidad del objeto.
Gancho superior – Soporte del vaso
Línea principal de la pantalla
Campos de referencia Icono de la Aplicación
Botones de la aplicación
Pulsar el botón ItemSettings– Configuración
de elementos para abrir la pantalla de
Configuración de la determinación elementos
de la determinación de densidad
(DensityDetermination).
Confirmar que selecciona la siguiente
Configuración (Setups) :
DensityType - Tipo de densidad :
Sólido
AuxiliaryLiquid – Líquido auxiliar:
Agua
Porous Material – Material poroso:Off
- apagado
Para ajustar el valor de temperatura del agua,
tocar el botón WaterTemp(temperatura del
agua).
Aparecerá una pantalla que permite introducir
un dato numérico.
Pantalla principal deDENSITY DETERMINATION – Determinación de la densidad :
4.5.1Medición de la densidad de un sólido mediante el uso de agua(método
por defecto)
Page 65

Balanzas ScoutTMSeries – STX ES 17
Introducir el valor actual de la temperatura del
agua, y luego pulsar [Save] - Guardar.
La balanza calcula la densidad del agua en
función de la temperatura del agua
introducido(consultando una tabla de
comprobación interna). Mida la temperatura
actual del agua con un termómetro de
precisión.
Pulsar [Back] - Atrás para volver a la pantalla
principal de determinación de la densidad
(DensityDetermination).
Para iniciar el proceso de determinación de
densidad (DensityDeterminationprocess),
pulsar
[Start] - Inicio
.
Etapa 1 de 2 – Pesaje del muestra en suspensión en el aire.
PulseStart - inicio. Siga las instrucciones que aparecen en pantalla, y luego pulse Accept -
Aceptarpara almacenar en la memoria el peso de la muestra en seco (“en aire / en
suspensión”).
Etapa 2 de 2 – Pesaje de la muestra en inmersión en líquido.
Siga las instrucciones que aparecen en pantalla, y luego pulse Accept - Aceptar para
almacenar en la memoria el peso de la muestra(sumergida en líquido).
Page 66

ES 18 Balanzas ScoutTMSeries – STX
Una vez que se han determinado los
pesos necesarios, se mostrará en pantalla
la densidad de la muestra en
g/cm
3
(junto
con el peso en suspensión – en el aire, y
el peso en inmersión en el agua) en la
pantalla de la
aplicación(Applicationscreen).
Pulsar
proceso.
La balanza también puede utilizarse para medir la densidad de un material en flotación
usando agua.
Siga el mismo procedimiento seguido para una material sólido (Solid Material) como se ha
descrito anteriormente, exceptuando el paso 2 de determinación de la densidad
(DensityDetermination), pulsar el botón [sampledown] – inmersión de la muestra (es
necesario el uso de una herramienta especial, no suministrada) en el líquido hasta que esté
sumergido por completo.
Start - Inicio
parareconfigurar / resetear (reset)todos los valores de pesaje y reiniciar el
4.5.2 Medición de la densidad de un sólido mediante el uso de un líquido
auxiliar
Para activar esta característica, entrar en la pantalla de configuración de elementos ItemSettings – y seleccione la siguiente configuración :
DensityType – Tipo de densidad :Solid - Sólido
AuxiliaryLiquid – Líquido auxiliar :Other - Otro
Porous Material – Material poroso :Off - apagado
Confirmar que los valores por defecto que se muestran en pantalla (LiquidDensity – densidad
del líquido, etc.) son correctos.
Iniciar el proceso de determinación de la densidad (Densitydeterminationprocess) pulsando
Start - inicio y siga las instrucciones que aparecen en pantalla.
4.5.3 Medición de la densidad de un sólido mediante el uso de un peso
calibrado (CalibratedSinker) (nosuministrado)
Para activar esta característica, entrar en la pantalla de configuración de elementos -
ItemSettings – y seleccione la siguiente configuración :
Page 67

Balanzas ScoutTMSeries – STX ES 19
DensityType – Típo de densidad:
Líquido
Nota :Cuando se configura la función Tipo de
Densidad (DensityType)en el modo
Líquido(Liquid), se desactivan las opciones de
Tipo de líquido (Liquidtype) y de material poroso
(Porous material).
Confirmar que el valor por defecto del volumen
del peso(sinkervolume) es correcto. Para editar
los valores configurados por defecto, tocar
SinkerVolume (volumen del peso)
.
Aparecerá en pantalla una ventana que
permite introducir un valor numérico.
Teclear el valor deseado y luego pulsar [Save]
- Guardar.
La pantalla volverá a la mostrar la pantalla
anterior.
Editar el campo de la temperatura del líquido
(Liquidtemperatura)si fuese necesario.
Para volver a la pantalla principal de
Determinación de densidad
(DensityDetermination), pulsar[Back] - Atrás.
Pulsar
Start - inicio
para iniciar el proceso.
Paso 1 de 2 – Efectuar el pesaje del peso
(lastre) en suspensión (en el aire).
Siga las instrucciones que aparecen en
pantalla, y pulsar Accept - Aceptar para
almacenar en la memoria el peso del peso
(lastre) en suspensión (“en el aire”).
Paso 2 de 2 – Pesaje del peso sumergido en
el líquido de prueba.
Siga las instrucciones que aparecen en
pantalla, y pulsar
Accept - Aceptar
para
almacenar en la memoria el peso del peso
(lastre) sumergido en líquido.
Page 68

ES 20 Balanzas ScoutTMSeries – STX
Una vez que se han determinado los pesos
necesarios, se mostrará en pantalla la densidad
de la muestra del líquido expresada en g/cm3
(junto con el peso en suspensión – en el aire, y
el peso en inmersión en el agua) en la pantalla
de la aplicación(Applicationscreen).
Pulsar Start - Inicio para reconfigurar /
resetear (reset) todos los valores de pesaje y
reiniciar el proceso.
Para activar esta funcionalidad, entrar en la
pantalla de configuración de elementos
(ItemSettingsscreen), y activar la siguiente
selección :
Tipo de Densidad : Sólido
Líquido Auxiliar: Aguar
Material Poroso :On - encendido
Para ajustar los valores de Temperatura del
Agua, y/o de densidad del aceite, tocar los
botones [WaterTemp] – Temperatura del
aguay[OilDensity] densidad del aceite.
La balanza calcula la densidad del agua en
función de la temperatura del agua introducido
(consultando una tabla de comprobación
interna). Mida la temperatura actual del agua
con un termómetro de precisión.
Aparecerá una pantalla que permite introducir
un dato numérico.
Introducir el valor actual de la temperatura del
agua, y luego pulsar [Save] - Guardar.
Para volver a la pantalla principal de la función
de Determinación de la Densidad
(DensityDetermination home screen), tocar el
botón[Exit] – salir.
4.5.4 Medición de la Densidad de un material poroso mediante el uso de
aceite
Page 69

Balanzas ScoutTMSeries – STX ES 21
Pulsar [Start]– inicio para iniciar el proceso
de determinación de la densidad.
Paso 1 de 3 – Pesaje de una muestra libre
de aceites en el aire.
Siga las instrucciones que aparecen en
pantalla y pulsar
[Accept] - Aceptar
para
almacenar del valor del peso de la muestra en
seco (en suspensión en el aire).
Etapa 2 de 3 – Pesar la muestra embebida
de aceite en suspensión en el aire.
Siga las instrucciones que aparecen en
pantalla y pulsar
[Accept] - Aceptar
para
almacenar del valor del peso de la muestra
embebida de aceite (oiled).
Etapa 3 de 3 – Pesar la muestra embebida
de aceite en inmersión en líquido.
Siga las instrucciones que aparecen en
pantalla y pulsar
[Accept] - Aceptar
para
almacenar del valor del peso de la muestra
embebida de aceite (en inmersión en líquido).
Una vez que se han determinado los pesos
necesarios, se mostrará en pantalla la
densidad de la muestra del líquido expresada
en g/cm3 (junto con el peso en suspensión –
en el aire, con aceite y sin aceite, y el peso en
inmersión en el agua) en la pantalla de la
aplicación(Applicationscreen).
Los valores se mantendrán fijos en pantalla
hasta que toque Start– Inicio.
Pulsar Start - Inicio para reconfigurar /
resetear (reset) todos los valores de pesaje y
reiniciar el proceso.
Page 70

ES 22 Balanzas ScoutTMSeries – STX
Línea principal de la pantalla
Campos de referencia Icono de la Aplicación
Botones de la aplicación
SampleName - Nombre de la muestra :
Introducir el nombre de la muestra
WeighingUnits – Unidades de
pesaje :Selecciona la unidad de pesaje que
aparecerá en pantalla.
PrintSettings – Configuración de impresión:
Para ver o modificar / ajustar las configuraciones
de impresión
4.6 Pesaje de comprobación - CheckWeighing
Se utiliza el pesaje de comprobación para comprobar el peso de una muestra contra unos
límites pre-establecidos.
1. Enla parte superior izquierda de la pantalla principal, seleccionar CheckWeighing – Pesaje
de comprobación.
2. Se mostrarán en pantalla los valores por defecto (o los últimos) límites de comprobación
establecidos (Checkweightlimits).
3. Colocar objetos en la bandeja.
4. Se mostrarán los estatus Under – inferior /Accept – aceptar /Over - superior en el área
de la barra de progreso mientras que en la línea principal de la pantalla (mainDisplayLinea)
aparecerá el peso efectivo del elemento.
La pantalla principal de la Aplicación de Pesaje de Comprobación(CHECK WEIGHING Home
screen) :
4.6.1 ItemSettings – Configuración de elementos
Para ver o modificar / ajustar la configuración actual, tocar el botón ItemSettings –
Configuración de elementos :
Tocar el botón ItemSettings – Configuración de elementos. Aparecerá la pantalla de
configuración
Page 71

Balanzas ScoutTMSeries – STX ES 23
Tocar el botón
Limits - límites
. Entonces
Aparecerá la pantalla de configuración de los
límites (limitssettingsscreenappears).
Los valores de los límites de comprobación
aparecerán en la pantalla de configuración
(settingsscreen).
Para configurar el OverLimitvalue – Valor del
límite superior, tocar el botón [OverLimit]–
Límite superior y después introducir el límite
superior deseado.
Para configurar el UnderLimitvalue – Valor del
límite inferior, tocar el botón
[UnderLimit]
–
Límite inferior y después introducir el límite
superior deseado.
Cuando haya terminado, pulsar
[Exit]
– Salir
para volver a la pantalla principal de la
aplicación.
4.6.2 Límites
Para ver o modificar / ajustar la configuración actual
Positive Check – Comprobación Positiva
Se utiliza la Comprobación Positive (Positive check) para determinar cuando el peso del
material añadido a la balanza se halla dentro de los márgenes pre-determinados. En este caso
los límites UNDER (inferior) y OVER (superior) deben de ser valores positivos. (El valor del
límite superior- OVER) debe de ser superior al del límite inferior - UNDER.)
Añadir material a la balanza hasta que el valor alcance el rango aceptado - ACCEPT.
NegativeCheck – Comprobación Negativa
Se utiliza la Comprobación Negativa (Negativecheck)para determinar cuando el peso del
material retirado de la balanza se halla dentro de los márgenes pre-determinados. En este caso
los límites UNDER (inferior) y OVER (superior) son ambos dos valores negativos.
(El valor del límite superior - UNDER debe de ser superior al del límite superior - OVER.)
Colocar el elemento que debe ser pesado sobre la balanza y luego pulsar TARE- TARA.
Retirar material de la balanza hasta que el valor alcance el rango aceptado - ACCEPT.
Zero Check – Comprobación Cero
Se utiliza la “comprobación cero” (Zero check) para comparar una serie de muestras con una
muestra de referencia inicial.En este caso, el límite inferior - UNDER debe de ser un valor
negativo y el límite superior - OVER debe de ser un valor positivo.
Colocar el elemento de referencia sobre la balanza y luego pulsar TARE - TARA. Retirar la
muestra de referencia y luego colocar elemento a comparar sobre la balanza para determinar
su peso se halla dentro del rango aceptado - ACCEPT.
Page 72

ES 24 Balanzas ScoutTMSeries – STX
Línea principal de la pantalla
Campos de referencia Icono de la Aplicación
Botones de la aplicación
Tocar el botón ItemSettings – Configuración de
elementos. Aparecerá la pantalla de
configuración.
Modo : Seleccionar el modo : Bien PeakHold –
fijar en pantalla el valor más elevado o
DisplayHold- fijación de un valor en pantalla (modo
por defecto).
SampleName - Nombre de la muestra :
Introducir un nombre para la muestra
WeighingUnits – Unidades de pesaje :
Selecciona la unidad de pesaje que aparecerá en
pantalla.
PrintSettings – Configuración de impresión:
Para ver o modificar / ajustar las configuraciones
de impresión
1. Colocar un elemento en la bandeja y
pulsar
Hold - fijar
. Se iniciar el proceso de
captura / almacenamiento.
2. La línea principal de la pantalla mostrará
ahora la primera lectura estable.
3. Pulsar Clear – borrar para suprimir el valor
fijado y volver a la página principal de la
aplicación de fijación de un valor en pantalla
(DisplayHold Home screen).
4.7 DisplayHold – Fijación de un valor en pantalla
La aplicación Displayhold– fijación de un valor en pantalla permite al usuario capturar y
almacenar el peso estable más elevado de una serie de mediciones de pesaje.
En la parte superior izquierda de la pantalla principal, seleccionar Displayhold– fijación de
un valor en pantalla.
La pantalla principal de la aplicación DISPLAY HOLD– fijación de un valor en pantalla :
4.7.1 ItemSettings – Configuración de elementos
Para ver o modificar / ajustar la configuración actual:
4.7.2 Modo DisplayHold– Fijación de un valor en pantalla
Este modo le permite al usuario mantener fijado en pantalla el valor de una lectura estable.
Siga las instrucciones que aparecen en pantalla para comenzar.
Page 73

Balanzas ScoutTMSeries – STX ES 25
1. Seleccionar el elemento PeakHoldMode –
Modo de fijación del valor más elevado en la
configuración de elementos (Itemsettings)
(véase el apartado 4.7.1).
2. Colocar un elemento en la bandeja y pulsar
Hold - fijar
. Se iniciar el proceso de captura /
almacenamiento.
3.Prosiga con el pesaje de elementos. El valor
estable más elevado se mantendrá fijado en
la pantalla.
4. Pulsar
Stop
para suprimir el valor fijado y
volver a la pantalla de funcionamiento normal.
1. Tocar la parte superior izquierda de la pantalla
principal. Aparecerá en pantalla el menú de
Aplicaciones (Applicationmenuappears). Tocar el icono
More – Máspara acceder a la página siguiente y
seleccioneTotalization– Totalización ; si se encuentra
allí.
2. Colocar elementos sobre la bandeja para empezar.
Línea principal de la pantalla
Campos de referencia Icono de la Aplicación
Botones de la aplicación
4.7.3 Modo Peakhold– Fijación en pantalla del valor más elevado
Este modo le permite al usuario mantener fijado en pantalla el valor de lectura estable más
elevado.
Siga las instrucciones que aparecen en pantalla para comenzar.
4.8 Totalization – Totalización
La función de totalización (Totalization) permite medir el peso acumulado de la secuencia de
un pesaje de distintos elementos. El total acumulado puede superar la capacidad máxima de
la balanza. El número máximo de muestras de la secuencia (n) es de 99.
La pantalla principal de la funcionalidadTOTALIZATION– Totalización :
Page 74

ES 26 Balanzas ScoutTMSeries – STX
Se mostrará en la línea principal de la pantalla el
peso de la muestra.
3. PulsarAccumulate - acumularpara sumar el
peso del elemento al total.
Cuando es, se muestra el nuevo total en la
línea secundaria de la pantalla.
4. Quitar el elemento de la bandeja de pesaje y
añadir el siguiente elemento, y vuelva a repetir lo
anteriormente descrito.
5. Pulsar
Result - Resultado
para ver los datos
acumulados y si resultase necesario, imprimirlos o
guardarlos en una memoria Flash drive USB.
6. Cuando haya terminado, pulsar el botón
Clear
Result – Borrar resultado
.
Aparecerá en pantalla una ventana de
confirmación.
Pulsar
Yes – sí
para reconfigurar / resetear el
peso total a cero.
PulsarNopara volver a la pantalla principal.
Línea principal de la pantalla
Campos de referencia Icono de la Aplicación
Botones de la aplicación
4.9.1 ItemSettings – Configuración de
elementos
Para ver o modificar / ajustar la configuración
actual:
Tocar el botón ItemSettings –
Configuración de elementos. Aparecerá la
pantalla de configuración.
Volúmenliquid - LiquidVolume:Configurar el
volumen de la solución del líquido si se
requiere la información de la molaridad.
4.9 MoleWeighing – Pesaje de mol
Utilizar esta aplicación para medir la cantidad de una muestra.
1. En la parte superior izquierda de la pantalla principal, seleccionarMole – Mol (Si no aparece
en pantalla, pulsar el icono More– Más).
2. PulsarMolar Mass – masa molar para configurar la masa de la sustancia.
3. Colocar la sustancia en la bandeja para iniciar el proceso.
Pantalla principal del Pesaje de Mol - Mole Weighing :
Page 75

Balanzas ScoutTMSeries – STX ES 27
SampleName - Nombre de la
muestra :Introducir el nombre de la muestra.
WeighingUnits – Unidades de
pesaje :Selecciona la unidad de pesaje para
el peso bruto y la tara.
PrintSettings– Configuración de impresión:
Para ver o modificar / ajustar las
configuraciones de impresión
4.9.2 Introducir masa molar(Molar
Mass)
Pulsar
Molar Mass – Masa molar
, y utilice el
teclado numérico para introducir el valor de la
Masa Molar de la sustancia exigido, y luego
pulsar
[Save] - Guardar
.
4.9.3 Cálculo de la Molaridad
La Molaridad se calcula únicamente cuando se
configura el volumen del líquido. Si se
configura el volumen del líquido, aparecerá el
valor de la Molaridad en la parte inferior
derecha de la ventana.
Gancho de pesaje inferior
Instalación del gancho de pesaje inferior
Apertura del pesaje inferior
4.10 Características adicionales
4.10.1 Gancho de pesaje inferior
La balanza Scout se halla equipada con un gancho inferior para efectuar pesajes por debajo de
la balanza. El gancho de pesaje se halla situado en la parte trasera de la cubierta de las pilas
como se muestra a continuación. Para poder hacer uso de esta característica y funcionalidad
tiene que quitar la cobertura roja de protección para abrir la parte inferior de la báscula.
Atención :
gire la clavija de bloqueo de transporte hacia la posición de “bloqueo” para evitar que
el equipo sufra daños.
Antes de girar la balanza, quitar la tapa y el apoyo de la tapa (si la hay), y
La balanza puede apoyarse mediante el uso de soportes de laboratorio o cualquier otro método
adecuado. Asegúrese de que la balanza se encuentra nivelada y apoyada con seguridad y que
el bloqueo de transporte ha sido anulado. Encienda la balanza, y use una cuerda o un alambre
para fijar los elementos que deban de ser pesados.
Page 76

ES 28 Balanzas ScoutTMSeries – STX
Puede utilizar un kit interfaz de conectividad
adicional para conectar la balanza a un
ordenador o a una impresora o a una pantalla
auxiliar OHAUS.
Se hallan disponibles los distintos accesorios de
Kit que se describen a continuación :
RS232, Host USB, DispositivoUSB, Ethernet,
Bluetooth®*.
Interfaz de conexión en la parte posterior
de la balanza :
* Los kits de interfaces disponibles pueden estar sujetos a cambios de acuerdo con las
distintas normativas nacionales aplicables
Conexión de
Interfaz
Jack del
adaptador AC
Ranura de
seguridad
4.10.2 Conectando el Interfaz
La palabra y el logotipo Bluetooth® son marcas registradas propiedad de Bluetooth SIG, Inc.,
OHAUS hace uso de dichas marcas al amparo de sus licencias de utilización.
Page 77

Balanzas ScoutTMSeries – STX ES 29
Entrar en el Menú
A partir de la pantalla de cualquier Aplicación,
Tocar [Menu].
Aparecerá en pantalla la lista del menú
principal (MainMenuList).
Seleccionar el Sub-Menú al que desee
acceder
Encuentre el elemento deseado en la lista del
menú principal (MainMenuList) y tóquelo.
Aparecerá el Sub-Menú correspondiente.
Seleccione el elemento deseado del Menú
Continúe hasta seleccionar la configuración
deseada en el listado del Menú. Tocar la
configuración para modificarla / llevar a cabo
los ajustes necesarios. La configuración
modificada se marcará en amarillo durante
aproximadamente 1 segundo para confirmar el
valor modificado.
5. CONFIGURACIONES DEL MENÚ (MENU SETTINGS)
5.1 Navegación en el Menú (MenuNavigation)
Toda la navegación en el menú se efectúa a través de la pantalla táctil. Para entrar en el
menú, toque [Menu]a partir de cualquier pantalla principal de una Aplicación
(ApplicationHome screen).Aparecerá el menú principal (Mainmenu), con botones de Back -
atrás y Exit - salir. Prosiga con la navegación táctil tocando la lista de elementos adecuada
para navegar a través de los distintos elementos del Menú o toque un botón para cambiar de
pantalla.
Cuando el interruptor de seguridad (Security Switch) está en la posición de bloqueo, lo menús
de Calibrado (Calibration) y de bloqueo (Lockout) permanecerán ocultos.
Interruptor de seguridad (Security switch) :
Bloqueado Desbloqueado
5.1.1 Modificaciones / ajustes en el menú (ChangingSettings)
Para modificar / ajustar un configuración del menú (menusetting), navegue a esta esa misma
configuración y siga los siguientes pasos :
Page 78

ES 30 Balanzas ScoutTMSeries – STX
SpanCalibration
Calibrado de
Rango
LinearityCalibr
ation
Calibrado
Lineal
5.2.1.1 Calibrado de Rango (SpanCalibration)
El calibrado de rango utiliza dos puntos de calibrado, siendo uno el de carga cero (zero load)
y el otro el de la plena carga especificada (full load / span - rango). Para obtener
informaciones con más detalle sobre la masa de calibrado, por favor consulte las tablas de
características técnicas en el apartado 7 de este mismo documento.Antes de iniciar el
proceso de calibrado, asegúrese de que el menú del interruptor de seguridad (Security
Switchmenú) está desbloqueado.
Con la balanza encendida (ON) y sin que haya ninguna carga colocada en la bandeja, tocar
SpanCalibration (Calibrado de Rango) para iniciar el procedimiento. Se mostrarán en
pantalla los valores adicionales de calibrado utilizados. Se alcanza el mayor grado de
precisión utilizando la masa de calibrado más próxima al valor del rango completo (full
spanvalue).
Nota : Para modificar o ajustar el punto de calibrado de rango, tocar el peso alternativo que
aparece en pantalla.
Siga las instrucciones que aparecen en pantalla y coloque el peso de calibrado especificado
sobre la balanza cuando se le pida. Cuando lo haya hecho, la pantalla mostrará el estatus
del calibrado de rango y volverá a la aplicación actualmente en ejecución.
5.2.1.2 Calibrado Lineal (Linearity Calibration)
El calibrado lineal utiliza tres puntos de calibrado ;cero, capacidad media y capacidad
plena. Antes de iniciar el proceso de calibrado asegúrese de que el menú del interruptor de
seguridad (Security Switch menú) está desactivado. Sin que haya ningún peso colocado en
la balanza, pulse Calibrado Lineal (LinearityCalibration) en el sub-menú de calibrado y siga
las instrucciones que aparecen en pantalla. Coloque el peso de calibrado especificado
sobre la balanza y se completará el proceso de calibrado. El estatus se mostrará en
pantalla y luego volverá a la aplicación actual.
Salir del Menú y volver a la Aplicación actual
Una vez confirmada la configuración, tocar Back - atrás oExit - Salirpara volver a la
Aplicación.
5.2 Menú principal (MainMenu)
A continuación de muestra la estructura del menú principal de la balanza Scout.
5.2.1 Calibrado
Las Balanzas ScoutSTX permiten escoger entre dos métodos de la calibrado : El Calibrado de
Rando (SpanCalibration) y el Calibrado Lineal (LinearityCalibration).
Nota :No interrumpir el proceso de calibrado mientras se está ejecutando.
Sub-menú de Calibrado
Page 79

Balanzas ScoutTMSeries – STX ES 31
Language
Idioma
UserSettings
Configuraciones del
usuario
FilterLevel
Nivel de filtros
Auto Zero Tracking
Ajuste a cero automático
Stability
Estabilidad
Auto Tare
Tara Automática
Date & Time
Fecha y Hora
Language - Idioma
Permite configurar los menús y los mensajes que se muestran en pantalla.
Hay 9 idiomas disponibles. Los idiomas que pueden ser seleccionados en función
del país / región son los siguientes :
Método -1:
Inglés / Alemán / Francés / Español / Italiano / Ruso / Chino / Japonés / Coreano
Método -2:
Inglés / Alemán / Francés / Español / Italiano / Polaco / Turco / Checo / Húngaro
UserSettings – Configuraciones propias del usuario
TouchCalibrate
Calibrado pantalla
táctil
Brightness
Brillo
Auto Dim
Auto
oscurecimiento
Auto Off
Apagado
automático
LevelAssist
Asistente de
nivelado
TouchCalibrate – Calibrado de la pantalla táctil
Permite efectuar el calibrado de la funcionalidad
táctil de la pantalla. Siga las instrucciones que
aparecen en pantalla.
Brightness - Brillo
Configurar el nivel de brillo de la pantalla.
Low– Bajo = resolución de la pantalla baja
Medium – Medio = resolución de la pantalla normal
High – Alto = resolución de la pantalla alta
Auto Dim – Auto oscurecimiento
Permite configurar el tiempo de inactividad tras el cual se
oscurecerá la pantalla.
Off - apagado, 10 s, 30 s, 60 s
Nota :Cuando la corriente AC está conectada, la función de auto-
oscurecimiento de la pantalla (Auto Dim) está desactivada.
5.2.2 Balance Setup – Configuración de la balanza
Entrar en este sub-menú para personalizar las funciones de la pantalla de
la Balanza.
Sub-menú de configuración de la balanza
A continuación de muestran en negrita las configuraciones por defecto de
salida de fábrica.
Page 80

ES 32 Balanzas ScoutTMSeries – STX
Auto Off – Apagado automático
Permite configurar el tiempo de inactividad tras el cual elequipo se
apagará automáticamente.
Off - apagado, 1 min., 5 mins., 10 mins.
Nota :La función de apagado automático (Auto Off) funciona en
bruto únicamente cuando el interruptor de seguridad está en la de
encendido (“on position”).
LevelAssist – Asistente de nivelado
Muestra como se nivela el equipo ajustando sus soportes.
Filterlevel – Nivel de filtrado
Permite configurar el nivel del filtrado de la señal.
LOW - Bajo = menor estabilidad, tiempo de estabilización más rápido
MEDIUM - Medio= estabilidad normal, tiempo de estabilización normal
HIGH– Alto = tiempo de estabilización más lento, mayor estabilidad
Auto Zero Tracking
Permite configurar la función de vuelta automática a cero (automaticzero tracking).
OFF - apagado = desactivada.
0.5 divisiones = Se mostrará el valor cero en pantalla hasta que se supere un cambio
de 0.5 divisiones por segundo.
1 división = Se mostrará el valor cero en pantalla hasta que se supere un cambio
de 1 divisiones por segundo.
3 divisiones = Se mostrará el valor cero en pantalla hasta que se supere un cambio
de 3 divisiones por segundo
Stability - Estabilidad
Permite configurar la cantidad de variaciones de la lectura mientras el símbolo de
estabilidad se mantiene encendido.
0.5 Divisiones = 0.5 graduaciones
1 División = 1 graduación
2 Divisiones = 2 graduaciones
5 Divisiones = 5 graduaciones
Auto Tare – Tara automática
Permite configurar el estatus de tara automática.
OFF - apagado= desactivado.
ON - encendido = activado.
Se mostrará el siguiente mensaje “Colocar un recipiente sobre la bandeja (Place
containeronthe pan)”cuando esté a punto de iniciarse el proceso de Tara
automática..
Aparecerá un botón de desactivación Deactivate - desactivar debajo del texto.
Pulse este botón para desactivar la función de Tara Automática(Automatic Tare
function).
Fecha y Hora
Permite configurar la fecha y la hora.
Modificar el formato (si lo desea), y luego introducir los valores actuales.
Fecha : Tocar M/D/Y para reposicionar el Mes, Día y Año.
Hora : Tocar 24 HRS para modificar el formato de la hora a 12HRS.
Pulsar [Save] paraconfirmar los nuevos valores.
Page 81

Balanzas ScoutTMSeries – STX ES 33
miligramos
gramos
kilogramos
quilates
onzas
onza troy
libras
Libras:Onzas
Pennyweight
Peso grano
Newtons
TaelHong Kong
TaelSingapur
Tael Taiwán
tical
tola
Unidad
personalizada 1
5.2.3 Unidades de pesaje
Entre en este sub-menú para activar las unidades de pesaje deseadas.
Nota :Por causa de las distintas leyes y normativas nacionales de aplicación, es posible que el
indicador no incluya algunas de las unidades de medida que aparecen en el siguiente listado.
Sub-menú de unidades
5.2.3.1 Unidad personalizada
Utilice “CustomUnit” - Unidad personalizada para mostrar en pantalla una unidad de medida
alternativa. La unidad de medida se define mediante un factor de conversión basado en la
unidad del gramo, en el que el factor de conversión es el número de unidades personalizadas
por gramo, expresado en notación científica (Factor x 10^Exponent).
Nombre
Se puede personalizar el nombre de la unidad personalizada (CustomUnit) con hasta 3
caracteres. Debería ser distinta de las unidades de pesaje existentes.
Factor
Permite configurar el factor de conversión (de 0.1 a 1.99)mediante el uso del teclado
numérico. La configuración por defecto es 1.0.
Exponente
Permite configurar el factor multiplicador.
100 = multiplicar por el factor 1
101 = multiplicar el factor por el 10
102 = multiplicar el factor por el 100
103 = multiplicar el factor antes de 1000
10-3 = dividir el factor antes de 1000
10-2 = dividen el factor por el 100
10-1 = dividen el factor por el 10
Dígito menos significativo (LeastSignificantDigit)
Configuración de la graduación.
Se hallan disponibles configuraciones de 0.5, 1, 2, 5, 10, 100.
Nota :La unidad personalizada (CustomUnit) se halla bloqueada en posición Off –
apagado – cuando el interruptor de seguridad (Security Switch) está en la posición
de bloqueo.
Page 82

ES 34 Balanzas ScoutTMSeries – STX
Exportar
USB
Importar a
partir de USB
InfoBalanza
Exportar a USB*
Exportar datos a un soporte flash drive USB. Pueden exportarse dos tipos de datos :
- Configuraciones de los modos de las aplicaciones (Application Mode Settings) = Peso
medio de la muestra (APW), peso de referencia (Ref.Weight) etc.
- Configuraciones de Menú (Menu Settings) = funciones de configuración de la
balanza, etc.
Nota :La función de almacenamiento en USB tiene que hallarse configurada en ON –
encendido – para permitir la transferencia de datos a un dispositivo USB.
Importar a partir de USB*
Importar datos a partir de un flash drive USB
Configuraciones de los modos de las aplicaciones (Application Mode Settings) =
importar configuraciones de la balanza y de las aplicaciones
Configuraciones de Menú (Menu Settings) = importar las configuraciones de los menús
Información sobre la Balanza
Información sobre la balanza :Tipo de Balanza, Identificador de la
Balanza(Balance ID), Capacidad, Legibilidad y versión del software.
RS-232
Configuraciones de
impresión
Velocidad de
transmisión
Transmisión
Comprobación protocolo de
comunicación (Handshake)
5.2.4 Data Maintenance – Conservación / almacenamiento de datos
Sub-menú de conservación / almacenamiento de datos :
*Únicamente disponible cuando el Host USB está conectado, y el controlador del flash drive USB
está instalada.
5.2.5 Comunicaciones
Entrar en este menú para definir los métodos y sistemas de comunicación externa y para
configurar los parámetros de impresión.
Los datos pueden ser emitidos en dirección a un PC o a una impresora
Se muestran en negrita las configuraciones por defecto de salida de fábrica.
Notas: Las funcionalidadesRS232, Ethernet, Bluetooth, Dispositivo USB el Menú del Host USB
Hostse hallan únicamente disponibles si el interfaz optativo ha sido previamente instalado.
Sub-menú de comunicaciones
Seleccionando un elemento de la configuración hace que aparezca un menú de otro
nivel :
Sub.Menú RS-232 :
Page 83

Balanzas ScoutTMSeries – STX ES 35
Velocidad de transmisión (BaudRate)
Permite configurar la velocidad de transmisión (bits por
segundo).
1200 = 1200 bps
2400 = 2400 bps
4800 = 4800 bps
9600 = 9600 bps
19200 = 19200 bps
38400 = 38400 bps
57600 = 57600 bps
115200 = 115200 bps
Transmisión
Configurar los bits de datos, bit de stop bit, y la paridad.
7 EVEN1 = 7 bits de datos, paridad par
7 ODD 1 = 7 bits de datos, paridad impar
7 NONE 1 = 7 bits de datos, sin paridad
8 NONE 1 = 8 bits de datos, sin paridad
7 EVEN2 = 7 data bits, paridad par
7 ODD 2 = 7 bits de datos, paridad impar
7 NONE 2 = 7 bits de datos, sin paridad
8 NONE 2 = 8 bits de datos, sin paridad
Handshake : comprobación del protocolo de
comunicación
Configurar el método de control de flujo de datos.
NONE - ninguno = sin comprobación del protocolo de
comunicación (no handshaking)
Xon-Xoff = handshakingXON/XOFF
Print Output
Salida de impresión
Auto Print
Impresión
automática
Print Content
Contenido de
impresión
Feed
Alimentación
Format
Formato
Alt. Command
Print Output – Salida de impresión
StableWeightOnly – únicamente si el pesaje es estable
Configuración de los criterios de impresión.
OFF - apagado = los valores se imprimen de modo automático, con
total independencia de la estabilidad.
ON - encendido = los valores se imprimen únicamente si se satisfacen
los criterios de estabilidad.
Únicamente valores numéricos (NumericValueOnly)
Configuración de los criterios de impresión.
OFF - apagado = Se imprimen los valores de todos los datos
ON - encendido = Se imprimen únicamente los valores
Nota :El carácter seleccionado puede ser utilizado únicamente para un comando.
Sub- Menú de configuraciones de impresión :
Page 84

ES 36 Balanzas ScoutTMSeries – STX
PwWr.UN
ON STABILITY
numéricos de los datos
Un solo encabezado (Single HeaderOnly)
Configuración de los criterios de impresión.
OFF – apagado = Se imprimirán los encabezados en cada impresión
ON – encendido = Los encabezados se imprimirán únicamente
una vez al día
Opciones de impresión*
Configuración de los criterios de impresión.
Printer - impresora = Envía los datos de impresión a una impresora
PC = Envía los datos de impresión a un PC
Nota :Si la selección del idioma está configurado en Chino, Japonés o Coreano,
estas opciones deben corresponderse de modo efectivo con el dispositivo
periférico correspondiente.
Impresión automática (Auto Print)
Permite configurar la funcionalidad de impresión automática.
OFF - Apagado = desactivada
ON – encendido criterio estabilidad satisfecha = Se imprimirá cada vez
que se cumplan los criterios de estabilidad
Intervalo (segundos) = Se imprimirá de acuerdo con los intervalos de
tiempo definidos.
Continua = Se imprimirá de modo continuo.
Cuando se selecciona el modo de estabilidad activo (ON Stability), es
necesario configurar las condiciones de impresión.
Load – Carga = Imprimirá cuando la carga que se muestra en
pantalla sea estable.
Load and Zero – Carga y cero = Imprimirá cuando la carga que se
muestra en pantalla o la lectura del cero sean estable.
Cuando se selecciona el modo intervalo (INTERVAL), es necesario
configurar el intervalo de tiempo mediante el teclado numérico.
Hay configuraciones disponibles que van de 1 a 3600 segundos.
Contenidos a imprimir (Print Content)
Entre en este sub-menú para definir el contenido de los datos a imprimir
Véase los datos a continuación :
Page 85

Balanzas ScoutTMSeries – STX ES 37
Selección (Selection)
Configurar el estatus.
Seleccionar todo = Todas las
opciones estarán encendidas
Desmarcar todo = Todas las
opciones estarán apagadas
Encabezado (Header)
Configurar el estatus.
OFF – apagado = No se imprimirá el
encabezado definido por el usuario.
ON – encendido = Se imprimirá el
encabezado definido por el usuario.
TEXTO DEFINIDO POR EL USUARIO
TEXTO DEFINIDO POR EL USUARIO
USER DEFINED TEXT
USER DEFINED TEXT
Nota :La información del encabezado
debe definirse mediante el uso del
comando del interfaz H x “texto - text”.
(Consulte el apartado 5.1.)
Fecha y hora
Configurar el estatus.
OFF – apagado = No se imprimirán la
fecha y la hora.
ON – encendido = Se imprimirán la
fecha y la hora.
01/31/10 12:30 PM
Identificador de la balanza (Balance ID)
Configurar el estatus.
OFF – apagado = No se imprimirá el
valor del identificador de la balanza
(Balance ID).
ON – encendido = Se imprimirá el valor
del identificador de la balanza (Balance
ID).
Identificador de
la balanza
(Balance Id):
XXXXXXX
Nombre de la balanza (Balance Name)
Configurar el estatus.
OFF – apagado = No se imprimirá el
nombre de la balanza.
ON – encendido = Se imprimirá el
nombre de la balanza.
Nombre de la balanza
Nombre de la muestra (SampleName)
Configurar el estatus.
OFF – apagado = No se imprimirá el
nombre de la muestra.
ON – encendido = Se imprimirá el
nombre de la muestra.
Resultado
Configurar el estatus.
OFF – encendido = No se imprimirá el
resultado de la lectura que aparece en
pantalla.
ON – apagado = Se imprimirá el
resultado de la lectura que aparece en
pantalla.
Bruto (Gross)
Configurar el estatus.
OFF – apagado = No se imprimirá el
peso bruto.
ON – encendido = Se imprimirá el peso
bruto.
12.000 kg
Neto (Net)
Configurar el estatus.
OFF – apagado = No se imprimirá
el peso neto.
ON – encendido = Se imprimirá el
peso neto.
Tare
Configurar el estatus.
OFF – apagado = No se imprimirá
el peso de la tara.
ON – encendido = Se imprimirá el
peso de la tara.
Información
Configurar el estatus.
OFF – apagado = No se imprimirá
la información de referencia.
ON – encendido = Se imprimirá la
información de referencia.
Nota :Vea las informaciones que
aparecen a continuación para obtener
más informaciones al respecto.
Línea para la firma (Signature Line)
10.000 kg NET
Page 86

ES 38 Balanzas ScoutTMSeries – STX
(Balance Name): XXXXXXX
Nombre de usuario (UserName)
Configurar el estatus.
OFF – apagado = No se imprimirá
el nombre del usuario.
ON – encendido = Se imprimirá del
nombre del usuario.
Nombre del usuario
(UserName): XXXXXXXX
Nombre del proyecto (Project Name)
Configurar el estatus.
OFF – apagado = No se imprimirá el
nombre del proyecto.
ON – encendido = Se imprimirá el
nombre del proyecto.
Nombre de la aplicación
(ApplicationName)
Configurar el estatus.
OFF – apagado = No se imprimirá el
nombre de la aplicación.
ON – encendido = Se imprimirá el nombre
de la aplicación.
Nombre del proyecto
(Project Name): XXXXXX
Nombre de la aplicación
(ApplicationName):
XXXXXXXXXXXX
Configurar el estatus.
OFF – apagado = No se imprimirá
la línea para la firma.
ON – encendido = Se imprimirá la
línea para la firma.
Firma :__________________
Verificadopor: _______________
Nota :El apartado “Verificado por” debe
de ser firmado por un oficial acreditado de
la oficina nacional de metrología (pesos y
medidas) para homologar / validar que los
resultados de calibrado y/o pesajes son
conformes a las leyes y normas de
aplicación.
Pie de página (Footer)
Configurar el estatus.
OFF – apagado = No se imprimirá el
pie de página definido por el usuario.
ON – encendido = Se imprimirá el pie
de página definido por el usuario..
TEXTO DEFINIDO POR
EL USUARIO
TEXTO DEFINIDO POR
EL USUARIO
USER DEFINED TEXT
USER DEFINED TEXT
Alimentación (Feed)
Configurar la alimentación del papel.
1 LINE (1 línea) = el papel se desplazará una línea hacia arriba una vez
concluida la impresión.
4 LINE (4 líneas) = el papel se desplazará hasta 4 líneas
hacia arriba una vez concluida la impresión
Formato
Permite configurar el formato de impresión.
SINGLE LINE = Se generará una única línea de impresión con
una espaciado TAB entre cada uno de los datos
emitidos.
MULTIPLE LINES = Se generará una impresión en múltiples líneas.
Se añadirá un espaciado CRLF entre cada uno
de los datos emitidos.
Page 87

Balanzas ScoutTMSeries – STX ES 39
AltCommand (Comando de impresión alternativo)
Comando de impresión alternativo (AlternatePrintCommand)
Permite configurar el carácter a utilizar como comando alternativo
para imprimir.
Hay configuraciones disponibles de la A a la Z. No hay configuración
por defecto exceptuando P.T o Z.
Comando alternativo de ejecución del procedimiento de Tara
(Alternate Tare Command)
Permite configurar el comando alternativo para ejecutar el
procedimiento de Tara.
Hay configuraciones disponibles de la A a la Z. No hay configuración
por defecto exceptuandoP&Z.
Comando alternativo retorno al cero (Alternate Zero Command)
Permite configurar el comando alternativo para ejecutar el retorno al
Cero.
Hay configuraciones disponibles de la A a la Z. No hay configuración
por defecto exceptuandoP&T.
Configuraciones del Menú de impresión (PrintSettingsMenu) :
Nota :Si el interruptor de seguridad está en posición de bloqueo, no se reconfigura
la función “Output-Stableprint” – impresión de datos en situación de estabilidad.
Se añade un delimitador ATAB entre cada emisión / salida de datos.
Header
Encabezado
Balance Name
Nombre de la
balanza
UserName
Nombre del
usuario
Project Name
Nombre del
proyecto
Footer
Pie de
página
Encabezado (Header)
Permite imprimir los encabezados de buenas prácticas de
laboratorio (GLP). Existen hasta 5 encabezados disponibles.
Se hallan disponibles configuraciones alfanuméricas
de hasta 25 caracteres para cada una de las
configuraciones de los encabezados.
Nombre de la balanza (Balance Name)
Configurar la identificación de la balanza.
Se hallan disponibles configuraciones alfanuméricas de hasta 25
caracteres.
La configuración por defecto esen blanco.
5.2.6 Datos GLP (Buenas prácticas de laboratorio) y GMP
(Buenas prácticas de fabricación)
Entrar en este menú para configurar los datos relacionados con las buenas prácticas de
laboratorio (GLP).
Datos del Sub-menú de buenas prácticas de laboratorio (GLP)
Page 88

ES 40 Balanzas ScoutTMSeries – STX
Nombre de usuario (UserName)
Configurar la identificación del usuario.
Se hallan disponibles configuraciones alfanuméricas de hasta 25
caracteres.
La configuración por defecto esScout.
Nombre del proyecto (Project Name)
Entrar en este menú para configurar la identificación del Proyecto.
Se hallan disponibles configuraciones alfanuméricas de hasta 25
caracteres.
La configuración por defecto esen blanco.
Pie de página (Footer)
Permite la impresión de los encabezados de buenas prácticas de laboratorio
(GLP). Hay 2 encabezados disponibles.
Se hallan disponibles configuraciones alfanuméricas
de hasta 25 caracteres para cada una de las
configuraciones de los encabezados.
Calibration
Calibrado
Balance Setup
Configuración de la balanza
WeighingUnits
Unidades de pesaje
Data Maintenance
Mantenimiento / salvaguardia de datos
Communication
Comunicación
GLP and GMP Data
Datos GLP y GMP
Factory Reset
Configuración de
salida de fábrica
5.2.7 Reconfiguración de salida de fábrica por defecto
(Factory Reset)
Utilizar este sub-menú para reconfigurar los menús a su configuración por defecto de
salida de fábrica.
Reconfigurar todo (ResetAll) = reconfigurar todos los menús a su configuración
por defecto de salida de fábrica.
Salir (Exit) = volver a la pantalla principal sin resetear / reconfigurar ninguno de
los menús.
Nota :No afecta a los datos de Calibrado.
5.2.8 Bloqueo
Utilice este menú para bloquear / desbloquear ciertos menús para evitar que se
produzcan cambios no autorizados en las configuraciones de los mismos. Una vez que
se hayan bloqueado los menús, aparecerá un pequeño candado de seguridad sobre el
icono del menú y los usuarios no podrán tener acceso a ese menú.
Sub-menú de bloqueo (Lockout Sub-menu)
Haga clic en alguno de los menús y seleccione.
OFF - apagado = el sub-menú no se halla bloqueado.
ON - encendido = el sub-menú se halla bloqueado.
Page 89

Balanzas ScoutTMSeries – STX ES 41
Riesgos de descarga eléctrica. Desconecte el equipo de la fuente de
energía cuando efectúe tareas de limpieza en el mismo.
Asegúrese de que no entran líquidos en el interior del Terminal o en la
basedel mismo.
Síntoma / Mensaje en
pantalla
Causa probable
Solución
No se puede encender el
dispositivo
La balanza no recibe
alimentación / corriente
Comprobar conexión y voltaje
Escasa precisión
Calibrado inadecuado
Entorno inestable
Llevar a cabo el procedimiento de
calibrado
Colocar la balanza en un
emplazamiento adecuado
No puede efectuarse el
calibrado
El interruptor de seguridad
está en la posición de cierre
Entorno inestable
Masas de calibrado
incorrectas
Girar el cierre de bloqueo /
seguridad
Colocar la balanza en un
emplazamiento adecuado
Usar masas de calibrado correctas
No se pueden modificar
las configuraciones del
menú
El interruptor de seguridad
está en la posición de cierre
Girar el cierre de bloqueo /
seguridad
Peso de referencia bajo
El peso de referencia es
demasiado bajo
El peso colocado sobre la
bandeja es demasiado bajo
para definir un peso de
referencia válido.
Usar una muestra de un tamaño
mayor
Peso de la muestra no
válido InvalidPieceWeight
El peso de la muestra
referencia es demasiado bajo
Incrementar el peso de la muestra
de referencia
Tiempo de operación
agotado OperationTimeout
La lectura del pesaje no es
estable
Girar el cierre de bloqueo /
seguridad
------
Ocupado – en funcionamiento
(tara, cero, impresión)
Esperar a que concluya la
operación en curso
6. Mantenimiento
6.1 Calibrado
Es conveniente comprobar el calibrado con cierta periodicidad colocado un peso con un peso
preciso establecido sobre la balanza para comprobar el resultado. Si resulta necesario efectuar
una calibración ejecute el procedimiento de calibrado interno.
6.2 Limpieza
Atención :No utilizar disolventes, productos químicos, alcohol, amoniaco o
productos abrasivos para limpiar la carcasa o el panel de control.
La carcasa puede limpiarse con un paño sin pelusas humedecido con un detergente suave si
fuese necesario.
6.3 Resolución de problemas
TABLA6-1. Resolución de problemas
Page 90

ES 42 Balanzas ScoutTMSeries – STX
6.4 Información sobre el servicio técnico
Si el apartado de resolución de problemas no le resulta útil para resolver un problema, puede
ponerse en contacto con su agente autorizado OHAUS. Para servicio o soporte técnico en los
Estados Unidos puede llamar al servicio de atención al cliente al número gratuito :1-800-6727722 ext. 7852entre las 8:00 AM y las 5:00 PM EST. Un especialista en los productos
OHAUSse hallará disponible para brindarle la asistencia técnica necesaria. Si reside fiera de la
Estados Unidos, por favor, visite nuestra web:
www.ohaus.com
o localice las oficinas de
OHAUSmás cercanas.
7. Datos técnicos
7.1 Características técnicas
Condiciones ambientales
Usar únicamente en espacios cerrados
Rango de temperaturas de funcionamiento operativo :+5 °C a +40 °C
Humedad relativa :10% a 80% a 31°C , con decrecimiento lineal hasta el 50% a 40°C, sin
condensación
Altitud :Hasta 2000 m
Alimentación :Corriente AC – Adaptador de corriente 100-240V 50/60 Hz y salida 5V DC 1 A, o 4 pilas AA
EMC / CEM : Ver declaración de conformidad
Nivel de polución : 2
Categoría de la instalación : II
Fluctuaciones de voltaje de la corriente principal :hasta ± 10% del voltaje nominal
Page 91

Balanzas ScoutTMSeries – STX ES 43
MODELO
STX123
STX223
STX222
STX422
STX622
STX1202
Capacidad (g)
120
220
220
420
620
1200
Legibilidad d (g)
0.001
0.001
0.01
0.01
0.01
0.01
Repetibilidad (desviació n
está ndar) (g)
0.002
0.002
0.01
0.01
0.01
0.02
Linealidad (g)
0.003
0.003
0.01
0.01
0.02
0.03
Masa de Calibrado de Rango*
100 g
200 g
200 g
200 g
300 g
1 kg
Masa de Calibrado de
Linealidad
50, 100 g
100, 200 g
100, 200 g
200, 400 g
300, 600 g
500 g, 1 kg
Unidades de pesaje*
mg, g, kg, ct, N, oz, ozt, dwt, lb, lb:oz, grn,Tael (HongKong),Tael (Singapore),Tael (Taiwan), tical, tola,
personalizado (1)
Aplicaciones
Pesaje, Recuento, Pesaje porcentual, Fijar peso en pantalla, Totalizació n, Comprobació n de peso, Densidad,
Pesaje diná mico, Pesaje molecular (Mol)
Duració n de la batería típica
7 horas
Calibració n
Seleccionable por el usuario de calibrado o de linealidad de calibració n externa / digital con pesa externa
Tiempo de estabilizació n
(habitual)
1.5 s
1.5 s
1s
1s
1s
1.5 s
Pantalla de protecció n
Sí
No
Rango de Tara
Plena capacidad por sustracció n
Pantalla
TFT a color Full-Color – Pantalla grá fica de Cristal Líquido LCS
Tamañ o de la pantalla
109 mm / 4.3 pulgadas (diagonal)
Rango de temperaturas de
funcionamiento operativo
específico
+10° C a +40°C a10% a 80% Humedad relativa, sin condensació n
Condiciones de
almacenamiento
-20° C a +55°C a10% a 90% Humedad relativa, sin condensació n
Comunicació n
RS232, dispositivo USB, Ethernet, Bluetooth***, Host USB Host (todos disponibles como accesorio)
Tamañ o de la plataforma
(Diá metro)
Ø 93 mm /
3.7 pulgadas
Ø 93 mm /
3.7 pulgadas
120mm /
4.7 pulgadas
120mm /
4.7 pulgadas
120mm /¨
4.7 pulgadas
170 x 140 mm /
6.7 x 5.5
pulgadas
Dimensiones de la balanza
(Ancho x Largo x Alto)
202 x 222 x 103 mm /
8.0 x 8.7 x 4.1 pulgadas
202 x 224 x 54 mm /
8.0 x 8.8 x 2.1 pulgadas
Dimensiones para envíos
(Ancho x Largo x Alto)
300 mm x 250 mm x 129 mm /
11.8 x 9.8 x 5.1 pulgadas
Peso Neto (kg)
1.0
Peso para envíos (kg)
1.6
Modelo
STX123
STX223
STX222
STX422
STX622
STX1202
Gram (g)
120 x 0.001
220 x 0.001
220 x 0.01
420 x 0.01
620 x 0.01
1200 x 0.01
Milligram (mg)
120000 x 1
220000 x 1
/ / /
/
Kilogram (kg)
/ / / / /
1.2 x 0.00001
Carat (ct)
600 x 0.005
1100 x 0.005
1100 x 0.05
2100 x 0.05
3100 x 0.05
6000 x 0.05
Newton (N)
1.17679 x
0.00001
2.15744 x
0.00001
2.1574 x 0.0001
4.1188 x 0.0001
6.0801 x 0.0001
11.7679 x 0.0001
Ounce (oz)
4.23290 x
0.00005
7.76030 x
0.00005
7.7600 x 0.0005
14.8150 x 0.0005
21.8700 x 0.0005
42.3290 x 0.0005
Ounce Troy (ozt)
3.85810 x
0.00005
7.07320 x
0.00005
7.0730 x 0.0005
13.5030 x 0.0005
19.9335 x 0.0005
38.5810 x 0.0005
Pennyweight (dwt)
77.162 x 0.001
141.463 x 0.001
141.46 x 0.01
270.07 x 0.01
398.67 x 0.01
771.62 x 0.01
Pound (lb) / / / /
1.36690 x
0.00005
2.64555 x
0.00005
Pound:Ounce (lb:oz)
/ / /
/
1lb:5.8700oz x
0.0005oz
2lb:10.3290oz x
0.0005oz
Grain (grn)
1851.88 x 0.02
3395.12 x 0.02
3395.0 x 0.2
6481.6 x 0.2
9568.0 x 0.2
18518.8 x 0.2
TABLA 7-1. Características técnicas
Notas:
* Las pesas de calibración se incluyen con los modelos de hasta 620g capacidad.
** Las unidades de pesaje disponibles, los modos de aplicación y los Kits de interfaces opcionales están sujetos a cambios de
acuerdo con las normativas nacionales aplicables.
*** Kit Bluetooth sólo está disponible en ciertas regiones de acuerdo con las regulaciones locales.
TABLA 7-2. Características técnicas (Continuación)
Capacidad x Legibilidad:
Page 92

ES 44 Balanzas ScoutTMSeries – STX
MODELO
STX2202
STX421
STX621
STX2201
STX6201
STX8200
Capacidad (g)
2200
420
620
2200
6200
8200
Legibilidad d (g)
0.01
0.1
0.1
0.1
0.1
1
Repetibilidad (desviació n
está ndar) (g)
0.02
0.1
0.1
0.1
0.1
1
Linealidad (g)
0.03
0.1
0.1
0.1
0.2
1
Masa de Calibrado de Rango
2 kg
200 g
300 g
2 kg
5 kg
8 kg
Masa de Calibrado de Linealidad
1 kg, 2 kg
200, 400 g
300, 600 g
1 kg, 2 kg
3 kg, 6 kg
4 kg, 8 kg
Unidades de pesaje*
mg, g, kg, ct, N, oz, ozt, dwt, lb, lb:oz, grn,Tael (HongKong),Tael (Singapore),Tael (Taiwan), tical, tola,
personalizado (1)
Aplicaciones
Pesaje, Recuento, Pesaje porcentual, Fijar peso en pantalla, Totalizació n, Comprobació n de peso,
Densidad, Diná mico, Peso molecular (Mol)
Duració n de la batería típica
7 horas
Calibració n
Seleccionable por el usuario de calibrado o de linealidad de calibració n externa / digital con pesa externa
Tiempo de estabilizació n
(habitual)
1.5 s
1.5 s
1s
1s
1s
1s
Pantalla de protecció n
No
Rango de Tara
Plena capacidad por sustracció n
Pantalla
TFT a color Full-Color – Pantalla grá fica de Cristal Líquido LCS
Tamañ o de la pantalla
109 / 4.3 pulgadas mm (diagonal)
Rango de temperaturas de
funcionamiento operativo
específico
+10° C a +40°C a10% a 80% Humedad relativa, sin condensació n
Condiciones de almacenamiento
-20° C a +55°C a10% a 90% Humedad relativa, sin condensació n
Comunicació n
RS232, dispositivo USB, Ethernet, Bluetooth***, Host USB Host (todos disponibles como accesorio)
Tamañ o de la plataforma
(Diá metro)
170 x 140 mm /
6.7 x 5.5
pulgadas
120 mm /
4.7
pulgadas
170 x 140 mm /
6.7 x 5.5
pulgadas
170 x 140 mm /
6.7 x 5.5
pulgadas
170 x 140 mm /
6.7 x 5.5
pulgadas
170 x 140 mm /
6.7 x 5.5
pulgadas
Dimensiones de la balanza
(Ancho x Largo x Alto)
202 x 224 x 54 mm / 8.0 x 8.8 x 2.1 pulgadas
Dimensiones para envíos
(Ancho x Largo x Alto)
300mm x 250mm x 129mm/ 11.8 x 9.8 x 5.1 pulgadas
Peso Neto (kg)
1.0
Peso para envíos (kg)
1.6
Model
STX2202
STX421
STX621
STX2201
STX6201
STX8200
Gram (g)
2200 x 0.01
420 x 0.1
620 x 0.1
2200 x 0.1
6200 x 0.1
8200 x 1
Kilogram (kg)
2.2 x 0.00001
/
/
2.2 x 0.0001
6.2 x 0.0001
8.2 x 0.001
Carat (ct)
11000 x 0.05
2100 x 0.5
3100 x 0.5
11000 x 0.5
31000 x 0.5
41000 x 5
Newton (N)
21.5744 x
0.0001
4.119 x 0.001
6.080 x 0.001
21.574 x 0.001
60.801 x 0.001
80.41 x 0.01
Ounce (oz)
77.6030 x
0.0005
14.815 x 0.005
21.870 x 0.005
77.600 x 0.005
218.700 x 0.005
289.25 x 0.05
Ounce Troy (ozt)
70.7320 x
0.0005
13.500 x 0.005
19.930 x 0.005
70.730 x 0.005
199.335 x 0.005
263.60 x 0.05
Pennyweight (dwt)
1414.63 x 0.01
270.1 x 0.1
398.7 x 0.1
1414.6 x 0.1
3986.7 x 0.1
5270 x 1
Pound (lb)
4.85020 x
0.00005
/
1.3670 x 0.0005
4.8500 x 0.0005
13.6685 x
0.0005
18.080 x 0.005
Pound:Ounce (lb:oz)
4lb:13.6030oz x
0.0005oz
/
1lb:5.870oz x
0.005oz
4lb:13.600oz x
0.005oz
13lb:10.700oz x
0.005oz
18lb:1.25oz x
0.05oz
Grain (grn)
33951.2 x 0.2
6480 x 2
9570 x 2
33950 x 2
95680 x 2
126540 x 20
TABLA 7-3. Características técnicas (Continuación)
Notas:
* Las pesas de calibración se incluyen con los modelos de hasta 620g capacidad.
** Las unidades de pesaje disponibles, los modos de aplicación y los Kits de interfaces opcionales están sujetos a
cambios de acuerdo con las normativas nacionales aplicables.
*** Kit Bluetooth sólo está disponible en ciertas regiones de acuerdo con las regulaciones locales.
TABLA 7-4. Características técnicas (Continuación)
Capacidad x Legibilidad:
Page 93

Balanzas ScoutTMSeries – STX ES 45
Modelo A B C
Con cubierta
202 mm/8.0in.
222 mm/8.7in.
103 mm/4.1in.
Sin cubierta
202 mm/8.0in.
224 mm/8.8in.
54 mm/2.1in.
7.2 Gráficos y Dimensiones
Dimensiones una vez completado el montaje
Gráfico 7.1 Dimensiones
8. ACTUALIZACIONES DE PROGRAMAS DE SOFTWARE
Ohaus está sumida como empresa en un proceso de mejora continua y continuada de mejora
del software de sus balanzas. Para obtener la última versión, por favor, póngase en contacto
con su agente autorizado Ohaus o con la empresaOhaus.
Page 94

ES 46 Balanzas ScoutTMSeries – STX
Marcaje
Estándar
Este producto es conforme con las normas armonizadas aplicables de
directivas de la UE 2011/65 / UE (RoHS) 2014/30 / UE (EMC) 2014/35 / UE
(LVD) y 2014/31 / UE (NAWI). La declaración de conformidad de la UE está
disponible en línea en www.ohaus.com/ce.
EN 61326-1
CAN/CSA-C22.2 No. 61010-1
UL Std. No. 61010-1
En cumplimiento con la Directiva Europea 2002/96/EC sobre la gestión de
residuos de equipos eléctricos y electrónicos (Waste Electrical and Electronic
Equipment - WEEE) este dispositivo no puede ser desechado junto con los
residuos domésticos. Esto también es de aplicación otros países fuera de la
Unión Europea, de acuerdo con sus normativas propias de aplicación.
La Directiva para Baterías 2006/66/CE introduce nuevos requisitos a partir
de septiembre de 2008 sobre la separación de las baterías de los residuos
de equipos en los Estados Miembros de la UE. Para dar cumplimiento a esa
Directiva, este dispositivo ha sido diseñado para permitir la extracción segura
de las baterías al final de su vida útil por parte de una instalación de
tratamiento de residuos.
Por favor, une vez concluida su vida útil, proceda a la eliminación de este
producto de conformidad con las normas aplicables en los puntos de
recogida especificados para dispositivos y equipos eléctricos y electrónicos.
Si tiene alguna duda o pregunta, por favor póngase en contacto con las
autoridades responsables o con el distribuidor donde efectuó la compra del
dispositivo.
En el caso de efectuarse la venta de este dispositivo a terceros (para su uso
privado o profesional), también se transfiere la responsabilidad en cuanto al
respeto de esta normativa.
Para las instrucciones sobre la eliminación de residuos aplicable en Europa,
por favor, consulte nuestra página web : www.OHAUS.com/weee.
Gracias por contribuir a la protección del medio ambiente.
9. CUMPLIMIENTO DE LA NORMATIVA VIGENTE
Compliance to the following standards is indicated by the corresponding mark on the product.
GESTIÓN DE RESIDUOS
Page 95

Balanzas ScoutTMSeries – STX ES 47
Nota de la FCC (Comisión Federal de Comunicaciones)
Este equipo ha sido probado y ha quedado establecido que cumple con los límites establecidos
para dispositivos digitales de Clase B, en cumplimiento del apartado 15 de la normativa FCC
(Comisión Federal de Comunicaciones). Estos límites han sido concebidos y diseñados para
suministrar una protección razonable contra las interferencias nocivas en instalaciones
residenciales. Este equipo usa, genera y puede emitir energías de radio-frecuencia, y, en el
caso de no estar instalado y usarse el mismo de acuerdo con las instrucciones del fabricante,
pueden producirse interferencias perjudiciales o peligrosas con las comunicaciones por radio.
No obstante, no existe garantía alguna de que dichas interferencias no ocurran en una
instalación en concreto. Si este equipo provoca interferencias perjudiciales o peligrosas en la
recepción de radio o televisión, lo cual puede determinarse encendiendo y apagando el
dispositivo, se recomienda que el usuario intente corregir la interferencia llevando a cabo una o
varias de las acciones siguientes :
- Reorientar o colocar en otro emplazamiento la antena de recepción.
- Incrementar la distancia entre el equipo y el receptor.
- Conectar el equipo en un enchufe de toma de corriente de un circuito distinto al cual se halle
conectado el receptor.
- Por favor, consulte con su agente autorizado / concesionario o con un técnico especializado
en radio/TV para obtener la ayuda adecuada.
Aviso de Industry Canada
Este aparato digital de la Clase A cumple con la norma canadiense ICES-003.
Registro ISO 9001
En 1994, Ohaus Corporation de Estados Unidos, recibió un certificado de registro a ISO 9001
de Bureau Veritus Quality International (BVQI), lo que confirma que el sistema de gestión de
calidad de Ohaus es compatible con los requisitos de la norma ISO 9001. El 21 de junio de
2012, Ohaus Corporation, EE.UU., volvió a registrarse en el estándar ISO 9001:2008.
GARANTÍA LIMITADA
Los productos de Ohaus están garantizados contra defectos en materiales y mano de obra
desde la fecha de entrega hasta el término del periodo de garantía. Durante el período de
vigencia de la garantía, Ohaus reparará, o, a su opción, sustituirá sin cargo alguno cualquier
componente que demuestre estar defectuoso, siempre que el producto se devuelva a Ohaus,
flete prepagado.
Esta garantía no es válida si el producto ha sido dañado por accidente o mal uso, expuesto a
materiales radiactivos o corrosivos, tiene materiales extraños que han penetrado en el interior
del producto, o ha sido sometido a reparaciones o modificaciones por personas o empresas
distintas a Ohaus. En caso de no existir una tarjeta de registro de garantía enviada
adecuadamente al fabricante, el periodo de garantía comenzará en la fecha de envío al
distribuidor autorizado. Ohaus Corporation no otorga ninguna otra garantía expresa o
implícita. Ohaus Corporation no será responsable de ningún daño indirecto.
Ya que la legislación sobre garantías difiere de un estado a otro y de país a país, póngase en
contacto con Ohaus o su distribuidor local de Ohaus para obtener más detalles.
Page 96

Page 97

Balances ScoutTM Séries – STX FR-1
TABLE DES MATIÈRES
1. INTRODUCTION ............................................................................................... 3
1.1 Description ................................................................................................................................................... 3
1.2 Définition des signaux d'avertissement et des symboles ............................................................................ 3
1.3 Mesures de sécurité ..................................................................................................................................... 3
1.4 Fonctionnalités ............................................................................................................................................. 4
2. INSTALLATION ................................................................................................. 4
2.1 Installation des composants ......................................................................................................................... 4
2.1.1 Déverrouillage du verrou de transport ..................................................................................................... 4
2.1.2 Installation du plateau de pesée .............................................................................................................. 4
2.1.3 Encoche de sécurité ................................................................................................................................ 4
2.2 Choix du site ................................................................................................................................................ 4
2.3 Mise de niveau de la balance ...................................................................................................................... 5
2.4 Raccordement au secteur ............................................................................................................................ 5
2.5 Étalonnage initial .......................................................................................................................................... 5
3. FONCTIONNEMENT ......................................................................................... 6
3.1 Commandes ................................................................................................................................................. 6
3.2 Présentation de l'affichage, Écran d'accueil ................................................................................................ 6
3.3 Fonctions principales et menu principal ....................................................................................................... 7
4. APPLICATIONS ................................................................................................ 8
4.1 Pesée ........................................................................................................................................................... 8
4.1.1 Paramètres de l'article ............................................................................................................................. 8
4.1.2 Nom de l'échantillon ................................................................................................................................. 9
4.1.3 Imprimer / Sauvegarder vers USB ........................................................................................................... 9
4.1.4 Menu……………………………………… .................................................................................................. 9
4.2 Comptage de pièces .................................................................................................................................... 9
4.3 Pesée en pourcentage ............................................................................................................................... 11
4.3.1 Paramètres de l'article ........................................................................................................................... 12
4.3.2 Recalculer le poids de référence ........................................................................................................... 12
4.4 Pesée dynamique /Animal ......................................................................................................................... 13
4.4.1 Paramètres de l'article ........................................................................................................................... 14
4.5 Détermination de la masse volumique ....................................................................................................... 15
4.5.1 Calcul de la masse volumique d'un solide à l'aide d'eau (défaut) ............................................................ 15
4.5.2 Calcul de la masse volumique d'un solide à l'aide d'un liquide auxiliaire ................................................. 17
4.5.3 Calcul de la masse volumique d'un liquide à l'aide d'une masse calibrée (pas fourni) ............................ 17
4.5.4 Calcul de la masse volumique d'une matière poreuse à l'aide d'huile ..................................................... 19
4.6 Pesée de contrôle ...................................................................................................................................... 20
4.6.1 Paramètres de l'article ........................................................................................................................... 21
4.6.2 Limites…………………………………………. ......................................................................................... 21
4.7 Maintien de l'affichage ............................................................................................................................... 22
4.7.2 Mode maintien d'affichage ........................................................................................................................ 23
4.7.3 Mode maintien du maximum ..................................................................................................................... 23
4.8 Totalisation ................................................................................................................................................... 23
4.9 Pesée molaire .............................................................................................................................................. 24
4.9.1 Paramètres de l'article ............................................................................................................................... 24
4.9.2 Saisir la masse molaire ............................................................................................................................. 25
4.9.3 Calculer la molarité ................................................................................................................................... 25
4.10 Fonctionnalités suppémentaires ................................................................................................................ 25
4.10.1 Pesée par en-dessous ............................................................................................................................ 25
4.10.2 Connection de l'interface ........................................................................................................................ 26
5. PARAMÈTRES MENU .................................................................................... 27
5.1 Menu navigation ......................................................................................................................................... 27
5.1.1 Modification des paramètres .................................................................................................................. 27
5.2 Menu Principal ………………………………………………………………………………………………... .28
5.2.1 Étalonnage ................................................................................................................................................. 28
5.2.1.1 Étalonnagepar intervalle ......................................................................................................................... 28
5.2.1.2 Étalonnagelinéaire .................................................................................................................................. 28
5.2.2 Montage de la balance ............................................................................................................................... 29
5.2.3 Unités de mesure ....................................................................................................................................... 31
5.2.4 Maintenance des données ......................................................................................................................... 32
Page 98

FR-2 Balances ScoutTMSéries - STX
5.2.5 Communication .......................................................................................................................................... 32
5.2.6 Données GLP et GMP ............................................................................................................................... 37
5.2.7 Retour aux paramètres usine ..................................................................................................................... 38
5.2.8 Verrouillage ................................................................................................................................................ 38
6. MAINTENANCE .............................................................................................. 39
6.1 Étalonnage .................................................................................................................................................. 39
6.2 Nettoayge .................................................................................................................................................... 39
6.3 Dépannage .................................................................................................................................................. 39
6.4 Information de service ................................................................................................................................. 39
7. DONNÉES TECHNIQUES ............................................................................... 40
7.1 Caractéristiques .......................................................................................................................................... 40
7.2 Plans et dimensions .................................................................................................................................... 43
8. MISE À JOUR LOGICIEL ................................................................................ 43
9. CONFORMITÉ ................................................................................................. 44
Page 99

Balances ScoutTM Séries – STX FR-3
ATTENTION
:
Lire toutes les mises en garde de sécurité avant l’installation, la
réalisation de connexions ou l’entretien de cet appareil. Ne pas se conformer à
ces mises en garde peut causer des blessures et/ou des dégâts matériels.
Conserver toutes les instructions pour future référence.
1. INTRODUCTION
1.1 Description
La balance Scout STX est un instrument de pesée de grande qualité qui vous procurera des
années de service si celui-ci est entretenu avec soin. Les modèles disponibles couvrent une
plage de 120 g à 8 200 g.
1.2 Définition des marques et symboles de mise en garde
Les consignes de sécurité sont marquées avec des messages et symboles de mise en garde.
Ceux-ci illustrent les questions de sécurité et les avertissements. Ignorer les consignes de
sécurité peut entraîner des blessures, des dégâts à l'appareil, des dysfonctionnements et des
résultats erronés.
Messages de mise en garde
MISE EN GARDE
AVERTISSEMENT
Attention
Note
Symboles de mise en garde
Risque d'ordre général Risque de choc électrique
Pour une situation dangereuse à risque moyen, pouvant entraîner
des blessures ou la mort si non évité.
Pour une situation dangereuse à faible risque, pouvant entraîner des
dégâts à l’appareil, aux biens, la perte de données ou des blessures
si non évitée.
Pour une information importante relative au produit.
Pour une information utile relative au produit.
1.3 Précautions de sécurité
Vérifiez que la tension d’alimentation électrique indiquée sur l'étiquette de données et
que le type de prise correspondent au courant alternatif utilisé.
S’assurer que le cordon d'alimentation ne constitue pas un obstacle potentiel ou un
risque lors d’un déplacement.
Utilisez la balance uniquement dans des endroits secs.
Ne pas laisser tomber les charges sur le plateau.
N’utiliser uniquement que des accessoires et des périphériques approuvés.
Faire fonctionner l'équipement que dans les conditions ambiantes spécifiées dans ce
mode d’emploi.
Débranchez l'appareil de l'alimentation électrique lors du nettoyage.
Ne pas faire fonctionner l'équipement dans des environnements dangereux ou instables.
Il est nécessaire que seul du personnel qualifié effectue l'entretien.
Ne placez pas la balance de telle sorte qu'il soit difficile d’avoir accès à la connexion de
l'alimentation électrique.
Page 100

FR-4 Balances ScoutTMSéries - STX
Commandes tactiles : Accès rapide, graphique à
toutes les fonctions de contrôle, utilisations et
fonctionnalités.
2.1.1 Déverrouillage du verrou de
transport
Libérer le verrou de transport rouge en
tournant le pointeur rouge de 90 degrés vers
la gauche pour déverrouiller.
Position
déverrouillée
Position
verrouillée
Sous-plateforme
Indicateur de
1.4 Fonctionnalités
2. INSTALLATION
2.1 Installation des composants
Se reporter aux illustrations et aux instructions ci-dessous pour identifier et assembler la
balance Scout et ses composants. Tous les composants doivent être assemblés avant d'utiliser
la balance.
2.1.2 Installation du plateau de pesée
Placer les moules rectangulaires dans la sous-plateforme comme illustré et exercer
une rotation vers la gauche jusqu'à leur verrouillage. Les plateaux ronds sont
placés du haut vers le bas sur la sous-plateforme.
2.1.3 Encoche de sécurité
Il est prévu à l'arrière de la balance une encoche de sécurité qui permet de sécuriser la balance
avec un câble en option muni d’une serrure.
2.2 Choix de l'emplacement
Pour de meilleurs résultats, il est nécessaire d’utiliser la balance Scout dans un environnement
propre et stable. Ne pas utiliser la balance dans des environnements avec des courants d'air
importants, avec des changements rapides de température, près de champs magnétiques ou à
proximité d'appareils générant des champs magnétiques ou des vibrations.
 Loading...