

OFYR CLASSIC STORAGE 85-100, CLASSIC BLACK 100-100, CLASSIC 100-100, CLASSIC 85-100, CLASSIC CONCRETE 100-100 User Manual
...Page 1
MANUAL
COOKING
UNITS
Page 2
ENGLISH
32
OFYR® MANUAL - COOKING UNITS OFYR® MANUAL - COOKING UNITS
OFYR® MANUAL
THANK YOU SO MUCH FOR BUYING AN OFYR
®
PRODUCT. THIS MANUAL CONTAINS SETUP INSTRUCTIONS,
WARRANTY CONDITIONS, AND ADDITIONAL INFORMATION ABOUT YOUR OFYR
®
COOKING UNIT.
OFYR® CLASSIC
85-100
OFYR
®
CLASSIC
BLACK 85-100
OFYR
®
CLASSIC
100-100
OFYR
®
CLASSIC
BLACK 100-100
OFYR
®
CLASSIC
STORAGE 85-100
OFYR
®
CLASSIC
CONCRETE 100-100
OFYR
®
CLASSIC
STORAGE 100-100
OFYR
®
ISLAND
85-100
OFYR® ISLAND
100-100
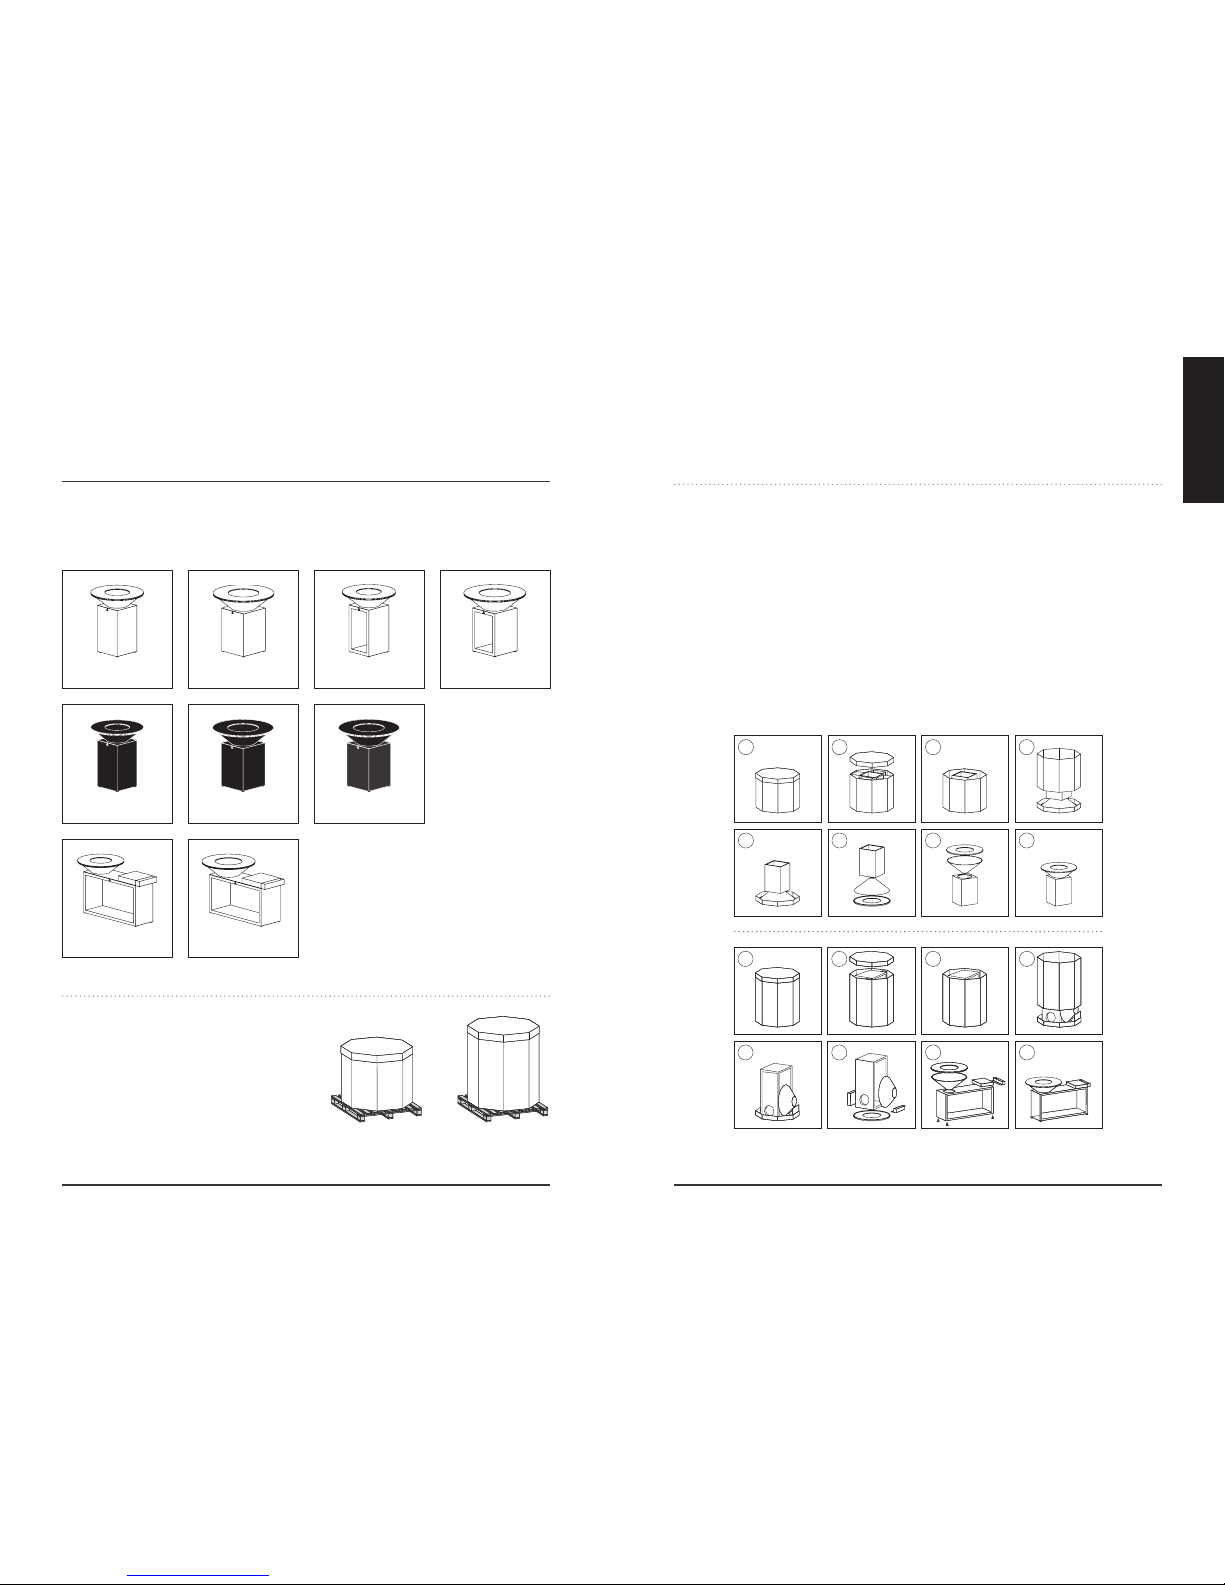
Fig.2 - OFYR’s Packed in octabin
Fig.1 - OFYR
®
cooking devices
Fig.3 - OFYR’s unpacking procedure
TRANSPORT/PACKAGING OF COOKING UNITS
The OFYR
®
Classic, Storage, and Black 85-100 and
100-100 are shipped upside down (see g. 2 and g.3).
Our OFYR
®
Black products are wrapped in an extra
layer of packaging material to prevent damage during
transport. The OFYR
®
Island 85-100 and 100-100 are
shipped vertically in special Island Octabins (see g. 2
and g.3). The OFYR
®
Concrete is packed straight up due
to the heavy weight of the base.
COOKING UNIT GENERAL INFORMATION
OFYR
®
cooking units are modular products consisting of various separate elements including a base, cone, and
cooking plate. All OFYR
®
cooking units are shipped in special octagonal packaging units, called Octabins. Our OFYR®
cooking units can be divided into 2 types: the OFYR
®
Classics and OFYR® Islands.
SETUP OF COOKING UNITS
The exterior of the Octabin features an explanation regarding how to unpack your OFYR
®
cooking unit.
Please note that all cooking units must be set up exactly as explained in these setup instructions!
We are not liable for any damage resulting from incorrect setup attempts of OFYR
®
cooking units.
BASE & CONE
First, place the base on a reproof surface. For our OFYR
®
Island models and OFYR® Concrete, we recommend placing
the base with two people, due to its considerable weight. Then, place the cone in the base’s hole levelly. If your surface
is not entirely level, you can use the base’s adjustable feet to make sure that it is level. Please note that if the adjustable
feet are extended too far, the OFYR
®
unit may become unstable. We recommend a maximum dierence in level of
10 mm. If the level dierence exceeds 10 mm, we recommend levelling the surface before setting up the OFYR
®
cooking unit. Once the OFYR
®
cooking unit has been set up, it must not be shifted. Shifting it could cause damage
to the adjustable feet and/or the rivet nuts with which the adjustable feet are attached. We do not accept warranty
claims or liability for any damage resulting from shifting your OFYR
®
cooking unit. Please note that the OFYR®
Classic Black has a coating and is thus more sensitive to damage during setup. We are not liable for any damage
or consequential damage resulting from the setup of your OFYR
®
cooking unit. Our OFYR® Island models contain
wooden work surfaces on the right. These surfaces have nylon feet that block any heat conduction from the top of
the Island base. The base contains a second top, and there is a gap of a few millimetres between the base and the
top. At the front right, back, or side of the base, this gap can be used to insert the spice tray.
01
05
02
06
03
07
04
08
01 02 03 04
08070605
Page 3
ENGLISH
54
OFYR® MANUAL - COOKING UNITS OFYR® MANUAL - COOKING UNITS
if you want to direct the heat elsewhere. When you light the re and add new wood to the re, it will generally
smoke for a bit until it catches re properly. This smoke formation can be prevented for the most part by using
our Buadoo blowpipe to blow oxygen into the re, causing the new wood to catch re almost instantly. The ideal
size for the pieces of wood is around 10 x 30 centimetres. We advise against using larger pieces of wood. These do
tend to catch re quickly, but generally do not burn down properly due to the lack of space for oxygen in the cone.
The fact that smaller pieces of wood are preferred is especially true for our 85-100 models, even more so than for
our 100-100 models. For an evening of cooking (4-5 hours) you will need around two Wood Bags of around 50 litres
each, depending on the temperature outside and the weather conditions.
03 INITIAL USE
Upon initial use, it is important to light a smaller re for roughly 30 minutes to allow the cooking plate to settle
properly. During manufacture, the middle of the cooking plate was pressed down just slightly. When the cook-
ing plate is heated, it will be pressed down even further, and if you light too big a re during your initial use of
your OFYR
®
cooking unit, this may cause the cooking plate to be pressed down too far during future use. It is
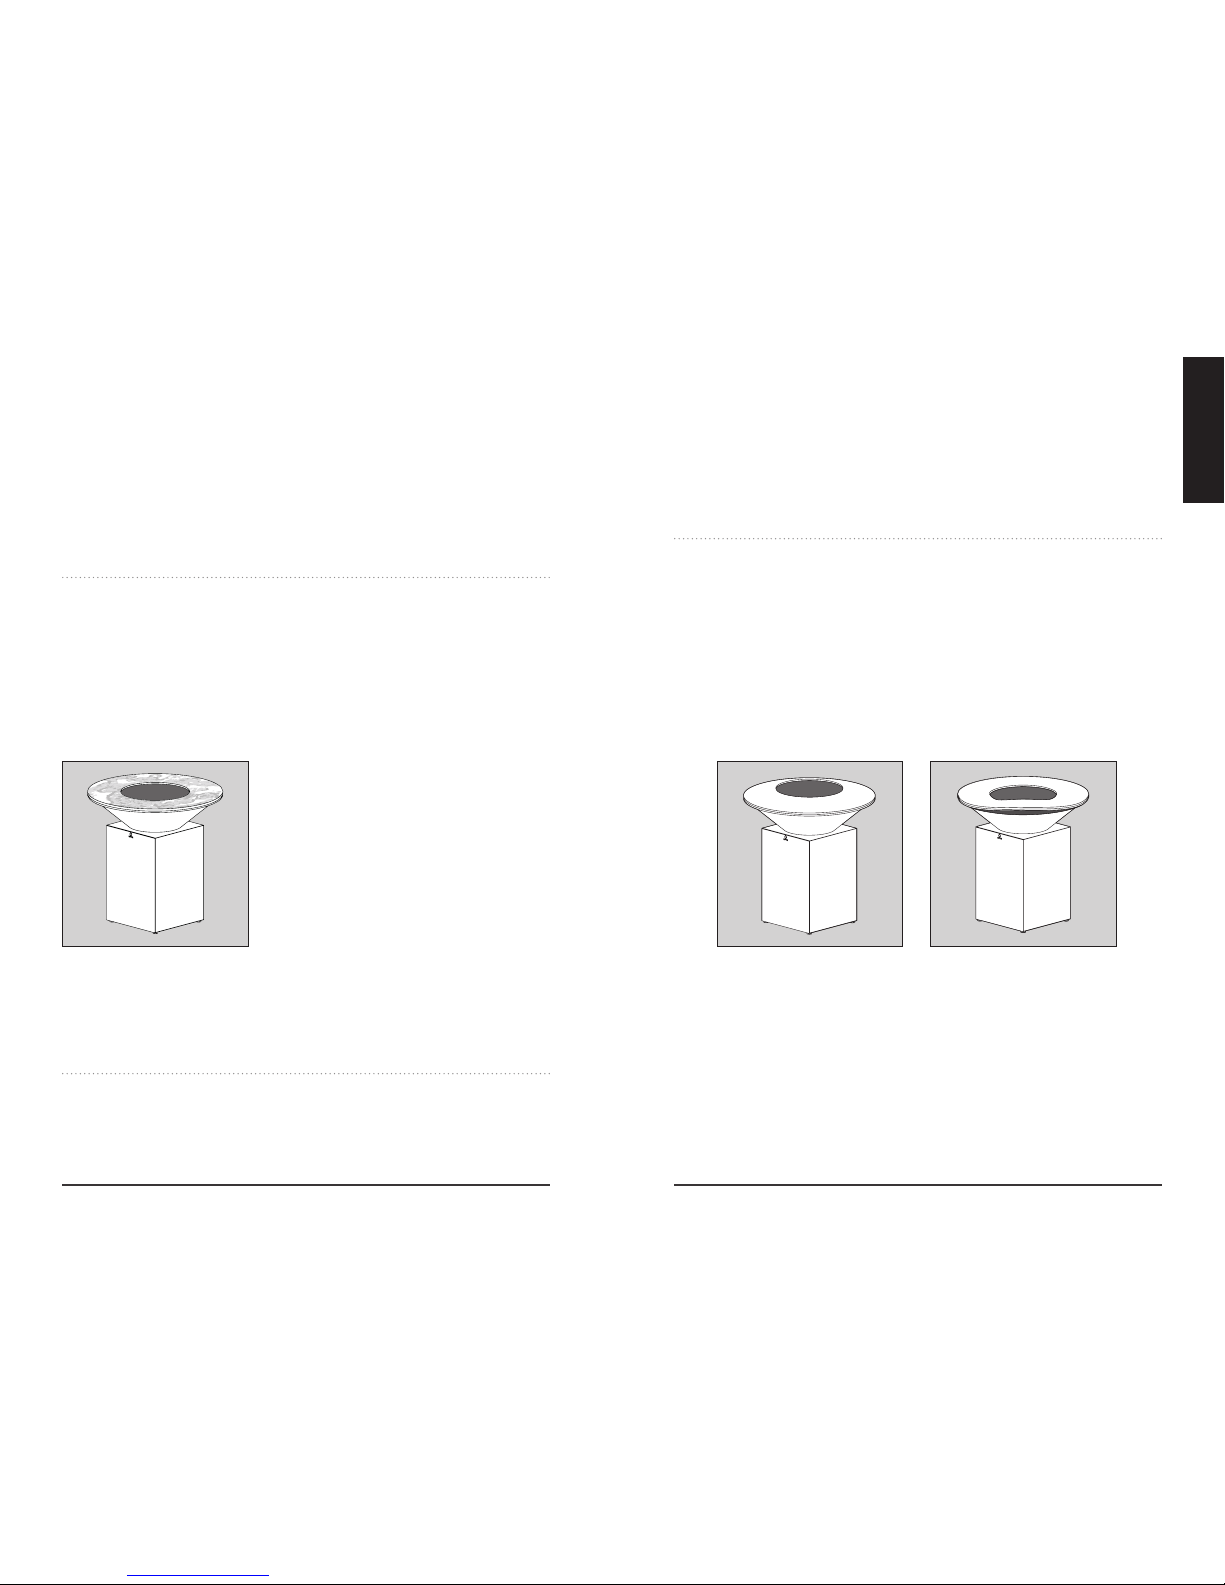
very important to prepare the cooking plate properly using the procedure outlined above. In some cases, the
cooking plate may instead bulge upwards in the middle and thus become convex (see g. 5). This means the steel
is incorrectly stressed. If this happens, please contact your dealer. If you light too big a re using wood that reaches
very high temperatures, such as the kind of hardwood that is used in construction, this may cause the cooking plate
to warp entirely (see g. 6). We do not accept warranty claims for any damage resulting from such incorrect usage.
All OFYR
®
cooking plates are treated with oil during manufacture for protection against corrosion. Once you have
prepped the cooking plate properly using a small re, you can start building a larger re. Considering the fact
that OFYR
®
cooking plate tops are 12 mm thick, it takes quite a sizeable re to get them heated through properly.
Once the cooking plate is well heated to heat up, drizzle on olive oil and spread it with a kitchen towel.
Do this 2-3 tim es. Then scrape d own the cooking pl ate with the suppl emented spatula a nd push the scrapings
into the re. We also have a PRO spatula in our product range for intensive use in a professional environment.
Initially, the cooking plate will give o a black substance. Simple drizzle it with olive oil a few more times, spread
out the oil, and scrape down the cooking plate. Once all you can manage to scrape o is beige scrapings,
the cooking plate is clean and ready for use. Simply drizzle on olive oil once more and spread it out, and start cooking!
We recommend using olive oil the rst 2-3 times you use your OFYR
®
cooking unit. Olive oil has a lower combustion
point, which will help the cooking plate get a nice brown-black hue. After the rst few uses, you can start using oil
types with higher combustion points, such as sunower oil or groundnut oil. Baking the oil into the cooking plate
also protects it from corrosion. However, if the cooking plate is not used for longer periods on end, the oil will dry
out and the cooking plate will start corroding when the weather is humid. To prevent such corrosion from forming,
please refer to Chapter 01, ‘Always outside’.
COOKING PLATE
To prevent the formation of burs on the cooking plate edge, we recommend that you do not roll the cooking plate
during transport, because burs may form and as a result of this the top can no longer be scraped down properly with
a spatula. We recommend lifting the cooking plate with 2 people, due to its considerable weight. You can hold on to it
using the thick outer edge as well as the inner edge. When placing the cooking plate onto the cone, we recommend
that 2 people hold the top’s inner edge and position it over the cone until it clicks into place. If the cooking plate does
not t the cone levelly, you can turn it until its ring settles over the cone.
USAGE
01 ALWAYS OUTSIDE
All OFYR
®
cooking units are made to stand outside in all weather conditions. The base and cone of our OFYR® Classic
and Classic Storage and Island cooking units are made of Corten steel and will already show signs of corrosion when
they arrive. The corrosion process may not yet have fully unfolded, meaning that the unit’s colour will change over time
as the corrosion process progresses. The natural layer of corrosion protects against rust perforation. Please note
that some corrosive water may run down the base and cone during the rst few months and damage the surface the
unit is standing on. We are not liable for any damage resulting from this corrosive wastewater. It is important that you
regularly treat the cooking plate with oil, both its surface and its rim. The cooking plate is made of steel and will corrode
if oil is not baked into it. Once the oil has properly been baked in,
only minor corrosion will develop. When the cooking plate is not
used for longer periods, we recommend treating it with oil every
7-10 days to prevent corrosion. Any corrosion that does develop
can be removed using steel wool. In the event of excessive corrosion
(see g. 4), we recommend polishing its surface with a wire brush
attached to a drill. It is best to heat the cooking plate before-
hand, because that will loosen up the layer of corrosion. Once
the cooking plate has been thoroughly polished, you will be able
to wipe away the polishing residue with a cloth. Once you treat
the cooking plate with oil, it will be good as new again. The base
plate of the cone contains a hole to allow rainwater to drain away.
To prevent the cone from getting clogged, we recommend that you
remove the ashes from the cone after every use. (Hot) ashes may
also drop through the hole in the base plate. You should take this
possibility into account when choosing a surface to place your OFYR
®
cooking unit on. You might want to put a steel
bucket with some water in the base. In the case of our Island and Storage models, the ashes are instead collected on
the top plate. For these models, the way to remove the ashes is by lifting the cone and cooking plate o of the base
to ensure that any rainwater can drain away. The hole in the base plate serves no additional purpose as an air supply
to ensure that the re stays lit. The concrete base has been treated with wax in order to make the surface shiny.
02 WOOD
For optimum user comfort, we recommend using oven-dried wood to prevent smoke formation during cooking.
Moreover, oven-dried wood is much easier to light. Stack the pieces of wood two by two, as if you were building a log
cabin, with the bark facing outwards to further prevent smoke formation. Oven-dried beech wood is best, because it
burns down to a mass of coals that optimally heats up the cooking plate. This mass of coals is easily shifted around
Fig. 5 - Upwards bulged cooking plate
Please note: we recommend the use of gloves when placing the cooking plat.
Also, please be careful not to stain your clothes.
Fig. 6 - Warped cooking plate due to
the use of incorrect wood
Fig. 4 - Excessive corrosion on cooking plate
Page 4

ENGLISH
76
OFYR® MANUAL - COOKING UNITS OFYR® MANUAL - COOKING UNITS
Fig. 8 - Wooden boards
Disclaimers
01 CORROSION
With the exception of the cooking plate, adjustable feet, hinges, screws, and the magnets underneath the wooden
planks, all steel elements of the OFYR
®
collection are made of Corten steel. Corten steel is a type of steel that
corrodes very rapidly, and it is precisely this corrosion that protects it against rust perforation. If you allow nature
to take its course, it will take 6-12 months for these Corten steel elements to corrode, depending on their location
and the humidity level. Unlike many manufacturers of Corten steel products, we provide buyers of our products
with an additional service by making sure that the corrosion process has already started by the time our products
are delivered. Depending on their location and the humidity level, it will take another 3-6 months for this supercial
corrosion to turn into a proper layer of corrosion. However, this does not guarantee an entirely smooth layer of
corrosion. Therefore, any Corten steel elements that are less corroded than others upon delivery are not eligible
for replacement. After all, they will corrode naturally over time under inuence of the weather. While the corrosion
is still supercial, the Corten steel elements may cause orange stains on clothes, skin, and the surface they stand
on. When it rains, corrosive water may also run o these elements, which may permanently stain light-toned stone
or wooden surfaces. Under normal circumstances, the Corten steel will gradually develop a smooth, dark brown
layer of corrosion that will not chip. However, this layer may chip in locations near the sea or the shore due to the
high levels of salinity in such locations. The chipping will not cause any damage, but the chipped corrosion must be
removed to prevent corrosion from forming on the surface the OFYR
®
cooking unit is placed on. We do not accept
liabilty for any damage resulting from the corrosion of our products.
02 WOODEN BOARDS
Some OFYR
®
products include wooden boards to be used as seating or work surface. (See g. 8) None of those
should be left outside for extended periods of time. Humid weather may cause them to warp and or crack.
We therefore recommend that you store these boards inside in a dry place after each use. We do not recommend
leaving them outside at night, as the weather tends to be humid then. The work surfaces can be used as cutting
boards, but should not be used as chopping blocks. If sharp or heavy
objects are used to exert great force on these surfaces, these will
become irreparably damaged. The work surfaces that come with the
Butcher Blocks 45-45-88 and the OFYR
®
Island 85-100 are the same
size. The work surfaces that come with the Butcher Blocks have
magnetic feet and those that come with the OFYR
®
Island 85-100
have nylon feet. The Butcher Blocks work surfaces are not suitable
for use on the OFYR
®
Island 85-100 because the magnetic feet are
conductive, and the conducted heat may cause the wood to warp.
We do not acept liability for any damage resulting from incorrect
use of wooden boards. Please note that you should not place OFYR
®
products with wooden elements directly next to any heat source,
including any of our cooking units, because the heat may cause
damage to the wood or cause it to warp.
Fig. 7 - Cedar wood planks
04 COOKING
It will take between 25 to 45 minutes, depending on the weather conditions and the outside temperature, for the
cooking plate to reach a temperature of around 300˚C on the inner edge and around 200˚C on the outer edge.
To do so, build a re using the wood cabin method mentioned above. Once your initial re’s wood is burning
properly, spread out the hot mass under the edges of the cooking plate and add new wood with the bark facing up.
Repeat the process for the entire duration that you wish to keep the cooking plate hot. You will notice that it will take
a lot more wood during autumn and winter to keep the cooking plate hot than during spring and summer. If there is a
breeze, the cooking plate will be hottest where the wind leaves the OFYR
®
cooking unit, i.e. in the direction of the wind.
You can compensate for this by pushing more hot coals into the opposite direction. Once the cooking plate is starting
to heat up, you must rst scrape it down using the spatula and then rub it with an oiled cloth. Once the cooking plate
is hot enough for cooking, add some oil where you intend to place the food. Whenever the cooking plate starts to
appear dry and matte, you will need to add extra oil, to ensure that the cooking plate is always suciently greased.
You will need to add more oil when cooking sh and vegetables than when cooking fatty meats. You can also use
(cedar) wooden planks (see g.7) to place thicker cuts of meat or sh on after you have seared the outsides, to allow
them to cook slowly. If any food residue is left behind on the cooking
plate, simply push it into the re using the spatula. Rub the cooking
plate down with an oiled cloth frequently, and it will be spotless
again. We recommend that you do not allow a thick layer of residue
to build up, because it will be hard to remove. It is better to scrape
down the cooking plate frequently. Once you get used to using
your OFYR
®
cooking unit, this will easily become a habit. Once you
are done cooking, clean the cooking plate one last time using the
procedure outlined above, and if it is still luke warm after that, rub
it with oil once more. This ensures that it will be properly protected
and ready for next time. For more cooking techniques and tips, visit our OFYR
®
YouTube channel, and/or our website,
www.OFYR.com. If you use your OFYR
®
cooking unit a lot, a smooth layer of carbon residue will build up on the
griddle top, making it extra smooth and extra comfortable to use. From time to time, this layer might come o here
and there. When you spot it chipping in places, simply scrape o the chips using the spatula, and rub on new oil.
The carbon residue layer will gradually renew itself this way.
05 EXTINGUISHING THE FIRE
The best way is to let the re die out on its own. Please note that the ashes and the cooking plate can stay hot long
after use. Another option is to cover the OFYR
®
cooking unit with one of the optional snuers (Ø50 and Ø60 cm in
diameter) to extinguish the re. If you have an OFYR
®
Island, we recommend that after you clean the cooking plate
you also clean the Island’s wooden work surfaces, for the sake of hygiene. These work surfaces should not be left
outside overnight or in the rain. Please note that you should never extinguish the re using water!
06 MAINTENANCE
OFYR
®
cooking units are relatively low-maintenance. As stated previously, corrosion may build up on your prepped
cooking plate if you do not use your OFYR
®
cooking unit for an extended period of time, but such corrosion can easily
be removed. If you do not prep your cooking plate properly, the corrosion may be extensive and you will need to use
a wire brush to remove the corrosion, as explained in Chapter 01, ‘Always outside’.
07 ISLAND
The wooden boards must be cleaned by hand and must not be treated with any corrosive substances or
cleaned in the dishwasher. After you clean them, we recommend that you store them inside, in a dry place with
low humidity. Large temperature dierences may cause the wood to warp. We strongly advise against leaving
these wooden boards outside. Please note that wood is a natural product and is always liable to warp somewhat.
We are not liable for any wood warping that may occur.
Page 5

ENGLISH
98
OFYR® MANUAL - COOKING UNITS OFYR® MANUAL - COOKING UNITS
Fig. 9 - Warranty Terms
03 ADJUSTABLE FEET ON OFYR
®
COOKING UNITS, BUTCHER BLOCKS, HOCKER, AND DRESSOIR
Once OFYR
®
cooking units, Butcher Blocks, Hocker, Bench, and Dressoir have been set up, the adjustable feet can
be used to make them level. We do not recommend using these feet to adjust the overall height of our cooking
units and other units, because the OFYR
®
cooking units, Butcher Blocks, Hocker, Bench, and Dressoir may become
unstable if the adjustable feet are extended by more than 10 mm. We do not accept liability for any damage resulting
from improper use of adjustable feet. Once the OFYR
®
cooking units, Butcher Blocks, Hocker, Bench, and Dressoir
have been set up, they must not be shifted. Shifting them could cause damage to the adjustable feet or the rivet nuts
with which the feet are attached. We do not accept warranty claims or liability for any damage resulting from shifting
and/or moving the OFYR
®
cooking units, Butcher Blocks, Hocker, Bench, and Dressoir.
04 DO NOT USE IN CLOSED-OFF SPACES
None of the OFYR
®
cooking units are suitable for use in partially or entirely closed-o spaces. Such use may cause
an excess of dangerous fumes that may result in carbon monoxide poisoning.
05 DO NOT USE PURE ALCOHOL, PETROL, OR OTHER CHEMICAL SUBSTANCES
The use of pure alcohol, petrol, or other chemical substances when lighting res is very dangerous and may aect
the food on the cooking plate. We are not liable for any health issues resulting from using chemical substances when
lighting your OFYR
®
cooking unit. Moreover, please make sure that the area around your OFYR® cooking unit is clear
of any highly ammable materials.
06 DO NOT LEAVE YOUR OFYR
®
UNATTENDED
Please note that you should never leave your OFYR
®
cooking unit unattended and keep children and pets away from
the unit as well.
07 WARRANTY TERMS PER ELEMENT
A limited lifetime warranty applies to the material and construction of all steel elements of all OFYR
®
cooking units
for the original buyers or owners, provided that they purchased their unit from an authorised dealer and registered
their warranty in the required manner.
B2C B2B
COOKING PLATE 5 YEARS 3 YEARS
CORTEN STEEL PRODUCTS (NOT THE CONE) 5 YEARS 3 YEARS
CONE 3 YEARS 1 YEAR
COATED PRODUCTS 2 YEARS 1 YEAR
CONCRETE PRODUCTS 2 YEARS 1 YEAR
WOODEN BOARDS 2 YEARS 1 YEAR
SYNTHETIC PARTS 2 YEARS 1 YEAR
METAL PARTS 2 YEARS 1 YEAR
FAQ’S
1. Transport/packaging of cooking units
HOW WILL YOUR OFYR
®
COOKING UNIT BE DELIVERED?
Your OFYR
®
cooking unit will be delivered in an octagonal packaging unit, called an Octabin. The OFYR® Classic
models are shipped upside down, whereas the Island models are shipped vertically. The OFYR
®
Concrete is packed
straight up due to the heavy weight of the base.
WHAT WILL BE DELIVERED ALONG WITH YOUR OFYR
®
COOKING UNIT?
Your OFYR
®
cooking unit will be delivered in an Octabin and will consist of a base, a cone, and a cooking plate. If you
have purchased an OFYR
®
Island, the package will also include a wooden block and a spice tray. We also supply a
free spatula with every unit.
2. Cooking unit general information
WHAT ARE OFYR® COOKING UNITS MADE OF?
An OFYR
®
unit’s cooking plate is made of steel. The bases and cones of the Classic models are made of Corten steel.
The bases and cones of the Black models are made of coated steel. The base of the OFYR
®
Classic Concrete is made
of heat resistant concrete.
IS MY OFYR
®
COOKING UNIT PORTABLE?
The OFYR
®
Classic models are delivered in three separate pieces and as such are easy to move. We recommend
moving the cooking plate with two people. OFYR
®
Islands are delivered in ve separate pieces. An Island unit’s base
is best lifted with 2 people.
CAN I LEAVE MY OFYR
®
COOKING UNIT OUTSIDE?
Your OFYR
®
cooking unit can be left outside in all weather conditions. The base and cone will continue to corrode
and eventually turn dark brown. The cooking plate may start corroding over time as well if it is not oiled properly.
We recommend oiling the cooking plate every 7 to 10 days while the OFYR
®
is not in use. The Black models can
also be left outside; as long as the bases and cones of our Black models are not scratched, they will not corrode.
Obviously the Concrete base will not corrode. The OFYR
®
Classic Concrete can also be left outside. Just the base will
need to be treated with wax for time to time in order to keep it shiny.
HOW DO I CLEAN MY OFYR
®
COOKING UNIT?
We recommend oiling your OFYR
®
cooking plate once every 7 to 10 days, as described above. After you use your
OFYR
®
, the leftover ashes must be removed to prevent the cone from clogging. Please note that the ashes will
stay hot for a very long time; therefore, make sure to only store leftover ashes in reproof containers, such as zinc
buckets. Once the ashes have cooled down, they can be removed with a regular dustpan and brush and deposited
into a regular waste bin.
CAN THE WOODEN ELEMENTS OF THE OFYR
®
PRODUCTS BE LEFT OUTSIDE?
All wooden elements of the OFYR
®
products are made of glued wood. If they are exposed to moisture, the wood will
warp. The outsides of the wooden surfaces can also begin to crack. For this reason, the wooden elements must be
stored inside in a dry place after each use.
• The OFYR® will become very hot!
• Do not use the OFYR
®
indoors!
• Keep children and pets away!
• Do not use spirit or petrol for lighting or re-lighting!
UseonlyrelighterscomplyingtoEN1860-3!
WARNING!
Page 6

ENGLISH
1110
OFYR® MANUAL - COOKING UNITS OFYR® MANUAL - COOKING UNITS
3. Setup of cooking units
WILL MY OFYR® COOKING UNIT SHOW SIGNS OF CORROSION UPON DELIVERY?
Yes, your OFYR
®
cooking unit’s corrosion process will have already have started upon delivery. As the unit stands
outside, the corrosion process will continue.
WHY DOES THE COOKING PLATE FEEL STICKY?
The cooking plate was oiled before transport to protect it against corrosion forming.
DO I NEED TO PLACE A PLATE UNDERNEATH MY OFYR
®
TO PROTECT THE SURFACE IT STANDS
ON FROM FIRE DAMAGE?
Water and ash may drain or drop down the hole in the OFYR
®
cooking unit’s cone. This may cause light-toned
surfaces to be permanently stained. To protect your surface, you can place a stone underneath the OFYR
®
cooking
unit, place a reproof bucket underneath, or place a steel plate in the base. The bottom of the base is not likely to
heat up enough during average use to damage your surface. In spite of the precautions mentioned above, however,
corrosive water may run down the OFYR
®
cooking unit and cause stains on light-toned surfaces. In the case of our
Island and Storage models, the ashes are instead collected on the top plate.
HOW DO I PREPARE MY OFYR
®
UNIT FOR ITS INITIAL USE?
Use the method described in Chapter 3, ‘Initial use’. Once the cooking plate has been prepped, your OFYR
®
cooking
unit will be ready for its rst cooking session. The food will stick to the cooking plate a little more at the beginning
than after 2-3 uses. Similar to an old-fashioned cast-iron frying pan, a natural non-stick coating will develop over time,
making for extremely enjoyable cooking.
CAN OFYR
®
PRODUCTS BE MOVED WITH THEIR ADJUSTABLE FEET IN POSITION?
No, they cannot, because the weight of the OFYR
®
cooking unit may cause the adjustable feet to bend or break and
may damage the rivet nuts with which the adjustable feet are attached.
CAN THE ADJUSTABLE FEET ON OFYR
®
PRODUCTS BE USED TO ADJUST THE HEIGHT LEVEL OF
THE PRODUCTS CONSIDERABLY?
No, the adjustable feet are solely intended to ensure that OFYR
®
cooking units can be made level when placed on
uneven surfaces. The feet should not be extended by more than 10 mm, because OFYR
®
cooking units may then
become unstable and the feet may bend or break.
4. Usage
HOW DO I LIGHT MY OFYR® COOKING UNIT?
When you light your OFYR
®
cooking unit for the rst time using the log cabin wood stacking method, it is important
that you let a low re burn in it for 25 minutes rst, to allow the cooking plate to settle properly.
HOW LONG WILL IT TAKE FOR THE OFYR
®
TO BE READY FOR COOKING?
Once the OFYR
®
cooking unit has been lit, it will take between 25 to 45 minutes, depending on the weather conditions
and the temperature outside, for the cooking plate to reach around 300˚C on the inner edge and around 200˚C
on the outer edge.
WHICH TYPE OF OIL SHOULD I USE?
The rst few times you light your OFYR
®
cooking unit, we recommend using olive oil. Olive oil has a lower combustion
point, which will help the cooking plate get a nice brown-black hue. After the rst few uses, you can start using natural
oil types like sunower oil and groundnut oil, which have higher combustion points.
FOR HOW MANY PEOPLE CAN I COOK ON MY OFYR
®
?
The OFYR
®
100 cooking units allow you to cook for up to 50 people, depending on the type of food you are preparing.
For the OFYR
®
85 cooking units, the number of people you can cook for is 20 to 30 people.
WHICH TYPE OF WOOD SHOULD I USE ON MY OFYR
®
?
Various types of wood can be used on your OFYR
®
cooking unit. Experience has shown that oven-dried beech wood
provides the best results, in part because it burns down to a mass of coals that keeps the cooking plate hot for a
longer time and that can easily be shifted around. Ash wood has almost the same qualities. Oak works less well,
because it produces a thinner type of ashes. Birch wood tends to burn up too quickly.
HOW MUCH WOOD WILL MY OFYR
®
REQUIRE?
Your OFYR
®
cooking unit will use up around two fully lled wood-carrying bags with a 50-litre capacity each on
average, depending on the weather conditions and the type of wood.
CAN I USE CHARCOAL INSTEAD OF WOOD?
Yes, you can use charcoal as fuel for your OFYR
®
cooking unit. However, charcoal might not reach the same
temperatures as re wood.
THERE ARE CHIPS ON MY COOKING PLATE; DOES THAT MEAN THE STEEL IS DAMAGED?
Cooking on your OFYR
®
regularly will cause a layer of carbon residue to build up on the cooking plate. This layer
might come o in some places when the OFYR
®
is not used for a while, resulting in chips forming. These chips can
simply be scraped o using the spatula. Then, just rub on a new layer of oil; a smooth carbon residue layer will
gradually build up once again.
MY COOKING PLATE BECAME CONVEX DURING THE INITIAL USE, SO NOW THE FAT RUNS OFF AT
THE OUTSIDE EDGE. WHAT SHOULD I DO?
During manufacturing, OFYR
®
cooking plates were pressed down slightly in the middle, and they are further pressed
down slightly when rst heated. In very rare cases, the cooking plate may bulge upwards and become convex.
If this happens, please contact your dealer.
5. Additional OFYR® products
ARE THERE ANY OFYR® COVERS AVAILABLE?
Yes, there are two types of covers for every model. Our Ø50cm and Ø60cm snuers are intended for extinguishing
re, whereas our Ø85cm and Ø100cm covers are intended to protect the cooking plate of the OFYR
®
85 and 100
model when not in use for an extended period of time. The Ø85cm and Ø100cm covers do not protect against
corrosion because humidity can build between the cooking plate and the cover.
Page 7

OCTOBER 2017 - V01
The design of some OFYR products have EU registration
under no 002580431-0001/2 and no 003122373-0001.
A US Design patent is registered under no US D798,099 S.
For further information,
please contact one of
our ocial distributors.
Copyright OFYR.
All rights reserved.
Creative Outdoor Products B.V.
Gewenten 43A
4704 RE Roosendaal
Nederland
+31 (0)165 74 31 10
info@ofyr.com
www.ofyr.com
 Loading...