

Page 1
ASSEMBLY SHEET FOR THE GTP CONVERSION KIT
* THIS CONVERSION KIT CONVERTS THE ULTRA GT LX & RTR,
BLAZER SST, BLAZER MONSTER, HODR LX, ULTRA WORLDS AND
WORLDS II CHASSIS INTO THE GTP CAR CLASS. ARM CHANGES,
SUCH AS MBX PIVOT BALL, ARE NOT INCLUDED AND ARE NOT
NEEDED FOR THIS CONVERSION.
* FOLLOW THE INSTRUCTION MANUAL TO ASSEMBLE YOUR CAR.
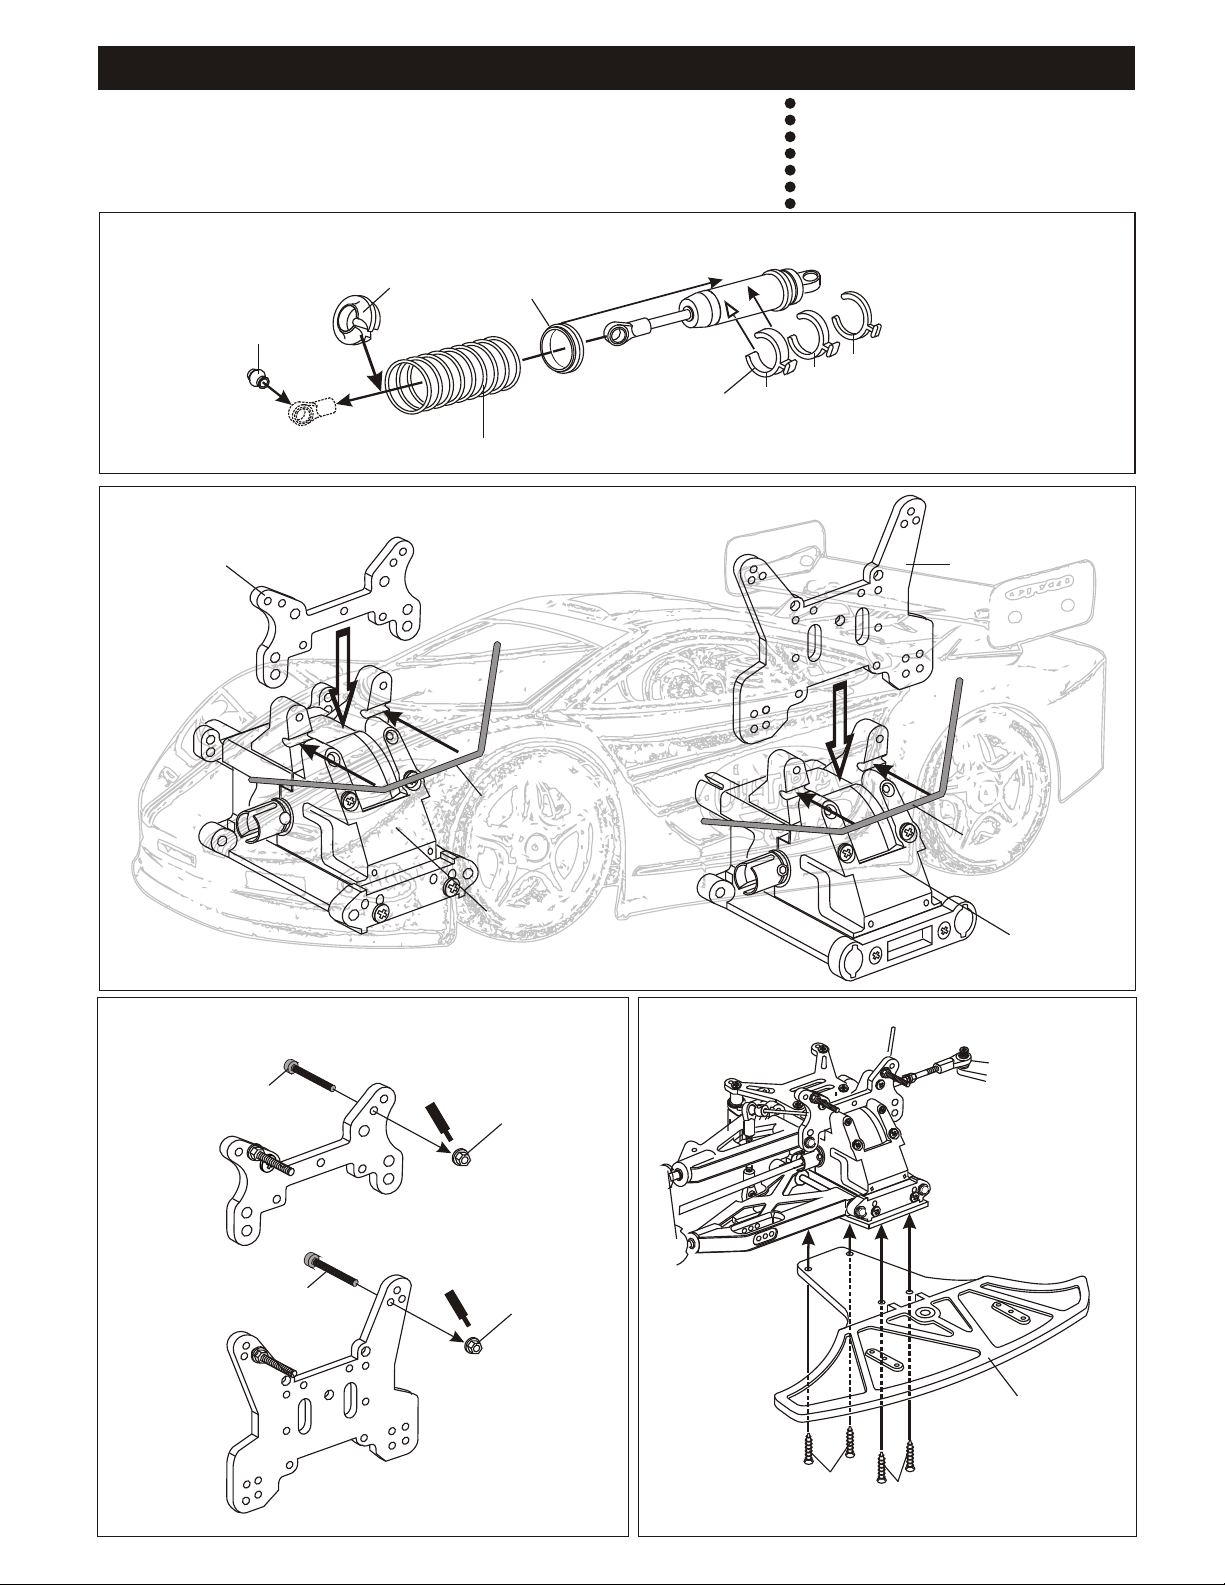
ASSEMBLY OF THE FRONT AND REAR SPRINGS
*Slide spring collar
onto Shock body.
* Push 6mm ball joint
into ball end.
30403
6mm
Ball Joint
32051
Spring Holder
32051
Spring Collar
32300 Shock Spring (Front)
32301 Shock Spring (Rear)
CHANGE THE SHOCK TOWERS ON THE FRONT AND REAR
34008
Front Shock Tower
Kit Includes:
(Standard)
5mm
32051 Spring Tension adjust .er
LARGE SCALE BODY.
LARGE FRONT BUMPER AND FOAM BUMPER.
BODY MOUNTS.
BODY DECAL AND WINDOW MASKING.
NEW FRONT AND REAR SHOCK TOWERS.
HARDER RACING SHOCK SPRINGS.
GLUED TIRES ON BLACK STAR WHEELS.
1mm
3mm
34009
Rear Shock
Tower
30340
Stabilizer Bar
1
0
* Insert the stabilizer before
assembling the shock tower
For (Worlds, Worlds II, Ultra MBX only.)
30010
Front Gear
Box Assembly
ASSEMBLY OF THE SCREWS INTO THE SHOCK TOWER
( Assemble the front and rear shock as usual.)
M3x20mm
Cap Screw
M3x20mm
Cap Screw
C
3mm
S
c
e
r
ew
men
Flange Nut
t
S
C
3mm
crew
e
m
en
Flange Nut
t
30340
Stabilizer Bar
ASSEMBLY OF THE FRONT BUMPER
1
0
30010
Rear Gear
Box Assembly
4 x 20mm
Flat Head
Tapping Screw
4 x 20mm
Flat Head
Tapping Screw
34090
Front Bumper
Page 2
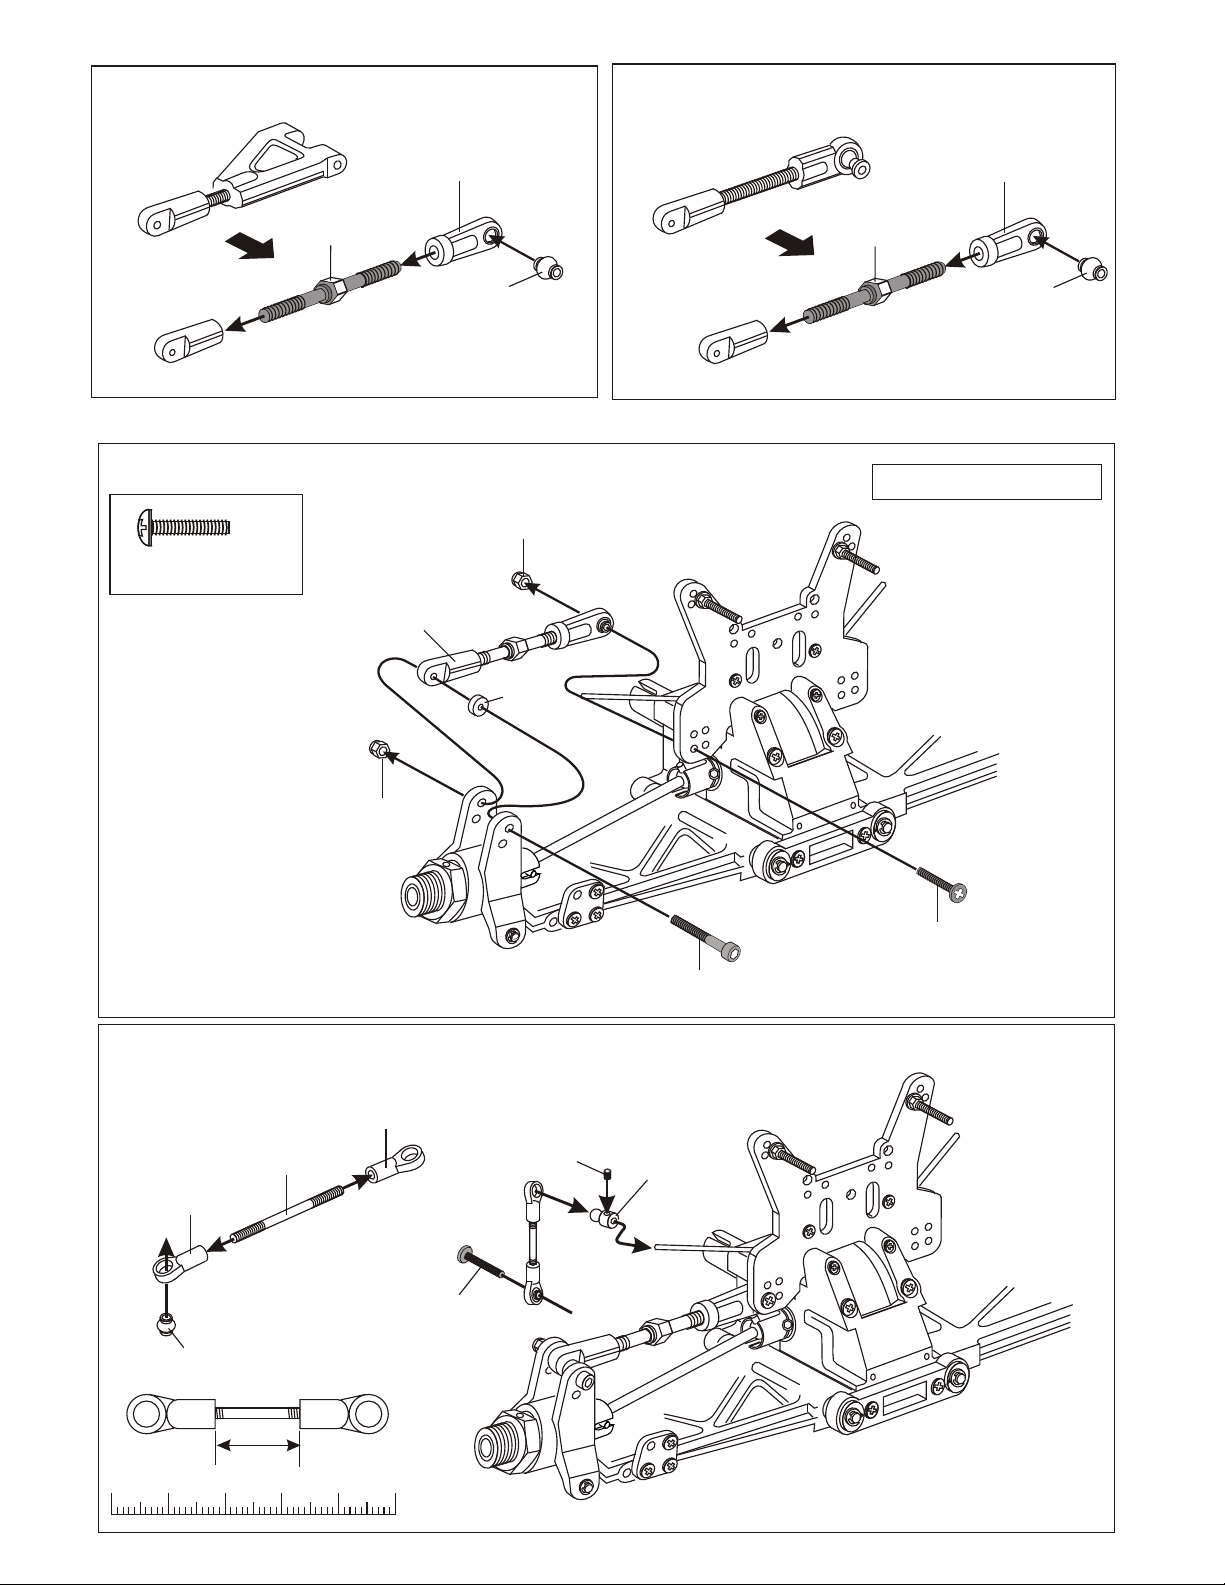
For Hodr,. Blazer SST.,Blazer Monster, option
For"Ultra GT LX", option
36690
7mm Plastic
Arm Ball End
36880
5x60mm
Turnbuckle
36850
7mm Ball
* Builds two upper arms for left
and right hand-side.
ASSEMBLY OF THE UPPER ARM ONTO THE GEAR BOX
M3
Nylon
Lock Nut
3 x 15mm Screw
* Insert into rear hub.
4mm
Plastic Washer
36690
7mm Plastic
Arm Ball End
36880
5x60mm
Turnbuckle
36850
7mm Ball
* Builds two upper arms for left
and right hand-side.
Assembly of the right and left hand side
are the same.
M3
Nylon
Lock Nut
* Insert 30320 drive shaft
before installing arms.
ASSEMBLY OF THE STABILIZER ROD
30401
6mm
Stabilizer
Ball End
30402
3 X 30mm
30401
6mm
Stabilizer
Ball End
30403
6mm
Ball Joint
Tie Rod
3 x 15mm
Screw
3 x 3mm
Set Screw
30340
6mm
Stabilizer
Ball End
3 x 25mm
Cap Screw
3 x 15mm
Screw
15mm
0 10 20 30 40 50
mm
Page 3

33011
Body Post Set
R
ASSEMBLY OF THE FRONT BODY POST
33010
33011
Front
Body Post
1
0
Front
Body Mount
R
M3x32
Flat Head Screw
2mm
Nut
1
0
Body Post
2x18mm
Screw
4x15mm
Tapping Screw
(Small Head)
ASSEMBLY OF THE FRONT FOAM BUMPER
Foam Bumper
Cover
1
R
0
34901
Foam Bumper
R
33011
Body Supporter
31149
Clips
31149
Clips
Page 4

ASSEMBLY OF THE REAR BODY MOUNT
3mm
Nylon Nut
33010
Body Mount
3 x 15mm
Screw
3 x 15mm
Screw
Rear
Body Post
2mmNut
2x18mm
Screw
ASSEMBLY OF THE REAR BODY SUPPORT
33011
Body Post Set
* Use this body post
for rear.
31149
Clips
33011
Body Supporter
31149
Clips
Page 5

ASSEMBLY OF THE TIRES AND WHEELS
86059
Inner Sponge
(Small)
* Take off
double side tape
backing.
86049
Chrome Wheel
86048
Black Wheel
* Stick the sponge to the middle
of the wheel.
86044 - Red
86045 - White
86046 - Lime
86087 - Yellow
86048 - Black
86049 - Chrome
17mm 5-star wheels,
Two (2) pairs per bag.
86032 - Orange
86033 - Chrome
86034 - White
86035 - Yellow
86036 - Lime
86037 - L.Gray
86038 - D.Gray
86039 - Red
17mm Dual Spoke
wheels, Two (2) pairs
per bag.
86050 - Slick Tire, No-Belt
86051 - Slick Tire, Belted
86052 - Street Tire, No-Belt
86053 - Street Tire, Belted
86059
Inner Sponge
(Large)
* Use cement
to glued together.
* The tires might be different
as picture shown here.
86050
Slick Tires
* Insert sponge into the
tire as shown.
*Insert the tire into
the grooves of the
wheel.
86504 - Pre-Glued Set, Slick
86505 - Pre-Glued Set, Street
Pre-glued set use 86045 wheels
GLUE
* Apply instant glue into
the grooves of the wheel.
INSTANT
INSTANT
GLUE
30051
Wheel Nut
Rear Hub Assembly
30051
Wheel Nut
RR
Front Knuckle Arm
Assembly
Page 6

SET-UP
ADJUSTMENT OF THE CHASSIS
RIDE HEIGHT CLEARANCE
Place the model car on a flat surface.
Use a 2mm hex wrench to adjustment
the chassis to it's minimum clearance.
We Suggest: 10mm in front and rear.
Adjust the right and left-handside
to the same height.
SET-UP OF THE FRONT WIDTH
* Use a 2.5mm hex wrench to
adjust the length of the steering
balls. This will make the
front wider or narrower.
Adjust the
steering balls.
Use 2mm hex wrench to
adjust 4x10mm set screw
in the front lower arm.
(FRONT)
(FRONT)
Use 2mm hex wrench to
adjust the 4x10mm set
screw in the rear
lower arm.
(REAR)
ADJUSTMENT OF THE FRONT AND REAR CAMBER
0
(Positive)
+
Adjust the upper
steering ball to
adjust the camber.
-
(Negative)
(FRONT)
154mm
FRONT TOE-IN AND TOE-OUT SETTINGS
0
Toe-Out
Adjust the length of the front
steering rod to change the toe
angle.
Making the steering rod longer
will make the front tires become
toe-in. The Response will be
slower.
Making the steering rod shorter
will make the front tires became
tor-out. The Response will be
quicker.
Toe-In
Steering Rod
Center
(Positive)
The rear camber adjustment can be
made by rotating the turnbuckle rod
on the upper arms, clockwise or
anticlockwise.
0
(Negative)
+
-
(REAR)
 Loading...