

Page 1
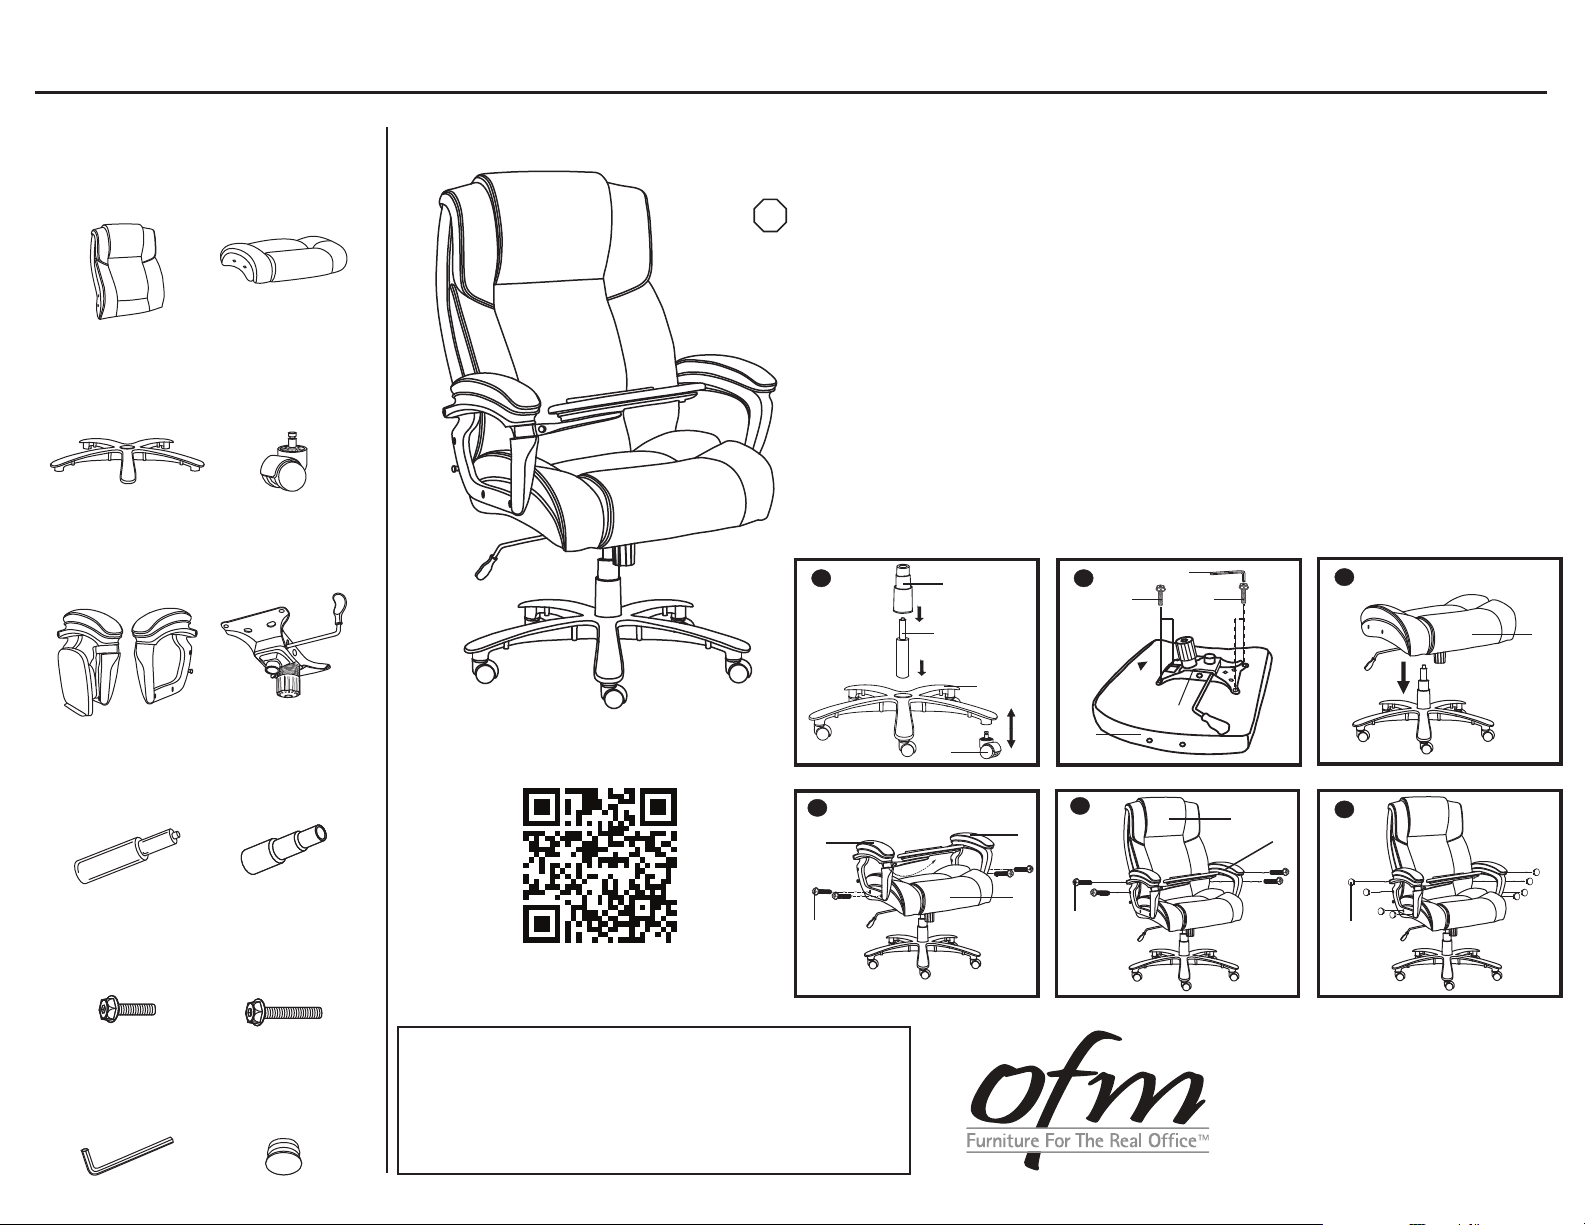
Model ORO200 Executive Big & Tall Conference Chair
Parts Listing
A
Chair Back
1 Unit
C
Chair Base
1 Unit
E
Chair Arms
2 Units
G
Gas Lift
1 Unit
B
Chair Seat
1 Unit
D
Casters
5 Units
F
Seat Mechanism
1 Unit
H
Telescopic Bellows
1 Unit
Product Web Page & Video
Assembly Instructions
Tools Needed: Allen Wrench - included
STOP
Please read all instructions before assembly.
Step 1: Insert Casters (D) into Chair Base (C). Insert Gas Lift (G) into Chair
Base (C) and cover with Telescopic Bellows (H).
Step 2: Attach Seat Mechanism (F) to the Chair Seat (B) with .75” Screws (I) at
back of seat and 1.25” Screws (J) at front of seat, using the Allen
Wrench (K) that is provided. Tension control knob should face front.
Step 3: Attach Chair Seat (B) to Chair Base (C) by inserting the top of the Gas Lift (G)
into the center hole of the Seat Mechanism (F), and press down firmly to secure.
Step 4: Attach Chair Arms (E) to Chair Seat (B) using .75” Screws (I) and Allen Wrench (K).
The tablet arm goes on the right side.
Step 5: Attach Chair Back (A) to Chair Arms (E) using .75” Screws (I) and Allen Wrench (K).
Step 6: Cover screw holes with Arm Caps (L).
1
H
2
K
J
J
G
C
front
F
B
D
4
E
5
E
A
E
3
6
B
I
0.75” Screws
8 Units
K
Allen Wrench
1 Unit
J
1.25” Screws
4 Units
L
Arm Caps
8 Units
I
WEIGHT CAPACITY: 400 lbs.
Assembly Notes:
During assembly, hand tighten screws only. When all screws
are in place, you may then tighten all screws completely.
CAUTION:
1. Do not use this chair as a step ladder.
2. Check for loose screws and tighten them every 6 months.
05.29.2013
B
I
161 Tradition Trail, Holly Springs, NC, 27540
800-520-7471 (voice)
919-303-6389 (voice)
support@ofminc.com
L
919-362- 4765 (fax)
www.ofminc.com
Page 2

270
O
90O90
O
ORO Chair Tablet Arm Operating Instructions — OPEN Tablet
Connection
Magnet
Tablet
Lock/Release
Bottom Edge/
Shelf Edge
180
Button
O
Bottom Edge/
Shelf Edge
Tablet
Lock/Release
Button
Pull tablet outward 180° from it’s Tucked Position at side of chair until it stops. Tablet is now
1
straight out and ready to be rotated.
Tablet
Lock/Release
Button
Connection
Magnet
Tablet
Lock/Release
Button
NOTE:
Distance
Adjustment
Channels
Notice the Tablet Lock/Release
Button, The Distance Adjustment
Channels and the Connection
Magnet underneath the tablet.
Place right hand under tablet mechanism at
3
the bottom right corner and push in the Tablet
Lock/Release Button. This will allow the tablet
to be rotated from this position.
With right hand on Bottom Edge/Shelf Edge of
2
tablet, lift up and over counter clockwise 270°
until it stops.
With left hand on Tablet Shelf Edge, pull
4
tablet towards you counter clockwise 90° until
it stops. Let go of Tablet Lock/Release Button
when tablet begins to rotate. Tablet is now
in nal position. At this time, Tablet Distance
from body can be adjusted.
5-2013OFM • 161 Tradition Trail • Holly Springs, NC • 27540
Page 3

270
O
180
O
180
O
ORO Chair Tablet Arm Operating Instructions — CLOSE Tablet
Tablet
Lock/Release
Button
With right hand, press the Tablet Lock/Release Button and begin rotating
1
the tablet clockwise 90° until it stops and the button clicks.
Connection
Magnet
Tablet is now straight out and ready to be tucked away.
3
Connection
Magnet
With right hand, lift from Shelf Edge, up and over, rotating tablet
2
clockwise 270° until it stops. Tablet is now in straight out position.
Pull Tablet clockwise 180° towards arm of chair and return it to
4
Tucked Position. Tablet will click when it comes in contact with
Connection Magnet.
5-2013OFM • 161 Tradition Trail • Holly Springs, NC • 27540
 Loading...