

Officine Gullo OGS 304FU, OGS 366FU, 2OGG 304FU, 2OGS 304FU, OGG 304FU Instruction Manual
...
OGG/OGS 304FU - OGG/OGS 366FU
2OGG/2OGS 304FU
RANGE WITH GAS
OVEN FOR
RESIDENTIAL USE
INSTRUCTIONS
for installation and use


EN
1
Pay attention to these symbols present in this manual:
WARNING
• This is the safety alert symbol. This symbol alerts you to
potential hazards that can kill or hurt you and others.
• You can be killed or seriously injured if you don’t follow
these instructions.
READ AND SAVE THESE INSTRUCTIONS.
WARNING
If the information in this manual is not
followed exactly, a fire or explosion may
result causing property damage, personal
injur
y or death.
- Do not store or use gasoline or other
flammable vapors and liquids in the
vicinity of this or any other appliance.
-
WHA
T TODO IF YOU SMELL GAS
• Do not try tolight any appliance.
• Do not touchany electrical switch.
• Do not use any phone in your building.
• Immediately call your gas supplier from
a neighbor’s phone. Follow the gas
supplier’s instructions.
• If you cannot reach your gas supplier
,
call the firedepartment.
- Installation and service must be
performed by a qualified installer
,
ser
vice agency or thegas supplier
.
IMPORTANT: Save these instructions for the local electrical
inspector use.
INSTALLER: Please leave this manual with owner for future
reference.
OWNER: Please keep this manual for future reference.
WARNING
Tip Over Hazard
A child or adult can tip the range and be killed.
Ensure the anti-tip bracket is engaged when the range is
moved.
Do not operate range without anti-tip bracket installed and
engaged.
Failure to follow these instructions can result in death or serious
burns to children and adults.
To verify the anti-tip bracket is installed and engaged:
• Slide range forward.
• Look for the anti-tip bracket securely attached to floor or wall.
• Slide range back so rear range foot is under anti-tip bracket.
•
See installation instructions for details.
Range Foot
Anti-Tip Bracket

EN
2
TABLE OF CONTENTS PAGE
1 - Safety Precautions 3
2 - Safety Instructions 5
Warnings for Gas and Electric Installation 5
3 - Features of your Oven 6
3 - The Control Panels 8
Control
8
Knobs 8
Signal lamps 8
5 - General Oven Information
9
6 - General Oven Tips 10
Oven Racks 10
Oven Telescopic Racks 11
7 -
Setting the Clock and Timer
12
Mechanical Minute Timer 12
Timer Touch Control 12
8 - Selecting the Oven Mode 13
9 - Cooking In The Oven 14
10 - Solving Baking Problems 15
11 - Do-It-Yourself Maintenance Oven Door Removal 16
To Remove Door 16
To Replace Door 16
12 - Replacing an Oven Light 17
To Replace a Light Bulb 17
13 - Features of your Cooktop 18
TABLE OF CONTENTS PAGE
14 - Gas Cooktop Operation 20
Gas Control Knob Setting 20
Gas burners 20
Burners with two flame rings 20
Super Sealed Surface Burners 21
15 - Cookware 22
Cookware Characteristics 22
Match Pan Diameter to Flame Size 22
16 - General Oven Care 23
Oven Cleaning
23
17 - Oven Finishes / Cleaning Methods 24
18 - Cleaning the Cooktop 25
Cooktop Part / Material Suggested Cleaners 25
19 - Solving Operational Problems 27
20 - Assistance or Service 28

EN
3
1 - Safety Precautions
WARNING
When properly cared for, your new range has been designed
to be a safe, reliable appliance. Read all instructions
carefully before using this range. These precautions will
reduce the risk of burns, electric shock, fire, and injury
to yourself and others. When using kitchen appliances,
basic safety precautions must be followed, including the
following:
This appliance must be properly installed and grounded by
a qualified technician. Connect only to properly grounded
outlet. See “Grounding Instructions” found in the Installation
Instructions.
• This appliance should be serviced only by a qualified service
technician. Contact the nearest authorized service center for
examination, repair or adjustment.
• Do not repair or replace any part of the appliance unless
specifically recommended. Refer service to an authorized
servicer.
• Do not operate this appliance if it is not working properly
or if it has been damaged, until an authorized servicer has
examined it.
• Install or locate this appliance only in accordance with the
Installation Instructions.
• Use this range only as intended by the manufacturer. If you
have any questions, contact the manufacturer.
• Do not cover or block any openings on this appliance.
• Use this appliance only for its intended use as described
in this manual. Do not use corrosive chemicals, vapors, or
nonfood products in this appliance. This type of oven is
specifically designed to heat or cook. It is not designed for
industrial or laboratory use. The use of corrosive chemicals
in heating or cleaning will damage the appliance.
• In the event that personal clothing or hair catches fire, DROP
AND ROLL IMMEDIATELY to extinguish flames.
WARNING
• In the event of a grease fire SMOTHER FLAMES with a
close-fitting lid, cookie sheet, or other metal tray, then turn
off the gas burner.
• BE CAREFUL TO PREVENT BURNS. If the flames do not
go out immediately, EVACUATE AND CALL THE FIRE
DEPARTMENT.
• Do not use water, including wet dishcloths or towels on
grease fires. A violent steam explosion may result.
• NEVER PICK UP A FLAMING PAN. You may be burned.
• ALWAYS have a working SMOKE DETECTOR near the
kitchen.
• LEAVE THE HOOD VENTILATOR ON when flambéing
food.
• Do not obstruct the flow of combustion air at the oven vent
nor around the base or beneath the lower front panel of
the range. Avoid touching the vent openings or nearby
surfaces as they may become hot while the oven is in
operation. This range requires fresh air for proper burner
combustion.
• NEVER cover any slots, holes or passages in the oven
or cover an entire rack with aluminum foil. Doing so
blocks air flow through the oven and may cause carbon
monoxide poisoning. Aluminum foil linings may also trap
heat, causing a fire hazard.
• NEVER use this appliance as a space heater to heat or
warm the room. Doing so may result in carbon monoxide
poisoning.
To reduce the risk of burn injuries during cooktop
use, observe the following:
• Children or pets should not be left alone or unattended in an
area where appliances are in use.
• Children should never be allowed to sit or stand on any part
of the appliance.
• Do not store flammable materials on or near the cooktop.
• When using the cooktop: DO NOT TOUCH THE BURNER
GRATES OR THE IMMEDIATE SURROUNDING AREA.
• Use only dry potholders; moist or damp potholders on hot
surfaces may cause burns from steam.
• Never leave the cooktop unattended when in use.
• Boilovers cause smoking, and greasy spillovers may ignite.
A spill on a burner can smother all or part of the flame or
hinder spark ignition. If a boilover occurs, turn off burner
and check operation. If burner is operating normally, turn it
back on.
IMPORTANT INSTRUCTION
Please read all instructions before using this appliance.

EN
4
1 - Safety Precautions
• During cooking, set the burner control so that the flame heats
only the bottom of the pan and does not extend beyond the
bottom of the pan.
• Take care that drafts like those from fans or forced air vents
do not blow flammable material toward the flames or push
the flames so that they extend beyond the edges of the pan.
• Always position handles of utensils inward so they do not
extend over adjacent work areas, burners, or the edge of
the cooktop.
• Wear proper apparel. Loose fitting garments or hanging
sleeves should never be worn while cooking.
• Never let clothing, potholders, or other flammable materials
come in contact with hot burners or hot burner grates.
• Use only certain types of glass, heatproof glass ceramic,
ceramic, earthenware, or other glazed utensils that are
suitable for cooktop use.
• Do not clean the cooktop while it is still hot. Some cleaners
produce noxious fumes when applied to a hot surface.
CAUTION
Do not allow aluminium foil, plastic, paper or cloth to come
in contact with hot burners or grates. Do not allow pans to
boil dry.
CAUTION
Do not store items of interest to children above the appliance.
If children should climb onto the appliance to reach these
items, they could be seriously injured.
To reduce the risk of fire in the oven cavity:
1. Do not store flammable materials in or near the oven.
2.
Do not use water on a grease fire. Smother fire or use a dry
chemical or foam-type extinguisher.
3. It is highly recommended that a fire extinguisher be readily
available and highly visible next to any cooking appliance.
4. Do not overcook food. Carefully attend oven if paper
,
plastic or other combustible materials are placed inside the
oven.
5.
Do not use the cavity for storage purposes. Do not leave
paper products, cooking utensils or food in the cavity when
not being used.
6.
If materials inside the oven should ignite, keep oven door
closed. Turn oven off and disconnect the circuit at the circuit
breaker box.
7.
Do not block any vent openings.
8. Be sure the blower fan runs whenever the oven is in
operation. If the fan does not operate, do not use the oven.
Call an authorized service center.
9.
For personal safety, wear proper clothing. Loose fitting or
garments with hanging sleeves should never be worn while
using this appliance.

EN
5
2 - Safety Instructions
• Tie long hair so that it doesn’t hang loose.
• Do not touch interior surfaces of oven.
• During and after use, do not touch or let clothing or other
flammable materials contact the burners or the interio
r
s
urfaces of the oven until they have had sufficient time to cool
.
O
ther surfaces of the appliance may become hot enoug
h
t
o cause burns - among these surfaces are (identification o
f
s
urfaces - for example, oven vent openings and surfaces nea
r
t
hese openings, oven doors, and windows of oven doors).
• The trim on the top and sides of the oven door may becom
e
h
ot enough to cause burns.
• Use care when opening the door. Open the door slightl
y
t
o let hot air or steam escape before removing or replacing
food.
• Do not heat unopened food containers. Build-up of pressur
e
m
ay cause the container to burst and cause injury.
• Always place oven racks in desired location while oven i
s
c
ool. If a rack must be moved while oven is hot, do not le
t
p
ot holder contact the hot burners.
• Use only dry pot holders. Moist or damp pot holders on ho
t
s
urfaces may result in burns from steam. Do not let pot holde
r
t
ouch burners. Do not use a towel or other bulky cloth.
WARNING
• For proper lighting and performance of the burners, keep
t
he igniters clean and dry.
• In the event that a burner goes out and gas escapes, ope
n
a
window or a door. Wait at least 5 minutes before using
the cooktop.
• Do not obstruct the flow of combustion and ventilation air.
• Do not use aluminium foil to line any part of the cooktop.
• If the range cookers is near a window, be certain blow
over or near the burners; they could catch on fire.
Warnings for Gas and Electric Installation
In case of Propane gas installation
T
he appliance is produced ready for use with natural gas. It
may be converted for use with propane gas using the propane
conversion kit supplied with the appliance.
Be sure the unit being installed is correct for the type of gas being
used. Refer to the rating plate (see Installation Instructions).
WARNING
Installation and service must be performed by a qualified
installer, service agency or the gas supplier.
CAUTION
• Always disconnect the electrical plug from the wal
l
r
eceptacle before servicing this unit.
• For personal safety, this appliance must be properl
y
g
rounded.
• Do not under any circumstances cut or remove the third
(ground) prong from the power cord plug..
CAUTION
When connecting the unit to propane gas, make certain
the propane tank is equipped with its own high pressure
regulator. In addition, the pressure regulator supplied with
the appliance must be on the inlet gas pipe of this unit.
In case of electrical failure
If for any reason a gas control knob is turned ON and there is
no electric power to operate the electronic igniter of the cook
top, turn OFF all gas control knobs and wait 5 minutes for the
gas to dissipate before lighting the burner manually.
To light the burner manually, carefully hold a lighted match to
the burner ports and push and turn the gas control knob to HI
until it lights and then turn the knob to desired setting.
EN
6
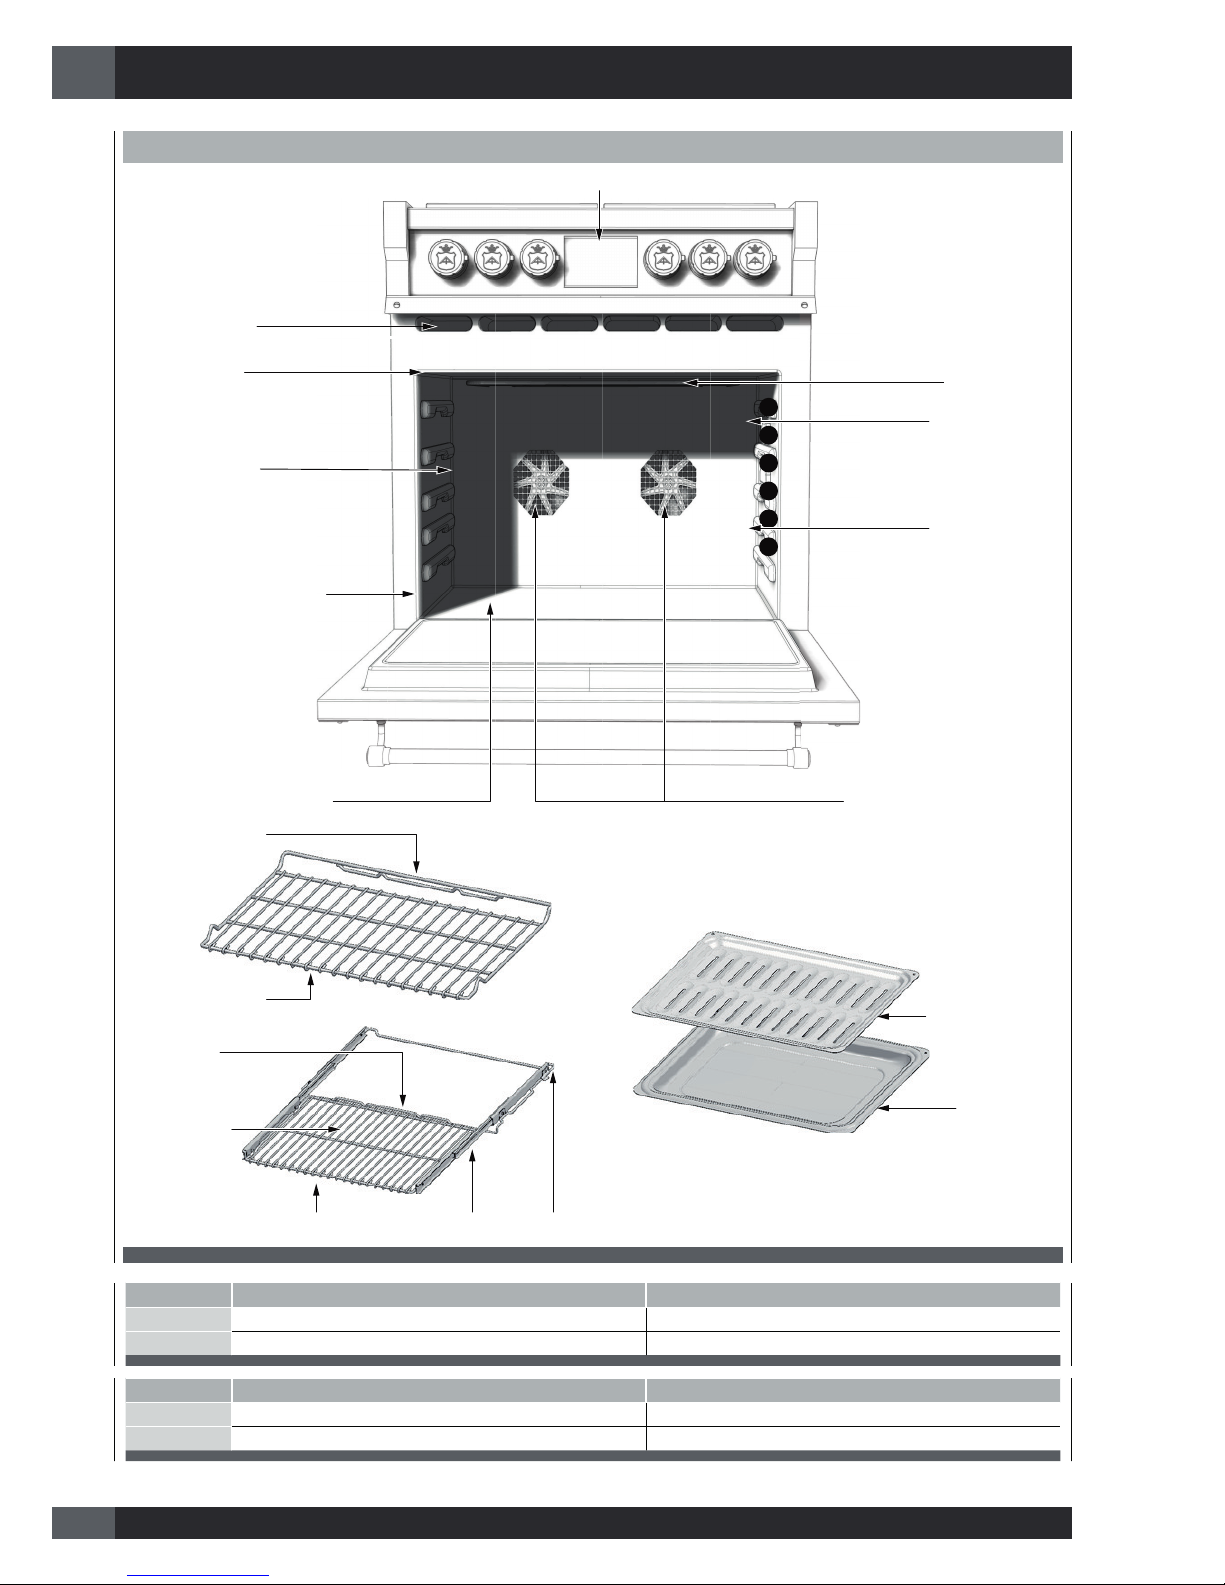
3 - Features of your Oven
FEATURES OF YOUR OVEN
Oven Rack Front
Oven Rack Back
Telescopic Rack
(if present)
Stop
Pan Stop
Slide ArmHandle (if equipped - not all models)
Broiler Pan Rack
Broiler Pan
Display panel
Broil Burner
Cooling Vents
Door gasket
Halogen Light
Model and Serial # Plate
Bottom Burner (concealed) Convection Fan (concealed)
Halogen Light
Halogen Light
6
4
5
3
2
1
.P.C.W ”01 ,saG )enaporP( PLP.C.W ”5 ,saG )larutaN( GN”03 LEDOM
BROIL
)W0083( h/utB 00031)W0014( h/utB 00041
OVEN
)W0074( h/utB 00061)W0035( h/utB 00081
.P.C.W ”01 ,saG )enaporP( PLP.C.W ”5 ,saG )larutaN( GN”63 LEDOM
BROIL
)W0005( h/utB 00071)W0035( h/utB 00081
OVEN
)W0036( h/utB 00512)W0036( h/utB 00512
NOTE: Btu/h de-rated 4% per 1000 feet for appliances installed over 2,000 feet (610mt)
EN
7
3 - Features of your Oven
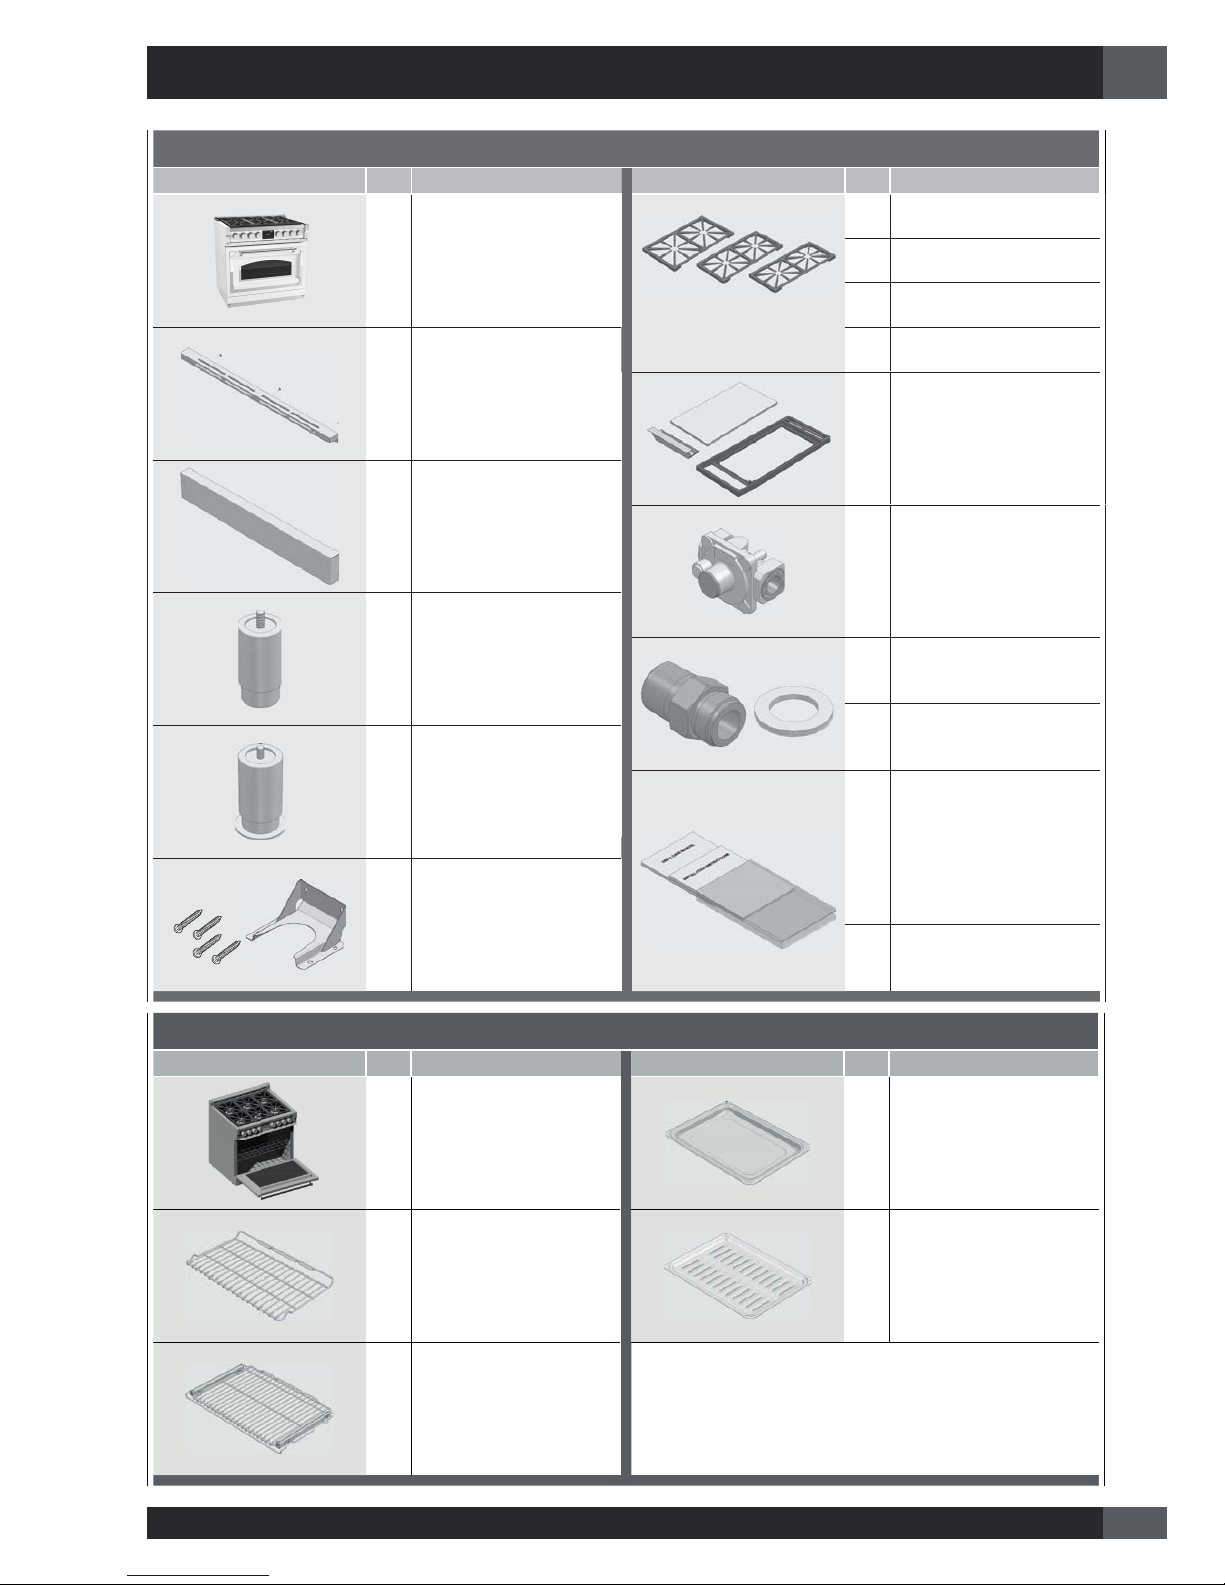
OVEN ACCESSORIES OF YOUR RANGE
NOITPIRCSEDYTQNOITPIRCSEDYTQ
1
OVEN (30" RANGES)
1 ENAMELED ROASTING PAN
2 CHROMED RACKS 1
ENAMELED ROASTING
PAN GRATE
1
TELESCOPIC CHROMED RACK
CONTENTS OF YOUR RANGE PACK
QTY DESCRIPTION QTY DESCRIPTION
1 RANGE COOKER
CAST IRON GRATES
2 Pcs. FOR 30” RANGE
3 Pcs. FOR 36” - 48” RANGE
1
3” BACKSPLASH
THREE FIXING SCREWS
1 GRIDDLE (FOR 48” RANGE)
1 KICK COVER
1 PRESSURE REGULATOR
3 FEET
1 NIPPLE
1 GASKET / WASHER
1 FOOT WITH COLLAR
MANUAL & GENERAL
DOCUMENTATION
1
ANTI TIP FOUR FIXING SCREWS
1 GAS CONVERSION KIT
4 Pcs. FOR 60” RANGE
2
OVENS (60" RANGES)
EN
8
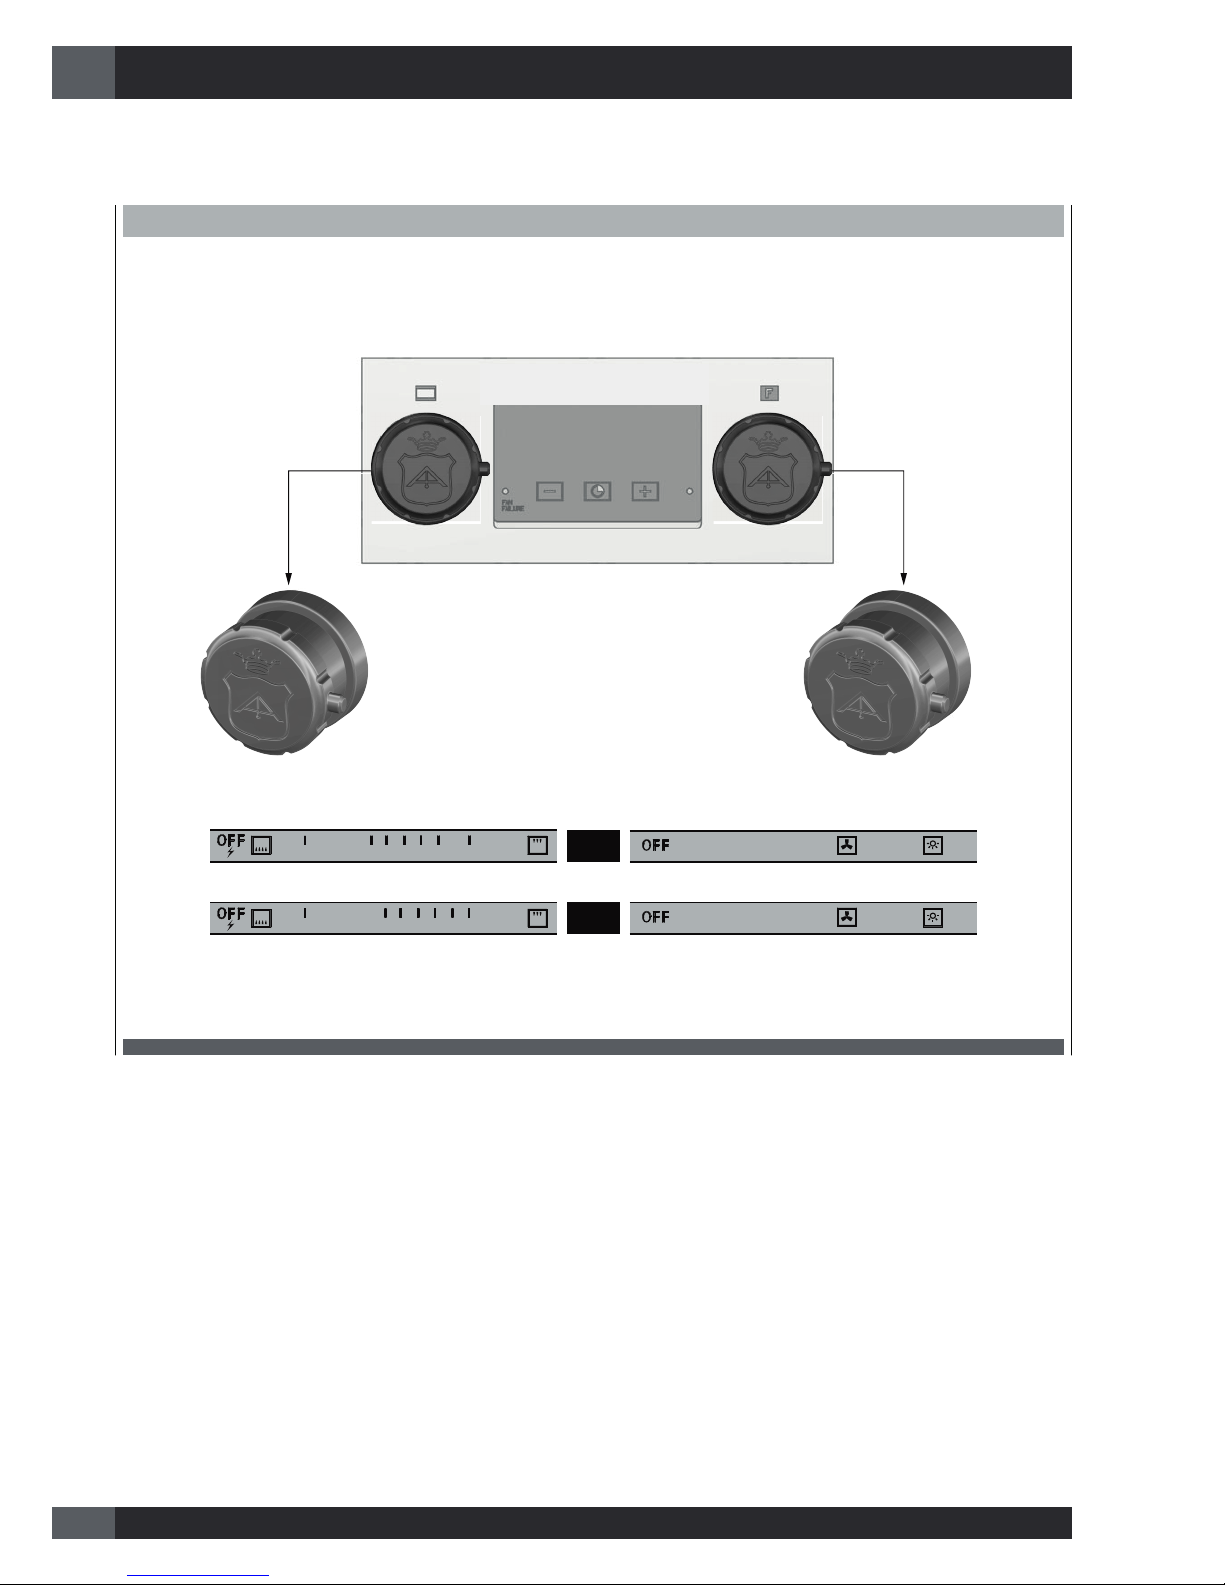
4 - The Control Panel
Control
Electronic Timer
Knobs
Function selector, w
ith two functions + OFF position.
1. Light
2. Oven fan
Thermostat with two functions + OFF position.
1. Counterclockwise: Oven burner + temperature regulation.
2. Clockwise: Broil Burner
Signal lamps
Left: Fan Failure
Ri
ght: ON oven indicator light
The user interface has the following features: display, preheat light indicators, keys for commands, cooking mode and temperature
selectors.
ELECTRONIC TIMER
´
´
295
350 400 430 475 500 570
275
350 400 430 475 500 550
 Loading...