

Page 1

Office Zone
1-800-543-5454
1-800-543-5454
(801) 927-3026
Standard Nagel M2 Bookletmaker
Operators Manual
Read this manual, and thoroughly familiarize
yourself with its contents before operating or
servicing the equipment
Page 2

2
TABLE OF CONTENTS
1. Setup
2. Loading of Staple Magazine
3. Adjustments
3.1. Paper Width
3.2. Paper Length
3.3. Position of Stapling Heads
4. Bookletmaking or Folding
5. Side or Corner Stapling
6. Troubleshooting
7. Maintenance
8. Security
9. Technical Data
Page 3
3
Congratulations for choosing to purcha se the BOOKLETMAKER FOLDNAK M2.
It makes fast and easy work of producing impressive looking booklets. Even small
quantities become efficient to produce because adjustment requirements are minimal.
Your bookletmaker is also a side or corner stapler or a folding machine.
COMPONENTS DELIVERED
Bookletmaker FOLDNAK M2 with two stapling heads, bag with two knurled screws (1),
5,000 NAGEL-Staples 26/6, instructions manual.
1. SETUP
Screw in the two knurled screws (1). Plug in the power cord.
2. LOADING OF STAPLE MAGAZINE
§ Pull stapler pusher (12) back until it locks on by itself.
§ Open magazine cover (13).
§ Load staples.
§ Close magazine cover (13).
§ Push staple pusher (12) gently down to unlock it and guide it towards the machine’s
front side. Do not let the staple pusher snap forward because this would smash the
stick of staples.
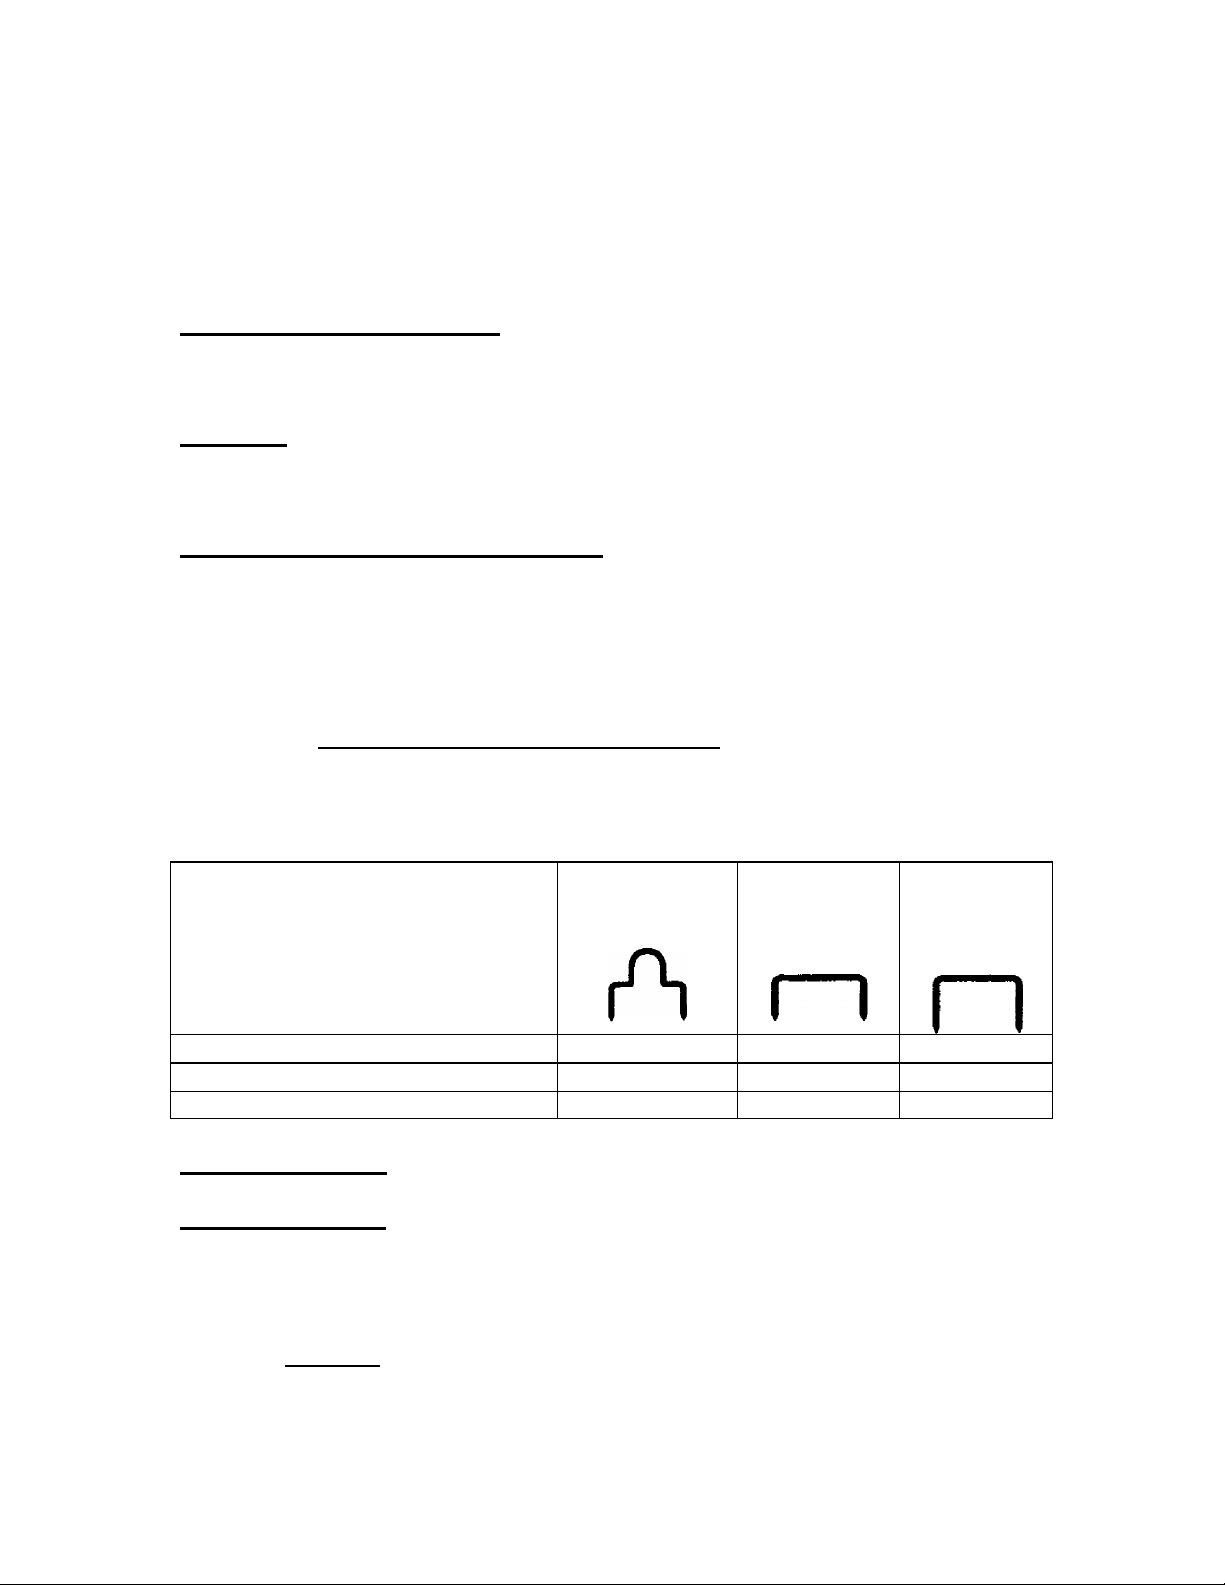
You can use either of the three original NAGEL-Staple types 26/6, Ri 26/6 or 26/8S. We
recommend that you use the staple types as shown below:
Staple Type:
Use only NAGEL staples as other
staples may damage the stapling head
or lead to bad results.
Booklets (2-15 sheets) X X
Thin Paper Sets (ca. 2-15 sheets) X
Thick Paper Sets (ca. 16-30 sheets) x
3. ADJUSTMENTS
3.1 PAPER WIDTH
§ Position the left side guide (10) according to the paper format required using scale (2)
and fix it with the knurled screw (1).
§ Insert paper squaring it up parallel to the left guide (10).
§ Shift the right side guide (11) closely to the inserted paper and fix it, leaving 0.5mm
of air. Important: The side guides (10, 11) must not catch on the movement of the
sheets.
Loop Staple
Ri 26/6
Flat Staple
26/6
Flat Staple
28/8S
Page 4

4
3.2 PAPER LENGTH
§ Open cover (5).
§ Adjust and fix the back stop (14) according to your paper format using the scale.
§ Close cover (5).
Check the adjustments 3.1 and 3.2 with a test run and readjust if necessary.
3.3 POSITION OF STAPLING HEADS
The bookletmaker FOLDNAK M2 is able to use four stapling positions with up to four
stapling heads (USA: Five stapling positions with three stapling heads). DIN-distances
between the stapling heads are 50mm x 80mm x 50mm (USA: 2 1/8” on center).
§ Unlock the latch (15).
§ Take out stapling head, put it into a new position and lock the latch (15). The driver
blade’s (16) hole needs to be hinged onto the pin (17), and the mark “26” on the
driver blade must show towards the rear side of the machine.
4. BOOKLETMAKING OR FOLDING
§ Adjust guides (10, 11, 14) to paper format.
§ Switch selector (8) to the icon for “BOOKLET”.
§ Insert paper making sure the sheets are squared up correctly.
§ Push button “START” (6).
The stacker (4) can be used to stack a couple of booklets. If you only want to fold
without stapling then just remove the staples from the stapling heads.
5. SIDE OR CORNER STAPLING
Note: There is a maximum of two stapling heads in this mode.
§ Switch selector (8) to the icon for “CORNER STAPLING”. A click-sound indicates
the activation of the corner stapling back stop which is responsible for stapling 4mm
away from the paper edge. Now the paper can only be inserted 5cm (2”) deep into
the bookletmaker FOLDNAK M2.
§ Disengage the folding knife to prevent the stapled paper from being folded. To do
this, pull the knob (3) on the machine’s left side and make a 90° turn so that it stays
pulled out.
§ Insert paper making sure the sheets are squared up correctly.
§ Push button “START’ (6).
Proceed in reverse order for making booklets again. You must distinctly feel that the
knob (3) on the machine’s left side is pushed in.
Page 5

5
6. TROUBLESHOOTING
Machine is switched on, but the light inside the ON/OFF selector (7) is not on
The power cord is plugged in improperly. Push power cord thoroughly into power
outlet.
Circuit breaker has been Push circuit breaker button in again. It is
located at the machine’s rear, beneath the
power cord outlet.
Internal Problem. Contact your dealer.
Button “START” (6) is being pushed, but machine does not work
Cover (5) is open. Close cover.
Staple jam inside staple channel. Take off stapling head, remove both screws
of front plate (18), take off front plate.
Remove jammed staple, clean staple
channel and reassemble.
Jam of the moving parts because too much
paper has been inserted.
Circuit breaker has been activated. Push circuit breaker button in again. It is
Internal problem. Contact your dealer.
Machine does not staple although the staple magazine is filled
Driver blade (16) is not hinged onto pin
(17).
Driver blade (16) is missing. Put in a driver blade. The mark “26” must
Staple jam inside stapler magazine. Use original NAGEL-Staples and make
Stapler pusher (12) does not push staples. Push staple pusher gently down to unlock
Staple jam inside staple channel. Take off stapling head, remove both screws
Push button “RESET” (9) for a few
seconds. The machine then runs
backwards, enabling the operator to pull
out the jammed paper.
located at the machine’s rear, beneath the
power cord outlet.
Hinge hole of the driver blade (16) onto pin
(17).
show towards the rear side of the machine.
sure to only use types 26/6, Ri 26/6 or
26/8S.
and guide it towards the staples.
of front plate (18), take off front plate.
Remove jammed staple, clean staple
channel and reassemble. Use only original
NAGEL-Staples and make sure to only use
types 26/6, Ri 26/6 or 26/8S.
Page 6

6
Frequently miss-stapling or two staples in one position
Insufficient staple quality. Use original NAGEL-Staples.
Incorrect staple type. Use original NAGEL-Staples, types 26/6,
Ri 26/6 or 26/8S. See chapter 2.
Driver blade (16) has been put in the wro ng
way.
Residues inside staple channel. Take off stapling head, remove both screws
Driver blade (16) is scratched or bent. Put in a new driver blade.
Button “START” (6) is being pushed
without paper inside the machine.
Staples give a weak bind because staple
legs are too short.
Paper cannot be inserted properly
Selector (8) is in position for “CORNER
STAPLING”.
Paper is not being folded and ejected
Knob (3) at the machine’s left side is
pulled out, disengaging the folding knife.
Internal problem. Contact your dealer.
Booklet is stapled correctly but incorrectly ejected
Reduce stickiness of fold rollers because of
dirt.
Too many sheets have been inserted. Do not insert more than 15 sheets. See
Put in the driver blade with the mark “26”
showing towards the rear side of the
machine.
of front plate (18), take off front plate.
Clean staple channel and reassemble the
stapling head.
Remove jammed staples from the anvils
and fire only with paper being inserted.
Use staples 26/8S with 8mm leg length for
thick paper sets. See chapter 2.
You can only insert paper for 5cm (2”)
when side or corner stapling. This is
normal. Set selector (8) into position
“BOOKLET’ if you wish to produce
booklets.
Pull the knob, turn it by 90°, push it
towards the machine.
Clean fold rollers.
chapter 9.
Page 7

7
Booklets are being stapled or folded incorrectly
The side guides (10, 11) or the back stop
(14) are fixed improperly and move
around.
The side guides (10, 11) are too far apart
from each other, allowing unparallel
insertion of paper.
The side guides (10, 11) are adjusted to
tightly, causing larger paper formats to curl
during folding which leads to incorrect
stapling.
Incorrect adjustment of backstop (14). Adjust backstop more precisely, so that the
Paper is not squared up correctly. Square up paper correctly before firing.
7. MAINTENANCE
Replace scratched or bent driver blades (16). Clean the machine only with a soft and
moist tissue without chemical substrates. Clean the folding rollers using a substrate that
does not dissolve rubber.
8. SECURITY
§ The machine must only be used for the stapling and folding of paper.
§ Connect machine only to an grounded power outlet. Switch off after use.
§ Make sure that the power requirement indicated at the machine’s back side is the
same being provided on your pre mises before connecting the power cord. Check
function of safety shut off regularly: the machine must not run with cover (5) opened.
§ Clean and service the machine only with the power cord disconnected.
§ Place on an even support and never in a humid surrounding, avoid direct sunlight.
§ Never put mugs, glasses or bottles onto the machine.
§ If you notice smoke, heat, excessive noises or any unusual performance, disconnect
the power cord immediately and call your dealer.
Fix the locking screws of the side guides
and back stop properly.
Shift side guides more closely together.
See chapter 3.1.
Shift side guides farther apart. See chapter
3.1.
machine folds in the center of the sheets.
Page 8

8
9. TECHNICAL DATA
Input paper sizes for booklets DIN A5 (5 ½ x 8 ½) – A3 (11 x 17, SRA3)
Paper sizes for side or corner stapling DIN A5 (5 ½ x 8 ½) – A4 (8 ½ x 11)
Maximum booklet size 60 pages or 15 sheets 80g paper
Maximum size of stapled blocks 30 sheets 80g paper
Stapling heads 2, upgradeable to 4 (USA: max. 3)
Staple magazine 210 staples/stapling head
Staples/Loop Staples NAGEL 26/6 (6mm leg length)
NAGEL Ri 26/6 (6mm leg length, loop)
NAGEL 26/8S (8mm leg length, steel)
Cycle speed User dependant up to 500 booklets/hr
Power requirements 230V AC 50Hz, 100W / 110V AC 60Hz,
100W
Weight (shipping weight) 39 kg/86 lbs. (41.5 kg/91.5 lbs.)
Dimensions (height x width x length) 11 ½” x 19 1/3” x 20”
Shipping dimensions (height x width x length) 16 1/3” x 26 2/3” x 24”
Accessories Stand on casters
Additional stapling heads
Original NAGEL-Staples
 Loading...