

om218 T_UG_051219
CMS 218T Electronic Cash Register
User Guide
!
Please Read This Before Proceeding
3 new “AA” batteries must be installed in the cash register to
prevent data and user-programmed settings from being erased in
the event AC power is disconnected, or in case of power failure.

CONTENTS
System Features 1
1 Getting Started
1.1 Safety Notes and Precautions 2
1.2 Data backup Batteries 2
1.3 Printer Mechanism Notes 2
1.4 Connecting to the Power Supply 2
1.5 Installing Batteries 3
1.6 Installing Paper Roll 3
1.7 Using Paper Reel 3
1.8 Keyboard Layout 4
1.9 Control Key Positions 5
1.10 Display Layout and Indicators 5
1.11 Department Shift Key Function 5
2 Date and Time Settings
2.1 Programming the Date 6
2.1aChanging the Date Format 6
2.2 Programming the Time 6
2.2aChanging the Time Format 6
2.2bChanging the Time Print Setting 6
2.2c View the Time during Operations 6
3 Clerk Settings
3.1 Programming Clerk System ON/OFF 7
3.2 Programming Clerk Security Code 7
3.3 Clerk Log On with PIN Code 7
3.4 Clerk Log On with PIN Code not assigned 7
4 Department Settings
4.1 Programming the Tax Rates 8
4.2 Department Shift Key Function 8
4.3 Programming Department Status 8
5 PLU (Price Look Up) Settings
5.1 Programming PLU item price 9
5.2 Programming PLU status 9
5.3 PLU Dump Report
6 Discount Rate (-%) Key Setting 10
7 Grand Total & Z Counter Clear 10
8 Reset Memory, Reports and Data
8.1 Partial Reset 10
8.2 Full Reset Reports 10
8.3 Full Reset All Data 10
9 Foreign Currency Settings & Operations
9.1 Foreign Currency (FC) Settings 11
9.2 FC Conversion Operations 11
10 Calculator Settings & Operations
10.1 Calculator Mode Password Setting 12
10.2 Calculator Mode Operations 12
11 Caption Settings
11.1 Character Allocation Chart 13
11.2 Control Options for Character Inputting 13
11.3 Selecting Caption Programming Modes 14
11.4 Selecting a Caption Number 14
11.5 Inputting Text for a Caption 14
12 Programming for System Functions 15
13 REG Operations
13.1 Department Entry note 17
13.2 Error Prompt note 17
13.3 Electronic Journal (EJ) notes 17
13.4 EJ Balance and Time Displays 17
13.5 Sample Receipts 18
Sample Receipt 1 and 2 18
Sample Receipt 3 and 4 19
13.6 Department Entries 20
13.7 PLU Entries 20
13.8 Minus ( – ) Operations 21
13.9 Discount [ – % ] Key Operations 21
13.10 VOID / Correction Key Operations 22
13.11 Merchandise Return Operations 22
13.12 Received On Account Operations 23
13.13 Paid Out Operations 23
13.14 Non-Add # Print Operations 23
13.15 No Sale Operations 23
13.16 Cash Tender Operations 24
13.17 Check Tender Operations 24
13.18 Charge Tender Operations 24
13.19 Split Tender Operations 25
13.20 Card Tender Operations 25
13.21 After Receipt Operations 25
13.22 Receipt ON/OFF 25
14 Management Reports
14.1 Programming the Z-Report Code 26
14.2 Printing Reports (Quick Reference) 26
14.3 Financial Report 27
14.4 PLU Report 27
14.5 CLERK Report 28
14.6 EJ Report – X & Z Modes 28
14.7 Full Report for EJ 29
14.8 Oldest Report for EJ 30
14.9 Oldest Report for EJ 30
14.10 Daily Report for EJ 30
15 Balancing Formulas 31
16 Troubleshoot – Print Function 31
17 Warranty Policy 32
Warranty Registration (Back Cover)
To be completed by the Purchaser, cut out and
return portion to the address provided.
User Guide: OFFICEMASTER CMS-218 T
© 2005 Loginet Technologies SB

CMS-218 TUSER GUIDE:
Department : 16 (DEPT shift system)
PLU : 200
Clerk : 8 Clerks
Tax : Value add TAX mode (4 VAT's)
Payment : Cash, Check, Charge, Card
Management Report
● X/Z Financial report ● X/Z PLU report ● X/Z Clerk report ● X/Z Full report for Electronic Journal (EJ)
● X/Z Oldest report for EJ ● X/Z Latest report for EJ ● X/Z Daily report for EJ
Printer
● SII LTPZ225 - LINE THERMAL PRINTER ● Print Speed : 5.2 line/sec Note: [DEPT01 1.00] data & 25℃
● No. of Columns : 24 Columns ● Paper Width : 57.5 ± 0.5mm ● MCTF : About 6150000 LINES
Display
● Alpha & Numeric (Union-Jack) Display (10 digits)
Programmability
● Date (Month-day-year/Day-month-year) & Time (24 hr / 12 hr) - Time will print
● TAX rate - VAT .......... 0 - 99.999%
● Department - Price (Max.7 digits) / Caption / Taxable / Single item cash
● PLU - Price (Max.7 digits) / Caption / Link DEPT / Sub-department / Dump report
● % rate (0 - 99.99%)
● FC - Caption / Rate preset
● Grand total & Z counter clear
● Z report security code (4 digits)
● Clerk – Caption / System (Active/Inactive) / Security code (3 digits)
● Decimal point position (0./0.0/0.00/0.000)
● Language select (English/French/German/Spanish/Dutch/Danish/Portuguese/Swedish)
● Zero price entry setting
● European rounding (Normal/Swiss/Swedish/Denmark)
● Rounding method for VAT calculation (Round down/Round off/Round up)
● Multi ple receipt issuing (Allow/Not Allow)
● Zero skip printing preset
● Print total VAT amount (Non print/Print)
● Print Taxable amount splited per rate (Non print/Print)
● Print total Taxable amount (Non print/Print)
● Print Taxable amount out of VAT splited per rate (Non print/Print)
● Print total Taxable amount out of VAT (Non print/Print)
● Print tax symbol at right hand side of amount (Non print/Print)
● Tax details print (Before tender/After tender)
● EJ is Active/Inactive
● Transaction in REG mode is buffered to EJ memory (All transaction /Only sales transaction)
● Warning beep for nearly full of EJ memory will be sound (Yes/No)
Warning beep for nearly full of EJ memory will be sound at the start (Yes/No)
●
● Consecutive counter will not be reset in Z financial report (Yes/No)
● Calculation machine mode password (4 digits)
● Store header (4 lines)
System Features
1
USER GUIDE:
CMS-218 T
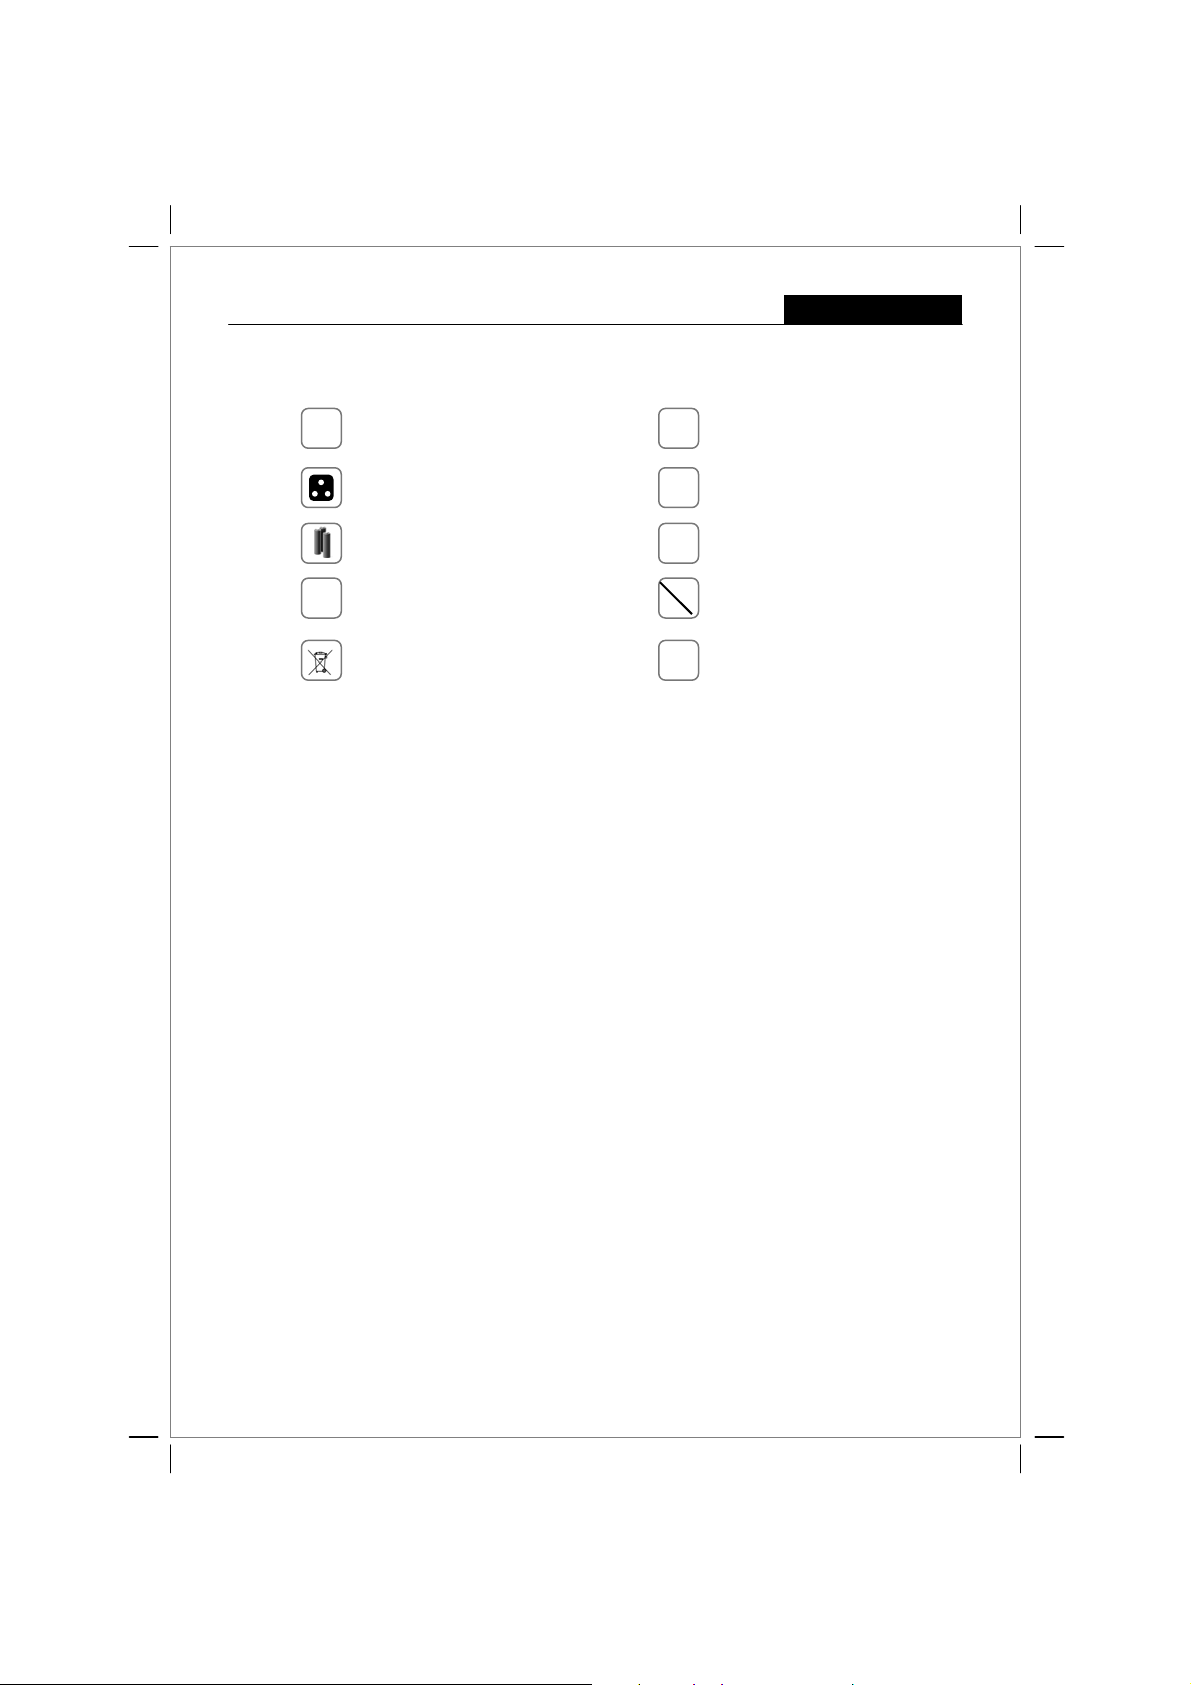
1.1 Safety Notes & Precautions
Getting Started
This cash register is exclusively intended for use
in processing cash register business indoors. Any
L
other use is considered unintended use.
Ensure that the mains power supply corresponds
to that specified on the rating label of the ECR.
Use only batteries of the same type as supplied!
Use of other types may cause malfunction.
Install the supplied batteries according to the
+
-
polarity (as displayed on the battery compartment).
Dispose off the batteries in an e nvironm e nt ally
friendly manner, according the local regulation.
1.2 Data Backup Batteries
Three new “AA” batteries must be installed in the cash register to prevent data and user-programmed
settings from being erased from the memory in the event AC power is switched off, or accidentally
disconnected, or in case of power failure.
1.3 Printer Mechanism Notes
To ensure long, trouble-free operation, observe the following instructions:
Never
• print without any paper installed.
• pull the paper while printer is operating.
• use poor quality paper.
• insert used paper rolls.
• tamper with the printer using hard objects.
• move the printer drive by hand.
Pay attention to the markings indicated at the end of the paper roll. Change the paper roll immediately.
Have the ECR/printer mechanism serviced regularly by an authorised service agent.
Never insert objects, such as screwdriver, paper
clip, etc. in the ECR. This could damage the ECR
a
and exposes you to the risk of an electric shock.
Never attempt to repair the ECR yourself.
#
Repairs by authorised service agent only.
Do not expose the ECR to extreme temp er at ures.
Ã
E.g. – direct sunlight, cookin g eq ui pmen t, etc.
Do not place the ECR next to liquid dis p ensi n g
6
equipment e.g. wash basin, soda machine, etc.
Clean any dust from the cash register by wiping it
gently with a dry cloth. Never use water or
,
solvents such as thinner, spirits, etc.
1.4 Connecting to the Power Supply
Before connecting the cash register to the mains power supply, please make sure that the voltage and
frequency specified on the rating label matches with the local power supply.
Safety note:
Data retention:
The power outlet must be near the cash register and easily accessible. This allows you to
disconnect the power supply to the cash register quickly in case of emergency.
With data backup batteries installed, all data in the machine is retained when the power
supply is disconnected. The length of time data will be retained without continuous mains
power supply depends on the level of power available in the batteries.
2
CMS-218 TUSER GUIDE:
1.5 Installing Batteries
Install the batteries supplied to ensure that data is retained in the event of a power failure.
1. Open the printer lid.
2. Open the battery compartment cover (black flap) behind the paper compartment.
3. Insert the three AA round cell batteries. Pay attention to the correct polarity of the batteries.
4. Close the battery compartment cover
5. Close the printer lid.
Replacing batteries: To ensure data retention, replace the batteries once a year with the cash register
switched on.
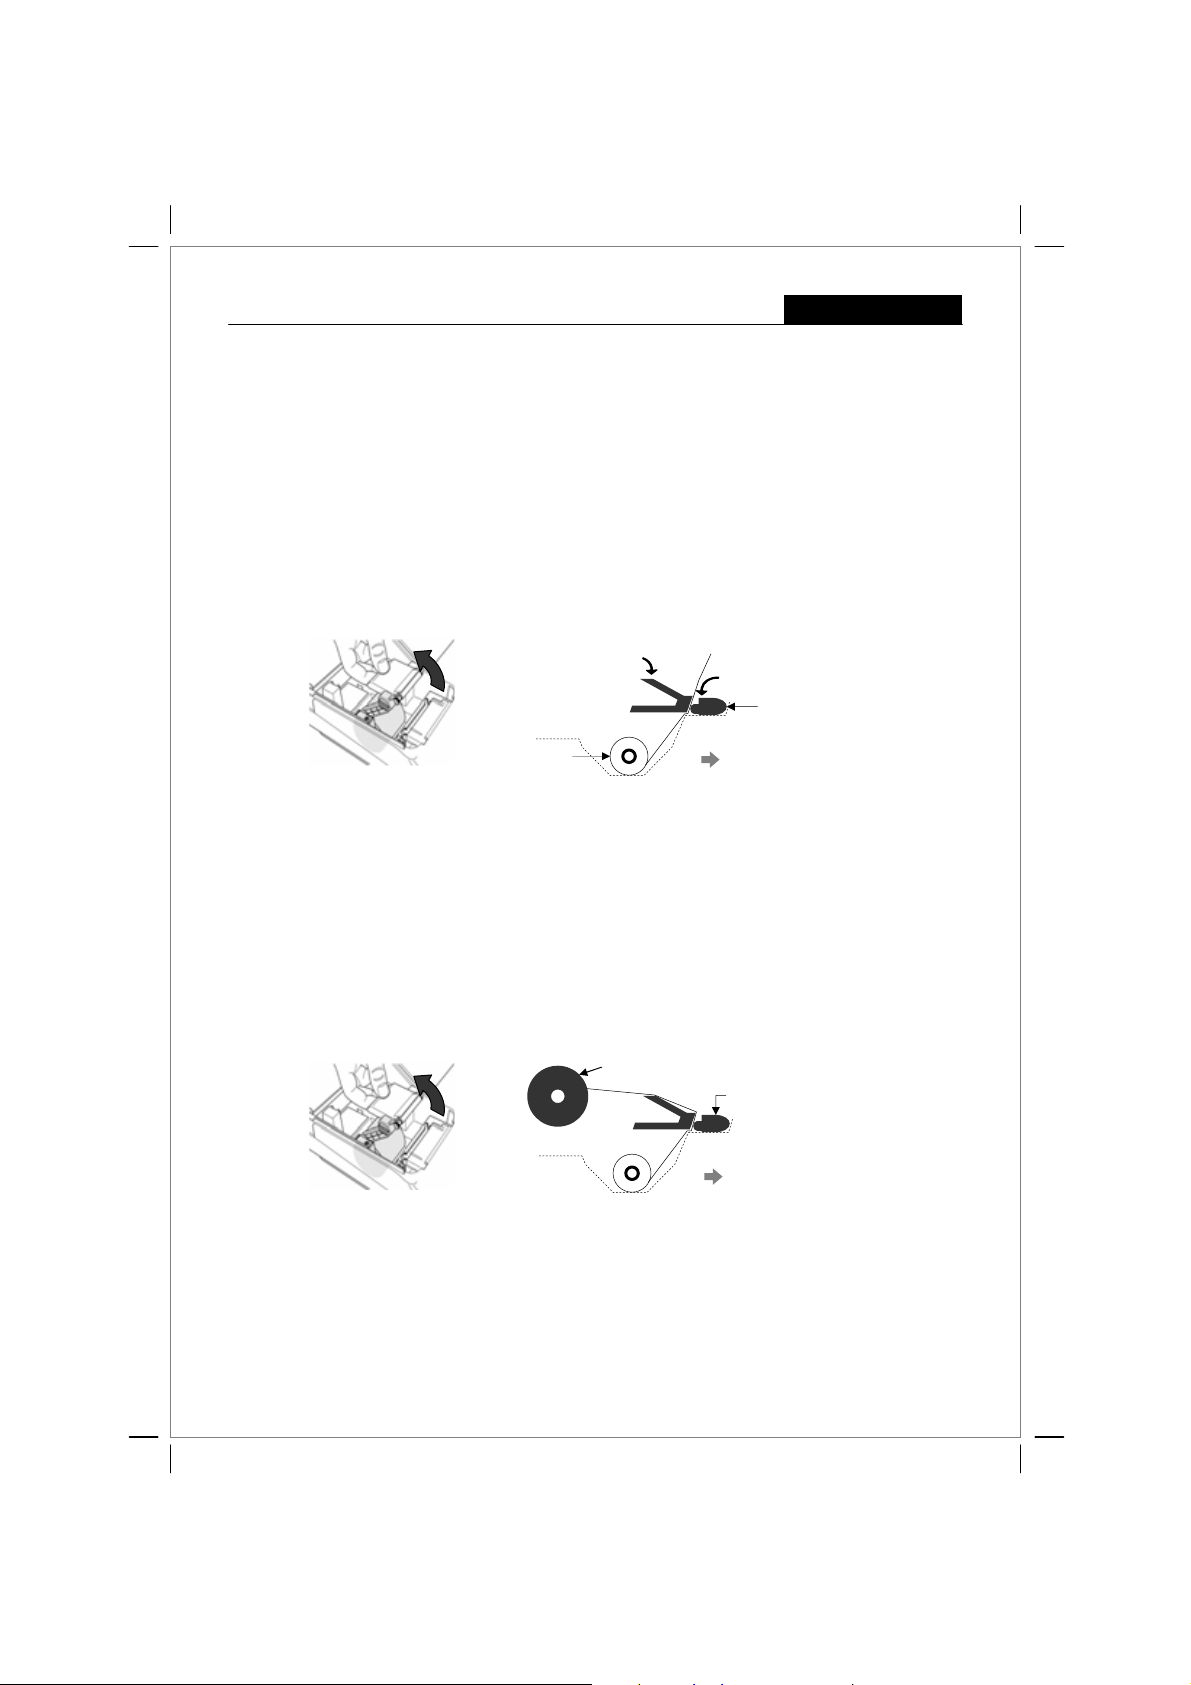
1.6 Installing Paper Roll
Getting Started
Step 2
A
1. Remove the printer cover.
2. Pull the paper transport cover ‘A’up.
3. Insert a thermal paper roll (57 mm Width and max. 70 mm Diameter).
4. Draw the leading edge of the paper over the tear-off edge.
5. Push the paper transport cover ‘A’down, locking it in place.
6. Depending on the required use (receipt or journal),
a) for Receipt use – tear off the paper at the tear-off edge of the printer mechanism, or
b) for Journal use – feed the paper onto the paper reel. See details on section 1.7
7. Replace the printer cover.
1.7 Using Paper Reel
Step 2
A
1. Open the printer cover.
2. Thread the end of the journal paper into the slit in the paper reel.
3. Insert the paper reel into the reel guides.
4. To remove the journal paper after it has been rolled up on the reel, remove the paper reel and pull the
journal roll off.
5. Reinsert the paper reel.
6. Close the printer cover.
Step 5
Step 6 (a)
Printer mechanism
Paper roll
Keyboard Side
Paper Reel
Printer mechanism
Keyboard Side
3

CMS-218 TUSER GUIDE:
1.8 Keyboard Layout
DEPT CLERK
Getting Started
RECEIPT
ON/OFF
RECEIPT
ISSUE
FEED
RA /
EURO
PO
AT / TL = - The Amount Tendered/TOTAL key is used for cash tender transaction.
CHARGE - The Charge key is used for charge tender transaction.
C - The Clear key will clear an entry made on the numeric keypad or Qty/Time key before it is finalized on a department or
FEED - Depressing the FEED key will advance the receipt or journal paper one line, or continuously until the key is released.
REF/- - The Ref/- key is used to subtract an amount from the sale total. The financial report records the (-) key total. As the Ref/-
-% - The -% key is used to subtract a percentage from the sale total. The financial report records the -% key total.
SUBTOTAL - Depressing the Subt otal key will display the sales total.
PO - The PAID OUT key is used to remove media from the cash dr awer. It carries its own total on the financial report.
RA / EURO - The RECEIVED ON ACCOUNT key is used to rec ord a media payment, or loan to the cash drawer. Th e
CHECK - The Check key is used for check tender transaction.
CARD - The Card key is used for card tender transaction.
PLU - Price look up function.(200 Kinds)
X / TIME / dbl - The Qty/Time key is used to multiply department or (-) key entries. Inform remaining buffers for EJ.
DEPT 1/9-8/16 - Department key is used to select non-taxable sales at th e pre-programmed tax rate.
DEPT - Department SHIFT key is used for select a department 9-16. See pages 5 & 8 for details.
# / NS - # / NO SALE key is used as a non-add number key and non sale key.
CLERK - Clerk key is used for assign a Clerk.
VOID - The void key used to erase an incorrect entry, or for error correct operations. The financial report records the void total.
Receipt ON/OFF - The Receipt ON/OFF key is used to saving paper or not. It is switched to reverse by depressing again.
Receipt ISSUE - The Receipt Issue key is used to post receipt or multiple receipt. (Multiple receipt is useful for changing paper roll)
VOID
REF/-
PLU
X/TIME
C
dbl
function key. The Clear key is also used to clear error conditions.
key, this is used for refund operation. The financial report records the refund total.
financial report records the received on account total. As the (RA/FC) key, this is used for FC conversion operation.
7 8 9
@
GHI
PQRS
ABC
4
1
5
JKL
2
TUV
0 00
“#
SP/
DEF
6
MNO
3
WXYZ
•
del
4 / 12 8 / 16
3 / 11
2 / 10
1 / 9 5 / 13
7 / 15
6 / 14
X
:
+
-%
CARD
ST
# / NS
CHECK
CHARGE
AT / TL
=
4

CMS-218 TUSER GUIDE:
1.9 Control Key Positions
OFF - The system is inoperable.
REG 1 - Registration mode. Papers are used as journal
REG 2 - Registration mode. Papers are used as receipt
X - The X position is used for reading the financial report.
Z - The Z position is used to read the financial report.
PRG - The PRG position is used for all programming.
PRG
OFF
REG 1 (Journal)
REG 2 (Receipt)
X
Z
1.10 Display Layout and Indicators
Calculator Mode is activated
When register is in Calculator mode, an indicator
is lighted here
For Calculator operation, see page 12.
Receipt ON/OFF
When receipt printing is switched OFF, an indicator
is lighted here
For Receipt On/Off operation, see page 25.
Electronic Journal (EJ) is “Nearly Full”
When EJ memory is “Nearly Full”, an indicator
is lighted here
For EJ warning details, see page 17.
Getting Started
Receipt ON/OFF does not work in this mode. (Receipt as ON always)
CL
;
CL
;
CL
;
.
.
EJ
EJ
EJ
Error Prompt
When an incorrect key is pressed or an incorrect
key sequence is entered, a warning tone is
activated with an “E” symbol displayed. To resume
operation, press the [ C ] key. (see page 17).
1.11 Department Shift Key Function
The shift key is used when you want to select department numbers 9 to 16.
DEPT
Examples:
To select DEPT 9 :
To select DEPT 10:
To select DEPT 16:
This function can be used on both REG and PRG modes.
DEPT
DEPT 2 /10 x
DEPT 8 /16
1 / 9 +
5
E
CL
;
EJ

CMS-218 TUSER GUIDE:
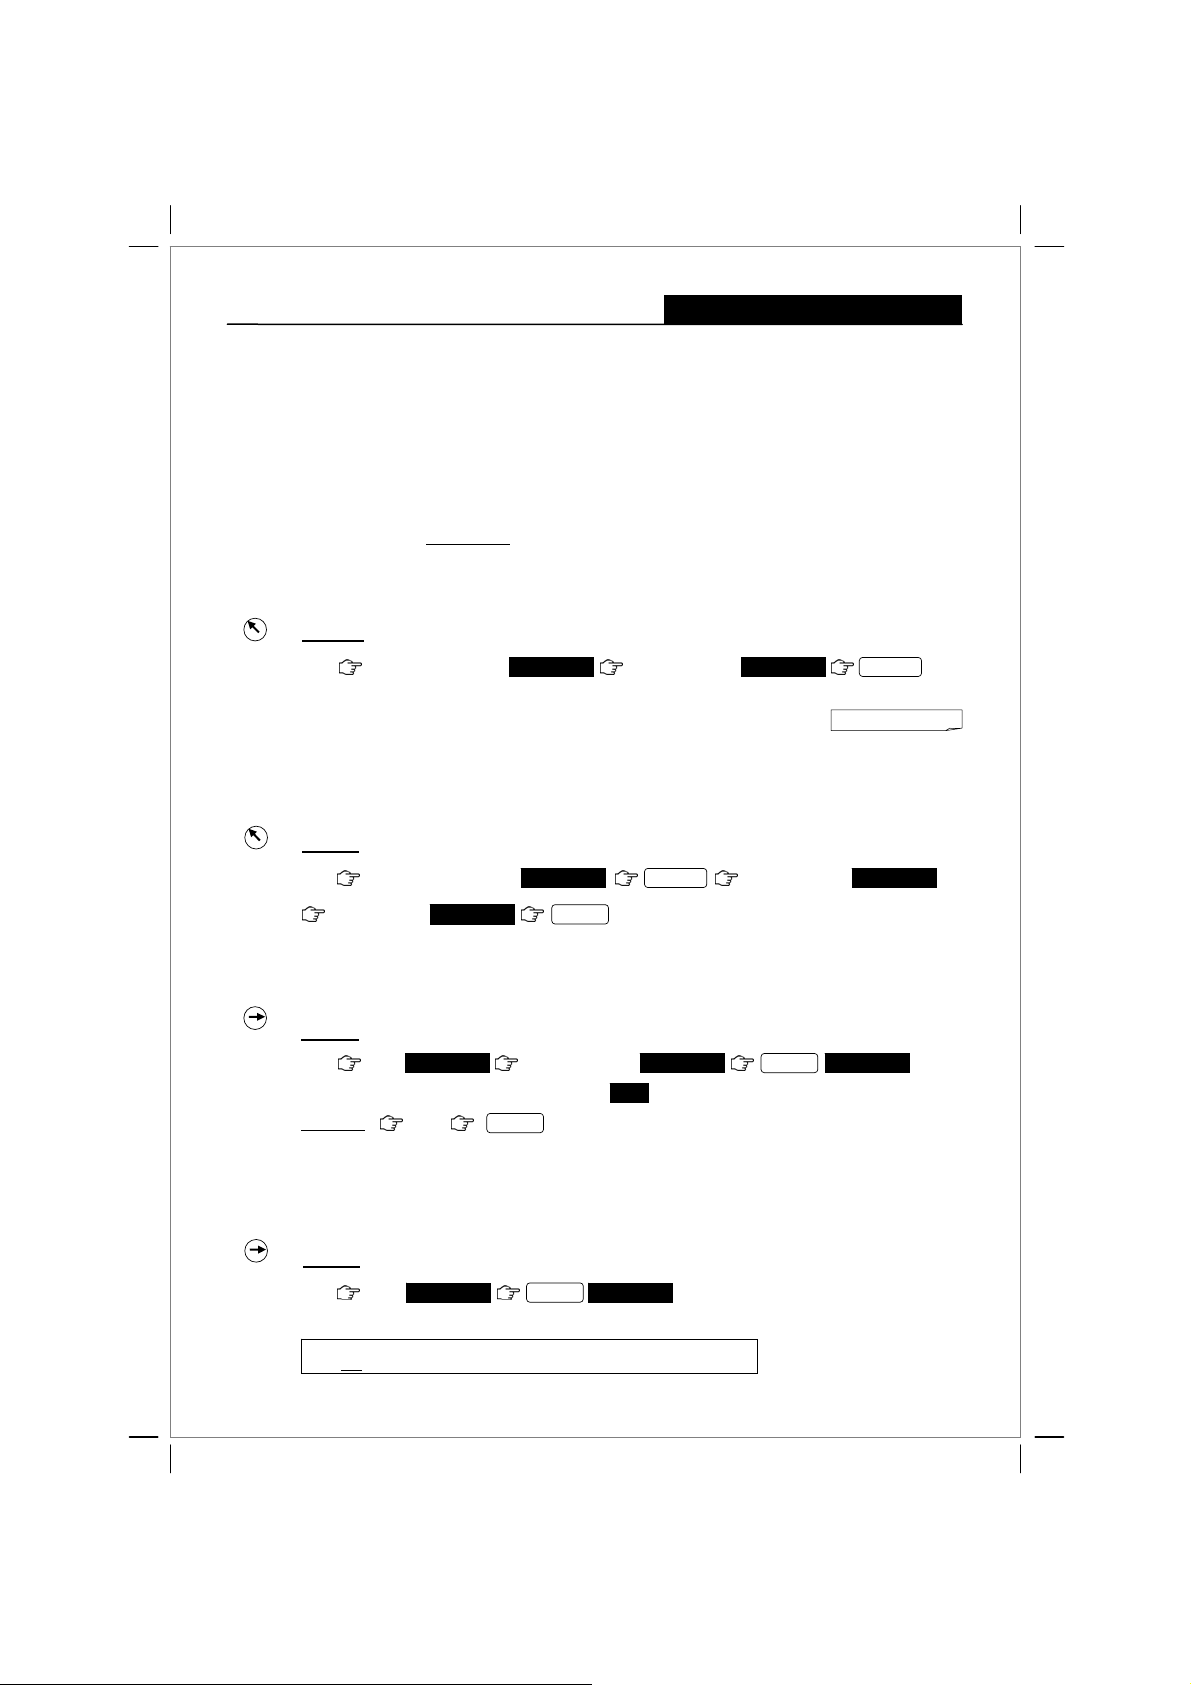
2 Date and Time Settings
2.1 Programming the Date
OFF
Key sequence : < PRG > → { ddmmyy } → [ # / NS ]
PRG
REG 1
REG 2
Example: To set the date as 30thJanuary 2006
X
Z
PRG
date input { 300106 }
2.1a Changing the Date Format
Key sequence : < PRG > → { function # = 7 } → { option # } → [ RA ]
Options # : { 0 } = mm - dd - yy; { 1 } = dd - mm - yy (default)*
: To change 30-01-06 (default) Date format to 01-30-06
Example
PRG
function # { 7 }
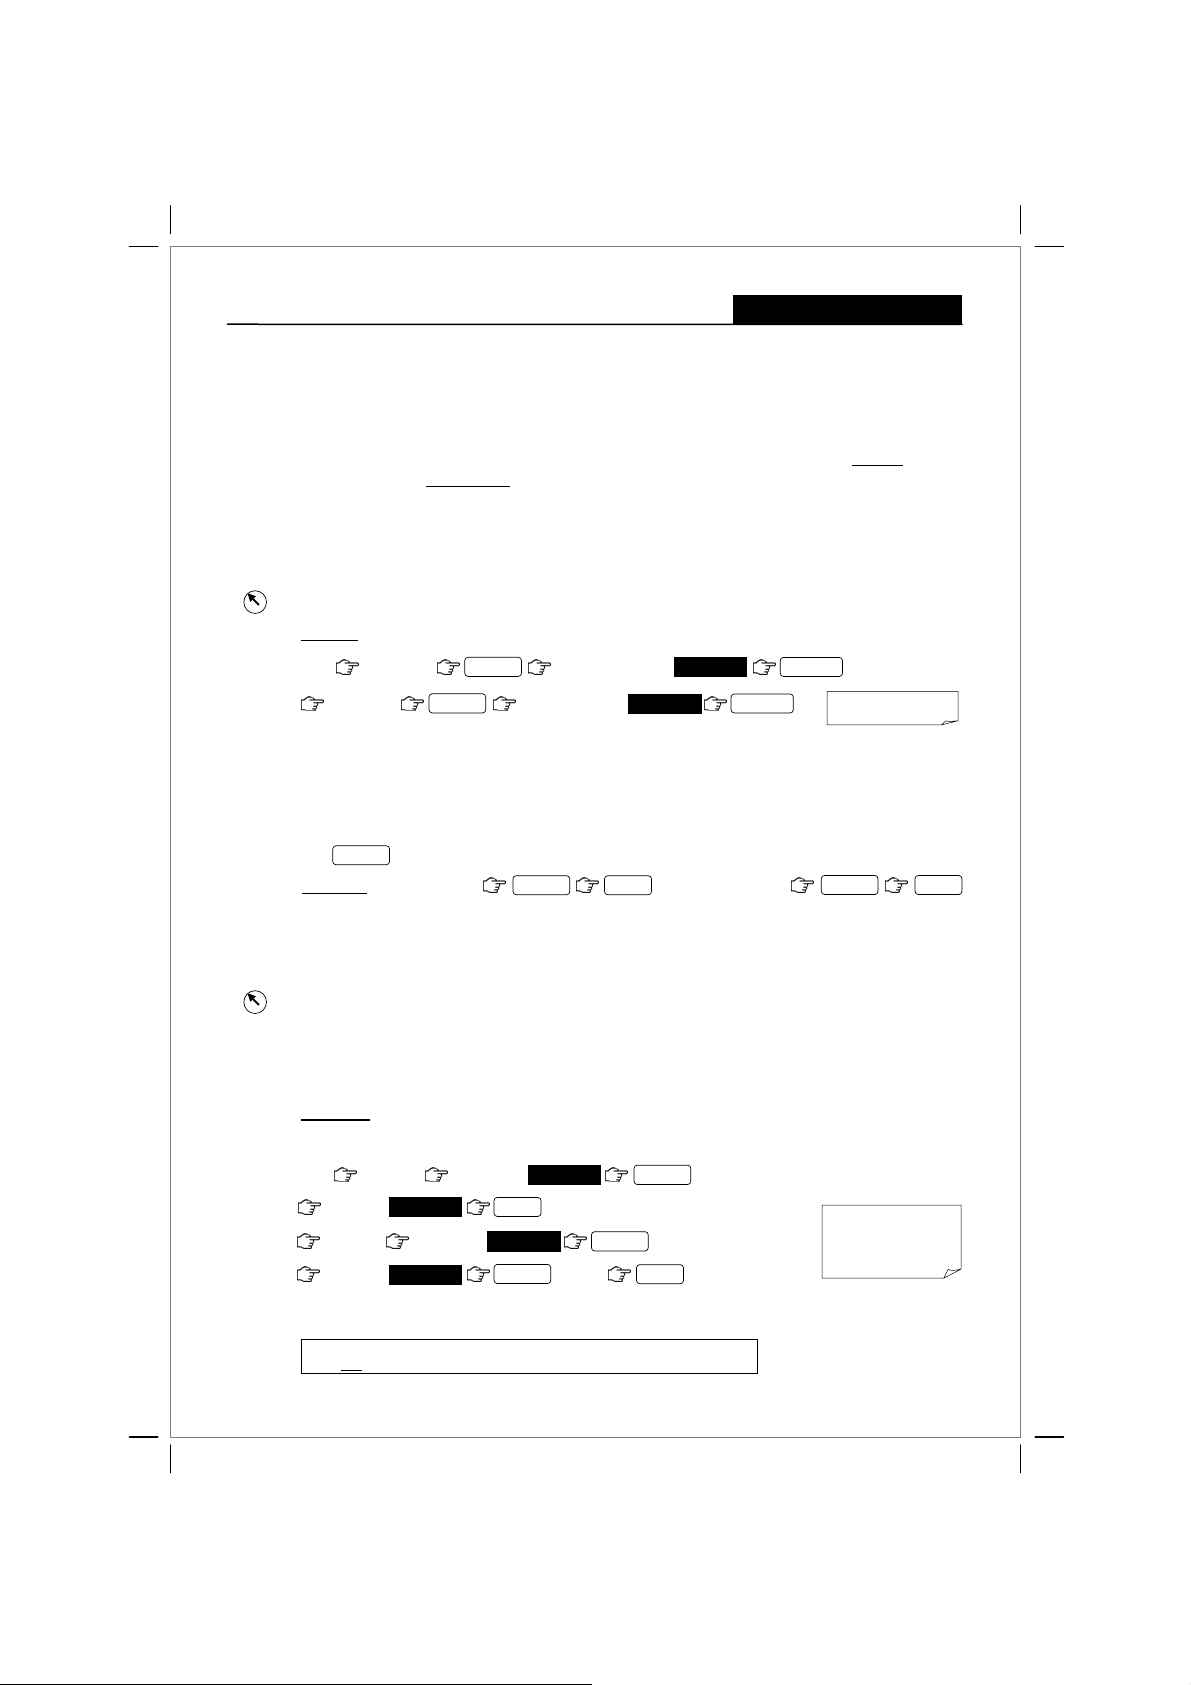
2.2 Programming the Time
Key sequence : < PRG > → { hhhh } → [ X / TIME / dbl ] hhhh = in military standard time (24:00)
Example: To set the Time as 1:18pm i.e. 13:18 hours
PRG
Note : The default Time display and print is in 12-hour format i.e.:
2.2a Changing the Time Format
Key sequence : < PRG > → { function # = 4 } → { option # } → [ RA ]
Options # : { 0 } = 24hr format; { 1 } = 12hr format (default)*
Example
PRG
time input { 1318 }
: To change 1.18pm (default) Time format to 13:18 hours
function # { 4 } option # { 0 }
3001.06
option # { 0 }
13.18
# / NS
0.70
X / TIME / dbl
0.40
Date/Time Settings
RA / EURO
ι 1-18
A vertical bar here to denote PM
CLERK 1 PM01:18
RA / EURO
**Print
30-01-06
P FUNCTIONS 0.70
P FUNCTIONS 0.40
**Print
**Print
PM01-18
**Print
2.2b Changing the Time Print Setting
Key sequence : < PRG > → { function # = 23 } → { option # } → [ RA ]
Options # : { 0 } = Time will print (default ); { 1 } = Time will not print
Example
: To change Time will print (default) to Time will not print
PRG
function # { 23 } option # { 1 }
2.2c Viewing the Time during operations
Key sequence : < REG 1 or 2 > → [ X / TIME / dbl ]
OFF
PRG
REG 1
REG 2
Example at 1.18 PM
X
Z
Note : Pressing the [ X/Time/ dbl ] again will display the EJ balance. See page 17 f or details.
L KEY legend : < > = Control key position; { } = numeric key entry; [ ] = function key entry
mode, you can exit/ESC any time during programming by pressing the [ AT/TL = ] key.
L In PRG
: In REG1 or 2
2.31
RA / EURO
This operation is not allowed during a transaction.
X / TIME / dbl
ι 1-18
(** You must be LOG ON as a clerk)
6
P FUNCTIONS 2.31
**Print
CMS-218 TUSER GUIDE:
3 Clerk Settings
The Clerk System allows you to assign up to 8 clerks for the ECR and all transactions will be recorded
by the respective Clerk # assigned. You also have the option to switch the Clerk System OFF.
With the “Clerk System ON” (factory default), a Clerk code must be LOG ON before the register can be
operated in REG1 (Journal) or REG2 (Receipt) mode.
Unless the Clerk LOG OFF, the Clerk code entered is retained even if any other operation is done in
PRG, X, or Z modes. The current Clerk is required to LOG-OFF before another Clerk can LOG ON.
For security purpose, a 3-digit Personal Identification Number (PIN) can be assigned to each Clerk.
You can assign a name/caption
3.1 Programming Clerk System – ON/OFF
Key sequence : < PRG > → { function # = 4 4 4 4 4 } → { Status # : 0 = OFF; 1 = ON } → [ AT/TL = ]
OFF
PRG
REG 1
REG 2
Example: To turn Clerk System OFF (default is ON)
X
Z
PRG
function # { 4 4 4 4 4 } status to OFF { 0 }
Note: With "Clerk System OFF“, Clerk LOG ON operation is not required. Under OFF
mode, the register prints “Clerk 1" o n receipts, journals and re ports. All of sales will
be put together into Clerk 1 and Clerk report covers only sales for Clerk 1.
3.2 Programming Clerk Security PIN code
OFF
Key sequence : < PRG > → { function # = 4 4 4 4 4 4 } → [ AT/TL = ] → { Clerk # } → { 3-digit PIN } → [ CLERK ]
PRG
REG 1
REG 2
Example : To programme PIN code ‘456’ for Clerk 1
X
Z
PRG
function # { 4 4 4 4 4 4 }
e.g. Clerk 1 = DEBBIE. See page 14 for Caption programming.
444.44
4444.44
Clerk Settings & Operations
AT / TL =
4444.40
Clerk # input { 1 }
AT / TL =
**Print
4444.40
0.01
PIN # { 4 5 6 }
14.56
CLERK
to save.
3.3 Clerk LOG ON with PIN Code
OFF
Key sequence : < REG 1 or 2 > → { 1-digit Clerk # } → { 3-digit PIN # } → [ CLERK ]
PRG
REG 1
REG 2
X
Example
Z
: To Log On Clerk 1 with PIN code ‘456’
REG
{ 1 }Clerk PIN { 4 5 6 }
( If the 3-digit PIN # is not correctly entered, an error sign will appear on the display )
To log off, CLERK
0.01
E
{ 0 }
Note: It is not possible to change the current assigned Clerk while a transaction is in progress.
3.4 Clerk LOG ON with PIN Code not assigned
OFF
Key sequence : < REG 1 or 2 > → { 1-digit Clerk # } → [ CLERK ]
PRG
REG 1
REG 2
X
Z
: To Log On Clerk 1 with PIN code not assigned
Example
REG
{ 1 }
L KEY legend : < > = Control key position; { } = numeric key entry; [ ] = function key entry
mode, you can exit/ESC any time during programming by pressing the [ AT/TL = ] key.
L In PRG
0.01
CLERK
C01 0.00
7
14.56
CLERK
Clerk # display
↓
C01 0.00
**Non-Print
CMS-218 TUSER GUIDE:
Department Settings
4 Department Settings
The Department System allows you to organise various items into the 16 departments provided, where
each department can be assigned with different status. ( see section 4.3 )
The status’ factory default for all departments are ‘normal department’ and ‘non-taxable’.
Before you change the status from the default status, it is advisable to programme the tax rate
You can assign a name/caption
4.1 Programming the Tax Rates
A maximum of four different tax rates can be programmed {T1, T2, T3 & T4}.
Key sequence : < PRG > → { Tax # } → [ CARD ] → { Tax Rate } → [ AT/TL = ]
OFF
PRG
REG 1
REG 2
Tax # : { 1 } = VAT 1 ; { 2 } = VAT 2 ; { 3 } = VAT 3 ; { 4 } = VAT 4
X
Z
Example: To enter T1 as tax rate 14% and T2 as 8.5%
PRG
Tax # { 1 }
Tax # { 2 }
CARD
* Tax rate ~ ( 0.001 % to 99.999 % )
4.2 Department Shift Key Function (can be used on both REG and PRG modes)
The shift key is used when you want to select department numbers 9 to 16.
DEPT
Examples: To select DEPT 9 :
e.g. Dept 1 = FRUITS See page 14 for Caption programming.
CARD
Tax # { 8 5 0 0 }
0.001 % → { 1}
0.012 % → { 1 2 }
0.123 % → { 1 2 3 }
DEPT 1 / 9 +
Tax # { 1 4 0 0 0 }
14.000
8.000
AT / TL =
1.234 % → { 1 2 3 4 }
12.345 % → { 1 2 3 4 5 }
14.000 % → { 1 4 0 0 0 }
To select DEPT 10:
AT / TL =
DEPT 2 /10 x
first.
14.000T1
8.500T2
**Print
4.3 Programming Department Status
OFF
Key sequence : < PRG > → { status S1, S2 } → [ CHECK ] → { price* } → [ Department # ]
PRG
REG 1
REG 2
Status S1: { 0 } = Normal department (default)
X
Z
Price* : for ‘free pricing’, key in { 1 } otherwise input actual price.
Example 1
PRG
{ 1 } = Single item cash
: DEPT 1 is a Normal department Taxable by VAT 1 (free pricing), and
DEPT 16 is a Normal department Non-taxable (free pricing).
to assign to DEPT 1.
0.00
DEPT
0.01
shift key
S1 # { 0 }
price* { 1 }
S1 # { 0 }
price* { 1 }
L KEY legend : < > = Control key position; { } = numeric key entry; [ ] = function key entry
mode, you can exit/ESC any time during programming by pressing the [ AT/TL = ] key.
L In PRG
S2 # { 0 1 }
0.01
S2 # { 0 0 }
0.01
1 / 9 +
Status S2: { 00 } = Non-taxable (default)
{ 01 } = Taxable by VAT 1
{ 02 } = Taxable by VAT 2
{ 03 } = Taxable by VAT 3
{ 04 } = Taxable by VAT 4
CHECK
CHECK
8 /16
to assign to DEPT 16.
8
P DEPARTMENT 0.01
DEPT01 0.01T1
P DEPARTMENT 0.00
DEPT16 0.01
**Print
CMS-218 TUSER GUIDE:
5 PLU (Price Look Up) Settings
The PLU System allows you to assign fixed item price and department for assorted items.
You can also assign the PLU as a Sub-Department (operate with free pricing).
A caption
5.1 Programming PLU item price
OFF
Key sequence : < PRG > → [ X / TIME / dbl ] → { PLU # } → [ PLU ] → { price } → [ DEPT ] → [ X / TIME / dbl ]
PRG
REG 1
REG 2
X
Example: PLU123 priced at 10.00 Rand which belongs to DEPT 1.
Z
PRG
can be assigned for each PLU e.g. PLU 001 = APPLE See page 14 for Caption programming.
X / TIME / dbl
P001 0.00 P123 0.00
PLU # { 1 2 3 }
PLU Settings
PLU
price { 10.00 }
After you press the [DEPT] key, you can loop back and input a preset price, which will be assigned to the next PLU #
ª
displayed, or you can start programming by inputting a new PLU # which is different from the assigned # displayed.
P123 10.00
5.2 Programming PLU status
Note: This step is only necessary for PLUs which operate with free pricing.
OFF
Key sequence : < PRG > → [ PO ] → { PLU # } → [ PLU ] → { status # } → [ DEPT ] → [ PO ]
PRG
REG 1
REG 2
Status # : { 0 } = Treat as a PLU (fixed price) – default
X
Z
Example
PRG
{ 1 } = Treat as a Sub-Department (free pricing)
: PLU125 to be treated as a Sub-department which belongs to DEPT 2.
P001 0.00
PO
status # { 1 }
P125 0.01
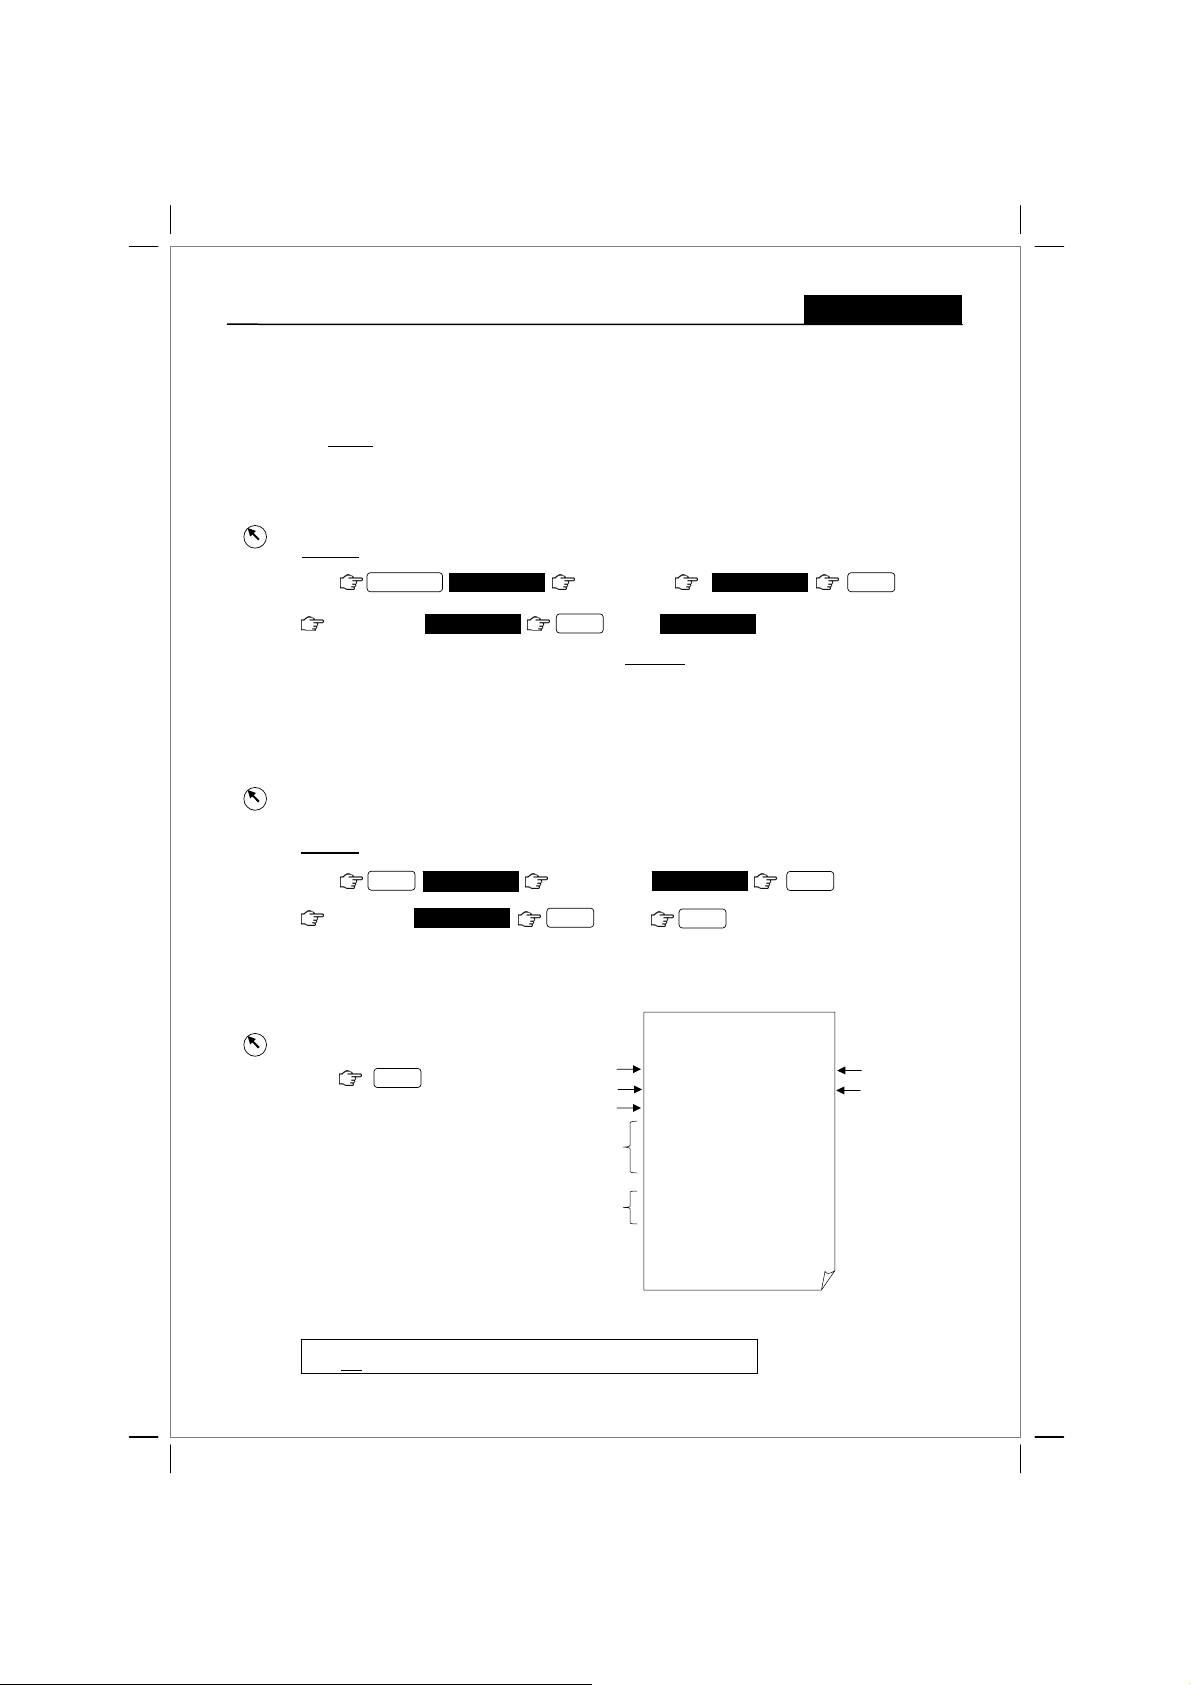
5.3 PLU Dump Report
A list of the programmed PLUs can be printed out.
OFF
PRG
REG 1
REG 2
< PRG > → [ PLU ]
X
Z
PRG
PLU
Assigned DEPT with caption
1 / 9 +
PLU # { 1 2 5 }
2 /10 x
PLU Number 001
PLU 001 with caption
PLU 002 with caption
DEPT without caption
PLU 003 without caption
DEPT without caption
P124 0.00
DEPT 1
P125 0.00
DEPT 2.
PO
CLERK 1 PM12-29
30-01-2006 0002
P PLU 001 STATUS 0
FRUITS 1.00T1
APPLE
P PLU 002 STATUS 0
DEPT02 2.00T2
COKE
P PLU 003 STATUS 1
DEPT03 3.00T3
P PLU 004 STATUS 0
FRUITS 4.00T1
MELON
ª
**Non-Print
PLU
PLU Status
PLU Price
& Tax status
L KEY legend : < > = Control key position; { } = numeric key entry; [ ] = function key entry
mode, you can exit/ESC any time during programming by pressing the [ AT/TL = ] key.
L In PRG
9

CMS-218 TUSER GUIDE:
6 Discount Rate (-%) Key Setting
You can enter a discount value from 0.01 - 99.99%.
OFF
PRG
REG 1
REG 2
Key sequence : < PRG > → { 4 digits r ate } → [ -% ]
X
Z
: To set an index discount rate at 10% ( = 10.00 ).
Example
PRG
discount rate { 1 0 0 0 }
10.00
Note: The attribute of [ -% ] in the REG mode is identical with the attribute of the item (Dept or PLU) registered just before.
When [ -% ] is used after Subtotal, it attributes to all the items registered by th en.
7 Grand Total & Z Counter Clear
OFF
Key sequence : < PRG > → { 20 } → [ RA / EURO ]
PRG
REG 1
REG 2
X
PRG
Z
0.20
RA / EURO0 “#2 TUV
8 Reset Memory, Reports And Data
8.1 Partial Reset
All working memory will be cleared, after that, return to idle status.
A partial reset deletes the last malfunction. The programming isretained.
Power OFF the machine. Then holding down and keys Power ON
C 7 @
-%
Settings
**Print
P DISCOUNT 10.00%-
**Print
P FUNCTIONS 0.20
Reset System
8.2 Full Reset Reports
All working memory, all report data will be cleared.
All sales are deleted. The programming is retained.
Power OFF the machine.
8.3 Full Reset All Data
All working memory, all report data, all program data will be cleared.
All programming and sales are deleted. The cash register is reset to its default factory settings.
Power OFF the machine. Then holding down and keys Power ON
L KEY legend : < > = Control key position; { } = numeric key entry; [ ] = function key entry
mode, you can exit/ESC any time during programming by pressing the [ AT/TL = ] key.
L In PRG
Then holding down and keys Power ON
C 7 @ 9 DEF
C 7 @3 WXYZ
10

CMS-218 TUSER GUIDE:
9.1 Foreign Currency (FC) Settings
A maximum of 4 FC presets can be programmed. The following must be entered for the programming :
→ { FC # } – 1, 2, 3 or 4
→ { Exp } – For setting decimal place of FC rate : 0 to 8
→ { D.P. } – For setting decimal place of converted amount : 0 to 3
→ { RATE } – Exchange rate : 6-digit entry from 000001 to 999999
OFF
PRG
REG 1
REG 2
Key sequence : < PRG > → { FC # } → { Exp } → { D.P. } → { RATE } → [ ST ] Subtotal key
X
Z
Example: To preset the following FC rates
( Rates used for demo purpose only )
PRG
9.2 FC Conversion Operations
Subtotal Amount × FC exchange rate = Converted Amount
*
9.2a Example: Direct Tender
Sequence : < REG > → { PLU Entry } → [ ST ] → { FC # } → [ RA / EURO ] → { FC amt tendered } → [ AT/TL = ]
E.g. FC exchange rate : 0.16 (D.P = 2) FC # 2 Caption = FC-2 SYSTEM D.P = 2
OFF
PRG
REG 1
REG 2
X
Z
FC # { 1 } EXP # { 3 }
FC # { 2 }{ 2 }
FC # { 3 }{ 3 }
{ 2 }{ 0 0 0 0 1 6 }
EXP
{ 2 }{ 0 1 9 0 5 9 }
Subtotal value is shown on the display using FC
exchange rate. Original value and converted value are
shown in turn each time when depressed the key.
Non-print
*
*
PLU # { 1 }
ST
FC # { 2 }
RA / EURO
FC # { 2 }
AT / TL =
PLU
Subtotal key
RA / EURO
RA / EURO
01 10.00
S 10.00
S 10.00
= 1.60
FC Settings & Operations
FC # 1 → R1.00 = 0.135 Euro ( i.e. LOCAL = 0.135 LOCAL)
FC # 2 → R1.00 = 0.16 USD
FC # 3 → R1.00 = 19.059 Yen
DP # { 2 } rate { 0 0 0 1 3 5 }
2220000.16
3320190.59
10.00 x 0.16 =1.60
1.60
1.60
FC# 2 total
FC cash amount
EXP
1320001.35
ST
ST
Converted amount is displayed
with a ‘square box’lighted here
CL
;
ST
P FC RATE 1320001.35
P FC RATE 2220000.16
P FC RATE 3320190.59
**Print
1. 6 0
//////////////////////
/ YOUR RECEIPT /
/ THANK YOU /
//////////////////////
CLERK 1 PM12-29
30-01-2006 0020
PLU 001 10.00
-----------SUBTTL 10.00
FC-2 *0.16 1.60
CASH FC-2 1.60
EJ
9.2b Example: Over Tender
Sequence : < REG > → { Dept Entry } → [ ST ] → { FC # } → [ RA / EURO ] → { FC amt tendered } → [ AT/TL = ]
E.g. FC exchange rate : 0.16 (D.P = 2) FC # 2 Caption = FC-2 SYSTEM D.P = 2
price { 10.00 }
Subtotal key
ST
FC # { 2 }
RA / EURO
FC amt tendered { 2.00 }
AT / TL =
01 10.00
1 / 9 +
S 10.00
1.60
C2.50
Total in FC
Amt. tendered in FC
2.00
Change amt. in Rand
10.00 x 0.16 =1.60
Amount tendered in FC
Change amount in Rand
Change amount in FC-2
//////////////////////
/ YOUR RECEIPT /
/ THANK YOU /
//////////////////////
CLERK 1 PM12-29
30-01-2006 0021
DEPT01 10.00
-----------SUBTTL 10.00
FC-2 *0.16 1.60
CASH FC-2 2.00
CHANGE 2.50
CHANGE FC-2 0.40
11

CMS-218 TUSER GUIDE:
10.1 Calculator Mode Password Setting
OFF
PRG
REG 1
Key sequence : < PRG > → { function # = 8 } → { 4-digit password } → [ RA / EURO ]
REG 2
X
Z
Example
: To set the calculator mode password as 1234.
PRG
function # { 8 }
Note: If the password # is programmed to "0000“, Calculator mode can be activated without keying in the password.
10.2 Calculator Mode Operations
OFF
In REG1 or 2 idle mode (i.e. when a "Sales Transaction“ is not in progress) the calculator mode can be
PRG
REG 1
REG 2
activated following the steps below.
X
Z
(1) Key in the preset password. If a wrong password is used, this mode will not activate.
Calculator mode can be activated without a password if the password is programmed to "0000".
(2) Press [ AT/TL = ] and hold down. Then press [ C ] while the [ AT/TL = ] key is being held down.
(3) To exit Calculator mode, repeat step (2).
Example 1
REG
To exit
: Password = ‘1234’
password # { 1 2 3 4 }
and hold down
password # { 1 2 3 4 }
and hold down
C
AT / TL =
Calculator Settings & Operations
P FUNCTIONS 812.34
C
RA / EURO
AT / TL =
to enter Calculator mode.
**Print
Example 2
REG
To exit
Operation Notes
: Password = ‘0000’
Cand hold down AT / TL =
and hold down
C
to enter Calculator mode.
AT / TL =
ECR display
In Calculator mode, an indication bar is lighted here
In this mode, print function is not
During Calculator operation, key tone is muted.
When a result from a division includes figures below zero, it will be rounded to a nearest integer after
rounding up/down ( 5/4 ) the first place after the decimal point.
Key Functions
→ Clear
C
AT / TL =
1 / 9 +
2 /10 x
5 /13 –
6 /14 :
{ Numeric } entry keys
7 @ 8 ABC 9 DEF
4 GHI 5 JKL 6 MNO
1 PQRS
0 “#
=
→
→ +
→ x
→ –
→ :
2 TUV 3 WXYZ
00 SP/
operational.
Input Demo
CL
;
{ 1 2 3 4 5 }
1 / 9 +
5 /13 –
5 /13 –
AT / TL =
C
{ 5 0 0 } 2 /10 x AT / TL =
{ 5 0 0 } AT / TL =6 /14 :
{ 1 0 }
{ 2 }
{ 1 0 0 }
........+) 12345
…….+) 10
…….- ) 2
…….- ) 100
…….=) 12253
……… 0
{ 2 }
{ 2 }
EJ
500 x 2 = 1000
500 / 2 = 250
12

CMS-218 TUSER GUIDE:
11 Caption Settings
You can programme captions or names for PLU items, Departments, Clerks, Receipt Header and Foreign
Currencies.
11.1 Character Allocation Chart
In Caption programming mode, each numeric key is allocated various numbers of characters. You can
scroll through the list by pressing the same numeric key repeatedly. After the last character allocated is
displayed, the offset starts from the first character again. To select a character, stop pressing at the
required character and then continue to select another character.
Caption Settings
Offset →
0 “#
1 PQRS
2 TUV
3 WXYZ
4 GHI
5 JKL
*
6 MNO
7 @
8 ABC
9 DEF
1
20
L
J K
Display format
Offset value for the numeric key
6
7
8
&
'
(
r
s
1
2
Ú
Ű
y
z
3
4
G
Ġ
5
Ł
lkj
ł
6
Ń
Ñ
_
{
8
Á
A
9
Ð
Ė
X Y
Allocated character
Ş
zźZŹÝxwZYXW
11.2 Control Options for Character Inputting
• DEL
X / TIME / dbl
Deleting character entry/input like back-space of PC i.e. to delete the last character displayed one at atime.
Double Width character shift key. Press this key preceding each Double Width character you wish to input.
7
654321098765432109543
?>=<;:/.-,+*)%$#"!0
śşрŚŞqpSRQP
úùûűüůÜÛÙŮvutVUT
ìígÏÎİÍihgIHG
òöôόōőóńñÖÔόŌŐÓonmONM
·
↑」「ⅢⅡⅠ¿¨ŒÆØΣ←→§¡~}^]∖[@7
ćcäâàąáÇĆCßÄÂÀÅĄcbaCBA
ëêéèeėÊÈÉĘfedFED
*
5 JKL
1 time
5 JKL
2ndtime
5 JKL
3rdtime
0 J
1 K
2 L
00 SP / ENT
Dual function control ke y.
1) As a character ‘SPACE’ key. Press this key once to allocate a sp ac e , a nd t h e pr ess a gai n to mov e th e
cursor to the next position for character input. For multiple spaces press this key repeatedly.
2) As a character ‘ENTER’ key. A same character cannot be inputted consecutively without using this key.
This key is used to fixed a character before the same character can be inputted again
For example “AAA”. After inputting the 1
character location. Then key in the 2
st
“A”, press the [ SP/ENT ] key to move the cursor to the next
nd
“A”. Press [ SP/ENT ] again and the 3rd“A”.
13

CMS-218 TUSER GUIDE:
11.3 Selecting Caption Programming Modes
OFF
Key sequence : < > = Control key position [ ] = depressing one of the function keys is necessary
PRG
REG 1
REG 2
< PRG > → [ # / NS ] to toggle between the different programming modes.
X
Z
Set key to PRG.
# / NS
1 time
nd
# / NS
2
time
rd
# / NS
# / NS
# / NS
# / NS
time
3
th
time
4
th
5
time
th
6
time
You can exit any time during the programming sequence by
11.4 Selecting a Caption Number
OFF
After a Caption mode has been selected, the individual caption number in that Caption mode can be
PRG
REG 1
REG 2
selected using the plus and minus keys.
X
Z
Example
: If you are in the PLU caption programming mode
# / NS
1 / 9 +
1 / 9 +
5 /13 –
You can exit any time during the programming sequence by
P001
P002
P003
P002
P001
D01
C01
H01
F01
1 / 9 +
0.00
Normal programming mode
PLU caption mode
DEPT caption mode
CLERK caption mode
Header message mode
Foreign currency mode
0.00
Back to Normal programming mode
5 /13 –
PLU caption mode
Use the [ + ] key
to move forward
to higher number
[ - ] key to move to
lower number
Caption Settings
AT / TL =
Mode Numbers/mode
PLU P001 P200
Department D01 D16
Clerk C01 C08
Header H01 H04
Foreign Currency F01 F04
AT / TL =
11.5 Inputting Text for a Caption
OFF
Key sequence :
PRG
REG 1
REG 2
< PRG > → [ # / NS ] to toggle → { input text } → [ CHECK ]
X
Z
Example: To key in a text caption “APPLE” for PLU 001
PRG
The next caption number appears
Caption mode.
Max. no. of characters/mode.
< > = Control key position { } = entry from the numeric keypad is necessary [ ] = depressi ng one of th e funct io n ke y s i s ne ce s sary
P001
# / NS
00 SP/
to fix ‘P’ and move the cursor
5 JKL
3 times to input ‘L’
2 APPL 1 APPLE
P002
PLU
12 12 12 24 10 24
8 ABC
0 AP
1 time for ‘A’
9 DEF
0 A
1 PQRS
2 times for ‘E’
1 PQRS 0 AP
1 time for ‘P’
again for another ‘P’
0 APP
You can exit during the programming sequence by
1 / 9 +
5 /13 –Note: Before [ AT/TL = ] key is pressed, you can use and keys to toggle up/down the PLU caption numbers.
Department Clerk Header Foreign Currency Footer
14
CHECK
AT / TL =

CMS-218 TUSER GUIDE:
12 Programming Options for System Functions
OFF
You have the options to change the settings/formats for the various system functions available in the ECR.
PRG
REG 1
REG 2
Key sequence: < PRG > → { 1 or 2 digits System Function # } → { 1 digit Option # } → [ RA ]
X
Z
Example
PRG
: To change the Time display format from 12-hour (default) to 24-hour format.
< PRG > → { Function # = 4 } → { Option # = 0 } → [ RA ]
4 GHI
0 “#
0.40
RA / EURO
to confirm.
Option #Function #
0 = Decimal point position – n
1 = Decimal point position – n.n
1
2 = Decimal point position – n.nn (Default)
3 = Decimal point position – n.nnn
Reserved
2
1 = Add-on TAX
3
2 = VAT TAX (Default)
0 = Time display - 24HR indication
4
1 = Time display - 12HR indication (Default)
0 = Print X/Z report header – NON PRINT
5
1 = Print X/Z report header – PRINT (Default)
Reserved6
0 = Date format - Month-Day-Year
7
1 = Date format - Day-Month-Year (Default)
Reserved8
Reserved9
Reserved10
0 = Language - English (Default)
1 = Language - French
11
2 = Language - German
3 = Language - Spanish
0 = Zero price entry will not
12
1 = Zero price entry will be allowed
0 = No European rounding (Default)
13
1 = European rounding - Switzerland
be allowed (Default)
0 = Rounding method for VAT calculation – Round down
14
1 = Rounding method for VAT calculation – 5/4 (Default)
2 = Rounding method for VAT calculation – Round up
4 = Language – Dutch
5 = Language – Danish
6 = Language – Portuguese
7 = Language – Swedish
2 = European rounding - Swedish
3 = European rounding - Danish
System Options
Note 2
Note : When European rounding is selected, the payment value is rounded as following method.
Rounding is performed when press total key or subtotal key.
Swiss Rounding
0.01 – 0.02 = 0.00
0.03 – 0.07 = 0.05
0.08 – 0.09 = 0.10
Swedish Rounding
0.00 – 0.24 = 0.00
0.25 – 0.74 = 0.50
0.75 – 0.99 = 1.00
Denmark Rounding
0.00 – 0.12 = 0.00
0.13 – 0.37 = 0.25
0.38 – 0.62 = 0.50
0.63 – 0.87 = 0.75
0.88 – 0.99 = 1.00
15

CMS-218 TUSER GUIDE:
12 Programming Options for System Functions
OFF
PRG
Key sequence: < PRG > → { 1 or 2 digits System Function # } → { 1 digit Option # } → [ RA ]
REG 1
REG 2
X
Z
0 = Multiple Receipt issuing is allowed (Default)
15
1 = Multiple Receipt issuing is not
0 = Zero skip printing Z report (Default)
16
1 = No zero skip printing Z report
0 = Print total VAT amount – Non print (Default)
17
1 = Print total VAT amount – Print
0 = Print Taxable amount splited per rate – Non print (Default)
18
1 = Print Taxable amount splited per rate – Print
0 = Print total Taxable amount – Non print (Default)
19
1 = Print total Taxable amount – Print
0 = Print Taxable amount out of VAT splited per rate – Non print (Default)
20
1 = Print Taxable amount out of VAT splited per rate –Print
0 = Print total Taxable amount out of VAT – Non print (Default)
21
1 = Print total Taxable amount out of VAT – Print
0 = Print tax symbol at right hand side of amount – Non print
22
1 = Print tax symbol at right hand side of amount – Print (Default)
0 = Time will print (Default)
23
1 = Time will not
Reserved (Do not enter 1 as status, only allow to enter 0 as status)
24
0 = Tax details print – Before tender
25
1 = Tax details print – After tender (Default)
0 = EJ is Active. (Default)
26
1 = EJ is not
print
Active.
Option #Function #
allowed
0 = All transaction in REG mode is buffered to EJ memory. (Default)
27
1 = Only sales transaction in REG mode is buffered to EJ memory. In other words, RA,
PO and Non-sale is not buffered to EJ memory.
0 = Warning beep for ‘EJ nearly full’ issued at end of transaction. (Default)
28
1 = Warning beep for ‘EJ nearly’ full NOT issued at the end of transaction.
0 = Warning beep for ‘EJ nearly full’ issued at start of transaction. (Default)
29
1 = Warning beep for ‘EJ nearly’ full NOT issued at the start of transaction.
0 = Consecutive counter will not be reset in Z financial report. (Default)
30
1 = Consecutive counter will be reset in Z financial report.
Character size for printing 0 = 7(W ) x 12(H) Font (Default)
97
1 = 5(W) x 10(H) Font - small size
Line space width for printing
0 = 0.5 mm
1 = 0.75 mm
98
2 = 1.00 mm (Default)
3 = 1.25 mm
4 = 1.5 mm
System Options
5 = 1.75 mm
6 = 2.00 mm
7 = 2.25 mm
8 = 2.5 mm
9 = 2.75 mm
16

CMS-218 TUSER GUIDE:
13 Register Operations
This section gives information regarding the operation.
All operations is performed with the Control Switch in the REG 1 or 2 position
13.1 Department Entry note
The term ‘department entry’ is used in many times in the operating sequences. This refers to a normal
department entry - remember that an amount must be entered via the numeric keypad before depression
of a department key.
13.2 Error Prompt note
E 0.00
13.3 Electronic Journal (EJ) notes
This ECR has 3000 lines for EJ memory. Those are used for REG mode transaction and Z financial report.
Therefore, other transaction like X report and programming dump report will not be buffered to EJ memory.
An error prompt
error tone which is cleared by pressing the Clear key. An error prompt indicates an
incorrect key sequence, or a compulsory function has not been performed.
Register Operations
is shown as symbol ‘E’which appears on the display, follow by an
ECR display
CL
;
In case of ‘Nearly Full’ EJ in REG mode
When the EJ memory is ‘nearly full’, the indicator will be lit. Warning beep ( about 2 seconds) will be
emitted. There are two programmable options – (1) Beep at the end of transaction. (2) Beep at the start of
transaction. See page 16 --Function # 28 & 29.
In case of ‘Full
When the EJ memory is full, the message will be displayed as
This is displayed at the start of transaction. And, a warning beep ( about 2 secs ) will be sounded.
At this time, ECR will wait some input.
C
If key is inputted, the transaction will be able to start.
This transact ion will not be saved
VOID
If key is inputted, the transaction will be escaped.
‘Full’ EJ memory means to less than
.
’ EJ in REG mode
EJ
to EJ memory and Consecutive counter will not be updatedin this case.
150 lines for remaining in buffer memory.
13.4 EJ Balance and Time Displays
In REG mode, when you are LOG ON as a Clerk, you can view the Time and EJ balance by using the
[ X / TIME / dbl ] key as a toggle.
X / TIME / dbl
X / TIME / dbl
X / TIME / dbl
st
time. The Time will be displayed.
1
2nd time. The EJ balance will be displayed.
again. The Time will be displayed again.
Warning indicator for ‘Nearly Full’ EJ
‘Nearly Full’ means less than 500 lines
remaining in buffer memory.
EJ FULL
ι 1-18
i.e. the free capacity of EJ
11.00
ι 1-18
17

CMS-218 TUSER GUIDE:
13.5a Sample Receipt 1
System function options at factory default** (refer Options chart at pages 15 and 16)
17=0 Print total VAT amount –Non print
18=0 Print Taxable amount splited per rate –Non print
19=0 Print total Taxable amount – Non print
20=0 Print Taxable amt out of VAT splited/rate –Non Print
21=0 Print total Taxable amou nt o ut of V AT – N o n pr int
22=1 Print tax symbol at right hand side of amount – Print
OFF
PRG
REG 1
REG 2
Control Key position < RECEIPT >
X
Z
13.5b Sample Receipt 2
OFF
PRG
Z
price { 1.00 }
price { 2.00 }
price { 3.00 }
price { 4.00 }
price { 5.00 }
Subtotal
ST
AT / TL =
to conclude transaction
System function options
17=1 Print total VAT amount –Print
18=0 Print Taxable amount splited per rate –Non print**
19=0 Print total Taxable amount – Non print**
20=0 Print Taxable amt out of VAT splited/rate –Non Print**
21=0 Print total Taxable amou nt o ut of V AT – N o n pr int **
22=1 Print tax symbol at right hand side of amount – Print**
REG 1
REG 2
Control Key position < RECEIPT >
X
price { 1.00 }
price { 2.00 }
price { 3.00 }
price { 4.00 }
price { 5.00 }
Subtotal
ST
AT / TL =
to conclude transaction
Dept 1
1 / 9 +
Dept 2
2 /10 x
Dept 3
3 /11
Dept 4
4 /12
Dept 5
5 /13 –
cash tendered { 20.00 }
Dept 1
1 / 9 +
Dept 2
2 /10 x
Dept 3
3 /11
Dept 4
4 /12
Dept 5
5 /13 –
cash tendered { 20.00 }
Clerk Name
Date
Department Caption
Operations
Store Header (4 Line)
Std Character..24/Line
Double Character..12/Line
Time
Consecutive Number
Taxable 1 Department
Taxable 2 Department
Taxable 3 Department
Taxable 4 Department
Non-taxable Department
Subtotal
Cash Amount
Change
VAT 1 Amount
VAT 2 Amount
VAT 3 Amount
VAT 4 Amount
Total VAT Amount
** Factory default setting
18

USER GUIDE:
CMS-218 T
Operations
13.5c Sample Receipt 3
System function options
17=1 Print total VAT amount – print
18=0 Print Taxable amount splited per rate –Non print**
19=0 Print total Taxable amount – Non print**
20=0 Print Taxable amt out of VAT splited/rate –Non Print**
21=1 Print total Taxable amount out of VAT – print
22=1 Print tax symbol at right hand side of amt – Print**
** Factory default setting
13.5d Sample Receipt 4
System function options
17=1 Print total VAT amount – print
18=1 Print Taxable amount splited per rate – print
19=1 Print total Taxable amount – print
20=1 Print Taxable amt out of VAT splited/rate – Print
21=1 Print total Taxable amount out of VAT – print
22=1 Print tax symbol at right hand side of amt – Print**
Total VAT Amount
Taxable Amount
(Without Tax)
Total Taxable Amount
(Without Tax)
OFF
PRG
REG 1
REG 2
Control Key position < RECEIPT >
X
Z
price { 1.00 }
price { 2.00 }
price { 3.00 }
price { 4.00 }
price { 5.00 }
Subtotal
ST
AT / TL =
to conclude transaction
Dept 1
1 / 9 +
Dept 2
2 /10 x
Dept 3
3 /11
Dept 4
4 /12
Dept 5
5 /13 –
cash tendered { 20.00 }
Taxable Amount
(With Tax)
Total VAT Amount
Taxable Amount
(Without Tax)
Total Taxable Amount
(Without Tax)
19

CMS-218 TUSER GUIDE:
13.6 Department Entries
Department entries can be made with a maximum 7 digits amount entry.
OFF
PRG
REG 1
Single Department Entry:
REG 2
X
e.g. 1 unit @ R1.00 from Dept 1
Z
REG
Repeat Department Entry:
e.g. 2 units @ R2.00 from Dept 2
Multiple Department Entry:
e.g. 2 units @ R3.00 from Dept 3
* Quantity ~ { 0.001 to 99.999 }
13.7 PLU Entries
PLU Entry:
e.g. (PLU 001 = Apple) with preset price @ R1. 0 0
OFF
PRG
REG 1
REG 2
REG
X
Z
Sub-department Entryª:
e.g. (PLU 002 = Coke) with manualprice entry @ R2.00
Multiple PLU Entry:
e.g. 2 units of (PLU003 = Grape) with preset price @ R3.00
* Quantity ~ { 0.001 to 99.999 }
price { 10.00 }
price { 2.00 } Dept 2
2 /10 x
Dept 2 key again to repeat the same entry
quantity # { 2 }
price { 3.00 } Dept 3
PLU # { 1 }
PLU # { 2 }
manual price input { 2.00 }
quantity # { 2 }
PLU # { 3 }
Dept 1
2 /10 x
X / TIME / dbl
3 /11
PLU
PLU
X / TIME / dbl
PLU
1 / 9 +
key
PLU
AT / TL =
AT / TL =
Operations
Single DEPT entry
Repeat DEPT entry
Multiple DEPT entry
PLU preset price entry
Sub-department entry
(manual pricing)
Multiple PLU entry
ª see page 9 for PLU status programming
20

CMS-218 TUSER GUIDE:
13.8 Minus ( – ) Operations
Minus or Deduction ( – ) key entries can be made with a maximum 7 digits amount entry.
OFF
PRG
REG 1
REG 2
Single ( – ) Key Entries:
X
Z
REG
Multiple ( – ) Key Entry:
* Quantity ~ { 0.001 to 99.999 }
13.9 Discount [ – % ] Key Operations
OFF
Sale Discount ( e.g. Preset rate = 10%): Item Discount (Manual % rate):
PRG
REG 1
REG 2
X
Z
REG
price { 10.00 }
price { 20.00 } Dept 2
deduction amt { 0.10 }
deduction amt { 0.20 }
price { 30.00 } Dept 3
price { 40.00 } Dept 4
quantity # { 2 }
deduction price { 0.25 }
price { 10.00 }
price { 20.00 } Dept 2
Subtotal key Discount key
ST
–%
Preset rate
Dept 1
2 /10 x
REF/ –
REF/ –
3 /11
4 /12
X / TIME / dbl
REF/ –
Dept 1
2 /10 x
1 / 9 +
1 / 9 +
AT / TL =
REG
price { 10.00 }
price { 20.00 } Dept 2
5% discount { 5 }
AT / TL =
Operations
Single DEPT entry
Single DEPT with
Repeated ( -) entries
Single DEPT entry
Single DEPT with
Multiple ( - ) entry
Dept 1
1 / 9 +
2 /10 x
–%
AT / TL =
E.g. Preset -% rate
Override Preset -% rate
21

CMS-218 TUSER GUIDE:
13.10 VOID / Correction Key Operations
The Void key is used to correct error operations inside of a sale.
OFF
PRG
REG 1
Last item entry Void:
REG 2
X
Z
REG
price { 10.00 }
price { 20.00 } Dept 2
Non-Last item entry Void:
Dept 1
2 /10 x
1 / 9 +
Operations
VOID
price { 30.00 }
price { 40.00 }
3 /11
4 /12
C
Incorrect DEPT entry to VOID
VOID
price { 30.00 }
3 /11
AT / TL =
13.11 Merchandise Return Operations
OFF
PRG
REG 1
Merchandise return of a single DEPT entry:
REG 2
e.g. 1 unit @ R10.00 from Dept 1 returned
X
Z
price of item returned { 10.00 }
AT / TL =
X / TIME / dbl
AT / TL =
Dept 1
REF/ –
1 / 9 +
REG
Merchandise return of a multiple DEPT entry:
e.g. 2 units @ R2.00 each from Dept 2 returned
REF/ –
quantity of items returned { 2 }
Dept 2
2 /10 x
Last item VOID
Non-Last item VOID
22

CMS-218 TUSER GUIDE:
13.12 Received On Account Operations
OFF
PRG
REG 1
Key sequence : < REG > → { amount received } → [ RA / EURO ]
REG 2
X
Z
Example
REG
13.13 Paid Out Operations
OFF
PRG
REG 1
REG 2
Key sequence : < REG > → { amount paid out } → [ PO ]
X
Z
Example :
REG
13.14 Non-Add # Print Operations
The #/NS key is a non-add key which accepts up to a 7 digits
numeric entry. Entry will not add to any activity or sales totals.
OFF
PRG
REG 1
REG 2
Key sequence : < REG > → { max. 7 digits } → [ # / NS ]
X
Z
Example : A Non-Add # in a Sales Transaction
REG
:
amount received { 10.00 }
amount paid out { 5.00 }
{ 1 2 3 4 5 6 7 }
price { 10.00 }
AT / TL =
Dept 1
RA
PO
# / NS
1 / 9 +
Operations
Non-Add #
13.15 No Sale Operations
A no sale operation will simply open the cash drawer.
However, the financial report records the no-sale activity count.
OFF
PRG
REG 1
REG 2
Key sequence : < REG > → [ # / NS ]
X
Z
Example :
REG
{ 1 2 3 4 5 6 7 }
# / NS
23

CMS-218 TUSER GUIDE:
13.16 Cash Tender Operations
OFF
PRG
REG 1
Example :
REG 2
X
Z
REG
13.17 Check Tender Operations
OFF
PRG
REG 1
Example :
REG 2
X
Z
REG
price { 10.00 }
price { 20.00 }
amt tendered { 50.00 }
price { 10.00 }
price { 20.00 }
amt tendered { 50.00 }
1 / 9 +
2 /10 x
AT / TL =
1 / 9 +
2 /10 x
AT / TL =
Operations
ST
Cash amount
Change
or
ST
CHECK
Check amount
Change
13.18 Charge Tender Operations
OFF
PRG
REG 1
Example :
REG 2
X
Z
REG
price { 30.00 }
price { 40.00 }
3 /11
4 /12
CHARGE
24

CMS-218 TUSER GUIDE:
13.19 Split Tender Operations
OFF
PRG
REG 1
Example :
REG 2
X
Z
REG
13.20 Card Tender Operations
OFF
PRG
REG 1
Example :
REG 2
X
Z
REG
price { 10.00 }
price { 20.00 }
amt tendered { 30.00 }
price { 30.00 }
price { 40.00 }
1 / 9 +
2 /10 x
3 /11
4 /12
Operations
ST
AT / TL = CHARGE
Cash payment
Change payment
CARD
13.21 After Receipt Operations
After a transaction is completed with receipt issued
To issue more copies of the same receipt, press the [ Receipt ISSUE ] key again.
This operation is able to print in following condition.
a) The Control key is in REG-2 position.
b) The system option for “Multiple Receipt” is set to “allowed” (default).
c) The ECR will not print multiple receipt if “Multiple Receipt” function is set to “Not
13.22 Receipt ON/OFF
Receipt ON/OFF
Notes: 1) Only applicable for REG 2 (RECEIPT) mode.
2) Operation is possible only when a transaction is not in progress.
3) Any receipt is not printing in ‘Receipt OFF’ condition without post receipt.
to toggle between ON and OFF.
25
Receipt ISSUE
Receipt OFF
indicator light
to print another receipt.
allowed”,
CL
;
ECR display
EJ

CMS-218 TUSER GUIDE:
14 Management Reports
This section gives instructions for taking reports.
OFF
PRG
REG 1
REG 2
Reports may be taken with the Control Key in the X or Z position
X
Z
x X Position - Reads financial reports (without memory deletion).
x Z Position - Reads financial reports, and resets
The read-out for the financial report is the same whether taken in the X or Z position, the only difference is
that totals are reset to zero after a Z position report.
14.1 Programming the Z-Report Security Code
When reports are printed in the "Z" position, transaction totalsare reset to zero. Assigning a security code
can prevent accidental reset of transaction totals to zero. With the security code assigned, the "Z" report
prints only after code is entered correctly.
Note: Assign a number easily remembered. You should also keep the program receipt as a reminder.
If you do forget the code, reset this program with a new code. Then, print using the new code.
OFF
Key sequence : < > = Control key position { } = entry from the numeric keypad is necessary [ ] = depressing one of the function keys is necessary
PRG
REG 1
REG 2
< PRG > → { 4 digits code } → [ CHARGE ]
X
Z
Example : To programme ‘5678’ as a Z-report security code
PRG
14.1a To Print Z-report with Security Code assigned
OFF
Key sequence : < Z > → { code # } → [ AT / TL = ]
PRG
REG 1
REG 2
Example
X
Z
Z
5 JKL 6 MNO
: To print Z-report with Security Code ‘5678’ assigned.
5 JKL 6 MNO
7 @ 8 ABC
totals to zero.
56.78
56.78
CHARGE7 @ 8 ABC
AT / TL =
Management Reports
**Print
P SECU CODE 56.78
14.1a To Print Z-report with Security Code NOT assigned
AT / TL =
Z
prints financial reports, and resets totals to zero.
14.2 Printing Reports (Quick Reference)
Set Control Key to X or ZReport type
X
Financial
PLU
Clerk
Electronic Journal
Key sequence :
< > = Control key position [ ] = depressing one of the function keys is necessary
< Report type Control Key position > → [ Function key ]
(without memory deletion)
Z (with memory deletion)
X
(without memory deletion)
Z (with memory deletion)
X (without memory deletion)
Z (with memory deletion)
X
(without memory deletion)
Z (with memory deletion)
26
Start print-out by pressing the Function key below
AT / TL =
PLU
CLERK
ST

CMS-218 TUSER GUIDE:
14.3 Financial Report
OFF
Key sequence : < > = Control key position [ ] = function key
PRG
REG 1
REG 2
< Z > → { Z report security code # } → [ AT / TL = ]
X
Z
Example : If security code # is ‘5678’
5 JKL 6 MNO 7 @ 8 ABC
Z
Example
Z
Clerk Name
: If security code not assigned
AT / TL =
Date
AT / TL =
Time
Transaction Counter
Z1 Counter
Sales Counter
DEPT 1 Sales Total (Tax 1)
DEPT 2 Sales Total (Tax 2)
DEPT 3 Sales Total (Tax 3)
DEPT 4 Sales Total (Tax 4)
Management Reports
Tax Amount Total
Coupon (-) Total
-% Total
Net Sales Total
Refund Total
Void Total
Gross Sales Total
Tender Rounding Total
Cash Sales Counter
Cash Sales Total
Check Counter
Check Sales Total
Charge Counter
Charge Sales Total
Card Counter
Card Sales Total
Recd On Acct Counter
Recd On Acct Total
Paid Out Counter
Paid Out Total
FC-in-drawer
Total(1-4)
14.4 PLU Report
Key sequence :< > = Control key position [ ] = function key
< X or Z > → [ PLU ]
X Positions - Reads PLU reports.
Z Positions -Reads PLU reports, and resets totals to zero.
X or Z
PLU
All Department Total
PLU Caption
27
No Sale Counter
Cash-in-drawer Total
Check-in-drawer Total
Grand Total
Report type
Sales Counter
Sales Total
All PLU Sales Total

CMS-218 TUSER GUIDE:
14.5 CLERK Report
Key sequence :< > = Control key position [ ] = function key
< X or Z > → [ CLERK ]
X Positions - Reads CLERK reports.
Z Positions -Reads CLERK reports, and resets totals to zero.
X or Z
CLERK
14.6 Electronic Journal (EJ) Report – X and Z Modes
This ECR has the following types of EJ reports
Full Report Oldest Report Latest Report Daily Report
These report have following common key functions.
1) Pause function during print
When [ C ] key is entered during printing, the report will be stopped.
Next available options are
a) press [ C ] key again to continue printing.
b) press [ VOID ] to exit printing. The following will be printed at point of exit -
Clerk Name
Activity Counter
Management Reports
Report type
Sales Total
All Clerks Sales Total
“<><><><><><><><><>”
2) Confirmation function for clearing EJ memory
When the report printing is completed in Z mode, the ECR will display ‘CL’ on the screen and a long
beep (about 2 seconds) will be activated.
This is to prompt you whether you want to clear the EJ memory or not.
a) If YES, press the [ C ] key.
b) If NO, and you wish to keep the EJ memory, press [ VOID ] to exit without
clearing.
28

CMS-218 TUSER GUIDE:
14.7 Full Report for EJ
Key sequence :< > = Control key position [ ] = function key
< X or Z > → [ ST ]
Example
: ST
X
Management Reports
Transaction # 0017
Transaction # 0001 Transaction # 0002
Transaction # 0003
Z1# = 0001
Transaction # 0003
Z1# = 0003
29

CMS-218 TUSER GUIDE:
14.8 Oldest Report for EJ
Key sequence : < > = Control key position { } = entry from the numeric keypad is necessary [ ] = depressing one of the function keys is necessary
< X or Z > → { NNN } → [ ST ] NNN = 001 - 999
“NNN” means the transaction number you wish to appoint.
EJ will be reported from the oldest transaction.
ECR will print the issued transactions. When the print reach “NNN” number, the report will be stopped.
the issued transaction are printed before the inputted “NNN” number, the report will be stopped.
If all
14.9 Oldest Report for EJ
Key sequence : < > = Control key position { } = entry from the numeric keypad is necessary [ ] = depressing one of the function keys is necessary
< X or Z > → { NNN } → [ PO ] NNN = 001 - 999
“NNN” means the transaction number you wish to appoint.
EJ will be reported transaction older than the appointed number.
When the issued transaction reach to the latest, the report will be stopped.
If the appointed number is bigger than any saved transaction in the EJ memory, the report will be started
from the oldest transaction.
14.10 Daily Report for EJ
Key sequence : < > = Control key position { } = entry from the numeric keypad is necessary [ ] = depressing one of the function keys is necessary
< X or Z > → { DD } → [ RA / EURO ] DD = 01 - 99
Management Reports
“DD” means the number of issued Z financial reports you wish to appoint.
EJ will be reported from the oldest transaction.
ECR will print the issued Z financial reports. When printing reach “DD” number, the report will be stopped.
the issued data is printed before “DD’number, the report will be stopped.
If all
30

CMS-218 TUSER GUIDE:
15 System & Media Balance
Balancing Formulas
SYSTEM BALANCE
(+) Department 1
(+) Department 2
(+) Department 3
(+) Department 4
(+) Department 12
(+) Department 13
(+) Department 14
(+) Department 15
(+) Department 16
(-) Minus Total
(-) -% Total
(=) Net Sales
(+) Net Sales
(+) Minus Total
(+) -% Total
(+) Return Total
(+) Void Total
(=) Gross Sales
(+) Net Sales
(+) Previous Grand Total
(=) Ending Grand Total
16 Troubleshoot – Print Function
MEDIA BALANCE
(+) Net Sales
(+) Adjustment
(-) Check
(-) Charge
(-) Card
(+) Received On Account
(-) Paid Out
(-) Payments Out
(=) Cash In Drawer
If the cash register fails to print receipts or reports, check whether a special function has been activated.
Special functions are indicated by a lighted horizontal bar in the display:
The Receipt function has been deactivated on the
cash register. There is no paper transport and,
therefore, no receipt is printed.
Solution: Press [ Receipt ON/OFF ] to activate the
print function. See page 25 for details.
The ECR is in Calculator mode. Print function is not
operational in Calculator mode.
See page 12 for details.
Receipt OFF
indicator light
Calculator ON
indicator light
CL
;
CL
;
ECR display
Printer malfunction
In the event of a printer error, switch the ECR off immediately and disconnect the power plug. Check
whether the paper roll is inserted correctly or is there a foreign body in the printer mechanism.
Caution: If there is a foreign body, remove it very carefully. Do not use a knife, screwdriver or anything
This could damage the printer mechanism. Switch the ECR on again and complete the registration.
If the printer error reoccurs, contact the service centre.
similar. Never use force.
31
EJ
EJ

CMS-218 TUSER GUIDE:
17 Warranty Policy
Subject to the terms below, OFFICEMASTER, warrants their equipment for a period of twelve (12) months,
from date of purchase against any defect in material or workmanship.
The Warranty covers all parts and labour provided the equipment is repaired on the premises of
OFFICEMASTER, or their Authorised Distributor/Service Agents.
17.1 General Conditions
i. The Purchaser to complete the Warranty Registration and return the detachable portion to
OFFICEMASTER or their Authorised Distributor within 21 days of purchase.
ii. The Warranty is not transferable and applies only to the Purchaser on presentation of the Warranty
Registration particulars as stated below (Section 17.4) and/or original invoice/proof of purchase.
iii. Transport of equipment to and from
repairs are at the Purchasers risk and expense.
iv. Any alterations to serial numbers invalidates the Warranty.
v. OFFICEMASTER or their Authorised Distributor shall not be held responsible for any loss or
consequential loss arising from the use of the equipment.
17.2 Warranty Exclusions
i. Costs incurred through negligence, power surges, lightning, accidents, force majeure, misuse and/or
operator error.
ii. Unauthorized repairs, alterations, modifications or upgrades.
iii. Programming or set up of equipment
iv. Service related to consumables - ink rollers, ink ribbons, paper rolls not supplied by OFFICEMASTER
or their Authorised Distributor, paper feeding, normal wear and tear, and/or routine servicing.
v. Travelling and/or transport costs.
vi. Re-creation of data loss for any cause whatsoever.
Warranty Policy
OFFICEMASTER or their Authorised Service Agents for Warranty
17.3 Equipment returned for credit
Equipment returned for credit within the time frame and conditions allowed, must be complete in all
respects i.e. Outer packaging (box), inner packaging (polystyrene) manuals, ribbon, paper roll, two sets of
keys (6), pick-up spool, cover, insert tray etc Failing this, credit on the said equipment will not be granted.
17.4 Warranty Registration Particulars
Name:
Address:
Contact Name : Telephone:
Model: OFFICEMASTER ECR CMS-218 T
Serial No. (s) :
Date of Purchase:
Purchased from (DealerIStore) name:
Authorised Main
Service Agent
ICONICA Unit 13 Bromwell Mews, 373 Albert Road, Salt River
PO Box 55360, Sunset Beach 7441, Cape Town
Tel no. : + 27 21 447 9246 Fax no.: + 27 21 447 9257
32
32

WARRANTY REGISTRATION
This portion to be returned within 21 days of purchase.
Please read the Warranty Policy stipulated on the preceding page.
And then, kindly complete this Warranty Registration, cut along the dotted line and post the
completed portion to the address stated overleaf within the abovementioned period to
activate your warranty cover.
Name :
Address :
Contact Name :
Telephone :
Model:
OFFICEMASTER ECR CMS-218 T
Serial No. :
Date of Purchase :
Purchase from (Dealer/Store) name :

Affix
Here
Stamp
ICONICA
Unit 13 Bromwell Mews
373 Albert Road, Salt River
PO Box 55360
Sunset Beach 7441, Cape Town
 Loading...