

Page 1
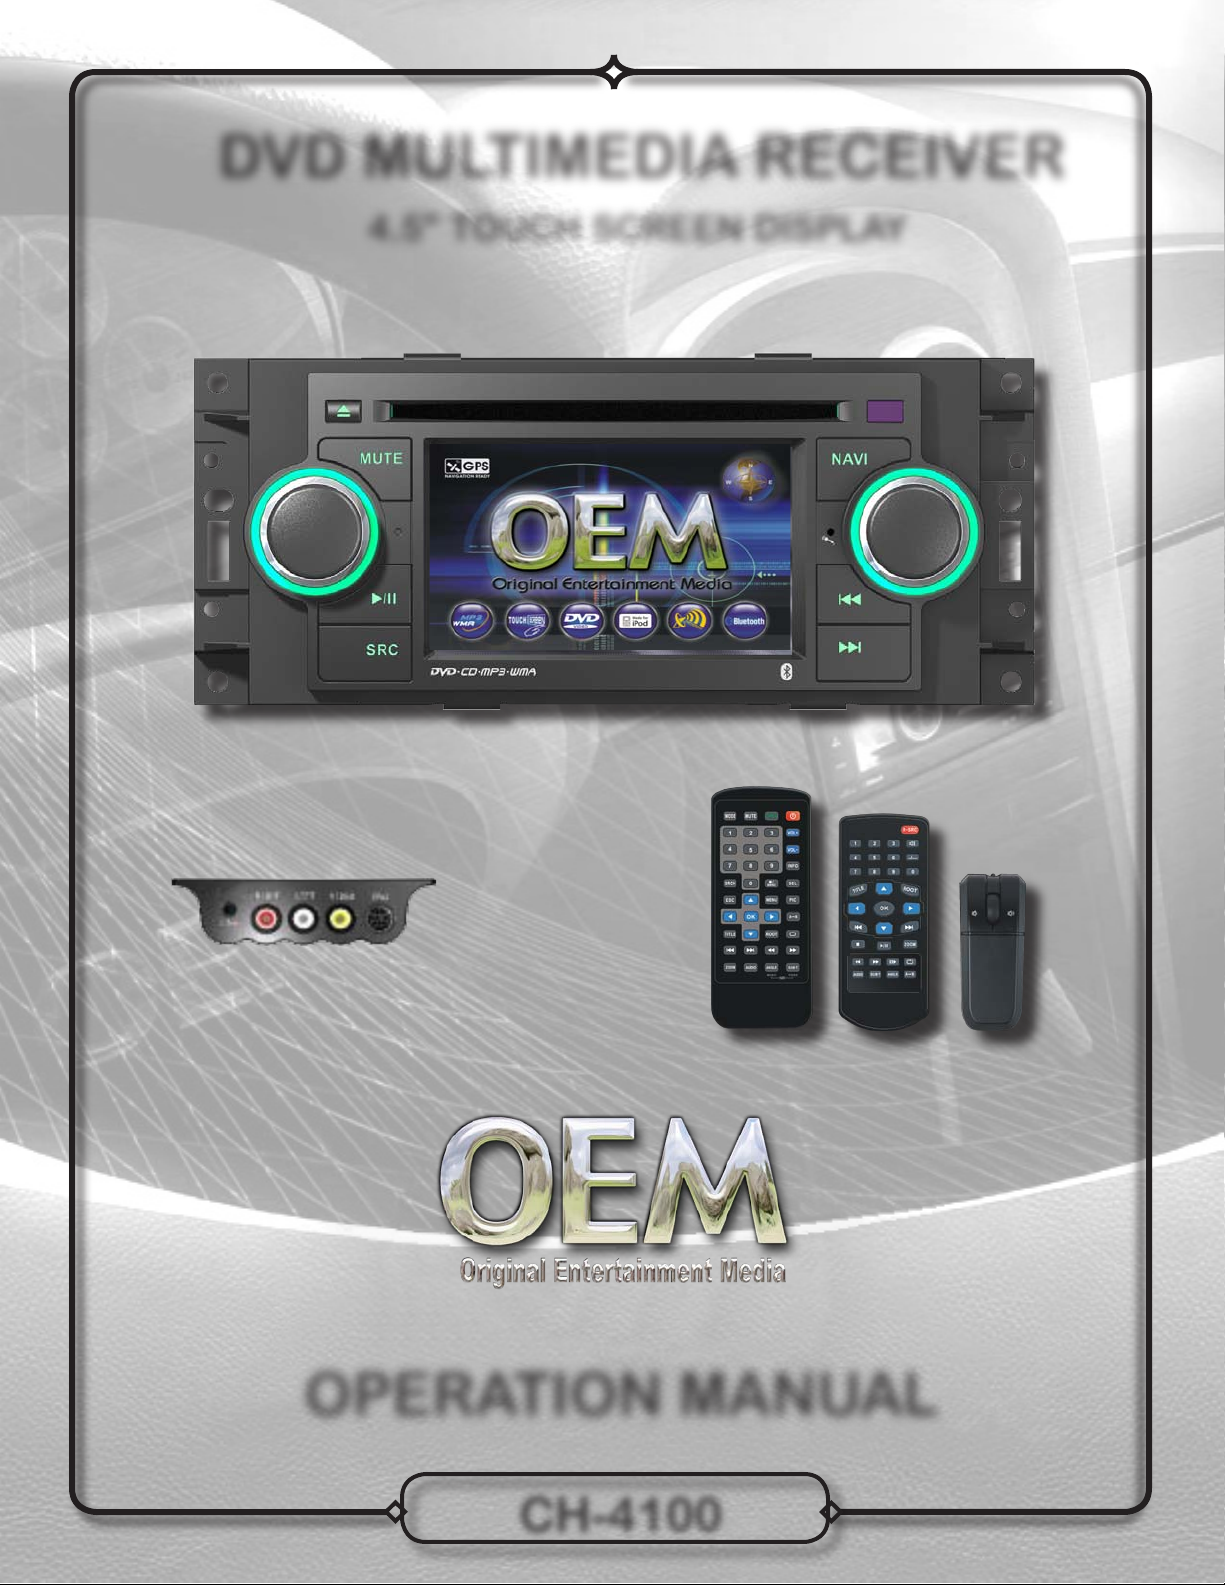
DVD MULTIMEDIA RECEIVER
4.5" TOUCH SCREEN DISPLAY
OPERATION MANUAL
CH-4100
Page 2
Table of Contents
Safety Information .......................................................................................................... 3
Care and Installation ...................................................................................................... 4
Wiring Diagram .............................................................................................................. 5
Controls .......................................................................................................................... 6
Remote Control .............................................................................................................. 7
Monitor Operation ........................................................................................................... 8
Monitor Operation ........................................................................................................... 9
General Operation .......................................................................................................... 10
Main Access Menu ......................................................................................................... 11
General Set Up Menu ..................................................................................................... 12
Adjusting the Clock ......................................................................................................... 13
Screen Setup .................................................................................................................. 14
Audio Signal Processing (ASP).......................................................................................15
AM/FM Tuner Operation.................................................................................................. 16 -17
DVD Information ............................................................................................................. 18
Initializing Parking Brake ................................................................................................ 19
DVD Operation ............................................................................................................... 20
DVD Controls .................................................................................................................. 21
DVD Search Function ..................................................................................................... 22
DVD Setup Menu - Language ........................................................................................ 23
DVD Setup Menu - Video ............................................................................................... 24
DVD Setup Menu - Ratings ............................................................................................ 25
DVD Setup Menu - Audio ............................................................................................... 26
DVD Setup Menu - Speakers ......................................................................................... 27
DVD Setup Menu - Surround I and II .............................................................................. 28
CD/DVD/MP3/WMA Information ..................................................................................... 29
CD Operation .................................................................................................................. 30
MP3/WMA Operation ...................................................................................................... 31
iPod Operation ................................................................................................................ 32-33
XM Radio Operation ....................................................................................................... 34-35
Bluetooth Operation ........................................................................................................ 36-37
Navigation ....................................................................................................................... 38
Muli-Zone Operation ....................................................................................................... 39
Multi-Zone AM/FM Tuner ................................................................................................ 40
Mulit-Zone XM Radio ...................................................................................................... 41
Mulit-Zone iPod Operation .............................................................................................. 42
Limited One Year Warranty.............................................................................................. 43
Troubleshooting............................................................................................................... 44-45
Notes............................................................................................................................... 46
Specifications ................................................................................................................. 47
2
Page 3
Safety Information
Please read all instructions prior to installation and operation
It is highly recommended to have a professional installer or an authorized dealer install your
CH-4100 multimedia reciever.
This product is only for use in vehicles with 12VDC negative ground only.
The DVD video display of the in-dash unit will not operate while the vehicle is moving. This is
a safety feature to prevent driver distraction. In-dash DVD video functions will only operate
when vehicle is in Park and the parking brake is engaged. It is illegal in most states for the
driver to view video while the vehicle is in motion.
WARNINGS to prevent injury or damage to unit:
This model incorporates a motorized moving monitor. Before final installation make sure the
1)
monitor will not obstruct the dash, shifter or any other controls.
The Yellow/Blue lead must be connected to the brake switch circuit in order for the in-dash video
2)
safety feature to function properly. Failure to properly install this safety feature could cause
the driver to distracted, which could result in serious injury or death to the vehicle's occupants,
persons outside the vehicle and/or property damage.
Installation
Do not install the unit in a spot exposed to direct sunlight or excessive heat.
3)
Make sure to ground the unit securely to the vehicle chassis ground
4)
Use only the hardware and wire harness provided.
5)
When extending the ignition, battery or ground cables, make sure to use automotive-grade cables
6)
or other cables with an area of 0.75mm (AWG 18) or more to prevent voltage drops.
To prevent short circuits when replacing a fuse, disconnect the wiring harness first.
7)
When replacing a fuse, only use a new one with the prescribed rating. Using a fuse with the wrong
8)
rating may cause the unit to malfunction and may result in a fire.
Do not remove the top or bottom covers of the unit.
9)
Do not subject the unit to excessive shock and avoid impact to the LCD monitor.
10)
Do not touch the liquid crystal fluid if the LCD is damaged or broken. The liquid crystal fluid may
11)
be hazardous to your health or fatal. If the liquid crystal fluid from the LCD contacts your body or
clothing, wash it off with soap immediately.
Do not get water, other liquids or cleaning fluid on the unit.
12)
Only a 5" (12cm) compact disc may be used in the disc player. Never insert any foreign object into
13)
the disc player as the mechanism can be damaged. This includes the use of a 3" (8cm) CD-single,
either with or without an adaptor. This type of damage is not covered by the Warranty on this
product.
33
Page 4
Care and Installation
Care and Maintenance
To clean the monitor or front panel, wipe only with a dry silicone cloth or soft cloth and neutral
1)
Installation
detergent. Do not use a stiff cloth, or volatile solvents such as paint thinner and alcohol. They can
scratch the surface of the panel and/or remove the printing.
It is recommended to use a cleaning disc in this unit more frequently then the player in your home,
2)
since your vehicle is exposed to different environmental conditions.
When the temperature of the unit falls (as in winter), the liquid crystal inside the screen will become
3)
darker than usual. Normal brightness will return after using the monitor for a while.
Under damp conditions or when the vehicle warms up during cold weather, condensation may
4)
become visible on the LCD panel. Until the moisture has evaporated, the screen may not work
properly.
If the temperature inside the player gets too hot, a protective circuit automatically stops play of the
5)
disc. If this occurs, allow the unit to cool before operating the player again.
If the temperature inside the vehicle is extremely hot or cold, the CD player may not operate
6)
properly. Before using the player, allow the inside of the vehicle to reach normal temperature.
FCC Compliance:
This device complies with part 15 of the FCC rules and regulations. Operation is subject to the following
two conditions:
This device may not cause harmful interference, and
1.
This device must accept any interference received, including interference that may cause undesired
2.
operation.
Disconnect the Battery:
To prevent short circuit, turn off the ignition and remove the negative (-) battery cable prior to installation.
Installation Help
If you experience problems during installation, consult your nearest OE RADIO dealer.
1.
If the unit malfunctions, reset the unit as described on page 6 first. If the problem still persists, consult
2.
your nearest OE RADIO dealer or call tech assistance @ 1-877-305-8972.
4
Page 5
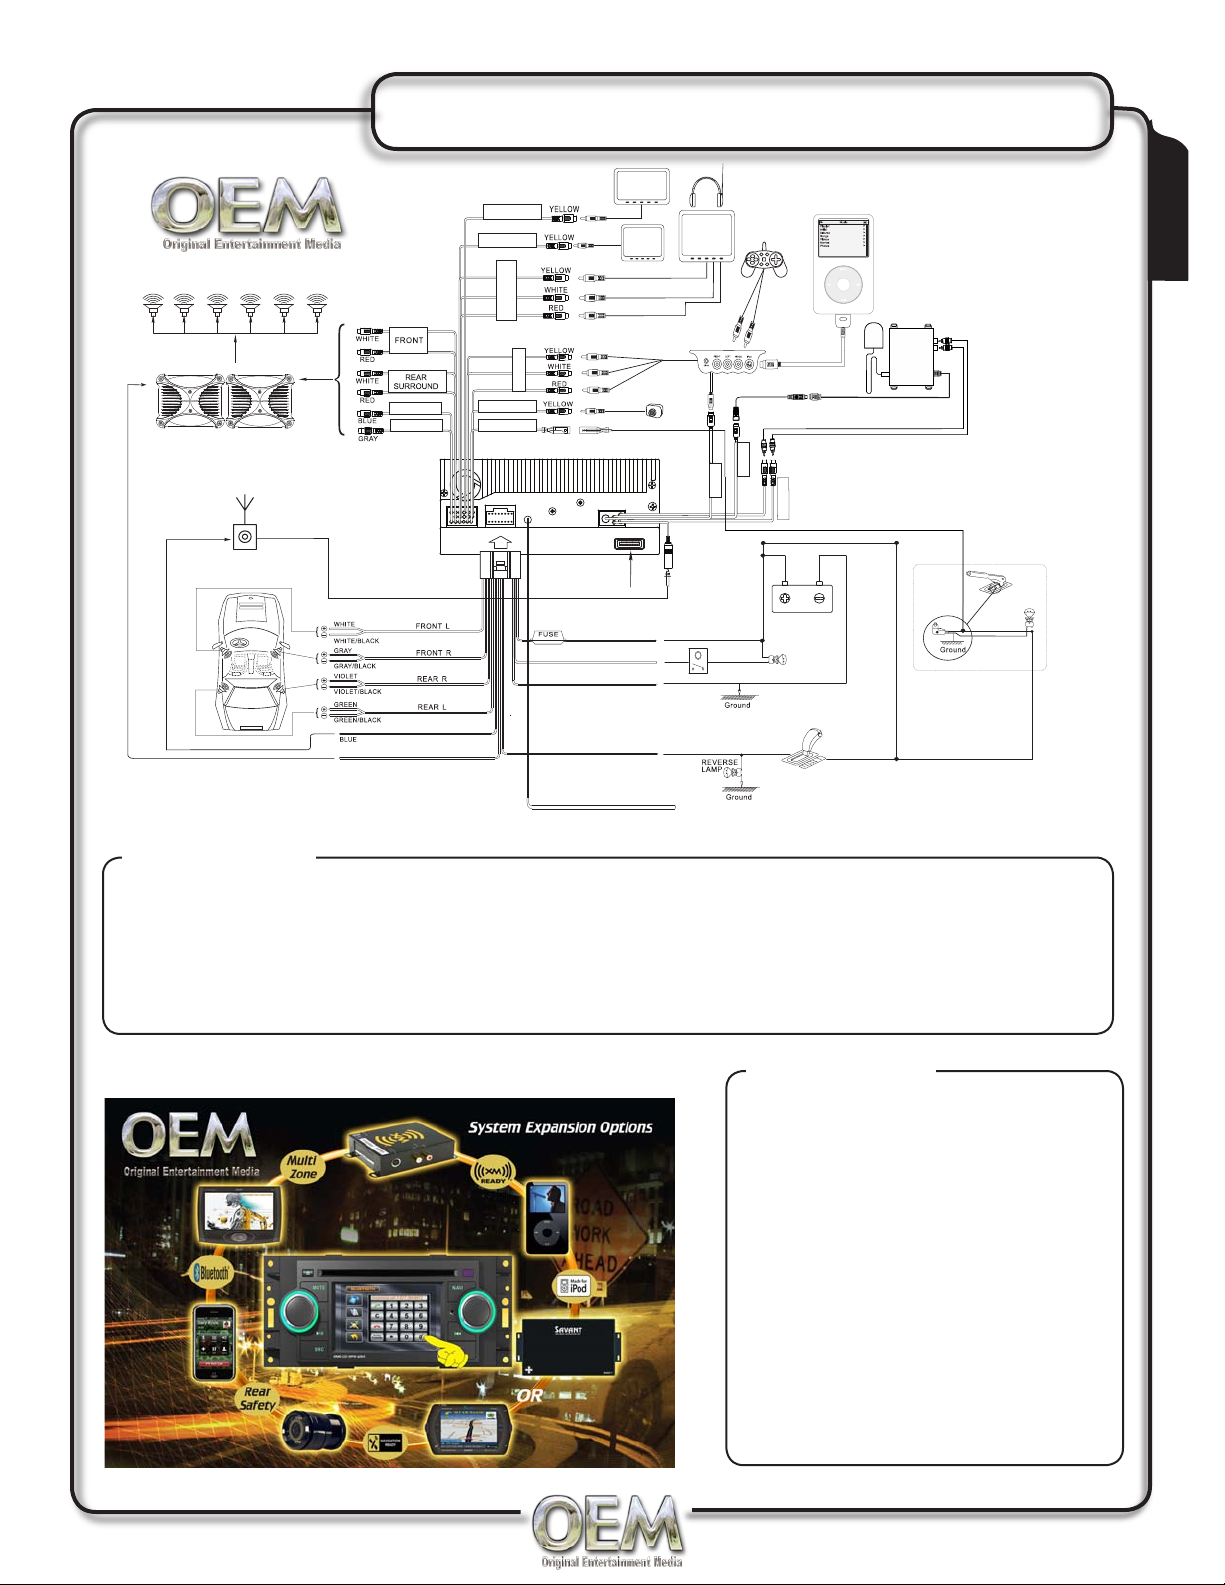
iPOD
XM DATA
XM AUDIO
LEFT/RIGHT
AM/FM
ANTENNA
PARKING BRK (-)
A/V AUX IN
SUBWOOFER
BACK-UP CAM
VIDEO OUTPUT 2
BLUE / WHITE
POWER ANTENNA
AMP REMOTE
BLACK
WHITE / BROWN
GROUND
REVERSE
DRE*ACC
EMERGENCY
BRAKE
SWITCH
Parking
Lamp
OPTIONAL POWER AMPLIFIERS
20A
YELLOW / BLUE
OPTIONAL
BACKUP
CAMERA
iPod
(NOT INCLUDED)
XM DIRECT TUNER AND ANTENNA
(NOT INCLUDED)
iNPORT ADAPTER
(INCLUDED)
VIDEO GAME
(NOT INCLUDED)
OPTIONAL
TFT
MONITOR
iPod CABLE
(INCLUDED)
NAV INPUT
MULTI-ZONE
A/V OUTPUT
OPTIONAL
TFT
MONITOR
VIDEO OUTPUT 1
OPTIONAL
TFT
MONITOR
CENTER
XM Cables
(INCLUDED)
ILLUMI +
ORANGE
YELLOW
BATTERY +
(*NOTE: CONNET RED WIRE TO 10A FUSE AT FUSE BOX OR INLINE WITH CAN ADAPTER)
Wiring Diagram
Installation
Wiring Notes:
Additional hardware and accessories may be required for installation such as CAN or LAN
adapters or wiring harnesses (Not Included)
* Steering wheel controls may not work with some vehicles
* If opting to NOT use the CAN or LAN adapters, an IGN wire must be run from the radio to the fuse box.
We recommend tapping into at least a 10A amp IGN fuse at the fuse box if using this procedure.
Optional A/V Connections
Wiring Notes:
•
The SUBWOOFER audio output
(Blue RCA) is active in all audio
modes and must be connected
to an external amplifier.
A rear view camera (not
•
included) can be connected to
the CAMERA input.
Connect the yellow/blue PARKING
•
BRAKE wire to brake switch circuit
in order for the in-dash video safety
feature to function properly.
NEED HELP?? Call our Technical
•
Service Hotline, 1-877-305-8972.
5
Page 6
Controls
1
2
3
Controls
4
5
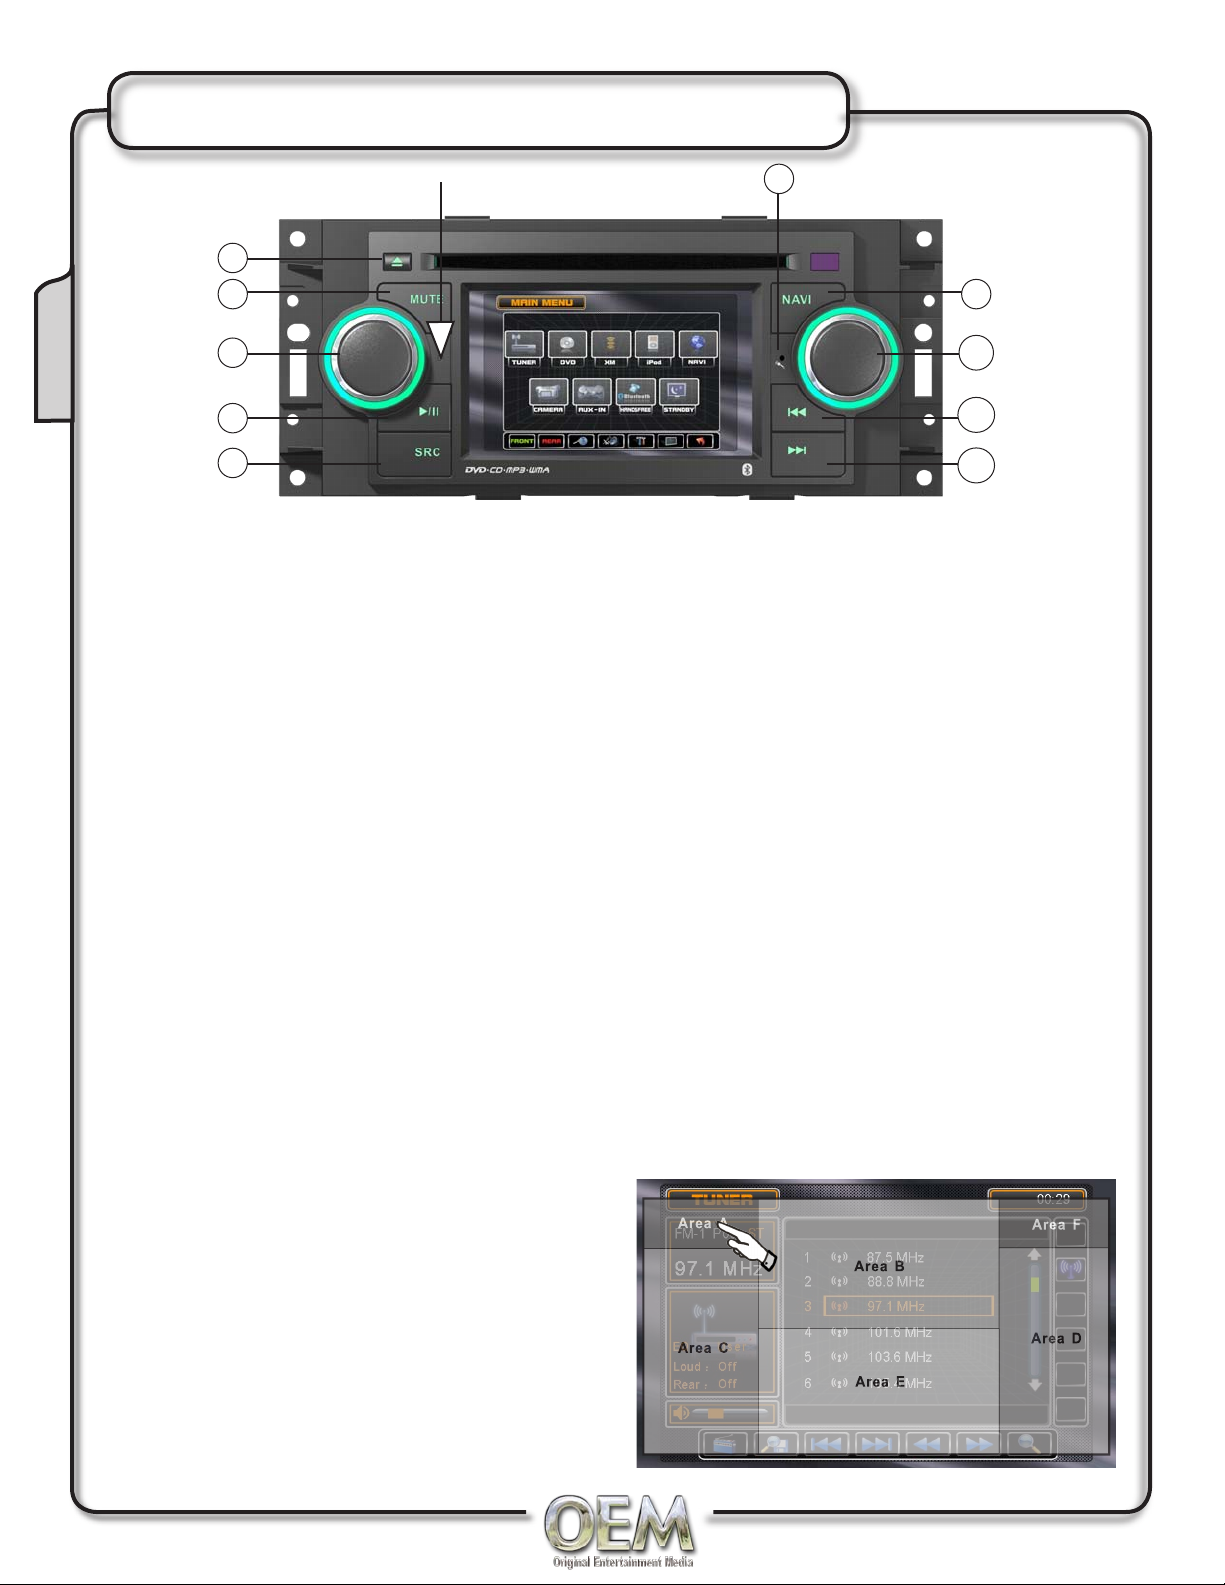
Button Operation
EJECT - Press once for DISC ejection
1)
MUTE - Press once to MUTE audio, press
2)
again to return audio. The volume icon will
change.
VOL / SMART DIAL - Rotate knob Q
3)
or P for desired VOLUME level. Rotate
clockwise/counter clockwise to select
desired item in any MODE and press once to
ENTER. Press and hold to access AUDIO
menu.
PLAY/PAUSE - Press play to resume
4)
disc playback, press again to suspend disc
playback.
Reset Button
6
7
8
9
10
MIC - Utilized during operation of a Bluetooth
6)
device. Do not obstruct, or spray with any
cleaning solution.
NAVI - Press once to enter Navigation
7)
Operation Interface.
FM/AM - Press to increment from FM1,
8)
FM2, FM3, AM1]FM1. Press and hold to
adjust picture settings. Press q or p to
select desired parameter.
PREVIOUS - Press tt to fast reverse
9)
in DVD mode or to select desired parameter
within each different mode. Press to SEEK
TUNE in Tuner Mode.
SRC - Press select source. Press and hold
5)
to toggle to rear zone mode ON/OFF
System Reset
If you experience abnormal operation or your
unit is inoperable, use the tip of a pen to press
the RESET button for 3 seconds (upper left hand
corner of unit). After a system reset, the unit
restores all factory default settings.
Hidden Touch Screen area while in
TUNER mode
Area A can be used in any mode to access MAIN
menu.
6
NEXT - Press uu to fast forward in DVD
10)
mode or to select desired parameter within
each different mode. Press to SEEK TUNE in
Tuner Mode.
Page 7
Remote Control
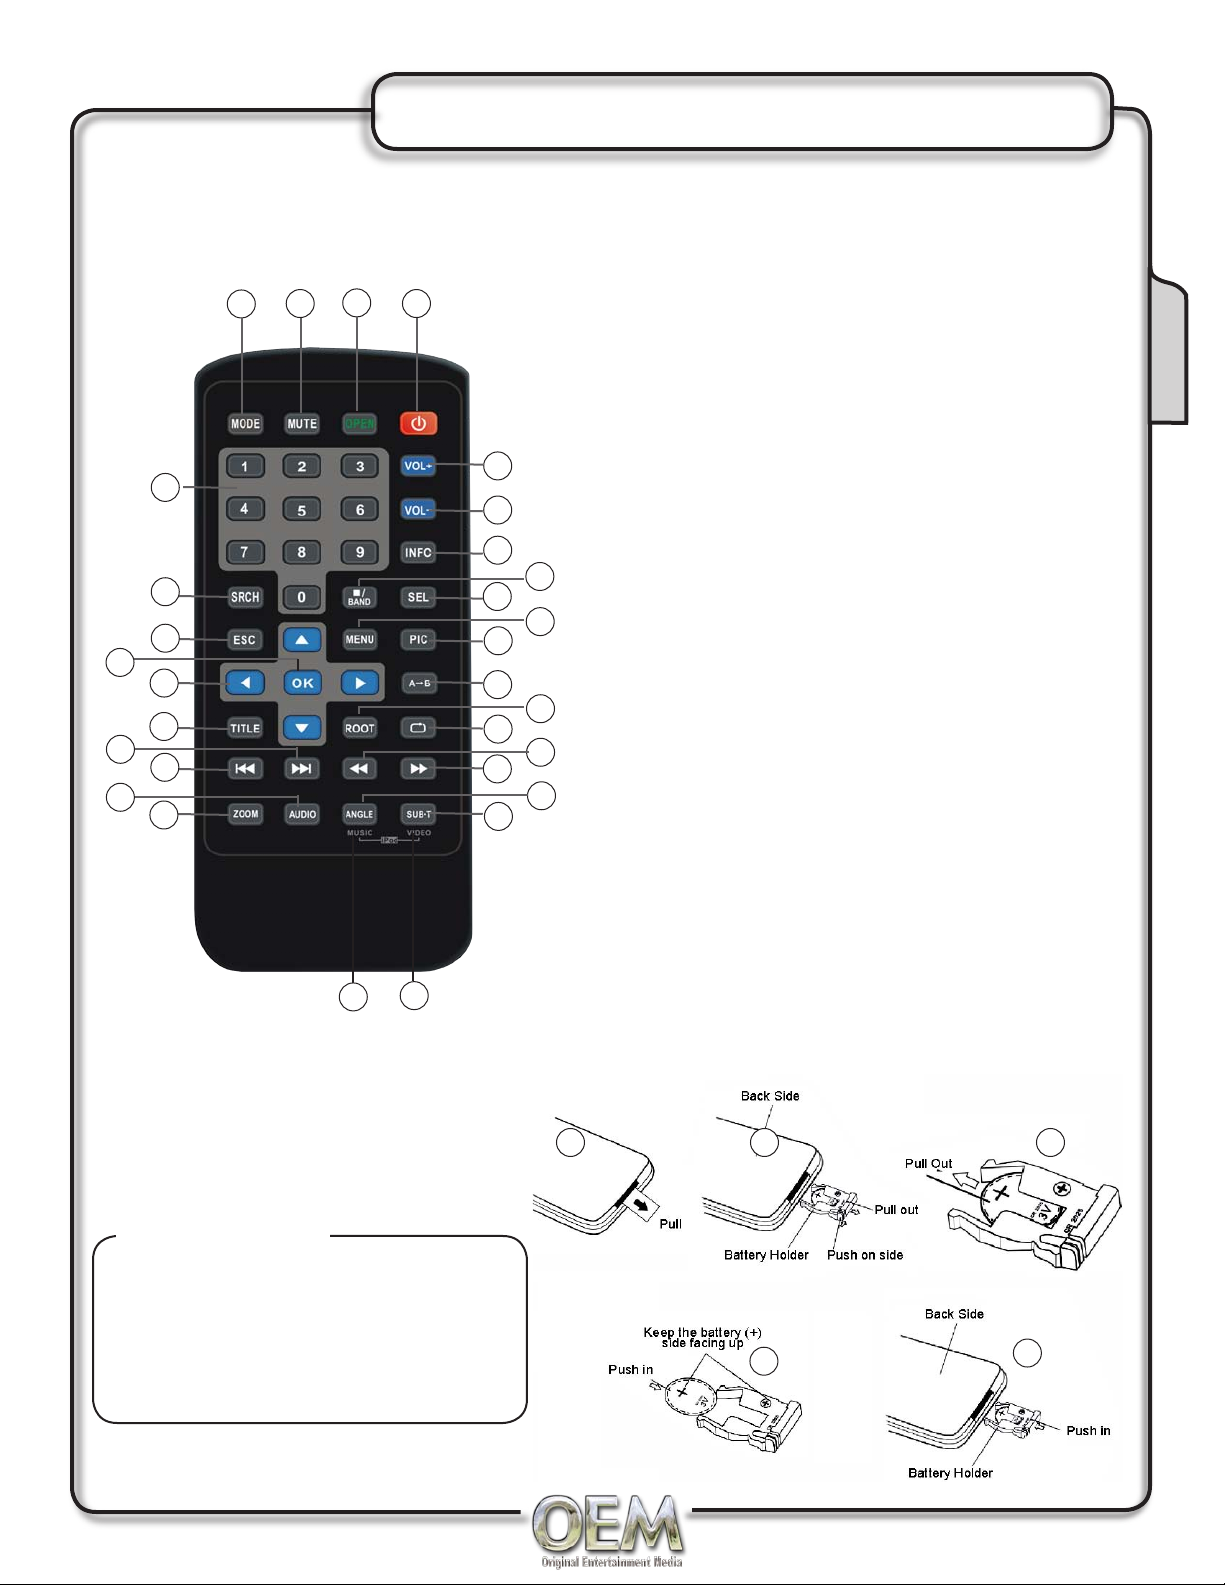
Main Remote Buttons
Pull the battery insulation tape out
before using IR remote
3
26
24
22
30
29
28
27
25
23
21
2
1
19
4
20
Insert / Replacing the Battery:
7
9
10
12
13
15
17
Mode - Press once to select between TUNER,
1)
DVD, AV1, CAMERA, XM, NAV, BLUETOOTH
and iPod inputs.
Mute - Press once to MUTE or restore Audio
2)
Open/Close - Open or Close Monitor
3)
Power-Power ON/OFF
4)
Volume Up - Increase volume
5)
Volume Down - Decrease volume
6)
Info - Displays system information
7)
Band/Stop - Increment BAND or STOP while in
8)
DVD/MP3 mode
Audio Select - Enter AUDIO setup mode
5
6
8
11
14
16
18
9)
Picture - BRIGHTNESS setting for Monitor
10)
Menu - Enter MAIN system menu
11)
Repeat A-B - Repeat playback from frame A to
12)
frame B
Repeat - Playback current DVD chapter
13)
Root - Main DVD disc menu
14)
Fast Forward - Fast forward disc content
15)
Fast Rewind - Fast rewind disc contentAngle
16)
Sub-Title - Language selection for subtitles
17)
Angle - Adjust angle of TFT Monitor
18)
Music (iPod) - Selects iPod music mode
19)
Video (iPod) - Selects iPod video mode
20)
Zoom - Zoom in/out on DVD image
21)
Audio - Change audio language for DVD disc
22)
playback
Chapter/Track Down - Previous chapter/track
23)
Chapter/Track Up - Next chapter/track
24)
Title Menu - Enter title menu on DVD
25)
OK - Start/Pause playback or confirm settings
26)
Up/Down/Left/Right Select - Navigating system
27)
and DVD menus
Escape - Exit current menu
28)
Search - Search function for DVD / CD disc
29)
Numeric buttons - Access chapter/track/preset
30)
station for current BAND
Controls
Pull out the battery holder
1.
Remove battery from holder
2.
Install new battery*
3.
Make sure the (+) side faces up
4.
Insert battery holder
5.
Notes and CAUTION
If IR Remote will not be used for a
•
month or longer
Remove and dispose of battery
•
properly
Do not store battery with metallic objects
•
or materials.
* The remote control uses one 3 volt
Lithium CR2025 battery.
1
2 3
4
5
7
Page 8

Multi-Zone Remote
Multi-Zone Remote Buttons
Pull the battery insulation tape out before using IR remote
R-SRC - Selected playing sources
1)
Mute - Toggle on/off audio output
2)
GOTO search - Search function in the VCD/
3)
Controls
DVD disc
Root - Main DVD disc menu
4)
Up/Down/Left/Right - Navigating system for
5)
selection.
Next - Select the next chapter/track for
6)
playback. Search an available radio station by
increasing tuning frequency in tuner mode
Start/Pauses - For playback
7)
Zoom - Zoom in/out on DVD image
8)
Slow Play - Slow forward playback
9)
Repeat - Playback current DVD chapter
10)
Repeat A-B - Repeat playback from frame A to
11)
frame B
Angle - Playback in different angle for a scene
12)
(if applicable)
SUB-T - Language selection for subtitle
13)
Audio Select - Enter AUDIO setup mode
14)
Fast Rewind - Fast rewind DISC content
15)
Fast Forward - Fast forward DISC content
16)
STOP - Stop playback on other mode
17)
Previous - Select the previous chapter/track for
18)
playback. Search an available radio station by
decreasing tuning frequency in tuner mode
OK - Start/pause playback or confirm settings
19)
Title - Enter the title menu of current source
20)
Numeric - Directly access chapter/track/preset
21)
station for current band
19
16
13
21
20
18
17
15
14
1
2
3
4
5
6
7
8
9
10
11
12
Smart Dial Remote Buttons
VOL Up - Increase the volume
1)
VOL Down - Decrease the volume
2)
Smart Dial - Press this encoder to access
3)
the system setup. Rotate up/down to select a
desired feature and press once to access or
confirm.
8
3
2
1
Page 9
Monitor Operation
Safe Monitor Operation
The vehicle must be in park and the parking brake applied to view video on the in-dash monitor.
•
The video display of the in-dash unit will not operate while the vehicle is moving. As a safety
•
feature, a blue “PARKING” screen will show on the display when the vehicle's parking brake is not
engaged. DVD, AV1 audio can be heard while the vehicle is in motion.
It is illegal in most states for the driver to view video while the vehicle is in motion. Refer to local
•
laws in your area. See INITIALIZING PARKING BRAKE for more details, page 19.
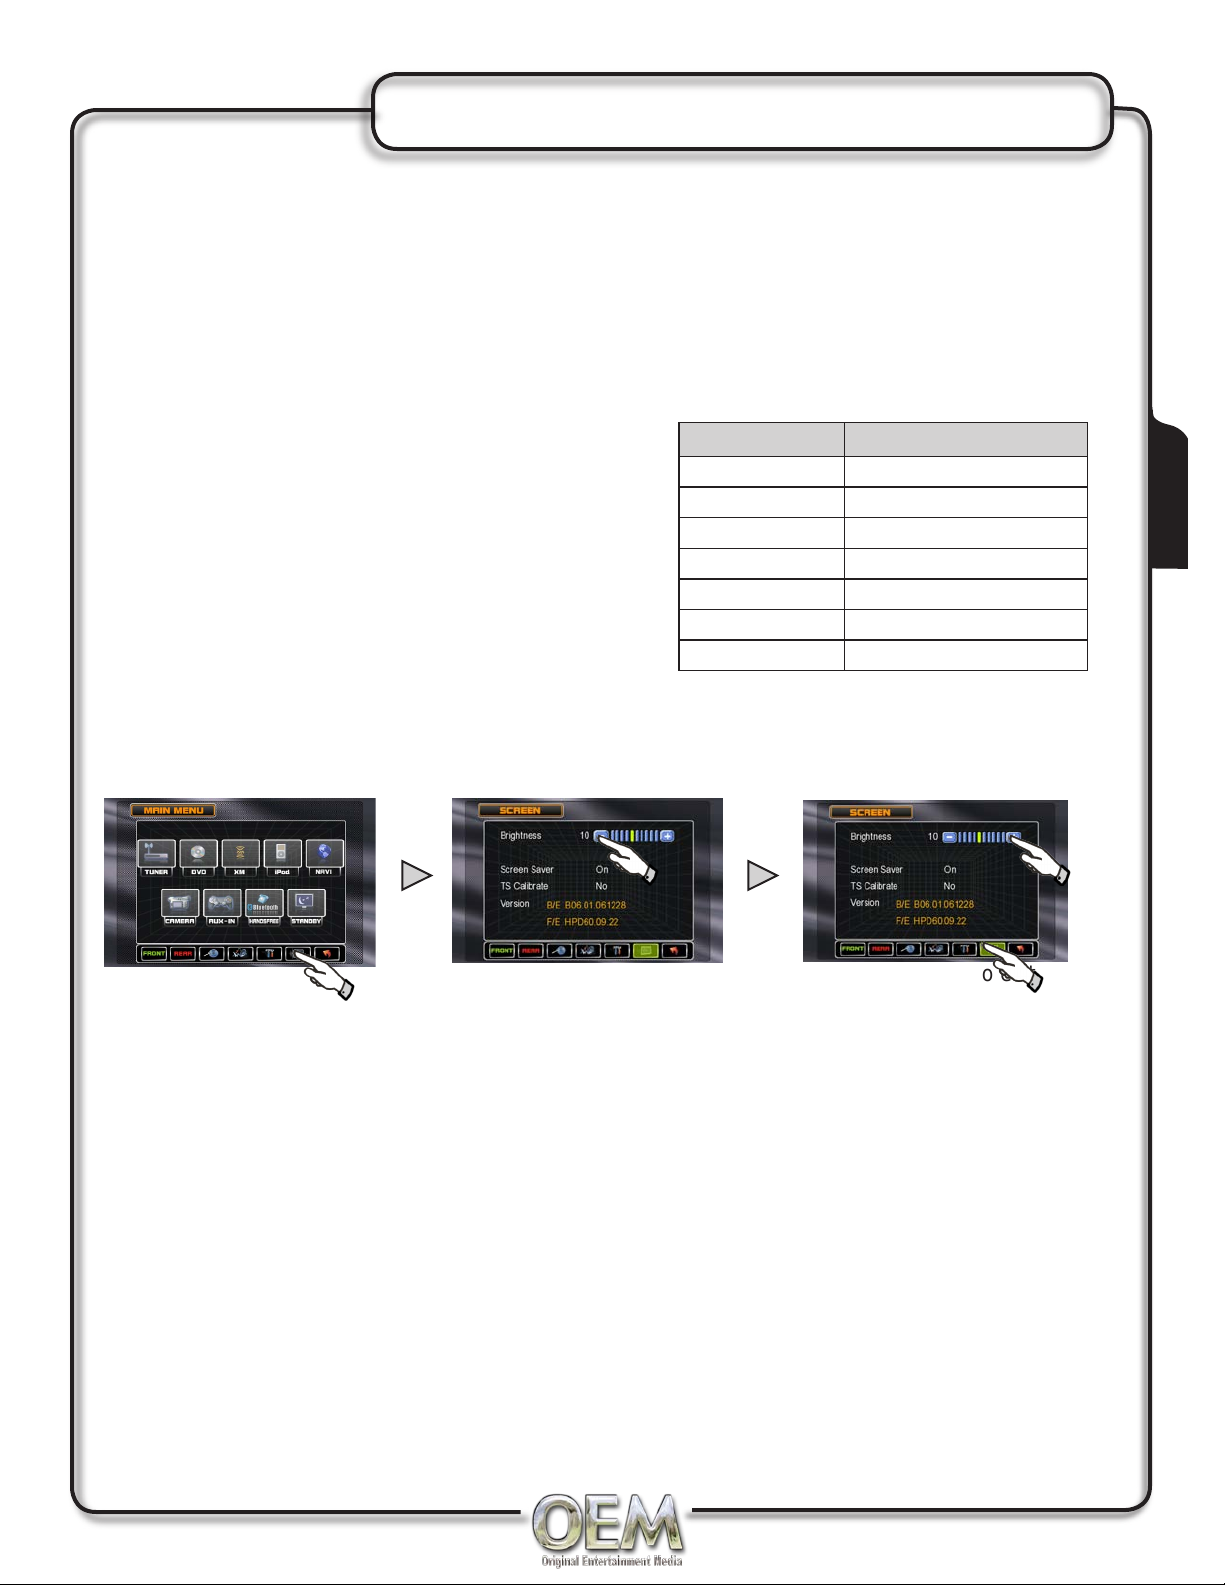
Image Setting
While in RGB mode, the only parameter that
can be adjusted is BRIGHTNESS. To access
SHARPNESS, CONTRAST, COLOR, TINT you
must be in CVBS (Composite Video Signal) mode.
RGB Brightness
Press PIC on the remote and use t or u to set
to desired BRIGHTNESS or touch Area A (upper
left hand corner of monitor) to access main menu.
Press SCREEN Setup Touch [-] to DIM TFT Touch [+] to brighten TFT
0 to +20 is possible Touch ARROW to exit
Default is 10
Playing Source Video Output Format
FM / AM TUNER RGB Mode
DVD RGB Mode
NAV RGB Mode
AUX IN CVBS Mode
CAMERA CVBS Mode
iPOD (video) CVBS Mode
XM CVBS Mode
Operation
.
Monitor in Rear Camara Mode
When the vehicle is placed in "Reverse" and an optional rear camera is connected to the unit, the
MONITOR will automatically switch to the camera inport source.
9
Page 10
General Operation
Power On / Off
Press the VOL/SMART DIAL once to turn on the unit. Once on, press to MUTE sound, press again to
restore sound. To turn off, press and hold. The unit can also be turned on using the remote.
Volume Adjustment
Adjust the Volume using the VOL/SMART DIAL knob or the remote to adjust the volume to the desired
listening level. The volume is set at a default value. This default memory value can be reset by selecting
the desired volume and then holding down the MENU button until you hear a 1 beep.
Mute
The volume will be muted when the following situations occur:
When a telephone call is received by the car phone or when verbal navigation is performed.
1)
When the "MUTE" wire is connected to a cell phone
2)
When the power button on the front panel is pressed once or the MUTE button on the remote is
3)
Operation
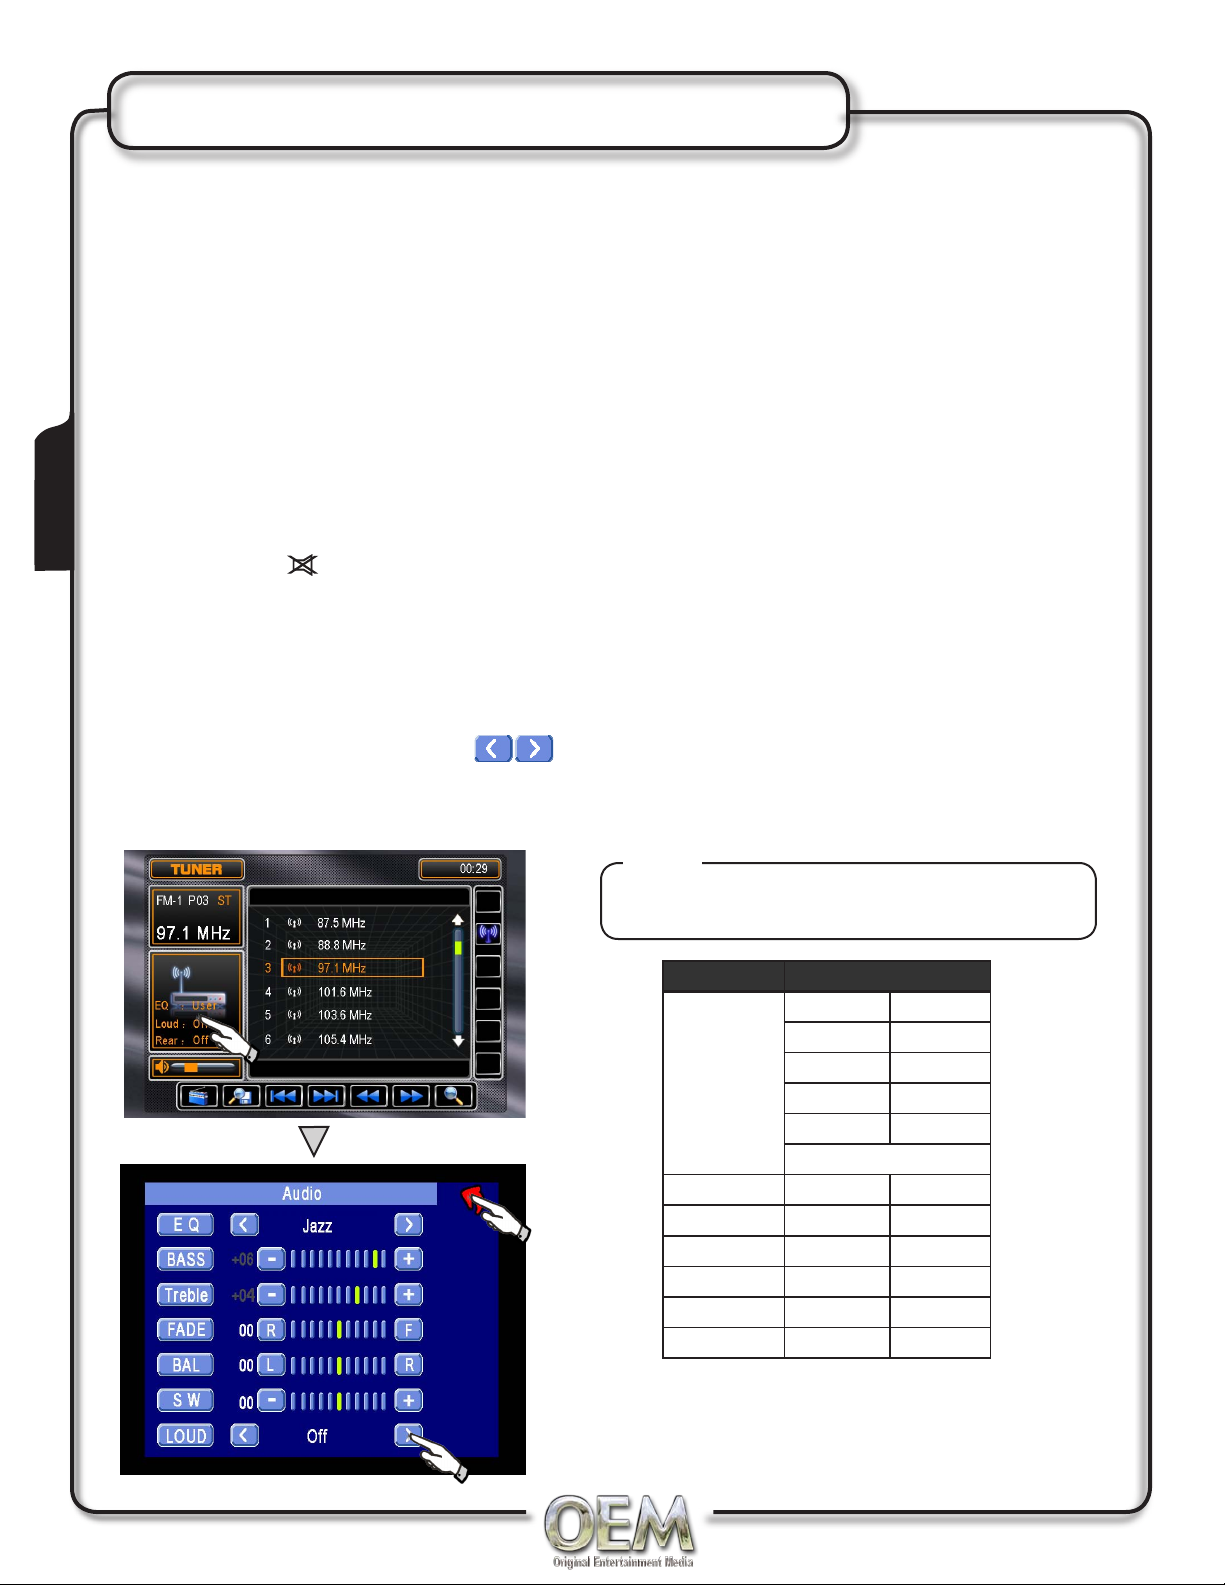
Audio Control Menu
pressed. The symbol will appear on the Monitor.
You can adjust your audio system to meet the acoustical characteristics of your vehicle which vary on the
type and size of vehicle. To get the best sound quality, be sure to adjust the settings of your speakers.
Properly setting the FADE and BALANCE will enhance the effects of the cabin equalizer. To access the
Audio Control Menu, press Area C, press and hold the Vol/Smart Dial or SEL on your remote. Change
the eqaulizer settings by touching the buttons or by pressing t or u on the remote. Press the p
q buttons on the remote to select an setting to be adjusted or touch screen to adjust settings.
Touch the arrow on the screen or ESC or SEL on the remote to exit.
Notes:
The Bass and Treble levels are only
adjustable when EQ is set to “User” mode.
ITEM RANGE
EQ
BASS -7 +7
TREBLE -7 +7
FADE -9 +9
BALANCE -9 +9
SUB -7 +7
LOUD OFF ON
The Loud function compensates for deficiencies in sound
ranges at low levels. When the Loud function is on, LOUD
is displayed on the screen.
USER FLAT
JAZZ POP
CLASSIC ROCK
NEWS URBAN
RAVE MOVIE
TECHNO
10
Page 11
Main Access Menu
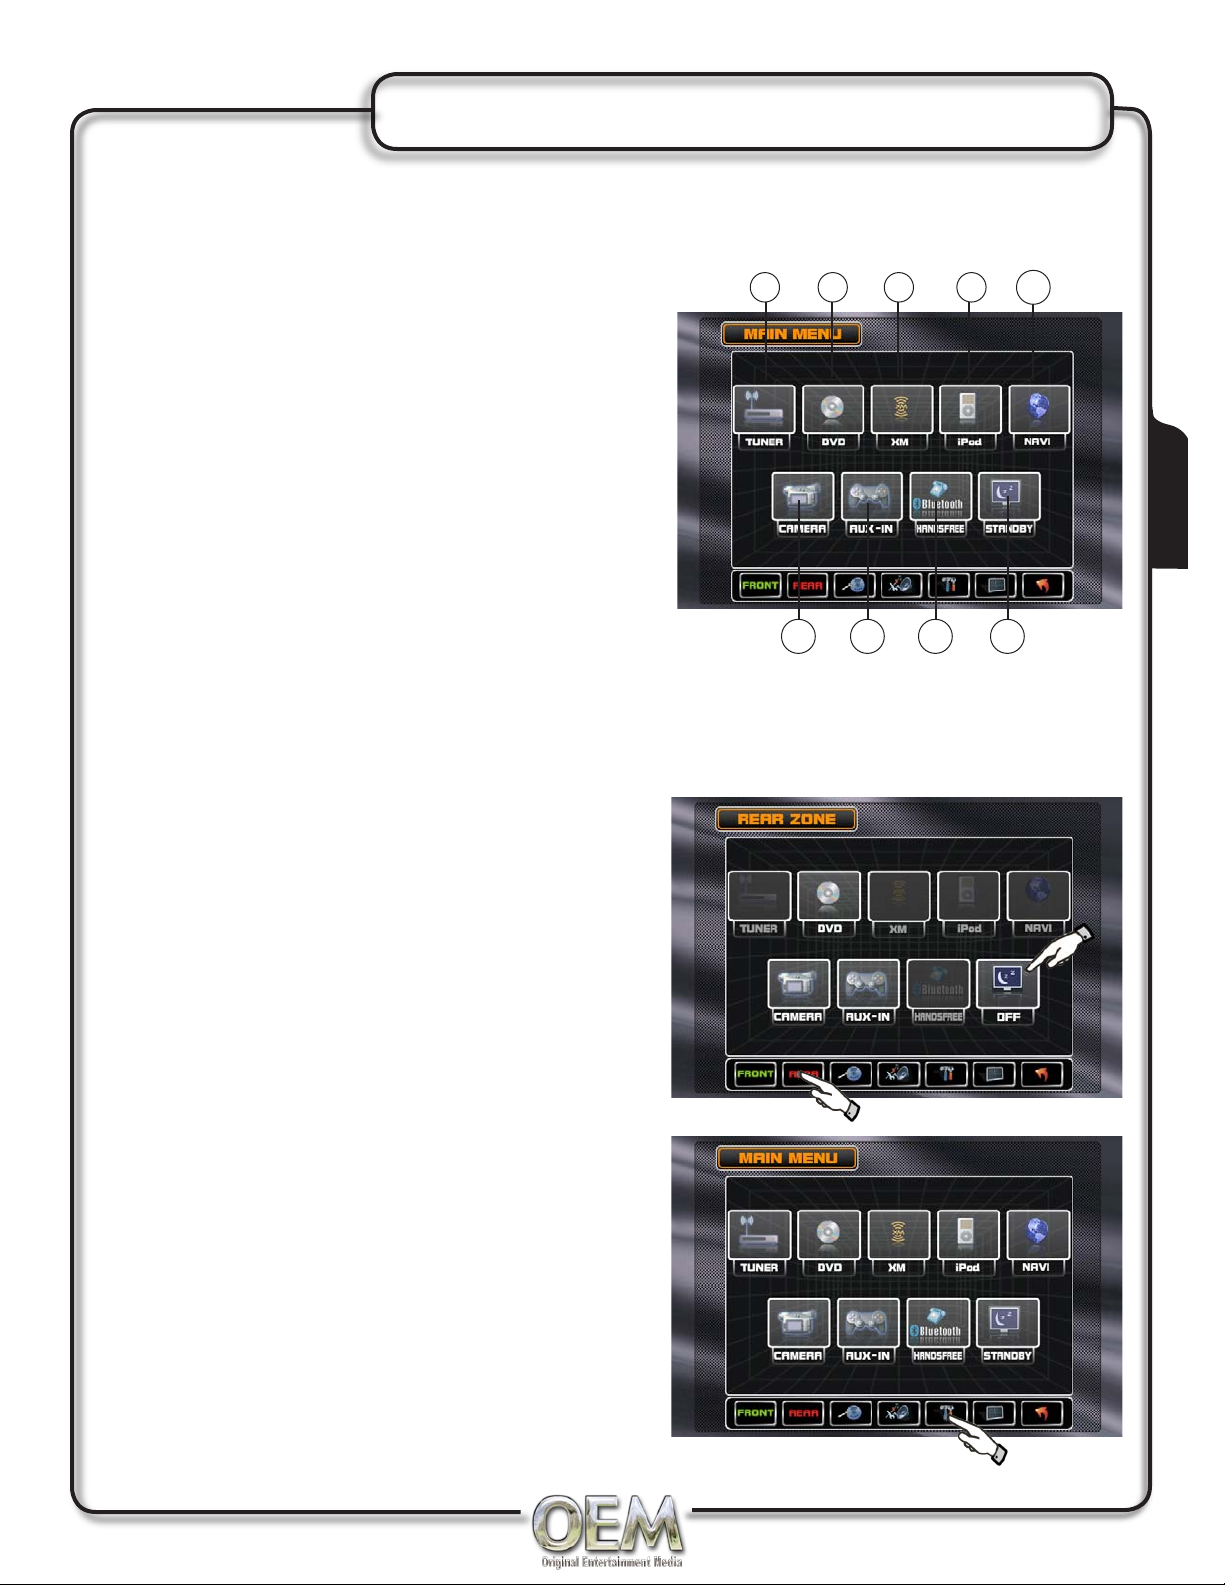
Main Access Menu
The MAIN menu can be access by pressing the MENU button on the remote or by touching the Area A
(upper left hand side) on the monitor.
5
Touch Access Buttons
Touch to access AM/FM TUNER mode.
1)
Touch to access CD/DVD mode, CD/DVD must
2)
be inserted.
Touch to access XM MODE. (XM Receiver must
3)
be connected to activate).
Touch to access iPOD mode. (iPod must be
4)
connected to activate)
Touch to access NAVIGATION mode
5)
Touch to access CAMERA mode. (If optional
6)
camera isn't connected then "No Video Signal"
will be displayed).
Touch to access AUXILIARY A/V INPUT mode.
7)
Touch to access BLUETOOTH mode.
8)
(BLUETOOTH must be activated first).
Touch to STANDBY screen.
9)
1 2 43
6
7 98
Operation
Source Selection
Sources can also be selected by pressing the SRC button on the front panel to change among TUNER,
Disc, iPod, SAT, AUX IN, CAMERA (rear view video
camera) and NAVI. The source mode is displayed on
the Monitor.
Standby Mode
In the standby mode, the LCD is off with audio input
only. The VOLUME level can be controlled without
interrupting STANDBY. Touch screen again or any
button to resume display.
Rear Zone
Touch to access the rear zone source menu. Press
and hold the SRC button on the front panel to toggle
REAR ZONE mode On.
Exit Rear Zone
Touch the STANDBY button on the rear zone menu.
Selecting Front Zone Source
The Main Menu allows you to select a source for the
front zone.
Access General Setup Menu
Press the SETUP button to access the GENERAL
•
setup mode
Select desired parameter you wish to change
•
Page will return to previous screen after 10 sec. of
•
inactivity or by pressing the arrow to exit.
11
Page 12
General Set Up Menu
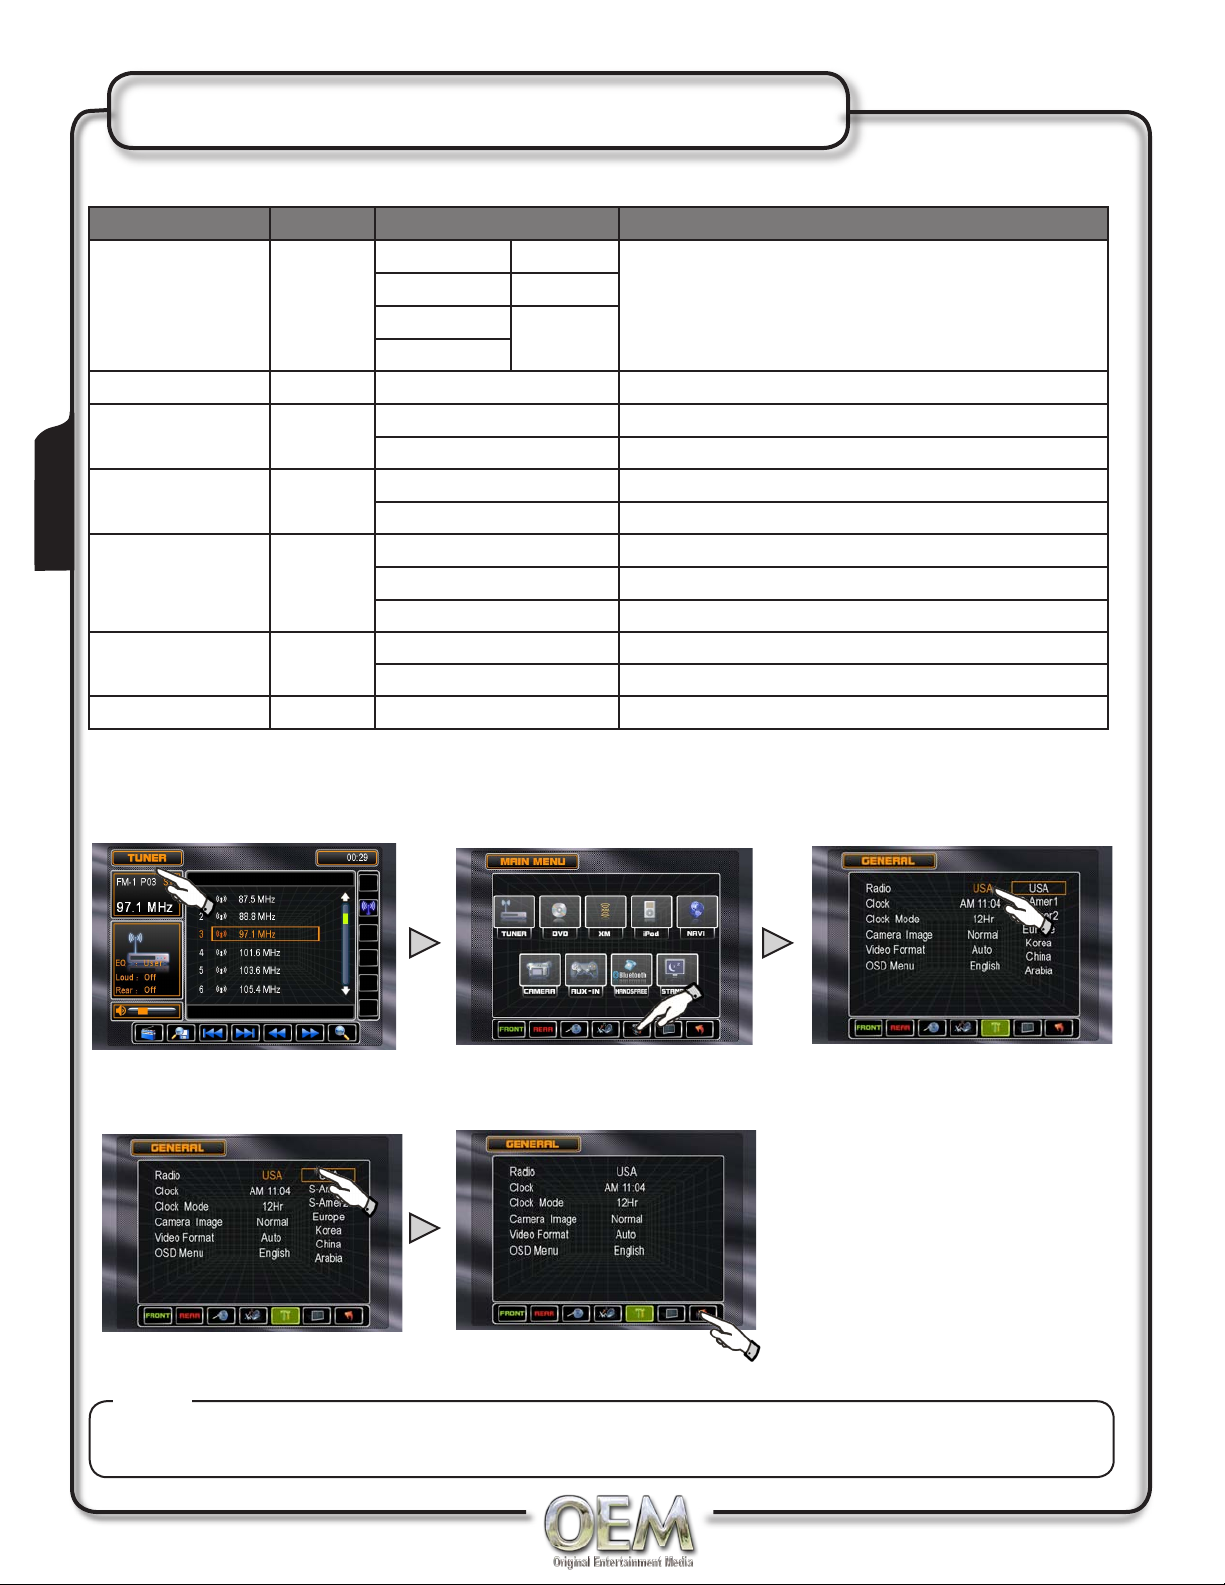
GENERAL Setup Menu Table
Settings Default Options Function
USA Korea
Radio
USA
Clock adjust AM HH:MM See adjusting the clock for more details
Clock Mode 12Hr
Camera Image Normal
Operation
Video Format Auto
Bluetooth Off
OSD Menu English English The menus are displayed in English only
S-AMER1 China
Set to appropriate setting for your Country
S-AMER2
Arabia
Europe
12Hr PM 6:00
24Hr 18:00
Normal Normal Image
Reverse Mirror camera input image 180 degrees
AUTO System will auto detect NTSC or PAL
NTSC For NTSC compatibility
PAL For PAL compatibility
Off Turns off functionality of Bluetooth
On Activates Bluetooth functions
*Not all GENERAL setup features are described in detail
Adjusting TUNER Frequency
Touch Area A to access Touch GENERAL Setup button Touch USA
GENERAL MENU
Touch setting for your country Touch arrow to EXIT
Notes:
The SMART DIAL can also be used by selecting the desired setup button, then pressing to obtain a
submenu. Select the desired value and then pressing again to confirm the setting.
12
Page 13
Adjusting the Clock
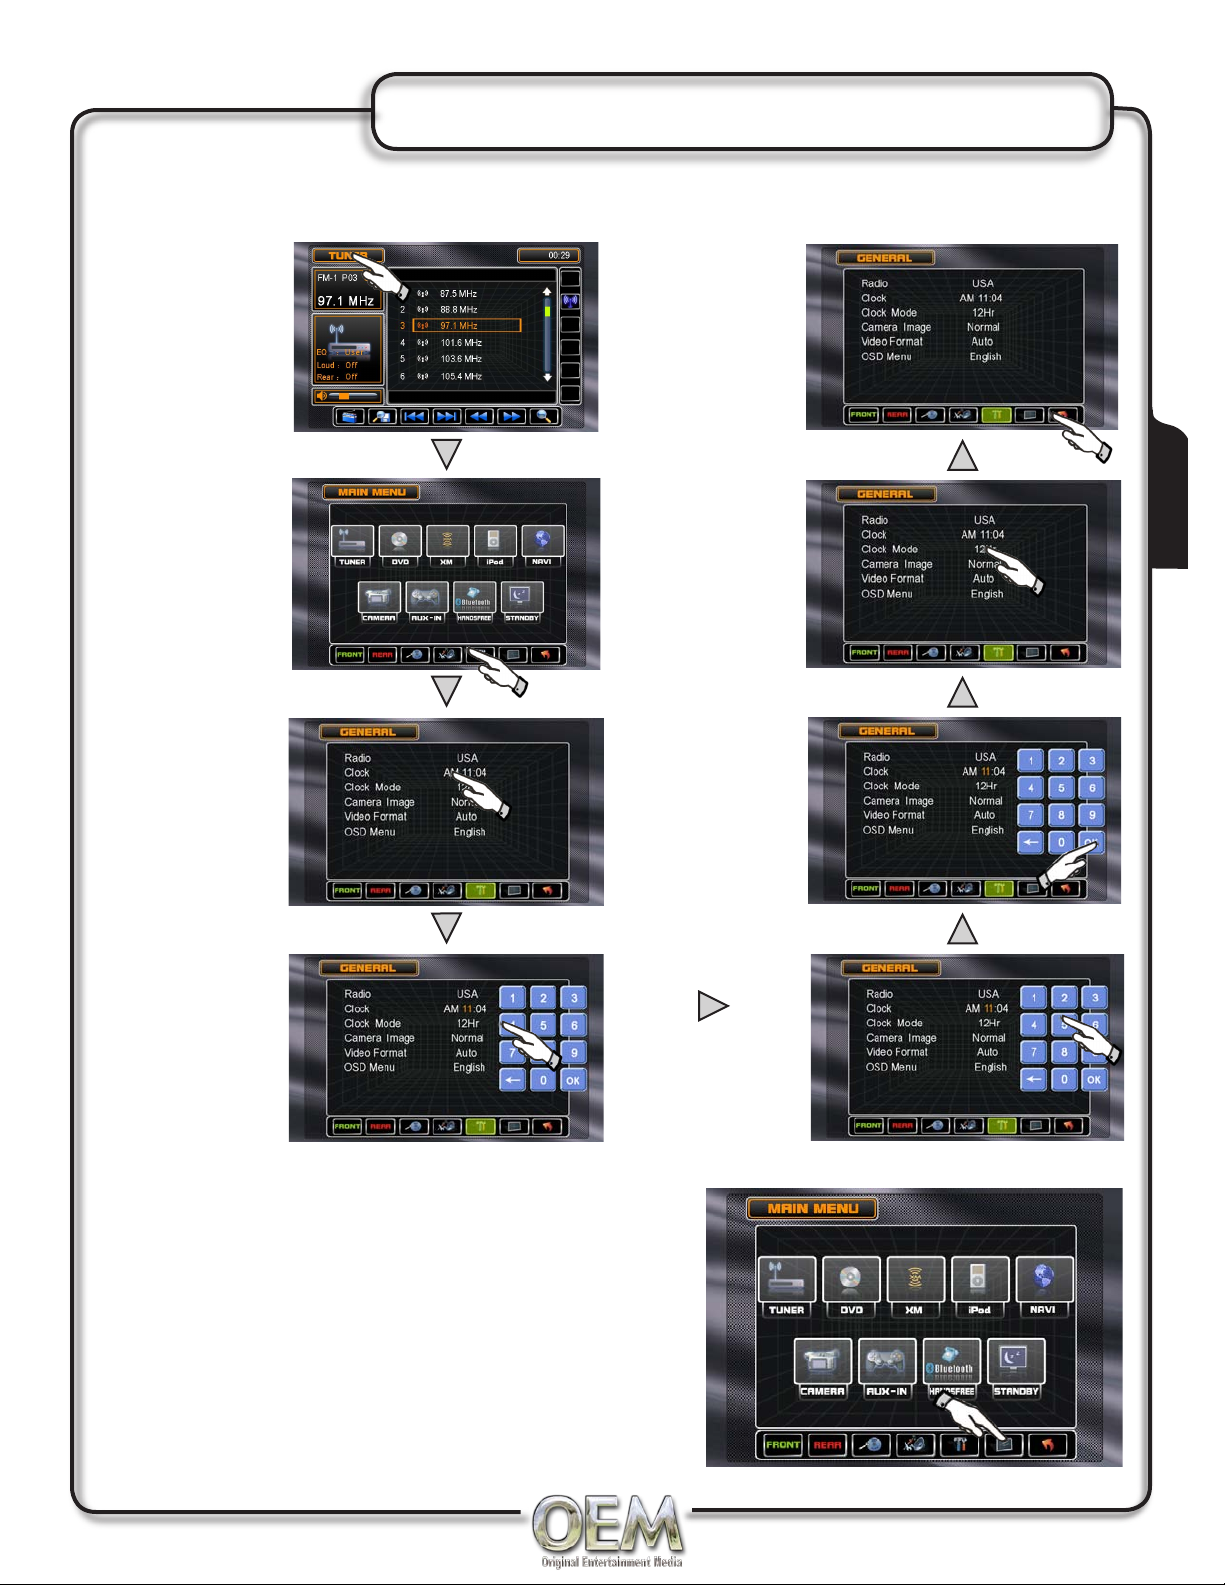
12 or 24 Hour Clock Mode
Touch Area A of
screen
Touch
GENERAL
setup button
Touch AM or
PM to set
correct hour.
Touch arrow to
EXIT setup
Operation
If you desire
24Hr format,
select 24Hr
from CLOCK
MODE
Touch 00:00
area in the
CLOCK row to
set the hour.
Keypad should
appear. Enter
Screen Setup Menu
Press the SCREEN Setup button to access the
•
SCREEN SETUP mode
Select desired parameter you wish to change
•
Page will return back to previous screen after 10 secs
•
of inactivity or by pressing the RETURN button
Touch OK.
Touch 00:00
area. Enter
correct minutes.
13
Page 14
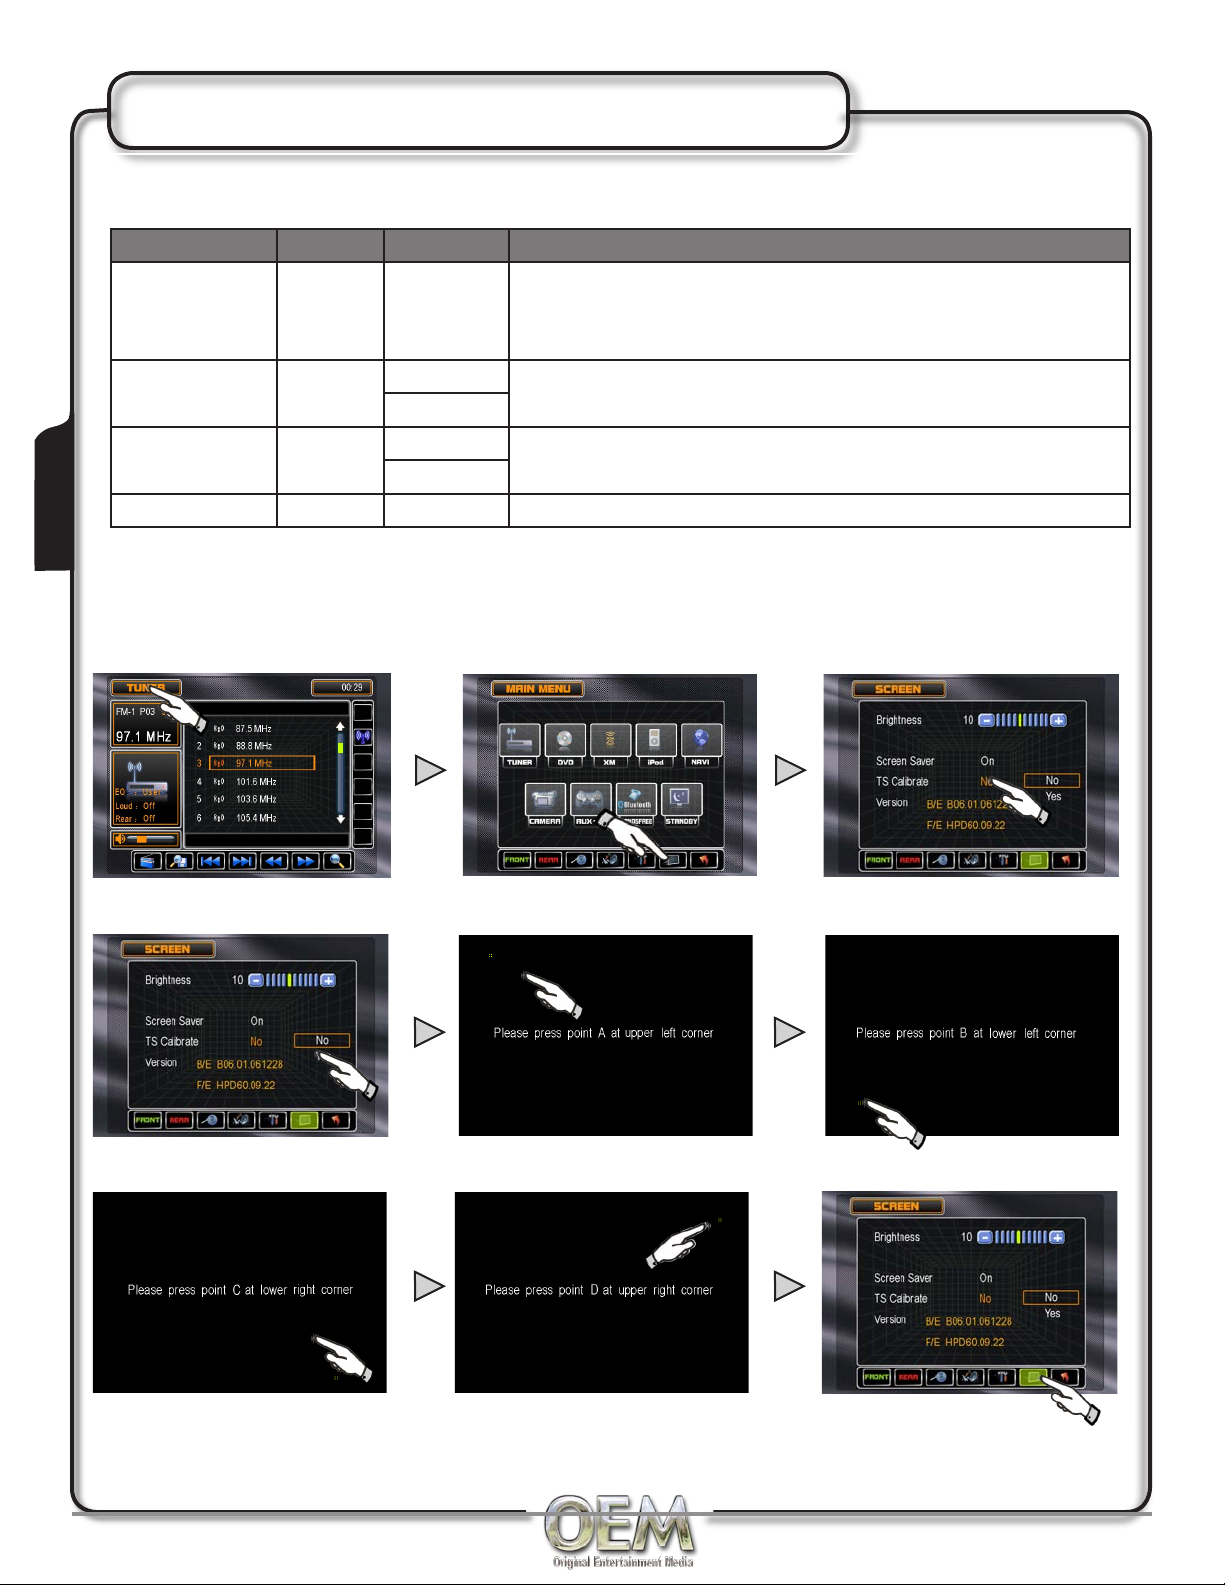
Screen Setup
Screen Setup Functions
Settings Default Options Function
Press the < / > buttons on the remote, touch the (-) or
Brightness 10 0 to +20
Screen Saver On On Select On to activate the screen saver, Off to deactivate
Off
Touch Screen
Calibration
Version Software version of unit
No No Touch Yes to enter the Touch Screen calibration mode
Yes
Operation
Touch Screen Calibration
It may become necessary to recalibrate the touch screen.
Touch Area A Touch SCREEN Setup Button Touch NO in TS Calibration
(+) buttons on the screen or rotate the SMART DIAL to
adjust the BRIGHTNESS to the desired setting
Then press YES Touch and hold point A Touch and hold point B
Then touch and hold point C Touch and hold point D Touch arrow to EXIT
14
Page 15
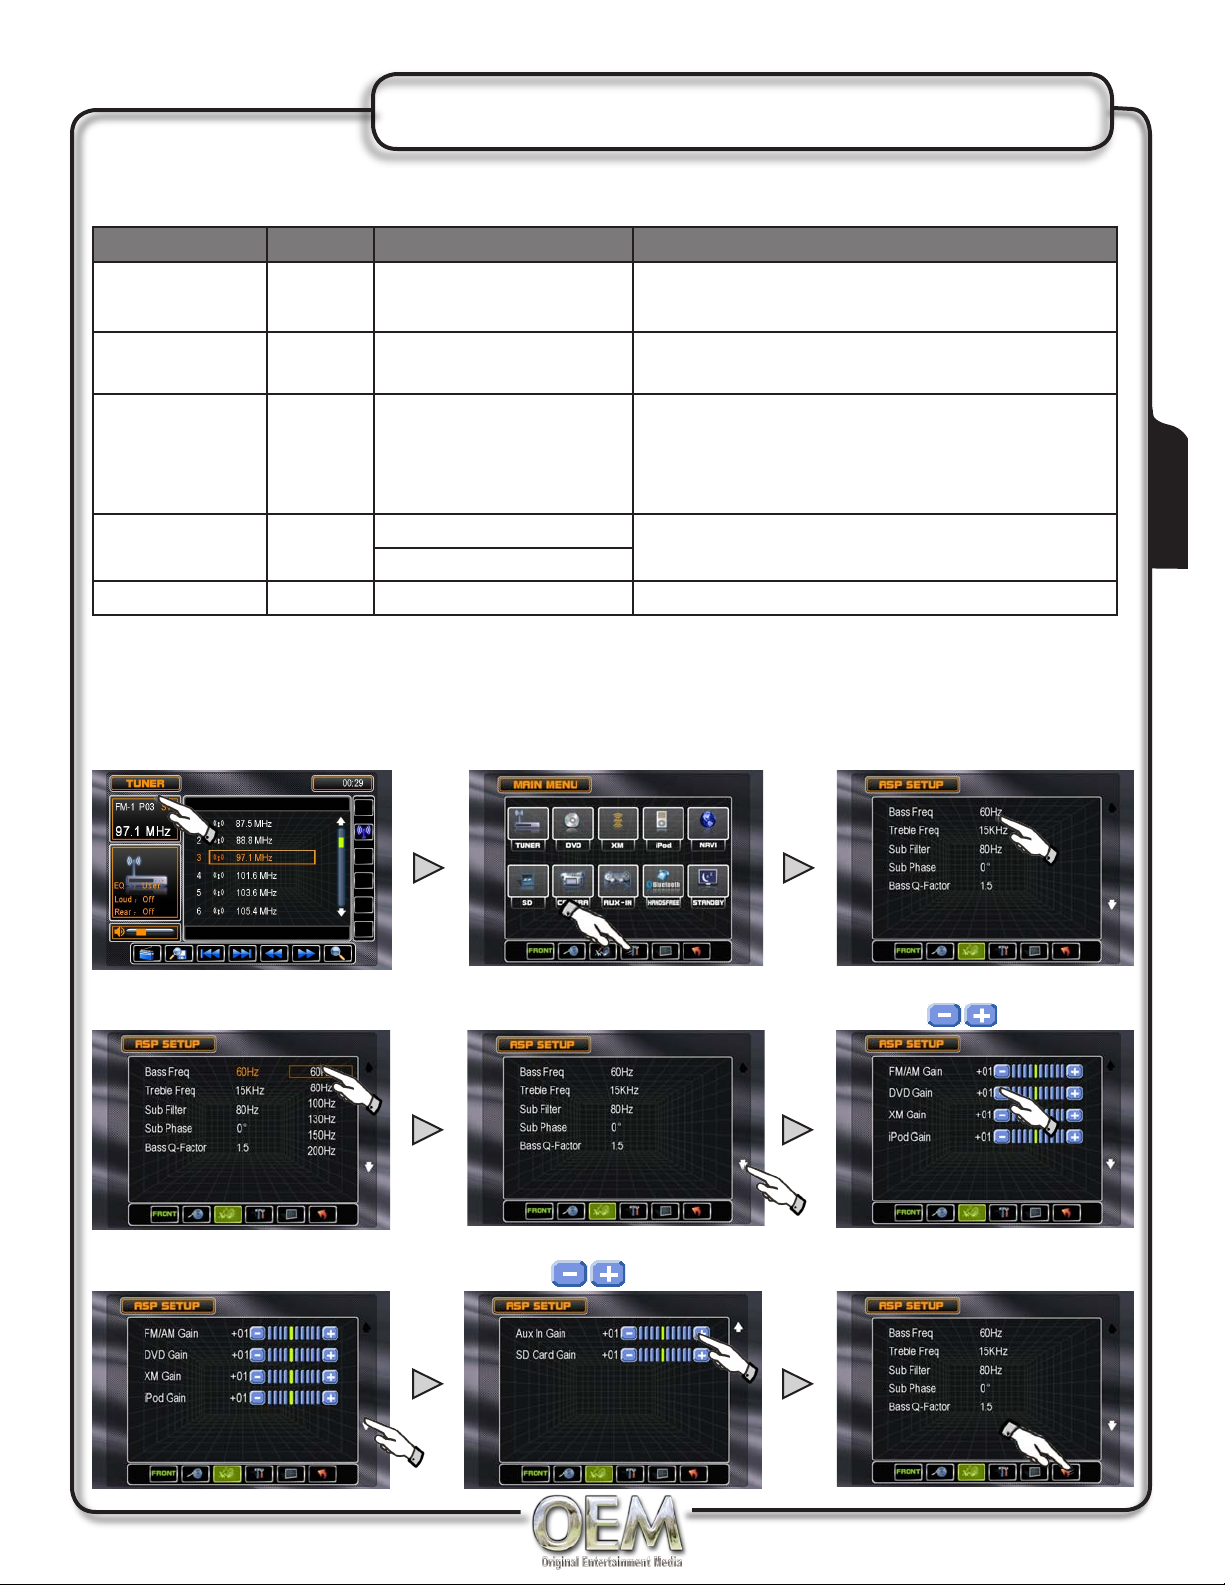
Audio Signal Processing (ASP)
ASP Configuration Menu
Settings Default Options Function
Bass Freq 60 Hz 60Hz, 80Hz, 100Hz,
130Hz, 150Hz, 200Hz
Select the desired frequency to obtain the
best bass effect.
Treble Freq 15KHz 10KHz, 12.5KHz,
15KHz, 17KHz
Sub Filter 80Hz 80Hz, 120Hz, 160Hz Sets a cut off frequency of the subwoofer's
Sub Phase 0° 0° Subwoofer output IN phase
180°
Bass Q-Factor 1.5 1.0, 1.25, 1.5, 2.0 Alters the sharpness of the Bass output
The ASP Configuration Menu allows fine adjustment of your audio.
Select the desired frequency to obtain the
best bass effect.
LPF (low pass lter) and the "SMALL"
speakers HPF (high pass lter). This setting
has no effect if the subwoofers are OFF
Subwoofer output OUT OF phase
Accessing ASP Configuration Menu
Touch Area A of screen Touch ASP SETUP button Select desired parameter
Operation
Choose value from pop up menu Scroll down to gain menus Touch to adjust
Scroll down to AUX1 and SD Gain Touch to adjust Touch arrow to EXIT
15
Page 16
AM/FM Tuner Operation
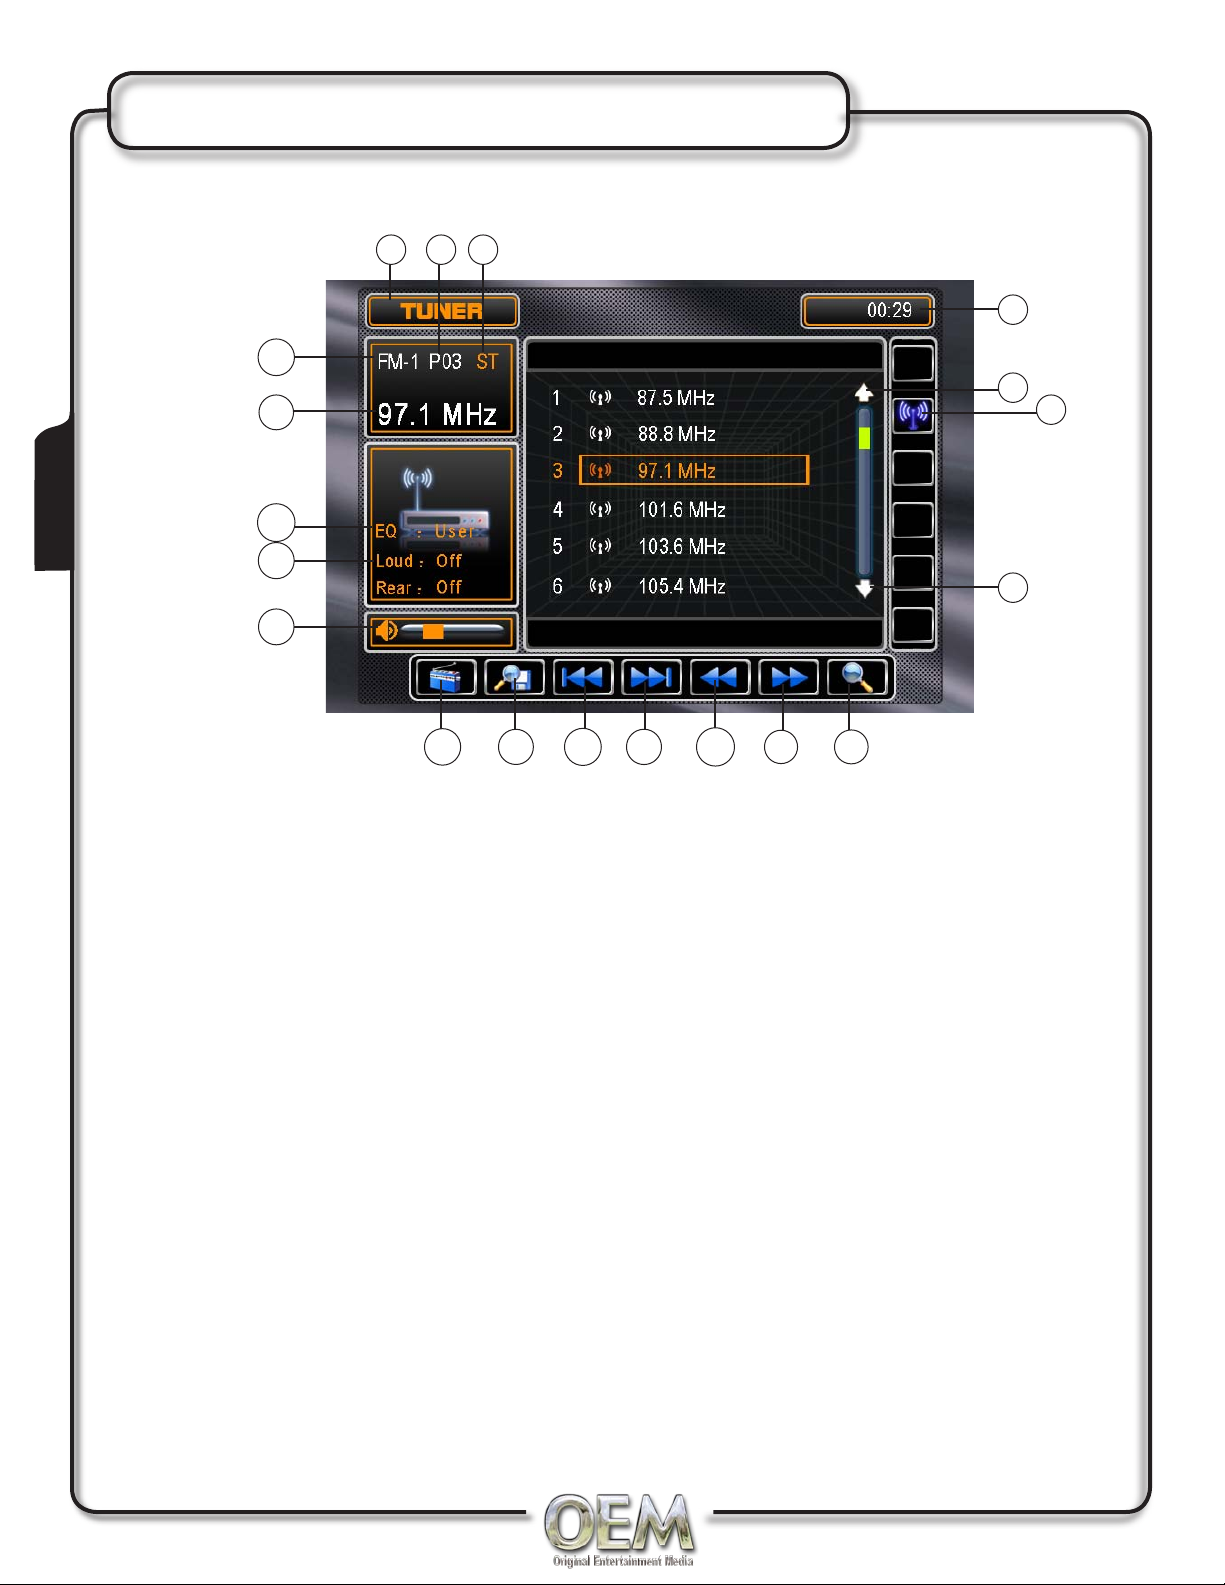
AM / FM Tuner Screen
19
18
17
Operation
16
15
1 2 3
4
5
6
7
14
Current souce MODE. Touch to access
1)
MAIN menu. TUNER, DVD, XM*, iPod*,
CAMERA, Bluetooth, NAVi*, AUX are
indicated in the OSD (On Screen Display).
Current PRESET station indicator.
2)
Broadcast indicator for STEREO
3)
Clock
4)
Page up PRESET
5)
Selection for LOCAL/DISTANCE
6)
Page down PRESET
7)
Auto station SCAN button
8)
Up for MANUAL TUNE
9)
13
12
11
10
Up for SEEK TUNE
11)
Down for SEEK TUNE
12)
Press AS/PS (Auto store / Preset Scan) for 1
13)
sec to start station PRESET SCAN function,
press AS/PS for 2 secs to start AUTO
STORE station preset function in current
BAND
Press BAND to increment from FM1, FM2,
14)
FM3, AM1] FM1.
Indicator for VOLUME
15)
Indicator for LOUD
16)
Equalizer indicator, touch to access AUDIO
17)
Setup menu
Current radio frequency indicator
18)
9
8
Down for MANUAL TUNE
10)
* iPod, XMD1000™ Tuner Module and SNAV-1 must be connected to appear in the MODE selection
string. (XMD1000™ and SNAV-1 each sold separately)
16
Current radio BAND indicator
19)
Page 17
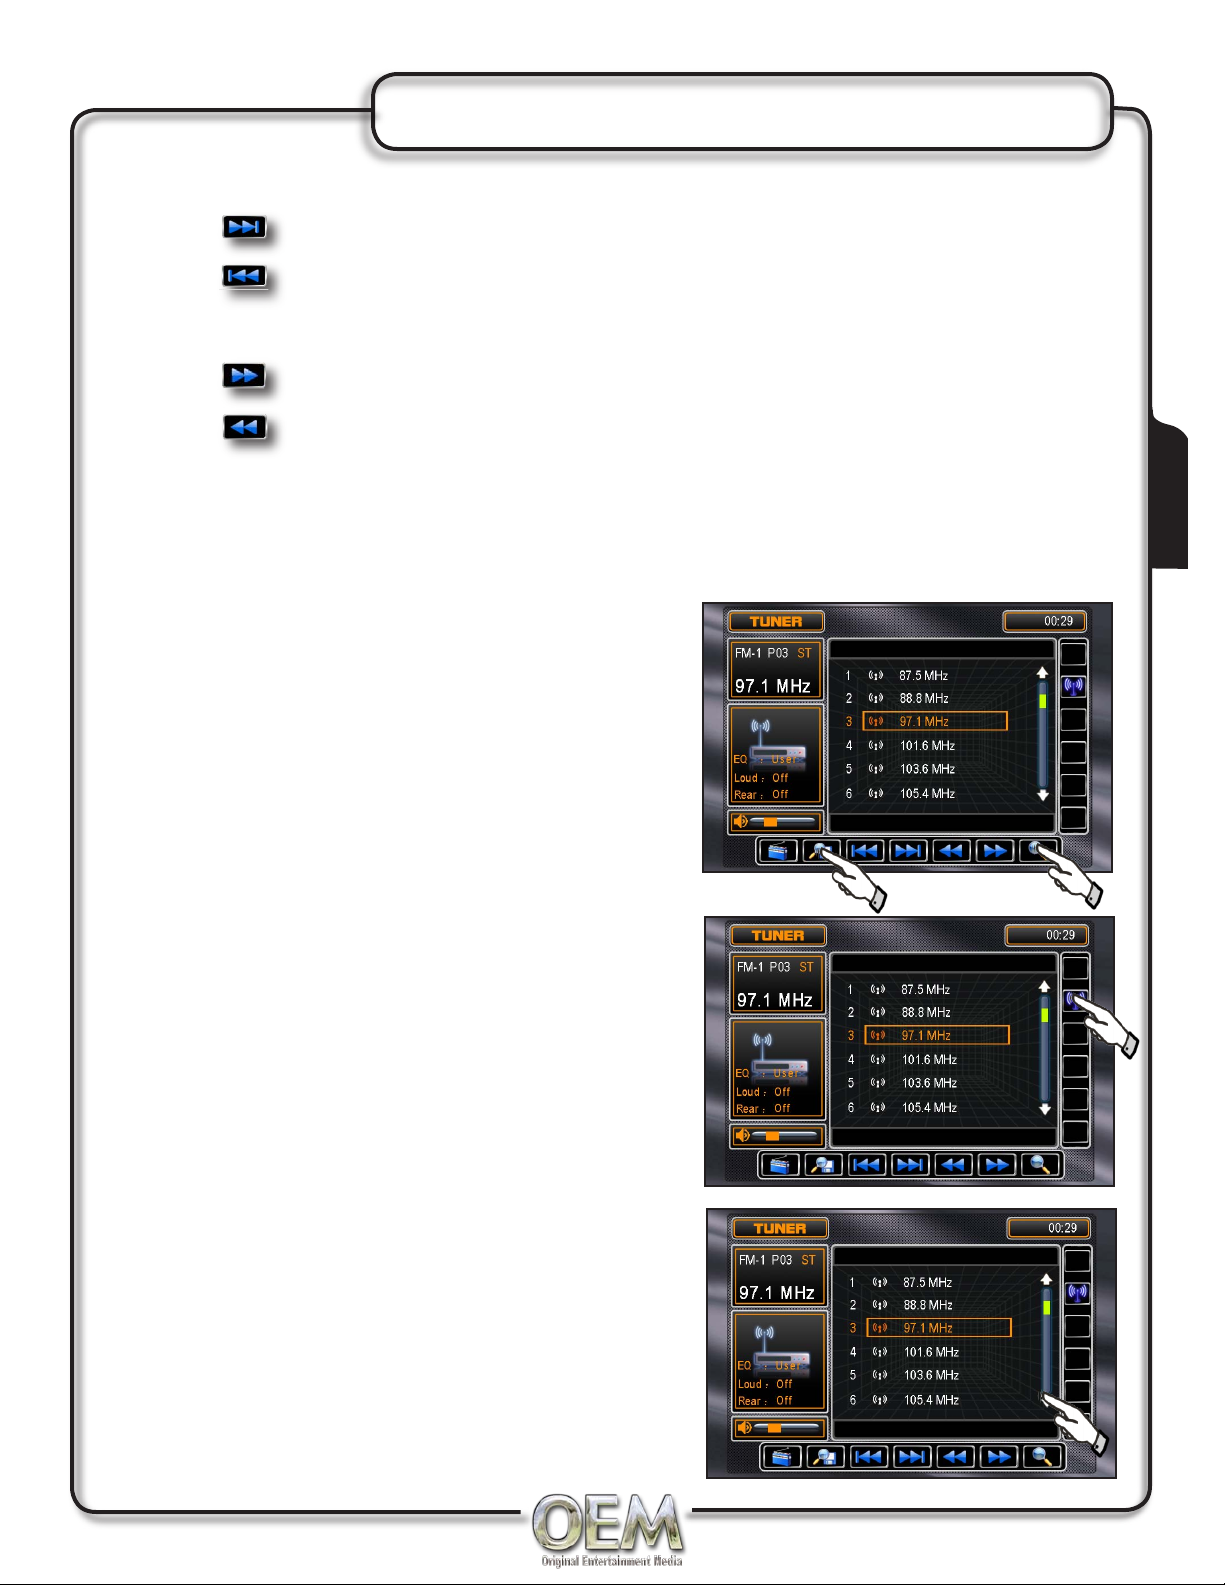
AM/FM Tuner Operation
Auto Seek Tuning
Press the button to auto SEEK up the next strongest station.
Press the button to auto SEEK down the next strongest station.
Manual Tuning
Press the button to manually tune up one step at a time.
Press the button to manually tune down one step at a time.
Auto Store (As)
Press and hold AS/PS for more than 2 seconds to automatically store the twelve strongest stations
in the current band. Automatic Local tuning is activated during the initial band scan, repeat for other
bands.
All presets within the current band will be overwritten.
Program Scan (PS)
Press AS/PS for less than 2 seconds to scan presets
1-12 on the current band, pausing for 5 seconds at each.
Press AS/PS again to cancel.
Scan
Press SCAN to preview strong stations on the current
band, pausing for 5 seconds at each station. Press
SCAN again to cancel.
AS/PS
Scan
LOC/DX Radio Station
Touch LOC button on the TFT to activate LOC / DX when
the LOCAL function is on, LOC will appear, only radio
stations with a strong signal are received, DX is for radio
stations that are far away and/or have weak signals.
Operation
Storing Radio Stations Preset
Up to 36 FM stations and 12 AM stations can be stored.
To store a station, select the desired band and station.
Press and hold the desired preset button (1-12) for more
than 2 seconds. When stored, the PRESET number will
appear in the display. The station can be recalled anytime
by pressing the corresponding preset button on the
MONITOR.
Recalling a Radio Station Preset
Touch an corresponding PRESET number for less than 2
secs to recall.
Preset Page Up/Down
Only 6 PRESETS can be display at one time, use
PRESET page up/down to access next stored PRESETS
accordingly.
17
Page 18
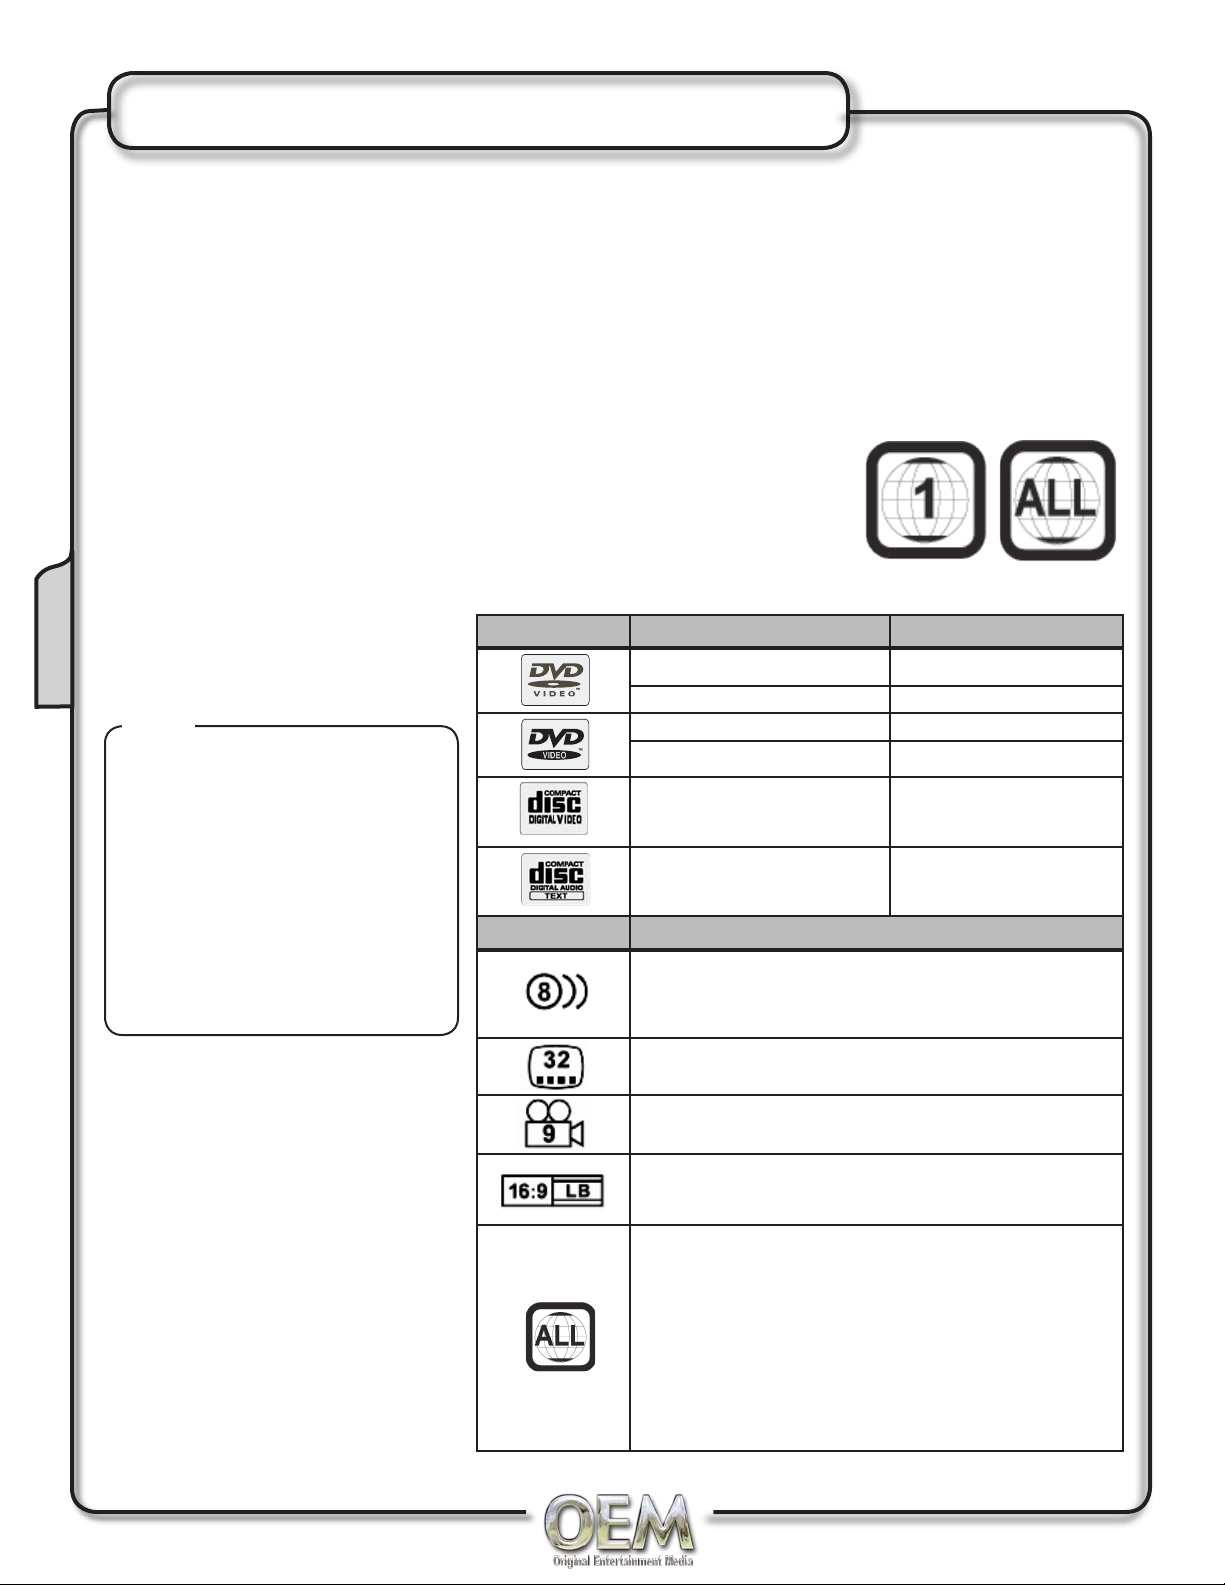
DVD Information
DVD Region Management
Some DVD discs can be played only in certain playback modes according to the intentions of the
software. As the CH-4100 plays discs according to their intentions, some functions may not work
as intended. Please be sure to read the instructions provided with each disc. This player has been
designed to play back DVD software that has been encoded for specific region areas. It cannot
play back DVD software encoded for other region areas than the region areas for which it has been
designed.
The CH-4100 will play discs labeled “Region 1” or “All”.
DVD region codes:
1 - USA, Canada
2 - Japan, Europe, South Africa, Middle East
3 - Rep. of Korea, Taiwan, Hong Kong, Parts of Southeast Asia
4 - Australia, New Zealand, Mexico, South America
5 - Eastern Europe, Russia, India, Africa
6 - China
DVD
Notes:
Some DVD discs can be
played only in certain playback
modes according to the
intentions of the software.
As the CH-4100 plays discs
according to their intentions,
some functions may not work
as intended. Please be sure to
read the instructions provided
with each disc.
Symbol 12cm Disc Properties Max Play Time
Single side single layer (DVD-5) (MPEG 2 Method)
Single side double layer (DVD-9) 133 minutes
Double side single layer (DVD-10) 242 minutes
Double side double layer (DVD-18) 484 minutes
Single side single layer (VCD)
Single side single layer 74 minutes
(MPEG1 Method)
74 minutes
Symbol Meaning
Number of voice languages recorded.
The number inside the icon indicates the number languages on the disc
(maximum of 8).
18
Number of subtitle languages available on the disc (maximum of 32)
Number of angles provided (maximum of 9)
Aspect ratio available, "LB" stands for Letter Box and "PS" stands for
Pan/Scan. In the example on the left, the 16:9 video can be converted to
Letter Box video.
Indicates the region code where the disc can be played.
Region 1: USA, Canada, East Pacific Ocean islands
•
Region 2: Japan, Western Europe, Northern Europe, Egypt, South
•
Africa, Middle East
Region 3: Taiwan, Hong Kong, South Korea, Thailand, Indonesia,
•
South-East Asia
Region 4: Australia, New Zealand, Middle and South America,
•
South Pacific Ocean Islands/Oceania
Region 5: Russia, Mongolia, India, Middle Asia, Eastern Europe,
•
North Korea, North Africa, North-West Asia
Page 19
Initializing Parking Brake
SAFETY WARNING
The video display of the in-dash unit will not operate while the vehicle is moving.
•
As a safety feature, “ENGAGE PARKING BRAKE” blue screen will show on the display when the
•
vehicle's parking brake is not engaged. Video display on the front monitor isn't allowed until the
PARKING BRAKE is active, however, DVD and AV1 audio can be heard while the vehicle is in
motion without engaging the parking brake.
This is a safety feature to prevent driver distraction. It is illegal in most states for the driver to view
•
video while the vehicle is in motion. Refer to local laws in your area.
CAUTION !!!
IT'S UNLAWFUL TO OPERATE A VEHICLE WHILE VIDEO IS
DISPLAYED IN THE DRIVERS VIEWING AREA.
ENGAGE EMERGENCY BRAKE
TO ENJOY VIDEO
Front Monitor Video Initialization
Follow this two initialization procedure carefully to allow video playback on CH-4100 front panel
monitor:
DVD
There are usually two situations that start the PARKING BRAKE Sequence.
Initializing Parking Brake Scenario 1
First situation is while driving:
Stop vehicle, put in Park, make sure PARKING BRAKE is off / released
1)
Depress PARKING BRAKE for 2 to 3 seconds
2)
Release PARKING BRAKE for 2 to 3 seconds
3)
Depress PARKING BRAKE permanently
4)
Once above procedure 1-4 is completed, approx 3 sec—video will display.
Initializing Parking Brake Scenario 2
Second situation is while already parked and the PARKING BRAKE is already depressed:
Keep vehicle in Park, PARKING BRAKE should be off
1)
Release PARKING BRAKE for 2 to 3 seconds
2)
Depress PARKING BRAKE for 2 to 3 seconds
3)
Release PARKING BRAKE for 2 to 3 seconds
4)
Depress PARKING BRAKE permanently
5)
Notes:
Once 2nd procedure is completed, approx 5 sec—video will display.
•
This procedure will have to repeated if the IGN is turned off.
•
The transition time must be less than 2 seconds between depressed and released.
•
19
Page 20
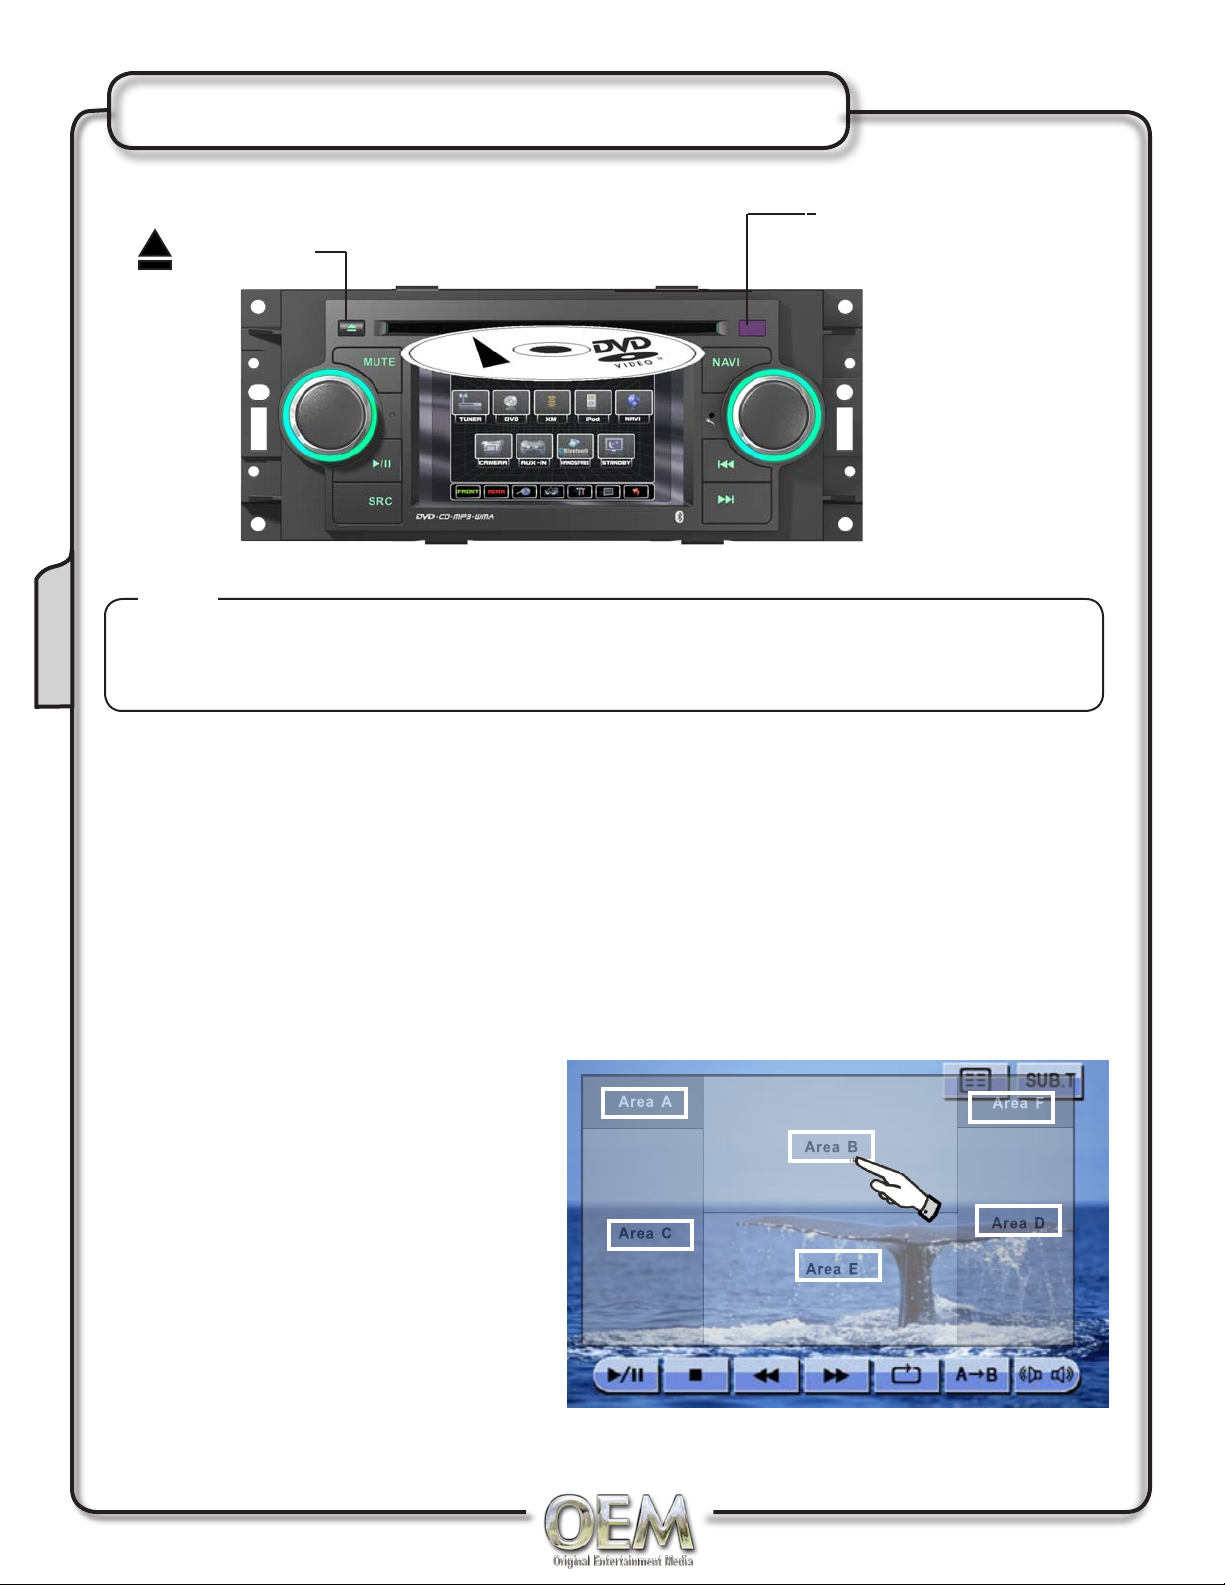
DVD Operation
DVD Loading Slot
Eject button
Notes:
If PARENTAL Lock is activated and the disc inserted is not authorized, a 4-digit code must be
DVD
1)
entered and/or the disc be authorized.( see "RATING MENU")
Only one disc can be inserted at one time.
2)
Disc Indicator Light -
Blue light indicates no disc,
otherwise light is red
Insert CD/DVD with
label facing upwards
Inserting a DISC
When inserting a DVD disc, it will play automatically. Other sub-menus may have to be pressed to
access the DVD movie / music content, read the directions of your specific DVD disc for hidden
features.
Ejecting the DISC
Press the EJECT button
Resetting the Loading Mechanism
If the disc loads abnormally or an system error occurs, press and hold the eject button for 3 seconds to
reset the loading mechanism. The disc will eject and normal operation should resume.
Hidden Touch Screen area while
in DVD mode
Areas "A-F" can be used in DVD mode to
access:
A - MAIN menu access
B - Displays DVD track information
C - Selects PREVIOUS chapter
D - Select NEXT chapter
E - Displays the full DVD transport controls
F - GOTO search menu
A DVD disc must be inserted to access the
hiddern screen functions
20
Page 21
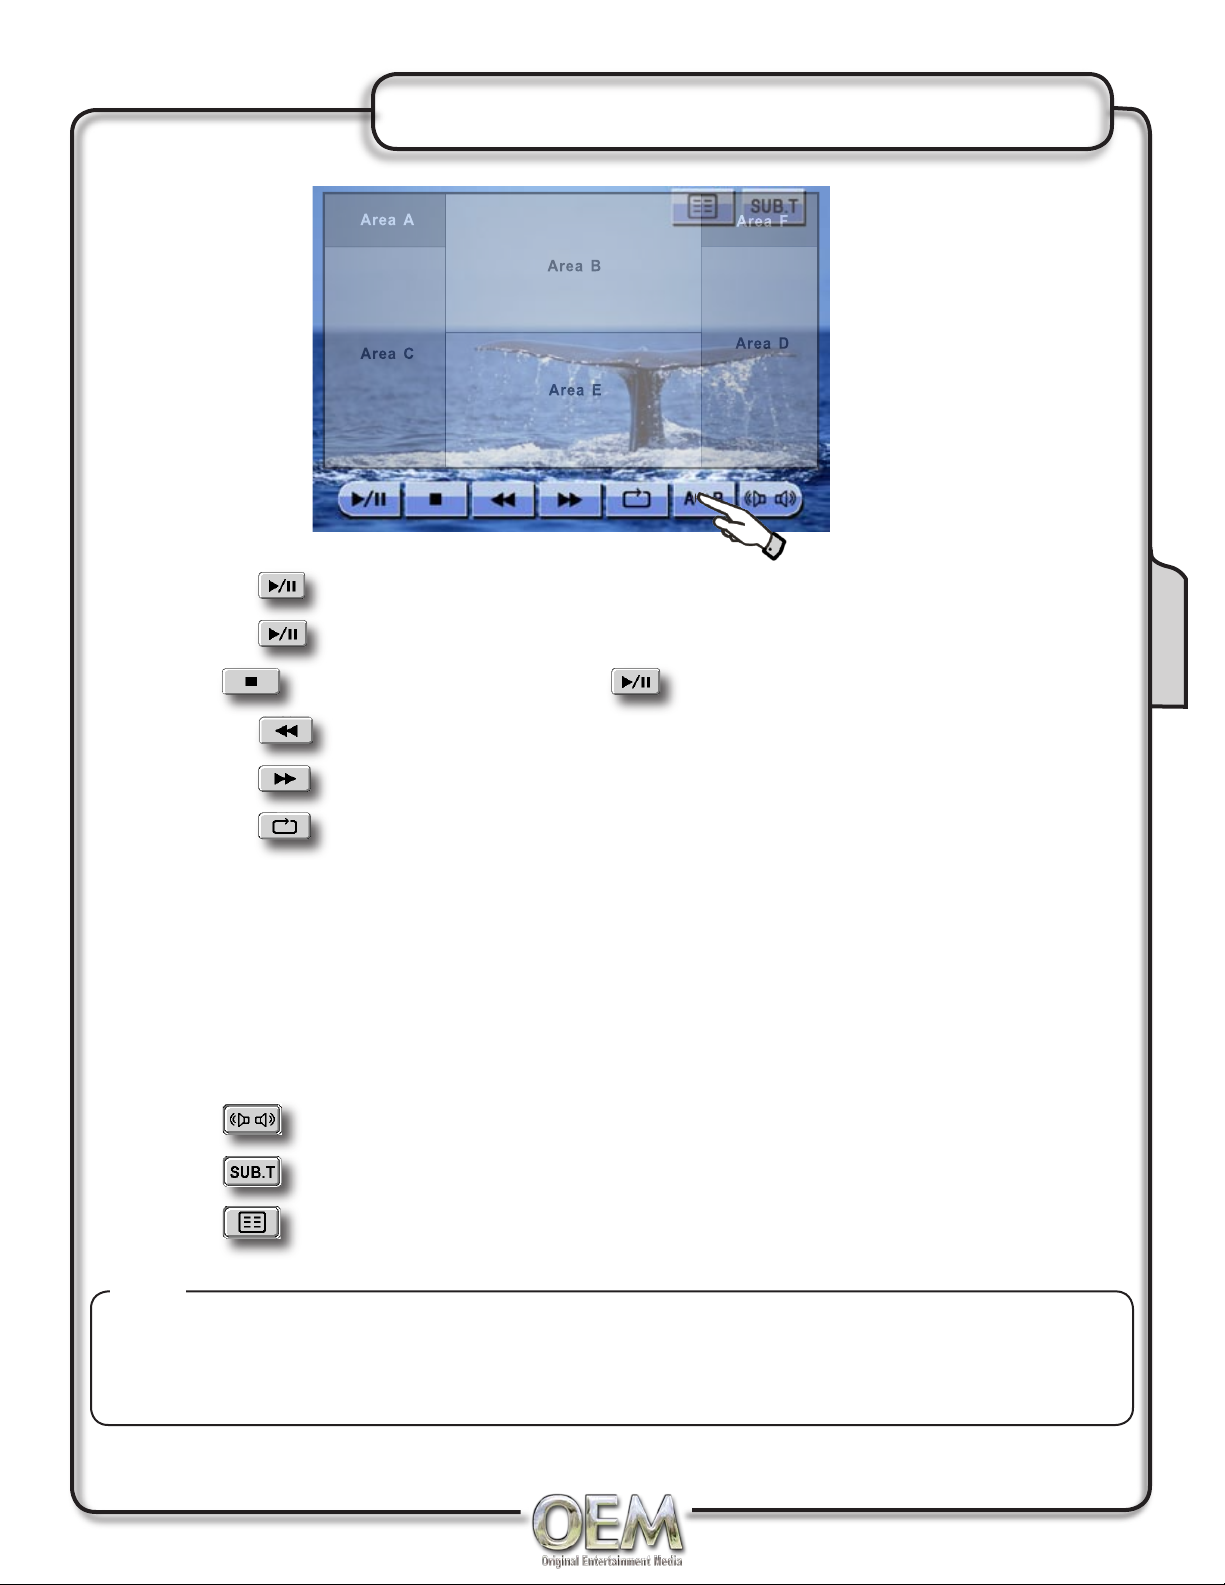
DVD Controls
Touch the PLAY button or on the front panel to resume disk playback.
1)
Touch the PAUSE button again to suspend the disc playback.
2)
Touch button to STOP playback, touch or OK on the remote to resume playback.
3)
DVD
Touch the REVERSE button to FAST REVERSE on DVD, 2x, 4x, 8x to 20x.
4)
Touch the FF button to FAST FORWARD on DVD, 2x, 4x, 8x to 20x.
5)
Touch the Repeat to scroll through the following:
6)
DVD: Repeat Title, Repeat Chapter, Repeat OFF
MP3: Repeat Single, Repeat Folder, Repeat OFF
Use the A-B function to define a specific area of disc to repeat. Press the Repeat A-B button to
A.
set a start point of the (A) selection.
Press the A-B button again once you reach the desired end point (B) of the repeated section,
B.
the selected portion of the DVD will now repeat continuously.
Press A-B button once again to cancel the A-B selection and stop repeat playback
C.
7) Touch to change Audio language playback
8) Touch to change Sub-title of DVD
9) Touch to return to DVD MAIN menu
Notes:
Some DVD discs can be played only in certain playback modes according to the intentions of the
software. As the CH-4100 plays discs according to their intentions, some functions may not work as
intended. Please be sure to read the instructions provided with each disc.
21
Page 22
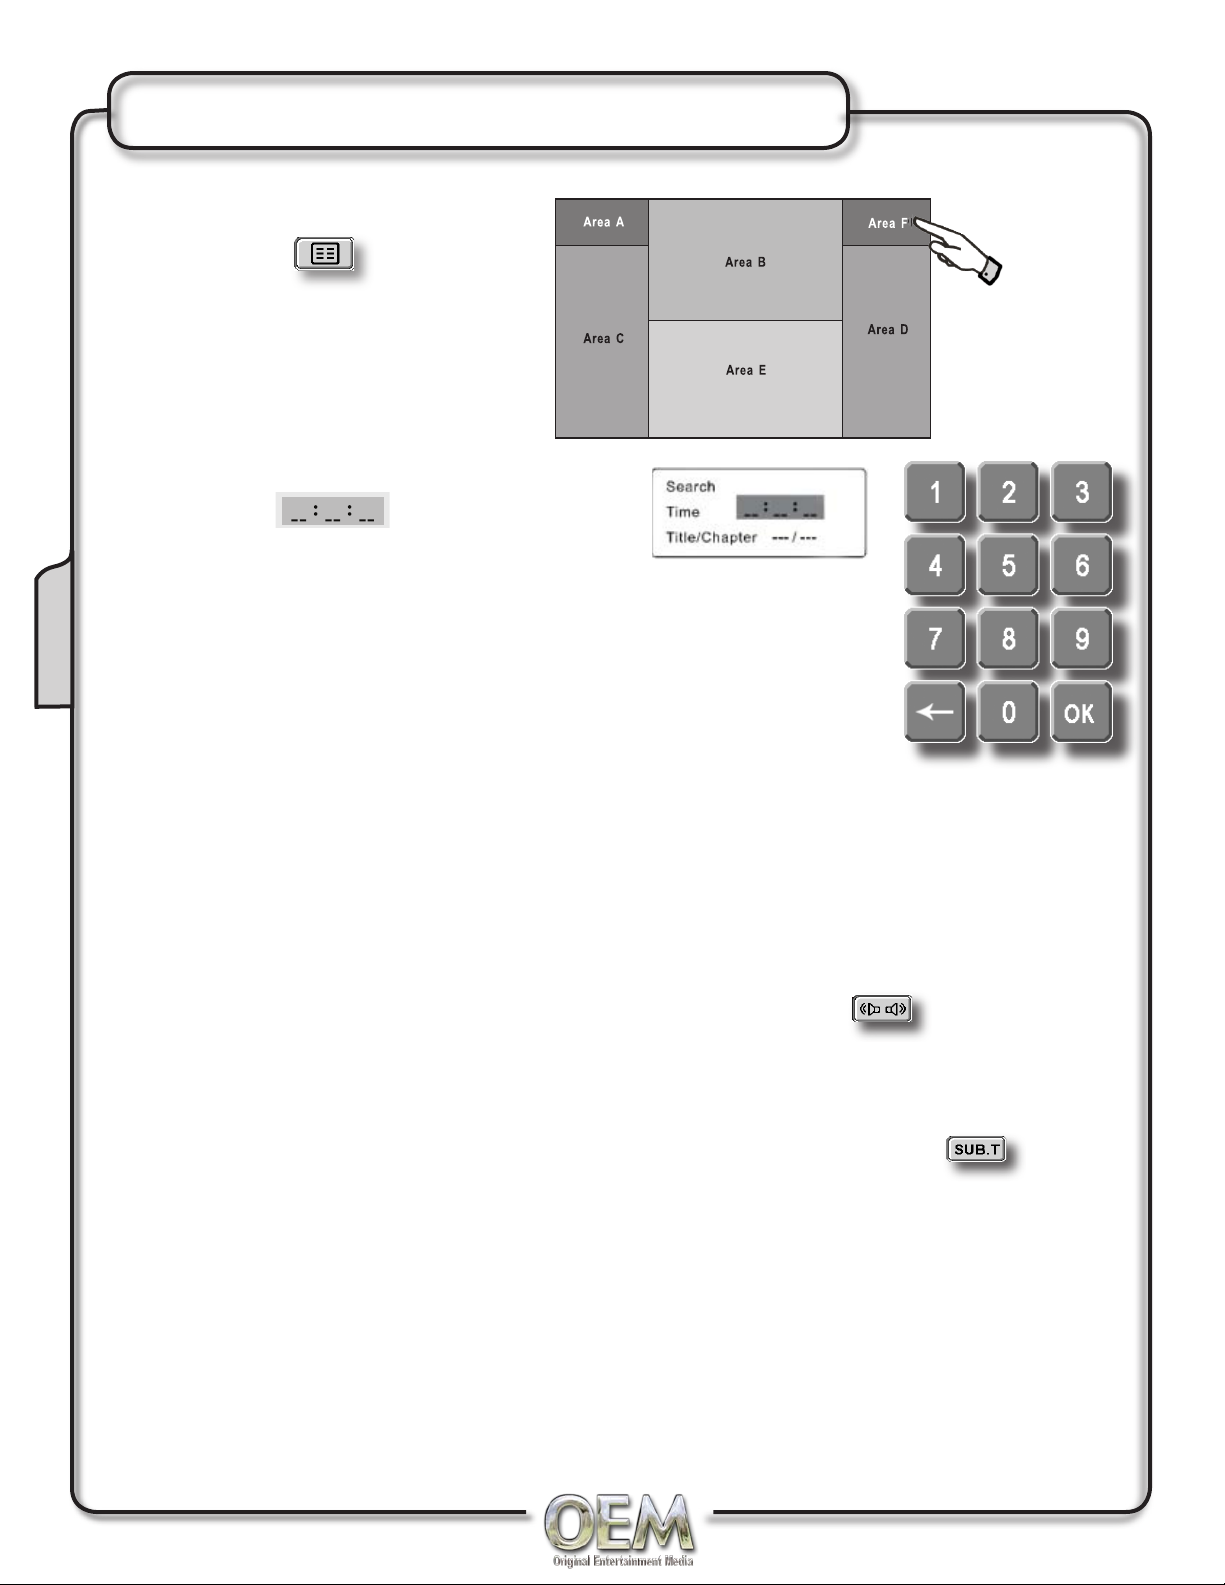
DVD Search Function
Searching a DVD
Touch the search button in AREA F.
Searching by Time, Title or Chapter
Touch the in the TIME area.
1)
A touch keypad will now appear, enter your
2)
desired TIME to search.
Enter OK.
3)
DVD
Direct Chapter / Track Selection
During DVD and CD playback, you can use the numeric keypad on the IR
remote to access tracks directly
Viewing an Alternate Picture Angle (DVD Only)
Some DVD's contain scenes that have been shot simultaneously from different angles. For discs
recorded with multiple angle, press the ANGLE button on the remote control to toggle between
available angles on the screen.
Multi-Language Disc
If you are watching a disc recorded in multiple languages, press the AUDIO button on the IR remote
to choose your desired language. You can also touch AREA E and use the button to change
languages.
Changing Subtitle Language
If you are watching a disc recorded in multiple languages with subtitles, press the SUB-T button on the
IR remote to choose your desired subtitle, You can also touch AREA E and use the button to
change languages.
DVD Playback Information
During playback, press the INFO button on the IR remote or touch AREA B to display the playback
information on screen. The following playback will be displayed at the top of the screen.
VCD Playback Information
The information displayed for the VCD playback is the same as the DVD Playback except the current
title number is not shown only the chapter number.
22
Page 23
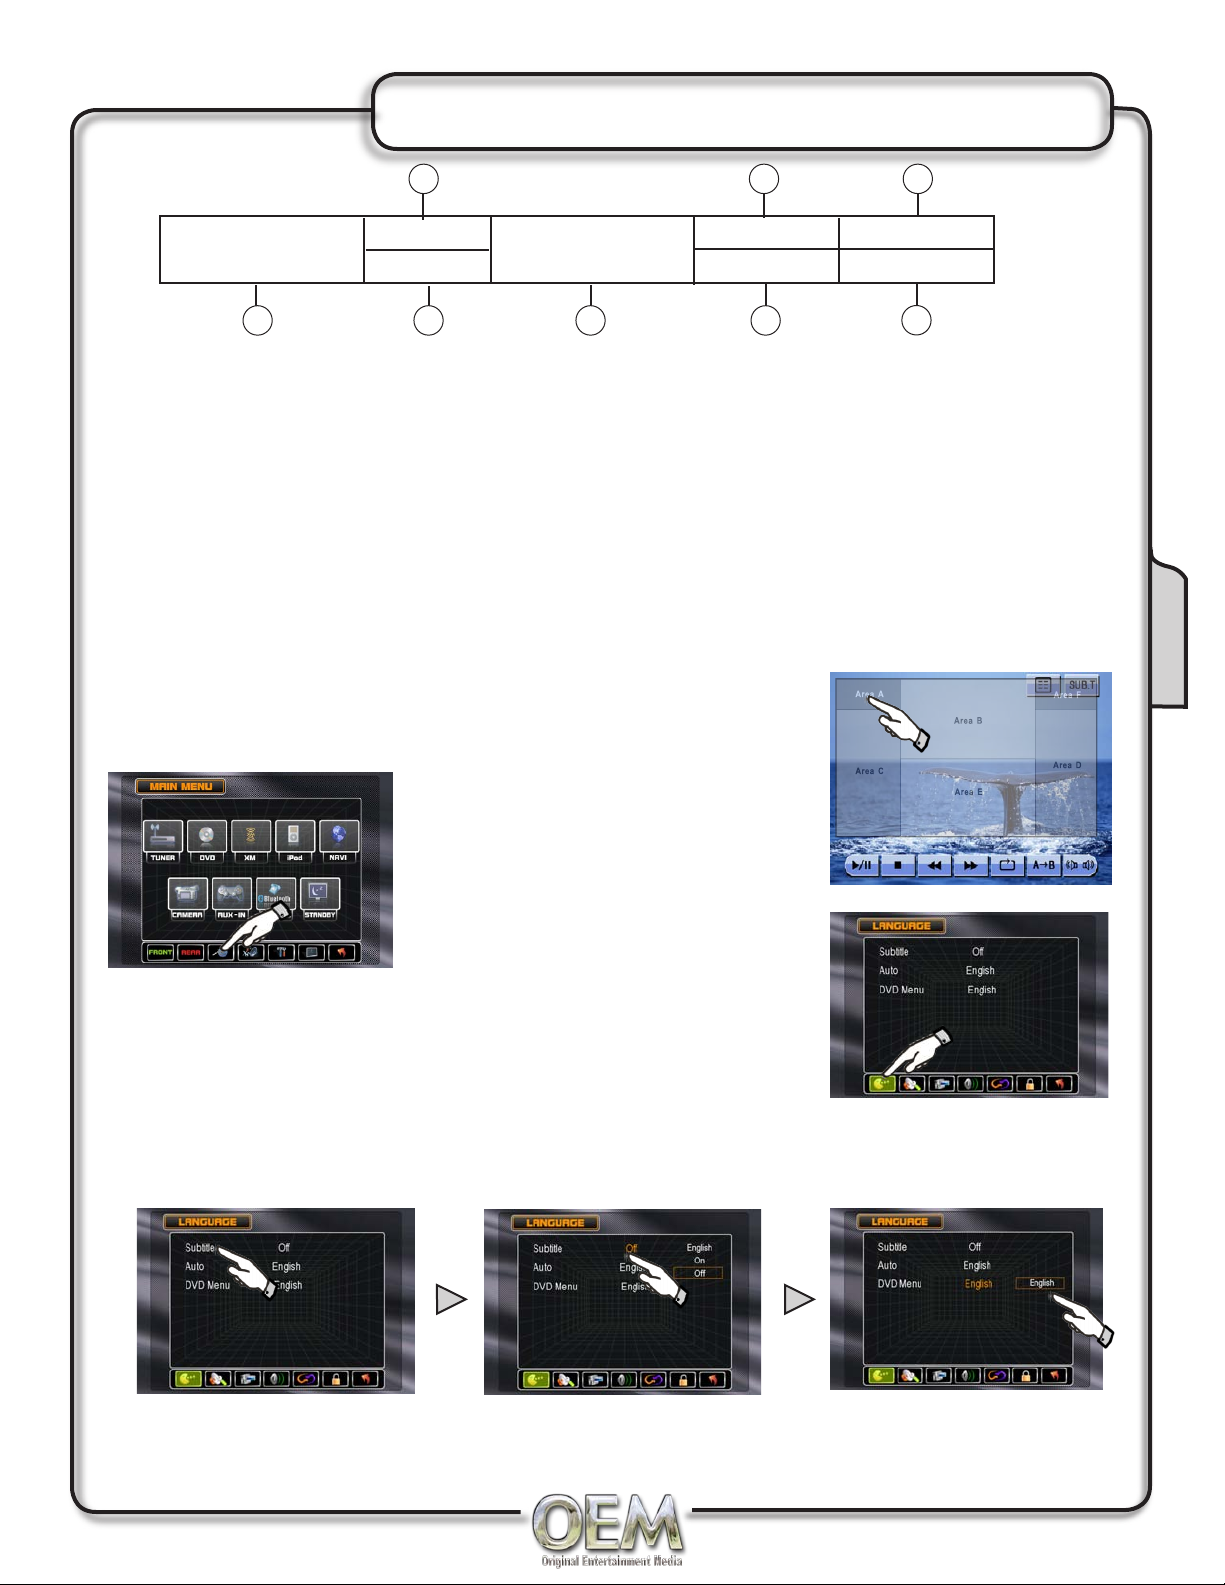
DVD Setup Menu - Language
5 72
DVD VIDEO
T: 4/16
C: 1/20
Indicates current source playing.
1)
Indicates that the fourth of sixteen title on
2)
the DVD is currently playing.
Indicates that the first of twenty chapters on
3)
the DVD is currently playing.
Indicates the playback time if the current
4)
title.
00:01:42
5)
6)
7)
8)
USER
LOUD ON
Indicates the USER defined EQ levels or
decoding mode when listening to a DVD
with 5.1 surround sound.
Indicates the SOUND setting is on.
Indicates the current system time.
Indicates the current playback source of the
rear zone.
Language Setup Menu
With the monitor open in DVD mode and a DISC inserted, press the
AREA A (top left screen) to display the MAIN menu bar.
08:06
Rear:OFF
641 3
8
DVD
Press DVD Setup to access the DVD
setup menu.
Press LANGUAGE icon to select LANGUAGE setup page.
Press to select desired disc sub-
title language.
ENGLISH
ON
OFF = DEFAULT
Press to select desired disc
audio language.
ENGLISH = DEFAULT
Press to select desired disc
menu language.
ENGLISH = DEFAULT
23
Page 24
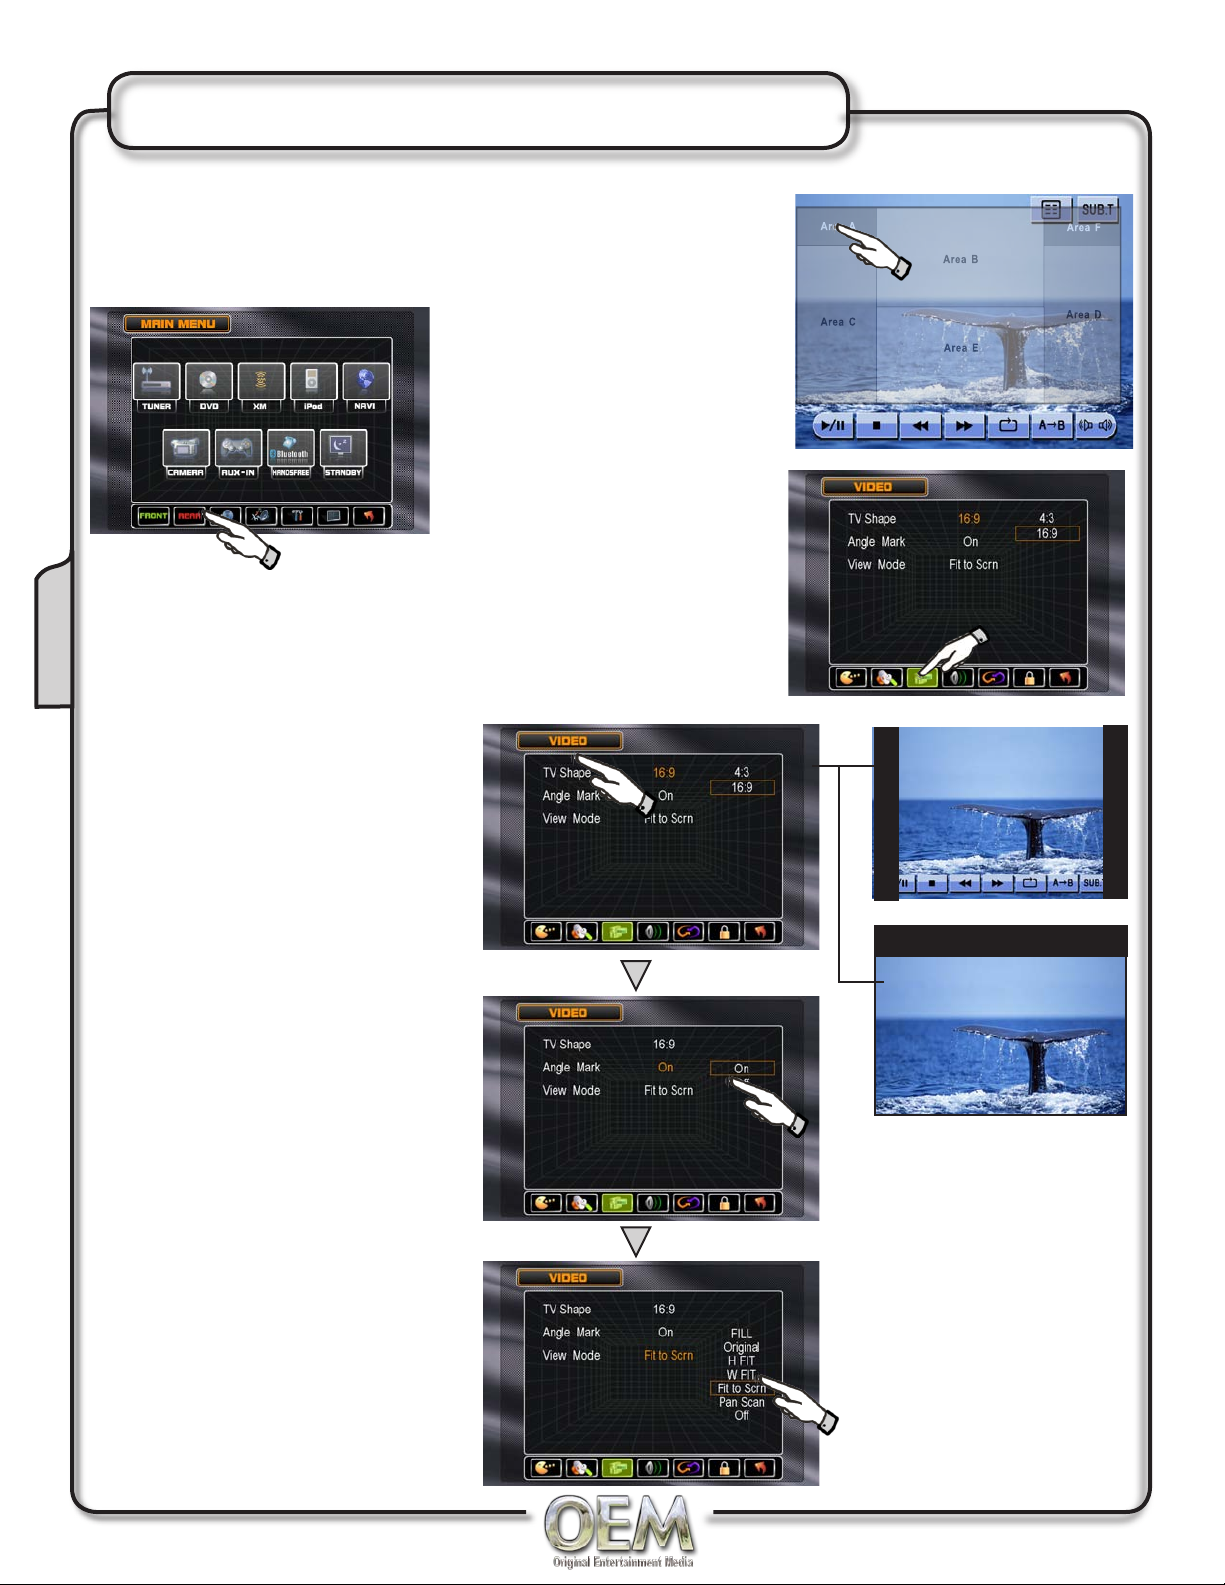
DVD Setup Menu - Video
Video Setup Menu
With the monitor open in DVD mode and DVD disc inserted, press
the AREA A (top left screen) to display the MAIN menu bar.
Press DVD Setup to access the
DVD setup menu.
Press VIDEO icon to select from the following menus:
DVD
TV Shape
Press to select desired TV Shape.
Angle Mark
Press to select desired Angle Mark.
Video Mode
Press to select desired Video mode.
NORMAL- 4:3
WIDE - 16:9
ON
OFF
FILL
ORIGINAL
H FIT
W FIT
FIT TO SCRN
PAN SCAN
OFF
24
Page 25
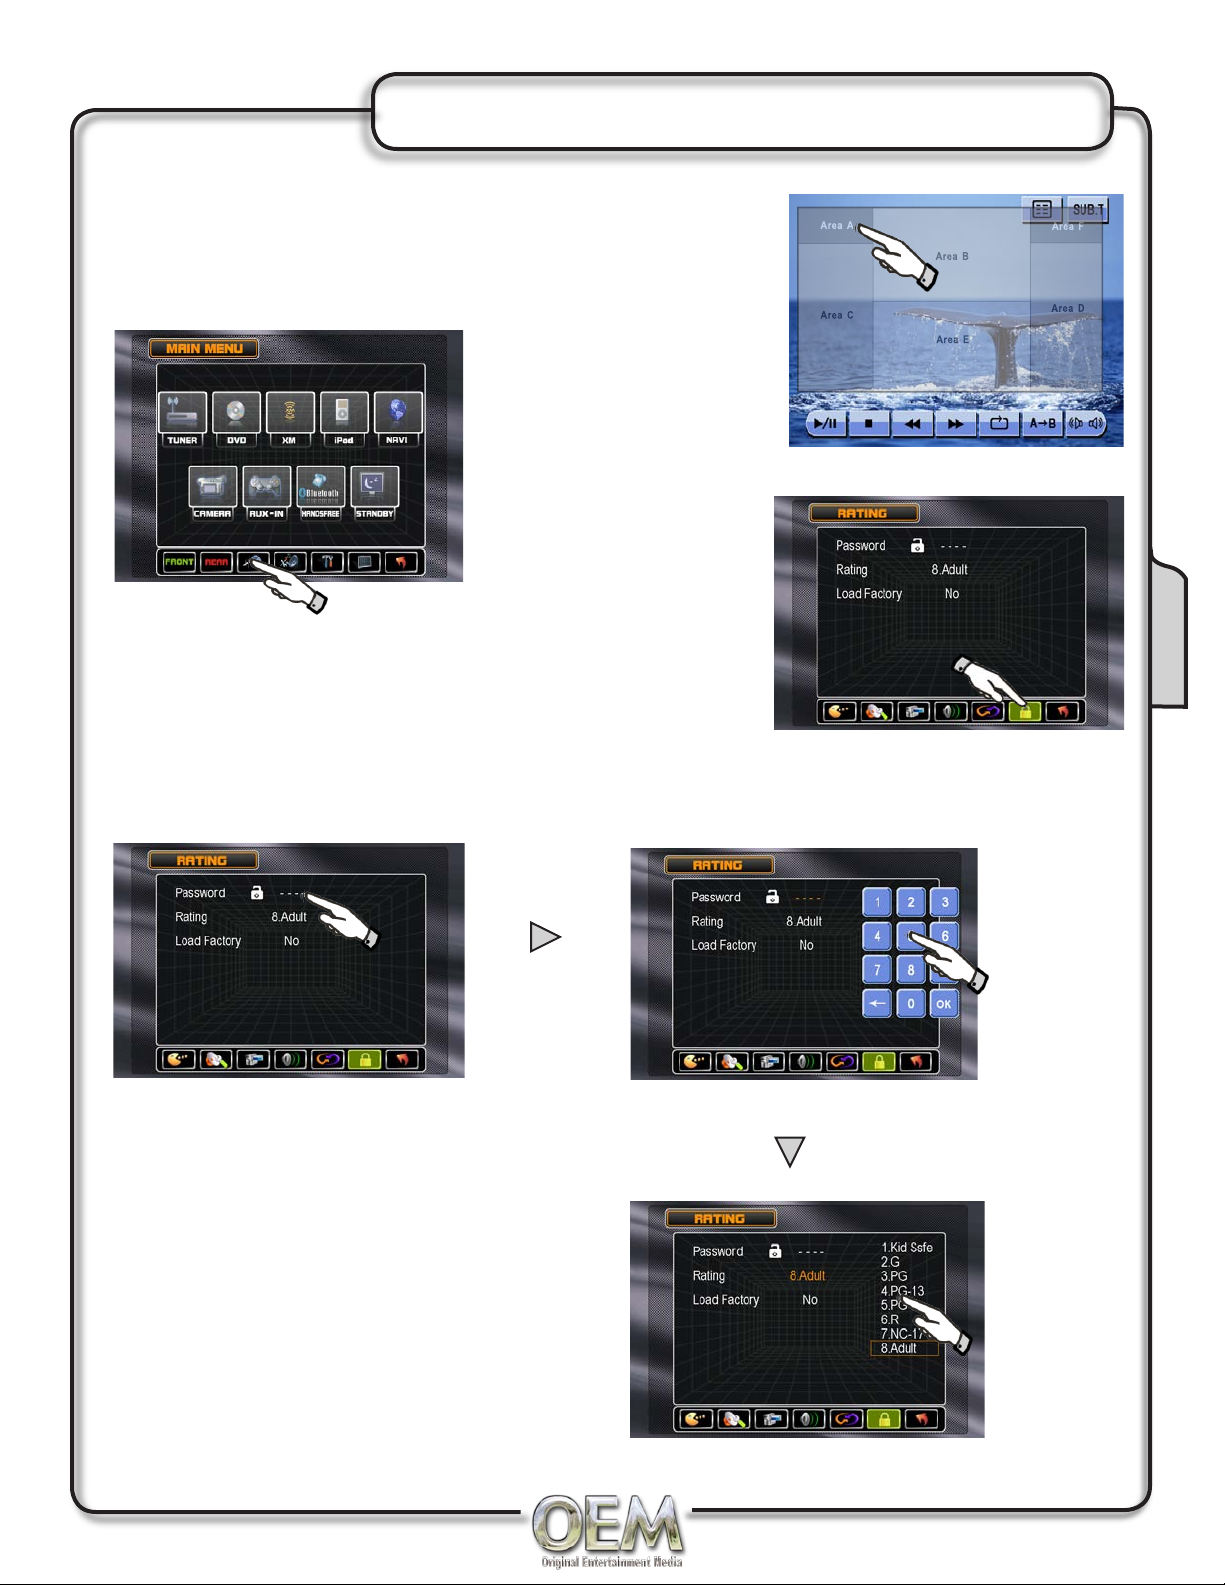
DVD Setup Menu - Ratings
Ratings Setup Menu
With the monitor open in DVD mode and a DVD Disc inserted,
press the AREA A (top left screen) to display the MAIN menu bar.
Press DVD Setup to access
the DVD setup menu.
Press RATING icon to select from the following menus:
DVD
Enable Parental Lock Password
Press ---- to enter a your desired password.
Setting Parental Lock Password
Enter a 4-digit code
1)
Write the code down
2)
Save in a safe place
3)
Rating Setting
Press to select desired Rating Setting.
Parental Password Override
In the event you forget or loose your PARENTAL
LOCK password, enter 9991
1. Kid Safe
2. G
3. PG
4. PG-13
5. PG-R
6. R
7. NC-17
8. Adult
25
Page 26
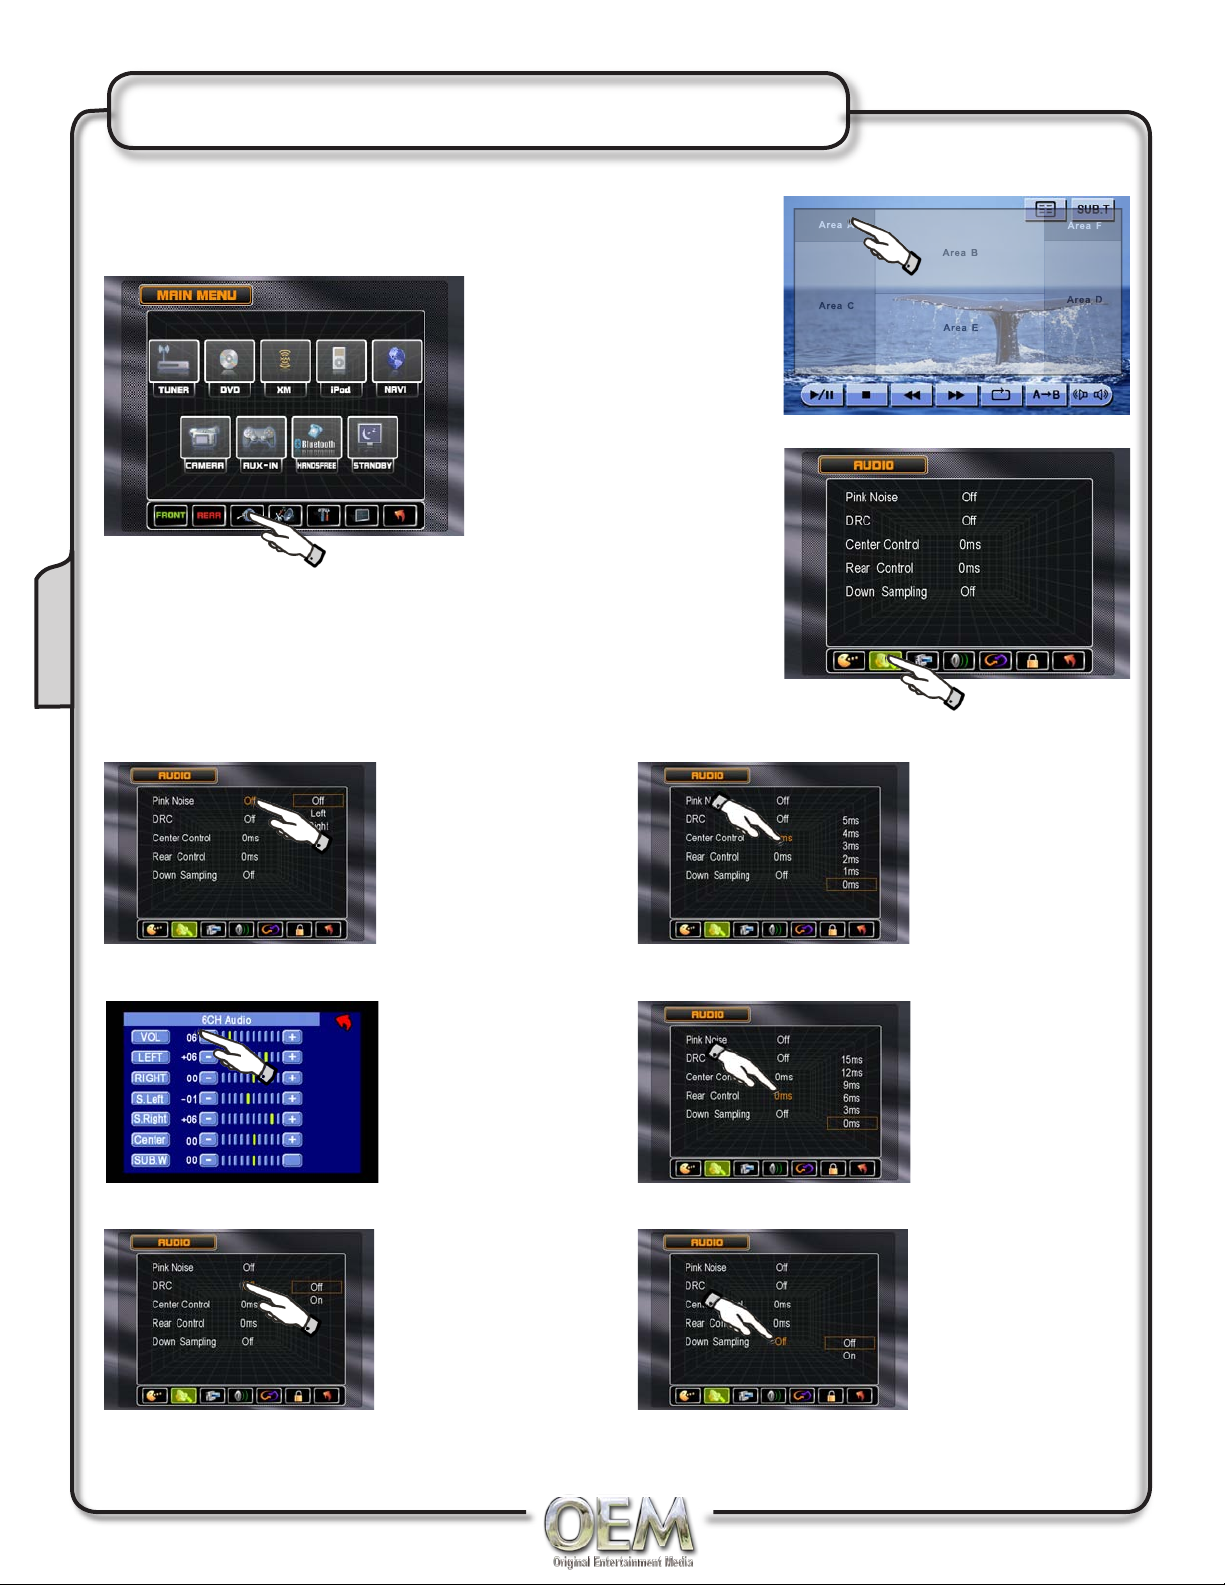
DVD Setup Menu - Audio
Audio Setup Menu
With the unit in DVD mode, press Area A to display the MAIN
menu.
Press DVD Setup to access
the DVD setup menu.
Press the AUDIO button to access the following menus:
Audio Settings
DVD
The Pink Noise generator is used to set the relative speaker
levels for multi-channel playback. Press to activate Pink Noise
generator for desired channel.
Downmix (2 channel) Settings
Center Channel Time Delay, in milliseconds
Full 6CH (6 channel) settings
Dynamic Range Control
Off = Default
On
Off = Default
Left
Right
Touch arrow
to exit
5ms
4ms
3ms
2ms
1ms
0ms = Default
Rear Channel Time Delay, in milliseconds
15ms
12ms
9ms
6ms
3ms
0ms = Default
Down Sampling*
Off = Default
On
26
* When Down Sampling is ON, the DVD audio output
will be downsampled to 48kHz. When OFF, the original
sampling frequency is preserved.
Page 27
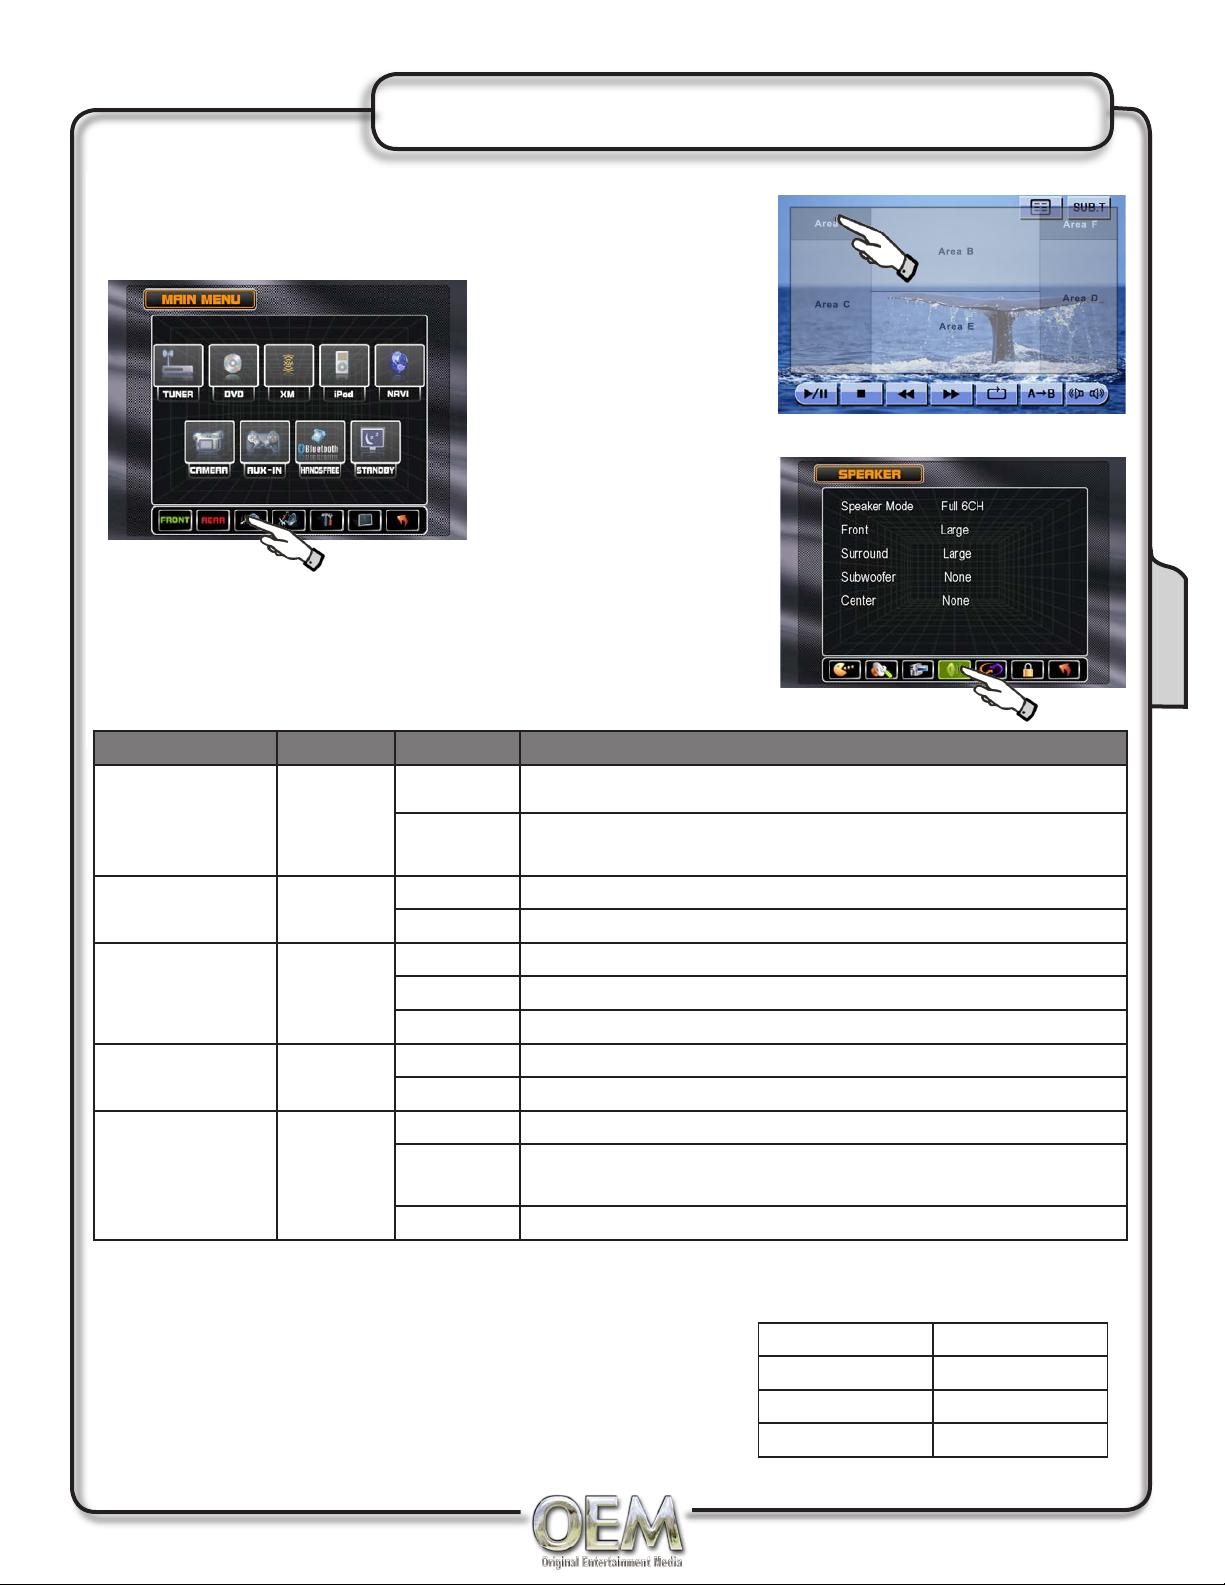
DVD Setup Menu - Speaker
Speaker Setup Menu
With the unit in DVD mode, press Area A to display the MAIN
menu.
Press DVD Setup to
access the DVD setup
menu.
Press the SPEAKER button to access the following menus:
DVD
Settings Default Options Function
Full 6CH 6-channel mode
Speaker Mode DownMix
Front* Large
Surround* Large
Subwoofer* None
Center* None
DownMix
Large Use when front speakers have good bass output.
Small Use when front speakers do not have good bass output
Large Use when rear speakers have good bass output
Small Use when rear speakers do not have good bass output
None Use when rear speakers are not present
Present Use when subwoofer is present
None Use when subwoofer is not present
Large Use when center speaker has good bass output
Small
None Use when a center speaker is not present
2-channel mode. The selections below will not be
available when using this mode.
Use when center speaker does not have good bass
output
*Full 6CH mode must be selected to adjust the speaker size
Speaker Selection
Selecting LARGE for the multi-channel speaker option will give
a full range output. Selecting SMALL for the multi-channel
speaker option will activate a high pass filter whose crossover is
dependent on the sub-woofer low pass frequency. For example,
if the subwoofer low pass filter is set to 80Hz, then the high
pass SMALL speaker crossover will be set to 90Hz.
Low Pass High Pass
80 Hz 90 Hz
120 Hz 135Hz
160Hz 180Hz
27
Page 28
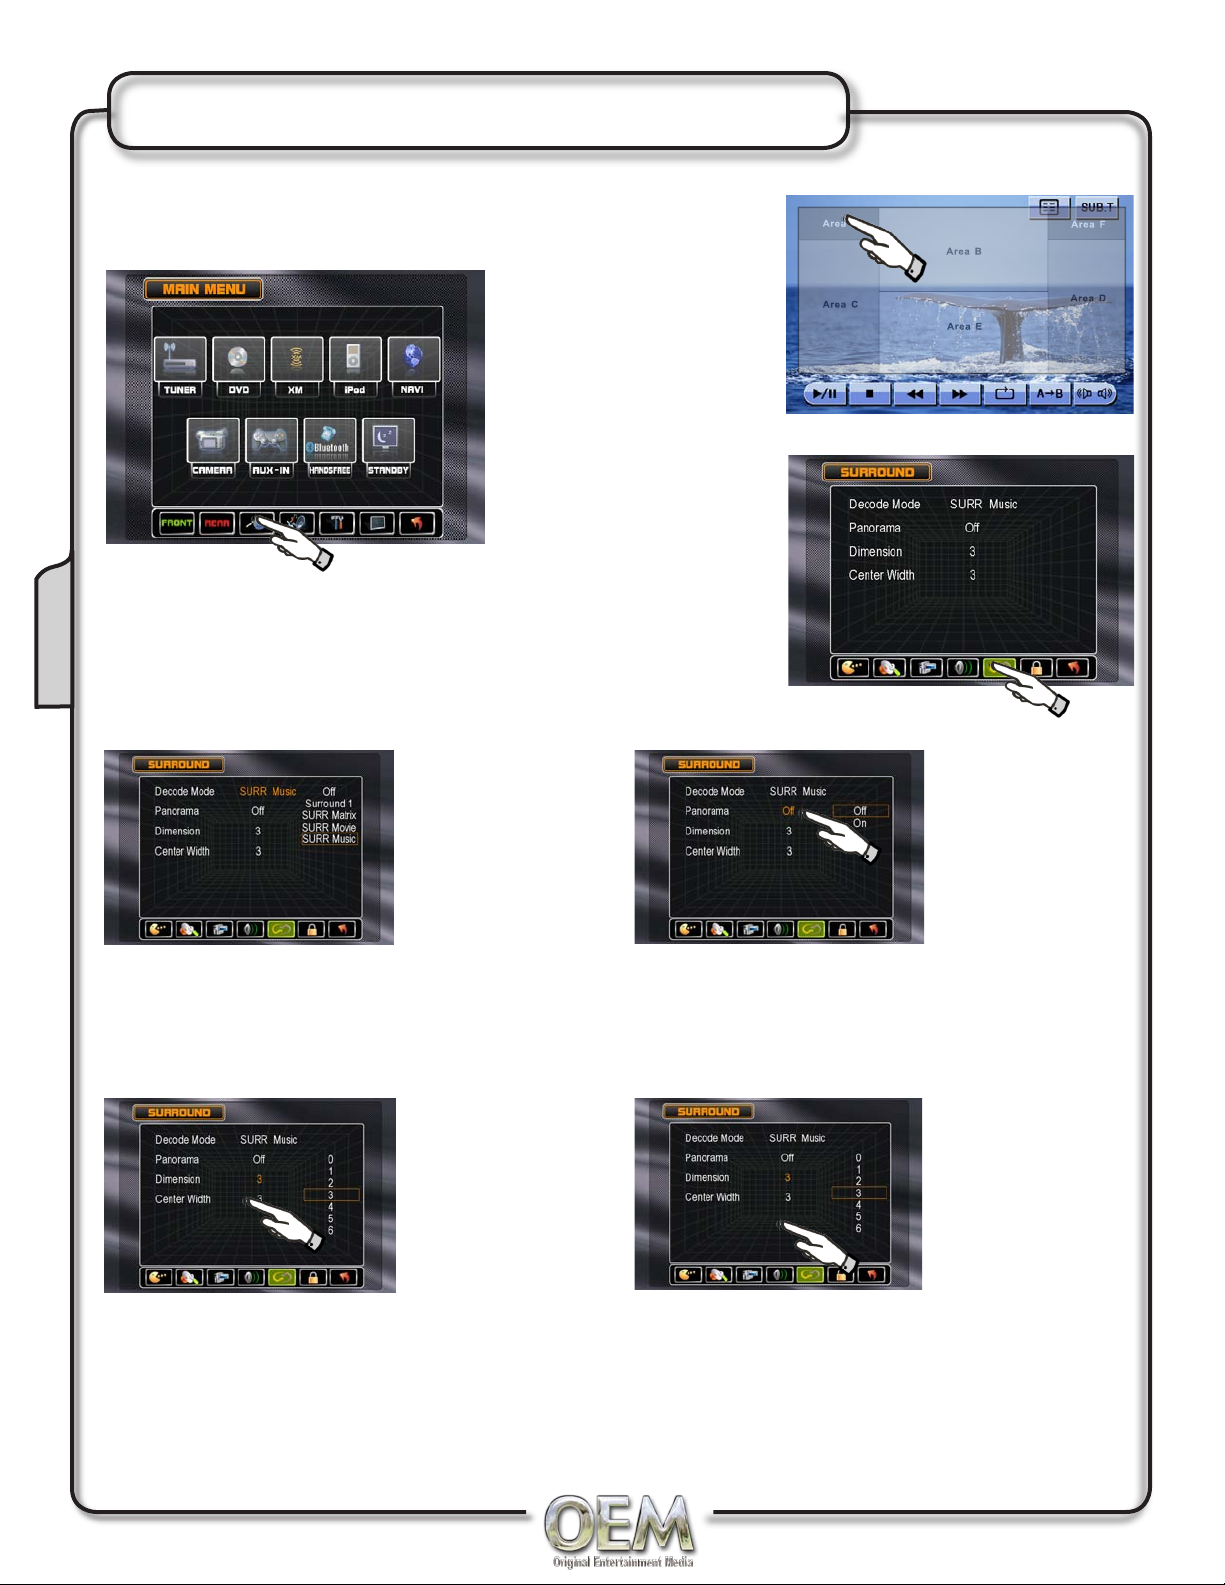
DVD Setup Menu - Surrround I
Speaker Setup Menu
With the unit in DVD mode, press Area A to display the MAIN
menu.
Press DVD Setup to access
the DVD setup menu.
Press the SPEAKER button to access the following menus:
DVD
Decode Mode
Dimension*
Off
Surround
Matrix
Movie
Music
0
1
2
3 = Default
4
5
6
Panorama Mode*
Off = Default
On
Panorama ON extends the front stereo image to
include the surround speakers for a wrap around
effect.
Center Channel Width*
Changing the dimension control allows you to
adjust the sound stage either towards the front or
towards the rear.
*Surround Music decode mode must be selected to activate Panorama Mode or to adjust the Dimension or Center width.
28
Center width control allows adjustment of the
center image to be heard from the center speaker
only, from the Left/Right speakers only as a
"phantom" center image or various combinations
off all three speakers.
Page 29
CD/DVD/MP3/WMA Information
Media Compatibility
The following types of discs/files are compatible:
CD-ROM (ISO), CD-R, CD-RW, DVD+R/RW,
•
DVD-R/RW, DVD-R/DL
CD-DA, DVD Video
•
MP3 data
•
WMA data
•
The following types of discs/files are not compatible:
WMA files that are protected by DRM
•
(Digital Rights Management)
WMA lossless format
•
Discs recorded with Track At Once or packet
•
writing
MP3 PRO format
•
MP3 playlists
•
WAV format
•
WMV format
•
JPG format
•
DivX format
•
AVI format
•
MPG format
•
Valid characters for folder/file names are letters
•
A-Z (all caps), numbers 0-9, and “_” (underscore).
Some characters may not be displayed correctly,
depending on the character type.
This device can play back discs in Joliet and other
•
standards that conform to ISO9660. MP3/WMA
written in the formats other than the above may not
play and/or their file names or folder names may
not be displayed properly.
Additional MP3/WMA Information
An internal buffer provides ESP (Electronic Skip
Protection) to virtually eliminate skipping.
When playing a disc recorded with regular audio files
(CD-DA or .WAV) and MP3/WMA files, the unit will play
the MP3/WMA files only.
Only MP3 files with filename extension (.mp3) can be
played.
Only WMA files with filename extension (.wma) can be
played.
DVD
Some recordable DVDs and CDs may be incompatible
with this unit, depending on media type and recording
method.
Playback Order
MP3/WMA playback sequence is based on recorded
order of files and begins in the root folder of the disc.
Any empty folders or folders that do not include MP3/
WMA files are skipped. This unit may not play files in
the order they were recorded in. Refer to your recording
software’s user’s manual for more information.
Compatible Recording Formats
ISO9660 level 1
•
ISO9660 level 2
•
Yellow Book MODE 1
•
Yellow Book MODE 2 FORM 1
•
Multi session
•
Maximum files - 1500
•
Maximum folder levels - 8
•
MPEG-1/2 Audio Layer-3
•
•
ISO9660 standards:
Maximum nested folder depth is 8 (including the
•
root folder).
Do not attempt to play discs which contain
NON-MP3/WMA files with the MP3/WMA extension.
Some files may not play or be displayed correctly,
depending on sampling rates and bit rates.
Sampling Frequency Rates
MP3 WMA
32kHz ~ 48kHz 32kHz ~ 48kHz
Transfer Bit Rates
MP3 WMA
40kbps~320kbps constant 40kbps~192kbps constant
Variable bit rates Variable bit rates
Recommended Settings for Burning
Discs
MP3
128kbps or higher constant bit rate
44.1kHz or higher sampling frequency
WMA
64kbps or higher constant bit rate
44kHz or higher sampling frequency
29
Page 30
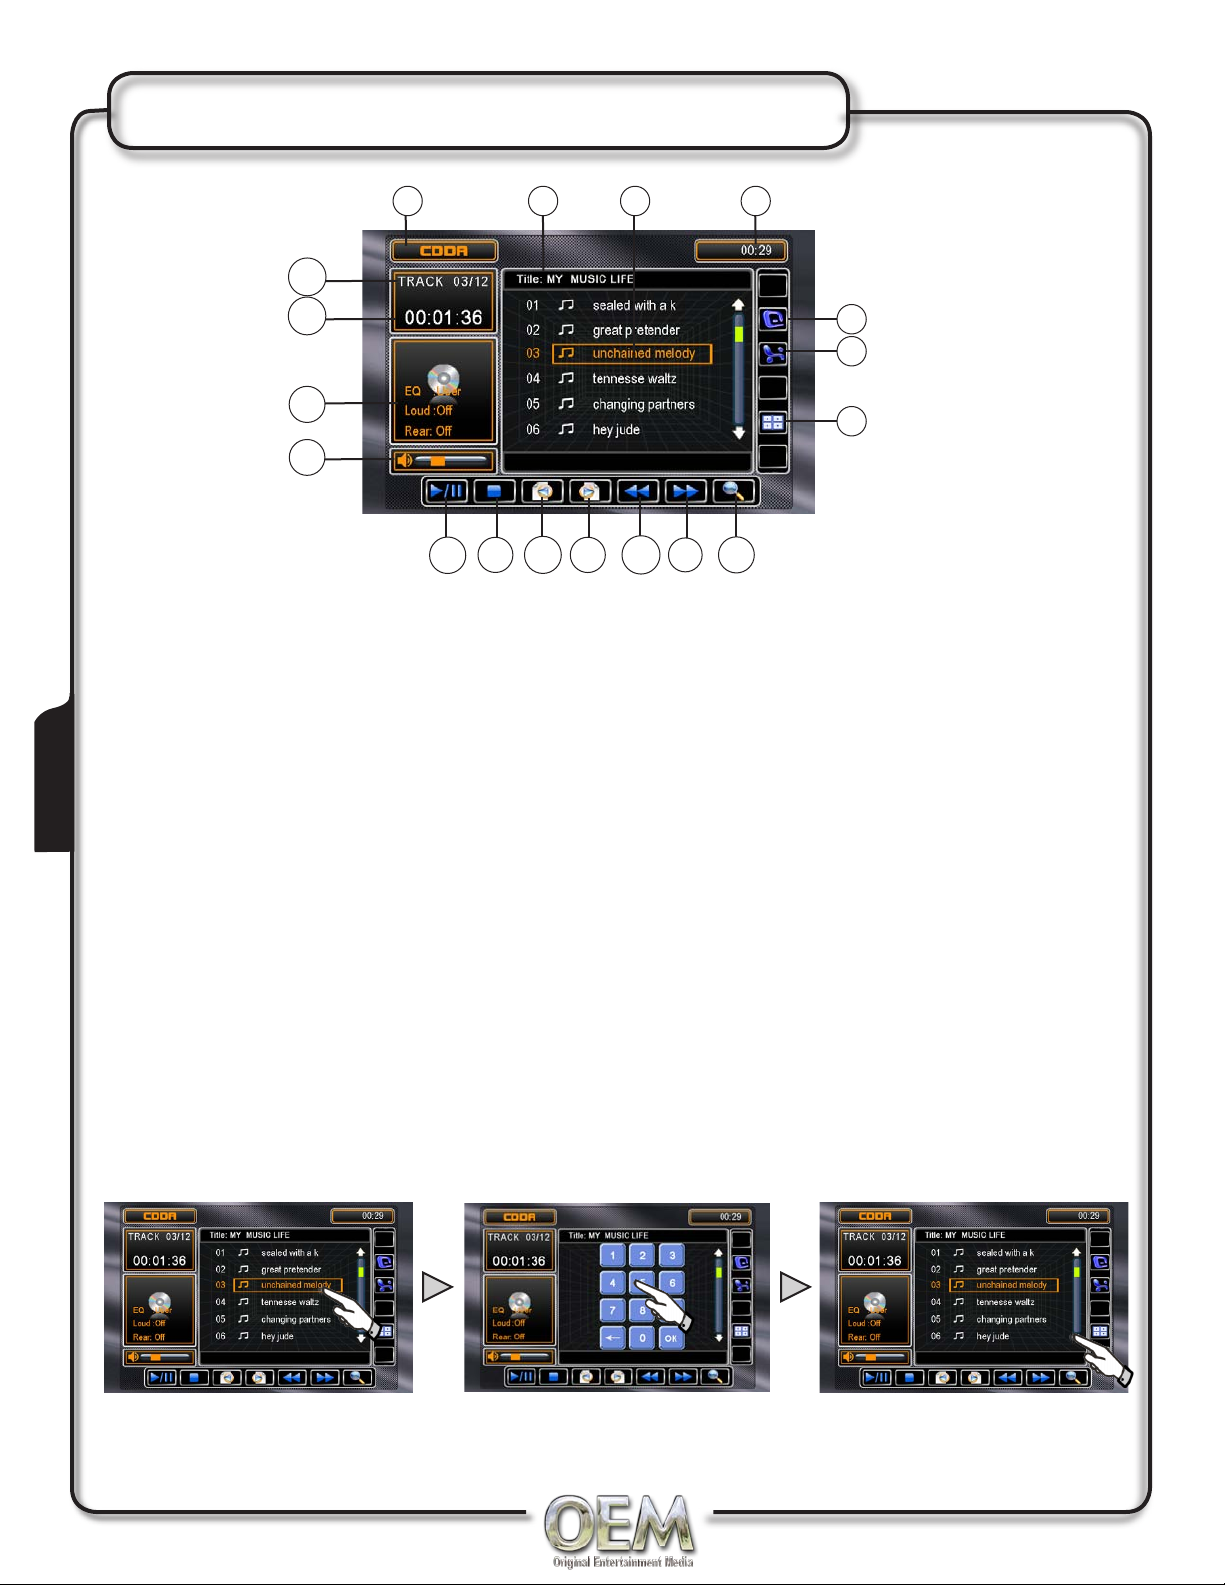
CD Operation
CD
1 2
18
17
16
15
14
13
Current source indicator, touch AREA A to
1)
access MAIN source menu
Disc title.
2)
Track title.
3)
Current TIME.
4)
Touch to activate / deactivate REPEAT:
5)
Single mode.
12
11
10
43
5
6
7
8
9
Touch to FAST FORWARD current track.
9)
Touch to FAST REVERSE current track.
10)
Touch to PAGE up.
11)
Touch to PAGE down.
12)
Touch to STOP disc playback.
13)
Touch to PLAY / PAUSE disc playback.
14)
Touch to activate / deactivate RANDOM
6)
mode.
Touch to access the DIRECT TRACK
7)
access keypad
Touch to SCAN CD tracks for 5 sec each
8)
track, touch again to deactivate.
Volume indicator.
15)
Playback information.
16)
Elapsed playback time.
17)
Current track and total number of tracks on
18)
the disc.
Ratings Setup Menu
After inserting a CD disc, files will play in numerical order in the directory.
Touch to playback track Touch for DIRECT TRACK access Touch to view UP / DOWN
pages of available TRACKS
30
Page 31
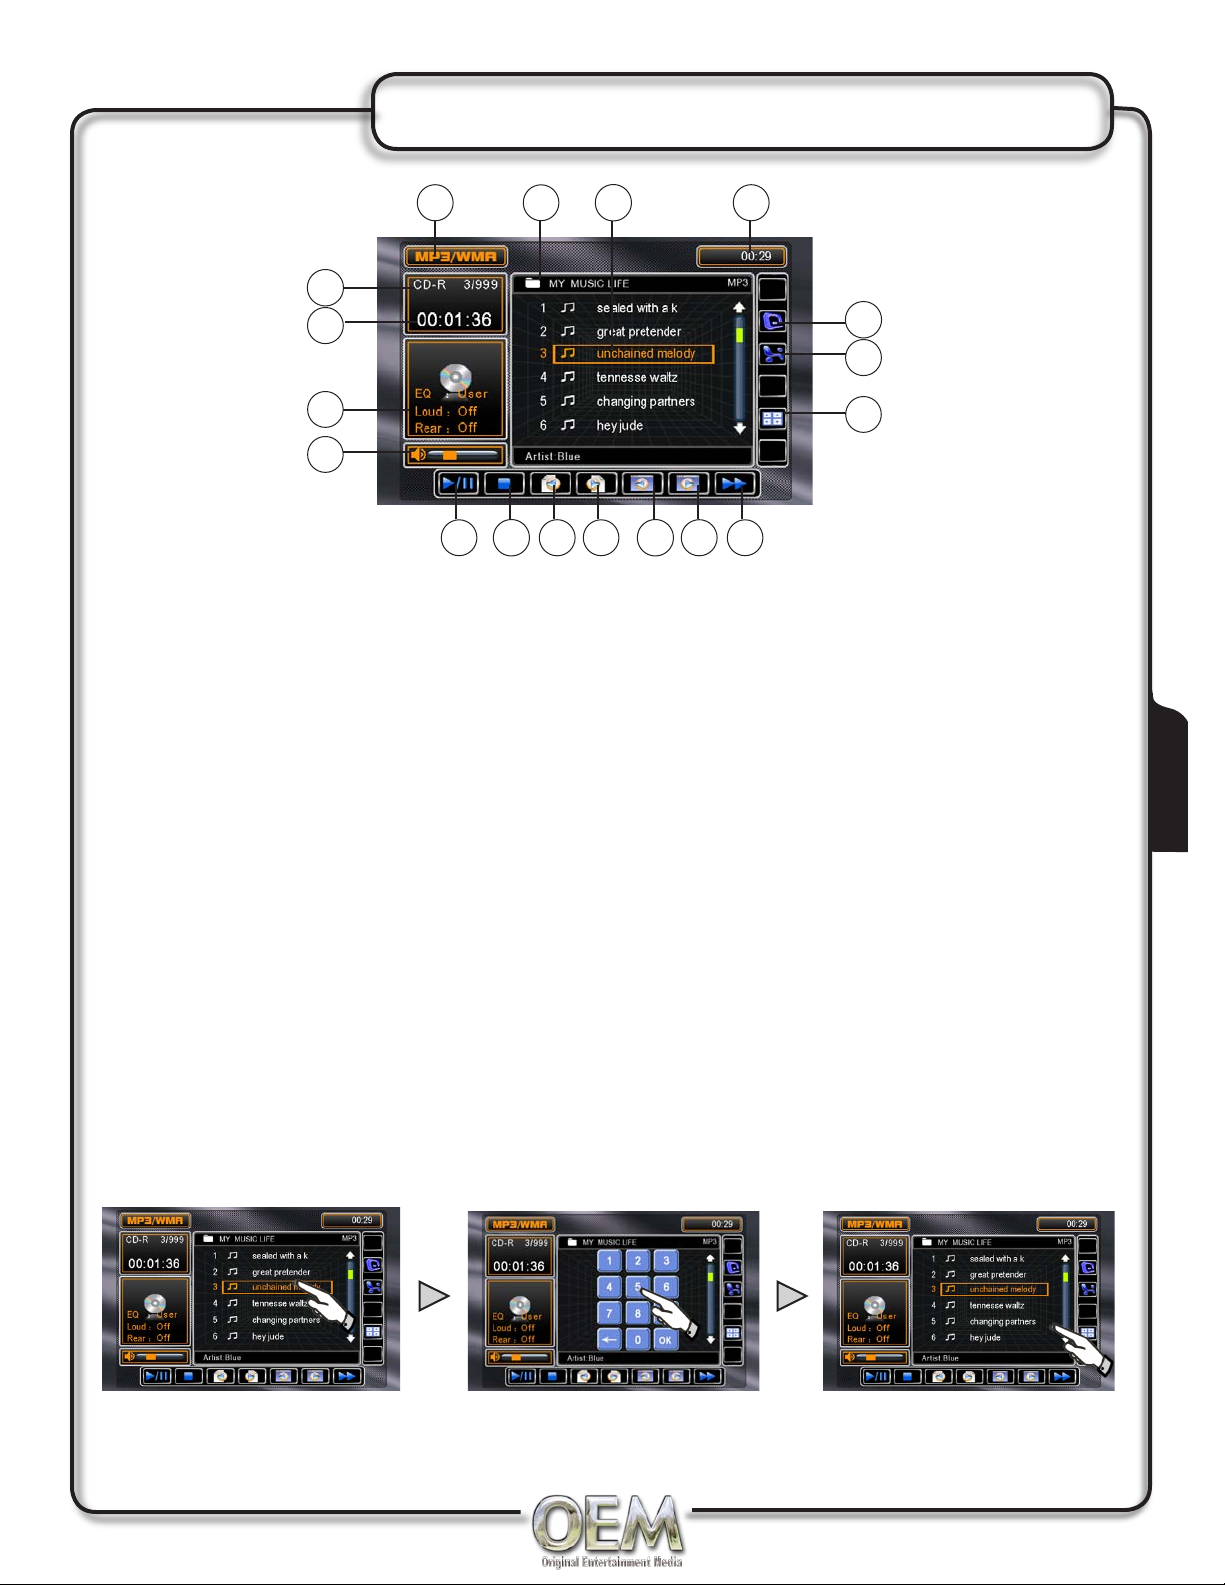
MP3/WMA Operation
1
15
16
17
18
5
Current source indicator, touch AREA A to
1)
access MAIN source menu
Disc title.
2)
Track title.
3)
Current TIME.
4)
2
6
3
7
9
8
Touch to FAST FORWARD MP3 tracks,
11)
touch PLAY to deactivate.
Touch to activate / deactivate REPEAT:
12)
Single mode.
Touch to activate / deactivate RANDOM
13)
mode.
10
4
12
13
14
11
MP3
Touch to PLAY / PAUSE disc playback.
5)
Touch to STOP disc playback.
6)
Touch to PAGE down.
7)
Touch to PAGE up.
8)
Touch to PREVIOUS FOLDER.
9)
Touch to NEXT FOLDER.
10)
Touch to access the DIRECT TRACK
14)
access keypad.
Current track and total number of tracks on
15)
the disc.
Elapsed playback time.
16)
Playback information.
17)
Volume indicator.
18)
Playing MP3/WMA Files
After inserting a CD disc, files will play in numerical order in the directory.
Touch to playback single track Touch to for DIRECT TRACK access Touch to view UP / DOWN
pages of available TRACKS
31
Page 32
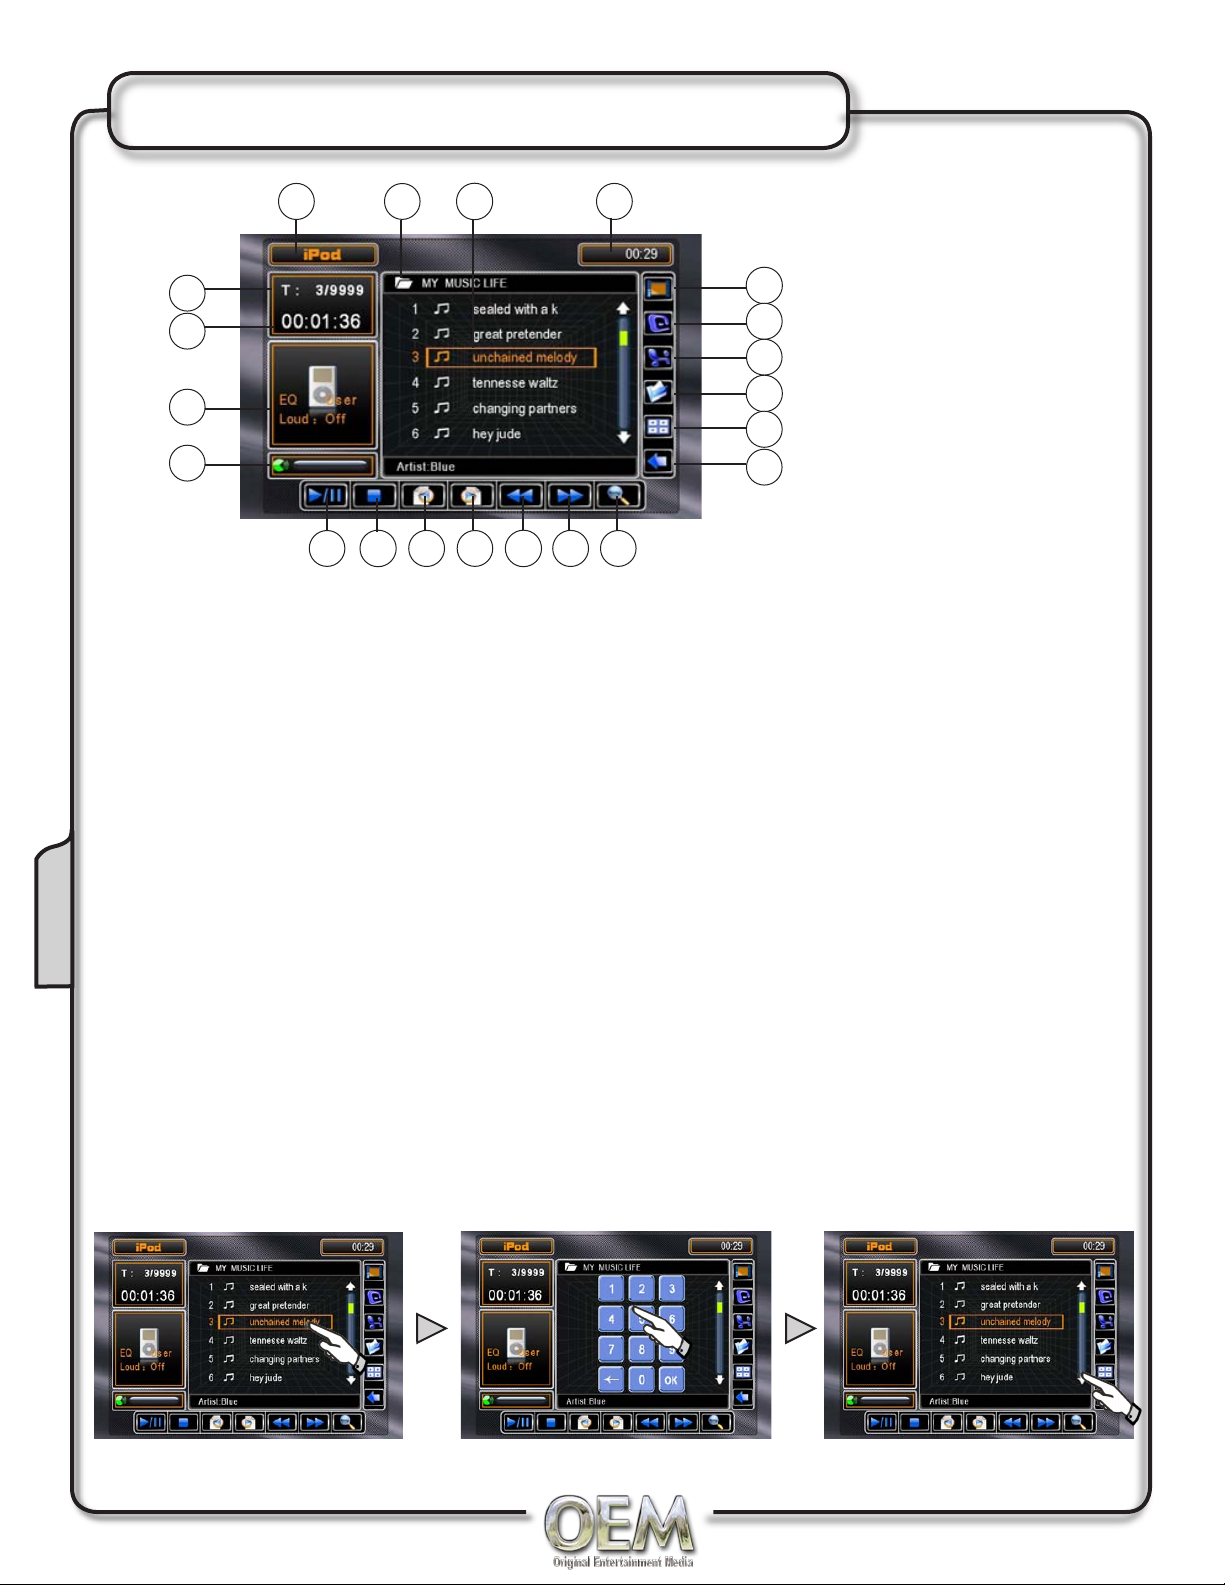
iPod Operation
1
18
19
20
21
5
Current source indicator, touch AREA A to
1)
access MAIN source menu
Disc title.
2)
Track title.
3)
Current TIME.
4)
Touch to PLAY / PAUSE disc playback.
5)
Touch to STOP disc playback.
6)
2
6
3
7
8
4
12
13
14
15
16
17
9
10
11
Touch to wait for iPod VIDEO or PHOTO.
12)
Touch to activate / deactivate REPEAT:
13)
Single mode.
Touch to activate / deactivate RANDOM
14)
mode.
Touch to access root directory.
15)
Touch to access DIRECT SONG access
16)
keypad.
To switch to iPod press the
MODE button on the front
panel or IR remote or from the
MAIN source menu
Touch to PAGE down.
iPod
7)
Touch to PAGE up.
8)
Touch to FAST REVERSE current song.
9)
Touch to FAST FORWARD current song.
10)
Touch to SCAN SONGS for 5sec each
11)
SONG, touch again to deactivate.
Touch to display song list.
17)
Current song and total number of songs on
18)
the disc.
Elapsed playback time.
19)
Playback information.
20)
Volume indicator.
21)
Playing iPod Files
After connecting an iPod, files will play in numerical order in the directory.
Touch to playback single SONG Touch for DIRECT SONG access Touch to view UP / DOW
N pages of available
32
Page 33
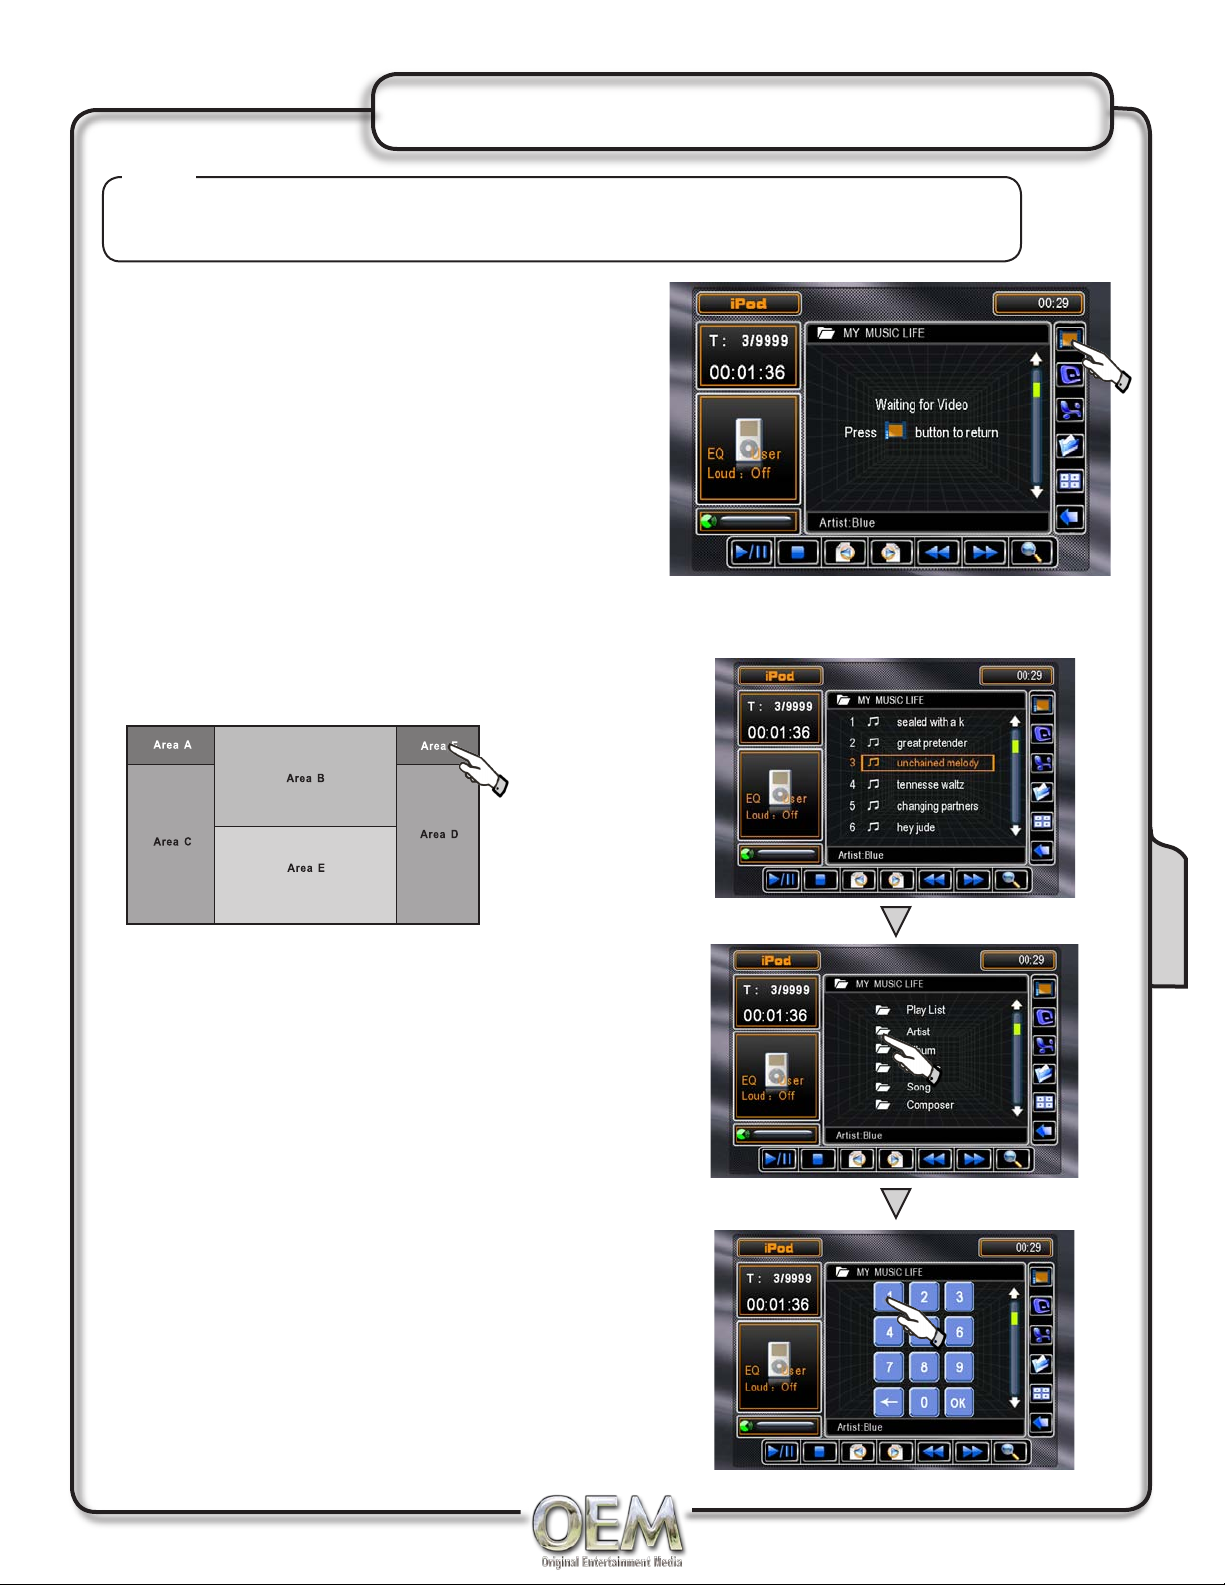
Notes:
1. PHOTO FILES are only compatible with NANO and G5 iPod
2. VIDEO FILES are only compatible with G5 iPod
Playing Photo or Video File From iPod
Make sure the following options through the iPod
1)
video settings menu are set to: TV Out = ON,
Signal = NTSC and Widescreen = ON.*
Touch VIDEO icon
2)
Press PLAY on your iPod, video should now
3)
appear on the Monitor
*Consult your iPod owners manual for details.
iPod Operation
Releasing Video Content from iPod
Touch AREA F (upper right screen) to reconnect
iPod to play music again.
Selecting Music By:
Playlist
•
Artist
•
Album
•
Genre
•
Song
•
Touch desired Folder, music will begin to play after
selection.
iPod Will Now Reconnect
iPod
Direct Song Access
Touch the Keypad icon, keypad will appear.
1)
Enter the desired song you wish to play.
2)
Enter OK.
3)
33
Page 34
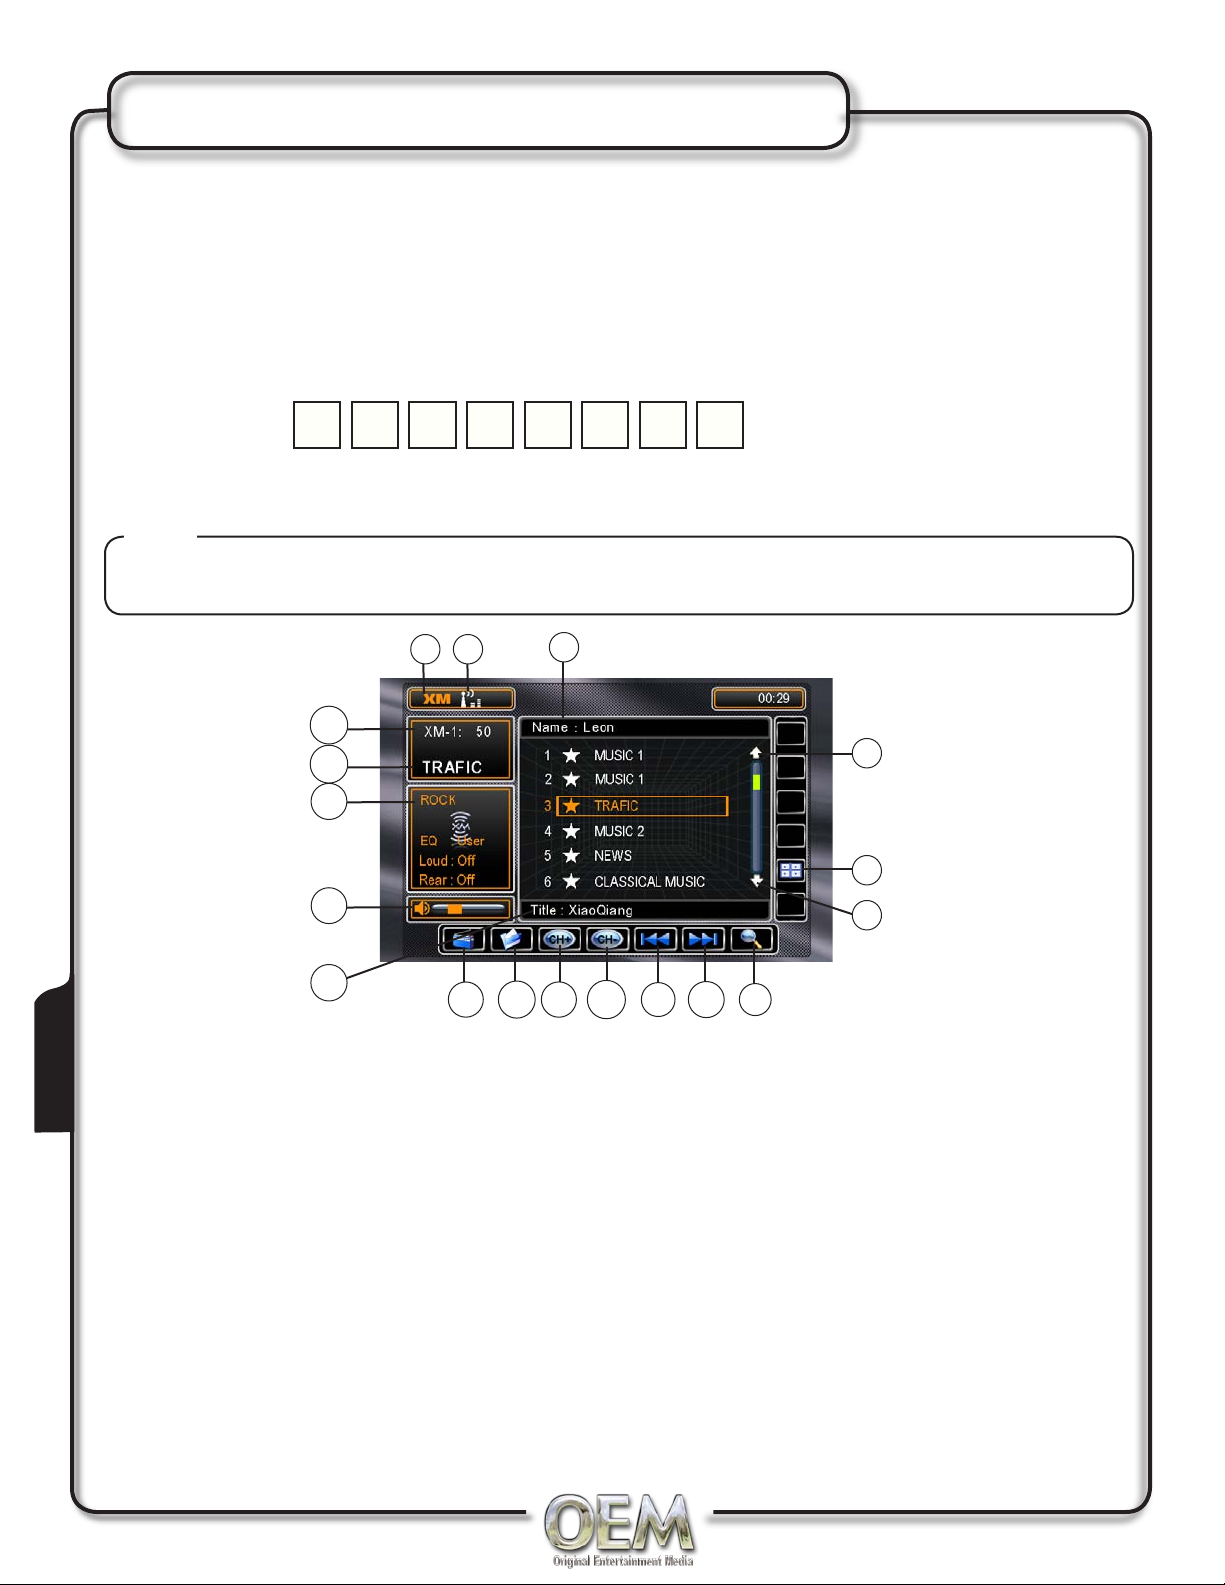
XM Radio Operation
Activating Your XM Receiver (when connected):
Touch top left corner of screen.
1)
Touch to access XM MODE, XM Receiver must be connected to activate
2)
Verify channel 1 (XM Preview Channel) is playing.
3)
Select Channel 0. The XM receiver’s eight character Radio ID number will appear on the
4)
CH-4100 display. The Radio ID number is also located on the XM receiver unit (sold separately).
Record the number here for future reference:
5)
6) Activate your XM Satellite Radio service, log onto http://www.xmradio.com/activation or call
1-800-967-2346.
Notes:
You will need to keep your TY-6100 turned on for at least one hour after requesting activation to
receive the full channel line-up.
XM Radio
1
18
17
16
15
14
indicator for XM MODE
1)
Antenna signal strength meter for XM
2)
Song Name
3)
Page up button for PRESET
4)
13
12
11
3
4
5
6
8
10
9
10)
11)
12)
13)
7
Increment Channel up
Increment Channel down
Selection for CATEGORY
Band selection for XM
2
34
Entry keypad for DIRECT Channel
5)
Page down button for PRESET
6)
XM Station SCAN
7)
Channel up for CATEGORY
8)
Channel down for CATEGORY
9)
Song Title
14)
Volume Indicator
15)
Name for CATEGORY
16)
Station Name
17)
Band indicator for XM
18)
Page 35
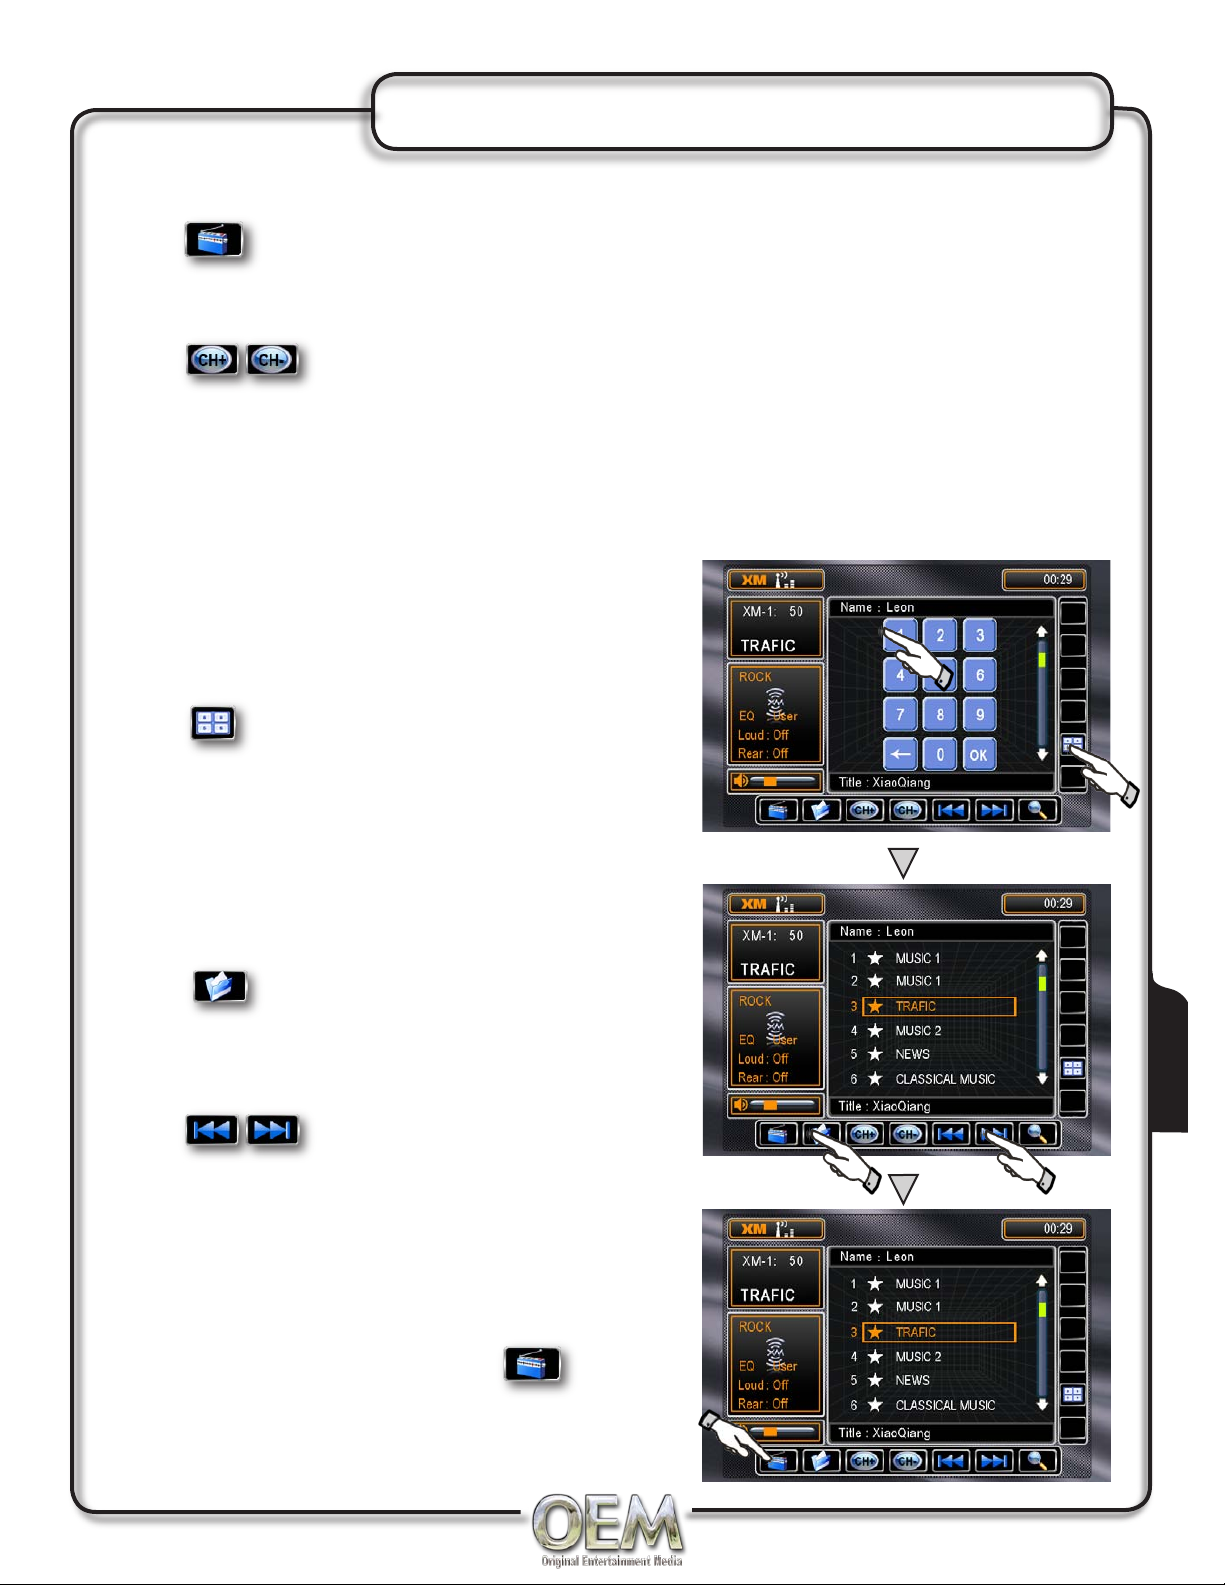
XM Radio Operation
Tuning Modes
Touch to select between XM, XM1, XM2 and XM3 bands.
Channel Slection
Touch momentarily to select the next available channel.
Storing and Recalling Preset Channels
Up to 48 XM channels can be stored. To store a channel, select XM, XM1, XM2 or XM3 band and the
desired channel. Press and hold the desired preset button (1-12) for more than 2 seconds. When
stored, the preset number will now be highlighted by a box and the station will appear in the display.
The channel can be recalled anytime by pressing the
corresponding preset button.
Direct Channel Selection
Touch to select XM DIRECT channel entry. Enter
the desired channel using buttons 1-0, then press OK
to confirm the selected channel. If the channel is not
available, the current channel will be retained.
Channel Search by Category
Touch once to display the category list. Touch
your desired CATEGORY.
Channel Search by Category
Touch momentarily to select the next
available channel within a CATEGORY you have entered
into.
XM Radio
Exit Category Mode
To exit CATEGORY mode, touch the button to
resume normal XM CHANNEL selections.
35
Page 36
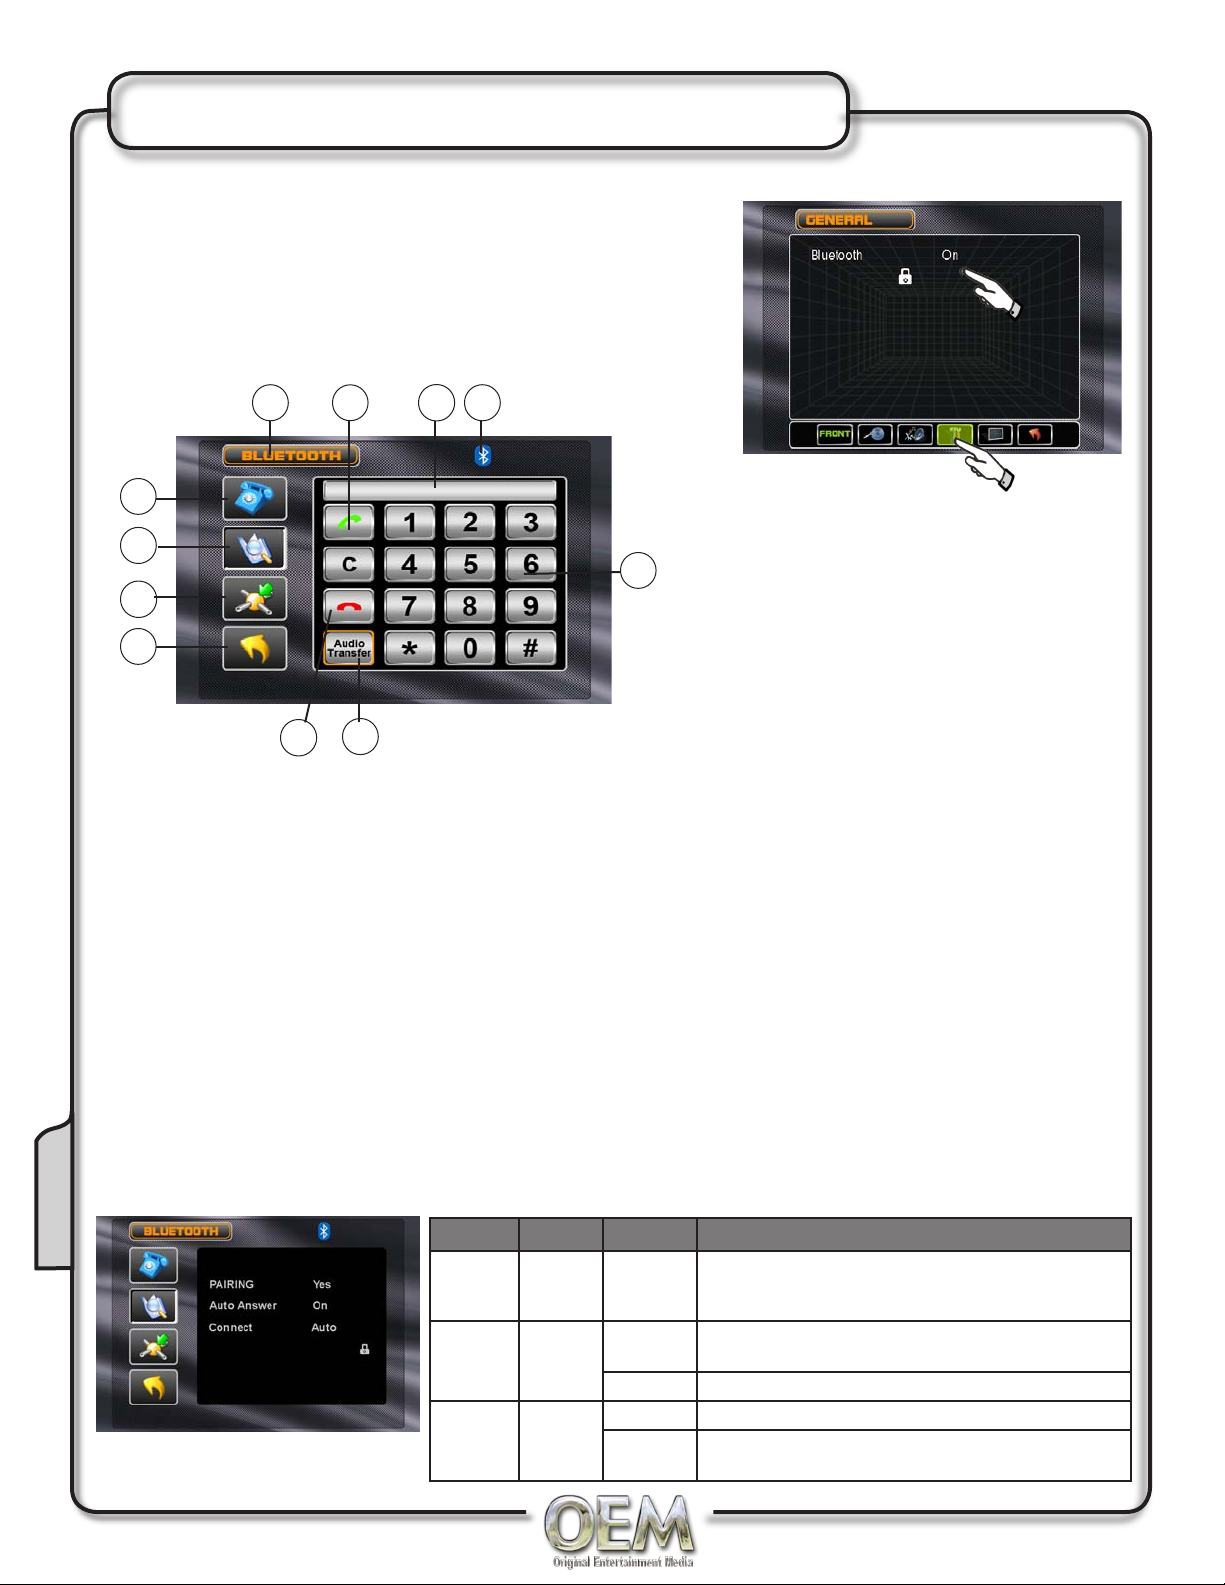
Bluetooth Operation
Activating Bluetooth Operation
Select Bluetooth option in the General Setup (see page 11 to
access General Setup) and select ON to activate the Bluetooth
feature.
From the Main Menu, touch the Bluetooth icon on the screen.
1
2
3
4
11
10
9
8
7
Displays current mode.
1)
Press Talk Button to answer an incoming call
2)
6
or to place an outgoing call.
Display Indicator showing the phone number
3)
and call status.
When the Bluetooth function is OFF, the
4)
Bluetooth Status Indicator is black. When
the Bluetooth function is ON and no phone is
connected (paired) to the unit, the indicator
will flash blue. When the Bluetooth function
is ON and a phone is connected (paired) to
the unit, the indicator is blue.
5
Press 0 -9, *, # and + to enter phone number
5)
on the Keypad Interface. Press C to clear the
last digit.
Press to transfer audio between the head
6)
unit and mobile phone.
Press to END a call in progress or to reject
7)
an incoming call.
Touch to RETURN to previous screen
8)
Press to access Bluetooth Setup Menu
9)
Press to access Phone Book Menu
10)
Bluetooth Setup Menu
Bluetooth
36
Press to display the Keypad Interface.
11)
Settings Default Options Function
Pairing Yes
Auto
Answer
Connect Manual
Off
Yes
(Pair)
Off
On Head unit will automatically answer incoming calls.
Manual Connect phone to head unit each time.
Auto
Press YES to begin the pairing function. Press YES
again to cancel.
Talk button must be pressed to answer incoming
calls.
Head unit will automatically connect to previously
paired phone.
Page 37
Bluetooth Operation
Bluetooth Setup
Pairing
Access Bluetooth setup menu and press YES option on the screen, then "Wait Pairing..." will display.
Now you can pair a mobile device with the unit. When prompted by your mobile device, enter 1234 for
the PIN or pass code. After the pairing process has completed, the Bluetooth icon will turn solid blue.
This unit can remember more than 4 mobile devices. The head unit will delete the phone that was least
used to allow for the new pairing (connection). The mobile device that is initially connected will always
be remembered and set as the default phone.
Auto Connect
The head unit will automatically connect to a previously connected mobile device when the Connect
feature is set to Auto. If the connect feature is set to Manual, the head unit will not automatically
connect to any mobile device. Set the Connect feature the Manual when you do not want to connect to
any Bluetooth mobile device.
Auto Answer
The head unit will automatically answer incoming calls when the Auto Answer feature is set to ON. If
the Auto Answer feature is set to OFF, the Talk Button must be pressed to answer an incoming call.
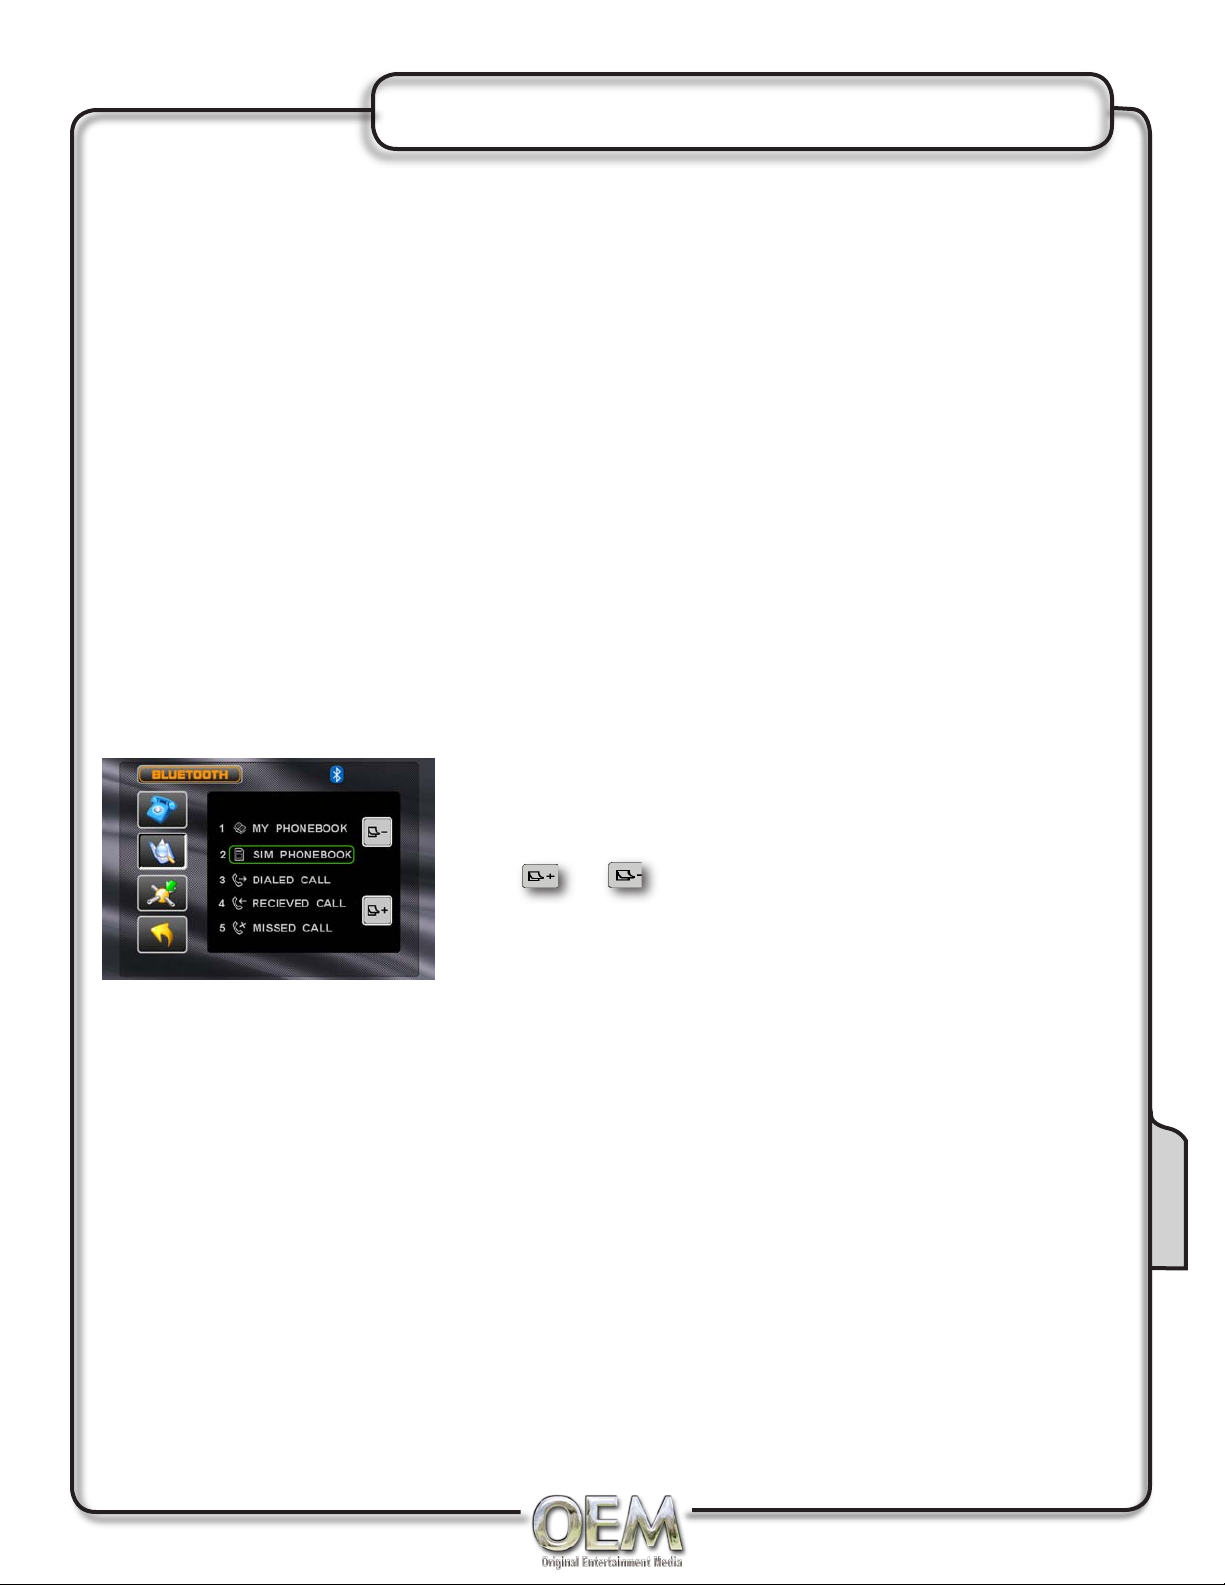
Bluetooth Phone Book Menu
Phonebook
Press the phone book icon to access the phone book. You can see
the phone book list, SIM book list, dialed call list, received call list
and missed call list. Touch the desired name to call.
Press or to navigate through the phone list.
Making a Phone Call
Phone calls can be completed four different ways:
Enter the desired number using the keypad interface, then press the Talk Button
1)
Enter the desired number using the numeric keypad on the remote, then press OK.
2)
Select a previous call from the phone book menu.
3)
If your phone supports voice dial, access this mode on your phone instead of using the
4)
phonebook.
Answering a Phone Call
When calls come in, the interface will display on the screen. The head unit will answer calls
automatically if the Auto Answer feature is set to ON, otherwise, the Talk Button must be pressed
to answer an incoming call. During an incoming call, the audio is muted for the current source and the
incoming call screen will be displayed. Adjust the volume during the call using the volume controls on
the main unit.
Bluetooth
Ending a Phone Call
Press the END Button on the screen or the ESC button on the main remote control to end a call in
progress or to reject an incoming call.
37
Page 38
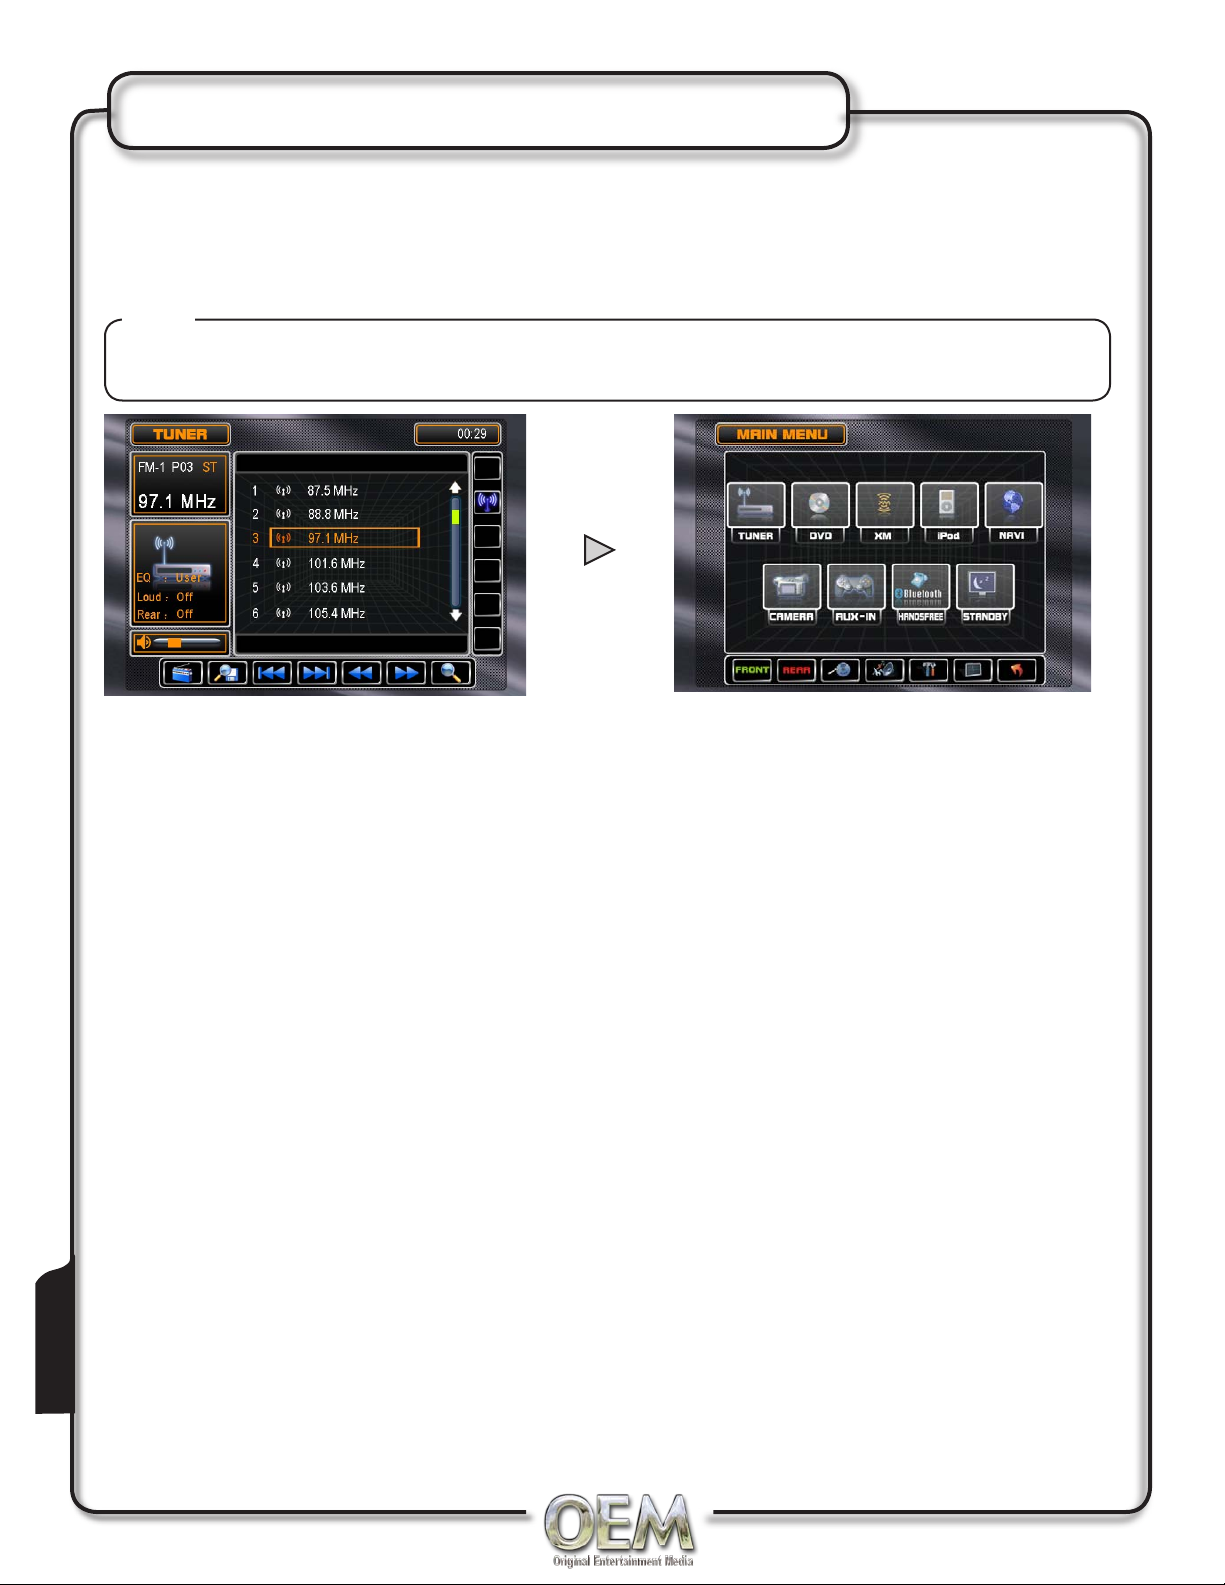
Navigating Operation
Accessing Navigation
Access the MAIN menu by pressing the NAVI button on the front panel, pressing the SRC button on
the front panel or touching Area A or the upper left hand corner of the screen and select the NAVI
button to enter the Navigation Operation interface.
Notes:
SNAV-1 , SPiN3510 or SPiN3550 must be connected to access navigation mode.
Navigation Operation
Please refer to the SNAV-1 or P-NAVi navigation user manuals.
Listening to an Audio Program while using/viewing the Navigation
You can listen to an audio program while using Navigation. To do so, do the following:
Select the audio source. The source can be the Tuner, Satellite Radio, iPod or the audio from
1)
the AUX input.
Touch the NAVI button on the front panel to select Navigation. The map will be shown on the
2)
Monitor and audio will continue to play while you are in Navigation mode.
Navigation voice prompts will mute the audio source, give the instruction and then return to the
3)
audio source.
To adjust a parameter of the audio source, for example selecting another radio station, touch the
4)
NAVI button. This will return you to the audio source screen. Make the adjustments and then
press the NAVI button to return to the Navigation function. Navigation will continue while you are
in an audio source screen and voice prompts will continue while you make adjustments.
Navigation
38
Page 39
Multi-Zone Operation
Multi-Zone Operation
Independent sources can be played simultaneously on the unit. For example, the AM/FM tuner can
be selected for the front zone, while the DVD video is selected for the Mult-Zone source (for headrest
monitors, overhead monitors, etc.)
Multi-Zone Menu Access
The MAIN menu can be access by pressing the MENU button on the remote or by touching the
1.
Area A (upper left hand side) on the monitor.
Press and hole the REAR button on the front panel to turn the Multi-Zone on.
2.
Press the desired source from the REAR zone menu.
3.
Selecting a Front Zone Source
Press the MENU button, then touch the desired front zone source.
1.
Press MODE on the main remote to select desired front zone source.
2.
Notes:
AM/FM tuner, XM Radio and iPod models will change to a "blue-screen" background when any
optical mode (DVD, CD, MP3/WMA) is selected as the Mulit-Zone source.
Front Zone Standby
To conserve the LCD backlight lifespan or to eliminate glare while night driving, press STANDBY.
The monitor screen will black out, however all other operations continue to operate. Press any button
except VOLUME or touch the screen again to return to normal viewing.
3
1
2
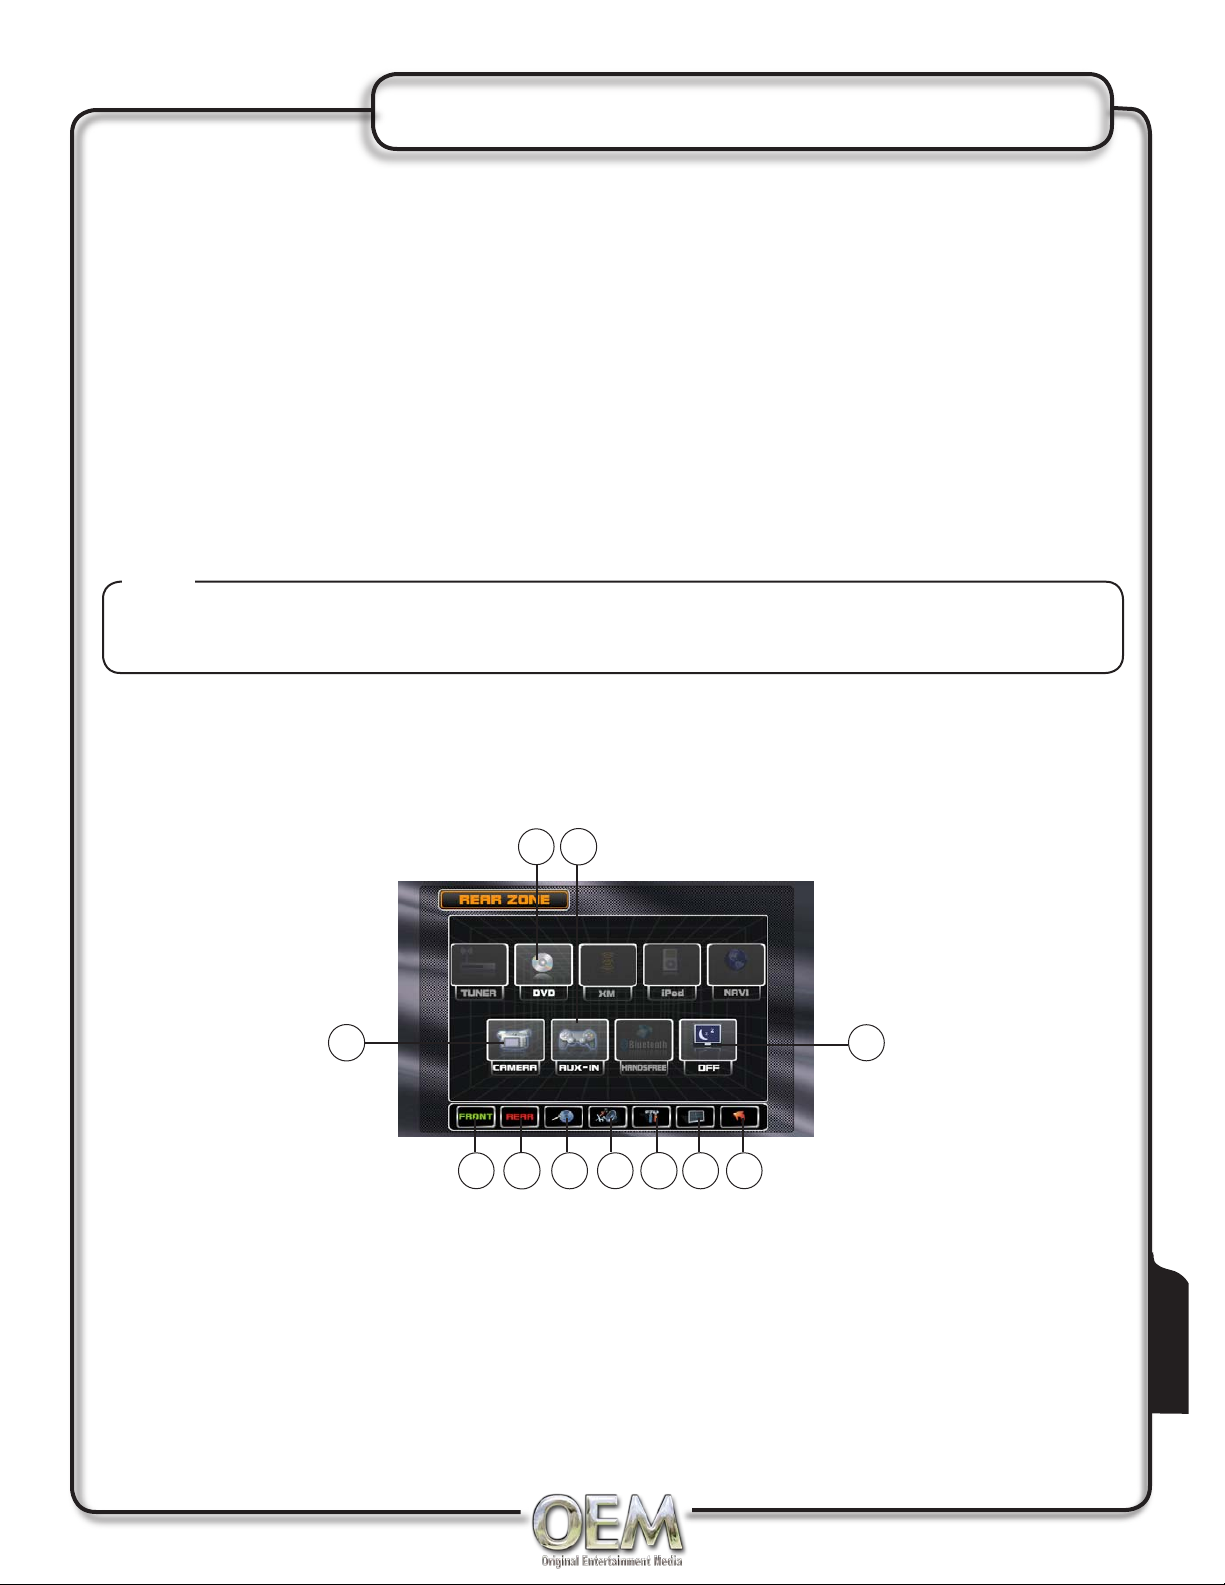
Touch Access Buttons
Touch to access CD/DVD mode, CD/DVD
1)
must be inserted
Touch to set CAMERA mode as Multi-Zone
2)
mode, if optional camera isn't connected
then 'No Video Signal" will display.
Touch to set AUXILIARY A/V INPUT mode
3)
as the Multi-Zone.
Touch to set Mulit-Zone mode into
4)
STANDBY (off).
6
5
7
9
8
10
11
Touch to access MAIN source menu.
5)
Touch to access Multi-Zone source menu
6)
Touch to access ASP configuration.
7)
Touch to access CD/DVD SETUP menu.
8)
(CD/DVD must be inserted to function)
Touch to access GENERAL SETUP menu.
9)
Touch to access SCREEN SETUP menu.
10)
Touch to return to previous screen.
11)
4
Multi-Zone
39
Page 40
Multi-Zone AM/FM Tuner
2
1
13
12
11
10
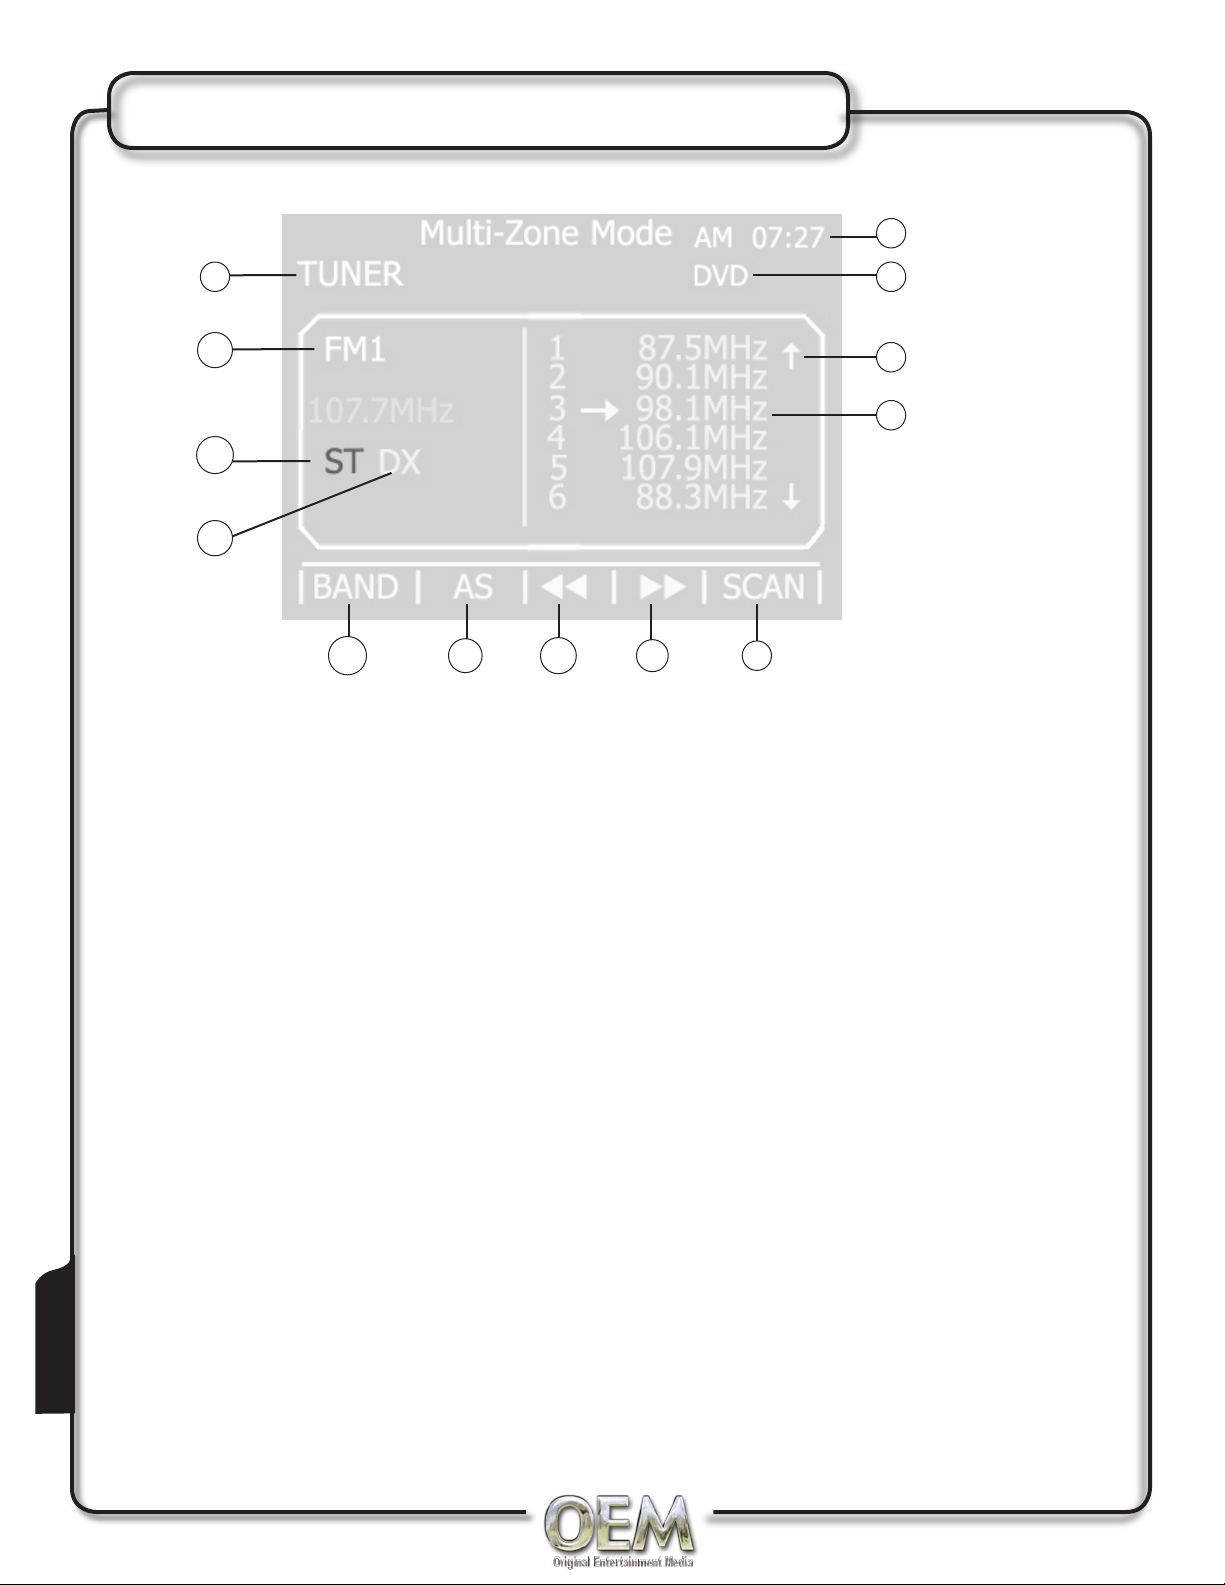
Indicator for MAIN ZONE
1)
Displays current time on CLOCK
2)
INDICATOR
Indicator for MULTI-ZONE
3)
Page up/down arrow for PRESET PAGE
4)
Shows the preset station list by frequency
5)
for the PRESET NUMBER LIST DISPLAY.
Touch and hold frequency to store presets.
Touch the TUNER SCAN to scan through all
6)
available stations in the current band.
9
3
4
5
8
7
Touching the PRESET SCAN/AUTO
9)
STATION STORE button will scan through
all presets in the current band. Holding
this button for more than 2 seconds will
automatically program the 12 strongest
stations available into the presets in the
current band.
Touch the BAND button repeatedly until the
10)
desired band is displayed FM1, FM2, FM3
or AM
Press the LOCAL/DX TUNING MODE
11)
button to select between local or distance
tuning.
6
Multi-Zone
40
Touching the TUNE FREQUENCY UP icon
7)
will tune the radio to a higher frequency by
one frequency step.
Touching the TUNE FREQUENCY DOWN
8)
icon will tune the radio to a lower frequency
by one frequency step.
Indicator for STEREO, showing that the
12)
frequency selected is received in stereo. ST
will change to red during stereo reception.
The BAND INDICATOR shows the current
13)
band FM1, FM2, FM3 or AM
Page 41
Multi-Zone XM Radio
2
1
12
11
10
9
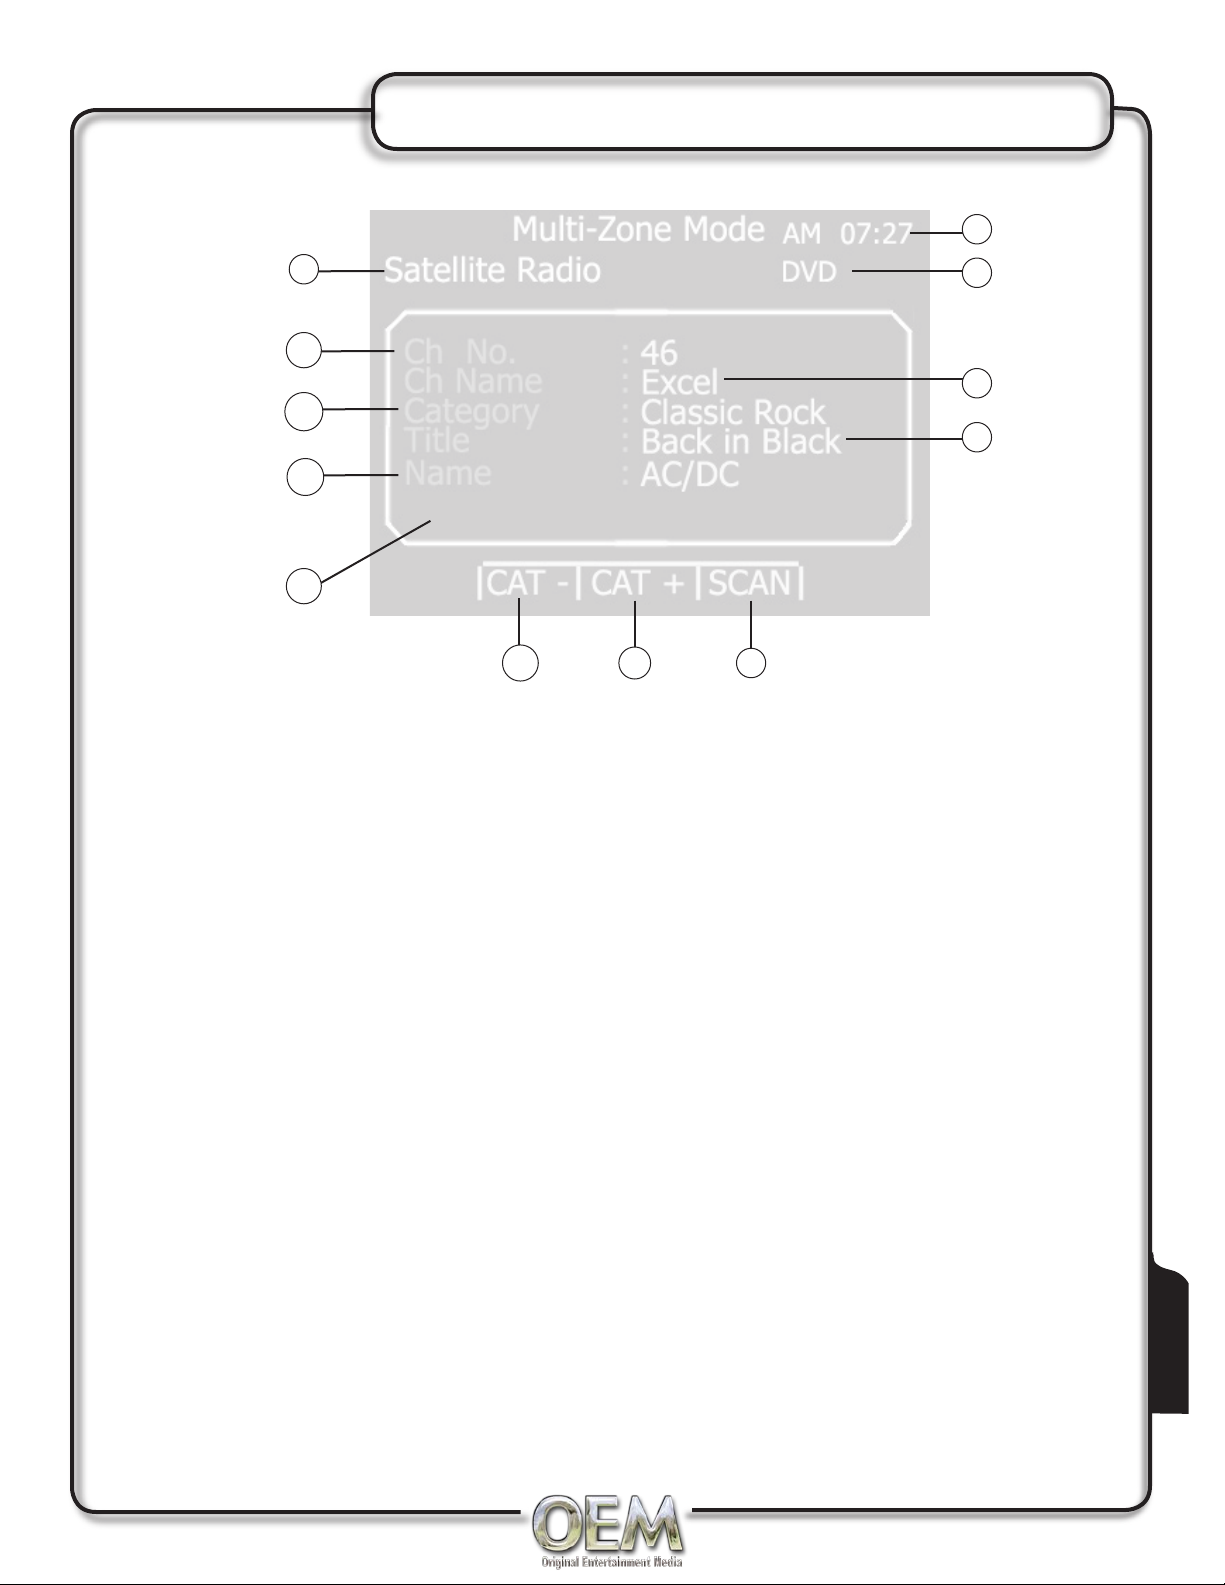
Indicator for MAIN ZONE
1)
Displays current time on CLOCK
2)
INDICATOR
Indicator for MULTI-ZONE
3)
Displays the CHANNEL NAME
4)
Displays the TITLE of the current song
5)
3
4
5
8
7
7)
8)
9)
6
Touching CATEGORY NEXT CHANNEL
will select the next available channel in the
current category
Touching CATEGORY PREVIOUS
CHANNEL will select the previous available
channel in the current category
Show which XM BANK is currently
displayed
Touch CHANNEL SCAN to scan through
6)
all available available channels, pausing for
10 seconds on each channel. Touch again
to cancel. SCAN will change to green when
the scan function is active.
Displays the NAME of the artist for the
10)
current song
Displays the CATEGORY of the current
11)
channel.
Display the CHANNEL number
12)
Multi-Zone
41
Page 42
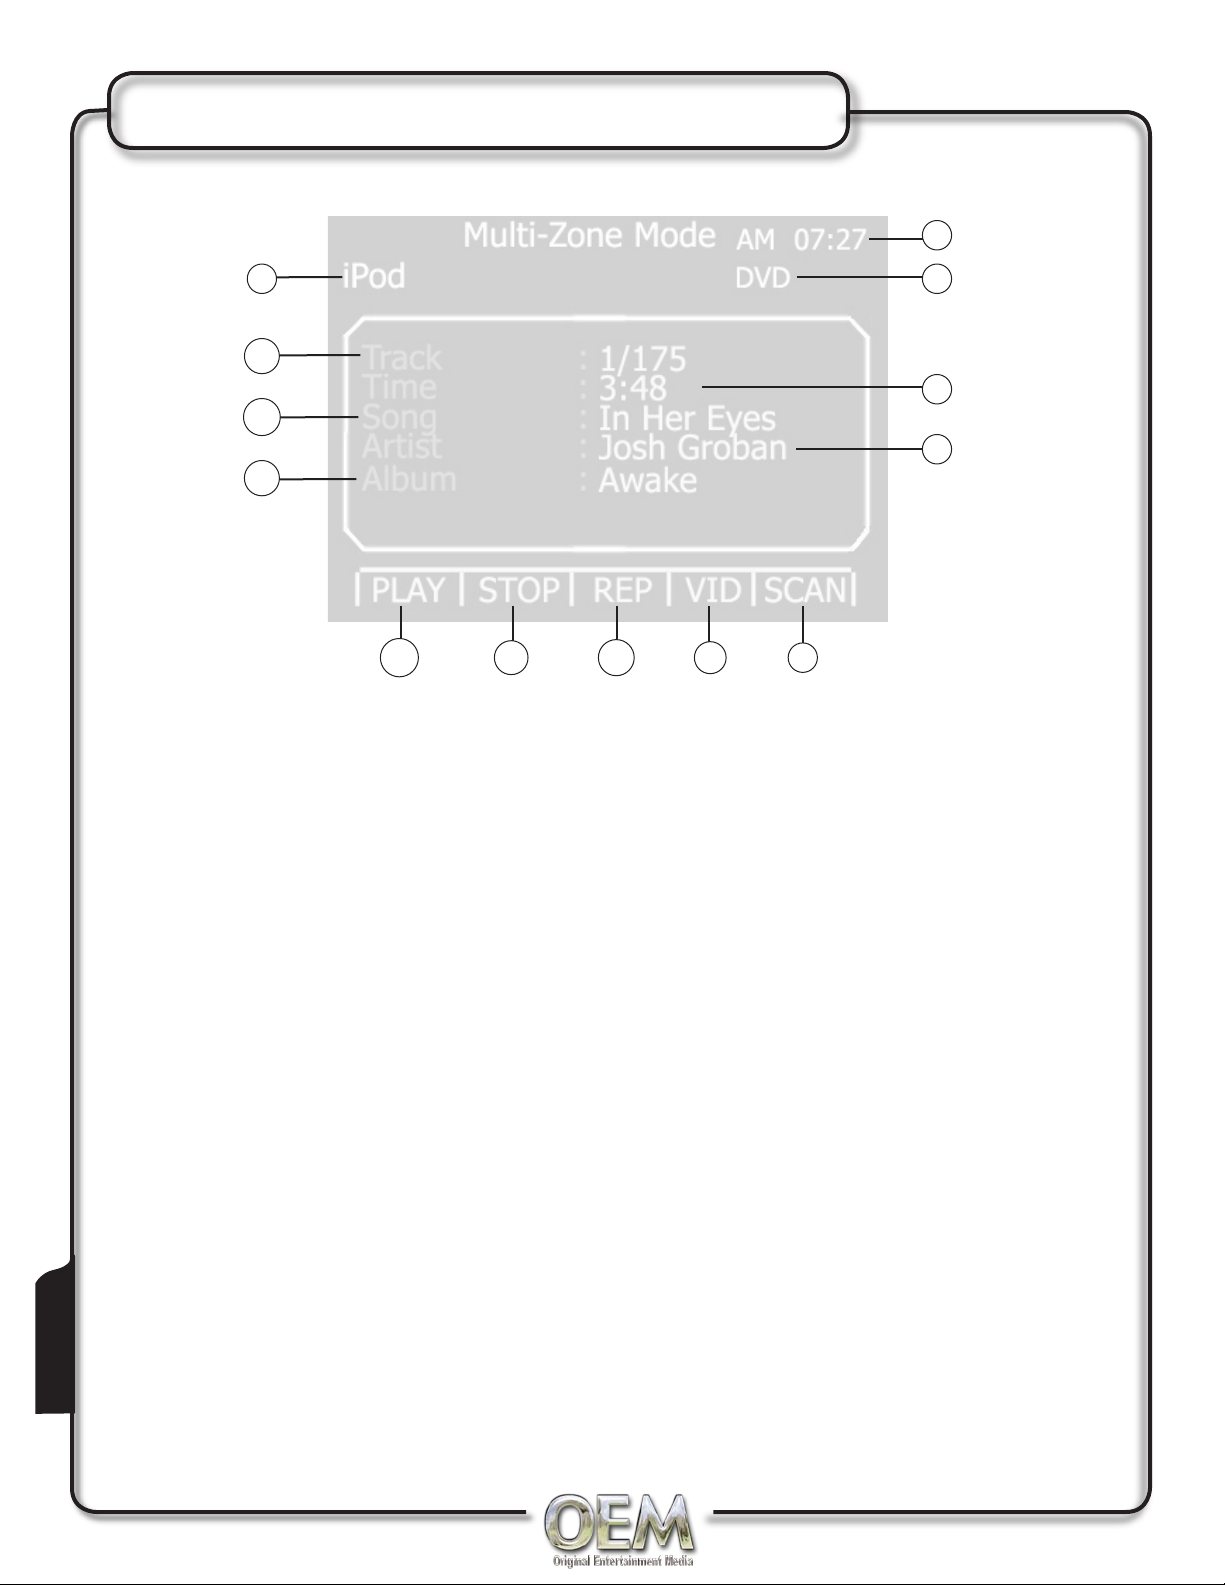
Multi-Zone iPod
2
1
13
12
11
10
Indicator for MAIN ZONE
1)
Displays current time on CLOCK
2)
INDICATOR
Indicator for MULTI-ZONE
3)
3
4
5
9
8
8)
9)
7
Touching REPEAT to repeat current song.
Touch again to cancel. REP will change to
green when the repeat function is active.
Touching STOP to stop the song where it is.
STOP will change to green.
6
Multi-Zone
42
Displays the TIME ELAPSED of the current
4)
song
Displays the NAME of the artist for the
5)
current song
Touch SONG SCAN to scan through all
6)
available available songs, pausing for 10
seconds on each song. Touch again to
cancel. SCAN will change to green when
the scan function is active.
Touch to access VIDEO MODE. iPod will
7)
disconnect and wait for video signal. Press
VID again to cancel.
Touch PLAY to temporarily stop playback.
10)
Touch PLAY again to resume playback.
PLAY will change to white during pause.
Displays the ALBUM name of the current
11)
song
Displays the TITLE of the current song
12)
Displays the TRACK number of the current
13)
song
Page 43
Limited One Year Warranty
Limited One Year Warranty Applies to Multimedia Headunits
Who is covered?
PRIORITY AUDIO (the Company) extends this warranty to the original retail purchaser of products purchased
through an authorized PRIORITY AUDIO retailer in
the U.S.A. or Canada. This warranty is not transferable
or assignable.
What is covered?
The Company warrants that should this product or
any part thereof, under normal use and conditions, be
proven defective in material or workmanship within
12 months from the date of original purchase, such
defect(s) will be repaired or replaced with a new or
reconditioned product (at the Company’s option) without charge for parts and repair labor.
What is not covered?
This Warranty does not cover the following:
• Any product not distributed by PRIORITY AUDIO
within the United States or Canada
• Damage incurred during shipping (claims must be
addressed to the carrier)
• Incidental damages related to transporting the
product to a service center, including loss of
personal time, transportation costs, and loss of use
of product
• Elimination of car static or motor noise
• Correction of antenna problems
• Costs incurred for installation, removal, or
reinstallation of the product
• Consequential damage to compact discs, USB
devices, digital media cards, cell phones and other
accessories or property
• Damage to vehicle electrical systems. Alteration,
improper installation, mishandling, misuse, neglect,
accident, blown fuse, battery leakage, theft or
improper storage. Exposure to moisture, humidity,
excessive temperature or extreme environmental
conditions. External natural forces, including
without limitation, fire, flood, earthquake, sand or
storm
• Products subjected to removal or defacement
of the factory serial number/bar code label(s) or
markings
• Service performed by an unauthorized person,
company or association.
• Any product which has been adjusted altered or
modified without PRIORITY AUDIO'S consent.
• Defects in cosmetic, decorative or non-operative
structural parts such as framing
Please review the "Safety Information" and "Care and
Installation" section of this Operation Manual for additional information regarding the proper use of your
product.
Limitations
THE EXTENT OF THE COMPANY’S LIABILITY
UNDER THIS WARRANTY IS LIMITED TO THE
REPAIR OR REPLACEMENT PROVIDED ABOVE
AND, IN NO EVENT, SHALL THE COMPANY’S
LIABILITY EXCEED THE PURCHASE PRICE PAID BY
PURCHASER FOR THE PRODUCT.
This Warranty is in lieu of all other express warranties or liabilities. ANY IMPLIED WARRANTIES,
INCLUDING ANY IMPLIED WARRANTY OF
MERCHANTABILITY, SHALL BE LIMITED TO
THE DURATION OF THIS WRITTEN WARRANTY.
ANY ACTION FOR BREACH OF ANY WARRANTY
HEREUNDER INCLUDING ANY IMPLIED
WARRANTY OF MERCHANTABILITY MUST BE
BROUGHT WITHIN A PERIOD OF 24 MONTHS
FROM DATE OF ORIGINAL PURCHASE. IN NO
CASE SHALL THE COMPANY BE LIABLE FOR ANY
CONSEQUENTIAL OR INCIDENTAL DAMAGES FOR
BREACH OF THIS OR ANY OTHER WARRANTY,
EXPRESS OR IMPLIED, WHATSOEVER. No per-
son or representative is authorized to assume for the
Company any liability other than expressed herein in
connection with the sale of this product.
Some states do not allow limitations on how long an
implied warranty lasts or the exclusion or limitation of
incidental or consequential damage so the above limitations or exclusions may not apply to you. This Warranty
gives you specific legal rights and you may also have
other rights which vary from state to state.
Obtaining Warranty Service
To obtain warranty repair or replacement within the
terms, contact 1-877-305-8972 for location of warranty
station serving your area.
Warrranty
43
Page 44
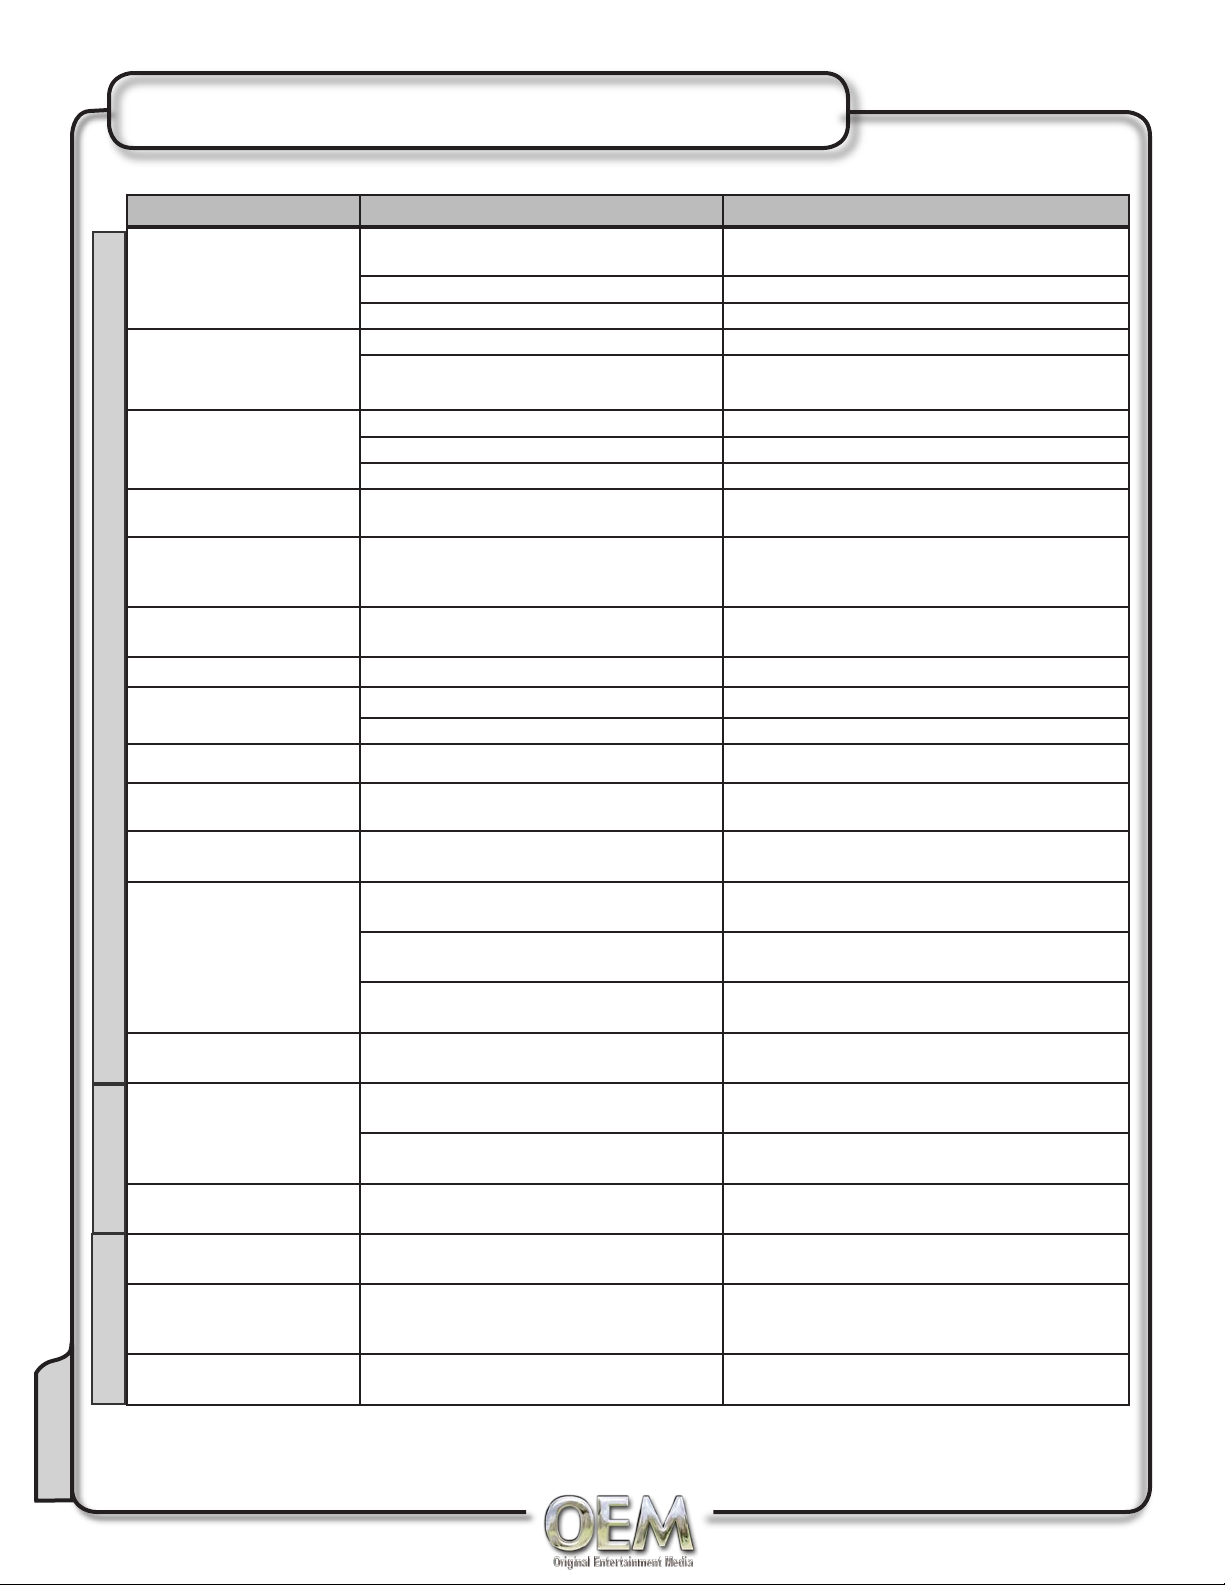
Troubleshooting
Problem Cause Solution
Unit will not turn on
(no power)
Unit has power
(but no sound)
Unit blows fuse
Unit has audio
(but no video)
No video display
(when in reverse)
Yellow wire not connected or incorrect voltage
Red wire not connected or incorrect voltage
Black wire not connected Check connection to ground
Fuse blown Replace fuse
Speaker wires not connected Check connections at speakers
One or more speaker wires touching each other
or touching chassis ground
Yellow or red wire touching chassis ground Check for pinched wire
Speaker wires touching chassis ground Check for pinched wire
Incorrect fuse rating Use fuse with correct rating
Parking brake safety circuit not connected
Parking brake not applied
Reverse circuit not connected
Vehicle is not in reverse
Check connections for proper voltage (11~16VDC)
Insulate all bare speaker wires from each other and
chassis ground
Check connections at parking brake
Apply parking brake
Check connections at reverse lamp
Select reverse gear
DVD does not start playback
IR remote does not work Dead battery Replace battery
Excessive skipping
ERR-DISC appears on display Focus error or disc is in upside down Press eject or RESET
Basic Unit Operation
Region code error appears
on display
Front panel will not open/close Front panel obstructed
Weak station searching
Unit resets itself when engine
is off
Interruption during playback
Physical defect in media
Wrong region
Unit is not mounted correctly Check mounting sleeve
Physical defect in media Check media for scratches
Region code error Use only DVDs labeled “Region 1” or “All” only.
Auto antenna is not fully extended Connect the auto antenna control cable properly
Auto antenna not properly connected Connect the auto antenna control cable properly
Local function is activated Turn LOCAL function OFF
Incorrect connection between ACC and positive
battery wire
Disc is dirty or scratched Clean disk or replace
File is damaged/bad recording Recreate disc with good files
Check media for scratches
Use discs labeled "Region 1" or "All" only.
Remove the obstacle and press OPEN again to
resume the monitor open/close sequence.
Check wiring and correct
MP3
Incorrect playback message
displayed
iPod source not available Incorrect cable connections Check connection of the inport adapter to rear of radio
Cannot see video and photo
media on TFT screen
iPod
All other errors Refer to the iPOD FAQ section on the website
Message is longer than LCD can display.
or connection of iPod to inport adapter
Wrong iPod Video Settings Change iPod video settings to TV Out
Check yellow RCA cable from the inport adapter to the
radio
Troubleshoot
44
Page 45
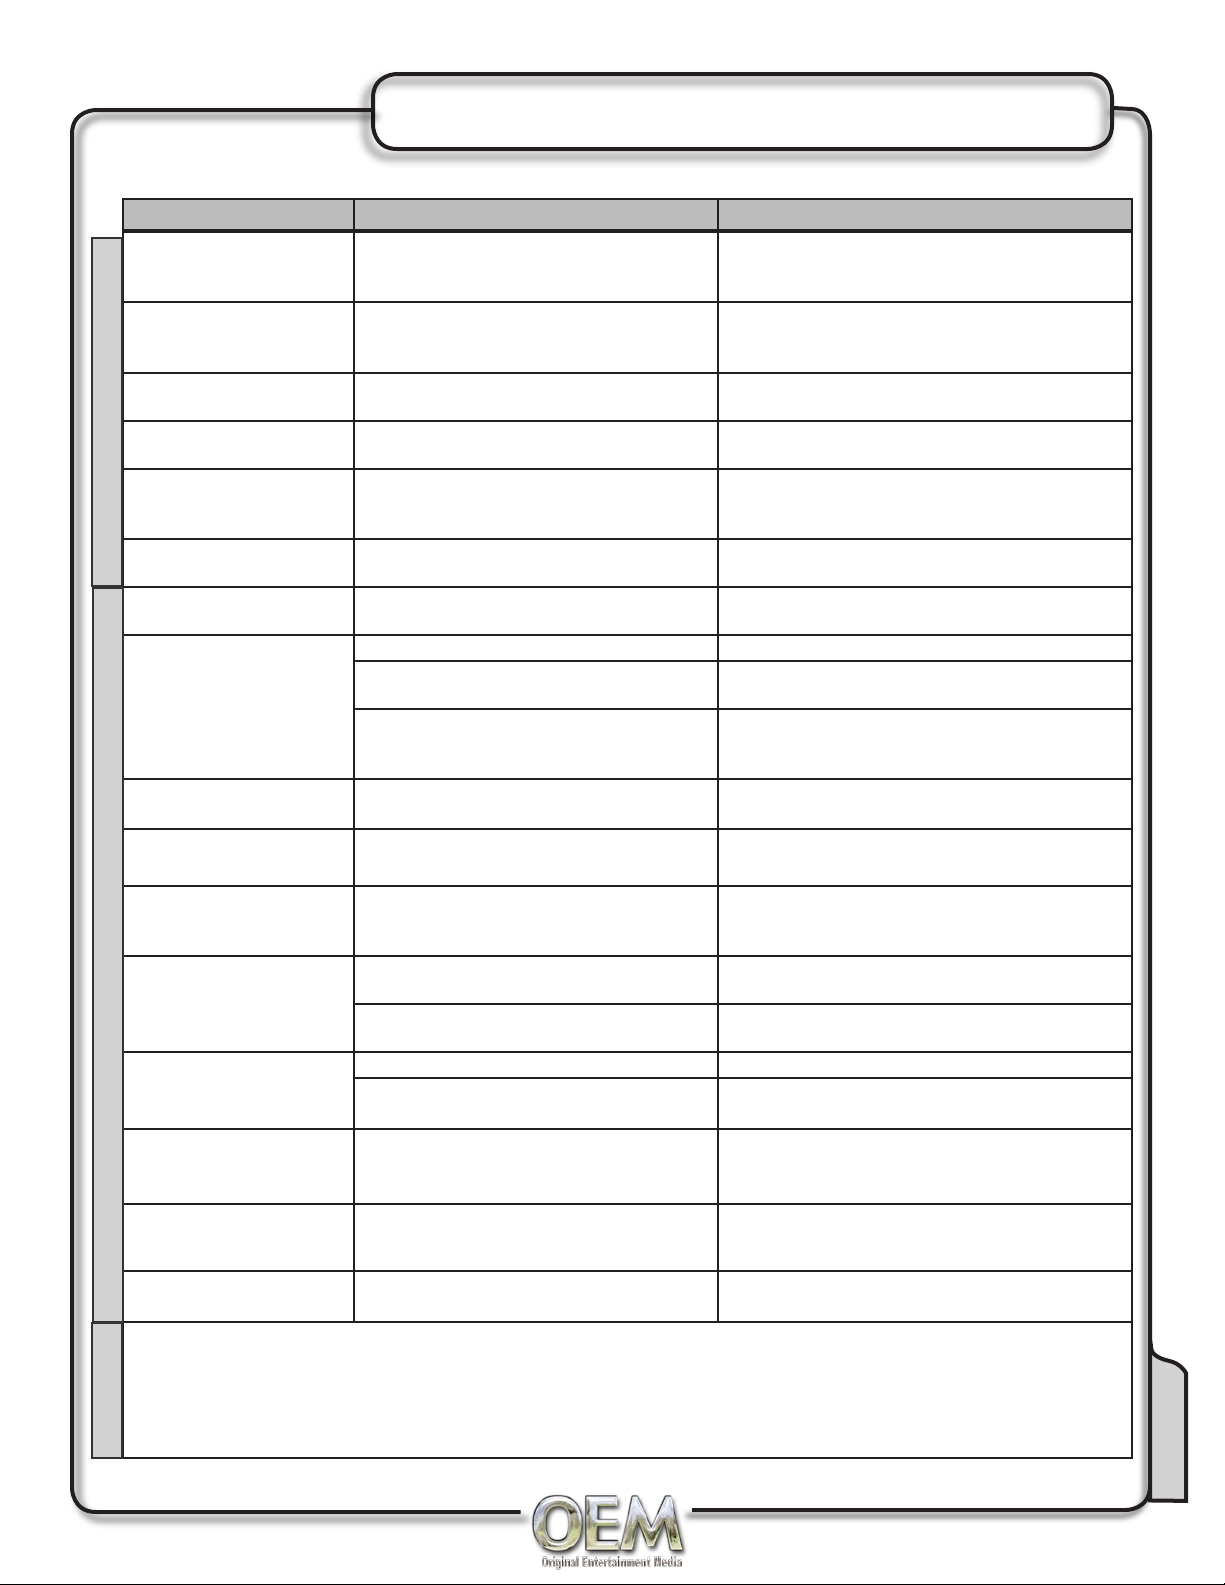
Troubleshooting
Problem Cause Solution
OFF AIR appears on display
No song title or artist name is
displayed
You can not receive any XM
channels
You can not tune into a
specific XM channel
XM Radio
NO SIGNAL appears on
display
CHK ANTENNA appears on
display
Please connect first appears
in the display
Mobile device will not connect
to the head unit.
ERROR! Connect Timeout
appears on display
The selected channel is not in service
The antenna cable is damaged
This information may not be available for some
music channels, news channels, or when there
is no song playing
Your XM Radio receiver is not activated Contact XM
You may not be authorized to receive that
channel
The XM signal is blockedThis message may
appear when driving inside a tunnel or under
obstacles
The XM antenna is not connected
There is no mobile device connected to the
head unit.
Bluetooth function is not active on the head unit. Activate Bluetooth function in General Setup
Bluetooth function is not active on the mobile
device
A mobile device is already connected to the
head unit. This time the head unit can only be
connected to one device at a time.
The time limit for the pairing mobile device has
been reached
Try another channel
Check for pinched or cut antenna cable
This condition is normal, there is nothing wrong with
your receiver
Verify your subscription with XM Contact
Move vehicle from obstructed area (such as inside a
tunnel or a garage)
Check XM antenna connection.
Make sure the antenna has a clear view of the sky
Pair and or connect a mobile device to the head unit as
described under Bluetooth Operation.
Refer to owner's manual of your mobile device.
Disconnect current mobile device first, then connect the
desired mobile device
Pair the mobile device within 120 seconds
Pairing Fail appears in display The attempted pairing process has failed. Retry the pairing process again.
Mobile device will not connect
to the head unit automatically.
Ring tone cannot be heard
Bluetooth
through the speakers
Echo or noise is heard during
a phone call
Call is connected (but no
audio can be heard through
the speakers)
Call is answered automatically Auto Answer function is set to ON
Caller ID does not appear
during incoming call
Refer to SNAV-1 or P-NAVi owners manual
When the Connect function is set to Manual, the
head unit will not connect to any mobile device
automatically
Ring tone volume is turned down
MUTE function is activated in the head unit
Possible road noise or interior interference Close all windows and turn off any fans or A/C
Microphone opening on the front panel is
obstructed
Audio is routed to the mobile device
The calling mobile device is not set to send the
Caller ID or the service is not available.
Set Connect Function to Auto as described on page 37.
Increase the volume of the ring tones using the up and
down volume control during the ringing process
Press MUTE to cancel the mute function and resume
audio
Clear any obstacles in front of microphone opening
Press Audio Transfer to allow audio from the phone to
be heard through the speakers
Set Auto Answer function to OFF as described on page
37
Some devices may not communicate or work properly
with this head unit.
Troubleshoot
Navigation
45
Page 46
Notes
46
Page 47
Specifications
General
Operating voltage: 11-16 VDC, neg. gnd
Speaker output impedance: 4~8 ohms
Line output voltage: 2 Volts
DVD Player
Frequency response: 10Hz-20kHz
Channel separation @ 1kHz: >65dB
D/A converter: 24 Bit
Line output impedance: 200 ohms
Chassis dimensions: 2" x 7" x 7"
(51 x178 x178 mm)
Monitor
Resolution: 960 W x 234 H
Brightness (cd/m2): 350
FM Tuner
Tuning range: 87.5MHz-107.9MHz
Usable sensitivity: 8.5dBf
50dB quieting sensitivity: 10dBf
Contrast ratio: 300:1
Elements: 224,640
View angle (up/down/left/right): 30/60/60/60
Panel size (diagonal): 4.5” (114.3 mm)
Stereo separation @ 1kHz: 40dB
Frequency response: 30Hz-13kHz
AM Tuner
Tuning range: 530kHz-1710kHz
Usable sensitivity: 22uV
Frequency response: 30Hz-2.2kHz
Design and specifications subject to change without notice.
CEA-2006 Power Standard Specifications
(reference: 14.4VDC +/- 0.2V, 20Hz~20kHz)
Power Output: 22 Watts RMS x 4 channels at 4 ohms and < 1% THD+N
Signal to Noise Ratio: 80dBA (reference: 1 watt into 4 ohms)
Copyright Notes
This product incorporates copyright protection technology that is protected by method claims of certain U.S. patents and other intellectual
property rights owned by Macrovision Corporation and other rights owners. Use of this copyright protection technology must be authorized by
Macrovision Corporation, and is intended for home and other limited viewing uses only unless otherwise authorized by Macrovision Corporation.
Reverse engineering or disassembly is prohibited.
Windows Media and the Windows logo are trademarks, or registered trademarks of Microsoft Corporation in the United States and or other
countries.
iPod is a trademark of Apple Computer, Inc., registered in the U.S. and other countries.
The Bluetooth trademark and logos are owned by Bluetooth Sig, Inc.
All other trademarks are property of their respective owners.
OEM-03
Printed in China
Page 48
OE RADIO
Toll Free: 1-877-305-8972
www.oeradio.com
©2007 PRIORITY AUDIO All rights reserved.
 Loading...