

Page 1
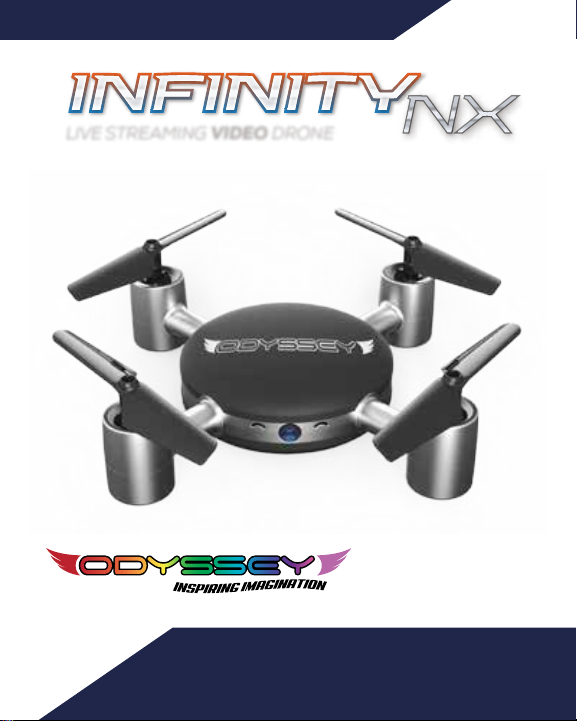
INSTRUCTION & REFERENCE MANUAL • Model no. ODY-17 15
LIVE STREAMI NG VIDEO DRONE
FOR AGES
14
+
Thank you for your purchase of the Infinity NX Live
Streaming Video Drone. You’re just moments away
from creating stunning aerial acrobatics!
Page 2
Please read this manual carefully before use and retain it for future reference.
Product/spare parts included in this packaging
WHAT’S IN THE BOX
Rechargeable LiPo Battery
Infinity NX Drone Unit
x1
2.4 Gh z Radio Tran smitte r
x1
USB Charger
x1
X-Guard Propeller Pieces
x4
Propeller Changer
x1
x1
Smartphone Holder
x1
USB Charger
x1
X-Guard Propeller Pieces
x4
Propeller Changer
x1
Safety guidelines
● This product is not a toy. It is not appropriate for children under 14 years old.
● Please read this instruction manual carefully before operating the product
according to the manual.
● The manufacturer and dealers disclaim all responsibility for damage caused by misuse.
● Keep the small accessories away from children to avoid choking accidents.
● Keep batteries away from fire or other high-temperature environments.
● When flying the model, keep it at least 1~2 meters away from the user or others to
avoid injury due to collision.
● Do not modify the product; modification may cause malfunction or accident.
● Fly the model within your line of sight to control it safely.
● Children require adult supervision when using this product.
● Remove rechargeable batteries before charging them.
● Recharge rechargeable batteries only under adult supervision.
● Remove exhausted batteries from the controller.
● Do not short circuit the supply terminals.
● The USB charger to be used with the product should be regularly examined for
potential hazards, such as damage to the cable or cord, plug, and
other parts. In the event of such damage, the product must not be used.
2
Page 3
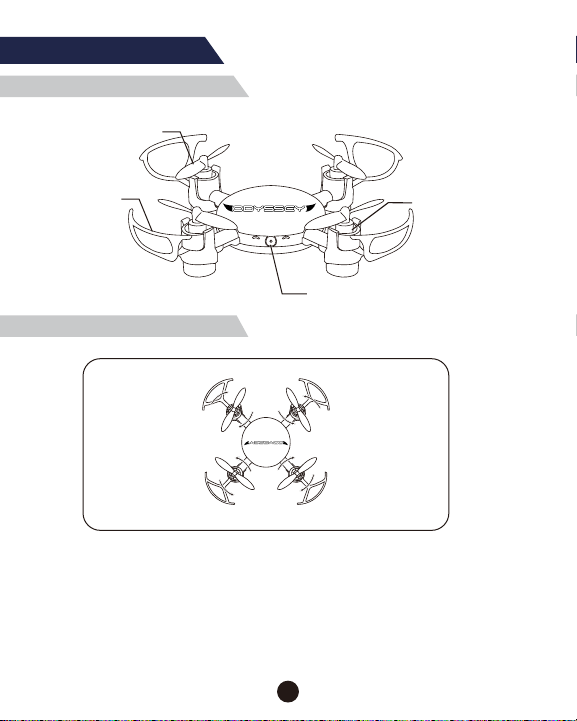
The Drone Unit
Major parts of the Drone
Propeller
Protecting
Guard
Camera
Orientation Confirmation
Propeller A
(Clockwise Motor)
Propeller B
(Counter Clockwise
Motor)
Power on the model and make sure that the propellers are installed in the right
position. Propeller A at the left-front and the right-rear corner should spin clockwise.
Propeller B at the right-front and the left-rear corner should spin counterclockwise.
Head of the
model
Left Right
Tail of the
model
Propeller B
(Counter Clockwise
Motor)
Propeller A
(Clockwise Motor)
3
Motor
Page 4
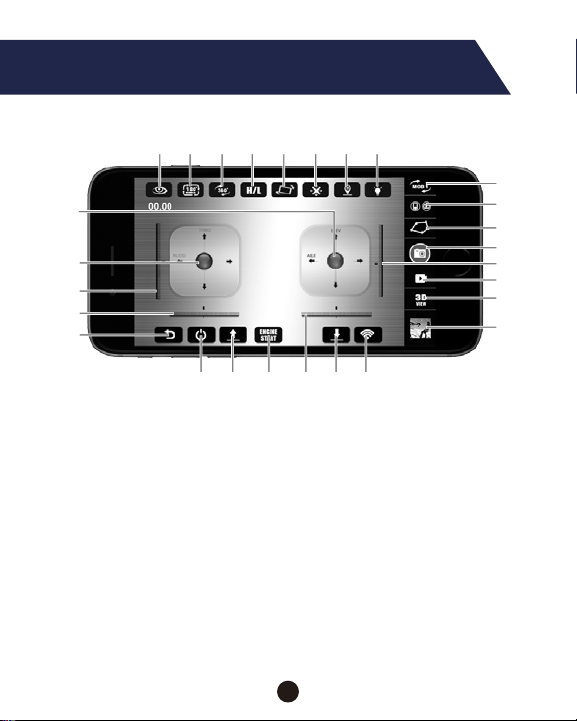
Smartphone App “MJX H”
Introduction to the Control & Functions
4
3
2
1
5
27
26
25
24
23
22
21
20
7
6
18
19
8
9
10
11
12
13
14
15
16
17
1. Hide the interface
2. 180° screen eversion
3. 360° Roll
4. H/L speed
5. Gravity control mode
6. Smart Fly mode
7. Home Beacon
8. Light switch
9. Mode Switches
10. Low-level/
Medium-level
Throttle switch
11. Waypoints
12. Link/Unlink drone
13. Trimmer D
14. Video
15. 3D visual effects
16. File play
17. WIFI signal of
the drone
18. One key landing
19. Trimmer C
20. One key Unlock
21. One key start
4
22. App control
switch
23. Return
24. Trimmer B
25. Trimmer A
26. Left stick
27. Right stick
Page 5
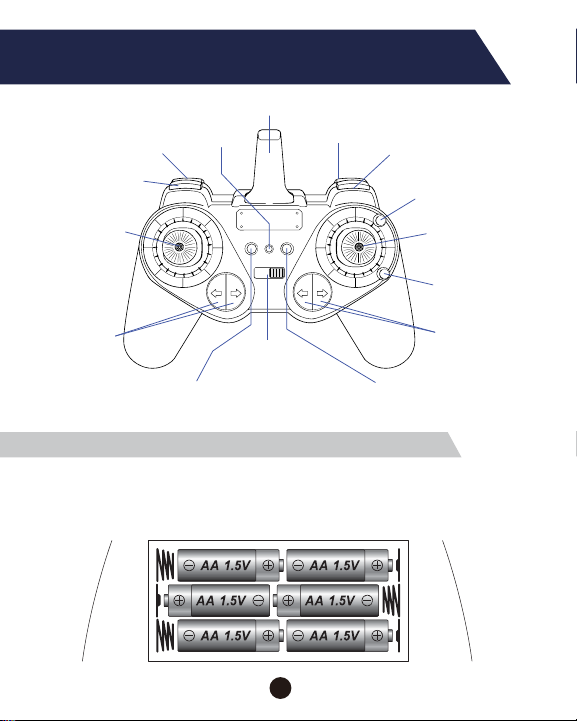
Remote Control
Button & Feature Locations
Photo Button
Left Control
Stick
Trim A
Turn Left/Right
Trim Setting
Light Button
One Button Auto Start
1st Push –Auto Start
Antenna
Power
Indicator
Power Switch
(Speed Setting x3
Low/Med/High)
2nd Push –Auto Takeoff
3rd Push –Auto Landing
Manual Flip &
Roll Button
Installing the Batteries in the Remote Control
Use a small screwdriver to remove the screw securing the battery cover on the back of the
remote control. Then install 6 x AA batteries (not included) in the orientation shown below.
Then replace the battery cover back on the remote control and put the screw back in.
Video
Shooting
Trim C
(Forward Trim Setting)
Directional Stick
(Press down to enter
SmartFly Mode)
Trim D
(Reverse Trim Setting)
Trim B
Strafe Left/Right
Trim Setting
Switch between Left/Right Turns
or Sideward Flights (Short Press)
5
Page 6
How to Charge the Drone Battery
Disconnect the battery wire plug from
the power supply wire plug . Pull on the
silver foil to remove the battery from the
Drone. Then connect the battery wire
plug with the USB charging cable plug,
and insert the USB interface to any USB
charging outlet to charge the battery.
The USB indicator light illuminates while
charging is proceeding and turns off
once the battery is fully charged. Full
charging time is around 70 minutes.
Reinstall the Drone Battery
Connect the battery wire plug with the power
supply wire plug and insert the battery into
the battery compartment.
Pic.1
Installing and Removing the Protective Guards
Pic. 2 Pic.3
1. Before flying, insert each protecting
guard on the bottom of a rotor housing
as shown and push the guard up
until the clips at its top secure the guard.
2. If you wish to remove the guards for storage,
gently pull apart the clips at the top of each
guard and pull down the base until the guard
is removed.
6
Page 7

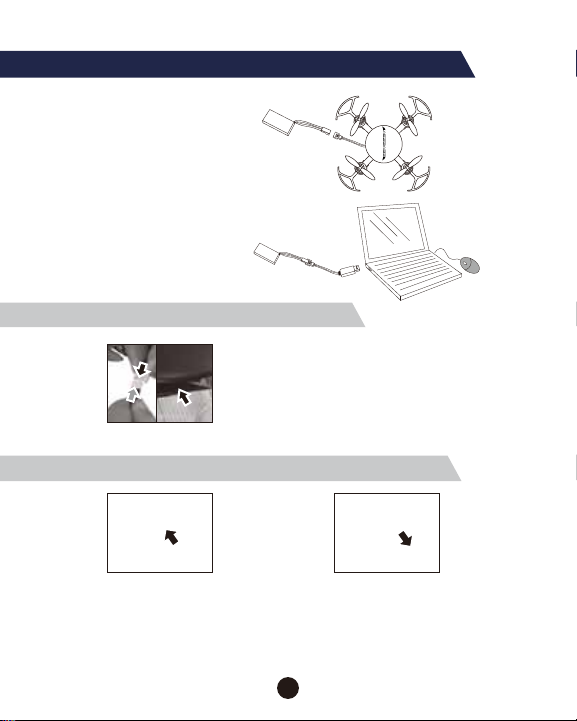
Preparation for Flight
APP Remote control software download
For Android systems, please visit our website www.mjxrc.com to download the
software “MJX H”.
For Apple IOS system, please go to the APP store to download the software “MJX H”.
(Or download either mobile phone APP by scanning the QR code below.)
QR Code
iOS
QR Code
Android
WiFi connection instructions*
1. Power on the model. The indicator light will flash rapidly. The model is
in gyro-detection state. Put the Infinity NX drone unit on the ground.
2. Enter your smart phone’s WIFI settings and connect to the WIFI signal
“MJX H ****”. After a successful connection, exit settings.
3. Open the “MJX H” APP on your smart phone and click the logo “MONITOR” to enter
the control interface to watch the real-time video. Or click “CONTROL” to enter
the APP control interface to control the flight with the APP. Touch“ ” when it shows in
RED, which means that your mobile phone has successfully connected with the drone.
When connected, the indicator light on your drone will stay on. Touch “ ” and
the rotor blades will rotate slowly. Then, push up the throttle control stick,
and the drone will take off.
*If you want to use the remote control instead of the mobile device to control your Inifinity,
turn on your remote control and link it to your drone before opening up your MJX app … if
you want to use the smart device only, do not turn on the remote control.
7
Page 8

Enter into the APP Control
1.Open the software
“MJX H”
2.Cilck the “CONTROL”
button.
3.Activate the mobile
phone APP real-time
remote control
interface.
Drone Calibration
Please perform calibration for the first flight or when the flight performance is poor.
Poor flight performance (except vibration created by camera mount) or even
complete failure may result from out-of-date calibration. To calibrate your unit,
whether using the controller or smart phone app:
1. Put the model on the ground or any flat & still surface.
2. Pull down both of the control sticks to the bottom right corner for 2 seconds (Pic .4).
The indicator light of the drone will flash rapidly and then stay on, indicating that
calibration is complete.
Note: Please make sure that the model is put on the ground or any flat & still surface.
If the model inclines, it will bring unsatisfactory altitude-hold performance after
the model takes off.
Note: If you are using the Remote
Control Transmitter, perform the same
operation for Drone Calibration.
Pic.4
One key Take-off and Landing
1. After the model is unlocked, by pressing the Power button and then Engine Start, the rotor
blades will rotate slowly; touch “ ” , the model will take off.
2. While the drone is flying, make sure the drone is completely level and then touch “ ”.
The drone will automatically & gently land on the ground. Push the left throttle stick down
once the drone reaches the ground to automatically stop the engine and propeller blades.
8
Page 9

Emergency Stop
Whether using the controller or the smart phone APP, if you encounter an emergency,
it’s easy to perform an immediate landing. Just pull the left control stick to the left-bottom
corner while pulling the right control stick to the right-bottom corner (Pic.5).
Note: If you are using the Remote
Control Transmitter, perform the same
operation for Emergency Stop.
Pic.5
Gravity Sensor (G-Sensor) Control Function
Touch “ ” ; once it turns red, the model is in G-sensor control mode. The drone
movement (turn left, turn right, fly left, fly right, fly forward and backward) will be
controlled by the mobile phone’s accelerometer.
Smart Fly (Headless Mode)
Enter into Smart Fly mode:
Touch the icon “ ”; once it turns red and the indicator light of the model turns from
constant on to flashing, it means that the model has enter into headless mode.
Exit Smart Fly Mode:
While the model is flying in Smart Fly mode, touch the icon “ ” again. Once the icon
turns black and the model indicator light turns from flashing to constant illumination,
the drone has exited headless mode.
Setting Flight direction control in Smart Fly mode:
● When checking the flight direction of the drone, set the model nose straight ahead
and tail facing you. This direction will be constantly considered as “forward”
when forward signal is given from the remote control, no matter where the model
nose is pointing to.
9
Page 10

● When the model is flying in Smart Fly (Headless mode), you should keep facing
the forward direction. Otherwise, the model will be difficult to control.
The model control is shown as below:
Push up the forward/
backward control stick, the
model will fly forward, away
from you.
Push down the forward/
backward control stick,
the model will fly backward,
toward you.
Turn the sideward
flight control stick left, and
the drone will fly to your
left.
Turn the sideward
flight control stick right,
and the drone will fly to
your right.
Turn the turning
control stick right, and
the drone will turn to your
left.
Turn the turning
control stick left, andthe
drone will turn to your
right.
Remarks:
● Flight direction proof is needed when the model is going to fly in Smart Fly mode. When
checking on the flight direction, the drone should be set straight ahead with its tail
facing you. You should face the same direction the model nose is pointing.
You should stand in the same orientation when flying the drone.
● When the model is flying in Smart Fly mode, if the flight direction is inconsistent,
land the drone quickly and carry out the flight direction proof action again.
Home Beacon (One Key Return)
When the model is in headless mode, touch “ ” and the drone will fly back to the pilot.
Press this button again or push the forward/backward control stick to exit the Home
Beacon function.
10
Page 11

Mode Switch
Touch “ ” to choose the control stick mode.
Forward/Backward
control
Foward/Backward
trimmer
Left/Right turning
control
Left/Right turning
trimmer
Upward/Downward
control
Left/Right turning
control
Left/Right turning
trimmer
Forward/Backward
control
Foward/Backward
trimmer
Leftward/Rightward
control
Left/Right sideward
flight trimmer
MODE 1
MODE 2
MODE 3
Upward/Downward
control
Leftward/Rightward
control
Left/Right sideward
flight trimmer
Forward/Backward
control
Foward/Backward
trimmer
Leftward/Rightward
control
Left/Right sideward
flight trimmer
Upward/Downward
control
Left/Right turning
control
Left/Right turning
trimmer
11
Page 12

Upward/Downward
control
Leftward/Rightward
control
Left/Right sideward
flight trimmer
MODE 4
Forward/Backward
Foward/Backward
Left/Right turning
Left/Right turning
Medium / Low Throttle Control Switch
1. Touch “ ” to change the throttle control.
2. When “ ” is displayed, the medium throttle control is used to
control the drone when not in altitude-control function
3. When “ ” is displayed, the low throttle control is used to
control the drone when not in altitude-control function
Waypoints –Setting up your Flight Plan
Touch “ ” to enter into the flight plan
interface. (Pic. 6)
Touch “ ” to adjust the flight proportion.
The maximum proportion is 1:5 and minimum
proportion is 1:1. Player can choose different
proportion to regulate the flight route range.
In the flight plan interface, the movements forward, backward and sideways can
be achieved through the flight route drawn by the pilot. Use the diagrams below
for reference.
control
trimmer
control
trimmer
Pic.6
Forward
Draw the route upward, the
model will fly forward.
12
Page 13

Backward
Draw the route downward,
and the drone will fly
backward.
Leftward
flight
Rightward
flight
Draw the route to the left,
and the drone will fly left.
Draw the route to the right,
the drone will fly right.
Trimming Functions
1. If the model keeps moving forward/backward even there is no control signal
given, adjust the forward/backward trimmer in the app control interface or the
remote control to keep the model balanced.
13
Page 14

2. If the drone turns to the left or right even when there is no control signal given,
adjust the left/right trimmer.
3. If the drone spins even when there is no control signal given, adjust
the left/right turning trimmer.
Drone Control
Whether using the smartphone app or the included remote control, the controls are similar.
Push up the throttle
control stick–the rotation
Upward
speeds of the rotors
will increase,
and the drone will climb
accordingly.
14
Page 15

Downward
Turn left
Turn right
Forward
Backward
Push down the throttle
control stick–rotation
speeds of the
rotors will decrease,
and the drone will descend
accordingly.
Turn the left/right turning
control stick to the left, and
the drone will turn left.
Turn the left/right turning
control stick to the right,
and the drone will turn
right.
When the drone is
flying, push up the
forward/backward
control stick, and the
drone will move forward.
When the drone is
flying, push down the
forward/backward
control stick, and the
drone will move backward.
Leftward
flight
Rightward
flight
Turn the sideways flight
control stick to the left
side, and the drone will fly
leftward.
Turn the sideways flight
control stick to the right
side,and the model will fly
rightward.
15
Page 16

Troubleshooting
Problem Possible Cause Solution
The drone is
powered on and
the indicator light
1
is flashing quickly.
1. The model is in gyro
detecting state.
2. The gyro component
is damaged.
1. Put the model on the ground
or any flat & still surface.
The drone’s
indicator light is
2
flashing very
slowly.
The drone’s
indicator light
repeats flashing
twice and turns
3
off. The drone
cannot be
activated.
Altitude-hold
performance is
unsatisfactory.
4
powered.
The model is not
connected with the
mobile phone or
controller.
1. The model is not put
on a flat & still
surface while it is
detecting the gyro.
2. The model has been
shocked by collision
or rough landing,
which results in the
deformation of the
rotor blades and
excessive vibration.
16
Charge the battery.The model is under
1.Open “MJX H” APP and press
the remote control power button.
2.Exit “MJX H”; close the running
grogram of the mobile phone
and re-open the “MJX H” APP to
operate.
3. Or switch to the controller to
operate the drone.
1. Put the model on a flat & still
surface and perform model
calibration once again.
2. Change the distorted rotor
blade.
Page 17

Notes on Changes & Modifications
a) Changes or modifications not expressly approved by the party responsible for
compliance could void the user's authority to operate the equipment.
b) This equipment has been tested and found to comply with the limits for a Class
B digital device, pursuant to part 15 of the FCC Rules. These limits are designed to
provide reasonable protection against harmful interference in a residential
installation. This equipment generates, uses and can radiate radio frequency
energy and, if not installed and used in accordance with the instructions, may
cause harmful interference to radio communications.
However, there is no guarantee that interference will not occur in a particular
installation. If this equipment does cause harmful interference to radio or
television reception, which can be determined by turning the equipment off and
on, the user is encouraged to try to correct the interference by one or more of
the following measures:
— Reorient or relocate the receiving antenna.
— Increase the separation between the equipment and receiver.
— Connect the equipment into an outlet on a circuit different from that to
which the receiver is connected.
— Consult the dealer or an experienced radio/TV technician for help.
17
Page 18

FLYING SAFE •BE AWARE OF YOUR ENVIRONMENT and SURROUNDINGS
Alw ays fly on a sunn y, brigh t day with as lit tle wind as
possi ble. Flyi ng in extreme he at or cold can adv ersely
aff ect your fl ying cont rol and respo nse of the vehic le.
WARRANTY REFERENCE
Atta ch your recei pt and/or pro of-of-p urchase he re as futur e ref erence, in ca se you ever need to co ntact
Ody ssey Toys abou t you r warr anty or any is sues you may hav e.
18
Page 19

GENERAL CARE & MAINTENANCE
• Do not submerge the unit in any liquids.
• Keep the unit dry.
• Disconnect the unit and monitor from USB
power sources when not in use.
• Do not expose the unit to extreme hot or cold
temperatures.
• Do not hit, drop, or smash the unit.
• Do not disassemble the unit for any reason.
• Do not place the unit near powerful,
un-shielded magnets.
NOT FOLLOWING ANY OF THESE PRECAUTIONS WILL VOID YOUR WARRANTY.
CAUTIONS & WARNINGS
•Suit able for ages 14 an d up. Adult sup ervisio n is always rec ommende d.
•This pr oduct con tains small par ts which ar e a chokin g hazard. Ke ep away from sm all childre n.
•Keep Qu adcopte r at leas t 10 fee t awa y duri ng use.
• Accur ately asse mble the quad copter and f ly it under the gui delines of thi s manual. Sma ll parts shou ld be installed b y
an adul t.
•Manu factur ers and deale rs disclaim all re sponsibi lity for dama ge caused by mis use.
•Keep ha nds, hair and loo se clothing aw ay from rot ors when pow ered on to to prev ent damage to th e vehicle or seri ous
injur y to oneself or o thers.
•The qua dcopter sh ould never be f lown in high win ds in excess of 5 MPH or nea r a pool.
•Neve r leav e the device un attende d when being cha rged.
TECHNICAL SPECFICATIONS & PARAMETERS
Char ging Time: A pproxima tely 70 minut es (dependen t on usage)
Fly ing Time: Ap proximat ely above 6- 9 minu tes (depende nt on flyin g cond itions)
Radio Co ntrol moni tor viewi ng distance li mit: appro x. 50 meters
NOTICES
This device complies with part 15 of the FCC Rules. Operation is subject to the following two
conditions: (1) This device may not cause harmful interference, and (2) this device must accept
any interference received, including interference that may cause undesired operation.
19
Page 20

Follow us at
20855 NE 16 Avenue No. C22 • Miami, FL 33179 United States
For Customer Service please email: Care@OdysseyToys.com
Please note the units model number and name in your email.
A division of Odyssey Toys
Model no. ODY-1715
Infinity NX Live Streamin Video Drone
Extra Parts Available!
Visit Odyssey online to order:
• Extra Batteries
• New rotor blades
• X-Guard components
 Loading...