

Page 1

INSTRUCTION & REFERENCE M ANUAL
Model no. ODY-5000A
Extra Parts Available!
Visit Odyssey online to order:
• Extra Batteries
• New rotor blades
•4 GB Micro SD Memory Card
www.OdysseyToys.com
Follow us at
Page 2
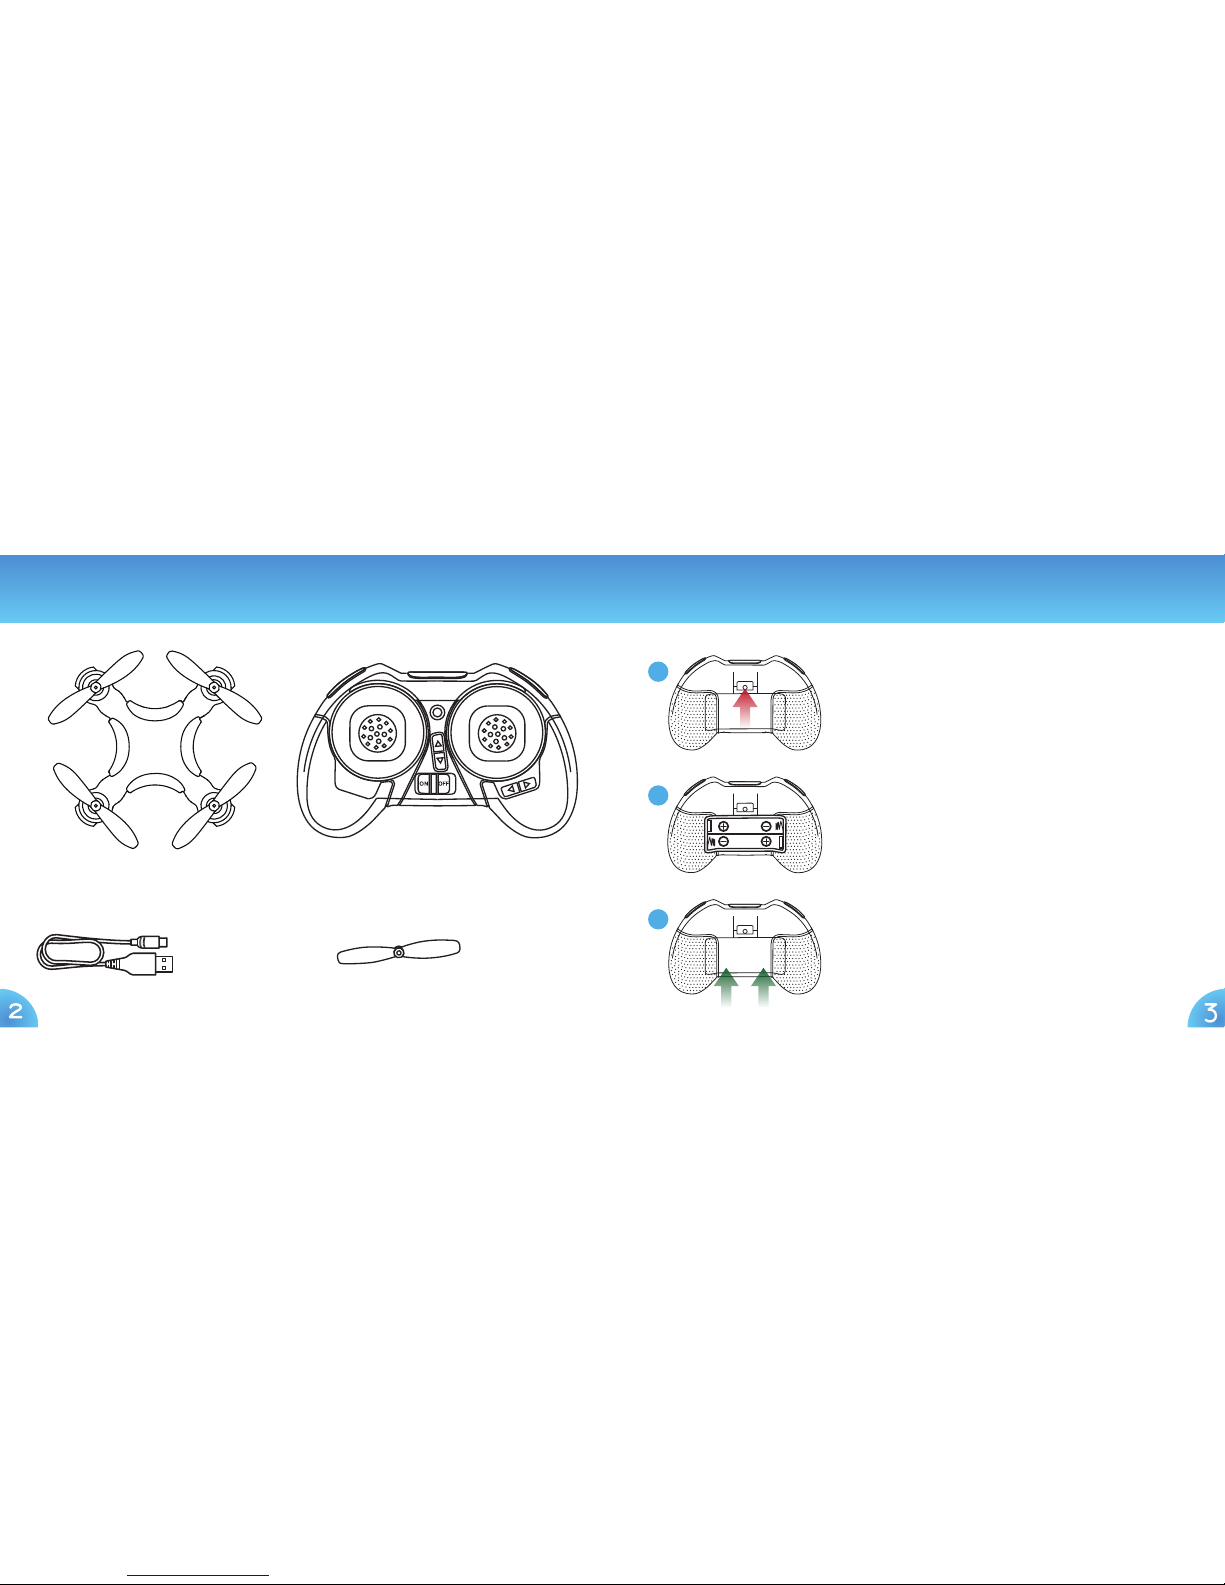
WildFX Quadcopter Drone WildFX Controller
1. Turn the Controller upside-down and
open the bat tery cover by pulling up on
the tab above the cover.
1
2
3
2. Install two AAA alkaline batteries
(not included), making sure the polarity
(“+” and “-”) is correct.
3. Re-at tach the battery cover by first
inserted the t wo tabs at the bottom of the
cover, then pushing in the tab until it clicks.
USB Charging
Cable
Replacement
Blades x4
What’s it in the box? Battery Installation
2 3
Page 3
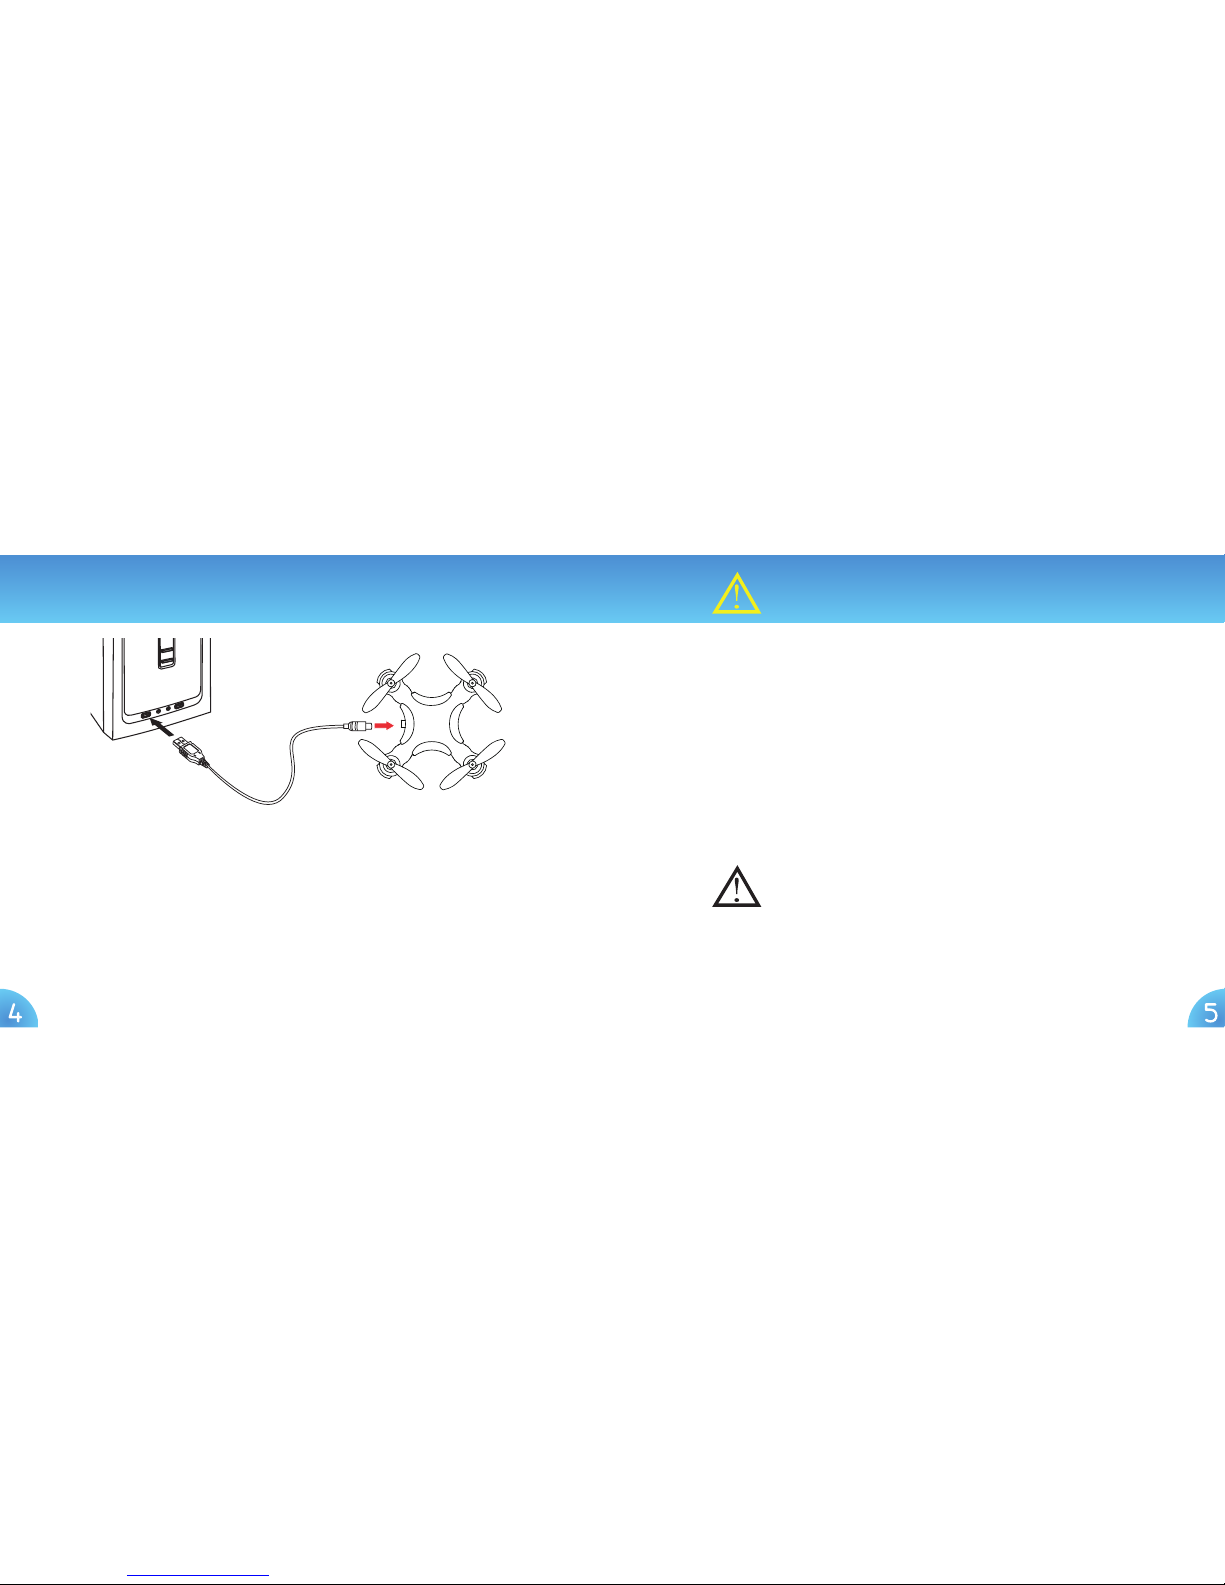
1. Locate the charging slo t just below the ON/OFF switch of the Quadcopter and
carefull y plug in the small end of the charging cord . The small tab below the
connector should be on the bot tom.
2. Connec t the USB end of the Charging Cable to a computer or to a smart phone
charger, but use only t he standard +5 +0.5V USB chargers. While charging, t he
red L ED inside the USB casing will illuminate. When the Quadcopter is f ully
charged, the light will go out. To preven t damage, remove the Charging Cord fr om
the Q uadcopter as soon as the charging light goes out.
Charging the Drone CAUTION
NOTICE
When charging through the included USB cable: The red LED light
illuminates to show the battery is charging. The red LED light goes
out to indicate charging is complete. Remove the charger from the
USB charger or computer immediately.
The battery usually comes with a partial charge from the factory. It
is recommended to use the WildF X Quadcopter Drone and
completely discharge the bat tery before charging for the first time.
DO NOT OVERCHARGE THE BAT TERY TO AVOID OVERHEATING
AND DAMAGE TO THE RECHARGEABL E BATTERY!
ALWAYS CHARGE UNDER ADULT SUPERVISION!
4 5
Page 4
Getting to know your WildFX Remote Control
Your W ildF X Dron e will all ow you to c hange th e Thro ttl e Stick t o the ri ght and t he Direc tiona l
St ick to th e left p osit ion. W ith th e Cont rolle r off, h old dow n the Ai leron Tri m butt on whi le
tur ning on t he Con troll er. Then r elease t he Aile ron Trim bu tto n. Mode 2 i s set by de fault .
Not e: The d efaul t set ting sw itche s the Th rot tle to t he righ t-hand s tick an d the Dir ectio nal
con trol t o the lef t-han d stic k. If yo u are in Rig ht-Ha nd Thro tt le Mode, y ou will n eed to ta ke
thi s swit ch int o account i n follo wing an y of the di recti ons in th is manual .
•Thr ott le St ick
•36 0º R otat ional Yaw
•Lo w-Fa st Mode
Selection
Auto
Landing
Power Switch
Right-Handed Throttle (Mode 1)Left-Handed Throttle (Mode 2)/Default)
Ai ler on Tr im
(Lef t /Righ t Thro tt le Mode Ke y)
Power Indicator
Power Indicator
Au to Take Of f
Auto
Landing
Power Switch
Ai ler on Tr im
(Lef t /Righ t Thro tt le Mode Ke y)
Au to Take Of f
Forward/Reverse
(Elevator),
Lef t/Right (A ileron),
3D F lips & Ro lls
Forward/Reverse
(Elevator),
Lef t/Right (A ileron),
3D F lips & Ro lls
•Thr ott le St ick
•36 0º R otat ional Yaw
•Lo w-Fa st Mode
Selection
6 7
Page 5
Getting ready for your first flight! Checklist.
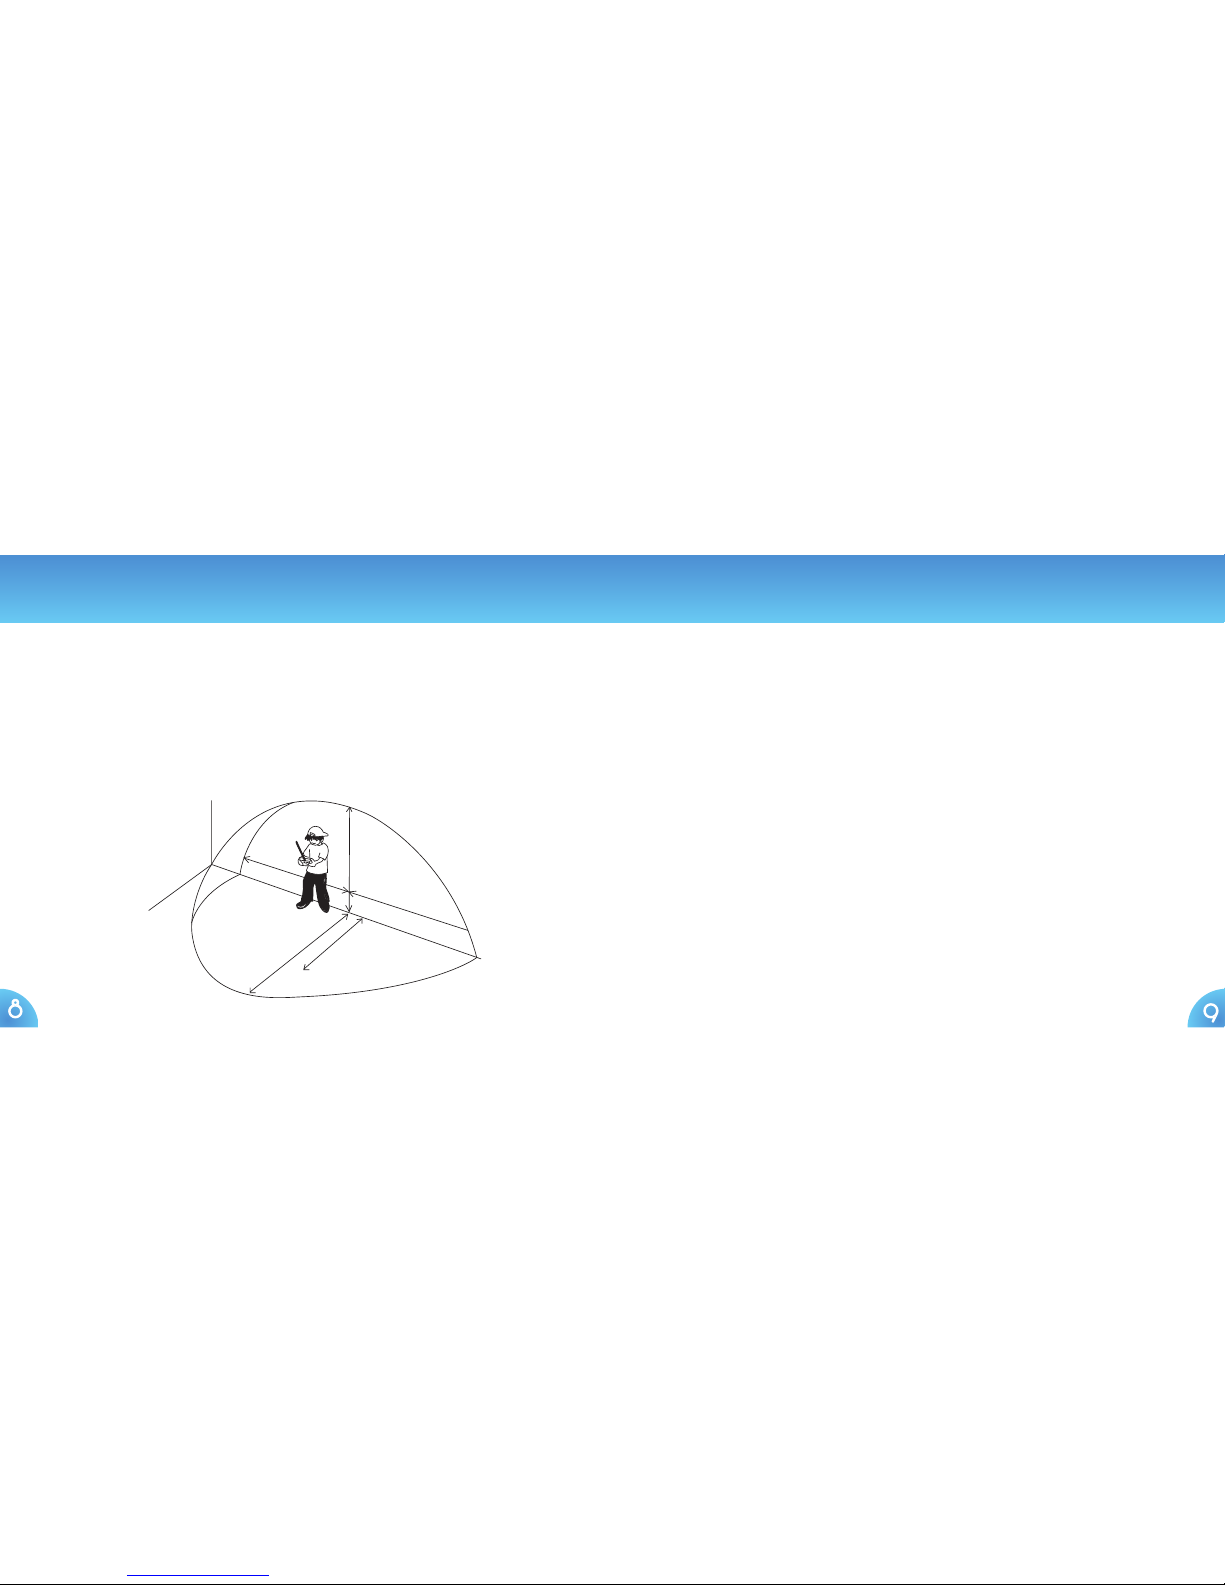
Check Your Flight Environment
Al ways fly on a sunn y, brigh t day wit h as lit tle wi nd as pos sible. F lyin g in ext reme
hea t or cold wi ll aff ect your a bilit y to pro perly c ontro l your dr one.
Al ways be su re to hav e adequat e space aro und you t o fly the ve hicle. B e aware of
your surroundi ngs to make s ure peop le or pet s are not i n the imm ediate v icini ty.
•Be sure so secure loose hair and/or clothing.
• Be sure to have at least 10 feet of clear space in all
directions.
•Make sure your unit is fully charged to avoid erratic
flying and proper response from your drone.
•Be sure to have fresh bat teries in the remote control.
• Make sure to not fly over/around any water, as falling
into water will damage the drone.
• Check all your propellers for damage before flying.
8 9
Page 6

Pairing your drone unit to the remote control.
Af ter you’ve fully charged your drone and properly inst alled the batteries in
your controller, you’re ready to use your Wild FX . Before each use, you mus t
pair the drone with the controller so they can communicate with each other.
2. Turn on the controller. It will beep
once. Move the throttle throt tle (t he
lef t-hand s tick in default mode) stick
up to the 12 o”clock posit ion.
3. Then move the throttle all the way
down to the six o’clock posi tion. T he
controller’s and the drone’s lights
will stop flashing and show a steady
ligh t, indicating a successful pairing.
Not e: Af ter "S tep 3," b e patient. I t may take u p to 7 secon ds for
the l ights t o stop fl ashing , confir ming a succ essful pair ing.
1. Turn on the drone and place it on a flat surface.
2. Its indicator ligh ts will flash.
(NOT E: You will need to re-pair the units af ter each flight or af ter the units are turned off.)
1
2
3
10 11
Page 7

How to Start/Stop the Motors How to Start/Stop the Motors
1. Once y our uni ts are pa ired, y ou’re re ady to ar m the mot ors —to ge t the pro peller s
spi nning. S tar t the mo tors by p ushing b oth s ticks a t the same t ime. S imult aneous ly
pus h the lef t hand t hrot tle s tick to t he 7 o’clock p osit ion and th e right -hand t hrot tle
st ick to th e 5 o’clock po siti on. The p ropel lers on t he quadco pter wi ll sta rt to sp in, not
enou gh to lif t the q uadcopt er, but t hey’r e ready f or comman d to take o ff!
2. To s top the motor s (for ex ample, a fter landing), agai n push the stic ks at the
same t ime to t he 5 and 7 o’clock posi tions a nd hold them the re for 2 sec onds. T he
propellers will stop spinning.
1
2
12 13
2 sec.
Page 8

Controlling your WildFX Drone while in flight!
To take o ff you h ave tw o optio ns: 1. Au to Take -O ff
2. Manual Operation
Opt ion 1 –Aut o Take-O ff
Wi th the units paired and the dr one on a flat surf ace, push up the Au to Take-o ff
but ton. Your drone should rise to an altitude of about 2 feet of f of the surface. adjust
alt itude by pushing the T hrot tle (left- hand) st ick up to fly higher and push it dow n to
fly lower. To maintain altitude, release the thrott le so that it return s to the cen ter.
Option 2 –Manual Operation
Wi th the units paired and the motor s star ted and in motion and the propeller s
spinning, push up on the throt tle stick (Diagram shows Lef t-Handed Mode 2).
Depending on weat her condi tions, have the drone climb t o an alti tude of about 3 -4
feet. Adjust alti tude by pushing the Throt tle (le ft-hand) stick up to fly higher and
push it dow n to fly low er. To main tain altit ude, release the thro ttle so that it returns
to the center.
2
Au to Take Of f
Throttle Stick
1
14 15
Page 9

Controlling your WildFX Drone while in flight!
Practice maneuvering by using the
Directional (right- hand) Stick, going t o the
lef t and right and forward and backward
(to ward you). Keep your drone wi thin 25
feet so tha t it maintains contact wi th your
controller. Be cautious whenever your
drone is fly ing toward you or anyone else.
Do not permit your drone to get too clos e.
You can al ways push the Auto-Landing
but ton if necessary. (See “L anding,” nex t
page.)
Not ice that t he two blue LE Ds indicate the
front of the Drone. Giving i t the command to
fly forward will send i t in the direction of i ts
front. If you need to reposi tion the fron t of
the Drone for bet ter control, push t he
Thr ottle Stick to the lef t or right to turn the
Drone in flight.
Whenever you wan t to land, press t he (A) Auto-Landing button. ( This is a handy
but ton for emergencies—when your Drone get s dangerously close to people or
objects.) You can also practice landing “manually” by using the T hrot tle Stick (B) to
slowly lower your Drone. Af ter landing, disarm the mo tors. (See page 13.)
Landing
A
Auto Landing
B
Throttle Stick
Forward
Direction
Reverse
Direction
16 17
Page 10

Whe n your Dron e is flyin g at a fixed al titu de, push th e Throt tle S tick to th e left t o rotat e the Dron e
coun ter-cloc kwise , or push th e Throt tle St ick to the r ight to r otate t he Drone c lockwi se.
Fast Rotation (Requires Advanced Mode setting)
You can pe rfor m flips an d rolls in a ny of the t hree mo des. Pr ess the D irect ional S tick st raigh t down and
rele ase it . The Con trol ler will b eep once, i ndicat ing tha t Flip -Roll M ode is tu rned on . While t he Cont rolle r
beep s, move t he move t he Direc tiona l Stic k quick ly in th e direc tion i n which t he Fli p-Ro ll is wan ted (r ight or l eft ).
NOT E: Make su re there i s enough sp ace in each dir ectio n before p erfor ming a Fl ip-Ro ll, and kee p a safe heig ht of
at leas t 3 ½ feet . Flips an d Rolls ar e bett er perf ormed wh ile ascen ding, as i t is then eas ier to mai ntain al titu de.
36 0º Flips & Rolls
Left Ro ll Left Ro ll
Front F lip Back Fli p
Mode Settings Advanced Features
You can fl y in 3 unique modes: Beginner, Intermediate, or Advanced. Your unit is
in Beginner Mode as i ts default se tting. To change flying modes, while the
Con troller is on, gently press the T hrot tle St ick straight down. The Contr oller will
beep once, indicat ing it’s in Beginner Mode. Gently press the Throt tle Stick
straigh t down again, and t he Cont roller w ill beep t wice, indicating i t’s in
Int ermediate Mode. Gen tly press the Thro ttle Stick straight down once more
time, and the Con troller will beep three ti mes, indicating it ’s in Advanced Mode.
Left-Handed Throttle
(Mode 2)
Right-Handed Throt tle
(Mode 1)
18 19
Page 11

If your Drone begins to be unstable during flight or drifts quickly to
one direction, correct these problems by trimming the unit.
1. Place the Drone on a flat surface. Turn on the Drone and the
Controller and pair them.
2. Enter the Advance Mode (see above) by pressing the Throttle Stick
and releasing it three times.
3. Push the Throttle Stick and Directional Stick to the lowest right
corner (7 o’clock position) and hold them there. The indicator lights
will flash for 1-2 seconds. Release the sticks. Wait until the LEDs stop
flashing, which will indicate a success ful calibration.
If your Drone drifts/moves to the right without any input f rom the direct ional
stick, t hen push the lef t trim button. A djust as necess ary.
If your Drone drifts/moves to the left without any i nput from the directional
stick, t hen push the right trim but ton. A djust as necessary.
Left Trim Adjustment
Right Trim Adjustment
Push
Push
Calibrating the Accelerometer Trimming the Drone
20 21
Page 12

To make your Drone fly
higher, gradually push the
lef t throt tle stick (the
lef t-hand stick) forward
(away from you) until your
Drone reaches the desired
altitude.
TO ASCEND
TO DE SCEND
To make your Drone fly lower,
gradually pull the throttle st ick
backward (toward you) to stop
the propellers from spinning and
therefore decrease altitude.
To fly fo rwar d: Push t he direc tion
st ick (the righ t-hand j oyst ick)
forward.
To fly bac kward : Pull th e direct ion
stick back ward.
To str afe (la teral) t o the le ft: P ush
the d irect ion st ick to the l eft .
To str afe (la teral) t o the ri ght: P ush
the d irect ion st ick to the r ight .
FLIGHT DIRECTION
Turn le ft: P ush the t hrot tle
st ick to th e left .
Turn right : Push t he thro ttle
st ick to th e right .
TURN LEFT/RIGHT
How to Fly! How to Fly!
22 23
Page 13

• Do not submerge the unit in any liquids.
• Keep the unit dry.
• Disconnect the unit and monitor from USB power
sources when not in use.
• Do not place the unit near power ful, un-shielded
magnets.
• Do not expose the unit to extreme hot or cold
temperatures.
• Do not hit, drop, or smash the unit with extreme force.
• Do not disassemble the unit for any reason.
NOT FOLLOWING THESE PRECAUTIONS WILL VOID
YOUR WARRANTY.
General Care & Maintenance
24 25
Sui table f or ages 12 an d older. Ad ult supe rvis ion is al ways rec ommended.
Thi s produc t cont ains smal l part s that ar e a choking hazard. Ke ep away fr om small
children.
Keep t he dron e (the fl ying element ) at leas t 10 feet a way fro m yours elf, ot her peop le, and
objects during use.
Cor rectl y assem ble all pa rts of t he Wil dFX Q uadcop ter Dron e and fly i t only under the
guid elines o f this in stru ction m anual. S mall par ts sho uld be ass embled b y an adult .
Keep h ands, ha ir, and loos e cloth ing away f rom th e propel lers wh en power ed on to
pre vent inj ury to y ourse lf or damag e to the pr oduct .
The W ildF X Quad copter Drone s hould no t be flow n in wind y condi tions ( winds o f 5 MPH or
st ronger ) or near any b ody of wa ter.
Never leave a c harging bat tery u natt ended. T he bat ter y may becom e damaged f rom
overcharging.
Manu facturers a nd dealer s discla im all res ponsib ilit y for dama ge caused b y misuse .
Ple ase ret ain this m anual fo r futur e refer ence.
Before operating your Pocke t Drone for the first time, please read thr ough the
following not ices to be aware of proper drone and bat tery care.
CAUTIONS & NOTICES
Page 14

How to Maintain Your Battery Remote Control Battery Rederence
26 27
PL EAS E REF EREN CE THE SE NO TICE S ON THE B ATT ERIE S FOR TH E REMO TE CO NTR OL
Your Dr one is fu rnishe d with a remov able, re chargeab le bat tery. Pleas e pay careful
attention to the following safet y ins tructions:
1. Use o nly the c harging USB cor d provided by O dysse y Toys f or charg ing.
2. W hen char ging the b att ery, if t he bat tery i s too hot i t means t he bat tery i s
over charge d. In such a ca se, sto p chargin g the bat ter y immed iatel y. Overcharging
could damage the battery permanentl y.
3. A fter fl ying , the Dro ne’s bat ter y temper ature m ay be rela tive ly high. Wait 10 m inute s
unt il the ba tte ry has cooled be fore re chargin g.
4. Tur n off bo th the D rone and C ontr oller w henever i t is not i n use. If y ou don’t p lan on
fly ing your D rone fo r a time, ch arge the b att ery for a bout 1 ho ur befor e stor ing it .
Cau tion: T here is a r isk of ex plosi on if the b atte ry is re placed by a n incorr ect ty pe.
Disp ose of us ed bat terie s accordi ng to local l aws. Ne ver leav e this pr oduct
una tten ded whil e charging— this can b e a fire haz ard.
Use o nly AAA no n-rechargea ble bat ter y or AA A rechar geable ba tte ry in th e contr oller.
Do no t mix the t wo t ypes.
Insert ba tte ries wi th corr ect pol arit y.
Do no t shor t circui t the supp ly ter minals .
Li thium i on bat terie s can be flamm able if misuse d.
Do no t mix old a nd new bat ter ies.
Do no t mix alk aline ba tter ies, s tandar d (carbon -zinc), or recha rgeable
(nickel-cadmium/NiCad) batteries.
Remove exhausted or drained batteries.
Remove rechargeable batteries before charging them.
Rem ove and store t he bat terie s away fr om the Co ntroller wh en not in u se to avoi d damage
fro m batter y leakage .
 Loading...