

Page 1
Beaming Knowledge to Everyone
Odyssey 700 Satellite-Enabled Tablet Computer
User Manual
Page 2

Copyright © 2014 Yazmi USA, LLC. All rights reserved. Yazmi, Odyssey, LAMBDAS, AfriStar, AsiaStar, and Beaming
Knowledge to Everyone are trademarks of Yazmi USA, LLC. Commercial reproduction or distribution of this material in whole
or in part without the prior written consent of Yazmi USA, LLC is prohibited.
Version ODY700A
2
Page 3

Table of Contents
1 The Odyssey 700 Tablet ....................................................................................................................... 4
2 Power Button Usage ............................................................................................................................. 5
3 Touch-Screen Navigation..................................................................................................................... 5
4 Using microSD Memory Card ............................................................................................................. 5
5 Getting Started ...................................................................................................................................... 6
6 Screen Lock .......................................................................................................................................... 7
7 Launcher ............................................................................................................................................... 8
8 Pre-loaded Applications ....................................................................................................................... 9
9 Antenna Setup .................................................................................................................................... 15
10 Charging of Odyssey 700 tablet and Setup of Optional Solar-Power Charging Station ................. 23
11 Application Management ................................................................................................................... 28
12 People ................................................................................................................................................. 29
13 Voice Search (requires Internet connection) ..................................................................................... 30
14 Clock .................................................................................................................................................. 32
15 Google Play Store .............................................................................................................................. 34
16 Browser and Chromium ..................................................................................................................... 37
17 Calendar ............................................................................................................................................. 38
18 Camera ............................................................................................................................................... 41
19 Calculator ........................................................................................................................................... 43
20 Email .................................................................................................................................................. 44
21 Explorer .............................................................................................................................................. 46
22 Music .................................................................................................................................................. 48
23 Video .................................................................................................................................................. 50
24 Gallery ................................................................................................................................................ 52
25 Gmail .................................................................................................................................................. 54
26 Maps, Local, and Latitude ................................................................................................................. 57
27 Google Talk ........................................................................................................................................ 60
28 Google ................................................................................................................................................ 62
29 Wi-Fi .................................................................................................................................................. 64
30 Accounts ............................................................................................................................................. 66
31 Settings ............................................................................................................................................... 67
3
Page 4
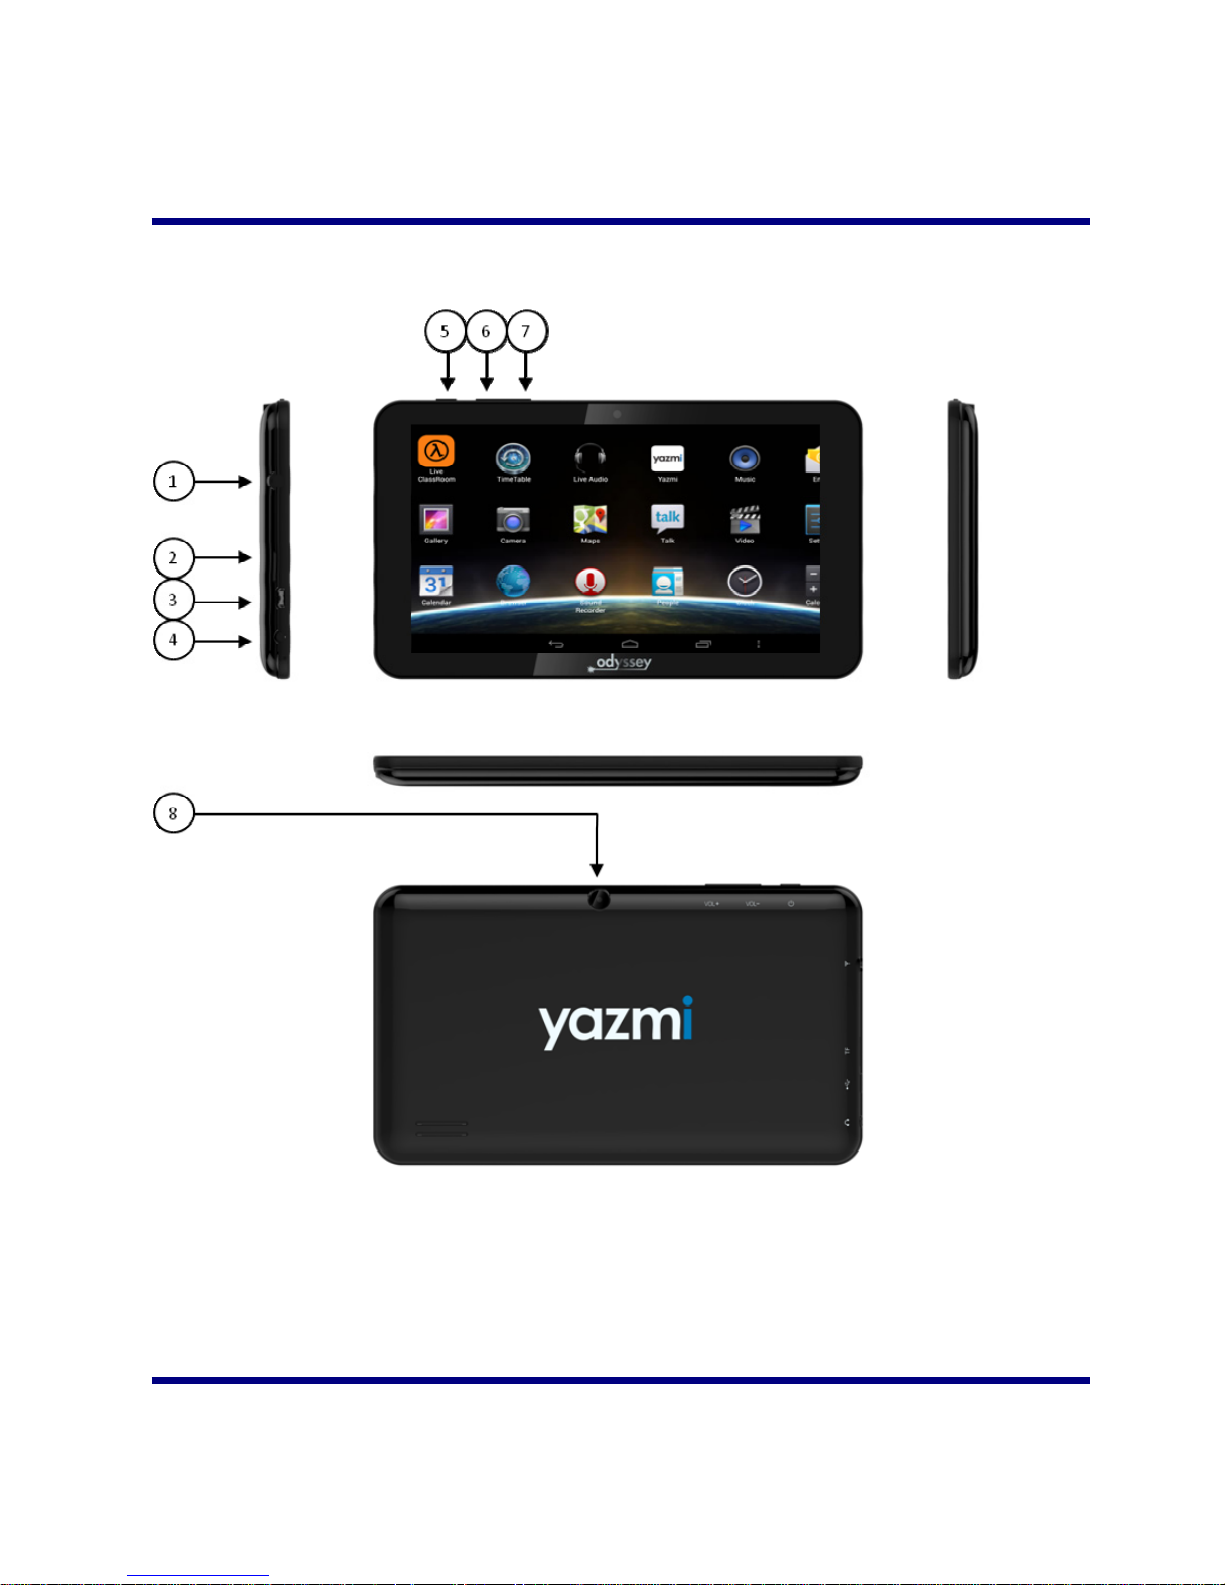
1 The Odyssey 700 Tablet
① Antenna connector ⑤ Power button
② microSD Card port ⑥ Vo lu me do wn b utton
③ Micro USB/Charging port ⑦ Volume up button
④ Earphone port ⑧ Rear-facing camera lens
4
Page 5

2 Power Button Usage
Turn On : Press the power button and hold for 2 seconds.
Turn Off: Press the power button and hold for 2 seconds → tap Power off → tap OK.
Airplane mode On/Off: Press the power button and hold for 2 seconds → tap airplane mode.
Sleep Mode On/Off: Press & release the power button quickly to turn sleep mode on and off.
3 Touch-Screen Navigation
The touch-screen allows for quick, easy and convenient navigation for all applications.
Throughout the User Guide, the following tap or touch navigation methods are discussed:
Tap: quick tap & release on an item on the screen.
Finger slide: touch & slide your finger across the screen and then release.
Touch & hold: touch and hold for about 2 seconds, and then release.
Important Note: To avoid scratching or crushing, use only an approved tablet stylus or your
finger on the touch-screen. Do not place sharp, rough, hot, wet, or heavy objects on the
touch-screen surface. Do not leave tablet in direct sunlight for extended periods of time.
4 Using microSD Memory Card
A microSD memory card (maximum 32 GB) can be inserted in the microSD port in order to
expand the total data storage capacity of the Odyssey 700. To begin use of a new microSD
memory card in the Odyssey 700, insert the card into the microSD slot until it clicks into place.
To remove a microSD card from the Odyssey 700:
· Close all applications or documents which have been opened on the card. Press Settings →
Storage → SD Card → Unmount Storage → OK.
· Press on microSD card and then release. The microSD card should pop out partially from the
port. Remove the card and store in a safe, cool and dry location until next use.
Important Note: Do not repeatedly insert and remove the microSD memory card in a short time,
as this may cause damage to the card and result in loss of data and irreparable damage to the
microSD memory card.
5
Page 6

5 Getting Started
Charge the device
The Odyssey 700 has an internal battery. The battery must be fully charged after unboxing and
prior to first use, which should take approximately 4 hours to complete. The battery is recharged
using an electrical outlet and the included MicroUSB wall charger. While charging, the battery
indicator light should be lit. When fully charged, the battery indicator light will turn off.
1. Plug the power adapter MicroUSB plug into the MicroUSB/Charging port on the Odyssey
700. Plug the power adapter into an electrical wall outlet of no more than 120V.
The Odyssey 700 battery can also be recharged using the optional Yazmi solar-power charging
station. See the solar-power charging station user guide for more details and appropriate usage.
Important Note Regarding the Odyssey 700 Internal Lithium-Ion Battery
The Odyssey 700 lithium-ion battery should only be handled by experienced repair personnel.
Only use an authentic Yazmi Odyssey 700 battery in the tablet. Use of an unauthorized battery
could result in an explosion. Opening of the tablet shell by the user could result in voiding of the
manufacturer's warranty and result in personal injury.
Turn the device on
Press the power button and hold for 2 seconds.
Start Wi-Fi Network
· Turn on Wi-Fi
Since many features require a Wi-Fi connection, we recommend set up of Wi-Fi network now.
Press Settings → Wi-Fi. Check Wi-Fi to turn on.
· Connect to Wi-Fi
The device automatically scans and lists all local Wi-Fi Networks found. A symbol
indicates a secure network that requires the correct login name and password to connect.
1) Tap the desired network to which you want to connect, → enter the Network Password if
applicable, → tap Connect.
2) Tap back key to return to the Home screen.
Important Note: If your desired Wi-Fi network is set as hidden, it will not be recognized during
the auto scan. Tap
Contact your IT administrator for appropriate login name and password for your network.
6
“+”
on the top of the screen and follow the prompts to add your network.
Page 7
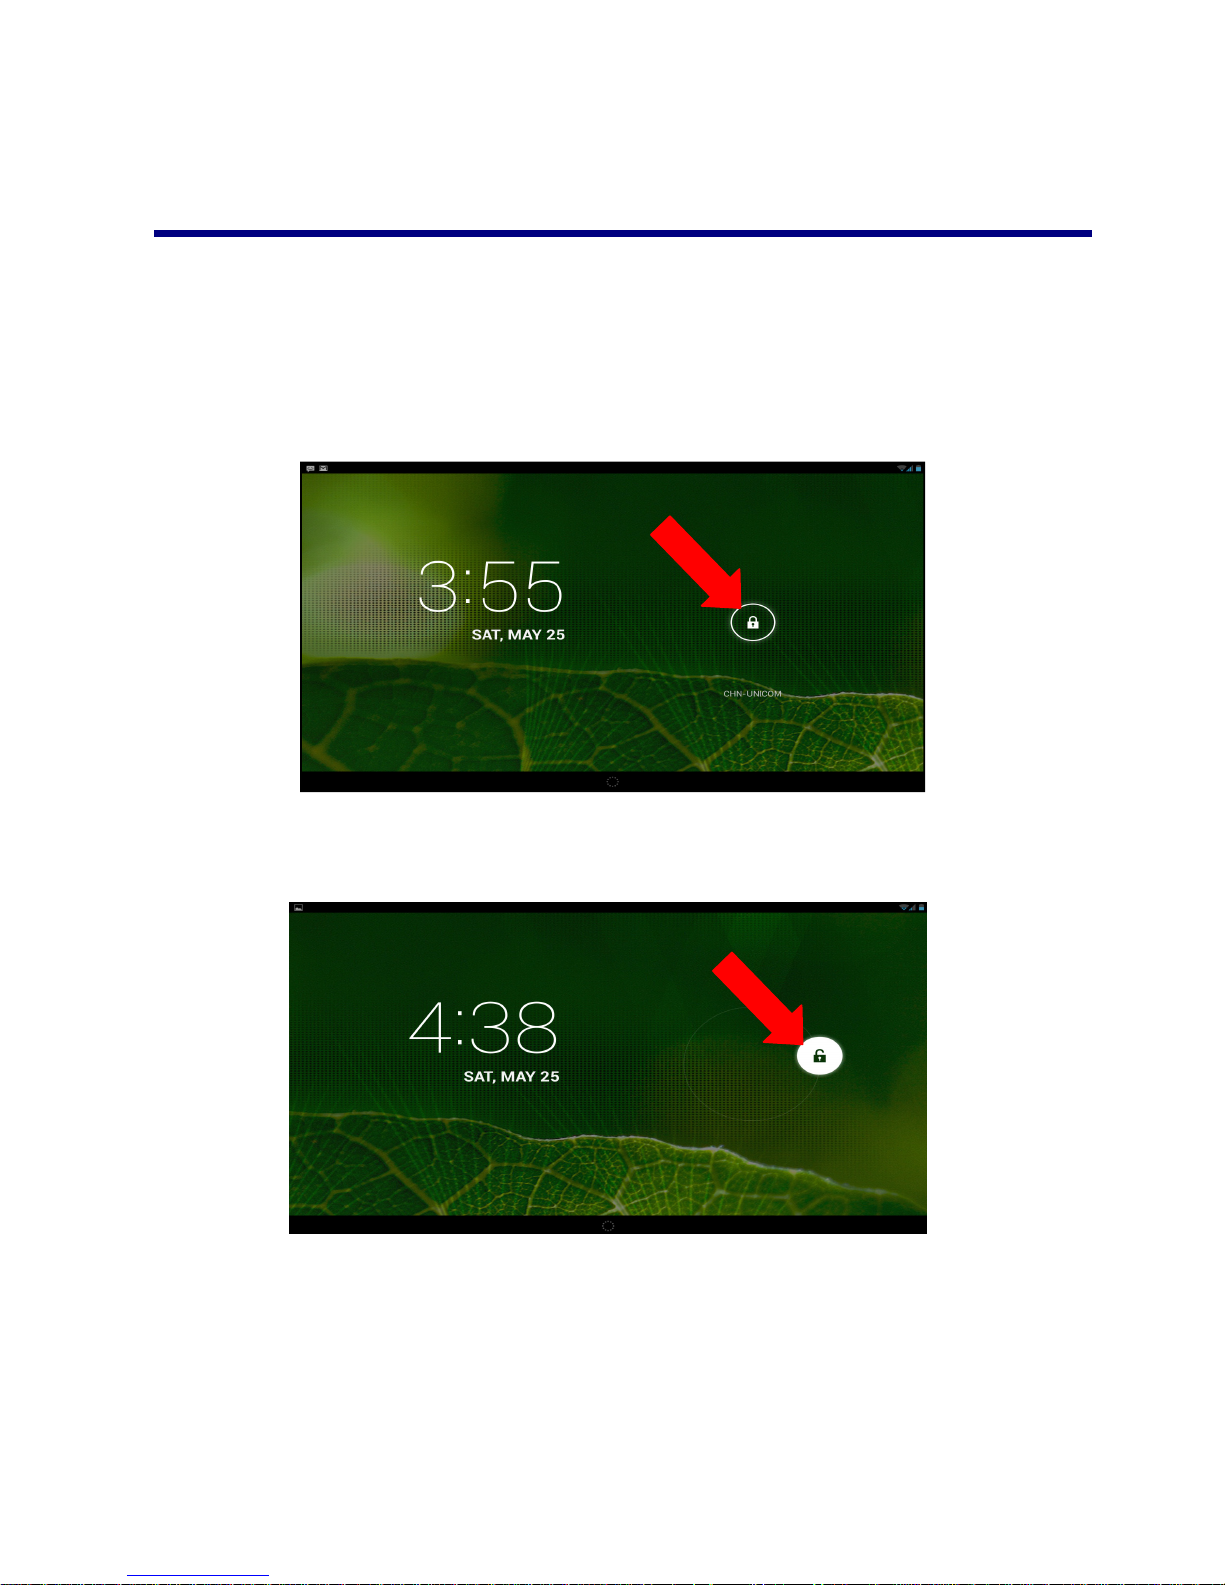
6 Screen Lock
The screen lock feature can be set to automatically lock the screen to protect user data. The screen
can also be manually locked by quickly pressing the power button. Once locked, the home screen
will display a lock icon as shown below:
To exit the screen lock, press the lock icon and gently drag it in any direction across the screen.
The lock icon will change to an unlocked icon as shown below:
7
Page 8
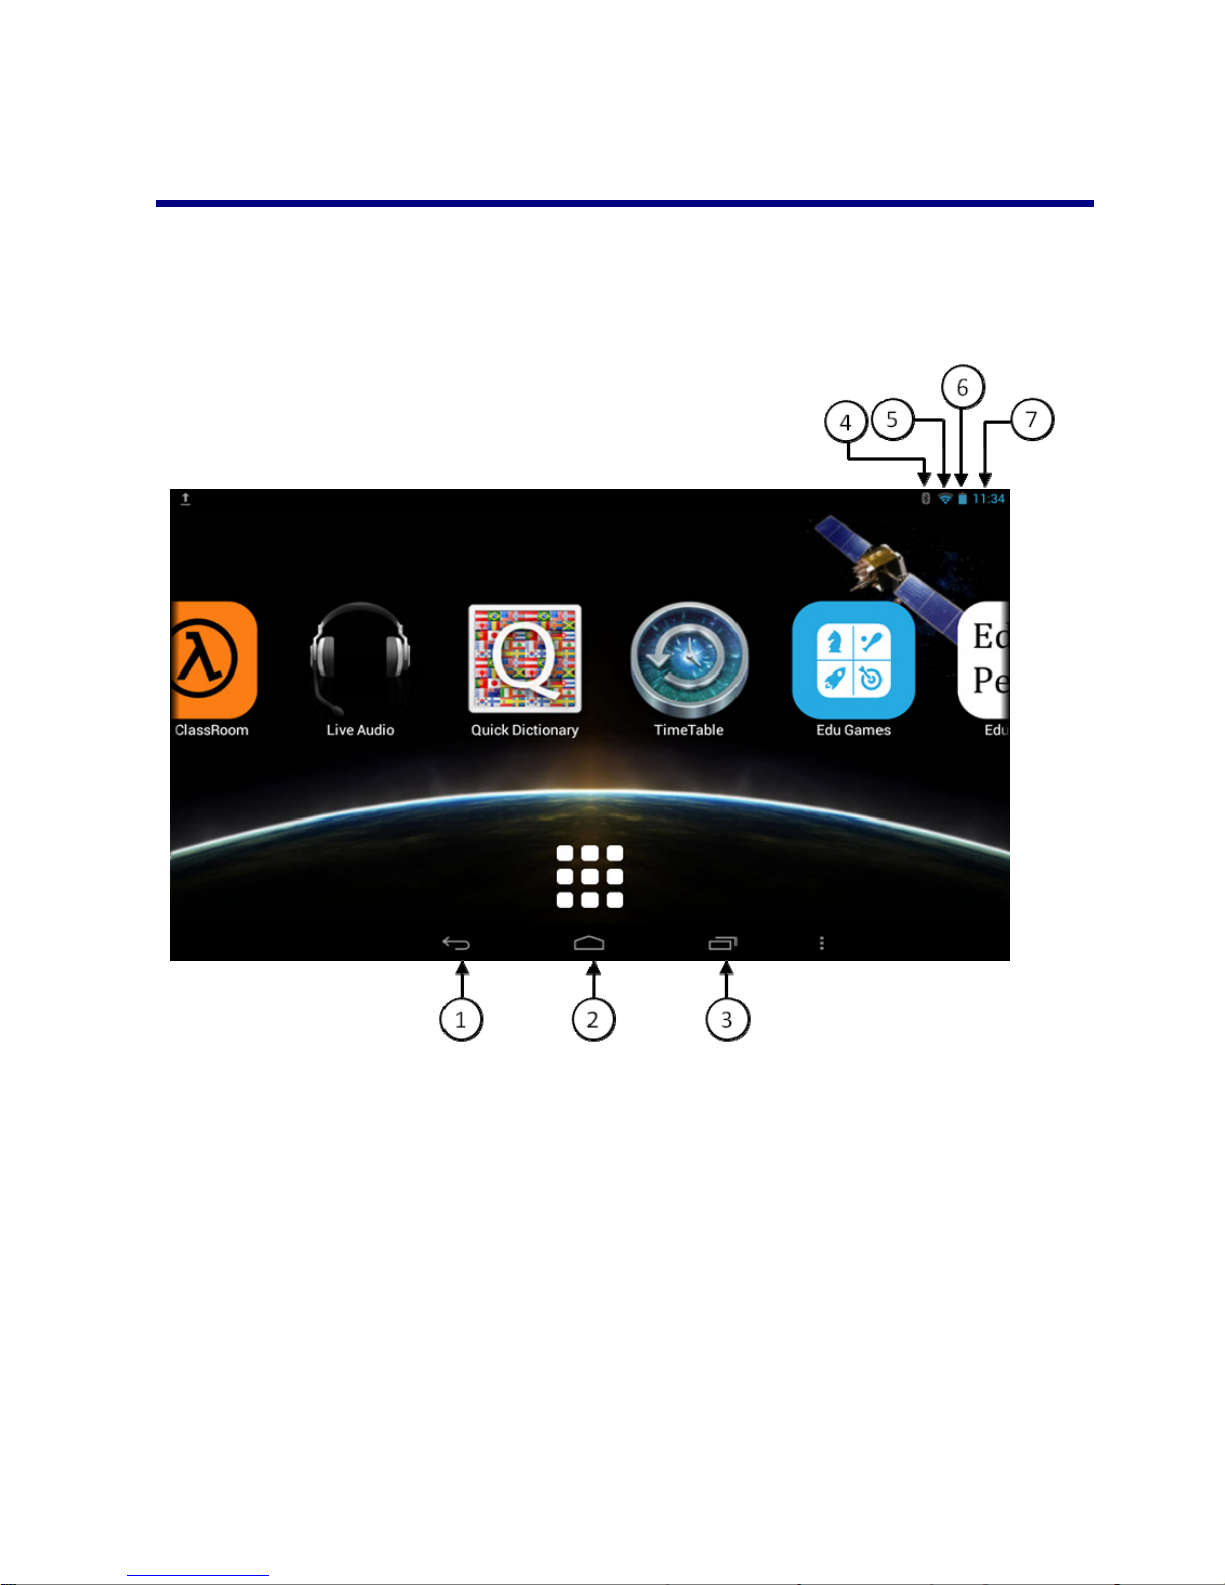
7 Launcher
① Back key ⑤ Wi-Fi signal strength
② Home key ⑥ Battery charge status
③ Display open programs ⑦ Current time
④ Bluetooth status ⑧ Satellite signal strength (see image next page)
8
Page 9
8 Pre-loaded Applications
9
Page 10
App Description
Shows Satellite Signal reception level and Channel Details.
Allows user to select/deselect Yazmi channels.
Allows user to delete data in internal storage.
Control Station
EYazmi's proprietary Live audio and Multimedia Broadcast
Directly Access via Satellite (LAMBDAS) player for video
presentations and lectures.
Presentation files in formats including Microsoft® PowerPoint®,
Word®, and PDF can be broadcast along with sender’s/teacher’s
Live Class Room
audio and video lecture.
Player for live and pre-recorded audio.
Live Audio
10
Page 11

Edu Portal
r
e
Time Table
Edu Portal is the Digital Curriculum centre for the registered use
Access applicable content by subject and grade level.
Access resources and Internet links.
Updates automatically over-the-air including new content and
annual or semester-based refresh.
Scheduling ap.p
Schedules are available in daily and monthly formats.
Automated notification with direct links to scheduled tasks.
Searchable encyclopedia.
Social learning platform.
EduPedia
Quick Dictionary
Ebook
Searchable dictionary.
Support for various languages.
E-reader supporting EPUB and PDF formats as well as Adobe
DRM encrypted eBooks.
Fully-customizable reading experience: adjust font size, font type
font and background colors, margin, alignment, line spacing as w
as brightness to best suit your preference.
Language localization: supports various languages.
Video tutorials from Khan Academy™.
Extensive library of lectures.
Khandroid
11
Page 12
App for solving mathematical problems for
Algebra I, Algebra II, Calculus, and Math for
secondary and university students, including
detailed answers.
Edu Games
Helps learn English grammar by practicing
interactive grammar exercises.
Name numbers
Count
Compare numbers
Add
Subtract
Match numbers
People
Save a person’s information
Voice Search
Voice-based search
12
Clock
Play Store
Browser
Use as alarm clock with scheduled alarms.
Google Play® online app store with hundreds of thousands of
free and pay apps available for download (available via Wi-Fi
connection).
Access the Internet and “surf the web” whenever desired
(available via Wi-Fi connection).
Page 13
Calendar
Sound recorder
Camera
Calculator
Email
Explorer
Calendar with ability to set events.
Audio memo recorder.
Camera application with still photo and video capability.
Includes a variety of photo filters..
Standard and scientific notation.
Send/Receive email using your existing email addresses
(available via Wi-Fi connection).
Explorer application for viewing and managing files and apps.
Use to install Android apps, and to backup files to your
microSD card.
Music
Play and manage audio files.
Video Player
Play and manage video files.
Gallery
View and manage photo files.
Gmail
For sending and receiving mails by Gmail® server (available
via Wi-Fi connection). Requires Gmail email account.
Maps
For discovering the world with street and satellite data from
Google Earth®.
13
Page 14

Dev Tools
Places
Latitude
Settings
Apk Installer
Google
Android® debug tools.
Local search using Navigation service.
Lets pre-selected users view each others’ locations on maps
and share status messages with each other.
Multiple settings for personalizing and enhancing the Odyssey
700.
Used for installation of =Android applications on a microSD
card or NANDFLASH.
Online search engine (available via Wi-Fi connection).
Chrome
Web browser to access the Internet and “surf the web”
whenever desired (available via Wi-Fi connection).
Downloads
Library of downloaded applications.
Movie-Studio
Play and manage video files.
Search
Search for installed applications.
Talk
Instant messaging service (available via Wi-Fi connection).
☆ To move an icon to the Desktop screen, touch & hold on the icon, and then release it when it
appears on the Desktop screen. Touch, hold and slide icons onto “
the Desktop screen.
14
×” to remove them from
Page 15
9 Antenna Setup
Antenna setup & optimization for receiving YAZMI Satellite signal.
The Odyssey 700 requires the included external antenna in order to utilize the Yazmi satellite
service. The antenna must be located within the Yazmi satellite coverage area and have no
obstructions between the antenna and sartellite (clear "line-of-sight"). The antenna must be
located either in a window facing the satellite or outdoors to receive an optimal signal.
Yazmi has two satellites called AfriStar and AsiaStar. The purchasing organization for your
Yazmi tablet will have received access to either AfriStar or AsiaStar depending on the location of
the users. The antenna needs to be set up at the correct vertical angle and in the correct direction
(north-south east-west azimuth) to receive the optimal satellite signal.
For example, from a location in India, the AsiaStar satellite is located Southeast and the vertical
angle depends on the latitude of the tablet location.
Elevation angle and azimuth direction for a variety of cities (and surrounding areas) are listed
on pages 69 to 73 of this manual. Contact your IT administrator if no city near you is listed.
Adjust antenna orientation and make it face the applicable Yazmi Satellite.
The following sections provide additional detail on setting up the satellite antenna.
Training
procedure ID
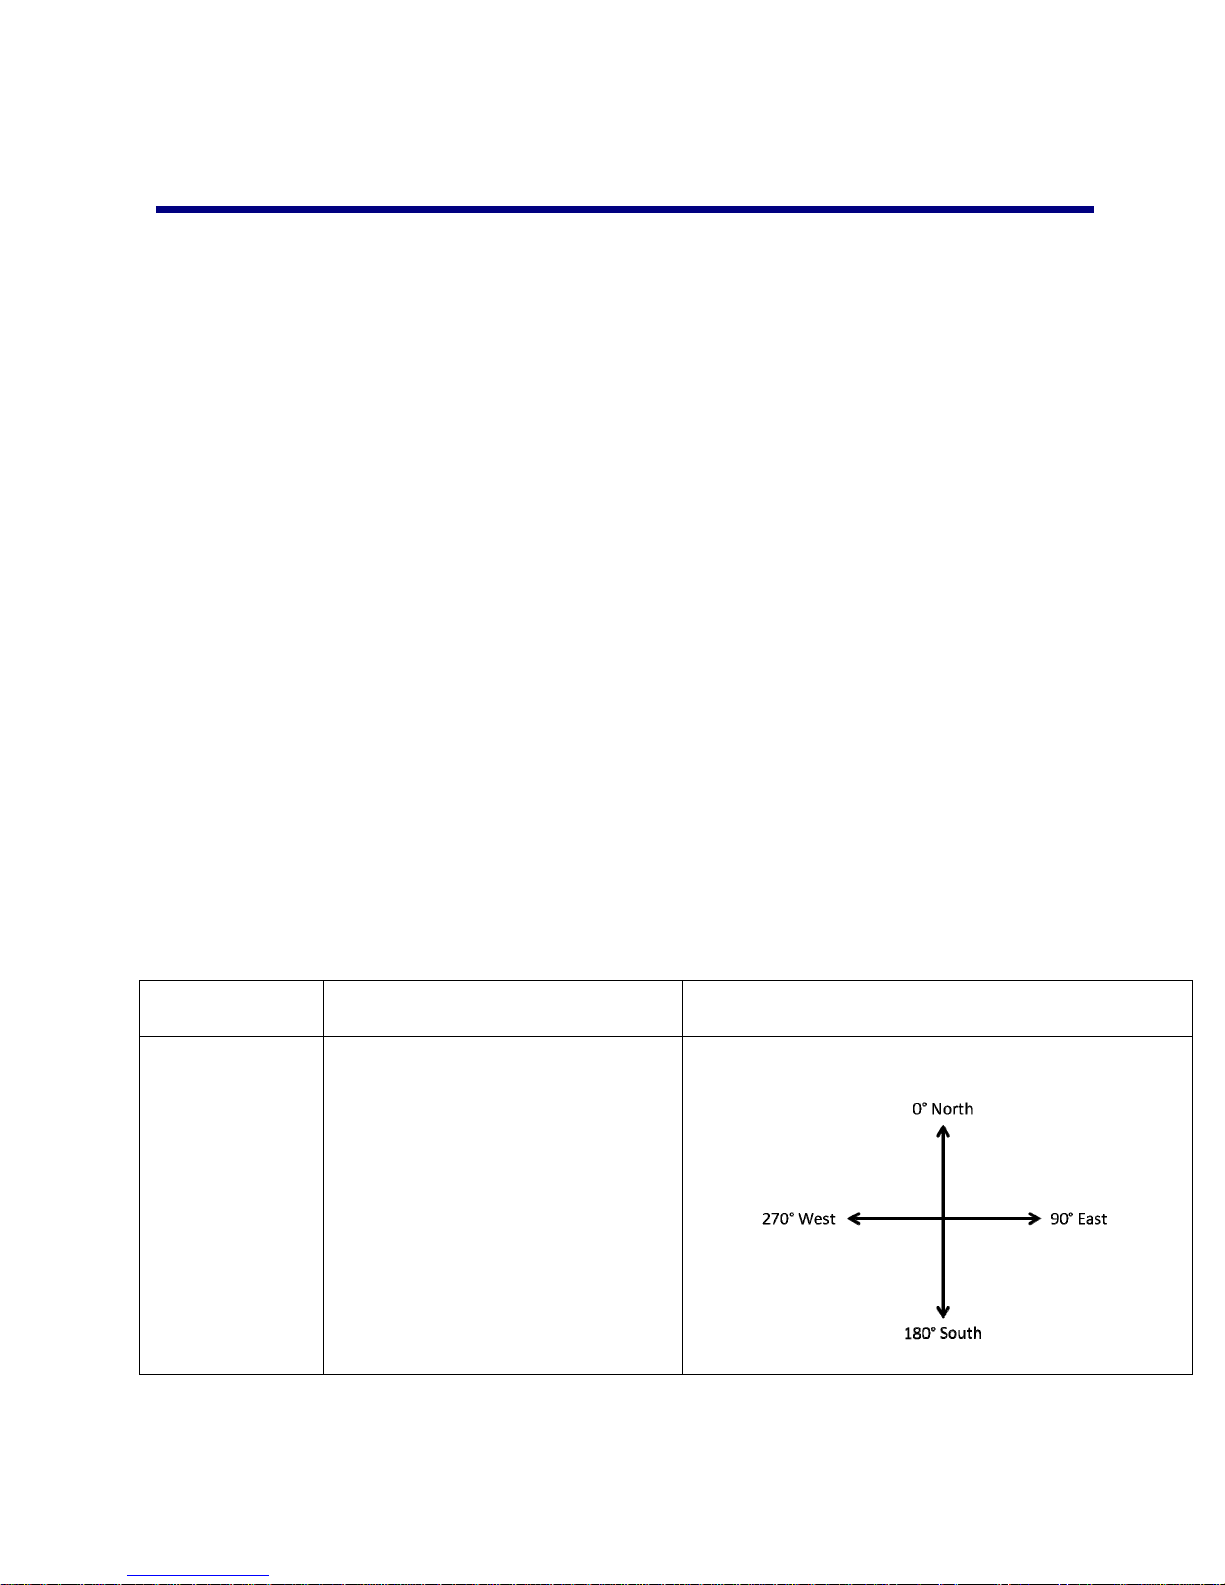
TP2-0001 When setting up the antenna you
have to consider 2 directions:
15
Action to be carried Visual
Azimuth
Azimuth - which is the
angle calculated from
True north
Page 16
Elevation - which is the
angle calculated between
satellite and horizon
(measured from the
horizon - a larger number
means a the satellite is
located "higher" in the
sky).
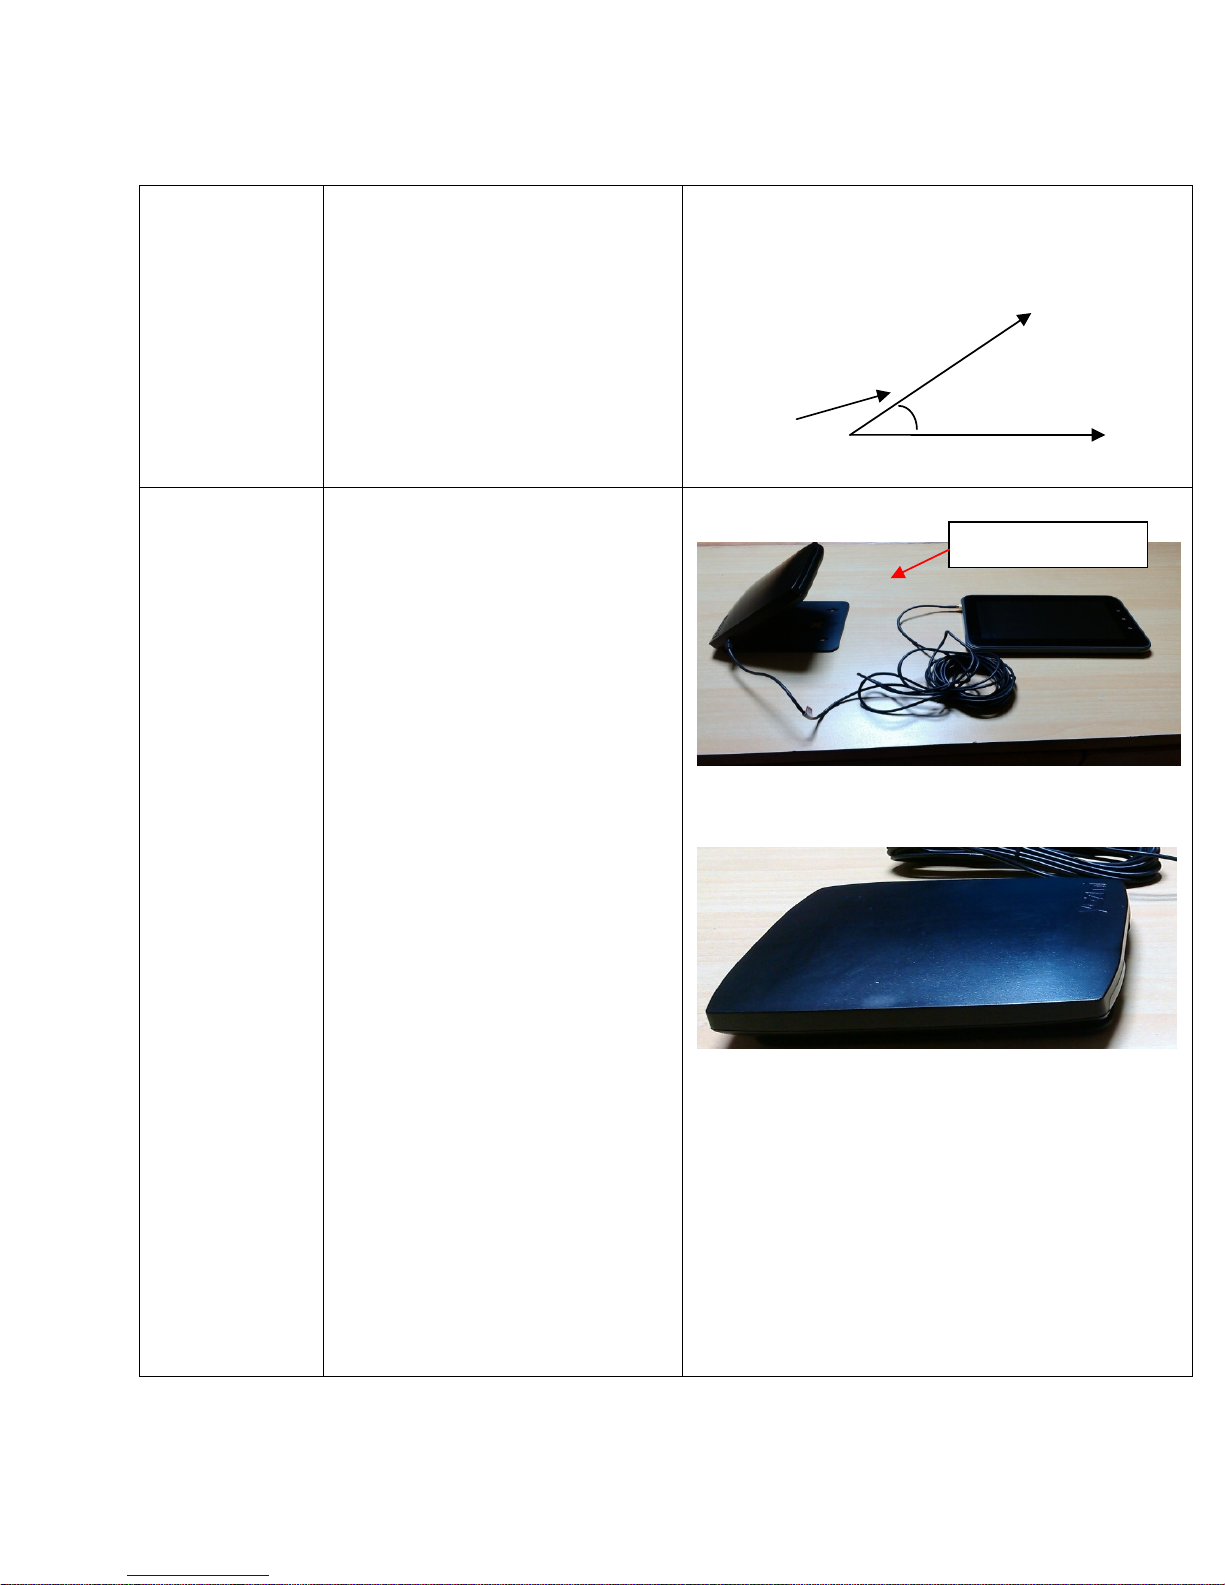
TP2-0002
Elevation angle as shown in
Picture-0001
90 degree (90°) elevation as shown
in Picture-0002
Elevation angle is the angle
between the base and antenna face.
Antenna is fully flat on its base at a
90 degree elevation.
16
Elevation
Antenna look angle
Horizon
Elevation
Angle.
Picture-0001
Elevation angle
Picture-0002
Page 17
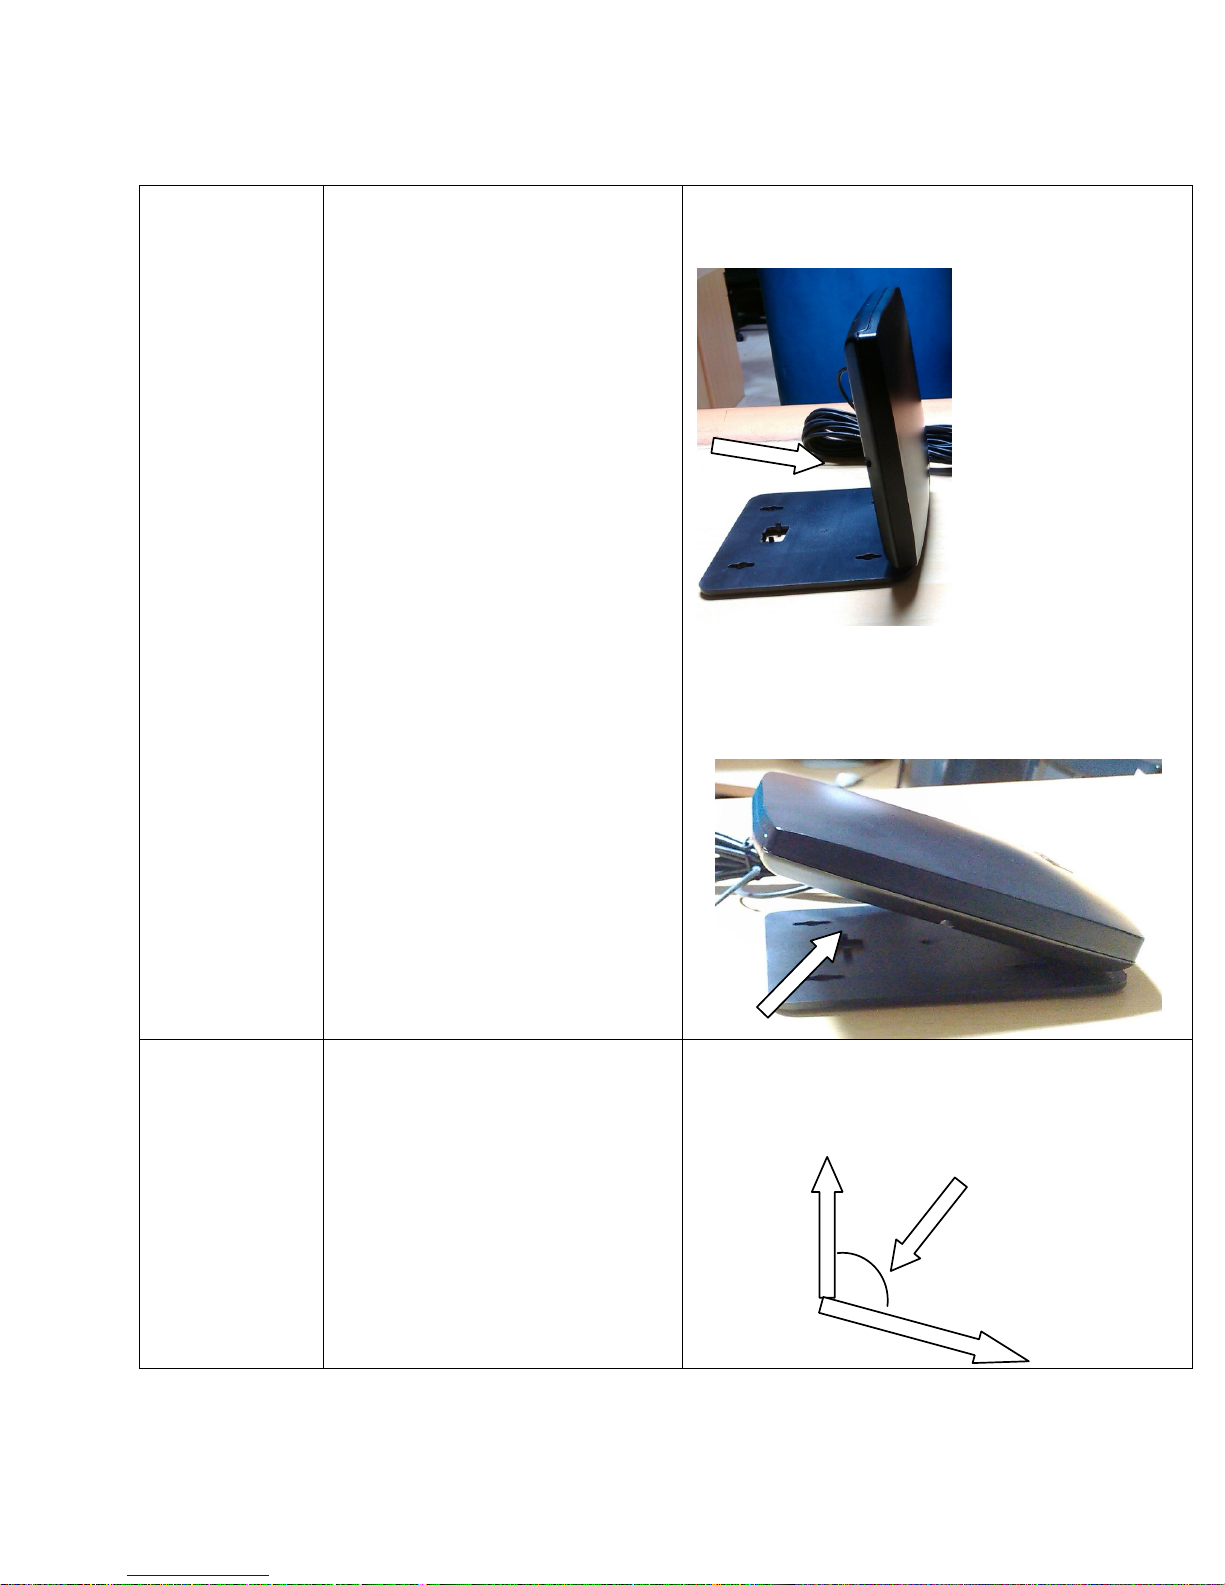
0 degree (0°) elevation as shown in
Picture-0003
Antenna is fully opened up with the
antenna face point straight out at
the horizon.
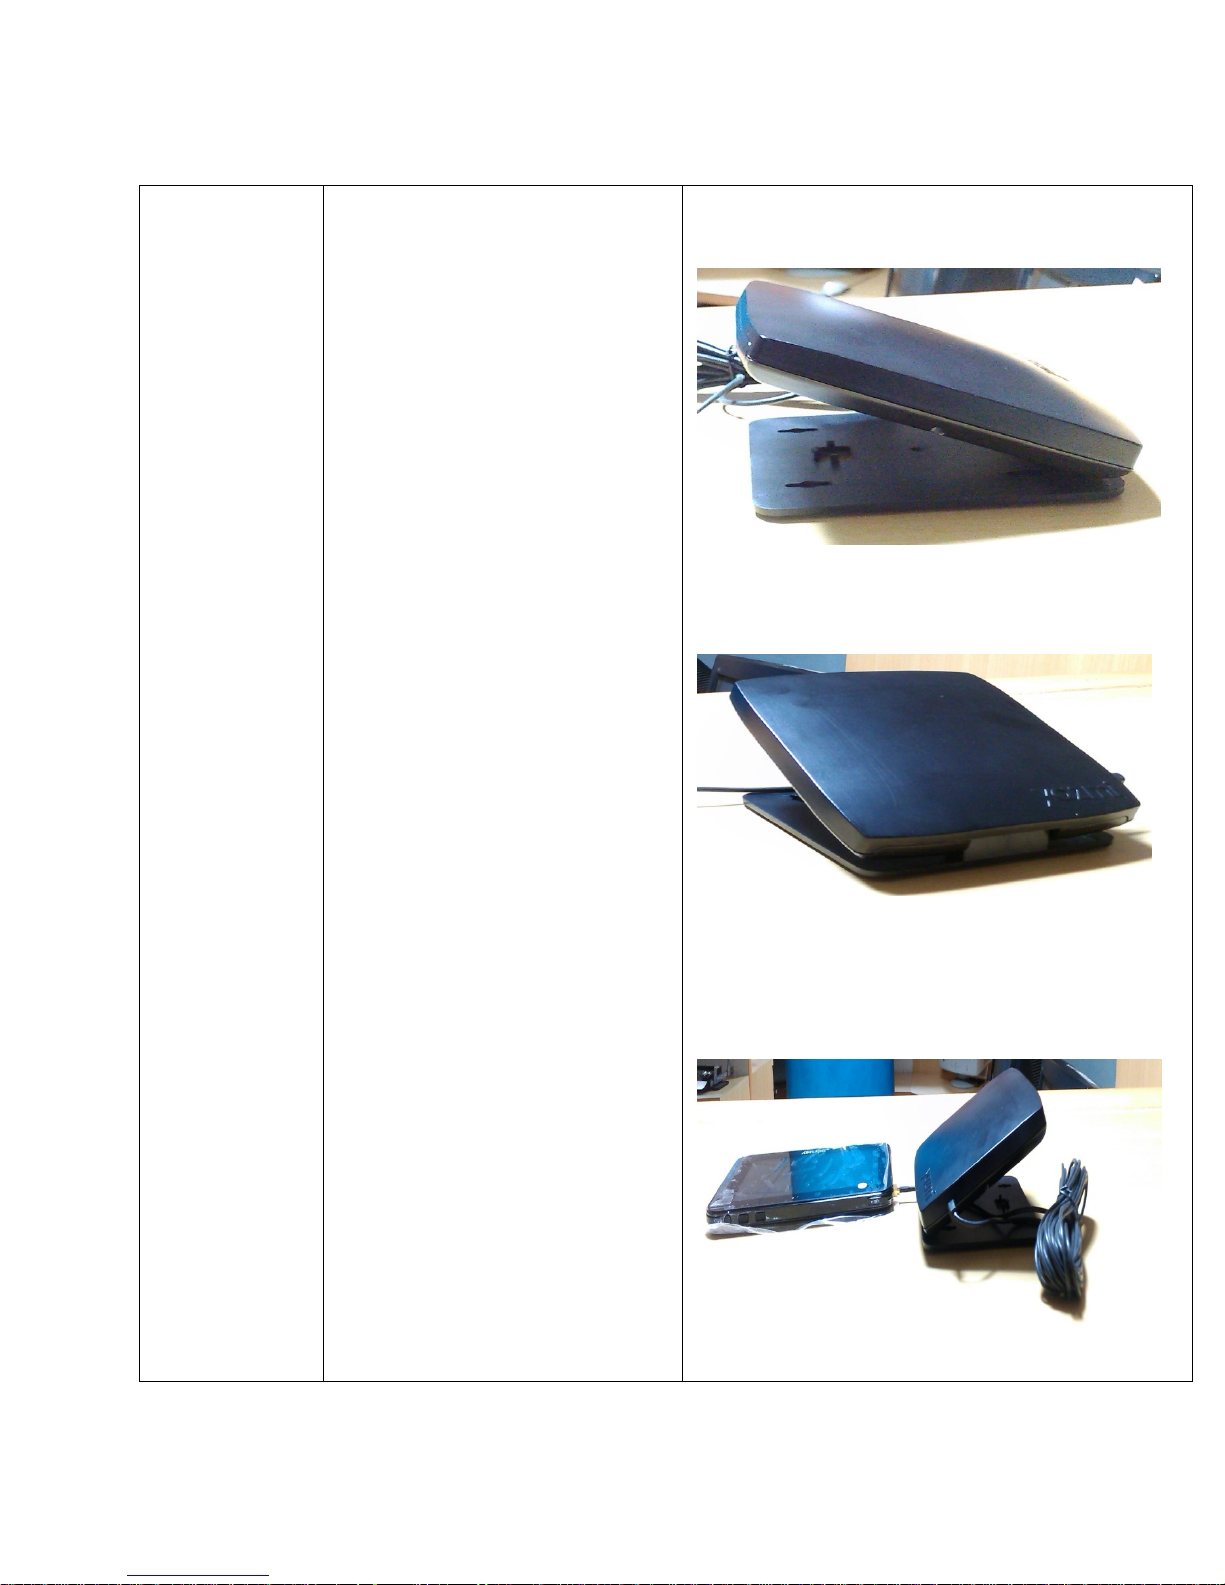
50 degree (50°) elevation as shown
in Picture-0004
Picture-0003
Picture-0004
TP2-0003
Azimuth angle as shown in
Picture-0005
Azimuth is always calculated from
True North.
17
Picture-0005
North
Page 18
90 degree (90°) azimuth as shown
in Picture-0006
Antenna face (YAZMI logo
engraved) is positioned due EAST.
160 degree (160°) azimuth as
shown in Picture-0007.
Antenna face is positioned
SOUTH-SOUTHEAST.
270 degree (270°) azimuth as
shown in Picture-0008.
Antenna face is positioned due
WEST.
Picture-0006
Picture-0007
Picture-0008
18
Page 19
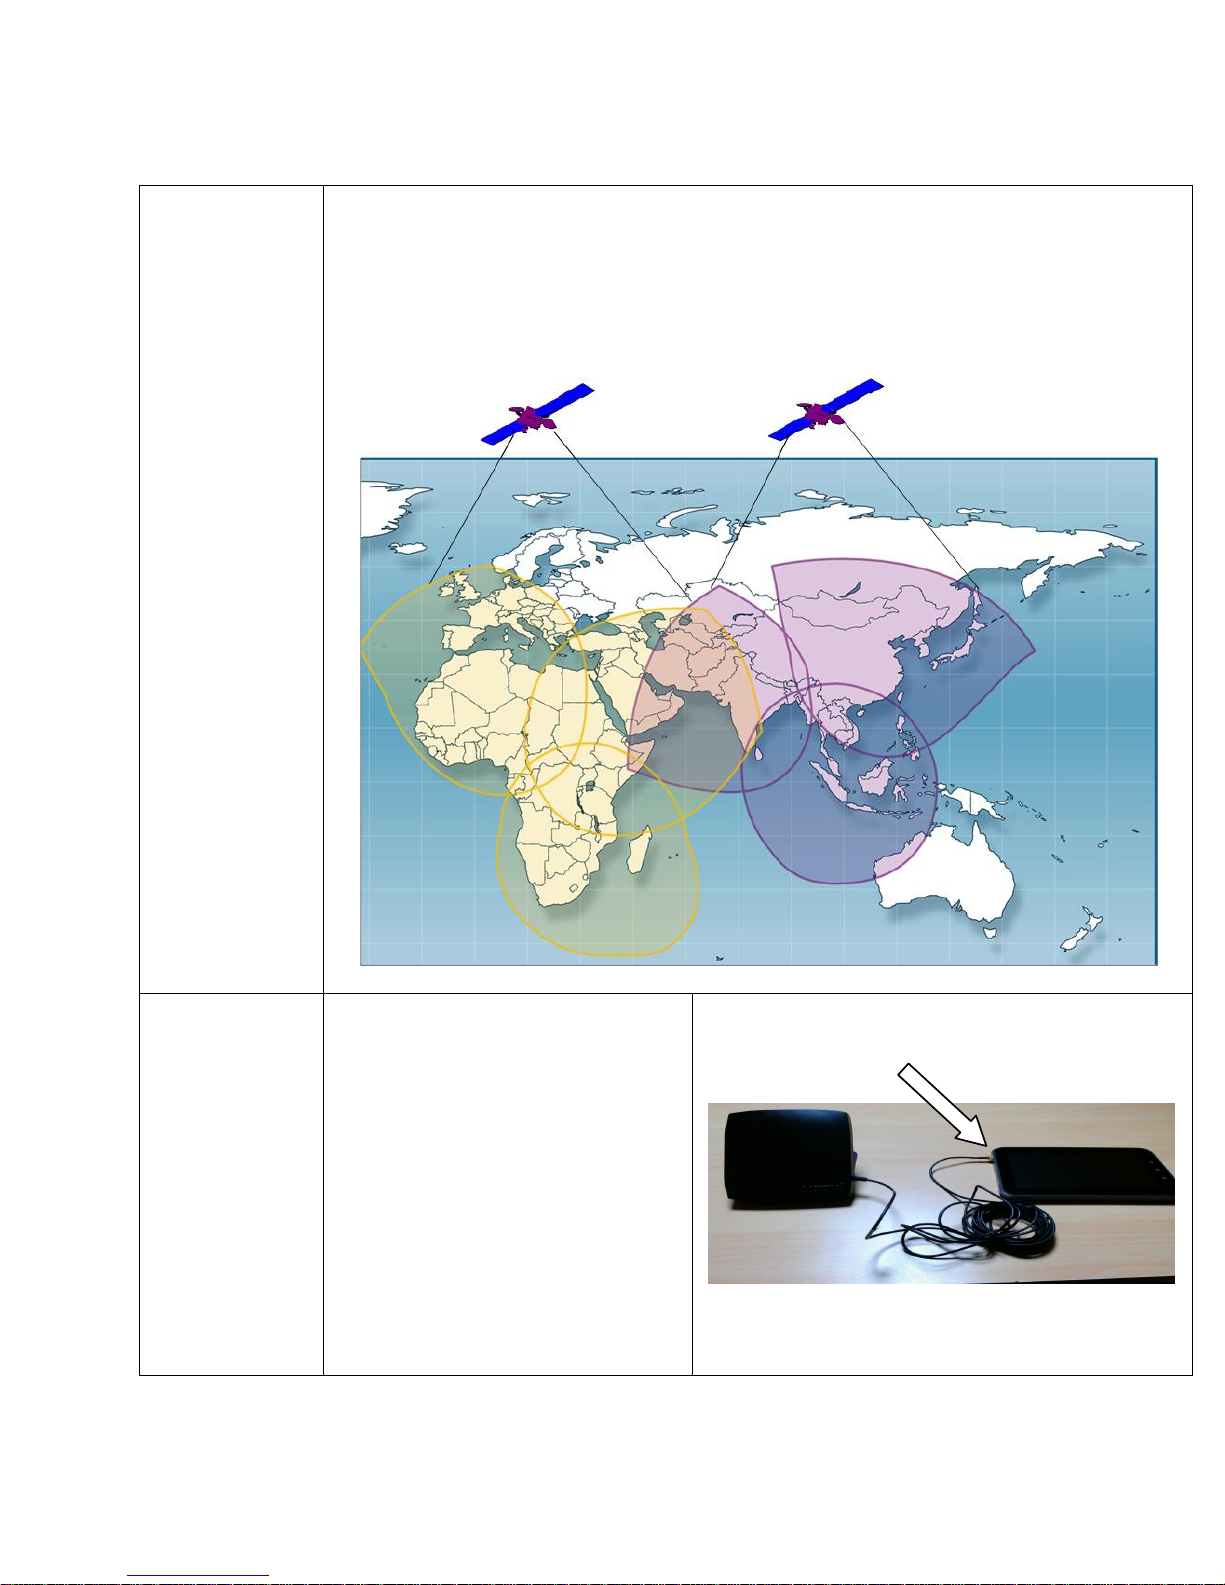
TP2-0004
Yazmi operates the AfriStar and AsiaStar satellites, which together provide coverage
over more than 120 countries as shown in Picture-0009. Depending upon your location,
you may be able to obtain a signal from one or both satellites. However, it is important to
remember which satellite your purchasing organization has contracted to use.
Picture -0009
TP2-0005
Antenna connection with tablet
Connect the antenna to
tablet antenna connector as
shown in Picture-0010
Push connect for mating with
the tablet and pull out for
disconnecting (MCX
connectiotion point at the
tablet end)
19
Picture-0010
Page 20
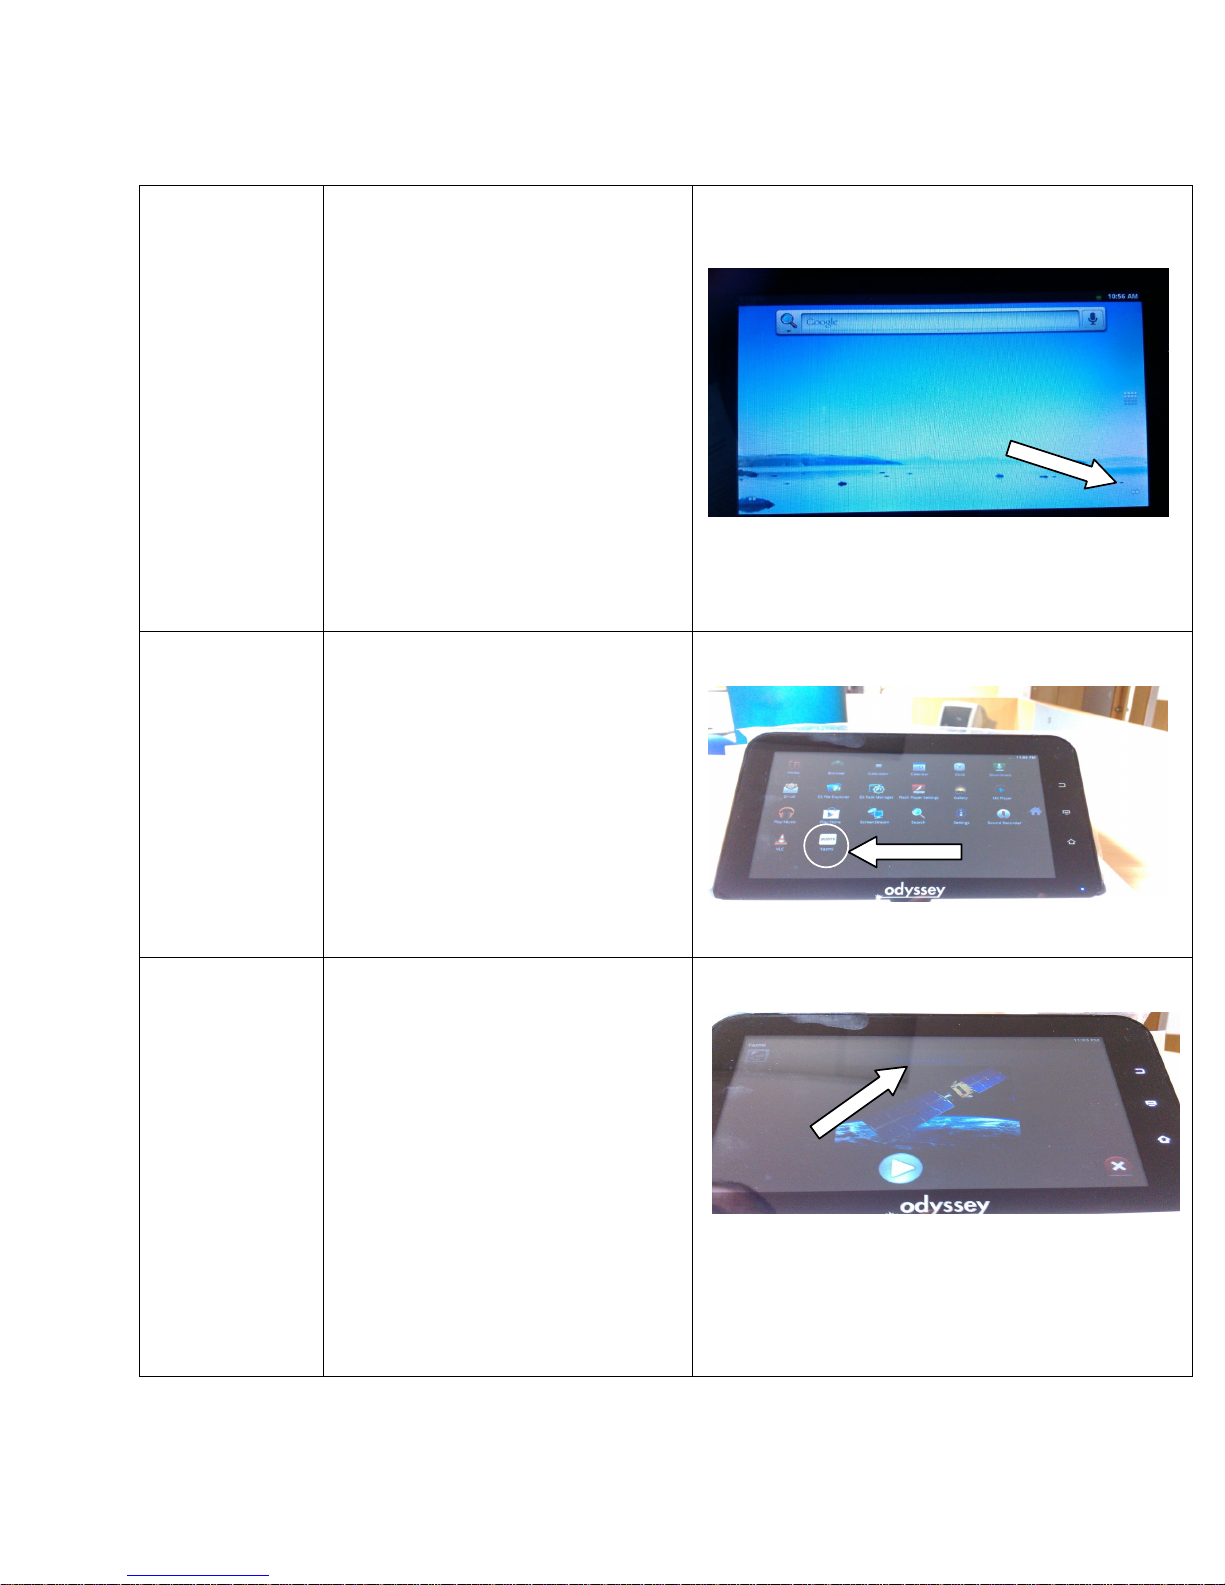
TP2-0006
TP2-0007
Antenna installation and signal
optimization
Check whether antenna is
installed in the direction of
the satellite
Place the antenna next to a
window or outside so that
there are no obstacles
between the antenna and
the satellite
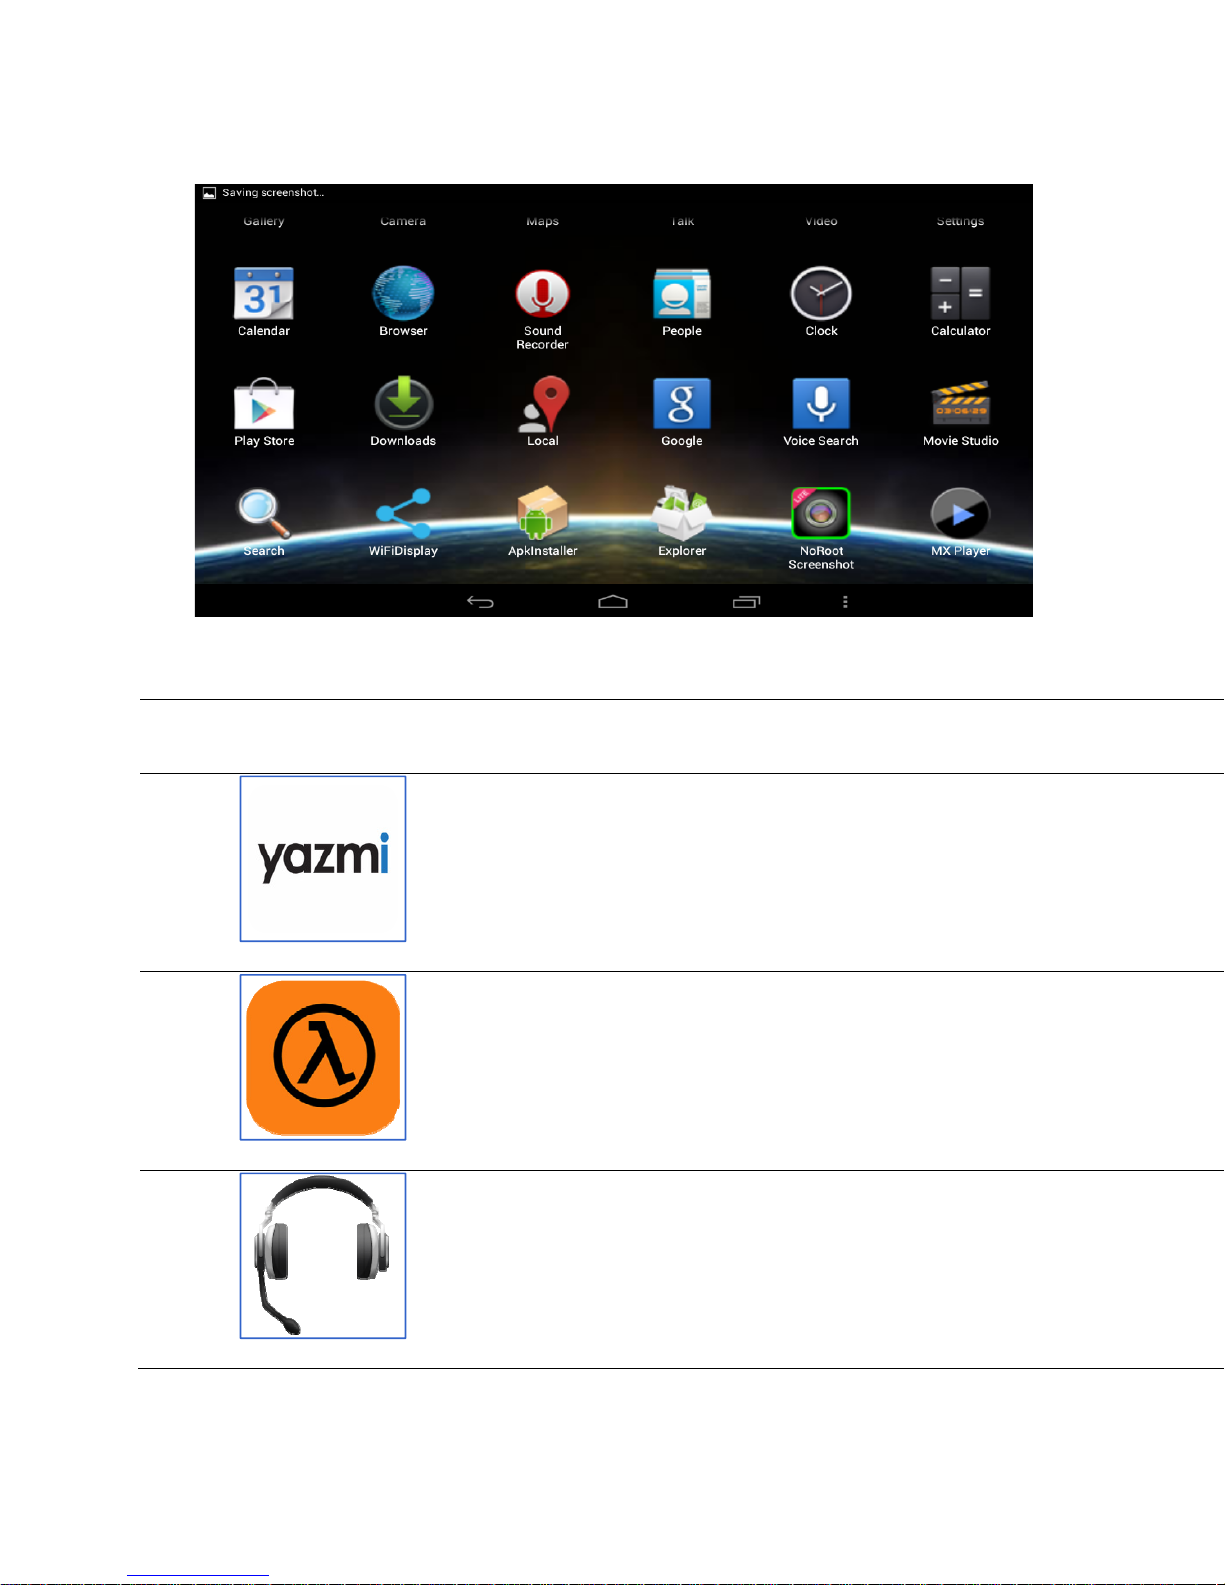
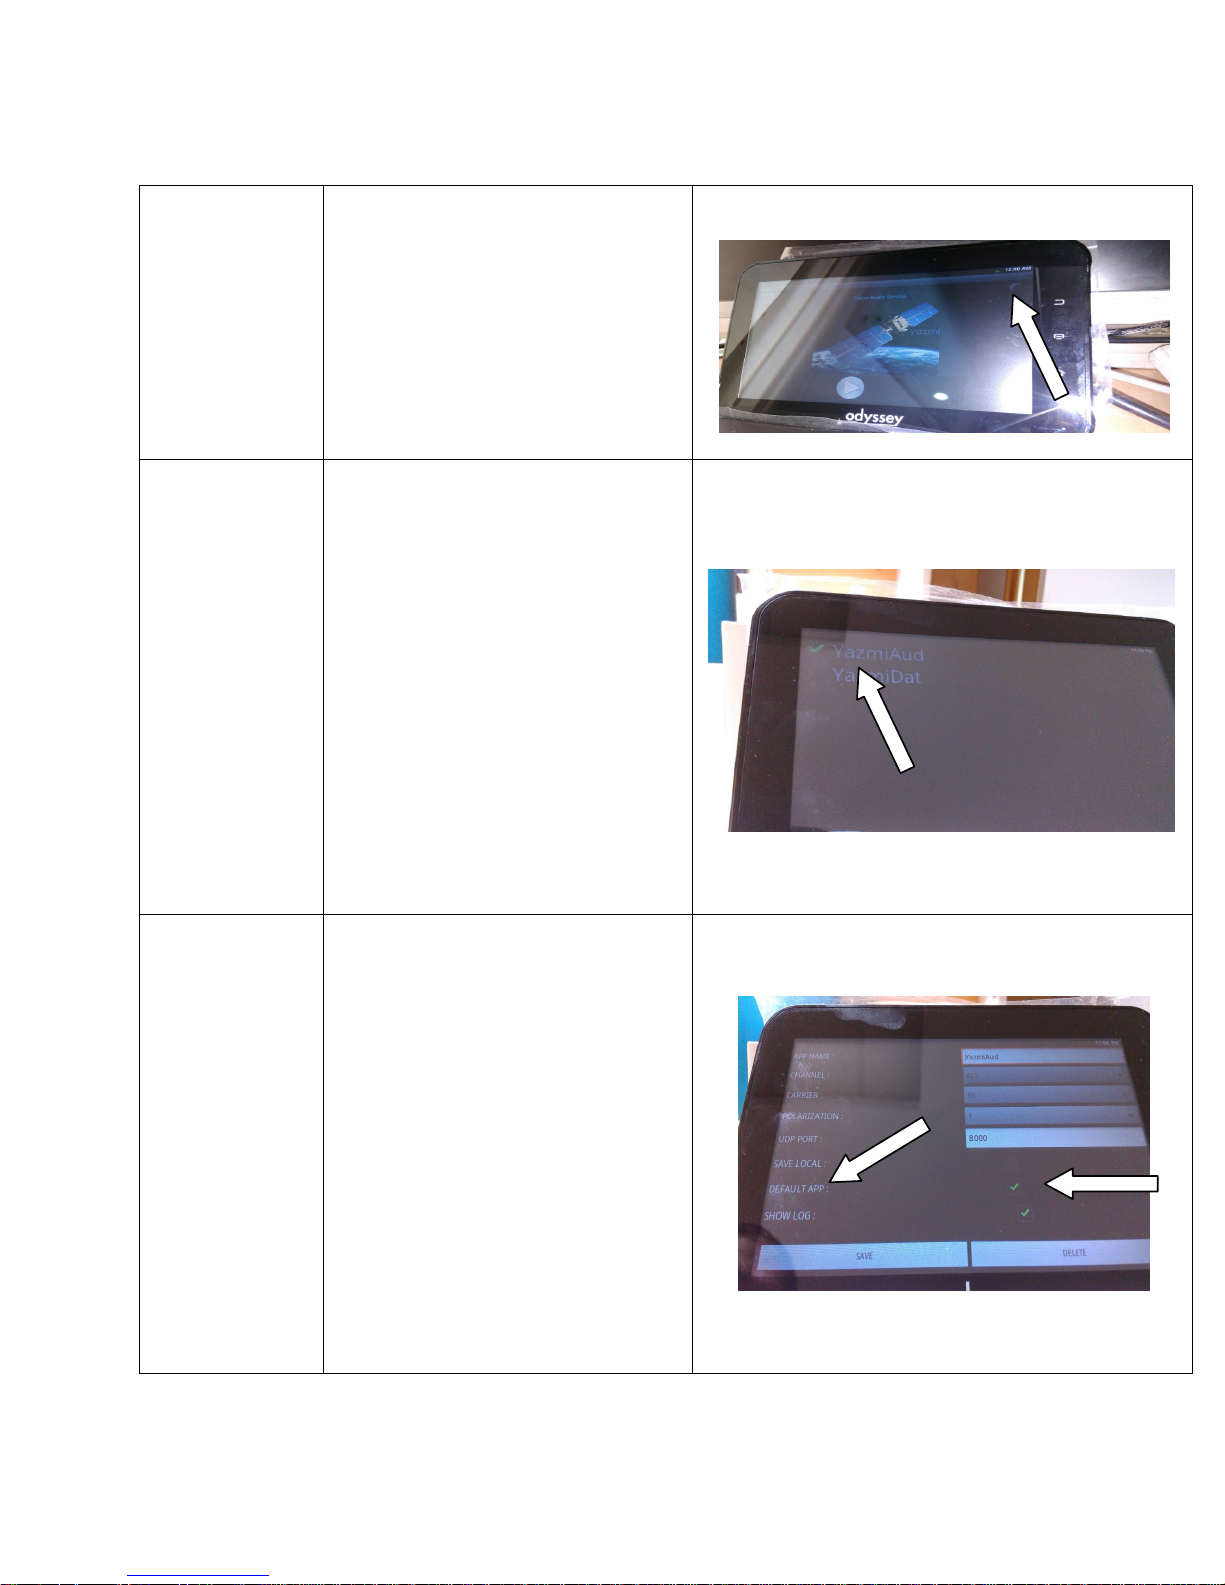
Switch on the tablet and
press the Home Menu as
shown in Picture-0011
Press the Yazmi icon in the display
as shown in Picture-0012
Picture-0011
Picture -0012
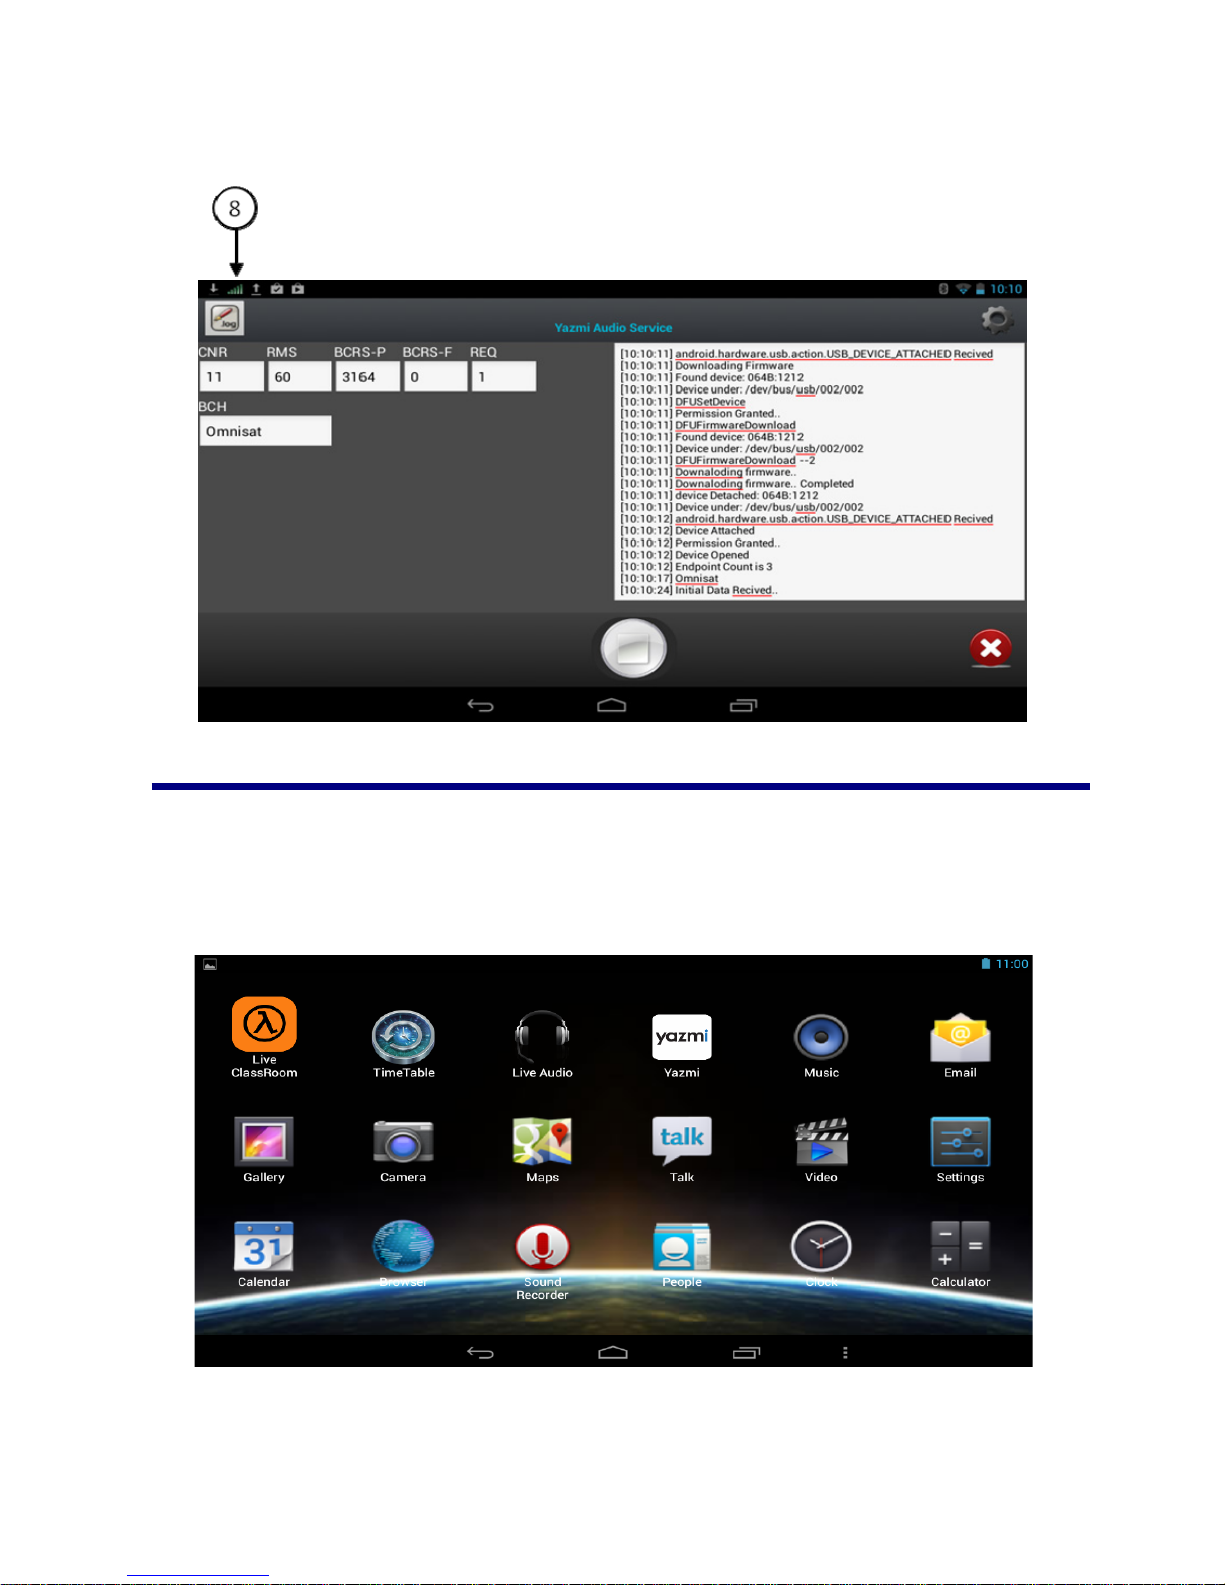
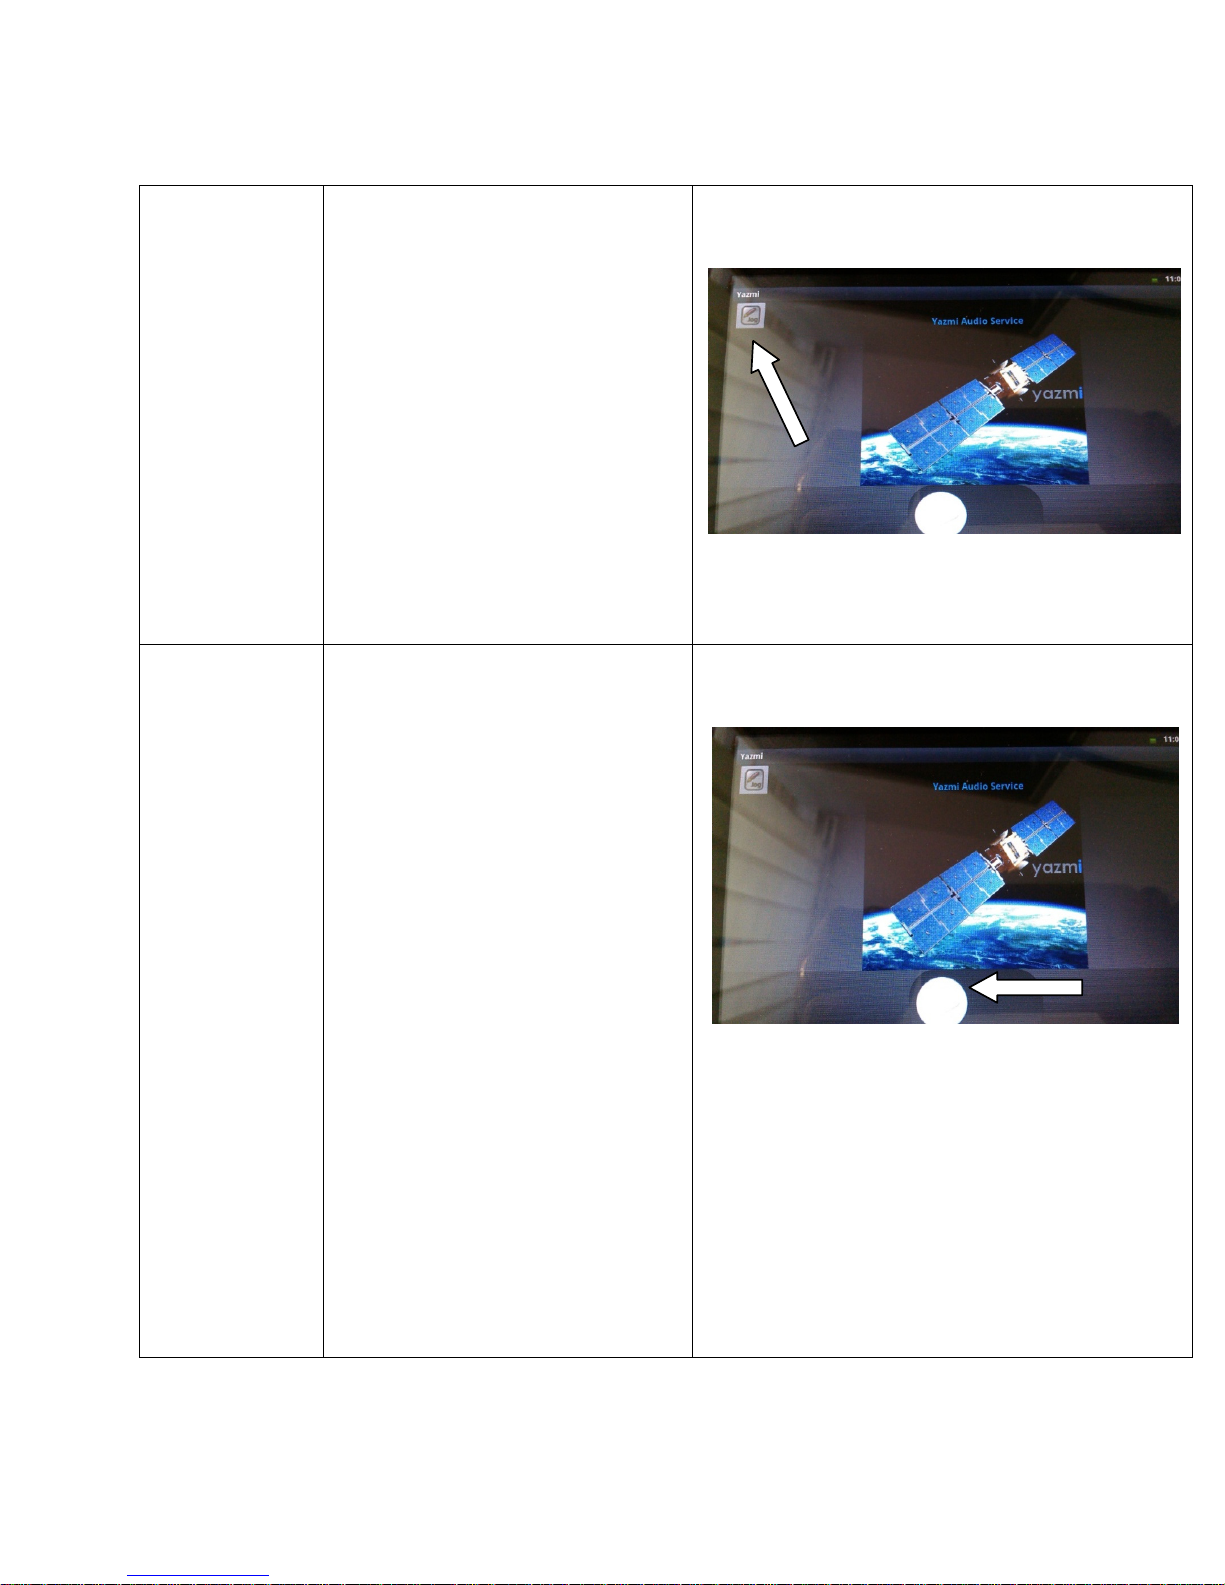
TP2-0008
20
Check whether Yazmi audio service
icon is displayed as per
Picture-0013
Picture-0013
Page 21
TP2-0009
TP2-0011
Press the Setting button in the top
right hand corner of the screen as
shown in Picture-0014
Ensure YazmiAud is selected as
shown in Picture-0015
Click on
YazmiAud
and make sure
the settings on your Odyssey 700
match those shown in Picture-0016.
Confirm
SHOW LOG are selected
DEFAULT APP
and
. Press
SAVE button to save any changes.
Picture-0014
Picture-0015
Picture-0016
21
Page 22
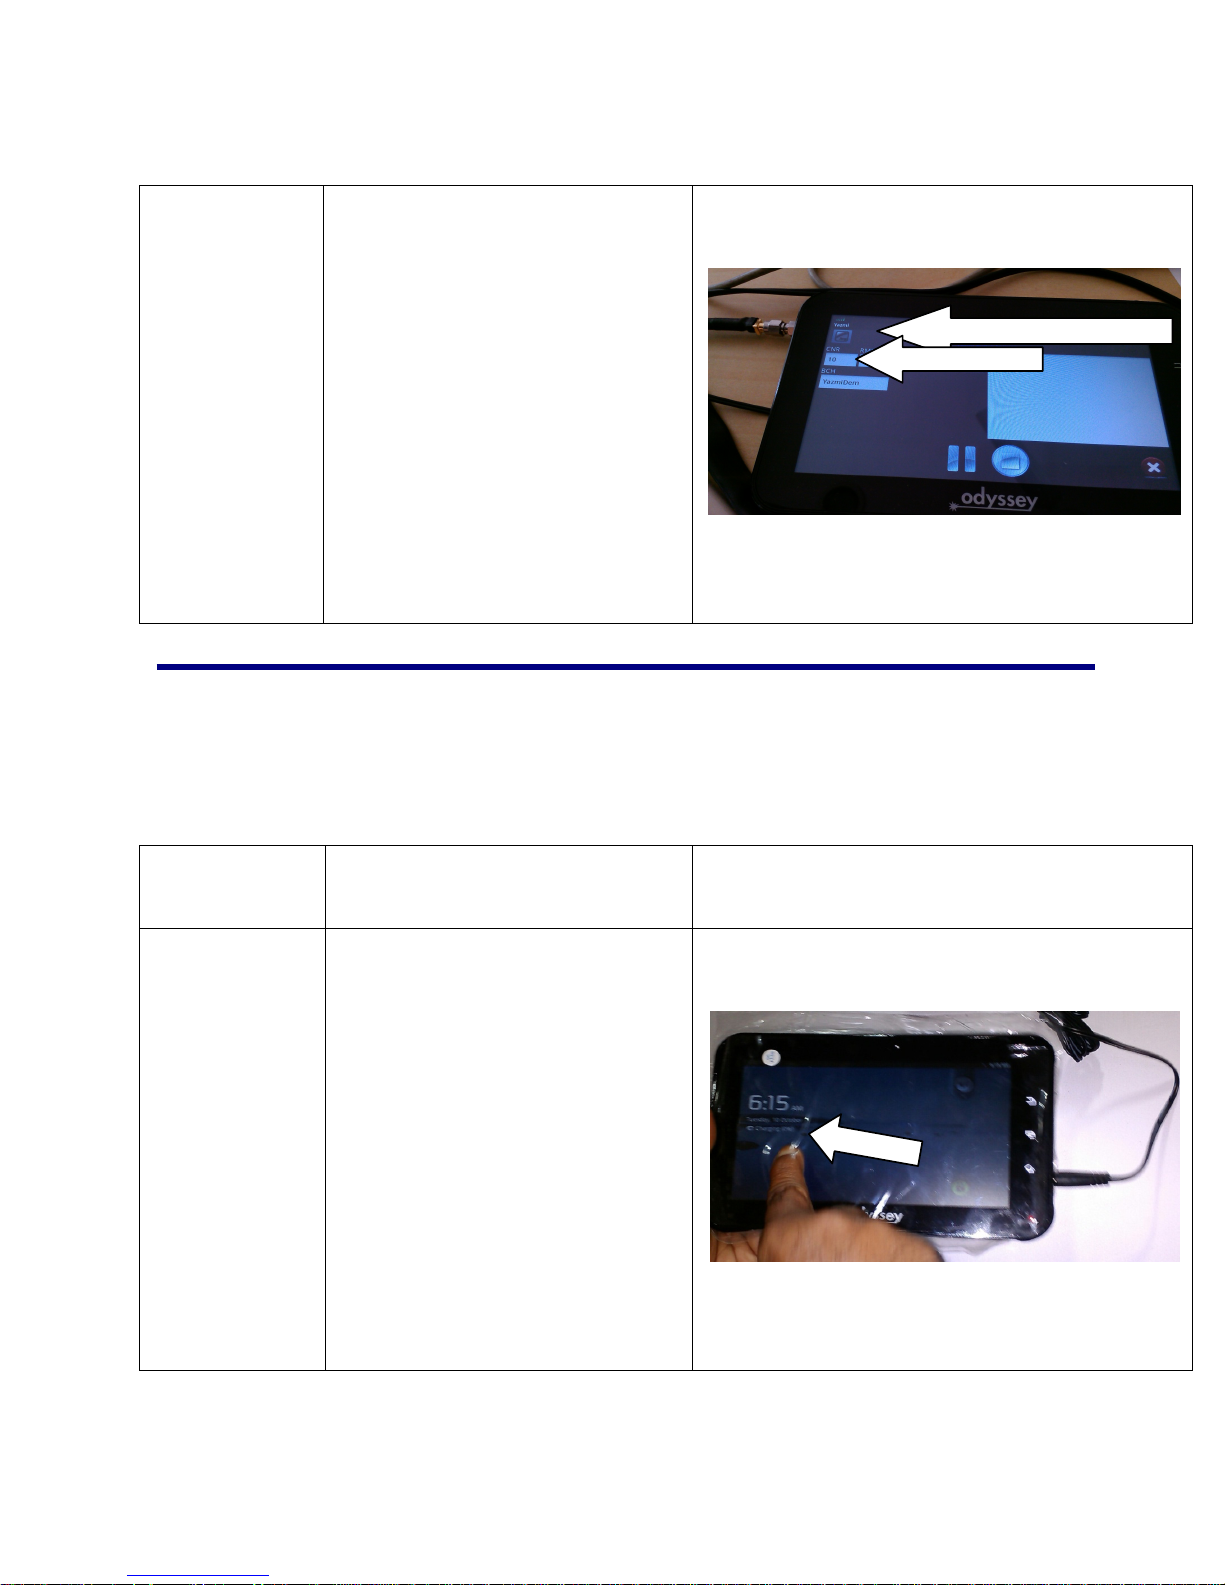
TP2-0012
TP2-0013
Press the Yazmi log icon on the top
left hand side as shown in
Picture-0017
Press the Play icon in the display as
shown in Picture-0018.
Picture-0017
Picture-0018
22
Page 23
Picture-0019
Satellite Signal Strength Indicator
CNR Amount (in dB)
TP2-0014
Check whether you are able to see
C/N.
When the antenna is optimally
positioned within the Yazmi
coverage area, the CNR amount
should read between 8 and 10 dB
and the satellite signal strength
indicator at the top left corner of the
screen should show 4 bars.
Satellite service is possible in
certain circumstances with CNR
level of as little as 1 dB.
10 Charging of Odyssey 700 tablet and Setup of
Optional Solar-Power Charging Station
Training
Procedure ID
TP3-0001
Check for battery charge level.
Charge the tablet battery to 100%
before first use. Battery life will be
optimized by recharging the battery
to 100% each time. The battery
charge level is displayed on the
home screen (as seen in
Picture-0001) when the tablet is
connected to the MicroUSB wall
charger or to the optional Yazmi
solar-power charging station
accessory. Battery indicator is off
when charger is disconnected from
tablet.)
Action to be carried Visual
Picture-0001
23
Page 24

TP3-0002
Tablets can be charged using DC
adapter as shown in Picture-0002 or
the Yazmi solar-power charging
station as shown in Picture-0003.
Important Notes:
* Use
adapter
only
the
Yazmi OEM wall
included in the tablet box.
. * Use only the Yazmi-brand
solar-power charging station.
Picture -0002
Picture-0003
TP3-0003
The solar-power charging station
has the following components as
shown in Picture-0004:
5-watt solar panel with mounting
clamps
5-metre connector cable for
charging the internal battery of
the charging station
Charging station box including
internal battery cable to charge
the tablet
24
Picture-0004
Page 25

TP3-0004
The solar panel and clamps (legs) as
shown in Picture-0005 must be
assembled prior to use. The
standard elevation angle for the
solar panel is approximately 18 to
22 degrees.
Solar panel must be attached to
clamps using screws (included with
solar-power charging station) as
shown in Picture-0006 and
Picture-0007
Picture-0005
Picture-0006
Picture-0007
25
Page 26

TP3-0005
The solar panel needs to face the sun
at the standard elevation angle
(achieved by attaching the clamp
legs and then placing the assembled
solar panel on a flat level surface) as
shown in Picture-0009 and
Picture-0010.
Charging rate of the battery within
the solar-power charging station
will be highest during the late
morning and early afternoon.
Charging rate will be affected by
cloud cover, latitude, air
temperature, age and condition of
the solar panel, and any coverage or
blockage of the solar panel. Always
handle the solar panel with care and
store indoors in a safe, dry and cool
place when not in use.
Users of a Yazmi solar-power
charging station north of the
Equator should face the solar panel
to the south. Users of a Yazmi
solar-power charging station south
of the Equator should face the solar
panel to the north.
Picture-0008
Picture-0009
Picture-0010
26
Page 27

TP3-0006
The Odyssey tablet should be
recharged when it reaches 25%
charge level. The tablet will
automatically power off when it
reaches a critical level.
Charging station battery has built-in
capacity of 8400 mAh. Tablet
battery capacity is 4500 mAh.
A fully charged charging station has
the capacity to recharge the
Odyssey 700 tablet twice.
Power bank has 3 indicators and 1
switch as shown in Picture-0012:
When the charging station is
switched on using the rocker
switch (1), the Tab On LED light
(2) will glow. This indicates that
the charging station is ready to
charge an Odyssey tablet.
CHG. On LED light (3) will
glow when the solar panel is
connected to the charging
station.
Bat Low LED (4) will glow
when the battery in the charging
station is low. If the Low LED
light is glowing, recharge the
charging station battery using the
solar panel before attempting to
charge the tablet.
Picture-0011
Picture-0012
1
3
4 2
27
Page 28

11 Application Management
Installing Android Applications Stored On An External Computer
Android applications that are stored on a computer and need to be transferred and
installed on the Odyssey 700 can be installed quickly and easily using the
ApkInstaller application.
1. Copy the .apk files that you want to install onto a microSD card or USB device, →
insert or connect to your Device.
2. Tap the ApkInstaller application icon.
3. Tap Install and locate the folder (Internal Memory or TF Card) in which the .apk
application files were saved.
4. Tap on a .apk file → Install.
The application is installed and an application icon is added to the Applications
screen.
5. Tap Open to launch the application now, or tap Done to return to the ApkInstaller
screen.
Downloading Android Applications Directly from a Website
Using a Wi-Fi connection to the Internet, you can download Android applications
directly from websites onto the Odyssey 700, and then quickly and easily install them
on the tablet:
1. Ensure you have an active Wi-Fi connection.
2. Tap the
3. Enter the desired website URL, and tap the download link for the application you
want to install on your device.
4. After the download is complete, touch & hold on the download file (in the
Download history screen), → tap Open → Install.
Browser application icon to launch the internet browser.
28
Page 29

Downloading Android Applications direct from Google Play Store
Please refer to the Chapter entitled “Google Play Store”.
Uninstalling Android Applications
You can also uninstall Android applications that you have installed.
1. Press Settings → Applications
2. Tap the application you want to uninstall, → Uninstall.
3. Tap OK to confirm the Uninstall.
Alternatively, you can use ApkInstaller to uninstall Android applications:
1. Tap the ApkInstaller application icon.
2. Tap Manage.
3. Tap one .apk from the application list and tap Uninstall.
4. Tap OK to confirm to uninstall the .apk.
12 People
People is an address book app that allows you to enter and save contact information (mail address,
emails, phone and fax numbers) information for friends, family, work colleagues and any other
entities. You can also create contact groups.
To open the app:
1. Touch the people icon.
2. At the top of the screen, you will see GROUPS, ALL, FAVOURITES
Touch the contact name or picture of the desired contact, and that person's contact information
will appear on the right side of the screen. To add a group ,touch GROUPS and . Type the
Group’s name and select members of the group. To add a person’s message to a contact, touch
ALL and . Type the contact’s name, phone ,email as desired.
29
Page 30

13 Voice Search (requires Internet connection)
Press the icon to open the following window and Tap the mic icon to enter the speaking
mode.
30
Page 31

Mic Icon
The mic icon will turn red while the speaking mode is on. Say in a clear voice what you want to
search. If the app can understand your request, then it will start searching the Internet
automatically.
31
Page 32

14 Clock
Alarm
Add Alarm
1. Tap the Clock application icon.
2. Press to add alarm
3. Set up your alarm as desired.
4. Tap Turn on alarm to activate the alarm.
5. Tap Done or tap Revert to reset your alarm again.
Note: The clock icon displayed at the bottom of screens indicates that one or more
alarms have been set and are active.
To set the countdown
To view
active alarms
32
Display the current time
Stopwatch
Night mode & settings
Page 33

Tab to add a alarm
To do more settings, touch settings to open the following window, and make your choice.
33
Page 34

15 Google Play Store
The Google Play Store has more than one million free or for-fee applications that you
can quickly and easily download to your Odyssey 700. Accessing the Google Play
Store requires an active Internet connection (via WiFi or SIM) and may require a credit
card. Children should obtain approval from parents or teachers before accessing the
Google Play Store. (please refer to the Wi-Fi chapter).
Downloading Applications
1. Tap the Play Store application icon and tap Accept on the bottom of the
screen.
Note:
The first time, you are prompted for your App Market login information. If you have not
yet registered an account, tap New. Otherwise, tap Exiting and enter your login
information and then tap Done.
34
Page 35

The first time you enter your account, you will be requested to provide your credit card
details. Tap set up credit card button to open the following window, where you can
input your credit card information. Yazmi takes no responsibility for the safety or
security of using a credit card on the Google Play Store or the content of applications
available on the Google Play Store. Users should be careful not to download content
that may be offensive or that may run afoul of local laws. Yazmi recommends that users
set their content filters appropriately as discussed in the "App Market Function
Settings" section below.
If you prefer not to add credit card information, tap the Not now button to enter the
Play Store directly.
2. You can select applications from the default Featured group, or tab Apps/Games
on bottom of the screen on the left to choose from the application list by categories,
or you can also search applications by name by tapping the icon.
3. Tap the application you want to download, → Download → Accept &
download. A for-fee app will require payment in the Play Store before
downloading starts.
Once the download process started, the icon will be displayed on the status
bar.
Once the icon is displayed on the status bar, the app has been downloaded
successfully. Do not disconnect your Internet connection before the app has been
35
Page 36

fully downloaded.
4. Slide down the status bar and tap “Successfully installed” → tap Open to launch
the app. If you prefer to uninstall the app, tap Uninstall.
5. Press Back key to return to the Play Store home screen to download other
applications as desired.
App Market Function Menu
Press Menu key to display the App Market Function Menu.
Search
Tap to enter the keys of the application for which you want to search.
My Apps
This page displays the apps installed on your device that can be also found in the App
Market.
。
Uninstall apps (With Installed displayed on right of the item)
1. Tap the app you want to uninstall.
2. Tap Uninstall.
3. Tap “OK” to confirm you want to uninstall the app.
Update apps (For FREE displayed on right of the item)
1. Tap the app you want to update.
2. Tap Download → Accept & Download.
Settings
You can see some settings, such as: Filtering level and Notifications settings.
Filtering level Set the content filtering rules as desired.
Notifications Set whether a notification prompt when an application has been
downloaded.
Help
If you have some doubts, please refer to this part.
36
Page 37

16 Browser and Chromium
Using Browser to surf the Web (requires WiFi or SIM connection to Internet).
Opening Browser
Tap the browser icon on the Home screen , and then you can open the Web browser.
An internet connection is required to use the Web browser.
Website of current page
Network Status
37
Page 38

Browser options
You can tap the settings button (shows three dots) to make more choices:
Options
Refresh/stop (Browser) Refresh the current page/stop opening the
current page
New Tab (Browser, Chrome) Enter the latest added tab
New incognito tab (Browser, Chrome Enter the incognito tab
Share page (Browser) Share your favorite pages with your friends
Find on page (Browser, Chrome) Looking for something in the current page
Request desktop site (Browser) You can select or unselect the options
Save for offline reading (Browser) save the current content for offline reading
Page info (Browser) Display the current web page information
Settings (Browser, Chrome) For some other Settings
Book marks (Chrome) Books let you revisit your favorite web pages
with one touch
Other devices (Chrome) Sign in to Chrome to contact with other devices
Help (Chrome) Useful tips that you can refer to
17 Calendar
Tap the Calendar application icon.
For the first time using the Calendar, you need to add an Exchange account or a
Gmail account (requires Internet connection). Enter the account address and password
information, click Next and follow the prompts to complete the account configuration.
Then you can use the Calendar.
Open Calendar
Events from each account you’ve added to your device and configured to synchronize
calendars is displayed in Calendar. There are different views you can choose in Calendar
by pressing Menu key and touch Agenda View, Day View, Month View.
38
Page 39

Agenda View
Touch to add
new agenda
Touch to view the details
of an agenda
Day View
39
Show additional
settings
Page 40

Week View
Month View
Drag up or down to view
earlier or later months
Touch an event to
view its details
40
Page 41

Creating an Event
1. In any view of Calendar, press Menu key -> More -> New event.
2. Add details about the event.
3. Press Menu and touch Show extra options to add details about the event.
4. Scroll to the bottom of the event details screen and tap Done.
Edit /Delete/View an Event
To edit an event, touch and hold the event, then touch Edit event. Edit event details,
then touch Done.
To delete an event, touch and hold the event, then touch Delete event.
To view an event, touch and hold the event, then touch View event.
18 Camera
Tap the Camera application icon.
Taking P ictu re s
1. In Camera tap photos mode, tap to change from front and rear
camera; and tap
2. The picture will be saved automatically.
3. Slide the screen to the left to enter Gallery to review saved pictures. Yazmi
recommends that you backup your photos to a removable microSD card or to an
online storage service to protect them from unintentional loss.
4. Press Back to exit Gallery and return to Camera.
5. Press Back again to exit the Camera and return to the Home screen.
to take the picture.
41
Page 42

Taking Vi deos
1. Tap switch to video. Note that videos are larger files than photos, and saving
many videos or long videos may deplete the available storage capacity of the
Odyssey 700.
2. Tap to begin and tap to stop.
3. The video will be saved.
4. Slide the screen to the left to enter Gallery to play saved videos.
5. Press Back to return to video mode.
6. Tap switch back to photo mode if desired.
7. Press Back to exit the Camera and back to the Home screen.
Panorama Photography
1. Tap switch to panorama photography, which can generate a wide-angle
photo.
2. Tap to begin.
3. Move your device slowly to generate the panoramic photo. shows
filming schedule. If the camera is panned too fast, the screen will show a red
block.
4. Tap to stop.
5. The picture will be saved.
6. Tap switch to return to standard photo mode.
7. Press Back to exit tCamera and return to the Home screen.
Photo options
On the preview of the camera, tapping the icon will launch additional settings options.
42
Page 43

19 Calculator
1. Tap the Calculator application icon on Home screen to launch it.
2. Tap the numbers and sign of operation to do a calculation.
3. Tap CLEAR to clear the result one by one, tap and hold CLEAR to clear all.
Tap and hold to clear
all data.
43
Page 44

20 Email
POP3 and SMTP accounts are supported. Requires WiFi or SIM connection to Internet.
Add Email accounts
You can enter one or more personal email addresses that you would like to access
through your Tablet.
1. Tap the Email application icon.
2. On the Your Accounts screen, tap Next.
3. Tap in the Email address entry field, → enter your email address.
4. Tap in the Password entry field, → enter your email password.
5. Tap Done.
6. Manual Setup (optional): The server settings are automatically populated based
on your email account provider (i.e., gmail.com, etc). However, if you need to
change the server settings tap Manual Setup and make necessary changes.
7. Tap Next.
8. Optional: Enter a name for the account.
9. Enter name for outgoing message, → tap Done.
Note: After setup, if you are unable to connect to a free
email provider to make sure their servers support free accounts on Post Office Protocol
(POP) or Simple Mail Transfer Protocol (SMTP).
email account, check with your
Email Inbox
1. Tap the Email application icon.
2. If you set up only one email account, it opens immediately. If you set up multiple
accounts, they are listed in the Accounts screen.
3. Tap on the desired email account, → tap Inbox.
44
Page 45

Open Email Message
1. On the Inbox screen, tap on an email to open it.
2. For attachments, tap Open to launch appropriate application, or tap Save to save
attachment to a SD card.
3. To replay, tap Reply or Reply all.
a. Tap in the Compose Mail entry field to enter your reply message.
b. Tap SEND to send immediately, SAVE DRAFT to save without send or Delete
to discard without saving or sending.
4. To delete the email immediately, tap Delete.
Compose New Email Message
1. On the Inbox screen, touch .
2. Tap in the To entry field and then enter the recipient’s email address.
3. Optionally, if you want to add Cc or Bcc recipients, touch settings → Add Cc/Bcc,
and then enter the recipient’s email address.
4. Tap in the Subject entry field to enter your desired subject title.
5. Tap in the Compose Mail area to enter your personal message.
6. If desired, touch to attach a file.
7. When ready to send the email, touch SEND.
Edit Email Account
1. Tap the Email application icon.
2. On the Inbox screen, touch settings.
3. Set your desired preferences to customize your email account.
4. Touch back to return to the Inbox screen.
Delete Email Accounts
If you have multiple accounts, and you delete the account designated as the default
account, the next email listed is automatically set as the default.
1. Tap the Email application icon.
2. On the Inbox screen, touch settings.
3. Touch the account you want to delete.
4. In the right Account options window, tap Remove account.
5. Tap OK to confirm the deletion.
45
Page 46

Set Default Email Account
You must always have one account designated as the default account, so if you have
multiple email accounts, you can select any one as the default.
1. Tap the Email application icon.
2. On the Inbox screen, touch settings.
3. Tap Default Account to select it.
If you delete the account that was designated as the default account, the next email
listed is automatically designated as the default.
21 Explorer
Tap the File Browser application icon to view the files on all storage devices
(Internal memory, microSD card, or external storage attached via the MicroUSB port),
and to quickly and easily install Android applications on your tablet.
Check the file in SD Card
Check the file in internal memory
Check the file in USB device
46
Page 47

Functions of icons introduction
Tap to display the root directory of Explorer.
Tap to go to the parent directory of the
current folder.
Tap to select multiple items displayed.
Tap to do some operation for a selected item, such
as copy, delete, move, paste, rename.
Tap to build a new folder.
Tap to go to the previous page.
Tap to go to the next page.
Delete files
Tap and hold on the folder/file you want to delete, → tap Delete.
47
Page 48

Install an Android application
You can use Explorer to install an Android application. Before doing this please first
copy the .apk files onto a microSD card or into the tablet's internal memory.
1. Tap the File Browser application icon to view the files.
2. Tap the applicable .apk that you want to install on your devices.
22 Music
Get music
Transfer music from a computer to the Odyssey 700 using microUSB port
Transfer music files from a computer to your memory card.
1. With a microSD memory card inserted in the Odyssey 700, and the tablet showing
the Home screen, use the USB-to-microUSB cable to connect the tablet to a USB
port on your computer. Your tablet should show in the status bar.
2. Tap . The tablet should show a USB connected message above the status bar,
then touch the message to open the storage dialog. Note: Files on the microSD card
are not available for use while this transfer is in progress.
3. Touch Turn on USB storage.
4. Tap OK to confirm.
5. Drag and drop selected music to a folder on the microSD memory card, which will
automatically start the transfer.
6. When you complete your desired transfers, tap Turn off USB storage.
48
Page 49

Play Music
1. Tap the Music application icon.
2. Tap any audio file from Albums/Artists/Songs/Playlists/ to begin playback of the
selected file.
3. To stop playback, tap the Pause icon.
4. To leave the music playing and return to previous screens, press Back key to return
to the Home screen.
At this interface, you can do: view the lyrics, play / pause, switch to the previous / next
song, loop play, random play etc.
Touch the settings icon to adjust various settings:
49
Page 50

23 Video
Play Video
1. Tap the My Video application icon.
2. Touch any video from the video list.
3. Tap on the playing video screen, the options displayed on the screen below.
Vo l u m e
down
Playback
shuttle
Add time
bookmark
Change screen
brightness
Add to bookmark
Touch to bookmark (save) the current elapsed time while a video is playing. You can
then choose to start the video in the future from that bookmarked point.
Play the video in small window
Tap the button to enter a "small window" mode, as shown in the following picture:
Change the size of
the video screen
Rewind Play/pause
Play the video
in small window
Fast
forward
Restart
video
Vo l u m e
up
Other
settings
50
Page 51

To exit the small window, tap and hold the window until there is an"X" in the middle of the
window, then tap the "X" to close the window.
Other options
Delete Bookmark and play from beginning
Tap during video playback and elapsed time bookmark will be deleted, and the video
will start again from the beginning.
Delete bookmark
Touch during video playback and elapsed time bookmark will be deleted.
Play mode
Touch play mode during video playback, which offers the following options:
Single The video player will stop once the current video ends.
Repeat one The current video will play to its end and then restart from the beginning.
Repeat all All stored videos on the tablet will be played in sequence..
Help Provides help information about the video player
51
Page 52

Return Causes the user to exit the play mode screen and return to video player home
screen.
24 Gallery
Opening Gallery (photo viewer) and viewing albums
1. Touch the Gallery icon in the Launcher or on the Home screen
OR
2. Open Gallery from Camera by touching the thumbnail image at the top right
Note: If you have many pictures or videos on your microSD card or USB storage, it
may take Gallery a few minutes to initialize when started.
Working with albums
Open Gallery and touch the album whose contents you want to view
Albums open displaying the pictures and videos they contain in a
chronologically-ordered grid. The name of the album is shown at the top of the screen.
Touch a picture or video to view it.
Get the details of an album
1. Open the main Gallery window.
2. Touch the albums for which you want details.
Delete an album
1. Open the main Gallery window.
2. Touch and hold the albums you want deleted for a second.
3. Touch the at the top of the screen.
52
Page 53

Working with pictures
View and browse pictures
Open Gallery album and touch a picture.
Watch a slideshow of your pictures
1. Open Gallery album and touch a picture.
2. Touch the settings at the top of the screen to see the controls of the picture. Touch
Slideshow to see pictures in a slideshow.
Edit/crop a picture
1. Open Gallery album and touch a picture.
2. Touch the settings at the top of the screen to see the controls of the picture.
3. Touch edit->edit the picture.
4. Touch crop-> crop the picture.
Get details about a picture
1. Open Gallery album and touch a picture.
2. Touch the settings at the top of the screen to see the controls of the picture.
3. Touch Details to get more information about the picture.
Set a picture as screen background wallpaper
1. Open Gallery album and touch a picture.
2. Touch the settings at the top of the screen to see the controls of the picture.
3. Touch Set picture as and touch Wallpaper then crop on the top of the screen
53
Page 54

25 Gmail
Gmail is a free email client offered by Google. Requires WiFi or SIM connection to Internet.
Opening Gmail and your Inbox
Open Gmail
Touch Gmail icon on the Home screen or in the Launcher.
When you open Gmail, the current Google Account is displayed at the top of the Inbox.
If you have more than one account, you touch the current account to switch accounts.
Open your Inbox when Gmail is running
The Gmail interface is divided into two parts, the left one lists all the mail types, such as
Inbox, Priority Inbox, Starred, Chats, and Outbox. The right side presents the details.
So when reading a message, you can easily return to the Inbox by touching the Inbox on
the left side . You can also touch the back key until you return to your Inbox.
54
Tab to refresh
Tab to search
for an email
Tab to create a new
email message
Page 55

Switching accounts
Gmail displays conversations, messages, and settings from one Google Account at a
time. If you have more than one account, you can open the Accounts screen to view
how many unread messages you have in each account and to switch accounts.
1. From your Inbox, touch the current account at the top right of the screen.
Each account is listed, along with the number of unread messages in your Inbox.
2. Touch the account that contains the email you want to read.
Read a message
Touch a conversation that contains the messages you want to read. The message header
shows the sender, recipient, time and date when message sent, andinformation. A
paperclip icon indicates whether the message has an attachment.
When reading messages in a conversation, you can use the buttons at the top of the
screen to archive the entire conversation. Touch the topic on the left side to open the
next or previous conversation in the Inbox.
Work with an attachment
Gmail can display several types of attached images (PNG, GIF, JPEG, etc.) in a
message. Others have a Preview or Download button you can use. Depending on the
applications installed on your device, you may also be able to download and read a
variety of kinds of files, including spreadsheets, word-processing documents, or PDF
files. Other applications may add support for opening other kinds of files. Attachments
you download are stored on your device’s USB storage or microSD card. Image files
are added to albums in Gallery.
Composing and sending a message
Compose and send a message
When viewing the Inbox, touch settings and touch Compose.
1.
Enter all the information that is needed for a message and touch SEND
2.
to send the message.
55
Page 56

Tab to forward
the email
Tabs to reply
or reply-all to
the email
Attach a photo to a message
1. Touch settings on the view of composing message and touch .
2. Touch to choose a picture to attach as an attachment for the message.
Replying to or forwarding a message
1. Touch the reply icon on the view of the conversation that you want to reply.
Or touch the arrow to display the Forward icon for forwarding a message.
56
Page 57

26 Maps, Local, and Latitude
Maps
Google Maps for Android includes the Maps application as well as the Latitude,
Navigation, and Places components, with each available within Maps and as a separate
shortcut in the Launcher.
Open maps
Touch Maps icon in the Launcher or on the Home screen.
Note: Maps requires WiFi or SIM connection to the Internet to download the map data
the first time you open the application.
Move the map
Drag the map with your finger.
Zoom on the map
1. Touch the plus or minus side of the Zoom control.
OR
2. Double-tap a location on the map with one finger zoom in that location top once
with two fingers to zoom out.
OR
3. Touch an area with two fingers at once and spread them apart to zoom in; pinch
them together to zoom out.
57
Page 58

Finding your friends with Google Latitude
Google Latitude lets you and your friends view each others’ locations on maps and
share status messages with each other (requires WiFi or SIM connection to Internet).
Join Latitude
While viewing a map touch settings and touch Join Latitude.
The first time you join Latitude you’re prompted to accept or reject the Google privacy
policy.
Open Latitude
After you join Latitude, you can open it to find your friends and view their updates.
While viewing a map, touch settings and touch Latitude
Invite friends to share their locations
After you join Latitude, you can start to share your location with your friends. Only
friends whom you have explicitly invited or accepted can see your location.
1. Open Latitude touch settings and touch Add friends.
2. Touch Select from Contacts or Add via email address in the menu that opens.
If you touch Select from Contacts, a list of all your contacts opens. Check all of
the contacts you want to invite.
If you touch Add via email address, you can enter one or more email addresses,
58
Page 59

separated by commas, of the friends you want to invite.
3. Touch Add friends at the bottom of the screen.
If your friends already use Latitude, they receive an email request and a
notification on Latitude. If they have not yet joined Latitude, they receive an email
inviting them to sign into Latitude with their Google Account.
Respond to an invitation
When a friend invites you to share your location in Latitude, you can respond in the
following ways.
Accept and share back You and your friend can see each other’s locations.
Accept, but hide my location You can see your friend's location, but they can’t see
yours.
Don’t accept No location information is shared between you and your friend.
View your friends locations
You can view your friends’ locations on a map or in a list.
Your friends’ locations are shown when you open Maps. Each friend is represented by
their picture from Contacts with an arrow that points to their approximate location. If a
friend has chosen to share city-level locations, their picture doesn’t have an arrow and
appears in the middle of the city.
Manage connections with your friends
Touch a friend’s contact details balloon in Map view or touch a friend in List view to
open the friend’s profile. In the Profile screen, you can communicate with your friend
and set privacy options.
Show on map Shows the friend’s location on the map.
Chat using Google Talk Open a Google Talk chat window with that friend. Send
email Opens Gmail with a message addressed to the friend. Directions get directions to
the friend’s location.
Hide from this friend Stop sharing your location with this friend in Latitude, in a
list or on a map. To share your location with this friend again, touch Unhide from this
friend.
Share only city-level location Share only the city you are in, not your street-level
location. Your friend sees your picture in the middle of the city you are in. To share
59
Page 60

more precise locations again, touch Best available location.
Remove Remove the friend from your list and stop sharing locations altogether.
Control what you share
You have control over how and when your friends can find you in Latitude. Only the
last location sent to Latitude is stored with your Google Account. If you turn off
Latitude or are hiding, no location is stored.
Open Latitude, touch your own name, and touch Edit privacy settings. You can set the
.
following privacy options
your
Detect
update frequency
level
and
location Let Latitude detect and update
is determined
how
recently
your
location has
your
by several factors, such as
changed.
location as you move.
your
device’s battery
The
charge
Set your location
from Contacts,
Set the location shared with others as an address you
pick
location.
Hide your lo
cation
Sign ou t of Latitude Disable
can
always rejoin
Latitude.
27 Google Talk
Google Talk is the free instant messaging application offered by Google (requires WiFi
or SIM connection to Internet).
a spot on a map, or resume having Latitude share
Hide your
location from
all your friends.
Latitude and stop sharing
your location
enter; or,
your actua
or status. You
l
Touch the widgets “Google Talk” on the home screen, or tap the
application icon.
The first time you open Google, the below page is displayed.
60
Google Talk
Page 61

y
If you don’t have a Google account, tap
new
to create one. Edit your information according
to the prompt. when you finish creating the account, it will login automatically.
If you already have a Google account, tap
exiting
and
login
.
When you login successfully, you will see the following window,
Search Google Talk
Invite a friend to chat
Tap here to edit
your status message
Tap here to choose
our status
More options
More options
Display options
Sign out
Settings
Help
61
Tap to sign out (tap your account to sign in again)
Includes options for privacy
connect to the internet for help
Choose the methods to sort your friend list
Page 62

28 Google
Requires WiFi or SIM connection to Internet. Touch the widget “Google ” on the home
screen. or tap the
left red block to input the content by keyboard to start searching. Tap the microphone
icon to speak out the content to start searching. Tap the “three dot” settings icon to open
the menu.
Google
application icon to open the following window. Tap the
62
Page 63

Settings
Tap settings to open the following window:
This window is divided by two parts:
The right part is to show the details.
The left part is to show the main terms.
Google now Set Sticky Notes, such as the weather location, when to appear the card and so on.
Voice Set the language, choose the time when speech output, choose whether to hide the
recognized offensive results or not, choose whether to do Hotword detection or not.
Tablet search Set the range for searching according to what you need
Privacy and accounts Some settings associated with your account.
63
Page 64

29 Wi-Fi
Connecting to Wi-Fi networks
1. Press Settings -> Wi-Fi
2. Check Wi-Fi item on the top of the screen to turn it on
3. Touch a network to connect to it
Note:
- If the network is open, you are prompted to confirm that you want to
connect to that network by touching Connect.
- If the network is secured, you’re prompted to enter a password or
other credentials. (Ask your network administrator for details.)
Receive notifications when open networks are in range
By default, when Wi-Fi is on, you receive notifications in the Status bar when your
device detects an open Wi-Fi network.
1. Turn on Wi-Fi, if it’s not already on.
2. In the Wi-Fi settings screen, check Network notification.
You can uncheck this option to stop receiving notification.
Add a Wi-Fi network
1. Turn on Wi-Fi, if it’s not already on.
If you’re adding a Wi-Fi network when first setting up your device, Wi-Fi is
turned on automatically.
2. In the Wi-Fi settings screen, touch Add network (at the top of your screen).
3. Enter the SSID (name) of the network. If the network is secured, touch the Security
menu and then touch the type of security deployed on the network.
4. Enter any required security credentials.
5. Touch Save.
The device connects to the wireless network. Any credentials that you entered
are saved, so you are connected automatically the next time you come within
range of this network.
64
Page 65

Forget a Wi-Fi network
You can erase the details of a Wi-Fi network that you added if you no longer want to
connect to that network automatically or if it is a network that you no longer use.
1. Turn on Wi-Fi, if it’s not already on.
2. In the Wi-Fi settings screen, touch & hold the name of the network.
3. Touch Forget in the dialog that opens.
Wi-Fi Settings screen
In addition to the settings described in this section, you can press Menu and Advanced
Wi-Fi settings as described in “Advanced Wi-Fi”.
Wi-Fi
Check to turn on Wi-Fi so you can connect to Wi-Fi networks. When connected to a
network, displays the network’s name.
Wi-Fi networks
Displays a list of Wi-Fi networks you’ve previously configured and those detected when
the device last scanned for Wi-Fi networks.
Add Wi-Fi network
Opens a dialog where you can add a Wi-Fi network by entering its SSID (the name it
broadcasts) and security type.
Advanced Wi-Fi settings screen
Network notification
Check to receive a notification when an open Wi-Fi network becomes available.
Keep Wi-Fi on during sleep
Opens a dialog where you can set whether and when the Wi-Fi radio disconnects.
Disabling sleep uses more battery power.
MAC address
The Media Access Control (MAC) is the unique identifier of the tablet when connecting
to a Wi-Fi network.
65
Page 66

IP address
The Internet Protocol (IP) address assigned to the device by the Wi-Fi network you are
connected to (unless you used the IP settings to assign it a static IP address).
30 Accounts
Adding and removing accounts
Add an account
1. Open the Accounts & Sync Settings screen:
Press Settings -> Accounts
2. Touch + Add account
3. Touch the kind of account you want to add.
4. Follow the steps displayed on the screen to enter the required and optional
information about the account.
Remove an account
1. Open the Accounts & Sync Settings screen:
Press Settings -> Accounts
2. Touch the account to delete
3. Touch Settings on the top of the screen and then touch Remove account on the
dropdown menu.
4. Confirm that you want to remove the account.
Configuring account sync and display options
Sync information manually
1. Open the Accounts Settings screen:
Press Settings -> Accounts
2. Touch the account whose data you want to sync.
3. Touch Menu on the top of the screen and touch Sync now on the dropdown menu.
Change an account’s sync settings
66
Page 67

1. Open the Accounts Settings screen:
Settings -> Accounts
Press
2. Touch the account whose sync settings you want to change.
3.
Check or uncheck the kinds of information you want to sync to the device.
31 Settings
67
Page 68

68
Page 69

Wireless & networks
HDMI
Sound
Display
Location access
Apps
Backup & reset
Wi-Fi
Bluetooth
Data usage
More
Turn on HDMI
HDMI Resolution
Screen Zoom
Silent mode
Volume
Call ringtone &vibrate
System
Brightness
Wallpaper
Sleep
Daydream
Font size
Wireless display
Access to my locstion
Location sources
Downloaded
On SD card
Running
All
Backup &restore
Factory data reset
Turn on Wi-Fi.
Turn on/off Bluetooth and manage it.
Turn on Mobile data to check the data usage
Touch to set VPN, portable hotspot, Wi-Fi direct and
Mobile network.
Turn on HDMI before using HDMI.
Set the resolution before using HDMI.
Zoom in/out the display of tablet on TV.
Silence all sounds except media & alarms.
To adjust the Media volume, Alarm volume and
Notification volume. Tap & slide
and then tap OK.
Choose phone ringtone and whether vibrate when ring.
Select to enable a sound when making a selection.
Tap & slide to adjust the
screen brightness as desired, and then tap OK.
Touch to set the wall paper
Choose how long before going asleep when no operation
happened
Choose pictures as Daydream
Choose the appropriate font size
Turn on Wi-Fi to look for nearby wireless displays
Turn on the button to let apps that have asked your
permission use your location information.
Wi-Fi &mobile network location
Program downloaded from your tablet.
Manage and remove installed applications from your SD
card
View and control currently running services.
Manage all the programs in your tablet
You can choose to backup your data or not
Tap to reset the device to its initial factory state, erasing
all data and downloaded applications. Tap Reset Tablet
to proceed with reset, or press Back key to cancel and
return to previous screen.
WARNING! The following will be erased during the
factory reset:
69
Page 70

Backup & reset
(continued)
Security
Language & input
Screen security
Passwords
Device administration
Credential storage
Language
Spell checker
Personal dictionary
Keyboard & input
methods
speech
~ Google account
~ System and application data and settings
~ Downloaded applications
The factory reset will NOT erase:
~ Current system software and bundled applications
~ SD card files, such as music or photos
You can choose a appropriate mode to unlock your
screen and you can choose to show your owner info on
lock screen or not.
You can choose to make passwords visible.
Choose to allow installation of non-Market apps.
Include trusted credentials and Install from SD card.
Select the language and region according to your
location.
Pitch on to enable spell checker
You can add words to a personal dictionary, words that
may not be included in the default dictionary.
Choose a appropriate input from the list.
Include voice speech and text-to speech output
Date & time
About tablet
Mouse/trackpad
Automatic date &time
Set date
Select time zone
Set time
Use 24-hour format
Choose date format
Tap & slide and then tap
OK.
Use network-provided values.
Set the date manually when Automatic is not checked.
Select the time zone when Automatic is not checked.
Set the time when Automatic is not checked.
You can choose to use 24-hour format or 12-hour format.
You can select the date format.
View updates Status (Battery, Wi-Fi, etc), Legal
information, Model number, Android version, Kernel
version and Build number.
70
Page 71

Guide for Elevation and Azimuth (in Degrees)
Yazmi AsiaStar Satellite
Country (City) Azimuth Elevation
Afghanistan 125 33
Bahrain 108 24
Bangladesh 147 58
Bhutan 150 54
Brunei 245 78
Burma 156 64
Cambodia 180 75
China (Shanghai) 210 49
India (Mumbai) 118 47
India (Chennai) 116 58
India (Kolkata) 143 58
India (Bangalore) 118 55
Indonesia (Jakarta) 280 76
Iran 114 25
Japan (Tokyo) 230 36
Kazakhstan 135 24
Kuwait 107 20
Kyrgyz Republic 139 33
Laos 177 68
Malaysia (Kuala Lumpur) 134 85
Maldives 97 53
Mongolia 178 37
71
Page 72

Nepal 141 50
Oman 107 31
Pakistan 125 38
Philippines 238 66
Qatar 107 24
Saudi Arabia 103 20
Singapore 137 88
Somalia 93 24
South Korea 216 42
Sri Lanka 106 60
Taiwan 215 57
Tajikistan 133 33
Thailand 162 74
Turkmenistan 121 25
United Arab Emirates 109 28
Uzbekistan 127 27
Vietnam 184 71
Yemen 100 23
72
Page 73

Guide for Elevation and Azimuth (in Degrees)
Yazmi AfriStar Satellite
Country Azimuth Elevation
Afghanistan 240 29
Algeria 144 52
Angola 14 75
Armenia 214 37
Azerbaijan 218 45
Bahrain 232 45
Benin 116 65
Botswana 352 64
Burkina Faso 118 60
Burundi 291 79
Cameroon 124 78
Cape Verde 105 36
Central African Republic 172 82
Chad 172 72
Comoros 296 60
Congo 78 83
Cote d'Ivoire 163 40
Cyprus 201 47
Democratic Republic of Congo 316 86
Djibouti 243 62
Egypt 199 57
Equatorial Guinea 98 77
Eritrea 232 62
Ethiopia 244 66
Gabon 87 79
Gambia 109 46
Georgia 212 36
73
Page 74

Ghana 109 63
Guinea 107 51
Iran 231 38
Iraq 218 45
Jordan 208 50
Kenya 269 70
Kuwait 225 45
Lebanon 206 47
Lesotho 346 55
Liberia 101 54
Libya 173 58
Madagascar 305 53
Malawi 315 69
Mali 123 56
Mauritania 119 47
Mozambique 321 63
Morocco 135 42
Namibia 10 64
Niger 146 66
Nigeria 124 71
Oman 244 43
Pakistan 246 28
Qatar 234 45
Rwanda 283 79
Saudi Arabia 229 51
Senegal 109 46
Seychelles 281 52
Sierra Leone 103 51
Somalia 259 59
South Africa 351 56
Sudan 213 71
74
Page 75

Swaziland 338 57
Syria 209 45
Tanzania 295 72
Togo 112 65
Tunisia 160 48
Turkey 202 43
Uganda 264 76
United Arab Emirates 239 44
Yemen
242 54
Zambia 334 72
Zimbabwe 335 65
Note: Approximate orientation is sufficient to obtain the Yazmi satellite signal.
75
Page 76

Beaming Knowledge to Everyone
Ya zmi USA , LL C
8515 Georgia Avenue
Silver Spring, Maryland 20910 USA
www.yazmi.com
76
 Loading...