

Odyssey 7 User Manual

PROFESSIONAL MONITOR/RECORDER
MANUAL
Updated March 24, 2015 | Firmware Release v5.10.100
ProRes 422 (HQ)
ProRes 422
ProRes 422 (LT)

USER MANUAL // FIRMWARE V5.10.100
TABLE OF CONTENTS
INTRODUCTION // READ THIS FIRST! 2
PACKAGE CONTENTS 3
OVERVIEW 4
Odyssey7 Features 4
Odyssey7 Specicaons 5
Recording Capabilies 6
RECORDING CAPABILITIES 6
Record Time Capacies 7
RECORDING CAPABILITIES 7
SSD MEDIA 8
2.5” Premium SSD Media 8
Odyssey Ulity Drive 8
ANATOMY 9
Mechanical Drawings 11
GETTING STARTED 12
Odyssey7 Acvaon 12
Inializing 12
Powering Down 13
the Odyssey7 Touchscreen 13
The Odyssey7 Menu 13
Demo Mode 13
MENU SYSTEM 17
Upper Tool Bar (Record Mode) 18
Lower Tool Bar (Record Mode) 25
Upper Tool Bar (Play Mode) 29
Lower Tool Bar (Play Mode) 30
MENU SYSTEM 32
WORKING WITH MEDIA 33
Loss of Power During a Record 33
File Storage 33
Downloading Media 33
CD Apple ProRes Transfer Ulity 34
Apple ProRes 35
Working with Files Recorded by the Odyssey 35
ACCESSORIES 36
Convergent Design Accessories 36
Third Party Accessories 40
RELEASE NOTES 41
Firmware v4.10.100 41
Firmware v3.10.100 45
Firmware v2.20.141 48
Firmware v2.10.141 50
Earlier Versions 54
LIMITED WARRANTY 55
WEBSITE LINKS 56
MENU SYSTEM 14
Odyssey Menu 14
SETUP Menu 15
Outputs Menu 17
Convergent Design, Inc.
4525 Northpark Drive
Colorado Springs, CO 80918
Tel: ++(720)221-3861
Email: CDSupport@convergent-design.com
Website: Convergent-Design.com
Updated March 24, 2015 | Firmware Release v5.10.100
1

INTRODUCTION // READ THIS FIRST!
BEFORE YOU BEGIN USING THE ODYSSEY7, WE STRONGLY SUGGEST
YOU REVIEW THE INCLUDED QUICK START GUIDE. WE ALSO
STRONGLY RECOMMEND THE FOLLOWING:
1. Always record to the INTERNAL MEDIA OF THE CAMERA; this is critical for proper
timecode and ideal for dual media / backup.
2. DO NOT REMOVE THE FOUR SCREWS FROM REAR OF CASE. This may result in
damage to the OLED panel. Such damage is not covered by warranty.
3. Power and Cabling: Make sure you have PROPER POWER (6.5-34VDC), plugged in to
the proper power port (left side of recorder), and that 3G-rated SDI cables are used.
4. Power source must be able to provide up to 24 watts at all times to the Odyssey7.
5. When powering the Odyssey7 from an ARRI ALEXA camera, we recommend using the
24V R/S Fischer-3 output from the ALEXA using the optional Convergent Design cable.
6. Familiarize yourself with the equipment and test prior to shooting.
7. Before using the SSDs it is IMPERATIVE TO FORMAT them in the Odyssey7.
Formatting SSD media is a DESTRUCTIVE PROCESS; any existing data will be lost
during format.
8. Ensure that the camera’s viewnder data is not being recorded; IF YOU SEE
VIEWFINDER DATA ON THE ODYSSEY7 monitor, then it will be recorded! In a future
update, if your camera can provide both clean and data-overlayed video feeds, it will be
possible to monitor one while recording the other.
9. NEVER DELETE ANY FILES OFF AN SSD FROM A COMPUTER, except when going
through a rmware update procedure.
10. While we recommend that you always maintain the latest rmware on your Odyssey7,
WE DO NOT RECOMMEND UPDATING FIRMWARE IF YOU ARE IN THE MIDDLE OF
A SHOOT (unless specically instructed to do so by our Technical Support staff).
11. When ofoading media, ALWAYS MAKE A BACKUP COPY, ideally to a RAID1 drive.
12. Be sure to allow the Odyssey7 to nish closing a Record le before taking any further
action.
13. Always safely eject SSD Media by pressing the button before removing SSD media
from the Odyssey7.
2

PACKAGE CONTENTS
Odyssey7 box contains one (1) Odyssey7 monitor/recorder and one (1) Universal Power Supply.
MEDIA AND ACCESSORIES SOLD SEPARATELY!
3
OVERVIEW
ProRes 422 (HQ)
ProRes 422
ProRes 422 (LT)
ODYSSEY7 FEATURES
MONITORING
PROFESSIONAL MONITOR: 7.7” 1280x800 OLED panel featuring true blacks, and accurate color with
a full range color gamut for Rec709 or DCI-P3 viewing.
IMAGE ANALYSIS TOOLS: Waveform, Vectorscope (in future update), Histogram, False color exposure
view, Zebra, three-mode Focus Assist, Pixel Zoom (1:1 & 2:1), LUTs, and Frame Guides.
FLEXIBLE I/O: One dedicated 3G-SDI input, one dedicated 3G-SDI output, one HDMI input, one HDMI
output. Active cross-conversion means that both outputs are always active no matter which input is used.
RECORDING
HIGH-CAPACITY RECORDING. A high-speed Solid State Drive (SSD), available in 256GB, 512GB and
1TB capacities allows for extended recording.
Apple ProRes up to 1080/60p, 1080/60i and 720/60p. Additional frame rates and popular compressed
codecs will be available at a later date via free rmware update.
OTHER FEATURES
VERSATILE POWER. Wide voltage range (6.5-34v) and low draw (8-15w, depending on mode) for great
exibility of battery and other power options.
LIGHT WEIGHT. A magnesium case and efcient board design means only 1.25lbs for the basic unit.
SMALL SIZE. even with a 7.7” screen, the Odyssey7 is approximately 8”x6”x1”, making it easy to use
on cameras, mounted in tight spots or held in one’s hand.
MOUNTING
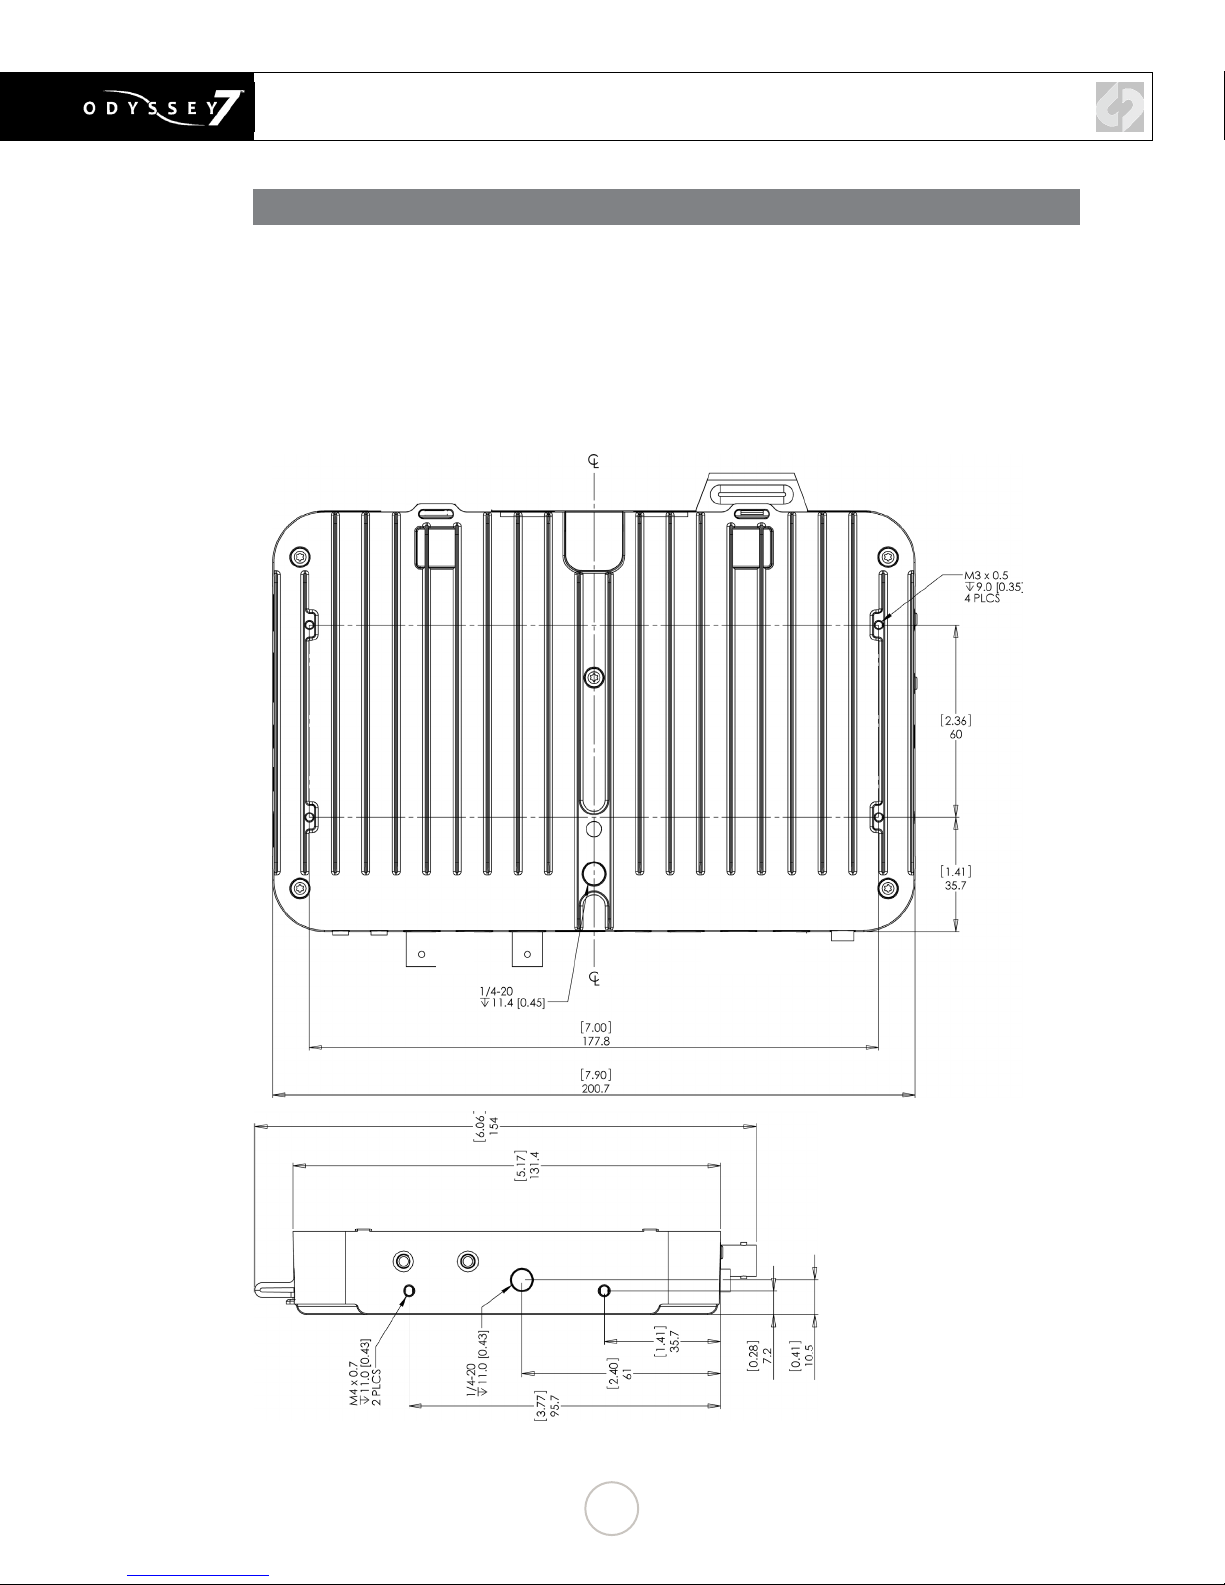
The Odyssey7 features three ¼-20 threaded sockets, one on the lower rear of the case and one each
on the left and right sides of the case. Do not exceed 11mm of depth when inserting a bolt, otherwise
damage may occur to the Odyssey7. Additionally, there are four M3 threaded socketson the rear of the
case and two M4 sockets on each of the sides of the case.
CONTINUED »
4
OVERVIEW
ODYSSEY7 SPECIFICATIONS
Display
SDI Video I/O
HDMI Video I/O
LUT Support
Focus Assist
Zebras
False Color
Waveform Monitor
Histogram
Vectorscope (future)
Pixel Zoom
OLED Frame
7.7" OLED, 1280x800, RGB 8-Bit Panel, ~ 16 million colors, wide gamut, 3400:1 Contrast, 176°
Viewing, True Blacks
HD-SDI/3G Support: Single Link, 1-Input, 1-Output, Full-size BNCs, Up to 1080p60 4:2:2 10-bit
HDMI I/O Version 1.4a support, Up to 1080p30 4:2:2 8-bit
ARRI Log-C, Canon C-Log, Sony S-Log, S-Log2, S-Log3 LUTs (No Custom LUT Support)
Video + Edges (Peaking), Edges Only, Enhanced Edges, user choice of color: Red, Green, or Blue
Currently one programmable level, future two programmable levels
False color with 5 programmable levels
Luma only, RGB Parade, Red only, Blue only, Green only
Luma only, RGB Parade, Red only, Blue only, Green only
Color vectorscope with 2X zoom
1:1 and 2:1 Image Magnicaon with frame drag
Vercal Auto-Flip (defeatable), Aspect Rao Guides
Reference
Digital Audio I/O
Analog Audio I/O
Remote and
Timecode
User Interface
DC Power Input
Power Draw
Weight and Size
Operang
Temperature
Record Triggers
Recording Media
(Single SSD Slot)
Recording Formats Compressed Formats - Apple ProRes 422 (HQ) / Apple ProRes 422 / Apple ProRes 422(LT) up to
2-Channel Embedded Audio (48KHz, 24-bit)
3.5mm stereo unbalanced input up to -10dB (future), 3.5mm stereo headphone output
RS-232 I/O (future), programmable GPIO (future). Timecode: LTC I/O (BNC) or embedded SDI /
HDMI
Capacive Touchscreen, Two mechanical keys
6.5 to 34 VDC with built-in reverse polarity protecon; locking power connector, built-in power
switch
8 Was (monitor only), 9-12 Was (simultaneous monitor/record mode)
560 grams / 1.2 lbs., 7.9" x 6.1" x 1.0" (200 x 155 x 25 mm), -10 to +40°C (Operang), -20 to
+70°C (Storage)
"-10 to +40°c (Operang)
-20 to +70°c (Storage)"
Touchscreen, SDI record trigger (ARRI, Canon, Panasonic, Red, Sony), Oponal Remote Control
Cable
Convergent Design Premium 2.5” SSDs with power-loss protecon, in 256GB, 512GB and 1
TB sizes, 420Mb/sec write, 500Mb/sec read speed, compable with USB 3.0 and Thunderbolt
Adapters. SSDs and adapters sold separately.
1080/60p, 1080/60i, 720/60p
CONTINUED »
5

RECORDING CAPABILITIES
RECORDING CAPABILITIES
The Odyssey7 is a single channel HD video recorder that records onto Convergent Design Odyssey SSD
Media from HD-SDI or HDMI inputs.
HD VIDEO
The Odyssey7 records HD video as Apple ProRes
3G-SDI: accepted 1080p/psf / 23.98, 24, 25, 29.97, 30, 50, 59.97, 60, 720p50, 60
HDMI: accepted 1080p/psf / 3.98, 24, 25, 29.97, 30, 50i, 60i, 720p50, 60
Compressed Apple ProRes 1080p/psf / 23, 24, 25, 29 50, 60; 1080i 50, 60; 720p 50, 60
Future free rmware updates will include addional compressed video codecs with expanded frame
rates.
APPLE PRORES RECORDING
Odyssey now supports recording Apple ProRes 422 (HQ), Apple ProRes 422 and Apple ProRes 422 (LT).
Files are saved in .MOV format.
PRORES 422 (HQ)
PRORES 422
PRORES 422 (LT)
The Apple ProRes 422 (HQ) codec oers the utmost possible quality for 4:2:2 or 4:2:0 sources
(without an alpha channel) and provides the following:
• Target data rate of approximately 220 Mbps (1920 x 1080 at 60i)
• Higher quality than Apple ProRes 422
The Apple ProRes 422 codec provides the following:
• Target data rate of approximately 145 Mbps (1920 x 1080 at 60i)
• Higher quality than Apple ProRes 422 (LT)
The Apple ProRes 422 (LT) codec provides the following:
• Roughly 70 percent of the data rate of Apple ProRes 422 (smaller le sizes than ProRes 422)
• Higher quality than Apple ProRes 422 (Proxy)
NOTE
Convergent Design also manufactures the Odyssey7Q and Odyssey7Q+ that are designed
for recording in 2K, 4K, RAW, MultiStream and other formats. Please see our website or talk
to your dealer for details.
6

RECORDING CAPABILITIES
RECORD TIME CAPACITIES
The Odyssey7 can record several video formats and frame rates. Record time varies based on format and
frame rate. The chart below indicates maximum record time in minutes based on the use of one 512 GB
SSD. For 256 GB, divide in half, for 1TB, multiply by two.
RECORDING FORMAT
24fps
25fps
30fps
50fps
60fps
Apple ProRes 422 (HQ) (Included FREE with Odyssey)
1080p Apple ProRes 422 (HQ) 335 321 268 161 134
1080i Apple ProRes 422 (HQ) 322 268
720p Apple ProRes 422 (HQ) 362 302
Apple ProRes 422 (Included FREE with Odyssey)
1080p Apple ProRes 422 424 254 212
1080i Apple ProRes 422 424
720p Apple ProRes 422 462 386
Apple ProRes 422(LT) (Included FREE with Odyssey)
1080p Apple ProRes 422 (LT) 368 302
1080i Apple ProRes 422 (LT) 606
720p Apple ProRes 422 (LT) 606
CONTINUED »
7
SSD MEDIA
2.5” PREMIUM SSD MEDIA
To enable recording on the Odyssey, you must use Convergent Design Odyssey Premium SSD media.
Only Convergent Design Odyssey SSDs will work in the Odyssey. These SSDs, available in 256GB,
512GB and 1TB capacities and must be purchased separately. Firmware updates must be completed
only with Convergent Design Odyssey SSD or Convergent Design SSD Utility Drives.
256GB Odyssey SSD CD-SSD-256GB
512GB Odyssey SSD CD-SSD-512GB
1TB Odyssey SSD CD-SSD-1TB
ODYSSEY UTILITY DRIVE
The Odyssey Utility Drive is designed as a lower cost alternative to the Odyssey Premium SSD media
for secondary tasks. The Odyssey Utility Drive can be used for Odyssey rmware updates and future
functionality such as 3D-LUT les.
The Convergent Design SSD Utility Drive will not record video les. It is intended for Odyssey owners
who do not wish to tie up an SSD with utility features, or for Odyssey owners who use their devices as
monitors and do not need to purchase the more expensive recording media.
Utility Drive for Odyssey CD-SSD-UTILITY
8
ANATOMY
ODYSSEY7 - BOTTOM
There are seven connector ports on the bottom side of the Odyssey7 (left to right)
PWR on Power input socket to Odyssey7 (see Geng started – power). Just in front of the pwr On port is a
SDI in BNC connector for 3G-SDI input
LTC io BNC connector for linear Timecode input/output
HDMI in HDMI 1.4 input from HDMI video source.
HDMI Out HDMI 1.4 output to external monitor or other device
SDI Out BNC connector for 3G-SDI output
AUDIO in 3.5mm mini-phone stereo socket for analog audio in.
AUDIO Out 3.5mm mini-phone stereo headphone socket.
buon, which is a Force power On/O control. Hold buon ve seconds to force power o. This is
only to be used if standard power on or o procedures fail (see Geng started – inializing).
This input will be enabled in a free future rmware update.
ODYSSEY7 - TOP
There is a single Solid State Drive (SSD) slot on the top of the Odyssey7
Only Convergent Design 256GB, 512GB and 1TB Odyssey SSDs can be used to capture video on the
Odyssey7. The Odyssey Utility Drive can be used for rmware updates and other future functions, but
not to record video les.
To mount SSD, insert connector-end rst with the label facing forward and the handle near ush with the
back of the Odyssey7. Push gently but rmly until the handle ange is ush with the top of the Odyssey7.
It is a snug t, but the SSD should insert smoothly.
CONTINUED »
9

ANATOMY
ODYSSEY7 - LEFT SIDE
There are two Function buttons, F1 LOCK and F2 SHUT DOWN.
F1 LOCK
F2 SHUT
DOWN
Lockout control for the Odyssey7 touchscreen. Push to engage and SCREEN LOCK will appear in the
center of the touchscreen’s Upper Tool Bar. Push F1 again to disengage. Engaging F1 also re-calibrates
the touchscreen.
Preferred method to power down the Odyssey7. Properly closes les on the SSDs and performs other
maintenance funcons (see Geng Started -- Powering Down). Push to acvate prompt asking SAFELY
POWER DOWN UNIT? In a future free rmware update it will be possible to program these buons for
addional funcons.
ODYSSEY7- RIGHT SIDE
There are three connector ports, (top to bottom) USB, HDMI OUT and RMT.
USB
HDMI OUT
RMT
KENSINGTON LOCK PORT
An access point for servicing by Convergent Design.
Output to an HDMI compable device
A remote control connecon to the Odyssey7 supports remote trigger and tally. A future
rmware update will allow control interface with funcons of the Odyssey7.
A rectangular hole above the RMT port is for accepng a Kensington Security Lock.
MOUNTING
The Odyssey7 features three ¼-20 threaded sockets, one on the lower rear of the case and one each
on the left and right sides of the case. Do not exceed 11mm of depth when inserting a bolt, otherwise
damage may occur to the Odyssey7. Additionally, there are four M3 threaded sockets on the rear of the
case and two M4 sockets on each of the sides of the case.
CONTINUED »
10
ANATOMY
MECHANICAL DRAWINGS
11

GETTING STARTED
ODYSSEY7 ACTIVATION
Convergent Design requires each Odyssey7 to be registered via our website. This is so that we can
provide notices of free rmware updates, issue alerts for critical issues, and track rentals or purchases
of record options.
Upon rst initializing of the Odyssey7 (see below), a prompt will appear asking if the device is to be
Activated at this time or if it is to be used in DEMO mode. In DEMO mode the Odyssey7 is fully functional,
however a blue or pink bar “watermark” will appear in any recorded video.
In order to Activate the Odyssey7 after initial purchase, go to Convergent-Design.com to register and
activate your unit. When you have registered a new account (or logged into your existing account) you
will be able to Add a Device to your account at which time you will be provided the Basic Activation Key
for your device.
The Activation prompt will appear upon every initialization of the Odyssey7 until the device is Activated.
When Activate is selected, follow the prompts to Activate the Odyssey7 using the Basic Activation Key
you were given on the website.
Also, make sure your Odyssey7 has the latest rmware, posted here:
Convergent-Design.com/support/rmware-downloads.html
INITIALIZING
Plug in power to the Odyssey7. It should take about 5-10 seconds to initialize, depending on the mode
it is set to. If the Odyssey7 does not self-initialize, push the PWR ON button next to the power socket on
the lower left corner of the Odyssey7.
As part of the initializing process, SMPTE color bars may appear briey on the screen. If there is a
signal input into SDI A IN that matches the record format the Odyssey7 is set to, then the image should
appear on the screen. If there is an SSD mounted in the Odyssey7 then a DETECTING SSD message
will appear on the lower left of the screen. If the SSD needs to be re-initialized or formatted, a second
message may appear. If the Trigger Button in the Upper Tool Bar appears as a red box surrounding a
white circle, then the Odyssey7 is ready to record.
12
GETTING STARTED
POWERING DOWN
While it may seem an odd time to note this, it is important to know that there is a preferred method to
shutting down the Odyssey7. On the left side of the case, the F2 SHUT DOWN button should be pressed.
This prompts a conrmation to “SAFELY POWER DOWN UNIT?”
Powering down in this fashion properly closes the les and directory system on the SSDs, preventing
corruption. If the Odyssey7 should ever suffer a failure and the F2 SHUT DOWN sequence does not
function properly, the unit can be Force Power Off by holding the PWR ON button by the power socket on
the lower left corner of the Odyssey7, or simply by pulling the power connector out of the power socket.
If the Odyssey7 is ever powered down in this fashion, it is important to run a recovery on the SSDs in the
Odyssey menu:
☼
» ODYSSEY » SSDs » REBUILD SSD1SETTING UP & USING
THE ODYSSEY7 TOUCHSCREEN
The touchscreen of the Odyssey7 features all of the device’s controls in a straightforward, easy to navigate
structure. Each box is a “virtual button.” Tap it briey to activate/deactivate it, or hold it for a few seconds
to open up the menu dening its function. The controls at the top of the display (Upper Tool Bar) are the
recording, playback and formatting administration. The controls at the bottom of the display (Lower Tool
Bar) are the image analysis adjustments.
THE ODYSSEY7 MENU
Starting on the left, tapping the ☼ button brings up the initial setup menus for the Odyssey7. Don’t be
intimidated by the number of selections in the ☼ section. This is by far the most in-depth section of the
Odyssey7 touchscreen menus. More information about the Odyssey7 Menu System is available on the
following pages.
DEMO MODE
Out of the box the Odyssey7 is in DEMO MODE and must be owner-registered with Convergent Design.
On the Odyssey7a watermarking blue bar will appear on the lower third of the image both on the OLED
and in the recording while in DEMO MODE.
To activate the Odyssey7 after initial purchase, go to Convergent-Design.com, create a user account and
add the device to your account. When you add a device to your account you will be provided with the
Basic Activation Key for that device.
13
MENU SYSTEM
ODYSSEY MENU
The ODYSSEY Menu allows you to access basic device settings. This is where you can view device info,
set date, time & metadata, format & recover SSDs and view information about the device such as the
rmware version and serial number. It is accessed by tapping ☼ then tapping ODYSSEY.
ODYSSEY
ACTIVATION
DEMO MODE: ALL AVAILABLE RECORD OPTIONS ARE FUNCTIONAL IN A DEMO MODE, BUT IF THE OPTION HAS NOT BEEN
ACTIVATED THE IMAGE FOR THAT OPTION WILL APPEAR WITH A LARGE BLUE BAR “WATERMARK” ON SCREEN WHEN
RECORDING. THIS BAR IS RECORDED IN THE IMAGE FILE.
SSDS ERASE & FORMAT SSD1
TIME
DATE
RESET
ABOUT
Option Description Notes
→
UNIT
Enter Key or
‘OK’
REBUILD SSD1
PLEASE NOTE: Formang should be performed at the start of use of any new SSDs and the start of any new
project. Recovery is for when the SSD was not properly dismounted from the Odyssey7. This includes
physically removing the SSD without running the eject sequence, sudden loss of power to the Odyssey7 or
improper powering down of the Odyssey7. The Recover process accesses any incomplete les on the SSD
and, when possible, properly closes them. NOTE: FORMATTING OF SSDs SHOULD ALWAYS BE PERFORMED
ON THE ODYSSEY7.
MENU
METADATA
ALL (FACTORY DEFAULTS)
Displays the rmware version, serial number, warranty status, and which Opons are acvated.
Check our website regularly to ensure you are running the current rmware.
For acvang Odyssey7
(required)
Permanently erases everything
on SSD1.
Non-destrucvely recovers /
rebuilds le system of SSD1
Set the appropriate me.
Set the appropriate date.
Restore all default sengs.
Resets metadata elds
Resets all sengs
Tap to reveal a key code prompt.
To acvate the Odyssey7 aer inial
purchase, go to Convergent-Design.
com, create an account and add the
device.
FORMATTING IS A DESTRUCTIVE
PROCESS AND WILL ERASE ANY FILES
CURRENTLY ON THE SSD. BE SURE
TO DOWNLOAD ALL FILES BEFORE
FORMATTING.
Use only in extreme cases (such as
if a computer corrupts the SSDs le
system).
IMPORTANT FOR RECORDING OPTION
RENTALS
Does not eect rmware version or
record opons.
14
MENU SYSTEM
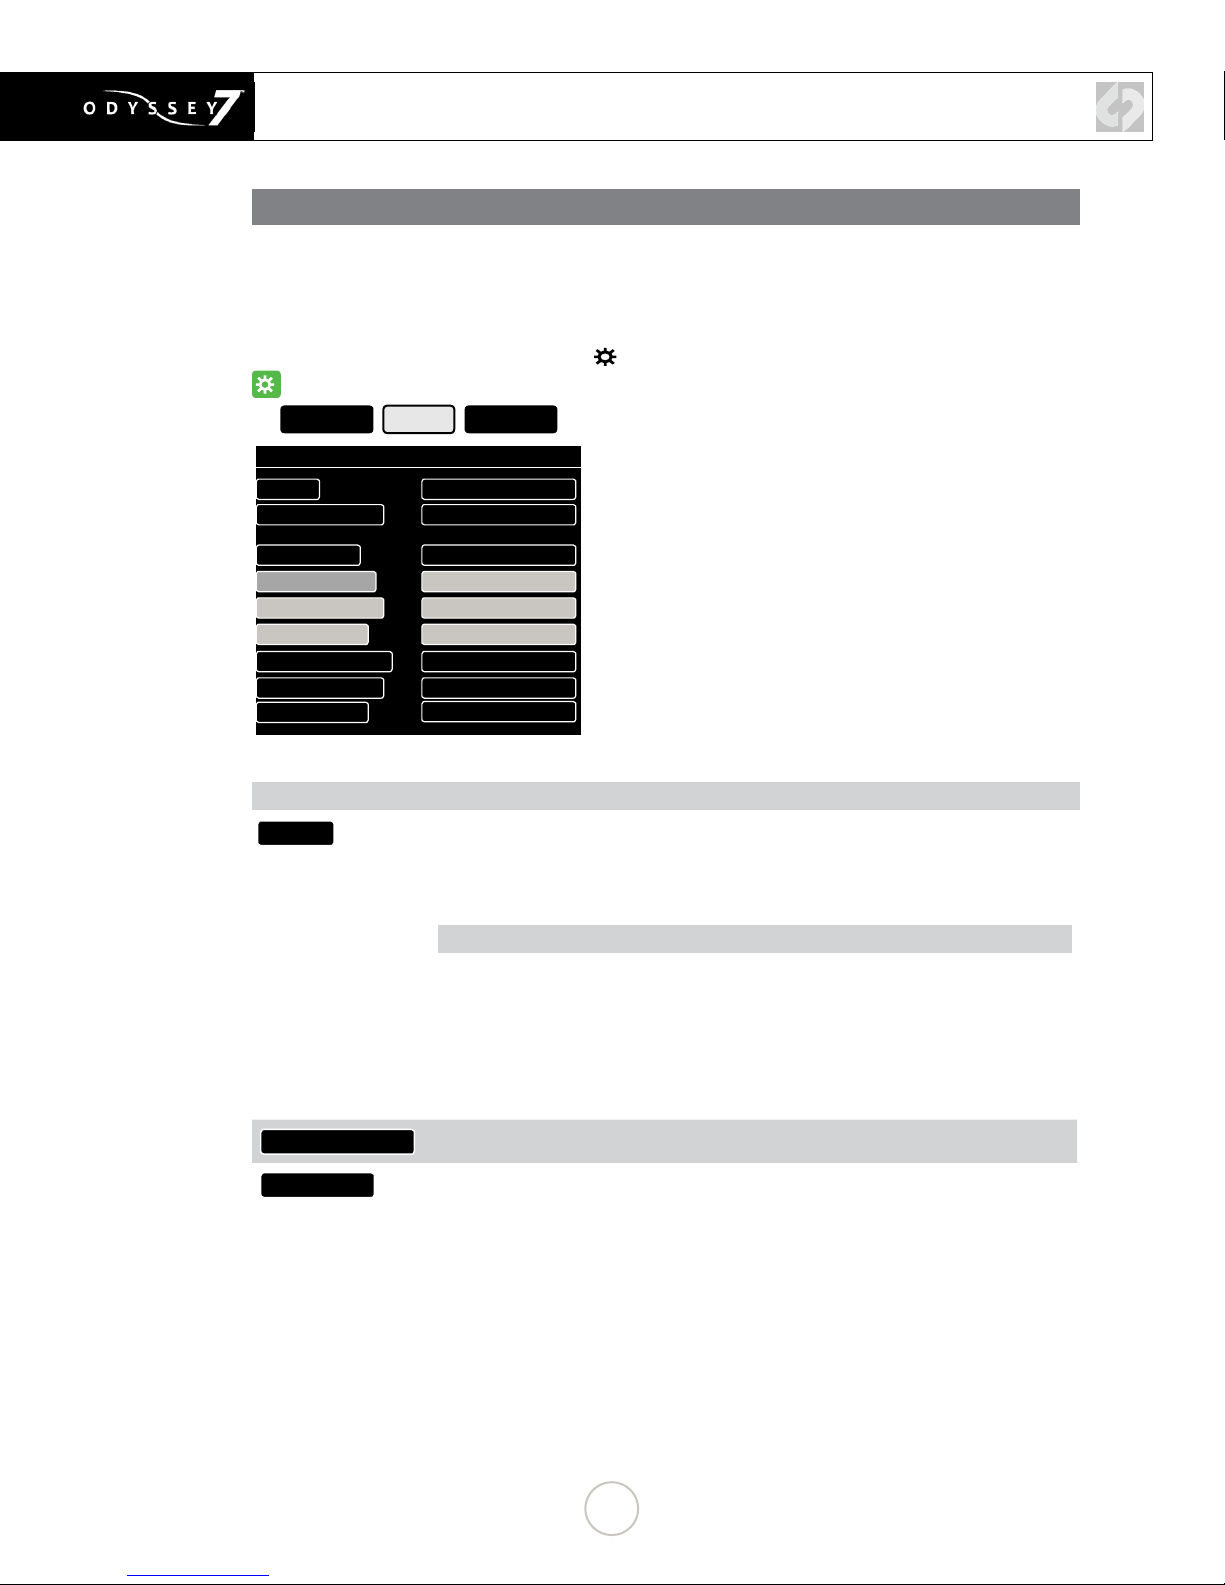
SETUP MENU
The SETUP Menu functions as both a detailed status display as well as a selection point to change
status and settings. It allows you to setup the Odyssey7 and adjust settings for monitoring and recording
including the type of camera input, recording format, video cadence, frame rate, audio source, timecode
source and record trigger. Many of the controls are also available by pressing other Upper Toolbar buttons.
The SETUP menu is accessed by tapping ☼ then tapping SETUP.
☼
ODYSSEY SETUP OUTPUTS
╚
SET UP MONITORING / RECORDING
CAMERA: SONY
MONITOR->RECORD HD->UHD PRORES
VIDEO CODEC: PRORES HQ
VIDEO CADENCE: PROGRESSIVE/PSF
AUDIO CHANNELS: 2
AUDIO SOURCE: SDI/HDMI
TIMECODE SOURCE: SEED/RECORD RUN
RECORD TRIGGER: RECORD BUTTON
PROJECT RATE:
∟
( ACTIVATED )
FOLLOWS INPUT
SETUP MENU OPTIONS
CAMERA:
MONITOR->RECORD
VIDEO CODEC
Tapping status boxes brings up a list of selections for each. Choice of CAMERA determines
MONITOR -> RECORD selections for that camera. CAMERA also determines Trigger,
Timecode and LUT integration.
AVAILABLE CAMERAS:
Sony FS7/FS700
Sony (F3, F5 and F55 and others)
Canon (C500 and others)
ARRI (ARRI Alexa)
Other (sundry HD video sources)
Panasonic
RED
Displays options for the currently selected camera
Displays current recording format. In compressed recording, tap status box for list of
options. Currently available compressed video formats include Apple ProRes 422 (HQ),
Apple ProRes 422 and Apple ProRes 422 (LT).
15
MENU SYSTEM
VIDEO CADENCE:
TIMECODE SOURCE:
This identies the cycling of the signal coming into the Odyssey7 and how it is to be
recorded.
AVAILABLE CADENCES:
PROGRESSIVE/PSF: For video signals structured as True Progressive (p) or
Progressive Segmented Frames (PSF).
INTERLACED: For HD video signals structured as interlaced elds (i). Records a
1080i60 video signal without alteration. Note that some cameras carry progressive
video embedded within an interlaced signal. See 3:2 Pulldown below.
REMOVE 3:2 PULLDOWN (TO 24P): For 24p video signals striped within a 60i signal.
Extracts the 24p video, records it as 1080p24 and discards the excess elds for greater
efciency and smoother post.
Allows selection for origination of timecode. Note that some video sources do not carry
timecode data and at high frame rates some cameras do not generate timecode. In these
cases the Odyssey7 will generate a Record Run timecode from its internal clock. LTC not
supported when recording ARRIRAW.
AVAILABLE TIMECODE SOURCES:
SDI/HDMI (embedded in incoming signal)
LTC (input from external source to LTC port)
TIME-OF-DAY NDF (Odyssey internal clock, non-drop frame counng)
TIME-OF-DAY DF (Odyssey internal clock, drop frame counng)
SEED/RECORD RUN (Set mecode counter, increments while recording)
AUDIO CHANNELS:
AUDIO SOURCE:
RECORD TRIGGER:
Currently locked to two channels. Future rmware updates will allow up to eight audio
channels.
Allows selection of audio input source.
AVAILABLE AUDIO SOURCES:
SDI/HDMI (embedded in incoming signal)
ANALOG (analog 2-channel input via AUD IN port) - Currently available only for HD
ProRes recording.
Allows selection of record trigger mechanism for Odyssey. Note that some cameras do
not output trigger signals over SDI or HDMI.
AVAILABLE RECORD TRIGGERS
RECORD BUTTON (Tap Record Buon on Upper Toolbar to start/stop recording)
CAMERA (Use camera’s trigger to stop/start recording -- trigger output must be
enabled on camera)
TIMECODE (Use detecon of mecode incremenng to start/stop recording -Odyssey7 TIMECODE must be set to SDI/HDMI or LTC and mecode source set to
Record Run)
REMOTE (Use the Convergent Design Remote Trigger accessory to start/stop
recording. Currently only available for HD Apple ProRes recording.
16
 Loading...