

Odea Giro, Giro Plus Maintenance Manual
Operation and maintenance manual
Before using the machine, please read the attached operating instructions.
Carefully read the safety rules
Mode d'emploi
Veuillez lire attentivement le mode d'emploi
(notamment les consignes de sécurité) avant d'utiliser l'appareil.
FOR HOUSEHOLD USE ONLY

2
IMPORTANT SAFEGUARDS
When using electrical appliances, basic safety precautions should always be
followed to reduce the risk of fire, electric shock, and/or injury to persons,
including the following:
1 Read all instructions and information in this instruction book and any
other literature included in this carton referring to this product before
operating or using this appliance.
2 Do not touch hot surfaces. Use handles or knobs.
3 To protect against fire, electric shock and personal injury do not immerse
cord, plugs or appliance in water or other liquid.
4 Close supervision is necessary when any appliance is used by or near
children.
5 Unplug from outlet when not in use and before cleaning. Allow to
cool before putting on or taking off parts, and before cleaning the
appliance.
6 Do not operate any appliance with a damaged cord or plug or after
the appliance malfunctions or has been damaged in any way. Return
appliance to the nearest authorized service centre for examination,
repair or adjustment.
7 The use of accessory attachments not recommended by the appliance
manufacturer may result in fire, electric shock or personal injury.
8 Do not use outdoors.
9 Do not let cord hang over edge of table or counter, or touch hot
surfaces.
10 Do not place on or near a hot gas or electric burner, or in a heated
oven.
11 Always turn appliance “OFF”, then plug cord into the wall outlet. To
disconnect, turn switch to “OFF”, then remove plug from wall outlet.
12 Do not use appliance for other than intended household use.
13 Use extreme caution when using hot steam.
SAVE THESE INSTRUCTIONS

3
CAUTION
This appliance is for household use only. Any servicing, other than cleaning
and user maintenance, should be performed by an authorized service
centre. Do not immerse machine in water. To reduce the risk of fire or
electric shock, do not disassemble the machine. There are no parts inside
the machine serviceable by the user. Repair should be done by authorized
service personnel only.
1 Check voltage to be sure that the voltage indicated on the nameplate
corresponds with your voltage.
2 Never use warm or hot water to fill the water tank. Use cold water only.
3 Keep your hands and the cord away from hot parts of the appliance
during operation.
4 Never clean with scrubbing powders or harsh cleaners. Simply use a soft
cloth dampened with water.
5 For optimal taste of your coffee, use purified or bottled water. Periodic
descaling is still recommended every 2-3 months.
INSTRUCTIONS FOR THE POWER
SUPPLY CORD
A A short power-supply cord is provided to reduce risks of tangling or
tripping over a longer cord.
B Longer extension cords are available and may be used if care is exercised in
their use.
C If a long extension cord is used:
1 the marked electrical rating of the extension cord should be at least as great
as the electrical rating of the appliance.
2 if the appliance is of the grounded type, the extension cord should be a
grounding type
3 the cord should not hang from the table to avoid the risk of tangling or
tripping.

4
CONTENTS
GENERAL INFORMATION ................................................................................................5
APPLIANCE .......................................................................................................................6
ACCESSORIES ..............................................................................................................................................6
INSTALLATION ..................................................................................................................7
STARTING THE MACHINE .............................................................................................................................7
“AQUA PRIMA” FILTER ...................................................................................................................................8
CONTROL PANEL .............................................................................................................9
ADJUSTMENTS ..............................................................................................................10
COFFEE VOLUME ADJUSTMENT PER CUP ..............................................................................................10
"AROMA" (OPTI-DOSE) INDICATES THE COFFEE DOSE PER CUP ........................................................10
DRIP TRAY HEIGHT ADJUSTMENT ............................................................................................................10
COFFEE GRINDER ADJUSTMENT .............................................................................................................11
COFFEE BREWING ........................................................................................................12
HOT WATER DISPENSING .............................................................................................13
CAPPUCCINO .................................................................................................................14
DESCALING ....................................................................................................................15
CLEANING AND MAINTENANCE ...................................................................................17
HOW TO CLEAN THE MACHINE .................................................................................................................17
CLEANING THE BREW GROUP ..................................................................................................................18
TROUBLESHOOTING .....................................................................................................19
SAFETY RULES ..............................................................................................................20
TECHNICAL DATA ...........................................................................................................22

5
GENERAL INFORMATION
This coffee machine is suitable for preparing espresso coffee using coffee beans, and it is equipped with
a device to dispense steam and hot water.
The machine is designed for domestic use only and is not suitable for heavy or professional use.
Warning: no liability is assumed for any damage caused by:
• incorrect use not in accordance with the intended uses;
• repairs not carried out by authorized customer service centres;
• tampering with the power cable;
• tampering with any part of the machine;
• the use of non-original spare parts and accessories;
• failure to descale the machine or use at temperatures below 0°C (32°F).
IN THESE CASES, THE WARRANTY IS NOT VALID.
THE WARNING TRIANGLE INDICATES ALL IMPORTANT
INSTRUCTIONS FOR THE USER’S SAFETY. PLEASE FOLLOW THESE
INSTRUCTIONS CAREFULLY TO PREVENT SERIOUS INJURIES!
HOW TO USE THESE OPERATING INSTRUCTIONS.
Keep these operating instructions in a safe place and make them available to anyone else who may use the
coffee machine. For further information or in case of problems, please refer to any authorized service centre.
KEEP THESE INSTRUCTIONS FOR FUTURE REFERENCE.
6
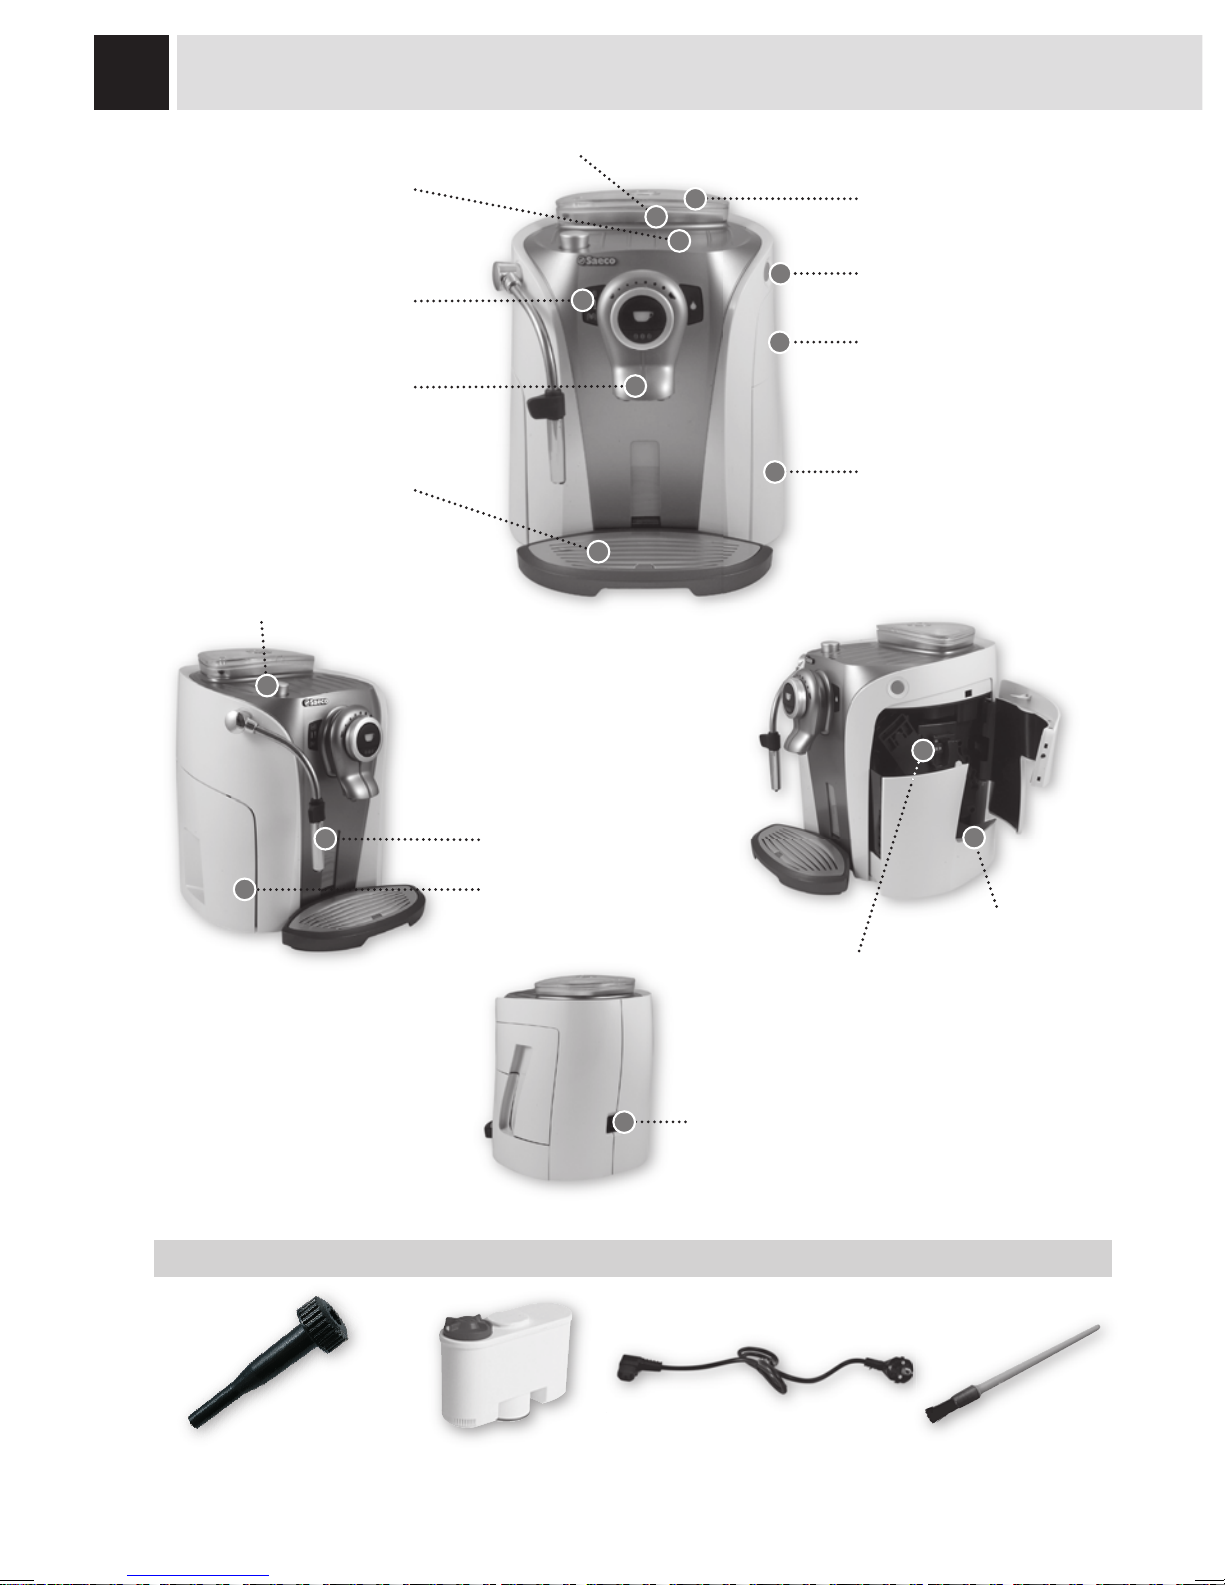
APPLIANCE
ACCESSORIES
“Aqua Prima”
water fi lter (optional)
Power cable
Cleaning brush
Brew Group
Coffee grounds drawer
Socket for power cable
Coffee bean hopper
Cup stacking surface
Power button
Service door
Coffee bean hopper cover
Drip tray
Control panel
Dispensing head
Drip tray + grill and fl oat
Hot water / steam
spout
Water tank
Hot water / steam knob
Grinder adjustment key
7
7
1 2
8 9
3
4 5 6
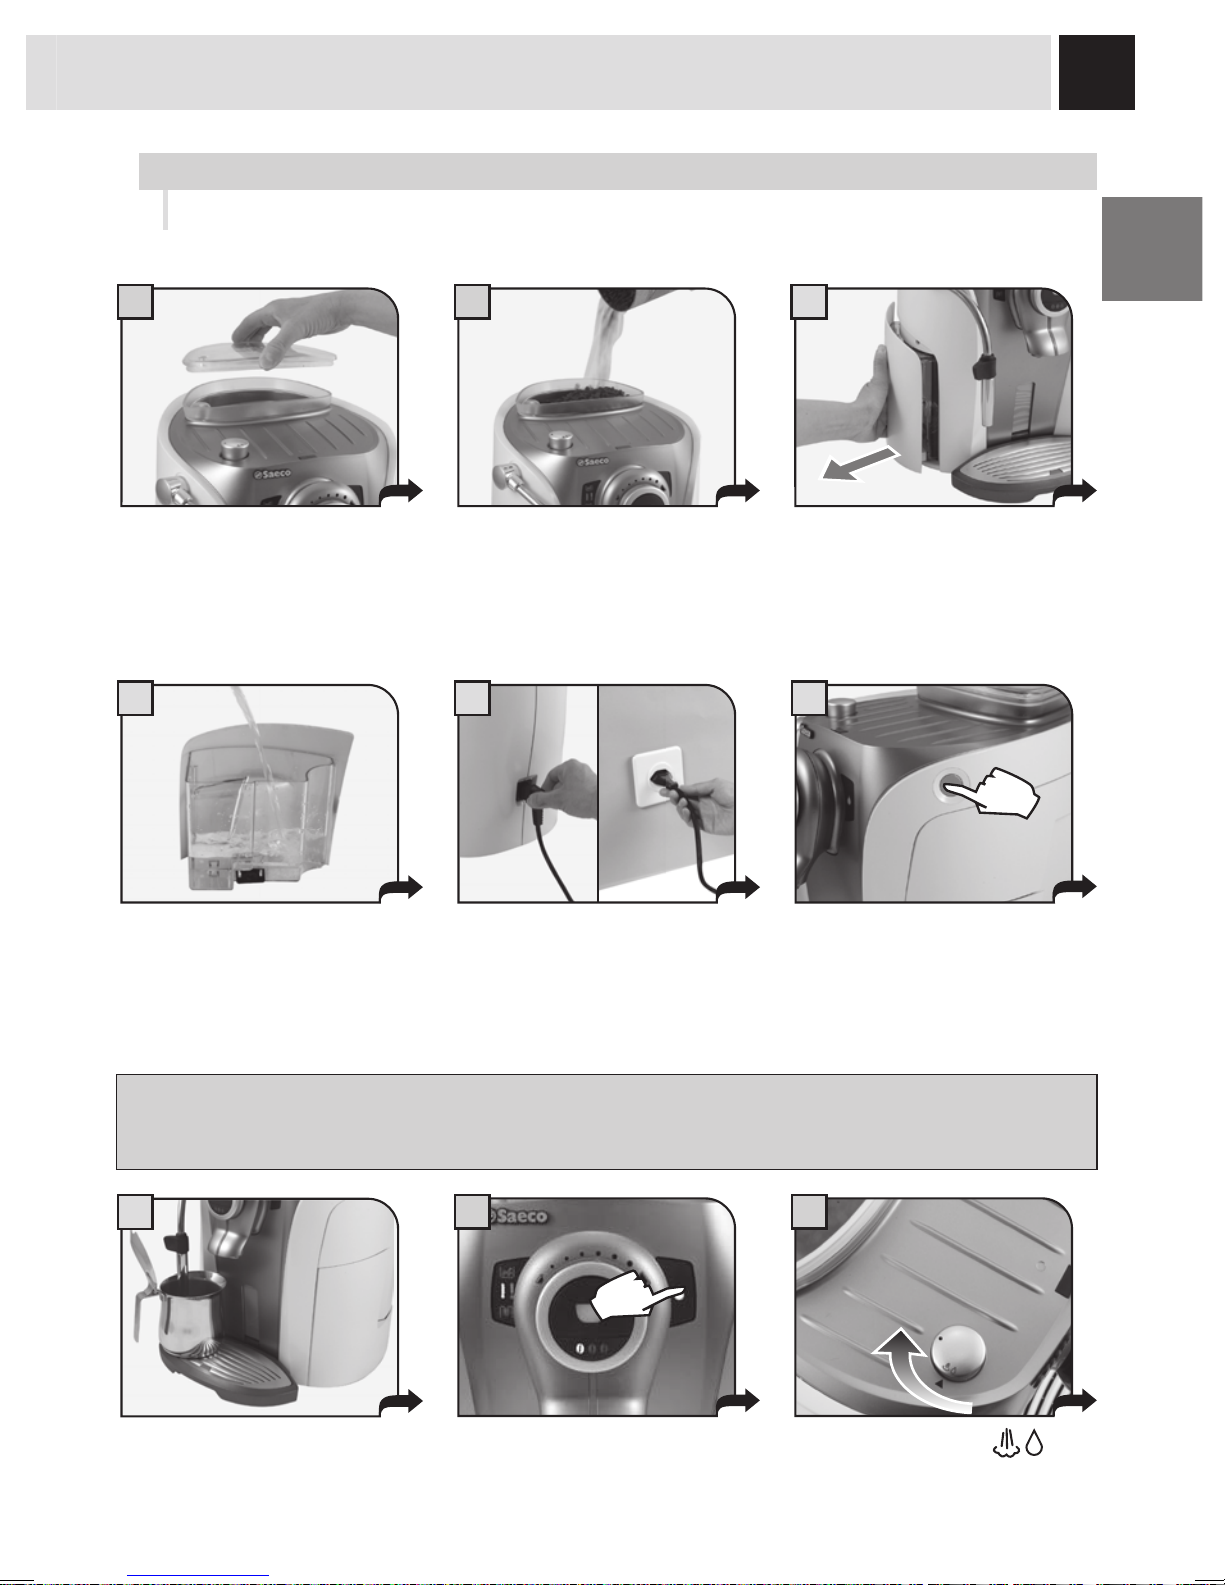
INSTALLATION
STARTING THE MACHINE
Make sure the power button is not pressed and the machine is turned off. Check the machine features on
the label on the bottom of the appliance.
Lift the cover of the coffee bean
hopper.
Remove the water tank.
We recommend installing the
“Aqua Prima” water fi lter (see
page 8).
Fill the container with coffee
beans. Close the cover placing
it correctly on the hopper.
Fill the tank with fresh drinking
water up to the MAX level.
Reinsert the tank.
Firmly push down the power
button to turn on the machine.
The machine performs a selftest.
Insert the plug into the socket
located in the rear panel of the
machine and insert the other
end into a socket with suitable
current.
Place a container beneath the
steam spout.
Turn the knob until the
position is reached.
Press the water button. The
indicator light turns on.
The machine automatically primes the circuit. If this operation is not completed, proceed manually as described
from step 7 to 12.

8
12
1 2 3
5
10
11
4
Wait until a steady fl ow of water
comes out of the spout.
Press the water button again.
The indicator light turns off.
Remove the container. The
machine is ready for use.
Turn the knob until it is in the
rest position ( ).
Remove the “Aqua Prima” fi lter
from its packaging. Enter the
date of the current month.
Fill the tank with fresh water. Let
the fi lter soak for 30 minutes.
After 30 minutes discard the
water in the tank and refi ll with
fresh water.
Insert the fi lter in the empty tank.
The reference mark and the
groove must match. Push fi rmly
until it is completely inserted.
Place a container beneath the steam
spout. Dispense the water in the
tank using the hot water function
(see page 13).
Fill the tank again with fresh
drinking water.
The machine is ready for use.
“AQUA PRIMA” WATER FILTER (OPTIONAL)
To improve the quality of the water you use, it is recommended to install the “Aqua Prima” fi lter. Before
using it, leave the fi lter immersed in the tank for 30 minutes.
“AQUA PRIMA” WATER FILTER
When the correct temperature is reached, the machine performs a rinse cycle of the internal circuits. A small
amount of water is dispensed; during this phase, the lights fl ash counterclockwise. Wait for this cycle to be
completed.
 Loading...