

Page 1

User’s Manual
odd-i N700D
Page 2

Introductions
Thank you for purchasing an odd-i N700D.
Odd-i is a brand for people who believe in realizi ng their dreams and who have a dif ferent way of looki ng at
things.
Our starting point is the belief that your way of seeing is special - “You see the world differently .”
This manual is written to help you to use the various convenient features of the prod uct.
We recommand that you read this manual before using the product.
odd-i N700D User Guide
2
Page 3

s
Content
Contents
Introduction
Safety Precautions
Before Using the Product
Accessories 8
Description of Components 10
Using the Product
Connecting the Product 15
Turning On/Off the Product 18
Using Navigation 19
Using the Overlay Function 20
Firmware Update 22
Using the Menu Functions
Music Player 30
Photo Album 40
File Management 43
Environment Settings 47
External Inputs 55
Rear Monitoring Camera 59
Vehicle Management 62
Appendix
FAQ 75
Warranty Card
Features 6
Installing the Product 13
Movie Player 23
Specifications 70
odd-i N700D User Guide
3
Page 4
Safety Precautions
➲
T o use the product safely, follow these instructions.
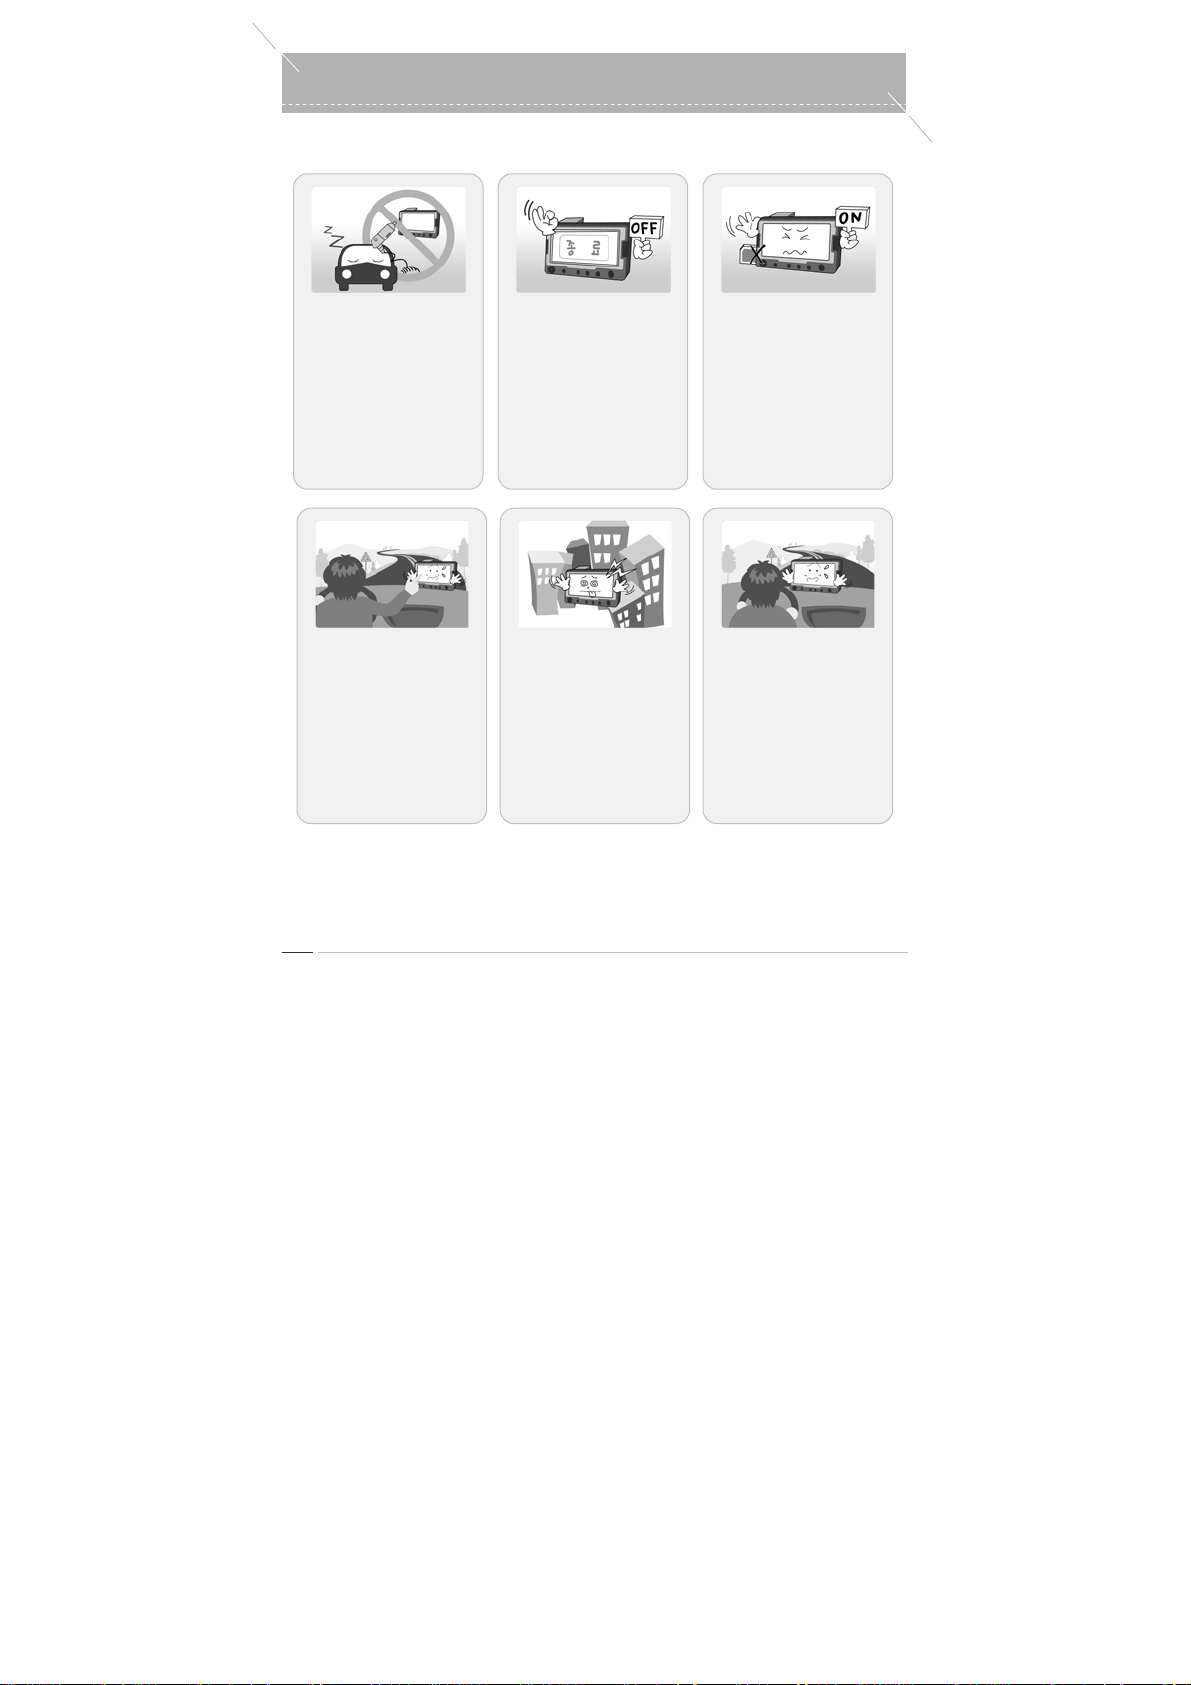
Be sure to start the vehicle
before turning the product
on, and turn it off before
switching the car ignition off,
in order to avoid a potentially
damaging voltage surge.
It is recommended to exit all
programs before shutting
the product down.
Do not remove the SD card
or hard disk drive when the
product is turned on.
Operating or looking at the
product while driving is
extremely dangerous. Be
sure to operate or look at the
product only after stopping
the vehicle.
Y ou may have a problem
receiving GPS signals when
you are driving between
high rise buildings.
Install the product so that it
does not obstruct your field
of vision.
odd-i N700D User Guide
4
Page 5
s
➲
To use the product safely, follow these instr uctions.
Safety Precaution
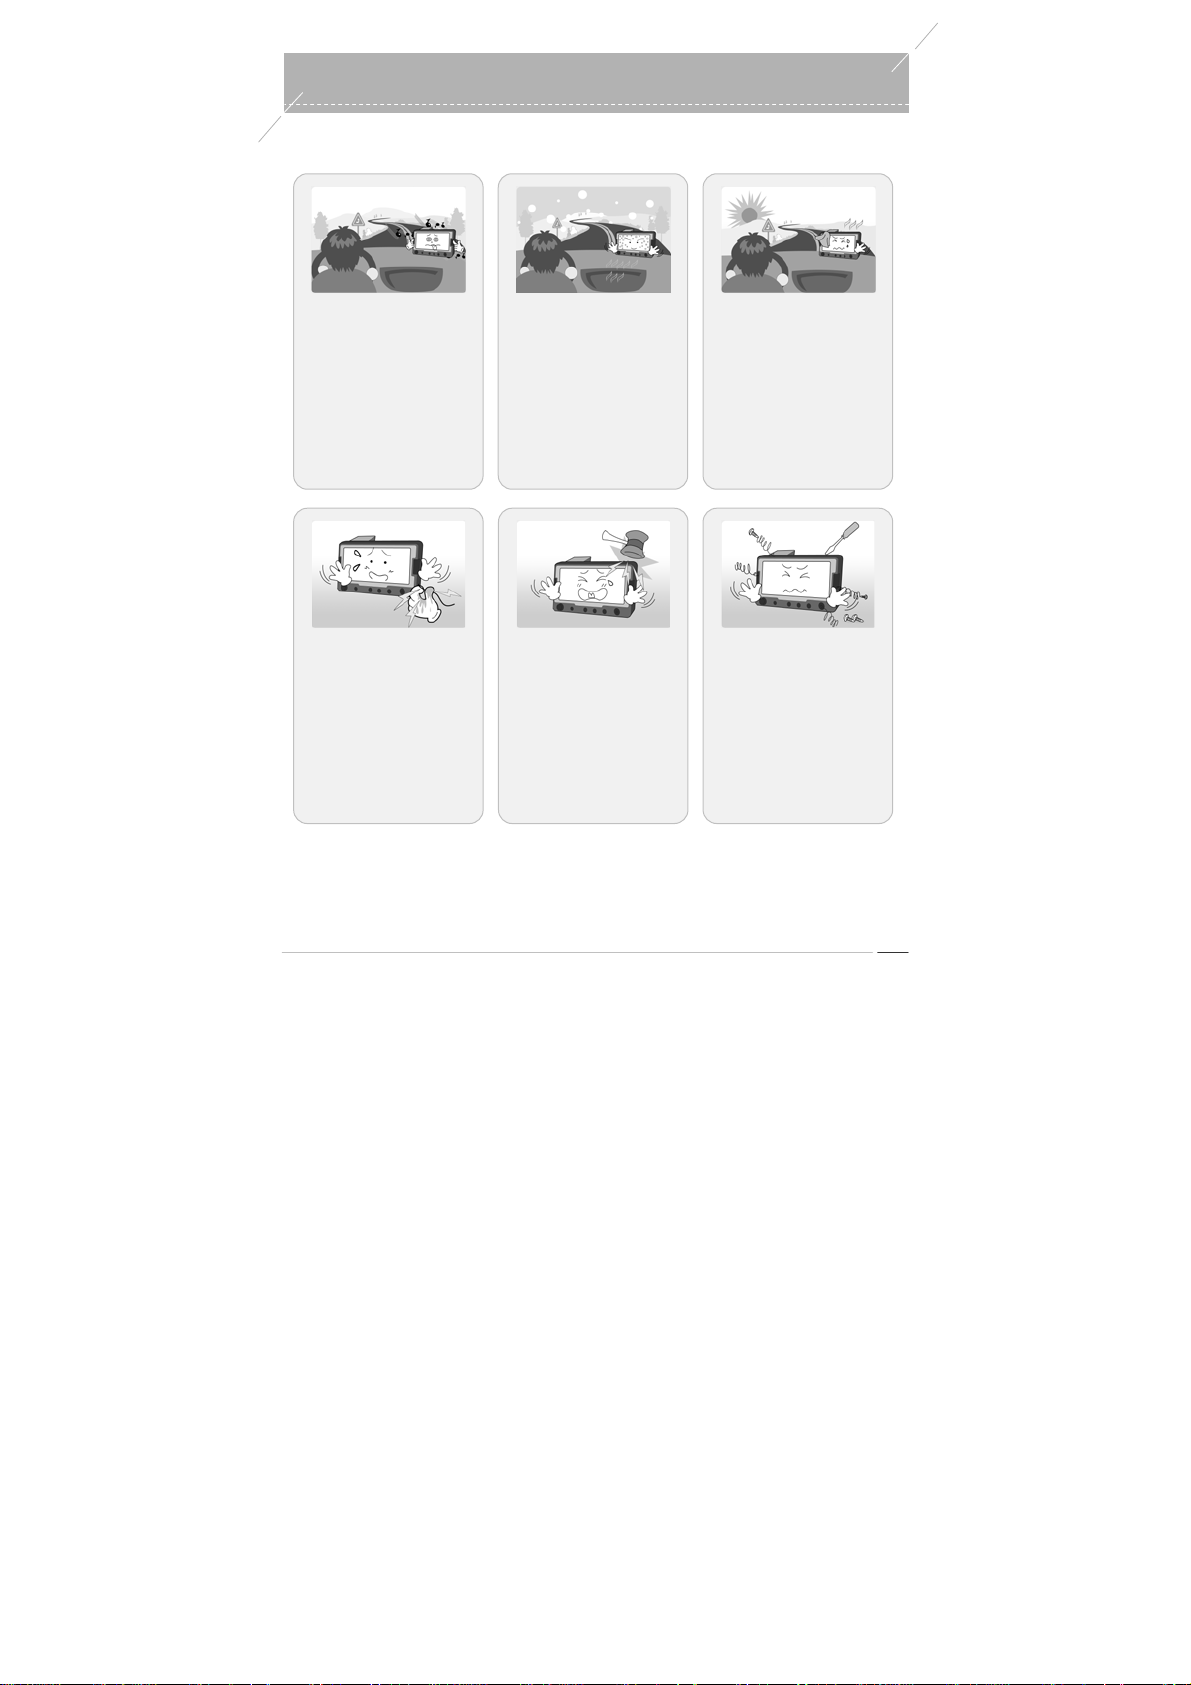
If the volume is too loud you
may not be able to hear
other vehicles, which is
potentially dangerous.
Maintain the volume at a
moderate level.
Keep the product away from
moisture, and do not touch
the product with wet hands.
A sudden increase in the
internal temperature of the
vehicle in cold weather may
cause moisture formation. If
this happens, wait for a
while before using the
product.
Do not leave the product in a
vehicle. There is a risk of
theft, and the product may
malfunction due to a sudden
change in temperature.
Avoid excessive impact to
the product.
Do not attempt to repair or
disassemble the product
yourself. It may damage the
product or cause a
malfunction. After-sales
service may not be provided
when damage has been
caused by unauthorized
tampering with the product.
odd-i N700D User Guide
5
Page 6

o
o
t
Features
Features in odd-i N700D
①
7 Inch Wide LCD Adopted
The 7 inch (480X234) 16:9 wide LCD screen of the odd-i N700D enables you to
enjoy perfect and realistic picture quality. In addition, it enables you to play various
content formats by providing a variety of video codec (MPEG1, MPEG4 SP, XVID,
MP43, DivX 3.x/4.x/5.x, WMV 7/8/9).
②
Ergonomic UI Design Emphasizing Luxury and Convenience
The odd-i N700D employs an easy-to-use UI design with intuitive and fun graphics
for easier access to all menus.
③
The Best GPS Navigation Software in Korea, Mappy Adopted
The odd-i N700D has adopted the Mappy for searching and providing Korean
nationwide road information. It receives information about your current location fr om
GPS satellites in real-time, and provides audio and graphics information on routes t
your destination.
④
Multitasking Support
The odd-i N700D supports the overlay of one video source on top of a second vide
source, so that you can view them simultaneously . For exam ple, Navigation+DMB,
Navigation+Movie Player and Movie Player+DMB are supported.
⑤
Vehicle Management
The odd-i N700D provides a Car Maintenance Account Book fu nction for easier cos
management for vehicle maintenance, which includes oil consumption, servicing,
and other expenditure.
odd-i N700D User Guide
6
Page 7
s
Features in odd-i N700D
Feature
⑦
Rear Monitoring Camera Input Support
The odd-i N700D supports a Rear Monitoring Camera Input Port so that you can
view the rear of your vehicle using the camera installed in the vehicle.
⑧
External Video In/Out Support
The odd-i N700D has a built-in TV output system so that you can view photos or
video on a TV monitor . You can also save video images from the CVBS Video IN
port of the odd-i N700D in MPEG4 format and watch it later .
⑨
MP3 Player and Easy-to-Use FM Radio Support
The odd-i N700D supports the MP3, WAV OGG and WMA formats. In addition, i t
allows you to listen to FM radio through the FM tuner speakers in your vehicle.
⑩
File Navigation Support
The odd-i N700D provides functions that enable you to navigate folders and files
exactly as in Windows Explorer .
⑪
USB Host Function
The odd-i N700D has adopted the USB 1.1 Host function so that you can exchange
data with a USB device such as a digital camera or MP3 player.
⑫
Removable Disk Support
The odd-i N700D also supports the USB 2.0 Device function that enables quick file
downloads.
odd-i N700D User Guide
7
Page 8
Accessories
➲
The following parts are included in the product p ackaging.
(Parts included may be changed without any advance notice to improve the perform ance or quality of the
product.)
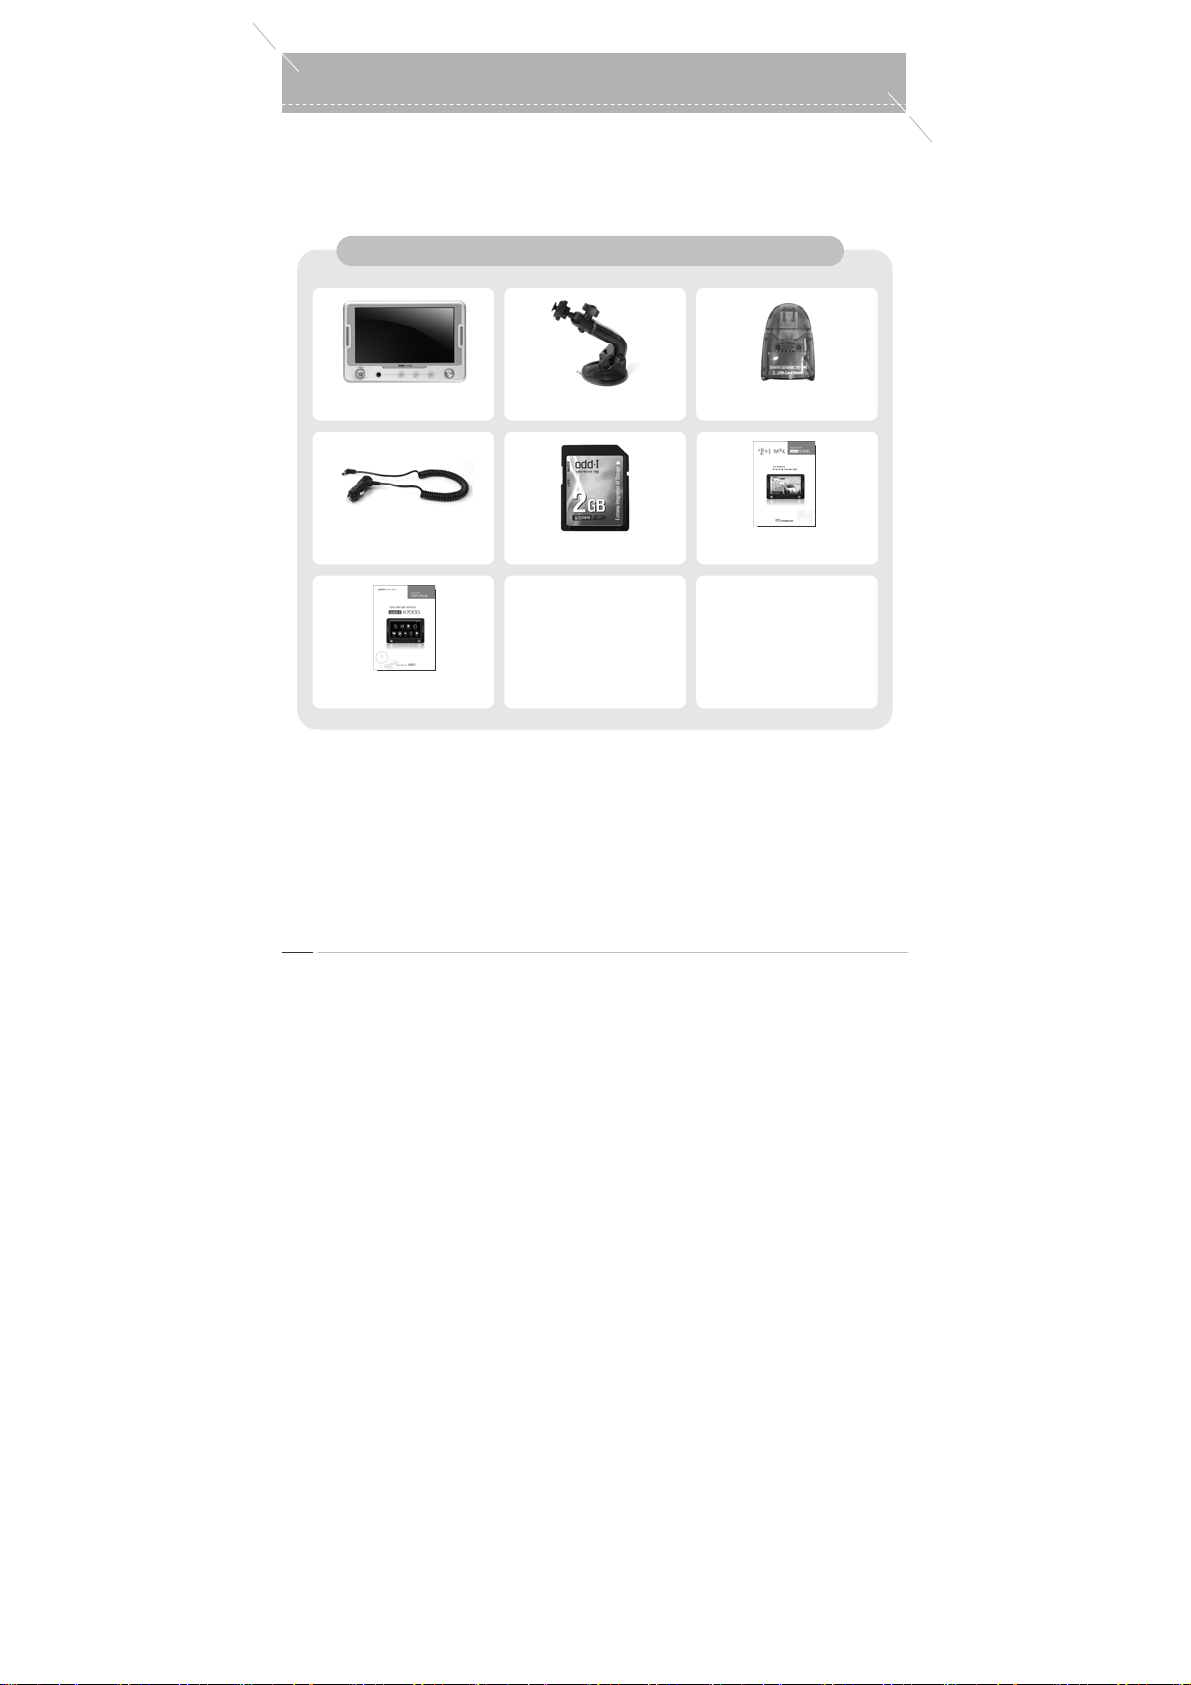
Basic Package Content s fo r the odd-i N7 00D
Main body Vehicle Cradle
Cigar Jack Adapter
User Manual
SD Card (2GB)
SD Card Reader
Mando Mappy User Manual
odd-i N700D User Guide
8
Page 9
s
Accessorie
➲
The following parts are included in the product p ackaging.
(Parts included may be changed without any advance notice to improve the perform ance or quality of the
product.)
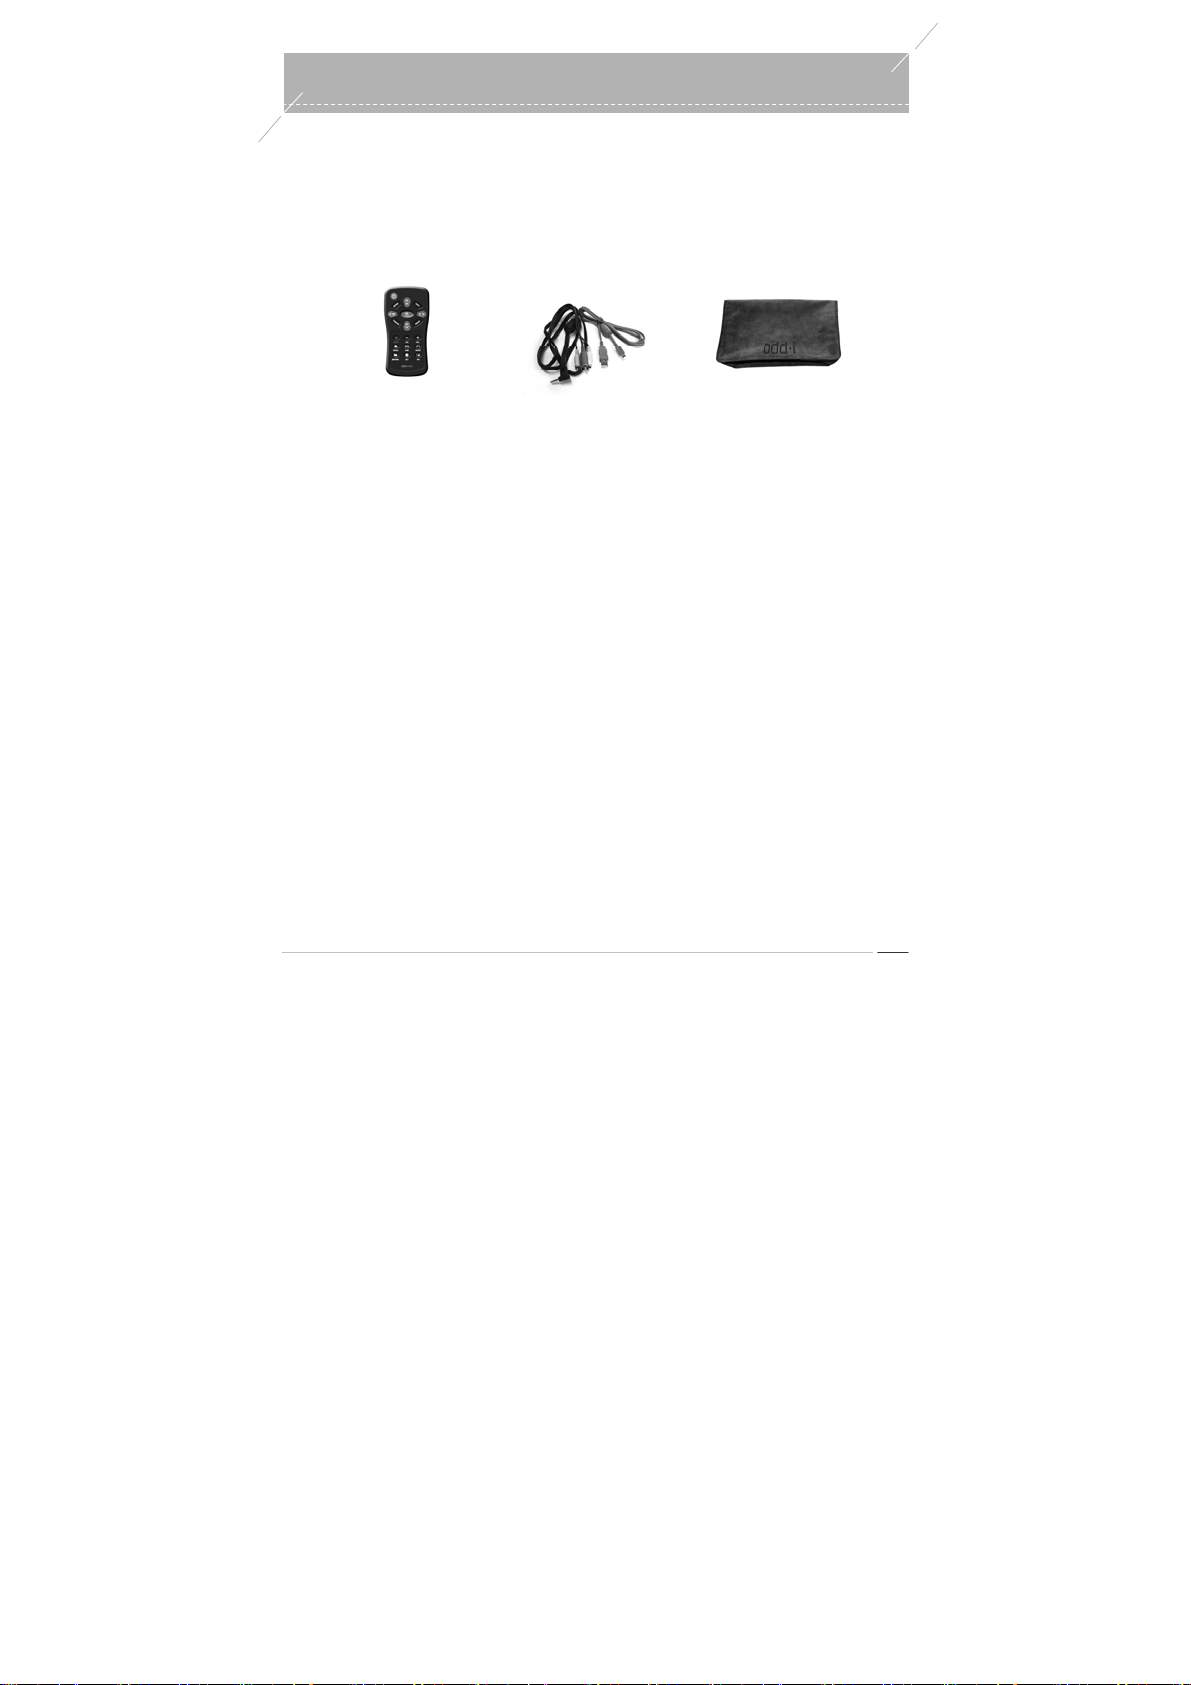
Cable for AV, USB Devices Wireless Remote Control
Case
odd-i N700D User Guide
9
Page 10
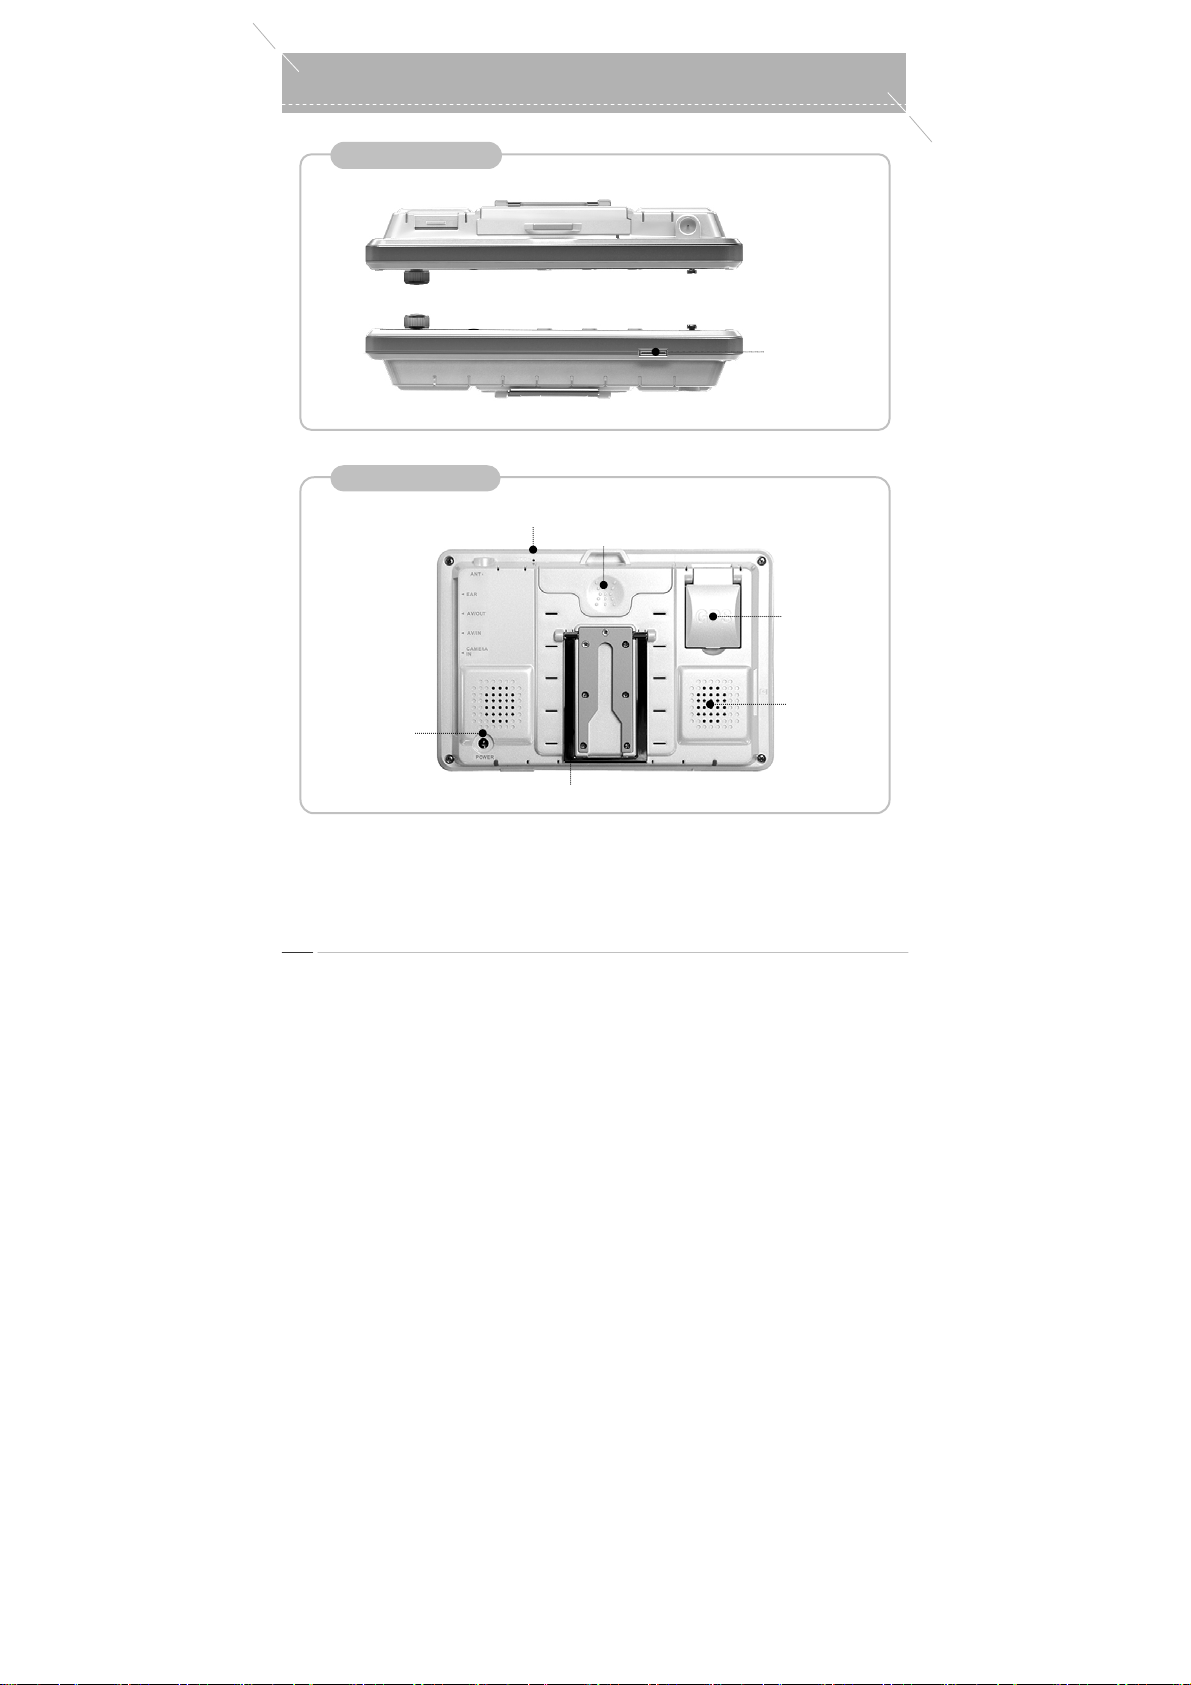
Description of Components
Top / Bottom
Rear
HDD Operation LED
24-Pin Connector
HDD COVER
GPS Antenna
Power Jack:
odd-i N700D User Guide
10
S
peaker
Support
Page 11
s
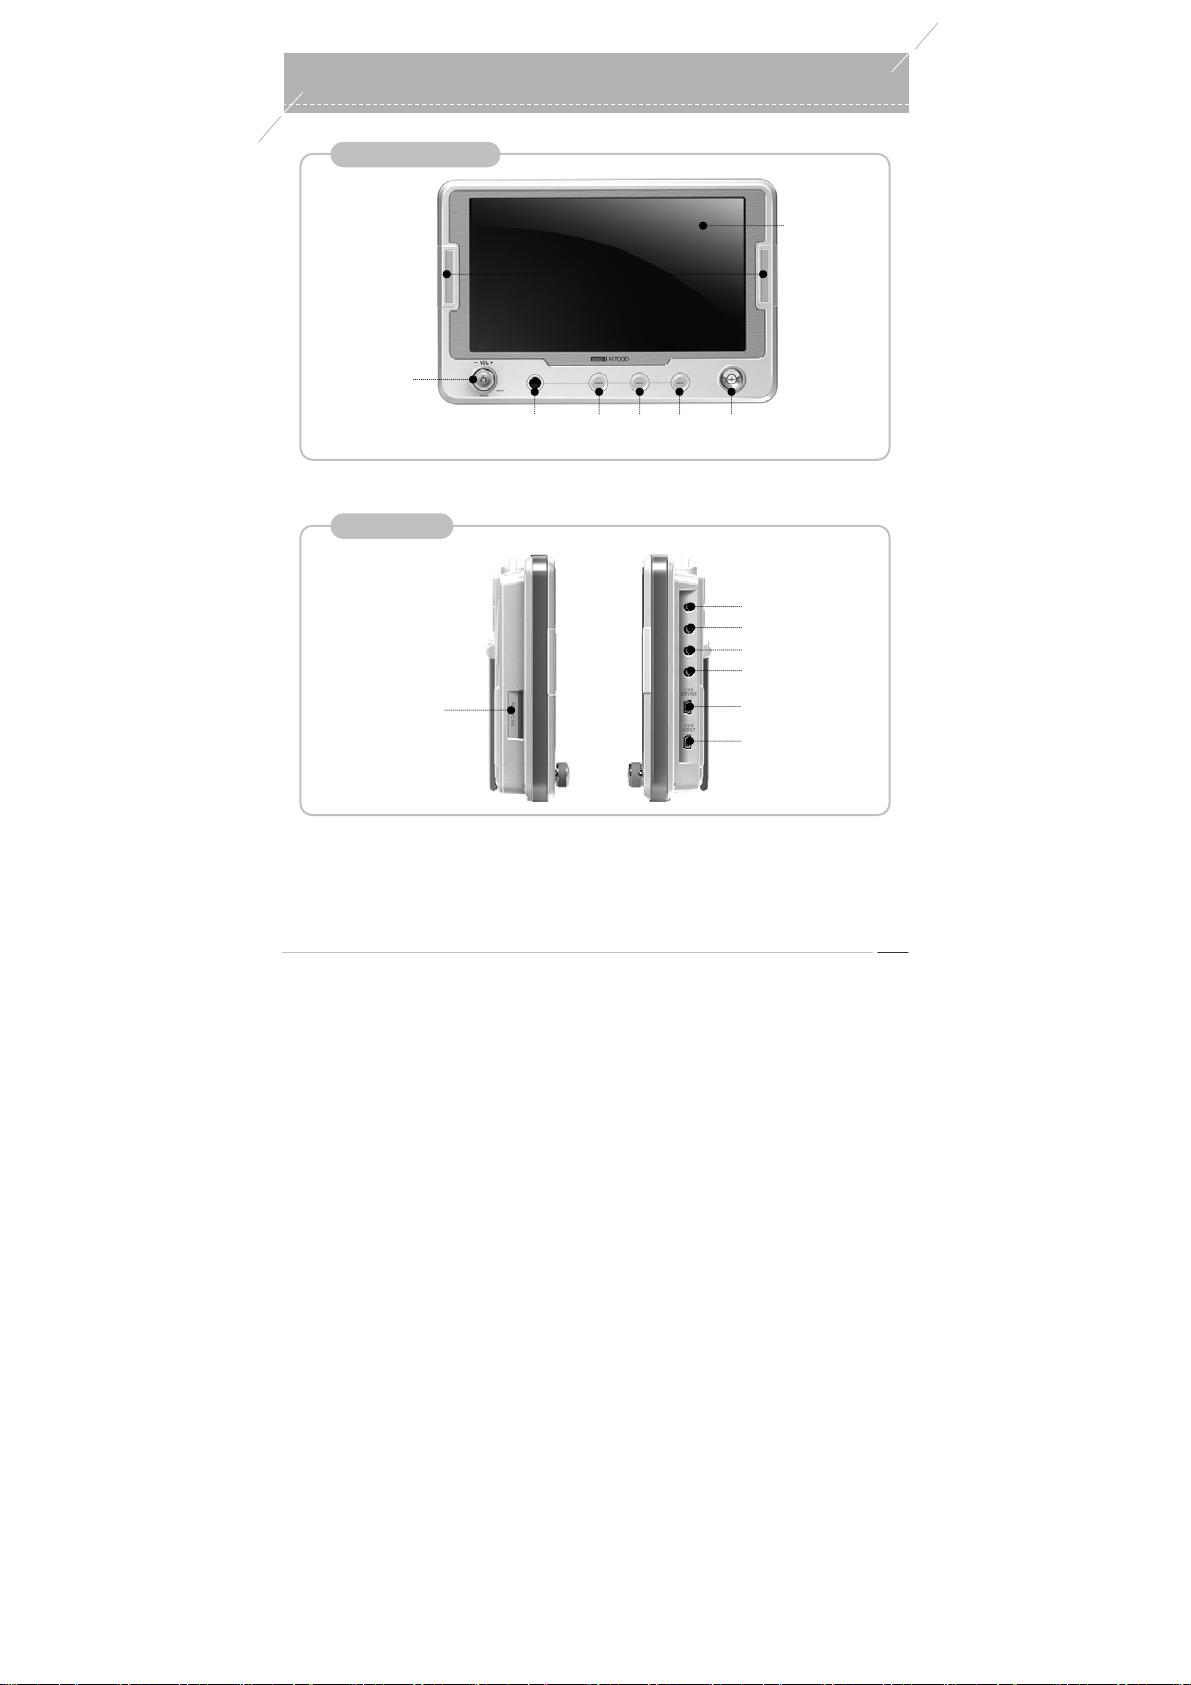
Power On / Off Key
Volume Key
Front
Sides
Remote Control
Sensor
Description of Component
LED ILLUMINATIO N
MODE NAVI MENU Joystick
Key Key Key
Main LCD
Earphone Jack
AV/OUT Jack
AV/IN Jack
CAMERA IN Jack
SD Card Slot
USB Device Port
USB HOST Port
odd-i N700D User Guide
11
Page 12

y
)
y
Description of Components
Wireless Remote Control (Optional)
Power Key
MODE
Cancel
Mute Ke
Movie Key
File Manager Ke
Up/Down Control (same a s with the jo ystick
NAVI
Left/Right Control (sam e as with th e joystick)
OK Key
MENU
Volume Up
Music Key
PIN Key
Volume Down
Setup Key
odd-i N700D User Guide
12
Page 13
t
Installing the Produc
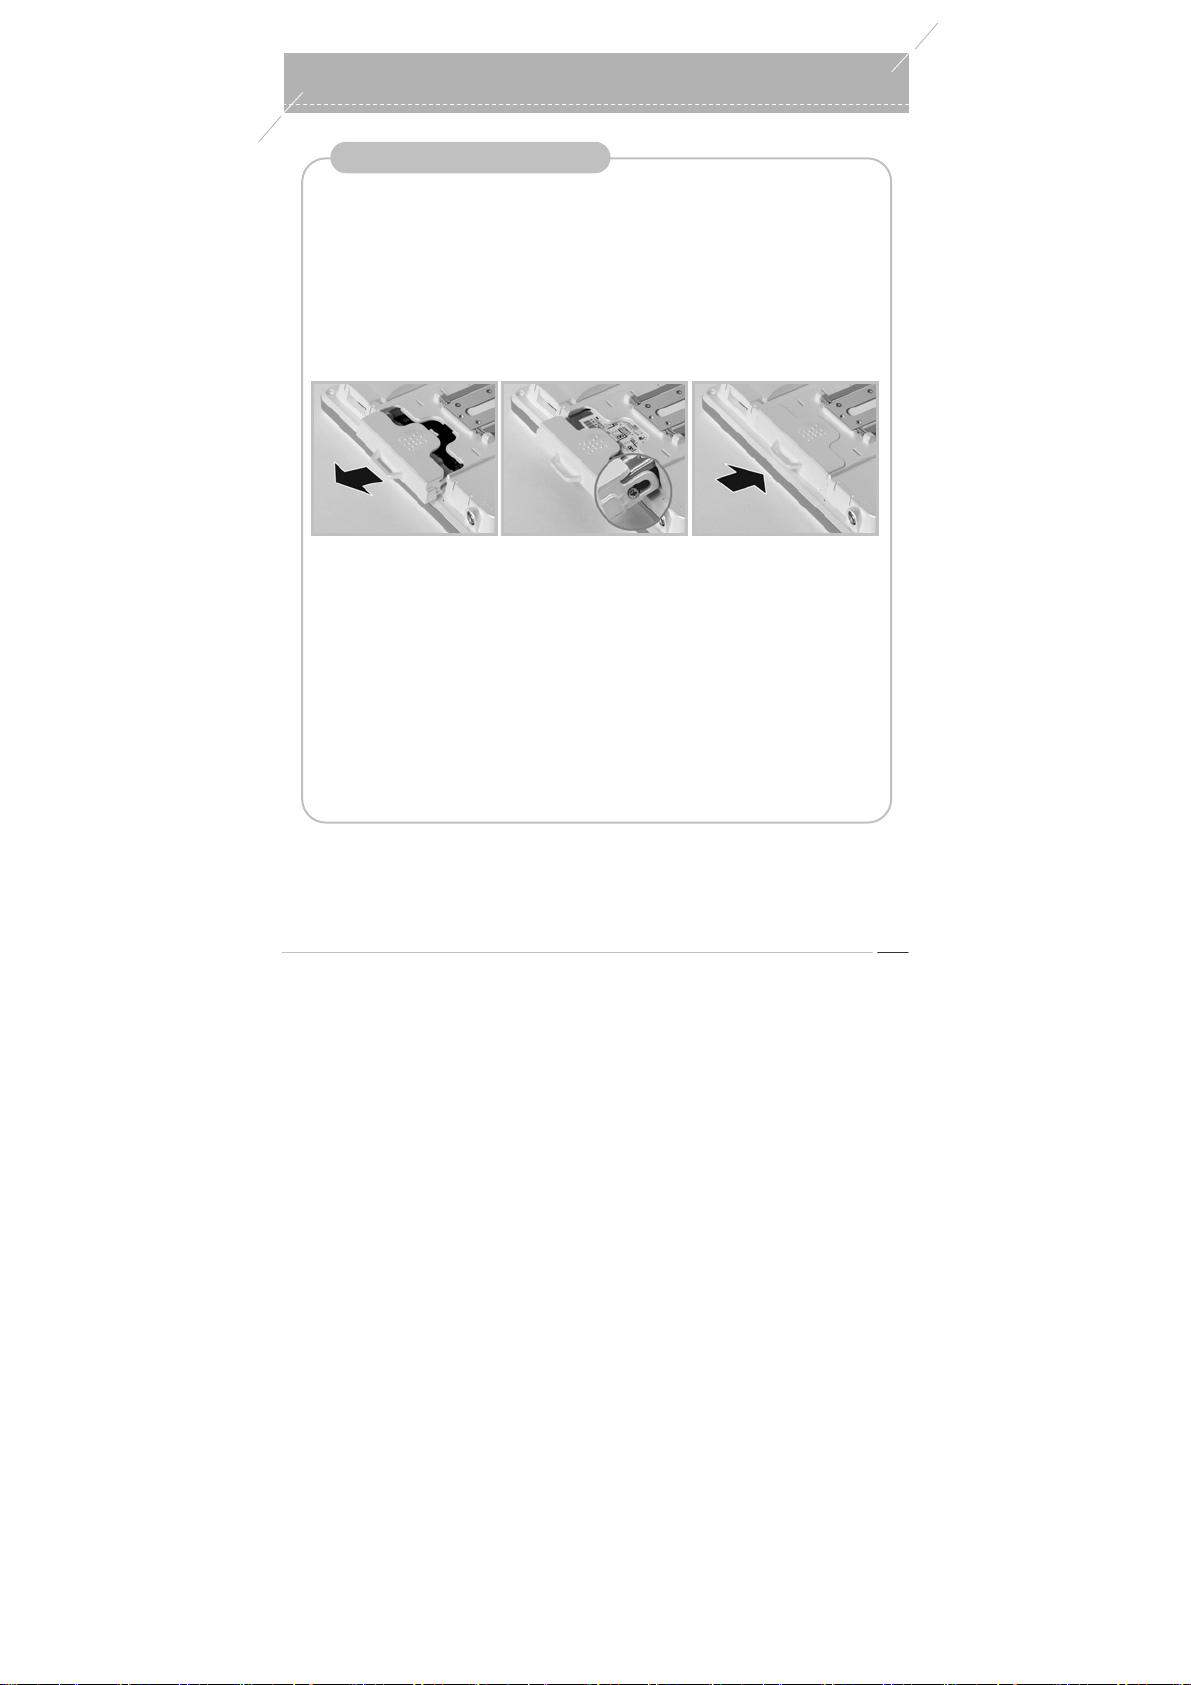
Installing the Hard Disk Drive
1. T urn the main body power of f completely and remove the AC power adapter.
2. Pull the HDD Cover out while pressing the catch down.
3. Assemble the hard disk drive and the HDD Cover and fasten the screw .
Make sure that the hard disk drive is installed the right way round.
4. Slide the hard disk driv e in and close the HDD Cover .
Insert the disk drive smoothly . If you press it in with excessive for ce, it can get caught.
5. If you have dif ficulty inserting the har d disk drive, try pr essing lightly on the bottom of the rear
side of the product.
Note.
※
- If it cannot be comected in properly , do not insert it forcibly. Try sliding it into the m ain body
again.
- Be sure to check the direction of the hard disk drive before inserting it.
- Do not touch the hard disk drive with wet hands, and beware of static electricity when
handling it.
- Run the anti-virus program and checkdisk, and defragment the hard disk drive as you would
for a computer.
- It is recommended to use a hard disk drive designed for vehicles when you are using it i n a
vehicle.
- Take care not to lose the screw fastening the hard disk drive, or let it fall into the product.
- Be sure to format the hard disk drive in FAT32.
odd-i N700D User Guide
13
Page 14
Installing the Product
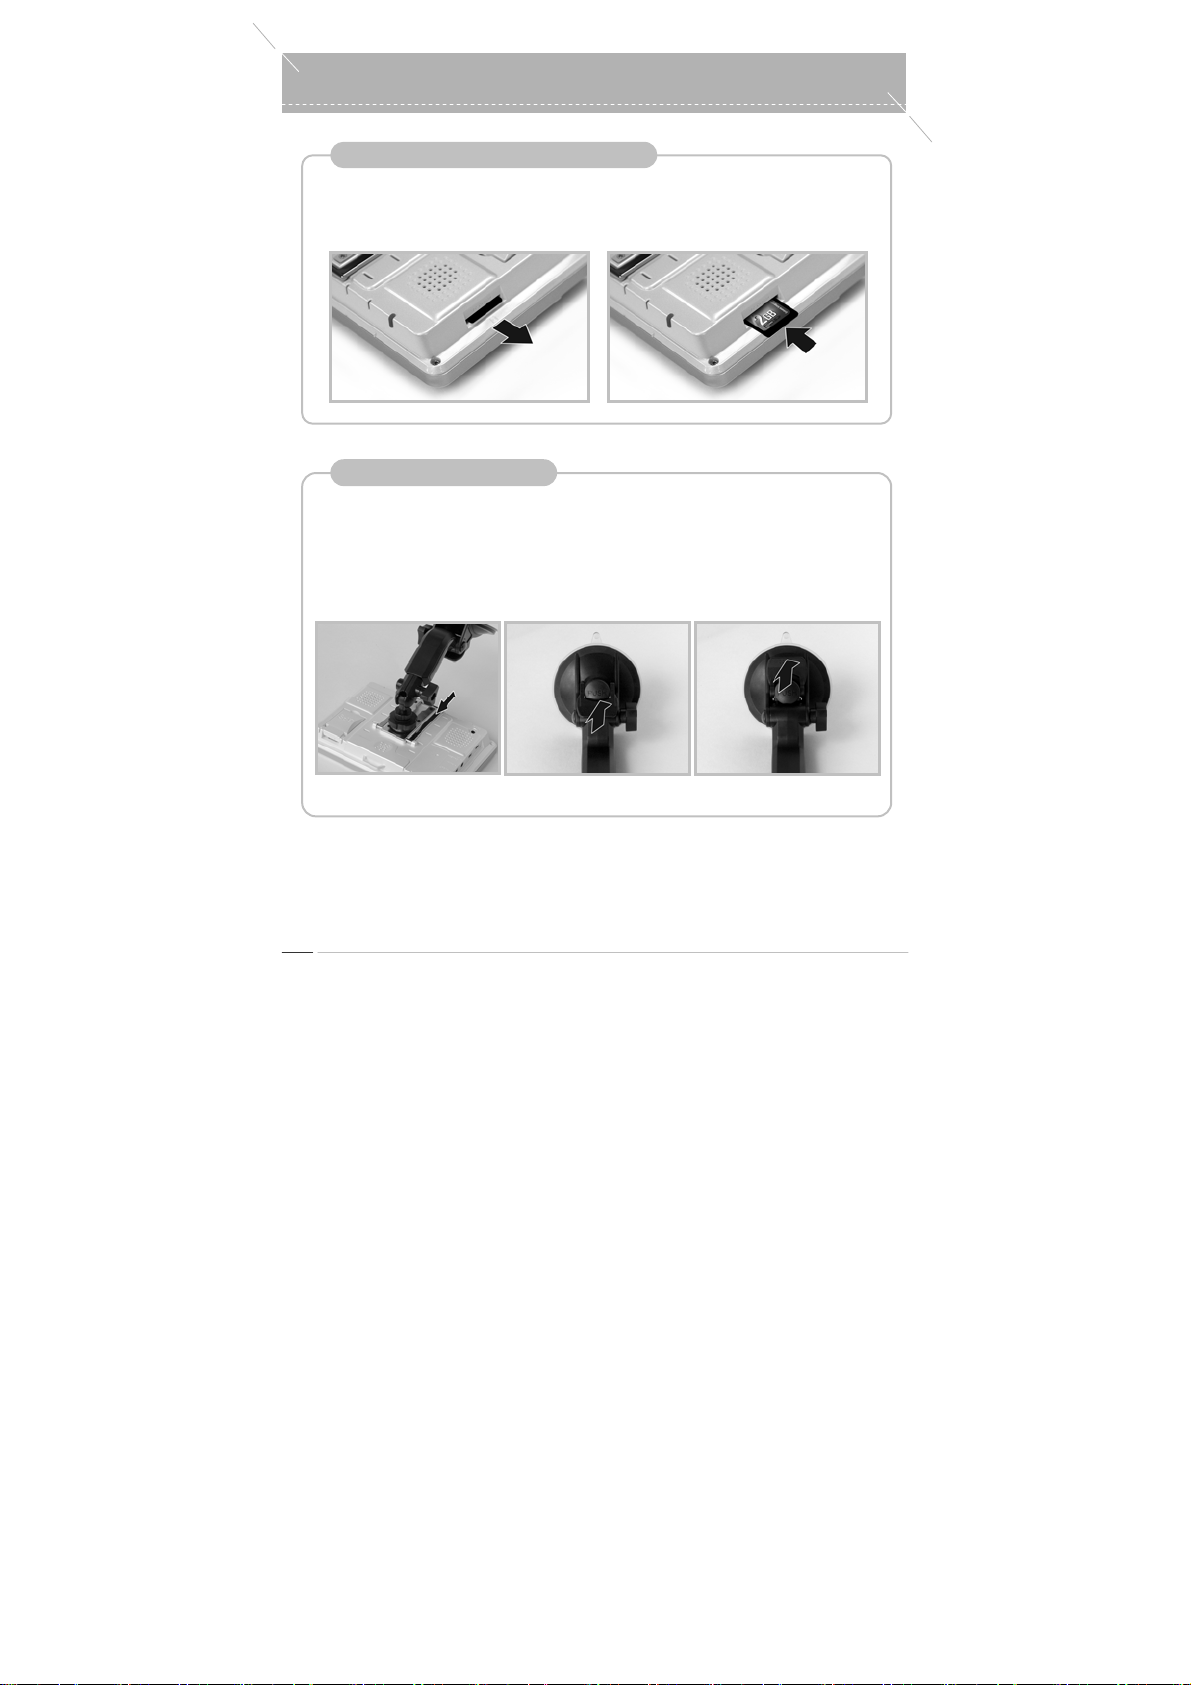
Installing and Removing an SD Card
1. To Remove: Push the edge of the card slightly inwards. It will then pop up. Pull it out with your
fingers.
2. To Insert: Insert the SD card and push it in until it clicks.
Installing the Cradle
1. W ash the inner surface of your windscreen wi th a wet towel or tissue.
2. Assemble the product to the cradle by fast ening the cradle screw.
3. To install on the windscreen, push the housing onto the windshi eld and pull the lever down.
4. If the instal lation position i s not quite ri ght, pull the l ever up, adjust the position, and then pul l it
down again.
For your safety , use the product above the dashboard.
※
odd-i N700D User Guide
14
Page 15
t
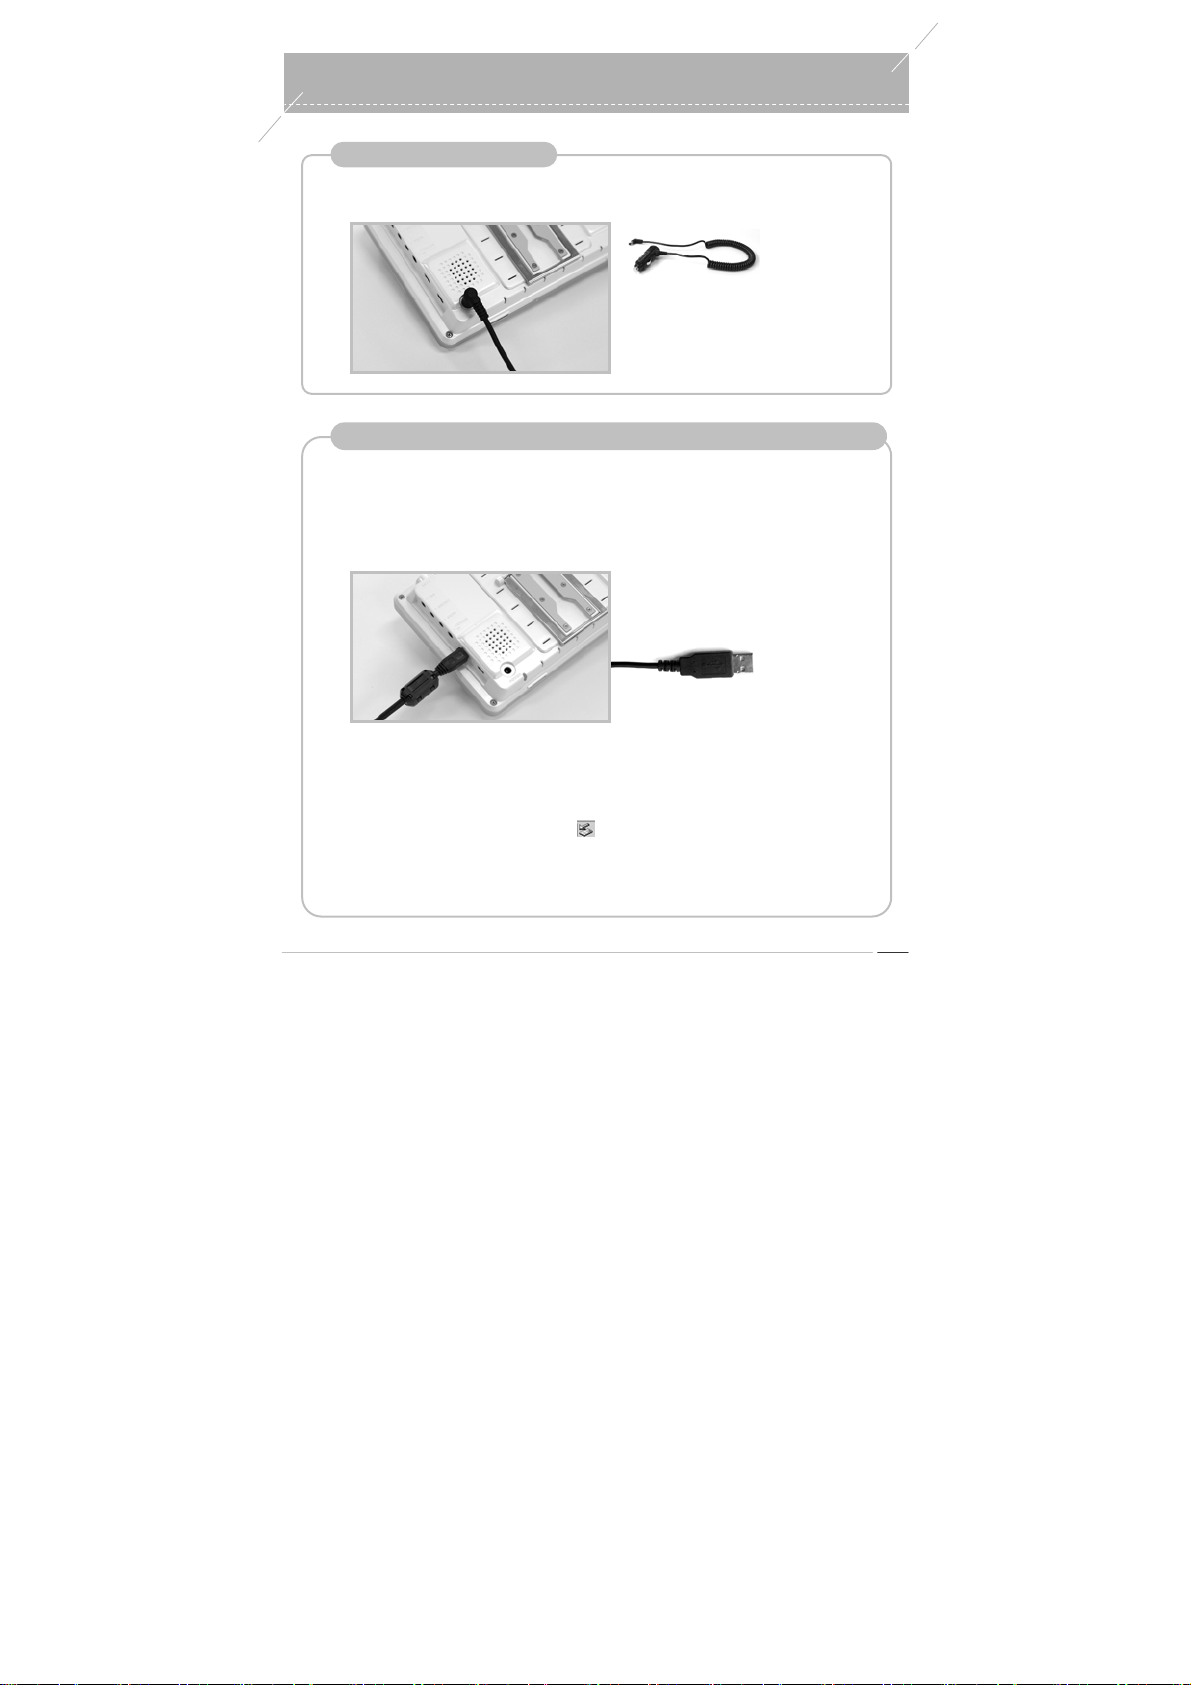
Connecting the Power
Connect the power cable jack to the Power port of the product.
Connecting the Produc
Cigar Jack Adapter
Connecting a USB Device-This is available only when a hard disk drive is installed.
Turn the power on and connect the end of the USB cable to the USB por t on the right-hand
side of the product, and connect the other end to the USB port of the computer . The device
driver is automatically installed and you can check it through Wi ndows Explorer on the
computer. (For Windows 98, however, you should download the device driver from the odd-i
web site and install it manually.)
- Please exit all programs before connecting or removing a USB host or device, if possible, and select
Connect or Remove from the Main Menu to connect or remove a USB host or device.
- Make sure to run the ‘Safely Remove Hardware’ before disconnecting the USB Device cable,
otherwise you may lose data.
Safely Remove Hardware: If you click the icon from the Taskbar of your computer, ‘USB Mass
※
Storage Device’ appears in the Safely Remove Hardwar e window. Select it and click ‘Stop’. The
Stop a Hardware devic e pop-up w indo w appe ars. S elect ‘OK ’. Th en you can rem ove the hardwar e
safely .
USB Cable
odd-i N700D User Guide
15
Page 16
A
Connecting the Product
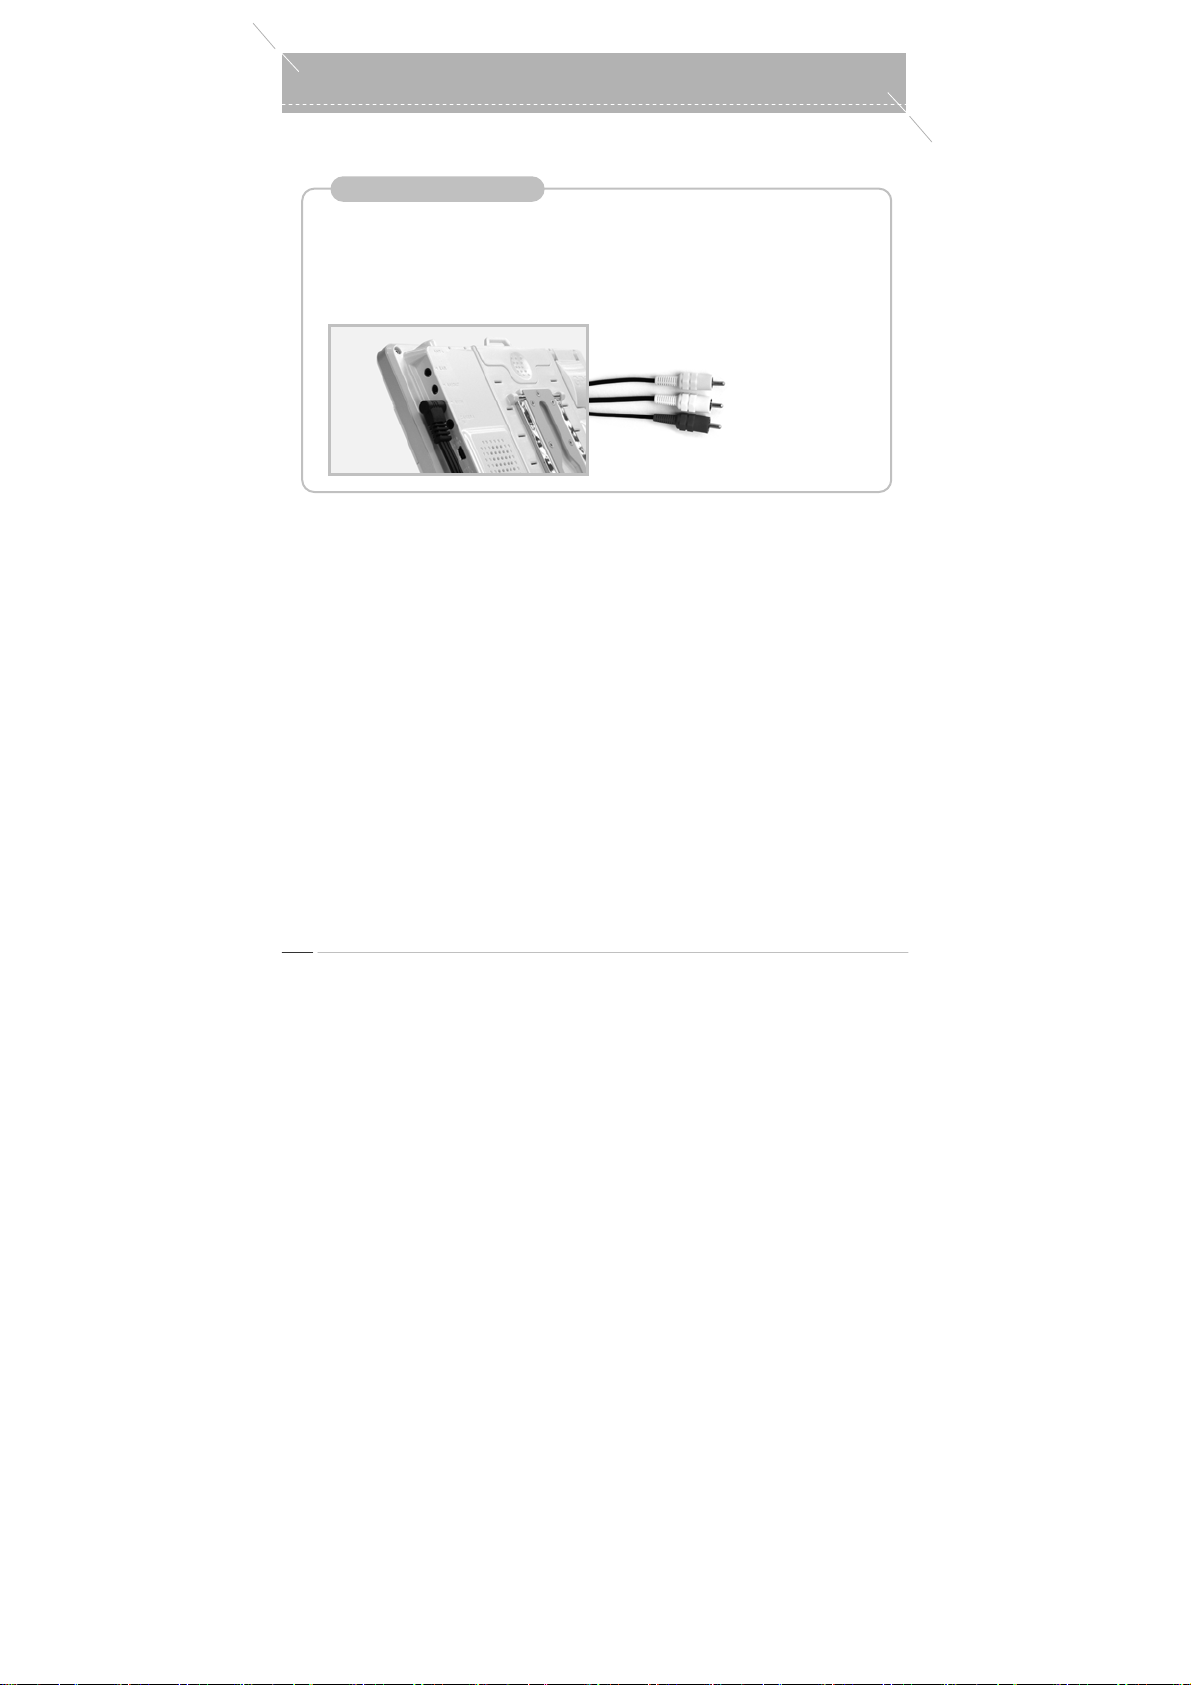
Connecting a TV IN
Y ou can connect the product to a TV, to watch or record video from a TV.
Y ou can not only connect a TV but also any device supporting CVBS such as a VCR,
Camcorder, etc.
Connect the cable and select ‘External IN’ from the Main Menu.
(Refer to ‘External Input’ on page 52)
V Cable
Yellow: Vi deo
White: Sound L
Red: Sound R
odd-i N700D User Guide
16
Page 17
t
Connecting the Produc
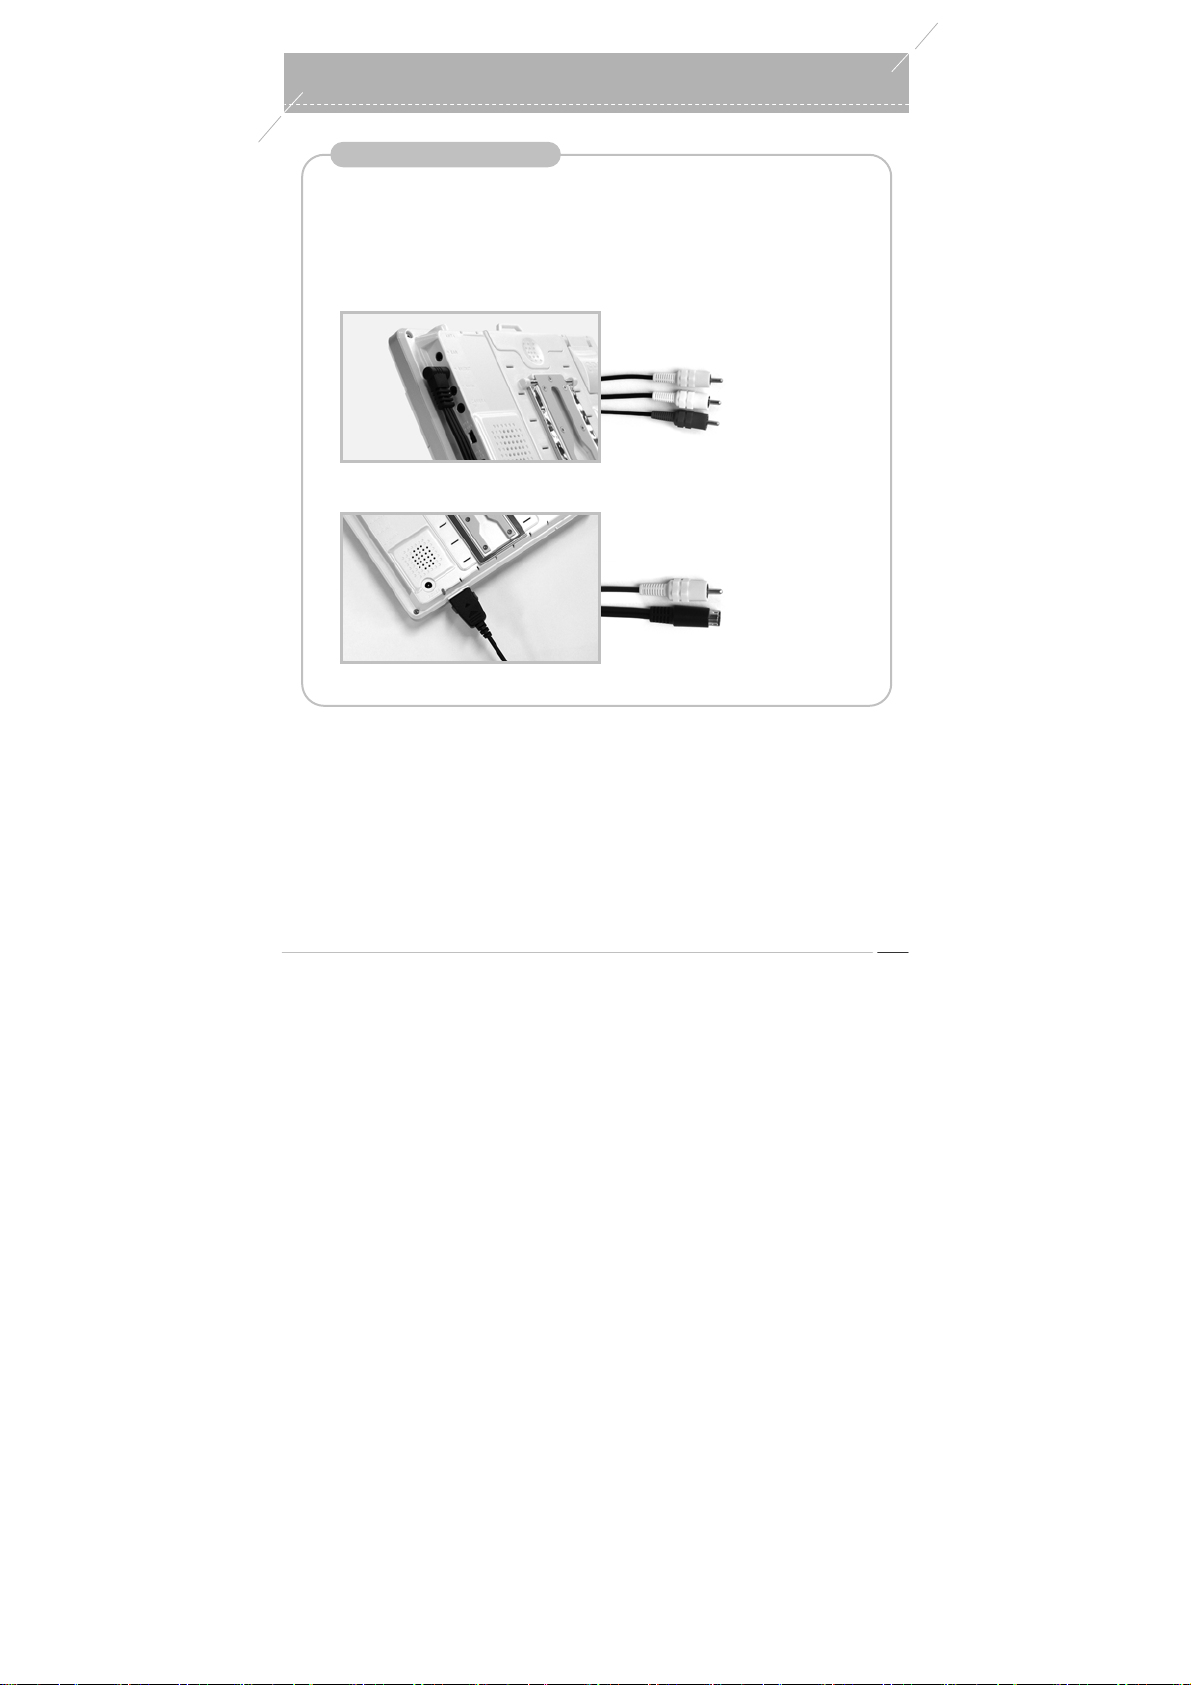
Connecting a TV OUT
Y ou can connect the product to a TV, to watch video from the product on a TV.
T o view a video from the product on a TV, you have to select the appropriate ‘TV OUT’ in the
Environment Settings.
(Refer to ‘Environment Settings’ on page 47)
To Connect through the CVBS Port
●
To Connect through the S-Video P ort
●
Y ou should purchase a 24-pi n cable separatel y .
※
CVBS TV Port
Yellow: Vi deo
White: Sound L
Red: Sound R
Connect the Black Connector to the S-Video
Port of the TV .
Yellow: Sound (Connect to
an audio device)
Black: Video (Connect to a
TV)
odd-i N700D User Guide
17
Page 18

Turning On/Off the Product
Turning on the Product
1. Check the power connection status.
2. Fold out the GPS antenna on the rear side of the product so that it faces upwar ds.
3. Press and hold the Power button for approximately 1 second.
4. The booting screen appears and the M ain Menu appears af ter a while.
5. Navigation runs automatical ly.
Y ou can set it so that Navigation i s not launched automatically. (Refer to ‘Environment
Settings‘ on page 50.)
Turning off the Product
1. Exit all runni ng programs.
2. Press and hold the Power button for approximately 1 second.
odd-i N700D User Guide
18
Page 19
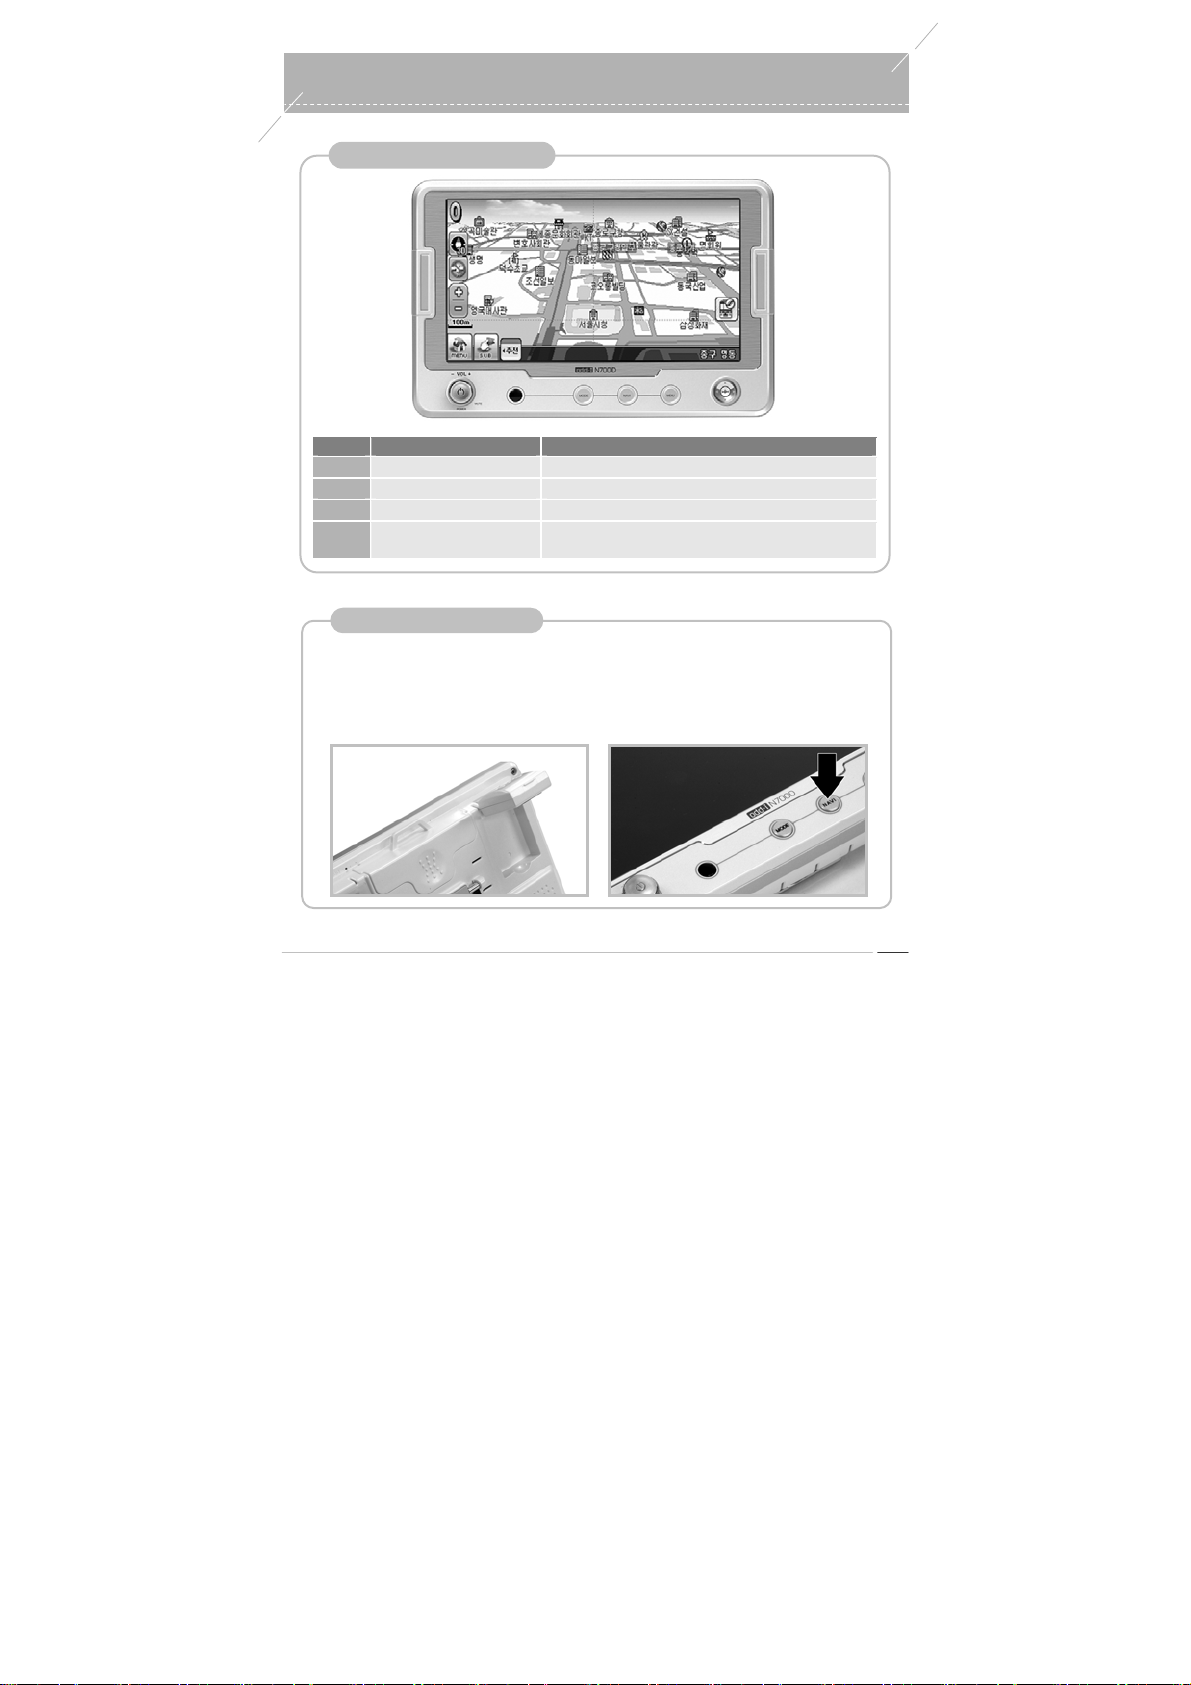
Navigation Key Map
Number Name Function
1
OK Key Registers Safe Driving Points
2
Up/Down/Left/Right Key Move over the map.
3
NAVI Key Moves to the current position of the vehicle.
4
Cancel (Wireless Remote
Control)
Starting Navigation
Registers the current location (Registers My Point)
Using Navigation
1. Fold out the GPS antenna on the rear side of the product so that it faces upwar ds.
2. Press the ‘Navigation’ button fr om the Main Menu or press the ‘NAVI’ key on the body.
3. Navigation is launched.
4. For procedures on using Mappy, refer to the Mappy MXC User’s Manual.
odd-i N700D User Guide
19
Page 20
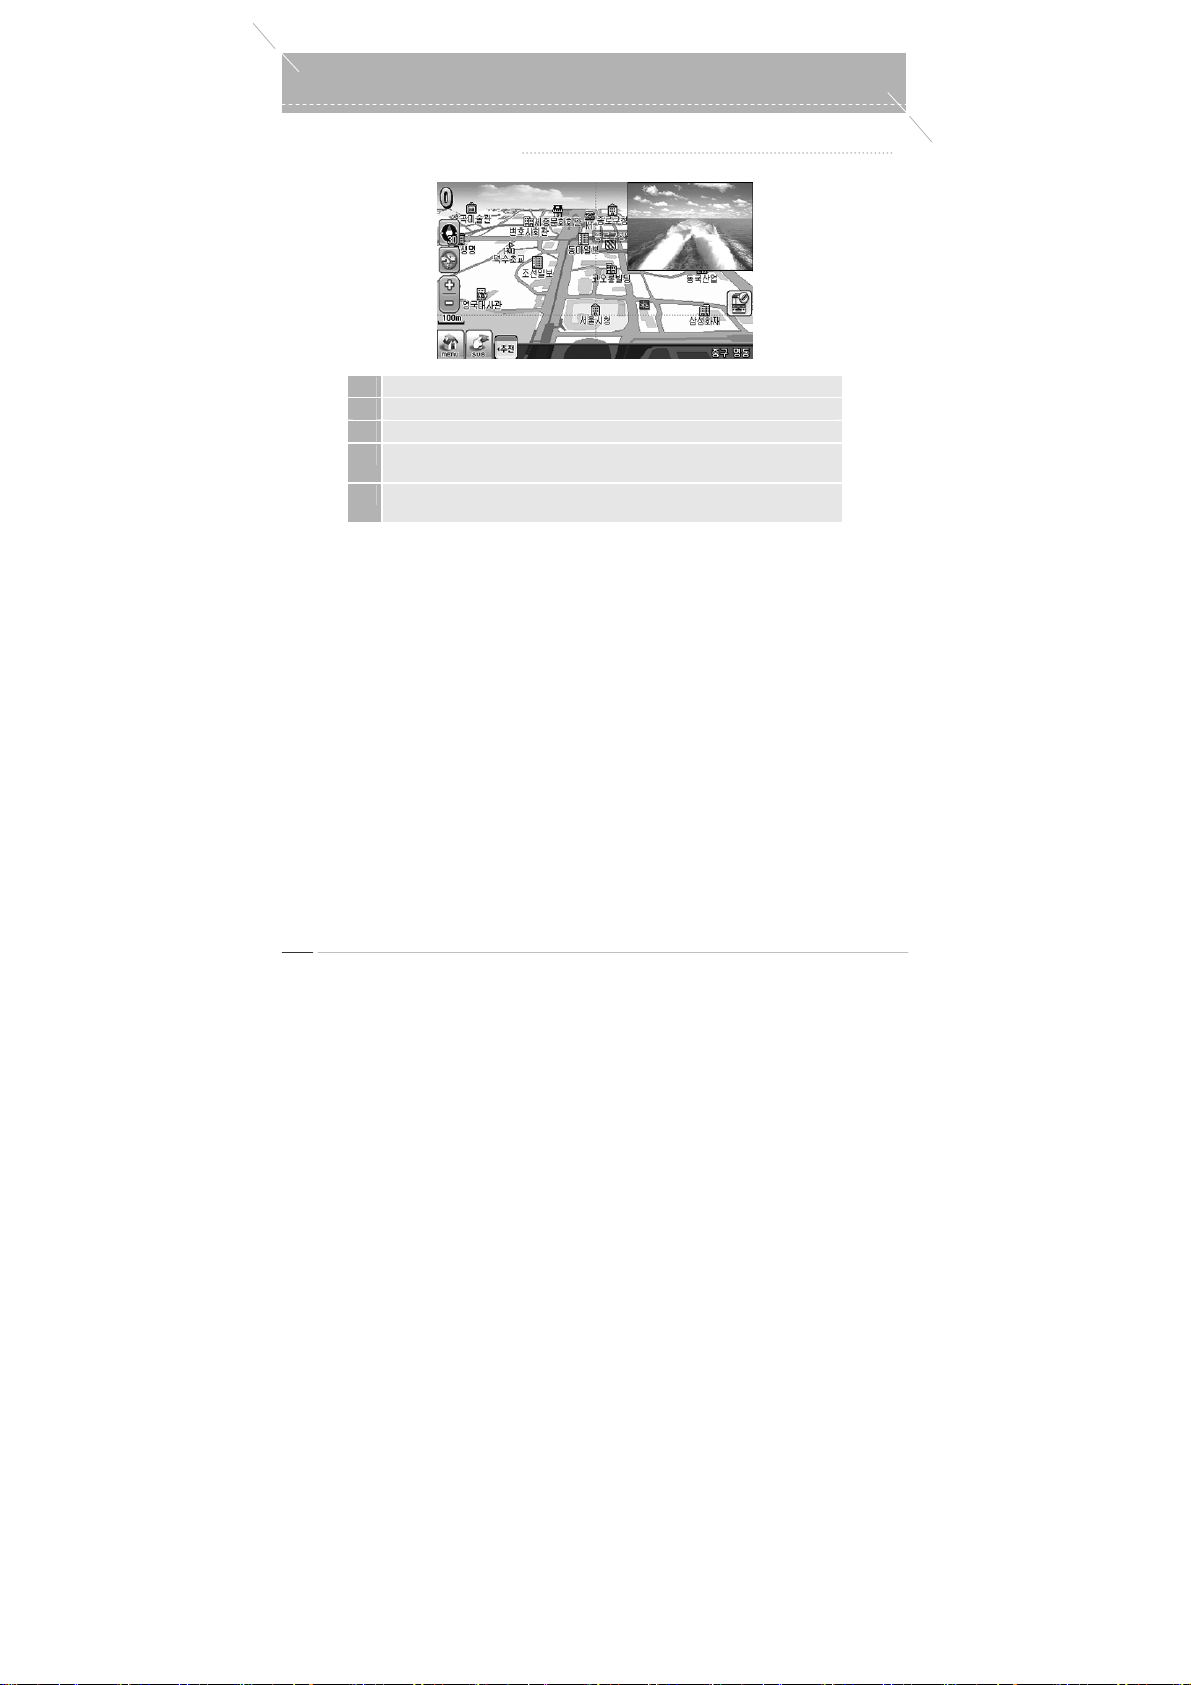
Using the Overlay Function
Movie Player + navigation
●
1 Launch the Movie Player.
2 T ouch the screen. The Control Bar appears.
3 Press the ‘NA VI’ button on the Control Bar .
4 The Movie Player screen is decreased and displayed together with
Navigation.
5 When you touch the Movie Player screen, the Movie Player screen size is
adjusted in 3 steps.
odd-i N700D User Guide
20
Page 21
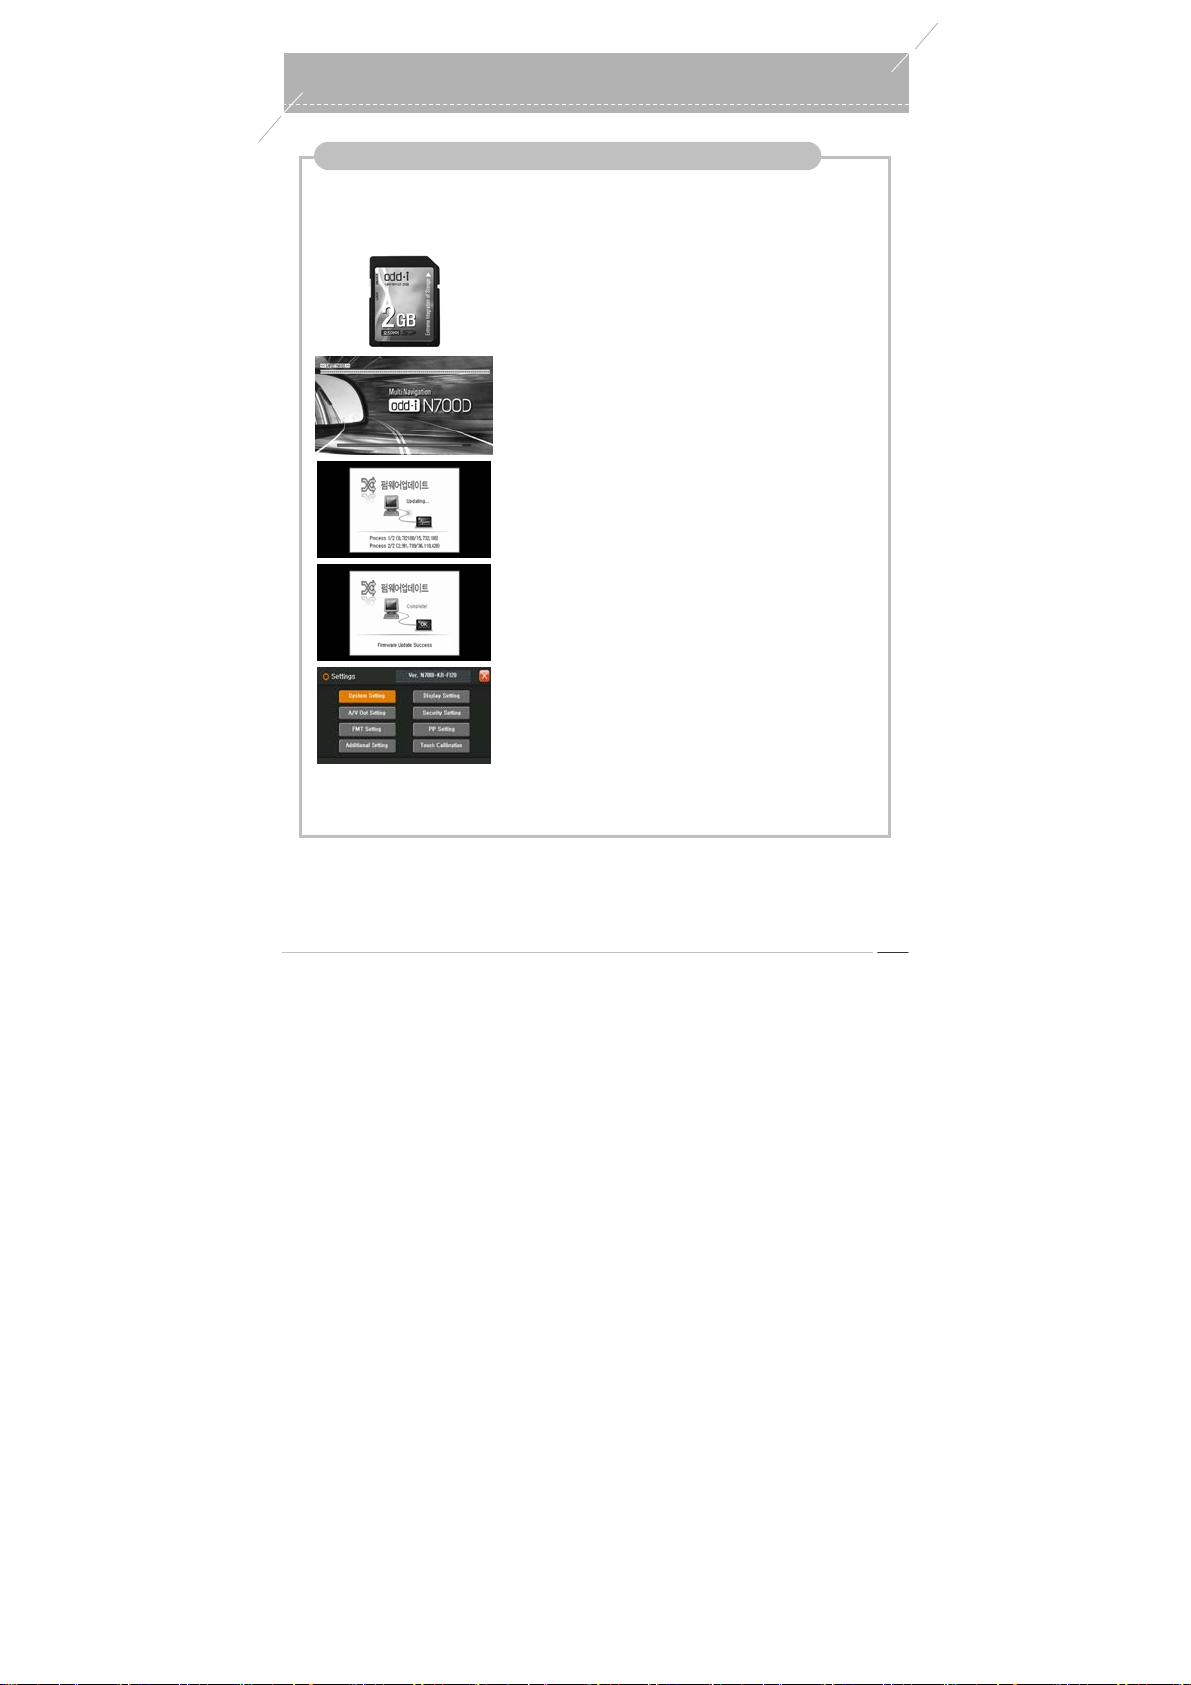
Using Navigation
Firmware Update
New firmware updates are announced in the Download Firmware section of the odd-i web site
▶
(http://www.odd-i.co.kr). If ther e is a new update available, download i t.
Remove the SD card from the product, insert it into the card
reader of the computer and copy the firmware file into the root
directory of the SD card.
Install the SD card into the N700D again and boot the product in
Safe Mode.
(T o boot the product i n Safe Mode, Press the Power key while
holding the Menu key down.)
The firmware is automatically updated.
When the ‘update complete’ message appears, rest art the
system to complete the update.
Check the firmware version in ‘Environment Settings’.
Since update procedures are subject to change, make sure to read the ‘Update Announcement’
※
section on the odd-i web site.
odd-i N700D User Guide
21
Page 22
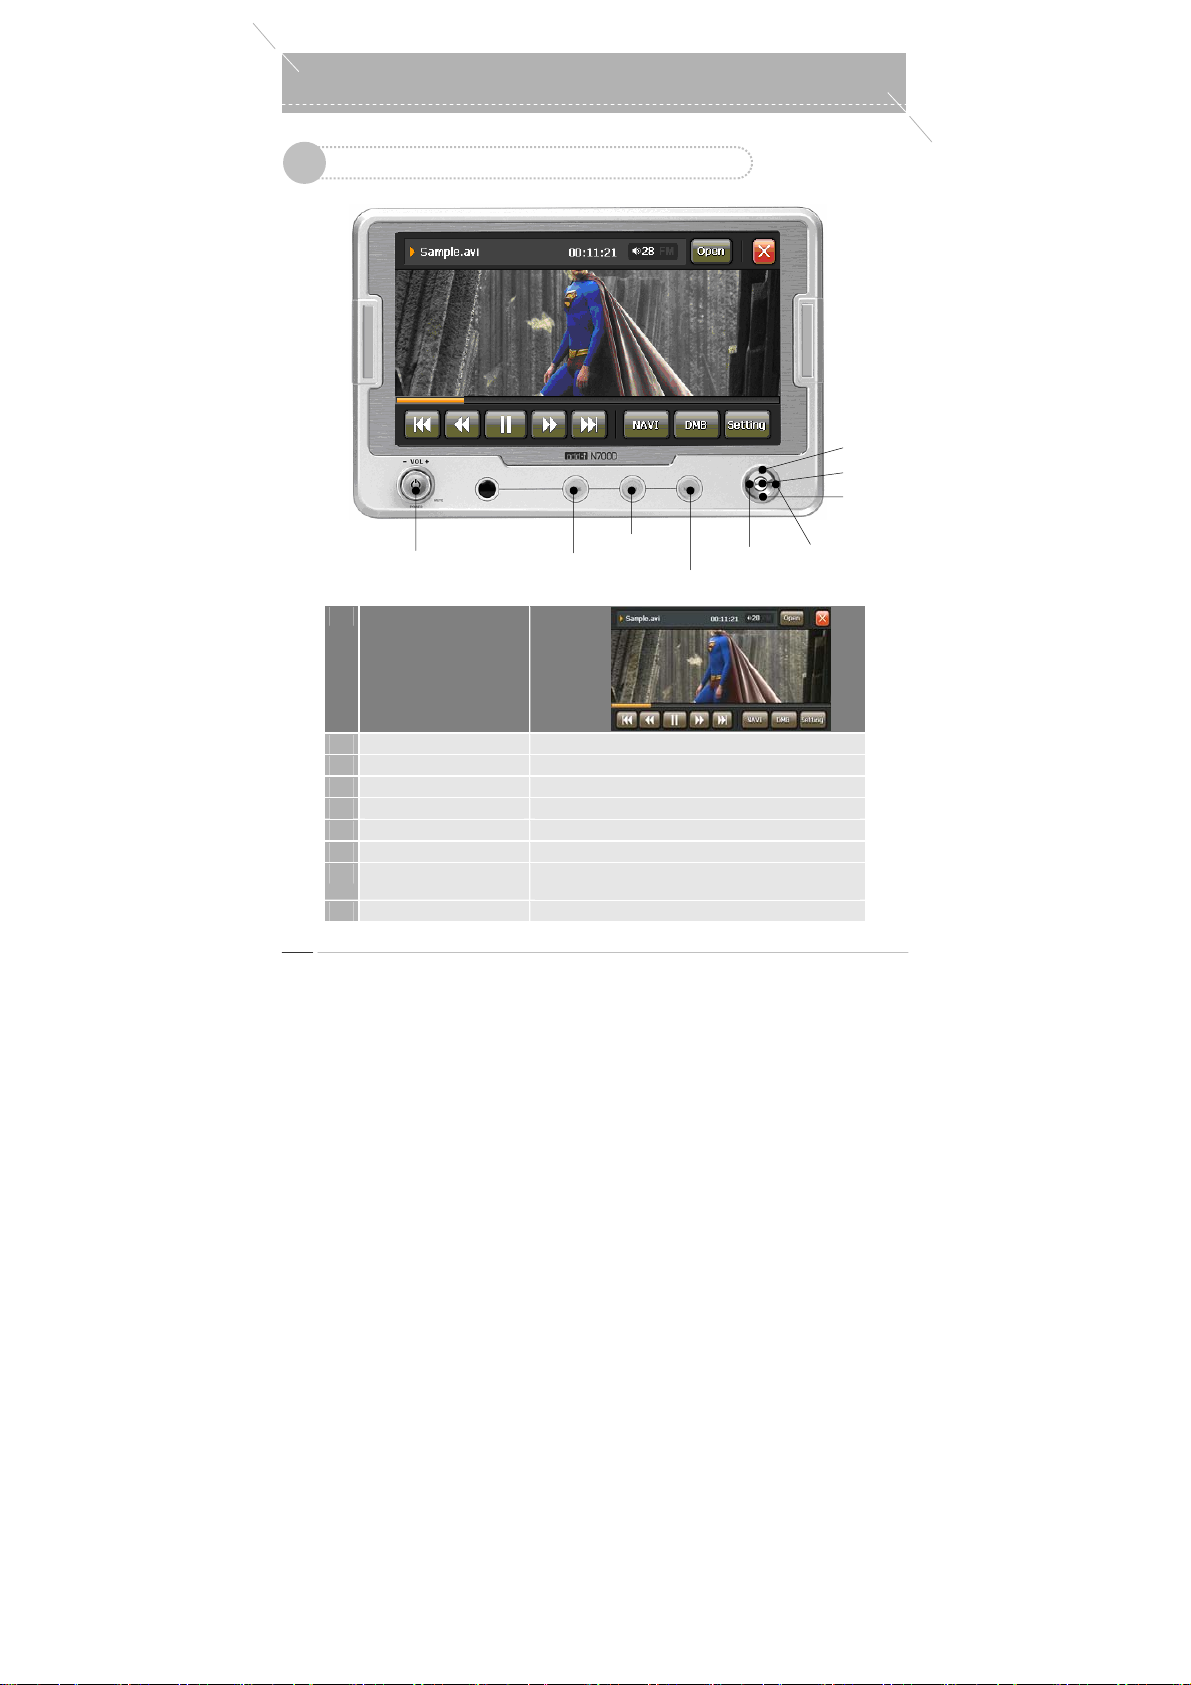
y
Movie Player
0
Movie Player Keymap
1
Power On/Off
Volume Ke
No. Name
Up Key
OK Key
DownKey
NAVI Key
MODE Key
MENU Key
Left Key
Right Key
1
OK Key Play/Pause
2
Up(long) Key Plays the previous file in the list.
3
Down(long) Key Plays the next file in the list.
4
Left(long)/Right(long) Key Rewind/Fast Forward
5
MENU Key Moves to Main (Same for all programs)
6
NAVI Key Moves to Navigation (Same for all programs)
7
MODE / MODE(long) Key
8
Volume Key Volume Control, Mute, Power ON/OFF
odd-i N700D User Guide
22
Function
Switches to another cu rrently running p rogram ( Same for a ll
programs) / LCD OFF
Page 23
r
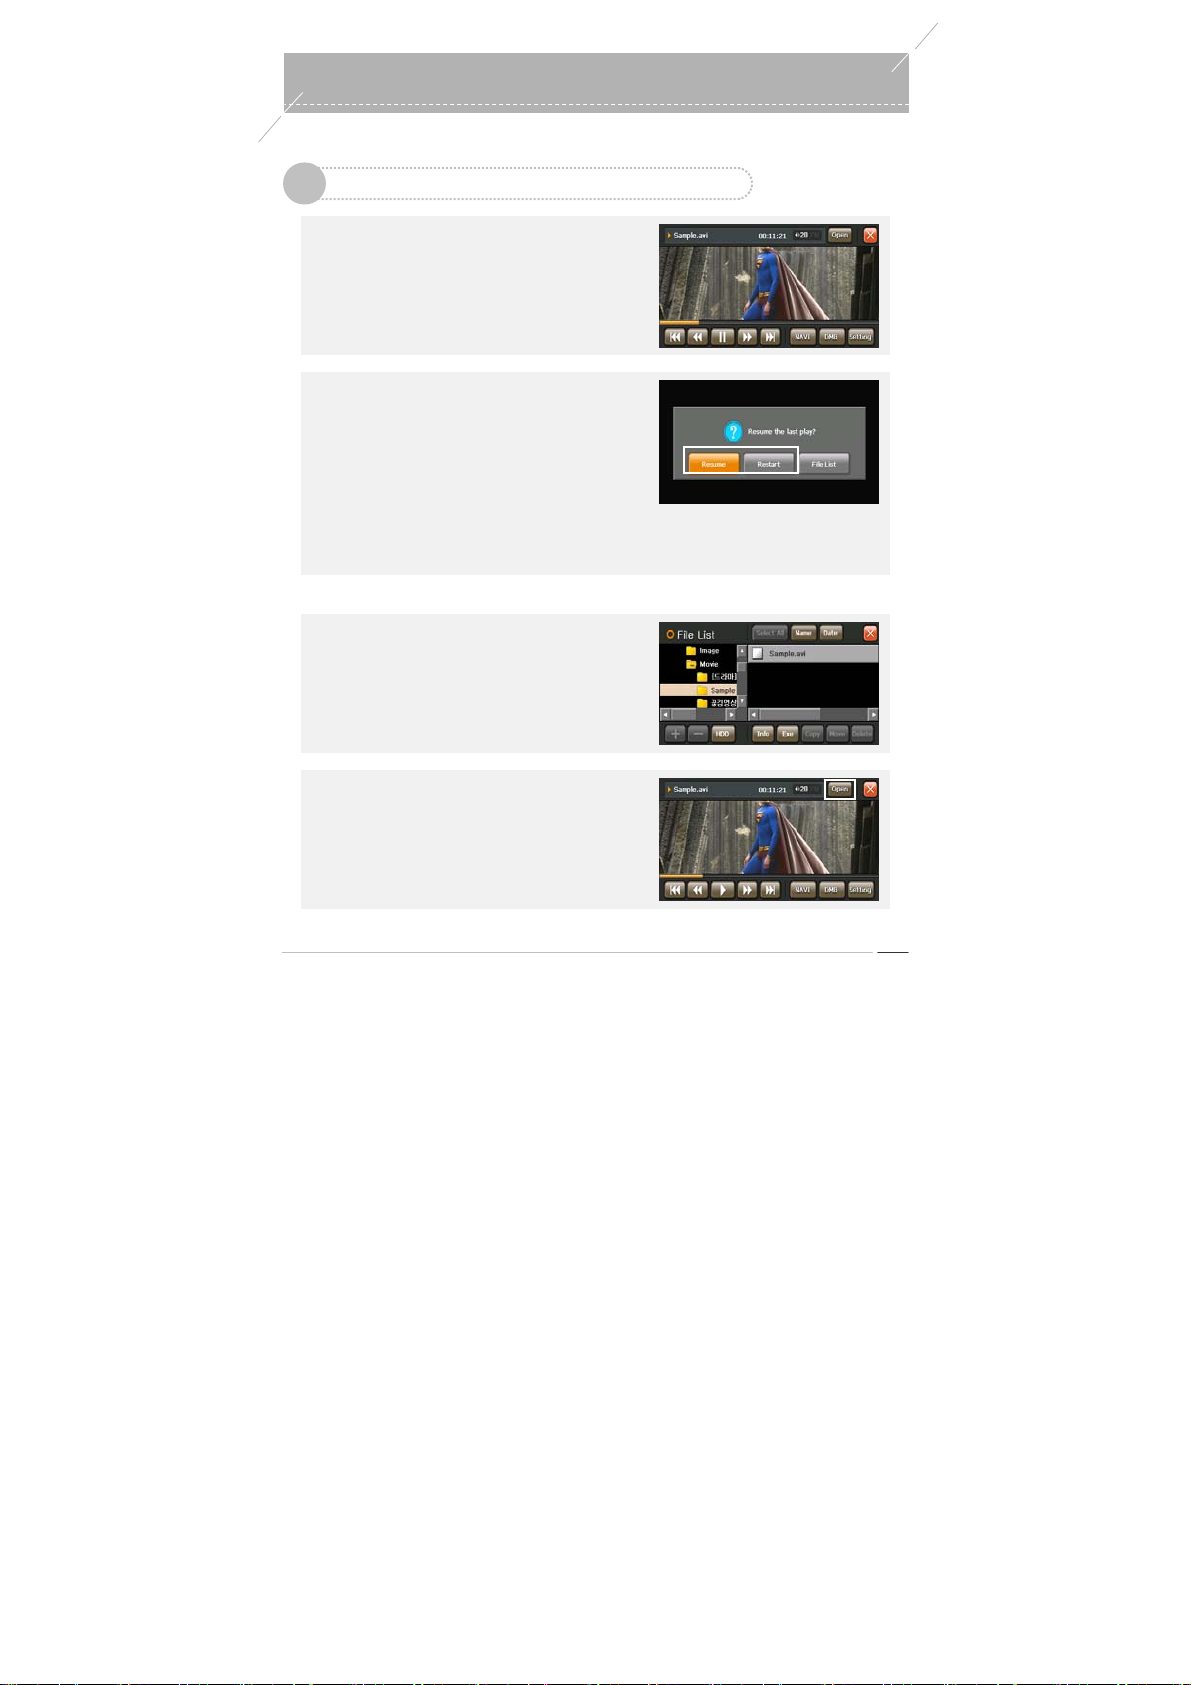
Playing a Video File
2
▶
To Launch Movie Player
Press the
to launch the Movie Player .
‘Movie Player’
button from the Main Menu
Movie Playe
0
▶
To Play a File (when ‘Resume from the Last
Position’ is set)
Select the
▶
To Play a File (when ‘Resume from the Last
Y ou can select a file from the Fi lelist and play it.
▶
To Play Another File during a Play
Press the
‘Resume from the Last Position’
from the Beginning’
- Resume from the Last Position: Resumes
playback from the last play position.
- Play from the Beginning: Plays from the beginning
of the current file.
- Filelist: Enables selecting and playing another file
from the Filelist.
Position’ is not set)
‘Open’
Filelist. Select a file from the list and play it.
- The current file playback continues even if you
press the ‘Exit’ button in the File list screen.
button in the pop-up window.
button during a play to move to the
or
‘Play
odd-i N700D User Guide
23
Page 24
Movie Player
0
▶
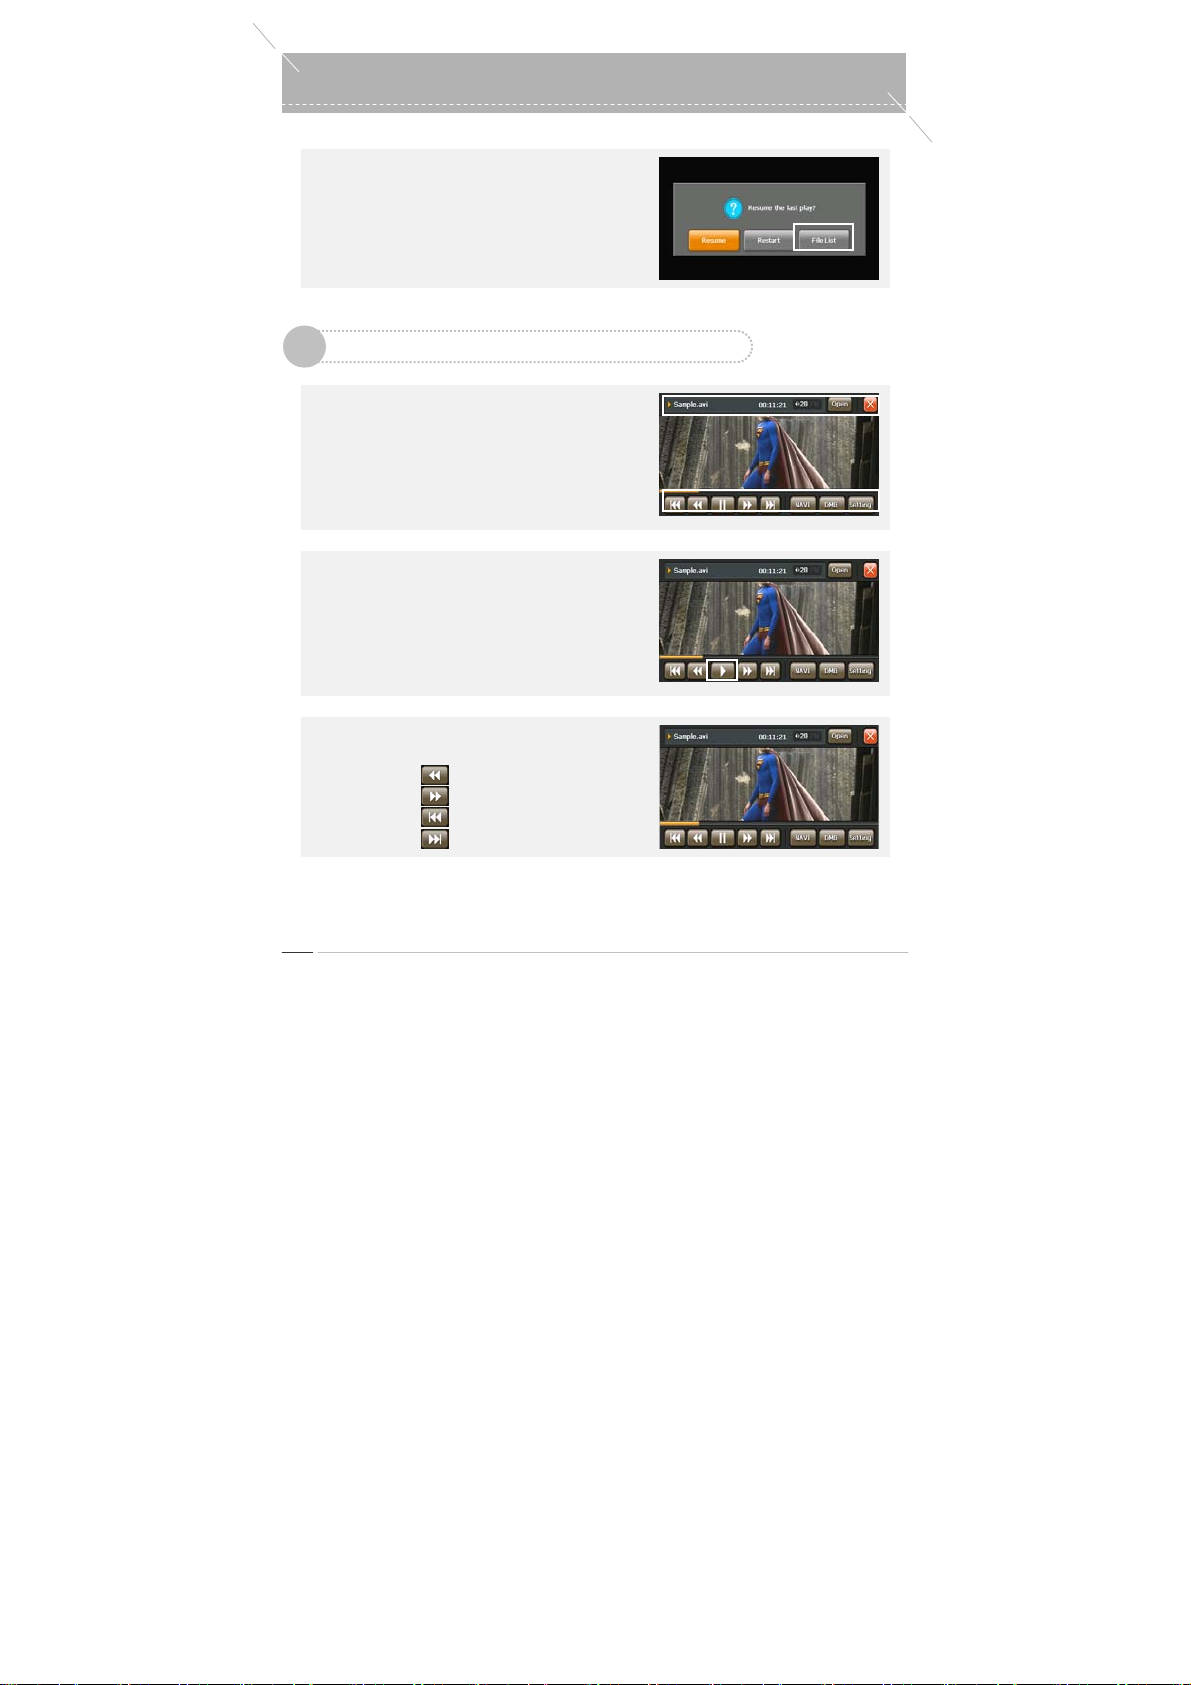
To Play a V ideo File from the List
When the window pops up asking you file to be
played, press the
and select a file to be played.
‘Filelist’
button to move to Filelist
Using Movie Player
3
▶
To Launch Control Bar during a Play
If you touch the screen during a video playback, the
Control Bar is launched. If you touch the screen
again, or if it is left untouched for a specified period of
time, the Control Bar disappears.
- Play Information / File Title / Exit Button, Setup
Button
▶
To Play/Pause
T o Play: Select a file from the Filelist and press
T o Pause: Press the
▶
To Rewi nd/Fast Forward or Play Previous/Next
File during a Playback
- Rewind : Rewinds the current file.
- Fast Forward : Fast forwards the current file.
- Previous File : Plays the previous file.
- Next File : Plays the next file
the
‘Play’
button. The selected file plays.
‘Pause’
Bar during a playback to pause. To
resume the playback, press the
button once again.
button on the Control
‘Pause’
odd-i N700D User Guide
24
Page 25
r
▶
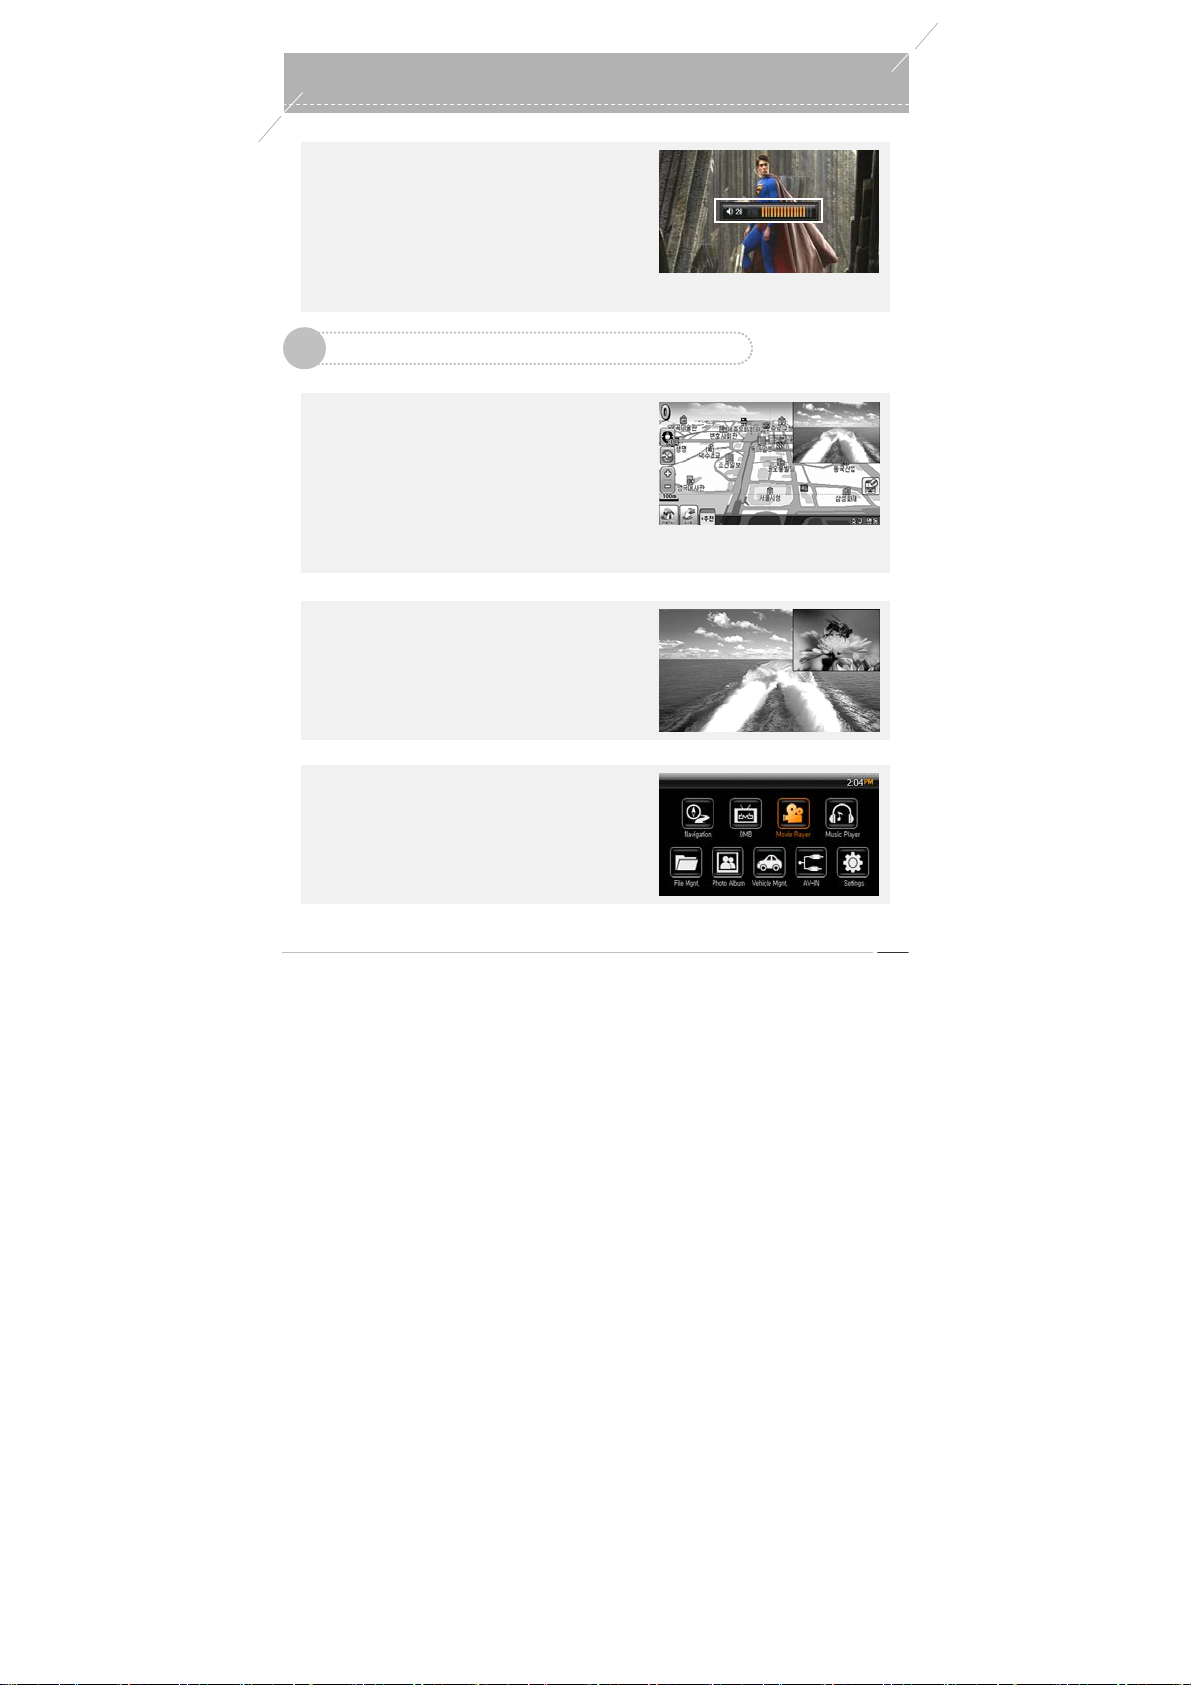
Volume Control/Mu te Setting
Volume Control : Turn the
Mute : Press the
Using Movie Player
3
▶
Using the PIN (Picture In Navigation) Function
Press the
If you touch the screen while using the PIN function,
▶
To watch DMB during a Playback
Press the
▶
To Launch Other Programs
Press the
If you press the
‘NAVI’
video playback to run the PIN function.
the PIN screen is resized in 3 steps. If you touch the
screen 3 times, the original screen size is restored.
- You can use Rewind/Fast For ward, Previous/Next
File Play , Pause and Vol ume Control while running
PIN.
video playback. The DMB and the Movie Player are
then switched to the PIP mode.
to move to the Main Menu. Then you can run other
programs.
other programs that are running.
button on the Control Bar during a
‘DMB’
button on the Control Bar during a
‘MENU’
‘MODE’
‘Volume’
‘Volume’
key left (-) or
key briefly to
right (+) to adjust the volume. (32
steps in total)
mute the sound. To cancel the
mute function, press the button
once again.
key while running the Movie Player
key, you can toggl e between
Movie Playe
0
odd-i N700D User Guide
25
Page 26
Movie Player
0
▶
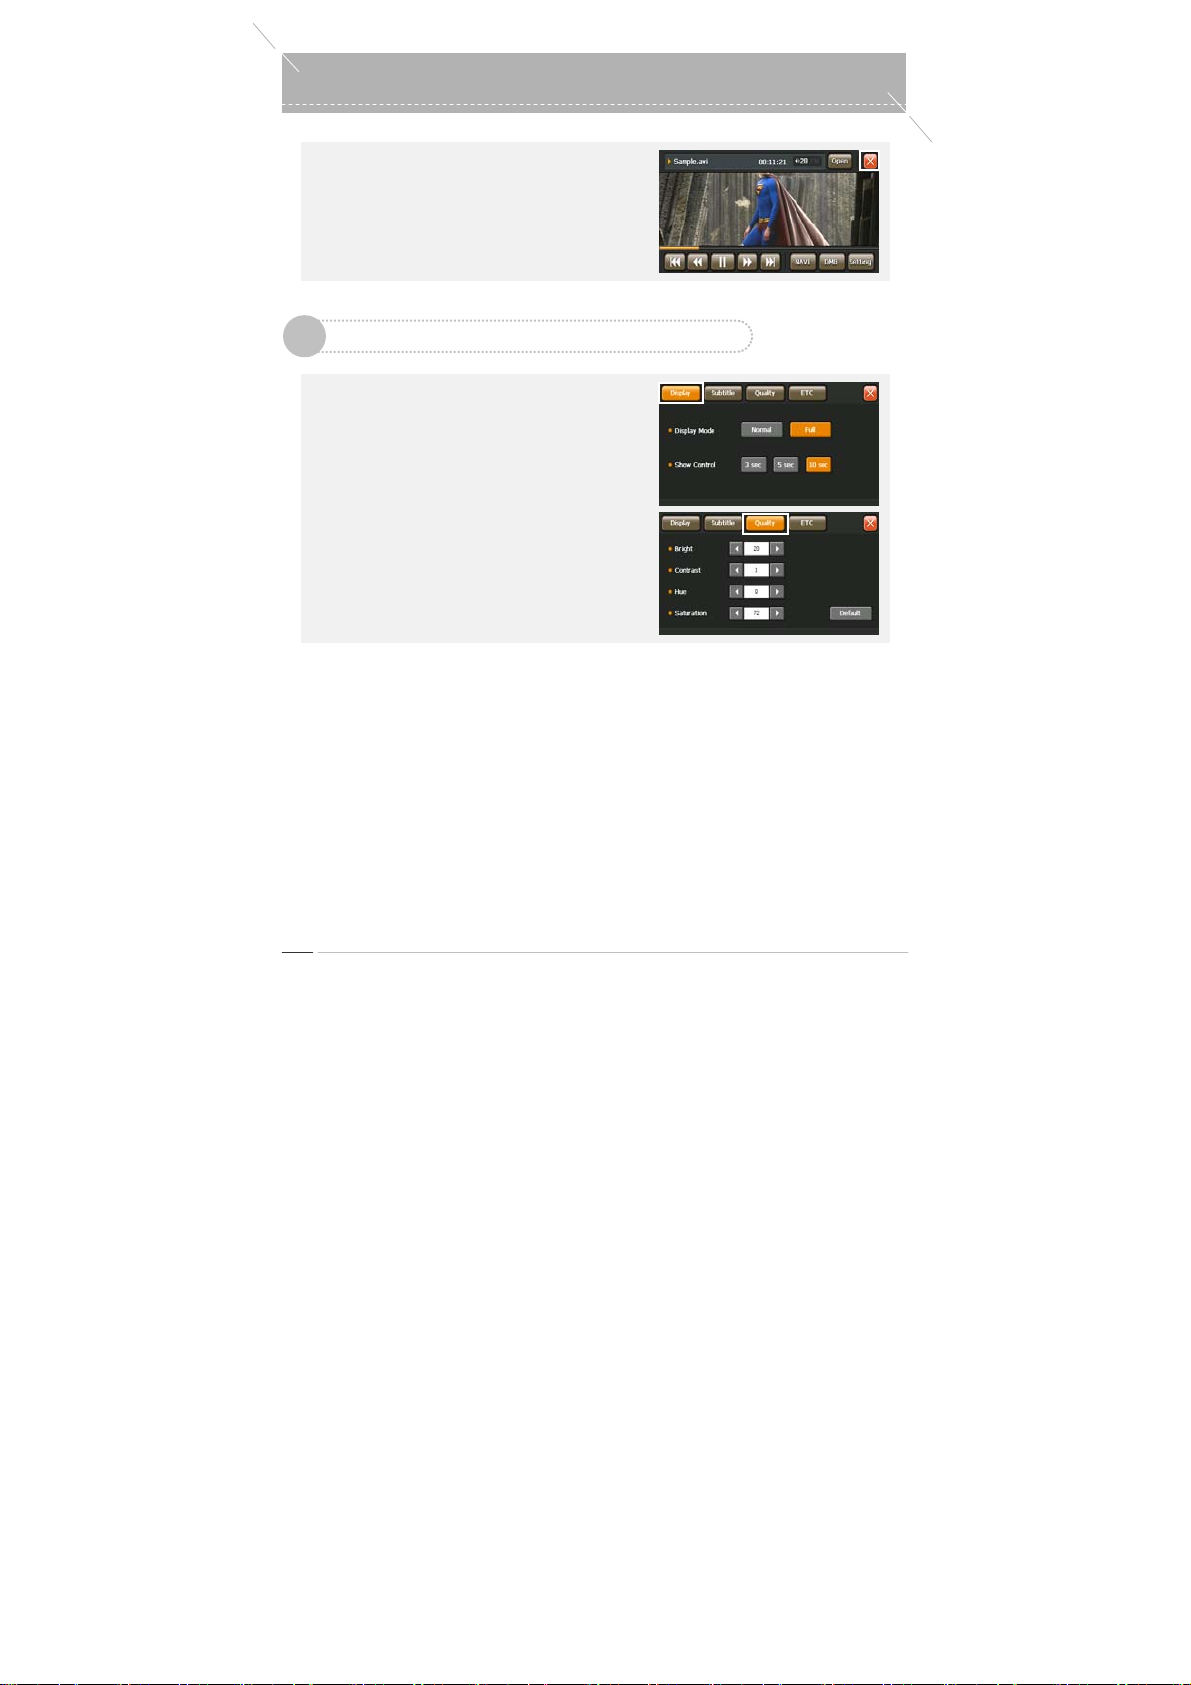
To Exit
Press the
‘Exit’
during a video playback to exit the Movie Player .
button at the top left of the screen
Screen Settings
4
Press the
‘Setup’
Settings menu appears. Select the
tab from the Video Settings menu to view or set up the
screen settings.
- Screen Mode: Basic Screen, Full Screen (Output
Video Size)
- Control Bar Display: 3, 5, 10 Seconds
- Brightness/Contrast/Chroma/Color: You can set up
the screen quality by setting these items. If you press
the ‘Default Settings’ button, the se ttings are initi alized
to factory defaults.
When you have completed the settings, press the
‘Exit’
button on the Control Bar . The Vi deo
‘Screen Settings’
button at the top right of the screen.
odd-i N700D User Guide
26
Page 27
r
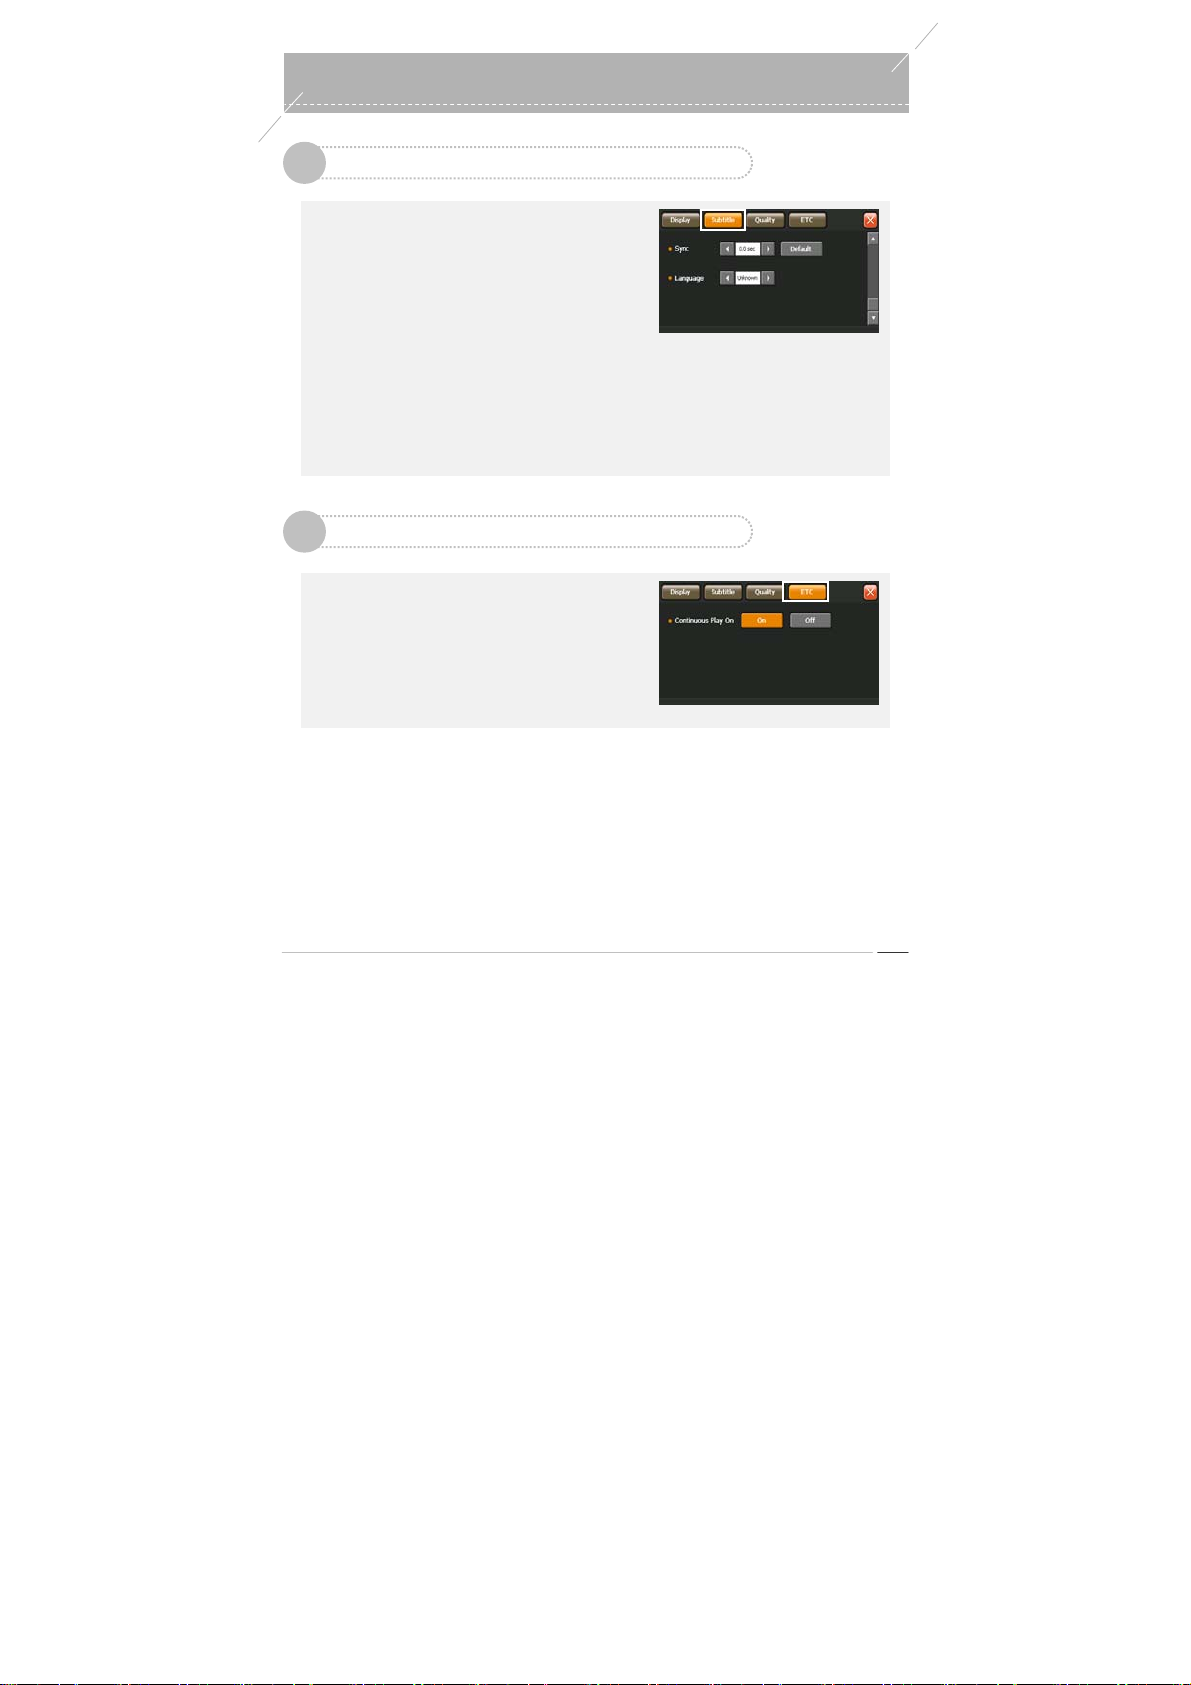
Subtitle Settings
5
Press the
‘Setup’
Settings menu appears. Select the
tab to view or set up the subtitle settings.
- Subtitle Setting: You can determine whether to show
or hide subtitles.
- Font Size: You can set the font size incremental ly
from 15 to 40 (26 steps in total).
- Font Color: You can select from White, Yellow, Red,
Blue and Black.
- Subtitle Sync: You can adjust the subtitle sync in 0.5
second steps.
- Language Setting: Available languages are
displayed. Y ou can s elect one of them.
When you have completed the settings, press the
‘Exit’
Continuous Play Setting
6
Press the
Settings menu appears. Select the
Setting’
settings.
- ON: Activates the Continuous Play function.
- OFF: Inactivates the Continuous Play function.
If you change a setting, the new setting is applied
immediately .
button on the Control Bar . The Vi deo
button at the top right of the screen.
‘Setup’
button on the Control Bar . The Vi deo
tab to view or set up the continuous play
‘Subtitle Settings’
‘Continuous Play
Movie Playe
0
odd-i N700D User Guide
27
Page 28
y
Music Player
0
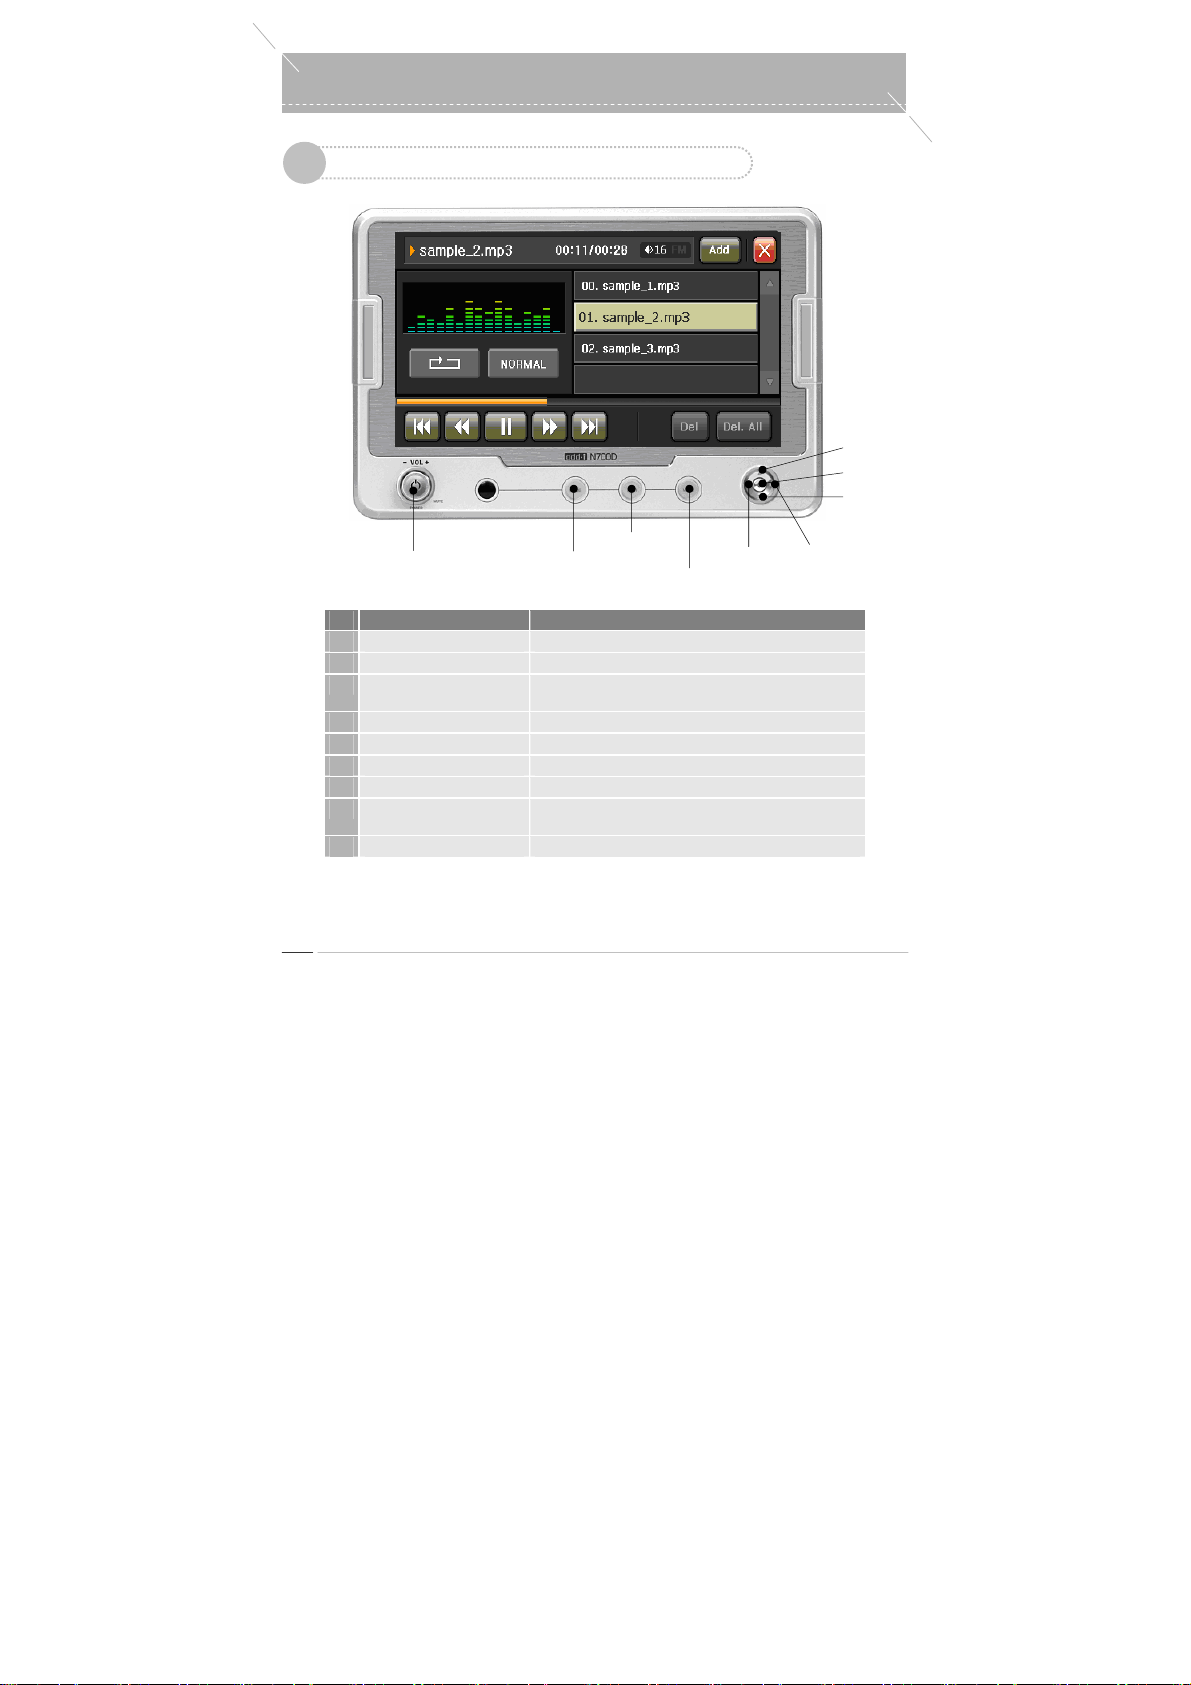
Music Player Keymap
1
Power On/Off
Volume Ke
No. Name Function
1
OK Key Play/Pause
2
Up/Down Key Switches between playlists.
3
Left(Short) Key Plays from the beginning of the current track/Plays the
4
Right(short) Key Plays the next track.
5
Left(long)/Right(long) Key Rewind/Fast Forward
6
MENU Key Moves to Main (Same for all programs)
7
NAVI Key Moves to Navigation (Same for all programs)
8
MODE / MODE(long) Key
9
Volume Key Volume Control, Mute, Power ON/OFF
MODE Key
previous track.
Switches to another cu rrently running p rogram ( Same for a ll
programs) / LCD OFF
NAVI Key
MENU Key
Left Key
Up Key
OK Key
DownKey
Right Key
odd-i N700D User Guide
28
Page 29
r
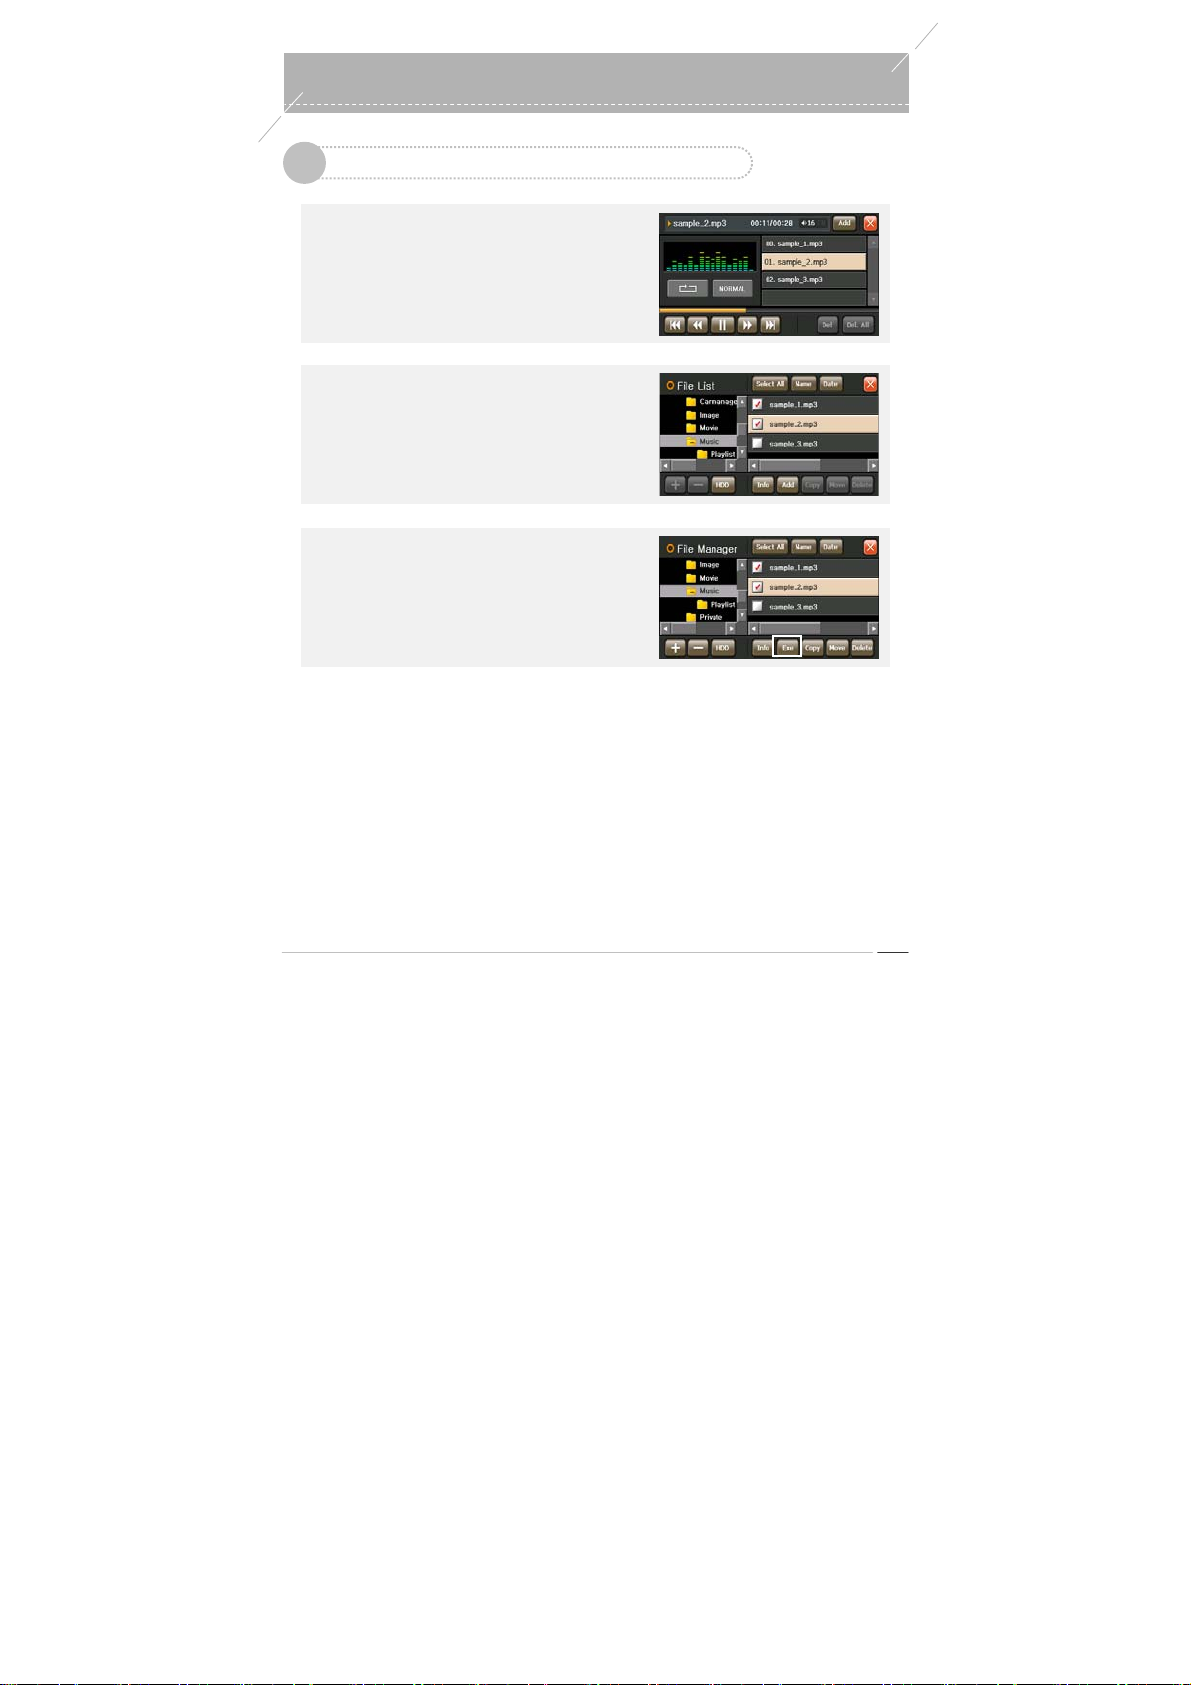
Playing a Music Fil e
2
▶
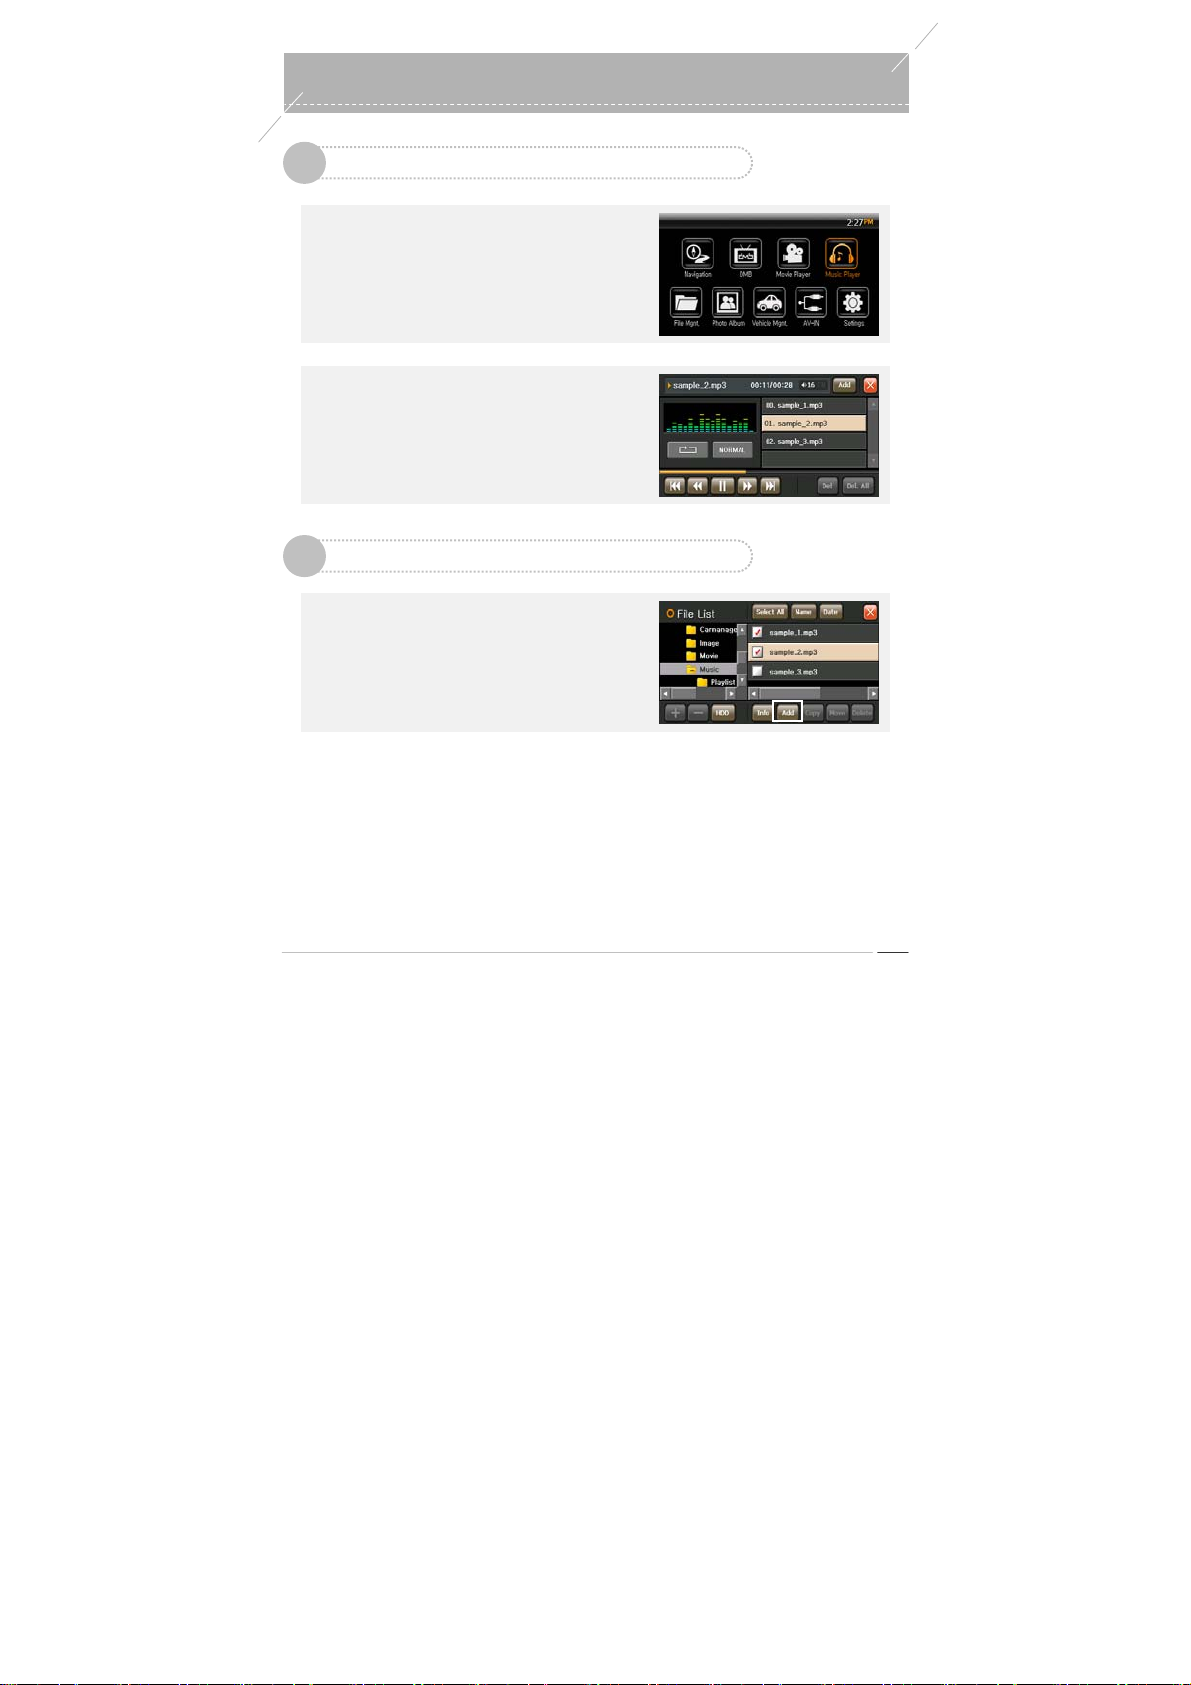
If there is a playlist
Press the
▶
If there is no playlist
Press the
▶
In File Management
Press the
‘Music Player’
to launch the Music Player. The music file that was
being played when it was last used is automatically
played.
‘Add’
move to Filelist and select a file from the list in order to
add the file to the playlist.
‘File Management’
Menu. The File Management screen appears. Select
a file from File Management and press the
button. The selected music file is played.
button from the Main Menu
button in the Music Player screen,
button from the Main
‘Play’
Music Playe
0
odd-i N700D User Guide
29
Page 30
Music Player
0
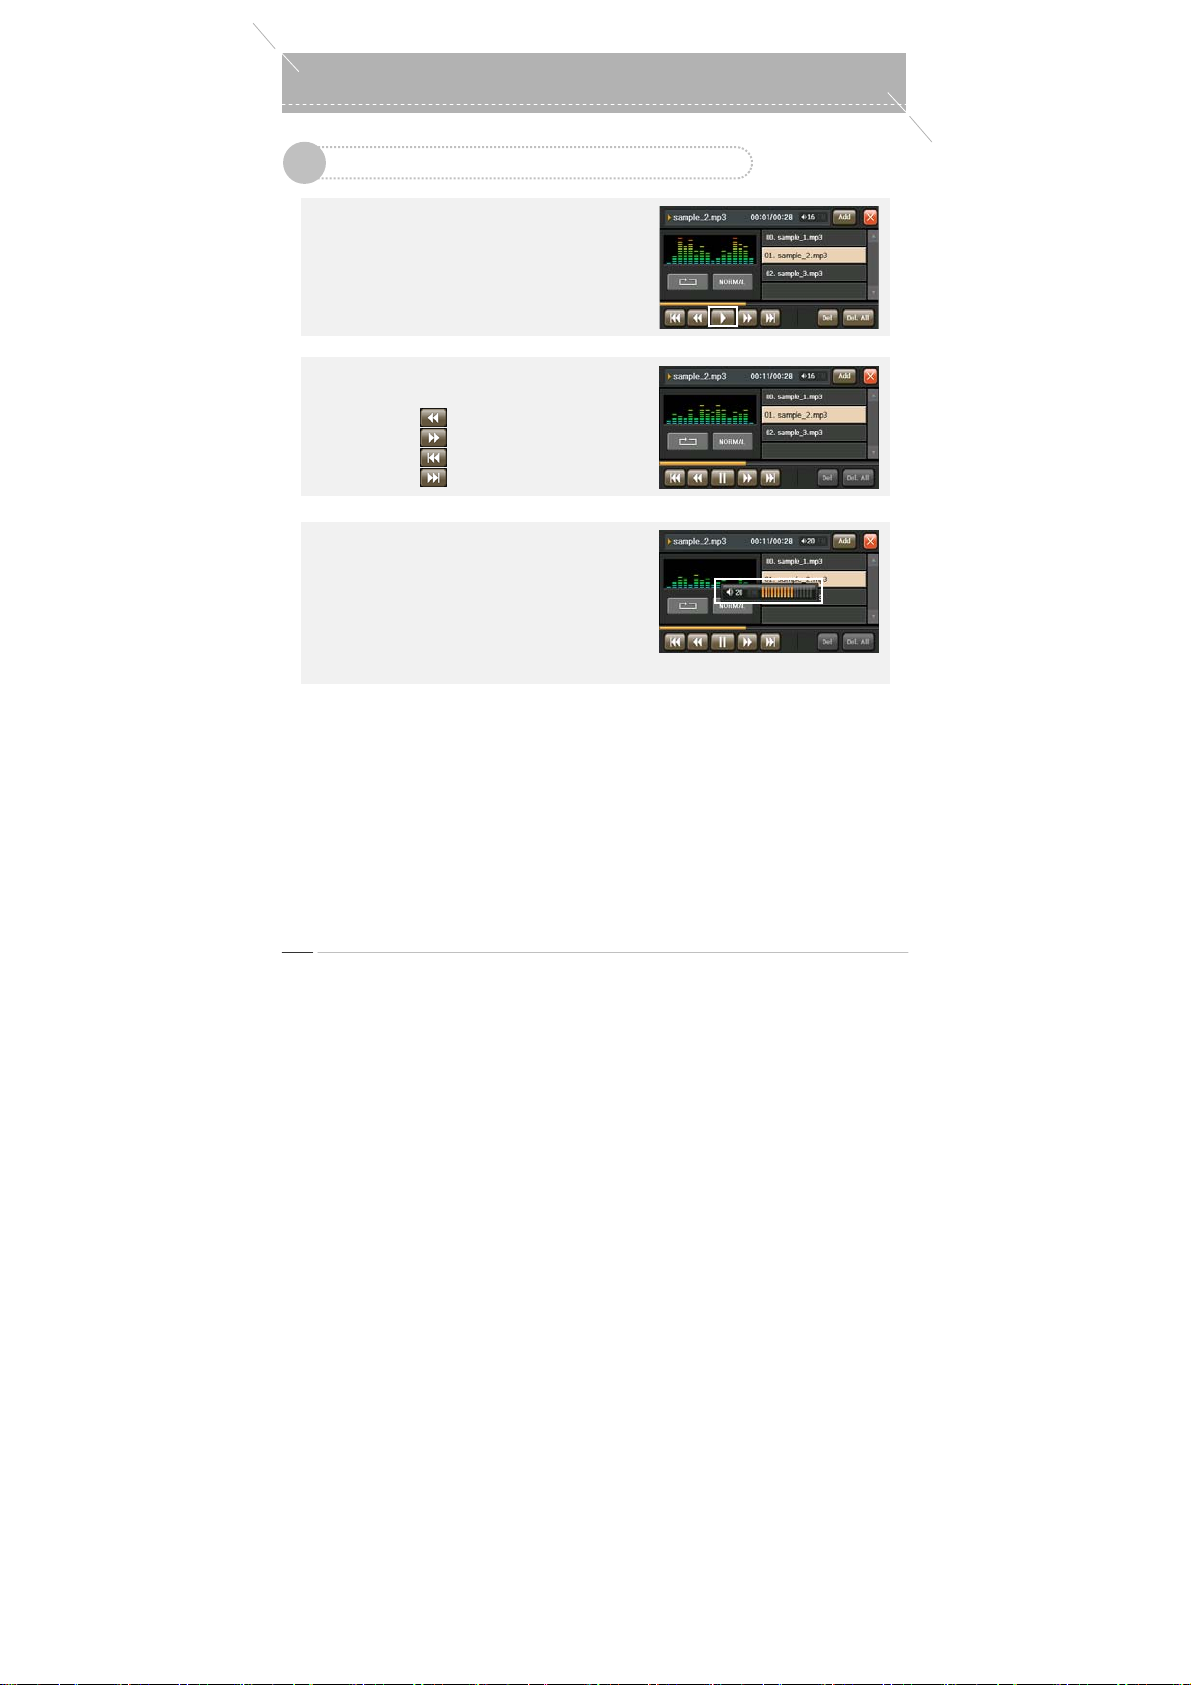
Using the Music Player
3
▶
To Play/Pause
Play a music file in the Music Player Playlist/ Filelist.
Press the ‘Pause’ button during a playback to p ause.
T o resume the playback, press the
once again.
▶
To Rewind/Fast Forward or Play Previous/Next
File during a Playback
- Rewind : Rewinds the current file.
- Fast Forward : Fast forwards the current file.
- Previous File : Plays the previous file.
- Next File : Plays the next file.
▶
Volume Control/Mu te Setting
Volume Control : Turn the
Mute : Press the
right (+) to adjust the volume. (32
steps in total)
mute the sound. To cancel the
mute function, press the button
once again.
‘Volume’
‘Volume’
‘Pause’
button
key left (-) or
key briefly to
odd-i N700D User Guide
30
Page 31
r
Using the Music Player
3
▶
To Launch Other Programs
Press the
If you press the
▶
To Exit
Press the
4
‘MENU’
to move to the Main Menu. Then you can run other
programs.
other programs that are running.
during a playback to exit the Music Player .
Adding Files to a Playlist
Press the
files to be added and press the
selected files are added to the playlist.
key while running the Music Player
‘MODE’
key, you can toggl e between
‘Exit’
button at the top left of the screen
button to launch Filelist, select
‘Add’
‘Add’
button. The
Music Playe
0
31
odd-i N700D User Guide
Page 32
Music Player
0
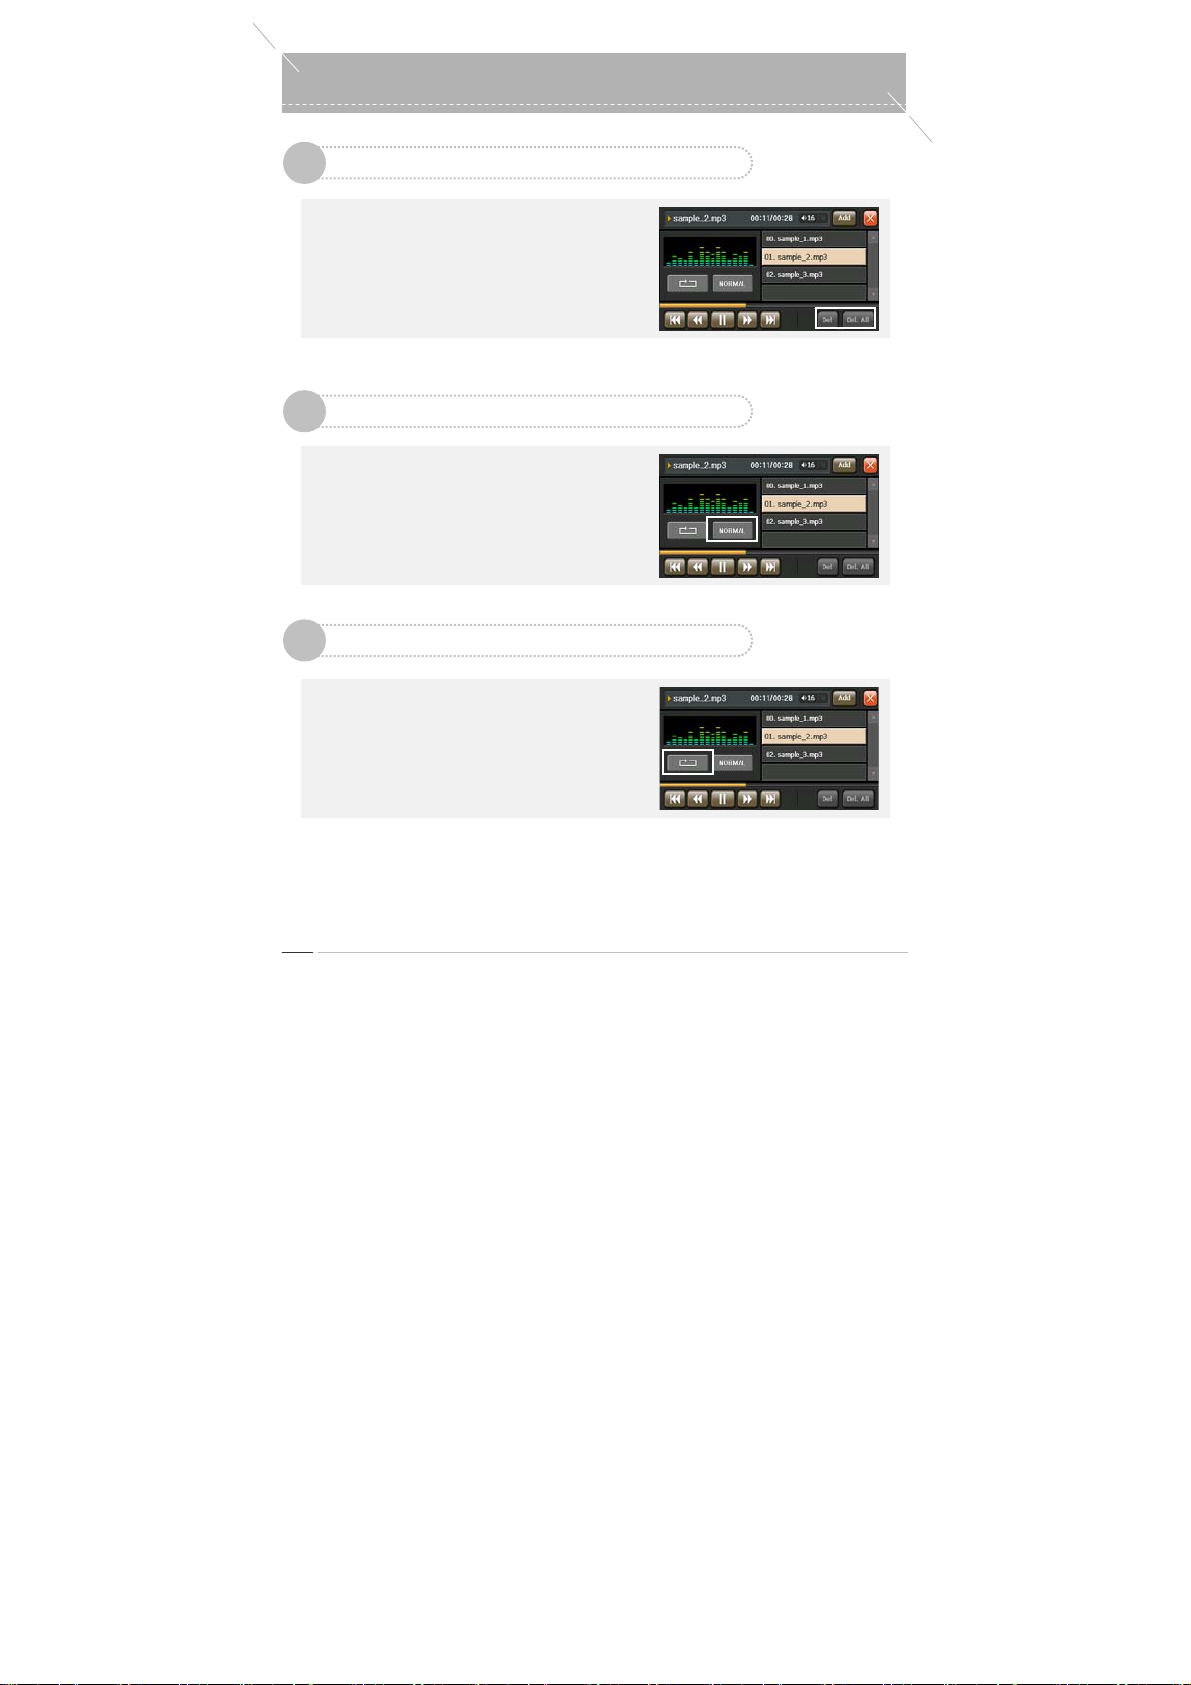
Deleting Files in a Playlist
5
Press the
‘Pause’
Click the
‘Delete’
‘Delete All’
playlist.
button to delete all files from the
button to pause a playback.
button to delete a file or the
Sound Effect Setting
6
Press the
‘Sound Effect’
Player to view or set up Sound Settings.
- Select a Sound Effect (Normal, Rock, Pop, Jazz,
Classic, Dance, Heavy, Disco, Sof t, 3D/Live, Hall).
Play Mode Setting
7
Press the
‘Play Mode Setting’
Player to change the Play Mode.
- Select a Play Mode (No Repeat, Repeat a Track,
Repeat All, Shuffle).
button in the Music
button in the Music
odd-i N700D User Guide
32
Page 33

r
Viewing Lyrics
8
Y ou can view lyrics with music. The LRC lyrics file
format is supported, and lyrics files must be in the
folder in which the corresponding music file is
saved.
When lyrics are displayed, the equalizer is not
displayed.
Music Playe
0
odd-i N700D User Guide
33
Page 34
y
Photo Album
0
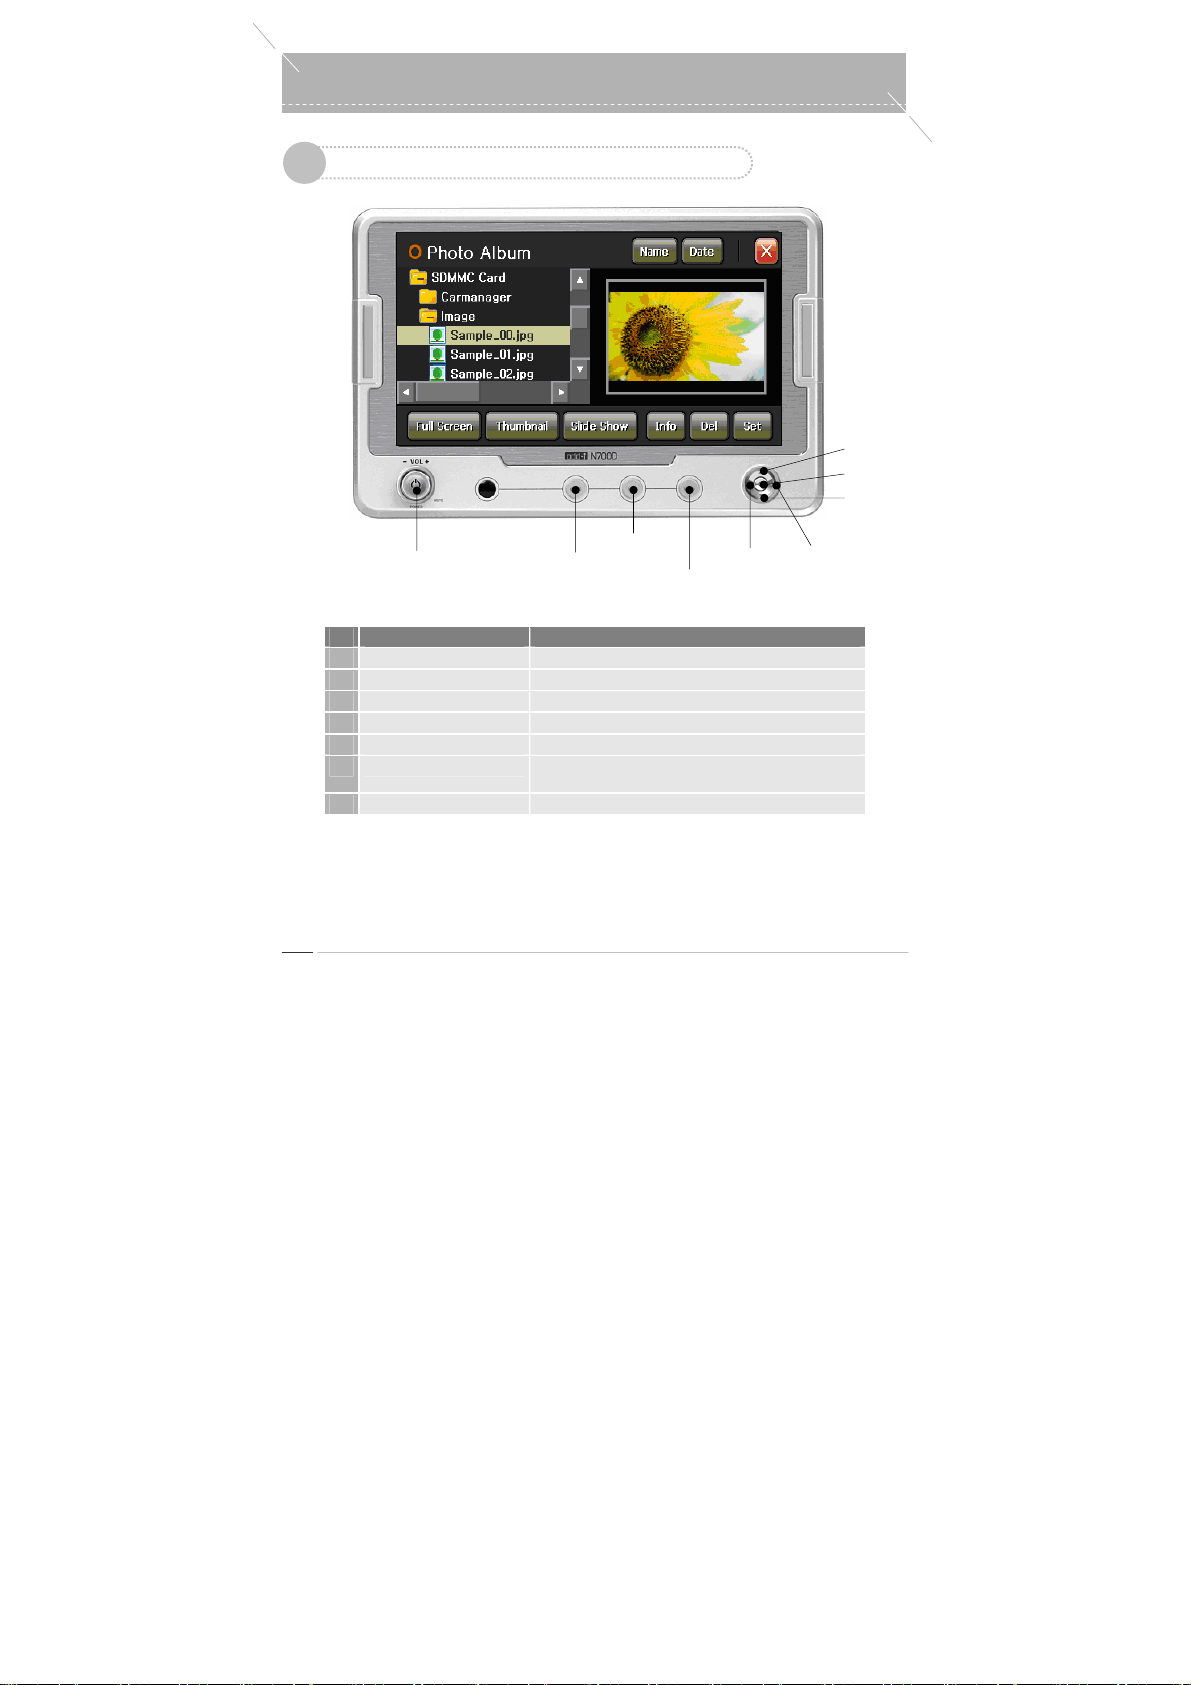
Photo Album Keymap
1
Power On/Off
Volume Ke
No. Name Function
1
OK Key Selected Photo Full Screen View
2
Up/Down Key Shows Previous/Next Photo
3
Left/Right Key Moves to Super / Sub Folder
4
MENU Key Moves to Main (Same for all programs)
5
NAVI Key Moves to Navigation (Same for all programs)
6
MODE / MODE(long) Key
7
Volume Key Volume Control, Mute, Power ON/OFF
MODE Key
Switches to another cu rrently running p rogram ( Same for a ll
programs) / LCD OFF
NAVI Key
MENU Key
Left Key
Up Key
OK Key
DownKey
Right Key
odd-i N700D User Guide
34
Page 35
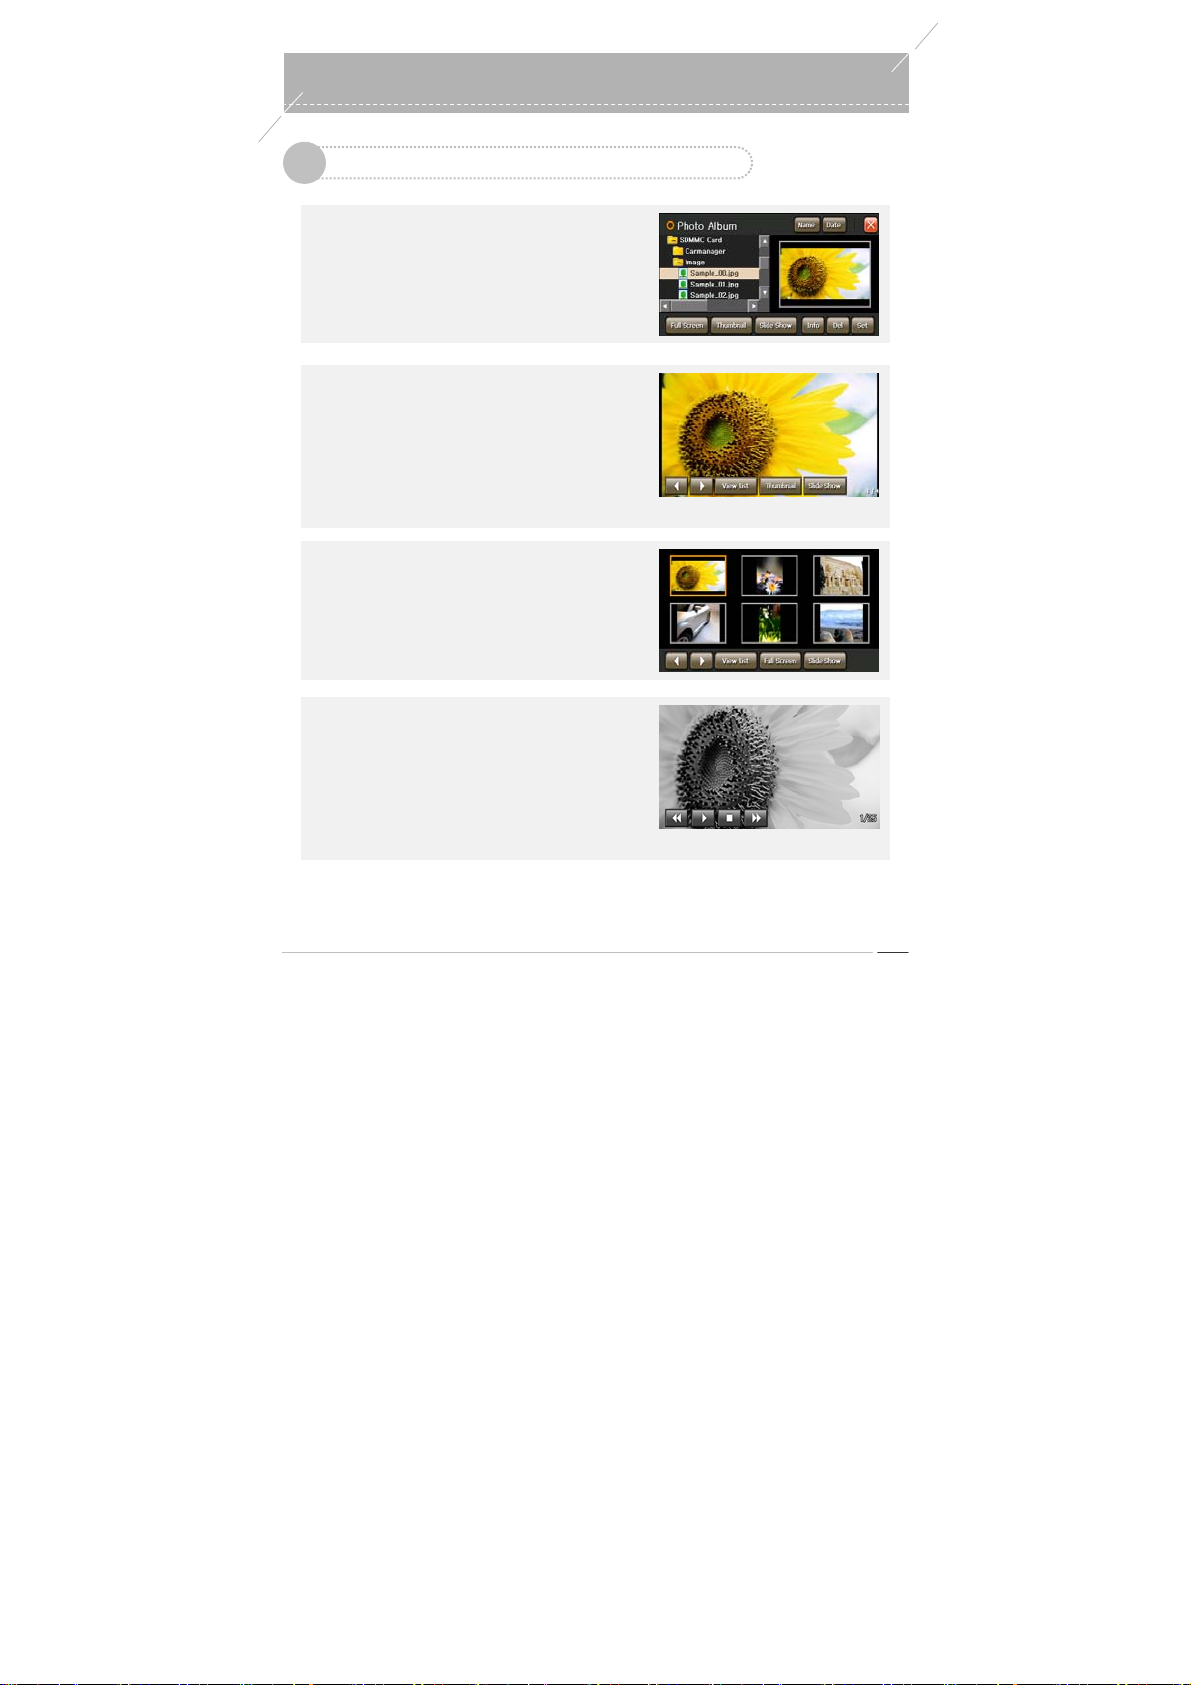
Photo Album View
2
▶
List View
Press the
The Filelist and Preview screen appear .
‘Photo Album’
to launch the Photo Album.
button from the Main Menu
Photo Album
0
▶
Large View
▶
Thumbnail View
T o view a photo in full screen, select a photo and
Press the ‘Thumbnail View’ button i n the List or Large
press the
‘Large View’
View of the Photo Alb um to view the photos in
Preview of the Photo Album, double- touch a photo in
Thumbnail View .
the List view or press the
Thumbnail View .
When you touch the screen, the soft buttons at the
bottom toggle between appear or disappear .
▶
Thumbnail View
Press the
▶
SlideShow View
T o view photos in SlideShow, Press the
Press the ‘Stop SlideShow’ button to return to the Li st
‘Thumbnail View’
Large View of the Photo Album to view the photos in
Thumbnail View.
button in the List View of Photo Album, press the
‘SlideShow’
click the left arrow button, the SlideShow will continue
in reverse order.
View.
button in the List View or
‘Large View’
button in the Thumbnail View. If you
button in the
button in the List or
‘Large View’
odd-i N700D User Guide
35
Page 36
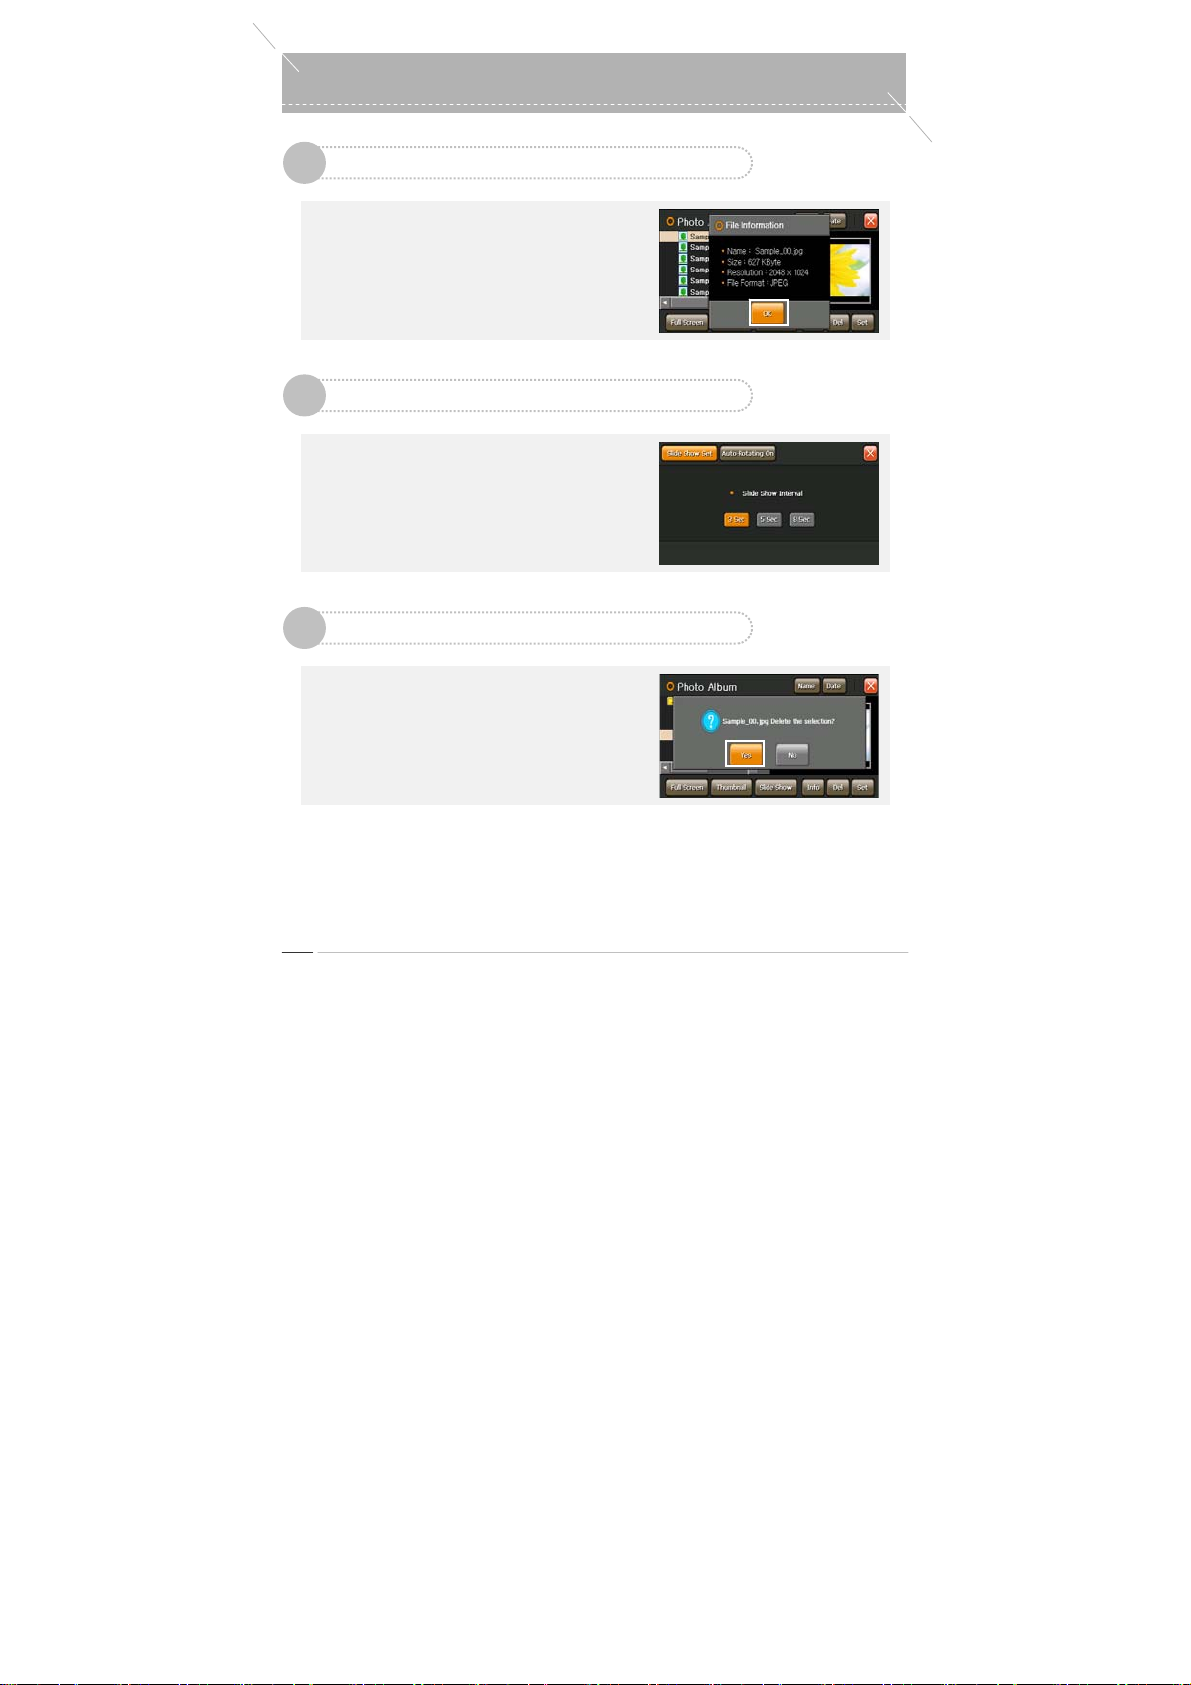
Photo Album
0
Information
3
Press the
‘Information’
the Photo Album to view the file i nformation on the
selected photo.
Press the
‘OK’
window.
button in the List View of
button to hide the information
Setting
4
Press the
Photo Album to set up Photo Album Settings.
Y ou can set the slide interval for SlideShow (3 / 5 /
8 seconds) and determine whether to use the
automatic rotation function.
Deleting a Photo
5
Select a photo file to be deleted and press the
‘Delete’
window appears.
Press the
button in the List View of the
‘Setup’
button. The deletion confirmation pop-up
button to delete the file.
‘Yes’
odd-i N700D User Guide
36
Page 37
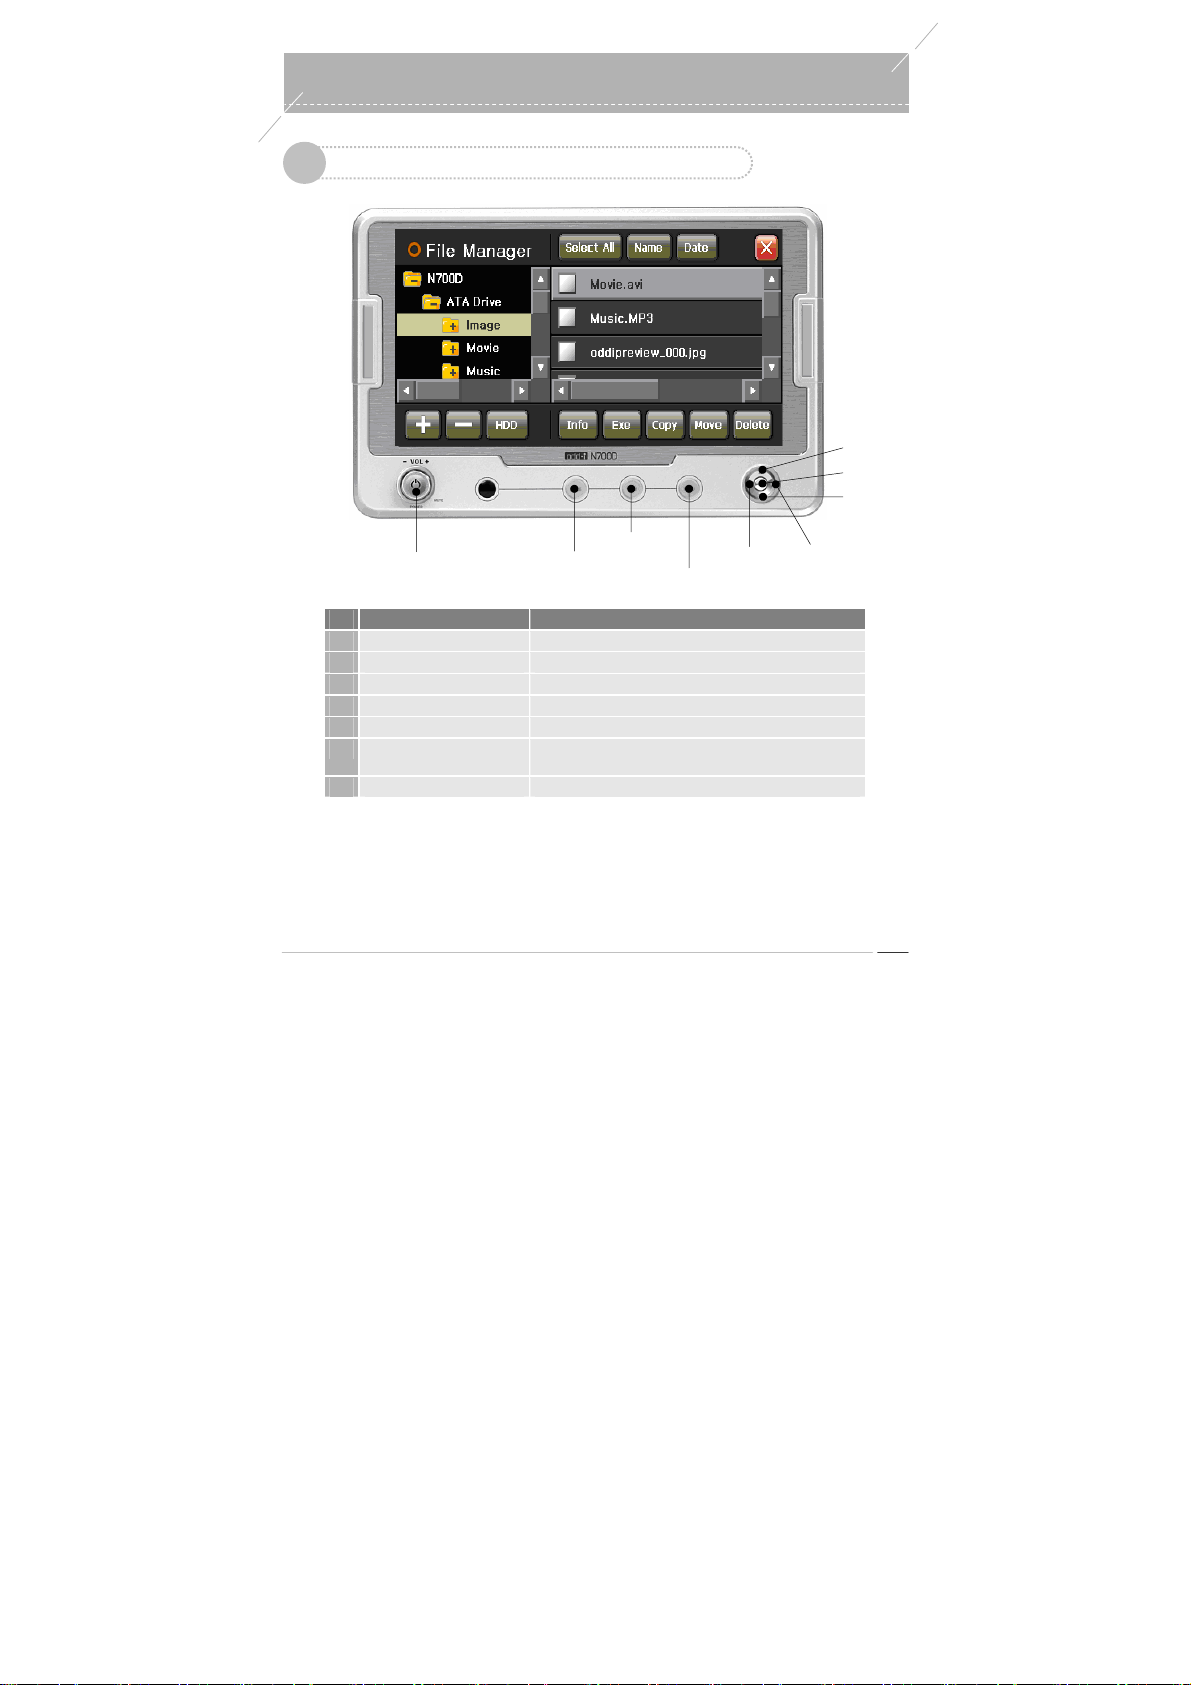
t
y
File Management Key Map
1
Power On/Off
Volume Ke
No. Name Function
1
OK Key Opens/Closes a Folder or Selects or Plays a File
2
Up/Down Key Navigates list in one step at a time.
3
Left/Right Key Moves Focus Left or Right.
4
MENU Key Moves to Main (Same for all programs)
5
NAVI Key Moves to Navigation (Same for all programs)
6
MODE / MODE(long) Key
7
Volume Key Volume Control, Mute, Power ON/OFF
MODE Key
Switches to another cu rrently running p rogram ( Same for a ll
programs) / LCD OFF
File Managemen
NAVI Key
MENU Key
Left Key
0
Up Key
OK Key
DownKey
Right Key
odd-i N700D User Guide
37
Page 38
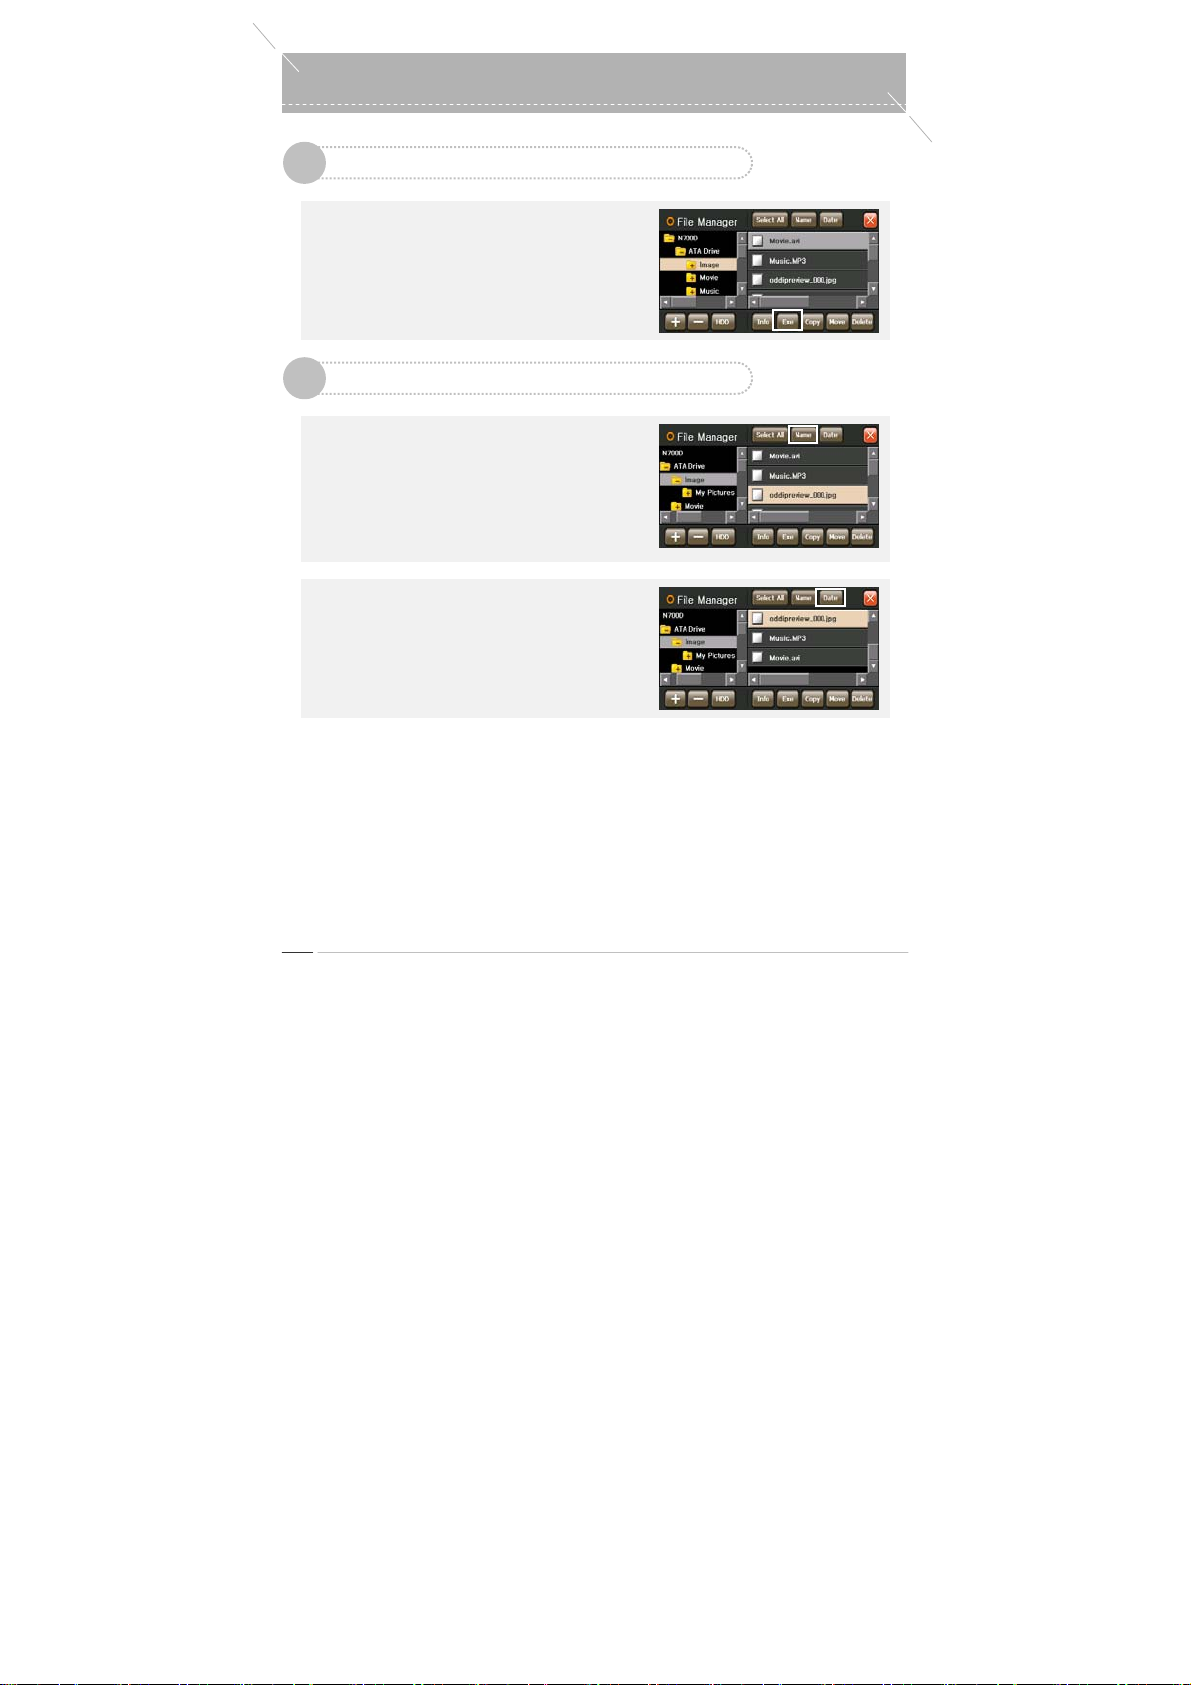
File Management
0
File Management Screen
2
Press the
‘File Management’
Main Menu to open File Management.
Select a file and press the
button from the
‘Play’
button to play the file.
Sorting Files
3
▶
To Sort by Name
If you press the
name.
When you press it once: Files are sorted in
descending order by name.
When you press it twice: Files are sorted in ascending
order by name.
▶
To Sort by Date
If you press the
When you press it once: Files are sorted in
descending order by date.
When you press it twice: Files are sorted in ascending
order by date.
‘File Name’
‘Date’
button, files are sorted by
button, files are sorted by date.
odd-i N700D User Guide
38
Page 39
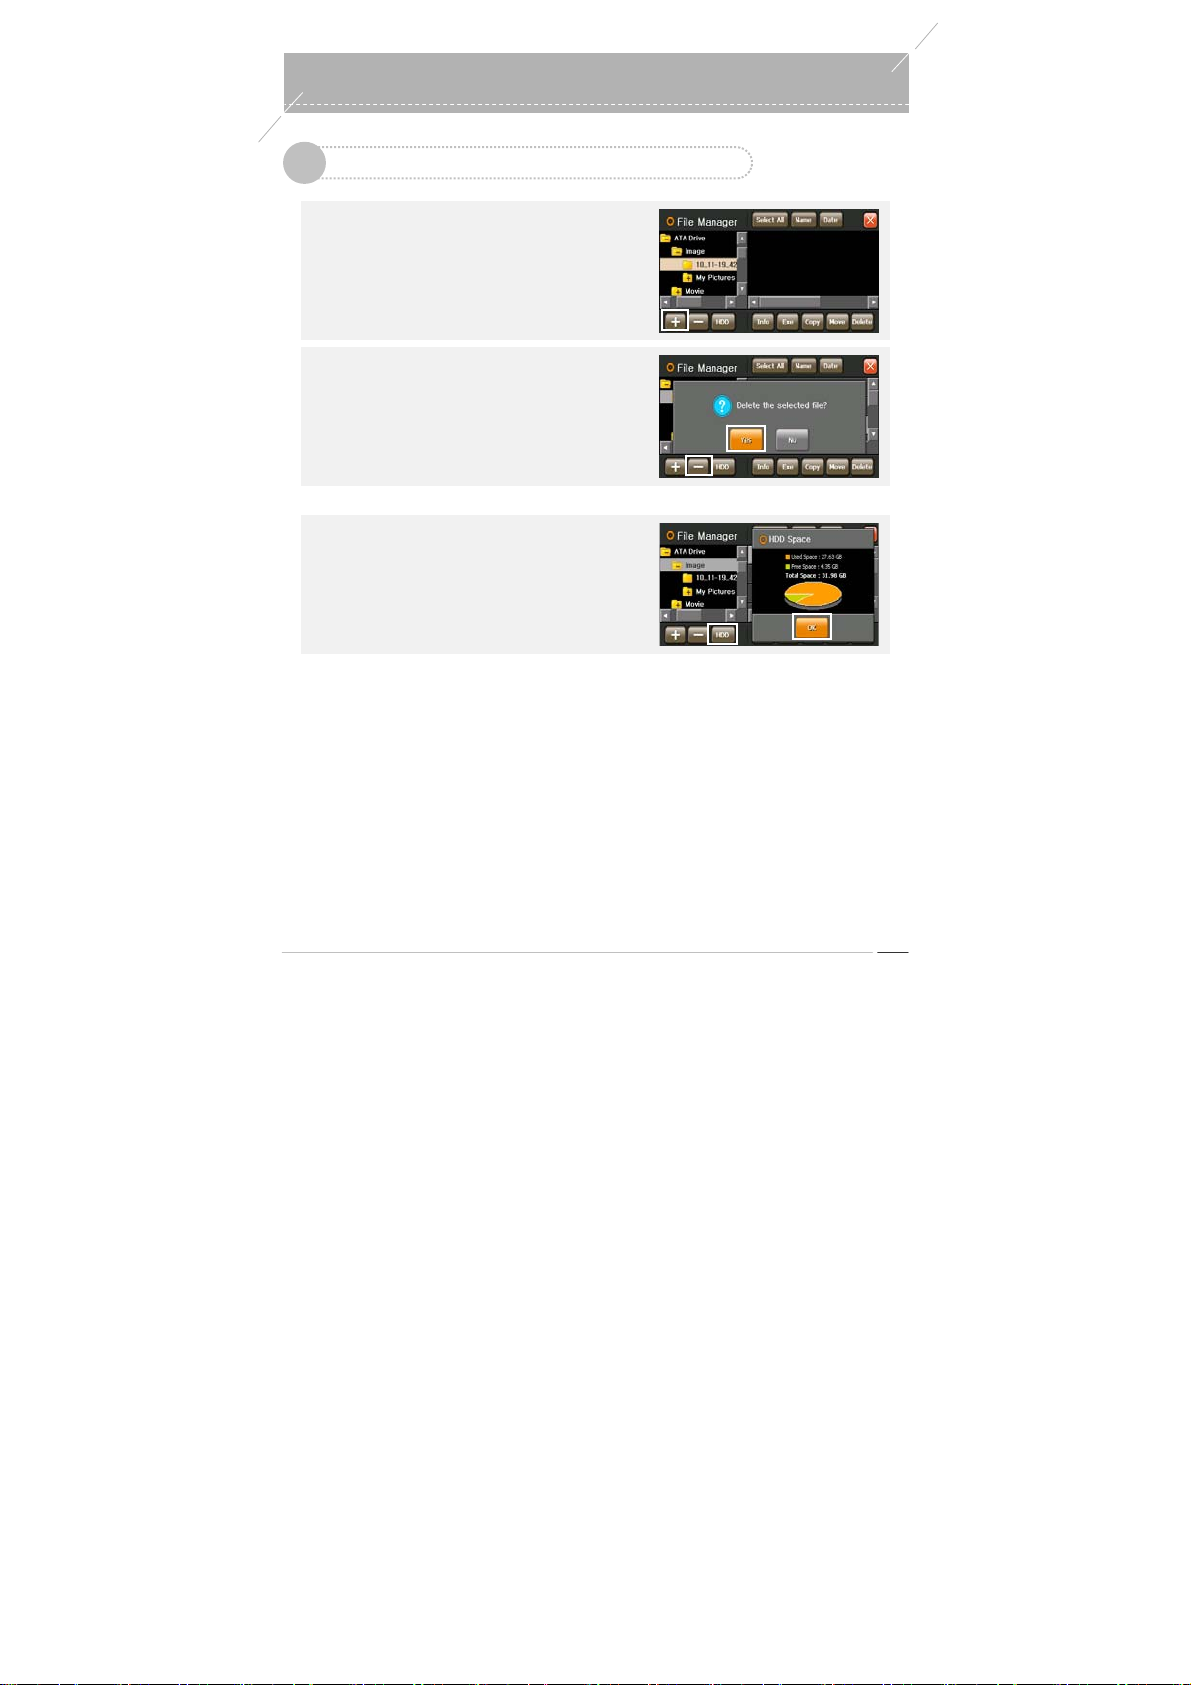
t
Folder Management
4
▶
To Create a Folder
Press the ‘+’ button to create a new folder in the
current folder.
File Managemen
0
▶
To Delete a Folder
Select a folder to be deleted and press the ‘-’ button.
The deletion confirmation pop-up window appears.
Press the
▶
HDD Space
Press the ‘HDD’ button to view the total cap acity,
Press the
‘Yes’
contents are deleted.
current usage and remaining capacity of the hard disk
drive.
disappears.
button. The selected folder and its all
‘OK’
button. The Information window
odd-i N700D User Guide
39
Page 40
File Management
0
File Management
5
▶
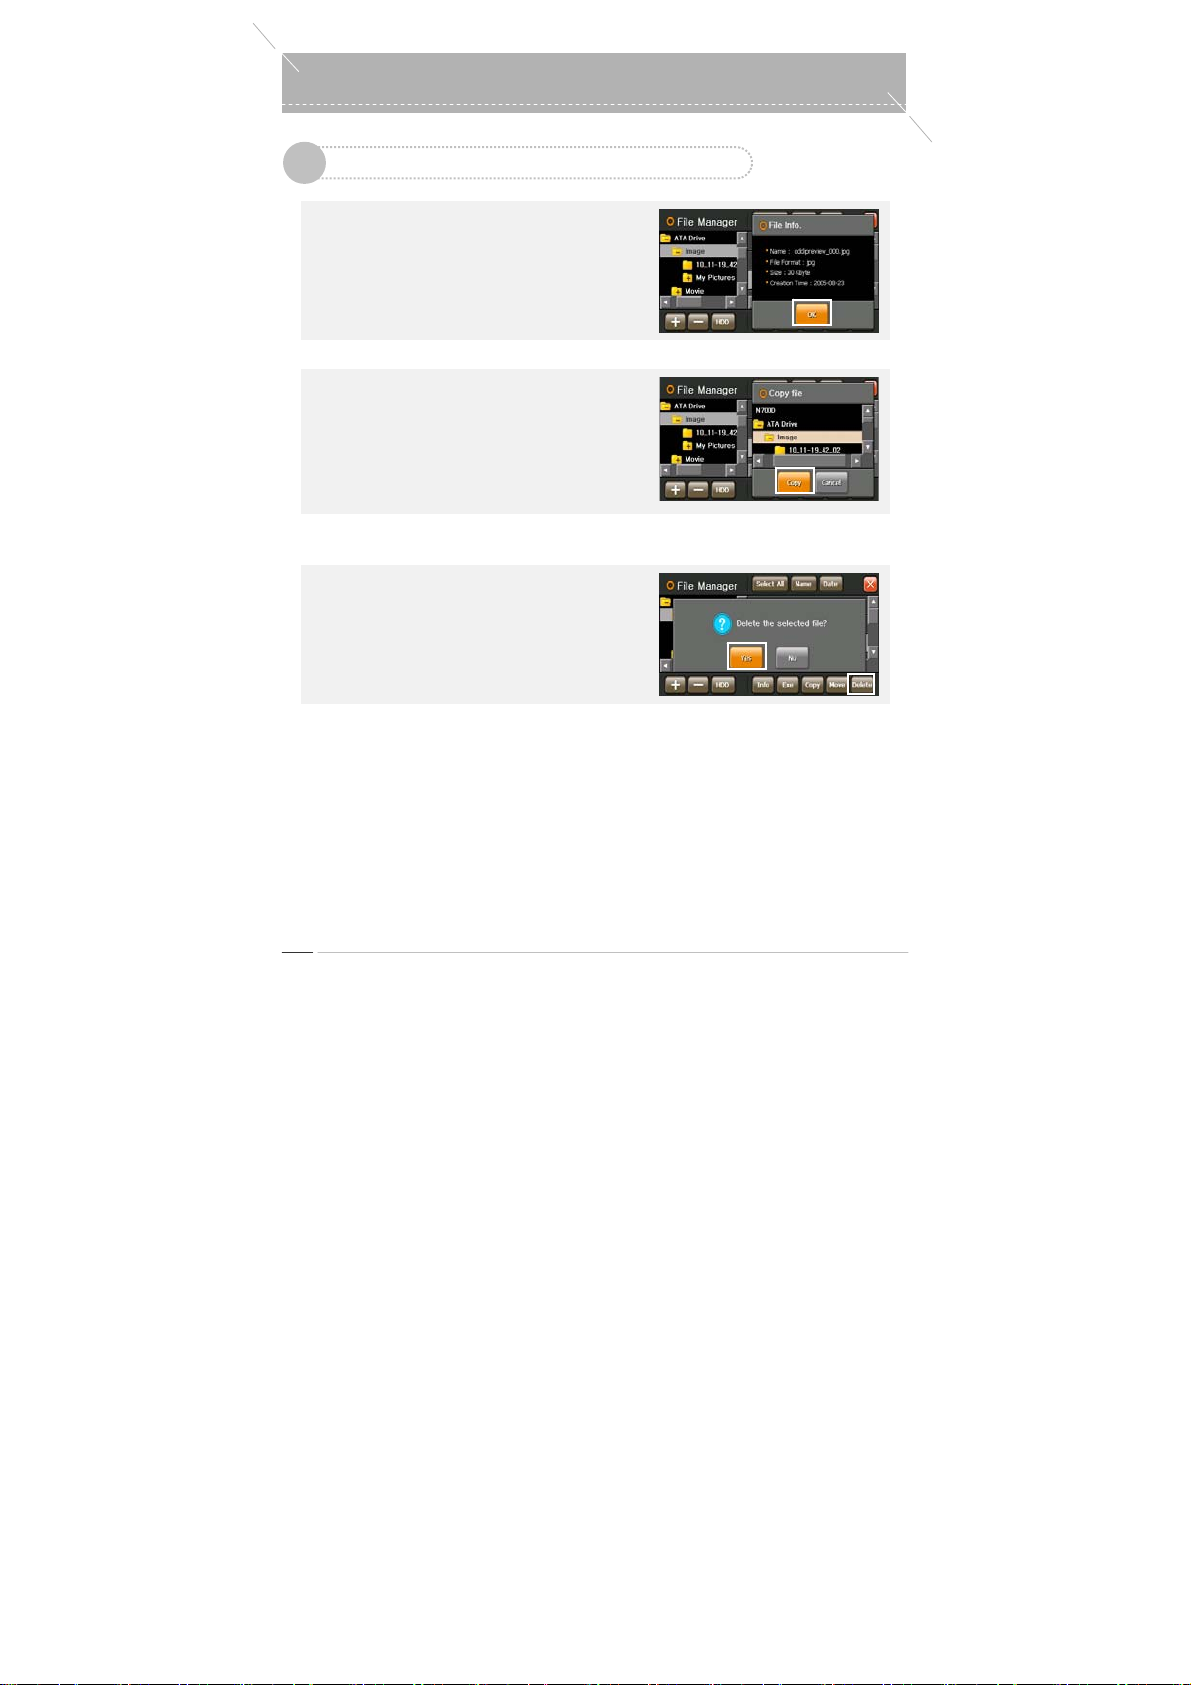
File Information
Select a file in the File Management screen and press
the
‘Information’
selected file is displayed.
Press the
disappears.
▶
To Copy or Move Files
Select one or more files by moving the cursor or
selecting the check box and press the
button. A small filelist window appears.
Select a destination folder into which the files are to
be copied and press the ‘Copy/Move’ button to copy
the files.
▶
To Delete a File
Select a file to be deleted and press the
button. The deletion confirmation pop-up window
appears.
Press the
button. The file information on the
‘OK’
button. The Information window
‘Copy/Move’
‘Yes’
button. The selected file is deleted.
‘Delete’
odd-i N700D User Guide
40
Page 41
s
y
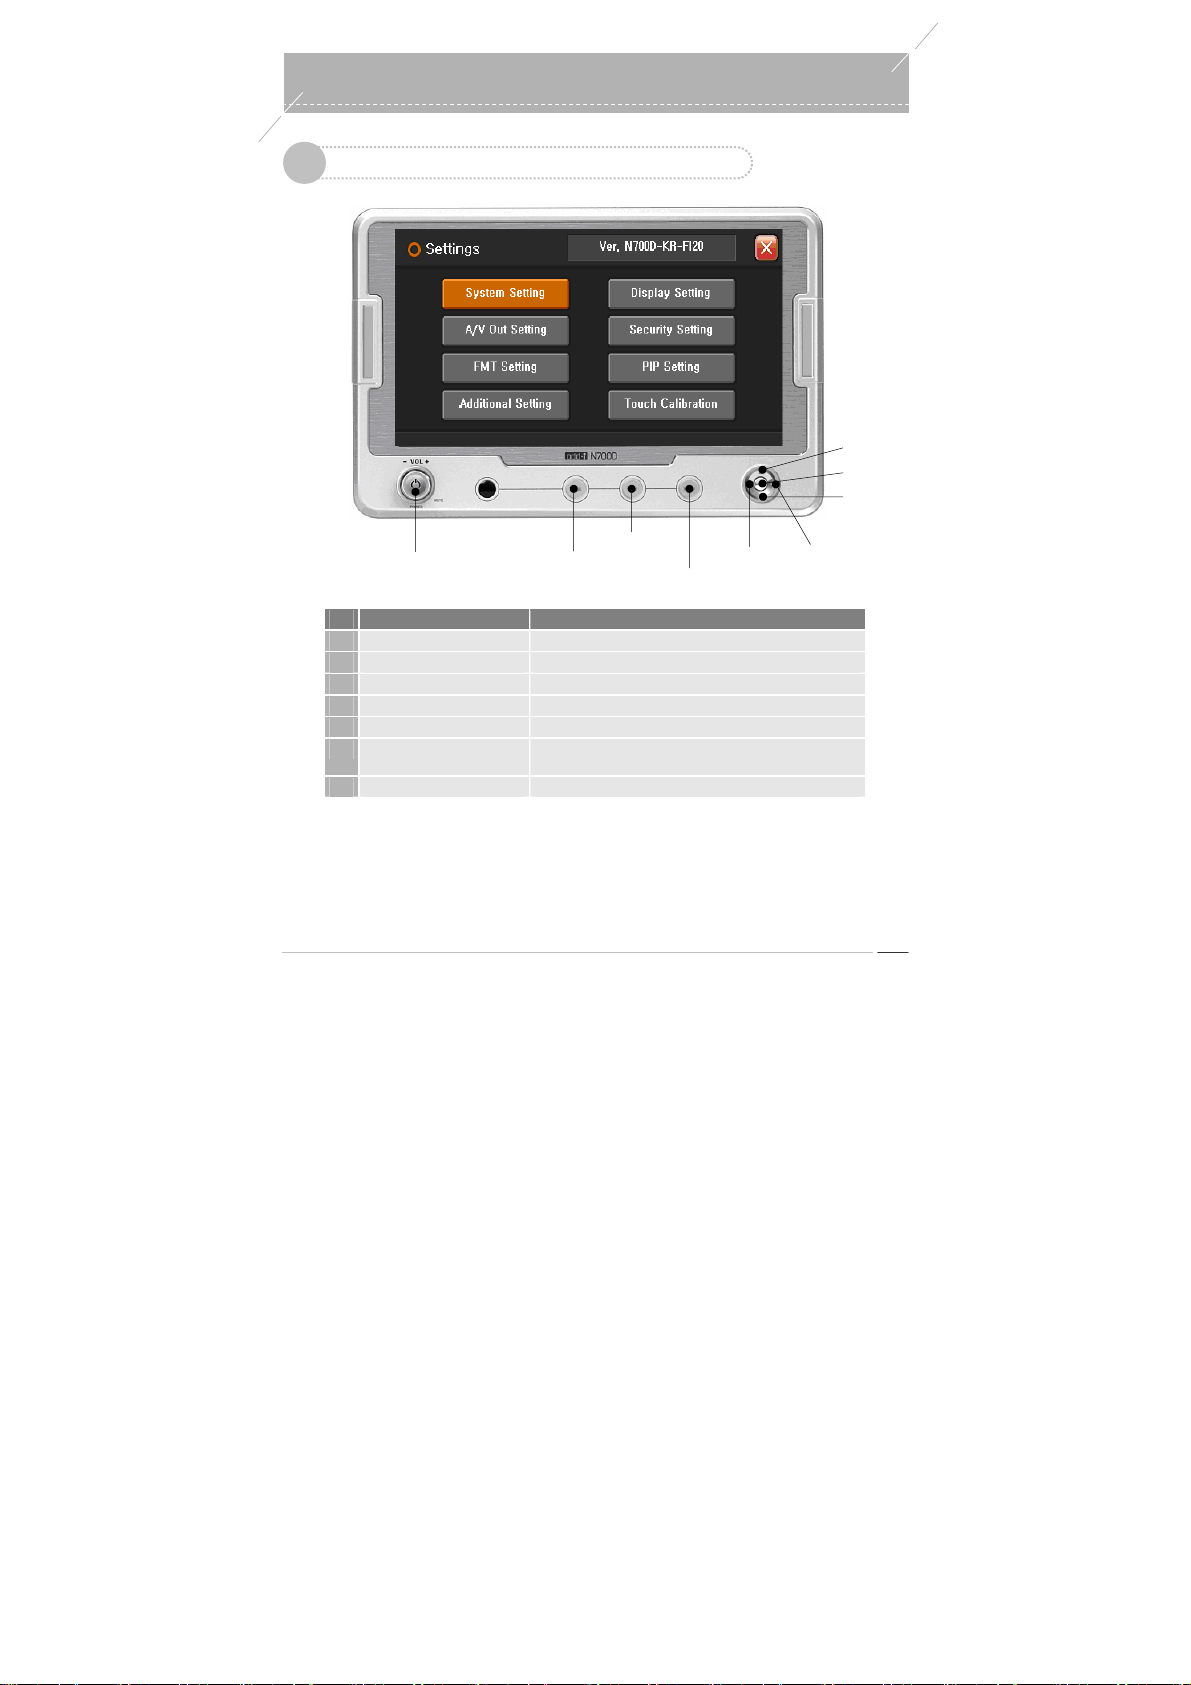
Environment Settings Keymap
1
Power On/Off
Volume Ke
No. Name Function
1
OK Key Play / OK
2
Up/Down Key Navigates list.
3
Left/Right Key Navigates list or changes value.
4
MENU Key Moves to Main (Same for all programs)
5
NAVI Key Moves to Navigation (Same for all programs)
6
MODE / MODE(long) Key
7
Volume Key Volume Control, Mute, Power ON/OFF
MODE Key
Switches to another cu rrently running p rogram ( Same for a ll
programs) / LCD OFF
Environment Setting
NAVI Key
MENU Key
Left Key
0
Up Key
OK Key
DownKey
Right Key
odd-i N700D User Guide
41
Page 42
Environment Settings
0
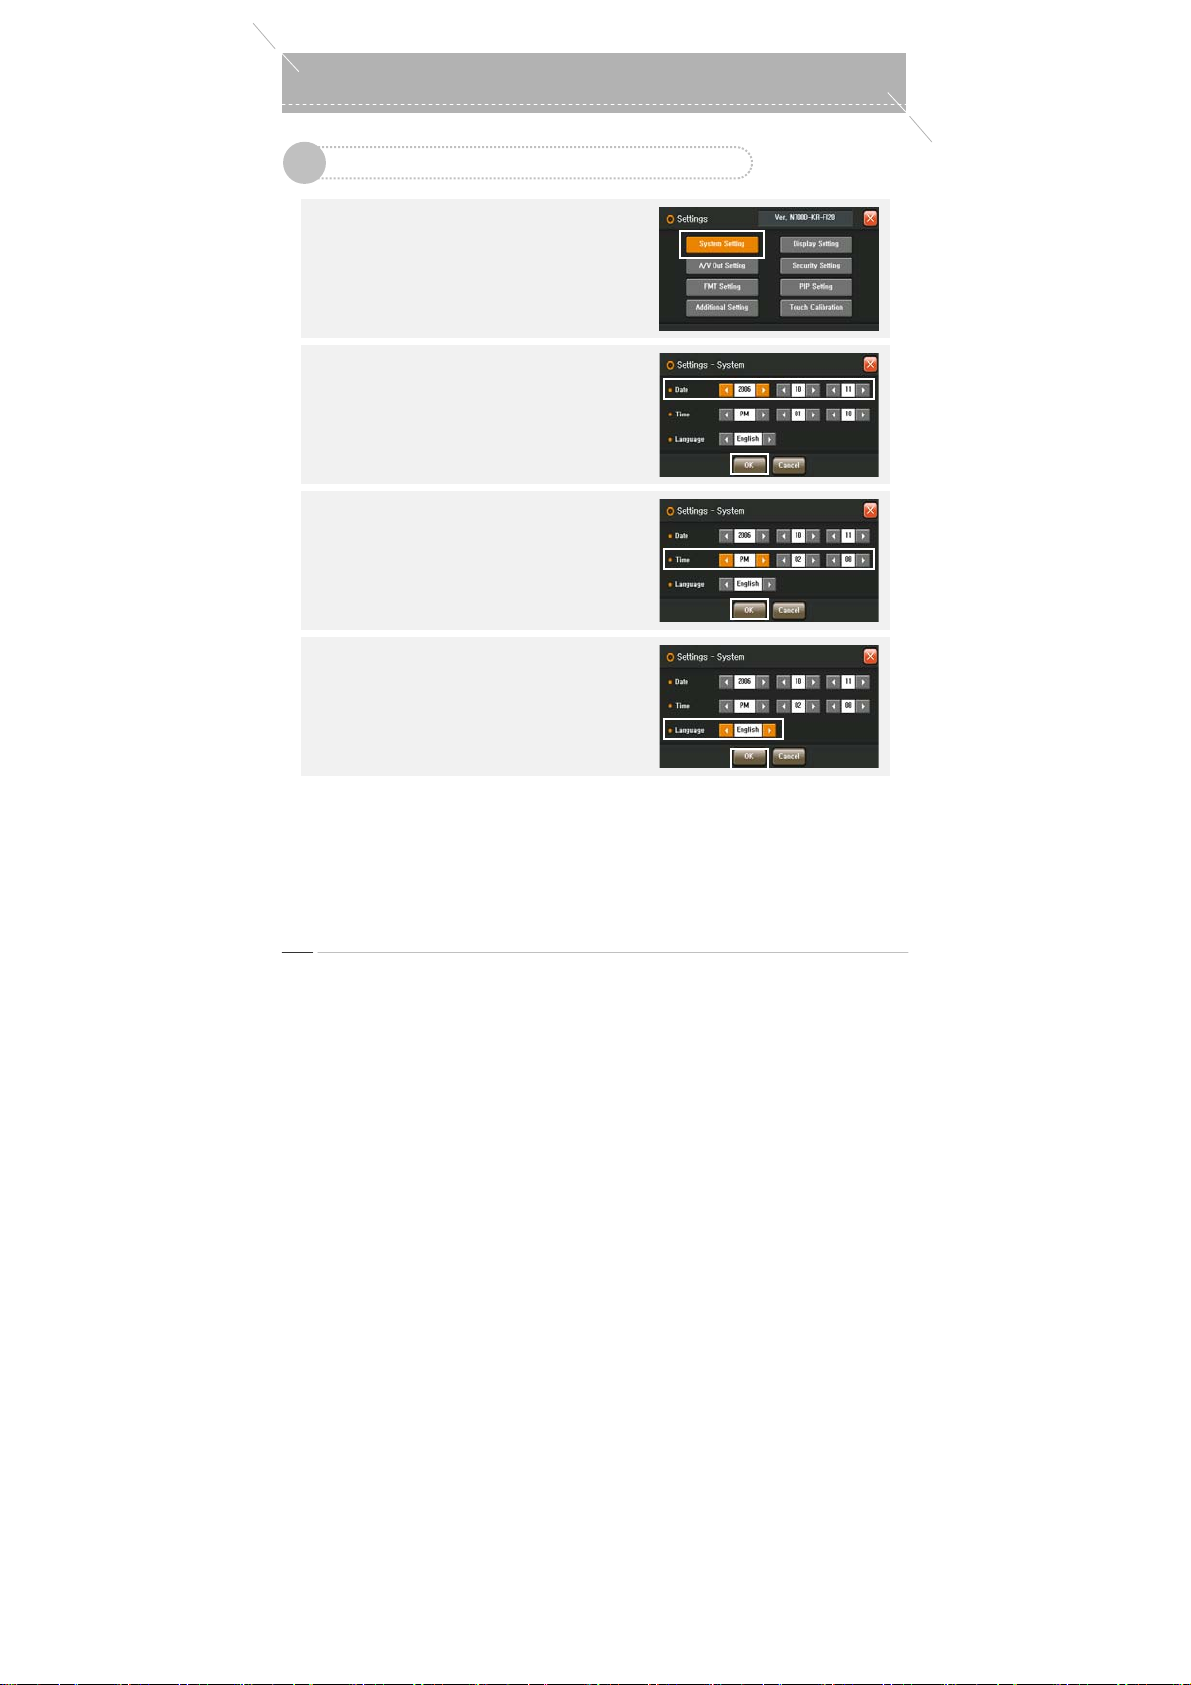
Environment Settings - System Settings
2
Press the
Press the
‘Environment Settings’
Main Menu to open the Environment Settings screen.
‘System Settings’
Environment Settings screen.
button in the
button from the
▶
Date Setting
Y ou can set the date in the System Settings screen.
After setting it press the
- Y ou cannot change the date while runni ng
Navigation.
▶
Time Setting
Y ou can set the time in the System Settings scr een.
After setting it press the
- You cannot change t he time while running
Navigation.
▶
Language Setting
Y ou can set the language in the System Setti ngs
screen. After setti ng it press the
‘OK’
button to finish.
‘OK’
button to finish.
‘OK’
button to finish.
odd-i N700D User Guide
42
Page 43
s
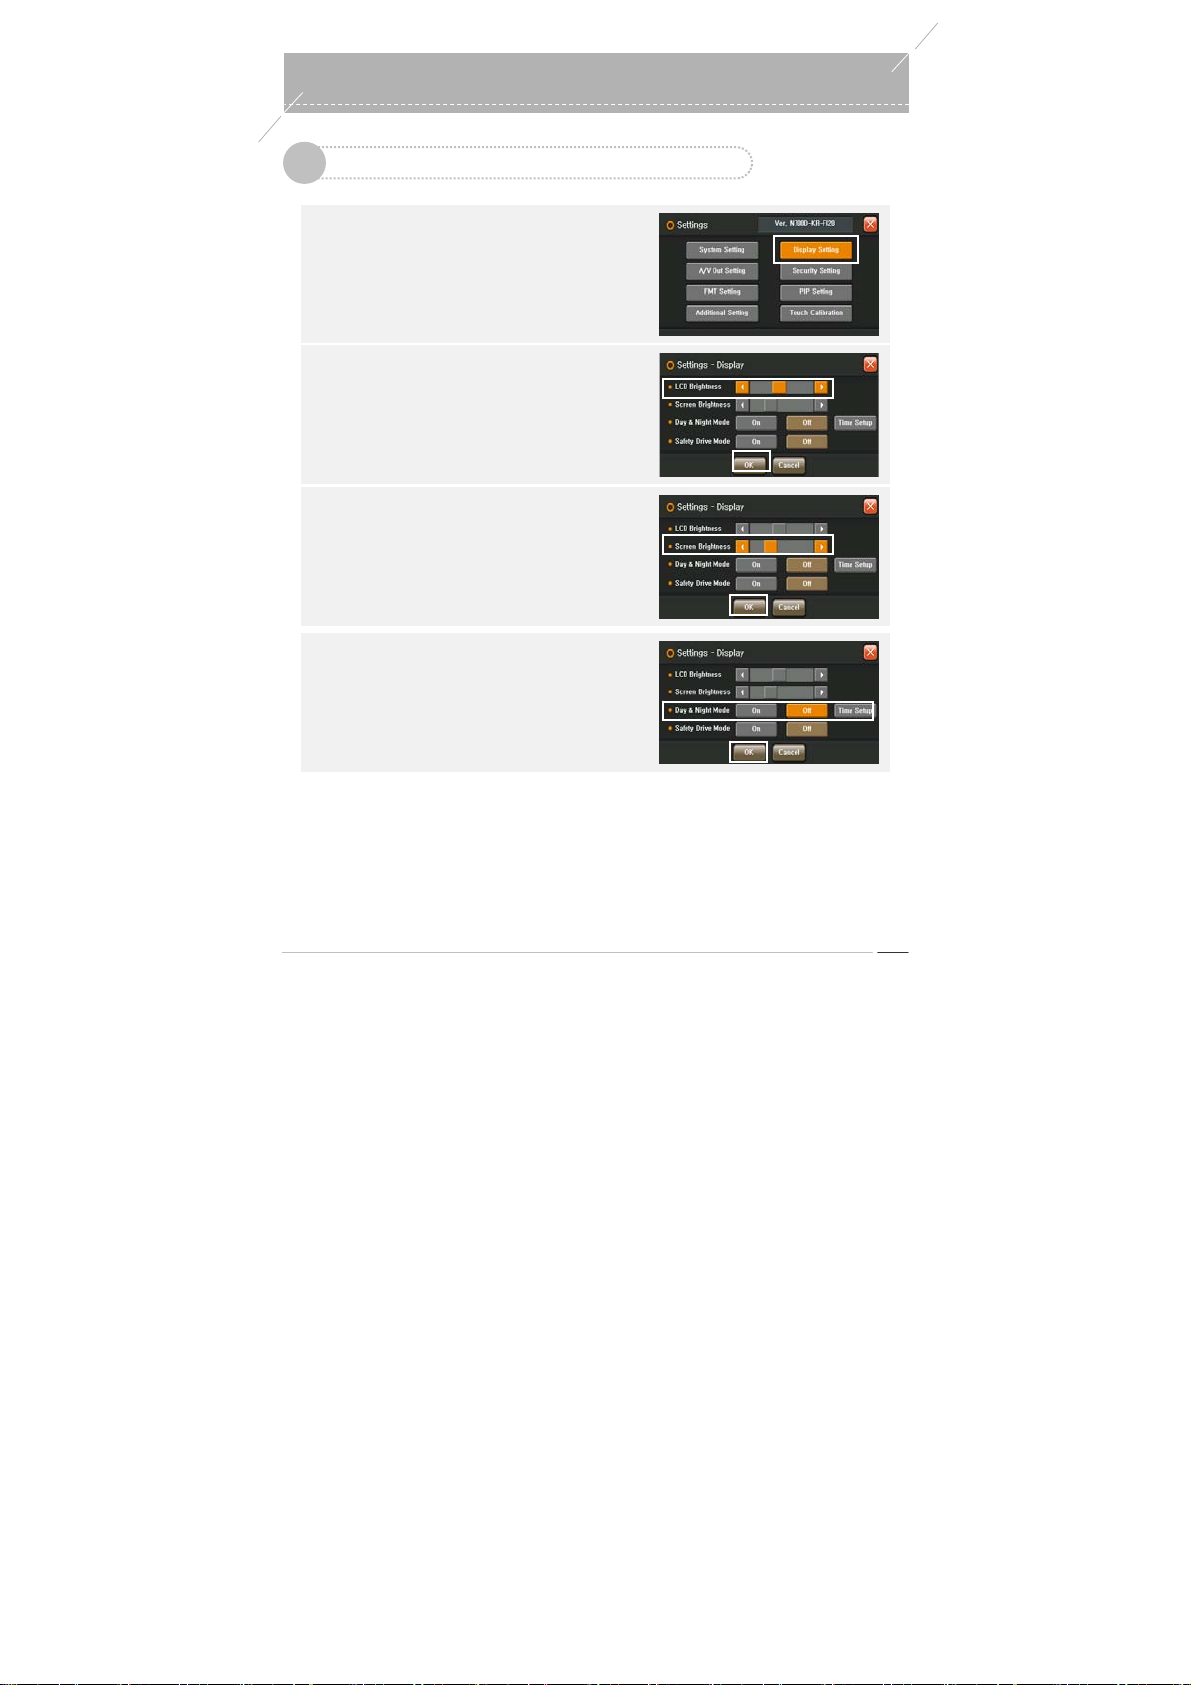
Environment Settings - Screen Settings
3
▶
To Move to the Screen Settings Screen
Press the
Environment Settings screen
▶
LCD Brightness Setting (LCD Backlight
Set the LCD Brightness in the Screen Settings screen
▶
Screen Brightness Setting
Set the Screen Brightness in the Screen Settings
‘Environment Settings’
Main Menu to open the Environment Settings screen.
button select.
Brightness Setting)
and press the
screen and press the
‘OK’
button to finish.
‘OK’
button from the
‘Screen Settings’
button to finish.
Environment Setting
0
▶
Day and Night Mode Setting
Set the Day and Night Mode setting and press the
‘OK’
button to finish.
- During the time set for Night Mode, the LCD
brightness is decreased to 70% of its original.
odd-i N700D User Guide
43
Page 44

Environment Settings
0
▶
Safe Drive Mode Setting
Set the Safe Drive Mode setting in the Screen
Settings screen and press the
- If Safe Drive Mode is selected, no picture is
displayed in the Movie or DMB Player and only the
Exit button works.
‘OK’
button to finish.
odd-i N700D User Guide
44
Page 45
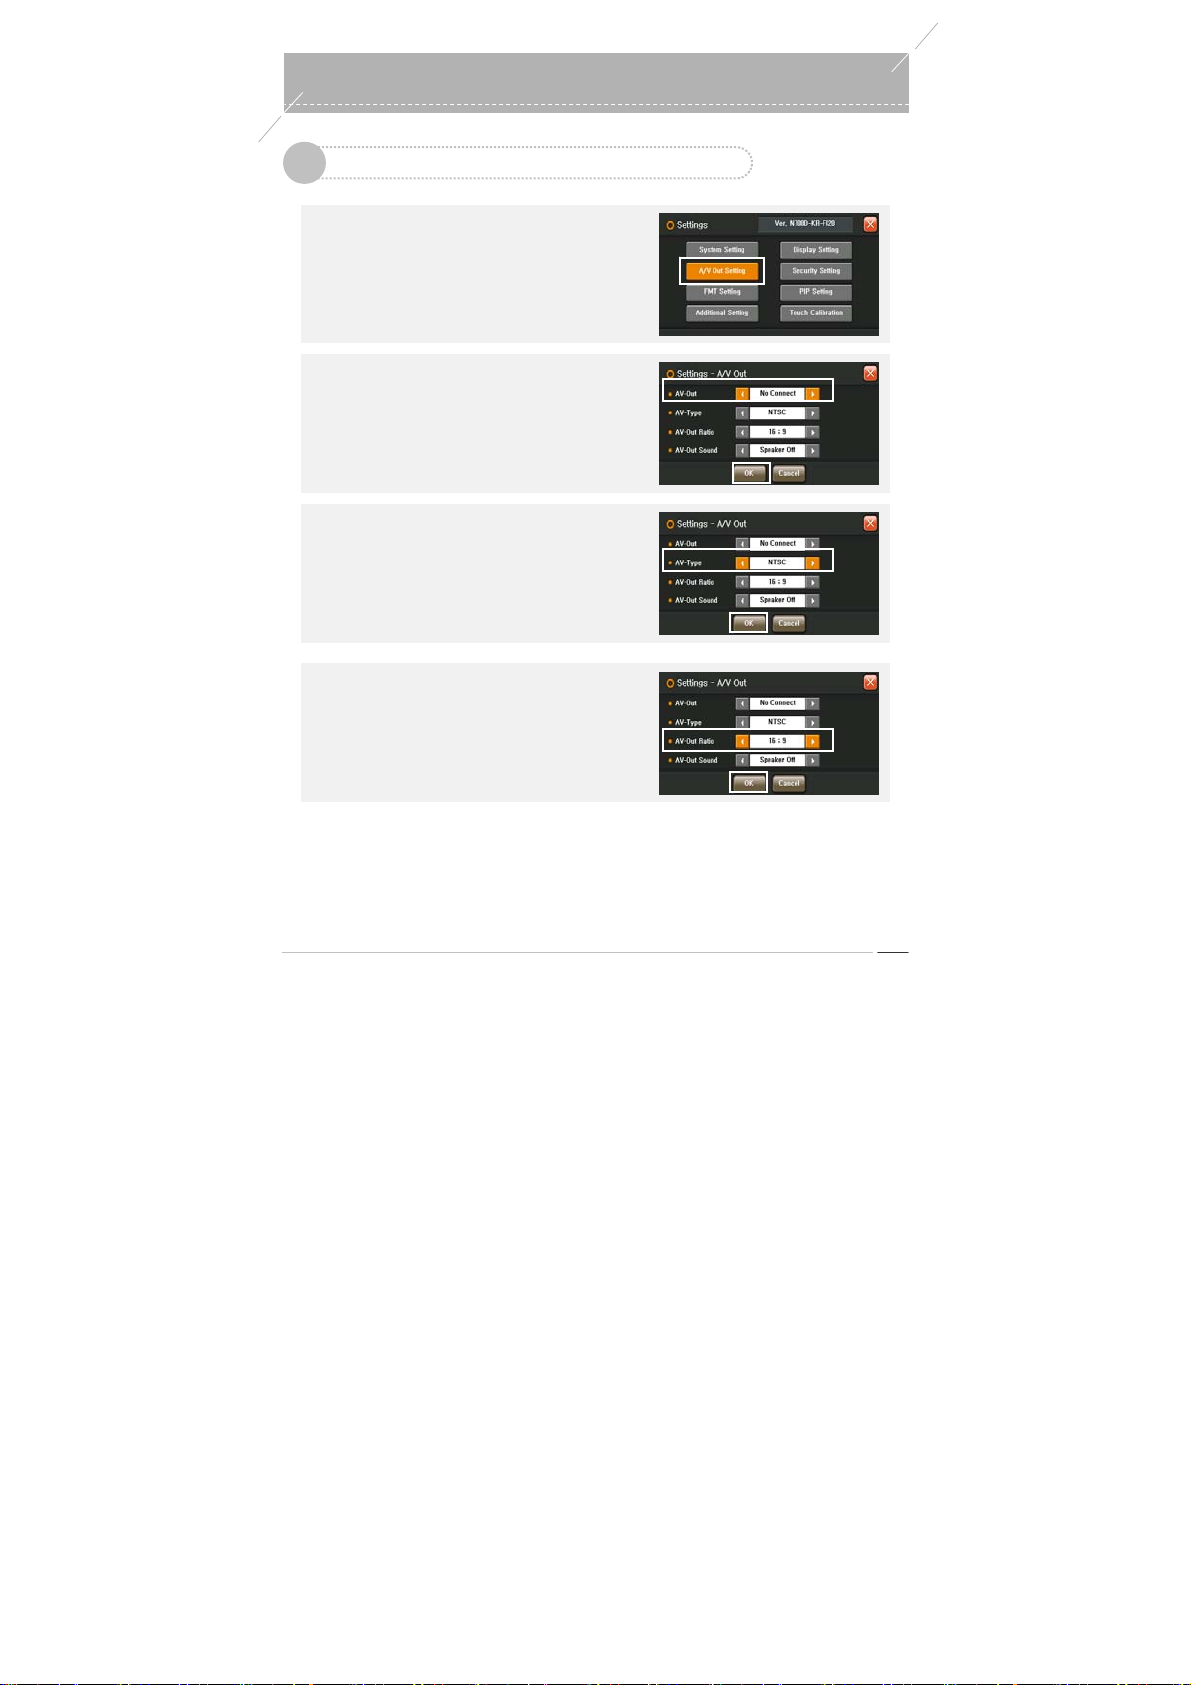
s
Environment Settings - Connection Settings
4
▶
Connection Settings screen mobile
Press the
Press the
▶
AV-OUT Setting
Set the AV-OUT setting in the Connection Setti ngs
▶
AV-Type Setting
Set the AV-T ype setting in the Connection Setti ngs
‘Environment Settings’
Main Menu to move to the Environment Settings
screen.
‘Connection Settings’
Environment Settings screen.
screen and press the
screen and press the
- NTSC: TV broadcast signal standard used in
Korea, China and North Americ a.
- PAL: TV broadcast signal st andard used in the EU.
‘OK’
‘OK’
button from the
button in the
button to finish.
button to finish.
Environment Setting
0
▶
AV-OUT Ratio Setting
Set the AV-OUT Ratio in the Connection Settings
screen and press the
‘OK’
button to finish.
odd-i N700D User Guide
45
Page 46
Environment Settings
0
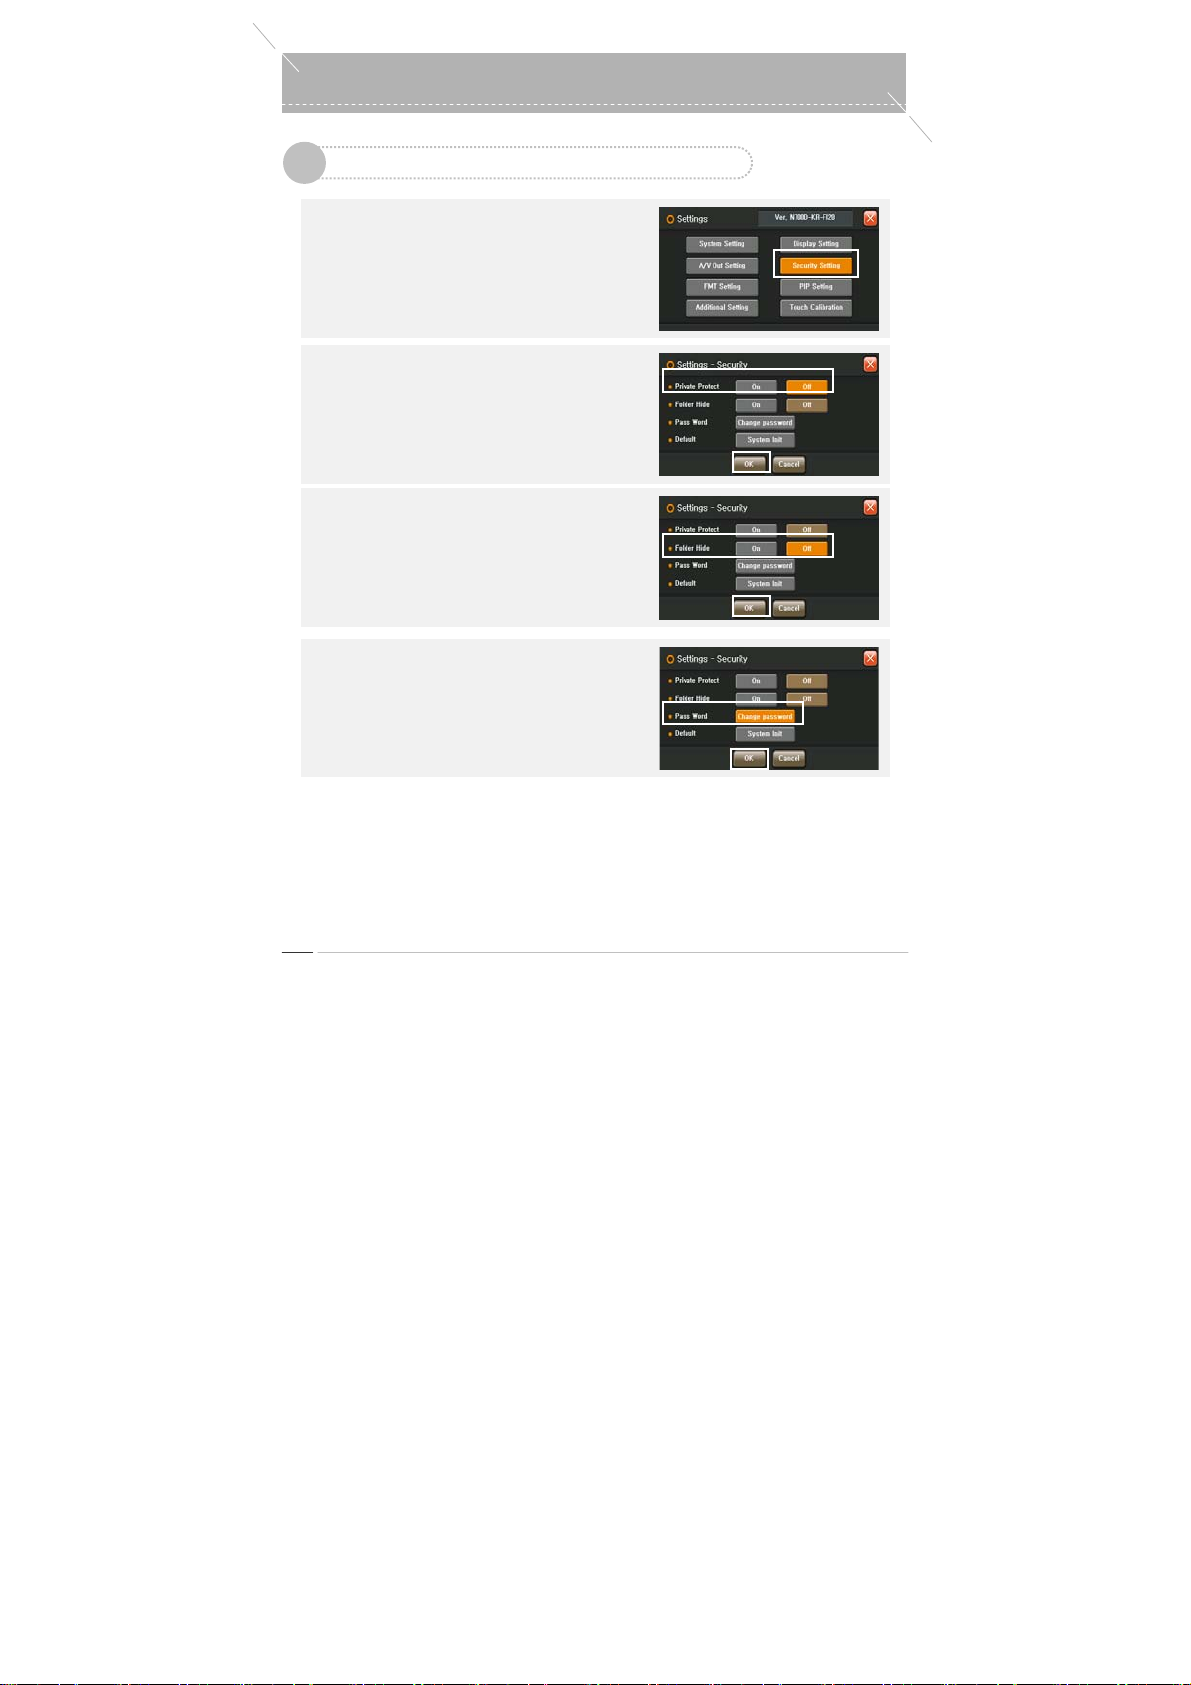
Environment Settings - Security Settings
5
▶
To Move to the Security Settings Screen
Press the
Press the
▶
Private Life Protection Setting
Set the Private Life Protection setting in the Security
▶
Hide Folder Setting
Set the Hide Folder setting in the Security Settings
‘Environment Settings’
Main Menu to move to the Environment Settings
screen.
‘Security Settings’
Environment Settings screen.
Settings screen and press the
screen and press the
‘OK’
button from the
button in the
‘OK’
button to finish.
button to finish.
▶
To Change Password
Press the ‘Change Password’ in the Security Settings
screen and press the
(Default Password: 0000)
odd-i N700D User Guide
46
‘OK’
button to finish.
Page 47
s
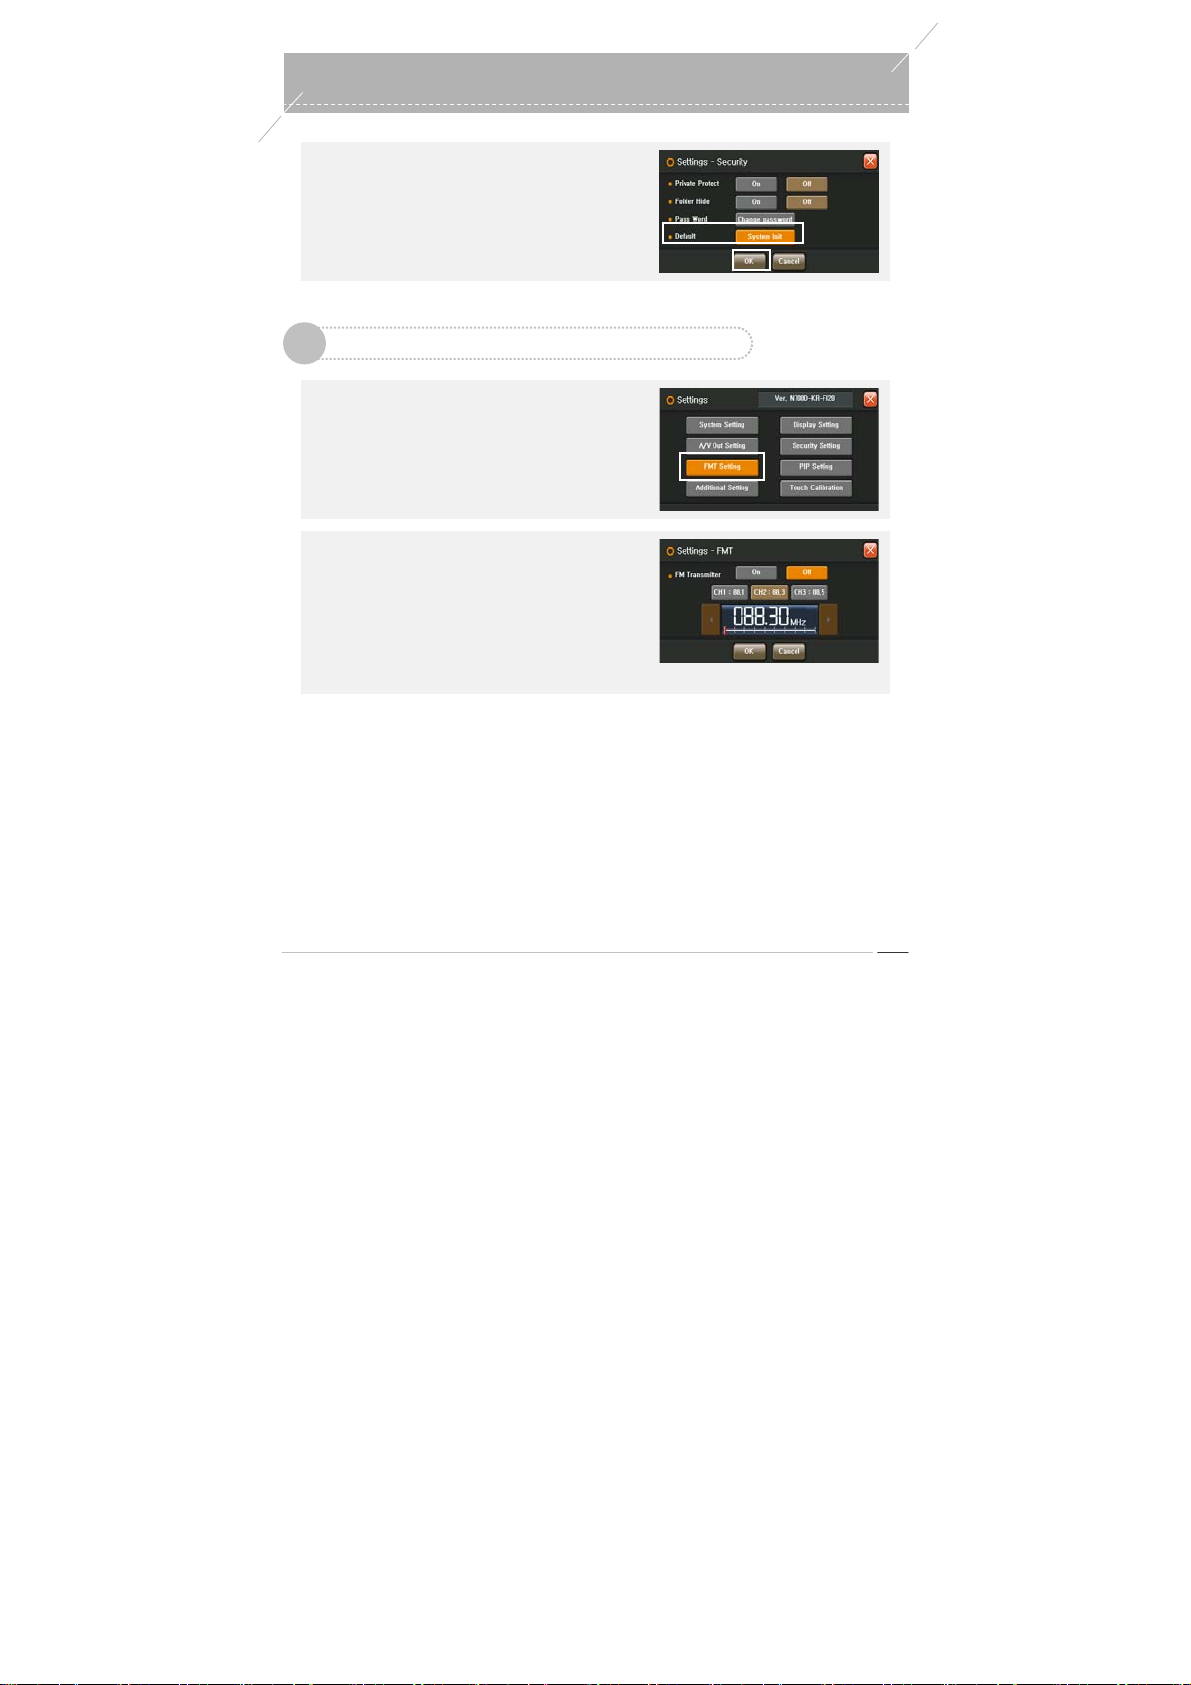
▶
To Initialize
Press the ‘Initialize’ button in the Security Settings
screen.
Environment Setting
0
Environment Set tings - FM T Settings
6
▶
To Move to the FMT Settings Screen
Press the
Press the
▶
FMT Setting
Press the ON button and select a channel from the 3
‘Environment Settings’
Main Menu to move to the Environment Settings
screen.
‘FMT Setting’
Settings screen.
channels available so that audio is clearly received by
the vehicle FM radio. Af ter selecting a channel press
the OK button to save the setting. Since radio
frequency bands may differ depending on your
region, up to 3 channels are supported for optimal
radio signal reception.
button in the Environment
button from the
odd-i N700D User Guide
47
Page 48
Environment Settings
0
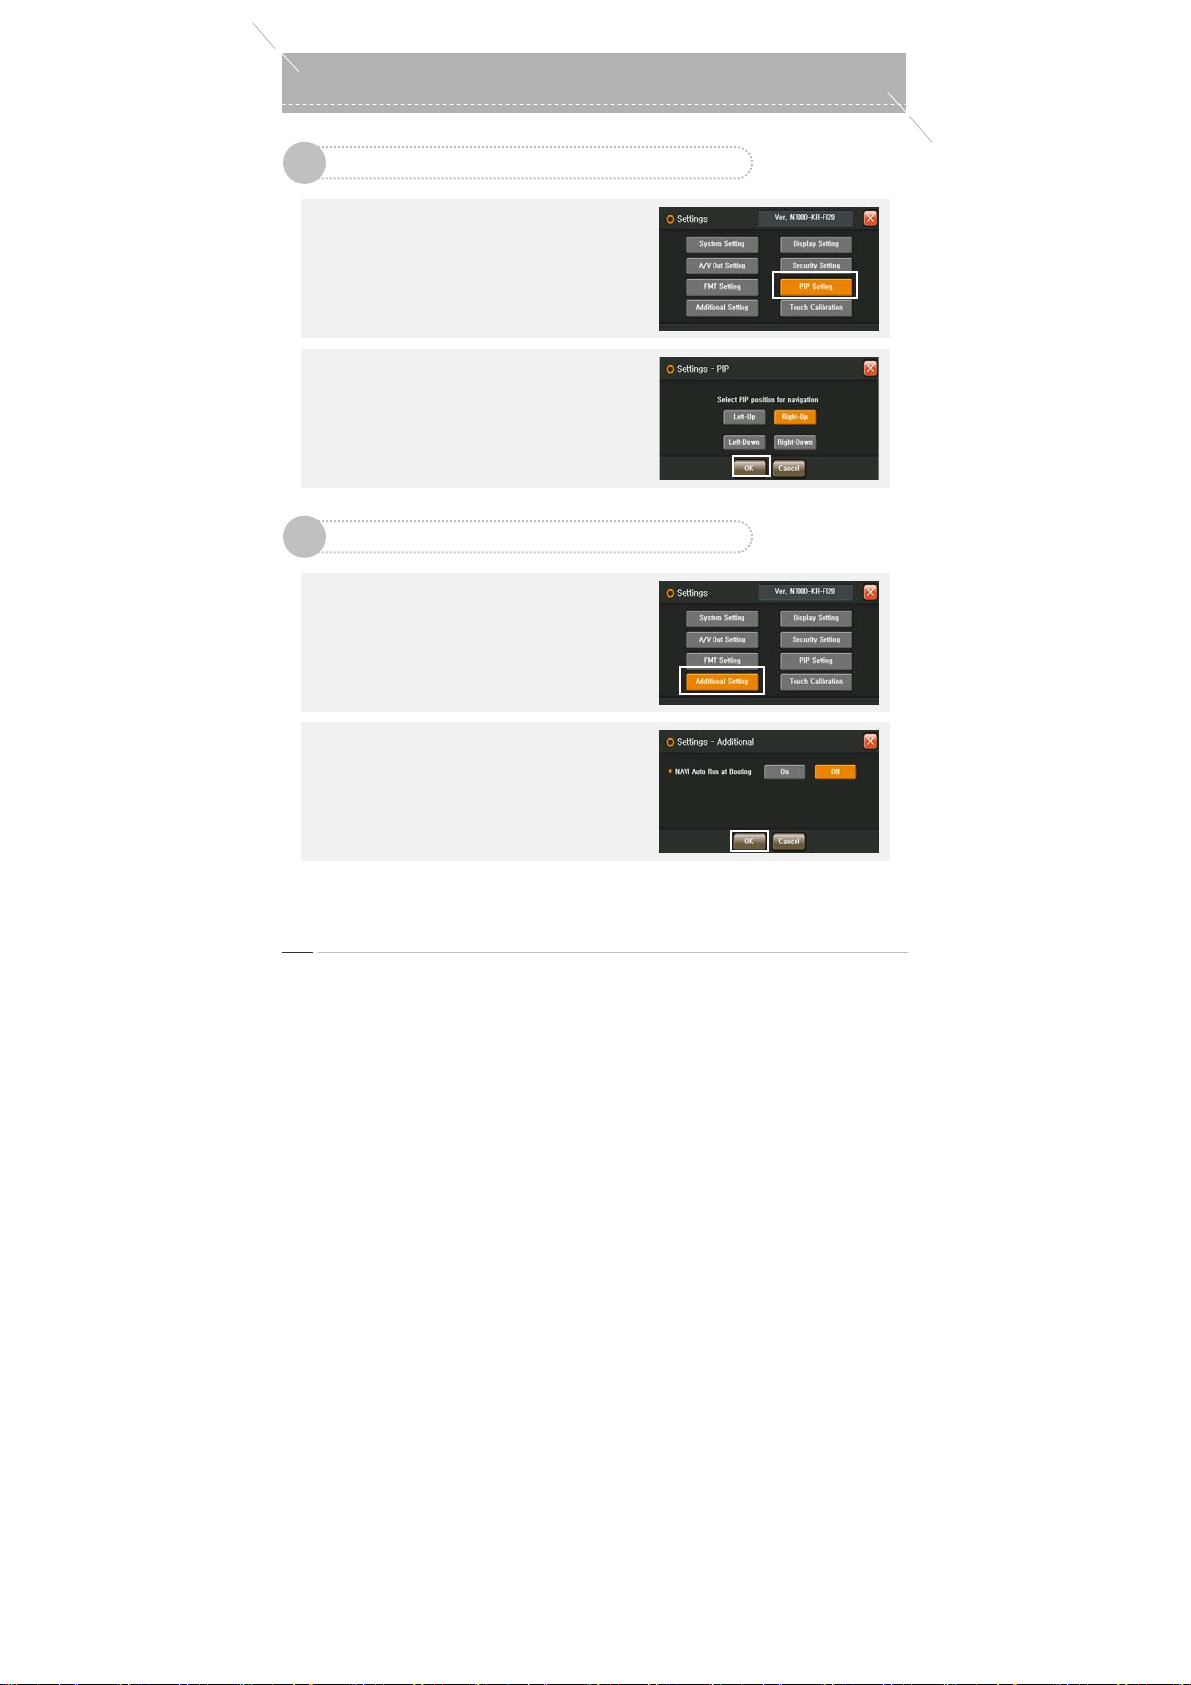
Environment Settings - PIP Settings
7
▶
To Move to the PIP Settings Screen
Press the
Press the
▶
PIP Setting
Select a PIP screen position in the PIP Settings
8
▶
To Move to the Additional S ettings Screen
Press the
Press the ‘Additional Settings’ button in the
▶
To Launch NAVI Automatically when Booting
If you set Launch NAVI Automatically when Booting to
‘Environment Settings’
Main Menu to move to the Environment Settings
screen.
‘PIP Settings’
Settings screen.
screen and press the OK button to save the setting.
Environment Settings - Additional Settings
‘Environment Settings’
Main Menu to move to the Environment Settings
screen.
Environment Settings screen.
‘ON’
, NAVI is automati cally launched. To disable
launching NAVI when booting, sel ect
Menu reappears.
button in the Environment
button from the
button from the
‘NO’
. The Main
odd-i N700D User Guide
48
Page 49
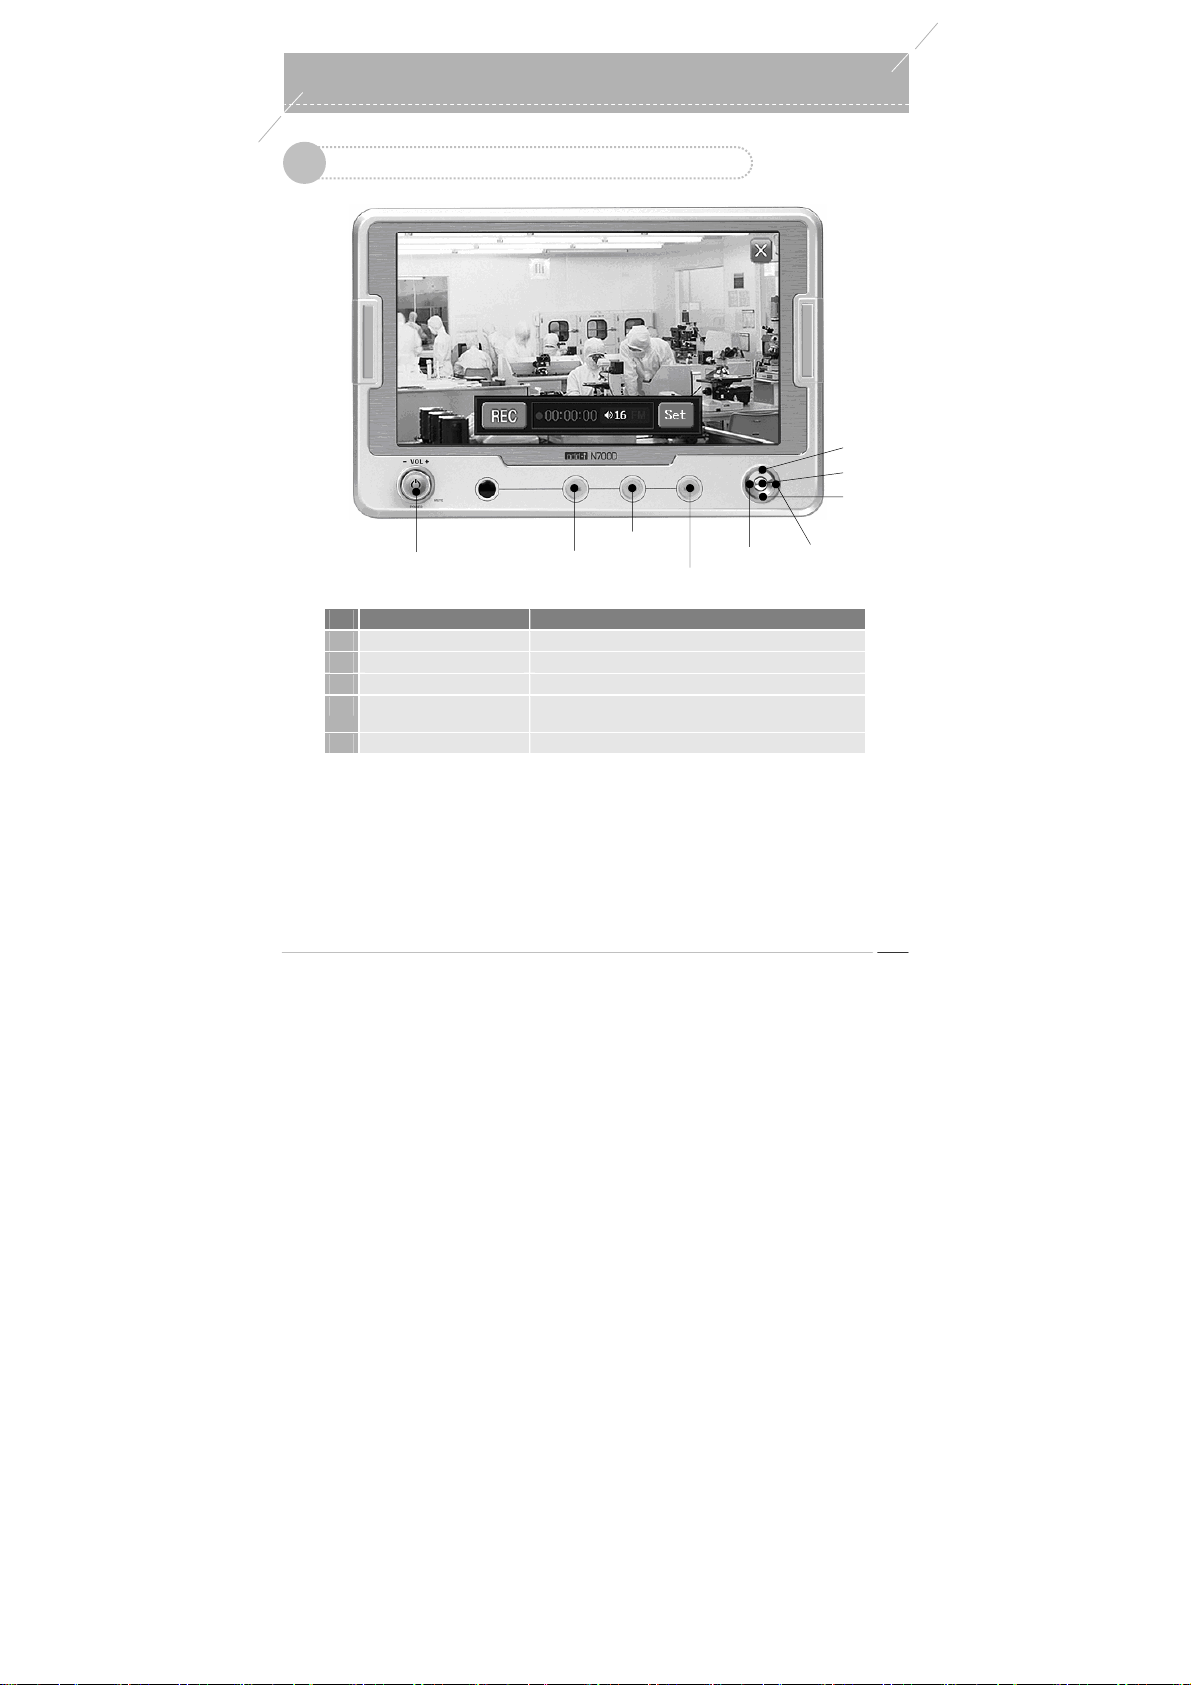
s
y
External Inputs Key Map
1
Power On/Off
Volume Ke
No. Name Function
1
OK Key Starts / S top s a Recording
2
MENU Key Moves to Main (Same for all programs)
3
NAVI Key Moves to Navigation (Same for all programs)
4
MODE / MODE(long) Key
5
Volume Key Volume Control, Mute, Power ON/OFF
MODE Key
Switches to another cu rrently running p rogram ( Same for a ll
programs) / LCD OFF
NAVI Key
External Input
Left Key
MENU Key
0
Up Key
OK Key
DownKey
Right Key
odd-i N700D User Guide
49
Page 50
External Inputs
0
External Input / Exit External Input
2
▶
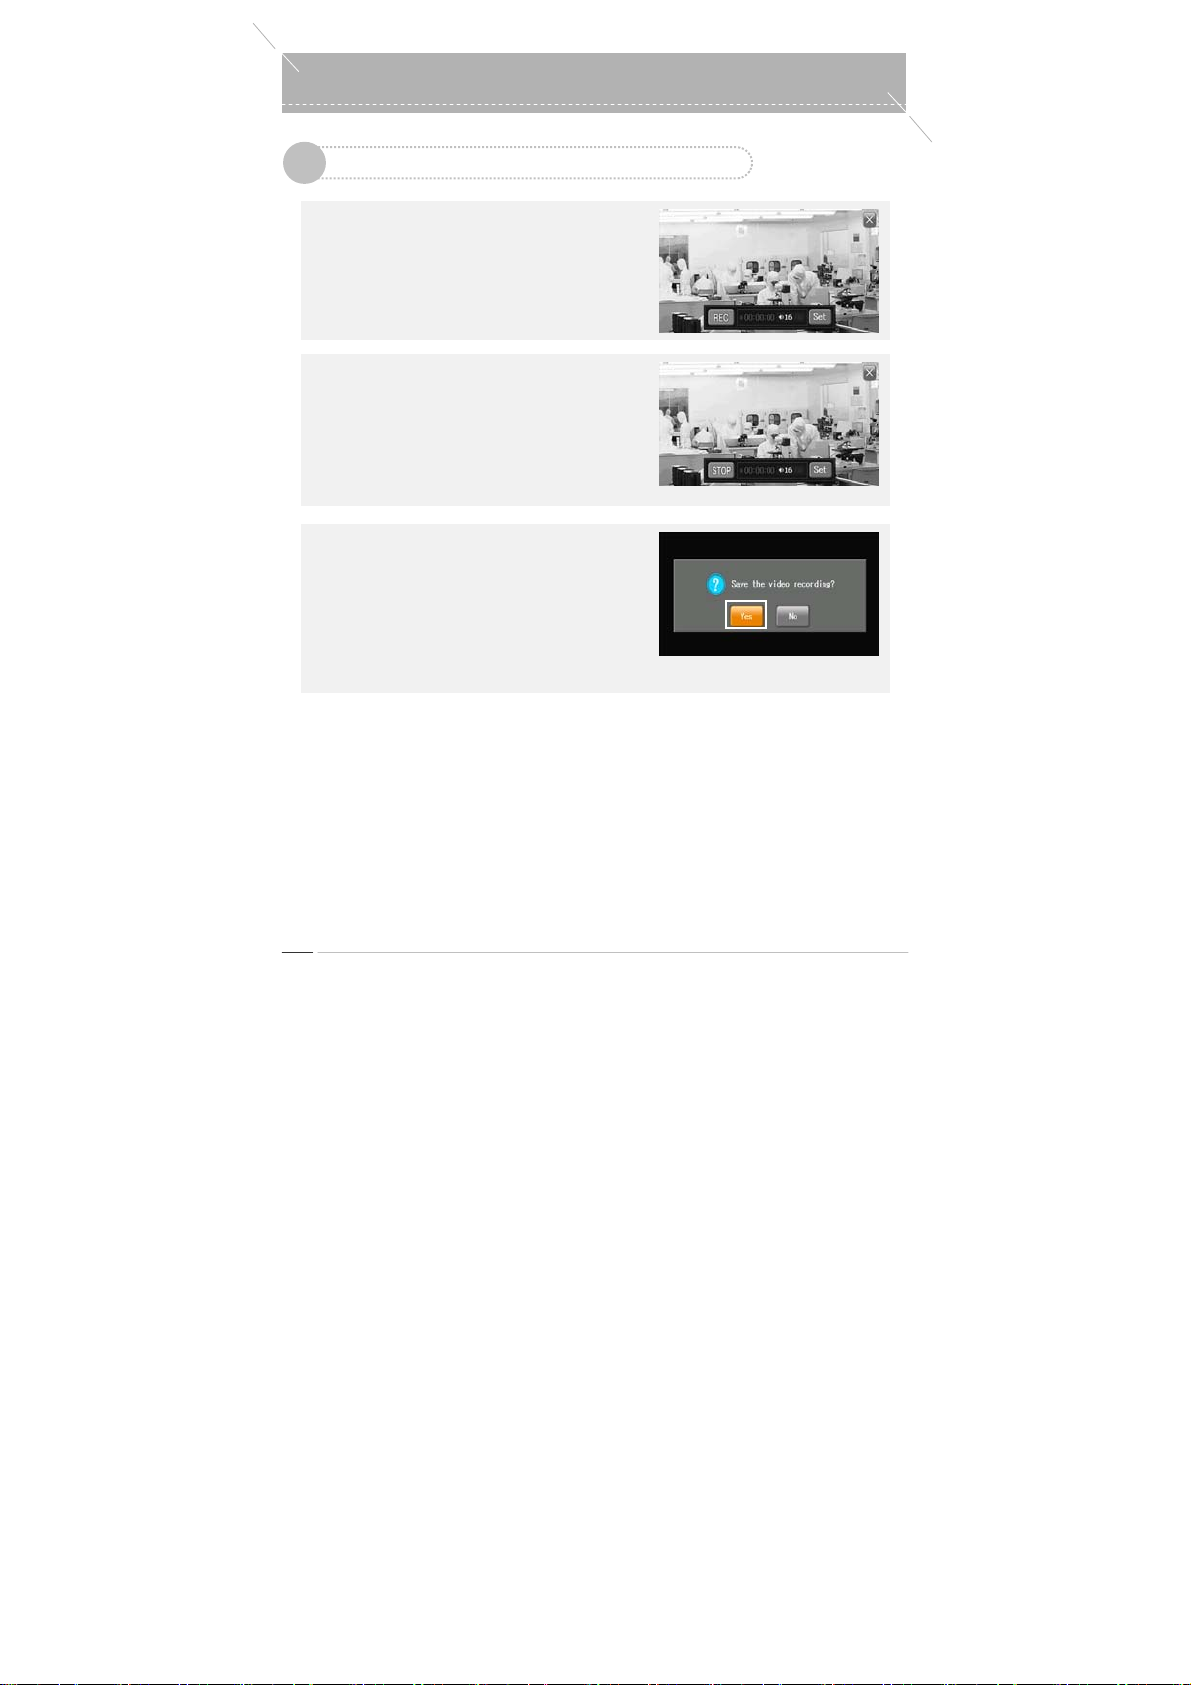
To S tart the Ex ternal Input Program
Press the ‘External IN’ button from the Main Menu to
move to the External Input screen. When the program
is launched, the preview screen appears. If the DMB
Player was running, it is terminated.
▶
To S tart a Recording
Press the
▶
To Save a Recording
Press the
‘REC’
currently displayed video is recorded and the
recording information is displayed at the Control Bar
at the bottom.
- You cannot run a program other than Navigation
when External Input is selected.
When the window asking you if you want to save the
recording appears, press the
- The recorded file is saved in the hard disk drive. If
there is no hard disk drive, the file is saved in the
SD card.
Save Path: /Record/Video/VideoXXX.avi
button in the Preview screen. The
‘STOP’
button. The recording is stopped.
‘Yes’
button.
odd-i N700D User Guide
50
Page 51
s
External Input / Exit External Input
2
▶
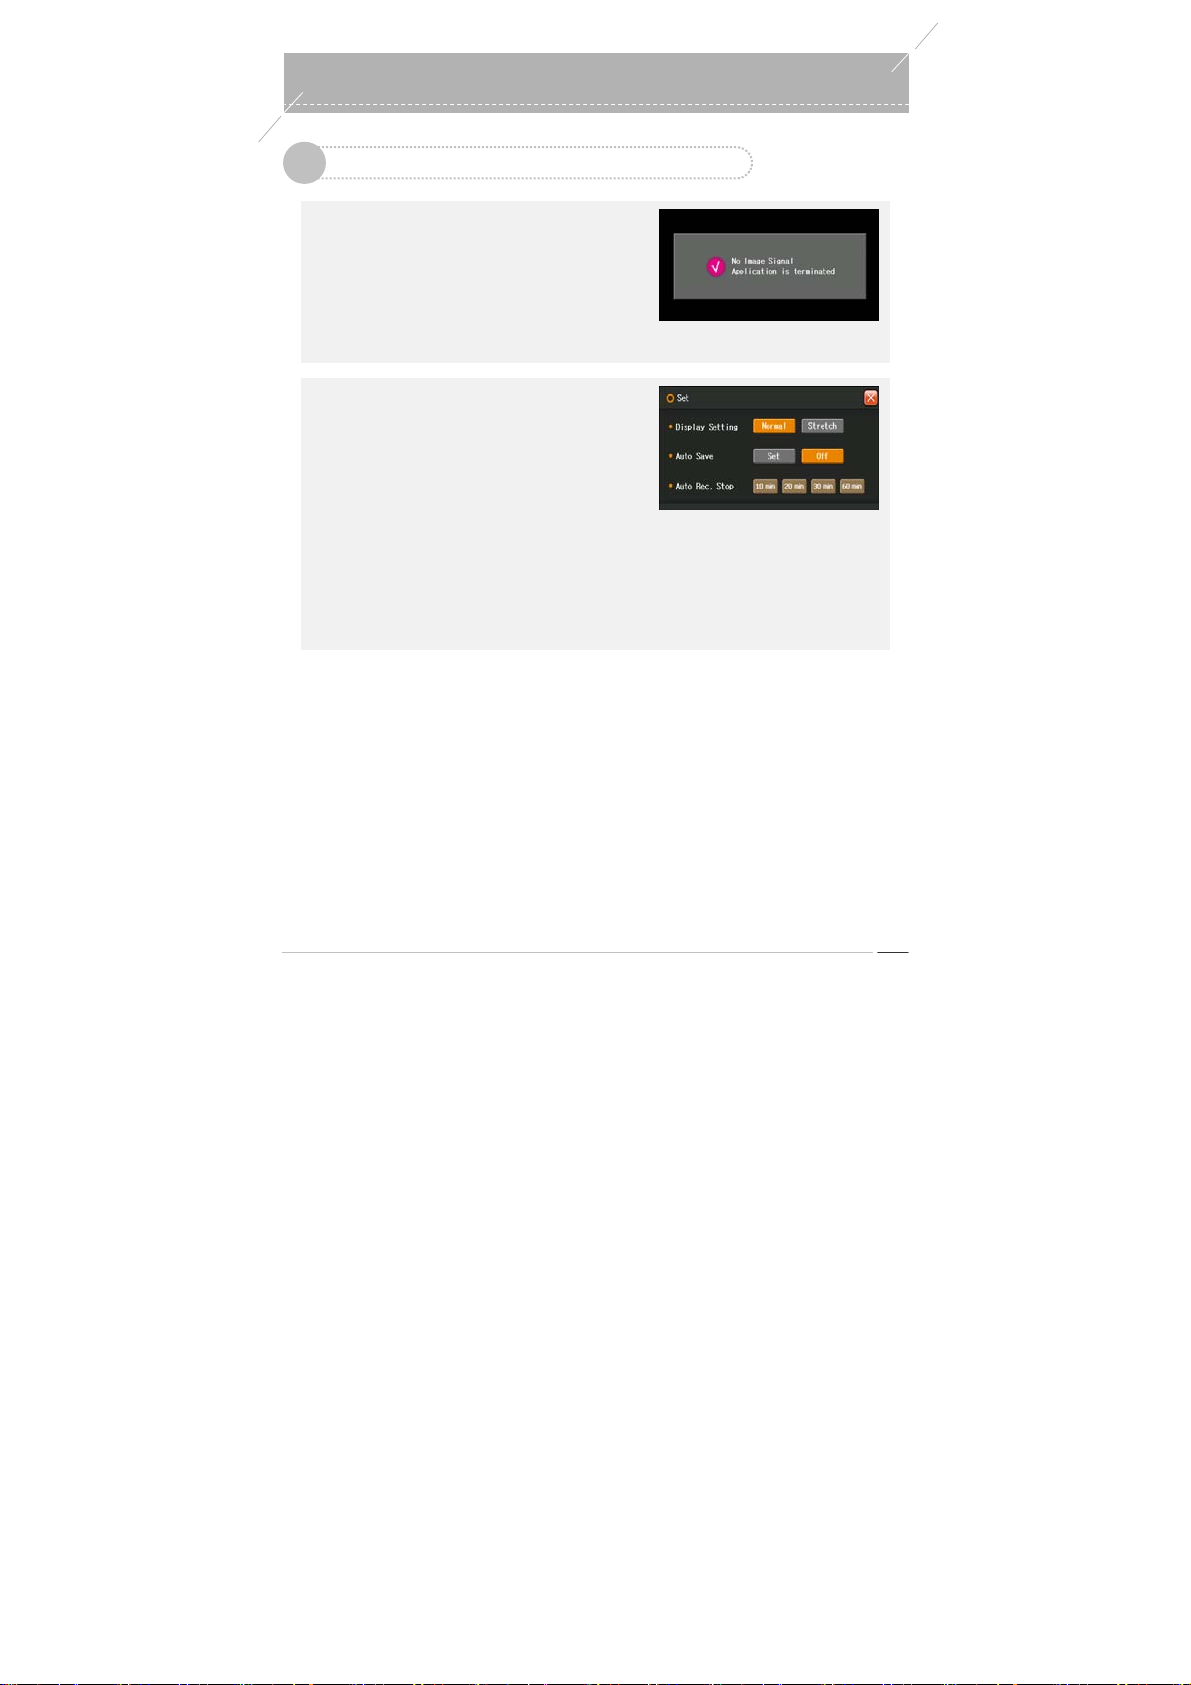
When the Video-IN signal disappears
If the Video-IN signal disappears during preview, the
‘Video-IN signal does not exist’ message appears and
the External Input program is terminated.
If this happens during a recording, the recorded file is
saved, the ‘Video-IN signal does not exist’ message
appears, and the External Input program is
terminated.
▶
Settings
If you press the
you can set up the Preview screen, Auto Save and
Auto Stop Recording settings.
- Screen Settings: Basic Screen (320x224), Full
Screen (480x224); 320x224 pixels for recording.
- Auto Save: ON (Saves the recorded file
automatically after recording); OFF
- Auto Stop Recording: 10 Min, 20 Min, 30 Min, 60
Min
Once the Auto S top Recordi ng is set, video is
recorded for the specified period of time, the
recording is saved as a file, and the Preview
screen appears automatically .
‘Setup’
button during a recording,
External Input
0
odd-i N700D User Guide
51
Page 52

External Inputs
0
▶
To Exit the External Input program
Press the
- During a Preview: Exit
- During a Recording: Save and Exit
▶
To Enter Rear Monitoring Ca mera
When the unit is not in External Input mode (i.e.
‘Exit’
screen to exit the External Input program.
Preview status), if the Rear Monitoring Camera is
connected, the ‘Changing Mode..’ message appears
and it enters Rear Monitoring Camera mode.
button at the top right side of the
odd-i N700D User Guide
52
Page 53
a
y
Rear Monitoring Camer
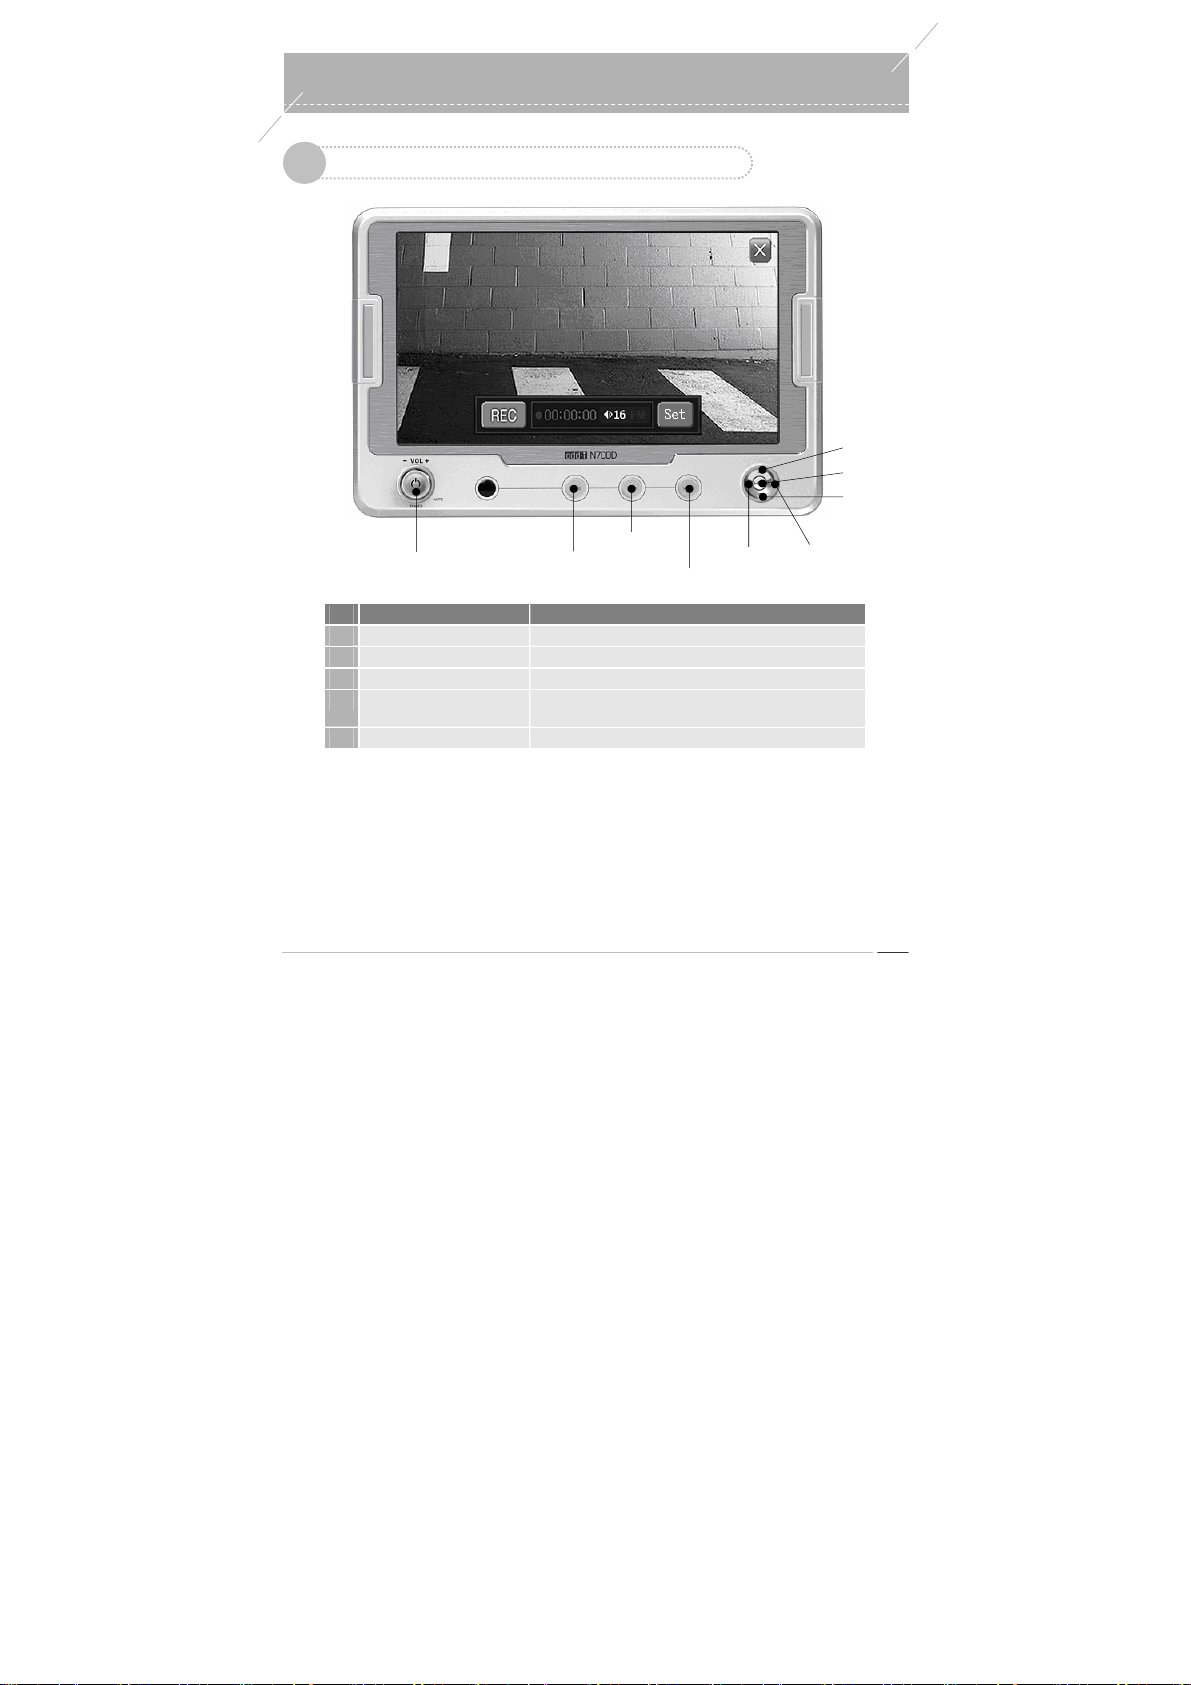
Rear Monitoring C amera Keym ap
1
Power On/Off
Volume Ke
No. Name Function
1
OK Key Starts / S top s a Recording
2
MENU Key Moves to Main (Same for all programs)
3
NAVI Key Moves to Navigation (Same for all programs)
4
MODE / MODE(long) Key
5
Volume Key Volume Control, Mute, Power ON/OFF
MODE Key
Switches to another cu rrently running p rogram ( Same for a ll
programs) / LCD OFF
NAVI Key
MENU Key
Left Key
0
Up Key
OK Key
DownKey
Right Key
odd-i N700D User Guide
53
Page 54
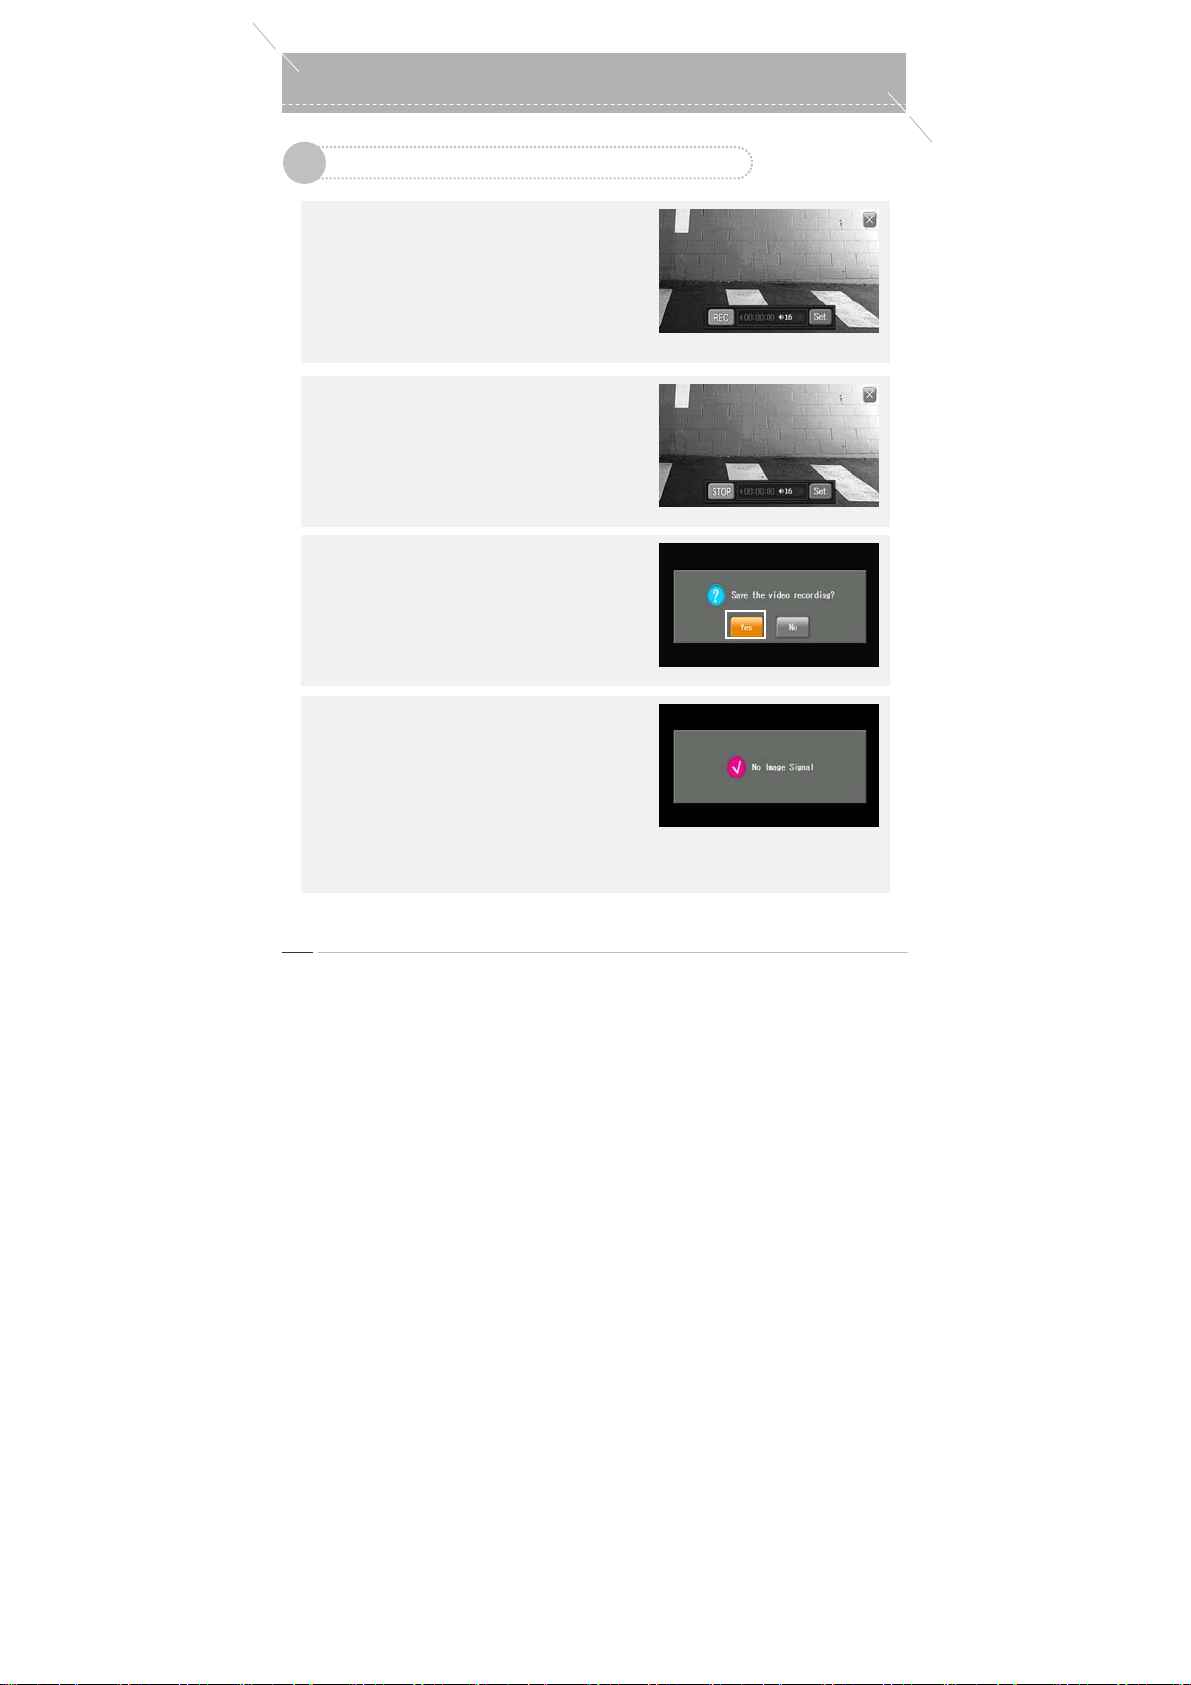
Rear Monitoring Camera
0
T o Run Rear Monitoring Camera / To Exit Rear Monitoring Camera
2
▶
To Run the Rear Monit oring Camera Program
If the Rear Monitoring Camera signal is received
when the unit is in the Main Menu status, the External
Input program is started. If another program was
running, it is terminated and the External Input
program is started.
When the program is launched, the Preview screen
appears.
▶
To S tart a Recording
Press the
▶
To Save a Recording
Press the
▶
When the Rear Monitoring Camera signal
If the Rear Monitoring Camera signal disappears
If this happens during a recording, the recorded file is
‘REC’
currently displayed video is recorded and the
recording information is displayed at the Control Bar
at the bottom.
- You cannot run a pro gram other than Navigation
when External Input is selected.
When a window asking you if you want to save the
recording appears, press the ‘Y es’ button.
- The recorded file is saved in the hard disk drive
only.
Save Path: /Record/Rearcam/RearXXX.avi
disappears
during preview, the ‘Rear Monitoring Camera signal
does not exist’ message appears and the External
Input program is terminated.
saved, the ‘Rear Monitoring Camera signal does not
exist’ message appears, and the External Input
program is terminated.
button in the Preview screen. The
‘STOP’
button. The recording is stopped.
odd-i N700D User Guide
54
Page 55
a
a
Rear Monitoring Camer
T o Run Rear Monitoring Camera / To Exit Rear Monitoring Camer
2
▶
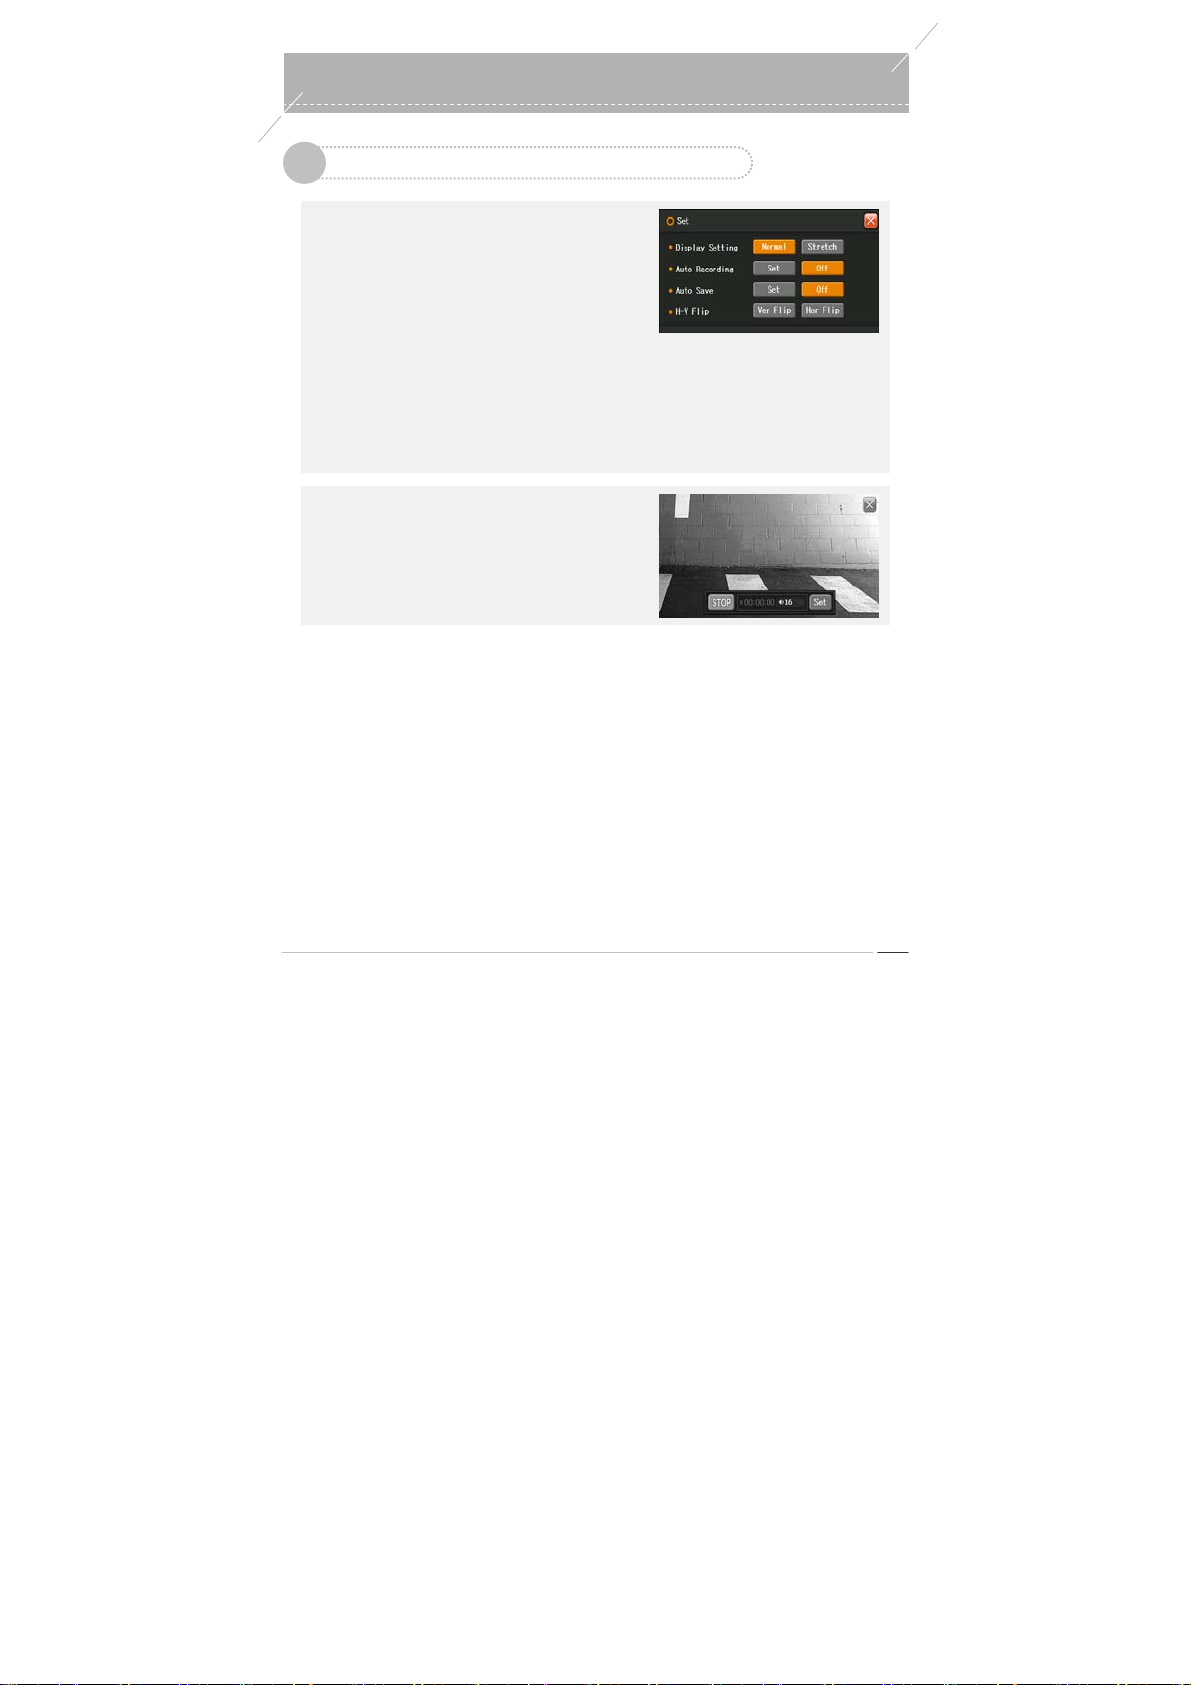
Setting
If you press the ‘Setup’ button during a recording, you
can set up the Screen Settings, Auto Record and
Auto Save, and Vertical or Horizontal Mirror settings.
- Screen Settings: Basic Screen (320x224), Full
Screen (480x224); 320x224 pixels for recording.
- Auto Record: ON (Record and save the recorded
file automatically when the program is launched);
OFF
- Auto Save: ON (Saves the recorded file
automatically after recording); OFF
- Vertical or Horizontal Mirror: Mirrors vert ically or
horizontally (the Preview screen is vertically or
horizontally flipped.)
▶
To Exit the Rear Monitoring Camera pr ogram
Press the ‘Exit’ button at the top right side of the
screen to exit the External Input program.
- During a Preview: Exit
- During a Recording: Save and Exit
0
odd-i N700D User Guide
55
Page 56
y
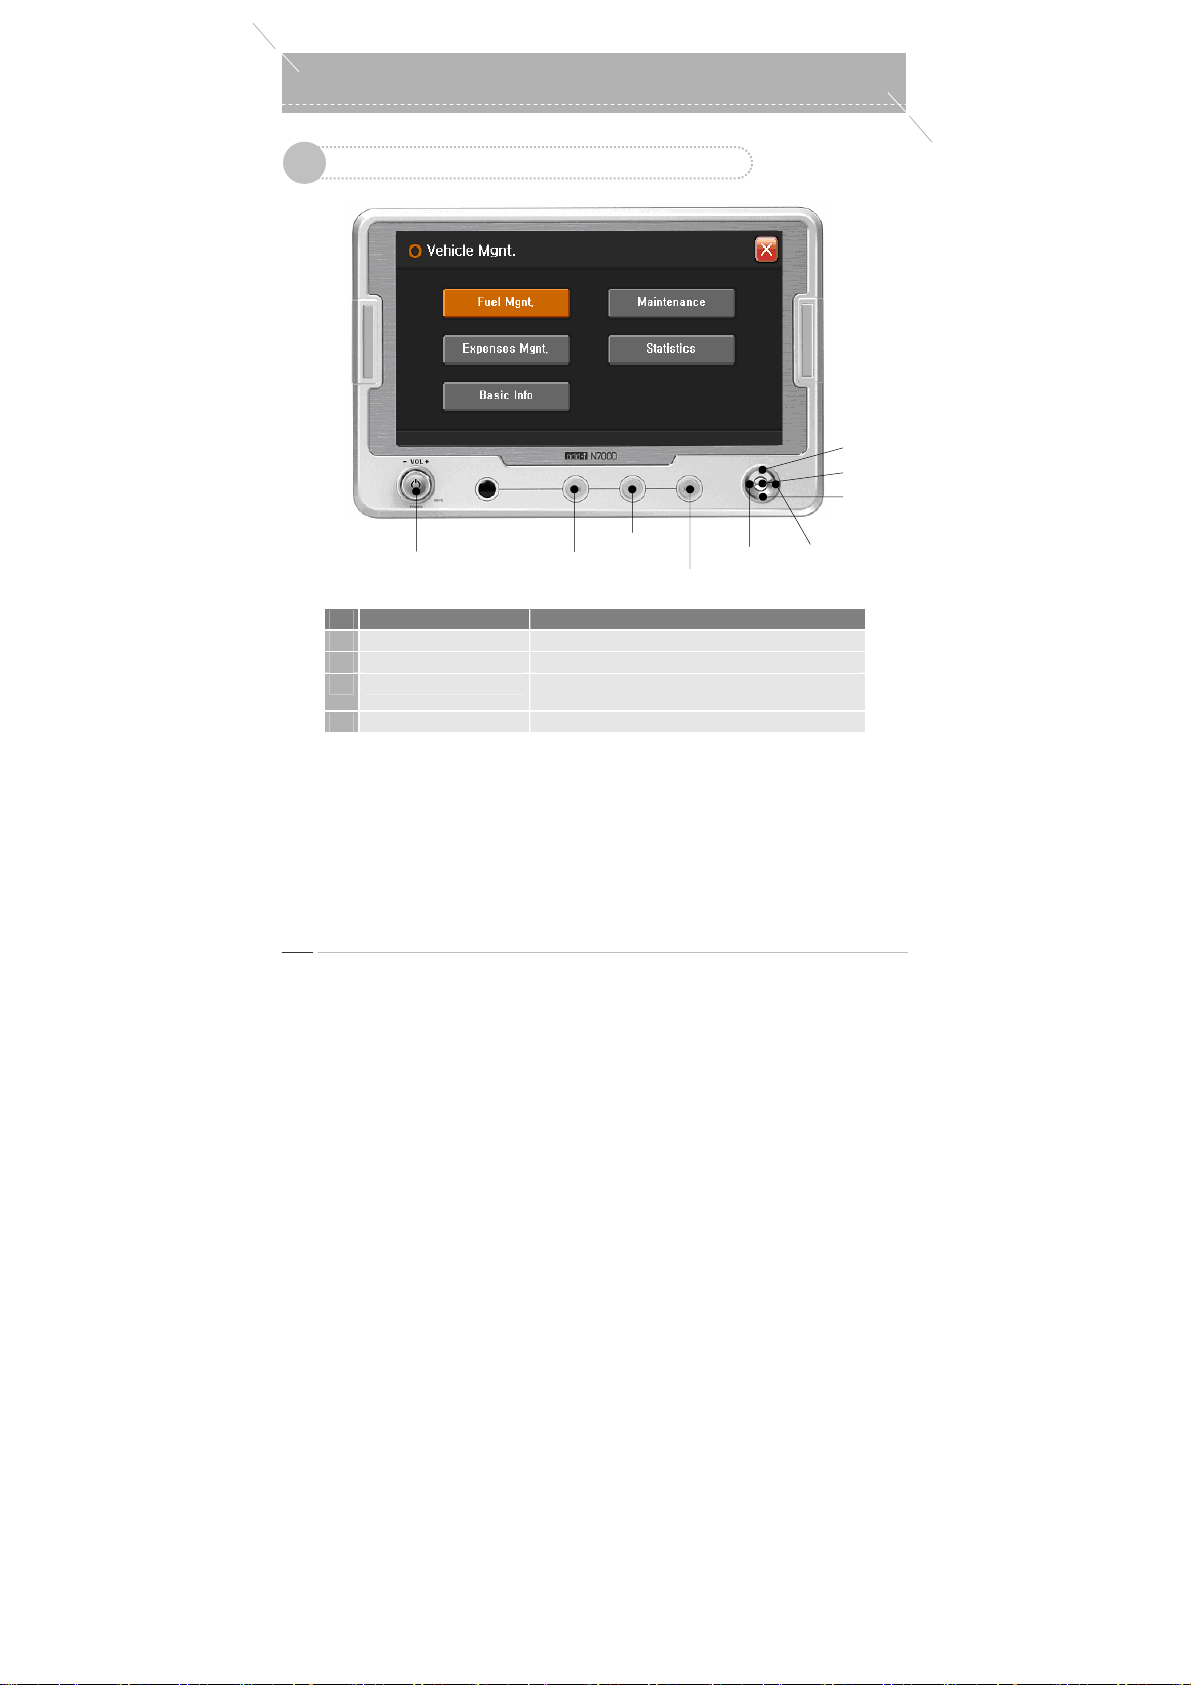
Vehicle Management
0
Vehicle Management Key Map
1
Power On/Off
Volume Ke
No. Name Function
1
MENU Key Moves to Main (Same for all programs)
2
NAVI Key Moves to Navigation (Same for all programs)
3
MODE / MODE(long) Key
4
Volume Key Volume Control, Mute, Power ON/OFF
MODE Key
Switches to another cu rrently running p rogram ( Same for a ll
programs) / LCD OFF
NAVI Key
MENU Key
Left Key
Up Key
OK Key
DownKey
Right Key
odd-i N700D User Guide
56
Page 57
t
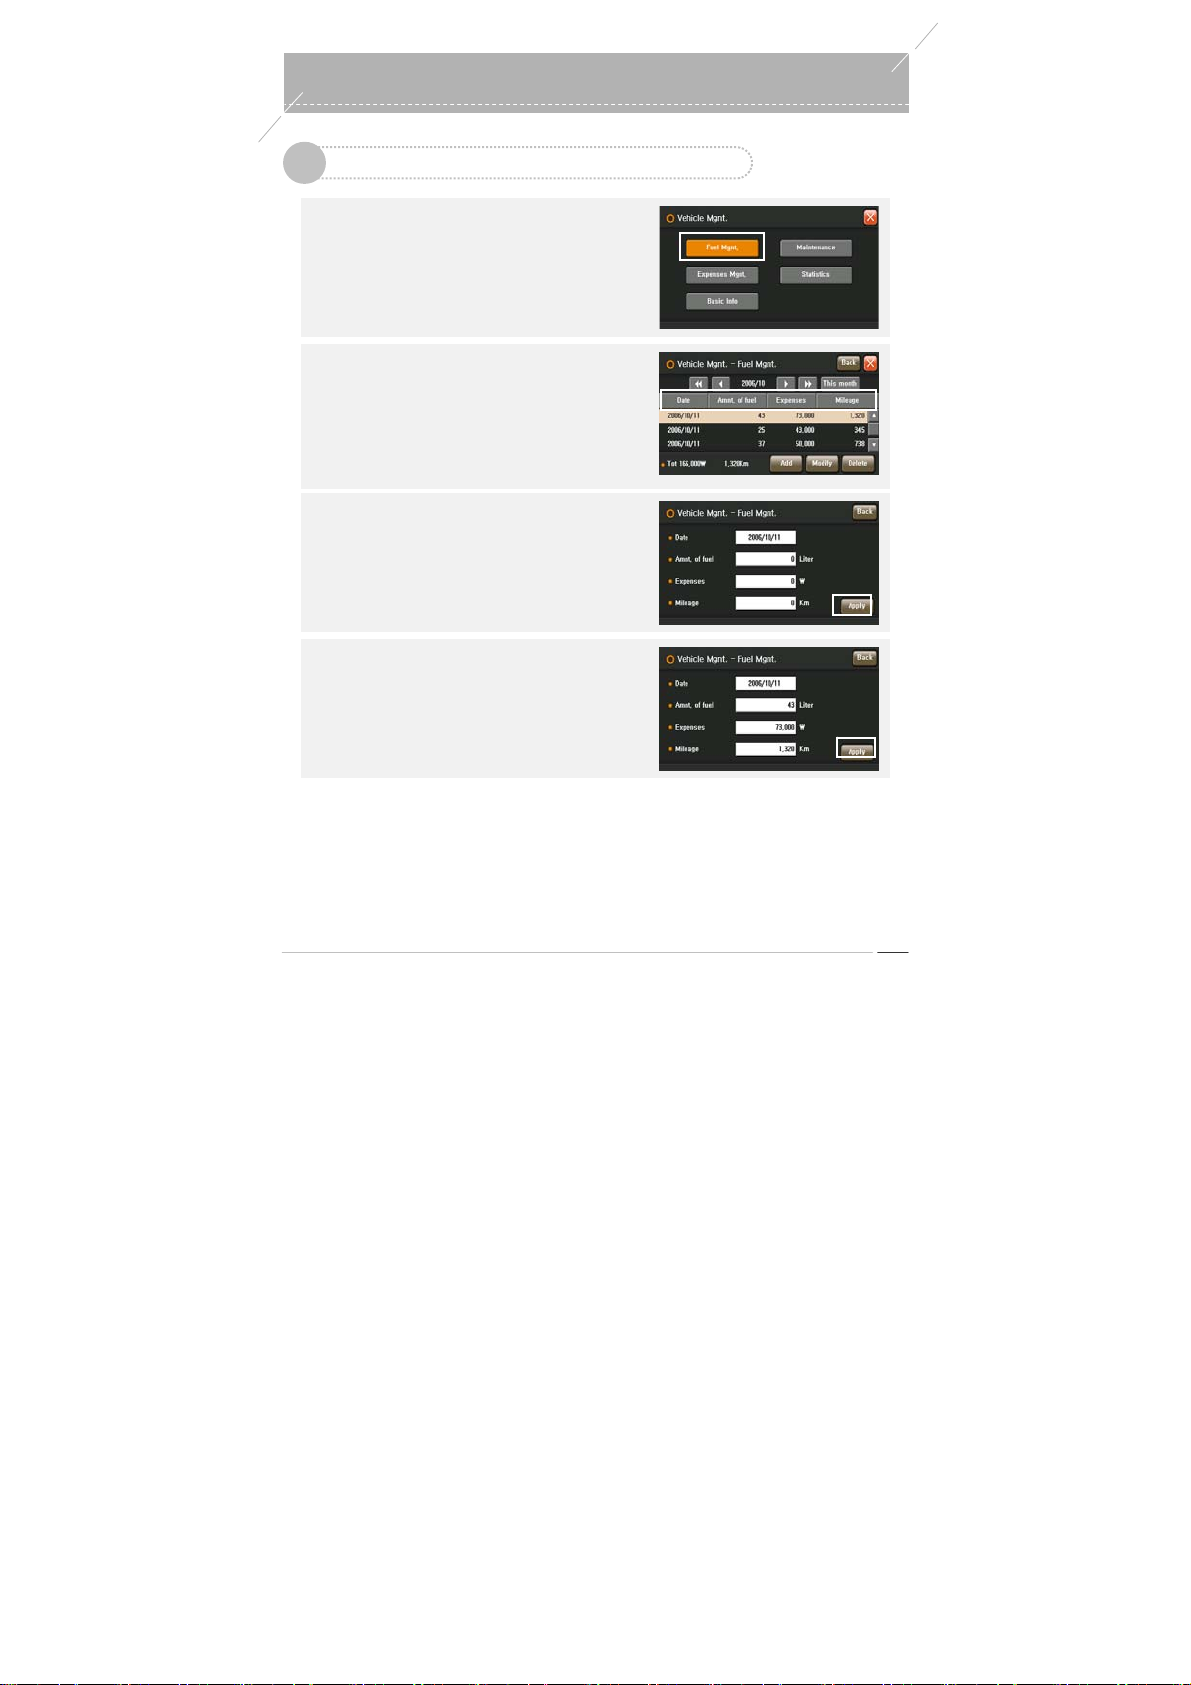
Oil Consumption Management
2
▶
To Move to the Vehicle Management Screen
Press the
Select
▶
To Search for Oil Consum ption History
Select Y ear/Month i n the Oil Consumption
▶
To Add Oil Cons umption History
Press the
Fill the fields in and press the
▶
To Modify Oil C onsumption History
Select an item to be modified and press the
‘Vehicle Management’
Main Menu to move to the Vehicle M anagement
Screen.
‘Oil Consumption Management’
Vehicle Management screen.
Management screen to view the corresponding
information. If you press a column heading
Consumption (quantity) / Cost (KRW) / Mileage
(Km))
, the items are sorted by the column in
ascending or descending order .
‘Add’
Management screen to move to the Oil Consumption
Management Input screen.
the changes.
button in the Oil Consumption Management screen to
move to the Modify Oil Consumption Management
screen. Fill the fields in and press the
to apply the changes.
button in the Oil Consumption
button from the
‘Apply’
in the
(Date / Oil
button to apply
‘Modify’
‘Apply’
button
Vehicle Managemen
0
odd-i N700D User Guide
57
Page 58
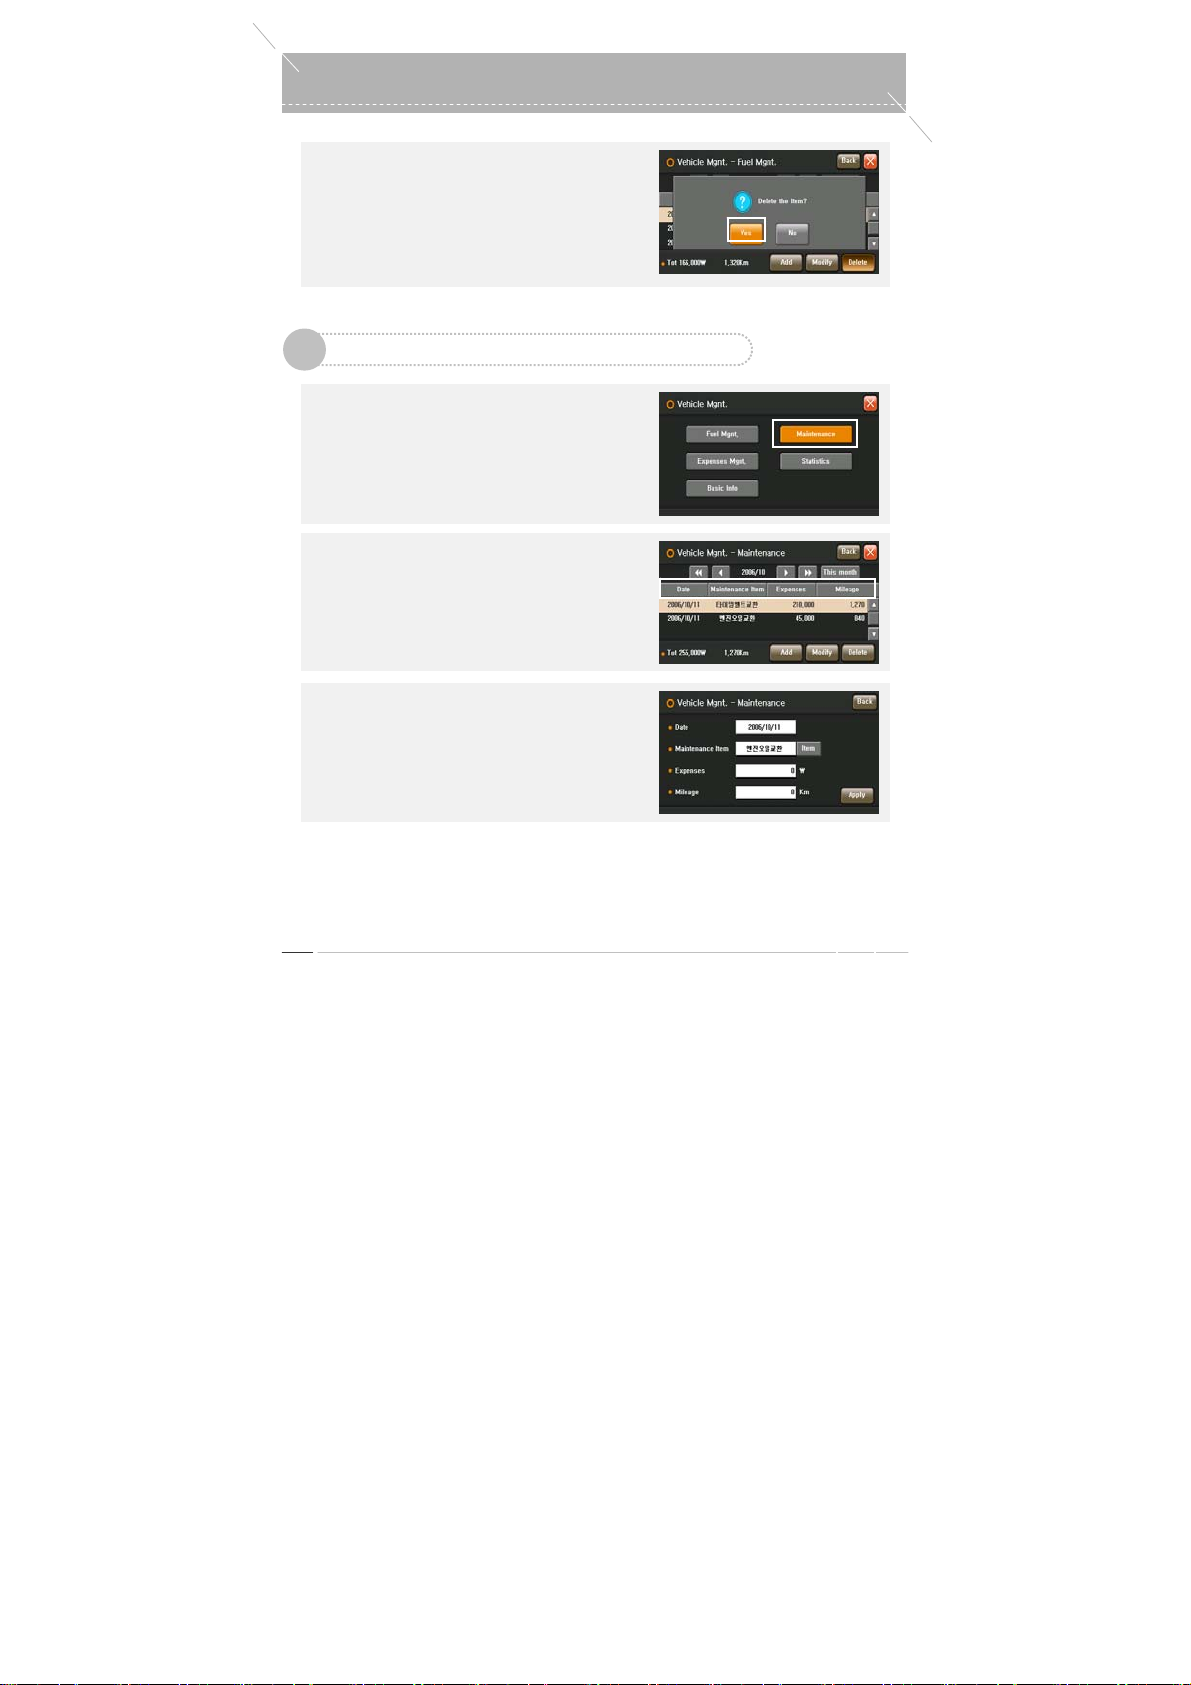
Vehicle Management
0
▶
To Delete Oil Cons umption History
Select an item to be deleted and press the ‘Delete’
button in the Oil Consumption Management screen to
delete the item. When the deletion confirmation
pop-up window appears, press the
corresponding Oil Consumption history is then
deleted.
Maintenance Management
3
▶
To Move to the Vehicle Management Screen
Press the
Select
▶
To Search for Maintenance History
Select Y ear/Month i n the Maintenance Management
▶
To Add a Maintena nce Management Item
Press the
Fill the fields in and press the
‘Vehicle Management’
Main Menu to move to the Vehicle M anagement
Screen.
‘Maintenance Management’
Management screen.
screen to view the corresponding information. If you
press a column heading
Cost (KRW) / Mileage (Km))
the column in ascending or descending order .
‘Add’
Management screen to move to the Maintenance
Management Input screen.
the changes.
button in the Maintenance
‘Yes’
button from the
in the Vehicle
(Date / Management Item /
, the items are sorted by
‘Apply’
button to apply
button. The
odd-i N700D User Guide
58
Page 59
t
▶
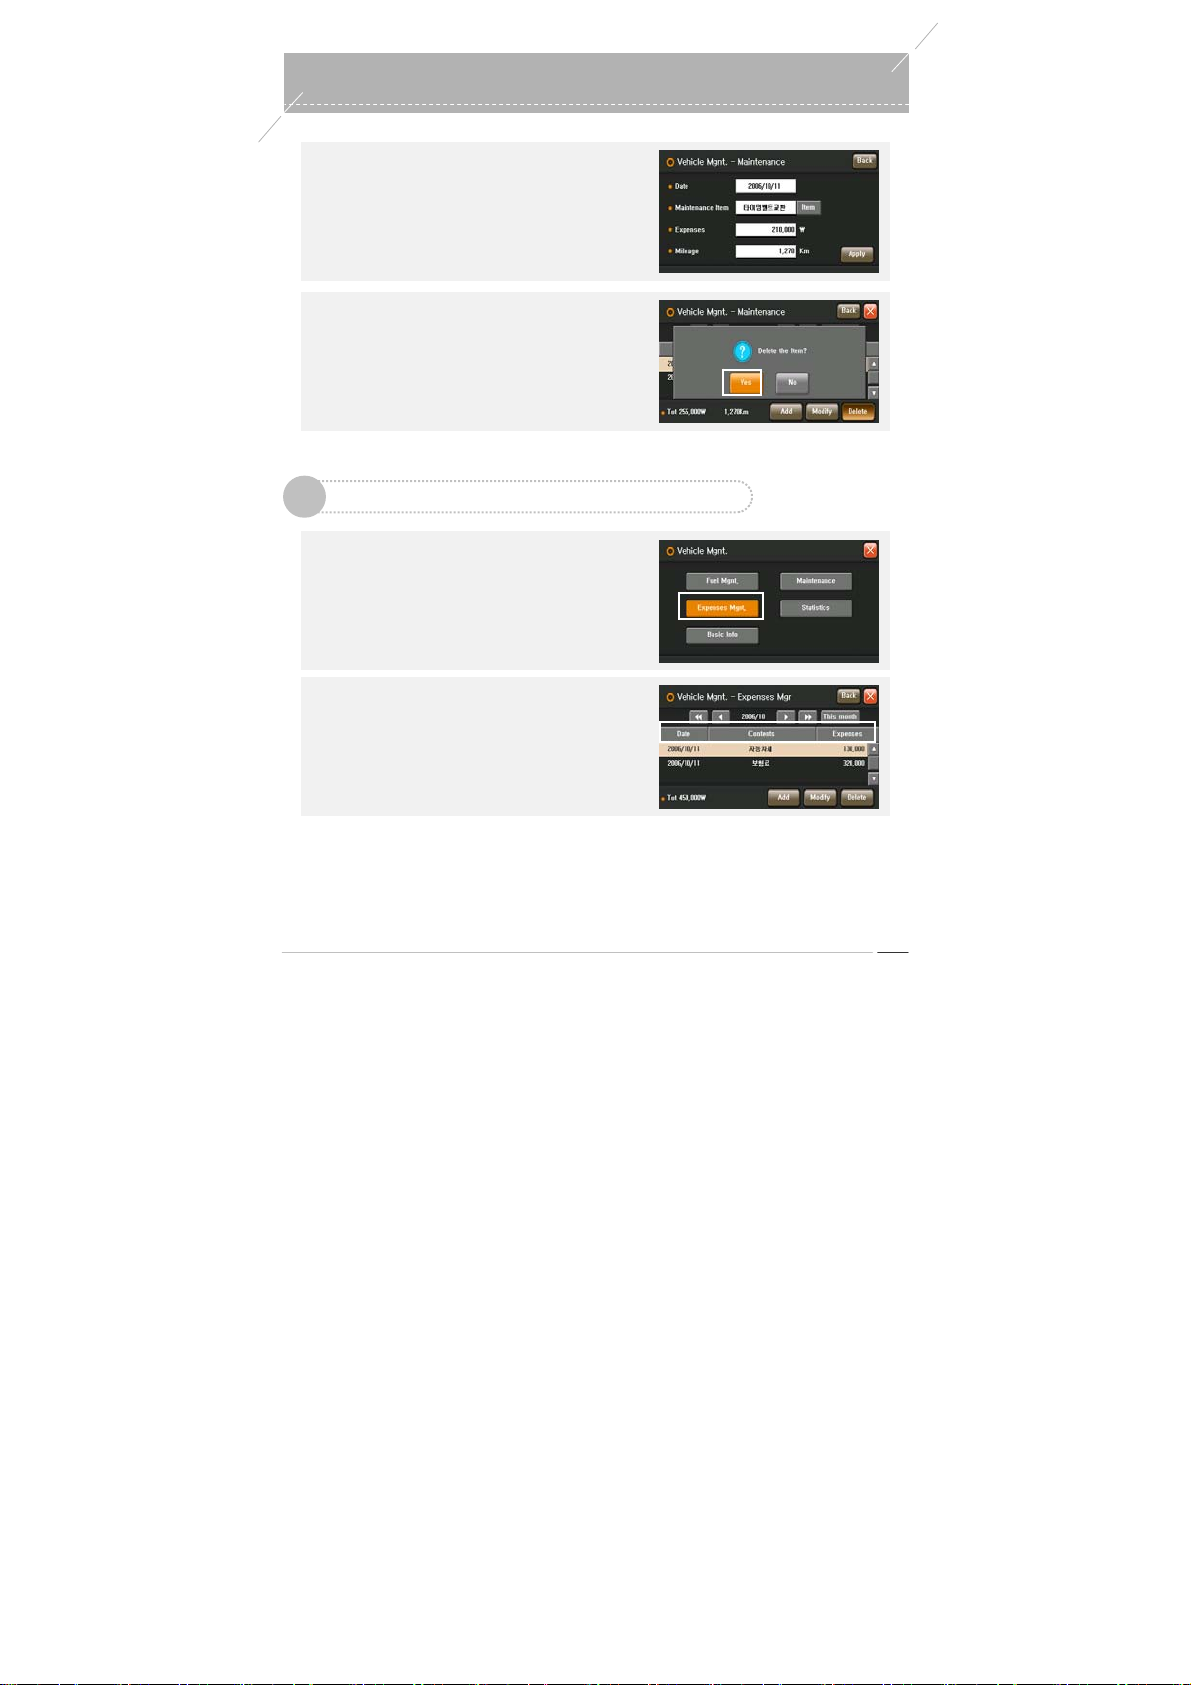
To Modify a Mainte nance Management Item
Select an item to be modified and press the
button in the Maintenance Management screen to
move to the Modify Maintenance Management
screen. Fill the fields in and press the
to apply the changes.
▶
To Delete a Maintena nce Management Item
Select an item to be deleted and press the
button in the Maintenance Management screen to
delete the item. When the deletion confirmation
pop-up window appears, press the
corresponding Maintenance item is deleted.
Expenditure Management
4
▶
To Move to the Vehicle Management Screen
Press the ‘Vehicle Management’ button from the Main
Menu to move to the Vehicle M anagement Screen.
Select
‘Expenditure Management’
Management screen.
▶
To Search for Expe nditure Management
Select Y ear/Month i n the Expenditure Management
screen to view the corresponding information. If you
press a column heading
(KRW))
, the items are sorted by the column in
ascending or descending order .
(Date / Contents / Cost
‘Apply’
‘Yes’
button. The
in the Vehicle
Vehicle Managemen
‘Modify’
button
‘Delete’
0
odd-i N700D User Guide
59
Page 60
Vehicle Management
0
▶
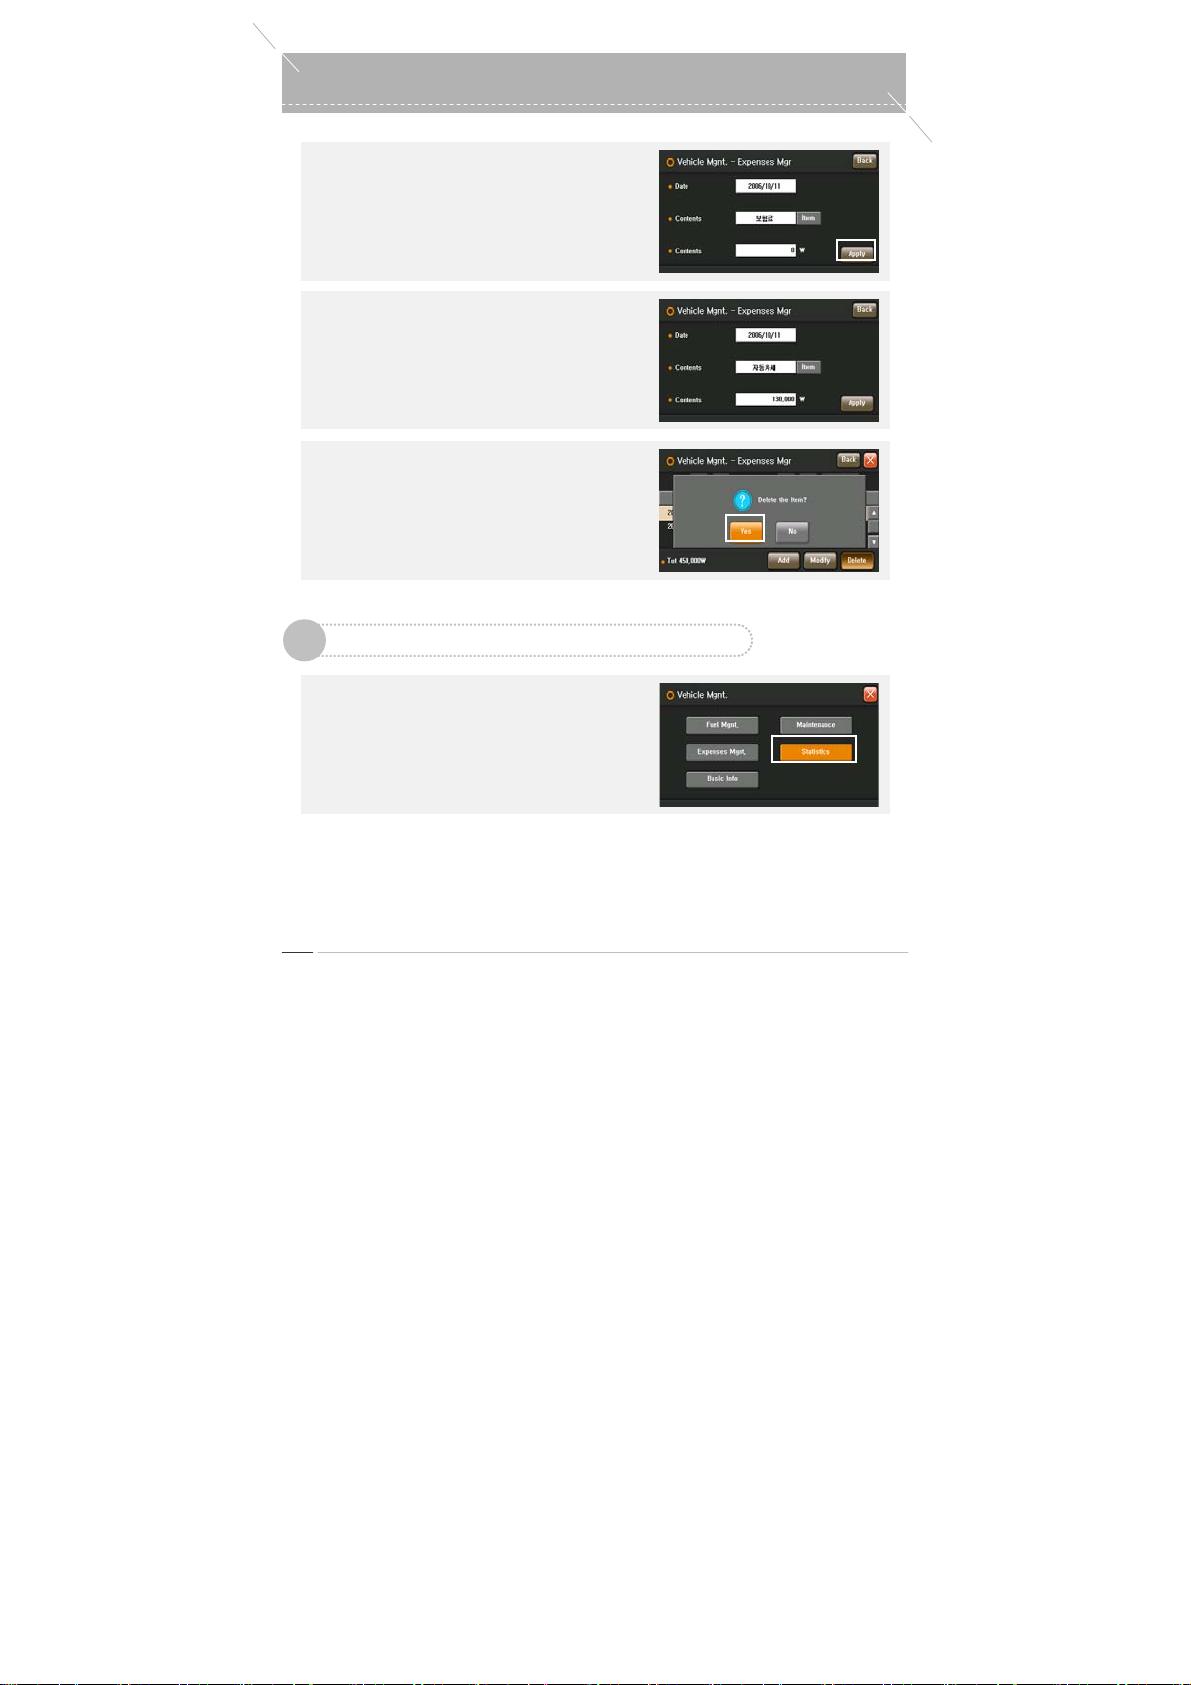
To Add an Expenditure Item
Press the
Fill the fields in and press the
▶
To Modify an Expe nditure Management Item
Select an item to be modified and press the
▶
To Delete an Expenditure Management Item
Select an item to be deleted and press the ‘Delete’
5
▶
To Move to the Vehicle Management Screen
Press the
Select
‘Add’
Management screen to move to the Expenditure
Management Input screen.
the changes.
button in the Expenditure Management screen to
move to the Modify Expenditure Management
screen. Fill the fields in and press the
to apply the changes.
button in the Expenditure Management screen to
delete the item. When the deletion confirmation
pop-up window appears, press the
corresponding Expenditure item is deleted.
Statistics
Main Menu to move to the Vehicle M anagement
Screen.
screen.
button in the Expenditure
‘Vehicle Management’
‘Statistics’
in the Vehicle M anagement
‘Apply’
button to apply
‘Yes’
button from the
‘Modify’
‘Apply’
button. The
button
odd-i N700D User Guide
60
Page 61
t
▶
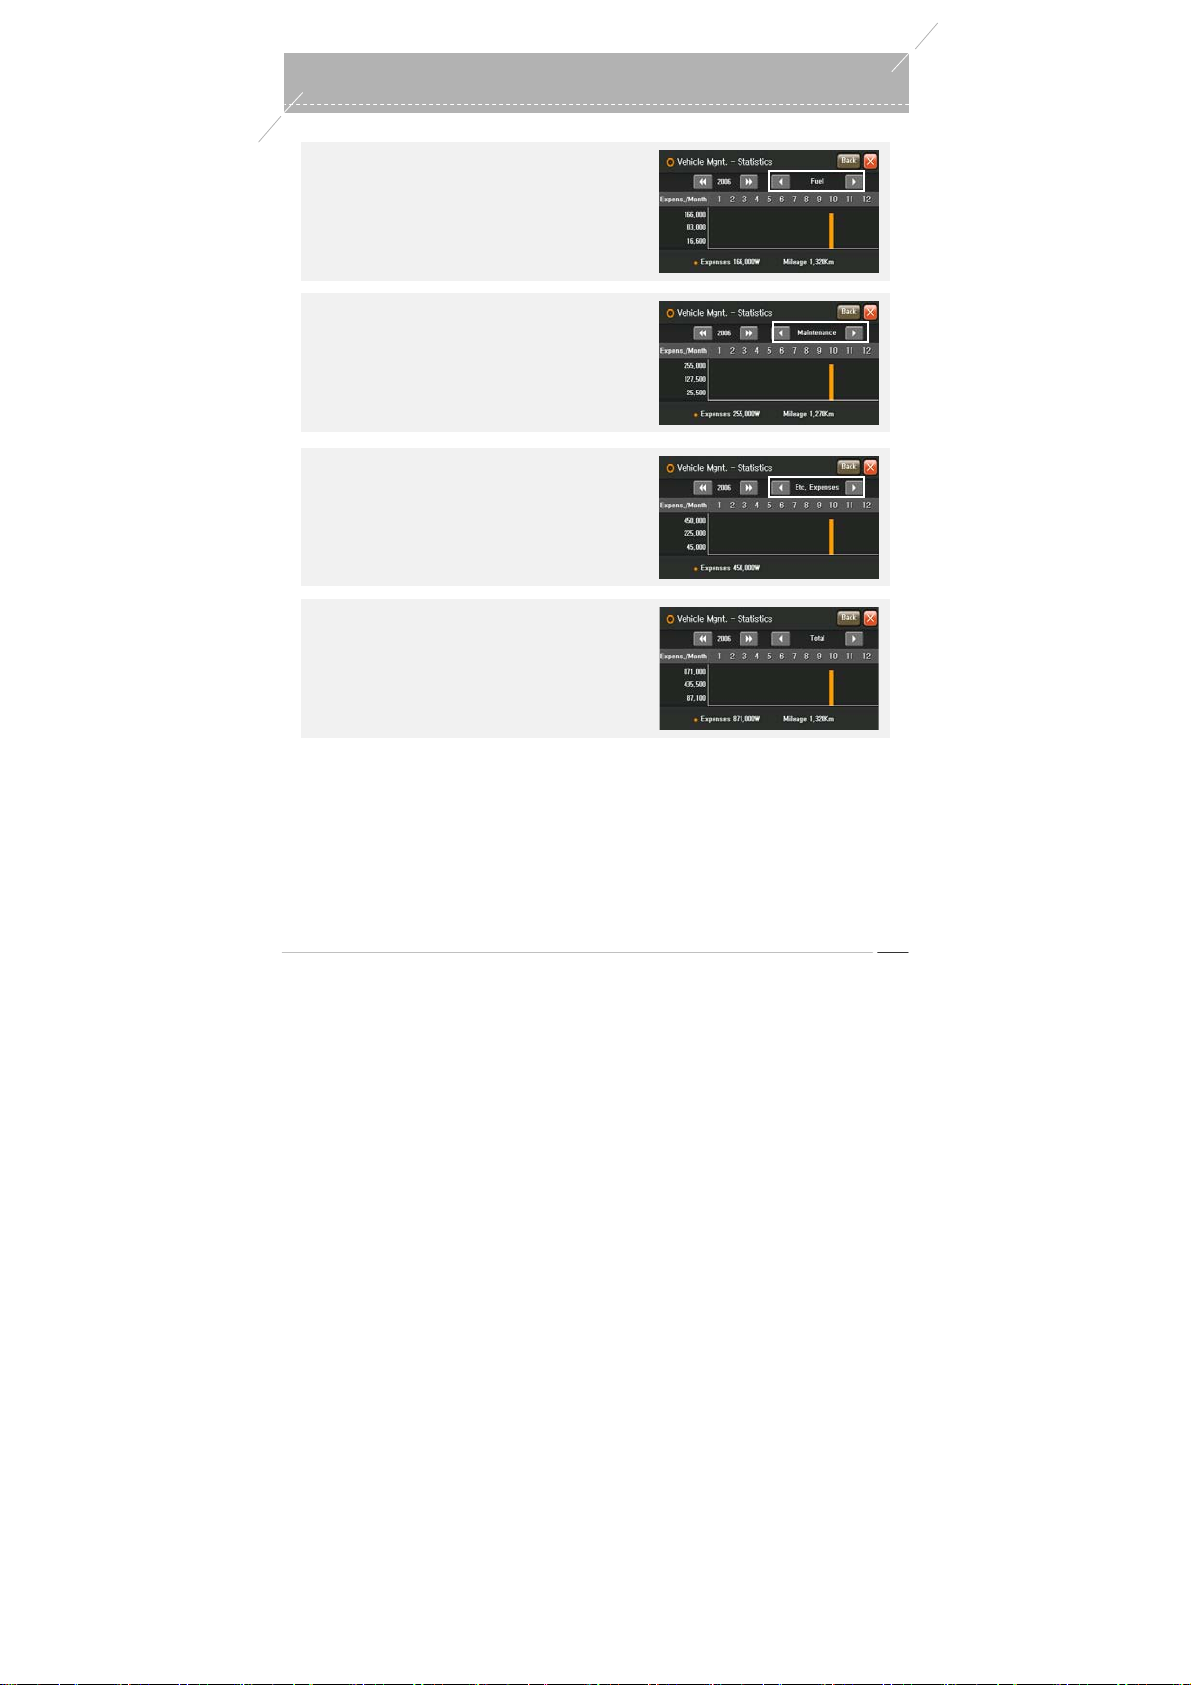
Oil Consumption Statistics V iew
If you select the Oil Consumption item in the St atistics
screen, the Oil Consumption information appears.
Select Y ear/Month in the Statistics screen to view the
corresponding statistics.
▶
Maintenance Statistics View
If you select the Maintenance item in the St atistics
screen, the Maintenance information appears.
Select Y ear/Month in the Statistics screen to view the
corresponding statistics.
▶
Other Expenditure Statistics View
If you select the Other Expenditure item in the
Statistics screen, the Other Expenditure information
appears.
Select Y ear/Month in the Statistics screen to view the
corresponding statistics.
▶
Tot al St atistics View
If you select the T ot al S tatisti cs in the S tatistics screen,
the Total Statistics informati on appears.
Select Y ear/Month in the Statistics screen to view the
corresponding statistics.
Vehicle Managemen
0
odd-i N700D User Guide
61
Page 62
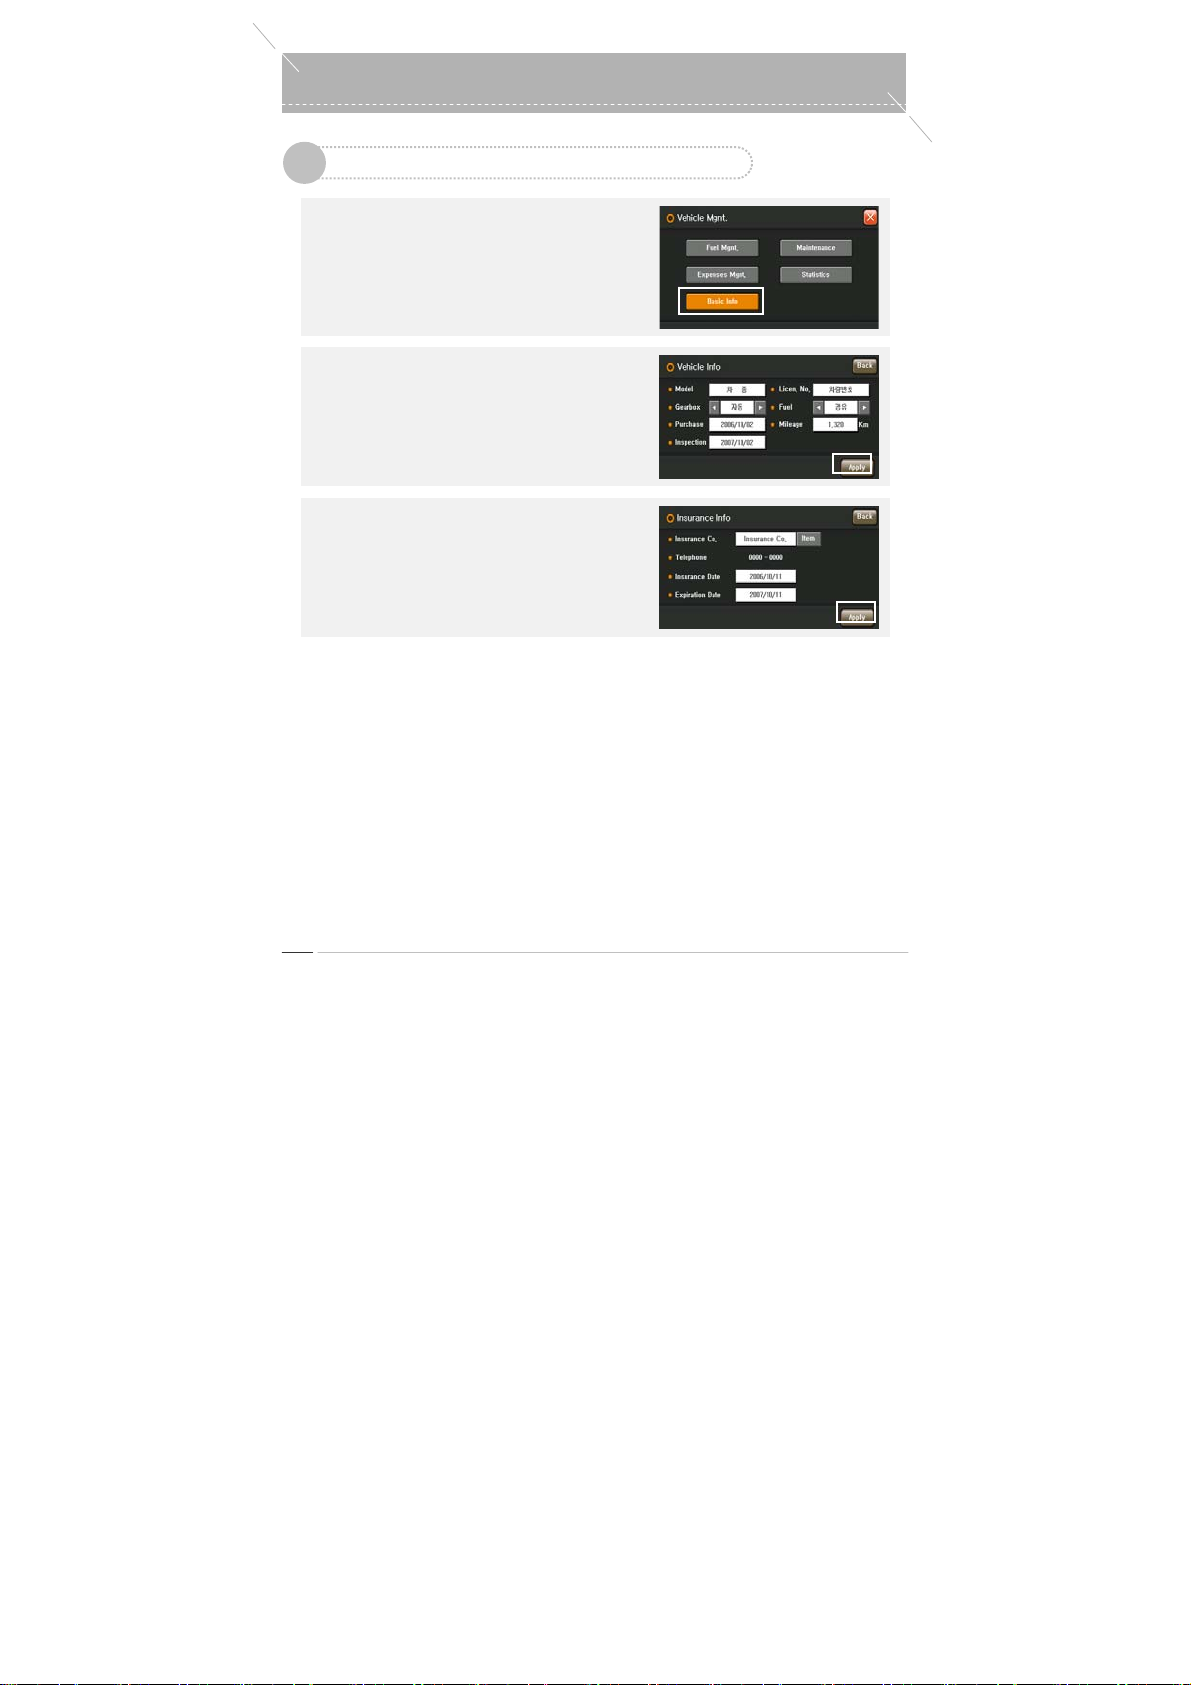
Vehicle Management
0
Basic Information
6
▶
To Move to Vehicle Management Screen
Press the
Select
▶
Vehicle Information Management
Press the Vehicle Information button i n the Basic
Fill the fields in and press the
▶
Insurance Information Management
Press the Insurance Information button in the Basic
Fill the fields in and press the
‘Vehicle Management’
Main Menu to open the Vehicl e Management screen.
‘Basic Information’
Management screen.
Information screen to open the Vehicl e Information
screen.
the changes.
Information screen to open the Insurance Information
screen.
the changes.
button from the
in the Vehicle
‘Apply’
button to apply
‘Apply’
button to apply
odd-i N700D User Guide
62
Page 63
t
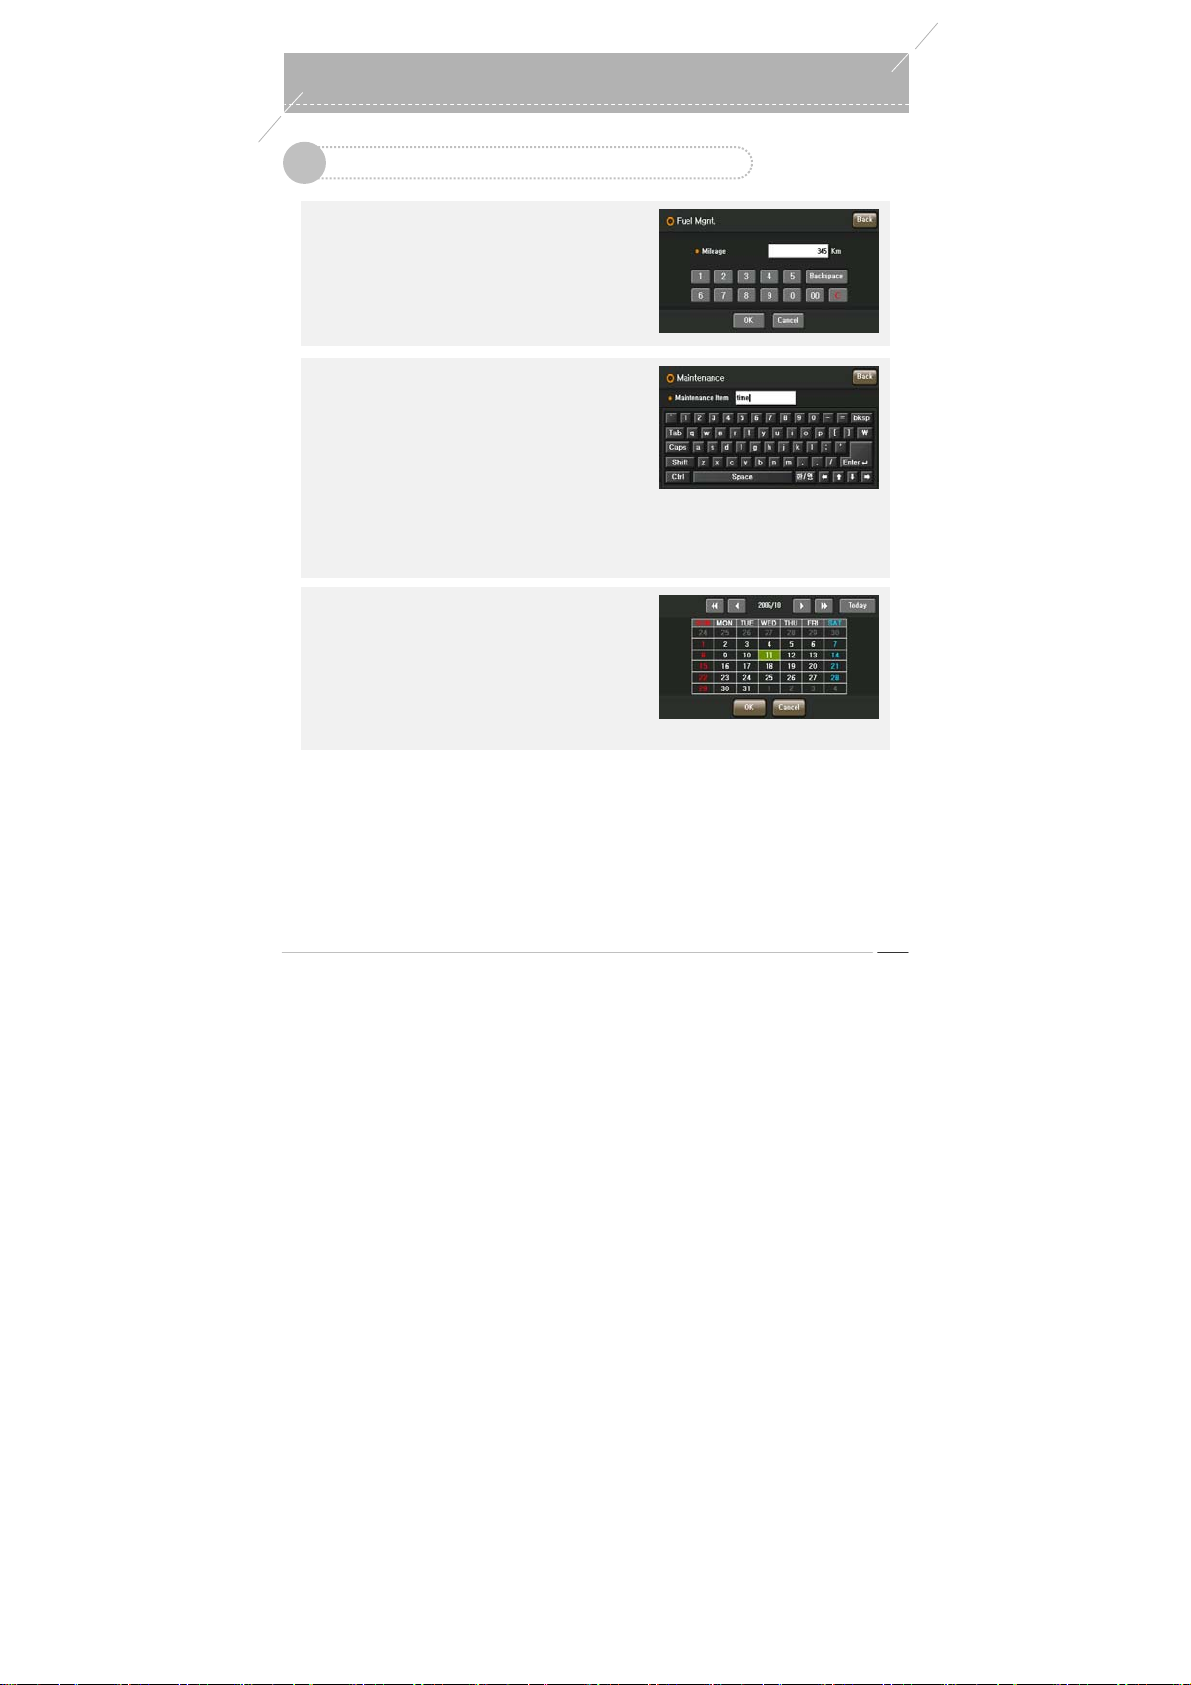
Using the Contents Input Window
7
▶
Number Input Window
Press the numeric buttons to enter a number in the
Oil Consumption Management, Maintenance
Management, Expenditure Management or Basic
Information screen and press the OK button. If you
press the
‘Cancel’
or
Number Input Window, the num ber input is cancelled.
▶
Text Input W indow
Press the keys on the virtual keyboard on the window
in the Maintenance Management, Expenditure
Management or Basic Information screen and press
the
‘Enter’
If you press the
the window, the text input is cancelled.
The Car Maintenance Account Book data is saved in
the /carmanager folder of the SD card. Take care not
to remove the file, and back up the data on a regular
basis to prevent loss of the data.
▶
Date Input Window
Press the date you want from the calendar on the
Date Input window in the Oil Consumption
Management, Maintenance Management,
Expenditure Management or Basic Information
screen and press the OK button. If you press the
‘Cancel’
number input is cancelled.
button.
button in the Number Input Window, the
‘Previous’
‘Previous’
button in the
button at the top right of
Vehicle Managemen
0
odd-i N700D User Guide
63
Page 64
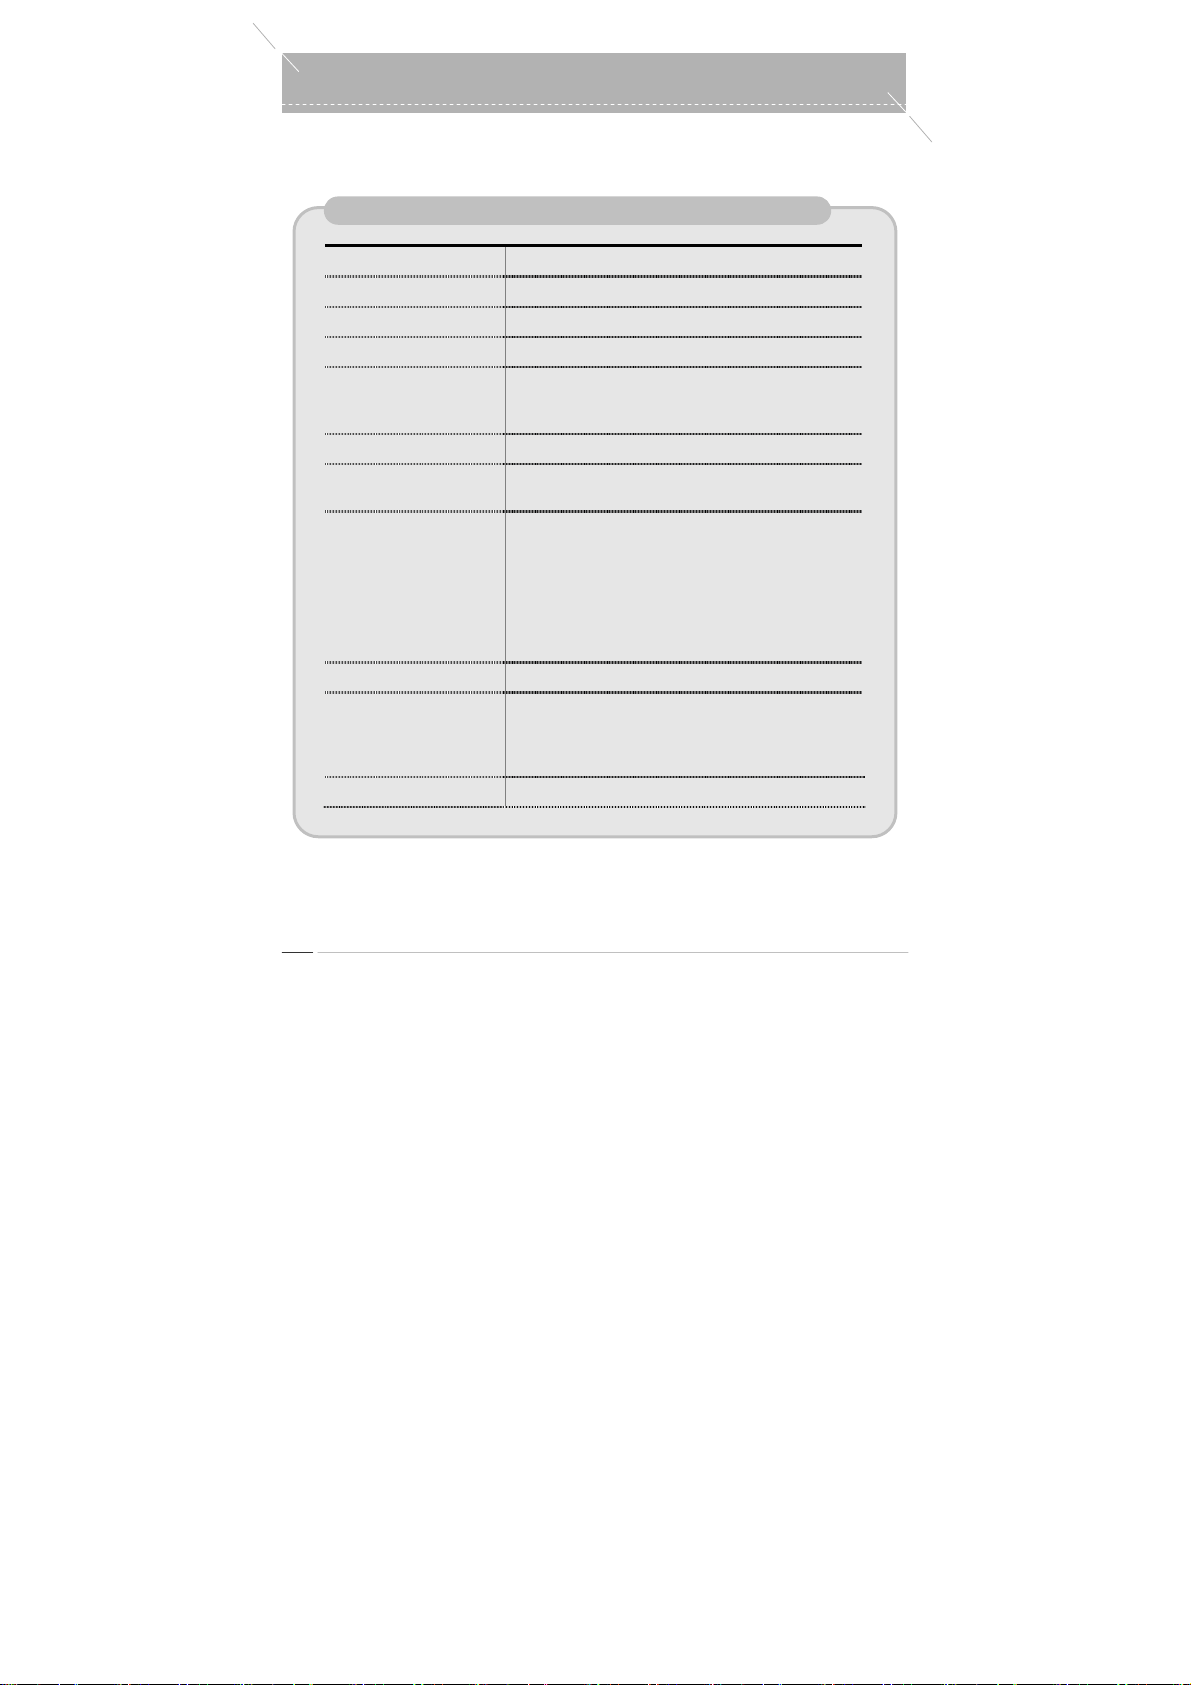
Specifications
0
➲
The functions of the product are subject to change without prior notice for the improvement of the pr oduct’s
quality or performance.
1. General Information
Name odd-i N700D
Dimensions 190mm(W) X 125mm(H) X 28.8mm(T)
Weight 564g (668g with Samsung 60GB HDD)
Operating System Windows CE 5.0 Core
Hardware Specifications CPU: MAGICEYES MMSP-2 (Dual Core)
Type Plug&Play (Removable Hard Disk Type)
LCD 7-Inch Wide QVGA TFT (480X234)
Interface SD Memory: 2GB (for Navigation Only)
Supported Languages Korean / English
Operating T emperatures
Power DC 12V ~ 24V, 3A
RAM: 128MB SDRAM, 64MB NAND Flash
GPS: SiRF Star
370 nits (including Touch)
HDD: 2.5-inch hard disk drive can be installed Removable Type
USB: Device - USB2.0, Host - USB1.1
A/V Input: CVBS, Rear Monitoring Camera Support,
Stereo Input (Video Recording)
A/V Output: CVBS, S-Video, Stereo Output
FM Transmitter, IrDA Remote Control Interface
℃
~ +60℃
-10
(This does not apply to hard disk drives. For the operating
temperature of a hard disk drive, refer to the corresponding
manufacturer’s spec i fi c ati ons .)
Ⅲ
Chip
odd-i N700D User Guide
64
Page 65
s
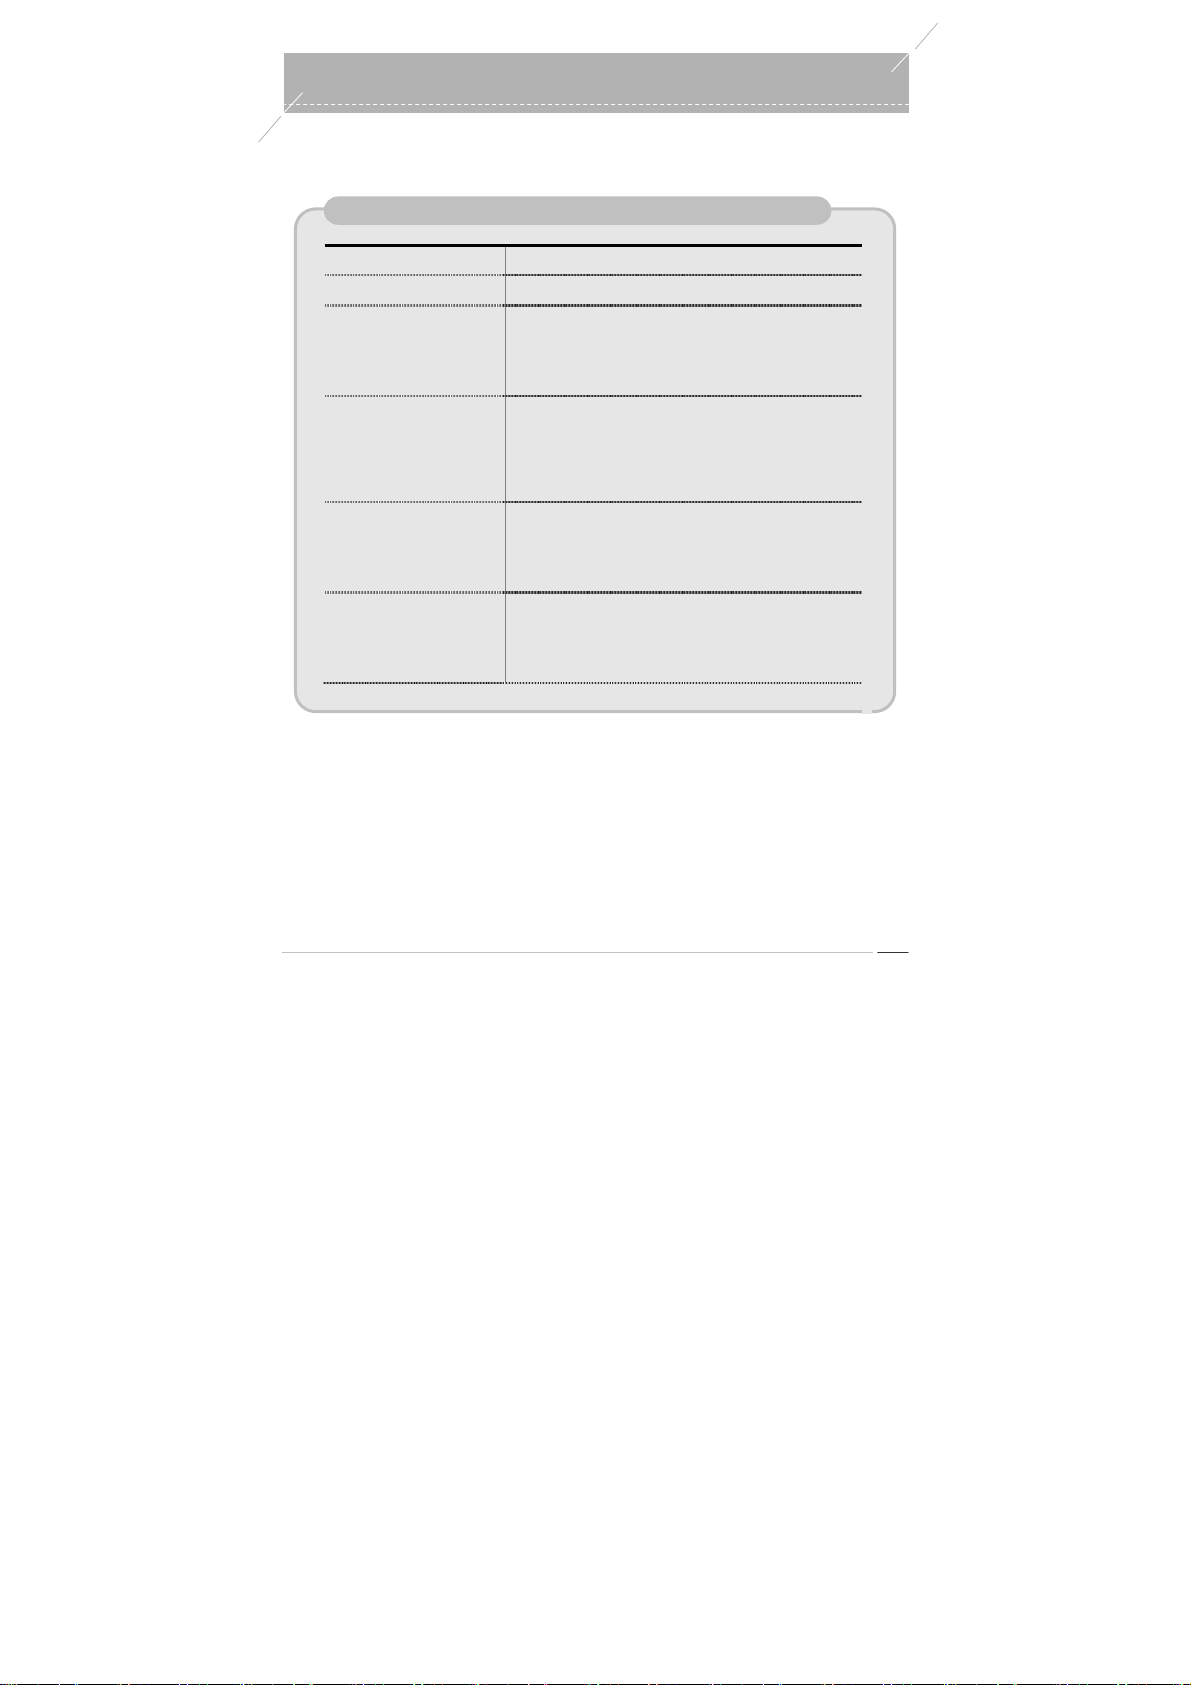
Specification
0
➲
The functions of the product are subject to change without prior notic e for the improvement of the produ ct’s
quality or performance.
2. Navigation
Map Mando Mappy MXC
GPS Receiver
Route Guide Multiple Path Search
Data Search Search by Name using initial letters/middle letters
Map Display 3D Mode Building Floor Information
Additional Functions Safe Driving Point Announcement
SiRF Star
Announcement of Junction Information
Announcement of Tol l Road Fares
TBT (Turn-by-Turn) + Direction Audio Announcement
Expressway Mode Announcement
Address Search (25 million addresses)
500,000 Basic Telephone Number Search
114 Telephone Number Search
Detailed Theme Information
JG Code Searc h
Night Mode
Real Road Width / U-Turn Display
Narrow Road, One Way Road Display (+ Door-to-Door
Route Guide)
9 Voice Types for Announcement
Subway Route Search
Unique Intro Screen
Upgrade without Charge (may be changed in the future)
Ⅲ
Chip
65
odd-i N700D User Guide
Page 66

Specifications
0
➲
The functions of the product are subject to change without prior notice for the improvement of the product’ s
quality or performance.
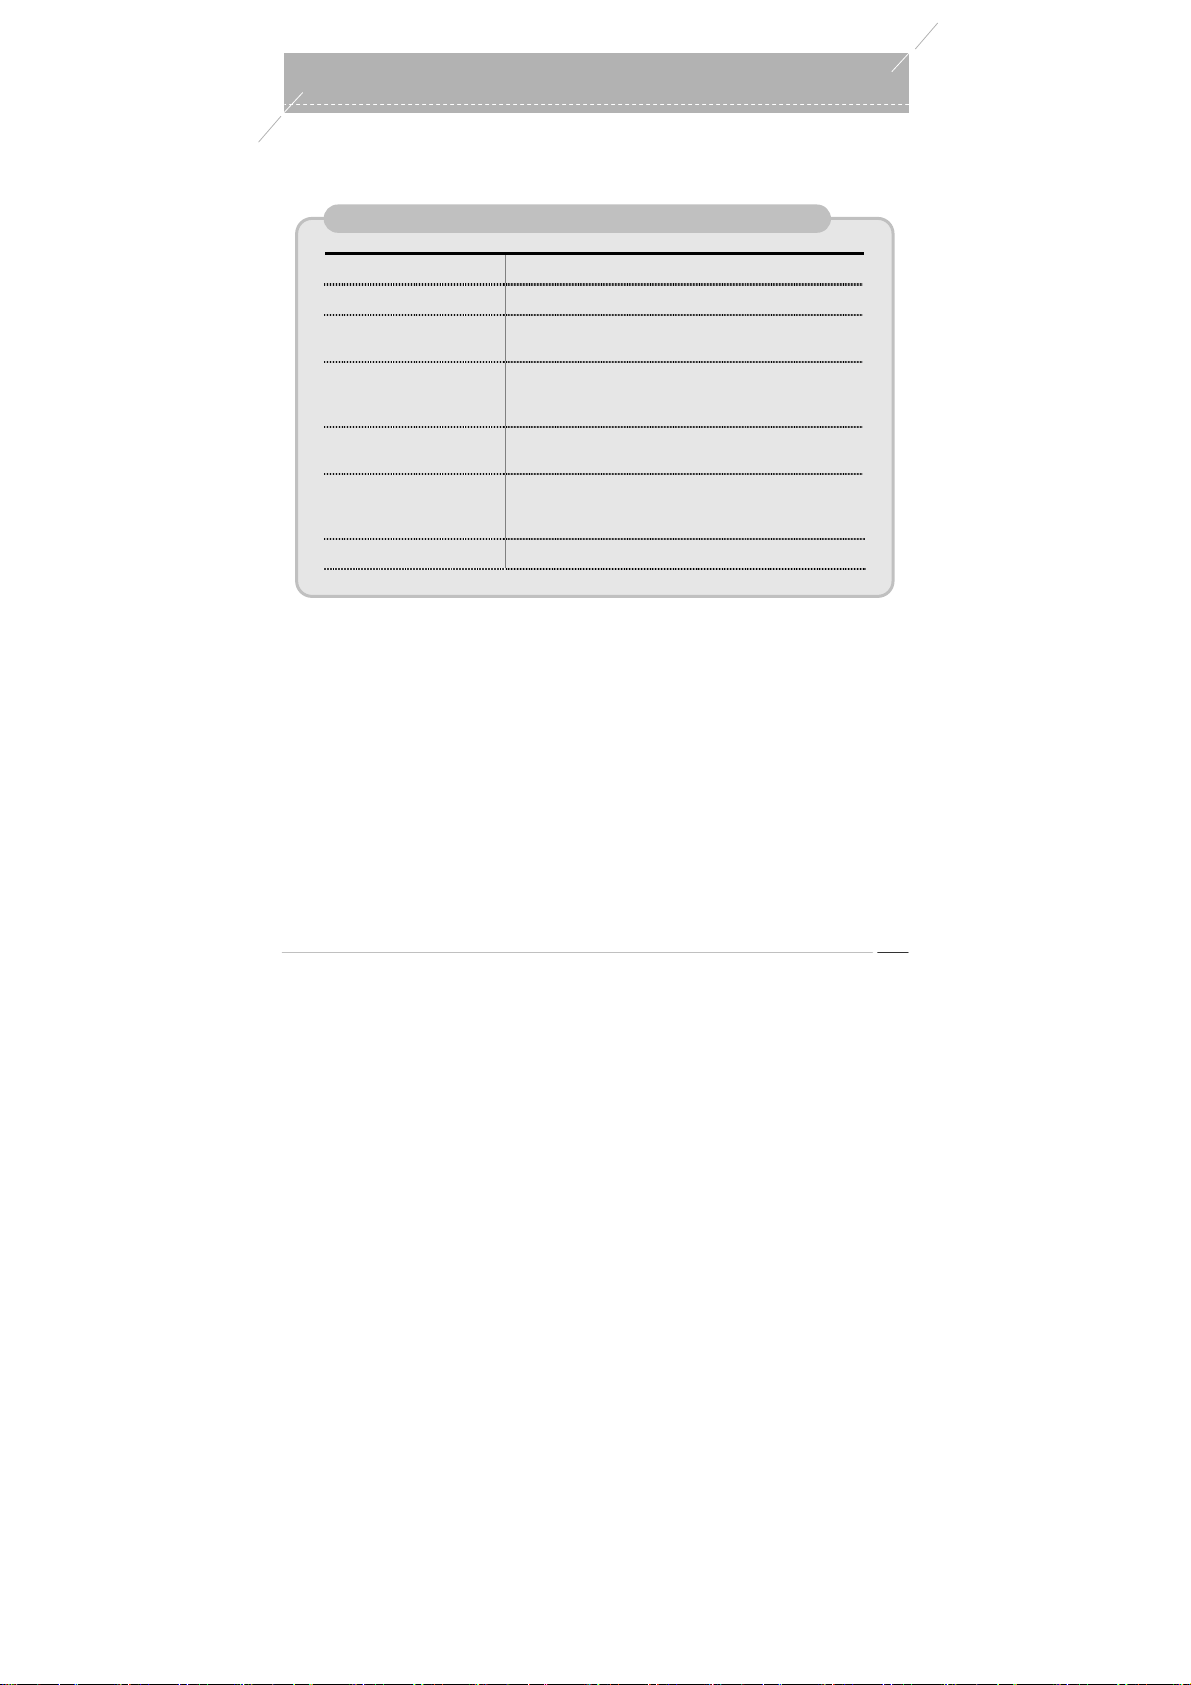
3. Video
Supported File Formats MPEG1, MPEG4, Xvid, DivX 3.X/4.X/5.X (720X480, Max
30 Frames), WMV7/8/9 (320X240, Max 30 Frames)
Supported Subtitle Format SMI
Overlay & Multi-Tasking Navigation
Navigation + Movie Player
Movie Player
odd-i N700D User Guide
66
Page 67
s
Specification
0
➲
The functions of the product are subject to change without prior notice for the improvement of the product’ s
quality or performance.
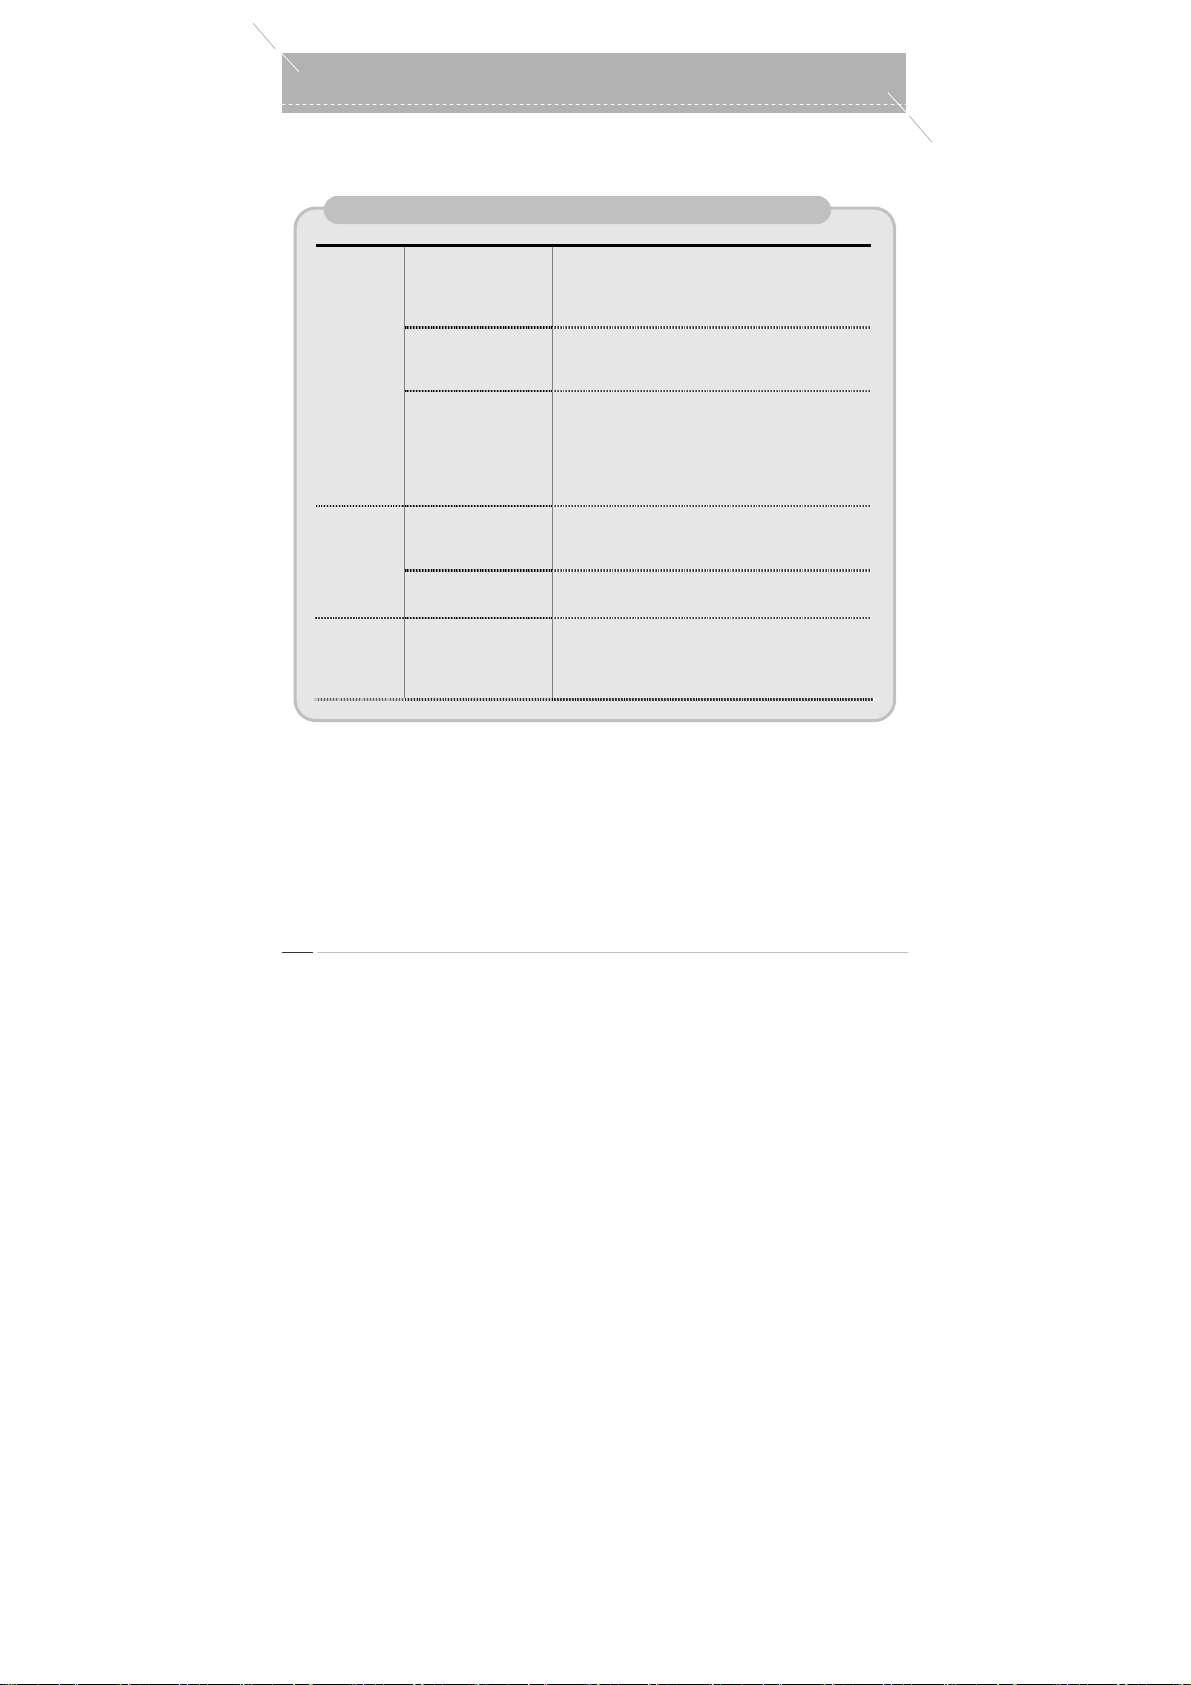
4. Audio
Supported File Formats MP3, WMA, WAV, OGG, AC3
Supported Outputs Built-in Stereo Speakers / Earphones / FM Radio
Frequency Response
Range
Output Power Earphones: 40mW (20mW + 20mW)
Signal to Noise Ratio (S/N
Ratio)
Equalizer 11 Preset EQs
FM Transmitter Frequency Range: 88.1 ~ 107.9 Mhz
20Hz ~ 20KHz
Built-in Speakers: 2W (1W + 1W), Max 2.4W (1.2W +
1.2W)
90dB or Higher
Normal, Rock, Pop, Jazz, Classic, Dance, Heavy,
Disco, Soft, 3DLive, Hall
odd-i N700D User Guide
67
Page 68
5
Specifications
0
➲
The functions of the product are subject to change without prior notice for the improvement of the product’ s
quality or performance.
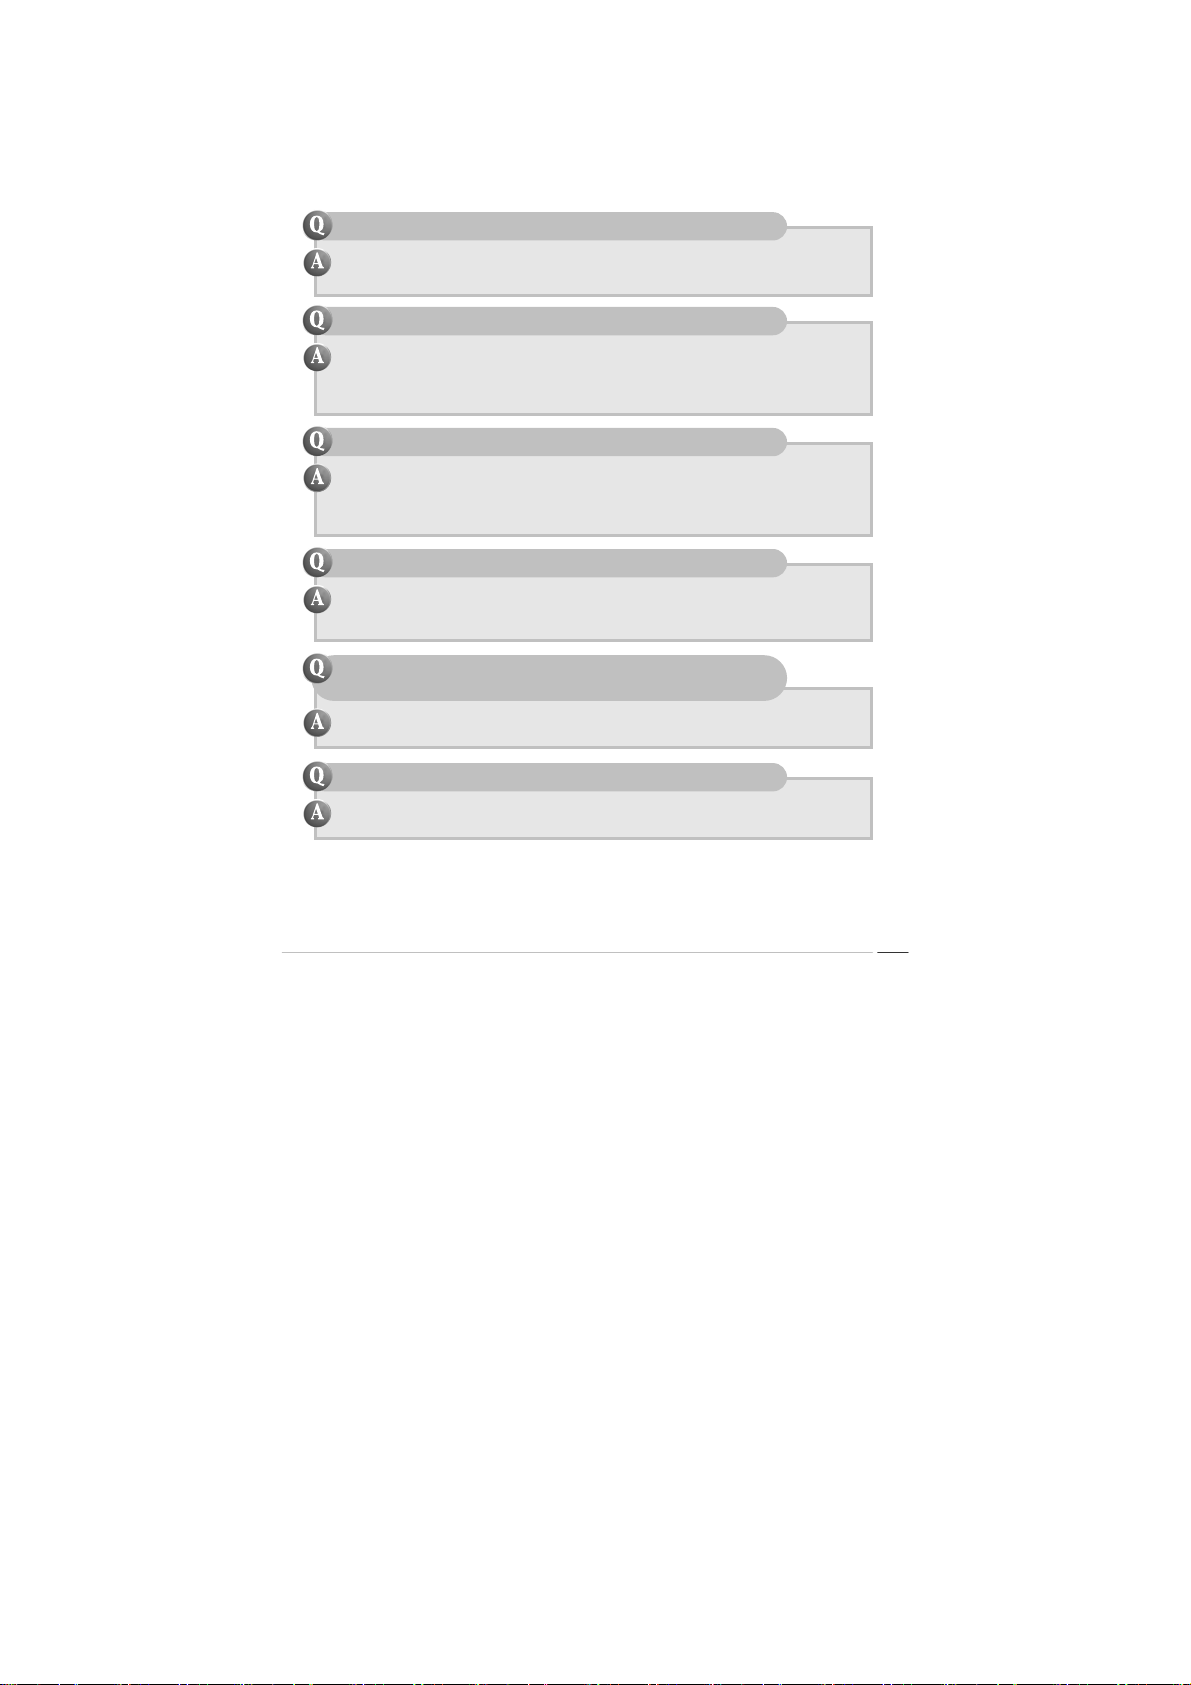
. Other
A/V IN/OUT
Additional
Functions
Operating
Environment
A/V OUT (TV
Connection Support)
A/V IN Input Signal: CVBS (NTSC / PAL)
Rear Monitoring
Camera Input
Function Support
Photo Viewer Supported File Formats: JPEG, BMP, GIF
Car Maintenance
Account Book
PC System Microsoft Windows 98SE / ME / 2000 / XP
Output Signal: NTSC / PAL
Function: CVBS / S-Video
Output Visual Quality Enhancement Function xView TM Adopted
Video View: Normal / Wide
Recording: 320X224 Pixels with MPEG4
Input Signal: CVBS (NTSC / PAL)
Auto Signal Detection: Automatically detect video
input and display.
Function: Vertical and Horizontal Flip Function
Automatic Recording of Rear Monitoring Video
(when an HDD is installed))
Additional Functions: Browser / Thumbnail / Full
View / Slide Show
Oil Consumption Management, Maintenance
Management, Expenditure Management
Pentium3 500MHz or Higher
128M available Ram
USB Port 2.0
odd-i N700D User Guide
68
Page 69
➲
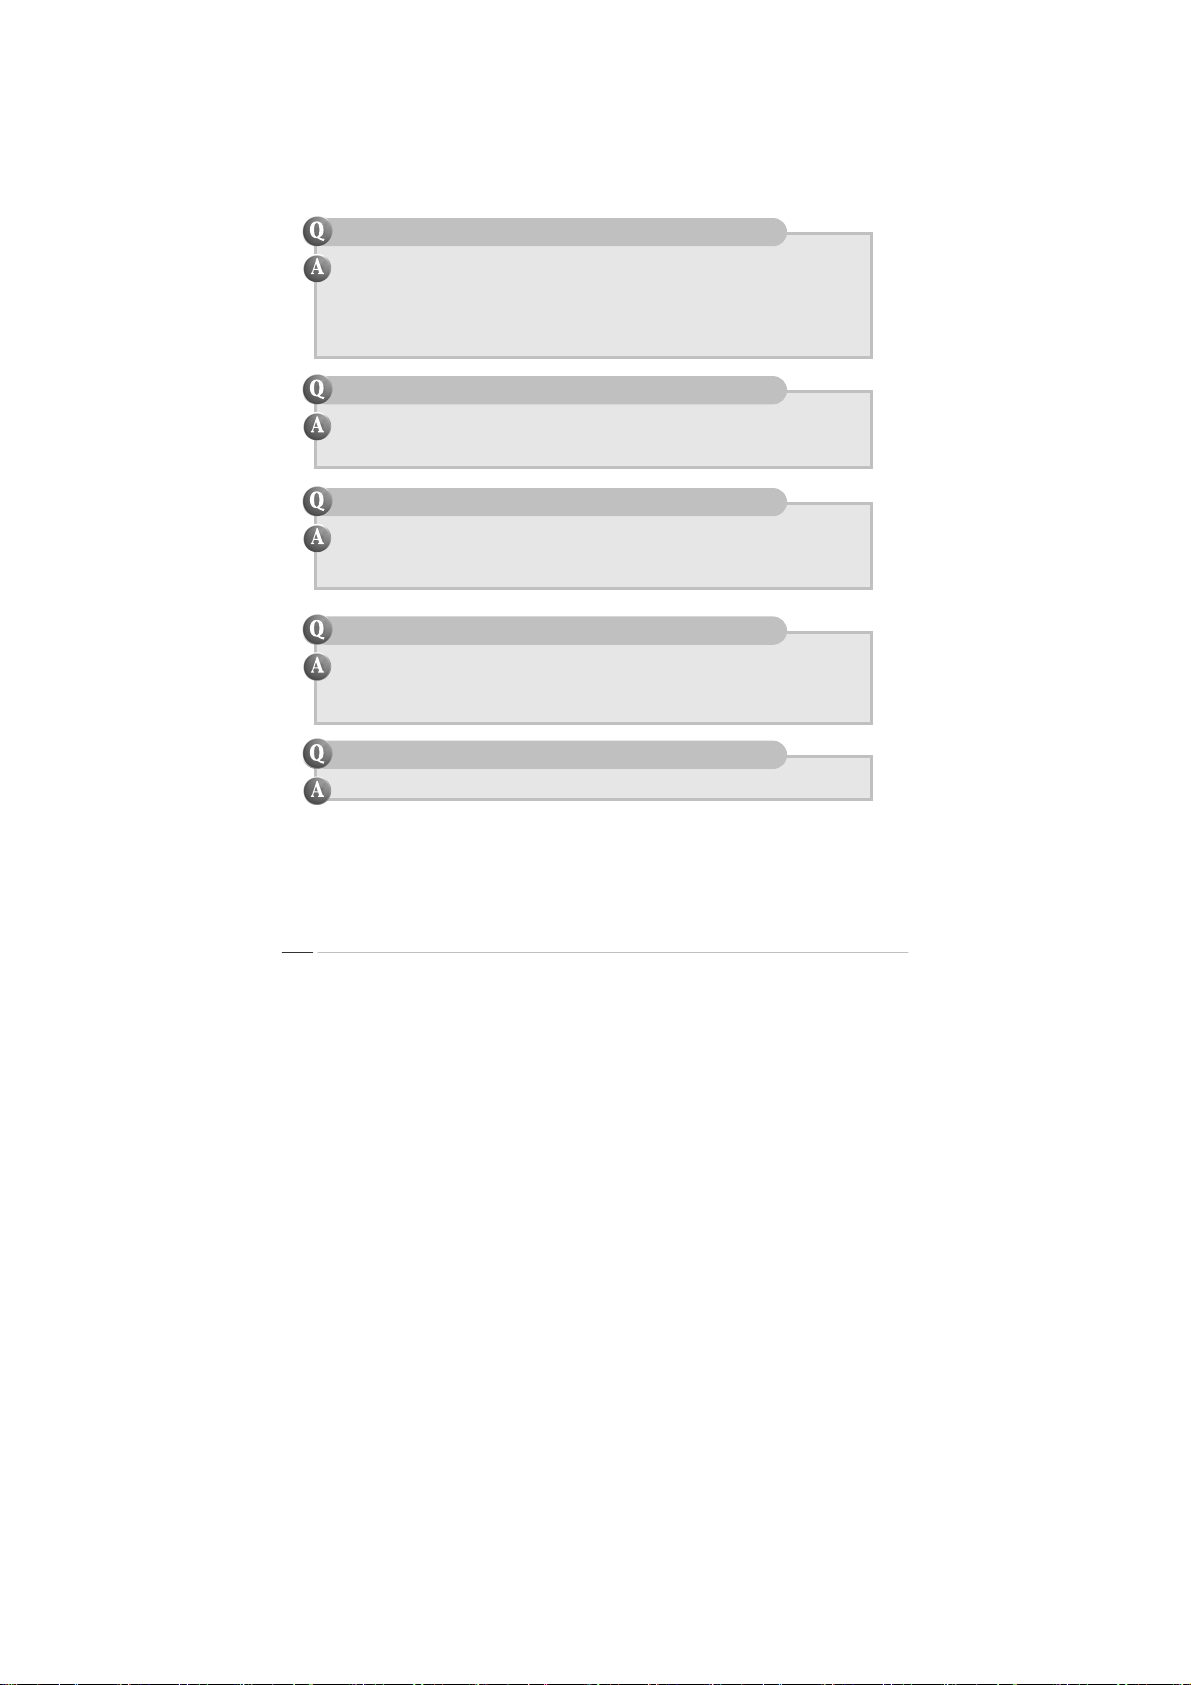
Please re-check to see if there is a genuine problem.
Frequently Asked Questions about the Product Functi ons
▶
I cannot turn the power on.
1. Check if the power adapter is properly connected to the cigar jack.
2. Press and hold the Power button down for more than 1 second.
There is no sound from the speaker.
1. Check if the earphones are conne cted.
2. Check whether the format of the file is playable on the PC.
3. Check if the volume level is set to 0 or if ‘M ute’ is set.
4. Check if the FM tran smitter is t urned on.
I cannot output video to the TV.
1. Check if the TV i s turned on.
2. Check if the TV In put Source setting is set to Ext ernal Inp ut.
3. Check if the AV and RCA cables are properly connec ted.
4. Check the output typ e setting i n the Envir onment Se tting.
I cannot record video from a TV.
1. Check if the TV i s turned on.
2. Check if the AV cable is properly connected.
3. Check if the product is turned o n.
The product is not recognized as a removable disk
1. Check if the cable is properly connected to the USB port.
2. Connect the cable to another USB port on the PC and try again.
I cannot download a file.
1. Check if the product is turned o n.
2. Check if the cable is properly connected to the USB port.
odd-i N700D User Guide
69
Page 70
Please re-check to see if there is a genuine problem.
➲
Frequently Asked Questions about the Product Functions
▶
A video file is not played or is played incorrectly .
1. When you play a video , the initial load ing may take a whi le.
2. Check whether the file format is supported by the product, or if the file is corrupted.
Try playing it on a PC to check the file's integrity.
3. Videos of higher resolution than catered for by the product’s specifications cannot be played.
4. If the Safe Driving Mode is set in the Environment Settings, video is not output, although audio
is output.
I cannot play an audio file or it is played incorrectly.
1. Check if the volume size is set to ‘0’.
2. Check whether the file format is supported by the product, or if the file is corrupted.
Try playin g it on a PC to check the file' s integrity.
I cannot display an image file or it is displayed incorrectly.
1. Check whether the file format is supported by the product, or if the file is corrupted.
Try view ing it on a PC to check the file' s integrity.
I cannot display video subtitles.
1. Check if the video file name and the subtitle (SMI ) file nam e are id enti cal , and if they ar e in t he
same folder .
2. Select Movie Player and then Subtitle Settings from the menu and check if ‘Show Subtitle’ is
selected.
A video or an image is displayed in too small a size.
1. Check the original video file size.
odd-i N700D User Guide
70
Page 71

Please re-check to see if there is a genuine problem.
➲
Frequently Asked Questions about the Product Functions
▶
The screen is not displaying anything.
1. Check if the product is turned o n.
2. Check if the TV A V cable i s connected.
The screen flickers when I watch video on a TV .
1. Check if the A V cable is properly connected.
A recorded video plays back incorrectly.
1. Check if the recording was made with the AV cable incorrectly connected or connected to the wrong
port.
odd-i N700D User Guide
71
Page 72
Please re-check to see if there is a genuine problem.
➲
Frequently Asked Questions about the Product in Gener al
▶
How can I get after-sales service?
1. Call the customer support center (1588-4487 ), or requ est af te r- sale s ser vice on th e "C ust omer
Service" page of our website.
2. Write down details on the probl em, and any ot her rela ted details you want us to kn ow about,
and send it with the PM P to our headquar ters by mail .
3. You can also visit o ur headquar ters and request af ter-sal es servic e in person.
How long is the warranty period?
1. The warranty period for free service cover s one year from the d ate of pur chase.
2. If the damage is due to user neglect, however, the free warranty period does not apply, and
after-sales service will be provided only for a fee.
I entered the serial number to register the product but the
‘serial number incorrect’ message appears.
1. Check if you have entered the S/N (Serial Number) of 17 alphanumeric characters printed on
the rear side of the product.
How can I register the product?
1. If you have purchased the product, connect to the odd-i website and select Customer
Support>Register Product on the website.
odd-i N700D User Guide
72
Page 73

Do not
Any changes or modifications to the equipment not expressly approved by the party
responsible for compliance could void user’s authority to operate the equipment.
FCC Compliance Statement
This device complies with part 15 of the FCC Rules. Operation is subject to the following
two conditions:
(1) This device may not cause harmful interference, and
(2) This device must accept any interference received,
Including interference that may cause undesired operation
Information to User
This equipment has been tested and found to comply with the limits for a Class B
digital device, Pursuant to part 15 of the FCC Rules. These limits are designed to
provide reasonable protection against harmful interference in a residential installation.
This equipment generates, uses and can radiate radio Frequency energy and, if not
installed and used in accordance with the instructions, may cause harmful
interference to radio communications.
However, there is no guarantee that interference will not occur in a particular
installation. If this equipment does cause harmful interference to radio or television
reception, which can be determined by turning the equipment off and on, the user is
encouraged to try to correct the interference by one or more of the following
measures:
- Reorient or relocate the receiving antenna.
- Increase the separation between the equipment and receiver- Connect the
equipment into an outlet on a circuit different from that to which the receiver is
connected.
- Consult the dealer or an experienced radio/TV technician for help.
User's Manual Information
odd-i N700D User Guide
73
 Loading...