

Page 1

Mesotest II b
Instruction Manual
Copyright by G/62800/0607/e
Page 2

Page 2
Instruction Manual Mesotest II
___________________________________________________________________
0. Foreword
Thank you for the confidence which you
have placed in us by buying this OCULUS
product. With this unit you have made your
decision for a modern, thoroughly thoughtout product which has been manufactured
and tested according to the highest quality
standards.
Ongoing research and development at
OCULUS, which are certainly in your
interests as well, may lead to changes in the
design and scope of standard equipment.
The illustrations shown in this Instruction
Manual may therefore differ in some
respects from the unit as delivered.
Our company can look back on a history
extending more than 100 years into the past.
OCULUS today is a medium-sized company
whose only focus is to support physicians
and optometrists in their demanding work
with a line of top-quality products for ocular
examinations and operations.
Your Mesotest II is a free-space unit for
testing mesopic vision and glare sensitivity.
In the early 1960s, OCULUS cooperated
with the University Eye Clinic in Tübingen to
develop and build the world's first unit for
testing mesopic vision and glare sensitivity.
At the beginning of the 1980s, this unit was
further developed even with the help of a
new optical system.
The latest generation, the Mesotest II, has
been further improved by the application of a
new functional principle. The use of an
electronic control system has made it
possible to substantially streamline the unit's
use and operation, which can now optionally
be carried out from a PC. This also permits
the processing of patient data and
examination results.
The instrument´s weight has also been
greatly reduced, facilitating mobile use.
Proper use is indispensable for safety in
working with the unit. Therefore, please
familiarize yourself thoroughly with the
contents of this Manual before using the unit
for the first time.
Should you have questions or desire further
information on your unit, give us a call or
send us a telefax message. Our service
team will be happy to help.
OCULUS Optikgeräte GmbH The Management and Staff
Page 3

Instruction Manual Mesotest II
Page 3
___________________________________________________________________
1. Table of Contents
Page
0. Foreword ................................................. ............2
1. Table of contents..................................................3
2. Standard equipment list........................................4
3. Safety precautions ...............................................5
4. Description of the unit and its functions ....... .......6
4.1. Components of the unit...................................6
4.2. Description of the unit .....................................8
4.3. Description of the control unit .......................10
4.4. Warning signs and labels on the unit …........12
5. Proper use..........................................................12
6. First use of the unit.............................................12
6.1. Before first use………... ................................12
6.2. Installation and adjustment ...........................12
6.3. Instructions on transport and storage ...........13
7. Operating the unit...............................................14
7.1. Before each use................................ ............14
7.2. Preparation of the examinee ........................14
7.3. The examination procedure ..........................15
7.4. Additional examinations................................ 16
7.5. Evaluation of results .....................................16
7.6. After each use .................................... ..........16
8. Maintenance.......................................................17
8.1. Care, cleaning and disinfection.....................17
8.2. Replacing the viewing aperture lining……....18
8.3. Replacing fuses.............................................19
8.4. Replacing the workplace light bulb................19
8.5. Solving problems and malfunctions.......... ....20
8.6. Maintenance: description and intervals.........20
9. Disposal..............................................................20
10. Terms of warranty and service ........................21
10.1. Terms of warranty ......................... .............21
10.2. Liability for malfunctions or damage............22
10.3. Manufacturer's and service address........... 22
11. Appendix...........................................................23
11.1. Literature references ..................................23
11.2. Declaration of compliance...........................24
11.3. Order information, accessories and
replacement parts.......................................24
11.4. Technical data ............................................25
Page 4

Page 4
Instruction Manual Mesotest II
___________________________________________________________________
2. Standard Equipment List
- Mesotest II
- Control unit with LCD module and work
area illumination
- Mains cable
- Instruction Manual
- Notepad for test results (100 pages)
- Dust cover
- Metal covering for viewing aperture
If you have also acquired the software
module (cf. Chapter 10.3.), please see the
separate Instruction Manual for this product
and its accessories.
Right reserved to change the scope and
design of standard equipment when
technical development so requires.
Page 5

Instruction Manual Mesotest II
Page 5
___________________________________________________________________
3. Safety Precautions
The manufacturer is required by law to
inform the user explicitly on safety aspects
involved in dealing with this unit. This
chapter contains a summary of the most
important points to be noted regarding
technical safety.
Other safety precautions are found in the
text of this Instruction Manual
and are designated by
Please pay special attention to these
instructions as well.
Store this Instruction Manual with care in a
place where it is accessible for persons
using the unit at all times; also, give due
attention to Instruction Manuals of the unit's
other accessories as required.
The unit may only be used for its intended
purpose, as described in this Instruction
Manual (chapter 5), and by persons whose
proper use of the unit is ensured by their
training and practical experience.
Use the unit only with original parts and
accessories delivered by us and in a
technically flawless condition. Do not
attempt to use a damaged unit, but contact
your supplier.
Please abide by accident prevention laws
where applicable, and be especially careful
to observe the instructions and information
printed on the unit.
The unit may be used in medical areas only
if these rooms are equipped according to
VDE norms or the equivalent (Association of
German Electrotechnical Engineers).
Always disconnect all mains plugs from their
power outlets before carrying out
maintenance or cleaning work.
Disconnect the mains plug at once if you
notice smoke, sparks, or unusual sounds
coming from the unit. Do not use the unit
again until the problem has been corrected
by our service personnel.
Do not connect electrical plugs and sockets
by force. If it is not possible to connect them,
verify whether the plug is correct for the
socket. If you find damage in either the plug
or the socket, have them repaired by our
service personnel.
Do not disconnect electric plugs from their
sockets by pulling on the cable, but rather
on the plug.
Auxiliary equipment connected to the analog
or digital interfaces of the unit must have
proven compatibility with the EN and/or IEC
specifications of these interfaces.
Furthermore, all configurations must meet
IEC Systems Norm 601-1.
Do not attempt to configure electro-medical
systems by combining the Mesotest II with
non-medical electrical equipment (e.g. data
processing equipment) if this might reduce
the level of patient safety below that
recommended by IEC Norm 601-1. Where
permissible levels for leakage current may
be exceeded due to such combinations,
protective disconnecting devices must be
present.
Do not use the equipment named in the
Standard Equipment List in the following
situations:
- Where there is danger of explosion.
- In the presence of flammable anesthetics
or volatile solvents such as alcohol, benzine
or the like.
Do not store or use the unit in damp rooms.
Avoid placing the unit near dripping,
gushing, or splashing water, and make
certain that no fluid can enter the unit. For
this reason, please do not place any
containers full of liquid on top of the unit,
and also take care when cleaning the unit
with a damp cloth that no fluid gets into the
unit.
Do not cover the ventilation openings.
This unit is a high-quality technical product.
To ensure that it performs flawlessly and
safely, we recommend having the unit
inspected regularly every two years by our
service personnel. Should any problem arise
which you cannot solve using the enclosed
checklist of errors, label the unit "Out of
Order" and contact our service department.
Page 6
Page 6
Instruction Manual Mesotest II
___________________________________________________________________
4. Description of the Unit and Its Functions
4.1. Components of the Unit
3 4 5
2
1
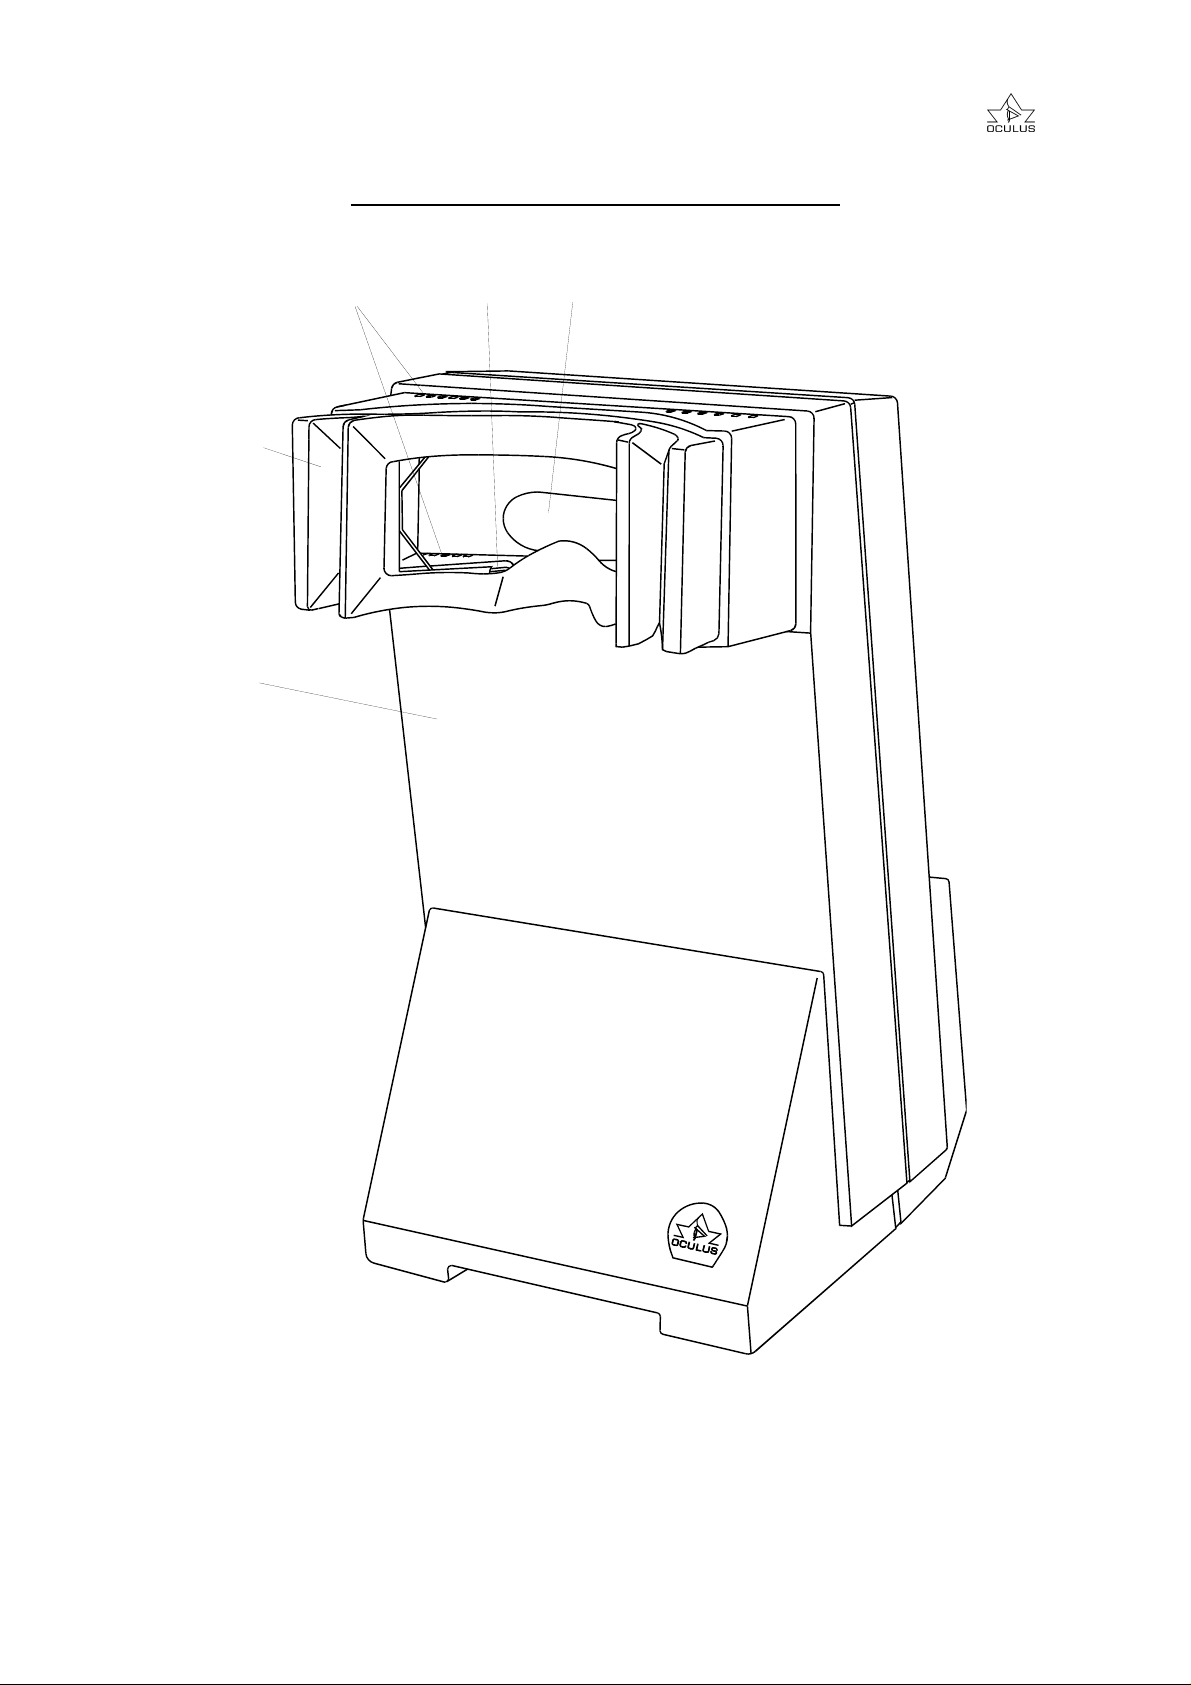
Figure 1 - Mesotest II, front view
No.1 - Front shell of the housing
No.2 - Lining of the viewing aperture
No.3 - Ventilation openings
No.4 - Clip spring
No.5 - Viewing aperture
Page 7
Instruction Manual Mesotest II
Page 7
___________________________________________________________________
7
6
11 10 9 8
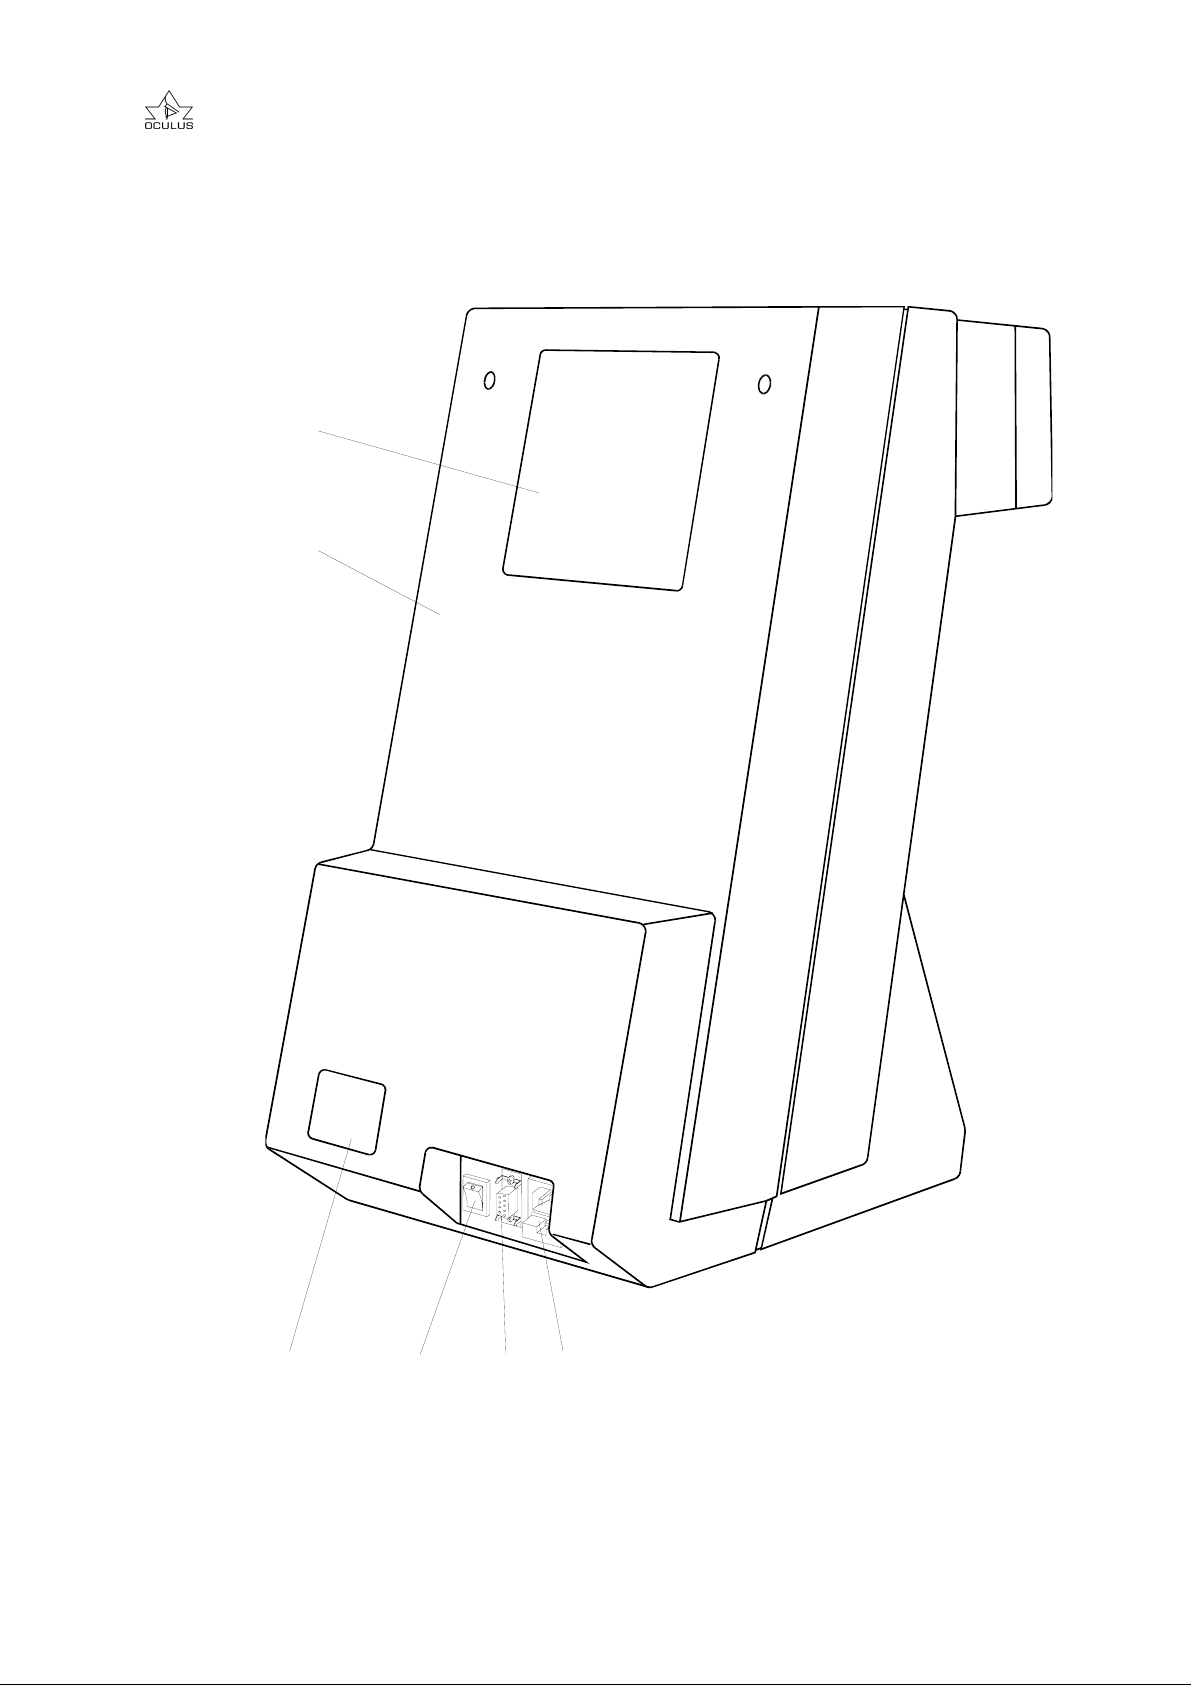
No.6 - Rear wall of housing
No.7 - Tinted window
No.8 - Mains plug with fuse holder
No.9 - Socket of the serial interface
No.10 - Mains switch
No.11 - Type plate
Figure 2 - Mesotest II b, rear view
Page 8

Page 8
A
Instruction Manual Mesotest II
___________________________________________________________________
4.2. Description of the Unit
Tests for mesopic vision and glare sensitivity
are an important supplement to tests of
photopic visual acuity, especially when
evaluating the ability to drive at night. Preand postsurgical examination is also to be
recommended for patients undergoing IOL
or refractive surgery, or when tinted lenses
are prescribed.
The Mesotest II is a PD-independent, freespace unit for testing mesopic vision and
glare sensitivity.
"Free-space" means that the test objects
appear under natural visual conditions.
Instrument myopia is eliminated for the most
part, since the eyes accommodate and
converge as in normal vision.
The comfortable, cushioned lining around
the viewing aperture ensures freedom of
viewing and optimum adjustment for all
examinees. The complete elimination of light
from other sources ensures correct
examinations even when room conditions
are only moderately dark.
The ventilation openings of the viewing
aperture lining ensure that condensation
cannot cloud the examinee's glasses or the
unit's occluder.
The test is carried out with optotypes of
different contrast levels. These optotypes
are presented in front of a low-brightness
backdrop.
The light intensity of the backdrop is 0.032
cd/m2 without and 0.10 cd/m2 with glare.
This corresponds to the brightness of
automobile traffic at twilight or at night.
Landolt rings acc. to DIN Norm No. 58220T1 are used as optotypes. Since visual
acuity decreases with decreasing
brightness, acuity level 0.1 is used. The
optotypes can be presented in six different
positions, and one position is preselected
automatically at the beginning of each test.
The Landolt ring positions which are
available for selection are:
LO - Top Left
O - Top
RO - Top Right
LU - Bottom Left
U - Bottom
RU - Bottom Right
Four different contrast levels are available.
They are:
1:23 / 1:5 / 1:2,7 / 1:2.
Here contrast level 1:23 corresponds to the
highest contrast, i.e. this level is the most
easily recognized.
Contrast 1:23 is the ratio between light
intensity of the optotypes and the backdrop.
The contrast levels are presented in each
case with and without glare (=BLEND). This
results in a total of eight tests which run
successively during the course of a test
routine.
Table 1 shows the course of the test routine.
Table 1
Test-No. 1 2 3 4 5 6 7 8
Contrast 1:23 1:5 1:2,7 1:2 1:23 1:5 1:2,7 1:2
Glare Off Off Off Off On On On On
utomatic
Land.sett.
LO RO O U RU U LU O
The viewing screen of the test panel is seen
through an optical system via a
semitransparent viewing mirror. The
optotypes are presented in front of this
viewing screen. Their virtual image appears
at a distance of 5 meters from the eye.
The optotypes are vacuum metallized onto a
glass disk. The projection disk is
manufactured to very tight tolerances for the
various contrast levels.
Page 9

e
F
ixat
ionAssist
e
Instruction Manual Mesotest II
Page 9
___________________________________________________________________
anc
Landolt Ring
Surrounding
GlareLight
Figure 3 - Test panel
The glare light source is situated at the left,
next to the test panel, at a visual angle of 3°
(cf. Figure 3). It is activated automatically in
accordance with test selection.
The glare light source simulates glare
created by an oncoming vehicle with its
headlights on dipped beam. The glare
intensity is 0.35 lux at the pupils.
The light sources are two white LED´s, one
for the surrounding and one for glare.
A stand-by function switches the illumination
off whenever there has been no operating
input for a certain period of time.
A projection device above the test panel
assists in fixation. It can be used to project
two red dots onto the test panel (cf. Figure
3).
This fixation assistance is turned off
automatically when the next test or
optotypes appear.
The Mesotest II is available with 3 sets of
minus lenses as an option. These make it
possible to determine the presence of night
myopia and thus to compensate for this form
of myopia, i.e. to improve nocturnal vision as
far as possible.
An integral part of this option is the
possibility of monocular examinations.
Fixation Assist anc
Page 10

Page 10
Instruction Manual Mesotest II
___________________________________________________________________
4.3. Description of the Control Unit
-0,5
Landol t r ing position: Top Left (LO)
2nd funct ion: i nt erpose -0.5 D minus lenses (Option)
-1,0
Landol t r ing position: Top (O)
2nd funct ion: i nt erpose -1.0 D minus lenses (Option)
-1,5
Landol t r ing position: Top Right (RO)
2nd funct ion: i nt erpose -1.5 D minus lenses (Option)
Landol t r ing position: Bot t om Left (LU)
Plug lock:
Press lever to
to c onnect
or r e lease !
FIX
R/L/BIN
-DPT.
START
STOP
Landol t r ing position: Bot t om (U)
0
Landol t r ing position: Bot t om Right (RU)
2nd funct ion: r eset minus lenses to 0 D (Opt ion)
Turns Fixati on A ssist ance on and off
Select an eye fo r Ex am i n ati o n
(Option)
Activ it at es 2nd f unc t ion (mi nus lenses)
Next pat ient , or stop current t ests and
return to beginning
TEST
NR.
CONTRAST
1 :____
R/L/BIN
-1,0 -1,5-0,5
-DPT.
BLEND
FIX
Workplace
light
0
R/L/BIN
TEST
<
TEST
>
Return to previous test
Proceed to next t est
FIX
START
STOP
TEST
<
MESOTESTII
-DPT.
TEST
>
Figure 4 - Control unit
Page 11
Instruction Manual Mesotest II
Page 11
___________________________________________________________________
The Mesotest II is operated via the external
control unit and the illuminated LCD module
(Figure 4). The control unit has its own work
area illumination to permit note-taking in
darkened rooms.
The unit can also be controlled from a PC by
means of an optional software module.
In this case, it is not the control unit but
rather the PC which is connected to the
serial interface of the Mesotest II.
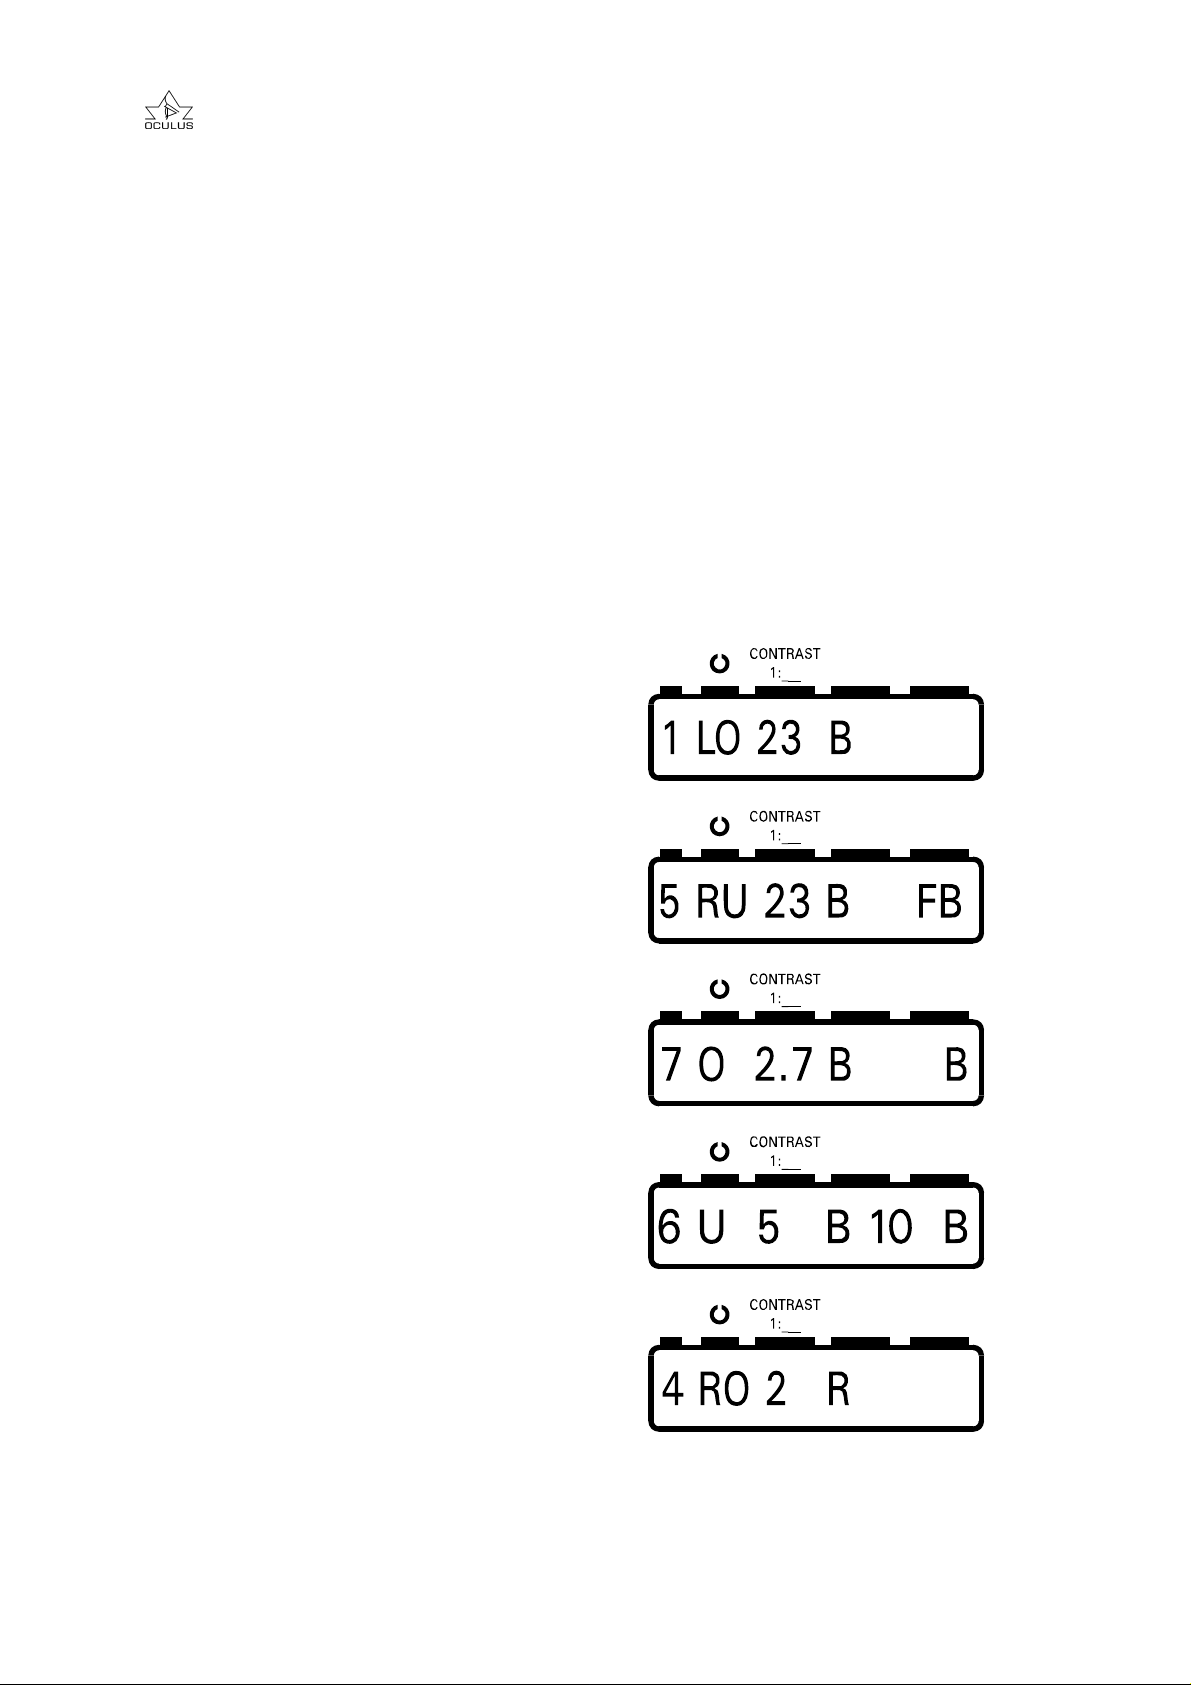
Following are a few displays which are
possible on the LCD module:
TEST
NR.
-DPT.
R/L/BIN
BLEND
FIX
Test No. 1: Display after the unit is turned on
B: Binocular examination
TEST
NR.
-DPT.
R/L/BIN
BLEND
FIX
Test No. 5: B: Binocular examination
F: Fixation assistance: On.
B: (=BLEND) = Glare: Active
TEST
NR.
-DPT.
R/L/BIN
BLEND
FIX
Test No. 7: B: Binocular examination
B: (=BLEND) = Glare: Active
TEST
NR.
-DPT.
R/L/BIN
BLEND
FIX
Test No. 6: -1.0 D minus lenses are
interposed (Option)
TEST
NR.
-DPT.
R/L/BIN
BLEND
FIX
Test No. 4: R: Monocular examination of
the right eye (Option).
Figure 5 - Sample displays of the LCD module
Page 12

Page 12
Instruction Manual Mesotest II
___________________________________________________________________
4.4. Warning Signs and Labels on the Unit.
Caution! Disconnect the mains plug
before opening the unit.
Caution! See the enclosed information sheets.
.
5. Appropriate Use
This unit is designed only for the purposes
described in this Instruction Manual. It is
designed for testing visual performance of
the human eye in the mesopic range.
This unit may be used only by persons
whose training and practical experience
ensure that they will work with the unit in an
appropriate manner.
Operate the unit only with original parts
and accessories delivered by us and in a
technically flawless condition.
Run the unit only on an electric power
supply system whose supply voltage is
within the voltage range given on the rating
plate.
Please abide by the safety precautions
given above.
6. First Use of the Unit
6.1. Before First Use
Please remove the unit and its accessories
from their packing and store the latter. You
can then send or transport the unit correctly
should service or repairs ever be required.
Before connecting the unit to the electric
power supply system, check whether the
supply voltage of the electric power supply
system is within the range given on the
rating plate.
This optical unit is to be handled with care.
Do not subject it to shocks, impacts, dirt or
high temperatures.
6.2. Installation and Adjustment
The Mesotest II should be set up in a
moderately bright or moderately darkened
room (room brightness between 2 and 5
lux).
tinted window of the unit should be
closed with the enclosed metal covering
in order to avoid falsification of the
examination results.
For example, if the unit must be
set up in a bright room due to
lack of available space, the
Page 13

Instruction Manual Mesotest II
Page 13
___________________________________________________________________
Proceed as follows to install this covering
(cf. Figure 6):
- Insert the metal covering on either side into
the slit between the viewing aperture and
the housing.
- Hold the metal firmly by the recessed grips
with one hand.
- Bend the metal with the other hand and let
it snap into the opposite slit.
To remove the metal covering, simply grasp
the recessed grips and pull it out.
However, closing the light
admission opening of the unit
increases the risk of instrument
myopia. This must be taken into account
when evaluating the examination results.
Avoid the vicinity of heating units or sources
of moisture which might enter the unit.
To put the unit into operation for the first
time, connect the control unit (or the serial
cable of the PC) to the socket (Figure 2, No.
9).
Figure 6 - Installing the metal covering
6.3. Instructions for Transport and Storage
A carrying bag is available for purposes of
transportation, e.g. for mobile use. If you
have decided not to acquire this, please
transport the unit only in its original packing
in order to avoid unnecessary damage and
expenses.
Avoid shocks when relocating the unit, since
they can have a negative effect on
calibrations.
Inspect the unit for damage after every
relocation. Do not under any circumstances
attempt to use a damaged unit, but please
contact our service personnel.
If you keep the unit in an automobile during
the cold season of the year, its optical
Connect the mains cable (to No. 8 in Figure
2).
Switch on the mains switch (Figure 2, No.
10). The unit is ready for use after a brief,
automatic self- test.
The LCD module, the work area light, and
the light in the mains switch light up to show
readiness for use.
components may become fogged with
condensation after being brought into much
warmer surroundings.
Please give the unit time to adjust to the
new surroundings before turning it on.
The conditions prescribed for transportation
and storage by IEC Norm 601-1 are:
- Surrounding temperature: -40° C to
+70°C.
- Relative humidity: 10% to 100%
including condensation.
- Air pressure: 500 hPa to 1060 hPa
If the unit is kept in its corresponding
packing, these values apply for a period of
15 weeks maximum.
Page 14

Page 14
Instruction Manual Mesotest II
___________________________________________________________________
7. Operating the Unit
7.1. Before Each Use
Please inspect the unit prior to each use to
make sure that:
- The unit is in flawless technical
condition.
- All cables and plugs are free of defects.
- You have connected the unit with the
mains cable which is intended for the
unit.
- You have inserted the mains plug into a
power outlet with a flawless protective
earth conductor.
7.2. Preparation of the Examinee
This poses no problem if the Mesotest II
has been set up in a darkened room. If it
has been set up in a brightly lit room, the
examinee has to be adapted by having
him look into the unit for a
corresponding period of time.
If the person being tested wears spectacles
or contact lens, the examination is then
carried out with the spectacles or contact
lenses.
This should be noted on the test form sheet
(also the presence of tinted lenses, if any).
The eyes of the person to be
examined must be adapted to
darkness for ca. 5 minutes
before the examination.
Page 15

Instruction Manual Mesotest II
___________________________________________________________________
Page 15
7.3. The Examination Procedure
Turn on the unit. After carrying out an
automatic calibration, the Mesotest II begins
Test No. 1.
A specific Landolt ring setting is pre-selected
for each test (cf. Table 1, Page 8). Test 1,
with contrast level 1:23, is the most easily
recognized and can therefore be used to
instruct the examinee.
After giving instructions, show the examinee
at least 5 different Landolt ring positions.
You can select these as desired with the
keys. The visual requirements are regarded
as fulfilled when the examinee has
Carry out the rest of the tests (Nos. 5 to 8) in
the same manner as Nos. 1 to 4.
Fill out all other spaces on the test form
sheet.
In order to start the examination again, e.g.
for a new patient, press the START/STOP
key. The program then restarts with Test
No.1.
Figure 7 - Test form sheet No. 62855 (reduced in
scale)
recognized at least 3 of 5 positions (60%
criterion). Mark these correspondingly on the
form sheet (No. 62855, cf. Figure 7).
Pressing the TEST> key as often as
required brings you to each subsequent test
(Nos. 2 to 4), with contrast levels 1:5, 1:2,7
Name
First Name
Street
City
Examinat ion
TestNo.12345678
Contrast 1:23 1:2 1:23 1:5 1:2,7 1:21:2,71:5
wears no visual ai d
with contact l enses
Date of birt h
Sex m f
tinted lenses
clear l enses
binocular
monoc. right
monoc. left
and 1:2. The contrast diminishes with each
test. Level 1:2 is the most difficult to
recognize.
In presenting the Landolt ring positions,
proceed as during the first test. Mark these
results on the form sheet as well.
In case of uncertainty, the previous test can
be repeated by pressing the TEST< key.
Tests 5 to 8 are presented at the same
contrast levels as tests 1 to 4, but in brighter
surroundings and with continuous glare.
Before continuing the examination with Test
No. 5, turn on the fixation assistance with
the FIX key. Ask the examinee to direct his
gaze between the two red lights.
If the examinee does not do this and looks
directly into the glare light source during the
change to Test No. 5, he will recognize no
optotypes at first. This can cause a delay in
the examination, since he requires some
time (ca.10-30 seconds) for readaptation.
You can turn the fixation assistance off
again with the FIX key. However, it is
automatically turned off after each change of
tests or optotypes in order to prevent a
falsification of the examination results.
Now press the TEST> key again.
Visual performance improves
with differentlensepowers
Qualified for Night Driving Yes No
City, date Examiner
Mesotest II fort estingmesopie vision
Typ 62800
and glaresensitivity
The unit switches to "Standby" whenever ca.
7 minutes have elapsed with no change in
settings. Press any key to turn the
illumination on again.
If you have interrupted the examination,
show the examinee a different Landolt ring
position or a different test after taking up the
examination again.
-0.5 D -1.0 D -1. 5 D
Test form sheet No.62855
Optikgerät eGmb H
D-35549 Wetzlar
Tel.+ + 49/641/2005-0
Fax + + 49/641/2005-55
Page 16

Page 16
Instruction Manual Mesotest II
___________________________________________________________________
7.4. Additional Examinations
Provided that your Mesotest II is equipped
with minus lenses and an eye cover, you
have the option of carrying out additional
examinations.
You can use the minus lenses to determine
whether night myopia is present.
Activate the minus lenses for the last test
number which the examinee just barely
recognized.
To interpose a minus lens, first press the DPT.- key, then the key with the desired
lens power (marked in red on the control
unit).
If the examinee's visual performance
improves, night myopia is possibly present
and should be corrected with a
corresponding visual aid.
The degree of night myopia can be
determined by interposing different lens
powers (-0.5/-1.0/-1.5 D).
The eye cover also permits monocular
examinations to be carried out.
This is very important, e.g. for IOL patients
or excimer laser patients.
To swing the eye cover into place, press the
R/L/BIN key on the control unit. The cover is
advanced farther each time the key is
pressed. The screen display shows which
eye is being examined ( R / L / B ).
7.5. Evaluation of Results
The test with the least contrast which is still
correctly recognized constitutes the basis for
evaluating visual performance.
For the evaluation of the ability to drive at
night the German Ophthalmological society
(DOG) gives following recommendations:
Driver's licence in classes: A, A1, B, BE, M, L
and T
without glare: contrast level 1 : 5 (Test 2)
with glare: contrast level 1 : 5 (Test 6)
Driver's licence in classes: C, C1, CE, C1E,
D, D1, DE, D1E and passenger transport
without glare: contrast level 1 : 2,7 (Test 3)
with glare: contrast level 1 : 2,7 (Test 7)
Minimum requirements concerning the
mesopic vision and glare sensitivity according
to “Berufsgenossenschaft Principle G 25”
(Berufsgenossenschaft: Institution for Statutory
Accident Insurance and Prevention):
Requirement level 2 (only for increased
requirement)
without glare: contrast level 1 : 5 (Test 2)
with glare: contrast level 1 : 5 (Test 6)
Requirement level 1 (only for increased
requirement)
without glare: contrast level 1 : 2,7 (Test 3)
with glare: contrast level 1 : 2,7 (Test 7)
As a test criterion you must operate with a
criterion to interrupt just like the DIN 58220
(visual acuity). 3 out of 5 test-signs must be
recognized correctly.
Mark an "X" in the proper space on the
"Qualified for Night Driving" line of the form
sheet. If appropriate, also give the desired
driver's licence class.
7.6. After Each Use
Turn off the unit after using it, and use the
dust cover to protect it against foreign
matter.
Page 17

Instruction Manual Mesotest II
___________________________________________________________________
Page 17
8. Maintenance
8.1. Care, Cleaning and Disinfection
General Remarks
Disconnect the mains plug
before cleaning the unit!
Always observe the product
descriptions and instruction manuals for any
agents and equipment which are used in
caring for, cleaning, and disinfecting the unit
or its accessories.
Do not use agents which are aggressive,
contain chlorine, are abrasive, or may attack
the finish of the unit.
Cleaning Painted Surfaces and the Housing
Take care that no cleaning agents get inside
the unit.
In general, we recommend the use of a
cleaning agent with antistatic action for
plastic surfaces (to reduce subsequent static
attraction of dust particles).
Otherwise, clean the outer surfaces of the
unit by wiping them with a damp cloth.
If there are residues, you can wipe them off
with a mixture of equal parts of alcohol and
distilled water. You can also add a few drops
of a standard commercial dishwashing liquid
to this fluid.
Cleaning the Glass of the Viewing Aperture
Soiling caused by dust or fingerprints may
affect the examination. You can clean the
glass of the viewing aperture with a soft
cloth or an optical brush, using alcohol or a
lens cleaner if necessary.
Cleaning and disinfecting the lining of the Viewing Aperture
You can clean the lining of the viewing
aperture with mild soapsuds.
We recommend alcohol or spirits for
disinfecting it.
The lining of the viewing aperture should be
replaced in case of intense soiling (cf.
Chapter 8.3).
Page 18

Page 18
Instruction Manual Mesotest II
___________________________________________________________________
8.2. Replacing the Viewing Aperture Lining
The lining of the viewing aperture consists of
an elastic material. There is a slot on its
outer edge which slips onto the front frame
of the unit's casing. The lining of the viewing
aperture is reinforced on the inside with a
wire clip spring to stabilize its shape.
The unit can be laid on its back in order to
replace the lining of the viewing aperture.
Caution! Disconnect the
mains plug before tipping
the unit.
Be sure to lay the unit on
a soft surface.
Caution! Be careful not to
damage the glass of the viewing aperture
when installing the new lining of the
viewing aperture.
In order to replace the lining of the viewing
aperture, first remove the clip spring (Figure
10 a).
To do this, grasp the clip spring successively
by both of its rounded ends and unhook the
ends of the spring upwards out of the rubber
holder. Then pull the clip spring completely
out of the upper guide slot.
Now press the lining of the viewing aperture
out of its guide slot and pull it out, starting on
one side (Figure 10 b).
The replacement is carried out in the
reverse order:
Compress the lining of the viewing aperture
vertically and insert it into the frame of the
casing. Beginning from either side, press the
slot of the viewing aperture lining into the
frame. Take care not to bend the small
ventilation openings at the back.
With the continuous spring uppermost, place
the clip spring into its guide slot (Figure 11).
Take care that the spring is completely in
the slot.
Then grasp both rounded ends of the clip
spring one after the other and hook them
again into the groove at the bottom.
Figure 10 a - Removing the clip spring
Figure 10 b - Removing the lining of the viewing
aperture
Figure 11 - Inserting the clip spring
Page 19

Instruction Manual Mesotest II
___________________________________________________________________
Page 19
8.3. Replacing Fuses
Figure 12 - Mains plug with fuse drawer
Disconnect the mains plug
before replacing the fuses!
Replace only with a fuse of
type T 400 mA. A repeated
blowing of the fuses indicate
an internal fault of the Mesotest II.
Please clearly mark the unit as nonoperational and contact our service
personnel.
The two fuses of the unit are located in a
small fuse drawer which is built into the
mains input connector.
To open the drawer, grasp the small grip on
its top and pull the drawer out towards the
back.
For replacements, use only the fuse type
given on the rating plate. Press the drawer
back into place until the grip of the drawer
snaps into place again.
8.4. Replacing the Work Area Light.
Figure 13 - Work area light.
The bulb of the work area light has a long
working life. Should it ever burn out,
however, replacement is very easy.
The bulb is replaced as a unit with its plastic
socket, which also serves as a light shade.
Simply remove the light by pulling it
upwards. Take care not to bend the contact
wires of the bulb when inserting the new
light.
Guide the contact wires of the bulb and the
plastic nipples of its mounting into their
holes and push in the light until it is seated.
Page 20

Page 20
Instruction Manual Mesotest II
___________________________________________________________________
8.5. Solving Problems and Malfunctions
If a problem occurs which you cannot solve
with the Troubleshooting Table below, label
Problem Possible cause Solution
the unit as "Out of Order" and contact our
service personnel.
No reaction when the mains
switch is turned on.
The control unit or the serial
The fuses of the unit are
The unit was switched off and on
The examinee says that he does
not recognize anything.
The examination room is too
The work area light fails to light
up.
R/L/BIN and - DPT. do not
function with correct minus lens
values but are nevertheless
displayed in the LCD.
The Mesotest II is not connected
to the power mains.
Power failure, or the power
outlet is inactivated.
cable of the PC is incorrectly
connected.
defective.
again too quickly.
The unit is in Stand-by Mode. Press any key of the control unit.
brightly illuminated.
The light bulb is defective. Replace it (cf. Chapter 8.4).
Optional equipment has not
been installed in the unit.
Insert the mains cable into the
power outlet or into the input
connector of the Mesotest II.
Contact your house electrician.
Check whether the plug is
connected correctly.
Exchange the fuses (cf.
Chapter 8.3).
Wait 5 seconds between
switching the unit off and on.
Darken the room or cover the
tinted window with the enclosed
metal cover.
8.6. Maintenance: Description and Intervals
The Mesotest II has been built in such a way
that no special maintenance is required.
9. Disposal
Have the packaging disposed of
as recyclable waste.
When the device has reached
the end of its service life it has
to be disposed of properly:
The metal parts of the device should go to
scrap yard.
Plastic components, electrical components and
circuit boards should be disposed of as scrap
electronics.
To be certain, however, we recommend an
inspection of the photometric values every 2
years. Contact your OCULUS service
personnel for this purpose
Batteries should be disposed of as special
waste.
Materials should be disposed of according to
the laws of your country.
Please use the services of suitable waste
disposal companies.
Ask your town or municipal administration for
information about local waste disposal
companies.
Page 21

Instruction Manual Mesotest II
___________________________________________________________________
Page 21
10. Terms of Warranty and Service
10.1. Terms of Warranty
With the purchase of this instrument you
have chosen a high-quality product from
OCULUS. Your instrument has been
manufactured with great care using highgrade materials and state-of-the-art
production technology. Any software
delivered with this product has been tested
by OCULUS and confirmed to comply with
current technical standards. Please be sure
to read the operating manual as well as all
safety instructions before initial use and to
observe them when using the instrument.
This instrument is provided with a warranty
in accordance with the legal regulations.
Any manipulation of the device by
unauthorized persons voids all warranty
claims, since improper alterations or
attempts at repair can create considerable
hazards for users as well as patients.
Any manipulation by unauthorized persons
of PC hardware or software included in the
delivery likewise voids all warranty claims.
Please report any transport damage to the
shipping agent immediately upon or after
delivery and have this confirmed on the
freight bill so that any claims can be duly
settled.
In general our General Business and
Delivery Terms as amended at the date of
purchase shall apply.
Page 22

Page 22
Instruction Manual Mesotest II
___________________________________________________________________
10.2. Liability for Malfunction or Damage
OCULUS considers itself responsible for the
safety, reliability and functionalism of the
unit only if the unit is used in accordance
with this Instruction Manual.
The unit contains no parts (except the light
bulb), which require maintenance or repair
by the user.
No liability whatever is possible on the part
of OCULUS if assembly work, additions to
the unit, readjustments, maintenance work,
alterations, or repairs are carried out on the
unit by non-authorized persons or if the unit
is improperly cared for or handled.
If the above-mentioned work is carried out
by authorized persons, these persons must
be requested to provide a certification of the
type and extent of their repair work,
including details on changes made in the
ratings or the capacities of the unit if
required. The certification must bear the
date on which the work was carried out as
well as the name of the service company
and must be signed.
If desired, OCULUS will provide authorized
persons with circuit diagrams, replacement
parts lists, additional descriptions, and
adjustment instructions for this purpose.
Use only original parts from OCULUS for
repairs.
10.3. Manufacturer's and Service Address
You can receive additional information from
our service department or from our
authorized representatives.
Manufacturer's and Service Address:
OCULUS Optikgeräte GmbH
Münchholzhäuser Str. 29
D - 35582 Wetzlar
Tel.:++49 / 641 / 2005-0
Fax:++49 / 641 / 2005-255
e-mail = sales@oculus.de
Page 23

Instruction Manual Mesotest II
___________________________________________________________________
Page 23
11. Appendix
11.1. Literature References
- Aulhorn, E. und Harms, H.: Über die
Untersuchung der Nachtfahreignung von
Kraftfahrern mit dem Mesoptometer
Klin.Mbl. für Augenheilkunde 157/1970,
843-873, F. Enke-Verlag, Stuttgart
- B. Lachenmayr, Annemarie Buser und
Susanne Müller:
Welche visuelle Information benötigt der
Kraftfahrer für die sichere Teilnahme am
Straßenverkehr?
Ophthalmologie (1994) 91: 383-394
© Springer-Verlag 1994
- Nolte, W., (1962), Die Leuchtdichteverhältnisse im Straßenverkehr als Grundlage für die Augenuntersuchung von
Kraftfahrern.
Ber Dtsch Ophthalmol Ges 64: 543-547
- Empfehlung der Deutschen Ophthalmologischen Gesellschaft zur Fahreignungsbegutachtung für den Straßenverkehr
DOG, Heidelberg 1996
- DIN 58220-T1; März 1988; Sehschärfebestimmung, Normsehzeichen,
Beuth-Verlag, Berlin
Page 24

Page 24
Instruction Manual Mesotest II
___________________________________________________________________
11.2. Declaration of Compliance
We hereby declare as sole proprietor that
this product complies with the following
norms or normative documents:
- EN 60601-1 Medical electrical equipment;
General requirements for the safety,
05/1994
- EN 60601-1-2 Collateral Standard:
Electromagnetic compatibility, 09/1994
in accordance with the directives of
Guideline 93/42/EWG for Medical Products.
Dipl.Ing. Rainer Kirchhübel
Managing Director
OCULUS Optikgeräte GmbH
11.3. Order Information, Accessories, Replacement Parts
62800 Mesotest II
62801 Mesotest II Type 62800
with 3 additional sets of minus lenses
and an eye cover
62802 Carrying bag
62855 Set of 10 test note pads
6280006004 Light (spare light bulb for workplace light)
6280000001 Dust cover
6280001003 Lining of the viewing aperture
6280001007 Clip spring (for the viewing aperture lining)
05100090 Fuse 0.4 AT
62803 Software module for IBM-compatible PCs for recording examinations and
controlling the Mesotest II, incl. interface cable.
Diverse electrically operated elevation platforms on request.
Page 25

Instruction Manual Mesotest II
___________________________________________________________________
Page 25
11.4. Technical Data
Mains connection
100 - 240 VAC
50 - 60 Hz
35 VA
Fuses
2 x T 0,4 A - 250 V
Weight
7.8 kg incl. control unit and mains cable
Light sources
White LED´s
One for surrounding and one for glare
Dimensions
WxDxH 246 x 377 x 464 mm
Control unit WxDxH 82 x 152 x 45 mm
37
377 246
464
82
152
Mode of operation:
Via an external control unit with LCD and
integrated work area lighting.
Connection via cable to a serial interface, all
adjustments are carried out by a motor.
Option: Operation via PC.
Test distance:
5 m
No. of tests:
8 tests (4 with and 4 without glare);
6 different, freely selectable Landolt ring
positions.
We reserve the right to make changes necessitated by ongoing technical development.
Optotype carrier:
Permanently installed glass disc.
Optotypes:
Landolt rings, visual acuity 0.1
4 contrast levels: 1:23 / 1:5 / 1:2,7 / 1:2
Fixation assistance:
Via 2 light diodes, can be turned on at any
time.
Unit viewing aperture:
Elastic lining to seal off distracting room
light, made of material which is pleasant to
the touch, with ventilation, appropriate for all
head sizes.
Window of the unit:
Via a semitransparent mirror through a
tinted window in free space, used to avoid
instrument myopia.
Photometric data:
Brightness of surroundings:
Without glare: 0.032 ±0.003 cd/m2
With glare: 0.10 ± 0.01 cd/m2
Glare light source: 0.35 ± 0.03 lux
Angle of glare: 3°
Minus lenses:
Optional, for ascertaining the presence of
night myopia, with 3 sets of minus lenses:
-0.5 D / -1.0 D / - 1.5 D
Can be swung into position by motor, with
integrated eye cover for monocular
examinations
IEC 601-1 Classification:
Type of protection against electrical shock:
Safety class 1
Degree of protection against electrical
shock: Type B
Degree of protection against entry of water:
IP 20
Operating conditions:
Temp.: +10°C to +40°C
Humidity: 30 % to 75 %
Air pressure: 700 hPa to 1060 hPa
 Loading...