


LRC300
Learning Remote Control
User Guide
by Opus Technologies
For use with the Octopus Multi-Room System
Editable device names
Clock and Alarm features
Backlit display and keys
Hard coded dedicated Octopus buttons
Learning storage buttons compatible
with nearly all source equipment
High power IR output for extended transmission range
Local banks for control of bedroom TV etc
Macro facility
Cloning feature

The LRC300 is a learning remote control designed to
work either with a full Octopus A-BUS Multi-Room system
or an Octopus A-BUS keypad when used with compatible
A-BUS Ready™ outputs on receivers or amplifiers.
The LRC300 has 8 device banks (Tuner, DVD etc.),
6 of which are related to the 6 inputs on the Octopus
system plus 2 further Local banks which can be used
to control sources local to the room in which the remote
is being used. The 8 device bank buttons have been
pre-coded to send the correct Octopus codes to change
sources on our hubs but these buttons can also be
taught new codes if required.
There are 6 dedicated hard-coded buttons that control
the features of the Octopus A-BUS keypads: Standby, CCTV
(only used when an Octopus video switcher is installed),
Select, Mute, Vol/Function Up and Vol/Function Down.
In addition there are 38 buttons per device bank that
can be taught any IR code from the source equipment's
own remote controls (e.g. a CD player remote). This allows
the LRC300 to control all functions of the source equipment
in addition to controlling the Octopus system itself.
The 8 device banks and all storage button names can
be renamed so that any desired text can appear in the
LCD display window.
A Macro function allows the LRC300 to send out a chain
of IR commands actioned by a single button-press.
All 38 storage buttons and even the device bank
buttons can contain a Macro of up to 20 steps.
A clock is provided which together with a Timer feature
allows the LRC300 to wake the user up to the Tuner
input at any desired time.
INTRODUCTION
2
BACKLIGHT
BUTTON
IN PU T 4 IN PU T 5 IN PU T 6
LO CA L 1
LO CA L 2
CL EA R
1
SE LE CT
EX IT
RE C TI ME
GU ID E
EN TE R
ME NU
TI TL E
VO L
PL AY
PA US E ST OP
MU TE
2 3
4 5 6
7 8 9
+10 0
CD DV D
RA ND IN FO ON
SLE EP
VI D+
OF F
STAT ION / TR ACK
BAND / DISC
CCTV
TU NER
3
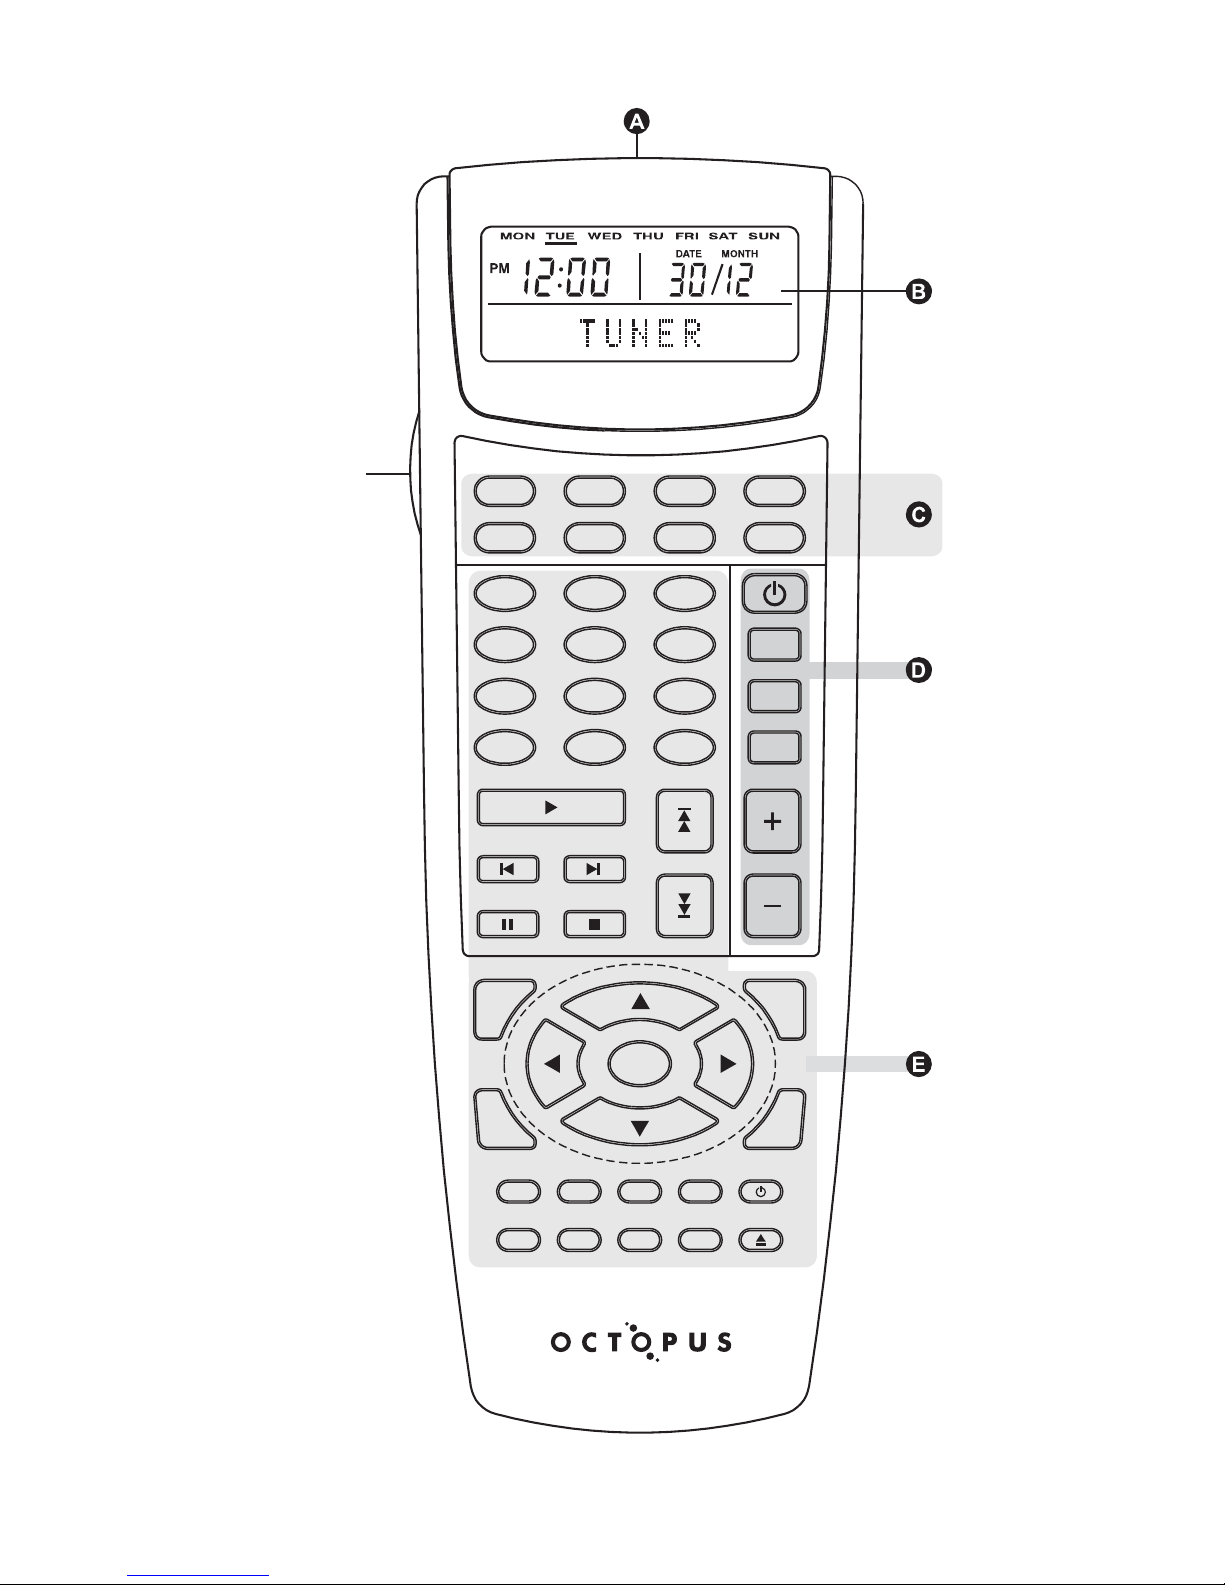
UNIT DIAGRAM
INFRARED TRANSMITTER AND LEARNING EYE
DISPLAY (LCD) WINDOW
DEVICE BUTTONS
STORAGE BUTTONS
LEARN/MACRO BUTTON
EDIT BUTTON
CLEAR BUTTON
RESET BUTTON
ALARM/TIMER ON/OFF
4
:
:
:
ENTER
1
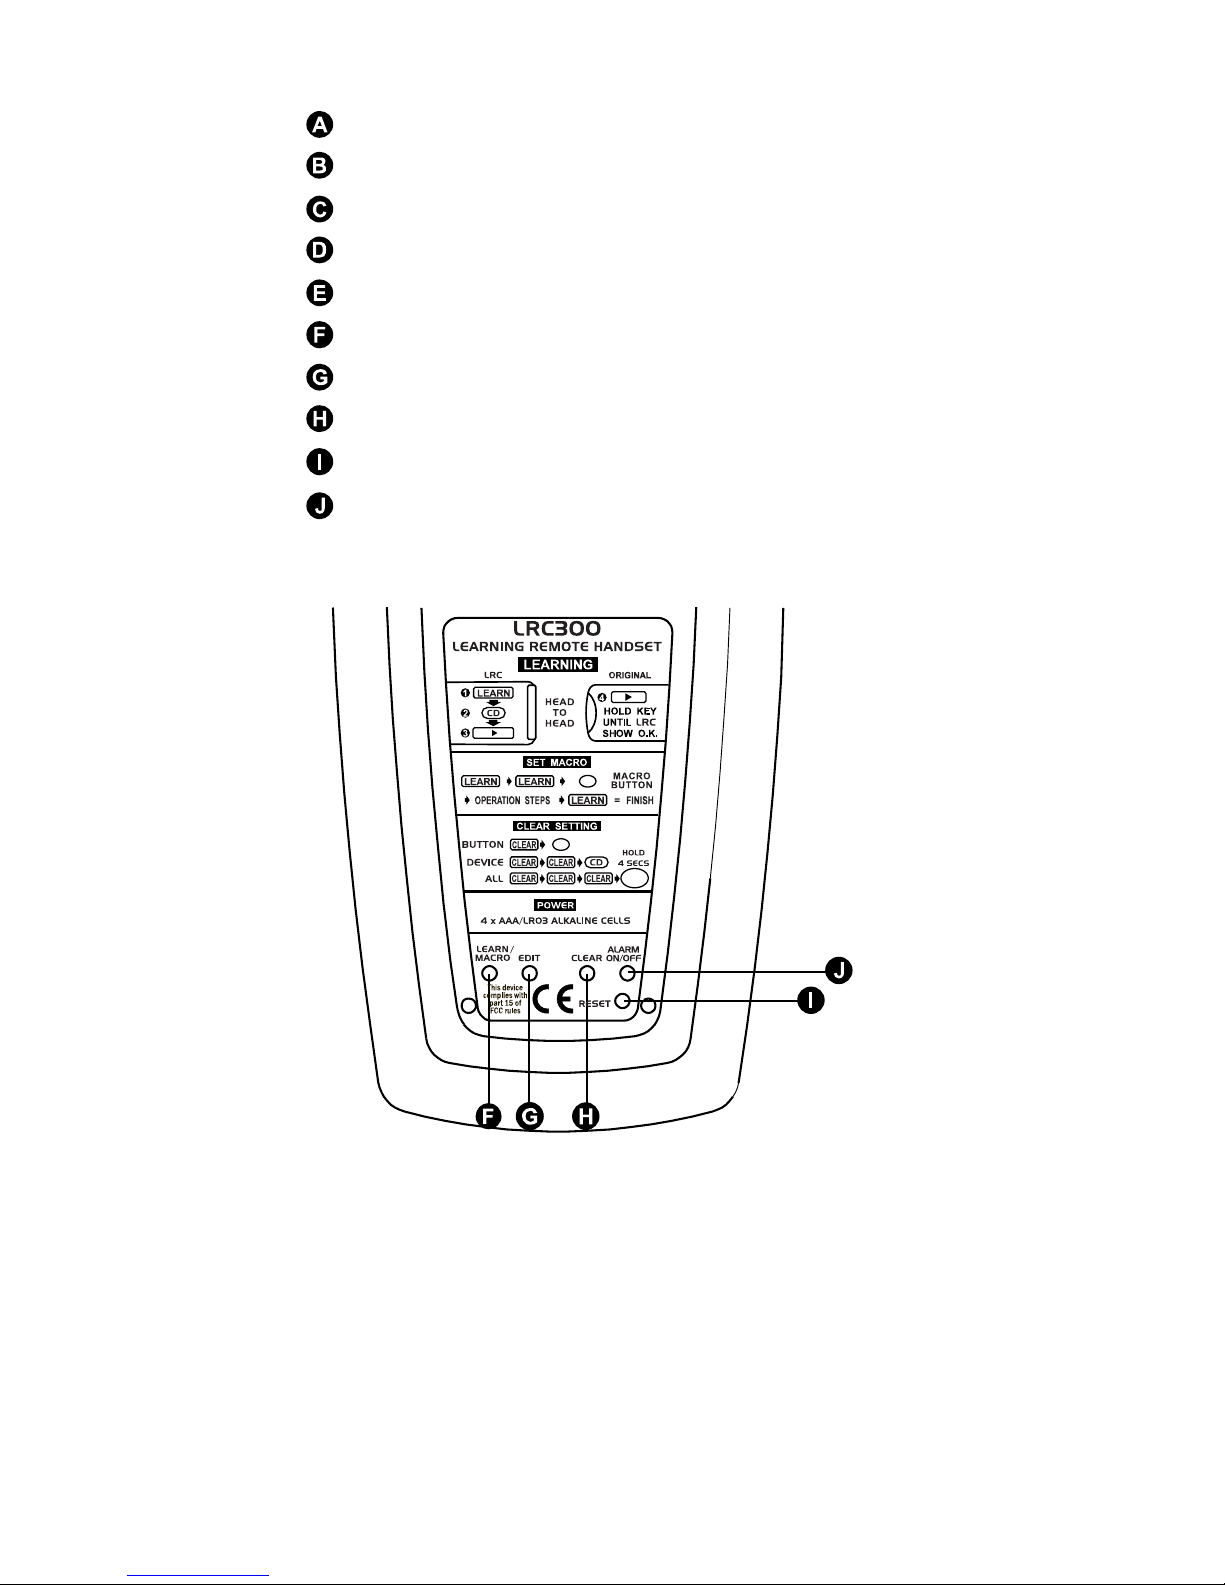
Use only Alkaline type batteries.
(1) Remove the battery cover.
(2) Insert 4 AAA/LR03/sum-4 batteries.
(3) Close the battery cover until it clicks.
In case of battery replacement, all stored data is retained
in non-volatile memory whilst the batteries are removed.
INSTALLING BATTERIES
DEDICATED OCTOPUS SYSTEM BUTTONS
REAR OF LRC300
EXIT
GUIDE
ENTER
MENU
TITLE
EXIT
GUIDE
ENTER
MENU
TITLE
EXIT
GUIDE
ENTER
MENU
TITLE
EXIT
GUIDE
ENTER
MENU
TITLE
EX IT
EN TE R
TI TL
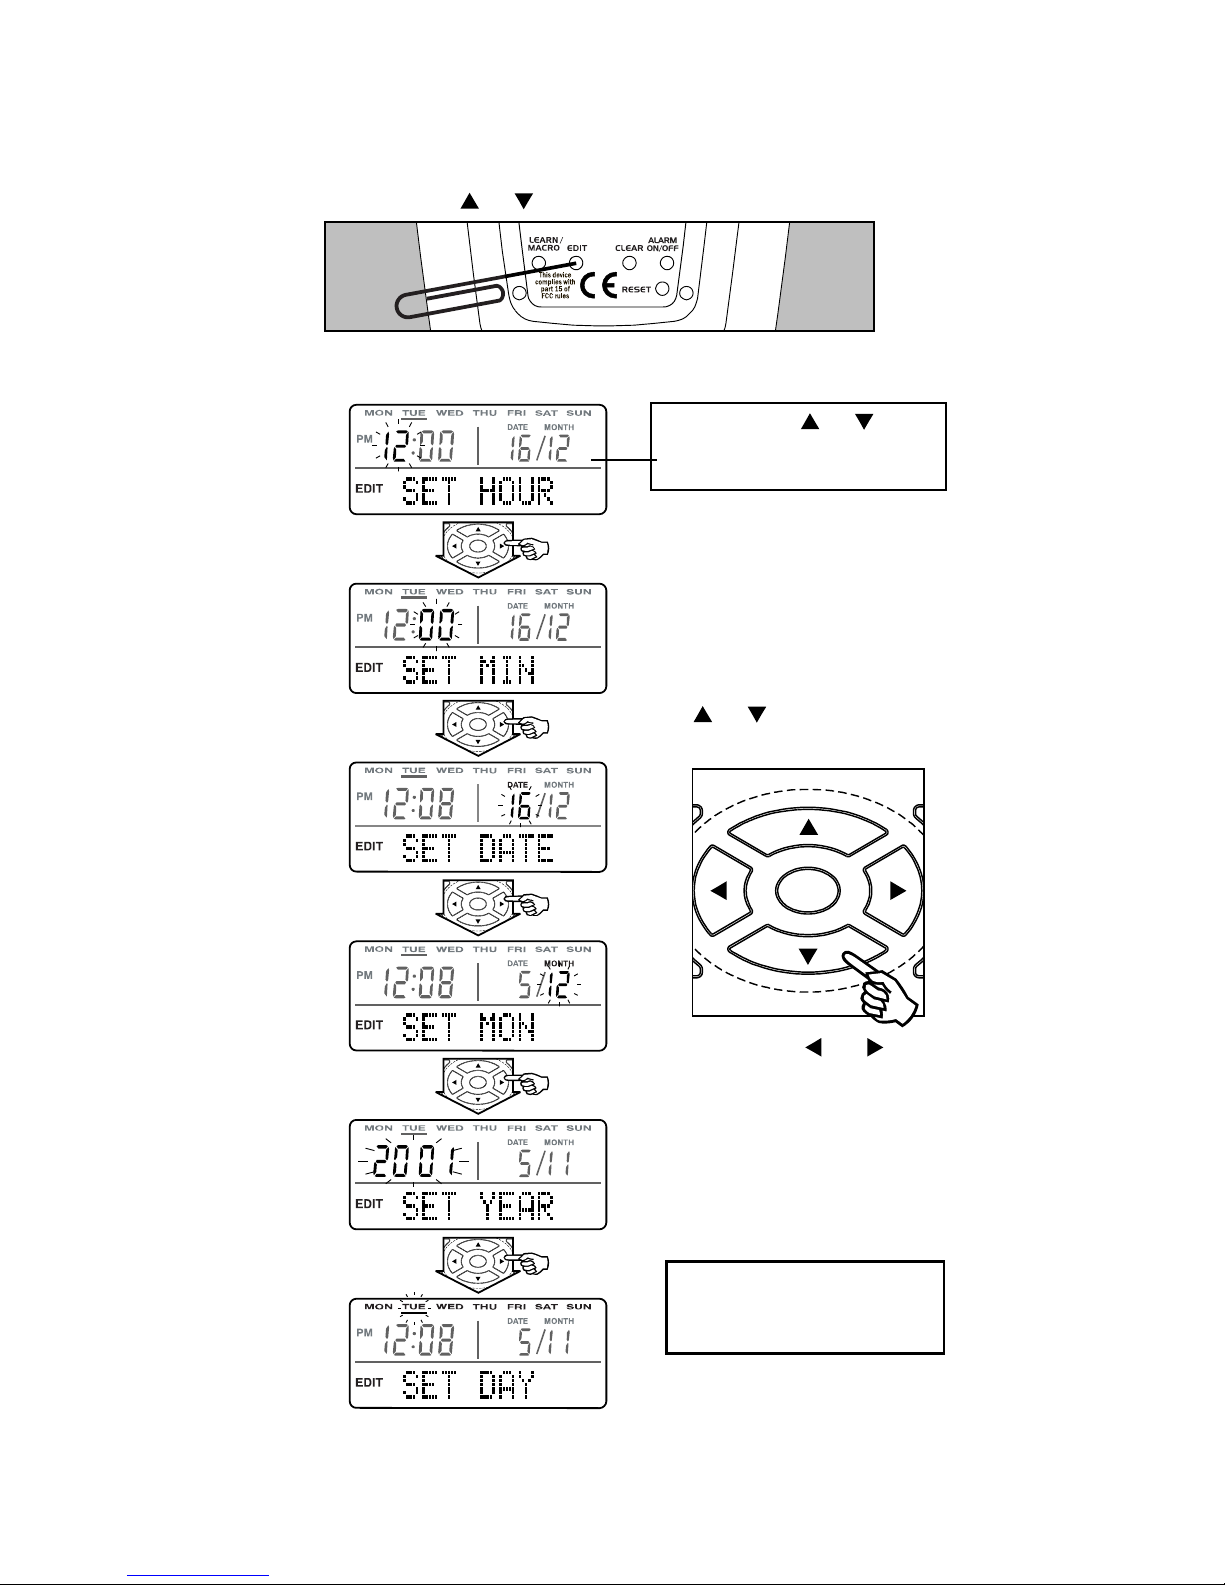
SETTING UP THE REMOTE CONTROL
On the back of the remote press EDIT once (using a paperclip or
similar), to enter Real Time Clock mode. Display shows "CLOCK?"
flashing. Press the or buttons to start editing.
REAL TIME CLOCK / DATE / MONTH / YEAR / WEEKDAY SETTING
When finished press the EDIT button or wait 15 seconds
to exit Real Time Clock mode.
Follow the steps below to set the desired values:
For all settings pressing
or scrolls through
the desired values
Pressing or
steps forwards or
backwards through
the Setting steps
Keep holding or
buttons to go through
the 12/24 hour time format
Holding a cursor key
will fast advance
the function
5
EXIT
GUIDE
ENTER
MENU
TITLE
1.
2.
3.
 Loading...