

Page 1

1
Installation Guide
Page 2

2
Contents
Application Diagram ........................................................ 3
Installation ....................................................................... 3
Smart ScanTM....................................................................3
Configuring Smart ScanTM.................................................4
Description.......................................................................4
Features...........................................................................4
Remote Control Guide.....................................................5
Warranty...........................................................................7
Disclaimers.......................................................................7
Specifications...................................................................8
Page 3
3
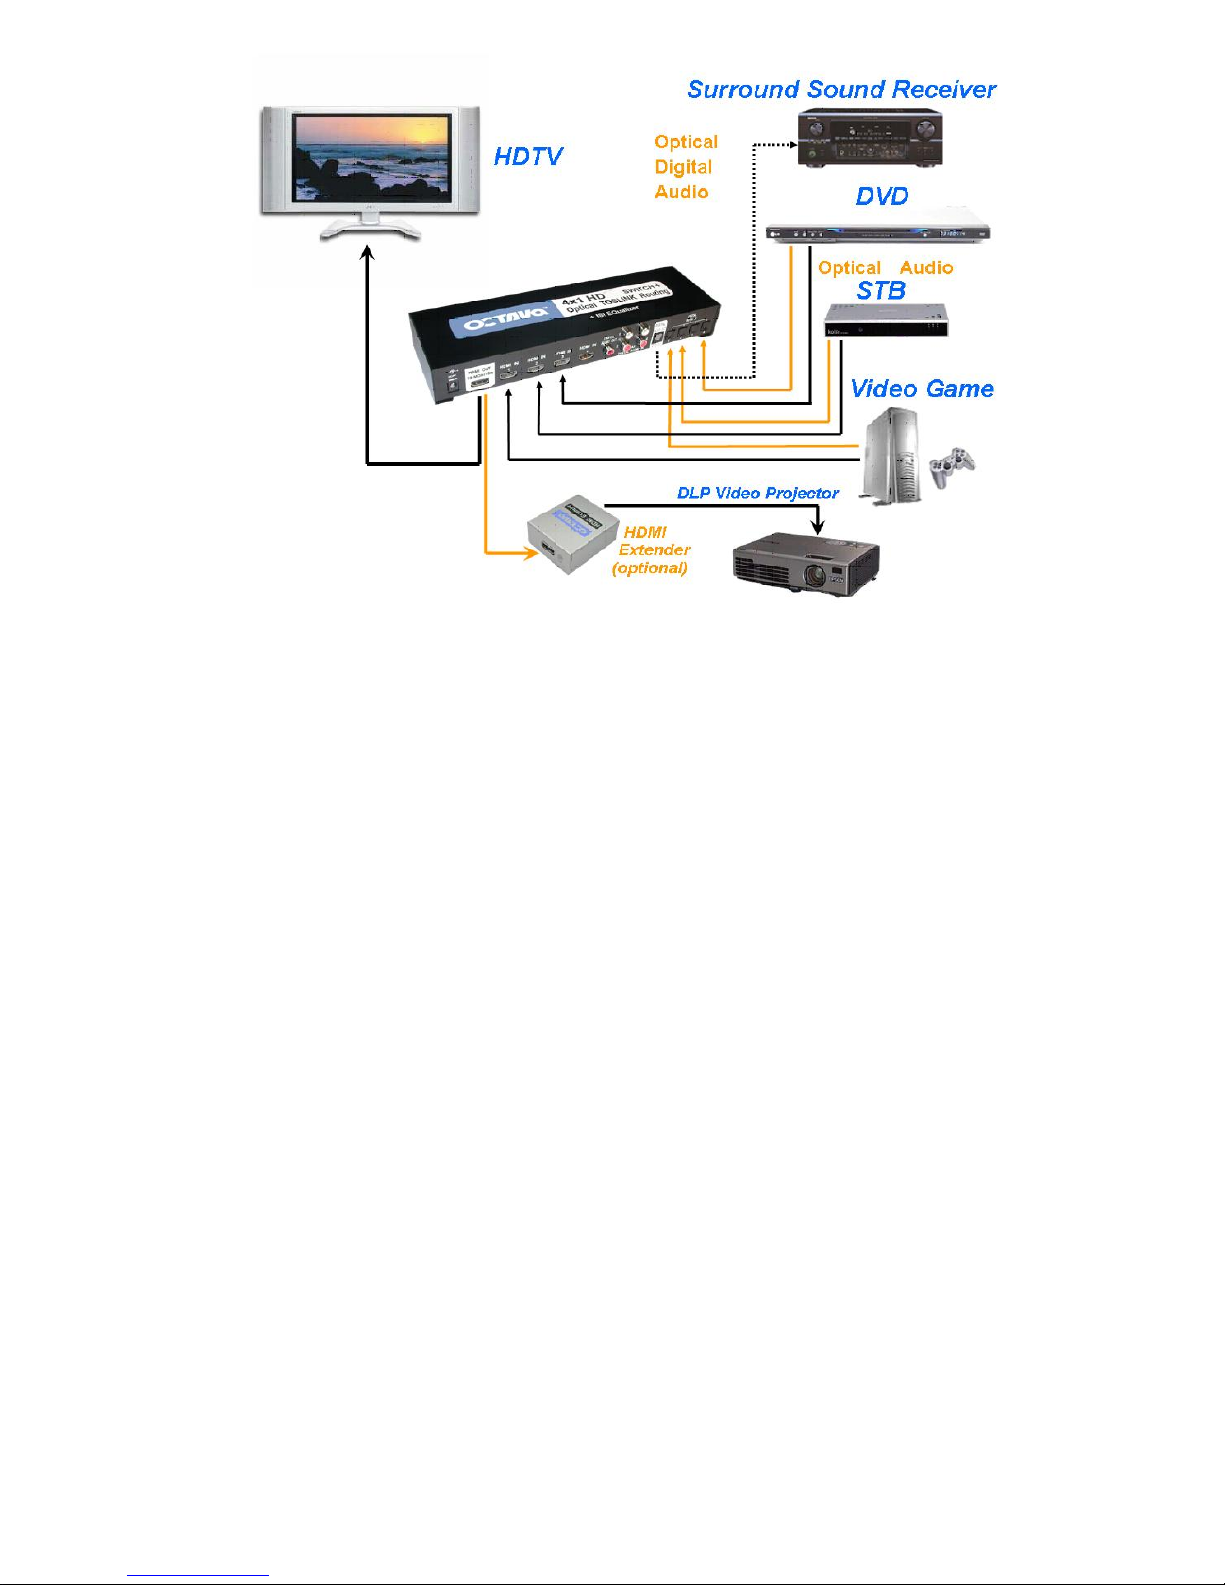
Application Diagram
Installation:
1) Connect the Monitor to the HDMI OUT port
2) Connect the HDMI sources to the HDMI IN ports (1-4)
3) Connect the TOSLINK / Coax SPDIF AUDIO sources to the
TOSLINK/Coax IN ports (1-4)
4) Connect the TOSLINK / Coax SPDIF AUDIO Output to your audio
receiver
5) Connect the DC power adapter
Smart Scan
TM:
Octava’s HD switch with Smart ScanTM saves you the hassle of fumbling
with multiple remote controls. Simply power on the HDMI source you want
to view and the HDMI switch will automatically switch to the correct port.
Energy Smart: If the HDTV is off or if all HDMI sources are off, the
switch will go into standby mode to conserve power.
"The AUDIO Inputs will switch in sync with the HDMI Input selected.
For example,
If HDMI INPUT 3 is selected, then both the TOSLINK and COAX Digital
Audio will also be switched to the AUDIO INPUT 3.
Page 4

4
Configuring Smart ScanTM:
In the event that you wish to disable the Smart Scan feature please
follow these steps:
1) Turn On your HDTV and at least 1 HD source. Make sure LED is ON.
2) Press the manual pushbutton on the front of the unit for ~ 5 seconds
until the LED flashes.
You can turn the Smart Scan feature back on by simply recycling the
power to the switch. This will enable the Smart Scan feature.
Description:
Share your HDMI or DVI-D sources with a single HD monitor. This
unique switch allows you to switch between multiple HDMI sources
(settop box, DVD players, video game stations, computers) and your
Hi Def monitor. This switch passes both digital and audio signals
through the HDMI ports!
Our proprietary Clear EYETM transmission line and ISI reduction
design will IMPROVE the digital video signals. Smart ScanTM
algorithm intelligently selects the correct HDMI source so you can
enjoy the program instead of fumbling with the remote.
Features:
Easy to connect multiple HDMI or DVI-D sources to one HD display.
4 x1 Toslink optical audio routing.
4x1 Digital Coax audio routing.
Works with HDMI or DVI-D, HDCP-enabled HDTV.
Supports high-resolution video 480P, 720I/P, 1080I/P.
Supports HDMI Deep Color and shaper images.
Saves power. Switch will go into standby mode if HDMI sources
or HDTV are OFF.
LED dimming allows for ultimate theater viewing experience.
Clear EYETM design optimizes HDMI signal transmission.
Smart SCAN TM algorithm intelligently selects the correct input.
Page 5

5
Pressing
+/-Increments/Decremen
ts to the next available
Source.
Remote Control Guide:
Button
Function
Notes
+, -
Increments/Decrements to the next
available Source
1,2,3,4,5
Selects the corresponding
numbered source.
Turns ON/OFF the LED light.
Turns ON HDMI switch.
Put HDMI switch to Standby mode.
Other
Not used
Octava’s Remote control uses discrete code so can be easily
integrated with most Universal Remote Controls such as Logitech’s
Harmony.
Pressing ON/OFF
Turns On/Off the
HDMI switch.
Pressing 1…5
Selects the corresponding
numbered source.
Pressing LED
Turns on/off the
Blue LED light.
Page 6

6
Front Panel Control Button:
LED Indication:
Function
Action
Notes
Change
Channel
Press to manually change to the
next available Source.
Disable
Smart
Scan
Press and hold for 5 seconds until
Blue LED cycle to disable Smart Scan.
Meaning
Notes
LED ON
HDMI switch is ON and source is
selected as indicated by LED.
NO LED
LED is OFF. Press to turn on
LED.
NO LED,
No Video
HDMI switch is in standby and/or no TV
or HDMI sources are on.
Input Source LED
Infrared
Detector
Manual
Input Select
DC Power Input
HDMI Output
( To TV)
HDMI In
Toslink In
SPDIF In
SPDIF Out
Toslink Out
Page 7

7
Warranty
Octava warrants the equipment purchased to be free from defects in
material and workmanship under normal use and service for a period of 1
year. In the event applicable law imposes any implied warranties, the
implied warranty period is limited to 1 year from the date of receipt.
If Octava's equipment fails because of defects (1) year from the date of
receipt, Octava will at its option, A) repair or replace the equipment, or B)
request return of equipment for refund of the price paid for the product
provided that the equipment has not been subjected to mechanical,
electrical or other abuse or modifications.
Proof of sale required to claim warranty.
Disclaimers
IN NO EVENT SHALL OCTAVA'S OR ITS SUPPLIER’S LIABILITY FOR
ANY CLAIM WHATSOEVER EXCEED THE COST OF THE PRODUCTS
GIVING RISE TO THE CLAIM, WHETHER BASED IN CONTRACT,
WARRANTY, INDEMNITY OR TORT (INCLUDING, WITHOUT
LIMITATION, NEGLIGENCE AND STRICT LIABILITY) OR OTHERWISE.
IN NO EVENT SHALL OCTAVA INC. OR ITS SUPPLIERS BE LIABLE
FOR ANY SPECIAL, INCIDENTAL, CONSEQUENTIAL OR OTHER
INDIRECT DAMAGES (INCLUDING, WITHOUT LIMITATION, LOSS OF
REVENUES, PROFITS OR OPPORTUNITIES), HOWEVER CAUSED, ON
ANY THEORY OF LIABILITY, WHETHER OR NOT OCTAVA INC HAS
BEEN ADVISED OF THE POSSIBILITY OF SUCH DAMAGES.
WHILE EVERY PRECAUTION HAS BEEN TAKEN IN THE
PREPARATION OF THIS MANUAL, OCTAVA ASSUMES
NO RESPONSIBILITY FOR ERRORS OR OMISSIONS. IN NO
EVENT WILL OCTAVA ASSUME ANY LIABILITY FOR DAMAGES
RESULTING FROM THE USE OF THEINFORMATION CONTAINED HEREIN.
OCTAVA RESERVES THE RIGHTTO CHANGE THE SPECIFICATIONS,
FUNCTIONS OR CIRCUITRY OFTHE PRODUCT WITHOUT NOTICE.
Page 8

8
Description
Specifications
IN/Out Connectors
19 pin HDMI female type-A
Optical Digital Audio Inputs
4
Optical Audio Outputs
1
Coax Digital Audio Inputs
4
Coax Digital Audio Outputs
1
HDCP pass thru
Yes
Display Selection
Remote, manual, Smart Scan
Single Link Range
480 P, 720 I/P, 1080 I/P
Video Data Rate
6.75 Gbps
Deep Color Support
Yes
Vertical Frequency Scan Rate
24 / 50 / 60 Hz
Dimension
11.5 x 3.4 x 1.5 inch
(290.5 x 85.5 x 38.1 mm)
DC adapter (included)
9VDC, 500mA
Remote control (IR)
Infrared, Discrete code
For Questions and support:
Email: info@octavainc.com
URL: www.octavainc.com
Copyright© 2007 Octava Inc. All rights reserved.
HDMI, the HDMI logo and High-Definition Multimedia Interface are trademarks or
registered trademarks of HDMI Licensing LL.C
All trademarks are the sole property of their respective companies
 Loading...