


HDMI Over IP Installation Manual-PRO DSX
HDMI Over IP Installation Manual-PRO DSX
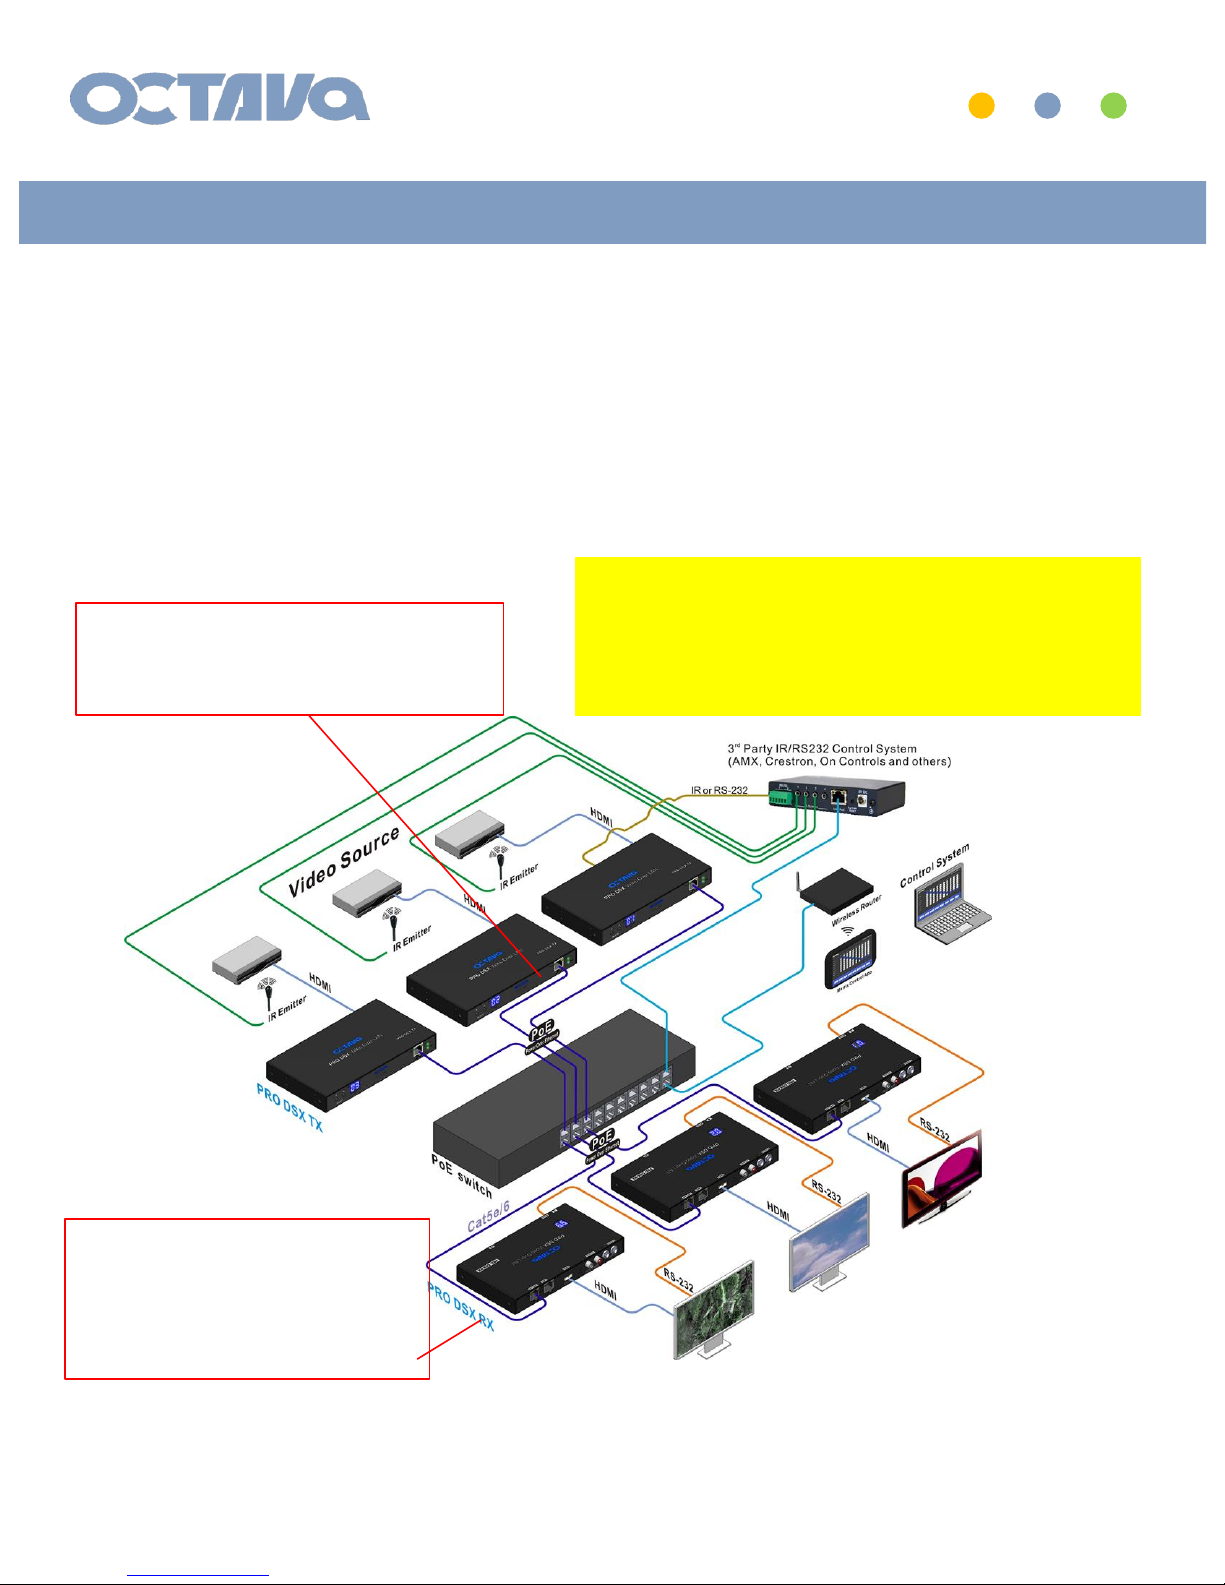
172 Subnet and with Wireless AP + IR
Revision: 1.1
Date : 8-29-18
HDMI Over IP
Installation Manual-PRO DSX
1
PRO DSX- TX
IP : 172.31.2.1-199
The Static IP Addresses range of the PRO DSX system is in the 172.31 subnet
depending on preference.
Network Setup
PRO DSX- RX
IP : 172.31.3.1-199
• Other static IP address can be
set by WEB Interface
• Contact us for info.
HDMI Over IP
Installation Manual-PRO DSX
2
The Octava PRO DSX HDMI Video over IP solution is a scalable multiscreen 4K
video connectivity platform. Designed to be scalable so you can build virtually
any sized NxM HDMI Video Matrix, or Video Wall. The PRO DSX is runs on
standard 1 Gigabit and LAN cables that is easy to install and maintain while
delivery stunning 4K picture quality.
The PRO DSX includes wideband IR in and out ports and can be used for:
1. changing the Zone receiver ( PRO DSX- RX) source selection.
2. controlling each video source
An example is shown below.
Octava Remote
Video Source
Remote
IR System Diagram
HDMI Over IP
Installation Manual-PRO DSX
3
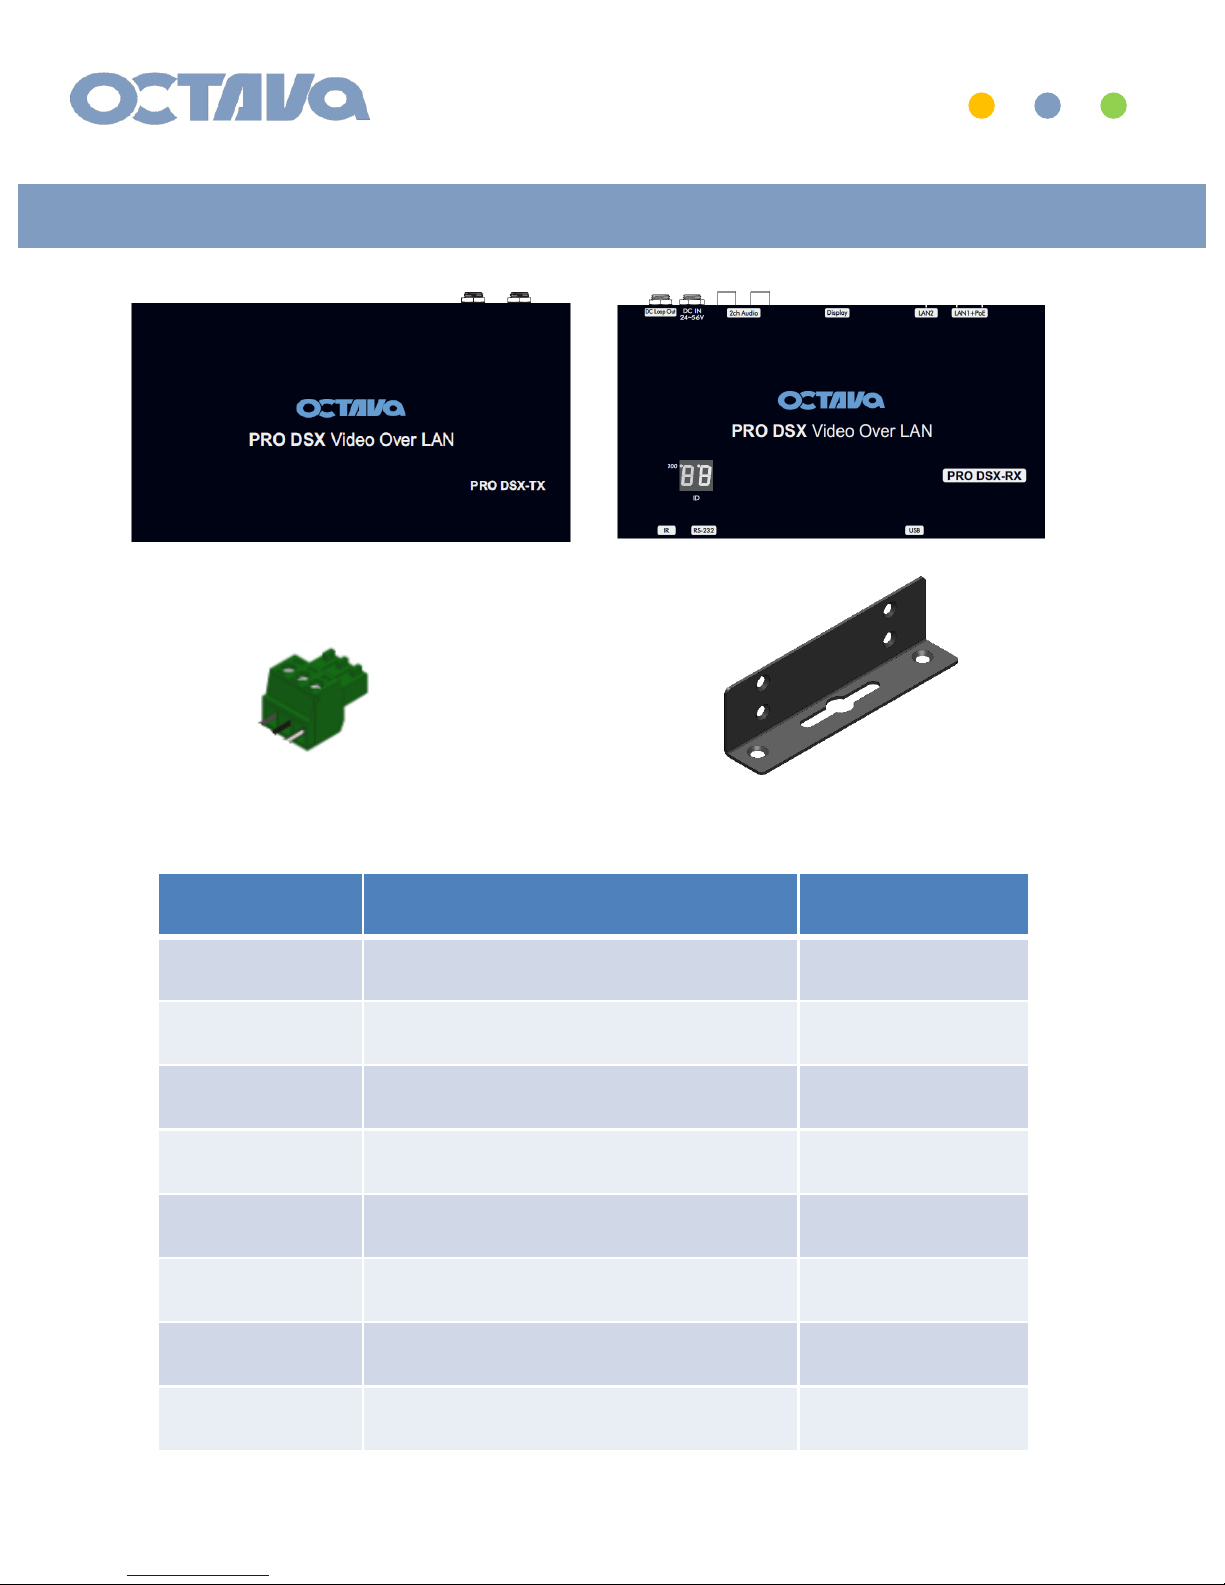
Model Description QTY
PRO DSX- TX
Pro HD over LAN Video Encoder Transmitter 1
Phoenix Connector ( 3 position) 1
Mounting Bracket 2
PRO DSX- RX
Pro HD over LAN Video Decoder Receiver 1
Phoenix Connector ( 3 position) 1
Mounting Bracket 2
PRO DSX –TX Transmitter PRO DSX –RX Receiver
Phoenix Connector ( 3 position) for RS-232 Mounting Bracket
Parts and Accessories: Included Parts
HDMI Over IP
Installation Manual-PRO DSX
4
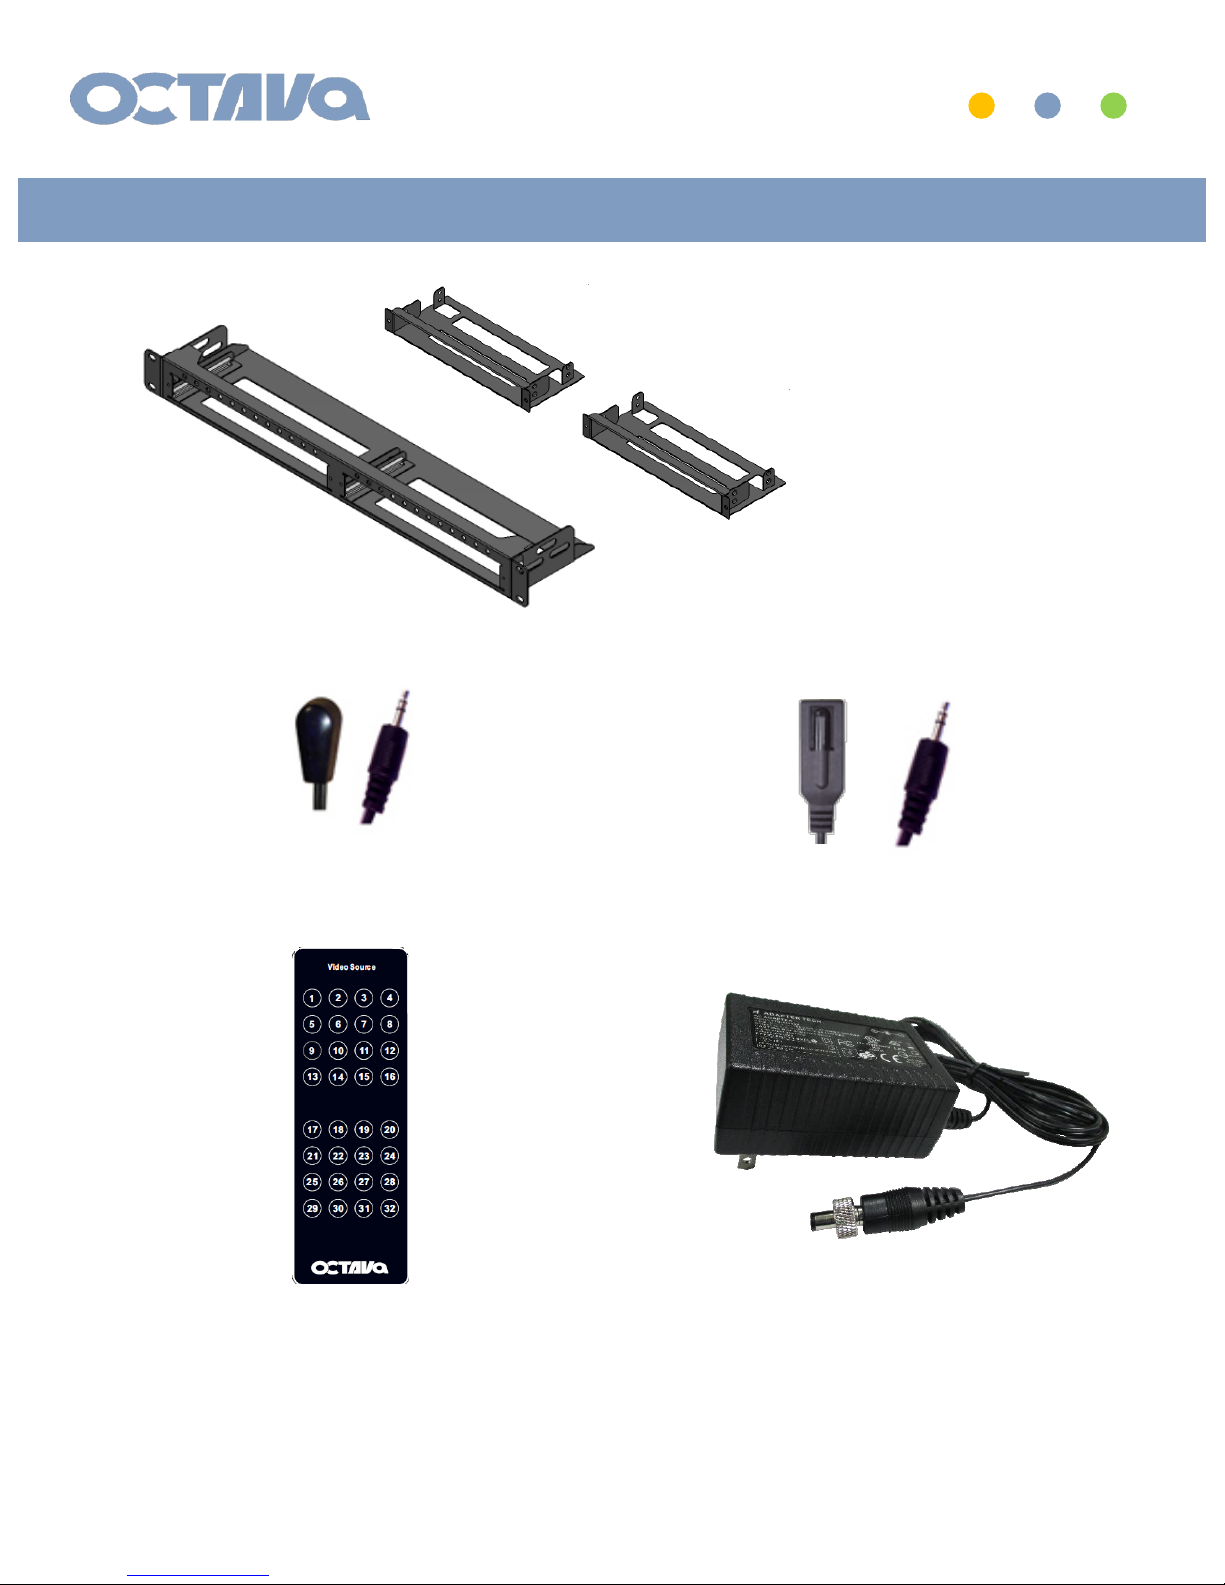
PRO DSX DC Power Supply 48V, 0.5 Amps
PRO DSX IR Emitter Cable
PRO DSX IR Receiver Cable
PRO DSX Remote Control
PRO DSX TX 1 RU Mounting kit
Parts and Accessories: Optional Accessories
HDMI Over IP
Installation Manual-PRO DSX
5
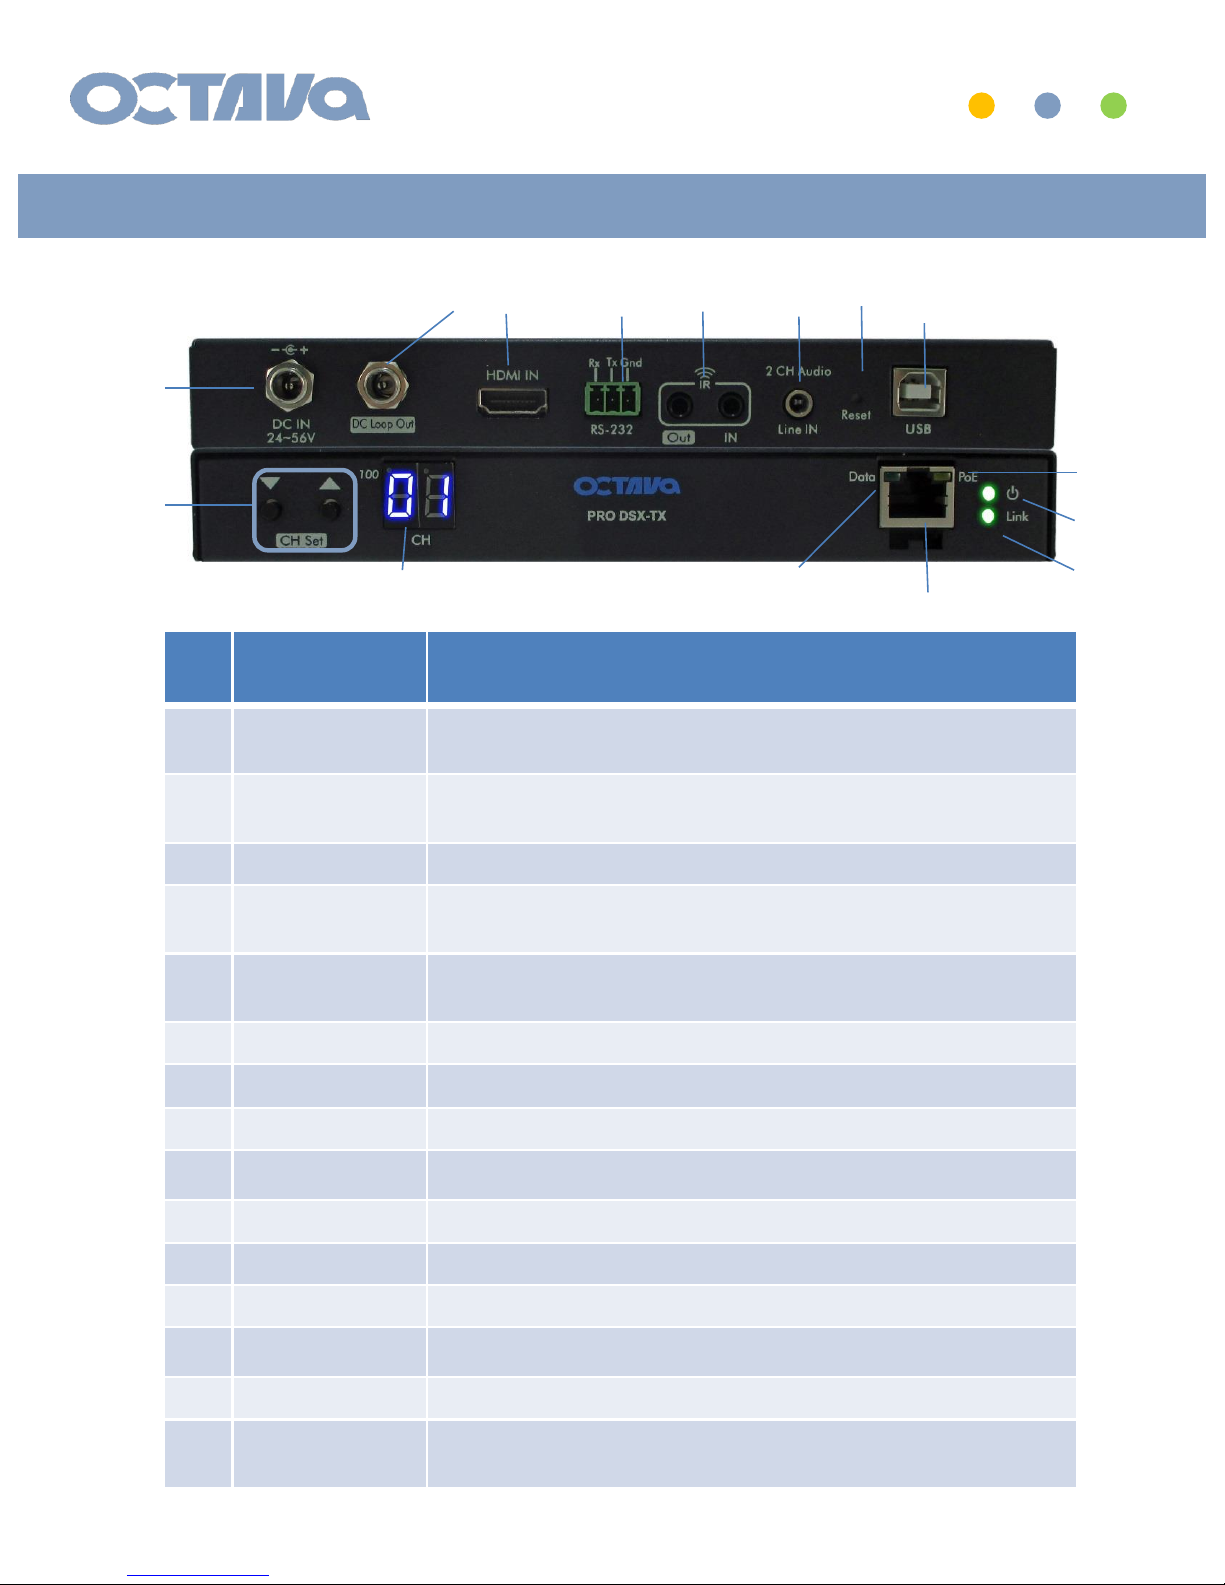
Port Description
1 DC-IN Local DC Power Supply Input . Optional, as Pro DSX-TX can be
powered over PoE.
2 DC Loop Out DC Power Loop Out . For powering additional PRO DSX-TX units.
(Maximum = 4 PRO DSX-TX).
3 HDMI IN HDMI Source Input
4 RS-232 Port Serial Port. Supports up to 115200 bps. Type = Phoenix 3 port
connect
5 IR Out and IN Infrared Cable Out , Infrared Cable IN
Wide Band 20-60KHz using supplied Octava IR cables.
6 2CH Audio Line In 3.5 mm 2 Ch. audio inject. Overrides HDM input audio
7 Reset Hardware Reset of PRO DSX –TX unit
8 USB USB 2.0 Port
9 CH SET Button Set the PRO DSX Source ID ( 1-199)
10 CH ID LED PRO DSX TX CH ID Indicator LED
11 RJ-45 out /PoE IN RJ-45 Port
12 Data LED Data ok
13 Power LED ON = PRO DSX-TX is powered
14 PoE LED ON = PRO DSX-TX is by PoE
15 Link LED ON = Video Link
Blink =Video Link not established to any PRO DSX -RX
15
13
14
12
10
9
1
2
3
4
5
6
8
7
11
I/O Descriptions: TX
HDMI Over IP
Installation Manual-PRO DSX
6
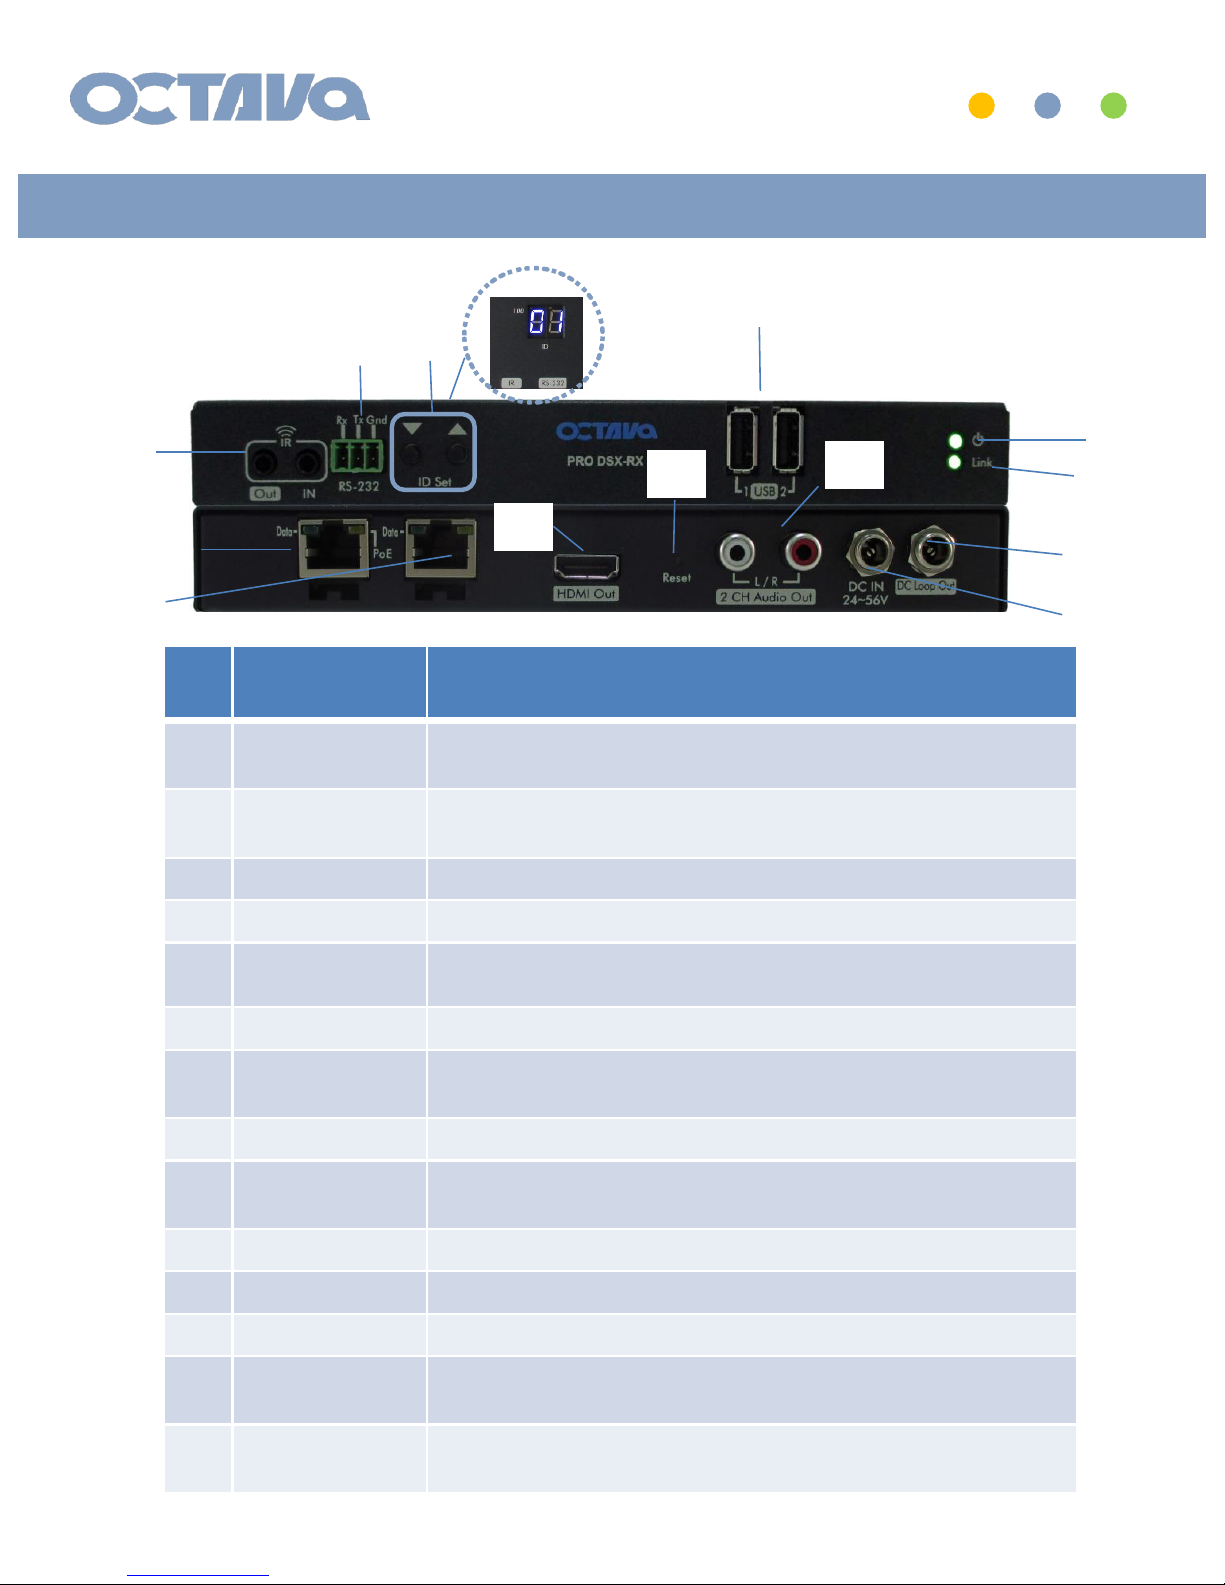
Port Description
16 IR Out and IN Infrared Cable Out , Infrared Cable IN
Wide Band 20-60KHz using supplied Octava IR cables.
17 RS-232 Port Serial Port. Supports up to 115200 bps. Type = Phoenix 3 port
connect
18 RX ID Button Set the PRO DSX RX ID ( 1-199)
19 RX ID LED PRO DSX RX ID Indicator LED
20 USB USB 2.0 Port
21 Power LED ON = PRO DSX-TX is powered
22 Link LED ON = Video Link
Blink =Video Link not established to any PRO DSX -TX
23 RJ-45 out /PoE IN RJ-45 Port
24 RJ-45 LOOP Out RJ-45 Port loop out port for cascading additional PRO DSX-RX .
(No PoE out)
25 HDMI Out HDMI Out to Display
26 Reset Hardware Reset of PRO DSX –TX unit
27 2CH Audio Out 2ch Audio Line Out
28 DC-IN Local DC Power Supply Input . Optional, as Pro DSX-TX can be
powered over PoE.
29 DC Loop Out DC Power Loop Out . For powering additional PRO DSX-RX units.
(Maximum = 4 PRO DSX-RX).
28
22
21
25
24
23
16
17
18
19
20
26
27
29
I/O Descriptions: RX
HDMI Over IP
Installation Manual-PRO DSX
7

PRO DSX –TX Transmitter
PRO DSX –RX Receiver
The PRO DSX can be PoE powered directly over the CATx LAN cables
PoE Powered:
Use PoE Source conforming to IEEE 802.3af or IEEE 802.3at
Basic Installation : Powering
Connect to PoE port
HDMI Over IP
Installation Manual-PRO DSX
8

A table showing the LED Indicators will help clarify
ID and IP Setup :
Each PRO DSX – TX and RX unit need to be set to a unique ID and IP address.
For ease of installation, the ID and IP address can be set using the front panel
push buttons.
NOTE: The factory default RX ID is set to “199” . Resetting device to factory
default will also initialize the RX ID to “199”
.
99
RX ID indicator
Subnet 172.31
indicator
+100 Indicator
.
99
Subnet 172.31
indicator
+100 Indicator
TX CH ID indicator
RX ID Set Buttons
TX CH ID Set Buttons
HDMI Over IP
Installation Manual-PRO DSX
9

Each RX includes a LED ID indicator to easily identify the RX.
The RX ID represents RX ID and the last octet of the RX IP address.
PRO DSX_RX will have ID in the range : 01-199
PRO DSX_RX will have IP address in the range : 172.31.3.xxx.
RX LED Indicators indicating device has been set to 172.31.x.x subnet is below
RX ID RX ID
LED
RX IP Address
RX001
172.31.3.1
RX002
172.31.3.2
RX099
172.31.3.99
RX100
172.31.3.100
RX101
172.31.3.101
RX199
172.31.3.199
RX ID LED Indicator 172.31.x.x subnet
01
02
99
00
01
99
HDMI Over IP
Installation Manual-PRO DSX
10

Each TX includes a LED ID indicator to easily identify the TX.
The TX ID represents the CH ID and last octet of the TX IP address.
PRO DSX-TX will have IP address in the range : 172.31.2.xxx.
TX CH ID TX CH ID
LED
TX IP Address
TX CH 01
172.31.2.1
TX CH 02
172.31.2.2
TX CH 99
172.31.2.99
TX CH 100
172.31.2.100
TX CH 101
172.31.2.101
TX CH 199
172.31.2.199
TX ID LED Indicator 172.31.x.x subnet
01
02
99
00
01
99
HDMI Over IP
Installation Manual-PRO DSX
11

ID and IP Setup : RX ID and IP
NOTE: The factory default is RX ID = 199 and IP = 169.254.3.199
Resetting the RX will reset RX ID = 199 and IP = 169.254.3.199
HDMI Over IP
Installation Manual-PRO DSX
12

The PRO DSX-RX ID can be manually setup per procedure shown below
Example 2: Setting PRO DSX –RX to ID = 4 and IP = 172.231.3.4
10
11
13
14
15
16
1
Connect
PRO DSX –RX and verify it is powered up.
2
PRESS
HOLD the button for ~ 5 seconds until the LED
display indicates “N6”
.
3
Press to change to N7 ( 172.31.3.xx subnet mode)
4
PRESS HOLD + button for ~ 5 seconds until LED blinks
“N7”.
ID and IP Setup : RX ID and IP
HDMI Over IP Installation
Manual-PRO DSX
13

10
11
13
14
5
Release
the button. LED will blink
6
Press button to
increment from 01 to the desired RX ID.
7
PRESS HOLD both the
+ button for ~ 5 seconds until
LED blinks.
Release the buttons
and LED will “cycle”
8
RX will
reboot and indicate the RX ID when complete
Note the 172 subnet LED indicator is ON
9
The above example has programmed the RX to
RX ID = 4 and IP = 172.31.3.4
ID and IP Setup : RX ID and IP
Note the 172 subnet
LED indicator is ON
HDMI Over IP Installation
Manual-PRO DSX
14

ID and IP Setup : TX ID and IP
NOTE: The factory default is TX CH ID = 199 and IP = 169.254.2.199
Resetting the TX will reset TX CH ID = 199 and IP = 169.254.2.199
HDMI Over IP Installation
Manual-PRO DSX
15
10
11
13
14
15
16
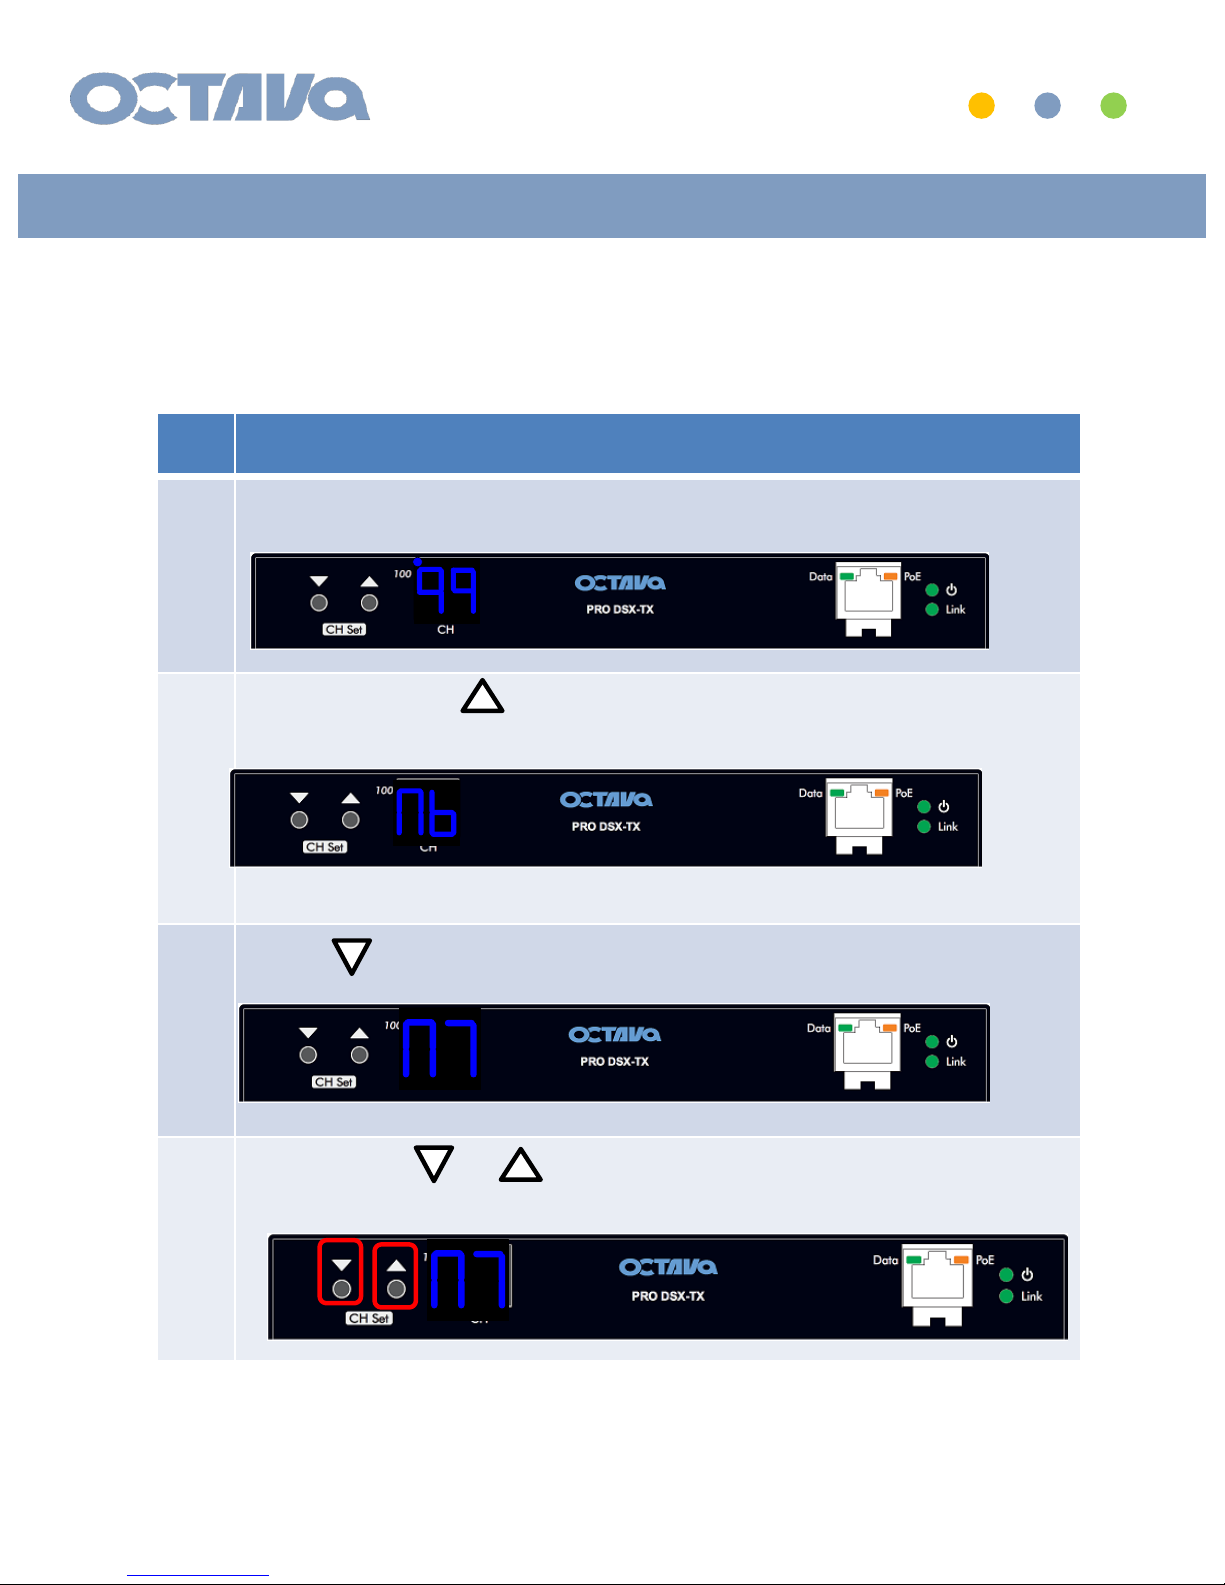
1
Connect
PRO DSX –TX and verify it is powered up
2
PRESS
HOLD the button for ~ 5 seconds until the LED
display indicates “N6” ( 172.31.2.x subnet mode).
3
Press to change to N7 ( 172.31.2.xx subnet mode)
4
PRESS HOLD + button for ~ 5 seconds until LED blinks
“N7”.
ID and IP Setup : TX ID and IP SETUP
The PRO DSX-TX CH can be manually setup per procedure shown below
Example 4: Setting PRO DSX –TX to ID = 05 and IP = 172.31.2.5
HDMI Over IP Installation
Manual-PRO DSX
16
10
11
13
14
15
16
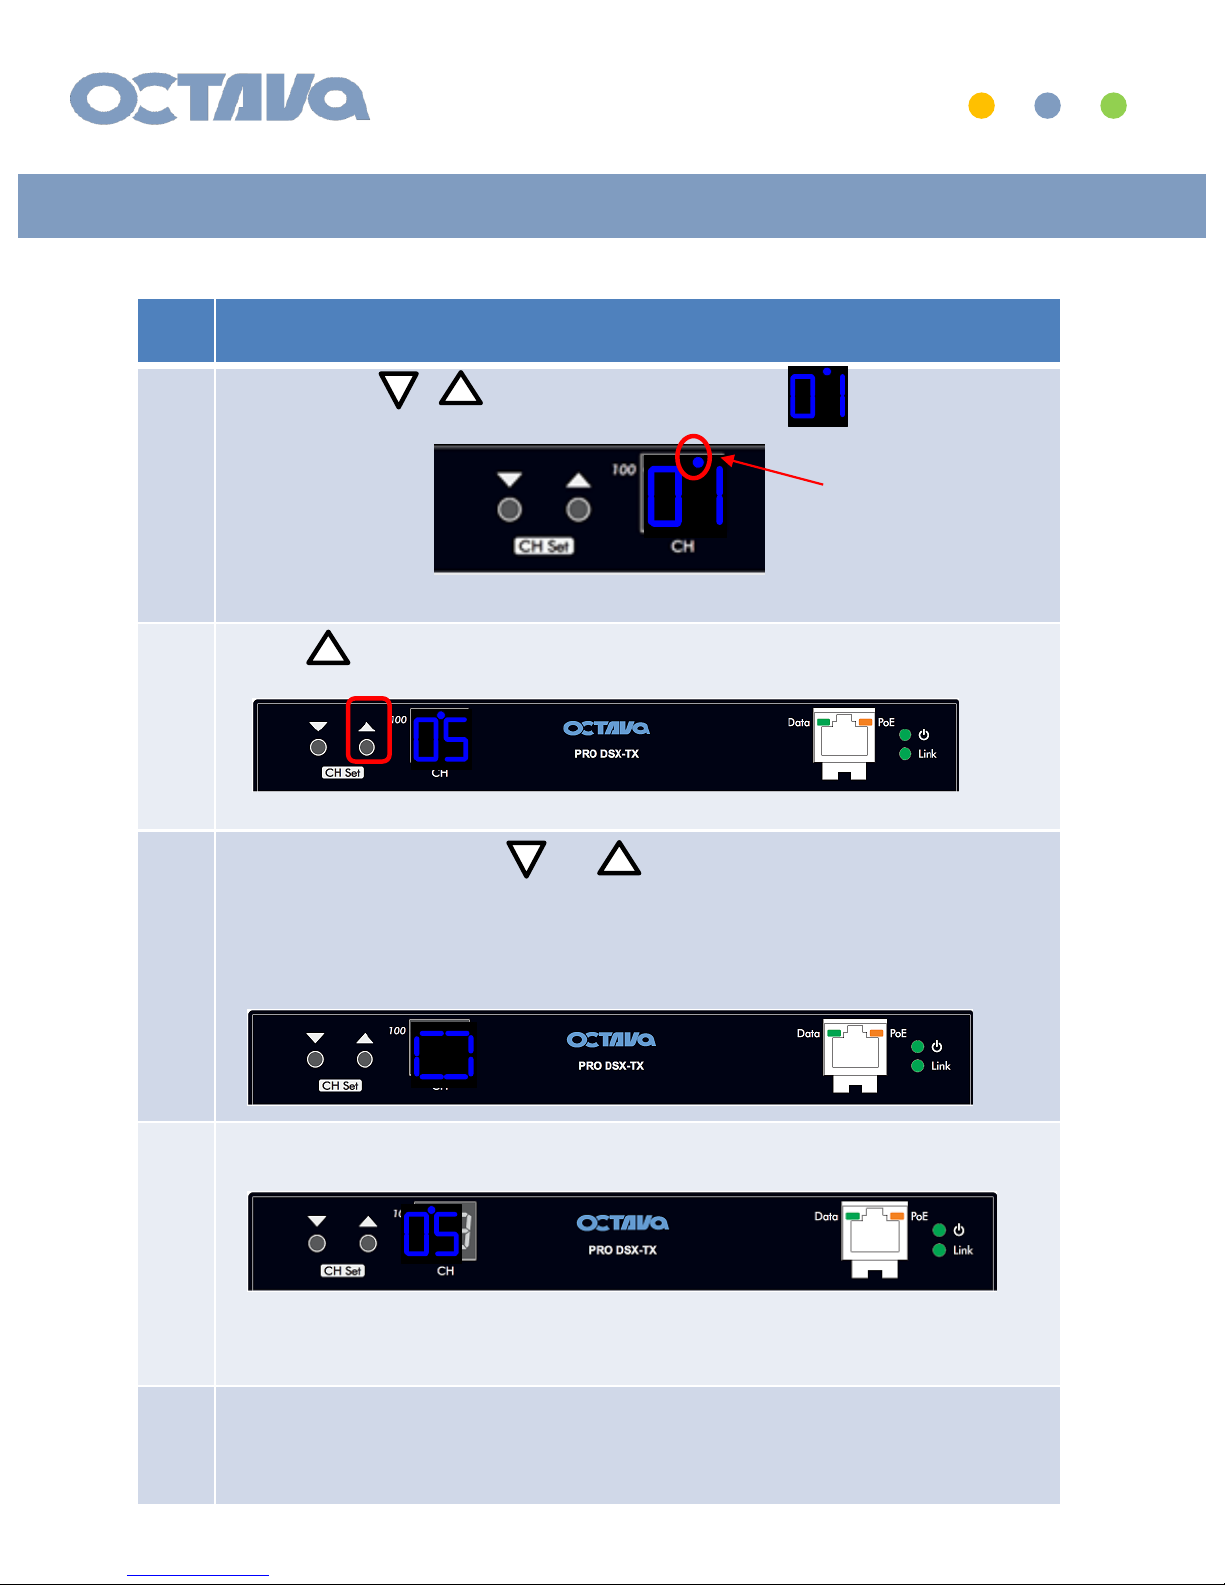
5
Release
the button. LED will blink
6
Press button to
increment from 01 to the desired TX CH ID.
7
PRESS HOLD both the
+ button for ~ 5 seconds until
LED blinks.
Release the buttons
and LED will “cycle”
8
TX will reboot and indicate the TX CH ID when complete
Note the 172 subnet LED indicator is ON
9
The above example has programmed the TX to
TX CH ID = 05 and IP = 172.31.2.5
ID and IP Setup : TX ID and IP SETUP
Note the 172 subnet
LED indicator is ON
HDMI Over IP Installation
Manual-PRO DSX
17

Basic Installation : Connecting TX and RX
PRO DSX- RX Installation
1
Connect
a PRO DSX –RX to Ethernet switch and set the RX ID = 01
Refer to :
“RX ID and IP “
2
Connect the HDMI output to Display 1 of your system
3
Connect a PRO DSX
–RX to Ethernet switch and set the RX ID = 02
4
Connect the HDMI output to Display 2 of your system
Continue for all PRO DSX
-RX needed in your system installation
PRO DSX- TX Installation
5
Connect a
PRO DSX –TX to Ethernet switch and set the TX CH ID =
01
Refer to :
“TX ID and IP SETUP “
6
Connect the HDMI in to
Video source 1 of your system
7
Connect a
PRO DSX –TX to Ethernet switch and set the TX CH ID =
02
8
Connect the HDMI in to
Video source 2 of your system
Continue for all PRO DSX
-TX needed in your system installation
Connect the PRO DSX-TX and RX to a recommended Ethernet Switch
per the following procedures:
HDMI Over IP
Installation Manual-PRO DSX
18

Basic Installation : RX Check List
RX ID RX IP Display Name
RX 01
RX 02
RX 03
RX 04
RX 05
RX 06
RX 07
RX 08
RX 09
RX 10
RX 11
RX 12
RX 13
RX 14
RX 15
RX 16
RX 17
RX 18
RX 19
RX 20
Note the RX ID , IP address and the connected Display for future reference.
HDMI Over IP
Installation Manual-PRO DSX
19

Basic Installation : TX Check List
TX CH ID TX IP Video Source Name
TX 01
TX 02
TX 03
TX 04
TX 05
TX 06
TX 07
TX 08
TX 09
TX 10
TX 11
TX 12
TX 13
TX 14
TX 15
TX 16
Note the TX CH ID , IP address and the connected Display for future reference.
HDMI Over IP
Installation Manual-PRO DSX
20
The PRO DSX- TX and RX has various features that can be enabled and
modified by directing accessing the TX or RX web interface by entering the
TX or RX IP address in a browser.
WEB Interface Access
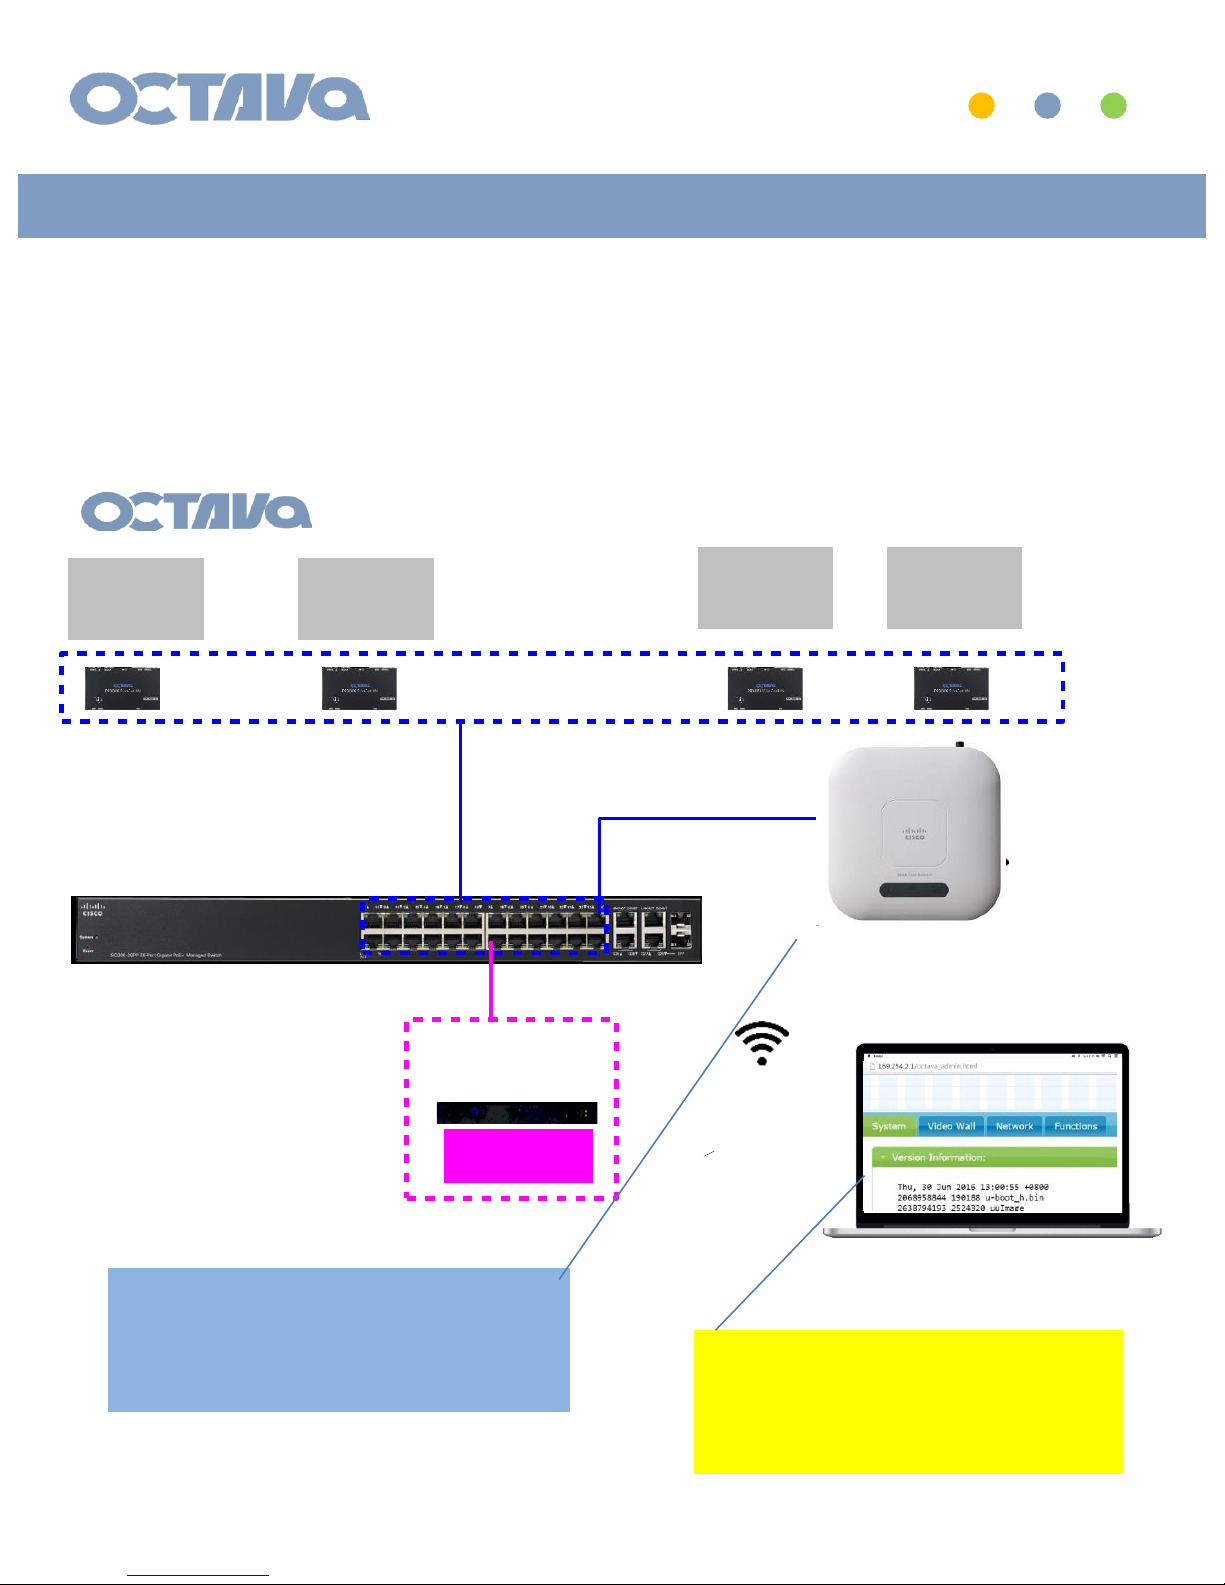
TV 1 TV 2
TV 3 TV 4
Video Source
Octava PRO DSX TX
Octava PRO DSX RX
Cisco SG300-28PP
Wireless AP
iPad/ Phone/ PC
1 x 4
Connect All devices to PoE Ports.
Set your network to
IP : 172.31.1.xx
Subnet Mask: 255.255.0.0
Gateway/Router: 172.31.1.245
Set your Wireless AP
IP : 172.31.1.245
Subnet Mask: 255.255.0.0
Gateway/Router: 172.31.1.1
HDMI Over IP
Installation Manual-PRO DSX
21

The PRO DSX- TX and RX has various features that can be enabled and
modified by directing accessing the TX or RX web interface by entering the
TX or RX IP address in a browser.
WEB Interface Access
Access PRO DSX-TX by entering:
172.31.2.xx
Access PRO DSX-RX by entering:
172.31.3.xx
HDMI Over IP
Installation Manual-PRO DSX
22

Integrated Octava System Controller
Integrated inside the PRO DSX unit is the Octava System Controller Software.
The integrated System Controller enables you to install |customize| operate
your video system without additional hardware/gateways or software.
Select Settings to Setup your System
Open a browser ( Chrome recommended). Access the Integrated Octava System
Controller on the TX 01 by entering:
172.31.2.1/octavaswitch
172.31.2.1/octavaswitch
HDMI Over IP Installation
Manual-PRO DSX
23
Note: TX and RX Unit must have firmware version 6.4.3 180502 installed.

Integrated Octava System Controller
Enter the Name of your Video Sources Here and Match to the corresponding
PRO DSX-TX unit.
Note- Only Enter the sources that you will use. Leave others blank
Enter the Name of your Displays Here and Match to the corresponding PRO
DSX-RX unit.
Note- Only Enter the displays that you will use. Leave others blank
HDMI Over IP
Installation Manual-PRO DSX
24

Integrated Octava System Controller
Enter the Name of your Video Sources here and match to the corresponding
PRO DSX-TX unit.
Note- Only Enter the sources that you will use. Leave others blank
Enter the Name of your Displays here and match to the corresponding PRO
DSX-RX unit.
Note- Only Enter the displays that you will use. Leave others blank
Press the HOME icon when complete
HDMI Over IP
Installation Manual-PRO DSX
25

Integrated Octava System Controller
Your System Interface will be created.
HDMI Over IP
Installation Manual-PRO DSX
26

Remote Control
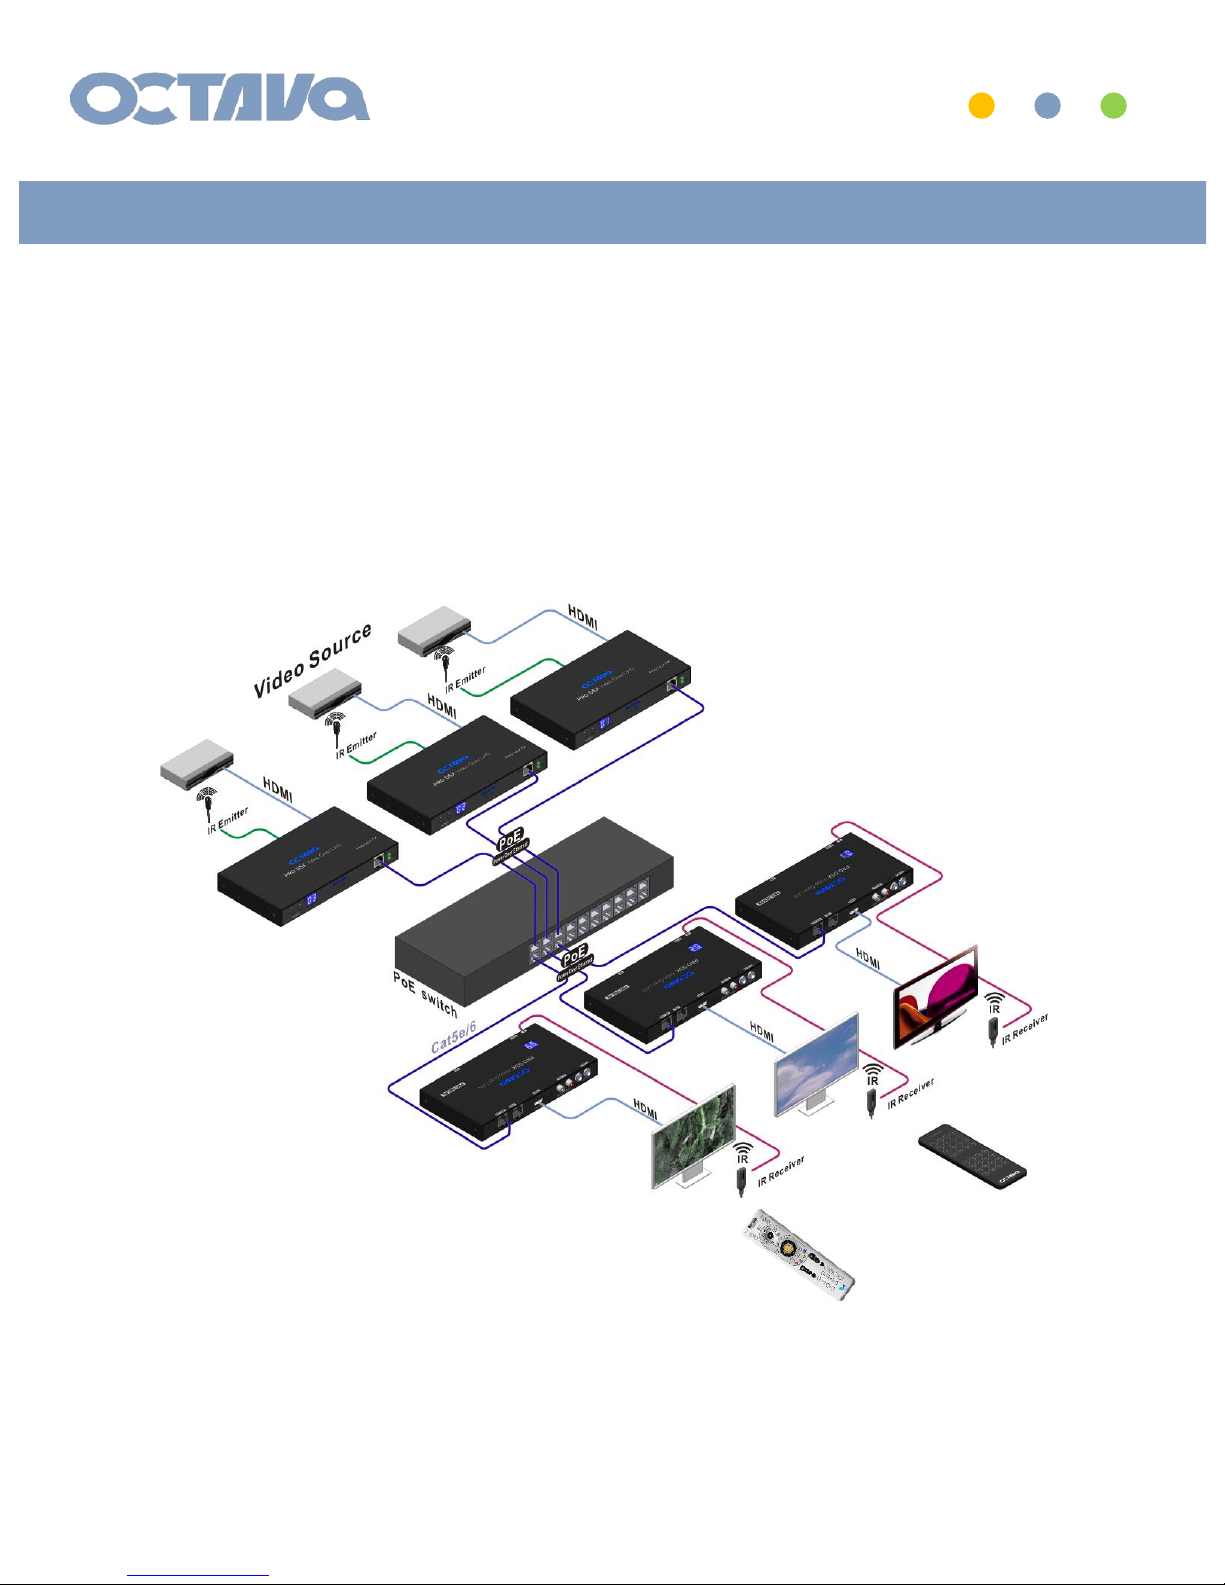
The PRO DSX includes wideband IR in and out ports and can be used for:
1. changing the Zone receiver ( PRO DSX- RX) source selection.
2. controlling each video source
An example is shown below.
Octava Remote
Video Source
Remote
IR: IR System Setup
HDMI Over IP
Installation Manual-PRO DSX
27

Video Source
Octava IR Receiver Cable
Connect the IR Emitter cable to the IR OUTPUT Port as shown.
Place the IR Emitter over the IR Receiver of the Video Source
Connect the IR Receiver cable to the IR IN Port as shown.
Place the IR Receiver cable so there is line of sight from remote control
IR Detector
Octava Remote
Octava IR Emitter Cable
Video Source Remote
IR: IR emitter and receiver cable connections
HDMI Over IP Installation
Manual-PRO DSX
28

Safety Information
HDMI Over IP Installation
Manual-PRO DSX
29

Pro DSX Video over LAN
Contact Information
Octava Inc.-7078 Peachtree Ind. Blvd
Suite 300
Norcross, Ga. 30071
Tel 770.825.0388
www.octavainc.com
Email: info@octavainc.com
HDMI Over IP Installation
Manual-PRO DSX
30
 Loading...