

Octalarm is a registered trademark
From Adesys bv, Wateringen, NL
Edition 16-08-2002
OCTALARM
®
-T2
OCTALARM
®
-T4
OCTALARM
®
-T8
OCTALARM
®
-T16

Contents
Adesys bv, Wateringen, NL
2 Octalarm-T2 / T4 / T8 / T16
General...............................................................................................................................................................4
1. INTRODUCTION.................................................................................................................................4
1.1 Used pictograms .............................................................................................................................5
2.
DELIVERY CHECK .............................................................................................................................5
2.1 Environment ....................................................................................................................................5
3.
GUARANTEE AND LIABILITY ............................................................................................................6
Operation instructions ......................................................................................................................................7
4.
FUNCTIONING OF TELEPHONE ALARM ..........................................................................................7
4.1 Alarm procedure..............................................................................................................................8
4.2 Dialling order...................................................................................................................................8
4.3 Alarm channels and report codes....................................................................................................8
4.3.1 Report to telephone.................................................................................................................8
4.3.2 Report to pager .......................................................................................................................9
4.3.3 Report to mobile telephone .....................................................................................................9
4.3.4 Report to reporting services ....................................................................................................9
4.4 Reset procedure............................................................................................................................10
4.5 More than one alarm simultaneously.............................................................................................10
4.5.1
Reporting channels with a default dialler...............................................................................10
4.5.2
Reporting channels with a deviant dialler ..............................................................................10
4.5.3 Combination of a default/custom dialler.................................................................................10
5. FUNCTIONING OF THE LOCAL ALERT...........................................................................................11
5.1 Alarm buzzers ...............................................................................................................................11
5.2 Flashlight.......................................................................................................................................11
6. OPERATION .....................................................................................................................................12
6.1 Alarm indicators.............................................................................................................................12
6.2 Alarm channel selection keys........................................................................................................12
6.3 Device malfunction indicators........................................................................................................12
6.4 Reset key ......................................................................................................................................13
6.5 Test key.........................................................................................................................................13
6.6 Buzzer key ....................................................................................................................................13
6.7 Telephone dialler key ....................................................................................................................13
6.8 Display and cursor keys ................................................................................................................13
6.9 Prog-key........................................................................................................................................14
6.10 Esc-key .....................................................................................................................................14
7. SET CALL NUMBERS.......................................................................................................................15
7.1 Report to a telephone....................................................................................................................15
7.2 Report to a pager ..........................................................................................................................16
7.2.1 Characteristics of a tone-only pager......................................................................................16
7.2.2
Characteristics of an (alpha) numerical pager.......................................................................16
7.3 Report to a mobile telephone ........................................................................................................17
7.4 Report to a reporting service .........................................................................................................17
7.5 Set reset procedure.......................................................................................................................17
7.5.1 Reset during call ...................................................................................................................18
7.5.2 Reset by the service..............................................................................................................18
7.5.3 Reset by calling back ............................................................................................................18
8. CALL BACK TO RESET AN ALARM.................................................................................................19
8.1 Reset without using a reset code ..................................................................................................19
8.2 Reset using a reset code...............................................................................................................19
9. RETRIEVE ALARM STATUS BY TELEPHONE................................................................................20
10. SWITCHING THE RELAY OUTPUT BY TELEPHONE .....................................................................20
11. NIGHT TIME MODE..........................................................................................................................21
12. MAINS FAILURE...............................................................................................................................22
12.1
Mains failure report....................................................................................................................22
12.2
Battery empty report..................................................................................................................22
12.3 Back up supply..........................................................................................................................22
12.4 Automatic battery test................................................................................................................22
13. TESTING...........................................................................................................................................23
13.1 Optic and acoustic alarms test ..................................................................................................23
13.2 Telephone report test ................................................................................................................23

Adesys bv, Wateringen, NL
Contents
Octalarm-T2 / T4 / T8 / T16
3
14. SWITCH OFF COMPLETELY ...........................................................................................................23
15. ERROR MESSAGES ........................................................................................................................24
Installation instruction ....................................................................................................................................25
16. INSTALLATION.................................................................................................................................25
16.1
Placement .................................................................................................................................25
16.2
Connection diagram ..................................................................................................................25
16.3
Connection of inputs..................................................................................................................26
16.3.1 Alarm inputs ......................................................................................................................26
16.3.1.1 Direct connection..........................................................................................................26
16.3.1.2 Connection through Sensornet .....................................................................................27
16.3.2 Input night time mode........................................................................................................27
16.3.3 Input external reset contact...............................................................................................28
16.4 Connection of outputs ...............................................................................................................28
16.4.1 Output external signal light................................................................................................28
16.4.2
External buzzer outputs.....................................................................................................28
16.4.3
External relay output .........................................................................................................28
16.5
Connection of the telephone line...............................................................................................28
16.5.1
ISDN telephone connection...............................................................................................30
16.5.1.1 General guidelines for ISDN.........................................................................................32
16.6 Placing and connecting the GSM antenna ................................................................................32
16.6.1 Internal antenna ................................................................................................................32
16.6.2 External antenna ...............................................................................................................32
16.7 Placing the SIM card .................................................................................................................32
16.8 Connecting the COM port..........................................................................................................33
17. PROGRAMMING OF INSTALLATION DATA....................................................................................34
17.1
Programming options ................................................................................................................34
17.1.1
Programming using the operation panel............................................................................34
17.1.2
Programming using the PC ...............................................................................................34
17.1.3
Programming using a telephone line.................................................................................35
17.1.3.1
Analogue or ISDN model ..............................................................................................35
17.1.3.2 GSM model...................................................................................................................35
18. INSTALLATION PROGRAMS ...........................................................................................................36
18.1 Prog 10 “set display contrast”....................................................................................................36
18.2 Prog 11 “ show version number”................................................................................................36
18.3 Prog 21 “set alarm inputs”.........................................................................................................36
18.4 Prog 23 “set alarm on display”...................................................................................................37
18.5 Prog 31 “set alarm buzzer”........................................................................................................37
18.6
Prog 41 “set dialler” ...................................................................................................................38
18.6.1
Octalarm for PSTN (analogue network).............................................................................38
18.6.2
Octalarm for ISDN (digital network)...................................................................................38
18.6.3
Octalarm for GSM (mobile communication network) .........................................................40
18.7 Prog 42 “set dial sequence” ......................................................................................................41
18.8 Prog 55 “set pager codes” .........................................................................................................43
18.8.1 Set report codes tone-only pager ......................................................................................43
18.8.2 Set report codes numerical pager .....................................................................................43
18.8.3 Set codes of alpha-numerical pager and SMS-messages.................................................44
18.9 Prog 59 “record voice messages”..............................................................................................44
18.10 Prog 61 “set access code”.....................................................................................................44
18.11
Prog 71 “set night time mode” ...............................................................................................45
18.12
Prog 95 “sensor test”.............................................................................................................46
18.13
Prog 97 “read data log” .........................................................................................................47
18.14
Prog 98 “choose language” ...................................................................................................48
18.15
Prog 99 “clear all settings”.....................................................................................................48
19. TECHNICAL SPECIFICATIONS .......................................................................................................49
Settings summary............................................................................................................................................50

General
Adesys bv, Wateringen, NL
4 Octalarm-T2 / T4 / T8 / T16
General
1. INTRODUCTION
The Octalarm is an alarm system that signals and reports technical failures and calamities by
telephone, of both manned and unmanned installations and processes.
Alarms can be put through to fixed telephones, mobile telephones, radiotelephones, switchboards or
combination of these, using an analogue ISDN telephone connection (model -I) or a mobile 900 or
1800Mhz network (model -G). There are various optical and acoustic signal options for local alarm
systems.
The Octalarm-T2, -T4, -T8 and –T16 are equipped with respectively 2, 4, 8 or 16 alarm channels. A
telephone report takes place by means of a recognizable tone code or a self-recorded voice message.
The codes for reporting to a pager can be set freely, just like the desired dialling order and the reset
procedures.
The alarm status of the guarded object can be retrieved from each Octalarm using the telephone line.
Furthermore, the Octalarm disposes of:
•
user-definable delay times
•
user-definable start and stop conditions for local alert
•
display of alarm cause
•
built-in emergency power supply
•
mains supply guard
•
guard of battery performance
•
telephone line test
•
flashlight output
•
remote control output
•
night time mode
•
data log
•
Sensornet connection (only for versions T4, T8 and T16)
•
access protection
•
extensive test facilities
•
RS-232 connection
•
permanent memory for all settings and report texts.
Operation and configuration are menu-driven. They take place using the control panel, via a directly
connected PC, or by telephone line using the built-in modem.
After connecting, a number of fixed installation parameters have to be set on the Octalarm. As they are
of a technical nature and since technical knowledge of, e.g. the connected alarm devices is assumed,
we recommend leaving the entry of this data to the installer. Therefore, this manual is divided into:
•
A general part for the user and the installer.
•
Operation instructions for the user containing all items concerning the configuration and
operation by the user.
•
Installation instructions
for the installer containing all items concerning the connecting of the
Octalarm and the programming of the installation data.
•
A
settings summary
for both the user and the installer.
We advise you to read this manual carefully, so that you can take optimal advantage of all the
application possibilities of the Octalarm.

Adesys bv, Wateringen, NL
General
Octalarm-T2 / T4 / T8 / T16
5
1.1 Used pictograms
This manual makes use of a couple of pictograms. They have the following meanings:
@
Hint or point of special interest
B
Action to be performed
2. DELIVERY CHECK
Check the packing for damages. In case the delivery seems to be damaged or incomplete on
reception, please contact your supplier immediately.
The delivery includes:
•
Octalarm
•
protective cover for the connections
•
connecting cables:
•
analogue execution: telephone wire with country-dependent telecom plug,
•
ISDN model: ISDN cable,
•
GSM-execution: none.
•
this manual
•
guarantee card.
You can check the Octalarm's model number by pressing the test button after having switched it on. .
The display will show the message
OCTALARM TEST-
followed by the model number (OT2, OT4, OT8
or OT16), followed by:
•
-S: model with voice messages instead of tone code messages,
•
-I : model for the ISDN network,
•
-G: model for the mobile GSM network,
•
or a combination of the above.
After connecting it to a wall socket, the Octalarm switches on automatically. You can switch it off by
disconnecting the plug from the wall socket and by keeping the reset key depressed for some time.
2.1 Environment
This product contains a lead battery. For the sake of the environment, do not dispose of the product
with the household refuse when you have to replace it at the end of its life span. You can hand in the
device to your supplier or to a depot intended for this purpose.

General
Adesys bv, Wateringen, NL
6 Octalarm-T2 / T4 / T8 / T16
3. GUARANTEE AND LIABILITY
ADESYS puts every Octalarm through a series of extensive tests and an endurance test before
shipping. Therefore, ADESYS offers a two years term of guarantee, on condition that the guarantee
card is completed and returned upon taking into operation. The guarantee claim expires when:
•
the malfunction is caused by gross negligence or by incompetent installation,
•
the device has been repaired and/or altered without permission of ADESYS,
•
the serial number on the device is removed or damaged.
ADESYS rejects any liability for consequential damage caused by incompetent use of, and/or
malfunctions of the Octalarm.
Adesys bv, Wateringen, NL
Operation instructions
Octalarm-T2 / T4 / T8 / T16
7
Operation instructions
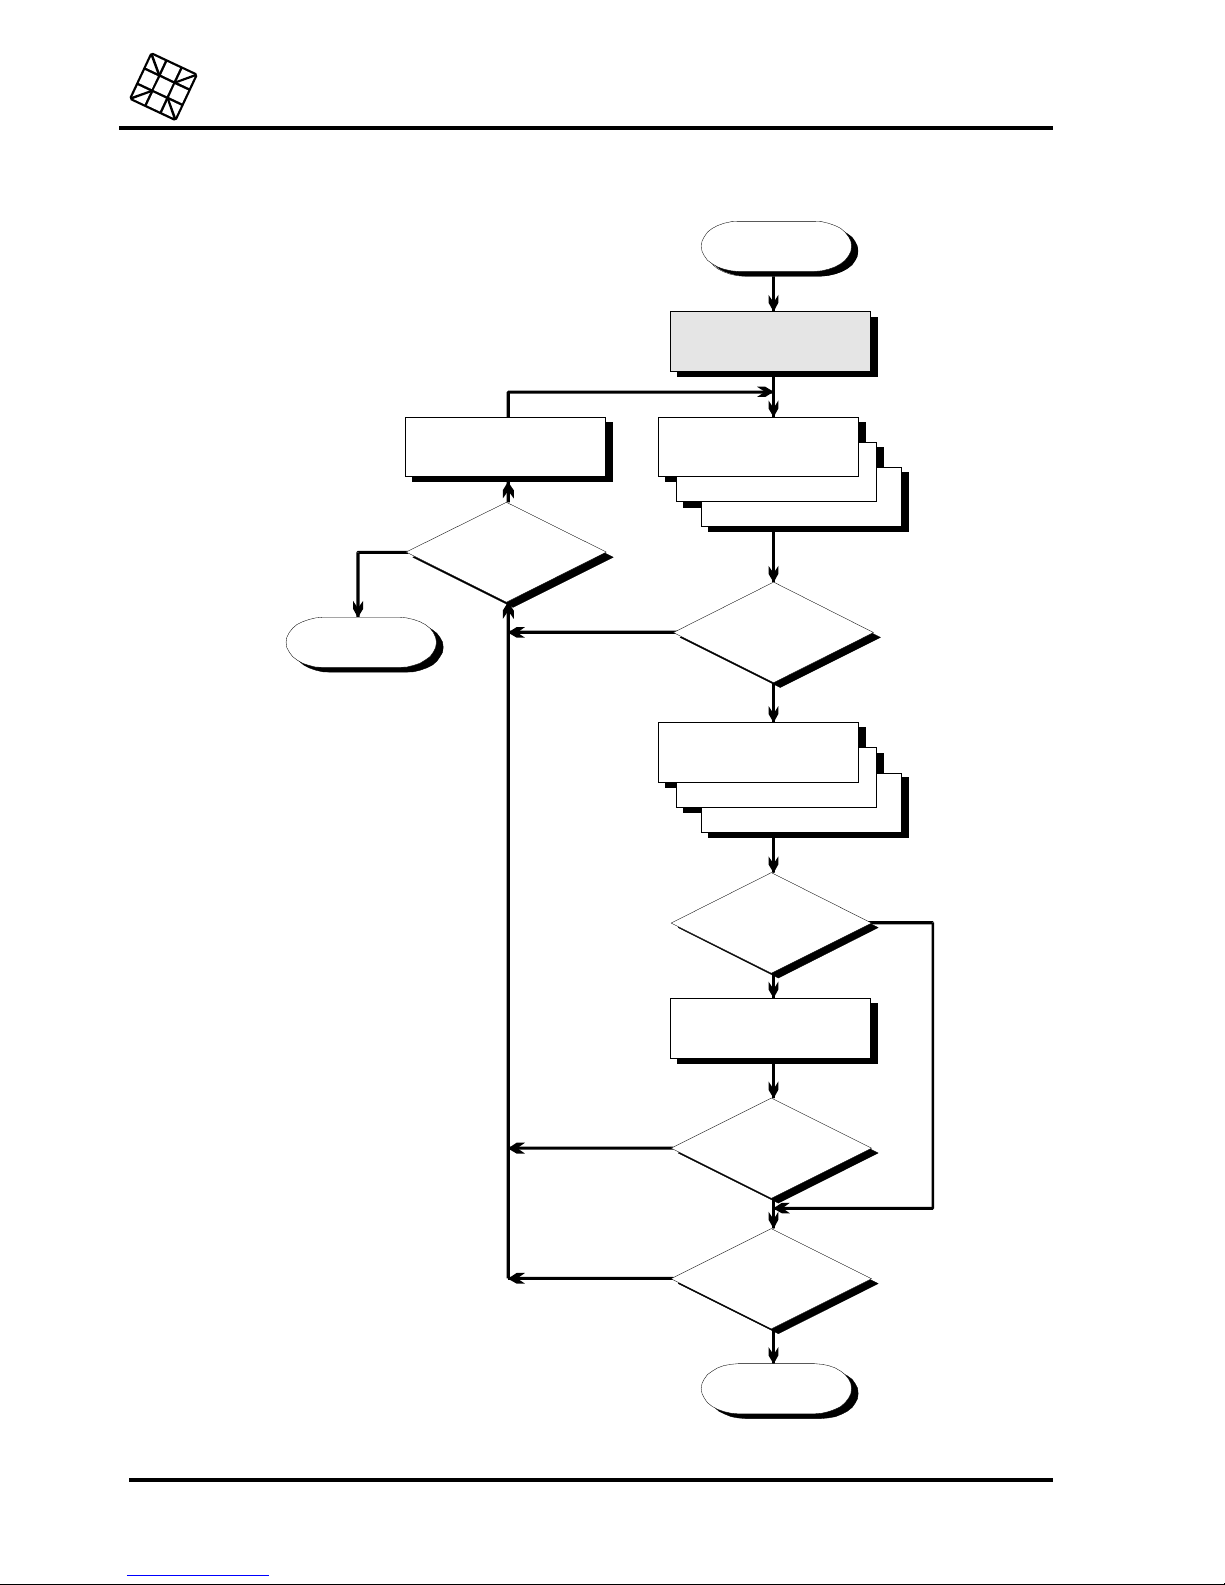
4. FUNCTIONING OF TELEPHONE ALARM
alarm
wait for possible set delay
time
dial
telephone number
pager number
number of reporting service
select the same or the
succeeding number after
the set delay time
already
15 failures ?
end
occupied
or not
answered ?
tone code or
voice message
report to pager
report to reporting service
reset by
call back set ?
wai t f or
call back
called back
in time ?
report correctly
reset ?
end
no
yes
yes
no
no
no
no
yes
yes
yes

Operation instructions
Adesys bv, Wateringen, NL
8 Octalarm-T2 / T4 / T8 / T16
4.1 Alarm procedure
The telephone alarm procedure diagram shows what happens in case an alarm channel is activated
using the factory defaults. Navigate through the diagram in the direction of the arrows, starting at the
ALARM block.
The function of the shaded block is by standard switched off. It can be activated by the installer
using the installation program.
4.2 Dialling order
When the Octalarm fails to report successfully, it will start a new dialling attempt to the subsequent set
number. The Octalarm considers a report unsuccessful if:
•
the dialling attempt has failed, e.g. if there is no dialling tone or the busy signal is received during
dialling,
•
the person being called does not answer the call,
•
the reset procedure is not accomplished correctly.
Using the factory defaults, all numbers entered (A through J) are passed in alphabetical order,
whereby blank numbers are skipped automatically. When for example four numbers are entered, these
numbers will be dialled alternately until the reset procedure is properly accomplished. After 15
unsuccessful attempts, the Octalarm will reset itself.
It is possible to set a specific dialling order for each alarm channel. This alteration has to be carried out
in the installation program. See paragraph 18.7 Prog 42 “set dial sequence”.
Alterations of dialling order have to be carried out carefully, because it might happen that an alarm
will no longer be reported due to a wrong setting!
4.3 Alarm channels and report codes
The Octalarm disposes of respectively 2, 4, 8 or 16 externally activated alarm channels and two
internal channels: "mains failure" and "battery empty". An individual message is assigned to each
channel.
4.3.1 Report to telephone
In case of a telephone report, an individual self-recorded voice message (for version -S) or a
recognizable tone code will be reproduced for each channel.
The tone codes are pre-set and sound for the Octalarm –T2, -T4 and –T8 as follows:
•
alarm channels 1 to 8: respectively 1 to 8 beeps
•
mains failure: 9 beeps
•
battery failure: 10 beeps.
The tone-codes for the Octalarm –T16 sound as follows:
•
alarm channels 1 to 16: respectively 1 to 16 beeps
•
mains failure: 17 beeps
•
battery failure: 18 beeps.
•
The messages (for version -S) can be recorded using the installation program.

Adesys bv, Wateringen, NL
Operation instructions
Octalarm-T2 / T4 / T8 / T16
9
4.3.2 Report to pager
The following report codes are programmed for a report to pagers:
channel tone-only
pagers
numerical pagers alpha-numerical
pagers and SMSmessages
alarm 1
alarm 2
alarm 3
alarm 4
1
2
3
4
1
2
3
4
alarm 1
alarm 2
alarm 3
alarm 4
alarm 5
alarm 6
alarm 7
alarm 8
1
2
3
4
5
6
7
8
alarm 5
alarm 6
alarm 7
alarm 8
alarm 9
alarm 10
alarm 11
alarm 12
1
2
3
4
9
10
11
12
alarm 9
alarm 10
alarm 11
alarm 12
alarm 13
alarm 14
alarm 15
alarm 16
1
2
3
4
13
14
15
16
alarm 13
alarm 14
alarm 15
alarm 16
mains failure 4 9 or 90 (Octalarm-T16) mains failure
battery empty 4 10 or 91 (Octalarm-T16) battery empty / failure
With the Octalarm-T16, each alphanumerical radio telephone message and each SMS message is
also preceded by an opening message of your choosing.
If required, all codes can be altered using the installation program 55.
4.3.3 Report to mobile telephone
The Octalarm can report to mobile telephones in two different ways:
•
by means of a pre-set tone code or by a self-recorded voice message (version -S), as with a
normal telephone,
•
by using the Short-Message-Service (SMS), whereby the device's display is used as a pager. The
report messages used for this purpose are equal to those of an alpha-numerical pager.
Take account of the receiving range of your mobile telephone.
Sometimes, depending on the degree of capacity-use of the mobile network, messages by SMS
are passed with some delay. Therefore, it is recommendable to have time critical messages
acknowledged by call back (see paragraph 4.4 “Reset procedure”) and to have a second call
number dialled in case there is no response in time.
4.3.4 Report to reporting services
The Octalarm uses the report codes for alpha-numerical pagers to report to the Adesys reporting
centre. For reports to other centres, please contact your supplier.

Operation instructions
Adesys bv, Wateringen, NL
10 Octalarm-T2 / T4 / T8 / T16
4.4 Reset procedure
The Octalarm has two ways of resetting a telephone report:
•
Reset during the report. In case of reports to a pager, a reporting service or a mobile telephone
with SMS, the reception of the acceptance tone is sufficient to reset the Octalarm. In case of
telephone reports, a 4-digit reset code has to be entered during the report, using a tone dialling
telephone.
•
Reset by call back. Using this setting, the Octalarm has to be called back to acknowledge the
reception of the report. The call back time limit is adjustable, as is the reset code (for optional
use).
All settings mentioned above are adjustable for each individual call number.
4.5 More than one alarm simultaneously
The transaction order of alarms occurring simultaneously depends on whether a deviant dialling order
has been set for the alarm channels concerned or not. (See configuration in the installation program
Prog 42 “set dial sequence”.
4.5.1 Reporting channels with a default dialler
No specific call numbers are selected for these reporting channels. The report attempts can be sent to
each of the numbers entered (factory default).
In case more than one alarm takes place at the same time, the alerts will be passed on in groups as
much as possible. With telephone reports, more than one alarm is heard at the same time and in case
of a report to a pager or a reporting service, the report codes are passed on immediately after each
other. In this way, the alarms are reported quickly and they can be reset simultaneously.
4.5.2 Reporting channels with a deviant dialler
A selection from the call numbers entered has been made for these reporting channels. The report
attempts are only allowed to be sent to a limited number of call numbers, according to a determined
order.
If these reporting channels are activated simultaneously, the Octalarm functions according to the
priority principles, whereby the alarm with the highest priority precedes the other alarms. An alarm
having a lower priority will only be reported after a telephone reset of the alarm with the highest
priority, or following 15 unsuccessful report attempts. The priority of the reporting channels is
determined as follows:
•
battery empty channel,
•
alarm channel 1,
•
alarm channel 2, etc.
•
mains failure channel.
If a channel with a higher priority is activated during a report, the running report will be interrupted and
the highest priority alarm will be reported. After completing this alert, the report of the channel with a
lower priority is resumed.
4.5.3 Combination of a default/custom dialler
Reporting channels with a different dialling order always have a higher priority to channels with a
default dialling order.

Adesys bv, Wateringen, NL
Operation instructions
Octalarm-T2 / T4 / T8 / T16
11
5. FUNCTIONING OF THE LOCAL ALERT
5.1 Alarm buzzers
In case of an alarm, the built-in buzzer will ring together with the buzzer(s) that may have been
connected externally. The conditions that enable and disable the buzzer can be set:
•
Enable immediately after detection of the alarm (factory default).
•
Enable after a set delay time.
•
Only enable if a telephone report has failed completely.
•
Disable automatically after a set delay time or at the moment the reset key is pressed.
•
Disable when the telephone report has passed off correctly (factory default).
•
Only disable at the moment the reset key is pressed.
The default start and stop conditions can be modified using the installation program. (See paragraph
18.5 Prog 31 “set alarm buzzer”
The volume of the internal buzzer can be adjusted from 0 up to 4 (factory default: 2). When connecting
the external buzzer (optional accessory, supplied by ADESYS), its volume can be adjusted to three
levels.
5.2 Flashlight
The Octalarm is equipped with a flashlight output (as option deliverable). As opposed to the alarm
buzzer, the flashlight cannot be turned off in the event of an alarm by using the reset key. The
flashlight can only be switched off by cancelling the alarm or by switching off the alarm selection key.
The flashlight reminds the user of the fact that the alarm has in fact been reset, but the cause is still
not resolved.
Operation instructions
Adesys bv, Wateringen, NL
12 Octalarm-T2 / T4 / T8 / T16
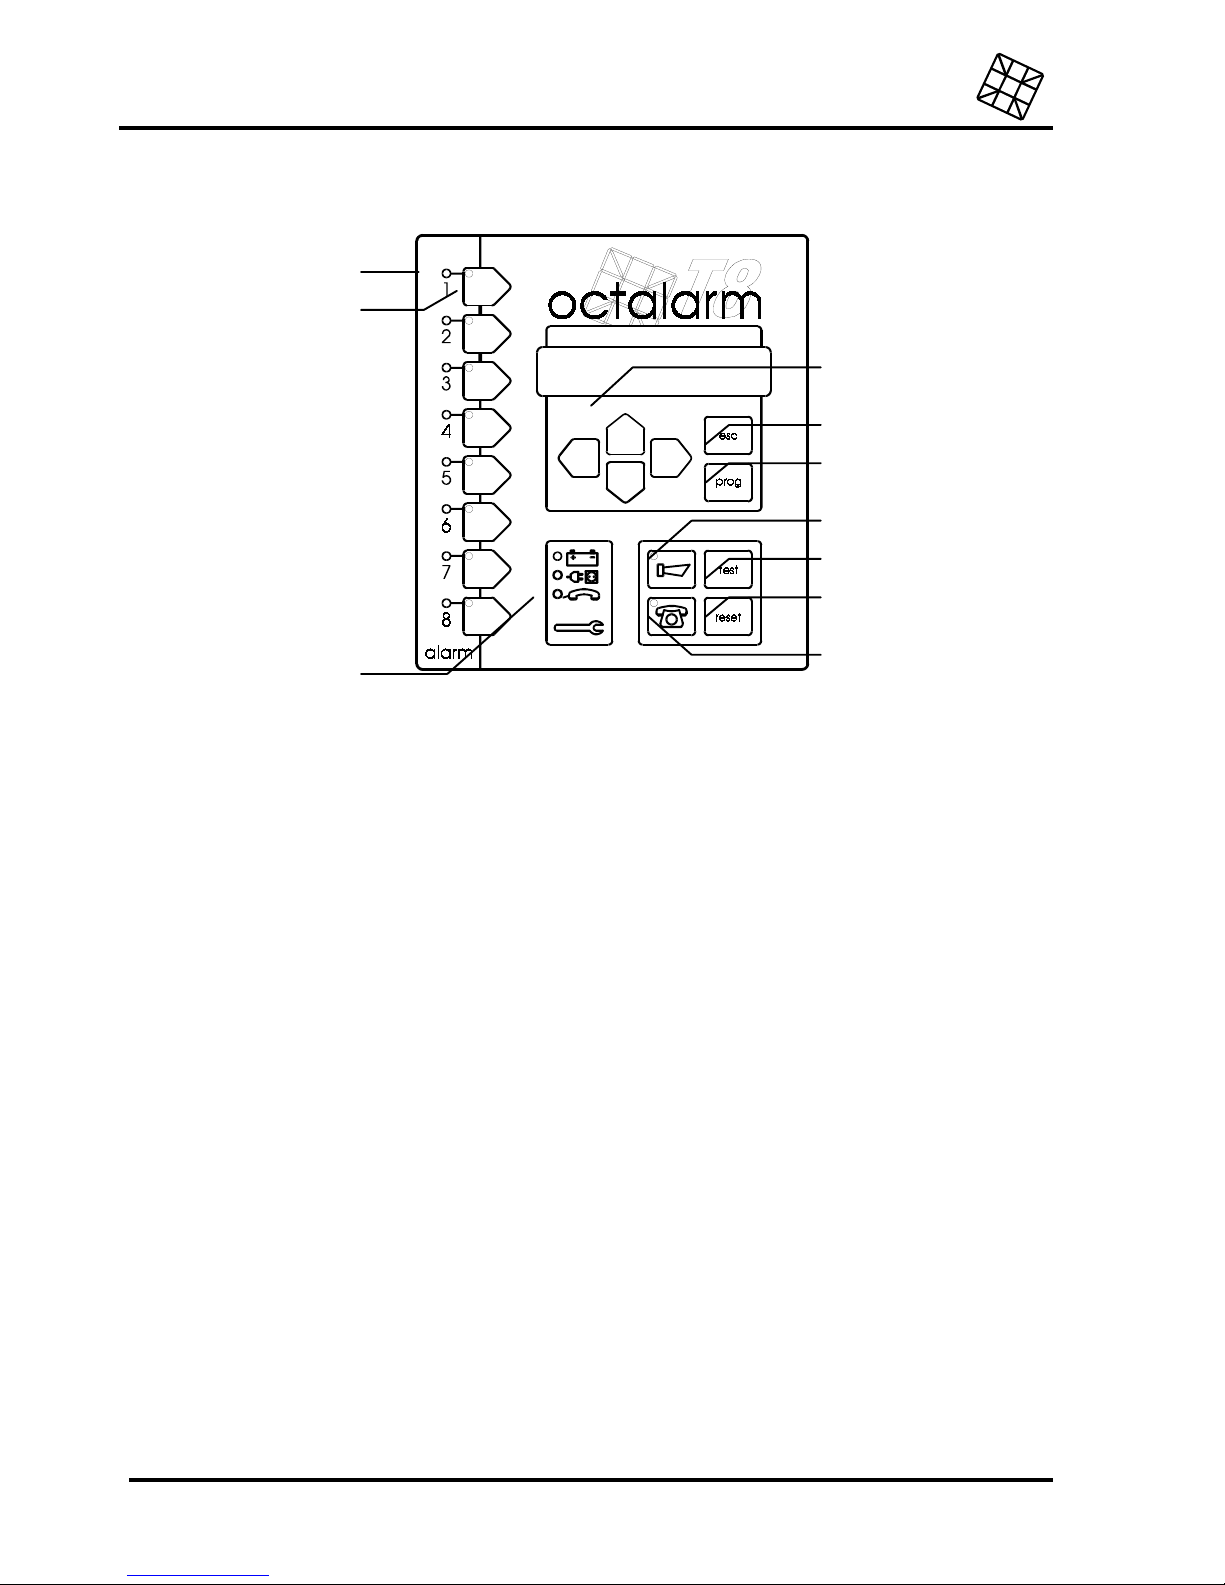
6. OPERATION
6.1 Alarm indicators
The status of an alarm channel is indicated as follows by the red LED’s:
•
LED off: no alarm.
•
LED on: alarm.
•
LED blinks: alarm coming up. The alarm has been detected at the input of the reporter, but is not
being relayed since the set alarm delay time for this channel has not yet elapsed. The indicator will
switch off when the alarm expires in the course of this period. In case the alarm still exists after the
determined time, the indicator will light up continuously and the message will be reported.
6.2 Alarm channel selection keys
Using these keys, the message transmission can be switched off for each alarm channel (at OctalarmT16: per two alarm channels). The green indicator in the key lights up in case the passing of the report
is enabled. To avoid the transmission of the message being interrupted accidentally (e.g. while
cleaning), the key has to be kept depressed when turning off.
When an alarm channel is switched off (green LED off), an incoming alarm on the relevant
channel will not be reported.
6.3 Device malfunction indicators
The Octalarm periodically checks the major connections and facilities. A defect will be signalled. The
following malfunctions will be reported using individual LED’s:
•
battery failure
•
mains failure
•
telephone line interrupted or a failure in the mobile network (model -G).
When the telephone line indicator lights up without reason, this function can be switched off. See
6.2
6.3
6.5
6.4
6.6
6.7
6.8
6.10
6.9

Adesys bv, Wateringen, NL
Operation instructions
Octalarm-T2 / T4 / T8 / T16
13
chapter 18.6 Prog 41 “set dialler”
6.4 Reset key
Press this key to disable the buzzer and to interrupt the telephone report.
6.5 Test key
This key allows you to test the main alarm functions in a quick and convenient way. See part 13
“TESTING" for the test options.
6.6 Buzzer key
The key to switch on/off the built-in buzzer and the signallers that may be connected externally. The
indicator in the key lights up in case the buzzer is switched on. To avoid the buzzer being disabled
accidentally (e.g. while cleaning), the key has to be kept depressed when turning off.
6.7 Telephone dialler key
Key for switching on/off the telephone report. The LED inside the key lights up in case the telephone
dialler is switched on. To avoid switching off the telephone report accidentally (e.g. while cleaning), the
key has to be kept depressed when turning off.
In case the telephone dialler is switched off (LED off), an alarm will not be reported by telephone.
Calling
up the Octalarm in order to receive the alarm status by telephone will, however remain
possible.
6.8 Display and cursor keys
The display is used for:
•
the menu-driven setting of telephone numbers by the user
•
the menu-driven programming of installation data by the installer
•
showing the progress status of a telephone report
•
showing possible alarms or device malfunctions.
The cursor on the display blinks whenever a value can be entered or an option can be chosen during
the set-up. Use the cursor keys
C
and
D
to move the cursor around and the keys E and
F
to modify the
value or the option at the cursor's position. Every new setting has to be confirmed using the Prog-key.

Operation instructions
Adesys bv, Wateringen, NL
14 Octalarm-T2 / T4 / T8 / T16
6.9 Prog-key
The key used for configuring the telephone numbers and for programming the installation data by the
installer. To set the telephone numbers, the key has to be pressed shortly. This key is also used to
confirm and store input. For further information about the set-up, see part 7 "SET".
By pressing the Prog-key repetitively, the display shows all current settings without altering them.
In case a setting has to be modified, all questions asked have to be answered, until the message
SETTINGS STORED appears. Quitting the set-up program during configuration by using the esc-
key, will restore all previous settings!
In case this key is pressed prolonged (five seconds), the Octalarm will switch over to the
installation program. The text
Prog 10 SET DISPLAY CONTRAST
will appear on the display. Press
the esc-key to leave this program. The settings in this program require understanding of technical
matters and are only intended for the installer. Modifications introduced arbitrary can lead to an
alarm being reported wrongly or not at all.
6.10 Esc-key
Press the esc-key in order to quit a configuration or a program on the display and to return to the
previous menu without saving a possible modification. Also use this key to end the configuration or the
programming and to return to the standard program of the Octalarm.

Adesys bv, Wateringen, NL
Operation instructions
Octalarm-T2 / T4 / T8 / T16
15
7. SET CALL NUMBERS
Pressing the Prog-key for a short time will start the set up of the call numbers. The general report
program will be closed (all LED’s switched off) and the Octalarm will guide you by asking some
questions.
Up to 10 call numbers can be set. Each call number is assigned to a letter (A through J) and has its
own reset procedure. Defining all numbers is not necessary. Numbers which have not been set will be
skipped automatically.
A call number can be set as follows:
B
Press the Prog-key for a short time. On the display appears:
A:REPORT TO.................
B
If desired, select an alternative call number (A-J) using
E
or
F
.
BPress the Prog-key for a short time in order to confirm the selected number.
BUsing E or
F
,
select which telephone connected to the telephone network, will receive the report
and confirm this using the Prog-key. You can choose from the following options:
•
report to a telephone. (see paragraph 4.3.1 Report to telephone)
•
report to a pager. (see paragraph 4.3.2 Report to pager)
•
report to a mobile telephone. (see paragraph 4.3.3 Report to mobile telephone)
•
report to a reporting service. (see paragraph 4.3.4 Report to reporting services)
A number can be erased completely by selecting
(NOT DEFINED)
Confirm each new or altered setting by pressing the Prog-key repeatedly, until the message
SETTINGS STORED
appears on the display. Quitting the set-up program during configuration by
using the esc-key, will restore all previous settings!
After erasing the only call number set for a particular alarm, it is no longer possible to report this
alarm by telephone. Therefore, first refer to "dialler" on the list of settings made up by the installer
(see “
Fout! Verwijzingsbron niet gevonden.
") before erasing any number.
7.1 Report to a telephone
B
The Octalarm asks for the number to be dialled. Use
C
or
D
to move the cursor to the field for
setting or changing a digit. Now you can enter the digit using the
E
and F key. The following
characters may be used for settings as well:
•
- : setting a delay for a dialling tone (e.g. if the Octalarm is connected to a home exchange,
requiring a pause after dialling 0 in order to wait for the dialling tone of the outside line).
• ,
: indicates a 2 seconds delay during the dialling and can for example be used if one has to
wait for an undefined dialling tone.
• !
: used in combination with the
C
and
D
keys to insert or delete digits at the position of the
cursor.
B
Confirm the entered number using the Prog-key.
B
Select the desired reset procedure. See paragraph 7.5 “Set reset procedure”.

Operation instructions
Adesys bv, Wateringen, NL
16 Octalarm-T2 / T4 / T8 / T16
7.2 Report to a pager
B
Select the pager type. The following options are available:
•
tone-only pager, (see paragraph 7.2.1 “Characteristics of a tone-only pager")
•
(alpha) numerical pager, (see paragraph 7.2.2 “Characteristics of an (alpha) numerical pager”)
The Octalarm has an individual report code or text message for each type of pager and for each
alarm channel. For a summary of the default settings, see paragraph 4.3.2 “Report to pager”.
B
Confirm the selection using the Prog-key.
B
In case a numerical or alpha-numerical pager has been selected, the Octalarm asks for the pager
type as well.
B
The Octalarm now asks you to enter the call number or the number of the paging service. Use
C
or
D
to move the cursor to the field for setting or changing a digit. Now you can enter the digit
using the
E
and
F
key. The following characters may be used for settings as well:
• -
: setting a delay for a dialling tone (e.g. if the Octalarm is connected to a home exchange,
requiring a pause after dialling 0 in order to wait for the dialling tone of the outside line).
•
,
: indicates a 2 seconds delay during the dialling and can for example be used if one has to
wait for an undefined dialling tone.
•
!: used in combination with the
C
and
D
keys to insert or delete digits at the position of the
cursor.
B
Confirm the entered number using the Prog-key.
BDepending on the selected pager type, the Octalarm can ask some additional questions, such as:
•
pager number : this question will only appear when using a pager with a general paging
service extension number, followed by a unique pager number.
• pin code
: this question will appear for pagers using some sub-address. (These pagers do not
involve any subscription expenses because many pagers are placed on one single
subscription. Separation takes place by the sub-address in the report code.) In case you do
not have to use a PIN code for your pager, you can leave this question unanswered.
B
Select the desired reset procedure, see paragraph 7.5 “Set reset procedure”.
7.2.1 Characteristics of a tone-only pager
This pager transmits a tone code and is sometimes equipped with a small numeric display. The pager
is supplied with 4 or 8 individual call numbers, with the transmitted tone code being determined by the
last digit. Nevertheless, the last digit is not important to the Octalarm.
When setting the call number, only one of the numbers provided must be entered. The Octalarm
itself will alter the last digit in order to transmit the right tone code for the right alarm channel.
7.2.2 Characteristics of an (alpha) numerical pager
This pager disposes of a display on which a user-defined numerical code or an alpha-numerical text
can be shown. Before the report can take place, one has to select the call number. Next, the report
code (and in some cases an additional pager number or sub-address) must be entered using a
telephone or a modem.
Attention: some numerical pagers are connected to paging services that are not able to send
defined acceptance signals on behalf of automatic dialling devices. Reporting to these kind of
pagers is therefore not possible!

Adesys bv, Wateringen, NL
Operation instructions
Octalarm-T2 / T4 / T8 / T16
17
7.3 Report to a mobile telephone
B
Select the option with which the report to a mobile telephone has to take place. The following
options are available:
•
report using SMS.
•
report using a tone code or voice report (only for version -S).
The Octalarm disposes of an individual alpha-numerical message for every single reporting
channel on behalf of reports using SMS (Short-Message-Service). For a summary of the default
settings, see paragraph 4.3.2 “Report to pager”.
A tone code or voice reports to a mobile telephone function in the same way as to a regular
telephone.
B
Confirm the selection using the Prog-key.
B
The Octalarm now asks you to enter the call number / extension number or the number of the
SMS service. (model -G does not ask this question) Use
C
or
D
to move the cursor to the field for
setting or changing a digit. Now you can enter the digit using the
E
and
F
key. The following
characters may be used for settings as well:
• -
: setting a delay for a dialling tone (e.g. if the Octalarm is connected to a home exchange,
requiring a pause after dialling 0 in order to wait for the dialling tone of the outside line).
• ,
: indicates a 2 seconds delay during the dialling and can for example be used if one has to
wait for an undefined dialling tone.
•
!: used in combination with the
C
and
D
keys to insert or delete digits at the position of the
cursor.
B
Confirm the entered number using the Prog-key.
BIn case of an SMS report, the Octalarm will ask for the extension number.
B
Select the desired reset procedure, see paragraph 7.5 “Set reset procedure”.
7.4 Report to a reporting service
Select the kind of reporting service.
The Octalarm disposes of an individual numerical or alpha-numerical message for each alarm
channel. For a summary of the default settings, see “Report to pager”.
B
Confirm the selection using the Prog-key.
BThe Octalarm now asks you to enter the call number. Use
C
or
D
to move the cursor to the position
where a digit has to be entered or modified. Now you can enter the digit using the
E
and
F
key. The
following characters may be used for settings as well:
• -
: setting a delay for a dialling tone (e.g. if the Octalarm is connected to a home exchange,
requiring a pause after dialling 0 in order to wait for the dialling tone of the outside line).
• ,
: indicates a 2 seconds delay during the dialling and can for example be used if one has to
wait for an undefined dialling tone.
•
!: used in combination with the
C
and
D
keys to insert or delete digits at the position of the
cursor.
B
Confirm the entered number using the Prog-key.
BSelect the desired reset procedure, see paragraph 7.5 ”Set reset procedure”.
7.5 Set reset procedure
It is possible to choose from the following reset procedures:

Operation instructions
Adesys bv, Wateringen, NL
18 Octalarm-T2 / T4 / T8 / T16
•
Reset during call (for reports to a telephone)
•
Reset by the service (for reports to a pager, a reporting service or an SMS-message in case of a
mobile telephone)
•
Reset by calling back.
7.5.1 Reset during call
B
Select this option and confirm using the Prog-key
B
Enter the (compulsory) 4-digit reset code and confirm using the Prog-key.
B
Enter the delay time to be taken into account between a failed report attempt and a new dialling
attempt and confirm using the Prog-key. The following text will appear on the display: SETTINGS
STORED
.
7.5.2 Reset by the service
B
Select this option and confirm using the Prog-key.
B
Enter the delay time to be taken into account between a failed report attempt and a new dialling
attempt and confirm using the Prog-key. The following text will appear on the display: SETTINGS
STORED
7.5.3 Reset by calling back
BSelect this option and confirm using the Prog-key.
B
Enter the time in which the Octalarm has to be called back and confirm using the Prog-key.
B
If necessary, enter the reset code to be applied and confirm using the Prog-key. The following text
will appear on the display:
SETTINGS STORED
.
Not entering a reset code might lead to an accidental reset of the Octalarm, in case someone
happens to call the Octalarm within the set delay time! Therefore, the use of a reset code is
strongly recommended.
A reset code can only be entered using a tone dialling telephone.
Do not set the
wait time if failed
or the
call back time
too short in order to avoid the reporting
attempts being carried out too soon after one another. The reporting stops after 15 unsuccessful
attempts.

Adesys bv, Wateringen, NL
Operation instructions
Octalarm-T2 / T4 / T8 / T16
19
8. CALL BACK TO RESET AN ALARM
Depending on the reset procedure programmed with the call number, you have to call back the
Octalarm in order to acknowledge the alarm report and to reset the transmission.
BDial the number of the Octalarm.
B
Provided the telephone line is not engaged, the Octalarm will answer the call after 2 rings and
transmit the alarm twice using a recognizable tone code or a recorded voice message (version -S).
See paragraph 4.3.1 “Report to telephone" for the characteristics of the tone codes.
8.1 Reset without using a reset code
In case the call number is not provided with a reset code, the alarm report is followed by an extended
beep (5 seconds) indicating the Octalarm is being reset.
In case no reset code is set, it may be possible that, if someone happens to call the Octalarm
within the set delay time, the Octalarm is reset accidentally! Therefore, the use of a reset code is
strongly recommended.
8.2 Reset using a reset code
In case the call number is provided with a reset code, after the alarm report, the Octalarm will send
short waiting beeps with extended pauses in between, indicating the reset code to be entered now.
Enter the reset code using the telephone. If the code is right, an extended beep (5 seconds) is heard
and the alarm is reset. In case of an incorrect reset code, you hear some short error beeps shortly
after each other and the Octalarm waits for the correct reset code. The connection will be interrupted
after 2 minutes.
After the reset code has been accepted, the Octalarm will send waiting beeps again to give the caller
the opportunity to send commands for switching or remote programming. See paragraph 10
"SWITCHING THE RELAY OUTPUT BY TELEPHONE” respectively paragraph 17.1.3 “Programming
using a telephone line”.
A reset code can only be entered using a tone dialling telephone.

Operation instructions
Adesys bv, Wateringen, NL
20 Octalarm-T2 / T4 / T8 / T16
9. RETRIEVE ALARM STATUS BY TELEPHONE
This option enables you to retrieve the alarm status of the guarded object using a telephone. In case
the telephone dialler key is switched off, the status report can be retrieved anyhow.
Dial the number of the Octalarm. Provided the telephone line is not engaged, the Octalarm will answer
the call and put through all present alarms twice, using a recorded voice message (for version -S) or a
recognizable tone code. See paragraph 4.3.1 “Report to telephone" for the characteristics of the tone
codes.
In case no alarm is present, the Octalarm sends an extended beep of 5 seconds.
In case the Octalarm is connected to a analogue telephone line together with communication
equipment provided with answering facilities (modem, fax and such) the usage of this option could
cause problems. If necessary, alter the number of signals after which the Octalarm has to answer
the call or completely switch off this function using the installation program.
10. SWITCHING THE RELAY OUTPUT BY TELEPHONE
The Octalarm is equipped with a relay control output. A connected relay can be controlled at a
distance using a telephone, for example to:
•
reset an alarm device
•
temporarily release an entrance door
•
switch on or off the ventilation, the lighting or the burglar alarm.
The control can take place as follows:
B
Dial the number of the Octalarm, listen to the possible alarms and wait for the short waiting beeps.
B
Enter one of the following switch commands:
• # 1 #
, to switch on,
• # 0 #
, to switch off,
• # 2 #
, for a switch pulse of 10 seconds.
B
In case an access code is set, the switch command has to be given as follows:
# switch command
# access code #.
The access code is entered in the installation program.
BWait until the acceptance tone is sent back, the command will then be executed. A short
continuous error beep sounds in case of an incorrect code.
Remote switching is only possible using a tone dialling telephone.

Adesys bv, Wateringen, NL
Operation instructions
Octalarm-T2 / T4 / T8 / T16
21
11. NIGHT TIME MODE
The Octalarm -T4, -T8 and -T16 are equipped with a night time mode. When the Octalarm operates in
night time mode, this is indicated on the display.
The night time mode influences the following functions:
•
Start conditions (delay times included) of the telephone report.
•
Start and stop conditions (delay times included) of the built-in buzzer and the external signal
devices.
•
The volume of the built-in buzzer.
•
Locking the keyboard.
The night time mode is set using the installation program.
The night time mode cannot be activated on the Octalarm itself. For activating, it disposes of an
individual input that is to be connected to external devices such as a burglar alarm, a key switch, a
time switch, an access control system, etc.
Example of a configuration
If the night time mode input is connected to a burglar alarm, the night time mode is activated
automatically the moment the burglar alarm is switched on, for instance when leaving the location.
The reports can be carried out as follows:
Reports during daytime
•
The acoustic alarm sounds instantly after detecting an alarm.
•
The telephone report only starts after 5 minutes, allowing a prior reset of the Octalarm.
•
The acoustic alarm does not stop until the device has been reset or if a possible telephone report
has succeeded.
•
The operation of the Octalarm will not be locked.
Reports during night time
•
The telephone report starts immediately after receiving an alarm, without any delay.
•
The acoustic alarm only sounds after the telephone report fails. Possible neighbours can be
alerted through these signals.
•
The operation of the Octalarm will be locked.
Using daytime as well as night time mode, the telephone key and the buzzer key are to be
operated as usual (providing the operation not being intentionally locked). However, while
switching from daytime mode to night time mode or the other way round, the night time mode
settings, as selected in the installation program, are re-applied.

Operation instructions
Adesys bv, Wateringen, NL
22 Octalarm-T2 / T4 / T8 / T16
12. MAINS FAILURE
The Octalarm is equipped with a built-in, maintenance free standby battery. This keeps the Octalarm
functioning in case of a mains failure.
12.1 Mains failure report
The Octalarm will report a mains failure through an acoustic signal and/or by telephone using an
especially reserved internal reporting channel. For the report codes being used, see paragraph 4.3
“Alarm channels and report codes”.
12.2 Battery empty report
In case the battery is almost run down during a mains failure, this will be reported through an acoustic
signal and/or by telephone using the "battery empty" channel. For the report codes being used, see
paragraph 4.3 “ Alarm channels and report codes”.
12.3 Back up supply
During a mains failure, the period that can be backed up with the built-in battery strongly depends on
the operation mode and the external signal devices. In general, a new battery obtains a back up
supply of:
•
approximately 15 hours in standby mode
•
approximately 10 hours in case of a continuous acoustic alarm through the built-in buzzer.
•
approximately 3,5 hours in case of a continuous acoustic alarm through the built-in buzzer and the
external connected signal devices.
12.4 Automatic battery test
During normal use, the battery will be recharged continuously to its maximum level.
The battery performance is tested automatically every month. In case the battery does not dispose of
sufficient capacity during the test (less than 30% of the original capacity), the red indicator "battery
empty" will light up and the message "battery failure" appears on the display. The internal buzzer will
be activated and a telephone report using the "battery empty" channel will be issued as well.
The Octalarm will continue to function during the battery test.

Adesys bv, Wateringen, NL
Operation instructions
Octalarm-T2 / T4 / T8 / T16
23
13. TESTING
The test key enables you to test most options of the Octalarm in a quick and convenient way. It also
enables you to find possible set-up errors.
13.1 Optic and acoustic alarms test
Press the test key. All indicators will illuminate and the built-in buzzer and the external signal devices
will be activated. On the display appears: -OCTALARM-TEST- , followed by the type number OT2, OT4,
OT8 or OT16, possible followed by:
•
-S: model with voice messages instead of tone code messages,
•
-I : model adjusted for the ISDN network,
•
-G: model for the mobile GSM network,
•
or a combination of the above.
The test can be interrupted using the reset key. After 5 seconds, the test will be interrupted
automatically.
13.2 Telephone report test
Press the test key followed, within 5 seconds, by the selection key of the alarm channel to be tested.
The set report procedure for the relevant channel will be passed through completely. With the model
for analogue or ISDN connections, the built-in speaker produces all signals on the telephone line,
making it possible to trace possible set-up errors of telephone numbers, reporting procedures and
such. It is not possible to listen in on conversations with the GSM model.
14. SWITCH OFF COMPLETELY
The Octalarm does not dispose of an on/off switch on the operating panel. The following has to be
done to completely turn off the device:
B
Disconnect the plug from the power socket,
BKeep the reset key on the operation panel or the reset key underneath the connection cover
depressed until the display and all the indicators have been turned off.
Connecting the plug to the power socket will automatically turn on the Octalarm.

Operation instructions
Adesys bv, Wateringen, NL
24 Octalarm-T2 / T4 / T8 / T16
15. ERROR MESSAGES
Installation or set-up errors may give the following error messages:
Display messages Cause Solution
BATTERY FAULT,
REPLACE BATTERY
The Octalarm has detected that the
emergency battery capacity has dropped
below 30% of the original value. There is a
possibility that a telephone warning of a
network error cannot be passed on.
Have the battery replaced
by professionals.
SHORTCIRCUIT IN
THE SENSOR
NETWORK
A short-circuit has been detected in the
Sensor network cable.
Check the cable circuits.
TELEPHONE
CONNECTION
DEFECTIVE
There is no power on the telephone line,
owing to a failure, or is dropping to an
extremely low value during the use of another
machine or peripheral connected to the same
line.
Check the telephone line.
The telephone line
monitoring can be
switched off, see also
prog. 41 “adjusting the
dialler”.
SETUP ERROR ISDN
CALL NUMBER XX
A message has been sent to a non-existent
ISDN call number.
Check the call number
installed.
ISDN S-BUS
DEFECTIVE
The Octalarm has detected that there is no
power on the ISDN line (i.e. the S box).
Check the ISDN line and
the ISDN connection
cables.
ISDN NETWORK
ERROR XX
There is a failure in the service provider’s
ISDN network.
Wait for a while to see
whether the failure
continues. If it does,
contact your service
provider.
ISDN MODULE
DEFECTIVE
The inbuilt ISDN module is defective. Send the Octalarm to be
repaired.
GSM NETWORK: NO
INCOMING SIGNAL
There is no connection with the mobile
network, possibly because of a fault in the
network or because the antenna is defective
or not properly placed.
Check whether the mobile
network is present. If it is,
check and/or move the
antenna.
GSM:
NO SIM CARD
No SIM card has been inserted, or the
inserted card is not recognized.
Check the SIM card under
the protective cover.
GSM BLOCKED! PIN
CODE INCORRECT!
An incorrect PIN code has been entered,
blocking the SIM card.
Unblock the SIM card,
see prog. 41, “adjusting
the dialler”.
GSM MODULE
DEFECTIVE
The inbuilt GSM module is defective. Send the Octalarm to be
repaired.

Adesys bv, Wateringen, NL
Installation instructions
Octalarm-T2 / T4 / T8 / T16
25
Installation instruction
16. INSTALLATION
16.1 Placement
Install the Octalarm at a location not exposed to direct sunlight or other heat sources. Choose a
mounting location, shielded against penetration of moisture into the device.
The Octalarm can be placed on a table or it can be mounted onto a wall.
All connections are situated in the connecting area underneath the ribbed protective cover. Remove
the cover by pulling it up or aside on its corners.
Connect the Octalarm to a power socket with an earth connection. A proper grounding offers
maximum overvoltage protection on the telephone network and on the in- and outputs.
The GSM model Octalarm has a higher transmission frequency than standard mobile telephones.
In certain conditions, this may affect the functioning of nearby electronic equipment. If an external
antenna is used, the effects depend on the distance from the antenna to the nearby equipment.
Desk top installation
Detach the hindmost breakaway partition for leading the connection cables into the back. After
connection, fix the connection cables to the little bridges on the backplane, avoiding tensile strain.
Mounting onto a wall
The backplane of the Octalarm has two notches for mounting it onto a wall. Install the Octalarm as
follows:
B
Screw the Octalarm against the wall using the middle hole (only visible from the back), level the
device and fix it with a screw through the slit in the connection compartment.
B
Remove the lower breakaway partition of the connecting compartment in order to lead the
connection cables through. Preferably, keep the hindmost partition intact to minimize the
penetration of moisture and dust.
B
After connection, fix the connection cables to the little bridges on the backplane, avoiding tensile
strain.
In case the Octalarm is placed next to other equipment, reckon with sufficient space necessary for
removing the protective cover and for the connectors to be in easy reach.
Take care to attach the telephone cable or antenna cable (with the model -G) to the underlying
tensile relief bridge in order to prevent damage caused by pulling the cable loose sideward.
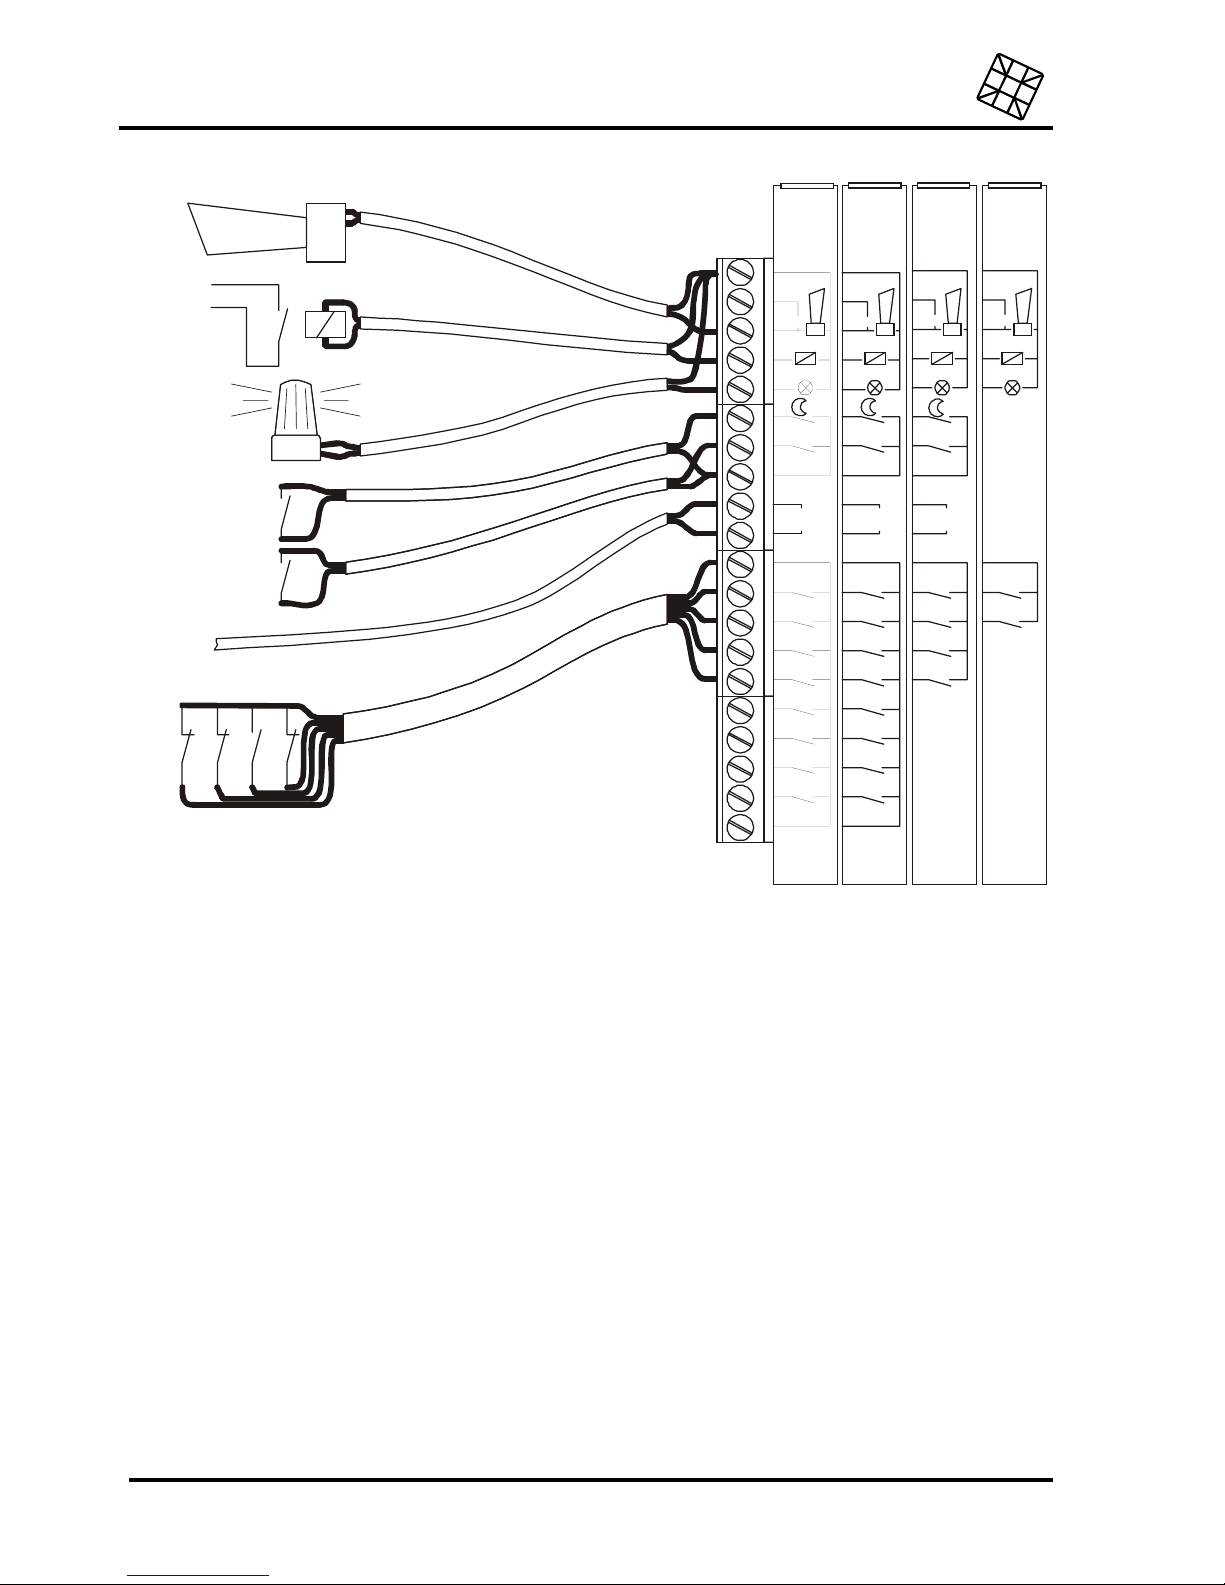
16.2 Connection diagram
Installation instructions
Adesys bv, Wateringen, NL
26 Octalarm-T2 / T4 / T8 / T16
nc
AL 1
AL 2
AL 3
AL 4
AL 5
AL 6
AL 7
AL 8
sensor
net
reset in
gnd
gnd
gnd
AL9..16
+12V
150mA
T16
no
+
-
in
nc nc nc
AL 1 AL 1 AL 1
AL 2 AL 2 AL 2
AL 3 AL 3
AL 4 AL 4
AL 5
AL 6
AL 7
AL 8
sensor
net
sensor
net
reset in reset in
gnd gnd
gnd
gnd gnd gnd
+12V
150mA
+12V
150mA
+12V
150mA
T8 T4 T2
no no no
+
+
--
in
in
op a fsta nd
te s c h a k e le n
alarmzoemer
octalarm
flitslicht
dag/nacht
schakelaar
externe
resetknop
sensornet
kabel
alarmcontacten
16.3 Connection of inputs
All inputs have to be activated by potential-free contacts.
16.3.1 Alarm inputs
Both normally open and normally closed contacts can be applied.
For the connection, it is possible to choose between:
•
a direct connection to the Octalarm, or
•
a connection through Sensornet (only possible for Octalarm -T4 and -T8). Using a Sensornet
connection can save on wiring, because all inputs are connected using one single two-core cable.
The Octalarm-T16 works with either type of connection: the alarm contacts for points 1-8 should be
connected directly, points 9-16 should be connected via the Sensor network.
16.3.1.1 Direct connection
Connect the potential-free alarm contact to the alarm input AL .. and to the GND terminal.
Adesys bv, Wateringen, NL
Installation instructions
Octalarm-T2 / T4 / T8 / T16
27
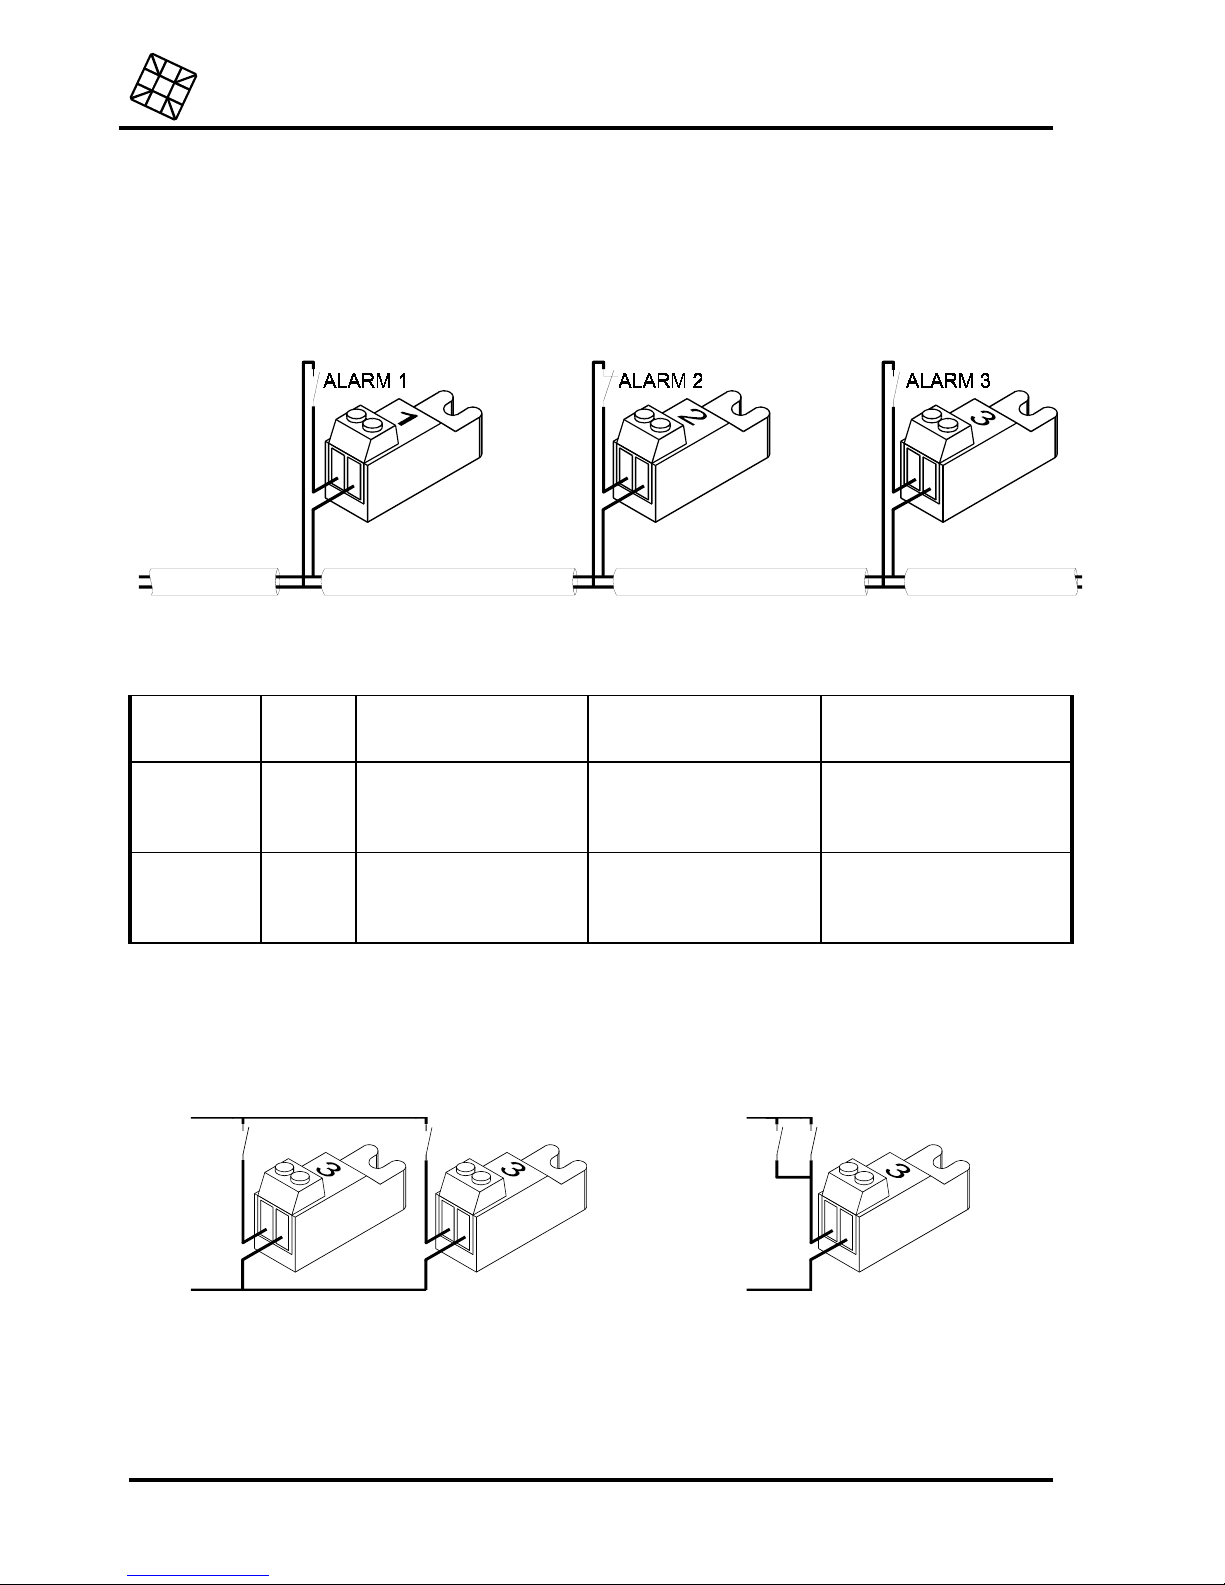
16.3.1.2 Connection through Sensornet
The Sensornet connection allows you to connect more than one alarm input using one single 2-core
cable (2 x 0.75mm at minimum, 1.000m at maximum). For this, coded terminal blocks are needed,
which are available in a set of 4 pieces, to be supplied as an optional accessory with the Octalarm -T4
or T8.
Connect the alarm contacts as follows:
Every connection block is coded. The code and the connection polarity, together with the Octalarm
model used, determine which alarm entry point is activated, according to the following table:
Connection
block
number:
With
polarity:
With Octalarm-T4
activates:
With Octalarm-T8
activates:
With OctalarmT16 activates:
1 + / -
alarm 1 alarm 1 alarm 9
2 + / -
alarm 2 alarm 2 alarm 10
3 + / -
alarm 3 alarm 3 alarm 11
4 + / -
alarm 4 alarm 4 alarm 12
1 - / +
alarm 1 alarm 5 alarm 13
2 - / +
alarm 2 alarm 6 alarm 14
3 - / +
alarm 3 alarm 7 alarm 15
4 - / +
alarm 4 alarm 8 alarm 16
The Octalarm-T4 and -T8 are allowed to "see" each terminal block only once! Therefore, never
connect two identical blocks (e.g. in order to let both of them activate the same alarm input),
because this will cause malfunctions or the wrong input being activated!
wrong:
right:
16.3.2 Input night time mode
Input to be able to activate the night time mode. Closing this contact will make the acoustic alarm and
the telephone report function according to the night time mode settings, see paragraph 18.11.

Installation instructions
Adesys bv, Wateringen, NL
28 Octalarm-T2 / T4 / T8 / T16
16.3.3 Input external reset contact
Input in order to reset the Octalarm by remote control. Just like when pressing the reset key on the
operation panel, the report will be interrupted as soon as the contact is made. The input only reacts to
the closing of the contact. A subsequent report will thus not be blocked in case the contact remains
closed.
16.4 Connection of outputs
All the following outputs are connected through one connection cable to the 12V terminal on top of
the terminal block and another cable to the relevant output terminal. The maximum current
available for all the externally connected devices is 150 mA.
16.4.1 Output external signal light
This output is activated as long as one of the inputs is in a state of alarm and the relevant selection
key is switched on. This output remains active even after the acoustic alarm or the telephone report is
reset. The output can be used for the direct control of a 12 V flashlight or (through a 12 V relay) a large
230 V light on a manifest place indicating the alarm still applies. Switching off only takes place when
the alarm expires or when the selection key concerned is switched off.
16.4.2 External buzzer outputs
Outputs for connecting additional acoustic signal devices or for controlling existing alarm systems.
There are two connection options:
•
Output “NO” (Normally Open) will be active in case of an alarm. It can be used for the direct
control of 12 V buzzers. Fitting in a 12 V relay allows you to switch heavier equipment.
•
Output “NC” (Normally Closed). It is active in rest on the contrary, and drops out in case an alarm
occurs. The Octalarm can be connected to another (existing) alarm circuit using a 12 V relay on
this output, functioning through break contacts.
Both outputs are connected simultaneously with the internal buzzer.
16.4.3 External relay output
An external 12 V relay can be connected to this output. This relay can be switched on and off from a
distance by telephone.
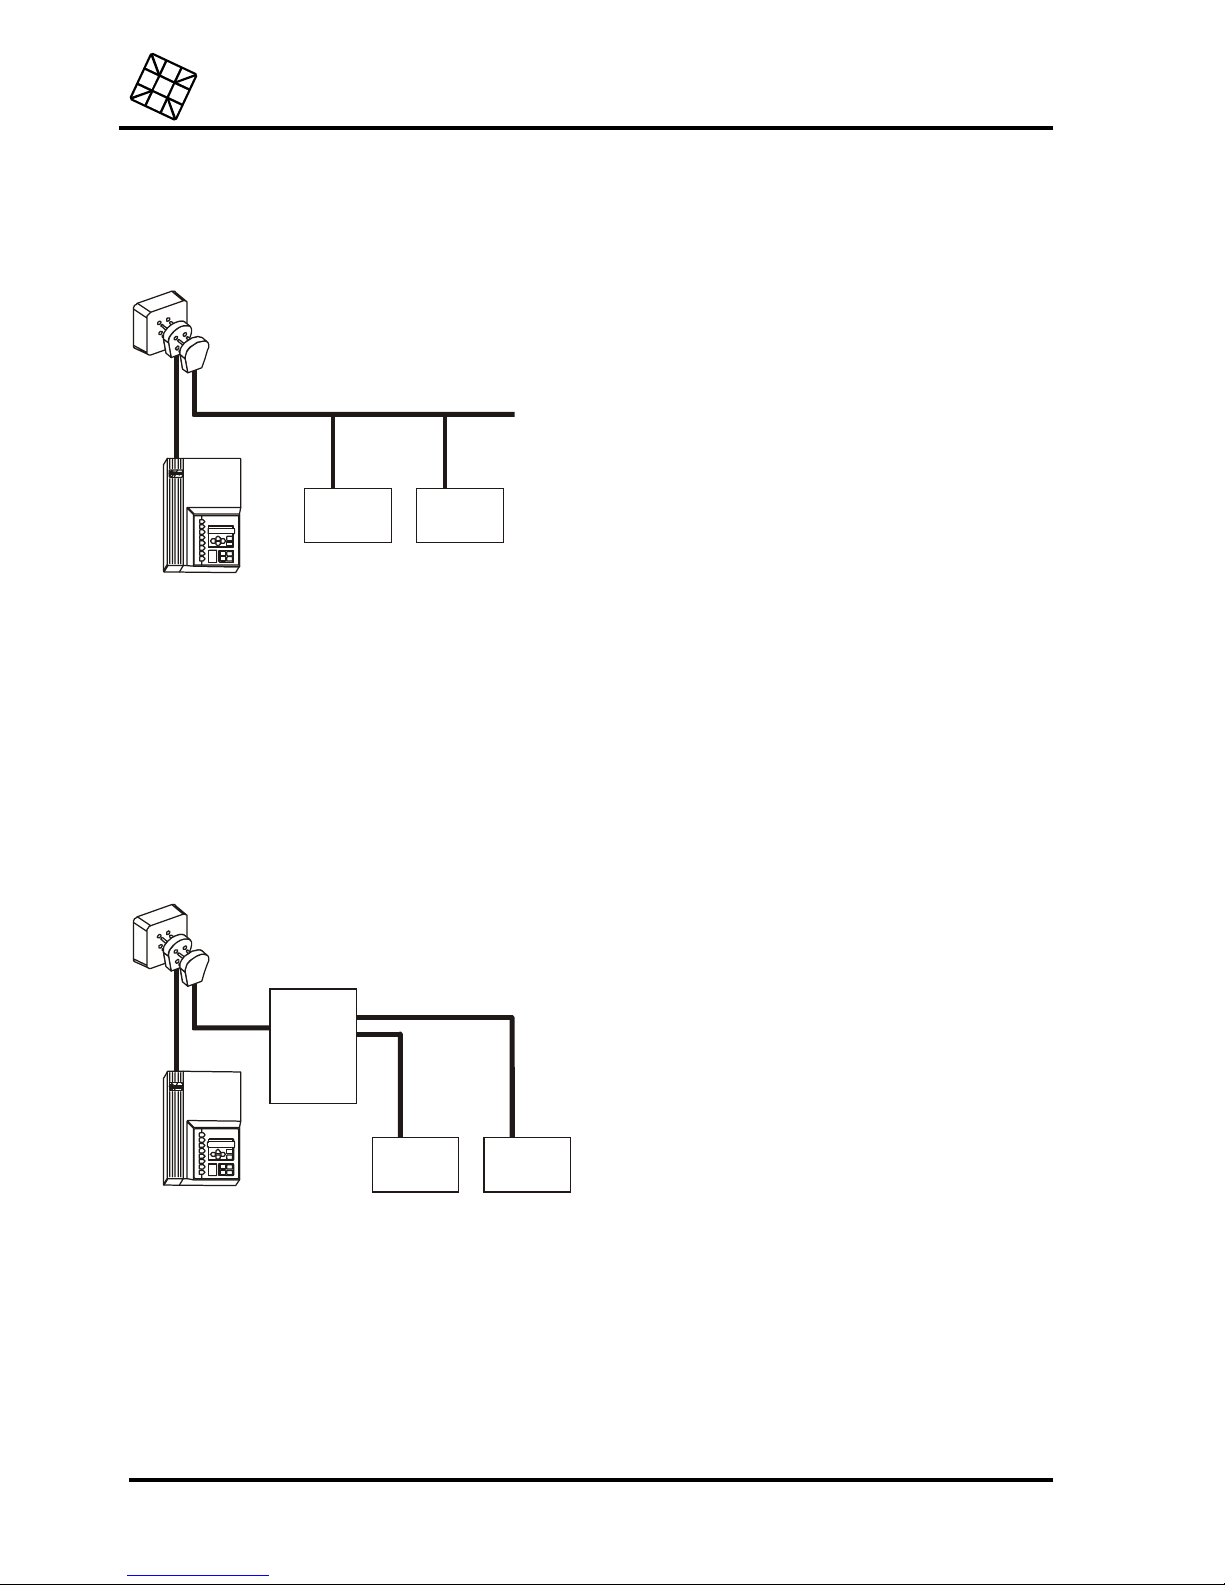
16.5 Connection of the telephone line
Connect the Octalarm to the telephone network using the supplied telephone joint plug. Preferably,
reconnect all the remaining telephone equipment to this connector. In case of an alarm, the Octalarm
will interrupt all the connected equipment, so that the alarm is always given priority.
a
b
b'
a'
Adesys bv, Wateringen, NL
Installation instructions
Octalarm-T2 / T4 / T8 / T16
29
The Octalarm only needs the A and B connections to the telephone network to function properly.
When not active, A and B are put through to A’ and B’, respectively. The most common type of
connection is:
overige
rand-
apparatuur
overige
rand-
apparatuur
If the Octalarm is connected to a fully wired RJ-11 main connection by the telephone company,
without a connecting plug, it may cause a short-circuit in the telephone network, owing to the A-A’
and B-B’ reconnection when not active. If so, set up an additional RJ-11 connection box with only
the two centre pins connected, or else use a 2-core connection cable rather than the standard 4core model supplied.
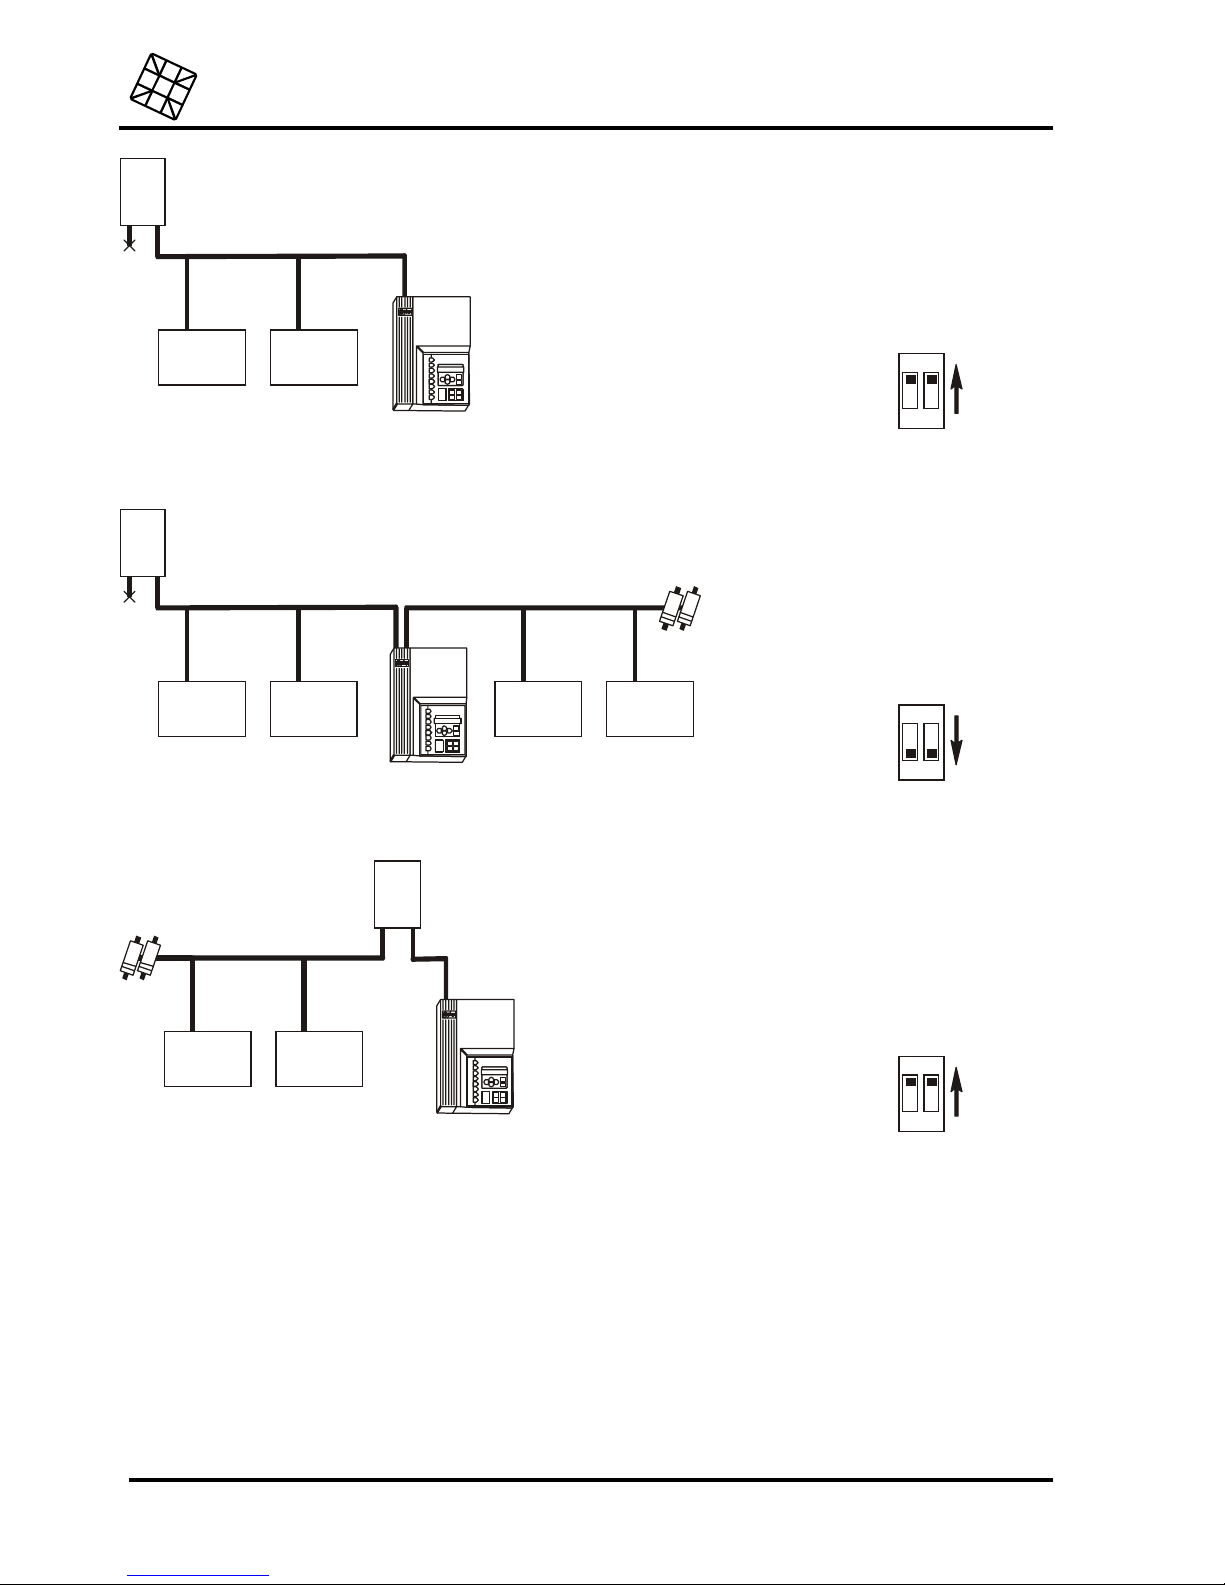
Avoid connecting the Octalarm behind a telephone switchboard. In the case of a network failure,
the connections of telephone switchboards often stop working. This will prevent the Octalarm from
sending a telephone alarm!
If the Octalarm has to be connected together with a telephone switchboard, do so according to the
following diagram:
overige
rand-
apparatuur
overige
rand-
apparatuur
PABX
(interne
centrale)

Installation instructions
Adesys bv, Wateringen, NL
30 Octalarm-T2 / T4 / T8 / T16
16.5.1 ISDN telephone connection
(only for Octalarm ISDN models)
Connect the Octalarm’s NT1 connection to the telephone company’s NT1, using the cable provided.
In the case of an alarm, the Octalarm will first check whether a line is free. If so, the alarm is started. If
not, the Octalarm will terminate the current connections by giving a termination command. Both the
telephone company and the peripheral equipment will then free the lines. In order to ensure that none
of the peripherals fail to terminate the connection (because of behaviour that is not entirely according
to the telecommunication guidelines), the Octalarm also has a disconnection relay, with which the
peripherals can be fully disconnected, if necessary.
It is therefore advisable to reconnect all other
ISDN equipment to the Octalarm’s TEL connection.
The recommended connection scheme is as follows:
NT1
S-bus
Cable disconnection
NT1
Octalarm-T
S box
on
on
12
on
off
NT1
overige
rand-
apparatuur
S-bus
2x 100
Ω
overige
rand-
apparatuur
Cable disconnection
NT1
Octalarm-T
S box
on
off
12
on
on
If the S box cabling does not allow any of the connection schemes shown above, one of the following
schemes may be usable. However, full disconnection cannot always be guaranteed in these schemes.
If this is important for the purpose of the equipment, the disconnection will have to be tested for each
peripheral item connected directly to the NT1.
Adesys bv, Wateringen, NL
Installation instructions
Octalarm-T2 / T4 / T8 / T16
31
NT1
overige
rand-
apparatuur
S-bus
overige
rand-
apparatuur
Cable disconnection
NT1
Octalarm-T
S box
on
on
12
on
off
NT1
overige
rand-
apparatuur
overige
rand-
apparatuur
S-bus
2x 100
Ω
overige
rand-
apparatuur
overige
rand-
apparatuur
Cable disconnection
NT1
Octalarm-T
S box
on
off
12
on
on
NT1
overige
rand-
apparatuur
S-bus
S-bus
2x 100
Ω
overige
rand-
apparatuur
Cable disconnection
NT1
Octalarm-T
S box
off
on
12
on
on
Always connect the Octalarm to the NT1’s S box,
avoid connecting it to an S box behind a
switchboard,
because:
•
The internal S box of the switchboard will often stop working in the case of a network
failure, preventing the Octalarm from sending a telephonic warning,
•
The internal S box of a switchboard may work according to different standards than the
S box of the telephone company’s NT1, so that faultless operation cannot be
guaranteed.

Installation instructions
Adesys bv, Wateringen, NL
32 Octalarm-T2 / T4 / T8 / T16
?
16.5.1.1 General guidelines for ISDN
The following guidelines should be taken into account for a reliable ISDN wiring:
•
No more than 2 cables may lead from an NT1 connection to peripheral equipment. No star
connections may be used to connect more peripherals.
•
The S box cable may not be longer than 150m.
•
For cables up to 10m in length, standard round 4- or 8-core telephone wires are sufficient,
also called norm88 cables. For longer cables, use UTP (Unshielded Twisted Pair) of CAT-3
category or better.
•
The cable should be closed at both ends with 100Ω between the two cores or each pair of
cores. For most ISDN peripherals:
•
NT1: resistors can be adjusted,
•
Telephones, faxes, modems etc.: some can be adjusted, but most do not have resistors,
•
Telephone switchboards: some can be adjusted, but most have standard resistors installed.
•
Octalarm-T: resistors can be adjusted.
•
If necessary, additional disconnection resistors, in the form of connecting plugs, splitters, or
integrated in connection boxes, are available at any telecommunications store.
•
Changing cores or pairs of cores will cause improper functioning (unlike with analogue
lines).
16.6 Placing and connecting the GSM antenna
(only for Octalarm GSM model)
16.6.1 Internal antenna
Connect the two antenna plugs in the connection compartment to one another. Connect the antenna
provided to the connector on the outside of the cover. Always place the antenna upright for maximum
signal strength.
16.6.2 External antenna
Place the external GSM antenna using the instructions in the set-up manual provided. In areas with
reduced reception, place the antenna as high as possible, and always upright. Connect the cable
provided to the connector in the connection compartment.
After placing the antenna, always check the field strength of the signal. Press one of the arrow
buttons to call it up on the display. Changes in the signal strength are always announced very
slowly, please take this into account when moving the antenna, for example.
16.7 Placing the SIM card
(only for Octalarm GSM model)
The SIM card needed for the mobile network is placed as follows:
- Switch off the Octalarm completely,
- Use a sharp object to press the yellow button next to the screw connectors. This will release the
SIM card,
- Place the SIM card in the holder and slide it into the alarm,
- Switch the Octalarm on,
- Enter the PIN code of the SIM card using prog. 41, “adjusting dialler” (factory setting: 0000).
Using a so-called Prepay SIM card is highly unadvisable for alarm purposes. The mobile network

Adesys bv, Wateringen, NL
Installation instructions
Octalarm-T2 / T4 / T8 / T16
33
does not allow for alarm diallers to automatically check the calling credit status. Running out of
credit will result in the alarm system being blocked!
The Octalarm has numerous different alarm protocols, some of which are not yet supported by all
network providers. See the
GSM enclosure
provided for an up-to-date list.
16.8 Connecting the COM port
The COM port is designed in accordance with the V.24 / RS-232 standard, and provides the following
signals:
PIN nr Name In / Out Description
2 TXD in Transmit Data
3 RXD out Receive Data
4 RTS in Request To Send
5 CTS out Clear To Send
6 DSR out Data Set Ready
7 GND - Ground
8 CD out Carrier Detect
20 DTR in Data Terminal Ready

Installation instructions
Adesys bv, Wateringen, NL
34 Octalarm-T2 / T4 / T8 / T16
17. PROGRAMMING OF INSTALLATION DATA
After the Octalarm has been placed, the installation dependent parameters such as normally open /
normally closed contacts for the alarm inputs, possible delay times and such, have to be set. These
settings take place in the so-called installation program. See part 18 “INSTALLATION PROGRAMS”.
Each Octalarm is supplied with factory defaults, as generally used in practice.
Make a note of every modified setting at the back of this manual in order not to lose the overview
and to avoid future operation errors. For resetting the default settings, see chapter 18.15.Prog 99
“clear all settings”
17.1 Programming options
The Octalarm can be programmed in the following ways:
•
using the operation panel,
•
using a PC at the serial interface (RS-232 connection),
•
through the telephone line using the built-in modem.
•
over the mobile network, using the inbuilt modem (only model -G).
17.1.1 Programming using the operation panel
B
Press the Prog-key continuously until after approximately 5 seconds
PROG 10: set display
contrast display
appears on the display. You are now in the installation program.
BSelect the number of the program that you want to modify or check the settings by using the
E
and
F
keys. Press the Prog-key again in order to start the program. In case a blinking setting or cursor
appears, a selection can be made using the
E
and
F
keys. Use the cursor keys
C
and
D
to move
the cursor around. Confirm each new setting by pressing the Prog-key.
Following each modified setting, you must answer all additional questions until the message
SETTINGS STORED appears. When the installation program is closed prematurely by using the esc-
key, all former settings will be replaced!
Pressing the Prog-key repeatedly enables you to check the current settings.
During set-up subsequent menus are partly dependent on data entered earlier. Therefore, it is
possible that not all menus described appear on the display during set-up.
17.1.2 Programming using the PC
B
Connect the RS-232 connection of the Octalarm to the serial port (COM port) of the PC using a
serial cable.
BLaunch a terminal emulation program. Examples of such programs are ”Procomm”, “PC+”, “Norton
Commander”, “Telix” etc. Set the following options for the COM port used: 19.200 baud, no parity,
8 bit data, 1 stop bit.
B
Start communication by entering "OT" on the keyboard of the PC. The menu for the Octalarm -T
appears.

Adesys bv, Wateringen, NL
Installation instructions
Octalarm-T2 / T4 / T8 / T16
35
B
Scroll through the various menu options using the arrow keys and confirm each choice with the
enter-key.
17.1.3 Programming using a telephone line
17.1.3.1 Analogue or ISDN model
Remote programming is possible using the built-in modem of the Octalarm on 2.400 baud (V.22bis).
After establishing the connection, the programming menu of the Octalarm appears. Scroll through the
various menu options using the arrow keys and confirm each choice with the enter-key.
The Octalarm disposes of two ways to establish a modem connection:
•
Call the Octalarm using a telephone and enter the following code (during the short beeps):
“# 9 #
requisite access code ##".
Put the telephone down. Call the Octalarm from a PC with a modem
within one minute.
•
Call the Octalarm using a telephone and enter the following code (during the short beeps):
“# 9 #
requisite access code # telephone number to call back #".
Put the receiver down. The Octalarm
will call the number entered immediately and will expect a modem to be available.
Programming by telephone is only possible if the function has been made available
beforehand in prog. 61, “setting access code”. Remote programming is not possible without an
access code.
If the Octalarm has been set so that the alarm status is first transmitted by telephone, it will
take longer before the modem connects. Take this into account when setting up the
transmitting modem. It may be necessary to increase the waiting time for the carrier. Most
modems use the command ATS7= ... for this.
17.1.3.2 GSM model
The inbuilt GSM modem allows communication with modems on the analogue network, for remote
programming. Set the analogue modem in the PC to 9.600bd. Other speeds may be possible,
depending on the network operator. A data supplement to the GSM subscription should not be
necessary.
Call the Octalarm using a telephone and enter the following code (during the short beeps):
“# 9 #
requisite access code # telephone number to call back #".
Put the receiver down. The Octalarm will
call the number entered immediately and will expect a modem to be available.
Once the connection has been made, the Octalarm’s programming menu will appear. Use the arrow
keys to go through the various options, and confirm each choice with the Enter key.
Programming by telephone is only possible if the function has been made available
beforehand in prog. 61, “setting access code”. Remote programming is not possible without an
access code.

Installation instructions
Adesys bv, Wateringen, NL
36 Octalarm-T2 / T4 / T8 / T16
18. INSTALLATION PROGRAMS
18.1 Prog 10 “set display contrast”
The contrast of the display can be adjusted using the E and
F
keys.
18.2 Prog 11 “ show version number”
After the Prog-key is pressed, the software version is shown on the display.
18.3 Prog 21 “set alarm inputs”
Select the output of which you want to modify or check the settings of. After confirming the selection
using the Prog-key, the following settings are available:
CONTACT INPUT 1: NORMALLY OPEN / NORMALLY CLOSED
Select whether the alarm has to be activated through a normally open contact or a normally closed
contact on the alarm input.
CONTACT INPUT 1: DIRECT / VIA SENSORNET
Select whether the alarm contact is directly connected to the Octalarm or whether it is connected by
means of a Sensornet terminal block (only for Octalarm -T4 and T8). See paragraph 16.3.1.2
“Connection through Sensornet”.
ALARM DELAY: 00:00 (MIN:SEC)
Set the desired alarm delay time. The alarm will only be issued after the activation of the alarm
exceeds this delay time.
MEMORY FUNCTION ON ALARM: OFF / ON
Define whether the report has to stop or whether it must be finished in case the alarm expires.
•
OFF : both the local and telephone report are interrupted immediately in case the alarm expires.
• ON
: the report will be completely finished in case the alarm expires. With this option, the following
additional question regarding the alarm indicator appears:
Reset memory: after teleph. Reset / by reset key
Define whether the alarm indicator has to extinguish by telephonic reset or whether it only can be
extinguished by pressing the reset key.
In case an alarm expires and re-occurs after having been reported, while the setting on is
activated, the report will start again, even if the alarm indicator on the Octalarm is still on. Also, the
use of this option will not result in reporting a recurring alarm only once.

Adesys bv, Wateringen, NL
Installation instructions
Octalarm-T2 / T4 / T8 / T16
37
18.4 Prog 23 “set alarm on display”
During an alarm, the Octalarm shows the number of the alarm channel and a user-definable message
on the display. The alarm cause can be reproduced in this way (for example "computer failure").
First select the input of which you want to modify or check the settings. After confirming the selection
using the Prog-key, the cursor appears on the lower line. Enter the alarm cause here. The maximum
text length is limited to 16 characters.
18.5 Prog 31 “set alarm buzzer”
This program allows you to set the start and stop conditions of the internal and external buzzer. The
following options are available:
ALARM BUZZER ON: DIRECT AT ALARM / DIALLING FAILURE / AFTER DELAY
Set the start condition for the alarm buzzer:
• DIRECT AT ALARM
the alarm buzzer sounds immediately after the detection of the alarm.
•
DIALLING FAILURE the alarm buzzer will only sound after the complete failure of a
telephone report, also following 15 failing dialling attempts. The alarm buzzer will however
sound immediately in case the telephone dialler key is switched off.
•
AFTER DELAY the alarm buzzer only sounds after the set delay time has elapsed. With
this option, the following additional question appears:
DELAY TIME 01 MIN.
Set the desired delay time here (from 1 to 99 min).
ALARM BUZZER OFF: AFTER TEL. RESET / BY RESET KEY / AFTER DELAY
Set the stop condition for the alarm buzzer:
•
AFTER TEL. RESET
the alarm buzzer is switched off after a successful telephone report. The
buzzer keeps sounding after 15 failed report attempts. If the telephone dialler key is
switched off, the alarm buzzer will sound until the reset key is pressed.
•
BY RESET KEY
the alarm buzzer only stops after pressing the reset key.
• AFTER DELAY
the alarm buzzer stops automatically after the set delay time has elapsed.
With this option, the following additional question appears:
DELAY TIME: 01 MIN.
Set the desired delay time here (from 1 to 99 min).
VOLUME INTERNAL BUZZER: 1/2/3
Select the desired volume for the built-in buzzer. The Octalarm enables you to hear the
chosen volume during adjustment. (The volume of the external buzzer can be adjusted to
three levels using the supplied reducer).

Installation instructions
Adesys bv, Wateringen, NL
38 Octalarm-T2 / T4 / T8 / T16
18.6 Prog 41 “set dialler”
18.6.1 Octalarm for PSTN (analogue network)
The following options are available:
DIALLER DELAY: 00 MIN
Set the desired delay time here (from 1 to 99 min). The report is only started after the set delay
time has elapsed.
AUTO ANSWER: OFF / ON
Here you can define whether you want to retrieve the alarm by telephone:
• OFF
the Octalarm does not answer an incoming call,
• ON
the Octalarm answers after an adjustable number of rings (see below) and passes on
the status of the alarm channels by means of a tone code or a voice message (version -S).
In case the selected option is
off
and a telephone report is being acknowledged by a call back
(only if this is set with the relevant telephone number), the Octalarm answers after 2 rings.
In case the selected option is
on,
retrieving the alarm status is always possible, even when the
telephone dialler key is switched off.
AUTOANSWER AFTER: 05 RINGS
Here you can enter the number of rings (1 through 19) the Octalarm has to wait for before
answering an incoming call in order to pass on the alarm status.
DIAL MODE::PULSE / TONE (DTMF)
Here you can define whether the dialling of call numbers has to be done using pulse or tone
dialling.
WAIT FIRST DIALLING TONE: YES / NO
Set this option to "no" only if it turns out that the Octalarm does not recognize the first dialling
tone (the tone you hear immediately after you lift the receiver). This can be the case if the
Octalarm is connected to a (home) telephone exchange, not giving a correct dialling tone.
Telephone line test: on / off
The default setting for telephone line testing is on. If the telephone connection is lost, the
warning light and the buzzer will come on. You can turn this setting off if the telephone line
test alarm regularly comes on if another telephone connected to the same line is used.
(Combinations of the Octalarm with some home or professional switchboards and some
telephones may cause problems.)
18.6.2 Octalarm for ISDN (digital network)
The following options are available:
Report delay: 00 MIN

Adesys bv, Wateringen, NL
Installation instructions
Octalarm-T2 / T4 / T8 / T16
39
Use this option to set the delay in minutes (from 0 to 99 min). The alarm will not be sent
until the set time has passed.
MSN number:
Use this option to set the MSN number (Multiple Subscriber Number) at which the
Octalarm has to be available on the S box (without prefix). If no number is entered, the
Octalarm will respond to every incoming call. The following question shows next:
CLIP number:
Use this option to set the number (without prefix) with which the Octalarm should identify
itself to the call receiver (CLIP, or Caller Line Identification Presentation function). In most
cases, this can be the MSN number. If no number is entered, the Octalarm will identify
itself with the main ISDN number.
Auto answer: on / off
Use this option to allow remote access to the alarm status:
•
OFF the Octalarm will not answer calls to the machine,
•
ON the Octalarm will answer after a set number of call signals (see below) and
will pass on the status of the alarm channels, using tone code or speech (model
-S).
In case the selected option is
off
and a telephone report is being acknowledged by a call back
(only if this is set with the relevant telephone number), the Octalarm answers after 2 rings.
In case the selected option is
on,
retrieving the alarm status is always possible, even when the
telephone dialler key is switched off.
ANSWER AFTER: 05 CALL SIGNALS
Use this option to set the number of call signals (1 to 19) that the Octalarm should wait
before answering to send on the alarm status.
Make sure that the MSN number is entered correctly, without prefix. If the MSN number is not
correct, the Octalarm will not answer. If no MSN number has been entered, the Octalarm will
respond to every incoming call after the set number of call signals.
Telephone line test: on / off
The default setting for telephone line testing is on. If the telephone connection is lost, the
warning light and the buzzer will come on. You can turn this setting off if the telephone line
test alarm regularly comes on if another telephone connected to the same line is used.
(Combinations of the Octalarm with some home or professional switchboards and some
telephones may cause problems.)

Installation instructions
Adesys bv, Wateringen, NL
40 Octalarm-T2 / T4 / T8 / T16
18.6.3 Octalarm for GSM (mobile communication network)
The following options are available:
Report delay: 00 MIN
Use this option to set the delay in minutes (from 0 to 99 min). The alarm will not be sent
until the set time has passed.
Auto answer: off / on
Use this option to allow remote access to the alarm status:
• OFF
the Octalarm will not answer calls to the machine,
•
ON the Octalarm will answer after a set number of call signals (see below) and
will pass on the status of the alarm channels, using tone code or speech (model
-S).
•
If the setting is
off
and a telephonic alarm is followed by a dial-back to confirm
the alarm (if this option has been selected for this telephone number), the
Octalarm will nevertheless answer.
If this option is set to on , it is always possible to access the alarm status, even if the
telephone dialler button has been switched off.
SMS central number:
To send SMS messages, Octalarm needs the so-called SMS central number. This number
is provided by the network operator or service provider when you take out your
subscription. Enter that number here.
Set GSM PIN code yes / no
If you wish to enter the PIN code of your SIM card, select
yes
.
You cannot change the PIN code of your SIM card using the Octalarm. If you so wish,
you can change the code by temporarily placing the SIM card in a standard mobile
telephone, changing the code, replacing the SIM card in the Octalarm and entering the
new code.
GSM unblocking code:
If your SIM card has been blocked because an incorrect PIN code was entered, the
Octalarm will ask this question. Enter the unblocking code provided with your SIM card.
Remember to enter the correct PIN code afterwards!

Adesys bv, Wateringen, NL
Installation instructions
Octalarm-T2 / T4 / T8 / T16
41
18.7 Prog 42 “set dial sequence”
Within this program, the order of the call numbers to be dialled for the connected alarm channels and
for the "mains failure" and "battery empty" channels can be re-assigned. This is done using two alarm
entries on the Octalarm-T16. Alarm entries 1 and 2 are connected to the same channel internally, etc.
The following options are available for each single channel:
ALARM CHANNEL 1: ALL NUMBERS / OFF / SELECTIVE DIAL
Select the desired telephone report order as follows:
• OFF
: the alarm concerned is not reported by telephone, but locally by the alarm buzzer.
•
ALL NUMBERS : the dialling starts with the call number set first (usually number A). In case this
report fails, the Octalarm will attempt to call the next number set. All defined numbers will pass
in alphabetical order from A through J, whereby a blank number will be skipped automatically.
If, for instance, 4 numbers are set, these numbers are dialled alternately until the reset
procedure is passed through correctly. The reporting stops after 15 unsuccessful report
attempts.
•
SELECTIVE DIAL : makes a selection from the call numbers A through J for each single alarm
channel possible. Compilation of reporting groups is possible as well, whereby a reset by
telephone must be received from each reporting group before the reporting ceases. With this
option, the following question appears:
REPORT TO:
Enter the numbers to call using the cursor keys. The numbers defined are dialled alternately until
the reset procedure is passed through correctly. The reporting stops after 15 unsuccessful report
attempts.
Creating reporting groups is possible as well. The call numbers belonging to one group are
entered immediately after one another. Groups of call numbers are divided by a "+" sign. In an
alarm situation, a report will be sent at first to the first group. After one of the call numbers resets
the report by telephone, a new report cycle to the next reporting group is initiated.
Examples:
• A
: report only to call number A. The reporting is stopped after a reset by telephone or 15
unsuccessful report attempts.
•
AB : report to call number A and, in case no reset is given, followed by report to B. If again no
reset follows, back to A, etc. Reporting to these numbers is stopped if one of the two numbers
gives a reset by telephone or after 15 unsuccessful report attempts.
•
AAAAB : 4 report attempts to call number A and only then an attempt to call B. The reporting
stops after 15 unsuccessful report attempts, the cycle AAAAB will also be repeated 3 times if
necessary.
•
A+B : reporting is limited to call number A exclusively. After a reset by telephone or after 15
unsuccessful report attempts, a second complete reporting cycle to call number B will still be
started. Also, both call numbers have to acknowledge the reception of the report.
•
ADCB+EG
: reporting is carried out to the group of call numbers existing of A, D, C or B and to
the group of call numbers existing of E or G. The dialling order in a group is determined by the
order of the characters. The reporting to the first group is stopped if the report is reset by
telephone by one of the numbers A, D, C or B. Now, the report is sent to the second group,
until one of these numbers called gives a reset by telephone as well. For each individual
group, 15 report attempts are carried out at most.

Installation instructions
Adesys bv, Wateringen, NL
42 Octalarm-T2 / T4 / T8 / T16
Changes of the dialling order are to be handled carefully, because in case of a wrong set-up, it is
possible that an alarm will no longer be reported! Therefore, always check if the numbers entered
(A-J) at the dialling order that have actually been entered are a call number (see: part 7 “SET ”).
In case more than one reporting group is set and no reset is given by the first reporting group, it
can take a long time (the time needed to carry out 15 reports, plus the delay times set with them)
before the second reporting group will be called.
Changes of the dialling order can lead to an alteration of the order in which simultaneously
occurring alarms are reported. See for the regarding effects: paragraph 4.5 “More than one alarm
simultaneously”.
AUTOMATIC REPEAT: YES / NO
Define whether an automatic repeat of a telephone alarm is desired.
•
NO the telephone report will be carried out only once, following the dialling order set with
the reporting channel.
• YES
the telephone report will be started again according to the dialling order set with the
alarm channel after a waiting time, irrespective of a former reset by telephone. The
repeating report will cease only if the alarm expires (alarm indicator off) or when the
relevant selection key on the Octalarm is switched off. The automatic repeating will be
finished after 24 hours.
AUT. REPEAT AFTER: 01:00 (HRS:MIN)
Set the waiting time for repeating telephone alarm here.

Adesys bv, Wateringen, NL
Installation instructions
Octalarm-T2 / T4 / T8 / T16
43
18.8 Prog 55 “set pager codes”
Setting an individual report code for each alarm channel and for all pager types is possible. The
following report codes are already pre-programmed:
channel tone-only pagers numerical pagers alpha-numerical pagers and
SMS-messages
alarm 1
alarm 2
alarm 3
alarm 4
1
2
3
4
1
2
3
4
alarm 1
alarm 2
alarm 3
alarm 4
alarm 5
alarm 6
alarm 7
alarm 8
1
2
3
4
5
6
7
8
alarm 5
alarm 6
alarm 7
alarm 8
alarm 9
alarm 10
alarm 11
alarm 12
1
2
3
4
9
10
11
12
alarm 9
alarm 10
alarm 11
alarm 12
alarm 13
alarm 14
alarm 15
alarm 16
1
2
3
4
13
14
15
16
alarm 13
alarm 14
alarm 15
alarm 16
mains failure 4 9 or 90 (OT16) mains failure
battery empty 4 10 or 91 (OT16) battery empty / failure
18.8.1 Set report codes tone-only pager
Select the option:
SET REPORT CODES TONE-ONLY PAGER.
After the Prog-key is pressed, the following appears:
ALARM CHANNEL 1: 1
Here, enter the code (1 through 8) to appear on the pager in case alarm channel 1 is
activated.
When using the report codes 5 to 8, it must be checked if the pager can actually receive these
codes. Tone-only pagers are in fact supplied for 4 as well as for 8 report codes.
18.8.2 Set report codes numerical pager
Select the option:
SET REPORT CODES NUMERICAL PAGER.
After the Prog-key is pressed, the following appears:
ALARM CHANNEL 1: 1
Here, you enter the code to appear on the display of the numerical pager in case alarm
channel 1 is activated. The maximum number of digits to be set is 14.

Installation instructions
Adesys bv, Wateringen, NL
44 Octalarm-T2 / T4 / T8 / T16
Consider the PIN-code when using a PIN-code pager (see paragraph 7.2 “Report to a pager”),
because during a report, it is part of the report code. The sum of "PIN-code + report code" must
not exceed 14 characters. The Octalarm will not send the surplus of characters.
18.8.3 Set codes of alpha-numerical pager and SMS-messages
Select the option:
SET REPORT ALPHANUM. PAGER
After the Prog-key is pressed, the following appears:
ALARM CHANNEL 1: ALARM 1
Here you enter the message, which has to appear on the display of the alpha-numerical
pager in case alarm channel 1 is activated. Entering up to 40 characters is possible.
With the Octalarm-T16, the following will first appear:
Opening message: opening message
This message will be sent prior to the message set for the alarm channel in question. The
opening message can be used for such things as sending a location name.
18.9 Prog 59 “record voice messages”
This program is only available in case the Octalarm is equipped with a voice processor (version -S).
Record an individual message for every connected alarm channel and for the alarms "mains failure"
and "battery empty" as well. With the Octalarm-T16, also speak in the opening message. This
message will be sent prior to the message set for the alarm channel in question. The opening
message can be used for such things as sending a location name.
A spoken message will be shown by the telephone if the alarm in question is sent, or if the alarm is
called up by telephone.
RECORD/PLAYBACK ALARM CHANNEL 1
Select the number of an alarm channel in order to record or play back a message.
E
START RECORD
F
START PLAYBACK
Select playback or recording using the
E
or
F
key. In case start record is selected, the
recording starts immediately. Speak clearly into the built-in microphone from a distance of
approximately 20 cm. The microphone is situated at the bottom right in the frame of the
bottom, near the reset key.
The recorded message can be checked using the built-in speaker with
playback
.
In case no message is recorded, the telephone report and the alarm reproduction retrieved by
telephone take place through tone codes.
18.10 Prog 61 “set access code”
A number of functions can be protected by means of one shared 4-digit access code. Select whether
the function concerned has to be protected by this access code.

Adesys bv, Wateringen, NL
Installation instructions
Octalarm-T2 / T4 / T8 / T16
45
KEYBOARD ACCESS: WITHOUT CODE / WITH CODE
Select whether the entire operation of the Octalarm has to be protected by an access code.
PROGRAMMING: WITHOUT CODE / WITH CODE
Select whether programming the Octalarm has to be protected by an access code. The
setting "with code" only protects the use of the cursor keys, the Prog-key and the esc-key.
The remaining keys can be operated in the usual way.
REMOTE SWITCHING.: WITHOUT CODE / WITH CODE
Select whether entering an access code, in order to switch a relay output by telephone, is
required.
REMOTE PROGRAM.: INHIBITED / WITH CODE
Select whether programming the Octalarm at a distance through the telephone line using a
PC and a modem is desired:
•
INHIBITED programming at a distance is not possible.
•
WITH CODE
programming from distance is only possible after the access code is entered.
ACCESS CODE: 0000
Enter the 4-digit access code here.
Programming from a distance without the use of an access code is never possible.
18.11 Prog 71 “set night time mode”
Here you can define in what way the alarm report has to be carried out when the Octalarm functions in
night time mode.
AL. BUZZER NIGHT: OFF / ON
Define whether the use of the internal and external alarm buzzers is desirable in case of a
local alert at night. If so, the following options appear:
ALARM BUZZER ON: DIRECT AT ALARM / DIALLING FAILURE / AFTER DELAY
Set the start condition for the alarm buzzer:
DIRECT AT ALARM the alarm buzzer sounds immediately after the detection of the alarm.
DIALLING FAILURE the alarm buzzer only sounds after the complete failure of a telephone report
and also after 15 failing dialling attempts. The alarm buzzer will however sound immediately in
case the telephone dialler key is switched off.
AFTER DELAY the alarm buzzer only sounds after the set delay time has elapsed. With this option,
the following additional question appears:

Installation instructions
Adesys bv, Wateringen, NL
46 Octalarm-T2 / T4 / T8 / T16
DELAY TIME: 01 MIN
Here you can enter the desired delay time (from 1 to 99 min).
In case of a switched on alarm buzzer, the following question is asked:
ALARM BUZZER OFF: AFTER TEL. RESET / BY RESET KEY / AFTER DELAY
Set the stop condition for the alarm buzzer:
•
AFTER TEL. RESET the alarm buzzer is switched off after a successful telephone report.
The buzzer keeps sounding after 15 failed report attempts. If the telephone dialler key is
switched off, the alarm buzzer will sound until the reset key is pressed.
•
BY RESET KEY
the alarm buzzer only stops after pressing the reset key.
• AFTER DELAY
the alarm buzzer stops automatically after the set delay time has elapsed.
With this option, the following additional question appears:
DELAY TIME: 01 MIN
Set the desired delay time here (from 1 to 99 min).
VOLUME INTERNAL BUZZER: 2
Select the desired volume for the built-in buzzer. The Octalarm allows you to hear the
chosen volume during programming.
NIGHT TO DAY: ALARM BUZZER ON / ALARM BUZZER OFF
Here you can define whether the buzzer key has to be switched on or off when the night time
mode is disabled.
DIALLER NIGHT: OFF / ON
Define whether a telephone report at night is desirable. If so, the following question appears:
DIALLER DELAY: 00 MIN.
Here you can enter the desired delay time (from 1 to 99 min).
NIGHT TO DAY: DIALLER ON / DIALLER OFF
Here you can define here whether the telephone dialler key has to be switched on or off
when the night time mode is disabled.
KEYBOARD INHIBIT AT NIGHT: NO / YES
In case yes is chosen, all keys on the operation panel will be locked, irrespective of the
keyboard access being protected with an access code or not.
18.12 Prog 95 “sensor test”
This program enables the one- by- one testing of the Sensornet terminal blocks. If the Octalarm
recognizes the sensor, this will be reproduced on the display.
Take care to ensure that the Octalarm always "sees" only one sensor connected at the same time,
otherwise the message SENSOR DEFECTIVE appears. If necessary, disconnect Sensornet from the
Sensornet input and connect the block to test it directly to the input.

Adesys bv, Wateringen, NL
Installation instructions
Octalarm-T2 / T4 / T8 / T16
47
18.13 Prog 97 “read data log”
The data log stores the most important alarm reports and/or program modifications in a permanent
memory. About 50 incidents with a time reference are stored together.
The data log uses a continuously working counter as a time reference. With each registration, the
corresponding counter reading is stored as well. If you subtract this time from the actual logging time,
you are able to find out exactly how long ago a certain incident took place. The time reference runs
until 1.000 hours at maximum, after which it is restarted at time 0 again. Reports older than 1.000
hours will be removed.
The following messages can occur in the data log:
General:
LOG TIME xxx: x
The actual log reference time in hours and minutes. When you read out the data log, this is
the first message to appear.
000:00 OCTALARM STARTED
The Octalarm had a complete restart. The time has been reset to 000:00 by this.
Program modifications:
XXX: XX CALL NR.. A: CHANGED
The call number (A) shown is changed on time xxx:xx.
XXX: XX PROG zz CHANGED
Program zz is changed on time xxx:xx. In case this regards Prog. 42 (dial sequence), the
alarm channel of which the order has been changed is indicated as well.
XXX: XX SELECTION: 1---567- T Z
At time xxx:xx, the position of the selection keys has been changed. In this example, the
alarm selection keys 1,5,6,7 and the telephone dialler and buzzer key are switched on, the
remaining selection keys are off. To prevent a message arising in the log with every key
touch (by which the log would quickly be full), the final position of the selection keys is only
stored 5 minutes after the last key touch.
Alarm reports:
XXX: XX MAINS FAILURE
XXX: XX BATTERY EMPTY
XXX: XX TEL. FAILURE
XXX: XX ALARM 1
At time xxx:xx, respectively a mains failure, a battery empty alarm, a telephone line
malfunctioning or an alarm 1 (external) has taken place. If the relevant selection key was
switched off at the time of an external alarm, SEL. .KEY OFF appears on the display as well.
In case the telephone dialler key was switched off at the time of an alarm, also
tel. dialler
off .
appears on the display. If the alarm channel is turned off in מב,
ALARM X OFF IN
DIALSEQ.
appears on the display.

Installation instructions
Adesys bv, Wateringen, NL
48 Octalarm-T2 / T4 / T8 / T16
Report sequence:
XXX: XX ALARM 1 ACCEPTED A:
XXX: XX ALARM 1 FAILED
XXX: XX MANUAL RESET
xxx:xx ALARM 1 EXPIRED
At time xxx:xx ,respectively the report of alarm 1 is accepted by call number A, the report of
alarm 1 has been stopped after 15 unsuccessful reporting attempts, the Octalarm is reset
manually or alarm 1 has expired.
18.14 Prog 98 “choose language”
Choose between the languages “Dutch”, “German”, “French” or “English”. From now on, all messages
except self-defined will appear on display in the chosen language.
18.15 Prog 99 “clear all settings”
By erasing all the settings, the Octalarm will function according to the factory defaults again. Due to
protection, the question will be asked twice.
ALL telephone numbers entered, ALL modifications of the installation data and ALL recorded voice
messages (for version -S) will be erased.

Adesys bv, Wateringen, NL
Installation instructions
Octalarm-T2 / T4 / T8 / T16
49
19. TECHNICAL SPECIFICATIONS
Number of inputs 2, 4, 8 or 16
Input contacts: normally open or normally closed, potential-free,
contact power 1mA, open charge 5V.
Amount of call numbers: 10, at max. 16 digits per number
Dialling default analogue: tone code or pulse code
Dialling default ISDN Euro ISDN
(model–I)
Mobile network 900 / 1800Mhz
(model–G)
Outputs: open-collector, max. 150mA, with shared power supply 10 to 15Vdc
(nominal 12Vdc), short-circuit protected
RS-232 port: 25-pole female sub-D, connections in accordance with standard DCE,
at which connected:
signal pin input/output
RXD 2 input
TXD 3 output
RTS 4 input
CTS 5 output
DSR 6 output
GND 7 CD 8 output
DTR 20 input
RI 22 output
Baud rate: 19.200 baud,
Power supply: 205-245Vac, 50-60Hz
Power consumption: 4-9 Watt
Emergency power supply: maintenance- free lead battery 12V/ 1.2Ah
Back up emergency power
supply:
3.5 up to 15 hours, dependent on the externally connected alarm
devices
Length of power cable: approx. 1.7 m
Length of telephone cable: approx. 2 m
Size: 255 x 171 x 58 mm
Weight: 1.9 kg
Max. temperature for usage: -5 to +50 C

Settings summary
Adesys bv, Wateringen, NL
50 Octalarm-T2 / T4 / T8 / T16
Settings summary
Call numbers:
report to: reset
telephone
tone-only pager
(alpha) numerical pager
mobile voice / tone
mobile SMS
reporting service
number
by call back
during report
by report service
reset code delay time
A:
B:
C:
D:
E:
F:
G:
H:
I:
J:

Adesys bv, Wateringen, NL
Settings summary
Octalarm-T2 / T4 / T8 / T16
51
Installation programs
Prog 10: set display contrast
Prog 11: show version number
Prog 21: set alarm inputs
open (NO)
closed (NC)
direct
via sensornet
alarm delay
with memory
reset if
uccesful
input 1 : min
input 2 : min
input 3 : min
input 4 : min
input 5 : min
input 6 : min
input 7 : min
input 8 : min
open (NO)
closed (NC)
alarm delay
with memory
reset if
uccesful
input 9 : min
input 10 : min
input 11 : min
input 12 : min
input 13 : min
input 14 : min
input 15 : min
input 16 : min
batt. empty : min
mains
failure
: min

Settings summary
Adesys bv, Wateringen, NL
52 Octalarm-T2 / T4 / T8 / T16
Prog 23: set alarm in display
display text
channel 1
channel 2
channel 3
channel 4
channel 5
channel 6
channel 7
channel 8
display text
channel 9
channel 10
channel 11
channel 12
channel 13
channel 14
channel 15
channel 16
Prog 31: set alarm buzzer
alarm buzzer on direct at alarm
if dialling fails
after delay
min
volume internal buzzer
alarm buzzer off after tel. reset
by reset key
after delay
min
Prog 41: set dialler
(analogue model)
report delay min
auto answer off
on
after rings
dial mode tone (dtmf)
pulse (dtmf)
wait for first dialling tone yes
no
telephone line test on
off
Prog 41: set dialler (ISDN model)
report delay min
MSN number (without prefix)
CLIP number (without prefix)
auto answer off
on
after rings
telephone line test on
off
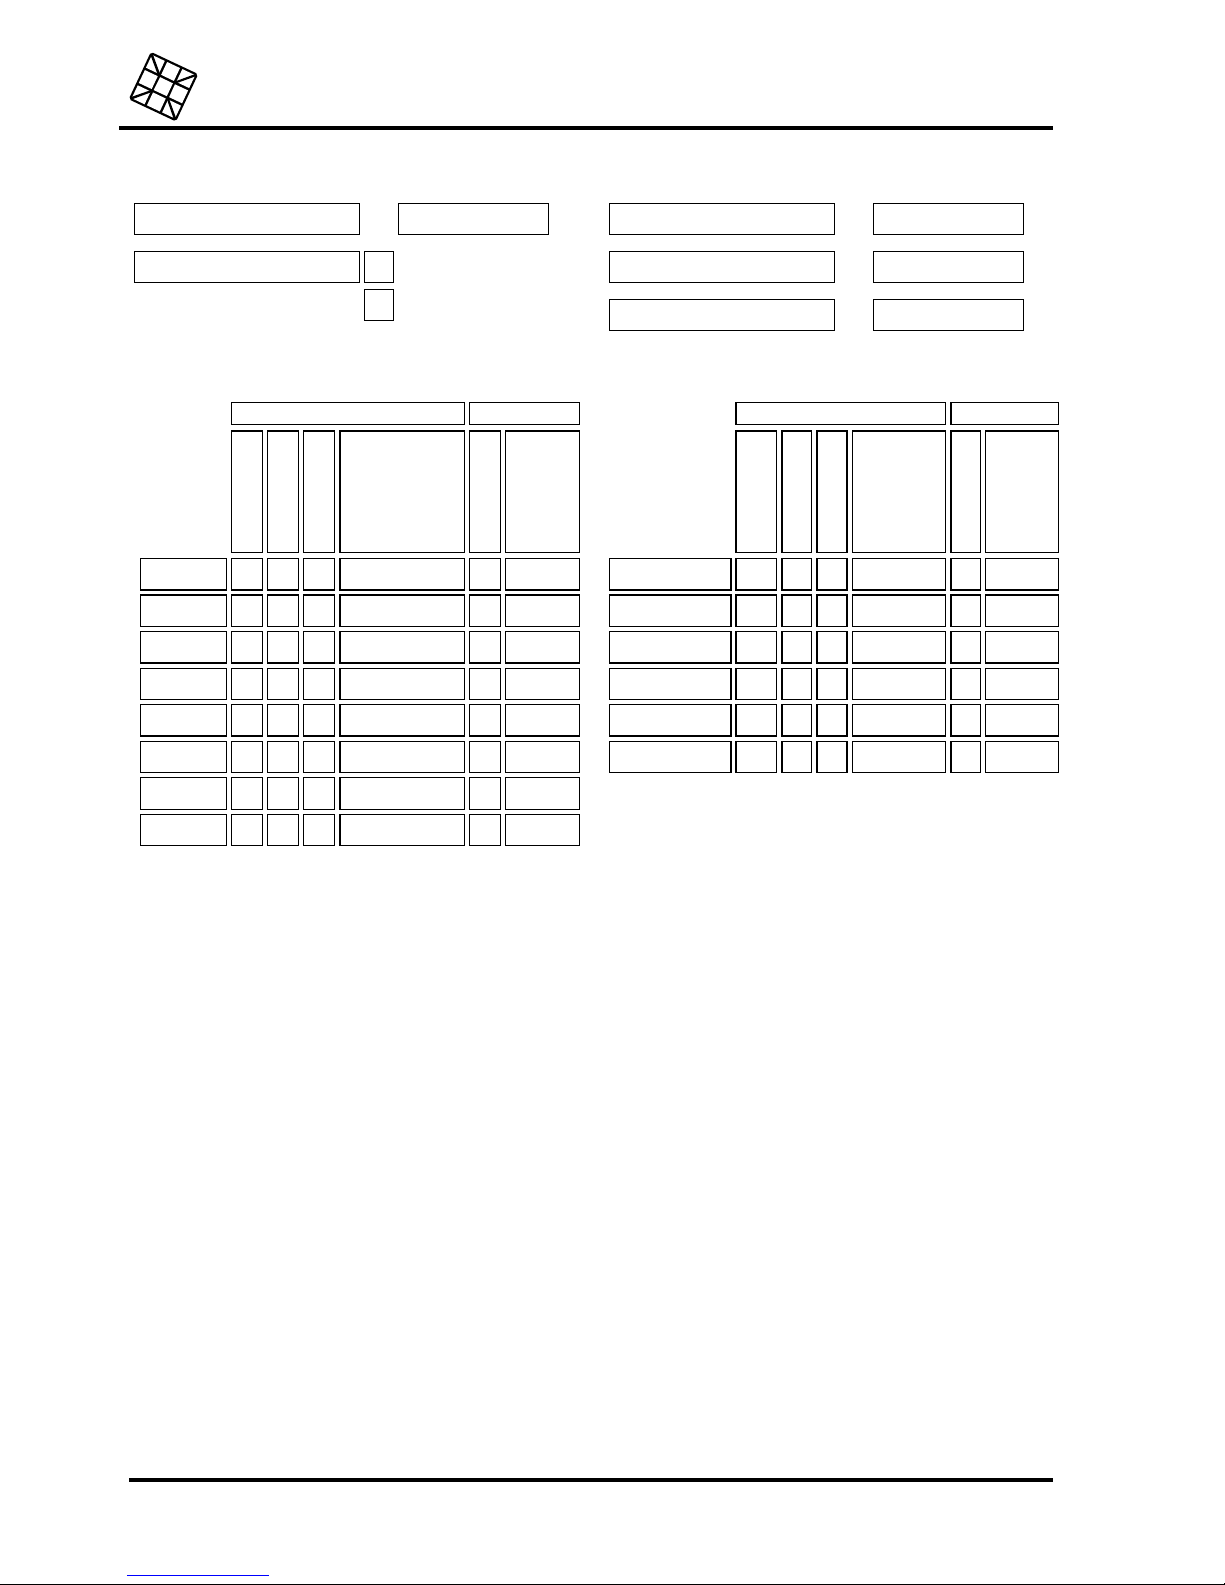
Adesys bv, Wateringen, NL
Settings summary
Octalarm-T2 / T4 / T8 / T16
53
Prog 41: set dialler
(GSM model)
alarm delay min
auto answer off
on
SMS central number
PIN code
PUK code (unblocking)
Prog 42: set dial sequence
report repeat
all numbers
off
selective
to
automatic
time
(hrs:min)
input 1
:
input 2 :
input 3 :
input 4 :
input 5 :
input 6 :
input 7 :
input 8 :
report repeat
all numbers
off
selective
to
automatic
time
(hrs:min)
input 9+10
:
input 11+12 :
input 13+14 :
input 15+16 :
battery empty :
mains failure :

Settings summary
Adesys bv, Wateringen, NL
54 Octalarm-T2 / T4 / T8 / T16
Prog 55: set pager codes
tone-only pagers numerical pagers alpha-numerical pagers en SMS-messages
channel 1
channel 2
channel 3
channel 4
channel 5
channel 6
channel 7
channel 8
channel 9
channel 10
channel 11
channel 12
channel 13
channel 14
channel 15
channel 16
mains failure
batt. empty / defect
main message
Prog 59: record voice messages
recorded text
channel 1
channel 2
channel 3
channel 4
channel 5
channel 6
channel 7
channel 8
recorded text
channel 10
channel 11
channel 12
channel 13
channel 14
channel 15
channel 16
mains failure
batt. empty / defect
main message

Adesys bv, Wateringen, NL
Settings summary
Octalarm-T2 / T4 / T8 / T16
55
Prog 61: set access code
service without code
with code
program without code
with code
remote switching without code
with code
remote programming blocked
with code
code:
Prog 71: set night time mode
alarm buzzer night off
on
alarm buzzer night on direct at alarm
If dialling fails
after delay
min
alarm buzzer night off after tel. reset
by reset key
after delay
min
volume internal buzzer
night to day alarm buzzer on
alarm buzzer off
dialling night off
on
report delay at night min
night to day dialler off
dialler on
keys blocked at night no
yes
Prog 95: sensor test
Prog 97: read data log
Prog 98: choose language
Prog 99: clear all settings

Settings summary
Adesys bv, Wateringen, NL
56 Octalarm-T2 / T4 / T8 / T16
Notes:
 Loading...