

Page 1

Bedienungsanleitung
OCTAGON SF 1018 HD - ALLIANCE
High Definition Satellite Twin Tuner PVR
Digital Innovation Life
Page 2

Page 3

3
Inhaltsverzeichnis Seite
Inhaltsverzeichnis ..................................................................................................................................................... 3
Schutzmaßnahmen ................................................................................................................................................... 5
1. Wichtige Sicherheitshinweise..................................................................................................................... 5
2. Hinweis ......................................................................................................................................................... 5
3. Das Urheberrecht ......................................................................................................................................... 6
4. Ablehnung der Haftung ............................................................................................................................... 6
5. Markenzeichen ............................................................................................................................................. 7
Vor dem Start ............................................................................................................................................................. 8
1. Hauptausstattungsmerkmale ...................................................................................................................... 8
2. Zubehör ........................................................................................................................................................ 9
Gerätebeschreibung ............................................................................................................................................. 10
1. Vorderseite ................................................................................................................................................. 10
2. Frontelemente (VFD Display) .................................................................................................................... 11
3. Rückseite .................................................................................................................................................... 12
4. Die Fernbedienung .................................................................................................................................... 13
5. Multi- IR- (Infrarot-Strahlungen) Fernbedienung- Programmierung ...................................................... 16
Anschlussbeispiele ................................................................................................................................................ 17
1. Receiver an TV mit Digitalem A/V Ausgang (HDMi) ................................................................................ 17
2. Receiver an TV mit Analog A/V Ausgang ................................................................................................. 17
3. Anschluss an die Antennenanlage .......................................................................................................... 18
3.1 Nutzung der Single Antenne ................................................................................................................... 18
3.2 Nutzung der Zwei Separaten Ant ennen .................................................................................................. 18
3.3 Nutzung der DiseqC Schalter .................................................................................................................. 18
Beschreibung der Funktionen ............................................................................................................................... 19
1. Programmauswahl ..................................................................................................................................... 19
1.1 Benutzung der Cursor- Tasten (Auf/Ab) .................................................................................................. 19
1.2 B
enutzung der Senderliste ...................................................................................................................... 19
1.3 Bedienung der Quickchannel Sender- Liste ............................................................................................ 19
1.4 Bedienung der zuletzt angesehene Sender- Liste (Recall) ..................................................................... 19
2. Informationsfenster ................................................................................................................................... 20
3. Multi-Picture-Display ................................................................................................................................. 20
4. Elektronischer Programmführer (EPG) .................................................................................................... 20
5. Favoritenliste erstellen/bearbeiten ........................................................................................................... 20
6. Lautstärkeregelung .................................................................................................................................... 20
7. Pause .......................................................................................................................................................... 21
8. Untertitel ..................................................................................................................................................... 21
9. Audio........................................................................................................................................................... 21
10. Teletext ....................................................................................................................................................... 21
11. PIP (Picture in Picture) Bild-in-Bild-Funktion .......................................................................................... 21
Aufnahme und Funktion ......................................................................................................................................... 23
1. Aufnahme ................................................................................................................................................... 23
1.1 Aufnahmemöglichkeiten ......................................................................................................................... .23
1.2 Aufnahme- Aufbereiten ........................................................................................................................... 24
1.3 Langzeitaufnahmen (Journaled, FAT32) ................................................................................................. 24
1.4 Aufnahme während der Pause ................................................................................................................ 24
2. Time-Shift-Funktion .................................................................................................................................. .25
3. Wiedergabe (Playlist)................................................................................................................................. 26
3.1 Aufgenommene Dateine ......................................................................................................................... 26
3.2 Eingefügte Dateien ................................................................................................................................. 27
3.3 Musik....................................................................................................................................................... 27
3.4 Foto ......................................................................................................................................................... 27
4. Das Lesezeichen (Bookmark) ................................................................................................................... 27
5. S
onderfunktionen ...................................................................................................................................... 28
Page 4

4
Menü Mappe ............................................................................................................................................................ 29
Beschreibung des Hauptmenüs ............................................................................................................................ 30
1. Systemeinstellungen ................................................................................................................................. 30
1.1 Speichermedien ...................................................................................................................................... 30
1.2 Timer Einstellung .................................................................................................................................... 30
1.3 Sender-Liste-Manager ............................................................................................................................ 31
1.4 Datentransfer .......................................................................................................................................... 32
2. Konfiguration ............................................................................................................................................. 32
2.1 Aufnahme-Option .................................................................................................................................... 32
2.2 Kindersicherung ...................................................................................................................................... 32
2.3 Sonstige Einstellungen............................................................................................................................ 33
2.4 Zeit Einstellungen ................................................................................................................................... 33
2.5 Spracheinstellungen ................................................................................................................................ 33
2.6 A/V Ausgänge ......................................................................................................................................... 34
3. Installation .................................................................................................................................................. 34
3.1 Antenneneinstellung ............................................................................................................................... 34
3.2 Positioniereinstellung .............................................................................................................................. 35
3.3 Programmsuche ...................................................................................................................................... 35
3.4 Netzwerkeinstellungen ............................................................................................................................ 36
3.5 System Wiederherstellen ........................................................................................................................ 37
3.6 System Information ................................................................................................................................. 37
4. Sonstiges .................................................................................................................................................... 38
4.1 Rechner .................................................................................................................................................. 38
4.2 Kalender .................................................................................................................................................. 38
4.3 CAS (Conditional Access System) .......................................................................................................... 38
Fehlersuche ............................................................................................................................................................. 39
Technische Daten ................................................................................................................................................... 40
Einstellungscode für die Universale Fernbedienung ................................
.......................................................... 42
1. Tasten- Tabelle ........................................................................................................................................... 42
2. TV- Marken ................................................................................................................................................. 44
3. VCR- Marken .............................................................................................................................................. 50
4. DVD- Marken .............................................................................................................................................. 55
Vorwort
Sehr geehrte Kundin, sehr geehrter Kund e,
Diese Bedienungsanleitung soll Ihnen helfen, die umfangreichen Funktionen Ihres OCTAGON
Digitalreceiver optimal zu nutzen. Die Bedienungshinweise wurden so verständlich wie möglich verfasst
und so knapp wie nötig gehalten. Der Funktionsumfang Ihres Gerätes wird durch Softwareanpassungen
stetig erweitert. Dadurch kommen gegebenenfalls Funktionen hinzu, welche in dieser Anleitung bisher
noch nicht erklärt werden. Auch kann sich die Bedienung schon bestehender Funktionen ändern. Aus
diesem Grunde sollten Sie von Zeit zu Zeit unsere Hersteller-Homepage
www.octagon-germany.de
besuchen um sich über eventuelle Änderungen/ Neuerungen zu informieren. Sollten Sie irgendwelche
Fehler in dieser Anleitung finden oder die Erklärung bestimmter Funktion vermissen, so teilen Sie uns das
bitte per e-Mail an die
info@octagon-germany.de mit. Auch Wünsche und Anregungen können Sie hier
gerne äußern.
Wir wünschen Ihnen viel Freude mit Ihrem OCTAGON Digitalreceiver!
Page 5

5
Schutzmaßnahmen
1. Wichtige Sicherheitshinweise
Vielen Dank, dass Sie sich für diesen Satelliten-Receiver entschieden haben! Zu Ihrer Sicherheit und damit Ihr
Receiver zuverlässig funktioniert, nehmen Sie sich bitte die Zeit, diese Anleitung aufmerksam zu lesen, bevor Sie das
Gerät anschließen und einschalten. Diese Anleitung soll Ihnen helfen, die zahlreichen Funktionen opti ma l zu nutzen .
• Nehmen Sie den Gehäusedeckel nicht ab. Andernfalls besteht die Gefahr eines elektrischen Schlags.
• Das Gerät ist nur für Netzanschluss 100- 250 V AC / 50 Hz vorgesehen
• Der Netzste cke r muss stets in der nähe sein, damit Sie im Notfall den Receiver vom Netz trennen können.
• Bei Gewitter oder Betriebsstörungen Stecker ziehen
• Die Kühlschlitze im Gehäusedeckel dürfen keinesfalls abgedeckt werden, um eine sichere Ableitung der im Gerät
entstehenden Wärme zu gewährleisten.
• Trennen Sie den Receiver bei Sturm oder längerer Abwesenheit vom Stromnetz.
• Knicken oder quetschen Sie das Netzk abel nicht und ber ühr en Sie es nicht mit feu chte n H änden . Es besteht sonst
die Gefahr eines elektrischen Schlags.
• Reparaturen an Stecker, Kabel oder Receiver dürfen nur von qualifiziertem Fachpersonal durchgeführt werden.
• Sicherstellen, dass Receiver und Netzstecker mit keinerlei Feuchtigkeit in Kontakt kommen.
• Stecken Sie niemals irgendwelche fremden Metallgegenstände in die Einschübe oder Lüftungsschlitze des Gerätes.
• Lassen Sie Kinder niemals unbeaufsichtigt den Receiver benutzen oder mit der Antennenanlage spielen.
• Wartungsarbeiten dürfen nur von qualifiziertem Fachpersonal durchgeführt werden.
• Ziehen Sie immer den Netzstecker, bevor Sie das Gerät reinigen Benutzen Sie kein Reinigungsmittel, sondern nur
ein leicht angefeuchtetes Tuch, um eventuell anhaftenden Staub zu binden.
ACHTUNG: Niemals das Gerät selber öffnen! Es besteht die Gefahr eines Elektroschocks. Sollte es einmal erforderlich sein das
Gerät zu öffnen, so wenden Sie sich bitte an geschultes Personal. Umbauten oder Modifikationen des Gerätes führen zum
Garantieverlust, wenn diese nicht von einem Fachhändler durchgeführt und schriftlich bestätigt werden.
2. Hinweis
Dieses Gerät wurde unter Ein ha ltu ng internationaler Sicherheitsstandards gefertigt. Lesen Sie die
folgenden Sicherheitshinweise sorgfältig durch.
Um einen elektrischen Schlag zu vermeiden, entfernen Sie auf keinen Fall die obere
Abdeckung (oder die Rückwand). Es sind keine Teile enthalten, die vom Benutzer
gewartet
werden können. Wartungsarbeiten dürfen nur von qualifizierten Fachkräften
durchgeführt werden.
Dieses Dreieck, welches auf Ihrem Bauteil angebracht ist, warnt Sie vor dem Vorhandensein nicht
isolierter gefährlicher Spannung im Gert. Diese Spannung kann so hoch sein, dass das Risiko
eines Stromschlags besteht.
Dieses Dreieck, welches auf Ihrem Bauteil angebracht ist, macht Sie auf wichtige Betriebs- und
Wartungshinweise in diesen Hinweisen aufmerksam.
Dieses Kennzeichen auf einem Produkt oder der Begleitdokumentation soll darauf hinweisen, dass
das
Produkt nach dem Ablauf seiner Nutzungsdauer nicht mit gewöhnlichem Hausmüll entsorgt werden
sollte.
Um mögliche Umweltschäden oder Gefährdungen für den Menschen durch unkontrollierte
Abfallbeseitigung zu verm eiden, tr enn en Sie dies es Pr odukt bitte von anderen Abfallsorten und entsorgen
Page 6

6
es verantwortungsbewusst im Sinne der Wiederverwertung materieller Ressourcen. Sie sollten entweder
den Händler, bei dem Sie das Produkt gekauft haben, oder Ihre Gemeindeverwaltung kontaktieren, um
Informationen zur umweltgerechten Entsorgung und Wiederverwertung dieses Produktes zu erlangen.
Privatanwender:
Einzelheiten zu Sammelstelle n und den m öglich en um w eltf reun dl ic hen Recyclingverfahren fragen Sie bitte
bei dem Händler, bei dem Sie dieses Produkt gekauft haben, oder bei den Behörden vor Ort an.
Gewerbliche Anwender:
Wenden Sie sich an Ihren Lieferanten, und lese n Sie die al lgemeinen Geschäftsbedingungen des
Kaufvertrags. Dieses Produkt darf nicht zusammen mit anderem gewerblichen Abfall entsorgt werden.
Der richtige Umgang mit Verbrauchte Batte rien (sind Sondermüll!)
Werfen Sie daher verbrauchte Batterien nicht in den Hausmüll, sondern geben Sie diese bei einer
Sammelstelle für Altbatterien ab!
Konformitätserklärung
Die Firma OCTAGON Germany erklärt hiermit für dieses Produkt die Übereinstimmung mit folgenden
Richtlinien und Normen:
Niederspannungsrichtl in ie 2006 /95/
Richtlinie zur elektrom agnetisc hen Vertr ä gl ichkeit 2004/108/EG
EN 55013 : 2001, A1:2003, A2:2006
EN 55020 : 2002, A1:2003, A2:2005
EN 61000-3-2 : 2000, 2006, A2:2005
EN 61000-3-3 : 1995, A1:2001, A2:2005
EN 60065 : 2002, A1:2006
Gerätetyp/Type: Digitaler HDTV Satellitenreceiver
Service
OCTAGON Germany
Buendtenaecker 2
D-79730 Murg
Tel: 0049-(0)7763-704484
Fax: 0049-(0)7763-704483
E-Mail:
info@octagon-germany.de
Internet:
www.octagon-germany.de
Garantie
Die Gewährleistungszeit entspricht den gesetzlichen Bestimmungen.
Updaten per USB- Schnittstelle
Während eines Updates niemals das USB- Gerät her aus ziehen. Es besteht die G ef ahr für
Betriebsstörungen zu führen.
3. Das Urheberrecht
Dieses Handbuch wird durch Urheberrechtsgesetze geschützt. Gebrauch und Wiedergabe dieses
Handbuches im Teil oder vollständiges, ohne die schriftliche Zustimmung der Freigabe von der Firma
OCTAGON Germany, ist es verboten zu kopieren.
4. Ablehnung der Haftung
Die Hersteller, die Vert ei ler und die Ver treter sind nic ht zu irgen de iner Ar t Schad en verurs ac ht unt er
Anwendung von den Informationen verantwortlich, die in diesem Handbuch enthalten werden. Die
Anweisung und die Beschreibungen, die dieses Handbuch enthält, basieren auf der Zeit dieses
Page 7

7
Bedienungsanleitungs- Produktion. Der Hersteller aktualisiert sie ständig mit neuen Funktionen und
Technologie. Alle Spezifikationen sind abhängig von Änderung ohne vorherige Nachricht.
5. Markenzeichen
HDMI, das HDMI Firmenzeichen und High-Definition Multimedia Interface sind
eingetragene
und geschützte Warenzeichen von HDMI, das LLC genehmigt.
Mit Lizenz von Dolby Laboratories hergestellt. Dolby und das doppelte D als Symbol
sind eingetragene Warenzeichen von Dolby Laboratories. Dieses Gerät beinhaltet
Technologien zum Urheberrechtsschutz, die von US-Patenten und anderen Rechten
geistigen Eigentums geschützt sind. Der Einsatz dieser Technologie zum
Urheberrechtsschutz muss von Macrovision genehmigt sein und ist nur für den
häuslichen Gebrauch und weitere begrenzte Anzeigezwecke bestimmt, sofern keine
anderweitige Genehmigung von Macrovision vorliegt. Zurückentwicklung oder
Disassemblierung sind verboten.
Page 8

8
Vor dem Start
1. Hauptausstattungsmerkmale
Twin Tuner HDTV PVR Receiver (MPEG-4 HD / H.264)
H.264 / MPEG4 - HD/SD , DVB-S2 Twin Tuner
Betriebssystem Linux OS
Time-Shifting mit internem HDD (SATA) / externen HDD (USB 2.0)
Aufnahme & Play-back mit internem HDD (SATA) / externen HDD (USB 2.0)
Aufnahme- und Time- Shift gleichzeitig
Aufnahme und Wiedergabe gleichzeitig
Einfache Aufnahmeprogrammierung aus dem EPG
2 CONAX CA und 2 CI PCMCIA
U NIC A BL E Support
F ast Scan Sup por t
Zwei USB 2.0 Anschluss (MP3-Player & JPEG-Projektor)
Ethernet- Schnittstelle (LAN 10/100MBit)
Universal Fernbedienung TV/SAT/ DVD
HDMI – Ausgang von Bild und Ton
Videoformat in 4:3, 16:9 und Letterbox
PIP und Splitscreen (Bild-in-Bild) Funktion (*)
BlindScan ( SD/HD)
Alphanumerisches VFD Display
Multi-LNB Unterstützung durch DiseqC-Steuerung Version 1.0, 1.1, 1.2 und USALS
Multi-Satelliten Suche
EPG- Unterstützung (elektronischer Programm-Führer) & MHW-EPG ( Mediahighway)
Hochauflösendes OSD Oberfläche
Favoriten- Gruppen für TV und Radio
Kanalsortierungsfunktionen wie löschen, umbenennen ,verschieben, sperren
Sicherung und Wiederherstellung der Einstellungen (Speichern/Wiederherstellen)
OSD in verschiedenen Sprache
Teletext und Untertitel Unterstützung
10.000 Programmplätze für TV & Radio
7 Tasten an der Frontblende
Netzschalter
Sehr schneller Suchlauf
Software- Update Funktion über USB/RS-232/Netzwerk
Kindersicherung
Cinch- Buchsen für AV - Signal (FBAS, Stereo-Audio)
FBAS, RGB und Y/C- Signal über SCART (TV)
Optischer (SPDIF) Ausgang über Dolby
1Watt Stand-by Verbrauch
Lieferumfang: Receiver , Fernbedienung, 2 Batterien, Bedienungsanleitung, HDMi- Kabel,
Durchschleifkabel, Festplatten- Vorbereitung.
Hinweis: Auslieferung erfolgt ohne Festplatte ab Werk.
(*): Diese Funktion im PIP, funktioniert nur im gleichen TP.
Weitere Informationen erhalten Sie auf unserer Webseite:
www.octagon-germany.de .
Page 9

9
2. Zubehör
Überprüfen Sie die Lieferung auf Vollständigkeit, bevor Sie das Gerät in Betrieb nehmen.
ACHTUNG: Bitte wenden Sie sich an Ihren Verkäufer, wenn eines der Zubehörteile fehlt.
Hinweis:
• Lassen Sie die Fernbedienung nicht unter Sonnenstrahlungen etc., es besteht die Gefahr das Auslaufen
von Chemischen Mittel.
• Die Bedienungsanleitung zum Gerät ist in Deutscher und Englischer Sprache.
Bedienungsanleitung
Fernbedienung
AAA Größe Batterie X2 HDMI Kabel
Durchschleifkabel
Fernbedienung
Durchschleifkabel
Page 10

10
Gerätebeschreibung
1. Vorderseite
1. Power-Knopf: in Standby ein-/ ausschalten.
2. LED-Anzeige: VFD Display. Das LED zeigt Ihnen bei „Rot“ das Standby Modus und bei „Blau“ in
Betrieb. Sie können LED-Beleuchtungs-Zeit und LED-Helligkeit justieren.
3. Fernbedienung- Sensor: Infrarotempfänger
4. Menü-Knopf: Zeigt den Hauptmenü oder bewegt sich auf das vorhergehende Menü zurück.
5. OK-Knopf: zeigt Ihnen die Senderliste im Normalmodus oder Menüfunktionen bestätigen bzw.
Auswählen.
6. CH-Knöpfe aufwärts/abwärts
7. Lautstärke erhöhen / Verringern
8. VFD Anzeige: Die VF D besteht aus 1 2 Buchstaben-Stellen und aus de n verschiedenen Ikonen. Diese
Buchstaben und Ikone zeigen den g egenwärtigen Status des Empfänger s wie Sender - Name, SenderInformationen und so weiter an.
9. Smart-Karten-Leser: Einschub für Smartkarten (Conax Verschlüsselung)
10. USB (Vorderseite): USB- Anschluss für einen USB- Speicher oder eine externe Festplatte.
11. Ci-Modul- Steckplatz: Steckplatz für Ci- Module.
Page 11

11
2. Frontelemente (VFD Display)
12- stelligen VFD- Display (Vakuum-Fluoreszenz-Display) mit zusätzlichen Symbolen. Das Display
zeigt den Programm-Namen und andere Informationen im Klartext an. Im Stand-by- Betrieb wird die
Uhrzeit angezeigt.
1. Standby- Anzeige: wenn das Gerät im Standby ist und dieses Symbol blinkt bei Empfang von
Infrarotsignalen der Fernbedienung.
2. Radio- Symbol: wenn Radio- Modus aktiv ist.
3. TV- Symbol: wenn TV- Modus aktiv ist.
4. SAT- Symbol: zeigt, dass Sie im SAT-Modus sind.
5. TER- Symbol: Terrestrischer Modus (ohne Funktion).
6. FILE- Symbol (Datei): Aufruf vom Speichermedium.
7. REC- Symbol: erscheint bei einer Aufnahme
8. Play- Symbol: erscheint bei einer Wiedergabe eines Video-Formats über diverse Speicher-Medien.
9. TIME-SHIFT- Symbol: erscheint bei Aufnahme nach einer Zeit.
10. Display-Stellen: zeigen Ihnen Sendername, Zeit and auch andere Informationen mit Buchstaben an.
11. Timer- Symbol: erscheint nach Aktivierung des Timers.
12. HD- Symbol: Das gewählte Programm ist in HDTV.
13. USB- Symbol: erscheint bei Anschluss eines USB- Gerät.
14. Sperr- Symbol: Sender ist Verschlüsselt.
15. DOLBY- Symbol: Das laufende Programm verfügt über das Dolby Digitalton.
16. Tu1- Symbol: empfangene Signal vom Tuner 1
17. Tu2- Symbol: empfangene Signal vom Tuner 2
18. MP3- Symbol: erscheint bei einer MP3 Wiedergabe.
19. Wiederholungs- Symbol: Recall- Wiedergabe (noch ohne Funktion)
20. Auflösungs-Symbole: Gewählte Auflösung des HDMI Ausgangs.
Page 12
12
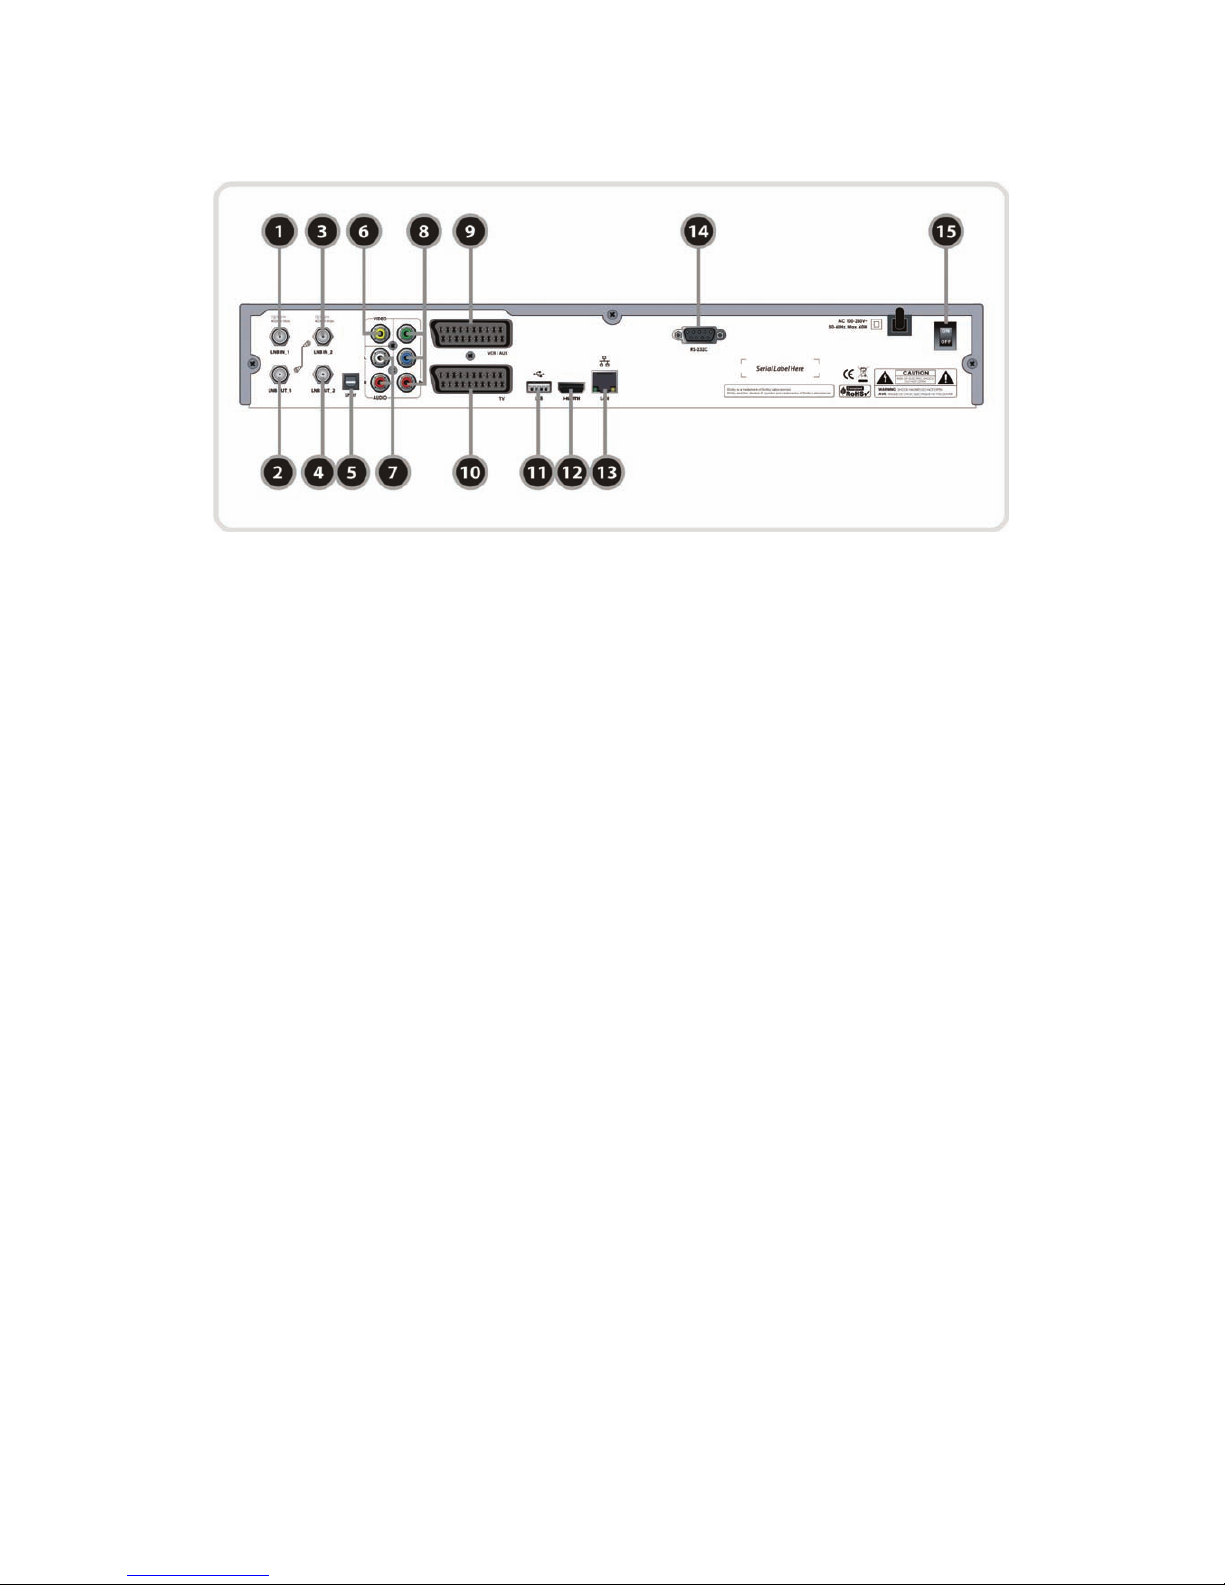
3. Rückseite
1. LNB-IN-1: Antenneneingang von der Satellitenantenne.
2. LNB- OUT-1: Antennenausgang für einen zweiten analogen oder digitalen Receiver und für Loop-
Through betrieb.
3. LNB-IN-2: Antenneneingang von der Satellitenantenne.
4. LNB-OUT-2: Antennenausgang für einen zweiten analogen oder digitalen Receiver.
5. SPDIF: Anschluss an Digitaler Audio-Ausgang optisch (AC3).
6. VIDEO : Anschluss an Ihr Fernsehgerät oder Videorecorder.
7. AUDIO L/R: zum Anschluss an Ihr Fernseh, Video- oder HiFi-Gerät.
8. YPbPr: Komponentenausgang YUV.
9. VCR SCART : VCR Scart- Anschluss.
10. TV SCART: TC Scart- Anschluss.
11. USB: Externes USB 2.0 Gerät.
12. HDMi: HDMI- Anschluss zum TV-Gerät.
13. Ethernet: Netzwerk- Anschluss 10/100Mbit
14. RS- 232C: Servic es chnit ts tell e, Ak t ualisi erun g durch P C
15. Power: Netzschalter (Stromnetz)
Page 13
13
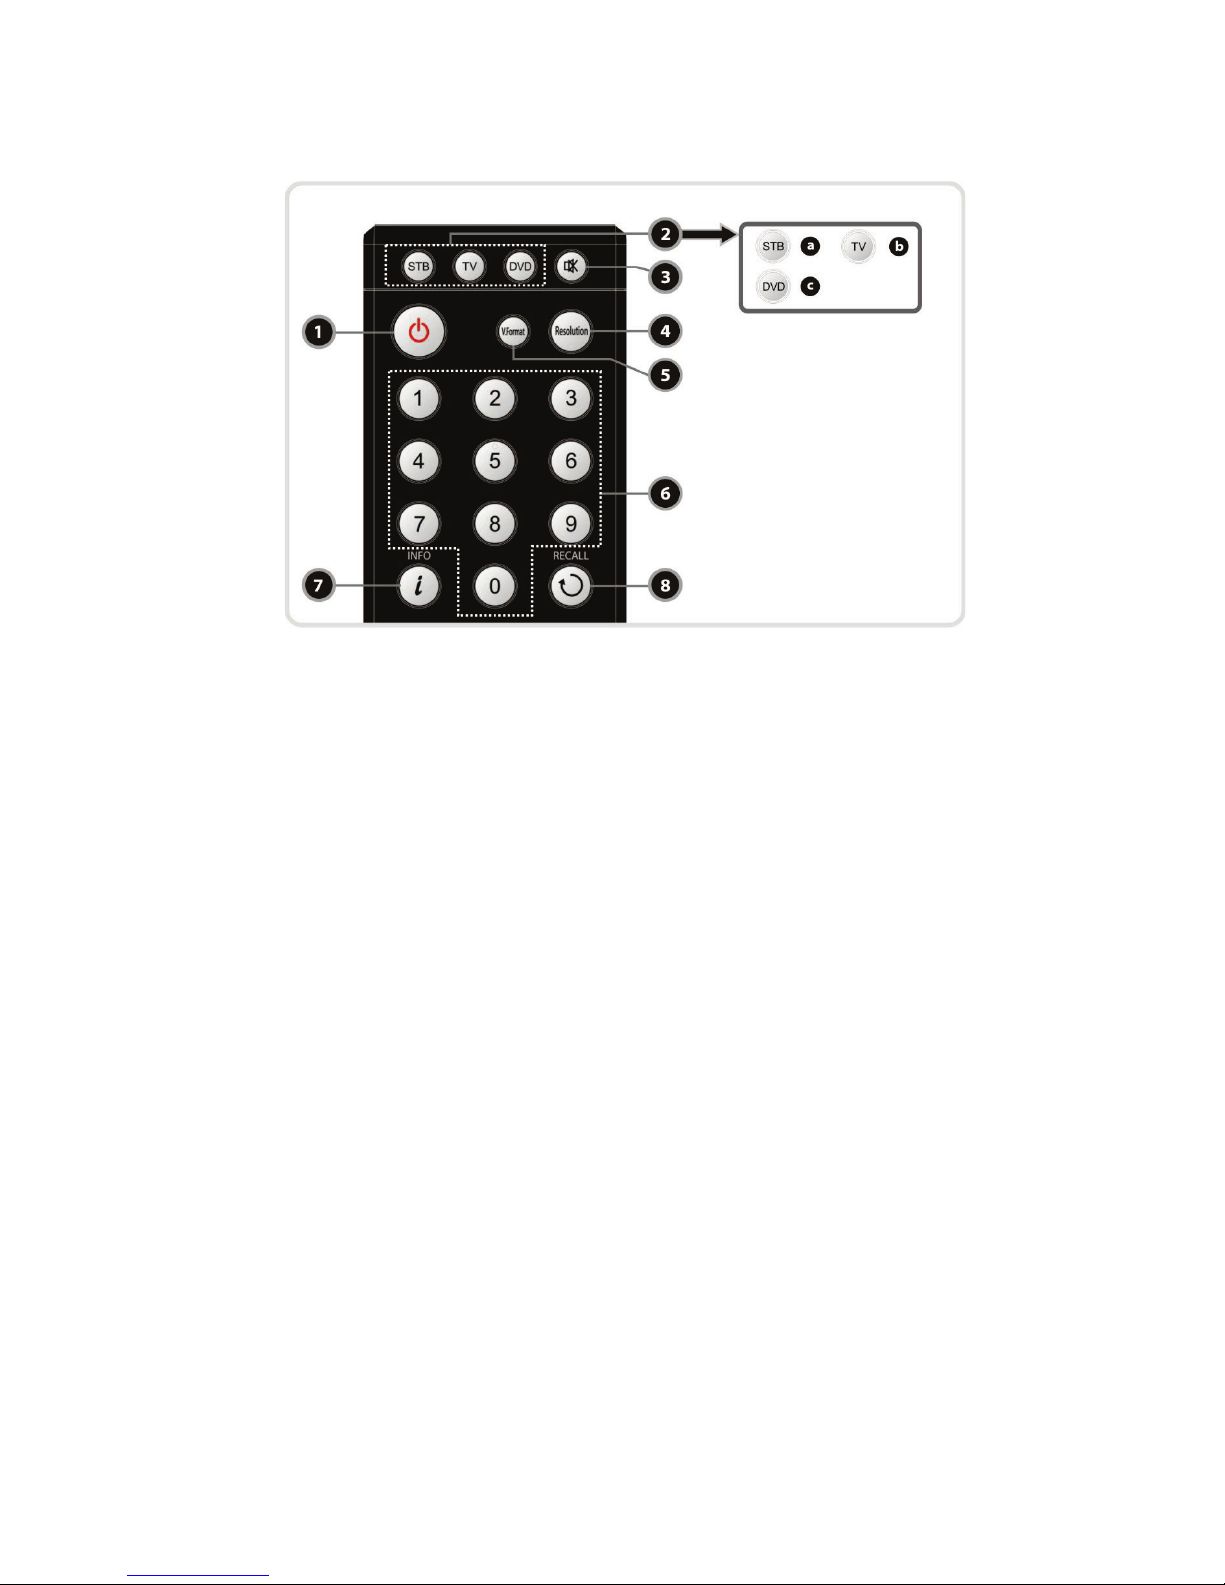
4. Die Fernbedienung
1. POWER : zum Ein-/Aus-Schalten des Receivers.
2. Universal-Tasten:
a. STB: Umschaltung der Fernbedienungsebene auf Receiver
b. Universal TV: Umschaltung der Fernbedienungsebene auf TV
c. Universal DVD: Umschaltung der Fernbedienungsebene auf DVD- Gerät
3. MUTE : zum Ein-/Aus-Schalten des Ton-Wiedergabe.
4. Resolution: ändert die Auflösung in der folgenden Reihenfolge: > 576i; > 576p; > 720p; 1080i.
5. V.Format: wechseln zu Fernseharten 4:3 und 16:9. (PAL/NTSC).
6. Numerisch: direkte Programmanwahl, Eingabe von Zahlen im Programmiermodus.
7. INFO: blendet die Infozeile zur laufenden Sendung ein. Erneutes Drücken, zeigt Detailinformatione n zur
Sendung.
8. RECALL (Wideraufruf): erscheint eine Liste der zuletzt angesehenen Sender, bei erneutem drücken,
schaltet es zum zuletzt gewählten Sender zurüc k.
Page 14

14
9. Menu: Aufruf des Hauptmenüs oder Rücksprung zur übergeordneten Menüebene.
10. Lautstärke Au f -/Ab: ändern des Lautstärke-Einstellung.
11. Sender Auf-/Ab: umschalten der Programme.
12. EXIT: Menü- oder Programmiermodus verlassen. Eingaben verwerfen.
13. Pfeil-Tasten:
a. Auf und Ab- Tasten: Hilft Ihnen zu Navigieren.
b. Links-/Rechts-Tasten: bewegt nach Links-/ Rechts.
14. OK oder Sender-Liste: ruft die Senderliste auf, bestätigt im Menü Modus die Auswahl.
15. EPG(Electronic Programm Guide): liefert weitere Programminformationen (Elektron.
Programmzeitschrift).
16. Page up / Page Down: wählt nächste / vorherige Seite (10er Schritte).
17. Wiedergabe-Tasten
a. S chneller Rücklauf: nach mehrmaliger betätigen, erhöhen Sie die Geschwindigkeit.
b. Schneller Vorspulen: nach mehrmaliger betätigen, erhöhen Sie die Geschwindigkeit.
c. Vorherige- Titel: Während der mp3 Wiedergabe auf den vorherigen Titel zurückspringen
d. Nächsten- Titel: Während der mp3 Wiedergabe auf den nächsten Titel springen.
e. Play/ Time-Shift: Zeigen Sie den Fortschrittsstab des Playbacks an, wenn kein Fortschrittsstab
angezeigt wird.
f. Aufnahme: Starten zum Aufnehmen
g. Wiedergabeliste: zeigen die Dateien, die auf den angeschlossenen Speicher-Medien vorhanden sind.
h. Pause: wird ver wendet um zu pausieren.
i. Stopp: Time-Shift, Wiedergabe oder Aufnahme
j. Wiederholung (*): Diese Taste wird verwendet, um eine Aufnahme wiederholt abzuspielen
ACHTUNG: Beim Einlegen der Batterien auf korrekte Polarität (+/-) achten.
(*): Diese Funktion wird mit den zukünftigen Firmware update möglich sein
Page 15

15
18. Farbige Taste:
a. Rot: Bookmark- Lesezeichen, während einer Wiedergabe der Sendung mittels dieser Taste eine
Markierung setzen, besteht die Möglichkeit die markierten Stellen mittels der Roten- Taste wieder
aufzurufen.
b. Grün: vorherigen Bookmark- Lesezeichen springen.
c. Gelb: Audio- Tonspur.
d. Blau: Mul ti- Picture (optional).
19. PIP- Tasten:
a. PIP- Taste (Picture in Picture): zu PIP- Funktion umschalten.
b. PIP- Wechsel: Schalten zwischen Haupt-Abbildung und Vor-Abbildung.
c. PIP- Sender- Liste: Zu den Vor-Abbildung Se nder - Liste gezeigt.
20. SLEEP: Sie können das Sleep- Timer einstellen.
21. Favoriten: Sat- Gruppe und die Fav- Gruppen aufrufen. 2x Drücken gelangen Sie zu Genre.
22. TV/RAD: zwischen TV und Radio umschalten.
23. Untertitel: sofern das Programm diesen Funktion sendet.
24. Teletext: Videotext aufrufen.
Page 16

16
5. Multi- IR- (Infrarot-Strahlungen) Fernbedienung- Programmierung
1. Direkter Code Eingabe
Schritt 1: Aktivieren Sie zuerst das Gewünschte Universal- Taste (TV, DVD, VCR).
Schritt 2: Halten Sie das gewünschte Universal- Taste (TV, DVD, VCR) mit der OK- Taste
gleichzeitig gerückt. Das LED sollte ca. nach 2 Sekunden angehen.
Schritt 3: Sie müssen innerhalb 20 Sekunden die Drei- stelligen Code Eingabe durchführen. Die
Codes zu Ihrem Universal- Geräte finden Sie am Ende der Anleitung.
Schritt 4: Zum testen drücken Sie die „Power- Taste“, wenn Ihr TV-, DVD-, oder VCR- Gerät sich
ausschaltet, haben Sie das korrekte Code eingegeben. Wenn sich Ihr Gerät nicht ausschaltet,
probieren Sie die nächsten Codes aus der Liste.
Schritt 5: Zum bestätigen drücken Sie die OK- Taste.
Vorsicht: Wenn während der Einstellung innerhalb 20 Sekunden für Schritt 2 und 3 keine Eingabe gemacht wird,
stellt sich die Einstellung aus.
Hinweis: Sollte kein Code aus der Liste funktionieren, dann Versuchen Sie es mit Auto Suche.
2. Automatischer Code Suche
Schritt 1: Aktivieren Sie zuerst das Gewünschte Universal- Taste (TV, DVD, VCR).
Schritt 2: Halten Sie das gewünschte Universal- Taste (TV, DVD, VCR) mit der OK- Taste
gleichzeitig gerückt. Das LED sollte ca. nach 2 Sekunden angehen.
Schritt 3: Bleiben Sie auf den Cursor- Tasten nach oben oder nach unten gedrückt, bis Ihr Gerät
sich selbst ausschaltet. Dies kann einige Minuten dauern.
Schritt 4: Zum Beenden und Speichern drücken Sie die OK- Taste.
Vorsicht: Wenn während der Einstellung innerhalb 20 Sekunden für Schritt 2 und 3 keine Eingabe gemacht wird,
stellt sich die Einstellung aus.
Hinweis: Sollte der Automatische Code Suche nicht funktionieren, dann wenden Sie sich an Ihrem Verkäufer.
Page 17

17
Anschlussbeispiele
1. Receiver zu TV mit Digitalem A/V Ausgang (HDMi)
• Verbinden Sie das Antennenkabel an das LNB IN – Anschluss.
• Verbinden Sie das HDMI- Kabel an das HDMI - Anschluss an Ihrem Receiver.
• Verbinden Sie das SPDIF- Anschluss mit Ihrer Digital- Anlage.
2. Receiver zu TV mit Analog A/V Ausgang
• Verbinden Sie das Antennenkabel an das LNB IN- Anschluss.
• Verbinden Sie das Komponenten- Anschluss mit Ihrem TV- Gerät
• Verbinden Sie die Chinch- Kab el zu Ihrem TV- Gerät
Page 18

18
3. Anschluss an die Antennenanlage
3.1 Nutzung der Single Antenne
• Verbinden Sie Ihren Antennenkabel an LNB IN - Anschluss
3.2. Nutzung der Zwei Separaten Antennen
Schließen Sie die beiden Antennenkabel an, die Ihrem Gerät unterschiedliche Sendesignale liefern.
LNB 1 IN und LNB 2 IN lassen sich voneinander unabhängig Ko nf igur ier en. Da zu wählen S ie im
Antenneneinstellungen Separ at.
3.3 Nutzung der DiseqC-Schalter
Verb inden Sie das Antennenkabel vom DiSEqC Schalter an das LNB IN- Anschluss
Kontrollieren Sie den Ordnungsgemäßen Anschluss aller Geräte und der Antenne, bevor Sie den
Receiver mit dem Stromnetz verbinden.
Page 19

19
Beschreibung der Funktione n
1. Programmauswahl
Um die gewünschte Sender zu wählen oder an zuseh e n, bezi eh en Si e sich die folgend en An w eisu nge n.
Das Gerät wird bereits optimal programmiert ausgeliefert, dass Sie die beschriebenen Einstellungen kaum
benötigen.
1.1 Benutzung der Cursor- Tasten (Auf/Ab)
siehe Punkt 1.3
1.2 Bedienung der Senderliste
Mit der OK- Taste können Sie die Senderliste aufrufen.
Mit der Rote- Taste können Sie nach Transponder (TP), Alphabet, HD
oder Pay- TV sortieren.
Grüne- Taste: Favoritenliste aufrufen.
Gelbe- Taste: alphanumerische Suchfeld.
Blaue- Taste: Send erl ist en Optio nen aufrufen.
1.3 Bedienung der Quickchannel Sender- Liste
Durch die Auf/ Ab Cursor- Tasten erscheint eine QuickProgrammliste mit Zusatzinformationen (EPG).
1.4 Bedienung der zuletzt angesehene Sender- Liste (Recall)
Drücken Sie einmal die RECALL- Taste, so wird eine Liste der zulet zt
gesehenen Sender eingeblendet, durch das erneutes drücken,
Springt zum vorher gesehenen Progr am m zurück.
Page 20

20
2. Informationsfenster
Mittels der Info- Taste gelangen Sie zum Info-Bar. Zusatzinformationen
zum laufenden Programm und weitere Informationen werden
eingeblendet.
3. Multi-Picture-Display (*)
Multi- Picture (optional).
(*) Diese Funktion wird mit den Zukünftigen s/w erscheinen.
4. Elektronischer Programmführer (EPG)
Mit der EPG- Taste gelangen Sie zum Elektronischen Programmführer
(EPG). Es bietet eine detaillierte Programm Übersicht. Timer
Reservierungen können Sie mittels der OK- Taste markieren. Durch
erneutes drücken der OK- Taste (2x) können Sie Reservierungen für
Timer Aufnahmen markieren. Mit der Aufnahme- Taste können Sie
Reservierte Timer- Aufnahmen bearbeiten.
EPG- Taste: Anzeigemodus (One CH./ Multi CH).
Gelbe- Taste: EPG- Suche Eingabefeld.
Blaue- Taste: MHW- EPG (Mediahighway)
Info- Taste: detailierte Programminformationen
5. Favoritenliste
Sat- Gruppe und die Fav- Gruppen aufrufen. 2x Drücken gelangen Sie
zu Genre.
6. Lautstärkeregelung
• Um das Audiovolumen zu justieren, drücken Sie die Vol.-AUF-/AB-
Tasten oder die Links/ Rechts Cursor Tasten.
• Audio-Lautstärke-Regler Stab wird in der Oberseite des Schirmes
angezeigt und nach 4 Sekunden verschwindet es.
• Drücken Sie Stumm- Taste (Mute), um AN/AUS des Lautstärke zu
schalten.
ACHTUNG: Die Stummschaltefunktion bleibt während der Kanalumschaltung aktiviert.
Sie können auch die Anzeigedauer im Menü ändern.
Menü > Konfiguration > Sonst. Einstellung > Lauts tä rk eba lken Anzeigedauer
Page 21

21
7. Pause
Wird verwendet um zu pausieren (Wiedergabe, Aufnahme u. TimeShift)
8. Untertitel
sofern das Programm diesen Funktion sendet
ACHTUNG: ist der Sender mit Untertitel nicht unterstützt, so funktioniert die Taste nicht.
9. Audio
Audio- Tonspur kann gewählt werden.
10. Teletext
Videotext aufrufen. 2x drücken für durchsichtige Darstellung.
11. PiP (Picture in Picture) Bild-in-Bild-Funktion
Hinweis: Der PIP funktioniert nur im gleichen TP
• PIP aktivieren, kleines Bild wird eingeblendet. Erneutes Betätigen stellt beide Bilder auf gleiche Größe
nebeneinander (Splitscreen).
• Mittels der zweiten PIP- Taste tauschen Sie beide Fenster gegeneinander aus.
• Die dritte PIP- Taste öffnet eine Programmauswahl für das im Fenster laufende Programm. Die PIP-
Tasten befindet sich über die Ziffern- Tasten.
Page 22

22
• Im PIP-Modus, können Sie mit der zweiten PIP- Taste, das Bild wechseln.
• Wenn Sie Bild im Bild- Programm die dritte PIP- Taste, drücken erscheint die Programmliste. Mit der OK-
Taste, können Sie das Programm der Vorabbildung sehen. Sie können das Programm der Vorabbildung
von der Liste auch ändern.
Page 23

23
Aufnahme Funktion
1. Aufnahme
Sie können Ihr Speichergerät vorwählen, unter diesen folgenden Einstellungen.
Menü> Konfiguration > Aufnahme-Option > Aufnahmemedium.
Bei extern angeschlossenen USB Geräten beachten Sie besonders bei Festplatten, ob diese eine externe Spannungsversorgung
benötigen. Zu hohe Stromaufnahme von Festplatten kann zu Funktionsstörungen führen.
1.1 Aufnahmemöglichkeiten
Es gibt 3 Arten zur Aufnahmemethode.
(Sofortige Aufnahme / Zeit- Reservierte Aufnahme / EreignisReservierte
Aufnahme).
• Sofortige Aufnahme: Durch drücken der Aufnahmetaste startet die
Aufnahme. Durch erneutes drücken können Einstellungen
vorgenommen werden. Mit der Stopp- Taste kann jederzeit beendet
werden.
• Zeit – Reserv iert e Aufnahme: Im Timer Einstellung können Sie
die Zeit & Programm auf Ihre gewünschte Art festlegen.
(Hauptmenü > Systemeinstellungen > Timer Ei n stellung). Wenn
Sie eine Reservierung im EPG- Menü vornehmen, erscheint die
automatisch im Timer Einstellung. Im der ersten Übersicht erhalten
Sie die Informationen über das Modus der Aufnahme, die Startzeit,
die Laufzeit und das gewählte Programm. Hier werden alle
Ereignisse aufgelistet, die über den EPG programmiert werden. Mit
der roten Taste können Sie die Timer- Ereignisse löschen. Mit der
Grünen- Taste Timer hinzufügen. Mit der gelben Taste wird der
Kalender aufgerufen. Durch die OK- Taste können Sie die Timer
bearbeiten. Sie haben folgenden Modusarten zu wählen, einmalig
oder täglich zur gleichen Zeit erfolgen soll. Mit „Mon.-Frei.“, wird die
Aufnahme an allen Wochentagen zur gleichen Zeit, bei „Sam.Son.“ wird nur am Wochenende aufgenommen. Mit
„Wöchentlich“ können Sie einzelne Tage festlegen.
• Ereignis-Reservierte Aufnahme: Sie können Reservierungen
Überscheidend einstellen. Bei bedingten Überschneidungen
werden Sie einen Hinweis erhalten, welches Sie betätigen müssen.
Tipp: Mit der EPG Suchfunktion können Sie Sendungen die sich
wiederholen finden und Timer programmiert aufnehmen.
Page 24

24
- Die Einstellungen werden für Event-Timer Aufnahme& Abspielen
der gewünschten Sendungen so einstellen.
1x OK- Taste entsteht Grüne Wiedergabe Symbol, zur
entsprechenden Zeit wird die Wiedergabe gestartet.
2x OK- Taste entsteht Roter Punkt Symbol, zur entsprechenden Zeit
wird die Aufnahme gestartet.
1.2 Aufnahme-Aufbereiten
2x die Aufnahmetaste drücken, so startet die Aufnahme und Sie
erhalten eine Aufnahmeinformation zum gewünschten Einstellungen
bearbeiten.
• Pause: Durch die Pause- Taste, nimmt es im Hintergrund auf.
• Laufzeit: Die Dauer der Aufnahme können Sie mit Links/ Rechts
Pfeil- Tasten festlegen.
• Stoppe Position: Die Zeit der Aufnahme bearbeiten
- Ende der gegenwärtigen Sendung: Soll aufhören mit der
Aufnahme, wenn die Sendung zu Ende ist.
- Ende der nächsten Sendung: soll nach dem nächsten
Aufnahme-Event aufhören zu Auf nehmen.
- Nicht Verfügbar: EPG ist nicht vorhanden.
• Laufende Aufnahme:
Wenn Sie zwei Aufnahmen zur gleichen Zeit haben, können Sie auf
Primär / Sekundär mit den Cursor- Tasten stellen. Mit der OK- Taste
bestätigen Sie das Aufnahmekanal.
1.3 Langzeitaufnahmen (Journaled, FAT32)
Während der Langzeit-Aufnahme ist auf 4GB (Giga Byte) aufnehmbar oder auch mehr, dass heißt pro
Aufnahme maximal 4Gb möglich. Die zusät zlic he n Auf nahmen werden anders genannt (z.B aaa.ts, aaa.ts1,
aaa.ts2... und so weiter). Diese Dateien sind am PC und am Receiver (STB) anzuschauen.
Achtung: Wenn Sie „Journaled“ wählen, wird die Lange Aufnahme, in eine Datei aufgenommen, dass heißt sie wird nicht geschnitten.
1.4 Aufnahme während der Pause
1x Pause Taste drücken, bleibt das aktuelle Bild stehen (Im
Hintergrund wird aufgenommen). 2x Pause- Taste Drücken, die
Sendung wird von der stelle Wiedergeben, wo sie pausiert wurde.
Das Funktioniert nur wenn TimeShift aktiviert ist.
• Bei der Aufnahme, können Sie die Wiedergabe-/ Time- Stift-Bar
(Rot) aufrufen.
Page 25

25
• Bei der Wiedergabe können Sie mit den Cursor- Tasten, innerhalb
der aufgenommenen Sendung zu den gewünschten Zeitoption
umschalten.
• Aufgenommne Dateien können in der Wiedergabeliste angese hen
werden.
Drücken Sie die Stopp- Taste wird die laufende Aufnahme beendet.
Sollten zwei gleichzeitige Aufnahmen haben, so erscheint eine
Meldung zur Auswahl, welche Aufnahme Sie stoppen möchten.
Hinweis dient Aufnahmen laufen im Hintergrund.
2. Time-Shift-Funktion
TimeShift erfolgt auf das interne Festplatte, USB1- Vorn, USB2-
Hinten und Network Drive.
• Durch die Pause- Taste, nimmt es im Hintergrund auf.
• Ein erneutes drücken der Pause- Taste, wiedergibt die Sendun g
weiter.
Page 26

26
• In der Live-Sendung können Sie die Rote- Taste drücken und das
Time-Shift- Banner sehen.
• Mit den Cur sor - Tasten können Sie sich innerhalb der
Aufgenommenen Sendung zu den gewünschten Zeitpunkt Voroder Zurückspulen.
• Mit der Stopp- Taste können Sie Time-Shift Aufnahme beenden.
3. Wiedergabeliste (Playlist)
Aufnahmen und Dateien können Sie hier Wiedergeben. Mit Hilfe der
Cursor- Tasten können Sie Wiedergabemodus gewünschte Dateien
(Video, Musik, Bilder) wieder geb en.
3.1 Aufgenommene Dateien
• Wähle Speicher- Medium: 2x drücken der Wiedergabeliste- Taste,
können Sie Dateien vom gewünschten Speicher-Medium
Wiedergeben.
ACHTUNG: Der Receiver zeigt nur die angeschlossen Speicher- Geräte an.
• Sortiere Liste: Die Gelbe- Taste bietet Ihnen die Dateien nach Zeit
/ Name und nach Größe sortieren.
• Datei Option: Mit der Blaue- Taste, können Sie die Datei löschen,
in ein Ordner verschie ben oder auch Umbenennen. Sie können
auch mehrere gleichzeitig markieren und löschen. Zum Markieren
nehmen Sie die Rote- Taste.
Sobald Sie die aufgenommene Datei markieren, wird sie im rechten
Teil des Bildes, in 1- fache Gesc hwind igkeit wiedergegeben. Durch
die Vor- und Zurückspul- Tasten können Sie hier die Geschwindigk eit
der Wiedergabe wählen.
Page 27

27
3.2 Eingefügte Dateien
• Mit den Cur sor - Tasten können Sie sich im Wiedergabe- Menü in
diversen Kategorien beweg en.
• Mit der OK- Taste wählen Sie und genießen Ihr en Film.
• Mittels der Roten- Taste markieren Sie die Dateien.
• Jetzt können Sie die markierten Dateien in die gewünschte Akten
oder Ordner verschieben.
3.3 Musik
• Wenn Sie die RECALL-Taste drücken, können Sie Ihrer
gewünschten Musik-Datei mit Wiederholung anhören.
• Sie können auc h wie bei der Wieder gabe-Liste (siehe 3.1) Ihre
Sortierung, genau so Sortieren.
3.4 Foto
• Die Rote- Taste startet Diashow alle verfügbaren Fotos.
• Die Grüne- Taste bietet Ihnen Optionen zur Diashow.
• Sie he auch Punkt 3.1
4. Das Lesezeichen (Bookmark)
• Lesezeichen setzen mittels Rote- Taste, mit der grünen- Taste
Aufruf der markierten stellen
• Cursor- Tasten bieten zusätzlich spring Funktion an.
Page 28
28
• Wenn Sie möchten können Sie bestimmte Bookmarks löschen, mit
der Grüne- oder Cursor- Taste gehen Sie auf die Bookmarks, dann
können Sie mit der Rote- Taste die Bookmarks löschen.
5. Sonderfunktionen
• Sie können die Geschwindigkeit des Vorwärts-Spulen erhöhen,
durch die FF-Taste. Drücken Sie die FF-Taste um schneller zu
Spulen mit x2-, x3-, x4-, x5- Fach. Wird noch mal nach x5-Facher
Vorspulen gedrückt, dann schaltet es wieder auf x1-Fach um.
• Sie können die Geschwindigkeit des Rückwärts-Spulen erhöhen,
durch die Rückspul- Taste. Drücken Sie die Rückspul- Taste um
schneller zu Spulen mit x2-, x3-, x4-, x5-Fach. Wird noch mal nach
x5-Facher Rückwärts-Spulen gedrückt, dann schaltet es wieder auf
x1- Fach um.
• Sie können die Pause- Taste drücken, während dem Vor- oder
Rückwärts Spulen. Drücken Sie nochmals die Pause- Taste, wird
die Datei von der Pause-Stelle weiter wie derg ebe n.
Page 29

29
Menü Mappe
Haupt Menü
Systemeinstellungen
1. Speichermedien
2. Timer Einstellung
3. Senderlisten Manager
4. Datentransfer
Konfiguration
1. Aufnahme Option
2. Kindersicherung
3. Sonst. Einstellu nge n
4. Zeit Einstellungen
5. Spracheinstellungen
6. A/V Ausgänge
Installation
1. Antenneneinstellung
2. Positioniereinstellung
3. Programmsuche
4. Netzwerkeinstellungen
5. System Wiederherstellen
6. System Information
Sonstiges
1. Rechner
2. Kalender
3. CAS
Page 30

30
Beschreibung des Hauptmenüs
Mit der Menü-Taste wird Menü aufgeruf en. M it den Cursor- Tasten
bewegen Sie sich im Menü. Nachdem können Sie Ihren gewünschten
Menüpunkt oder Bestätigungen mit der OK- Taste wählen. Um zurück
in den Vorhergehenden Me nü zuk ehr en, drücken Sie die Menü-Taste.
Wenn Sie das Menü verlassen möchte, drücken Sie die EXIT- Taste
zum verlassen in das Normalmodus.
1. Systemeinstellungen
1.1 Speichermedien
Detaillierte Informationen zu Speichermedien (Eigenschaften).
• Gewähltes Medium: wählen Sie Speicher- Medium, durch die
Cursor/ OK-Taste können Sie wähle n. Festplatte, USB1 (Vorn),
USB2 (Hinten) u. Network Drive.
• Status: Sie können die Information vom aktuellen Speicher-Gerät
sehen. Wie z.B verbunden, Nicht verbunden.
• Dateisystem: Es zeigt Ihnen den Aktuellen Datei Systeme vom
angeschlossenen Speicher-Gerät an. Sie können auch nach Wunsch den Format für Ihr Speicher-Gerät
ändern, wenn Sie es Formatieren.
ACHTUNG: Sie müssen FAT32 Dateisystem vorwählen, wenn Sie auf USB-Speichergeräte in Windows (am Computer) zurückgreifen
möchten.
• Gesamt: Zeigt ihnen die Gesamtgröße vom Speicher-Gerät.
• Frei: Zeigt Ihnen die noch zu Verfügung stehenden Speic h erpl at z.
• Format: Wenn Sie OK- Taste drücken, somit Formatieren Sie das Speicher-Gerät mit der oben
gewählte Dateisystem.
ACHTUNG: Wenn das Speicher-Gerät unbekannt ist, wird das Speicher-Gerät in Journaled System formatiert.
• Wiedergabeliste: Drücken Sie OK- Taste, wird das Wiedergabeliste- Menü aufgerufen.
1.2 Timer Einstellung
Timer hinzufügen oder Timer Einstellungen bearbeiten.
Programmierte Ereignisse werden hier aufgelistet.
Neuen Timer hinzufügen: Drücken Sie die Grüne- Taste, so wird
eine neue Zeile hinzugefügt. Sie können das spezifische
Anfangsdatum, die Zeit, die Dauer und den Sender damit einstellen.
Mit Modus können Sie die Aufnahme einmalig oder täglich zur
gleichen Zeit aufnehmen. Mon.-Frei.: Wöchentliche Aufnahme zur
gleichen Zeit . Sam.-Son.: gilt nur am Wochenende. Bei
Wöchentlicher Eins tel lu ng können Wochentage individuell markiert werden.
- Wenn Sie Aufnahme wählen, wird die Aufnahme in der eingestellten Zeit aufgenommen.
- Wenn Sie Wiedergabe wählen, wird die Wiedergabe in der eingestellten Zeit eingeschaltet und
wiedergeben.
• Änderung des vorhandenen Timer: Mit der OK- T as te ändern und bes tät ig en Timer- Eintrag.
• Vorhandene Timer löschen: Drücken Sie die Rote- Taste.
Page 31

31
1.3 Senderlisten Manager
Menü > Systemeinstellungen > Senderlistenmanager
• Sperren der Sender: Zum Sperren wählen Sie die OK- Taste. Die
gewählten Sender werden im mittleren Fenster angezeigt. Zum
Entsperren drücken Sie im mittleren Fenster. Zum wechseln der
Fenster, benutzen Sie die Cursor- Tasten. Zum Speichern,
müssen Sie nur noch Exit drücken.
• Bewegen der Programme: Zum Bewegen wählen Si e die OK-
Taste. Sie können eine oder auch mehrere Programme nach
Wunsch verschieben. Nachdem Sie gewählt haben und zum
gewünschten Programm plat z verschie ben m öc hten, so wählen Sie
die Grüne- Taste. Zum Speichern, müssen Sie nur noch Exit
drücken.
• Löschen der Programme: Zum Löschen wählen Sie die OK-
Taste. Die gewählten Sender werden im mittleren Fenster
angezeigt. Zum löschen der Programme wählen Sie die GrüneTaste. Es kommt eine Warnungshinweis, ob Sie diese Einstellung
löschen möchten oder abbrechen möchten.
• Überspringen der Programme: Zum Überspr ingen w ählen Si e
die OK- Taste. Sie können eine oder auch mehrere Programme
nach Wunsch markieren. Nachdem Sie gewählt haben und
möchten jetzt aktivieren& Speichern, müssen Sie nur noch Exit
drücken.
• Favoriten erstellen: Aus Werk sind bereits 12 Favoriten benannt.
Sie können bis zu 32 eigene Favoritenlisten selbst erstellen und
umbenennen. Wählen Sie einen der Favoriten, z.B. Sport. Die
Sender die Sie im Favoriten haben möchten, drücken Sie die OKTaste. Nachdem Sie gewählt haben und möchten jetzt aktivieren& Speichern, müssen Sie nur noch Exit
drücken.
• Sender-Einstellungen: Hier können Sie die Sender auf der
Linken Seite aufgelistet sind, umbenennen. Über die virtuelle
Tastatur können Sie den gewünschten Namen vergeben. Mit der
Rote- Taste speichern Sie.
Page 32

32
1.4 Datentransfer
• Systemdaten auf USB Speicher übertragen: Sie können Ihre
Einstellungen, wie z.B. Sprache, Sen der etc. auf den USB-Gerät
speichern. Sie drücken auf die OK- Taste und danach die RoteTaste um die Einstellungen zu speichern.
• Programmliste auf USB Speicher übertragen: Programmliste
wird auf das Speichermedium übertragen und mit der Roten-Taste
gespeichert.
• Datenübertragung aus USB Speicher: Dieser Menü möglicht
Ihnen die Übertragung der Dateien vom Speicher- Gerät auf das
Receiver. Mit der OK- Taste bestätigen Sie die Übertragung.
ACHTUNG: Die Systemdaten und Programmlisten werden ausschließlich nur auf die USB Anschlüsse USB1 und USB2
gespeichert. Sind keine USB- Geräte angeschl oss en, so wird dies nicht funktioni eren.
2. Konfiguration
2.1 Aufnahme Option
• Aufnahme wird beendet: meint ob Sie beim Stoppen einer Aufnahme eine Abfrage a ufgerufen werden
soll oder sofort gestoppt werden soll.
• Vorlaufzeit / Nachlaufzeit: Verlängerung können beim Überziehen der vorgesehenen Sendungsdauer.
Sie können die Extra-Aufnahmezeit selbst justieren. (1 Min/2 Min/3 Min/4 Min/5 Min/10 Min/15
Minute/aus ). Diese Wahl beeinflusst nur die tatsächliche Arbeit der Timer. Aber wenn Sie eine SenderAufnahme im Timer - Managermenü Reservieren, hat dies keinen Einfluss.
• TimeShift: Sie können die Zeit justieren. (30 Min/60 Min/90 Min/120 Min). In diesem Fall arbeitet die
Time-Shift-Funktion automatisch bis zur Begrenzung der Zeit auf, die Sie festlegen. Das Time-Shift
nimmt solange auf, solange noch das Speichergerät genügend Speicher-Platz hat. Mit der Option AUS
können Sie die TimeShift Funktion deaktivieren.
• Kommerziell Springen (Trick Mode): Mit den Cursor- Tasten nach Links/ Rechts bewegen Sie sich im
TimeShift- Banner. Sie können die Einstellung in 5 Sekundenweisen aus s et zend einste ll en. Die Zeit
selbst Justieren (10 Sec/15 Sec/20 Sec/25 Sec/30 Sec).
• Time-Shift Funktion: Sie können Ihre Aufnahme auf das gewünschte Speicher-Gerät wählen.
Einstellungen wie diese Festplatte, USB1 (Vorn), USB2 (Hinten) und Netzwerk HDD (Network Drive).
• Aufnahmemedium: Sie können auch die Aufnahme-Einstellung, das was Sie verwenden möc hten, w ie
diese einstellen Festplatte, USB1 (Vorn), USB2 (Hinten) und Netzwerk HDD (Network Drive). AufnahmeDateien werden in dieser Einstellung gespeichert.
2.2 Kindersicherung
In der Kindersicherung können Sie gegenüber Unbefugten bestimmte
Einstellungen schützen (Kinder, fremde Personen). Aus Werk ist der 4stelligen Code „0000“. Mit Pincode ändern können Sie die Werkscode
„0000“ auf einen beliebigen 4-stelligen Pincode Ihrer Wahl ändern.
ACHTUNG: Pincode Entsperren mit Masterpin 1008.
• Altersvorgabe: Das elterliche Niveau wird als Alter- Gegründete
Zahlen gegeben. Sie können Frei des weiteren 4, 6,8, 1 0, 12, 15 und
18 Jahren wählen.
• Pin-Code ändern: Geben Sie den neuen PIN-Code über die Ziffer- Tasten ein. Betätigen es erneut.
• System: Systemeinstellungen durch 4-stelligen Pincode sperren.
• Installation: Installation durch 4-stelligen Pincode sperren.
• Konfiguration: Konfiguration durch 4-stelligen Pincode sperren.
• Einstellungen: Einstellungen durch 4-stelligen Pincode sperren.
Page 33
33
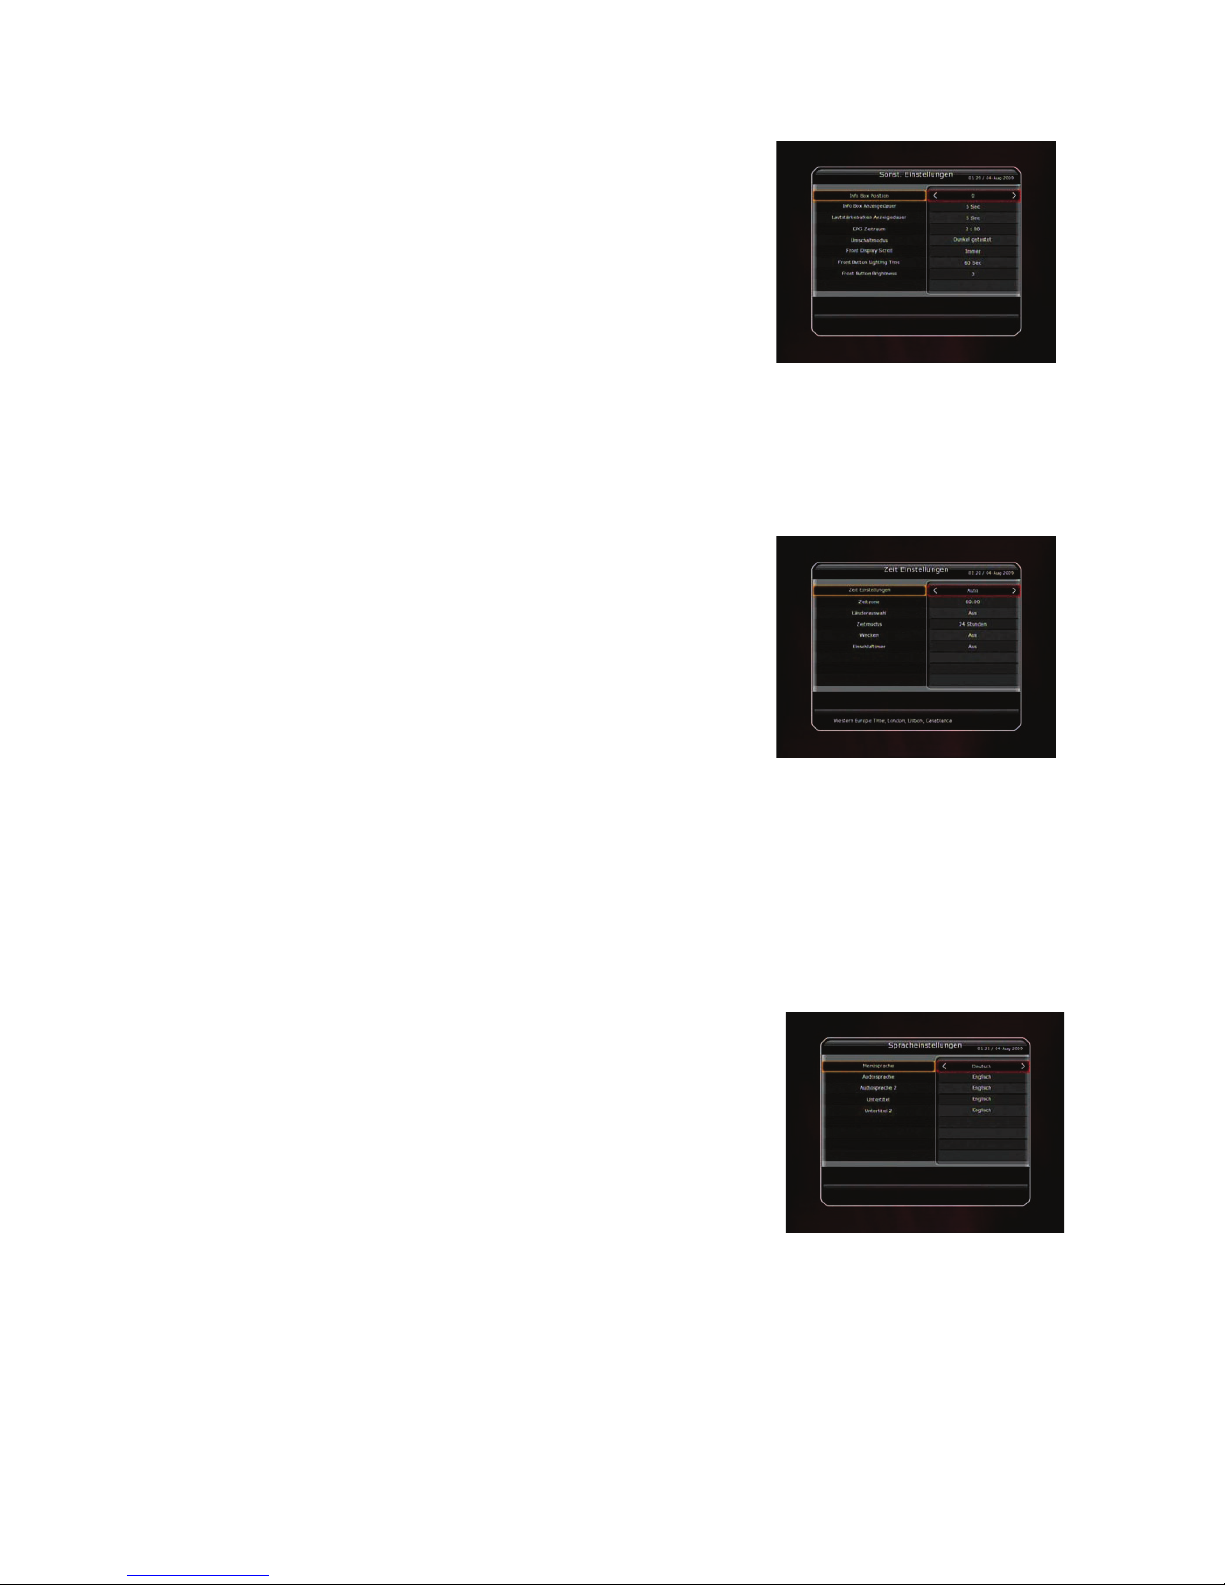
2.3 Sonstige Einstellungen
• Info Box Position: Hier können Sie die Position der
Statusinformation festlegen.
• Info Box Anzeigedauer: Hier können Sie die Dauer der
Statusinformation festlegen.
• L autstärk ebalken Anzeigedau er: Hier können Sie die Dauer der
Lautstärkeanzeige festlegen.
• EPG Zeitraum: Hier können Sie das Zeitraum einstellen.
• Start MHW- Epg Automatically: Aus / Ein dient für eine detaillierte
EPG Information.
• Umschaltmodus: Das Programmwechsel wird mit dunkeler Bild gewechselt oder das TV Bild bleibt.
• Front Display Scroll: Scroll- Funktion im VFD- Display für angezeigte Namen (Immer oder Einmal).
• Front Button Lighting Time: Die LED-Beleuchtung- Zeit können Sie auf 10,20,30,60 Sekunden und auf
immer einstellen.
• Front Button Brightness: Die Helligkeit der LED mit 4 Stufen einstellen, indem sie AUS einstellen, stellt
diese Wahl die vordere LED-Beleuchtung ab.
2.4 Zeit Einstellungen
• Zeit Einstellung: Um die aktuelle Uhrzeit einzustellen, können Sie
Automatisch und Manuell einstellen.
- Auto Zeit Einstellung: Die Zeit wird automatisch aus dem laufenden
Programm gestellt.
- Manuelle Zeit Einstellung Datum: Drücken Sie die OK- Taste und
geben es Manuell ein.
• Zeitzone: Wählen Sie Zeitzone zu GMT. Beispiel: +1:00
• Länderauswahl: Diese Wahl ist zur automatischen Anpassung an
Sommer und Winterzeit.
• Zeitmodus: Wählen Sie die den Cursor- Tasten 12 oder 24 Stunden- Anzeige.
• Wecken: Einschalten des Gerätes zu einer bestimmten Zeit (einmal, wöchentlich oder täglich).
- Weckdatum: Festlegung des Tages oder Wochentage für Weckdatum.
- Weck Zeit: Geben Sie mit den numerischen Tasten ein, wann sich der Receiver einschalten soll.
- Weck Programm: Drücken Sie OK- Taste und wählen Sie den Sender zu Weckfunktion.
• Einschlaftimer: Das Gerät wird zur gewählten Zeit automatisch ausschaltet. Wählen Sie hier nur einmal,
wöchentlich oder täglich.
- Einschlafdatum: Drücken sie OK- Taste und wählen Sie das/die gewünschte(n) Datum und Tage.
- Einschlafzeit: Geben Sie die Abschaltzeit mit den numerischer Zahlen ein.
2.5 Spracheinstellungen
Sie können die Sprachen auswähl en. Zusätzlich können Sie festlegen,
in welcher Sprache das Audiospur und das Untertitel ausgegeben
werden sollen.
ACHTUNG: Die Sprache kann vom dem verkauftem Land abhängig sein. Die
Vorhandene Sprache ist unabhängig vom Verkauf.
• Menüsprache: Gewünschte Sprache wählen. OK- Taste drücken,
Sprachliste wird aufgerufen , mit den Cursor- Tasten bewegen Sie sich
zu der gewünschten Sprache. Mit OK bestätigen Sie.
• Audiosprache: Gewünschte Sprache wählen. OK- Taste drücken, Liste wird aufgerufen, mit den Cursor-
Tasten bewegen Sie sich zu der gewünschten Sprache. Wenn nicht die gewünschte Sprache enthalten
ist, so wird sie vom Empfangenen Sender automatisch übernommen.
• U
ntertitel Sprache: Gewünschte Sprache wählen. OK- Taste drücken, Liste wird aufgerufen, mit den
Cursor- Tasten bewegen Sie sich zu der gewünschten Sprache und kann am Empfangenen Sender
eingestellt werden.
Page 34

34
2.6 A/V Ausgänge
• TV Typ: Im Auto Modus schaltet der Receiver automatisch zwischen
NTSC oder PAL, je nachdem welches Signal empfangen wird.
• TV Verhältnis: Abhängig vom Gerät, das angeschlossen ist.
(4:3/16:9).
• TV Auflösung: Wählen Sie die Anzeige- Auflösung Ihrer TV- Gerät.
Sie können die Auflösung mit Resolution- Taste auch ändern. Durch
erneutes drücken der Resolution- Taste, ändert die Auflösung in der
folgenden Reihenfolge: 576i, 576p, 720p, 1080i, Auto.
•
Format: Haben Sie das Bildschirmform at auf 4:3 eingestellt, so
können Sie zwischen Letterbox/ Pan Scan wählen. Ist 16:9
eingestellt, entfällt diese Option.
- 16:9 Anzeigeformat auf 4:3 Fernseher Einstellung
Pillar box: Eine 4:3 Format wird verkleinert wiedergegeben. Rechts und Links werden schwarze Balk en
angezeigt.
Full: Ein 4:3 Format wird gestreckt. Links und Rechts werden keine schwarzen Balken angezeigt. Das
Bild wird vom Wert gefälscht.
- 4:3 Anzeigeformat auf 16:9 Fernseher:
Letter Box: Eine 16:9 Format verkleinert wiedergegeben. Oben und Unten werden schwarze Balken
angezeigt.
Pan Scan: Eine 16:9 Format wird gestreckt. Links und Rechts keine schwarzen Balken angezeigt. Das
Bild wird vom Wert gefälscht.
• Video Ausgabe: Benutzen Sie CVBS, RGB oder YUV, je nachdem, welches System Ihr TV optimal
unterstützt.
- Im Falle mehr als 576p (HD): Der RGB - Ausgang wird automatisch gesperrt. Sie können Video-
Ausgangsmodus (CVBS, YPbPr, YC) wählen.
- Im Falle des 576i (SD): Der YPbPr- Ausgang wird automatisch gesperrt. Sie können Video- Ausgangs-
Modus (CVBS, RGB, YC) wählen.
• HDMI Dolby Digital: Sie können die Dolby Digital Übertragung über HDMi- Anschluss ein- oder
ausschalten.
• Audio: Stereo/Mono/Links/Rechts Auswahl (Cinch- und Scart- Anschluss)
• Standby Power: Mit EIN schalten Sie das VFD- Display ein, das heißt, wenn Sie Ihr Gerät auf Standby
schalten, dann zeigt es Ihnen die Uhrzeit. Mit AUS schalten Sie das VFD- Display aus, wenn Sie Ihr
Gerät auf Standby schalten, dann ist der Display dunkel.
3. Installation
3.1 Antenneneinstellungen
Satellit: Wählen Sie hier den Satelliten den Sie nach neuen
Programmen absuchen möchten, Sie können mit den Cursor- Tasten
suchen und mit OK bestätigen.
Tuner Anschluss: Loop oder Separat wählbar.
Frequenz: Sind bereits aus Werk vorhandene TP.
LNB Spannung: LNB Spannung kann EIN- oder AUS- geschaltet
werden.
LNB Typ: wie Bsp. Universal, Single oder Unicable.
LNB Frequenz: Bsp. 9750/10600 oder Manuell veränderbar.
LNB 22KHz: Verwenden Sie kein Universal- LNB, so haben Sie hier die Möglichkeit, auch komplexe
Antennenstrukturen mit Ihrem Receiver anzusteuern. Das ist lediglich in Sonderfällen notwendig.
DiSEqC: Dient zur Ansteuerung von DiSE qC-1.0-Relais mit bis zu 4 Eingängen oder Monoblock- LNB und
von DiSEqC-1.1-Relais in Anlagen mit bis zu 64 LNB´s bzw. Antennen.
Positioniereinstellung: OK- Taste drücken, wird das Positioniereinstellungs- Menü aufgerufen.
Programmsuche: D
rücken Sie OK um in das Programmsuche- Menü zu gelangen.
Page 35
35
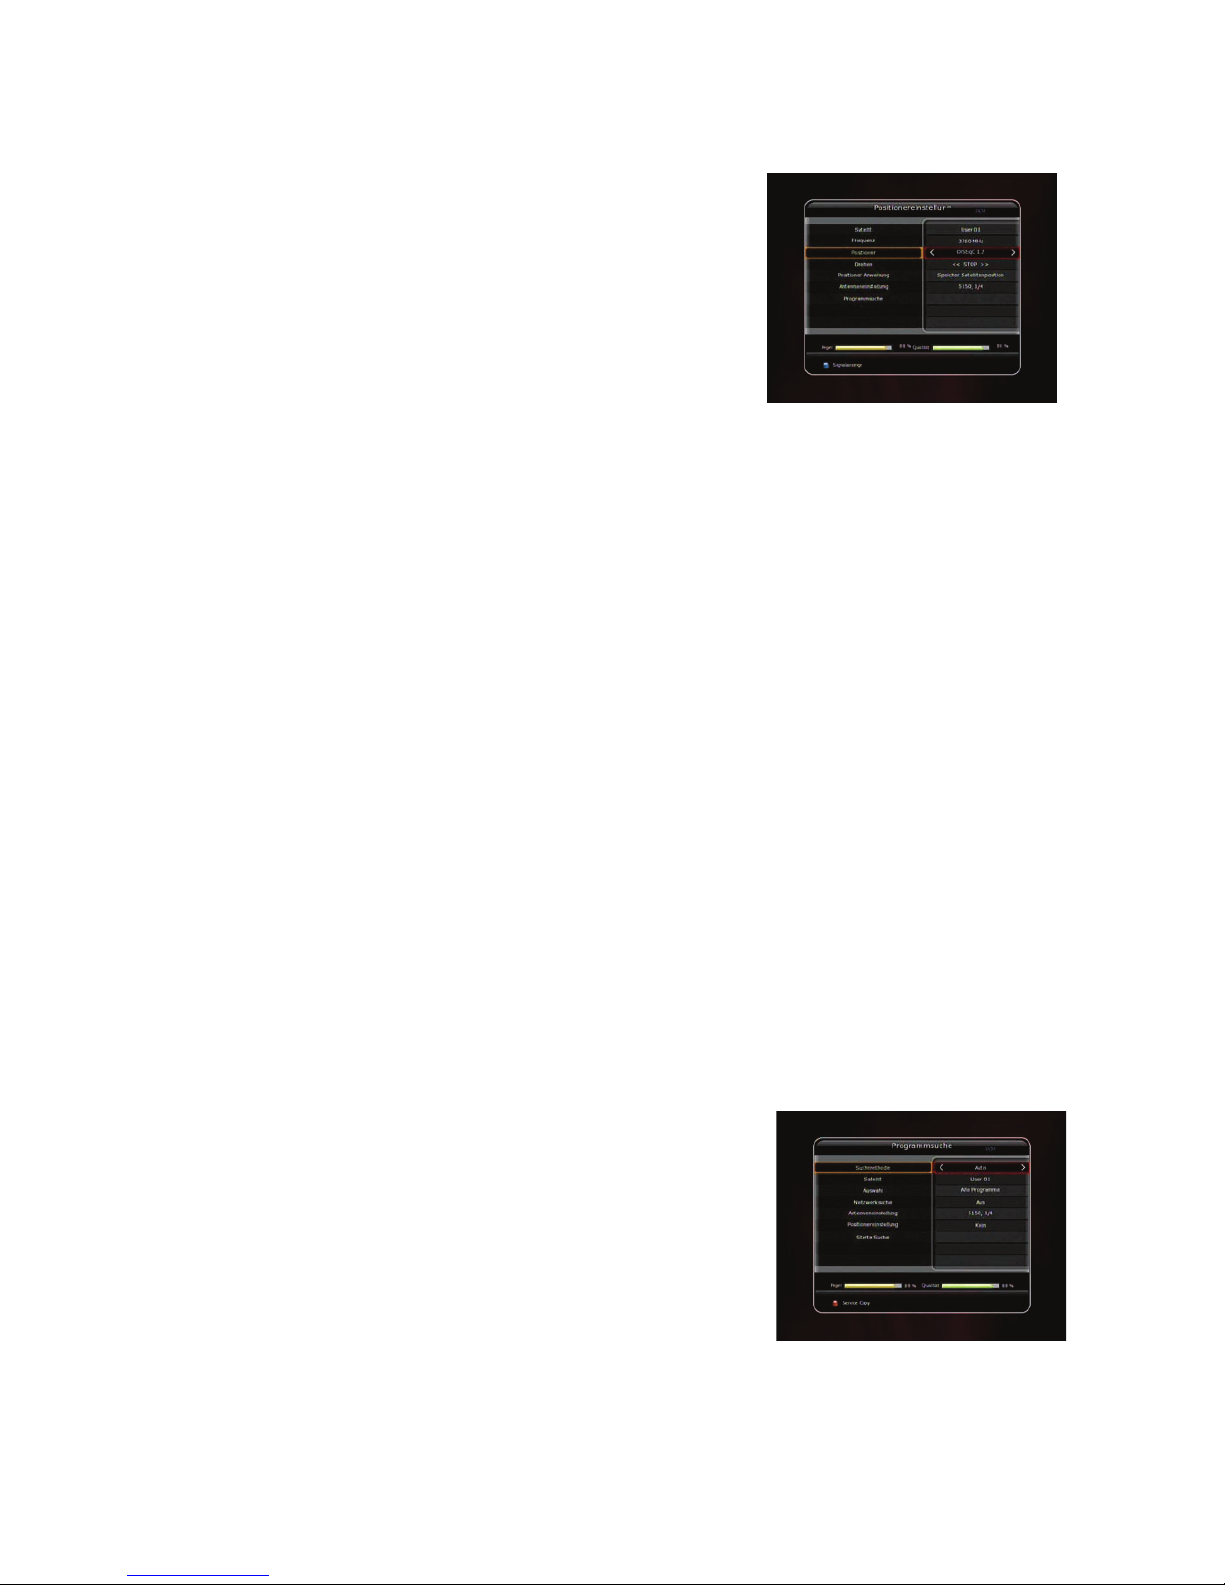
3.2 Positionereinstellung
• Satellit: Wählen Sie hier den Satelliten den Sie nach neuen
Programmen absuchen möchten, Sie können mit den CursorTasten suchen und mit OK bestätigen
• Positioner:
- Kein: Keine Dreh- Anlage v orhan den.
- DiSEqC 1.2:
Drehen: Um die Antenne nach OST/ WEST zu bewegen, drücken
Sie die Cursor- Tasten nach Links/ Rechts.
Positioner Anweisung: Mit den Links/ Rechts Cursor- Tasten
wählen Sie was der Positioner nun machen soll:
- Gehe zu gespeicherter Pos iti on: Fä hrt die Ant enn e zu einer Vorges pe ic herte n Po s itio n.
- Speichere Satellitenposition: Speichert die aktuelle Position für den gewählten Satelliten ab.
- Gehe zu Referenz: Dreht die Antenne zur Position des Referenz-Satelliten (Meist ASTRA 19,2° E)
- (neu-) berechnen: Berechnet nach einem Verlust der aktuellen Positionsdaten diese neu
- Setze Ost-/West-(soft)-Limit: Legt die Grenzen des Drehbereiches der Antenne fest
- Deaktiviere (soft) Limits: Löscht die Drehbereichsgrenzen der Antenne
- Mit der OK- Tas te wird die ge wählt e Auf gabe aus gef ü hr t.
- USALS:
Beim Anschluss einer USALS- Kompatiblen Drehanlage benötigen Sie die Positionsdaten Ihres
Standortes.
Drehen: um die Antenne zu bewegen, drücken Sie die Cursor- Tasten. Los lassen führt zum Anhalten.
Längengrad des Antennenstandortes: Eingabe mit den Ziffer- Tasten.
Breitengrad des Antennenstandortes: Eingabe mit Ziffer- Tasten.
Go To: Drücken Sie die OK- Taste und die Antenne schwenkt zur ausgewählten Satellitenposition.
Positioner Anweisung: mit den Cursor- Tasten wählen Sie aus, was der Positioner nun machen soll:
- Gehe zu gespeicherter Pos iti on: Fä hrt die Ant enn e zu einer Vorges pe ic herte n Po s iti on
- Speichere Satellitenposition: Speichert die aktuelle Position für den gewählten Satelliten ab.
- Gehe zu Referenz: Dreht die Antenne zur Position des Referenz-Satelliten ( Meist ASTRA 19,2° E)
- (neu-) berechnen: Berechnet nach einem Verlust der aktuellen Positionsdaten diese neu
- Setze Ost-/West-(soft)-Limit: Legt die Grenzen des Drehbereiches der Antenne fest
- Deaktiviere (soft) Limits: Löscht die Drehbereichsgrenzen der Antenne
- Mit der OK- Tas te wird die ge wählt e Auf gabe aus gef ü hr t.
• Antenneneinstellung: Mit der OK- Taste gelangen Sie zurück zur Antenneneinstellungs- Menü.
• Programmsuche: Drücken Sie OK um in das Programmsuche- Menü zu gelangen.
3.3 Programmsuche
Es bestehen folgende Suchm ethoden zu Verf ügung:
• Suchmethode:
- Auto
Bereits aus Werk sind die Transponder eingestellt.
Satellit: wählen Sie den gewünschten Satelliten (z. B. Astra).
Auswahl: Wählen Sie eine Suchart. Wie z.B. Alle Programme, Nur
FTA, Nur TV.
Netzwerksuche: Ein, bewirkt eine Suche basierend auf der NIT
(Netzwerk-Liste) des gewählten Satelliten. Dadurch werden alle
Transponder des Satelliten erf as s t, die zum gewählten N et zwerk
gehören.
Antenneneinstellung: OK- Taste drücken, um in den AntennenEinstellungs-Menü zu gelangen.
Positionierereinstellung: OK- Taste drücken, um in den Positionierereinstellungen- Menü zu gelangen.
Starte Suche: Drücken Sie die OK- Taste um zu starten.
Page 36

36
- Manuell:
Mit der manuellen Suche können Sie die Programme eines
Transponders gezielt suchen.
Satellit: wählen Sie den gewünschten Satelliten (z. B. Astra).
Frequenz: Geben Sie dazu die entsprechende Frequenz über die
Ziffer- Tasten oder über die Liste ein.
Symbol Rate: Geben Sie über die Ziffer- Tasten die Symbolrate ein.
Polarität: Auswahl zwische n hori zontaler bzw. v ertik aler Po larisa tion.
Auswahl: Wählen Sie aus: Alle Programme, Nur FTA (Freie
Programme) oder, Nur TV-Programme.
Netzwerksuche: Ein, bewirkt eine Suche basierend auf der NIT
(Netzwerk-Liste) des gewählten Satelliten. Dadurch werden alle
Transponder des Satelliten erfasst, die zum gewählten Netzwerk gehören.
Time Calibration: Sie können Simple, Full und Aus wählen, um TDT (Zeit- Datum- Tabelle) von jedem
Transponder korrekte Daten zu erhalten.
Antenneneinstellung: OK drücken, wird in das Menü Antenneneinstellung umgeschaltet.
Transmission: wählen sie die gewünschte Transmission DVB / DVB-S2. Es erscheinen unterpunkte wie
FEC, Modulation und Pilot.
Starte Suche: Drücken Sie die OK- Taste um zu starten.
- Blind:
Es wird auf den gewünschten Frequenzen und Parametern gesucht.
Satellit: wählen Sie den gewünschten Satelliten (z. B. Astra).
Frequenz: Wählen Sie Auto für Auto-Blind-Funktion. Wählen Sie
Manuell um die gewünschte Frequenz suchen zulassen.
Polarität: Auswahl zwisc hen h orizont aler b zw. vertik aler P olaris ation.
Auswahl: Wählen Sie aus: Alle Program me, Nur FTA (Freie
Programme) oder nur TV-Programme.
Antenneneinstellung: Drücken Sie die OK- Taste, um in den
Antennen-Einstellungs-Menü zu gelangen.
Starte Suche: Drücken Sie die OK- Taste um zu starten.
- Erweiterte:
Satellit: wählen Sie den gewünschten Satelliten ( z. B. Astra).
Frequenz: Mit der erweiterten Suche können Sie die Programme
eines Transponders gezielt suchen. Geben Sie dazu die
entsprechende Frequenz mit den Ziffer- Tasten ein.
Symbolrate: Geben Sie mit den Ziffer- Tasten die Symbolrate ein.
Polarität: Auswahl zwische n hori zontaler bzw. v ertik aler Po larisa tion.
Video PID : Eingabe der Video PID mittels T astatur .
Audio PID : Eingabe der Audio PID mittels Tastatur.
PCR PID : Eingabe der PCR PID mittels Tastatur.
Transmission: wählen sie die gewünschte Transmission DVB /
DVB-S2. Es erscheinen unterpunkte wie FEC, Modulation und Pilot.
Starte Suche: Drücken Sie die OK- Taste um zu starten.
3.4 Netzwerkeinstellungen
Wenn der Receiver und der Computer zusammen angeschlossen sind,
können Sie diese über den Computer bearbeiten, wie z.B. Festplatte,
USB1, USB2 und Netzwerk HDD.
• DHCP: Sie können EIN/AUS von DHCP wählen, um die alle
Konfiguration vom Router automatisch zu erhalten.
- Wenn Sie EIN stellen, dann Konfiguriert der Receiver automatisch
die Daten vom Router. In diesem Fall müssen Sie die restlichen
Page 37

37
Positionen (IP Adresse, Subnetmaske, Gateway, Bevorzugte DNS, Alternativ DNS) nicht Manuell
eingeben.
- Wenn Sie AUS stellen, dann müssen Sie die Angaben Manuell über Ziffer- Tasten eingeben.
• I P Ad resse, Subnetmaske, Gateway, Bevorzugte DNS, Alternativ DNS: Mit der OK- Taste gelangen
Sie zum Eingabe, über die Ziffer - Tasten können Sie Ihren IP eingeben. Zu den anderen Punkten
gelangen Sie über die Cursor- Taste nach unten. Für die weiteren Einstellungen können Sie wie gefolgt
weiter machen.
• Firmware Upgrade Server: Wählen Sie es nur für eine Aktualisierung des Firmware für das Gerät. Mit
der OK- Taste erscheint ein Fenster, bei dem sie die Seite angeben, bei der Sie downloaden sollen.
Nach dem Sie die Ziel- Adresse eingegeben haben, drücken Sie die Rote- Taste (Enter), für die
Verbindung.
• MAC Adresse: Dieses zeigt das MAC Adresse der Ethernet-Schnittstelle an, aber Sie können diese
nicht ändern.
• Steuern Sie die Daten vom Netzwerk über Ihrem PC:
- Sehen Sie in Ihrem Receiver nach dem IP- Nummer nach.
- Geben Sie diese in die Adressleiste Ihres PCs ein,
z.B.
\\168.158.10.146
- Sie können auch andere Geräte sehen, wie z.B. Storage.
ACHTUNG: Es werden nur angeschlossene Geräte angezeigt. Bitte beachten Sie,
dass es sich bei den Dateien im Root- Verzeichnis zum Teil um Systemdateien handelt, die Sie nicht verändern dürfen um die
Funktion des Gerätes nicht zu gefährden!
3.5 System Wiederherstellen
• Auf Werkseinstellung zurücksetzen
Wir empfehlen Ihnen alle Parameter die Sie erstellt haben zu sichern.
Damit haben Sie immer die Möglichkeit das Gerät auf Ihre
Einstellungen zurück zusetz en, wenn Si e m al verse hen tlich et was
verstellt haben. Drücken Sie die OK- Taste, so werden alle
Einstellungen gelöscht und zum Werkseinstellung gestellt.
• Systemdaten rücksichern
Dieses Menü erlaubt Ihnen, die gespeicherten Werte einschließlich
Wartungsangaben und Systemsparameter wieder herzustellen. Drücken Sie die OK- Taste, so werden
alle Einstellungen zurück gerufen.
• Systemdaten speichern
Hier haben Sie die Möglichkeit, die Systemdaten und Senderlisten Ihres Receivers zur späteren
Verwendung, z.B. vor einer Werks einst ellun g, zu sich e r n.
ACHTUNG: Wenn Sie eine Werkseinstellung durchführen, gehen alle Ihre Einstellungen verloren.
3.6 System Information
Dieses Menü zeigt allgemeine Informationen über die Hardware- und Soft ware-Version Ihres Receivers an.
Diese Informationen benötigen Sie unbedingt bei Serviceanfragen.
Page 38

38
4. Sonstiges
4.1 Rechner
Drücken Sie die OK- Taste. Für Bewegungen benutzen Sie die
Cursor- Tasten und zum wählen OK- Taste.
4.2 Kalender
Drücken Sie die OK- Taste. Mit den Cursor- Tasten können Sie sich
in diversen Monaten bewegen.
4.3 CAS (Conditional Access System)
• Sm art Card -Slot
- Conax Smart Card Menü
• CAM 1
• CAM 2
ACHTUNG: Die angezeigten Informationen von Module können abhängig von
Modulen unterschiedlich sein.
Page 39

39
Fehlersuche
Achtung:
Bei längeren Betriebspausen, wie z. B. Urlaub, sollte das Gerät ebenfalls von der Antenne und vom Strom
getrennt werden. Ferner empfiehlt es sich, die Batterien aus der Fernbedienung zu nehmen, um ein Auslaufen
von leeren Batterien zu verhindern.
Probleme Lösung
Keine Anzeige an der Vorderseite
des Receivers
- prüfen Sie das Stromkabel und prüfen Sie, ob der Receiver ordnungsgemäß an
den Strom angeschlossen ist.
- prüfen Sie, ob der Netzschalter an der Rückseite des Receivers auf ON oder OFF
steht.
Kein Bild
irgendeine Anzeige an der Vorderseite des Gerätes sichtbar?
- ist der Video Ausgang korrekt an Fernsehgerät und Video angeschlossen?
- falls über HDMi- Ausgang angeschlossen wurde, ist das Kabel korrekt an das
Fernsehgerät angeschlossen?
- fal ls der Receiver über den HDMi- Ausgang angeschlossen wurde, prüfen Sie, ob
das Fernsehgerät korrekt eingestellt ist.
- prüfen Sie, ob bei Ihrem Fernsehgerät der richtige Kanal oder Videoausgang
eingestellt ist.
- prüfen Sie die Helligkeit Ihres TV
Schlechte Bildqualität
- siehe oben: keine Anzeige an der Vorderseite des Receivers
- prüfen Sie die Signalstärke. Ist diese schwach, so prüfen Sie bitte die Einstellung
Ihrer Antenne.
Kein T on
- siehe oben: keine Anzeige an der Vorderseite des Receivers.
- prüfen Sie die Lautstärke an Ihrem Receiver und TV
- prüfen Sie die Tonstummschaltung (Mute) des Receivers bzw. TV
Fernbedienung funktioniert nicht
- halten Sie die Fernbedienung direkt in Richtung Receiver
- tauschen Sie gegebenenfalls die Batterien der Fernbedienung
Keines oder schlechtes Signal
- funktioniert das LNB? gegebenenfalls tauschen
- prüfen Sie das LNB Kabel, korrekt angeschlossen?
- Antenne korrekt ausgerichtet? Falls nötig, nachstellen.
- ist ein DiSEqC 1.0 Schalter angeschlossen, so stellen Sie sicher, das die einzelnen
LNB´s korrekt angeschlossen sind.
- kontrollieren Sie Signal Level und Signal Qualität.
Page 40

40
Technische Daten
Empfangsteil (Tuner & Channel Decoder)
LNB Eingang
Durchschleif-Ausgang
Frequenzbereich
Eingangs-Impedanz
Eingangssignalstärke
LNB Versorgung
22KHz Signal
DiSEqC Steuerung
Demodulation
Symbolrate
FEC Decoder
F-Buchse, IEC 169-24
F-Buchse, IEC 169-24
950MHz - 2150MHz
75_, unsymmetrisch
-65 to -25dBm
13/18VDC, max.400mA
(22±2)KHz, (0.6±0.2)V
V1.0/1.2/USALS kompatibel
QPSK / 8PSK
2 ~ 45 Ms/s(QPSK auf DVB-S)
2 ~ 45 Ms/s(QPSK auf DVB-S2)
2 ~ 37 Ms/s(8PSK auf DVB-S2)
1/2, 2/3, 3/4, 5/6 und 7/8 mit Begrenzungs-Länge K=7(DVB-S)
1/2, 3/5, 2/3, 3/4, 4/5, 5/6, 8/9 und 9/10 (DVB-S2)
MPEG Transport-Strom A/V Decodierung
Transportstrom
Profil-Level
Eingangssymbolrate
Video-Formate
Video-Auflösung
Audio Decoder
Audio-Mode
Sampling-Rate
H.264(MPEG-4 part 10, MPEG-4/AVC und H26L)
MPEG-II ISO/IEC 13818-2/11172-2
MPEG-4/AVC MP@L4, MPEG-II MP@HL
Max. 15Mbit/s
4:3 Letter Box, 4:3 PanScan, 16 : 9
720 x 576i, 720 x 576p, 720 x 480i, 720 x 480p
1280 x 720p, 1920 x 1080i
Dolby Digital, MPEG-1 Layer 1,2 and 3
Stereo/Joint stereo/Mono, Dolby Digital bitstream
32KHz, 44.1KHz and 48KHz(Entsprechend Eingang)
Hauptsystem
Haupt-Prozessor
Speicher
STi chipset
Flash-ROM : 32 Mbyte
SDRAM : 192 Mbytes
EEPROM : 128 Bytes
Page 41

41
Audio-/Video- und Daten- Ein-/Ausgänge
TV SCART
VCR SCART
RCA
Component
HDMI
OPTIC
RS-232C
USB
Ethernet
RGB, CVBS Video, Audio L, R Ausgang
CVBS Video, Audio L, R Ausgang
RGB, CVBS, Audio L, R Eingang
CVBS Video Ausgang, Audio L, R Ausgang, SPDIF Ausgang
YpbPr Video Output
Video & Audio Ausgang
Dolby Digital (Chinch (RCA) & Optisch)
9-pol Stecker D-SUB, Baudrate: 115 kBit
USB 2.0 Host Front & Rear Support. (5V DC 500 mA Max.)
RJ45 connector , 100 Mbps
Frontplatte
Anschlüsse/Einschübe
Tasten
Display
1 USB 2.0 Host Port
2 Kartenleser für SmartCard
2 Common-Interface Steckplätze für CI-Module
7 Tasten (CH, ON/OFF, VOL, MENU, OK)
1 2-stellige VFD-Multifunktions-Anzeige (Kanal-Infos oder Uhrzeit)
Stromversorgung / Netzteil
Eingangsspannung
Type
Stromverbrauch (Betrieb)
Stromverbrauch (StandBy)
Schutzeinrichtung
100 - 250V Wechselstrom, 50/60Hz
SMPS (Schaltnetzteil)
Max. 60W
Max. 1W
Interne Sicherung, getrennter Überspannungsschutz
Masse und Gewichte
Abmessungen (BxHxT)
Gewicht(Netto)
Temperatur (Betrieb)
Temperatur (Lagerung)
430mm X 60mm X 270mm
2.7 Kg (Ausschließlich HDD)
0°C ~ +45°C
-10°C ~ +70°C
Technische Änderungen vorbehalten!
Weitere Hinweise zum Gerät finden Sie auf:
www.octagon-germany.de
Page 42
42
Einstellungscode für die Universale Fernbedienung
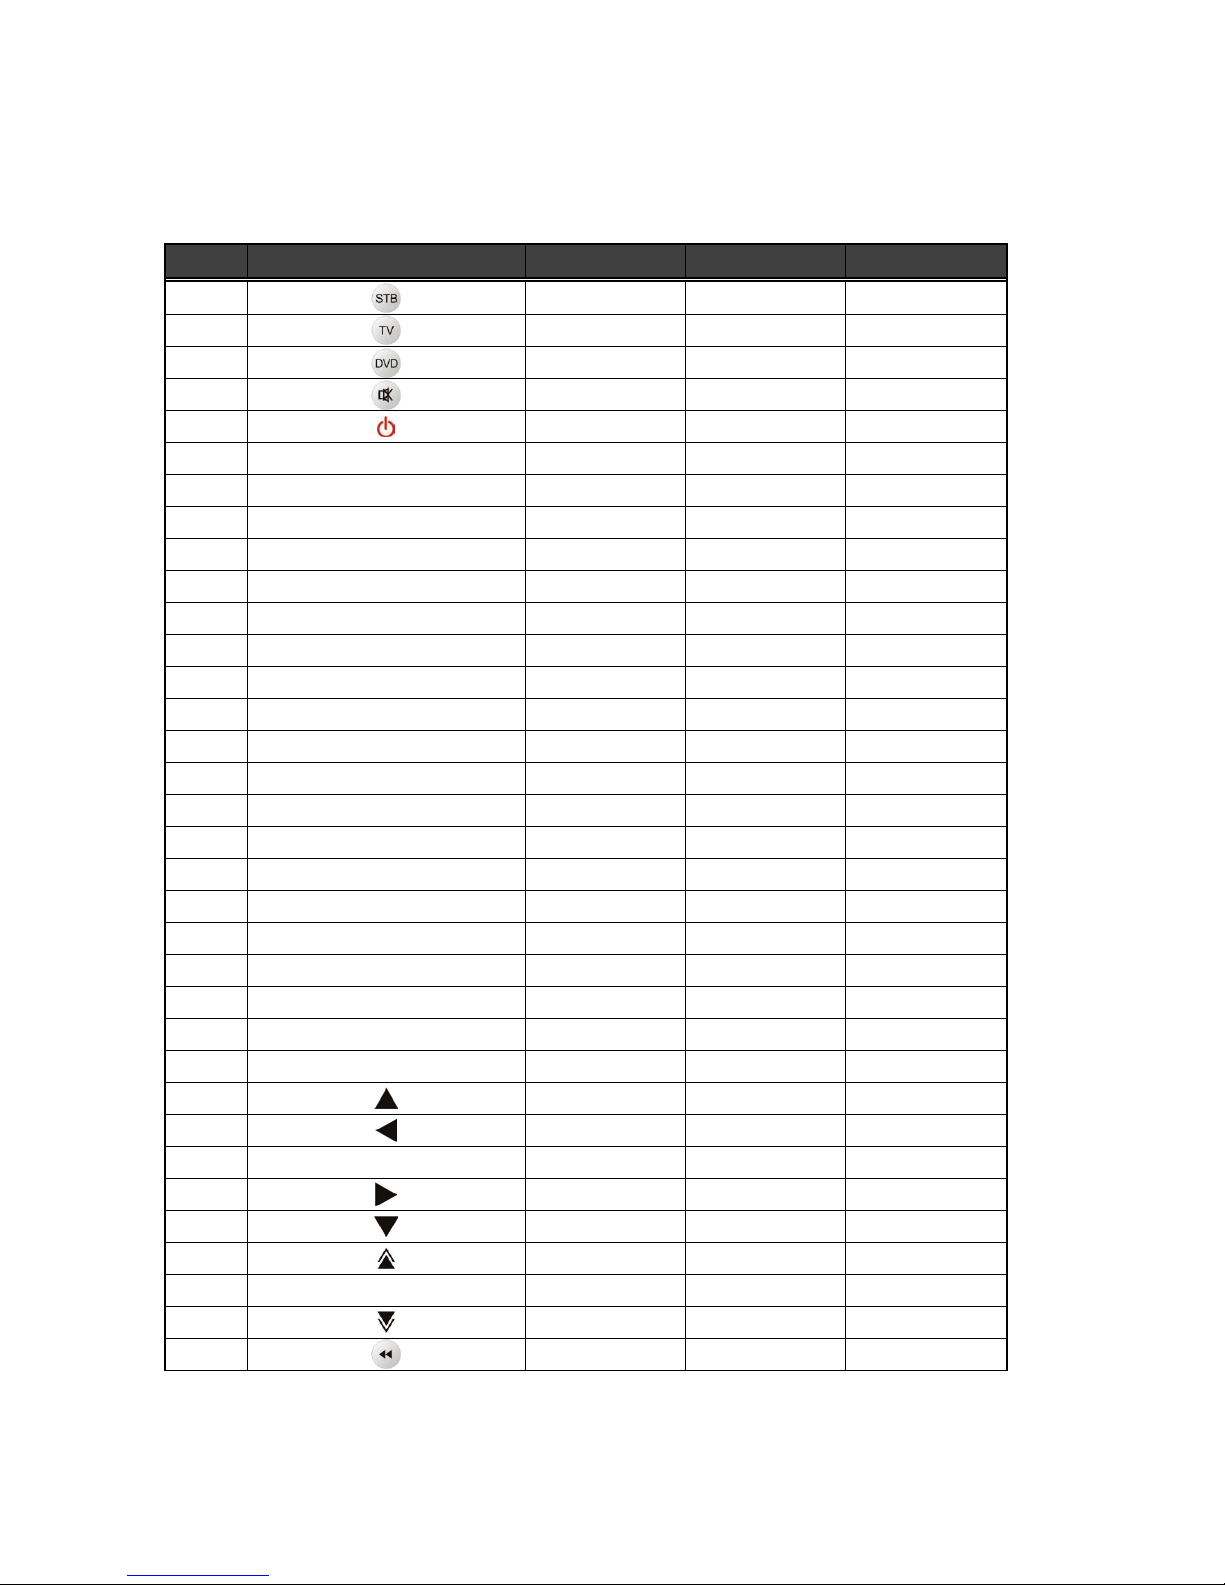
1. Tasten-Tabelle
Nr Taste n- NAME STB TV DVD
1
2
V
3
V
4
V V
5
V
6 V.Format
V
7 Resolution
V
8 1
V V V
9 2
V V V
10 3
V V V
11 4
V V V
12 5
V V V
13 6
V V V
14 7
V V V
15 8
V V V
16 9
V V V
17 INFO
V
18 0
V V V
19 RECALL
V
20 VOL+
V V
21 MENU
V
V
22 CH+
V V
23 VOL-
V V
24 EXIT
V
V
25 CH-
V V
26
V
V
27
V
V
28 OK
V
V
29
V
V
30
V
V
31
V
32 EPG
V
33
V
34
V
V
Page 43

43
Nr Taste n- NAME TV DVD VCR
35
V
V
36
V
V
37
V
V
38
V
39
V
40
V
41
V
V
42
V
V
43
V
44
V V
45
V V
46
V V
47
V V
48
V
49
V
50
V
51 SLEEP
V
52 FAV
V
53 TV/RAD
V V
54
V
55
V
Page 44

44
2. TV- Marken
TV Marken
Code
ADMIRAL
050 134
AKAI
093 049 123
ALBA
068
ALBIRAL
116
ALCATEL
022
AMSTRAD
158 021
ANAM
155 156 157
ARC EN CIEL
028 039 043 145 081
ARISTONA
099 049 050 019 142
149 078
ARTHUR MARTIN
053 139 11 7 120 122
123 125 128
ASA
050 055 057 11 3 134
ATLANTIC
099 111
AUDIOSONIC
054
AUSIND
053
AUTOVOX
099 144 055 019 057
069
BAIRD
083
BASICLINE
006
BAUR
011
BEKO
023 049
BLAUPUNKT
094 100 102 111 11 4
BRANDT
028 039 040 043 145
081
BRION VEGA
050
BRUNS
048 050
BSR
059 110 132
BUSH
033 068 124 074
CENTURY
098 101 050 079 136
CGE
016 101 124 079 132
136
CIHAN
065
CLARIVOX
048 116
CONDOR
099 111
CONTEC
087
CONTINENTAL EDITION
028 039 040 043 145
081
CROSLEY
101 050 109
CROWN
147
CTC CLATRONIC
046
DAEWOO
089
Page 45

45
TV Marken
Code
DECCA
099 060 063 11 5 118
DEGRAAF
036
DIXI
049 090
DRYNATRON
049
DUAL
099 141
DUAL-TEC
096 099 132
DUMONT
046 050 057 073
ELBE
016 11 6
ELBIT
065
ELCIT
046 097 103 050 109
127 132
ELMAN
046 132
ELTA
090
EMERSON
158 098 050
ERRES
049 142
EUROPHON
098 046 097 099 051
115 132
FERGUSON
146 040 041 150 057
061 116 149
FIDELITY
099 149
FINLUX
034 046 053 055 057
109 113 073 074 079
FISHER
015 048 050 052 109
136
FORGESTONE
149
FORMENTI
099 053 109 111 125
FORTRESS
137
FRABA
075
FRONTECH
054
FUJITSU
025
FUNAI
054 059
GBC
109 132
GEC
099 060 109 11 5 134
088
GELOSO
103 109 132 134 090
GOLDSTAR
092 003 017 099 049
075 076 077 090 152
GOODMANS
033 049 060 077
GORENJE
066 136
GREATZ
001 058 109 122 123
128 129 130 134
GRANADA
033 099 049 058 060
142 115 125 134
HANTAREX
097
Page 46

46
TV Marken
Code
HEMMERMANN
127
HANSEATIC
033 047 099 049 109
139 111
GRUNDIG
094 100 057 058 108
112 11 4 082
HIFIVOX
028 039 043 145 081
HINARI
158 033 045 143 090
HITACHI
014 033 034 036 099
145 056 109 139 11 0
067 117 132 134 084
091 081 088
HYPER
093 099
IMPERIAL
016 101 124 079 132
133
INGELEN
001 058 109 122 128
129 130 134
INKEL
000
INNO HIT
093 098 097 099 143
077 090
INTERFUNK
047 049 050 145 058
109 142 123 128 129
091
IRRADIO
093 143 053 077 090
ITT
001 140 058 105 109
122 123 128 148 129
130 134 135 083 089
JVC
033 154
KTV
099
KAISUI
006
KARCHER
006
KENDO
098
KENNEDY
144 019 109
KORTING
050 059 111
KRIESLER
099 049 050 019 142
149 078
LENOIR
099
LG
043
LOEWE OPTA
008 097 047 049 050
115 072
LOGIK
118 149
LUMA
049 120 134
LUXOR
058 139 11 7 120 123
129 135 083
McMICHAEL
088
Page 47

47
TV Marken
Code
MAGNADYNE
046 097 103 050 109
115 127 132
MEMOREX
090
MARANTZ
049
MATSUI
158 099 106 060 11 8
068 134 090
MAGNAFON
046 097 099 051 053
115
METZ
094 050 11 4 133
MINERVA
094 100 057 058 11 4
MISTRAL
149
MITSUBISHI
033 035 047 049 050
062 118 119 148 080
138
MIVAR
097 099 11 5 077
MULTITECH
046 099 11 5 136
MURPHY
134
MAONIS
096 144 019 11 0 134
NATIONAL
042 104 109
NEC
033 085
NECKERMANN
099 050 139 120 136
NEI
049
NIKKAI
060
NOBLEX
015
NOBLIKO
098 046 099 053 057
NOGAMATIC
028 039 043 145 081
NOKIA
001 140 058 105 109
122 123 128 148 129
130 134 135 083 089
NORDMENDE
028 032 039 043 145
131 091 081
OCEANIC
109 064 123
ONCEAS
099
OPTONICA
137
ORION
158 059 11 8 068 127
090
OSAKI
060
OSIO
077
OSUME
087
OTTO VERSAND
033 047 049 109 139
P.T ACTTRON
065
PAEL
099 053
PANASONIC
030 042 095 104 107
109 121 126
Page 48

48
TV Marken
Code
PATHE CINEMA
099 111 116 132
PERDIO
060
PRANDONI-PRINCE
098 097 053 11 5 134
PREMIER
124
PHILIPS
009 010 013 018 024
099 049 050 019 142
148 149 078 088
PHOENIX
099 053 109 111 125
PHONOLA
099 049 050 019 142
149 078
PIONEER
020 049 145 091
PHILCO
016 030 101 050 109
124 079 132 136
PRINCE
098 097 053 134
PROTECH
049 054
PYE
099 049 050 019 142
148 149 078
QUASAR
046 097 051 053 077
QUELLE
047 099 100 049 053
055 057 058 111 11 2
113 11 4 118 123 073
074 128
RADIOLA
099 049 050 019 142
149 078
RADIOMARELLI
046 097 103 050 109
062 127 132
RANK
074
RBM
074
REDIFFUSION
062 123 134
REX
096 144 019 141 11 0
069 134
ROBOTRON
048 050
RTF
048 050
SABA
028 031 032 037 039
040 043 097 050 145
115 120 086 091 081
SAISHO
158 099 11 8 119 068
090
SALORA
053 139 11 7 120 122
123 125 128 135 083
SAMBERS
046 097 051 053 11 5
077
SAMPO
121
SEG
046
Page 49

49
TV Marken
Code
SEI
158 059
SANYO
001 002 005 033 044
048 060 11 3 118 071
054
136
SBR
049 142 148 149 088
SCHAUB LORENZ
001 058 109 122 123
128 129 130 134
SCHNEIDER
096 099 049 050 052
019 141 109 142 125
149 078 132
SAMSUNG
015 026 029 054 077
090 099 136 151 153
SELECO
016 096 144 019 141
110 069 134
SHARP
033 087 137
SIAREM
046 097 050 109 11 5
SICATEL
116
SIEMENS
005 094 036 100 111
114 087
SIERA
099 049 050 019 142
149 078
SILVER
054
SINGER
016 046 050 109
SINUDYNE
158 046 050 059 109
127
SONOKO
049 090
SONY
146 007 027 033 038
118
STERN
096 144 019 11 0 069
134
TANDBERG
133
TANDY
099 060 137
TASHIKO
002 033
TATUNG
099 060 063 065 11 5
118
TEC
096 099 132
TELEAVIA
028 039 040 043 145
091 081
TELEFUNKEN
028 041 145 150 086
091
TELETECH
090
TELEVIDEON
099 053 109 111 125
TENSAI
049
TOCOM
029
Page 50

50
TV Marken
Code
TOSHIBA
004 016 033 070 074
THORN-FERGUSON
014 040 041 054 150
057 061 11 6 149 086
THOMSON
012 028 032 039 040
043 145 091 081
TRANS CONTINENTS
098 097 053 134
TRIUMPH
158
UHER
052 111 125
ULTRA VOX
098 046 099 050 109
120
UNIVERSUM
092 034 054 077
UNIVOX
116
VEGAVOX
079
VOXSON
050 134
WATSON
111
WATT RADIO
046 099 051 109 11 6
127
WEGA
033
WHITE WESTINGHOUSE
099 111
YOKO
099
ZANUSSI
096 144 019 11 0 069
134
ZOPPAS
096 144 019 11 0 134
3. VCR- Marken
VCR Marken CODE
AKAI 122 133 142 152 132
ALBA
108 120
AMSTRAD 111
ANITSCH 109
ARC EN CIEL
142 156 152
ARISTONA 145 131
ASA 118
AWIA
111 142
BAIRD 142 133
BAUER. BOSCH 114 143
BLAUPUNKT
114 143 155 131 154
140
BRANDT ELECTRONIQUE 142 156 152
BRIONVEGA
141
BUSH 108 120
Page 51

51
VCR Marken CODE
C.EDISON 141
CANON 114
CAPEHART
120
CGE 111 142 152
CONTINENTAL EDISON 142 156 152
CRAIG
100 113
CURTIS MATHES 119
DAEWOO 101 120 121
DAY TRON
120
DECCA 111 142
DEGRAAF 103 106 111 145 11 8
DUAL
142 152
DUMONT 103 111 118
DYNAT ECH 111
EMERSON
102 110 111 11 9 125
FERGUSON 142 159 130 152 134
136
FIDELITY
111
FINLANDIA 103 118
FINLUX 103 106 111 118
FISHER
100 103 105
FUNAI 111
GE 119
GENERAL
114
GOLDSTAR 104 162
GOODMANS 108 111 146
GRAETZ
141 142 156 150 152
138
GRANA DA 103 105 118
GRUNDIG
114 143 11 8 155 131
153 154
HA NSE ATIC 143
HARMAN-KARDON
104
HIFIVOX 142 156 152
HINARI 102 108 124 127
HITACHI
106 107 111 142 157
IMPERIAL 111
INGELEN 142 156 152 138
Page 52

52
VCR Marken CODE
INGERSOL 127
ITT 105 141 142 156 150
152 133 138
JENSEN 142
JVC 142 156 160 130 152
163
KENWOOD 105 142 160
KRIESLER 145 131
KUBA
143
LG 100
LLOYD 111
LOEWE OPTA
114 11 8 129 131
LOGIK 108 127
LUXOR 133 138
MAGNADYNE
141
MAGNASONIC 138
MAGNAVOX 119
MARANTZ
104 114 146 118 131
MAT UI 110 125 127
MEMOREX 100 103 105 111 145
METZ
114 143 131 154 137
MGA 117
MINERVA 155 154
MIN OLTA
106 107
MITSUBISHI 160 117 149
MTC 111 113
MULTITECH
108 111
MURPHY 111
NAONIS 142 156 152
NATIONAL
140
NEC 104 142 160 152
NECKERMANN 102 141 114 142 152
NOGAMATIC
142 156 152
NOKIA 103 105 141 142 156
150 152 133 138
NORDMENDE
139 142 156 152 153
135
OPTONICA 145 146
Page 53

53
VCR Marken CODE
ORION 102 110 125 127
OSAKI 111
OTTO VERAND
143
P. CI NEM A 11 4
PALLADIUM 141 114
PANASONIC
123 151 140
PATHE MARCONI 142 156 152
PENTAX 106 107
PERDIO
111
PHILIPS 11 2 114 145 146 118
129 131
PHONOLA
114 145 11 8 129 131
PIONEER 160
PORTLAND 120
PROLINE
111
PYE 114 145 11 8 129 131
QUARTZ 105
QUELLE
102 144 154
RADIOLA 145 131
RADIOMARELLI 141
RCA
119
REALISTIC 100 103 105 111 11 3
145 146
REX
142 156 152
SABA 139 142 156 152 135
SAISHO 102 110 125 127
SALORA
105 117
SAMSUNG 111 11 3 119 132 161
SANSUI 142 160
SANYO
100 103 105 125 138
SBR 118 129
SCHAUB LORENZ 141 142 156 150 152
138
SCHNEIDER 108 111 145 131
SEI-SINUDYNE 127
SELECO
142 156 152
SENTRA 120
SHARP 145 146 1105 148
Page 54

54
VCR Marken CODE
SHINTOM 108
SIEMENS 11 4 143 155 131 154
138
SIERA 145 131
SINUDYNE 127
SONY
144 115 11 6 126 128
STERN 142 156 152
STS 106
SUNKAI
125
SYLVANIA 111 117
SYMPHONIC 111 11 7
TAS HIKO
111
TATUNG 111 142
TEAC 111 142
TEKNIKA
111
TELEAVIA 142 156 152
TELEFUNKEN 142 156 152
TENOSAL
108
THOMSON 142 156 152
THORN-FERGUSON 139 142 159 130 152
134 136
TOSHIBA 101 142 156 11 7 158
152
TOTELEVISION
113
UHER 142
ULTR A VOX 141
UNITECH
113
UNIVERSUM 141 114 143
URA NYA 141
VECTOR
104
VICTOR 142 160
VI DITAL 141
WESTING HOUSE
141
WARDS 11 9
YAMAHA 104 142
ZANUSSI
142 156 152
ZENDER 152
ZOPPA S 142 156
Page 55

55
4. DVD- Marken
DVD Marken CODE
AIWA
002
AKAI 007 044
ALBA 036
ANAM
074
ANSONIC 152
AMES 051
APEX
003 011 025 037 039
044 047 048 054 040
AUDIOSONIC 044
A-TREMD
061
BROKSONIC 000
BULE SKY 158 036
BUSH
067 044 000 152
CAT 036
CLASSIC 051
CELESTIAL
158
CENTREX 158
CINEULTRA 036
CONIA
158
COMBRIDGE AUDIO 088
CROWN 044
CYBERCOM
152
CYBERRHOME 061
DAEWOO 005 045 052
DAEWOO INTERNATIONAL
036
DEC 036
DENON 041 050
DENVER
036
DENZEL 083
DIGITREX 0 11 158
DIK
152
DK DIGITAL 152
DRAGON 152
DUAL
083 152
ELTA 004 010 044
ENZER 083
EMERSON
013 019 032 067
FISHER 015
FUNAI 019 032
GE
044 062
GOLDSTAR 013 067
GOLEMANS 044
GO-VIDEO
012 016 021
GRADIENTE 008
HARMAN/KARDON 023
Page 56

56
DVD Marken CODE
HITACHI 001 035 004 070 067
083
HITEKER
011 158
HOHER 152
JEKEN 036
JVC
014 028 067
KENWOOD 036 041
KENDO 036
KISS
083
KLH 044
KONKA 042 049 056 063
KOSS
008
LASONIC 006
LECSON 088
LENCO
036 152
LENOXX 044
NEXIA 036
LIFETEC
152
LG 013 072 067 059 039
LUXMAN 004 070
MAGNAVOX
026 027
MARANTZ 013 026 027
MDS 036
MEDION
152
MEMOREX 018
MICROSOFT 020
MICROSTAR
152
MINTEK 044
MONYKA 083
MUSTEK
051
NAD 013 065
NAKAMICHI 058
NORDMENDE
152
MBO 044
NEUFUNK 083
OMNI
044 036
OPTIMUS 001
ORITRON 008
PALSONIC
158 067
PANASONIC 041 068
PACIF IC 018 152
PHILIPS
026 027 064 045
PHONOTREND 036
PIONEER 001
PROLINE
008 158 085
PROSCAN 062
PROSONIC 036
Page 57

57
DVD Marken CODE
RADIOSHACK 038 066 067
RAITE 083
REC
067
REOC 053
REVOY 036
RCA
038 044 062 066 067
RO ADS TAR 067 044 036
ROTEL 067
SAMSUNG
012 021 070 071
SAMPO 022
SANSUI 000
SANYO
015
SCOTT 158
SEG 029 083
SILVASCHNEIDER
152
SHARP 020 067
SHANGHAI 158
SHERWOOD
009 073
SHINCO 044
SINGER 044
SM ELECTRONIC
044
SONY 033 034 004 070
SOUNDWORKS 088
SYLVANIA
019 032
SYLMPHONIC 019 032
SVA 158
TEAC
001 067
TECHNICS 041 068
TEASAI 044
TEVION
018 031 046 053 060
TH ETA D IGI TAL 001
TOSHIBA 000 017 024 026
TOKAI
083
UMAX 044
UNITED 035
UNIVERSUM
067
VOXSON 152
WELKIN 152
WESDER
036
WHARFEDALE 059 085 088
WINDY SAM 040 070
XMS
067
YAMAHA 041 043
YAMAKAWA 030 083
ZENITH
068 013 069 067
Page 58

Page 59

User's Manual
SF 1018 HD - ALLIANCE
High Definition Satellite Twin Tuner PVR
Digital Innovation Life
Page 60

Page 61

3
INDEX
INDEX ................................................................................................................................... 3
Precautions ......................................................................................................................... 5
1. Important Safety Instructions...................................................................................................... 5
2. Notice ......................................................................................................................................... 6
3. Copyright .................................................................................................................................... 7
4. Disclaimer ................................................................................................................................... 7
5. Trademarks ................................................................................................................................ 7
Before Y ou Begin ................................................................................................................ 8
1. Main Features ............................................................................................................................ 8
2. Accessories ................................................................................................................................ 9
Hardware Description ....................................................................................................... 10
1. Front Panel Configuration ........................................................................................................ 10
2. VFD(Vacuum Fluorescent Display) .......................................................................................... 11
3. Rear Panel Configuration ......................................................................................................... 12
4. Remote Control Unit ................................................................................................................. 13
5. Multi-Brand IR Remote Controller Setting ................................................................................ 16
Connections Diagram ....................................................................................................... 17
1. Receiver to TV with Digital A/V Output ..................................................................................... 17
2. Receiver to TV With Analog A/V Output ................................................................................... 18
3. Receiver to TV and VCR .......................................................................................................... 19
4. Connecting to Dish ................................................................................................................... 19
4.1 Connecting one dish to both tuners by Loop through ......................................................... 19
4.2 Connecting each Dish to each Tuner .................................................................................. 20
4.3 Connecting Antenna cable to each Tuner using DiSEqC SW (Recommend) ..................... 20
Guide of Functions ........................................................................................................... 21
1. Selecting a Service ................................................................................................................... 21
1.1 Using CH UP/DOWN buttons.............................................................................................. 21
1.2 Using Service List ............................................................................................................... 21
1.3 Using Instant Service List .................................................................................................... 21
1.4 Using Recent Service List ................................................................................................... 22
2. Information Window .................................................................................................................. 22
3. Multi-Picture Display. (*) ........................................................................................................... 22
4. Electronic Program Guide (EPG) ............................................................................................. 22
5. Favorite Group ......................................................................................................................... 23
6. Volume Control ......................................................................................................................... 23
7. Pause ....................................................................................................................................... 23
8. Subtitle...................................................................................................................................... 23
9. Audio Track .............................................................................................................................. 24
10. Teletext ..................................................................................................................................... 24
11. PIP (Picture in Picture) ............................................................................................................. 24
Page 62

4
PVR (Personal Video Recorder) Function ....................................................................... 26
1. Recording ................................................................................................................................. 26
1.1 Recording methods ............................................................................................................. 26
1.2 Recording Edit ..................................................................................................................... 28
1.3 Long Time recording ........................................................................................................... 28
1.4 Pause during recording ....................................................................................................... 28
2. Time Shifting ............................................................................................................................. 30
3. Playback (Play List) .................................................................................................................. 31
3.1 Recorded Files .................................................................................................................... 31
3.2 Imported Files ..................................................................................................................... 32
3.3 Music ................................................................................................................................... 32
3.4 Photo ................................................................................................................................... 32
4. Bookmark ................................................................................................................................. 32
5. Trick mode ................................................................................................................................ 33
Menu Map .......................................................................................................................... 34
Main Menu of Guide .......................................................................................................... 35
1. System Tools ............................................................................................................................ 35
1.1 Storage Manager ................................................................................................................. 35
1.2 Timer Settings ..................................................................................................................... 35
1.3 Service List Manager .......................................................................................................... 36
1.4 Data Transfer....................................................................................................................... 37
2. Configuration ............................................................................................................................ 38
2.1 Parental Control .................................................................................................................. 38
2.2 Display Setting .................................................................................................................... 39
2.3 Time Setting ........................................................................................................................ 39
2.4 Language Setting ................................................................................................................ 39
2.
5 A/V Output Setting .............................................................................................................. 40
3. Installation ................................................................................................................................ 41
3.1 Dish Setting ......................................................................................................................... 41
3.2 Positioner Setting ................................................................................................................ 42
3.3 Service Search .................................................................................................................... 42
3.4 Network Setting ................................................................................................................... 44
3.5 System Recovery ................................................................................................................ 44
3.6 System Information ............................................................................................................. 44
4. Utilities ...................................................................................................................................... 45
4.1 Calculator ............................................................................................................................ 45
4.2 Calendar .............................................................................................................................. 45
4.3 CAS (Conditional Access System) ...................................................................................... 45
Troubleshooting ................................................................................................................ 46
Specifications .................................................................................................................... 47
Code Table for Universal Remote Control Unit ............................................................... 49
1. Key Table .................................................................................................................................. 49
2. TV Brands ................................................................................................................................ 51
3. VCR Brand s ............................................................................................................................. 57
4. DVD Brand s ............................................................................................................................. 62
Page 63

5
Precautions
1. Important Safety Instructions
Read these instructions.
Keep these instructions.
Heed all warnings.
Follow all instructions.
Do not use this apparatus near water.
Clean only with dry cloth.
Do not block any ventilation openings. Install in accordance with the manufacturer’s instructions.
Do not install near any heat sources such as radiators, heat registers, stoves, or other apparatus
(including amplifiers) that produce heat.
Do not reverse the safety purpose of the polarized or grounding-type plug. A polarized plug has two
blades with one wider than the other. A grounding type plug has two blades and a third grounding
prong. The wide blade or third prong is provided for your safety. If the provided plug does not fit into
your outlet, consult an electrician for replacement of the obsolete outlet.
Protect the power cord from being walked on or pinched particularly at plugs, convenience
receptacles, and the point where they exit from the apparatus.
Only use attachments/accessories specified by the manufacturer.
Use only with the cart, stand, tripod, bracket, or table specified by the manufacturer, or sold with the
apparatus. When a cart is used, use caution when moving the cart/apparatus combination to avoid
injury from tip-over.
Unplug this apparatus during lightning storms or when unused for long periods of time.
Refer all servicing to qualified service personnel. Servicing is required when the apparatus has been
damaged in any way, such as power-supply cord or plug is damaged, liquid has been spilled or objects
have fallen into the apparatus, the apparatus has been exposed to rain or moisture, does not operate
normally, or has been dropped.
WARNING : To Prevent fire or shock hazard do not expose the set to rain or moisture.
Page 64

6
2. Notice
These servicing instructions are for use by qualified service personnel only. To reduce the risk of
electric shock, do not perform any servicing other than that contained in the operating instructions
unless you are qualified to do so.
The apparatus shall not be exposed to dripping or splashing and that no objects filled with liquids,
such as vases, shall be placed on the apparatus.
The mains plug is used as the disconnect device. The disconnect device shall remain readily operable.
To reduce the risk of electric shock, do not remove
the cover (or back).
No user serviceable parts are inside.
Refer servicing to qualified service personnel.
The Lightning Flash with arrowhead symbol
within an equilateral triangle, is intended to
alert the user to the presence of un-insulated
"dangerous voltage" within the product
enclosure that may be of sufficient magnitude
to constitute a risk of shock to persons
The exclamation point within an
equilateral triangle is intended to alert
the user to the presence of important
operating and maintenance
(servicing) instructions in the
literature accompanying the product
Service
OCTAGON Germany
Buendtenaecker 2
D-79730 Murg
Fon: 0049-(0)7763-704484
Fax: 0049-(0)7763-704483
E-Mail:
info@octagon-germany.de
Internet:
www.octagon-germany.de
Declaration of Conformity
The Company OCTAGON Germany to explain the product fort this agreement with following
engineer standards and terms of reference:
Low Voltage Equipment Directive 2006/95/
Electromagnetic Compatib ility Directive 2004/108/EG
EN 55013 : 2001, A1:2003, A2:2006
EN 55020 : 2002, A1:2003, A2:2005
EN 61000-3-2 : 2000, 2006, A2:2005
EN 61000-3-3 : 1995, A1:2001, A2:2005
EN 60065 : 2002, A1:2006
device Type: Digital HDTV satellite receiver
Page 65

7
3. Copyright
This manual is protected by copyright laws.
Copy, use and reproduction of this manual in part or whole without OCTAGON 's prior written
approval are prohibited.
4. Disclaimer
The manufacturers, distributors and agents are not liable to any kind of damage caused by the
use of the information contained in this manual.
The instruction and descriptions which this manual contains are based on the time of this
manual's production.
The manufacturer constantly updates it with new functions and technology.
All the specifications are subject to change without prior notice.
5. Trademarks
HDMI, the HDMI logo and High-Definition Multimedia Interface are
trademarks or registered trademarks of HDMI Licensing LLC
Manufactured under license from Dolby Laboratories.
Dolby and the double-D symbol are trademarks of Dolby Laboratories.
Page 66

8
Before You Begin
1. Main Features
Twin Tuner HDTV PVR Receiver (MPEG-4 HD / H.264)
H.264 / MPEG4 - HD/SD , DVB-S2 Twin Tuner
Powerful compatibility through Embedded Linux OS
Time Shifting with Internal HDD (SATA) / External Storage Devices ( USB 2.0 )
Recording & Playback with Internal HDD (SATA) / External Storage Devices ( USB 2.0 )
Recording and Time Shifting Simultaneously
Recording and Playback Simultaneously
Event Recording by EPG
2 conax card reader and 2 CI common interface slot
Unicable support
Fastscan support
Dual USB 2.0 Host Support (MP3 Player & JPEG Viewer)
Ethernet port / Universal remote control unit
HDMI Video & Audio Output
PIP(Picture-in-Picture)
Blind scan
Multi-LNB Controlled by DiSEqC Control Version 1.0, 1.1, 1.2 and USALS
Multi-Satellite Search
Support EPG (Electronic Program Guide)
On-Screen Display with Full Color & Resolution
Favorite Service Groups
Powerful Service Control by Favorites, Lock, Skip, Move and Delete
Service Sorting by Alphabet, Transponder and CAS
Multi-language Supported ( OSD & Menu )
Teletext Support
Maximum 10,000 Services Programmable
Parental Lock / System Lock / Installation Lock
CVBS Video & Audio Output via RCA
CVBS, RGB, Y/C Video & Audio Output via TV SCART
Optical Output for Digital Audio(SPDIF)
1W Stand-by Power Consumption
NOTE : (*) This feature(Multi-picture Display) will be supported later, by new s/w version by
upgrading. Please refer to your local dealer / distributor..
Page 67

9
2. Accessories
NOTE : If any accessories listed above are missing, contact the sales representative where you
purchased this unit.
User's Manual
AAA size Batteries X2
Loop through Cable
Remote Control
HDMI Cable
Page 68

10
Hardware Description
1. Front Panel Configuration
1. POWER BUTTON : Press to switch between STANDBY and POWER ON modes.
2. LED indication : The LED lights on in running mode and standby mode. You can adjust LED Lighting
Time and LED Brightness. (Main Menu >Configuration>UI Setting)
3. Remote Sensor : Receives signal from remote controller.
4. MENU Button : Press to display the main menu or to move to the previous menu.
5. OK Button : Press to display the service list in non-menu mode and to select an item or confirm
in menu mode.
6. CH Up/Down button : Press to change services in normal mode, or to move highlighted-bar in menu
mode.
7. Vol Up/Down button : Press to change audio volume in normal mode or to navigate menu in menu
mode.
8. VFD Display : The VFD consist of 12-digit letter and various icons. These letters and icon display the
current status of receiver such as service name, service information and so on.
9. SMART CARD READER : Insert smart card for encrypted service access.
10. USB(Front) : Use it when connecting to external USB storage device.
11. PCMCIA : To receive pay-tv service you need a CA-Module and a smart card from the service provider.
Page 69
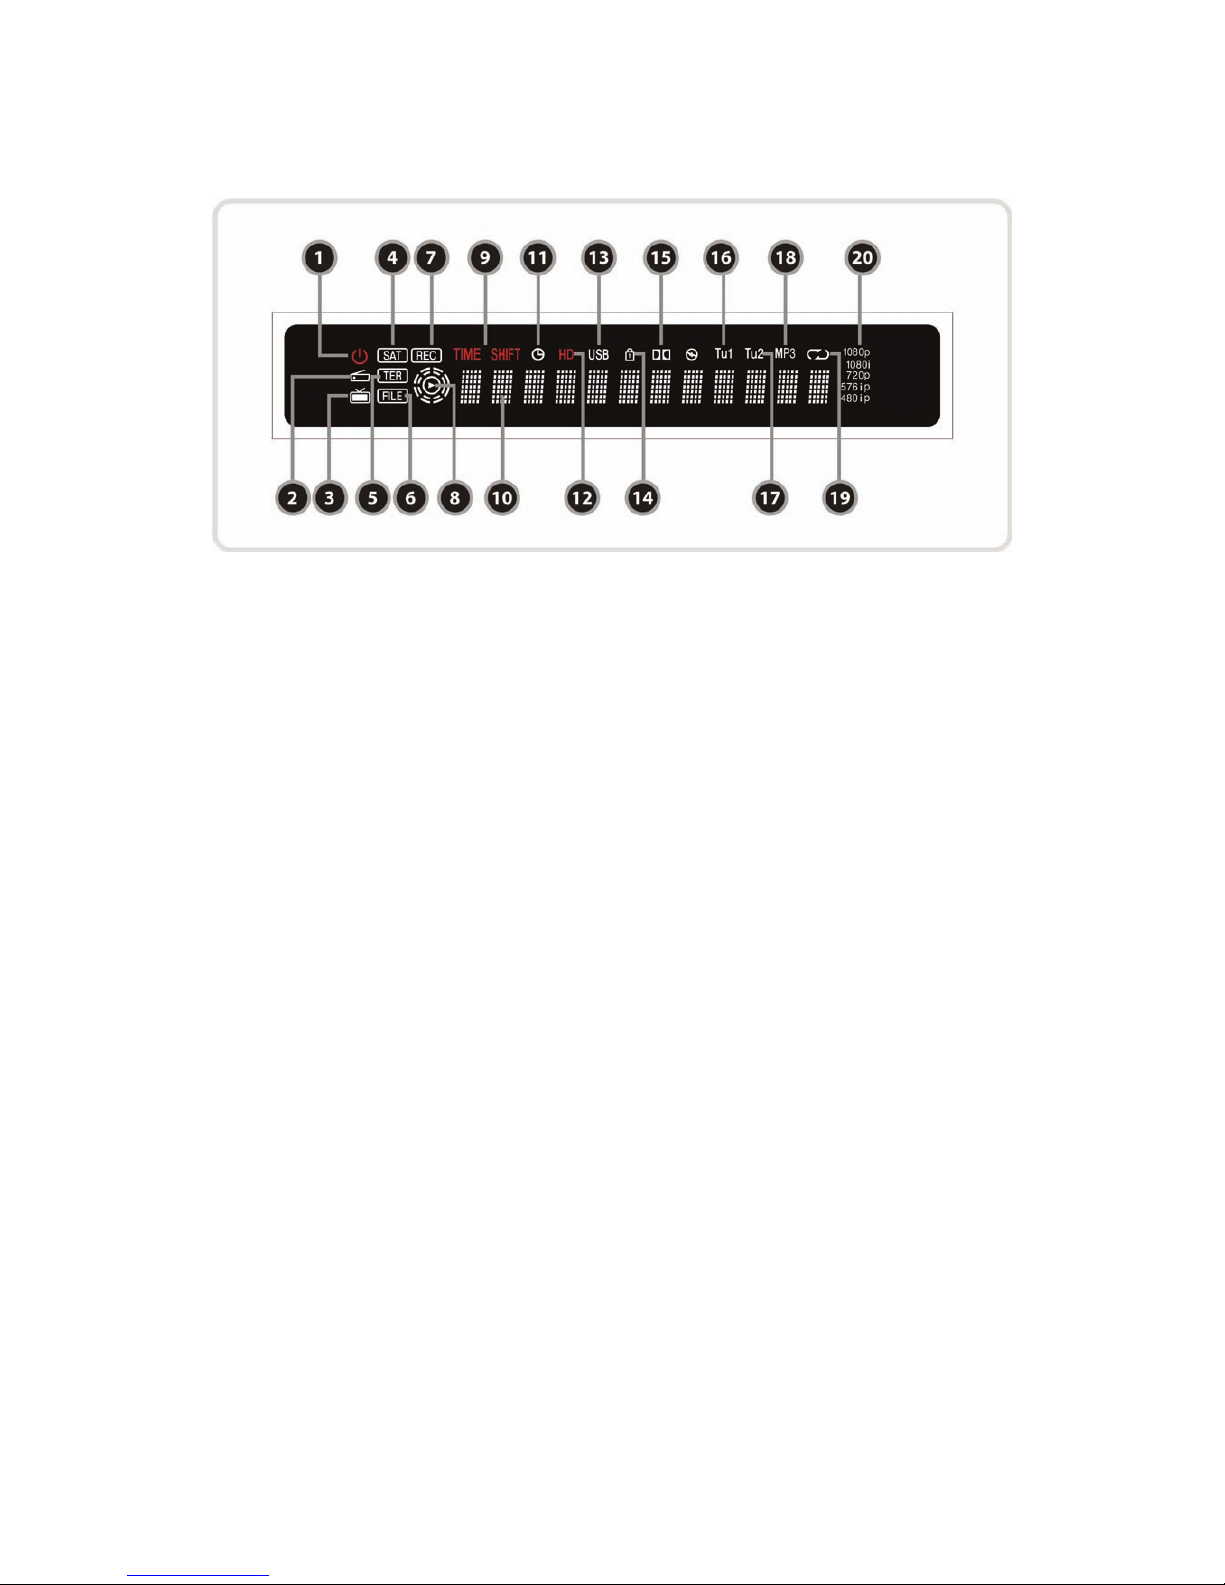
11
2. VFD(Vacuum Fluorescent Display)
1. Remote Indication LED : The LED lights on when a key on the Remote Controller is pressed.
2. Radio icon : The icon lights on when it is change the radio service.
3. TV icon : The icon lights on when it is change the TV service.
4. SAT : Satellite mode.
5. TER(Option) : Terrestrial mode.
6. FILE : Turn on when file list is displayed in the SATA HDD or USB Storage Device.
7. REC : Turned on during recording.
8. PLAY Mod e : Turn on when you play the file on file list. (SATA HD D, USB Storage Device)
9. TIME SHIFT : Turned on during Time-shift.
10. Information : Display information including service name and other information.
11. TIMER : Turned on during timer is set.
12. HD : Turned on during HD service.
13. USB : Turned on during USB device working.
14. LOCK : Turned on during lock service.
15. Dolby : Turned on during Dolby service.
16. Tu1 : Turned on during used Tuner1
17. Tu2 : Turned on during used Tuner2
18. MP3 : Turned on during MP3 listen.
19. Repetition(*) : Turned on during recording repeatedly.
20. Resolution : Turned on and indicating current Resolution setting.
NOTE : (*) This icon(Repetition) will be supported later, by new s/w version by upgrading. Please
refer to your local dealer / distributor.
Page 70

12
3. Rear Panel Configuration
1. LNB IN_1
Satellite broadcasting signal input socket for the first tuner. Connects a satellite antenna LNB cable.
2. LNB OUT_1
Satellite broadcasting signal output socket through the first tuner. Connects to a second tuner for
loop-through.
3. LNB IN_2 :
Satellite broadcasting signal input socket for the second tuner. Connects a satellite antenna cable or
from the first tuner LNB OUT_1 connector.
4. LNB OUT_2 :
Satellite broadcasting signal output socket through the second tuner. Connects to another STB for
loop-through.
5. SPDIF : Connects to the audio system using a S/PDIF cable. (digital audio)
6. VIDEO : Connects to the TV or VCR using a RCA cable. (Composite video output / Yellow)
7. AUDIO L/R : Connects to the TV or VCR using a RCA cable. (Stereo audio output / White, Red)
8. Component : Connects to the TV or VCR using a component cable. ( YPbPr)
9. VCR SCART : Connects to the VCR or DVD using a VCR SCART cable.
10. TV SCART : Connects to the TV input using a TV SCART cable.
11. USB : Use it when connecting to external USB storage device.
12. HDMI : Connects to the TV by using a HDMI cable for the best quality picture and audio.
13. Ethernet : Local area network port for direct computer connection.
14. RS-232C : Serial port for firmware update and data transfer.
15. A/C Switch : Power switch
Page 71

13
4. Remote Control Unit
1. POWER : Turns the STB On/Off.
2. Universal Buttons
a. STB : Change the STB Remote Controller.
b. Universal TV : Change the TV Remote Controller.
c. Universal DVD : Change the DVD Remote Controller.
3. MUTE : Turns the sound On/Off.
4. Resolution : To select the resolution format. Each time you press the Resolution button, the
resolution changes in the following sequence: 576i > 576p > 720p > 1080i
5. V.Format : You can switch the Display Format (4:3 / 16:9)
6. Numeric : Controls the numerical operation and service numbers directly.
7. Information : Shows the information of the current program. If you press one more, detail
information box will be shown.
8. Recall : Moves to previous service.
Page 72

14
9. Menu : To enter the main menu or to move to the previous menu.
10. Volume Up & Down : To change the Volume.
11. Channel Up & Down: To change service channel.
12. EXIT : Exit from the menu or pop-up window.
13. ARROW Buttons
a. Up & Down Buttons : To change the value of a selected item with preprogrammed values in menu.
b. Left & Right Buttons : To move the cursor left and right in menu.
14. OK or Service List : Show the service list in non-menu mode and select an item or confirm in menu
mode.
15. EPG(Electronic Program Guide) : Show the TV/Radio program guide.
16. Page Up& Down : Move to the next or previous page if more than one page are available. This button
also is change the location of sub picture in PIP.
17. Playback Control Buttons
a. Rewind : Rewinds at high speed. Each time you press this button the rewind speed is increased.
b. Fast Forward : Fasts forward at high speed. Each time you press this button the speed is increased.
c. Previous File : To play the previous MP3 file in MP3 play mode. This button is also used to jump
back to beginning of recording during a playback.
d. Next File : To play the next file. This button is also used to jump to end of recording during a
playback.
e. Play / Time shift : Display the progress bar of playback when no progress bar is displayed. Start
playback with normal speed. Return to normal speed from trick mode..
f. Recording : To start Recording.
g. Play List : To show the file list in the SATA HDD or USB Storage Device.
h. Pause : This key is used to pause the video. Press once more to resume the video.
i. STO P : To stop time shifting, play back or recording.
j. Repetition (*): This key is used to play back a recording repeatedly.
Page 73

15
18. Color Buttons
a. RED : Used for special function in menu. RED key is used to sort lists in service list or go to previous
day search in EPG or make/delete the current position as a bookmark.
b. GREEN : Used for special function in menu. Green key is used to set favorites setting in service list
or go to the next bookmark position.
c. YELLOW : Used for special function in menu. Yellow key is used to find service in service list or
change the audio track.
d. BLUE : Used for special function in menu. Blue key is used to set service list option in service list or
display Multi-Picture.(*)
19. PIP Buttons
a. PIP(Picture in Picture) : To set PIP window.
b. PIP Swap : Switching between main-picture and sub-picture
c. PIP(Picture in Picture) Service List : To shown the sub-picture service list.
20. Sleep : To adjust sleep timer.
21. Favorite : To display the satellite group and the favorite groups.
22. TV/RADIO : Switches between TV and Radio.
23. Subtitle : To show multilingual subtitle.
24. Teletext : To show the digital teletext.
NOTE : (*) This Feature(Multi-Picture) will be supported later, by new s/w version by upgrading.
Please refer to your local dealer / distributor.
Page 74

16
5. Multi-Brand IR Remote Controller Setting
1. Direct Code Entry
Step 1 : Turn on the component that you want to set up(TV,DVD,VCR).
Step 2 : Hold the component key “ TV,DVD, VCR” and “OK” key down until the component key light
comes on. The light should come on after approximately 2 seconds.
Step 3 : Within twenty seconds, enter in a 3-digit code number(See device code pages).
Step 4 : Test the code by pressing the “Power” key. If the component turns off, you’ve got the right
code. If the component does NOT turn off, press the next 3-digit code listed.
Step 5 : Finish set up by pressing “OK” key.
CAUTION : During setup if no key was pressed within 20 seconds during steps 2-3,
LED will turn off and setting will not be applied.
NOTE : If no any brand code is matched, please try Auto Code Search.
2. Auto Code Search
Step 1 : Turn on the component that you want to set up(TV,DVD,VCR).
Step 2 : Hold the component key “ TV,DVD, VCR” and “OK” key down until the component key light
comes on. The light should come on after approximately 2 seconds.
Step 3 : Press and release the “ CH+” or “CH-“key until your device shuts off. This may take some time.
Step 4 : Finish setup by pressing “OK” key right after device shuts off.
CAUTION : During setup if no key was pressed within 20 seconds during steps 2-3,
LED will turn off and setting will not be applied.
NOTE : If no any brand code is matched, please try Auto Code Search.
Page 75

17
Connections Diagram
1. Receiver to TV with Digital A/V Output
Connect the satellite antenna cable to LNB IN.
Connect the HDMI Cable to the HDMI Connector of the TV.
Connect SPDIF to Digital audio input of the equipment(Digital Audio)
NOTE : Depending on the A/V equipment you own, there are various ways you can connect
the STB. To choose the best connection option, please refer to the manual of the
equipment you would like to connect to. To get High Definition playback of High
Definition content, we recommend that you connect your high definition display
with a HDMI cable. HDMI supports standard, enhanced or high-definition video
and multichannel audio in a single cable.
Page 76

18
2. Receiver to TV With Analog A/V Output
Connect the satellite antenna cable to LNB IN.
Connect the TV SCART to the SCART input of the TV.
Connect the VCR SCART to the SCART input of the VCR.
Connect the Component to the Component input of the TV.
Connect the RCA to the RCA input of the TV.
NOTE : The component connection(YPbPr) is recommended for Digital TV.
The SCART cable connection is recommended for analogue TV or VCR
The composite connection(RCA cable) is recommended for analogue TV
You cannot view high definition video with the SCART and the composite video
connector.
Page 77
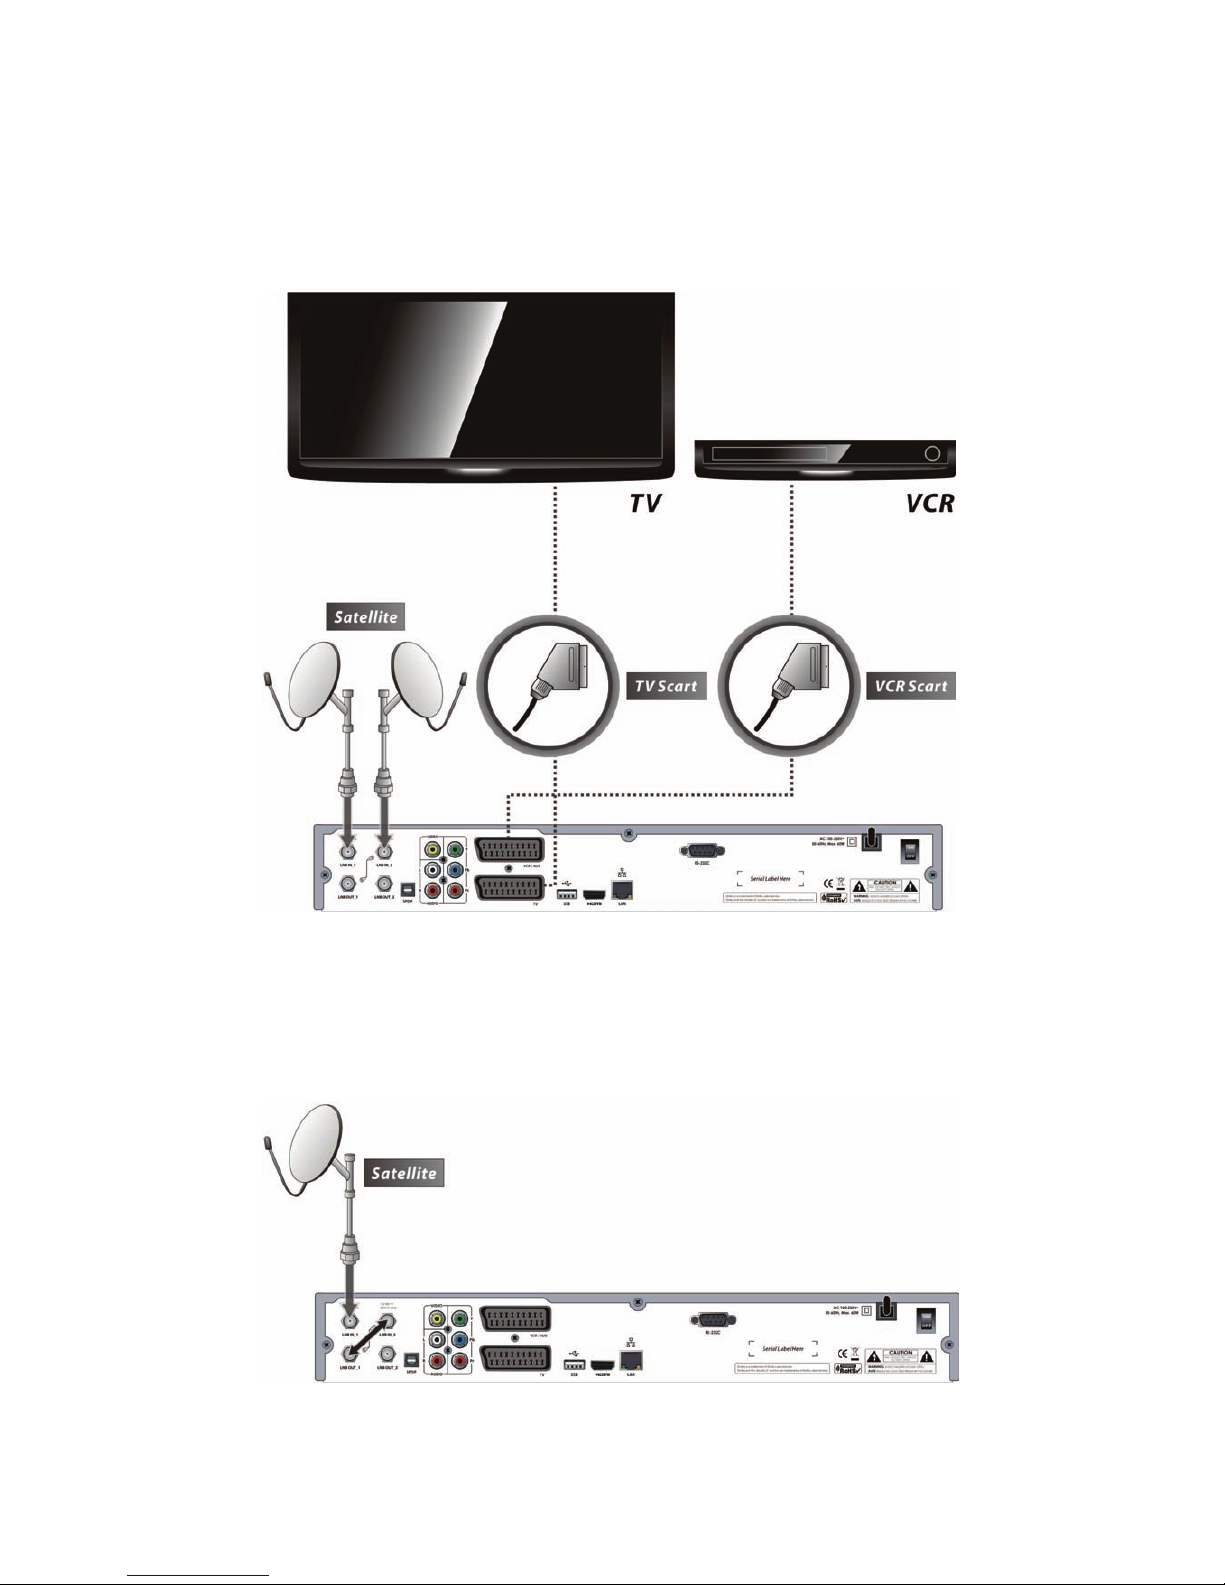
19
3. Receiver to TV and VCR
Connect the satellite antenna cable to LNB IN.
Connect the TV SCART to the SCART input of the TV.
Connect the VCR SCART to the SCART input of the VCR.
4. Connecting to Dish
4.1 Connecting one dish to both tuners by Loop through
Page 78
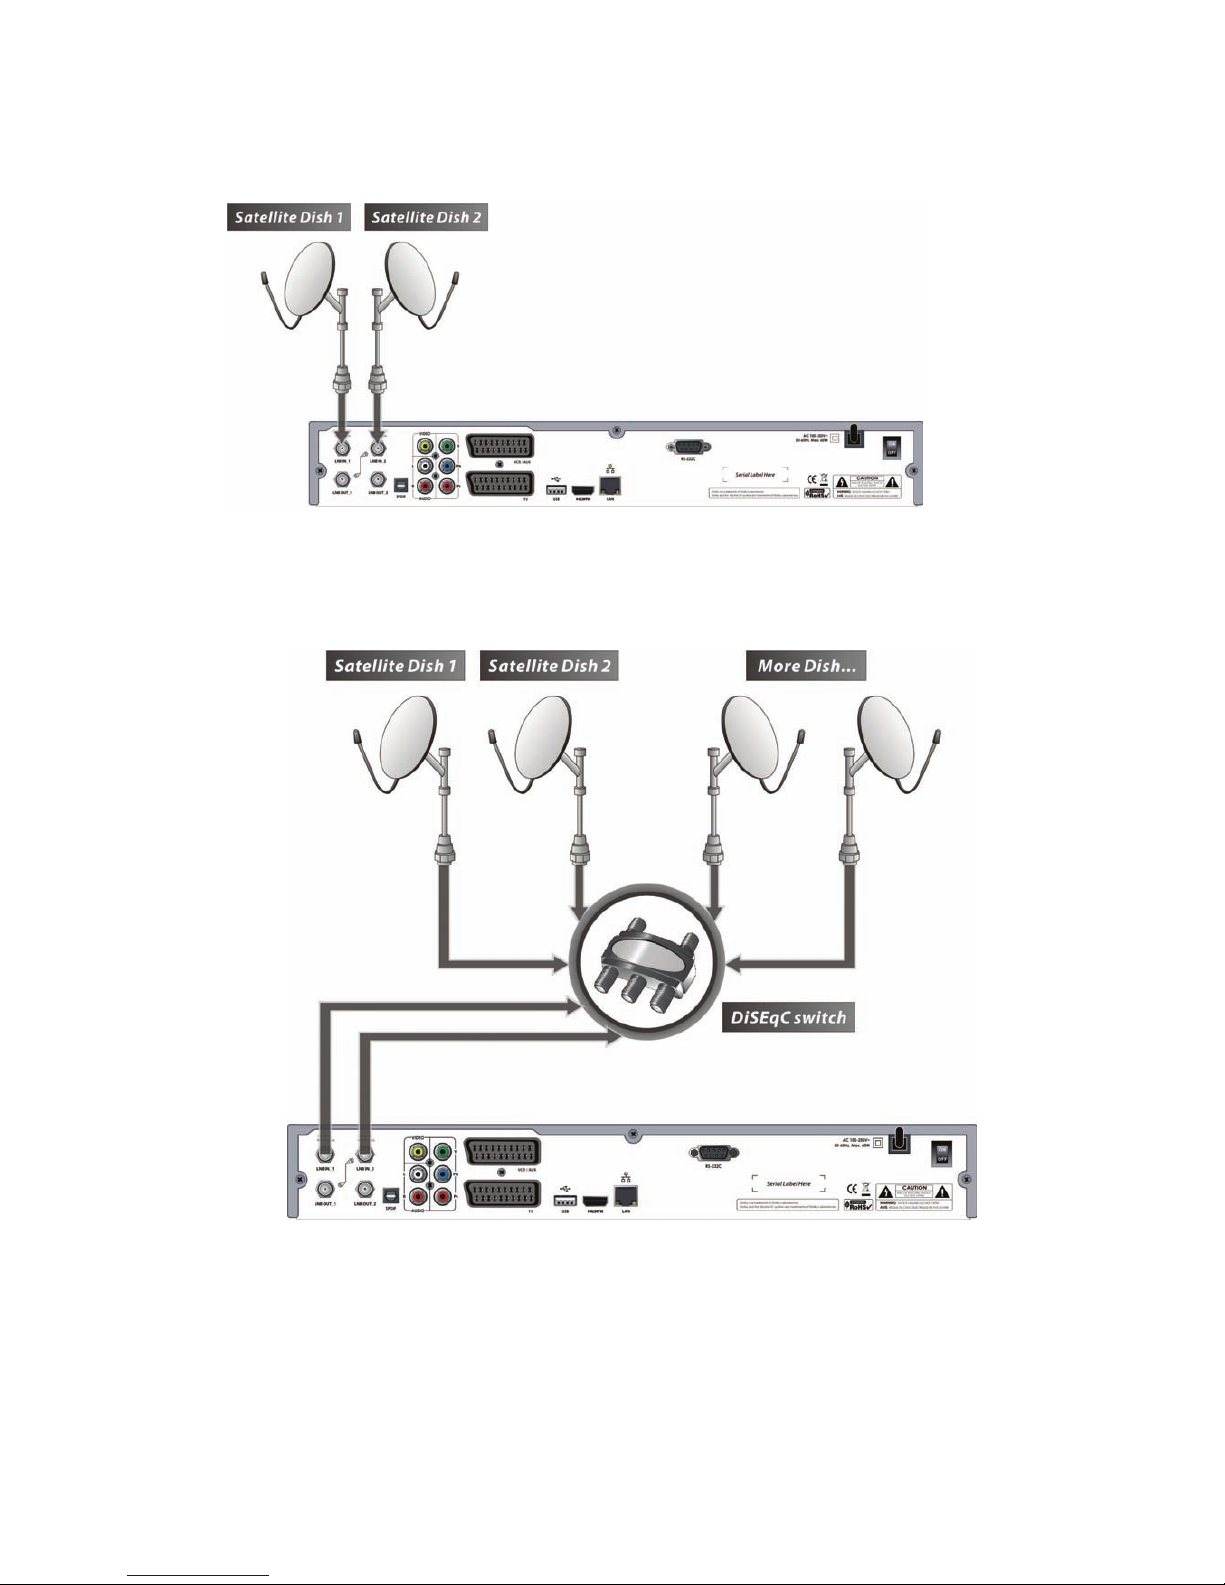
20
4.2 Connecting each Dish to each Tuner
4.3 Connecting Antenna cable to each Tuner using DiSEqC SW (Recommend)
Page 79
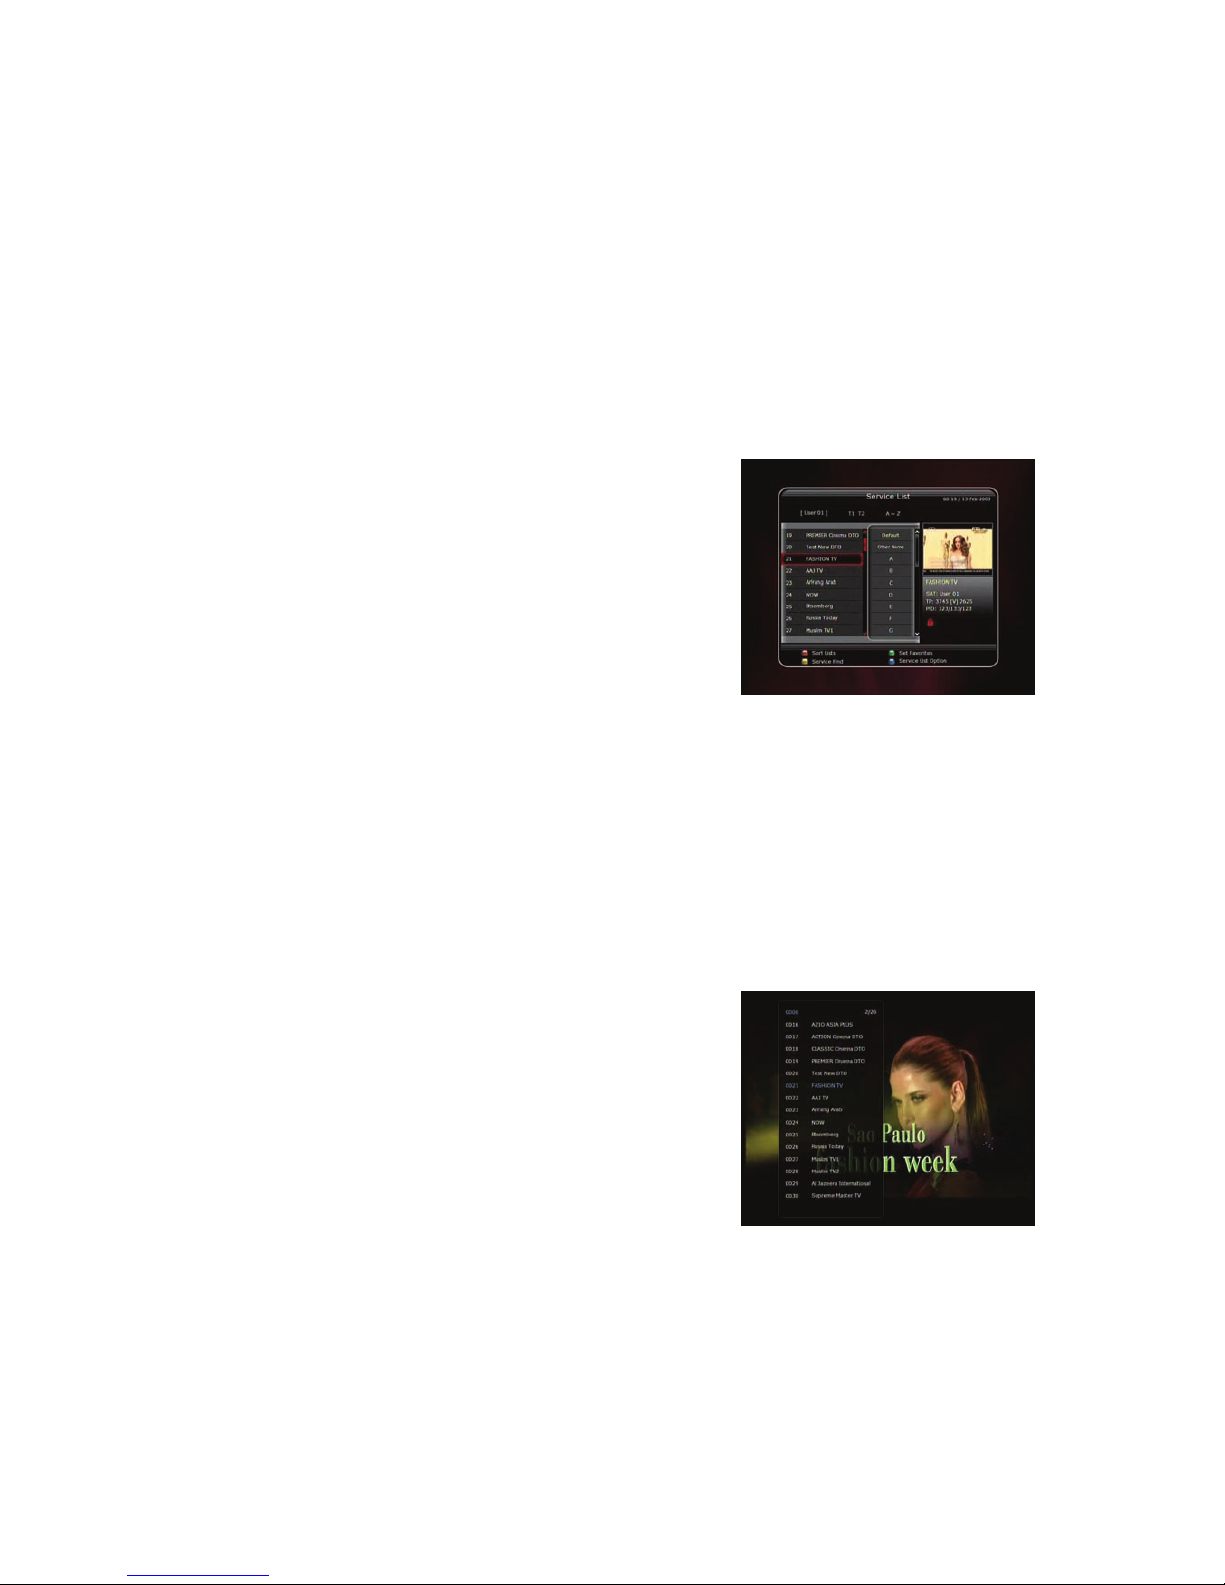
21
Guide of Functions
1. Selecting a Service
To select the desired service (channel), please refer to the instructions below.
1.1 Using CH UP/DOWN buttons
You can navigate between services by pressing CH UP/DOWN buttons. Whenever you press the CH
UP(DOWN) button, current service will be changed to next/previous service. Please press CH UP or CH
DOWN button until you fine the service you want to watch.
1.2 Using Service List
To select the desired service in the service list, you should firstly
display the service list by pressing the OK button.
Use the ARROW buttons to select a desired service and press
the OK button.
You can see that the service is changed in the small screen on
the top-right.
To watch that service, press the OK button once more.
To watch the previous service, press the EXIT button.
In the Service List window, you can also select additional
functions with the COLOR buttons.
Press the RED button, and you can sort the services by the Alphabet, Transponder(TP), Group, Tuner
and CAS (Conditional Access System).
Press the GREEN button, and you can add the services to one of 10 Favorite List.
Press the YELLOW button, and you can search & find the service via a virtual keyboard.
Press the BLUE button, and you can adjust service list option.
NOTE : If you connect the tuner with a loop-through, you c annot use the sort list option.
1.3 Using Instant Service List
If you press NUMERIC buttons or UP/DOWN ARROW button,
instant service list will be displayed.
Select the desired service by using the ARROW button, and
press OK button to watch.
You can also enter the service number directly by using the
NUMERIC button.
Page 80

22
1.4 Using Recent Service List
To return to the previous service that you were watching,
press RECALL button for a short time.
To display recent service list, press the RECALL button for a
little bit longer time.
To chose the service from the recent service list, use the
ARROW button to select, then press the OK button.
Press EXIT button to exit from the recent service list.
2. Information Window
If you want to view the information of the current service that you
are watching, press INFO button. Then the Information window
will be displayed.
This Information window is automatically displayed when
changing between the services. This window contains much
useful information such as service number, service name,
scrambled types of service, teletext, subtitle, Audio indication for
Dolby Digital, Time duration of the service and so on.
By pressing INFO button once again, you can get more detailed
information about the service.
3. Multi-Picture Display. (*)
Press the BLUE button to display multiple pictures and use the
RED button to select the display options for 9 or 12 multiple
pictures.
NOTE : (*) This feature will be supported later, by new s/w
version by upgrading. Please refer to your local
dealer / distributor.
4. Electronic Program Guide (EPG)
Electronic Program Guide (EPG) allows you to see program
schedule and program information from the service which
includes this data as part of their transmission. Multiple services
will be shown with a time line of programming events. The EPG
supplies additional information of channel service, such as
program listings, start/end times and detailed information about
the program listings for all available services.
The availability and details of information of these program
details can be varied, depending on the particular broadcasters,
individual services.
Page 81

23
Press the EPG button, then the EPG menu will be displayed.
Use the ARROW buttons to move to other services or to see previous/next guide.
Press the EPG button once to view full EPG with multi service list, and press it twice to view the
additional EPG information of a specific channel service. Keep pressing the EPG button to toggle
between the full and detailed menus of EPG.
Press the GREEN button to view next day EPG and the RED button to view EPG for a previous day.
Select the program by using the ARROW buttons then set the event timer by pressing OK.
You can schedule a recording with the EPG menu as follows.
- Press RECORD button to schedule the event. This schedule can be checked in the menu of Timer
Settings, in the System tool menu.
- To cancel the schedule of the recording, press the OK button for the appointed event.
- To edit the schedule of the recording, press the RECORD button for the appointed event.
5. Favorite Group
Select the FAV (Favorite) to view all favorite ten groups such as
sports, movie, drama, satellite group and so on. Scroll through the
various favorite group using the ARROW buttons, and select the
desired favorite group by pressing OK.
6. Volume Control
To adjust the audio volume, press the VOL UP/ DOWN
buttons.
Audio volume control bar will be displayed at the top of the
screen and disappear after 4 seconds.
When necessary, press the MUTE button to turn on/off the
audio sound.
NOTE : The mute function remains set while you change
services.
7. Pause
The PAUSE button is used to freeze the video. Press PAUSE button once more to resume the video.
8. Subtitle
You can select the language for a Subtitle, if the program provides subtitle information.
Press the SUBTITLE button on your remote control unit.
Select the desired subtitle language then press OK button.
Page 82

24
The subtitle will be displayed in the selected language at the bottom of the screen.
To turn OFF the subtitle from the screen, Select ‘Off’ from the subtitle language list.
NOTE : When program does not provide subtitle information, SUBTITLE butto n is not active.
9. Audio Track
User can select the audio language list by pressing the
AUDIO(YELLOW) button. Use the ARROW buttons to choose
the preferred audio track from the list, then press OK to change.
Multiple use of the YELLOW button toggles between additional
menus
10. Teletext
When the TELETEXT icon on INFO Banner is appeared (Activated), Press the TELETEXT button to view
the teletext information.
11. PIP (Picture in Picture)
When you press the PIP button, a sub picture screen will appear on the main screen view.
If you press the PIP button one more time, the primary picture and the sub picture will appear
together side-by-side with the same size. The picture of the left side is the primary and the picture on
the right side is sub. If you press the PIP button one more time, the sub picture will disappear.
Page 83
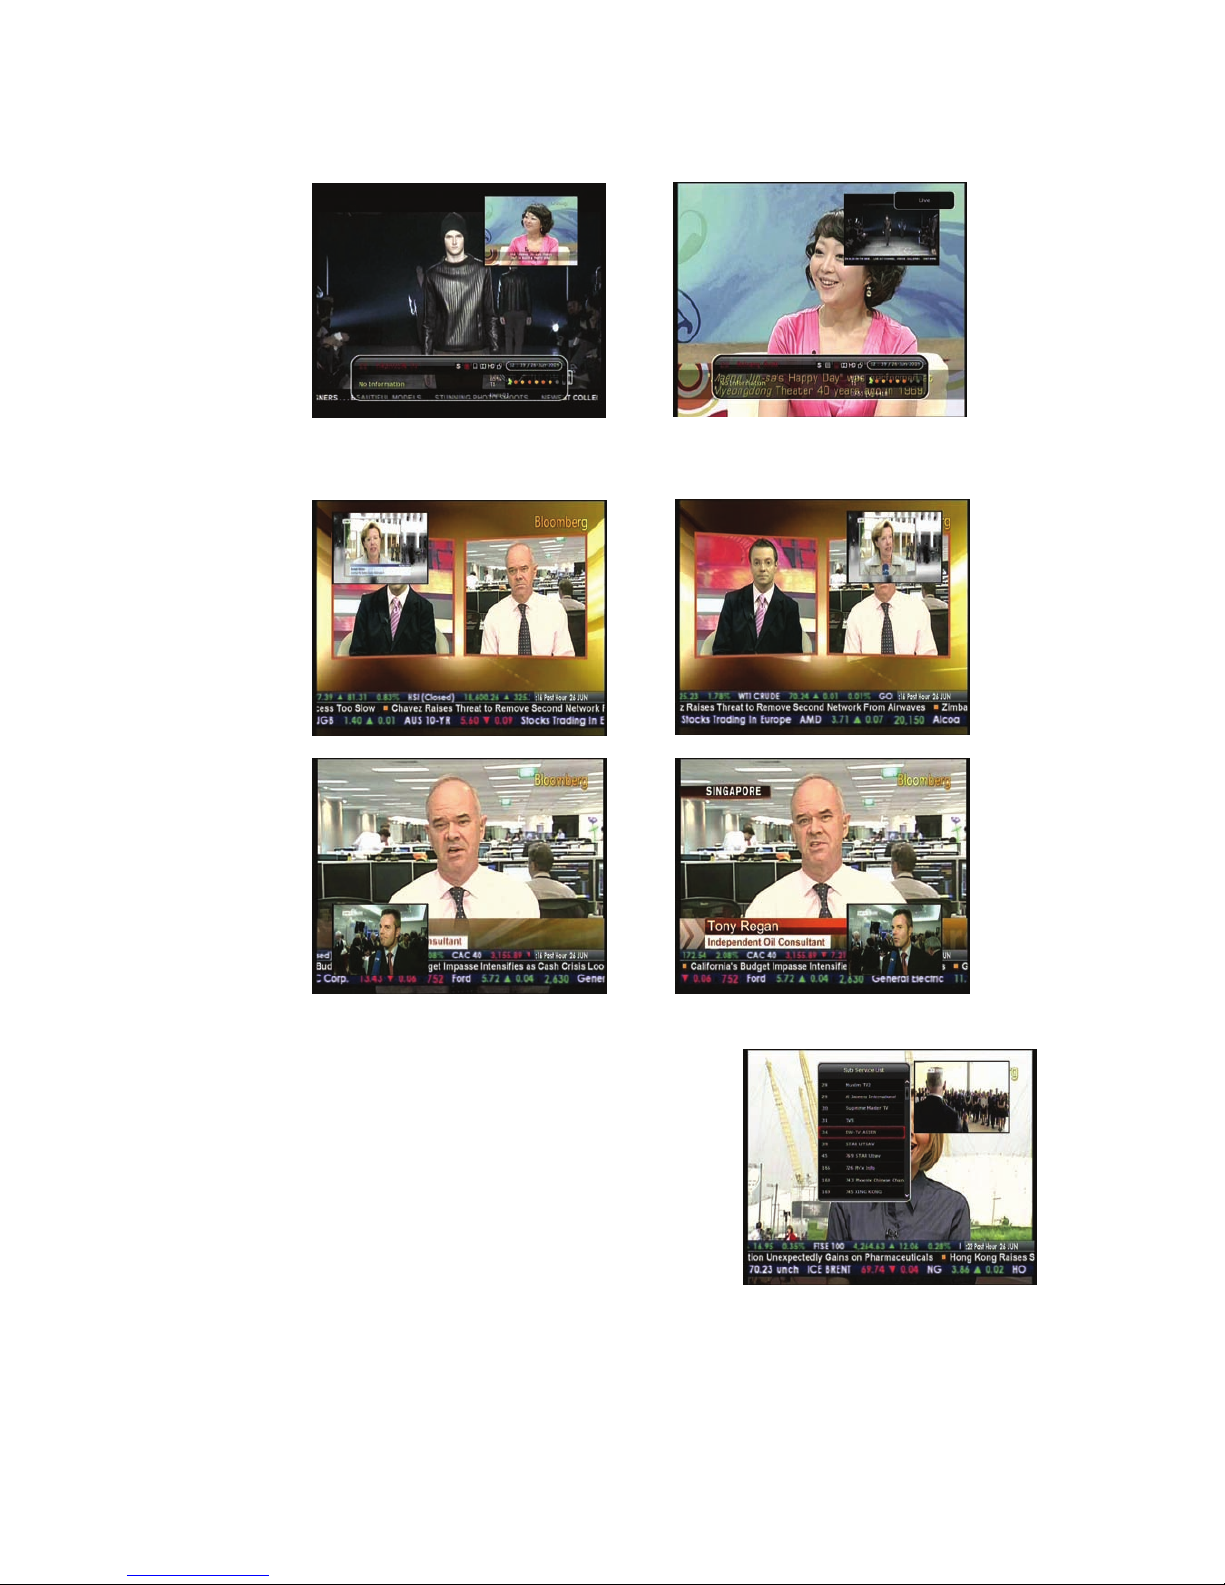
25
In the PIP mode, you can change primary and sub with the PIP SWAP button.
If you press the PAGE UP/DOWN button, the location of the sub picture is changed.
If you press the PIP SERVICE LIST button, you can see the list
of services of sub picture.
You can change the service of the sub picture from the service
list shown.
NOTE : Changing services of sub the picture could be
limited by the condition of the tuner connection or
a recording event ongoing.
Page 84

26
PVR (Personal Video Recorder) Function
1. Recording
You can select a recording storage device with the following sequence :
Menu > Configuration > Recording Option > Record Device.
Default is set to ‘Hard Disk’.
1.1 Recording methods
There are 3 type recording methods.
(Instant Recording / Time Scheduled Recording / Event
Scheduled Recording).
Instant Recording :
At anytime, you may press the RECORD button to start your
recording instantly.
Time Scheduled Recording :
- In Timer Settings menu, you may set the time & program to
record your desired service program.
(Main Menu > System Tools > Timer Settings)
- Press the GREEN button to activate the new timer edit screen.
- In the Timer Edit screen, you may choose start date/time,
duration, service, mode, type (Recording/Play), Tuner
(Auto/1/2) then simply press the Yes button to schedule
your recording event. Please note that the minimum offset
time of 3 minutes is required from the Start time & current
time for appropriate recording process to take place.
Page 85
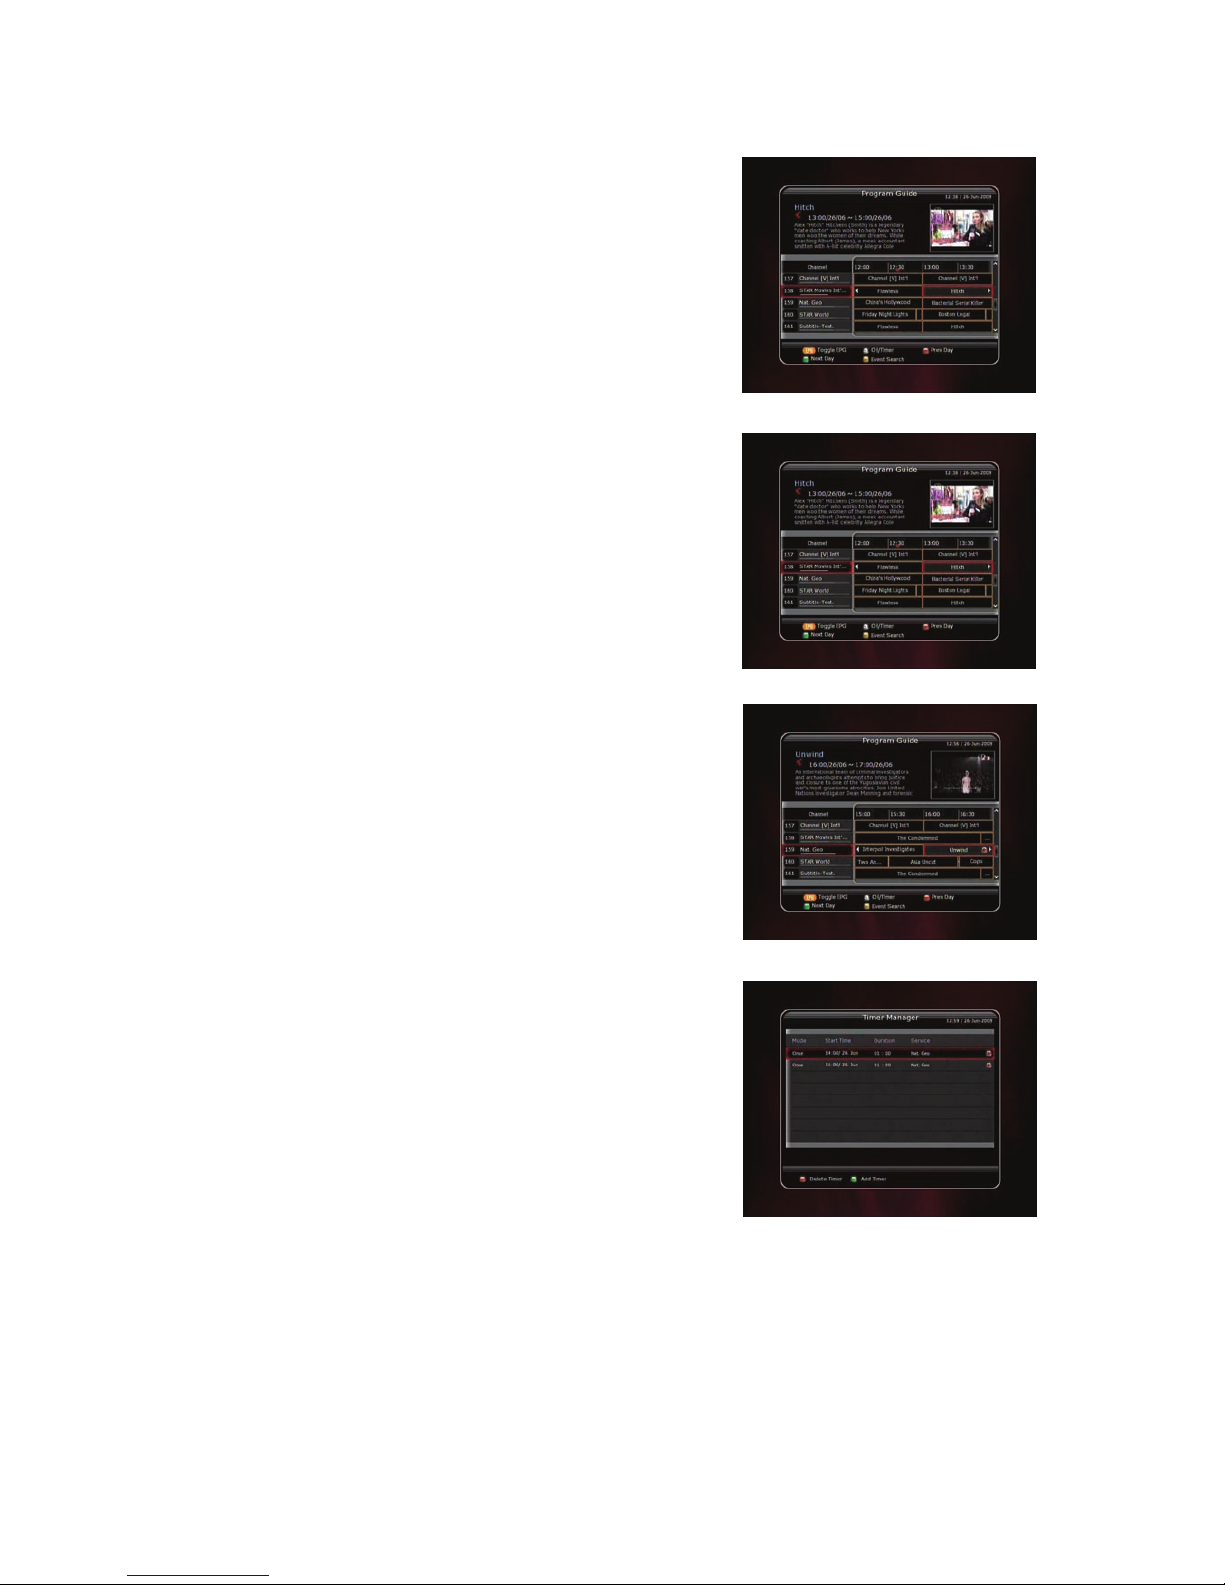
27
Event Scheduled Recording via EPG :
In the EPG menu screen, you can choose the event you wish to
schedule or record.
- While watching the LIVE TV screen, press the EPG button to
access the EPG menu screen.
- Go to the event which you wish to view at the time
indicated on the EPG schedule, then press OK. The event
will be scheduled with the BLUE play icon. This BLUE play
icon means that you want to just watch the event at the
scheduled time.
- Press the OK button one more time, then the event will be
scheduled with the RED dot icon. This RED dot icon means
that you want to record the event at the scheduled time.
- When you set an event for scheduled recording via the EPG
menu. It automatically sets a Timer Event in the Main
Menu > System Tools > Timer Settings.
Page 86
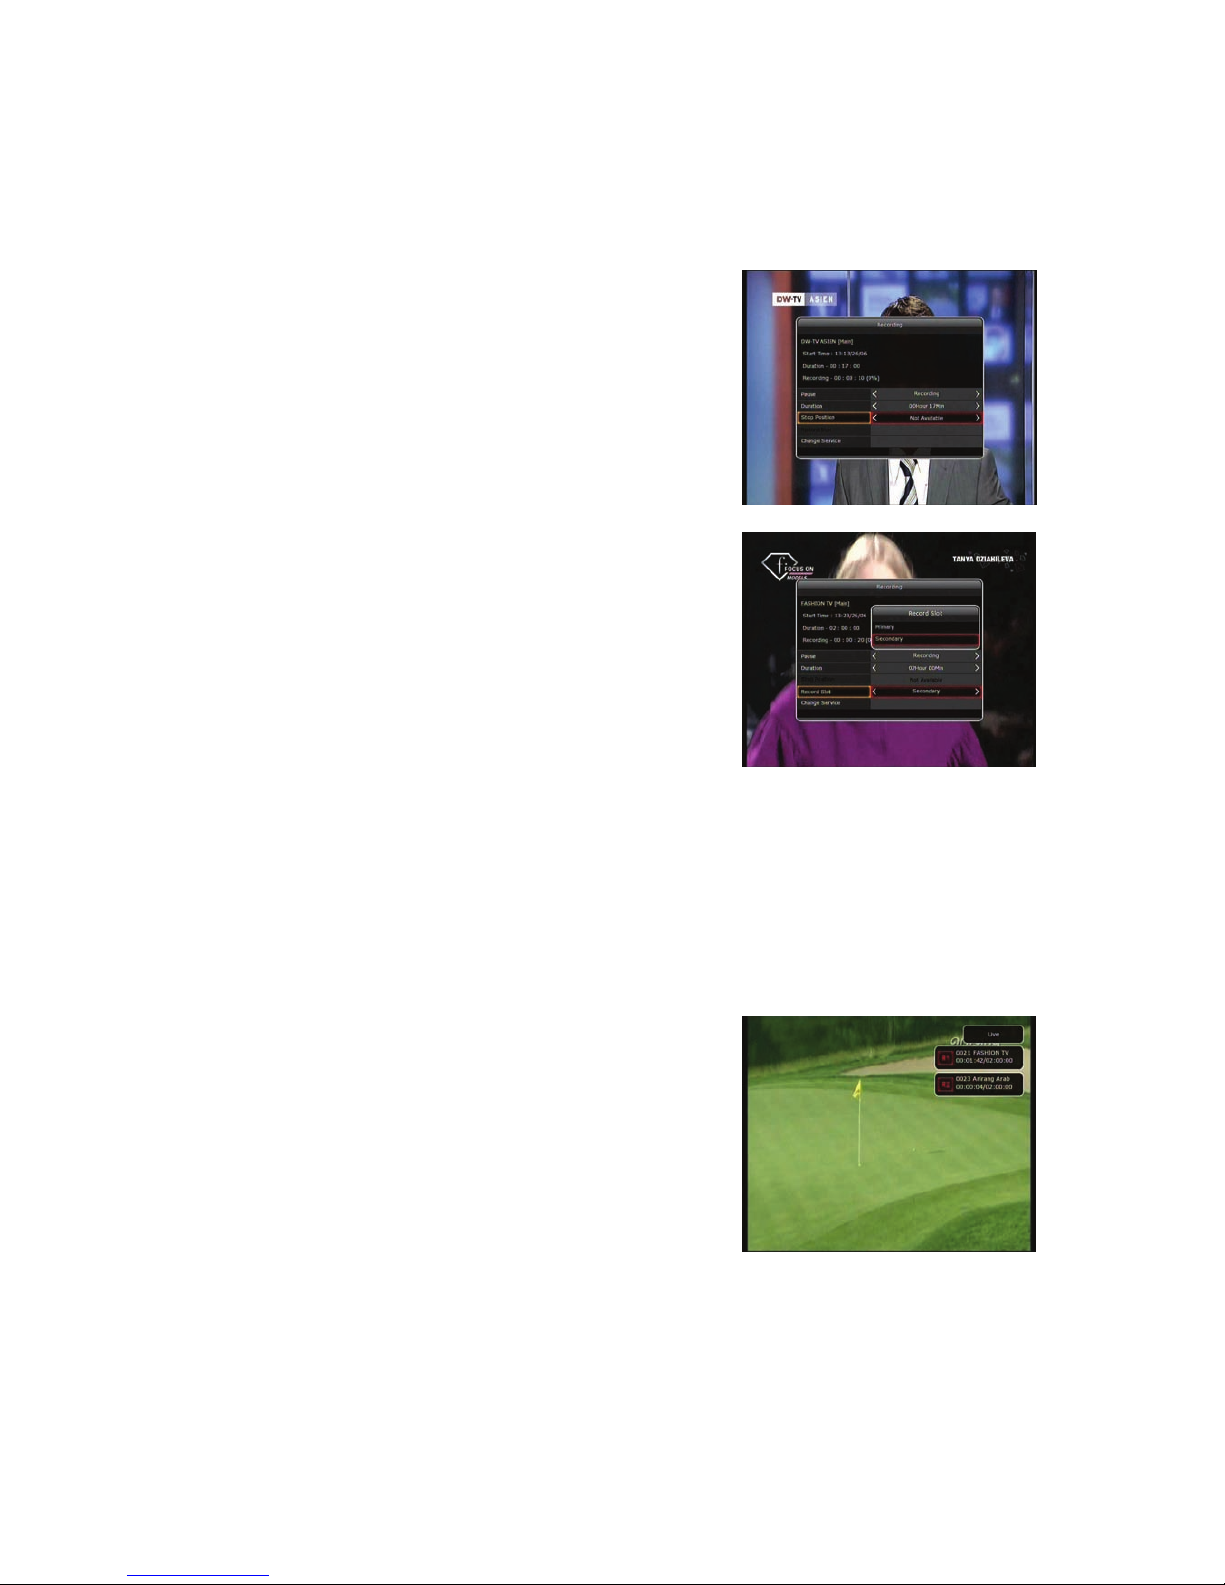
28
1.2 Recording Edit
Press the REC button while recording to see the recording message window.
Pause : Select Pause Recording then press OK to pause the current recording process.
Duration : Set recording duration. Press LEFT/RIGHT ARROW button to change recording duration.
Stop Position :
Set the finishing time of recording.
- End of current event : finish recording at the end of current
event
- End of next event : finish recording at the end of next
event.
- Not Available : EPG is not available.
Record Slot : When you are recording 2 services, you can set
Primary / Secondary with Left/Right ARROW button. Press
OK button to go to the recording service.
1.3 Long Time recording
During lengthy time recording processes of 4GB(Giga Byte) or more, additional files may be created per
every 4GB. (For example; aaa.ts, aaa.ts1, aaa.ts2… and so on).
You must remember not to erase any of duplicated file. These files are only able to be viewed with your
PC not with the receiver (STB).
1.4 Pause during recording
When the PAUSE button is pressed during recording, only the
live video is paused, but recording is continued at the selected
recording device.
(Menu > Configuration > Recording Option > Record Device)
Press PAUSE button once again and event will resume from
the pause time.
Page 87

29
During recording, press the PLAY/TIMESHIFT button to show
the Play bar screen.
While the Play bar is shown on your screen, you may use the
LEFT/RIGHT ARROW button to move (forward & backward)
freely within recorded time.
If you press the STOP button, it will go to LIVE and you may press PREV FILE button to view the
recorded file from the beginning.
When recording 2 services at the same time, Press the STOP
button to see a message window of current recording status /
information.
If you select one of the 2 recordings and press the OK button,
that recording service will be stopped.
If you press the STOP button during recording 1 service, the
recording will be stopped.
NOTE : Dual Recording
STB can record up to two different services simultaneously. Time shifting is also a
recording, so Time shifting will be possible on one of the two recordings during dual
recording.
Page 88

30
2. Time Shifting
You can select a storage device for a temporary file of the Time
shifting with the following sequence:
Menu > Configuration > Recording Option > TimeShift Device.
Default storage device is set to ‘Hard Disk(SATA)’
If pressing the PAUSE button during Time shift, the live video
is paused but the temporary recording for time shift is
continued at the selected storage device.
Press the PAUSE button once again, then the event will
resume from the paused time.
While watching live TV, press the PLAY/TIMESHIFT button to
show the play bar on your screen.
When the play bar is displayed on your screen, you may use
the LEFT/RIGHT ARROW buttons to move freely through the
recorded times bar.
If you press the STOP button while time-shifting, the screen
will be turned to a live TV channel. You can also use PREV FILE
button to move to a start location of the Time-shifted file.
Page 89

31
3. Playback (Play List)
You can playback many files with the Playlist which you access by the PLAYLI ST button.
In the Playlist, you can check and playback recorded files, multimedia movie files, MP3 music files, and
image files. With the LEFT/RIGHT ARROW button, go to the Recorded Files, Imported Files, Music and
Photo category and check & for playback files in each category. Press the RIGHT ARROW button once to
go to Imported Files, press the RIGHT ARROW button one more time to go to the Music menu and press
the RIGHT ARROW button one more time to go to the Photo menu.
3.1 Recorded Files
To enter Recorded Files menu, press the PLAY LIST button.
Locate the recorded file(s) you wish to play with the
UP/DOWN button and press the OK button to playback the
recorded file(s).
To choose a particular selection of files, select a desired file
and press the RED button. Press the OK button to begin the
selected files.
Select Device : Press PLAYLIST button one more time in the
Playlist mode to see “Select Device” window, and select the
device which has the file you want to play.
NOTE : “Select Device” window shows d evices which are
currently connected to the STB.
Sorting : If you press the YELLOW button, you can sort the
files by Time / Name / Size.
File Option : If you press the BLUE button, you can delete or
move files, make a folder, rename in File Option. You can
select multiple files together and delete or move all of them at
once.
Page 90

32
3.2 Imported Files
If you press RIGHT ARROW button in Recorded Files, you can
go to Imported File menu.
Locate the file(s) you wish to play with the UP/DOWN button
and press the OK button to enjoy the movie.
To choose a particular selection of files, select a desired file
and press the RED button. Press the OK button to begin the
selected files.
You can use the same ‘Select Device’, ‘Sorting’ and ‘File
Option’ features as in the Recorded Files.
3.3 Music
If you press the RIGHT ARROW button in Imported Files, you
can go to Music menu.
If you press the RECALL button, you can enjoy music with
Shuffle playback and repeat.
You can use the same ‘Select Device’, ‘Sorting’ and ‘File
Option’ features as in the Recorded Files.
3.4 Photo
If you press the RIGHT ARROW button in Music, you can go to
the Image Photo menu.
If you press the RED button or OK button, you can start the
slide show of image files. Press the EXIT button to stop slide
show.
If you press the GREEN button, you can adjust the Slide Time,
Repetition, Title, Down-scale.
You can use the same ‘Select Device’, ‘Sorting’ and ‘File
Option’ features as in the Recorded Files.
4. Bookmark
When the Play bar is displayed, you may move to desired time
and book mark it by pressing the RED button. Bookmark(s)
are indicated with a Green line on the play bar. Also, you may
press the RED button to activate the play bar to mark your
bookmark(s).
Page 91

33
When the play bar is on, user can move / jump between the bookmarks by pressing the GREEN button.
If you wish to delete any Bookmarks, go to that bookmark by
pressing the GREEN button, then press the RED button to
delete the current bookmarks.
5. Trick mode
The user can change the speed of a fast forward play with
FF(Fast Forward) button. Press FF button to change the
speed to x2, x3, x4, and x5. If you once again press FF button
in its x5 mode, it returns to normal(x1) speed play.
You can also change rewind speed with the REWIND button.
Press REWIND button to change the speed to x2, x3, x4, and
x5. If you press the REWIND button again in it is at the x5
mode, it returns to normal speed.
You may press the PAUSE button at any time to pause a pre-recorded event. Press the PAUSE button
once again to resume play of the recorded event.
Page 92
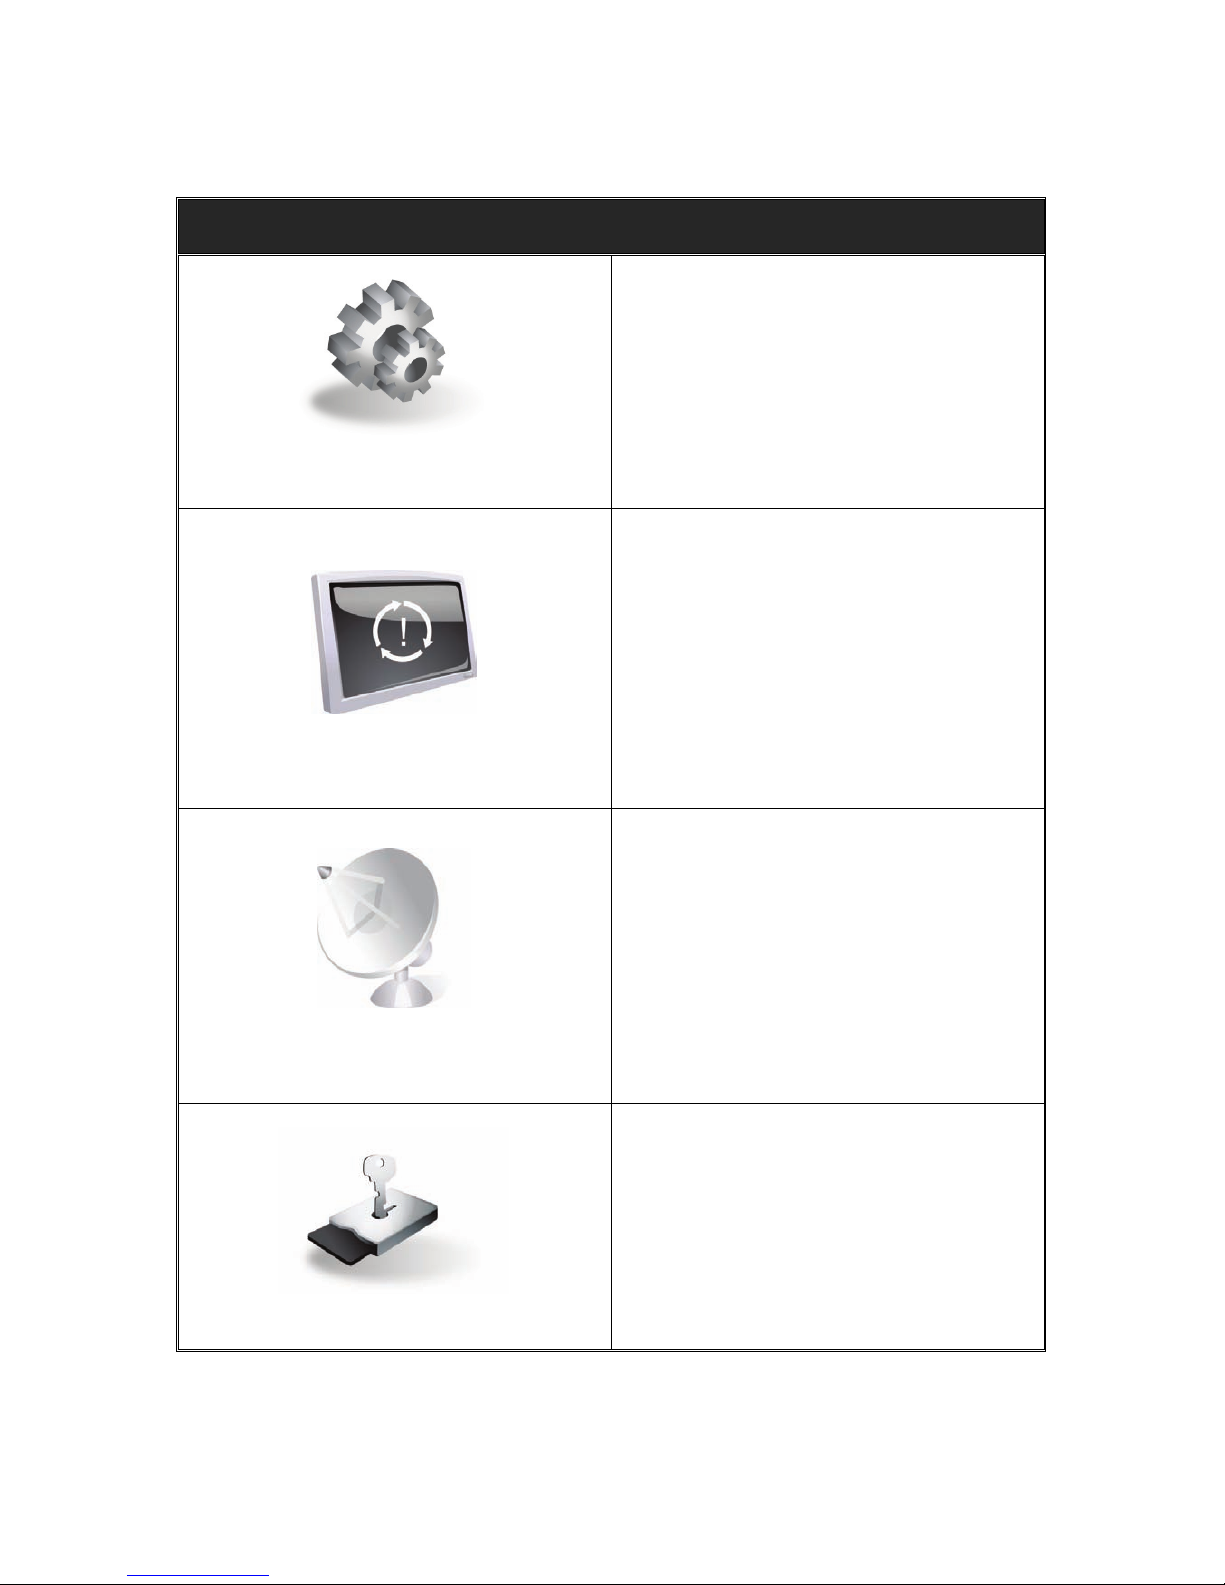
34
Menu Map
Main Menu
System Tools
1. Storage Manager
2. Timer Settings
3. Service List Manager
4. Data Transfer
Configuration
1. Recording Option
2. Parental Control
3. Display Setting
4. Time Setting
5. Language Setting
6. A/V Output Setting
Installation
1. Dish Setting
2. Positioner Setting
3. Service Search
4. Network Setting
5. System Recovery
6. System Information
Utilities
1. Calculator
2. Calendar
3. CAS
Page 93
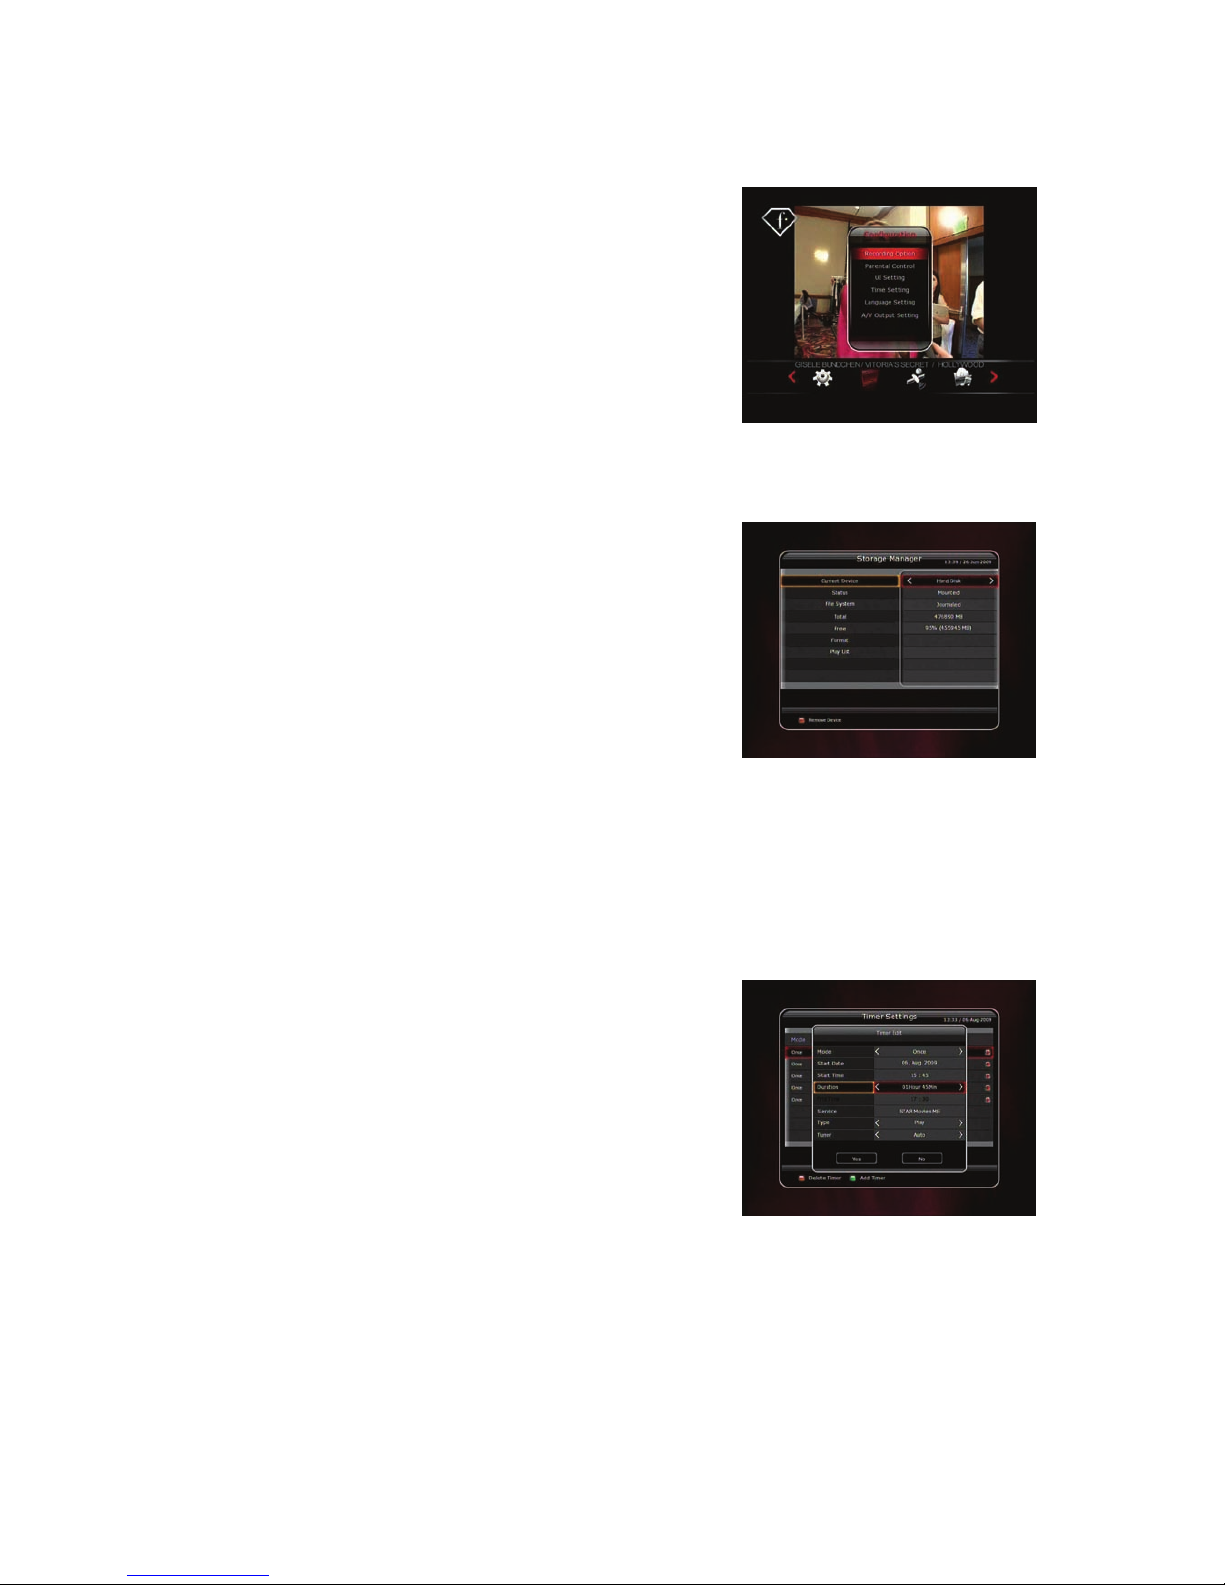
35
Main Menu of Guide
To display the menu, press the MENU button at any time. You can
select the sub menus by using the ARROW buttons.
The selected sub menu becomes highlighted. After selecting
(highlighting) the sub menu you want to access, press the OK
button. If you want to return to the previous menu, press the
MENU button. And if you want to exit from the menu, press the
EXIT button.
1. System Tools
1.1 Storage Manager
The items in this menu allow you to access and control the
storage devices that you want.
Current Device : Select the storage device you want to access
with the ARROW/OK buttons.
Status : You can see the information of current connected
devices, such as ‘Mounted’, ‘Not Available’
File System : It shows the file system of the current device.
You can also select desired file system that you want when you
format the device.
NOTE : You must select FAT 32 file system, if you want to
access the USB storage devices in Windows
Total : Displays total size of current device.
Free : Displays free size of current device.
Format : If you press the OK button to format current device, the device will be formatted with above
file system.
NOTE : When file system is ‘Unknown’, the device will be formatted with ‘Journaled’.
Play List : Press OK button to move to ‘Play List’ menu directly.
1.2 Timer Settings
Insert a new timer entry or modify an existing timer entry.
To add new timer entry : Press the GREEN button. Timer Edit
window will popup. You can set the specific start date, time,
duration and service for its reservation. And you can choose
one of Timer Modes as 'Once' or 'Daily' or 'Weekly'. You can
choose timer operation type as ‘Recording’ or just to 'Play'.
- If you choose 'Recording', it will start recording at that time.
- If you choose 'Play', it will change and tune to the service that you wish to watch.
To modify existing timer entry : Choose the timer entry which you wish to modify and press the OK
button.
To delete an existing timer entry : Choose the timer entry that you want to delete and press the RED
button.
NOTE : If you reserve one or more event through the EPG menu, the reserved event(s) will be
added to Timer Settings automatically.
Page 94

36
1.3 Service List Manager
Service List Manager menu will appear when you press the OK button.
You can select Edit Mode by pressing the YELLOW button.
Lock Services : All service lists will be shown on the left side of
the window, the middle will show the list of service to be locked.
By using the ARROW and OK buttons, you may move the chosen
service to the middle window to lock that service. Services can
also be moved back from the middle to the left side to un-lock
them.
Move Services : All service lists will be shown on left side of the
window, services to be moved will be shown on the middle
window. Move the service to the middle window by using the
ARROW and OK buttons, then the middle window service will be
moved to a specified location when the desired location is
selected from the left window.
Delete Services : All service lists will be shown on left side of the
window. By using the ARROW and OK buttons you may select
services to be deleted by placing them in the middle window.
The press the GREEN button to delete the selected services.
Skip Services : All services will be shown on left side of the
window, the middle window will only show the services that are
chosen to be skipped. By using the ARROW and OK buttons you
may move the selected services from the left to middle window
to skip them.
Page 95

37
Set Favorite Services : Use the ARROW and OK buttons to
select your desired favorite group. Once, favorite group is
chosen, the left side window will show all service lists and the
middle window will only show the selected services of the
favorite group selected. By using the ARROW and OK buttons,
you may ADD the desired services to a favorite group or
DELETE any from the favorite group. The name of the favorite
group can be edited by pressing the GREEN button.
Edit Services : All service names will be shown on the left side
of the window. Move the highlighted bar to the service where
you want to edit its name and press the OK button. Then you
will see the virtual keyboard. Using the ARROW and OK
buttons, you can edit the name of the service with the
keyboard.
1.4 Data Transfer
When the data transfer task is in process, the Front USB slot is set to a default device slot. But, if no
USB device is connected on a front USB slot, then the Rear USB slot is set as a device to be used for the
data transfer process.
NOTE : If no USB device is connected on either two (Front
& Rear) USB slots, then a Menu item will not b e
available.
Transfer all System data to USB storage : If you want to
transfer and use BOTH of the current system parameters and
service data in the future, this menu will allow you to store all
data to your USB device. Press OK button to store all current
data to an external USB storage.
Transfer Service data to USB storage : If you want to transfer
and use ONLY the service data in the future, this menu allows
you to store current service data. Press the OK button to store the current service data to your external
USB storage. The service data can also be viewed and edited on a PC with an appropriate editor
(DrEdit) for the file saved.
Data download from USB storage device : This menu allows you to download the saved data from
the external USB storage to your STB. Press OK button to download data.
Page 96

38
2. Configuration
Recording Stop Message :
- Set 'On' : When you press the STOP button while recording,
then a confirmation window is displayed.
- Set 'Off' : When you press the STOP button while recording,
the STB will stop the recording process immediately /
instantly with no extra confirmation message.
Extra Recording Time Before Start (After Finish):
You can add an extra recording time before start/after finish (1
Min/2 Min/3 Min/4 Min/5 Min/10 Min/15 Min/off ) to
scheduled recording events.
If you set an extra recording time by using the ARROW and OK buttons, the scheduled recording
event will have a ‘Start’ / ‘Finish’ time of additional recording time added to the basic event..
This option only works for real time events. But, when you schedule a service recording in the Timer
Settings menu, this option has no affect.
Time-Shift :
You can adjust the time-shift in 30 minute intervals. (Off/30 Min/60 Min/90 Min/120 Min)
When selected, time shifting function works automatically up to the limit of time that you set, as long
as the Time-Shift storage device has enough memory space.
If you set this option to ‘OFF’ status, then the time shifting function never works.
Commercial Skip :
When you use LEFT/RIGHT ARROW button to move fast through the recorded time bar, You can
adjust skip time in 5 second intervals. (10 Sec/15 Sec/20 Sec/25 Sec/30 Sec)
Time-Shift Device :
You can select the Time-Shift Device you want, such as Hard Disk / USB1(Front) / USB2(Rear).
Record Device :
You can also set a Recording Device which you want to use, such as the Hard Disk / USB1(Front) /
USB2(Rear). Recorded files are stored in the device you set.
2.1 Parental Control
User’s access rights to a service and programs are controlled by
a 4-digit secret code that is defined by the user. Whenever you
attempt to access the parental control menu, a pop-up window
will ask you to input a PIN code. (If necessary, you can change
it.)
NOTE : The default PIN code is ‘0000’
Censorship : Set the parental guidance rating of highlighted
censorship classification. The parental level is given as an age-
based number.
Change Pin code : To change your PIN code, input the new
PIN code using the NUMERICAL buttons. To verify the new
PIN code, input the new PIN code again.
System : Set the access rights to the System menu.
Installation : Set the access rights to the Installation menu.
Configuration :
Set the access rights to the Configuration menu.
Edit Service : Set the access rights to the Edit menu.
Page 97
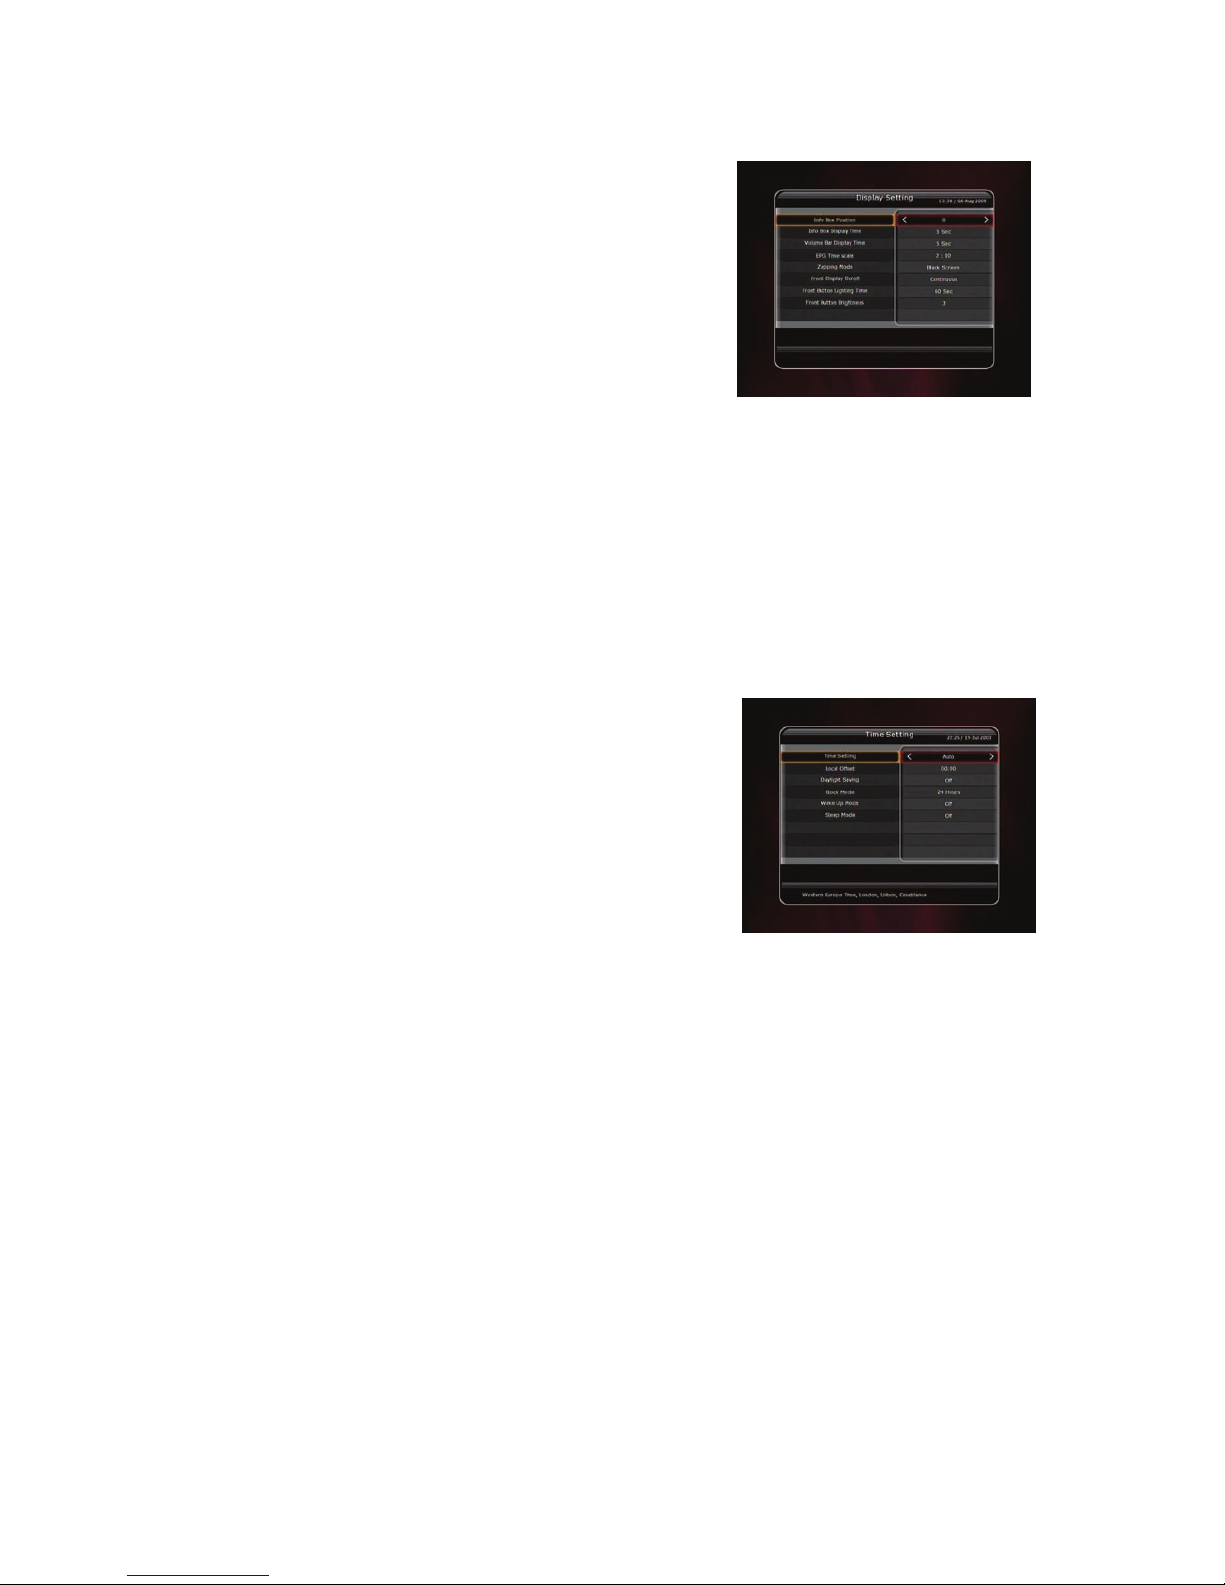
39
2.2 Display Setting
Info Box position : Set a position of the information window.
Info Box Display Time : Set the time duration of the
information window being displayed on the screen after
changing services.
Volume Bar Display Time : Set the time duration of the
volume bar being displayed on the screen after changing
audio volumes.
EPG Time Range : You can set the time range in hours which
is displayed for a program in the EPG window.
Zapping Mode : You can set the zapping mode as follows (zapping mode is when changing services).
- Black screen : Display a black screen when changing between services.
- Freeze : Display the last still picture when changing services.
Front Display Scroll : You can set how the VFD Display Scrolls.
- On : Continually scroll the service name, if the letters of the service name is over 12 characters.
- Off : Scroll service name once, if the letters of the service name is over 12 characters.
Front LED Lighting Time : You can adjust the lighting time of the front LED.
Front LED Brightness : You can adjust brightness of the front LED with 4 steps. By setting ‘off’ this
option, will turn off the front LED lighting.
2.3 Time Setting
Time Setting : To set the current time, you can use two
modes; Auto or Manual.
- Auto Time Setting
Local Offset : Enter the offset value by using the
standardized information of current service area.
Daylight Saving : If you want to apply daylight saving,
select the counter by using the ARROW buttons.
- Manual Time Setting
Date : Enter the calendar date by using ARROW buttons
then press the OK button to finish.
Time : Enter the time by using the NUMERIC buttons.
Clock Mode : Select the type of clock display(12 Hours or 24 Hours) using ARROW buttons.
Wake Up Mode : Enter the time for the receiver to automatically power ON. And you can choose one
of Wake Up Mode as ‘off’ or ‘Once’ or ‘Daily’ or ‘Weekly’.
- Wake Up Date : Select the date when the STB is turn on. Press the OK button to display calendar.
- Wake Up Days : Select a day of the week when the STB is turn on.
- Wake Up Time : Enter the wake up time of the STB using the NUMERIC buttons.
- Wake Up Service : Select the service when the STB is turn on. Press the OK button to display the
service list.
Sleep Mode : Enter the time for the receiver to automatically switch OFF and go to standby mode.
And you can choose one of the Wake Up Mode as 'off' or 'Once' or 'Daily' or 'Weekly'.
- Sleep Date : Select the date when the STB is turn off. Press the OK button to display the calendar.
- Sleep Days : Select a day of the week when STB is turn off.
- Sleep Time : Enter the turn-off time of the STB using the NUMERIC buttons.
2.4 Language Setting
Menu Language : Select the desired menu language by using the ARROW buttons.
NOTE : The menu and operation languages can be changed depending on the country sold.
Available languages are subject to change without prior notice.
Page 98

40
Audio Language : Select the default language for the audio
when changing services. If no other language is provided,
then the default language of current will be automatically
selected.
Subtitle Language : Select the default language for subtitle
when changing service.
2.5 A/V Output Setting
TV Type : Select the TV types.(PAL/NTSC/Auto) In Auto mode,
the STB is automatically selected to NTSC or PAL accordingly
to the service played.
TV Aspect Ratio : Select the aspect ratio of TV which is
connected to the STB.(4:3/16:9). This menu must be set prior to
selecting the Display Format function.
Display Resolution : Select the Display Resolution of the
screen by using ARROW or OK button. You can also change
the resolution with Resolution button in the remote. Each
time you press the Resolution button, the resolution changes in the following sequence: 576i > 576p
> 720p > 1080i
NOTE : Please note that your TV may not show a picture depending on the Display Resolution set
by your STB as well as if set to PAL when NTSC is required or vice versa. If you set the
Display Resolution as SD(576i), your TV cannot display anything when the TV is
connected to the Component Video(YPbPr). If you set the Display Resolution as HD(more
than 576p), your TV cannot display anything when the TV is co nnected to the SC A RT o r
Composite Video output of the STB. In case of HDMI, your TV can display a picture for
all of the resolution settings of the STB. But it is also possible that your TV may not
display a picture with 576i, because some HD TV’s does not support 576i.
Display Format :
In case of a 4:3 ratio TV set, you can select Letter Box or Pan&Scan. In case of a 16:9 ratio TV set, you
can select Pillar Box or Full Screen.
- 16:9 Display format on 4:3 TV set
Letter Box : You can see the full screen of 16:9, but top and bottom edges of your TV screen
display black horizontal Pillars.
Pan&Scan : The picture is displayed in full on your 4:3 TV screen, but left and right sides of the
original picture cannot be displayed.
- 4:3 Display format on 16:9 TV set
Pillar Box : You can see the full screen of 4:3, but left and right sides of your TV screen display black
vertical Pillars. 4:3
Full Screen : The picture is displayed in full on your 16:9 TV screen, but left and right sides of the
original picture is displayed with widening of the screen from left and right. Because of the artificial
widening, the TV picture will be distorted.
HDMI Dolby Digital : Set the Dolby Digital mode ‘On’ or ‘Off’ in status of HDMI output.
Video Output Mode : According to Display Resolution, you can select the Video Output Mode.
- In case of More than 576p(HD) : The ‘RGB’ output will be disabled automatically. You can select
Video Output Mode (CVBS, YPbPr, YC).
- In case of 576i(SD) : The ‘YPbPr’ output will be disabled automatically. You can select Video Output
Mode (CVBS, RGB, YC).
Sound Mode : Set the audio mode output among the RCA jack, optical SPDIF and
HDMI.(Stereo/Mono/Left/Right).
Page 99

41
3. Installation
3.1 Dish Setting
Select the satellite/antenna and LNB settings for service search.
The values that are set in this menu will be available for selection
in other service searching menus.
Satellite : Select the satellite which you want to do a search
for.
- Press the LEFT/RIGHT ARROW button to select the satellite.
- If you press the OK button, the entire satellite list will be
displayed.
- Select the desired satellite name to search.
- If the desired satellite name is not listed then select User
Defined.
Tuner Connection : You can set connection type between Tuner and LNB.
- Separate : Set the connection type option to ‘Separate’, if each of the tuners are connected to
different LNBs (LNB IN_1 / LNB IN_2) individually / independently.
This Separate connection is used, when each two tuners are connected to different LNBs. Due the
independent & separate connections between two Tuners & LNBs, user can watch all the services
scanned by one tuner(1), while the other tuner(2) is set for recording at the same time.
- Loop-Through : Set the connection type option to ‘Loop-Through’, if you have connected the LNB
OUT_1 and LNB IN_2 with a loop-through cable. In this case, you would have some limitations in
using some features such as dual recording.
This connection is used when the Tuner(1) is connected with LNB output, and the Loop-through
output of the Tuner(1) is connected with input of the Tuner(2). This is the way to use & activate both
tuners when you have only 1 LNB with your dish antenna. However, this will limit the possible
tuning range (Satellite & Polarization) of the 2
nd
tuner, while the 1st tuner is being used for its
recording process (because the input signal of 2
nd
tuner is dependent of the signal which the 1st
tuner is tuned to).
NOTE : User should make the appropriate connection by choosing the right tuner connections
between the Loop-Through and Separate connections. Due to the difference of these
two connections, wrong LNB and Tuner connection may cause the loss of signal reception.
We strongly recommend the use of professional service p erso nnel to mak e this installation
and connection if your knowledge is limited.
Tuner : Select the tuner which you want to set (Tuner 1/ Tuner 2). If you set ‘Loop-Through’ on the
menu(Installation-Dish Setting-Tuner Connection), this menu(Tuner) will be disabled automatically.
Frequency : Select the satellite frequency which you want to use for checking the signal.
LNB Power : Select the LNB power on or off.
LNB Type : Select the LNB type.
LNB Frequency : Select the local oscillator (L.O.). frequency that is specified for the LNB used..
- Use the LEFT/RIGHT ARROW buttons to select the LNB frequency.
- If the required LNB frequency is not listed, then enter the frequency manually using the NUMERIC
buttons.
- When you select Universal LNB type, both 9750 and 10600 are supported at the same time. And
then the LNB 22KHz setting is disabled.
LNB 22KHz : When you use a separate coax 22 KHz tone switch box, make the 22 KHz tone switch
enabled or disabled to select the input you desire of the tone switch.
DiSEqC Switch : If you use DiSEqC 1.0 or DiSEqC 1.1 switch, select one of the DiSEqC inputs.
Service Search : Press the OK button to move to the Search Menu
Page 100

42
3.2 Positioner Setting
Satellite : Select the satellite which you want to search for the
Service.
- Press the LEFT/RIGHT ARROW button to select the satellite.
- If you press the OK button, a complete satellite list will be
displayed.
- Select the wanted satellite name.
- If the desired satellite name is not listed then select User
Defined.
Tuner : Select tuner that you want to set (Tuner 1/ Tuner 2). If
you have set ‘Loop-Through’ in the menu(Installation-Dish
Setting-Tuner Connection), this menu(Tuner) will be automatically disabled.
Frequency : Select the satellite frequency you want to use to
check for a signal.
Positioner : Select the positioner.
- None : (No Positioner)
- Using DiSEqC 1.2 :
Move : To move the dish, press LEFT/RIGHT button.
Fine Move : To move the dish in smaller steps, press the
LEFT/RIGHT ARROW button.
Step : Set to positioner moving steps as 1, 2, 3, 4
Positioner Command : To use various positioner commands,
press the OK button. Then, available positioner commands
will appear.
- Using USALS :
Move : To move the dish, press the LEFT/RIGHT button.
Fine Move : To move the dish in smaller steps,, press the
LEFT/RIGHT ARROW button.
Step : Set to positioner moving steps as 1, 2, 3, 4
Dish Longitude : Enter the longitude position of the
antenna using the NUMERIC buttons.
Dish Latitude : Enter the latitude using the NUMERIC
buttons.
Go To : Press the OK button to rotate the dish to the selected antenna position.
Dish Setting : Press the OK button to move to Dish Setting menu directly.
Service Search : Press the OK button to move to Service Search menu directly.
3.3 Service Search
You can select the following search mode.
Auto Search Mode :
- Satellite : Press the OK button to select the target satellite
to be searched.
- Tuner : Select tuner what you want to set (Tuner 1/ Tuner 2).
If you set ‘Loop-Through’ on the menu (Installation-Dish
Setting-Tuner Connection), this menu (Tuner) will be
automatically disabled.
- Search Type : Select the search type.
- Network Search : You can select Off or On. When you select ‘On’, you can find more transponders
using the home network. As it refers to NIT during searching, if there is the frequency information of
other transponder, it searches the other transponder besides the transponder that the user inputs.
- D
ish Setting : Press the OK button to move to Dish Setting menu directly.
- Positioner Setting : Press the OK button to move to the Positioner Setting menu directly.
- Start Search : Press the OK button to start search.
 Loading...