

Page 1
I
OCS®-Gateway
User Guide
Outcome Concept Systems, Inc.
1818 East Mercer Street
Seattle, WA 98112
866.641.8324 • FAX 206.720.6018
www.ocsys.com
Page 2

This manual was published in Microsoft Word™. The screen shots were created
using Snagit
.
All other product names mentioned are trademarked or copyrighted by their
respective manufacturers.
© 2002-2006 OCS, Inc.
Printed in USA
Page 3

TABLE OF CONTENTS
Getting Started ....................................................................................Chapter 1
Overview ........................................................................................................ 1-1
Hardware and Software Requirements ....................................................... 1-2
Installation of OCS-Gateway ........................................................................ 1-3
OCS-CAST............................................................................................Chapter 2
Logging into OCS-CAST................................................................................. 2-1
Adding Agencies and Branches ................................................................. 2-3
Removing Agencies and Branches ................................................................ 2-7
Set Benchmark Password ................................................................................. 2-8
Set Descriptor ..................................................................................................... 2-9
Database Surrogates ..................................................................................... 2-10
Edit Existing Surrogate Database .................................................................. 2-10
Add New Database Surrogate...................................................................... 2-12
File/Folder Surrogates...................................................................................... 2-14
Edit Existing Surrogate File/Folder.................................................................. 2-15
Add New File/Folder Surrogate ..................................................................... 2-16
Admin Lockout Schedule............................................................................... 2-20
Archive Configuration..................................................................................... 2-22
Set Up User Profiles - Copy User ..................................................................... 2-23
Changing User Profile Passwords................................................................... 2-29
Create New User ............................................................................................. 2-30
Remove User Profiles ....................................................................................... 2-30
View Reports .................................................................................................... 2-32
OCS-Gateway.....................................................................................Chapter 3
Logging into OCS-Gateway ............................................................................ 3-1
Applications ...................................................................................................... 3-1
Utilities.................................................................................................................. 3-2
OCS-DIT and OCS-VISIT..................................................................................... 3-4
OCS-Benchmark Submission Tool (OCS-BMST) .............................................. 3-4
OCS-Database Management Tool (OCS-DBMT).......................................... 3-7
Key Utility............................................................................................................. 3-7
Database Conversion..................................................................................... 3-12
Benchmark Business Intelligence Reporter (OCS-BBI Reporter) .....Chapter 4
Overview............................................................................................................. 4-1
Benefits ............................................................................................................... 4-1
Internal versus External Benchmarking........................................................... 4-1
Deadlines for Submitting Quarterly Data ....................................................... 4-2
Accessing OCS-BBI Reporter Online .............................................................. 4-2
JCAHO Reports ........................................................................................ 4-4
OASIS Reports................................................................................................... 4-5
Online Benchmarking Graphs ........................................................................ 4-7
Page 4

Page 5

Chapter 1
Getting Started
Overview
OCS-Gateway streamlines the use of OCS products, serving as a single place to
access and manage the security of all OCS applications.
OCS-Gateway comes with the following utilities:
OCS-CAST: (OCS-Common Application Security Tool) Allows for the
creation and management of user accounts and the setup of agency
information. This should be accessed only by the System Administrator or
designated technical support personnel.
OCS-DIT: (OCS-Data Import Tool) Allows agencies to collect OASIS data in
MIS or point-of-care software and import the data into an OCS-OASIS
database for desktop and benchmark reporting.
OCS-VISIT: (OCS-Visit Import and Statistical Information Tool) Allows
agencies to import visit utilization data from electronic claims files into the
OCS-OASIS database for desktop and benchmark reporting. Accepts
both NSF 6.0 and 837 electronic file formats.
OCS-BMST: (OCS-Benchmark Submission Tool) Extracts, encrypts, and zips
appropriate data for quarterly benchmark submittals. The zipped file is
uploaded through the OCS website’s HIPAA-compliant Web Uploader.
OCS-DBMT: (OCS-Database Management Tool) Includes the archive,
backup/restore database, key utility, and database conversion tools.
Only the key utility and database conversion tool apply to SQL Server
databases. The SQL Server Database Administrator (DBA) must manage
database maintenance functionality (archiving, backup/restore, etc.) for
SQL Server through the SQL Server application.
OCS-Gateway is the centralized launch-point for all OCS applications.
Applications such as OCS-OASIS and OCS-EPIC are installed on top of OCSGateway. Unlike before, you will double-click one icon to access any OCS
application.
Please have your System Administrator or designated technical support
personnel review the following information to properly setup OCS-Gateway on
each workstation and/or network. If you need assistance or have questions or
concerns, please contact OCS Client Services at 866.641.8324.
2006 OCS, Inc. Page 1-1
Page 6

Getting Started
Hardware and Software Requirements
Hardware
• Pentium 1.5 GHz or better
• 256 MB RAM minimum (higher recommended)
• 24X CD-ROM
• 40 GB EIDE 7200 RPM hard drive
• Integrated Intel 10/100MB NIC
• 56 Kbps modem (Broadband internet such as cable or DSL
recommended)
Software
• Microsoft Windows 2000 Professional SP4, Windows 2000 Server SP4,
Windows 2003 Server SP1, or Windows XP Professional SP2
• Microsoft SQL Server 7 or 2000; required for using with a SQL Server
database
• Microsoft Access97, 2000, 2002, or 2003 recommended for Access
database users
Note: If multiple users use the same Microsoft Access database, all
must use the same version and service pack of Microsoft Access
and MS Jet
• Microsoft Internet Explorer 6.0 or higher
Software installed or updated by the OCS-Gateway installation
• Crystal Reports version 8.5
• MS Jet 4.0 SP6
• MDAC 2.7 SP1 Microsoft Data Access Components (MDAC)
• Microsoft.NET 2.0 Framework
Software Consideration
OCS uses Crystal Reports version 8.5 for many reporting functions. If you have
other applications installed on the same computer that will be used for OCS
applications, and those other programs use an earlier or later version of Crystal
Reports, installing OCS-Gateway may cause a problem with those reports or
may cause problems with OCS-Gateway.
2006 OCS, Inc. Page 1-2
Page 7

Getting Started
Installation of OCS-Gateway
Please refer to the Standard Installation Guide provided by OCS Client Services.
For more information, please call 866.641.8324 or email tech@ocsys.com
2006 OCS, Inc. Page 1-3
Page 8

Page 9
Chapter 2
OCS-CAST
OCS-CAST (Common Application Security Tool) is the security module that
controls access to all OCS products, including automatic access to online
benchmarking. It is very robust, allowing very specific levels of access to
individual applications, agencies and branches where appropriate. At the
same time, it includes features that simplify the process for setting up multiple
users.
Special Note: Before getting started in OCS-CAST, first install all OCS
applications.
To get started with any OCS application, you need to first set up users,
agencies, and if applicable, branches in OCS-Gateway. To do this, the Systems
Administrator or designated technical support personnel will need to go into
OCS-CAST.
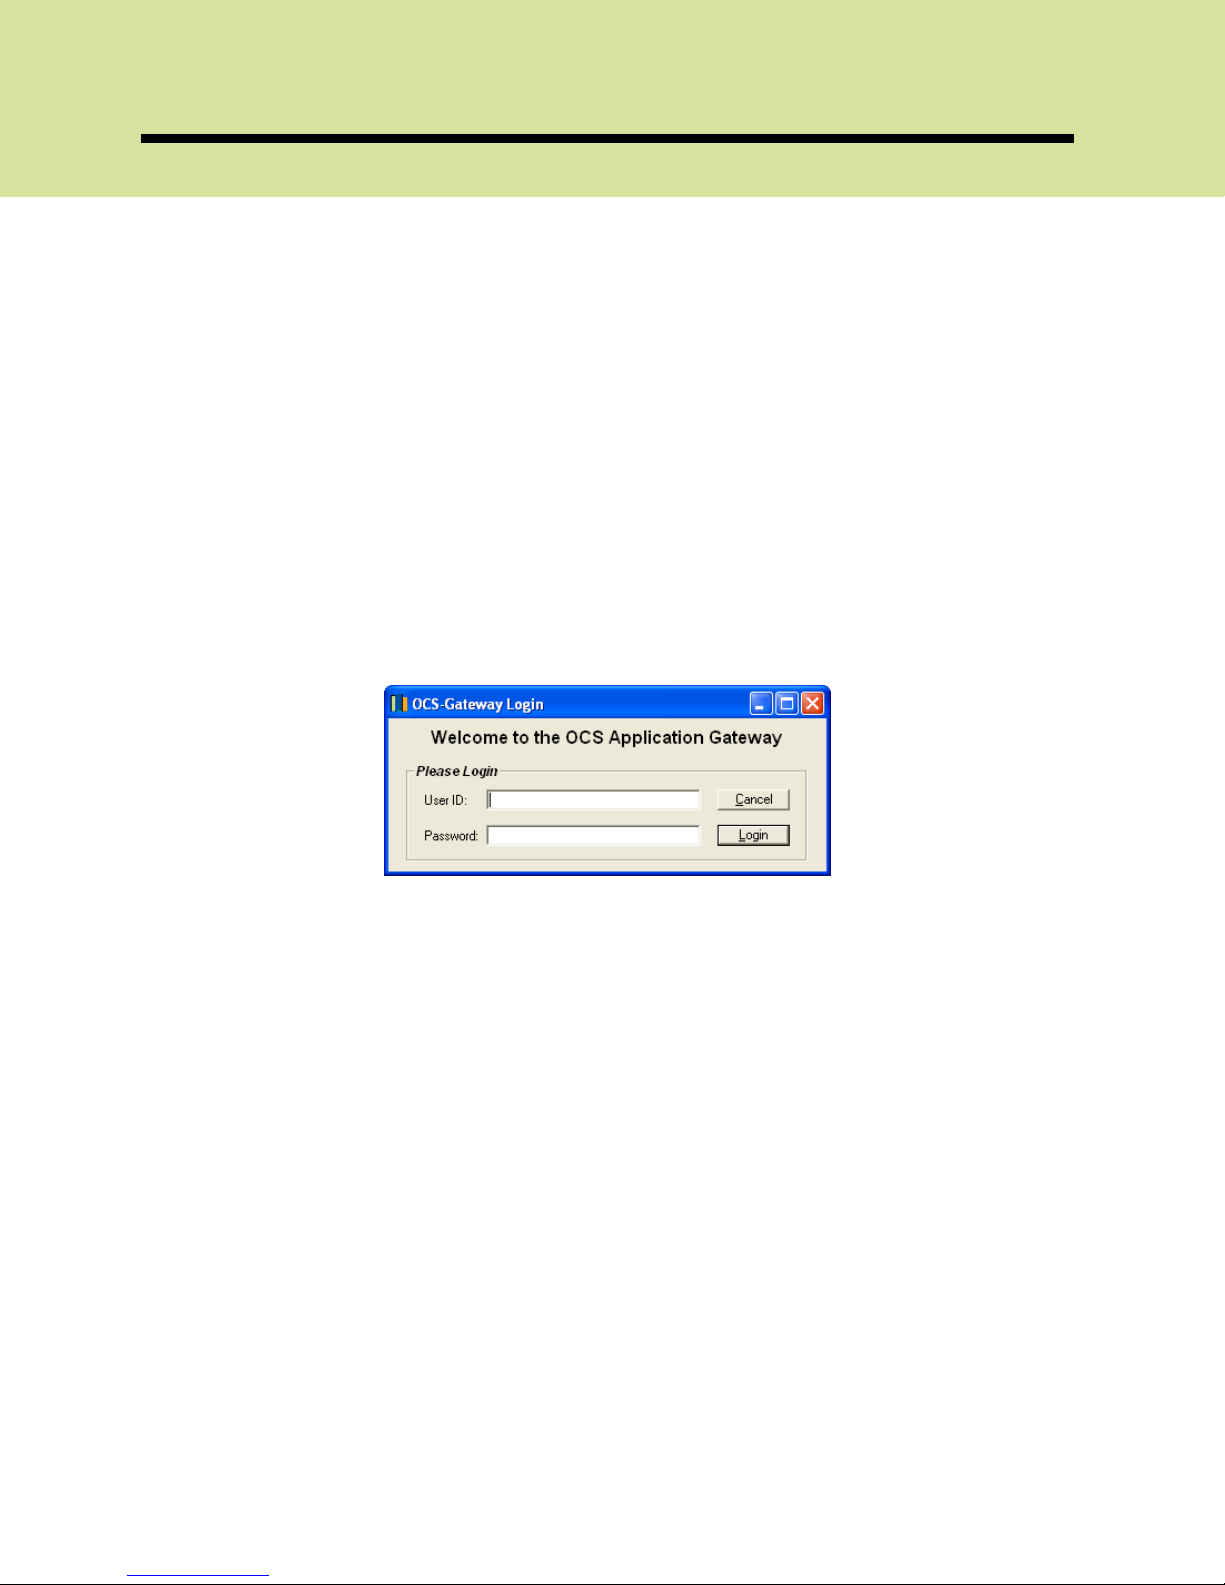
Launch OCS-Gateway through the shortcut created on the desktop or by
going into Start|Programs|OCS|OCSGateway
Important Note: To log into OCS-Gateway initially, use the default
User ID and Password: masteradmin (password is case sensitive).
For security reasons, please be sure to change the masteradmin
password from “masteradmin” to something more secure. Follow
the instructions laid out in the “Change User Profile Passwords”
section below. Be sure not to forget or lose this new password.
Click on the Utilities tab in the main OCS-Gateway interface. To access the
Common Application Security Tool, double click OCS-CAST or highlight it and
click [Go!]
2006 OCS, Inc. Page 2-1
Page 10
OCS-CAST
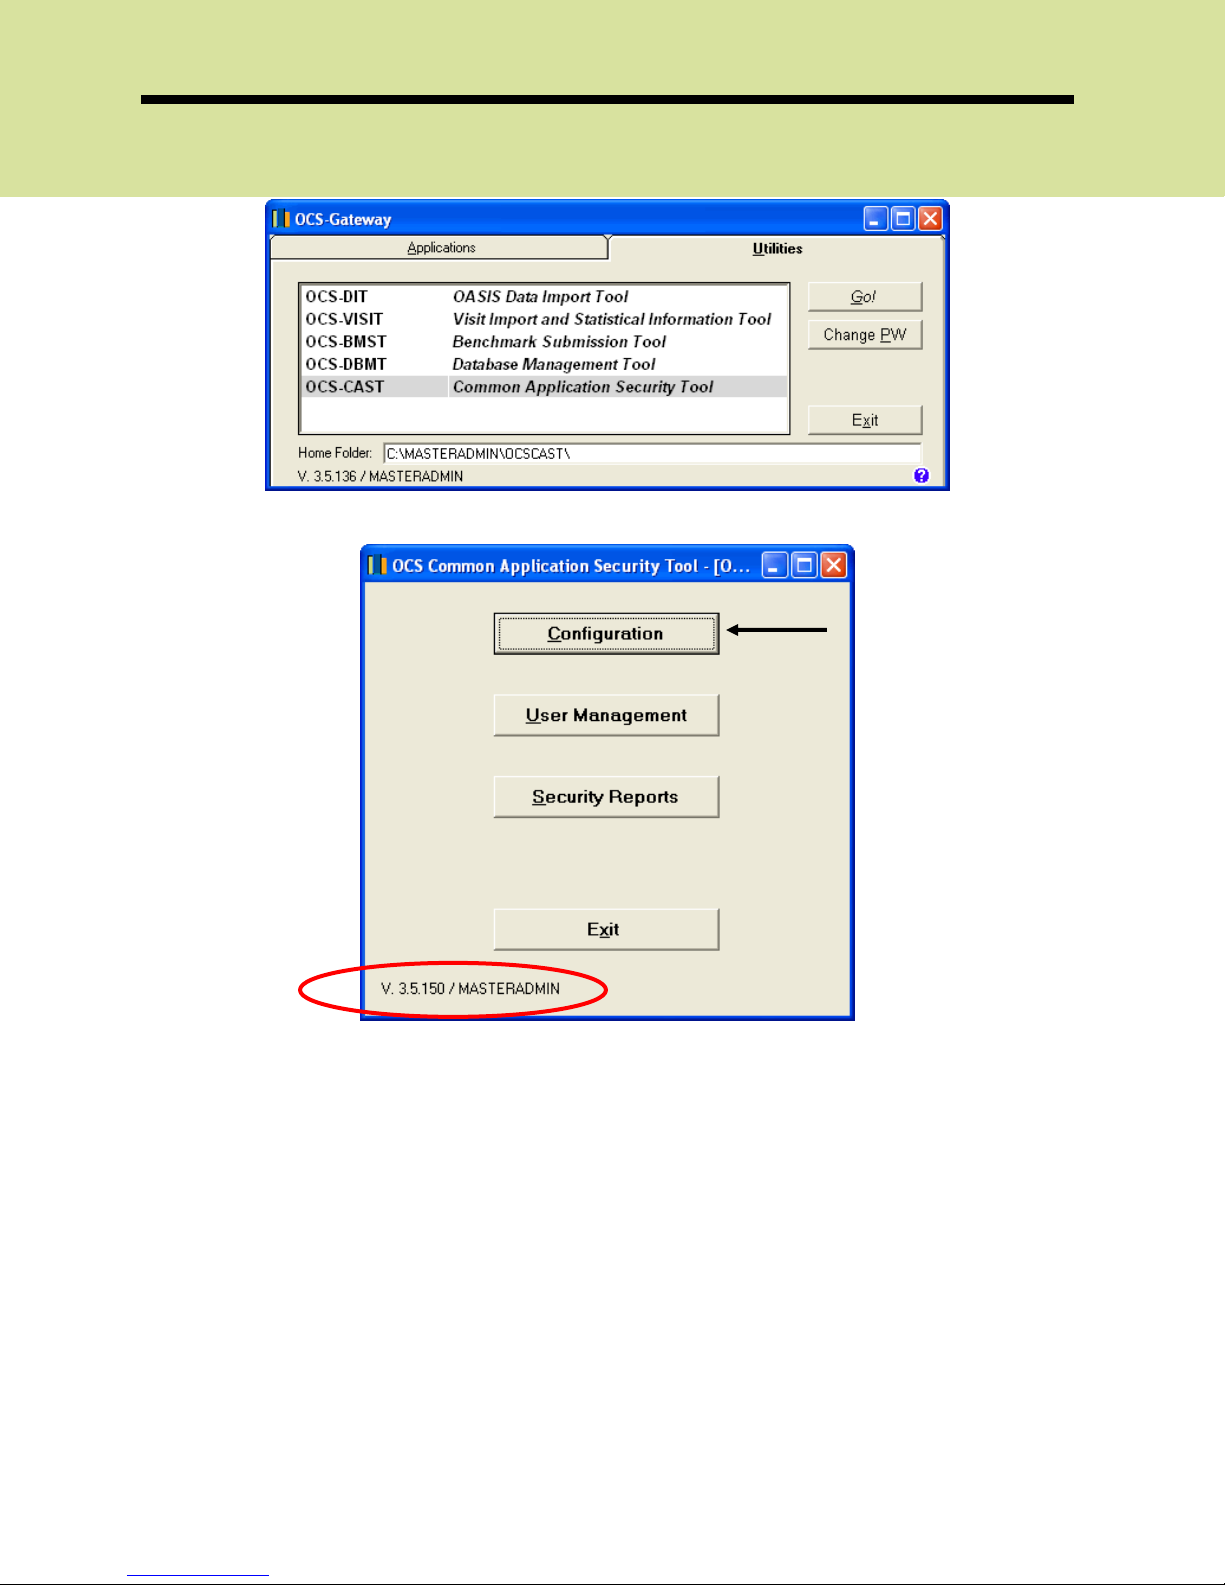
To configure the application, click [Configuration]
Interesting Note: OCS-Gateway shows the application version
number and the name of the logged in user in the bottom lefthand corner.
2006 OCS, Inc. Page 2-2
Page 11
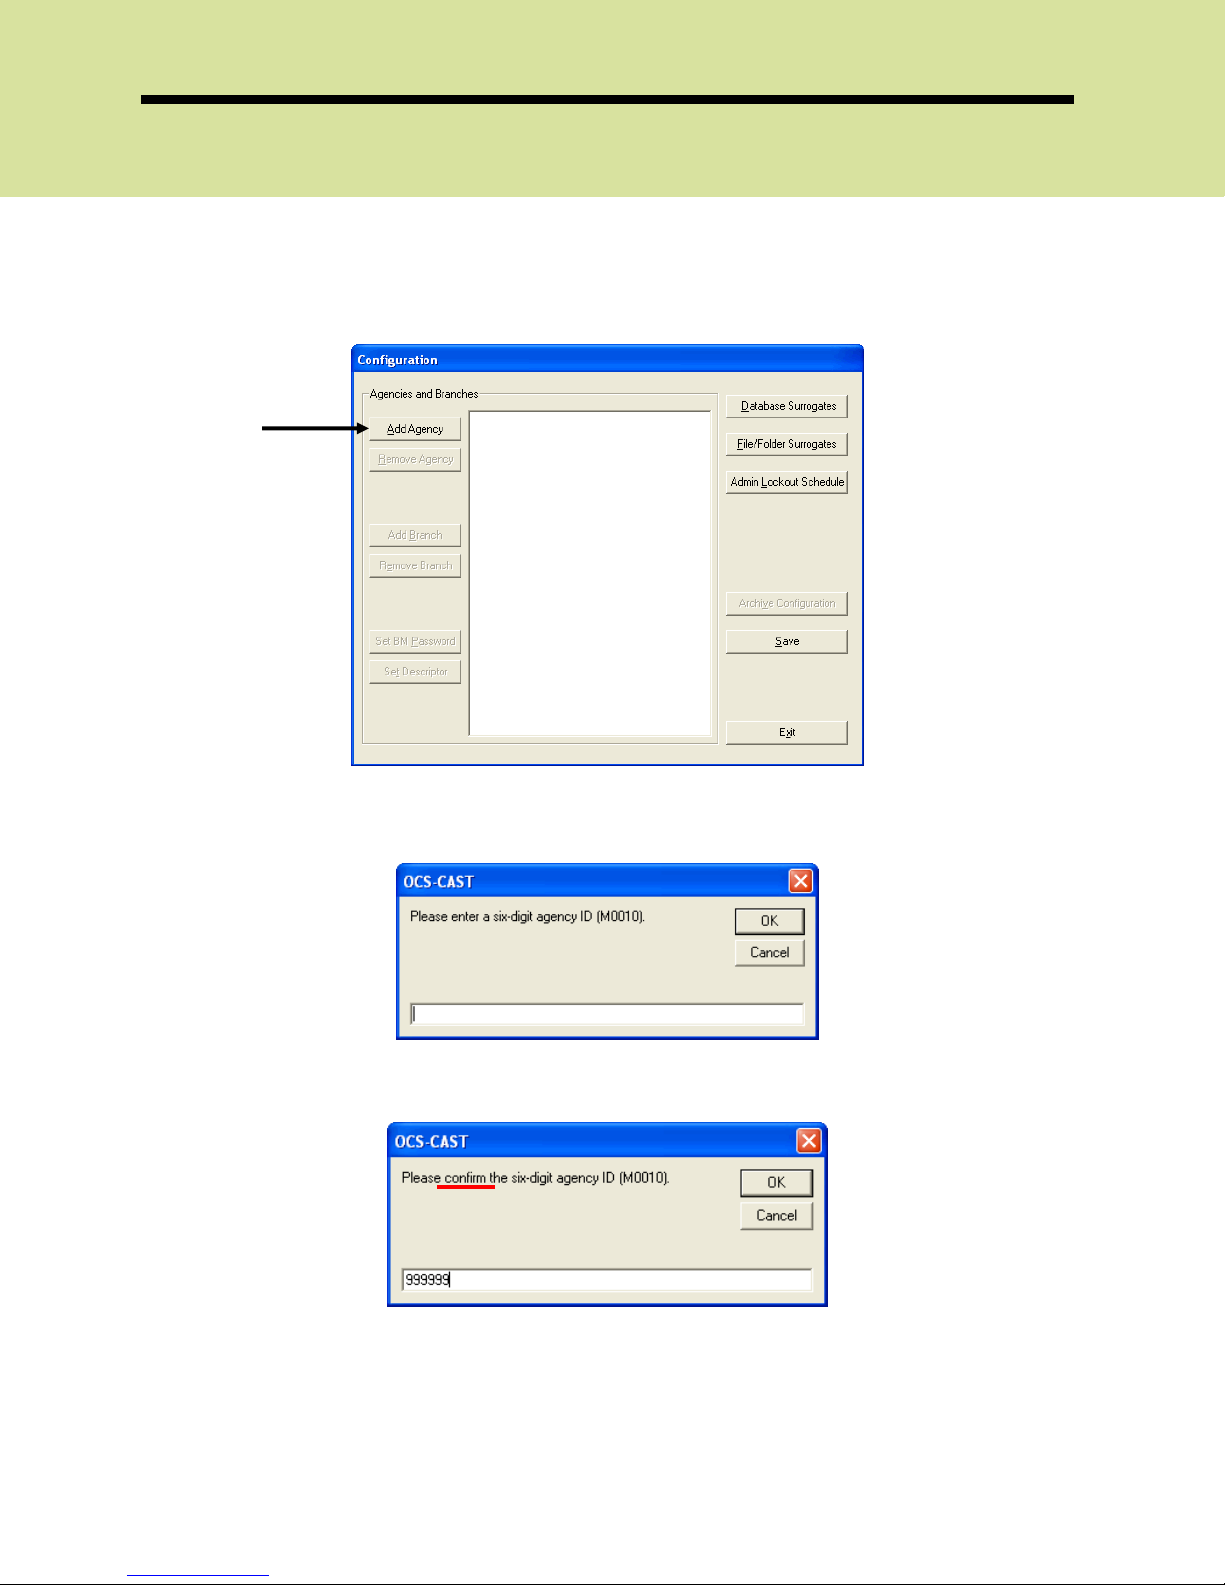
Adding Agencies and Branches
Start by entering your agency information. Click [Add Agency]
OCS-CAST
Enter your six-digit Agency ID (Medicare Provider Number / OASIS M0010)
When you hit [OK] the next pop-up screen will ask to confirm your six-digit
Agency ID entry:
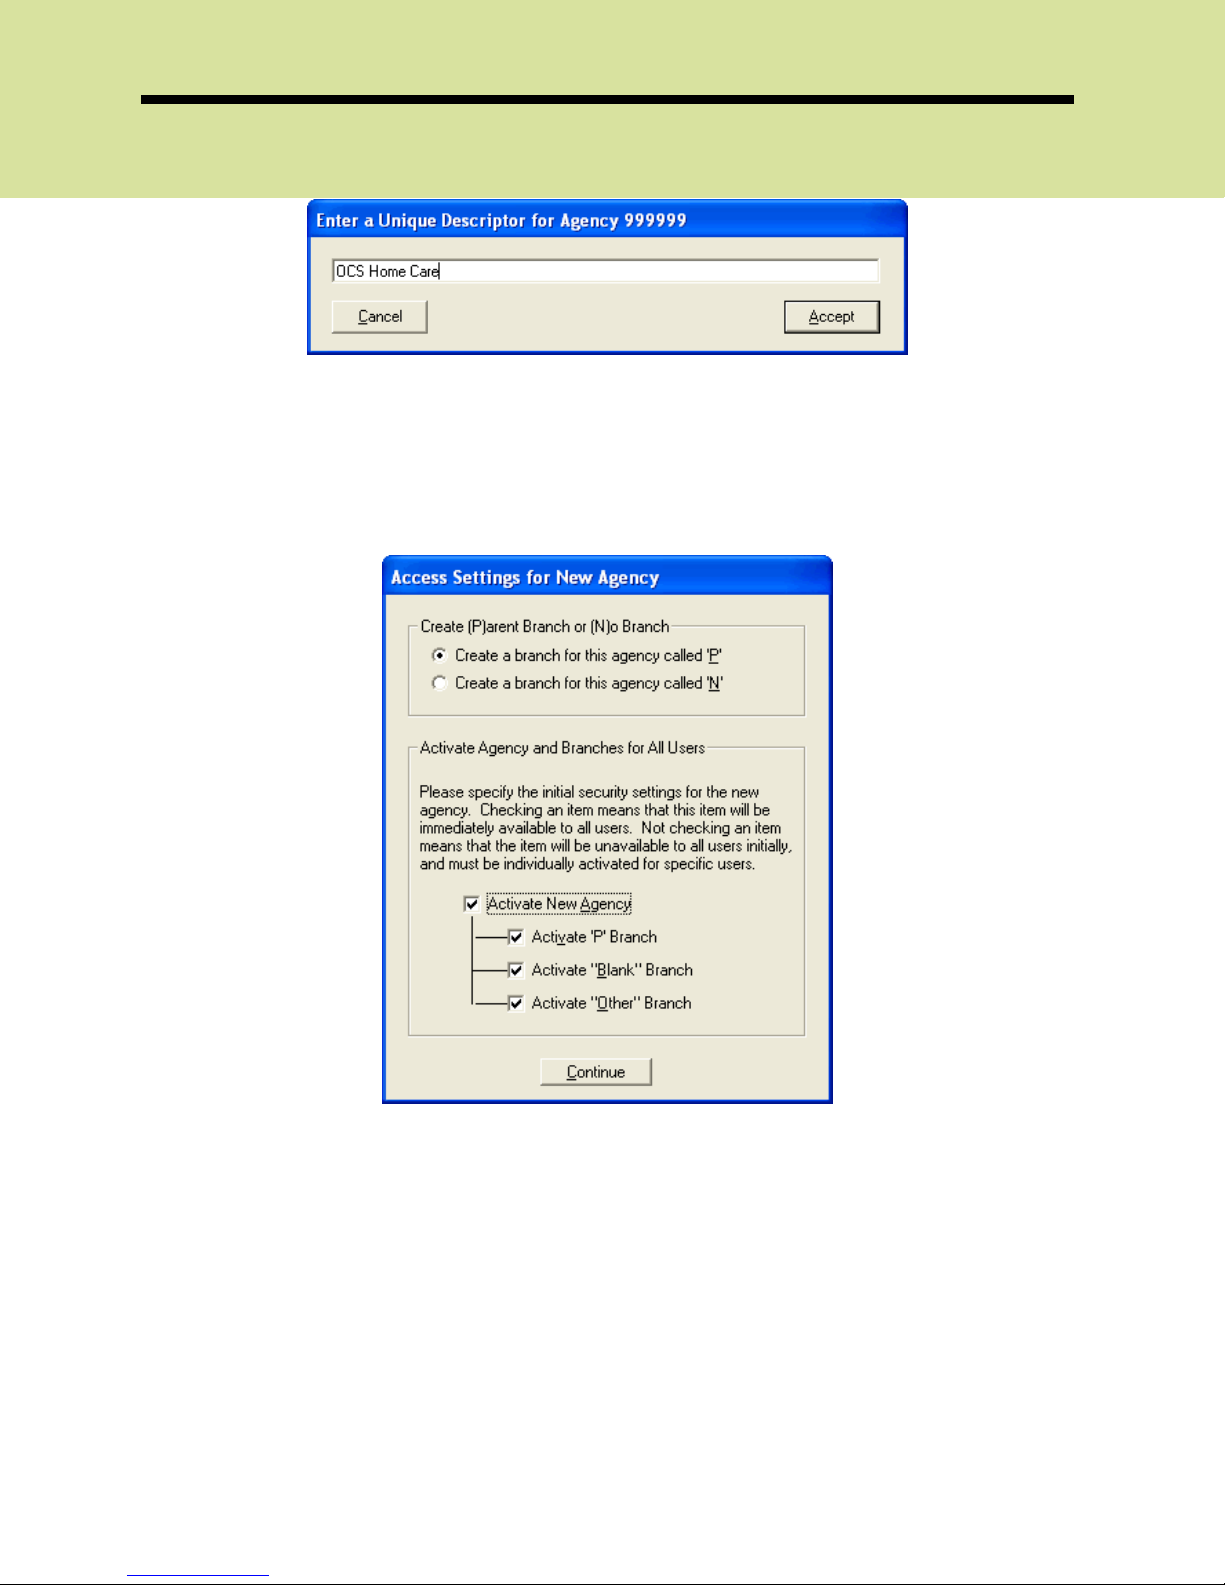
The next pop-up screen will ask you to enter the Agency Name for that Agency
ID (M0010). This name will appear on OCS desktop reports (in OCS-OASIS
Reporting and OCS-EPIC).
2006 OCS, Inc. Page 2-3
Page 12
OCS-CAST
You may want to specify the city or state if you have multiple agencies with
similar names that will be added to the list. Hit [OK]
Under Create (P)arent Branch or (N)o Branch heading, select the correct radio
button P or N. This Branch ID (M0016) is assigned by CMS. This will automatically
add the parent branch for you in OCS-CAST.
If you have entered users into OCS-CAST and wish to add a new Agency ID and
have all users with access to this new Agency ID, select Activate New Agency
If you have not added any users yet, you can choose not to select any of the
options. Make your selection and click [Continue]
You will be prompted to enter and confirm the password your agency was
assigned by OCS.
2006 OCS, Inc. Page 2-4
Page 13

OCS-CAST
Note: This is the Organization ID and Password used to log onto
your OCS-BBI Online Reports.
The Agency ID will have branches of Other and Blank. As of January 1, 2004, all
agencies are required by CMS to start using branch identifiers in M0016. "Other"
and "Blank" is to take care of those assessments/episodes with other (nonstandard Branch IDs) or blank (that is, no an empty value) in the M0016 field.
Note: Please contact OCS Client Services if you want to update all
Other and Blank Branch ID’s (M0016’s) in your database to your
current CMS assigned Branch ID’s.
If the agency has any branches, you can enter all of your branch information
under the main Agency ID.
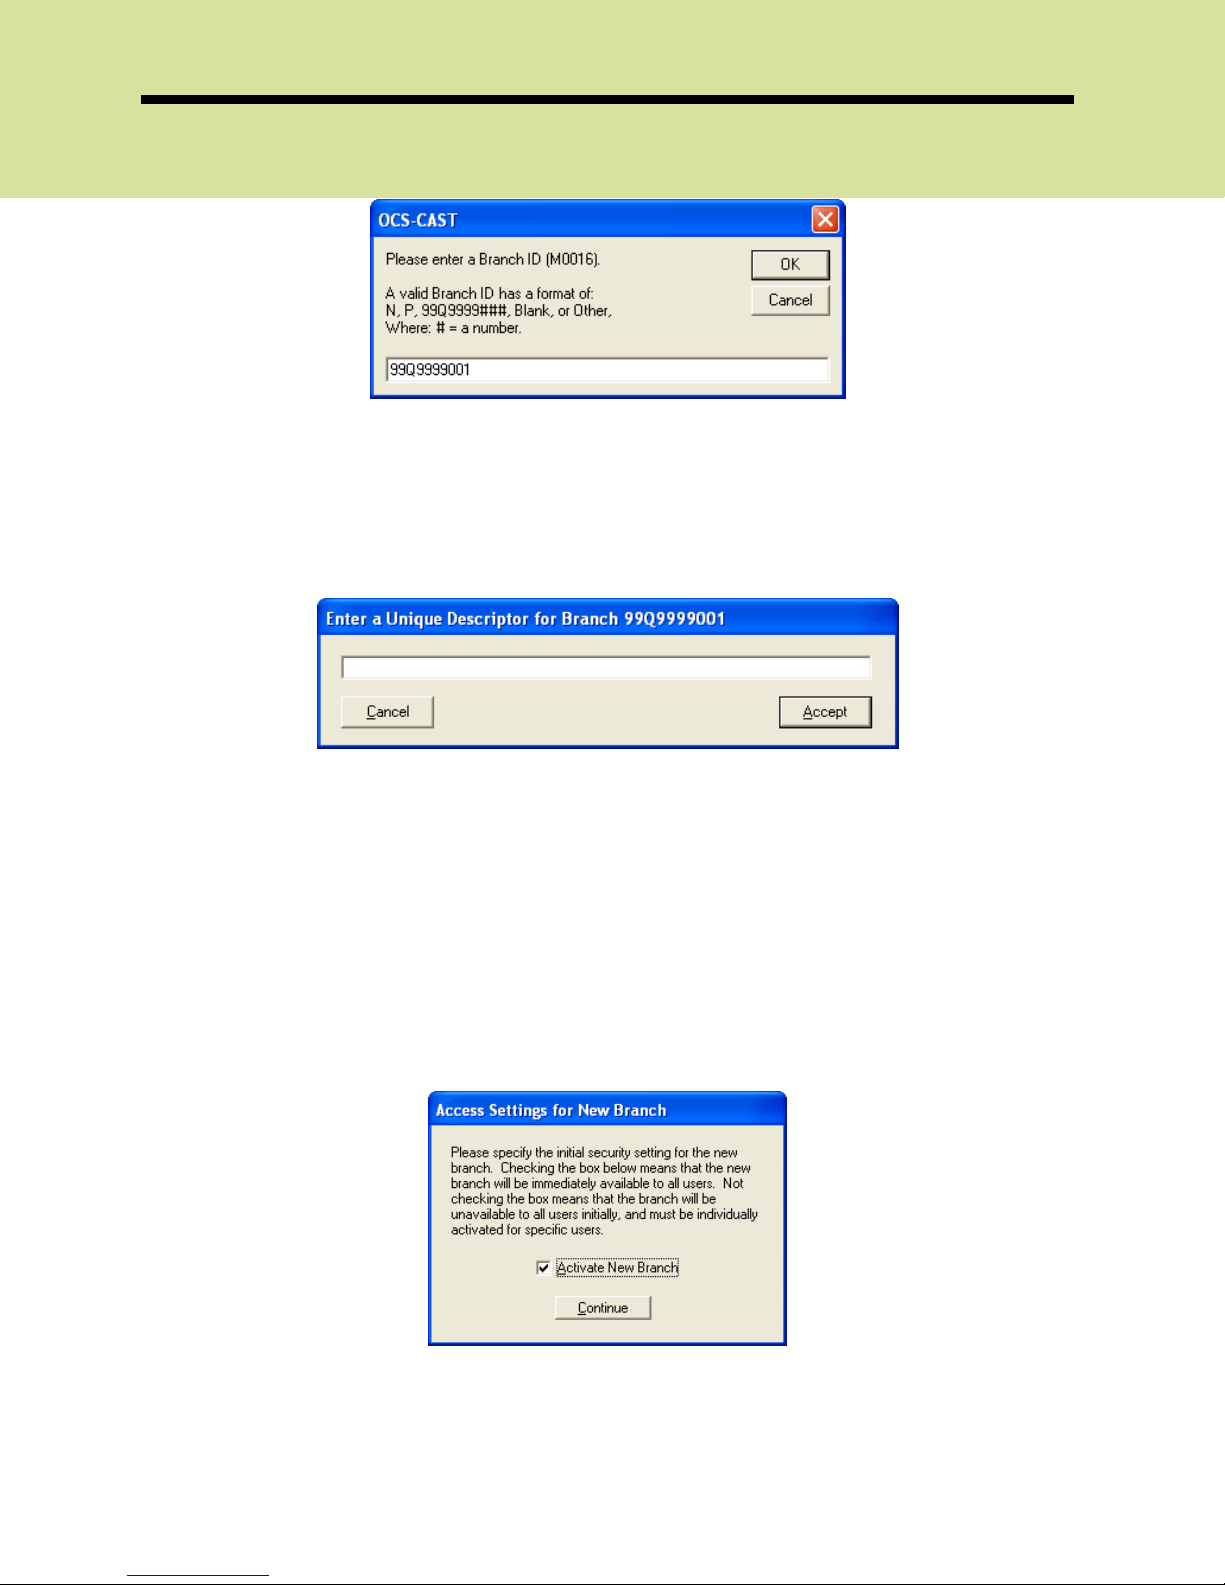
Highlight the agency provider number and select [Add Branch]
You will be prompted to enter the Branch ID (M0016) assigned by CMS.
2006 OCS, Inc. Page 2-5
Page 14
OCS-CAST
Special Note: The first seven digits will pre-populate for you, based
on the Agency ID (M0010) that you entered earlier. Add the last
three digits of your Branch ID and click [OK]
When you hit [OK] another pop-up screen appears, asking you to enter your
Branch Name.
Be specific so that when you look up the Branch ID, you will recognize who they
are right away. Each of the branches will be listed under the Agency ID you
specified.
If you have entered users into OCS-CAST and wish to add this new Branch ID
and have all users have access to this new Branch ID, select Activate New
Branch
Note: In this case, MASTERADMIN is also a user
If you have not added any users yet, you can choose not to select this option.
Make your selection and click [Continue]
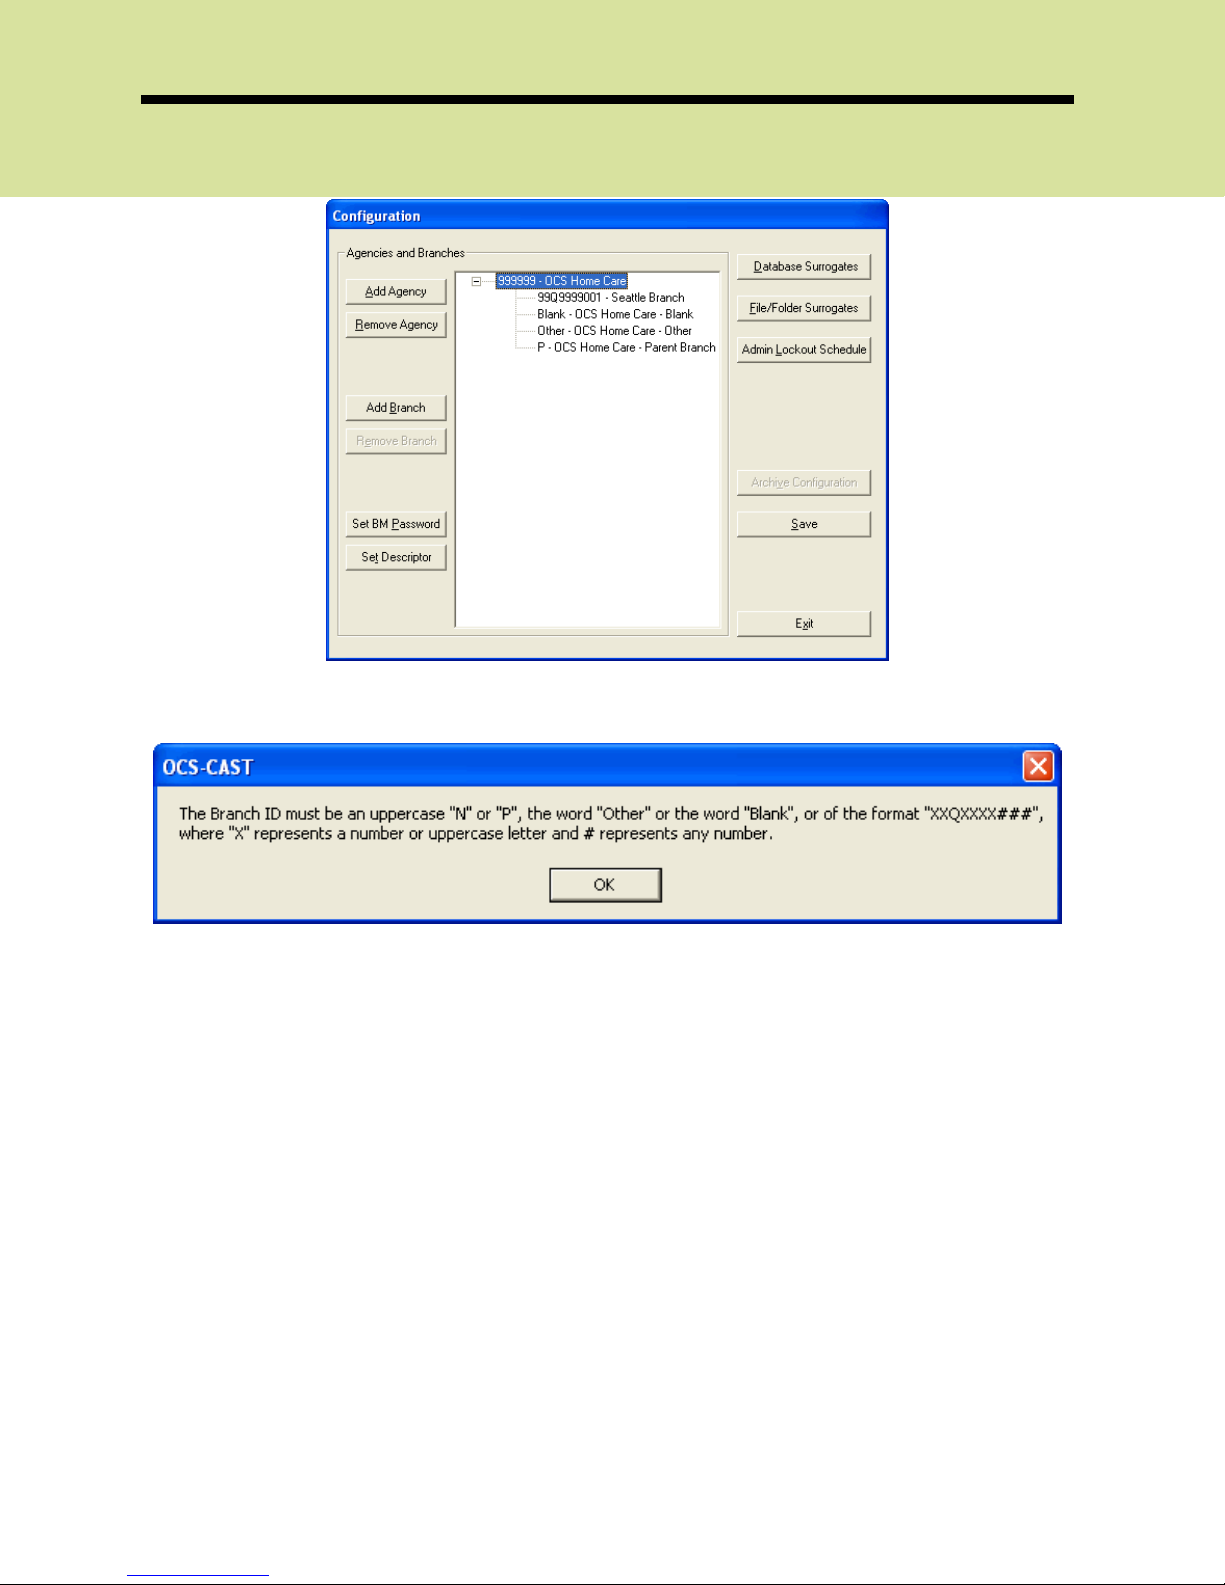
The newly entered Branch ID will appear under the specified Agency ID.
2006 OCS, Inc. Page 2-6
Page 15
OCS-CAST
Special Note: If you do not enter a Branch ID in the proper format,
you will get the following pop-up screen:
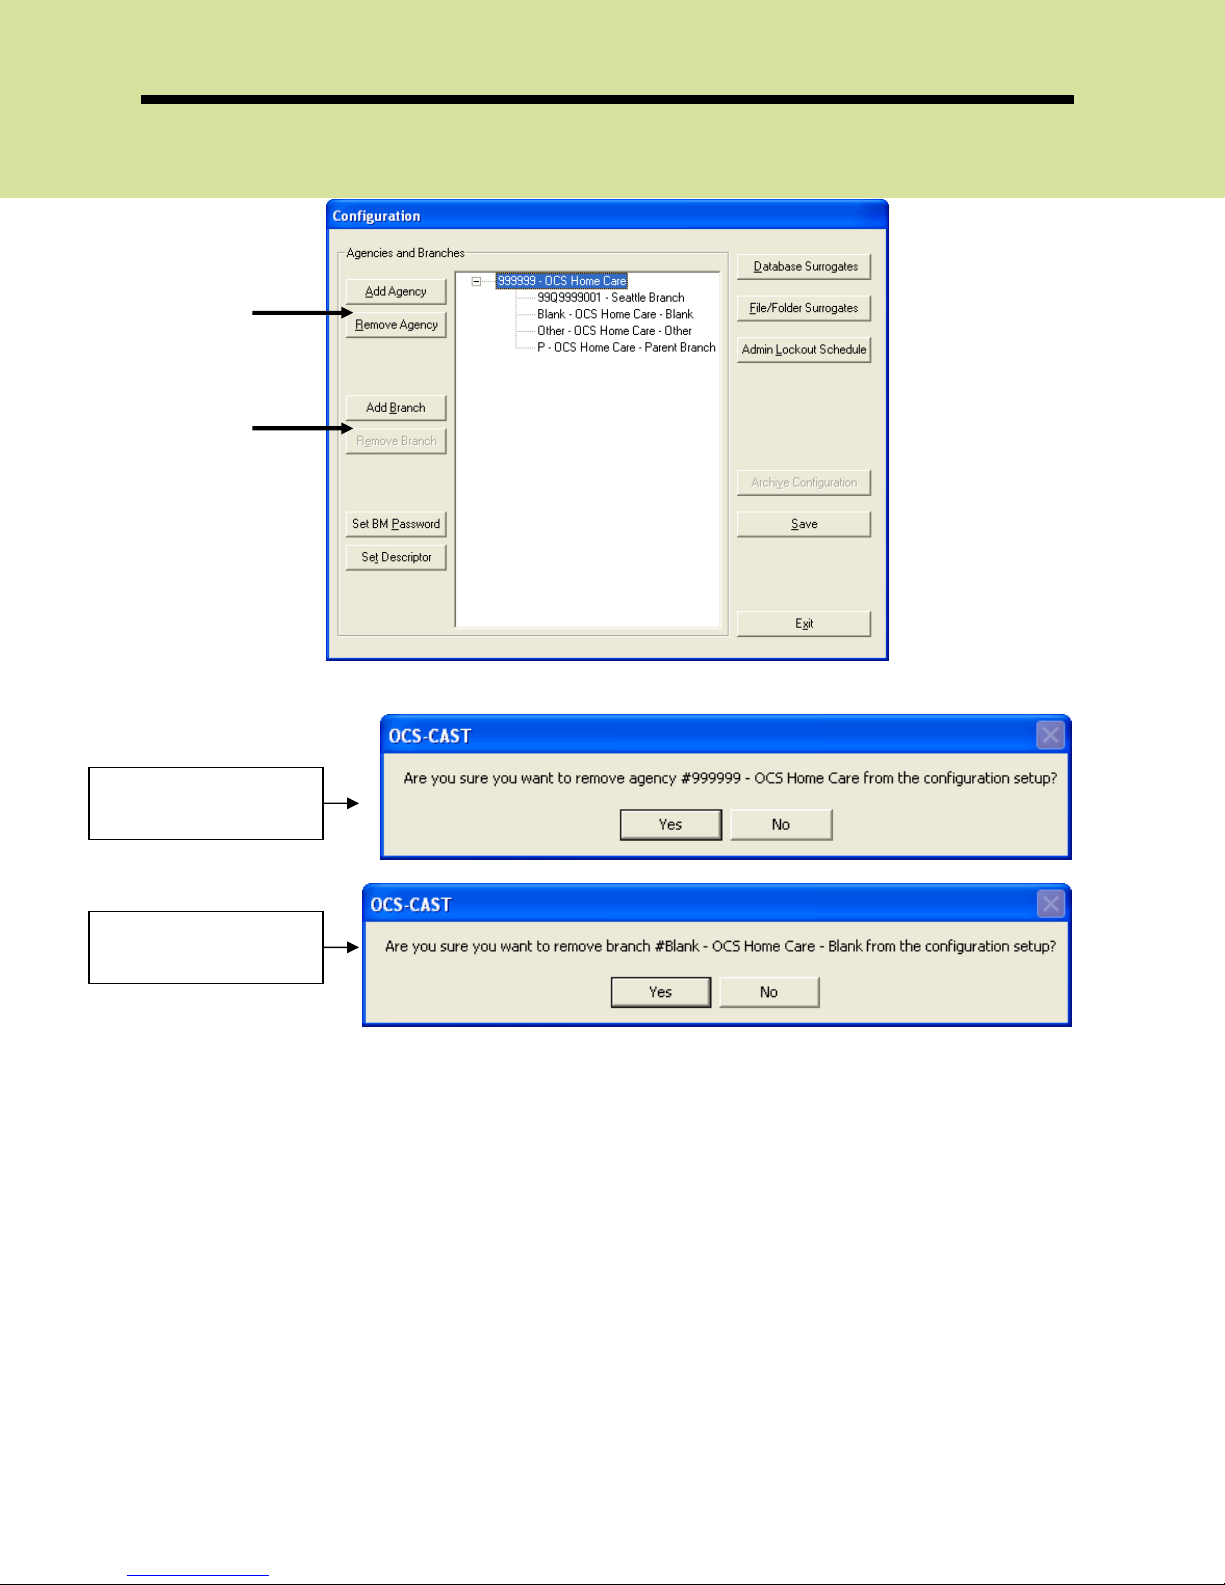
Removing Agencies and Branches
At any point, you can remove any Agency or Branches that were entered
inadvertently or you no longer want to include.
To remove just a specific branch, select the branch you wish to remove, and
click [Remove Branch]
To remove the Agency ID and all Branches associated with the Agency ID,
select the agency you wish to remove, and click [Remove Agency]
2006 OCS, Inc. Page 2-7
Page 16
OCS-CAST
After clicking the button, the following pop-up screen will appear:
[Remove Agency]
confirmation screen
[Remove Branch]
confirmation screen
Click [Yes] to delete or [No] to cancel out of this function.
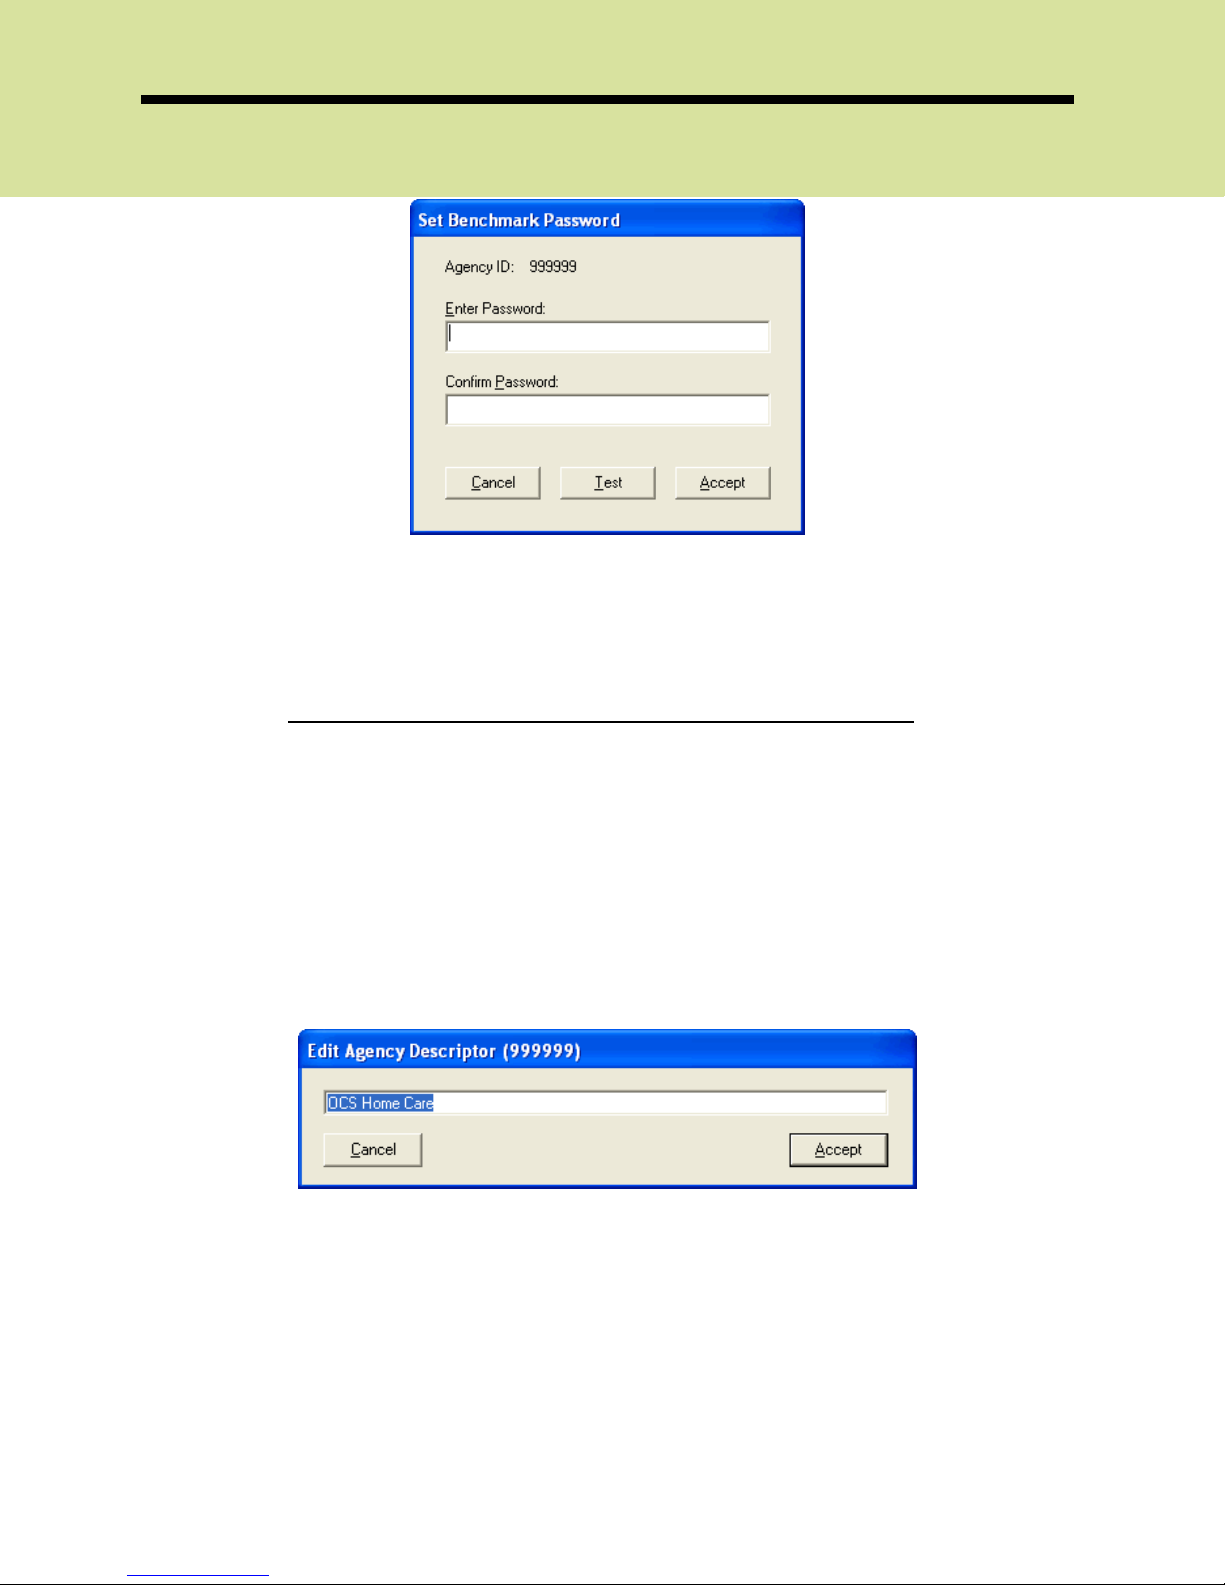
Set Benchmark Password
If you need to update the online benchmarking password for an agency, first
select the Agency ID you wish to update and select [Set BM Password]
The Set Benchmark Password window will appear. You will notice that the
password field has been cleared.
2006 OCS, Inc. Page 2-8
Page 17
OCS-CAST
Enter the correct or updated password here and hit [Accept] If you clicked on
the Set Password button in error, click on [Cancel] and the old password will be
saved.
Note: OCS assigns and manages online benchmarking passwords.
You cannot use this function to set your own password. If you need
to change your OCS-BBI password, please contact OCS Client
Services.
Set Descriptor
If you wish to change the way the Agency or Branch Name appears on screen,
you can select the Agency or Branch ID and select [Set Descriptor]
An Edit Agency/Branch Descriptor window will appear.
It will contain the current name assigned to the selected Agency ID or Branch
ID. Make any changes here and click [Accept] If you wish to exit without
making any changes, click [Cancel]
Note: Modifying the descriptor for the Agency ID does not
automatically modify the descriptor for the Branch ID. You must
select the Branch ID(s) separately and make appropriate
modifications here.
2006 OCS, Inc. Page 2-9
Page 18
OCS-CAST
Database Surrogates
Database surrogates allow your System Administrator or designated technical
support personnel to select the shared location of a database for all users to
access. If the database is ever moved to a different location, it is only
necessary to modify the surrogate path, rather than the specific database path
for each user. The change to the surrogate will ‘cascade’ to all users.
OCS-CAST comes with these surrogate databases created. They are currently
pointed to the local blank copy of the database in the root folder: C:\Program
Files\OCS
• OCS-OASIS database (ocsoasis.mdb) • OCS-EPIC Norms (ocsnorms.mdb)
• OCS-EPIC Project (ocsepic.mdb)
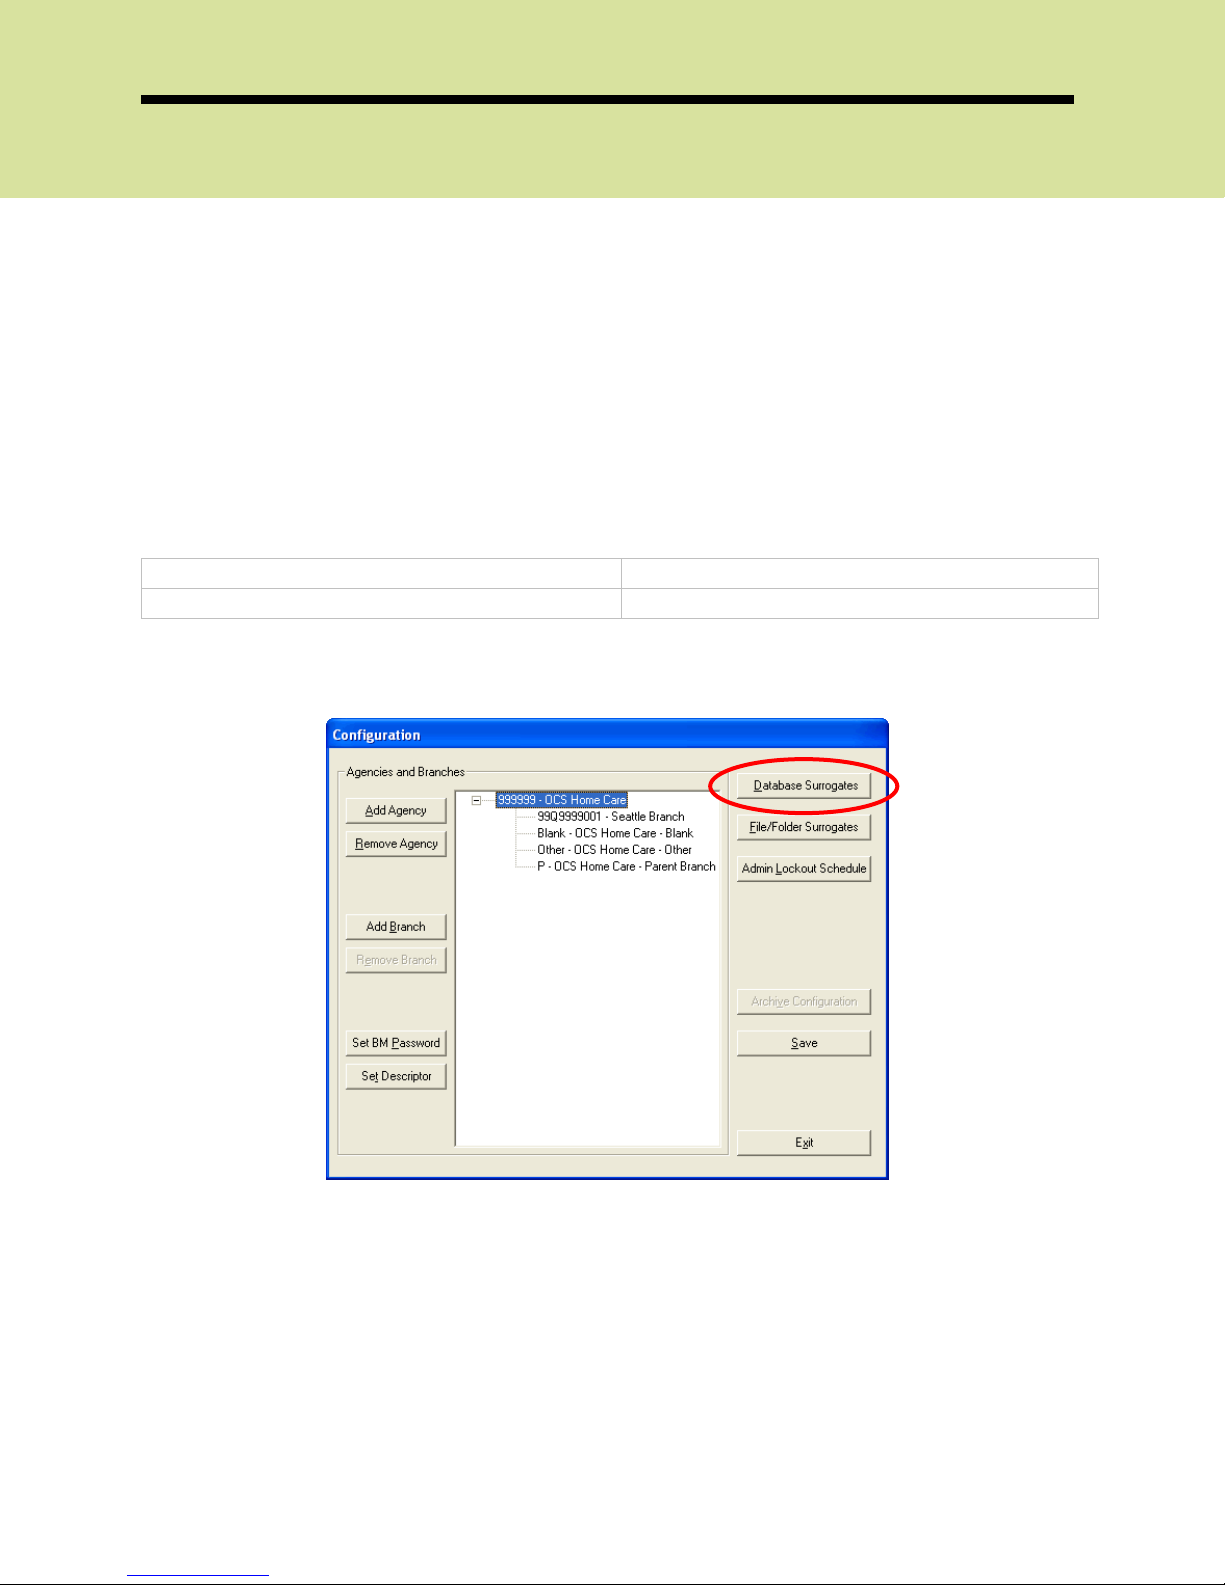
To change the location of the surrogate databases or create a new surrogate
database, click [Database Surrogates]
To edit the existing database surrogate, select the database you wish to
update and click [Edit]
2006 OCS, Inc. Page 2-10
Page 19
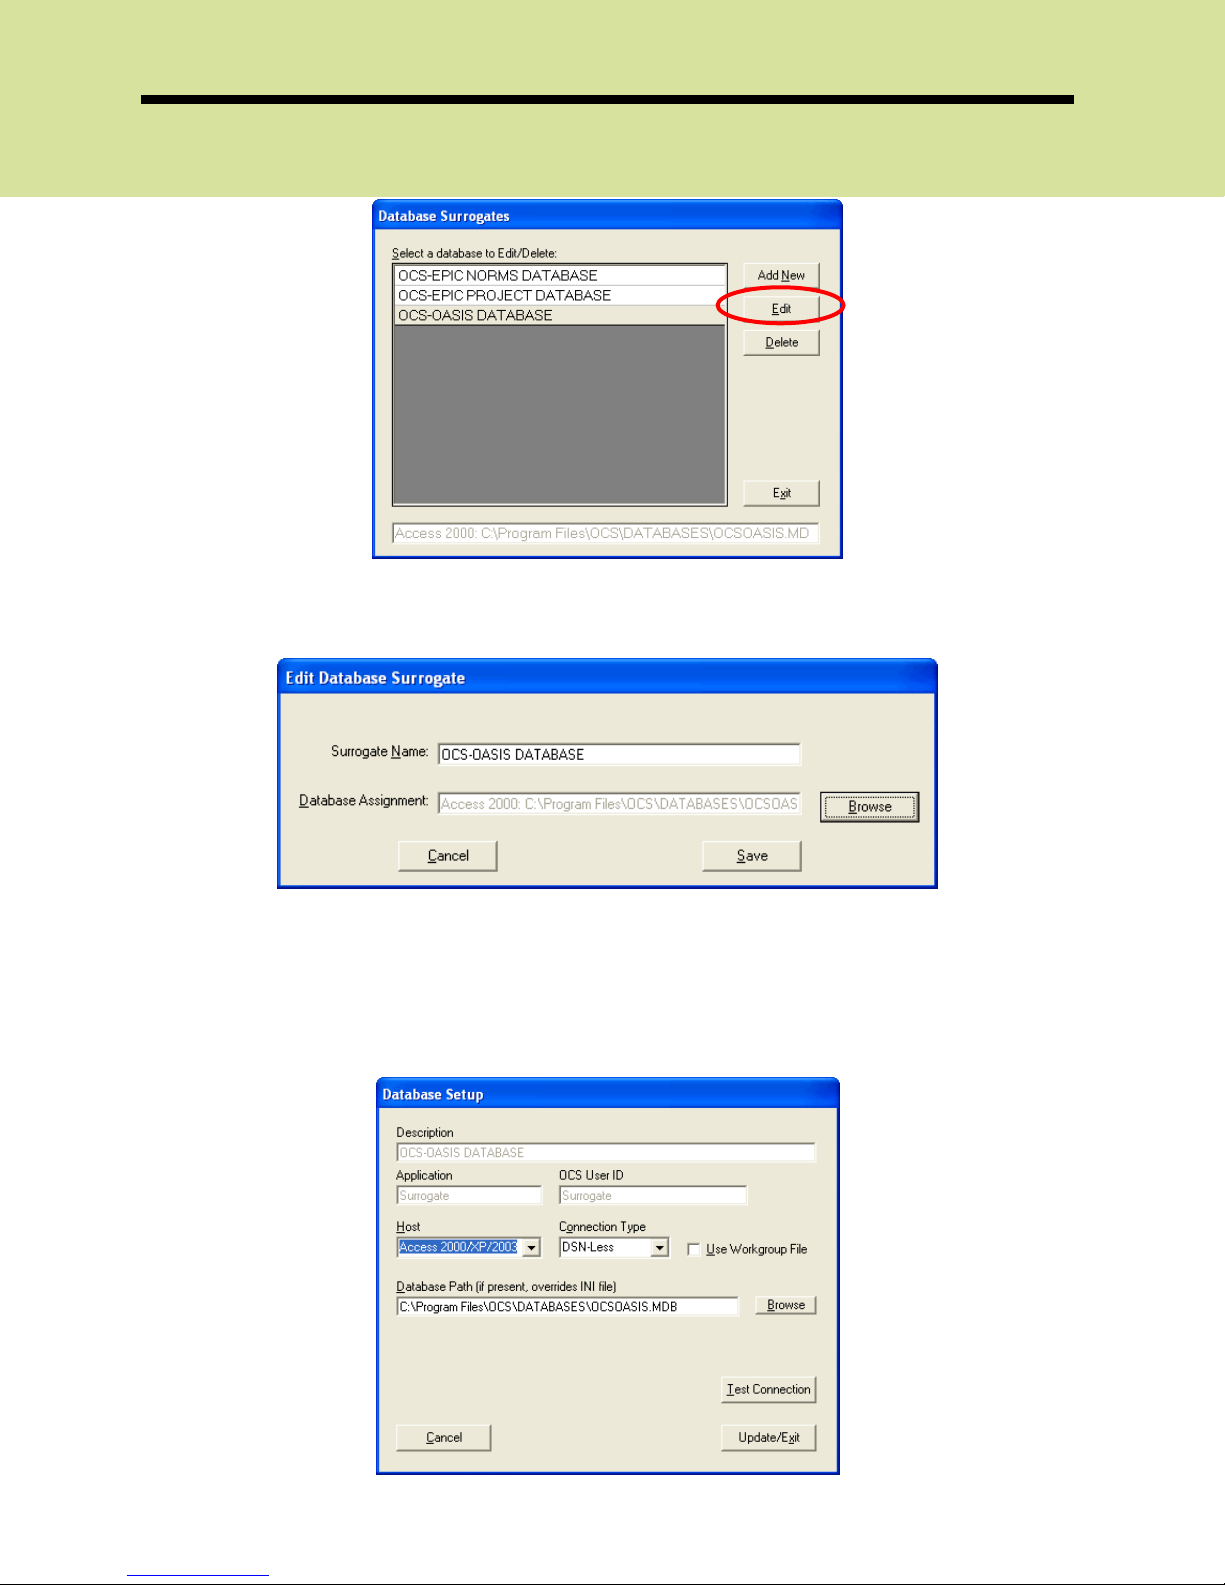
OCS-CAST
On the Edit Database Surrogate screen, click [Browse] to specify the location of
the database.
Click [Browse] again to select the database location. Here you have to select if
the database is a Microsoft Access database or a SQL Server Database. If you
choose to browse to a SQL database, it will ask you for a server name and
location, as well as to authenticate yourself as a user.
2006 OCS, Inc. Page 2-11
Page 20
OCS-CAST
Important Note: If the database is on a network drive, OCS highly
recommends that you specify the UNC (universal naming
convention) path of the database vs. the mapped path. For
example, instead of F:\OCS\ocsoasis.mdb it would be \\<server
name>\OCS\ocsoasis.mdb
Click [Test Connection] to ensure you have selected and entered the correct
information to access the database. Click [Update/Exit] to proceed.
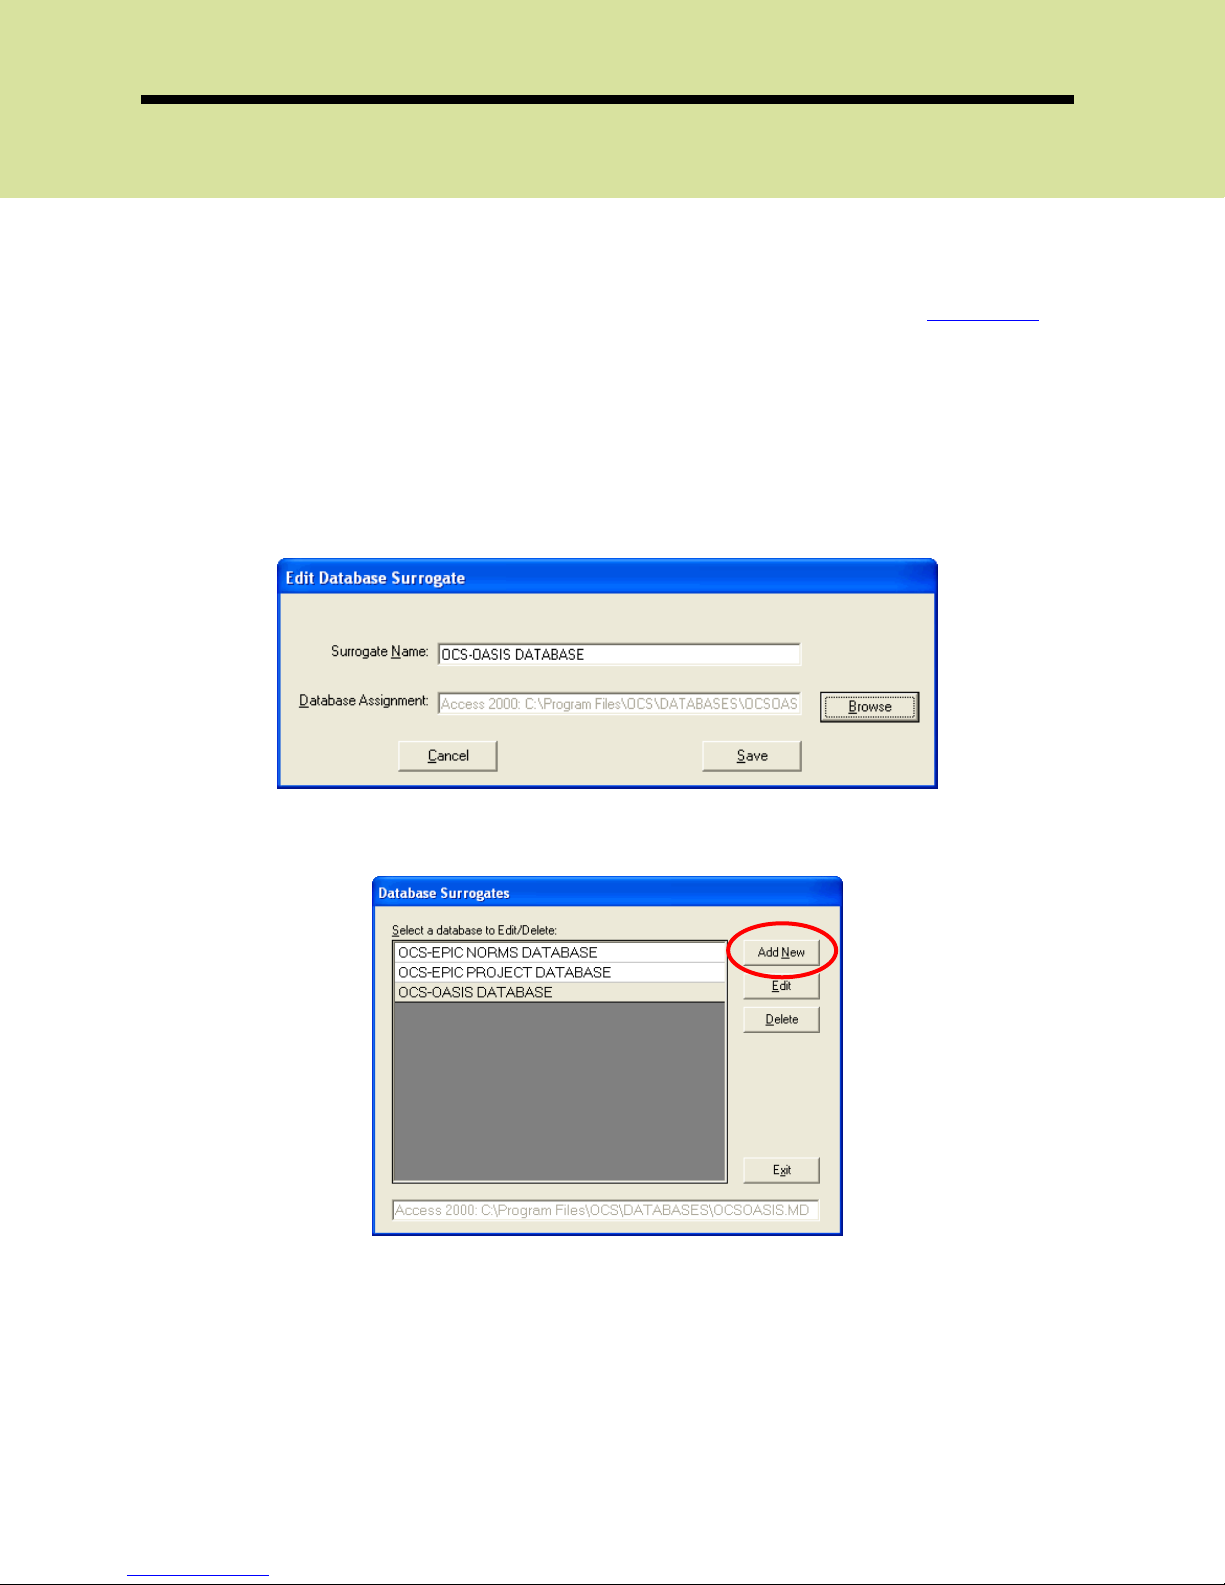
If you were able to connect to the database successfully, click [Update/Exit].
Followed by [Save] on the Edit Database Surrogate screen.
To enter a new database surrogate, click [Add New]
Enter the name (description) of the database – this is what you will see when
you select the surrogate database for each user and for each application.
Descriptions must be unique and are not case sensitive.
2006 OCS, Inc. Page 2-12
Page 21

OCS-CAST
Here you have to select if the database is a Microsoft Access database or a
SQL Server Database. If you choose to browse to a SQL database, it will ask
you for a server name, location, as well as to authenticate yourself as a user.
Click [Test Connection] to ensure you have selected and entered the correct
information to access the database. Then click [Update/Exit] to proceed.
2006 OCS, Inc. Page 2-13
Page 22

OCS-CAST
Special Note: If you assign a surrogate database to a
user and then try to delete that surrogate database,
you will receive the following pop-up screen:
Click [Yes] to continue with the deletion or if you want to cancel or
are unsure of whether you want to delete or not, click [No]
File/Folder Surrogates
As with Database Surrogates, you can select the File/Folder Surrogates, so at
any time the Systems Administrator or designated technical support personnel
decides to move the location of a file, they can move the location of files for all
users in one place.
OCS-CAST comes with these files/folders created. Currently, they are pointed to
the local blank copy of the database in the root folder: C:\Program Files\OCS
File:
• OCS-EPIC Address Book File
Folder(s):
• OCS-eCAT Bitmaps Folder • OCS-EPIC Components Folder
• OCS-eCAT Templates Folder • OCS-EPIC Job Queue Folder
• OCS-OASIS (RG) Report
• OCS-EPIC Process Queue Folder
Configuration Folder
• OCS-OASIS (RG) Report Setup Folder • OCS-EPIC Reports Folder
• OCS-OASIS (RG) Report Templates
• OCS-OASIS (DE) Reports Folder
Folder
2006 OCS, Inc. Page 2-14
Page 23

OCS-CAST
To change the location of the surrogate file/folder or to create a new surrogate
file/folder, click [File/Folder Surrogates]
To edit the existing file/folder surrogate, select the file/folder you wish to update
and click [Edit]
From here, select the file/folder you wish to update, and click [Edit]
2006 OCS, Inc. Page 2-15
Page 24

OCS-CAST
On the Edit Folder Surrogate screen, click [Browse] to specify the updated
location of the file/folder.
Once you have selected the updated location, click [OK] Click [Save/Exit] to
save your updated file/folder location.
To add a new file or folder, select [Add File]
2006 OCS, Inc. Page 2-16
Page 25

OCS-CAST
First select the type of surrogate you are creating – File Surrogate or Folder
Surrogate.
Then, enter the name (description) of the file– this is what you will see when you
select the surrogate file for each user and for each application.
You will be asked to locate the file – Click [Browse] to select the file location.
2006 OCS, Inc. Page 2-17
Page 26

OCS-CAST
Select the file and click [Open] Select [Save/Exit] on the Create New Surrogate
screen to exit.
It will appear on the list of available surrogate files/folders.
2006 OCS, Inc. Page 2-18
Page 27

OCS-CAST
All surrogate files and folders (and databases) will appear in pink. This is a visual
indication that the surrogate file or folder was selected. We will see this when
we add users in the next section.
File Surrogates with have this icon: , while the Folder Surrogate will have this
icon: .
Special Note: If you assign a surrogate file or folder to a user
and then try to delete that surrogate file or folder, you will
receive the following pop-up screen:
Click [Yes] to continue with the deletion or if you want to cancel or
are unsure of whether you want to delete or not, click [No]
2006 OCS, Inc. Page 2-19
Page 28

OCS-CAST
Admin Lockout Schedule
As the administrator, you can create a schedule to lock users out of OCS
applications at specified time frames. This may be useful to perform updates,
create database backups, and complete other administrative work.
To do this, click [Admin Lockout Schedule]
To lock days of the week or hours of the day, click on the gray headings that
appear on the top and the left-hand side of the screen. For example, if you
wish to lock all users out on Sundays, click on the Sunday heading.
Important Note: This feature prevents users from launching OCS
applications during designated hours. Users who are in any OCS
2006 OCS, Inc. Page 2-20
Page 29

OCS-CAST
application when the lockout period begins, however, will still have
access to the applications until they exit OCS-Gateway (they will
not be "kicked out" of the product).
You can select very specific times of the day as well. Just click on the cell that
corresponds to the day and time you wish to lock. In the example above, the
application is locked Monday – Thursday from 8 AM to 9 AM.
If users try to log into OCS-Gateway during these specified times, they will
receive the following message:
You can clear all entries made by clicking on [Clear] located on the top left
hand corner of the screen. Hit [Accept] to save changes prior to hitting [Exit]
Note: The Admin Lockout Schedule affects all users that do not
have access to OCS-CAST. Please give users access to OCS-CAST
privileges accordingly.
2006 OCS, Inc. Page 2-21
Page 30

OCS-CAST
Archive Configuration
Prior to exiting the [Configuration] screen, we recommend you archive a copy
of your configuration settings, in case your configuration files become
corrupted or you need to revert back to an earlier setting.
To archive the configuration files, click [Archive Configuration] in the
Configuration Main Menu to manually create an archive file.
It will prompt you for a location to save the archived file.
The name of the archived file will automatically be date and time stamped.
You will be asked to confirm your password. Enter your password and hit
[Proceed]
The next pop-up screen will notify you that the archive process is complete.
2006 OCS, Inc. Page 2-22
Page 31

OCS-CAST
Set Up User Profiles – Copy User
You are ready to set up a user’s profile. In order to start adding new users to
the security module, click [User Management]
From the main menu of the User Management screen, click [Create New User]
OCS-CAST has four template users created for your convenience – prefaced
with AA in front of the name: AAADMINUSER, AAPOWERUSER,
AAREPORTINGUSER , and AADATAENTRYUSER.
2006 OCS, Inc. Page 2-23
Page 32

OCS-CAST
• AAADMINUSER – User will full permissions to all applications and utilities,
including managing OCS-CAST
• AAPOWERUSER – User with permissions to all applications and utilities,
except OCS-CAST. This user does not have the ability to change the
database path in the various modules
• AAREPORTINGUSER – User only has permissions to applications with
reporting capabilities, limited access to modules
• AADATAENTRYUSER – User only has permissions to applications related to
data entry or importing data, limited access to modules
Special Note: OCS recommends that most users do not have
access to change the database path. If users have permissions to
change database path, administrators who change the surrogate
database location for all users, will not be able to update those
user accounts. Please contact OCS Client Services for more
information.
Click on the first drop down box to select the type of user you want to create.
For the purpose of this guide we are going to create a Power User.
2006 OCS, Inc. Page 2-24
Page 33

OCS-CAST
You will be prompted to enter a username that can be up to 16 alphanumeric
characters. The username cannot start with a number. Click [OK]
Note: Since the username is not case-sensitive, the username will
be displayed in upper case letters.
Next, enter and confirm the user’s password.
You can either hand-type a unique password for the user OR you can click [Set
password to user ID] If the user’s name is not six characters, it will add the
2006 OCS, Inc. Page 2-25
Page 34

OCS-CAST
numeric ‘1’ until the password is at least six characters long. For example, if the
user account is Doe, it will create the password as doe111.
Select [OK] to save the username and password.
Hit [Enter] to view the user’s privileges.
2006 OCS, Inc. Page 2-26
Page 35

OCS-CAST
The tree view presents the logic of the security system:
Users can have access to different OCS applications Therefore the
available applications are listed under each user’s heading
Within each application, you can assign access to different privileges
Therefore Privileges are listed under each application’s heading
There can be several different levels of privileges Therefore specific
privileges are listed, when appropriate, under the Privileges heading
An agency may have several branches Therefore all branches that
have been added in the Administrative Setup module will be listed
under the appropriate agency heading
A heading with hidden options under it will have a small plus sign in the box to
the left of the heading. To view options under any of the headings, click on the
plus sign.
Note: You can double-click on the heading as well, but doing
so will switch permissions for the item
2006 OCS, Inc. Page 2-27
Page 36

OCS-CAST
Each icon indicates the level of rights assigned to the user.
The heading icons will reflect rights assigned by the following three symbols:
1) Red X on heading—Access to nothing under the heading (and
sub-headings)
2) No mark on the heading—Access to the product, but not
necessarily the privileges
3) Solid green checkmark on sub-heading—Access to everything
under the heading and sub-headings
4) Green dashed checkmark on the sub-heading—Access to some
of the privileges or agencies under the heading, but not all
In order to change an assigned level of privilege, click on the appropriate listing
and hit the Space Bar on your keyboard or double-click on the heading.
Changing the allowed access to a product heading will not change any of the
assigned privileges or agency access. Changing the access on the Privileges
heading or Agency/Branch heading will change everything underneath that
heading.
Special Note: You cannot alter any of the OCS-CAST permissions
set for the MasterAdmin account. This is a safety precaution
feature added to avoid locking the entire system out.
Now that you have completed creating the user account you can finish the
process by entering the users information on the right by providing their name
and email address. Once you have filled in those boxes you may click save to
complete the process.
2006 OCS, Inc. Page 2-28
Page 37

OCS-CAST
Changing User Profile Passwords
To change the user’s password, click on the User Profile’s name and click [Reset
User Password]
The password must be at a minimum of 6 characters and a maximum of 20
characters long. If you enter more or less, you will receive the following pop-up
screen.
Enter the new password in both text boxes (‘Enter New Password’ and ‘Confirm
New Password’) and hit [Accept]
2006 OCS, Inc. Page 2-29
Page 38

OCS-CAST
You will be asked to confirm the change, hit [Yes] The password change will
occur immediately.
Note: You only need to provide the old password when
changing the password for the MASTERADMIN. You do not
need to enter the old password for any of the users created in
OCS-CAST.
Create New User
If you wish to use the Create New User button, please contact OCS for further
information.
Remove User Profiles
It is very easy to delete a user profile out of OCS-CAST.
Select the user you wish to delete and select [Remove User]
2006 OCS, Inc. Page 2-30
Page 39

OCS-CAST
OCS-CAST will prompt you to confirm the deletion:
Once you have selected [Yes] you cannot restore the deleted user profile.
The next pop-up screen will notify you that changes have been saved. Click
[OK]
Note: Instead of deleting a user profile, you can also
‘inactivate’ the user, selecting the username and clicking
[Inactive User] on the right-hand side of the screen.
2006 OCS, Inc. Page 2-31
Page 40

OCS-CAST
It will read ‘User Status is currently Inactive’.
You cannot delete nor inactivate the MASTERADMIN user profile.
View Reports
For auditing or troubleshooting purposes, you can generate reports of what has
been entered into OCS-CAST. Click [Security Reports] on the main OCS-CAST
menu.
This will take you to a menu of security reports you can run in OCS-CAST.
2006 OCS, Inc. Page 2-32
Page 41

OCS-CAST
First, select the type of report you wish to run, under Step 1: Select type of
report.
Depending on the report type you select, your available options will appear on
the right-hand pane, under Step 2
Make your selection and click [Run Report]
The report you have selected will pull up in a Crystal Report Viewer. You can
either print or export/save the report from here.
2006 OCS, Inc. Page 2-33
Page 42

OCS-CAST
IMPORTANT NOTE!!
• OCS STRONGLY RECOMMENDS THAT YOU CREATE AN ARCHIVE FILES
(BACKUP) OF THE TWO FOLDERS: “OCS\OCSCAST\VALIDATE” AND
“OCS\OCSCAST\OCSINI” THROUGH OCS-CAST. THESE FOLDERS
CONTAIN THE OCSCNFIG.TXT, OCSPW.TXT, MANY USER.CFG FILES, AND
MANY OCS.USER.INI FILES ANY TIME YOU MAKE ANY CHANGES IN OCSCAST.
It is strongly recommended to do this every time you make any
changes in OCS-CAST. If for any reason these files become
corrupted, you can restore the backups.
2006 OCS, Inc. Page 2-34
Page 43

Chapter 3
OCS-Gateway
Launch OCS-Gateway through the shortcut created on the desktop or by
going into Start|Programs|OCSGateway.
Log into the software with the username and password that has been assigned
through OCS-CAST.
Note: There is an online help button right on the OCS-Gateway
application! Click on the blue question mark in the bottom righthand corner to access OCS product specific user guides and
information.
There are two tabs on the screen: Applications and Utilities. All items that you
have access to will be in bold print.
Applications
The applications tab lists all products currently available in OCS-Gateway. All
bolded items are OCS products you have purchased and installed at your
agency.
To launch an OCS product, you can either double-click or click on the OCS
product and hit [Go!] to open the OCS product.
Please ask your System Administrator or designated technical support personnel
if you are unable to access OCS products you can see here.
2006 OCS, Inc. Page 3-1
Page 44

OCS-Gateway
Utilities
All importing and database utilities are centralized and available in the Utilities
tab.
When using OCS-DIT, OCS-VISIT, or OCS-BMST, you will be required to select the
OCS-OASIS database that you want to use if it was not set up by your System
Administrator in OCS-CAST in advance. If you have the ability to change the
database path within OCS-CAST, you can change it manually within the utility.
Click on [Select Database] or [Change Database], as appropriate.
Select the type of database you will be accessing, Access 97, Access 2000,
Access XP, or Access 2003, SQL Server97, or SQL Server2000 from the drop-down
list under the heading Host
If you are using an Access 97, Access 2000, Access XP, or Access 2003
database, the window will not change. Click [Browse] to search for and select
the applicable database.
2006 OCS, Inc. Page 3-2
Page 45

OCS-Gateway
If you are using a SQL Server database, you will be required to enter more
information.
Enter the applicable Server Name, Database Name, Database User ID and
Password.
With either type of database, you want to be sure that all of the information
entered is correct. To do so, click [Test Connection] When your setup is
complete, click [Update/Exit]
2006 OCS, Inc. Page 3-3
Page 46

OCS-Gateway
Note: The [Test Connection] function does not test to see if
you have selected the appropriate database. It only tests to
see if you can connect to the selected database.
OCS-DIT (Data Import Tool) and OCS-VISIT (Visit Import and Statistical
Information Tool)
Please refer to the User Guides for OCS-DIT and OCS-VISIT for instructions on
how to import your data. If you are familiar with the import process using the
stand-alone applications, the only change you will see in OCS-Gateway is how
the database path is selected.
OCS-BMST (Benchmark Submission Tool)
To create a file of your data for quarterly benchmarking with OCS, select the
OCS-BMST.
Enter the appropriate information about your agency and the person
responsible for submitting the data to OCS. Complete the submission
information. This information will be saved after creating your first submission file
so you won't have to reenter it.
Click [Create File]. OCS-BMST will scan your data for bad dates, create a new
database with only the required data for the benchmarking quarter, strip the
patient identifying information (name, social security number, Medicare
number and Medicaid number), and compress the resultant file.
The name of the file will be your agency’s Medicare Provider number (M0010)
followed by the appropriate quarter (for example, 123456 2004-Q1.zip). This file
2006 OCS, Inc. Page 3-4
Page 47

OCS-Gateway
is now ready to be sent, along with a completed copy of the OCS Benchmark
Data Submittal Form, to OCS for benchmark processing.
NOTE: Even if you have converted your database to MS
Access 2000, SQL Server7.0, or SQL Server 2000, the file that is
created will be an MS Access97 database.
To send your data to OCS via our HIPAA-compliant OCS-Web Uploader, please
follow these directions:
1. Log on to the Internet and go to the OCS web site: www.ocsys.com
2. Click on the link: Client Login
3. Select the Client Corner/Tech Talk link in the Client Login area at the right
side of the page
• Type in the User Name and Password for Tech Talk (Call OCS Client
Services if you need this information) then click the [Login] button
• Click on the Client Corner/Tech Talk link (first link on the Resources
page)
4. Click the link to the OCS-Web Uploader - Data Transmission to OCS, followed
by Web Upload Quarterly Data Submission
5. Click on one of the [Browse] buttons
When the Choose File window opens, select the file you wish to
submit. Highlight it, and click [Open] or double-click on the file
The file path and name will be displayed in the text box
If you need to send additional files, repeat the browse clicking on the
next [Browse] button
7. When you are ready to transmit, click [Upload!]
The status bar on the bottom of the page will show that the file is
being transmitted
When the process is complete, you will be taken to a new page listing
the files that were uploaded (with or without errors)
When the process is complete, you will be taken to a new page telling
you how many files were successfully transferred
8. Complete the process by calling OCS Client Services at 1.866.641.TECH
(8324) to let us know that you've sent data via the OCS-Web Uploader
Several user options are set automatically in the OCS-BMST that can be
changed, if necessary. You can change these options by clicking the Options
button. Each of the options is explained below.
2006 OCS, Inc. Page 3-5
Page 48

OCS-Gateway
the other file.
The default quarter
is determined by the
current date and
will change
automatically each
quarter. If you want
to change the
quarter of data that
will be extracted
from the database,
click on the down
arrow and select
another time frame
The default Source MDB is the
database being used by your
OCS-OASIS software. If you want
to create a submission file from
another database, click this
button to search for and select
By default all three extract file options are selected. You can chose
not to include any of the options by removing the check from the
box.
• Run date verifications—The Benchmarker Submission Tool checks
dates (SOC date, assessment date and birth dates) to make sure
that they are valid.
• Compress the submission file—Uses a zip utility to make the
resultant file
• Display monthly estimates—Selecting this option will produce an
informal report of approximately how many patient cases were
included in the file for each quarter.
2006 OCS, Inc. Page 3-6
Page 49

OCS-Gateway
OCS-DBMT (Database Management Tool)
Here is where you will find all of your tools to better manage your database.
The [Backup DB], [Restore DB], [Archive Tool] and [Repair and Compact DB]
database functions are only applicable to Microsoft Access 97, 2000, XP, or
2003 databases.
KEY UTILITY
This utility allows users with Key Utility privileges to change the primary keys of an
assessment in the event an error is made in these fields during data entry or
importing an assessment. The primary key fields for OCS are:
Agency ID (M0010)
Patient ID (M0020)
Start of Care Date (M0030)
Date Assessment Completed (M0090)
Assessment Type (M0100)
We recommend that this utility be used by administrators or ‘power users’ only.
To access this utility, click [Key Utility] on the main OCS Database Management
Tool menu.
2006 OCS, Inc. Page 3-7
Page 50

OCS-Gateway
Press [OK] to continue.
If you have yet to select a database path, you will receive the following pop-up screen:
Click [Yes] to select the database.
Once you click on [Test Connection], followed by [Update/Exit], you will be
taken to the Key Utility module.
2006 OCS, Inc. Page 3-8
Page 51

OCS-Gateway
Type in the name or identification number of the patient whose assessment
needs correction, click “Last Name” or “Patient ID” as appropriate, and click
[Search] A list of all patients who have assessment data in the database and
meet the criteria appears.
Note: It may take a couple of minutes for assessments to appear in
the list for agencies with large databases.
Once the list appears, you may search for a particular patient or assessment by
clicking on the appropriate Sorting button (Last Name, First Name, Patient ID,
Agency ID) and the list will be re-sorted for your search.
2006 OCS, Inc. Page 3-9
Page 52

OCS-Gateway
Important Note: A patient may be listed in this table more than
once if he or she has had more than one start of care date. Be
careful to select the correct start of care date associated with the
assessment.
If you need to alter the Agency ID, Patient ID, or Start-of-Care date, all
assessments for the patient (the series) must be updated. To do this, click on
the "Edit Assessment Series" button, key in the required changes in the Agency
ID, Patient ID, and/or Start-of-Care date boxes, and select [Update] A dialog
box asking you to confirm the changes will appear.
Click [Yes] to change the field(s) or [No] to cancel. If you click [Yes] a final
confirmation box will appear noting the changes and the edits will be reflected
in the list of assessments.
Important Note: Editing a value in an “assessment series” (M0010,
M0020, or M0030) will change that value in all assessments
associated with the episode of care. For example, editing the
M0020—Patient ID on a discharge assessment will cause the
patient ID to be updated on the SOC assessment for that episode
along with any other assessments that are part of the episode.
2006 OCS, Inc. Page 3-10
Page 53

OCS-Gateway
If you only need to alter a Date Assessment Completed or Assessment Type
field, you do not need to edit the entire series and can edit a single assessment
date. To do this, click on the appropriate assessment with the mouse cursor
and click the "Edit Specific Assessment" button. Key in the correct date or
select the correct assessment type, and select [Update]. A dialog box asking
you to confirm the changes will appear.
Click [Yes] to change the field or [No] to cancel. If you click [Yes] a final
confirmation box will appear noting the changes and the edits will be reflected
in the list of assessments.
Some data changes that can be made in Key Utility are state key field
changes. Corrections to key fields made on an assessment that has been
submitted to and accepted by the state require an inactivation record and the
corrected version of the assessment be submitted to the state.
2006 OCS, Inc. Page 3-11
Page 54

OCS-Gateway
In order to facilitate that process, the software will ask about the submission
status of the assessment when changing the data. If you indicate that the
assessment has been submitted to and accepted by the state, an inactivation
record will be created and the assessment prepared for re-export. It will be
necessary to submit both the inactivation record and the corrected assessment
to the state.
Changes that will trigger the key field change process:
M0100 on any assessment
M0090 on Recertification and Other Follow-Up assessments
M0030 on SOC assessments
Important Note: Changing M0030 on any assessment will change
the SOC date on all assessments that are part of the patient’s
episode. However, since the OASIS question is only a key field on
SOC assessments, that is the only assessment within the series that
will have an inactivation record created or will be prepared for reexport. Likewise, it is the only assessment for the episode that must
be resubmitted to the state.
To exit this utility, click [Exit]
Database Conversion
Database Conversion allows you to convert your OCS-OASIS database from
Access 97 to Access 2000, SQL Server 7.0, or SQL Server 2000 and vice versa.
To get started, click [Database Conversion]
The first step is to select your current MS Access 97 OCS-OASIS database--the
database you wish to convert. Select the Access 97 option button and browse
to your current OCS-OASIS database.
2006 OCS, Inc. Page 3-12
Page 55

OCS-Gateway
Click on [Test Connection] to verify the existence of the database and path.
Then select [Next]
Next, select the type of database that you wish to convert to. If you select
either SQL Server options, you will need to provide more information, including
the SQL server login and password in order to continue.
Enter the required information and hit [Convert]
2006 OCS, Inc. Page 3-13
Page 56

OCS-Gateway
Once the conversion is complete, you will get a confirmation screen. Click
[OK] to exit the Database Conversion Tool.
You can now use this newly converted database with all of your OCS programs.
Note: This database conversion tool only converts the tables within
your database to another format. If you have queries, forms,
reports, and/or macros in the database, you will need to import
that information separately.
One of the applications run through OCS-Gateway is the OCS Benchmark
Business Intelligence Reporter. Please ask your System Administrator or
2006 OCS, Inc. Page 3-14
Page 57

OCS-Gateway
designated technical support personnel if you are unable to access this
application.
2006 OCS, Inc. Page 3-15
Page 58

Page 59

Chapter 4
Benchmark Business Intelligence Reporter (OCS-BBI Reporter)
Overview
The OCS-OASIS program is designed to help home care agencies collect,
analyze, and benchmark OASIS data elements. Benchmarking is an important
component of outcome data analysis as it puts your individual agency
outcome scores into context. For example, knowing that your improvement in
ambulation rate is 79% is more meaningful when you know how that compares
to internal, regional, national, or other norms. Done correctly, benchmarking
helps you better understand your practices, prioritize opportunities for
improvement, and learn from the experience of others.
Benefits
The benefits that your agency can realize from benchmarking include:
• Identification of your strengths and weaknesses (“opportunities for
improvement”)
• Prioritization of your improvement activities
• Demonstration of measurable results from improvement efforts
• Improvement in practice patterns
• Opportunity to network with peer and “best in class” agencies
Effective communication with staff, payors, board members, and the
community about the value of the care you provide.
Internal versus External Benchmarking
Internal benchmarking is the comparison of practices and outcome scores
within an organization. For example, internal benchmarking activities might
include comparisons of ADL/IADL scores by assessment period (for example, 1st
quarter versus 2nd quarter), by
provider, by discipline, by patient type, or by diagnosis. Such analyses allow you
to identify areas, functions, or departments within your organization that are
performing most efficiently. You may want to try to normalize operations within
your organization to that “best-in-class” benchmark if appropriate.
2006 OCS, Inc. Page 4-1
Page 60

OCS-BBI Reporter
External benchmarking is the comparison of practices and outcome scores
between agencies. External benchmarking might involve comparing your
ADL/IADL scores to those of agencies of similar size and operating status. You
might wish to compare your outcomes to those of agencies that are in the same
geographic location. Your organization may want to set certain external high
performance norms revealed through this benchmarking process as internal
goals. Such analyses allow you to assess your competitive position and identify
the areas that require attention if your organization is to remain competent
providers of care and competitive in today’s marketplace.
Both types of benchmarking are supported by OCS-OASIS. Internal
benchmarking can be accomplished by running ad hoc reports at your agency
and using the sorting, grouping, and constraint features to compare different
areas. External benchmarking can occur after OCS has received and
aggregated the data from all users and released the quarterly benchmark
reports. These reports compare each of your OASIS outcome scores to regional,
national, state, system and characteristic-group norms. Examples of these
reports are included at the end of this chapter.
Deadlines for Submitting Quarterly Data
To be included in the comparative database, your quarterly data must be
received by OCS 30 days after the close of each quarter. OCS defines quarters
on a calendar-year basis as follows:
Quarter Period Data Due to OCS
First January – March April 27th
Second April – June July 27th
Third July – September October 27th
Fourth October –December January 26
th
Accessing OCS-BBI Reporter Online
Log into OCS-Gateway, and under the Applications tab, click on OCS-BBI and
select [Go!] This will take you to the OCS Benchmarking web site.
2006 OCS, Inc. Page 4-2
Page 61

Select your Agency ID listed in the view and click [Go!]
OCS-BBI Reporter
The Report Type selection screen will appear. All clients who have submitted
data will have access to the OASIS Quarterly Reports. Joint Commission
accredited agencies using OCS for ORYX submittal can access their monthly
JCAHO ORYX reports online.
2006 OCS, Inc. Page 4-3
Page 62

OCS-BBI Reporter
Select which report you would like to run and select [Next]
If you select to run JCAHO Monthly Reports, the JCAHO Monthly Report,
Definition page appears.
Click on the down arrow next to the Report Type selection box to pick which
report you want to run. For definitions and detailed information on the different
report and chart types, please refer to your OCS JCAHO ORYX Manual and OCS
JCAHO Report Interpretation Guide (JCAHO RIG). Select your desired month
for reporting, and the measure you want to review (your selected ORYX
2006 OCS, Inc. Page 4-4
Page 63

OCS-BBI Reporter
measures are marked with an “X,” but you can review any of the measures for
which you have submitted data). Click [Run Report]
If you select to run OASIS Quarterly Reports, the OASIS Quarterly Report,
Definition page appears.
Click on the down arrow on the Report Type drop-down box to select the type
of report you wish to run. Then click on the down arrow on the Date Range
drop-down box to select the reporting period of interest. Lastly, click on each
of the down arrows on the Compare Group drop-down boxes to select the
various compare group types you wish to include on your benchmark report.
Click [Next]
The Criteria Selections page appears.
2006 OCS, Inc. Page 4-5
Page 64

OCS-BBI Reporter
Click on the down arrow on the Service Lines drop-down box if you wish to
narrow the data printed on the report to a particular service line. Then click on
the down arrows for each of the Compare Group drop-down boxes to identify
the specific compare groups you wish to include on the report. After making
your selections, click [Run Report]
The Report Page will appear.
2006 OCS, Inc. Page 4-6
Page 65

OCS-BBI Reporter
To review the information online, use the scroll bars on the right side of the
page to move to the bottom of the page.
To print the report, click on the Print button on your browser toolbar or
select FILE|PRINT from the menu bar.
To create a new report, click [New Report] at the top of the page. You
will be returned to the Report Selections page to design a new
benchmark report.
Online Benchmarking Graphs
Graphs that represent the data in your benchmarking reports are quickly and
easily available by clicking on the name of the benchmark measure on the
report.
From the on-screen benchmark reports, select which measure you want to
graph and click on the measure name (which serves as a link to the graph).
2006 OCS, Inc. Page 4-7
Page 66

OCS-BBI Reporter
The Online Graph appears.
The data for your agency is displayed in red, while the norms that you selected
to display on your report are shown in blue. To return to your report and graph a
different measure, simply select [Back] on your browser window.
To exit Online Benchmarking, select FILE|CLOSE from the menu bar.
2006 OCS, Inc. Page 4-8
 Loading...